


r
AX-7
MIDI Keyboard Controller
Owner’s Manual
ENGLISH
mg
Thank you, and congratulations on your choice of the Roland AX-7 MIDI Keyboard Controller. The AX-7 is a powerful, easy-to-operate, dedicated shoulder keyboard for MIDI sound modules (whether or not they are GM2/GM/GS compatible). Please take the time to read through this Owner’s Manual. That way, you can feel assured that you understand every feature the AX-7 offers, and will enjoy many years of trouble-free operation.
The Roland AX-7 is a MIDI keyboard controller. It does not contain any sound-generating circuitry. It is designed to transmit note messages, program changes, bank select messages as well as a variety of other MIDI messages (such as Reverb and Chorus Send levels) to an external sound module.
To avoid confusion, let’s agree to…
•…use the word “button” for all keys on the front panel, and only use “key” when referring to the AX-7’s keyboard.
•…say “sequencer” when referring to both hardware sequencers (like the Roland MC-80) and computers with sequencer software.
•…talk about “MIDI instruments” to signify both isolated (“monotimbral”) instruments and parts/timbres/voices/multi channels of a multitimbral module or synth.
The contents of the illustrations appearing in this manual may differ slightly from what you see when you start using your instrument.
Before using this instrument, carefully read the sections entitled “Using the unit safely” and “Important notes”. These sections provide important information concerning the proper operation of the AX-7. Be sure to keep this manual in a safe place for future reference.
Copyright ©2001 ROLAND EUROPE. All rights reserved.
No part of this publication may be reproduced in any form without the written permission of Roland Europe s.p.a.

Used for instructions intended to alert the user to the risk of death or severe injury should the unit be used improperly.
Used for instructions intended to alert the user to the risk of injury or material damage should the unit be used improperly.
* Material damage refers to damage or other adverse effects caused with respect to the home and all its furnishings, as well to domestic animals or pets.
• Before using this instrument, make sure to read the instructions below, and the Owner’s Manual.
• Do not open (or modify in any way) the instrument, and avoid damaging an optional adapter.
•Do not attempt to repair the instrument, or replace parts within it. Refer all servicing to your retailer, the nearest Roland Service Center, or an authorized Roland distributor, as listed on the “Information” page.
•Never use or store the AX-7 in places that are:
• Subject to temperature extremes (e.g., direct sunlight in an enclosed vehicle, near a heating duct, on top of heat-generating equipment); or are
• Damp (e.g., baths, washrooms, on wet floors); or are
•Humid; or are
•Exposed to rain; or are
•Dusty; or are
•Subject to high levels of vibration.
•When using an optional adaptor, make sure the line voltage at the installation location matches the input voltage specified on the name plate.
•Do not allow any objects (e.g., flammable material, coins, pins); or liquids of any kind (water, soft drinks, etc.) to penetrate the instrument.
•Immediately turn the power off, disconnect the adaptor
from the outlet, and request servicing by your retailer, the nearest Roland Service Center, or an authorized Roland distributor, as listed on the “Information” page when:
•Objects have fallen into, or liquid has been spilled onto the instrument; or
•The instrument has been exposed to rain (or otherwise has become wet); or
•The instrument does not appear to operate normally or exhibits a marked change in performance.
The symbol alerts the user to important instructions or warnings.The specific meaning of the symbol is determined by the design contained within the triangle. In the case of the symbol at left, it is used for general cautions, warnings, or alerts to danger.
The  symbol alerts the user to items that must never be carried out (are forbidden). The specific thing that must not be done is indicated by the design contained within the circle. In the case of the symbol at left, it means that the unit must never be disassembled.
The ● symbol alerts the user to things that must be carried out. The specific thing that must be done is indicated by the design contained within the circle. In the case of the symbol at left, it means that the powercord plug must be unplugged from the outlet.
• In households with small children, an adult should provide supervision until the child is capable of following all the rules essential for the safe operation of the unit.
• Protect the instrument from strong impact. Do not drop it!
•When using an optional adaptor, do not force it to share an outlet with an unreasonable number of other devices. Be especially careful when using extension cords—the total power used by all devices you have connected to the extension cord’s outlet must never exceed the power rating (watts/amperes) for the extension cord. Excessive loads can cause the insulation on the cord to heat up and eventually melt through.
•Before using the instrument in a foreign country, consult
with your retailer, the nearest Roland Service Center, or an authorized Roland distributor, as listed on the “Information” page.
• The instrument and the optional adaptor should be located so their position does not interfere with their proper ventilation.
•Whenever the instrument is to remain unused for an extended period of time, disconnect the optional adaptor if you have one.
•Try to prevent cords and cables from becoming entangled.
Also, all cords and cables should be placed so they are out of the reach of children.
•Never climb on top of, nor place heavy objects on the instrument.
•Never handle the batteries or optional adaptor with wet
hands when plugging into, or unplugging from, an outlet or the AX-7.
•Before cleaning the AX-7, turn off the power and unplug the optional adaptor from the outlet.
2

rAX-7 Owner’s Manual
 Important notes
In addition to the items listed under “USING THE UNIT SAFELY” (page 2), please read and observe the following:
Power supply |
Repairs and data |
|
• The AX-7 can be operated using batteries or an optional adaptor. |
• Please be aware that all data contained in the instrument’s mem- |
|
Be careful to insert the batteries the right way around. If you pre- |
ory may be lost when it is sent for repairs. Important data should |
|
fer to use an adaptor, be sure to purchase a Roland ACA model. |
always be backed up via MIDI (see p. 15). In certain cases (such as |
|
• Before connecting the AX-7 to other devices, turn off the power to |
when circuitry related to memory itself is out of order), we regret |
|
that it may not be possible to restore the data. Roland assumes no |
||
all units. This will help prevent malfunctions and/or damage to |
||
liability concerning such loss of data. |
||
other devices. |
||
|
Placement
•Using the AX-7 near power amplifiers (or other equipment containing large power transformers) may induce hum. To alleviate the problem, change the orientation of this instrument; or move it farther away from the source of interference.
•This instrument may interfere with radio and television reception. Do not use it in the vicinity of such receivers.
•Do not expose the AX-7 to direct sunlight, place it near devices that radiate heat, leave it inside an enclosed vehicle, or otherwise subject it to temperature extremes. Excessive heat can deform or discolor the instrument.
Maintenance
•For everyday cleaning wipe the AX-7 with a soft, dry cloth or one that has been slightly dampened with water. To remove stubborn dirt, use a mild, non-abrasive detergent. Afterwards, be sure to wipe the instrument thoroughly with a soft, dry cloth.
•Never use benzene, thinners, alcohol or solvents of any kind, to avoid the possibility of discoloration and/or deformation.
Additional precautions
•Please be aware that the memory contents can be irretrievably lost as a result of a malfunction, or the improper operation of the instrument. To protect yourself against the risk of losing important data, we recommend that you periodically save a backup copy of important data in the instrument’s memory.
•Use a reasonable amount of care when using the instrument’s buttons, other controls, and jacks/connectors. Rough handling can lead to malfunctions.
•Never strike or apply strong pressure to the display.
•When connecting/disconnecting MIDI cables, grasp the connector itself—never pull on the cable. This way you will avoid causing shorts, or damage to the cable’s internal elements.
•A small amount of heat will radiate from the instrument during normal operation. This is perfectly normal.
•When you need to transport the instrument, package it in the box (including padding) that it came in. Otherwise, you will need to use equivalent packaging materials, or a flightcase.
 Contents
1. The AX-7 in a nutshell . . . . . . . . . . . . . . . . . . . .4
2. Panel descriptions . . . . . . . . . . . . . . . . . . . . . . . .5
‘Neck’ (control) section. . . . . . . . . . . . . . . . . . . . . . . . 5 Bottom panel . . . . . . . . . . . . . . . . . . . . . . . . . . . . . . . . 6 Connection panel (rear) . . . . . . . . . . . . . . . . . . . . . . . 6
3. The basics . . . . . . . . . . . . . . . . . . . . . . . . . . . . . . .7
Inserting or replacing the batteries . . . . . . . . . . . . . 7 Connecting the AX-7 . . . . . . . . . . . . . . . . . . . . . . . . . 8 Powering up . . . . . . . . . . . . . . . . . . . . . . . . . . . . . . . . . 8
4. Keyboard modes . . . . . . . . . . . . . . . . . . . . . . . . .9
5. Configuring the AX-7 . . . . . . . . . . . . . . . . . . . .10
Selecting the parameter to be edited . . . . . . . . . . 10 CONTROL parameters . . . . . . . . . . . . . . . . . . . . . . . . 11 DATA parameters. . . . . . . . . . . . . . . . . . . . . . . . . . . . 14 PRG CHG parameters . . . . . . . . . . . . . . . . . . . . . . . . 16
6. Miscellaneous . . . . . . . . . . . . . . . . . . . . . . . . . .17
Transpose . . . . . . . . . . . . . . . . . . . . . . . . . . . . . . . . . . 17 About MIDI Merge. . . . . . . . . . . . . . . . . . . . . . . . . . . 17 Working with Patches . . . . . . . . . . . . . . . . . . . . . . . 17 Restoring the factory settings . . . . . . . . . . . . . . . . 18 Specifications. . . . . . . . . . . . . . . . . . . . . . . . . . . . . . . 18
7. Reference . . . . . . . . . . . . . . . . . . . . . . . . . . . . 109
MIDI implementation chart . . . . . . . . . . . . . . . . . 109 Factory settings (based on the GM Tone Map) . 110 Blank Chart . . . . . . . . . . . . . . . . . . . . . . . . . . . . . . . 111 Control Change list . . . . . . . . . . . . . . . . . . . . . . . . 112
ENGLISH
3

The AX-7 in a nutshell
 1. The AX-7 in a nutshell
Four keyboard modes
The AX-7’s 45-note keyboard can be used in Layer, Split, and Whole modes.
Perfect control
The AX-7 puts you in control of all things MIDI in your keyboard rig. Velocity sensitivity, D Beam Controller, Expression Bar, and Touch Controller are built in – and can be set for the Upper and Lower sections independently. Then there is also a DATA ENTRY knob that can be assigned to any control change number between CC00 and CC119.
Of course, you can also transpose the Upper and Lower sections – either in octave or semitone steps. You can also set the tempo for an external sequencer and store that value in a Patch.
128 Patch memories
The AX-7 comes with 128 (2 x 64) Patch memories where you can save almost all settings, plus the MIDI channels for the Upper and Lower sections, and Bank Select/Program Change numbers to be transmitted on both section channels (where applicable) whenever you select the Patch in question.
Once you have used up all 128 internal Patch memories and need even more setups, you can archive your existing settings via MIDI (Bulk Dump function).
Supports Roland’s GS Format
The GS Format is a standardized set of specifications for Roland’s sound sources which defines the manner in which multitimbral sound modules will respond to MIDI messages. All devices compatible with the GS Format bear the GS logo. Every module or instrument bearing the GS logo will respond in the same way to the MIDI messages sent from the AX-7.
All Roland GS sound modules also fully support Level 1 of the General MIDI System. The AX-7 is also GM2compatible.
Important note
When using an AC adaptor, use only the specified device (Roland ACA series). Use of any other AC adaptor could result in damage, malfunction or electric shock.
4

rAX-7 Owner’s Manual
 2. Panel descriptions
‘Neck’ (control) section
AC
BD
E
ASTART/STOP button
This button allows you to transmit MIDI Start and Stop messages to start or halt playback of an external sequencer.
BDOWN/UP PATCH buttons
These buttons can be used for selecting the preceding (DOWN) or next (UP) Patch memory, EDIT parameters, or entering parameter values. In certain cases, pressing them simultaneously will switch the selected parameter on and off. In other cases, pressing them simultaneously recalls the default value of the selected parameter.
F G H I J K
FD Beam sensors
Move your hand over these two sensors to generate the assigned messages.
GD Beam ON/OFF switch
Press this switch to activate (indicator lights) or switch off (indicator dark) the D Beam Controller.
Note: Be sure to select the OFF position whenever you are not using the D Beam Controller (to save battery life).
HEDIT buttons
Press one of these buttons ([CONTROL], [DATA], or [PRG≈CHG]) to select the corresponding EDIT level. You can then use the numeric keypad to call up the parameter you wish to set.
IWRITE button
Press this button to save the current settings to one of the AX-7’s Patch memories. Writing a Patch also involves pressing other buttons (see p. 17).
CEXPRESSION BAR/TOUCH CONTROLLER
Press the Expression Bar to generate Modulation messages (CC01) and/or Aftertouch. Behind the Expression Bar (the “big switch”), you will find a ribbon strip. That is the Touch Controller. Slide your finger towards the left or right on this ribbon to transmit Pitch Bend messages.
DKEYBOARD MODE buttons
Press one of these buttons to select a Whole mode, the Layer, or Split mode. See page 9.
EDATA ENTRY knob
This knob (located behind the [START/STOP] button) can be used to transmit the assigned MIDI messages in realtime.
L M N O
P
JDisplay
This three-character display keeps you posted about the selected Patch memory, the tempo, or the parameter value you set.
KPATCH SELECT buttons
If none of the EDIT buttons lights, the buttons [A/B] and [1]~[8] allow you to enter the number of the desired Patch memory (two banks of 64 memories each). After pressing one of the EDIT buttons, the buttons [A/B], [1]~[8] and [TRANSPOSE] (which then functions as [9]) can be used for selecting the desired parameter (see p. 10).
LTRANSPOSE button
Usually, this button allows you to switch the AX-7’s keyboard transposition on and off and to set the transposition interval. When [CONTROL], [DATA], or [PRG≈CHG] lights, however, this buttons can be used for selecting a parameter (in which case it functions as [9]).
ENGLISH
5
Panel descriptions
MENTER button
Press this button to confirm a setting or a selection.
NEXIT button
Press this button to leave the currently selected EDIT level, or to ignore the value you just set (thus returning to the previously set value).
ODOWN/UP buttons
These buttons duplicate the DOWN/UP PATCH buttons.
PStrap pin
This is where you need to attach one end of the supplied strap. (The other end needs to be attached to one of the pins on the bottom panel.)
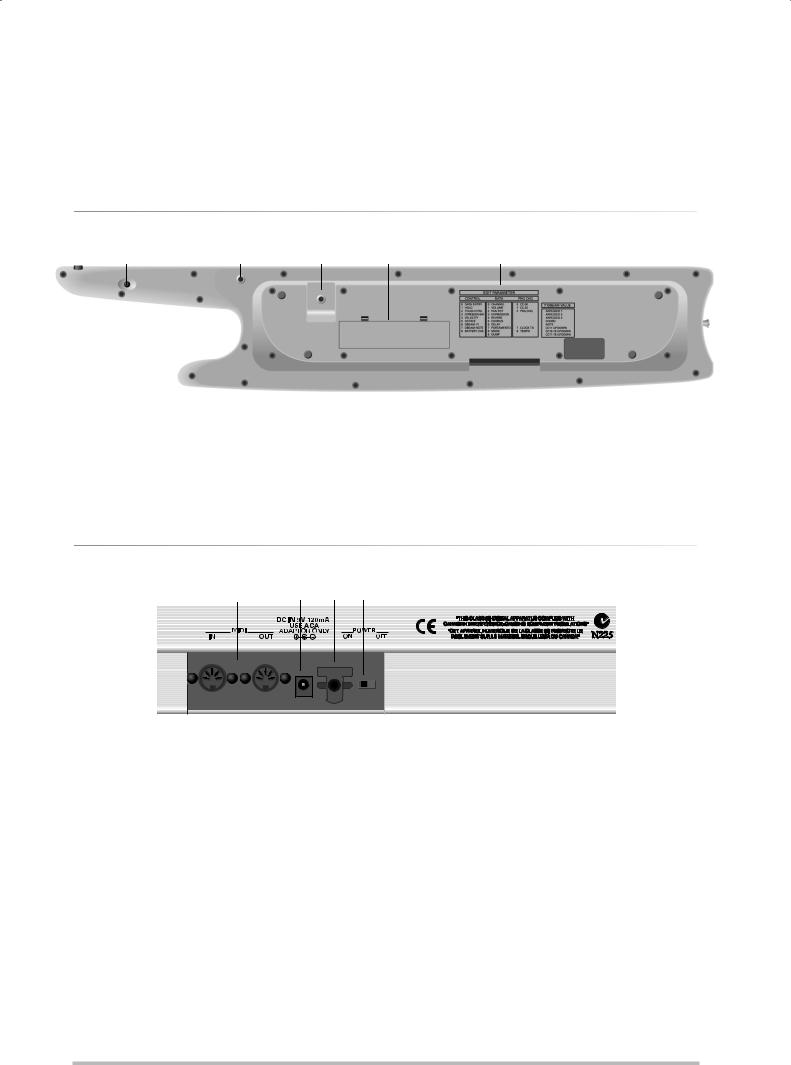
Bottom panel
E Q R R S T
QSustain button
This button has the same function as a Hold/Sustain pedal connected to a synthesizer or stage piano: press it to hold the notes you are playing.
RStrap pins
This is where you need to attach the other end of the supplied strap.
SBattery compartment
This is where you need to insert the supplied (or replacement) batteries.
TFunction overview
These lists provide at-a-glance information about the available Edit and D Beam functions.
Connection panel (rear)
U |
V |
W X |
UMIDI IN, OUT sockets
Connect the MIDI IN socket to the device that should transmit MIDI messages to the AX-7. Connect the MIDI OUT socket to the MIDI instrument you wish to control with your AX-7.
The AX-7 is capable of merging the MIDI messages received via MIDI IN with the messages you generate by playing on the AX-7.
VDC IN socket
This is where you can connect an optional ACA adaptor.
WCord hook
If you connect an optional ACA adaptor to the DC IN socket, be sure to wind the cable around this hook as a safeguard against accidental disconnection.
XPOWER switch
Set this switch to the ON position to switch the AX-7 on. Select the OFF position to power off your AX-7.
6
 Loading...