

Page 1
ControlNet PLC-5
Hot Backup System
Cat. No. 1785-CHBM
User Manual
Page 2
Important User Information
Because of the variety of uses for the products described in this
publication, those responsible for the application and use of these
products must satisfy themselves that all necessary steps have been taken
to assure that each application and use meets all performance and safety
requirements, including any applicable laws, regulations, codes and
standards. In no event will Rockwell Automation be responsible or liable
for indirect or consequential damage resulting from the use or application
of these products.
Any illustrations, charts, sample programs, and layout examples shown in
this publication are intended solely for purposes of example. Since there
are many variables and requirements associated with any particular
installation, Rockwell Automation does not assume responsibility or
liability (to include intellectual property liability) for actual use based
upon the examples shown in this publication.
TM
Allen-Bradley
Application, Installation and Maintenance of Solid-State Control
(available from your local Rockwell Automation office), describes some
important differences between solid-state equipment and
electromechanical devices that should be taken into consideration when
applying products such as those described in this publication.
Reproduction of the contents of this copyrighted publication, in whole or
part, without written permission of Rockwell Automation, is prohibited.
publication SGI-1.1, Safety Guidelines for the
Throughout this publication, notes may be used to make you aware of
safety considerations. The following annotations and their accompanying
statements help you to identify a potential hazard, avoid a potential
hazard, and recognize the consequences of a potential hazard
WARNING
Identifies information about practices or circumstances
that can cause an explosion in a hazardous
environment, which may lead to personal injury or
death, property damage, or economic loss.
:
!
ATTENTION
Identifies information about practices or circumstances
that can lead to personal injury or death, property
damage, or economic loss.
!
IMPORTANT
Identifies information that is critical for successful
application and understanding of the product.
PLC-5 is a registered trademark of Rockwell Automati on, Inc.
Allen-Bradley, ControlLogix, ControlBus, Data Highway Plus, FLEX I/O, RSLinx, RSLogix , RSNetWorx, PLC-5/40 and PLC-5/80 are trademarks of
Rockwell Automation, Inc.
ControlNet is a trademark of ControlNet International , Ltd.
DeviceNet is a trademark of the Open DeviceNet Vendor Ass ociation.
Ethernet is a registered trademark of Digital Equipment Company, Intel and Xerox Corporation.
Page 3

Rockwell Automation Support
Before you contact Rockwell Automation for technical assistance, we
suggest you please review the troubleshooting information contained
in this publication first.
If the problem persists, call your local Rockwell Automation
representative or contact Rockwell Automation in one of the
following ways:
Phone United
States/Canada
Outside United
States/Canada
Internet
⇒
1.440.646.5800
You can access the phone number for your
country via the Internet:
1. Go to http://www.ab.com
2. Click on Product Support
(http://support.automation.rockwell.com)
3. Under Support Centers, click on Contact
Information
1. Go to http://www.ab.com
2. Click on Product Support
(http://support.automation.rockwell.com)
Your Questions or Comments on this Manual
If you find a problem with or have a comment on this manual, please
notify us of it on the enclosed How Are We Doing form.
Page 4

Notes
Page 5

Preface
Manual Objectives
This manual shows you how to set up and apply a ControlNetTM
®
PLC-5
standard PLC-5/40
Hot Backup system. A backup system requires a pair of
TM
or PLC-5/80TM ControlNet programmable
controllers (Series F, Revision A or higher), with I/O remotely
connected to both PLC-5s via ControlNet.
IMPORTANT
For the ControlNet PLC-5 programmable controllers
to operate in backup mode, each PLC-5 must have a
new ControlNet Backup Cartridge (Cat. No.
1785-CHBM) inserted into its EEPROM memory
module slot.
Using ControlNet, the PLC-5s communicate with each other and with
ControlNet remote I/O to create a PLC-5 backup system that provides
high availability of control applications, where it is essential for
process continuity.
In this manual, we describe the following details of the ControlNet
Hot Backup system:
• system concepts
• required hardware and software components
• installation and configuration procedures
• system operation
• troubleshooting and diagnostics procedures
• system design considerations
Who Should Use This
Before you read this manual or attempt to use the ControlNet PLC-5
backup system, you should be familiar with the use and operation of
Manual
the ControlNet PLC-5 programmable controller. You should also be
familiar with:
• Remote I/O
• the ControlNet network
• RSLogix 5
• RSNetWorx
• RSLinx
1 Publication 1785-UM024B-EN-P - January 2003
TM
programming software
TM
for ControlNet software
TM
communications software
Page 6

Preface 2
What This Manual Contains
Refer to the following table to guide you through the information
contained in this manual.
For information on: Refer to chapter/appendix:
concepts for using a backup system in a
ControlNet system; basic system
architecture
the hardware and software components
required for a backup system
installing backup system components;
configuring the backup system
how to use I/O in your hot backup system 4 - Using I/O In Your ControlNet Hot Backup
the diagnostic capabilities of the backup
system; troubleshooting tips for the backup
system
specifications for the 1785-CHBM module A - Specifications
backup states and backup state transitions B - Backup States
the data table crossloading feature C - Data Table Crossloading
the program synchronization feature D - Program Synchronization
1 - Backup Concepts for the ControlNet PLC-5
Backup System
2 - Understanding the ControlNet PLC-5
Backup System Components
3 - Installing and Configuring Your ControlNet
PLC-5 Backup System
System
5 - Monitoring and Troubleshooting Your
ControlNet PLC-5 Backup System
Terms and Conventions
application examples; items to consider
before designing the backup system
reference information on the ControlNet
backup module for users familiar with the
Allen-Bradley 1785-BCM systems
ControlNet Hot Backup terminology Glossary
E - Application Guidelines
F - Comparison to the 1785-BCM System
In this document, when we refer to the PLC-5s, we mean the
programmable controllers you are using in your ControlNet Hot
Backup system. We also refer to the PLC-5 as the "controller" or
"processor."
The screen captures and other examples that appear in this document
represent the current version of software at the time of publishing. A
later or earlier version of the same screen capture or example may be
slightly different but the purpose remains the same. Use the screen
captures and examples for reference only.
Publication 1785-UM024B-EN-P - January 2003
Page 7
Preface 3
Related PLC-5 Publications
Related documentation for ControlNet and other PLC-5 programmable
controllers is available:
Publication Publication
Number
Enhanced PLC-5 Processor System Overview 1785-2.36
Enhanced and Ethernet PLC-5 Programmable Controllers User
Manual
ControlNet PLC-5 Programmable Controllers User Manual 1785-UM022
ControlNet PLC-5 Programmable Controllers Quick Start 1785-QS006
1785-PLC-5 Programmable Controllers Quick Reference 1785-7.1
1785-6.5.12
For more information about 1785 PLC-5 programmable controllers,
contact your local Rockwell Automation sales office or distributor.
To view or order these publications online, visit:
www.theautomationbookstore.com
Related ControlNet Publications
For detailed information about different aspects of planning and
installing your ControlNet network, see the following publications:
Publication Publication
Number
ControlNet Cable System Component List AG-2.2
ControlNet Coax Cable System Planning and Installation Manual 1786-6.2.1
ControlNet Network Access Cable Installation Instructions 1786-2.6
ControlNet System Overview 1786-SO001
ControlNet PLC-5 Hot Backup System User Manual 1785-6.5.24
ControlNet Fiber Planning Installation Guide CNET-IN001
Industrial Automation Wiring and Grounding Guidelines 1770-4.1
System Design for Control of Electrical Noise GMC-RM001
To view or order these publications online, visit:
www.theautomationbookstore.com
or contact your local Rockwell Automation sales office or distributor.
Publication 1785-UM024B-EN-P - January 2003
Page 8

Preface 4
For more information on any of the software components of the
ControlNet PLC-5 backup system (e.g., RSLogix 5, RSLinx, and
RSNetWorx), refer to the software documentation and online help for
the individual software packages.
Publication 1785-UM024B-EN-P - January 2003
Page 9
Summary of Changes
Summary of Changes
The information below summarizes the changes to the ControlNet
PLC-5 Hot Backup System User Manual.
New Features and Information
The following table highlights new features and information for the
Hot Backup system and its location in this manual.
For This New Information See Page(s)
Required Hardware, Software and Firmware Components Chapter 2 1 thru 4
Updated Installation and Configuration Procedures in
RSNetWorx
Advanced Configuration Options
User Program Control for Completion of Qualification
Configuring Optional Parameters in a ControlNet Hot
Backup System
Crossloading Data over Data Highway Plus
Requalification Option of Dual Primary Programmable
Controllers
Using I/O in Your ControlNet Hot Backup System Chapter 4 Chapter 4
Additional Hot Backup Major Fault Codes Chapter 5 5-2
Additional Invalid Backup State Codes 5-4
Troubleshooting with Output Ownership Verification 5-7
Chapter 3 1 thru 17
3-18
3-19
3-19
3-24
3-26
Additions to the ControlNet Backup and Configuration
Status Files
Specifications and Certifications Appendix A Appendix A
Considerations When Crossloading MG, BT or CT File Types Appendix C C-4
Appendix E E-4
Inhibiting ControlNet I/O Appendix E E-5
Sequential Process Application Considerations E-5
ControlNet Hot Backup Terminology Glossary Glossary
Index Index Index
1 Publication 1785-UM024B-EN-P - January 2003
5-8
Page 10

Summary of Changes 2
Notes
Publication 1785-UM024B-EN-P - January 2003
Page 11

Preface
Summary of Changes
Table of Contents
Manual Objectives. . . . . . . . . . . . . . . . . . . . . . . . . . . . . . . P-1
Who Should Use This Manual . . . . . . . . . . . . . . . . . . . . . . P-1
What This Manual Contains . . . . . . . . . . . . . . . . . . . . . . . . P-2
Terms and Conventions. . . . . . . . . . . . . . . . . . . . . . . . . . . P-2
Related PLC-5 Publications . . . . . . . . . . . . . . . . . . . . . . . . P-3
Related ControlNet Publications. . . . . . . . . . . . . . . . . . . . . P-3
New Features and Information. . . . . . . . . . . . . . . . . . . . . . S-1
Backup Concepts for the
ControlNet PLC-5 Hot Backup
System
Understanding the ControlNet
PLC-5 Hot Backup System
Components
Chapter 1
Chapter Objectives . . . . . . . . . . . . . . . . . . . . . . . . . . . . . . 1-1
Why Use a Backup System? . . . . . . . . . . . . . . . . . . . . . . . . 1-1
Basic System Architecture . . . . . . . . . . . . . . . . . . . . . . . . . 1-2
How the Backup System Works. . . . . . . . . . . . . . . . . . . . . 1-2
Qualification . . . . . . . . . . . . . . . . . . . . . . . . . . . . . . . . 1-3
Equivalence Checking . . . . . . . . . . . . . . . . . . . . . . . . . 1-4
Bumpless Transfer . . . . . . . . . . . . . . . . . . . . . . . . . . . . 1-4
Switchover. . . . . . . . . . . . . . . . . . . . . . . . . . . . . . . . . . 1-5
Chapter 2
Chapter Objectives . . . . . . . . . . . . . . . . . . . . . . . . . . . . . . 2-1
Hardware Components . . . . . . . . . . . . . . . . . . . . . . . . 2-1
Software Components . . . . . . . . . . . . . . . . . . . . . . . . . 2-2
Firmware Components . . . . . . . . . . . . . . . . . . . . . . . . 2-2
Summary of Required Hardware, Firmware and Software . . 2-4
ControlNet Backup Cartridge . . . . . . . . . . . . . . . . . . . . . . . 2-5
Installing and Configuring Your
ControlNet PLC-5 Backup
System
iii Publication 1785-UM024B-EN-P - January 2003
Chapter 3
Chapter Objectives . . . . . . . . . . . . . . . . . . . . . . . . . . . . . . 3-1
Installing the Hardware . . . . . . . . . . . . . . . . . . . . . . . . . . . 3-1
Configuring Your Backup System . . . . . . . . . . . . . . . . . . . 3-2
Configuring With a Single Control Application . . . . . . . 3-3
Configuring With Differing Applications . . . . . . . . . . . . 3-11
Page 12

Table of Contents iv
Advanced Configuration Options . . . . . . . . . . . . . . . . . . . . 3-18
Configuring Optional Parameters in a Backup System . . 3-19
Synchronous and Asynchronous Program Scanning. . . . 3-20
Equivalence Checks . . . . . . . . . . . . . . . . . . . . . . . . . . . 3-21
Crossloading . . . . . . . . . . . . . . . . . . . . . . . . . . . . . . . . 3-22
System Status. . . . . . . . . . . . . . . . . . . . . . . . . . . . . . . . 3-23
Crossloading Over Data Highway Plus . . . . . . . . . . . . . 3-24
Requalification of Dual Primary Processors. . . . . . . . . . . . . 3-26
PLC-5 Editing Considerations . . . . . . . . . . . . . . . . . . . . . . . 3-26
Downloading Editing Changes . . . . . . . . . . . . . . . . . . . 3-27
Testing Data Table Edits. . . . . . . . . . . . . . . . . . . . . . . . 3-27
Using I/O in Your ControlNet Hot
Backup System
Monitoring and
Troubleshooting Your
ControlNet PLC-5 Hot Backup
System
Specifications
Chapter 4
Chapter Objectives . . . . . . . . . . . . . . . . . . . . . . . . . . . . . . 4-1
Considerations when Using I/O. . . . . . . . . . . . . . . . . . . . . 4-1
Redundant Connections . . . . . . . . . . . . . . . . . . . . . . . . 4-2
Chapter 5
Chapter Objectives . . . . . . . . . . . . . . . . . . . . . . . . . . . . . . 5-1
ControlNet PLC-5 Backup-Specific Major Fault Error Codes . 5-2
Using the 1785-CHBM Cartridge Status Indicators . . . . . . . . 5-3
Troubleshooting the Invalid Backup State . . . . . . . . . . . . . 5-4
Troubleshooting Qualification Major Faults . . . . . . . . . . . . 5-6
Troubleshooting Qualification Crossloads. . . . . . . . . . . . . . 5-7
Troubleshooting with Output Ownership Verification. . . . . 5-8
ControlNet Backup Configuration and Status File . . . . . . . . 5-8
Appendix A
Specifications . . . . . . . . . . . . . . . . . . . . . . . . . . . . . . . . . . A-1
Backup States
Publication 1785-UM024B-EN-P - January 2003
Appendix B
Chapter Objectives . . . . . . . . . . . . . . . . . . . . . . . . . . . . . . B-1
Invalid Backup State . . . . . . . . . . . . . . . . . . . . . . . . . . B-2
No Control Backup State . . . . . . . . . . . . . . . . . . . . . . . B-3
Primary Backup State . . . . . . . . . . . . . . . . . . . . . . . . . . B-4
Lonely Primary Backup State . . . . . . . . . . . . . . . . . . . . B-5
Secondary Backup State . . . . . . . . . . . . . . . . . . . . . . . . B-5
Backup State Transitions . . . . . . . . . . . . . . . . . . . . . . . . . . B-6
Qualification . . . . . . . . . . . . . . . . . . . . . . . . . . . . . . . . B-6
Page 13

Table of Contents v
Qualification: From No Control State to Primary State . . B-6
Qualification: From No Control State to Secondary State B-7
Reasons for Qualification Major Fault . . . . . . . . . . . . . B-14
Switchover. . . . . . . . . . . . . . . . . . . . . . . . . . . . . . . . . B-14
Qualified Switchovers . . . . . . . . . . . . . . . . . . . . . . . . B-15
Unqualified Switchovers. . . . . . . . . . . . . . . . . . . . . . . B-16
Switchover Considerations . . . . . . . . . . . . . . . . . . . . . B-16
Data Table Crossloading
Program Synchronization
Appendix C
Chapter Objectives . . . . . . . . . . . . . . . . . . . . . . . . . . . . . . C-1
Data Table Crossloading . . . . . . . . . . . . . . . . . . . . . . . . . . C-1
On-Demand Data Table Crossloads . . . . . . . . . . . . . . . C-2
Optimizing On-Demand Crossloads . . . . . . . . . . . . . . . C-5
Triggering an On-Demand Data Table Crossload. . . . . . C-5
Qualification Crossloads. . . . . . . . . . . . . . . . . . . . . . . . C-6
Qualification Data Table Crossload . . . . . . . . . . . . . . . . C-7
Qualification State Data Table Crossload . . . . . . . . . . . . C-7
Data Table Crossload Time. . . . . . . . . . . . . . . . . . . . . . C-8
Data Table Crossload Data Latency. . . . . . . . . . . . . . . . C-8
Data Table Crossloading on ControlNet Channel . . . . . . C-9
Inhibiting Data Table Crossloads . . . . . . . . . . . . . . . . . C-9
Data Table Crossload Diagnostics . . . . . . . . . . . . . . . . . C-9
Data Table Crossloads Via Your Applications . . . . . . . C-10
Appendix D
Chapter Objectives . . . . . . . . . . . . . . . . . . . . . . . . . . . . . . D-1
Program Synchronization. . . . . . . . . . . . . . . . . . . . . . . . . . D-1
Determining Which Mode to Use . . . . . . . . . . . . . . . . . D-2
Using Synchronous Mode. . . . . . . . . . . . . . . . . . . . . . . D-2
Determining the Maximum Program Scan Time. . . . . . . D-2
Adjusted Maximum Program Scan Time . . . . . . . . . . . . D-3
Program Scan Overrun. . . . . . . . . . . . . . . . . . . . . . . . . D-3
Application Guidelines
Appendix E
Chapter Objectives . . . . . . . . . . . . . . . . . . . . . . . . . . . . . . E-1
Redundancy Considerations. . . . . . . . . . . . . . . . . . . . . . . . E-1
Switchover Considerations. . . . . . . . . . . . . . . . . . . . . . . . . E-2
Why Transfer Information? . . . . . . . . . . . . . . . . . . . . . . E-2
What Information Should Be Transferred? . . . . . . . . . . . E-3
When Should the Information Be Transferred? . . . . . . . E-4
How Often Should the Information Be Transferred?. . . . E-4
Performance Considerations . . . . . . . . . . . . . . . . . . . . . E-4
Inhibiting or Resetting ControlNet I/O . . . . . . . . . . . . . . . . E-5
Publication 1785-UM024B-EN-P - January 2003
Page 14

Table of Contents vi
Sequential Process Application Considerations . . . . . . . . . . E-5
What Causes a PLC-5 to Get Into an Incorrect State. . . . E-6
How to Keep the Controllers in the Same Process State. E-7
When the Controllers are in Different States . . . . . . . . . E-8
Complete Qualification in the Same Process State . . . . . E-9
Comparison to the 1785-BCM
System
Glossary
Appendix F
Chapter Objectives . . . . . . . . . . . . . . . . . . . . . . . . . . . . . . F-1
Comparison to the BCM System. . . . . . . . . . . . . . . . . . . . . F-1
. . . . . . . . . . . . . . . . . . . . . . . . . . . . . . . . . . . . . . . . . . . . G-1
Publication 1785-UM024B-EN-P - January 2003
Page 15
Chapter
Backup Concepts for the ControlNet PLC-5
Hot Backup System
1
Chapter Objectives
Why Use a Backup System?
This chapter describes why and how to use the ControlNet PLC-5
backup system and its basic system architecture.
The objective of any redundant system (i.e., backup system) is to
improve the amount of up-time of a machine or process by ensuring
consistent availability of that machine. This also reduces costs
associated with equipment failure. By using the ControlNet PLC-5 hot
backup system, you can help guard your application against
shutdowns caused by the programmable controller.
ATTENTION
!
The backup option is used where you must transfer the control of the
process to a secondary system without interrupting the
machine/process operation.
When using identical programs in both PLC-5
programmable controllers, using a backup system
does not necessarily protect you from faults
caused by programming errors or system timeouts.
Such errors or timeouts can also occur in the
secondary programmable controller. Be certain to
carefully check your programming, and to
thoroughly check redundant operations before
implementing the backup system.
To guard against system shutdown, a backup system must provide:
• equipment with exceptional reliability
• automatic fault isolation
• minimal disturbance of the process when switching from the
primary to the secondary system
1 Publication 1785-UM024B-EN-P - January 2003
Page 16
1-2 Backup Concepts for the ControlNet PLC-5 Backup System
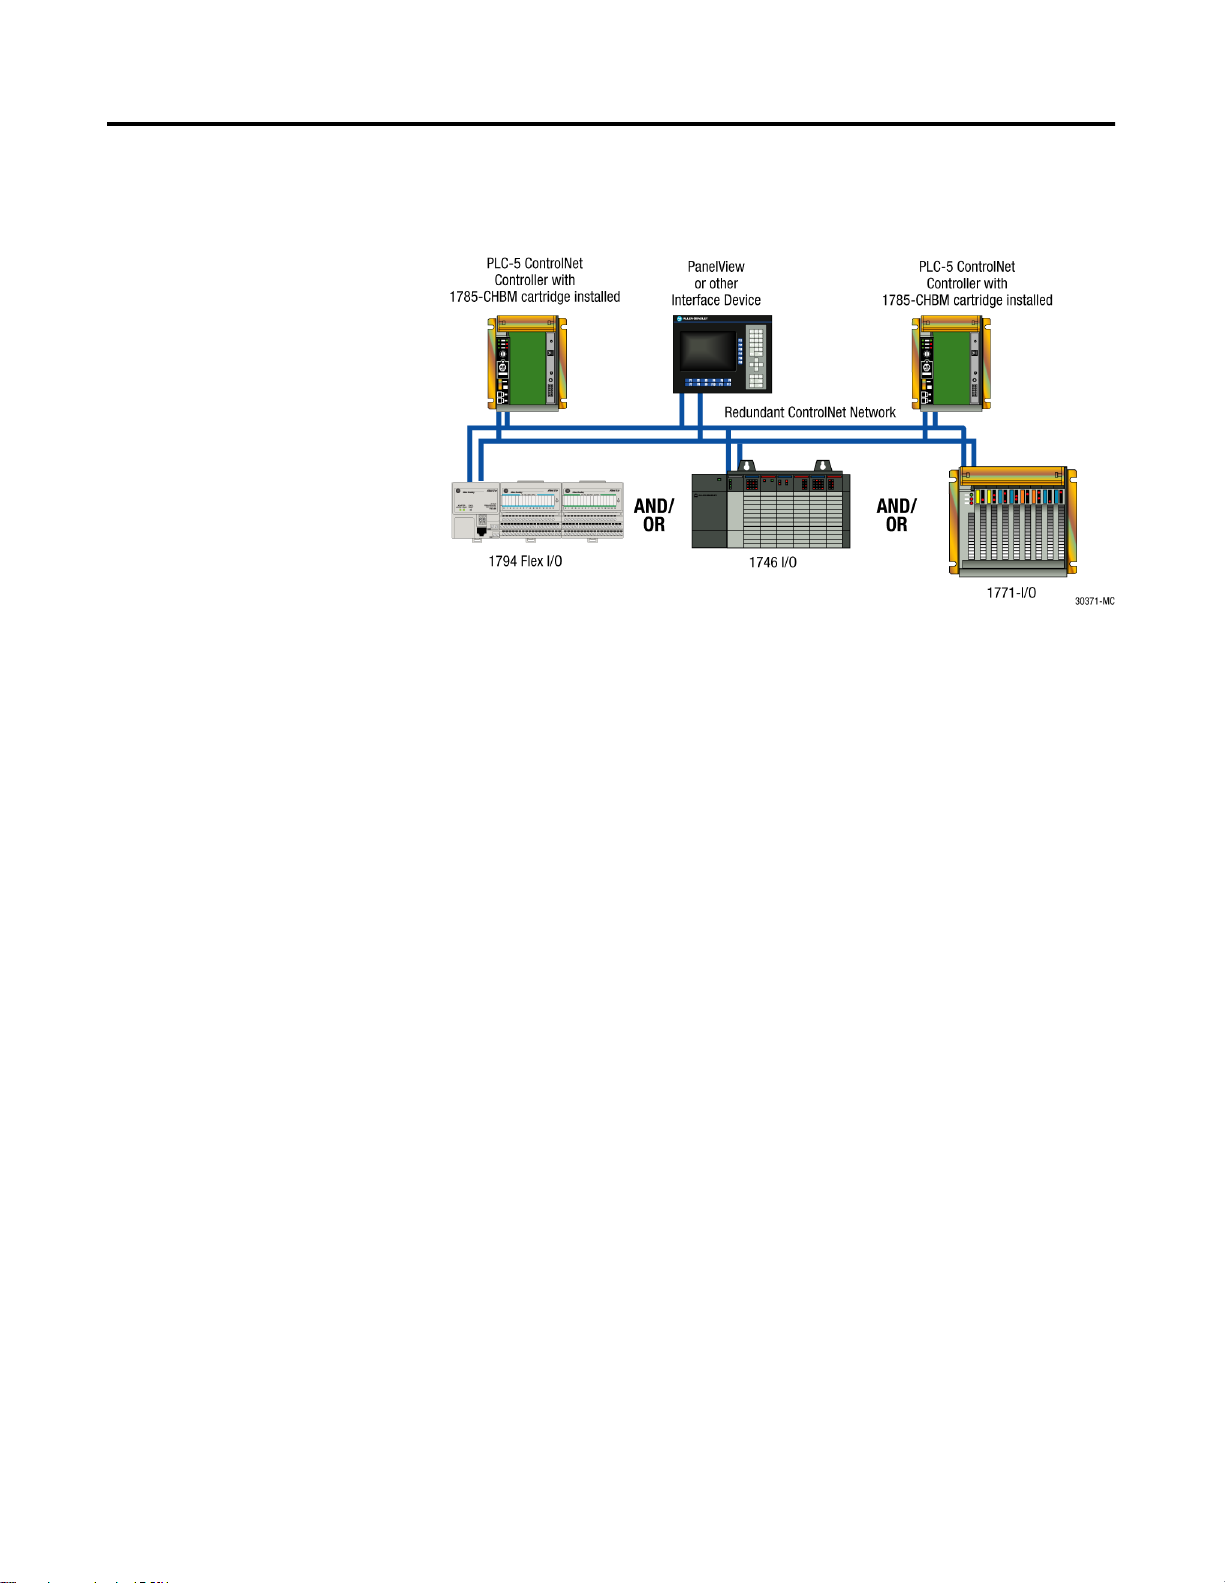
Basic System Architecture
How the Backup System Works
The following illustration describes the various components of the
basic ControlNet PLC-5 hot backup system:
TM
TM
In a ControlNet PLC-5 hot backup system, one PLC-5 programmable
controller, referred to as the primary programmable controller,
controls the operation of the ControlNet I/O. The other programmable
controller, referred to as secondary programmable controller, is set up
to take control of the ControlNet I/O in the event of a fault in the
primary programmable controller.
The ControlNet network is wired to both PLC-5 programmable
controllers, as well as to all ControlNet I/O in your system. Using
ControlNet, the programmable controllers communicate (or
“handshake”) with each other and exchange status information on
their operational states. If the primary programmable controller faults,
or is otherwise unable to continue control of the outputs, the
secondary programmable controller assumes control and becomes the
primary programmable controller.
Both PLC-5 programmable controllers are actively connected to the
ControlNet I/O, receive all input data sent by the I/O adapters, and
use that data as they execute their program scans. Output data is sent
via ControlNet from both programmable controllers. However, only
data from the primary programmable controller is used by the I/O
adapter(s).
With the ControlNet PLC-5 backup system there are several features to
consider that, though common to many backup systems, are uniquely
implemented in this particular system. Understanding these features
and their functions will help you design and implement your backup
applications.
Publication 1785-UM024B-EN-P - January 2003
Page 17

Backup Concepts for the ControlNet PLC-5 Backup System 1-3
Qualification
When bringing the secondary programmable controller of a backup
system online, it is important to ensure that it is in a state that will
enable it to take over the control of the system in the event of a
primary failure. This process of verifying and conditioning the state of
the secondary programmable controller is known as qualification.
Switchover will not occur without a qualified secondary
programmable controller. Additionally, the system is not truly
considered a backup system until the secondary programmable
controller has successfully completed qualification.
The qualification phase includes several tests and verifications
between the primary and secondary programmable controllers, as
well as data table file crossloading. You can tailor these tests,
verifications, and data table file crossloads to ensure the level of
system integrity required for your application. These tests and
verifications may cover:
• configuration file validity and integrity checking
• application program and data file structure equivalence
checking
• I/O map connection comparison
• force table comparison
• status file comparison
Data table file crossloading from the primary to the secondary
programmable controller may include the transfer of integer values,
floating point values, timers, counters, PID values, and others you
select.
Publication 1785-UM024B-EN-P - January 2003
Page 18

1-4 Backup Concepts for the ControlNet PLC-5 Backup System
Equivalence Checking
Backup systems are traditionally designed in a way such that both the
primary and secondary programmable controllers are programmed
with identical applications. This allows for the controlled process to
continue with normal production operation in the event of a primary
programmable controller failure. Equivalence checks ensure that the
primary and secondary programmable controllers have identical
ladder programs, data file structures, I/O map connection, etc. You, as
the designer of the backup system, require the ability to enforce
equivalence checks between the primary and secondary
programmable controllers during the qualification process, and
periodically during normal production operation.
In some cases, you may want the secondary programmable controller
to have a completely different application than the primary
programmable controller (e.g., “safe shutdown,” limited production,
clean and wash, etc.). In that case, equivalence checking may not be
required. With the ControlNet PLC-5 hot backup system, you can
enable or disable equivalence checking as required by your
application. You must have a thorough understanding of your
application in order to make this determination.
Bumpless Transfer
Ideally, when a programmable controller switchover takes place in the
backup system, there should be no adverse effect on system
operation, and the controlled process should continue to run as
though it were still being controlled by the original primary
programmable controller. This is generally referred to as a bumpless
transfer of control.
Bumpless transfer is not required for many backup applications, but it
is highly desirable. Divergence in program scanning, I/O tables, data
tables, and long switchover times can all cause bumps when
transferring control from a primary to a secondary programmable
controller. The ControlNet PLC-5 hot backup system allows you to
choose synchronous program scan operation, as well as on-demand
crossloading of data table files you select. These options can greatly
reduce the possibility of bumps during a programmable controller
switchover.
Publication 1785-UM024B-EN-P - January 2003
Page 19

Backup Concepts for the ControlNet PLC-5 Backup System 1-5
Switchover
Switchover is what occurs when the secondary programmable
controller assumes control of the process, thus becoming the primary
programmable controller. Several conditions can cause this to happen:
• critical failures in the primary programmable controller (e.g.,
hardware faults)
• internal conditions within the primary programmable controller
(e.g., a major fault), causing it to relinquish control of the
process to the secondary programmable controller
• external conditions recognized by the secondary programmable
controller (e.g., loss of communications with the primary
programmable controller), causing it to assume control of the
process
• a manual switchover (i.e., a forced switchover, where you cause
the secondary programmable controller to become primary, and
vice versa; you may choose to do this when testing your system
for backup performance and integrity, or as part of a system
maintenance program).
The ideal switchover time from the primary programmable controller
to the secondary programmable controller would be instantaneous.
The ControlNet PLC-5 hot backup system typically provides a
switchover time of 30-50 ms. This time is adequate to avoid a bump in
most systems, but you should determine the maximum allowable
switchover time for your applications.
Publication 1785-UM024B-EN-P - January 2003
Page 20

1-6 Backup Concepts for the ControlNet PLC-5 Backup System
Notes
Publication 1785-UM024B-EN-P - January 2003
Page 21

Chapter
Understanding the ControlNet PLC-5 Hot
Backup System Components
2
Chapter Objectives
This chapter describes the components that make up the ControlNet
PLC-5 hot backup system.
Hardware Components
• two PLC-5 ControlNet programmable controllers (either
1785-L40C15 or 1785-L80C15, Series F, Revision A or later)
Each programmable controller must be in a separate 1771
chassis, and each chassis must have its own power supply.
Various chassis and power supplies are available; choose them
based upon standard 1771 and 1785 selection and installation
criteria.
TIP
Though we do not recommend it, it is possible for
you to use a mixed set of programmable controllers
as a backup pair (e.g., one PLC-5/40 and one
PLC-5/80).
• two 1785-CHBM/A ControlNet backup cartridges (one for each
PLC-5 programmable controller)
• two 1771 chassis (one for each PLC-5 programmable controller)
• two 1771 power supplies (one for each chassis)
You can elect to use redundant power supplies within a chassis
if you wish. We do not recommend the use of I/O within the
chassis, since provisions for backing up the local I/O are not
provided.
• one or more ControlNet I/O adapters
1 Publication 1785-UM024B-EN-P - January 2003
Page 22

2-2 Understanding the ControlNet PLC-5 Hot Backup System Components
• ControlNet network cables, taps, and terminators for making
connections between the PLC-5 programmable controllers and
the I/O adapters
• a PC with a 1784-KTCX15 card, or a laptop computer with a
1784-PCC card
• other ControlNet devices, including HMI (optional)
Software Components
The basic ControlNet PLC-5 backup system includes the following
software components:
• RSLogix 5 programming software (Release 3.21 or later)
• RSNetWorx for ControlNet software (Release 1.80 or later)
• RSLinx communication software (Release 2.00.97.30 or later)
Firmware Components
IMPORTANT
If your version of RSNetWorx does not recognize a newer ControlNet
PLC-5, you may need to update your RSNetworx software or the
Electronic Data Sheet (EDS) for the programmable controller. To
update your EDS file, use the Hot Backup CD that was shipped with
your ControlNet PLC-5 programmable controller. If you don’t have the
CD, contact Rockwell Automation Technical Support at 440-646-5800
to update your EDS file.
This Series, Revision of Firmware: Is only compatible with:
Series F/Revisions C, C.1 and C.2 Series F/Revisions C, C.1 and C.2
Series F/Revisions B and B.1 Series F/Revisions B and B.1
Series F/Revisions A, A.1, A.2 and A.3 Series F/Revisions A, A.1, A.2 and A.3
ControlNet PLC-5 programmable controllers in a
backup system must have compatible firmware
revisions. This insures proper operation if a
switchover occurs. Subrevision releases (such as A.1,
A.2 and so on) are compatible with other subrevision
releases of the same series and revision. Refer to the
table below to determine compatibility.
Publication 1785-UM024B-EN-P - January 2003
Additionally, be sure that all spare ControlNet PLC-5 hot backup
processors contain compatible firmware.
Page 23

Understanding the ControlNet PLC-5 Hot Backup System Components 2-3
Compatibility Considerations
If the firmware series or revision do not match between the two
programmable controllers in a backup system, one or both
programmable controllers will detect an incompatibility and indicate a
Major Fault code 238. If the fault is cleared without correcting the
compatibility issue, the fault will continue to occur. However, the fault
will not occur in a programmable controller if it is in Run mode and is
controlling outputs.
IMPORTANT
The firmware revision in programmable controllers
in an operational backup system cannot be revised
during operation. The backup system and the
application must be powered down to revise the
firmware in one or both programmable controllers.
Firmware Update Considerations
You can change the firmware in a programmable controller for two
reasons. You can either:
• upgrade an older version of firmware to a new version, or
• backflash a newer version of firmware to an older version
For example, in an operational backup system, both programmable
controller’s firmware are at Series F, Revision A. If one programmable
controller fails and needs replacing, it must be replaced with an
identical series and firmware revision (Series F/Revision A). If a spare
part programmable controller is available, but it contains Series F/
Revision C firmware, it must be backflashed to Series F/Revision A.3.
IMPORTANT
PLC-5 programmable controllers Series F/Revision C
contain new flash devices and do not allow
Revisions A, A.1 A.2 and B to be backflashed into
them. They can only be backflashed with Revisions
A.3 and B.1 firmware, respectively.
Likewise, if you want to upgrade firmware in a backup system from
Series F/Revision A to Series F/Revision C, you would perform a flash
upgrade to both programmable controllers to ensure compatibility in
the backup system.
Publication 1785-UM024B-EN-P - January 2003
Page 24
2-4 Understanding the ControlNet PLC-5 Hot Backup System Components
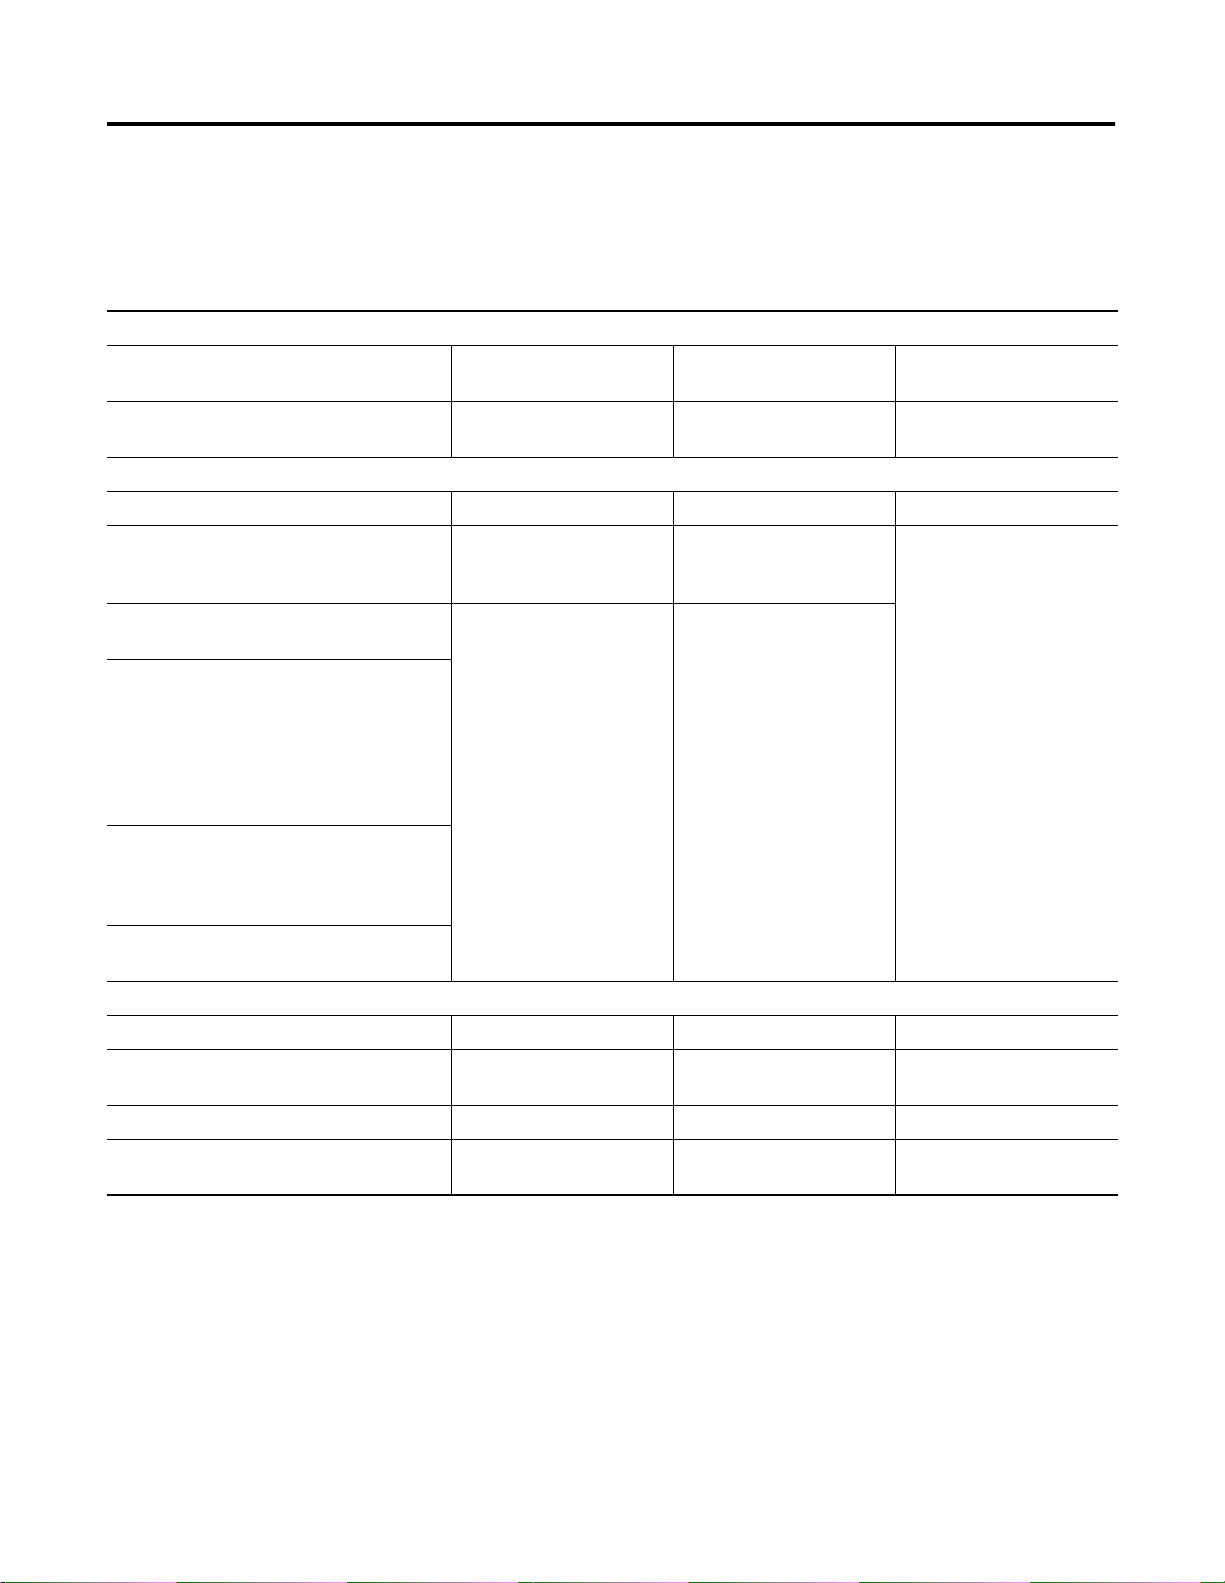
Summary of Required
The following table summarizes hardware, firmware and software
requirements. Additionally, the table describes major enhancements
Hardware, Firmware and
and in what revision of firmware they were made.
Software
Hardware
Required PLC-5 Programmable
Controllers:
1785-L40C15 or -L80C15, Series F 1794-ACN15 or -ACNR15
Firmware for:
PLC-5 Programmable Controllers FLEX I/O Adapter 1771 Adapter SLC Adapter
Series/Revision firmware must match for
ControlNet Hot Backup
Series F, Revision A.1 minimum for
ControlNet Hot Backup
Series F, Revision B firmware added
DataHighway Plus cross loading, fault code
for incompatible firmware revisions,
requalification of dual primary PLC-5
programmable controllers and user program
control for completion of qualification
enhancements
If you are using a FLEX
I/O adapter:
Series B, Revision A or later
Series C, Revisions E and F
added noisy network
tolerance.
Series D, Revision A is
required for IB32P module
support
If you are using a 1771
adapter:
1771-ACNR15 Series B,
Revision E or later
Series B, Revision H added
scheduled data update
latency enhancement
Series B, Revision J is
adding ControlNet Hot
Backup capability and
performance enhancements
to the 1771-ACN15 adapter
If you are using an SLC
adapter:
1747-ACN, -ACNR Series A,
Revision B or later
Series F, Revision C added SLC I/O, multicast
outputs, additional ControlNet I/O status bits
and expanded ControlNet I/O instruction
capability enhancements
Series F, Revision C.2 added noisy network
tolerance and performance enhancements
Software for:
PLC-5 Programmable Controllers FLEX I/O Adapter 1771 Adapter SLC Adapter
Windows 95 or Windows NT operating
system
RSLogix 5 ver. 3.21 or later RSLogix 5 ver. 3.21 or later RSLogix 5 ver. 3.21 or later RSLogix 5 ver. 5.0
RSNetWorx for ControlNet ver. 1.80 or later RSNetWorx for ControlNet
Windows 98 or Windows
NT operating system
ver. 1.80 or later
Windows 98 or Windows
NT operating system
RSNetWorx for ControlNet
ver. 1.80 or later
Windows 98 or Windows
NT operating system
RSNetWorx for ControlNet
3.0
Publication 1785-UM024B-EN-P - January 2003
Page 25
Understanding the ControlNet PLC-5 Hot Backup System Components 2-5
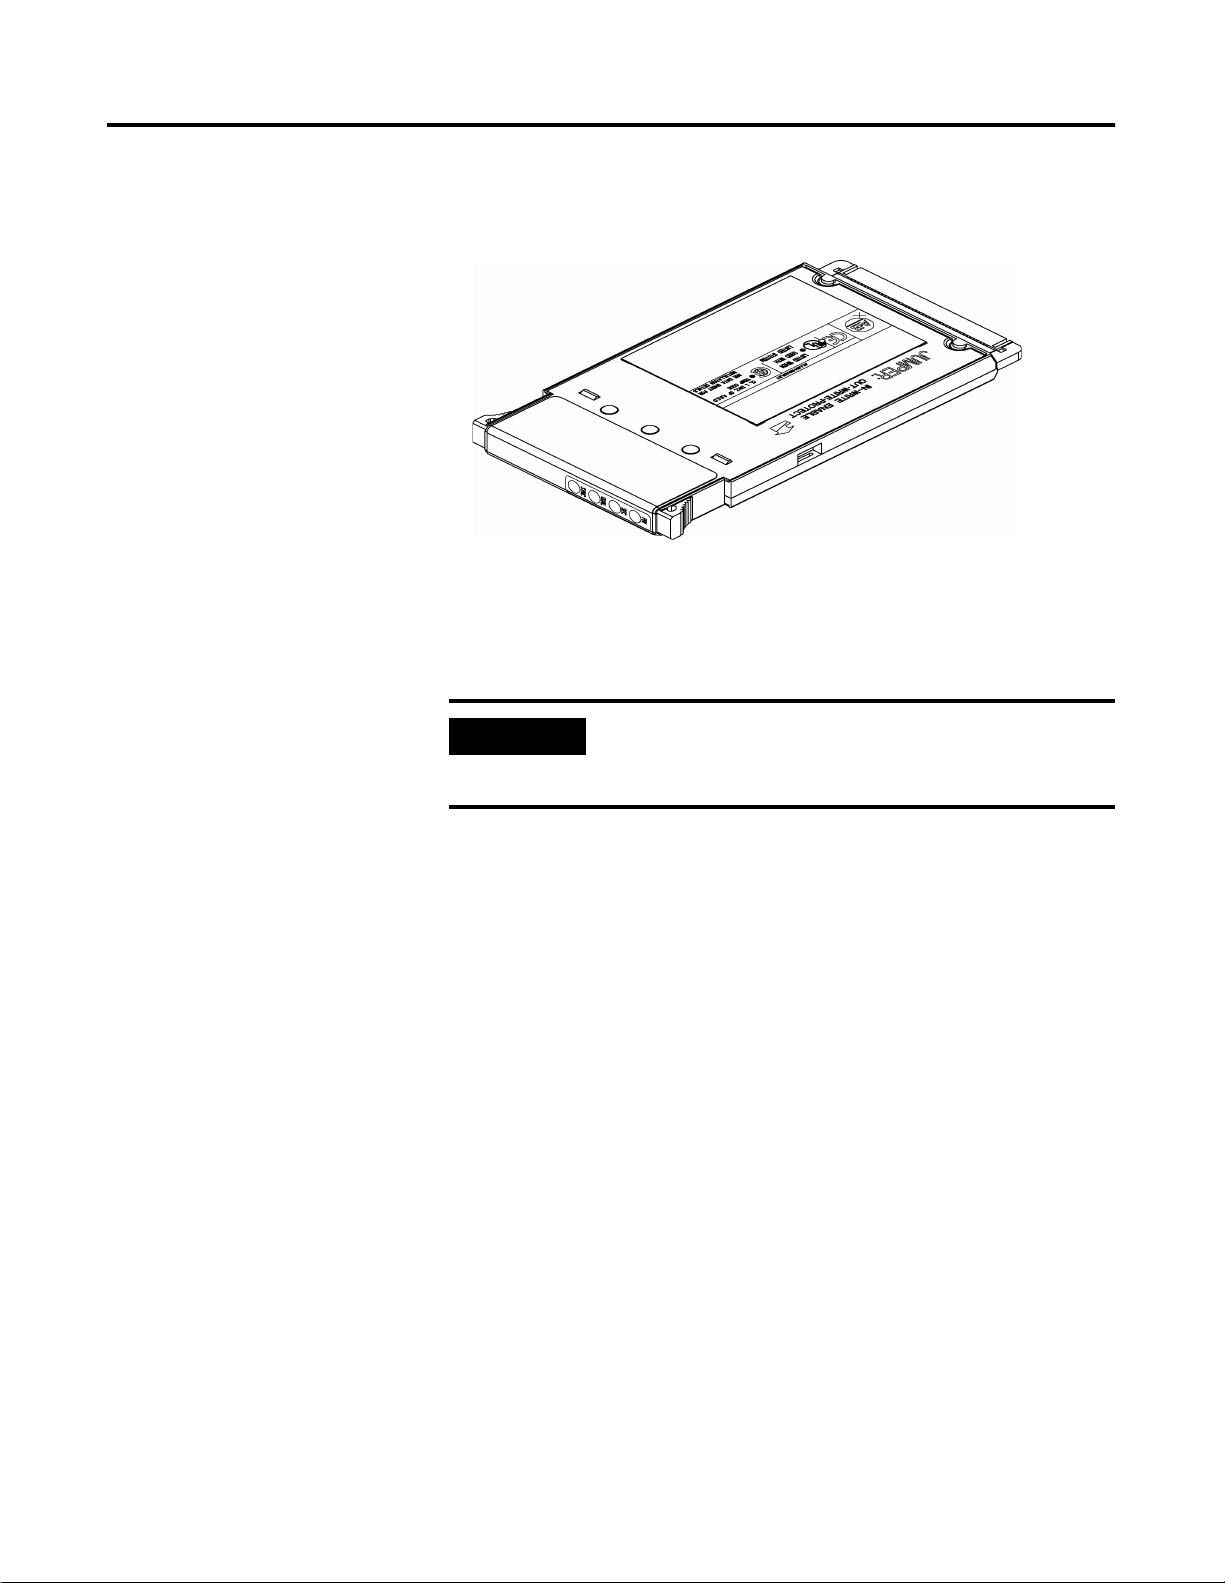
ControlNet Backup Cartridge
Each ControlNet PLC-5 programmable controller requires a
1785-CHBM/A ControlNet backup cartridge, inserted into the PLC-5
EEPROM memory cartridge slot, to enable backup functionality.
The ControlNet backup cartridge contains EEPROM memory cartridge
functionality (i.e., the cartridge can also be used as a standard PLC-5
EEPROM memory storage cartridge for the PLC-5 programmable
controller, with up to 100K of memory).
IMPORTANT
The 1785-CHBM ControlNet backup cartridge cannot
be used with non-backup PLC-5 programmable
controllers.
Publication 1785-UM024B-EN-P - January 2003
Page 26

2-6 Understanding the ControlNet PLC-5 Hot Backup System Components
Notes
Publication 1785-UM024B-EN-P - January 2003
Page 27

Chapter
Installing and Configuring Your ControlNet
PLC-5 Backup System
3
Chapter Objectives
Installing the Hardware
This chapter outlines the steps you must perform to install the backup
system components, and to subsequently configure them to create a
functioning backup system.
Before you begin, be sure that you have all of the required hardware
components, as listed in Chapter 2.
Follow these steps to install the required hardware for your backup
system.
1. Set the ControlNet node address number for each of the PLC-5
processors.
IMPORTANT
The node addresses must be consecutive, with the
lower number being odd. For example, a valid node
address pair is 1 and 2. You set the ControlNet node
address via the rotary switches on the top of each
processor. You may need to change the ControlNet
node address of other devices so that you have two
consecutive addresses available on your ControlNet
network.
2. Install each PLC-5 processor into a separate 1771 chassis.
3. Make certain that power is removed from each PLC-5.
4. Insert the 1785-CHBM ControlNet backup cartridge into the
EEPROM slot of each PLC-5 processor.
IMPORTANT
5. Install a power supply for each chassis, and connect to ac
power.
1 Publication 1785-UM024B-EN-P - January 2003
If the ControlNet backup cartridge is not inserted
into the PLC-5 processor, that processor will operate
as a normal, standalone processor, and will not
exhibit any of the necessary backup functions.
Page 28

3-2 Installing and Configuring Your ControlNet PLC-5 Backup System
6. Wire the ControlNet network to the PLC-5 processors and to the
ControlNet I/O adapters being used for the backup system.
IMPORTANT
The network cabling may consist of single or redundant
channels.
IMPORTANT
Basic installation is now complete.
7. Set the keyswitch to Program mode on each processor and
apply power to the processors.
Make certain that both ControlNet Hot Backup
PLC-5s and the Hot Backup I/O are on the same
ControlNet network. Bridging to another ControlNet
network is not allowed.
In non-redundant media applications, place your two
PLC-5 processors as the 2 nodes closest to a
terminator on a ControlNet segment. This eliminates
the possibility for a malfunctioning cable between
the processors to allow each processor to control a
subset of the I/O.
Configuring Your Backup System
Before you begin, make sure that you have installed RSLinx, RSLogix5,
and RSNetWorx for ControlNet software. For assistance with installing
any of these packages, refer to their respective installation
documentation.
There are two basic configuration paths. Select the appropriate path
based upon the type of backup system you are creating.
• If you are creating a backup system with identical (or nearly
identical) control applications in the primary and secondary
controllers, complete the steps in the section of this chapter
entitled “Configuring With a Single Control Application.”
• If you are creating a backup system where the secondary
controller is running a different application than the primary,
complete the steps in the section of this chapter entitled
“Configuring With Different Applications.”
Publication 1785-UM024B-EN-P - January 2003
Page 29

Installing and Configuring Your ControlNet PLC-5 Backup System 3-3
Configuring With a Single Control Application
This section assumes that you have already developed your control
application and have loaded it onto a single ControlNet PLC-5
processor (i.e., a non-backup system). Throughout this section, we
will refer to this processor as the first processor. Furthermore, we
assume that you have a second processor installed, powered on, and
in its default state. Both processors must be in Program mode and
must be physically connected to your ControlNet network.
To create and configure your backup system under these
circumstances, complete the following steps:
1. Reconfigure ControlNet I/O on the first PLC-5.
2. Configure handshaking messages between both PLC-5s.
3. Configure ControlNet I/O on the second PLC-5.
4. Save the ControlNet configuration.
5. Configure the hot backup parameters on the first PLC-5and save
the project.
6. Create and download the project for the second PLC-5 and save
the project.
Reconfigure ControlNet I/O on the First PLC-5
Reconfigure all ControlNet I/O adapters and modules that will be in
your ControlNet PLC-5 backup system by changing their ControlNet
connection from Exclusive Owner (default) to Redundant Owner.
1. Launch RSNetWorx for ControlNet.
2. Check the Edits Enabled checkbox on the toolbar.
3. Right click on the first PLC-5 processor (the odd-numbered
node) and choose Scanlist Configuration.
Publication 1785-UM024B-EN-P - January 2003
Page 30
3-4 Installing and Configuring Your ControlNet PLC-5 Backup System
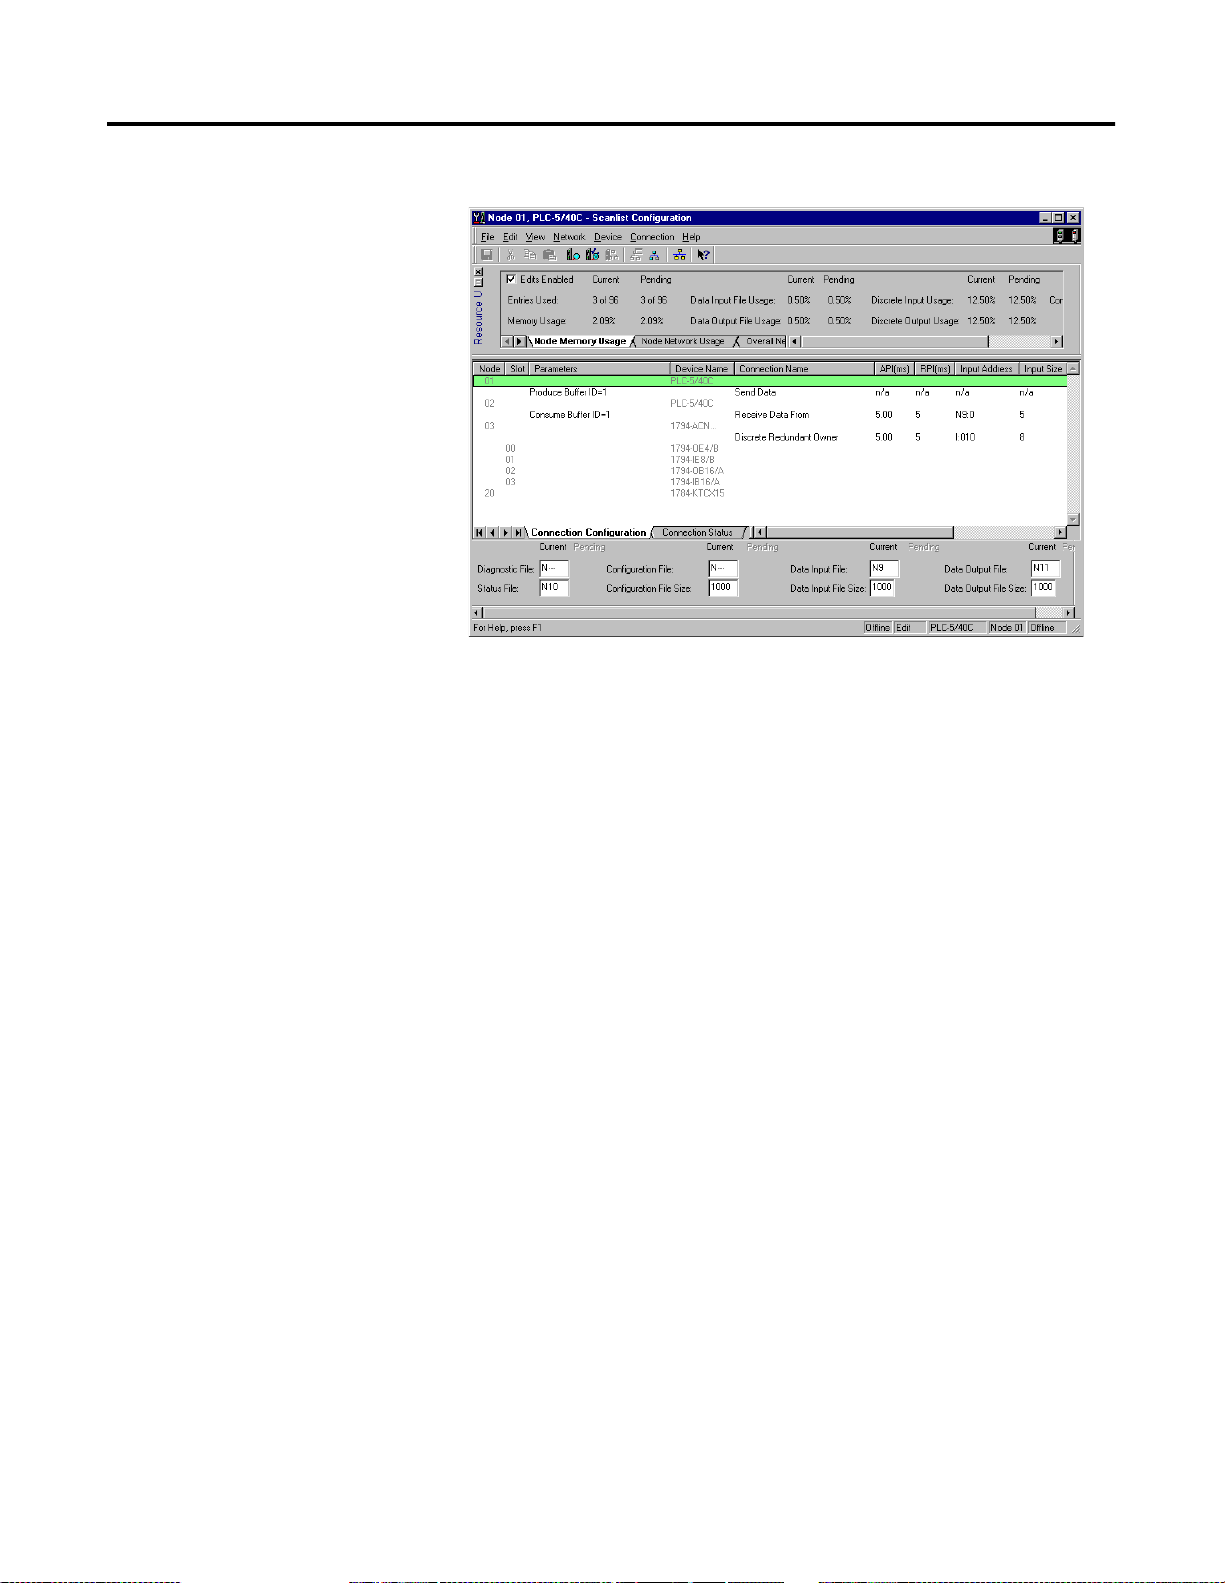
The Scanlist Configuration screen appears.
4. For each entry under the Connection Name column, double
click on Exclusive Owner, choose Redundant Owner from
the pull-down menu, and press Enter.
Configure Handshaking Messages With RSNetWorx
Within your backup system, you must use RSNetWorx to set up the
send and receive scheduled messages that allow handshaking to occur
between the two ControlNet PLC-5s that comprise your backup
system.
For each of the PLC-5s comprising a backup system, you must create
two scheduled peer-to-peer messages: one Produce Buffer ID (send)
and one Consume Buffer ID (receive). These messages must be
exactly five words in length
From the Scanlist Configuration screen for the first PLC-5, follow
these steps:
1. Right click on the even-numbered node (Node 2 in this
example) and choose Insert Connection.
Publication 1785-UM024B-EN-P - January 2003
Page 31

Installing and Configuring Your ControlNet PLC-5 Backup System 3-5
The Connection Properties dialog box appears.
The To Node field is already filled in for you. This number
indicates the node number from which you will receive the
Consume Buffer ID scheduled message. In your ControlNet
backup system, the odd-numbered node will receive the
message from the even node, and vice versa.
2. Double click under the Va l u e field to select the message number
you wish to assign to identify this message.
Publication 1785-UM024B-EN-P - January 2003
Page 32

3-6 Installing and Configuring Your ControlNet PLC-5 Backup System
Note that the message number for the Consume Buffer ID
message must match the message number of the corresponding
Produce Buffer ID message. The node number and message
number are used together to identify the specific message.
3. In the Requested Packet Interval field, enter an RPI value for
this message from 1 to 32,767. (For purposes of this example,
we will use an RPI value of 5ms.)
In general, the RPI value must be no less than the NUT value,
but less than 2 times the NUT value. This value must be the
same in both PLC-5s.
4. In the Input Size field, enter a value of 5 and click OK.
The Consume Buffer ID scheduled message is inserted in your
ControlNet Configuration for the odd-numbered node. The
corresponding Produce Buffer ID scheduled message is
automatically inserted for the even-numbered node.
5. From the main RSNetWorx for ControlNet screen, right click
on the second PLC-5 and choose Scanlist Configuration.
6. Right click on the odd-numbered node (Node 1 in this example)
and choose Insert Connection.
The Connection dialog box appears. The To Node field is
already filled in for you. This number indicates the node number
from which you will receive the Consume Buffer ID message. In
your ControlNet backup system, the odd-numbered node will
receive the message from the even node, and vice versa.
7. Repeat steps 2 through 4, creating a Consume Buffer ID message
for the even-numbered node.
8. Record the Produce Buffer ID and Consumer Buffer ID message
numbers from the odd-numbered PLC-5 below:
Produce Buffer ID message number:__________
Consume Buffer ID message number:__________
You will use these numbers later in the configuration process.
Publication 1785-UM024B-EN-P - January 2003
Page 33

Installing and Configuring Your ControlNet PLC-5 Backup System 3-7
Configure ControlNet I/O on the Second PLC-5
Configure all ControlNet I/O adapters and modules that will be in
your backup system, and ensure that the ControlNet I/O mapping and
data file assignments on the second PLC-5 match those on the first
PLC-5.
IMPORTANT
RSNetWorx for ControlNet does not automatically
assign the same data file addresses for redundant
connections on different PLC-5 programmable
controllers. Make sure the data file addresses match
exactly.
1. From the Scanlist Configuration screen (for the second
PLC-5), right click on the node corresponding to your I/O
adapter and choose Auto Insert > Selected Devices.
If you are not currently in Edit mode, you are prompted to
switch to Edit mode.
2. Click yes.
3. At the bottom of the Scanlist Configuration screen, enter data
table file addresses and sizes in the Diagnostic File,
Configuration File, Data Input File, and Data Output File
fields.
IMPORTANT
Note that these addresses and sizes must be
identical for both PLC-5s in your backup system.
Be careful to enter file numbers which do not
conflict with existing data table files.
4. Select each adapter and module in the backup system and enter
the data table address that matches the address assigned on the
first PLC-5.
5. From the File menu, choose Save to save the completed
ControlNet configuration.
Publication 1785-UM024B-EN-P - January 2003
Page 34

3-8 Installing and Configuring Your ControlNet PLC-5 Backup System
Configure the Hot Backup Parameters
1. Launch RSLogix 5.
2. From the Comms menu, choose System Comms.
The Communications dialog appears:
3. Click on the odd-numbered node address of the first PLC-5.
4. Click the Online button to connect to the processor.
The Going to Online Programming State dialog appears:
5. Click on Upload Logic, Merge with Existing File’s
Comment/Symbol DB button to confirm that you wish to
complete the upload.
This step is required since you have made changes to the
ControlNet configuration.
Publication 1785-UM024B-EN-P - January 2003
6. From the File menu, choose Save to save the project.
7. Click on the Hot Backup icon under the Controller folder to
launch the Hot Backup Configuration utility.
Page 35

Installing and Configuring Your ControlNet PLC-5 Backup System 3-9
The ControlNet Hot Backup screen appears, with the Configure
tab selected.
8. Set the following:
• Backup File - Enter an unused data file number. This creates
a 200-word integer file to be used as the ControlNet Backup
Configuration and Status file.
• Odd Node Address - Enter the ControlNet node address
corresponding to the odd node processor.
• Send Message - Enter the message number of the from the
Produce Buffer ID from the odd-numbered node address
(refer to the number you recorded on page 3-6.)
• Receive Message - Enter the message number of the
Consume Buffer ID from the odd-numbered node address
(refer to the number you recorded on page 3-6.)
If your system is properly configured, the PRI and SEC LEDs on
the first processor’s backup cartridge are off.
9. Save the configuration.
This completes the backup configuration for the first PLC-5.
Create and Download the Project for the Second PLC Processor
The next step in configuring your system is to duplicate the
fully-configured project from the first processor and apply it to the
second processor.
IMPORTANT
You must keep the ControlNet configuration you
created for the second processor, since it is not
completely identical to that of the first processor.
Publication 1785-UM024B-EN-P - January 2003
Page 36

3-10 Installing and Configuring Your ControlNet PLC-5 Backup System
1. In RSLogix 5, open the project associated with the first PLC-5,
offline.
2. From the File menu, choose Save As, and save the project
under a new name for the second PLC-5.
3. Go online with the even-numbered ControlNet node.
4. From the Comms menu, choose System Comms.
The Communications dialog appears:.
5. Click on the even-numbered node address of the second PLC-5.
6. Choose Download to download the project to the second
PLC-5.
7. When prompted to decide whether you wish to keep the
existing ControlNet configuration, choose Yes. You must select
Yes as it is not the default.
8. When prompted to use controller settings as new project
settings, choose Yes.
9. Go online with the second PLC-5.
10. From the File menu, choose Save to save the project.
This completes the backup configuration for the second PLC-5.
The QUAL LED on both processors should now be yellow, and
you have a valid backup system. If desired, you can now go to
Run mode.
Publication 1785-UM024B-EN-P - January 2003
Page 37

Installing and Configuring Your ControlNet PLC-5 Backup System 3-11
Configuring With Differing Applications
This section assumes that:
• you intend for the secondary PLC-5 in your backup system to
run a different application than the primary PLC-5
• you have already developed separate control applications for
the primary and secondary PLC-5s
• the control applications are loaded onto their respective PLC-5s
• both PLC-5s are powered on, are in Program mode, and are
physically connected to the ControlNet network
• you have not yet configured these PLC-5s to function within a
backup system
To create and configure your backup system under these
circumstances, complete the following steps:
1. Reconfigure ControlNet I/O on the first PLC-5.
2. Configure handshaking messages between both PLC-5s.
3. Reconfigure ControlNet I/O on the second PLC-5.
4. Save the ControlNet configuration.
5. Configure the hot backup parameters on the first PLC-5 and save
the project.
6. Configure the hot backup parameters on the second PLC-5 and
save the project.
Reconfigure ControlNet I/O on the First PLC-5
Reconfigure all ControlNet I/O adapters and modules that will be in
your ControlNet PLC-5 backup system by changing their ControlNet
connection from Exclusive Owner (default) to Redundant Owner.
1. Launch RSNetWorx for ControlNet.
2. Check the Edits Enabled checkbox on the toolbar.
3. Right click on the first PLC-5 processor (the odd-numbered
node) and choose Scanlist Configuration.
Publication 1785-UM024B-EN-P - January 2003
Page 38

3-12 Installing and Configuring Your ControlNet PLC-5 Backup System
The Scanlist Configuration screen appears.
4. For each entry under the Connection Name column, double
click on Exclusive Owner, choose Redundant Owner from
the pull-down menu, and press Enter.
Configure Handshaking Messages With RSNetWorx
Within your backup system, you must use RSNetWorx to set up the
send and receive scheduled messages that allow handshaking to occur
between the two ControlNet PLC-5s that comprise your backup
system.
For each of the PLC-5s comprising a backup system, you must create
two scheduled peer-to-peer messages: one Produce Buffer ID (send)
and one Consume Buffer ID (receive). These messages must be
exactly five words in length. From the Scanlist Configuration screen
for the first PLC-5, follow these steps:
1. Right click on the even-numbered node (Node 2 in this
example) and choose Insert Connection.
Publication 1785-UM024B-EN-P - January 2003
Page 39

Installing and Configuring Your ControlNet PLC-5 Backup System 3-13
The Connection Properties dialog box appears.
The To Node field is already filled in for you. This number
indicates the node number from which you will receive the
Consume Buffer ID scheduled message. In your ControlNet
backup system, the odd-numbered node will receive the
message from the even node, and vice versa.
2. Double click under the Va l u e field to select the message number
you wish to assign to identify this message.
Note that the message number for the Consume Buffer ID
message must match the message number of the corresponding
Produce Buffer ID message. The node number and message
number are used together to identify the specific message.
3. In the Requested Packet Interval field, enter an RPI value for
this message from 1 to 32,767. (For purposes of this example,
we will use an RPI value of 5ms.)
In general, the RPI value must be no less than the NUT value,
but less than 2 times the NUT value. This value must be the
same in both PLC-5s.
4. In the Input Size field, enter a value of 5 and click OK.
The Consume Buffer ID scheduled message is inserted in your
ControlNet Configuration for the odd-numbered node. The
corresponding Produce Buffer ID scheduled message is
automatically inserted for the even-numbered node.
5. From the main RSNetWorx for ControlNet screen, right click
on the second PLC-5 and choose Scanlist Configuration.
Publication 1785-UM024B-EN-P - January 2003
Page 40

3-14 Installing and Configuring Your ControlNet PLC-5 Backup System
6. Right click on the odd-numbered node (Node 1 in this example)
and choose Insert Connection.
The Connection dialog box appears. The To Node field is
already filled in for you. This number indicates the node number
from which you will receive the Consume Buffer ID message. In
your ControlNet backup system, the odd-numbered node will
receive the message from the even node, and vice versa.
7. Repeat steps 2 through 4, creating a Consume Buffer ID message
for the even-numbered node.
8. Record the Produce Buffer ID and Consumer Buffer ID message
numbers from the odd-numbered PLC-5 below:
Produce Buffer ID message number:__________
Consume Buffer ID message number:__________
You will use these numbers later in the configuration process.
Reconfigure ControlNet I/O on the Second PLC-5
Reconfigure all ControlNet I/O adapters and modules that will be in
your ControlNet PLC-5 backup system by changing their ControlNet
connection from Exclusive Owner (default) to Redundant Owner.
1. Launch RSNetWorx for ControlNet.
2. Check the Edits Enabled checkbox on the toolbar.
3. Right click on the second PLC-5 processor (the even-numbered
node) and choose Scanlist Configuration.
Publication 1785-UM024B-EN-P - January 2003
Page 41

Installing and Configuring Your ControlNet PLC-5 Backup System 3-15
The Scanlist Configuration screen appears.
4. For each I/O adapter entry under the Connection Name
column, double click on Exclusive Owner, choose Redundant
Owner from the pull-down menu, and press Enter.
5. From the File menu, choose Save to save the completed
ControlNet configuration.
Configure the Hot Backup Parameters on the First PLC-5
1. Launch RSLogix 5.
2. Go online with the odd-numbered ControlNet node.
3. From the Comms menu, choose System Comms.
The Communications dialog appears:.
4. Click on the odd-numbered node address of the first PLC-5.
Publication 1785-UM024B-EN-P - January 2003
Page 42

3-16 Installing and Configuring Your ControlNet PLC-5 Backup System
5. Click the Online button to connect to the PLC-5.
The Going to Online Programming State dialog appears:
6. Click on Upload Logic, Merge with Existing File’s
Comment/Symbol DB button to confirm that you wish to
complete the upload.
This step is required since you have made changes to the
ControlNet configuration.
7. From the File menu, choose Save to save the project.
8. Click on the Hot Backup icon under the Controller folder to
launch the Hot Backup Configuration utility.
The ControlNet Hot Backup screen appears, with the Configure
tab selected.
Publication 1785-UM024B-EN-P - January 2003
Page 43

Installing and Configuring Your ControlNet PLC-5 Backup System 3-17
9. Set the following:
• Backup File - Enter an unused data file number. This creates
a 200-word integer file to be used as the ControlNet Backup
Configuration and Status file.
• Odd Node Address - Enter the ControlNet node address
corresponding to the odd node processor.
• Send Message - Enter the message number of the from the
Produce Buffer ID from the odd-numbered node address
(refer to the number you recorded on page 3-6.)
• Receive Message - Enter the message number of the
Consume Buffer ID from the odd-numbered node address
(refer to the number you recorded on page 3-6.)
If your system is properly configured, the PRI and SEC LEDs on
the first processor’s backup cartridge are off.
10. Save the configuration.
11. Repeat steps 1 through 10 for the second processor, saving the
configuration under a different name.
The QUAL LED on both processors should now be yellow, and
you have a fully qualified backup system. If desired, you can
now go to Run mode.
Publication 1785-UM024B-EN-P - January 2003
Page 44

3-18 Installing and Configuring Your ControlNet PLC-5 Backup System
Advanced Configuration Options
The procedures in the previous sections outlined the steps required to
configure a basic ControlNet PLC-5 backup system. In addition, there
are other options you can configure for the backup system. In
addition to the information provided here, you can find specific
details on these features in the appendices of this manual.
• Synchronous and Asynchronous modes - provide you with
the opportunity to choose synchronous or asynchronous
program scanning for your backup system.
• Equivalence Checking - when enabled, equivalence checking
is the performance of verification checks to ensure the
qualifying secondary matches the primary. The current
equivalence status of the two processors is displayed.
Note: If equivalence checking is enabled during qualification
and differences are found, a major fault will occur on the
qualifying PLC-5.
• Crossloading - allows you to perform an on-demand transfer of
data files from the primary to the secondary processor
• Forced Switchover - allows you to force the primary processor
to secondary, and vice versa, on demand. This option is
available while both PLC processors are in Run mode. To force a
switchover, simply click on the Force Switchover button on the
Status tab of the ControlNet Hot Backup screen.
• System Status - provides you with informational messages and
current system status
• Crossload Data over Data Highway Plus - you can crossload
Data Table files over Data Highway Plus via channel 1 A. By
default, Data Table file crossloading is done over the ControlNet
channel.
Publication 1785-UM024B-EN-P - January 2003
This ability allows crossloading without affecting the ControlNet
channel. This may be desirable when the unscheduled
bandwidth of the ControlNet channel is so busy that any
additional traffic may cause network problems.
Requalification Option of Dual Primary Programmable
Controllers - you can select to requalify a ControlNet PLC-5 in
a Hot Backup system where dual primary programmable
controllers exist. This will avoid a potential major fault.
Additionally, this feature increases the availability of a qualified
backup system if communication is broken and later restored
between the two programmable controllers.
Page 45

Installing and Configuring Your ControlNet PLC-5 Backup System 3-19
• User Program Control for Completion of Qualification -
you can control when qualification completes by setting and
clearing word 39 in the CBI file.
For more information on how to use this feature, refer to page
5-11.
• Designated Primary - you can force the processor at the odd
node address to always be the primary PLC processor as long as
that processor is in Run mode and is qualified.
You can select the designated primary option from the
Configuration tab of the ControlNet Hot Backup screen in
RSLogix 5. Simply choose the Odd PLC Node from the
Designated Primary pull-down menu.
Note: You must make this selection for both processors, and
they must be in Program mode.
Configuring Optional Parameters in a ControlNet Hot Backup System
In a Hot Backup system, you must keep in mind that the configuration
parameters are system parameters and not individual PLC-5
parameters.
In a qualified backup system, the configuration parameters must be
the same for both programmable controllers. The backup system
automatically copies the parameters from the primary PLC-5 to the
secondary PLC-5. This means that one or more configuration
parameters on the secondary PLC-5 may change without any direct
involvement from the user on the secondary PLC-5.
Typically, there are two times when parameters are copied from the
primary to the secondary PLC-5:
• when the would-be secondary PLC-5 is undergoing
qualification - at this time, all configuration parameters are
passed from the primary to the secondary PLC-5. So any
configuration parameters on the would-be secondary PLC-5 are
meaningless because they will be overwritten.
• when you change the configuration parameters on the primary
PLC-5 - at this time, the changed parameters are immediately
copied to the secondary PLC-5, so there is never a time when
the parameters are different on both programmable controllers
Publication 1785-UM024B-EN-P - January 2003
Page 46

3-20 Installing and Configuring Your ControlNet PLC-5 Backup System
Synchronous and Asynchronous Program Scanning
One of the most important considerations when implementing a
backup system is the effect of divergence on the system. Divergence
occurs when the primary and secondary controllers are running their
applications and scanning the I/O asynchronously to each other. This
mode of operation can cause a condition where one of the controllers
is several program and I/O scans ahead of (or behind) the other.
Because of this condition, the logic in each controller could resolve
differently, thus creating differences (i.e., divergence) in the I/O and
data tables.
As divergence between the primary and secondary controllers
increases, the possibility of a bump in the process when a switchover
occurs also increases. This could be critical in some backup
applications.
Asynchronous program scanning allows both the primary and
secondary controllers to operate as fast as they possibly can, without
attempting to synchronize with each other. This mode of operation
should be used when the divergence of programs, I/O tables, and
data tables is not a critical consideration. Asynchronous program
scanning has no effect on program scan time. You should select this
mode of operation when the primary is programmed to run the
normal application, and the secondary is programmed to perform a
different task (e.g., a safety shutdown, a clean and wash operation,
etc.).
Synchronous program scanning forces the primary and secondary
controllers to synchronize their program and I/O scanning. Both
controllers start their program scan at the same time, and both gather
input data at the same time. This mode of operation should be used
when minimizing the divergence of programs, I/O tables, and data
tables is a critical and necessary consideration. Synchronous program
scanning impacts program scan time in both controllers (i.e., scan
times will be longer), although this impact is not significant in most
cases.
Publication 1785-UM024B-EN-P - January 2003
Page 47

Installing and Configuring Your ControlNet PLC-5 Backup System 3-21
You can change the operational mode from the Configure tab of the
ControlNet Hot Backup screen:.
Note: When you choose Synchronous mode, you will have to enter a
Maximum Program Scan Time as well. Before selecting Synchronous
mode, enter a value into the Max Program Scan Time field. This value
should be slightly larger than the maximum program scan time
recorded in the Processor Status file. (Refer to Appendix D for more
information on program synchronization.)
IMPORTANT
In Synchronous mode, if there is more than one
MCP, you must select Skip I/O Update for each of
the MCPs.
To change operational mode, click on the Operational Mode box and
choose the mode you would like to use (default is Asynchronous.)
Equivalence Checks
You can perform equivalence checking to verify that selected areas in
both the primary and secondary PLC processors are identical.
You can enable various equivalence checks from the Configuration
tab of the ControlNet Hot Backup screen. Simply check the boxes
corresponding to the equivalence checks you wish to enable.
Equivalence status is updated constantly on both PLC processors
while there is a qualified backup system. If there are differences
between the two processors, a status message appears, indicating the
difference(s), and warning you that the secondary will major fault
upon switching out of Run mode and back into Run mode.
A qualified system will not major fault if an equivalence check
mismatch is detected and enabled. Only when a PLC-5 qualifies does
an equivalence mismatch cause a major fault. The Configure tab
provides you with the current status for each equivalence check;
Publication 1785-UM024B-EN-P - January 2003
Page 48

3-22 Installing and Configuring Your ControlNet PLC-5 Backup System
Equivalent indicates that the two processors are identical, and
Different indicates that there were differences detected. Refer to
Appendix B for more information on equivalence checking.
Crossloading
You can perform data table crossloading on demand. While both PLC
processors are running, you can initiate a crossload from either the
primary or secondary processor. You can perform a crossload on the
following data file types:
• all timer accumulation values in the data table
• all counter accumulation values in the data table
• all PID files in the data table
• user-defined files, which allow you to select up to 2 separate
data file numbers and/or a range of files.
You can set up and select the files to be crossloaded from the
Crossload tab of the ControlNet Hot Backup screen.
To crossload timer, counter, or PID values, simply click on the
respective button. The crossload is performed as soon as you click on
the appropriate button.
To set up user-defined crossloading, you must designate the files you
wish to be crossloaded. If you are selecting individual files, enter the
first file you wish to crossload in the First Selected File box. If you
wish to also crossload a second file, enter it in the Second Selected
File box.
Publication 1785-UM024B-EN-P - January 2003
If you wish to crossload a range of files, enter the lowest file number
and the highest file number in the respective boxes.
Refer to Appendix C for more information on Data Table
Crossloading.
Page 49

Installing and Configuring Your ControlNet PLC-5 Backup System 3-23
Once you have selected the files you wish to crossload, click on the
Crossload User Files button to perform the operation. Note that you
can perform a crossload for individual files and for a range of files
simultaneously.
System Status
You can view system status from the Status tab of the ControlNet Hot
Backup screen.
The CBC Module LEDs section mirrors the display of the LEDs on the
1785-CHBM module which is currently online.
Diagnostic Counters
Diagnostic counters provide information on the number of times the
Maximum Program Scan has exceeded the Maximum Program Scan
Time configured for the system when in Synchronous mode. These
counters are incremented by 1 every time the actual program scan is
greater than the configured program scan. The Lost Partner counter
increments every time the system has detected a loss of
communication between the primary and secondary PLC processors.
You can press the Clear button to reset these values.
Qualification Error Reason
If the qualification of the system fails, the Qualification Error Reason
indicates the reason why the failure occurred. Refer to Chapter 5 for
information on corrective actions you can take.
Publication 1785-UM024B-EN-P - January 2003
Page 50

3-24 Installing and Configuring Your ControlNet PLC-5 Backup System
Invalid State Reason
If the system is in an Invalid backup state (refer to Appendix B for
more information on backup states), a description of the problem is
displayed. Refer to chapter 5 for information on corrective actions you
can take.
Maximum Pscan Information
This information is applicable for Synchronous mode operation only.
The following parameters are listed in this section:
• Configured Scan - the Maximum Program Scan Time
• Adjusted Scan - the Maximum Program Scan Time rounded up
to the next integer multiple of the NUT
• NUT Time (ms) - the parameter configured in RSNetWorx
• Number of NUTs - the number of NUTs in the Adjusted
Maximum Program Scan Time
Crossloading Over Data Highway Plus
You can crossload Data Table files over Data Highway Plus via
channel 1A. This ability allows crossloading without affecting the
ControlNet channel. This may be desirable when the unscheduled
bandwidth of the ControlNet channel is so busy that any additional
traffic may cause network problems.
To use this feature, you must set up channel 1A:
1. Wire the channel by installing a point-to-point blue wire on
Channel 1A of both of the processors
2. Set the Channel 1 A DIP switches located on the side of each
processor:
Side view of PLC-5/40C and -5/80C processors Switch Assembly SW1
Side View
switch pushed down
1234567
Publication 1785-UM024B-EN-P - January 2003
switch pushed up
Page 51

Installing and Configuring Your ControlNet PLC-5 Backup System 3-25
For the point-to-point DH+ network between the processors, set the
DH+ address based upon the ControlNet node address being an even
or odd number, as shown in the following table:
To set: Set
switch(es):
an odd-numbered ControlNet address 1 Up
2-6 Down
an even-numbered ControlNet address 1 Down
2 Up
3-6 Down
Baud Rate 7 Up
To :
(230.4kbps)
Reasons for invalid crossload channel configuration:
• Channel 1A must be configured as DH+
• Channel 1A baud rate must be 230.4Kbaud
• Odd-numbered ControlNet PLC-5 DH+ address must be 1
• Even-numbered ControlNet PLC-5 DH+ address must be 2
Correct this by changing the DIP switch to their proper positions
as shown in the above table.
Make the setting in RSLogix 5:
1. In the ControlNet Hot Backup Screen, choose the Crossload tab.
2. In the Crossload Channel dialog, toggle from Channel 2 to
Channel 1A.
If the PLC-5 is not in the invalid backup state, the feature is properly
configured.
Publication 1785-UM024B-EN-P - January 2003
Page 52

3-26 Installing and Configuring Your ControlNet PLC-5 Backup System
Requalification of Dual Primary Processors
You can select to requalify a PLC-5C Hot Backup processor if dual
primary processors exist. This will avoid a major fault. Additionally,
this feature increases the availability of a qualified backup system if
communication is broken between the two PLC-5 processors.
IMPORTANT
To set the requalification of dual primary PLC-5s, check the
Requalification Enabled box in the lower left corner:
When a processor requalifies, it transitions out of
Run mode into Program mode during qualification
and data table crossload - and then transitions back
into Run mode.
PLC-5 Editing Considerations
There are some considerations you should be aware of when editing
the processor of a ControlNet PLC-5 backup system. Editing, in this
context, refers to any changes you make to the program files, data
table structure, force tables, and status file. Edits that you make to one
PLC-5 are not automatically transferred to the other PLC-5. Thus, if
you wish for edits to apply to both PLC-5s, you must take the steps to
make that happen.
Most simply, you can ensure the changes are made to both PLC-5s by
manually making those changes yourself. If your edits are small, this
might be the fastest and easiest solution. However, if you have made
large amounts of editing changes to one PLC-5, it may be difficult and
time consuming to make all the same editing changes to the other
PLC-5. This section describes another method for doing this.
Publication 1785-UM024B-EN-P - January 2003
Page 53

Installing and Configuring Your ControlNet PLC-5 Backup System 3-27
Downloading Editing Changes
Downloading a program saved from one processor to another can
greatly simplify the transfer of editing changes from one processor to
another. If you follow the steps described earlier in this chapter, in the
section entitled “Create and Download the Project for the Second PLC
Processor,” then you can complete this processor-to-processor
download. The steps outlined there ensure that a new, different
project name is created for the program that is downloaded. They also
ensure that the ControlNet configuration information remains unique
for each of the processors, which must be the case.
This means that any edits you make to the I/O map table, you must
manually make on each processor.
Testing Data Table Edits
There may be instances where edits are made to the data table
structure, and these edits need to be tested on a running system.
If this is the case, place one of the processors in your backup system
into Program mode, and make the edits to that processor. Make sure
that the data table structure and the ladder program equivalence
checks are disabled while performing edit switchovers. Ladder
program equivalence checks are dependent on data table structures so
ladder program equivalence checking must also be disabled.
Next, place the edited system into Run mode. A forced switchover can
be performed, which makes the edited processor the primary, and the
unedited processor the secondary. If problems occur within the edited
system, a second forced switchover makes the unedited processor
primary again.
Note: Qualification crossloading and on-demand crossloading are
disabled when the data table structures between the processors are
different.
Publication 1785-UM024B-EN-P - January 2003
Page 54

3-28 Installing and Configuring Your ControlNet PLC-5 Backup System
Notes
Publication 1785-UM024B-EN-P - January 2003
Page 55

Chapter
Using I/O in Your ControlNet Hot Backup
System
4
Chapter Objectives
Considerations when Using I/O
This chapter describes special considerations when using I/O in a hot
backup system.
For scheduled connections, a special connection type has be
established called a redundant connection. A redundant connection
allows both processors to make identical scheduled connections and
only the outputs from the primary processor are used. The outputs
from the secondary processor are discarded.
ControlNet I/O (CIO) instructions must be managed differently in the
PLC-5 ControlNet Hot Backup system:
• with ControlNet I/O write instructions, the output should only
be sent from the primary processor. Use a simple ladder
program example described in this chapter to manage this.
• with ControlNet I/O read instructions, both PLC-5s can perform
the read instruction, or the primary PLC-5 can perform the read
instruction and the data can be crossloaded from the primary
PLC-5 to the secondary PLC-5.
HMI devices have specific requirements including:
• outputs sent from the backup system to the HMI device must
come from the primary PLC-5. There are specific procedures that
that we describe later in this chapter that instruct the HMI device
to determine the primary PLC-5. When the HMI device "knows"
which is the primary PLC-5, it can then gather the outputs
from it.
• HMI inputs must be sent to both the primary and secondary
PLC-5 programmable controllers in the Hot Backup system. This
chapter describes how to do this.
Finally, some of the I/O in the PLC-5 does not switch over when the
PLC-5 programmable controllers perform a switchover. The resident
chassis I/O and the I/O on the remote "blue wire" channel are not
backed up. Also, ControlNet scheduled connections not configured to
be the redundant connection type are not backed up. When a
switchover occurs, the new secondary PLC-5 continues to control the
outputs of the non-redundant outputs
1 Publication 1785-UM024B-EN-P - January 2003
Page 56

4-2 Using I/O in Your ControlNet Hot Backup System
This non-redundant I/O should only be used when all the
consequences of its operation are fully understood.
Redundant Connections
Redundant connections are required so that the PLC-5 ControlNet Hot
Backup system can properly switch over ownership of the scheduled
output from the former primary PLC-5 to the current primary PLC-5.
You must configure identical redundant connections for both PLC-5
programmable controllers to an I/O rack for discrete I/O or to specific
I/O modules.
Once both PLC-5 programmable controllers establish the redundant
connection, the scheduled output will only be used from the primary
PLC-5. The outputs from the secondary PLC-5 are discarded. However,
even after the outputs from the secondary PLC-5 are discarded, the
connection from the secondary PLC-5 remains open. This allows the
secondary PLC-5 to quickly take control of the outputs in the event of
a switchover.
The scheduled inputs for a redundant connection are sent to both
PLC-5 programmable controllers simultaneously, insuring that both the
primary and secondary PLC-5 programmable controllers receive the
scheduled inputs at the same time.
If only one of the redundant connections is established, it works
exactly like an exclusive owner connection. It is only when both of
the redundant connections are established to an I/O chassis or
module that special handling of the scheduled outputs occurs.
There are three adapter modules that support redundant connection
in the ControlNet Hot Backup system:
• 1771-ACN(R) adapter - with this adapter, the rack connection
must be established before any module connections can be
established
• 1794-ACN(R) FLEX I/O adapter
• 1747-ACN(R) SLC I/O adapter
How to Configure Redundant Connections
Configuration parameters of a redundant connection must be the
same for both the primary and secondary PLC-5. If any of the
configuration parameters are different, the second of the two
connections that attempts to be established will fail with a Redundant
Connection Mismatch error.
Publication 1785-UM024B-EN-P - January 2003
Page 57

Using I/O in Your ControlNet Hot Backup System 4-3
Redundant connection parameters consist of:
• Input size
• Output size
• RPI
• Data Table Module configuration size
• Data Table Module configuration data (with the number of
words depending on the module type)
• any other connection-dependent configuration parameters
such as Fault Action and Idle Action. You configure these
parameters in RSNetWorx for ControlNet software.
You can use the Equivalence Checks - I/O Map Table feature to
make sure that all of the redundant connection parameters are
identical for both PLC-5 programmable controllers. This feature also
verifies that the input and output image addresses are the same and
that there are the same number of redundant connection on each
processor.
Changing I/O Configuration
Use the following procedure to insure that I/O module configuration
changes are accepted on both the primary and secondary PLC-5
programmable controllers. This procedure assumes that the primary
and secondary programmable controller’s RSLogix5 projects (.rsp files)
are properly associated with the same RSNetWorx project (.xc file).
IMPORTANT
When you make I/O configuration changes to a
running application or process, you must place one
of the programmable controllers in Program mode.
However, the I/O configuration changes will
temporarily close and open the scheduled
connection. Thus, we recommend that you use the
procedure where both programmable controllers are
in program mode.
Making I/O Configuration Changes to a Running Hot Backup
System
1. Place the secondary PLC-5 in Program mode.
2. For each connection that requires an I/O configuration change,
use RSNetWorx to inhibit the I/O connection for the PLC-5 in
Program mode. You must do this so that when the I/O
configuration changes are made to the primary PLC-5, the other
PLC-5 connection must be closed so that the primary’s new
connection can be established.
Publication 1785-UM024B-EN-P - January 2003
Page 58

4-4 Using I/O in Your ControlNet Hot Backup System
The procedure is complete. Your Hot Backup system is once again
valid.
3. Use RSLogix5 to make all the desired I/O configuration changes
to the primary PLC-5. and accept all the changes. This will
temporarily close and open the scheduled connections.
4. Save the project in RSNetWorx and accept the pending edits. Do
a merged save.This makes the corresponding I/O configuration
changes to the PLC-5 in Program mode without affecting the
primary PLC-5.
5. Use RSNetWorx to uninhibit all the I/O connections that we
inhibited for the PLC-5 in Program mode.
6. Use RSNetWorx to verify that all redundant connections are
successful for both programmable controllers.
7. Place the PLC-5 currently in Program mode, back into Run
mode.
Making I/O Configuration Changes to a Hot Backup System in
Program Mode
1. Use RSLogix5 to make all the I/O configuration changes to one
of the ControlNet nodes.
2. Accept all the changes.
3. Save the project in RSNetWorx and accept the pending edits. Do
a merged save.This makes the corresponding I/O configuration
changes to the other PLC-5.
4. Use RSNetWorx to verify that all redundant connections are
successful for both programmable controllers.
Output Ownership Verification for Redundant Connections
Output ownership verification (OOV) determines if a primary
processor does not own all of the redundant connection’s outputs
when its redundant connection is open. Word 8 of the CBI file
indicate the number of redundant connections that are not owned by
the primary processor.
Publication 1785-UM024B-EN-P - January 2003
Page 59

Using I/O in Your ControlNet Hot Backup System 4-5
OOV is done via a round-robin poll that runs in the background of the
primary PLC-5.
EXAMPLE
In an application with 20 redundant connections, the
primary PLC-5 polls these redundant connections
sequentially until all of the redundant connections
have been polled. For each redundant connection
that indicated the primary processor is not the owner
of the outputs for that connection, the value in word
8 of the CBI file increments. Word 8 of the CBI file is
updated after every complete polling cycle. The
value in word 8 of the CBI file for a secondary PLC-5
will be -1 (0xFFFF Hex).
There are some possibilities where an OOV conflict may occur. For
example, if one or both of the special peer-to-peer handshake
connections between the programmable controllers were to fail, each
PLC-5 would become a primary PLC-5. In this case, one or both of the
programmable controllers would indicate OOV conflict.
Other situations where OOV conflict can occur is in high noise level
environments or with an improper network installation. Under these
conditions, it is possible for the redundant connection between the
primary PLC-5 and an output module or adapter to be corrupt. When
this happens, the adapter turns control of the output over to the
secondary PLC-5 without notifying the primary PLC-5 that it has lost
the connection. This puts the system in a state where the secondary
PLC-5 controls some of the outputs and the primary PLC-5 controls the
remaining outputs. This system state may not be acceptable in certain
applications.
The PLC-5 takes no action if there is a non-zero value in word 8 of the
CBI file for a primary PLC-5. Your application must poll word 8 of the
CBI file to determine if an OOV conflict exists. If a non-zero value is
found in word 8 of the CBI file for a primary PLC-5, the application
will notify the system operator to cycle power on one of the
programmable controllers which restores total output control to the
other PLC-5.
ControlNet I/O Instructions
ControlNet I/O (CIO) instructions are managed differently in the
ControlNet Hot Backup system. With CIO write instructions, the
output data must only be sent from the primary PLC-5. To do this, you
must add a condition to the rung with the CIO write instructions so
that the rung will only be true when the PLC-5 is the primary
programmable controller. Word 3, bit 2 in the CBI file indicates
whether the PLC-5 is primary or not.
Publication 1785-UM024B-EN-P - January 2003
Page 60

4-6 Using I/O in Your ControlNet Hot Backup System
With CIO read instructions, there are two possibilities:
Considerations when Using CIO Instructions
Be aware of certain considerations when using CIO instructions for an
I/O module that has redundant connections configured for that
module.
Writing different configuration data to the I/O module than is used by
the redundant connections must be prevented. If different module
configuration data is written to the I/O module than was for the
redundant connection, the redundant connection will not reopen
should the redundant connection ever close. If the I/O module
configuration data is intentionally altered, you must first alter the
configuration data for the redundant module connections. This means
you must first alter the configuration data for the redundant module
connections and then do a CIO write to the same module. One way to
ensure that the CIO instruction uses the same configuration data as
the redundant connection is for the CIO instruction to use the same
configuration data from the redundant connection’s data table
location.
• either both programmable controllers can perform the read, or
• the primary PLC-5 can perform the read and then the data can
be crossloaded from the primary to the secondary PLC-5
Human Machine Interface (HMI) Considerations
HMI devices can be used to:
• gather data from the programmable controllers and display it to
users, or
• gather input data from users and write it to the programmable
controllers
With these HMI considerations, we are assuming that the HMI devices
initiate the data transfers - meaning the HMI solicits requests to read
or write data to the PLC-5 programmable controllers. Additionally
these considerations apply not only to the ControlNet channel, but to
any other channel where both the primary and secondary PLC-5 are
each different nodes on the channel, such as DH+.
If the HMI device supports scheduled redundant connections on
ControlNet as described above, it also supports the PLC-5 Hot Backup
System. HMI that support scheduled but not redundant connections
should not use scheduled connections in the Hot Backup System. This
is because only one of the programmable controllers owns the
connection and if that PLC-5 were to fail, the other PLC-5 could not
pick up communication with the HMI device.
Publication 1785-UM024B-EN-P - January 2003
Page 61

Using I/O in Your ControlNet Hot Backup System 4-7
There are two areas of concern with HMI devices in a PLC-5
ControlNet Hot Backup System:
• the data gathered by the HMI device must only gather it from
the primary PLC-5. There are special requirements that allow the
HMI device to determine which of the programmable controllers
is the primary.
• data that is written to the PLC-5 by the HMI device must be sent
by the HMI device to both programmable controllers. With
single programmable controller systems, the HMI sends the
inputs to the single PLC-5. In a hot backup system, the inputs
must also be sent to the secondary PLC-5. There are different
procedures to follow to make sure that the input data is sent to
the secondary PLC-5.
In each of these situations, different procedures are required,
depending on whether the HMI uses RSLinx. If the HMI can use
RSLinx, the HMI can remain unchanged. If the HMI cannot use
RSLinx, the HMI will require additional programming so the HMI can
operate properly in a hot backup system.
Data Gathered by the HMI
Data gathered by the HMI must come from the primary PLC-5. This
can be challenging, because both the primary and secondary PLC-5
are both on the channel, and there is no predetermined way to know
which of the two is the primary PLC-5. If the HMI can access the
network with RSLinx, the following procedures can help:
1. In RSLinx, use the Alias Topic feature (under the DDE menu)
2. Set up a Topic for each of the programmable controllers
3. Make an Alias Topic using the two Topics set up in step 2.
4. Configure the Switch When Bit is (Zero or One) parameter.
Select zero.
5. Enter the address of the primary bit in the appropriate field. the
primary bit is word 3, bit 2 of the CBI file.
For example, if the CBI file were file 20, you would enter
N20:3/2 in the field. This procedure will only work if the CBI file
is the same file number for both programmable controllers.
With HMI devices that cannot use RSLinx, you must modify the
application so it only gathers the data from the primary PLC-5. The
application must be configured so it frequently polls the primary bit
for both programmable controllers.
Publication 1785-UM024B-EN-P - January 2003
Page 62

4-8 Using I/O in Your ControlNet Hot Backup System
The application must only gather data from the PLC-5 whose primary
bit was set. If both programmable controllers have their primary bit
off, then neither PLC-5 is the primary and it does not matter from
which PLC-5 the data is gathered.
If the data going to the HMI device must be sent periodically, it may
be easier to have the PLC-5 write the data to the HMI instead of
having the HMI read the data from the PLC-5. In this case, you would
program the PLC-5 to periodically write the data to the HMI via a CIO
or MSG instruction. The rung with the CIO or MSG instruction would
be conditioned so that the rung only goes true if the PLC-5 was the
primary PLC-5. This procedure assumes that the HMI device can
handle either CIO and/or MSG instructions sent to it.
Data Written by the HMI
As explained above, data written by HMI devices must go to both
programmable controllers in a Hot Backup System. You can do this in
a few different ways. With an HMI device that can access the network
via RSLinx, follow this procedure:
1. In RSLinx, use the Alias Topic feature (under the DDE menu).
2. Set up a Topic for each of the programmable controllers.
3. Make an Alias Topic using the two Topics set up in step 2.
4. Configure the Switch When Bit is (Zero or One) parameter.
Select zero.
5. Enter the address of the primary bit in the appropriate field. the
primary bit is word 3, bit 2 of the CBI file.
For example, if the CBI file were file 20, you would enter
N20:3/2 in the field. This procedure will only work if the CBI file
is identical for both programmable controllers.
6. Activate the Update All Topics selection. This will write to all
topics in the list when any single topic has data written to it.
For HMI devices that cannot use RSLinx, you must modify the
application to write to both programmable controllers whenever a
write to a PLC-5 occurs.
Publication 1785-UM024B-EN-P - January 2003
Another option that does not require changes to the HMI application
is to write to the primary PLC-5. The data is then crossloaded from the
primary PLC-5 to the secondary PLC-5. Do this with the On Demand
Data Table crossload feature.
Page 63

Using I/O in Your ControlNet Hot Backup System 4-9
This procedure assumes that the HMI knows which PLC-5 is the
primary programmable controller. Refer to the above procedures to
determine the primary PLC-5.
Checking ControlNet Resources
When an HMI device is connected to the PLC-5, it uses the some of
the limited resources of the PLC-5. The PLC-5 keeps diagnostic
information on its resources in its ControlNet diagnostics file. You can
check this information periodically to make sure the HMI device will
not allocate a resource from the PLC-5 that is no longer available.
Publication 1785-UM024B-EN-P - January 2003
Page 64

4-10 Using I/O in Your ControlNet Hot Backup System
Notes
Publication 1785-UM024B-EN-P - January 2003
Page 65

Chapter
Monitoring and Troubleshooting Your
ControlNet PLC-5 Hot Backup System
5
Chapter Objectives
This chapter describes the diagnostic capabilities of the ControlNet
PLC-5 backup system, and provides you with tips to help you in
troubleshooting difficulties with your system.
The PLC-5 ControlNet backup system generates diagnostic information
to assist you with troubleshooting problems that may arise within a
backup application. Most of the diagnostic information is stored
within the ControlNet Backup Configuration and Status file. Other
ControlNet backup diagnostic information is stored in the Major Fault
Code word of the Status File (S:12), and on the LEDs of the
1785-CHBM ControlNet backup cartridge.
You can access the ControlNet Backup Configuration and Status file
directly via ladder logic and the data monitor, or indirectly via the Hot
Backup utility within RSLogix 5. The sections in this chapter refer only
to direct access to the ControlNet Backup Configuration and Status
file, though we recommend performing the same operation via the
Hot Backup utility whenever possible.
1 Publication 1785-UM024B-EN-P - January 2003
Page 66

5-2 Monitoring and Troubleshooting Your ControlNet PLC-5 Hot Backup System
ControlNet PLC-5 Backup-Specific Major Fault Error Codes
If you see fault
code:
230 System attempted transition to Run mode with
231 Bypassed qualification (may occur during race
232 Both processors attempted to be primaries. Check all media for broken cables, loose connectors,
233 ControlNet configuration invalid on transition into
234 Failed Qualification. Refer to the qualification major faults troubleshooting
235 Illegal invalid backup state Cycle power to the processor. If the fault reoccurs, contact
236 Illegal No Control backup state Cycle power to the processor. If the fault reoccurs, contact
237 Illegal Primary/Secondary backup state Cycle power to the processor. If the fault reoccurs, contact
238 Incompatible firmware revisions Install the same series and revision of firmware into both
239 ControlNet keeper mismatch Use RSNetworx to make the PLC-5 processor a valid
Which indicates this fault: Take this corrective action:
processor in Invalid backup state.
condition when both processors attempt to go into
Run mode at the same time).
Run mode.
The PLC-5 processor stores major fault codes in word 12 of the
processor status file (S:12). The following table lists new major fault
codes specific to the ControlNet Hot Backup processor and the
suggested corrective action for each.
Change from the Invalid backup state to the No Control
backup state before transitioning into Run mode. Refer to
the Invalid backup state troubleshooting table later in this
chapter.
Transition the PLC-5 processors into Run mode one at a
time.
missing terminators, etc.
Reconfigure the ControlNet channel.
table later in this chapter.
Rockwell Automation Technical Support at 440-646-6800
Rockwell Automation Technical Support at 440-646-6800
Rockwell Automation Technical Support at 440-646-6800
hot backup PLC-5 processors
keeper
Publication 1785-UM024B-EN-P - January 2003
ATTENTION
!
The processor does not invoke the fault routine
for any of the new fault codes for the ControlNet
PLC-5 backup system since they are
non-recoverable faults.
Page 67

Monitoring and Troubleshooting Your ControlNet PLC-5 Hot Backup System 5-3
Using the 1785-CHBM
The 1785-CHBM cartridge status indicators indicate the operational
state of the ControlNet PLC-5 backup system. The following table lists
Cartridge Status Indicators
LED Color Indicates Probable Cause Corrective Action
PRI Green This processor is the primary (i.e., it controls the
outputs).
Green blinking This processor is in the Lonely Primary backup
state
Red The backup system is not yet completely
configured (i.e., system is in the Invalid backup
state).
Off This processor is not the primary (i.e., system is
in the No Control or Secondary backup state).
SEC Yellow This processor is the qualified secondary (i.e.,
system is in the Secondary backup state).
Red The backup system is not yet completely
configured (i.e., system is in the Invalid backup
state).
the various LED states and the recommended action:
Normal operation No action required
No good scheduled
connections
Improper backup
configuration
parameters
Improper ControlNet
Backup Integer file
Normal operation No action required
Normal operation No action required
Improper backup
configuration
parameters
Improper ControlNet
Backup Integer file
Check media for broken cables,
loose connectors, missing
terminators, etc.
Refer to Troubleshooting the
Invalid Backup State section,
later in this chapter.
Refer to Troubleshooting the
Invalid Backup State section,
later in this chapter.
Off This processor is not the secondary (i.e., system
is in the No Control or Primary backup state).
QUAL Green The system has both a primary and a secondary
processor, which are communicating properly
with each other; the secondary processor is
qualified.
Yellow The system has both a primary and a secondary
processor, which are communicating properly
with each other, but the secondary is not yet
qualified.
Alternating yellow
and green
Off The primary and secondary processors are not
Qualification active Normal operation No action required
communicating properly with each other.
Normal operation No action required
Normal operation No action required
Normal operation No action required
Standalone processor
One or both processors
are in the Invalid
backup state
Improper backup
configuration
parameters
Verify that the connection
parameters (words 0 - 2) of the
ControlNet Backup Integer file
are the same for both processors.
Publication 1785-UM024B-EN-P - January 2003
Page 68

5-4 Monitoring and Troubleshooting Your ControlNet PLC-5 Hot Backup System
LED Color Indicates Probable Cause Corrective Action
SYNC Green The system is operating in synchronous mode,
and this processor has never exceeded the
adjusted maximum program scan time
parameter.
Red The system is operating in synchronous mode,
and this processor has been out of sync (i.e., its
actual program scan time has exceeded the
adjusted maximum program scan time
parameter). While the out of sync condition may
have been temporary, this LED remains
illuminated to indicate that an out of sync
condition has occurred.
Off The system is operating in Asynchronous mode. Normal operation No action required
Troubleshooting the Invalid
The Invalid Backup state is indicated when both the PRI and SEC
LEDs are red. The first thing to check is that you have created the
Backup State
ControlNet Backup Configuration and Status file and that the file
number of this file is placed into the processor status file word S:67.
This file must be an Integer file (file type N) and must be exactly 200
words in length
Normal operation No action required
Maximum Program
Scan Time
configuration
parameter too small
Spike in program scan
time, possibly due to
online editing
Clear the Maximum Program
Scan Exceeded counter by
writing a non-zero value into the
clear diagnostics counters word
(word 32) of the ControlNet
Backup Configuration and Status
file.
Increase Maximum Program Scan
Time configuration parameter
(word 14) of the ControlNet
Backup Configuration and Status
file.
The ControlNet Backup Configuration and Status file contains a
diagnostic word (word 5) that indicates the reason for the Invalid
backup state. The following table lists the various Invalid backup state
reason codes and suggested corrective action.
Publication 1785-UM024B-EN-P - January 2003
Page 69

Monitoring and Troubleshooting Your ControlNet PLC-5 Hot Backup System 5-5
If you see reason
Which indicates this condition: Take this corrective action:
code:
0 Valid backup state No action required
1 Receive handshake connection not found in I/O Map
Tab le
Configure the handshake connections in the I/O map table.
Enter the handshake connection numbers in words 1 and 2
of the ControlNet Backup Configuration and Status file.
2 Send handshake connection not found in I/O map
table
Configure the handshake connections in the I/O map table.
Enter the handshake connection numbers in words 1 and 2
of the ControlNet Backup Configuration and Status file.
3 Receive handshake connection wrong size Make the handshake connection in the I/O map table 5
words long.
4 Send handshake connection wrong size Make the handshake connection in the I/O map table 5
words long.
5 Node address number wrong Enter the odd node number of the odd-even backup pair
into word 0 of the ControlNet Backup Configuration and
Status file.
6 Operation mode word invalid Enter a valid operation mode value into word 10 of the
ControlNet Backup Configuration and Status file.
0 = asynchronous
1 = synchronous
7 Equivalence mode word invalid Enter a valid equivalence mode word (i.e., 0 - 63) into word
11 of the ControlNet Backup Configuration and Status file.
8 Designated Primary word invalid Enter a valid Designated Primary word into word 12 of the
ControlNet Backup Configuration and Status file.
0 = inactive
1 = active
9 Maximum Program Scan Time word invalid Enter a valid Maximum Program Scan Time word (i.e., less
than or equal to 128*NUT) into word 13 of the ControlNet
Backup Configuration and Status file.
11 Handshake Requested Packet Interval (RPI) invalid Make the handshake connection’s RPI in the I/O map table
at least one NUT, but less than 2 NUTs.
12 Crossload file number parameters invalid Enter valid file numbers (0 - 999) into words 55 through 58
of the ControlNet Backup Configuration and Status file
Make sure the crossload range low word (word 57) value
is less than or equal to the crossload range high word
(word 58) value.
13 ControlNet NUT not established. Until the processor
Attach the processor to the ControlNet channel.
is attached to the ControlNet channel, the NUT is
unknown.
14 Invalid crossload channel configuration Set the value in word 70 of the CBI file:
0 = Crossload over Channel 2 (ControlNet - default)
1 = Crossload over Channel 1A (DH+)
Additional causes for this fault:
- Channel 1A must be configured to DH+
- Channel 1A baud rate must be 230.4Kbaud
- Odd-numbered ControlNet PLC-5 DH+ address must be 1
- Even-numbered ControlNet PLC-5 DH+ address must be 2
Change these settings by adjusting Channel 1A DIP
switches:
15 Keeper not configured Download correct network information using RSNetWorx
16 Signature mismatch Download correct network information using RSNetWorx
17 Handshake connections not scheduled Enter proper handshake connections using RSNetWorx
18 Invalid configuration parameter Set the value in word 72 of the CBI file:
0 = No requalification with dual primary (default)
1 = Requalification with dual primary
Publication 1785-UM024B-EN-P - January 2003
Page 70

5-6 Monitoring and Troubleshooting Your ControlNet PLC-5 Hot Backup System
Troubleshooting
When a qualification major fault occurs (S:12 = 234), the ControlNet
Backup Configuration and Status file contains a diagnostic word
Qualification Major Faults
(word 46) that indicates the reason why the qualification major fault
occurred. The following table lists the various qualification major fault
reason codes and the suggested corrective action.
If you see reason
code:
0 Qualification successfully completed No action required
1 Failed Qualification Equivalence check - Ladder
2 Failed Qualification Equivalence check - Data Table
3 Failed Qualification Equivalence check - Redundant
4 Failed Qualification Equivalence check - ControlNet
5 Failed Qualification Equivalence check - Force Tables
6 Failed Qualification Equivalence check - Configuration
8 Processor major faulted during qualification Fix the reason for the major fault. Refer to S:12 for major
9 Keyswitch changed to Program during qualification No action required
10 Files being created or deleted during qualification Refrain from editing the data table file or program files
11 Upload or Download in progress during qualification Refrain from uploading or downloading to the processor
12 ControlNet channel reconfiguration in progress during
13 The processor changed from the No Control backup
14 The partner processor was in the Primary backup
15 The partner’s ControlNet Hot Backup configuration
17 Qualification crossload failed Refer to the Troubleshooting Qualification Crossloads
18 Edits in progress during qualification Refrain from editing during qualification.
Which indicates this condition: Take this corrective action:
Disable ladder program equivalence check, if desired.
programs different
Structures different
connections in I/O Map Tables different
Hot Backup file connection parameters different
different
parameters in processor status file different
qualification
state to the Invalid backup state during qualification
state when qualification started. The partner
processor changed out of the Primary backup state
during qualification.
parameters are invalid
Make ladder programs identical in each processor.
Disable data table structure equivalence check, if desired.
Make data table structures identical in each processor.
Disable Redundant Connections in I/O Map Table
equivalence check, if desired.
Make redundant connections identical in each processor.
Disable ControlNet Hot Backup file connection parameters
equivalence check, if desired.
Make ControlNet Hot Backup file connection parameters
identical in each processor.
Disable Force Tables equivalence check, if desired.
Make Force Tables identical in each processor.
Disable processor status file equivalence check, if desired
Make processor status file configuration parameters
identical in each processor
fault codes
during qualification.
during qualification.
Refrain from performing a ControlNet channel
reconfiguration during qualification.
Refrain from modifying the ControlNet backup
configuration parameters during qualification.
Clear the fault and go back into Run mode.
Refrain from changing the partner processor’s ControlNet
Hot Backup configuration parameters during qualification.
section in this chapter.
Publication 1785-UM024B-EN-P - January 2003
Page 71

Monitoring and Troubleshooting Your ControlNet PLC-5 Hot Backup System 5-7
Troubleshooting Qualification Crossloads
If the data table structures are the same between the two processors,
data table crossloads automatically occur during qualification. Should
the Qualification Data Table crossloads fail, the processor major faults.
(Refer to Appendix C for more information on data table
crossloading.)
When a data table crossload fails, diagnostic information is stored in 2
words of the ControlNet Backup Configuration and Status file. Word
54 of this file contains the file number of the crossload that failed;
word 53 contains the error code indicating the reason why the
crossload failed. These error codes are identical to the Message
Instruction Error Codes. (See the Instruction Set Reference Manual,
Publication 6200-6.4.11 for a complete listing of the various error
codes which can be encountered while executing a Message
Instruction.)
For example, a qualification crossload could fail if the Data Table file
on the primary processor has read privileges disabled. This error
shows up as error code 0xF00B (privilege error) in word 53 of the
ControlNet Backup Configuration and Status file.
TIP
If the file number of the crossload that failed (word
54 of the ControlNet Backup Configuration and
Status file) is 0xFFFF on the qualifying processor,
then the file number that failed is on the primary
processor.
Troubleshooting with Output Ownership Verification
When operating in hot backup mode, the ControlNet PLC-5 has
output ownership verification - a feature designed to notify the system
operator that output ownership has become divided between the
primary and secondary processors.
It is important to use this feature because it is possible for the
redundant connection between a primary processor and an output
module or adapter to become corrupted - possible causes could be a
high noise level environment and/or an improper network
installation. When this happens, the adapter will turn control of the
output over to the secondary processor without notifying the primary
processor that it has lost the connection.
Publication 1785-UM024B-EN-P - January 2003
Page 72

5-8 Monitoring and Troubleshooting Your ControlNet PLC-5 Hot Backup System
This puts the system in a state where the secondary processor controls
some outputs and the primary processor controls the remaining
outputs. This system state may not be acceptable in certain
applications.
IMPORTANT
Output ownership verification is done via a round-robin poll that runs
in the background of the primary processor.
For example, if there are 20 redundant connections in a system, the
primary processor polls these connections starting with redundant
connection 1, then 2, then 3 and so on, until it has polled all 20
connections. If the primary processor has lost any of these 20
connections, output ownership verification places this value in register
08 of the ControlNet Backup Integer File. This register is written over
at the completion of every polling cycle, and contains a count related
only to the last polling cycle. The value in register 08 will always be -1
(FFFF Hex) in the secondary processor.
To be notified of this value, your application must poll register 08 in
the ControlNet Backup Integer File on a continuous basis in the
primary processor. If the value in this register is non-zero, the
application should notify the system operator to cycle power to the
secondary processor which restores output control to the primary
processor.
To be notified of this system state, you must poll the
output ownership verification feature.
ControlNet Backup Configuration and Status File
Publication 1785-UM024B-EN-P - January 2003
The data table file number of the ControlNet Backup Configuration
and Status file can be found in the PLC-5 processor at word S:67. The
default configuration parameters in this file are initialized, when the
file exists, the value in S:67 is correct, and at least one of the three
connection parameters (i.e., one of the first three words of the file) is
invalid. The ControlNet Backup Configuration and Status file consists
of 200 words, as defined in the following table.
Word Definition
0 Odd node address of the odd/even pair of node addresses for the two
PLC-5 backup processors.
1 Message number of the scheduled Backup Handshake connection being
sent from the processor at the Odd node address.
2 Message number of the scheduled Backup Handshake connection being
sent from the processor at the Even node address.
Page 73

Monitoring and Troubleshooting Your ControlNet PLC-5 Hot Backup System 5-9
Word Definition
3 Backup state of the processor. Valid values include:
0 - Invalid
1 - No Control
2 - Primary
4 - Secondary
4 Qualification state of the system. Valid values include:
0 - No qualified secondary present
1 - Qualified secondary present
5 Reason code indicating why the processor is in the Invalid backup state.
This word is constantly updated until the processor is no longer in this
state. Valid values include:
0 - In valid state
1 - Receive handshake connection not found in I/O map table
2 - Send handshake connection not found in I/O map table
3 - Receive handshake connection wrong size
4 - Send handshake connection wrong size
5 - node address number wrong
6 - Operation mode word invalid
7 - Equivalence mode word invalid
8 - Designated Primary word invalid
9 - Max Program Scan Time word invalid
11 - Handshake is not 1 NUT
12 - Crossload parameters invalid
13 - NUT not established
14 - Invalid crossload channel configuration
15 - Keeper not configured
16 - Signature mismatch
17 - Handshake connections not scheduled
18 - Invalid configuration parameter
6 This is a checksum of the first 3 words of this file. If the checksum is not
valid, the firmware will continuously write default values for the
configuration parameters in this file.
7 Partner present. This word is constantly updated by the PLC-5 processor,
indicating whether a partner processor is handshaking with the current
processor. This word is updated only when the processor is in a valid
backup state (i.e., No Control, Secondary, or Primary). Valid values
include:
0 - No partner found
1 - Partner PLC-5 handshaking with this PLC-5
8 Output Ownership Invalid Count word. This word indicates how many
connections are not owned by this processor (Primary backup state only).
This value is -1 when the processor is in the Secondary backup state.
9 Lonely Primary Backup State Counter. This counter is incremented every
time this processor goes into the Lonely Primary backup state.
10 Operational mode of the system. Valid values include:
0 - Asynchronous (default)
1 - Synchronous
Publication 1785-UM024B-EN-P - January 2003
Page 74

5-10 Monitoring and Troubleshooting Your ControlNet PLC-5 Hot Backup System
Word Definition
11 Equivalence checks; there are 6 bits defined (i.e., one bit per equivalence
check). If a bit is set, the corresponding equivalence check will be
performed. If the bit is not set, no check is performed. By default, all
equivalence checking is enabled. The remaining 10 bits in the word must
be set to 0.
Bit 0 - Ladder Logic equivalence check
Bit 1 - Data Table Structure equivalence check
Bit 2 - I/O Map Table equivalence check
Bit 3 - Backup Configuration and Status file equivalence check
Bit 4 - Force Table equivalence check
Bit 5 - Status file equivalence check
12 Designated Primary. Valid values are:
0 - No Designated Primary (default)
1 - The PLC-5 processor with the odd node address is the Designated
Primary
13 Qualification Delay. This is the amount of time (in ms) to delay the
secondary in Run mode before becoming qualified. The default value is 0.
14 Maximum Program Scan Time (Synchronous mode only); the amount of
time (in ms) for the largest program scan. This value cannot be greater
than 127 times the NUT value.
15-19 reserved
20-24 These words are functionally the same as words 10 through 14. The
difference is that words 20 through 24 display the current internal PLC-5
processor state of these configuration parameters. When in Run mode,
the PLC-5 processor will continuously update words 20 through 24. In
other words, the software tool will write the configuration parameters
into words 10 through 14, while the PLC-5 processor will write its
internal PLC-5 processor state of these configuration parameters into
words 20 through 24. When you accept configuration changes, the
configuration parameters in words 10 through 14 are copied into words
20 through 24.
25 Adjusted Maximum Program Scan Time. This word is the Maximum
Program Scan Time parameter, rounded up to the next integer multiple of
the NUT value. This word is written by the PLC-5 processor, and is
continuously updated while the processor is in Run mode.
26 The number of NUTs per Maximum Program Scan Time. This word is the
number of NUTs in the Adjusted Maximum Program Scan Time. This
word is written by the PLC-5 processor, and is continuously updated
while the processor is in Run mode.
27 The NUT time, in 10 microsecond units, is continuously written here
while the processor is in Run mode.
28 Configuration status. This word gives either the reason why the
configuration attempt was unsuccessful, or whether the configuration
parameters were overwritten because the system went into Run mode as
a secondary system.
6 - Operation mode word invalid
7 - Equivalence Check word invalid
8 - Designated Primary word invalid
9 - Max Program Scan Time word invalid
10 - Configuration parameters were overwritten by the primary system
12 - Crossload parameter invalid
29 reserved
Publication 1785-UM024B-EN-P - January 2003
Page 75

Monitoring and Troubleshooting Your ControlNet PLC-5 Hot Backup System 5-11
Word Definition
30 Accept Configuration Changes. A non-zero value written into this
location forces the primary PLC-5 processor to accept the new
configuration parameters. After the PLC-5 processor has done so, it will
zero this word. This command is only in effect for the primary processor.
The configuration parameters you change are:
Operational mode
Maximum Program scan time
Equivalence checks
Designated primary
Crossload parameters
Requalification
31 Force Switchover. A non-zero value written into this location forces the
primary processor to switch over control to a secondary processor. After
the processor has read the non-zero value, the PLC-5 processor will zero
this word. This command works for both the primary and secondary
processors. However, if there is a Designated Primary, this command will
not function.
32 Clear Diagnostic Counters. A non-zero value written into this location
clears the maximum program scan exceed counter, the lost partner
counter, and the lonely primary backup state counter. After the processor
has read the non-zero value, it will clear this word. This feature works for
both the primary and secondary processors, but will only work in Run
mode.
33 Perform On-Demand Crossload. You can specify whether to crossload
timers, counters, PID files, or user-defined files (configured in words 55,
56, 57, and 58 of the ControlNet Backup Configuration and Status file) by
setting appropriate bits in this word. After the PLC-5 has read the word,
it clears it. This feature works for both primary and secondary
processors.
Bit 0 - Crossload Timers
Bit 1 - Crossload Counters
Bit 2 - Crossload PID
Bit 3 - Crossload user-defined files
34-38 reserved
39 Completion of Qualification. You can control when qualification
completes by setting and clearing this word in the CBI file. When the
qualifying processor (either primary or secondary) executes its first scan
of the program, you can activate the delay of the completion of
qualification by writing a non-zero value into word 39 of the CBI file. The
delay continues until you clear this word.
40-45 The timedate stamp indicating when the processor last took over as the
primary is stored here. The format of the data is the same as the clock in
the status file.
Publication 1785-UM024B-EN-P - January 2003
Page 76

5-12 Monitoring and Troubleshooting Your ControlNet PLC-5 Hot Backup System
Word Definition
46 Qualification status. The reason code for why the processor failed
qualification or if the configuration parameters were changed by the
primary. Valid values include:
0 - Passed qualification
1 - Equivalence check - Ladder programs different
2 - Equivalence check - Data table structures different
3 - Equivalence check - I/O map tables different
4 - Equivalence check - ControlNet Backup Configuration and Status files
different
5 - Equivalence check - Force tables different
6 - Equivalence check - Status files different
7 - Qualification passed, but configuration parameters changed by
primary
8 - Qualification failed due to processor being faulted
9 - Qualification failed due to keyswitch change to Program mode
10 - Qualification failed due to Run mode inhibited
11 - Qualification failed due to processor uploading or downloading
program
12 - Qualification failed due to ContronNet reconfiguration in progress
13 - Qualification failed due to invalid backup state
14 - Qualification failed due to partner no longer being a primary
15 - Qualification failed due to invalid backup configuration parameters
16 - unused
17 - Qualification crossload failed
18 - Qualification failed due to unavailable edit resource
47 Lost Partner Counter. A counter which increments every time you lose
communication with the partner processor.
48 Maximum Program Scan Exceed Counter. A counter which increments
every time the maximum program scan time is exceeded. This counter is
reset for the processor on transition into Run mode.
49 Equivalence Check Error. A bit is set for each area in which an
equivalence mismatch is detected. There is a background check of the
ladder program, force tables, and status files for differences.
Bit 0 - Set if the ladder programs between the two systems are different
Bit 1 - Set if the data table structures between the two systems are
different. Note the data table structure is not the same as the values in
the data table files.
Bit 2 - Set if the I/O map tables between the two systems are different
Bit 3 - Set if the Backup Configuration and Status files between the two
systems are different
Bit 4 - Set if the Force tables between the two systems are different
Bit 5 - Set if the Status files between the two systems are different
50 Qualification Crossload Time. The time (in ms) it takes to crossload the
entire data table from the primary processor to the secondary processor.
This value is overwritten each time the processor goes through
qualification.
51 On-Demand Crossload Time. The time (in ms) it takes to crossload the
data table state information from the primary to the secondary. This
value is overwritten each time the processor goes through qualification,
and when you initiate an On-Demand Data Table Crossload command.
52 Crossload Active. This word equals 1 when a crossload is active; it is
equal to 0 when a crossload is not active. This word applies to both
Qualification and On-Demand crossloads.
Publication 1785-UM024B-EN-P - January 2003
Page 77

Monitoring and Troubleshooting Your ControlNet PLC-5 Hot Backup System 5-13
Word Definition
53 Crossload Status. This is a Message instruction error code. The
processor writes the value into this word. For information on error
descriptions, refer to your PLC-5 Instruction Set Reference Manual.
54 Crossload Failed File. This word displays the file number on which the
crossload failed. The crossload status word located in word 53 displays
the error code and word 54 displays its correlated file.
55 User-Defined Crossload File 1. You can select a single file number,
written in this word, to be crossloaded during the Qualification crossload,
and on-demand when setting the appropriate bit in word 33.
56 User-Defined Crossload File 2. You can select a single file number,
written in this word, to be crossloaded during the Qualification crossload,
and on-demand when setting the appropriate bit in word 33.
57 User-Defined Crossload Range Low File. You can select a range of files
to be crossloaded during the Qualification crossload, and on demand
when setting the appropriate bit in word 33. The lower file number of
the range of files to be crossloaded must be written into this register.
58 User-Defined Crossload Range High File. You can select a range of files
to be crossloaded during the Qualification crossload, and on demand
when setting the appropriate bit in word 33. The higher file number of
the range of files to be crossloaded must be written into this register.
59-64 The secondary time/date stamp of when the processor last took over as
secondary processor. The format of the date is the same as the system
clock in the status file.
65-68 These words are functionally the same as words 55 through 58. The
difference is that these words display the current PLC-5 processor state
of these configuration parameters. When in Run mode, the processor
continuously updates words 65 through 68. In other words, new
configuration parameters are written into words 55 through 58, while the
PLC-5 processor writes its internal state of these configuration
parameters into words 65 through 68. When you accept a configuration,
the configuration parameters in words 55 through 58 are copied into
words 65 through 68.
69 reserved
70 Crossloading over Data Highway Plus. Set the value in word 70 of the CBI
file:
0 = Crossload over Channel 2 (ControlNet - default)
1 = Crossload over Channel 1A (DH+)
71 Crossload status
72 Requalification of Dual Primary Programmable Controllers. Set the value
in word 72 of the CBI file:
0 = No requalification with dual primary (default)
1 = Requalification with dual primary
73 Requalification status
74-199 Reserved
IMPORTANT
Do not alter any reserved words. Values in
these words may be changed or used by the
PLC-5 processor during normal operation.
Publication 1785-UM024B-EN-P - January 2003
Page 78

5-14 Monitoring and Troubleshooting Your ControlNet PLC-5 Hot Backup System
Notes
Publication 1785-UM024B-EN-P - January 2003
Page 79

Specifications
Appendix
A
Specifications
The following specifications are for the 1785-CHBM cartridge.
Memory Module 1785-CHBM
Capacity 100K words
Type Nonvolatile
Write Protection By removing the jumper
Operating Temperature
Storage Temperature IEC 60068-2-1 (Test Ab, Un-packaged Non-operating Cold),
Relative Humidity IEC 60068-2-30 (Test Db, Un-packaged Non-operating
Vibration IEC60068-2-6 (Test Fc, Operating):
Shock IEC60068-2-27:1987, Test Ea (Unpackaged shock, ES#002)
Emissions CISPR 11:
Radiated RF Immunity IEC 61000-4-3:
Processor Compatibility 1785-L20C15, -L40C15 or -L80C5
Weight 2.5 oz (7.88g)
Certifications
(when product is marked)
1
See the Product Certification link at www.ab.com for Declarations of Conformity, Certificates, and other certification details.
IEC 60068-2-1 (Test Ad, Operating Cold),
IEC 60068-2-2 (Test Bd, Operating Dry Heat),
IEC 60068-2-14 (Test Nb, Operating Thermal Shock):
o
C (32–140oF)
0-60
IEC 60068-2-2 (Test Bc, Un-packaged Non-operating Dry Heat),
IEC 60068-2-14 (Test Na, Un-packaged Non-operating Thermal Shock):
–40 to 85
Damp Heat):
5–95% non condensing
2g @10–500Hz
Operating - 30g
Non-operating - 50g
Group 1, Class A (with appropriate enclosure)
10V/m with 1kHz sine-wave 80% AM from 30MHz to 1000Mhz
UL UL Listed Industrial Control Equipment
CSA CSA Certified Process Control Equipment
CSA CSA Certified Process Control Equipment for Class I, Division 2 Group
CE
C-Tick
o
C (–40 to 185oF)
1
European Union 89/336/EEC EMC Directive, compliant with:
EN 50082-2; Industrial Immunity
EN 61326; Meas./Control/Lab., Industrial Requirements
EN 61000-6-2; Industrial Immunity
EN 61000-6-4; Industrial Emissions
1
Australian Radiocommunications Act, compliant with:
A,B,C,D Hazardous Locations
AS/NZS 2064; Industrial Emissions
1 Publication 1785-UM024B-EN-P - January 2003
Page 80

A-2 Specifications
Notes
Publication 1785-UM024B-EN-P - January 2003
Page 81

Backup States
Appendix
B
Chapter Objectives
NON_BACKUP
This Appendix describes the possible backup states and backup state
transitions of the PLC-5 ControlNet backup system. There are four
main backup states:
• Invalid
• No Control
• Primary (and Lonely Primary)
• Secondary
NO BACKUP
CARD
POWERUP
NO
CONTROL
STATE
INVALID
BACKUP
CONFIGURATION
INVALID
STATE
VALID
BACKUP
CONFIGURATION
PRIMARY FOUND,
QUALIFICATION PASSED,
IN RUN MODE
SECONDARY
STATE
PRIMARY
STATE
STANDALONE
IN RUN MODE
NOT IN
RUN MODE
SWITCHOVER
NOT IN
RUN MODE
BACKUP STATE DIAGRAM
1 Publication 1785-UM024B-EN-P - January 2003
Page 82

B-2 Backup States
Invalid Backup State
When an improper backup configuration exists, the PLC-5 ControlNet
backup system goes into the Invalid backup state. Both the Primary
and Secondary LEDs on the 1785-CHBM cartridge are solid red when
the system is in this state, and the Qualified and Synchronous LEDs
are off. If you switch the system to Run mode while in the Invalid
backup state, a major fault occurs. (Refer to Chapter 5 for definitions
of the major fault codes.)
The backup system enters the Invalid backup state when one or more
of these conditions exists:
• the 200-word ControlNet Backup Configuration and Status File
does not exist
• the ControlNet Backup Configuration and Status File exists, but
is the wrong size (this file must be exactly 200 words in length)
• the file number index to the ControlNet Backup Configuration
and Status File in S:67 is incorrect
• the ControlNet peer-to-peer backup connections, configured in
RSNetWorx, do not exist or are not correct; these connections
must:
– be sent to and received from the partner processor
– be 5 words long
– have an actual packet interval rate equal to one NUT
• the first 3 words of the ControlNet Backup Configuration and
Status File are incorrectly configured
Publication 1785-UM024B-EN-P - January 2003
Word Valid Configuration
0 must equal the odd node number of the odd-even PLC-5
processor pair
1 must equal the message number of the ControlNet scheduled
peer-to-peer backup connection going from the odd node
number to the even node number of the odd-even PLC-5
processor pair
2 must equal the message number of the ControlNet scheduled
peer-to-peer backup connection going from the even node
number to the odd node number of the odd-even PLC-5
processor pair
• one of the optional configuration parameters in the ControlNet
Backup Configuration and Status File is invalid; the following
optional parameters are checked:
– Operational mode (invalid if not equal to 0 or 1)
– Equivalence checks (invalid if greater than 0x3f)
– Designated primary (invalid if not equal to 0 or 1)
Page 83

Backup States B-3
– Maximum program scan time (invalid if greater than (128 x
NUT) and synchronous operational mode)
– Crossload File 1, Crossload File 2, Crossload File Low, and
Crossload File High (invalid if greater than or equal to 1000)
– Crossload over DH+ (invalid if not equal to 0 or 1)
– Requalification of dual primary PLC-5s (invalid if not equal to
0 or 1)
While in the Invalid backup state, you can set default parameters for
the optional configuration parameters by intentionally entering an
incorrect configuration value for one of the first 3 words in the
ControlNet Backup Configuration and Status File. This will force all
parameters to be set to their default values. For example, by setting
Word 0 to be equal to 0, the following optional configuration
parameters are defaulted:
• Operational Mode = Asynchronous Mode
• Equivalence Checks = All Disabled
• Designated Primary = Disabled
• Maximum Program Scan Time = 0
• Qualification Delay = 0
• Crossload File 1 = 0
• Crossload File 2 = 0
• Crossload File Low = 0
• Crossload File High = 0
• Crossload over DH+ = 0
• Requalification of dual primary PLC-5s = 0
No Control Backup State
When a valid backup configuration exists, but the PLC-5 processor is
not in Run mode, the PLC-5 ControlNet backup system is in the No
Control backup state. Both the Primary and Secondary LED’s on the
1785-CHBM cartridge are off when in this state. While in the No
Control backup state, you can switch the PLC-5 processor to Run
mode; once in Run mode, however, the processor is no longer in this
state.
Publication 1785-UM024B-EN-P - January 2003
Page 84

B-4 Backup States
If there is a valid partner PLC-5 ControlNet backup system, and the
systems are connected on the ControlNet channel, the Qualified LED
is solid yellow. This indicates that the necessary configuration needed
to allow the backup pair to successfully communicate with each other
has been achieved.
You can make any configuration changes you wish to the ControlNet
Backup Configuration and Status file while the PLC-5 processor is in
the No Control backup state. Note that placing an invalid parameter
into the ControlNet Backup Configuration and Status file causes the
processor to switch to the Invalid backup state.
Primary Backup State
When a PLC-5 ControlNet backup system is in Run mode, and is
actively controlling all of the system outputs, it is in the Primary
backup state. The Primary LED is green, either blinking or solid; the
Secondary LED is off. The PLC-5 processor can go out of Primary
backup state if either the PLC-5 system is switched out of Run mode
or the partner PLC-5 becomes the Primary.
If there is a valid partner PLC-5 ControlNet backup system, and the
systems are connected on the ControlNet channel, the Qualified LED
is on. If the Qualified LED is solid yellow, the partner PLC-5 is not a
qualified secondary system, however the two systems are properly
configured to communicate with each other. If the Qualified LED is
solid green, the partner PLC-5 is a qualified secondary and could take
control of the system outputs if necessary. If the Qualified LED is off,
then there is no partner PLC-5 system communicating with this PLC-5
system on the ControlNet channel.
When the PLC-5 is in the Primary backup state, you can no longer
force the backup system to be in the Invalid backup state through
configuration changes. All configuration changes are checked for
validity before being accepted.
TIP
If a newly-entered configuration parameter is invalid,
the backup system uses the previous configuration
values.
Publication 1785-UM024B-EN-P - January 2003
Page 85

Backup States B-5
Lonely Primary Backup State
The Primary LED is solid green if there is at least one good scheduled
connection on the ControlNet channel. If there are no good scheduled
connections on the ControlNet channel the Primary LED blinks green.
This is referred to as the Lonely Primary backup state. Since there are
no valid scheduled connections on the ControlNet channel, this PLC-5
is not controlling the system outputs on the ControlNet channel.
A system could go into Lonely Primary backup state, for example,
when the ControlNet cable is disconnected.
When in Lonely Primary backup state, the PLC-5 waits 10 seconds
after the first connection is established before actively controlling the
system outputs on the ControlNet channel. This is so that if an existing
partner PLC-5 is controlling the system outputs on the ControlNet
channel, the PLC-5 system in Lonely Primary backup state does not
take control of the system outputs from the partner. If, during the
10-second wait, the PLC-5 in Lonely Primary backup state establishes
communication with the partner PLC-5 and notices that the other
PLC-5 is a primary, the PLC-5 in the Lonely Primary backup state
major faults. (Refer to chapter 4 for description of specific major fault
codes.)
Secondary Backup State
When a PLC-5 ControlNet backup system is in Run mode, and is not
actively controlling the system outputs, it is in the Secondary backup
state. The Secondary LED is solid yellow, the Primary LED is off, and
the Qualified LED is solid green. The PLC-5 can go out of Secondary
backup state if either the PLC-5 system goes out of Run mode, or the
partner PLC-5 system is no longer the primary. If the partner PLC-5 is
no longer the primary, the PLC-5 in the Secondary backup state
becomes the primary and assumes control of the system outputs.
When the PLC-5 is in the Secondary backup state, you cannot make
any backup configuration changes to that PLC-5 system. All backup
configuration changes must be made to the primary system and those
changes are immediately passed on to the secondary system.
Publication 1785-UM024B-EN-P - January 2003
Page 86

B-6 Backup States
Backup State Transitions
In the previous section, we described the possible states of the PLC-5
ControlNet backup system, with references to transitions between
states. For example, when in the No Control backup state, if you
change a configuration parameter to an invalid value, the PLC-5
ControlNet backup system transitions into the Invalid backup state.
This section describes two backup state transitions: Qualification and
Switchover.
Qualification
Qualification occurs when the PLC-5 ControlNet backup system
transitions from the No Control backup state to either the Secondary
backup state or the Primary backup state. You activate this backup
state transition by changing the PLC-5 system from Program mode to
Run mode.
You can tell that a qualification is active when the Qualified LED
blinks yellow and green, alternately.
Qualification: From the No Control State to the Primary State
The backup state transition from No Control backup state to the
Primary backup state occurs when the PLC-5 system transitions from
Program mode to Run mode and
• there is no partner PLC-5 system, OR
• the partner PLC-5 system is not in Primary backup state, OR
• the partner PLC-5 system is not communicating with this PLC-5
processor
The transition from No Control backup state to Primary backup state is
simple. There are no checks to be done. The transition occurs
immediately if there is no Qualification Connection Delay. Once the
transition to the Primary Backup State is complete, the LED’s on the
1785-CHBM cartridge indicate the new backup state.
Publication 1785-UM024B-EN-P - January 2003
Page 87

Backup States B-7
Qualification: From the No Control State to the Secondary State
The backup state transition from No Control backup state to
Secondary backup state occurs when the PLC-5 system transitions
from Program mode to Run mode, and the partner PLC-5 processor is
in the Primary backup state and is communicating with this PLC-5
processor. The entire qualification process has many components:
• Connection delay
There may be up to a 13-second delay before qualification
begins because of the time needed to establish connections on
the ControlNet channel. It is important to make a connection to
the partner PLC-5 processor in order to determine if this
processor is to become primary or secondary. If the partner
PLC-5 processor is primary, this processor goes through
qualification to become a secondary system. If the partner PLC-5
processor is not the primary, or if a partner is not on the
ControlNet channel, this processor goes through qualification to
become primary. In most cases there is no qualification
connection delay.
When a reconfiguration of the ControlNet channel occurs, all
connections are terminated and must be reestablished; the
13-second wait allows the connection to be reestablished with
the partner PLC-5 processor. Note that at powerup, a ControlNet
channel reconfiguration occurs.
Publication 1785-UM024B-EN-P - January 2003
Page 88

B-8 Backup States
• Backup configuration parameters passed to qualifying system
After the qualifying PLC-5 system has waited, if necessary, for
the qualification connection delay, the backup configuration
parameters are passed from the primary PLC-5 system to the
qualifying PLC-5 system. The backup configuration parameters
which were originally in the qualifying system are overwritten
and lost. The backup configuration parameters that are passed
from the primary system and overwritten on the qualifying
system are:
– Operational Mode
– Equivalence Checks
– Designated Primary
– Maximum Program Scan Time
– Crossload File 1
– Crossload File 2
– Crossload File Low
– Crossload File High
– Crossload over DH+ = 0
– Requalification of dual primary PLC-5s = 0
• Equivalence checks
The PLC-5 ControlNet backup system does not download the
entire memory from the primary system to the secondary
system; there are certain data table values that are crossloaded.
Areas such as the program files and data table structures may be
different between the primary and secondary system. In some
applications, this is desirable. However, in most applications,
you must know for certain whether the primary and secondary
systems are identical, or whether they may differ in certain
areas. Equivalence checking gives you the option of enforcing a
qualification major fault if the systems differ. (Refer to Chapter 4
for descriptions of specific major faults.)
You can implement qualification equivalence checking by
enabling checksum calculations for different memory areas of
the PLC-5 system. These checksums are calculated on both the
primary and qualifying secondary system, and are passed from
the primary system to the qualifying system before equivalence
checking is performed. If you enable equivalence checking for a
particular area, and the primary checksum is different than the
qualifying checksum, qualification fails and the qualifying
controller declares a major fault.
Publication 1785-UM024B-EN-P - January 2003
Page 89

Backup States B-9
There are 6 different areas in which equivalence checking can
be performed:
– Program File Structure and Program Files - This checksum is
calculated for all the Program files, with the notable exception
of SFC files. This checksum continues to be calculated when
the backup system is qualified. This allows status to be
available regarding whether the Program file checksums differ
for a qualified backup system.
Note: This should only be used when the data table
structures are the same.
– Data Table Structure - This checksum is only calculated when
the PLC-5 system goes through qualification. Since the Data
Table structure cannot change when in Run mode, this
checksum does not change after qualification. The Data Table
Structure checksum includes the data table file number, the
data table file type, and the size of the data table file. The
Data Table Structure checksum does not include the data
table file privilege information or the values of the data table
file elements.
– ControlNet I/O Map Table - This checksum is only calculated
when the PLC-5 system goes through qualification. Since the
ControlNet I/O map table cannot change when the PLC-5
system is in Run mode, this checksum does not change after
qualification. The ControlNet I/O Map Table checksum only
includes the scheduled redundant connections. Thus, as long
as the scheduled redundant connections are the same
between the backup PLC-5 systems, the ControlNet I/O Map
Table checksums will match.
– ControlNet Backup Configuration and Status file - This
checksum is only calculated when the PLC-5 system goes
through qualification. Since this checksum cannot change
when the PLC-5 system is in Run mode, this checksum does
not change after qualification. The ControlNet Backup
Configuration and Status File checksum is only calculated on
the first 3 words of the ControlNet Backup Configuration and
Status File.
– Force Tables - This checksum is calculated for all I/O force
tables and for force control words, and continues to be
calculated when the backup system is qualified. This allows
status to be available regarding whether the Force Table
checksums differ for a qualified backup system. Included in
the Force Tables checksum are:
• I/O Force Table values
• Extended Force Table values
• Force Status (is forcing enabled and are forces present)
Publication 1785-UM024B-EN-P - January 2003
Page 90

B-10 Backup States
No SFC information is included in the Force Tables
checksum. Also, note that you cannot perform forcing on
DIF or DOF files.
– Status File - This checksum is calculated for various
configured words in the Status File, and continues to be
calculated when the backup system is qualified. This allows
status to be available regarding whether the Status File
checksums differ for a qualified backup system. The different
words included in the Status File checksum for equivalence
checking are:
• Watchdog Set Point
• Fault Routine Number
• STI Set Point
• STI Routine Number
• I/O RESET Bits
• I/O INHIBIT Bits
• PII Routine Number
• PII Word Number
• PII AND Mask
• PII Polarity Mask
• PII Counter Preset
• Data Table Protection File Number
• ControlNet Backup Configuration and Status File Number
• ControlNet PLC-2 File Number
• MCP I/O Disable Word
• MCP INHIBIT Word
• MCP File Numbers
Publication 1785-UM024B-EN-P - January 2003
You can selectively enable equivalence checking for none,
some, or all of the 6 of the equivalence check areas, with one
exception: the Program File Structure and Program File
checksum is dependent on the Data Table Structure. Thus, if you
select the Program File Structure and Program File equivalence
check, you should also select the Data Table Structure
equivalence check.
Equivalence checking is only performed during qualification.
Once a PLC-5 system passes qualification, it does not become
disqualified even if the checksums for an area are different and
the equivalence checking for that area is enabled. For example,
if the Program File Structure and Program File equivalence
check is enabled and there is a qualified secondary, you can edit
the program files on either system without causing the
secondary system to disqualify. However, if one of the PLC-5
systems goes out of Run mode and back into Run mode and a
qualification occurs, an equivalence check failure during
qualification causes a major fault to be declared for the
qualifying system. Therefore, when performing edits on either
Page 91

Backup States B-11
PLC, we recommend that you disable equivalence checking first
to avoid the condition where a PLC-5 processor cannot become
qualified due to failing an equivalence check. Once all the edits
are tested and placed into both PLC-5 systems, you can reenable the equivalence check.
Word 49 in the ControlNet Backup Configuration and Status file
gives you equivalence check status for a qualified backup
system. A bit is set for each equivalence check area if the
equivalence areas checksum differs between the two processors.
This word is updated every few seconds so that you can know,
if secondary qualification were to happen, which equivalence
checks would pass, and which equivalence checks would fail.
• Complete data table crossload
If all the equivalence checks pass, a Qualification Data Table
crossload is performed. This crossload reads the data table file
values from the primary system and writes those values into the
corresponding data table files in the secondary system.
This data table crossload is performed while the qualifying
PLC-5 system is still in Program mode. It is necessary to remain
in Program mode until the data table crossload is finished in
order to prevent the qualifying system from major faulting or
going into an odd state due to uninitialized data table values. It
is safer for the qualifying PLC-5 system to first do the Data Table
crossload and then to go into Run mode. In that case, the data
table values are close to the values on the currently executing
primary system.
IMPORTANT
The time it takes to do the Qualification Data Table
crossload primarily depends on the amount of data
table data to be crossloaded. All elements of all data
table files are crossloaded in the Qualification Data
Table crossload, with the exception of the following
files. These files cannot be crossloaded because they
contain processor-specific configuration and status
information.
– Status File
– ControlNet Backup Configuration and Status File
– ControlNet Data Input File (DIF)
– ControlNet Data Output File (DOF)
– ControlNet Configuration File
– ControlNet I/O Status File
– ControlNet Diagnostic File
Publication 1785-UM024B-EN-P - January 2003
Page 92

B-12 Backup States
Though the complete Status File is not crossloaded, there are six
words in this file that are transferred from the primary system to
the qualifying system. These six words are the real-time clock.
The Qualification Data Table crossload does not occur if the
Data Table Structures are not the same. If you want to ensure
that a Qualification Data Table crossload occurs, you must
enable equivalence checking for the Data Table structure area.
If, for some reason, the Qualification Data Table crossload fails,
qualification also fails and a major fault is declared for the
qualifying system. (Refer to Chapter 5 for descriptions of specific
major fault codes.)
• Transition to Run mode
Once the complete Data Table crossload is complete, the
qualifying PLC-5 system transitions into Run mode. Although the
PLC-5 system is now in Run mode, the PLC-5 processor is not
through with qualification and is still in the No Control backup
state. Also note that any outputs in the qualifying processor that
are not ControlNet redundant connections are now controlled
by the PLC-5 processor. This includes any local resident chassis
outputs, remote I/O channel outputs, and non-redundant I/O
connections on the ControlNet channel.
• State data table crossload
Even though a Qualification Data Table crossload has occurred,
some of the crossloaded data may have become stale. For
example, if the Qualification Data Table crossload takes 10
seconds, the data in the original data table file that was
transferred is 10 seconds old. In order to bring certain state
information in the data table up to date, a Qualification State
Data Table crossload is performed.
The Qualification State Data Table crossload reads data table
values from the primary PLC-5 system and writes these values to
the qualifying PLC-5 system. The State Data Table crossload only
crossloads specific parts of the data table. There are 4 different
parts of the data table that are crossloaded:
– Timer Accumulators
– Counter Accumulators
– PD elements
– User-selectable files
Publication 1785-UM024B-EN-P - January 2003
Page 93

Backup States B-13
It may take many seconds for the Qualification State Data Table
crossload to finish. The time it takes to complete the data table
crossload primarily depends on the amount of data table data to
be crossloaded.
Even though the State Data Table crossload may take many
seconds to complete, the data that is transferred from the
primary system to the qualifying system is fresh. In other words,
the crossloaded data is not sitting in a buffer getting stale,
waiting for all the data to be crossloaded. Each packet of data is
immediately written into the qualifying system’s data table. So,
no matter how long the Qualification State Data Table crossload
takes, the data table elements which are crossloaded into the
qualifying system closely match the values in the primary
system.
The Qualification State Data Table crossload does not occur if
the Data Table Structures are not the same. If you want to
ensure that a Qualification State Data Table crossload occurs,
you must enable equivalence checking for the Data Table
structure area.
If, for some reason, the State Data Table crossload fails,
qualification also fails and a major fault is declared for the
qualifying system.
• Transition to Secondary backup state
After the State Data Table crossload is successfully completed,
the secondary system transitions into the Secondary backup
state, and qualification is complete - unless there is a delay.
There are three reasons why there may be a delay in
transitioning to secondary backup state:
– if you set word 39 (completion of qualification)
– all scheduled connections have not been attempted yet (to
shorten the delay, you should inhibit unconnected devices to
reduce qualification time). All scheduled connections will be
attempted at least once to make sure the secondary PLC-5 has
all the same connections as the primary PLC-5.
– if you set word 13 (qualification delay)
The LED’s on the 1785-CHBM cartridge indicate the new backup
state. Also, the Qualified LED on the primary system turns solid
green, indicating that there is a qualified secondary system.
Publication 1785-UM024B-EN-P - January 2003
Page 94

B-14 Backup States
If you selected the Designated Primary feature, and the odd
node of the odd-even backup pair has just gone through
secondary qualification, a switchover automatically occurs.
The odd node becomes the primary system, and the even node
transitions from the primary system to the secondary system.
The even node’s transition from primary to secondary happens
immediately. The even node does not go through qualification
when it becomes the secondary system.
Reasons for Qualification Major Fault
While qualification should complete without any problems, there are
several checks performed during qualification that can cause it to fail.
When the qualification procedure fails, a major fault is declared.
Qualification could fail under any of the following circumstances or
conditions:
• Failure of the Qualification Data Table crossload
• Failure of the Qualification State Data Table crossload
• Failure of the Equivalence Check
• The occurrence of an unrelated major fault in the PLC-5 system
during qualification
• Movement of the keyswitch to Program mode during
qualification
• Inability to retrieve the Edit Resource at the beginning of
qualification
• Presence of one or more invalid backup configuration
parameters
• A change in the primary status of the partner PLC-5 processor
(i.e., either the partner PLC-5 processor became primary during
qualification, or the partner PLC-5 went from primary to
non-primary during qualification).
• The ControlNet backup state was Invalid backup state.
Publication 1785-UM024B-EN-P - January 2003
Refer to Chapter 5 (Troubleshooting) for information on fixing a
Qualification major fault.
Switchover
Switchover occurs when one of the processors of the PLC-5
ControlNet backup system transitions from the Secondary backup
state to the Primary backup state. The new primary processor gains
control of the system outputs on the ControlNet channel; the old
primary processor loses control.
Page 95

Backup States B-15
There are two categories for switchovers:
• Qualified Switchovers
• Unqualified Switchovers
Qualified Switchovers
Qualified Switchovers are switchovers that transition the primary
processor to the Secondary backup state and the secondary processor
to the Primary backup state. Thus after a Qualified Switchover, there is
still a qualified backup system. There are 2 Qualified Switchover
cases:
• Designated Primary
When you configure the PLC-5 ControlNet backup system and
enable the Designated Primary feature, the odd ControlNet node
of the odd-even ControlNet pair is always the primary processor
if the odd node has passed qualification. This feature is useful
when you want a particular processor to always be the primary,
whenever that processor is available.
If the even ControlNet node is the only processor to pass
qualification, it is the primary processor. However, should the
odd ControlNet node pass qualification, a switchover
immediately occurs, the odd ControlNet node becomes the
primary processor, and the even ControlNet node becomes the
secondary processor.
Once there is a qualified primary processor, you cannot change
(i.e., enable or disable) the Designated Primary feature. The first
processor that goes through qualification determined whether
the Designated Primary feature is enabled or disabled. The
second processor that goes through qualification inherits the
configuration setting from the first processor. In order to enable
or disable the Designated Primary feature for a PLC-5 ControlNet
backup system, both processors must be in Program mode.
You can then change the Designated Primary feature on one of
the processors. You should then qualify the processor on which
you have changed this feature.
• Forced Switchover
Forced Switchover allows you to switch over a qualified PLC-5
ControlNet backup system at any time. You activate a Forced
Switchover by clicking on the Force Switchover button on the
Publication 1785-UM024B-EN-P - January 2003
Page 96

B-16 Backup States
status tab of the ControlNet Hot Backup screen. Once the
Forced Switchover is activated, the processor writes a zero into
the Forced Switchover word of the Backup Integer File. You can
activate this switchover from either the primary or secondary
processor.
Forced Switchover is useful when you want to test edits you
have made in your application program. In this case, you make
edits to the secondary system, force a switchover, and monitor
the results of the edits. If the edits cause problems, you can
perform another Forced Switchover to give the original
processor control of the system outputs on the ControlNet
channel.
Since the Forced Switchover feature is activated from writing to
the Backup Integer File, you can activate Forced Switchovers
from external applications writing to the Backup Integer File, as
well as the application on the processor itself.
Forced Switchover does not activate for an unqualified PLC-5
ControlNet backup system or for a PLC-5 ControlNet backup
system in which the Designated Primary feature is enabled.
Unqualified Switchovers
Unqualified Switchovers occur when the primary processor of a
qualified PLC-5 ControlNet backup system is no longer in Run mode,
or when the secondary processor loses its peer-to-peer handshake
connection with the primary processor. The secondary processor then
does a switchover to become a stand-alone primary processor.
There are many reasons why an Unqualified Switchover can occur:
• you changed the primary PLC-5 system out of Run mode
• a major fault occurred on the primary PLC-5 system
• the primary PLC-5 system failed
• the primary PLC-5 system lost power
• problems with the ControlNet network caused the loss of the
handshake connection with the primary processor
Switchover Considerations
Switchovers do not occur without some potential problems:
Publication 1785-UM024B-EN-P - January 2003
• Divergence - when the data table values diverge between the
primary processor and secondary processor.
Page 97

Backup States B-17
If the output values in the data tables are different between the
primary and secondary systems, there will be a bump in the
outputs when the new primary processor takes control of the
outputs. There are features in the PLC-5 ControlNet backup
system which minimize the divergence of outputs between the
primary and secondary processors. These features are
synchronized program scans and data table crossloads.
• Switchover time - the time delay before the new primary
processor can control the system outputs on the ControlNet
channel.
There is a time period between when the old primary processor
has relinquished control of the system outputs on the ControlNet
channel and the new primary processor writes new system
outputs on the ControlNet channel. This time period is called
Switchover Time. There are two separate cases to consider:
(Note that the Switchover Times described below are the worst
case times. Actual Switchover Times may be smaller.)
• Communicated Switchover - when the processor indicates to the
secondary processor that a switchover must occur. The
following events can cause a Communicated Switchover:
– A Designated Primary switchover
– A Forced switchover
– Switching the primary PLC-5 system out of Run mode
– The occurrence of a major fault on the primary PLC-5 system
Since the peer-to-peer handshake connection is one NUT, it only
takes up to one NUT for the primary system to indicate to the
secondary system that a switchover must occur. There is up to
5ms of processing on each processor to get the switchover
indication from the primary system to the secondary system.
Thus the formula for the Communicated Switchover Time is:
Communicated Switchover Time = 10ms + NUT
So, if the NUT is 5ms, the Communicated Switchover Time is
equal to 10ms plus 5ms, or 15ms.
• Timeout Switchover - when the secondary processor loses
communication with the primary processor for a certain length
of time, it times out the primary processor, and then performs a
switchover. The following events can cause a Timeout
Switchover:
– Primary PLC-5 system failure.
– Loss of power to the primary PLC-5 system
Publication 1785-UM024B-EN-P - January 2003
Page 98

B-18 Backup States
– Problems with the ControlNet network which causes loss of
the handshake connection with the primary processor.
The formula that determines the length of time the secondary
system waits before timing out the primary processor is as
follows:
Primary Timeout = 5 + (3 * NUT) or 25ms, whichever is
greater.
So, if the NUT is 5ms, the Primary Timeout is 25ms. If the NUT is
10ms, the Primary Timeout is 35ms.
The Primary Timeout is not the only factor in the Timeout
Switchover Time. There is also processing which must occur on
the secondary system after a Primary Timeout occurs. This
processing can take up to 5ms. The formula for the Timeout
Switchover Time is:
Timeout Switchover Time = Primary Timeout + 5ms.
So, if the NUT is 5ms, the Timeout Switchover Time is equal to
25ms plus 5ms, or 30ms.
Publication 1785-UM024B-EN-P - January 2003
Page 99

Data Table Crossloading
Appendix
C
Chapter Objectives
Data Table Crossloading
This appendix provides you with reference information on the data
table crossloading feature.
Data table crossloading is a feature you can enable to minimize the
bump in system outputs when a processor switchover occurs. This
feature is most useful when identical PLC-5 processors are used in the
backup system.
To minimize a bump in system outputs, it is often important for the
secondary processor’s data table values to closely match the primary
processor’s data table values. This is true in control applications where
output values are dependent upon other data table variables. If the
data table values between the processors are different, there may be a
bump in the system outputs when the secondary processor takes over
from the primary processor after a switchover.
In the PLC-5 ControlNet backup system, each processor has its own
data table, and values are not automatically exchanged between the
PLC-5 processors. During operation, each processor simultaneously
receives the same set of input data, executes its program logic, and
places program logic results in its own data table. Over time, the data
table values may diverge between the primary processor and the
secondary processor due to such things as internal timer differences
or asynchronous events such as CIO instruction completion.
Once backup system qualification is completed, there is no automatic
data table crossloading from the primary processor to the secondary
processor in the default PLC-5 ControlNet backup system. However,
there may be applications where it is highly desirable to be able to
easily and automatically crossload data table data from the primary
processor to the secondary processor. To meet this need, there is a
feature called On-Demand data table crossloading that greatly
simplifies the transfer of data table information from the primary
processor to corresponding data table locations on the secondary
processor.
1 Publication 1785-UM024B-EN-P - January 2003
Page 100

C-2 Data Table Crossloading
An On-Demand data table crossload transfers data table data from the
primary processor to the secondary processor. To set up On-Demand
data table crossload operations, you must load configuration
information, identifying the files to be crossloaded. Then, to trigger an
On-Demand data table crossload, you must enter a non-zero value
into word 33 of the ControlNet Hot Backup Integer file. Functionally,
an On-Demand data table crossload is equivalent to a series of
Message Instructions; however, no ladder programming is required.
In addition to the crossloading mentioned above, there is Automatic
data table crossloading, occurring at the time of qualification, which
transfers data table values from the primary processor to
corresponding data table locations on the secondary processor.
This ensures that when a secondary processor becomes qualified, that
processor is immediately ready to take over control of the outputs
should a switchover occur.
If configured to crossload over the ControlNet channel, both the
On-Demand data table crossload and Qualification data table
crossload use the unscheduled bandwidth of the ControlNet channel.
You can also perform data table crossloads in ladder logic, via the
message instruction. When you perform data table crossloads via the
message instruction, you can use any available channel; you are not
limited to the ControlNet channel or channel 1A.
The data table crossload can be configured to occur over the
unscheduled bandwidth of the ControlNet channel or over DH+
(channel 1A). You may want to perform data table crossloads over
channel 1A when there is insufficient unscheduled bandwidth over
the ControlNet channel or bumps in activity on the unscheduled
bandwidth are undesired.
IMPORTANT
Neither the On-Demand data table crossload nor the
Qualification data table crossload can occur unless
the data table structures are identical between the
two processors.
Also, data table crossloading only crossloads data table data (i.e., there
is no mechanism to crossload Program file information. It is up to you
to ensure that the proper program files are downloaded into your
processors.
Publication 1785-UM024B-EN-P - January 2003
 Loading...