

Page 1

DeviceNet
Communication
Card
1784-PCD
Installation
Instructions
Page 2

2
ATTENTION
!
IMPORTANT
Important User Information
Because of the variety of uses for the products described in this publication, those
responsible for the application and use of this control equipment must satisfy
themselves that all necessary steps have been taken to assure that each application
and use meets all performance and safety requirements, including any applicable
laws, regulations, codes and standards.
The illustrations, charts, sample programs and layout examples shown in this guide
are intended solely for purposes of example. Since there are many variables and
requirements associated with any particular installation, Allen-Bradley does not
assume responsibility or liability (to include intellectual property liability) for actual
use based upon the examples shown in this publication.
Allen-Bradley publication SGI-1.1, Safety Guidelines for the Application, Installation
and Maintenance of Solid-State Control (available from your local Allen-Bradley
office), describes some important differences between solid-state equipment and
electromechanical devices that should be taken into consideration when applying
products such as those described in this publication.
Reproduction of the contents of this copyrighted publication, in whole or part,
without written permission of Rockwell Automation, is prohibited.
Throughout this manual we use notes to make you aware of safety considerations:
Attention statements help you to:
Allen-Bradley is a trademark of Rockwell Automation
Publication 1784-IN029C-EN-P - June 2001
Identifies information about practices or circumstances that can
lead to personal injury or death, property damage or economic
loss.
• identify a hazard
• avoid a hazard
• recognize the consequences
Identifies information that is critical for successful application
and understanding of the product.
Page 3

3
European Communities (EC) Directive Compliance
If this product has the CE mark it is approved for installation within the European
Union and EEA regions. It has been designed and tested to meet the following
directives.
EMC Directive
This product is tested to meet the Council Directive 89/336/EC Electromagnetic
Compatibility (EMC) by applying the following standards, in whole or in part,
documented in a technical construction file:
• EN 50081-2 EMC — Generic Emission Standard, Part 2 — Industrial
Environment
• EN 50082-2 EMC — Generic Immunity Standard, Part 2 — Industrial
Environment
This product is intended for use in an industrial environment.
Low Voltage Directive
This product is tested to meet Council Directive 73/23/EEC Low Voltage, by
applying the safety requirements of EN 61131-2 Programmable Controllers, Part 2 Equipment Requirements and Tests. For specific information required by EN
61131-2, see the appropriate sections in this publication, as well as the
Allen-Bradley publication Industrial Automation Wiring and Grounding Guidelines,
publication 1770-4.1.
Open style devices must be provided with environmental and safety protection by
proper mounting in enclosures designed for specific application conditions. See
NEMA Standards publication 250 and IEC publication 529, as applicable, for
explanations of the degrees of protection provided by different types of enclosure.
Publication 1784-IN029C-EN-P - June 2001
Page 4

4
Notes:
Publication 1784-IN029C-EN-P - June 2001
Page 5

Summary of Changes
This release of the 1784-PCD installation instructions contains new and updated
information about Windows Me and 2000. It also contains information about the
new PCD Test Utility. You will see change bars, as shown to the left of this
paragraph, throughout this manual to help you quickly identify revisions.
Other information was revised extensively. For those chapters that contain all new
information, or extensively revised information, you will find a change bar in the
margin of the chapters.
In this Chapter or Section: We:
Preface made changes as noted by change bars
Chapter 2 added information pertaining to Windows Me and
Chapter 3 re-wrote the chapter to include only Windows 95
Chapter 4 re-wrote the chapter to include Windows 98 and
Chapter 5 • re-wrote the chapter to include more
Chapter 6 added a new chapter covering Windows 2000 driver
Chapter 9 re-wrote the chapter to include instructions for
Chapter 10 re-wrote the chapter to include more extensive
2000
16-and 32-bit driver information
Me driver information
information about third-party
plug-and-play software
• extensively revised Windows NT driver
installation information
information
running the new 1784-PCD Test Utility and
diagnostics
troubleshooting tips for all operating systems
Publication 1784-IN029C-EN-P - June 2001
Page 6

2 Summary of Changes
Notes:
Publication 1784-IN029C-EN-P - June 2001
Page 7

Preface
About the Manual
Use this manual to install, configure, and troubleshoot the DeviceNet PC card
(PCMCIA interface), catalog number 1784-PCD. This interface enables a computer
with PCMCIA slots to communicate on a DeviceNet network.
Audience
The information in this manual is intended for users who are:
• familiar with Windows 2000, Windows NT, Windows 98, Windows ME, or
Windows 95
• experienced with DeviceNet configuration software and the DeviceNet
network
Refer to the following table for the version of RSLinx you will need for your
operating system.
Operating System: Version of RSLinx:
Windows 95/98/Me/NT 2.00.97 or later
Windows 2000 2.2 or later with RSLinx Service Pack 2 installed
Note: For RSLinx versions later than 2.2, no
Service Pack is required for the 1784-PCD card
to work.
Publication 1784-IN029C-EN-P - June 2001
Page 8

2
Rockwell Automation Support
Rockwell Automation offers support services worldwide, with over 75 sales/support
offices, over 500 authorized distributors, and 260 authorized systems integrators
located throughout the United States alone, plus Rockwell Automation
representatives in every major country around the world. Contact your local
Rockwell Automation representative for:
• sales and order support
• product technical training
• warranty support
• support service agreements
Obtain Pre-Sales Product Support
If you need to contact Rockwell Automation for pre-sales product support, try one
of the following methods:
• Call your local Rockwell Automation representative
• Network pre-sales support line, 1.440.646.3638 (3NET)
• Pre-Sales e-mail, RACle3net@ra.rockwell.com
Obtain Technical Product Support
If you need to contact Rockwell Automation for technical assistance, try one of the
following methods:
Type of technical support: Access at:
Personalized Service Call your local Rockwell Automation representative
Post-sales Technical Support 1.440.646.5800
Email your questions to racleasktheexpert@ra.rockwell.com
Internet site www.ab.com, then select Product Support
Publication 1784-IN029C-EN-P - June 2001
or
www.ab.com/support/products/pccards.html
Note: You can access Rockwell Automation Knowledge
documents from this internet address.
Page 9

3
IMPORTANT
Abbreviations
Throughout this manual, we abbreviate some terms. Use the following table to
become familiar with our terminology.
This abbreviation: Means:
PCMCIA Personal Computer Memory Card International Association
IRQ Interrupt Request
PC Personal Computer
Conventions
You will see the following conventions used in this document:
Convention: Shows:
bold text you type, items you select from a menu, or anything you click
this symbol: ⇒ the mouse movement you make to access a sub-menu selection (for
The driver and firmware versions that appear in the screen
captures in this manual may differ from the versions you are
using.
example, Start ⇒ Settings ⇒ Control Panel)
In this document, we refer to the DeviceNet PC card as the 1784-PCD card or the
PCD card.
Publication 1784-IN029C-EN-P - June 2001
Page 10

4
Notes:
Publication 1784-IN029C-EN-P - June 2001
Page 11

Table of Contents
Important User Information . . . . . . . . . . . . . . . . . . . . . . . . . . . . 2
European Communities (EC) Directive Compliance . . . . . . . . . . . 3
EMC Directive . . . . . . . . . . . . . . . . . . . . . . . . . . . . . . . . . . . 3
Low Voltage Directive. . . . . . . . . . . . . . . . . . . . . . . . . . . . . . 3
Summary of Changes
Preface
About the Manual. . . . . . . . . . . . . . . . . . . . . . . . . . . . . . . . . . . P-1
Audience . . . . . . . . . . . . . . . . . . . . . . . . . . . . . . . . . . . . . . P-1
Rockwell Automation Support . . . . . . . . . . . . . . . . . . . . . . . . . P-2
Obtain Pre-Sales Product Support . . . . . . . . . . . . . . . . . . . . P-2
Obtain Technical Product Support . . . . . . . . . . . . . . . . . . . . P-2
Abbreviations. . . . . . . . . . . . . . . . . . . . . . . . . . . . . . . . . . . . . . P-3
Conventions. . . . . . . . . . . . . . . . . . . . . . . . . . . . . . . . . . . . . . . P-3
Chapter 1
About the PCD Card
What’s in This Chapter? . . . . . . . . . . . . . . . . . . . . . . . . . . . . . . 1-1
What is PCMCIA? . . . . . . . . . . . . . . . . . . . . . . . . . . . . . . . . . . . 1-1
What is a PC Card? . . . . . . . . . . . . . . . . . . . . . . . . . . . . . . . . . . 1-1
Architecture . . . . . . . . . . . . . . . . . . . . . . . . . . . . . . . . . . . . 1-1
Communication . . . . . . . . . . . . . . . . . . . . . . . . . . . . . . . . . 1-2
What is the PCD card? . . . . . . . . . . . . . . . . . . . . . . . . . . . . . . . 1-4
Chapter 2
Pre-installation Procedures
What’s in This Chapter? . . . . . . . . . . . . . . . . . . . . . . . . . . . . . . 2-1
Verify Your Package Contents. . . . . . . . . . . . . . . . . . . . . . . . . . 2-1
System Requirements . . . . . . . . . . . . . . . . . . . . . . . . . . . . . . . . 2-2
Remove Previously Installed Drivers . . . . . . . . . . . . . . . . . . . . . 2-2
Determine Which Driver to Install. . . . . . . . . . . . . . . . . . . . . . . 2-3
Locate the 1784-PCD Driver . . . . . . . . . . . . . . . . . . . . . . . . . . . 2-3
Publication 1784-IN029C-EN-P - June 2001
Page 12

ii Table of Contents
Chapter 3
Install and Use the 16- and 32-bit Drivers for Windows 95
What’s in This Chapter? . . . . . . . . . . . . . . . . . . . . . . . . . . . . . . 3-1
Guidelines for Using the Driver. . . . . . . . . . . . . . . . . . . . . . . . . 3-2
Install the Driver . . . . . . . . . . . . . . . . . . . . . . . . . . . . . . . . . . . 3-4
Stop the PCD Card . . . . . . . . . . . . . . . . . . . . . . . . . . . . . . . . . . 3-7
Method 1 . . . . . . . . . . . . . . . . . . . . . . . . . . . . . . . . . . . . . . 3-7
Method 2 . . . . . . . . . . . . . . . . . . . . . . . . . . . . . . . . . . . . . . 3-7
Remove the Driver . . . . . . . . . . . . . . . . . . . . . . . . . . . . . . . . . . 3-8
Chapter 4
Install and Use the 32-bit Driver for Windows 98/Me
What’s in This Chapter? . . . . . . . . . . . . . . . . . . . . . . . . . . . . . . 4-1
Guidelines for Using the Driver. . . . . . . . . . . . . . . . . . . . . . . . . 4-2
Install the Driver in Windows 98 . . . . . . . . . . . . . . . . . . . . . . . . 4-3
Install the Driver in Windows Me . . . . . . . . . . . . . . . . . . . . . . . 4-7
Stop the PCD Card . . . . . . . . . . . . . . . . . . . . . . . . . . . . . . . . . . 4-9
Method 1 . . . . . . . . . . . . . . . . . . . . . . . . . . . . . . . . . . . . . . 4-9
Method 2 . . . . . . . . . . . . . . . . . . . . . . . . . . . . . . . . . . . . . 4-10
Remove the Driver . . . . . . . . . . . . . . . . . . . . . . . . . . . . . . . . . 4-10
Chapter 5
Install and Use the Driver for Windows NT
What’s in This Chapter? . . . . . . . . . . . . . . . . . . . . . . . . . . . . . . 5-1
Do You Have Any of the Following Third-Party Plug-and-Play PC
Card Controller Software? . . . . . . . . . . . . . . . . . . . . . . . . . . . . 5-2
SystemSoft’s CardWizard . . . . . . . . . . . . . . . . . . . . . . . . . . . 5-3
Phoenix/Softex’s Card Executive . . . . . . . . . . . . . . . . . . . . . 5-3
Unicore/Touchstone Software’s CardWare . . . . . . . . . . . . . . 5-4
Install the Driver . . . . . . . . . . . . . . . . . . . . . . . . . . . . . . . . . . . 5-4
Test the PCD Card . . . . . . . . . . . . . . . . . . . . . . . . . . . . . . . . . . 5-7
Remove the Driver . . . . . . . . . . . . . . . . . . . . . . . . . . . . . . . . . . 5-8
Publication 1784-IN029C-EN-P - June 2001
Page 13

Table of Contents iii
Chapter 6
Install and Use the Driver for Windows 2000
What’s in This Chapter? . . . . . . . . . . . . . . . . . . . . . . . . . . . . . . 6-1
Install the Driver . . . . . . . . . . . . . . . . . . . . . . . . . . . . . . . . . . . 6-2
Update the 1784-PCD Plug and Play Driver . . . . . . . . . . . . . . . . 6-7
Stop and Eject the 1784-PCD Card. . . . . . . . . . . . . . . . . . . . . . . 6-8
Unsafe Removal of Card . . . . . . . . . . . . . . . . . . . . . . . . . 6-10
Show the Card Unplug/Eject Icon on the Taskbar . . . . . . . . . . 6-11
Chapter 7
Insert and Remove the 1784-PCD Card
What’s in This Chapter? . . . . . . . . . . . . . . . . . . . . . . . . . . . . . . 7-1
Insert the PCD Card . . . . . . . . . . . . . . . . . . . . . . . . . . . . . . . . . 7-1
Multiple Tones . . . . . . . . . . . . . . . . . . . . . . . . . . . . . . . . . . 7-3
Remove the PCD Card . . . . . . . . . . . . . . . . . . . . . . . . . . . . . . . 7-3
Chapter 8
Connect the Card to the DeviceNet Network
Chapter 9
Run the 1784-PCD Test Utility and Access Diagnostics
Before You Begin. . . . . . . . . . . . . . . . . . . . . . . . . . . . . . . . . . . 9-1
Run the PCD Test Utility. . . . . . . . . . . . . . . . . . . . . . . . . . . . . . 9-2
Access Diagnostics . . . . . . . . . . . . . . . . . . . . . . . . . . . . . . . . . . 9-6
Chapter 10
Troubleshoot the Card
General Troubleshooting Guidelines . . . . . . . . . . . . . . . . . . . . 10-1
Avoid Network Errors by Specifying a Unique Node Address and
the Correct Baud Rate. . . . . . . . . . . . . . . . . . . . . . . . . . . . 10-1
Understand What Hearing Multiple Tones Means . . . . . . . . 10-2
Use the PCD Test Utility . . . . . . . . . . . . . . . . . . . . . . . . . . 10-2
Troubleshooting on Windows 95/98/Me . . . . . . . . . . . . . . . . . 10-2
Understand What a Missing PC Card (PCMCIA) Icon Means 10-2
Enable the PC Card Icon in the Taskbar. . . . . . . . . . . . . . . 10-3
Publication 1784-IN029C-EN-P - June 2001
Page 14

iv Table of Contents
If the Driver Does Not Work . . . . . . . . . . . . . . . . . . . . . . . 10-4
Troubleshooting on Windows NT . . . . . . . . . . . . . . . . . . . . . . 10-7
Understand What a Missing PC Card (PCMCIA) Icon Means 10-7
Change Memory and Interrupt Resources. . . . . . . . . . . . . . 10-8
Troubleshooting on Windows 2000. . . . . . . . . . . . . . . . . . . . 10-10
Check for Incompatible BIOS . . . . . . . . . . . . . . . . . . . . . 10-10
If the Driver Does Not Work in Windows 2000 . . . . . . . . 10-10
Use the Hardware Properties Screen to Verify Your Card is
Working Properly . . . . . . . . . . . . . . . . . . . . . . . . . . . . . . 10-15
Appendix A
Specifications
1784-PCD Communication Card (Series C). . . . . . . . . . . . . . . . A-1
Environmental Conditions . . . . . . . . . . . . . . . . . . . . . . . . . A-1
Agency Certification . . . . . . . . . . . . . . . . . . . . . . . . . . . . . A-1
1784-PCD1 Cable . . . . . . . . . . . . . . . . . . . . . . . . . . . . . . . . . . A-1
Glossary
Index
Publication 1784-IN029C-EN-P - June 2001
Page 15

Chapter
1
About the PCD Card
What’s in This Chapter?
Read this Chapter to familiarize yourself with PCMCIA technology and the PCD
card.
For information on: See page:
What is PCMCIA? 1-1
What is a PC Card? 1-1
What is the PCD card? 1-4
What is PCMCIA?
The Personal Computer Memory Card International Association (PCMCIA)
developed a standard for credit-card size personal computer (PC) cards. The
PCMCIA standard defines an architecture and communication method for these PC
cards.
PC cards developed under Release 1.0 of the PCMCIA standard are used for data
storage. PC cards developed under Release 2.0 of the PCMCIA standard can be used
for both I/O and data storage.
What is a PC Card?
Since personal computers have become smaller, a need for smaller storage media
developed. The PC card is a small form-factor adapter that can add memory,
storage, and I/O capabilities to these smaller computers.
Architecture
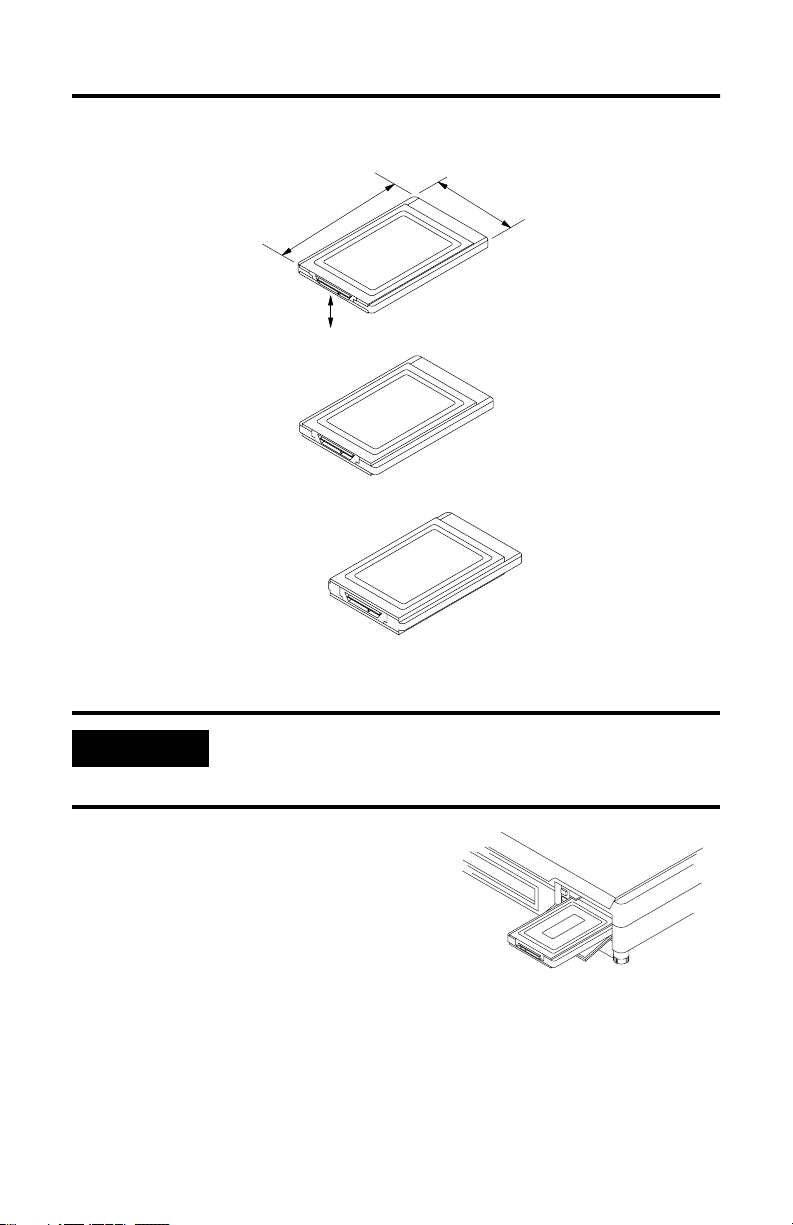
All PC cards measure the same length and width (85.6 mm x 54 mm or 3.37 in. by
2.13 in.), but differ in thickness at the center. The thickness at the connector end
along the rails is the same for all types of PC cards.
Publication 1784-IN029C-EN-P - June 2001
Page 16
1-2 About the PCD Card
IMPORTANT
Currently there are three types of PC cards:
85.6 mm
3.37 in.
54 mm
2.13 in.
Typ e I
3.3 mm thick
13 in.
Type II
5.0 mm thick
197 in.
Type III
10.5 mm thick
41 in.
data storage, such as Flash
memory cards
Center
I/O such as modem, LAN, and
host communications (the
Allen-Bradley 1784-PCD,
-PCMK, and -PCC cards are
Type II cards)
data storage or I/O capabilities
that require more space, such as
rotating media and wireless
communication devices
19911
If the PCMCIA slot in your computer is thick enough to
accommodate a Type III card, then it can also accommodate a
Type I or II card.
All three types of PC cards use the same
68–pin connector. The pins are in two
parallel rows of 34 pins. When inserted
into the PCMCIA slot on your computer,
the connector mates with a single molded
socket.
Communication
The socket provides the physical connection to the PC card. The PC card then is
connected to the I/O bus in your computer through a hardware interface called the
adapter.
Publication 1784-IN029C-EN-P - June 2001
19873
Page 17

About the PCD Card 1-3
Software interfaces defined by PCMCIA enable communications between an
installed PC card and the computer. We call these software interfaces Card and
Socket Services. Windows 95/98, Me, NT and 2000 have built-in card and Socket
Services capabilities. Once you establish communication, the PC card identifies
itself through its Card Information Structure.
Socket Services identifies how many sockets are present in your computer and
detects if a PC card is inserted into one of these sockets. The PCMCIA adapter
handles communication between the PC card and the sockets in your computer.
Socket Services controls this adapter.
Card Services provides access to system resources (such as memory and interrupt
requests) and automatically releases the system resources when you remove the PC
card from a socket. Card Services also provides an interface to higher-level software
if you need to load any hardware drivers.
After the PC card establishes communication with the computer, the card
Information Structure provides configuration information about the PC card, such
as available storage, device type, and data format to the computer.
Publication 1784-IN029C-EN-P - June 2001
Page 18

1-4 About the PCD Card
IMPORTANT
What is the PCD card?
The PCD card is a PCMCIA Type II form-factor card that interfaces between your
computer and a DeviceNet network.
.
Your computer must be PCMCIA 2.1 compliant to support the
1784-PCD card. To verify that your computer is PCMCIA 2.1
compliant, see your computer’s user manual.
Publication 1784-IN029C-EN-P - June 2001
Page 19

Chapter
2
Pre-installation Procedures
What’s in This Chapter?
The following table describes what this Chapter contains and where to find specific
information.
For information on: See page:
Verify Your Package Contents 2-1
System Requirements 2-2
Remove Previously Installed Drivers 2-2
Determine Which Driver to Install 2-3
Locate the 1784-PCD Driver 2-3
Verify Your Package Contents
Be certain that you have these items before you discard any packing material. If an
item is missing or incorrect, contact your local sales representative.
• 1784-PCD Communication card
• three 1784-PCD Setup disks. The one you use will depend upon your
operating system. The disks are labelled:
– 1784-PCD Installation Windows 95/98/2000/Me 32-bit Setup Disk
– 1784-PCD Installation Windows NT 4.0 Setup Disk
– 1784-PCD Installation Windows 95 16-bit Setup Disk
• 1784-PCD1 cable
• clear, plastic PC card carrying case
• installation manual, publication 1784-IN029C-EN-P
Publication 1784-IN029C-EN-P - June 2001
Page 20

2-2 Pre-installation Procedures
System Requirements
operating system
application software RSNetWorx for DeviceNet software
memory for computer resources at least 8 MB
memory for card resources 4KB
IRQ 1 available IRQ
hard disk space 300K
diskette drive one 3.5” diskette drive
PCMCIA slot one Type II slot
Microsoft
Windows 95/98/Me/NT: RSLinx 2.00.97 or later
Windows 2000: RSLinx 2.2 or later with RSLinx Service Pack 2
installed
Note: For RSLinx versions later than 2.2, no Service Pack is
required for the 1784-PCD card to work.
DeviceNet Manager software version 3.005 or later (16-bit driver
only)
Windows 95/98/Me, 2000, or NT 4.0
Remove Previously Installed Drivers
Always remove PCD drivers you may have installed previously before you install
new ones. Refer to the procedures for uninstalling the driver in the chapter specific
to your operating system.
Publication 1784-IN029C-EN-P - June 2001
Page 21

Pre-installation Procedures 2-3
Determine Which Driver to Install
Before you install the PCD card, you will need to determine which driver to install.
Refer to the table below to help you decide.
If you are using this operating
system:
Windows 95 (16-bit) • DeviceNet Manager
Windows 95 (32-bit) • RSNetWorx for
Windows 98/Me • RSNetworx for
Windows NT • RSNetWorx for
Windows 2000 • RSNetWorx for
And this software: Do this:
• third-party WinDNet16
• DeviceNet Monitor
DeviceNet
• RSLinx (version 2.00.97
or later)
DeviceNet
• RSLinx (version 2.00.97
or later)
DeviceNet
• RSLinx (version 2.00.97
or later)
DeviceNet
• RSLinx (version 2.2 or
later, Service Pack 2
installed)
Note: For RSLinx versions later
than 2.2, no Service Pack is
required for the 1784-PCD card
to work.
Locate the 1784-PCD Driver
Install the Windows 95 16-bit
driver. Refer to Chapter 3 for
more information.
Install the Windows 95 32-bit
driver. Refer to Chapter 3 for
more information.
Install the Windows 95/98/Me
32-bit driver. Refer to Chapter 4
for more information.
Install the Windows NT driver.
Refer to Chapter 5 for more
information.
Install the Windows 2000
driver. Refer to Chapter 6 for
more information.
There are three ways to obtain the 1784-PCD driver. The driver is located:
• on one of the following disks shipped with the card:
– 1784-PCD Installation Windows 95/98/2000/Me 32-bit Setup Disk
– 1784-PCD Installation Windows NT 4.0 Setup Disk
– the 1784-PCD Installation Windows 95 16-bit Setup Disk
• on the RSLinx product CD, located in the PnPDrivers folder
• or, for the latest versions, visit www.ab.com, then select Product Support
or www.ab.com/support/products/pccards.html
Publication 1784-IN029C-EN-P - June 2001
Page 22

2-4 Pre-installation Procedures
Notes:
Publication 1784-IN029C-EN-P - June 2001
Page 23

Chapter
TIP
Install and Use the 16- and 32-bit Drivers for
Windows 95
What’s in This Chapter?
This Chapter describes installation procedures for the 16- or 32-bit Windows 95
drivers. This Chapter describes how to:
For information on: See page:
Guidelines for Using the Driver 3-2
Install the Driver 3-4
Stop the PCD Card 3-7
Remove the Driver 3-8
The instructions in this Chapter assume that you:
3
• have already determined which operating system you are using, and which
driver you need to install
• are using Windows 95
You can have only one PCD card inserted into your computer
at one time in Windows 95. If you insert more than one card,
Windows 95 recognizes only the first card.
Publication 1784-IN029C-EN-P - June 2001
Page 24
3-2 Install and Use the 16- and 32-bit Drivers for Windows 95
TIP
TIP
IMPORTANT
IMPORTANT
Depending on the version of Windows 95 you are using, your
screens may look slightly differen from the ones shown in this
Chapter.
If you plan to use DeviceNet Manager software, DeviceNet
Monitor software, or other WinDNet16 software, you must
install the Windows 95 16-bit driver.
If you plan to use RSNetWorx for DeviceNet or RSLinx, you
must install the Windows 95 32-bit driver.
If you have a previously installed PCD driver on your PC, you
must remove it from your computer before installing the
current driver. Refer to Remove the Driver on page 3-8.
Guidelines for Using the Driver
Follow these guidelines for using the driver:
• Do not simultaneously load 16- and 32-bit drivers
• Do not use the Update Driver option in the Windows 95 Device Manager:
Publication 1784-IN029C-EN-P - June 2001
Although you can alternate between using the 16-bit and the
32-bit driver in your application, do not load both the 16-bit
and 32-bit drivers simultaneously. Windows 95 operating
systems allow only one driver per card type. You must
remove one driver before you install the other.
Instead, remove any existing drivers, then load the new drivers as described
in this Chapter. For information on how to remove the drivers, refer to
page 3-8.
Page 25

Install and Use the 16- and 32-bit Drivers for Windows 95 3-3
TIP
• When changing the series of the PCD card in Windows 95:
If you change the series of the PCD card, when the PC recognizes the new
PCD card for the first time, Windows reports that it has found new hardware
and may prompt you to insert the appropriate setup disk. If prompted, insert
the setup disk with the driver for your application. Be certain to install the
same type of driver (16- or 32-bit) for both cards. You will need to reboot
your PC after you install the card.
These drivers will work with the series A, B, and C PCD
cards. The series A, B, and C PCD cards use the same
setup disks.
Publication 1784-IN029C-EN-P - June 2001
Page 26
3-4 Install and Use the 16- and 32-bit Drivers for Windows 95
Install the Driver
1. Some earlier versions of the driver do not appear in the Add/Remove
Programs utility on the Windows Control Panel and can only be removed by
running the pcdupdt.exe program. To verify that an earlier version of the
driver is not installed, run the pcdupdt.exe program from the root of the
1784-PCD Installation Windows 95/98/Me 32-bit Setup Disk.
a. Place the 1784-PCD Installation Windows 95/98/2000/Me 32-bit Setup
Disk into your computer’s floppy disk drive.
b. Browse to x:\pcdupdt.exe where x: is your floppy disk drive letter.
c. Double-click on the pcdupdt.exe file to run it.
2. Insert one of the following disks into your floppy disk drive:
• the disk labelled 1784-PCD Installation Windows 95/98/Me 32-bit Setup
Disk
• the disk labelled 1784-PCD Installation Windows 95 16-bit Setup Disk
3. Insert the PCD card into your system as described in Chapter 7.
After you insert the card, the system will detect it and begin to build the
driver information needed to run it. To do this, the system must locate the
driver for the card, so it prompts you to specify where to find the driver.
4. Click Next. You see the following dialog box:
Publication 1784-IN029C-EN-P - June 2001
Page 27
Install and Use the 16- and 32-bit Drivers for Windows 95 3-5
TIP
5. Click Next. You see a dialog box similar to this one:
You may see a message indicating that no driver was found. If
you do get this message, type the path where the driver is
located (on the disk, or on your hard drive, if you downloaded
it). If Windows is still unable to find the driver, reboot your PC.
Publication 1784-IN029C-EN-P - June 2001
Page 28
3-6 Install and Use the 16- and 32-bit Drivers for Windows 95
TIP
6. Click Finish. The system begins to load the driver, then prompts you with
the following dialog box:.
If you see this dialog box, specify the drive letter for your disk
drive (usually a:) in the Copy files from... pulldown (see the
screen capture shown above). Press Enter or click OK.
You may be prompted to restart your computer for the driver to take effect.
7. For the 32-bit driver, run the PCD Test Utility to verify the installation. Refer
to Chapter 9 of this manual.
8. For the 16-bit driver, follow these instructions to verify the installation:
a. Start DeviceNet Manager Software.
b. Select Utilities ⇒ Set Up Online Communications.
c. Select PCD Interface version 2.2 or Later.
d. Click Ok.
e. Click Test Card.
f. Click Ok.
If: Then:
you do not see the message:
All Tests Passed
your computer is not connected to a
DeviceNet network
refer to Chapter 10. If your are still having
problems, contact Rockwell Automation
Technical Support.
you see the following message on the bottom
of the DeviceNet Manager window:
1784-PCD is not connected to a network or
there is no network power
Publication 1784-IN029C-EN-P - June 2001
Page 29
Install and Use the 16- and 32-bit Drivers for Windows 95 3-7
Stop the PCD Card
Before you remove the PCD card from its socket, you should stop the card, which
also stops the driver. There are two methods for stopping the card.
Method 1
1.Right-click the PC card icon in the
Windows taskbar.
2.Select Adjust PC Card Properties.
3. On the list of PC cards that appears, click on the 1784-PCD card you want to
stop.
4. Click Stop.
5. When you see the message that tells you that you may safely remove this
device, click OK.
Method 2
1.Left-click the PC card icon in the Windows
taskbar.
2.On the list of PC cards that appears, click on
the 1784-PCD card you want to stop.
3. When you see the message that tells you that you may safely remove this
device, click OK.
Publication 1784-IN029C-EN-P - June 2001
Page 30

3-8 Install and Use the 16- and 32-bit Drivers for Windows 95
TIP
Remove the Driver
You can use the uninstaller provided by Windows 95 to remove the driver from
your system.
1. Stop the PCD card as directed above.
2. Click Start ⇒ Settings ⇒ Control Panel.
3. Double-click the Add/Remove Programs icon.
4. Select Allen-Bradley 1784-PCD.
5. Click Add/Remove. Click Next.
6. Before files are deleted, you are prompted to confirm that you want to
remove the PCD card.
As an alternative, you can remove the driver by running
the pcdupdt.exe program from the root of the 1784-PCD
Installation Windows 95/98/Me 32-bit Setup Disk.
a. Place the 1784-PCD Installation Windows
95/98/2000/Me 32-bit Setup Disk into your
computer’s floppy disk drive.
b. Browse to x:\pcdupdt.exe where x: is your
floppy disk drive letter.
c. Double-click on the pcdupdt.exe file to run it.
Publication 1784-IN029C-EN-P - June 2001
Page 31

Chapter
TIP
TIP
4
Install and Use the 32-bit Driver for Windows 98/Me
What’s in This Chapter?
This Chapter describes installation procedures for the 32-bit Windows 95/98/Me
driver. This Chapter describes how to:
For information on: See page:
Guidelines for Using the Driver 4-2
Install the Driver in Windows 98 4-3
Install the Driver in Windows Me 4-7
Stop the PCD Card 4-9
Remove the Driver 4-10
16-bit drivers may work on some Windows 98/Me computers.
However, Rockwell Automation does not support this
configuration.
You can have only one PCD card inserted into your computer
at one time in Windows 98/Me. If you insert more than one
card, Windows 98/Me recognizes only the first card.
Publication 1784-IN029C-EN-P - June 2001
Page 32

4-2 Install and Use the 32-bit Driver for Windows 98/Me
IMPORTANT
TIP
The instructions in this Chapter assume that you:
• have already determined which operating system you are using, and which
driver you need to install
• are using Windows 98 or Me
• are using RSNetWorx or RSLinx software. RSLinx software must be at version
2.00.97.30 or later.
Always remove PCD drivers you may have installed
previously before you install new ones. Refer to Remove the
Driver on page 4-10.
Guidelines for Using the Driver
Follow these guidelines for using the driver:
• Do not use the Update Driver option in the Windows 95/98/Me Device
Manager:
Instead, remove any existing drivers, then load the new drivers as described
in this Chapter. For information on how to remove the drivers, refer to
page 4-10.
• When changing the series of the PCD card in Windows 98/Me:
Publication 1784-IN029C-EN-P - June 2001
If you replace the series A or B PCD card with a series C PCD card or vice
versa, the first time the PC recognizes the new PCD card, Windows reports
that it has found new hardware and may prompt you to insert the
appropriate setup disk. If prompted, insert the setup disk with the driver for
your application. You will need to reboot your PC after you install the card.
The series A, B, and C PCD cards use the same setup
disks.
Page 33

Install and Use the 32-bit Driver for Windows 98/Me 4-3
Install the Driver in Windows 98
1. Insert the 1784-PCD Installation Windows 95/98/2000/Me 32-bit Setup Disk
into your floppy disk drive.
a. Some earlier versions of the driver do not appear in the Add/Remove
Programs utility on the Windows Control Panel and can only be removed
by running the pcdupdt.exe program. To verify that an earlier version of
the driver is not installed, run the pcdupdt.exe program from the root of
the 1784-PCD Installation Windows 95/98/2000/Me 32-bit Setup Disk.
b. Browse to x:\pcdupdt.exe where x: is your floppy disk drive letter.
c. Double-click on the pcdupdt.exe file to run it.
2. Insert the PCD card into your system as described in Chapter 7. Windows 98
displays this screen.
3. Click Next.
Publication 1784-IN029C-EN-P - June 2001
Page 34

4-4 Install and Use the 32-bit Driver for Windows 98/Me
4. You see this screen:
5. Click Next. You see this screen:
6. Select one of the following:
• Floppy disk drives if you are going to use the 1784-PCD Installation
Windows 95/98/2000/Me 32-bit Setup Disk that ships with the 1784-PCD
card
• CD-ROM drive if you are going to get the file from the RSLinx CD-ROM
Publication 1784-IN029C-EN-P - June 2001
Page 35

Install and Use the 32-bit Driver for Windows 98/Me 4-5
TIP
• Specify a location if you downloaded the driver file from
www.ab.com/support.
If you select: Then:
Floppy disk drives insert the 1784-PCD Installation Windows
CD-ROM drives insert the RSLinx CD into the drive and click Next.
Specify a location use this selection if you have downloaded the driver
95/98/2000/Me 32-bit Setup Disk into the drive and
click Next. Windows 98/Me will search for the
appropriate driver.
Windows 98/Me will search for the appropriate driver.
from www.ab.com/support. You will be prompted for
the location path of the driver.
7. You see this screen:
You may see a message indicating that no driver was found. If
you do get this message, type the path where the driver is
located (on the disk, or on your hard drive, if you downloaded
it). If Windows is still unable to find the driver, reboot your PC.
Publication 1784-IN029C-EN-P - June 2001
Page 36

4-6 Install and Use the 32-bit Driver for Windows 98/Me
8. Click Next. You see this screen:
9. Click Finish. You see this screen:
10. Click Yes to reboot your computer.
11. Run the PCD Test Utility to verify the installation. Refer to Chapter 9 of this
manual.
Publication 1784-IN029C-EN-P - June 2001
Page 37

Install and Use the 32-bit Driver for Windows 98/Me 4-7
Install the Driver in Windows Me
1. Insert the 1784-PCD Installation Windows 95/98/2000/Me 32-bit Setup Disk
into your floppy disk drive.
a. Some earlier versions of the driver do not appear in the Add/Remove
Programs utility on the Windows Control Panel and can only be removed
by running the pcdupdt.exe program. To verify that an earlier version of
the driver is not installed, run the pcdupdt.exe program from the root of
the 1784-PCD Installation Windows 95/98/2000/Me 32-bit Setup Disk.
b. Browse to x:\pcdupdt.exe where x: is your floppy disk drive letter.
c. Double-click on the pcdupdt.exe file to run it.
2. Insert the PCD card into your system as described in Chapter 7. Windows
Me displays this screen:
Publication 1784-IN029C-EN-P - June 2001
Page 38

4-8 Install and Use the 32-bit Driver for Windows 98/Me
3. Click Next. You see this screen:
4. When the files finish copying, you see this screen:
Publication 1784-IN029C-EN-P - June 2001
Page 39

Install and Use the 32-bit Driver for Windows 98/Me 4-9
5. Click Finish. You see this screen:
6. Click Yes to reboot your computer.
7. Run the PCD Test Utility to verify the installation. Refer to Chapter 9 of this
manual.
Stop the PCD Card
Before you remove the PCD card from its socket, you should stop the card, which
also stops the driver.
Method 1
1. Right-click the PC card icon in the Windows
taskbar.
2. Select Adjust PC Card Properties.
3. On the list of PC cards that appears, click on the 1784-PCD card you want to
stop.
4. Click Stop.
5. When you see the message that tells you that you may safely remove this
device, click OK.
Publication 1784-IN029C-EN-P - June 2001
Page 40

4-10 Install and Use the 32-bit Driver for Windows 98/Me
Method 2
1.Left-click the PC card icon in the Windows
taskbar.
2.On the list of PC cards that appears, click on
the 1784-PCD card you want to stop.
3. When you see the message that tells you that you may safely remove this
device, click OK.
Remove the Driver
You can use the uninstaller provided by Windows 98/Me to remove the driver from
your system.
1. Stop the PCD card as directed above.
2. Click Start ⇒ Settings ⇒ Control Panel.
3. Double-click the Add/Remove Programs icon.
4. Select Allen-Bradley 1784-PCD.
5. Click Next.
Publication 1784-IN029C-EN-P - June 2001
Page 41

Install and Use the 32-bit Driver for Windows 98/Me 4-11
TIP
6. Click Add/Remove. If you have not already stopped the card, you see a
screen similar to the one below.
7. Before files are deleted, you are prompted to confirm that you want to
remove the PCD card.
As an alternative, you can run the pcdupdt.exe file from
the root of the 32-bit driver disk to remove the driver.
a. Place the 1784-PCD Installation Windows
95/98/2000/Me 32-bit Setup Disk into your
computer’s floppy disk drive.
b. Browse to x:\pcdupdt.exe where x: is your
floppy disk drive letter.
c. Double-click on the pcdupdt.exe file to run it.
Publication 1784-IN029C-EN-P - June 2001
Page 42

4-12 Install and Use the 32-bit Driver for Windows 98/Me
Notes:
Publication 1784-IN029C-EN-P - June 2001
Page 43

Chapter
Install and Use the Driver for Windows NT
What’s in This Chapter?
This Chapter describes how to:
To: See page:
Use Third-party Windows NT
Plug-and-play Software
Install the Driver 5-4
Test the PCD Card 5-7
Remove the Driver 5-8
The instructions in this Chapter assume that you:
5-2
5
• have already determined which operating system you are using, and which
driver you need to install
• are using Windows NT
• are using RSNetworx for DeviceNet software with RSLinx 2.00.97.30 or later
Publication 1784-IN029C-EN-P - June 2001
Page 44

5-2 Install and Use the Driver for Windows NT
TIP
TIP
With certain third-party plug-and-play software packages, two
PCD cards can be used at the same time. To determine if your
system will support two PCD cards, install two cards and
configure the PCD driver in RSLinx (select
Communications ⇒ Configure Drivers). If your system
supports two cards, you will see two serial numbers as shown
in this excerpt from the RSLinx PCD Driver Configuration
Screen.
Native NT (with no third-party plug-and-play software
installed) supports one PCD card at a time.
Do You Have Any of the Following Third-Party Plug-and-Play PC Card Controller Software?
If: Then:
you do have third-party plug-and-play
card controller software
you do not have third-party
plug-and-play card controller software
To find the version of your third-party plug-and-play software,
you can usually do the following:
1. Double-click the PC card icon.
2. When a dialog box appears, click Help ⇒ About.
Publication 1784-IN029C-EN-P - June 2001
a PC card icon (circled in
this illustration) will
appear on the Windows
task bar
go to page 5-4 and continue with the driver installation.
Page 45

Install and Use the Driver for Windows NT 5-3
TIP
IMPORTANT
IMPORTANT
Whenever you upgrade third-party plug-and-play software,
you must also upgrade all associated power management and
docking service software, if loaded, to the same version to
which you have upgraded the plug-and-play software.
SystemSoft’s CardWizard
If you have SystemSoft’s CardWizard plug-and-play software, you must upgrade it
to version 4.0 or later. In addition, you will be able to use the A-B 1784-PCD card
Control Panel to assign memory and interrupt resources for the card.
You cannot use a series A 1784-PCD card with SystemSoft’s
CardWizard. Attempting to use the series A card may cause
your computer to lock up. If your computer locks up, remove
the series A card from your computer and reboot it.
You cannot configure and use 2 PCD cards at the same time
with SystemSoft’s CardWizard.
For more information on obtaining the CardWizard upgrade for use with the
1784-PCD card, contact SystemSoft:
• Internet: www.systemsoft.com
• Phone: 1.800.796.0088 or 508.651.0088 (ask for sales)
Phoenix/Softex’s Card Executive
If you have Phoenix/Softex’s Card Executive plug-and-play software, you must
upgrade to version 2.21 or later.
Do not use the Allen-Bradley 1784-PCD card icon in the Control Panel to assign
memory and interrupt resources. The Phoenix/Softex PC card controller software
assigns these resources for you automatically.
For more information, contact Phoenix/Softex:
• Internet: www.softexinc.com
• Phone: 512.452.8836
• Fax: 512.795.8702
Publication 1784-IN029C-EN-P - June 2001
Page 46

5-4 Install and Use the Driver for Windows NT
Unicore/Touchstone Software’s CardWare
If you have Unicore/Touchstone Software’s CardWare, you must upgrade to version
2.11 or later.
Do not use the Allen-Bradley 1784-PCD card icon in the Control Panel to assign
memory and interrupt resources. The Unicore/Touchstone Software PC card
controller assigns these resources for you automatically.
For more information, contact Touchstone or Unicore:
• Touchstone: Internet: www.touchstonesoftware.com
• Unicore: Internet: www.unicore.com/products
Install the Driver
To install the driver, do the following:
1. To verify that an earlier version of the driver is not installed, click
Start ⇒ Settings ⇒ Control Panel. Double-click the Add/Remove
Programs icon. Click the Install/Uninstall tab. Scroll down the list to
ensure the driver is not listed.
If: Then:
the driver is installed remove it. Refer to Remove the Driver on
the driver is not installed click OK or Cancel.
page 5-8.
2. Shut down the PC.
3. Insert the PCD card into your computer as described in Chapter 7.
4. Start Windows NT.
If: Then:
you have third-party plug-and-play card
controller software
you do not have third-party plug-and-play
card controller software
refer to the bulleted list following this table
go to step 5 on page 5-6
• If you have Phoenix/Softex’s Card Executive on your system, you may
see the following message:
Publication 1784-IN029C-EN-P - June 2001
Page 47

Install and Use the Driver for Windows NT 5-5
TIP
If you get this message, do the following:
a. Choose the Do not install any driver for this card radio button.
b. Check the Do not display this dialog for the PC card again checkbox.
c. Press Enter or click Ok. You still need to install the driver. Go on to step
5.
• If you have SystemSoft’s CardWizard, you may see a screen that tells you
the PCMCIA card is not configured. Click Exit and continue with step 5.
• If you have Unicore/Touchstone Software’s CardWare, you may see a
screen similar to one of the following screens at any time during the
installation.
Different versions of Unicore/Touchstone Software’s CardWare
show the screens at different times.
Publication 1784-IN029C-EN-P - June 2001
Page 48

5-6 Install and Use the Driver for Windows NT
If you see this screen: Do this:
Click Done. If you do not, you will see this
screen every time you reboot your pc.
Click OK.
Click No.
5. Insert the 1784-PCD Installation Windows NT 4.0 Setup Disk into the floppy
disk drive.
6. Access the Run window by selecting Start ⇒ Run.
7. In the Run dialog box, type the path
a:\setup.exe
Substitute for a:\ the drive letter of your floppy disk, (for example, b:\).
Publication 1784-IN029C-EN-P - June 2001
Page 49

Install and Use the Driver for Windows NT 5-7
IMPORTANT
8. Click OK.
The InstallShield Wizard starts up. You see a progress bar advance as the
installation progresses.
9. Click Next.
10. At the Setup Complete screen, click the Yes I want to restart my
computer now radio button.
11. Click Finish.
If CardWare displays a message saying the driver could not be
started, you may have a resource conflict. Refer to Chapter 10
for troubleshooting information.
Test the PCD Card
To test the PCD card, refer to Chapter 9 of this manual.
Publication 1784-IN029C-EN-P - June 2001
Page 50

5-8 Install and Use the Driver for Windows NT
Remove the Driver
You can use the uninstaller provided by Windows NT to remove the driver from
your system.
1. Click Start ⇒ Settings ⇒ Control Panel.
2. Double-click the Add/Remove Programs icon.
3. Close the Control Panel. Doing this allows you to completely uninstall the
driver without rebooting your computer.
4. Select Allen-Bradley 1784-PCD Driver from the Add/Remove Programs list
box.
5. Click Add/Remove. Before files are deleted, you are prompted to confirm
that you want to remove the PCD card.
Publication 1784-IN029C-EN-P - June 2001
Page 51

Chapter
TIP
Install and Use the Driver for Windows 2000
What’s in This Chapter?
This Chapter describes how to:
To: See page:
Install the Driver 6-2
Update the 1784-PCD Plug and Play Driver 6-7
Stop and Eject the 1784-PCD Card 6-8
Show the Card Unplug/Eject Icon on the
Taskbar
In order to follow the instructions in this Chapter, you must:
• have Windows 2000 loaded
• have the Windows 2000 driver for the PCD card
• have RSLinx version 2.2 or later with RSLinx Service Pack 2 installed
6-11
6
For RSLinx versions later than 2.2, no Service Pack is required for the
1784-PCD card to work.
You can have two PCD cards installed to monitor different
networks or access different devices. If you install two PCD
cards, each card will have a unique serial number, as shown in
this excerpt from the RSLinx PCD Driver Configuration Screen.
Publication 1784-IN029C-EN-P - June 2001
Page 52

6-2 Install and Use the Driver for Windows 2000
TIP
IMPORTANT
If you are using Windows 2000, we strongly recommend that you
verify that your system BIOS supports Windows 2000. If you
have problems using the 1784-PCD card with a system running
Windows 2000, check that you have the latest system BIOS
installed. You can download BIOS updates from most computer
manufacturers’ websites. Contact your computer manufacturer
for details.
Install the Driver
If you are upgrading your system from Windows NT to
Windows 2000, keep the following in mind:
• Check that you have a Windows 2000-compatible BIOS
installed. You can download BIOS updates from most
computer manufacturers’ websites. Contact your computer
manufacturer for details.
• be sure to uninstall Windows NT PCD drivers before
attempting to install Windows 2000. If you do not, and
you see a wdnpcd.dll error message in RSLinx, remove the
old driver by running the pcdupdt.exe utility from the root
of your driver installation disk. Refer to Update the
1784-PCD Plug and Play Driver on page 6-7 for
instructions for removing the old driver. If you still have
problems, contact Rockwell Automation Technical
Support.
1. Insert the PCD card into your computer as described in Chapter 7.
IMPORTANT
Publication 1784-IN029C-EN-P - June 2001
Before you can install the driver for the 1784-PCD card, you must
be logged in as an administrator of the machine. Being an
administrator gives you permission to install or make changes to
the machine software. If you try to install the driver without
being an administrator, you will get error messages and the
driver will not install.
Page 53

Install and Use the Driver for Windows 2000 6-3
TIP
If you insert multiple PC Cards, you may hear more than one
tonal notification per card. Windows 2000 detects devices
during the power up process, and adjusts the device resources
accordingly. This results in sounding multiple tones. When the
system changes settings, for example, when removing a card,
the tones will sound again for each change.
IMPORTANT
2. After you insert the PCD card, the system detects the hardware and begins to
build the driver information needed to run the hardware. If you see the
Digital Signature Not Found screen, click Yes to continue the installation.
If a PCD driver is already installed, remove it by running the
pcdupdt.exe utility from the root of your driver installation disk.
Refer to Update the 1784-PCD Plug and Play Driver on page 6-7.
3. Because the driver has not been loaded, Windows 2000 displays a new
hardware dialog box and the following message:
Publication 1784-IN029C-EN-P - June 2001
Page 54

6-4 Install and Use the Driver for Windows 2000
Windows 2000 displays:
4. Click Next.
Windows 2000 displays:
Publication 1784-IN029C-EN-P - June 2001
Page 55

Install and Use the Driver for Windows 2000 6-5
5. Select Search for a suitable driver and click Next.
At this point you need to select where the file is located.
6. Select one of the following:
• Floppy disk drives if you are going to use the floppy disk that
ships with the 1784-PCD card
• CD-ROM drives if you are going to get the file from the RSLinx
CD-ROM, Version 2.2 Service Pack 2 or later.
• Specify a location if you downloaded the driver file from
www.ab.com/support/products/pccards.html.
If you select: Then:
Floppy disk drives insert the 1784-PCD Installation Windows
CD-ROM drives insert the RSLinx CD into the drive and click Next.
Specify a location use this selection if you have downloaded the driver
95/98/2000/Me 32-bit Setup Disk into the drive and
click Next. Windows 2000 will search for the
appropriate driver.
Windows 2000 will search for the appropriate driver.
from www.ab.com/support/products/pccards.html. You
will be prompted for the location path of the driver.
Publication 1784-IN029C-EN-P - June 2001
Page 56

6-6 Install and Use the Driver for Windows 2000
TIP
7. Click Next.
You may see a message indicating that no driver was found. If
you do get this message, type the path where the driver is
located (on the disk, or on your hard drive, if you downloaded
it). If Windows is still unable to find the driver, reboot your PC.
Publication 1784-IN029C-EN-P - June 2001
Page 57

Install and Use the Driver for Windows 2000 6-7
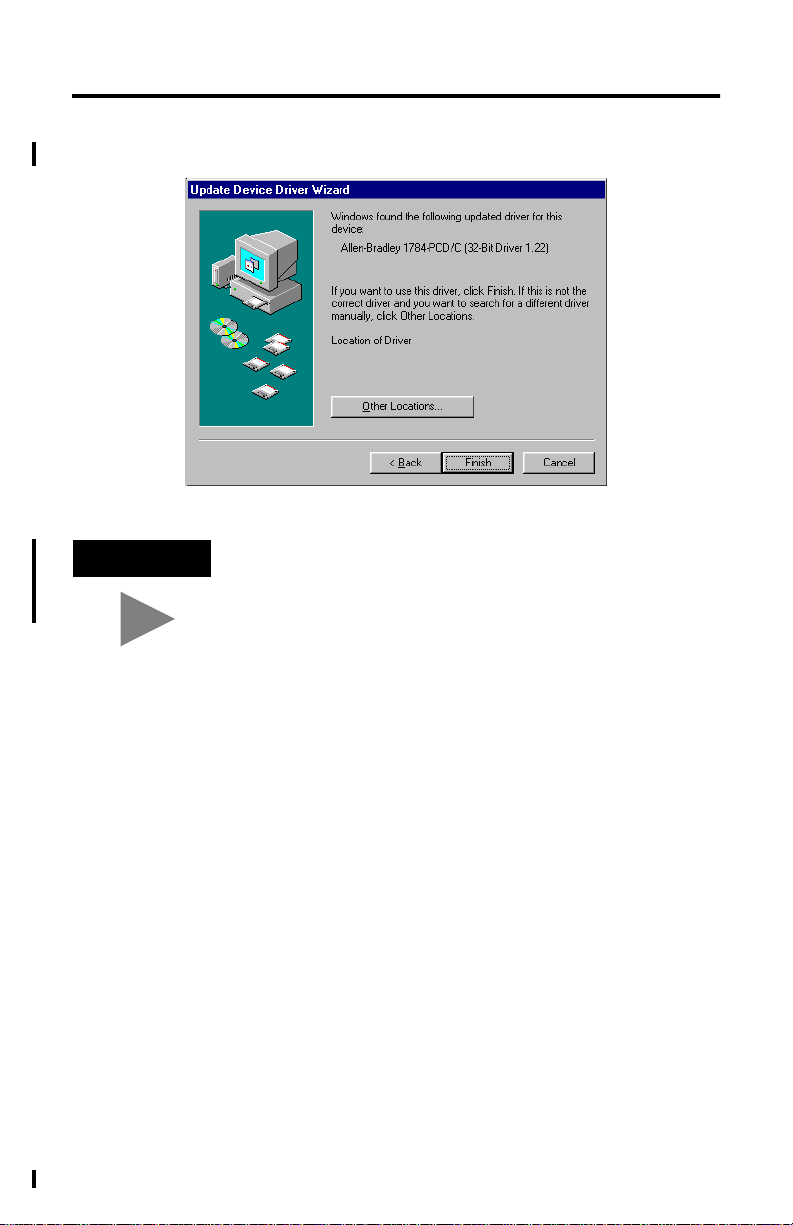
8. Once Windows 2000 installs the driver, the following displays.
9. Click Finish.
You may be prompted to restart you computer for the driver to take effect.
10. Run the 1784-PCD Test Utility to verify the installation. Refer to Chapter 9 of
this manual.
Update the 1784-PCD Plug and Play Driver
Perform these steps to update the driver to a newer version:
1. Run the pcdupdt.exe utility from the root of your driver installation disk.
a. Place the 1784-PCD Installation Windows 95/98/2000/Me 32-bit Setup
Disk into your computer’s floppy disk drive.
b. Browse to x:\pcdupdt.exe where x: is your floppy disk drive letter.
c. Double-click on the pcdupdt.exe file to run it.
2. Refer to Install the Driver on page 6-2 to continue installing the driver.
3. Run the 1784-PCD Test Utility to verify the installation. Refer to Chapter 9 of
this manual.
Publication 1784-IN029C-EN-P - June 2001
Page 58

6-8 Install and Use the Driver for Windows 2000
TIP
Stop and Eject the 1784-PCD Card
Before you remove the PCD card from its socket, you should stop the card, which
also stops the driver.
1. Double-click on the card unplug/eject icon on your task bar.
.
If you don’t have the icon on your taskbar, go to page
6-11 to activate the icon.
2. Click on the PCD card you want to stop from the list of cards.
Publication 1784-IN029C-EN-P - June 2001
Page 59

Install and Use the Driver for Windows 2000 6-9
3. Click Stop. You see this screen:
4. Click OK.
5. When you see the window that states you may safely remove this device,
click OK.
6. Remove the card.
Publication 1784-IN029C-EN-P - June 2001
Page 60

6-10 Install and Use the Driver for Windows 2000
Unsafe Removal of Card
If you do not stop the communication to your card before you remove a card from
your computer, Windows 2000 displays:
To stop the card, refer to Stop and Eject the 1784-PCD Card on page 6-8.
IMPORTANT
Publication 1784-IN029C-EN-P - June 2001
Use the Unplug/eject icon on the taskbar to insure you do not
damage your card.
Page 61

Install and Use the Driver for Windows 2000 6-11
Show the Card Unplug/Eject Icon on the Taskbar
If you frequently need to eject the PCD card, be sure to check the Show
Unplug/Eject icon on the taskbar box in the Completing the Add/Remove
Hardware wizard page. You can check the box the first time you install the card.
The next time you want to unplug or eject the device, you can use the icon on the
taskbar instead of the Add/Remove Hardware wizard.
1. Double-click My Computer on your desktop.
2. Double-click Control Panel.
3. Double-click Add/Remove Hardware.
4. Click Next.
5. Check Uninstall/Unplug a device and click Next.
6. Check Unplug/Eject a device and click Next.
7. Select the 1784-PCD card and click Next.
8. Confirm the device and click Next.
9. Check Show Unplug/Eject icon on the taskbar.
10. Click Finish.
11. Remove your card.
Publication 1784-IN029C-EN-P - June 2001
Page 62

6-12 Install and Use the Driver for Windows 2000
Notes:
Publication 1784-IN029C-EN-P - June 2001
Page 63

Chapter
TIP
Insert and Remove the 1784-PCD Card
What’s in This Chapter?
Read this Chapter to understand how to insert and remove the card from your
laptop computer.
To: See page:
Insert the PCD Card 7-1
Remove the PCD Card 7-3
Insert the PCD Card
7
IMPORTANT
.
If you are using Windows 95/98/Me or 2000, you can insert or
remove the 1784-PCD card from a powered computer. Be sure to
stop the card first. Refer to the Chapter for each operating system
for the procedure for stopping the card.
If you are using Windows NT, shut down the computer before
inserting or removing the card.
The following diagrams show a PCMCIA 2.1 compliant
system. If you are using another computer, your installation
may be slightly different.
Publication 1784-IN029C-EN-P - June 2001
Page 64

7-2 Insert and Remove the 1784-PCD Card
19869
1. Open the door to the PCMCIA slot.
Some slots do not have doors.
IMPORTANT
If you have more than one slot in your computer, you can insert
the 1784-PCD card into any empty slot. Check your computer’s
documentation for the slot numbers. You can use the other
available slots for other PC cards such as network or modem
cards.
2. Grasp the card by the edges with the logo facing upward and the 68-pin
connector facing into the PCMCIA slot.
3. Insert the card into the PCMCIA slot and slide the card in until it is firmly
seated in the connector. Some computers have an ejector button that pops
out when the card is seated in the connector.
If the computer is configured properly, your sound/speaker is enabled, and
you installed the 1784-PCD card successfully, you hear multiple tones when
you insert a card or boot the computer.
Publication 1784-IN029C-EN-P - June 2001
Page 65

Insert and Remove the 1784-PCD Card 7-3
Multiple Tones
If you insert multiple PC cards, you may hear more than one tonal notification per
card. Windows 95/98/Me, and 2000 detect devices during the power-up process,
and adjust the device resources accordingly. This results in sounding multiple
tones. When the system changes settings, for example, when a card is removed, the
tones will sound again for each change.
IMPORTANT
Do not remove the card under power on a Windows NT system.
Remove the PCD Card
IMPORTANT
On most computers, you press the release button and remove the card from the
slot. If this is not applicable to your computer, follow the instructions specified in
its user manual.
You hear multiple tones for each card that you remove, if your system is configured
properly. These tones indicate the card is now disabled.
IMPORTANT
Before removing the PCD card, you must first stop
communication to it, which also stops the card. Refer to the
appropriate Chapter for your operating system for procedures for
stopping the card.
You should stop any software communicating with the card
before removing the PCD card. If you do not do this, the stray
processes may affect the system’s performance, potentially
halting the system.
Publication 1784-IN029C-EN-P - June 2001
Page 66

7-4 Insert and Remove the 1784-PCD Card
Notes:
Publication 1784-IN029C-EN-P - June 2001
Page 67

Chapter
TIP
IMPORTANT
Connect the Card to the DeviceNet Network
This Chapter describes how to connect the PCD card to a Devicenet network.
These instructions assume that you have installed:
• your application software
• the card (Chapter 7)
• the 1784-PCD drivers (Chapters 3 through 6) and restarted Windows
If you need additional information about connecting cables,
see the DeviceNet Cable Planning and Installation Manual,
publication DN-6.7.2.
The following diagrams show a PCMCIA-2.1-compliant system.
If you are using another system, your installation may appear
slightly different.
8
To connect the cable to the card:
Be sure that your PCD driver is configured to the same baud
rate as your network. If the baud rates are different, operation
of devices on the network could be affected.
1. Attach the smaller end of
the 1784-PCD1 cable to
the 1784-PCD card.
The silver side should face upward
as you connect the cable to the
1784-PCD card.
2. Attach the other end of
20724-M
the 1784-PCD1 cable to
the DeviceNet network.
Publication 1784-IN029C-EN-P - June 2001
Page 68

8-2 Connect the Card to the DeviceNet Network
Connect the card to the network in any of the following ways:
Connect to the network using a: Catalog or part no.: See this portion of the figure
below:
5-pin probe cable 1787-PCABL 1
sealed mini-male cable 1787-MCABL 2
linear plug 1787-PLUG10R 3
optional 1787-OPCAB 1787-OPCAB/A 4
1 1784-PCD1 to 1787-PCABL to DeviceNet network
Notebook computer with
1784-PCD card installed
1784-PCD1
Open-style device
1787-PCABL
20725-M
2 1784-PCD1 to 1787-MCABL to DeviceNet network
Notebook computer with
1784-PCD card installed
1784-PCD1
Publication 1784-IN029C-EN-P - June 2001
DeviceNet
network
T-port tap
1787-MCABL
20725b-M
Page 69

Connect the Card to the DeviceNet Network 8-3
3 1784-PCD1 to 5-pin linear plug to DeviceNet network
Notebook computer with
1784-PCD card installed
1784-PCD1
1787-PLUG10R
4 1784-PCD to 1787-OPCAB/A
five loose pins
black
blue
clear
white
red
To DeviceNet
network
20725c-M
This cable does not ship with the
1784-PCD card.
31227-M
3. Verify that you can go online with the card and your application software. If
you have difficulty establishing communication, check your cable
connections and refer to the documentation for your application software.
Refer to Chapter 9 for information on testing the cable with the PCD Test
Utility.
Publication 1784-IN029C-EN-P - June 2001
Page 70

8-4 Connect the Card to the DeviceNet Network
Notes:
Publication 1784-IN029C-EN-P - June 2001
Page 71

Chapter
IMPORTANT
TIP
9
Run the 1784-PCD Test Utility and Access Diagnostics
Before You Begin
The 1784-PCD Test Utility lets you verify and troubleshoot the installation of your
1784-PCD card on Windows 95/98/Me/2000 and NT platforms. Follow the
procedure in this Chapter to run the test utility and access diagnostics.
This utility does not work with the Windows 95 16-bit driver.
Use the PCD_Test.exe program to test the card and driver. The program is in the
PCD_TEST directory on any of the following floppy disks:
1784-PCD Installation Windows 95/98/2000/Me 32-Bit Setup Disk
•
• 1784-PCD Installation Windows NT 4.0 Setup Disk
Copy the PCD_Test program to your hard drive for easy
access. The batch file
A:\PCD_TEST\CopyPCD_Test2HardDrive.bat
will copy the A:\PCD_Test\ directory to your hard drive as
C:\PCD_Test\.
To: See page:
Run the PCD Test Utility 9-2
Access Diagnostics 9-6
Publication 1784-IN029C-EN-P - June 2001
Page 72

9-2 Run the 1784-PCD Test Utility and Access Diagnostics
Run the PCD Test Utility
1. Navigate to the location of the PCD Test Utility, for example,
A:\PCD_TEST\pcd_test.exe.
2. Double-click on the pcd_test.exe file to start the PCD Test Utility.
The 1784-PCD Installation Test Utility automatically looks for your card and
begins the tests. As the tests are completed, a green check mark appears,
showing that the particular test was successful. If there is an error, you will
see a red X and an explanation.
Publication 1784-IN029C-EN-P - June 2001
Page 73

Run the 1784-PCD Test Utility and Access Diagnostics 9-3
TIP
If you: Follow the directions specified in a failure message
do not see all green check marks or you
do not see the message stating that the
1784-PCD completed all tests
successfully
are still getting an error • Review the Chapter for your operating system.
you may receive, or:
• In Windows NT, adjust system resources. Refer
to Change Memory and Interrupt Resources on
page 10-8.
• In Windows 95/98/Me and 2000, go to Device
Manager and adjust resources. Refer to Chapter 10
for details. If you are unable to adjust resources,
contact Rockwell Automation Technical Support.
• In Windows 2000, check with your computer
manufacturer to ensure you have a Windows 2000
BIOS installed. In most cases, you can download
the system BIOS from your computer
manufacturer’s website.
• Refer to Chapter 10 for troubleshooting
information.
• Follow the instructions again. If you are still having
problems, contact your Rockwell Automation
service representative for assistance.
• Refer to the Preface of this manual for information
on Rockwell Automation Support.
3. Once the tests are finished and successful, you see a screen asking if you
want to test the PCD cable.
If you: Then:
want to test the cable go to step a, below
do not want to test the cable click No
To see the resources assigned to the card, click Yes when
prompted whether you want to test the cable, even if you do
not intend to perform a cable test.
a. Attach the cable to the network access port as described in Chapter 8.
b. Click Yes.
Publication 1784-IN029C-EN-P - June 2001
Page 74

9-4 Run the 1784-PCD Test Utility and Access Diagnostics
c. When you click Yes, you see the PCD Configuration screen.
These fields show
the resources the
card is using.
d. Click OK to run the test.
Publication 1784-IN029C-EN-P - June 2001
Page 75

Run the 1784-PCD Test Utility and Access Diagnostics 9-5
TIP
If you are properly connected to your network, the test utility will browse your
network to find active nodes. You will see a node table with the active nodes
checked:
If you get an error message telling you the 1784-PCD card
does not appear to be connected to a network, check or
replace your network cabling.
Publication 1784-IN029C-EN-P - June 2001
Page 76

9-6 Run the 1784-PCD Test Utility and Access Diagnostics
Access Diagnostics
Whenever you configure the PCD card, you will see the 1784-PCD Driver
Configuration screen.
This screen lets you access diagnostics by clicking the Diagnostics button. To
cause the Diagnostics window to appear automatically when a system problem
occurs, check the Activate Diagnostic Window on Error checkbox.
Publication 1784-IN029C-EN-P - June 2001
Page 77

Run the 1784-PCD Test Utility and Access Diagnostics 9-7
You can also access diagnostics in RSLinx with the following procedure:
1. Click on the 1784-PCD entry to highlight it.
2. Right-click your mouse button and select Driver Diagnostics.
An RSLinx PCD Driver Diagnostics window will appear. To activate the PCD
Detailed Diagnostic window:
3. Select the Network Interface tab.
Click on the Network
Interface tab
Publication 1784-IN029C-EN-P - June 2001
Page 78

9-8 Run the 1784-PCD Test Utility and Access Diagnostics
4. Click on the Display Driver Specific Details button at the bottom of the
window.
Click on the Display
Driver Specific
Details button
Publication 1784-IN029C-EN-P - June 2001
Page 79

Run the 1784-PCD Test Utility and Access Diagnostics 9-9
5. You see a Diagnostics window similar to the one shown below.
Publication 1784-IN029C-EN-P - June 2001
Page 80

9-10 Run the 1784-PCD Test Utility and Access Diagnostics
Notes:
Publication 1784-IN029C-EN-P - June 2001
Page 81

Chapter
TIP
10
Troubleshoot the Card
Occasionally, you may need to modify your system to help the PCD card to
function properly. Use the tips and suggestions that follow to help you set up the
PCD card and driver(s) successfully.
The first step in troubleshooting is running the PCD Test Utility
and viewing diagnostics. Refer to Chapter 9 for more
information on running the utility and viewing diagnostics.
For information on: See page:
General Troubleshooting Guidelines 10-1
Troubleshooting on Windows 95/98/Me 10-2
Troubleshooting on Windows NT 10-7
Troubleshooting on Windows 2000 10-10
General Troubleshooting Guidelines
The following guidelines apply to all operating systems, unless specified otherwise.
Avoid Network Errors by Specifying a Unique Node Address and the
Correct Baud Rate
To avoid network errors, be certain to configure the PCD card with a unique node
address and the correct baud rate for the DeviceNet network to which you are
connecting.
Publication 1784-IN029C-EN-P - June 2001
Page 82

10-2 Troubleshoot the Card
IMPORTANT
Understand What Hearing Multiple Tones Means
If you insert multiple PC cards, you may hear more than one tonal notification per
card. Windows detects devices during power-up, and adjusts the device resources
accordingly. This results in multiple tones sounding. When the system changes
settings, for example, when you remove a card, the tones sound again for each
change.
Use the PCD Test Utility
You can use the PCD Test Utility to test card operation and show system diagnostics
when a problem occurs. Refer to Chapter 9 for instructions for running the PCD
Test Utility and viewing system diagnostics.
The PCD_Test.exe utility will not work with the Windows 95
16-bit driver.
Troubleshooting on Windows 95/98/Me
Understand What a Missing PC Card (PCMCIA) Icon Means
If you find that there is no PC card (PCMCIA) icon in the Control Panel, this
indicates that there is a problem with the PCMCIA socket hardware that prevents
Windows from locating the card. Contact your computer manufacturer for help in
solving this problem.
Publication 1784-IN029C-EN-P - June 2001
Page 83

Troubleshoot the Card 10-3
Enable the PC Card Icon in the Taskbar
The PC card icon in the taskbar informs you about the status of your PC card and
lets you stop any processing before you remove or change PC cards. Follow this
procedure to configure your system to display this icon within the taskbar:
1. Select Start ⇒ Settings ⇒ Control Panel.
2. Double-click on the PC card (PCMCIA) icon.
3. When the PC Card Properties dialog box appears, click on Show control
on taskbar. You see:
4. Click OK. The PC card icon appears in the taskbar.
Publication 1784-IN029C-EN-P - June 2001
Page 84

10-4 Troubleshoot the Card
If the Driver Does Not Work
Use the following procedure to resolve other driver issues.
1. Access the Device Manager by right-clicking on My Computer and selecting
Properties.
2. Select the Device Manager tab.
3. Scroll through the device list until you see the Allen-Bradley PCD family
entry.
4. Double-click on the + sign to the left of this entry to expand it.
5. Click on Allen-Bradley 1784-PCD card to select it.
6. Click the Properties button.
If code 10 (conflicting memory resources) or another conflict is reported in
the Device Status box, continue with the following steps.
Publication 1784-IN029C-EN-P - June 2001
Page 85

Troubleshoot the Card 10-5
TIP
7. In the Properties dialog box, click on the Resources tab.
8. Do the following:
• check for conflicts listed in the Conflicting Device list
• verify that you have assigned resources to the PCD card. You should
have, at minimum, an interrupt and memory range assigned.
Be aware that:
• series A 1784-PCD cards do not use an Input/Output
range
• you may have to disable a device to make an interrupt
available
Publication 1784-IN029C-EN-P - June 2001
Page 86

10-6 Troubleshoot the Card
TIP
TIP
9. If there are no conflicts, continue with step 10 below. If there are conflicts,
you may need to alter the settings of the conflicting devices to get the PCD
card to work properly. First try unchecking the Use Automatic Settings box
and then changing the memory or interrupt resources.
To find free memory and interrupt resources on Windows
95/98/Me systems, in the Device Manager window, right-click
on Computer and select Properties. You see the Computer
Properties screen, which shows you the resources in use.
To change the resources:
a. Click on the resource you want to change.
b. Click the Change Setting button.
c. Change the memory or interrupt resources to a free memory or interrupt
resource.
Depending on your Windows 98 operating system,
unchecking the Use Automatic Settings box may not be
successful. Contact Rockwell Automation Technical Support
for more information.
10. Select My Computer ⇒ Properties ⇒ Device Manager.
11. Scroll through the list until you see the PCMCIA sockets entry.
Publication 1784-IN029C-EN-P - June 2001
Page 87

Troubleshoot the Card 10-7
TIP
12. Double-click on PCMCIA sockets to expand it.
13. Click on the PCMCIA controller used by your system.
14. Click on Properties. Verify that the socket controller is enabled in the
hardware profile you are using.
If: Then:
you get this message:
This device is not present, not working properly, or does not
have all drivers installed, code 10
you do not get this message This device is working properly.
• click on the Resources tab and
check the Conflicting Device list for
possible hardware conflicts
• verify that the Use automatic
settings option is enabled
You may have a general PCMCIA problem.
Contact your computer manufacturer for
assistance.
Troubleshooting on Windows NT
Understand What a Missing PC Card (PCMCIA) Icon Means
If you find that there is no PC card (PCMCIA) icon in the Control Panel, this
indicates that there is a problem with the PCMCIA socket hardware that prevents
Windows from locating the card. Contact your computer manufacturer for help in
solving this problem.
When using Unicore/Touchstone Software’s Cardware or
Phoenix/Softex’s Card Executive third-party plug-and-play
software on Windows NT, use the plug-and-play software’s PC
card configuration tool on the Windows Control Panel for
information about the PC (PCMCIA) cards. Do not rely on the
PC card (PCMCIA) icon on the Windows control panel.
Publication 1784-IN029C-EN-P - June 2001
Page 88

10-8 Troubleshoot the Card
IMPORTANT
IMPORTANT
Change Memory and Interrupt Resources
If you experience difficulty in configuring the PCD card, you should change the
memory and interrupt resources.
If You Are using: Change Resources by:
pure NT (no third-party plug-and-play
software)
SystemSoft’s CardWizard third-party
plug-and-play software
Unicore/Touchstone Software’s CardWare
third-party plug-and-play software
Phoenix/Softex’s Card Executive
third-party plug-and-play software
To find the available resources in your system,
Select Start ⇒ Programs ⇒ Administrative Tools ⇒ Windows NT Diagnostics. If
no interrupts are available, you may need to disable another device.
Windows NT diagnostics may not show all interrupts that are
in use. If you continue to have problems, try another IRQ.
Recommended IRQ values are 7, 9, 10, 11, 12, and 15.
using the PCD card configuration tool on the
Windows Control Panel
using the PCD card configuration tool on the
Windows Control Panel
contacting Rockwell Automation Technical
Support for assistance
contacting Rockwell Automation Technical
Support for assistance
Publication 1784-IN029C-EN-P - June 2001
After you change these resources, you must reboot your PC for
the changes to take effect.
Page 89

Troubleshoot the Card 10-9
IMPORTANT
IMPORTANT
If you are using pure NT (no third-party plug-and-play software) or SystemSoft’s
CardWizard, follow this procedure to assign available resources with the PCD card
configuration tool.
1. Select Start ⇒ Settings ⇒ Control
Panel. Double-click the
Allen-Bradley 1784-PCD icon.
You see the Allen-Bradley
1784-PCD Configurator screen.
You can use this screen to assign
available resources.
2. To find available resources in your
system, do the following:
a. Select Start ⇒ Programs ⇒
Administrative Tools
⇒ Windows NT Diagnostics.
b. Click on the Resources tab.
c. Look for an interrupt number that is not listed.
d. Enter it in the 1784-PCD Configurator screen.
e. In the Windows NT Diagnostics tool, click on the Memory tab to see
which addresses the system is using (not available).
3. Click OK twice.
4. Reboot the computer.
Be aware that Windows NT protects its memory as well as its
interrupts and may not list all the resources it is using. We
suggest that you select a memory address in the range from
000D0000 to 000DFFFF.
f. Enter the memory address in the 1784-PCD Configurator screen.
You must restart Windows NT in order for your PCD card to
work with your software application.
Publication 1784-IN029C-EN-P - June 2001
Page 90

10-10 Troubleshoot the Card
TIP
TIP
Since Windows NT may be using a resource and may not
report it in Windows NT diagnostics, always run the PCD Test
Utility after configuring resources.
If the driver will not start or cannot find a card, try
reconfiguring the resources.
• If the IRQ test fails, try another IRQ.
• If the memory test fails, try another memory range.
You can also access diagnostics in RSLinx. Refer to Chapter 9 for information on
accessing diagnostics.
Troubleshooting on Windows 2000
Check for Incompatible BIOS
In Windows 2000, check with your computer manufacturer to ensure you have a
Windows 2000-compatible BIOS installed. In most cases, you can download the
system BIOS from your computer manufacturer’s website.
If the Driver Does Not Work in Windows 2000
To access Hardware Properties and verify that the 1784-PCD card is OK, follow the
steps below.
1. Double click on the Unplug/eject hardware icon in
the taskbar.
If you don’t have the icon on your task bar, refer to Show
the Card Unplug/Eject Icon on the Taskbar on page 6-11.
Publication 1784-IN029C-EN-P - June 2001
Page 91

2. Select the card.
3. Click Properties.
Troubleshoot the Card 10-11
Publication 1784-IN029C-EN-P - June 2001
Page 92

10-12 Troubleshoot the Card
4. Click the General tab.
If: Then:
the device status displays this message:
This device is not present, not working properly, or
does not have all drivers installed.
• click on the Resources tab and check the
Conflicting Device list for possible hardware
conflicts
• try disabling the Automatic Settings option.
Go to Step 5, below.
Publication 1784-IN029C-EN-P - June 2001
Page 93

5. Click on the Resources tab.
TIP
The majority of the time, we recommend that you use the
automatic settings. The card will assign an interrupt (memory
location) for you. An interrupt must be assigned to the
1784-PCD card. Verify that there is an interrupt assigned and
no resource conflicts display in the Conflicting Device list.
Troubleshoot the Card 10-13
Publication 1784-IN029C-EN-P - June 2001
Page 94

10-14 Troubleshoot the Card
TIP
6. In the unlikely event that you have a resource conflict, you may need to
assign a specific interrupt to free the resource for another device.
On Windows 2000 systems, you can find free memory and
interrupt resources with this procedure:
1. Right-click on My Computer and select Manage.
2. Click the + sign to the left of System Tools to expand it.
3. Click the + sign to the left of System Information to
expand it.
4. Click the + sign to the left of Hardware Resources to
expand it.
5. Click on the IRQs folder in the left window. You see the
interrupts in use.
6. Click on the Memory folder in the left window. You see
the memory resources in use.
Publication 1784-IN029C-EN-P - June 2001
Page 95

Troubleshoot the Card 10-15
TIP
7. To manually assign an interrupt:
a. Deselect the Use automatic settings box.
b. Click on Interrupt Request.
c. Click Change Setting... and select an interrupt location.
You may need to disable another device, such as an unused
serial or parallel port to make an interrupt available for the
PCD card.
8. In some cases, a device other than the 1784-PCD card may be determined to
use the interrupt that the PCD card wants. If this happens, let the other
device have the interrupt and assign the 1784-PCD card another interrupt
location.
Use the Hardware Properties Screen to Verify Your Card is Working
Properly
To verify that your card is working properly:
1. Right click My Computer.
2. Select Manage.
Publication 1784-IN029C-EN-P - June 2001
Page 96

10-16 Troubleshoot the Card
TIP
3. On the Computer Management screen that appears, select Device Manager.
Alternately, you can access Device Manager by selecting
My Computer ⇒ Properties ⇒ Hardware ⇒ Device Manager.
4. Click on the + next to Allen-Bradley PCMCIA Family to display the available
Allen-Bradley cards.
Publication 1784-IN029C-EN-P - June 2001
Page 97

Troubleshoot the Card 10-17
5. Double-click on 1784-PCD.
6. Check the Device Status field. You should see a message indicating the
device is working properly.
You see this screen.
Publication 1784-IN029C-EN-P - June 2001
Page 98

10-18 Troubleshoot the Card
Notes:
Publication 1784-IN029C-EN-P - June 2001
Page 99

Appendix
A
Specifications
1784-PCD Communication Card (Series C)
PCMCIA Type Type II form-factor network adapter card
PCMCIA Standard Compliant to PCMCIA Standard, release 2.1
Card and Socket Services Standard Compliant to PCMCIA Card and Socket Services Standard, revision 2.1
Power Requirements PC
Environmental
Conditions
Slot Temperature 0-50° C (32-122° F) -40-85° C (-40-185° F)
Humidity 5-95% without condensation 5-95% without condensation
Vibration 0-70 Hz constant.012”
Shock 30 G peak/11 ms 50 G peak/11 ms
Agency Certification
(when product or packaging is
marked)
1784-PCD1 Cable
Total length of cable 34.9 cm (13.75 in.)
Pin Assignments See Figure A.1 on page A-2.
1
From host computer, which must be UL Listed Information Technology Equipment or UL Listed Industrial
Control Equipment.
2
Power supplied to the DeviceNet terminals of this equipment must be Class 2 as defined in NFPA-70 National
Electrical Code.
3
The operating parameters describe the environment within the PCMCIA slot. Refer to the documentation for
your computer for environmental requirements. The 1784-PCD card should not exceed those specifications.
or greater
5V @ 210 mA maximum
Operating
displacement
70-500 Hz, constant 2 G
acceleration
3
UL Recognized Component - Industrial
Control Equipment
marked for all applicable directives
1
DeviceNet Network RATED:
2
24V dc
25 V dc maximum
10 mA minimum
Non-operating
N/A
Publication 1784-IN029C-EN-P - June 2001
Page 100

A-2 Specifications
Figure A.1 1747-PCD1 Cable pin assignment
PC card plug DeviceNet header
3
5
9
13
SHLD
SHLD
10
14
4
6
Figure A.2 1787-OPCAB cable pin assignment
1
2
3
4
5
PC card plug
3
9
SHLD
10
CLR
DeviceNet header
1
2
3
4
5
Publication 1784-IN029C-EN-P - June 2001
 Loading...