

Page 1

MicroLogix 1200
Programmable
Controllers
Bulletin 1762 Controllers and
Expansion I/O
User Manual
Page 2
Important User Information
WARNING
IMPORTANT
ATTENTION
SHOCK HAZARD
BURN HAZARD
Solid state equipment has operational characteristics differing from those of
electromechanical equipment. Safety Guidelines for the Application, Installation and
Maintenance of Solid State Controls publication SGI-1.1 available from your local
Rockwell Automation sales office or online at
http://www.literature.rockwellautomation.com describes some important differences
between solid state equipment and hard-wired electromechanical devices. Because of
this difference, and also because of the wide variety of uses for solid state equipment,
all persons responsible for applying this equipment must satisfy themselves that each
intended application of this equipment is acceptable.
In no event will Rockwell Automation, Inc. be responsible or liable for indirect or
consequential damages resulting from the use or application of this equipment.
The examples and diagrams in this manual are included solely for illustrative purposes.
Because of the many variables and requirements associated with any particular
installation, Rockwell Automation, Inc. cannot assume responsibility or liability for
actual use based on the examples and diagrams.
No patent liability is assumed by Rockwell Automation, Inc. with respect to use of
information, circuits, equipment, or software described in this manual.
Reproduction of the contents of this manual, in whole or in part, without written
permission of Rockwell Automation, Inc. is prohibited.
Throughout this manual we use notes to make you aware of safety considerations.
Identifies information about practices or circumstances
that can cause an explosion in a hazardous environment,
which may lead to personal injury or death, property
damage, or economic loss.
Identifies information that is critical for successful
application and understanding of the product.
Identifies information about practices or circumstances
that can lead to personal injury or death, property
damage, or economic loss. Attentions help you:
• identify a hazard
• avoid a hazard
• recognize the consequence
Labels may be located on or inside the drive to alert
people that dangerous voltage may be present.
Labels may be located on or inside the drive to alert
people that surfaces may be dangerous temperatures.
Publication 1762-UM001G-EN-P - March 2011
Page 3

Summary of Changes
To help you find new and updated information in this release of the manual,
we have included change bars as shown to the right of this paragraph.
Firmware Revision History
Features are added to the controllers through firmware upgrades. See the latest
release notes, 1762-RN001
level you need. Firmware upgrades are not required, except to allow you access
to the new features.
, to be sure that your controller’s firmware is at the
1 Publication 1762-UM001G-EN-P - March 2011
Page 4

Summary of Changes 2
Notes:
Publication 1762-UM001G-EN-P - March 2011
Page 5

Summary of Changes
Table of Contents
Preface
Hardware Overview
Install Your Controller
Table of Contents
Important User Information . . . . . . . . . . . . . . . . . . . . . . . . . . . . . . . . 1-2
Firmware Revision History . . . . . . . . . . . . . . . . Summary of Changes-1
Who Should Use This Manual. . . . . . . . . . . . . . . . . . . . . . . . . . . . . . . P-1
Purpose of This Manual. . . . . . . . . . . . . . . . . . . . . . . . . . . . . . . . . . . . P-1
Related Documentation. . . . . . . . . . . . . . . . . . . . . . . . . . . . . . . . . P-2
Common Techniques Used in This Manual . . . . . . . . . . . . . . . . . . . . P-2
Chapter 1
Hardware Features . . . . . . . . . . . . . . . . . . . . . . . . . . . . . . . . . . . . . . . . 1-1
Component Descriptions. . . . . . . . . . . . . . . . . . . . . . . . . . . . . . . . . . . 1-2
MicroLogix 1200 Memory Module and/or Real-time Clock. . . . 1-2
1762 Expansion I/O . . . . . . . . . . . . . . . . . . . . . . . . . . . . . . . . . . . 1-3
Communication Cables . . . . . . . . . . . . . . . . . . . . . . . . . . . . . . . . . . . . 1-4
Program the Controller . . . . . . . . . . . . . . . . . . . . . . . . . . . . . . . . . . . . 1-4
Communication Options . . . . . . . . . . . . . . . . . . . . . . . . . . . . . . . . . . . 1-4
Chapter 2
Required Tools . . . . . . . . . . . . . . . . . . . . . . . . . . . . . . . . . . . . . . . . . . . 2-1
Agency Certifications . . . . . . . . . . . . . . . . . . . . . . . . . . . . . . . . . . . . . . 2-1
Compliance to European Union Directives . . . . . . . . . . . . . . . . . . . . 2-2
EMC Directive. . . . . . . . . . . . . . . . . . . . . . . . . . . . . . . . . . . . . . . . 2-2
Low Voltage Directive. . . . . . . . . . . . . . . . . . . . . . . . . . . . . . . . . . 2-2
Installation Considerations . . . . . . . . . . . . . . . . . . . . . . . . . . . . . . . . . 2-2
Safety Considerations. . . . . . . . . . . . . . . . . . . . . . . . . . . . . . . . . . . . . . 2-3
Hazardous Location Considerations. . . . . . . . . . . . . . . . . . . . . . . 2-3
Disconnect Main Power . . . . . . . . . . . . . . . . . . . . . . . . . . . . . . . . 2-4
Safety Circuits. . . . . . . . . . . . . . . . . . . . . . . . . . . . . . . . . . . . . . . . . 2-4
Power Distribution . . . . . . . . . . . . . . . . . . . . . . . . . . . . . . . . . . . . 2-5
Periodic Tests of Master Control Relay Circuit . . . . . . . . . . . . . . 2-5
Power Considerations . . . . . . . . . . . . . . . . . . . . . . . . . . . . . . . . . . . . . 2-5
Isolation Transformers . . . . . . . . . . . . . . . . . . . . . . . . . . . . . . . . . 2-5
Power Supply Inrush . . . . . . . . . . . . . . . . . . . . . . . . . . . . . . . . . . . 2-6
Loss of Power Source . . . . . . . . . . . . . . . . . . . . . . . . . . . . . . . . . . 2-6
Input States on Power Down . . . . . . . . . . . . . . . . . . . . . . . . . . . . 2-6
Other Types of Line Conditions. . . . . . . . . . . . . . . . . . . . . . . . . . 2-7
Prevent Excessive Heat . . . . . . . . . . . . . . . . . . . . . . . . . . . . . . . . . . . . 2-7
Master Control Relay . . . . . . . . . . . . . . . . . . . . . . . . . . . . . . . . . . . . . . 2-8
Use Emergency-Stop Switches . . . . . . . . . . . . . . . . . . . . . . . . . . . 2-9
Schematic (Using IEC Symbols) . . . . . . . . . . . . . . . . . . . . . . . . . 2-10
Schematic (Using ANSI/CSA Symbols). . . . . . . . . . . . . . . . . . . 2-11
Install a Memory Module or Real-time Clock. . . . . . . . . . . . . . . . . . 2-12
Controller Mounting Dimensions . . . . . . . . . . . . . . . . . . . . . . . . . . . 2-13
Controller and
Expansion I/O Spacing . . . . . . . . . . . . . . . . . . . . . . . . . . . . . . . . . . . 2-13
Mount the Controller . . . . . . . . . . . . . . . . . . . . . . . . . . . . . . . . . . . . . 2-14
i Publication 1762-UM001G-EN-P - March 2011
Page 6

Table of Contents ii
Wire Your Controller
DIN Rail Mounting . . . . . . . . . . . . . . . . . . . . . . . . . . . . . . . . . . . 2-15
Panel Mounting . . . . . . . . . . . . . . . . . . . . . . . . . . . . . . . . . . . . . . 2-16
1762 Expansion I/O Dimensions. . . . . . . . . . . . . . . . . . . . . . . . . . . 2-17
Mount 1762
Expansion I/O. . . . . . . . . . . . . . . . . . . . . . . . . . . . . . . . . . . . . . . . . . 2-17
DIN Rail Mounting . . . . . . . . . . . . . . . . . . . . . . . . . . . . . . . . . . . 2-17
Mount on Panel . . . . . . . . . . . . . . . . . . . . . . . . . . . . . . . . . . . . . . 2-18
Connect Expansion I/O . . . . . . . . . . . . . . . . . . . . . . . . . . . . . . . . . . 2-19
Chapter 3
Wire Requirements. . . . . . . . . . . . . . . . . . . . . . . . . . . . . . . . . . . . . . . . 3-1
Wire without Spade Lugs. . . . . . . . . . . . . . . . . . . . . . . . . . . . . . . . 3-2
Wire with Spade Lugs . . . . . . . . . . . . . . . . . . . . . . . . . . . . . . . . . . 3-3
Use Surge Suppressors. . . . . . . . . . . . . . . . . . . . . . . . . . . . . . . . . . . . . 3-3
Recommended Surge Suppressors . . . . . . . . . . . . . . . . . . . . . . . . 3-5
Ground the Controller . . . . . . . . . . . . . . . . . . . . . . . . . . . . . . . . . . . . . 3-6
Wiring Diagrams . . . . . . . . . . . . . . . . . . . . . . . . . . . . . . . . . . . . . . . . . 3-7
Terminal Block Layouts. . . . . . . . . . . . . . . . . . . . . . . . . . . . . . . . . 3-7
Terminal Groupings . . . . . . . . . . . . . . . . . . . . . . . . . . . . . . . . . . . 3-9
Sinking and Sourcing Wiring Diagrams . . . . . . . . . . . . . . . . . . . . . . 3-12
1762-L24AWA, 1762-L24BWA, 1762-L24BXB, 1762-L24AWAR,
1762-L24BWAR and 1762-L24BXBR Wiring Diagrams . . . . . 3-12
1762-L40AWA, 1762-L40BWA, 1762-L40BXB, 1762-L40AWAR,
1762-L40BWAR and 1762-L40BXBR Wiring Diagrams . . . . . 3-15
Controller I/O Wiring . . . . . . . . . . . . . . . . . . . . . . . . . . . . . . . . . . . . 3-17
Minimize Electrical Noise . . . . . . . . . . . . . . . . . . . . . . . . . . . . . . 3-17
Expansion I/O Wiring. . . . . . . . . . . . . . . . . . . . . . . . . . . . . . . . . . . . 3-18
Discrete Wiring Diagrams . . . . . . . . . . . . . . . . . . . . . . . . . . . . . . 3-18
Analog Wiring . . . . . . . . . . . . . . . . . . . . . . . . . . . . . . . . . . . . . . . 3-25
Communication Connections
Publication 1762-UM001G-EN-P - March 2011
Chapter 4
Introduction . . . . . . . . . . . . . . . . . . . . . . . . . . . . . . . . . . . . . . . . . . . . . 4-1
Supported Communication Protocols. . . . . . . . . . . . . . . . . . . . . . . . . 4-1
Default Communication Configuration . . . . . . . . . . . . . . . . . . . . . . . 4-2
Use the Communications Toggle Push Button . . . . . . . . . . . . . . . . . 4-3
Connect to the RS-232 Port . . . . . . . . . . . . . . . . . . . . . . . . . . . . . . . . 4-4
Make a DF1 Point-to-Point Connection . . . . . . . . . . . . . . . . . . . 4-5
Use a Modem . . . . . . . . . . . . . . . . . . . . . . . . . . . . . . . . . . . . . . . . . 4-5
Isolated Modem Connection. . . . . . . . . . . . . . . . . . . . . . . . . . . . . 4-6
Connect to a DF1 Half-duplex Network . . . . . . . . . . . . . . . . . . . 4-8
Connect to a DH-485 Network. . . . . . . . . . . . . . . . . . . . . . . . . . . . . . 4-9
Recommended Tools. . . . . . . . . . . . . . . . . . . . . . . . . . . . . . . . . . . 4-9
DH-485 Communication Cable . . . . . . . . . . . . . . . . . . . . . . . . . 4-10
Connect the Communication Cable to the DH-485 Connector 4-10
Ground and Terminate the DH-485 Network. . . . . . . . . . . . . . 4-12
Page 7

Use Trim Pots
Use Real-time Clock and Memory
Modules
Table of Contents iii
Connect the AIC+ . . . . . . . . . . . . . . . . . . . . . . . . . . . . . . . . . . . . . . . 4-12
Cable Selection Guide . . . . . . . . . . . . . . . . . . . . . . . . . . . . . . . . . 4-13
Recommended User-supplied Components. . . . . . . . . . . . . . . . 4-15
Safety Considerations . . . . . . . . . . . . . . . . . . . . . . . . . . . . . . . . . 4-17
Install and Attach the AIC+ . . . . . . . . . . . . . . . . . . . . . . . . . . . . 4-17
Apply Power to the AIC+. . . . . . . . . . . . . . . . . . . . . . . . . . . . . . 4-17
DeviceNet Communications . . . . . . . . . . . . . . . . . . . . . . . . . . . . . . . 4-19
Cable Selection Guide . . . . . . . . . . . . . . . . . . . . . . . . . . . . . . . . . 4-19
Chapter 5
Trim Pot Operation . . . . . . . . . . . . . . . . . . . . . . . . . . . . . . . . . . . . . . . 5-1
Trim Pot Information Function File . . . . . . . . . . . . . . . . . . . . . . 5-2
Error Conditions . . . . . . . . . . . . . . . . . . . . . . . . . . . . . . . . . . . . . . 5-2
Chapter 6
Real-time Clock Operation . . . . . . . . . . . . . . . . . . . . . . . . . . . . . . . . . 6-1
Removal/Insertion Under Power . . . . . . . . . . . . . . . . . . . . . . . . . 6-1
Write Data to the Real-time Clock . . . . . . . . . . . . . . . . . . . . . . . . 6-2
RTC Battery Operation . . . . . . . . . . . . . . . . . . . . . . . . . . . . . . . . . 6-2
Memory Module Operation. . . . . . . . . . . . . . . . . . . . . . . . . . . . . . . . . 6-3
User Program and Data Back-up . . . . . . . . . . . . . . . . . . . . . . . . . 6-3
Program Compare . . . . . . . . . . . . . . . . . . . . . . . . . . . . . . . . . . . . . 6-4
Data File Download Protection . . . . . . . . . . . . . . . . . . . . . . . . . . 6-4
Memory Module Write Protection . . . . . . . . . . . . . . . . . . . . . . . . 6-4
Removal/Insertion Under Power . . . . . . . . . . . . . . . . . . . . . . . . . 6-4
Specifications
1762 Replacement Parts
Troubleshoot Your System
Appendix A
Controller Specifications . . . . . . . . . . . . . . . . . . . . . . . . . . . . . . . . . . A-1
Expansion I/O Specifications . . . . . . . . . . . . . . . . . . . . . . . . . . . . . . A-8
Discrete I/O Modules . . . . . . . . . . . . . . . . . . . . . . . . . . . . . . . . . A-8
Analog Modules . . . . . . . . . . . . . . . . . . . . . . . . . . . . . . . . . . . . . A-15
Combination Module DC-Input/Relay Output. . . . . . . . . . . . A-23
Appendix B
MicroLogix 1200 RTB Replacement Kit . . . . . . . . . . . . . . . . . . . . . . B-1
Appendix C
Interpret LED Indicators. . . . . . . . . . . . . . . . . . . . . . . . . . . . . . . . . . . C-1
Normal Operation . . . . . . . . . . . . . . . . . . . . . . . . . . . . . . . . . . . . . C-2
Error Conditions . . . . . . . . . . . . . . . . . . . . . . . . . . . . . . . . . . . . . . C-2
Controller Error Recovery Model . . . . . . . . . . . . . . . . . . . . . . . . . . . . C-3
Analog Expansion I/O Diagnostics and Troubleshooting . . . . . . . . C-4
Module Operation and Channel Operation . . . . . . . . . . . . . . . . . C-4
Power-up Diagnostics . . . . . . . . . . . . . . . . . . . . . . . . . . . . . . . . . . C-4
Publication 1762-UM001G-EN-P - March 2011
Page 8

Table of Contents iv
Use Control Flash to Upgrade Your
Operating System
Connect to Networks via RS-232
Interface
Critical and Noncritical Errors . . . . . . . . . . . . . . . . . . . . . . . . . . . C-5
Module Error Definition Table. . . . . . . . . . . . . . . . . . . . . . . . . . . C-5
Error Codes . . . . . . . . . . . . . . . . . . . . . . . . . . . . . . . . . . . . . . . . . . C-7
Call Rockwell Automation for Assistance. . . . . . . . . . . . . . . . . . . . . . C-8
Appendix D
Prepare for Upgrade. . . . . . . . . . . . . . . . . . . . . . . . . . . . . . . . . . . . . . D-1
Install ControlFlash Software . . . . . . . . . . . . . . . . . . . . . . . . . . . D-1
Prepare the Controller for Updating. . . . . . . . . . . . . . . . . . . . . . D-2
Sequence of Operation . . . . . . . . . . . . . . . . . . . . . . . . . . . . . . . . . . . D-2
Missing/Corrupt OS LED Pattern . . . . . . . . . . . . . . . . . . . . . . . . . . D-2
Appendix E
RS-232 Communication Interface. . . . . . . . . . . . . . . . . . . . . . . . . . . . E-1
DF1 Full-duplex Protocol . . . . . . . . . . . . . . . . . . . . . . . . . . . . . . . . . . E-1
DF1 Half-duplex Protocol. . . . . . . . . . . . . . . . . . . . . . . . . . . . . . . . . . E-2
Use Modems with MicroLogix 1200 Programmable Controllers E-3
DH-485 Communication Protocol . . . . . . . . . . . . . . . . . . . . . . . . . . . E-5
Devices that use the DH-485 Network . . . . . . . . . . . . . . . . . . . . E-5
Important DH-485 Network Planning Considerations . . . . . . . . E-6
Example DH-485 Connections. . . . . . . . . . . . . . . . . . . . . . . . . . . E-9
Modbus Communication Protocol . . . . . . . . . . . . . . . . . . . . . . . . . . E-12
ASCII . . . . . . . . . . . . . . . . . . . . . . . . . . . . . . . . . . . . . . . . . . . . . . . . . E-12
System Loading and Heat
Dissipation
Glossary
Index
Appendix F
System Loading Limitations. . . . . . . . . . . . . . . . . . . . . . . . . . . . . . . . . F-1
System Current Loading Example Calculations (24-point Controller)
F-1
Validate the System . . . . . . . . . . . . . . . . . . . . . . . . . . . . . . . . . . . . F-2
System Loading Worksheet . . . . . . . . . . . . . . . . . . . . . . . . . . . . . . . . . F-4
Current Loading . . . . . . . . . . . . . . . . . . . . . . . . . . . . . . . . . . . . F-4
System Current Loading Example Calculations (40-point Controller)
F-6
System Loading Worksheet . . . . . . . . . . . . . . . . . . . . . . . . . . . . . . . . . F-8
Current Loading. . . . . . . . . . . . . . . . . . . . . . . . . . . . . . . . . . . . . . . F-8
Calculating Heat Dissipation . . . . . . . . . . . . . . . . . . . . . . . . . . . . . . . F-10
Publication 1762-UM001G-EN-P - March 2011
Page 9

Preface
Read this preface to familiarize yourself with the rest of the manual. It provides
information concerning:
• who should use this manual
• the purpose of this manual
• related documentation
• conventions used in this manual
Who Should Use This Manual
Purpose of This Manual
Use this manual if you are responsible for designing, installing, programming,
or troubleshooting control systems that use MicroLogix 1200 controllers.
You should have a basic understanding of electrical circuitry and familiarity
with relay logic. If you do not, obtain the proper training before using this
product.
This manual is a reference guide for MicroLogix 1200 controllers and
expansion I/O. It describes the procedures you use to install, wire, and
troubleshoot your controller. This manual:
• explains how to install and wire your controllers
• gives you an overview of the MicroLogix 1200 controller system
Refer to publication 1762-RM001, MicroLogix 1200 and 1500 Programmable
Controllers Instruction Set Reference Manual, for the MicroLogix 1200 and
1500 instruction set and for application examples to show the instruction set
in use. Refer to your RSLogix 500 programming software user documentation
for more information on programming your MicroLogix 1200 controller.
1 Publication 1762-UM001G-EN-P - March 2011
Page 10
P-2 Preface
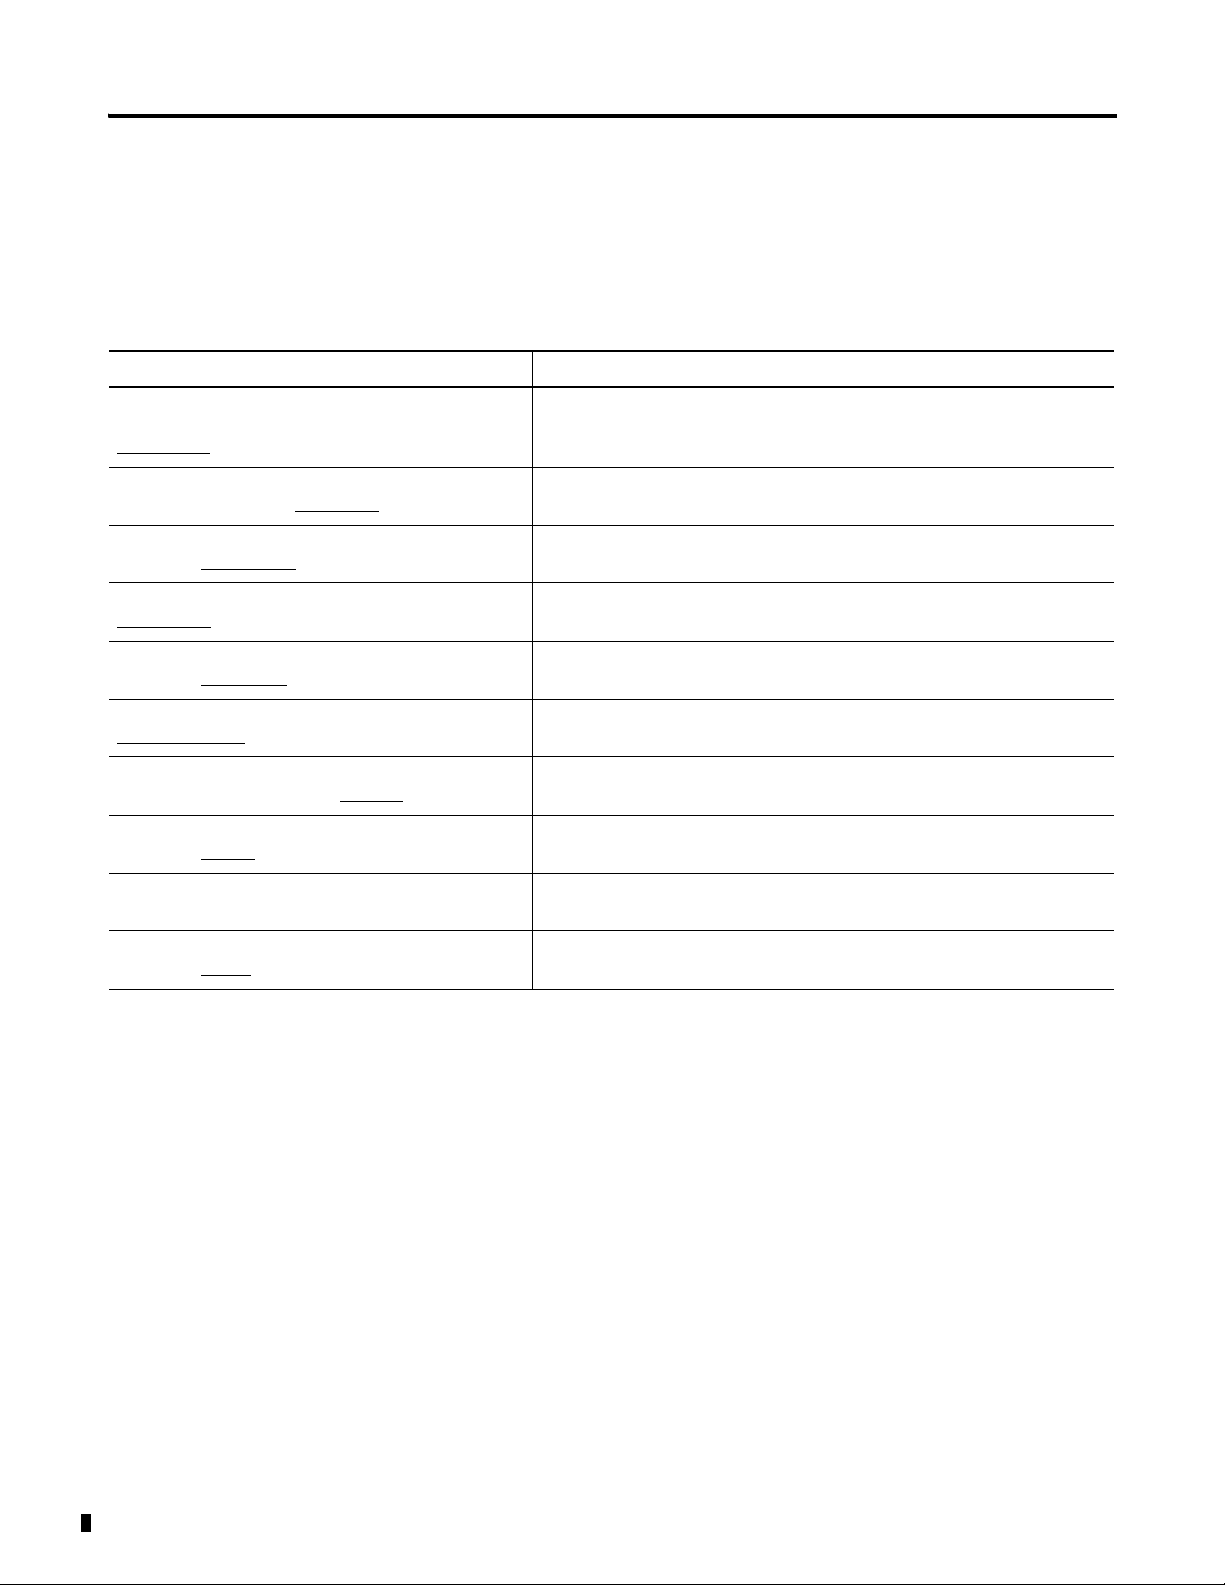
Related Documentation
The following documents contain additional information concerning Rockwell
Automation products. To obtain a copy, contact your local
Rockwell Automation office or distributor.
Resource Description
MicroLogix 1200 and 1500 Programmable Controllers
Instruction Set Reference Manual, publication
1762-RM001
MicroLogix 1200 Programmable Controllers Installation
Instructions, publication 1762-IN006
Advanced Interface Converter (AIC+) User Manual,
publication 1761-UM004
DeviceNet Interface User Manual, publication
1761-UM005
DF1 Protocol and Command Set Reference Manual,
publication 1770-6.5.16
Modbus Protocol Specifications available from
www.modbus.org
Allen-Bradley Programmable Controller Grounding and
Wiring Guidelines, publication 1770-4.1
Application Considerations for Solid-State Controls,
publication SGI-1.1
National Electrical Code - Published by the National Fire
Protection Association of Boston, MA.
Allen-Bradley Industrial Automation Glossary,
publication AG-7.1
Information on the MicroLogix 1200 Controllers instruction set.
Information on mounting and wiring the MicroLogix 1200 Controllers, including
a mounting template for easy installation.
A description on how to install and connect an AIC+. This manual also
contains information on network wiring.
Information on how to install, configure, and commission a DNI.
Information on DF1 open protocol.
Information about the Modbus protocol.
In-depth information on grounding and wiring Allen-Bradley programmable
controllers.
A description of important differences between solid-state programmable
controller products and hard-wired electromechanical devices.
An article on wire sizes and types for grounding electrical equipment.
A glossary of industrial automation terms and abbreviations.
Common Techniques Used in This Manual
Publication 1762-UM001G-EN-P - March 2011
The following conventions are used throughout this manual:
• Bulleted lists such as this one provide information, not procedural steps.
• Numbered lists provide sequential steps or hierarchical information.
Page 11
Hardware Overview
12
1
2
3
4
5
6
7
7
9
8
10
11
COM
0
1
Side View
Top View
Chapter
1
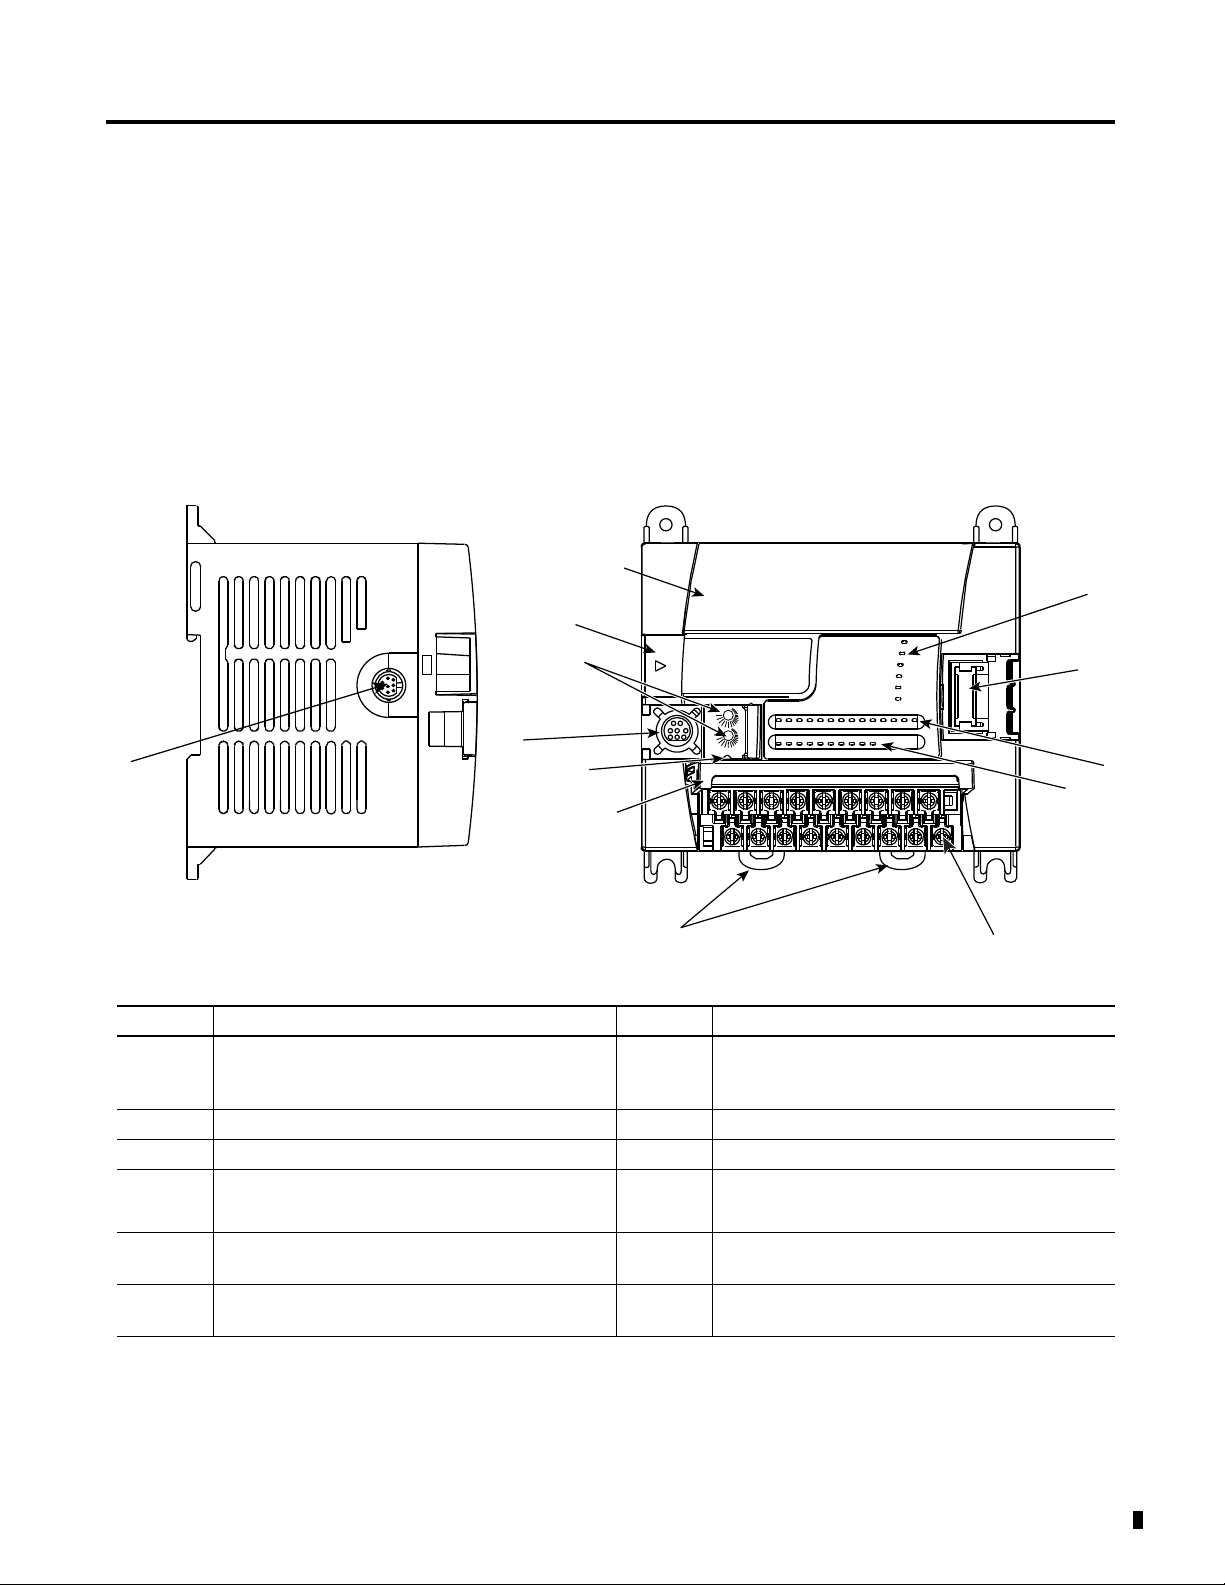
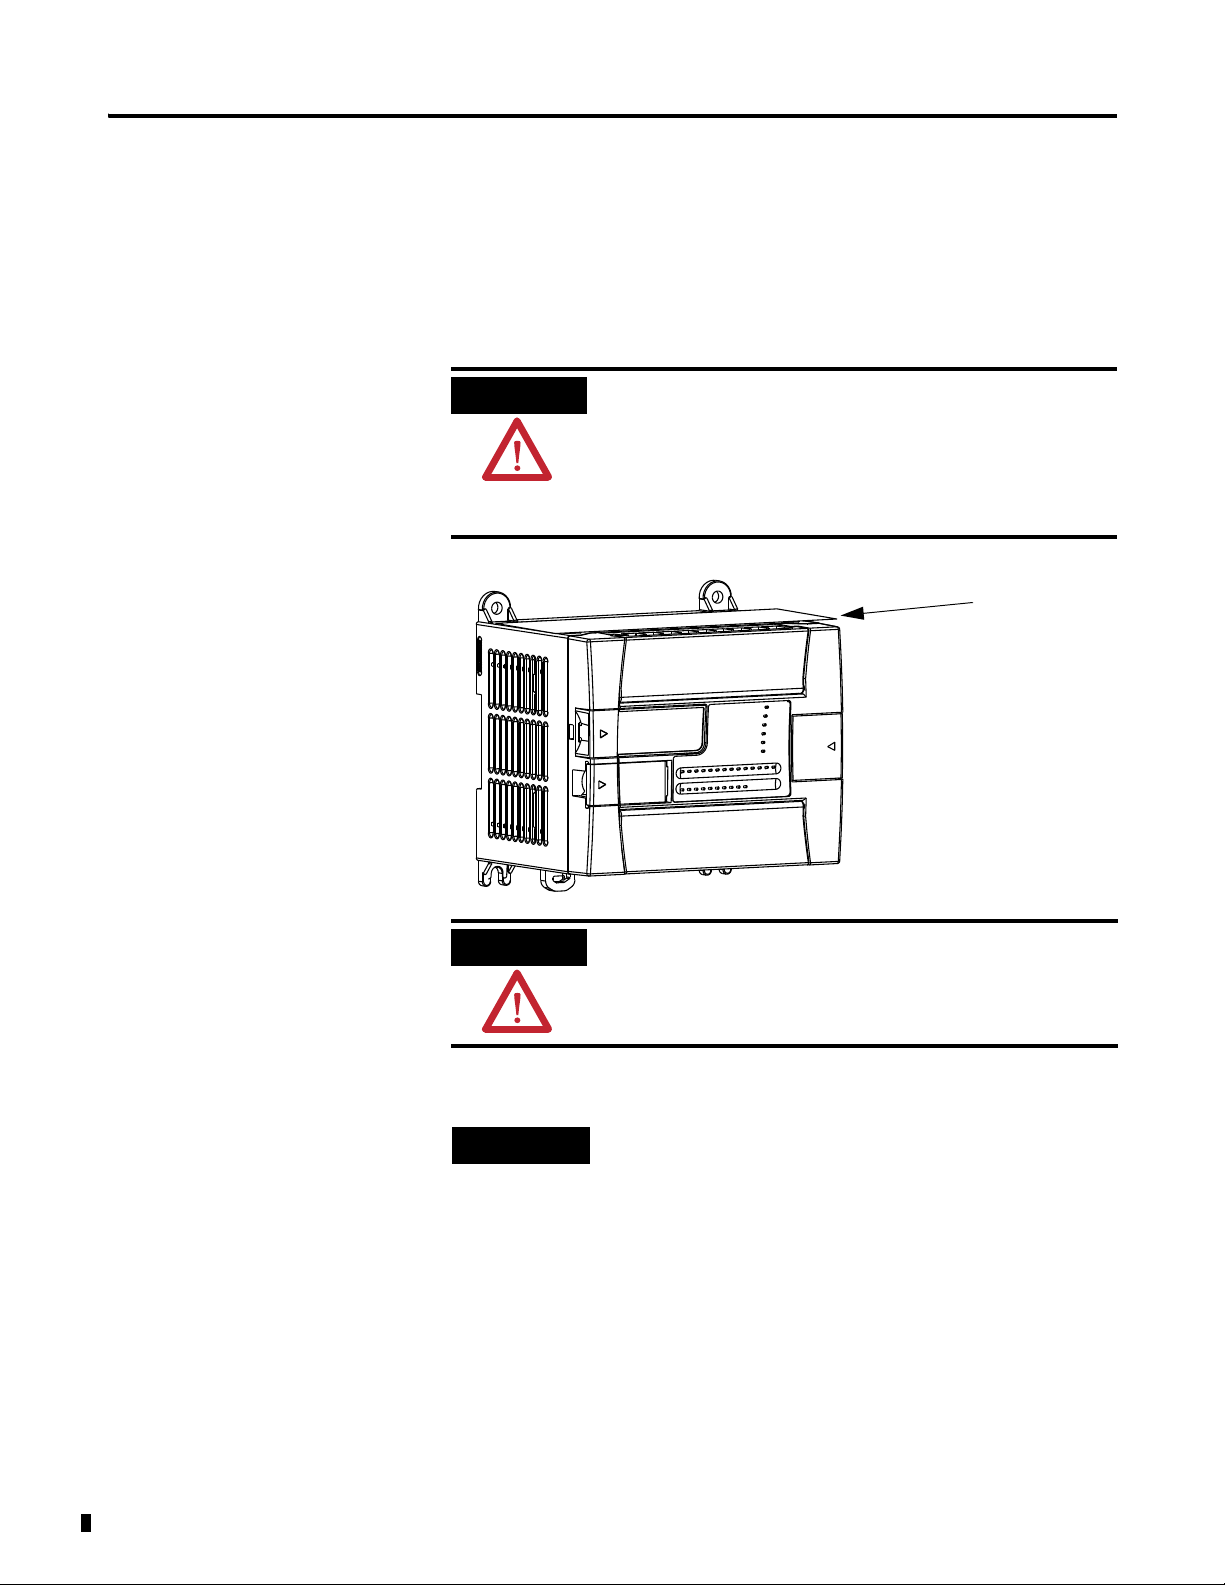
Hardware Features
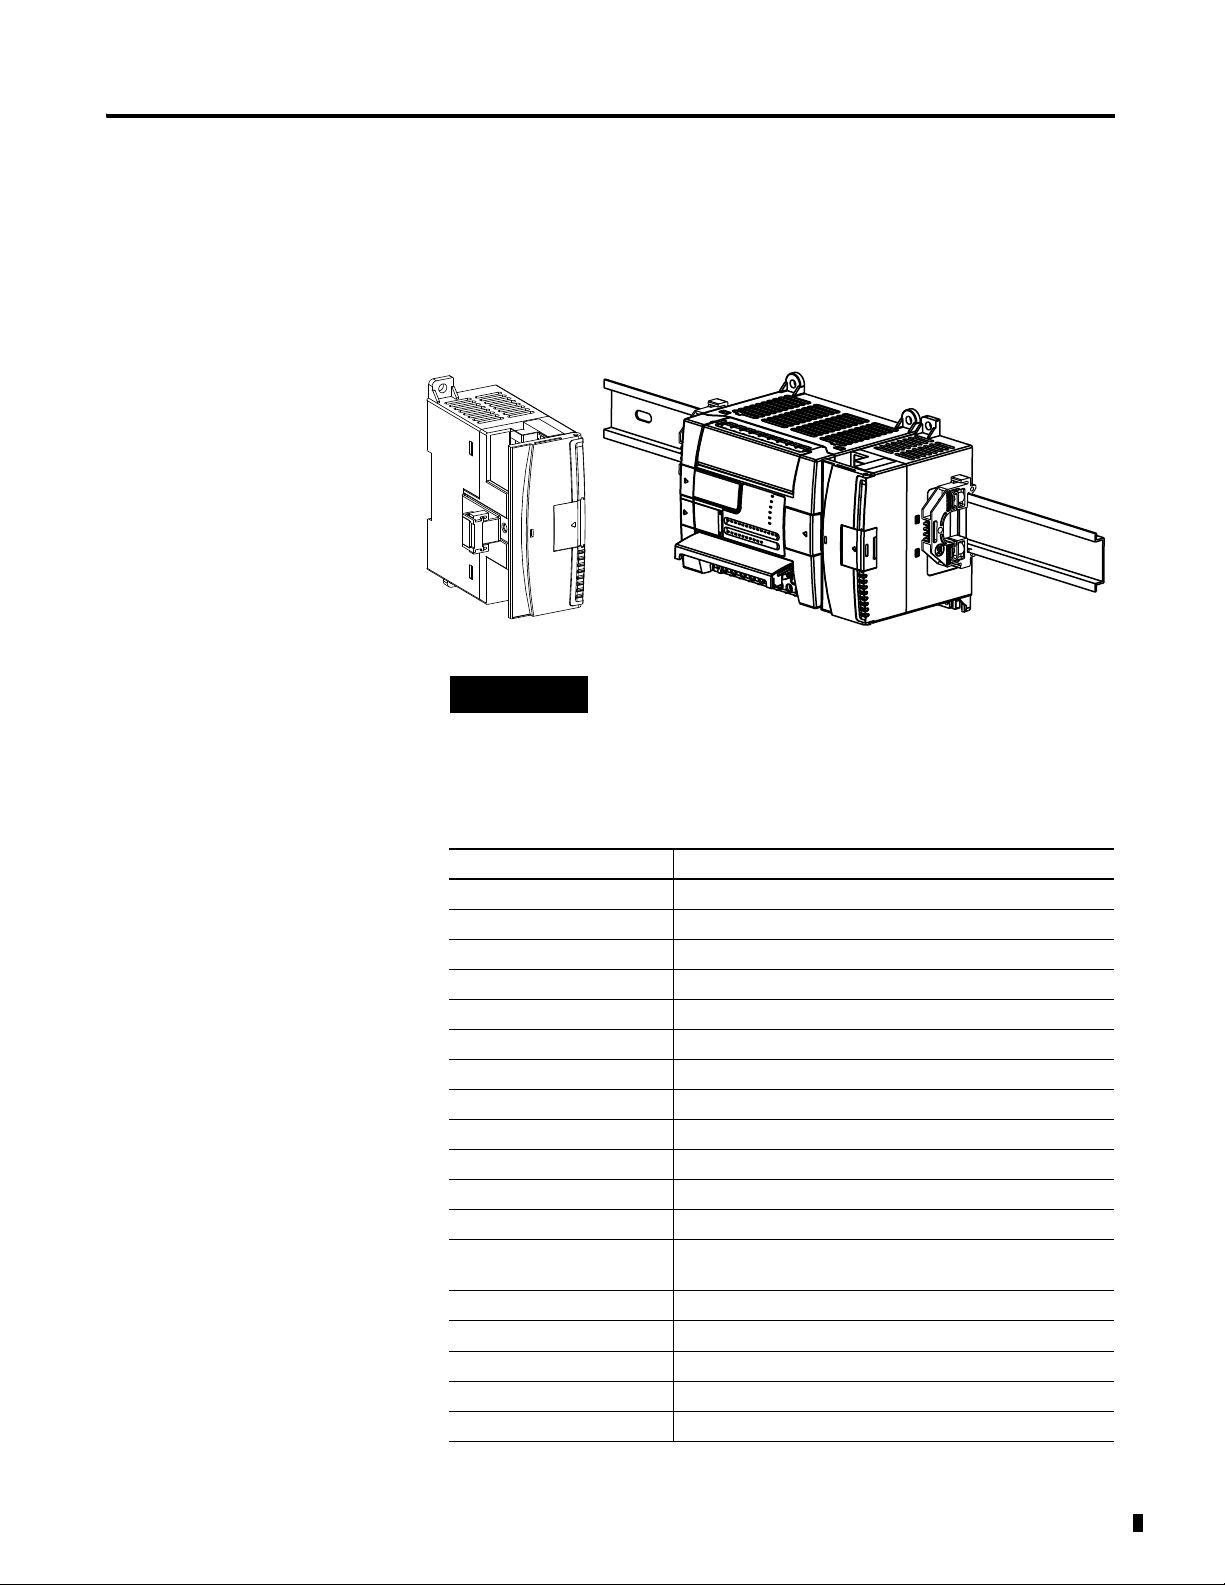
The Bulletin 1762, MicroLogix 1200 programmable controller contains a
power supply, input and output circuits, and a processor. The controller is
available in 24 I/O and 40 I/O configurations.
Figure 1.1 Hardware Features of the Controller
Table 1.1 Hardware Features
Feature Description Feature Description
1 Terminal Blocks
7 Terminal Doors and Labels
(Removable Terminal Blocks on 40-point controllers
only.)
2 Bus Connector Interface to Expansion I/O 8 Trim Pots
3 Input LEDs 9 Communications Toggle Push Button
4 Output LEDs 10
5 Communication Port/
Memory Module Port Cover
Memory Module and/or Real-Time Clock
11 DIN Rail Latches
(1)
-or-
Channel 0
6 Status LEDs 12 Programmer/HMI Port
(Equipped with 1762-LxxxxxR controllers only)
(1) Shipped with controller.
(2) Optional equipment.
1 Publication 1762-UM001G-EN-P - March 2011
(2)
Page 12
1-2 Hardware Overview
Table 1.2 Controller Input Power and Embedded I/O
Catalog Number Description
Input Power Inputs Outputs
1762-L24AWA, 1762-L24AWAR 120/240V ac (14) 120V ac (10) relay
1762-L24BWA, 1762-L24BWAR 120/240V ac (10) 24V dc
(4) fast 24V dc
1762-L24BXB, 1762-L24BXBR 24V dc (10) 24V dc
(4) fast 24V dc
1762-L40AWA, 1762-L40AWAR 120/240V ac (24) 120V ac (16) relay
1762-L40BWA, 1762-L40BWAR 120/240V ac (20) 24V dc
(4) fast 24V dc
1762-L40BXB, 1762-L40BXBR 24V dc (20) 24V dc
(4) fast 24V dc
(10) relay
(5) relay, (4) 24V dc FET
(1) high-speed 24V dc FET
(16) relay
(8) relay, (7) 24V dc FET
(1) high-speed 24V dc FET
Component Descriptions
These sections provide component descriptions for:
• MicroLogix 1200 Memory Module and/or Real-time Clock
• 1762 Expansion I/O
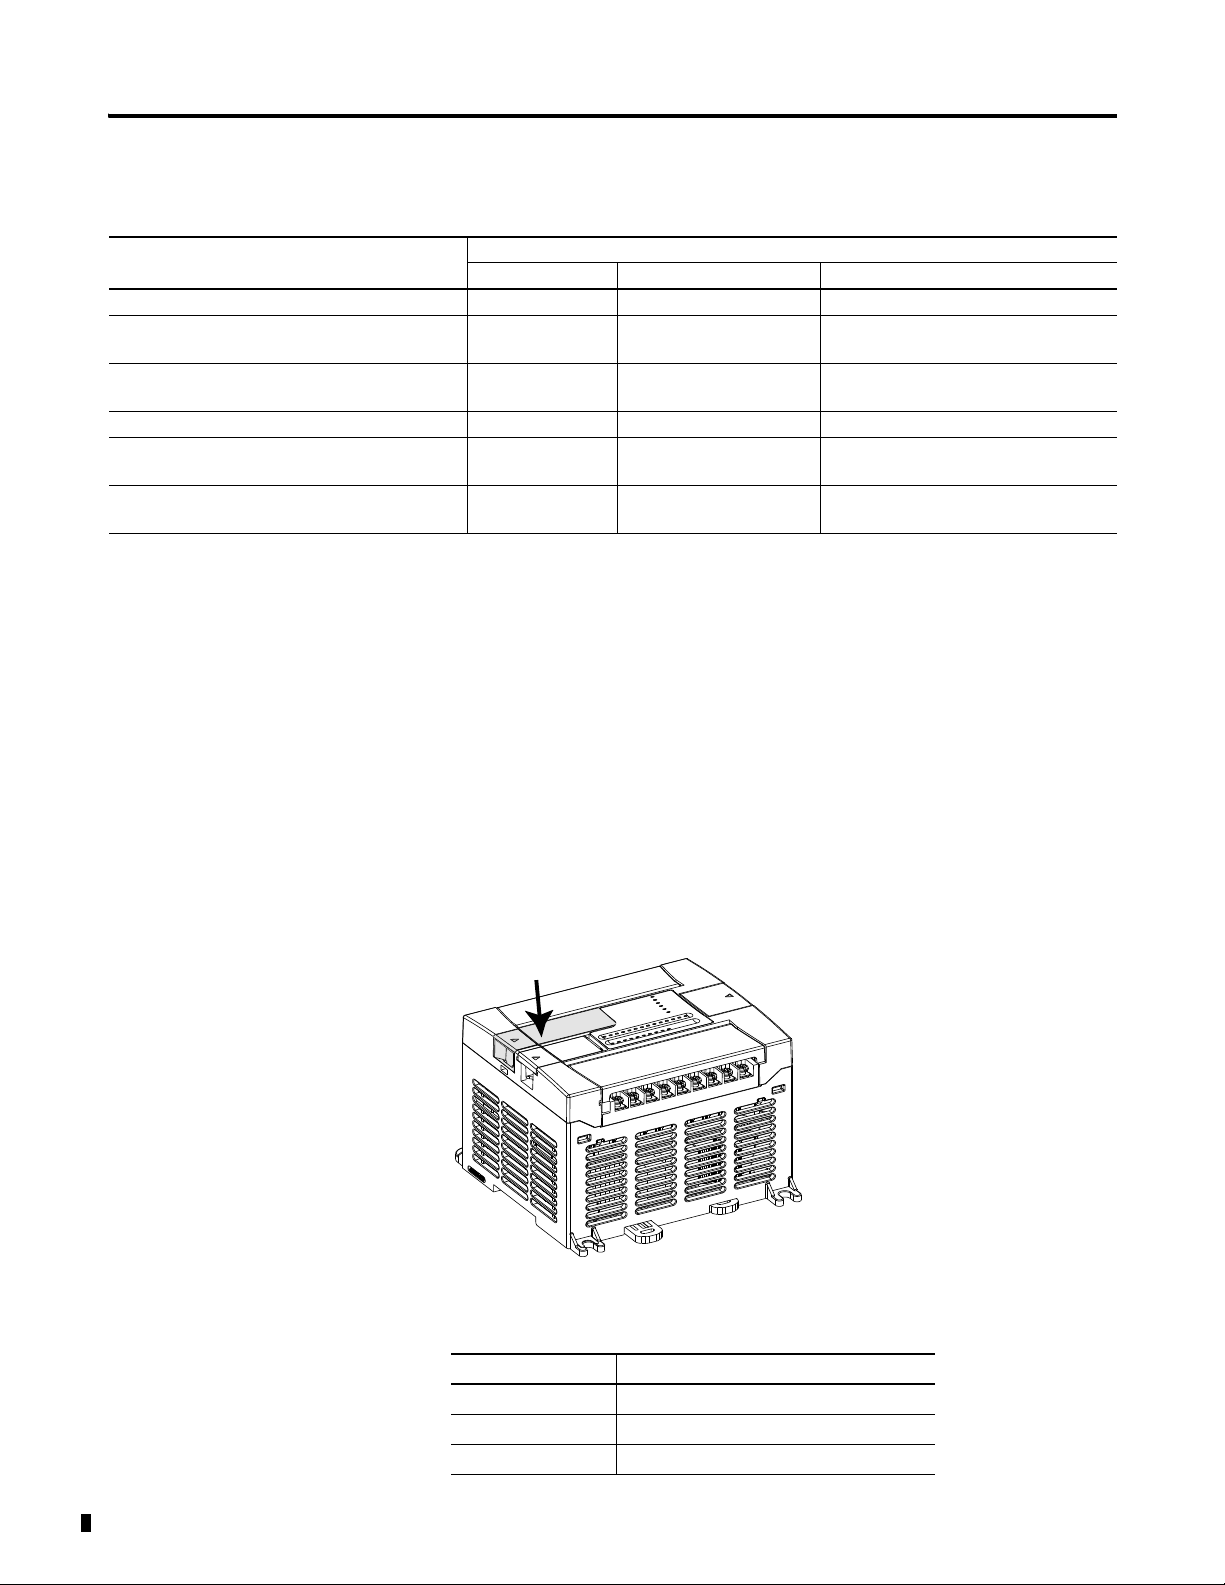
MicroLogix 1200 Memory Module and/or Real-time Clock
The controller is shipped with a memory module port cover in place. You can
order a memory module, real-time clock, or memory module and real-time
clock as an accessory.
Publication 1762-UM001G-EN-P - March 2011
Table 1.3 Memory Module and/or Real-time Clock
Catalog Number Description
1762-MM1 Memory Module only
1762-RTC Real-time Clock only
1762-MM1RTC Memory Module and Real-Time Clock
Page 13
Hardware Overview 1-3
1762 Expansion I/O 1762 Expansion I/O Connected to MicroLogix 1200 Controller
TIP
1762 Expansion I/O
1762 expansion I/O can be connected to the MicroLogix 1200 controller, as
shown below.
A maximum of six I/O modules, in certain combinations,
may be connected to a controller. See Appendix F, System
Loading and Heat Dissipation, to determine valid
combinations.
Table 1.4 Expansion I/O
Catalog Number Descriptions
1762-IA8 8-point 120V ac Input
1762-IQ8 8-point Sink/Source 24V dc Input
1762-IQ16 16-point Sink/Source 24V dc Input
1762-IQ32T 32-point Sink/Source 24V dc Input Module
1762-OA8 8-point AC Triac Output
1762-OB8 8-point Sourcing 24V dc Output
1762-OB16 16-point Sourcing 24V dc Output
1762-OB32T 32-point Sourcing 24V dc Output Module
1762-OV32T 32-point Sinking 24V dc Output Module
1762-OW8 8-point AC/DC Relay Output
1762-OW16 16-point AC/DC Relay Output
1762-OX6I 6-point Isolated Relay Output
1762-IF2OF2 2-channel Analog Voltage/Current Input
2-channel Analog Voltage/Current Output
1762-IF4 4-channel Analog Voltage/Current Input
1762-OF4 4-channel Analog Voltage/Current Output
1762-IR4 RTD/Resistance Input
1762-IT4 Thermocouple/mV Input
1762-IQ8OW6 DC-input/Relay-output Combination Module
Publication 1762-UM001G-EN-P - March 2011
Page 14

1-4 Hardware Overview
Communication Cables
Program the Controller
Use only the following communication cables with the MicroLogix 1200
controllers.
• 1761-CBL-PM02 series C or later
• 1761-CBL-HM02 series C or later
• 1761-CBL-AM00 series C or later
• 1761-CBL-AP00 series C or later
• 2707-NC8 series A or later
• 2702-NC9 series B or later
• 2707-NC10 series B or later
• 2707-NC11 series B or later
You program the MicroLogix 1200 programmable controller using RSLogix
500, revision 4 or later. You must use revision 4.5 or later of RSLogix 500 in
order to use the new features of the series B MicroLogix 1200 controllers,
including the full ASCII instruction set. Communication cables for
programming are not included with the software.
Communication Options
The MicroLogix 1200 can be connected to a personal computer. It can also be
connected to a DH-485 network, or a Modbus network as an RTU Master or
RTU Slave using an Advanced Interface Converter (catalog number
1761-NET-AIC) and to the DeviceNet network using a DeviceNet Interface
(catalog number 1761-NET-DNI). The controller can also be connected to
DF1 Half-duplex networks as an RTU Master or RTU Slave. Series B
controllers may also be connected to serial devices using ASCII.
See Chapter 4 Communication Connections for more information on
connecting to the available communication options.
The 1762-LxxxxxR controllers provide an additional communication port
called the Programmer/HMI Port. This port supports DF1 full-duplex
protocol only. The controller cannot initiate messages through this port. It can
only respond to messages sent to it. All communication parameters are fixed
and cannot be changed by a user.
See Default Communication Configuration on page 4-2 for the configuration
settings.
Publication 1762-UM001G-EN-P - March 2011
Page 15

Install Your Controller
This chapter shows you how to install your controller.
Topics include:
• required tools
• agency certifications
• compliance to European Union Directives
• installation considerations
• safety considerations
• power considerations
• preventing excessive heat
• master control relay
• install the memory module and/or real-time clock
• controller mounting dimensions
• controller and expansion I/O spacing
• mount the controller
• mount 1762 expansion I/O
• connect 1762 expansion I/O
Chapter
2
Required Tools
Agency Certifications
1 Publication 1762-UM001G-EN-P - March 2011
You need a screwdriver and a drill.
• UL 508
• C-UL under CSA C22.2 no. 142
• Class I, Division 2, Groups A, B, C, D
(UL 1604, C-UL under CSA C22.2 no. 213)
• CE compliant for all applicable directives
• C-Tick compliant for all applicable acts
Page 16

2-2 Install Your Controller
Compliance to European Union Directives
This product has the CE mark and is approved for installation within the
European Union and EEA regions. It has been designed and tested to meet
the following directives.
EMC Directive
This product is tested to meet Council Directive 89/336/EEC
Electromagnetic Compatibility (EMC) and the following standards, in whole
or in part, documented in a technical construction file:
• EN 50081-2
EMC - Generic Emission Standard, Part 2 - Industrial Environment
• EN 50082-2
EMC - Generic Immunity Standard, Part 2 - Industrial Environment
This product is intended for use in an industrial environment.
Low Voltage Directive
Installation Considerations
This product is tested to meet Council Directive 73/23/EEC Low Voltage, by
applying the safety requirements of EN 61131-2 Programmable Controllers,
Part 2 - Equipment Requirements and Tests.
For specific information required by EN 61131-2, see the appropriate sections
in this publication, as well as the following Allen-Bradley publications:
• Industrial Automation Wiring and Grounding Guidelines for Noise
Immunity, publication 1770-4.1
• Guidelines for Handling Lithium Batteries, publication AG-5.4
• Automation Systems Catalog, publication B113
Most applications require installation in an industrial enclosure (Pollution
(1)
Degree 2
Category II
possible from power lines, load lines, and other sources of electrical noise such
as hard-contact switches, relays, and AC motor drives. For more information
on proper grounding guidelines, see the Industrial Automation Wiring and
Grounding Guidelines publication 1770-4.1.
(1) Pollution Degree 2 is an environment where normally only non-conductive pollution occurs except that
occasionally temporary conductivity caused by condensation shall be expected.
(2) Overvoltage Category II is the load level section of the electrical distribution system. At this level, transient
voltages are controlled and do not exceed the impulse voltage capability of the products insulation.
) to reduce the effects of electrical interference (Over Voltage
(2)
) and environmental exposure. Locate your controller as far as
Publication 1762-UM001G-EN-P - March 2011
Page 17
Install Your Controller 2-3
ATTENTION
ATTENTION
WARNING
Vertical mounting of the controller is not
recommended due to heat build-up considerations.
Be careful of metal chips when drilling mounting
holes for your controller or other equipment within
the enclosure or panel. Drilled fragments that fall
into the controller or I/O modules could cause
damage. Do not drill holes above a mounted
controller if the protective debris shields are
removed or the processor is installed.
Safety Considerations
Safety considerations are an important element of proper system installation.
Actively thinking about the safety of yourself and others, as well as the
condition of your equipment, is of primary importance. We recommend
reviewing the following safety considerations.
Hazardous Location Considerations
This equipment is suitable for use in Class I, Division 2, Groups A, B, C, D or
non-hazardous locations only. The following WARNING statement applies to
use in hazardous locations.
EXPLOSION HAZARD
• Substitution of components may impair suitability
for Class I, Division 2.
• Do not replace components or disconnect
equipment unless power has been switched off.
• Do not connect or disconnect components unless
power has been switched off.
• This product must be installed in an enclosure.
All cables connected to the product must remain
in the enclosure or be protected by conduit or
other means.
• All wiring must comply with N.E.C. article
501-4(b).
Publication 1762-UM001G-EN-P - March 2011
Page 18
2-4 Install Your Controller
WARNING
WARNING
Use only the following communication cables in Class I, Division 2 hazardous
locations.
Communication Cables for Class I, Division 2 Hazardous Locations
1761-CBL-PM02 series C or later
1761-CBL-HM02 series C or later
1761-CBL-AM00 series C or later
1761-CBL-AP00 series C or later
2707-NC8 series A or later
2707-NC9 series B or later
2707-NC10 series B or later
2707-NC11 series B or later
Disconnect Main Power
Explosion Hazard
Do not replace components or disconnect equipment
unless power has been switched off.
The main power disconnect switch should be located where operators and
maintenance personnel have quick and easy access to it. In addition to
disconnecting electrical power, all other sources of power (pneumatic and
hydraulic) should be de-energized before working on a machine or process
controlled by a controller.
Safety Circuits
Explosion Hazard
Do not connect or disconnect connectors while
circuit is live.
Circuits installed on the machine for safety reasons, like overtravel limit
switches, stop push buttons, and interlocks, should always be hard-wired
directly to the master control relay. These devices must be wired in series so
that when any one device opens, the master control relay is de-energized,
thereby removing power to the machine. Never alter these circuits to defeat
their function. Serious injury or machine damage could result.
Publication 1762-UM001G-EN-P - March 2011
Page 19

Install Your Controller 2-5
Power Distribution
There are some points about power distribution that you should know:
• The master control relay must be able to inhibit all machine motion by
removing power to the machine I/O devices when the relay is
de-energized. It is recommended that the controller remain powered
even when the master control relay is de-energized.
• If you are using a dc power supply, interrupt the load side rather than
the ac line power. This avoids the additional delay of power supply
turn-off. The dc power supply should be powered directly from the
fused secondary of the transformer. Power to the dc input and output
circuits should be connected through a set of master control relay
contacts.
Periodic Tests of Master Control Relay Circuit
Power Considerations
Any part can fail, including the switches in a master control relay circuit. The
failure of one of these switches would most likely cause an open circuit, which
would be a safe power-off failure. However, if one of these switches shorts
out, it no longer provides any safety protection. These switches should be
tested periodically to assure they will stop machine motion when needed.
The following explains power considerations for the micro controllers.
Isolation Transformers
You may want to use an isolation transformer in the ac line to the controller.
This type of transformer provides isolation from your power distribution
system to reduce the electrical noise that enters the controller and is often used
as a step-down transformer to reduce line voltage. Any transformer used with
the controller must have a sufficient power rating for its load. The power
rating is expressed in volt-amperes (VA).
Publication 1762-UM001G-EN-P - March 2011
Page 20

2-6 Install Your Controller
Power Supply Inrush
During power-up, the MicroLogix 1200 power supply allows a brief inrush
current to charge internal capacitors. Many power lines and control
transformers can supply inrush current for a brief time. If the power source
cannot supply this inrush current, the source voltage may sag momentarily.
The only effect of limited inrush current and voltage sag on the MicroLogix
1200 is that the power supply capacitors charge more slowly. However, the
effect of a voltage sag on other equipment should be considered. For example,
a deep voltage sag may reset a computer connected to the same power source.
The following considerations determine whether the power source must be
required to supply high inrush current:
• The power-up sequence of devices in a system.
• The amount of the power source voltage sag if the inrush current
cannot be supplied.
• The effect of voltage sag on other equipment in the system.
If the entire system is powered-up at the same time, a brief sag in the power
source voltage typically will not affect any equipment.
Loss of Power Source
The power supply is designed to withstand brief power losses without
affecting the operation of the system. The time the system is operational
during power loss is called ‘program scan hold-up time after loss of power’.
The duration of the power supply hold-up time depends on the type and state
of the I/O, but is typically between 10 milliseconds and 3 seconds. When the
duration of power loss reaches this limit, the power supply signals the
processor that it can no longer provide adequate dc power to the system. This
is referred to as a power supply shutdown. The processor then performs an
orderly shutdown of the controller.
Input States on Power Down
The power supply hold-up time as described above is generally longer than the
turn-on and turn-off times of the inputs. Because of this, the input state
change from ‘On’ to ‘Off’ that occurs when power is removed may be
recorded by the processor before the power supply shuts down the system.
Understanding this concept is important. The user program should be written
to take this effect into account.
Publication 1762-UM001G-EN-P - March 2011
Page 21

Install Your Controller 2-7
TIP
Other Types of Line Conditions
Occasionally the power source to the system can be temporarily interrupted. It
is also possible that the voltage level may drop substantially below the normal
line voltage range for a period of time. Both of these conditions are considered
to be a loss of power for the system.
Prevent Excessive Heat
For most applications, normal convective cooling keeps the controller within
the specified operating range. Ensure that the specified temperature range is
maintained. Proper spacing of components within an enclosure is usually
sufficient for heat dissipation.
In some applications, a substantial amount of heat is produced by other
equipment inside or outside the enclosure. In this case, place blower fans
inside the enclosure to assist in air circulation and to reduce “hot spots” near
the controller.
Additional cooling provisions might be necessary when high ambient
temperatures are encountered.
Do not bring in unfiltered outside air. Place the
controller in an enclosure to protect it from a
corrosive atmosphere. Harmful contaminants or dirt
could cause improper operation or damage to
components. In extreme cases, you may need to use
air conditioning to protect against heat build-up
within the enclosure.
Publication 1762-UM001G-EN-P - March 2011
Page 22
2-8 Install Your Controller
ATTENTION
TIP
Master Control Relay
A hard-wired master control relay (MCR) provides a reliable means for
emergency machine shutdown. Since the master control relay allows the
placement of several emergency-stop switches in different locations, its
installation is important from a safety standpoint. Overtravel limit switches or
mushroom-head push buttons are wired in series so that when any of them
opens, the master control relay is de-energized. This removes power to input
and output device circuits. Refer to the figures on pages 2-10 and 2-11.
Never alter these circuits to defeat their function
since serious injury and/or machine damage could
result.
If you are using an external dc power supply,
interrupt the dc output side rather than the ac line
side of the supply to avoid the additional delay of
power supply turn-off.
The ac line of the dc output power supply should be
fused.
Connect a set of master control relays in series with
the dc power supplying the input and output
circuits.
Place the main power disconnect switch where operators and maintenance
personnel have quick and easy access to it. If you mount a disconnect switch
inside the controller enclosure, place the switch operating handle on the
outside of the enclosure, so that you can disconnect power without opening
the enclosure.
Whenever any of the emergency-stop switches are opened, power to input and
output devices should be removed.
When you use the master control relay to remove power from the external I/O
circuits, power continues to be provided to the controller’s power supply so
that diagnostic indicators on the processor can still be observed.
The master control relay is not a substitute for a disconnect to the controller. It
is intended for any situation where the operator must quickly de-energize I/O
devices only. When inspecting or installing terminal connections, replacing
output fuses, or working on equipment within the enclosure, use the
disconnect to shut off power to the rest of the system.
Publication 1762-UM001G-EN-P - March 2011
Page 23

Install Your Controller 2-9
TIP
TIP
Do not control the master control relay with the
controller. Provide the operator with the safety of a
direct connection between an emergency-stop
switch and the master control relay.
Use Emergency-Stop Switches
When using emergency-stop switches, adhere to the following points:
• Do not program emergency-stop switches in the controller program.
Any emergency-stop switch should turn off all machine power by
turning off the master control relay.
• Observe all applicable local codes concerning the placement and
labeling of emergency-stop switches.
• Install emergency-stop switches and the master control relay in your
system. Make certain that relay contacts have a sufficient rating for your
application. Emergency-stop switches must be easy to reach.
• In the following illustration, input and output circuits are shown with
MCR protection. However, in most applications, only output circuits
require MCR protection.
The following illustrations show the Master Control Relay wired in a grounded
system.
In most applications input circuits do not require
MCR protection; however, if you need to remove
power from all field devices, you must include MCR
contacts in series with input power wiring.
Publication 1762-UM001G-EN-P - March 2011
Page 24
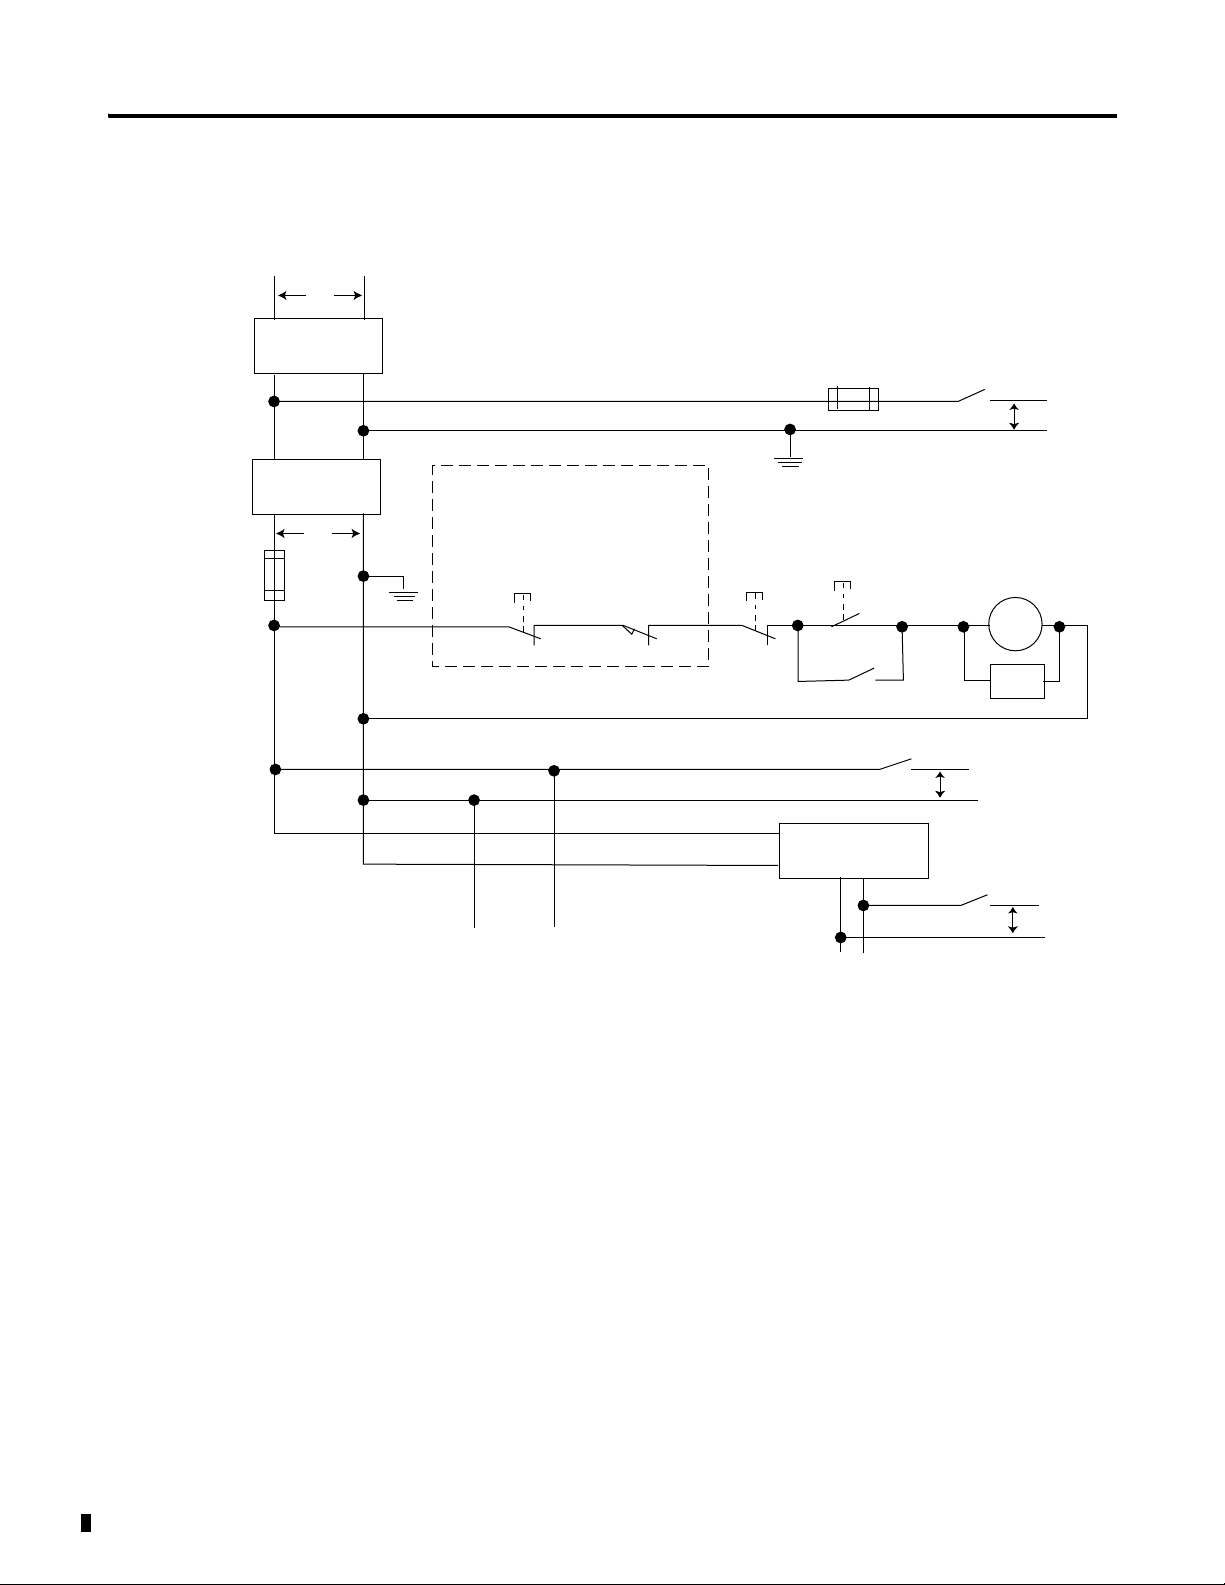
2-10 Install Your Controller
Disconnect
Isolation
Transformer
Emergency-Stop
Push Button
Fuse
MCR
230V ac
I/O
Circuits
Operation of either of these contacts will
remove power from the external I/O
circuits, stopping machine motion.
Fuse
Overtravel
Limit Switch
MCR
MCR
MCR
Stop
Start
Line Terminals: Connect to terminals of Power
Supply (1762-L24AWA, 1762-L24BWA,
1762-L40AWA, 1762-L40BWA,
1762-L24AWAR, 1762-L24BWAR,
1762-L40AWAR, and 1762-L40BWAR).
115V ac or
230V ac
I/O Circuits
L1
L2
230V ac
Master Control Relay (MCR)
Cat. No. 700-PK400A1
Suppressor
Cat. No. 700-N24
MCR
Suppr.
24V dc
I/O
Circuits
(Lo)
(Hi)
dc Power Supply.
Use IEC 950/EN 60950
X1
X2
115V ac
or 230V ac
Line Terminals: Connect to 24V dc terminals of
Power Supply (1762-L24BXB, 1762-L40BXB,
1762-L24BXBR, and 1762-L40BXBR).
_
+
Schematic (Using IEC Symbols)
Publication 1762-UM001G-EN-P - March 2011
Page 25
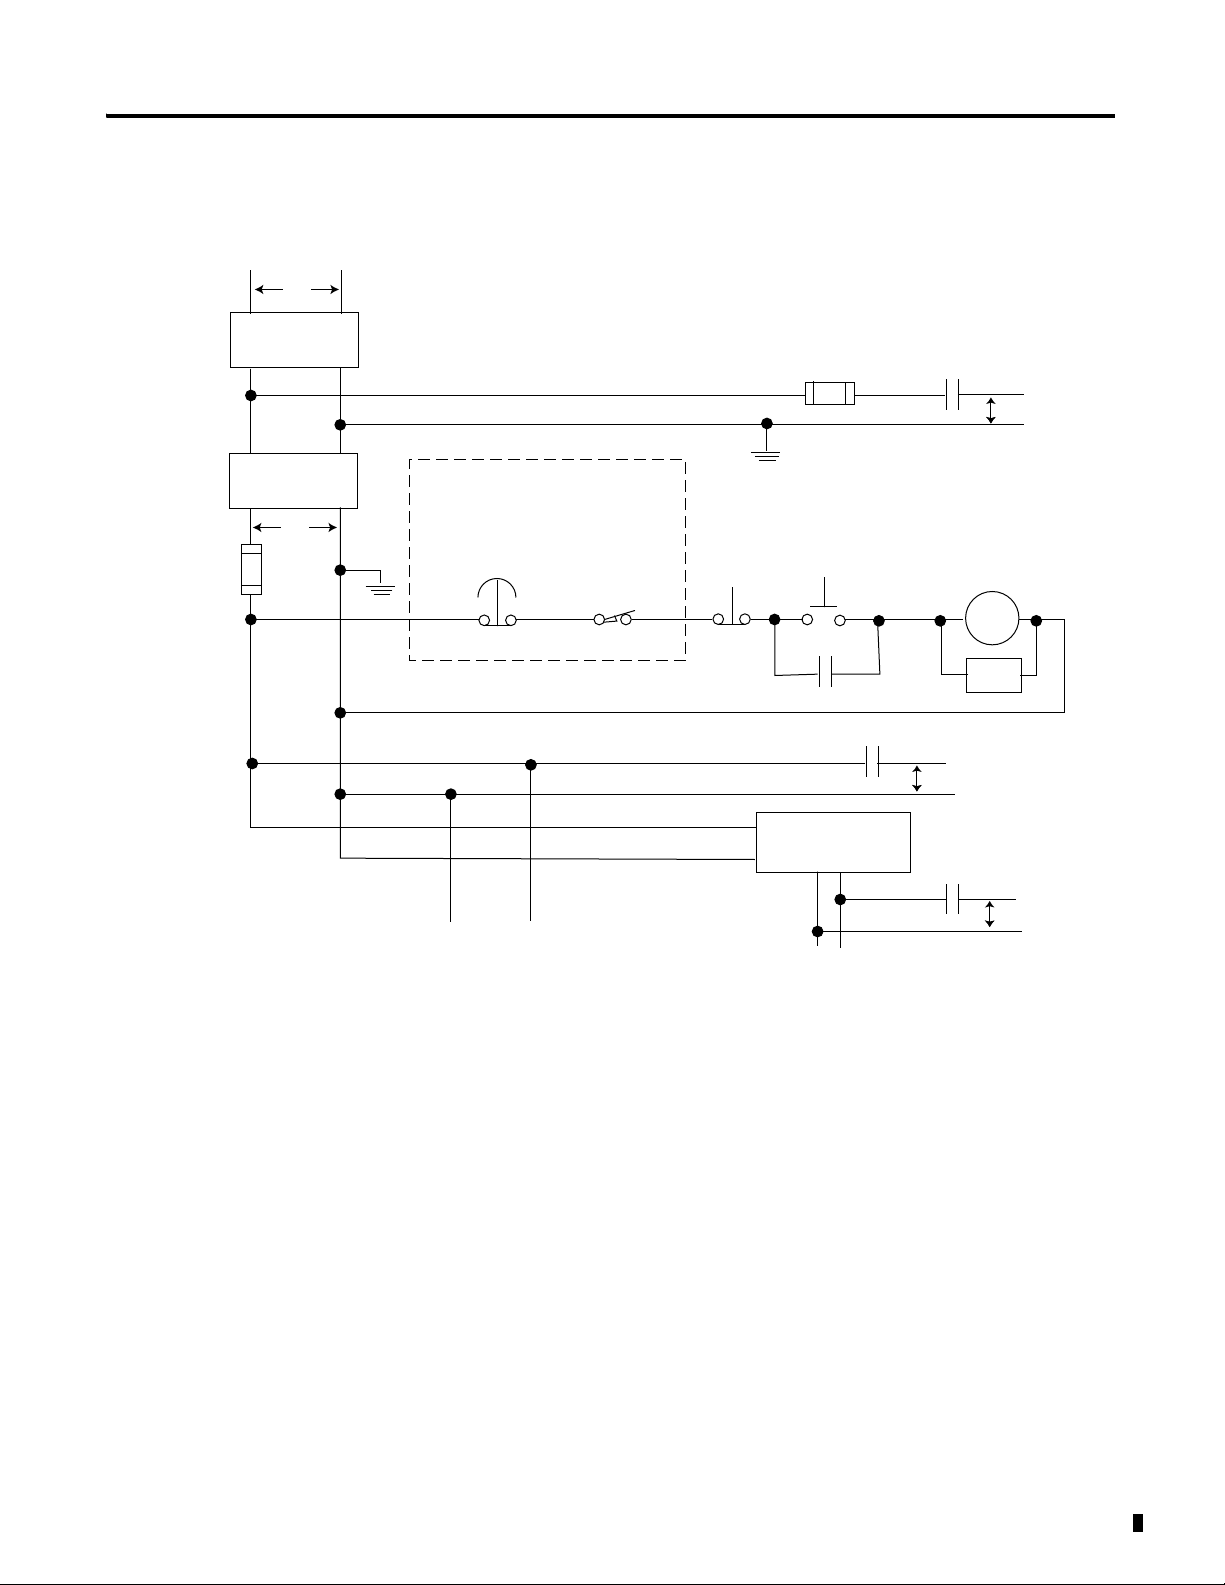
Schematic (Using ANSI/CSA Symbols)
Emergency-Stop
Push Button
230V ac
Operation of either of these contacts will
remove power from the external I/O
circuits, stopping machine motion.
Fuse
MCR
Fuse
MCR
MCR
MCR
Stop
Start
Line Terminals: Connect to terminals of Power
Supply (1762-L24AWA, 1762-L24BWA,
1762-L40AWA, 1762-L40BWA, 1762-L24AWAR,
1762-L24BWAR, 1762-L40AWAR, and
1762-L40BWAR).
Line Terminals: Connect to 24V dc terminals of
Power Supply (1762-L24BXB, 1762-L40BXB,
1762-L24BXBR, and 1762-L40BXBR).
230V ac
Output
Circuits
Disconnect
Isolation
Transformer
115V ac or
230V ac
I/O Circuits
L1
L2
Master Control Relay (MCR)
Cat. No. 700-PK400A1
Suppressor
Cat. No. 700-N24
(Lo)
(Hi)
dc Power Supply. Use
NEC Class 2 for UL
Listing
.
X1
X2
115V ac or
230V ac
_
+
MCR
24 V dc
I/O
Circuits
Suppr.
Overtravel
Limit Switch
Install Your Controller 2-11
Publication 1762-UM001G-EN-P - March 2011
Page 26
2-12 Install Your Controller
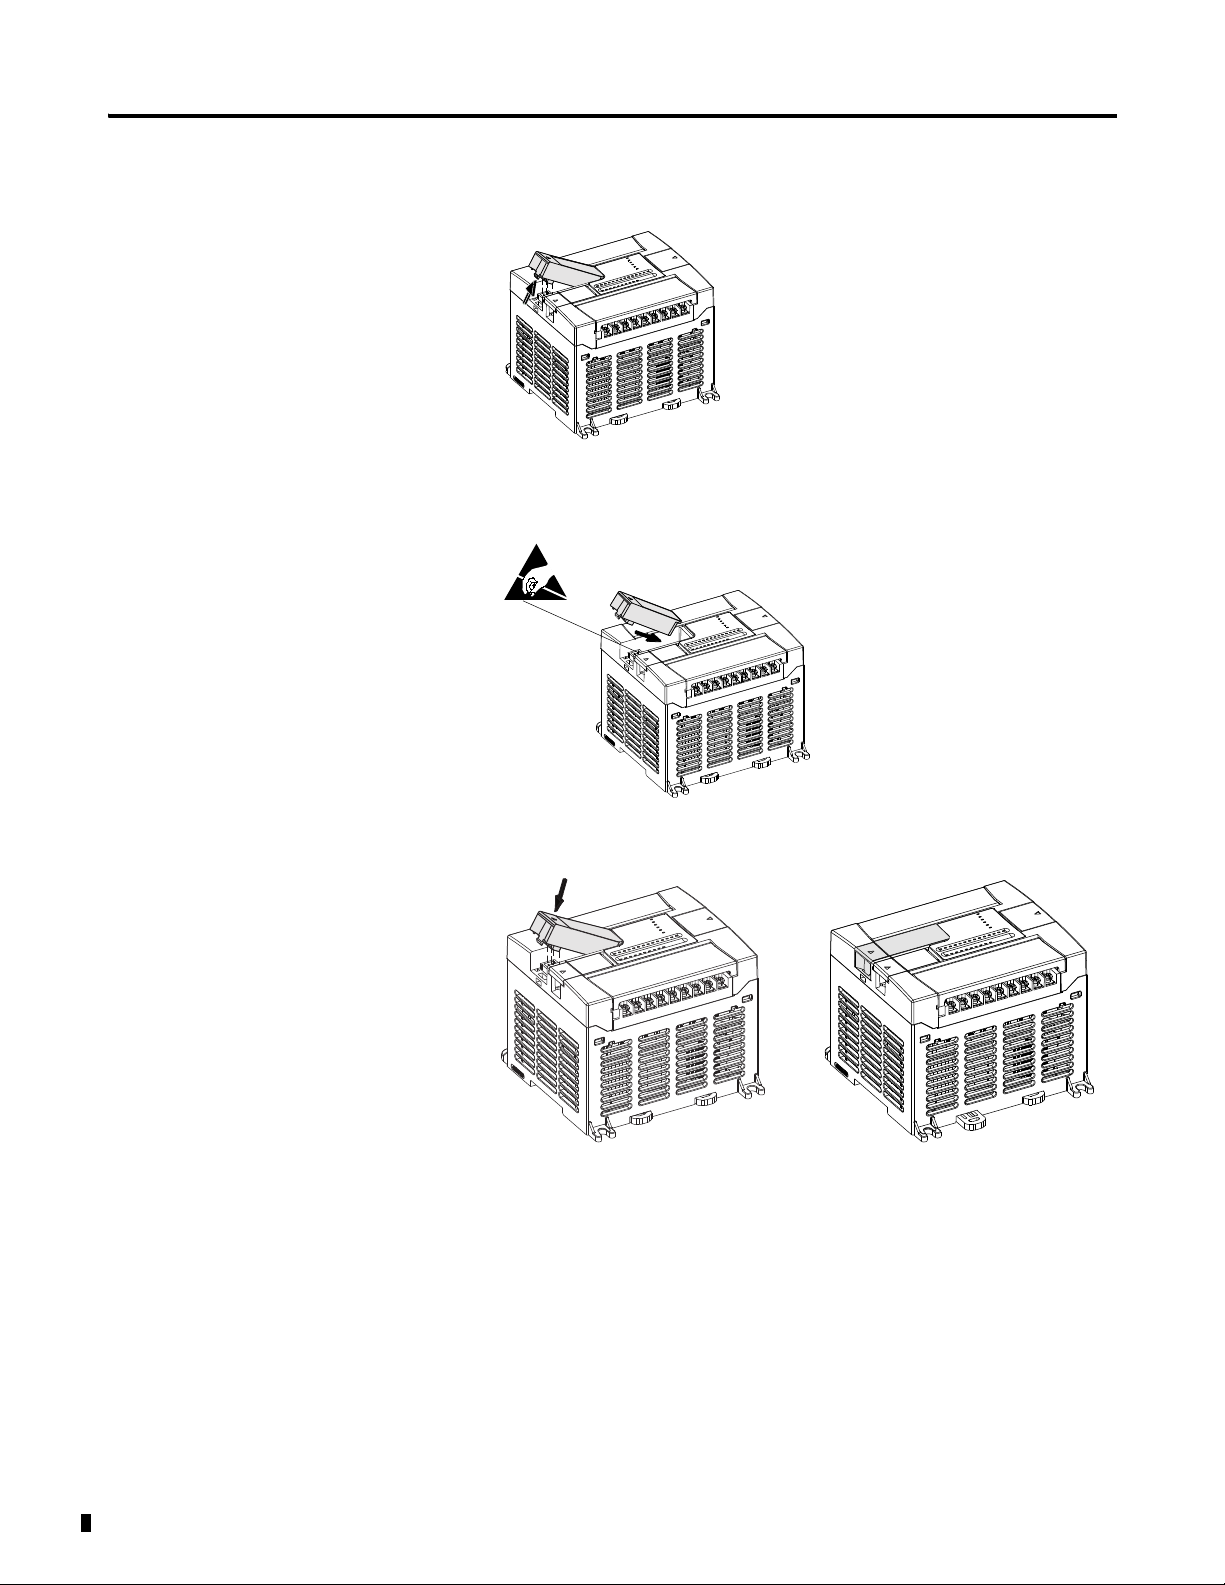
Install a Memory Module or Real-time Clock
1. Remove the memory module port cover.
2. Align the connector on the memory module with the connector pins on
the controller.
3. Firmly seat the memory module into the controller.
Publication 1762-UM001G-EN-P - March 2011
Page 27
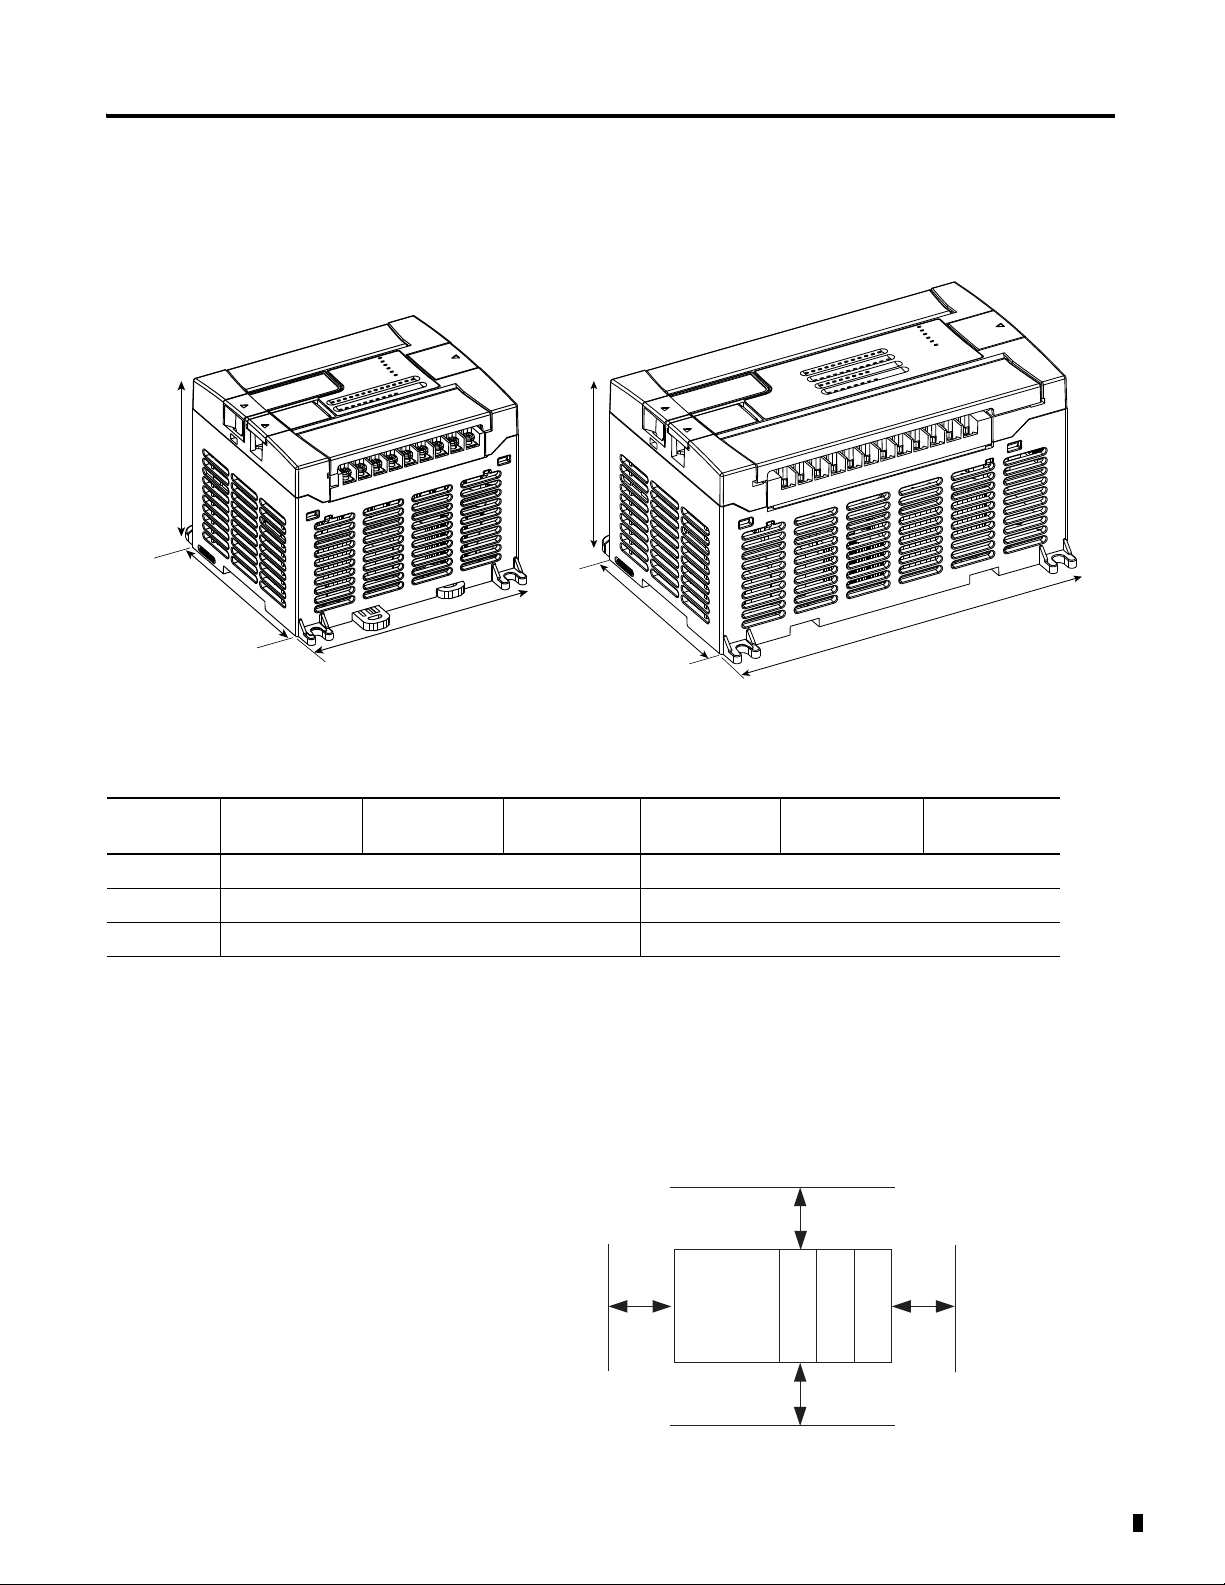
Controller Mounting
C
B
A
C
B
A
1762-L24AWA, 1762-L24BWA, 1762-L24BXB
1762-L24AWAR, 1762-L24BWAR, 1762-L24BXBR
1762-L40AWA, 1762-L40BWA, 1762-L40BXB
1762-L40AWAR, 1762-L40BWAR, 1762-L40BXBR
MicroLogix
1200
1762 I/O
1762 I/O
1762 I/O
Side Side
To p
Bottom
Dimensions
Install Your Controller 2-13
Table 2.1 Controller Dimensions
Dimension 1762-L24AWA
1762-L24AWAR
1762-L24BWA
1762-L24BWAR
1762-L24BXB
1762-L24BXBR
1762-L40AWA
1762-L40AWAR
1762-L40BWA
1762-L40BWAR
A 90 mm (3.5 in.) 90 mm (3.5 in.)
B 110 mm (4.33 in.) 160 mm (6.30 in.)
C 87 mm (3.43 in.) 87 mm (3.43 in.)
Controller and
The controller mounts horizontally, with the expansion I/O extending to the
right of the controller. Allow 50 mm (2 in.) of space on all sides of the
Expansion I/O Spacing
controller system for adequate ventilation. Maintain spacing from enclosure
walls, wireways, and adjacent equipment, as shown below.
1762-L40BXB
1762-L40BXBR
Publication 1762-UM001G-EN-P - March 2011
Page 28
2-14 Install Your Controller
ATTENTION
ATTENTION
TIP
debris shield
Mount the Controller
MicroLogix 1200 controllers are suitable for use in an industrial environment
when installed in accordance with these instructions. Specifically, this
equipment is intended for use in clean, dry environments (Pollution degree
(1)
) and to circuits not exceeding Over Voltage Category II
2
60664-1).
(3)
(2)
(IEC
Do not remove the protective debris shield until after
the controller and all other equipment in the panel
near the controller are mounted and wiring is
complete. Once wiring is complete, remove
protective debris shield. Failure to remove shield
before operating can cause overheating.
Electrostatic discharge can damage semiconductor
devices inside the controller. Do not touch the
connector pins or other sensitive areas.
For environments with greater vibration and shock
concerns, use the panel mounting method described
on page 2-16, rather than DIN rail mounting.
(1) Pollution Degree 2 is an environment where, normally, only non-conductive pollution occurs except that
occasionally a temporary conductivity caused by condensation shall be expected.
(2) Over Voltage Category II is the load level section of the electrical distribution system. At this level transient
voltages are controlled and do not exceed the impulse voltage capability of the product’s insulation.
(3) Pollution Degree 2 and Over Voltage Category II are International Electrotechnical Commission (IEC)
designations.
Publication 1762-UM001G-EN-P - March 2011
Page 29
Install Your Controller 2-15
27.5 mm
(1.08 in.)
27.5 mm
(1.08 in.)
90 mm
(3.5 in.)
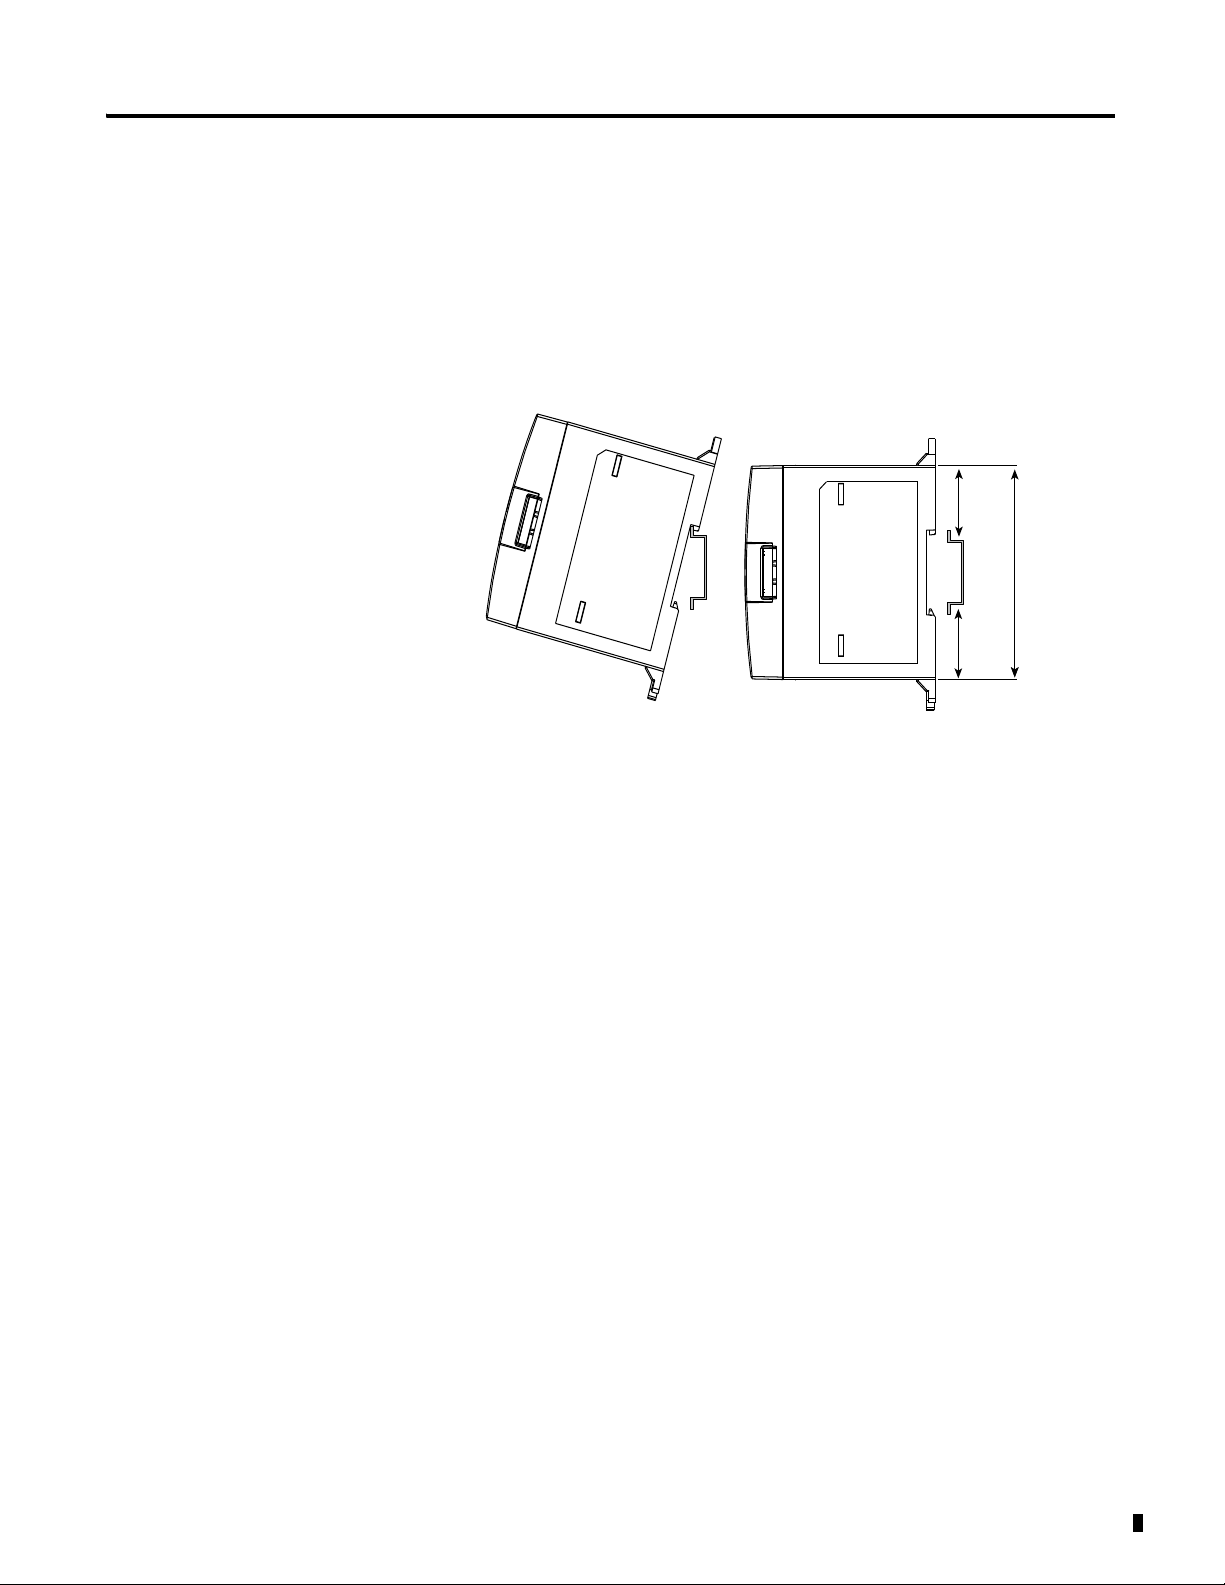
DIN Rail Mounting
The maximum extension of the latch is 14 mm (0.55 in.) in the open position.
A flat-blade screwdriver is required for removal of the controller. The
controller can be mounted to EN50022-35x7.5 or EN50022-35x15 DIN rails.
DIN rail mounting dimensions are shown below.
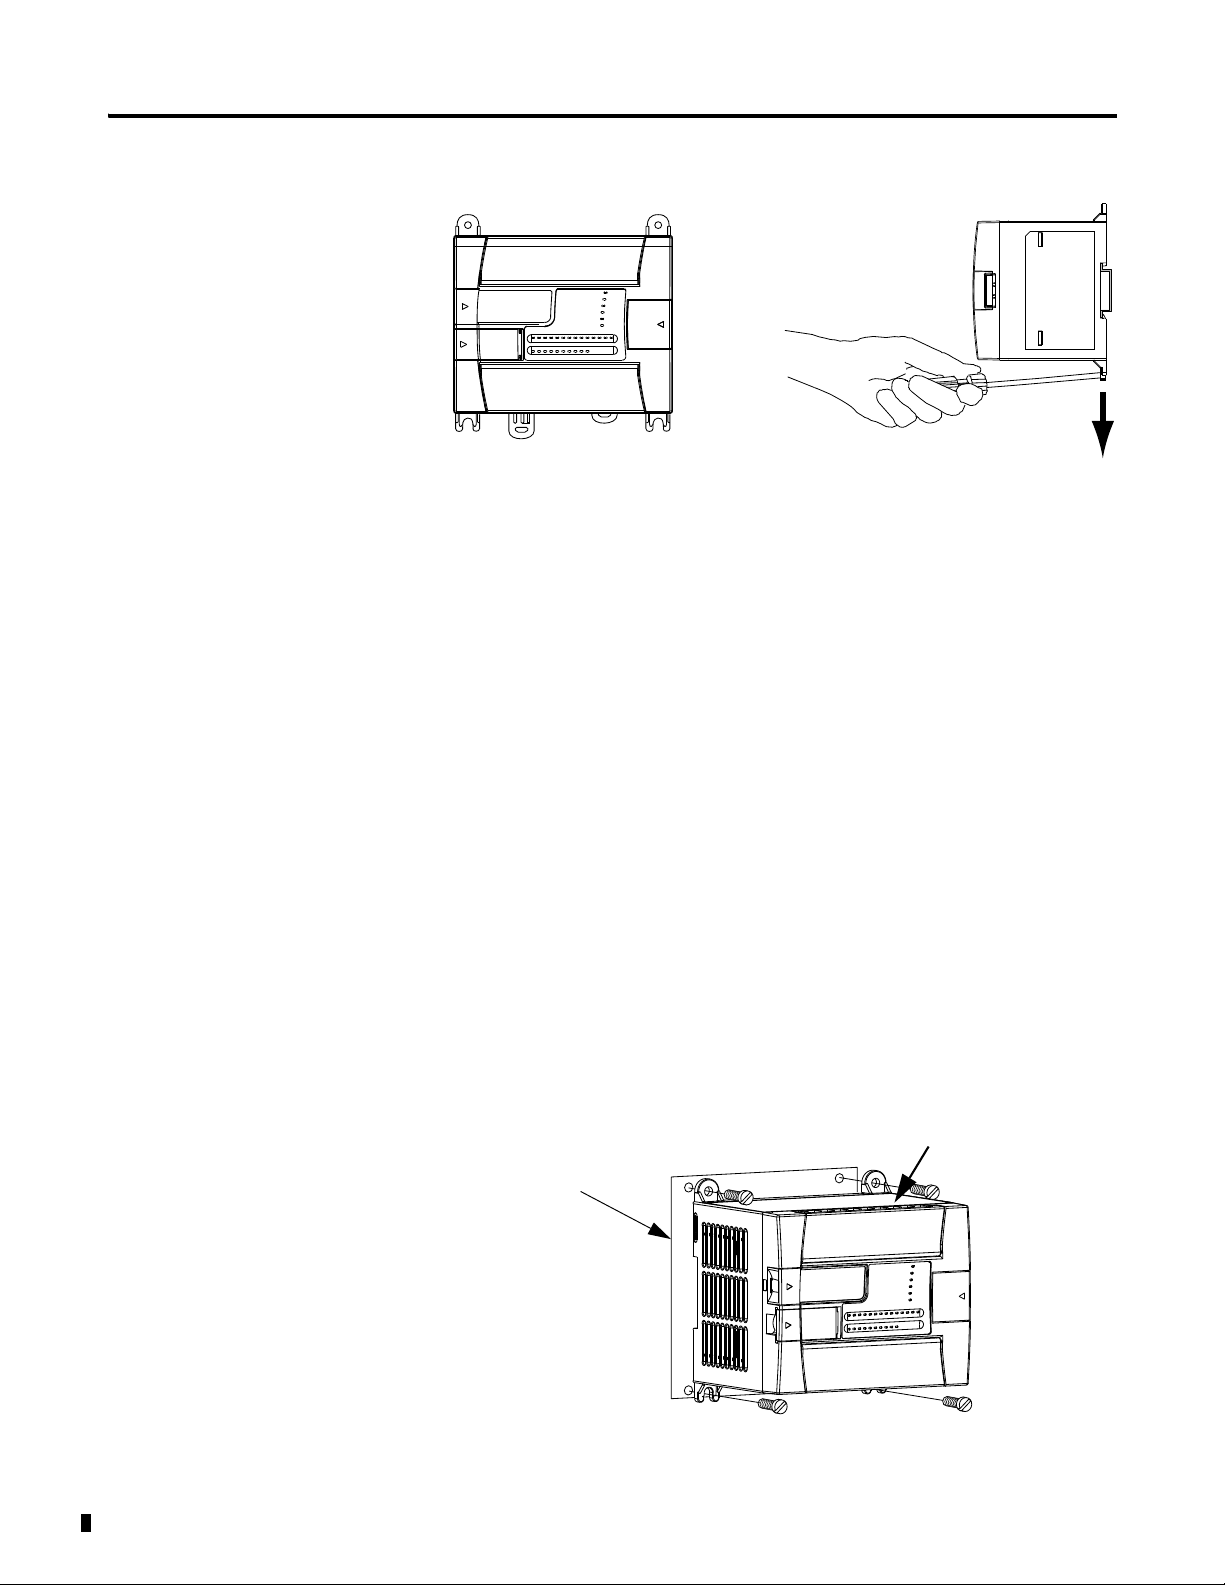
To install your controller on the DIN rail:
1. Mount your DIN rail. (Make sure that the placement of the controller
on the DIN rail meets the recommended spacing requirements,
see Controller and Expansion I/O Spacing on page 2-13. Refer to the
mounting template inside the back cover of this document.)
2. Close the DIN latch, if it is open.
3. Hook the top slot over the DIN rail.
4. While pressing the controller down against the top of the rail, snap the
bottom of the controller into position.
5. Leave the protective debris shield attached until you are finished wiring
the controller and any other devices.
To remove your controller from the DIN rail:
1. Place a flat-blade screwdriver in the DIN rail latch at the bottom of the
controller.
2. Holding the controller, pry downward on the latch until the latch locks
in the open position.
3. Repeat steps 1 and 2 for the second DIN rail latch.
4. Unhook the top of the DIN rail slot from the rail.
Publication 1762-UM001G-EN-P - March 2011
Page 30
2-16 Install Your Controller
open
closed
Mounting Template
Debris Shield
Panel Mounting
Mount to panel using #8 or M4 screws. To install your controller using
mounting screws:
1. Remove the mounting template from inside the back cover of the
MicroLogix 1200 Programmable Controllers Installation Instructions,
publication 1762-IN006.
2. Secure the template to the mounting surface. (Make sure your controller
is spaced properly. See Controller and Expansion I/O Spacing on page
2-13.)
3. Drill holes through the template.
4. Remove the mounting template.
5. Mount the controller.
6. Leave the protective debris shield in place until you are finished wiring
the controller and any other devices.
Publication 1762-UM001G-EN-P - March 2011
Page 31

1762 Expansion I/O
A
B
C
ATTENTION
Dimensions
Install Your Controller 2-17
Dimension Expansion I/O Module
A 90 mm (3.5 in.)
B 40 mm (1.57 in.)
C 87 mm (3.43 in.)
Mount 1762 Expansion I/O
DIN Rail Mounting
The module can be mounted using the following DIN rails:
• 35 x 7.5 mm (EN 50 022 - 35 x 7.5), or
• 35 x 15 mm (EN 50 022 - 35 x 15).
During panel or DIN rail mounting of all devices, be
sure that all debris (metal chips, wire stands) is kept
from falling into the module. Debris that falls into the
module could cause damage when the module is
under power.
Before mounting the module on a DIN rail, close the DIN rail latch. Press the
DIN rail mounting area of the module against the DIN rail. The latch
momentarily opens and locks into place.
Publication 1762-UM001G-EN-P - March 2011
Page 32

2-18 Install Your Controller
TIP
TIP
End Anchor
End Anchor
90
(3.54)
100
(3.94)
40.4
(1.59)
A
B
40.4
(1.59)
14.5
(0.57)
MicroLogix
1200
1762 I/O
1762 I/O
1762 I/O
For more than 2 modules: (number of modules - 1) x 40 mm (1.58 in.)
NOTE: All dimensions are in mm (inches).
Hole spacing tolerance: ±0.4 mm (0.016 in.).
A = 95.86mm (3.774 in.)
1762-L24AWA, 1762-L24BWA, 1762-L24BXB
1762-L24AWAR, 1762-L24BWAR, 1762-L24BXBR
B = 145.8 mm (5.739 in.)
1762-L40AWA, 1762-L40BWA, 1762-L40BXB
1762-L40AWAR, 1762-L40BWAR, 1762-L40BXBR
Use DIN rail end anchors (Allen-Bradley part number 1492-EA35 or
1492-EAH35) for vibration or shock environments. The following illustration
shows the location of the end anchors.
1762 expansion I/O must be mounted horizontally as
illustrated.
Mount on Panel
Use the dimensional template shown below to mount the module. The
preferred mounting method is to use two M4 or #8 panhead screws per
module. Mounting screws are required on every module.
For environments with greater vibration and shock
concerns, use the panel mounting method described
below, instead of DIN rail mounting.
Publication 1762-UM001G-EN-P - March 2011
Page 33

Install Your Controller 2-19
TIP
TIP
ATTENTION
Pull Loop
Connect Expansion I/O
The expansion I/O module is attached to the controller or another I/O
module by means of a flat ribbon cable after mounting, as shown below.
Use the pull loop on the connector to disconnect
modules. Do not pull on the ribbon cable.
Up to six expansion I/O modules can be connected
to a controller depending upon the power supply
loading.
Remove power before removing or inserting an I/O
module. When you remove or insert a module with
power applied, an electrical arc may occur. An
electrical arc can cause personal injury or property
damage by:
• sending an erroneous signal to your system’s field
devices, causing the controller to fault
• causing an explosion in a hazardous environment
Electrical arcing causes excessive wear to contacts on
both the module and its mating connector. Worn
contacts may create electrical resistance, reducing
product reliability.
Publication 1762-UM001G-EN-P - March 2011
Page 34

2-20 Install Your Controller
WARNING
EXPLOSION HAZARD
In Class I, Division 2 applications, the bus connector
must be fully seated and the bus connector cover
must be snapped in place.
In Class I, Division 2 applications, all modules must
be mounted in direct contact with each other as
shown on page 2-19. If DIN rail mounting is used, an end
stop must be installed ahead of the controller and after the
last 1762 I/O module.
Publication 1762-UM001G-EN-P - March 2011
Page 35

Chapter
ATTENTION
ATTENTION
3
Wire Your Controller
This chapter describes how to wire your controller and expansion I/O. Topics
include:
• wire requirements
• using surge suppressors
• grounding the controller
• wiring diagrams
• sinking and sourcing wiring diagrams
• controller I/O wiring
• expansion I/O wiring
Wire Requirements
Before you install and wire any device, disconnect
power to the controller system.
Calculate the maximum possible current in each
power and common wire. Observe all electrical
codes dictating the maximum current allowable for
each wire size. Current above the maximum ratings
may cause wiring to overheat, which can cause
damage.
United States Only: If the controller is installed
within a potentially hazardous environment, all
wiring must comply with the requirements stated in
the National Electrical Code 501-4 (b).
• Allow for at least 50 mm (2 in) between I/O wiring ducts or terminal
strips and the controller.
• Route incoming power to the controller by a path separate from the
device wiring. Where paths must cross, their intersection should be
perpendicular.
1 Publication 1762-UM001G-EN-P - March 2011
Page 36

3-2 Wire Your Controller
TIP
Finger-Safe Cover
Do not run signal or communication wiring and
power wiring in the same conduit. Wires with
different signal characteristics should be routed by
separate paths.
• Separate wiring by signal type. Bundle wiring with similar electrical
characteristics together.
• Separate input wiring from output wiring.
• Label wiring to all devices in the system. Use tape, shrink-tubing, or
other dependable means for labeling purposes. In addition to labeling,
use colored insulation to identify wiring based on signal characteristics.
For example, you may use blue for dc wiring and red for ac wiring.
Table 3.1 Wire Requirements
Wire Type
Solid Cu-90 °C (194 °F) #14 to #22 AWG
Stranded Cu-90 °C (194 °F) #16 to #22 AWG
(1) Wiring torque = 0.791 Nm (7 lb-in) rated
Wire Size (2 wire maximum per terminal screw)
Wire without Spade Lugs
When wiring without spade lugs, it is recommended to keep the finger-safe
covers in place. Loosen the terminal screw and route the wires through the
opening in the finger-safe cover. Tighten the terminal screw making sure the
pressure plate secures the wire.
(1)
Publication 1762-UM001G-EN-P - March 2011
Page 37

Wire Your Controller 3-3
Wire with Spade Lugs
The diameter of the terminal screw head is 5.5 mm (0.220 in.). The input and
output terminals of the MicroLogix 1200 controller are designed for a 6.35
mm (0.25 in.) wide spade (standard for #6 screw for up to 14 AWG) or a 4
mm (metric #4) fork terminal.
When using spade lugs, use a small, flat-blade screwdriver to pry the
finger-safe cover from the terminal blocks as shown below. Then loosen the
terminal screw.
Use Surge Suppressors
Because of the potentially high current surges that occur when switching
inductive load devices, such as motor starters and solenoids, the use of some
type of surge suppression to protect and extend the operating life of the
controllers output contacts is required. Switching inductive loads without
surge suppression can significantly reduce the life expectancy of relay contacts.
By adding a suppression device directly across the coil of an inductive device,
you prolong the life of the output or relay contacts. You also reduce the effects
of voltage transients and electrical noise from radiating into adjacent systems.
Publication 1762-UM001G-EN-P - March 2011
Page 38

3-4 Wire Your Controller
+dc or L1
Suppression
Device
dc COM or L2
ac or dc
Outputs
Load
VAC/DC
Out 0
Out 1
Out 2
Out 3
Out 4
Out 5
Out 6
Out 7
COM
+24V dc
IN4004 Diode
Relay or Solid
State dc Outputs
24V dc common
VAC/DC
Out 0
Out 1
Out 2
Out 3
Out 4
Out 5
Out 6
Out 7
COM
(A surge suppressor
can also be used.)
Surge Suppression for Inductive ac Load Devices
Output Device Output DeviceOutput Device
Varistor
RC Network
Surge
Suppressor
The following diagram shows an output with a suppression device. We
recommend that you locate the suppression device as close as possible to the
load device.
If the outputs are dc, we recommend that you use an 1N4004 diode for surge
suppression, as shown below. For inductive dc load devices, a diode is suitable.
A 1N4004 diode is acceptable for most applications. A surge suppressor can
also be used. See Table 3.2 for recommended suppressors. As shown below,
these surge suppression circuits connect directly across the load device.
Publication 1762-UM001G-EN-P - March 2011
Suitable surge suppression methods for inductive ac load devices include a
varistor, an RC network, or an Allen-Bradley surge suppressor, all shown
below. These components must be appropriately rated to suppress the
switching transient characteristic of the particular inductive device. See the
table on page 3-5 for recommended suppressors.
Page 39

Wire Your Controller 3-5
Recommended Surge Suppressors
Use the Allen-Bradley surge suppressors shown in the following table for use
with relays, contactors, and starters.
Table 3.2 Recommended Surge Suppressors
Device Coil Voltage Suppressor Catalog
Number
Bulletin 509 Motor Starter
Bulletin 509 Motor Starter
Bulletin 100 Contactor
Bulletin 100 Contactor
120V ac
240V ac
120V ac
240V ac
Bulletin 709 Motor Starter 120V ac
Bulletin 700 Type R, RM Relays ac coil None Required
Bulletin 700 Type R Relay
Bulletin 700 Type RM Relay
Bulletin 700 Type R Relay
Bulletin 700 Type RM Relay
Bulletin 700 Type R Relay
Bulletin 700 Type RM Relay
Bulletin 700 Type R Relay
Bulletin 700 Type RM Relay
Bulletin 700 Type R Relay
Bulletin 700 Type RM Relay
12V dc
12V dc
24V dc
24V dc
48V dc
48V dc
115-125V dc
115-125V dc
230-250V dc
230-250V dc
Bulletin 700 Type N, P, or PK Relay 150V max, ac or dc
Miscellaneous electromagnetic
150V max, ac or dc
devices limited to 35 sealed VA
(1)
599-K04
599-KA04
(1)
199-FSMA1
199-FSMA2
1401-N10
(2)
199-FSMA9
199-FSMA9
199-FSMA9
199-FSMA10
199-FSMA11
700-N24
700-N24
(2)
(2)
(2)
(2)
(1) Varistor – Not recommended for use on relay outputs.
(2) RC Type – Do not use with Triac outputs.
Publication 1762-UM001G-EN-P - March 2011
Page 40

3-6 Wire Your Controller
ATTENTION
TIP
ATTENTION
Grounding stamping
Ground the Controller
All devices connected to the RS-232 channel must be referenced to controller ground, or
be floating (not referenced to a potential other than ground). Failure to follow this
procedure may result in property damage or personal injury.
• For 1762-L24BWA, 1762-L40BWA, 1762-L24BWAR, and 1762-L40BWAR controllers:
The COM of the sensor supply is also connected to chassis ground internally. The
24V dc sensor power source should not be used to power output circuits. It should
only be used to power input devices.
• For 1762-L24BXB, 1762-L40BXB, 1762-L24BXBR, and 1762-L40BXBR controllers:
The VDC NEUT or common terminal of the power supply is also connected to
chassis ground internally.
In solid-state control systems, grounding and wire routing helps limit the
effects of noise due to electromagnetic interference (EMI). Run the ground
connection from the ground screw of the controller to the ground bus prior to
connecting any devices. Use AWG #14 wire. For AC-powered controllers, this
connection must be made for safety purposes.
This product is intended to be mounted to a well grounded mounting surface
such as a metal panel. Refer to the Industrial Automation Wiring and
Grounding Guidelines, publication 1770-4.1, for additional information.
Additional grounding connections from the mounting tab or DIN rail, if used,
are not required unless the mounting surface cannot be grounded.
Use all four mounting positions for panel mounting
installation.
Remove the protective debris strip before applying
power to the controller. Failure to remove the strip
may cause the controller to overheat.
Publication 1762-UM001G-EN-P - March 2011
Page 41

Wire Your Controller 3-7
TIP
VACL1VAC
NEUT
VAC
DC 0
VAC
DC 1
VAC
DC 2
OUT 3 VAC
DC 4
OUT 4 OUT 7 OUT 9
OUT 0 OUT 1 OUT 2 VAC
DC3
OUT 5 OUT 6 OUT 8
IN 0 IN 2 IN 5 IN 7 IN 9
COM
1
IN 11 IN 13
NC
COM
0
IN 1 IN 3 IN 4 IN 6 IN 8 IN 10 IN 12
NC
Inputs
Outputs
Group 0 Group 1
G
r
o
u
p
0
G
r
o
u
p
1
G
r
o
u
p
2
G
r
o
u
p
3
G
r
o
u
p
4
Wiring Diagrams
The following illustrations show the wiring diagrams for the MicroLogix 1200
controllers. Controllers with dc inputs can be wired as either sinking or
sourcing inputs. (Sinking and sourcing does not apply to ac inputs.) Refer to
Sinking and Sourcing Wiring Diagrams on page 3-12
The controller terminal block layouts are shown below. The shading on the
labels indicates how the terminals are grouped. A detail of the groupings is
shown in the table following the terminal block layouts.
This symbol denotes a protective earth ground
terminal which provides a low impedance path
between electrical circuits and earth for safety
purposes and provides noise immunity
improvement. This connection must be made for
safety purposes on ac-powered controllers.
This symbol denotes a functional earth ground
terminal which provides a low impedance path
between electrical circuits and earth for non-safety
purposes, such as noise immunity improvement.
Terminal Block Layouts
Figure 3.1 1762-L24AWA and 1762-L24AWAR
Publication 1762-UM001G-EN-P - March 2011
Page 42

3-8 Wire Your Controller
ATTENTION
VACL1VAC
NEUT
VAC
DC 0
OUT 0
VAC
DC 1
OUT 1
VAC
DC 2
OUT 2
VAC
DC 3
OUT 3
VAC
DC 4
OUT 4
OUT 5
OUT 6
OUT 7
OUT 8
OUT 9
+24
VDC
24
COM
IN 0 IN 2 IN 5 IN 7 IN 9
COM
1
IN 11 IN 13
COM
0
IN 1 IN 3 IN 4 IN 6 IN 8 IN 10 IN 12
Group 0
Group 1
G
r
o
u
p
0
G
r
o
u
p
1
G
r
o
u
p
2
G
r
o
u
p
3
G
r
o
u
p
4
Inputs
Outputs
+24
VDC
VDC
NEUT
OUT0OUT1OUT2OUT4OUT6VAC
DC 3
OUT
8
IN 0 IN 2 IN 5 IN 7 IN 9
COM
1
IN 11 IN 13
NC
COM
0
IN 1 IN 3 IN 4 IN 6 IN 8 IN 10 IN 12
NC
VAC
DC 0
VAC
DC 1
VDC2OUT3OUT
5
OUT7OUT
9
COM
2
Group 0
Group 1
G
r
o
u
p
0
G
r
o
u
p
1
G
r
o
u
p
2
G
r
o
u
p
3
OUT
11
VAC
DC 4
OUT
15
VAC
L1
OUT0OUT
1
OUT2VAC
DC 3
OUT
7
OUT
5
OUT
8
OUT
13
OUT10VAC
DC 5
NC
IN 0 IN 2 IN 5 IN 7 IN 8
COM
1
IN 10 IN 12 IN 14 IN 16 IN 18 IN 20 IN 22
COM
0
IN 1 IN 3 IN 4 IN 6 IN 9 IN 11 IN 13 IN 15 IN 17 IN 19 IN 21 IN 23
COM
2
NC
VAC
NEUT
VAC
DC 0
VAC
DC 1
VAC
DC 2
OUT
3
OUT4OUT
6
OUT
9
OUT
14
OUT
12
Inputs
Outputs
Group 0 Group 1
G
r
o
u
p
0
Group 2
G
r
o
u
p
1
G
r
o
u
p
2
G
r
o
u
p
3
G
r
o
u
p
4
G
r
o
u
p
5
Figure 3.2 1762-L24BWA and 1762-L24BWAR
The 24V dc sensor supply of the 1762-L24BWA and
1762-L24BWAR should not be used to power output
circuits. It should only be used to power input devices (for
example sensors and switches). See Master Control Relay
on page 2-8 for information on MCR wiring in output
circuits.
Figure 3.3 1762-L24BXB and 1762-L24BXBR
Figure 3.4 1762-L40AWA and 1762-L40AWAR
Publication 1762-UM001G-EN-P - March 2011
Page 43

Figure 3.5 1762-L40BWA and 1762-L40BWAR
ATTENTION
OUT
11
VAC
DC 4
VAC
NEUT
VAC
DC 0
VAC
DC 1
VAC
DC 2
OUT
3
OUT
46
OUT
OUT
9
OUT
14
OUT
12
OUT
15
VAC
L1
OUT0OUT1OUT2VAC
DC 3
OUT
7
OUT
5
OUT
8
OUT
13
OUT10VAC
DC 5
+24
VDC
COM
0
IN 1 IN 3 IN 4 IN 6 IN 9 IN 11 IN 13 IN 15 IN 17 IN 19 IN 21
COM
2
IN 23
24
COM
IN 0 IN 2 IN 5 IN 7 IN 8
COM
1
IN 10 IN 12 IN 14 IN 16 IN 18 IN 20
IN 22
G
r
o
u
p
1
G
r
o
u
p
2
G
r
o
u
p
3
G
r
o
u
p
4
G
r
o
u
p
5
Inputs
Outputs
Group 0 Group 1 Group 2
G
r
o
u
p
0
OUT
11
OUT
9
VDC
NEUT
VAC
DC 0
VAC
DC 1
VDC
2
OUT
3
OUT5OUT
7
VAC
DC 3
OUT
14
OUT
12
OUT
15
+24
VDC
OUT0OUT1OUT2OUT
4
OUT
8
OUT
6
COM
2
OUT
13
OUT10VAC
DC 4
NC
NC
COM
0
IN 1 IN 3 IN 4 IN 6 IN 9 IN 11 IN 13 IN 15 IN 17 IN 19 IN 21
COM
2
IN 23
IN 0 IN 2 IN 5 IN 7 IN 8
COM
1
IN 10 IN 12 IN 14 IN 16 IN 18 IN 20
IN 22
Inputs
Outputs
Group 0 Group 1
G
r
o
u
p
0
Group 2
G
r
o
u
p
2
G
r
o
u
p
1
G
r
o
u
p
3
G
r
o
u
p
4
The 24V dc sensor supply of the 1762-L40BWA and
1762-L40BWAR should not be used to power output
circuits. It should only be used to power input devices (for
example sensors and switches). See Master Control Relay
on page 2-8 for information on MCR wiring in output
circuits.
Wire Your Controller 3-9
Figure 3.6 1762-L40BXB and 1762-L40BXBR
Terminal Groupings
Table 3.3 Input Terminal Grouping
Controller Inputs
1762-L24AWA
1762-L24AWAR
1762-L24BWA
1762-L24BWAR
1762-L24BXB
1762-L24BXBR
1762-L40AWA
1762-L40AWAR
Input Group Common Terminal Input Terminal
Group 0 AC COM 0 I/0 through I/3
Group 1 AC COM 1 I/4 through I/13
Group 0 DC COM 0 I/0 through I/3
Group 1 DC COM 1 I/4 through I/13
Group 0 DC COM 0 I/0 through I/3
Group 1 DC COM 1 I/4 through I/13
Group 0 AC COM 0 I/0 through I/3
Group 1 AC COM 1 I/4 through I/7
Group 2 AC COM 2 I/8 through I/23
Publication 1762-UM001G-EN-P - March 2011
Page 44

3-10 Wire Your Controller
Table 3.3 Input Terminal Grouping
Controller Inputs
Input Group Common Terminal Input Terminal
1762-L40BWA
1762-L40BWAR
Group 0 DC COM 0 I/0 through I/3
Group 1 DC COM 1 I/4 through I/7
Group 2 DC COM 2 I/8 through I/23
1762-L40BXB
1762-L40BXBR
Group 0 DC COM 0 I/0 through I/3
Group 1 DC COM 1 I/4 through I/7
Group 2 DC COM 2 I/8 through I/23
Table 3.4 Output Terminal Grouping
Controller Outputs
Output
Group
Voltage
Term ina l
Output
Term ina l
Group 0 VAC/VDC 0 O/0
1762-L24AWA
1762-L24AWAR
Group 1 VAC/VDC 1 O/1
Group 2 VAC/VDC 2 O/2 through O/3
Group 3 VAC/VDC 3 O4 through O/5
Group 4 VAC/VDC 4 O/6 through O/9
Group 0 VAC/VDC 0 O/0
1762-L24BWA
1762-L24BWAR
Group 1 VAC/VDC 1 O/1
Group 2 VAC/VDC 2 O/2 through O/3
Group 3 VAC/VDC 3 O/4 through O/5
Group 4 VAC/VDC 4 O/6 through O/9
Group 0 VAC/VDC 0 O/0 Isolated Relay
Group 1 VAC/VDC 1 O/1
1762-L24BXB
1762-L24BXBR
Group 2 VDC 2, VDC
COM 2
O/2 through O/6 Isolated FET
Group 3 VAC/VDC 3 O/7 through O/9 Isolated Relay
Group 0 VAC/VDC 0 O/0
Group 1 VAC/VDC 1 O/1
Group 2 VAC/VDC 2 O/2 through O/3
1762-L40AWA
1762-L40AWAR
Group 3 VAC/VDC 3 O/4 through O/7
Group 4 VAC/VDC 4 O/8 through
O/11
Group 5 VAC/VDC 5 O/12 through
O/15
Group 0 VAC/VDC 0 O/0
Group 1 VAC/VDC 1 O/1
Group 2 VAC/VDC 2 O/2 through O/3
1762-L40BWA
1762-L40BWAR
Group 3 VAC/VDC 3 O/4 through O/7
Group 4 VAC/VDC 4 O/8 through
O/11
Group 5 VAC/VDC 5 O/12 through
O/15
Description
Isolated Relay
outputs
Isolated Relay
outputs
outputs
outputs
outputs
Isolated Relay
outputs
Isolated Relay
outputs
Publication 1762-UM001G-EN-P - March 2011
Page 45

Table 3.4 Output Terminal Grouping
Controller Outputs
Output
Group
Voltage
Terminal
Output
Terminal
Group 0 VAC/VDC 0 O/0 Isolated Relay
Group 1 VAC/VDC 1 O/1
1762-L40BXB
1762-L40BXBR
Group 2 VDC 2, VDC
COM 2
Group 3 VAC/VDC 3 O/10 through
O/2 through O/9 Isolated FET
O/11 Isolated Relay
Group 4 VAC/VDC 4 O/12 through
O/15
Wire Your Controller 3-11
Description
outputs
outputs
outputs
Publication 1762-UM001G-EN-P - March 2011
Page 46

3-12 Wire Your Controller
ATTENTION
TIP
L1a
L1bL1a
L1b
L2a
L2b
IN 0 IN 2 IN 5 IN 7 IN 9
COM
1
IN 11 IN 13
NC
COM
0
IN 1 IN 3 IN 4 IN 6 IN 8 IN 10 IN 12
NC
Sinking and Sourcing Wiring Diagrams
Any of the MicroLogix 1200 DC embedded input groups can be configured as
sinking or sourcing depending on how the DC COM is wired on the group.
Refer to pages 3-13 through 3-17 for sinking and sourcing wiring diagrams.
Type Definition
Sinking Input The input energizes when high-level voltage is applied to the input
terminal (active high). Connect the power supply VDC (-) to the input
group’s COM terminal.
Sourcing Input The input energizes when low-level voltage is applied to the input
terminal (active low). Connect the power supply VDC (+) to the input
group’s COM terminal.
The 24V dc sensor power source must not be used to
power output circuits. It should only be used to
power input devices (for example sensors and
switches). See Master Control Relay on page 2-8 for
information on MCR wiring in output circuits.
1762-L24AWA, 1762-L24BWA, 1762-L24BXB, 1762-L24AWAR, 1762-L24BWAR and 1762-L24BXBR Wiring Diagrams
In the following diagrams, lower case alphabetic
subscripts are appended to common-terminal
connections to indicate that different power sources
may be used for different isolated groups, if desired.
Figure 3.7 1762-L24AWA and 1762-L24AWAR Input Wiring Diagram
(1) “NC” terminals are not intended for use as connection points.
(1)
Publication 1762-UM001G-EN-P - March 2011
Page 47

Wire Your Controller 3-13
+24
VDC
24
COM
IN 0 IN 2 IN 5 IN 7 IN 9
COM 1
IN 11 IN 13
COM 0
IN 1 IN 3 IN 4 IN 6 IN 8 IN 10 IN 12
-DCb
+DCb
+DCb
+DCa
+DCa
+DC
-DCa-DC
+24
VDC
24
COM
IN 0 IN 2 IN 5 IN 7 IN 9
COM 1
IN 11 IN 13
COM 0
IN 1 IN 3 IN 4 IN 6 IN 8 IN 10 IN 12
-DCb
-DC +DCa
-DCb
+DCb
+DC
-DCa
-DCa
24V dc Sensor Power
Figure 3.8 1762-L24BWA and 1762-L24BWAR Sinking Input Wiring Diagram
Figure 3.9 1762-L24BWA and 1762-L24BWAR Sourcing Input Wiring Diagram
Publication 1762-UM001G-EN-P - March 2011
Page 48

3-14 Wire Your Controller
NOT
USED
IN 0 IN 2 IN 5 IN 7 IN 9
COM 1
IN 11 IN 13
COM 0
IN 1 IN 3 IN 4 IN 6 IN 8 IN 10 IN 12
-DCb
-DCa
+DCb
+DCb
+DCa
+DCa
NOT
USED
NOT
USED
0 IN 2 IN 5 IN 7 IN 9
COM1
IN 11 IN 13
COM0
IN 1 IN 3 IN 4 IN 6 IN 8 IN 10 IN 12
+DCb
+DCa
-DCb
-DCb
-DCa
-DCa
NOT
USED
CR CR
CRCR
L2
L1
-DCa
+DCa L1a L1b
L2d
L2c L1d
L2a L2b
L2b
L1c
L2d
L2c
VACL1VAC
NEUT
VAC
DC 0
VAC
DC 1
VAC
DC 2
OUT 3 VAC
DC 4
OUT 4 OUT 7 OUT 9
OUT 0 OUT 1 OUT 2 VAC
DC 3
OUT 5 OUT 6 OUT 8
Figure 3.10 1762-L24BXB and 1762-L24BXBR Sinking Input Wiring Diagram
Figure 3.11 1762-L24BXB and 1762-L24BXBR Sourcing Input Wiring Diagram
Publication 1762-UM001G-EN-P - March 2011
Figure 3.12 1762-L24AWA, 1762-L24BWA, 1762-L24AWAR, and 1762-L24BWAR
Output Wiring Diagram
Page 49

Wire Your Controller 3-15
CR
CRCR
+DC
-DCa -DCb -DCc
+DCa +DCb +DCc
-DCc
L1d
L2d
L2d
-DC
+24
VDC
VDC
NEUT
VAC
DC 0
VAC
DC 1
VDC2OUT
3
COM
2
OUT
5
OUT7OUT
9
OUT0OUT1OUT2OUT4OUT
6
VAC
OUT
8
DC 3
CR
NC
IN 0 IN 2 IN 5 IN 7 IN 8
COM
1
IN 10 IN 12 IN 14 IN 16 IN 18 IN 20 IN 22
COM
0
IN 1 IN 3 IN 4 IN 6 IN 9 IN 11 IN 13 IN 15 IN 17 IN 19 IN 21 IN 23
COM
2
NC
L2a
L2b
L2c
L1a
L1b L1c
L1a L1cL1b
IN 0 IN 2 IN 5 IN 7 IN 8
COM
1
IN 10 IN 12 IN 14 IN 16 IN 18 IN 20 IN 22
COM
0
IN 1 IN 3 IN 4 IN 6 IN 9 IN 11 IN 13 IN 15 IN 17 IN 19 IN 21 IN 23
COM
2
+24
VDC
24
COM
-DC
-DCa
-DCc
-DCb
+DCb
+DCc
+DCc
+DCb
+DC
+DCa
+DCa
Figure 3.13 1762-L24BXB and 1762-L24BXBR Output Wiring Diagram
1762-L40AWA, 1762-L40BWA, 1762-L40BXB, 1762-L40AWAR, 1762-L40BWAR and 1762-L40BXBR Wiring Diagrams
Figure 3.14 1762-L40AWA and 1762-L40AWAR Input Wiring Diagram
Figure 3.15 1762-L40BWA and 1762-L40BWAR Sinking Input Wiring Diagram
Publication 1762-UM001G-EN-P - March 2011
Page 50

3-16 Wire Your Controller
IN 0 IN 2 IN 5 IN 7 IN 8
COM
1
IN 10 IN 12 IN 14 IN 16 IN 18 IN 20 IN 22
COM
0
IN 1 IN 3 IN 4 IN 6 IN 9 IN 11 IN 13 IN 15 IN 17 IN 19 IN 21 IN 23
COM
2
+24
VDC
24
COM
-DC
+DC
+DCa
+DCc
-DCc
-DCc
-DCa
-DCa
-DCb
+DCb
-DCb
IN 0 IN 2 IN 5 IN 7 IN 8
COM
1
IN 10 IN 12 IN 14 IN 16 IN 18 IN 20 IN 22
COM
0
IN 1 IN 3 IN 4 IN 6 IN 9 IN 11 IN 13 IN 15 IN 17 IN 19 IN 21 IN 23
COM
2
NOT
USED
NOT
USED
+DCb
+DCc
+DCc
+DCb
+DCa
+DCa
-DCb
-DCc
-DCa
IN 0 IN 2 IN 5 IN 7 IN 8
COM
1
IN 10 IN 12 IN 14 IN 16 IN 18 IN 20 IN 22
COM
0
IN 1 IN 3 IN 4 IN 6 IN 9 IN 11 IN 13 IN 15 IN 17 IN 19 IN 21 IN 23
COM
2
NOT
USED
NOT
USED
-DCa
-DCa
+DCb
-DCb
-DCb
+DCa
+DCc
-DCc
-DCc
Figure 3.16 1762-L40BWA and 1762-L40BWAR Sourcing Input Wiring Diagram
Figure 3.17 1762-L40BXB and 1762-L40BXBR Sinking Input Wiring Diagram
Publication 1762-UM001G-EN-P - March 2011
Figure 3.18 1762-L40BXB and 1762-L40BXBR Sourcing Input Wiring Diagram
Page 51

Wire Your Controller 3-17
CRCR
CR
CR
CR
CR
CR
CR
L2
L1
L1a L1b L1c
L2a L2b L2c
L2c
L2d L2f
L2f
L2e
L2e
L2d
L1d L1f
L1e
OUT
11
VAC
DC 4
VAC
NEUT
VAC
DC 0
VAC
DC 1
VAC
DC 2
OUT
3
OUT
46
OUT
OUT
9
OUT
14
OUT
12
OUT
15
VAC
L1
OUT0OUT1OUT2VAC
DC 3
OUT
7
OUT
5
OUT
8
OUT
13
OUT10VAC
DC 5
CRCR
CR
CR
CR
CR
CR
CR
-DC
-DCe
-DCe
+DCd
-DCd
-DCc
-DCc
-DCd
-DCa
+DC
-DCb
+DCe
+DCa +DCb
+DCc
OUT
11
OUT
VDC
NEUT
VAC
DC 0
VAC
DC 1
VDC
2
OUT3OUT
57
OUT
VAC
DC3
OUT
14
OUT
12
OUT
15
+24
VDC
OUT0OUT
1
OUT
2
OUT8COM OUT
13
OUT10VAC
DC 4
9
OUT4OUT
6
CR
Figure 3.19 1762-L40AWA, 1762-L40BWA, 1762-L40AWAR, and 1762-L40BWAR
Output Wiring Diagram
Figure 3.20 1762-L40BXB and 1762-L40BXBR Output Wiring Diagram
Controller I/O Wiring
Minimize Electrical Noise
Because of the variety of applications and environments where controllers are
installed and operating, it is impossible to ensure that all environmental noise
will be removed by input filters. To help reduce the effects of environmental
noise, install the MicroLogix 1200 system in a properly rated (NEMA)
enclosure. Make sure that the MicroLogix 1200 system is properly grounded.
A system may malfunction due to a change in the operating environment after
a period of time. We recommend periodically checking system operation,
particularly when new machinery or other noise sources are installed near the
Micrologix 1200 system.
Publication 1762-UM001G-EN-P - March 2011
Page 52

3-18 Wire Your Controller
IN 7
IN 5
IN 3
IN 1
AC
COM
IN 6
IN 4
IN 2
IN 0
L1
L2
100/120V ac
AC
COM
Common
connected
internally.
IN 7
IN 5
IN 3
IN 1
DC
COM
IN 6
IN 4
IN 2
IN 0
24V dc
DC
COM
Common connected
internally.
-DC (sinking)
+DC (sourcing)
+DC (sinking)
-DC (sourcing)
Expansion I/O Wiring
The following sections show the discrete and analog expansion I/O wiring
diagrams.
Discrete Wiring Diagrams
Figure 3.21 1762-IA8 Wiring Diagram
Publication 1762-UM001G-EN-P - March 2011
Figure 3.22 1762-IQ8 Wiring Diagram
Page 53

Figure 3.23 1762-IQ16 Wiring Diagram
IN 7
IN 5
IN 3
IN 1
IN 6
IN 4
IN 2
IN 0
24V dc
IN 15
IN 13
IN 11
IN 9
DC
COM 0
IN 14
IN 12
IN 10
IN 8
24V dc
DC
COM 1
+DC (Sinking)
-DC (Sourcing)
-DC (Sinking)
+DC (Sourcing)
+DC (Sinking)
-DC (Sourcing)
-DC (Sinking)
+DC (Sourcing)
Wire Your Controller 3-19
Publication 1762-UM001G-EN-P - March 2011
Page 54

3-20 Wire Your Controller
44920
OUT 5
VAC
1
OUT 2
OUT 0
OUT 7
OUT 4
OUT 3
OUT 1
VAC
0
OUT 6
CR
CR
CR
CR
CR
CR
L2
L1
L2
L1
Figure 3.24 1762-IQ32T Wiring Diagram
Publication 1762-UM001G-EN-P - March 2011
Figure 3.25 1762-OA8 Wiring Diagram
Page 55

Figure 3.26 1762-OB8 Wiring Diagram
+DC
24V dc (source)
-DC
OUT 6
OUT 4
OUT 2
OUT 0
OUT 7
OUT 5
OUT 3
OUT 1
+VDC
CR
CR
CR
CR
CR
CR
DC COM
OUT 6
OUT 2
OUT 0
OUT 10
OUT 5
OUT 7
OUT 9
OUT 11
OUT 13
OUT 15
OUT 14
OUT 3
OUT 1
VDC+
OUT 8
OUT 12
CR
CR
CR
CR
CR
CR
CR
CR
CR
CR
OUT 4
DC COM
24V dc (source)
+DC
-DC
Figure 3.27 1762-OB16 Wiring Diagram
Wire Your Controller 3-21
Publication 1762-UM001G-EN-P - March 2011
Page 56

3-22 Wire Your Controller
44925
44915
Figure 3.28 1762-OB32T Wiring Diagram
Figure 3.29 1762-OV32T Wiring Diagram
Publication 1762-UM001G-EN-P - March 2011
Page 57

Figure 3.30 1762-OW8 Wiring Diagram
OUT 5
VAC-VDC2
OUT 2
OUT 0
OUT 7
OUT 4
OUT3
OUT 1
VAC-VDC 1
OUT 6
CR
CR
CR
CR
CR
CR
L1 VAC1 +
L2 DC1 COM
L1 VAC2 +
L2 DC2 COM
OUT 2
OUT 0
OUT 3
OUT 1
VAC-VDC
0
CR
CR
CR
OUT 6
OUT 4
OUT 7
OUT 5
CR
CR
CR
OUT 10
OUT 8
OUT 11
OUT 9
VAC-VDC
1
CR
CR
CR
OUT 14
OUT 12
OUT 15
OUT 13
CR
CR
CR
L1
L2
+DC
-DC
Wire Your Controller 3-23
Figure 3.31 1762-OW16 Wiring Diagram
Publication 1762-UM001G-EN-P - March 2011
Page 58

3-24 Wire Your Controller
L1-0
L1-1
L1-2
L1-3
L1-4
L1-5
OUT0 N.C.
OUT0 N.O.
OUT1 N.C.
OUT1 N.O.
OUT2 N.C.
OUT2 N.O.
OUT3 N.O.
OUT3 N.C.
OUT4 N.C.
OUT4 N.O.
OUT5 N.C.
OUT5 N.O.
CR
CR
CR
CR
CR
CR
L1 OR +DC
L1 OR +DC
L1 OR +DC
L1 OR +DC
L1 OR +DC
L1 OR +DC
L2 OR -DC
L2 OR -DC
L2 OR -DC
L2 OR -DC
L2 OR -DC
L2 OR -DC
Figure 3.32 1762-OX6I Wiring Diagram
Publication 1762-UM001G-EN-P - March 2011
Page 59

Figure 3.33 1762-IQ8OW6 Wiring Diagram
IN 6
IN 4
IN 3
IN 1
IN 5
IN 2
IN 0
OUT 4
OUT 2
OUT 0
VAC
VDC
VAC
VDC
DC
COM 1
OUT 3
OUT 1
IN 7
L1 or +DC
L1 or +DC
-DC (Sinking)
+DC (Sourcing)
Connected Internally
+DC (Sinking)
-DC (Sourcing)
L2 or -DC
OUT 5
+DC (Sinking)
-DC (Sourcing)
-DC (Sinking)
+DC (Sourcing)
DC
COM 0
CR
CR
CR
CR
Wire Your Controller 3-25
Analog Wiring
System Wiring Guidelines
Consider the following when wiring your analog modules:
• The analog common (COM) is not connected to earth ground inside the
• Channels are not isolated from each other.
• Use Belden 8761, or equivalent, shielded wire.
• Under normal conditions, the drain wire (shield) should be connected to
• To ensure optimum accuracy for voltage type inputs, limit overall cable
• The module does not provide loop power for analog inputs. Use a
module. All terminals are electrically isolated from the system.
the metal mounting panel (earth ground). Keep the shield connection to
earth ground as short as possible.
impedance by keeping all analog cables as short as possible. Locate the
I/O system as close to your voltage type sensors or actuators as
possible.
power supply that matches the input transmitter specifications.
Publication 1762-UM001G-EN-P - March 2011
Page 60

3-26 Wire Your Controller
ATTENTION
1
ON
2
Ch0 Ch1
Current (ON) Default
Voltage (OFF)
Switch Location
1762-IF2OF2 Input Type Selection
Select the input type, current or voltage, using the switches located on the
module’s circuit board and the input type/range selection bits in the
Configuration Data File. Refer to MicroLogix 1200 and 1500 Programmable
Controllers Instruction Set Reference Manual, publication number
1762-RM001. You can access the switches through the ventilation slots on the
top of the module. Switch 1 controls channel 0; switch 2 controls channel 1.
The factory default setting for both switch 1 and switch 2 is Current. Switch
positions are shown below.
1762-IF2OF2 Output Type Selection
The output type selection, current or voltage, is made by wiring to the
appropriate terminals, Iout or Vout, and by the type/range selection bits in the
Configuration Data File. Refer to MicroLogix 1200 and 1500 Programmable
Controllers Instruction Set Reference Manual, publication number
1762-RM001.
Analog outputs may fluctuate for less than a second
when power is applied or removed. This
characteristic is common to most analog outputs.
While the majority of loads will not recognize this
short signal, it is recommended that preventive
measures be taken to ensure that connected
equipment is not affected.
Publication 1762-UM001G-EN-P - March 2011
Page 61

Wire Your Controller 3-27
V Out 1
V Out 0
IN 1 (+)
IN 0 (+)
I Out 1
I Out 0
IN 1 (-)
IN 0 (-)
COM
COM
Common connected
internally.
IN 0 (+)
IN 0 (-)
V out 0
V out 1
I out 0
I out 1
COM
IN 1 (-)
IN 1 (+)
COM
Analog Sensor
Load
1762-IF2OF2 Wiring
The following illustration shows the 1762-IF2OF2 analog expansion I/O
terminal block.
Figure 3.34 1762-IF2OF2 Terminal Block Layout
Figure 3.35 Differential Sensor Transmitter Types
Publication 1762-UM001G-EN-P - March 2011
Page 62

3-28 Wire Your Controller
+
+
-
-
+-+
-
IN +
IN COM
+
-
IN +
IN COM
+
-
IN +
IN COM
Power
Supply
(1)
Tra ns mi tt er
Tra ns mi tt er
Tra ns mi tt er
Supply
Supply
Signal
Signal
Module
Module
Module
2-Wire Transmitter
3-Wire Transmitter
4-Wire Transmitter
Power
Supply
(1)
Power
Supply
(1)
(1) All power supplies rated N.E.C. Class 2.
1
Ch0 Ch1 Ch2 Ch3
ON
2 1ON2
Current (ON Default)
Voltage (OFF)
Switch Location
Figure 3.36 Single-ended Sensor/Transmitter Types
Publication 1762-UM001G-EN-P - March 2011
1762-IF4 Input Type Selection
Select the input type, current or voltage, using the switches located on the
module’s circuit board and the input type/range selection bits in the
Configuration Data File. Refer to MicroLogix 1200 and 1500 Programmable
Controllers Instruction Set Reference Manual, publication number
1762-RM001. You can access the switches through the ventilation slots on the
top of the module.
Page 63

Figure 3.37 1762-IF4 Terminal Block Layout
TIP
IN 1 (+)
IN 0 (+)
IN 1 (-)
IN 0 (-)
IN 3 (+)
IN 2 (+)
IN 3 (-)
IN 2 (-)
COM
COM
Commons internally connected.
IN 0 (+)
IN 0 (-)
IN 3 (+)
IN 3 (-)
IN 2 (+)
IN 2 (-)
COM
IN 1 (-)
IN 1 (+)
COM
Analog Sensor
Figure 3.38 Differential Sensor Transmitter Types
Wire Your Controller 3-29
Grounding the cable shield at the module end only
usually provides sufficient noise immunity.
However, for best cable shield performance, earth
ground the shield at both ends, using a 0.01µF
capacitor at one end to block AC power ground
currents, if necessary.
Publication 1762-UM001G-EN-P - March 2011
Page 64

3-30 Wire Your Controller
+
+
-
-
+-+
-
IN +
IN COM
+
-
IN +
IN COM
+
-
IN +
IN COM
Power
Supply
(1)
Power
Supply
(1)
Power
Supply
(1)
Transmitter
Transmitter
Transmitter
Module
Module
Module
Supply Signal
Supply
Signal
2-Wire Transmitter
3-Wire Transmitter
4-Wire Transmitter
(1) All power supplies rated N.E.C. Class 2.
V out 3
V out 2
V out 1
V out 0
I out 3
I out 2
I out 1
I out 0
COM
COM
Commons connected internally
Figure 3.39 Sensor/Transmitter Types
Publication 1762-UM001G-EN-P - March 2011
1762-OF4 Output Type Selection
The output type selection, current or voltage, is made by wiring to the
appropriate terminals, Iout or Vout, and by the type/range selection bits in the
Configuration Data File.
1762-OF4 Terminal Block Layout
Page 65

1762-OF4 Wiring
I out 0
I out 1
V out 2
V out 3
V out 0
V out 1
COM
I out 3
I out 2
COM
Current Load
Voltage Load
Wire Your Controller 3-31
Publication 1762-UM001G-EN-P - March 2011
Page 66

3-32 Wire Your Controller
Notes:
Publication 1762-UM001G-EN-P - March 2011
Page 67

Communication Connections
Chapter
4
Introduction
This chapter describes how to communicate to your control system. The
method you use and cabling required to connect your controller depends on
what type of system you are employing. This chapter also describes how the
controller establishes communication with the appropriate network. Topics
include:
• supported communication protocols
• default communication configurations
• using communications toggle push button
• connecting to RS-232 port
• connecting to DH-485 network
• connecting to AIC+
• DeviceNet communications
MicroLogix 1200 controllers with the additional communications port
(1762-L24AWAR, 1762-L24BWAR, 1762-L24BXBR, 1762-L40AWAR,
1762-L40BWAR, 1762-L40BXBR) offer advanced communications options,
providing a clean, cost effective solution for applications requiring a network
connection and HMI.
The additional communications port (Programmer/HMI Port) enables two
communication devices to be connected to the controller simultaneously. For
example, it provides local connectivity of an operator interface or
programming terminal such as DF1 PanelView HMI, IBM-compatible
personal computer using RSLogix 500 programming software, or 1747-PSD
program storage device, and also allows the primary port (Channel 0) to be
connected to either a network, a modem, or an ASCII device such as a barcode
reader or weigh scale.
Supported Communication
MicroLogix 1200 controllers support the following communication protocols
from the primary RS-232 communication channel, Channel 0:
Protocols
• DH-485
• DF1 Full-duplex
• DF1 Half-duplex
• DF1 Radio Modem
• Modbus Master and Slave
• ASCII
1 Publication 1762-UM001G-EN-P - March 2011
Page 68

4-2 Communication Connections
TIP
The 1762-L24AWAR, 1762-L24BWAR, 1762-L24BXBR, 1762-L40AWAR,
1762-L40BWAR, and 1762-L40BXBR controllers are equipped with an
additional RS-232 communication channel called the Programmer/HMI Port,
which supports DH Full-duplex only. The controller cannot initiate messages
through this port. It can only respond to messages sent to it. All
communication parameters are fixed and cannot be changed by a user.
See Default Communication Configuration on page 4-2 for the configuration
settings.
For more information on MicroLogix 1200 communications, refer to the
MicroLogix 1200 and MicroLogix 1500 Programmable Controllers Instruction
Set Reference Manual, publication number 1762-RM001.
Default Communication Configuration
The MicroLogix 1200 has the following default communication configuration.
The same default configuration is applied for both Channel 0 and the
Programmer/HMI Port (for 1762-LxxxxxR only). The configurations for the
Programmer/HMI Port are fixed and you cannot change them.
For Channel 0, the default configuration is present
when:
• The controller is powered-up for the first time.
• The communications toggle push button specifies
default communications (the DCOMM LED is on).
• An OS upgrade is completed.
See Appendix E for more information about communicating.
Table 4.1 DF1 Full-duplex Default Configuration Parameters
Parameter Default
Baud Rate 19.2K
Parity none
Source ID (Node Address) 1
Control Line no handshaking
Stop Bits 1
Publication 1762-UM001G-EN-P - March 2011
Page 69

Communication Connections 4-3
TIP
COM
COM
0
1
0
1
Communications toggle
push button
Use the Communications Toggle Push Button
The Communications toggle push button is located on the processor under
the processor door (if installed), as shown below.
Use the Communications toggle push button to change from the user-defined
communication configuration to the default communications mode and back
on Channel 0. The parameters of the Programmer/HMI Port are fixed at the
default communications configuration. The Default Communications
(DCOMM) LED operates to show when the controller is in the default
communications mode (settings shown on page 4-2).
The Communications toggle push button must be
pressed and held for one second to activate.
The Communications toggle push button only affects
the communication configuration of Channel 0.
Publication 1762-UM001G-EN-P - March 2011
Page 70

4-4 Communication Connections
ATTENTION
Connect to the RS-232 Port
There are two ways to connect the MicroLogix 1200 programmable controller
to your personal computer using the DF1 protocol: using a point-to-point
connection, or using a modem. Descriptions of these methods follow.
All devices connected to the RS-232 channel must be
referenced to controller ground, or be floating (not
referenced to a potential other than ground). Failure
to follow this procedure may result in property
damage or personal injury.
• For 1762-L24BWA, 1762-L40BWA, 1762-L24BWAR
and 1762-L40BWAR controllers:
The COM of the sensor supply is also connected
to chassis ground internally. The 24V dc sensor
power source should not be used to power
output circuits. It should only be used to power
input devices.
• For 1762-L24BXB, 1762-L40BXB, 1762-L24BXBR
and 1762-L40BXBR controllers:
The VDC NEUT or common terminal of the
power supply is also connected to chassis ground
internally.
Table 4.2 Available Communication Cables
Communication Cables Length
1761-CBL-PM02 series C or later 2 m (6.5 ft)
1761-CBL-HM02 series C or later 2 m (6.5 ft)
1761-CBL-AM00 series C or later 45 cm (17.7 in)
1761-CBL-AP00 series C or later 45 cm (17.7 in)
2707-NC8 series A or later 2 m (6.5 ft)
2707-NC9 series B or later 15 m (49.2 ft)
2707-NC10 series B or later 2 m (6.5 ft)
2707-NC11 series B or later 2 m (6.5 ft)
Publication 1762-UM001G-EN-P - March 2011
Page 71

Communication Connections 4-5
TERM
A
B
COM
SHLD
CHS GND
TX
TX PWR
TX
DC SOURCE
CABLE
EXTERNAL
1761-CBL-AM00 or 1761-CBL-HM02
(1)
1747-CP3 or 1761-CBL-AC00
MicroLogix 1200
Channel 0 or Programmer/HMI Port
24V dc
MicroLogix 1200 provides power to the AIC+ or an
external power supply may be used.
Personal Computer
IMPORTANT
Make a DF1 Point-to-Point Connection
You can connect the MicroLogix 1200 programmable controller to your
personal computer using a serial cable (1761-CBL-PM02) from your personal
computer’s serial port to the controller via Channel 0 and/or the
Programmer/HMI Port (for 1762-LxxxxxR only). The recommended
protocol for this configuration is DF1 Full-duplex.
We recommend using an Advanced Interface Converter (AIC+), catalog
number 1761-NET-AIC, as your optical isolator, as shown on the following
page. See page 4-13 for specific AIC+ cabling information.
(1) Series C or higher cables are required.
Use a Modem
You can use modems to connect a personal computer to one MicroLogix 1200
controller (using DF1 Full-duplex protocol), to multiple controllers (using
DF1 Half-duplex protocol), or Modbus RTU Slave protocol via Channel 0, as
shown in the following illustration. (See Appendix E for information on types
of modems you can use with the micro controllers.
Do not attempt to use DH-485 protocol through
modems under any circumstance.
Publication 1762-UM001G-EN-P - March 2011
Page 72

4-6 Communication Connections
TERM
A
B
COM
SHLD
CHS GND
TX
TX PWR
TX
DC SOURCE
CABLE
EXTERNAL
Modem Cable
(straight-through)
Personal Computer
Modem
Optical Isolator
(recommended)
Modem
MicroLogix 1200
Channel 0
Protocol Options
• DF1 Full-duplex protocol (to 1 controller)
• DF1 Half-duplex protocol (to multiple controllers)
• Modbus RTU Slave protocol
TERM
A
B
COM
SHLD
CHS GND
TX
TX PWR
TX
DC SOURCE
CABLE
EXTERNAL
1761-CBL-AM00 or 1761-CBL-HM02
(1)
User-supplied modem cable
Modem
MicroLogix 1200
Channel 0
24V dc
MicroLogix 1200 provides power to the AIC+ or an external power
supply may be used. See Appendix F, System Loading and Heat
Dissipation.
We recommend using an AIC+, catalog number 1761-NET-AIC, as your
optical isolator. See page 4-13 for specific AIC+ cabling information.
Isolated Modem Connection
Using an AIC+ to isolate the modem is illustrated below.
(1) Series C or higher cables are required.
For additional information on connections using the AIC+, refer to the
Advanced Interface Converter (AIC+) User Manual, publication
1761-UM004.
Publication 1762-UM001G-EN-P - March 2011
Page 73

Communication Connections 4-7
DTE Device
(AIC+,
MicroLogix,
SLC, PLC)
DCE Device
(Modem,
PanelView)
9-Pin 25-Pin 9-Pin
3 TXD TXD 2 3
2 RXD RXD 3 2
5GND GND7 5
1 DCD DCD 8 1
4DTR DTR204
6 DSR DSR 6 6
8 CTS CTS 5 8
7 RTS RTS 4 7
DTE Device
(AIC+,
MicroLogix,
SLC, PLC)
DCE Device
(Modem,
PanelView)
9-Pin 25-Pin 9-Pin
3TXD TXD 2 3
2 RXD RXD 3 2
5GND GND 7 5
1 DCD DCD 8 1
4DTR DTR 20 4
6 DSR DSR 6 6
8 CTS CTS 5 8
7 RTS RTS 4 7
Construct Your Own Modem Cable
If you construct your own modem cable, the maximum cable length is
15.24 m (50 ft) with a 25-pin or 9-pin connector. Refer to the following typical
pinout for constructing a straight-through cable:
Construct Your Own Null Modem Cable
If you construct your own null modem cable, the maximum cable length is
15.24 m (50 ft) with a 25-pin or 9-pin connector. Refer to the following typical
pinout:
Publication 1762-UM001G-EN-P - March 2011
Page 74

4-8 Communication Connections
(1)
(1)
(1)
(1)
(2)
(2)
(2)
(2)
(3)
(3)
(3)
(3)
0
1
COM
0
1
COM
0
1
COM
SLC 5/03
processor
MicroLogix 1200
MicroLogix 1200
MicroLogix 1200
CH0
CH0
CH0 to port 1
or port 2
CH0 to port 1
or port 2
1761-CBL-AP00 or 1761-CBL-PM02
(4)
1761-CBL-AM00 or 1761-CBL-HM02
(4)
1761-CBL-AM00 or
1761-CBL-HM02 to
controller
(4)
1761-CBL-AP00 or
1761-CBL-PM02 to
controller
(4)
1761-CBL-AP00 or
1761-CBL-PM02 to controller
(4)
1761-CBL-AM00 or
1761-CBL-HM02 to
controller
(4)
DF1
Master
DF1 Slave
DF1
Slave
DF1 Slave
straight 9-25 pin cable
straight 9-25
pin cable
radio modem
or lease line
radio
modem or
lease line
AIC+
AIC+
AIC+
RS-485 DF1 Half-duplex
RS-485 DF1 Half-duplex
Connect to a DF1 Half-duplex Network
Use the following diagram for DF1 Half-duplex Master-Slave protocol without
hardware handshaking.
Publication 1762-UM001G-EN-P - March 2011
(1) DB-9 RS-232 port
(2) mini-DIN 8 RS-232 port
(3) RS-485 port
(4) Series C or higher cables are required.
Page 75

Communication Connections 4-9
TERM
A
B
COM
SHLD
CHS GND
TX
TX PWR
TX
DC SOURCE
CABLE
EXTERNAL
TERM
A
B
COM
SHLD
CHS GND
TX
TX PWR
TX
DC SOURCE
CABLE
EXTERNAL
(2)(3)
(1)
(2)(3)
(1)
MicroLogix 1200
connection from port 1 or port 2
to MicroLogix Channel 0
1761-CBL-AM00
or 1761-CBL-HM02
(4)
1761-CBL-AP00
or 1761-CBL-PM02
(4)
1761-CBL-AP00
or 1761-CBL-PM02
1747-CP3
or 1761-CBL-AC00
24V dc
(user supply required if Port 2 is
not connected to a controller)
AIC+
24V dc
(user supplied)
PC
PC to port 1
or port 2
(1) DB-9 RS-232 port
(2) mini-DIN 8 RS-232 port
(3) RS-485 port
(4) Series C or higher cables are required.
MicroLogix DH-485 Network
AIC+
Belden, shielded,
twisted-pair cable
(see table below)
Connect to a DH-485 Network
The following illustration shows how to connect to a DH-485 network.
Recommended Tools
To connect a DH-485 network, you need tools to strip the shielded cable and
to attach the cable to the AIC+ Advanced Interface Converter. We
recommend the following equipment (or equivalent):
Table 4.3 Working with Cable for DH-485 Network
Description Part Number Manufacturer
Shielded Twisted Pair Cable #3106A or #9842 Belden
Stripping Tool 45-164 Ideal Industries
1/8” Slotted Screwdriver Not Applicable Not Applicable
Publication 1762-UM001G-EN-P - March 2011
Page 76

4-10 Communication Connections
TIP
Belden #3106A
or #9842
Belden #3106A or
#9842
Belden #3106A or
#9842
Connector
Connector
Connector
Incorrect
DH-485 Communication Cable
The suggested DH-485 communication cable is either Belden #3106A or
#9842. The cable is jacketed and shielded with one or two twisted-wire pairs
and a drain wire.
One pair provides a balanced signal line and one additional wire is used for a
common reference line between all nodes on the network. The shield reduces
the effect of electrostatic noise from the industrial environment on network
communication.
The communication cable consists of a number of cable segments
daisy-chained together. The total length of the cable segments cannot exceed
1219 m (4000 ft). However, two segments can be used to extend the DH-485
network to 2438 m (8000 ft). For additional information on connections using
the AIC+, refer to the Advanced Interface Converter (AIC+) User Manual,
publication 1761-UM004.
When cutting cable segments, make them long enough to route them from one
AIC+ to the next, with sufficient slack to prevent strain on the connector.
Allow enough extra cable to prevent chafing and kinking in the cable.
Use these instructions for wiring the Belden #3106A or #9842 cable. (See
Cable Selection Guide on page 4-13 if you are using standard Allen-Bradley
cables.)
Connect the Communication Cable to the DH-485 Connector
We recommend a daisy-chained network. Do not
make the incorrect connection shown below:
Publication 1762-UM001G-EN-P - March 2011
Page 77

Communication Connections 4-11
Orange with White Stripes
White with Orange Stripes
Shrink Tubing Recommended
Blue (#3106A) or
Blue with White
Stripes (#9842)
Drain Wire
6 Termination
5 A
4 B
3 Common
2 Shield
1 Chassis Ground
to Next Device
to Previous Device
Single Cable Connection
When connecting a single cable to the DH-485 connector, use the following
diagram.
Multiple Cable Connection
When connecting multiple cables to the DH-485 connector, use the following
diagram.
Table 4.4 Connections using Belden #3106A Cable
For This Wire/Pair Connect This Wire To This Terminal
Shield/Drain Non-jacketed Terminal 2 - Shield
Blue Blue Terminal 3 - (Common)
White/Orange White with Orange Stripe Terminal 4 - (Data B)
Orange with White Stripe Terminal 5 - (Data A)
Table 4.5 Connections using Belden #9842 Cable
For This Wire/Pair Connect This Wire To This Terminal
Shield/Drain Non-jacketed Terminal 2 - Shield
Blue/White White with Blue Stripe
Cut back - no connection
Blue with White Stripe Terminal 3 - (Common)
White/Orange White with Orange Stripe Terminal 4 - (Data B)
Orange with White Stripe Terminal 5 - (Data A)
(1) To prevent confusion when installing the communication cable, cut back the white with blue stripe wire
immediately after the insulation jacket is removed. This wire is not used by DH-485.
Publication 1762-UM001G-EN-P - March 2011
(1)
Page 78

4-12 Communication Connections
Jumper
Jumper
Belden #3106A or #9842 Cable
1219 m (4000ft) Maximum
Jumper
AIC+ Advanced Interface Converter
(1761-NET-AIC)
3
2
4
5
1
Ground and Terminate the DH-485 Network
Only one connector at the end of the link must have Terminals 1 and 2
jumpered together. This provides an earth ground connection for the shield of
the communication cable.
Both ends of the network must have Terminals 5 and 6 jumpered together, as
shown below. This connects the termination impedance (of 120 ohm) that is
built into each AIC+ as required by the DH-485 specification.
End-of-Line Termination
Connect the AIC+
The AIC+, catalog number 1761-NET-AIC, enables a MicroLogix 1200 to
connect to a DH-485 network. The AIC+ has two RS-232 ports and one
isolated RS-485 port. Typically, there is one AIC+ for each MicroLogix 1200.
When two MicroLogix controllers are closely positioned, you can connect a
controller to each of the RS-232 ports on the AIC+.
The AIC+ can also be used as an RS-232 isolator, providing an isolation
barrier between the MicroLogix 1200 communications port and any
equipment connected to it (for example a personal computer or modem).
The following figure shows the external wiring connections and specifications
of the AIC+.
Publication 1762-UM001G-EN-P - March 2011
Page 79

Communication Connections 4-13
1761-CBL-PM02
(2)
1761-CBL-AP00
(2)
1761-CBL-HM02
(1)
1761-CBL-AM00
(1)
Item Description
1 Port 1 - DB-9 RS-232, DTE
2 Port 2 - mini-DIN 8 RS-232 DTE
3 Port 3 - RS-485 Phoenix plug
4 DC Power Source selector switch
(cable = port 2 power source,
external = external power source connected to item 5)
5 Terminals for external 24V dc power supply and chassis ground
For additional information on connecting the AIC+, refer to the Advanced
Interface Converter (AIC+) User Manual, publication 1761-UM004.
Cable Selection Guide
Cable Length Connections from to AIC+ External
Power Supply
(1)
1761-CBL-AP00
1761-CBL-PM02
Required
(2)
(2)
45 cm (17.7 in)
2m (6.5 ft)
SLC 5/03 or SLC 5/04 processors, ch 0 port 2 yes external
MicroLogix 1000, 1200, or 1500 port 1 yes external
PanelView 550 through NULL modem
port 2 yes external
adapter
DTAM Plus / DTAM Micro port 2 yes external
PC COM port port 2 yes external
(1) External power supply required unless the AIC+ is powered by the device connected to port 2, then the selection switch should be set to cable.
(2) Series C or higher cables are required.
Power
Selection
Switch
(1)
Setting
Publication 1762-UM001G-EN-P - March 2011
Page 80

4-14 Communication Connections
1761-CBL-AC00
1747-CP3
user-supplied cable
1761-CBL-AS03
1761-CBL-AS09
Table 4.6
Cable Length Connections from to AIC+ External
Power Supply
Required
1761-CBL-AM00
1761-CBL-HM02
(1) Series C or higher cables are required.
(2) External power supply required unless the AIC+ is powered by the device connected to port 2, then the selection switch should be set to cable.
(1)
(1)
45 cm (17.7 in)
2m (6.5 ft)
MicroLogix 1000, 1200, or 1500 port 2 no cable
to port 2 on another AIC+ port 2 yes external
(2)
Cable Length Connections from to AIC+ External
Power Supply
Required
1747-CP3
1761-CBL-AC00
(1)
3m (9.8 ft)
45 cm (17.7 in)
SLC 5/03 or SLC 5/04 processor, channel 0port 1 yes external
PC COM port port 1 yes external
(1)
Power
Selection
Switch
Settings
Power
Selection
Switch
Setting
(1)
PanelView 550 through NULL modem
port 1 yes external
adapter
DTAM Plus / DTAM Micro port 1 yes external
Port 1 on another AIC+ port 1 yes external
(1) External power supply required unless the AIC+ is powered by the device connected to port 2, then the selection switch should be set to cable.
Cable Length Connections from to AIC+ External
Power Supply
Required
(1)
Power
Selection
Switch
Setting
straight 9-25 pin — modem or other communication device port 1 yes external
(1) External power supply required unless the AIC+ is powered by the device connected to port 2, then the selection switch should be set to cable.
(1)
Publication 1762-UM001G-EN-P - March 2011
Page 81

Communication Connections 4-15
Programming
Device
Controller
9-Pin D-Shell 8-Pin Mini Din
9RI 24V1
8CTS GND2
7RTS RTS3
6 DSR RXD 4
5GND DCD5
4DTR CTS6
3TXD TXD7
2RXD GND8
1DCD
Cable Length Connections from to AIC+ External
Power Supply
(1)
1761-CBL-AS03
1761-CBL-AS09
3m (9.8 ft)
9.5m (31.17 ft)
SLC 500 Fixed,
SLC 5/01, SLC 5/02, and SLC 5/03
Required
port 3 yes external
processors
PanelView 550 RJ45 port port 3 yes external
(1) External power supply required unless the AIC+ is powered by the device connected to port 2, then the selection switch should be set to cable.
1761-CBL-PM02 Series C (or equivalent) Cable Wiring Diagram
Power
Selection
Switch
(1)
Setting
Recommended User-supplied Components
These components can be purchased from your local electronics supplier.
Table 4.7 User Supplied Components
Component Recommended Model
external power supply and chassis ground power supply rated for 20.4 to 28.8V dc
NULL modem adapter standard AT
straight 9-25 pin RS-232 cable see table below for port information if
making own cables
Publication 1762-UM001G-EN-P - March 2011
Page 82

4-16 Communication Connections
1761-CBL-AP00 or 1761-CBL-PM02
DB-9 RS-232
RS-485 connector
cable straight D connector
Port 1
Port 2
Port 3
6
7
8
9
1
2
3
4
5
4
1
2
5
876
3
6
5
4
3
2
1
Table 4.8 AIC+ Terminals
Pin Port 1: DB-9 RS-232
1 received line signal detector
Port 2
cable)
(2)
: (1761-CBL-PM02
Port 3: RS-485
Connector
24V dc chassis ground
(DCD)
2 received data (RxD) ground (GND) cable shield
3 transmitted data (TxD) request to send (RTS) signal ground
4
DTE ready (DTR)
(1)
received data (RxD)
5 signal common (GND) received line signal detector
(3)
DH-485 data B
DH-485 data A
(DCD)
6
DCE ready (DSR)
(1)
clear to send (CTS)
(3)
termination
7 request to send (RTS) transmitted data (TxD) not applicable
8 clear to send (CTS) ground (GND) not applicable
9 not applicable not applicable not applicable
(1) On port 1, pin 4 is electronically jumpered to pin 6. Whenever the AIC+ is powered on, pin 4 will match the
state of pin 6.
(2) An 8-pin mini DIN connector is used for making connections to port 2. This connector is not commercially
available. If you are making a cable to connect to port 2, you must configure your cable to connect to the
Allen-Bradley cable shown above.
(3) In the 1761-CBL-PM02 cable, pins 4 and 6 are jumpered together within the DB-9 connector.
Publication 1762-UM001G-EN-P - March 2011
Page 83

Communication Connections 4-17
WARNING
ATTENTION
Safety Considerations
This equipment is suitable for use in Class I, Division 2, Groups A, B, C, D or
non-hazardous locations only.
EXPLOSION HAZARD
AIC+ must be operated from an external power
source.
This product must be installed in an enclosure. All
cables connected to the product must remain in the
enclosure or be protected by conduit or other
means.
See Safety Considerations on page 2-3 for additional information.
Install and Attach the AIC+
1. Take care when installing the AIC+ in an enclosure so that the cable
connecting the MicroLogix 1200 controller to the AIC+ does not
interfere with the enclosure door.
2. Carefully plug the terminal block into the RS-485 port on the AIC+ you
are putting on the network. Allow enough cable slack to prevent stress
on the plug.
3. Provide strain relief for the Belden cable after it is wired to the terminal
block. This guards against breakage of the Belden cable wires.
Apply Power to the AIC+
In normal operation with the MicroLogix 1200 programmable controller
connected to port 2 of the AIC+, the controller powers the AIC+. Any AIC+
not connected to a controller requires a 24V dc power supply. The AIC+
requires 120 mA at 24V dc.
If both the controller and external power are connected to the AIC+, the
power selection switch determines what device powers the AIC+.
If you use an external power supply, it must be
24V dc (-15%/+20%). Permanent damage results if a
higher voltage supply is used.
Publication 1762-UM001G-EN-P - March 2011
Page 84

4-18 Communication Connections
ATTENTION
ATTENTION
24VDC
DC
NEUT
CHS
GND
Bottom View
Set the DC Power Source selector switch to EXTERNAL before connecting
the power supply to the AIC+. The following illustration shows where to
connect external power for the AIC+.
Always connect the CHS GND (chassis ground)
terminal to the nearest earth ground. This connection
must be made whether or not an external 24V dc
supply is used.
Power Options
Below are two options for powering the AIC+:
• Use the 24V dc user power supply built into the MicroLogix 1200
controller. The AIC+ is powered through a hard-wired connection
using a communication cable (1761-CBL-HM02, or equivalent)
connected to port 2.
• Use an external DC power supply with the following specifications:
– operating voltage: 24V dc (-15%/+20%)
– output current: 150 mA minimum
– rated NEC Class 2
Make a hard-wired connection from the external supply to the screw
terminals on the bottom of the AIC+.
If you use an external power supply, it must be 24V
dc (-15%/+20%). Permanent damage results if
miswired with the wrong power source.
Publication 1762-UM001G-EN-P - March 2011
Page 85

Communication Connections 4-19
V–
CAN_L
SHIELD
CAN_H
V+
NET
MOD
NODE
DANGER
GND
TX/RX
DeviceNet Node (Port 1)
(Replacement connector
part no. 1761-RPL-RT00)
Use this write-on
area to mark the
DeviceNet node
address.
RS-232 (Port 2)
1761-CBL-AM00
1761-CBL-HM02
1761-CBL-AP00
1761-CBL-PM02
(2)
DeviceNet Communications
You can connect a MicroLogix 1200 to a DeviceNet network using the
DeviceNet Interface (DNI), catalog number 1761-NET-DNI. For additional
information on using the DNI, refer to the DeviceNet Interface User Manual,
publication 1761-6.5. The following figure shows the external wiring
connections of the DNI.
Cable Selection Guide
(1)
Cable Length Connections from to DNI
1761-CBL-AM00
1761-CBL-HM02
45 cm (17.7 in)
2m (6.5 ft)
MicroLogix 1000 port 2
MicroLogix 1200 port 2
Cable Length Connections from to DNI
1761-CBL-AP00
1761-CBL-PM02
45 cm (17.7 in)
2m (6.5 ft)
SLC 5/03 or SLC 5/04 processors,
channel 0
PC COM port port 2
(1) Series C (or higher) cables are required.
Publication 1762-UM001G-EN-P - March 2011
port 2
Page 86

4-20 Communication Connections
Notes:
Publication 1762-UM001G-EN-P - March 2011
Page 87

Use Trim Pots
0
1
COM
Trim Pot 0
Trim Pot 1
Maximum
(fully clockwise)
Minimum
(fully counterclockwise)
Chapter
5
Trim Pot Operation
The processor has two trimming potentiometers (trim pots) which allow
modification of data within the controller. Adjustments to the trim pots
change the value in the corresponding Trim Pot Information (TPI) register.
The data value of each trim pot can be used throughout the control program
as timer, counter, or analog presets depending upon the requirements of the
application.
The trim pots are located below the memory module port cover and to the
right of the communications port, as shown below.
Use a small flathead screwdriver to turn the trim pots. Adjusting their value
causes data to change within a range of 0 to 250 (fully clockwise). The
maximum rotation of each trim pot is three-quarters, as shown below. Trim
pot stability over time and temperature is typically ±2 counts.
Trim pot file data is updated continuously whenever the controller is powered
up.
1 Publication 1762-UM001G-EN-P - March 2011
Page 88

5-2 Use Trim Pots
Trim Pot Information Function File
The composition of the Trim Pot Information (TPI) Function File is described
in the MicroLogix 1200 and 1500 Programmable Controllers Instruction Set
Reference Manual, publication 1762-RM001.
Error Conditions
Error conditions of the TPI Function File are described in the MicroLogix
1200 and 1500 Programmable Controllers Instruction Set Reference Manual,
publication 1762-RM001.
Publication 1762-UM001G-EN-P - March 2011
Page 89

Chapter
TIP
6
Use Real-time Clock and Memory Modules
For more information on ‘Real-time Clock Function
File’ and ‘Memory Module Information File’ refer to
the MicroLogix 1200 and 1500 Programmable
Controllers Instruction Set Reference Manual,
publication 1762-RM001.
Three modules with different levels of functionality are available for use with
the MicroLogix 1200 controller.
Catalog Number Function
Real-time Clock Operation
1762-RTC Real-time Clock
1762-MM1 Memory Module
1762-MM1RTC Memory Module and Real-time Clock
The following sections cover:
• Removal/Insertion Under Power
• Write Data to the Real-time Clock
• RTC Battery Operation
Removal/Insertion Under Power
At power-up and when the controller enters a run or test mode, the controller
determines if a real-time clock module (RTC) is present. If an RTC is present,
its values (date, time and status) are written to the RTC Function File in the
controller.
The RTC module can be installed or removed at any time without risk of
damage to either the module or the controller. If an RTC is installed while the
MicroLogix 1200 is in a run or test mode, the module is not recognized until
either a power cycle occurs or until the controller is placed in a non-executing
mode (program mode, suspend mode or fault condition).
Removal of the RTC during run mode is detected within one program scan.
Removal of the RTC while in run mode causes the controller to write zeros to
the RTC Function File.
1 Publication 1762-UM001G-EN-P - March 2011
Page 90

6-2 Use Real-time Clock and Memory Modules
The following table indicates the accuracy of the RTC for various
temperatures.
Table 6.1 RTC Accuracy
Ambient Temperature
0 °C (+32 °F) +34 … -70 seconds/month
+25 °C (+77 °F) +36 … -68 seconds/month
+40 °C (+104 °F) +29 … -75 seconds/month
+55 °C (+131 °F) -133 … -237 seconds/month
(1) These numbers are maximum worst case values over a 31-day month.
Accuracy
(1)
Write Data to the Real-time Clock
When valid data is sent to the real-time clock from the programming device or
another controller, the new values take effect immediately.
The real-time clock does not recognize or accept invalid date or time data.
Use the Disable Clock button in your RSLogix programming software to
disable the real-time clock before storing a module. This decreases the drain
on the RTC battery during storage.
RTC Battery Operation
The real-time clock has an internal battery that is not replaceable. The RTC
Function File features a battery low indicator bit (RTC:0/BL), which shows
the status of the RTC battery. When the battery is low, the indicator bit is set
(1). This means that the battery may fail within 14 days and the real-time clock
module needs to be replaced. When the battery low indicator bit is clear (0),
the battery level is acceptable or a real-time clock is not attached.
If the RTC battery is low and the controller is powered, the RTC operates
normally. If the controller power is removed and the RTC battery is low, RTC
data is lost.
Life Span Operating Temperature
5 years 0…40 °C (32 … 104 °F) -40 … 60 °C (-40 … 140 °F)
(1) Stored for six months.
Storage Temperature
(1)
Publication 1762-UM001G-EN-P - March 2011
Page 91

Use Real-time Clock and Memory Modules 6-3
ATTENTION
ATTENTION
Operating with a low battery indication for more
than 14 days may result in invalid RTC data unless
power is on continuously.
Memory Module Operation
The memory module supports the following features:
• User Program and Data Back-up
• User Program Compare
• Data File Download Protection
• Memory Module Write Protection
• Removal/Insertion Under Power
Electrostatic discharge can damage the Memory
Module. Do not touch the connector pins or other
sensitive areas.
User Program and Data Back-up
The memory module provides a simple and flexible program/data transport
mechanism, allowing the user to transfer the program and data to the
controller without the use of a personal computer and programming software.
The memory module can store one user program at a time.
During program transfers to or from the memory module, the controller’s
RUN LED flashes.
Publication 1762-UM001G-EN-P - March 2011
Page 92

6-4 Use Real-time Clock and Memory Modules
TIP
IMPORTANT
Program Compare
The memory module can also provide application security, allowing you to
specify that if the program stored in the memory module does not match the
program in the controller, the controller will not enter an executing (run or
test) mode. To enable this feature, set the S:2/9 bit in the system status file. See
‘Status System File’ in the MicroLogix 1200 and 1500 Programmable
Controllers Instruction Set Reference Manual, Publication 1762-RM001 for
more information.
Data File Download Protection
The memory module supports data file download protection. This allows user
data to be saved (not overwritten) during a download.
Data file download protection is only functional if the
processor does not have a fault, size of all protected
data files in the memory module exactly match the
size of protected data files within the controller, and
all protected data files are of the same type. See
‘Protecting Data Files During Download’ in the
MicroLogix 1200 and 1500 Programmable Controllers
Instruction Set Reference Manual, publication
1762-RM001.
Publication 1762-UM001G-EN-P - March 2011
Memory Module Write Protection
The memory module supports write-once, read-many behavior. Write
protection is enabled using your programming software.
Once set, write protection cannot be removed. A
change cannot be made to the control program
stored in a write protected memory module. If a
change is required, use a different memory module.
Removal/Insertion Under Power
The memory module can be installed or removed at any time without risk of
damage to either the memory module or the controller. If a memory module is
installed while the MicroLogix 1200 is executing, the memory module is not
recognized until either a power cycle occurs, or until the controller is placed in
a non-executing mode (program mode, suspend mode or fault condition).
Page 93

Appendix
Specifications
The 1762 specifications include:
• Controller Specifications
• Expansion I/O Specifications
Controller Specifications
Table A.1 General
Attribute 1762-
L24AWA
L24AWAR
Dimensions Height: 90 mm, 1
Width: 110 mm
Depth: 87 mm
Shipping weight 0.9 kg (2.0 lbs) 1.1 kg (2.4 lbs)
Number of I/O 14 inputs and 10 outputs 24 inputs, 16 outputs
Power supply voltage 100 … 240V ac
(-15%, +10%)
at 47…63 Hz
Heat dissipation 15.2 W 15.7 W 17.0 W 21.0 W 22.0 W 27.9 W
Power supply inrush
current
Power supply usage 68VA 70VA 27 W 80VA 82VA 40 W
Power
supply
output
Sensor power output none 250 mA at 24V dc
Input circuit type 120V ac 24V dc
Output circuit type Relay Relay Relay/FET Relay Relay Relay/FET
Relay life - Electrical
Temperature, operating 0…55 °C (32…131 °F) ambient
Temperature, storage -40…+85 °C (-40…185 °F) ambient
Operating humidity 5…95% relative humidity (non-condensing)
Vibration Operating: 10…500 Hz, 5G, 0.030 in. max. peak-to-peak, 2 hours each axis
5V dc 400 mA
24V dc 350 mA
120V ac: 25A for 8 ms
240V ac: 40A for 4 ms
5
1 x 10
operations min. (at 3A, 250VAC/30 VDC) resistive load
Relay Operation: 1.5G
L24BWA
L24BWAR
04 mm (with DIN latch o
(1)
400 mA
(1)
350 mA
AC Ripple < 500 mV
peak-to-peak
400 µF max.
sink/source
(1)
L24BXB
L24BXBR
pen)
24V dc
(-15%, +10%)
Class 2
SELV
24V dc:
15A for 20 ms
400 mA 600 mA
350 mA 500 mA
none none
24V dc
sink/source
L40AWA
L40AWAR
Height: 90 mm, 104
Width: 160 mm
Depth: 87 mm
100 … 240V ac
(-15%, +10%)
at 47…63 Hz
120V ac: 25A for 8 ms
240V ac: 40A for 4 ms
120V ac 24V dc
L40BWA
L40BWAR
mm (with DIN latch open
(2)
600 mA
(2)
500 mA
400 mA
at 24V dc
AC Ripple < 500 mV
peak-to-pe
400 µF max.
sink/source
ak
(2)
L40BXB
L40BXBR
)
24V dc
(-15%, +10%)
Class 2
SELV
24V dc:
15A for 30 ms
600 mA
500 mA
none
24V dc
sink/source
A
1 Publication 1762-UM001G-EN-P - March 2011
Page 94

A-2 Specifications
Table A.1 General
Attribute 1762-
L24AWA
L24AWAR
L24BWA
L24BWAR
L24BXB
L24BXBR
L40AWA
L40AWAR
Shock Operating: 30G; 3 pulses each direction, each axis
Relay Operation: 7G
Non-Operating: 50G panel mounted (40G DIN Rail mounted); 3 pulses each direction, each axis
Agency certification • UL 508
• C-UL under CSA C22.2 no. 142
• Class I, Div. 2, Groups A, B, C, D
(UL 1604, C-UL under CSA C22.2 no. 213)
• CE/C-Tick compliant for all applicable directives/acts
Electrical/EMC The controller has passed testing at the following levels:
• EN 61000-4-2: 4 kV contact, 8 kV air, 4 kV indirect
• EN 61000-4-3: 10V/m, 80 to 1000 MHz, 80% amplitude modulation, +900 MHz keyed carrier
• EN 61000-4-4: 2 kV, 5 kHz; communications cable: 1 kV, 5 kHz
• EN 61000-4-5: communications cable 1 kV galvanic gun
I/O: 2 kV CM (common mode), 1 kV DM (differential mode)
AC Power Supply: 4 kV CM (common mode), 2 kV DM (differential mode)
DC Power Supply: 500V CM (common mode), 500V DM (differential mode)
• EN 61000-4-6: 10V, communications cable 3V
Terminal screw torque 0.79
(1) Do not allow the total load power consumed by the 5V dc, 24V dc, and sensor power outputs to exceed 12W.
(2) Do not allow the total load power consumed by the 5V dc, 24V dc, and sensor power outputs to exceed 16W.
See Appendix F for system validation worksheets.
1 Nm (7 in-lb)
rated
L40BWA
L40BWAR
L40BXB
L40BXBR
Table A.2 Input Specifications
Attribute 1762-L24AWA
1762-L40AWA
1762-L24AWAR
1762-L40AWAR
On-state voltage range 79…132V ac 14…24V dc
1762-L24BWA, -L24BXB, -L40BWA, -L40BXB
1762-L24BWAR, -L24BXBR, -L40BWAR, -L40BXBR
Inputs 0 through 3 Inputs 4 and higher
10…24V dc
(+10% at 55 °C/131 °F)
(+25% at 30 °C/86 °F)
(+10% at 55 °C/131 °F)
(+25% at 30 °C/86 °F)
Off-state voltage range 0…20V ac 0…5V dc
Operating frequency 47…63 Hz 0 Hz…20 kHz 0 Hz…1 kHz
(scan time dependent)
On-state current:
• minimum
• nominal
• maximum
Publication 1762-UM001G-EN-P - March 2011
• 5.0 mA at 79V ac
• 12 mA at 120V ac
• 16.0 mA at 132V ac
• 2.5 mA at 14V dc
• 7.3 mA at 24V dc
• 12.0 mA at 30V dc
• 2.0 mA at 10V dc
• 8.9 mA at 24V dc
• 12.0 mA at 30V dc
Page 95

Table A.2 Input Specifications
Specifications A-3
Attribute 1762-L24AWA
1762-L40AWA
1762-L24AWAR
1762-L40AWAR
1762-L24BWA, -L24BXB, -L40BWA, -L40BXB
1762-L24BWAR, -L24BXBR, -L40BWAR, -L40BXBR
Inputs 0 through 3 Inputs 4 and higher
Off-state leakage current 2.5 mA max. 1.5 mA min.
Nominal impedance 12 kΩ at 50 Hz
3.3 kΩ 2.7 kΩ
10 kΩ at 60 Hz
Inrush current (max.) at 120V ac 250 mA Not Applicable
Table A.3 Output Specifications - General
Attribute 1762-
L24AWA
L24BWA
L24AWAR
L24BWAR
L24BXB
L24BXBR
L40AWA
L40BWA
L40AWAR
L40BWAR
L40BXB
L40BXBR
Relay and FET Outputs
Controlled load, max. 1440VA – 1440VA 1440VA
Continuous current, max.
Current per group common 8 A 7.5 A 8 A 8 A
Current per controller at 150V max 30 A or total of per-point loads, whichever is less
at 240V max 20 A or total of per-point loads, whichever is less
Relay Outputs
Turn on time/Turn off time
10 msec (minimum)
(1)
Load current 10 mA (minimum)
(1) scan time dependent
Publication 1762-UM001G-EN-P - March 2011
Page 96

A-4 Specifications
0.25
10˚C
(50˚F)
30˚C
(86˚F)
50˚C
(122˚F)
1.0A, 55˚C (131˚F)
1.5A, 30˚C (86˚F)
70˚C
(158˚F)
0.5
0.75
1.0
1.25
1.5
1.75
2.0
1.0
10˚C
(50˚F)
30˚C
(86˚F)
50˚C
(122˚F)
5.5A, 55˚C (131˚F)
8A, 30˚C (86˚F)
70˚C
(158˚F)
2.0
3.0
4.0
5.0
6.0
7.0
8.0
9.0
FET Current per Point
(1762-L24BXB, L40BXB
1762-L24BXBR, L40BXBR)
FET Total Current
(1762-L40BXB and L40BXBR)
Current (Amps)
Current (Amps)
Temperature
Temperature
Valid
Range
Valid
Range
Table A.4 BXB FET Output Specifications
Attribute General Operation
Power supply voltage 24V dc (-15%, +10%)
On-state voltage drop:
• at maximum load current
• at maximum surge current
• 1V dc
• 2.5V dc
Current rating per point
• maximum load
• minimum load
• maximum leakage
• See graphs below.
• 1.0 mA
• 1.0 mA
Maximum output current (temperature dependent):
High Speed Operation
(Output 2 Only)
• Not Applicable
• Not Applicable
• 100 mA
• 10 mA
• 1.0 mA
(1)
Publication 1762-UM001G-EN-P - March 2011
Page 97

Table A.4 BXB FET Output Specifications
Specifications A-5
Attribute General Operation
High Speed Operation
(1)
(Output 2 Only)
Surge current per point:
• peak current
• maximum surge duration
• maximum rate of repetition at 30 °C (86 °F)
• maximum rate of repetition at 55 °C (131 °F)
• 4.0A
• 10 ms
• once every second
• once every 2 seconds
• Not applicable
• Not applicable
• Not applicable
• Not applicable
Turn-on time, max. 0.1 ms 6 µs
Turn-off time, max. 1.0 ms 18 µs
Repeatability, max. n/a 2 µs
Drift, max. n/a 1 µs per 5 °C (41 °F)
(1) Output 2 is designed to provide increased functionality over the other FET outputs. Output 2 may be used like the other FET transistor outputs, but in addition, within a
limited current range, it may be operated at a higher speed. Output 2 also provides a pulse train output (PTO) or pulse width modulation output (PWM) function.
Table A.5 AC Input Filter Settings
Nominal Filter Setting (ms) ON Delay (ms) OFF Delay (ms)
Minimum Maximum Minimum Maximum
8 2 20 10 20
Table A.6 Fast DC Input Filter Settings (Inputs 0 to 3)
Nominal Filter Setting (ms) ON Delay (ms) OFF Delay (ms) Maximum Counter Frequency (Hz)
Minimum Maximum Minimum Maximum
50% Duty Cycle
0.025 0.005 0.025 0.005 0.025 20.0 kHz
0.075 0.040 0.075 0.045 0.075 6.7 kHz
0.100 0.050 0.100 0.060 0.100 5.0 kHz
0.250 0.170 0.250 0.210 0.250 2.0 kHz
0.500 0.370 0.500 0.330 0.500 1.0 kHz
1.00 0.700 1.000 0.800 1.000 0.5 kHz
2.000 1.700 2.000 1.600 2.000 250 Hz
4.000 3.400 4.000 3.600 4.000 125 Hz
8.000
(1)
6.700 8.000 7.300 8.000 63 Hz
16.000 14.000 16.000 14.000 16.000 31 Hz
(1) This is the default setting.
Publication 1762-UM001G-EN-P - March 2011
Page 98

A-6 Specifications
Table A.7 Normal DC Input Filter Settings (Inputs 4 and higher)
Nominal Filter Setting (ms) ON Delay (ms) OFF Delay (ms) Maximum Frequency (Hz)
Minimum Maximum Minimum Maximum
50% Duty Cycle
0.500 0.090 0.500 0.020 0.500 1.0 kHz
1.000 0.500 1.000 0.400 1.000 0.5 kHz
2.000 1.100 2.000 1.300 2.000 250 Hz
4.000 2.800 4.000 2.700 4.000 125 Hz
8.000
(1)
5.800 8.000 5.300 8.000 63 Hz
16.000 11.000 16.000 10.000 16.000 31 Hz
(1) This is the default setting.
Table A.8 Relay Contact Ratings
Maximum Volts Amperes Amperes
Make Break Make Break
240V ac 7.5A 0.75A
120V ac 15A 1.5A
125V dc
24V dc
(1) 1.5A above 40°C.
(2) For dc voltage applications, the make/break ampere rating for relay contacts can be determined by dividing 28 VA by
the applied dc voltage. For example, 28 VA/48V dc = 0.58A. For dc voltage applications less than 14V, the make/break
ratings for relay contacts cannot exceed 2A.
0.22A
1.2A
(2)
(2)
Continuous
(1)
2.5A
(1)
2.5A
1.0A 28 VA
2.0A
Volt-Amperes
1800 VA 180 VA
1800 VA 180 VA
Table A.9 Working Voltage (1762-L24AWA, 1762-L40AWA)
Attribute 1762-L24AWA, 1762-L40A
WA,
1762-L24AWAR, 1762-L40A
WAR
Power supply input to backplane isolation Verified by one of the following dielectric tests: 1836V ac for 1 second or 2596V dc for 1 second
265V ac Working Voltage (IEC Class 2 reinforced insulation)
Input group to backplane isolation Verified by one of the following dielectric tests:1517V ac for 1 second or 2145V dc for 1 second
132V ac Working Voltage (IEC Class 2 reinforced insulation)
Input group to input group isolation Verified by one of the following dielectric tests:1517V ac for 1 second or 2145V dc for 1 second
132V ac Working Voltage (basic insulation)
Output group to backplane isolation Verified by one of the following dielectric tests: 1836V ac for 1 second or 2596V dc for 1 second
265V ac Working Voltage (IEC Class 2 reinforced insulation)
Output group to output group isolation Verified by one of the following dielectric tests: 1836V ac for 1 second or 2596V dc for 1second
265V ac Working Voltage (basic insulation) 150V ac Working Voltage (IEC Class 2 reinforced
insulation).
Publication 1762-UM001G-EN-P - March 2011
Page 99

Specifications A-7
Table A.10 Working Voltage (1762-L24BWA,
Attribute 1762-L24BWA,
1762-L40
BWA, 1762-L24BWAR,
1762-L40
BWA, 1762-L24BWAR,
1762-L40
BWAR)
1762-L40
BWAR
Power supply input to backplane isolation Verified by one of the following dielectric tests:1836V ac for 1 second or 2596V dc for 1 second
265V
a
c Working Voltage (IEC Class 2 reinforced insulation)
Input group to backplane isolation and
input group to input group isolation
Verified by one of the following dielectric tests: 1200V ac for 1 second or 1697V dc for 1 second
75V dc Working Voltage (IEC Class 2 reinforced insulation)
Output group to backplane isolation Verified by one of the following dielectric tests: 1836V ac for 1 second or 2596V dc for 1 second
265V
a
c Working Voltage (IEC Class 2 reinforced insulation).
Output group to output group isolation Verified by one of the following dielectric tests: 1836V ac for 1 second or 2596V dc for 1 second
265V
ac
Working Voltage (basic insulation) 150V Working Voltage (IEC Class 2 reinforced
insulation)
Table A.11 Working Voltage (1762-L24BXB,
Attribute 1762-L24BXB,
Input group to backplane isolation and
input group to input group isolation
1762-L40
BXB, 1762-L24BXBR,
1762-L40
BXB, 1762-L24BXBR,
1762-L40
BXBR)
1762-L40
BXBR
Verified by one of the following dielectric tests: 1200V ac for 1 second or 1697V dc for 1 second
75V dc Working Voltage (IEC Class 2 reinforced insulation)
FET output group to backplane isolation Verified by one of the following dielectric tests: 1200V ac for 1 second or 1697V dc for 1 second
75V dc Working Voltage (IEC Class 2 reinforced insulation)
Relay output group to backplane
isolation
Relay output group to relay output
group and FET output group isolation
Verified by one of the following dielectric tests: 1836V ac for 1 second or 2596V dc for 1 second
265V
a
c Working Voltage (IEC Class 2 reinforced insulation).
Verified by one of the following dielectric tests: 1836V ac for 1 second or 2596V dc for 1 second
265V
ac
Working Voltage (basic insulation) 150V Working Voltage (IEC Class 2 reinforced
insulation)
Publication 1762-UM001G-EN-P - March 2011
Page 100

A-8 Specifications
Expansion I/O
Discrete I/O Modules
Specifications
Table A.12 General Specifications
Attribute Value
Dimensions 90 mm (height) x 87 mm (depth) x 40.4 mm (width)
height including mounting tabs is 110 mm
3.54 in. (height) x 3.43 in. (depth) x 1.59 in. (width)
height including mounting tabs is 4.33 in.
Temperature, storage -40…85 °C (-40…185 °F)
Temperature, operating
Operating humidity 5…95% non-condensing
Operating altitude 2000 m
Vibration Operating: 10…500 Hz, 5G, 0.030 in. max. peak-to-peak,
Shock Operating: 30G panel mounted, 3 pulses per axis
Agency certification C-UL certified (under CSA C22.2 No. 142)
-20…65 °C (-4…149 °F)
(656
1 ft)
2 hours per ax
Relay Operation: 1.5G
Relay Operation: 7G
Non-Operating: 50G panel mounted, 3 pulses per axis
(40G DIN Rail mounted)
UL 508 listed
CE compliant for all applicable directives
C-Tick marked for all applicable acts
is
(1)
Hazardous environment class For 1762-IQ32T, 1762-OB32T, and 1762-OV32T modules
Hazardous Location, Class I, Division 2 Groups A, B, C, D (UL 1604, C-UL under CSA C22.2 No. 213,
ANSI/ISA-12.12.01)
For all other modules:
Hazardous Location, Class I, Division 2 Groups A, B, C, D (UL 1604, C-UL under CSA C22.2 No. 213)
for all modules
Radiated and conducted emissions EN50081-2 Class A
Electrical /EMC: The module has passed testing at the following levels:
ESD immunity For 1762-IQ32T, 1762-OB32T, and 1762-OV32T modules
IEC61000-4-2: 4 kV contact, 8 kV air, 4 kV indirect
For all other modules:
IEC1000-4-2: 4 kV contact, 8 kV air, 4 kV indirect
Radiated RF immunity
(IEC1000-4-3)
For 1762-IQ32T, 1762-OB32T, and 1762-OV32T modules
IEC61000-4-3: 10V/m, 80…2700 MHz, 80% amplitude modulation
For all other modules:
IEC1000-4-3: 10 V/m, 80…1000 MHz, 80% amplitude modulation, +900 MHz keyed carrier
for all modules
Publication 1762-UM001G-EN-P - March 2011
 Loading...