

Page 1
ControlLogix
DH-485
Communication
Module
1756-DH485
User Manual
Page 2
Important User Information
SHOCK HAZARD
Solid state equipment has operational characteristics differing from those of
electromechanical equipment. Safety Guidelines for the Application, Installation and
Maintenance of Solid State Controls (publication SGI-1.1 available from your local
Rockwell Automation sales office or online at
http://literature.rockwellautomation.com
) describes some important differences
between solid state equipment and hard-wired electromechanical devices. Because of
this difference, and also because of the wide variety of uses for solid state equipment,
all persons responsible for applying this equipment must satisfy themselves that each
intended application of this equipment is acceptable.
In no event will Rockwell Automation, Inc. be responsible or liable for indirect or
consequential damages resulting from the use or application of this equipment.
The examples and diagrams in this manual are included solely for illustrative purposes.
Because of the many variables and requirements associated with any particular
installation, Rockwell Automation, Inc. cannot assume responsibility or liability for
actual use based on the examples and diagrams.
No patent liability is assumed by Rockwell Automation, Inc. with respect to use of
information, circuits, equipment, or software described in this manual.
Reproduction of the contents of this manual, in whole or in part, without written
permission of Rockwell Automation, Inc., is prohibited.
Throughout this manual, when necessary, we use notes to make you aware of safety
considerations.
WARNING
Identifies information about practices or circumstances that can cause
an explosion in a hazardous environment, which may lead to personal
injury or death, property damage, or economic loss.
IMPORTANT
ATTENTION
Identifies information that is critical for successful application and
understanding of the product.
Identifies information about practices or circumstances that can lead
to personal injury or death, property damage, or economic loss.
Attentions help you identify a hazard, avoid a hazard, and recognize
the consequence
Labels may be located on or inside the equipment, for example, a drive
or motor, to alert people that dangerous voltage may be present.
BURN HAZARD
Labels may be located on or inside the equipment, for example, a drive
or motor, to alert people that surfaces may be dangerous
temperatures.
The first line of trademarks is an example; the brand or product name changes according to publication but the rest of the line should remain the
same. The second line should be used exactly as listed below in any case where it applies.
Allen-Bradley, ControlLogix, and RSLinx are trademarks of Rockwell Automation, Inc.
Trademarks not belonging to Rockwell Automation are property of their respective companies.
Page 3

Table of Contents
Important User Information . . . . . . . . . . . . . . . . . . . . . . . . . . . . . . . . 1-2
Preface
1756-DH485 Module Overview
Overview of the DH-485 Network
Purpose of This Manual. . . . . . . . . . . . . . . . . . . . . . . . . . . . . . . Preface-i
Who Should Use This Manual. . . . . . . . . . . . . . . . . . . . . . . . . . Preface-i
Other Resources. . . . . . . . . . . . . . . . . . . . . . . . . . . . . . . . . . . . . Preface-i
Chapter 1
Introduction . . . . . . . . . . . . . . . . . . . . . . . . . . . . . . . . . . . . . . . . . . . . . 1-1
What the Module Does . . . . . . . . . . . . . . . . . . . . . . . . . . . . . . . . . . . . 1-1
Module Requirements . . . . . . . . . . . . . . . . . . . . . . . . . . . . . . . . . . . . . 1-1
Module Features. . . . . . . . . . . . . . . . . . . . . . . . . . . . . . . . . . . . . . . . . . 1-2
Prevent Electrostatic Discharge . . . . . . . . . . . . . . . . . . . . . . . . . . . . . 1-3
Removal and Insertion Under Power . . . . . . . . . . . . . . . . . . . . . . . . . 1-4
Typical Applications. . . . . . . . . . . . . . . . . . . . . . . . . . . . . . . . . . . . . . . 1-5
Remote Messaging . . . . . . . . . . . . . . . . . . . . . . . . . . . . . . . . . . . . . . . . 1-7
Remote Upload and Download . . . . . . . . . . . . . . . . . . . . . . . . . . 1-7
Routing Limitations . . . . . . . . . . . . . . . . . . . . . . . . . . . . . . . . . . . . . . . 1-8
DH-485 and CIP Messaging . . . . . . . . . . . . . . . . . . . . . . . . . . . . . 1-8
Alphanumeric Indicators . . . . . . . . . . . . . . . . . . . . . . . . . . . . . . . . 1-9
Chapter 2
Introduction . . . . . . . . . . . . . . . . . . . . . . . . . . . . . . . . . . . . . . . . . . . . . 2-1
DH-485 Network Description . . . . . . . . . . . . . . . . . . . . . . . . . . . . . . 2-1
DH-485 Network Protocol . . . . . . . . . . . . . . . . . . . . . . . . . . . . . . . . . 2-2
DH-485 Token Rotation . . . . . . . . . . . . . . . . . . . . . . . . . . . . . . . . . . . 2-2
DH-485 Network Initialization . . . . . . . . . . . . . . . . . . . . . . . . . . . . . . 2-2
Devices that Use the DH-485 Network . . . . . . . . . . . . . . . . . . . . . . . 2-3
1747-AIC Isolated Link Coupler for DH-485 . . . . . . . . . . . . . . . . . . 2-4
1761-NET-AIC Advanced Interface Converter Product Overview . 2-6
Operating Modes . . . . . . . . . . . . . . . . . . . . . . . . . . . . . . . . . . . . . . . . . 2-6
Device Compatibility . . . . . . . . . . . . . . . . . . . . . . . . . . . . . . . . . . . . . . 2-6
Node Address Identification . . . . . . . . . . . . . . . . . . . . . . . . . . . . 2-7
Misconception about the 1761-NET-AIC Converter . . . . . . . . . . . . 2-7
1747-UIC USB to DH-485 Interface Converter . . . . . . . . . . . . . . . . 2-7
Example System Configuration. . . . . . . . . . . . . . . . . . . . . . . . . . . . . . 2-8
Configure the SLC 5/03, SLC 5/04, and SLC 5/05 Controller
Channel 0 for DH-485. . . . . . . . . . . . . . . . . . . . . . . . . . . . . . . . . . 2-9
Important Planning Considerations . . . . . . . . . . . . . . . . . . . . . . . . . 2-10
Hardware Considerations . . . . . . . . . . . . . . . . . . . . . . . . . . . . . . 2-10
Software Considerations . . . . . . . . . . . . . . . . . . . . . . . . . . . . . . . 2-12
Additional Resources . . . . . . . . . . . . . . . . . . . . . . . . . . . . . . . . . . . . . 2-13
i Publication 1756-UM532A-EN-P - May 2006
Page 4

Table of Contents ii
Use Data Highway 485 Network
Use RSLinx Software to Create a
Routing Table
Chapter 3
Introduction . . . . . . . . . . . . . . . . . . . . . . . . . . . . . . . . . . . . . . . . . . . . . 3-1
What Is Data Highway 485? . . . . . . . . . . . . . . . . . . . . . . . . . . . . . . . . 3-1
Link Design . . . . . . . . . . . . . . . . . . . . . . . . . . . . . . . . . . . . . . . . . . 3-2
Two Methods of Communication Over a DH-485 Network . . . . . . 3-2
Use DH-485 Messaging . . . . . . . . . . . . . . . . . . . . . . . . . . . . . . . . . . . . 3-3
Local DH-485 Messaging . . . . . . . . . . . . . . . . . . . . . . . . . . . . . . . 3-3
Limitations of Local DH-485 Messaging . . . . . . . . . . . . . . . . . . . 3-5
Remote DH-485 Messaging . . . . . . . . . . . . . . . . . . . . . . . . . . . . . 3-5
Configuration Information in DH-485 Messaging. . . . . . . . . . . . . . 3-11
Application Timeout . . . . . . . . . . . . . . . . . . . . . . . . . . . . . . . . . . . . . 3-12
Example DH-485 Network Routing Configuration. . . . . . . . . . . . . 3-13
Use the Common Industrial Protocol (CIP) Messaging. . . . . . . . . . 3-14
Chapter 4
Introduction . . . . . . . . . . . . . . . . . . . . . . . . . . . . . . . . . . . . . . . . . . . . . 4-1
Choose the Correct Software. . . . . . . . . . . . . . . . . . . . . . . . . . . . . . . . 4-1
Use RSLinx Software to Create a Routing Table . . . . . . . . . . . . . . . . 4-2
What Is a Routing Table? . . . . . . . . . . . . . . . . . . . . . . . . . . . . . . . 4-2
ControlLogix Routing . . . . . . . . . . . . . . . . . . . . . . . . . . . . . . . . . . 4-2
Create the Routing Table . . . . . . . . . . . . . . . . . . . . . . . . . . . . . . . . . . . 4-3
Set the Controller Slot . . . . . . . . . . . . . . . . . . . . . . . . . . . . . . . . . . 4-8
Communicate from an SLC 5/03
Controller to a Logix Controller
over a DH-485 Network
Chapter 5
Introduction . . . . . . . . . . . . . . . . . . . . . . . . . . . . . . . . . . . . . . . . . . . . . 5-1
Hardware Configuration . . . . . . . . . . . . . . . . . . . . . . . . . . . . . . . . . . . 5-2
Use the Controller Slot to Route the Local Message . . . . . . . . . . . . . 5-3
Create a Local Message in RSLogix 500 . . . . . . . . . . . . . . . . . . . . . . . 5-4
Configure the Message. . . . . . . . . . . . . . . . . . . . . . . . . . . . . . . . . . . . . 5-5
Create a Logic Map for the Local Message in
RSLogix 5000 Software . . . . . . . . . . . . . . . . . . . . . . . . . . . . . . . . . 5-6
Publication 1756-UM532A-EN-P - May 2006
Page 5

Communicate Between SLC
Controllers over DH+ and DH485
Networks
Communicate Between a PLC-5
Controller and a Remote SLC 5/03
Controller over Multiple DH-485
Networks
Table of Contents iii
Chapter 6
Introduction . . . . . . . . . . . . . . . . . . . . . . . . . . . . . . . . . . . . . . . . . . . . . 6-1
SLC 5/04 Controller Sends a Remote Message . . . . . . . . . . . . . . . . . 6-2
Hardware Configuration . . . . . . . . . . . . . . . . . . . . . . . . . . . . . . . . 6-2
Create the Routing Table in RSLinx Software . . . . . . . . . . . . . . . 6-3
Configure the SLC 5/03 Controller Channel 1 Link ID . . . . . . . 6-4
Configure the SLC 5/04 Channel 1 Link ID . . . . . . . . . . . . . . . . 6-5
Create a Message in RSLogix 500 . . . . . . . . . . . . . . . . . . . . . . . . . 6-6
Configure the Message . . . . . . . . . . . . . . . . . . . . . . . . . . . . . . . . . 6-7
SLC 5/03 Controller Sends a Remote Message . . . . . . . . . . . . . . . . . 6-8
Hardware Configuration . . . . . . . . . . . . . . . . . . . . . . . . . . . . . . . . 6-8
Create the Routing Table in RSLinx Software . . . . . . . . . . . . . . . 6-9
Create a Remote Message in RSLogix 500 . . . . . . . . . . . . . . . . . 6-10
Configure the Message . . . . . . . . . . . . . . . . . . . . . . . . . . . . . . . . 6-11
Chapter 7
Introduction . . . . . . . . . . . . . . . . . . . . . . . . . . . . . . . . . . . . . . . . . . . . . 7-1
Hardware Configuration . . . . . . . . . . . . . . . . . . . . . . . . . . . . . . . . . . . 7-2
Create the Routing Table . . . . . . . . . . . . . . . . . . . . . . . . . . . . . . . . . . . 7-3
Configure the PLC-5 DH+ Channel 1A Link ID . . . . . . . . . . . . 7-4
Create a Message in RSLogix 5 . . . . . . . . . . . . . . . . . . . . . . . . . . . . . . 7-4
Configure the Message. . . . . . . . . . . . . . . . . . . . . . . . . . . . . . . . . . . . . 7-5
Communicate from an SLC 5/05
Controller to an SLC 5/03
Controller over an EtherNet/IP
Network
Communicate to a SLC 5/03
Controller on a DH-485 Network
Chapter 8
Introduction . . . . . . . . . . . . . . . . . . . . . . . . . . . . . . . . . . . . . . . . . . . . . 8-1
Hardware Configuration . . . . . . . . . . . . . . . . . . . . . . . . . . . . . . . . . . . 8-2
Create a Message in RSLogix 500 . . . . . . . . . . . . . . . . . . . . . . . . . . . . 8-3
Configure the Message. . . . . . . . . . . . . . . . . . . . . . . . . . . . . . . . . . . . . 8-4
Review the Multihop Feature in RSLogix 500 . . . . . . . . . . . . . . . . . . 8-5
Chapter 9
Introduction . . . . . . . . . . . . . . . . . . . . . . . . . . . . . . . . . . . . . . . . . . . . . 9-1
Hardware Configuration . . . . . . . . . . . . . . . . . . . . . . . . . . . . . . . . . . . 9-2
Create a Message in RSLogix 5000 . . . . . . . . . . . . . . . . . . . . . . . . . . . 9-3
Configure the Message. . . . . . . . . . . . . . . . . . . . . . . . . . . . . . . . . . . . . 9-4
Publication 1756-UM532A-EN-P - May 2006
Page 6

Table of Contents iv
Communicate from a Logix
Controller to an SLC 5/03
Controller over EtherNet/IP and
DH-485 Networks
Specifications
Troubleshoot the 1756-DH485
Module
Index
Chapter 10
Introduction . . . . . . . . . . . . . . . . . . . . . . . . . . . . . . . . . . . . . . . . . . . . 10-1
Hardware Configuration . . . . . . . . . . . . . . . . . . . . . . . . . . . . . . . . . . 10-2
Create a Remote 1756-ENBT Message in RSLogix 5000 . . . . . . . . 10-3
Configure the Message. . . . . . . . . . . . . . . . . . . . . . . . . . . . . . . . . . . . 10-4
Appendix A
Appendix B
Introduction . . . . . . . . . . . . . . . . . . . . . . . . . . . . . . . . . . . . . . . . . . . . . B-1
Check Power Supply and Module Status . . . . . . . . . . . . . . . . . . . . . . B-1
Interpret the LED Status Indicators . . . . . . . . . . . . . . . . . . . . . . . . . . B-2
Interpret the Alphanumeric Indicators . . . . . . . . . . . . . . . . . . . . . . . . B-3
Interpret the OK
Status Indicator. . . . . . . . . . . . . . . . . . . . . . . . . . . . . . . . . . . . . . . . . . . B-4
Routing Errors in DH-485 Messaging . . . . . . . . . . . . . . . . . . . . . . . . B-4
Routing Errors in Local DH-485 Messaging . . . . . . . . . . . . . . . . B-4
Routing Errors in Remote DH-485 Messaging . . . . . . . . . . . . . . B-5
Rockwell Automation Support . . . . . . . . . . . . . . . . . . . . . . . . Backcover
Installation Assistance . . . . . . . . . . . . . . . . . . . . . . . . . . . . Backcover
New Product Satisfaction Return . . . . . . . . . . . . . . . . . . . Backcover
Publication 1756-UM532A-EN-P - May 2006
Page 7

Preface
Purpose of This Manual
Who Should Use This Manual
Other Resources
This manual describes how to understand, configure, and troubleshoot your
ControlLogix Data Highway 485 communication interface module.
This manual also provides step-by-step procedures on how to use the
1756-DH485 module to send DH-485 messages between ControlLogix, PLC,
and SLC controllers in DH-485 applications.
Use this manual if you program applications that use 1756-DH485 modules.
We assume you have a good understanding of the Data Highway 485 protocol.
This user manual contains a brief description of the Data Highway 485
network in Chapter 2, Overview of the DH-485 Network.
Refer to the manuals listed in the table Devices that Use the DH-485 Network
on page 2-3.
i Publication 1756-UM532A-EN-P - May 2006
Page 8

Preface ii
Notes:
Publication 1756-UM532A-EN-P - May 2006
Page 9

1756-DH485 Module Overview
Chapter
1
Introduction
What the Module Does
This chapter describes the 1756-DH485 module, and what you must know and
do before you begin to use it.
For See
What the Module Does 1-1
Module Requirements 1-1
Module Features 1-2
Prevent Electrostatic Discharge 1-3
Removal and Insertion Under Power 1-4
Typical Applications 1-5
Remote Messaging 1-7
Routing Limitations 1-8
The 1756-DH485 module supports the following types of communication:
• Data Highway 485 (DH-485) Messaging
• Connectivity to two separate DH-485 networks in one module
• Common Industrial Protocol (CIP) Messaging
Module Requirements
1 Publication 1756-UM532A-EN-P - May 2006
The following are required for using the 1756-DH485 communication
module:
• RSLinx Software, version 2.41 or later
• Node address within the range of 0-31
• AIC+ link coupler (1761-NET-AIC) communications adapter
• Compatible with SLC 5/03 controllers or later
Page 10
1-2 1756-DH485 Module Overview
WARNING
Module Features
The 1756-DH-485 module offers the following features:
• Sends messages between devices on DH-485 networks and devices on
other networks such as ControlNet, EtherNet/IP, or other DH-485
networks
• Bridges support to other NetLinx networks via the CLX gateway
• Configure channels and ports using RSLinx Classic software, version
2.43 or later
• Accesses other networks by using a routing table editor that lets
DH-485 devices use the 1756-DH485 module and ControlLogix chassis
• Supports all benefits and attributes of a ControlLogix communication
module
• Supports firmware upgrades
TIP
• Removal and insertion under power (RIUP), can be removed and
inserted under power without disrupting power to other modules in the
chassis
Download firmware upgrades via the backplane. Do
not use DH485 network for downloads.
When you insert or remove the module while backplane
power is on, an electrical arc can occur. This could cause an
explosion in hazardous location installations.
Be sure that power is removed or the area is nonhazardous
!
• 4-character display
• Default Controller Slot feature for local messaging
• Serial Port Configuration
• No limit on number of modules per chassis, up to the number of
available slots and the capabilities of the power supply
This figure shows the external features of the 1756-DH485 module.
before proceeding. Repeated electrical arcing causes
excessive wear to contacts on both the module and its
mating connector. Worn contacts may create electrical
resistance that can affect module operation.
Publication 1756-UM532A-EN-P - May 2006
Page 11
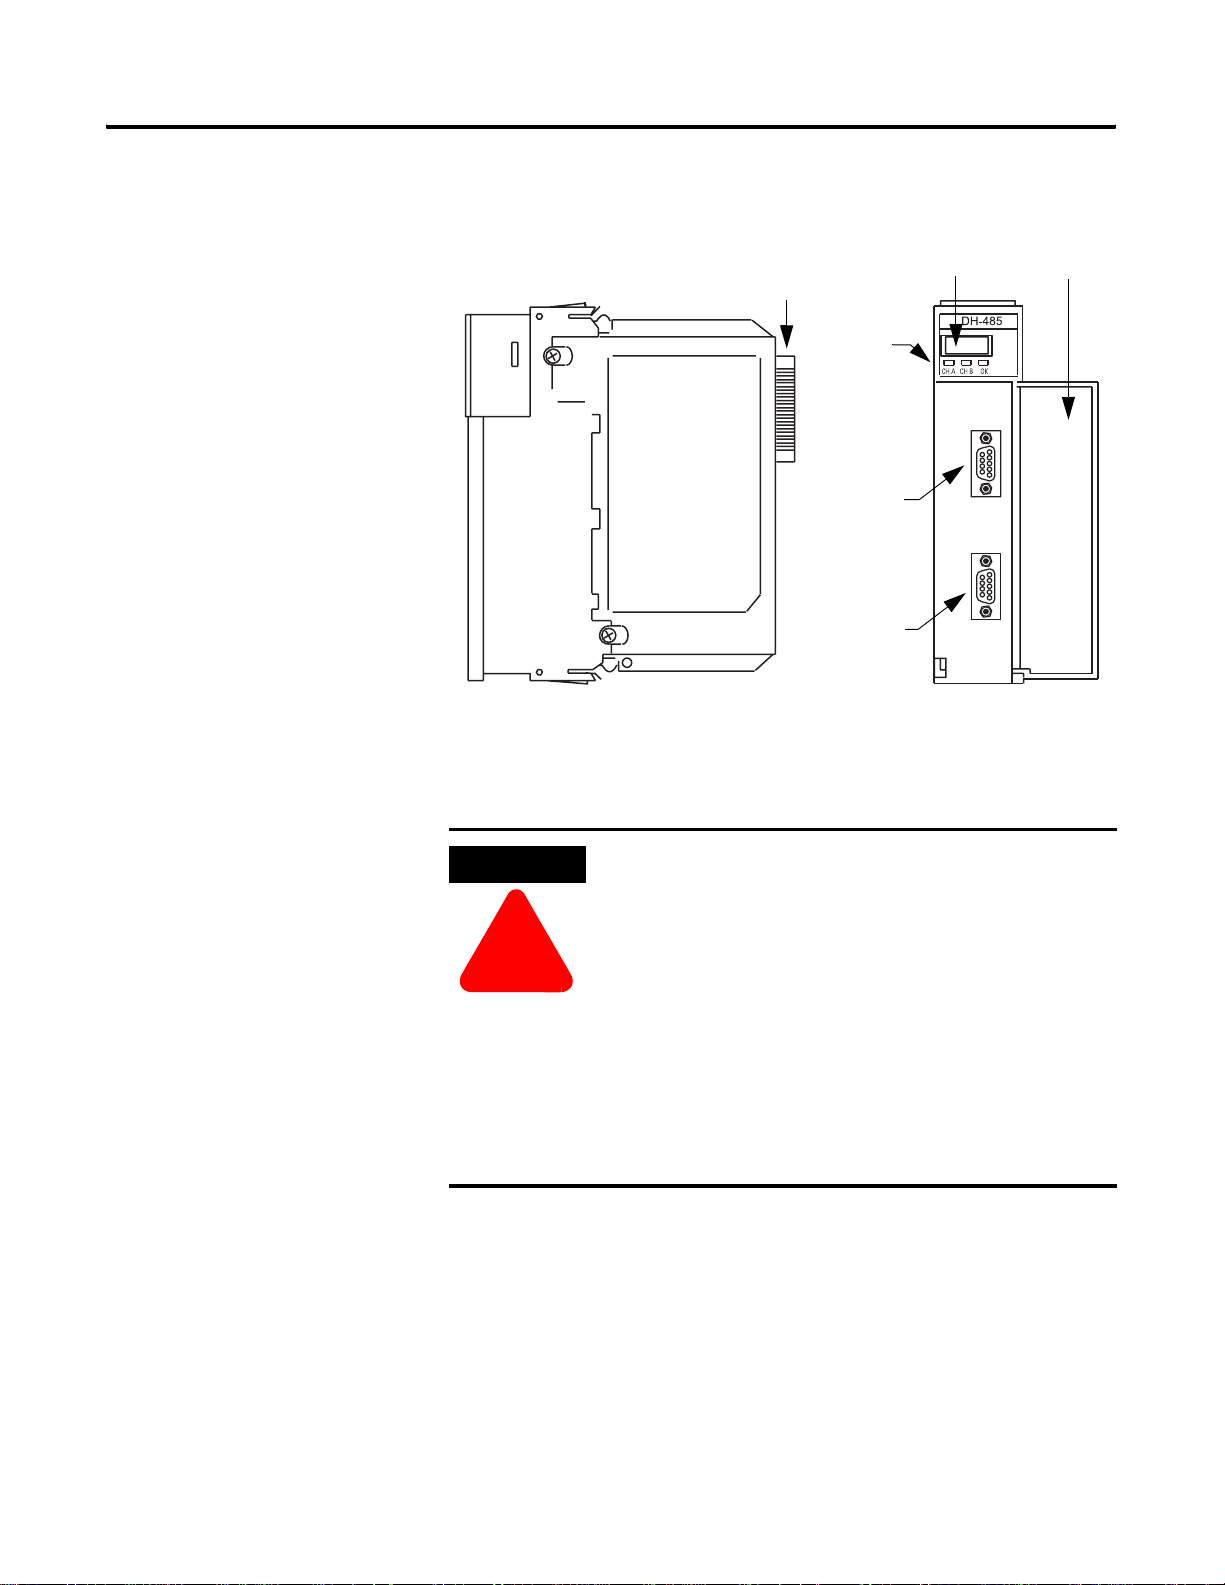
External Features of the 1756-DH485 Module
1756-DH485 Module Overview 1-3
Prevent Electrostatic
Backplane
Connector
Channel
and
Module
Status
Indicators
Channel A
Connector
Channel B
Connector
Alphanumeric
Status Indicator
The DH-485 module is sensitive to electrostatic discharge.
Door
Label
43842
Discharge
ATTENTION
!
This equipment is sensitive to electrostatic discharge, which
can cause internal damage and affect normal operation.
Follow these guidelines when you handle this equipment:
• Touch a grounded object to discharge potential static.
• Wear an approved grounding wriststrap.
• Do not touch connectors or pins on component
boards.
• Do not touch circuit components inside the equipment.
• Use a static-safe workstation, if available.
• Store the equipment in appropriate static-safe
packaging when not in use,.
Publication 1756-UM532A-EN-P - May 2006
Page 12

1-4 1756-DH485 Module Overview
WARNING
Removal and Insertion Under Power
You can install or remove the module while chassis power is applied if you
observe the following precautions.
When you insert or remove the module while backplane
power is on, an electrical arc can occur. This could cause an
explosion in hazardous location installations.
Be sure that power is removed or the area is nonhazardous
!
before proceeding. Repeated electrical arcing causes
excessive wear to contacts on both the module and its
mating connector. Worn contacts may create electrical
resistance that can affect module operation.
Publication 1756-UM532A-EN-P - May 2006
Page 13
1756-DH485 Module Overview 1-5
Typical Applications
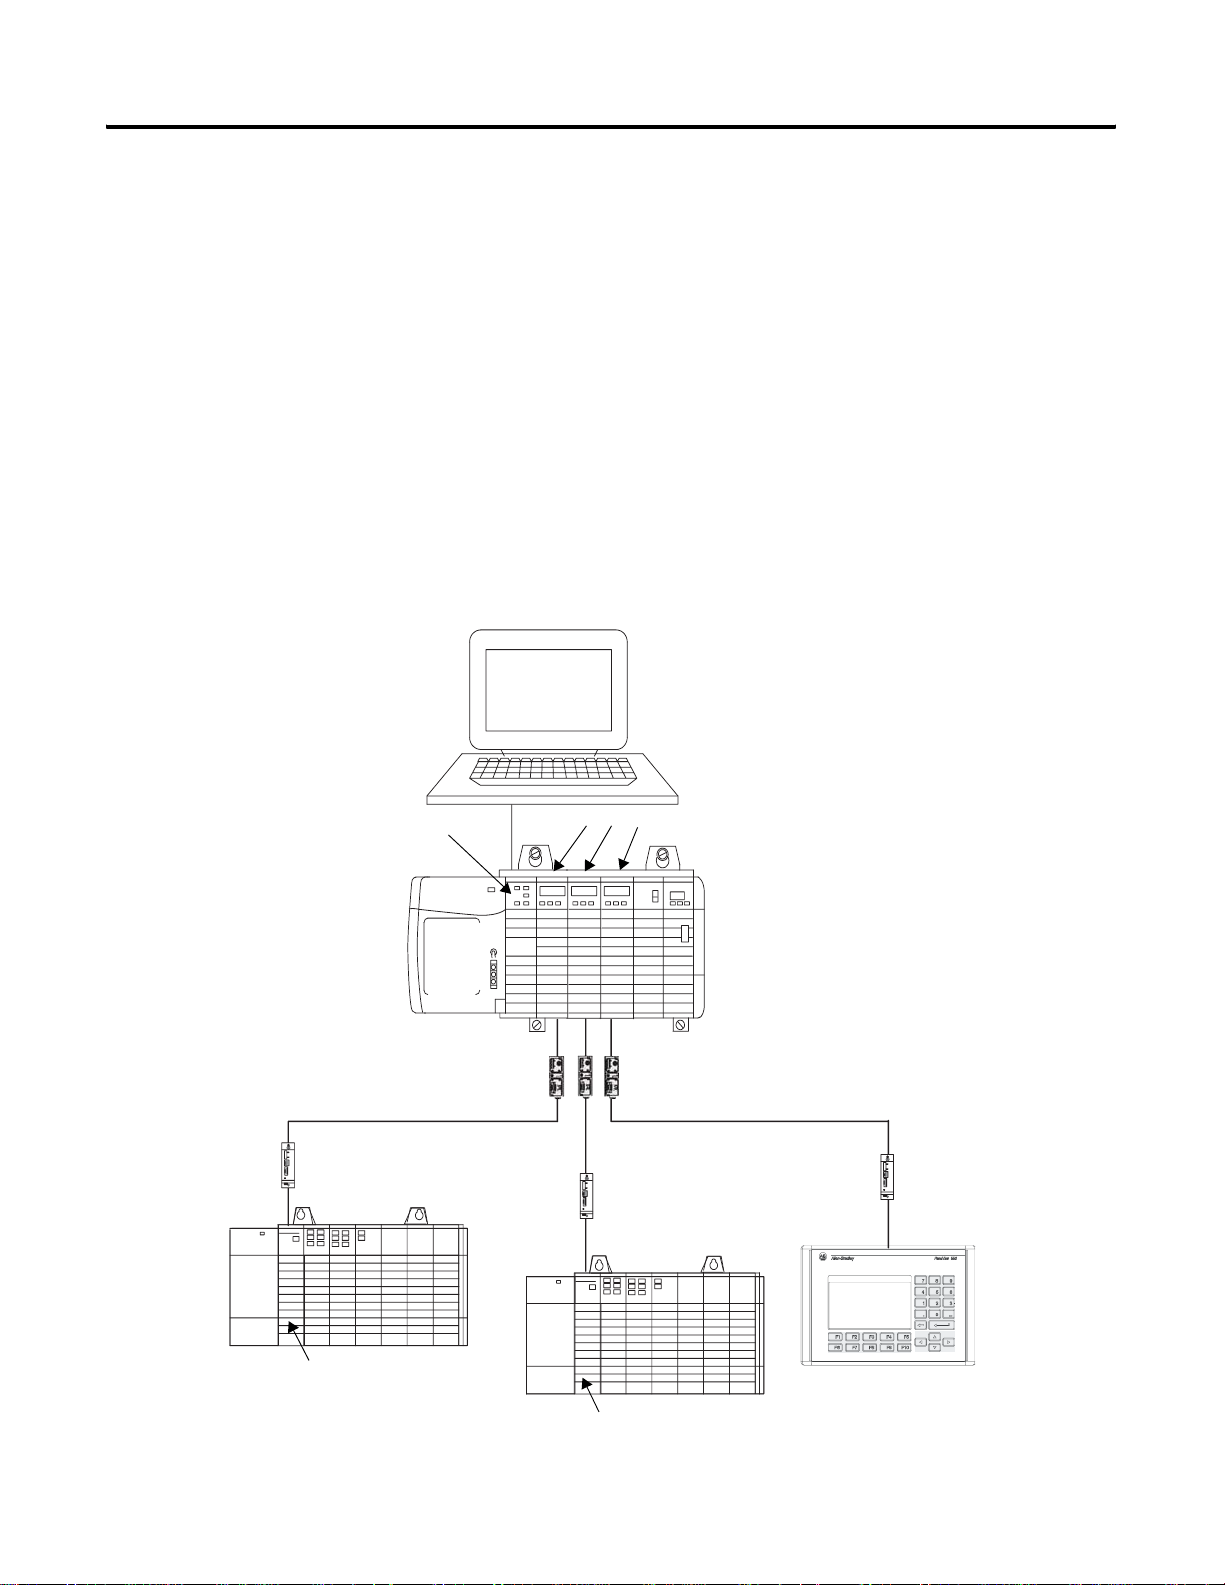
The first example is a typical gateway application connecting multiple networks
together.
In this example you can:
• upload and download SLC 500 and Panelview display programs.
• seamlessly communicate between SLC controllers.
• connect multiple DH-485 networks together for inter-network
communications, for example, messages between SLC 5/03 controllers.
• provide connection to other NetLinx networks, such as EtherNet/IP, to
allow a single-point access, for example: upload and download to an
SLC controller, MicroLogix controller, and Panelview display.
Connection of Multiple Networks
Computer with RSlogix 500
and RSLogix 5000 Software
1756-ENBT
AIC Link Coupler
SLC 5/03 Controller
1756-DH485
AIC+ Link Couplers
AIC Link Coupler
SLC 5/03 Controller
PanelView
AIC Link Coupler
44137
Publication 1756-UM532A-EN-P - May 2006
Page 14
1-6 1756-DH485 Module Overview
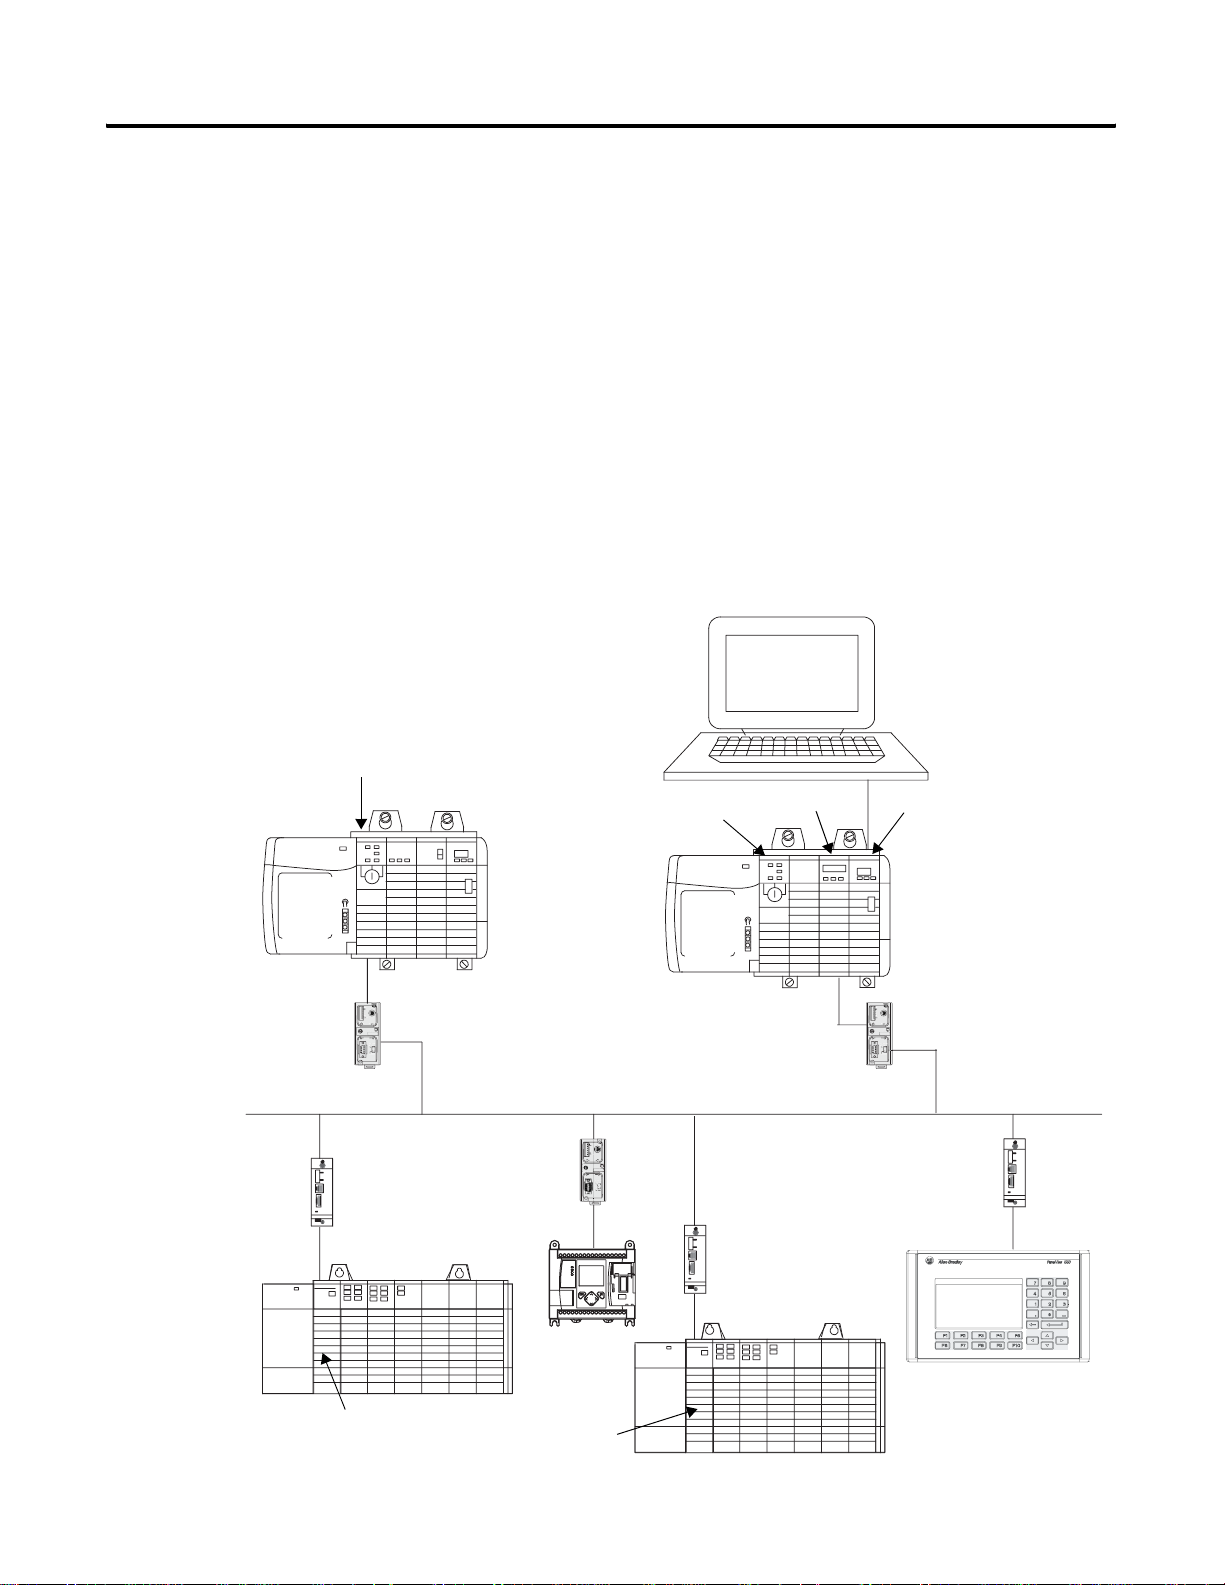
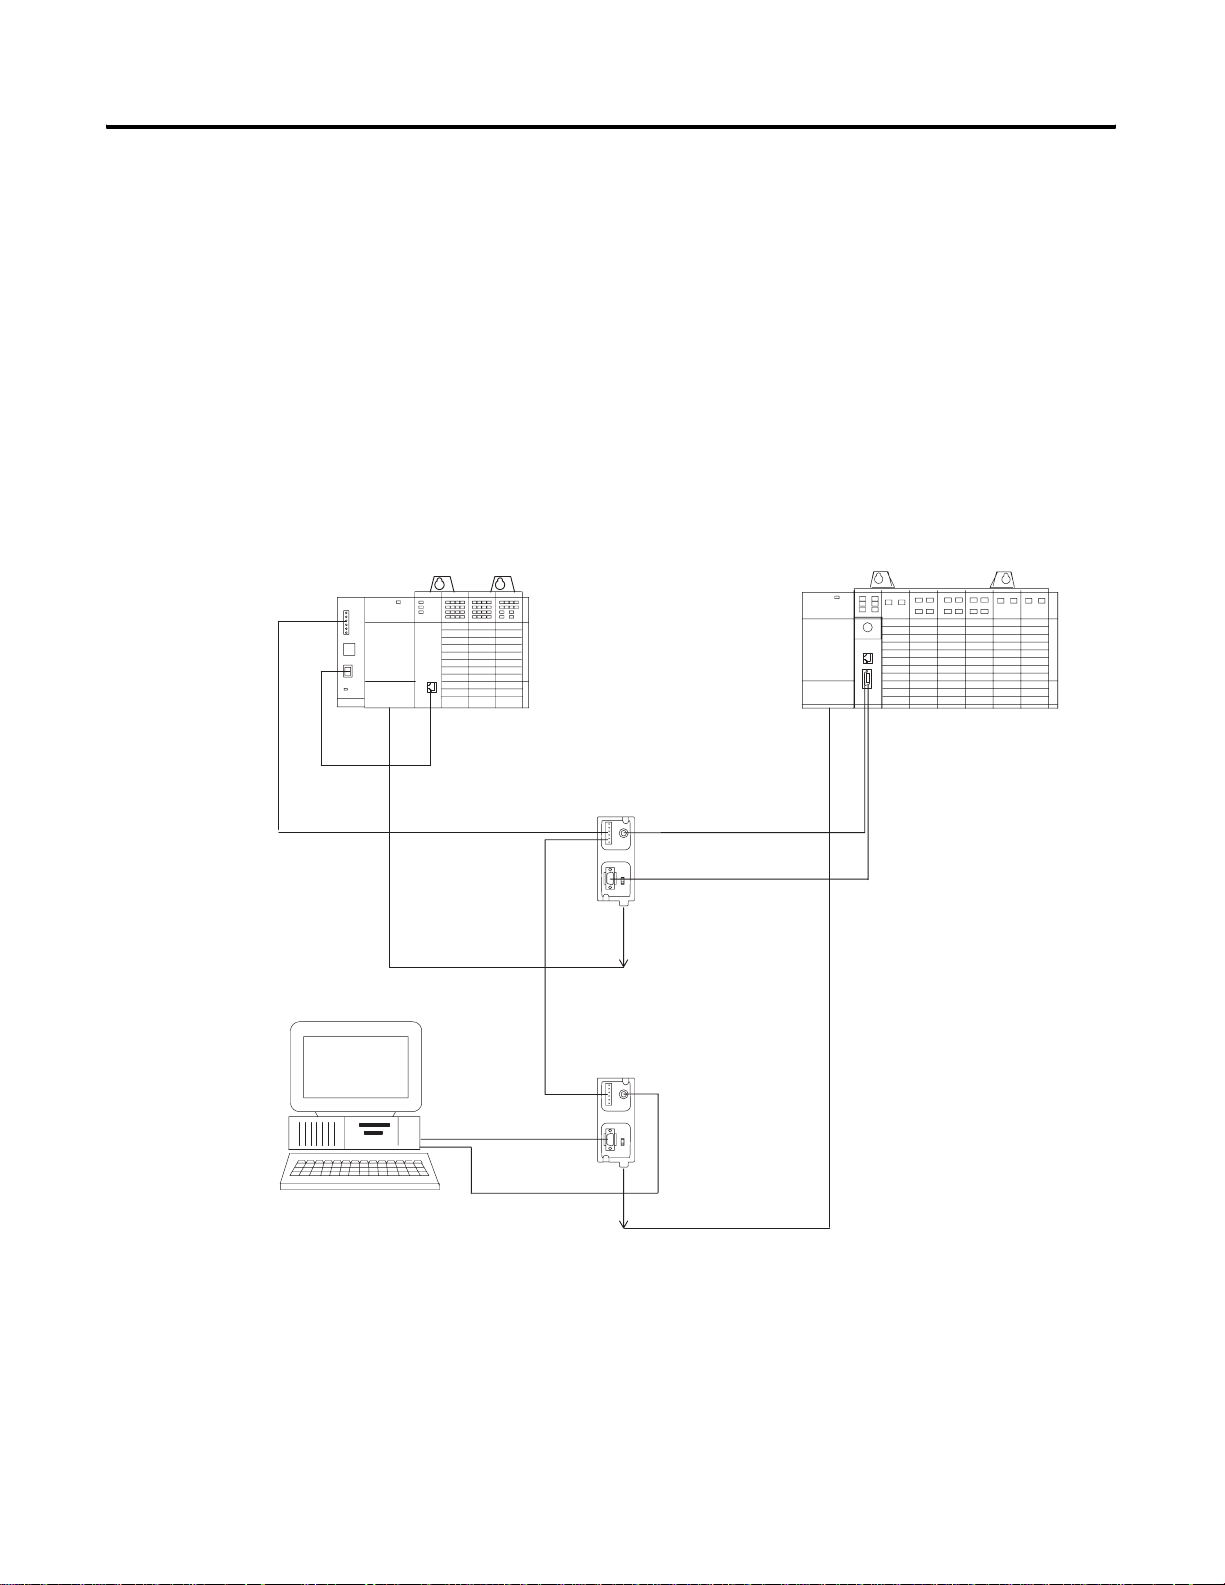
The second example shows how you can connect or migrate a legacy system to
a new installation with RSLogix software.
• Connect multiple DH-485 networks together for inter-network
communications.
• Message between SLC 5/03 controllers.
• Provide connection to other NetLinx networks.
• Access through a single point and download to an SLC controller,
MicroLogix controller, and Panelview display.
• Allow communications between legacy and ControlLogix systems for
high integration of control systems (except for fixed SLC controllers).
• Phase SLC systems into ControlLogix architecture by using a migration
tool.
Connect or Migrate a Legacy System to a New Installation
Computer with RSlogix 500
and RSLogix 5000 Software
ControlLogix Controller
AIC+ Link Coupler
AIC Link Coupler
AIC+
MicroLogix
ControlLogix Controller
DH485 Network
AIC Link Coupler
1756-DH485
1756-ENBT Module
AIC+ Link Coupler
AIC Link Coupler
SLC 5/03 Controller
Publication 1756-UM532A-EN-P - May 2006
SLC 5/03 Controller
PanelView Display
44136
Page 15

1756-DH485 Module Overview 1-7
Remote Messaging
The configuration of remote messaging is similar to data highway remote I/O
(DHRIO). It is achieved through routing table functions and module
configuration. The multi-hop functionality is available in RSLogix 5 and 500
(version 6.3 or later)
Remote Upload and Download
You can bridge EtherNet/IP and ControlNet networks to a DH-485 network
using the 1756-DH485 module
You can upload and download:
• all MicroLogix and SLC 500 controllers on DH-485 from NetLinx
network by using RSLinx Classic software.
• PanelView Standard terminals on DH-485 from NetLinx network by
using RSLinx Classic.
Logix controllers message via a NetLinx network through a ControlLogix
gateway to the DH-485 network to all MicroLogix and SLC 5/03 (and above)
controllers on DH-485 network. RSLinx Classic software on the DH-485
network can browse through the ControlLogix gateway to any device on a
NetLinx network.
IMPORTANT
Logix controllers on a NetLinx network will not be able to
initiate messages through the ControlLogix gateway to the
DH-485 network to fixed SLC 500, SLC 5/01, or SLC
5/02 controllers on a DH-485 network.
Publication 1756-UM532A-EN-P - May 2006
Page 16
1-8 1756-DH485 Module Overview
Routing Limitations
Data Collection and
Recipe Management
The 1756-DH485 module can route a message through up to four
communications networks and three chassis. This limit applies only to the
routing of a message and not to the total number of networks or chassis in a
system.
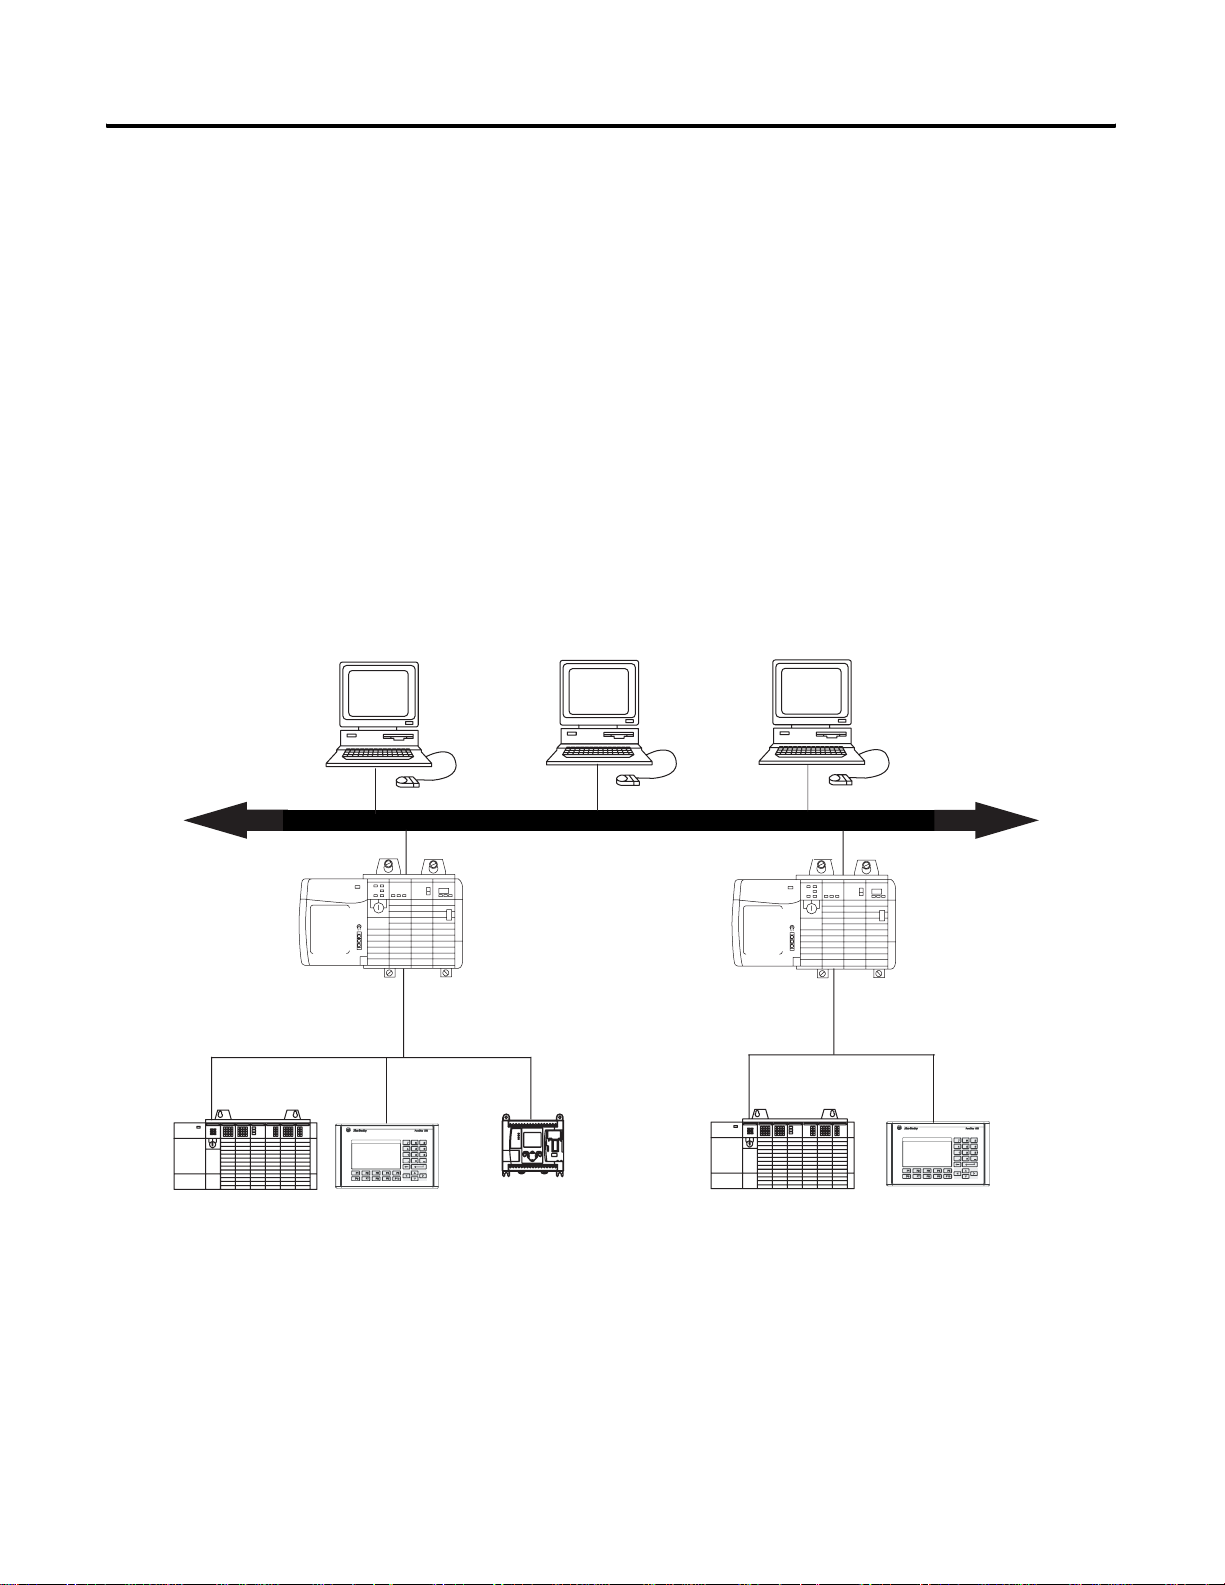
DH-485 and CIP Messaging
The 1756-DH485 module lets devices, such as ControlLogix, PLC, and SLC
controllers exchange information. With the 1756-DH485 module, you may
exchange information between the ControlLogix, PLC, or SLC controllers on
different networks. Communication between SLC controllers on different
networks is accomplished using remote messaging.
Communication Between SLC Controllers on Differen t Networks
RSView
Programming Terminal
EtherNet/IP Network
DH-485
SLC 5/03
PanelView
ControlLogix
Chassis
MicroLogix
SLC 5/03
DH-485
ControlLogix
Chassis
PanelView
44056
Publication 1756-UM532A-EN-P - May 2006
Page 17

1756-DH485 Module Overview 1-9
Alphanumeric Indicators
When you apply power to the module, the alphanumeric display begins to
cycle through the following sequence.
1. All LEDs flash on then off -CHA, CHB OK
2. OK displays red then changes to green.
3. INIT displays.
4. Firmware Revision flashes on scrolling display: DH-485
5. Channel A and the network used for channel A.
6. Channel A node address.
7. Channel A status.
8. Channel B and the network used for channel.
9. Channel B node address.
10. Channel B status.
This sequence runs continuously during normal module operation.
EXAMPLE
For example, if your module uses the following:
• Channel A for DH-485 with node address 14
• Channel B is not connected
and the channels are operating properly, you see the
following sequence:
A DH, A#14, A OK, B DH, B#00, ONLY NODE
Refer to Appendix B, Troubleshoot the 1756-DH485 Module and publication
1756-IN587, the ControlLogix DH-485 Communications Module Installation
Instructions, for more information about LEDs and status indicators.
Publication 1756-UM532A-EN-P - May 2006
Page 18

1-10 1756-DH485 Module Overview
Notes:
Publication 1756-UM532A-EN-P - May 2006
Page 19

Overview of the DH-485 Network
Chapter
2
Introduction
The information in this chapter will help you plan, install, and operate devices
on a DH-485 network. This chapter also contains information that describes
the DH-485 network functions, network architecture, and performance
characteristics.
For See
DH-485 Network Description 2-1
DH-485 Network Protocol 2-2
DH-485 Token Rotation 2-2
DH-485 Network Initialization 2-2
Devices that Use the DH-485 Network 2-3
1747-AIC Isolated Link Coupler for DH-485 2-4
1761-NET- AIC Advanced Interface Converter Product Overview 2-6
Operating Modes 2-6
Device Compatibility 2-6
1747-UIC USB to DH-485 Interface Converter 2-7
Example System Configuration 2-8
Important Planning Considerations 2-10
Additional Resources 2-13
DH-485 Network Description
1 Publication 1756-UM532A-EN-P - May 2006
The DH-485 network passes information between devices on the plant floor.
The network monitors process parameters, device parameters, device status,
process status, and application programs to support data acquisition, data
monitoring, program upload/download, and supervisory control.
The DH-485 network offers:
• interconnection of 32 devices.
• multi-master capability.
• token passing access control.
• the ability to add or remove nodes without disrupting the network.
(1)
• maximum network length of 1219 m (4000 ft)
(1) The network can be extended to 2,438 meters (8,000 feet) by connecting two AIC+ Advanced Interface
Converters (1761-NET-AIC). Refer to the AIC+ Advanced Interface Converter User Manual, publication number
1761-6.4.
.
Page 20

2-2 Overview of the DH-485 Network
T
The protocol used to control message transfers on the DH-485 network
supports two classes of devices: initiators and responders. All initiators on the
network get a chance to initiate message transfers. To determine which
initiator has the right to transmit, a token passing algorithm is used.
DH-485 Network Protocol
DH-485 Token Rotation
A node holding the token is able to transmit a configurable number of
message packets (plus two retries) onto the network before having to pass the
token on to the next node. This configuration parameter is called the Token
Hold Factor and has a minimum value of one and a maximum value of four.
Once a node holding the token has sent any messages that it has to send, up to
its Token Hold Factor maximum allowed, it attempts to pass the token to its
successor by sending a token-pass packet.
If no network activity occurs, the initiator sends the token-pass packet again.
After two retries (a total of three tries) the initiator will attempt to find a new
successor.
IMPORTAN
The allowable range of the node address of an initiator is 0 to 31. The
allowable address range for all responders is 1 to 31. There must be at least one
initiator on the network.
The maximum address that the initiator will search for
before wrapping to zero is the value in the configurable
parameter maximum node address. The default value for
this parameter is 31 for all initiators and responders.
DH-485 Network Initialization
Publication 1756-UM532A-EN-P - May 2006
Network initialization begins when a period of inactivity exceeding the time of
a link dead timeout is detected by an initiator on the network. When the time
for a link dead timeout is exceeded, usually the initiator with the lowest address
claims the token. When an initiator has the token it will begin to build the
network. The network requires at least one initiator to initialize it.
Building a network begins when the initiator that claimed the token tries to
pass the token to the successor node. If the attempt to pass the token fails, or
if the initiator has no established successor (for example, when it powers up), it
begins a linear search for a successor starting with the node above it in the
addressing.
When the initiator finds another active initiator, it passes the token to that
node, which repeats the process until the token is passed all the way around
the network to the first node. At this point, the network is in a state of normal
operation.
Page 21
Overview of the DH-485 Network 2-3
Devices that Use the
Presently, the following SLC 500 devices support the DH-485 network:
DH-485 Network
Devices that Use the DH-485 Network
Catalog Number Description Installation
Requirement
1756-DH485 ControlLogix DH485
Communication
Module
1747-Lxxx SLC 500
Programmable
Controllers
1747-KE DH-485/DF1
Interface Module
1747-UIC USB to DH-485
Interface Converter
1747-AIC Isolated Link Coupler Standalone Provided connection to SLC 500 family devices to the
ControlLogix
Chassis
SLC Chassis Programmable controllers. 1747-UM011
SLC Chassis Provides a non-isolated DH-485 interface for
Standalone Provides connection to personal computer’ s USB port
Function Publication
Bridge DH485 messages in ControlLogix. 1756-UM532
SLC 500 devices to host computers over RS-232
using full- or DF1 half-duplex protocol. Enables
remote programming to an SLC 500 controller or the
DH-485 network through modems. Ideal for low cost
RTU/SCADA applications.
and features an RS-232 and an RS-485 port for
connection to SLC 500 controllers.
DH-485 network. The coupler provides a 6-position
removable terminal block for connection to the
DH-485 communication cable.
1747-IN006
1747-IN063
1747-UM011
1761-NET-AIC Advanced Interface
Converter
1770-KF3
1785-KA5 DH+/DH-485
1785-KA5P Standalone
1784-KTX, 1784-KTXD PC DH-485 Interface
1784-PCMK PCMCIA Interface
1761-L
1762-L
1763-L
1764-L
1756-L
1769-L
1794-L
(1)
DH-485/DF1
Interface Module
Gateway
Card
Card
MicroLogix
Programmable
Controllers
Logix Programmable
Controllers
Standalone Provides a communication link between various
Standalone, or
desktop
(1771) PLC
Chassis
ISA Bus Provides DH-485 or DH+ connection. 1784-6.5.22
PCMCIA slot in
computer
Standalone Programmable Controllers 1761-UM003
1756 Chassis or
DIN Rail
1761-UM004
networks devices.
Provides an isolated DH-485 interface for SLC 500
devices to host computers over RS-232 using full- or
DF1 half-duplex protocol. Enables remote
programming to an SLC 500 controller or the DH-485
network through modems.
Provides communication between stations on the
PLC-5 (DH+) and SLC 500 (DH-485) networks. Lets
communication and data transfer from PLC to SLC
500 on DH-485 network. Also enables software
programming or data acquisition across DH+ to
DH-485.
Provides DH-485 or DH+ connection. 1784-6.5.19
Programmable Controllers 1756-UM001
1770-6.5.18
1785-6.5.5
1785-1.21
1762-UM001
1763-UM001
1764-UM001
1769-UM011
1794-UM001
Publication 1756-UM532A-EN-P - May 2006
Page 22
2-4 Overview of the DH-485 Network
Devices that Use the DH-485 Network
Catalog Number Description Installation
Requirement
2707-L8P1
2707-L8P2
2707-L40P1
2707-L40P2
2707-V40P1
2707-V40P2
2707-V40P2N
2707-M232P3
2707-M485P3
2711-K5A2,
2711-B5A2,
2711-K5A5,
2711-B5A5,
2711-K5A1,
2711-B5A1,
2711-K9A2,
2711-T9A2,
2711-K9A5,
2711-T9A5,
2711-K9A1, and
2711-T9A1
(1)
,
(1)
,
(1)
,
(1)
,
(1)
,
(1)
,
(1)
(1)
(1)
,
, and
DTAM Plus and
DTAM Micro
Operator
Interfaces
PanelView 550 and
PanelView 900
Operator Terminals
(1)
Panel Mount Provides electronic operator interface for SLC 500
Panel Mount Provides electronic operator interface for SLC 500
Function Publication
2707-800,
controllers.
controllers.
2707-803
2711-UM014DF
1784-PKTX,
1784-PKTXD
(1) This product is no longer available for order.
PC DH-485 Interface
Card
1747-AIC Isolated Link Coupler for DH-485
PCI Bus Provides DH-485 or DH+ connection 1784-6.5.27
Use the isolated link coupler (1747-AIC) to connect SLC 500 family devices to
the DH-485 network (as shown on page 2-5). The coupler provides a
6-position removable terminal block for connection to the DH-485
communication cable.
To establish network connections for:
• SLC 500 controllers (SLC 5/03 and below), use a 304.8 mm (12 in.)
cable, supplied with the link coupler (catalog number 1747-C11).
If you need to connect a peripheral device that is between 1.8 m (6 ft) and 6.1
m (20 ft) away, use the 1747-C20 cable.
To protect connected devices, the coupler provides 1500V dc isolation
between the communications cable and the attached SLC 500 controller and
peripheral devices.
Publication 1756-UM532A-EN-P - May 2006
Page 23
Overview of the DH-485 Network 2-5
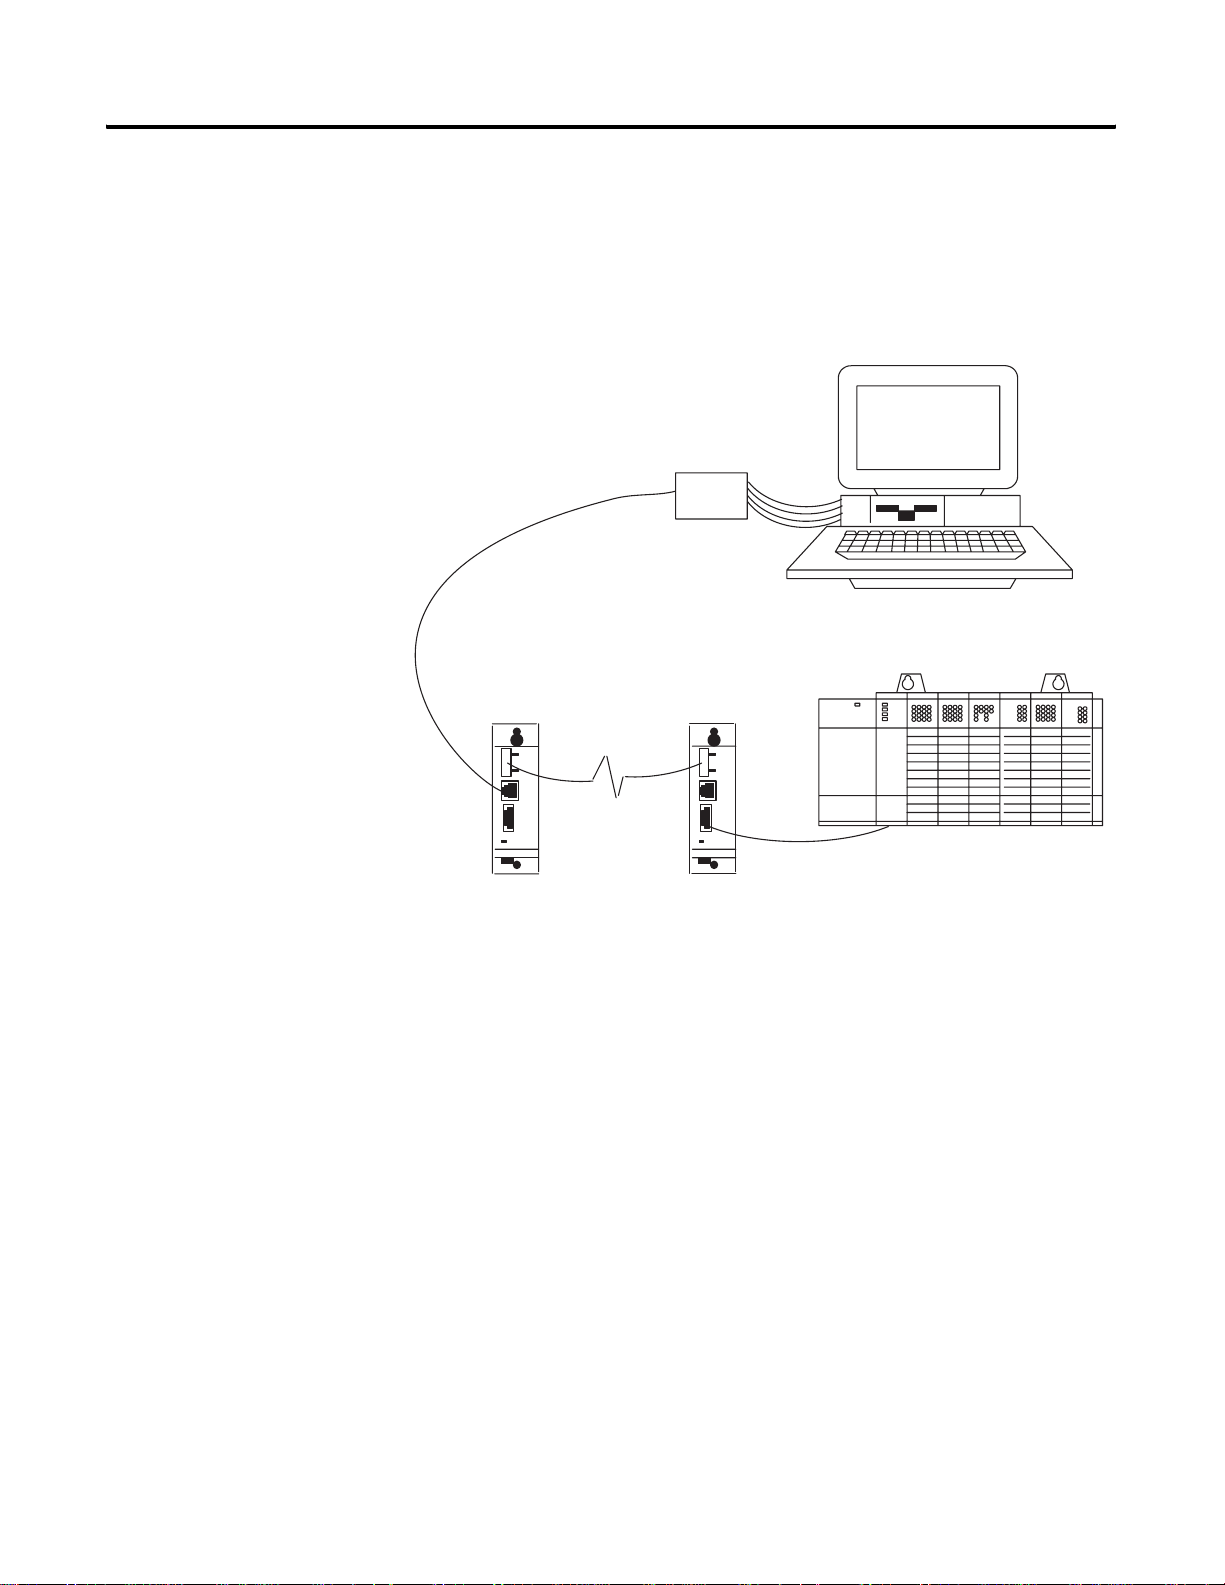
You can also use the isolated link coupler to provide connectivity between
devices for distances greater than 1.8 m (6 ft) up to a maximum of 1219 m
(4000 ft). Below is an example of a remote connection between a computer
running your programming software and an SLC 500 controller.
Remote Connection Between a Computer Running Programming Software and an
SLC 500 Controller
RSLogix 500
Software
1747-UIC
UIC
1747-C13
1747-AIC
+24V dc
1747-AIC
>1.8m (6 ft)
1747-C11
Publication 1756-UM532A-EN-P - May 2006
Page 24

2-6 Overview of the DH-485 Network
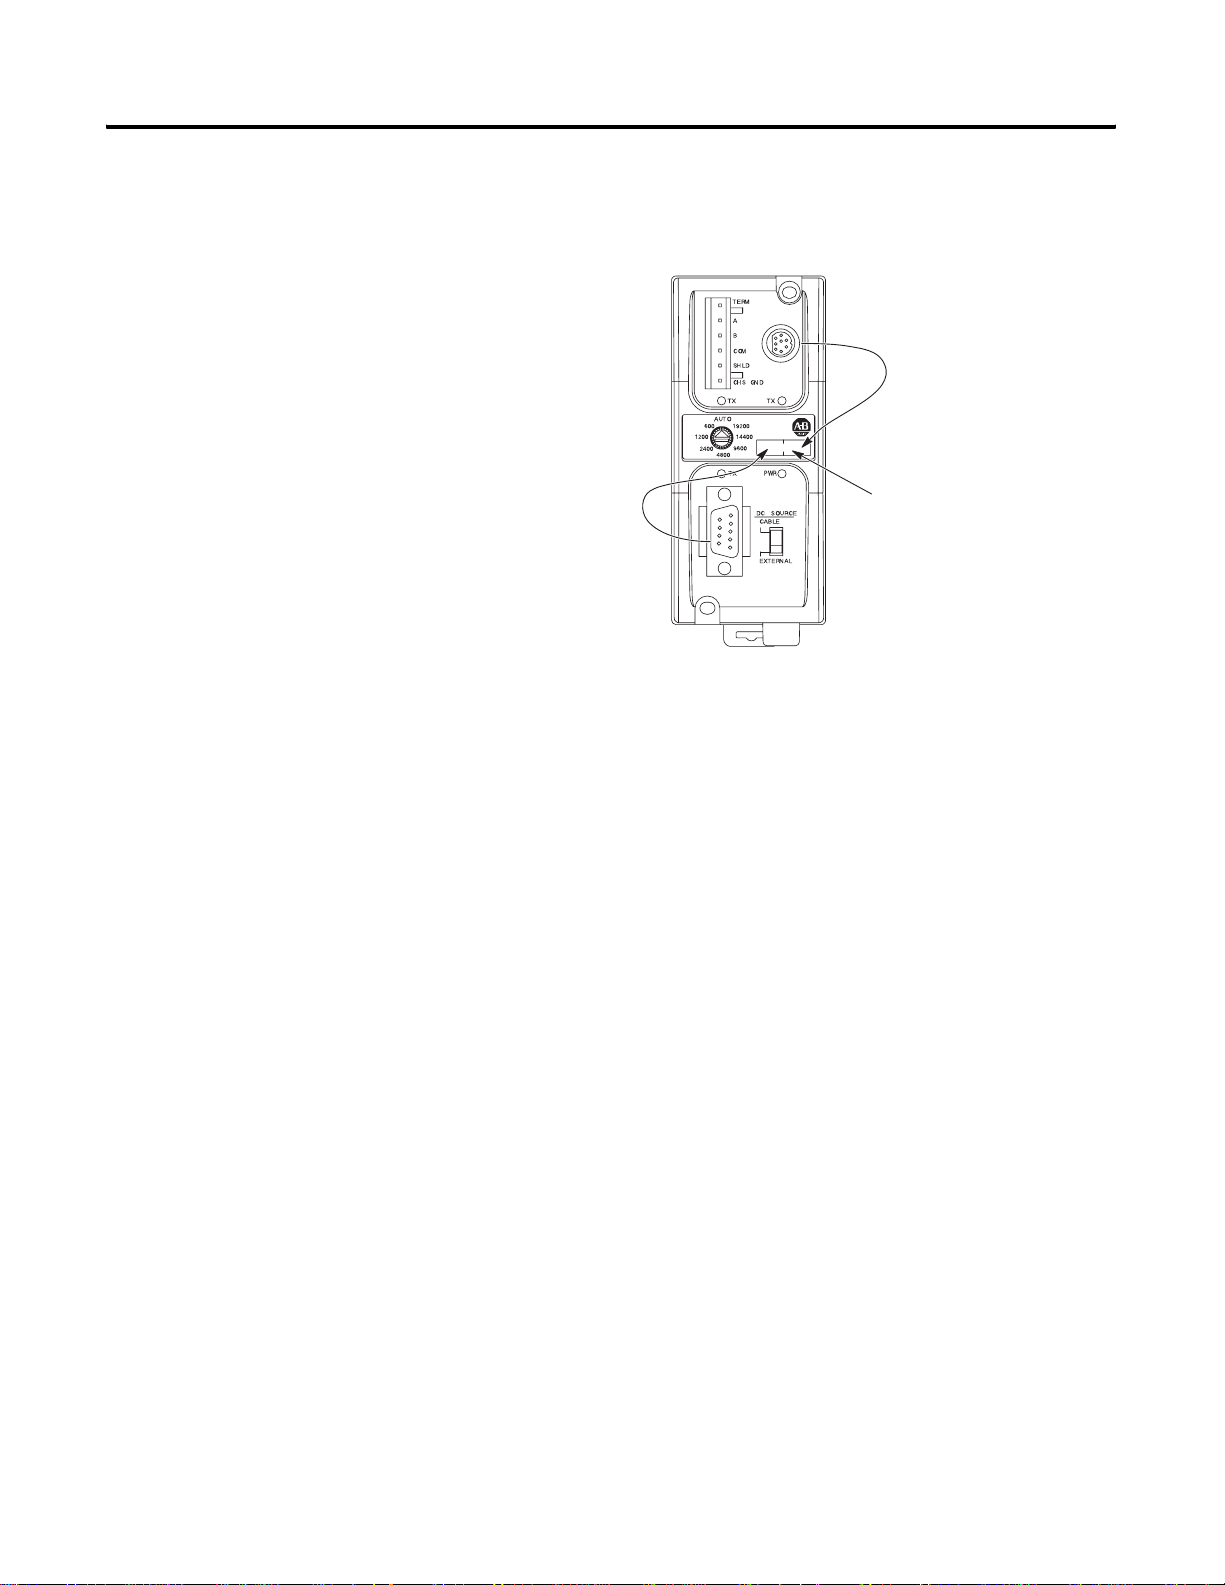
1761-NET-AIC Advanced Interface Converter Product Overview
Operating Modes
The AIC+ advanced interface converter provides a communication link
between various networks devices. Ports 1, 2, and 3 are used for making the
communication connections. The AIC+ is compatible with a variety of SLC
and MicroLogix controllers and the 1756-DH485 communications module.
The MicroLogix controllers provide power to the AIC+ via port 2’s cable.
However, if a controller is not connected to port 2, a 24V dc power supply
connected to the converter’s external power terminals is required. The DC
power source selector switch needs to be set for your particular configuration.
The baud rate selector switch is used to match the baud rate filter of the AIC+
to the network baud rate. This switch does not change the network baud rate
and is normally left in the AUTO position. In high noise environments, the
baud rate selector switch should be taken out of the AUTO mode and set to
the same baud rate as the network.
The AIC+ can be used in the following modes for DH-485:
• point-to-point RS-232 isolator
• RS-232 to RS-485 isolator
Communication is established using hardware handshaking or auto transmit
signals.
Device Compatibility
The AIC+ can be used to interconnect the following devices:
• SLC 500, 5/01, 5/02, and 5/03 controllers (channel 1)
• SLC 5/03, 5/04, and 5/05 controllers (channel 0)
• MicroLogix controllers
• Logix Controllers
• Operator interface devices
• PC serial ports (or any 9-pin DTE serial port)
• Logix controller serial port (DH485 mode)
• 1756-DH485 module
TIP
The 1761-HHP-B30 Hand-Held Programmer is not
connectable to the AIC+ advanced interface converter.
Publication 1756-UM532A-EN-P - May 2006
Page 25
Node Address Identification
Overview of the DH-485 Network 2-7
Misconception about the 1761-NET-AIC Converter
There is no node
address associated
with the network port
(Port 3).
1 Node Address
Port
(The node address
is configured in the
device connected to
Port 1.)
Port 2 Node Address
(The node address is
configured
connected to Port 2.)
Use this write-on area
to mark the node address
of each connection.
in the device
The function of the 1761-NET-AIC converter is to accomplish two tasks. The
first is to convert RS232 electrical signals to RS485 electrical signals and RS485
electrical signals to RS232 electrical signals.
The second function is to provide electrical isolation between all three
communication ports. This protects against ground loops and voltage
differences between devices connected to the 1761-NET-AIC converter.
1747-UIC USB to DH-485 Interface Converter
A common misconception is that the 1761-NET-AIC device converts
protocol, this is not true, it passes the protocol but converts the electrical
signals. An example device that would convert protocol and electrical signal is
the 1747-KE module.
Refer to the Isolation Interface Converter (AIC+) User Manual, publication
1761-UM004 for complete information.
The 1747-UIC lets you connect DH-485 devices directly to a computer’s USB
port. It features an RS-232 port for connection to SLC 5/03 and higher
controllers, MicroLogix, PanelView 300 and higher terminals,
1761-NET-AIC+, and Logix controllers, as well as an RS-485 port for
connection to SLC 5/03 and lower controllers, PanelView 300 and higher
terminals, and 1747-AIC. The converter can communicate with devices on the
DH-485 network at 19.2K baud.
Publication 1756-UM532A-EN-P - May 2006
Page 26
2-8 Overview of the DH-485 Network
Example System Configuration
Personal Computer
SLC 5/03, 5/04, or 5/05
1747-UIC
Interface
Converter
1747-AIC
Isolated
Link
Coupler
Modular Controller
1761-NET-AIC
Advanced Interface
Converter
SLC 500 20-Point
Fixed Controller
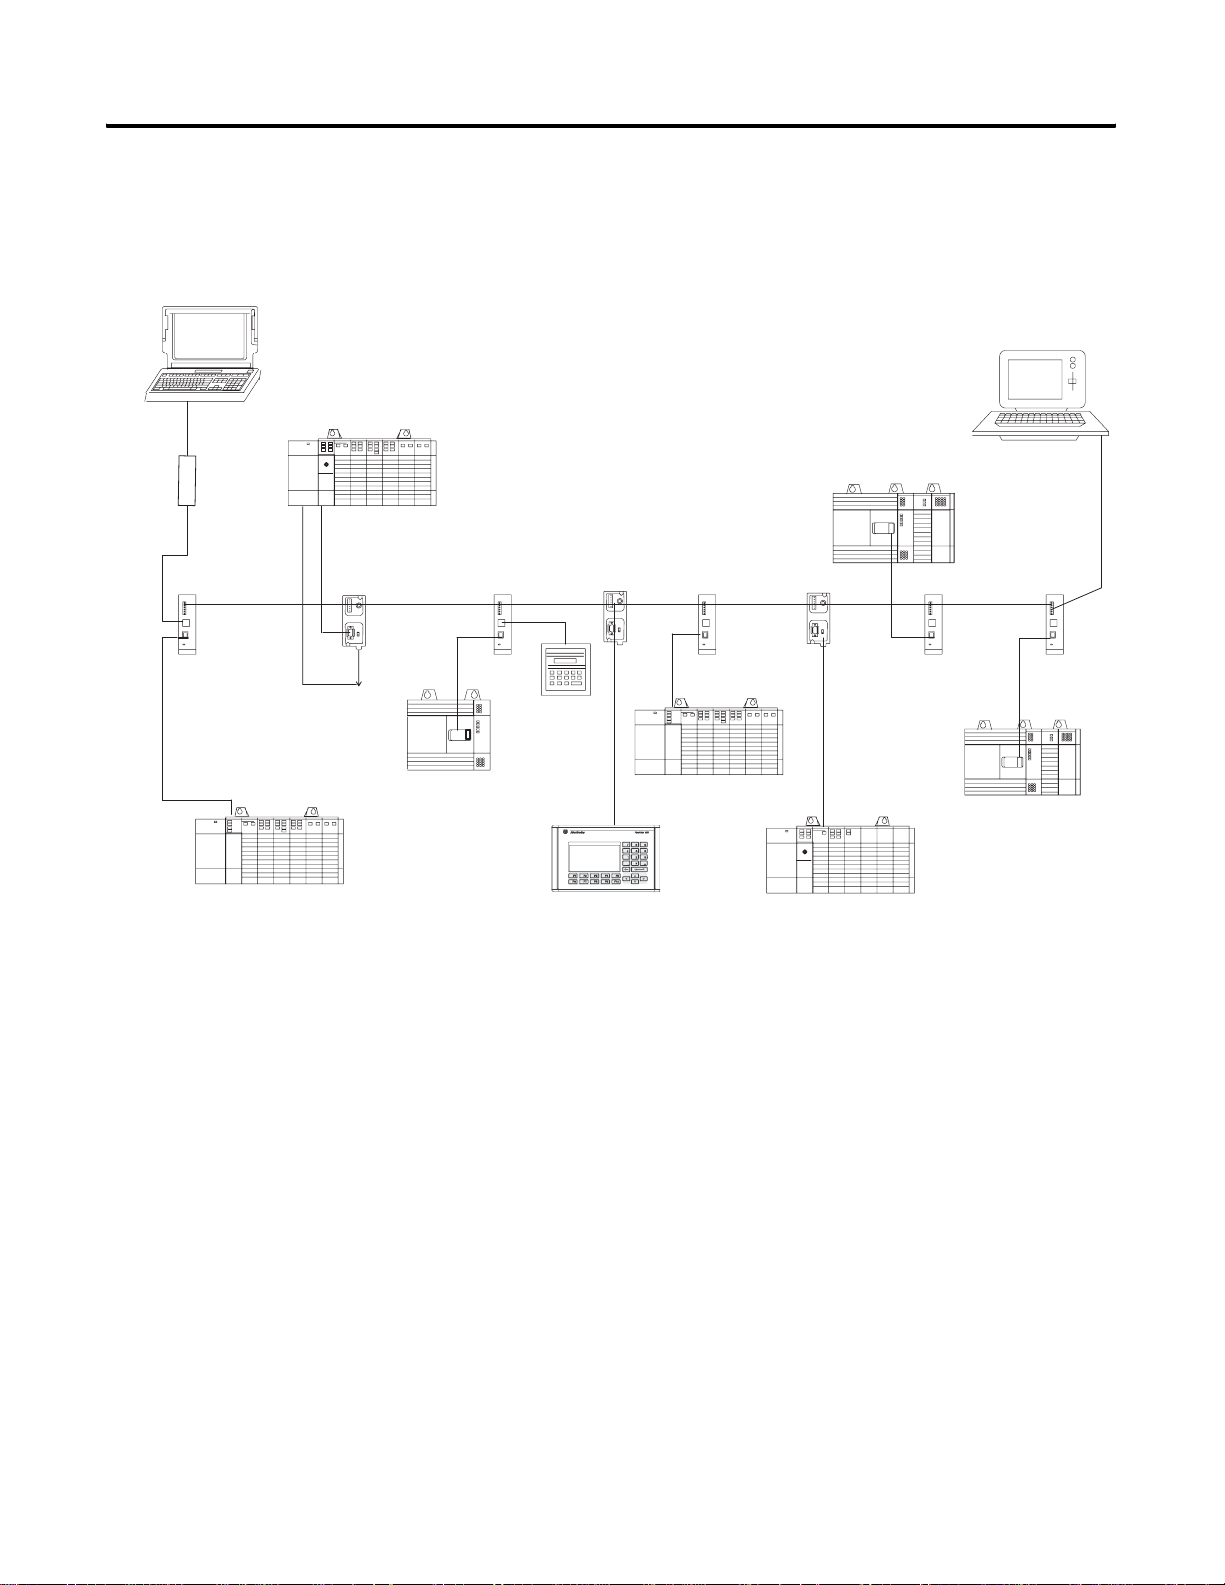
Below is an example of a DH-485 network.
Example DH-485 Network System Configuration
DH-485 Network
max. length 1219 m (4,000 ft)
1747-AIC
Data Table
Access
Module
SLC 5/01 Modular Controller
1747-AIC
SLC 500 20-Point Fixed
Controller with 2-Slot
Expansion Chassis
1747-AIC
1761-NET-AIC
SLC 500 Fixed Controller
Personal Computer
1747-AIC
SLC 5/02 Modular Controller
PanelView
ControlLogix Controller and 1756-DH485
Communications Module
44138
Publication 1756-UM532A-EN-P - May 2006
Page 27
Overview of the DH-485 Network 2-9
Configure the SLC 5/03, SLC 5/04, and SLC 5/05 Controller Channel 0 for DH-485
The RS-232 port (channel 0) of the SLC 5/03, SLC 5/04, and SLC 5/05
controllers can be configured for DH-485 protocol. You can connect channel
0 of the SLC 5/03, SLC 5/04, and SLC 5/05 controllers to a DH-485 network
using the 1747-CP3 cable and a 1761-NET-AIC Advanced Interface
Converter (AIC+). In this case, the AIC+ must be powered with 24V dc. The
1746-P1, -P2, -P4, -P5, and -P6 power supplies provide 24V dc user power
that may be used to power the AIC+
Configure an SLC Controller for DH-485.
DH-485
1747-AIC
Personal Computer
APS
SLC 5/01
1747-C11
DH-485
SLC 5/03, 5/04, or 5/05
24V dc Power
Supply
1761-NET-AIC
1761-CBL-PM02 or
1747-CP3
RS-232
24V dc User Power
Connection
1761-NET-AIC
1747-CP3 or
1761-CBL-PM02
24V dc User Power Connection
Publication 1756-UM532A-EN-P - May 2006
Page 28

2-10 Overview of the DH-485 Network
Important Planning Considerations
Carefully plan your network configuration before installing any hardware.
Listed below are some of the factors that can affect system performance:
• Amount of electrical noise, temperature, and humidity in the network
environment
• Number of devices on the network
• Connection and grounding quality in installation
• Amount of communication traffic on the network
• Type of process being controlled
• Network configuration
The major hardware and software issues you need to resolve before installing a
network are discussed in the following sections.
Hardware Considerations
You need to decide the length of the communication cable, where you will
route it, and how to protect it from the environment where it will be installed.
Before you install the communication cable, you need to know how many
devices are to be connected during installation and how many devices will be
added in the future. The following sections will help you understand and plan
the network.
Number of Devices and Length of Communication Cable
You must install a link coupler communications adapter (1747-AIC or
1761-NET-AIC) for each node on the network. If you plan to add nodes later,
provide additional link couplers during the initial installation to avoid recabling
after the network is in operation.
The maximum length of the communication cable is 1219 m (4000 ft). This is
the total cable distance from the first node to the last node on the network.
Publication 1756-UM532A-EN-P - May 2006
Page 29

Overview of the DH-485 Network 2-11
Plan Cable Routes
Follow these guidelines to help protect the communication cable from
electrical interference:
• Keep the communication cable at least 1.52 m (5 ft) from any electric
motors, transformers, rectifiers, generators, arc welders, induction
furnaces, or sources of microwave radiation.
• If you must run the cable across power feed lines, run the cable at right
angles to the lines.
• If you do not run the cable through a contiguous metallic wireway or
conduit, keep the communication cable at least 0.15 m (6 in.) from ac
power lines of less than 20A, 0.30 m (1 ft) from lines greater than 20A,
but only up to 100k VA, and 0.60 m (2 ft) from lines of 100k VA or
more.
• If you run the cable through a contiguous metallic wireway or conduit,
keep the communication cable at least 0.08 m (3 in.) from ac power lines
of less than 20A, 0.15 m (6 in.) from lines greater than 20A, but only up
to 100k VA, and 0.30 m (1 ft) from lines of 100k VA or more.
Running the communication cable through conduit provides extra
protection from physical damage and electrical interference. If you route
the cable through conduit, follow these additional recommendations:
– Use ferromagnetic conduit near critical sources of electrical
interference. You can use aluminum conduit in non-critical areas.
– Use plastic connectors to couple between aluminum and
ferromagnetic conduit. Make an electrical connection around the
plastic connector (use pipe clamps and the heavy gauge wire or wire
braid) to hold both sections at the same potential.
– Ground the entire length of conduit by attaching it to the building
earth ground.
– Do not let the conduit touch the plug on the cable.
– Arrange the cables loosely within the conduit. The conduit should
contain only serial communication cables.
– Install the conduit so that it meets all applicable codes and
environmental specifications.
For more information on planning cable routes, see Industrial Automation
Wiring and Grounding Guidelines, Publication Number 1770-4.1.
Publication 1756-UM532A-EN-P - May 2006
Page 30

2-12 Overview of the DH-485 Network
Software Considerations
Software considerations include the configuration of the network and the
parameters that can be set to the specific requirements of the network. The
following are major configuration factors that have a significant effect on
network performance:
• Number of nodes on the network
• Addresses of those nodes
• Baud rate
• Maximum node address selection
• SLC 5/03, SLC 5/04, and SLC 5/05 controllers only: token hold factor
• Maximum number of communicating devices
The following sections explain network considerations and describe ways to
select parameters for optimum network performance (speed).
Number of Nodes
The number of nodes on the network directly affects the data transfer time
between nodes. Unnecessary nodes (such as a second programming terminal
that is not being used) slow the data transfer rate. The maximum number of
nodes on the network is 32.
Set Node Addresses
The best network performance occurs when node addresses start at 0 and are
assigned in sequential order. Controllers cannot be node 0. Also, initiators such
as personal computers should be assigned the lowest numbered addresses to
minimize the time required to initialize the network.
Set Controller Baud Rate
The best network performance occurs at the highest baud rate. All devices
must be at the same baud rate.
Publication 1756-UM532A-EN-P - May 2006
Page 31

Overview of the DH-485 Network 2-13
T
Maximum Node Address Setting
The maximum node address parameter should be set as low as possible. This
minimizes the amount of time used in soliciting successors when initializing
the network. If all nodes are addressed in sequence from 0, and the maximum
node address is equal to the address of the highest addressed node, the token
rotation will improve by the amount of time required to transmit a solicit
successor packet plus the slot timeout value.
You cannot add any nodes to the network without affecting the response time.
On the other hand, since the time required to hold an open station address is
greater than the time required to pass a token, it can be useful to leave a
temporary device (such as a personal computer) connected if there is only one
such device. A solicit successor packet requires the same transmission time as
the token pass, but there is an added slot timeout period.
See your programming software user manual for the procedures to set node
addresses, controller baud rate, and maximum node addresses.
Additional Resources
IMPORTAN
The SLC 500 Series A (only) controllers set the maximum
node address to 31 when power is cycled increasing
initialization and response time of the network.
Maximum Number of Communicating Devices
SLC 500 fixed and SLC 5/01 controllers can be selected by two initiators
maximum at the same time. Using more than two initiators to select the same
SLC 500 fixed and SLC 5/01 controllers at the same time can cause
communication timeouts.
Refer to the manuals listed in the table Devices that Use the DH-485 Network
on page 2-3.
Publication 1756-UM532A-EN-P - May 2006
Page 32

2-14 Overview of the DH-485 Network
Notes:
Publication 1756-UM532A-EN-P - May 2006
Page 33

Use Data Highway 485 Network
Chapter
3
Introduction
What Is Data Highway 485?
This chapter describes the basics of the Data Highway 485 system and the
operation of a DH-485 network.
For See
What Is Data Highway 485? 3-1
Two Methods of Communication Over a DH-485 Network 3-2
Use DH-485 Messaging 3-3
Configuration Information in DH-485 Messaging 3-11
Application Timeout 3-12
Example DH-485 Network Routing Configuration 3-13
Use the Common Industrial Protocol (CIP) Messaging 3-14
On the most basic level, Data Highway 485 is a wire or cable and a protocol
that connects computers and peripheral devices so that they can communicate.
The wire used for a network is called the network medium.
A DH-485 link transfers data between ControlLogix controllers, SLC
controllers, and other devices that use the DH-485 network. These devices are
called stations. You can connect a maximum of 32 stations to a single DH-485
link.
1 Publication 1756-UM532A-EN-P - May 2006
Page 34

3-2 Use Data Highway 485 Network
Link Design
When you design your DH-485 link, you should use good design practices,
including laying out the link before installation. We also recommend you
consider the following when designing your DH-485 link:
• All performance requirements
• Maintenance
• Possible future changes to the link
Use a Belden 9842 or a Belden 3106A cable to connect your module to
DH-485. Only connect a DH-485 network using a daisy-chain configuration.
If you need to know how to install a DH-485 network, refer to publication
1747-UM011, SLC 500 Modular Hardware Style User Manual.
Two Methods of Communication Over a DH-485 Network
The 1756-DH485 module acts as a bridge for two methods of communication.
These methods are:
• DH-485 Messaging
• Common Industrial Protocol (CIP) Messaging
The table Types of Communication on the 1756-DH485 Module lists the
devices that support each communication method.
Types of Communication on the 1756-DH485 Module
Type of Communication Devices and Software Support
DH-485 messaging SLC-500 -5/05, 5/04, 5/03, 5/02, 5/01, MicroLogix
Logix controllers
RSLinx and RSLogix 500 software
Common Industrial Protocol
(CIP) messaging
Logix controllers
RSLogix 5000 and RSLinx software
Publication 1756-UM532A-EN-P - May 2006
Page 35

Use Data Highway 485 Network 3-3
Use DH-485 Messaging
DH-485 Messaging offers the following benefits:
• You can send messages between devices on the same link.
• You can send messages between devices on different links.
DH-485 messaging is divided into two types:
• Local DH-485 Messaging - See page 3-3
• Remote DH-485 Messaging - See page 3-5
Before you can design a control system to meet your application needs, be
aware of the difference between Local DH-485 Messaging and Remote
DH-485 Messaging.
Local DH-485 Messaging
Devices use local DH-485 messaging to communicate between devices on the
same physical link. A device that uses local DH-485 messaging must:
• generate local DH-485 packets.
• support local DH-485 protocol.
• send and receive messages.
TIP
SLC 5/01 controller receives and replies, but does not
initiate.
Publication 1756-UM532A-EN-P - May 2006
Page 36

3-4 Use Data Highway 485 Network
This figure shows an SLC controller sending a local message to Channel A on
the 1756-DH485 module. Because the controller slot for Channel A is
configured to 0, the message is forwarded to the ControlLogix controller in
slot 0.
SLC Controller Sending a Local Message to Channel A on the 1756-DH485 Module
ControlLogix Chassis
AIC+ Link Coupler
1756-DH485 Module
Channel A
AIC Link Coupler
44052
SLC 5/03 Controller
Because a local DH-485 message has only enough address information to get
the message to a target node on the same DH-485 network, the 1756-DH485
module that receives this message cannot identify where to send the message.
The 1756-DH485 module uses the Controller Slot configuration parameter in
RSLinx software to send the message to the local controller.
Publication 1756-UM532A-EN-P - May 2006
Local DH-485 messaging does not require a populated routing table. Local
DH-485 messaging does require a default or applied controller slot for each
channel configured for a DH-485 network.
IMPORTANT
Local DH-485 Messaging can target only one ControlLogix
controller per DH-485 channel. The ControlLogix
controller must reside in the same chassis as the
1756-DH485 module receiving the message.
Refer to Remote DH-485 Messaging on page 3-5 for more
information.
Page 37

Use Data Highway 485 Network 3-5
Limitations of Local DH-485 Messaging
When using Local DH-485 Messaging, you must remember:
• the DH-485 message contains only a node ID for a node on the
DH-485 network.
• a local DH-485 message sent to the node ID of a port on the
1756-DH485 module is forwarded to a single user-configured controller
slot.
• messages on one DH-485 network cannot be routed to other networks.
Logix controllers message via a NetLinx network through a ControlLogix
gateway to DH-485 network to all MicroLogix and SLC 5/03 (and above)
controllers on DH-485 network. RSLinx Classic on DH-485 network can
browse through ControlLogix gateway to any device on NetLinx network.
IMPORTANT
Logix controllers on NetLinx network will not be able to
message through ControlLogix gateway to DH-485
network to fixed SLC 500, SLC 5/01, or SLC 5/02
controllers on DH-485 network.
Remote DH-485 Messaging
Devices use remote DH-485 messaging to communicate between devices on
physically separate networks. A device that uses remote DH-485 messaging
must be able to:
• generate Remote Data Highway 485 network packets.
• support Remote Data Highway 485 network protocol.
• send and receive messages.
Remote DH-485 messaging should be used when:
• The message originating device or the message target device is one of
the supported devices.
Refer to table Types of Communication on the 1756-DH485 Module
on page 3-2.
• There is a DH-485 network link in the message’s path from originator to
target.
• The originating and the target devices are on separate networks
communicating through a ControlLogix gateway.
Publication 1756-UM532A-EN-P - May 2006
Page 38

3-6 Use Data Highway 485 Network
TERMTT
AAA
A
B
B
This figure shows an example of remote DH-485 messaging between SLC/03
(or later) controller A and SLC 5/03 (or later) controller B. In this example, the
following information must be included in the remote DH-485 message
routing message instruction:
• Local DH-485 node = 020
• Destination link ID = 2
• Remote DH-485 node = 030
Remote DH-485 Messaging Between
SLC 5/03 Controller A and SLC 5/03 Controller B
1756-DH485 Module
ControlLogix Chassis
Link ID 1
Channel A - Node: 020
AIC+
Channel B - Node: 025
AIC+
AIC
Link ID 2
AIC
SLC 5/03 Controller A
SLC 5/03 Controller B
Node: 030
44053
Link IDs
To use remote DH-485 messaging, each network that is an originating network
or target network must have a unique link ID. The 1756-DH485 module
requires these link IDs to be decimal values between 1-199. Each DH-485
channel on a 1756-DH485 module must have its own unique link ID.
Publication 1756-UM532A-EN-P - May 2006
Page 39

Use Data Highway 485 Network 3-7
The message originates on the source network. The destination network is the
message’s target network. This applies to all source and destination networks,
including DH-485, ControlNet, EtherNet/IP, and a ControlLogix chassis
backplane.
IMPORTANT
For remote DH-485 messaging, the ControlLogix chassis
backplane should be considered a separate, independent
network. Therefore, a system of 1 DH-485 network and
one ControlLogix chassis is a two-link system.
The ControlLogix chassis backplane is required to be a
separate, independent link for DH-485 messaging if there
is more than one message target ControlLogix controller in
a ControlLogix chassis.
Routing Tables in Remote DH-485 Messaging
The 1756-DH485 module contains a routing table that you define for your
application. The routing table contains information used to steer Remote
DH-485 Messages through the system to remote nodes located on separate
networks. By using the routing table, the 1756-DH485 module lets existing
devices, such as an SLC controller, to use DH-485 Remote Addressing for
messaging.
You must use RSLinx software to configure your routing table. Refer to Use
RSLinx Software to Create a Routing Table on page 4-2, for more information.
Publication 1756-UM532A-EN-P - May 2006
Page 40

3-8 Use Data Highway 485 Network
Programming Message Block Instructions in a Controller for Remote DH-485
Messaging
Before programming your message block instructions in your controller, you
must:
• determine which links will send and receive remote DH-485 messaging.
• draw a network to make sure you meet the design requirements for
remote DH-485 messaging.
If you are using remote DH-485 messaging, you must also:
• assign link numbers.
The numbers must be a decimal value between 1-199. ControlLogix
chassis backplane may also be assigned link IDs.
• assign DH-485 node numbers.
• use RSLinx software to load routing tables into each 1756-DH485
module.
When using remote DH-485 messaging, you must include the following in the
message instruction:
• Destination link ID - A user-defined number representing a network in
your system.
• Remote node or slot - The node or slot on the remote network with
which you want to communicate.
If the message originates on a DH-485 network, you must also include a local
DH-485 node. The node on your local DH-485 network is capable of routing
the message. If the message originates on EtherNet/IP, ControlNet, or
ControlLogix, you must also include a CIP path to the first 1756-DH485
module.
Publication 1756-UM532A-EN-P - May 2006
Page 41

Use Data Highway 485 Network 3-9
The following table lists what the controllers are capable of on DH-485.
Controllers and the Types of Messaging Capable on a DH-485 Network
Controller
Messaging
Respond to
Local DH-485
Initiate Local
DH-485
Respond to
Remote
DH-485
MicroLogix 1000 Yes Yes Yes No
MicroLogix 1100 Yes Yes Yes Yes
MicroLogix 1200 Yes Yes Yes Yes
MicroLogix 1500 Yes Yes Yes Yes
SLC 500 fixed Yes No No No
SLC 5/01 Yes No No No
SLC 5/02 Yes Yes No No
SLC 5/03 Yes Yes Yes Yes
SLC 5/04 Yes Yes Yes Yes
SLC 5/05 Yes Yes Yes Yes
Logix Yes Yes
(1)
Yes for CIP remote messaging only.
No
(1)
Initiate
Remote
DH-485
Yes
Publication 1756-UM532A-EN-P - May 2006
Page 42

3-10 Use Data Highway 485 Network
Limitations of Remote DH-485 Messaging
Remote DH-485 messages are encapsulated in CIP messages and sent on CIP
connections when they are sent across ControlNet, EtherNet/IP, and the
ControlLogix chassis backplane. Although this is transparent to the user, there
are resource limits associated with CIP on the 1756-DH485 module.
The 1756-DH485 module supports up to 32 CIP connections. These
connections are made when devices want to send a DH-485 message out of a
1756-DH485 module’s DH-485 channel. The 1756-DH485 module makes
these connections when it receives DH-485 message traffic. The 1756-DH485
module recovers connections if they are not being used.
Because of the various paths involved, the 1756-DH485 module responds to
‘out of connections’ in one of the following ways:
• The 1756-DH485 module may generate a Routing Error on DH-485 for
DH-485 message requests if there are no connections available.
• The Message Originator may generate an application timeout if a remote
1756-DH485 module has no connections available for a DH-485
Message response.
For more information on application timeouts, refer to Application
Timeout on page 3-12.
• The Message Originator may receive an ‘out of connections’ error if the
path from the originator to the 1756-DH485 module is a ControlLogix
chassis, a ControlNet network, or an EtherNet/IP network.
Publication 1756-UM532A-EN-P - May 2006
Page 43

Use Data Highway 485 Network 3-11
Configuration Information in DH-485 Messaging
When you are doing DH-485 messaging, you must first set up the
1756-DH485 module configuration. The following configuration information
is stored in the non-volatile (NVS) memory on your 1756-DH485 module
when you configure the module using RSLinx software.
• Any routing table that may be needed to send DH-485 messages
through the module. - This information must be applied to the module’s
configuration separately from other information. Use RSLinx to apply
the routing table.
For more information about routing tables, see the section Use RSLinx
Software to Create a Routing Table in Chapter 4.
• Controller slot assignment for each DH-485 channel.
Refer to Set the Controller Slot on page 4-8 for more information on
local messaging.
• The node number of the module.
IMPORTANT
If you restore defaults with RSLinx software, the slot
number will remain the 1756-DH485 module’s non-volatile
memory, but the routing table and the controller slot for
both DH-485 channels will be reset.
Publication 1756-UM532A-EN-P - May 2006
Page 44

3-12 Use Data Highway 485 Network
Application Timeout
DH-485 Link 1
When an error occurs while sending a message to a remote link, it appears to
the sending station as an application timeout because error messages are not
routed back. When an error occurs during routing, it may be dropped.
For example, if an SLC 5/03 controller sends a message to another SLC 5/03
controller, and the second SLC 5/03 controller’s buffers are full, three
things happen:
• The SLC 5/03 controller refuses the message because the buffers are
full.
• The originator detects an application timeout when no reply is received.
• The originator increments its error count.
The SLC 5/03 controller can retry to send the message later. This figure
shows an example of an application timeout.
Example of an Application Timeout
1756-DH485 Module
ControlLogix Chassis
DH485
1756-DH485 Module
DH485
AIC+
AIC
SLC 5/03 controller detects an
application timeout and
increments an error bit.
Routed messages sent
over the backplane.
AIC+
AIC
DH-485
Link 2
SLC 5/03 controller
buffers are full.
44068
SLC 5/03 Controller
Publication 1756-UM532A-EN-P - May 2006
Page 45

Use Data Highway 485 Network 3-13
Example DH-485 Network Routing Configuration
1756-DH485 Module
Channel A Node 15
Channel B Node 16
ControlLogix Controller
Slot 0
ControlLogix Chassis
AIC
SLC 5/03 Controller
Node 30
Link ID 6
The Example of DH-485 Routing Configuration figure below shows an
example DH-485 routing configuration. All node numbers on DH-485 are
given in decimal. Node numbers on ControlNet and slot numbers in
ControlLogix chassis are given in decimal. Links IDs for all networks are given
in decimal.
IMPORTANT
Some devices in this figure have the same node number
because they are on different networks. Devices on the
same network must have unique node numbers. You must
assign the node numbers.
Example of DH-485 Routing Configuration
1756-DH485 Module
Channel A Node 30
Channel B Node 31
ControlLogix Controller
Slot 5
DH485
DH485
AIC+
DH-485
Link ID 4
DH-485
Link ID 1
AIC
SLC 5/03 Controller
Node 20
DH-485
Link ID 2
AIC+
AIC
PanelView
Node 21
AIC+
DH-485
Link ID 5
AIC
AIC
SLC 5/03
Controller
Node 20
SLC 5/03
Controller
Node 20
44054
Publication 1756-UM532A-EN-P - May 2006
Page 46

3-14 Use Data Highway 485 Network
Use the Common Industrial Protocol (CIP) Messaging
Common Industrial Protocol (CIP) is the communication mechanism on
ControlLogix chassis, ControlNet, and EtherNet/IP networks with the
Encapsulation Protocol (EPIC) protocol.
Like DH-485 messaging, CIP supports communication between devices on
the same link and physically separate links. However, CIP messaging uses a
different method to route messages than DH-485 messaging.
CIP uses a relative path concept for routing messaging. Because the message
itself, or the connection the message is sent on, contains all the information
required to route the message, CIP messages do not require any routing table
or link IDs.
Devices such as ControlLogix devices, devices that use the ControlNet
network, and devices that use CIP protocol support this new type of
communication.
IMPORTANT
Your 1756-DH485 module supports bridging CIP
messaging over a DH-485 link. However, your
1756-DH485 module does not support bridging CIP I/O
data from a ControlLogix controller to an 1756-I/O
module.
Publication 1756-UM532A-EN-P - May 2006
Page 47

Chapter
4
Use RSLinx Software to Create a Routing Table
Introduction
Choose the Correct Software
This chapter describes how to configure your 1756-DH485 module in
DH-485 applications. For more information on the configuration software,
refer to the online help in each.
For See
Choose the Correct Software 4-1
Use RSLinx Software to Create a Routing
Table
Create the Routing Table 4-3
The programming software you need is dependent on what products you are
using with the 1756-DH485 module. The table below explains what software is
needed for your application.
Software Needed for 1756-DH485 Applications
If you are using this product with the
1756-DH485 module to read/write data
in a DH-485 application
SLC Controllers RSLinx, version 2.43 or later
4-2
You must use this software
RSLogix 500, version 6.3 or later
ControlLogix Controllers RSLinx, version 2.43 or later
RSLogix 5000
1 Publication 1756-UM532A-EN-P - May 2006
Page 48

4-2 Use RSLinx Software to Create a Routing Table
Use RSLinx Software to Create a Routing Table
DH-485 protocols do not use the Common Industrial Protocol (CIP), the
communication protocol used in the ControlLogix architecture. The
1756-DH485 module is the transition point from the DH-485 network to
ControlLogix. In this capacity, the 1756-DH485 module serves as the DH-485
message source and requires a full message route, or path, to deliver the
message. A routing table, using link IDs and node addresses, provides the full
path.
What Is a Routing Table?
Before you can create a routing table for your 1756-DH485 module, you must
assign link IDs to all networks (including ENET and CNET) that route
information through the module. Link IDs are numbers from 1 to 199.
DH-485 module addressing provides the link IDs and node addresses. The
routing table translates link IDs and node address information into path, or
routing, information. Thus, the routing table specifies a 'map' to other links in
the system. Routing tables are set up at each node to build accurate
connections.
ControlLogix Routing
The ControlLogix routing protocols use CIP, a message-based protocol that
implements a relative path to send a message from the source device in a
system to the destination device. In this way, the source device in a networks
system contains the path information that steers the message along the proper
route to reach its destination. Since the source device holds this information,
other devices along the path simply pass this information; they do not need to
store it. ControlLogix routing has two significant benefits:
• You do not need to configure routing tables in the bridging module,
greatly simplifying maintenance and module replacement.
• You maintain full control over the route taken by each message, enabling
you to select alternative paths for the same end device.
Publication 1756-UM532A-EN-P - May 2006
Page 49

Use RSLinx Software to Create a Routing Table 4-3
Create the Routing Table
A.Expand the configuration
tree until the module
appears.
B.Right-click on the
1756-DH485 module.
C.Select Module
Configuration.
To create a routing table for your application, follow these steps:
1. Start RSLinx.
2. Browse the network.
3. Right-click on the 1756-DH485 module.
4. Use the left-side navigation bar to see your DH-485 application, as
shown in the example below.
Publication 1756-UM532A-EN-P - May 2006
Page 50

4-4 Use RSLinx Software to Create a Routing Table
5. Select the DH-485 Routing Table tab.
You must build the routing table based on the 1756-DH485 modules in
the ControlLogix chassis. Each link ID (for example: chassis backplane,
channels A and B of any 1756-DH485 module in the chassis) is initially
undefined.
Publication 1756-UM532A-EN-P - May 2006
Page 51

A. Right-click on the
1756-DH485 module.
B. Click Edit Module.
C.Assign Link IDs and click OK.
Use RSLinx Software to Create a Routing Table 4-5
6. You must assign link IDs, as shown below.
IMPORTANT
Keep track of your Link ID assignments. You need the
Link ID values when you send messages via RSLogix 500
and RSLogix 5000 software.
Publication 1756-UM532A-EN-P - May 2006
Page 52

4-6 Use RSLinx Software to Create a Routing Table
The 1756-DH485 routing table displays with the link IDs defined.
Publication 1756-UM532A-EN-P - May 2006
Page 53

A.Right-click on the
Backplane.
B.Click Edit Module.
C.Assign Link IDs and click OK.
Use RSLinx Software to Create a Routing Table 4-7
7. Assign a Link ID for the chassis backplane.
8. Click OK
The software prompts you to download routing table changes.
9. Click Yes.
This completes the routing table creation process.
Publication 1756-UM532A-EN-P - May 2006
Page 54

4-8 Use RSLinx Software to Create a Routing Table
Set the Controller Slot
Setting the controller slot location creates a simple way for the SLC controllers
to exchange data with the ControlLogix controller as long as the SLC
controller is on the same DH-485 network as the module. The SLC controller
can use local messaging to send data to a ControlLogix controller with this
feature. No routing table is required.
A. Change the
controller slot, if
needed.
B.Click OK.
IMPORTANT
This is not the slot location of the 1756-DH485 module, it
is the slot location of the ControlLogix controller where
you want to send the local message.
The controller slot is the physical location of a ControlLogix controller in a
DH-485 application. The default setting is slot 0. If necessary, use the Channel
Configuration tabs to change the controller slot number.
Publication 1756-UM532A-EN-P - May 2006
For more information about using the DH-485 network, refer to Chapter 3,
Use Data Highway 485 Network.
Page 55

Chapter
5
Communicate from an SLC 5/03 Controller to a Logix Controller over a DH-485 Network
Introduction
This chapter describes how to set up the communications initiated by an SLC
5/03 controller through a 1756-DH485 module to a 1756-Lx controller.
For See
Hardware Configuration 5-2
Use the Controller Slot to Route the Local Message 5-3
Create a Local Message in RSLogix 500 5-4
Configure the Message 5-5
Create a Logic Map for the Local Message in
RSLogix 5000 Software
IMPORTANT
The examples use SLC 5/03 modules to send DH-485
messages. In each case, the use of these devices is strictly
for example purposes and not an indication of restrictions
on the 1756-DH485 module.
5-6
1 Publication 1756-UM532A-EN-P - May 2006
Page 56

5-2 Communicate from an SLC 5/03 Controller to a Logix Controller over a DH-485 Network
TERMTET
AAA
A
BBB
COMCC
Hardware Configuration
In this hardware configuration, the communications are initiated by an SLC
5/03 controller. The message is sent to a 1756-DH485 module and the
1756-Lx controller is located in slot 11.
Communications Between an SLC 5/03 Controller and a 1756-DH485 Module
1756--L1 Controller
DH+/RIO
DH485 network
communicating
through link
couplers.
1756-DH485
DH485
AIC+
SLC 5/03 Controller
44070
AIC
Publication 1756-UM532A-EN-P - May 2006
Page 57

Communicate from an SLC 5/03 Controller to a Logix Controller over a DH-485 Net work 5-3
Use the Controller Slot to Route the Local Message
Enter the slot number of the
controller.
When a local DH485 message is received, the message will automatically be
routed to the controller based on the configured slot number. In this case, the
1756-Lx controller is in slot 11. A routing table is not needed.
Publication 1756-UM532A-EN-P - May 2006
Page 58

5-4 Communicate from an SLC 5/03 Controller to a Logix Controller over a DH-485 Network
Create a Local Message in RSLogix 500
This is an example of a local message being initiated by the SLC 5/03
controller.
Publication 1756-UM532A-EN-P - May 2006
Page 59

Communicate from an SLC 5/03 Controller to a Logix Controller over a DH-485 Net work 5-5
Configure the Message
This is the Setup dialog for the example message.
Publication 1756-UM532A-EN-P - May 2006
Page 60

5-6 Communicate from an SLC 5/03 Controller to a Logix Controller over a DH-485 Network
Create a Logic Map for the Local Message in RSLogix 5000 Software
You must logically map the SLC data address to the ControlLogix tag. To get
to the Logix Map in RSLogix 5000 software go to: Logic > Map PLC/SLC
Messages.
This is the logic map needed for the example message.
Publication 1756-UM532A-EN-P - May 2006
Page 61

Chapter
6
Communicate Between SLC Controllers over DH+ and DH485 Networks
Introduction
This chapter describes how to set up the message communications between
two SLC controllers.
For See
SLC 5/04 Controller Sends a Remote Message 6-2
Hardware Configuration 6-2
Create the Routing Table in RSLinx Software 6-3
Create a Message in RSLogix 500 6-6
Configure the Message 6-7
SLC 5/03 Controller Sends a Remote Message 6-8
Hardware Configuration 6-8
Create the Routing Table in RSLinx Software 6-9
Create a Remote Message in RSLogix 500 6-10
Configure the Message 6-11
IMPORTANT
The examples use SLC 5/03 and SLC 5/04 controllers to
send DH-485 messages. In each case, the use of these
devices is strictly for example purposes and not an
indication of restrictions on the 1756-DH485 module.
1 Publication 1756-UM532A-EN-P - May 2006
Page 62

6-2 Communicate Between SLC Controllers over DH+ and DH485 Networks
SLC 5/04 Controller Sends a Remote Message
ControlLogix Controller
In this example an SLC 5/04 controller initiates a remote message and sends it
to an SLC 5/03 Controller.
Hardware Configuration
In this hardware configuration, an SLC 5/04 controller sends a remote
message to an SLC 5/03 controller.
• The SLC 5/04 controller is on a DH+ network (1).
• The SLC 5/04 controller connects to Channel B on the 1756-DHRIO
module (2).
• The SLC 5/03 controller connects to Channel A of the 1756-DH485
module in the same rack as the 1756-DHRIO module (3).
• The SLC 5/04 controller sends a remote message to the SLC 5/03
controller on a DH485 network (4).
1756-DHRIO
(2)
1756-DH485
DH+ Network
DH+/RIO
Channel B (2)
SLC 5/04 Controller initiates
the message.
(1)
DH485
AIC+
AIC
SLC 5/03 Controller (4)
Channel A (3)
DH485 network
communicating
through link
couplers.
44063
Publication 1756-UM532A-EN-P - May 2006
Page 63

This is the routing table for the
1756-DH485 module.
In this example, the:
• SLC 5/04 controller is on the
DH+ network.
• SLC 5/04 controller is node
10 octal.
• SLC 5/04 controller connects
to a 1756-DHRIO module at
node 56 octal or 46 decimal.
Communicate Between SLC Controllers over DH+ and DH485 Networks 6-3
Create the Routing Table in RSLinx Software
These are the routing tables needed for the example configuration.
• connection is on Channel B of
the 1756-DHRIO.
• SLC 5/04 controller sends a
remote message to the SLC
5/03 controller that is on a
DH485 network. The SLC
5/03 controller is located at
node 1.
• SLC 5/03 controller is
connected to Channel A of
the 1756-DH85 module.
• 1756-DHRIO module is in
slot 8 of the 1756 rack and is
in the same rack is a
1756-DH485 module. The
1756-DH485 module is in slot
14.
This is the routing table for the
1756-DHRIO module.
Publication 1756-UM532A-EN-P - May 2006
Page 64

6-4 Communicate Between SLC Controllers over DH+ and DH485 Networks
Configure the SLC 5/03 Controller Channel 1 Link ID
The SLC 5/03 remote link ID needs to be programmed to match the link IDs
configured into the 1756-DH485 module. These are labeled in the channel
configuration as the Channel 1 Passthru Link ID.
Publication 1756-UM532A-EN-P - May 2006
Page 65

Communicate Between SLC Controllers over DH+ and DH485 Networks 6-5
Configure the SLC 5/04 Channel 1 Link ID
The SLC 5/04 controller remote link ID needs to be programmed to match
the link IDs configured into the 1756-DH485 module. These are labeled in the
channel configuration as the Channel 1 Passthru Link ID.
Publication 1756-UM532A-EN-P - May 2006
Page 66

6-6 Communicate Between SLC Controllers over DH+ and DH485 Networks
Create a Message in RSLogix 500
This is the message for the example configuration.
Click Setup Screen to
configure the message
Publication 1756-UM532A-EN-P - May 2006
Page 67

The SLC 5/04 controller connects
to a 1756-DHRIO module at node
56 octal or 46 decimal.
The SLC 5/04 controller sends a
remote message to the SLC 5/03
controller that is on a DH485
network.
Communicate Between SLC Controllers over DH+ and DH485 Networks 6-7
Configure the Message
This is the Setup dialog for the example message.
The SLC 5/03 controller is located
at node 1. The DH485 network is
assigned as link 1.
Publication 1756-UM532A-EN-P - May 2006
Page 68

6-8 Communicate Between SLC Controllers over DH+ and DH485 Networks
SLC 5/03 Controller Sends a Remote Message
ControlLogix Controller
In this example an SLC 5/03 controller initiates a remote message and sends it
to an SLC 5/04 controller.
Hardware Configuration
In this hardware configuration, an SLC 5/03 controller initiates a message to
an SLC 5/04 controller on a DH-485 network. (1)
• This SLC 5/03 controller connects to Channel A on the 1756-DH485
module. (2)
• The SLC 5/04 controller is connected to Channel B of the
1756-DHRIO module in the same rack as the 1756-DH485 module. (3)
• The SLC 5/04 controller receives a remote message from the SLC 5/03
controller through the 1756-DHRIO on the DH+ network. (4)
Communication Between Two SLC Controllers Over DH-485 and DH+ Networks
1756-DHRIO
1756-DH485
Channel B (3)
DH+ Network
DH+/RIO
SLC 5/04 Controller (4)
AIC+
AIC
The SLC 5/03 controller
initiates the message.
DH485
Channel A (2)
DH485 network
communicating
through link couplers.
44064
(1)
Publication 1756-UM532A-EN-P - May 2006
Page 69

In this example, the:
• SLC 5/03 controller is connected
to Channel A of the 1756-DH485
module. The 1756-DH485 node
address on the DH-485 network
is node 0.
• 1756-DHRIO and the
1756-DH485 modules are on the
same backplane.
• 1756-DH485 module is in slot 14.
Communicate Between SLC Controllers over DH+ and DH485 Networks 6-9
Create the Routing Table in RSLinx Software
These are the routing tables needed for the example configuration.
• 1756-DHRIO module is in slot 8.
• Link ID of Channel B of the
1756-DHRIO is Link 20.
• SLC 5/04 controller is connected
to Channel B of the
1756-DHRIO.
• node address of the SLC 5/04
controller on DH+ is 10 octal or
8 decimal.
• SLC 5/03 controller initiates a
remote message to the SLC 5/04
controller.
Publication 1756-UM532A-EN-P - May 2006
Page 70

6-10 Communicate Between SLC Controllers over DH+ and DH485 Networks
Create a Remote Message in RSLogix 500
This is the example message for the hardware configuration.
Click on Setup Screen to
configure the message.
Publication 1756-UM532A-EN-P - May 2006
Page 71

In this example, the SLC 5/03
controller is connected to
Channel A of the 1756-DH485
module. The 1756-DH485 node
address on the DH-485 network
is node 0.
Communicate Between SLC Controllers over DH+ and DH485 Networks 6-11
Configure the Message
This is the Setup Screen for the example message.
Publication 1756-UM532A-EN-P - May 2006
Page 72

6-12 Communicate Between SLC Controllers over DH+ and DH485 Networks
Notes:
Publication 1756-UM532A-EN-P - May 2006
Page 73

Chapter
7
Communicate Between a PLC-5 Controller and a Remote SLC 5/03 Controller over Multiple DH-485 Networks
Introduction
This chapter describes how to set up the communications for a remote PLC-5
controller to send a message to a remote SLC 5/03 controller over multiple
DH-485 Networks.
For See
Hardware Configuration 7-4
Create a Message in RSLogix 5 7-4
Configure the Message 7-5
Create the Routing Table 7-3
IMPORTANT
The examples use SLC 5/03 modules to send DH-485
messages. In each case, the use of these devices is strictly
for example purposes and not an indication of restrictions
on the 1756-DH485 module.
1 Publication 1756-UM532A-EN-P - May 2006
Page 74

7-2 Communicate Between a PLC-5 Controller and a Remote SLC 5/03 Controller over Multiple DH-485 Networks
Hardware Configuration
In this hardware configuration, a remote PLC-5 controller sends a message to
an SLC 5/03 controller.
Communications Between a PLC-5 and a Remote SLC 5/03 Controller on a DH-485 Network
ControlLogix Controller
PLC-5 controller
sends a message to
an SLC 5/03
controller.
DH+ Network
(1)
1756-DHRIO
DH+/RIO
Channel A (2), (3)
The 1756-DHRIO and the
1756-DH485 are on the
same backplane.
1756-DH485
DH485
AIC+
AIC
Channel A (4)
DH485 network
communicates
through link
couplers.
Publication 1756-UM532A-EN-P - May 2006
44069
SLC 5/03 Controller (5)
The PLC-5 controller sends a message to an SLC 5/03 controller located on a
DH-485 network.
• The PLC-5 controller is located on a DH+ network. (1)
• The PLC-5 controller is connected to channel A on a 1756-DHRIO
module located at node 12. (2)
• The 1756-DHRIO is on the same backplane as the 1756-DH485
module and is located in slot 8 of the chassis. (3)
• The 1756-DH485 module is located in slot 14 of the chassis. (4)
• The 1756-DH485 module uses channel A to connect to the SLC/03
controller located at node 1 over the DH-485 network. (5)
Page 75

Communicate Between a PLC-5 Controller and a Remote SLC 5/03 Controller over Multiple DH-485 Networks 7-3
Create the Routing Table
This is the routing table for
the 1756-DH485 module.
These are the routing tables for the message in the example configuration.
This is the routing table for
the 1756-DHIRO module.
Publication 1756-UM532A-EN-P - May 2006
Page 76

7-4 Communicate Between a PLC-5 Controller and a Remote SLC 5/03 Controller over Multiple DH-485 Networks
Configure the PLC-5 DH+ Channel 1A Link ID
The PLC-5 DH+ Channel 1A Link ID needs to be configured. This is an
example of the channel properties.
Create a Message in RSLogix 5
This is an example of a remote message for the example configuration.
Publication 1756-UM532A-EN-P - May 2006
Page 77

Communicate Between a PLC-5 Controller and a Remote SLC 5/03 Controller over Multiple DH-485 Networks 7-5
Configure the Message
This is the Setup dialog for the message in the example configuration.
Publication 1756-UM532A-EN-P - May 2006
Page 78

7-6 Communicate Between a PLC-5 Controller and a Remote SLC 5/03 Controller over Multiple DH-485 Networks
Notes:
Publication 1756-UM532A-EN-P - May 2006
Page 79

Chapter
8
Communicate from an SLC 5/05 Controller to an SLC 5/03 Controller over an EtherNet/IP Network
Introduction
This chapter describes the communications from an SLC 5/05 controller to an
SLC 5/03 controller over an EtherNet/IP network.
For See
Hardware Configuration 8-2
Create a Message in RSLogix 500 8-3
Configure the Message 8-4
Review the Multihop Feature in RSLogix 500 8-5
IMPORTANT
The examples use SLC 5/05 controllers to send DH-485
messages. In each case, the use of these devices is strictly
for example purposes and not an indication of restrictions
on the 1756-DH485 module.
1 Publication 1756-UM532A-EN-P - May 2006
Page 80

8-2 Communicate from an SLC 5/05 Controller to an SLC 5/03 Controller over an EtherNet/IP Network
Hardware Configuration
ControlLogix Controller
In this hardware configuration, an SLC 5/05 controller communicates to an
SLC 5/03 controller over an EtherNet/IP network.
• The SLC 5/05 controller initiates a message. (1)
• The message is sent over an EtherNet/IP network to a 1756-ENBT
module. (2)
• The message is then sent over the backplane to a 1756-DH485 module.
(3)
• The 1756-DH485 module then sends the message through channel A
and link couplers to the SLC 5/03 controller. (4)
ETHERNET
(3)
1756-DH485 (3)
DH485
Channel A (4)
1756-ENBT
DH+/RIO
EtherNet/IP Network (2)
SLC 5/05 controller
initiates the message.
(1)
AIC+
AIC
1756-DH485 communicates
through link couplers.
SLC 5/03 Controller (4)
(4)
44065
Publication 1756-UM532A-EN-P - May 2006
Page 81

Communicate from an SLC 5/05 Controller to an SLC 5/03 Controller over an EtherNet/IP Network 8-3
Create a Message in RSLogix 500
This is the message for the example configuration. Click on Setup Screen to
configure the message.
Click on Setup Screen to
configure the message.
Publication 1756-UM532A-EN-P - May 2006
Page 82

8-4 Communicate from an SLC 5/05 Controller to an SLC 5/03 Controller over an EtherNet/IP Network
Configure the Message
In this example, the:
• The SLC 5/05 controller on
an EtherNet/IP network
with it’s IP address at
100.100.100.8.
• The SLC 5/05 controller
sends the message to an
SLC 5/03 controller on a
DH-485 network via the
1756-ENBT module at IP
address 100.100.100.7 over
the backplane to a
1756-DH485 module.
• The 1756-ENBT module is
in slot 10 and the
1756-DH485 is in slot 14 of
the ControlLogix rack.
This is the setup screen for the example configuration.
• The SLC 5/03 controller is
connected to Channel A of
the 1756-DH485 module
and is communicating
through link couplers.
The firmware in the SLC 5/05 controller must be capable of handling CIP
protocol. CIP protocol is what the 1756-ENBT module supports. The
firmware for the SLC 5/05 controller has been upgraded to handle both CSP
and CIP protocols. Refer to Knowledgebase document G16915 for minimum
firmware revisions needed for the SLC 5/05 controller to communicate to a
1756-ENBT controller. The SLC 5/05 controller needs to be at a minimum,
Series A, 0S501 Firmware 5.
Publication 1756-UM532A-EN-P - May 2006
Page 83

Communicate from an SLC 5/05 Controller to an SLC 5/03 Controller over an EtherNet/IP Network 8-5
Review the Multihop Feature in RSLogix 500
The multihop feature of RSLogix 500 takes care of routing this remote
message. No routing table is required.
This is the multihop dialog for the example configuration.
Publication 1756-UM532A-EN-P - May 2006
Page 84

8-6 Communicate from an SLC 5/05 Controller to an SLC 5/03 Controller over an EtherNet/IP Network
Notes:
Publication 1756-UM532A-EN-P - May 2006
Page 85

Chapter
9
Communicate to a SLC 5/03 Controller on a DH-485 Network
Introduction
This chapter describes how to configure remote CIP communication from a
1756-L55 controller to an SLC 5/03 controller through DH+ and DH485
networks.
For See
Hardware Configuration 9-2
Create a Message in RSLogix 5000 9-3
Configure the Message 9-4
IMPORTANT
The examples use the 1756-DH485 module to initiate the
message to the SLC 5/03 module. In each case, the use of
these devices is strictly for example purposes and not an
indication of restrictions on the 1756-DH485 module.
1 Publication 1756-UM532A-EN-P - May 2006
Page 86

9-2 Communicate to a SLC 5/03 Controller on a DH-485 Network
Hardware Configuration
ControlLogix
Controller
ControlLogix
Controller
In this hardware configuration, the ControlLogix controller initiates a CIP
message from the 1756-DHRIO module to an SLC 5/03 controller located on
a DH-485 network.
1756-DHRIO (1)
DH+/RIO
DH+ Network
1756-DHRIO
DH+/RIO
(2)
1756-DH485 (3)
DH485
Channel A (4)
• The communication path goes from the local
1756-DHRIO module across the DH+ network to
another 1756-DHRIO module on the same DH+
network. (1)
• The remote 1756-DHRIO module is node 12 octal or
10 decimal. (2)
• This 1756-DHRIO module at node 12 is located on the
same backplane as a 1756-DH485 module in slot 14. (3)
• Channel A (4) of the 1756-DH485 module is on a
DH-485 network (5) with an SLC 5/03 controller as
node 1. (6)
AIC+
DH-485 network
communicates
through link
couplers.
AIC
The SLC 5/03 controller
receives the message.
(5)
44066
(6)
Publication 1756-UM532A-EN-P - May 2006
Page 87

Communicate to a SLC 5/03 Controller on a DH-485 Network 9-3
Create a Message in RSLogix 5000
This is the message for the example configuration.
Click to configure the message.
Publication 1756-UM532A-EN-P - May 2006
Page 88

9-4 Communicate to a SLC 5/03 Controller on a DH-485 Network
Configure the Message
These are the configuration dialogs for the example message.
Data table memory is in the
SLC 5/03 controller. The
message is coming from the
ControlLogix controller.
Destination storage is in the
1756-L55 controller.
Path Item Description
dhrio_ser_B When you browse to
the local 1756-DHRIO
module appears if you
have it configured in
the I/O configuration
tree in RSLogix 5000
software.
2 Channel A of the
1756-DHRIO module.
10
1
14
2
1
The remote 1756-DHRIO is
node 12 octal or 10
decimal.
Backplane
1756-DH485 module in
slot 14.
Channel A of the
1756-DH485 module.
SLC 5/03 Controller Node
Address
TIP
You do not need to create a routing
table when your communication
method is CIP messaging.
Publication 1756-UM532A-EN-P - May 2006
Page 89

Chapter
10
Communicate from a Logix Controller to an SLC 5/03 Controller over EtherNet/IP and DH-485 Networks
Introduction
This chapter describes how to set up communication from a Logix controller
to an SLC controller over an EtherNet/IP network.
For See
Hardware Configuration 10-2
Create a Remote 1756-ENBT Message in
RSLogix 5000
Configure the Message 10-4
IMPORTANT
The examples use SLC 5/03 modules to send DH-485
messages. In each case, the use of these devices is strictly
for example purposes and not an indication of restrictions
on the 1756-DH485 module.
10-3
1 Publication 1756-UM532A-EN-P - May 2006
Page 90

10-2 Communicate from a Logix Controller to an SLC 5/03 Controller over EtherNet/IP and DH-485 Networks
Hardware Configuration
ControlLogix Controller
In this hardware configuration, a Logix controller communicates to an SLC
5/03 controller over EtherNet/IP.
• The 1756-ENBT module
module
(2) over the EtherNet/IP network backplane
• The 1756-DH485 module
to the SLC 5/03
(4) controller through link couplers over a DH-485
(1) to communicate to a remote 1756-ENBT
(3) then communicates through Channel A
Network.
1756-ENBT
(1)
Backplane
1756-ENBT (2)
1756-DH485 communicating
through link couplers.
1756-DH485
(3)
Channel A
AIC+
SLC 5/03 Controller (4)
AIC
44067
Publication 1756-UM532A-EN-P - May 2006
Page 91

Communicate from a Logix Controller to an SLC 5/03 Contro ller over EtherNet/IP and DH-485 Networks 10-3
Create a Remote 1756-ENBT Message in RSLogix 5000
This is an example remote 1756-ENBT message.
Click the button to configure the message.
Configure the message.
Publication 1756-UM532A-EN-P - May 2006
Page 92

10-4 Communicate from a Logix Controller to an SLC 5/03 Controller over EtherNet/IP and DH-485 Networks
Configure the Message
Message Type: SLC Typed Write
Source Element: interger_slc_dh485[20]
Make sure you specify the starting array
element, for example [20].
Number of Elements: 1
Destination Element: N7:20
This dialog shows example values on the Configuration tab for the remote
message.
Publication 1756-UM532A-EN-P - May 2006
Page 93

Path Item Description
series_A
This means go to the
backplane to slot 5 where
the 1756-ENBT named
Series_A is located.
Series A is defined as
backplane 1, slot 5.
2 EtherNet/IP port.
100.100.100.7
1
14
2
1
The remote 1756-ENBT.
Go to the backplane of the
remote 1756 chassis.
Go to the slot location of
the 1756-DH485 module.
Go out Channel A of the
1756-DH485 module.
Go to Node 1 or the
location of the SLC 5/03
controller.
Communicate from a Logix Controller to an SLC 5/03 Contro ller over EtherNet/IP and DH-485 Networks 10-5
This is the Communication tab for the remote message.
TIP
You do not need to create a routing
table when your communication
method is CIP messaging.
Publication 1756-UM532A-EN-P - May 2006
Page 94

10-6 Communicate from a Logix Controller to an SLC 5/03 Controller over EtherNet/IP and DH-485 Networks
Notes:
Publication 1756-UM532A-EN-P - May 2006
Page 95

Appendix
Specifications
ControlLogix DH-485 Communications Module 1756-DH485
Attribute Value
Module Location ControlLogix chassis
Maximum Backplane
Current Load
Power Dissipation 4.5 W
Thermal Dissipation, Max 15.4 BTU/hr
Isolation Voltage 50V
Available Communication Rates 19.2 Kbps (default) and 9600 Kbps
Wiring Category
(1)
Use this Conductor Category information for planning conductor routing. Refer to Publication 1770-4.1, Industrial
Automation Wiring and Grounding Guidelines.
(1)
850 mA @ +5.1V dc and 1.7mA @ 24V dc
from I/O chassis backplane
Tested to withstand 750V dc for 60 s
2 - on communications ports
A
Environmental Specifications
Attribute Value
Operational Temperature IEC 60068-2-1 (Test Ad, Operating Cold),
IEC 60068-2-2 (Test Bd, Operating Dry Heat),
IEC 60068-2-14 (Test Nb, Operating Thermal Shock):
0...60 °C (32...140 °F)
Storage Temperature IEC 60068-2-1 (Test Ab, Unpackaged Nonoperating Cold),
IEC 60068-2-2 (Test Bb, Unpackaged Nonoperating Dry Heat),
IEC 60068-2-14 (Test Na, Unpackaged Nonoperating Thermal
Shock):
-40...85 °C (-40...185 °F)
Relative Humidity IEC 60068-2-30 (Test Db, Unpackaged Nonoperating Damp Heat):
5...95% noncondensing
Vibration IEC 60068-2-6 (Test Fc, Operating):
2 g @ 10...500 Hz
Operating Shock IEC 60068-2-27 (Test Ea, Unpackaged Shock):
30 g
Non-operating Shock IEC 60068-2-27 (Test Ea, Unpackaged Shock):
50 g
Emissions CISPR 11:
Group 1, Class A
ESD Immunity IEC 61000-4-2:
4 kV contact discharges
8 kV air discharges
Radiated RF Immunity IEC 61000-4-3:
10 V/m with 1 kHz sine-wave 80%AM from 80...2000 MHz
10 V/m with 200 Hz 50% Pulse 100% AM at 900 Mhz
1 Publication 1756-UM532A-EN-P - May 2006
Page 96

A-2 Specifications
Environmental Specifications
Attribute Value
EFT/B Immunity IEC 61000-4-4:
+/-2 kV at 5 kHz on communications ports
Surge Transient Immunity IEC 61000-4-5:
+/-1 kV line-earth (CM) on communications ports
Conducted RF Immunity IEC 61000-4-6:
10 Vrms with 1 kHz sine-wave 80%AM from 150 kHz...80 MHz
Magnetic Field Immunity IEC 61000-4-8:
30 A/m at 50 Hz
Enclosure Type Rating None (open-style)
Certifications
Attribute Value
Certifications
(when product is marked)
(1)
See the Product Certification link at www.ab.com for Declarations of Conformity, Certificates, and
other certification details.
c-UL-us UL Listed for Class I, Division 2 Group A,B,C,D Hazardous
(1)
Locations, certified for U.S. and Canada. See UL File
E194810.
CE European Union 89/336/EEC EMC Directive, compliant with:
EN 50082-2; Industrial Immunity
EN 61326; Meas./Control/Lab., Industrial Requirements
EN 61000-6-2; Industrial Immunity
EN 61000-6-4; Industrial Emissions
C-Tick Australian Radiocommunications Act, compliant with:
AS/NZS CISPR 11; Industrial Emissions
Publication 1756-UM532A-EN-P - May 2006
Page 97

Appendix
Troubleshoot the 1756-DH485 Module
B
Introduction
Check Power Supply and Module Status
This chapter describes diagnostics and methods of troubleshooting the
module.
For See
Check Power Supply and Module Status B-1
Interpret the LED Status Indicators B-2
Interpret the Alphanumeric Indicators B-3
Interpret the OK Status Indicator B-4
Routing Errors in DH-485 Messaging B-4
When you apply power to the module, three events take place simultaneously.
Alphanumeric status indicator on the module illuminates and cycles through
the following sequence of messages:
– INIT
– Channel A and the network used for channel A
– Channel A node address
– Channel A status
– Channel B and the network used for channel B
– Channel B node address
– Channel B status
This channel sequences run continuously during normal module
operation.
EXAMPLE
Module OK status indicator flashes red, then goes solid green.
1 Publication 1756-UM532A-EN-P - May 2006
For example, if your module uses the following:
• Channel A for DH485 with node address 14
• Channel B for DH485 with node address 0, but being
the only node on the network.
• A DH, A#14, A OK, B DH, B#0, ONLY NODE
Page 98

B-2 Trou bleshoot the 1756-DH485 Module
If the alphanumeric indicator on the 1756-DH485 module does not cycle
through these messages when you apply power, refer to the following table and
to the troubleshooting section that follows.
Power Cycle Indicators
Interpret the LED Status Indicators
If the POWER
Indicator is
Off Not operating. Turn power ON.
On Operating. None, normal operation.
Power Supply
Status is
Recommended Action
Check power wiring connections.
Check fuse.
The LED status indicators on the module provide information about your
module and the status of each channel. The following tables outline the
indicator condition and the corresponding status, and explain what each
condition means.
Interpret the LED Status Indicators
Module OK
Indicator
Off Not operating. Apply chassis power.
Green flashing Operating but not
Module Status Recommended Action
Verify module is completely inserted into
chassis and backplane.
None, if no messages are actively being
routing messages.
routed through the module.
Publication 1756-UM532A-EN-P - May 2006
To route messages, configure module with
RSLinx software.
Solid Red, then Off Performing self-test. None, normal operation.
Solid Green Operating and routing
messages.
Solid Red In major fault. Reboot module. If red reoccurs, then
Red flashing In major fault or
configuration fault.
Verify module configuration.
replace module.
Check alphanumeric indicator and take
action described in the Alphanumeric
Display Descriptions table.
Page 99

Troubleshoot the 1756-DH485 Module B-3
Interpret the Alphanumeric Indicators
Your 1756-DH485 module displays alphanumeric codes that provide
diagnostic information about your module. The alphanumeric display flashes
the codes at approximately one-second intervals. This table summarizes the
codes.
Alphanumeric Display Descriptions
Message Description Recommended Action
ONLY NODE Only node on
DH-485 link.
OFF LINE DH-485 link is in STOP
state.
DUPL NODE DH-485 Duplicate
node address.
ONLY NODE Only node on
DH-485 link.
OFF_LINE Not trying to
communicate.
OK Normal operation. None.
Check the cables.
Correct the configuration.
Choose another node address.
Check the cables.
None. Normal state if controller is not
controlling remote I/O.
Publication 1756-UM532A-EN-P - May 2006
Page 100

B-4 Trou bleshoot the 1756-DH485 Module
Interpret the OK Status Indicator
Routing Errors in DH-485
The three LED status indicators on the module provide information about
your module and the status of each channel. The following tables outline the
indicator condition and the corresponding status, and explain what each
condition means.
Interpreting the OK Status Indicator
If the Module OK
Indicator is
Off Not operating. Apply chassis power.
Red, then Off Performing self-test. None, normal operation.
Green Operating and routing
Red In major fault Reboot module. If red reoccurs, then
This section describes routing errors in local and remote messaging.
Module Status Recommended Action
Verify module is completely inserted into
chassis and backplane.
Verify module configuration.
messages.
replace module.
Messaging
Routing Errors in Local DH-485 Messaging
If the 1756-DH485 module has a problem with routing a DH-485 message, it
may return a response with an error status of D0 hex. A PLC-5 controller
displays this error as D000 hex when monitoring the message instruction. If
you receive this error message, take the following actions:
• Check your message instruction to make sure a valid destination node
was entered.
• Check your default slot configuration to make sure that it matches the
location of the ControlLogix controller in the chassis.
• Make sure the 1756-DH485 module is turned on and verify chassis
power is recognized by the 1756-DH485 module.
Publication 1756-UM532A-EN-P - May 2006
 Loading...