

Page 1

Using RSLogix
Guard PLUS!
Software with
GuardPLC™
Controllers
Bulletin 1753, 1754, 1755
Programming Manual
Page 2

Important User Information
Solid state equipment has operational characteristics differing from those of
electromechanical equipment. Safety Guidelines for the Application,
Installation and Maintenance of Solid State Controls (Publication SGI-1.1
available from your local Rockwell Automation sales office or online at
http://www.ab.com/manuals/gi) describes some important differences
between solid state equipment and hard-wired electromechanical devices.
Because of this difference, and also because of the wide variety of uses for
solid state equipment, all persons responsible for applying this equipment
must satisfy themselves that each intended application of this equipment is
acceptable.
In no event will Rockwell Automation, Inc. be responsible or liable for
indirect or consequential damages resulting from the use or application of
this equipment.
The examples and diagrams in this manual are included solely for illustrative
purposes. Because of the many variables and requirements associated with
any particular installation, Rockwell Automation, Inc. cannot assume
responsibility or liability for actual use based on the examples and diagrams.
No patent liability is assumed by Rockwell Automation, Inc. with respect to
use of information, circuits, equipment, or software described in this manual.
Reproduction of the contents of this manual, in whole or in part, without
written permission of Rockwell Automation, Inc. is prohibited.
Throughout this manual we use notes to make you aware of safety
considerations.
WARNING
Identifies information about practices or circumstances
that can cause an explosion in a hazardous environment,
which may lead to personal injury or death, property
damage, or economic loss.
IMPORTANT
ATTENTION
Identifies information that is critical for successful
application and understanding of the product.
Identifies information about practices or circumstances
that can lead to personal injury or death, property
damage, or economic loss. Attentions help you:
• identify a hazard
• avoid a hazard
• recognize the consequence
GuardPLC is a trademark of Rockwell Automation.
Modbus is a registered trademark of Schneider Automation, Inc.
DeviceNet is a trademark of Open DeviceNet Vendor Association.
All other trademarks are the property of their respective holders and are hereby acknowledged.
Page 3

Summary of Changes
The information below summarizes the changes to this manual since
the last publication.
To help you find new and updated information in this release of the
manual, we have included change bars as shown to the right of this
paragraph.
Programming and configuration procedures and examples have been
removed from the GuardPLC Controller Systems User Manual,
publication 1753-UM001 and assembled in this programming manual.
In addition, new and updated information has been provided as
described in the table below.
For Information About See
The hardware, installation, wiring, and communications
information for GuardPLC controllers and distributed I/O
modules
The purpose of this manual page P-1
the GuardPLC Controller
Systems User Manual,
publication 1753-UM001
Related publications pages P-1 and P-2
What to do if communication to a new controller fails page 1-22
Connecting to GuardPLC distributed I/O modules Chapter 2
Understanding the Signal Editor page 3-5
Connecting distributed I/O module signals page 3-10
Connecting analog signals page 3-10
Connecting high-speed counter signals page 3-11
Recovering from a FAILURE_STOP page 4-2
Archiving and restoring projects Chapter 7
Valid data types for variables page 8-4
Programming software versions, compatibility, and firmware
upgrades
Converting projects developed in different software versions page A-5
Creating time-based variables Appendix C
Appendix A
iii Publication 1753-PM001A-EN-P - November 2005
Page 4

iv Summary of Changes
Publication 1753-PM001A-EN-P - November 2005
Page 5

Connect to the GuardPLC
Controller
Table of Contents
Preface
Who Should Use This Manual . . . . . . . . . . . . . . . . . . . . . . P-1
Purpose of this Manual . . . . . . . . . . . . . . . . . . . . . . . . . . . P-1
Related Documentation . . . . . . . . . . . . . . . . . . . . . . . . . . . P-1
Chapter 1
In This Chapter. . . . . . . . . . . . . . . . . . . . . . . . . . . . . . . . . 1-1
Connect to the Controller via RSLogix Guard PLUS! Software 1-1
Connect to a GuardPLC 1200 Controller . . . . . . . . . . . . 1-1
Connect to a GuardPLC 1600 or 1800 Controller . . . . . . 1-2
Connect to a GuardPLC 2000 Controller . . . . . . . . . . . . 1-2
GuardPLC Controller Factory Default Settings . . . . . . . . 1-2
Understand Ethernet Addressing. . . . . . . . . . . . . . . . . . 1-2
Configure the IP Address of Your Programming Terminal 1-3
Go Online with the GuardPLC Controller . . . . . . . . . . . . . . 1-5
Step 1: Open RSLogix Guard PLUS! Software. . . . . . . . . 1-6
Step 2: Create a New Project . . . . . . . . . . . . . . . . . . . . 1-6
Step 3: Configure the Controller Type and SRS . . . . . . . 1-7
Step 4: Get Communication Settings . . . . . . . . . . . . . . . 1-9
Step 5: Change Settings via MAC Address . . . . . . . . . . . 1-10
Step 6: Move the Settings Into Your Offline Project . . . . 1-11
Step 7: Use the Control Panel to Connect to the
GuardPLC Controller . . . . . . . . . . . . . . . . . . . . . . . . . . 1-12
Step 8: Change the Controller to STOP Mode . . . . . . . . 1-14
Step 9: Reset the Controller to the Default Settings . . . . 1-14
Step 10: Ping the Controller . . . . . . . . . . . . . . . . . . . . . 1-15
Step 11: Configure the GuardPLC Controller’s IP
Address . . . . . . . . . . . . . . . . . . . . . . . . . . . . . . . . . . . . 1-16
Step 12: Recover from a Controller Fault After Using
the Reset Button . . . . . . . . . . . . . . . . . . . . . . . . . . . . . 1-17
Configure the Programming Terminal . . . . . . . . . . . . . . . . 1-19
Specify the Host SRS . . . . . . . . . . . . . . . . . . . . . . . . . . 1-19
Login Dialog. . . . . . . . . . . . . . . . . . . . . . . . . . . . . . . . . . . 1-20
Determine the IP Address and SRS of the Controller . . . . . . 1-21
Change the SRS of the Controller . . . . . . . . . . . . . . . . . . . . 1-22
Change the IP Address of the Controller . . . . . . . . . . . . . . 1-23
Chapter 2
Connect to GuardPLC Distributed
I/O Modules
v Publication 1753-PM001A-EN-P - November 2005
In This Chapter. . . . . . . . . . . . . . . . . . . . . . . . . . . . . . . . . 2-1
Understand Module Addressing . . . . . . . . . . . . . . . . . . . . . 2-1
Module Default Settings . . . . . . . . . . . . . . . . . . . . . . . . 2-1
SRS (System.Rack.Slot) . . . . . . . . . . . . . . . . . . . . . . . . . 2-1
IP Address. . . . . . . . . . . . . . . . . . . . . . . . . . . . . . . . . . 2-2
Add the Module to the Hardware Configuration . . . . . . . . . 2-2
Configure the Module . . . . . . . . . . . . . . . . . . . . . . . . . . . . 2-3
Page 6

vi Table of Contents
Create a GuardPLC Project
Set I/O Properties . . . . . . . . . . . . . . . . . . . . . . . . . . . . 2-4
Configure the Offline IP Address . . . . . . . . . . . . . . . . . 2-4
Go Online With the Module . . . . . . . . . . . . . . . . . . . . . . . 2-5
Chapter 3
In This Chapter. . . . . . . . . . . . . . . . . . . . . . . . . . . . . . . . . 3-1
Start a New Project . . . . . . . . . . . . . . . . . . . . . . . . . . . . . . 3-1
Configure the Project and Hardware . . . . . . . . . . . . . . . . . 3-2
Configure the Controller Resource . . . . . . . . . . . . . . . . 3-2
Create Signals . . . . . . . . . . . . . . . . . . . . . . . . . . . . . . . . . . 3-4
Understand the Signal Editor . . . . . . . . . . . . . . . . . . . . 3-5
Create Signals in the Signal Editor. . . . . . . . . . . . . . . . . 3-6
Connect Signals to I/O Terminals. . . . . . . . . . . . . . . . . . . . 3-6
Connect Digital Input Signals . . . . . . . . . . . . . . . . . . . . 3-7
Connect Output Signals . . . . . . . . . . . . . . . . . . . . . . . . 3-9
Connect Distributed I/O Signals . . . . . . . . . . . . . . . . . . 3-10
Connect Analog Input Signals (GuardPLC 1800
Controllers) . . . . . . . . . . . . . . . . . . . . . . . . . . . . . . . . . 3-10
Connect High-speed Counter Signals (GuardPLC 1800
Controllers) . . . . . . . . . . . . . . . . . . . . . . . . . . . . . . . . . 3-11
Create a Function Block Program. . . . . . . . . . . . . . . . . . . . 3-13
Save, Compile, Test, and Download the Program . . . . . . . . 3-16
Save the Program. . . . . . . . . . . . . . . . . . . . . . . . . . . . . 3-16
Compile the Code . . . . . . . . . . . . . . . . . . . . . . . . . . . . 3-17
Run an Off-Line Simulation . . . . . . . . . . . . . . . . . . . . . 3-18
Download the Program . . . . . . . . . . . . . . . . . . . . . . . . 3-20
How to Monitor the Routine Online. . . . . . . . . . . . . . . . . . 3-22
Check, Download, Start, and Test
a Routine
Monitor and Force Signals
Publication 1753-PM001A-EN-P - November 2005
Chapter 4
Using This Chapter . . . . . . . . . . . . . . . . . . . . . . . . . . . . . . 4-1
Check Consistency . . . . . . . . . . . . . . . . . . . . . . . . . . . . . . 4-1
Download a Routine . . . . . . . . . . . . . . . . . . . . . . . . . . . . . 4-2
Troubleshoot the Download Process. . . . . . . . . . . . . . . 4-3
Start a Routine . . . . . . . . . . . . . . . . . . . . . . . . . . . . . . . . . 4-4
Test a Routine. . . . . . . . . . . . . . . . . . . . . . . . . . . . . . . . . . 4-5
How a Routine Executes . . . . . . . . . . . . . . . . . . . . . . . . . . 4-6
Controlling a Routine . . . . . . . . . . . . . . . . . . . . . . . . . . 4-6
Chapter 5
In This Chapter. . . . . . . . . . . . . . . . . . . . . . . . . . . . . . . . . 5-1
Monitor Signals . . . . . . . . . . . . . . . . . . . . . . . . . . . . . . . . . 5-1
Forcing. . . . . . . . . . . . . . . . . . . . . . . . . . . . . . . . . . . . . . . 5-3
Enable Forces . . . . . . . . . . . . . . . . . . . . . . . . . . . . . . . . . . 5-4
Start the Force Editor. . . . . . . . . . . . . . . . . . . . . . . . . . . . . 5-4
Specify Force Values and Force Marks . . . . . . . . . . . . . . . . 5-5
Page 7

Access Management
Archive and Restore Projects
Create User-Defined Function
Blocks
Table of Contents vii
Force Time . . . . . . . . . . . . . . . . . . . . . . . . . . . . . . . . . . . . 5-6
Start Forces. . . . . . . . . . . . . . . . . . . . . . . . . . . . . . . . . . . . 5-6
Stop Forces. . . . . . . . . . . . . . . . . . . . . . . . . . . . . . . . . . . . 5-7
Chapter 6
In This Chapter. . . . . . . . . . . . . . . . . . . . . . . . . . . . . . . . . 6-1
How the Controller Uses Access Levels . . . . . . . . . . . . . . . 6-1
Create User Access . . . . . . . . . . . . . . . . . . . . . . . . . . . . . . 6-2
Chapter 7
In This Chapter. . . . . . . . . . . . . . . . . . . . . . . . . . . . . . . . . 7-1
Archive a Project. . . . . . . . . . . . . . . . . . . . . . . . . . . . . . . . 7-2
Restore a Project . . . . . . . . . . . . . . . . . . . . . . . . . . . . . . . . 7-3
Chapter 8
In This Chapter. . . . . . . . . . . . . . . . . . . . . . . . . . . . . . . . . 8-1
Create User-Defined Function Blocks. . . . . . . . . . . . . . . . . 8-1
Declare variables. . . . . . . . . . . . . . . . . . . . . . . . . . . . . . . . 8-4
Define Technical Units and Scaling. . . . . . . . . . . . . . . . 8-6
Define I/O Positions . . . . . . . . . . . . . . . . . . . . . . . . . . 8-7
How the Variables Display . . . . . . . . . . . . . . . . . . . . . . 8-8
Move Declared Variables to the User-Defined Function
Block Page . . . . . . . . . . . . . . . . . . . . . . . . . . . . . . . . . . . . 8-9
Generate Function Block Code . . . . . . . . . . . . . . . . . . . . . 8-10
Check for Errors and Warnings. . . . . . . . . . . . . . . . . . . 8-11
Programming Software Versions,
Compatibility, and Firmware
Updates
Appendix A
In This Appendix . . . . . . . . . . . . . . . . . . . . . . . . . . . . . . . A-1
RSLogix and RSLogix Guard PLUS! Versions . . . . . . . . . . . . A-1
About RSLogix Guard Software, Version 3.3 . . . . . . . . . A-2
About RSLogix Guard PLUS! . . . . . . . . . . . . . . . . . . . . . A-2
RSLogix Guard PLUS! Software and GuardPLC Firmware
Compatibility . . . . . . . . . . . . . . . . . . . . . . . . . . . . . . . . . . A-3
RSLogix Guard PLUS! Software and Associated GuardPLC
Firmware Versions . . . . . . . . . . . . . . . . . . . . . . . . . . . . A-3
Firmware and Software Version Compatibility . . . . . . . . A-4
Convert Projects . . . . . . . . . . . . . . . . . . . . . . . . . . . . . . . . A-5
Upgrade GuardPLC Firmware . . . . . . . . . . . . . . . . . . . . . . A-5
Upgrade CPU Firmware . . . . . . . . . . . . . . . . . . . . . . . . A-6
Upgrade COM Firmware . . . . . . . . . . . . . . . . . . . . . . . A-6
Reset Your SRS . . . . . . . . . . . . . . . . . . . . . . . . . . . . . . A-7
Publication 1753-PM001A-EN-P - November 2005
Page 8

viii Table of Contents
Configure the GuardPLC OPC
Server
Create a Time-based Variable
Appendix B
In This Appendix . . . . . . . . . . . . . . . . . . . . . . . . . . . . . . . B-1
Choose an IP Address . . . . . . . . . . . . . . . . . . . . . . . . . . . . B-2
Add the GuardPLC Controller and the OPC Server to the
Project . . . . . . . . . . . . . . . . . . . . . . . . . . . . . . . . . . . . . . . B-2
Configure the GuardPLC System for OPC Communication. . B-3
Configure the Communication Network . . . . . . . . . . . . B-3
Connect Signals . . . . . . . . . . . . . . . . . . . . . . . . . . . . . . B-4
Set the System Properties . . . . . . . . . . . . . . . . . . . . . . . B-6
Generate Code for the OPC Server. . . . . . . . . . . . . . . . . . . B-8
Go Online with the Controller . . . . . . . . . . . . . . . . . . . . . . B-8
Use the OPC Server. . . . . . . . . . . . . . . . . . . . . . . . . . . . . . B-8
Appendix C
Index
Publication 1753-PM001A-EN-P - November 2005
Page 9

Preface
Who Should Use This Manual
Purpose of this Manual
Use this manual if you are responsible for programming, or
troubleshooting control systems that use GuardPLC controllers.
Personnel responsible for installation, programming, operation, and
troubleshooting of safety-related controllers must be familiar with
relevant safety standards for Programmable Electronic Systems (PES).
The manual provides procedural information on programming your
controller system, including information on establishing
communication between your programming terminal and the
GuardPLC controller, creating a GuardPLC project, adding GuardPLC
distributed I/O to your project, and creating user-defined function
blocks.
For information on installing, configuring, operating, and monitoring
the status of your GuardPLC controller system, refer to the GuardPLC
Controller Systems User Manual, publication number 1753-UM001.
This manual does not provide information on SIL 3 or Cat. 4 safety
application requirements. For detailed information on the safety policy
regarding GuardPLC controllers, including information on the
controller’s central functions, input and output channels, operating
system, application program safety and regulations for use, refer to the
GuardPLC Controller Systems Safety Reference Manual, publication
number 1753-RM002.
Related Documentation
1 Publication 1753-PM001A-EN-P - November 2005
The table on the following page lists documents that contain
additional information concerning Rockwell Automation GuardPLC
products.
If you would like a manual, you can:
• download a free electronic version from the internet at
www.rockwellautomation.com/literature.
• purchase a printed manual by contacting your local
Allen-Bradley distributor or Rockwell Automation sales office.
Page 10

2 Preface
For Read this Document Document
Number
In-depth information on the safety concept of GuardPLC
controller systems, including the DeviceNet Safety Scanner for
GuardPLC Controller Systems Safety Reference
Manual
1753-RM002
GuardPLC Controllers.
Information on installing, configuring, operating, and
GuardPLC Controller Systems User Manual 1753-UM001
monitoring the status of your GuardPLC controller system.
Information on installing, configuring, and operating a
DeviceNet Safety Scanner in a GuardPLC application.
Information on operating 1791DS DeviceNet Safety I/O
DeviceNet Safety Scanner for GuardPLC Controllers
1753-UM002
User Manual
DeviceNet Safety I/O User Manual 1791DS-UM001
Modules
Information on using Certified Function Blocks in your GuardPLC
safety application.
In-depth information on grounding and wiring Allen-Bradley
programmable controllers
A description of important differences between solid-state
GuardPLC Certified Function Blocks Safety Reference
1753-RM001
Manual
Industrial Automation Wiring and Grounding
1770-4.1
Guidelines
Application Considerations for Solid-State Controls SGI-1.1
programmable controller products and hard-wired
electromechanical devices
An article on wire sizes and types for grounding electrical
equipment
National Electrical Code - Published by the National Fire Protection
Association of Boston, MA.
A glossary of industrial automation terms and abbreviations Allen-Bradley Industrial Automation Glossary AG-7.1
Publication 1753-PM001A-EN-P - November 2005
Page 11
In This Chapter
Chapter
Connect to the GuardPLC Controller
For information about See page
connecting to the controller via RSLogix Guard PLUS 1-1
going online with the GuardPLC controller 1-5
configuring the programming terminal 1-19
login dialog 1-20
determining the IP address and SRS of the controller 1-21
changing the SRS of the controller 1-22
changing the IP address of the controller 1-23
1
Connect to the Controller via RSLogix Guard PLUS! Software
You connect the controller to the programming terminal via an
Ethernet port on the controller. The programming terminal must have
an Ethernet port or Ethernet communication card.
To directly connect the programming terminal to the controller, use a
cross-over Ethernet cable. The GuardPLC 1600 and 1800 controllers
feature auto-sensing ports so that a cross-over or straight-thru cable
may be used.
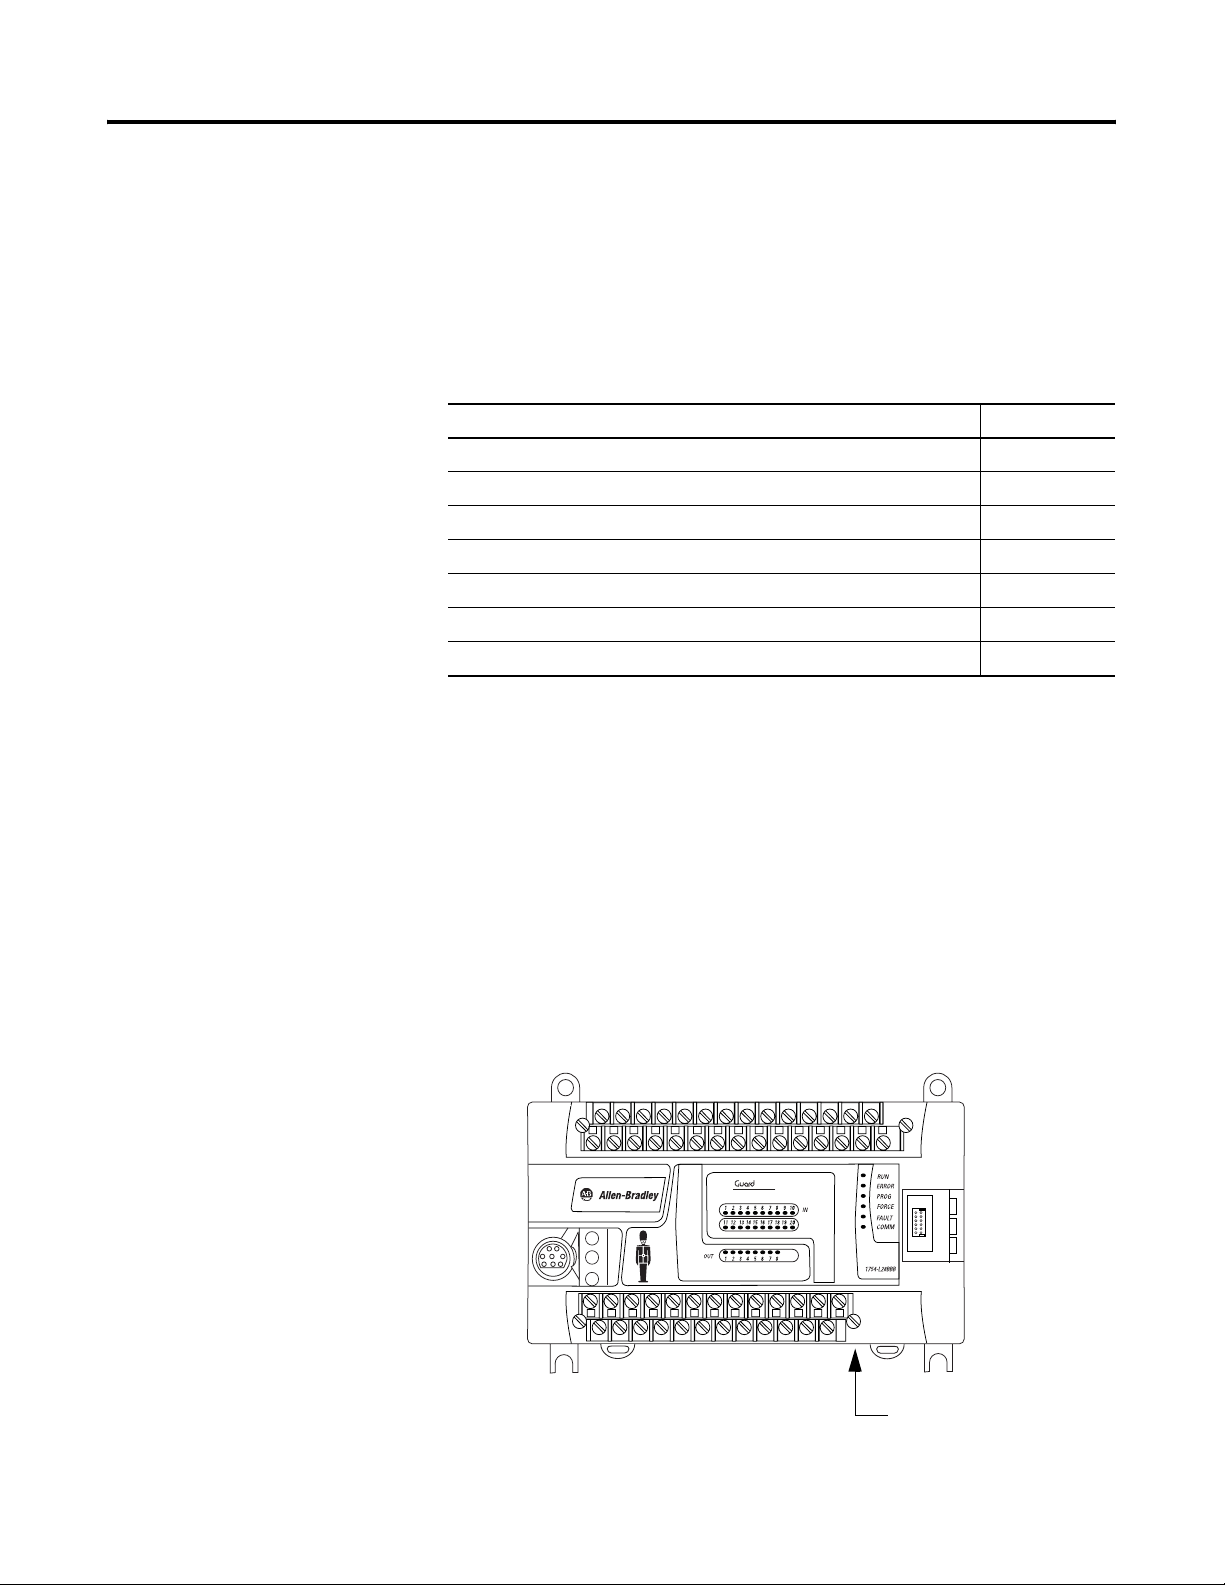
Connect to a GuardPLC 1200 Controller
PLC
1200
Ethernet port
(on the bottom of the controller)
1 Publication 1753-PM001A-EN-P - November 2005
Page 12
1-2 Connect to the GuardPLC Controller
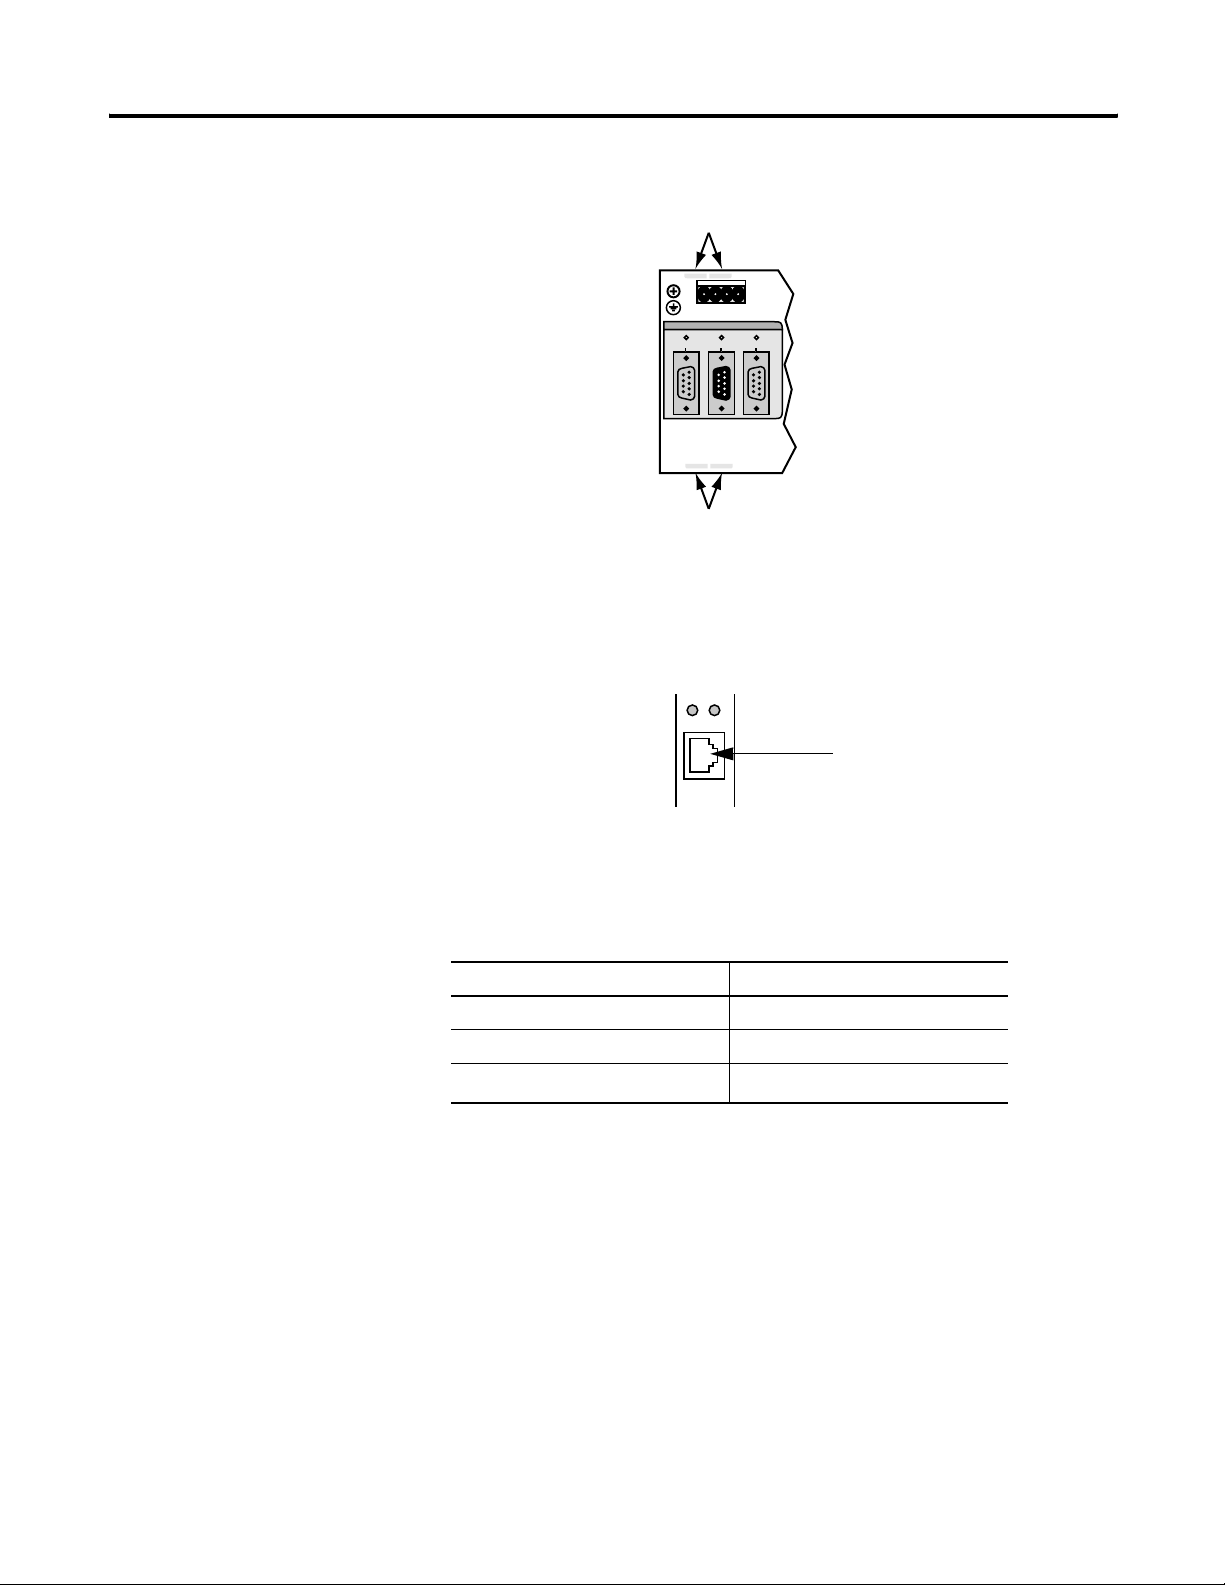
Connect to a GuardPLC 1600 or 1800 Controller
Ethernet Ports 3 and 4
(—)4(—)
3
L-L- L+ L+
24V DC
RS-485
10/100 BaseT
(—)2(—)
1
MODBUS
COMM1
COMM2COMM3
ASCII/HSP
GuardPLC Ethernet
Ethernet Ports 1 and 2
Connect to a GuardPLC 2000 Controller
Tx COL
Ethernet port
10/100 Base T
GuardPLC Controller Factory Default Settings
Parameter Setting
IP Address 192.168.0.99
Subnet Mask 255.255.252.0
(1)
SRS
(1) The SRS code is compiled with the program. It guarantees that the program can only be
downloaded to a GuardPLC controller with a matching SRS stored in non-volatile memory.
60000
Understand Ethernet Addressing
Publication 1753-PM001A-EN-P - November 2005
As with any connection between devices on Ethernet, the IP address
and subnet mask determine if the connection can take place. Every
device on Ethernet has an IP address and subnet mask.
The IP address and subnet mask are made up of four (4) octets
(001.002.003.004) The IP address is made up of the Network ID
Page 13

Connect to the GuardPLC Controller 1-3
(octets 001 and 002) and the Host ID (octets 003 and 004). The
Network ID portion of the IP address is derived from the subnet mask.
When any two devices attempt to talk on Ethernet, a check is made to
see if the Network ID of both the originator and the destination
address match. If they match, then the message is sent on the local
network. If they do not match, then the message is sent to the
Gateway to route the message to the destination. The subnet masks of
all the devices on a local network should be the same.
The example below illustrates how to derive the Network ID based on
the GuardPLC controller’s IP address and subnet mask defaults.
EXAMPLE
Determine the Network ID
Default Settings:
IP Address 192.168.0.99 = 11000000 . 10101000 . 00000000 . 01100011
Subnet Mask 255.255.252.0 = 11111111 . 11111111 . 11111100 . 00000000
Network ID = 11000000 . 10101000 . 000000xx . xxxxxxxx
Set up the programming terminal’s IP address so that it has the same Network ID as
the GuardPLC controller. Octets one and two have to be the same because the
subnet mask octets are 255. The third subnet mask octet is 252, which means that
only the last two bits can be different.
If the factory default settings above are used, the allowable IP addresses for the
programming terminal running RSLogix Guard PLUS! software are:
• 192.168.0.xxx (xxx represents any value between 000-255)
• 192.168.1.xxx
• 192.168.2.xxx
• 192.168.3.xxx
Configure the IP Address of Your Programming Terminal
IMPORTANT
The first time you connect to a controller, you must
use the factory-set IP address of 192.168.0.99 and the
default SRS of 60000. After you establish
communications with the controller (using the steps
on the following pages), you can change the IP
address and SRS to better accommodate your
Ethernet network.
Publication 1753-PM001A-EN-P - November 2005
Page 14
1-4 Connect to the GuardPLC Controller
Change the IP address of your programming terminal running RSLogix
Guard PLUS! software so that the GuardPLC controller and
programming terminal can communicate on a local network.
TIP
If you suspect the GuardPLC controller has the
factory-set default IP address of 192.168.0.99 and the
default subnet mask of 255.255.252.0, set your
programming terminal’s IP address to 192.168.0.98
with a subnet of 255.255.252.0 to establish
communications.
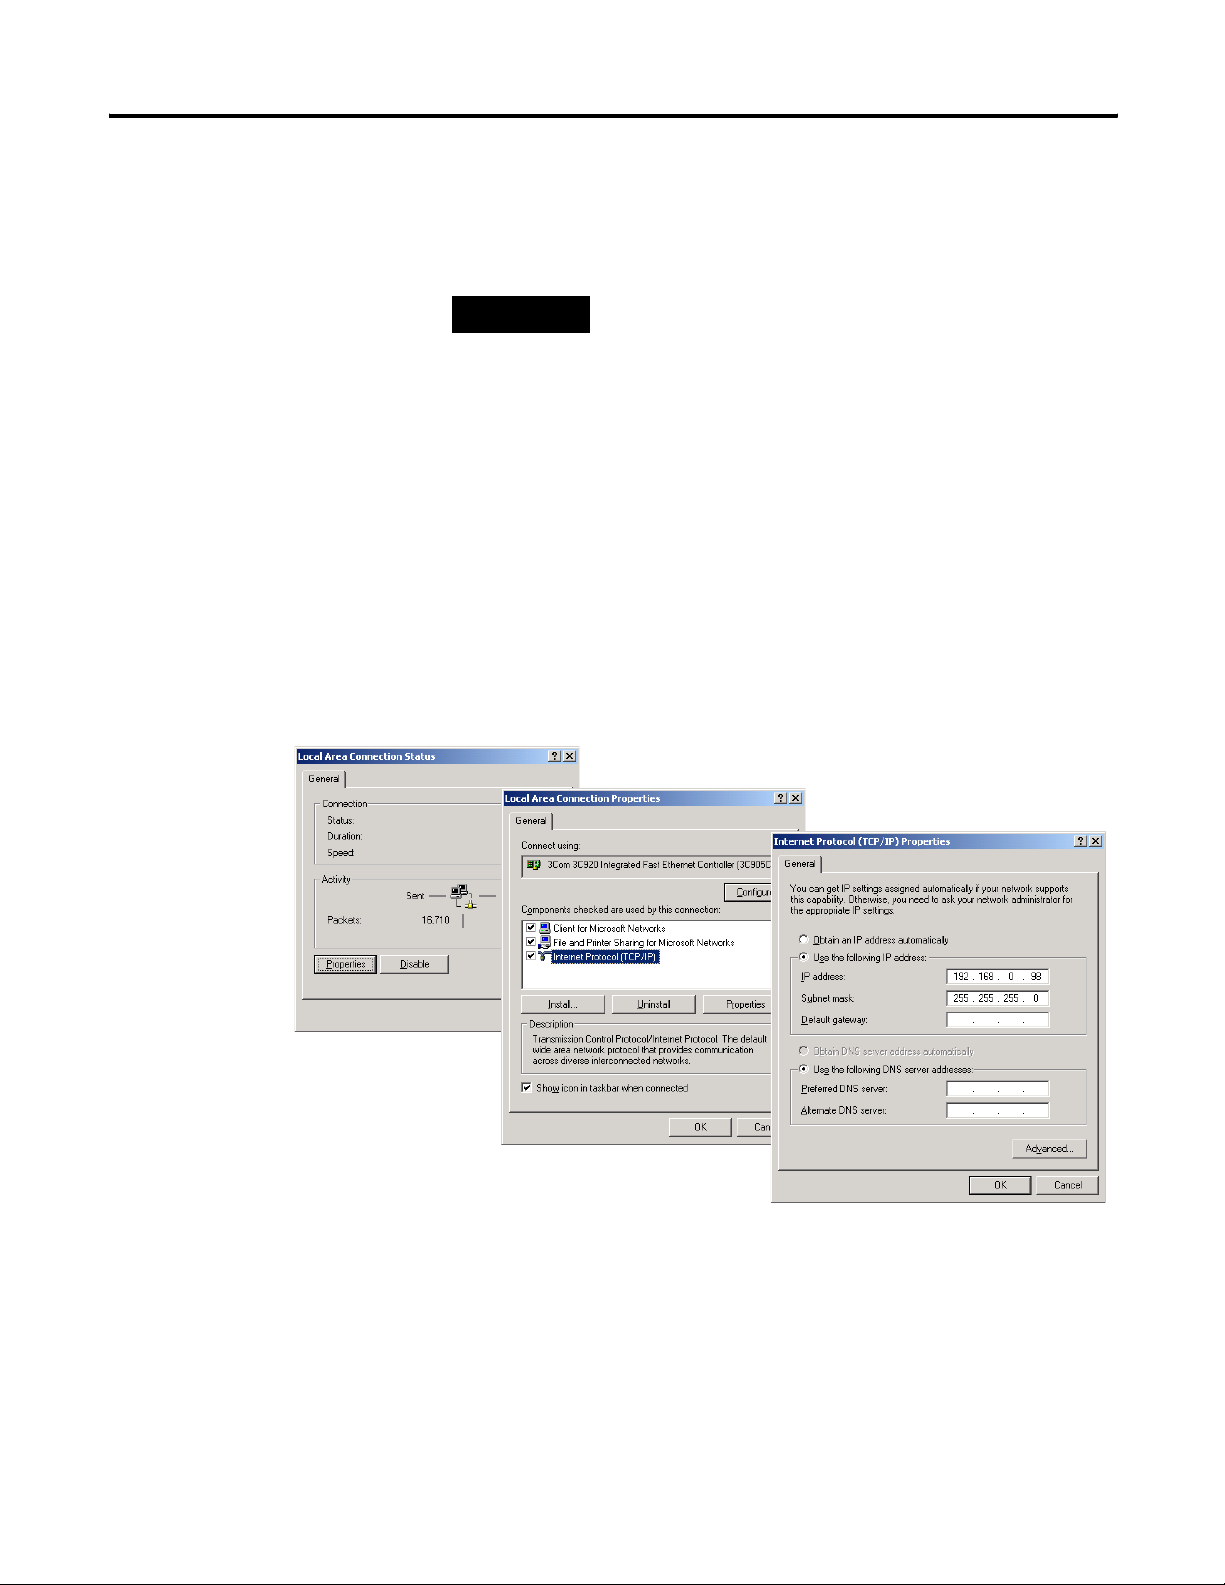
To change the IP address:
1. In Windows 2000, choose Start>Setting >Control Panel>Network
and Dial-up Connections.
2. Open Local Area Connections and click Properties. Select TCPIP
and click Properties.
3. Set the General TCP/IP Properties as shown below.
Publication 1753-PM001A-EN-P - November 2005
4. Confirm your settings by clicking OK in both dialog boxes.
Page 15
Connect to the GuardPLC Controller 1-5
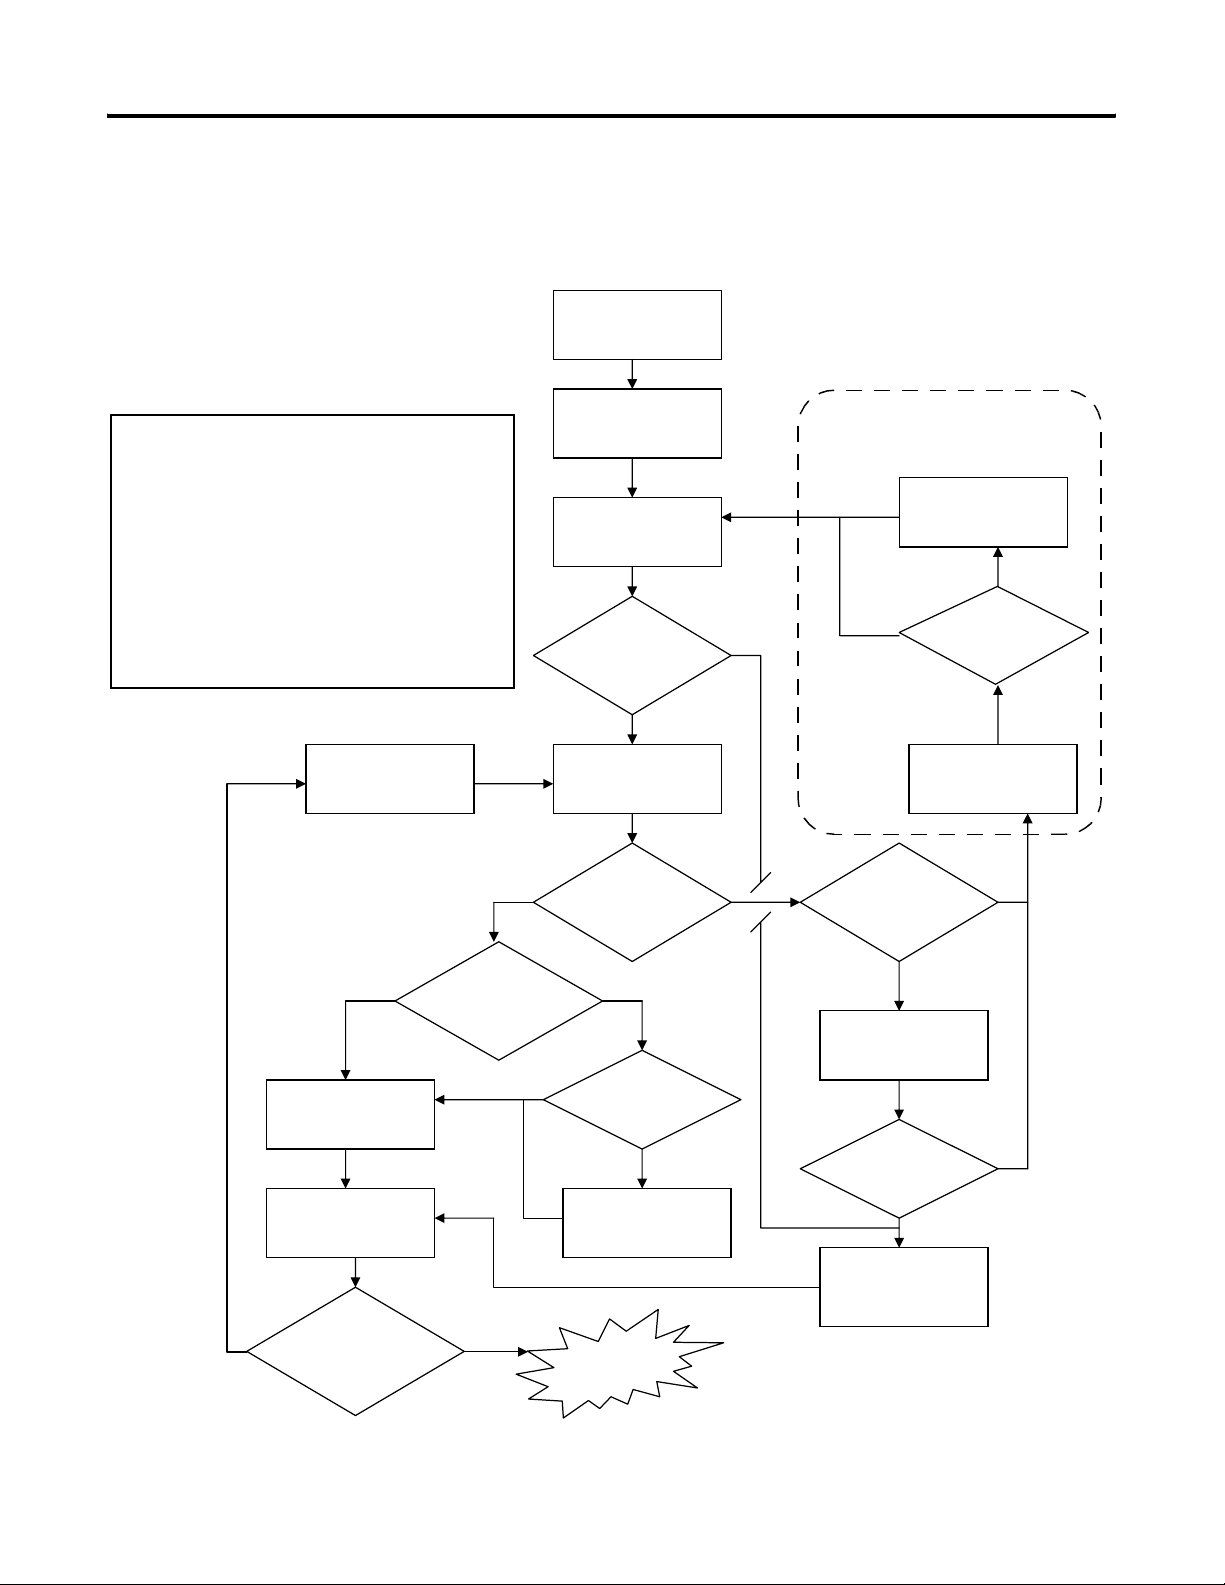
Go Online with the GuardPLC Controller
Notes:
(1) Assume correct SRS was entered in Step 3.
(2) The controller reverts back to its prior settings if it is
not re-configured before the next power cycle.
(3) If the controller was previously running and the SRS
was changed in Step 5, or if the controller is new
(out-of-box), the only way to clear the FAULT is to
download a program with a matching SRS.
Step 8: Change
Controller Mode to
STOP
The following flowchart illustrates the steps required to successfully
go online with the GuardPLC controller.
Step 1: Open RSLogix
Guard PLUS!
Step 2: Create a New
Project
Step 3: Configure the
controller type and SRS
Do you already know
settings?
NO
Step 4: Communication
Settings
YES
Note: This path is not possible for
GuardPLC 1200 and GuardPLC 2000
controllers.
Step 12: Fault Recovery
NO
after Reset.
YES
Is the
FAULT LED
illuminated?
Step 9: Reset Controller
Default Settings
(2)
Step 6: Move Settings
into Offline Project
Step 7: Connect to
Controller Using
Control Panel
NO
Are you online with
the correct settings?
NO
YES
Do you
want to change these
settings in the
controller?
YES
YES
Did
communication
settings read IP/SRS
successfully?
YES
Is the
controller in RUN
mode?
NO
Step 5: Change
Settings via MAC
Address
(3)
DONE
NO
Do you
think you know the
controller settings?
YES
Step 10: Ping the
Controller
Ping successful?
YES
Step 11: Configure
Controller IP
Address
(1)
NO
NO
The steps are described in detail in the following sections.
Publication 1753-PM001A-EN-P - November 2005
Page 16
1-6 Connect to the GuardPLC Controller
Step 1: Open RSLogix Guard PLUS! Software
Choose Start>Programs>RSLogix Guard PLUS>RSLogixGuardPLUS.
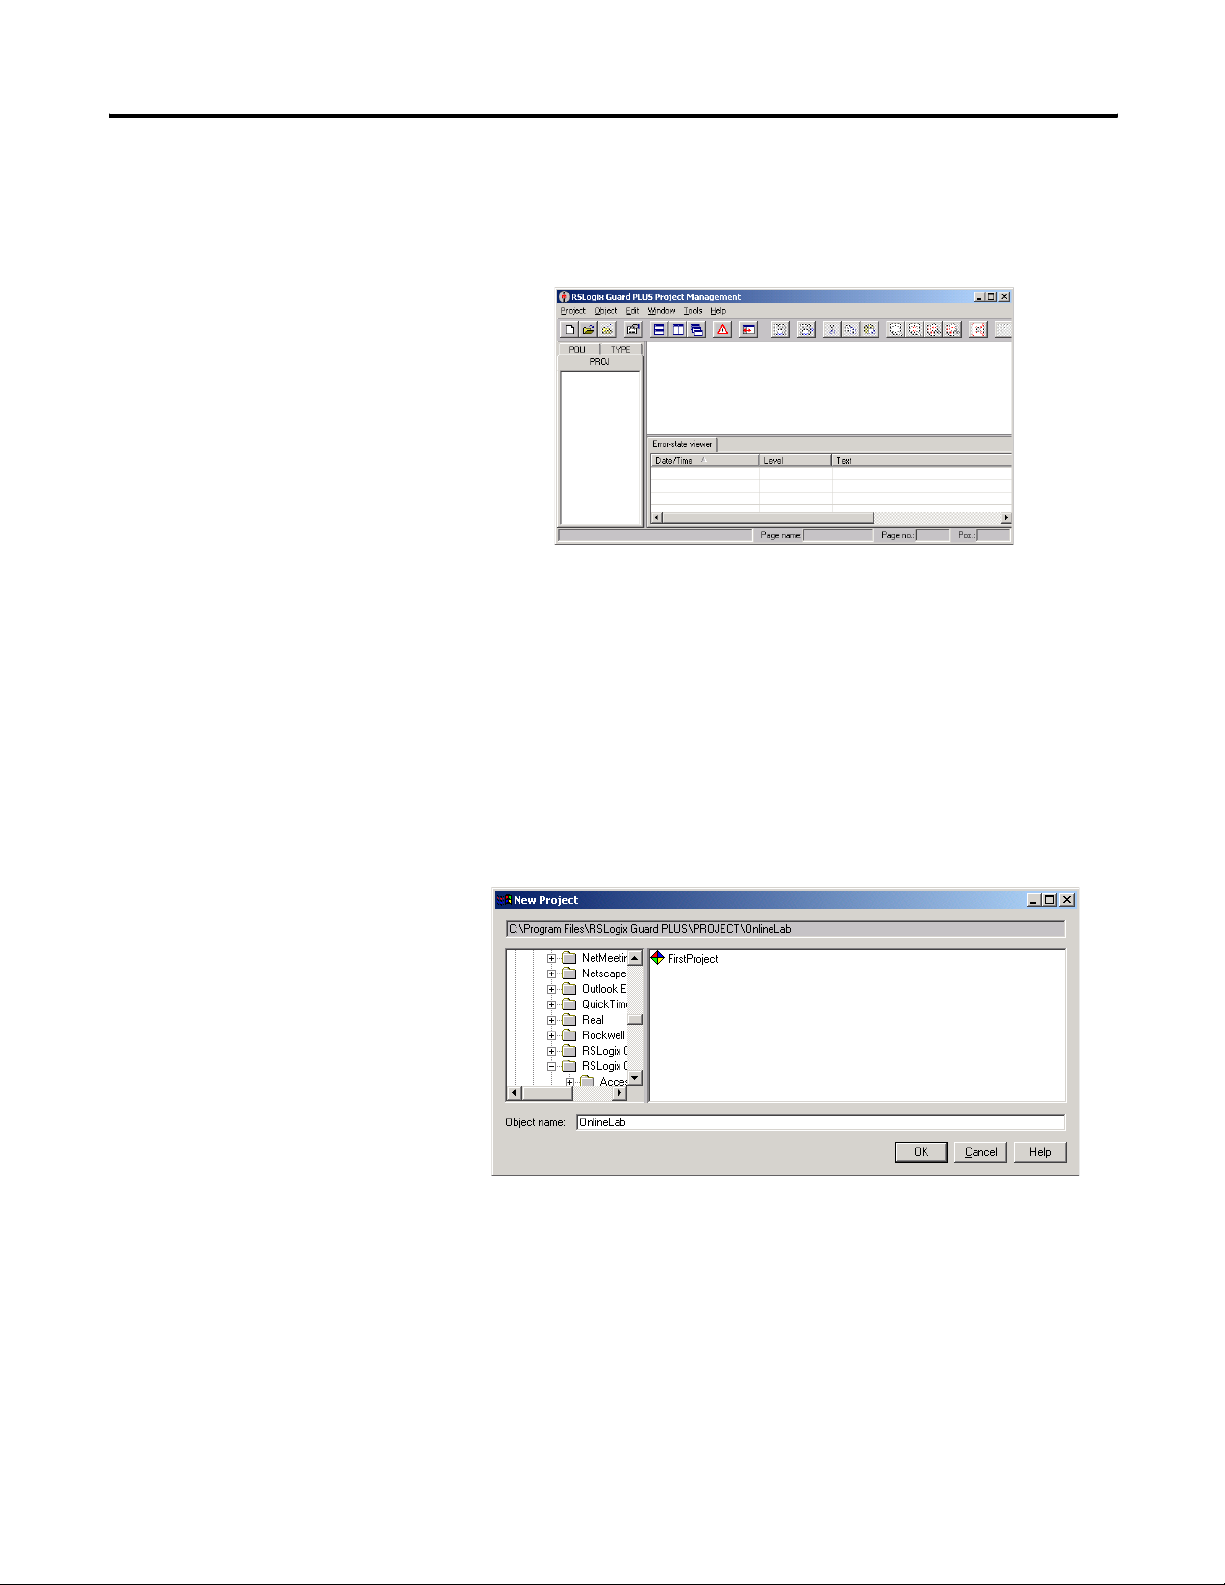
Step 2: Create a New Project
Open an existing project or create a new project that contains a
GuardPLC controller.
1. To create a new project, choose Project>New from the main
menu or click the New icon.
2. Enter the name of the project in the Object Name field.
3. Click OK.
Publication 1753-PM001A-EN-P - November 2005
Page 17

Connect to the GuardPLC Controller 1-7
The RSLogix Guard PLUS! Hardware Management window opens.
Both the Project Management and Hardware Management windows
are normally open when running RSLogix Guard PLUS! software.
Step 3: Configure the Controller Type and SRS
To go online, you must specify the controller type and change the
default SRS. The software defaults to an SRS of zero (0), which is the
only illegal SRS value. To accept the controller type, the SRS must be
changed to a value between 2
(1)
and 65535.
1. Expand the project tree in the Hardware Management window
until [0] Resource is visible.
2. Right-click [0] Resource and choose Properties.
(1) The programming terminal defaults to 1.
Publication 1753-PM001A-EN-P - November 2005
Page 18

1-8 Connect to the GuardPLC Controller
3. Specify the controller type and enter an SRS of 60000.
You must use the default SRS of 60000 the first time you connect
to a GuardPLC controller.
4. Click OK.
The Hardware Management window appears as shown below.
Notice that the SRS has changed to 60000.
Publication 1753-PM001A-EN-P - November 2005
Page 19
Connect to the GuardPLC Controller 1-9
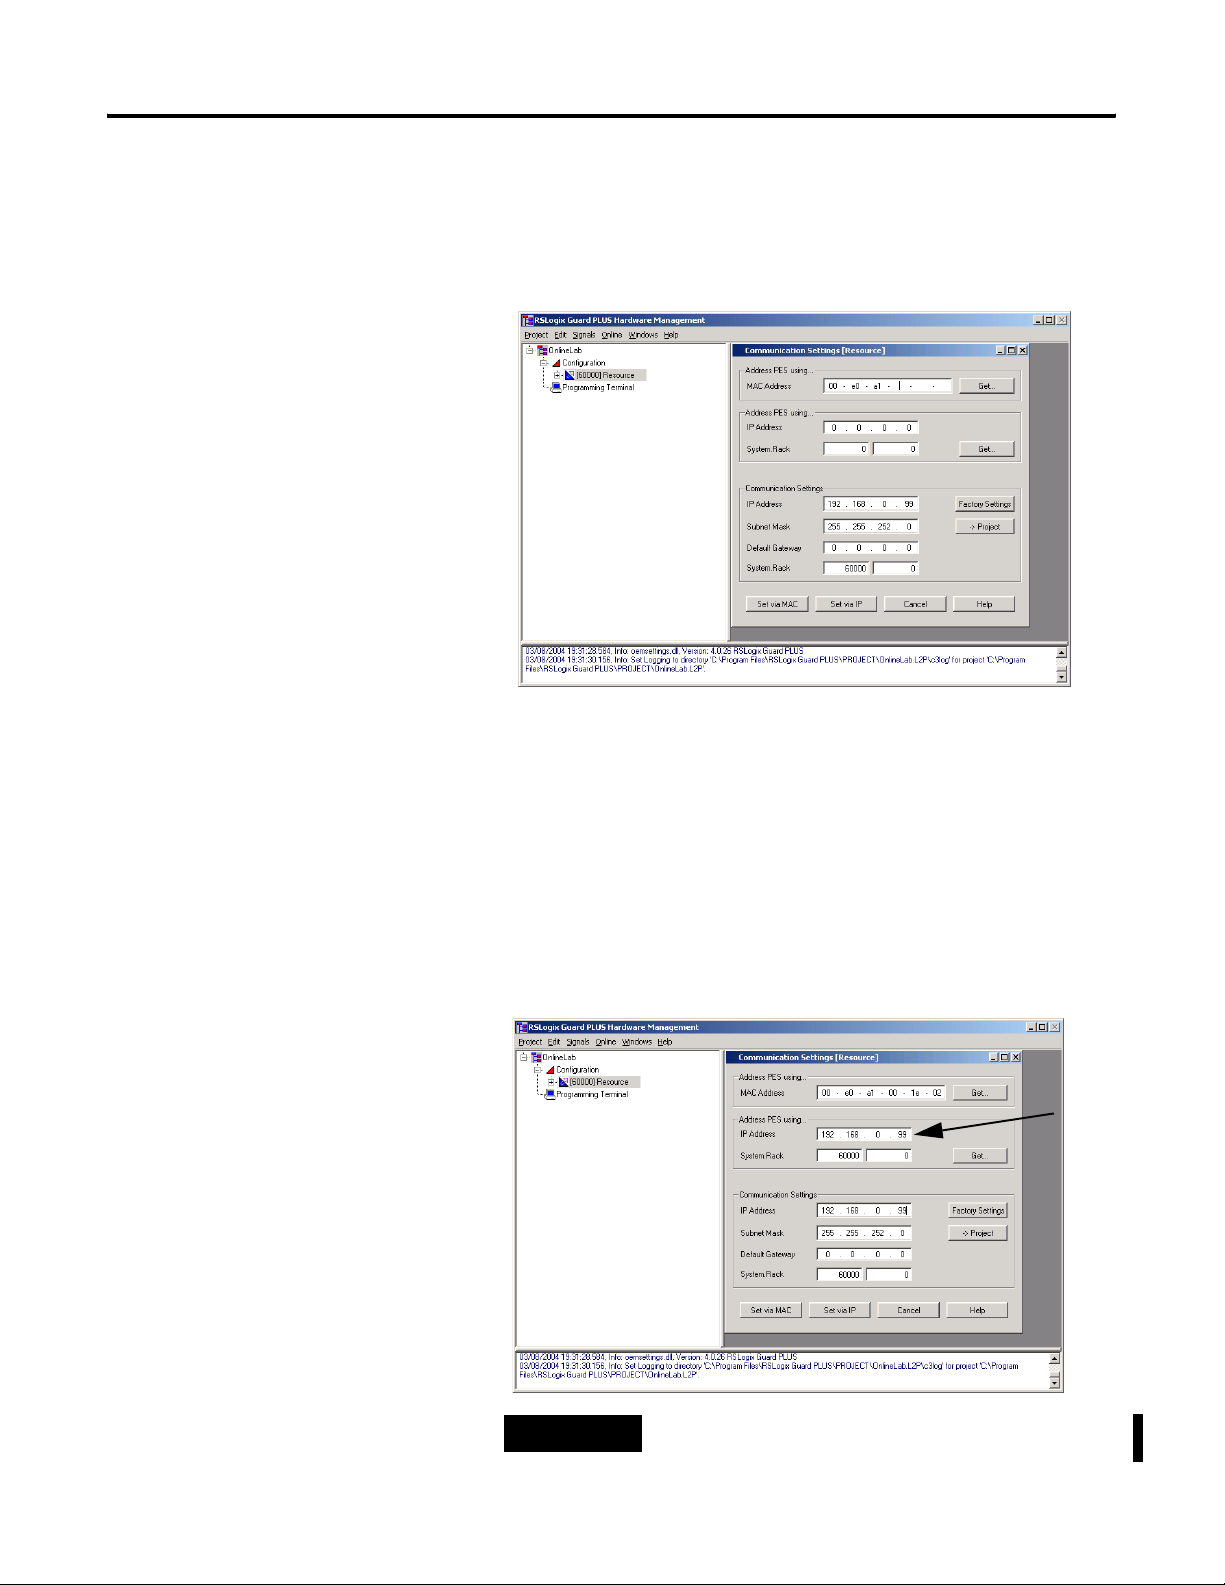
Step 4: Get Communication Settings
1. Choose Online>Communication Settings from the pull-down
menu.
2. Enter the last three elements of the MAC address into the MAC
Address field and click Get.
The MAC address is on the sticker on the side of a GuardPLC
1200 controller, on the label positioned over both lower RJ-45
connections on GuardPLC 1600/1800 controllers and I/O, or on
the front bezel of the AB-CPU module of a GuardPLC 2000
controller.
The IP address and SRS of the GuardPLC controller should
appear in the Address PES using… fields.
TIP
If communication fails, you may need to
disable your fire wall or security settings.
Publication 1753-PM001A-EN-P - November 2005
Page 20
1-10 Connect to the GuardPLC Controller
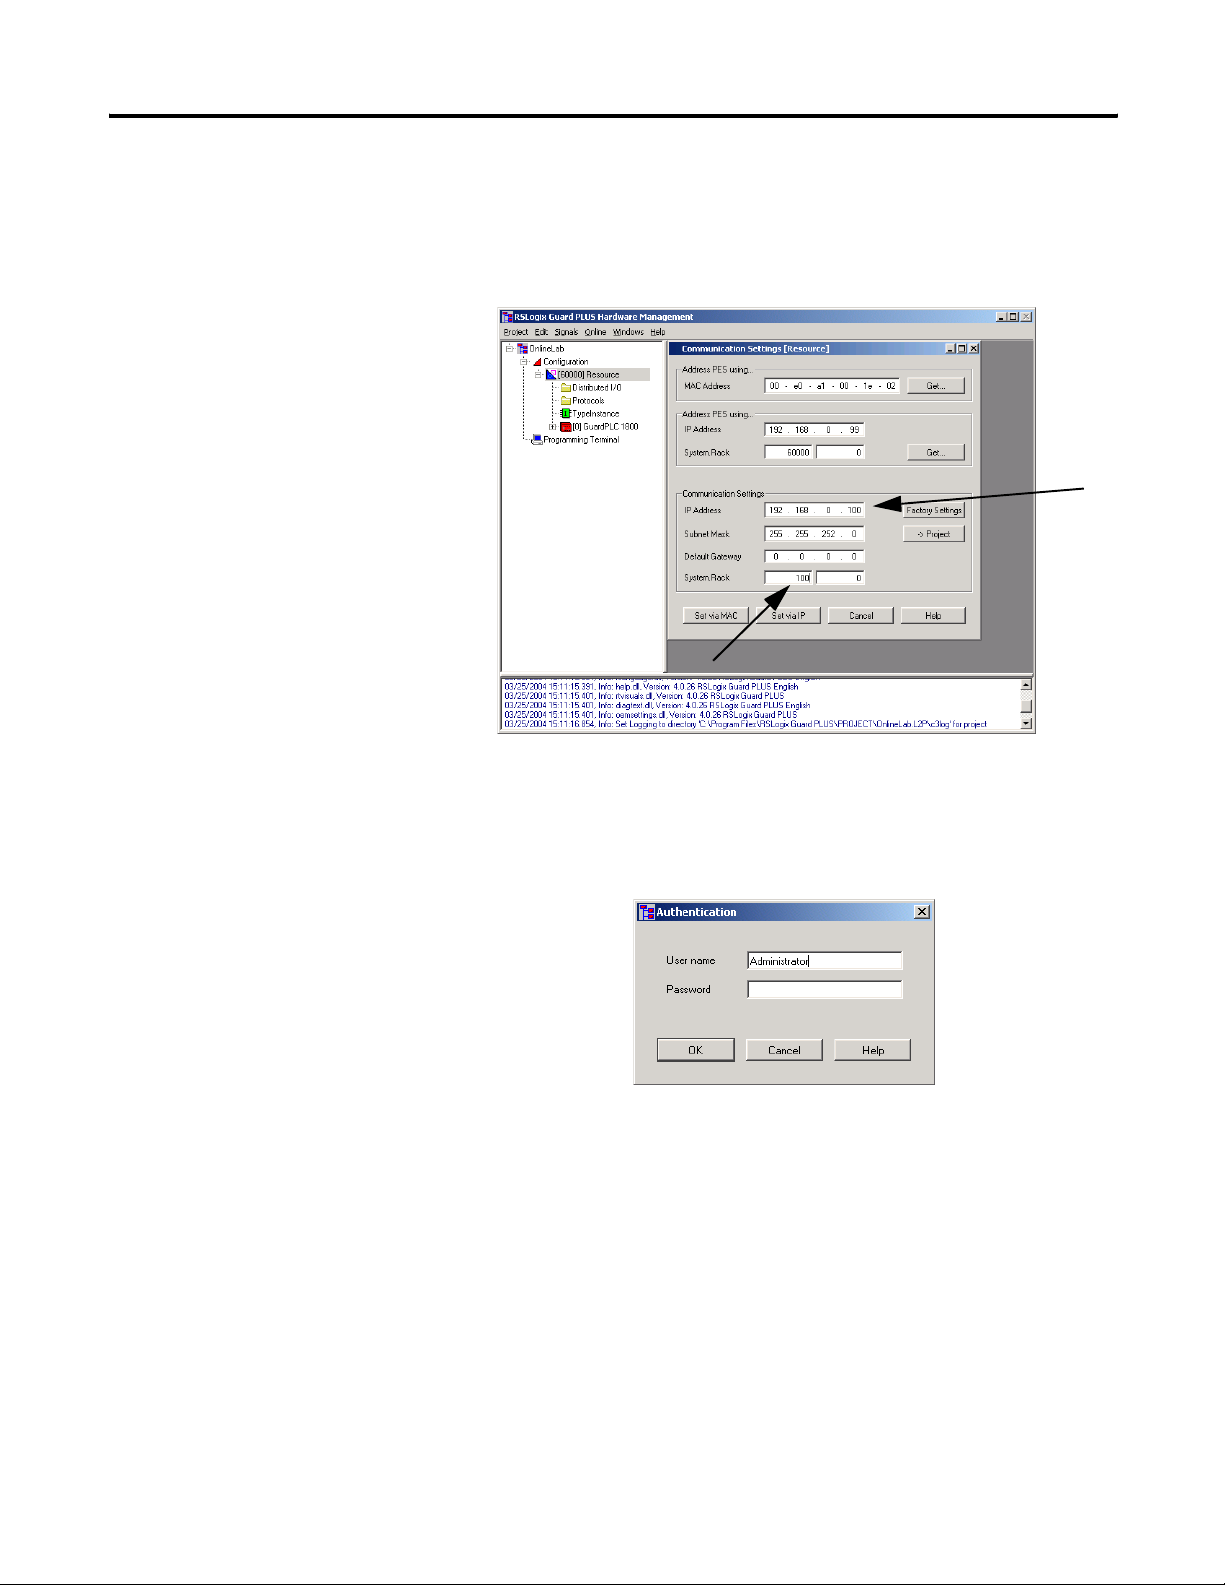
Step 5: Change Settings via MAC Address
1. Enter desired settings for the IP and SRS in the Communication
Settings fields indicated by the arrows below.
2. Click the Set via MAC button.
3. Enter the default username ‘Administrator’ in the Authentication
window, as shown below.
4. Click OK.
Publication 1753-PM001A-EN-P - November 2005
Page 21
Connect to the GuardPLC Controller 1-11
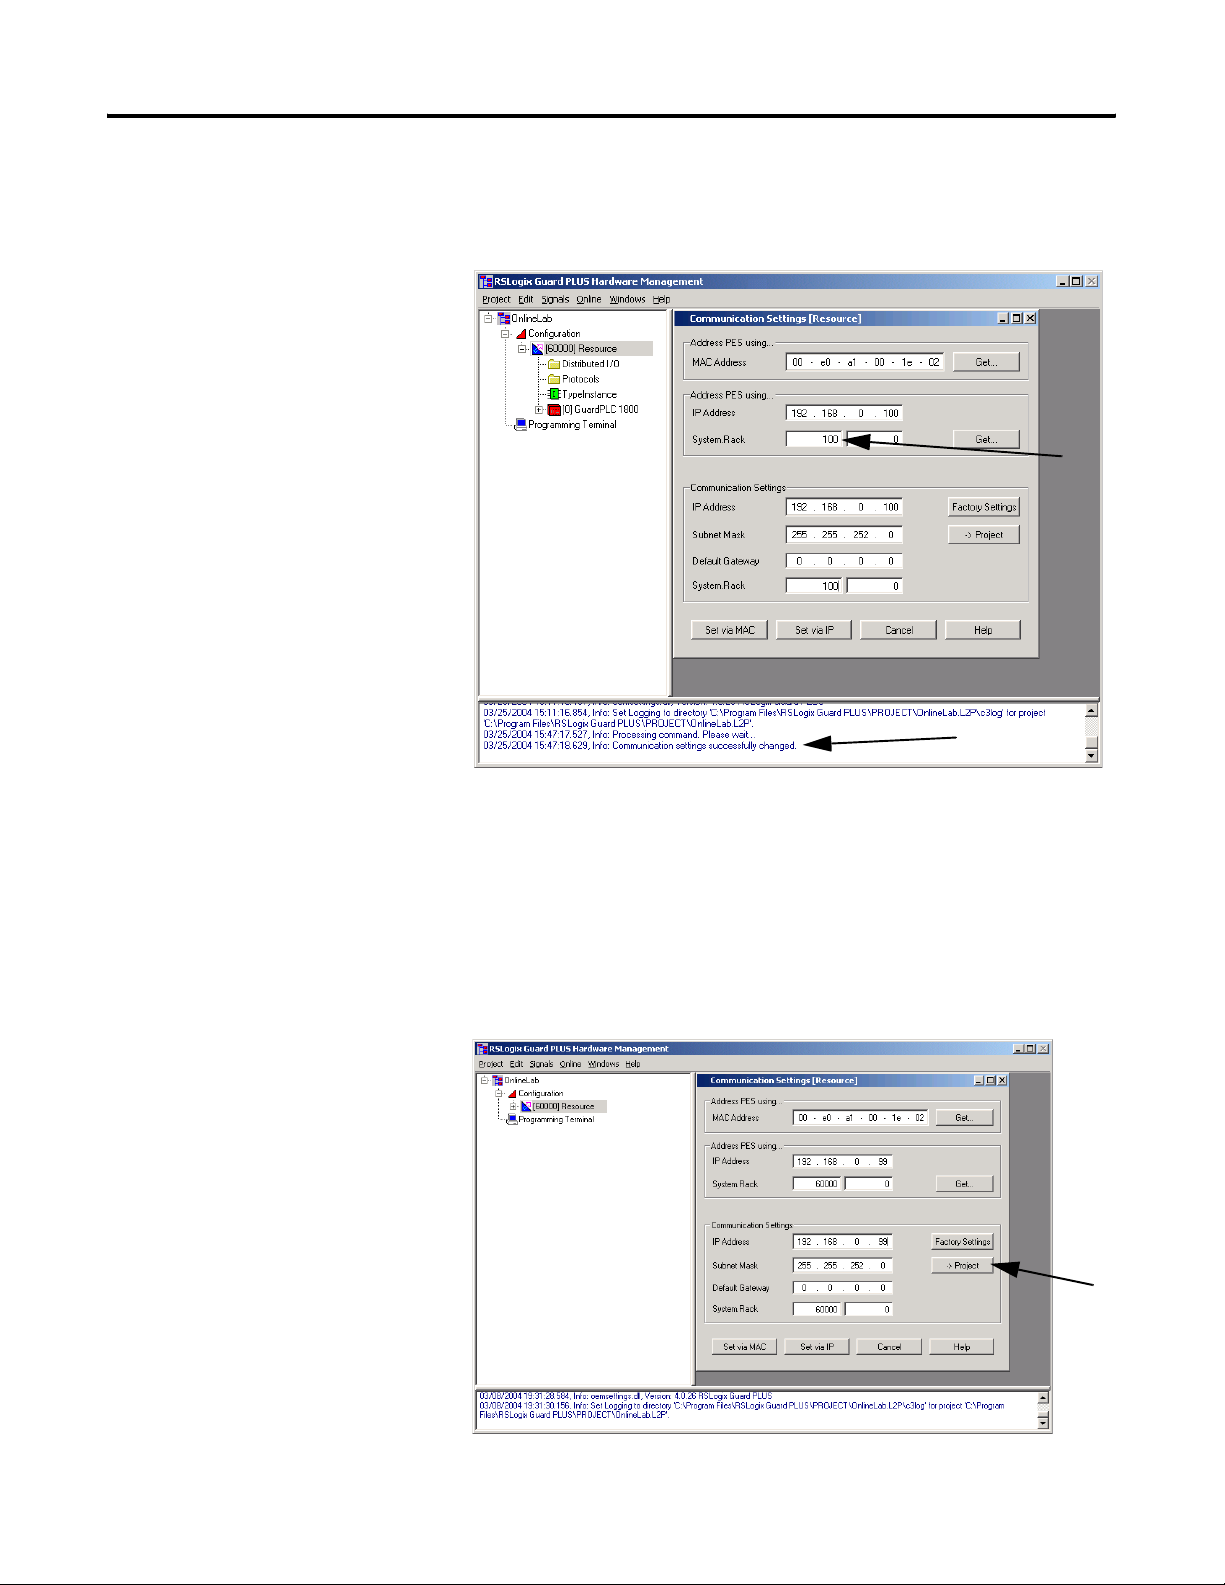
The IP address and SRS should have changed. A prompt appears at
the bottom of the window and the settings in the middle fields
change.
Step 6: Move the Settings Into Your Offline Project
If you wish to connect using the current GuardPLC controller settings,
move the settings into your offline project.
1. Left-click -> Project.
Publication 1753-PM001A-EN-P - November 2005
Page 22
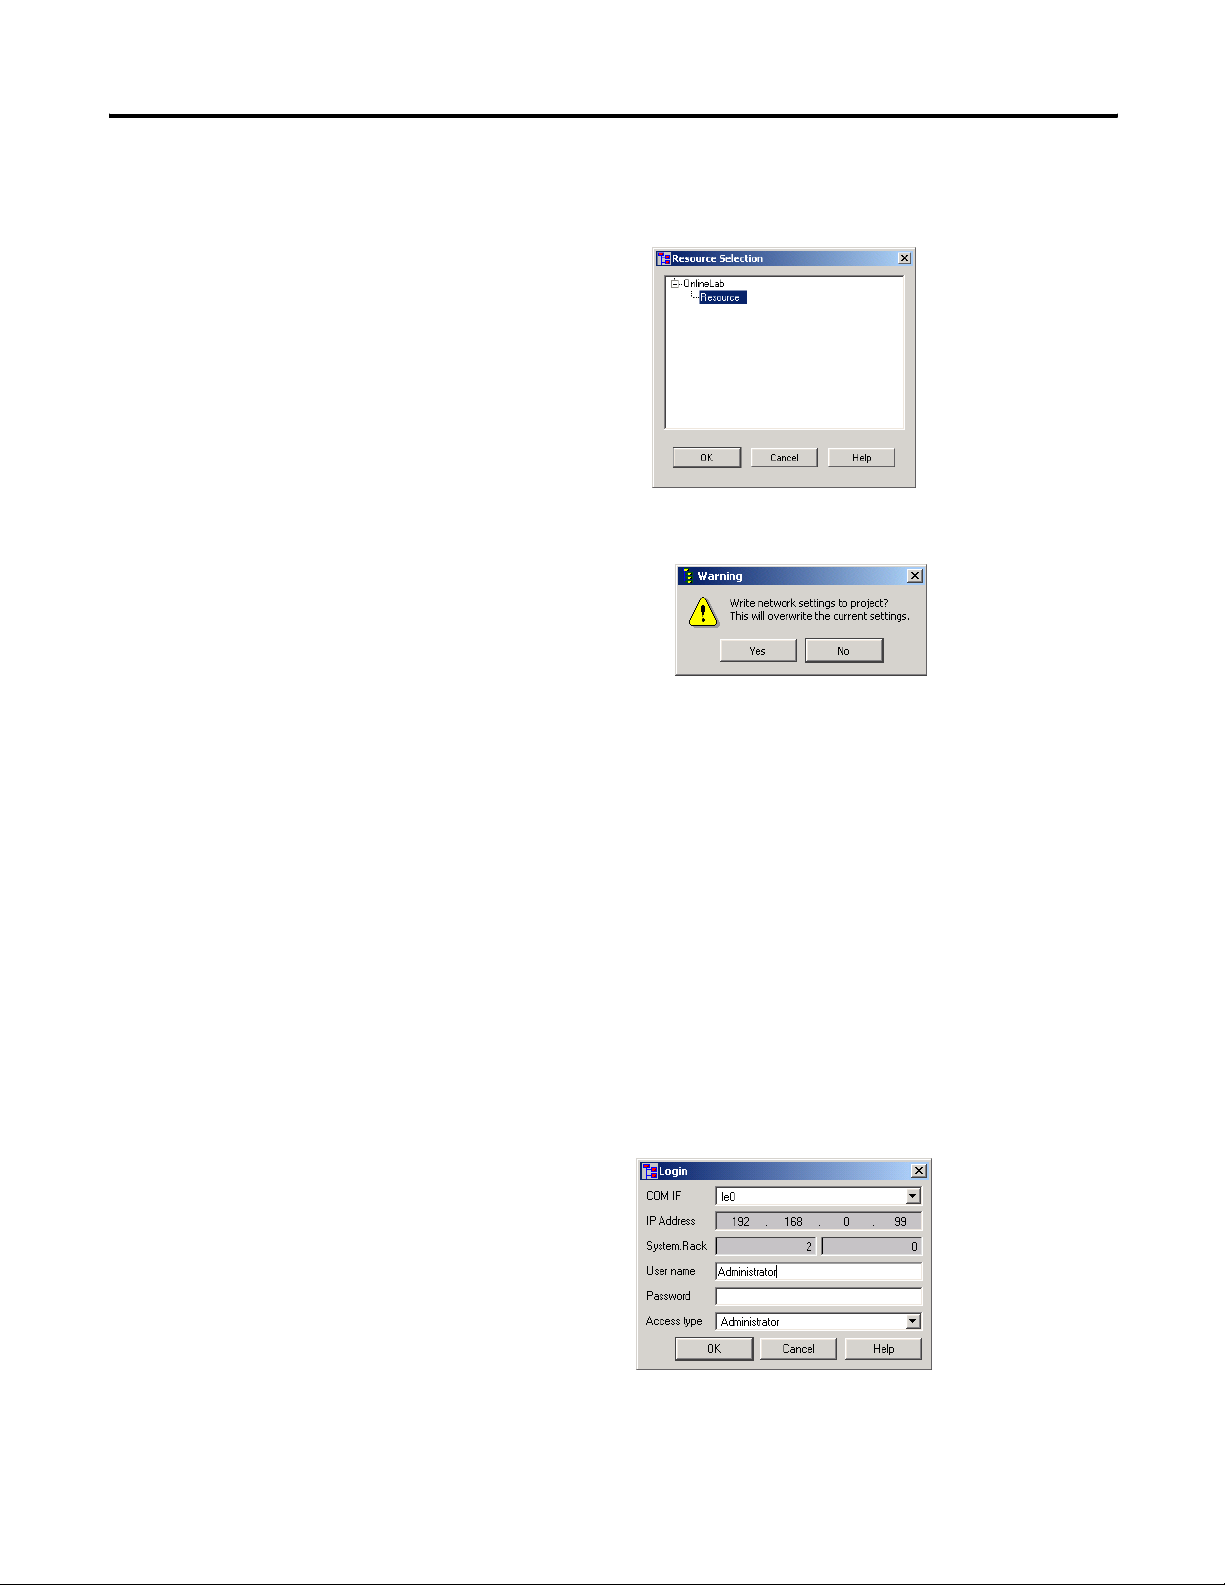
1-12 Connect to the GuardPLC Controller
2. Make sure Resource is selected in the Resource Selection
window and click OK.
3. Click Yes.
This moves the IP address and SRS of the GuardPLC controller to your
offline project and overwrites the existing values. These new values
are used in the login screen to connect with the GuardPLC controller.
Step 7: Use the Control Panel to Connect to the GuardPLC
Controller
1. Right-click [60000] Resource.
2. Choose Online>Control Panel.
3. Type [Ctrl]+[A] to fill in the default Username, Password, and
Access Type in the Login Window.
Publication 1753-PM001A-EN-P - November 2005
4. Click OK.
Page 23
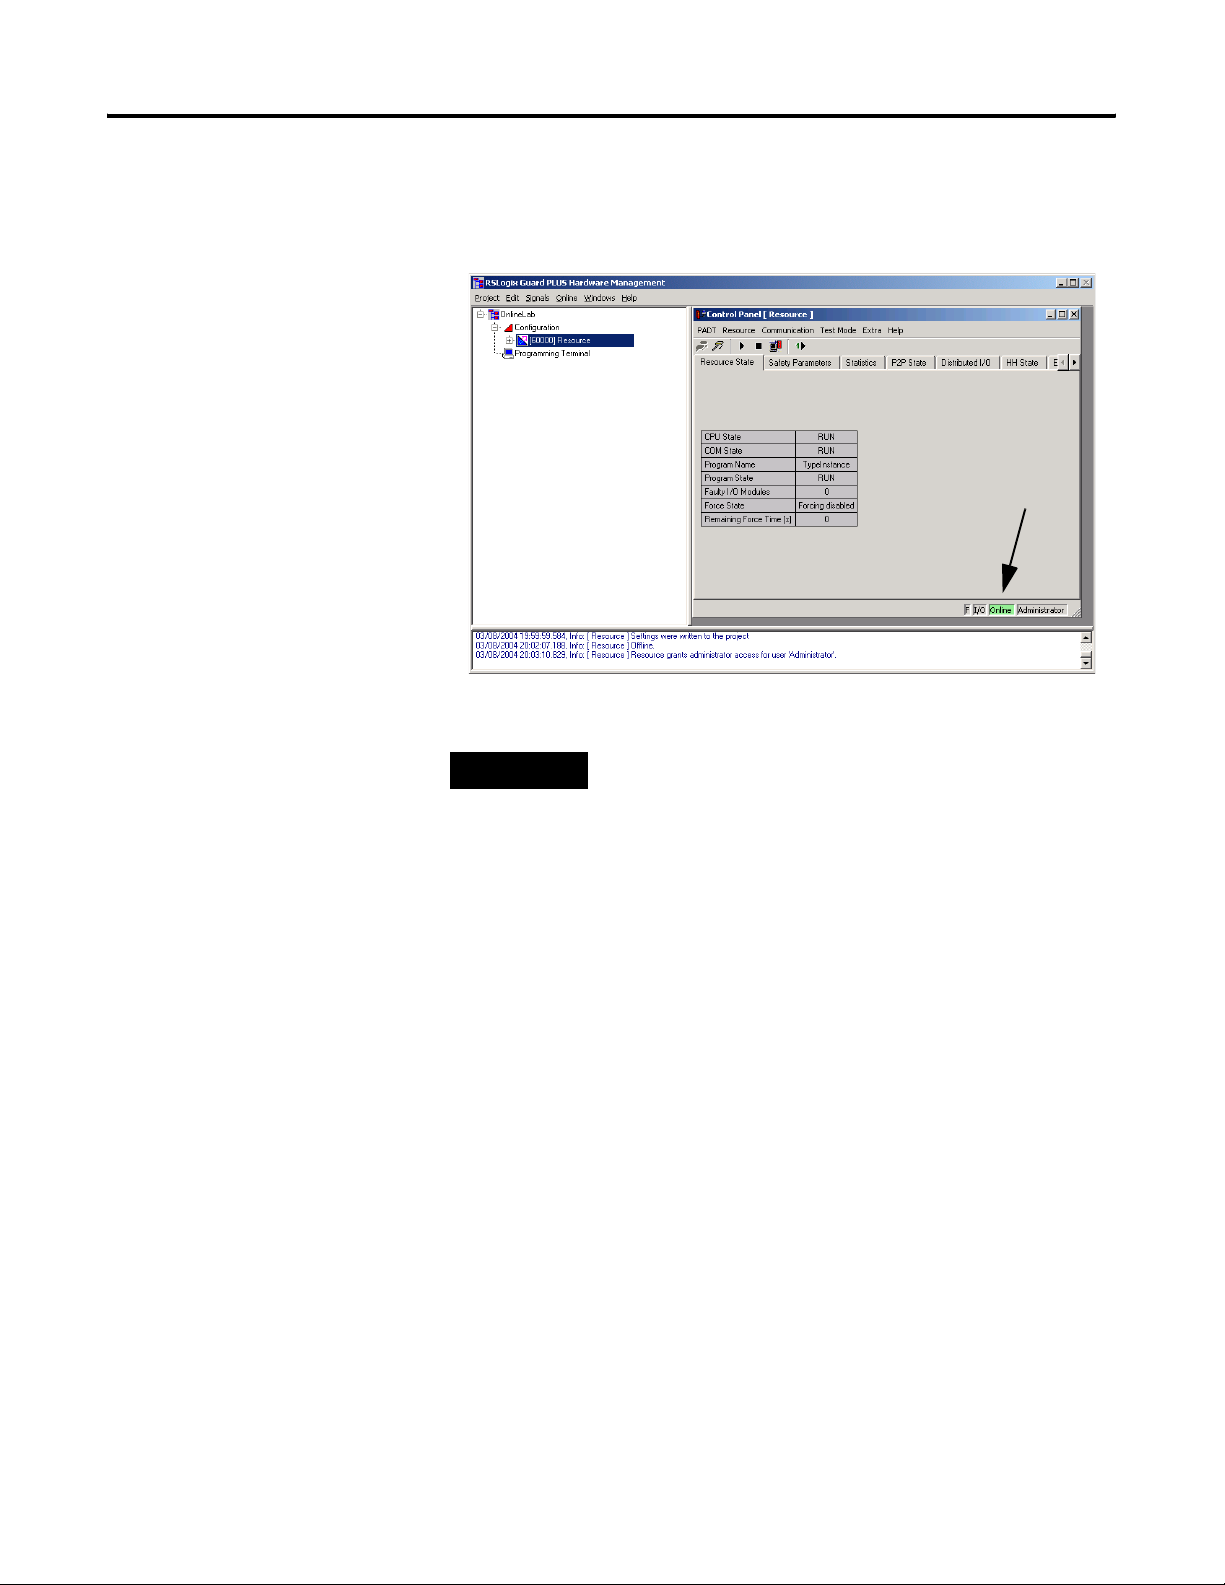
Connect to the GuardPLC Controller 1-13
The Control Panel Online indicator will be GREEN if the controller is
in RUN Mode. The Online indicator may also be yellow, white, or red
based on its current state.
TIP
If you are successfully online with the GuardPLC
controller and in RUN mode (Green Online indicator
as shown above), you do not need to continue with
the steps 8 through 12. However, if you are not
online and in RUN mode, consult the flowchart on
page 1-5, and perform the appropriate steps.
Publication 1753-PM001A-EN-P - November 2005
Page 24
1-14 Connect to the GuardPLC Controller
Step 8: Change the Controller to STOP Mode
To change the controller to STOP mode, choose Resource>Stop from
the Control Panel or use the Stop icon.
When in STOP Mode, the Control Panel appears as follows:
Close the Control Panel.
Step 9: Reset the Controller to the Default Settings
In some cases, you may have to reset the GuardPLC controller to its
default IP address and SRS.
GuardPLC 1600 and 1800 controllers have a Reset button that is
accessible via a small hole directly to the right of the Ethernet ports on
top of the controller. The Reset button returns the IP address, SRS and
Password settings to:
Parameter Setting
IP Address 192.168.0.99
SRS 60000
Username Administrator
Password [none]
Publication 1753-PM001A-EN-P - November 2005
Page 25
Connect to the GuardPLC Controller 1-15
To reset the controller:
1. Hold down the Reset button, then power cycle the GuardPLC
controller.
2. Continue to hold down the Reset button until the PROG led
stops flashing.
At the next power cycle, the settings will revert back to the last
configured settings. These could be the settings in place prior to the
Reset operation, if you did not reconfigure them after resetting the
controller.
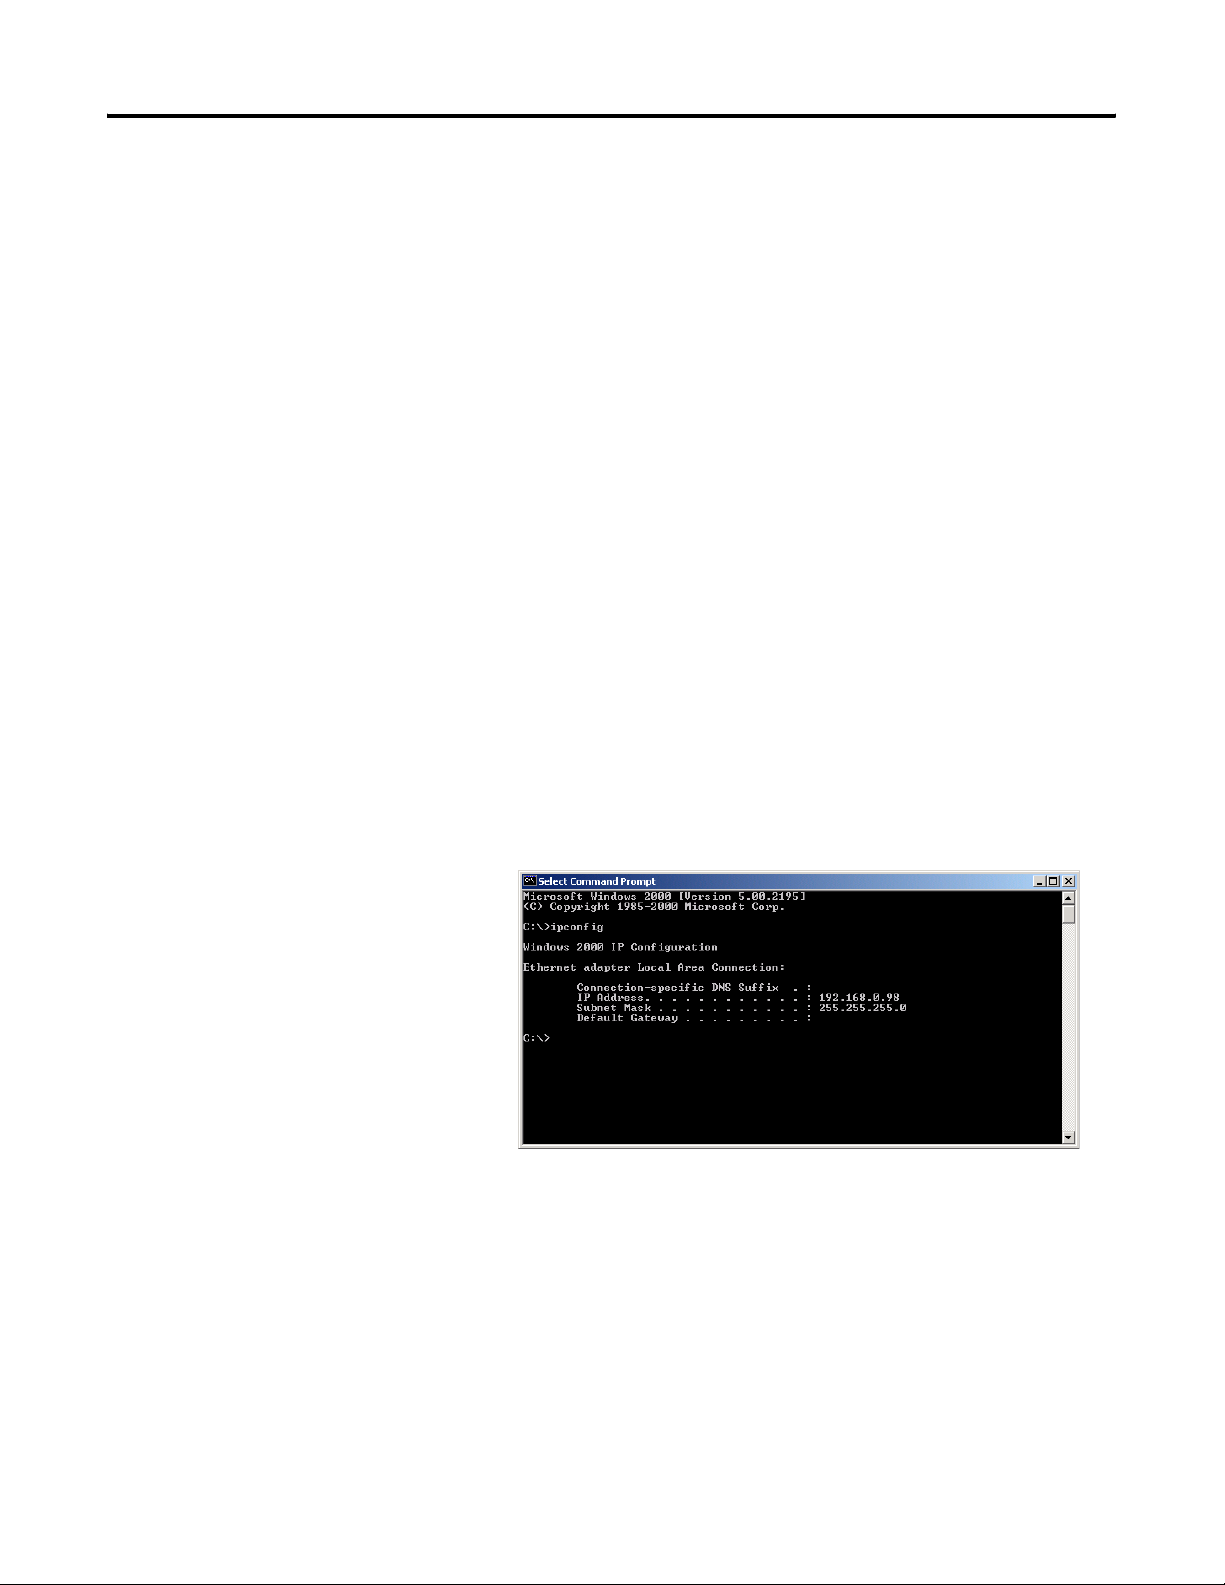
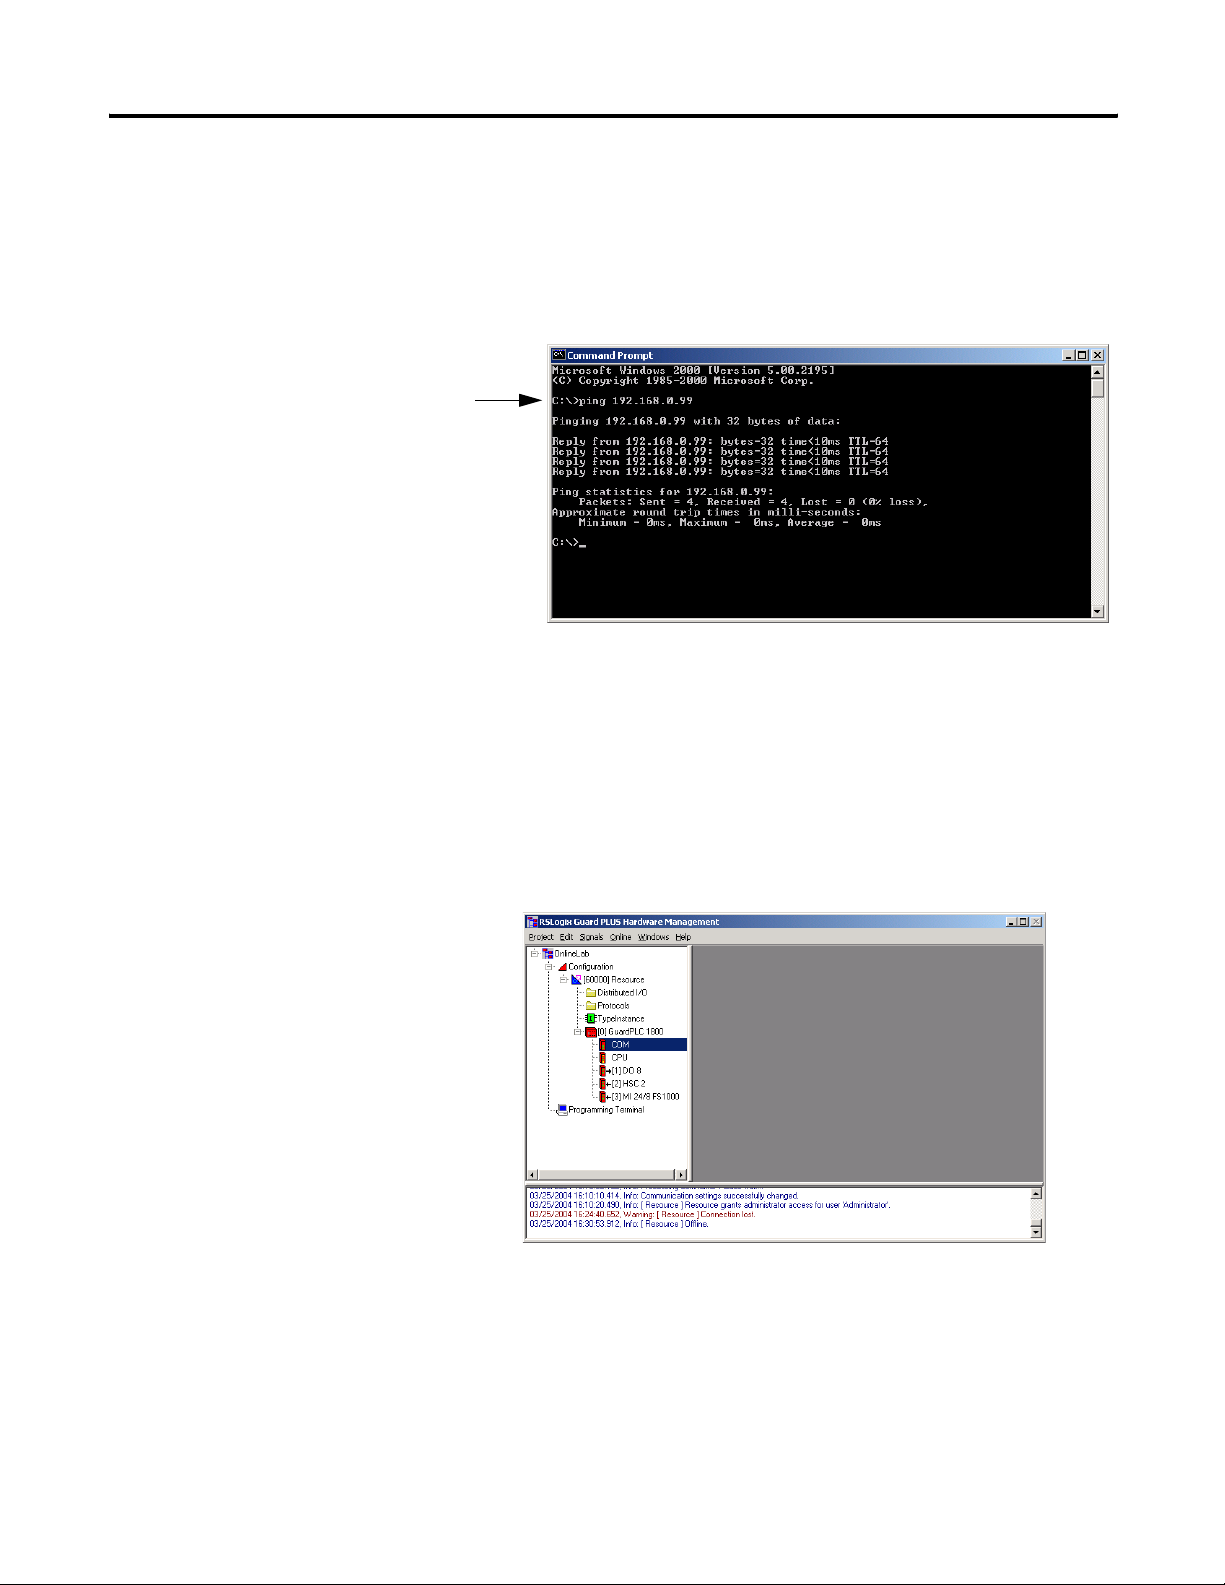
Step 10: Ping the Controller
Use the Start menu to open the RSLogix Guard PLUS! Command
Prompt.
1. Choose Start>Programs>RSLogix Guard PLUS>RSLogix Guard
PLUS Command Prompt.
2. Run IPCONFIG at the DOS Command prompt to verify your
computer’s IP address. It must be on the same local network as
the GuardPLC controller.
Publication 1753-PM001A-EN-P - November 2005
Page 26
1-16 Connect to the GuardPLC Controller
3. Ping the GuardPLC controller using the command shown at the
C:\> below. If the ping is successful, the IP address of the
GuardPLC controller has been verified and the Ethernet link is
operating. If the ping was not successful either the IP address,
subnet mask, or Ethernet link is not correct. The picture below is
the result of a successful ping.
4. Type EXIT at the command prompt to close the Command
Prompt window.
Step 11: Configure the GuardPLC Controller’s IP Address
1. Expand the project tree in the Hardware Management window
until the controller COM icon is visible.
2. Right-click COM and choose Properties.
Publication 1753-PM001A-EN-P - November 2005
Page 27
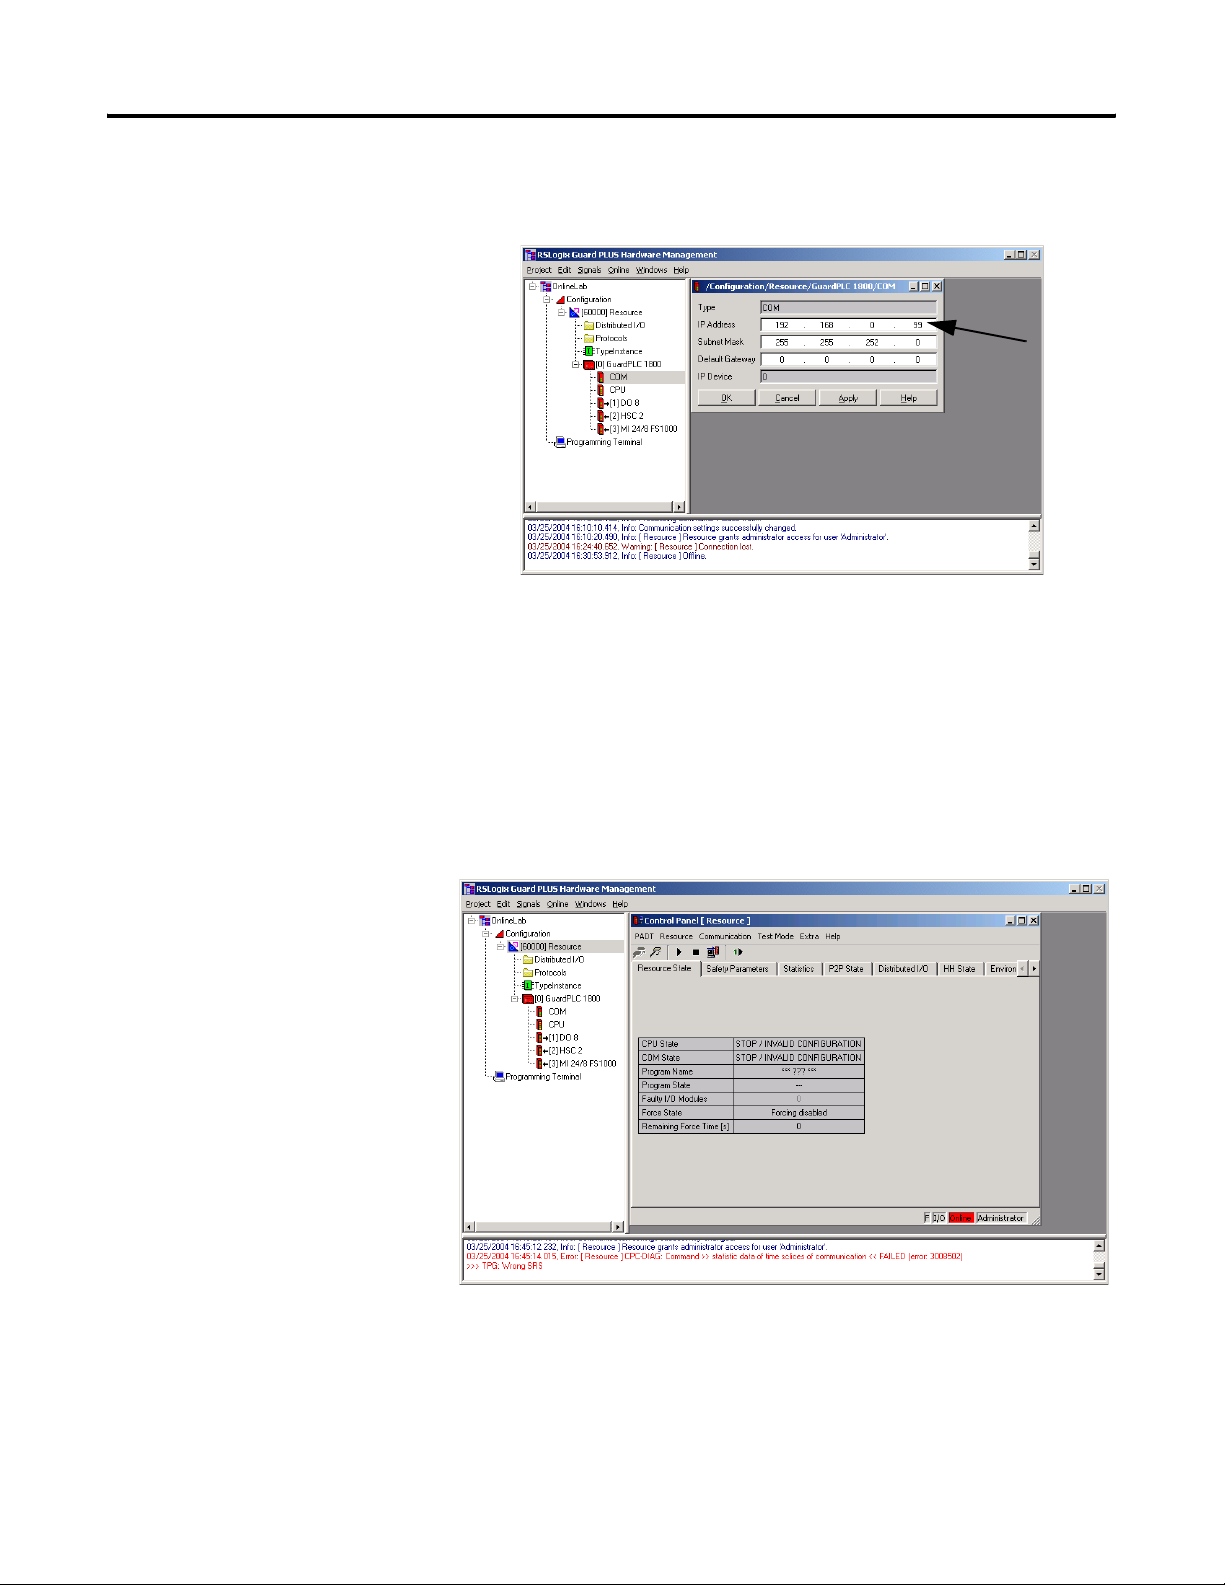
Connect to the GuardPLC Controller 1-17
3. Edit the IP address to match the GuardPLC controller and click
OK.
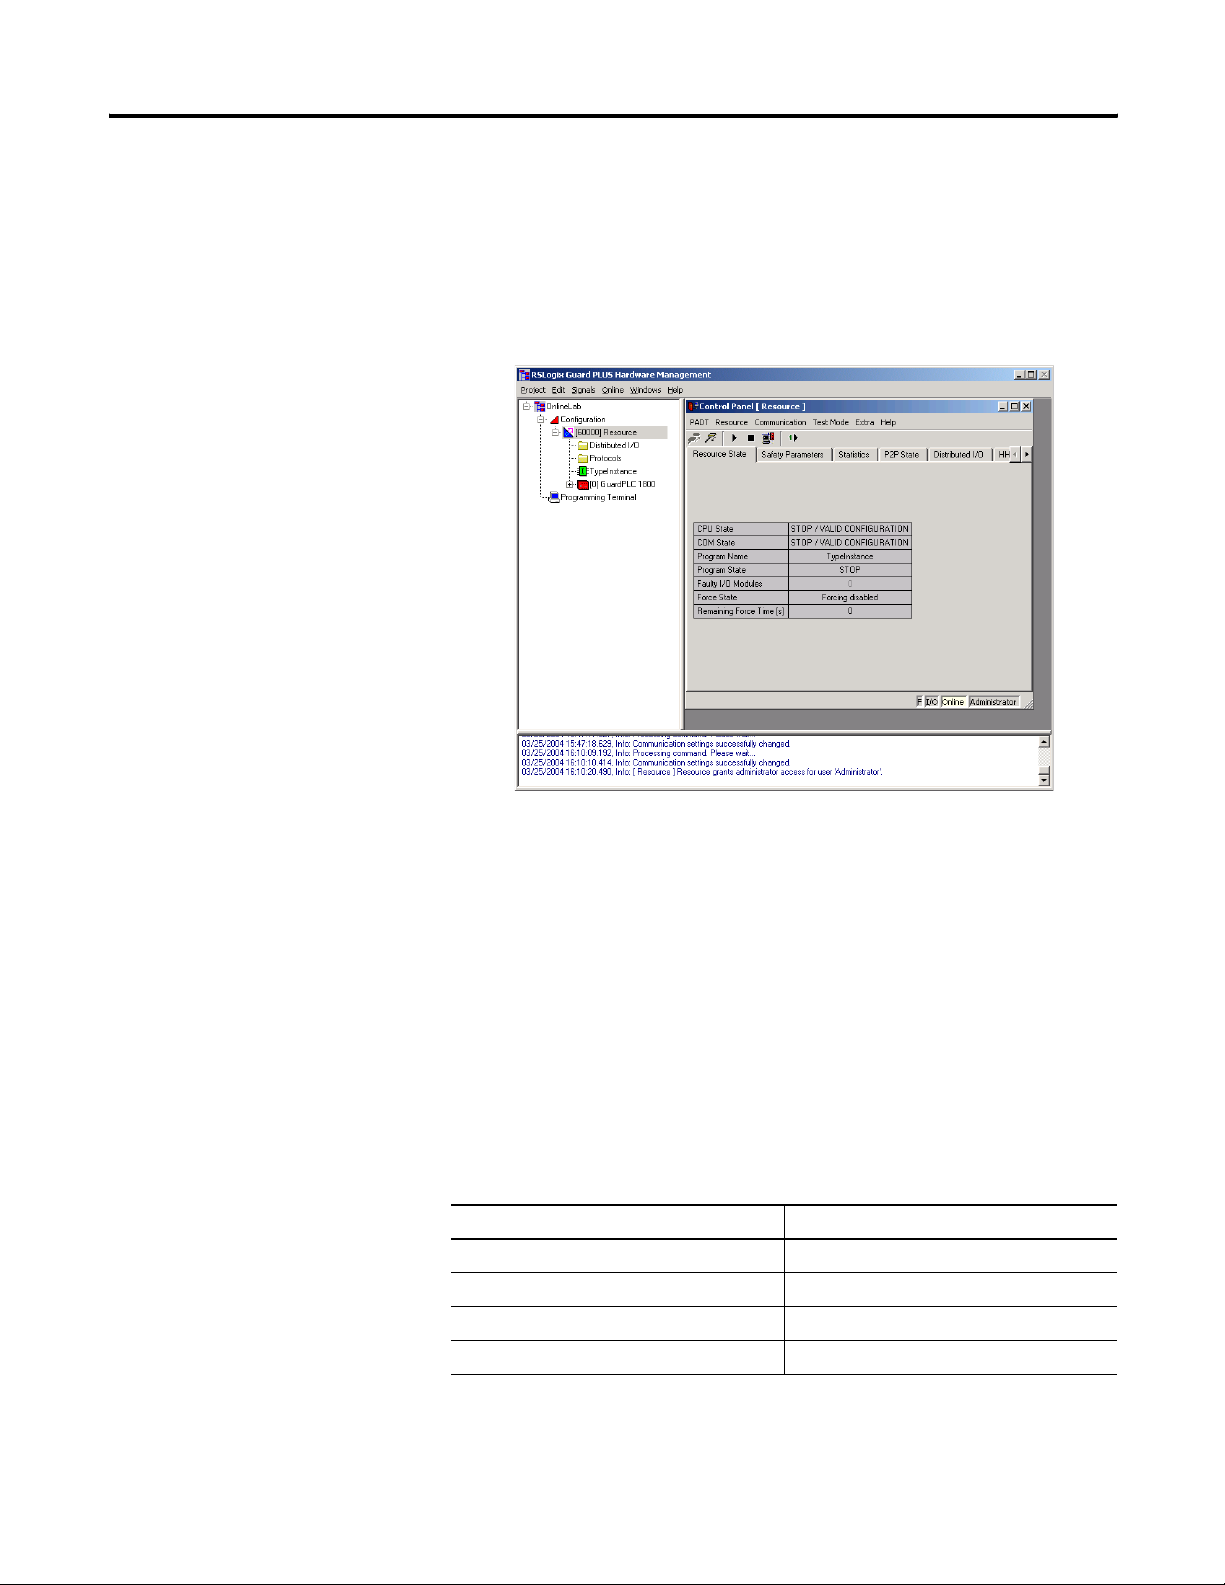
Step 12: Recover from a Controller Fault After Using the Reset
Button
After using the Reset button, the Control Panel appears as follows if
the SRS was not originally 60000 prior to the Reset. The Fault LED on
the front of the GuardPLC controller is illuminated, and the CPU State
of the Resource is STOP/INVALID CONFIGURATION.
Publication 1753-PM001A-EN-P - November 2005
Page 28
1-18 Connect to the GuardPLC Controller
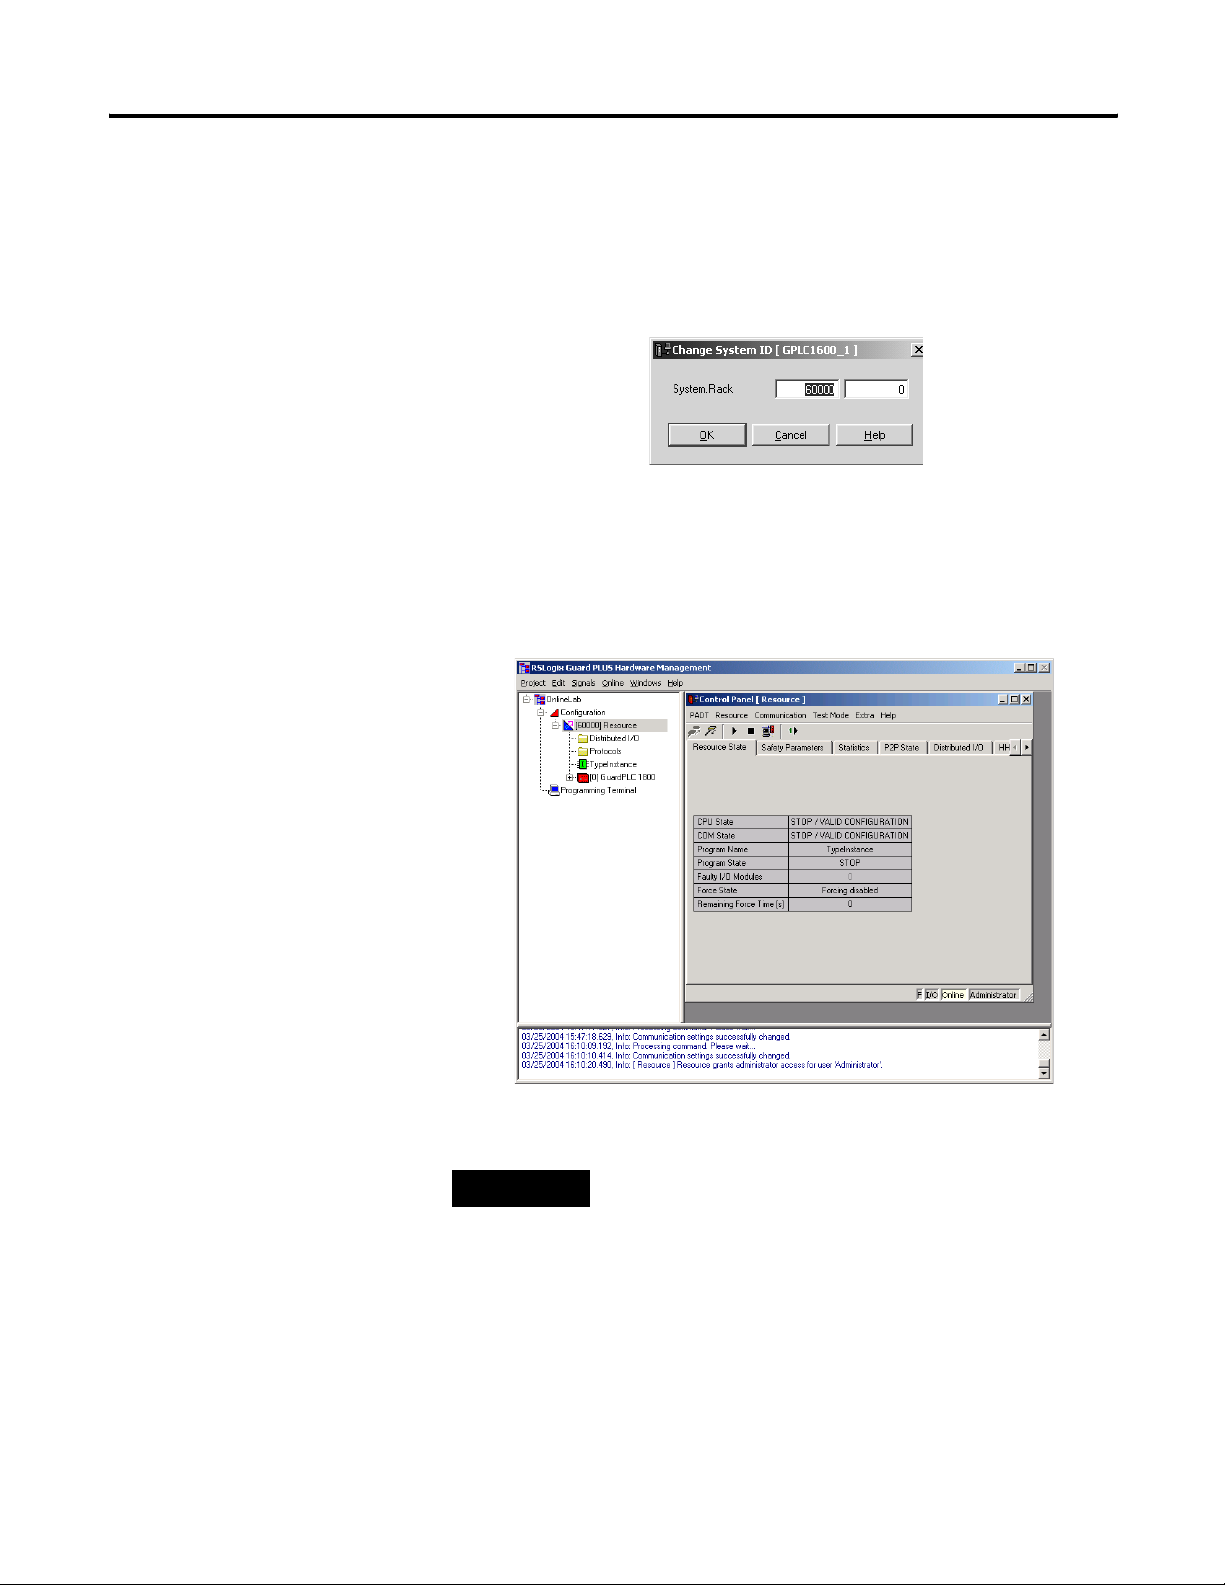
To recover from this fault:
1. Choose Extra>Change System ID from the Control Panel.
2. Verify that 60000 appears in the first window with 0 in the
second, as shown below.
3. Click OK.
The Fault LED should turn off, and the Control Panel should show
that the CPU State has changed to STOP/VALID CONFIGURATION, as
shown below.
Publication 1753-PM001A-EN-P - November 2005
TIP
The Online indicator is white because the GuardPLC
controller is in STOP/VALID mode.
Page 29
Connect to the GuardPLC Controller 1-19
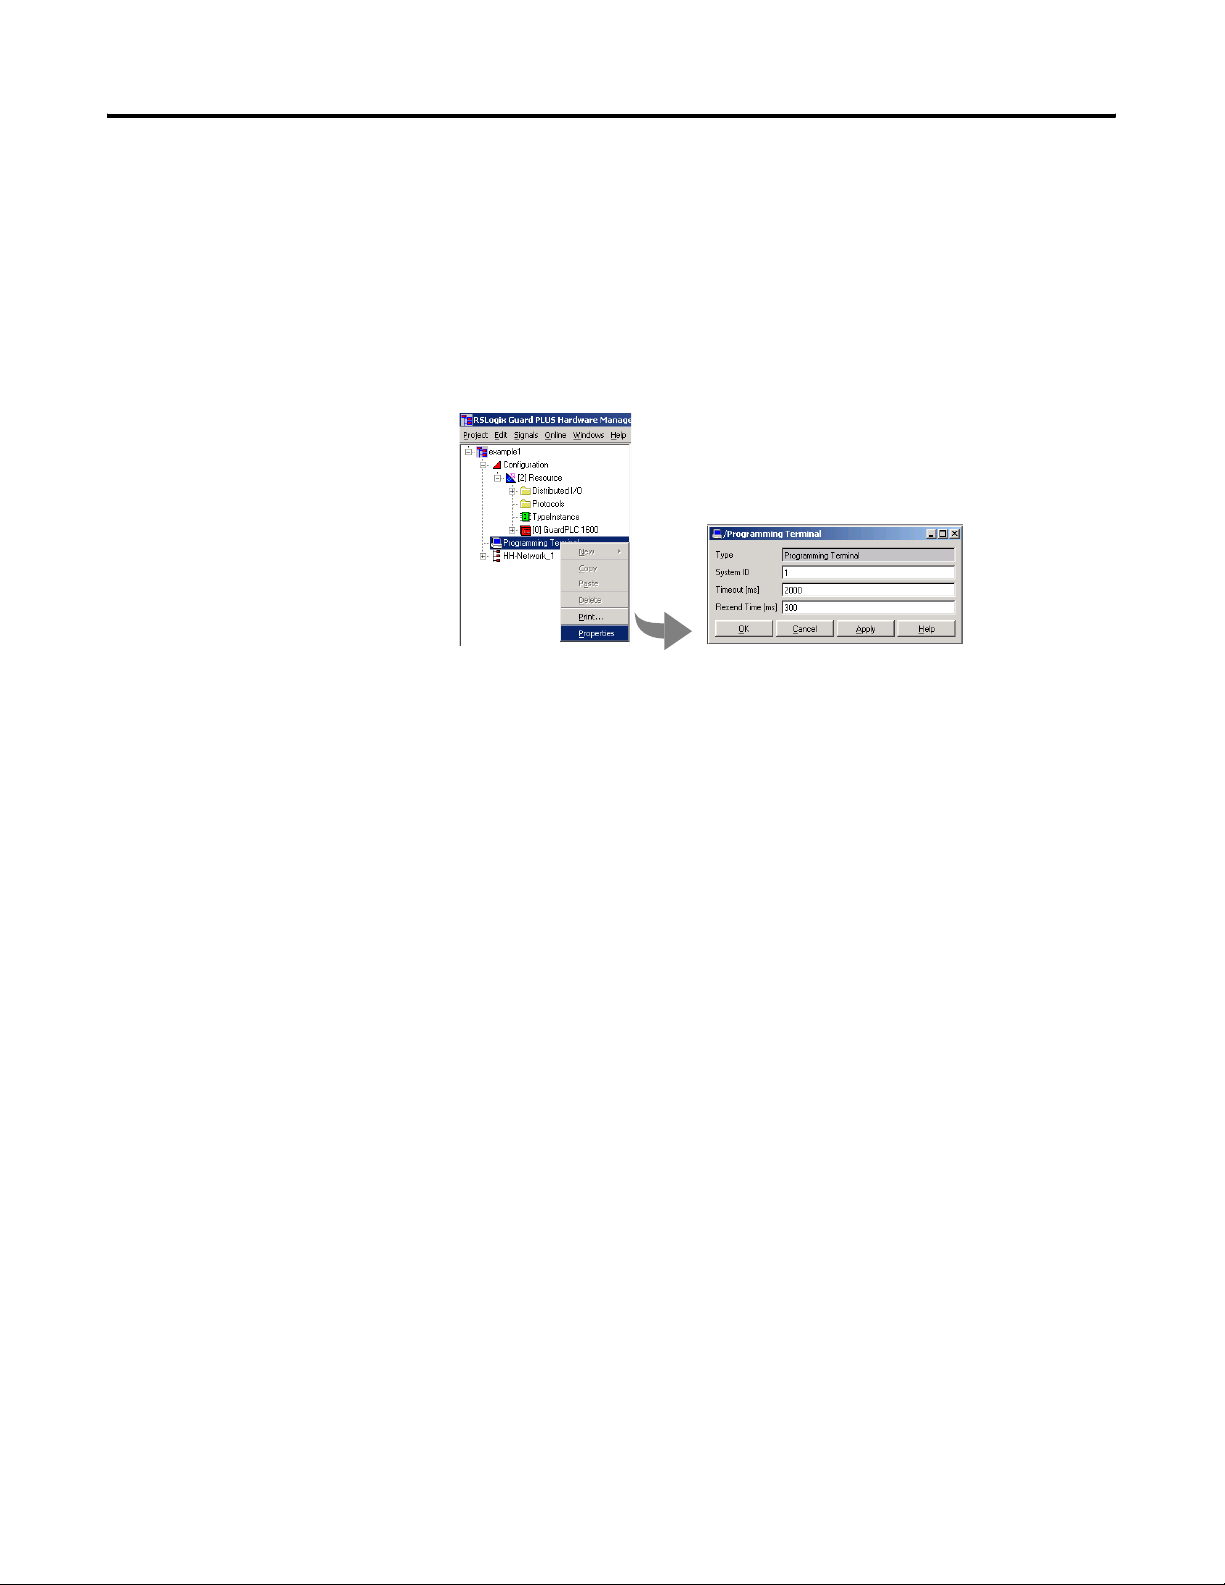
Configure the Programming Terminal
Specify the Host SRS
From the Hardware Management window, you can specify the host
SRS of the programming terminal.
1. Right-click Programming Terminal and choose Properties.
2. Enter the host SRS (1 to 65535) for the programming terminal.
Make sure the host SRS of the programming terminal is not identical to
the system ID (SRS) of any other controllers or programming
terminals.
In a network, as many as five programming terminals can connect to
the same controller at the same time. However, only one
programming terminal can have read/write access.
If another controller logs in with read access, that additional user can
query controller states and parameters (RUN, STOP, controller
switches, etc.) with the Control Panel. The additional user can also
display data values if the programming terminal has the same
configuration as the controller.
If there are multiple programming terminals in one network, each
programming terminal must have a unique host SRS.
Publication 1753-PM001A-EN-P - November 2005
Page 30

1-20 Connect to the GuardPLC Controller
Login Dialog
The Login dialog defines the communication parameters between the
controller and the programming terminal.
Field Description
IP address The IP address of the controller on the Ethernet network.
The factory-set IP address is 192.168.0.99.
SRS SRS stands for System, Rack, Slot. The rack and slot IDs are already preset by the controller, so you only
need to enter the system ID. You can enter any number from 1 to 65,535. However, the number must be
unique from the programming terminal and from any other GuardPLC controllers on the same
Peer-to-Peer Ethernet.
The default (factory-set) SRS is 60000.
Username
(default = Administrator)
Password
(default = <blank>)
Access Type Your access level.
Your username.
The Administrator assigns a username. The username is sensitive to upper and lower case characters. A
username can only contain letters, numbers, and underscore characters.
You can define as many as 10 usernames per GuardPLC controller.
Your password.
An Administrator assigns a password. The password is case sensitive. A password can only contain
letters, numbers, and underscore characters.
Login as one of these options:
Administrator highest privileges
manage usernames and passwords
read data from controller
write routines and data into controller
force tags
stop, start, freeze, and force a routine
download an operating system
change IP address and system ID
reboot the controller
can also login under read/write and read levels
Read/Write read data from controller
write routines and data into controller
force tags
start, stop, freeze, and force a routine
can also login under read level
Read lowest privileges
only read data from controller
As many as five users can login to the same controller at the same time; however, only one of those
users can login as Administrator or Read/Write. The others must login with Read access. If you login
while someone else is logged in with Administrator or Read/Write access, you automatically get Read
access, regardless of the access type you select.
For new controllers, and if the backup battery was removed from a GuardPLC 1200 or 2000 controller,
access is available using the following system defaults:
Username: Administrator
Password <blank>
Access Type Administrator
Publication 1753-PM001A-EN-P - November 2005
Page 31

Connect to the GuardPLC Controller 1-21
Determine the IP Address and SRS of the Controller
The default IP address of a new controller is 192.168.0.99. The default
SRS of a new controller is 60000. To check the current IP address and
SRS of a controller:
1. Choose Online>Communication Settings.
2. In the MAC address field, enter the MAC address of the
controller.
The MAC address is on the sticker on the side of a GuardPLC
1200 controller, on the label positioned over both lower RJ-45
connections on GuardPLC 1600/1800 controllers and I/O, or on
the front bezel of the AB-CPU module of a GuardPLC 2000
controller.
3. Click Get.
The controller responds back with the IP address and the SRS it
is currently using.
Publication 1753-PM001A-EN-P - November 2005
Page 32

1-22 Connect to the GuardPLC Controller
Change the SRS of the
TIP
There are two ways to change the SRS of the controller:
If communication fails:
• check to make sure you entered the address
correctly.
• check that your PC is configured properly.
• anti-virus or firewall programs have blocked
communications.
• the cable is not connected or is not the correct
cable.
– A GuardPLC 1600 or 1800 controller can use
direct or cross-over cable.
– A GuardPLC 1200 or 2000 controller can use a
cross-over cable connected directly from a PC
to the controller or direct cables connected to
a switch or hub.
• your hardware (either the controller or the PC) is
not working.
Controller
From the Control Panel:
1. Choose Change System ID (SRS) from the Extra menu.
2. Enter the SRS.
3. Click OK.
Or follow Step 4: Get Communication Settings on page 1-9 and
Step 5: Change Settings via MAC Address on page 1-10.
Publication 1753-PM001A-EN-P - November 2005
Page 33

Connect to the GuardPLC Controller 1-23
Change the IP Address of the Controller
TIP
After you establish communications with the controller, you can
change the IP address of the controller to match your Ethernet
network. There are two ways to change the IP address of the
controller:
From the Control Panel:
1. Choose Device Settings from the Extra menu.
2. Enter the new IP address.
3. Click OK.
Typically, you change the SRS of the GuardPLC
controller to match that of the controller/routine that
you wish to download to it. Recall that the SRS is
compiled into the executable and ensures that this
.EXE can only be downloaded to a GuardPLC
controller with a matching SRS.
Or follow Step 4: Get Communication Settings on page 1-9 and
Step 5: Change Settings via MAC Address on page 1-10.
TIP
To re-establish communications with the new IP
address and subnet of your GuardPLC controller, you
may need to change the IP and subnet address of
your programming terminal. Use the Network
section of the Windows Control Panel to change the
programming terminal’s IP address and subnet mask.
Publication 1753-PM001A-EN-P - November 2005
Page 34

1-24 Connect to the GuardPLC Controller
Publication 1753-PM001A-EN-P - November 2005
Page 35

In This Chapter
Chapter
2
Connect to GuardPLC Distributed I/O Modules
For this information See page
Understand Module Addressing 2-1
Add the Module to the Hardware Configuration 2-2
Configure the Module 2-3
Go Online With the Module 2-5
This chapter guides you through the process of addressing,
configuring, and connecting to the distributed I/O modules. GuardPLC
distributed I/O modules are ‘owned’ by a GuardPLC controller. This
allows the parent controller to connect signals to the inputs and
outputs of the distributed I/O modules the same way that signals are
connected to the controller’s local I/O.
Understand Module Addressing
Module Default Settings
The out-of-box settings for a GuardPLC distributed I/O module are
shown in the table below.
Parameter Setting
IP Address 192.168.0.99
Subnet Mask 255.255.252.0
(1)
SRS
(1) The SRS code is compiled with the program.
60000.1
SRS (System.Rack.Slot)
The SRS of the parent controller is always xxxxx.0. For example, the
default SRS of a GuardPLC controller is 60000.0. If you change the SRS
to 25, the actual SRS of the controller is 25.0.
1 Publication 1753-PM001A-EN-P - November 2005
Page 36

2-2 Connect to GuardPLC Distributed I/O Modules
Distributed I/O modules inherit the first portion of the SRS from the
parent controller. You configure the second part of the SRS. For
example, the default SRS of distributed I/O modules is 60000.1. If the
module is owned by a controller with an address of 25, then the SRS
of the distributed I/O should be 25.1. If a second module is added to
the controller, its SRS is then 25.2. A third module would be SRS 25.3.
IP Address
Like any Ethernet device, the distributed I/O module requires a
unique IP address.
Add the Module to the Hardware Configuration
To add a distributed I/O module to your GuardPLC project’s hardware
configuration:
1. In the Hardware Management window of RSLogix Guard PLUS!,
right-click the Distributed I/O folder under your controller
Resource.
2. Choose New and the desired I/O module.
Publication 1753-PM001A-EN-P - November 2005
The Specify HH Network dialog appears. Because the controller
and the distributed I/O modules communicate via GuardPLC
Ethernet, you must specify a GuardPLC Ethernet network.
Page 37

Connect to GuardPLC Distributed I/O Modules 2-3
3. Click New….
The Create HH Network dialog appears.
4. Click OK.
The Specify HH Network window reappears showing the
selected network.
Configure the Module
5. Click OK to confirm your selection.
The distributed I/O module now appears in the project tree.
To configure the module, you need to:
• set I/O properties
• configure the offline IP address
Publication 1753-PM001A-EN-P - November 2005
Page 38

2-4 Connect to GuardPLC Distributed I/O Modules
Set I/O Properties
1. In the RSLogix Guard PLUS! Hardware Management window,
right-click the module in the project tree and select Properties.
2. You must change the Rack ID [SRS] to configure the second
portion of the SRS. Change the Rack ID [SRS] value to 1.
3. Click OK.
The offline SRS is now 60000.1. The 60000 comes from the
parent controller, as shown by the arrow in the illustration
above.
Configure the Offline IP Address
1. Expand the module in the project tree.
2. Right-click COM and choose Properties.
Publication 1753-PM001A-EN-P - November 2005
3. Change the IP address to match the module.
4. Click OK.
Page 39

Connect to GuardPLC Distributed I/O Modules 2-5
The offline configuration of the module is complete. The next section
explains how to go online with the module and change the IP address
and SRS to match the offline settings.
Go Online With the Module
Make a point-to-point connection between your programming
terminal and the distributed I/O module. Over this connection,
change the IP address and SRS of the module, following these steps:
1. Right-click the module in the project tree and choose Online >
Communication Settings.
2. Enter the MAC address, which is located on the label positioned
over the RJ-45 connectors.
3. Click Get.
The IP address and SRS of the module appear. If the module is
new, it has the default IP address of 192.168.0.99, the same as
any GuardPLC controller. However, the default SRS is 60000.1.
Publication 1753-PM001A-EN-P - November 2005
Page 40

2-6 Connect to GuardPLC Distributed I/O Modules
4. To change the IP address and SRS settings, enter the new data
into the Communication Settings fields.
5. Click the Set via MAC button.
6. Enter Administrator in the User Name field and click OK.
The new IP address and SRS settings are shown in the Address
PES using … fields.
7. Close the Communication Settings dialog by clicking the Cancel
button.
Publication 1753-PM001A-EN-P - November 2005
Page 41

Create a GuardPLC Project
Chapter
3
In This Chapter
Start a New Project
This chapter guides you through the following basic steps required to
create a project:
• Start a new project.
• Configure the project and hardware.
• Create signals.
• Connect signals to the I/O points.
• Create a Function Block program using the signals.
• Save, compile, test, and download the program to the GuardPLC
controller.
• Monitor the project online.
To start a new GuardPLC project:
1. Start RSLogix Guard PLUS! software.
2. Create a new project using the New icon or by choosing
Project>New.
3. Enter ‘FirstProject’ in the Object Name field as shown below and
click OK.
The Hardware Management window opens. This window is
used to configure the project, controller, I/O, and signals.
1 Publication 1753-PM001A-EN-P - November 2005
Page 42

3-2 Create a GuardPLC Project
4. Return to the Project Management window and expand the
project tree until it matches the example below.
When the project is expanded, you can see that it contains a
Configuration and under the Configuration there is a Resource, which
is the actual GuardPLC controller. Under the Resource is the program
TypeInstance that will run on the GuardPLC controller.
Configure the Project and Hardware
TIP
You can add an additional controller to the project
by right-clicking Configuration and choosing
New > Resource.
Configure the Controller Resource
1. In the Hardware Management window, expand the project tree
so that the Configuration, Resource, and TypeInstance are
visible, as shown below:
Publication 1753-PM001A-EN-P - November 2005
2. Right click [0] Resource and choose Properties.
Page 43

Create a GuardPLC Project 3-3
3. Edit the properties as shown below.
The Resource Type needs to match the type of GuardPLC
controller to which you want to connect. The SRS is a code that
is compiled with the function block routine. The routine can be
downloaded only to a GuardPLC controller with a matching SRS
code stored in its non-volatile memory. For more information on
configuring the controller, refer to the controller configuration
chapter of the GuardPLC Controller Systems User Manual,
publication number 1753-UM001.
TIP
The default SRS of a new controller is 60000.
You must use this SRS to initially establish
communications with the controller. Once you
have established communications, you can
change the SRS.
4. Click Apply to move these values into the project.
5. Check the four (4) unchecked boxes and click OK.
TIP
You can rename the controller using the
Program Management window. Expand the
project tree and the Configuration.
Right-click on Resource and choose
Rename.
Publication 1753-PM001A-EN-P - November 2005
Page 44

3-4 Create a GuardPLC Project
6. Expand the Resource so that the Hardware Management project
tree appears as shown below.
7. Right click COM under the GuardPLC 1800 controller, and
choose Properties.
Create Signals
Publication 1753-PM001A-EN-P - November 2005
8. Enter the IP address of your GuardPLC controller. Neither the
Subnet Mask nor the Default Gateway should require changes.
TIP
T
The GuardPLC controller’s default IP address is
192.168.0.99.
9. Click OK.
Because the example in this chapter uses the GuardPLC 1800
controller, there are predefined I/O listed under the controller in the
project tree. The 1200/1600/1800 are fixed controllers with
pre-configured I/O. If you use a GuardPLC 2000 controller, the I/O
must be configured, since it is a modular controller.
Page 45

Create a GuardPLC Project 3-5
Understand the Signal Editor
The Signal Editor lets you define the signals for your application.
The Name column contains a unique name for the signal. The Name is
required and must be less than 32 characters in length.
The Type column indicates the desired data type for the signal. The
default is Boolean.
Signals are typically stored in RAM memory. However, a checkmark in
the Retain column specifies that the signal be stored in Flash memory,
thus retaining its value following a restart caused by a power cycle or
a STOP to RUN mode transition.
IMPORTANT
Even if a signal is marked as Retain, specific program
code is required to prevent it from being overwritten.
In addition, the Retain feature requires a warmstart,
either by choosing Warmstart from the Resource menu
of the Control Panel or by right-clicking on the Type
Instance of the Resource in the project tree and
choosing Properties. Then, choose Warmstart from the
Autostart Enable pull-down menu.
The Constant column specifies that the value of the signal cannot be
changed in program code. It will always equal the value entered in
the Init Value column.
The Init Value column specifies the initial value of the signal. This
value can be changed by program code if Constant is not checked.
Publication 1753-PM001A-EN-P - November 2005
Page 46

3-6 Create a GuardPLC Project
Create Signals in the Signal Editor
1. To open the Signal Editor, choose Signals > Editor from the
Hardware Management menu bar.
2. Create 3 new signals, START, STOP, and MOTOR:
a. Left-click on New Signal in the Signal Editor. Type START in
the Name field and press the Enter key.
b. Left-click on New Signal again. Type STOP in the Name field
and press the Enter key.
c. Left Click on New Signal again. Type MOTOR in the Name
field and press the Enter key.
Connect Signals to I/O Terminals
Publication 1753-PM001A-EN-P - November 2005
Connect signals to I/O by dragging the signals from the Signal Editor
to the Input or Output tabs of the Connect Signals dialog.
Page 47

Create a GuardPLC Project 3-7
Connect Digital Input Signals
1. Right-click on the controller’s inputs (DI 20 for 1600 or MI 24/8
FS1000 for 1800) or on a Distributed I/O module and choose
Connect Signals.
TIP
Set up your screen so that you can easily drag
signals from the Signal Editor window to the
Signal Connections window. Both the Name
fields in the Signal Editor and the Signal fields
in the Signal Connections window must be
visible, as shown above.
2. Verify that the Inputs tab is selected on the Signal Connections
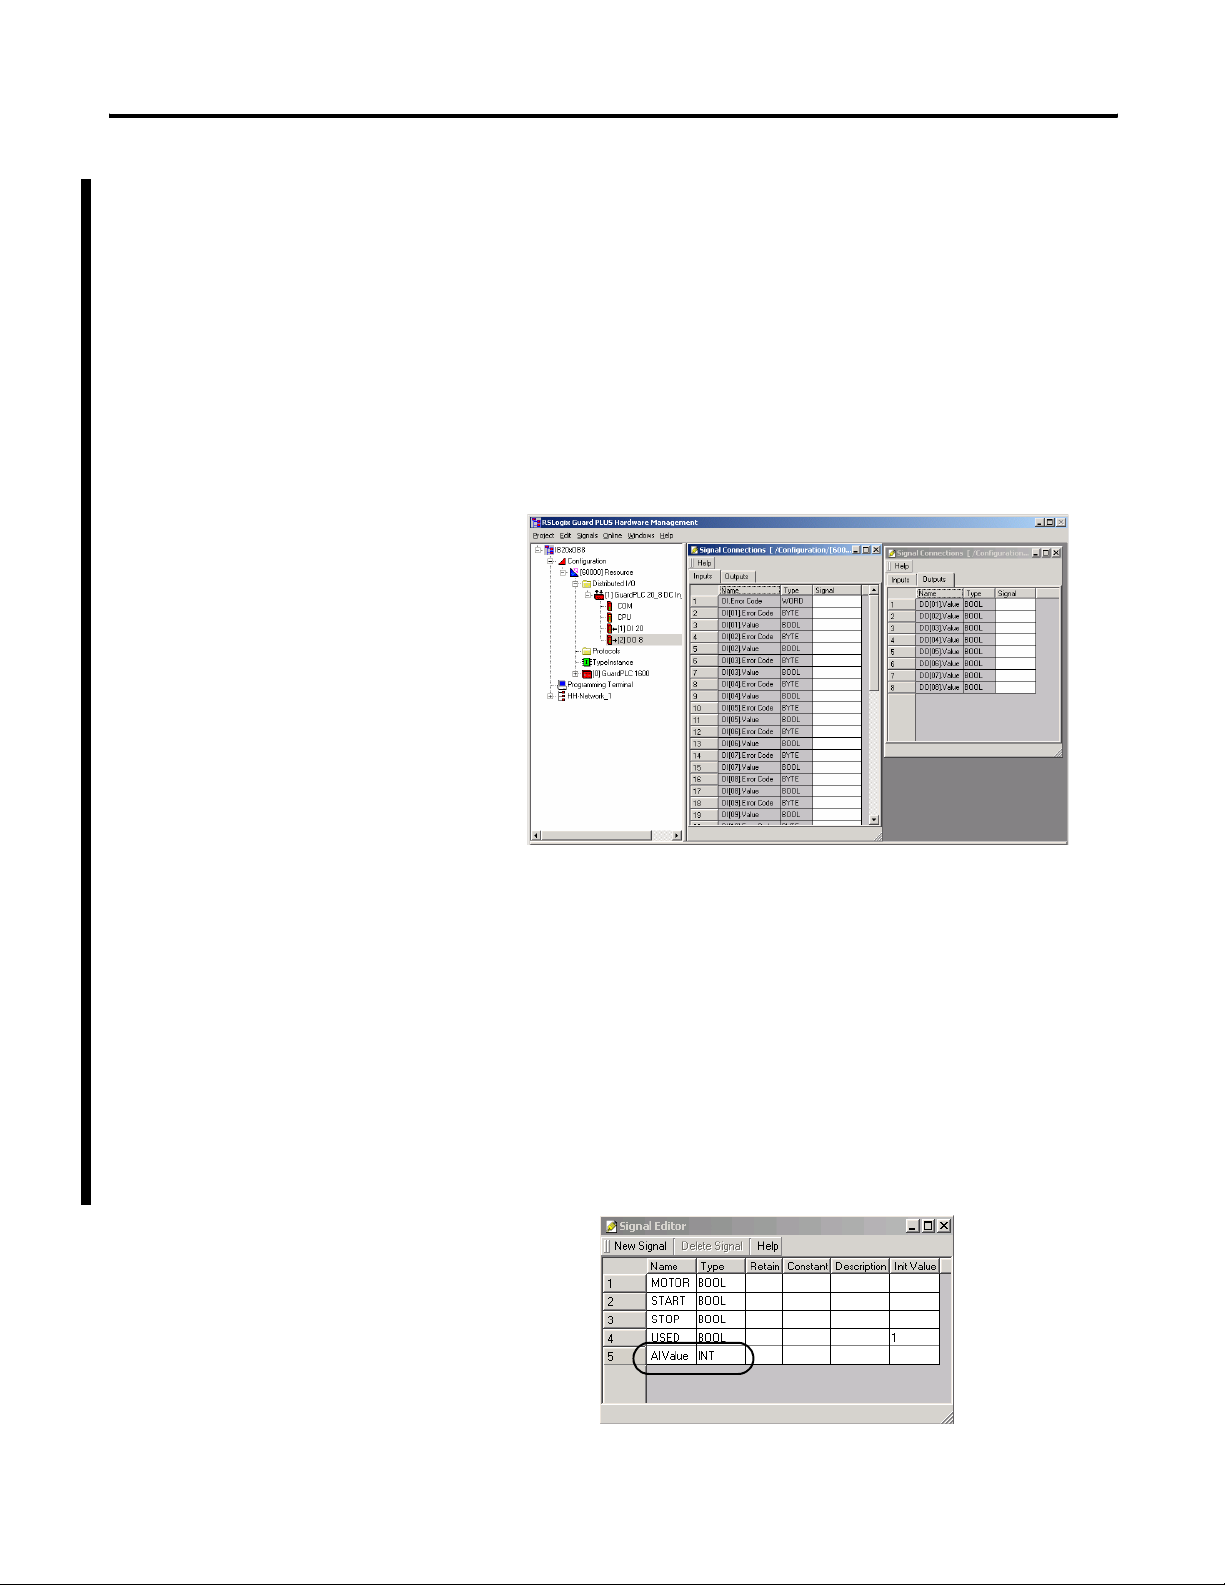
dialog.
Two signals exist for each input: Value and Error Code. The
GuardPLC 1800 controller adds another signal called Value
Analog.
Error Code is a status signal that can be used for point-level
diagnostics. The Value contains the actual field state of the input:
ON (1) or OFF (0).
Publication 1753-PM001A-EN-P - November 2005
Page 48

3-8 Create a GuardPLC Project
3. Connect the START and STOP signals to inputs by dragging
START and STOP from the Name field in the Signal Editor to the
Signal field in the Signal Connections window.
a. Make sure the cursor is not active in any field in either the
Signal Editor or the Signal Connections dialog.
b. Left-click and hold on the Name field. Drag the signal to the
Signal field in the Signal Connections dialog.
c. Release when over the proper field.
TIP
Signals can only be dragged and dropped onto
Signal fields of the same data type. Dropping a
BOOL signal onto a BYTE field is not
permitted.
When both signals have been connected, the screens should
appear as follows:
Publication 1753-PM001A-EN-P - November 2005
4. If your controller is a GuardPLC 1800, an additional step is
required. The digital inputs on a GuardPLC 1800 controller are
actually analog circuits with a resolution of one (1) bit. Any
voltage greater than 13V dc will be a 1. Any voltage less than
7V dc will be a 0. Since GuardPLC analog circuits require the
user to specify which channels are being used, this is also
required for the 24 digital inputs on the GuardPLC 1800
controller.
a. Add a new signal, called USED, to the Signal Editor.
b. Give this signal an initial value of 1. You will never change
this value in your program, so USED will always be 1.
c. Choose the Outputs tab of MI 24/8 FS1000.
Page 49

Create a GuardPLC Project 3-9
d. Connect USED to the DI channels being used: DI[17].Used,
and DI[18].Used
5. Close the DI Signal Connections window.
Connect Output Signals
1. Right-click the controller’s outputs (DO8) or a Distributed I/O
module and choose Connect Signals.
2. The Signal Connections window defaults to the Inputs tab.
Choose the Outputs tab to view the output fields.
3. Connect the MOTOR signal to the first output, as shown below.
Publication 1753-PM001A-EN-P - November 2005
Page 50
3-10 Create a GuardPLC Project
Connect Distributed I/O Signals
For distributed I/O modules, you connect signals to the distributed
I/O module’s inputs and outputs just as if they were I/O points on a
controller.
1. Expand the distributed I/O module in the Hardware
Management project tree and right-click on DI for inputs or DO
for outputs.
2. Choose the proper tab, Inputs or Outputs, on the Signal
Connections dialog.
3. Drag and drop signals from the Signal Editor onto the Input or
Output tabs to map the signals to the appropriate terminals on
the distributed I/O module.
Connect Analog Input Signals (GuardPLC 1800 Controllers)
1. Right-click the GuardPLC 1800 controller’s inputs (MI 24/8
FS1000) and choose Connect Signals.
2. In the Signal Editor, create signals for the analog values.
Publication 1753-PM001A-EN-P - November 2005
Page 51

Create a GuardPLC Project 3-11
3. Connect these signals to the analog inputs on the Inputs tab of
the Signal Connections dialog.
4. Choose the Outputs tab of the Signal Connections dialog.
5. Connect the USED signal from the Signal Editor to the analog
input channels you are using for your application.
Connect High-speed Counter Signals (GuardPLC 1800 Controllers)
To connect signals to the high-speed counters on the GuardPLC 1800
controller, you must first create signals to configure the high-speed
counters. You will also need to create signals for the counter values.
Then, connect these signals to the counter inputs and outputs.
Create Configuration and Counter Value Signals
1. In the Signal Editor, create true and false signals with constant
values. True signals have a value of 1; false signals have a value
of 0.
Publication 1753-PM001A-EN-P - November 2005
Page 52

3-12 Create a GuardPLC Project
2. Create a Count signal for counter value.
Connect Configuration Signals and Counter Value Signals
1. Right-click the GuardPLC 1800 controller’s high speed counters
(HSC2) and choose Connect Signals to open the Signal
Connections dialog.
2. Choose the Outputs tab.
3. Connect the True and False signals to the counter outputs to
configure the desired counter behavior.
Publication 1753-PM001A-EN-P - November 2005
Page 53

Count Up regardless of Direction
Count Up based on Direction
Create a GuardPLC Project 3-13
Counter[xx] Output Variable Description
5/24V Mode True (1) = 24V
False (0) = 5V
Auto Advance Sense True (1) = Count Up or Down Based on Direction
False (0) = Count Up Regardless of Direction
Direction If Auto Advance Sense is False (0), then count in the
indicated Direction:
• True (1) = Down
• False (0) = Up
Gray Code True (1) = Use Gray Code Mode
False (0) = Use Pulse Mode
Reset True (1) = No Counter Reset
False (0) = Reset Counter
4. Select the Input tab on the Connect Signals dialog.
5. Connect the Count signal you created to the Counter Value
input.
Create a Function Block Program
These signals can now be used in your application program logic.
The following example creates code to start and stop a motor using
the two input signals we created earlier.
TIP
For more information on Function Block
programming, consult the online Help and
Chapter 8, Create User-Defined Function Blocks.
Publication 1753-PM001A-EN-P - November 2005
Page 54

3-14 Create a GuardPLC Project
1. Close the Signal Connections window. Leave the Signal Editor
active, and restore the Project Management window.
2. If necessary, expand the project tree in Project Management
until [I] TypeInstance is visible and double left-click
[I] TypeInstance to open the Function Block Editor program
page.
3. Drag signals from the Signal Editor (in Hardware Management)
to any location on the FB Editor program page.
TIP
To make the Signal Editor and the FB Editor fit
comfortably on your screen, restore both the
Project Management and Hardware
Management windows. Then, choose Tile
Windows Vertically from the Windows task bar
located on the bottom of your screen.
Publication 1753-PM001A-EN-P - November 2005
Whenever a page is edited for the first time, a window appears
asking for a page name. You do not need to name the page.
Click OK to close this dialog box.
Page 55

Create a GuardPLC Project 3-15
4. Minimize the Hardware Management window.
TIP
You can delete the white areas under the
signals, which are used for descriptions, by
clicking the white area and hitting the Delete
key.
5. In the Project Management project tree, expand StandardLibs,
IEC61131-3, and Bistr as shown below.
6. Drag an AND and an OR block onto the routine (Left-click, hold,
drag and release).
Publication 1753-PM001A-EN-P - November 2005
Page 56

3-16 Create a GuardPLC Project
7. Connect the blocks with lines by left-clicking and holding the
very small dots on the edges of the boxes. Drag and release over
the destination dot.
TIP
8. Create a duplicate MOTOR signal by right-clicking MOTOR and
choosing Duplicate. Drag and drop the signal on the page.
9. Invert the STOP signal by right-clicking on the dot and choosing
Invert.
Use the Zoom In tool on the toolbar to
zoom in to see the dots on the edge of the
boxes.
Save, Compile, Test, and Download the Program
Publication 1753-PM001A-EN-P - November 2005
TIP
In addition to standard function blocks, you can
create user-defined function blocks that consist of
standard function block logic, as described in
Chapter 8. You can also purchase
application-specific safety function blocks that have
been certified by TÜV. Go to www.ab.com/guardplc
or contact your local Rockwell Automation
representative for more information.
Save the Program
1. Left-click the Save button to save your program edits.
A window appears, which you can use to document your
changes.
Page 57

2. Click OK
Create a GuardPLC Project 3-17
TIP
The FB editor menu bar displays the number of
edits since the last save. Following a save, it
displays ‘(unchanged)’.
Compile the Code
1. Close the Type Instance Program.
2. Right-click Resource and choose Code Generation.
3. The results of the code generation are shown on the Error State
Viewer.
If the Error State Viewer is not visible, click the red triangle
to make it visible.
If the compile was successful, ‘Error Free code generated’ appears in
the Error-State Viewer.
TIP
If you are using a GuardPLC 1800 controller, you will
see a warning in the Error State Viewer. Go to the
Hardware Management window to view the
warning, which reads ‘USED’ has an initial value, but
no source.’ Disregard this warning, because the
‘USED’ signal has an initial value of 1, but no source
drives its value.
Publication 1753-PM001A-EN-P - November 2005
Page 58

3-18 Create a GuardPLC Project
Run an Off-Line Simulation
To test the code before downloading it to the GuardPLC controller,
run an off-line simulation:
1. Right-click Resource and choose OFF-Line-Simulation.
The OLS tab appears.
2. Double left-click [I] TypeInstance.
The following appears.
Publication 1753-PM001A-EN-P - November 2005
Page 59

Create a GuardPLC Project 3-19
3. Choose points to toggle/view during the simulation. To activate
a point, left-click on a point, drag, release, and left-click again.
4. Start the simulation by left-clicking the blue flag button.
5. Double left-click the yellow field to toggle TRUE/FALSE. Blue
lines represent OFF. Red lines represent ON.
6. When finished testing, stop the simulation by choosing the Stop
icon.
7. Close the Off-line simulation using the Close OLS icon.
TIP
If you do not save your changes, you will
have to re-select the points to simulate.
8. Click the PROJ tab to return to the project tree.
Publication 1753-PM001A-EN-P - November 2005
Page 60

3-20 Create a GuardPLC Project
Download the Program
1. Connect the GuardPLC controller to your PC’s Ethernet port
using a Cat. 5 Ethernet cable.
2. In the Hardware Management window, close the Signal Editor.
3. Right-click [60000] Resource.
4. Choose Online>Control Panel.
5. Enter the default Username (Administrator) with no password
and click OK.
The Control Panel opens.
TIP
You can use the [Ctrl]+[A] shortcut to enter the
default Username and Password.
If you are unable to go online, see Chapter 2 for information on
determining the IP address and SRS of the GuardPLC controller
and for information on the appropriate setting for your PC’s IP
address.
Publication 1753-PM001A-EN-P - November 2005
6. If the GuardPLC controller is in RUN mode, change to STOP
mode. Left-click the Stop icon on the Control Panel.
7. Answer Yes to the warning prompt.
Page 61

Create a GuardPLC Project 3-21
8. Left-click on the Download icon.
9. Answer Yes to the warning prompt.
10. Make sure the download was successful by checking the Status
Field for a ‘Resource Configuration successfully loaded’
message.
11. Put the GuardPLC controller into RUN mode by clicking the
Coldstart button and answering Yes to the warning prompt.
Publication 1753-PM001A-EN-P - November 2005
Page 62

3-22 Create a GuardPLC Project
How to Monitor the Routine Online
To monitor the routine online, you must be online with the controller,
and the controller must be in RUN mode.
1. In the Project Management window, right-click Resource and
choose ON-Line Test.
The Project Manager appears as shown below.
2. Double left-click [I] TypeInstance.
If the lines appear RED (TRUE) and BLUE (FALSE), then the
monitor is active. Test the routine and monitor the function
code.
Publication 1753-PM001A-EN-P - November 2005
Page 63

Create a GuardPLC Project 3-23
3. Close the On-Line Test when finished testing.
4. Click the PROJ tab to return to the project tree.
If the lines are RED/BLACK striped, then the Control Panel is
NOT online with the GuardPLC controller or the controller is not
in RUN mode.
See Chapter 2 for information on going online with the
GuardPLC controller.
TIP
For more information on downloading, see
Chapter 4.
Publication 1753-PM001A-EN-P - November 2005
Page 64

3-24 Create a GuardPLC Project
Publication 1753-PM001A-EN-P - November 2005
Page 65

Using This Chapter
Chapter
Check, Download, Start, and Test a Routine
For information about See page
checking consistency (whether you need to download your routine) 4-1
downloading a routine 4-2
starting a routine 4-4
testing a routine 4-5
how a routine executes 4-6
To download and run a routine, you must:
4
Check Consistency
• Complete your system configuration and your routine logic.
• Save your logic by choosing Object>Save on the Project
Management menu bar.
• Generate code. Make sure all your system configuration is
complete before you generate code.
• Connect the programming terminal (running RSLogix Guard
PLUS! software) to the controller.
• Download the routine to the controller. See page 4-2.
• Start the routine. See page 4-4.
To determine whether or not you need to download your routine, you
can use the Check Consistency feature to verify whether the routine
running in the controller is the same routine you are editing in
RSLogix Guard PLUS! software. Choose Resource>Check Consistency
to compare the two programs. If all the codes match, your offline
routine has been previously downloaded to the controller.
1 Publication 1753-UM001B-EN-P - November 2005
Page 66

4-2 Check, Download, Start, and Test a Routine
Download a Routine
1. Choose Online>Control Panel.
The software automatically asks you to log in.
2. After you successfully log in, the Control Panel opens.
DownloadColdstart
Stop
3. The routine must be stopped before downloading is permitted.
Choose Resource>Stop.
4. Choose Resource>Download to load the routine into the
controller.
IMPORTANT
If your controller is in FAILURE_STOP, it must be
rebooted before you can download a routine. While
online with the controller, choose Reboot Resource
from the Control Panel.
For more information on recovering from a
FAILURE_STOP, refer to the GuardPLC Controller
Systems User Manual, publication number
1753-UM001.
Publication 1753-UM001B-EN-P - November 2005
Page 67

Check, Download, Start, and Test a Routine 4-3
Troubleshoot the Download Process
The SRS of the controller must match the SRS saved in the routine in
order to download the routine. When you specify an SRS for a
controller in a project, that SRS gets saved in the routine when you
generate code.
Check the SRS of the Controller
1. Choose Online>Communication Settings.
2. In the MAC address field, enter the MAC address of the
controller.
The MAC address is on the sticker on the side of a GuardPLC
1200 controller, on the label positioned over both lower RJ-45
connections on GuardPLC 1600/1800 controllers and I/O, or on
the front bezel of the AB-CPU module of a GuardPLC 2000
controller.
3. Click Get.
The controller responds back with the IP address and the SRS it
is currently using.
Now you know the correct SRS to use. Change the SRS and generate
code again. Then the download should work.
Update the SRS in the Controller
In some cases, most likely after a reboot due to a FAILURE_STOP, the
SRS of the controller might be the same as the SRS in the routine, but
the routine still will not download. If this happens, change the SRS to
the same number and click OK, as shown on the following page. This
Publication 1753-UM001B-EN-P - November 2005
Page 68

4-4 Check, Download, Start, and Test a Routine
updates the SRS in the controller and corrects the issue. You should
now be able to download the routine.
TIP
For more information on recovering from
FAILURE_STOP, refer to the GuardPLC Controller
Systems User Manual, publication number
1753-UM001.
1. Choose Extra>Change System ID (SRS).
2. Enter the SRS and click OK.
3. Try the download again.
Start a Routine
After you successfully download a routine, you can start the routine.
From the Control Panel, choose Resource>Coldstart or use the
Coldstart button on the menu bar.
or
Options Description
Warmstart Allows the user routine to be started by the programming terminal
and to continue with the previously saved Retain signals.
You must have Administrator or Read/Write access to initiate a
warmstart.
Coldstart If a routine is in STOP or FREEZE mode, it can be started using this
cold start option. The cold start option re-initializes the routine and
available process values are lost.
Stop Use this option to stop a routine that is in RUN or FREEZE mode.
Publication 1753-UM001B-EN-P - November 2005
Page 69

Check, Download, Start, and Test a Routine 4-5
Test a Routine
Test Option Description
Enter Test Mode (Hot Start) To enter test mode hot, a routine must be loaded and started in the controller.
Enter Test Mode (Warm Start) Halts the execution of the routine with the signals declared as Retain retaining their
Enter Test Mode (Cold Start) A routine must be loaded in the controller to allow you to enter test mode cold.
Test a routine to check for and eliminate errors. You must have
Administrator or Read/Write access to test a routine. Test options are
discussed in the table below.
From the Test Mode menu on the Control Panel, choose the test
option you want
After a security query, the routine is paused (FREEZE) while retaining the current process
data after terminating the cycle. No input signals are processed. The output signals retain
their current state.
values and with all other signals being reset.
After a security query, the routine is initialized, started, and immediately enters FREEZE
mode. No input signals are processed, and all the output signals stay in their basic state.
If the routine was in RUN mode when enter test mode cold was selected, the cycle in
progress is terminated and the process data is re-initialized.
.
Single cycle Single cycle can only be executed when the controller is in the test mode. Use single cycle
to manually trigger the execution of a single cycle of the routine. The routine is executed
exactly once. The input signals are read in, processed, and the resulting output signals are
transferred.
Use the force editor to perform a step-by-step check of the data. See Chapter 5 for
information on forcing.
Continue with Run This option terminates the test mode. The routine mode changes from FREEZE to RUN
without re-initialization. The current process data are retained. (This corresponds to a
routine hot start.)
Publication 1753-UM001B-EN-P - November 2005
Page 70

4-6 Check, Download, Start, and Test a Routine
How a Routine Executes
A controller has only one routine. A routine can be in any one of
these states:
Routine State Description
RUN_RUN The controller is in the RUN mode.
• The routine is executed cyclically by the controller.
• Input data are processed in the routine.
• Output data of the routine are operated.
RUN_FREEZE The controller is in the RUN mode.
• The routine is not executed.
• No input data are processed by the routine.
• No output data of the routine are operated.
IMPORTANT: This mode is not permissible for safety-related
operation!
STOP The controller is in the STOP mode.
• The routine is not (no longer) executed.
• All outputs have been reset.
FAILURE_STOP The controller is in the STOP mode.
• The routine was stopped due to an error.
• All outputs have been reset.
Controlling a Routine
You can control a routine using the actions described below:
Control Action Description
Start the routine from STOP Starting the routine is the same as transferring the controller from the STOP mode into the RUN mode. The
routine is then transferred into the RUN_RUN mode. If Freezing is activated while starting, the routine will
be in the RUN_FREEZE mode. However, freeze operation is only possible if the Freeze Enable software
switch has been enabled. In addition to starting in freeze mode, cold start is also possible.
Starting a routine is only possible when both the controller restart switch and the routine restart switch
are enabled.
Start the routine from RUN The routine is transferred into the RUN_RUN mode if it has not already been operating in this mode.
Starting is also possible in cold start, hot start, and no-freeze modes.
IMPORTANT: This function is not allowed for safety operations of the controller!
Single cycle the routine The routine must be in the RUN_FREEZE mode. Exactly one RUN cycle of the routine is executed, and the
routine is then put back into the RUN_FREEZE mode. The command for the single cycle is the start
command with the attributes hot start and freeze. This does not have any effect on the mode of the
controller. Single cycle is only performed by the controller for the routine if freeze mode is enabled.
IMPORTANT: This function is not allowed for safety operations of the controller!
Restart the routine If the routine is in the FAILURE_STOP mode, it can be restarted via the programming software using a start
command. After the restart, the entire routine is checked again.
Stop the routine Stopping the routine is the same as transferring the controller from RUN mode into STOP mode. The
routine is then transferred from RUN into the STOP mode.
Freeze the routine The routine is transferred from the RUN_RUN mode into the RUN_FREEZE mode. This does not affect the
mode of the controller. Freeze mode must be enabled for the routine.
IMPORTANT: This function is not allowed for safety operations of the controller!
Publication 1753-UM001B-EN-P - November 2005
Page 71

In This Chapter
Chapter
Monitor and Force Signals
For information about See page
monitoring signals 5-1
forcing 5-3
enabling forces 5-4
starting the force editor 5-4
force time 5-6
specifying force values and force marks 5-5
starting forces 5-6
stopping forces 5-7
5
Monitor Signals
The Force Editor provides a window that lets you choose signals to
monitor, whether they are forced or not.
1. Right-click the Resource and choose Online>Force Editor.
If the Control Panel is already open, you do not have to login.
Otherwise, the software asks you to log in.
1 Publication 1753-PM001A-EN-P - November 2005
Page 72

5-2 Monitor and Force Signals
2. After you successfully log in, the software displays the Force
Editor.
3. In the Force Editor, choose Configure.
The software displays a list of force signals you can choose
whether to view or not.
Publication 1753-PM001A-EN-P - November 2005
Page 73

Monitor and Force Signals 5-3
4. If you are not already connected, in the Force Editor, choose
File>Connect.
The R-Value (Resource Value)
column displays the current
values of the signals.
The software displays the values of the signals you selected
You can force any of the signals that have been configured in the
Force Editor.
.
Forcing
Forcing describes the intervention of the user in the logic of the
application program loaded into the controller. When data is forced,
the controller uses the forced values rather than its process values.
This changes the value of one or more signals and affects the safety of
the controller.
Only signals used in the controller can be forced. The application
program and the inputs and outputs are only affected when the
controller is in RUN mode.
ATTENTION
When using forcing on a controller with safety tasks,
always obey the restrictions listed in the GuardPLC
Controller Systems Safety Reference Manual,
publication number 1753-RM002.
Publication 1753-PM001A-EN-P - November 2005
Page 74

5-4 Monitor and Force Signals
Enable Forces
Start the Force Editor
To enable forcing, both the Forcing allowed and Main Enable switches
must be set. The Forcing allowed switch can be set via the
programming software, but only if the controller is in RUN or STOP
mode.
A forced value remains saved in the controller until:
• the user program is stopped,
• the force value is replaced by another value, or
• the controller is switched off.
TIP
Any user can start the Force Editor, regardless of access privilege.
However, you can only force signals if Forcing allowed is enabled for
the controller. Forcing is always disabled for users with Read access.
If a new configuration is loaded, all of the force
switches and associated force values are reset.
Publication 1753-PM001A-EN-P - November 2005
Before you start the Force Editor, make sure the program running in
the controller is the same program that you are editing in RSLogix
Guard PLUS! software.
To verify whether these programs are the same:
1. Start the Control Panel and choose Resource>Check
Consistency.
2. If the offline/online programs are not identical then the Force
Editor will come up offline.
Page 75

Monitor and Force Signals 5-5
Specify Force Values and Force Marks
To set a signal with a force value, you:
1. Enter the force value for the signal in the Force column.
TIP
2. Double-click in the F column to mark that you want the
controller to use the force value rather than the process value.
3. Send the force value(s) to the controller.
The Force Editor displays the force value(s) in the R-Force
column. A mark in the RF (resource force) column indicates that
the controller will use the corresponding force value instead of
the process value when forcing is enabled.
Multiple force values can be written into the controller at the same
time. The force values remain saved in the controller until the routine
is reloaded. If the routine is stopped, the resource force marks are also
reset.
For Boolean signals, True or False and
1 or 0 are acceptable values.
Publication 1753-PM001A-EN-P - November 2005
Page 76

5-6 Monitor and Force Signals
Field Description
Signal The name of the signal you want to force.
Force The value you want to force the signal to have.
The value you enter must match the type displayed in the Type field.
F (force mark) A check in this field identifies that the force value you entered is sent to and saved in the
controller and will become active when forcing is active.
Double-click in this column to mark that you want the controller to use this force value rather than
the controller’s process value.
Type Displays the type of the signal, as defined in the signal Editor.
R-Value (resource value) Displays the controller value, resulting from the current process and program logic.
R-Force (resource force value) Displays the value of the signal while forcing is active.
RF (resource force mark) A check in this field identifies that the controller is using the force value rather than the process
value as soon as forcing is active.
Force Time
Start Forces
The force time is monitored by the controller. To enter the force time
in seconds, the controller must be in RUN or STOP mode with Forcing
allowed set. For unlimited forcing activity, enter ‘-1’.
The force time begins when the force process starts. The time is reset
to 0 if a new configuration is loaded or if the operating voltage is
disconnected.
After the specified time, forcing activity ends. If the controller switch
Stop on Force Timeout is enabled, the routine returns to STOP mode
when forcing ends. If Stop on Force Timeout is disabled, the routine
continues with the current process values once forcing ends.
To start forces:
1. Choose the Start… tab or choose File>Start.
2. Enter the Force Time in the Start forcing dialog box and click
Start.
Publication 1753-PM001A-EN-P - November 2005
Page 77

Monitor and Force Signals 5-7
3. The Force Editor opens.
Once forcing starts, the Forcing activated box is checked and R-Force
values take precedence over R-Values.
Stop Forces
To stop forcing, click the Stop… tab or choose File>Stop.
Once forcing is stopped, the Forcing activated check box is cleared.
However, the Resource Force Mark (RF) field is still checked,
indicating that force values remain in the resource, but are inactive.
Publication 1753-PM001A-EN-P - November 2005
Page 78

5-8 Monitor and Force Signals
Publication 1753-PM001A-EN-P - November 2005
Page 79

In This Chapter
Chapter
Access Management
For information about See page
how the controller uses access levels 6-1
creating user access 6-2
6
How the Controller Uses Access Levels
An Administrator can set up access privileges for a maximum of ten
users per controller. The controller stores the access privileges in its
non-volatile memory. The access privileges are not saved with the
program, and are not downloaded to the controller with the program.
If the controller is changed, access privileges must be re-entered.
Every controller has the same default user account, which applies
when:
• the controller is new, out of the box.
• disconnecting the operating voltage with the backup battery
removed (GuardPLC 1200/2000 controllers only).
• using the Reset button (GuardPLC 1600/1800 controllers only).
Refer to the GuardPLC Controller Systems User Manual,
publication number 1753-UM001, for details on how to use the
Reset button.
The default account is:
Username: Administrator
Password: <blank>
Access Type: Administrator
1 Publication 1753-PM001A-EN-P - November 2005
Page 80

6-2 Access Management
The following access levels are available:
This access level Allows
Administrator • highest privileges
• manage usernames and passwords
• read data from controller
• write routines and data into controller
• force tags
• stop, start, freeze, and force a routine
• download an operating system
• reboot the controller
• change IP address and system ID
• can also login under read/write and read levels
Read/Write • read data from controller
• write routines and data into controller
• force tags
• start, stop, freeze, and force a routine
• can also login under read level
Read • lowest privileges
• only read data from controller
Create User Access
To create a user access level:
1. Choose Online>Access Management.
If the Control Panel is open, you do not have to login.
Otherwise, the software asks you to log in
.
Publication 1753-PM001A-EN-P - November 2005
Page 81
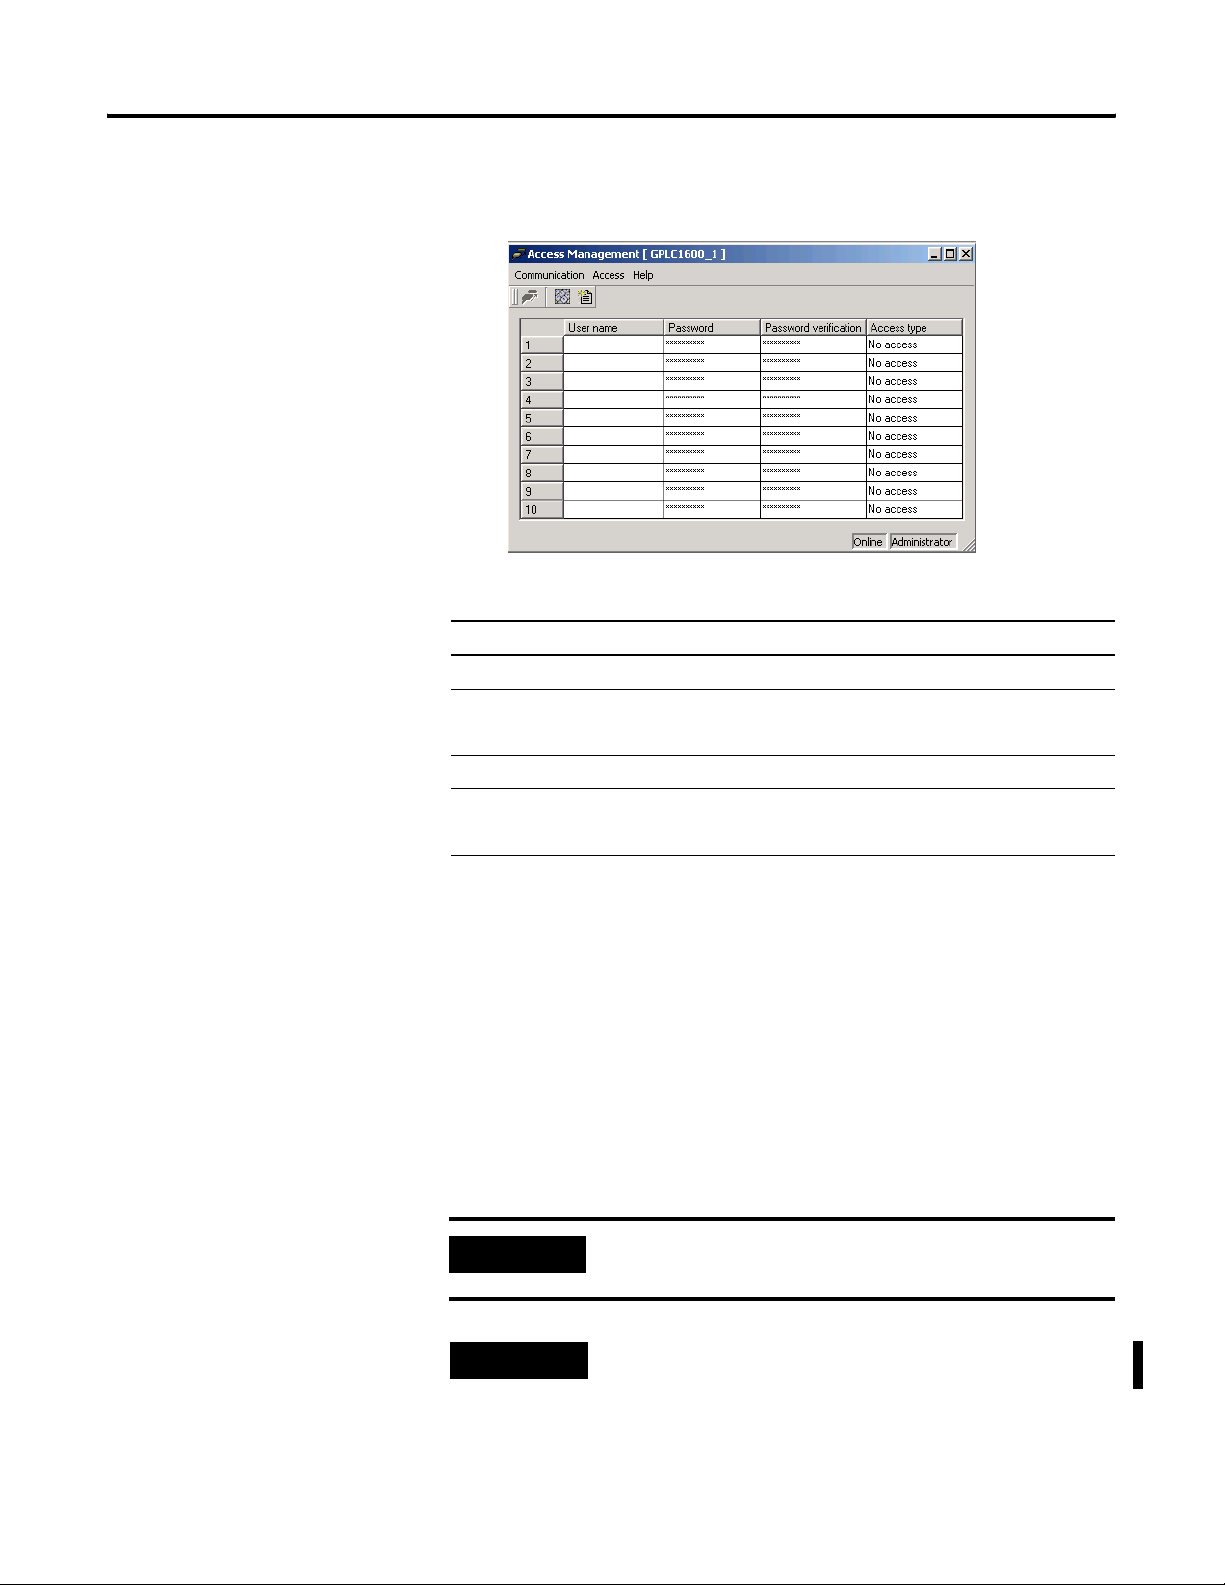
Access Management 6-3
2. After you successfully log in with Administrator access, the
software displays the Access Management window
Field Description
Username Name of the user.
.
Password Password of the user.
The password is case sensitive.
Password Verification Verify the password specified above.
Access Type The access level of the user.
Specify Administrator, Read/Write, Read, or No Access.
The username and password are case sensitive and can contain as
many as 31 characters. You can use letters, numbers and
underscore ( _ ) characters.
At least one of the users must have Administrator privileges.
If you make changes to the user list, use the Set Accounts button to
save the changes in the controller.
The Administrator can delete access privileges of all users with the
default account access and reset the Administrator account to the
default setting of Administrator and no password (blank).
IMPORTANT
Changes to access privileges can only be executed
when the controller is in the state STOP.
TIP
If battery and external power to the GuardPLC 1200
or GuardPLC 2000 controller are simultaneously off,
the controller loses all account information and
reverts to the default account.
Publication 1753-PM001A-EN-P - November 2005
Page 82

6-4 Access Management
Publication 1753-PM001A-EN-P - November 2005
Page 83

In This Chapter
Chapter
7
Archive and Restore Projects
For information about See page
Archive a Project 7-2
Restore a Project 7-3
Archiving a project moves the project to a back up location. It also
freezes a project so that no changes can be made to it. The archived
project can be moved from one PC to another or emailed. You should
archive all of your project prior to installing a new version of RSLogix
Guard PLUS! software to ensure that projects are not lost if problems
occur in the installation process.
A project, even one with multiple resources, can be archived. The
archive process creates a folder entitled archivename.L3P, where
archivename is the name of the archive. The folder contains three
archive files. When an archived project is restored, a projectname.L2P
folder is created.
1 Publication 1753-PM001A-EN-P - November 2005
Page 84

7-2 Archive and Restore Projects
Archive a Project
To archive a project:
1. Open the RSLogix Guard PLUS! Program Management window.
2. Right-click the project name in the project tree and choose
Archive.
3. Click the Browse button and choose the folder into which you
want to place the archived project.
4. Enter the name of the archived project in the Object Name field.
The name you choose for the archive does not have to match
the current name of the project.
5. Click OK.
6. Verify that the target directory and name are correct and click
Archive.
When the archive process is complete, the Project Management page
reappears.
Publication 1753-PM001A-EN-P - November 2005
Page 85

Archive and Restore Projects 7-3
Restore a Project
Restoring an archived project extracts the project files from the archive
file and creates the .L2P files and folders that can then be edited.
To restore an archived project:
1. Open the Project Management window, but do not open a
project.
2. From the Project pull-down menu, choose Restore Project….
The Restore dialog opens.
3. Browse for the target directory where you want to place the
restored project.
4. Browse for the archived project that you want to restore.
5. Click Restore.
The project is restored to the target directory and opened.
Publication 1753-PM001A-EN-P - November 2005
Page 86

7-4 Archive and Restore Projects
Publication 1753-PM001A-EN-P - November 2005
Page 87

In This Chapter
Chapter
Create User-Defined Function Blocks
For information about See page
creating user-defined function blocks 8-1
declaring variables 8-4
moving declared variables to the user-defined function block page 8-9
generating function block code 8-10
8
Create User-Defined
Function Blocks
With RSLogix Guard PLUS! software, you can create user-defined
function blocks that consist of standard function block logic, as shown
in the illustrations below.
Existing Function Block
User-Defined Function Blocks
1 Publication 1753-PM001A-EN-P - November 2005
Page 88

8-2 Create User-Defined Function Blocks
To create a function block:
1. In the Program Management Window, right-click Configuration
and choose New>Library.
2. Right-click the new Library and choose New>Function Block
Type to create the new function block.
3. You can rename the new function block by right-clicking it and
choosing Rename.
Publication 1753-PM001A-EN-P - November 2005
Page 89

Create User-Defined Function Blocks 8-3
4. Double-click the new function block to start the editor.
Interface
Declaration
Editor
Drawing
Field
Variable Declaration Editor
The FBD editor for user-defined function blocks differs slightly from
the FBD editor for routines. The components of the editor are:
Use this component To
Overview Window displays the function block diagram in reduced scale.
Drawing field create the logic of the FB-type.
Variable declaration editor
(only in FB type editor)
Interface declaration editor
(only in FB type editor)
create and define internal variables of a block and initialize them for further use.
define the graphical appearance of a block.
The appearance of the block will match the appearance of the user-defined function block
in the FBD Editor.
Overview
Window
IMPORTANT
You cannot place an instance of a user-defined
function block within itself.
Publication 1753-PM001A-EN-P - November 2005
Page 90

8-4 Create User-Defined Function Blocks
Declare variables
Variable declaration defines the connecting points of the function
block. There are tabs for these types of variables.
Use this tab To define
VAR an internal variable without type limitations.
You can also define the attribute:
CONST a constant value that cannot be changed by logic
VAR_INPUT an input variable, which is also displayed on the block.
VAR_OUTPUT an output variable, which is also displayed on the block.
VAR_EXTERNAL
ACTION an action block.
a global variable that can also be used and edited within
function blocks or functions. Value changes are also visible
to the outside.
Action blocks describe what action should be performed and
which behavior should trigger it.
Valid data types for variables are: BOOL, BYTE, DINT, DWORD, INT,
LREAL, REAL, SINT, TIME, UDINT, UINT, USINT, WORD. The default
type is BOOL.
The controller handles REAL values as float values and LREAL values
as double values.
To declare a variable, choose the tab for the type of variable from the
user-defined FBD editor. Right-click in any blank area and choose
New Variable.
Publication 1753-PM001A-EN-P - November 2005
Page 91

You can either define the variable here or use the Derivation Type
buttons (recommended). The Derivation Type buttons activate dialogs
to help declare a variable of the chosen type. Use these buttons to
ensure accurate syntax.
This button Defines a variable type
Direct derived directly from another variable type
Create User-Defined Function Blocks 8-5
Array array of one or more dimensions
For example:
ARRAY:array[1..10] of INT
• one-dimensional array of INT values
• ARRAY[7] accesses the 7th element
ARRAY:array[1..10,1..10] of REAL
• two-dimensional array of REAL values
• ARRAY[3,5] accesses the 3rd element of the 5th row
Publication 1753-PM001A-EN-P - November 2005
Page 92

8-6 Create User-Defined Function Blocks
This button Defines a variable type
Subrange has values that should be within a certain range
Enumeration not yet implemented
For example:
DINT(0,200) is an DINT value where
• the minimum allowable value is 0 and
• the maximum allowable value is 200
Define Technical Units and Scaling
You can define technical units and scaling for each variable:
In this field Define
Techn. unit an available unit from the pulldown menu
min. value
max. value
internally represented as
reference points to convert a technical unit into an internal value
For example:
• technical unit from 0 to 24V
• internal representation from 0 to 1000
Enter floating point numbers for the scaling.
The available technical units are:
Abbreviation Unit Definition
A Ampere electrical current
Bq Bequerel activity of a radioactive source,
C Colomb electrical charge
cd Candela light intensity
F Farad capacitance
Gy Gray absorbed dose
H Henry inductance
Hz Hertz frequency
J Joule energy
K Kelvin temperature (in Kelvin)
disintegration rate
Publication 1753-PM001A-EN-P - November 2005
Page 93

Create User-Defined Function Blocks 8-7
Abbreviation Unit Definition
kg Kilogram mass
lm Lumen illumination
lx Lux illumination density
m Meter length
mol Mol amount of substance
N Newton force
Ohm Ohm electrical resistance
Pa Pascal pressure
Rad Radiant plane angle
s Siemens electrical conductance
S Second time
sr sRadiant solid angle
T Tesla magnetic flux density
V Volt electrical potential
W Watt power
Wb Weber magnetic flux
Define I/O Positions
For input and output variables, you need to define the variables’
positions on the function block. The position portion of the variable
declaration display is only available for input and output variables.
You can define:
In this field Define
Connection the side of the block (left, top, right, or bottom) to which the input or output should be connected
Position the position of the input or output within the block
Inverted whether to invert I/O of data type BOOL
You can only invert BOOL data. Inversions are indicated by a circle around the I/O.
Alternate I/O identifier an I/O-name
This name appears in the block, rather than the generated name.
Publication 1753-PM001A-EN-P - November 2005
Page 94

8-8 Create User-Defined Function Blocks
Symbol Definition
How the Variables Display
Once you declare your variable, the editor displays the variables.
The editor uses these symbols to identify the variables:
Used as source
The variable is read from.
Used as sink
The variable is written to.
Used as source and sink
The variable is read from and written to.
Variables used in different types of connections are also identified by this symbol.
Not used as source or sink; but the variable is set in the function block diagram.
Not used
The variable is declared but not set in the function block diagram.
Publication 1753-PM001A-EN-P - November 2005
Page 95

Create User-Defined Function Blocks 8-9
Move Declared Variables to the User-Defined Function Block Page
In order to use these declared variables, you must:
1. Drag them from the Variable Definition Editor to the
user-defined function block page.
2. Drag down the required function blocks and make all the
necessary connections.
To use the completed user-defined function blocks, you must drag
them to the function block page and connect signals to them.
Publication 1753-PM001A-EN-P - November 2005
Page 96

8-10 Create User-Defined Function Blocks
Generate Function Block Code
When you complete your function block logic, you must compile that
logic into code the controller can execute. In the Program
Management Window, expand the project. Right-click the Resource
and choose Code Generation.
IMPORTANT
You should save before every Code Generate. A save
is required for any change to the function block
page.
Any time a change is made, the number of changes
displayed on the function block menu bar
increments.
When the save is complete, the menu bar displays
unchanged.
The software compiles your function block logic and generates the
files that you download to the controller.
IMPORTANT
When the code generator compiles logic, it also
takes into consideration the settings you specified in
the Hardware Management Window. If you change
these settings and want the changes to take effect,
you must compile and download the project again.
Publication 1753-PM001A-EN-P - November 2005
Page 97

Create User-Defined Function Blocks 8-11
Check for Errors and Warnings
After performing a code generate, check the status bar at the bottom
of the Project Management window. The status bar indicates whether
or not a .L2P file was successfully generated.
If a .L2P file was not created, check the Hardware Management
Window to view the errors and/or warnings compiled during the
process of code generation.
The window below shows an example of code generation warnings.
Publication 1753-PM001A-EN-P - November 2005
Page 98

8-12 Create User-Defined Function Blocks
Publication 1753-PM001A-EN-P - November 2005
Page 99

In This Appendix
Appendix
Programming Software Versions,
Compatibility, and Firmware Updates
For information about See page
RSLogix and RSLogix Guard PLUS! Versions A-1
RSLogix Guard PLUS! Software and GuardPLC Firmware Compatibility A-3
Convert Projects A-5
Upgrade GuardPLC Firmware A-5
A
RSLogix and RSLogix Guard PLUS! Versions
Programming
Software
RSLogix Guard
RSLogix Guard PLUS!
RSLogix Guard PLUS!
Catalog
Number
1755-PCS 3.3
1754-PCS 3.3 GuardPLC 1200 series B • 200 tags
1753-PCS-USB
1753-PCS-PAR
1753-PCS-USB
1753-PCS-PAR
Version Supported Controllers Limitations Activation
(1)
3.5 GuardPLC 1200 series C
(2)
3.5
(1)
4.0/4.1 GuardPLC 1200 series C
(2)
4.0/4.1
GuardPLC 1200 series B
GuardPLC 2000 series B
GuardPLC 2000 series C
GuardPLC 1600
GuardPLC 1800
GuardPLC 2000 series C
GuardPLC 1600
GuardPLC 1800
(3)
• 650 tags
• 40 user-defined function
blocks per routine
• 100 pages
• 15 user-defined function
blocks per routine
• 100 pages
No tag, user-defined function
block, or page limitations.
No tag, user-defined function
block, or page limitations.
Software activation
required.
Hardlock activation
required.
Hardlock activation
required.
(1) USB hardlock.
(2) Parallel port hardlock.
(3) See About RSLogix Guard Software, Version 3.3 for information about using RSLogix Guard software with Series C controllers.
1 Publication 1753-PM001A-EN-P - November 2005
Page 100

A-2 Programming Software Versions, Compatibility, and Firmware Updates
About RSLogix Guard Software, Version 3.3
RSLogix Guard software can go online to any GuardPLC controller to
start, stop or reboot the controller. However, you cannot open any
projects that include unsupported controllers in the project tree, for
example GuardPLC 1600. RSLogix Guard software cannot download
programs to a GuardPLC 1600 or 1800.
RSLogix Guard software can go online, download, and monitor
programs in series C GuardPLC 1200 and GuardPLC 2000 controllers.
However, not all functionality is supported. RSLogix Guard does not
allow you to configure GuardPLC Distributed I/O on GuardPLC
Ethernet. If you are online with a series C controller, some items, such
as the subnet mask appear incorrectly due to memory map changes
between series B and series C controllers.
About RSLogix Guard PLUS!
RSLogix Guard PLUS! version 3.5 added support for GuardPLC 1600
and GuardPLC 1800 controllers, and GuardPLC Distributed I/O, as
well as offline simulation and online test features.
RSLogix Guard PLUS! can be used to monitor, start, and stop an
operational series B GuardPLC 1200 or GuardPLC 2000 controller.
TIP
RSLogix Guard PLUS! version 4.0 adds support for DeviceNet Safety to
GuardPLC 1600 and GuardPLC 1800 controllers. Version 4.0 supports
the DeviceNet Safety Scanner for GuardPLC Controllers (1753-DNSI),
and 1791DS DeviceNet Safety I/O. GuardPLC 1200 and
GuardPLC 2000 do not support DeviceNet Safety.
If you need to download to a series B controller
using RSLogix Guard PLUS!, update the controller to
series C. This prevents the problem of downloading
with functionality that the series B GuardPLC
controllers do not support.
Publication 1753-PM001A-EN-P - November 2005
 Loading...