

Renault Kadjar Driver's Handbook Manual

DRIVER’S HANDBOOK
KADJAR

A passion
for
perf ormance
ELF, partner of
RENAULT recommends ELF
Partners in cutting-edge automotive technology, Elf and Renault combine their expertise on both
the racetrack and the city streets. This enduring partnership gives drivers a range of lubricants
perfectly suited to Renault cars. Lasting protection and optimum performance for your engine –
guaranteed. Whether changing the oil or simply topping up, to find the approved ELF lubricant
best suited to your vehicle, ask your Renault dealer for a recommendation or consult your vehicle maintenance handbook.
www.lubricants.elf.com
A brand from
0.1
Translated from French. Copying or translation, in part or in full, is forbidden unless prior written permission has been obtained from the vehicle manu-
facturer.
This Driver’s Handbook contains the information necessary:
– for you to familiarise yourself with your vehicle, to use it to its best advantage and to benefit fully from the all the functions and
the technical developments it incorporates.
– to ensure that it always gives the best performance by following the simple, but comprehensive advice concerning regular main-
tenance.
– to enable you to deal quickly with minor faults not requiring specialist attention.
It is well worth taking a few minutes to read this handbook to familiarise yourself with the information and guidelines it contains
about the vehicle and its functions and new features. If certain points are still unclear, our Network technicians will be only too
pleased to provide you with any additional information.
The following symbol will help you when reading this handbook:
Welcome to your new vehicle
The descriptions of the models given in this handbook are based on the technical specifications at the time of writing. This handbook covers all items of equipment (both standard and optional) available for these models but whether or not these are
fitted to the vehicle depends on the version, options selected and the country where the vehicle is sold.
This handbook may also contain information about items of equipment to be introduced later in the model year.
Throughout the manual, the “approved Dealer” is your RENAULT Dealer.
To indicate a hazard, danger or safety recommendation.
Enjoy driving your new vehicle.

0.2
0.3
Getting to know your vehicle ...............................
Driving ...................................................................
Your comfort .........................................................
Maintenance .........................................................
Practical advice ....................................................
Technical specifications ......................................
Alphabetical index ...............................................
Sections
1
CONTENTS
2
3
4
5
6
7

0.4

1.1
Section 1: Getting to know your vehicle
Key, radio frequency remote control: General information, use, deadlocking . . . . . . . . . . . . . . . . . . 1.2
RENAULT card: General information, use, deadlocking . . . . . . . . . . . . . . . . . . . . . . . . . . . . . . . . . . 1.6
Locking, unlocking the opening elements . . . . . . . . . . . . . . . . . . . . . . . . . . . . . . . . . . . . . . . . . . . . . 1.13
Opening and closing the doors . . . . . . . . . . . . . . . . . . . . . . . . . . . . . . . . . . . . . . . . . . . . . . . . . . . . . 1.16
Automatic locking when driving . . . . . . . . . . . . . . . . . . . . . . . . . . . . . . . . . . . . . . . . . . . . . . . . . . . . . 1.18
Headrests - Seats . . . . . . . . . . . . . . . . . . . . . . . . . . . . . . . . . . . . . . . . . . . . . . . . . . . . . . . . . . . . . . . 1.19
Seat belts. . . . . . . . . . . . . . . . . . . . . . . . . . . . . . . . . . . . . . . . . . . . . . . . . . . . . . . . . . . . . . . . . . . . . . 1.23
Additional methods of restraint . . . . . . . . . . . . . . . . . . . . . . . . . . . . . . . . . . . . . . . . . . . . . . . . . . . . . 1.27
to the front seat belts . . . . . . . . . . . . . . . . . . . . . . . . . . . . . . . . . . . . . . . . . . . . . . . . . . . . . . . 1.27
to the rear seat belts . . . . . . . . . . . . . . . . . . . . . . . . . . . . . . . . . . . . . . . . . . . . . . . . . . . . . . . 1.31
Side . . . . . . . . . . . . . . . . . . . . . . . . . . . . . . . . . . . . . . . . . . . . . . . . . . . . . . . . . . . . . . . . . . . . 1.32
Child safety: general information . . . . . . . . . . . . . . . . . . . . . . . . . . . . . . . . . . . . . . . . . . . . . . . . . . . . 1.34
Choosing a child seat mounting . . . . . . . . . . . . . . . . . . . . . . . . . . . . . . . . . . . . . . . . . . . . . . . 1.37
Fitting a child seat, general information . . . . . . . . . . . . . . . . . . . . . . . . . . . . . . . . . . . . . . . . . 1.39
Child seat: attachment by seat belt or by Isofix system. . . . . . . . . . . . . . . . . . . . . . . . . . . . . . . . . . . 1.41
Deactivating, activating the front passenger airbag . . . . . . . . . . . . . . . . . . . . . . . . . . . . . . . . 1.47
Driving position . . . . . . . . . . . . . . . . . . . . . . . . . . . . . . . . . . . . . . . . . . . . . . . . . . . . . . . . . . . . . . . . . 1.50
Instrument panel . . . . . . . . . . . . . . . . . . . . . . . . . . . . . . . . . . . . . . . . . . . . . . . . . . . . . . . . . . . . . . . . 1.54
On-board computer . . . . . . . . . . . . . . . . . . . . . . . . . . . . . . . . . . . . . . . . . . . . . . . . . . . . . . . . 1.62
Vehicle settings customisation menu . . . . . . . . . . . . . . . . . . . . . . . . . . . . . . . . . . . . . . . . . . . 1.72
Steering wheel/Power-assisted steering . . . . . . . . . . . . . . . . . . . . . . . . . . . . . . . . . . . . . . . . . . . . . . 1.74
Clock and exterior temperature . . . . . . . . . . . . . . . . . . . . . . . . . . . . . . . . . . . . . . . . . . . . . . . . . . . . . 1.75
Rear-view mirrors . . . . . . . . . . . . . . . . . . . . . . . . . . . . . . . . . . . . . . . . . . . . . . . . . . . . . . . . . . . . . . . 1.76
Exterior lighting and signals. . . . . . . . . . . . . . . . . . . . . . . . . . . . . . . . . . . . . . . . . . . . . . . . . . . . . . . . 1.79
Audible and visual signals . . . . . . . . . . . . . . . . . . . . . . . . . . . . . . . . . . . . . . . . . . . . . . . . . . . . . . . . . 1.84
Headlight beam adjustment . . . . . . . . . . . . . . . . . . . . . . . . . . . . . . . . . . . . . . . . . . . . . . . . . . . . . . . . 1.85
Windscreen washers and wipers . . . . . . . . . . . . . . . . . . . . . . . . . . . . . . . . . . . . . . . . . . . . . . . . . . . . 1.87
Fuel tank (filling with fuel) . . . . . . . . . . . . . . . . . . . . . . . . . . . . . . . . . . . . . . . . . . . . . . . . . . . . . . . . . 1.95
1.2
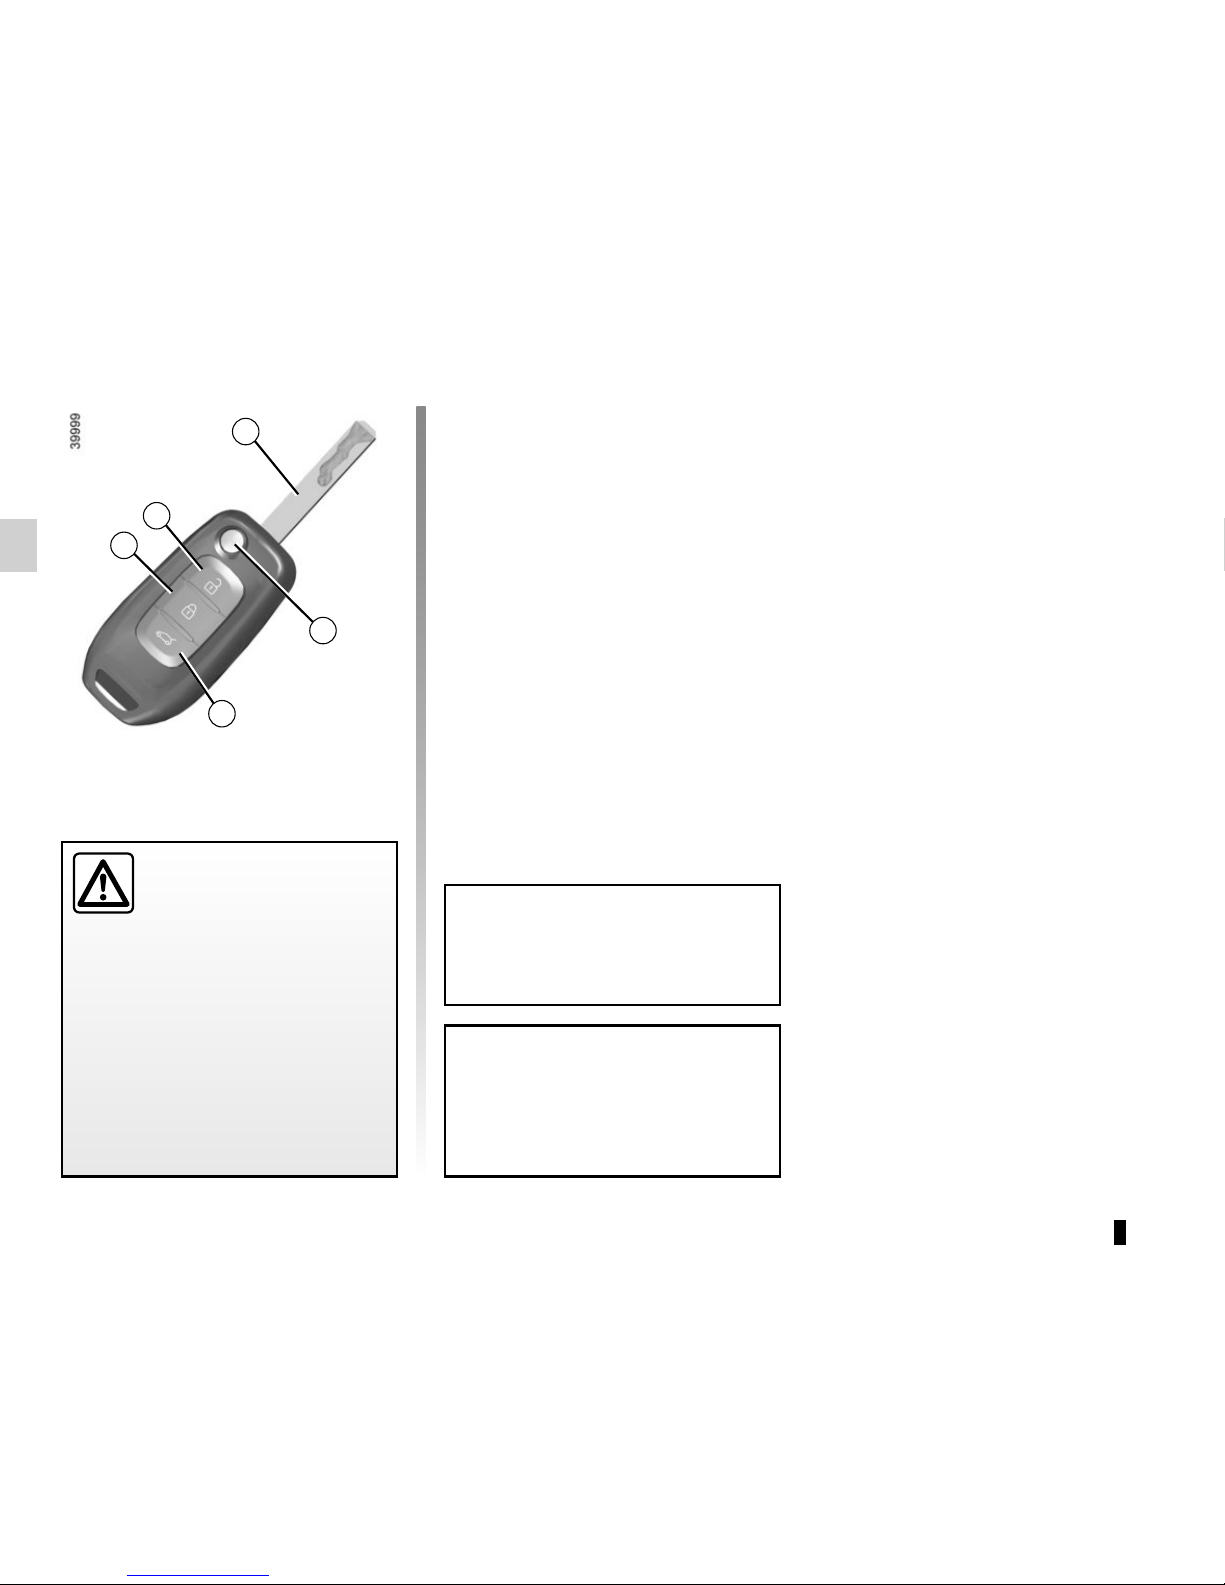
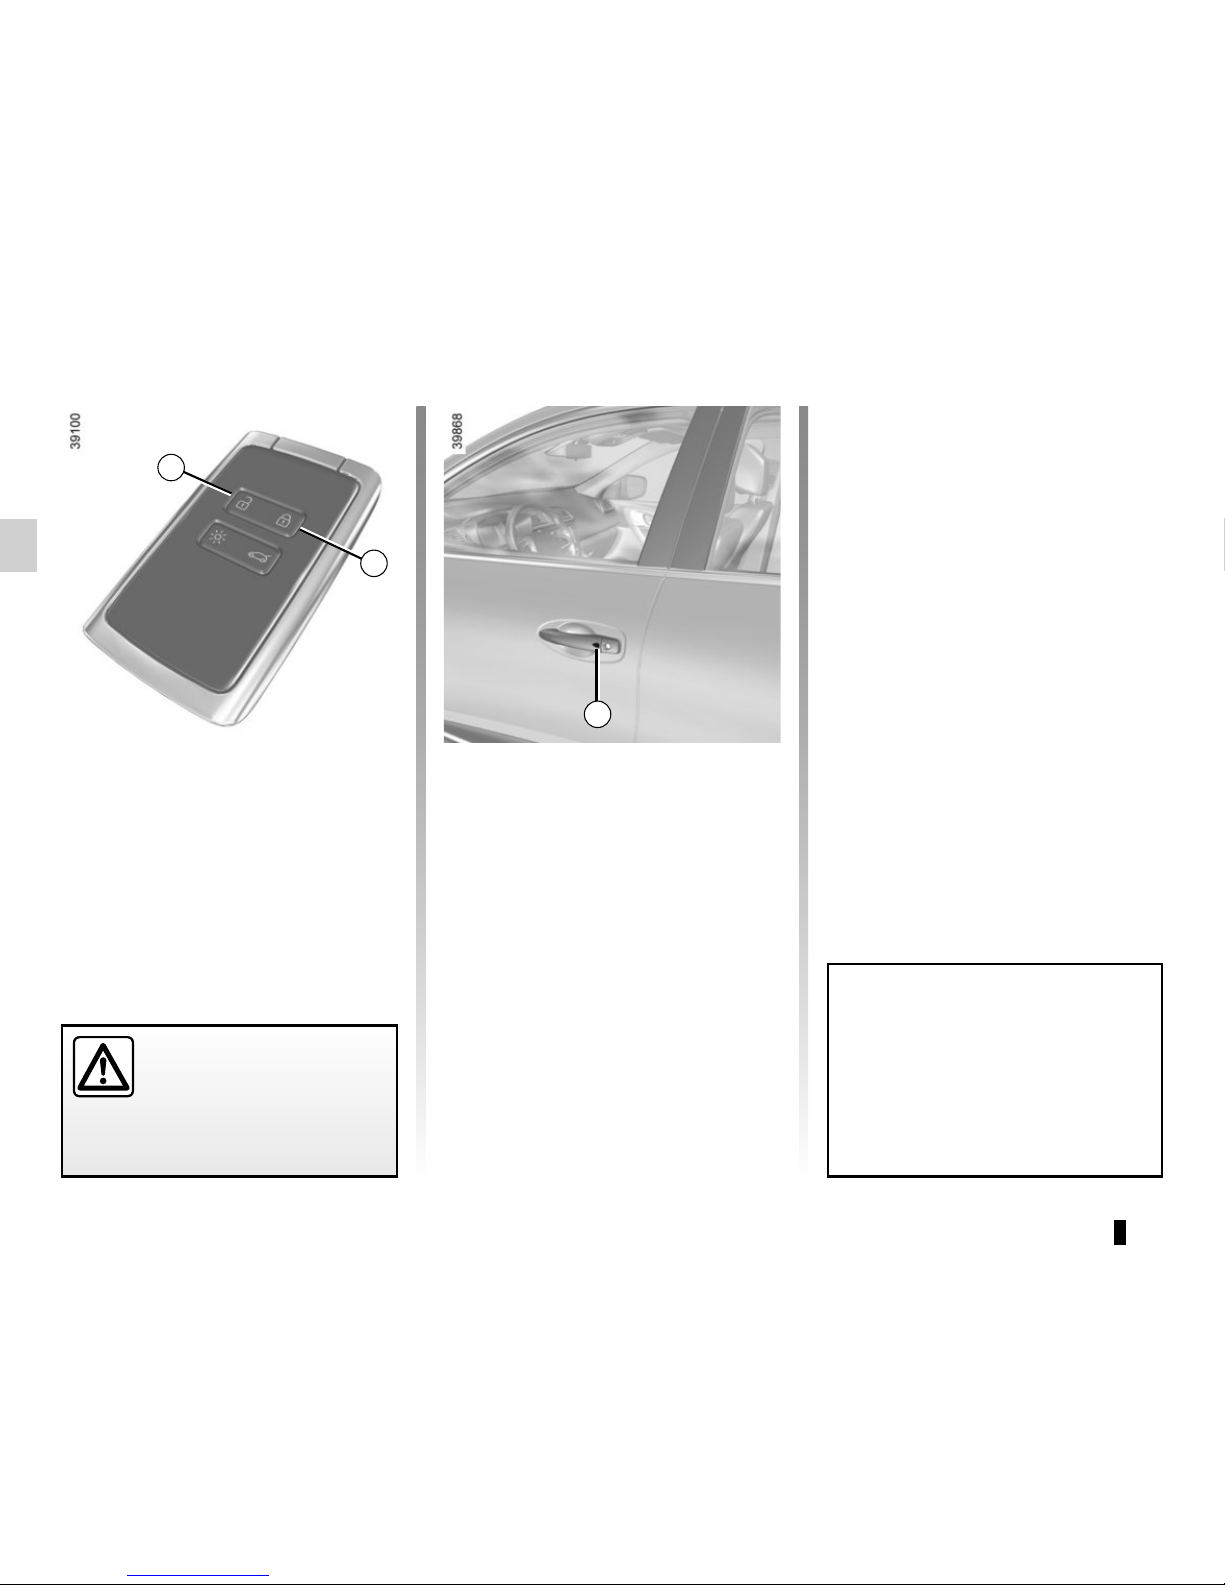
1 Locks all the opening elements.
2 Unlocks all the opening elements.
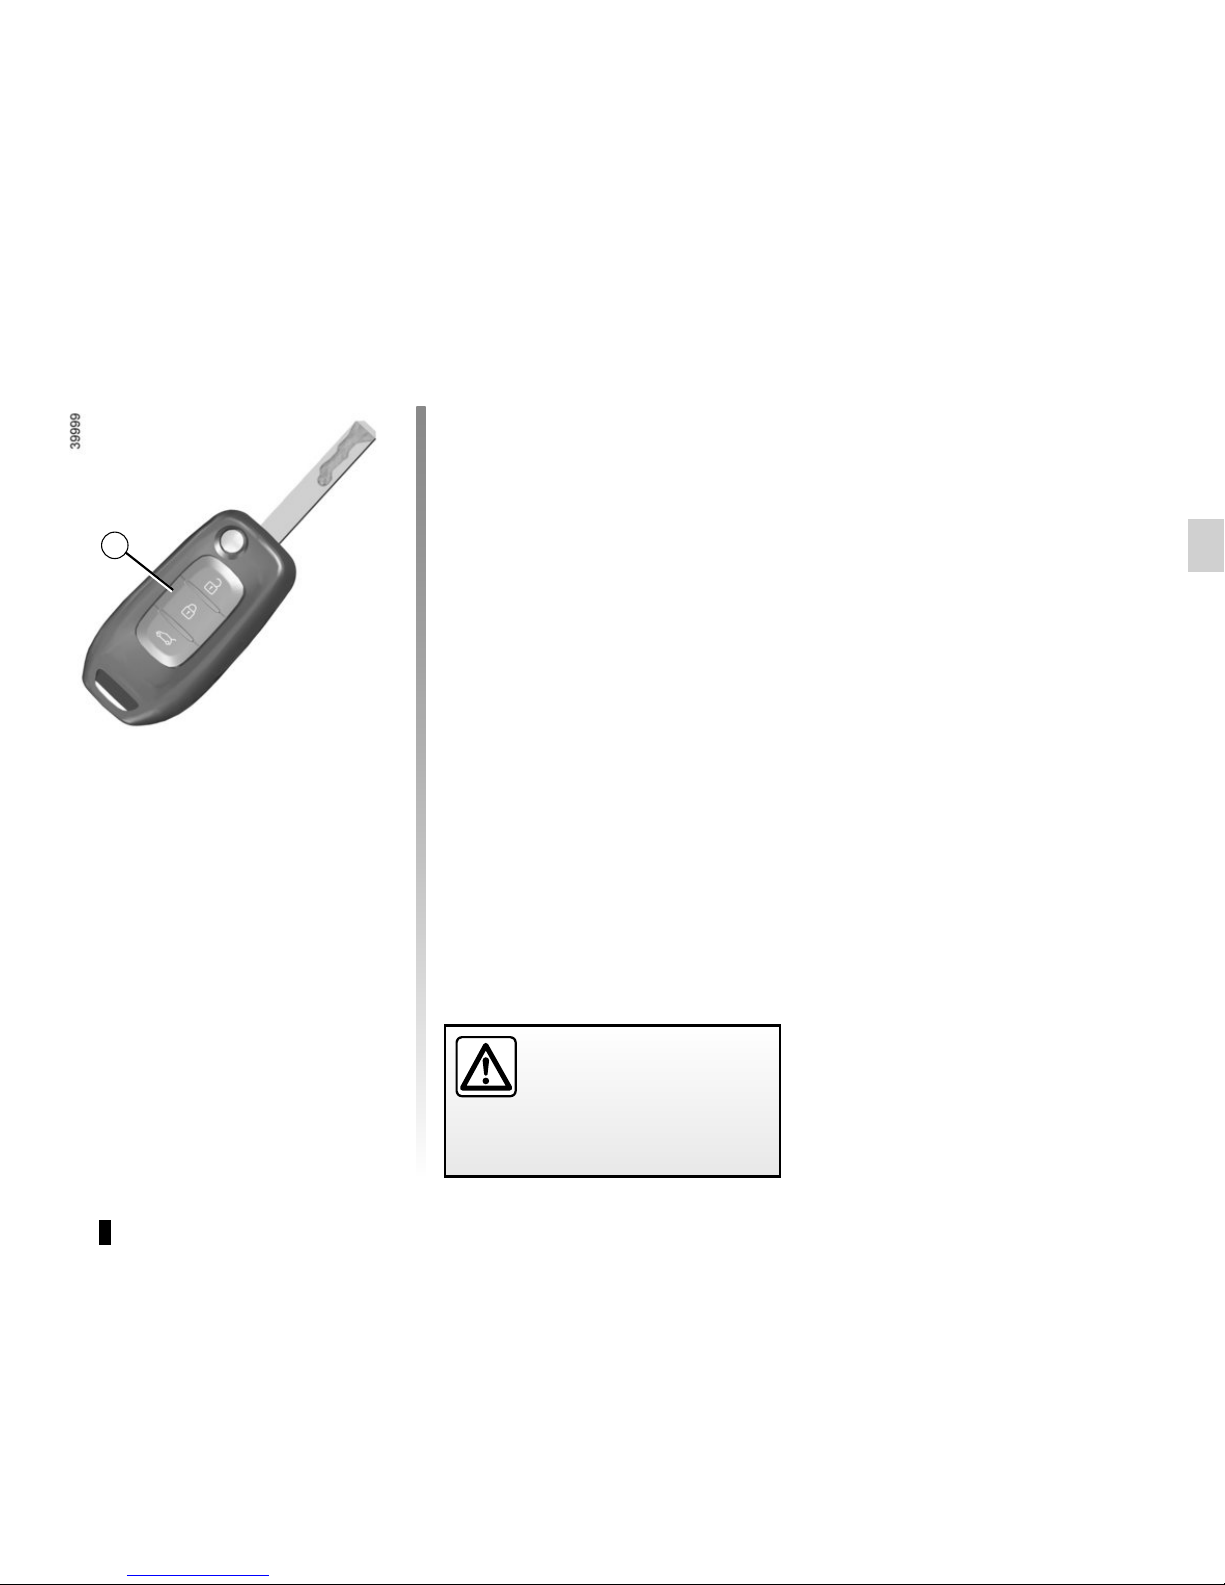
3 Ignition and front door key.
4 Locking/unlocking the tailgate only.
Remote control with switchblade
key:
5 Locking/unlocking using the switch-
blade key. To release the insert from
its housing, press button 5, it comes
out automatically. Press button 5 and
guide the insert back into its housing.
KEY, RADIO FREQUENCY REMOTE CONTROL: general information (1/2)
The key must not be used for any
function other than those described
in the handbook (removing the cap
from a bottle, etc.).
Advice
Avoid leaving the remote control in
hot, cold or humid areas.
Driver’s responsibility
Never leave your vehicle
with the card inside the
vehicle and never leave a
child (or a pet) unsupervised. With
the card in the reader, it would be
possible to start the engine or operate electrical equipment such as the
electric windows and there is a risk
that part of their body may become
trapped (neck, arm, hand, etc.).
Risk of serious injury.
5
1
2
3
4

1.3
KEY, RADIO FREQUENCY REMOTE CONTROL: general information (2/2)
Radio frequency remote
control operating range
This varies according to the surroundings: take care not to lock or unlock the
doors by inadvertently pressing the buttons on the remote control.
Note: If a door or the boot is open or
not closed properly, the doors and boot
lock/unlock in quick succession.
Interference
Interference by factors in the immediate
vicinity (external installations or the use
of equipment operating on the same
frequency as the remote control) may
affect the operation of the remote control.
Replacement and additional keys
or remote controls.
You must only contact an approved
dealer:
– If you need to replace a key it will
be necessary to take the vehicle
and all of its keys to an approved
Dealer in order to initialise the
system.
– Depending on the vehicle, you
have the option of using up to
four remote controls.
Remote control unit failure
Make sure that the correct battery
type is being used, and that the
battery is in good condition and inserted correctly. These batteries
have a service life of approximately
two years.
Refer to Section 5: “Radio frequency remote control: batteries”
for the battery changing procedure.
1.4
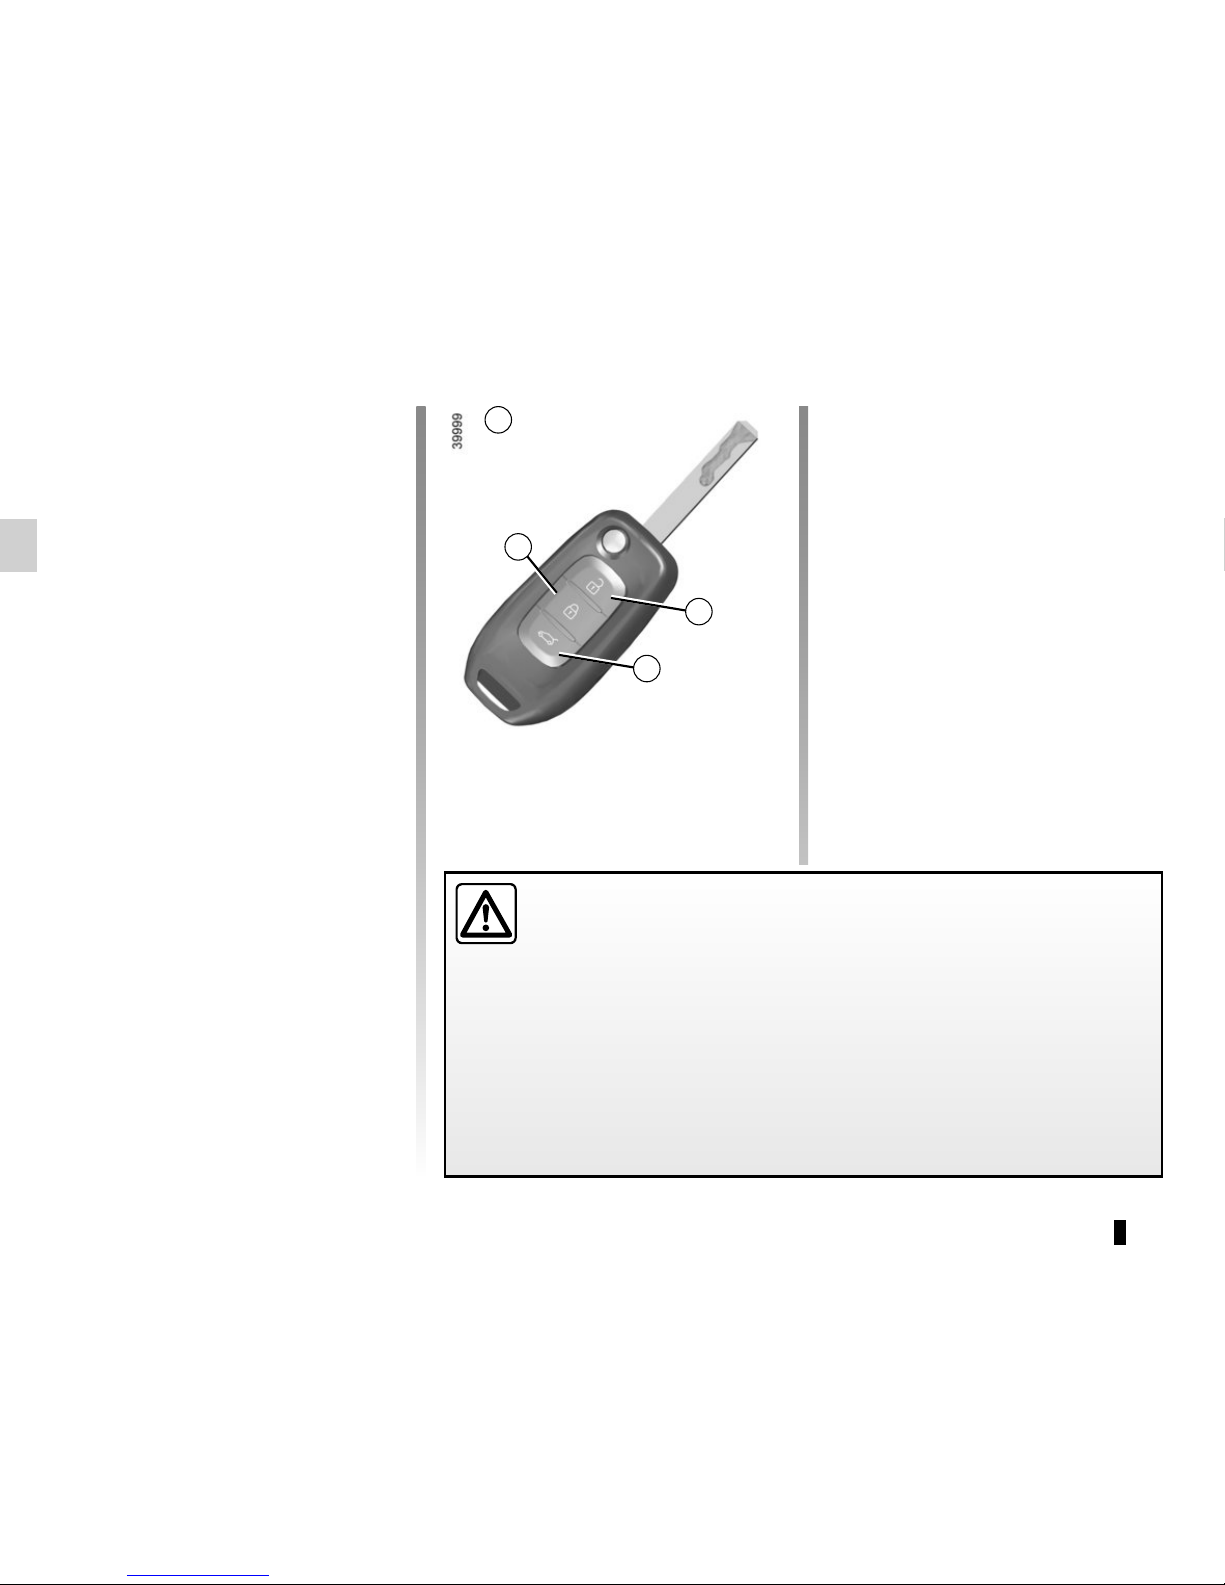
Locking/unlocking only the
boot
Press the button 3.
RADIO FREQUENCY REMOTE CONTROL UNIT: use
The remote control A can be used to
lock or unlock the doors and boot.
It is powered by a battery which must
be replaced (refer to the information on
“Radio frequency remote control: batteries” in Section 5).
Locking the doors
Press locking button 1.
The side indicator lights and hazard
warning lights flash twice to indicate
that the doors have been locked.
If a door or the boot is open or not properly shut, they will lock and unlock in
quick succession and the hazard warning lights and indicator lights will not
flash.
Unlocking the doors
Pressing button 2 unlocks the doors
and tailgate.
The side indicator lights and hazard
warning lights flash once to indicate
that the doors have been unlocked.
1
3
A
2
Note:
With the engine running, the ignition
switched on and in accessories position
(refer to “Ignition switch: vehicles with a
key” in Section 2), the remote control
buttons will be inactive.
Driver’s responsibility when parking or stopping the vehicle
Never leave an animal, child or adult who is not self-sufficient alone on
your vehicle, even for a short time.
They may pose a risk to themselves or to others by starting the engine,
activating equipment such as the electric windows or locking the doors.
Also, in hot and/or sunny weather, please remember that the temperature inside
the passenger compartment increases very quickly.
RISK OF DEATH OR SERIOUS INJURY.
1.5
RADIO FREQUENCY REMOTE CONTROL UNIT: deadlocking
Never use deadlocking if
someone is still inside the
vehicle.
If the vehicle is equipped with a deadlocking function, this allows you to lock
the opening elements and to prevent
the doors from being unlocked using
the interior handles (for example, by
breaking the window and then trying to
open the door from the inside).
To activate deadlocking
Press button 1 twice in quick succes-
sion.
The hazard warning lights and indicator
lights give two slow flashes and three
quick flashes to indicate locking.
Special note: deadlocking is not possible if the hazard warning lights or the
side lights are lit.
1
1.6
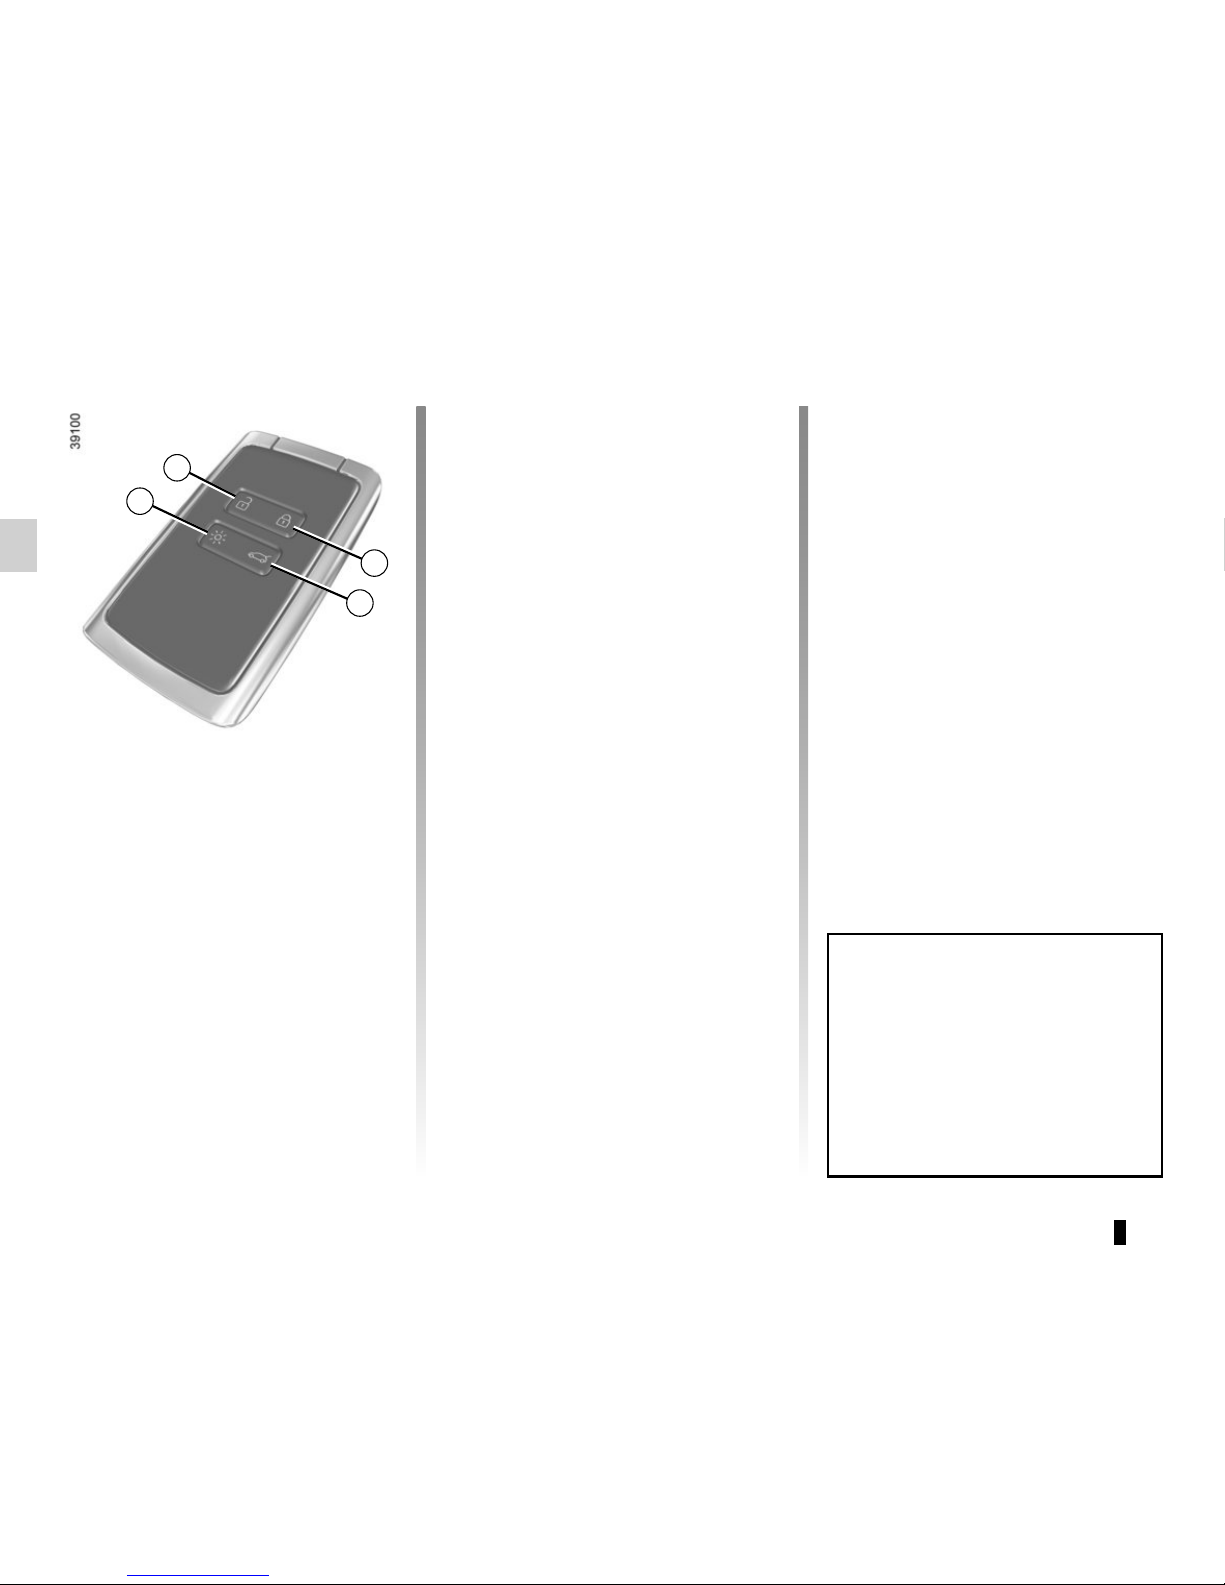
RENAULT CARD: general information (1/2)
The RENAULT card is used
for:
– locking/unlocking the doors and boot
(see the following pages);
– switching on the vehicle lighting re-
motely (refer to the following pages);
– starting the engine; refer to the in-
formation on “Starting the engine” in
Section 2.
Battery life
Make sure that the correct battery type
is being used, and that the battery is in
good condition and inserted correctly.
Its service life is approximately two
years: replace it when the message
“Keycard battery low” appears on the
instrument panel (refer to the information on the “RENAULT card: battery” in
section 5).
RENAULT card operating
range
This varies according to the surroundings. It is important to make sure when
handling the RENAULT card that you
do not lock or unlock the doors by inadvertently pressing the buttons.
When the battery is flat, you can
still lock/unlock and start your vehicle. Please see the information on
“Locking and unlocking the doors”
in Chapter 1 and “Starting, stopping
the engine” in Chapter 2.
1
2
3
4
1 Unlocking the doors and tailgate.
2 Locking all doors and tailgate.
3 Unlocking/locking the boot.
4 Switching on the lighting remotely.

1.7
RENAULT CARD: general information (2/2)
Advice
Avoid leaving the card in hot, cold or
humid areas.
Do not keep the RENAULT card in
a place where it could be bent or
damaged accidentally, such as in a
back pocket of a garment.
Replacement: need for an
additional RENAULT Card
If you lose your RENAULT card or
require another, you can obtain one
from an approved dealer.
If a RENAULT card is replaced, it
will be necessary to take the vehicle and all of its RENAULT cards
to an approved dealer to initialise
the system.
You may use up to four RENAULT
cards per vehicle.
Distance lighting function
Pressing button 4 switches on the
dipped beam headlights, the indicator
lights and the interior lighting for approximately 30 seconds. This can be
used, for example, to identify the vehicle from a distance when parked in a
car park.
Note: Pressing button 4 again switches
off the lighting.
4
Driver’s responsibility
when parking or stopping
the vehicle
Never leave an animal,
child or adult who is not self-sufficient alone on your vehicle, even for
a short time.
They may pose a risk to themselves
or to others by starting the engine,
activating equipment such as the
electric windows or locking the
doors.
Also, in hot and/or sunny weather,
please remember that the temperature inside the passenger compartment increases very quickly.
RISK OF DEATH OR SERIOUS
INJURY.
1.8
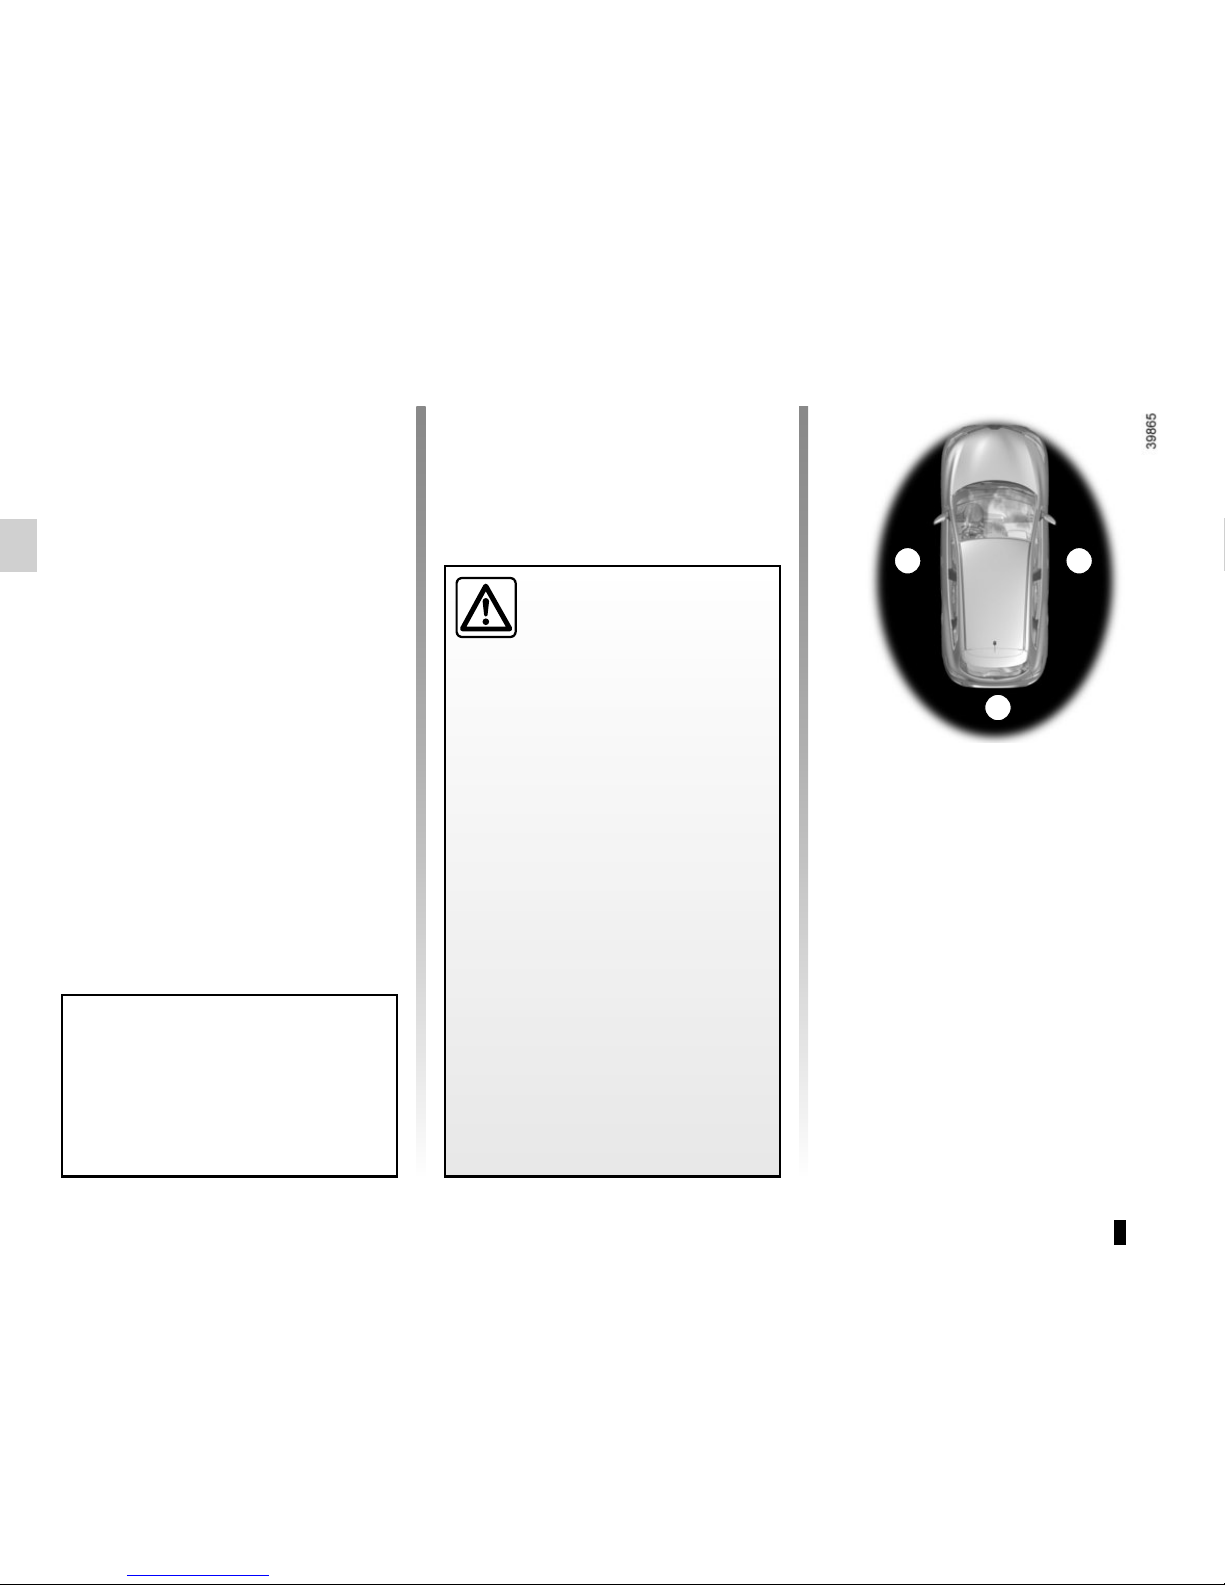
RENAULT CARD: usage (1/4)
Do not store the RENAULT card
anywhere it may come into contact with other electronic equipment
(computer, phone, etc.) as this could
hinder its operation.
There are two ways to unlock/lock the
vehicle:
– the “hands-free” function;
– RENAULT card buttons.
Using the card in hands-free
mode
It allows locking/unlocking without input
on the card RENAULT when within the
access zone 1.
Note: It is possible to deactivate the
hands-free system – please refer to
the information on the “Vehicle settings
customisation menu” in Section 1.
11
1
Driver’s responsibility
when parking or stopping
the vehicle
Never leave an animal,
child or adult who is not self-sufficient alone on your vehicle, even for
a short time.
They may pose a risk to themselves
or to others by starting the engine,
activating equipment such as the
electric windows or locking the
doors.
Also, in hot and/or sunny weather,
please remember that the temperature inside the passenger compartment increases very quickly.
RISK OF DEATH OR SERIOUS
INJURY.
1.9
RENAULT CARD: usage (2/4)
Special features relating to vehicle
locking
– When locking, if a door is open or in-
correctly closed, the vehicle will lock
and unlock in quick succession without the hazard warning lights flashing;
– after locking by pressing button 2
or 3, you have to wait approximately
3 seconds to be able to unlock the
vehicle again.
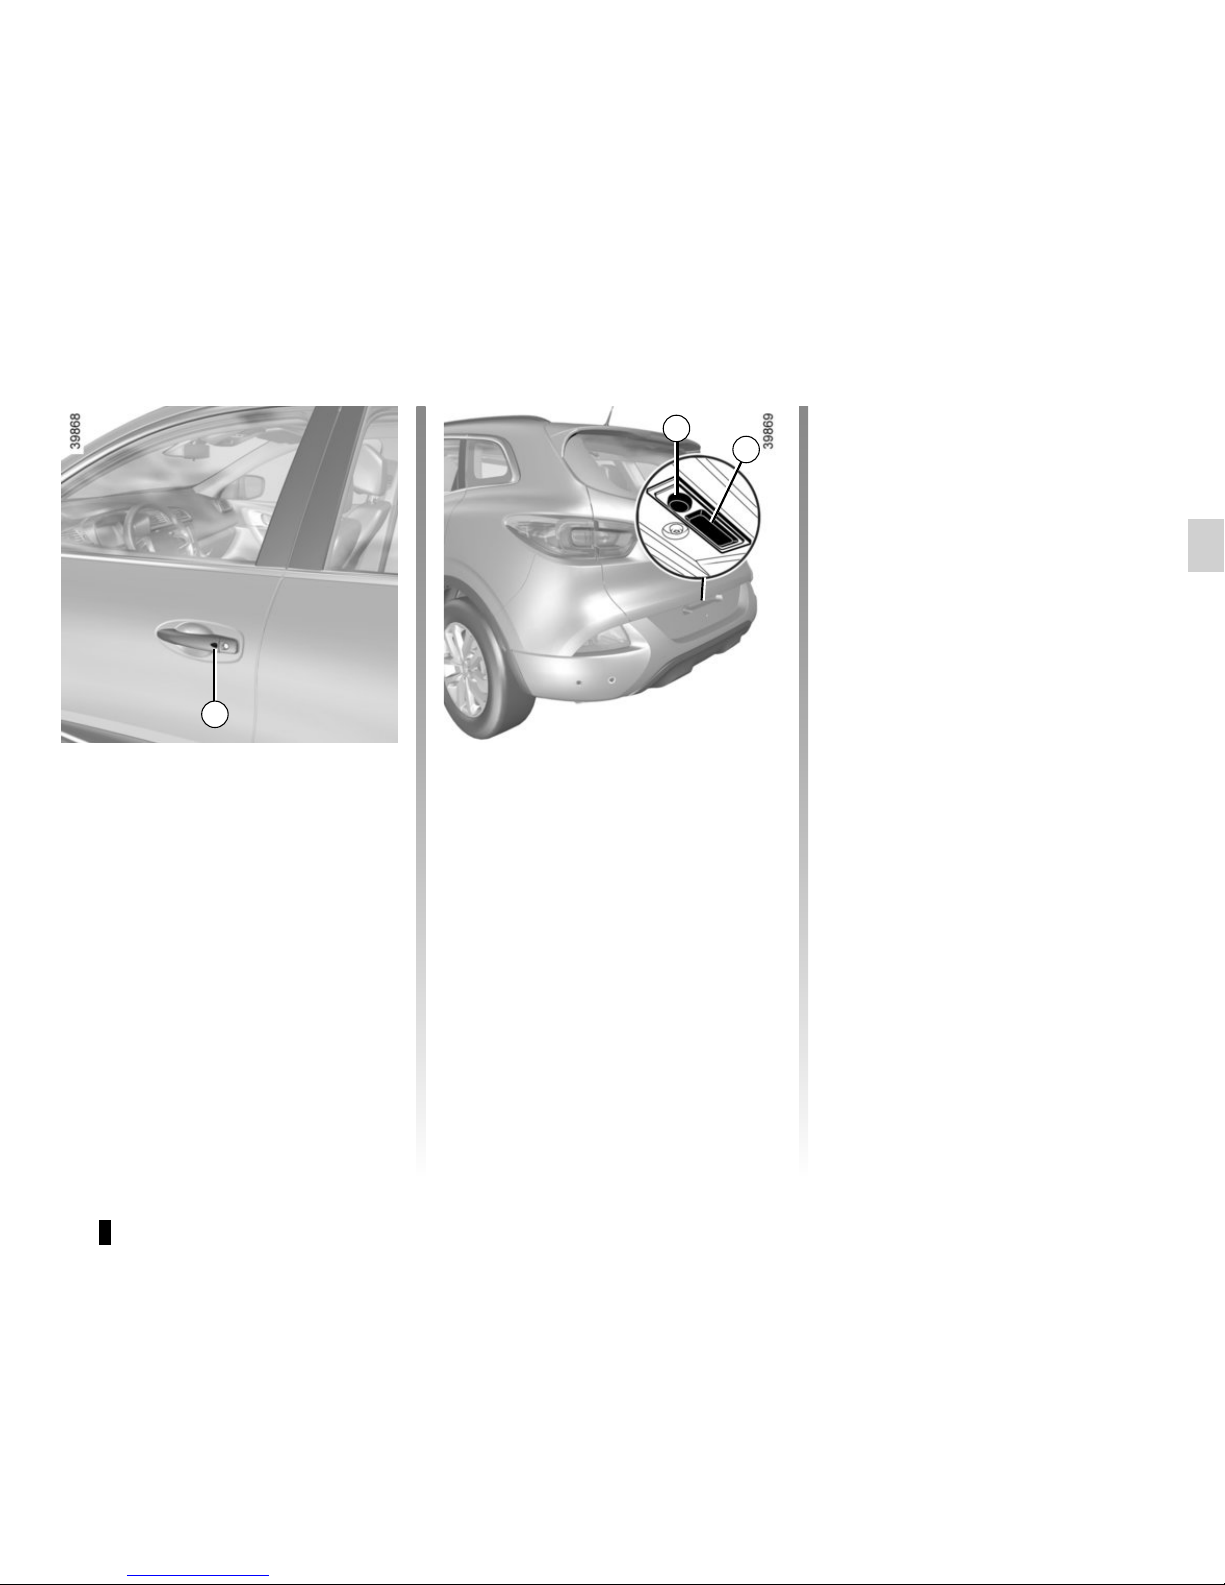
2
Locking using button 2 or 3
With the doors and boot closed, press
button 2 on one of the front door handles or button 3 on the tailgate. The vehicle will lock.
The hazard warning lights flash twice
to indicate that the vehicle is locked.
“Hands-free” unlocking
With the RENAULT card in zone 1,
press the button 2 on the handle of one
of the two front doors: the vehicle will
unlock.
The hazard warning lights flash once
to indicate that the doors have been unlocked.
Pressing the button 4 unlocks the entire
vehicle and releases the boot.
3
4

1.10
RENAULT CARD: usage (3/4)
Using the card as a remote
control
Unlocking with the card RENAULT
Press the button 5.
The hazard warning lights flash once
to indicate that the doors have been unlocked.
Locking using the RENAULT card
With the doors and boot closed, press
button 6: the vehicle will lock.
The hazard warning lights flash twice
to indicate that the vehicle is locked.
NB: The maximum distance at which
the vehicle locks depends on the surroundings.
Special features
If the a door or the boot is open or not
properly closed, the vehicle cannot be
locked. The vehicle will lock/unlock in
quick succession, but the hazard warning lights will not flash.
5
6
7
The card buttons are deactivated
when the engine is running.
If, while the engine is running, a door
is opened and closed, and the card is
no longer in the zone 7, the message
Keycard not detected indicates that
the card is not inside the vehicle. This
avoids you driving away after having
dropped off a passenger who has the
card, for example.
The warning disappears when the card
is detected again.

1.11
Locking/unlocking only the
boot
Press the button 8 to lock/unlock the
boot only.
8
RENAULT CARD: usage (4/4)
Driver’s responsibility
when parking or stopping
the vehicle
Never leave an animal,
child or adult who is not self-sufficient alone on your vehicle, even for
a short time.
They may pose a risk to themselves
or to others by starting the engine,
activating equipment such as the
electric windows or locking the
doors.
Also, in hot and/or sunny weather,
please remember that the temperature inside the passenger compartment increases very quickly.
RISK OF DEATH OR SERIOUS
INJURY.
1.12
Never use deadlocking if
someone is still inside the
vehicle.
To activate deadlocking
Press button 2 twice in quick succession.
With the vehicle unlocked, you can also
press the button 3 on the driver’s door,
passenger’s door or the boot twice in
quick succession (or, depending on the
vehicle, on the tailgate of the rear door).
In both cases, locking is indicated by
the hazard warning lights flashing five
times.
If the vehicle is equipped with a deadlocking function, this allows you to lock
the opening elements and to prevent
the doors from being unlocked using
the interior handles (for example, by
breaking the window and then trying to
open the door from the inside).
RENAULT CARD: deadlocking
To deactivate deadlocking
Unlock the vehicle using button 1 on
the RENAULT card.
The hazard warning lights flash once to
indicate that the doors have been unlocked.
After activating the deadlocking
function using button 2, “handsfree” locking and unlocking are deactivated.
To reactivate the “hands-free” mode:
restart the vehicle.
1
2
3
1.13
LOCKING, UNLOCKING THE DOORS (1/3)
If the remote control or,
depending on the vehicle, the
RENAULT card does not work
In some cases, the radio frequency
remote control or the RENAULT card
may not work:
– RENAULT card/radio frequency
remote control battery worn or run
flat, vehicle battery flat, etc.
– use of appliances operating on the
same frequency as the card (mobile
phone, etc.);
– vehicle located in a high electromag-
netic radiation zone.
Never leave your vehicle
with the key or RENAULT
card inside.
It is then possible:
– depending on the vehicle, use the
radio frequency remote control or
the emergency key integrated in the
card to unlock the front left-hand
door;
– to lock each of the doors manually;
– to use the interior door locking/un-
locking control (refer to the following
pages).
1.14
LOCKING, UNLOCKING THE DOORS (2/3)
Vehicles with key/remote
control
Using the key
Insert the key 2 into the lock 1 and lock
or unlock the front left-hand door.
2
1
1
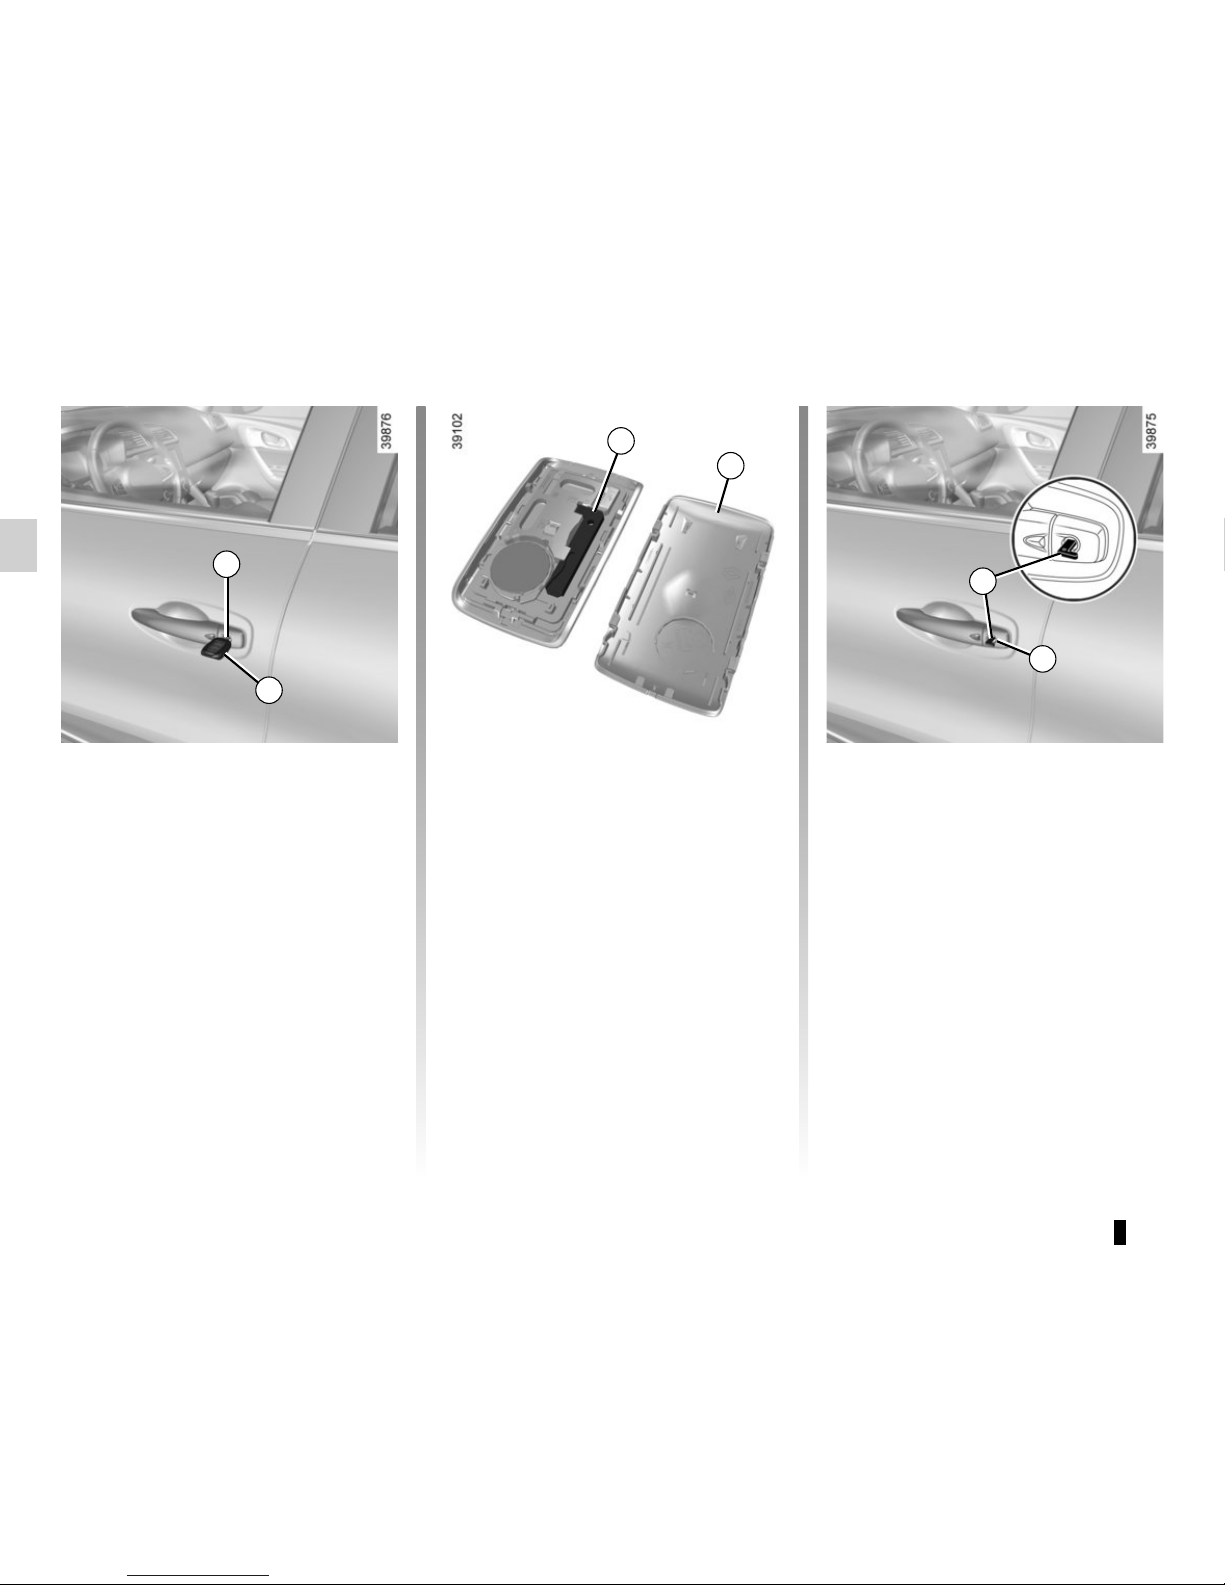
Using the integrated key
Insert the key 3 into the lock 1 and lock
or unlock the front left-hand door.
Once you are inside the vehicle, put the
key back in its casing in the RENAULT
card.
3
4
Vehicles with RENAULT card
Access key 3 integrated in the card
Slide the casing 4 upwards and pull the
key 1.
3
1.15
LOCKING, UNLOCKING THE DOORS (3/3)
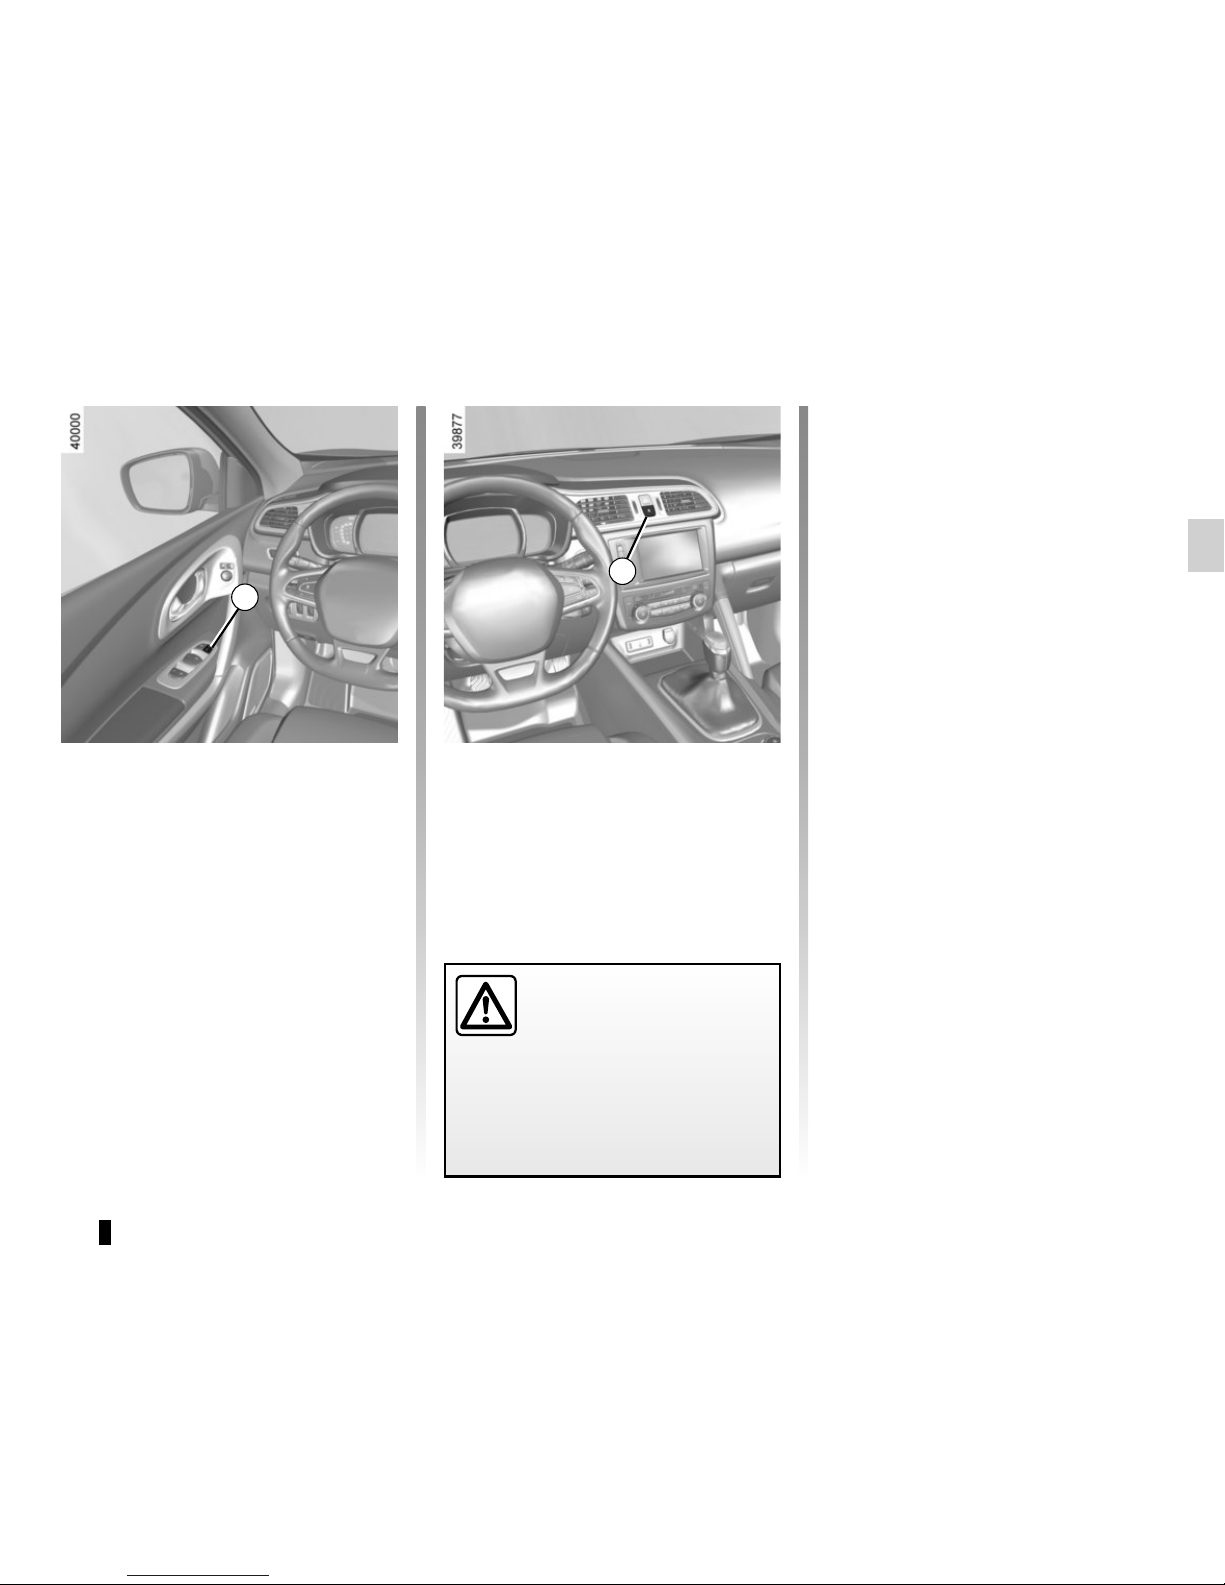
Interior locking/unlocking
door control
The switch 6 located on the driver and
passenger doors simultaneously controls the doors and the boot.
Unlocking: press the switch 6 on side
‡.
Locking: press the switch 6 on side
….
If a door or the tailgate is open or not
closed properly, the doors and tailgate
lock/unlock quickly.
If you need to transport objects with the
boot open, the other opening elements
can still be locked: with the engine
stopped, press and hold the switch 6
on side
… for more than 5 seconds to
lock the other opening elements.
Locking the opening
elements without the
RENAULT card or the key
For example, in the event of a discharged battery or the RENAULT card
or key temporarily not working, etc.
With the engine switched off and
an opening element (door or boot)
open, press and hold the switch 6 on
side
… for more than 5 seconds.
When the door is closed, all the doors
and the tailgate will be locked.
Unlocking the vehicle from the outside
is only possible with the RENAULT card
in the vehicle’s access zone or using
the key.
Door and tailgate status
indicator
With the ignition on, the warning
light 7 informs you of the locking status
of the opening elements:
– indicator light on, the doors and tail-
gate are locked;
– indicator light off, the doors and tail-
gate are unlocked.
When you lock the doors from the outside, the indicator light remains lit for a
moment, and then goes out.
7
Driver’s responsibility
If you decide to keep the
doors locked when you are
driving, remember that it
may be more difficult for those assisting you to gain access to the
passenger compartment in the
event of an emergency.
6
1.16
Opening from the inside
Pull the handle 3.
Lights-on reminder buzzer
If you have switched off the ignition
and left the lights switched on, a reminder buzzer will sound when a door
is opened and if the light stalk is not in
position AUTO.
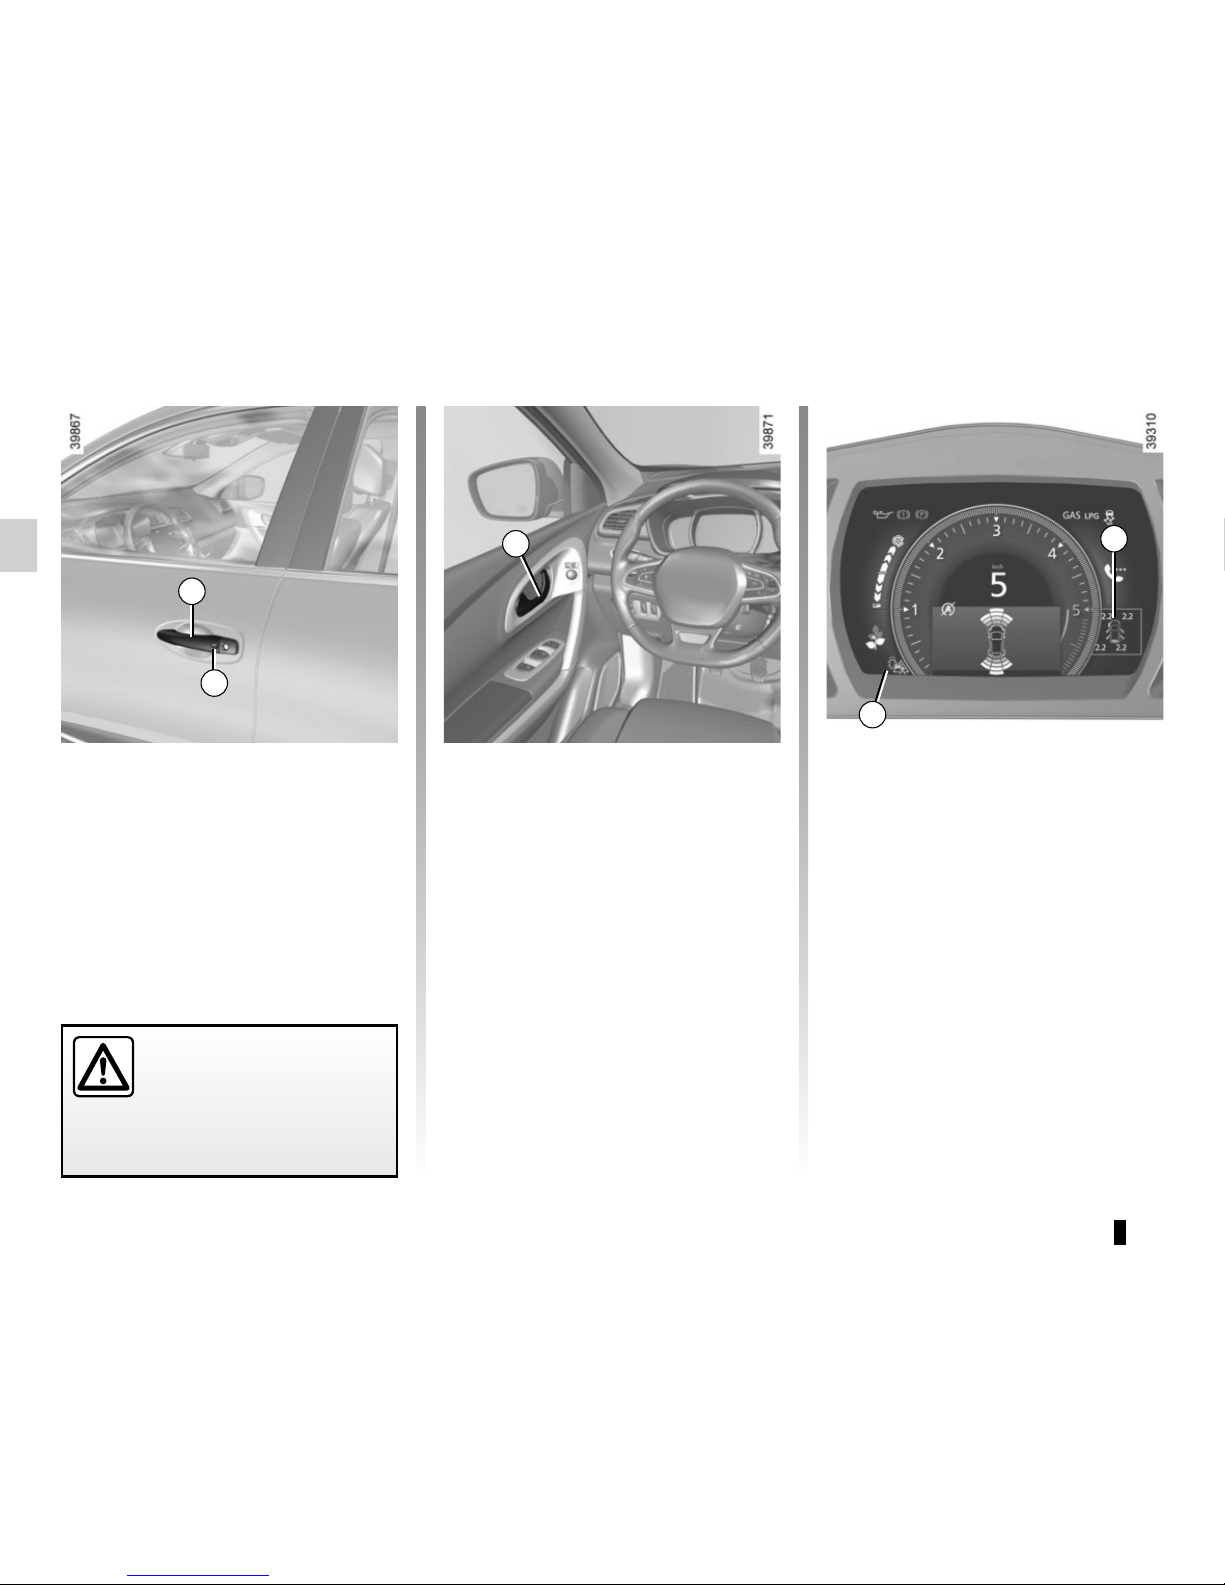
Opening the doors from the
outside
With the doors unlocked, pull handle 1.
Special feature on vehicles
equipped with a RENAULT card
With the doors locked, press button 2
on handle 1 of one of the two front
doors and pull towards you.
OPENING AND CLOSING THE DOORS (1/2)
1
3
As a safety precaution,
the doors should only be
opened or closed when the
vehicle is stationary.
2
4
5
Door/tailgate open buzzer
At a standstill, the warning light 4 lights
up on the instrument panel alongside
the warning light 5 2 indicating the
opening elements (door, boot) are open
or incorrectly closed.
Once the vehicle reaches a speed of
approximately 12 mph (20 km/h), a
warning light indicates the opening
element(s) (door, boot) open of improperly closed, alongside the message “Boot open” or “Door open” and a
beep will sound for around 40 seconds
or until the opening element is closed.
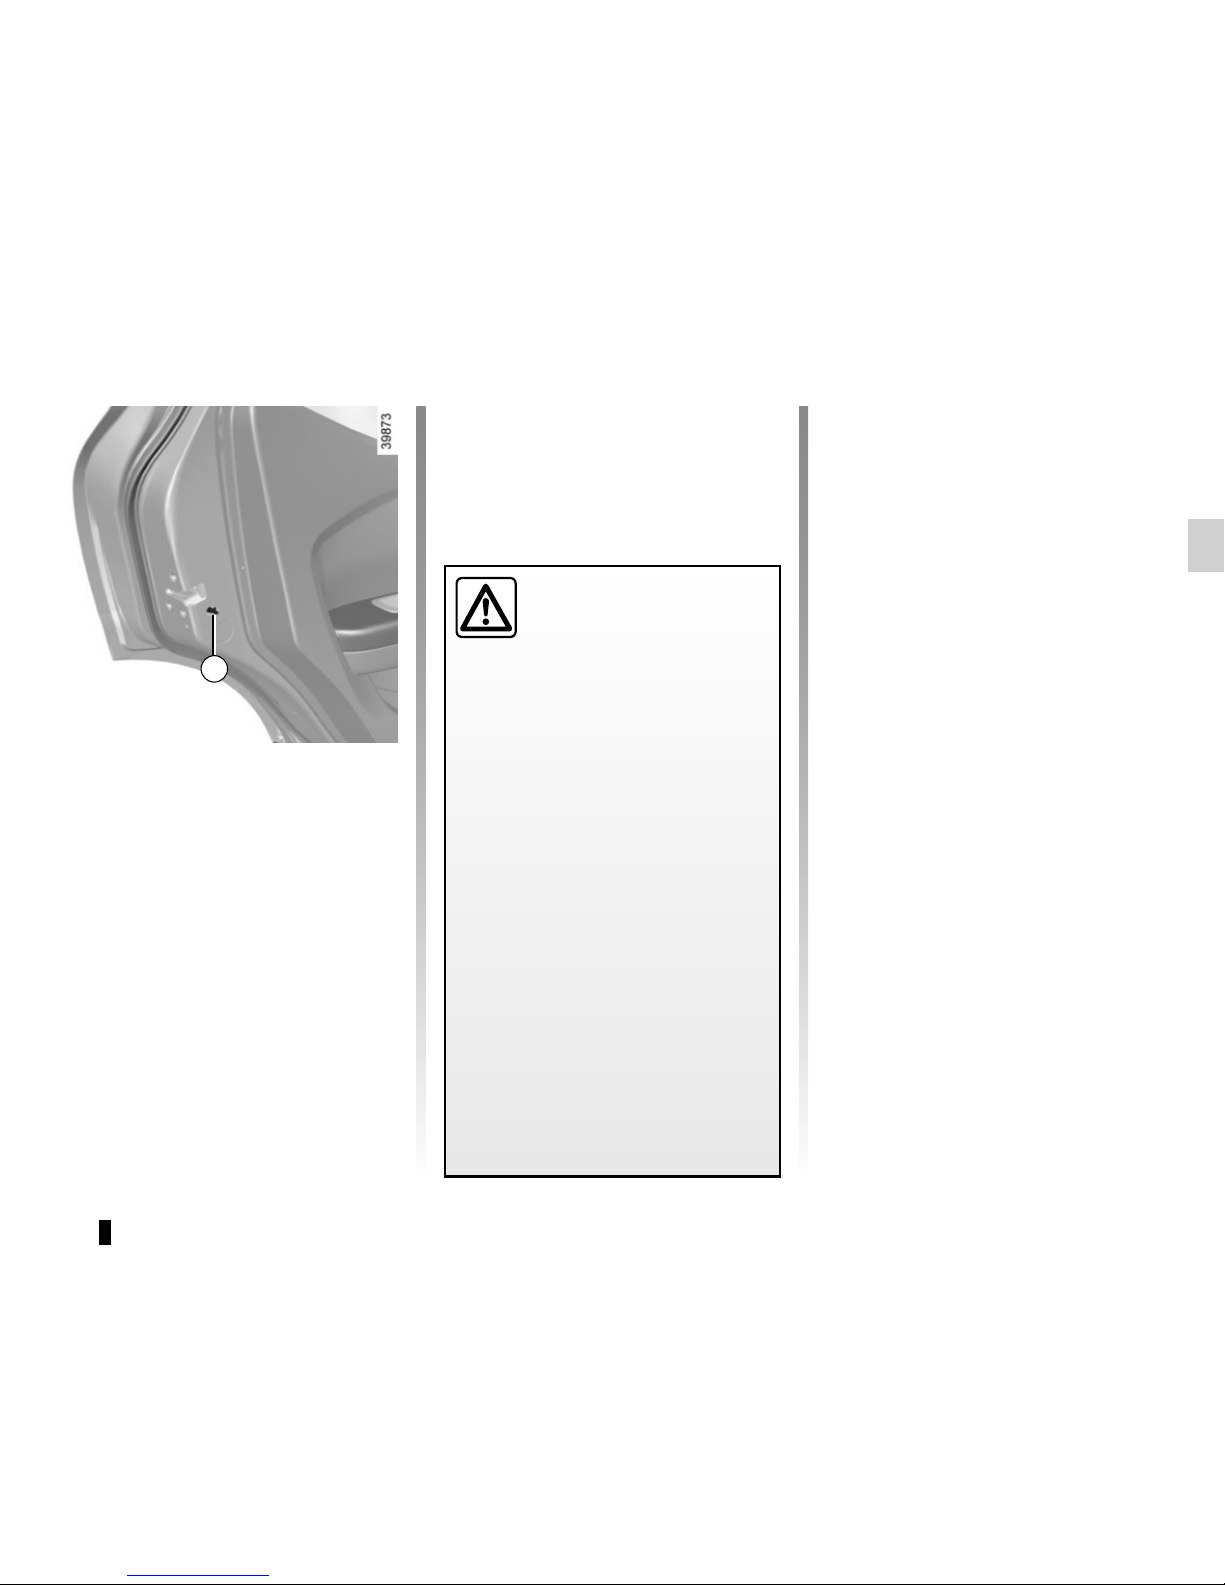
1.17
6
Vehicle with manual door locking
To make it impossible for the rear doors
to be opened from the inside, move
lever 6 on each door and check from
the inside that the doors are securely
locked.
OPENING AND CLOSING THE DOORS (2/2)
Driver’s responsibility
when parking or stopping
the vehicle
Never leave an animal,
child or adult who is not self-sufficient alone on your vehicle, even for
a short time.
They may pose a risk to themselves
or to others by starting the engine,
activating equipment such as the
electric windows or locking the
doors.
Also, in hot and/or sunny weather,
please remember that the temperature inside the passenger compartment increases very quickly.
RISK OF DEATH OR SERIOUS
INJURY.
1.18
Operating principle
After the vehicle is started, the system
automatically locks the doors when you
are driving at approximately 6 mph
(10 km/h) and over.
The door can be unlocked:
– by pressing the central door unlock-
ing switch 1
‡.
– at a standstill, by opening a front
door from inside the vehicle.
NB: if a door is opened or closed, it
will automatically lock again when the
vehicle reaches a speed of 6 mph
(10 km/h).
RENAULT ANTI-INTRUDER DEVICE (RAID)
Driver’s responsibility
If you decide to keep the
doors locked when you are
driving, remember that it
may be more difficult for those assisting you to gain access to the
passenger compartment in the
event of an emergency.
1
2
Depending on the vehicle, you can
also deactivate/activate this function
from the instrument panel or, depending on the vehicle, from the multifunction screen.
Refer to “Vehicle settings customisation
menu” in Section 1, regarding the “Lock
doorswhen in motion” function.
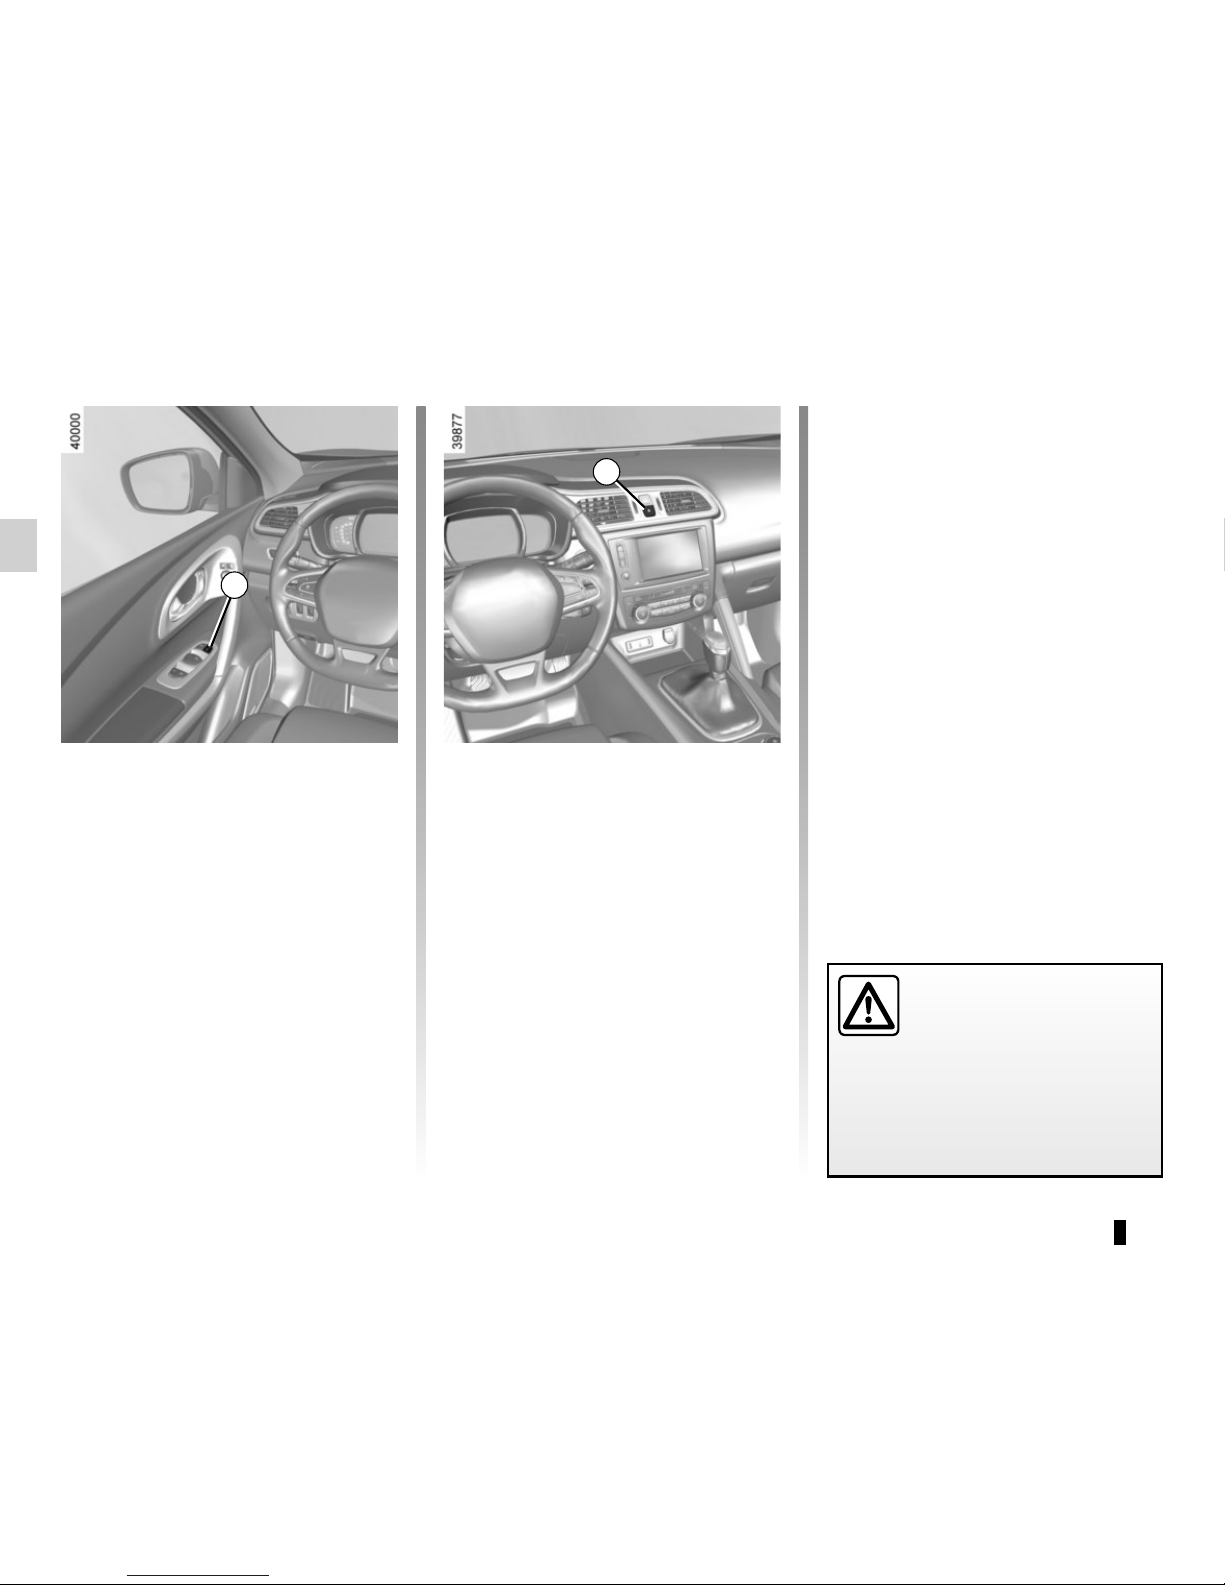
Operating faults
If you find an operating fault (no automatic locking, the warning light 2
does not light up when trying to lock
the doors and boot, etc.), firstly check
that the doors and boot lid are properly
closed. If they are properly closed, contact an authorised dealer.
Activating/deactivating the
function
To switch it on: with the vehicle at a
standstill and the engine running, press
the switch 1 on side … until a beep
sounds.
To deactivate: with the vehicle at a
standstill and the engine running, press
the switch 1 on side
‡ until two
beeps sound.
1.19
FRONT HEADRESTS
To raise the headrest
Pull the headrest upwards to the desired height. Check that it is correctly
locked.
To lower the headrest
Press button 3 and guide the headrest
down to the desired height. Check that
it is correctly locked in place.
A
3
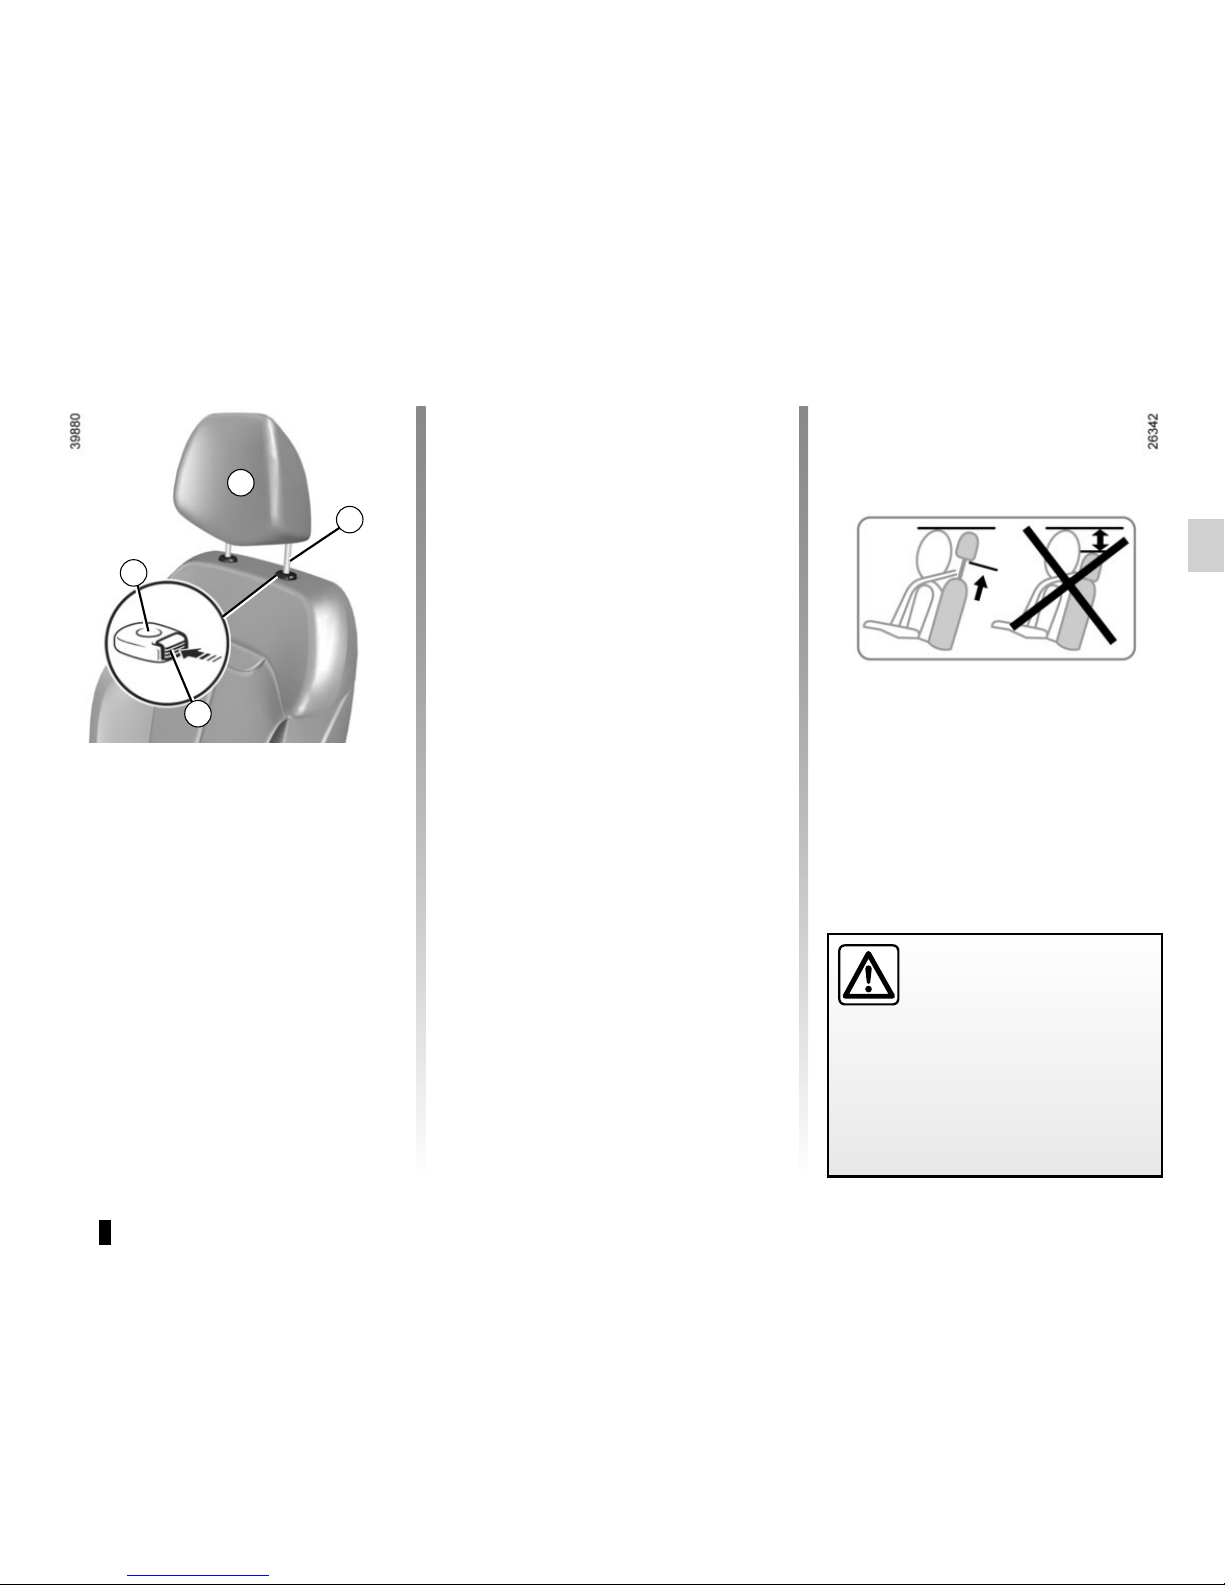
To raise the headrest
Raise the headrest to its highest position (tilt the seatback backwards if
necessary). Press button 3 and lift the
headrest to release it.
To refit the headrest
Check that the headrest rods are
clean 2.
The rod with a notch should be inserted into the slot 1 fitted with a locking button 3.
Insert the headrest rods into the holes
(tilt the seatback backwards if necessary).
Press the 3 button and push in the
headrest as far as it will go, then adjust
it to the desired height. Check that
each rod 2 on the seatback is securely
locked.
The headrest is important
for safety. Ensure that it is in
place and in the correct po-
sition: the top of the headrest should be as close as possible
to the top of the head and there must
be a minimal distance between the
head and the headrest A.
2
1
1.20
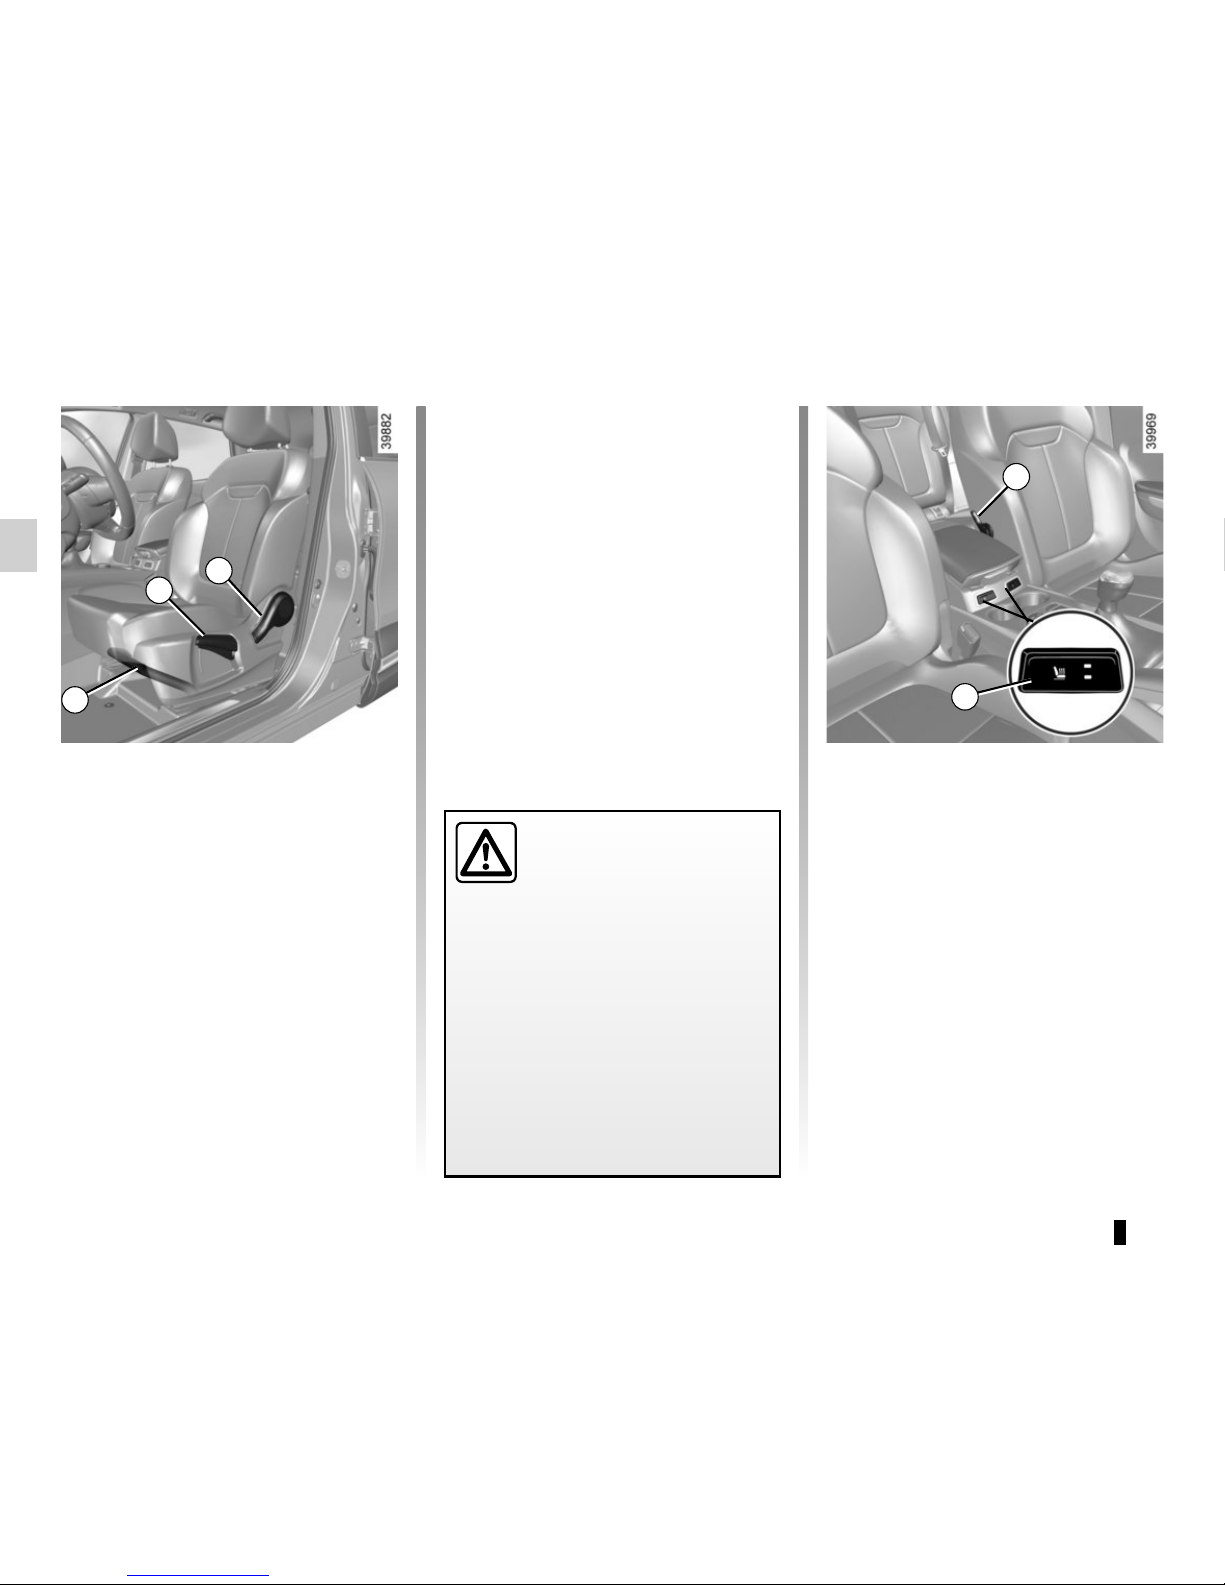
To raise or lower the seat
base
Move lever 2 as many times as necessary upwards or downwards.
To tilt the seatback
Lift the lever 3 and move the seatback
to the desired position.
To move the seat forwards or
backwards
Lift handle 1 to unlock. Release the
handle once the seat is in the correct
position and ensure that the seat is
locked.
FRONT SEATS WITH MANUAL CONTROL (1/2)
2
1
3
For safety reasons, carry
out any adjustments when
the vehicle is not being
driven.
We would advise you not to recline
the seatbacks too far to ensure that
the effectiveness of the seat belts is
not reduced.
Nothing should be placed on the
floor (area in front of driver) as such
objects may slide under the pedal
during braking manoeuvres, thus
obstructing its use.
5
6
To adjust the lumbar support
on the driver’s seat
Lower handle 5 to increase the support
and lift to decrease it.
Heated seats
With the ignition on, press the switch 6
for the seat desired. The switch warning lights come on.
The system automatically decides
whether or not the heating is needed.
Pressing the button again lowers the
temperature. Pressing a third time
switches the heating off.
1.21
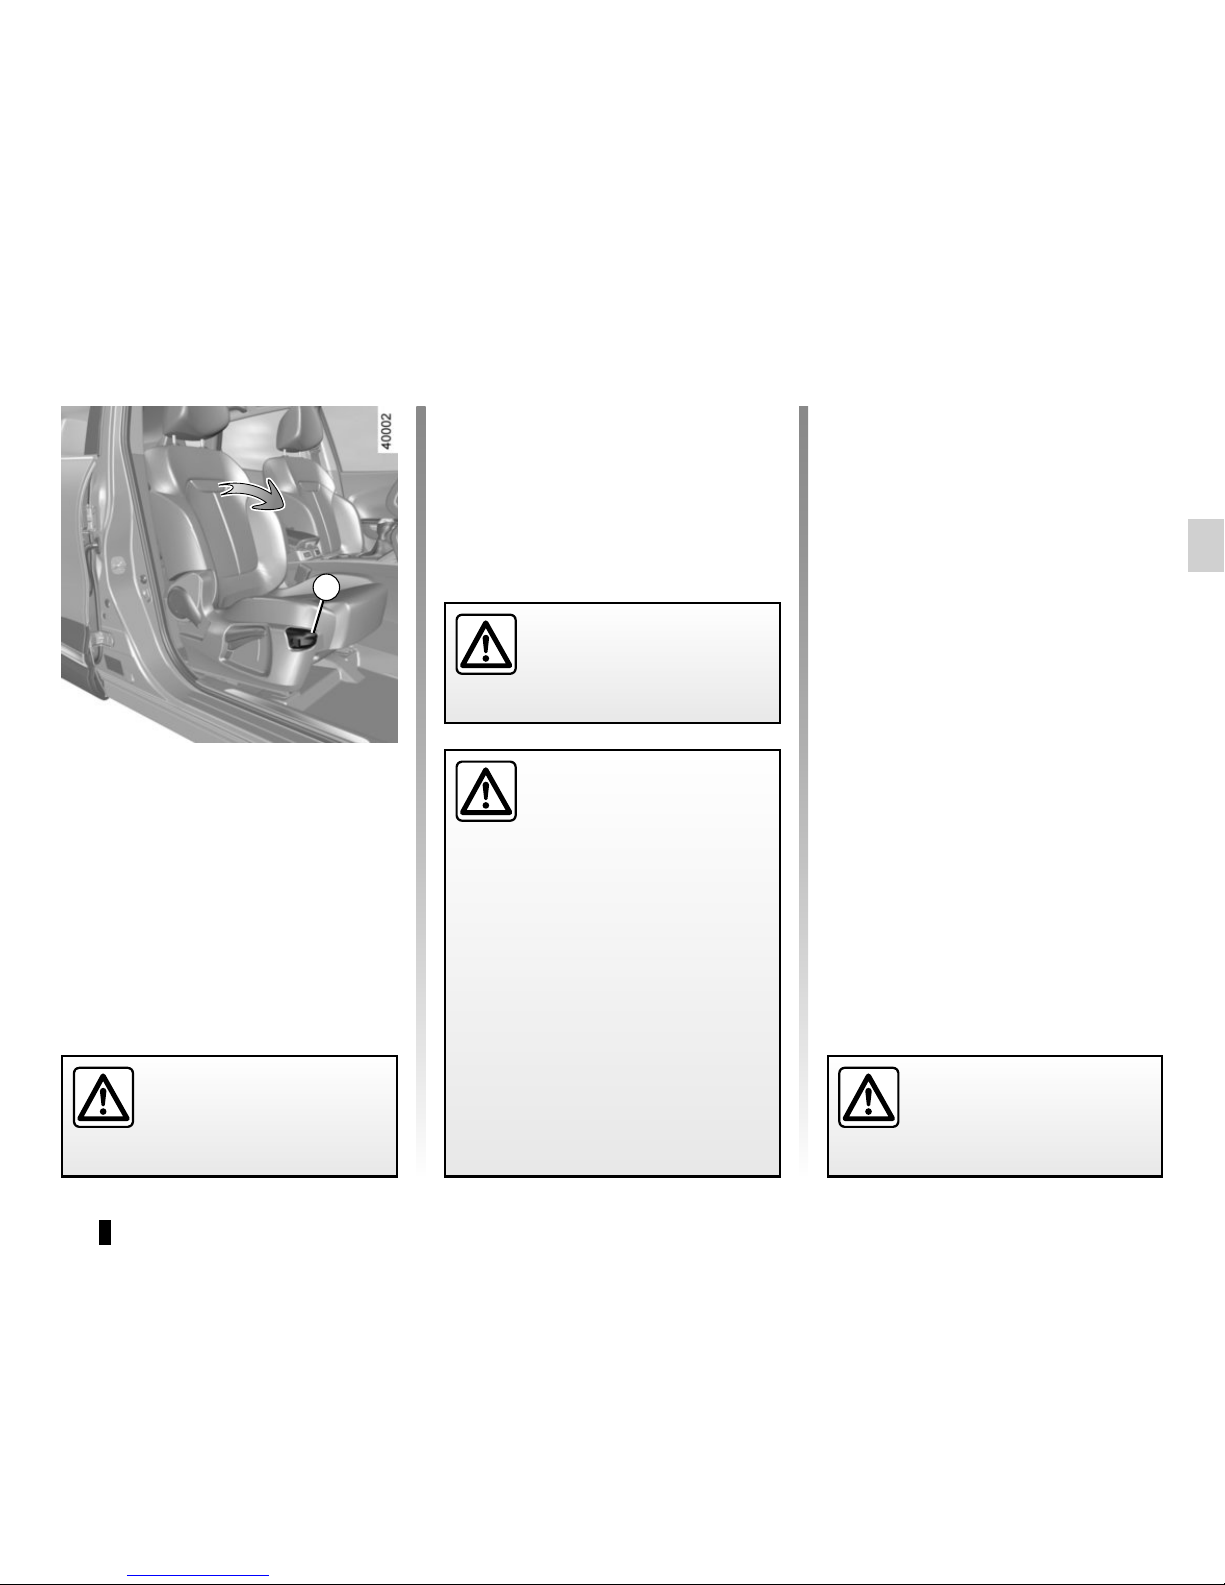
Table function
Depending on the vehicle, the passenger seatback may be folded down onto
the seat base to create a table.
– Lower the headrest;
– move the seat back;
– pull the handle 7 and fully lower the
seatback.
FRONT SEATS WITH MANUAL CONTROL (2/2)
When the front seat is in
table position, the front passenger air bag must be dis-
abled (see information on
“Child safety: activating/deactivating the front passenger air bag” in
Section 1).
Risk of serious injury caused by
items resting on the seatback table
which may be dislodged when the
air bag is deployed.
The label (on the dashboard) and
the markings (on the windscreen)
remind you of these instructions.
7
For your safety, attach any
transported objects when
the seat is in the table position.
When using the passenger seat in table
position, you must not use the two rear
seats immediately behind it.
Repositioning the seat
Make sure that nothing prevents the
seat from moving.
– Pull the handle 7 and raise the seat-
back, ensuring that it locks firmly in
place.
– Reposition the seat base.
Be sure to hold the seat-
back when placing it in the
flat position. Risk of injury.
For safety reasons, carry
out any adjustments when
the vehicle is not being
driven.
1.22
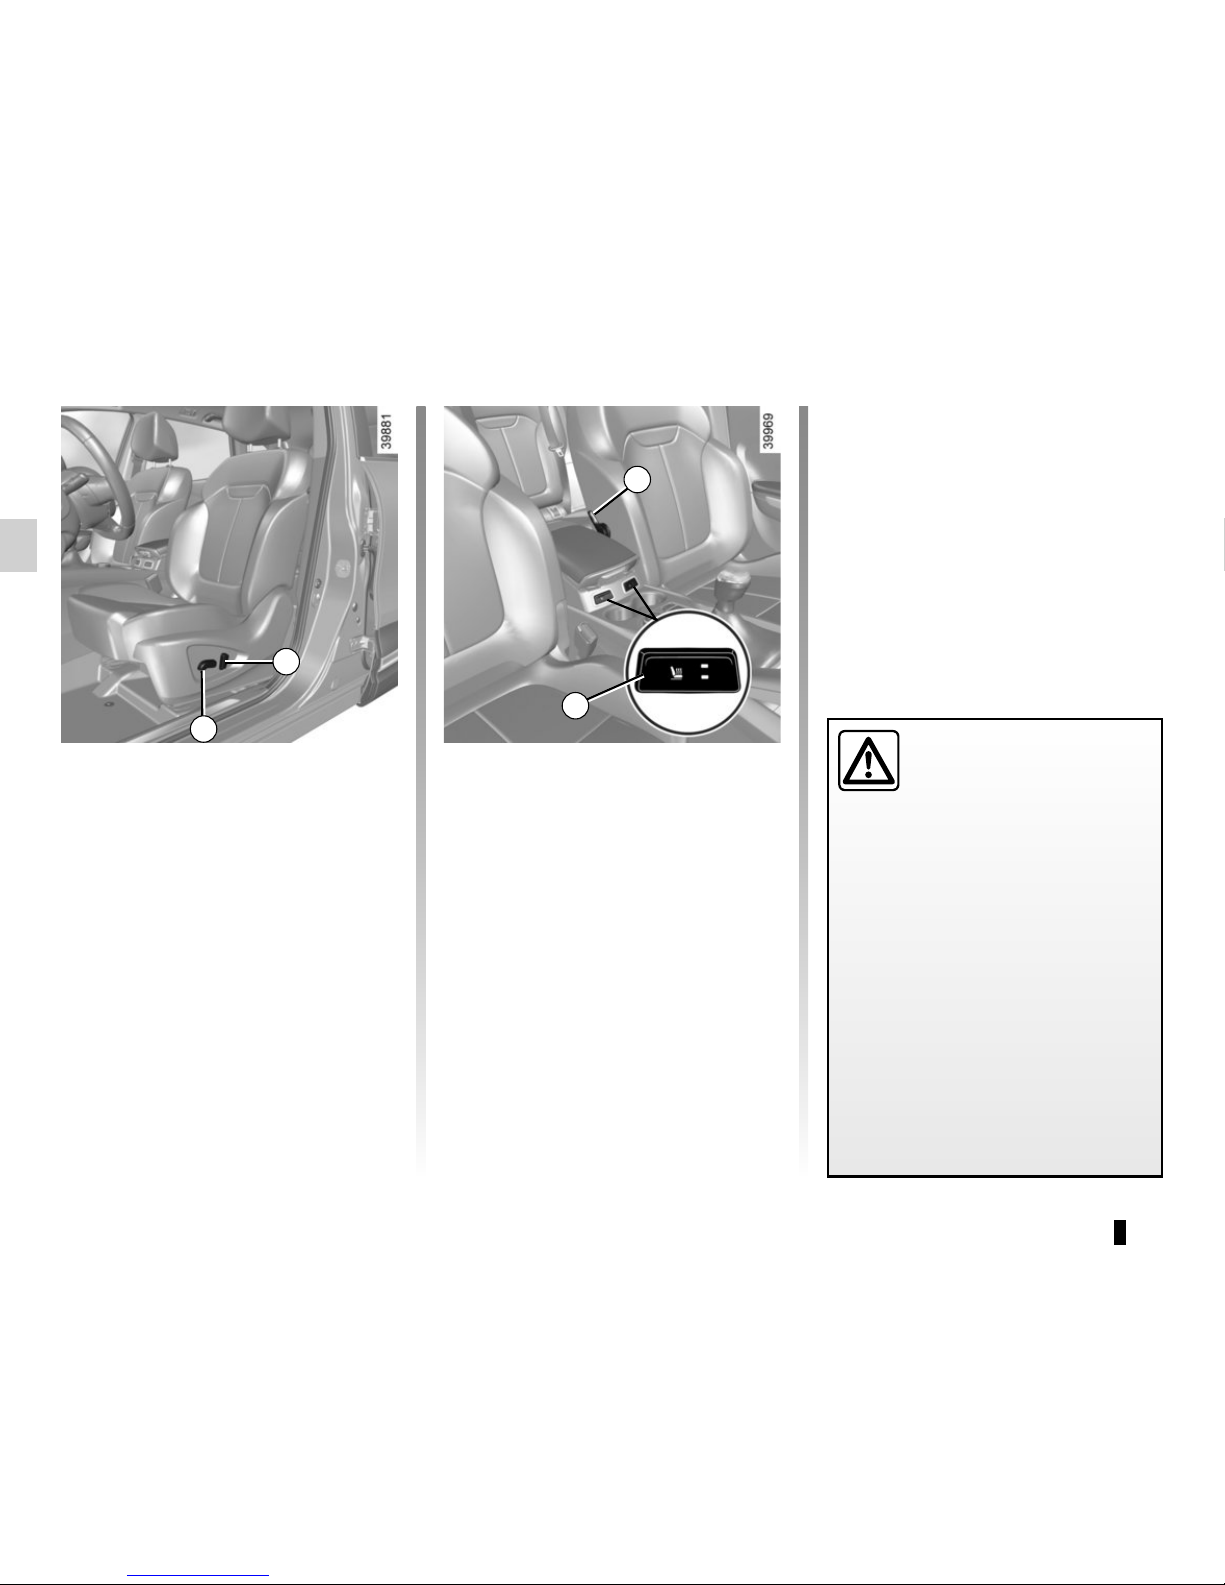
DRIVER’S SEAT WITH ELECTRIC CONTROLS
For safety reasons, carry
out any adjustments when
the vehicle is not being
driven.
Make sure that the seatbacks are
correctly locked in place.
We would advise you not to recline
the seatbacks too far to ensure that
the effectiveness of the seat belts is
not reduced.
No object should be placed on the
floor (in front of the driver). such
objects may slide under the pedals
during sudden braking manoeuvres
and obstruct their use.
Adjusting the seat squab:
– To move the seat forwards or back
Move the switch 1 forwards or back-
wards.
– To raise or lower the seat base
Move the switch 1 up or down.
Adjusting the seatback:
To tilt the seatback, move the switch 2
forwards or backwards.
Heated seats
With the ignition on, press the switch 4
for the seat desired. The switch warning lights come on.
The system automatically decides
whether or not the heating is needed.
Pressing the button again lowers the
temperature. Pressing a third time
switches the heating off.
1
2
To adjust the seat’s lumbar
position
Lower the handle 3 to increase the support and lift to decrease it.
3
4
1.23
Always wear your seat belt when travelling in your vehicle. You must also
comply with the legislation of the particular country you are in.
SEAT BELTS (1/4)
1
2
Incorrectly adjusted or
twisted seat belts may
cause injuries in the event
of an accident.
Use one seat belt per person,
whether child or adult.
Even pregnant women should wear
a seat belt. In this case, ensure that
the lap belt is not exerting too much
pressure on the abdomen, but do
not allow any slack.
Before starting, first adjust your driving position, then ask all occupants
to adjust their seat belts to ensure
optimum protection.
Adjusting your driving
position
– Sit well back in your seat (having
first removed your coat or jacket).
This is essential to ensure your back
is positioned correctly;
– adjust the distance between the
seat and the pedals. Your seat
should be as far back as possible
while still allowing you to depress
the clutch pedal fully. The seatback
should be adjusted so that your arms
are slightly bent when you hold the
steering wheel;
– adjust the position of your head-
rest. For the maximum safety, your
head must be as close as possible to
the headrest;
– adjust the height of the seat. This
adjustment allows you to select the
seat position which offers you the
best possible view;
– adjust the position of the steering
wheel.
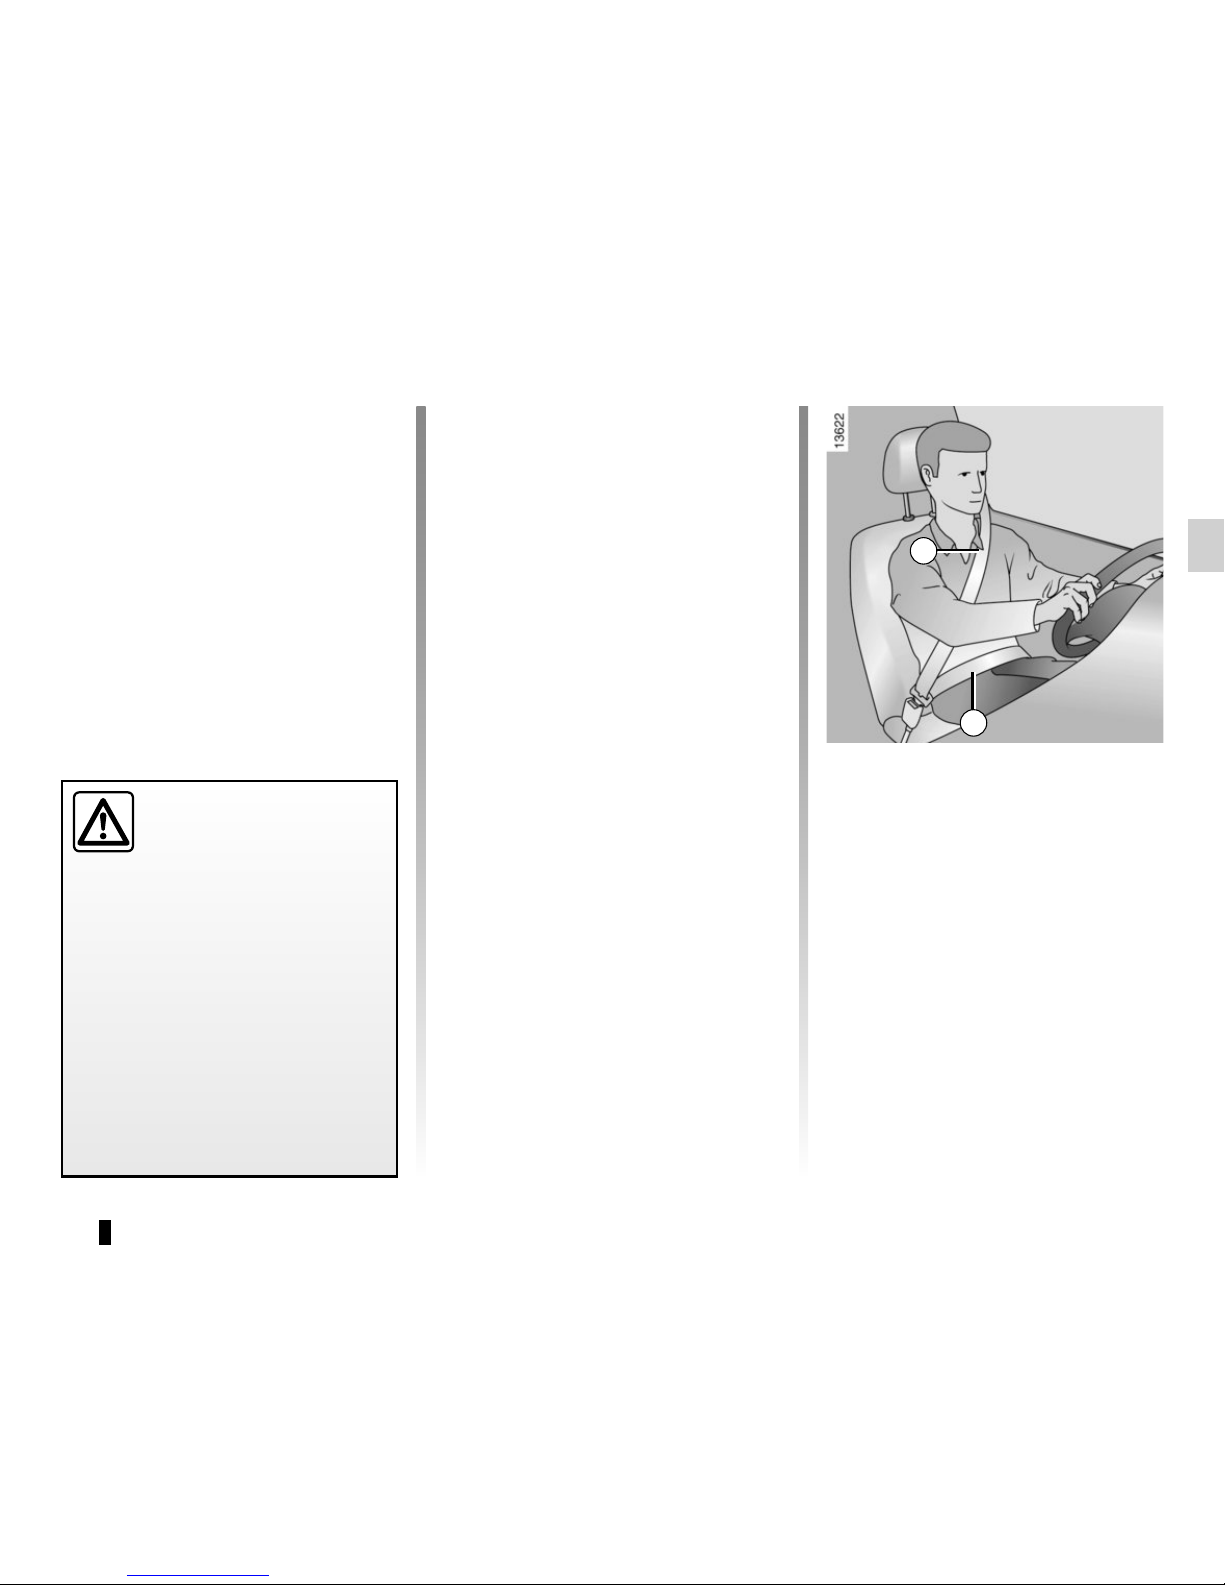
Adjusting the seat belts
Sit with your back firmly against the
seatback.
Shoulder strap 1 should be as close as
possible to the base of the neck but not
on it.
Lap belt 2 should be worn flat over the
thighs and against the pelvis.
The belt should be worn so that it is
as close as possible to your body, i.e.:
avoid wearing heavy clothing or keeping bulky objects under the belts, etc.
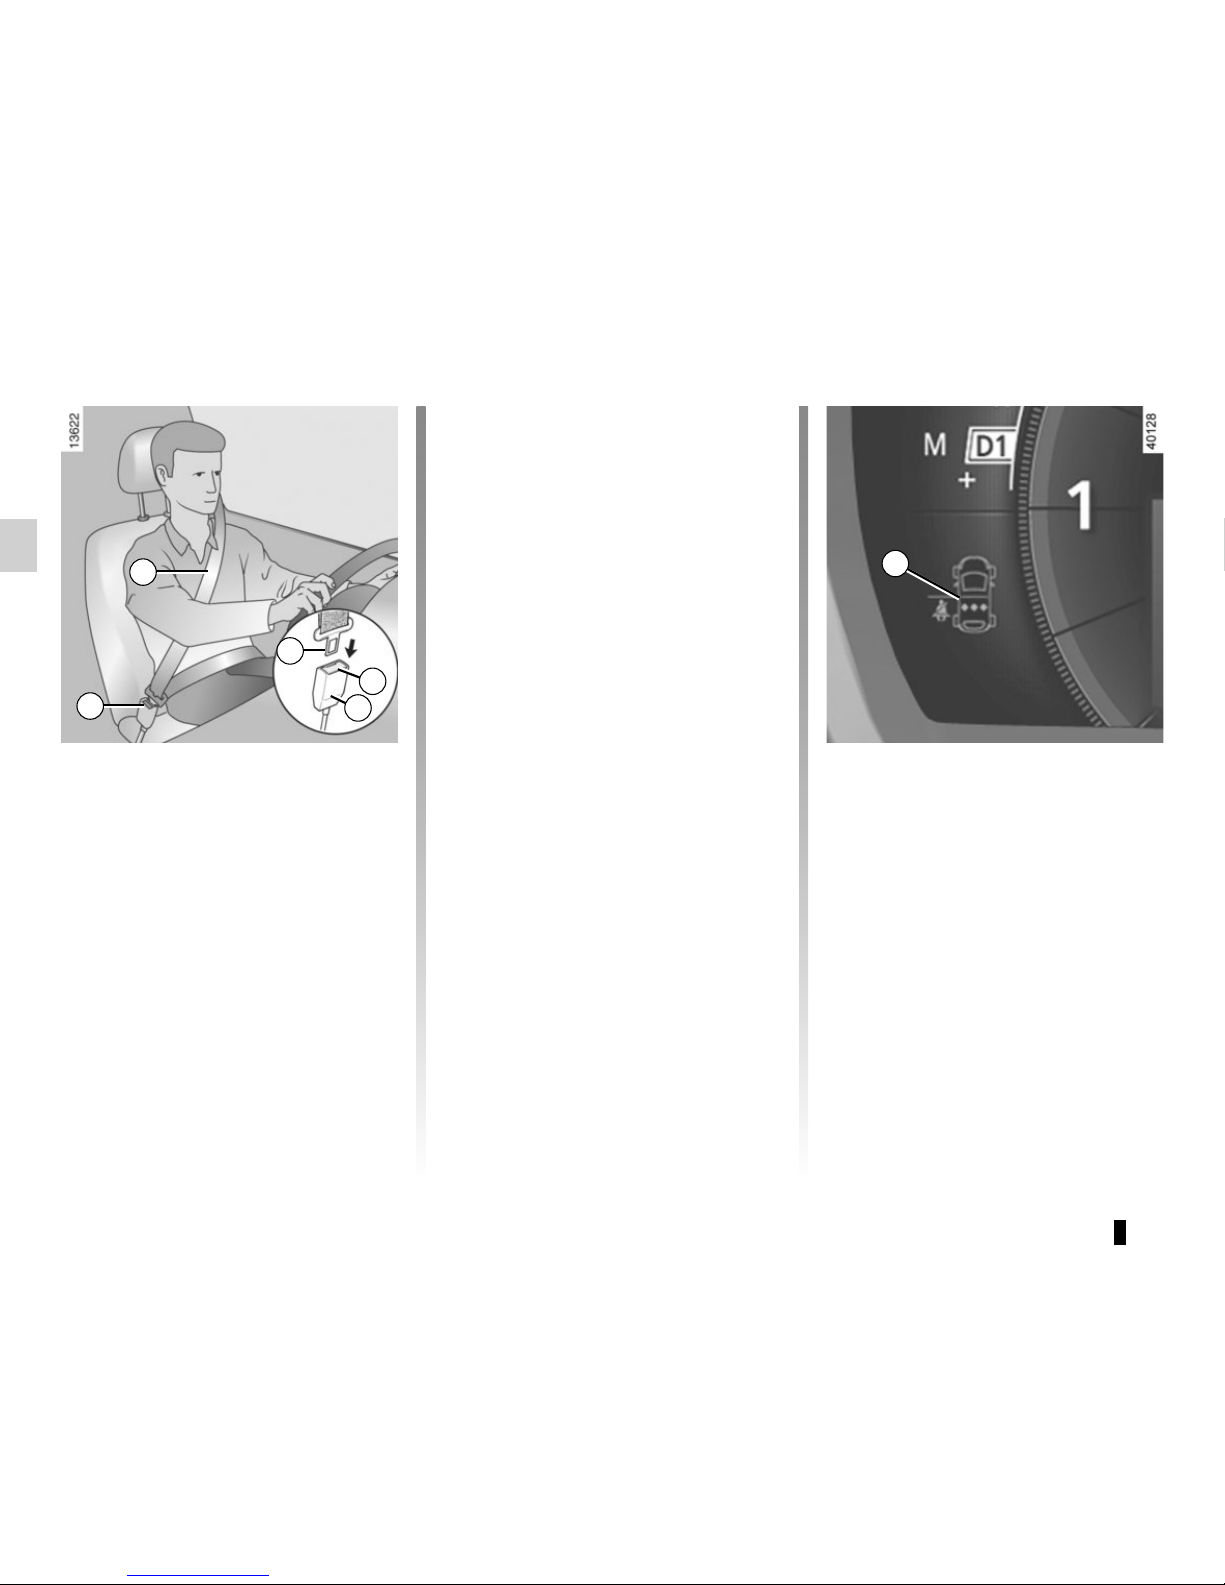
1.24
SEAT BELTS (2/4)
Locking
Unwind the belt slowly and smoothly
and ensure that buckle 3 locks into
catch 5 (check that it is locked by pulling on buckle 3).
If the belt jams, allow it to return slightly
before attempting to unwind it again.
If your seat belt is completely jammed,
pull slowly, but firmly, so that just over
3 cm unwinds. Allow it to return slightly
before attempting to unwind it again.
If there is still a problem, contact an approved dealer.
1
5
3
4
5
ß
Driver’s seat belt reminder
and, depending on the vehicle, front passenger seat belt reminder
This lights up on the central display
when starting the engine then, if the
driver’s or front passenger’s seat belt
(if this seat is occupied) is not fastened
and the vehicle has reached approximately 12 mph (20 km/h), it flashes and
a bleep sounds for around 120 seconds.
Note: an object placed on the passenger seat base may activate the warning
light in some cases.
Rear seat belt reminder (depending
on vehicle)
Warning light
ß lights up on the
central display, accompanied by the
graphic 6 on the instrument panel for
approximately 30 seconds each time
the vehicle is started, a door is opened
or a rear seat belt is fastened or unfastened.
Check that the rear passengers are
wearing seat belts and that the number
of seat belts shown as fastened corresponds to the number of rear seat
places occupied.
On the graphic 6:
– marker in green: seat belt fastened;
– marker in red: seat belt unfastened.
Unfastening
Press button 4 and the seat belt will be
rewound by the inertia reel. Guide the
belt.
6
 Loading...