

Quadra-Fire Pioneer-III-ABK, Pioneer-III-RBK Owner's Manual
Pour demander un exemplaire en
Owner’s Manual
Care and Operation
français de ce Manuel
du propriétaire, visitez www.quadra-
re.com/translations.
INSTALLER: Leave this manual with party responsible for use and operation.
OWNER: Retain this manual for future reference.
NOTICE: DO NOT discard this manual!
R
WARNING: If the information in these
instructions is not followed exactly, a re
Model(s):
or explosion may result causing property
damage, personal injury, or death.
Pioneer-III-ABK
Pioneer-III-RBK
• DO NOT store or use gasoline or other am-
mable vapors and liquids in the vicinity of this
or any other appliance.
DO NOT overre. Overring will void your
•
warranty.
• Comply with all minimum clearances to com-
bustibles as specied. Failure to comply may
cause house re.
EPA CERTIFIED WOODBURNING
FIREPLACE
Installation and service of this appliance should be performed by
qualified personnel. Hearth & Home Technologies recomends HHT
Factory Trained or NFI certified professionals.
WARNING
HOT SURFACES!
Glass and other surfaces are hot during
operation AND cool down.
Hot glass will cause burns.
• DO NOT touch glass until it is cooled
• NEVER allow children to touch glass
• Keep children away
• CAREFULLY SUPERVISE children in same room as
replace.
• Alert children and adults to hazards of high temperatures.
High temperatures may ignite clothing or other ammable
materials.
• Keep clothing, furniture, draperies and other ammable
materials away.
WARNING
Fire Risk.
For use with solid wood fuel only.
Other fuels may overre and generate poisonous
gases (i.e. carbon monoxide).
Quadra-Fire • Pioneer III Owner’s Manual • 4182-900 • Rev D • 08/19
1

Safety Alert Key:
• DANGER! Indicates a hazardous situation which, if not avoided will result in death or serious injury.
• WARNING! Indicates a hazardous situation which, if not avoided could result in death or serious injury.
• CAUTION! Indicates a hazardous situation which, if not avoided, could result in minor or moderate injury.
• NOTICE: Indicates practices which may cause damage to the replace or to property.
Table of Contents
1 Welcome
A. Congratulations 3
B. LIMITED LIFETIME WARRANTY 4
2 Product Specic Information
A. Fireplace Certication 6
B. BTU & Efciency Specications 6
C. Mobile Home Approved 6
D. Glass Specications 6
3 Important Safety and Operating Information
A. Fireplace Safety 7
1. Clear Space 7
2. Firebrick 8
3. Bafe and Blanket 8
4. Over-Firing Your Fireplace 8
5. Chimney Fire 8
B. General Operating Parts 9
1. Smart Burn Technology System Activation 10
2. Thermostat Location & Wiring to Fireplace 11
3. Programmable Wall Thermostat Install 12
4. Outside Air 16
5. Glass Doors 16
6. Convection Fan Operation 16
7. Battery Holder 16
C. Fuel 17
1. Hardwood vs. Softwood 18
2. Moisture Content 18
3. Seasoning 18
4. Storing Wood 19
5. Burning Process 19
6. Dirty Glass 19
7. Creosote Formation 19
8. Opacity 19
D. First Fire 19
E. Lighting Instructions 20
F. Heat Output Control 22
G. Manual Override of Air Control 22
H. Frequently Asked Questions 23
I. Quick Start Guide 24
4 Maintenance and Service
A. Maintenance Tasks-Homeowners 25
1. Chimney Inspection 25
2. Creosote (Chimney) Cleaning 26
3. Care and Cleaning of Plated Surfaces 27
4. Glass Door 27
5. Glass Cleaning 27
6. Door Gasket 27
7. Ash Removal 27
8. Bafe and Blanket 27
9. Firebrick 27
B. Replacement Maintenance 28
1. Glass Replacement 28
2. Tighten or Adjust Door Latch 28
3. Manifold Tubes Removal and Replacement 28
4. Door Handle Assembly 28
5. Firebrick Replacement 28
6. Thermocouple Replacement 30
7. Bafe Removal and Installation 31
8. Fan Replacement 31
5 Troubleshooting
A. FAQs 33
B. Troubleshooting Table 35
►
6 Reference Materials
A. Service Parts 38
►
B. Contact Information 43
2
Quadra-Fire • Pioneer III Owner’s Manual • 4182-900 • Rev D • 08/19

Model:
Pioneer-III
E
PA CERTIFIED FIREPLACE
U.S. ENVIRONMENTAL PROTECTION AGENCY - Certified to comply with 2020 particulate emission standards using cord wood.
This wood heater was found to have an average emissions rate of 2.0g/hr using method ASTM E3053-17.
DO NOT REMOVE THIS LABEL
4182-990A
Made in U.S.A. of US and imported parts
www.quadrafire.com
A brand of Hearth & Home Technologies
7571 - 215th Street West, Lakeville, MN. 55044
This wood heater needs periodic inspection and repair for proper operation. Consult owner’s manual for further information. It is against federal regulations to operate this
wood heater in a manner inconsistent with the operating instructions in the owner’s manual.
SERIAL NO./NUMERO DESERE
MODEL/MODELE
FIREPLACE ALSO FOR USE
IN MANUFACTURED/MOBILE
HOMES WITH SOLID FUEL ONLY
FIREPLACE FOR USE
OUTDOORS
YES
NO
YES
NO
FIRE CHAMBER INTENDED FOR USE WITH HEARTH & HOME TECHNOLOGIES LISTED FIREPLACE PARTS. SEE
INSTALLATION AND OPERATING INSTRUCTIONS FOR THIS MODEL. REPLACE GLASS ONLY WITH CERAMIC.
NE PAS surcuisson. UTILISER UNIQUEMENT: COMBUSTIBLES SOLIDES OU BOIS COTÉES
APPLIANCE DE GAZ DÉCORATIF. NE PAS UTILISER UN INSERT CHEMINEE OU AUTRES
PRODUITS NON POUR USAGE SPÉCIFIÉ AVEC CE PRODUIT.
DO NOT OVERFIRE. USE ONLY: SOLID WOOD FUEL. DO NOT
USE A FIREPLACE INSERT OR OTHER PRODUCTS NOT SPECIFIED FOR USE WITH THIS PRODUCT.
CHIMNEY/CHEMNEE
2 IN. MIN.
51 MM
WARNING! THIS FIREPLACE HAS NOT BEEN TESTED WITH AN UNVENTED GAS LOG SET.
TO REDUCE THE RISK OF FIRE OR INJURY,
DO NOT INSTALL AN UNVENTED GAS LOG SET INTO FIREPLACE.
DEGAGEMENT DES
MATEIAUX COMBUSTIBLES:
FIREBOX/
FOYER
MM
MIN.
IN.
MIN.
WARNING! TO AVOID THE RISK OF DAMAGING FIREPLACE MATERIALS AND INCREASING THE RISK OF SPREADING A FIRE DO NOT USE THE
FIREPLACE TO COOK OR WARM FOOD.
ATTENTION! POUR ÉVITER LE RISQUE DE MATÉRIAUX ENDOMMAGER FOYER ET AUGMENTER LE RISQUE DE DIFFUSER UN
INCENDIE NE PAS UTILISER LA FOYER À CHAUD DES ALIMENTS OU COOK.
IF INSTALLATION OR OPERATING INSTRUCTIONS ARE MISSING CONTACT:
HEARTH & HOME TECHNOLOGIES,
7571 215th Street West, Lakeville, MN 55044
MM
MIN.
IN.
MIN.
CLEARANCE TO
COMBUSTIBLES:
BACK
SIDE
RETOUR
COT
É
AVERTISSEMENT! CE FOYER N'A PAS ÉTÉ TESTÉ AVEC UN
JOURNAL DE GAZ NON APPROUVÉ. POUR RÉDUIRE LES RISQUES D'INCENDIE OU DE
BLESSURES, N'INSTALLEZ PAS D'ENREGISTREMENT DE GAZ NON CONTINU AU FOYER.
NE PAS ENLEVER L'ÉTIQUETTE
Fabriqué aux États-Unis-d’Amérique par des pièces d’origine américaine et pièces importées.
DO NOT USE GRATE OR ELEVATE FIRE. BUILD WOOD FIRE DIRECTLY ON FIREBRICK.
NE PAS UTILISER DE GRATE OU D'ÉLEVER UN FEU. CONSTRUISEZ UN FEU DE BOIS DIRECTEMENT SUR FIREBRICK.
1
25
1-1/2
38
UL 127-2011, CAN/ULC-S610
Cet appareil de chauffage au bois doit être inspecté et réparé périodiquement pour fonctionner correctement. Consultez le manuel du propriétaire pour plus d’informations. Il est
contraire à la réglementation fédérale d’utiliser ce poêle à bois d’une manière non conforme aux instructions d’utilisation du manuel du propriétaire.
X
X
PIONEER-III
MP182
2019 2020 2021 2022 2023 2024
Jan Feb Mar Apr May June July Aug Sept Oct. Nov. Dec.
Mfg
by:
0061WF102E
Welcome
1
Read this manual before installing or operating this replace.
Please retain this owner’s manual for future references.
A. Congratulations
Congratulations on selecting a Quadra-Fire wood burning
replace. The Quadra-Fire replace you have selected is
designed to provide the utmost in safety, reliability, and ef-
ciency.
As the owner of a new replace, you'll want to read and
carefully follow all of the instructions contained in this
Owner's Manual. Pay special attention to all Cautions and
Warnings.
Local Dealer Information
This Owner's Manual should be retained for future reference. We suggest that you keep it with your other important
documents and product manuals.
Your new Quadra-Fire wood burning replace will give you
years of durable use and trouble-free enjoyment. Welcome
to the Quadra-Fire family of replace products!
Quadra-re is a registered trademark of Hearth & Home
Technologies.
DEALER: Fill in
your name, address,
phone and email
information here and
replace information
Dealer Name: ________________________________________________________
Address: ____________________________________________________________
____________________________________________________________
below.
Phone: _____________________________________________________________
Email: _____________________________________________________________
Fireplace Information:
Brand: ________________________________________________ Model Name: ___________________________
Serial Number: __________________________________________ Date Installed: __________________________
Listing Label Information/Location
The model information regarding your specic replace can be found on
the rating plate usually located in the control area of the replace.
Quadra-Fire • Pioneer III Owner’s Manual • 4182-900 • Rev D • 08/19
Model Number
Serial Number
3
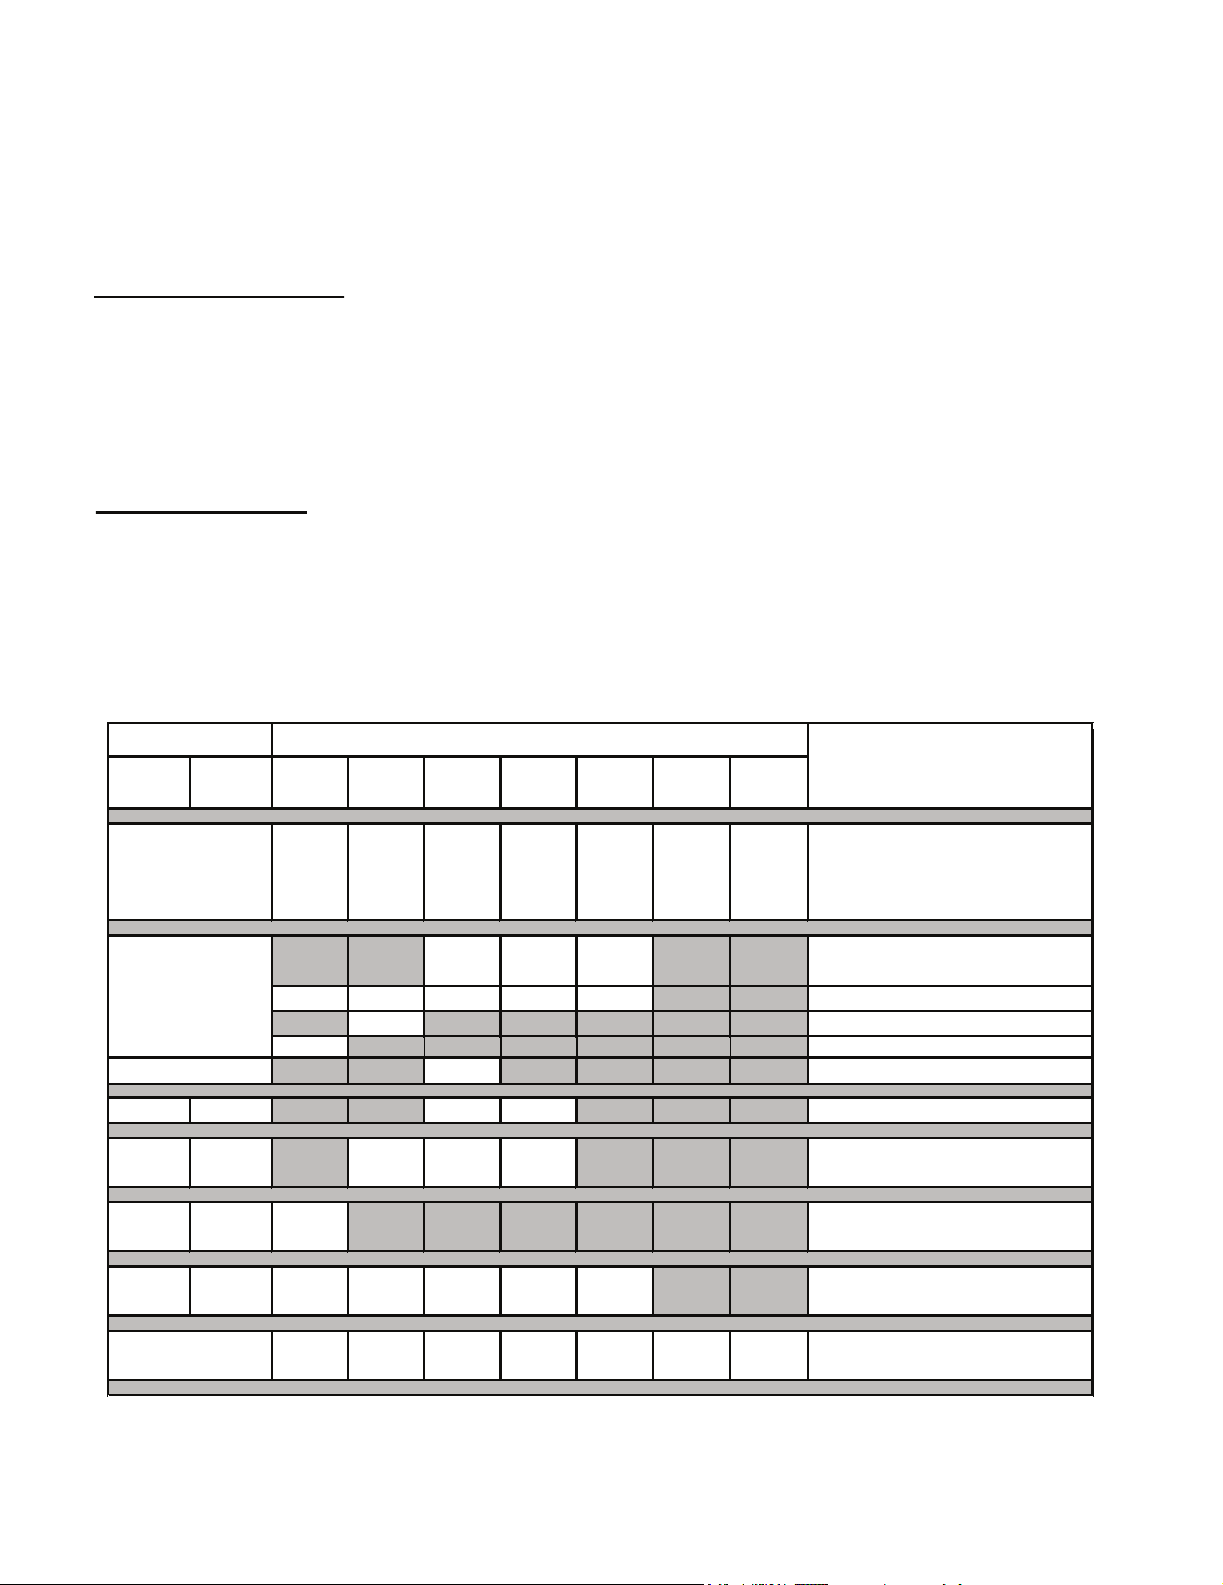
B. LIMITED LIFETIME WARRANTY
Wood
All parts and material except as
listed
Igniters, electronic components,
and glass
X X X X X Factory-installed blowers
X Firepots and burnpots
5 years 1 year X X Castings and baffles
HHT chimney and termination
years
Lifetime
beyond warranty period
3 years
Hearth & Home Technologies
LIMITED LIFETIME WARRANTY
Hearth & Home Technologies, on behalf of its hearth brands (“HHT”), extends the following warranty for HHT
gas, wood, pellet, coal and electric hearth appliances that are purchased from an HHT authorized dealer.
WARRANTY COVERAGE:
HHT warrants to the original owner of the HHT appliance at the site of installation, and to any transferee taking ownership
of the appliance at the site of installation within two years following the date of original purchase, that the HHT appliance
will be free from defects in materials and workmanship at the time of manufacture. After installation, if covered components manufactured by HHT are found to be defective in materials or workmanship during the applicable warranty period,
HHT will, at its option, repair or replace the covered components. HHT, at its own discretion, may fully discharge all of its
obligations under such warranties by replacing the product itself or refunding the verified purchase price of the product
itself. The maximum amount recoverable under this warranty is limited to the purchase price of the product. This warranty
is subject to conditions, exclusions and limitations as described below.
WARRANTY PERIOD:
Warranty coverage begins on the date of original purchase. In the case of new home construction, warranty coverage
begins on the date of first occupancy of the dwelling or six months after the sale of the product by an independent,
authorized HHT dealer/ distributor, whichever occurs earlier. The warranty shall commence no later than 24 months
following the date of product shipment from HHT, regardless of the installation or occupancy date. The warranty period for
parts and labor for covered components is produced in the following table.
The term “Limited Lifetime” in the table below is defined as: 20 years from the beginning date of warranty coverage for
gas appliances, and 10 years from the beginning date of warranty coverage for wood, pellet, and coal appliances. These
time periods reflect the minimum expected useful lives of the designated components under normal operating conditions.
Warranty Period HHT Manufactured Appliances and Venting
Parts Labor Gas Wood Pellet
1 Year
XXXXXXX
XXX
EPA
Coal Electric Venting
2 years
X Molded refractory panels
X
7 years 3 years X X X
10
Limited
1 year X Burners, logs and refractory
3 years X X X X X Firebox and heat exchanger
Components Covered
covered by Conditions,
Exclusions, and Limitations
Ignition Modules
Manifold tubes,
90 Days
4021-645H 10/15 Page 1 of 2
4
XXXXXXX
See conditions, exclusions, and limitations on next page.
Quadra-Fire • Pioneer III Owner’s Manual • 4182-900 • Rev D • 08/19
All replacement parts

WARRANTY CONDITIONS:
• This warranty only covers HHT appliances that are purchased through an HHT authorized dealer or distributor. A list of
HHT authorized dealers is available on the HHT branded websites.
• This warranty is only valid while the HHT appliance remains at the site of original installation.
• This warranty is only valid in the country in which the HHT authorized dealer or distributor that sold the appliance
resides.
• Contact your installing dealer for warranty service. If the installing dealer is unable to provide necessary parts, contact
the nearest HHT authorized dealer or supplier. Additional service fees may apply if you are seeking warranty service
from a dealer other than the dealer from whom you originally purchased the product.
• Check with your dealer in advance for any costs to you when arranging a warranty call. Travel and shipping charges
for parts are not covered by this warranty.
WARRANTY EXCLUSIONS:
This warranty does not cover the following:
• Changes in surface finishes as a result of normal use. As a heating appliance, some changes in color of interior and
exterior surface finishes may occur. This is not a flaw and is not covered under warranty.
• Damage to printed, plated, or enameled surfaces caused by fingerprints, accidents, misuse, scratches, melted items,
or other external sources and residues left on the plated surfaces from the use of abrasive cleaners or polishes.
• Repair or replacement of parts that are subject to normal wear and tear during the warranty period. These parts
include: paint, wood, pellet and coal gaskets, firebricks, grates, flame guides, batteries and the discoloration of glass.
• Expansion, contraction, or movement of certain parts causing noise. These conditions are normal and complaints
related to this noise are not covered by this warranty.
• Damages resulting from: (1) failure to install, operate, or maintain the appliance in accordance with the installation
instructions, operating instructions, and listing agent identification label furnished with the appliance; (2) failure to
install the appliance in accordance with local building codes; (3) shipping or improper handling; (4) improper opera-
tion, abuse, misuse, continued operation with damaged, corroded or failed components, accident, or improperly/
incorrectly performed repairs; (5) environmental conditions, inadequate ventilation, negative pressure, or drafting
caused by tightly sealed constructions, insufficient make-up air supply, or handling devices such as exhaust fans or
forced air furnaces or other such causes; (6) use of fuels other than those specified in the operating instructions; (7)
installation or use of components not supplied with the appliance or any other components not expressly authorized
and approved by HHT; (8) modification of the appliance not expressly authorized and approved by HHT in writing;
and/or (9) interruptions or fluctuations of electrical power supply to the appliance.
• Non-HHT venting components, hearth components or other accessories used in conjunction with the appliance.
• Any part of a pre-existing fireplace system in which an insert or a decorative gas appliance is installed.
• HHT’s obligation under this warranty does not extend to the appliance’s capability to heat the desired space. Informa-
tion is provided to assist the consumer and the dealer in selecting the proper appliance for the application. Consideration must be given to appliance location and configuration, environmental conditions, insulation and air tightness of
the structure.
This warranty is void if:
• The appliance has been over-fired or operated in atmospheres contaminated by chlorine, fluorine, or other damaging
chemicals. Over-firing can be identified by, but not limited to, warped plates or tubes, rust colored cast iron, bubbling,
cracking and discoloration of steel or enamel finishes.
• The appliance is subjected to prolonged periods of dampness or condensation.
• There is any damage to the appliance or other components due to water or weather damage which is the result of, but
not limited to, improper chimney or venting installation.
LIMITATIONS OF LIABILITY:
• The owner’s exclusive remedy and HHT’s sole obligation under this warranty, under any other warranty, express or
implied, or in contract, tort or otherwise, shall be limited to replacement, repair, or refund, as specified above. In no
event will HHT be liable for any incidental or consequential damages caused by defects in the appliance. Some states
do not allow exclusions or limitation of incidental or consequential damages, so these limitations may not apply to you.
This warranty gives you specific rights; you may also have other rights, which vary from state to state. EXCEPT TO
THE EXTENT PROVIDED BY LAW, HHT MAKES NO EXPRESS WARRANTIES OTHER THAN THE WARRANTY
SPECIFIED HEREIN. THE DURATION OF ANY IMPLIED WARRANTY IS LIMITED TO DURATION OF THE
EXPRESSED WARRANTY SPECIFIED ABOVE.
4021-645H 10/15 Page 2 of 2
Quadra-Fire • Pioneer III Owner’s Manual • 4182-900 • Rev D • 08/19
5
2 Listing and Code Approvals
A. Appliance Certication
Model:
Laboratory: Underwriters Laboratories, Inc.
Report No:
Type:
Standard: UL 127 - 2011 and CAN/ULC S610-
Pioneer III
Project 4788732172
Wood Fireplace
2018 (A1998) and (UM) 84-HUD,
Manufactured Home Approved.
B. BTU & Efciency Specications
EPA Certied Emissions: 2.0 grams per hour
*LHV Tested Efciency: 74.3%
**HHV Tested Efciency: 69.1%
***EPA BTU Output: 14,700-72,800
Vent Size: 8 inches
Firebox Size: 4.07 cubic feet
Recommended Log Length: 24 inches
Fuel Seasoned Cord Wood less
than 20% moisture
*Weighted average LHV (Low Heating Value) efciency using
cord wood and data collected during EPA emission test. LHV
assumes the moisture is already in a vapor state so there is no
loss in energy to vaporize.
**Weighted average HHV (High Heating Value) efciency using
cord wood and data collected during EPA emission test. HHV
includes the energy required to vaporize the water in the fuel.
***A range of BTU outputs based on HHV and the burn rates
from the low and high EPA tests, using cord wood.
C. Mobile Home Approved
• This appliance is approved for mobile home installations when not installed in a sleeping room and when
an outside combustion air inlet is provided.
• The structural integrity of the mobile home oor, ceil-
ing, and walls must be maintained.
• The appliance must be properly grounded to the
frame of the mobile home with #8 copper ground
wire.
• Outside Air Kit must be installed in a mobile home
installation.
D. Glass Specications
This replace is equipped with 5mm ceramic glass.
Replace glass only with 5mm ceramic glass. Please contact your dealer for replacement glass.
WARNING
Fire Risk.
Hearth & Home Technologies disclaims any
responsibility for, and the warranty will be voided by,
the following actions:
• Installation and use of any damaged appliance.
• Modication of the appliance.
• Installation other than as instructed by Hearth & Home
Technologies.
• Installation and/or use of any component part not approved
by Hearth & Home Technologies.
• Operating appliance without fully assembling all components.
• Do NOT Overre - If appliance or chimney connector glows,
you are overring.
Any such action that may cause a re hazard.
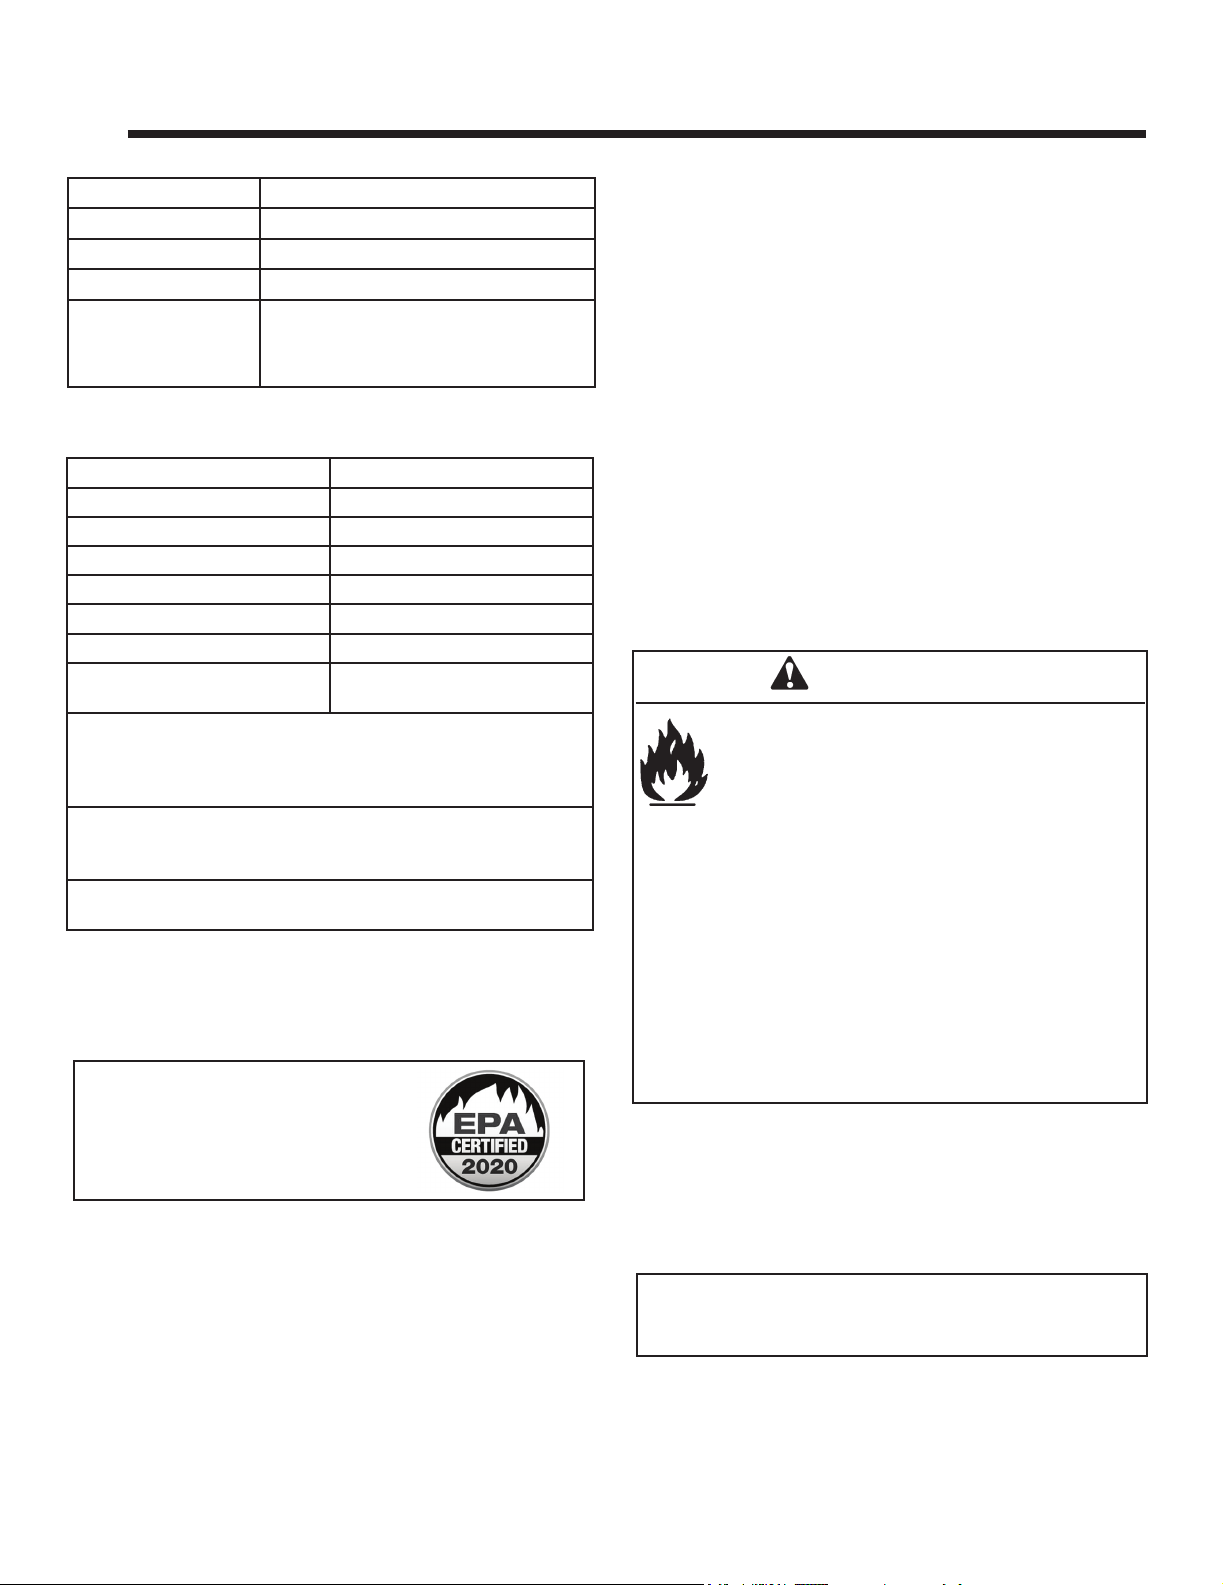
The Pioneer III is Certied to
comply with 2020 particulate
emission standards.
The PIONEER III Wood Appliance meets the U.S. ENVIRONMENTAL PROTECTION AGENCY Certied to comply
with 2020 particulate emission standards using cord wood.
This wood heater needs periodic inspection and repair for
proper operation. It is against federal regulations to operate
this wood heater in a manner inconsistent with operating
instructions in this manual.
6
Quadra-Fire • Pioneer III Owner’s Manual • 4182-900 • Rev D • 08/19
Improper installation, adjustment, alteration, service or
maintenance can cause injury or property damage.
For assistance or additional information, consult a qualied
installer, service agency or your dealer.
NOTE: Hearth & Home Technologies, manufacturer of
this appliance, reserves the right to alter its products,
their specications and/or price without notice.
Quadra-Fire is a registered trademark of Hearth & Home
Technologies.
Important Safety and Operating Information
3
A. Fireplace Safety
Most problems are caused by improper installation and op-
eration of the replace. To provide reasonable re safety,
the following should be given serious consideration:
• The re should be supervised whenever the replace is
in use.
• An annual inspection should be performed on the
replace system.
• Install at least one smoke detector on each oor of your
home to ensure your safety.
• Install a CO detector in the room with the replace.
• Install a conveniently located Class A re extinguisher
near the replace.
• Devise a practiced evacuation plan, consisting of at least
two escape routes.
• Devise a plan to deal with a chimney re:
- Close all openings into the replace.
- Evacuate.
- Notify the re department.
WARNING! Risk of Fire! Hearth & Home Technologies
disclaims any responsibility for, and the warranty and
agency listing will be voided by the following actions.
DO NOT:
• operate damaged replace
• modify replace
• overre
• install any gas log set
• install any component not approved by Hearth & Home
Technologies
• install parts or components not Listed or approved
• operate the fireplace without fully assembling all
components
Improper installation, adjustment, alteration, service or
maintenance can cause injury or property damage.
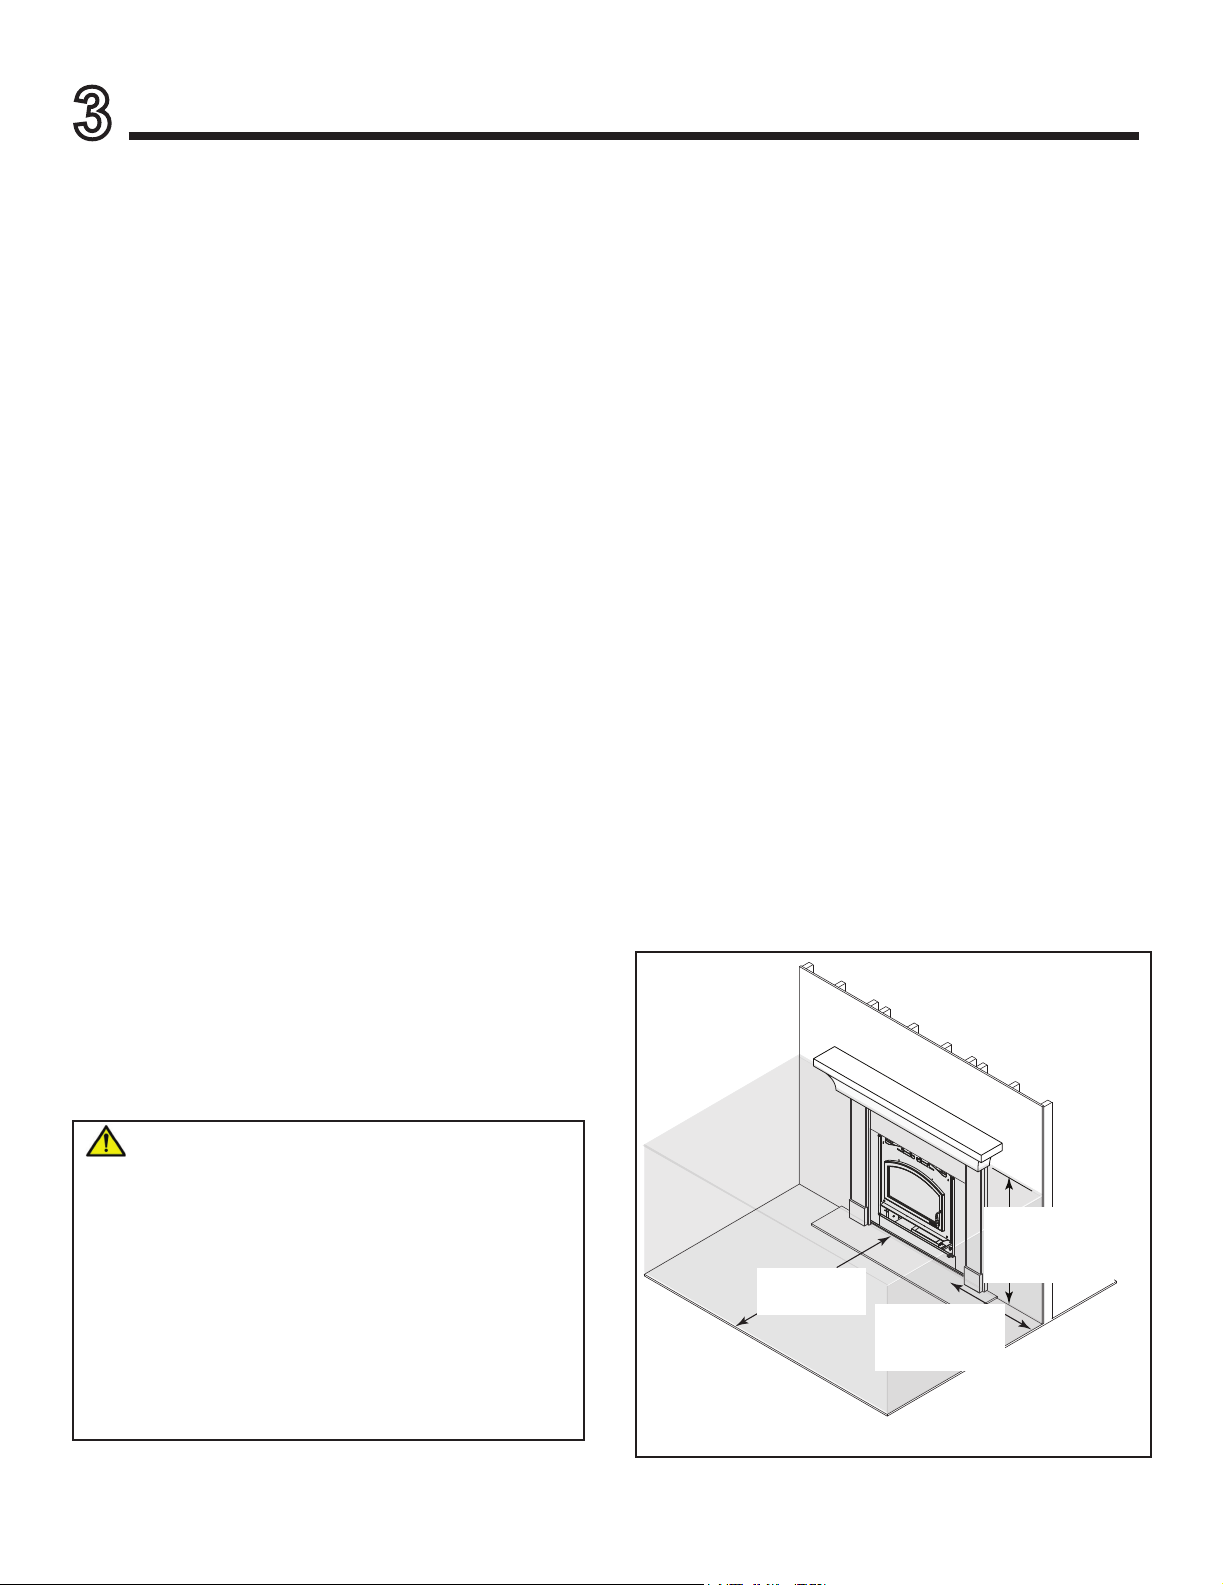
1. Clear Space
Combustible materials must not be stored on the hearth
extension. Room furnishings such as drapes, curtains,
chairs or other combustibles must be at least 4 ft
(1219 mm) from the open front of the replace.
Combustible materials are materials made of or surfaced with any of the following materials:
- Wood - Compressed paper
- Plant bers - Plastic
- Plywood/OSB - Drywall
- Any material that can ignite and burn, ame proofed
or not, plastered or un-plastered.
Non-combustible materials are materials which will not
ignite and burn, composed of any combination of the
following:
- Steel - Iron
- Brick - Tile
- Concrete - Slate
- Glass - Plasters
WARNING! Risk of Fire! Keep combustible materials,
gasoline and other ammable vapors and liquids clear of
the replace.
DO NOT:
• store ammable materials close to the replace
• use gasoline, lantern fuel, kerosene, charcoal lighter
uid or similar liquids to start or “freshen up” a re in this
replace.
WARNING: This product and the fuels used to operate this product (wood
and wood pellets), and the products of
combustion of such fuels, can expose
you to chemicals including carbon black,
which is known to the State of California
to cause cancer and carbon monoxide,
which is known to the State of California to
cause birth defects or other reproductive
harm. For more information go to: www.
P65Warnings.ca.gov.
Quadra-Fire • Pioneer III Owner’s Manual • 4182-900 • Rev D • 08/19
48 in. (1219 mm)
Clear Space
Front of Fireplace
Figure 3.1 Clear Space
12 in. (305 mm)
Clear Space
Sides of Fireplace
(from the FP opening)
62 in. (1575 mm)
Clear Space
Bottom of Fireplace to
Lower Edge of Mantel
or Trim
7
2. Firebrick
Your replace is lined with high quality rebrick, which has
exceptional insulating properties.
Do not operate the replace without bricks. Make sure
bricks are installed as shown in Section 5.
Do not use a grate; simply build a re on the rebox oor.
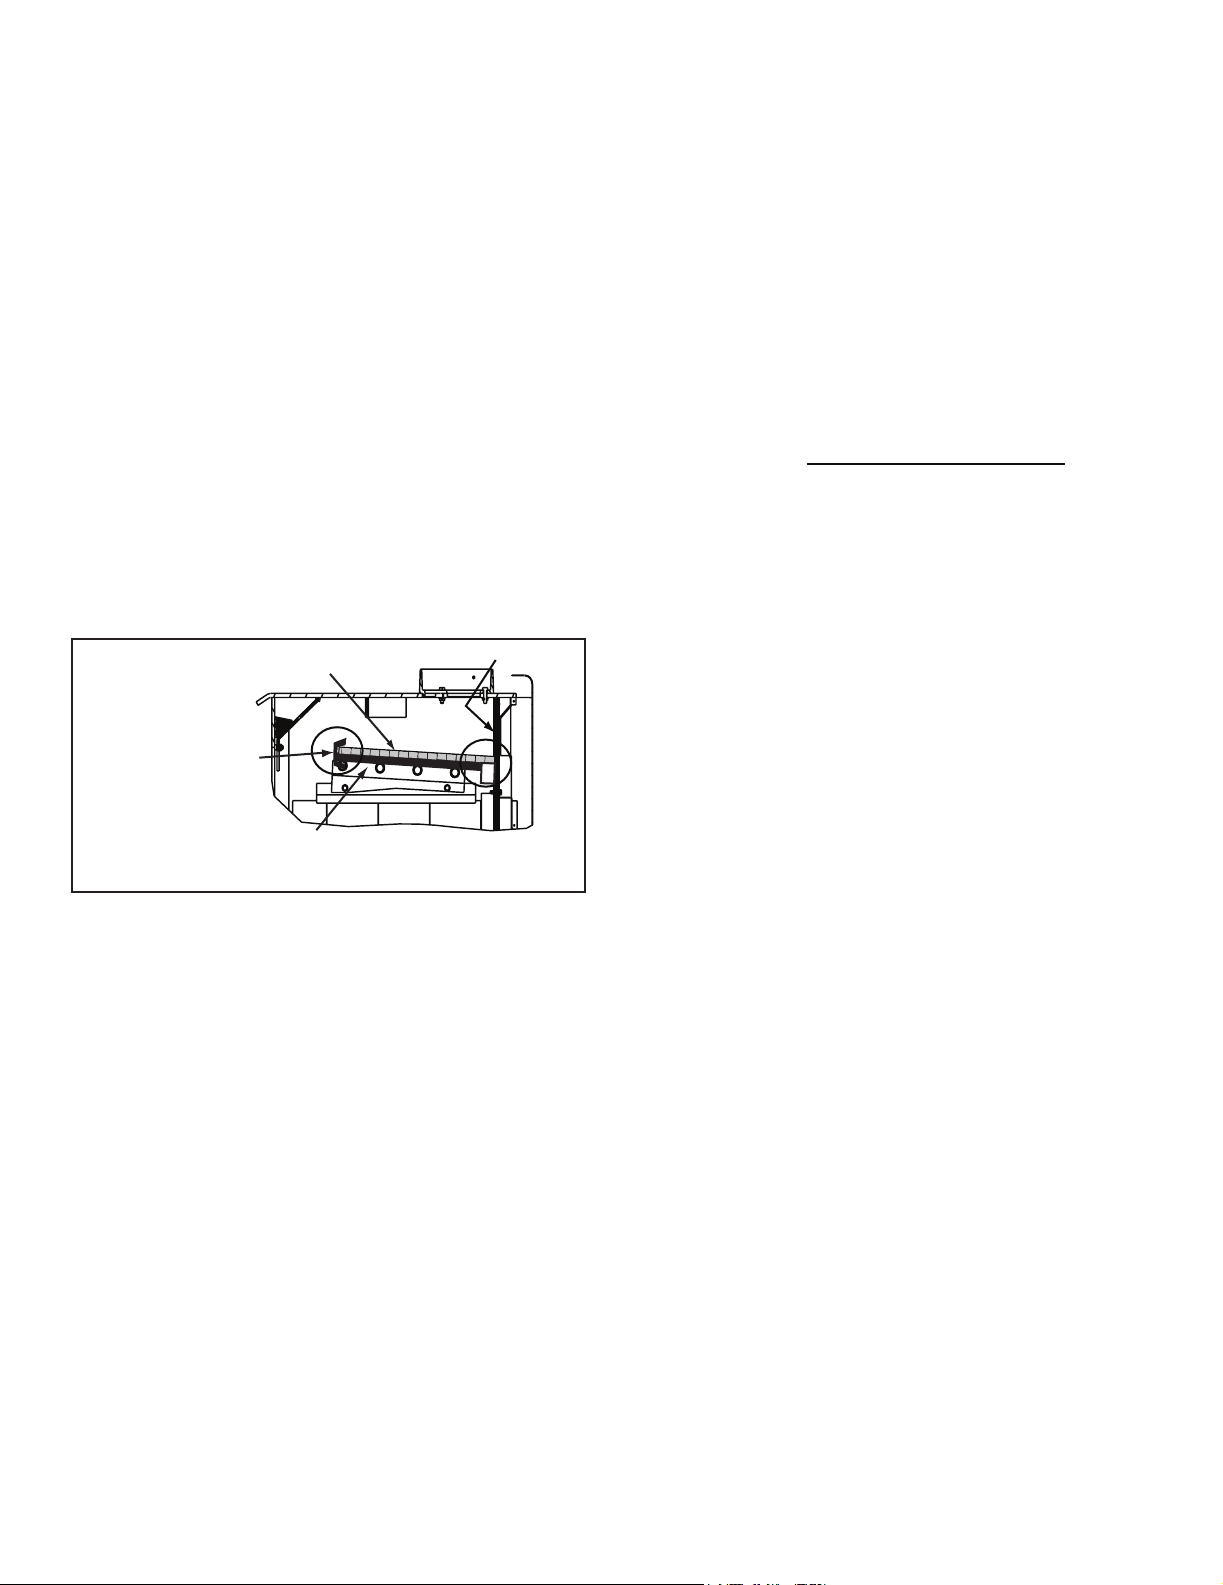
3. Bafe and Blanket
Ensure correct bafe and bafe protection channel placement; replace bafe components if damaged or missing.
(Please refer to Section 5.)
NOTICE: Firebox damage due to improper bafe placement
is not covered by warranty. Operate the wood burning
replace with the bafe in the correct position only. Not
doing so could result in:
• reduced efciency
• overheating the chimney
• overheating the rear of the rebox
• poor performance
Back of Firebox
Baffle Protection
Channel in position
Ceramic Blanket
Baffle Board
To prevent over-ring your replace. DO NOT:
• use ammable liquids
• overload with wood
• burn trash or large amounts of scrap lumber
• permit too much air to the re (leaving the door open)
Symptoms of over-ring may include one or more of the
following:
• chimney connector or replace glowing
• roaring, rumbling noises
• loud cracking or banging sounds
• metal warping
• chimney re
What to do if your replace is over-ring:
• Immediately close the door and air controls to reduce
air supply to the re.
• If you suspect a chimney re, call the re department
and evacuate your house.
• Contact your local chimney professional and have
your fireplace and chimney inspected for any
damage.
• Do not use your fireplace until the chimney
professional informs you it is safe to do so.
• Hearth & Home Technologies WILL NOT warranty
fireplaces that exhibit evidence of over-firing.
Evidence of over-ring includes, but is not limited to:
- warped air tube
- deteriorated refractory brick
- deteriorated bafe and other interior components
Figure 3.2 Bafe and Blanket Placement
The bafe board must be in contact with the manifold at the back of the rebox. The ceramic blanket
should lay on top of the bafe board and manifold.
The bafe protection channel should be in position
and cover the front of the blanket and bafe board.
4. Over-Firing Your Fireplace
DO NOT OVERFIRE THIS FIREPLACE UNIT
Attempts to achieve heat output rates that exceed design
specications can result in permanent damage to the
replace.
5. Chimney Fire
In the event of a chimney re:
• Have the chimney and adjacent structure inspected by
qualied professionals. Hearth & Home Technologies
recommends that NFI or CSIA certied professionals,
or technicians under the direction of certified
professionals, conduct a minimum of an NFPA 211
Level 2 inspection of the chimney.
• Replace components of the chimney and replace
as specied by the professionals.
• Ensure all joints are properly engaged and the
chimney is properly secured.
WARNING! Risk of Fire! A chimney re can perma-
nently damage your chimney system. Failure to replace damaged components and make proper repairs
can cause a structure re.
8
Quadra-Fire • Pioneer III Owner’s Manual • 4182-900 • Rev D • 08/19
WARNING
HOT SURFACES!
Glass and other surfaces are hot during operation AND cool down.
Hot glass will cause burns.
• DO NOT touch glass until it is cooled
• NEVER allow children to touch glass
• Keep children away
• CAREFULLY SUPERVISE children in same room as replace.
• Alert children and adults to hazards of high temperatures.
High temperatures may ignite clothing or other ammable materials.
• Keep clothing, furniture, draperies and other ammable materials away.
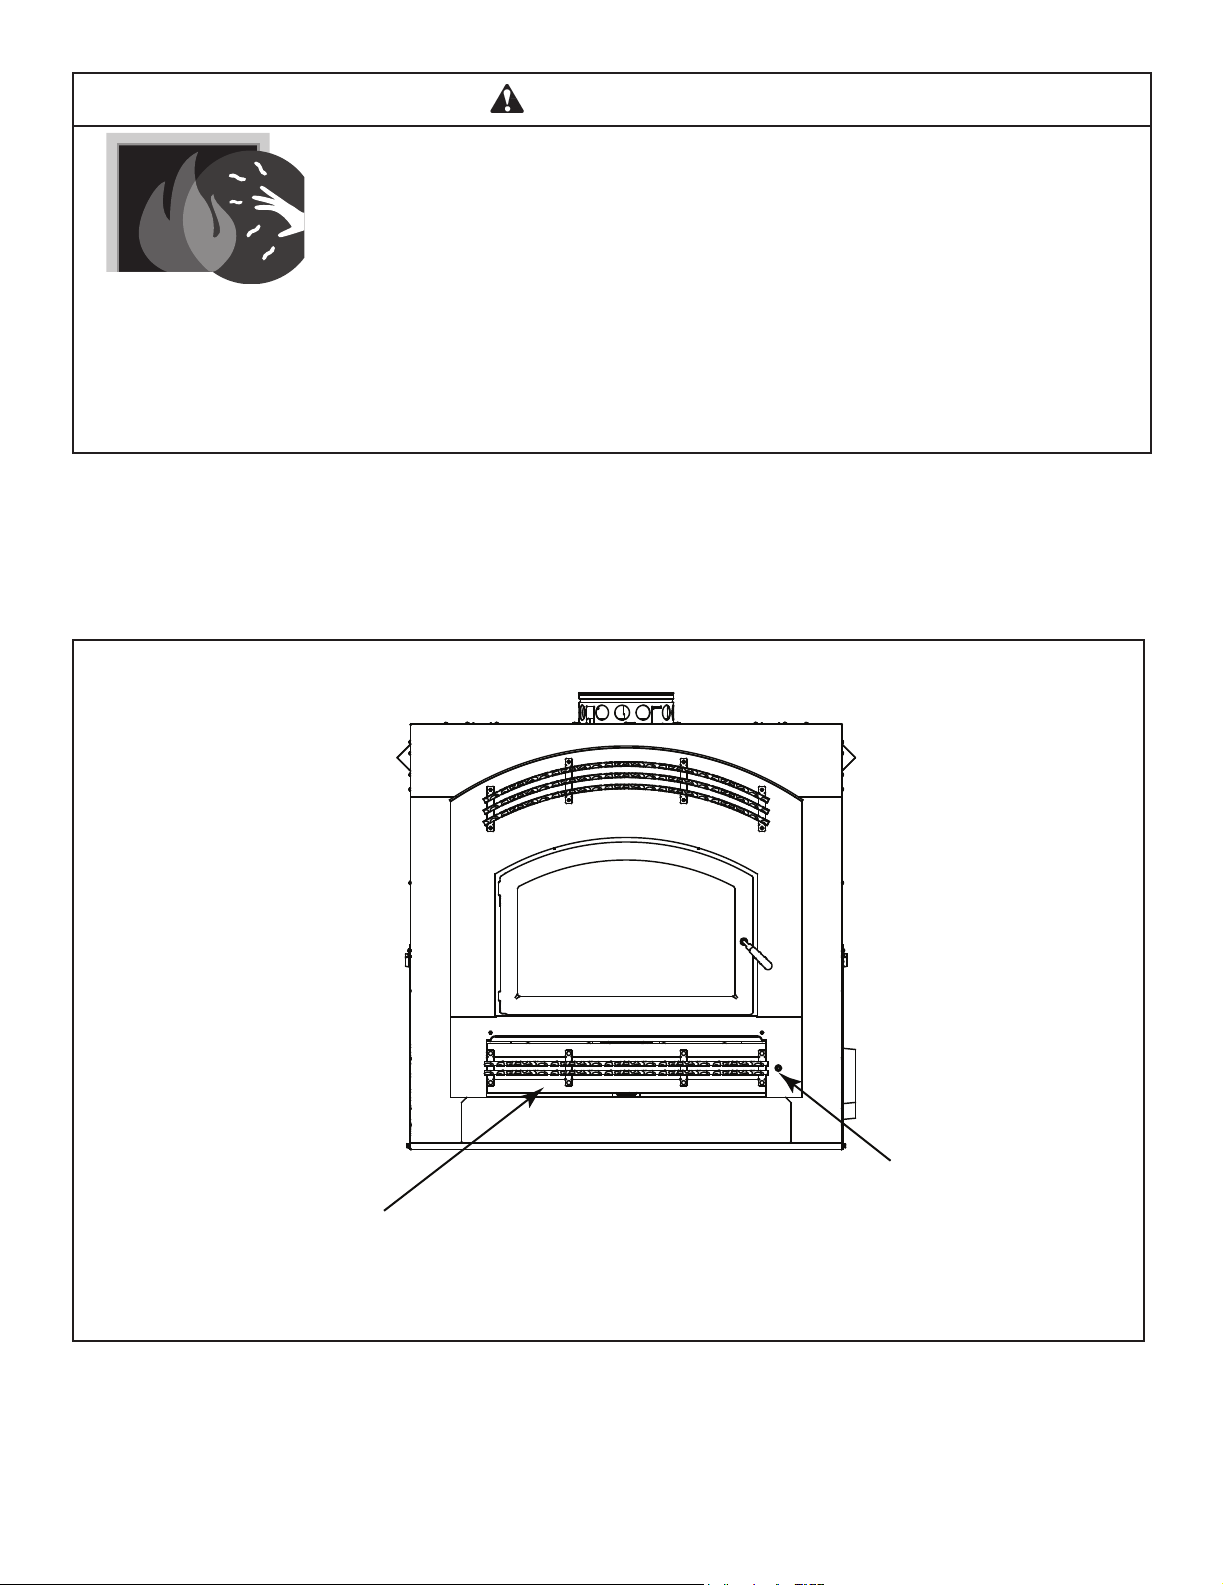
B. General Operating Parts
WARNING! DO NOT operate replace before reading and understanding operating instructions. Failure to operate replace according to operating instructions could cause re or injury.
Bottom access cover, outside
air control, and fan speed
control are located in behind
the access panel.
Figure 3.3 General Operating Parts
Quadra-Fire • Pioneer III Owner’s Manual • 4182-900 • Rev D • 08/19
SBT Button
9

1. Smart Burn Technology (SBT)
The Smart Burn Technology system allows the thermostat to be set at the desired temperature, start the re,
load the appliance with wood and it will burn efciently
and clean with little interaction by the homeowner.
Battery Backup allows the appliance to operate without
110V but will not operate the fans.
The appliance can also be operated manually if neces-
sary.
SMART Burn Technology Activation
Pushing the button will activate the appliance and
open the air control to high.
Green Light
The green light illuminates when the button is pressed.
This is indicating that the appliance is ready for a new
re or a reload. If neither of these events happens, the
light will stay on for 2 hours and the air control will stay
open. After 2 hours of no heat rise in the appliance
then the light will go out and the air control closes to
the zero position.
If a re is started or the appliance is reloaded, the light
will stay on through the warm up cycle. If the thermo-
stat is calling for heat then the light stays green for as
long as the appliance is burning on high.
No Light
The appliance will progress into a shutdown phase
and slowly cool down and the light will turn off. Every-
thing is working OK, but the SBT button will need to be
pushed when reloading fuel.
Red Light
When the thermostat calls for heat while the appliance
is in charcoal phase, the air control will open all the way
and the red light illuminates. This is indicating that the
appliance is trying to heat the room but there is only
charcoal left and needs reloaded.
SBT
Button
Figure 3.4
10
Quadra-Fire • Pioneer III Owner’s Manual • 4182-900 • Rev D • 08/19
2. Thermostat Location and Wiring to Fireplace
The kit comes with a programmable wall thermostat (C1)
and 25’ of thermostat wire (C2). If you need to run more
than 25’ make sure you use a continuous strand of 18 to
22 gauge thermostat wire. For optimum performance your
thermostat should be:
• Mounted on an inside wall, approximately 5’ above the
oor
• Do not locate where there is poor air circulation such
as in a corner, alcove, behind doors, bookcase or
other objects
• Located away from drafts, direct sunlight, above a
lamp, television, radiator, a wall next to a window, or
direct heat from the appliance
• Avoid damp environments as this can lead to corrosion
that may shorten thermostat life
• If painting or construction work around, cover the
thermostat completely or wait until work is complete
before installation.
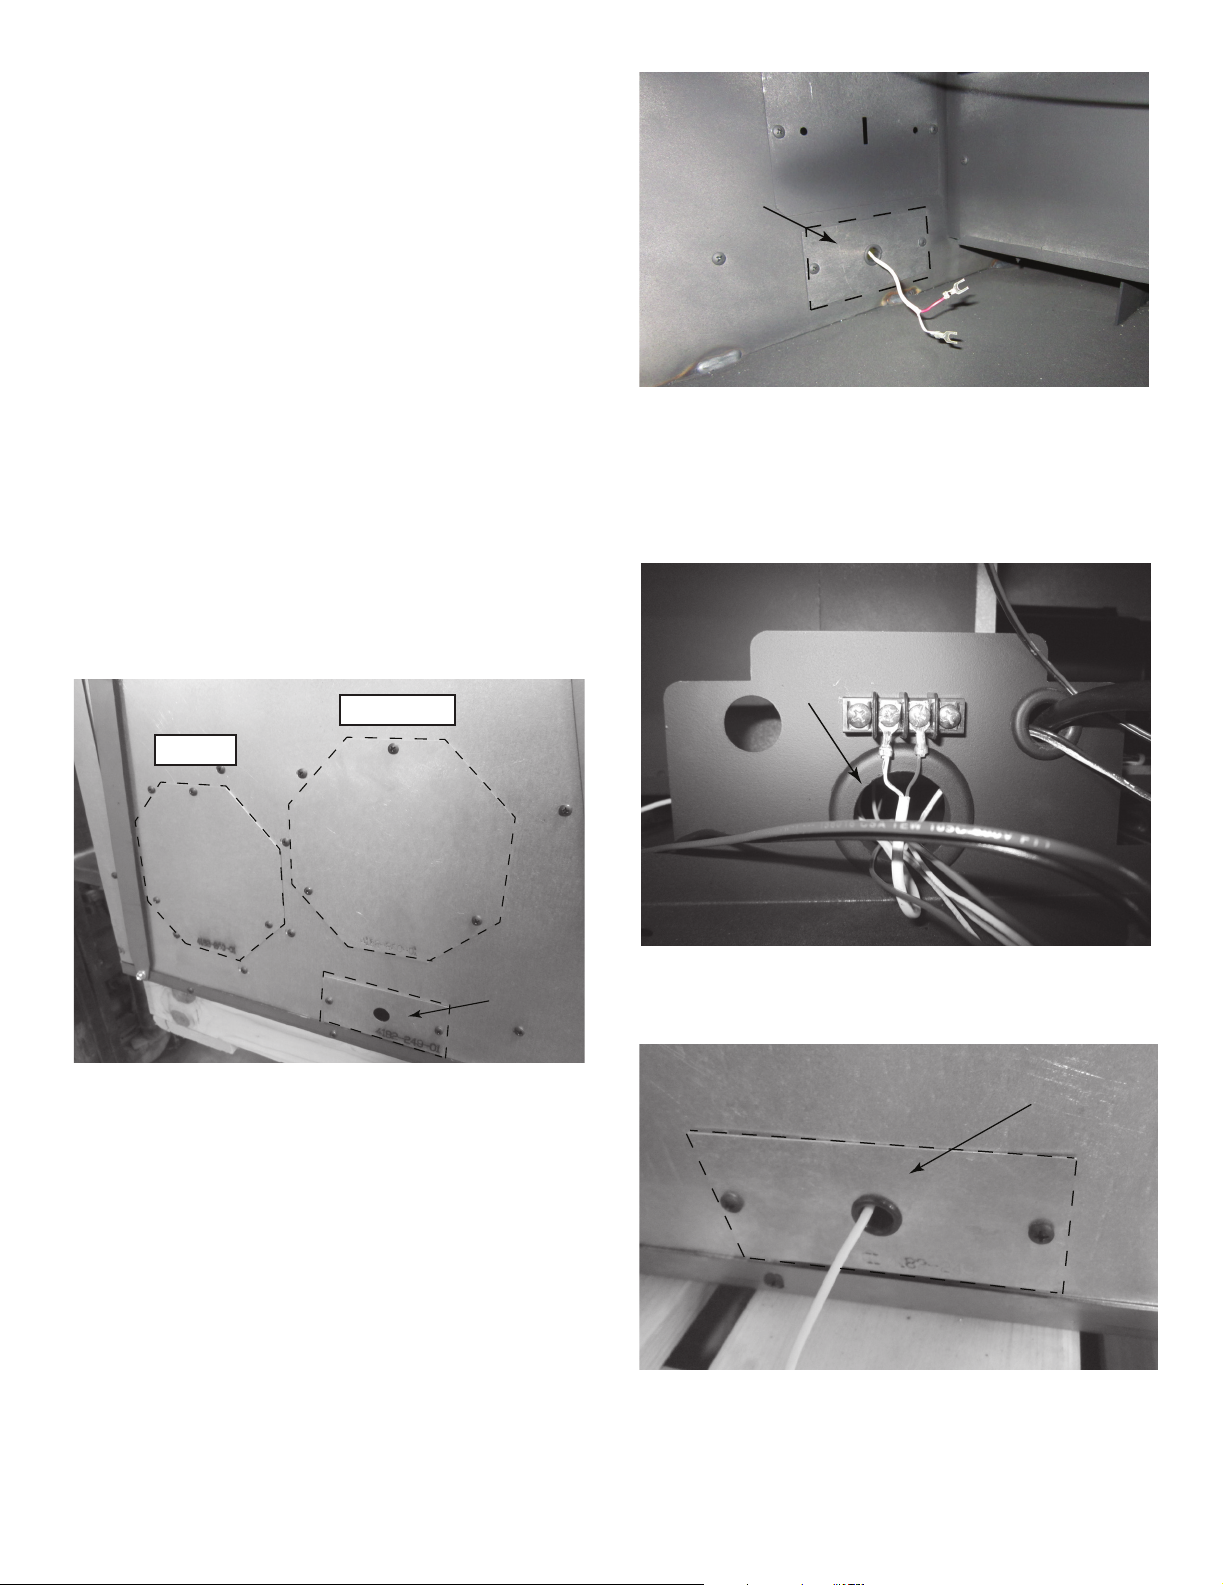
• The thermostat wire will be installed on the opposite
side of where the electric comes in at. See Figure 3.6.
Outside Air
Inner thermostat wire
cover plate
Figure 3.7
• Open the lower access panel on the front of the
replace. Locate the end of the thermostat wire and
run it in through from the back of the large hole and up
to and attach it to the terminal block. See Figure 3.8.
Wire through
large hole.
Fan Air
Fan Air
Cover Plate
Figure 3.6
• Remove the outer thermostat wire cover plate and
insert the end of the wire with the spade ends on it
through the hole in the cover plate. See Figure 3.6.
Continue inserting the wire into the replace and
through the hole in the inner cover plate. See Figure
3.7.
Outside Air
Cover Plate
Outer cover plate
for thermostat wire
Figure 3.8
• Reinstall outer thermostat cover plate. See Figure 3.9.
Outer thermostat
wire cover plate
Figure 3.9 Thermostat wire installed through outer cover
plate
Quadra-Fire • Pioneer III Owner’s Manual • 4182-900 • Rev D • 08/19
11
BATTERY
BATTERY
WR
WR
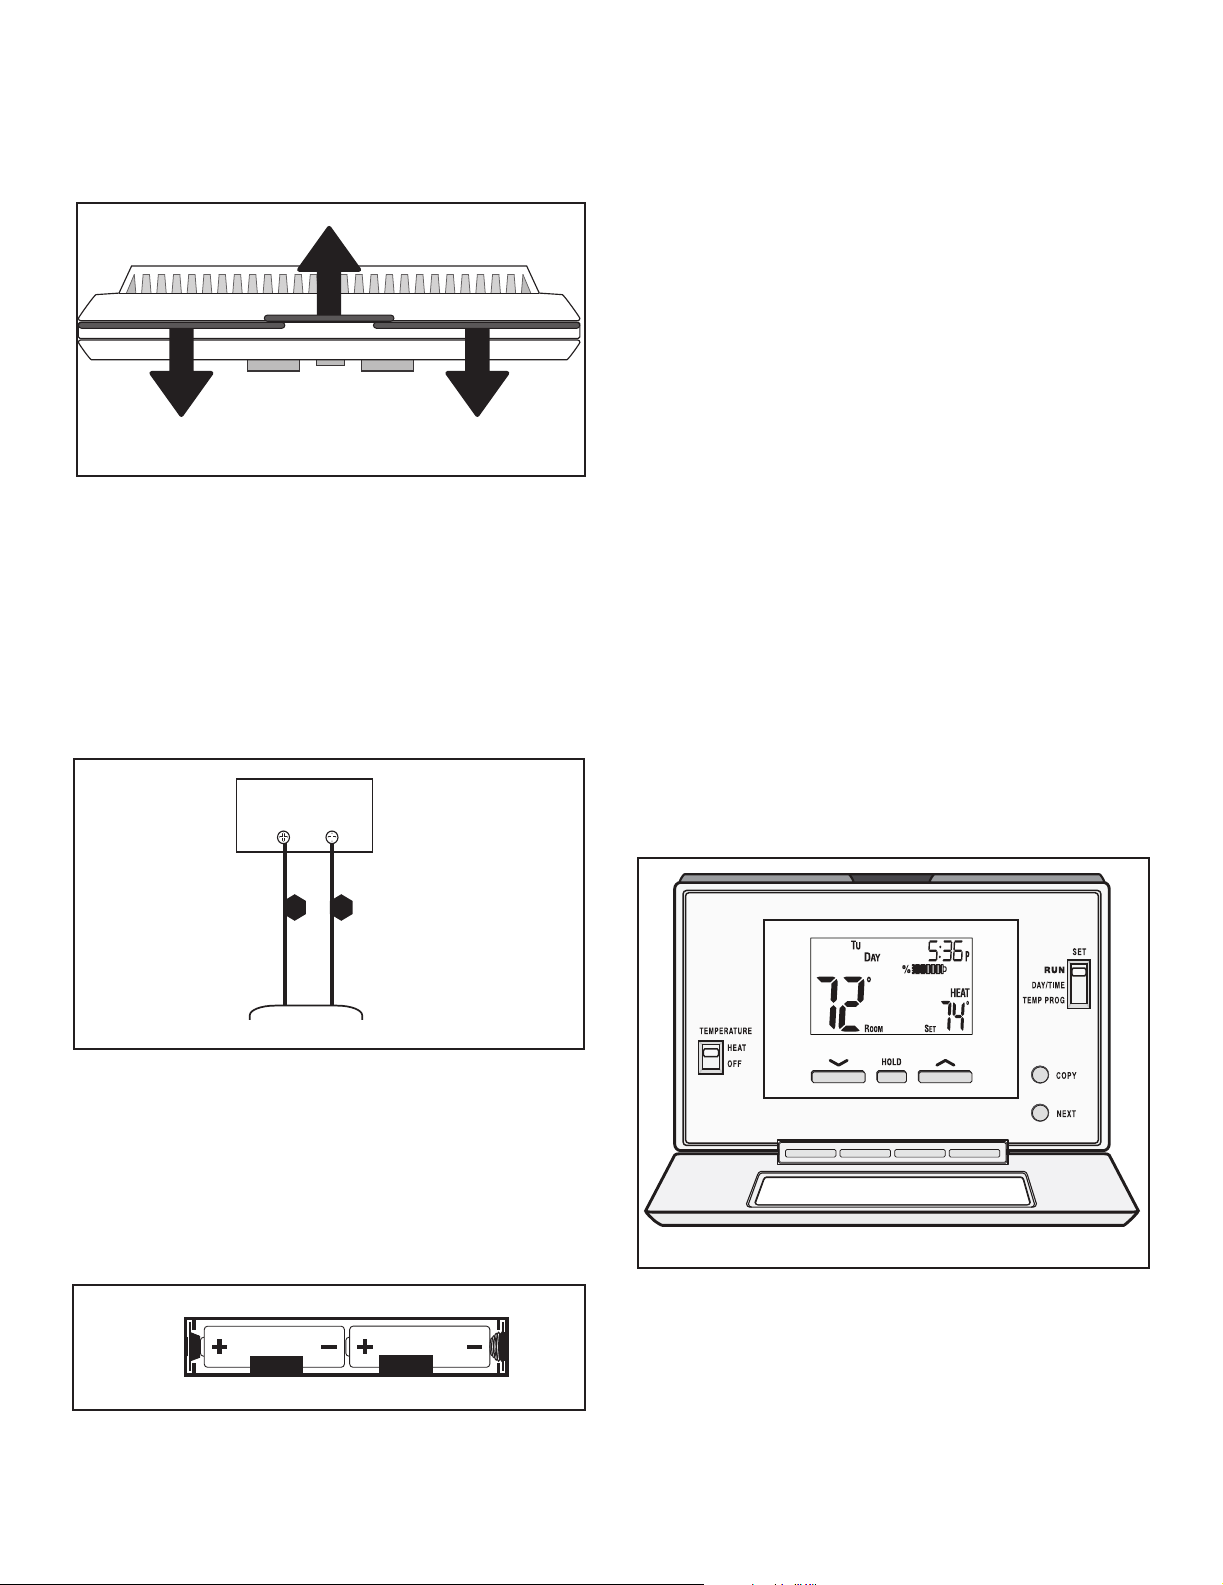
3. Programmable Wall Thermostat Installation
1. Separate the body of the thermostat from the mount-
ing plate by gently pulling the two pieces apart. See
Figure 3.10.
Figure 3.10
Thermostat Controls
TEMPERATURE (HEAT / OFF) SWITCH:
Set this switch to HEAT to control your appliance. The
OFF position will disable the appliance.
SET (MULTI- FUNCTION) SLIDE SWITCH:
This provides easy access to common settings, and should
always remain in RUN unless items are being adjusted.
NOTE: When thermostat is set to “Manual” non-program-
mable mode, all positions of the SET slide switch
will act like RUN.
UP / DOWN BUTTONS:
The UP and DOWN buttons are used to control the set
temperature, or adjust any other on-screen items. An
items ashing, is the item currently being adjusted.
2. Use a drill with either a 3/16 drill bit for drywall or a
7/32 drill bit for plaster drill holes.
3. Using a hammer tap in wall anchors.
4. Route the wires through the opening in the base plate,
and hold the base against the wall while aligning up
to the holes. Attach base plate using a Phillips head
screwdriver and two screws (C2).
5. Connect your thermostat wire to the W and R termi-
nals. See Figure 3.11.
Figure 3.11
NOTE: Ensure bare wire ends are held ALL the way into
the terminal block while the screws are being
tightened.
6. There are two AA ALKALINE ONLY batteries already
installed into the thermostat; to activate, remove black
plastic tab that is located inside the battery compart-
ment.
HOLD BUTTON:
This button activates and deactivates the manual Temperature HOLD feature, which maintains a xed set tempera-
ture indenitely without following a program routine.
COPY BUTTON:
This is used to copy temperature program items from one
day to the next. Also used to access the menu setup.
NEXT BUTTON:
This is used when setting items such as software options,
and temperature programs when they are ashing on the
screen. Pressing the NEXT button will cycle through which
item is ashing.
Figure 3.13
Figure 3.12
7. Snap the thermostat to the base plate.
12
Quadra-Fire • Pioneer III Owner’s Manual • 4182-900 • Rev D • 08/19

Thermostat Setup Options
Setup options for how the thermostat will function are performed using a menu on the display screen.
TO ACCESS THE SETUP MENU:
Move the System Mode Switch into the OFF position, and
then hold down the COPY button for approximately 5 sec-
onds until the screen changes. The menu will always start
with item #01, and is advanced to each following item by a
single press of the NEXT button. The options for each item
are changed using the UP or DOWN buttons.
ITEM #01 (CLK = CLOCK FORMAT):
• 12Hr, default: This displays the clock times using standard AM and PM values.
• 24Hr: This displays the clock times using the militarytime format (example 22:00 hours, without using AM
or PM).
• Use the UP/DOWN buttons to change the number
value between 1 and 9. Generally your system should
cycle on about 3 to 6 times per hour. A smaller differential number makes the system cycle more frequently, so the room temperature is more precise and
constant. A larger differential number will make the
system remains on for a longer duration each time and
decreases the number of cycles per hour.
• Default is set to 4.
Operating Instructions
SET DAY AND TIME:
Place the SET switch into the DAY/TIME position. With
the day ashing press UP or DOWN to set the day or the
week. Press NEXT and the clock time will start ashing.
Use UP or DOWN to set the time; verify the AM/PM indicator is correct. Return the SET switch to RUN position when
nished.
ITEM #02 (TMP = TEMPERATURE SCALE):
• F, default: Shows all temperature values in Fahrenheit.
• C: Shows all temperature values Celsius.
ITEM #03 (PROGRAMMING STYLE):
• 7 Day, default: This style uses a separate program
routine for each of the 7 days in the week.
• 5/2 Day: This style uses a weekday program routine
for Monday, Tuesday, Wednesday, Thursday, Friday,
and a separate weekend program routine for Saturday
and Sunday.
• Manual Non-Programmable: In this setting, there are
no program routines for the thermostat to follow and
the temperature control will be set only by the UP and
DOWN buttons on the front panel.
ITEM #04 (PERD = EVENT OR PERIOD QUANTITY):
• 4P, default: Thermostat uses four Events per day
(called MORN, DAY, EVE, and NITE).
• 2P: The thermostat uses two Events per day (called
DAY and NITE).
NOTE: Event or Period Quantity feature is not accessible
during Manual Non-Programmable mode.
ITEM #07 (DLAY = DELAY TIME):
• 5, default: Thermostat waits 5 minutes before turning
the system back on after it was last run. This internal delay prevents the appliance from turning on too
quickly after shutting down. The 5 minute setting is
ne for most applications.
• 2: Same operation as above but reduced to 2 minutes
between state changes. NOTE: This delay does not
happen when the thermostat is manually turned up
and down.
ITEM #08 (TEMPERATURE DIFFERENTIAL):
• The thermostat works by turning your heating system
on and off whenever the room temperature varies
from the desired set-point temperature.
HEATING:
Basic operation of the thermostat can be obtained with the
SET switch in the RUN position. The temperature can be
adjusted using the UP and DOWN buttons. When the thermostat is rst powered on, it will follow a default tempera-
ture routine that is preset from the factory.
Event Time Temperature
MORN 6:00 AM 70°F (21°C)
DAY 8:00 AM 62°F (17°C)
EVE 6:00 PM 70°F (21°C)
NITE 10:00 PM 62°F (17°C)
LCD DISPLAY BACKLIGHT:
The display screen is lighted to assist viewing at nighttime, or in locations with low light levels. Press any button
on the front panel to activate the approximate 10 second
backlight.
TEMPERATURE OVERRIDE:
While thermostat is in RUN mode, the set temperature can
be temporarily changed by pressing UP or DOWN. The
temporarily changed set temperature will return to the programmed value stored in memory when start time of the
next upcoming scheduled event is reached (MORN, DAY,
EVE, OR NITE). While the temporary changed set temperature is in effect, the word OVERRIDE will be shown
on the display screen. To cancel, move TEMPERATURE
switch to OFF and back to HEAT again.
TEMPERATURE HOLD:
Temperature hold is used for maintaining a xed set
temperature; once a HOLD is initiated, the thermostat
will maintain the set temperature indenitely. To enter a
HOLD state, press the HOLD button one time and the
word HOLD will appear on the display. To cancel, press
the HOLD button once again.
Quadra-Fire • Pioneer III Owner’s Manual • 4182-900 • Rev D • 08/19
13
 Loading...