

H270SB

Pure Warranty Statement for Australia
This statement replaces any reference to warranty which may be contained elsewhere within this manual.
What do you need to do now?
Option 1: You can register your purchase on-line at https://www.pure.com/au/register/register.asp
Option 2: Or you can do nothing other than keep your proof of purchase as evidence of your purchase date. This proof of purchase would need to be
presented if warranty service was ever required.
If you have any questions about your warranty you can call us toll free 1800 988 268.
What’s covered by this warranty?
• Pure agrees to refund, repair or replace, at your election, without charge to you, any part found to be defective during the warranty period.
• If equipment has been used according to its accompanying instruction manual and is used in a domestic situation, a three year warranty period applies.
How do you make your claim?
Call 1800 988 268 for instructions on how to return your Pure product for warranty service or go to http://support.pure.com/au/ and complete the contact
us form.
What’s NOT covered by this warranty?
Under this express warranty Pure will not be liable for loss or damage of any kind whatsoever, whether direct, indirect, incidental, consequential or otherwise.
• Replacement of parts due to normal wear and tear
• Products with serial number defacement, modification or removal
• Water damage or corrosion caused by dampness
• Any damage or deterioration due to shipment
• Any product which has been subjected to misuse, abuse or accident
Australian consumers — The benefits to the consumer given by this express warranty are in addition to other rights and remedies of the consumer under
a law in relation to the goods or services to which this warranty relates. Our goods come with guarantees that cannot be excluded under the Australian
Consumer Law, You are entitled to a replacement or refund for a major failure and for compensation for any other reasonably foreseeable loss or damage.
You are also entitled to have the goods repaired or replaced if the goods fail to be of acceptable quality and the failure does not amount to a major failure.
Pure is distributed and supported in Australia by PIONEER ELECTRONICS AUSTRALIA PTY LTD, 5 ARCO LANE, HEATHERTON, VICTORIA, 3202.
1
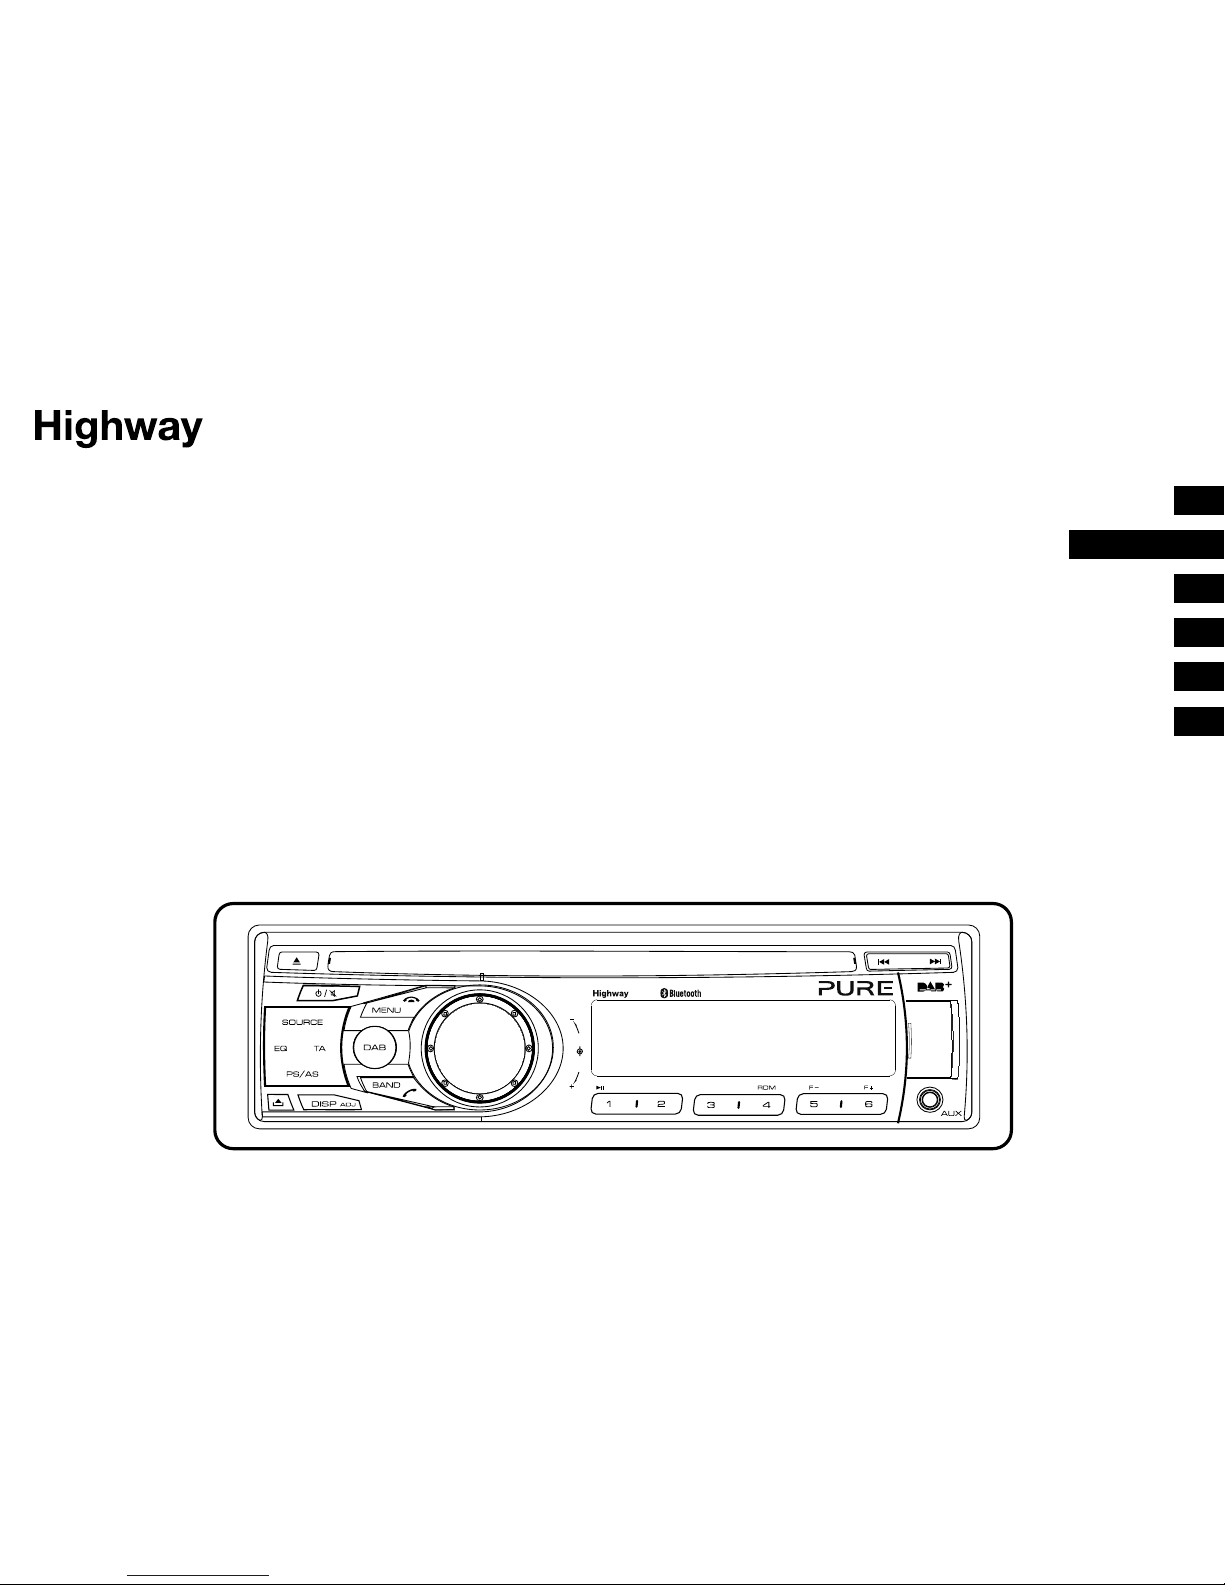
Thank you for choosing Highway H270SB. This manual will get you up and running in no time,
and explains how to make the most of your Highway H270SB. We’re constantly improving and
adding new features to our products. To take advantage of any enhancements made since
your product was shipped, please visit support.pure.com where you can check for any updated
versions of software and download the latest version of this user guide in PDF format.
H270SB
VOL
SEL
INTTOP RPT
H270SB
FR
ES
IT
NO
ENGLISH
DE
NL

2
Please read through these operating instructions
so you will know how to operate Highway properly.
After you have finished reading the instructions,
keep this manual in a safe place for future reference.
Precautions
Use only in a 12-volt DC negative-ground
electrical system.
Disconnect the vehicle’s negative battery
terminal while mounting and connecting the
unit.
When replacing the fuse, be sure to use one
with an identical amperage rating.
Using a fuse with a higher amperage rating
may cause serious damage to the unit.
DO NOT attempt to disassemble the unit. Laser
beams from the optical pickup are dangerous
to the eyes.
Make sure that no pins or other objects get
inside the unit as this may cause malfunctions,
or create safety hazards such as electric
shocks or laser beam exposure.
If you have parked the car for a long time in
hot or cold weather, wait until the temperature
in the car becomes normal before operating
Highway.
Keep the volume at a level where you can still
hear outside warning sounds (horns sirens,
etc.).
Stop the car before performing any complex
operations.
CD notes
Playing a defective or dusty CD can cause
dropouts in sound.
Handle the CD by holding its inner and outer
edges.
Do not touch the surface of the unlabelled side
of the CD.
Do not attach any seal, label or data protection
sheet to either side of a CD.
Do not expose a CD to direct sunlight or
excessive heat.
Wipe a dirty CD from the centre outwards with
a cleaning cloth.
Never use solvents such as benzine or alcohol.
Highway can not play 3-inch ( 8cm ) CDs.
Never attempt to insert a 3-inch CD with
an adapter or other irregularly shaped CD.
Highway may not be able to eject it, resulting in
a malfunction.
In addition to ordinary CDs, Highway can also
play back CD-R/CD-RW/MP3/UDF discs.
Caution
Please power off Highway and return it to the aftersales service centre or dealer /distributor that you
purchased Highway from if one of the following
symptoms occurs:
(1) Water or other obstacle enters Highway;
(2) Smoke;
(3) Highway emits a burning smell.
Safety information

3
Warranty information
Imagination Technologies Limited warrants to the end user that this product will be free from defects in materials and workmanship in the
course of normal use for a period of three years from the date of purchase. This guarantee covers breakdowns due to manufacturing or
design faults; it does not apply in cases such as accidental damage, however caused, wear and tear, negligence, adjustment, modification
or repair not authorised by us.
Please visit www.pure.com/register to register your product with us. Should you have a problem with your unit please contact your
supplier or contact Pure Suppor t at the address shown on the rear of this manual. If you need to return your product please use the
original packaging and include all par ts and accessories. We reserve the right to refuse incomplete or badly packaged returns.
Note: To register Highway you will need Highway’s serial number, which can be found on the back of the detachable front panel.
Disclaimer
Imagination Technologies Limited makes no representation or warranties with respect to the content of this document and specifically
disclaims any implied warranties of merchantability or fitness for any particular purpose. Further, Imagination Technologies Limited
reser ves the right to revise this publication and to make changes in it from time to time without obligation of Imagination Technologies
Limited to notify any person or organization of such revisions or changes.
Copyright
Copyright 2014 by Imagination Technologies Limited. All rights reserved. No part of this publication may be copied or distributed,
transmitted, transcribed, stored in a retrieval system, or translated into any human or computer language, in any form or by any means,
electronic, mechanical, magnetic, manual or otherwise, or disclosed to third parties without the express written permission of Imagination
Technologies Limited. Version 4 July 2014.
Trademarks
Highway H270SB, Pure, the Pure logo, Imagination Technologies, and the Imagination Technologies logo are trademarks or registered
trademarks of Imagination Technologies Limited, iPod and iPhone are trademarks of Apple Inc., registered in the U.S. and other countries.
“Made for iPod,” and “Made for iPhone” mean that an electronic accessory has been designed to connect
specifically to iPod, or iPhone, respectively, and has been certified by the developer to meet Apple performance
standards.
Apple is not responsible for the operation of this device or its compliance with safety and regulatory standards.
Please note that the use of this accessory with iPod or iPhone may affect wireless performance.
iPhone and iPod are trademarks of Apple Inc., registered in the U.S. and other countries.
Contents
4 Getting started
4 Front panel controls
5 Using your Highway
5 Removing and fitting the detachable
front panel
5 Listening to digital radio
6 Listening to FM or MW radio
6 Service following
7 Listening to a CD or USB drive
10 Listening to iPod or iPhone content
12 Using Bluetooth
14 Setup options
14 Options available in digital radio
14 Options available in FM radio
16 General options
17 Adjusting audio settings
18 Appendix
18 Electrical connections
19 Installation guide
20 Carrying out a factory reset
21 Removing the Highway head unit
22 Troubleshooting
23 Specifications
EN

4
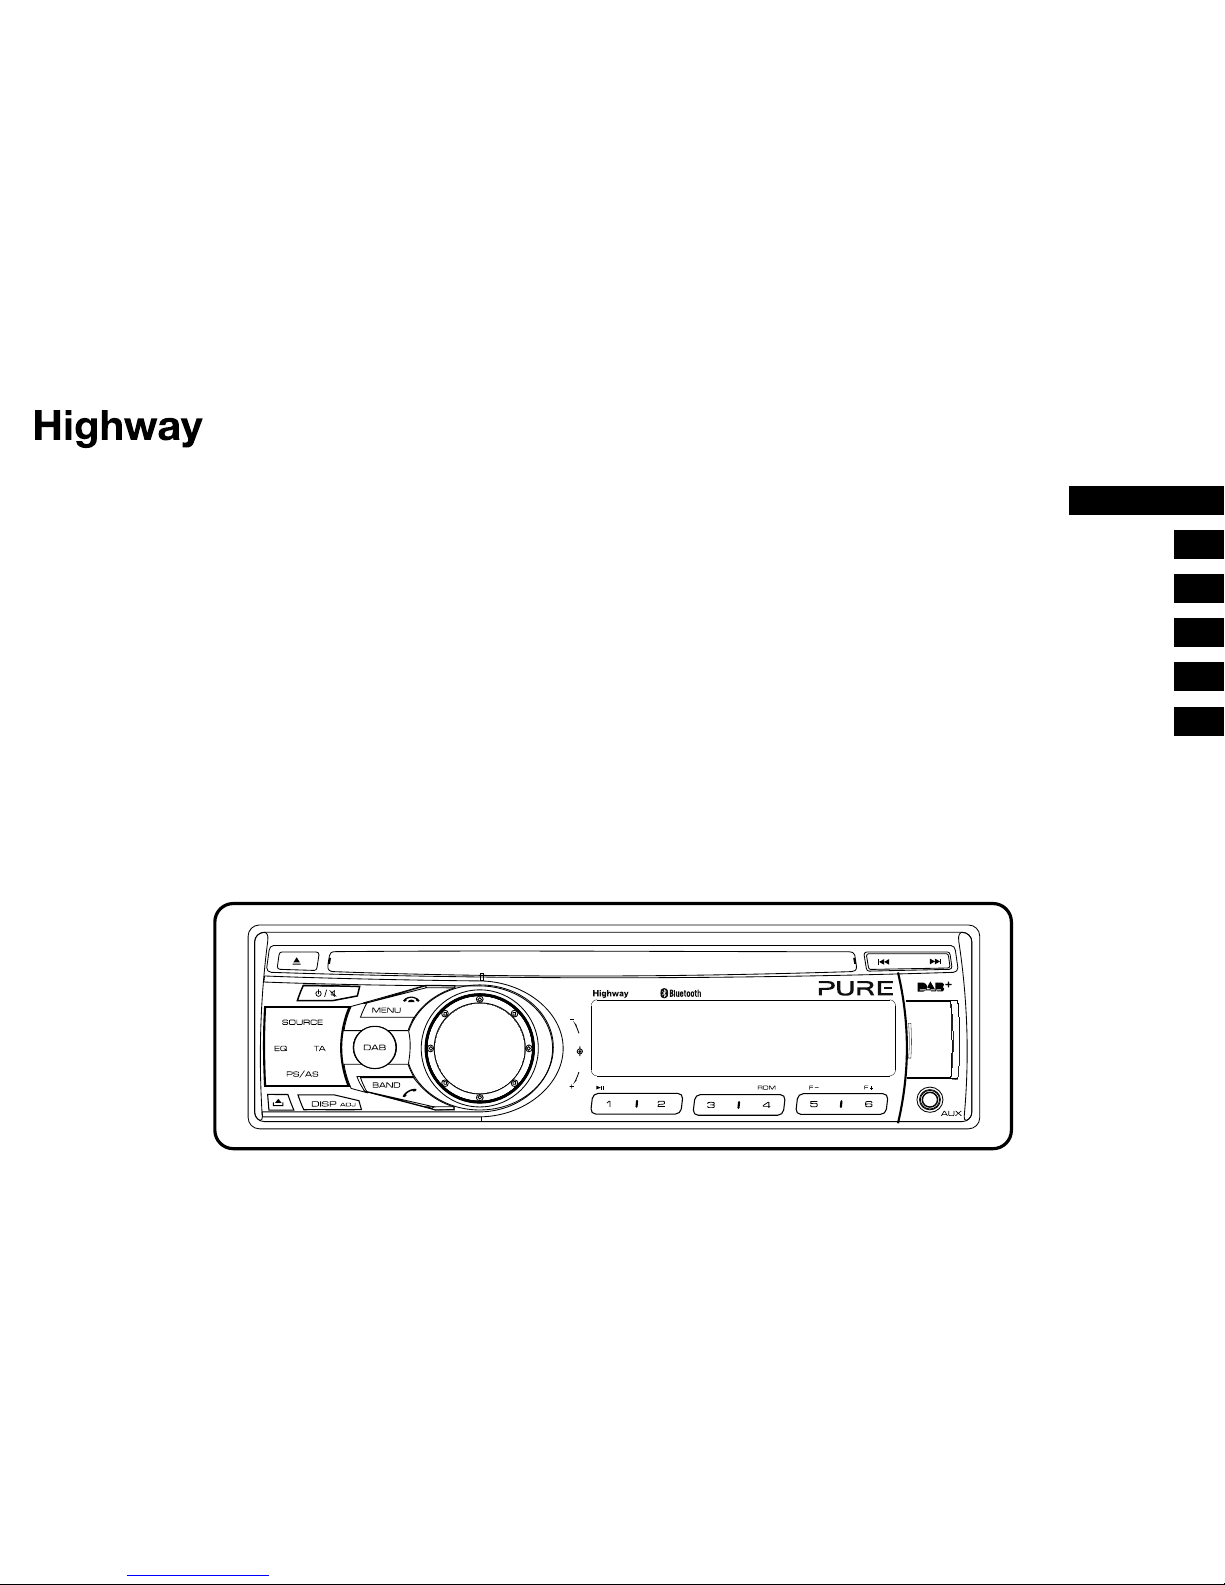
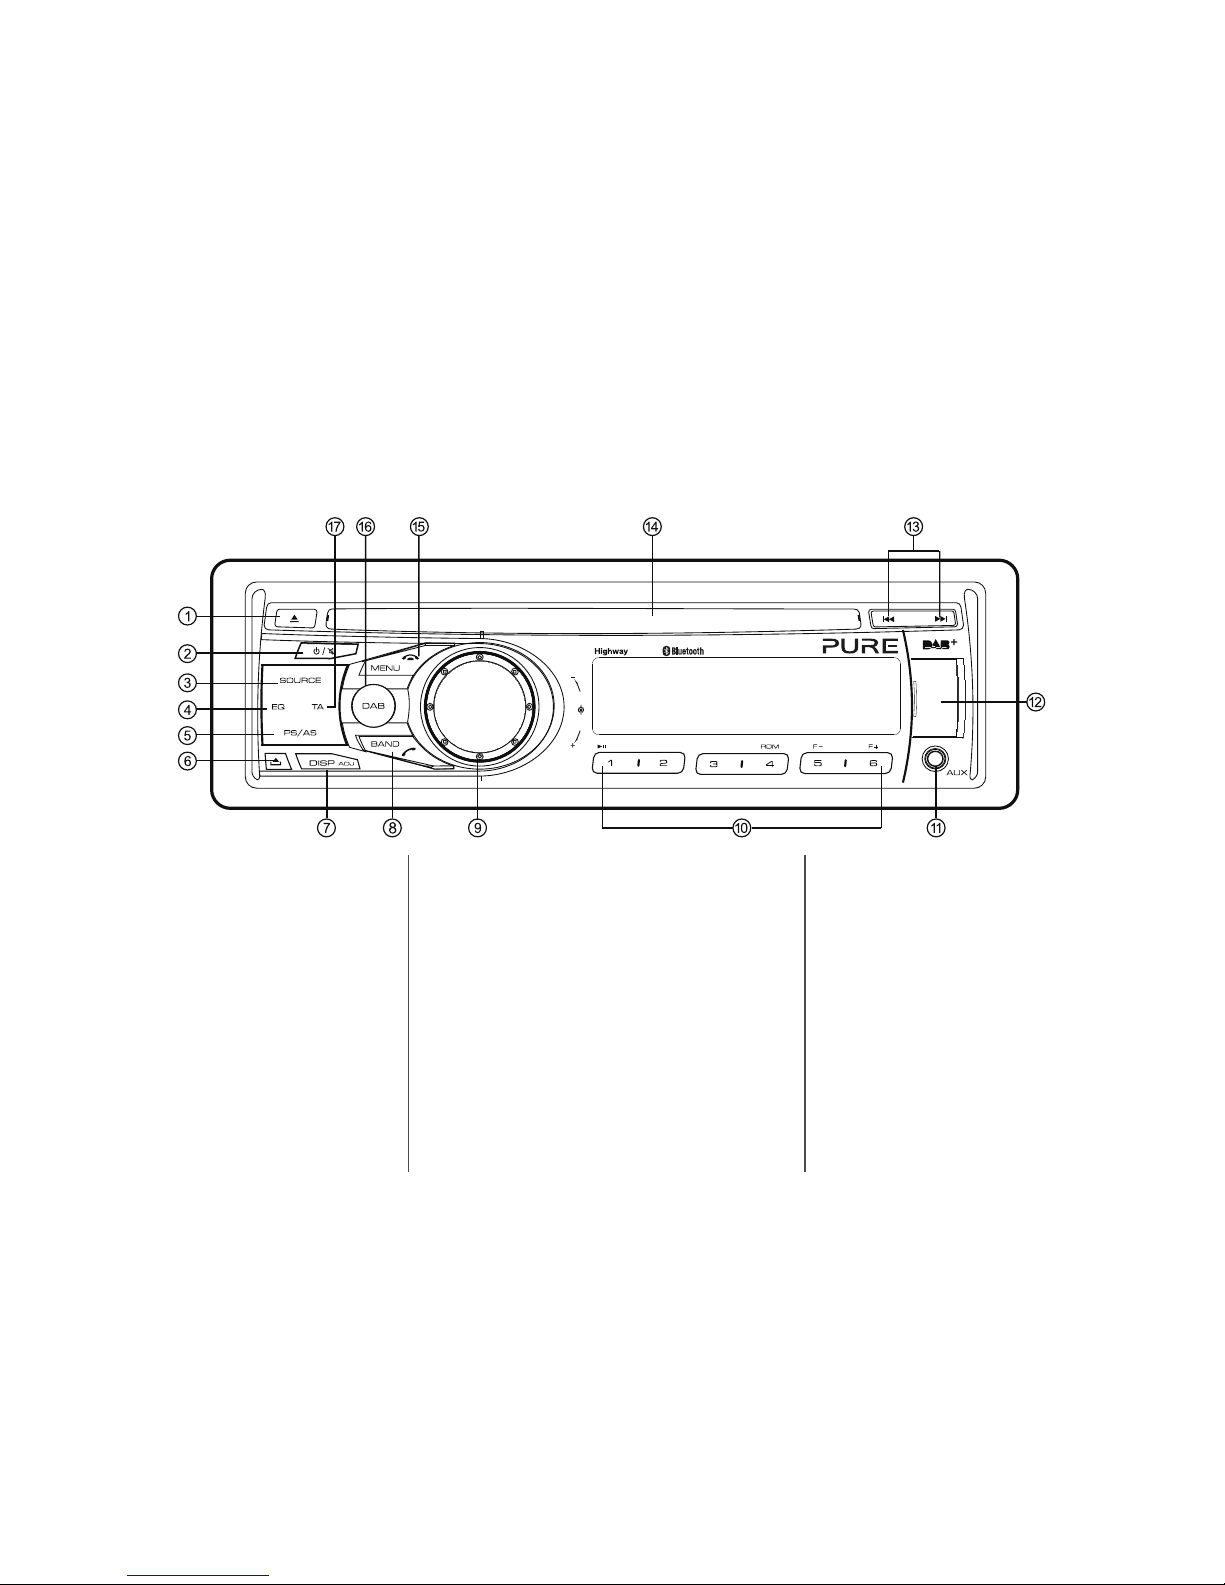
Front panel controls
1. Press to eject a CD
2. Power/Mute
3. Toggle the audio source
4. Sound effect setting
5. TUNER mode (FM or MW only):
- Preset scan
- Auto store (long press)
DAB mode – Autotune
6. Unlock the front panel.
7. Display switch
- Adjust system setup (long press)
8. Band switch:
- TUNER mode – FM1 > FM2 > FM3 > MW
- DAB mode – D1 > D2 > D3
- BLUETOOTH mode – Dial / Answer call
9. Adjust volume level / Confirm (press)
10. Button 1: Play / Pause / Top play (long press)
(see page 7) / Preset station 1
Button 2: Scan play / Preset station 2
Button 3: Repeat play / Preset station 3
Button 4: Random play / Preset station 4
Button 5: Previous folder / Preset station 5 /
MP3 and WMA tracks -10 down (long
press)
Button 6: Next folder / Preset station 6 / MP3
and WMA tracks +10 up (long press)
11. Aux-in socket
12. USB connector (open cover)
13. CD mode – Previous / next track
TUNER mode – Manual tune (short press)
Seek + / - (long press)
DAB mode – Previous / next station
Bluetooth mode - Previous / next track
14. CD slot
15. TUNER mode – PTY select
CD mode – No function
DAB mode – No function
BLUETOOTH mode – Terminate call
AUX mode – No function
iPod mode – iPod menu
CD/USB MP3 and WMA mode – Folder search
16. DAB button – Press to toggle between digital
radio and previously used audio source
17. Traffic announcement
Getting started
VOL
SEL
INTTOP RPT
H270SB
5
Using your Highway
Listening to digital radio
Selecting digital radio as playing source
Press DAB once, or Source repeatedly until ‘DAB’ is
displayed on the screen.
Changing digital stations
Press the or buttons to scroll through the
list of stations and press the VOLUME dial to select.
Choosing a digital radio band
Highway includes a BAND button that you can press
to change the stations that are allocated to the six
preset buttons. There are three bands available for
digital radio, allowing you to store up to 18 digital
radio presets. Press BAND to select band D1, D2
or D3.
Storing and selecting presets
Manually storing a preset
Tune into the digital radio station you want to store.
Press and hold one of the numbered preset buttons
(1-6) to store it in the memory.
Recalling a preset
To tune to a preset, press the corresponding preset
button (1 to 6).
Carrying out an autotune
The autotune function scans all digital radio
frequencies and automatically updates the station
list by adding any stations found and removing any
stations that are no longer available. To carry out an
autotune, press the PS/AS button.
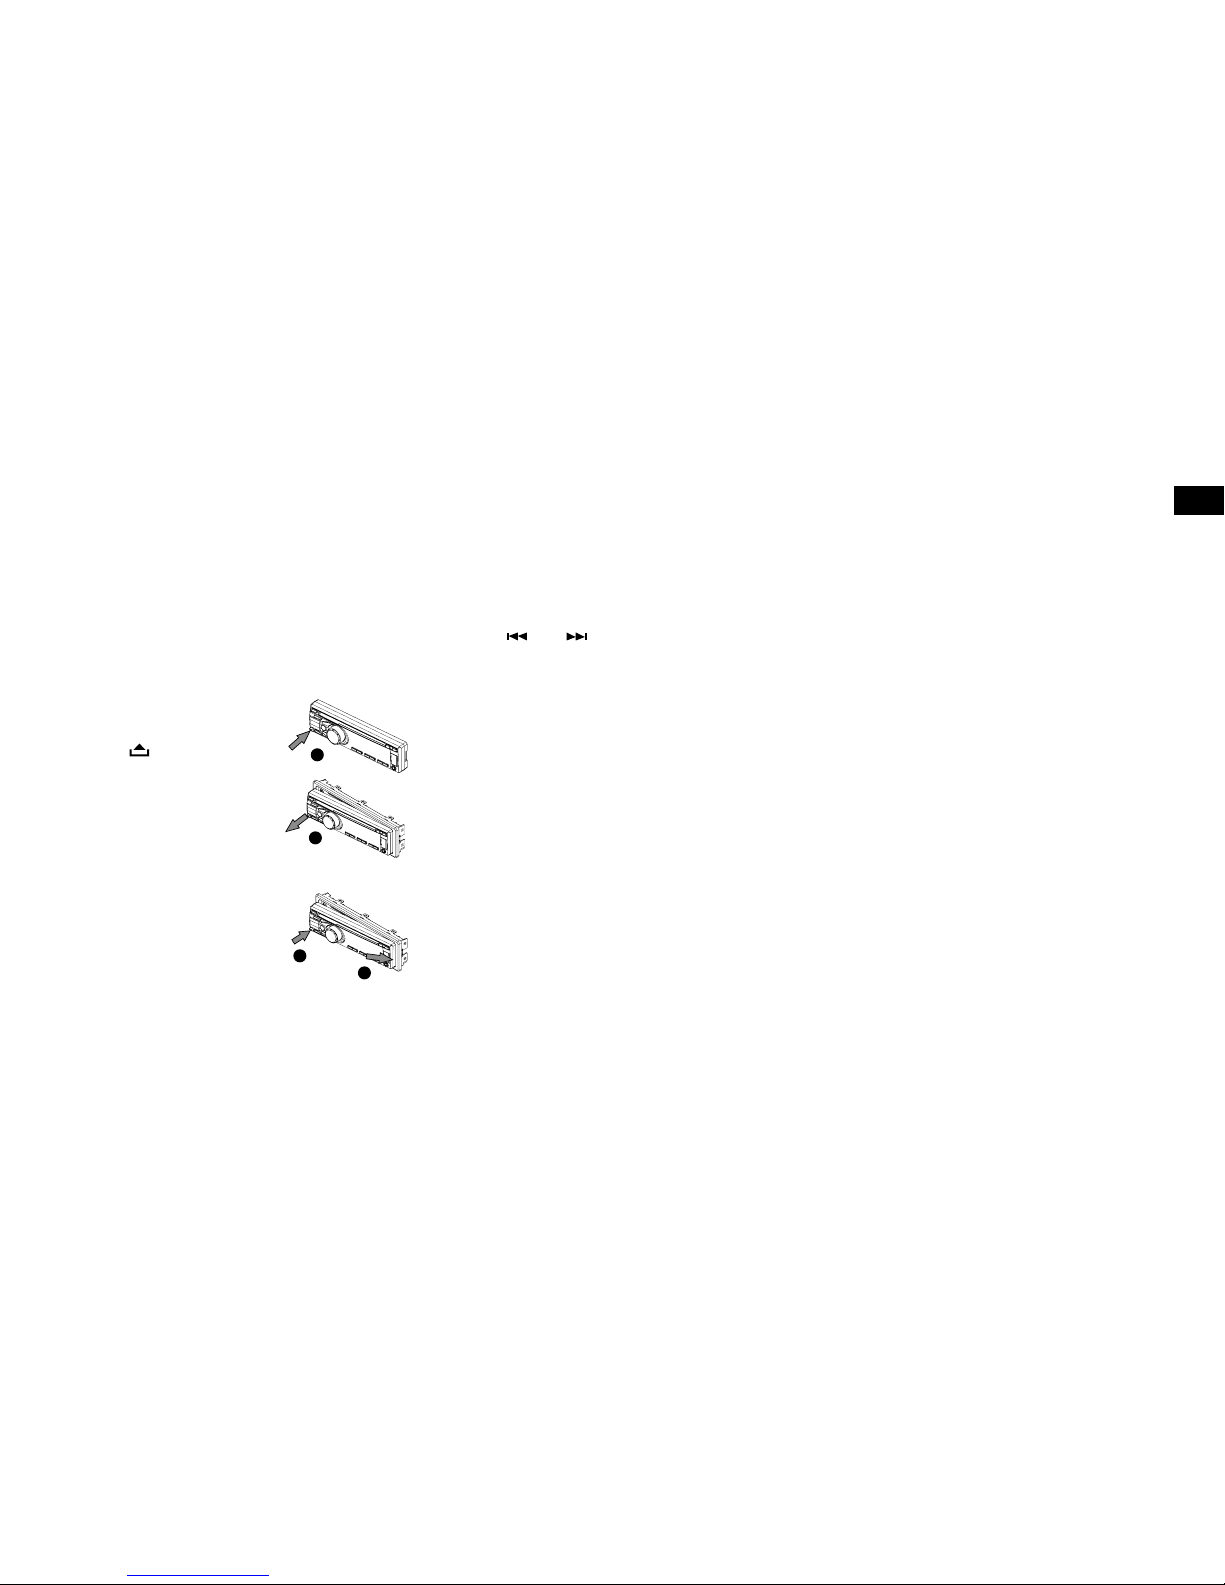
Removing and fitting the
detachable front panel
To help improve security, Highway has a
detachable front panel so you can take it with you
whenever you leave your car.
Note: To prevent damage, place the front panel in
the protective case whenever you remove the front
panel from the head unit.
Removing the detachable
panel
1. Press the button.
2. Hold the loose part of the
panel and remove from the
head unit.
Fitting the detachable
panel
1. Line up the groove on the
right side of the face panel
with the slot on the unit.
2. Press down the left side of
the face plate until it clicks
into the panel slot.
2
2
1
1
2
1
Changing the information shown on
screen
In digital radio mode, Highway displays two
rows of text. The first row always displays the
name of the radio station.
You can toggle the information that is
displayed on the second row by pressing the
DISP button.
Highway can display the current time, scrolling
text, programme type (PTY) information, multiplex
(MUX), band information and frequency.
EN

6
Listening to FM or MW radio
Press SOURCE repeatedly until ‘TUNER’ is
displayed on the screen.
Changing FM or MW stations
Manual tuning
Press the or buttons to tune in to a higher
or lower station.
Seek tuning
Press and hold the or buttons to seek to
the next or previous radio station that has a strong
signal.
Note: To stop seek tuning, repeat the steps above
or press any other button that has a radio function.
Choosing an FM or MW radio band
Highway includes a BAND button that you can
press to change the stations that are allocated to
the six preset buttons. In FM there are three bands
available, allowing you to store up to 18 FM presets.
In MW there is only one band available, allowing
you to store up to 6 presets. Press BAND to select
either FM1, FM2, FM3 or MW.
Storing and selecting presets
Manually storing a preset
Tune into the FM or MW radio station that you
want to store. Press and hold one of the numbered
preset buttons (1-6) to store it in the memory.
Recalling a preset
To tune to a preset, press the corresponding preset
button (1 to 6).
Auto storing presets
You can use the auto store function to automatically
populate your presets with radio stations that are
detected by Highway.
Press and hold the PS/AS button to start automatic
station search.
To stop auto store, press any button that has a
radio function.
Notes: If you start the auto store function in an
FM band, the auto store function will automatically
populate the presets in all the FM bands (FM1, FM2
and FM3). If you start the auto store function in the
MW band, the auto store function will automatically
populate the presets in the MW band.
Preset scan
You can use the preset scan function to listen
to ten seconds of audio from each of the radio
stations stored in your presets.
1. Press the PS/AS button to begin the preset
scan.
2. Press the PS/AS button again when you hear a
station that you want to listen to.
Note: Pressing the PS/AS button for more than
one second will start the auto store function, which
will overwrite all your presets.
Changing the information shown on
screen
In FM mode, Highway displays two rows of text.
The first row will display RDS information if it is
available. If there is no RDS information, the band
and frequency will display.
You can toggle the information that is displayed
on the second row by pressing the DISP button.
Highway can display the current time, scrolling text
(if available), programme type (PTY) information,
and band and frequency.
Service following
If you are listening to a digital radio station and
you lose the digital radio reception, Highway’s
service following feature will always attempt to
automatically tune in to the same radio station with
a better reception or a similar digital radio station. If
the same or a similar digital station cannot be found,
Highway will attempt to find the same station in FM
mode*.
Note: If Highway has used service following to
retune a digital radio station to the same FM station,
Highway’s screen will display ‘FM’ after the radio
station’s name.
Note: Digital to FM service following will not work
if TA standby mode is enabled. See page 14 for
more information.
*Service following is only supported by some broadcasters.
7
Listening to a CD or USB drive
Highway can play audio CDs and MP3 and WMA
files that are stored on a CD or USB drive.
Note: Highway cannot play AAC files stored on a
CD or USB drive.
Loading a CD
Insert a CD into the centre of the CD slot with the
label facing upwards. The CD will play automatically
after it has been loaded.
Notes:
• Never insert foreign objects into the CD slot.
• If the CD is not inserted easily, there may be
another CD in the mechanism or the unit may
require a service.
• Some CD-R/CD-RW discs may not be usable.
• In addition to ordinary CDs Highway can also
play back CD-R and CD-RW discs.
Ejecting a CD
Press the button to eject a CD.
Notes:
• Forcing a CD into the unit can damage the CD.
• If a CD (12 cm) is left ejected for 15 seconds, the
CD is automatically reloaded.
Listening to a CD that is already loaded
in Highway
Press the SOURCE button to select CD/MP3
mode.
When Highway enters CD/MP3 mode, the CD will
play automatically.
Playback controls for an audio CD and
MP3/WMA tracks saved to a CD or
USB drive
Fast-forward
Press and hold the button.
Rewind
Press and hold the
button.
* For MP3/WMA discs, there may be a slight
delay when searching and skipping between
tracks.
Pausing playback
Press the 1 button to pause playback. Whilst
playback is paused, ‘PAUSE’ will appear on the
display.
To resume playback , press the 1 button again.
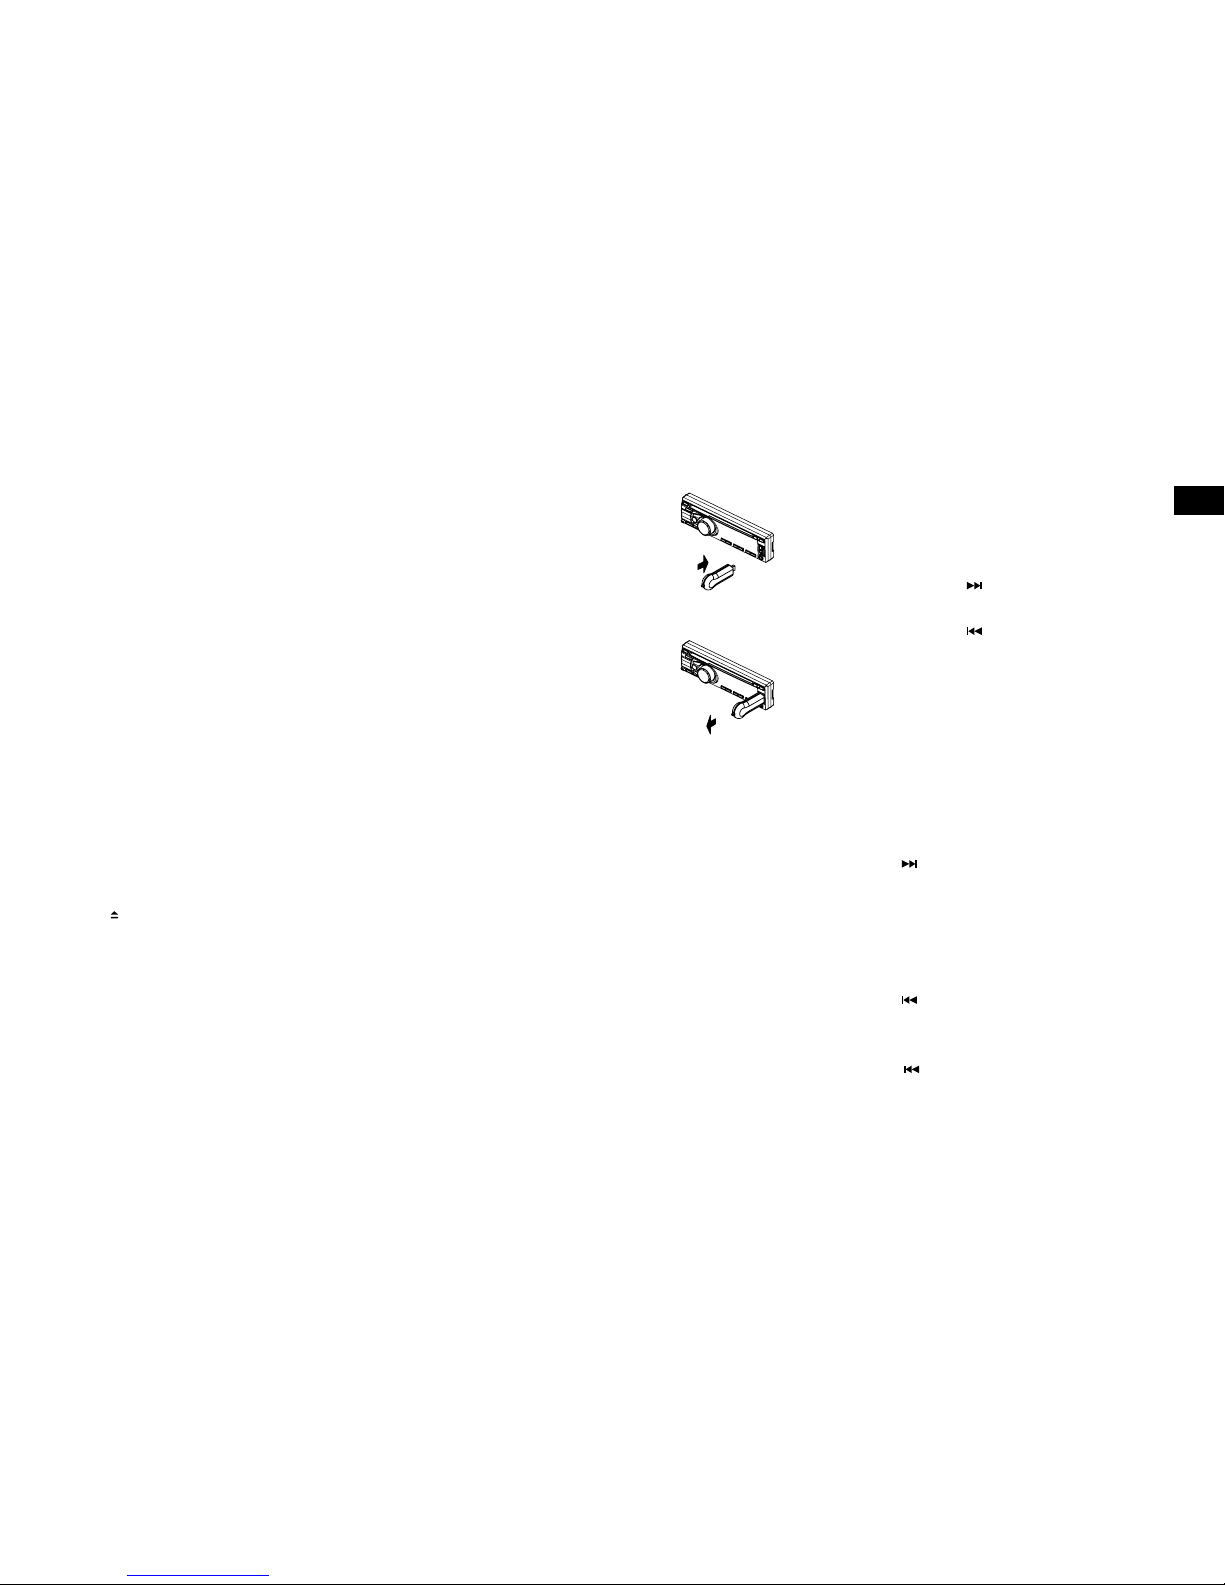
Skipping to the next track
Press the button to skip to the beginning of
the next track.
If you are listening to an MP3/WMA file, press
and hold the 6 button (1 sec.) to move ahead
10 tracks.
Playing the previous track
Press the button within the first 10 seconds
of the track to go to the previous track.
Playing the beginning of a track
Press the button after the first 10 seconds
of the track to go to the start of the track.
For MP3/WMA files, press and hold the 5 button (1
sec.) to move back 10 tracks.
Inserting a USB drive
Insert a USB device into the
USB connector.
When connecting a USB
device, the unit will read the
files automatically.
Removing a USB drive
Before removing a USB drive,
select another source or
turn off the power to avoid
damaging the USB device.
For more information on
listening to MP3 or WMA files
see the following section.
1
1
2
EN

8
Random play function
If listening to an audio CD, you can use the random
play function to play all the tracks on the CD in a
random order.
If listening to an MP3 or WMA file, you can use the
random play function to play all the MP3 or WMA
files on the CD or USB drive in a random order.
Press the 4 button to toggle the random play
function on ‘RDM ON’ and off ‘RDM OFF’.
Displaying title data
Highway can display the title data for MP3 and
WMA files.
If the CYCLE setting is OFF (see page 16), you
can press the DISP button to change the title data
displayed on the screen. Highway can display the
following data about the MP3 or WMA file:
File name > Folder name > Track Title > Album >
Artist > File ...
Notes:
• If the MP3/WMA file has no ID3 tag, ‘NO TITLE‘
will appear on the display.
Selecting a folder
You can select the folder that contains the MP3/
WMA files you want to listen to. Highway will start
to play all the tracks stored in the folder, starting
from the first track.
To move to the next folder, press the 6 button.
To move to the previous folder, press the 5 button.
Press the or button to change tracks within
a folder.
Using the search function
Highway can search for MP3 or WMA files stored
on a CD or USB drive.
1. Press the MENU / button to see the FOLD
SCH option.
2. Press the VOLUME dial to enter the folder list
search.
3. Tur n the VOLUME dial to select the folder that
you want to search in.
4. Press the VOLUME dial to see the file list on the
display.
5. Tur n the VOLUME dial to choose a track and
press to play.
Listening to the first track on a CD or USB
drive
Highway features a function called Top that allows
you to listen to the first track on the CD that is
currently playing. To listen to the first track on the
CD that is currently playing, press and hold the
Top (1) button (1 sec.).
Note: If you are listening to an MP3/WMA file,
pressing the 1 button will play the first track on the
CD or USB drive.
Intro function
If listening to an audio CD, you can use the intro
function to play the first 10 seconds of the next track
and the rest of the tracks on the CD in sequential order.
If listening to an MP3 or WMA file, this function
allows you to play the first 10 seconds of all the
MP3 or WMA tracks on a CD or USB drive.
To use the intro function, press the 2 button during
playback. The ‘SCN’ icon will display on the screen
when the intro function is enabled.
To turn the intro function off, press the 2 button.
Repeat play function
If listening to an audio CD, you can use the repeat
play function to play the current track repeatedly.
Press the 3 button to toggle the repeat function on
‘RPT ON’ and off ‘RPT OFF’.
If you are listening to an MP3/WMA file, press the
3 button to choose one of the following repeat
options:
TRK RPT: Repeats the current track.
FOLD RPT: Repeats all the tracks in the current
folder.
RPT OFF: No tracks repeated.

9
Logical format (File system):
1. When writing MP3/WMA files to a CD-R disc
or CD-RW disc, please select either ‘ISO9660
level 1, 2 or Joliet’ or Apple ISO as the writing
software format. Normal playback might not
be possible if the disc is recorded in any other
format.
2.
The folder name and file name can be displayed
as the title during MP3/WMA playback.
However, the title must be within 30 single byte
alphabetical letters and numerals (including an
extension).
3.
Do not name a folder with the same name as a
file within that folder.
Folder structure:
You cannot play a CD that contains folders with
more than eight hierarchical levels.
Number of files or folders:
1.
Up to 999 files can be recognised per folder.
Up to 3000 files can be played.
2.
Tracks are played in the order that they were
recorded onto a CD. (Tracks may not always be
played in the order displayed on a computer.)
3. Some noise may occur depending on the type
of encoder software used while recording.
Notes about listening to WMA/MP3 files
Disabling DRM (Digital Rights Management)
Highway will not play any WMA files if they are
DRM (Digital Rights Management) enabled. If you
want to play a WMA file on Highway, you will need
to disable DRM.
If using Windows Media Player 9/10/11, click on
Tools > Options > Copy Music tab. Under Copy
settings, un-check the Copy protect music.
checkbox, then reconstruct the files.
Personally constructed WMA files are used at your
own responsibility.
File extensions:
1. Always add a file extension ‘.MP3’, ‘.WMA’ to
an MP3, WMA file by using single byte letters. If
you add a file extension other than specified or
forget to add the file extension, the file cannot
be played.
2. Files without MP3/WMA data will not play. The
files will play with no audio if you attempt to
play files without the MP3/WMA data.
* When VBR files are played, the play time display
may differ depending on the play location.
* When MP3/WMA files are played, very little or
no sound will play between tunes.
EN

10
Listening to iPod or iPhone content
Connecting an iPod and iPhone
Connect an iPod or iPhone* to the USB connector.
After connecting an iPod/iPhone, you will be able
to control all playback functions and view all the
information about the track’s stored on your iPod/
iPhone using Highway’s controls.
Listening to audio from an iPod or
iPhone
You can listen to audio from any music or videos
stored on your iPod. To listen to audio from your iPod:
1. Press the MENU / button.
2.
Turn and press the VOLUME dial to select
‘MUSIC’ or ‘VIDEO’.
3. If you selected ‘MUSIC’, turn and press the
VOLUME dial to select either ‘PLAY LISTS’,
‘ARTISTS’, ‘ALBUMS’, ‘SONGS’, ‘GENRES’ or
‘COMPOSERS’.
If you selected ‘VIDEO’, turn and press the
VOLUME dial to select either ‘MOVIES’, ‘MUSIC
VIDEOS’, ‘TV SHOWS’, ‘VIDEO PODCASTS’,
or ‘RENTALS’.
Note: When you play a video file, Highway
can only play the audio from the video and not
display any image content.
4.
Turn and press the VOLUME dial to select the
item that you want to listen to.
Note: The items listed in VIDEO MENU vary
depending on what model of iPod you have
connected and the language used.
Searching for content on your iPod/
iPhone
Highway lets you search for content using
alphabetical letters. To search for content:
1.
Press the MENU / button to select the iPod
menu mode.
2.
Turn the VOLUME dial to specify whether you
want to search for ‘MUSIC’ or ‘VIDEO’ content.
3.
If you selected ‘MUSIC’, turn the VOLUME
dial to select either ‘PLAY LISTS’, ‘ARTISTS’,
‘ALBUMS’, ‘SONGS’, ‘GENRES’ or
‘COMPOSERS’.
If you selected ‘VIDEO’, turn the VOLUME dial
to select either ‘MOVIES’, ‘MUSIC VIDEOS’,
‘TV SHOWS’, ‘VIDEO PODCASTS’, or
‘RENTALS’.
4.
Press the VOLUME dial to display all the
contents that match the selected category.
5.
Press and hold the DISP button (1 sec).
6.
Turn the VOLUME dial to specify a letter to
search for.
7.
Press the DISP button again to start searching.
8.
Press the VOLUME dial to confirm.
Repeat play function
You can use the repeat play function to play
the track currently being played on your iPod
repeatedly.
Press the 3 button to specify one of the following
repeat options:
RPT ONE: Repeats the current track.
RPT ALL: Repeats all the tracks in the current
folder.
Random play (Shuffle) function
Album Shuffle
To play all the albums stored on your iPod or
iPhone in a random order, press the 4 button until
‘RDM ALBUM’ is displayed on the screen.
Song Shuffle
To play the tracks in the folder you are currently
listening to on your iPod or iPhone in a random
order, press the 4 button until ‘RDM SONG’ is
displayed on the screen.
Disabling the Shuffle function
To disable the shuffle function, press the 4 button
until ‘RDM OFF’ is displayed on the screen.
*Supports most iPod and iPhone models. For the latest information, check the compatibility table on our website: www.pure.com/products/ipod-compatibility.

11
Using your iPod/iPhone to select tracks
on your Highway
Highway allows you to use your iPod/iPhone to
select the tracks that are playing on Highway. This
function is known as simple control (S-CTRL).
This setting is disabled by default.
To enable your iPod/iPhone to select tracks on
Highway:
1.
Press and hold the DISP button to enter
system setup.
2.
Press or button to scroll to ‘S-CTRL’.
3.
Turn and press the VOLUME dial to turn
S-CTRL ‘ON’ or ‘OFF’. Select ‘ON’ to enable
your iPod to control Highway’s iPod/iPhone
functions. Select ‘OFF’ to disable the S-CTRL
function.
Notes:
• Be patient when selecting tracks on Highway
with your iPod/iPhone as there may be a slight
delay.
• Do not try to select tracks on Highway using
your iPod and the controls on the head unit at
the same time.
• Some iPod models do not support the S-CTRL
function. Consult your nearest dealer or the Pure
website to confirm which models do not support
S-CTRL.
EN

12
Using Bluetooth
Highway’s Bluetooth feature allows you to use
Highway’s microphone and your car’s built in audio
system to make handsfree phone calls. Once
connected, you can also use Highway’s display
to view information about incoming, outgoing and
missed phone calls.
If your mobile phone is capable of storing audio
files, you can also use Bluetooth to stream any
music stored on your phone to Highway.
Notes:
• Do not install Highway’s microphone in noisy
areas within your vehicle, such as near the air
vents.
• Do not place your Bluetooth handsfree device
in places where it can be exposed to direct
sunlight as high temperatures may affect
Highway’s performance.
• Highway may not be compatible with some
mobile phones and Bluetooth audio players.
• Audio playback will be set to the same volume
level set during a telephone call.
Pairing your mobile phone with Highway
Before you can use Highway’s Bluetooth function,
you will need to pair your mobile phone with
Highway.
1. Turn on your mobile phone’s Bluetooth function.
2. Enter your mobile phone’s Bluetooth setup
menu.
3. Search for new Bluetooth devices.
4. Select Pure Highway from the pairing list on
the mobile phone.
After pairing successfully, the BT and HFP icons
will light up on Highway.
The A2DP icon will light up to indicate that music
can be streamed from your Bluetooth device to
Highway.
Auto connection
1. Highway can pair and store a maximum of five
mobile phones.
Auto connection will be enabled once you have
paired your mobile phone with Highway.
2. Your mobile phone will need to be switched on
to use the auto connection function.
3. The auto connection function will only work with
the last mobile phone that you connected to.
If you want to connect another mobile phone,
you will need to connect manually.
Using the handsfree telephone function
Accessing the Bluetooth menu
Toggle the SOURCE button to switch the source
to ‘BLUETOOTH’.
Press the
MENU /
button to select a way to
make outgoing call.
Dialling a number
1. Press the MENU / button.
2. Turn and press the VOLUME dial on the front
panel to select ‘DIAL NUMBER’.
3.
Turn and press the VOLUME dial to select the
first number of the phone number that you
want to dial. Repeat until you have entered the
whole phone number.
4.
Press the BAND / button to dial the phone
number.
When you have finished your phone call, press the
MENU /
button to hang up.
Answering a call
Press the
BAND /
button to answer an incoming
call.
To reject an incoming call press the
MENU /
button.
Ending a call
When you have finished your phone call, press the
MENU /
button to hang up.

13
Viewing your call history
You can view your recent call history on Highway
to retrieve information about calls that you recently
Dialled, Missed, or Received.
To view your call history:
1. Press the MENU / button:
2. Turn and press the VOLUME dial on the front
panel to select ‘DIALLED CALL’, ‘MISSED
CALL’ or ‘RECEIVED CALL’.
3. Press the VOLUME dial to view the selected
call history contacts.
4. Turn the VOLUME dial to scroll through the
list of contacts and press when you see the
contact name or phone number that you want
to call.
Switching between handsfree and normal
mobile phone operation
You can switch between handsfree and normal
mobile phone operation by pressing the
BAND / button during a phone call.
Audio Streaming Operations
What is Bluetooth audio streaming?
Using Bluetooth allows you to stream music
from an external audio player/phone to Highway
wirelessly and listen to the tracks through your
car’s speakers.
CAUTION
Please avoid operating your connected mobile
phone while streaming audio.
Audio streaming may or may not resume after it is
interrupted by a telephone call -- this is dependent
on the mobile phone.
If the audio streaming source is disconnected,
Highway’s display will show a ‘BLUETOOTH
DISCONNECT’ message.
Note:
Be sure to read the chapter ‘Pairing your mobile
phone with Highway’ on the previous page before
proceeding.
Playing or pausing a track
Press the 1 button to pause audio playback.
To resume audio playback, press the 1 button again.
Selecting a track
Skipping to the next track
Press the button to skip to the beginning of the
next track.
Playing the beginning of a track
Press the button to play the beginning of the
current track.
Note:
The order that tracks are played in will vary
between different Bluetooth
audio players.
When the button is pressed, some A2DP
devices will restart the current track depending
on the track duration.
During music streaming playback ’HFP’ or
‘A2DP’ will be shown on the display.
If ‘BLUETOOTH DISCONNECT’ is shown on
the display, your Bluetooth
audio player may
not have synchronized the play/pause function
with Highway. Please make sure that both your
Bluetooth device and Highway have the same
play/pause status when streaming music to
Highway from a connected Bluetooth audio
player.
EN

14
Options available in digital radio
Digital radio antenna setting
You can specify the type of digital radio antenna you
are connecting to Highway. The available options
are ‘ACTIVE’ and ‘PASSIVE’. See page 19 for
more information.
L-band settings
You can specify whether or not Highway tunes in to
radio stations that broadcast on L-band.
To enable or disable the L-band setting:
1.
Press and hold the DISP button on the front
panel until ‘CLOCK’ is displayed on the screen.
2. Press the or buttons to scroll to ‘DAB
LBND’.
3.
Turn and press the VOLUME dial to toggle the
L-band function ‘ON’ or ‘OFF’.
Setup options
Options available in FM radio
Local seeking
You can use the local seeking function so that
Highway only tunes into radio stations with a strong
signal.
To enable or disable the local seeking function:
1.
Press and hold the DISP button on the front
panel until ‘CLOCK’ is displayed on the screen.
2.
Use the button to scroll to ‘DX/LO’.
3.
Turn and press the VOLUME dial to select
either ‘LOCAL’ (enable) or ‘DX’ (disable).
Note: The number of radio stations that can be
received will decrease when local seeking function
is enabled.
Highway has a built-in Radio Data System (RDS)
decoder system that supports broadcast stations
transmitting RDS data.
RDS settings
AF function
If you are listening to an FM radio station and the
signal starts to weaken, the AF function will try to
search and automatically retune Highway to the
same radio station on an alternative frequency. This
setting is ON by default.
1.
Press and hold the DISP button on the front
panel until ‘CLOCK’ is displayed on the screen.
2. Press the or buttons to scroll to ‘AF’.
3. Turn the VOLUME dial to select ‘ON’ or ‘OFF’.
When the AF function is enabled, the AF indicator
will appear on the display.
Note: Digital to FM service following will not work
when the AF function is disabled.
Radio Data System

15
REG (Regional programme) function
When the REG function is ON, Highway will
automatically tune into the station with the strongest
signal within the specified region using the AF
control. If this function is OFF and the regional area
changes as you drive, Highway will tune into a
station within the current region. This setting is ON
by default.
Notes:
• This function is disabled when Highway is tuned
into a national station, such as BBC R2.
• The REG function ON/OFF setting only applies
when the AF function is ON.
1. Press and hold the DISP button on the front
panel until ‘CLOCK’ is displayed on the screen.
2. Press the or buttons to scroll to ‘REG’.
3. Turn the VOLUME dial to select ON or OFF.
Manually tuning to a regional station in the
same network
You can manually tune to a regional station in the
same network when the AF function is ON and the
REG function is OFF.
Note: This function can be used when a regional
broadcast of the same network is received.
TA (Traffic Announcement)
In TA standby mode (‘TA’ icon is lit on the display),
Highway will wait for a TA signal from any available
FM station that is in range. When Highway
receives a TA or EON traffic signal, Highway
will automatically tune into the FM station it has
found with a traffic announcement. When the
traffic announcement has finished, Highway will
automatically tune back to the last FM station you
were listening to.
To cancel an active traffic announcement, press
the TA button.
Setting the TA standby mode
Note: If TA standby mode is on, digital to FM
service following will not work.
Press the TA button to toggle the ‘TA’ icon on
and off. When the ‘TA’ icon is lit in the display,
Highway will remain in TA standby mode until a
traffic announcement is broadcast. When a traffic
announcement broadcast starts, Highway will
display ‘TRAF INF’ if the traffic announcement is
being broadcast from the radio station that you are
currently listening to. If Highway tunes in to a traffic
announcement from another radio network, ‘EON
INF’ will appear on the display.
PTY (Programme Type)
You can use the PTY (Programme Type)
function to search for radio broadcasts that
match a certain genre. In Europe there are thirty
one predefined programme type genres.
* Some countries do not currently broadcast PTY
information.
* In the TA standby mode, a TP station has priority
over a PTY broadcast station.
To use the PTY function to search for a particular
type of radio broadcast:
1. Press the
MENU /
button.
2. Turn and press the VOLUME dial on the front
panel to select the genre of the PTY broadcast
that you want to search for.
Highway will start to search for a matching radio
broadcast and tune into the first radio station that
matches the specified PTY type.
Repeat the above steps to search for another
station that matches the specified PTY type.
EN

16
In any mode, press and hold the DISP button to
enter the system setup menu. Press the
or
buttons to scroll through the options, and turn the
VOLUME dial to adjust a setting.
CLOCK
1. Press the VOLUME dial.
2. The hour will flash on and off. Turn and press
the VOLUME dial to set the hour. Repeat to set
the minutes.
LANGUAGE
You can select the language that your Highway
uses for menus and options.
1. Press the VOLUME dial.
2. Turn and press the VOLUME dial to select
a menu language from ‘English’, ‘French’,
‘German’ or ‘Italian’.
AUX SENS (AUX mode)
Turn and press the VOLUME dial to increase or
decrease the audio boost level for the AUX input. The
available options are LOW, MID or HIGH.
AUTO CON: ON/OFF
(Bluetooth mode only)
Enabling this option automatically connects the
mobile phone that you last connected.
Turn and press the VOLUME dial to switch the
Auto Con feature ‘ON’ or ‘OFF’.
General options
COLOUR
Turn the VOLUME dial to choose a backlight
colour.
SCN: The backlight continually cycles through all
available colours.
COLOUR 01~12: Select a preset colour.
USER1~3: Create your own colour. Press the
dial to enter colour setting mode and press
the
buttons to select the RED, GREEN and
BLUE (RGB) values of your desired colour. Turn and
press the VOLUME dial to select a colour.
Press and hold the VOLUME dial to add the
custom colour to the radio memory.
CYCLE: ON/OFF
This function is used to control how Highway
displays the track name, folder name, title, album,
and artist in CD/MP3, USB and iPod mode:
ON: Select this option to specify that the display
will automatically alternate between the TRACK,
FOLDER, TITLE, ALBUM and ARTIST.
Note: In iPod mode, the cycle option only alternates
the display between TITLE, ALBUM and ARTIST.
OFF: Select this option to stop the display from
automatically alternating between the TRACK,
FOLDER, FILE, ALBUM, TITLE, and ARTIST. To
change the information that is currently displaying
on the screen (Highway displays the Track name
by default, except for iPod mode), press the DISP
button.
REAR / S-W
If you are using Highway with an external amplifier,
you can use this setting to specify if you are
connecting the Rear line-outs to an external
amplifier connected to full range speakers (REAR)
or a Sub Woofer (S-WOOFER). See the diagram on
page 18 for more information.
Turn and press the VOLUME dial to select either
REAR or S-WOOFER.
REAR: Select this option to provide an external
amplifier with a full range signal from the rear left
and right line-outs.
S-WOOFER: Select this option to allow
adjustments to be made to a dedicated subwoofer
amplifier from the EQ menu without affecting the
signal from the front line-outs, or sound from the
built-in amplifier.
DIMMER: ON/OFF
Turn and press the VOLUME dial to toggle the
DIMMER setting ‘ON’ or ‘OFF’.
ON: The display brightness is dimmed.
OFF: Disables the dimmer setting so that the LCD
brightness is set to the maximum level.
BEEP: ON/OFF
Turn and press the VOLUME dial to toggle the
beep sound that is made when pressing a button
‘ON’ or ‘OFF’.
12/24H
Turn and press the VOLUME dial to change the
time format to either ‘12HOURS’ or ‘24HOURS’.

17
CT: ON/OFF
Turn and press the VOLUME dial to toggle
automatic time updates from the digital or FM radio
signal ‘ON’ or ‘OFF’.
Adjusting audio settings
Press the EQ button to enter equalizer setting
mode. When you initially press EQ, the current EQ
setting is displayed. Turn the dial to change the
DSP EQ in the following order:
OFF > POP > ROCK > CLASSIC > JAZZ >
CUSTOM
Creating a custom EQ setting
1. Press the EQ button.
2. Turn and press the VOLUME dial to select
‘CUSTOM’.
3. Press the or button to select the EQ
value that you want to change. The available
options are: BASS-G > BASS-F >BASS-Q
> MID-G > MID-F >MID-Q >TREBLE-G >
TREBLE-F.
4. Turn the VOLUME dial to adjust the value.
5. Press the or button to move to another
custom EQ setting or press the VOLUME dial if
you have finished.
Audio control settings
1. Press the EQ button.
2. Press the or button to select the audio
control setting that you want to adjust. The
available options are BALANCE > FADER >
LOUD > SUBW FRE > SUBW VOL.
3. Turn and press the VOLUME dial to adjust the
value. The available values are for each option
are shown below:
BALANCE: LEFT 1-7 > CENTRE > RIGHT 1-7
FADER: FRONT 1-7 > CENTRE > REAR 1-7
LOUD: ON/OFF
SUBW FRE: THROUGH > 80 > 120 > 160
SUBW VOL: (-6) - (+6)
EN
18
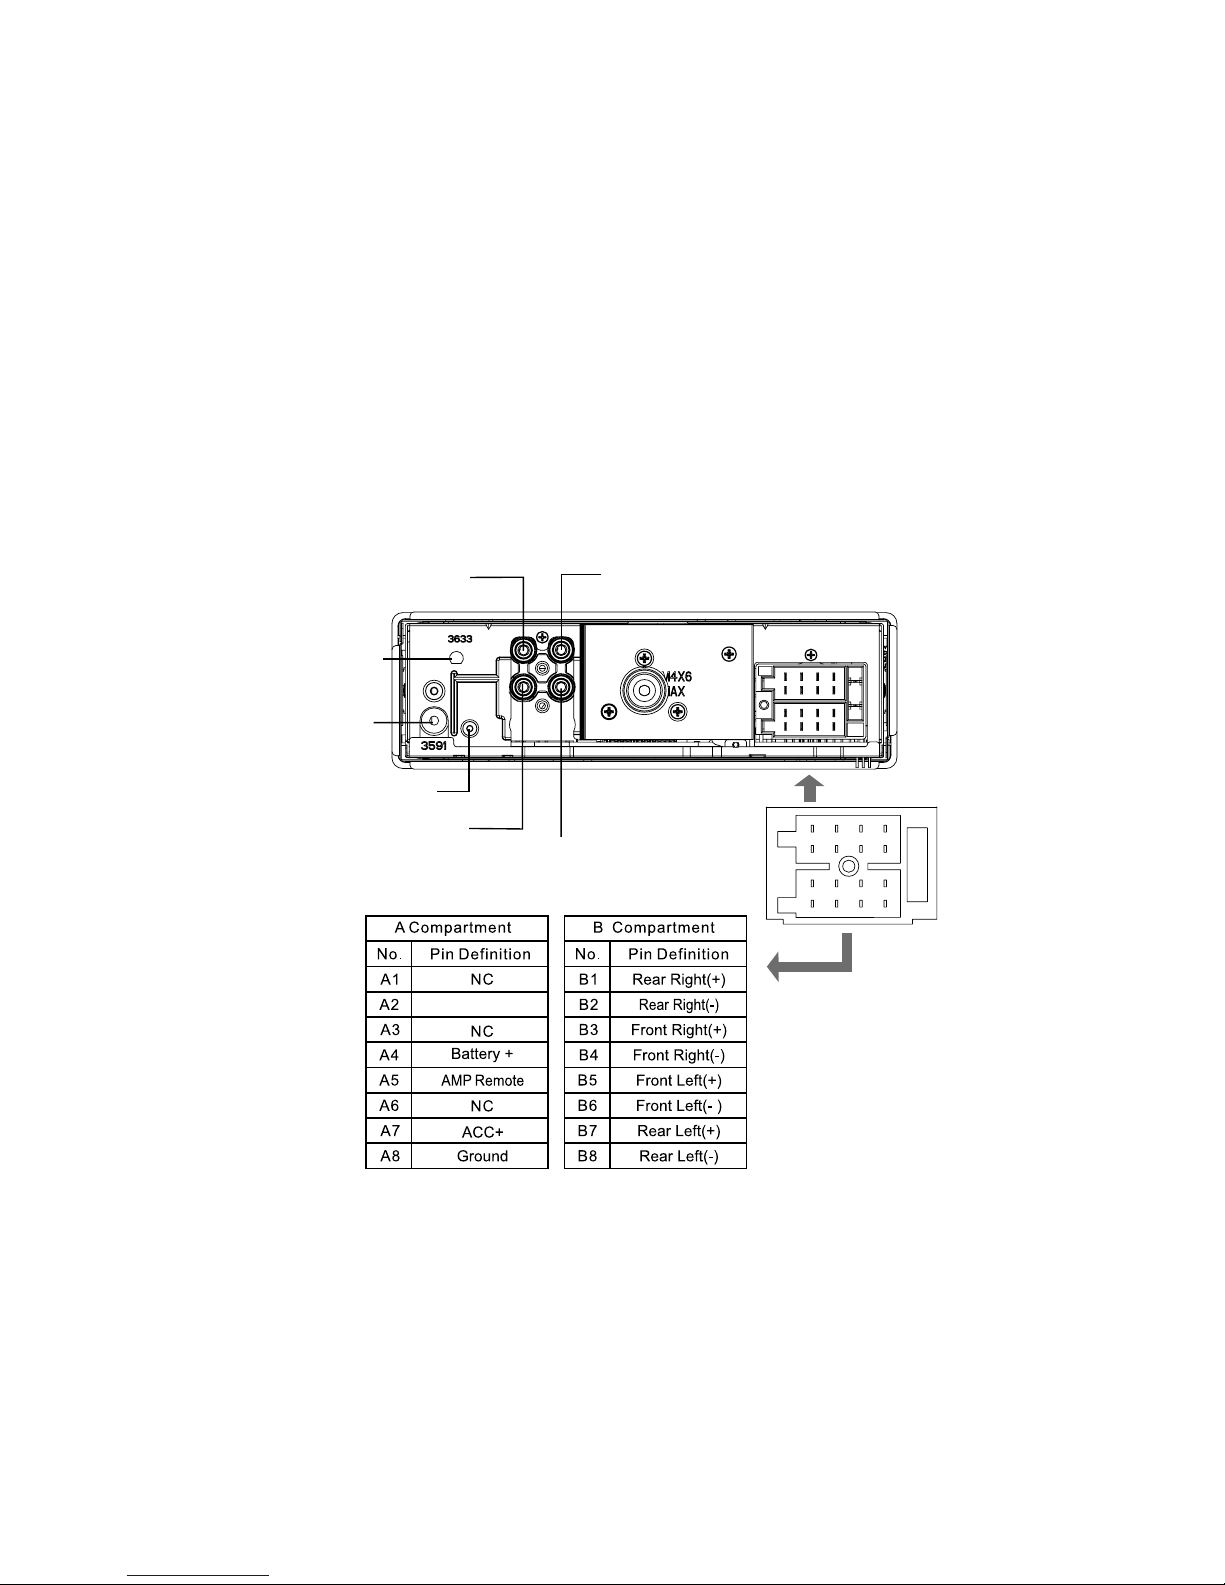
Electrical connections
Wiring Diagram
FM/MW ANTENNA
Rear Right Line-out
(Red)
SUB OUT
Front Right Line-out (Red)
Front Left Line-out (White)
A
B
1357
2468
1
357
2
468
DAB ANTENNA
MICROPHONE
Rear Left Line-out
(White)
SUB OUT
Telemute
Appendix
19
Digital radio antenna setting
Highway features an SMB type digital radio
antenna connector and should be used with an
automotive antenna appropriate for your vehicle and
geographical area (e.g. band 3 for UK use).
An antenna is not supplied with the product in order
to allow an appropriate antenna to be used for your
specific vehicle needs.
If your chosen antenna operates at a different
voltage to the 12 volts supplied by Highway,
then an in-line voltage regulator must be used
to correct the voltage to the level required by
the antenna BEFORE connecting the antenna to
Highway. The antenna power should then be set
to 'ACTIVE' using the previous steps (Highway is
set to 'ACTIVE' from the factory).
Under no circumstances should a separate power
supply at either 12 volts, or any other voltage,
be provided in-line with the antenna connection
with the antenna power set to either 'ACTIVE',
or 'PASSIVE' as this will present power to the
product through the centre of the antenna cable
and will cause damage to the product not covered
by the warranty.
WARNING - Connecting an active antenna that
is not designed to operate at 12 volts to the SMB
Digital Radio Antenna Connector on Highway may
cause damage to the antenna or Highway, which
is not covered by the warranty.
Installing a digital radio antenna
Highway is designed to work with an active digital
radio antenna. Before installing the Highway head
unit ensure that you have installed an appropriate
digital radio antenna in your vehicle. Refer to your
digital radio antenna installation guide for more
information.
Note: Always insert the mounting sleeve into the
dashboard before fitting the head unit
.
Antenna power for Active Antennas:
As many automotive antennas have an amplifier
either built-in, or in-line with the cable connected
to the car stereo, this product provides power at
12 volts along the centre of the digital antenna
connector (centre pin of SMB connector).
Most active automotive digital radio antennas work
on 12 volts. However, some may be designed to
operate at other voltages, e.g. 5 volts. The antenna
power output from the product is set to ‘Active’, i.e.
12 volts ON, from production (shown as ‘DAB ANT
ACTIVE’ in the system menu).
If your chosen antenna does not have an amplifier
(i.e. it is ‘PASSIVE’), please set the antenna power
to ‘PASSIVE’ using the following steps before
connecting the antenna to Highway:
1. Press and hold the DISP button until ‘CLOCK’
appears on the top line of the display. This
shows that you have entered the system menu.
2. Press the button repeatedly until ‘DAB ANT’
appears on the top line of the display.
3. Turn the VOLUME dial until ’PASSIVE’ appears
on the second line of the display.
4. Press the DISP button once to confirm the
new antenna setting and return to the previous
screen.
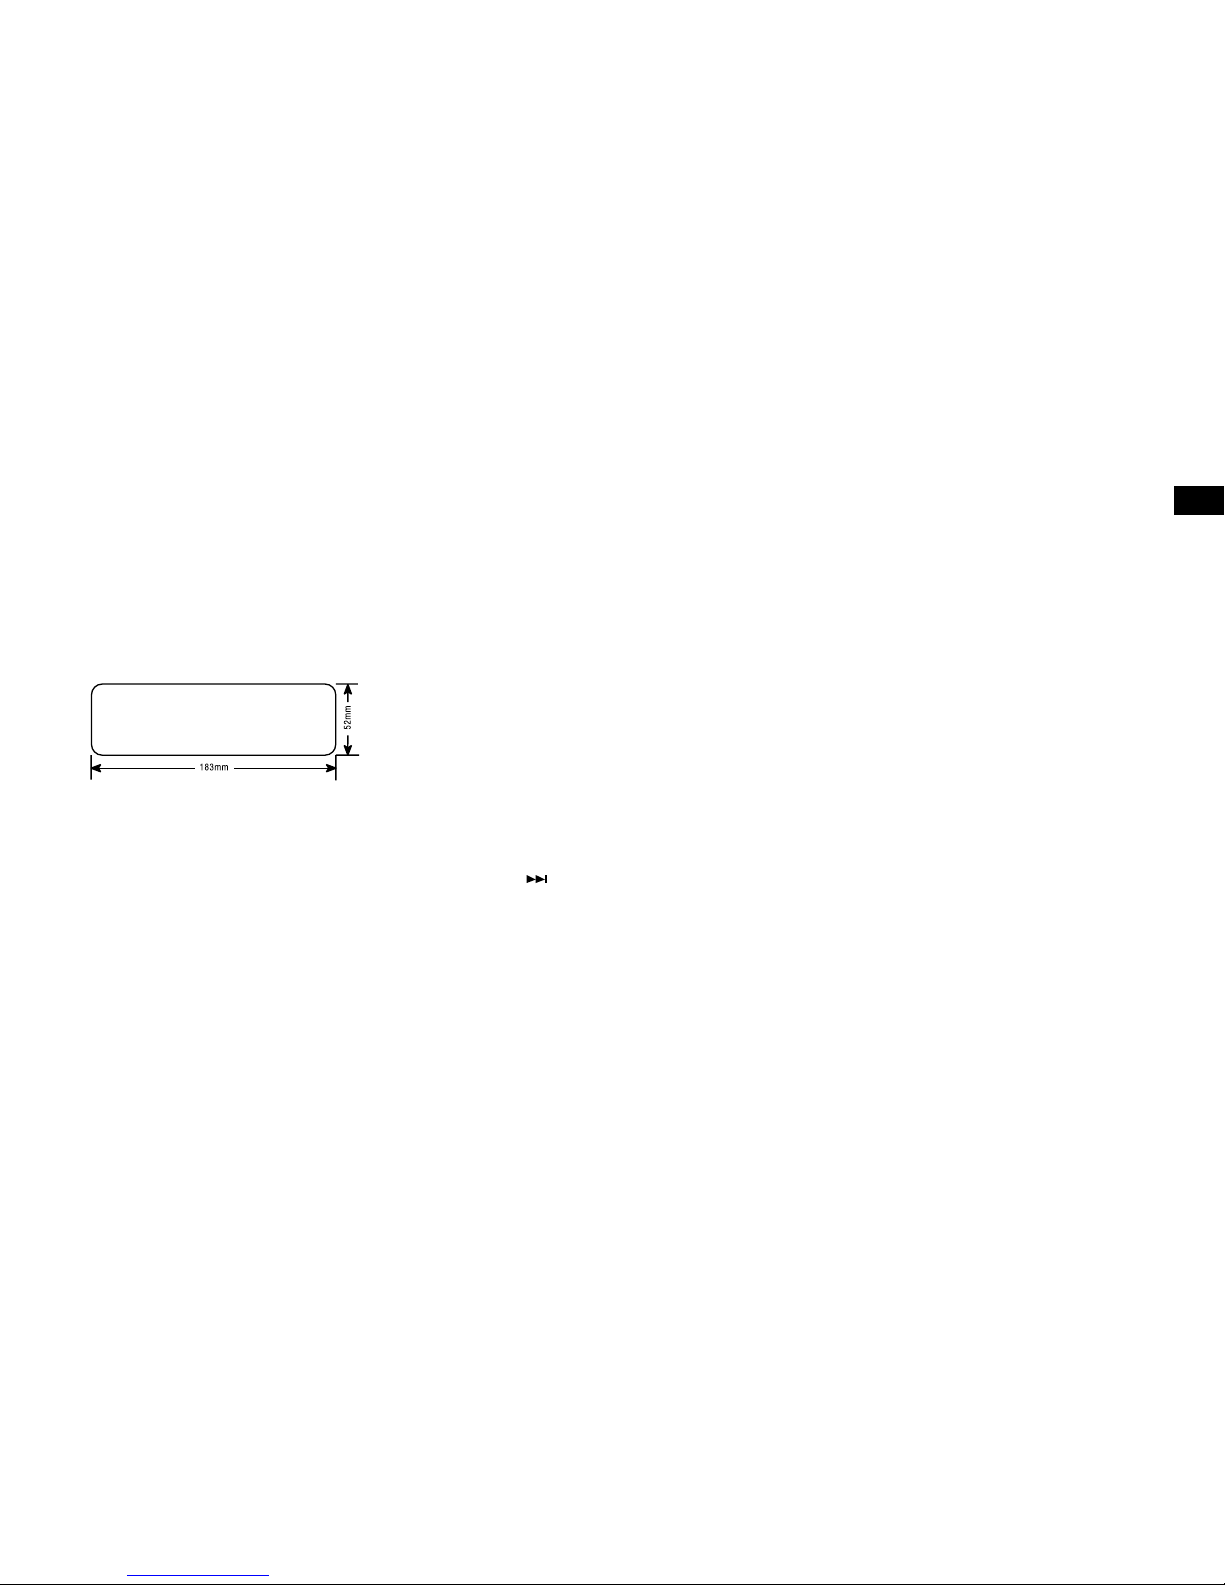
Installation guide
Installation notes
Preparing to install Highway
Highway can be installed in any dashboard that has
an opening matching the dimensions shown in the
diagram below. The dashboard needs to be
4.75mm - 5.56mm thick in order to be able to
support Highway.
EN
20
Installing the detachable panel
1. Line up the groove on the
right side of the face panel
with the slot on the unit.
2. Press down the left side of
the face plate until it clicks
into the panel slot.
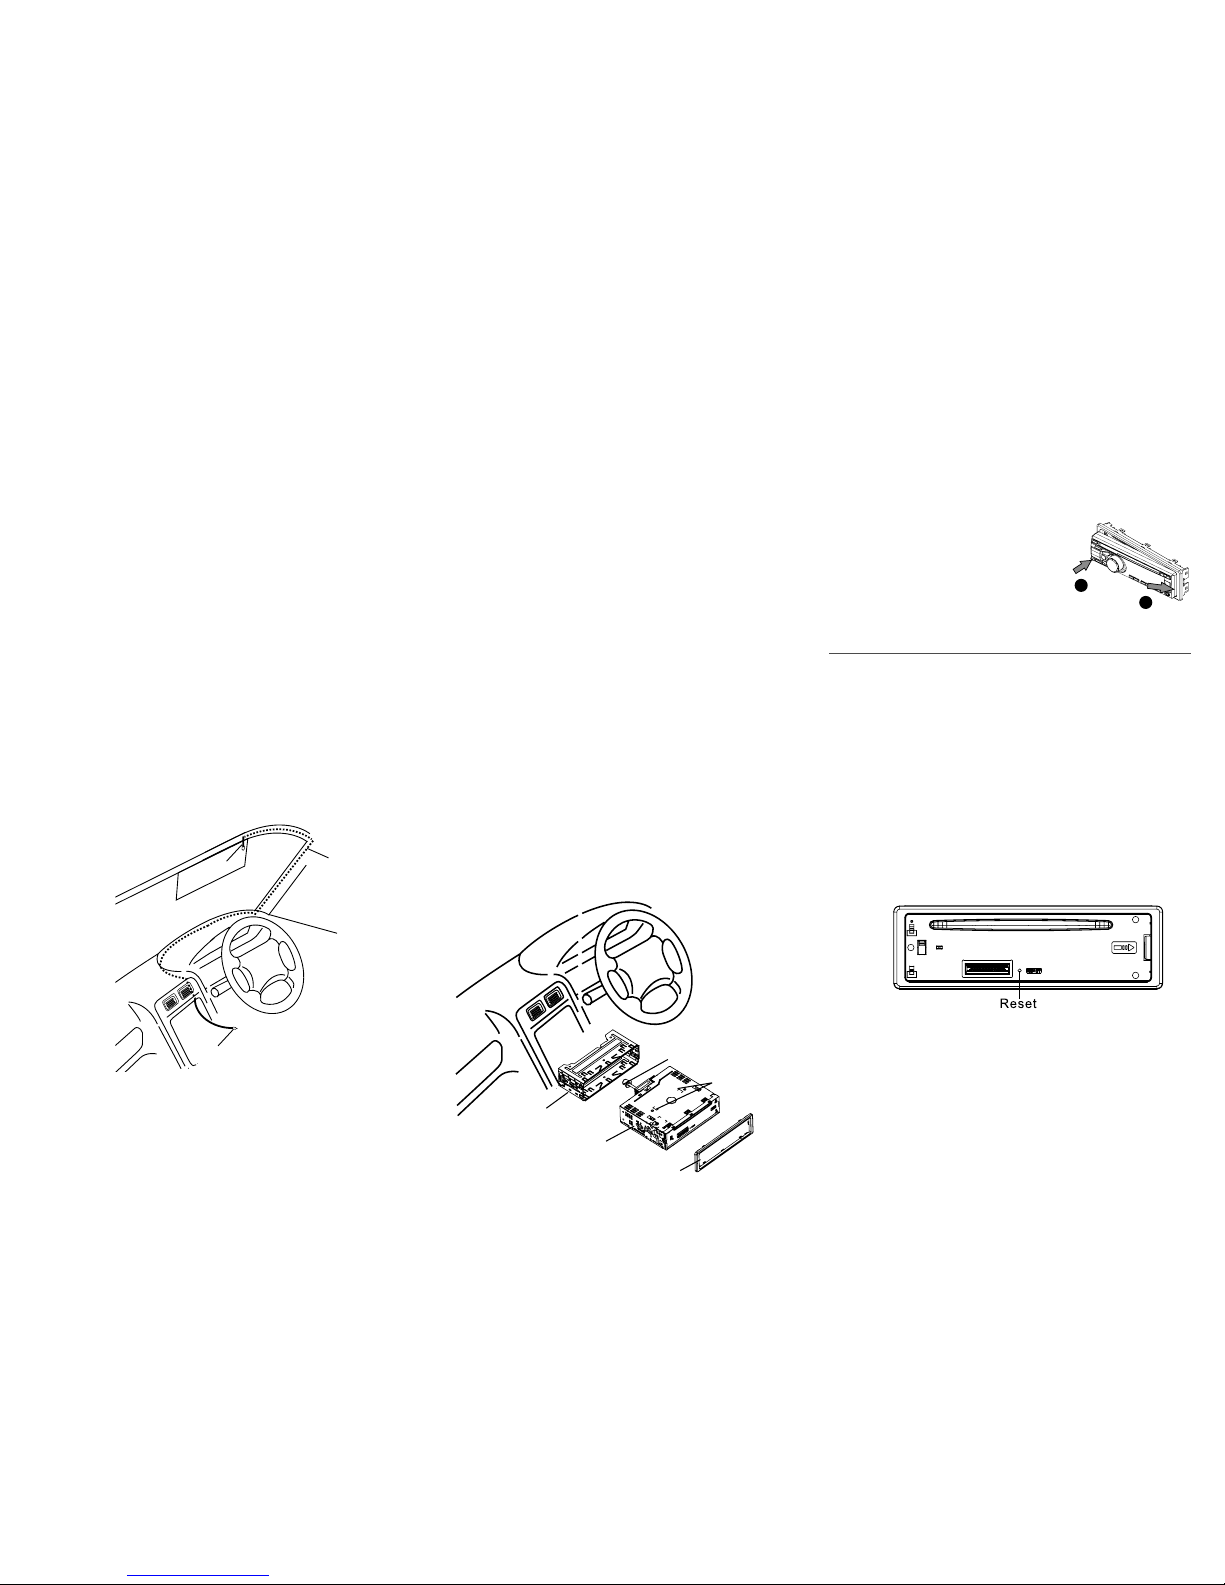
Installing the Highway head unit
1. Insert the mounting sleeve into the dashboard. Fix
it firmly in place by folding down the metal tabs.
2. Connect the audio, microphone, FM/MW antenna
and electrical cables to the back of Highway (see
page 18).
3. Install the detachable panel (see opposite) and
test Highway to check that all audio functions are
working properly.
4. Connect the digital antenna cable.
Note:
See page 19 before connecting the
digital antenna cable.
5. Remove the two protective screws on the top of
Highway so that the CD function works and slide
Highway into the mounting sleeve and push to
secure in place.
6. Attach the outer trim frame.
If you are not sure how to install this unit
correctly, contact a qualified technician.
Carrying out a factory reset
1. Remove the detachable panel as described on
page 5.
2. Press the RESET button with a pointed object
to reset Highway to factory settings.
3. Replace the detachable panel as described on
page 5.
Note: Pressing the RESET button will erase the
clock setting and stored stations.
2
2
1
1
Installing the microphone
You will need to install the included microphone to
make handsfree phone calls using Highway and your
mobile phone.
Note: Do not install Highway’s microphone in noisy
areas within your vehicle, such as near air vents.
1. Loosen any trim panels.
2. Use the supplied clip to attach the microphone to
the sun visor above the driving position (A).
3. Route the cable behind the trim panels (B) and
leave the microphone connector hanging out of
the dashboard (C), ready for connecting to the
head unit.
4. Secure the cable using the supplied self-adhesive
clip.
5. Return all the trim panels to their original positions.
(A)
(B)
(C)
Mounting sleeve
Main unit
Trim plate
Remove the
two screws
Mounting bolt
Rubber cushion
CAUTION:
Do not route the microphone or any other
cables across airbags as they may not operate as
intended in the event of a collision. Cables should be
secured away from airbag deployment zones. Take
extra care when working around airbags.
21
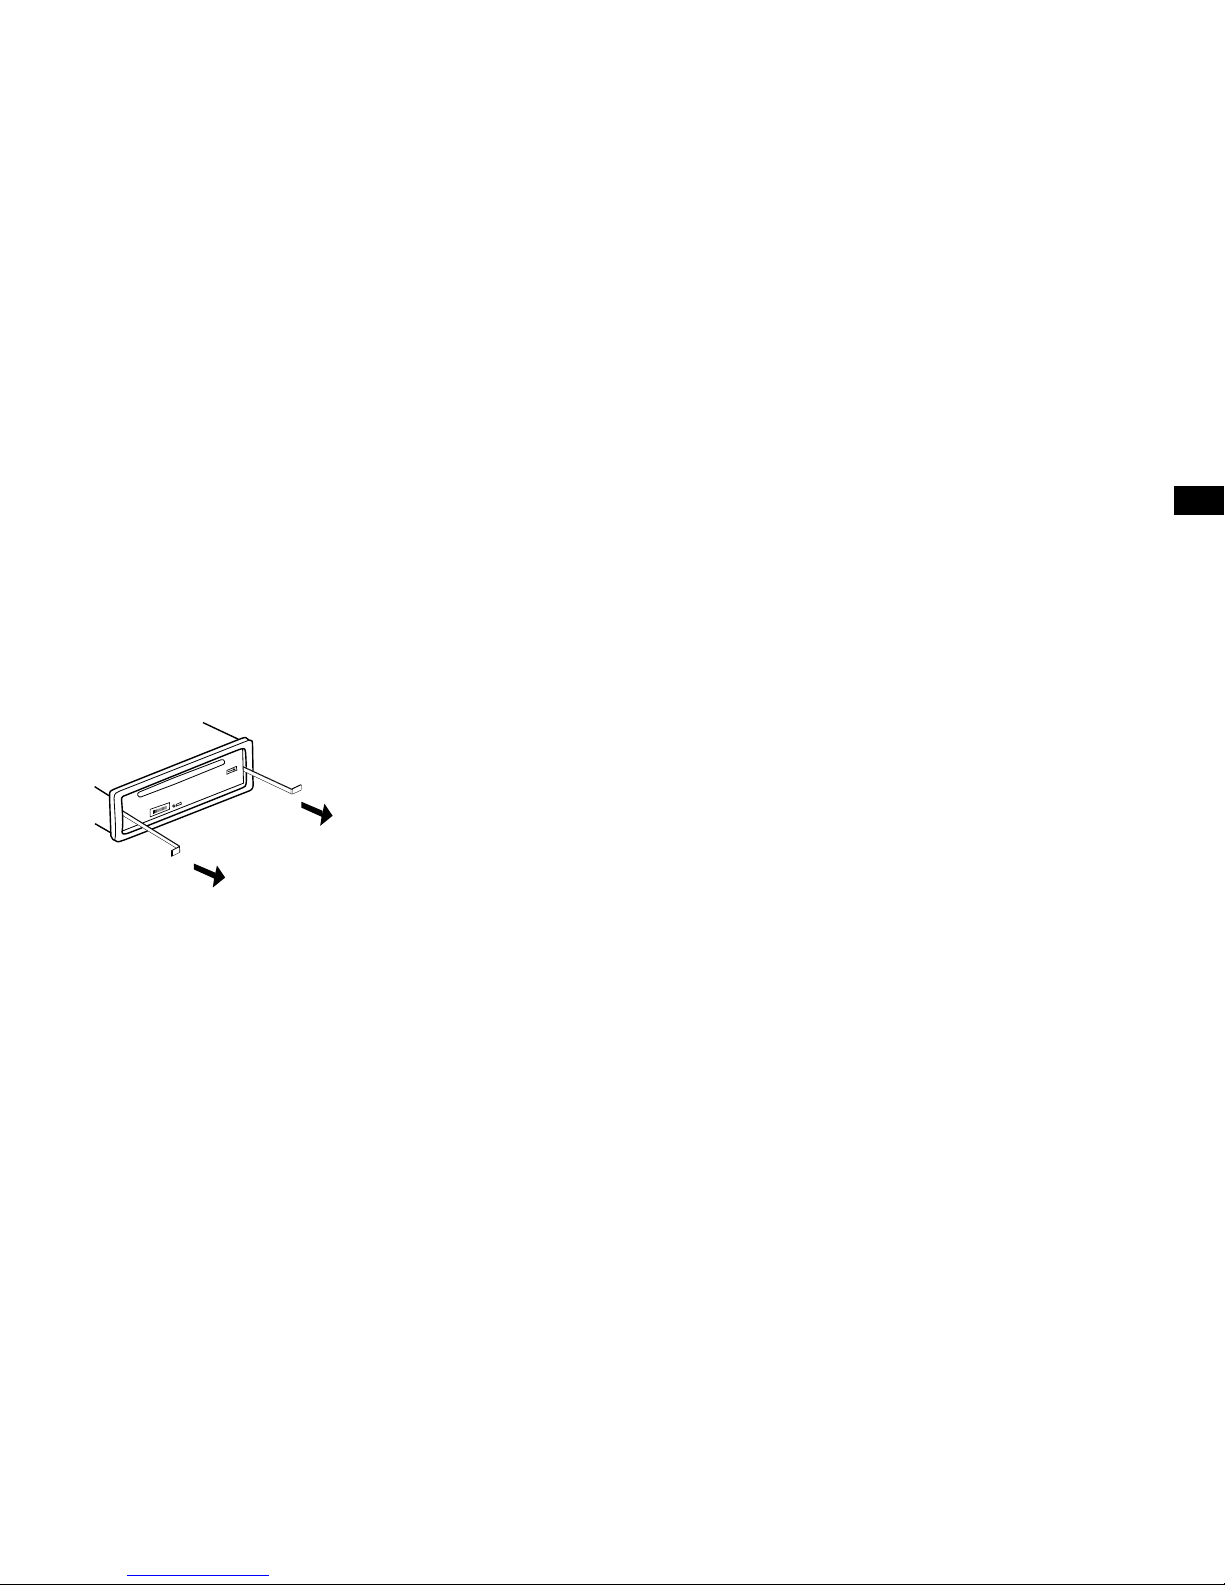
Removing the Highway head unit
1. Power off Highway.
2. Remove the detachable panel as described on
page 5.
3. Remove the outer trim frame.
4. Insert the L-key removal tools into the slots on
the front of Highway until they lock (as shown in
the diagram below).
5. Pull out Highway and disconnect all cables.
EN

22
Troubleshooting
The following checklist can help you solve any problems that you might encounter when using Highway. Before checking this list, check the connections and follow
all the instructions in this user guide. Do not use Highway if you see smoke or if there is a burning smell as this can cause a fire or electric shock. If this occurs stop
using Highway immediately and contact your reseller.
Problem Possible cause Solution
General
Highway will not switch on. Car ignition is not on.
Cable is not properly connected.
Fuse has blown.
Turn your car key in the ignition.
Check the cable connection.
Replace the fuse with a new fuse of the same rating.
No sound Volume is set to the minimum level or the mute
function is on.
Check the volume or switch the mute function off.
Highway’s screen does not work normally. Highway is unstable. Press the RESET button.
CD mode
Highway will not play CDs. The CD is inserted incorrectly.
The CD is dirty or damaged.
CD must be inserted with the label side facing up. Clean
the CD and check for damage. Try another CD.
Sound skips due to vibration. Mounting angle is over 30˚.
Mounting is unstable.
Adjust mounting angle to less than 30˚.
Mount the unit securely with the supplied parts.
TUNER mode
Unable to receive stations. The antenna is not connected properly. Connect the antenna properly.
Poor quality reception of radio station. The antenna is not fully extended or it is broken. Fully extend the antenna and if broken, replace it with a
new one.
Preset stations are lost. The battery cable is not properly connected. Connect the permanent live on the unit to the permanent
live on the vehicle.
USB mode
The USB device cannot be read. The USB device may not be suitably formatted. Check that the file system is in FAT or FAT32 format. Due
to different formats, some models of storage devices or
MP3 players may not be compatible.
23
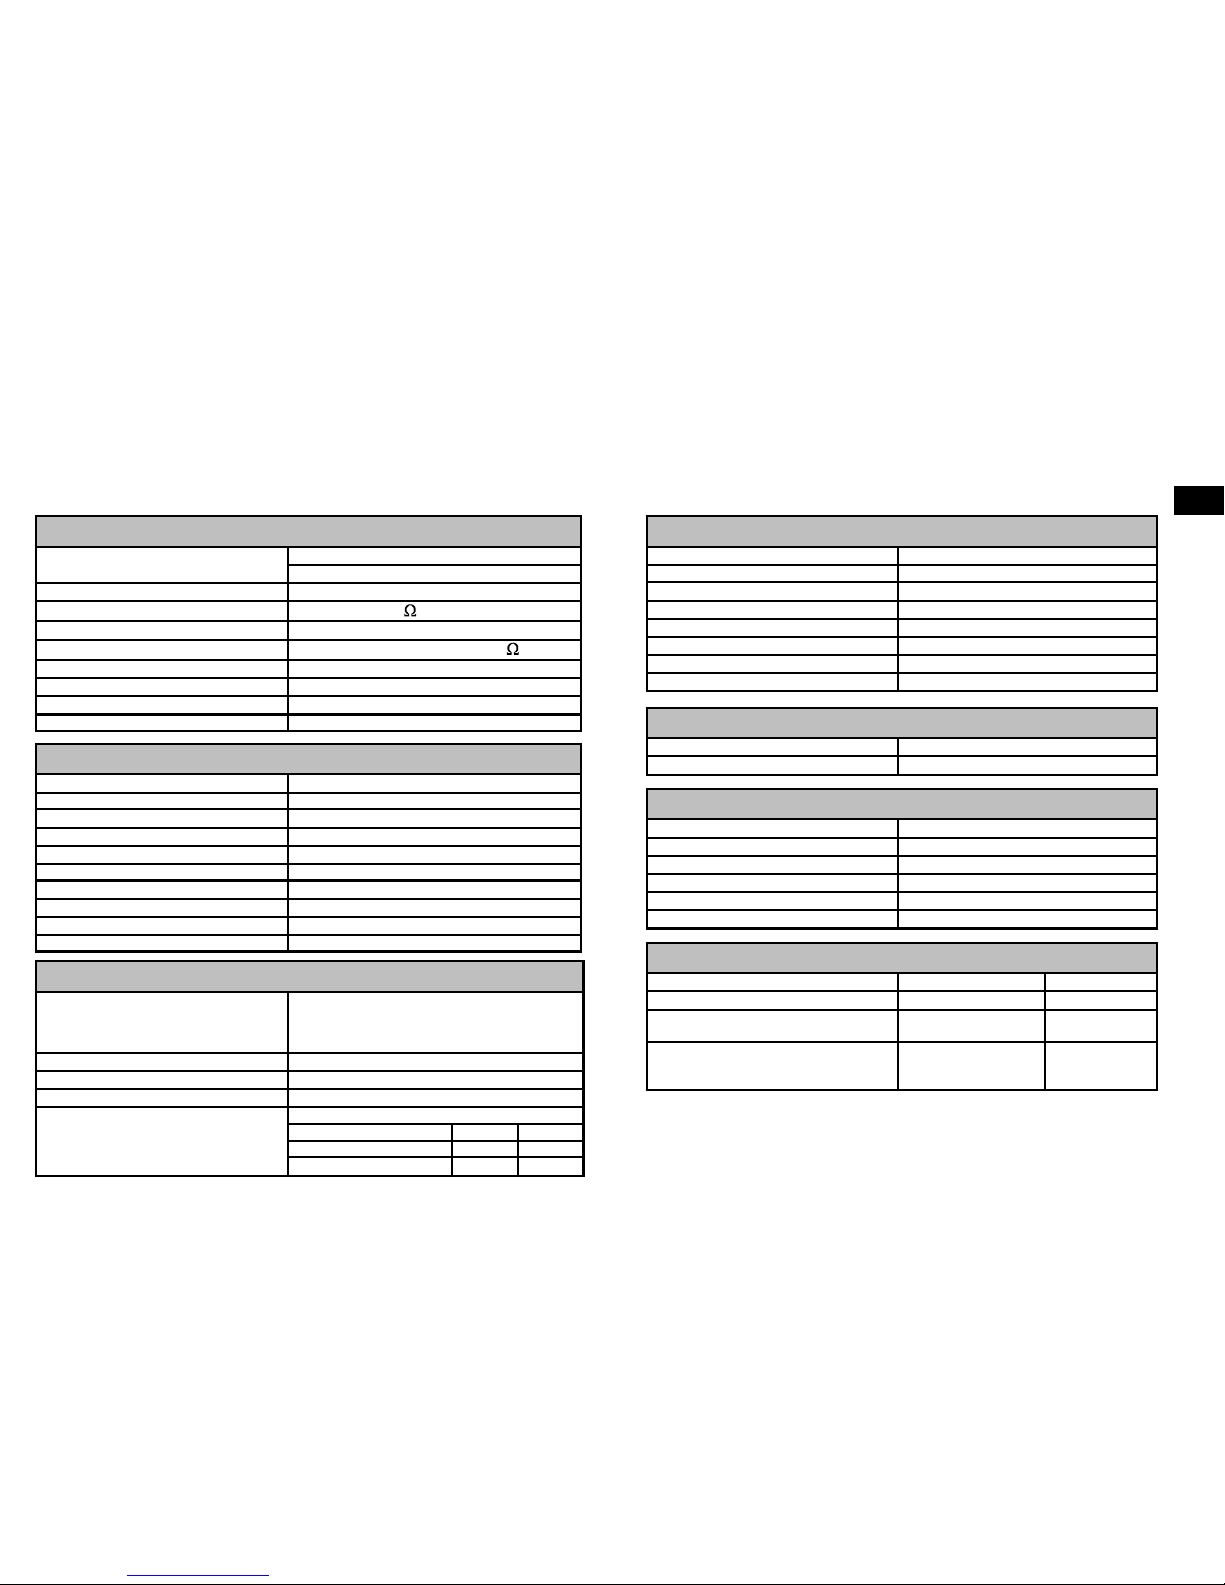
Specifications
Note: Specifications and the design are subject to change without notice
due to improvements in technology.
General
Power supply: 12V DC (11V-16V)
Test voltage 14.4V, negative ground
Maximum power output: 55W x4 channels
Continuous power output:
20W x4 channels (4 ,10% T.H.D.)
Suitable speaker impedance: 4-8 ohm
Pre-Amp output voltage:
2.0V (CD play mode: 1KHz, 0 dB, 10 K load)
Fuse: 15A
Dimensions(WxHxD): 178x50x166mm
Weight: 1.7kg
Aux-in: ≥300mV
Components
Mounting sleeve: 1
Machine screws M5x6mm: 4
Mounting bolt (50mm): 1
L-key removal tool: 2
Trim plate: 1
Microphone: 1
Self-adhesive cable clip 1
Sun visor clip 1
Rubber cushion: 1
Operating instructions: 1
FM Stereo Radio
Frequency range: 87.5-108.0MHz (Europe)
Usable sensitivity: 8 dBμ
Quieting sensitivity (S/N=50dB): 12 dBμ
Frequency response: 30Hz-15kHz
Stereo separation: 30dB (1kHz)
Image response ratio: 50dB
IF response ratio: 70dB
Signal/noise ratio: 55dB
AM(MW) Radio
Frequency range: 522-1620 KHz
Usable sensitivity (S/N=20dB): 30 dBμ
CD Player
System: Disc digital audio system
Frequency response: 20Hz-20kHz
Signal/noise ratio: >80 dB
Total harmonic distortion:
Less than 0.20% (1kHz)
Wow and flutter: Below measurable limits
Channel separation: >55 dB
MP3/WMA
Media format: MP3 WMA
Sampling rate: 8 kHz-48 kHz N/A
Bit rate: 32 kbps-320 kbps /
VBR
32 kbps-196
kbps
File name, file folder and metadata character
limit:
30 characters (including
extension)
30 characters
(including
extension)
Digital (DAB) Radio
Frequency range: DAB Band III:
174.928MHz ~ 239.200MHz
DAB Band L:
1452.960MHz ~ 1490.624MHz
Usable sensitivity (RF=-72 dBM): -95dBM
Frequency response: 20hz-20khz
Stereo separation: ≥50db
Signal/noise ratio: ≥60db
Item Min Max
Far off selectivity: 42dB 60dB
Adjacent channel rejection: 35dB 40dB
EN

24
1
NL
Vielen Dank, dass Sie sich für den Highway H270SB entschieden haben. Mit diesem
Handbuch ist das Gerät in kürzester Zeit betriebsbereit. Lesen Sie hier, wie Sie die
fantastischen Funktionen des Highway H270SB optimal nutzen können. Wir arbeiten ständig
daran, unsere Produkte weiter zu verbessern und um neue Funktionen zu erweitern. Wenn Sie die
vielen Erweiterungen nutzen möchten, die seit der Auslieferung Ihres Geräts vorgenommen wurden,
besuchen Sie bitte die Website support.pure.com. Hier finden Sie aktualisierte Versionen der
Software und können die neueste Version dieses Benutzerhandbuchs im
PDF-Format herunterladen.
H270SB
VOL
SEL
INTTOP RPT
H270SB
FR
ES
IT
NO
EN
DEUTSCH

2
Bitte lesen Sie diese Bedienungsanleitungen
sorgfältig durch, um Ihren Highway richtig bedienen
zu können. Nachdem Sie die Anleitungen gelesen
haben, bewahren Sie dieses Handbuch zur späteren
Referenz an einem sicheren Ort auf.
Vorsichtsmaßnahmen
Verwenden Sie ausschließlich ein Elektriksystem
mit 12 Volt Gleichstrom und Minus-Erdung.
Ziehen Sie den Anschluss am Minuspol der
Fahrzeugbatterie zum Ein- und Ausbau des
Geräts ab.
Vergewissern Sie sich beim Auswechseln der
Sicherung, dass Sie eine Sicherung mit den
gleichen Kenndaten verwenden.
Durch Verwendung einer Sicherung mit einer
höheren Amperezahl kann das Gerät schwer
beschädigt werden.
Versuchen Sie NICHT, das Gerät zu zerlegen.
Laserstrahlen aus dem optischen Abtaster sind
gefährlich für die Augen.
Vergewissern Sie sich, dass keine Stifte oder
andere Objekte in das Innere des Geräts
geraten, da dies zu Fehlfunktionen und
Sicherheitsrisiken wie Stromschlägen oder
einem Freisetzen des Laserstrahls führen kann.
Wenn Sie das Fahrzeug bei heißer oder kalter
Witterung längere Zeit geparkt haben, warten
Sie, bis die Temperatur im Fahrzeug wieder
normal ist, bis Sie den Highway einschalten.
Halten Sie die Lautstärke auf einem Niveau, bei
dem Sie Warntöne von außen (Hupen, Sirenen
etc.) noch gut hören können).
Halten Sie das Fahrzeug an, bevor Sie
komplexe Vorgänge ausführen.
CD-Hinweise
Das Abspielen defekter oder verstaubter CDs
kann zu Ausfällen bei der Tonwiedergabe führen.
Fassen Sie die CD nur am inneren oder
äußeren Rand an.
Berühren Sie die Oberfläche der unbeschrifteten
Seite der CD nicht.
Bringen Sie keine Siegel, Etiketten oder
Datenschutz-Aufkleber auf den Seiten einer CD an.
Setzen Sie CDs nicht direktem Sonnenlicht
oder starker Hitze aus.
Wischen Sie verschmutze CDs mit einem
sauberen Tuch von innen nach außen sauber.
Verwenden Sie niemals Lösungsmittel wie
Benzin oder Alkohol.
Highway kann keine 3-Zoll-CDs (8 cm) abspielen.
Versuchen Sie niemals, eine 3-Zoll-CD mit
einem Adapter oder eine andere CD mit
ungewöhnlicher Form einzulegen. Highway
kann eine solche CD eventuell nicht mehr
auswerfen, was zu Fehlfunktionen führt.
Neben gewöhnlichen CDs kann Highway auch
CD-R/CD-RW/MP3/UDF-Disks abspielen.
Achtung!
Bei einem der folgenden Fälle schalten Sie Ihren
Highway aus und bringen Sie das Gerät zu einem
Servicezentrum oder Ihrem Händler/Distributor, bei
dem Sie es gekauft haben:
(1) Wenn Wasser oder andere Substanzen in den
Highway gelangen.
(2) Bei Rauchentwicklung im Gerät.
(3) Wenn das Gerät angebrannt riecht.
Informationen zur Sicherheit

3
Garantieerklärung
Imagination Technologies Limited garantiert dem Endverbraucher, dass dieses Gerät frei von Material- und Herstellungsfehlern im
Rahmen des normalen Gebrauchs ist. Diese Garantie gilt für einen Zeitraum von drei Jahren ab Kaufdatum. Die Garantie umfasst
Störungen aufgrund von Herstellungs- oder Ausführungsfehlern. Sie gilt jedoch nicht für Unfallschäden jeglicher Art und Schäden, die auf
Verschleiß, Fahrlässigkeit oder von uns nicht autorisierte Anpassungen, Änderungen oder Reparaturen zurückzuführen sind.
Bitte registrieren Sie Ihr Produkt unter www.pure.com/register. Sollte es ein Problem mit Ihrem Gerät geben, wenden Sie sich bitte an
Ihren Händler oder an den Kundenservice von Pure unter der Adresse, die auf der Rückseite dieses Handbuchs aufgeführt ist. Verwenden
Sie bei Rücksendungen bitte die Originalverpackung und fügen Sie alle Teile und das vollständige Zubehör bei. Wir behalten uns das
Recht vor, unvollständige oder unzureichend verpackte Rücksendungen abzulehnen.
Anmerkung: Zur Registrierung Ihres Highway benötigen Sie die Highway-Seriennummer; Sie finden diese Nummer auf der Rückseite des
abnehmbaren Bedienfelds.
Haftungsausschluss
Imagination Technologies Limited übernimmt keine Verantwortung oder Garantie bezüglich des Inhalts dieses Dokuments und weist
insbesondere alle konkludenten Zusagen der Marktgängigkeit und der Eignung für einen bestimmten Zweck zurück. Weiterhin behält sich
Imagination Technologies Limited das Recht vor, diese Veröffentlichung zu überarbeiten und von Zeit zu Zeit Änderungen vorzunehmen,
ohne dass Imagination Technologies Limited dazu verpflichtet ist, Personen oder Organisationen über solche Überarbeitungen oder
Änderungen zu benachrichtigen.
Copyright
Copyright 2014, Imagination Technologies Limited. Alle Rechte vorbehalten. Ohne ausdrückliche schriftliche Zustimmung durch
Imagination Technologies Limited ist jede Vervielfältigung dieser Publikation, auch auszugsweise, sowie ihre Verbreitung, Übermittlung,
Abschrift, Speicherung in einem Datenverarbeitungssystem oder Übersetzung in eine natürliche Sprache oder Programmiersprache in
jeglicher Form, sei sie elektronisch, mechanisch, magnetisch, manuell oder anderweitig, und jegliche Offenlegung an Dritte verboten.
Version 4. Juli 2014.
Marken
Highway H270SB, Pure, das Pure Logo, Imagination Technologies und das Imagination Technologies Logo sind Warenzeichen
oder eingetragene Warenzeichen von Imagination Technologies Limited. iPod und iPhone sind in den USA und in anderen Ländern
eingetragene Warenzeichen von Apple Inc.
“Made for iPod” und “Made for iPhone” bedeuten, dass elektronisches Zubehör eigens für den Anschluss an
einen iPod bzw. ein iPhone entwickelt wurde und der Entwickler die Erfüllung der Leistungsstandards von
Apple bestätigt.
Apple ist nicht für die Funktion dieses Geräts und für die Einhaltung der Sicherheits- und sonstigen Auflagen
verantwortlich. Bitte beachten Sie, dass die Verwendung dieses Zubehörs mit iPod bzw. iPhone sich auf die
Wireless-Leistung auswirken kann.
iPhone und iPod sind in den USA und anderen Ländern eingetragene Warenzeichen von Apple Inc.
Inhalt
4 Erste Schritte
4 Bedienelemente an der Vorderseite
5 Nutzung des Highway-Geräts
5 Abnehmen und Anbringen des
abnehmbaren Bedienfelds
5 Digitalradio hören
6 FM- oder MW-Radio hören
6 Serviceverfolgung
7 Inhalte von CD oder
USB-Laufwerk hören
10 Inhalte von iPod oder iPhone hören
12 Verwendung von Bluetooth
14 Einstellungsoptionen
14 Verfügbare Digitalradio-Optionen
14 Verfügbare Optionen im FM-Betrieb
16 Allgemeine Optionen
17 Audio-Einstellungen anpassen
18 Anhang
18 Elektrische Anschlüsse
19 Einbauanleitung
20 Zurücksetzen auf die Werkseinstellungen
21 Abnehmen der Highway-Haupteinheit
22 Beheben von Störungen
23 Technische Daten
DE
4
Bedienelemente an der Vorderseite
1. Drücken, um eine CD auszuwerfen
2. Ein/Stumm
3. Audioquelle umschalten
4. Soundeffekt-Einstellung
5. TUNER-Modus (nur FM oder MW):
- Voreinstellungen scannen
- Auto-Speicherung (lange drücken)
DAB-Modus – Autotune
6. Bedienfeld entriegeln.
7. Anzeige umschalten
- Systemeinstellung anpassen (lange drücken)
8. Band umschalten:
- TUNER-Modus – FM1 > FM2 > FM3 > MW
- DAB-Modus – D1 > D2 > D3
- BLUETOOTH-Modus – Wählen / Anruf
- annehmen
9. Lautstärke anpassen / Bestätigen (drücken)
10. Taste 1: Wiedergabe / Pause / Top-Play
(lange drücken) (siehe Seite 7) /
Voreingestellter Sender 1
Taste 2: Wiedergabe suchen / Voreingestellter
Sender 2
Taste 3: Wiedergabe wiederholen /
Voreingestellter Sender 3
Taste 4: Zufällige Wiedergabe / Voreingestellter
Sender 4
Taste 5: Voriger Ordner / Voreingestellter
Sender 5 / MP3- und WMA-Tracks -10
abwärts (lange drücken)
Taste 6: Nächster Ordner / Voreingestellter
Sender 6 / MP3- und WMA-Tracks
+10 aufwärts (lange drücken)
11. Aux-In-Buchse
12. USB-Anschluss (Abdeckung öffnen)
13. CD-Modus – Voriger/Nächster Titel
TUNER-Modus – manuelle Einstellung (kurz
drücken)
Suchen +/- (lange drücken)
DAB-Modus – voriger/nächster Sender
Bluetooth-Modus - voriger/nächster Track
14. CD-Schlitz
15. TUNER-Modus – PTY-Auswahl
CD-Modus – Keine Funktion
DAB-Modus – Keine Funktion
BLUETOOTH-Modus – Anruf beenden
AUX-Modus – Keine Funktion
iPod-Modus – iPod-Menü
CD/USB MP3- und WMA-Modus – Ordnersuche
16. DAB-Taste – Drücken zum Umschalten zwischen
Digitalradio und zuvor verwendeter Audioquelle
17. Verkehrsdurchsage
Erste Schritte
VOL
SEL
INTTOP RPT
H270SB

5
Nutzung des Highway-Geräts
Digitalradio hören
Auswahl von Digitalradio als
Wiedergabequelle
Drücken Sie einmal auf DAB oder wiederholt auf
Source, bis ‘DAB’ auf dem Bildschirm angezeigt
wird.
Digitalsender wechseln
Drücken Sie die Tasten oder , um durch die
Liste der Sender zu blättern, und drücken Sie zum
Auswählen auf das LAUTSTÄRKE-Wählrad.
Auswahl eines Digitalradio-Bands
Highway hat eine Taste BAND, mit der Sie
zwischen Sendern wechseln können, die den
sechs Voreinstellungstasten zugeordnet sind. Für
Digitalradio stehen drei Bänder zur Verfügung,
sodass Sie bis zu 18 Digitalradiosender einstellen
können. Drücken Sie BAND, um Band D1, D2 oder
D3 auszuwählen.
Voreinstellungen speichern und
anwählen
Manuelles Speichern einer Voreinstellung
Stellen Sie den gewünschten Digitalradio-Sender
ein. Drücken Sie eine der Voreinstellungstasten
(1-6) und halten Sie sie gedrückt, um den Sender
zu speichern.
Auswählen eines voreingestellten Senders
Zum Auswählen eines voreingestellten Senders
drücken Sie die entsprechende Voreinstellungstaste
(1 bis 6).
Abnehmen und Anbringen des
abnehmbaren Bedienfelds
Für eine höhere Sicherheit hat Highway ein
abnehmbares Bedienfeld, sodass Sie es einfach
mitnehmen können, wenn Sie Ihr Fahrzeug verlassen.
Anmerkung: Um Beschädigungen zu vermeiden,
legen Sie das Bedienfeld in die Schutztasche,
wenn Sie es von der Haupteinheit abnehmen.
Abnehmen des
Bedienfelds
1. Drücken Sie die Taste .
2. Halten Sie die lose Seite des
Bedienfelds und ziehen Sie es
von der Haupteinheit ab.
Anbringen des
Bedienfelds
1. Richten Sie die Nut an der
rechten Seite der Frontblende
an dem Schlitz an der Einheit
aus.
2. Drücken Sie die linke Seite
der Frontblende nach
unten, bis sie in dem Schlitz
einrastet.
2
2
1
1
2
1
Angezeigte Display-Informationen
ändern
Im Digitalradio-Modus zeigt Highway zwei Zeilen
Text an. Die erste Zeile zeigt immer den Namen
des Senders an.
Mit der Taste DISP können Sie die in der zweiten
Zeile angezeigten Informationen umschalten.
Highway kann die aktuelle Uhrzeit, Lauftext,
Programmtyp (PTY), Multiplex (MUX), BandInformationen und Frequenz anzeigen.
Durchführen eines Autotune
Die Autotune-Funktion scannt alle DigitalradioFrequenzen und aktualisiert die Senderliste
automatisch, indem neu gefundene Sender
hinzugefügt und die nicht mehr verfügbaren
Sender gelöscht werden. Zur Durchführung der
Autotune-Funktion drücken Sie die Taste PS/AS.
DE

6
FM- oder MW-Radio hören
Drücken Sie mehrmals auf SOURCE, bis
‘EMPFAENGER’ auf dem Display erscheint.
FM- oder MW-Sender wechseln
Manuelle Senderwahl
Drücken Sie die Tasten oder , um zum
nächsthöheren bzw. -niedrigeren Sender auf der
Skala zu wechseln.
Automatische Sendersuche
Drücken Sie die Tasten oder und halten
Sie sie gedrückt, um den nächsten oder vorherigen
Radiosender mit starkem Signal zu suchen.
Anmerkung: Zum Beenden der Suche wiederholen
Sie die obigen Schritte oder drücken Sie eine
andere Taste mit einer Radiofunktion.
Auswahl eines FM- oder MW-Radiobands
Highway hat eine Taste BAND, mit der Sie
zwischen Sendern wechseln können, die den sechs
Voreinstellungstasten zugeordnet sind. Für FM
stehen drei Bänder zur Verfügung, mit denen Sie
bis zu 18 FM-Voreinstellungen speichern können.
Für MW gibt es nur ein Band, mit dem Sie bis zu
6 Voreinstellungen speichern können. Drücken Sie
BAND, um FM1, FM2, FM3 oder MW auszuwählen.
Voreinstellungen speichern und anwählen
Manuelles Speichern einer Voreinstellung
Gehen Sie zu dem FM- bzw. MW-Sender, den
Sie speichern wollen. Drücken Sie eine der
Voreinstellungstasten (1-6) und halten Sie sie
gedrückt, um den Sender zu speichern.
Auswählen eines voreingestellten Senders
Zum Auswählen eines voreingestellten Senders
drücken Sie die entsprechende Voreinstellungstaste
(1 bis 6).
Automatisches Speichern der
Voreinstellungen
Sie können mit der Autostore-Funktion automatisch
die von Highway erkannten Radiosender in Ihre
Voreinstellungen eintragen.
Drücken Sie die Taste PS/AS und halten Sie sie
gedrückt, um die automatische Sendersuche zu
starten.
Zum Stoppen der automatischen Speicherung drücken
Sie eine beliebige Taste mit einer Radiofunktion.
Anmerkungen: Wenn Sie die Autostore-Funktion
in einem FM-Band beginnen, werden automatisch
die Voreinstellungen in allen FM-Bändern (FM1, FM2
und FM3) eingetragen. Beginnen Sie die AutostoreFunktion im MW-Band, werden die Voreinstellungen
automatisch im MW-Band eingetragen.
Voreinstellungen scannen
Mit der Funktion "Voreinstellungen scannen"
können Sie zehn Sekunden lang Audiodaten von
jedem der in Ihren Voreinstellungen gespeicherten
Radiosender hören.
1. Drücken Sie die Taste PS/AS, um mit dem
Scannen der Voreinstellungen zu beginnen.
2. Drücken Sie die Taste PS/AS erneut, wenn Sie
einen Sender hören, der Ihnen gefällt.
Anmerkung: Wenn Sie PS/AS länger als eine
Sekunde drücken, wird die automatische Speicherung
gestartet, die alle Ihre Voreinstellungen überschreibt.
Angezeigte Display-Informationen ändern
Im FM-Modus zeigt Highway zwei Zeilen Text
an. Die erste Zeile enthält RDS-Informationen,
sofern solche Daten verfügbar sind. Falls keine
RDS-Informationen vorliegen, werden Band und
Frequenz angezeigt.
Mit der Taste DISP können Sie die in der zweiten
Zeile angezeigten Informationen umschalten.
Highway kann die aktuelle Uhrzeit, Lauftext (sofern
vorhanden), Programmtyp (PTY) sowie Band und
Frequenz anzeigen.
Serviceverfolgung
Wenn Sie einen Digitale Radiosender hören
und das Empfangssignal verloren, versucht die
Servicenachverfolgung des Highway immer
automatisch, den gleichen Radiosender mit einer
besseren Empfangsqualität oder einen ähnlichen
Digitalradiosender einzustellen. Wenn der gleiche
oder ein ähnlicher Digitalradiosender nicht gefunden
wird, versucht Highway, den gleichen Sender im
FM-Modus zu finden*.
Anmerkung: Wenn Highway die Servicenachverfolgung zum erneuten Einstellen eines
Digitalradiosenders verwendet hat, zeigt das
Highway-Display ‘FM’ hinter dem Namen des
Radiosenders an.
Anmerkung: Die Serviceverfolgung von Digital zu
FM funktioniert nicht, wenn der TA-Standby-Modus
eingeschaltet ist. Weitere Weitere Informationen
siehe Seite 15.
*Die Serviceverfolgung wird nicht von allen Sendern unterstützt.

7
Inhalte von CD oder
USB-Laufwerk hören
Highway kann Audio-CDs sowie MP3- und
WMA-Dateien auf CD- oder USB-Laufwerken
wiedergeben.
Anmerkung: Highway kann keine AAC-Dateien auf
CD- oder USB-Laufwerken wiedergeben.
Laden einer CD
Legen Sie eine CD mit dem Etikett nach oben in die
Mitte des CD-Schlitzes ein. Die CD wird nach dem
Laden automatisch abgespielt.
Anmerkungen:
•
Legen Sie niemals Fremdobjekte in den
CD-Schlitz ein.
• Wenn sich die CD nicht leicht einlegen lässt,
liegt möglicherweise eine andere CD in dem
Mechanismus, oder die Einheit muss gewartet
werden.
• Manche CD-R/CD-RW-Disks sind eventuell nicht
verwendbar.
• Neben gewöhnlichen CDs kann Highway auch
CD-R- und CD-RW-Disks abspielen.
Auswerfen einer CD
Drücken Sie zum Auswerfen einer CD die Taste .
Anmerkungen:
• Durch kräftiges Hineindrücken in die Einheit kann
die CD beschädigt werden.
• Wird eine CD (12 cm) 15 Sekunden lang nach
dem Auswerfen nicht herausgenommen, so wird
sie automatisch erneut geladen.
Wiedergaberegler für eine Audio-CD
und MP3/WMA-Tracks auf einer CD
oder einem USB-Laufwerk
Schneller Vorlauf
Drücken Sie die Taste und halten Sie sie
gedrückt.
Rücklauf
Drücken Sie die Taste
und halten Sie sie gedrückt.
* Bei MP3/WMA-Disks kann beim Suchen und
Springen zwischen den Tracks eine kleine
Verzögerung auftreten.
Wiedergabe anhalten
Drücken Sie die Taste 1, um die Wiedergabe
anzuhalten. Solange die Wiedergabe angehalten ist,
wird auf dem Display ‘PAUSE’ angezeigt.
Zur Fortsetzung der Wiedergabe drücken Sie die
Taste 1 erneut.
Springen zum nächsten Track
Drücken Sie die Taste , um zum Anfang des
nächsten Tracks zu springen.
Wenn Sie eine MP3/WMA-Datei wiedergeben,
drücken Sie die Taste 6 und halten Sie sie gedrückt
(1 Sek), um 10 Tracks weiter zu springen.
Wiedergabe des vorigen Tracks
Drücken Sie die Taste innerhalb der ersten
10 Sekunden des Tracks, um zum vorigen Track zu
springen.
Wiedergabe des Anfangs eines Tracks
Drücken Sie die Taste nach den ersten
10 Sekunden des Tracks, um zum Anfang des
folgenden Tracks zu springen.
Für MP3/WMA-Dateien drücken Sie die Taste 5
und halten Sie sie gedrückt (1 Sek.) um 10 Tracks
zurückzuspringen.
USB-Laufwerk
anschließen
Schließen Sie ein
USB-Speichermedium
an die USB-Buchse an.
Beim Anschließen eines USBSpeichermediums liest die
Einheit die Dateien automatisch.
Entfernen eines
USB-Laufwerks
Bevor Sie ein USB-Laufwerk
entfernen, wählen Sie eine
andere Quelle aus oder
schalten Sie das Gerät aus,
um eine Beschädigung des
USB-Speichermediums zu
vermeiden.
Weitere Informationen zum Hören von MP3- oder
WMA-Dateien finden Sie im folgenden Abschnitt.
1
1
2
Hören einer CD, die bereits im Highway
geladen ist
Drücken Sie die Taste SOURCE, um den CD/MP3Modus auszuwählen.
Wenn der Highway den CD/MP3-Modus aktiviert,
wird die CD automatisch abgespielt.
DE

8
Zufallswiedergabe
Beim Hören einer Audio-CD können Sie die
Zufallswiedergabefunktion verwenden, um alle Tracks
auf der CD in zufälliger Reihenfolge abzuspielen.
Wenn Sie eine MP3- oder WMA-Datei anhören,
können Sie mit der Zufallswiedergabefunktion alle
MP3- oder WMA-Dateien auf der CD oder dem
USB-Laufwerk in zufälliger Reihenfolge abspielen.
Drücken Sie die Taste 4, um die Zufallswiedergabefunktion ein- oder auszuschalten (‘RDM AN’ bzw.
‘RDM AUS’).
Anzeigen der Titeldaten
Highway kann die Titeldaten für MP3- und WMADateien anzeigen.
Wenn die CYCLE-Einstellung AUS ist (siehe Seite
16), können Sie die Taste DISP drücken, um die
auf dem Display dargestellten Titeldaten zu ändern.
Der Highway kann die folgenden Daten über die
MP3- oder WMA-Datei anzeigen:
Dateiname > Name des Ordners > Name des Titels
> Album > Interpret > Datei ...
Anmerkungen:
• Wenn die MP3/WMA-Datei keine ID3-Kennung
hat, wird ‘KEIN TITEL‘ auf dem Display angezeigt.
Auswählen eines Ordners
Sie können den Ordner auswählen, der die
gewünschten MP3/WMA-Dateien enthält.
Highway beginnt die Wiedergabe aller im Ordner
gespeicherten Tracks mit dem ersten Track.
Zum Wechseln in den nächsten Ordner drücken
Sie die Taste 6.
Zum Wechseln in den vorigen Ordner drücken Sie
die Taste 5.
Drücken Sie die Taste oder , um die Tracks
in einem Ordner zu wechseln.
Verwenden der Suchfunktion
Highway kann nach MP3- oder WMA-Dateien auf
einer CD oder einem USB-Laufwerk suchen.
1. Drücken Sie die Taste MENU / , um die
Option ORDNERPL anzuzeigen.
2. Drücken Sie das Wählrad LAUTSTÄRKE, um
die Ordner-Listensuche aufzurufen.
3. Drehen Sie das LAUTSTÄRKE--Wählrad, um den
Ordner auszuwählen, in dem gesucht werden soll.
4. Drücken Sie das LAUTSTÄRKE-Wählrad, um
die Dateiliste auf dem Display anzuzeigen.
5. Drehen Sie das LAUTSTÄRKE-Wählrad, um
einen Track auszuwählen, und drücken Sie es
zum Abspielen.
Den ersten Track einer CD oder eines USBLaufwerks hören
Highway hat eine Funktion "Top", mit der Sie den
ersten Track der momentan abgespielten CD
wiedergeben können. Zum Anhören des ersten
Tracks der momentan abgespielten CD drücken Sie
die Taste Top (1) und halten Sie sie gedrückt (1 Sek.).
Anmerkung: Wenn Sie eine MP3/WMA-Datei
anhören, wird durch Drücken der Taste 1 der
erste Track der CD bzw. des USB-Laufwerks
wiedergegeben.
Intro-Funktion
Wenn Sie eine Audio-CD anhören, können Sie mit
der Intro-Funktion die ersten 10 Sekunden des
nächsten Tracks wiedergeben und die restlichen
Tracks auf der CD in sequenzieller Reihenfolge.
Wenn Sie eine MP3- oder WMA-Datei anhören,
ermöglicht Ihnen diese Funktion immer die Wiedergabe
der ersten 10 Sekunden der gesamten MP3- oder
WMA-Tracks auf einer CD oder einem USB-Laufwerk.
Zur Verwendung der Intro-Funktion drücken Sie die
Taste 2 bei der Wiedergabe. Das Symbol ‘SCN’
wird auf dem Bildschirm angezeigt, wenn die IntroFunktion aktiviert ist.
Zum Ausschalten der Intro-Funktion drücken Sie
die Taste 2.
Funktion "Wiederholt abspielen"
Bei der Wiedergabe einer Audio-CD können Sie mit
der Funktion "Wiederholt abspielen" den aktuellen
Track wiederholt wiedergeben.
Drücken Sie die Taste 3, um die Wiederholungsfunktion
ein- oder auszuschalten (‘RPT AN’ bzw. ‘RPT AUS’).
Während der Wiedergabe einer MP3/WMA-Datei
können Sie die Taste 3 drücken, um eine der
folgenden Wiederholungsfunktionen auszuwählen:
TRK RPT: Wiederholt den aktuellen Track.
FOLD RPT: Wiederholt alle Tracks im aktuellen
Ordner.
RPT AUS: Es werden keine Tracks wiederholt.

9
Logisches Format (Dateisystem):
1. Beim Schreiben von MP3/WMA-Dateien auf
eine CD-R-Disk oder CD-RW-Disk wählen
Sie entweder ‘ISO9660 Stufe 1, 2 oder Joliet’
oder Apple ISO als Software-Schreibformat
aus. Wenn die Disk in einem anderen Format
aufgezeichnet wurde, ist eine Wiedergabe
eventuell nicht möglich.
2.
Ordnername und Dateiname können bei der
MP3/WMA-Wiedergabe als Titel angezeigt
werden. Der Titel darf jedoch maximal
30 Einzel-Byte-Buchstaben oder Ziffern
(einschließlich der Dateierweiterung) lang sein.
3.
Geben Sie einem Ordner nicht den gleichen
Namen wie einer Datei in diesem Ordner.
Ordnerstruktur:
Sie können keine CD wiedergeben, die Ordner mit
mehr als acht Hierarchiestufen enthält.
Anzahl der Dateien oder Ordner:
1.
Pro Ordner können bis zu 999 Dateien erkannt
werden.
Es können bis zu 3000 Dateien wiedergegeben
werden.
2.
Tracks werden in der Reihenfolge
wiedergegeben, in der sie auf der CD
aufgezeichnet wurden. (Die Tracks werden nicht
unbedingt in der Reihenfolge wiedergegeben, in
der sie auf einem Computer angezeigt werden.)
3. Je nach der beim Aufzeichnen verwendeten
Codierer-Software können Rauschen und
andere Störgeräusche auftreten.
Hinweise zum Anhören von WMA/MP3Dateien
Deaktivieren von DRM (Digital Rights
Management)
Highway spielt keine WMA-Dateien ab, für die DRM
(Digital Rights Management) aktiviert wurde. Wenn
Sie eine WMA-Datei auf dem Highway wiedergeben
wollen, müssen Sie DRM deaktivieren.
Klicken Sie bei Verwendung von Windows
Media Player 9/10/11 auf das Register Extras
> Optionen > Musik kopieren. Heben Sie
unter Kopiereinstellungen die Markierung des
Kästchens Musik kopiergeschützt auf und stellen
Sie die Dateien wieder her.
Selbst erstellte WMA-Dateien werden auf Ihre
eigene Verantwortung verwendet.
Dateierweiterungen:
1. Hängen Sie immer eine Dateierweiterung ‘.MP3’,
‘.WMA’ aus Ein-Byte-Buchstaben an eine MP3bzw. WMA-Datei an. Wenn Sie eine andere
Dateierweiterung als die angegebene anhängen
oder vergessen, diese Erweiterung anzuhängen,
kann die Datei nicht wiedergegeben werden.
2. Dateien ohne MP3/WMA-Daten können nicht
wiedergegeben werden. Die Dateien werden ohne
Audiowiedergabe abgespielt, wenn Sie versuchen,
Dateien ohne MP3/WMA-Daten wiederzugeben.
* Bei der Wiedergabe von VBR-Dateien kann
sich die Wiedergabedauer je nach der
Abspielposition unterscheiden.
* Bei der Wiedergabe von MP3/WMA-Dateien
wird kein oder fast kein Sound zwischen den
einzelnen Stücken abgespielt.
DE

10
Inhalte von iPod oder iPhone hören
Anschließen eines iPod oder iPhone
Schließen Sie einen iPod oder ein iPhone* an den
USB-Anschluss an.
Nach dem Anschließen eines iPods/iPhones
können Sie alle Wiedergabefunktionen steuern und
die Informationen zu den auf Ihrem iPod/iPhone
gespeicherten Tracks mit den Bedienelementen
des Highway anzeigen.
Audio-Inhalte von einem iPod oder
iPhone hören
Sie können Audiodaten von allen auf Ihrem iPod
gespeicherten Musik- oder Videodateien hören. So
hören Sie Audiodaten von Ihrem iPod:
1. Drücken Sie die Taste MENU / .
2. Drehen und drücken Sie das LAUTSTÄRKE-
Wählrad, um ‘MUSIC’ oder ‘VIDEO’ auszuwählen.
3. Wenn Sie ‘MUSIC’ ausgewählt haben, drehen
Sie am LAUTSTÄRKE-Wählrad und drücken
Sie darauf, um ‘PLAY LISTS’, ‘ARTISTS’,
‘ALBUMS’, ‘SONGS’, ‘GENRES’ oder
‘COMPOSERS’ auszuwählen.
Falls Sie ‘VIDEO’ ausgewählt haben, drehen
und drücken Sie auf das LAUTSTÄRKE-
Wählrad, um ‘MOVIES’, ‘MUSIC VIDEOS’, ‘TV
SHOWS’, ‘VIDEO PODCASTS’ oder ‘RENTALS’
auszuwählen.
Anmerkung: Bei der Wiedergabe einer Videodatei
kann Highway nur die Audiodaten des Videos
wiedergeben, aber keine Bildinhalte anzeigen.
4. Drehen und drücken Sie das LAUTSTÄRKE-
Wählrad, um das Element auszuwählen, das
wiedergegeben werden soll.
Anmerkung: Die im VIDEO MENU aufgelisteten
Elemente variieren je nach dem angeschlossenen
iPod-Modell und der verwendeten Sprache.
Suchen nach Inhalten auf Ihrem iPod/
iPhone
Highway ermöglicht die Suche nach Inhalten mithilfe
von Buchstaben. So suchen Sie nach Inhalten:
1. Drücken Sie die Taste MENU / , um den
iPod-Menü-Modus auszuwählen.
2. Drehen Sie das LAUTSTÄRKE-Wählrad, um
anzugeben, ob Sie nach ‘MUSIC’- oder nach
‘VIDEO’-Inhalten suchen wollen.
3. Wenn Sie ‘MUSIC’ ausgewählt haben, drehen
Sie am LAUTSTÄRKE-Wählrad, um ‘PLAY
LISTS’, ‘ARTISTS’, ‘ALBUMS’, ‘SONGS’,
‘GENRES’ oder ‘COMPOSERS’ auszuwählen.
Falls Sie ‘VIDEO’ ausgewählt haben, drehen
Sie das LAUTSTÄRKE-Wählrad, um ‘MOVIES’,
‘MUSIC VIDEOS’, ‘TV SHOWS’, ‘VIDEO
PODCASTS’ oder ‘RENTALS’ auszuwählen.
4. Drücken Sie das LAUTSTÄRKE-Wählrad, um
alle Inhalte anzuzeigen, die der ausgewählten
Kategorie entsprechen.
5. Drücken Sie die Taste DISP und halten Sie sie
gedrückt (1 Sek).
6. Drehen Sie das LAUTSTÄRKE-Wählrad, um
einen Buchstaben einzugeben, nach dem
gesucht werden soll.
7
. Drücken Sie die Taste DISP erneut, um die
Suche zu starten.
8
. Drücken Sie das LAUTSTÄRKE-Wählrad zur
Bestätigung.
Funktion "Wiederholt abspielen"
Mit der Funktion "Wiederholt abspielen" können Sie
den momentan auf Ihrem iPod wiedergegebenen
Track wiederholt abspielen.
Drücken Sie die Taste 3, um eine der folgenden
Wiederholungsfunktionen anzugeben:
RPT EIN: Wiederholt den aktuellen Track.
RPT ALLE: Wiederholt alle Tracks im aktuellen
Ordner.
Funktion Zufallswiedergabe (Shuffle)
Album-Shuffle
Zum Abspielen aller auf Ihrem iPod oder iPhone
gespeicherten Alben in zufälliger Reihenfolge
drücken Sie die Taste 4, bis ‘RDM ALBUM’ auf
dem Display angezeigt wird.
Song-Shuffle
Zum Abspielen der Tracks in dem momentan auf
Ihrem iPod oder iPhone wiedergegebenen Ordner
in zufälliger Reihenfolge drücken Sie die Taste 4,
bis ‘RDM SONG’ auf dem Display angezeigt wird.
Deaktivieren der Shuffle-Funktion
Zum Deaktivieren der Shuffle-Funktion drücken
Sie die Taste 4, bis ‘RDM AUS’ auf dem Display
angezeigt wird.
*Unterstützt die meisten iPod- und iPhone-Modelle. Aktuelle Informationen finden Sie in der Kompatibilitätstabelle auf unserer Website: www.pure.com/products/ipod-compatibility.

11
Verwendung Ihres iPods/iPhones zur
Auswahl von Tracks auf Ihrem Highway
Highway ermöglicht die Verwendung Ihres iPods/
iPhones zum Auswählen der Tracks, die auf dem
Highway abgespielt werden. Diese Funktion wird als
einfache Kontrolle (S-CTRL) bezeichnet.
Diese Einstellung ist standardmäßig deaktiviert.
So aktivieren Sie Ihren iPod / Ihr iPhone zum
Auswählen von Tracks auf dem Highway:
1. Drücken Sie die Taste DISP und halten Sie sie
gedrückt, um die Systemeinrichtung aufzurufen.
2. Drücken Sie die Taste oder , um zu
‘S-CTRL’ zu blättern.
3. Drehen und drücken Sie das LAUTSTÄRKE-
Wählrad, um S-CTRL ein- oder auszuschalten.
Wählen Sie ‘AN’ , um Ihren iPod für die
Kontrolle Ihrer Highway-iPod/iPhoneFunktionen zu aktivieren. Wählen Sie ‘AUS’, um
die S-CTRL-Funktion zu deaktivieren.
Anmerkungen:
• Haben Sie bei der Auswahl der Tracks auf dem
Highway etwas Geduld mit Ihrem iPod/iPhone;
hier kann es zu kleinen Verzögerungen kommen.
• Versuchen Sie nicht, Tracks auf dem Highway
mit Ihrem iPod und den Bedienelementen an der
Haupteinheit gleichzeitig auszuwählen.
• Einige iPod-Modelle unterstützen die S-CTRLFunktion nicht. Klären Sie mit Ihrem Händler
oder mithilfe der Pure Website, welche Modelle
S-CTRL nicht unterstützen.
DE

12
Verwendung von Bluetooth
Über die Highway Bluetooth-Funktion können Sie
das Highway Mikrofon und das in Ihrem Fahrzeug
integrierte Audiosystem als Freisprecheinrichtung
zum Telefonieren verwenden. Nach dem
Anschließen können Sie mit dem Highway Display
auch Informationen über eingehende, ausgehende
und verpasste Telefonanrufe anzeigen.
Wenn Ihr Mobiltelefon Audiodateien speichern
kann, können Sie über Bluetooth auch die auf
Ihrem Telefon gespeicherte Musik auf Highway
streamen.
Anmerkungen:
• Bauen Sie das Highway-Mikrofon nicht in lauten
Bereichen in Ihrem Fahrzeug ein, etwa direkt an
den Lüftern.
• Platzieren Sie Ihre Bluetooth Freisprecheinrichtung nicht an Orten, wo sie direkter
Sonneneinstrahlung ausgesetzt ist, da hohe
Temperaturen die Leistung des Highway
beeinträchtigen können.
• Highway ist eventuell nicht kompatibel mit
einigen Mobilgeräten und Bluetooth-AudioPlayern.
• Die Audio-Wiedergabe wird bei einem
Telefonanruf auf die gleiche Lautstärke
eingestellt.
Abstimmen ("Pairing") Ihres Mobiltelefons
mit Highway
Bevor Sie die Highway Bluetooth-Funktion
verwenden können, müssen Sie das Mobiltelefon
mit dem Highway abstimmen.
1. Schalten Sie die Bluetooth-Funktion Ihres
Mobiltelefons ein.
2. Rufen Sie das Bluetooth-Einrichtungsmenü
Ihres Mobiltelefons auf.
3. Suchen Sie nach neuen Bluetooth-Geräten.
4. Wählen Sie Pure Highway in der Pairing-Liste
im Mobiltelefon aus.
Nach dem erfolgreichen Abstimmen leuchten die
Symbole BT und HFP am Highway.
Das A2DP-Symbol leuchtet als Hinweis darauf,
dass Musik vom Bluetooth-Gerät auf den Highway
gestreamt werden kann.
Automatische Verbindung
1. Highway kann eine Abstimmung und
Speicherung mit maximal fünf Mobiltelefonen
durchführen.
Die automatische Verbindung wird aktiviert,
sobald Sie Ihr Mobiltelefon mit dem Highway
abgestimmt haben.
2. Ihr Mobiltelefon muss eingeschaltet sein, damit die
automatische Verbindung verwendet werden kann.
3. Die automatische Verbindung funktioniert nur
mit dem letzten Mobiltelefon, zu dem Sie eine
Verbindung hatten. Wenn Sie eine Verbindung
zu einem anderen Mobiltelefon verwenden
wollen, müssen Sie diese manuell herstellen.
Verwendung der Freisprecheinrichtung
Bluetooth-Menü aufrufen
Schalten Sie die Quelle über die Taste SOURCE
auf ‘BLUETOOTH’ um.
Drücken Sie die Taste
MENU /
, um eine
Möglichkeit für einen ausgehenden Anruf
auszuwählen.
Wählen einer Nummer
1. Drücken Sie die Taste MENU / .
2. Drehen und drücken Sie das LAUTSTÄRKE-
Wählrad am Bedienfeld, um ‘NUMMER
WAEHLEN’ auszuwählen.
3.
Drehen und drücken Sie das LAUTSTÄRKE-
Wählrad, um die erste Ziffer der gewünschten
Telefonnummer auszuwählen. Wiederholen
Sie diesen Vorgang, bis die vollständige
Telefonnummer eingegeben ist.
4.
Drücken Sie die Taste BAND / , um die
eingegebene Telefonnummer anzuwählen.
Wenn Sie das Telefonat beendet haben, drücken
Sie die Taste
MENU /
zum Auflegen.
Annehmen eines Anrufs
Drücken Sie die Taste
BAND /
, um einen
eingehenden Anruf anzunehmen.
Zum Zurückweisen eines eingehenden Anrufs
drücken Sie die Taste
MENU /
.

13
Beenden eines Anrufs
Wenn Sie das Telefonat beendet haben, drücken
Sie die Taste
MENU /
zum Auflegen.
Anzeigen der Anrufhistorie
Sie können die Historie Ihrer letzten Anrufe auf
dem Highway anzeigen, um Informationen über
Anrufe abzurufen, die Sie in letzter Zeit angewählt,
verpasst oder entgegengenommen haben.
So zeigen Sie die Anruf-Historie an:
1. Drücken Sie die Taste MENU / :
2. Drehen und drücken Sie das LAUTSTÄRKE-
Wählrad am Bedienfeld, um ‘GEWAEHLTER
ANRUF’, ‘VERPASSTER ANRUF’ oder
‘EMPFANGEN. ANRUF’ auszuwählen.
3. Drücken Sie das LAUTSTÄRKE-Wählrad, um
die Kontakte der ausgewählten Anruf-Historie
anzuzeigen.
4. Drehen Sie das LAUTSTÄRKE-Wählrad ,
um durch die Liste der Kontakte zu blättern,
und drücken Sie das Wählrad, wenn
der gewünschte Kontaktname bzw. die
Telefonnummer angezeigt wird.
Umschalten zwischen
Freisprecheinrichtung und normalem
Mobiltelefon-Betrieb
Sie können zwischen Freisprecheinrichtung und
normalem Mobiltelefon-Betrieb umschalten, indem Sie
während eines Anrufs die Taste BAND / drücken.
Audio-Streaming-Funktionen
Was ist Bluetooth-Audio-Streaming?
Die Verwendung von Bluetooth ermöglicht
Ihnen das drahtlose Streamen von Musik von
einem externen Audio-Player/Telefon auf den
Highway und das Anhören von Tracks über die
Fahrzeuglautsprecher.
ACHTUNG
Vermeiden Sie den Betrieb Ihres angeschlossenen
Mobiltelefons während des Audio-Streamings.
Das Audio-Streaming kann nach einer
Unterbrechung durch einen Telefonanruf nicht in
allen Fällen fortgesetzt werden -- dies hängt von
dem verwendeten Mobiltelefon ab.
Wenn die Quelle des Audio-Streamings getrennt
wird, zeigt das Highway-Display die Meldung
‘BLUETOOTH TRENNEN’ an.
Anmerkung:
Bevor Sie fortfahren, sollten Sie unbedingt das
Kapitel “Abstimmen ("Pairing") Ihres Mobiltelefons
mit Highway” auf der vorigen Seite lesen.
Titel abspielen oder unterbrechen
Drücken Sie die Taste 1, um die Audio-Wiedergabe
anzuhalten.
Zur Fortsetzung der Audio-Wiedergabe drücken Sie
die Taste 1 erneut.
Auswählen eines Tracks
Springen zum nächsten Track
Drücken Sie die Taste , um zum Anfang des
nächsten Tracks zu springen.
Wiedergabe des Anfangs eines Tracks
Drücken Sie die Taste , um zum Anfang
des aktuellen Tracks zu springen.
Anmerkung:
Die Reihenfolge, in der die Tracks abgespielt
werden, variiert je nach dem verwendeten
Bluetooth-Audio-Player. Wenn die Taste
gedrückt wird, starten manche A2DP-Geräte je
nach der Dauer des Tracks den aktuellen Track
erneut.
Während der Musik-Streaming-Wiedergabe wird
auf dem Display ’HFP’ oder ‘A2DP’ angezeigt.
Wird ‘BLUETOOTH TRENNEN’ auf dem Display
angezeigt, so wurde Ihr Bluetooth-Audio-Player
eventuell nicht mit der Wiedergabe/Pause-Funktion
des Highway abgestimmt. Bitte vergewissern Sie
sich, dass beim Streamen von Musik von einem
angeschlossenen Bluetooth-Audio-Player auf
Highway Ihr Bluetooth-Gerät und Highway den
gleichen Wiedergabe/Pause-Status haben.
DE

14
Verfügbare Digitalradio-Optionen
Digitalradio-Antenne Einstellung
Sie können angeben, welche Art von DigitalradioAntenne Sie an den Highway anschließen. Die
verfügbaren Optionen sind ‘AKTIV’ und ‘PASSIV’.
Weitere Informationen siehe Seite 19.
L-Band-Einstellungen
Sie können angeben, ob Highway Radiosender
einstellt, die auf dem L-Band senden.
So aktivieren bzw. deaktivieren Sie die L-BandEinstellung:
1.
Drücken Sie die Taste DISP am Bedienfeld und
halten Sie sie gedrückt, bis auf dem Display
‘UHR’ angezeigt wird.
2. Drücken Sie die Taste oder , um zu
‘DAB LBND’ zu blättern.
3.
Drehen und drücken Sie das LAUTSTÄRKE-
Wählrad, um die L-Band-Funktion ‘AN’ oder
‘AUS’ zu schalten.
Einstellungsoptionen
*Die Serviceverfolgung wird nicht von allen Sendern unterstützt.
Verfügbare Optionen im FM-Betrieb
Lokale Suche
Sie können mit der Funktion "Lokale Suche"
auswählen, dass Highway nur Radiosender mit
einem starken Signal einstellen soll.
So aktivieren oder deaktivieren Sie die lokale
Suchfunktion:
1.
Drücken Sie die Taste DISP am Bedienfeld und
halten Sie sie gedrückt, bis auf dem Display
‘UHR’ angezeigt wird.
2.
Blättern Sie mit der Taste zu ‘DX/LO’.
3.
Drehen und drücken Sie das LAUTSTÄRKE-
Wählrad, um ‘LOKAL’ (aktivieren) oder ‘DX’
(deaktivieren) auszuwählen.
Anmerkung: Wenn die Funktion der lokalen
Suche aktiviert ist, können weniger Radiosender
empfangen werden.
Der Highway hat ein integriertes Radio Data
System (RDS) Decoder-System, das RDS-Daten
von entsprechenden Sendestationen unterstützt.
RDS-Einstellungen
AF-Funktion
Wenn Sie einen UKW-Sender hören und das Signal
schwächer wird, führt die AF-Funktion automatisch
eine Suche durch und versucht, den Highway auf
dem gleichen Sender mit einer alternativen Frequenz
neu einzustellen. Diese Einstellung ist standardmäßig
eingeschaltet.
1.
Drücken Sie die Taste DISP am Bedienfeld und
halten Sie sie gedrückt, bis auf dem Display
‘UHR’ angezeigt wird.
2. Drücken Sie die Taste oder , um zu ‘AF’
zu blättern.
3. Drehen Sie das LAUTSTÄRKE-Wählrad, um
‘AN’ oder ‘AUS’ auszuwählen.
Wenn die AF-Funktion aktiviert ist, erscheint der
AF-Indikator auf dem Display.
Anmerkung: Wenn die AF-Funktion aktiviert ist,
funktioniert der Service digital zu UKW nicht.
Radio Data System

15
TA ("Traffic Announcement",
Verkehrsdurchsage)
Im TA-Standby-Modus (das ‘TA’-Symbol leuchtet auf
dem Display) wartet der Highway auf ein TA-Signal von
einem verfügbaren FM-Sender in Reichweite. Wenn
der Highway ein TA- oder EON-Verkehrsfunksignal
empfängt, stellt er sich automatisch auf den
gefundenen FM-Sender mit der Verkehrsdurchsage
ein. Wenn die Durchsage beendet ist, stellt Highway
den letzten FM-Sender ein, den Sie gehört haben.
Zum Abbrechen einer aktiven Verkehrsdurchsage
drücken Sie die Taste TA.
Einstellen des TA-Standby-Modus
Anmerkung: Wenn der TA-Standby-Modus
eingeschaltet ist, funktioniert der Service digital zu
UKW nicht.
Drücken Sie die Taste TA, um das ‘TA’-Symbol
ein- und auszublenden. Wenn das Symbol ‘TA’
im Display leuchtet, bleibt der Highway im TAStandby-Modus, bis eine Verkehrsdurchsage
gesendet wird. Wenn die Übertragung eines
Verkehrshinweises beginnt, zeigt der ‘TRAF INF’ an,
wenn die Verkehrsdurchsage von dem Sender, den
Sie momentan hören, übertragen wird. Wenn sich
Highway von einem anderen Radionetzwerk aus in
der Verkehrsdurchsage einstellt, erscheint auf dem
Display der Hinweis ‘EON INF’.
Funktion REG (Regionale Programme)
Wenn die REG-Funktion eingeschaltet ist, stellt sich
der Highway mithilfe der AF-Steuerung automatisch
auf den Sender mit dem stärksten Signal innerhalb
der angegebenen Region ein. Ist diese Funktion
ausgeschaltet und ändert sich der Regionalbereich
während Ihrer Fahrt, so stellt sich der Highway auf
einen Sender innerhalb der aktuellen Region ein.
Diese Einstellung ist standardmäßig eingeschaltet.
Anmerkungen:
• Diese Funktion ist deaktiviert, wenn Highway
auf einen landesweiten Sender wie z. B.
Deutschlandfunk eingestellt ist.
• Die Einstellung REG AN/AUS gilt nur bei
eingeschalteter AF-Funktion.
1. Drücken Sie die Taste DISP am Bedienfeld und
halten Sie sie gedrückt, bis auf dem Display
‘UHR’ angezeigt wird.
2. Drücken Sie die Taste oder , um zu
‘REG’ zu blättern.
3. Drehen Sie das LAUTSTÄRKE-Wählrad, um
‘AN’ oder ‘AUS’ auszuwählen.
Manuelles Einstellen auf einen regionalen
Sender im gleichen Netzwerk
Sie können manuell einen regionalen Sender im
gleichen Netzwerk einstellen, wenn die AF-Funktion
ein- und die REG-Funktion ausgeschaltet ist.
Anmerkung: Diese Funktion kann verwendet
werden, wenn ein regionales Sendesignal des
gleichen Netzwerks empfangen wird.
PTY (Programmtyp)
Mit der PTY-Funktion (Programmtyp) können
Sie nach Radiosendungen suchen, die einem
bestimmten Genre entsprechen. In Europa
gibt es 31 vordefinierte ProgrammtypGenres.
* In manchen Ländern werden derzeit keine
PTY-Informationen gesendet.
* Im TA-Standby-Modus hat ein TP-Sender
Vorrang vor einem PTY-Sender.
So verwenden Sie die PTY-Funktion zum Suchen
nach einem bestimmten Typ von Radiosendung:
1. Drücken Sie die Taste
MENU /
.
2. Drehen und drücken Sie das LAUTSTÄRKE-
Wählrad am Bedienfeld, um das Genre der
gewünschten PTY-Sendung auszuwählen.
Highway beginnt mit der Suche nach einer
entsprechenden Radiosendung und stellt den
ersten Radiosender ein, der dem angegebenen
PTY-Typ entspricht.
Wiederholen Sie die obigen Schritte, um
einen anderen Sender zu suchen, der dem
angegebenen PTY-Typ entspricht.
DE

16
Drücken Sie in einem beliebigen Modus die
Taste DISP und halten Sie sie gedrückt, um das
Systemeinrichtungsmenü aufzurufen. Drücken
Sie die Taste
oder , um durch die Optionen
zu blättern, und drehen Sie das LAUTSTÄRKE-
Wählrad zum Anpassen der Einstellungen.
UHR
1. Drücken Sie das LAUTSTÄRKE-Wählrad.
2. Die Stundenanzeige blinkt. Drehen und drücken
Sie das LAUTSTÄRKE-Wählrad, um die
Stunde einzustellen. Wiederholen Sie diesen
Schritt, um die Minuten einzustellen.
SPRACHE
Sie können die Sprache auswählen, die Ihr
Highway für Menüs und Optionen verwendet.
1. Drücken Sie das LAUTSTÄRKE-Wählrad.
2. Drehen und drücken Sie das LAUTSTÄRKE-
Wählrad, um unter "Englisch", "Franzoes",
"Deutsch" oder "Italien" die gewünschte
Menüsprache auszuwählen.
AUX SENS (AUX-Modus)
Drehen und drücken Sie das LAUTSTÄRKE-Wählrad,
um das Audio-Boost-Level für den AUX-Eingang
einzustellen. Die verfügbaren Optionen sind LOW, MID
oder HIGH.
AUTO CON: AN/AUS
(Nur Bluetooth-Modus)
Durch die Aktivierung dieser Option wird automatisch
das zuletzt verbundene Mobiltelefon verbunden.
Drehen und drücken Sie das LAUTSTÄRKE-
Wählrad, um die automatische Verbindungsfunktion
ein- oder auszuschalten.
Allgemeine Optionen
FARBE
Drehen Sie das LAUTSTÄRKE-Wählrad, um eine
Hintergrundfarbe auszuwählen.
SCN: Die Hintergrundbeleuchtung durchläuft
kontinuierlich alle verfügbaren Farben.
FARBE 01~12: Wählen Sie eine voreingestellte
Farbe aus.
NUTZER1~3: Erstellen Sie Ihre eigene
Farbe. Drücken Sie das Wählrad, um den
Farbeinstellungsmodus aufzurufen, und drücken
Sie die Tasten
, um die Werte für ROT,
GRUEN und BLAU (RGB) der gewünschten
Farbe auszuwählen. Drehen und drücken Sie
das LAUTSTÄRKE-Wählrad, um eine Farbe
auszuwählen.
Drücken Sie das LAUTSTÄRKE-Wählrad und
halten Sie es gedrückt, um die individuelle Farbe
dem Radiospeicher hinzuzufügen.
CYCLE: AN/AUS
Mit dieser Funktion wird gesteuert, wie Highway den
Track-Namen, den Ordnernamen, den Titel, das
Album und den Interpreten im CD/MP3-, USB- und
iPod-Modus anzeigt:
AN: Wählen Sie diese Option aus, um anzugeben,
dass das Display automatisch zwischen TRACK,
FOLDER, TITLE, ALBUM und ARTIST wechselt.
Anmerkung: Im iPod-Modus schaltet die CycleOption das Display nur zwischen TITLE, ALBUM
und ARTIST um.
AUS: Wählen Sie diese Option aus, um den
automatischen Wechsel des Displays zwischen
TRACK, FOLDER, FILE, ALBUM, TITLE und ARTIST
zu beenden. Zum Ändern der momentan auf dem
Display angezeigten Informationen (Highway zeigt
standardmäßig den Track-Namen an, außer im
iPod-Modus) drücken Sie die Taste DISP.
HINTEN/S-W
Wenn Sie Highway mit einem externen Verstärker
verwenden, können Sie mit dieser Einstellung
angeben, ob Sie die hinteren Line-out-Ausgänge über
einen externen Verstärker mit Breitbandlautsprecher
(HINTEN) oder einem Subwoofer (S-WOOFER)
verbinden. Weitere Informationen hierzu finden Sie im
Diagramm auf Seite 18.
Drehen und drücken Sie das LAUTSTÄRKE-Wählrad,
um HINTEN oder S-WOOFER auszuwählen.
HINTEN: Wählen Sie diese Option aus, um über
die hinteren Line-out-Ausgänge rechts und links
einen externen Verstärker mit einem Breitbandsignal
bereitzustellen.
S-WOOFER: Wählen Sie diese Option aus, um vom
EQ-Menü aus Anpassungen an einem dedizierten
Subwoofer-Verstärker zuzulassen, ohne das Signal
der vorderen Ausgänge zu beeinträchtigen, oder den
Sound vom integrierten Verstärker zu verwenden.
DIMMER: AN/AUS
Drehen und drücken Sie das LAUTSTÄRKE-
Wählrad, um die DIMMER-Einstellung zwischen
‘AN’ und ‘AUS’ umzuschalten.
AN: Die Display-Helligkeit wird abgedunkelt.
AUS: Deaktiviert die Dimmer-Einstellung, sodass
die LCD-Helligkeit auf ein maximales Niveau
eingestellt wird.

17
BEEP: AN/AUS
Drehen und drücken Sie das LAUTSTÄRKE-
Wählrad, um den Piepston beim Drücken einer
Taste ein- oder auszuschalten.
12/24H
Drehen und drücken Sie das LAUTSTÄRKE-
Wählrad, um das Uhrzeitformat auf ‘12STUNDEN’
oder ‘24STUNDEN’ einzustellen.
CT: AN/AUS
Drehen und drücken Sie das LAUTSTÄRKE-Wählrad,
um den automatischen Zeitabgleich mit dem Digitaloder FM-Radiosignal ein- oder auszuschalten.
Audio-Einstellungen anpassen
Drücken Sie die Taste EQ, um den Einstellungsmodus für den Equalizer aufzurufen. Wenn Sie
EQ zum ersten Mal drücken, wird die aktuelle EQEinstellung angezeigt. Drehen Sie das Wählrad, um
DSP EQ in der folgenden Reihenfolge zu ändern:
AUS > POP > ROCK > KLASSIK > JAZZ > INDIVID.
Erstellen einer individuellen EQ-Einstellung
1. Drücken Sie die Taste EQ.
2. Drehen und drücken Sie das LAUTSTÄRKE-
Wählrad, um ‘INDIVID.’ auszuwählen.
3. Drücken Sie die Taste oder , um den
EQ-Wert auszuwählen, der geändert werden
soll. Folgende Optionen sind einstellbar:
BASS-G > BASS-F >BASS-Q > MID-G >
MID-F >MID-Q >HOEHEN-G > HOEHEN-F.
4. Drehen Sie das LAUTSTÄRKE-Wählrad, um
den Wert einzustellen.
5. Drücken Sie die Taste oder , um zu
einer anderen individuellen EQ-Einstellung
zu wechseln, oder drücken Sie das
LAUTSTÄRKE-Wählrad, wenn Sie fertig sind.
Audio-Kontrolleinstellungen
1. Drücken Sie die Taste EQ.
2. Drücken Sie die Taste oder , um die
Audio-Kontrolleinstellung auszuwählen,
die Sie einstellen wollen. Die verfügbaren
Optionen sind BALANCE > REGLER >
LAUT > SUBW FRE > SUBW VOL.
3. Drehen und drücken Sie das LAUTSTÄRKE-
Wählrad, um den Wert einzustellen. Die
verfügbaren Werte für die einzelnen Optionen
sind nachfolgend dargestellt:
BALANCE: LINKS 1-7 > MITTE > RECHTS 1-7
REGLER: VORN 1-7 > MITTE > HINTEN 1-7
LAUT: AN/AUS
SUBW FRE: BIS > 80 > 120 > 160
SUBW VOL: (-6) - (+6)
DE

18
Elektrische Anschlüsse
Schaltplan
FM/MW ANTENNA
Line-Out hinten rechts (Rot)
SUB OUT
Line-Out vorn rechts (Rot)
Line-Out vorn links (Weiß)
A
B
1357
2468
1
357
2
468
DAB ANTENNA
MICROPHONE
Line-Out hinten links (Weiß)
SUB OUT
Nr.Pin-Definition Nr.Pin-Definition
A1 NC B1 Hinten rechts (+)
A2 Telemute B2 Hinten rechts (-)
A3 NC B3 Vorn rechts (+)
A4 Batterie +B4Vorn rechts (-)
A5 AMP Remote B5 Vorn links (+)
A6 NC B6 Vorn links (-)
A7 ACC+ B7 Hinten links (+)
Fach A Fach B
Anhang

19
Einbauanleitung
Installationshinweise
Vorbereitung zum Einbau des Highway
Highway kann in jedem Armaturenbrett eingebaut
werden, das eine entsprechende Öffnung mit den im
folgenden Diagramm angegebenen Abmessungen hat.
Das Armaturenbrett muss 4,75 mm - 5,56 mm dick
sein, um den Highway daran befestigen zu können.
Digitalradio-Antenne Einstellung
Highway verfügt über einen DigitalradioAntennenanschluss des Typs SMB und sollte mit
einer für Ihr Fahrzeug und die Region geeigneten
Automobil-Antenne verwendet werden.
Im Lieferumfang des Produkts ist keine Antenne
enthalten. Verwenden Sie eine für die spezifischen
Anforderungen Ihres Fahrzeugs geeignete Antenne.
Wenn Ihre Antenne mit einer anderen Spannung
als den vom Highway bereitgestellten 12 Volt
arbeitet, muss ein Line-In-Spannungsregler
verwendet werden, um die Spannung auf
die von der Antenne benötigte Spannung
anzupassen, BEVOR die Antenne am Highway
angeschlossen wird. Der Antennenstrom muss
dann entsprechend den weiter vorn beschriebenen
Schritten auf 'AKTIV' eingestellt werden (Highway ist
ab Werk auf 'AKTIV' eingestellt).
Unter keinen Umständen darf eine separate
Stromversorgung mit 12 Volt oder einer anderen
Spannung In-Line mit dem Antennenanschluss
verbunden werden, wenn der Antennenstrom auf
'AKTIV' oder 'PASSIV' eingestellt ist; dadurch würde
Strom über die mittlere Phase des Antennenkabels
an das Produkt geleitet, was zu Schäden führt, die
nicht durch die Produktgewährleistung abgedeckt
sind.
WARNUNG - Durch den Anschluss einer aktiven
Antenne, die nicht für den Betrieb mit 12 Volt am
SMB-Digitalradio-Antennenanschluss des Highway
ausgelegt ist, kann die Antenne oder Highway
beschädigt werden; solche Schäden sind nicht
durch die Gewährleistung abgedeckt.
Einbau einer Digitalradio-Antenne
Highway wurde für den Einsatz mit einer aktiven
Digitalradio-Antenne konzipiert. Stellen Sie vor dem
Einbau der Highway-Haupteinheit sicher, dass eine
geeignete Digitalradio-Antenne in Ihrem Fahrzeug
eingebaut ist. Schlagen Sie weitere Informationen
hierzu in der Einbauanleitung zu Ihrer DigitalradioAntenne nach.
Anmerkung: Setzen Sie immer die Montagehülse im
Armaturenbrett ein, bevor Sie die Haupteinheit einführen
.
Antennenstrom für aktive Antennen:
Da zahlreiche Automobil-Antennen einen
eingebauten Verstärker haben oder über ein
Stromkabel mit der Radioanlage des Fahrzeugs
verbunden werden müssen, stellt dieses Produkt
einen 12-Volt-Stromausgang in der Mitte des
digitalen Antennenanschlusses (mittlerer Pin des
SMB-Anschlusses) zur Verfügung.
Die meisten aktiven Digital-Radioantennen
für Automobile arbeiten mit 12 Volt. Manche
Modelle können jedoch auch andere Spannungen
verwenden, z. B. 5 Volt. Der AntennenStromausgang vom Produkt ist ab Werk auf ‘Aktiv’
eingestellt, d. h. auf 12 Volt AN eingestellt (im
System-Menü als ‘DAB ANT
AKTIV’ dargestellt).
Wenn Ihre ausgewählte Antenne keinen
Verstärker hat (d. h. ‘PASSIV’ ist), stellen Sie den
Antennenstrom wie folgt auf ‘PASSIVE’ ein, bevor
Sie die Antenne an den Highway anschließen:
1. Drücken Sie die Taste DISP und halten Sie sie
gedrückt, bis ‘UHR’ in der oberen Zeile des
Displays erscheint. Dies zeigt an, dass Sie das
System-Menü aufgerufen haben.
2. Drücken Sie mehrmals die Taste , bis ‘DAB
ANT’ in der oberen Zeile des Displays erscheint.
3. Drehen Sie das LAUTSTÄRKE-Wählrad, bis
’PASSIVE’ in der zweiten Zeile des Displays
erscheint.
4. Drücken Sie einmal die Taste DISP, um die
neue Antenneneinstellung zu bestätigen und
zum vorigen Bildschirm zurückzukehren.
DE

20
Einbau des abnehmbaren
Bedienfelds
1. Richten Sie die Nut an
der rechten Seite der
Frontblende an dem Schlitz
an der Einheit aus.
2. Drücken Sie die linke Seite
der Frontblende nach unten,
bis sie in dem Schlitz einrastet.
Einbauen der Highway-Haupteinheit
1. Setzen Sie die Montagehülse in das
Armaturenbrett ein. Biegen Sie zum Befestigen
der Hülse die Metallbügel um.
2. Schließen Sie das Audio-, Mikrofon-, FM/MWAntennen- und das Stromversorgungskabel an
der Rückseite des Highway an (siehe Seite 18).
3. Bringen Sie die abnehmbare Blende (siehe
gegenüber) an und testen Sie den Highway,
um sicherzustellen, dass alle Audiofunktionen
korrekt funktionieren.
4. Schließen Sie das Kabel der Digitalantenne an.
Anmerkung:
Schlagen Sie unter Seite 19 nach,
bevor Sie das Kabel der Digitalantenne anschließen.
5. Nehmen Sie die beiden Sicherungsschrauben an
der Oberseite des Highway ab, damit das CDLaufwerk funktionieren kann. Schieben Sie dann
den Highway in die Montagehülse und drücken
Sie ihn fest in Position.
6. Bringen Sie den äußeren Trim-Rahmen an.
Wenn Sie nicht sicher sind, wie die Einheit
richtig eingebaut wird, wenden Sie sich an einen
qualifizierten Techniker.
Zurücksetzen auf die
Werkseinstellungen
1. Nehmen Sie die abnehmbare Blende wie auf
Seite 5.
2. Drücken Sie mit einem spitzigen Objekt auf
die Taste RESET, um den Highway auf die
Werkseinstellungen zurückzusetzen.
3. Bringen Sie die abnehmbare Blende wieder an,
wie auf Seite 5.
Anmerkung: Durch Drücken der Taste RESET
werden die Einstellung der Uhr und die
gespeicherten Sender zurückgesetzt.
2
2
1
1
Einbau des Mikrofons
Sie müssen das im Lieferumfang enthaltene Mikrofon
einbauen, um Highway und Ihr Mobiltelefon als
Freisprecheinrichtung nutzen zu können.
Anmerkung: Bauen Sie das Highway-Mikrofon nicht
in lauten Bereichen in Ihrem Fahrzeug ein, etwa direkt
an den Lüftern.
1. Lockern Sie alle eventuell angebrachten Blenden.
2. Verwenden Sie die mitgelieferte Klammer, um
das Mikrofon an der Sonnenblende über der
Fahrerposition anzubringen (A).
3. Führen Sie das Kabel hinter den Blenden (B)
entlang und lassen Sie den Mikrofonanschluss aus
dem Armaturenbrett (C) heraushängen, sodass Sie
später die Haupteinheit daran anschließen können.
4. Sichern Sie das Kabel mit dem mitgelieferten Haft-Clip.
5. Bringen Sie alle Blenden wieder an ihrer
ursprünglichen Position an.
(A)
(B)
(C)
Montagehülse
Hauptgerät
Blende
Entfer
nen Sie
die beiden Schrauben
Montageschraube
Gummikissen
ACHTUNG: Führen Sie das Mikrofonkabel und andere
Kabel nicht über Airbags, da diese dadurch bei einer
Kollision eventuell nicht wie vorgesehen funktionieren. Die
Kabel müssen außerhalb der Airbag-Entfaltungszonen
geführt werden. Arbeiten Sie in der Umgebung der
Airbags besonderes vorsichtig.

21
Abnehmen der Highway-Haupteinheit
1. Highway ausschalten.
2. Nehmen Sie die abnehmbare Blende wie auf
Seite 5.
3. Nehmen Sie den äußeren Trim-Rahmen ab.
4. Setzen Sie die L-förmigen Ausbauwerkzeuge in die
Schlitze an der Seite vorn am Highway ein, bis sie
einrasten (wie im Schaubild unten dargestellt).
5. Ziehen Sie den Highway heraus und ziehen Sie alle
Kabel ab.
DE

22
Beheben von Störungen
Die folgende Checkliste hilft Ihnen beim Lösen von Problemen, die bei der Verwendung des Highway auftreten können. Bevor Sie diese Checkliste durchgehen,
überprüfen Sie die Verbindungen und befolgen Sie alle Anleitungen in diesem Benutzerhandbuch. Verwenden Sie den Highway nicht, wenn Sie Rauchentwicklung
oder einen Brandgeruch wahrnehmen; dies könnte zu einem Brand oder einem Stromschlag führen. Schalten Sie in einem solchen Fall Highway unverzüglich aus
und wenden Sie sich an Ihren Händler.
Problem Mögliche Ursache Lösung
Allgemein
Highway lässt sich nicht einschalten. Die Zündung des Fahrzeugs ist nicht eingeschaltet.
Das Kabel ist nicht richtig angeschlossen.
Eine Sicherung ist durchgebrannt.
Drehen Sie den Fahrzeugschlüssel im Zündschloss.
Überprüfen Sie die Kabelverbindung.
Ersetzen Sie die Sicherung durch eine neue Sicherung mit den
gleichen Kenndaten.
Kein Sound Die Lautstärke ist auf einen minimalen Wert eingestellt,
oder die Stummschaltung wurde aktiviert.
Überprüfen Sie die Lautstärkeeinstellung, oder schalten Sie die
Stummschaltung aus.
Das Highway Display funktioniert nicht richtig. Der Highway ist instabil. Drücken Sie die Taste RESET.
CD-Modus
Der Highway spielt keine CDs ab. Die CD wurde falsch eingelegt.
Die CD ist verschmutzt oder beschädigt.
Die CD muss mit dem Etikett bzw. der Beschriftung nach oben
eingelegt werden. Reinigen Sie die CD und überprüfen Sie sie
auch auf Beschädigungen. Probieren Sie eine andere CD aus.
Der Sound springt aufgrund von Vibrationen. Der Einbauwinkel beträgt mehr als 30˚.
Die Montage ist instabil.
Passen Sie den Montagewinkel auf weniger als 30˚ an.
Montieren Sie die Einheit sicher mithilfe der im Lieferumfang
enthaltenen Teile.
EMPFAENGER-Modus
Es können keine Sender empfangen werden. Die Antenne ist nicht richtig angeschlossen. Schließen Sie die Antenne richtig an.
Schlechte Sender-Empfangsqualität. Die Antenne ist nicht ganz ausgefahren oder gebrochen. Fahren Sie die Antenne vollständig aus. Falls sie gebrochen ist,
ersetzen Sie sie durch eine neue.
Voreingestellte Sender gehen verloren. Das Batteriekabel ist nicht richtig angeschlossen. Verbinden Sie die permanente Plusphase an der Einheit mit der
permanenten Plusphase am Fahrzeug.
USB-Modus
Das USB-Speichermedium kann nicht
gelesen werden.
Das USB-Speichermedium ist eventuell nicht richtig
formatiert.
Überprüfen Sie, ob das Dateisystem das FAT- oder FAT32-Format
hat. Wegen der unterschiedlichen Formate sind manche Modelle
der Speichermedien oder MP3-Player eventuell nicht kompatibel.

23
Technische Daten
Anmerkung: Aufgrund von Fortschritten bei der Technologie
bleiben Änderungen an Spezifikationen und Design ohne vorherige
Ankündigung vorbehalten.
Allgemein
Netzteil: 12 V DC (11 V - 16 V)
Testspannung 14,4 V, negative Erdung
Maximale Ausgangsleistung: 55 W x 4 Kanäle
Kontinuierliche Ausgangsleistung:
20 W x 4 Kanäle (4 ,10 % T.H.D.)
Geeignete Lautsprecher-Impedanz: 4-8 Ohm
Vorverstärker-Ausgangsspannung:
2,0 V (CD-Wiedergabemodus: 1 kHz, 0 dB, 10 K Last)
Sicherung: 15 A
Abmessungen (B x H x T): 178 x 50 x 166 mm
Gewicht: 1,7 kg
Aux-in: ≥300 mV
Komponenten
Montagehülse: 1
Maschinenschrauben M 5 x 6 mm: 4
Montageschraube (50 mm): 1
L-förmiges Ausbauwerkzeug: 2
Blende: 1
Mikrofon: 1
Selbsthaftender Kabel-Clip 1
Sonnenblenden-Clip 1
Gummikissen: 1
Bedienungsanleitungen: 1
FM Stereoradio
Frequenzbereich: 87,5 - 108,0 MHz (Europa)
Nutzbare Empfindlichkeit: 8 dBμ
Schalldämmungs-Empfindlichkeit (S/N=50 dB): 12 dBμ
Frequenzgang: 30 Hz - 15 kHz
Stereo-Trennung: 30 dB (1 kHz)
Bild-Reaktionsverhältnis: 50 dB
IF-Reaktionsverhältnis: 70 dB
Signal/Rausch-Verhältnis: 55 dB
AM(MW) Radio
Frequenzbereich: 522-1620 kHz
Schalldämmungs-Empfindlichkeit (S/N=20 dB): 30 dBμ
CD-Player
System: Disk Digital Audio System
Frequenzgang: 20 Hz - 20 kHz
Signal/Rausch-Verhältnis: >80 dB
Gesamt-Klirrfaktor:
Unter 0,20 % (1 kHz)
Gleichlaufschwankungen: Unter den messbaren Grenzwerten
Kanaltrennung: >55 dB
MP3/WMA
Medienformat: MP3 WMA
Sampling-Rate: 8 kHz-48 kHz k. A.
Bitrate: 32 kbps-320 kbps / VBR 32 kbps-196 kbps
Zeichen-Limit für Dateiname, Dateiordner und
Metadaten:
30 Zeichen
(einschließlich
Erweiterung)
30 Zeichen
(einschließlich
Erweiterung)
Digital (DAB) Radio
Frequenzbereich: DAB Band III:
174.928 MHz ~ 239.200 MHz
DAB Band L:
1452.960 MHz ~ 1490.624 MHz
Nutzbare Empfindlichkeit (RF=-72 dBM): -95 dBM
Frequenzgang: 20 Hz - 20 kHz
Stereo-Trennung: ≥50 db
Signal/Rausch-Verhältnis: ≥60 db
Element Min. Max.
Weitabselektion: 42 dB 60 dB
Nachbarkanal-Unterdrückung: 35 dB 40 dB
DE

24

1
NL
Merci d'avoir choisi Highway H270SB. L'objectif de ce manuel est de vous permettre
de mettre en service votre appareil en un rien de temps et de tirer parti de la plupart des
fonctionnalités de votre Highway H270SB. Nous améliorons et ajoutons de nouvelles
fonctionnalités à nos produits en permanence. Pour tirer parti des améliorations apportées
depuis la sortie de notre produit, veuillez visiter le site support.pure.com à partir duquel
vous pouvez vérifier la disponibilité de mises à jour de ce logiciel et télécharger la dernière
version de ce guide utilisateur au format PDF.
H270SB
VOL
SEL
INTTOP RPT
H270SB
ES
IT
NO
EN
FRANÇAIS
DE

2
Merci de lire attentivement les présentes instructions
d'utilisation afin de savoir comment faire fonctionner
votre Highway correctement. Après les avoir lues,
conservez ce manuel en lieu sûr pour pouvoir le
consulter ultérieurement.
Précautions d'emploi
Utilisez uniquement cet appareil sur une source
de courant continu de 12V à masse négative.
Débranchez la borne négative de la batterie du
véhicule avant de monter et de brancher l'appareil.
Lorsque vous remplacez le fusible, assurez-vous
d'utiliser un fusible neuf d'ampérage identique.
L'utilisation d'un fusible possédant un
ampérage supérieur risque d'endommager
sérieusement l'appareil.
N'essayez PAS de démonter l'appareil.
Les faisceaux laser du lecteur optique sont
dangereux pour les yeux.
Assurez-vous qu'aucune épingle ni aucun autre
objet ne pénètre dans l'appareil. Cela pourrait
provoquer un dysfonctionnement ou provoquer
des risques de sécurité, tels que des chocs
électriques ou une exposition aux faisceaux laser.
Si votre voiture est restée pendant une longue
période exposée à des températures élevées ou
basses, patientez jusqu'à ce que la température
redevienne normale à l'intérieur de votre voiture
avant de faire fonctionner Highway.
Gardez le volume à un niveau qui vous permet
de continuer à entendre les avertissements des
autres automobilistes (klaxons, sirènes, etc.).
Arrêtez votre voiture avant d'effectuer des
opérations complexes.
Notes sur les CD
La lecture d'un CD défectueux ou poussiéreux
peut entraîner des pertes de niveau audio.
Manipulez le CD en le tenant par ses bords
intérieurs et extérieurs.
Ne touchez pas la surface gravée du CD.
Ne fixez aucun seau, aucune étiquette ni feuille
de protection des données sur l'une ou l'autre
surface du CD.
N'exposez jamais un CD aux rayons directs du
soleil ni à des sources de chaleur importantes.
Utilisez un chiffon de nettoyage pour essuyer
un CD poussiéreux, en allant du centre vers
l'extérieur.
N'utilisez jamais de solvants tels que du
benzine ou de l'alcool.
Highway ne peut pas lire de CD de 8cm.
Ne tentez jamais d'insérer un CD de 8cm
avec un adaptateur ou tout autre CD de
forme irrégulière. Highway pourrait ne pas
pouvoir l'éjecter et cela pourrait provoquer un
dysfonctionnement.
En plus des CD ordinaires, Highway peut
également lire les CD-R/CD-RW/MP3/UDF.
Attention
Veuillez mettre Highway hors tension et le renvoyer
à votre service après-vente ou au vendeur/
distributeur auprès duquel vous l'avez acheté si l'un
des faits suivants se produit:
(1) De l'eau ou d'autres objets se sont introduits
dans Highway;
(2) Highway émet de la fumée;
(3) Highway émet une odeur de brûlé.
Informations de sécurité

3
Informations sur la garantie
Imagination Technologies Limited garantit à l’utilisateur final que le présent produit est exempt de défauts de matière et de main-d’œuvre
dans le cadre d’une utilisation normale, pour une période de trois ans à compter de la date d’achat. La présente garantie couvre les
pannes dues à un défaut de conception ou de fabrication; elle n'est pas applicable aux dommages accidentels, quelle qu'en soit la
cause, à l'usure normale du produit, ainsi qu'à tous les dommages dus à la négligence et aux interventions, modifications ou réparations
effectuées sans notre autorisation.
Connectez-vous sur www.pure.com/register pour enregistrer votre produit. Pour tout problème, veuillez vous adresser à votre revendeur
ou prendre contact avec l'assistance technique de Pure, à l'adresse indiquée au dos du présent manuel d'utilisation. Si vous avez besoin
de retourner votre article, veuillez le renvoyer dans son emballage d'origine et n'oubliez pas de retourner également tous les éléments/
accessoires. Nous nous réservons le droit de refuser tout article retourné qui serait incomplet ou mal emballé.
Remarque: pour enregistrer Highway vous aurez besoin de son numéro de série que vous pouvez trouver sur le dos de façade amovible.
Avis de non-responsabilité
Imagination Technologies Limited décline toute responsabilité et n'accorde aucune garantie quant au contenu du présent document,
notamment en ce qui concerne les garanties implicites de valeur marchande ou d’adéquation à un usage spécifique. En outre, Imagination
Technologies Limited se réserve le droit de réviser la présente publication et d’y apporter des modifications, quand elle le souhaite, sans
obligation de sa part d'aviser les personnes physiques ou morales desdites révisions ou modifications.
Copyright
Copyright 2014 Imagination Technologies Limited. Tous droits réservés. Aucune partie de cette publication ne peut être copiée, distribuée,
transmise, transcrite, stockée dans un système de restauration ou traduite dans un langage humain ou informatique, en tout ou par tie,
sous quelque forme et par quelque procédé que ce soit, électronique, mécanique, magnétique, manuel ou autre, ni divulguée à des tiers,
sans le consentement écrit préalable d'Imagination Technologies Limited. Version 4Juillet 2014.
Marques déposées
Highway H270SB, Pure, le logo Pure, Imagination Technologies et le logo Imagination Technologies sont des marques, déposées ou non,
d'Imagination Technologies Limited. iPod et iPhone sont des marques déposées d'Apple Inc., enregistrées aux États-Unis et dans d'autres pays.
Les étiquettes «Made for iPod» et «Made for iPhone» signifient qu’un accessoire électronique a été
développé spécifiquement pour connecter un iPod ou un iPhone (respectivement) et que son développeur
certifie qu’il répond aux normes de performance Apple.
Apple n'est pas responsable du fonctionnement de ce dispositif ni de sa conformité avec les normes de
sécurité et réglementaires. Veuillez noter que l'utilisation de cet accessoire avec un iPod ou un iPhone peut
avoir une incidence sur les performances du dispositif sans fil.
iPod et iPhone sont des marques de commerce d'Apple Inc., enregistrées aux États-Unis et dans les autres pays.
Table des matières
4 Pour commencer
4 Commandes de la façade
5 Fonctionnement de votre
Highway
5 Retrait et mise en place de la façade
amovible
5 Écoute de la radio numérique
6 Écoute de la radio FM ou MW
7 Écoute d'un CD ou d'une clé USB
10 Écoute du contenu de votre iPod ou iPhone
12 Utilisation de la connexion Bluetooth
14 Options de configuration
14 Options disponibles pour la radio numérique
14 Options disponibles pour la radio FM
16 Options générales
17 Réglage des paramètres audio
18 Annexe
18 Connexions électriques
19 Guide d'installation
20 Rétablissement des paramètres par défaut
21 Retrait de l'unité principale de Highway
22 Dépannage
23 Spécifications
FR

4
Commandes de la façade
1. Appuyer pour éjecter un CD
2. Marche/arrêt ou mode silence
3. Basculer la source audio
4. Paramétrer l'effet sonore
5. Mode TUNER (FM ou MW uniquement):
- Recherche des présélections
- Mémorisation automatique (appui long)
Mode DAB– Syntonisation automatique
6. Déverrouiller la façade.
7. Commutateur d'affichage
- Régler la configuration système (appui long)
8. Commutateur de bande:
- Mode TUNER – FM1 > FM2 > FM3 > MW
- Mode DAB – D1 > D2 > D3
- Mode BLUETOOTH – composer / répondre
- à un appel
9. Régler le niveau du volume / confirmer (appui)
10. Bouton 1: lire / mettre en pause / lecture du
premier titre (Top) (appui long) (voir
page 7) / station de présélection 1
Bouton 2: lecture de l'intro / station de
présélection 2
Bouton 3: répéter la lecture / station de
présélection 3
Bouton 4: lecture aléatoire / station de
présélection 4
Bouton 5: dossier précédent / station de
présélection 5 / titres MP3 et WMA
- 10 enfoncé (appui long)
Bouton 6: dossier suivant / station de
présélection 6 / titres MP3 et WMA +
10 relâché (appui long)
11. Prise entrée auxiliaire
12. Port USB (capot ouvert)
13. Mode CD – titre précédent/suivant
Mode TUNER – syntonisation manuelle (appui bref)
Syntonisation automatique + / - (appui long)
Mode DAB – station précédente/suivante
Mode Bluetooth - titre précédent/suivant
14. Fente du CD
15. Mode TUNER – sélectionner PTY
Mode CD – aucune fonction
Mode DAB – aucune fonction
Mode BLUETOOTH – terminer un appel
Mode AUX – aucune fonction
Mode iPod – menu iPod
Mode CD/USB MP3 et WMA – recherche
de dossier
16. Bouton DAB – appuyer pour basculer entre la radio
numérique et la source audio précédemment utilisée
17. Annonces de trafic routier
Pour commencer
VOL
SEL
INTTOP RPT
H270SB

5
Fonctionnement de votre Highway
Écoute de la radio numérique
Sélection d'une radio numérique comme
source de lecture
Appuyez sur DAB une fois ou plusieurs fois sur
Source jusqu'à ce que «DAB» s'affiche.
Changement de stations numériques
Appuyez sur le bouton ou pour faire défiler
la liste des stations, puis appuyez sur la molette du
VOLUME pour en sélectionner une.
Choix d'une bande de radio numérique
Highway inclut un bouton BAND sur lequel vous
pouvez appuyer pour changer les stations qui
sont attribuées aux six boutons de présélection.
Il existe trois bandes ou radios numériques
disponibles, qui vous permettent de stocker jusqu'à
18présélections de radio numérique. Appuyez sur
BAND pour sélectionner la bande D1, D2 ou D3.
Mémorisation et sélection des
présélections
Mémorisation manuelle d'une présélection
Syntonisez sur la station radio numérique que vous
souhaitez mémoriser. Maintenez enfoncé l'un des
boutons de présélection numérotés (1-6) pour
l'enregistrer dans la mémoire.
Rappel d'une présélection
Pour syntoniser sur une présélection, appuyez sur
le bouton de présélection correspondant (1à 6).
Retrait et mise en place de la
façade amovible
Pour plus de sécurité, Highway comporte une façade
amovible pour vous permettre de l'emporter avec
vous à chaque fois que vous quittez votre voiture.
Remarque: pour ne pas risquer de l'abîmer,
placez la façade dans un boîtier de protection à
chaque fois que vous la retirer de l'unité principale.
Retrait de la façade
amovible
1. Appuyez sur le bouton .
2. Tenez la partie détachée de la
façade et retirez-là de l'unité
principale.
Insertion de la façade
amovible
1. Alignez la rainure du côté
droit de la façade sur la fente
de l'appareil.
2. Appuyez sur le côté gauche
de la façade jusqu'à ce
qu'elle encliquette dans la
fente de la façade.
2
2
1
1
2
1
Réalisation d’une syntonisation
automatique
La fonction de syntonisation automatique
recherche toutes les stations disponibles
sur la fréquence numérique et met à jour
automatiquement la liste de stations en
ajoutant les nouvelles stations trouvées et en
supprimant celles qui ne sont plus disponibles.
Pour réaliser une syntonisation automatique,
appuyez sur le bouton PS/AS.
Sélection des informations affichées
à l'écran
En mode radio numérique, Highway affiche
deux lignes de texte. La première ligne affiche
toujours le nom de la station radio.
Vous pouvez faire basculer les informations
affichées sur la seconde ligne en appuyant sur
le bouton DISP.
Highway peut afficher l'heure actuelle, le texte
défilant, les informations sur le programme type
(PTY), le multiplex (MUX), les informations de
bande et la fréquence.
FR

6
Écoute de la radio FM ou MW
Appuyez plusieurs fois sur SOURCE jusqu'à ce que
«TUNER» apparaisse.
Changement de stations FM ou MW
Syntonisation manuelle
Appuyez sur le bouton ou pour syntoniser sur
une station à la fréquence supérieure ou inférieure.
Syntonisation automatique
Appuyez sur le bouton ou pour rechercher
la station radio suivante ou précédente émettant un
signal fort.
Remarque: pour arrêter la syntonisation automatique,
répétez les étapes ci-dessus ou appuyez sur un autre
bouton correspondant à une fonction radio.
Sélection d'une bande radio FM ou MW
Highway inclut un bouton BAND qui permet de
changer les stations qui sont attribuées aux six
boutons de présélection. Il existe trois bandes
FM disponibles, ce qui vous permet d'enregistrer
jusqu'à 18présélections FM. Il existe seulement une
seule bande MW, ce qui vous permet d'enregistrer
jusqu'à 6présélections. Appuyez sur BAND pour
sélectionner FM1, FM2, FM3 ou MW.
Mémorisation et sélection des
présélections
Mémorisation manuelle d'une présélection
Syntonisez sur la station FM ou MW que vous
souhaitez enregistrer. Maintenez enfoncé l'un des
boutons de présélection numérotés (1-6) pour
l'enregistrer dans la mémoire.
Rappel d'une présélection
Pour syntoniser sur une présélection, appuyez sur
le bouton de présélection correspondant (1à 6).
Présélections de mémorisation automatique
Vous pouvez utiliser la fonction d'enregistrement
automatique pour remplir automatiquement vos
présélections avec des stations radio détectées
par Highway.
Maintenez enfoncé le bouton PS/AS pour démarrer
la recherche de station automatique.
Pour arrêter l'enregistrement automatique, appuyez
sur un bouton correspondant à une fonction radio.
Remarques: si vous démarrez la fonction
d'enregistrement automatique dans une bande
FM, cette fonction remplira automatiquement
les présélections dans toutes les bandes FM
(FM1, FM2 et FM3). Si vous démarrez la fonction
d'enregistrement automatique dans la bande
MW, cette fonction remplira automatiquement les
présélections de la bande MW.
Recherche des présélections
Vous pouvez utiliser la fonction de recherche des
présélections pour écouter dix secondes d'audio
de chaque station radio enregistrée dans vos
présélections.
1. Appuyez sur le bouton PS/AS pour
commencer la recherche des présélections.
2. Appuyez de nouveau sur le bouton PS/AS
lorsque vous entendez une station que vous
souhaitez écouter.
Remarque: si vous appuyez sur le bouton
PS/AS pendant plus d'une seconde, vous
démarrez la fonction d'enregistrement automatique
qui va remplacer toutes vos présélections.
Sélection des informations affichées à
l'écran
En mode FM, Highway affiche deux lignes de texte.
La première ligne affiche les informations RDS, le
cas échéant. S'il n'existe aucune information RDS,
la bande et la fréquence sont affichées.
Vous pouvez faire basculer les informations
affichées sur la seconde ligne en appuyant sur
le bouton DISP. Highway peut afficher l'heure
actuelle, le texte défilant, les informations sur le
programme type (PTY) ainsi que la bande et la
fréquence.
Suivi de service
Si vous écoutez une station numérique et que
vous perdez la réception de la radio numérique,
l'option de suivi de service de Highway tentera de
se syntoniser automatiquement sur la même station
radio avec une meilleure réception ou une station
radio numérique similaire. S'il est impossible de
trouver la même station numérique ou une station
similaire, Highway tentera de trouver la même
station en mode FM*.
Remarque: si Highway a utilisé le suivi de service
pour resyntoniser une station radio numérique
vers la même station FM, l'affichage de Highway
indiquera «FM» après le nom de la station radio.
Remarque: le suivi de service numérique vers FM
fonctionnera pas si la mode de veille d’annonces
de trafic routier est définie sur « MARCHE ».
Reportez-vous à la page 14 pour obtenir plus
d'informations.
*Le suivi de service est uniquement pris en charge par certains diffuseurs.

7
Écoute d'un CD ou d'une clé USB
Highway peut lire des CD audio et des fichiers MP3
et WMA enregistrés sur un CD ou une clé USB.
Remarque: Highway ne peut pas lire les fichiers
AAC enregistrés sur un CD ou une clé USB.
Chargement d'un CD
Insérez un CD au milieu de la fente du CD, son
étiquette vers le haut. Le CD est automatiquement
lu une fois qu'il est chargé.
Remarques:
• N'insérez jamais d'objets étrangers dans la fente
du CD.
• Si le CD ne s'insère pas facilement, il se peut
qu'un autre CD soit resté dans l'appareil ou ce
dernier doit être réparé.
• Certains disques CD-R/CD-RW peuvent ne pas
être lisibles.
• En plus des CD ordinaires, Highway peut
également lire les CD-R et les CD-RW.
Éjection d'un CD
Appuyez sur le bouton pour éjecter un CD.
Remarques:
• Ne forcez pas l'insertion d'un CD dans l'appareil,
vous risqueriez de l'endommager.
• Si un CD (12cm) n'est pas retiré dans les
15secondes suivant son éjection, il est
automatiquement rechargé.
Écoute d'un CD déjà chargé dans Highway
Appuyez sur le bouton SOURCE pour sélectionner
le mode CD/MP3.
Lorsque Highway entre en mode CD/MP3, le CD
est lu automatiquement.
Commandes de lecture d'un CD audio
et de titres MP3/WMA enregistrés sur un
CD ou une clé USB
Avance rapide
Appuyez sur le bouton .
Réécoute
Appuyez sur le bouton
.
* Pour les disques MP3/WMA, vous pouvez
constater un léger retard lorsque vous cherchez
et passez d'un titre à l'autre.
Mise en pause de la lecture
Appuyez sur le bouton 1 pour mettre la lecture en
pause. Lorsque la lecture est en pause, «PAUSE»
s'affiche.
Pour reprendre la lecture, appuyez de nouveau sur
le bouton 1.
Passage au titre suivant
Appuyez sur le bouton pour passer au début
du titre suivant.
Si vous écoutez un fichier MP3/WMA, maintenez
enfoncé le bouton 6 (1sec.) pour avancer de
10titres.
Lecture du titre précédent
Appuyez sur le bouton dans les 10premières
secondes du titre pour aller au titre précédent.
Lecture du début d'une piste
Appuyez sur le bouton après les 10premières
secondes du titre pour accéder au début du
titre.
Pour les fichiers MP3/WMA, maintenez enfoncé le
bouton 5 (1 sec.) pour reculer de 10titres.
Insertion d'une clé USB
Insérez une clé USB dans le
port USB.
Lorsque vous branchez
une clé USB, l'appareil lit
automatiquement ses fichiers.
Retrait d'une clé USB
Avant de retirer une clé USB,
sélectionnez une autre source
ou coupez l'alimentation afin
d'éviter d'endommager la clé
USB.
Pour obtenir plus d'informations
sur l'écoute de fichiers MP3 ou
WMA, consultez la section suivante.
1
1
2
FR

8
Répétition de la fonction lecture
Si vous écoutez un CD audio, vous pouvez utiliser
la fonction de répétition de la lecture pour lire
plusieurs fois le titre en cours.
Appuyez sur le bouton 3 pour basculer la fonction
de répétition sur «RPT ON» et «RPT OFF».
Si vous écoutez un fichier MP3/WMA, appuyez
sur le bouton 3 pour choisir l’une des options de
répétition suivantes:
TRK RPT: votre radio répète le titre en cours d’écoute.
FOLD RPT: répète tous les titres du dossier actuel.
RPT OFF: aucun titre n’est répété.
Fonction de lecture aléatoire
Si vous écoutez un CD audio, vous pouvez utiliser
la fonction de lecture aléatoire pour lire tous les
titres du CD de manière aléatoire.
Si vous écoutez un fichier MP3 ou WMA, vous
pouvez utiliser la fonction de lecture aléatoire pour
lire tous les fichiers MP3 ou WMA du CD ou de la
clé USB de manière aléatoire.
Appuyez sur le bouton 4 pour basculer la fonction de
lecture aléatoire sur «RDM ON» et «RDM OFF».
Affichage des données du titre
Highway peut afficher les données du titre pour les
fichiers MP3 ou WMA.
Si le réglage du CYCLE est en ARRET (voir page
16), vous pouvez appuyer sur le bouton DISP
pour changer les données du titre affichées.
Highway peut afficher les données suivantes sur le
fichier MP3 ou WMA:
Nom de fichier > Nom de dossier > Titre de la piste
> Album > Artiste > Fichier ...
Remarques:
• Si le fichier MP3/WMA n'a aucun tag ID3,
«AUCUN TITRE» s'affiche.
Sélection d'un dossier
Vous pouvez sélectionner le dossier qui contient
les fichiers MP3/WMA que vous souhaitez
écouter. Highway commencera à lire tous les titres
enregistrés dans le dossier, en commençant par le
premier titre.
Pour passer au dossier suivant, appuyez sur le
bouton 6.
Pour passer au dossier précédent, appuyez sur le
bouton 5.
Appuyez sur le bouton ou pour changer de
titres au sein d'un dossier.
Utilisation de la fonction de recherche
Highway peut rechercher des fichiers MP3 ou
WMA enregistrés sur un CD ou une clé USB.
1. Appuyez sur le bouton MENU / pour
afficher l'option FOLD SCH.
2. Appuyez sur la molette du VOLUME pour
rechercher dans la liste des dossiers.
3. Tournez la molette du VOLUME pour sélectionner
le dossier dans lequel vous souhaitez effectuer
une recherche.
4. Appuyez sur la molette du VOLUME pour
afficher la liste des fichiers.
5. Appuyez sur la molette du VOLUME pour
sélectionner un titre, puis appuyez pour le lire.
Écoute du premier titre d'un CD ou d'une
clé USB
Highway dispose d'une fonction appelée «Top»
qui vous permet d'écouter le premier titre sur le CD
actuellement en cours de lecture. Pour écouter le
premier titre du CD actuellement en cours de lecture,
maintenez enfoncé le bouton Top (1) (1 sec.).
Remarque: si vous écoutez un fichier MP3/WMA
et que vous appuyez sur le bouton 1; le premier
titre du CD ou de la clé USB sera lu.
Fonction d'introduction
Si vous écoutez un CD audio, vous pouvez utiliser
la fonction d'introduction pour lire les 10premières
secondes du titre suivant et le reste des titres du CD
par ordre séquentiel.
Si vous écoutez un fichier MP3 ou WMA, cette
fonction vous permet de lire les 10premières
secondes de tous les titres MP3 ou WMA sur un
CD ou une clé USB.
Pour utiliser la fonction d'introduction, appuyez sur le
bouton 2 pendant la lecture. L'icône «SCN» s'affiche
lorsque la fonction d'introduction est activée.
Pour désactiver la fonction d'introduction, appuyez
sur le bouton 2.

9
Format logique (système de fichiers):
1. Lorsque vous écrivez des fichiers MP3/WMA
sur un disque CD-R ou CD-RW, veuillez
sélectionner «ISO9660 level 1, 2 or Joliet» ou
Apple ISO comme format logiciel d'écriture. Si
le disque est enregistré dans un autre format,
il peut être impossible de lire normalement le
fichier.
2.
Les noms de dossier et de fichier peuvent être
affichés comme titre lors de la lecture d'un
fichier MP3/WMA. Cependant, le titre ne doit
pas dépasser 30chiffres et lettres alphabétiques
d'un seul octet (extension incluse).
3.
Ne nommez pas un dossier en utilisant le
même nom qu'un fichier contenu dans ce
dossier.
Structure de dossier:
Vous ne pouvez pas lire un CD contenant des
dossiers qui comportent plus de huit niveaux
hiérarchiques.
Nombre de fichiers ou de dossiers:
1.
Il est possible de reconnaître jusqu'à
999fichiers par dossier.
Jusqu'à 3000fichiers peuvent être lus.
2.
Les titres sont lus dans l'ordre où ils ont été
enregistrés sur un CD. (Il se peut que les
fichiers ne soient pas toujours lus dans l'ordre
affiché sur l'ordinateur.)
3. Des parasites peuvent survenir selon le
type de logiciel d'encodage utilisé pendant
l'enregistrement.
Remarques sur l'écoute de fichiers
WMA/MP3
Désactivation de la gestion de droits
numériques (DRM, Digital Rights
Management)
Highway ne lit aucun fichier WMA s'il est protégé
par la gestion de droits numériques. Si vous
souhaitez lire un fichier WMA sur Highway, vous
devez désactiver la gestion de droits numériques.
Si vous utilisez le lecteur multimédia Windows
Media Player 9/10/11, cliquez sur Outils > Options
> Copier la musique. Sous Paramètres de la
copie, décochez Protéger la musique contre la
copie, puis reconstruisez les fichiers.
Les fichiers WMA construits personnellement sont
utilisés sous votre propre responsabilité.
Extensions de fichier:
1. Ajoutez toujours une extension de fichier
«.MP3», «.WMA» à un fichier MP3 ou WMA
en utilisant des lettres d'un seul octet. Si vous
ajoutez une extension de fichier autre que
celle spécifiée ou si vous omettez d'ajouter
l'extension de fichier, le fichier ne peut être lu.
2. Les fichiers sans données MP3/WMA ne seront
pas lus. Les fichiers seront lus sans audio si
vous tentez de lire les fichiers sans les données
MP3/WMA.
* Lorsque des fichiers à débit binaire variable
(VBR) sont lus, l'affichage du temps de lecture
peut varier selon l'emplacement de lecture.
* Lorsque des fichiers MP3/WMA sont lus, très
peu de son ou aucun son n'est lu entre les
morceaux.
FR

10
Écoute du contenu de votre iPod
ou iPhone
Connexion d'un iPod et d'un iPhone
Connectez un iPod ou un iPhone* au port USB.
Une fois la connexion effectuée, vous pouvez
commander toutes les fonctions de lecture et afficher
toutes les informations sur la piste stockée sur votre
iPod/iPhone en utilisant les commandes de Highway.
Écoute de contenu audio à partir d'un
iPod ou d'un iPhone
Vous pouvez écouter du contenu audio à partir de
toute musique ou vidéo enregistrée sur votre iPod.
Pour écouter du contenu audio à partir de votre iPod:
1. Appuyez sur le bouton MENU / .
2. Tournez et appuyez sur la molette du VOLUME
pour sélectionner «MUSIC» ou «VIDEO».
3. Si vous avez sélectionné «MUSIC», tournez
et appuyez sur la molette du VOLUME pour
sélectionner «PLAY LISTS», «ARTISTS»,
«ALBUMS», «SONGS», «GENRES» ou
«COMPOSERS».
Si vous avez sélectionné «VIDEO», tournez
et appuyez sur la molette du VOLUME pour
sélectionner «MOVIES», «MUSIC VIDEOS »,
«TV SHOWS», « VIDEO PODCASTS » ou
«RENTALS».
Remarque: lorsque vous lisez un fichier vidéo,
Highway peut uniquement lire le fichier audio à
partir de la vidéo et ne peut afficher aucune image.
4. Tournez et appuyez sur la molette du VOLUME
pour sélectionner un élément que vous
souhaitez écouter.
Remarque: les éléments répertoriés dans VIDEO
MENU varient selon le modèle d'iPod branché et la
langue utilisée.
Recherche de contenu sur votre iPod/iPhone
Highway vous permet de rechercher du contenu en
utilisant des lettres alphabétiques. Pour rechercher
du contenu:
1. Appuyez sur le bouton MENU / pour
sélectionner le mode de menu iPod.
2. Tournez la molette du VOLUME pour indiquer si
vous souhaitez rechercher du contenu de type
«MUSIC» ou «VIDEO».
3. Si vous avez sélectionné «MUSIC», tournez
et appuyez sur la molette du VOLUME pour
sélectionner «PLAY LISTS», «ARTISTS»,
«ALBUMS», «SONGS», «GENRES» ou
«COMPOSERS».
Si vous avez sélectionné «VIDEO», tournez
et appuyez sur la molette du VOLUME pour
sélectionner «MOVIES», «MUSIC VIDEOS»,
«TV SHOWS», «VIDEO PODCASTS» ou
«RENTALS».
4. Appuyez sur la molette du VOLUME pour
afficher tous les contenus qui correspondent à
la catégorie sélectionnée.
5. Maintenez le bouton DISP enfoncé (1sec).
6. Tournez la molette du VOLUME pour spécifier
une lettre à rechercher.
7
. Appuyez de nouveau sur le bouton DISP pour
lancer la recherche.
8
. Appuyez sur la molette du VOLUME pour
confirmer.
Répétition de la fonction lecture
Vous pouvez utiliser la fonction de répétition de la
lecture pour lire plusieurs fois le titre actuellement
lu sur votre iPod.
Appuyez sur le bouton 3 pour spécifier l'une des
options de répétition suivantes:
RPT ONE: votre radio répète le titre en cours
d'écoute.
RPT ALL
: répète tous les titres du
dossier actuel.
Fonction de lecture aléatoire (Shuffle)
Lecture aléatoire (Shuffle) de l'album
Pour lire tous les albums enregistrés sur votre iPod
ou votre iPhone de manière aléatoire, appuyez
sur le bouton 4 jusqu'à ce que «RDM ALBUM»
s'affiche.
Lecture aléatoire (Shuffle) des chansons
Pour lire tous les titres du dossier actuel en les
écoutant sur votre iPod ou votre iPhone de manière
aléatoire, appuyez sur le bouton 4 jusqu'à ce que
«RDM SONG» s'affiche.
Désactivation de la fonction de lecture
aléatoire (Shuffle)
Pour désactiver la fonction de lecture aléatoire
(shuffle), appuyez sur le bouton 4 jusqu'à ce que
«RDM OFF» s'affiche.
*Prend en charge la plupart des modèles d'iPod et d'iPhone. Pour obtenir les informations les plus récentes, consultez le tableau de compatibilité disponible sur notre site Web: www.pure.com/products/ipod-compatibility.

11
Utilisation de votre iPod/iPhone pour
sélectionner les titres sur votre Highway
Highway vous permet d'utiliser votre iPod/iPhone
pour sélectionner les titres qui sont lus sur Highway.
Cette fonction est connue sous le nom de contrôle
simple (S-CTRL).
Ce paramètre est désactivé par défaut.
Pour activer votre iPod/iPhone afin de sélectionner
les titres sur votre Highway:
1. Maintenez le bouton DISP enfoncé pour
accéder à la configuration système.
2. Appuyez sur le bouton ou pour
accéder au contrôle simple «S-CTRL».
3. Tournez et appuyez sur la molette du VOLUME
pour activer ou désactiver la fonction S-CTRL.
Sélectionnez «MARCHE» pour activer votre
iPod/iPhone afin de commander les fonctions
d'iPod/iPhone de Highway. Sélectionnez
«ARRET» pour désactiver la fonction S-CTRL.
Remarques:
• Soyez patient lorsque vous sélectionnez des
titres sur Highway avec votre iPod/iPhone car
cela peut prendre un peu de temps.
• Ne tentez pas de sélectionner des titres
sur Highway en utilisant votre iPod et les
commandes de l'appareil principal en même
temps.
• Certains modèles iPod ne prennent pas en
charge la fonction S-CTRL. Contactez votre
revendeur le plus proche ou visitez le site
Web de Pure pour vérifier les modèles qui ne
prennent pas en charge la fonction S-CTRL.
FR

12
Utilisation de la connexion Bluetooth
La fonction Bluetooth de Highway vous permet
d’utiliser le microphone de Highway et le système
audio intégré de votre véhicule afin de passer des
appels en mains-libres. Une fois connecté, vous
pouvez également utiliser l’affichage de Highway
pour afficher des informations sur les appels
téléphoniques entrants, sortants ou manqués.
Si votre téléphone mobile peut stocker des fichiers
audio, vous pouvez également utiliser le Bluethooth
pour diffuser en streaming de la musique
enregistrée sur votre téléphone sur Highway.
Remarques:
• N'installez pas le microphone de Highway dans
des zones bruyantes de votre véhicule, par ex.
près de la ventilation.
• Ne placez pas votre appareil mains libres
Bluetooth à des endroits où il peut être
exposé à la lumière directe du soleil ou à des
températures élevées pouvant affecter les
performances de Highway.
• Highway peut ne pas être compatible avec
certains téléphones mobiles ou lecteurs audio
Bluetooth.
• La lecture audio sera paramétrée au même
niveau de volume défini lors d'un appel
téléphonique.
Couplage de votre téléphone mobile avec
Highway
Avant d'utiliser la fonction Bluetooth de Highway,
vous devez coupler votre téléphone mobile à
Highway.
1. Activez la fonction Bluetooth de votre téléphone
mobile.
2. Accédez au menu de paramétrage Bluetooth
de votre téléphone mobile.
3. Recherchez les nouveaux appareils Bluetooth.
4. Sélectionnez Pure Highway à partir de la liste
de couplage de votre téléphone mobile.
Une fois le couplage réussi, les icônes BT et HFP
s'allument sur Highway.
L'icône A2DP s'allume pour indiquer qu'il est
possible de diffuser en streaming de la musique
depuis votre appareil Bluetooth vers Highway.
Connexion automatique
1. Highway peut être couplé et enregistrer cinq
téléphones mobiles au maximum.
La connexion automatique sera activée une fois
que vous aurez couplé votre téléphone mobile
à Highway.
2. Votre téléphone mobile devra être allumé pour
utiliser la fonction de connexion automatique.
3. La fonction de connexion automatique
fonctionne uniquement avec le dernier
téléphone mobile connecté. Si vous souhaitez
connecter un autre téléphone mobile, vous
devez le faire manuellement.
Utilisation de la fonction de téléphone
mains libres
Accès au menu Bluetooth
Utilisez le bouton SOURCE pour changer la source
sur «BLUETOOTH».
Appuyez sur le bouton
MENU /
pour
sélectionner une façon de faire un appel sortant.
Composition d'un numéro
1. Appuyez sur le bouton MENU / .
2. Tournez et appuyez sur la molette du VOLUME
sur la façade pour sélectionner «COMPOSER
NUMERO».
3.
Tournez et appuyez sur la molette du VOLUME
pour sélectionner le premier chiffre du numéro
de téléphone que vous souhaitez composer.
Répétez cette opération jusqu'à la saisie du
numéro de téléphone complet.
4.
Appuyez sur le bouton BAND / pour
composer le numéro de téléphone.
Une fois votre appel terminé, appuyez sur le
bouton
MENU /
pour raccrocher.
Réception d'un appel
Appuyez sur le bouton
BAND /
pour répondre à
un appel entrant.
Pour rejeter un appel entrant, appuyez sur le
bouton
MENU /
.
Terminaison d'un appel
Une fois votre appel terminé, appuyez sur le
bouton
MENU /
pour raccrocher.

13
Affichage de votre historique d'appel
Vous pouvez afficher votre historique d'appel récent
sur Highway pour récupérer des informations sur
les appels récemment composés, manqués ou
reçus.
Pour afficher votre historique d'appel:
1. Appuyez sur le bouton MENU / :
2. Tournez et appuyez sur la molette du VOLUME
sur la façade pour sélectionner «APPEL
COMPOSE», «APPEL MANQUE» ou «APPEL
RECU».
3. Appuyez sur la molette du VOLUME pour
afficher les contacts de l'historique d'appel
sélectionné.
4. Tournez la molette du VOLUME pour faire
défiler la liste des contacts, puis appuyez
de nouveau lorsque vous voyez un nom de
contact ou un numéro de téléphone que vous
souhaitez appeler.
Passer du mode mains libres à l'utilisation
normale du téléphone mobile
Vous pouvez passer du mode mains libres
au mode de fonctionnement normal de votre
téléphone mobile en appuyant sur le bouton
BAND / pendant un appel téléphonique.
Opérations de diffusion audio en streaming
Qu'est-ce que la diffusion audio en
streaming Bluetooth?
L'utilisation du Bluetooth vous permet de diffuser en
streaming de la musique à partir d'un lecteur audio
externe/d'un téléphone vers Highway et d'écouter
des titres via les enceintes de votre véhicule.
ATTENTION
Évitez d'utiliser votre téléphone mobile lorsque
vous diffusez du contenu audio en streaming.
La diffusion de contenu audio en streaming peut ou
ne peut pas reprendre après avoir été interrompue
par un appel téléphonique, selon le téléphone
mobile utilisé.
Si la source de diffusion de contenu audio en streaming
est déconnectée, l'affichage de Highway indiquera le
message «BLUETOOTH DECONNECTE».
Remarque:
assurez-vous de lire le chapitre «Couplage de
votre téléphone mobile avec Highway» à la page
précédente avant de continuer.
Lecture ou mise en pause d'un titre
Appuyez sur le bouton 1 pour mettre la lecture
audio en pause.
Pour reprendre la lecture audio, appuyez de
nouveau sur le bouton 1.
Sélection d'un titre
Passage au titre suivant
Appuyez sur le bouton pour passer au début
du titre suivant.
Lecture du début d'une piste
Appuyez sur le bouton pour lire le début
du titre actuel.
Remarque:
l'ordre dans lequel les titres sont lus varie selon
les différents lecteurs audio Bluetooth. Lorsque
vous appuyez sur le bouton
, certains
appareils A2DP redémarrent le titre actuel selon
la durée du titre.
Pendant la lecture en streaming de la musique,
«HFP» ou «A2DP» s'affichent.
Si «BLUETOOTH DECONNECTE» s'affiche,
votre lecteur audio Bluetooth peut ne pas avoir
synchronisé la fonction lire/mettre en pause
avec Highway. Assurez-vous que votre appareil
Bluetooth et Highway ont un statut lire/mettre
en pause identique lorsque vous diffusez de
la musique en streaming vers Highway à partir
d'un lecteur audio Bluetooth connecté.
FR

14
Options disponibles pour la radio
numérique
Réglage de l'antenne de radio numérique
Vous pouvez spécifier le type d'antenne radio
numérique que vous connectez à Highway. Les
options disponibles sont « AMPL » et « NON
AMPL». Reportez-vous à la page 19 pour obtenir
plus d'informations.
Paramètres de bande L
Vous pouvez spécifier si Highway peut ou non se
syntoniser sur des stations radio qui diffusent en
bande L.
Pour activer ou désactiver le paramètre de bande L:
1. Maintenez enfoncé le bouton DISP sur la
façade jusqu'à faire apparaître «HORLOGE»
à l'écran.
2. Appuyez sur le bouton ou pour accéder
à «BANDE L».
3.
Tournez et appuyez sur la molette du VOLUME
pour activer ou désactiver la fonction en bande L.
Options de configuration
Options disponibles pour la
radio FM
Syntonisation automatique locale
Vous pouvez utiliser la fonction de syntonisation
automatique locale pour que Highway se syntonise
uniquement sur les stations radio émettant un
signal fort.
Pour activer ou désactiver la fonction de
syntonisation automatique locale:
1.
Maintenez enfoncé le bouton DISP sur la
façade jusqu'à faire apparaître «HORLOGE»
à l'écran.
2. Utilisez le bouton pour accéder à «DIST/
LOC».
3.
Tournez et appuyez sur la molette du VOLUME
pour sélectionner «LOCAL» (activer) ou
«DIST» (désactiver).
Remarque: le nombre de stations radio pouvant
être reçues est moins important lorsque la fonction
de syntonisation automatique locale est activée.
Système de données radio
Highway dispose d’un système de décodeur RDS
(Radio Data System) intégré qui prend en charge des
stations de diffusion transmettant des données RDS.
Paramètres RDS
Fonction AF
Si vous écoutez une station radio FM et que le
signal commence à s’affaiblir, la fonction AF tente
de rechercher et de resyntoniser automatiquement
Highway sur la même station radio, mais sur une
autre fréquence. Ce paramètre est activé par défaut.
1.
Maintenez enfoncé le bouton DISP sur la façade
jusqu’à faire apparaître «HORLOGE» à l’écran.
2. Appuyez sur les boutons ou pour
accéder à «AF».
3. Tournez la molette du VOLUME pour
sélectionner «MARCHE» ou «ARRET».
Lorsque la fonction AF est désactivée, l'indicateur
AF s'affiche.

15
Fonction REG (Programme régional)
Lorsque la fonction REG est sur «MARCHE»,
Highway se syntonise automatiquement sur la
station émettant le signal le plus fort au sein de la
région spécifiée à l'aide du contrôle AF. Si la fonction
est sur «ARRET » et que la zone régionale change
au fur et à mesure que vous conduisez, Highway se
syntonise sur une station de la région actuelle. Ce
paramètre est sur «MARCHE» par défaut.
Remarques:
• Cette fonction est désactivée lorsque Highway est
syntonisé sur une station nationale, par ex. Europe 1.
• Le paramétrage «MARCHE/ARRET» de la
fonction REG s'applique uniquement lorsque la
fonction AF est sur «MARCHE».
1.
Maintenez enfoncé le bouton DISP sur la façade
jusqu'à faire apparaître «HORLOGE» à l'écran.
2. Appuyez sur le bouton ou pour accéder
à «REG».
3. Tournez la molette du VOLUME pour
sélectionner «MARCHE» ou «ARRET».
Syntonisation manuelle sur une station
régionale du même réseau
Vous pouvez effectuer une syntonisation manuelle
sur une station régionale du même réseau lorsque la
fonction AF est sur «MARCHE» et que la fonction
REG est sur «ARRET».
Remarque: cette fonction peut être utilisée
lorsqu'une diffusion régionale est reçue sur le
même réseau.
TA (Annonces de trafic routier)
En mode de veille d’annonces de trafic routier (l’icône
« TA » est allumée à l’écran), Highway attend de
recevoir un signal d’annonces de trafic routier d’une
station FM disponible dans sa portée. Lorsque
Highway reçoit un signal de trafic d’annonces
de trafic routier ou EON, Highway se syntonise
automatiquement sur la station FM qui diffuse une
annonce de trafic routier. Lorsque l’annonce de
trafic routier est terminée, Highway se syntonise
automatiquement sur la dernière station FM que
vous écoutiez.
Pour annuler une annonce de trafic routier, appuyez
sur le bouton TA.
Paramétrage du mode de veille d'annonces
de trafic routier
Remarque : si le mode de veille d’annonces
de trafic routier est activé, le suivi de service
numérique vers FM ne fonctionnera pas.
Appuyez sur le bouton TA pour activer ou
désactiver l’icône « TA ». Lorsque l’icône « TA
» est allumée, Highway reste en mode de veille
d’annonces de trafic routier jusqu’à ce qu’une
annonce de trafic routier soit diffusée. Lorsque
la diffusion d’une annonce de trafic routier
commence, Highway affiche « TRAF INF » si
l’annonce de trafic routier est diffusée par la station
radio que vous écoutez actuellement. Si Highway
se syntonise sur une annonce de trafic routier d’un
autre réseau radio, « EON INF » apparaît.
PTY (Programme type)
Vous pouvez utiliser la fonction PTY (Programme type)
pour rechercher des diffusions radio correspondant
à un certain genre. En Europe, il existe trente
genres de programmes types prédéfinis.
* Certains pays ne diffusent actuellement
aucune information de programme type.
* En mode de veille d'annonces de trafic routier,
une station TP est prioritaire sur une station de
diffusion PTY (Programme type).
Pour utiliser la fonction PTY (Programme type) et
rechercher un type particulier de diffusion radio:
1. Appuyez sur le bouton
MENU /
.
2. Tournez et appuyez sur la molette du VOLUME sur
la façade pour sélectionner le genre de diffusion de
programme type que vous souhaitez rechercher.
Highway commencera à rechercher une diffusion
radio correspondante et se syntonisera sur la
première station radio correspondant au type de
programme type spécifié.
Répétez les étapes ci-dessus pour rechercher une
autre station correspondant au type de programme
type spécifié.
FR

16
Dans n'importe quel mode, maintenez le bouton
DISP enfoncé pour accéder au menu de
configuration système. Appuyez sur le bouton
ou pour faire défiler les options, puis tournez la
molette du VOLUME pour régler un paramètre.
HORLOGE
1. Appuyez sur la molette du VOLUME.
2. L'heure clignote. Tournez et appuyez sur
la molette du VOLUME pour régler l'heure.
Répétez l'opération pour régler les minutes.
LANGUE
Vous pouvez choisir la langue d'affichage des
menus et options utilisée par votre radio Highway.
1. Appuyez sur la molette du VOLUME.
2. Tournez le bouton VOLUME pour définir la
langue du menu parmi «Anglais», «Francais»,
«Allemand» ou «Italien».
VOL AUX (mode AUX)
Tournez et appuyez sur la molette du VOLUME pour
augmenter ou diminuer le niveau de boost audio de
l'entrée auxiliaire. Les options disponibles sont BAS,
MOYEN ou HAUT.
CONNAUTO: MARCHE/ARRET
(mode Bluetooth uniquement)
Une fois activée, cette option connecte automatiquement le dernier téléphone mobile connecté.
Tournez et appuyez sur la molette du VOLUME
pour activer ou désactiver la fonction CONNAUTO.
Options générales
COULEUR
Appuyez sur la molette du VOLUME pour choisir
une couleur de rétroéclairage.
SCN: le rétroéclairage passe continuellement par
toutes les couleurs disponibles.
COULEUR 01~12: sélectionnez une couleur de
présélection.
UTLSTR1~3: créez votre propre couleur.
Appuyez sur la molette pour accéder au mode
de paramétrage de la couleur, puis appuyez sur
les
boutons pour sélectionner les valeurs
ROUGE, VERT et BLEU (RVB) de la couleur que
vous souhaitez. Tournez et appuyez sur la molette
du VOLUME pour sélectionner une couleur.
Maintenez enfoncé la molette du VOLUME pour
ajouter la couleur personnalisée à la mémoire de la
radio.
CYCLE: MARCHE/ARRET
Cette fonction sert à commander la façon dont
Highway affiche le nom du titre, le nom du dossier,
le titre, l'album et l'artiste en mode CD/MP3, USB
et iPod:
MARCHE: sélectionnez cette option pour spécifier
que l'affichage alternera automatiquement entre
TRACK (Titre), FOLDER (Dossier), TITLE (Titre),
ALBUM (Album) et ARTIST (Artiste).
Remarque: en mode iPod, l'option de cycle alterne
uniquement l'affichage entre TITLE (Titre), ALBUM
(Album) et ARTIST (Artiste).
ARRET: sélectionnez cette option pour arrêter
l'alternance automatique de l'affichage entre TRACK
(Titre), FOLDER (Dossier), FILE (Fichier), ALBUM
(Album), TITLE (Titre) et ARTIST (Artiste). Pour
modifier les informations actuellement affichées
(Highway affiche le nom du titre par défaut, sauf en
mode iPod), appuyez sur le bouton DISP.
ARRIERE / S-W
Si vous utilisez Highway avec un amplificateur
externe, vous pouvez utiliser ce paramètre pour
spécifier si vous connectez les sorties ligne arrière
sur un amplificateur externe connecté à des
haut-parleurs à gamme étendue (ARRIERE) ou à
un subwoofer (S-WOOFER). Reportez-vous au
diagramme de la page 18 pour obtenir plus
d'informations.
Tournez et appuyez sur la molette VOLUME pour
sélectionner ARRIERE ou S-WOOFER.
ARRIERE: sélectionnez cette option pour fournir
un amplificateur arrière avec un signal à gamme
étendue à partir des sorties ligne arrière gauche et
droite.
S-WOOFER: sélectionnez cette option pour
permettre d'effectuer les réglages nécessaires à un
amplificateur de subwoofer dédié à partir du menu
EQ sans affecter le signal des sorties ligne avant, ni
le son de l'amplificateur intégré.

17
ATTENUER: MARCHE/ARRET
Tournez et appuyez sur la molette du VOLUME
pour activer ou désactiver le paramètre
d'ATTÉNUATION.
MARCHE: la luminosité de l'écran est atténuée.
ARRET: désactive le paramètre d'atténuation afin
que la luminosité de l'écran LCD soit réglée au
niveau maximum.
BIP: MARCHE/ARRET
Tournez et appuyez sur la molette du VOLUME
pour activer/désactiver le bip sonore qui retentit
lorsque vous appuyez sur un bouton.
12/24H
Tournez et appuyez sur la molette du VOLUME
pour modifier le format de l'heure en «12HEURES»
ou «24HEURES».
CT: MARCHE/ARRET
Tournez et appuyez sur la molette du VOLUME
pour activer ou désactiver les mises à jour horaires
automatiques à partir du signal radio numérique
ou FM.
Réglage des paramètres audio
Appuyez sur le bouton EQ pour passer en
mode de paramétrage de l'égaliseur. Lorsque
vous appuyez pour la première fois sur EQ, le
paramétrage de l'égaliseur actuel apparaît. Tournez
la molette pour changer le EQ DSP dans l'ordre
suivant:
ARRET > POP > ROCK > CLASSIQ. > JAZZ >
PERSO
Création d'un paramètre d'égaliseur
personnalisé
1. Appuyez sur le bouton EQ.
2. Tournez et appuyez sur la molette du VOLUME
pour sélectionner «PERSO».
3. Appuyez sur le bouton ou pour
sélectionner la valeur EQ que vous souhaitez
modifier. Les options disponibles sont
les suivantes: GRAVES-G > GRAVES-F
>GRAVES-Q > MEDIUMS-G > MEDIUMS-F
>MEDIUMS-Q >AIGUS-G > AIGUS-F.
4. Tournez la molette du VOLUME pour régler la
valeur.
5. Appuyez sur le bouton ou pour passer
à un autre paramétrage d'égaliseur ou appuyez
sur la molette du VOLUME si vous avez terminé.
Paramètres des commandes audio
1. Appuyez sur le bouton EQ.
2. Appuyez sur le bouton ou pour
sélectionner le paramètre de commande
audio que vous souhaitez régler.
Les options disponibles sont BALANCE >
FADER > BOOST > FREQ SUB >
VOL SUB.
3. Tournez la molette du VOLUME pour régler
la valeur. Les valeurs disponibles pour
chaque option sont indiquées ci-dessous:
BALANCE: GAUCHE 1-7 > CENTRE >
DROITE 1-7
FADER: AVANT 1-7 > CENTRE >
ARRIERE 1-7
BOOST: MARCHE/ARRET
FREQ SUB: TOUTES > 80 > 120 > 160
VOL SUB: (-6) - (+6)
FR

18
Connexions électriques
Schéma de câblage
A
NTENNE FM/MW
Sortie ligne arrière droite (rouge)
Caisson désactivé
Sortie ligne avant droite (rouge)
Sortie ligne avant gauche (blanche)
A
B
1357
2468
1
357
2
468
ANTENNE DAB
MICROPHONE
Sortie ligne arrière gauche (blanche)
Caisson désactivé
N° Définition du brochage N° Définition du brochage
A1 NC B1 Arrière droite(+)
A2 Telemute B2 Arrière droite(-)
A3 NC B3 Avant droite(+)
A4 Batterie +B4Avant droite(-)
A5 AMP distantB5Avant gauche(+)
A6 NC B6 Avant gauche(-)
A7 ACC+ B7 Arrière gauche(+)
A8 TerreB8Arrière gauche(-)
Compartiment A Compartiment B
Annexe

19
Guide d'installation
Notes d'installation
Préparation de l'installation de Highway
Highway peut être installé sur un tableau de bord
doté d'une ouverture correspondant aux dimensions
indiquées dans le diagramme ci-dessous. L'épaisseur
du tableau de bord doit être comprise entre 4,75mm
et 5,56mm pour pouvoir supporter Highway.
Réglage de l'antenne de radio numérique
Highway est équipé d'un connecteur d'antenne de
radio numérique de type SMB et doit être utilisé avec
une antenne automobile adaptée à votre véhicule et
à la zone géographique.
Aucune antenne n'est fournie avec le produit
de manière à ce que vous utilisiez une antenne
appropriée aux besoins de votre véhicule spécifique.
Si votre antenne sélectionnée fonctionne à
une tension différente celle de 12V fournie
par Highway, vous devez utiliser un régulateur
de tension en ligne pour corriger la tension
au niveau requis par l'antenne AVANT de
connecter l'antenne à Highway. La puissance
de l'antenne ne doit jamais être définie sur
«AMPL» pendant que vous effectuez les
étapes précédentes (Highway est défini sur
«AMPL» à sa sortie d'usine).
En aucun cas une alimentation séparée à 12V
ou tout autre tension ne doit être fournie en
ligne avec la connexion d'antenne lorsque la
puissance de l'antenne est définie sur «AMPL»
ou «NON AMPL» car cela conduirait le courant
au produit par le centre du câble d'antenne et
endommagerait le produit sans qu'il soit couvert
par la garantie.
AVERTISSEMENT: connecter une antenne
active non conçue pour fonctionner à une
tension de 12V sur le connecteur d'antenne
de radio numérique SMB sur Highway peut
endommager l'antenne ou Highway sans que
ceux-ci soient couverts par la garantie.
Installation d'une antenne de radio numérique
Highway est conçu pour fonctionner avec une
antenne de radio numérique active. Avant d'installer
l'unité principale de Highway, assurez-vous d'avoir
installé une antenne de radio numérique adaptée
dans votre véhicule. Reportez-vous au guide
d'installation de votre antenne de radio numérique
pour obtenir plus d'informations.
Remarque: insérez toujours la gaine de montage dans
le tableau de bord avant d'installer l'unité principale
.
Puissance de l'antenne pour les antennes
actives:
Comme de nombreuses antennes automobiles sont
dotées d'un amplificateur intégré ou en ligne avec
le câble connecté au système stéréo du véhicule,
ce produit fournit un courant de 12V le long du
centre du connecteur de l'antenne numérique (fiche
centrale du connecteur SMB).
La plupart des antennes automobiles de radio
numérique fonctionnent sur 12V. Cependant,
certaines peuvent être conçues pour fonctionner à
d'autres tensions, par ex. 5V. La puissance de sortie
de l'antenne du produit est définie sur «AMPL»,
i.e. 12V, à partir de la production (indiquée comme
«ANT DAB
AMPL» dans le menu système).
Si l'antenne choisie n'est pas dotée d'un
amplificateur, (autrement dit, si elle est
«NON AMPL»), veuillez régler la puissance de
l'antenne sur «NON AMPL» à l'aide des étapes
suivantes avant de connecter l'antenne à Highway:
1. Maintenez enfoncé le bouton DISP jusqu'à ce
que «HORLOGE» apparaisse sur la première
ligne de l'écran. Cela indique que vous êtes
dans le menu système.
2. Appuyez plusieurs fois sur le bouton jusqu'à
ce que «ANT DAB» apparaisse sur la première
ligne de l'écran.
3. Tournez la molette du VOLUME jusqu'à ce que
«NON AMPL» apparaisse sur la seconde ligne
de l'écran.
4. Appuyez une fois sur le bouton DISP pour
confirmer le nouveau réglage de l'antenne et
revenir à l'écran précédent.
FR

20
Installation de la façade amovible
1. Alignez la rainure du côté
droit de la façade sur la fente
de l'appareil.
2. Appuyez sur le côté gauche
de la façade jusqu'à ce
qu'elle encliquette dans la
fente de la façade.
Installation de l'unité principale de Highway
1. Insérez la gaine de montage dans le tableau de
bord. Fixez-la fermement en place en repliant les
languettes métalliques.
2. Connectez les câbles électriques et l'antenne FM/
MW, le microphone, l'audio à l'arrière de Highway
(voir page 18).
3. Installez le panneau amovible (voir ci-contre)
et testez Highway pour vérifier le bon
fonctionnement de toutes les fonctions audio.
4. Connectez le câble de l'antenne numérique.
Remarque:
voir page 19 avant de connecter
le câble de l'antenne numérique.
5. Retirez les deux vis de protection sur le dessus
de Highway pour que la fonction CD fonctionne,
puis introduisez Highway dans la gaine de
montage et poussez pour le mettre en place.
6. Attachez le cadre de garnitures extérieur.
Si vous n'êtes pas sûr de savoir comment installer
correctement cet appareil, contactez un technicien
qualifié.
Rétablissement des paramètres
par défaut
1. Retirez le panneau amovible comme décrit à la
page 5.
2. Appuyez sur le bouton RESET à l'aide d'un
objet pointu pour rétablir les paramètres par
défaut de Highway.
3. Remettez en place la panneau amovible
comme décrit à la page 5.
Remarque: si vous appuyez sur le bouton
RESET, les réglages de l'horloge et les stations
mémorisées seront effacés.
2
2
1
1
ATTENTION:
ne faites pas passer le microphone ni tout
autre câble au niveau des airbags car ils pourraient ne
pas fonctionner comme prévu en cas de choc. Les câbles
doivent être sécurisés en dehors des zones de déploiement
de l'airbag. Soyez particulièrement vigilant lorsque vous
travaillez à côté des airbags.
(A)
(B)
(C)
Gaine de montage
Unité principale
Panneau de garnitures
Boulon de montage
Coussin de caoutchouc
Retirez les
deux vis
Installation du microphone
Vous devrez installer le microphone inclus pour
passer des appels téléphones en mode mains libres
en utilisant Highway et votre téléphone mobile.
Remarque: n'installez pas le microphone de
Highway dans des zones bruyantes de votre véhicule,
par ex. près de la ventilation.
1. Desserrez les panneaux de garnitures.
2. Utilisez le clip fourni pour attacher le microphone au
pare-soleil au-dessus du siège du conducteur (A).
3. Faites passer le câble derrière les panneaux
de garnitures (B) et laissez le connecteur du
microphone pendre du tableau de bord (C), prêt à
être connecté à l'unité principale.
4. Sécurisez le câble à l'aide du clip auto-adhésif fourni.
5. Reposez tous les panneaux de garnitures à leurs
emplacements d'origine.

21
Retrait de l'unité principale de
Highway
1. Mettez Highway hors tension.
2. Retirez le panneau amovible comme décrit à la
page 5.
3. Retirez le cadre de garnitures extérieur.
4. Insérez les outils de retrait en L dans les fentes
à l'avant de Highway jusqu'à ce qu'ils se
verrouillent (comme illustré dans le diagramme
ci-dessous).
5. Retirez Highway et débranchez tous les câbles.
FR

22
Dépannage
La liste suivante peut vous aider à résoudre les éventuels problèmes que vous pourriez rencontrez en utilisant Highway. Avant de consulter cette liste, vérifiez les
connexions et suivez les instructions du présent guide utilisateur. N'utilisez pas Highway si vous voyez de la fumée ou sentez une odeur de brûlé car il existe alors
un risque d'incendie ou de choc électrique. Si tel est le cas, cessez immédiatement d'utiliser Highway et contactez votre revendeur.
Problème Cause possible Solution
Généralités
Highway ne s'allume pas. Le contact du véhicule est coupé.
Le câble n'est pas correctement branché.
Le fusible a sauté.
Tournez la clé de contact.
Vérifiez le branchement du câble.
Remplacez le fusible avec un nouveau fusible d'ampérage identique.
Pas de son Le volume est réglé à un niveau minimum ou la
fonction silence est activée.
Vérifiez le volume ou désactivez la fonction silence.
L'écran de Highway ne fonctionne pas
normalement.
Highway est instable. Appuyez sur le bouton RESET.
Mode CD
Highway ne lit pas les CD. Le CD est mal inséré.
Le CD est sale ou endommagé.
Le CD doit être inséré avec son étiquette vers le haut. Nettoyez le
CD et vérifiez qu'il n'est pas endommagé. Essayez un autre CD.
Pertes de son dues aux vibrations. L'angle de montage est supérieur à 30˚.
Le montage n'est pas stable.
Réglez l'angle de montage à un degré inférieur à 30˚.
Montez l'appareil de manière sécurisée avec les pièces fournies.
Mode TUNER
Impossible de capter des stations. L'antenne n'est pas correctement branchée. Connectez correctement l'antenne.
Mauvaise qualité de réception de la station
radio.
L'antenne n'est pas entièrement déployée ou
est cassée.
Déployez entièrement l'antenne. Si elle est cassée, remplacez-la
par une nouvelle.
Les stations présélectionnées sont
perdues.
Le câble de la batterie n'est pas correctement
branché.
Branchez le fil permanent de l'appareil sur le fil permanent du
véhicule.
Mode USB
La clé USB ne peut pas être lue. La clé USB n'est peut-être pas correctement
formatée.
Vérifiez que le système de fichiers est au format FAT ou FAT32.
En raison des différents formats, certains modèles d'appareils de
stockage ou de lecteurs MP3 peuvent ne pas être compatibles.

23
Spécifications
Remarque: caractéristiques et conception susceptibles d'être modifiés
sans préavis à la suite d'avancées technologiques.
Généralités
Alimentation électrique: 12VCC (11V-16V)
Tension de test 14,4V, masse négative
Puissance maximale de sortie: 55W x 4canaux
Puissance continue de sortie:
20W x 4canaux (4 ,10% T.H.D.)
Impédance d'enceinte adaptée: 4-8ohm
Tension de sortie du préamplificateur:
2,0V (mode de lecture CD: 1KHz, 0dB, charge 10K )
Fusible: 15A
Dimensions (lxHxP): 178 x 50 x 166mm
Poids: 1,7kg
Entrée auxiliaire: ≥300mV
Composants
Gaine de montage: 1
Vis machine M5 x 6mm: 4
Boulon de montage (50mm): 1
Outils de retrait en L: 2
Panneau de garnitures: 1
Microphone: 1
Clip de câble auto-adhésif 1
Clip de pare-soleil 1
Coussin de caoutchouc: 1
Instructions de sécurité: 1
Radio stéréo FM
Gamme de fréquences: 87,5-108,0MHz (Europe)
Sensibilité utile: 8dBμ
Sensibilité à repos (S/N = 50dB): 12dBμ
Réponse en fréquence: 30Hz-15kHz
Séparation stéréo: 30dB (1kHz)
Rapport de réponse à l'image: 50dB
Rapport de réponse FI: 70dB
Rapport signal/bruit: 55dB
Radio AM (MW)
Gamme de fréquences: 522-1620KHz
Sensibilité à repos (S/N = 20dB): 30dBμ
Lecteur de CD
Système: Système audio numérique de disque
Réponse en fréquence: 20Hz-20kHz
Rapport signal/bruit: >80dB
Distorsion totale d'harmonique:
Moins de 0,20% (1kHz)
Pleurage et scintillement: En dessous de la limite mesurable
Séparation des canaux: >55dB
MP3/WMA
Format de média: MP3 WMA
Taux d'échantillonnage: 8kHz-48kHz N/D
Débit: 32kb/s-320kb/s / VBR 32kb/s-196kb/s
Nom de fichier, dossier de fichier et limite
de caractère métadonnées:
30caractères
(incluant l'extension)
30caractères
(incluant l'extension)
Radio numérique (DAB)
Gamme de fréquences: DAB en bande III:
174,928MHz ~ 239,200MHz
DAB en bande L:
1452,960MHz ~ 1490,624MHz
Sensibilité utile (RF=-72dBM): -95dBM
Réponse en fréquence: 20hz-20khz
Séparation stéréo: ≥ 50db
Rapport signal/bruit: ≥ 60db
Élément Min Max
Sélectivité: 42dB 60dB
Sélectivité sur canaux adjacents: 35dB 40dB
FR

24

1
NL
Grazie per avere scelto Highway H270SB. Il presente manuale illustra come accendere e
attivare in breve tempo Highway H270SB e come sfruttarne al meglio le caratteristiche.
Miglioriamo continuamente e aggiungiamo sempre nuove funzioni ai nostri prodotti. Per
conoscere i vantaggi di tutti gli aggiornamenti successivi alla consegna del prodotto,
visitare support.pure.com, dove è possibile verificare la disponibilità di versioni aggiornate e
scaricare la versione più recente della presente guida per l'utente in formato PDF.
H270SB
VOL
SEL
INTTOP RPT
H270SB
ES
FR
NO
EN
ITALIANO
DE

2
Per utilizzare correttamente Highway leggere
integralmente queste istruzioni. Una volta completata
la lettura delle istruzioni, conservare questo manuale
in un posto sicuro per poterlo consultare in seguito.
Precauzioni
Utilizzare un impianto elettrico a 12 Volt CC
con collegamento di messa a terra del polo
negativo.
Durante il montaggio e il collegamento dell'unità,
scollegare il terminale negativo della batteria.
In caso di sostituzione del fusibile, assicurarsi
di utilizzare un fusibile con identico amperaggio
nominale.
L'utilizzo di fusibili con amperaggio più elevato
può causare gravi danni all'unità.
NON tentare di smontare l'unità. I raggi laser
emessi dal rilevatore ottico sono pericolosi per
gli occhi.
Assicurarsi che spilli o altri oggetti non
penetrino nell'unità in quanto potrebbero
causare malfunzionamenti o pericoli per la
sicurezza, ad esempio scosse elettriche oppure
esposizione ai raggi laser.
Se la vettura è rimasta ferma per lunghi
periodi in climi caldi o freddi, prima di utilizzare
Highway attendere che la temperatura della
vettura raggiunga valori normali.
Mantenere il volume a un livello che consenta
di udire eventuali allarmi acustici provenienti
dall'esterno (clacson, sirene, ecc.).
Arrestare la vettura prima di eseguire operazioni
complesse.
Note riguardanti il CD
La riproduzione di CD difettosi o impolverati
può causare interruzioni del suono.
Manipolare il CD afferrandolo sui rispettivi bordi
interni ed esterni.
Non toccare la superficie del CD sul lato privo
di etichetta.
Non applicare alcun sigillo, etichetta o foglio di
protezione dei dati sui due lati del CD.
Non esporre il CD alla luce diretta del sole o a
calore eccessivo.
Pulire il CD sporco dal centro verso l'esterno
utilizzando un panno per pulizia.
Non utilizzare mai solventi come benzina o alcol.
Highway non è in grado di riprodurre CD
da 3 pollici (8 cm).
Non tentare mai di inserire un CD da 3 pollici con
un adattatore, o altri CD di formato irregolare.
Highway potrebbe non riuscire ad espellere il
disco, con conseguenti malfunzionamenti.
Oltre ai comuni CD, Highway è anche in grado
di riprodurre dischi CD-R/CD-RW/MP3/UDF.
Attenzione
Spegnere Highway e riportarlo al centro di assistenza
post-vendita oppure al rivenditore/distributore
presso il quale Highway è stato acquistato se si
verifica una delle seguenti condizioni:
(1) Acqua o altri oggetti penetrano all'interno di
Highway.
(2) Fumo.
(3) Highway emette odore di bruciato.
Informazioni di sicurezza

3
Informazioni sulla garanzia
Imagination Technologies Limited garantisce all’utente finale che questo prodotto, usato normalmente, non presenterà difetti di materiale
e manodopera per un periodo di tre anni dalla data di acquisto. Questa garanzia copre i guasti dovuti ad anomalie di fabbricazione o
progettazione; non si applica in caso di danni accidentali di qualunque tipo, dovuti a usura e negligenza o a interventi di regolazione,
modifica o riparazione non autorizzati da noi.
Per registrare il prodotto, accedere alla pagina web www.pure.com/register. Qualora si dovessero presentare problemi relativi
all’apparecchio, rivolgersi al rivenditore oppure contattare l’assistenza Pure all’indirizzo riportato sul retro del manuale. Nel caso in cui il
prodotto debba essere restituito, è necessario utilizzare l'imballaggio originale, includendo tutte le parti e gli accessori. Ci riserviamo il
diritto di respingere prodotti restituiti con l’imballaggio incompleto o danneggiato.
Nota: Per registrare il prodotto, è necessario il numero di serie di Highway, disponibile alla retro del pannelo anteriore amovibile.
Esonero di responsabilità
Imagination Technologies Limited non rilascia attestazioni o garanzie rispetto al contenuto di questo documento e, in particolare, nega
qualunque garanzia implicita di commerciabilità o adeguatezza all’uso per qualunque particolare scopo. Inoltre, Imagination Technologies
Limited si riserva il diritto di revisionare questa pubblicazione e di apportare, di volta in volta, delle modifiche senza l’obbligo di dover
notificare ad alcun soggetto tali revisioni o modifiche.
Copyright
Copyright 2014 by Imagination Technologies Limited. Tutti i diritti riservati. Nessuna parte della presente pubblicazione può essere copiata
o distribuita, trasmessa, trascritta, memorizzata in un sistema di archiviazione, o tradotta in un formato comprensibile dall’uomo o da un
computer, in qualsiasi forma o con qualsiasi mezzo, elettronico, meccanico, magnetico, manuale o altro, o divulgata a terze parti senza il
permesso scritto di Imagination Technologies Limited. Versione 4 luglio 2014.
Marchi
Highway H270SB, Pure, il logo Pure, Imagination Technologies e il logo Imagination Technologies sono marchi commerciali o marchi
commerciali registrati di Imagination Technologies Limited. iPod e iPhone sono marchi commerciali di Apple Inc., registrati negli Stati Uniti
e in altri Paesi.
Le diciture “Made for iPod” e “Made for iPhone” attestano che l'accessorio elettronico è stato specificamente
concepito per essere collegato ad iPod e iPhone e che lo sviluppatore ne certifica la conformità agli standard
prestazionali Apple.
Apple non è responsabile del funzionamento di questo apparecchio e della sua conformità alle norme di sicurezza
o ai requisiti di legge. L'uso di questo accessorio con iPod e iPhone può influire sulle prestazioni wireless.
iPhone e iPod sono marchi commerciali di Apple Inc., registrati negli Stati Uniti e in altri Paesi.
Sommario
4 Per iniziare
4 Comandi del pannello anteriore
5 Utilizzo di Highway
5 Rimozione e installazione del pannello
anteriore amovibile
5 Ascolto della radio digitale
6 Ascolto della radio FM o MW
6 Service following
7 Ascolto di un supporto di memoria CD o
USB
10 Ascolto dei contenuti in un iPod o iPhone
12 Utilizzo del Bluetooth
14 Impostazione delle opzioni
14 Opzioni disponibili per la radio digitale
14 Opzioni disponibili per la radio FM
16 Opzioni generali
17 Regolazione delle impostazioni audio
18 Appendice
18 Connessioni elettriche
19 Guida all'installazione
20 Effettuare un reset di fabbrica
21 Rimozione della centralina di Highway
22 Risoluzione dei problemi
23 Specifiche
IT

4
Comandi del pannello anteriore
1. Premere per espellere un CD
2. Attivazione/Disattivazione
3. Cambiare la sorgente audio
4. Impostazione dell'effetto sonoro
5. Modalità TUNER (solo FM o MW):
- Scansione stazione preselezionata
- Memorizzazione automatica (pressione lunga)
Modalità DAB – Sintonizzazione automatica
6. Sbloccare il pannello anteriore.
7. Interruttore display
- Regolare le impostazioni di sistema (pressione
lunga)
8. Commutatore di banda:
- Modalità TUNER – FM1 > FM2 > FM3 > MW
- Modalità DAB – D1 > D2 > D3
- Modalità BLUETOOTH – Comporre /
- Rispondere a una chiamata
9. Regolare il livello del volume / Confermare
(premere)
10. Tasto 1: Riproduzione / Pausa / Riproduzione
Top (pressione lunga) (vedere pagina
7) / Stazione preselezionata 1
Tasto 2: Riprodurre inizio traccia / Stazione
preselezionata 2
Tasto 3: Ripetere la riproduzione / Stazione
preselezionata 3
Tasto 4: Riproduzione casuale / Stazione
preselezionata 4
Tasto 5: Cartella precedente / Stazione
preselezionata 5 / Tracce MP3 e
WMA -10 in basso (pressione lunga)
Tasto 6: Cartella successiva / Stazione
preselezionata 6 / Tracce MP3 e
WMA +10 in alto (pressione lunga)
11. Presa Aux In (ausiliario in)
12. Connettore USB (aprire lo sportellino)
13. Modalità CD – Traccia precedente / successiva
Modalità TUNER – Sintonizzazione manuale (pressione
breve) Ricerca + / - (pressione lunga)
Modalità DAB – Stazione precedente / successiva
Modalità BLUETOOTH – Traccia precedente /successiva
14. Fessura CD
15. Modalità TUNER – Selezione PTY
Modalità CD – Nessuna funzione
Modalità DAB – Nessuna funzione
Modalità BLUETOOTH – Chiudere una chiamata
Modalità AUX – Nessuna funzione
Modalità iPod – menu iPod
Modalità CD/USB MP3 e modalità WMA –
Ricerca cartella
16. Tasto DAB – Premere per passare dalla radio digitale
alla sorgente audio utilizzata in precedenza e viceversa
17. Informazioni sul traffico
Per iniziare
VOL
SEL
INTTOP RPT
H270SB

5
Utilizzo di Highway
Ascolto della radio digitale
Selezione della radio digitale come
sorgente audio
Premere DAB una volta, oppure Source
ripetutamente fino a visualizzare "DAB" sulla
schermata.
Modifica delle stazioni digitali
Premere il tasto oppure per far scorrere
l'elenco delle stazioni e premere la manopola
VOLUME per impostare.
Scelta della banda della radio digitale
Highway include il tasto BAND la cui pressione
consente di cambiare le stazioni assegnate ai sei tasti
di preselezione. Per la radio digitale sono disponibili
tre bande, che consentono di memorizzare fino a
18 preselezioni della radio digitale. Premere BAND
per selezionare la banda D1, D2 o D3.
Memorizzazione e richiamo delle
preselezioni
Memorizzazione manuale di una stazione
preselezionata
Sintonizzarsi sulla stazione della radio digitale che si
desidera memorizzare. Premere e tenere premuto
uno dei tasti di preselezione (1-6) per memorizzarlo.
Richiamare una stazione preselezionata
Per sintonizzarsi su una stazione preselezionata,
premere il tasto corrispondente (da 1 a 6).
Rimozione e installazione del
pannello anteriore amovibile
Per migliorare la sicurezza, Highway è dotato di un
pannello anteriore amovibile che è possibile portare
con sé quando si esce dalla vettura.
Nota: Onde evitare danneggiamenti, collocare il
pannello anteriore nella custodia protettiva ogni
volta in cui lo si rimuove dalla centralina.
Rimozione del pannello
amovibile
1. Premere il tasto .
2. Afferrare la parte libera del
pannello e rimuoverla dalla
centralina.
Installazione del pannello
amovibile
1. Allineare la scanalatura sul lato
destro del pannello frontale con
la fessura situata sull'unità.
2. Premere verso il basso il lato
sinistro della piastra frontale
fino a farla scattare in sede
nella fessura del pannello.
2
2
1
1
2
1
Modifica delle informazioni sulla
schermata
Nella modalità radio digitale, Highway visualizza
due righe di testo. La prima riga visualizza
sempre il nome della stazione radio.
È possibile cambiare le informazioni visualizzate
nella seconda riga premendo il tasto DISP.
Highway è in grado di visualizzare l'ora attuale,
il testo a scorrimento, le informazioni sul tipo
di programma (PTY), i dati multiplex (MUX) e le
informazioni sulla banda e frequenza.
Effettuare una sintonizzazione
automatica
Durante la sintonizzazione automatica, viene
eseguita la scansione di tutte le frequenze radio
digitali, dopodiché l’elenco delle stazioni viene
aggiornato aggiungendo le eventuali stazioni
trovate ed eliminando le stazioni non più
disponibili. Per effettuare una sintonizzazione
automatica, premere il tasto PS/AS.
IT

6
Ascolto della radio FM o MW
Premere SOURCE ripetutamente fino a visualizzare
"SINTONIZ." sulla schermata.
Modifica stazioni FM o MW
Sintonizzazione manuale
Premere il tasto oppure per sintonizzarsi su
una stazione con frequenza superiore o inferiore.
Sintonizzazione
Premere e tenere premuti il tasto o per
cercare una stazione successiva o precedente
avente un segnale potente.
Nota: Per fermare la ricerca della sintonizzazione,
ripetere le operazioni descritte sopra oppure premere
qualsiasi altro tasto relativo a una funzione radio.
Scelta della banda radio FM o MW
Highway include il tasto BAND la cui pressione
consente di cambiare le stazioni assegnate ai sei tasti
di preselezione. Per le FM sono disponibili tre bande,
che consentono di memorizzare fino a 18 stazioni
preselezionate. Per le MW è disponibile una sola
banda, che consente di memorizzare fino a 6 stazioni
preselezionate. Premere BAND per scegliere tra
FM1, FM2, FM3 o MW.
Memorizzazione e richiamo delle
preselezioni
Memorizzazione manuale di una stazione
preselezionata
Sintonizzarsi sulla stazione radio FM o MW da
memorizzare. Premere e tenere premuto uno dei
tasti di preselezione (1-6) per memorizzarlo.
Richiamare una stazione preselezionata
Per sintonizzarsi su una stazione preselezionata,
premere il tasto corrispondente (da 1 a 6).
Memorizzazione automatica delle stazioni
preselezionate
Si può utilizzare la funzione di memorizzazione
automatica per compilare automaticamente le proprie
preselezioni con le stazioni radio rilevate da Highway.
Premere e tenere premuto il tasto PS/AS per
avviare la ricerca automatica della stazione.
Per interrompere la memorizzazione automatica,
premere uno qualsiasi dei tasti relativi a una funzione
radio.
Note: Se si avvia la funzione di memorizzazione
automatica in una banda FM, tale funzione compilerà
automaticamente le stazioni preselezionate in tutte le
bande FM (FM1, FM2 e FM3). Se si avvia la funzione
di memorizzazione automatica in una banda MW,
tale funzione compilerà automaticamente le stazioni
preselezionate nella banda MW.
Scansione stazione preselezionata
Si può utilizzare la funzione di scansione della
stazione preselezionata per ascoltare fino a dieci
secondi di audio di ciascuna delle stazioni radio
memorizzate come preselezionate.
1. Premere il tasto PS/AS per iniziare la scansione
della stazione preselezionata.
2. Premere nuovamente il tasto PS/AS quando
ci si sintonizza su una stazione che si desidera
ascoltare.
Nota: Premendo il tasto PS/AS per più di un
secondo, si avvierà la funzione di memorizzazione
automatica, che sovrascriverà tutte le proprie
stazioni preselezionate.
Modifica delle informazioni sulla
schermata
Nella modalità FM, Highway visualizza due righe
di testo. La prima riga visualizzerà, se disponibili,
le informazioni RDS. Se non sono disponibili
informazioni RDS, viene visualizzata la banda e la
frequenza.
È possibile cambiare le informazioni visualizzate
nella seconda riga premendo il tasto DISP.
Highway è in grado di visualizzare l'ora attuale, il
testo a scorrimento (se disponibile), le informazioni
sul tipo di programma (PTY), e le informazioni sulla
banda e frequenza.
Service following
Se mentre si ascolta una stazione radio digitale viene
persa la ricezione, la funzione "Service following" di
Highway proverà a sintonizzarsi automaticamente
sulla stessa stazione radio con una ricezione
migliore o su una stazione radio digitale simile.
Nel caso in cui non sia possibile trovare la stessa
stazione digitale o una simile, Highway proverà a
sintonizzarsi sulla stessa stazione in modalità FM*.
Nota: Se Highway ha utilizzato il Service following
per risintonizzare una stazione radio digitale sulla
stessa stazione FM, sulla schermata di Highway,
la lettera "FM" seguirà il nome della stazione radio.
Nota: Il servizio da digitale ad FM non funzionerà
a meno quando è attiva la modalità standby TA,
la commutazione automatica da digitale a FM
(“service following”) non funziona.
*Il seguente servizio è supportato soltanto da alcune emittenti.

7
Ascolto di un supporto di
memoria CD o USB
Highway è in grado di riprodurre CD audio e file MP3
e WMA memorizzati su un supporto CD o USB.
Nota: Highway non è in grado di riprodurre file AAC
memorizzati su un supporto CD o USB.
Caricare un CD
Inserire il CD al centro della fessura per CD con
l'etichetta rivolta verso l'alto. Una volta caricato, il CD
verrà riprodotto automaticamente.
Note:
• Non inserire mai oggetti estranei nella fessura per CD.
• Se non si riesce ad inserire facilmente il CD,
all'interno del meccanismo potrebbe essere
presente un altro CD, oppure l'unità potrebbe
necessitare di assistenza tecnica.
• Alcuni dischi CD-R/CD-RW potrebbero non
essere utilizzabili.
• Oltre ai comuni CD, Highway è anche in grado di
riprodurre dischi CD-R e CD-RW.
Espulsione di un CD
Per espellere il CD, premere il tasto .
Note:
• Forzando l'inserimento di un CD nell'unità si
potrebbe danneggiare il CD.
• Se un CD (12 cm) viene lasciato in posizione di
espulsione per 15 secondi, il disco verrà ricaricato
automaticamente.
Ascolto di un CD già caricato in Highway
Per selezionare la modalità CD/MP3, premere il
tasto SOURCE.
Quando Highway attiva la modalità CD/MP3, il CD
verrà riprodotto automaticamente.
Comandi per la riproduzione di un CD
audio e delle tracce MP3/WMA salvate su
un supporto di memoria CD o USB
Avanzare velocemente
Premere e tenere premuto il tasto .
Riavvolgere
Premere e tenere premuto il tasto
.
*Con i dischi MP3/WMA potrebbe verificarsi
un leggero ritardo quando si cercano e si
saltano le tracce.
Pausa riproduzione
Premere il tasto 1 per mettere in pausa la
riproduzione. Quando la riproduzione è in pausa,
sul display sarà visualizzato "PAUSA".
Per riprendere la riproduzione, premere nuovamente
il tasto 1.
Saltare alla traccia successiva
Premere il tasto per saltare all'inizio della
traccia successiva.
Se si sta ascoltando un file MP3/WMA, premere
e tenere premuto il tasto 6 (1 sec.) per avanzare
di 10 tracce.
Riprodurre la traccia precedente
Premere il tasto entro i primi 10 secondi della
traccia per tornare alla traccia precedente.
Riprodurre l'inizio di una traccia
Premere il tasto dopo i primi 10 secondi della
traccia per tornare all'inizio della traccia.
Con i file MP3/WMA, premere e tenere premuto il
tasto 5 (1 sec.) per retrocedere di 10 tracce.
Inserimento di un
supporto di memoria USB
Inserire un dispositivo USB nel
connettore USB.
Quando si collega un
dispositivo USB, l'unità leggerà
i file automaticamente.
Rimozione di un
supporto USB
Prima di rimuovere un
supporto USB, selezionare
un'altra sorgente, oppure
disattivare l'alimentazione,
per evitare di danneggiare il
dispositivo USB.
Per ulteriori informazioni sull'ascolto
dei file MP3 o WMA, fare riferimento
alla sezione successiva.
1
1
2
IT

8
Funzione di riproduzione random (casuale)
Se si sta ascoltando un CD audio, si può utilizzare
la funzione di riproduzione casuale per ascoltare
secondo un ordine non prestabilito tutte le tracce
presenti sul CD.
Se si sta ascoltando un file MP3 o WMA, si può
utilizzare la funzione di riproduzione casuale per
ascoltare secondo un ordine non prestabilito tutti i
file WMA presenti sul supporto CD o USB.
Premere il tasto 4 per attivare e disattivare la
funzione di ripetizione casuale, impostando "RDM
ON" oppure "RDM OFF".
Visualizzazione delle informazioni del
titolo
Highway può visualizzare le informazioni relative al
titolo dei file MP3 e WMA.
Se l'impostazione CICLO è regolata su SPENTO
(vedere pagina 16), si può premere il tasto DISP
per modificare le informazioni del titolo visualizzate
sulla schermata. Highway visualizza i seguenti dati
relativi ai file MP3 o WMA:
Nome del file > Nome della cartella > Titolo della
traccia > Album > Artista > File...
Nota:
• Se il file MP3/WMA non include etichette ID3,
"NESSUN TITOLO" verrà visualizzato sul display.
Selezione di una cartella
È possibile selezionare la cartella contenente i file
MP3/WMA che si desidera ascoltare. Highway
inizierà a riprodurre tutte le tracce memorizzate
nella cartella, iniziando dalla prima traccia.
Per spostarsi alla cartella successiva, premere il
tasto 6.
Per spostarsi alla cartella precedente, premere il
tasto 5.
Premere il tasto o per modificare le tracce
all'interno di una cartella.
Utilizzo della funzione di ricerca
Highway è in grado di cercare i file MP3 o WMA
memorizzati su un supporto CD o USB.
1. Premere il tasto MENU / per visualizzare
l'opzione CER.CART.
2. Premere la manopola VOLUME per accedere
alla ricerca dell'elenco della cartella.
3. Ruotare la manopola VOLUME per selezionare la
cartella in cui si desidera effettuare la ricerca.
4. Premere la manopola VOLUME per visualizzare
sul display l'elenco dei file.
5. Ruotare la manopola VOLUME per scegliere
una traccia e premere la manopola per
riprodurre la traccia.
Ascoltare la prima traccia di un supporto
CD o USB
Highway offre una funzione denominata Top (alto)
che consente di ascoltare la prima traccia del
CD riprodotto attualmente. Per ascoltare la prima
traccia sul CD riprodotto attualmente, premere e
tenere premuto il tasto Top (1) (1 sec.).
Nota: Se si sta ascoltando un file MP3/WMA,
premendo il tasto 1 verrà riprodotta la prima traccia
del supporto CD o USB.
Funzione Intro
Se si sta ascoltando un CD audio, si può utilizzare
la funzione intro per riprodurre i primi 10 secondi
della traccia successiva e le restanti tracce del CD in
ordine sequenziale.
Se si sta ascoltando un file MP3 o WMA, questa
funzione consente di riprodurre i primi 10 secondi
di tutte le tracce MP3 o WMA presenti su un
supporto CD o USB.
Per utilizzare la funzione intro, premere il tasto
2 durante la riproduzione. L'icona "SCN" sarà
visualizzata sulla schermata quando la funzione
intro è attivata.
Per disattivare la funzione intro, premere il tasto 2.
Funzione Ripeti riproduzione
Se si sta ascoltando un CD audio, si può utilizzare
la funzione Ripeti riproduzione per ascoltare la
traccia attuale in modo ripetuto.
Premere il tasto 3 per attivare e disattivare la
funzione di ripetizione, impostando "RPT ON"
oppure "RPT OFF".
Se si sta ascoltando un file MP3/WMA, premere il
tasto 3 per scegliere una delle seguenti opzioni di
ripetizione:
RPT BRANO: Ripete la traccia in ascolto.
RPT CARTEL: Ripete tutte le tracce nella cartella
corrente.
RPT OFF: Non viene ripetuta alcuna traccia.

9
Formato logico (File system):
1. Nella scrittura di file MP3/WMA su un disco
CD-R o CD-RW, selezionare, per il formato
software di scrittura, “ISO9660 level 1, 2 o Joliet”
oppure Apple ISO. La normale riproduzione
potrebbe non essere possibile se il disco viene
registrato in qualunque altro formato.
2.
Il nome della cartella e il nome del file possono
essere visualizzati come titolo durante la
riproduzione MP3/WMA. Il titolo deve tuttavia
contenere un numero massimo di 30 lettere e
numeri composti da un singolo byte (inclusa
l'estensione).
3.
Non denominare una cartella con lo stesso
nome di un file contenuto nella cartella stessa.
Struttura della cartella:
Non è possibile riprodurre un CD contenente
cartelle con più di otto livelli di gerarchia.
Numero dei file o cartelle:
1.
È possibile riconoscere fino a 999 file per
cartella.
Si possono riprodurre fino a 3000 file.
2.
Le tracce vengono riprodotte nell'ordine di
registrazione sul CD. (Le tracce potrebbero non
essere sempre riprodotte nell'ordine visualizzato
su un computer.)
3. A seconda del tipo di software di codificazione
utilizzato durante la registrazione, potrebbero
verificarsi disturbi nella riproduzione.
Note riguardanti l'ascolto dei file WMA/MP3
Disattivazione di DRM (Digital Rights
Management)
Highway non riprodurrà alcun file WMA se per
tali file è attivata l'opzione DRM (Digital Rights
Management - Gestione dei diritti digitali). Se si
desidera riprodurre un file WMA su Highway, sarà
necessario disattivare DRM.
Se si utilizza Windows Media Player 9/10/11, fare
clic sulla scheda Strumenti > Opzioni > Copia
musica. Da Impostazioni copia, deselezionare la
casella di controllo Aggiungi protezione contro la
copia ai file musicali. quindi ricostruire i file.
I file WMA costruiti personalmente sono utilizzati
sotto la propria responsabilità.
Estensioni dei file:
1. Aggiungere sempre un'estensione file “.MP3”,
“.WMA” ai rispettivi file MP3 e WMA utilizzando
lettere composte da un singolo byte. Se si
aggiunge un'estensione file diversa da quella
specificata, oppure ci si dimentica di inserirla, il
file non potrà essere riprodotto.
2. I file privi dei dati MP3/WMA non verranno
riprodotti. Il file verranno riprodotti senza audio
se si tenta di riprodurli in assenza dei dati MP3/
WMA.
* Se si riproducono file VBR, la visualizzazione
dell'ora di riproduzione potrebbe differire a
seconda della località in cui avviene la riproduzione.
* Se si riproducono file MP3/WMA, l'audio
riprodotto tra i brani sarà molto limitato o assente.
IT

10
Ascolto dei contenuti in un iPod
o iPhone
Connessione a un iPod o iPhone
Connessione di un iPod o iPhone* al connettore USB.
Una volta collegato l'iPod/iPhone, utilizzando
i comandi Highway sarà possibile gestire tutte
le funzioni di riproduzione e visualizzare tutte le
informazioni riguardanti la traccia memorizzata sul
proprio iPod/iPhone.
Ascolto di contenuti audio da un iPod
o iPhone
È possibile ascoltare l'audio da qualsiasi file
musicale o video memorizzato nel proprio iPod.
Per ascoltare l'audio dal proprio iPod:
1. Premere il tasto MENU / .
2. Ruotare e premere la manopola VOLUME per
selezionare "MUSIC" oppure "VIDEO".
3. Se è stato selezionato "MUSIC", ruotare e
premere la manopola VOLUME per selezionare
tra "PLAY LISTS", "ARTISTS", "ALBUMS",
"SONGS", "GENRES" oppure "COMPOSERS".
Se è stato selezionato "VIDEO", ruotare e
premere la manopola VOLUME per selezionare
tra "MOVIES", "MUSIC VIDEOS", "TV SHOWS",
"VIDEO PODCASTS", oppure "RENTALS.".
Nota: Quando si riproduce un file video,
Highway può riprodurre solamente l'audio
appartenente al video, ma non sarà in grado di
visualizzare alcun contenuto di immagini.
4. Ruotare e premere la manopola VOLUME per
selezionare la voce che si desidera ascoltare.
Nota: Le voci ascoltate nel VIDEO MENU variano
a seconda del modello di iPod collegato e della
lingua utilizzata.
Ricerca dei contenuti sul proprio
iPod/iPhone
Highway consente di cercare il contenuto utilizzando
lettere alfabetiche. Per cercare i contenuti:
1. Per selezionare la modalità del menu iPod,
premere il tasto MENU / .
2. Ruotare la manopola VOLUME per specificare
se si desidera cercare contenuti relativi alle
opzioni "MUSIC" o "VIDEO".
3. Se è stato selezionato "MUSIC", ruotare la
manopola VOLUME per selezionare un'opzione
tra "PLAY LISTS", "ARTISTS", "ALBUMS",
"SONGS", "GENRES" oppure "COMPOSERS".
Se è stato selezionato "VIDEO", ruotare la
manopola VOLUME per selezionare un'opzione
tra "MOVIES", "MUSIC VIDEOS", "TV SHOWS",
"VIDEO PODCASTS", oppure "RENTALS".
4. Premere la manopola VOLUME per visualizzare
tutti i contenuti corrispondenti alla categoria
selezionata.
5. Premere e tenere premuto il tasto DISP (1 sec).
6. Ruotare la manopola VOLUME per specificare
la lettera da cercare.
7
. Premere nuovamente il tasto DISP per iniziare
la ricerca.
8
. Premere la manopola VOLUME per confermare.
Funzione Ripeti riproduzione
È possibile utilizzare la funzione Ripeti riproduzione
per riprodurre in modo ripetuto la traccia in ascolto
sul proprio iPod.
Premere il tasto 3 per specificare una delle seguenti
opzioni di ripetizione:
RPT UNO: Ripete la traccia in ascolto.
RPT TUTTI: Ripete tutte le tracce nella cartella
corrente.
Funzione di riproduzione casuale (Shuffle)
Shuffle degli album
Per riprodurre in ordine casuale tutti gli album
memorizzati sul proprio iPod o iPhone, premere
il tasto 4 fino a visualizzare "RDM ALBUM" sulla
schermata.
Shuffle dei brani
Per riprodurre in ordine casuale tutte le tracce
esistenti nella cartella attualmente in ascolto sul
proprio iPod o iPhone, premere il tasto 4 fino a
visualizzare "RDM SONG" sulla schermata.
Disattivazione della funzione Shuffle
Per disattivare la funzione shuffle, premere il tasto 4
fino a visualizzare "RDM OFF" sulla schermata.
*Supporto della maggior parte dei modelli di iPod e iPhone. Per le informazioni più aggiornate, controllare la tabella di compatibilità sul nostro sito web: www.pure.com/products/ipod-compatibility.

11
Utilizzo del proprio iPod/iPhone per
selezionare le tracce su Highway
Highway consente di utilizzare il proprio iPod/iPhone
per selezionare le tracce in ascolto su Highway.
Questa funzione è conosciuta come controllo
semplice (S-CTRL).
Questa impostazione è disattivata in modo
predefinito.
Per abilitare il proprio iPod/iPhone a selezionare le
tracce su Highway:
1. Premere e tenere premuto il DISP per inserire la
configurazione del sistema.
2. Premere il tasto oppure per scorrere fino
a "S-CTRL".
3. Ruotare e premere la manopola VOLUME
per impostare S-CTRL su "ACCESO" oppure
"SPENTO". Selezionare "ACCESO" per
consentire all'iPod di gestire le funzioni iPod/
iPhone di Highway. Selezionare "SPENTO" per
disattivare la funzione S-CTRL.
Note:
• Quando si selezionano le tracce su Highway con
il proprio iPod/iPhone, attendere qualche istante
in quanto potrebbe verificarsi un leggero ritardo.
• Non tentare di selezionare tracce su Highway
utilizzando allo stesso tempo il proprio iPod e i
comandi della centralina.
• Alcuni modelli di iPod non supportano la
funzione S-CTRL. Per informazioni sui modelli
che non supportano S-CTRL, consultare il
rivenditore più vicino oppure il sito web Pure.
IT

12
Utilizzo del Bluetooth
La funzionalità Bluetooth di Highway consente
di utilizzare il microfono di Highway e l'impianto
audio integrato nella propria vettura per effettuare
chiamate in vivavoce. Una volta collegati, si
può anche utilizzare Highway per visualizzare le
informazioni sulle chiamate in entrata, in uscita
e perse.
Se il proprio telefono cellulare è in grado di
memorizzare file audio, si può utilizzare Bluetooth
anche per trasferire in streaming ad Highway la
musica memorizzata sul proprio telefono.
Nota:
• Non installare il microfono Highway in aree
rumorose all'interno del proprio veicolo, per
esempio vicino alle bocchette di ventilazione.
• Non collocare il dispositivo Bluetooth per le
chiamate in vivavoce in luoghi ove potrebbe
essere esposto alla luce diretta del sole, in
quanto temperature elevate potrebbero influire
sulle prestazioni di Highway.
• Highway potrebbe non essere compatibile con
alcuni telefoni cellulari e lettori audio Bluetooth.
• La riproduzione audio verrà impostata allo
stesso livello di volume definito durante una
chiamata telefonica.
Abbinamento (funzione pairing) del proprio
telefono cellulare ad Highway
Prima di iniziare a utilizzare la funzione Bluetooth di
Highway, è necessario abbinare il proprio telefono
cellulare ad Highway.
1. Attivare la funzione Bluetooth del proprio
telefono cellulare.
2. Accedere al menu di configurazione Bluetooth
del proprio telefono cellulare.
3. Cercare nuovi dispositivi Bluetooth.
4. Selezionare Pure Highway dall'elenco della
funzione pairing disponibile sul telefono cellulare.
Una volta completato il pairing con successo, le
icone BT e HFP si illumineranno su Highway.
L'icona A2DP si illuminerà per indicare che la
musica può essere trasferita in streaming dal
dispositivo Bluetooth ad Highway.
Connessione automatica
1. Highway è in grado di abbinare con la funzione
pairing e memorizzare fino a cinque telefoni
cellulari.
La connessione automatica sarà abilitata dopo
avere effettuato il pairing con Highway.
2. Per utilizzare la funzione di connessione
automatica, il proprio telefono cellulare dovrà
essere acceso.
3. La funzione di connessione automatica
funzionerà esclusivamente con l'ultimo telefono
cellulare collegato. Se si desidera collegare un
altro telefono cellulare, si dovrà effettuare la
connessione manualmente.
Utilizzo della funzione del telefono vivavoce
Accesso al menu Bluetooth
Premere il tasto SOURCE per cambiare la sorgente
in “BLUETOOTH”.
Premere il tasto
MENU /
per selezionare un
modo per effettuare chiamate in uscita.
Comporre un numero
1. Premere il tasto MENU / .
2. Ruotare e premere la manopola VOLUME sul
pannello anteriore per selezionare "COMPONI
NUMERO".
3.
Ruotare e premere la manopola VOLUME per
selezionare la prima cifra del numero di telefono
che si desidera comporre. Ripetere fino a
completare l'inserimento del numero telefonico.
4.
Premere il tasto BAND / per comporre il
numero di telefono.
Al termine della chiamata telefonica, premere il
tasto
MENU /
per riagganciare.
Rispondere a una chiamata
Premere il tasto
BAND /
per rispondere a una
chiamata in entrata.
Per rifiutare una chiamata in entrata, premere il
tasto
MENU /
.
Terminare una chiamata
Al termine della chiamata telefonica, premere il
tasto
MENU /
per riagganciare.

13
Visualizzare la cronologia delle chiamate
È possibile visualizzare su Highway la cronologia
delle chiamate per ottenere informazioni sulle
chiamate recenti effettuate, perse o ricevute.
Per visualizzare la cronologia delle chiamate:
1. Premere il tasto MENU / :
2. Ruotare e premere la manopola VOLUME sul
pannello anteriore per selezionare "CHIAMATA
COMPOSTA", "CHIAMATA PERSA" o
"CHIAMATA RICEVUTA".
3. Premere la manopola VOLUME per visualizzare
i contatti della cronologia selezionata.
4. Ruotare la manopola VOLUME per far scorrere
l'elenco dei contatti e premerla quando è
visualizzato il nome o il numero telefonico che si
desidera chiamare.
Passare dal vivavoce al funzionamento
normale del telefono cellulare e viceversa
È possibile passare dal vivavoce al funzionamento
normale del telefono cellulare premendo il tasto
BAND /
durante una chiamata telefonica.
Operazioni di streaming audio
Cos'è lo streaming audio Bluetooth?
Utilizzando la funzione Bluetooth è possibile
trasferire musica in streaming da un lettore audio
esterno/telefono ad Highway in modalità wireless
ed ascoltare le tracce attraverso gli altoparlanti
della vettura.
ATTENZIONE
Durante lo streaming audio, evitare di utilizzare il
proprio telefono cellulare collegato.
A seconda del telefono cellulare utilizzato, lo
streaming audio potrebbe non riprendere quando
viene interrotto da una chiamata telefonica.
Se la sorgente dello streaming audio è disconnessa,
su Highway compare il messaggio "DISCONNES.
BLUETOOTH".
Nota:
Prima di procedere, assicurarsi di leggere il
capitolo “Abbinamento (funzione pairing) del
proprio telefono cellulare con Highway” alla pagina
precedente.
Riproduzione o messa in pausa di una
traccia
Premere il tasto 1 per mettere in pausa la
riproduzione audio.
Per riprendere la riproduzione audio, premere
nuovamente il tasto 1.
Selezionare una traccia
Saltare alla traccia successiva
Premere il tasto per saltare all'inizio della traccia
successiva.
Riprodurre l'inizio di una traccia
Premere il tasto per riprodurre l'inizio della
traccia in ascolto.
Nota:
L'ordine di riproduzione delle tracce varia a
seconda dei diversi lettori audio Bluetooth .
Premendo il tasto
, alcuni dispositivi A2DP
riavvieranno la traccia in ascolto in base alla
durata della traccia.
Durante la riproduzione in streaming di musica,
sul display saranno visualizzati "HFP" oppure
"A2DP".
Se "DISCONNES. BLUETOOTH" viene
visualizzato sul display, il proprio lettore
audio Bluetooth potrebbe non avere
sincronizzato la funzione riproduzione/pausa
con Highway. Assicurarsi che il dispositivo
Bluetooth e Highway abbiano lo stesso stato
di riproduzione/pausa quando si effettua lo
streaming di musica ad Highway da un lettore
audio Bluetooth.
IT

14
Opzioni disponibili per la radio
digitale
Impostazione dell'antenna radio digitale
È possibile specificare il tipo di antenna radio digitale
da connettere ad Highway. Le opzioni disponibili
sono "ATTIVA" e "PASSIVA". Vedere a pagina 19
per ulteriori informazioni.
Impostazioni banda L
È possibile specificare se Highway può o meno
sintonizzarsi sulle stazioni radio che trasmettono
sulla banda L.
Per abilitare o disabilitare le impostazioni su banda L:
1.
Premere e tenere premuto il tasto DISP sul
pannello anteriore fino a visualizzare "OROLOG"
sulla schermata.
2. Premere il tasto oppure per scorrere fino
a "BANDA L".
3.
Ruotare e premere la manopola VOLUME per
commutare la funzione banda L su "ACCESO"
oppure "SPENTO".
Impostazione delle opzioni
*Il seguente servizio è supportato soltanto da alcune emittenti.
Opzioni disponibili per la radio FM
Ricerca locale
Si può utilizzare la funzione di ricerca locale per fare
in modo che Highway si sintonizzi esclusivamente
sulle stazioni radio aventi un segnale potente.
Per attivare e disattivare la funzione di ricerca locale:
1.
Premere e tenere premuto il tasto DISP sul
pannello anteriore fino a visualizzare "OROLOG"
sulla schermata.
2.
Utilizzare il tasto per scorrere fino all'opzione
"DX/LO".
3.
Ruotare e premere la manopola VOLUME per
selezionare "LOCALE" (attiva) oppure "DX"
(disattiva).
Nota: Il numero di stazioni radio ricevibili si riduce
quando la funzione di ricerca locale è attivata.
Highway integra un sistema decodificatore Radio
Data System (RDS) compatibile con le stazioni
emittenti che trasmettono informazioni RDS.
Impostazioni RDS
Funzione AF
Se l’intensità del segnale inizia a diminuire durante
l’ascolto di una stazione radio FM, la funzione AF
ricerca automaticamente la medesima stazione
e prova a risintonizzare Highway su di essa o su
una frequenza alternativa. Questa impostazione è
attivata in modo predefinito.
1.
Premere e tenere premuto il tasto DISP sul
pannello anteriore fino a visualizzare "OROLOG"
sulla schermata.
2. Premere il tasto oppure per scorrere fino
a "AF".
3. Ruotare la manopola VOLUME per selezionare
"ACCESO" oppure "SPENTO".
Se la funzione AF è abilitata, l'indicatore AF
apparirà sul display.
Radio Data System
(Sistema di informazioni radio)

15
TA (Informazioni sul traffico)
Nella modalità standby TA (l’icona “TA” è illuminata
sul display), Highway attende un segnale TA da
qualsiasi stazione FM disponibile entro l’area servita.
Quando riceve un segnale sul traffico TA oppure
EON, Highway si sintonizza automaticamente
su una stazione FM trovata con informazioni sul
traffico disponibili. Al termine delle informazioni sul
traffico, Highway si risintonizza sull’ultima stazione
FM ascoltata.
Per annullare le informazioni sul traffico attive,
premere il tasto TA.
Impostazione della modalità standby TA
Nota: quando è attiva la modalità standby TA, la
commutazione automatica da digitale a FM (“service
following”) non funziona.
Premere il tasto TA per attivare e disattivare l’icona
“TA”. Se l’icona “TA” è illuminata sul display, Highway
rimane nella modalità standby TA fino a quando
non vengono trasmesse informazioni sul traffico.
Quando inizia la trasmissione delle informazioni
sul traffico, Highway visualizza “TRAF INF”, se le
informazioni vengono trasmesse dalla stazione
radio che si sta ascoltando. Se invece Highway si
sintonizza sulle informazioni sul traffico trasmesse da
un’altra emittente radio, sul display viene visualizzato
“EON INF”.
Funzione REG (programma regionale)
Se la funzione REG è impostata su ACCESO,
utilizzando il comando AF Highway si sintonizzerà
automaticamente sulla stazione con il segnale
più potente. Se questa funzione è impostata su
SPENTO e l'area locale servita cambia durante
la guida, Highway si sintonizzerà su una stazione
emittente all'interno dell'attuale area locale. Questa
impostazione è attivata in modo predefinito.
Note:
• Questa funzione è disabilitata quando Highway
è sintonizzato su una stazione nazionale, per
esempio RAI Radio 2.
• L'impostazione ACCESO/SPENTO della
funzione REG è abilitata solamente quando la
funzione AF è attivata.
1. Premere e tenere premuto il tasto DISP sul
pannello anteriore fino a visualizzare "OROLOG"
sulla schermata.
2. Premere il tasto oppure per scorrere
fino a "REG".
3. Ruotare la manopola VOLUME per selezionare
"ACCESO" oppure "SPENTO".
Sintonizzazione manuale su una stazione
locale nella stessa rete
È possibile sintonizzarsi manualmente su una
stazione locale esistente nella stessa rete quando
la funzione AF è impostata su ACCESO e la
funzione REG è impostata su SPENTO.
Nota: Questa funzione può essere utilizzata
quando è in corso la ricezione di un'emittente
locale della stessa rete.
PTY (Programme type - tipo di programma)
Si può utilizzare la funzione PTY (Programme type tipo di programma) per cercare le trasmissioni radio
corrispondenti a un determinato genere. In Europa
sono disponibili trentuno generi predefiniti di tipo di
programma.
* Alcuni paesi attualmente non trasmettono
informazioni PTY.
* Nella modalità standby TA, una stazione TP
ha priorità su una stazione emittente PTY.
Come utilizzare la funzione PTY per cercare un tipo
particolare di trasmissione radio:
1. Premere il tasto
MENU /
.
2. Ruotare e premere la manopola VOLUME sul
pannello anteriore per selezionare il genere di
trasmissione PTY che si desidera cercare.
Highway inizierà la ricerca di una trasmissione radio
corrispondente e si sintonizzerà sulla prima stazione
radio che coincide con il tipo PTY specificato.
Ripetere le operazioni precedenti per cercare un'altra
stazione corrispondente al tipo di PTY specificato.
IT

16
Da una qualsiasi delle modalità, premere e
tenere premuto il DISP per accedere al menu
di configurazione del sistema. Premere il tasto
oppure per far scorrere l'elenco delle opzioni
e premere la manopola VOLUME per regolare
un'impostazione.
OROLOGIO
1. Premere la manopola VOLUME.
2. L'ora visualizzata lampeggia. Ruotare e
premere la manopola VOLUME per impostare
l'ora. Ripetere per regolare i minuti.
LINGUA
È possibile selezionare la lingua che Highway
utilizza per i menu e le opzioni.
1. Premere la manopola VOLUME.
2. Ruotare e premere la manopola VOLUME per
selezionare una lingua di menu tra inglese,
francese, tedesco o italiano.
VOL AUX (Modalità AUX - ausiliare)
Ruotare e premere la manopola VOLUME per
aumentare o diminuire il livello di amplificazione audio
per l'ingresso AUX. Le opzioni disponibili sono BASSI,
MEDI o ALTI.
AUTOCON: ACCESO/SPENTO
(soltanto la modalità Bluetooth)
Abilitando questa opzione viene collegato
automaticamente il telefono cellulare che è stato
collegato per ultimo.
Ruotare e premere la manopola VOLUME per
impostare la funzionalità Auto Con su "ACCESO"
oppure "SPENTO".
Opzioni generali
COLORE
Ruotare la manopola VOLUME per selezionare un
colore di retro illuminazione.
SCN: La retro illuminazione cambia colore
continuamente in modo ciclico in tutti i colori disponibili.
COLORE 01~12: Scelta di un colore preselezionato.
UTENTE1~3: Creare il proprio colore personalizzato.
Premere la manopola per accedere alla modalità di
impostazione del colore e premere i tasti
per
selezionare i valori ROSSO, VERDE e BLU (RVB) del
colore desiderato. Ruotare e premere la manopola
VOLUME per selezionare un colore.
Premere e tenere premuta la manopola VOLUME
per aggiungere il colore personalizzato alla
memoria della radio.
CICLO: ACCESO/SPENTO
Questa funzione è utilizzata per gestire il modo in
cui Highway visualizza il titolo traccia, il nome della
cartella, il titolo, l'album, e l'artista nella modalità CD/
MP3, USB e iPod:
Acceso: Selezionare questa opzione per
specificare che il display alternerà automaticamente
la visualizzazione tra TRACK, FOLDER, TITLE,
ALBUM e ARTIST.
Nota: Nella modalità iPod, l'opzione ciclo alterna la
visualizzazione solamente tra TITLE, ALBUM e ARTIST.
SPENTO: Selezionare questa opzione per
interrompere la visualizzazione automatica alternata
di TRACK, FOLDER, FILE, ALBUM, TITLE e ARTIST.
Per cambiare le informazioni attualmente visualizzate
sulla schermata (Highway visualizza il nome della
traccia in modo predefinito, ad eccezione della
modalità iPod), premere il tasto DISP.
POST./ S-W
Se si sta utilizzando Highway con un amplificatore
esterno, si può utilizzare questa impostazione per
specificare se si collegano le uscite linea posteriori
all'amplificatore esterno collegato ad un'intera serie
di amplificatori (POSTERIORI) oppure a un Sub
Woofer (S-WOOFER). Per maggiori informazioni
vedere il diagramma a pagina 18.
Ruotare e premere la manopola VOLUME per
selezionare POST. oppure S-WOOFER.
POST.: Selezionare questa opzione per fornire a un
amplificatore esterno un segnale a gamma intera
dalle uscite linea destra e sinistra posteriori.
S-WOOFER: Selezionare questa opzione per
consentire che le regolazioni di un amplificatore
subwoofer dedicato siano effettuate dal menu
EQ senza influire sul segnale proveniente dalle
uscite linea anteriori, oppure sul suono emesso
dall'amplificatore integrato.
DIMMER: ACCESO/SPENTO
Ruotare e premere la manopola VOLUME per
commutare l'impostazione DIMMER su "ACCESO"
oppure "SPENTO".
ACCESO: La luminosità del display viene ridotta.
SPENTO: Disattiva l'impostazione dimmer in
maniera che la luminosità del LCD venga impostata
al massimo livello.
BEEP: ACCESO/SPENTO
Ruotare e premere la manopola VOLUME per
cambiare il segnale acustico emesso quando viene
premuto "ACCESO" oppure "SPENTO".

17
12/24 ORE
Ruotare e premere la manopola VOLUME per
cambiare il formato orario in "12 ORE" oppure
"24 ORE".
CT: ACCESO/SPENTO
Ruotare e premere la manopola VOLUME per
impostare su "ACCESO" oppure "SPENTO" gli
aggiornamenti automatici dell'ora emessi dal
segnale radio digitale o FM.
Regolazione delle impostazioni
audio
Premere il tasto EQ per accedere alla modalità
di impostazione dell'equalizzatore. Alla prima
pressione di EQ, viene visualizzata l'impostazione
EQ attuale. Ruotare la manopola per modificare
l'impostazione DSP EQ nell'ordine seguente:
SPENTO > POP > ROCK > CLASSIC > JAZZ >
PERSON.
Creazione dell'impostazione EQ
personalizzata
1. Premere il tasto EQ.
2. Ruotare e premere la manopola VOLUME per
selezionare "PERSON.".
3. Premere il tasto oppure per selezionare
il valore EQ che si desidera modificare. Le
opzioni disponibili sono: BASSI-G > BASSI-F
>BASSI-Q > MEDI-G > MEDI-F > MEDI-Q
>ACUTI-G > ACUTI-F.
4. Ruotare la manopola VOLUME per regolare il
valore.
5. Premere il tasto o per spostarsi su
un'altra impostazione EQ personalizzata,
oppure premere la manopola VOLUME se le
operazioni sono terminate.
Impostazioni di controllo audio
1. Premere il tasto EQ.
2. Premere il tasto oppure per
selezionare l'impostazione di controllo audio
che si desidera modificare.
Le opzioni disponibili sono BILANC. >
FADER > LOUD > FR. SUB > SUB.VOL.
3. Ruotare e premere la manopola VOLUME
per regolare il valore. I valori disponibili
per ciascuna delle opzioni sono indicati di
seguito:
BILANCIAMENTO: SX 1-7 > CENTRO
> DX 1-7
FADER: ANT. 1-7 > CENTRO > POST. 1-7
LOUD: ACCESO/SPENTO
FR. SUB: NO FILT > 80 > 120 > 160
SUB.VOL: (-6) - (+6)
IT

18
Connessioni elettriche
Schema elettrico
FM/MW ANTENNA
Uscita linea posteriore destra (Rosso)
SUB OUT (USCITA INF.)
Uscita linea anteriore destra (Rosso)
Uscita linea anteriore sinistra (Bianco)
A
B
1357
2468
1
357
2
468
DAB ANTENNA
MICROFONO
Uscita linea posteriore sinistra (Bianco)
SUB OUT (USCITA INF.)
No.Definizione piedinoNo. Definizione piedino
A1 NC B1 Posteriore destro(+)
A2
Telemute (Disattiv.
volume a distanza)
B2 Posteriore destro(-)
A3 NC B3 Anteriore destro(+)
A4 Batteria +B4Anteriore destro(-)
A5 Remoto AMPB5Anteriore sinistro(+)
A6 NC B6 Anteriore sinistro(-)
A7 ACC+ B7 Posteriore sinistro(+)
A8 Terra B8 Posteriore sinistro(-)
Vano A Vano B
Appendice

19
Guida all'installazione
Note relative all'installazione
Preparazione dell'installazione Highway
È possibile installare Highway in qualsiasi cruscotto
con un'apertura corrispondente alle dimensioni
indicate nel seguente diagramma. Per potere reggere
Highway, il cruscotto deve avere uno spessore di
4,75 mm - 5,56 mm.
Impostazione dell'antenna radio digitale
Highway è dotato di un connettore per l'antenna
radio digitale di tipo SMB, e deve essere utilizzato
con un'antenna per veicoli idonea alla propria vettura
ed area geografica.
Il prodotto non include in dotazione alcuna antenna
per consentire all'utente di scegliere l'antenna più
idonea alle specifiche esigenze del veicolo.
Se l'antenna prescelta funziona con tensioni
diverse rispetto ai 12 Volt forniti da Highway,
PRIMA di collegare l'antenna ad Highway è
necessario utilizzare un regolatore di tensione in
linea per correggere la tensione al livello richiesto
dall'antenna. L'alimentazione dell'antenna
deve essere impostata su "ATTIVA" seguendo
le operazioni descritte sopra (Highway è
impostata in fabbrica su "ATTIVA").
Non fornire per nessun motivo un'alimentazione
separata, a 12 Volt o ad altre tensioni, in linea con
il collegamento dell'antenna, e con l'alimentazione
dell'antenna impostata su "ATTIVA" oppure
"PASSIVA". Tale configurazione alimenterebbe
il prodotto di elettricità attraverso il cavo
dell'antenna, con conseguenti danneggiamenti al
prodotto non coperti da garanzia.
AVVERTENZA - Il collegamento di un'antenna
attiva, non progettata per funzionare a 12 Volt,
al connettore dell'antenna radio digitale SMB su
Highway potrebbe causare danni all'antenna o ad
Highway non coperti da garanzia.
Installazione di un'antenna radio digitale
Highway è concepito per funzionare con un'antenna
radio digitale attiva. Prima di installare la centralina,
assicurarsi di avere installato nel proprio veicolo
un'antenna radio digitale idonea. Per ulteriori
informazioni fare riferimento alle istruzioni di
installazione della propria antenna radio digitale.
Nota: Prima di installare la centralina, inserire
sempre il manicotto di montaggio nel cruscotto
.
Alimentazione dell'antenna per antenne attive:
Molte antenne per autoveicoli hanno un amplificatore
integrato, oppure in linea con il cavo collegato
all'impianto stereo della vettura, pertanto questo
prodotto fornisce l'alimentazione a 12 Volt lungo il
centro del connettore dell'antenna digitale (piedino
centrale del connettore SMB).
La maggior parte delle antenne radio digitali per
autoveicoli funziona a 12 Volt. Tuttavia, alcune
antenne potrebbero essere state progettate per
funzionare con tensioni differenti, ad esempio 5 Volt.
L'uscita dal prodotto dell'antenna di alimentazione
è impostata di fabbrica su "Attiva", ad esempio
"ACCESO" a 12 Volt (indicato come "ANT DAB
ATTIVA nel menu di sistema).
Se l'antenna prescelta non è dotata di amplificatore
(vale a dire, l'antenna è "PASSIVA"), prima di
collegare l'antenna ad Highway è necessario
impostare l'alimentazione dell'antenna su "PASSIVA"
seguendo le operazioni descritte di seguito:
1. Premere e tenere premuto il tasto DISP fino a
visualizzare "OROLOG" sulla riga superiore del
display. "OROLOG" indica in questo caso che
si ha avuto accesso al menu di sistema.
2. Premere ripetutamente il tasto fino a
visualizzare "ANT DAB" sulla riga superiore del
display.
3. Ruotare la manopola VOLUME fino a
visualizzare "PASSIVA" sulla seconda riga del
display.
4. Premere una volta il tasto DISP per confermare
la nuova impostazione dell'antenna e tornare
alla schermata precedente.
IT

20
Installazione del pannello amovibile
1. Allineare la scanalatura sul lato
destro del pannello frontale
con la fessura situata sull'unità.
2. Premere verso il basso il lato
sinistro della piastra frontale
fino a farla scattare in sede
nella fessura del pannello.
Installazione della centralina di Highway
1. Inserire il manicotto di montaggio nel cruscotto.
Fissarlo saldamente in sede piegando verso il basso
le linguette metalliche.
2. Collegare i cavi relativi ad audio, microfono,
antenna FM/MW e i cavi elettrici sul retro di
Highway (vedere pagina 18).
3. Installare il pannello amovibile (vedere lato opposto)
e provare a utilizzare Highway per verificare che
tutte le funzioni audio funzionino correttamente.
4. Collegare il cavo dell'antenna digitale.
Nota:
Prima di collegare il cavo dell'antenna radio
digitale, vedere a pagina 19.
5. Rimuovere le due viti di protezione sulla
parte superiore di Highway per consentire il
funzionamento del dispositivo CD, quindi fare
scivolare Highway nel manicotto di montaggio
spingendolo fino a bloccarlo saldamente in sede.
6. Applicare il telaio del rivestimento esterno.
Se non si è sicuri su come installare correttamente
questa unità, contattare un tecnico qualificato.
Effettuare un reset di fabbrica
1. Rimuovere il pannello amovibile come descritto
a pagina 5.
2. Premere il tasto RESET con un oggetto
appuntito per ripristinare le impostazioni di
fabbrica di Highway.
3. Rimuovere il pannello amovibile come descritto
a pagina 5.
Nota: Premendo il tasto RESET verranno
cancellate le impostazioni dell'orologio e le stazioni
memorizzate.
2
2
1
1
Installazione del microfono
Per effettuare chiamate telefoniche in vivavoce
utilizzando Highway e il proprio telefono cellulare è
necessario installare il microfono in dotazione.
Nota: Non installare il microfono Highway in aree
rumorose all'interno del proprio veicolo, per esempio
vicino alle bocchette di ventilazione.
1. Allentare il fissaggio di eventuali pannelli di rivestimento.
2. Utilizzare la graffa in dotazione per fissare il microfono
alla visiera parasole sopra al posto di guida (A).
3. Fare passare il cavo dietro ai pannelli di
rivestimento (B) e lasciare il connettore del
microfono appeso esternamente al cruscotto (C),
pronto per la connessione alla la centralina.
4. Assicurare il cavo utilizzando la graffa autoadesiva
in dotazione.
5. Riportare tutti i pannelli di rivestimento nella posizione
originale.
(A)
(B)
(C)
Manicotto di montaggio
Unità principale
Piastra di rivestimento
Rimuovere
le due viti
Bullone di montaggio
Ammortizzatore in gomma
ATTENZIONE:
Non fare passare il microfono né alcun altro
cavo vicino agli airbag, che in caso di collisione potrebbero
non funzionare nel modo atteso. I cavi devono essere fissati
saldamente in zone ben distanti dalle aree di spiegamento
degli airbag. Prestare particolare attenzione quando si opera
intorno agli airbag.

21
Rimozione della centralina di Highway
1. Spegnimento di Highway.
2. Rimuovere il pannello amovibile come descritto
a pagina 5.
3. Rimuovere il telaio del rivestimento esterno.
4. Per la rimozione inserire gli appositi attrezzi
a forma di "L", fino a bloccarli, nelle fessure
situate sulla parte superiore di Highway
(come indicato nell'illustrazione qui sotto).
5. Estrarre Highway e scollegare tutti i cavi.
IT

22
Risoluzione dei problemi
La seguente lista di controllo può servire di aiuto nella risoluzione di eventuali problemi che potrebbero verificarsi utilizzando Highway. Prima di controllare la lista,
verificare i collegamenti e seguire tutte le istruzioni contenute in questa guida per l'utente. Non utilizzare Highway in presenza di fumo o di odore di bruciato in
quanto potrebbero verificarsi incendi e scosse elettriche. In questo caso, interrompere immediatamente l'utilizzo di Highway e rivolgersi al proprio rivenditore.
Problema Possibile causa Soluzione
Generale
Highway non si accende. L'accensione della vettura non è inserita.
Il cavo non è collegato correttamente.
Il fusibile è bruciato.
Inserire e girare la chiave nell'accensione.
Verificare il collegamento del cavo.
Sostituire il fusibile con uno nuovo avente la stessa potenza
nominale.
Suono assente Il volume è impostato al livello minimo oppure è
attivata la funzione mute (disattivazione volume).
Controllare il volume oppure disattivare la funzione mute.
La schermata di Highway non funziona
normalmente.
Highway è instabile. Premere il tasto RESET.
Modalità CD
Highway non riproduce i CD. Il CD è inserito correttamente.
Il CD è sporco o danneggiato.
Il CD deve essere inserito con il lato etichettato rivolto verso l'alto.
Pulire il CD e verificare la presenza di danneggiamenti. Provare
con un altro CD.
Il suono salta a causa delle vibrazioni. L'angolo di montaggio è superiore a 30˚.
Il montaggio è instabile.
Regolare l'angolo di montaggio a un valore inferiore a 30˚.
Montare saldamente l'unità con le parti in dotazione.
Modalità SINTONIZZATORE
Impossibile ricevere le stazioni radio. L'antenna non è collegata correttamente. Collegare l'antenna correttamente.
Scarsa qualità di ricezione della
stazione radio.
L'antenna non è estesa completamente oppure è
guasta.
Estendere l'antenna completamente e, se è guasta, sostituirla con
una nuova.
Le stazioni preselezionate non sono più
disponibili.
Il cavo della batteria non è collegato correttamente. Collegare il cavo energizzato sull'unità al cavo energizzato sul
veicolo.
Modalità USB
Impossibile leggere il dispositivo USB. Il dispositivo USB potrebbe non essere stato
formattato in modo adeguato.
Verificare che il formato del file system sia FAT oppure FAT32.
A causa dei diversi formati, alcuni modelli di dispositivi di
memorizzazione o lettori MP3 potrebbero non essere compatibili.

23
Specifiche
Nota: In considerazione dei continui progressi tecnologici, le specifiche
e la progettazione sono soggette a modifica senza preavviso.
Generale
Alimentazione: 12 V CC (11 V - 16 V)
Tensione di test 14,4 V, collegamento di messa a terra negativo
Massima uscita di alimentazione: 55 W x 4 canali
Uscita di alimentazione continua:
20 W x 4 canali (4 ,10% T.H.D.)
Impedenza altoparlante idonea: 4-8 ohm
Tensione di uscita pre-amp:
2,0 V (modalità di riproduzione CD: 1 KHz, 0 dB, carico 10 K )
Fusibile: 15 A
Dimensioni (L x A x P): 178 x 50 x 166 mm
Peso: 1,7 kg
Aux-in (Ausiliario in): ≥300 mV
Componenti
Manicotto di montaggio: 1
Viti senza dado M5 x 6 mm: 4
Bullone di montaggio (50 mm): 1
Attrezzi a forma di "L" per rimozione: 2
Piastra di rivestimento: 1
Microfono: 1
Graffa autoadesiva per il cavo 1
Graffa per la visiera parasole 1
Guarnizione in gomma: 1
Istruzioni operative: 1
Radio stereo FM
Gamma di frequenza: 87,5 - 108,0 MHz (Europa)
Sensibilità utilizzabile: 8 dBμ
Sensibilità di silenziamento (S/N=50dB): 12 dBμ
Risposta di frequenza: 30 Hz - 15 kHz
Separazione stereo: 30 dB (1 kHz)
Frequenza di risposta immagine: 50 dB
Rapporto di risposta IF: 70 dB
Rapporto segnale/rumore: 55 dB
Radio AM(MW)
Gamma di frequenza: 522 - 1620 KHz
Sensibilità utilizzabile (S/N=20dB): 30 dBμ
Lettore CD
Sistema: Sistema per dischi audio digitali
Risposta di frequenza: 20 Hz - 20 kHz
Rapporto segnale/rumore: >80 dB
Distorsione armonica totale:
Inferiore a 0,20 % (1 kHz)
Wow and flutter (distorsione): Inferiore ai limiti misurabili
Separazione del canale: >55 dB
MP3/WMA
Formato supporti: MP3 WMA
Frequenza di campionamento: 8 kHz - 48 kHz N/D
Velocità in bit: 32 kbps-320 kbps / VBR 32 kbps-196 kbps
Limite caratteri per il nome file, cartella dei
file e metadati:
30 caratteri (inclusa
l'estensione)
30 caratteri (inclusa
l'estensione)
Radio digitale (DAB)
Gamma di frequenza: DAB di banda III:
174,928 MHz ~ 239,200 MHz
DAB di banda L:
1452,960 MHz ~ 1490,624 MHz
Sensibilità utilizzabile (RF=-72 dBM): -95 dBM
Risposta di frequenza: 20 Hz - 20 kHz
Separazione stereo: ≥50db
Rapporto segnale/rumore: ≥60db
Elemento Min. Max.
Selettività far-off: 42 dB 60 dB
Rifiuto adiacente canali: 35 dB 40 dB
IT

24

1
NL
Takk for at du valgte Highway H270SB. Denne bruksanvisningen gjør at du kommer raskt i gang
og forklarer hvordan du best mulig kan bruke Highway H270SB. Vi foretar stadig forbedringer og
tilføyer nye funksjoner i våre varer. For å benytte deg av eventuelle forbedringer siden varen ble
sendt til deg, se support.pure.com, hvor du kan se etter oppdaterte versjoner av programvare
og nedlaste den siste versjonen av denne bruksanvisningen i PDF-format.
H270SB
VOL
SEL
INTTOP RPT
H270SB
ES
FR
IT
EN
NORSK
DE

2
Vennligst les gjennom bruksanvisningen, slik at du vet
hvordan du skal bruke Highway korrekt. Etter at du
har lest gjennom bruksanvisningen, bør du oppbevare
den på et sikkert sted for fremtidig referanse.
Forholdsregler
Må kun benyttes i et 12V DC-system med
negativ jording.
Koble kjøretøyets negative batteripol fra når
enheten monteres og tilkobles.
Når sikringen byttes, sørg for å bytte den med
en som har tilsvarende amperenivå.
Bruk av sikring med høyere amperenivå kan
forårsake alvorlig skade på enheten.
FORSØK IKKE å demontere enheten.
Laserstrålene fra den optiske leseren er farlig
for øynene.
Sørg for at ingen nåler eller andre objekter
kommer inn i enheten, da dette kan føre til
funksjonsfeil eller forårsake sikkerhetsfare
som elektrisk støt eller eksponering overfor
laserstråler.
Hvis du har parkert bilen lenge i varmt eller
kaldt vær, vent til temperaturen i bilen er normal
før du bruker Highway.
Hold volumet på et nivå hvor du fortsatt kan
høre varselsignaler utenfra (horn, sirener osv.).
Stopp bilen før du gjør handlinger som kan
være kompliserte.
Bruk av CD
Bruk av en ødelagt eller støvet CD kan føre til
at lyden faller ut.
Hold CD-en ved å berøre kun kantene innerst
og ytterst.
Den blanke siden av CD-en må ikke berøres.
Forsegling, merking eller databeskyttelse må
ikke festes på noen side av CD-en.
Eksponer ikke en CD for direkte sollys eller
sterk varme.
En skitten CD må tørkes av innenfra og utover
med en ren klut.
Bruk aldri løsemidler som lettbensin eller
alkohol.
Highway kan ikke spille 3" CD (8 cm).
Prøv aldri å sette inn en 3" CD med en
adapter, heller ikke en annen CD med uvanlig
dimensjon. Den kan kanskje ikke støtes ut
igjen, noe som kan føre til feil.
I tillegg til ordinære CD, kan Highway også
spille av CD-R/CD-RW/MP3/UDF-disker.
Forsiktig
Slå av strømmen på Highway og lever den tilbake
til servicesentret for ettersalg eller hos forhandleren/
distributøren der du kjøpte den dersom ett av
følgende symptomer skulle oppstå:
(1) Vann eller annet fremmedobjekt kommer inn
i Highway
(2) Røyk
(3) Highway avgir en brent lukt.
Sikkerhetsinformasjon
 Loading...