

Page 1
Owner’s Manual
T
X
+
+
ChargePAK
READY
™
Page 2

noitamrofni ytnarraW
p s
ceT noitanigam
I
htu
desiro
a
lp tinu
ypoC
p
itacilbu
seitrap
olonh
rf sraey owt fo
ht mo
r esael
su yb
P .
uoy tc
atnoc esae
.launam siht fo raer
retsige
s r
thgir
oc
yam no
eb
e eht tuohtiw
tsid r
o deip
i
t
rw sserpx
ht ot stnarraw .dtL seig
a t
on seod ti ;stluaf ngised ro gnirutcafunam
P tcatnoc ro reilppu
o
g
lonhceT noitanigamI yb 6002 thgirypoC
ubir
c ro namuh yna otni detalsnart ro ,metsys
noiss
imrep net
t resu d
ne e
no tcudorp ruoy
uo
uS ERU
e
imiL sei
t
upmo
l ret
I fo
iht tah
oc eetnaraug sihT .esahcrup fo etad e
srev
s
a
cc
a hcus sesac ni ylpp
e
t
i
a
fidom ,tnemtsujda ,ecnegilgen ,raet dna raew ,desuac revewoh
ti
w r
sbe
sthgir
llA .d
rcsnart ,dettimsnart ,det
ugna
i ,ega
iwrehto ro launam ,citengam ,lacinahcem ,cinortcele ,snaem
igam
tan
r ro noi
c
up.www ta e
r
r
p a evah uoy dluohS .drac ytnarraw ruoy gninruter dna ni gnillif yb ro
bo
a eht ta tropp
v
N .de
ese
r
r
rots ,debi
f yna n
o mro
solcsid
ro ,es
on
ceT noi
h
eerf eb ll
iw tcudor
i
do
a rof esu lamron fo esruoc eht ni pihsnamkrow dna slairetam ni stcefed morf
rep
d snwodkaerb
ot e
u
latnedi
d
,egama
t
iap
on r
er/moc.e
retsig
ruoy htiw mel
eht
no nwohs sserdd
o
b r
e
d
seigol
iL
sih
fo tr
t
ap
rt
lavei
r a ni de
e
yn
a y
driht ot
.detim
remialcsiD
e
ceT noi
igam
tan
I
m
T
r
OVE
P
r
a
o
rp
libatnah
cre
er detimiL
mit ot
K
E
art e
s fo n
oitazinagro
kr
eda
s
am
TX
h
C
2-
,
D ERU
igi
skram
ed
a
n tcud
m
L seig
imi
olonh
f ss
o
ntif ro yti
a r
e
ht sevres
bo tuohtiw e
m
I ,ogol lat
r ro
e
ra se
er ot thgir e
I fo noitagil
si
oi
ver hcu
t
an
iga
deretsig
t
rt e
s
e
r on
kam det
e
ps
dna tnemucod siht fo tnetnoc eht ot
cifice
n
a
up r
ucitrap y
l
t esiv
tan
ceT noi
igam
a
.segn
hc ro sn
TX
2
-EKOVE eht ,KAPegra
eT noi
ht
fo skrameda
UP ,ogol
olonhc
a ,seig
skramedar
I fo
ser
cep
rie
oitatnes
pe
l
id ylla
cs
op
s
e
r
,ER
dn
ht
igam
tan
i y
a smia
n
uF .
igam
tan
I e
ceT noi
napmoc evit
i
.se
n
r
w
raw ro
ot detimiL seigolonh
olonh
i
seitnar
raw dei
lpm
noi
tanigamI ,rehtr
ton
UP ,ogol ERUP eht
L seig
i
J
3 noisreV
tceps
r ht
seitnar
fo
sei
g
hceT
olon
emit morf ti ni segnahc ekam ot dna noitacilbup sih
ro
s
p yna yfi
o
e
n
r
,
l
eht
atigiD ER
g
ol seigolonhceT noi
o
to ll
detim
re
h
A .
2
.60
yrauna
0
Page 3

Contents
Introduction .........................................................................................................................1
Safety instructions ........................................................................................................................................................ 1
Overview diagrams .............................................................................................................2
Front panel - controls ................................................................................................................................................... 2
Rear panel - connectors ................................................................................................................................................ 3
LCD screen .................................................................................................................................................................... 3
Getting started ....................................................................................................................4
Switching on and off ......................................................................................................................................................4
Using DAB ............................................................................................................................5
Changing stations .......................................................................................................................................................... 5
Using presets ................................................................................................................................................................ 5
Changing the information on the screen ....................................................................................................................... 6
DAB setup options .........................................................................................................................................................7
Using FM ..............................................................................................................................9
Changing stations .......................................................................................................................................................... 9
Using presets ................................................................................................................................................................ 9
FM setup options ......................................................................................................................................................... 10
Using an auxiliary device ...................................................................................................11
Setting an alarm ................................................................................................................12
Setting a countdown timer ................................................................................................13
General setup options .......................................................................................................14
Using batteries ..................................................................................................................15
Using a ChargePAK™ .................................................................................................................................................. 15
Using batteries ............................................................................................................................................................ 15
Hints and Tips ....................................................................................................................16
Technical Specifications ....................................................................................................17
Page 4
Introduction
Safety instructions
Keep the radio away from heat sources.
Do not use the radio near water.
Avoid objects or liquids getting into the radio.
Do not remove screws from or open the radio casing.
Remove batteries if exhausted or if they will not be used again for a long period.
Use only the supplied 9V power adapter if connecting the radio to the mains.
Thank you for buying the PURE EVOKE-2XT - luxury portable stereo DAB and FM
radio.
Please take a minute or two to read through this manual to help you get the most
of your radio, read the safety instructions below, and register your product on our
website at www.pure.com/register or by filling in and returning your warranty card.
1
Page 5
Overview diagrams
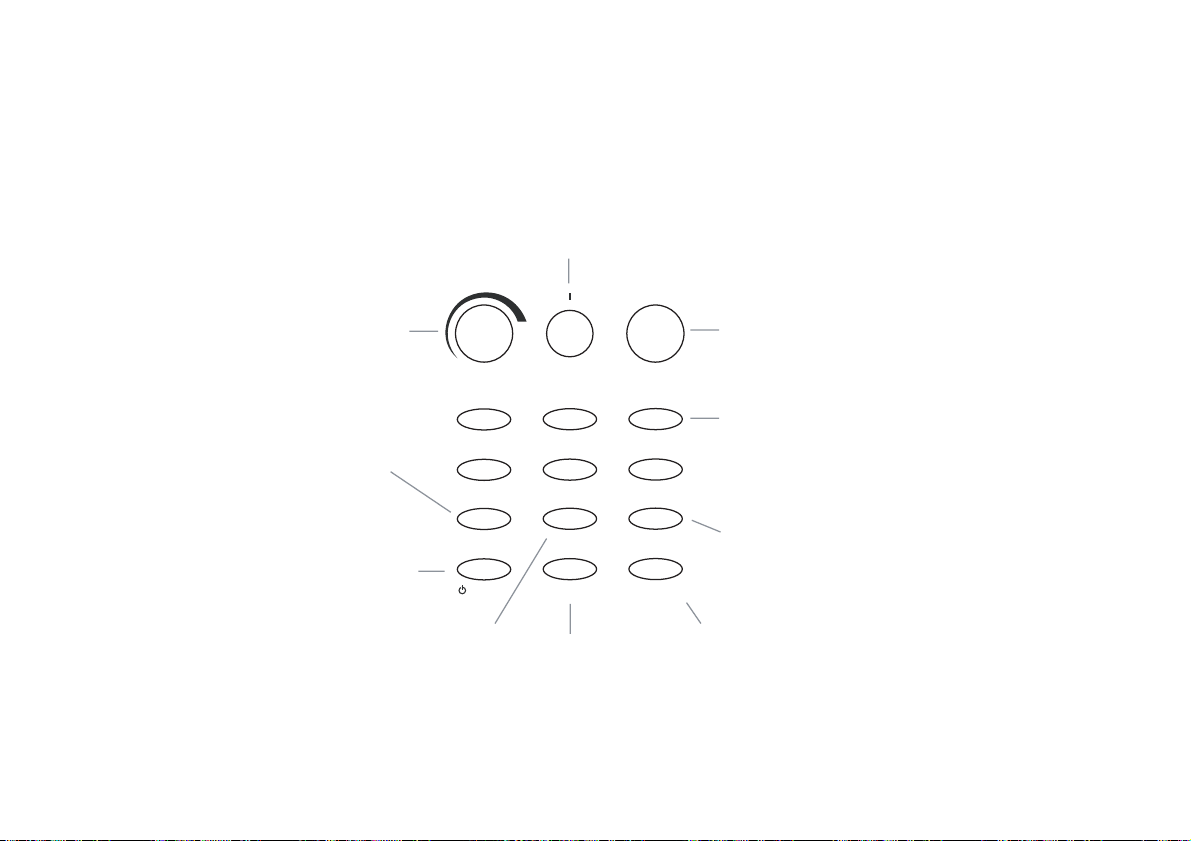
Front panel - controls
Turn to adjust
the volume
Press to turn backlight on
for 10 seconds
Press to switch between on and standby using mains.
Press to switch between on and off using batteries.
Press and repeat to change the text
shown on the bottom of the display
2
Volume
Light
Standby
Tone
Turn to adjust tone
from low (more bass)
to high (more treble)
Volume Tone Tune
123
456
Light Info Menu
Standby Timer DAB/FM/AUX
Info
Timer
Press and use Tune to set
a countdown timer which
will sound an alarm after
the period you set
(from 1 min to 23 hrs 59 mins)
Tune
Turn to scroll through and then press to select stations
and menu options. Push in DAB mode to see signal strength,
push in FM mode to change the tuning method.
Presets (1-6)
Press and hold for 2 seconds
to store a preset.
Press to listen to a preset.
Menu
Press to access and exit setup menu options,
turn the Tune knob to scroll through
and push to select an option
DAB/FM/AUX
Press to switch between
DAB, FM and AUX modes
Page 6
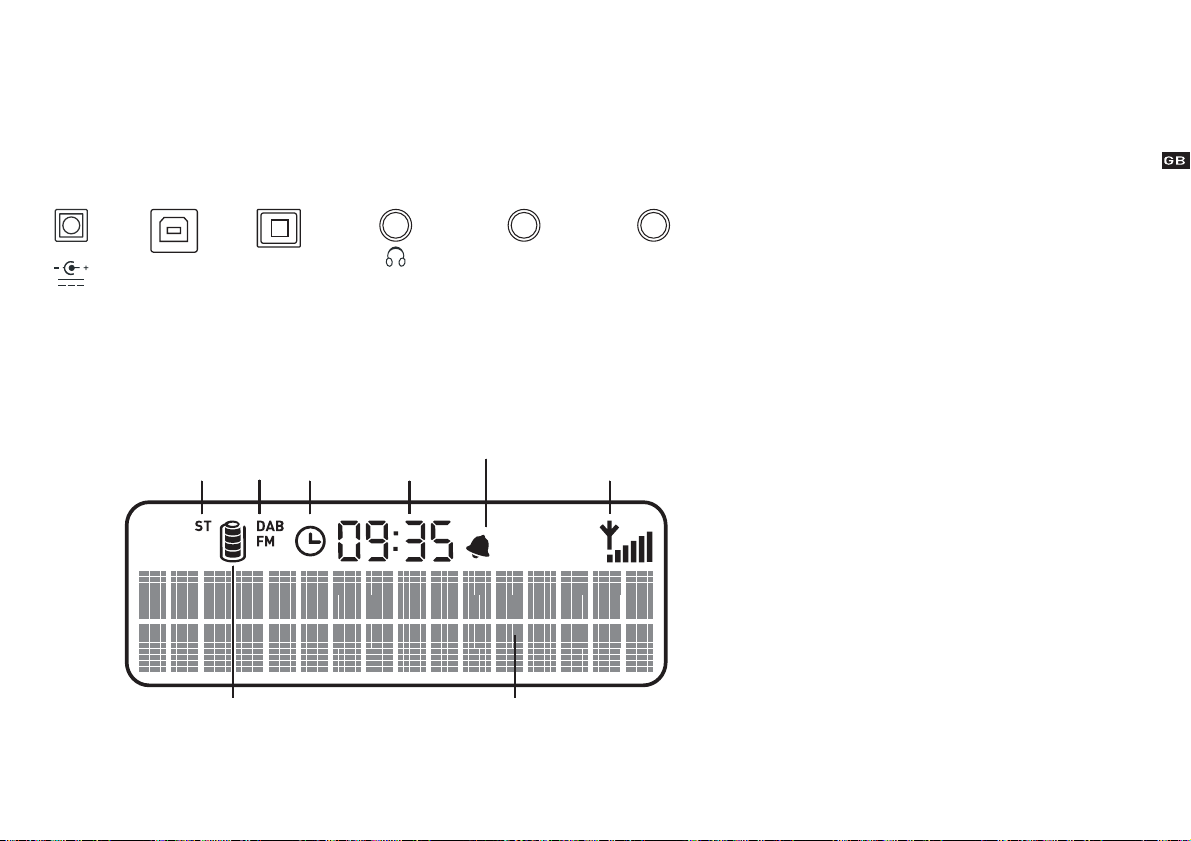
Rear panel - connectors
9V DC
Connect
to mains
adapter
9V DC
USB
Connect to
a PC for
software
upgrades
USB
LCD screen
ST
Stereo
station
Digital Out
S/PDIF optical
digital out
(DAB only)
Digital Out
DAB/FM
current
mode
Timer
timer
active
Headphones
Connect to
headphones
(mutes speakers)
Clock
time from
DAB signal
Line Out
Analogue output
to external amplifier
or recorder
Line Out Aux In
Alarm
alarm set
Signal strength
for current station
(6 levels, full shown)
Aux In
Analogue stereo input
from auxiliary device such as
iPod, CD player, MiniDisc etc.
Battery
battery charge monitor (6 levels, full shown,
lowest level flashes)
Animated when charging ChargePAKTM.
Text area
16 x 2 character
text display area.
3
Page 7

Getting started
You’ve unpacked the box - here’s how to quickly get up and running using your EVOKE-2XT.
1 Fully extend the telescopic aerial, connect the mains adapter and plug in to your power supply or fit six size ‘C’
batteries or the ChargePAK C6 available from PURE.
XT
The LCD lights up and the display shows ‘PURE EVOKE-2
the progress of an autotune to find the DAB stations available in your area. The stations found will be stored in
alphanumeric order and the first station on the list will be selected.
Adjust the Volume and Tone knob if required.
2
3
Turn the Tune knob to see all the stations available and push to change to another station.
4 Press the Info button and repeat to cycle through the optional DAB display modes.
5
Switching on and off
Press the DAB/FM/AUX button to change to FM mode and listen to FM stations and again to listen to a
connected auxiliary device such as an iPod, CD or MiniDisc player.
To switch on your EVOKE-2XT press the Standby button.
To switch your EVOKE-2XT from on to standby press the Power button. In standby state your EVOKE-2XT uses a very
small amount of power.
XT
Note To switch off your EVOKE-2
saved.
completely unplug the power adapter. Your preset stations and other settings will be
’ and a progress bar on the bottom line indicates
4
Page 8

Using DAB
To listen to digital radio stations press the DAB/FM/ AUX button until you see the DAB icon on screen.
If this is the first time you have switched to DAB, you hear the first station on the list, otherwise
you hear the last station you were listening to.
Changing stations
You can change stations using the Tune knob or by selecting a numbered preset button.
1. Turn the Tune knob to scroll the list and find the station you want.
The current station is shown at the top of the screen.
2. Push the Tune knob to change the station.
A station with ‘?’ before its name may not be currently available either because you have lost
reception or the station is not currently broadcasting. You can use the ‘Trim stn. list ’ option
to remove them from the station list, see page 8.
Using presets
The numbered buttons enable you to assign up to six DAB radio stations to presets for easy
one-touch access. You can also automatically transfer your six favourite stations to presets,
see Station order on page 7.
You can store a station to a preset while listening to it or when you see the station name
at the bottom of the screen while scrolling through the station list. Press and hold down a
numbered button to store the station under that number. This will overwrite any existing DAB
preset stored under this number.
1Xtra - BBC
Bringing you hot
Default DAB screen
1Xtra - BBC
Virgin
Changing stations
Virgin Radio
Preset 1 saved
Storing a preset
When you save a station as a preset, the station name shows the preset number next to it on
the station list. To select a preset press the relevant numbered button.
5
Page 9

Virgin Radio
oday's best musi
Scrolling text
Virgin Radio
18:36 07-11-2005
Time and date
Virgin Radio
11D 222.06MHz
Channel and frequency
Changing the information on the screen
Press the Info button to change what you see on the bottom line of the screen.
Scrolling text The default mode, broadcast by most stations.
Program Type Type of content being broadcast.
Multiplex Multiplex the current station belongs to. Multiplexes or ensembles are
groups of stations owned and broadcast by a single operator.
Time and date Time and date updated regularly from the current multiplex. If your radio
has been unplugged there may be a slight delay before the time appears
when you switch on.
Channel Multiplex channel and frequency.
Signal info Stereo or mono indicator and data rate at which the signal is being
transmitted. This rate is set by the broadcaster to suit the type of material.
Higher rates generally mean higher quality.
Signal quality Signal quality. As a guide, values from 85 to 100 indicate good reception,
70 to 84 borderline reception and 0 to 69 poor reception.
6
Page 10

DAB setup options
Press the Menu button, turn the Tune knob and push to choose one of the following options.
Station order
Changes the order of stations on your station list. Turn the Tune knob to scroll through the
following options and push to select one:
Alphanumeric Displays all stations in alphanumeric order.
Fav station Displays your six most listened to stations at the top of the station list and
the rest below, in alphanumeric order. Your favourite stations are displayed
with a
next to their names.
♥
Active station Displays active stations at the top of the station list and inactive ones at
the bottom in alphanumeric order. Inactive stations are those on the station
list but not currently available, marked with a ’?’.
Multiplex Lists stations in groups according to their multiplex. Multiplexes, sometimes
called ensembles, are groups of stations owned and broadcast by a single
operator.
Trim stn. list Removes inactive stations from the station list.
→ presets Available only when Fav station order (above) has been selected. Transfers
♥
your favourite stations to the six presets.
Alphanumeric
Fav station
Station order menu
DRC value
DRC (Dynamic Range Control) value makes the quieter sounds in a broadcast easier to hear
at low volume or in a noisy environment. The DRC level of a broadcast is set by the station
and sent with the signal. At the time of writing in the UK only BBC Radio 3 and 4 regularly use
DRC. Check with the broadcasters to find out if they use DRC on their stations.
DRC Off
DRC Full
DRC value
7
Page 11

Autotune... 12
Turn the Tune knob to scroll through the following options and push to choose one:
DRC Off DRC is switched off. Any DRC level broadcast will be ignored.
DRC Half DRC level is set to half that sent with the broadcast.
DRC Full Applies the DRC level as sent with the broadcast.
Autotune UK
Scans all UK frequencies for DAB stations and adds any new ones to the station list.
Autotune UK Band III option
12B 225.64MHz
Tuning aid - channel
12B 225.64MHz
Tuning aid - low signal
12B BBC DAB
Tuning aid - good signal
8
Autotune full
Scans the full range of digital frequencies in Band III. This option is for use outside the UK
where other Band III stations may be available.
Tuning aid
Shows signal level which you can use to find the best position for your radio and aerial.
1. Turn the Tune knob to scroll through different channels and push to choose one (UK
stations are in the range 11B to 12D). You see a signal level display.
The empty block indicates the minimum required level for reception and the filled blocks
indicate the current level.
2. Move your aerial while watching the display and to try to raise the current level to the
empty block or beyond. Once you have a good signal the display will show the multiplex
name and add the stations to the station list.
3. Push the Menu button to exit the tuning aid or use the Tune knob to change station.
Note You can display the signal level at any time by pushing the Tune knob.
Page 12

Using FM
To listen to FM radio stations press the DAB/FM/AUX button until you see the FM icon on screen.
If this is the first time you have switched to FM, EVOKE-2
frequency range, otherwise you hear the last station you were listening to.
XT
starts at the beginning of the
Changing stations
You can change stations using the Tune knob or by selecting a numbered preset button.
Turn the Tune knob and let go to search up or down the frequency range and find the station
you want. You may see ‘Searching...’ briefly on screen while the search for the next station is
in progress.
You can change the FM tuning method, if preferred, to enable you to manually step up and
down the frequency range see Tuning method on page 10.
Using presets
The numbered buttons enable you to assign up to six FM radio stations to presets for easy
one-touch access. These six presets are in addition to any DAB presets you may have stored
and are only accessible while in FM mode.
To store presets press and hold down a numbered button to store the station under that
number. This will overwrite any existing FM preset stored under this number.
To select a preset press the relevant numbered button.
87.50MHz FM
Default FM screen
Searching... > .
Seek tune - Searching for station
98.20MHz FM
Preset 1 saved
Storing a preset
9
Page 13

Seek Tune
Manual Tune
Tuning method options
Stereo
Mono
FM Stereo options
FM setup options
Press the Menu button, scroll using the Tune knob and push to choose one of the following
setup options.
Tuning method
Changes how you tune from one station to another. The current method is shown on the top
line of the display.
Turn the Tune knob to view the options and push to select one:
Seek Tune automatically searches for the next FM station
Manual Tune lets you manually step through the frequency range in steps of 0.05 MHz
Mono/Stereo
Changes between stereo and mono reception - mono may be clearer for stations with weak
signals. The current mode is shown on the top line of the display.
Turn the Tune knob to view the options and push to select one.
10
Page 14

Using an auxiliary device
You can listen to an auxiliary device such as an iPod or CD player through the speakers on your
EVOKE-2
XT
by connecting it to the Aux In socket on the rear panel.
1. Use a dual phono to 3.5 mm or 3.5 mm to 3.5 mm stereo cable to connect to your device.
2. Press the DAB/FM/AUX button until you see ‘Auxiliary input’ on the screen.
3. Press play on your auxiliary device.
4. Set the volume high on your auxiliary device then adjust volume and tone on your EVOKE-2
XT
required.
Aux In
9V DC
USB
Digital Out Line Out Aux In
Aerial
Designed in the UK Manufactured in China
/ AUDIO OUT
Auxiliary input mode
as
11
Page 15

Setting an alarm
Alarm - settings
Classic FM
stress-free mix
Alarm - set icon
EVOKE-2XT has a daily alarm which switches the radio on (if in standby mode) and tunes to the
station you have chosen or sounds a tone. To set or change an alarm:
1. Press the Menu button to see the current alarm settings.
2. Push the Tune knob if you want to change the alarm settings.
3. Turn the Tune knob to scroll through the following settings and push to change them. The
current setting is shown on the top line of the screen.
Set alarm Set the alarm on or off.
Set time Turn the Tune knob to set the hours, push the Tune knob, turn again and push to
set the minutes.
Set mode Choose between a DAB radio alarm (set to latest station tuned to in that mode)
or Tone alarm. The alarm volume will be whatever the volume control is set at
when the alarm goes off.
When finished, press the menu button or wait to exit. You will see a bell symbol on the screen
next to the clock showing that an alarm is set. Note If you set a DAB alarm and the station is
not available when it is due to go off, a tone alarm will sound instead.
XT
When the alarm goes off, EVOKE-2
clock and the backlight flashing on screen. You cancel the alarm as follows:
Radio alarm Press any button to cancel the alarm and perform the button’s normal function.
Tone alarm Push the Tune knob or Standby to cancel the alarm.
All alarms will automatically stop after 60 minutes if not cancelled and your EVOKE-2XT will go i n to
standby.
will beep or tune to the station you have chosen. You see the
12
Page 16

Setting a countdown timer
You can set a timer which will sound an alarm after a period — ideal for use in the kitchen.
1. Press the Timer button.
2. Turn the Tune knob to change the hours, push and turn again to change the minutes and push
again to confirm.
The timer is now set, you see the Timer icon on screen and the alarm will sound after the
period you have set. To view the time remaining press the Timer button again. To cancel or
reset the timer to zero before it goes off, press and hold down the Timer button for three
seconds. When the timer alarm goes off you can cancel the alarm by pushing the Tune knob or
Standby button.
Countdown timer - setting
Classic FM
stress-free mix
Countdown timer - set icon
13
Page 17

General setup options
Display
To change the screen backlight settings, select one of the following options:
Brightness
To change the screen brightness turn the Tune knob to choose between Off, Low and High
and push to select one.
Standby mode
To change the screen brightness for when your EVOKE-2
knob to choose between Off, Low and High and push to select one.
Sw version
Displays the version of the software in your radio. You may be asked to quote this if you
contact Technical Support.
Sw upgrade
You can upgrade the software in your EVOKE-2XT using a PC connected to the USB port on
the rear panel. To upgrade, select Sw upgrade and follow the instructions provided with the
software. Upgrades may be issued to provide enhanced functions or improve performance.
Register your product and include an e-mail address to receive notification of software
updates or visit our website at www.pure.com/support. To exit the software upgrade menu
press the Menu button again.
XT
is in standby mode turn the Tune
14
Page 18

Using batteries
As an alternative to mains power you can use six size ‘C’ alkaline or rechargeable batteries
or use the PURE ChargePAK™ C6 rechargeable battery pack. When using batteries or a
ChargePAK the Battery Charge monitor icon on the screen gives an indication of the charge
remaining in the batteries.
To switch to battery supply remove the power adapter plug from the rear of the unit.
Using a ChargePAK™
The PURE ChargePAK C6 is the easiest option if you want to use your EVOKE-2
mains power frequently. ChargePAK is a rechargeable battery pack which plugs into the
socket in your EVOKE-2XT battery compartment. Whenever your EVOKE-2
a mains supply the ChargePAK will be charging. A complete charge should take around 10
hours. You can safely leave the ChargePAK in your radio so it is always ready to use. For more
details on or to purchase a PURE ChargePAK C6, contact your nearest PURE dealer, visit the
shop on our website at www.pure.com or call the PURE order line on 0845 045 1122.
Note After charging your ChargePAK can feel warm to the touch, this is completely normal.
Using batteries
If you use rechargeable batteries (NiMh or NiCd), connecting the unit to the mains will not
recharge the batteries. Use a separate charger such as the BC-CD6 battery charger available
from PURE to recharge your batteries. Rechargeable batteries do not provide as much power
as alkaline batteries, and therefore your EVOKE-2XT will not give you the same battery life on
rechargeable as using alkaline batteries. We recommend high capacity rechargeable batteries
(3500 mAh or greater).
XT
away from
XT
is connected to
+
+
ChargePAK
™
JAZZFM
Best Variety Of
Using batteries or ChargePAK
- fully charged
talkSPORT
- the nation's f
Using batteries or ChargePAK
- charge low
15
Page 19

Hints and Tips
(<</>>) Secondary DAB services
Secondary services accompany some stations, providing extra information or alternative content and may only be broadcast at certain
times. At the time of writing not many secondary services are available. If a station has secondary services available, the station shows
‘>>’ next to its name in the station list and the secondary service appears next to the station in the list. A secondary service has a ‘<<’
before its name in the station list.
(?) Inactive or unavailable DAB stations
Inactive or unavailable stations are those which appear on the station list but are not currently available because either you are outside
the broadcast area, have lost reception or the station is not currently broadcasting. Unavailable stations have a ‘?’ before their name on
the station list. If you select a station which has this symbol, EVOKE-2
I hear a ‘burbling’ sound on some DAB stations
Although DAB is excellent at providing quality audio from very little signal, the quality can suffer if the signal strength is too low. If that
happens, a ‘burbling’ sound can sometimes be heard. To help reduce this, check that your aerial is fully extended and upright. If the
problem persists try moving your radio or repositioning your aerial using manual tuning.
Display says ‘ No stations available’
Check that your aerial is fully extended. Use Autotune to search for stations. Use manual tuning to adjust your aerial or radio position.
Clock shows the wrong time
This may happen if the DAB multiplex you are tuned to broadcasts an incorrect time signal, try tuning to a station in another multiplex.
My radio won’t switch on
Check that you have charged batteries/ChargePAK inserted or a mains supply connected. If you have batteries in your unit and mains
power has been lost remove the power lead from your EVOKE-2
XT
returns to the last station you were listening to.
XT
to use battery power.
Resetting your radio
Resetting your EVOKE-2
1. Press and hold the Menu button for three seconds. The screen shows ‘Press Tune to confirm reset’.
2. Push the Tune knob to confirm the reset or press no buttons to cancel the reset.
XT
removes all presets, stored stations and favourite station settings and resets all options to defaults. To reset:
16
Page 20

Technical Specifications
General Stereo DAB digital and FM radio with full Band III DAB reception capability, for reception of all UK DAB
broadcasts and full UK FM capability. Fully compliant with ETS 300 401 and capable of decoding all
DAB transmission modes 1-4 up to and including 256 kb/sec.
Speakers Two full-range 3 inch drive units
Frequency range DAB – Band III (174-240 MHz), with fast Autotune feature
FM – 87.5-108 MHz
Aerial Removable telescopic aerial supplied
Input connectors 9V DC power adapter socket (230V adapter supplied), USB (B type) connector for software upgrades,
3.5 mm Line in for connection of auxiliary devices
Output connectors 3.5 mm socket for headphones, 3.5 mm Line out (analogue), Digital out (Optical S/PDIF)
Controls Power on/standby, DAB/FM/AUX selector, rotary Volume, rotary Tone, 6 preset buttons, rotate and
push Tune knob, Menu, Light and Info.
LCD display Custom, easy to read LCD with 16 x 2 character display plus status icons.
Mains power supply 230V AC to 9V DC external power adapter
Input power 9V 1.5A
Battery power 6 size 'C' batteries or ChargePAK (available separately). Battery life of 25 hours on alkaline batteries
for DAB at normal listening levels, over 10 hours using ChargePAK. Ultra low-power standby mode.
Approvals CE marked. Compliant with the EMC and Low Voltage Directives (89/336/EEC and 73/23/EEC)
Dimensions 290 mm (width) x 220 mm (height) x 130 mm (depth)
17
Page 21

www.pure.com
PURE Digital, Imagination Technologies Ltd., Home Park Estate, Kings Langley, Herts, WD4 8LZ, UK
12P38
+44 (0)1923 277488 sales
+44 (0)1923 270188 +44 (0)1923 277477 support
support@pure.com
sales@pure.com
 Loading...