

Page 1
Evoke
F4 with Bluetooth
Page 2

Page 3
1
ES
ENGLISH
FR
Thank you for choosing Evoke F4 with Bluetooth. This wireless music and
radio system brings a world of listening simply and easily within your reach.
You can use it to enjoy music streamed wirelessly from your iOS or Android
device or from your PC or Mac; to listen to any Internet or FM radio station;
and to play thousands of podcasts, on-demand radio programs and evocative
ambient sounds. You can also access the Pure Connect cloud-based
on-demand subscription streaming service to gain instant access to millions of
music tracks. This manual will get you up and running in no time, and explains
how to make the most of your Evoke F4. We’re constantly improving and
adding new features to our products. To take advantage of any enhancements
made since your product was shipped, please visit support.pure.com/us
where you can download the latest version of this user guide in PDF format.
SelectVolume
Evoke
F4 with Bluetooth
Page 4

2
Important Safety Instructions
1. Read these instructions – All the safety and operating instructions should be read before this product is
operated.
2. Keep these instructions – The safety and operating instructions should be retained for future reference.
3. Heed all warnings – All warnings on the appliance and in the operating instructions should be adhered to.
4. Follow all instructions – All operating and use instructions should be followed.
5. Do not use this apparatus near water.
6. Clean only with dry cloth.
7. Do not block any ventilation openings. Install in accordance with the manufacturer’s instructions.
8. Do not install near any heat sources such as radiators, stoves, or other apparatus that produce heat.
9. Only use attachments and accessories specified by the manufacturer.
10. Unplug the apparatus during lightning storms or when unused for long periods of time.
11. Do not use the mains adapter outdoors.
12. Be aware of volume levels when using headphones, excessive volume can damage your hearing.
13. Cease use immediately if apparatus exhibits any signs of mechanical damage, excessive temperature,
swelling or splitting.
14. Refer all servicing to qualified service personnel. Servicing is required when the apparatus has been
damaged in any way, such as power-supply cord or plug is damaged, liquid has been spilled or objects
have fallen into the apparatus, the apparatus has been exposed to rain or moisture, does not operate
normally, or has been dropped.
15. To reduce the risk of electric shock, do not remove cover (or back) as there are no user-serviceable parts
inside. Refer servicing to qualified personnel.
16. Use only power supplies listed in the user instructions (with model no. DSA-24CA-05 055357,
manufactured Pure).
17. Servicing is required when the apparatus has been damaged in any way, such as power supply cord or
plug is damaged, or the apparatus does not operate normally, or has been dropped.
18. WARNING To reduce the risk of fire or electric shock, do not expose this apparatus to rain or moisture.
The apparatus shall not be exposed to dripping or splashing and that objects filled with liquids, such as
vases, shall not be placed on apparatus.
19. CAUTION: Danger of explosion if battery is incorrectly replaced. Replace only with the same or equivalent
type.
20. WARNING: The direct plug-in adapter is used as disconnect device, the disconnect device shall remain
readily operable.
21. This equipment is a Class II or double insulated electrical appliance. It has been designed in such a
way that it does not require a safety connection to electrical earth.
Damage to hearing can occur with consistent exposure to high volume when using headphones. Always
check the volume level before inserting headphones into your ears.
Use of headphones while operating a vehicle is not recommended and is illegal in some areas. Stop
listening to your radio if you find it distracting while operating any type of vehicle or performing any other
activity that requires your full attention.
Page 5

3
EN
Contents
4 Getting started
4 Quick start
5 Controls and sensors
6 Rear panel
6 Switching between Sleep, Standby and
On
7 Screen icons
8 Internet listening via Pure
Connect
8 Listening to Internet radio
9 Listening to other Internet content
10 Music streaming
10 Pure Connect tagging service
11 SiriusXM
12 Streaming from the Pure
Connect app
12 Download the Pure Connect app
12 Selecting Evoke or other Pure Jongo
compatible device in the Pure Connect
app
13 Streaming music from a PC
or Mac
13 Listening to streamed tracks on Evoke
13 Listening to FM radio
13 Changing FM stations
13 Storing a preset
13 Listening to a preset
14 Listening to audio from a
USB memory stick
14 Using Bluetooth
15 Recording radio programs
15 Instant recordings
15 Timed recordings
16 Setting alarms and timers
16 Setting an alarm
16 Setting the sleep timer
16 Setting the kitchen timer
16 Cancelling a sounding alarm or timer
16 Snoozing a sounding alarm
16 Changing the alarm snooze time
16 Cancelling a snoozing alarm
17 Options and settings
17 Pure Connect settings
17 FM settings
17 Network/USB media
18 Audio settings
19 Setting the clock
19 Changing the language shown on the
display
19 Changing Evoke’s name
19 Bluetooth settings
20 Upgrading Evoke
20 Resetting Evoke to factory settings
21 Network settings
22 Using an optional ChargePAK
F1
22 Installing a ChargePAK
23 Help and advice
24 Specifications
Page 6
4
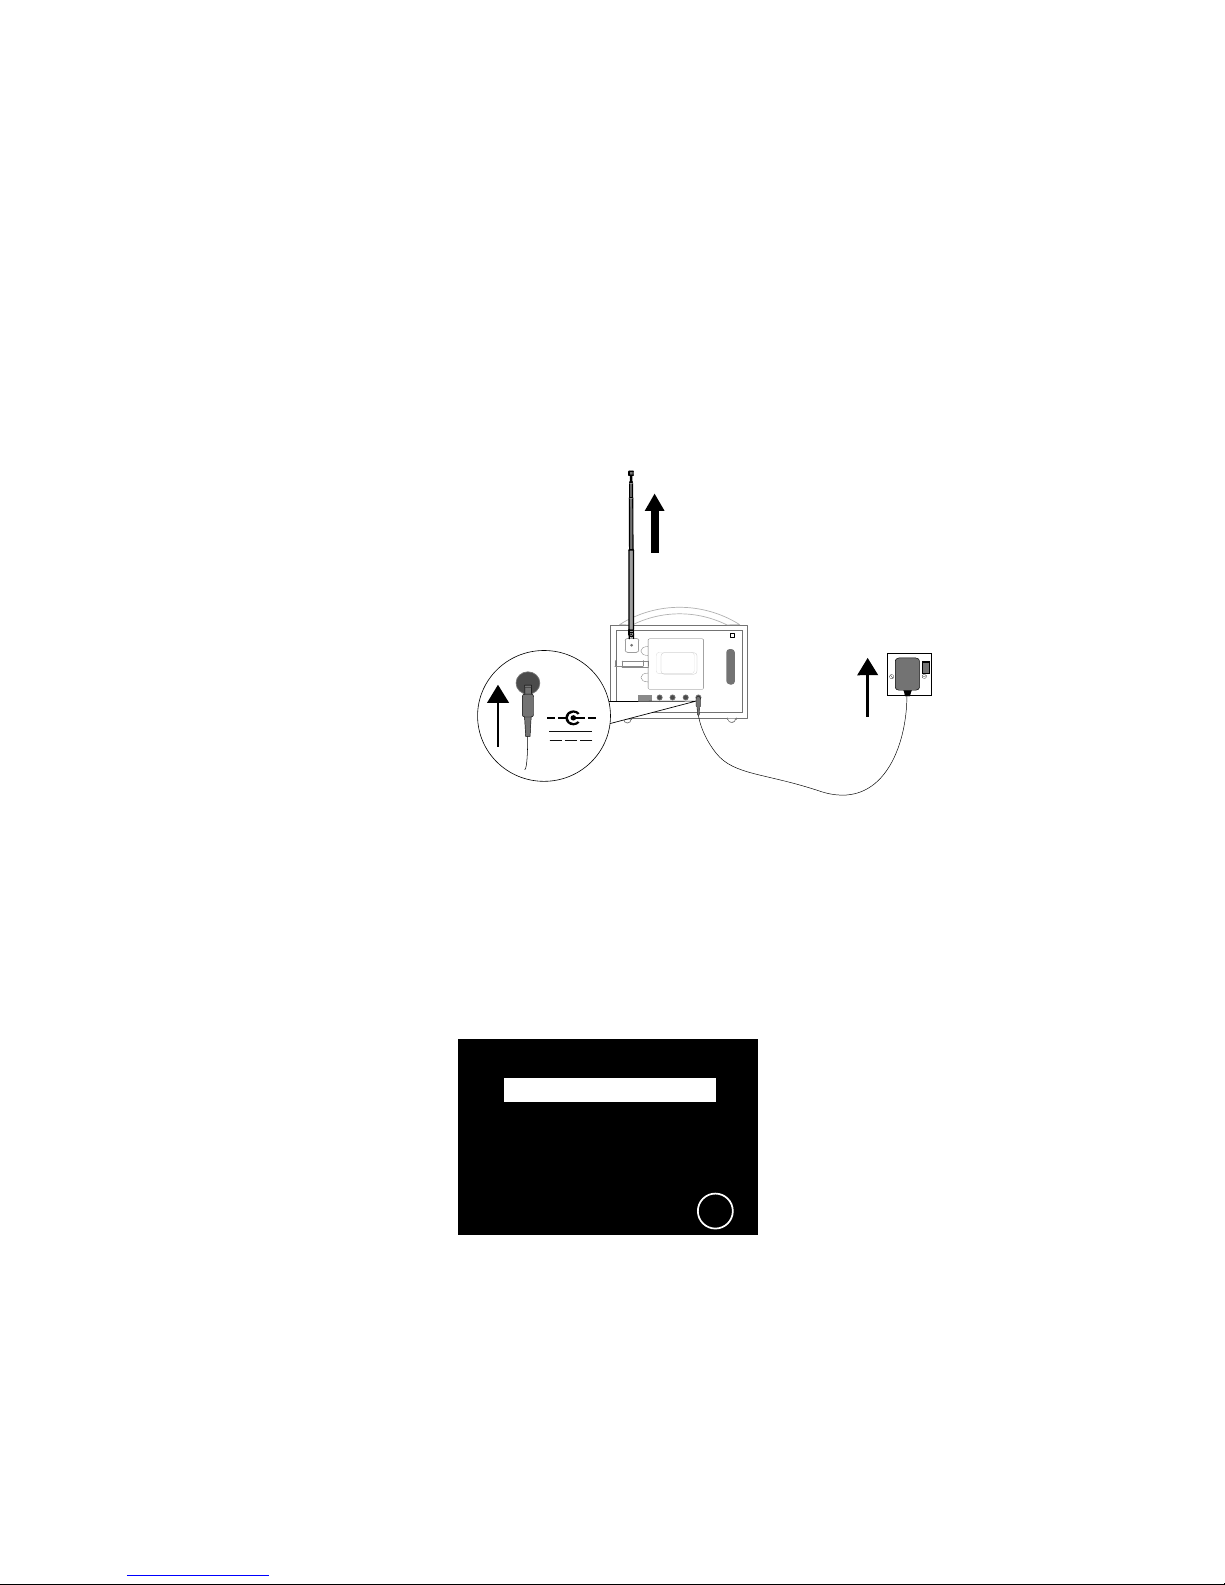
Extend the aerial and insert the connector of the supplied power adapter into the 5.5V DC
input on the rear of Evoke. Plug the adapter into the power supply. Pure is displayed briefly
on-screen.
Getting started
Quick start
Note: If you have a ChargePAK F1 rechargeable battery (sold separately) fit it now before plugging in
Evoke. See page 22 for more information.
Choose your display language (English, French or Spanish) by turning the Select dial to
highlight the language you want. Push the Select dial in to confirm your choice. Repeat this
process to select the time zone and region closest to you.
1
2
3
Stereo Out
Aerial
Aux Speaker
Stereo OutAux Speaker
5.5V DC
Network/USB media
OK
Pure Connect
FM radio
Auxiliary input
Settings
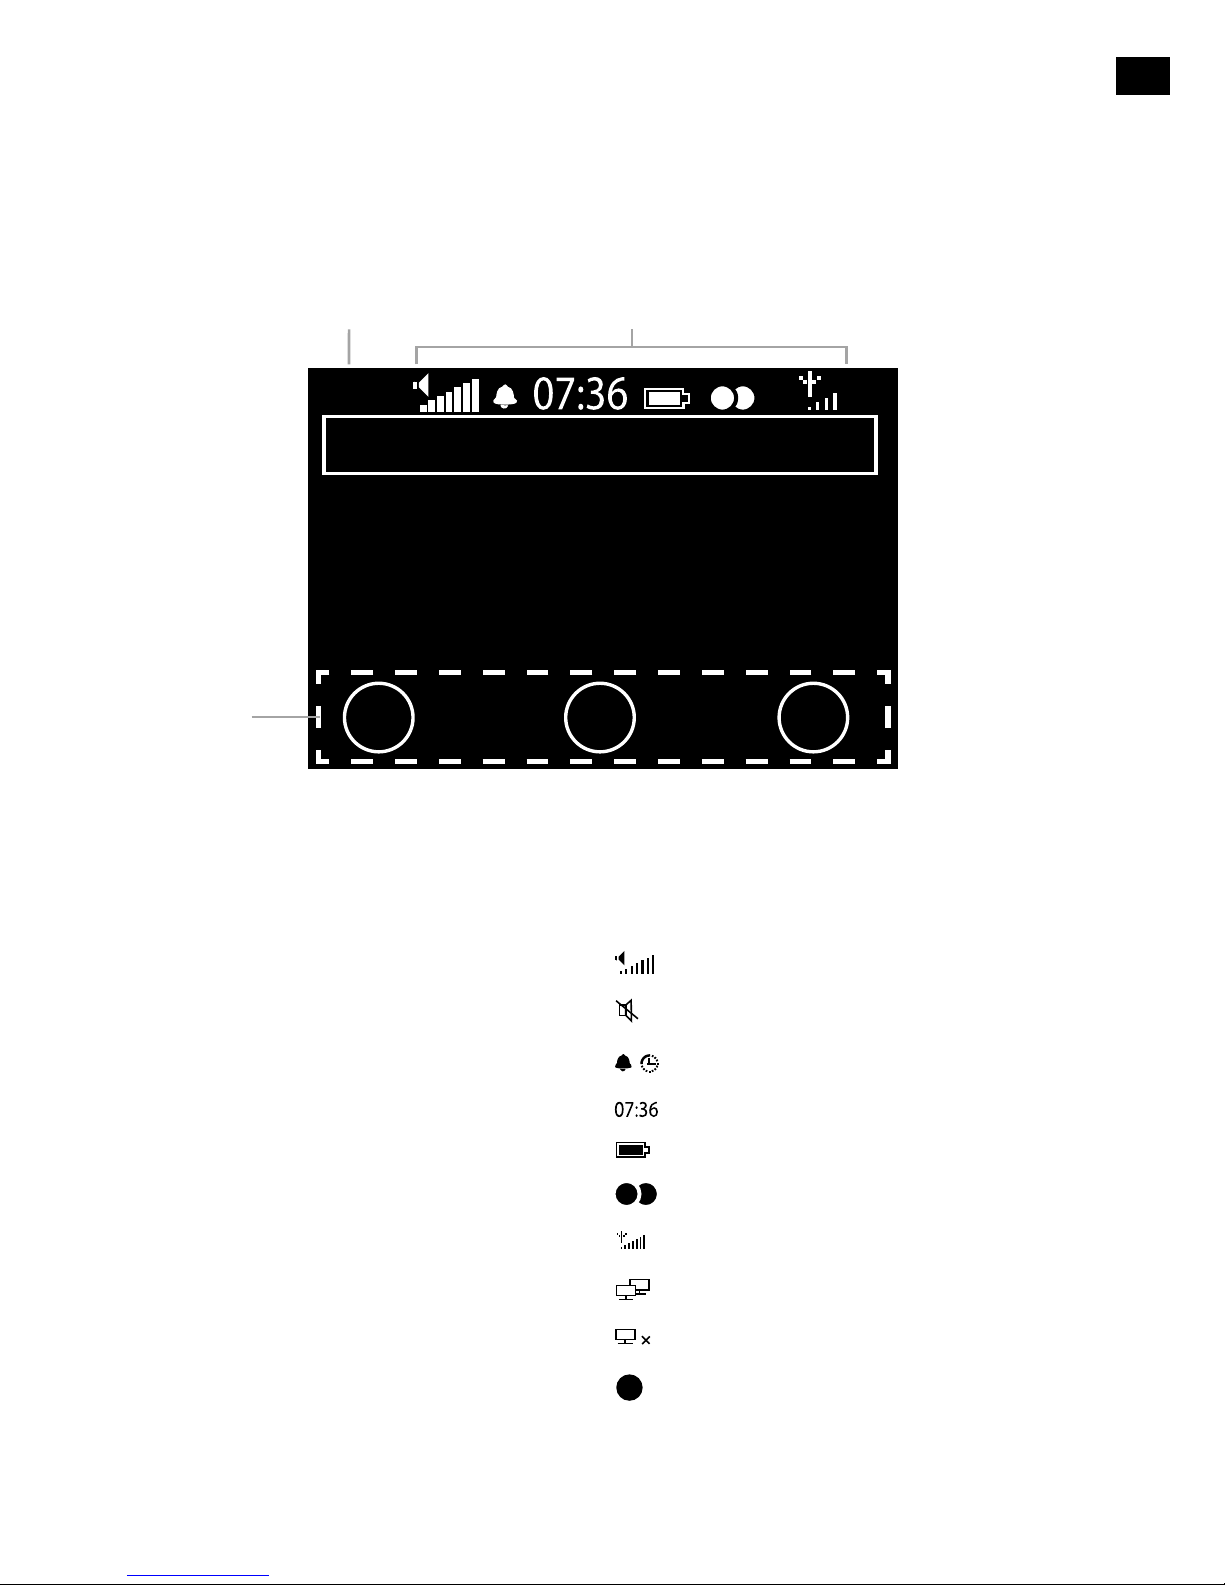
The Home screen is displayed:
Turn the Select dial to highlight and press to select one of the following options:
Pure Connect
See page 8
Network/USB media See page 13
FM radio See page 13
Auxiliary input See page 6
To change any of Evoke’s settings, tap the Settings button (see page 17).
Page 7
5
EN
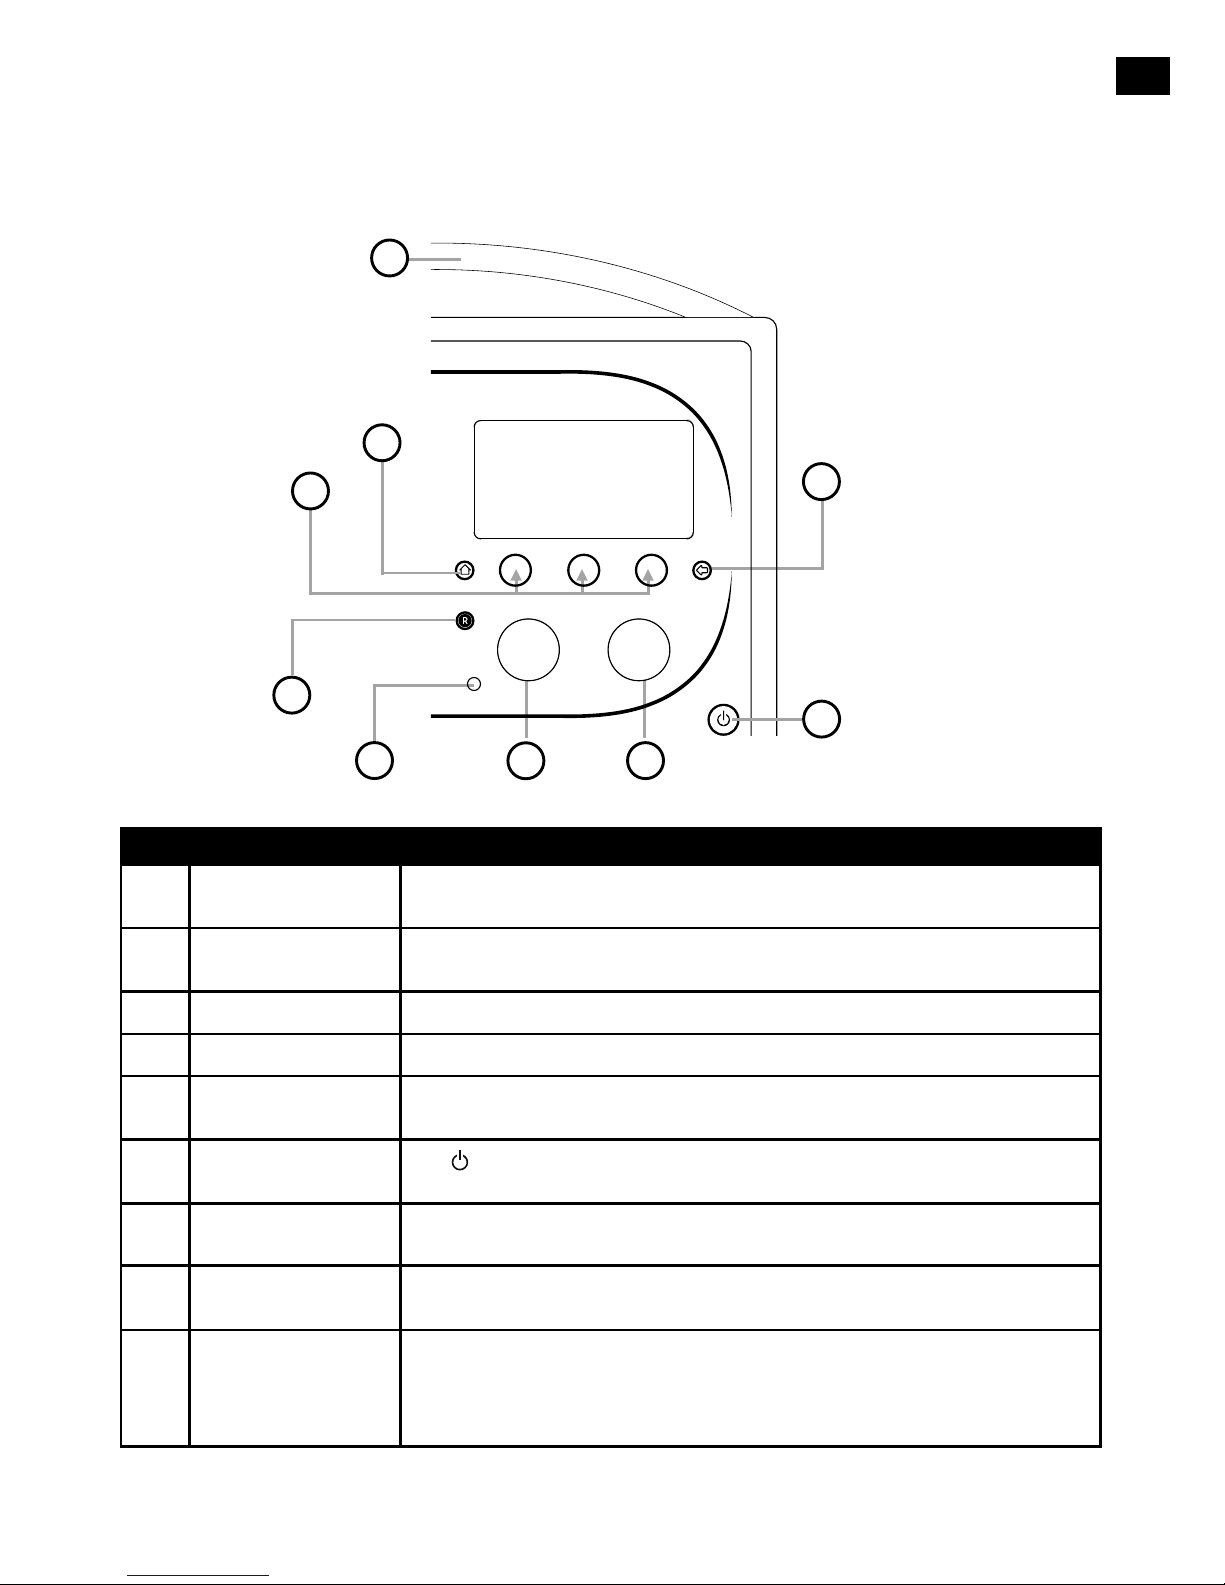
Controls and sensors
No. Control Description
1 Home Tap to return to the Home screen.
2
Context-sensitive
touch buttons
Tap the button that corresponds to the function shown on screen that you
want to use.
3 Back Tap to go back to the previous screen.
4 Volume/mute dial Turn to adjust volume. Push to mute and un-mute.
5 Select dial
Turn to navigate menus, stations or options and push to select an item.
Push to pause a media track or podcast.*
6 Standby touch key
Tap
to switch between Sleep, Standby and On. See page 6 for
more information.
7 Light sensor Do not cover. Adjusts the display brightness according to the light levels in
your room (only works when brightness level is set to ‘Automatic’).
8 Record button Tap to instantly record the internet radio station that is playing. See page
15 for more information.
9
SnoozeHandle
Tap to snooze the alarm. Grip and hold to brighten the display to maximum
brightness for 3 seconds.
Note: The alarm will not sound if Evoke is powered down and if Evoke is not
connected to mains power.
* The > symbol indicates that you will need to use the same control to navigate through the various menu options.
SelectVolume
1
2
3
4
5
6
7
8
9
Page 8

6
Rear panel
Switching between Sleep, Standby and On
Evoke has three power modes, Standby, Sleep and On. In Standby, Evoke uses minimal power. In Sleep
mode, Evoke remains connected to the wireless network (once attached) and is ready to stream music.
See page 12 for more information.
To enter Sleep mode, tap Standby.
To enter Standby mode, tap and hold Standby.
Once in Sleep/Standby mode, tap Standby to switch to On.
Note: If you press the Standby button and Evoke is being powered by the ChargePAK F1, Evoke will
power off and not enter the Sleep power state.
1. USB connector for USB Ethernet adapter, Bluetooth adapter or a USB drive for recording/playback.
Also used for upgrading Evoke’s software when an internet connection is not available.
2. Output connector for the Evoke F4 stereo speaker (sold separately).
3. Output connection for headphones (3.5mm).
4. 3.5mm auxiliary input connection for an iPod, MP3 player, etc.
5. 5.5V DC input connection for supplied mains adapter.
6. Acoustically tuned bass reflex port (do not cover).
7. Compartment for ChargePAK F1 rechargeable battery (sold separately).
8. USB Bluetooth adapter.
Aerial
5.5V DCStereo speaker Aux in
7
1 2 3 4 5
6
8
Page 9
7
EN
Welcome to Pure Connect
Add
Wide range of great content
PC
♥
Options
Screen icons
Source Icons
*ChargePAK F1 sold separately.
Source Icons
PC
Pure Connect
Volume level
MP Media player
Mute
FM FM
Alarm/timer set indicators
AUX Auxiliary input
Clock
PS Music streaming
ChargePAK battery level*
Stereo signal
Signal strength (FM or Wi-Fi)
Ethernet connection active
Ethernet connection lost
R
Timed recording indicator
Contextsensitive
buttons
BT Bluetooth
Page 10
8
Internet listening via Pure Connect
Pure Connect is an online media portal that provides you with quick and easy access to thousands of
internet radio stations, on-demand programs, podcasts and ambient sounds. You can enjoy all this content
on your Evoke, on smartphones and tablets running the Pure Connect app, and on the Pure Connect
website. You can also use Pure Connect to access additional subscription services such as the Pure
Connect’s cloud-based music streaming service*, which provides you with instant access to millions of
music tracks, and SiriusXM, which provides you with access to over 140 additional satellite radio channels.
To access Pure Connect on Evoke, you will need to connect Evoke to your network. See below for more
information.
After connecting Evoke to your network, you can register your Evoke on the Pure Connect website. We
recommend registering your Evoke as this allows you to manage your Pure Connect favorites and access
additional services like music streaming and SiriusXM.
Connecting to the Internet
Using your wireless network
1. Tap Home and select Pure Connect from the Home screen.
Evoke will scan for wireless networks and show them in a list.
2. Select your network. If your network requires a key, follow steps
3-4.
3. Enter your network key or password by turning and pressing
the Select dial to highlight and select characters. Select sp
to insert a space. Tap More... for lower-case; tap it again for
symbols. Tap Delete to remove the last character.
4. Tap Save to finish. Evoke will connect to your network.
Helpful hint: Your Wi-Fi key is case sensitive, make sure to enter it
exactly as shown.
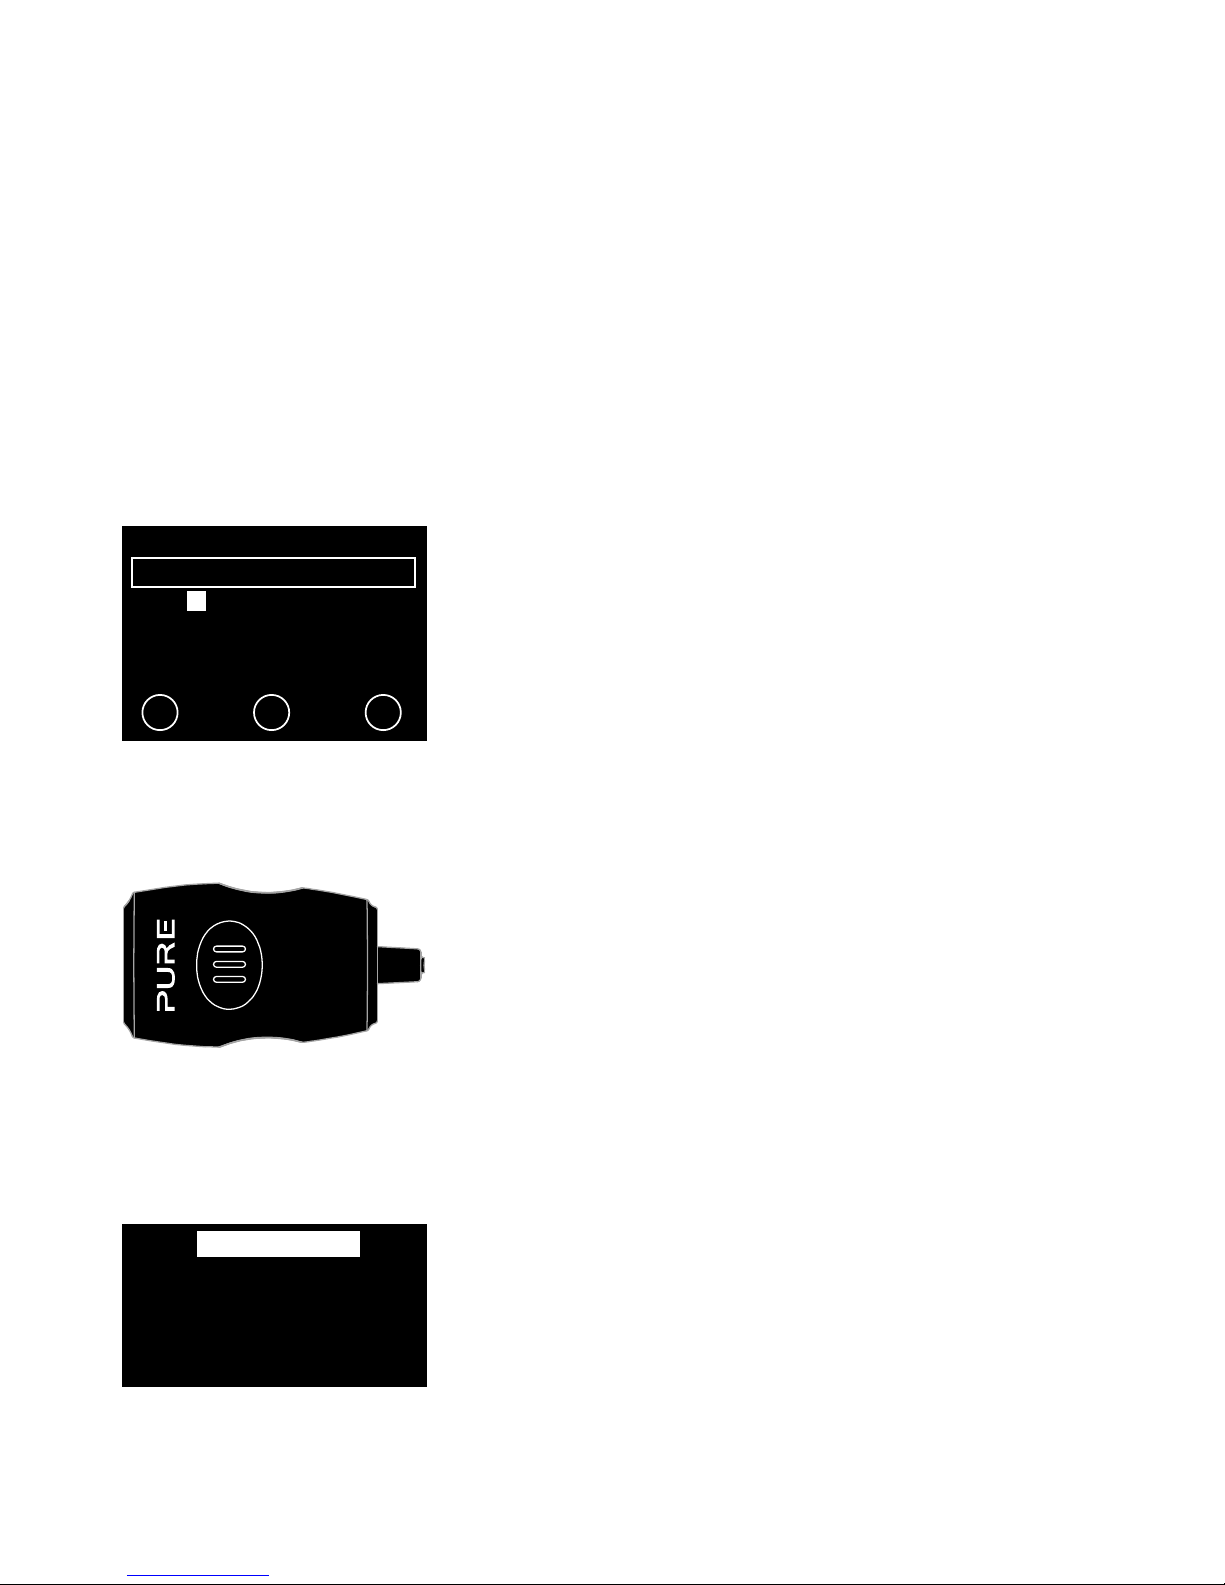
Using an Ethernet connection
You can also connect Evoke to the Internet using the optional Pure
USB Ethernet adapter.
To use the Pure USB Ethernet adapter, connect your network cable
to the adapter, then connect the adapter to the USB socket on your
Evoke. The adapter USB light comes on and a connection to your
network is made automatically.
The Ethernet connection status is shown on screen (see page 7).
A B C DEFGHIJKLM
NOPQRSTUVWXYZ
sp0123456789
Enter key or password
Delete Save More...
6578616D706C
LAN
USB
100Mbps
LAN
USB
My favorites♥
Pure Music
SiriusXM
Live Radio
Listen Again
Podcasts
Pure Connect menu
Listening to Internet radio
Thousands of radio stations around the world broadcast online. To
listen, select Pure Connect from the Home screen. Your Evoke will
tune to the last station you listened to or show you the stations list.
Turn the Select dial to enter the Pure Connect menu. Select Live
Radio to see a list of currently available Internet stations. Use the
Select dial to browse the list and push to tune in. You can add a
station to your Favorites by tapping Add.
* You will need to subscribe to our Blue or Violet subscription level to access music streaming on Evoke. For more information on the
various subscription levels visit connect.pure.com.
Page 11

9
EN
Search for a station
Tap Search when browsing the station list to search for stations by
Name, Genre, Country, Language, Quality (sound quality), or any
combination of these. Use the Select dial to set your options and tap
Go to see the list of results.
Searching for an internet radio station using Quick Jump
The Quick Jump function lets you to search for stations that begin with
a certain letter. To use Quick jump:
1. Tap the A-Z button to open the Quick Jump box.
2. Turn and press the Select dial to select the first letter of the
radio station that you want to search for.
Listening to other Internet content
Tap Home and select Pure Connect from the Home screen, then one
of the following content types:
Listen again
Select this option to access the BBC Listen Again service, which lets
you catch up with any BBC radio shows that you might of missed.
These archived radio programs are available to listen to for a set period
of time after the live broadcast.
Podcasts
Podcasts are prerecorded audio shows on a wide variety of subjects
such as comedy, arts, business, and culture, for you to enjoy anytime.
Pure Sounds
Our library of evocative ambient sounds, including birdsong,
cityscapes, and waves on shore.
Creating a Pure Connect account
All you need to create a Pure Connect account and register your Evoke
is a valid e-mail address. We’ll need to send you a couple of e-mails
and you won’t be able to complete the process without access to
them.
To create a Pure Connect account:
1. Open your Internet browser.
2.
Go to connect.pure.com.
3. Click Create account and follow the instructions on-screen.
Register your Evoke on Pure Connect
1. Log in to Pure Connect, click Me and select Devices. You’ll
see your registration code.
2. From Pure Connect settings on your radio, select Register
with Pure Connect to enter your code. Use the Select dial to
highlight and select characters; tap Del to erase characters;
and tap Save to finish.
Congratulations! You’ve registered your Evoke on Pure Connect. The
favorites you’ve created on Pure Connect will be visible on your Evoke,
and those you’ve created on Evoke will appear on Pure Connect.
Clear all
Clear
Go Lounge
Name [All]
Genre [Classical]
Country [Netherlands]
Language [Dutch]
Quality [All]
Station search screen
Wind chimes in suburbs
Wooden lock
Accoustic guitar (E,A,D...
Active daytime birds
Arctic Blizzard
Browsing Pure Sounds
connect.pure.com
Optional registration at
connect.pure.com adds
advanced features to your
radio. Register now?
Ye
sN
everLater
Enter registration code
DelSav
eM
ore...
QPZKE
A B C D E F G H I J K L M
N O P Q R S T U V W X Y Z
sp 0 1 2 3 4 5 6 7 8 9
Page 12

10
Music streaming
Pure Connect’s music streaming is a cloud-based on-demand subscription service that gives you instant
access to millions of music tracks from one of the world’s largest music catalogs covering almost every
conceivable artist and genre. You can listen on our music streaming and radio systems, on an Apple or
Android device running the Pure Connect app or on the Pure Connect website.
Pure Connect’s music streaming service is only available in certain countries. Please see http://www.pure.com/availability/ for details.
Accessing Pure Connect’s music streaming on Evoke
1. Tap Home and select Pure Connect from the Home screen.
2. Turn and press the Select dial to select Pure Music.
3. Turn and press the Select dial to select one of the following options:
My Tracks: Select this option to access the tracks that you have purchased from Pure Connect.
Catalog: Select this option to browse or search the complete music catalog on your Evoke.
By playlist: Select this option to listen to playlists created by you at connect.pure.com or via the Pure
Connect App (see “Streaming from the Pure Connect app” on page 12).
Pure Connect tagging service
The Pure Connect tagging service can be used to identify, bookmark and purchase tracks that are
playing on an FM or Internet radio station. In addition to accessing your favorite music tracks, the Pure
tagging service also automatically back catalogs any music by similar artists that you might be interested
in, allowing you to explore something completely new or rediscover forgotten favorites.
Note: To use the Pure Connect tagging service, your Evoke will need to be connected to the internet
and you will need a Pure Connect account. See page 9 for more information on setting up a Pure
Connect account.
1. Tap the Tag button.
2. Evoke will identify the name of the song that is being played and allow you to buy it (or stream it if
you have a music streaming subscription).
Note:
To access your tagged tracks list, you will need to log in to your Pure Connect account at
connect.pure.com.
Note: The Pure Connect tagging service will attempt to identify and match any playing track using our
extensive catalog. Purchasing and streaming tracks is subject to availability.
Page 13

11
EN
SiriusXM
SiriusXM is a subscription service that is available in the USA that provides access to live radio and
on-demand content from over 140 satellite radio stations.
You can listen to SiriusXM on Evoke by linking your SiriusXM account to Evoke on the Pure Connect
website if you have a valid subscription to the SiriusXM internet radio service.
Linking Evoke to your SiriusXM account
1. Log in to Pure Connect, click Me and select My Account.
2. Click the Add credentials button in the SiriusXM Subscription panel to open the SiriusXM
Subscription page.
3. Enter your SiriusXM username and password and click the Save credentials button.
You will now be able to access SiriusXM on compatible products that are registered on your Pure
Connect account.
Accessing SiriusXM on Evoke
1. Press Home and select Pure Connect.
2. Turn and press the Select dial to select SiriusXM.
3. Turn and press the Select dial to select one of the following
options:
Live radio: Select this option to view the list of live radio station
that are available through the SiriusXM service. You can choose
to view all available radio stations or filter the list that is displayed
by a specific genre.
On Demand: Select this option to catch up with any radio shows
that you may have missed. You can choose to view all available
shows or filter the list that is displayed by a specific genre.
Pure Connect My Account page
SiriusXM Subscription page
SiriusXM Live Radio category
selection
Search
All
Howard Stern
Latin & World
Music
News & Issues
Page 14

12
Streaming from the Pure Connect app
Download the Pure Connect app
You can download the Pure Connect app on your smartphone or tablet from the Apple App Store or
Google Play.
You can use the Pure Connect app to stream any music stored on your smartphone or tablet as well as
all the content available on Pure Connect to Evoke and other Jongo compatible devices.
Note: Any devices that you want to use with the Pure Connect app will need to be on the same network.
from the Apple App Store
from Google Play
Selecting Evoke or other Pure Jongo compatible device in the Pure
Connect app
With the Pure Connect app you can stream to a single Jongo device or multiple Jongo devices
simultaneously.
To start streaming content:
1. Select the content that you want to stream in the Pure Connect app.
2. Tap the icon in the app player bar on your iOS or Android device to view a list of available
devices on your network.
3. Tap the icon next to the Pure Jongo compatible devices that you want to stream to.
Your selected content will start playing on the Jongo devices that you selected.
See the help supplied with the app for more information on streaming to a Jongo device.
A
Pure Connect app
Page 15
13
EN
You can stream music stored on your computer or on a UPnP-compatible Network Attached Storage
(NAS) device to Evoke. To stream music from your computer you will need to install media server
software on it.
Listening to streamed tracks on Evoke
1. Tap Home and turn and press the Select dial to choose Network/USB media player from Home
screen.
2. Turn and press the Select dial to choose the media player that you want to stream music from.
3. Turn and press the Select dial to navigate and select the track or playlist.
Playing/pausing audio playback
Press the Select dial to pause/play a track that is playing on Evoke.
Seeking within a track
While paused, you can hold down the and buttons to seek within the track.
Skipping backwards and forwards between tracks
If you are streaming audio on Evoke from a media server, you can tap the buttons to skip back/
forward between tracks.
Streaming music from a PC or Mac
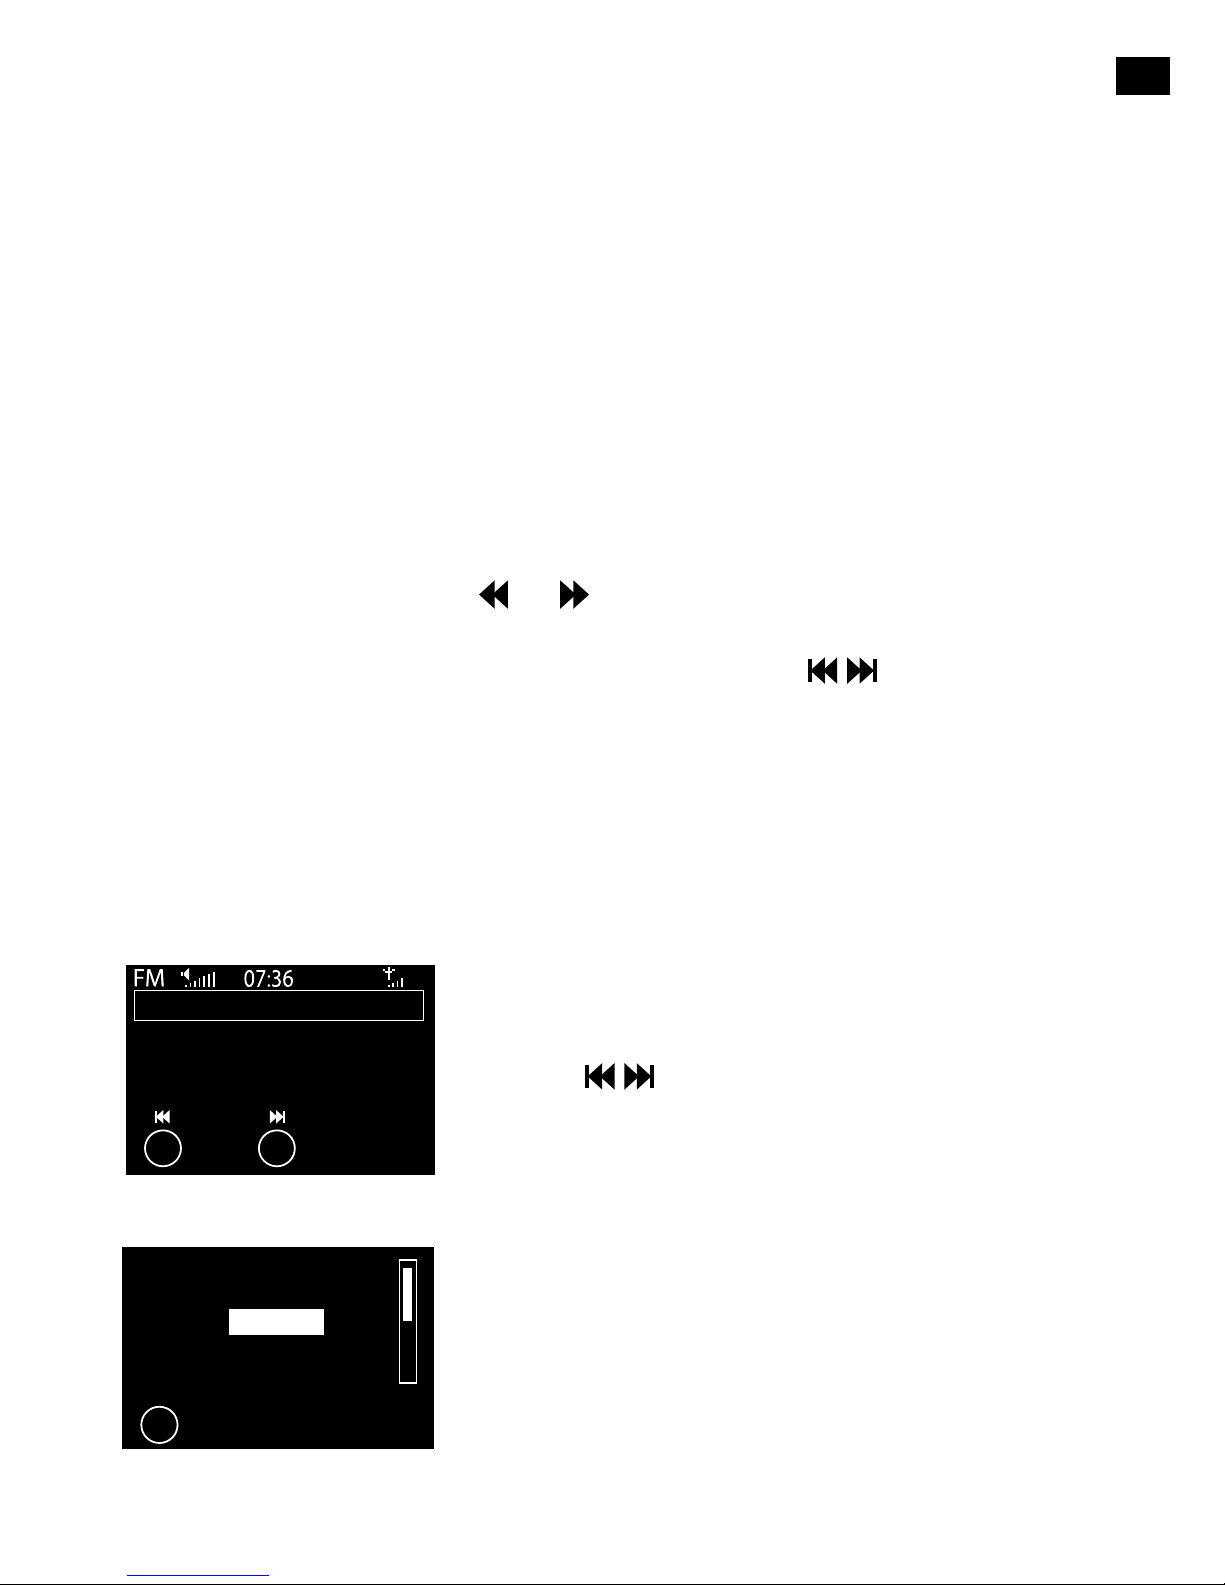
Listening to FM radio
Changing FM stations
Seek tuning
1. Turn the Select dial.
2. Tap the buttons to seek to the next or previous FM
radio station that has a strong signal.
Manual tuning
Turn the Select dial right or left to step up or down 0.05 MHz.
Storing a preset
Tune to the station you want to store as a preset and tap Presets.
Turn the Select dial to highlight a preset number. Tap Add to store
the preset. (You can replace existing presets.)
Listening to a preset
Tap Presets, select the station that you want to recall and tap
Listen, or push the Select dial.
Extend the aerial, then tap Home and select FM radio from the Home screen.
Buzz FM
OK
Add
Empty 1
Empty 2
Empty 4
Empty 5
♥
Selecting a preset
Using seek tuning to change
FM stations
103.30
Seek tune
Options
Page 16

14
To listen to tracks from a USB memory stick:
1. Tap Home and turn and press the Select dial to choose Network/USB media from the Home
screen.
2. Turn and press the Select dial to select the USB device.
3. Turn and press the Select dial to specify the type of audio (Playlists, Artists, Genres or Pure
recordings) that you want to listen to.
4. Turn and press the Select dial to select the audio that you want to listen to,
Playing/pausing audio playback
Press the Select dial to pause/play a track that is playing on Evoke.
Seeking within a track
While paused, you can hold down the and buttons to seek within the track.
Skipping backwards and forwards between tracks
Tap the buttons to skip back/forward between tracks.
Evoke can play music from a USB memory stick connected to the USB port on the back. Evoke supports
WMA (Standard V9), AAC, MP3 and MP2 audio files. By default, Evoke looks for audio on your network if
you have not connected a USB memory stick to the back of Evoke.
Listening to audio from a USB memory
stick
Using Bluetooth
If your phone or tablet is capable of storing audio files, you can use Bluetooth to stream any music stored
on your phone or tablet to Evoke.
Note: Adding a Bluetooth device varies on different mobile devices. See your Bluetooth mobile device
manual for specific information.
Preparing Evoke to stream audio using Bluetooth
1. Ensure that the Bluetooth adapter is inserted into Evoke’s USB connector.
2. Enable Bluetooth on your mobile device.
3. On your mobile device, select the option to add a new Bluetooth device. On some mobile devices you
may need to select the search or scan option.
4. Start the pairing process on your mobile device. Do this by selecting Evoke from the list of available
devices that appear on the mobile device’s screen. This will connect automatically once paired.
You will now be able to start streaming audio to Evoke from your Bluetooth device.
Note: You will need to disconnect any connected mobile Bluetooth devices from Evoke to stream using
Wi-Fi or to stream from a different Bluetooth device. Bluetooth will automatically disconnect if you go out of
range of Evoke. To manually disconnect you will usually need to use the Bluetooth settings on your
mobile device.
Note: For more help with Bluetooth , see our “Help and advice” on page 23.
Page 17

15
EN
Recording radio programs
Evoke allows you to record live radio from an internet (via Pure Connect) radio station. You can either
schedule recordings or record instantly. To record, you need to connect a USB memory stick to the USB
port on the back of Evoke. The length of time that you can record depends on the amount of space
available on your USB memory stick and the station that you are recording. A 2GB USB memory stick can
record around 15 to 30 hours of internet radio (based on the most common station data rates of 128kbps
and 64kbps, respectively). If your USB memory stick runs out of space during a recording, Evoke will stop
recording and display a message.
Note: You can only record live radio if you have selected Pure Connect as the audio source.
Note: You can not record any live radio or listen again content from the SiriusXM subscription service.
Instant recordings
To record instantly you will need to:
1. Tap Home to display the home menu.
2. Turn and press the Select dial to select Pure Connect.
3. Tune into the radio station that you want to record and tap the Record button on the front of Evoke to
begin recording.
To stop instant recording, tap the Record button on the front of Evoke.
Timed recordings
You can use the timed recordings function to schedule a recording from an internet radio station that has
been added to your favorites.
1. Tap Home to display the Home menu.
2. Tap Settings and turn and press the Select dial to select Timed recordings.
3. Turn and press the Select dial to choose a recording slot.
4. Tap the Edit button.
5. Turn and press the Select dial to turn the recording On or Off.
6. Turn the Select dial to adjust the hour the recording should start and press to confirm. Repeat to set
the minutes.
7. Turn the Select dial to adjust the hour the recording should end and press to confirm. Repeat to set
the minutes.
8. Turn the Select dial to set the days the timed recording should occur . Choose between Once only,
Daily, Weekdays, Weekends, Every Monday, Every Tuesday, Every Wednesday, Every Thursday,
Every Friday, Every Saturday and Every Sunday then press the Select dial to confirm.
9. Press the Select dial to confirm that you want to record content from Pure Connect.
10. Turn and press the Select dial to choose the radio station that you want to record from your favorites
list.
11
. A timed recording is indicated by R in the icon bar.
Page 18

16
Setting alarms and timers
Evoke has two alarms and two types of timers (kitchen and sleep). To set an alarm or a timer up, tap Home
to display the Home screen. Tap Settings. Turn and press the Select dial to select Alarms and timers.
Setting an alarm
1. From the Alarms and timers menu, turn and press the Select dial to select either Alarm 1 settings
or Alarm 2 settings and tap Edit.
2. Turn and press the Select dial to turn the alarm On or Off.
3. Turn the Select dial to adjust the hours and press to confirm. Repeat to set the minutes.
4. Turn the Select dial to set the days the alarm sounds. Choose between Once only, Daily,
Weekdays, Weekends, Every Saturday and Every Sunday then press the Select dial to confirm.
5. Turn the Select dial to set the alarm type. Choose between Pure Connect station, FM radio or Tone
then press the Select dial to confirm.
6. If you’ve set the alarm type as Pure Connect station or FM radio, turn the Select dial to choose
between Last tuned (last station tuned to) or select a favorite Pure Connect station or FM preset if
you have any saved.
7. Turn the Select dial to change the alarm volume and press to confirm.
8. A set alarm is indicated by in the icon bar.
Note: If you are powering Evoke using a ChargePAK, any alarms that are set will not go off unless Evoke
is powered on.
Setting the sleep timer
The sleep timer switches your radio into standby/sleep after a specified amount of time. From the Alarms
and timers menu, select Sleep timer. Use the Select dial to adjust the length of the sleep timer in 15
minute steps from 15 mins to 1 hour 30 mins. Tap Save to store.
A set sleep timer is indicated by
in the icon bar.
Setting the kitchen timer
The kitchen timer sounds a beeping tone after a set period of time.
From the Alarms and timers menu select Kitchen timer and use the Select dial to adjust the length of
time. Tap Mins to toggle between minutes and hours. Tap Save to confirm.
A set kitchen timer is indicated by
in the icon bar.
Cancelling a sounding alarm or timer
To cancel a sounding alarm or timer, push either the Select or Volume dial. A sounding alarm will
automatically cancel after 1 hour.
Note: Pushing the Volume dial will not cancel a tone alarm.
Warning: When powered by ChargePAK F1, tapping Standby switches the radio off and any set alarms or
timers will not sound.
Snoozing a sounding alarm
Tap the Snooze button or the SnoozeHandle to snooze a sounding alarm for the specified time (default 9
minutes).
Changing the alarm snooze time
From the Alarms and timers menu, select Snooze time. Use the Select dial to adjust the duration of the
snooze from 5 to 15, then either 20/25/30/40 minutes, or 1 hour.
Cancelling a snoozing alarm
To cancel a snoozing alarm push either the Select or Volume dial.
Page 19

17
EN
Pure Connect settings
These settings are only available when listening to Pure Connect. Tap Home to display the home menu
and then tap Settings. Turn and press the Select dial to select Pure Connect.
Pure Music repeat
Turn and press the Select dial to select a repeat option for the specified content on Pure Connect’s cloudbased on-demand streaming service. Select All to specify that all tracks should be repeated. Select Track to
specify that the track currently playing on Evoke should be repeated. Select Off to disable the repeat option.
Pure Music Shuffle
Turn and press the Select dial to select a shuffle option for the specified content on Pure Connect’s cloudbased on-demand streaming service. Select On to shuffle all tracks. Select Off to disable shuffling.
Clear favorites
Select Clear favorites to remove all stations/podcasts/Pure Sounds from your favorites list, as well as
from Pure Connect if your radio is connected.
Register with Pure Connect
Enter your Pure Connect registration code if you haven’t already done so. See page 9 for more information.
FM settings
These settings are only available when listening to FM radio. Ta p Home to display the home menu and
then tap Settings. Turn and press the Select dial to select FM.
FM stereo
Switch between receiving FM stations in Mono (default) or Stereo. If listening with headphones or have
connected an auxiliary speaker, you may want to change this setting to stereo.
Network/USB media
These settings are only available when listening to the Network/USB media source. Tap Home to display
the home menu and then tap Settings. Turn and press the Select dial to select Network/USB media.
Repeat
Select the repeat type.
Off (default): Tracks are played until the end of the current album, folder, playlist or search results.
All: Continuously repeats the current album, folder, playlist, or your search results.
Track: Repeats the current track.
Shuffle
Select the order that tracks in the current album, folder, playlist or search results are played:
Off (default): Tracks play in the order that they are displayed on-screen.
On: Tracks play in random order.
Media details
View technical details about your current media server or re-scan for alternative servers:
Current details: Turn the Select dial to view information about the media server, including the media
server name, the software version, the IP address and the port number.
Options and settings
Page 20

18
Display options
Adjust display settings, such as screen duration and the information displayed while you are listening to
each source. Tap Home to display the home menu and then tap Settings. Turn and press the Select dial
to select Display.
Information
Different information displays are available for each audio source:
FM radio
Scrolling text: Text information broadcast by the current station. May include song titles, program
details, news, etc.
Reception info: Displays the current frequency and signal strength.
Time and date: Displays the current time and date.
Pure Connect
Description: Broadcast by the current station. May include song titles and program details. If
streaming a track from Pure Connect’s cloud-based on-demand streaming service this displays the
artist and album of the track.
Location and Genre: Information about the current station, e.g., US Rock.
Time offset: Most stations will be live streams, but otherwise displays how far into a broadcast the
station is. If streaming a track from Pure Connect’s cloud-based on-demand streaming service this
displays how far into the track’s duration you are.
Wi-Fi signal strength: Displays a bar indicating the current Wi-Fi signal strength.
Station URL: Displays the URL address of the current station. If streaming a track from Pure Connect’s
cloud-based on-demand streaming service this displays the URL of the track.
Time and date: Displays the date with a full-screen clock (as in standby mode).
Media player
Track info: Displays artist and album information (id3 tags).
Time offset/duration: Displays a progress bar and timers indicating the current track position.
Wi-Fi signal strength: Displays a bar indicating the current Wi-Fi signal strength.
Time and date: Displays the date with a full-screen clock (as in standby mode).
Active and Standby backlight
You can adjust the duration that the screen is illuminated when switched on or in standby. Select Active
backlight to adjust the display settings that apply when the radio is switched on or Standby backlight
to adjust the display settings that apply when your radio is in standby. Choose from Always on or Off
after 7 seconds.
Active and Standby brightness
You can adjust the brightness of the screen when Evoke is switched on or in standby. Select Active
brightness to adjust the display brightness when Evoke is switched on or Standby brightness to adjust
the display brightness when Evoke is in standby.
Audio settings
You can use this menu to adjust the bass and treble.
1.
Tap Home to display the home menu and then tap Settings. Turn
and press the Select dial to select Audio.
2. Turn the Select dial to adjust the bass level.
3. Tap Treble and turn the Select dial to adjust the treble level.
4. Tap OK when you have finished adjusting the audio settings.
OK Treble
Bass 0
Treble 0
- Bass Audio
Page 21

19
EN
Setting the clock
The clock will automatically set itself using your FM radio signal or your network. However, if you cannot
receive an updated time signal, or see the message ‘Time not available’, you can manually set the time
and date. To set up the time and date manually:
1. Tap Home to display the Home menu and then tap Settings.
2. Turn and press the Select dial to select Alarms and timers > Set clock.
3. Turn and press the Select dial to adjust the time and date.
4. Tap or to move to the previous or next setting.
5. Tap Save when you have finished setting up the time and date.
Changing the language shown on the display
To switch the display language between English, Spanish and French:
1. Tap Home to display the Home menu and then tap Settings.
2. Turn and press the Select dial to select Miscellaneous > Language.
3. Turn and press the Select dial to set the display language.
Changing Evoke’s name
Your Evoke is assigned a name. This name is used so that you can find your radio easily when using the
Pure Connect website to manage your listening. This name is also used to identify Evoke as an available
speaker in Pure Connect and Bluetooth. By default this name is Evoke F4 ******, but here you can change
this to anything you like to make it more memorable.
Note: ****** represents a six digit code that will be unique to each Evoke, which is based on the last six
digits of Evoke’s MAC address.
To assign a custom name to Evoke:
1. Tap Home to display the Home menu and then tap Settings.
2. Turn and press the Select dial to select Miscellaneous > View/change device name. The name
that has currently been assigned to Evoke will display at the top of the screen.
3. Turn and press the Select dial to enter a new name.
4. Tap Save when you have finished setting up the radio name.
Bluetooth settings
You can use the Bluetooth menu to make Evoke visible or invisible to other Bluetooth devices.
1. Tap Home to display the Home menu and then tap Settings.
2. Turn and press the Select dial to select Miscellaneous > Bluetooth
3. Turn and press the Select dial to select one of the following options:
On (Discoverable)
On (Hidden)
Off
Page 22

20
Upgrading Evoke
Software updates may be issued in the future to provide new features and functions We recommend using
automatic software updates for your Evoke, which are delivered via the Wi-Fi connection. If a software
update is available, Evoke will display a message asking if you would like to install the software update.
To upgrade over your network manually
1. Tap Home to display the Home menu and then tap Settings.
2. Turn and press the Select dial to select Miscellaneous > Upgrade.
3. Evoke will search for any available updates. If an update is available the message New version
available: vX.X will appear on screen (X.X is the version number, i.e. v2.1).
4. Tap OK to download and install the new software. This can take up to 5 minutes.
To upgrade using a USB drive (when a network is not available)
Contact Pure technical support (http://support.pure.com/us) for information on how to upgrade Evoke to
the latest version of software.
Warning: Do not switch off Evoke while it is updating.
Resetting Evoke to factory settings
Carry out the following to reset your Evoke to factory settings:
1. Tap Home to display the Home menu and then tap Settings.
2. Turn and press the Select dial to select Miscellaneous > Factory reset.
3. Tap Yes to start the reset.
Page 23

21
EN
Network settings
Evoke can be connected to your network using a Wi-Fi or Ethernet connection. The settings that you can
change are different depending on the type of connection you are using. Tap Home to display the Home
menu and then tap Settings. Turn and press the Select dial to select Network.
Wireless network settings
Connection wizard
Scan for wireless networks to connect to.
View details
Displays your network configuration details.
Network name (SSID)
Encryption method (WEP, WPA or WPA2)
IP address
Network mask
DNS IP address
Router IP address
Device Wi-Fi MAC address
Access point MAC address
Manual setup
Manually configure your wireless network (for advanced users only).
Retry connection: Attempts to reconnect to the selected network.
Network name: Scan for networks or Enter SSID manually to specify a new SSID for your wireless
network.
Encryption mode: Change the encryption mode between WEP, WPA (PSK), WPA2 (PSK) or None.
Evoke automatically detects the mode for your network. Only change this setting if you think the
encryption mode is incorrect.
Key or password: Enter a new encryption key or password.
IP address: Choose between DHCP (dynamic) or Static. If you select Static, another menu will appear
where you will need to specify the IP address settings for Evoke.
Ethernet network settings
View details
Displays your network configuration details.
IP address
Network mask
DNS IP address
Router IP address
Device Wi-Fi MAC address
Ethernet MAC address
Manual setup
Manually configure your wireless network (for advanced users only).
IP address: Choose between DHCP (dynamic) or Static. If you select Static, another menu will appear
where you will need to specify the IP address settings for Evoke.
General network settings
Clear network settings
Evoke will delete all previous Wi-Fi connections, passwords and other network settings. If using the
wireless connection method, this will also perform a fresh scan for available networks.
Page 24
22
ChargePAK makes your Evoke truly portable, so you can enjoy the programs you love in the yard or at
the beach.
Because it’s rechargeable, ChargePAK is much cheaper than regular batteries. It’s also more eco-friendly
because it reduces the amount of toxic substances sent to landfill. And, because it’s a fit-and-forget
solution that charges whenever your radio is connected to the power outlet, it’s much more convenient
than standard rechargeable batteries.
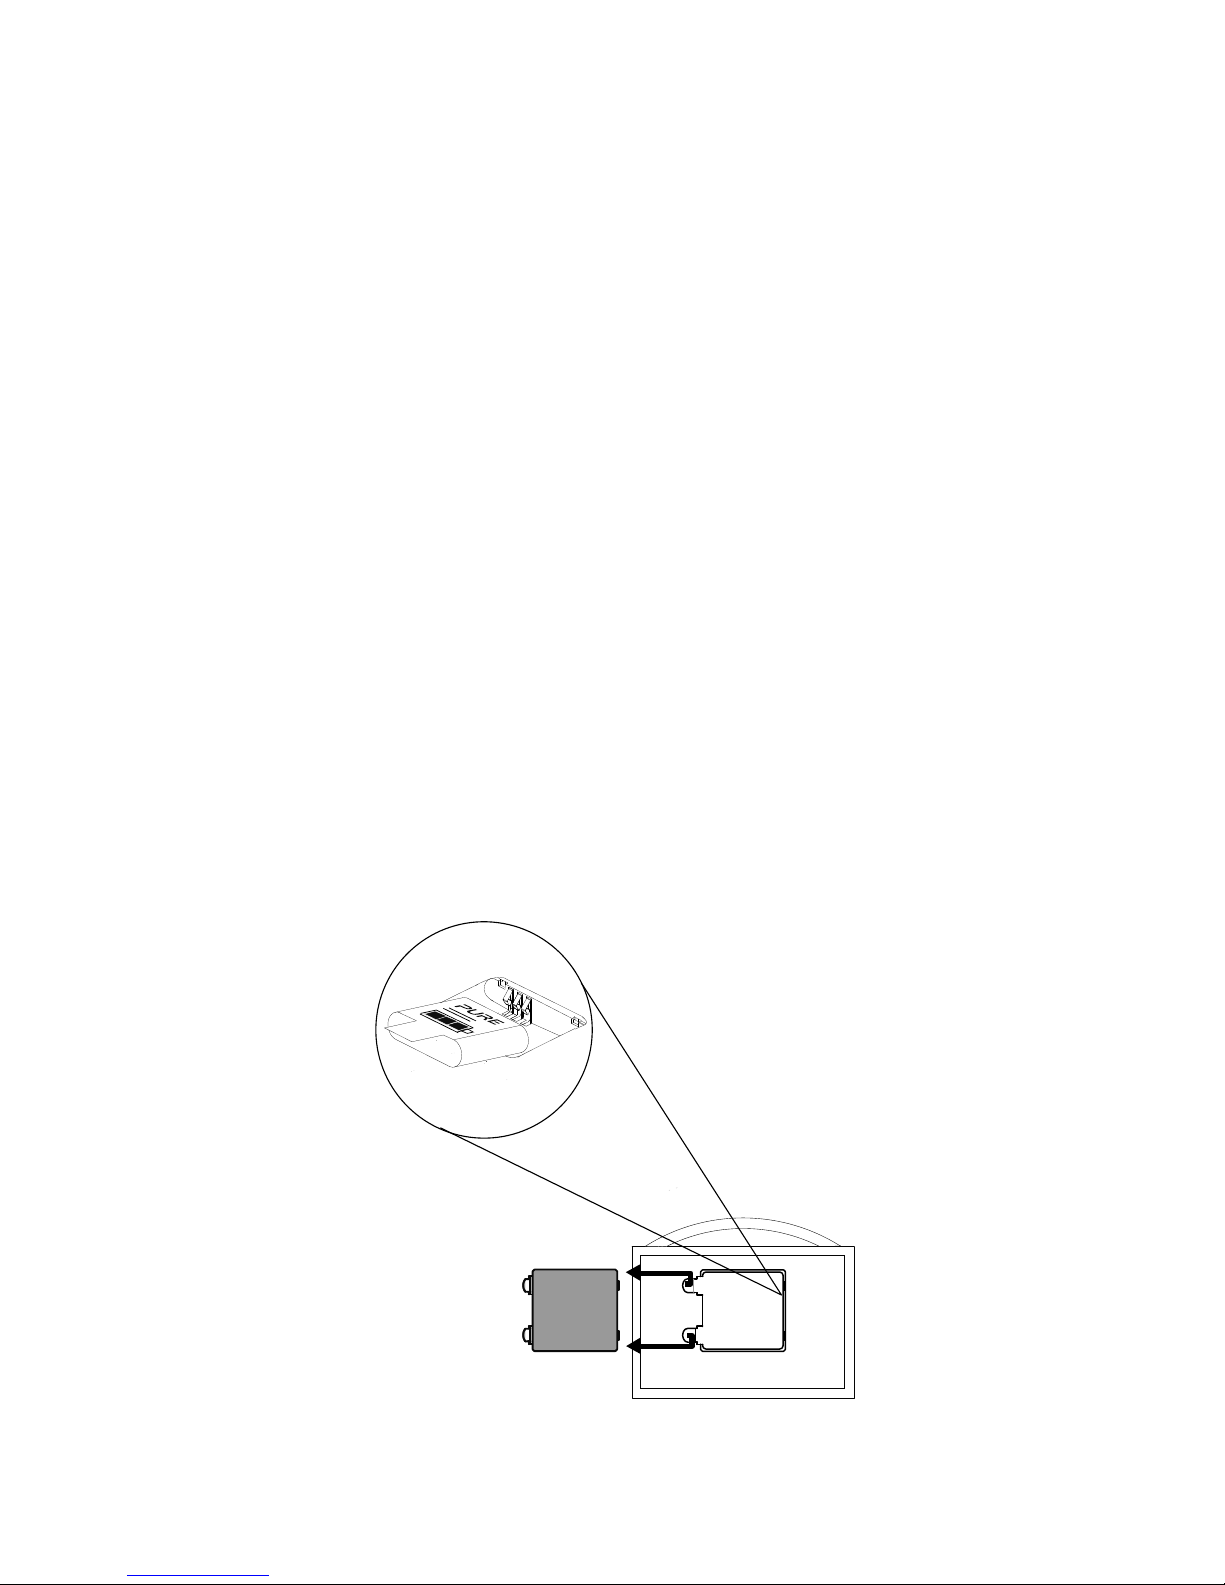
Installing a ChargePAK
1. Switch your Evoke off and disconnect it from the power supply.
2. Open the battery compartment and position ChargePAK so that the Pure label is facing the
battery compartment lid and ChargePAK’s contacts line up with the three terminals in the battery
compartment.
3. Replace the battery door and connect your product to a power outlet.
4. ChargePAK will begin charging. When charging your ChargePAK for the first time or after an
extended period of inactivity we recommend that you charge it for around 24 hours to ensure full
battery power.
Note: It is normal for your ChargePAK to get warm, especially during charging. Your ChargePAK will give
years of trouble-free use under normal circumstances, but like all rechargeable batteries its efficiency will
gradually reduce with age.
Important: Evoke can only be powered with a Pure ChargePAK F1 and is not compatible with any other
batteries, either disposable or rechargeable, or any other ChargePAK model.
Using an optional ChargePAK F1
Page 25

23
EN
Help and advice
I am having trouble connecting to my network
• Your radio can’t connect to wireless networks that are access controlled, such as office networks,
without a WEP, WPA or WPA2 key or password.
• Your radio needs to be positioned within the range of your wireless network, which will be reduced
if there are walls between your router and radio. Although Evoke is very good at picking up wireless
networks, the strength of the Wi-Fi signal will vary depending on your router and the surrounding
environment. If Evoke fails to find your wireless network, or the signal drops off, move the radio closer
to the router.
• Unless your wireless network is ‘open’ (this is generally not recommended due to the risk of
unauthorized access), make sure you have your WEP, WPA or WPA2 key to hand.
• Make sure that you have entered the correct WEP, WPA or WPA2 key or password for your network.
• If you also experience trouble connecting to your network with the Ethernet adapter, check your
Internet connection using a computer. If this is OK, try restarting your router or modem.
Screen displays ‘Station not available’
• If a station will not play visit http://support.pure.com/us for assistance.
I can’t see Evoke in the list of available Bluetooth devices on my mobile device
This may be because your Evoke Bluetooth visibility setting is set to ‘On (Hidden)’ or ‘Off’ (see page
19). Your Evoke setting will need to be set to ‘On (Visible)’ to pair wih your mobile device.
My mobile device is prompting me for a passcode when I try to pair with Evoke
Some legacy Bluetooth devices may prompt you to enter a passcode when trying to pair with Evoke. If this
occurs, enter the code ‘0000’.
Page 26

24
Radio FM and internet radio (via Wi-Fi or Ethernet connection).
Frequencies
FM 87.9-107.9 MHz.
Network Wi-Fi: 802.11b and 802.11g supported with WEP and WPA/WPA2 encryption.
2.412GHz ~ 2.462GHz (channels 1 to 11).
Ethernet (requires optional adapter): 10/100 Mbps.
0.5 MB broadband speed recommended.
Bluetooth: A2DP supported via supplied USB dongle.
Media streaming Audio codecs supported include WMA (Standard V9), AAC, MP3, MP2.
Media streaming requires UPnP server or PC/MAC running UPnP
server software (supplied upon registration to connect.pure.com).
Speaker 3.5" full range driver.
Input connectors 5.5V DC power adapter socket (adapter supplied). 3.5mm Line-in for
auxiliary devices. USB (Full-size A type) for USB recording/playback,
product updates (also available over Wi-Fi), Bluetooth dongle or
optional USB Ethernet adapter.
Output connectors 3.5mm stereo headphone socket. 3.5mm stereo socket for Evoke F4
stereo auxiliary speaker.
Presets 10 FM radio and unlimited internet radio favorites (requires registration at
connect.pure.com).
Display Large high contrast white on black graphical 128 x 64 OLED display.
Mains power adapter Input: 100-240C AC, 50/60Hz, 0.8A
Output: 5,5V DC, 3.57A
ChargePAK
Pure ChargePAK F1 rechargeable battery pack (available separately).
Power consumption
Standby: <1W, Active: 3.4W.
Australian C-Tick N1600 and Electrical Safety.
Dimensions 8.23" (209 mm) wide x 4.33" (110 mm) deep x 6.89" (175 mm) high
Weight 3.31 lbs (1.5 kg)
Warranty Comprehensive two year warranty.
Approvals
CE marked. Hereby, Pure, declares that this Band II LPD device is in
compliance with the essential requirements and other relevant provisions
of Directive 1999/5/EC. The Declaration of Conformity may be consulted at
http://www.pure.com/R&TTE-DoC.
ETSI EN 300 401 compliant.
Specifications
Page 27

25
EN
FCC NOTICE TO A USER IN THE UNITED STATES
Warning: Changes or modifications to this unit not expressly approved by the party responsible for compliance
could void the user’s authority to operate the equipment.
NOTE: This equipment has been tested and found to comply with the limits for a Class B digital device,
pursuant to Part 15 of the FCC Rules. These limits are designed to provide reasonable protection against
harmful interference in a residential installation. This equipment generates, uses and can radiate radio frequency
energy and, if not installed and used in accordance with the instructions, may cause harmful interference to
radio communications.
However, there is no guarantee that interference will not occur in a particular installation. If this equipment does
cause harmful interference to radio or television reception, which can be determined by turning the equipment
off and on, the user is encouraged to try to correct the interference by one or more of the following measures:
• Reorient or relocate the receiving antenna.
• Increase the separation between the equipment and receiver.
• Connect the equipment into an outlet on a circuit different from that to which the receiver is connected.
• Consult the dealer or an experienced radio/TV technician for help.
This device complies with part 15 of the FCC rules. Operation is subject to the following two conditions: (1) This
device may not cause harmful interference, and (2) this device must accept any interference received, including
interference that may cause undesired operation.
FCC RF Radiation Exposure Statement
Caution: This Transmitter must be installed to provide a separation distance of at least 20 cm from all persons.
IC NOTICE TO A USER IN CANADA
Since digital circuitry may cause interference to other radio or television tuners nearby, switch this unit off when not
in use or move it away from the affected radio/television tuner.
NOTE: This digital apparatus does not exceed the Class B limits for radio noise emissions from digital
apparatus as set out in the Radio Interference Regulations of Industry Canada. These limits are designed
to provide reasonable protection against harmful interference in a residential installation. This equipment
generates, uses and can radiate radio frequency energy and, if not installed and used in accordance with the
instructions, may cause harmful interference to radio communications. However, there is no guarantee that
interference will not occur in a particular installation. If this equipment does cause harmful interference to radio
or television operation (which can be determined by turning the equipment off), the user is encouraged to try to
correct the interference by one or more of the following measures:
• Reorient or relocate the receiving antenna.
• Increase the separation between the equipment and receiver.
• Connect the equipment into an outlet on a circuit different from that to which the receiver is connected.
• Consult the dealer or an experienced radio / TV technician for help.
This Class B digital apparatus complies with Canadian ICES-003.
Page 28

26
Copyright
Copyright 2014 by Imagination Technologies Limited. All rights reserved. No part of this publication may be copied
or distributed, transmitted, transcribed, stored in a retrieval system, or translated into any human or computer language, in any form or by any means, electronic, mechanical, magnetic, manual or otherwise, or disclosed to third
parties without the express written permission of Imagination Technologies Limited. Version 2 January 2014.
Trademarks
Evoke F4 with Bluetooth, ChargePAK, Pure, the Pure logo, Imagination Technologies, and the Imagination
Technologies logo are trademarks or registered trademarks of Imagination Technologies Limited. All other product
names are trademarks of their respective companies.
Warranty Information
Imagination Technologies Limited warrants to the end user that this product will be free from defects in materials
and workmanship in the course of normal use for a period of two years from the date of purchase. This guarantee
covers breakdowns due to manufacturing or design faults; it does not apply in cases such as accidental damage,
however caused, wear and tear, negligence, adjustment, modification or repair not authorized by us.
Please visit www.pure.com/register to register your product with us. Should you have a problem with your unit
please contact your supplier or contact Pure Support at the address shown at the rear of this manual.
Disclaimer
Imagination Technologies Limited makes no representation or warranties with respect to the content of this
document and specifically disclaims any implied warranties of merchantability or fitness for any particular purpose.
Further, Imagination Technologies Limited reserves the right to revise this publication and to make changes in it
from time to time without obligation of Imagination Technologies Limited to notify any person or organization of
such revisions or changes.
Acknowledgement of License Agreements
Portions of the code used in Evoke F4 are subject to the GPL, LPGL, BSD, and other open source licenses. For
more details please refer to: http://www.pure.com/licensing
Disposal of Waste Electrical & Electronic Equipment
This symbol on the product or on its packaging indicates that this product should not be treated as
household waste. Instead it should be handed over to a suitable collection point for the recycling
of electrical and electronic equipment. By ensuring this product is disposed of correctly, you will
help prevent potential negative consequences for the environment and human health, which could
otherwise be caused by inappropriate waste handling of this product. The recycling of materials will
help to conserve natural resources. For more detailed information about recycling of this product,
please contact your local council office, your household waste disposal service or the shop where
you purchased the product.
Page 29

1
ES
FRANÇAIS
EN
Merci d'avoir choisi Evoke F4. Ce système de diffusion en continu de musique
et de radio vous permet d'écouter les contenus du monde entier en toute
facilité et simplicité. Vous pouvez l'utiliser pour profiter de la musique en
continu sans fil à partir de votre appareil iOS ou Android, ou depuis votre PC
ou votre Mac, pour écouter un vaste éventail de stations radio Internet ou
FM; ainsi que des milliers de podcasts, de programmes radio à la demande
et de sons d'ambiance évocateurs. Vous pouvez également accéder au
service d'abonnement de musique à la demande basé sur le «cloud», pour
accéder instantanément à des millions de titres de musique. L'objectif de ce
manuel est de vous permettre de mettre en service votre appareil en un rien
de temps et de tirer parti de la plupart des fonctionnalités de votre Evoke F4.
Nous améliorons et ajoutons de nouvelles fonctionnalités à nos produits en
permanence. Pour tirer parti des améliorations apportées depuis la sortie
de votre produit, veuillez visiter le site support.pure.com à partir duquel vous
pouvez télécharger la dernière version de ce guide utilisateur au format PDF.
SelectVolume
Evoke
F4 with Bluetooth
Page 30

2
Instructions de sécurité importantes
1. Veuillez lire les présentes instructions: vous devez lire toutes les instructions de sécurité et d'utilisation
avant d'utiliser cet appareil.
2. Veuillez conserver les présentes instructions: vous devez conserver les instructions de sécurité et
d'utilisation en lieu sûr pour toute référence ultérieure.
3. Veuillez respecter tous les avertissements: vous devez respecter tous les avertissements figurant sur
l'appareil ou dans le mode d'emploi.
4. Veuillez suivre toutes les instructions: vous devez suivre toutes les instructions d'utilisation.
5. N'utilisez pas cet appareil à proximité d'un point d'eau.
6. Nettoyez l'appareil uniquement avec un chiffon sec.
7. Les orifices d'aération ne doivent pas être obstrués. Installez l'appareil conformément aux instructions du
fabricant.
8. N'installez pas l'appareil à proximité de sources de chaleur telles que des radiateurs, des poêles ou tout
autre équipement qui produit de la chaleur.
9. N'utilisez que les fixations et accessoires spécifiés par le fabricant.
10. Débranchez l'appareil en cas d'orages ou avant toute inutilisation prolongée.
11. N'utilisez pas d'adaptateur secteur à l'extérieur.
12. Faites attention au niveau du volume lors de l'utilisation d'un casque d'écoute (tout volume excessif
risquant d'endommager votre système auditif).
13. Éteignez immédiatement l'appareil s'il présente des signes de dommage mécanique, de température
excessive, de gonflement ou de fissure.
14. Faites exécuter toutes les tâches de service après-vente par des techniciens qualifiés. Il est nécessaire
de procéder à un entretien quand l'appareil a subi des dommages, de quelque manière que ce soit; par
exemple, si une prise ou un cordon électrique est endommagé, si du liquide a éclaboussé l'appareil ou
des corps étrangers y ont pénétré, si l'appareil a été exposé à la pluie ou à l'humidité, s'il ne fonctionne
pas correctement ou s'il est tombé.
15. Afin de réduire le risque de choc électrique, n'ôtez pas le couvercle (ni la partie arrière) car il ne renferme
pas de pièces devant faire l'objet d'un entretien. Faites exécuter toutes les tâches de service après-vente
par des techniciens qualifiés.
16. Utilisez cet appareil uniquement sur des tensions secteur conformes à celles spécifiées dans le guide de
l'utilisateur (en utilisant la référence DSA-24CA-05 055357, fabriquée par Pure).
17. Une réparation s'impose lorsque l'appareil a été endommagé (cordon d'alimentation ou prise, par
exemple), qu'il ne fonctionne pas normalement ou qu'il est tombé.
18. AVERTISSEMENT: afin de réduire le risque d'incendie ou de choc électrique, n'exposez pas l'appareil à la
pluie ni à l'humidité. N'exposez pas cet appareil à des éclaboussements ni à des gouttes d'eau; ne placez
aucun objet contenant du liquide (tel qu'un vase) sur l'appareil.
19. ATTENTION: danger d’explosion si la pile n’est pas remise en place correctement. Remplacez-la
uniquement avec le même type de pile ou un type équivalent.
20. AVERTISSEMENT: l'adaptateur directement enfichable est utilisé comme dispositif de sectionnement,
lequel doit être prêt à fonctionner à tout moment.
21. Cet appareil est de classe 2 ou dispose d'un équipement à double isolation électrique. Il a été conçu
de sorte à ne requérir aucune connexion de sécurité pour la mise à la terre.
Une perte d’audition peut survenir en cas d’exposition constante à un fort volume lors de l’utilisation des
écouteurs. Vérifiez toujours le niveau du volume avant d’insérer les écouteurs dans vos oreilles.
L’utilisation d’écouteurs lors de la conduite d’un véhicule n’est pas recommandée et est illégale dans
certaines régions. N’écoutez pas votre radio si cela vous distrait lorsque vous conduisez ou manœuvrez
tous types de véhicules, ou lorsque vous procédez à une autre activité nécessitant toute votre attention.
Page 31

3
FR
Table des matières
4 Pour commencer
4 Mise en service rapide
5 Commandes
6 Panneau arrière
6 Passage entre les modes veille
prolongée, veille et marche
7 Icônes de l'écran
8 Écoute d'Internet via Pure
Connect
8 Écoute des stations radio Internet
9 Écoute d'autres contenus Internet
11 Musique en streaming
11 Service de marquage Pure Connect
12 SiriusXM
13 Écoute de la musique en
continu depuis l’application
Pure Connect
13 Téléchargez l’application Pure Connect
13 Sélection d’Evoke ou d’un autre
appareil compatible Pure Jongo dans
l’application Pure Connect
14 Écoute de la musique en
continu depuis un PC ou un
Mac
14 Écoute de vos titres en continu sur
Evoke
14 Écoute de la radio FM
14 Changement de stations FM
14 Mémorisation d'une présélection
14 Écoute d'une présélection
15 Écoute audio à partir d'une
clé USB
15 Utilisation de la connexion
Bluetooth
16 Enregistrement de
programmes radio
16 Enregistrements instantanés
16 Enregistrements programmés
17 Paramétrage des alarmes et
minuteries
17 Paramétrage d'une alarme
17 Programmation de la minuterie de mise
en veille
17 Programmation de la minuterie de
cuisine
17 Annulation d'une alarme ou d'une
minuterie qui retentit
18 Interruption d'une alarme qui retentit
18 Modification du délai avant rappel
d'alarme
18 Annulation d'une répétition d'alarme
18 Options et paramètres
18 Paramètres de Pure Connect
18 Paramètres FM
19 Réseau/clé USB
20 Paramètres audio
21 Réglage de l’horloge
21 Modification de la langue affichée
21 Modification du nom de votre Evoke
21 Paramètres Bluetooth
22 Mise à jour de votre Evoke
22 Réinitialisation Evoke aux réglages
d’usine
22 Paramètres réseau
24 Utilisation d'un bloc-batterie
ChargePAK F1 proposé en
option
24 Installation d'une batterie ChargePAK
25 Aide et conseils
26 Spécifications
Page 32

4
Sortez l'antenne et insérez le connecteur de l'adaptateur secteur fourni dans l'entrée 5,5Vc.c.
située sur la face arrière de votre Evoke. Branchez l'adaptateur au secteur. Pure apparaît
brièvement à l'écran.
Pour commencer
Mise en service rapide
Remarque: si vous disposez d'une batterie rechargeable ChargePAK F1 (vendue séparément), installez-la
maintenant, avant de brancher Evoke. Reportez-vous à la page 24pour obtenir plus d'informations.
Choisissez votre langue d'affichage (anglais, français ou espagnol) en tournant le bouton
Select (Sélectionner) pour mettre en surbrillance la langue de votre choix. Appuyez sur le
bouton Select (Sélectionner) pour valider votre choix. Répétez ce processus pour sélectionner
le fuseau horaire et le lieu le plus proche de chez vous.
1
2
3
Stereo Out
Aerial
Aux Speaker
Stereo OutAux Speaker
5.5V DC
Network/USB media
OK
Pure Connect
FM radio
Auxiliary input
Settings
L'écran d'accueil s'affiche :
Tournez et appuyez sur le bouton Select (Sélectionner) pour sélectionner l'une des options
suivantes:
Pure Connect
Cf. page 8
Réseau/clé USB Cf. page 14
FM radio (Radio FM) Cf. page 14
Entrée auxiliaire Cf. page 6
Pour modifier l'un des paramètres de votre Evoke, appuyez sur le bouton Settings
(Paramètres) (cf. page 18).
Page 33

5
FR
Commandes
N° Commande Description
1 Accueil Appuyez pour revenir à l'écran d'accueil.
2
Boutons tactiles
contextuels
Appuyez sur le bouton correspondant à la fonction affichée que vous
souhaitez utiliser.
3 Retour Une pression permet de revenir à l'écran précédent.
4 Bouton Volume/
Mode silence
Tournez le bouton pour régler le volume. Appuyez sur le bouton pour activer
ou désactiver le mode silence.
5 Bouton Select
(Sélectionner)
Tournez ce bouton pour parcourir les menus, les stations ou les options, puis
appuyez pour sélectionner un élément. Appuyez sur le bouton pour mettre en
pause un titre multimédia ou un podcast.*
6 Touche tactile de
mise en veille
Appuyez sur
pour commuter entre les modes Veille prolongée, Veille et
Marche. Reportez-vous à la page 6 pour obtenir plus d'informations.
7 Capteur de
luminosité
Ne pas recouvrir. Ce capteur corrige le niveau de luminosité de l'écran en
fonction de l'éclairage ambiant de la pièce (pour cela, le niveau de luminosité
doit être réglé sur «Automatic» (Automatique)).
8 Bouton
d'enregistrement
Appuyez pour enregistrer instantanément la station Internet actuellement
diffusée. Reportez-vous à la page 16 pour obtenir plus d'informations.
9
SnoozeHandle
Appuyez pour rappeler une alarme. Prenez la poignée à pleine main pour que
l'écran d'affichage s'éclaire à sa luminosité maximum pendant 3secondes.
Remarque: l'alarme ne se déclenchera pas si votre radio Evoke est mise hors
tension et si Evoke n'est pas connecté au secteur.
* Le symbole > indique que vous devrez utiliser la même commande pour naviguer dans les diverses options de menu.
SelectVolume
1
2
3
4
5
6
7
8
9
Page 34

6
Panneau arrière
Passage entre les modes veille prolongée, veille et marche
Evoke propose trois modes de fonctionnement: Standby (Veille), Sleep (Veille prolongée) et On
(Marche). En mode Veille, Evoke fonctionne à une puissance minime. En mode Veille prolongée, Evoke
reste connecté au réseau sans fil (auquel il a été configuré) et est prêt à lire de la musique. Reportez-vous
à la page 13 pour obtenir plus d'informations.
Pour passer en mode Veille prolongée, appuyez sur le bouton Standby (Veille).
Pour passer en mode Veille, maintenez le bouton Standby (Veille) enfoncé.
En mode Veille ou Veille prolongée, appuyez sur le bouton Standby (Veille) pour passer en mode Marche.
Remarque: si vous appuyez sur le bouton Standby (Veille) et qu'Evoke est alimenté par la batterie
ChargePAK F1, Evoke va directement s'éteindre, sans passer en mode Veille.
1.
Connecteur USB pour adaptateur USB, adaptateur Bluetooth ou clé USB pour l'enregistrement/
la lecture. Également utilisé pour mettre à jour le logiciel d'Evoke en cas d'indisponibilité d'une
connexion Internet.
2. Sortie pour le haut-parleur stéréo Evoke F4 (vendu séparément).
3. Sortie pour écouteurs (prise mini-jack 3,5mm).
4. Entrée auxiliaire format mini-jack pour iPod, lecteur MP3, etc.
5. Entrée 5,5Vc.c. pour le transformateur secteur fourni.
6. Évent bass-reflex, acoustiquement équilibré (ne pas recouvrir).
7. Compartiment pour bloc-batterie rechargeable ChargePAKF1 (vendu séparément).
8. Adaptateur Bluetooth USB.
Aerial
5.5V DCStereo speaker Aux in
1 2 3 4 5
6
8
7
Page 35

7
FR
Welcome to Pure Connect
Add
Wide range of great content
PC
♥
Options
Icônes de l'écran
Source Icônes
*ChargePAK F1 vendu séparément.
Source Icônes
PC
Pure Connect
Volume sonore
MP Lecteur multimédia
Son OFF
FM FM
Témoins d'alarme/minuteur
AUX Entrée auxiliaire
Horloge
PS Musique streaming
Niveau de charge de la batterie ChargePAK*
Signal stéréo
Intensité du signal (FM/Wi-Fi)
Connexion Ethernet active
Connexion Ethernet perdue
R
Témoin d'enregistrement programmé
Boutons
contextuels
BT Bluetooth
Page 36

8
Écoute d'Internet via Pure Connect
Pure Connect est un portail multimédia en ligne qui donne rapidement et facilement accès à des milliers de
stations radio Internet, de programmes à la demande, de podcasts et d’ambiances sonores. Vous pouvez
profiter de tout ce contenu sur votre Evoke, sur des smartphones et des tablettes exploitant l’application
Pure Connect et sur le site Web Pure Connect. Vous pouvez également utiliser Pure Connect pour accéder
à d’autres services d’abonnement, tel que le service de diffusion de Pure Connect basé sur le « cloud »* qui
vous offre un accès instantané à des millions de titres de musique, et SiriusXM qui vous permet d’accéder
à plus de 140 chaînes de la radio satellite supplémentaires et à des contenus à la demande.
Pour accéder à Pure Connect sur Evoke, vous devez connecter Evoke à votre réseau. Voir ci-dessous pour
plus d’informations.
Une fois votre Evoke connecté à votre réseau, vous pouvez l’enregistrer sur le site Web Pure Connect.
Nous vous recommandons d’enregistrer votre Evoke pour pouvoir gérer vos favoris Pure Connect et
accéder aux autres services d’abonnement, tels que la musique en streaming et SiriusXM.
Connexion à Internet
Utilisation de votre réseau sans fil
1. Appuyez sur le bouton Accueil , puis sélectionnez Pure
Connect à partir de l'écran d'accueil. Evoke recherche les
réseaux sans fil et les affiche sous forme de liste.
2. Sélectionnez votre réseau. Si votre réseau requiert une clé
réseau, suivez les étapes 3-4.
3. Pour entrer votre clé réseau ou mot de passe, tournez et
appuyez sur le bouton Select (Sélectionner) pour mettre en
surbrillance et sélectionner les caractères. Sélectionnez sp
(espace) pour insérer un espace. Appuyez sur More... (Plus...)
pour accéder au bas de casse; appuyez de nouveau pour avoir
accès aux symboles. Appuyez sur Delete (Supprimer) pour
supprimer le dernier caractère.
4. Appuyez sur Save (Enregistrer) pour terminer. Evoke établit la
connexion à votre réseau.
Conseil utile: votre clé Wi-Fi est sensible à la casse, assurez-vous
de la saisir exactement telle qu'elle apparaît.
Utilisation d'une connexion Ethernet
Vous pouvez également connecter Evoke à Internet à l'aide de
l'adaptateur Ethernet USB Pure proposé en option.
Pour utiliser l'adaptateur Ethernet USB Pure, branchez votre câble
réseau sur l'adaptateur, puis branchez l'adaptateur sur la fiche USB
de votre Evoke. Le témoin de votre adaptateur USB s'allume et une
connexion est automatiquement établie à votre réseau.
L'état de la connexion Ethernet est affiché à l'écran (cf. page 7).
A B C DEFGHIJKLM
NOPQRSTUVWXYZ
sp0123456789
Enter key or password
Delete Save More...
6578616D706C
LAN
USB
100Mbps
LAN
USB
My favorites♥
Pure Music
SiriusXM
Live Radio
Listen Again
Podcasts
Menu Pure Connect
Écoute des stations radio Internet
Des milliers de stations radio à travers le monde diffusent du contenu
en ligne. Pour les écouter, sélectionnez Pure Connect depuis l'écran
d'accueil. Votre Evoke se syntonise sur la dernière station que vous
écoutiez ou vous affiche la liste des stations. Tournez le bouton Select
(Sélectionner) pour accéder au menu Pure Connect. Sélectionnez Live
Radio (Radio en direct) pour visualiser la liste des stations Internet
actuellement disponibles. Utilisez le bouton Select (Sélectionner) pour
parcourir cette liste, puis appuyez sur le nom d'une station pour la
sélectionner. Vous pouvez ajouter une station à vos Favorites (Favoris)
en appuyant sur Add (Ajouter).
* Vous devez vous abonner à notre niveau d’abonnement Blue ou Violet pour accéder au service de diffusion de musique en streaming
sur Evoke. Pour obtenir plus d’informations sur les différents niveaux d’abonnement, visitez le site connect.pure.com
Page 37

9
FR
Recherche d'une station
Appuyez sur Search (Rechercher) pour naviguer dans la liste de
stations par Name, Genre, Country, Language, Quality (nom, genre,
pays, langue, qualité du son), ou selon n'importe quelle combinaison
de ces critères. Définissez vos options à l'aide du bouton Select
(Sélectionner) et appuyez sur Go (Rechercher) pour visualiser la liste
des résultats.
Recherche d'une station radio Internet en utilisant l'Accès rapide
La fonction Accès rapide vous permet de rechercher des stations
commençant par une certaine lettre. Pour utiliser cette fonction:
1. Appuyez sur le bouton A-Z pour ouvrir la boîte de dialogue
Accès rapide.
2. Tournez et appuyez sur le bouton Select (Sélectionner) pour
sélectionner la première lettre de la station radio que vous
souhaitez rechercher.
Écoute d'autres contenus Internet
Appuyez sur la touche Accueil et sélectionnez Pure Connect depuis
l'écran d'accueil, puis l'un des types de contenus suivants:
Contenus à la demande
Sélectionnez cette option pour accéder au service de réécoute qui
vous permet d'écouter les émissions radio que vous avez manquées.
Ces programmes radio archivés peuvent être écoutés pendant une
période déterminée après la diffusion en direct.
Podcasts
Les podcasts sont des émissions audio pré-enregistrées portant sur
une large palette de sujets, tels que les comédies, l'art, les affaires et la
culture, dont vous pouvez profiter à tout moment.
Pure Sounds
Notre bibliothèque de sons d'ambiance évocateurs vous propose
notamment des chants d'oiseaux, des bruits de la ville, des vagues sur
la côte.
Clear all
Clear
Go Lounge
Name [All]
Genre [Classical]
Country [Netherlands]
Language [Dutch]
Quality [All]
Écran de recherche de station
Wind chimes in suburbs
Wooden lock
Accoustic guitar (E,A,D...
Active daytime birds
Arctic Blizzard
Naviguer parmi les sons Pure
Page 38

10
Création d'un compte Pure Connect
Pour créer un compte Pure Connect et enregistrer votre Evoke, il vous
suffit de disposer d'une adresse e-mail valide. Nous devrons vous
envoyer quelques e-mails qui vous seront nécessaires pour terminer
votre processus d'inscription.
Pour créer un compte Pure Connect:
1. Ouvrez votre navigateur Internet.
2. Allez sur connect.pure.com.
3. Cliquez sur Create account (Créer un nouveau compte), puis
suivez les instructions à l'écran.
Enregistrement de votre Evoke sur Pure Connect
1. Connectez-vous à Pure Connect et cliquez sur Me (Moi), puis
sélectionnez Devices (Appareils). Le code d'enregistrement
apparaît alors à l'écran.
2. À partir du menu Pure Connect settings (Paramètres de
Pure Connect) de votre radio, sélectionnez Register with
the Pure Connect (M'enregistrer sur Pure Connect) pour
saisir votre code. Utilisez le bouton Select (Sélectionner) pour
mettre en surbrillance et sélectionner les caractères; appuyez
sur Del (Suppr.) pour effacer les caractères; puis sur Save
(Enregistrer) pour terminer.
Félicitations! Vous avez enregistré votre Evoke sur Pure Connect. Les
favoris que vous avez créés sur Pure Connect apparaîtront sur votre
Evoke, et inversement, ceux créés sur Evoke apparaîtront sur Pure
Connect.
connect.pure.com
Optional registration at
connect.pure.com adds
advanced features to your
radio. Register now?
Ye
sN
everLater
Enter registration code
DelSav
eM
ore...
QPZKE
A B C D E F G H I J K L M
N O P Q R S T U V W X Y Z
sp 0 1 2 3 4 5 6 7 8 9
Page 39

11
FR
Musique en streaming
La diffusion en streaming de Pure Connect est un service d’abonnement de musique à la demande
basé sur le « cloud » qui vous offre un accès instantané à des millions de titres de l’un des catalogues de
musique les plus importants au monde, regroupant quasiment tous les artistes et genres existants. Vous
pouvez écouter votre musique sur nos systèmes de diffusion en continu et nos systèmes radios, depuis
votre appareil Apple ou Android exécutant l’application Pure Connect ou sur le site Web Pure Connect.
Le service de diffusion de musique en streaming Pure Connect est uniquement disponible dans certains pays. Veuillez visiter http://www.pure.
com/availability/ pour plus de détails.
Accès musique en streaming depuis votre Evoke
1. Appuyez sur le bouton Accueil , puis sélectionnez Pure Connect à partir de l’écran d’accueil.
2. Tournez et appuyez sur le bouton Select (Sélectionner) pour sélectionner Pure Music.
3. Tournez et appuyez sur le bouton Select (Sélectionner) pour sélectionner l’une des options
suivantes:
My Tracks (Mes titres): sélectionnez cette option pour accéder aux titres que vous avez achetés
depuis Pure Connect.
Catalogue: sélectionnez cette option pour parcourir ou effectuer une recherche dans le complet
catalogue des musique en streaming sur votre Evoke.
By playlist (Par liste de lecture): sélectionnez cette option pour écouter des listes de lecture que
vous avez créées sur connect.pure.com ou via l’application Pure Connect (voir “Écoute de la musique
en continu depuis l’application Pure Connect” à la page 13).
Service de marquage Pure Connect
Le service de marquage Pure Connect peut être utilisé pour identifier, marquer et acheter des titres
diffusés sur une station radio Internet ou FM. En plus d’accéder à vos titres de musique favoris, le service
de marquage de Pure Connect effectue également automatiquement une recherche dans les catalogues
pour trouver des musiques d’artistes similaires susceptibles de vous intéresser. Vous pouvez ainsi
découvrir de toutes nouvelles choses ou redécouvrir vos musiques favorites oubliées.
Remarque: pour utiliser le service de marquage, votre Evoke doit être connecté à Internet et vous devez
disposer d'un compte Pure Connect. Reportez-vous à la page 10 pour obtenir plus d'informations sur
le paramétrage d'un compte Pure Connect.
1. Appuyez sur le bouton Tag.
2. Evoke identifie le nom de la chanson diffusée et vous permet de l’acheter (ou de l’écouter en continu
si vous disposez d’un abonnement au service de diffusion de musique en streaming).
Remarque: pour accéder à votre liste de titres marqués, vous devez vous connecter à votre compte
Pure Connect sur
connect.pure.com.
Remarque: le service de marquage Pure Connect tentera d'identifier et de faire correspondre les titres
de lectures en utilisant notre catalogue étendu. L'achat et la diffusion en continu de titres se font sous
réserve de disponibilité.
Page 40

12
SiriusXM
SiriusXM est un service d'abonnement disponible aux États-Unis qui permet d'accéder à la radio en direct
et de réécouter des contenus à partir de plus de 140stations radio satellite.
Vous pouvez écouter SiriusXM sur nos systèmes de diffusion en continu et nos systèmes radios.
Remarque: Vous aurez besoin de relier votre Evoke à votre compte SiriusXM sur le site Pure Connect
avant que vous puissiez accéder au service SiriusXM. Voir connect.pure.com pour plus d’informations.
Associer Evoke à votre compte SiriusXM
1. Connectez-vous à Pure Connect et cliquez sur Me (Moi), puis sélectionnez My Account (Mon compte).
2. Cliquez sur le bouton Add credentials (Ajouter des identifiants) du volet SiriusXM Subscription pour
ouvrir la page d’abonnement SiriusXM.
3. Saisissez votre nom d’utilisateur et votre mot de passe SiriusXM, puis cliquez sur le bouton Save
credentials (Enregistrer les identifiants).
Vous pourrez à présent accéder à SiriusXM sur des produits compatibles enregistrés sur votre compte
Pure Connect.
Accès à SiriusXM depuis votre Evoke
1. Appuyez sur le bouton Home (Accueil) puis sélectionnez Pure
Connect.
2. Tournez et appuyez sur le bouton Select (Sélectionner) pour
sélectionner SiriusXM.
3. Tournez et appuyez sur le bouton Select (Sélectionner) pour
sélectionner l'une des options suivantes:
Live radio (Radio en direct): sélectionnez cette option pour afficher
la liste des stations radio en direct disponibles par le biais du service
SiriusXM. Vous pouvez choisir d'afficher toutes les stations radio
disponibles ou de filtrer la liste affichée par genre.
On Demand (Contenu à la demande): sélectionnez cette option pour
écouter les émissions radio que vous avez manquées. Vous pouvez
choisir d'afficher toutes les stations radio disponibles ou de filtrer la
liste affichée en fonction d'un genre spécifique.
Page Mon compte Pure Connect
Page Abonnement SiriusXM
SiriusXM sélection de la
catégorie Live Radio
Search
All
Howard Stern
Latin & World
Music
News & Issues
Page 41

13
FR
Écoute de la musique en continu depuis
l’application Pure Connect
Téléchargez l’application Pure Connect
L’application Pure Connect est téléchargeable sur votre smartphone ou votre tablette à partir de l’Apple
App Store ou de Google Play.
Vous pouvez utiliser l’application Pure Connect pour diffuser sur votre Evoke ou un appareil compatible
Jongo de la musique en continu stockée sur votre smartphone ou votre tablette et tout le outre contenu
Pure Connect.
Remarque : tous les appareils sur lesquels vous souhaitez utiliser la fonction multiroom sans fil Pure
doivent être connectés au même réseau.
à partir de
l’Apple App Store
à partir de
Google Play
Sélection d’Evoke ou d’un autre appareil compatible Pure Jongo
dans l’application Pure Connect
Avec Pure Connect application, vous pouvez écouter à un dispositif Jongo seul ou plusieurs
périphériques simultanément Jongo.
Pour lancer le contenu en streaming:
1. Ouverture de l’application Pure Connect et choix de la musique.
2. Appuyez sur dans la barre du lecteur pour afficher une liste des appareils Jongo disponibles sur
votre réseau.
3. Appuyez sur en regard de votre appareil.
Vous pouvez alors diffuser de l’audio en continu sur votre appareil compatible Jongo.
Pour plus d’informations sur l’utilisation de l’application Pure Connect, veuillez vous reporter à l’aide
fournie avec l’application.
A
L’application Pure Connect
Page 42

14
Vous pouvez écouter en continu de la musique enregistrée sur votre ordinateur ou sur un appareil de
stockage relié au réseau compatible UPnP à Evoke. Pour écouter en continu de la musique depuis
votre ordinateur, vous devez installer un logiciel serveur multimédia sur ce dernier.
Écoute de vos titres en continu sur Evoke
1. Appuyez sur le bouton Accueil puis tournez et appuyez sur le bouton Select (Sélectionner) pour
sélectionner Network/USB media player (Réseau/clé USB) à partir de l'écran d'accueil.
2. Tournez et appuyez sur le bouton Select (Sélectionner) pour sélectionner le lecteur multimédia que
vous souhaitez utiliser pour écouter de la musique en continu.
3. Tournez et appuyez sur le bouton Select (Sélectionner) pour naviguer et sélectionner le titre ou la
liste de lecture.
Lecture/mise en pause de la lecture audio
Appuyez sur le bouton Select (Sélectionner) pour mettre en pause/lire un titre actuellement diffusé
sur Evoke.
Recherche à l'intérieur d'un titre
Pendant que votre radio est en pause, vous pouvez maintenir enfoncés les boutons et pour
effectuer une recherche à l'intérieur du titre.
Passage d'un titre à un autre, en avançant ou en reculant
Si vous lisez des fichiers audio en continu sur Evoke à partir d'un serveur multimédia, vous pouvez
appuyer sur les boutons
pour passer d'un titre à un autre, en avançant ou en reculant.
Écoute de la musique en continu depuis
un PC ou un Mac
Écoute de la radio FM
Changement de stations FM
Syntonisation automatique
1. Tournez le bouton Select (Sélectionner).
2.
Appuyez sur les boutons pour syntoniser sur la station
suivante ou précédente sur la bande FM qui émette un signal
assez puissant.
Syntonisation manuelle
Tournez le bouton Select (Sélectionner) vers la droite ou la gauche
pour avancer ou reculer de 0,05 MHz dans la gamme de fréquences.
Mémorisation d'une présélection
Syntonisez sur la fréquence que vous souhaitez mémoriser en
présélection et appuyez sur Presets (Présélections). Tournez le
bouton Select (Sélectionner) pour mettre en surbrillance un numéro
de présélection. Appuyez sur Add (Ajouter) pour enregistrer la
présélection. (Vous pouvez remplacer les présélections existantes.)
Écoute d'une présélection
Appuyez sur Presets (Présélections), sélectionnez la station que
vous souhaitez activer, puis appuyez sur Listen (Écouter) ou sur le
bouton Select (Sélectionner).
Déployez l'antenne, puis appuyez sur Home (Accueil) et sélectionnez FM radio (Radio FM) depuis
l'écran d'accueil.
Buzz FM
OK
Add
Empty 1
Empty 2
Empty 4
Empty 5
♥
Accès à une présélection
Utilisation de la syntonisation
automatique pour changer de
stations FM
103.30
Seek tune
Options
Page 43

15
FR
Pour écouter des titres depuis une clé USB:
1.
Appuyez sur le bouton Accueil puis tournez et appuyez sur le bouton Select (Sélectionner) pour
sélectionner Network/USB media player (Réseau/clé USB) à partir de l'écran d'accueil.
2.
Tournez et appuyez sur le bouton Select (Sélectionner) pour sélectionner la clé USB.
3.
Tournez et appuyez sur le bouton Select (Sélectionner) pour spécifier le type d'audio (Playlists,
Artists, Genres (listes de lecture, artistes, genres)) ou Pure recordings (Enregistrements Pure) que
vous souhaitez écouter.
4.
Tournez et appuyez sur le bouton Select (Sélectionner) pour sélectionner le contenu audio que vous
souhaitez écouter.
Lecture/mise en pause de la lecture audio
Appuyez sur le bouton Select (Sélectionner) pour mettre en pause/lire un titre actuellement diffusé sur
Evoke.
Recherche à l'intérieur d'un titre
Pendant que votre radio est en pause, vous pouvez maintenir enfoncés les boutons et pour
effectuer une recherche à l'intérieur du titre.
Passage d'un titre à un autre, en avançant ou en reculant
Appuyez sur les boutons pour passer d'un titre à un autre, en avançant ou en reculant.
Evoke peut lire de la musique à partir d'une clé USB connectée au port USB situé à l'arrière de l'appareil.
Evoke prend en charge les fichiers audio WMA (norme V9), AAC, MP3 et MP2. Par défaut, Evoke recherche
des fichiers audio sur votre réseau si vous n'avez pas branché de clé USB à l'arrière de votre Evoke.
Écoute audio à partir d'une clé USB
Utilisation de la connexion Bluetooth
Si votre téléphone ou votre tablette peut stocker des fichiers audio, vous pouvez également utiliser le Bluethooth
pour diffuser en streaming de la musique enregistrée sur votre téléphone ou votre tablette sur Evoke.
Remarque:
l’ajout d’un appareil Bluetooth varie selon les appareils mobiles. Reportez-vous au manuel de
votre appareil mobile Bluetooth pour obtenir des informations spécifiques.
Préparation de votre Evoke pour diffuser de l'audio en continu via Bluetooth
1.
Assurez-vous que l’adaptateur Bluetooth est inséré dans le port USB d’Evoke.
2.
Activez le Bluetooth sur votre appareil mobile.
3.
Sur ce dernier, sélectionnez l’option permettant d’ajouter un nouvel appareil Bluetooth. Sur certains appareils
mobiles, vous devrez peut-être sélectionner l’option de recherche ou d’analyse.
4. Démarrez le processus de couplage sur votre appareil mobile. Pour ce faire, sélectionnez votre Evoke à
partir de la liste des appareils disponibles qui s’affiche sur votre appareil mobile. Ce processus vous connectera
automatiquement une fois le couplage réalisé.
Vous pouvez alors commencer à diffuser de l'audio en continu sur votre Evoke depuis votre appareil Bluetooth.
Remarque: vous devrez déconnecter tout appareil mobile Bluetooth connecté d'Evoke pour diffuser en
Wi-Fi ou à partir d'un autre appareil Bluetooth. Le Bluetooth se déconnecte automatiquement si vous vous
trouvez hors de portée de votre Evoke. Pour vous déconnecter manuellement, vous devez en général passer
par les paramètres Bluetooth de votre appareil mobile.
Remarque: pour vous aider à utiliser le Bluetooth, consultez notre section “Aide et conseils” à la page 25.
Page 44

16
Enregistrement de programmes radio
Evoke vous permet d'enregistrer la radio en direct à partir d'une station radio Internet (via Pure Connect).
Vous pouvez programmer des enregistrements ou effectuer des enregistrements instantanés. Pour
enregistrer, vous devez brancher une clé USB sur le port USB situé à l'arrière de votre Evoke. La durée
d'enregistrement dépend de la capacité disponible sur votre clé USB et de la station que vous enregistrez.
Une clé USB de 2Go peut enregistrer environ 15à 30heures de contenu radio Internet (basé sur des débits
de données les plus courants de 128en kb/s et 64en kb/s respectivement). Si votre clé USB n'a plus de
capacité disponible pendant un enregistrement, Evoke arrête l'enregistrement et affiche un message.
Remarque: vous pouvez uniquement enregistrer la radio en direct si vous avez sélectionné Pure Connect
comme source audio.
Remarque: vous ne pouvez pas enregistrer la radio en direct ni réécouter des contenus à partir du service
d'abonnement SiriusXM.
Enregistrements instantanés
Pour effectuer un enregistrement instantané, procédez comme suit:
1.
Appuyez sur Home (Accueil) pour afficher le menu d'accueil.
2. Tournez et appuyez sur le bouton Select (Sélectionner) pour sélectionner Pure Connect.
3. Syntonisez sur la station radio que vous souhaitez enregistrer, puis appuyez sur le bouton Record
(Enregistrer) sur la façade d'Evoke pour lancer l'enregistrement.
Pour arrêter l'enregistrement instantané, appuyez sur le bouton Record (Enregistrer) sur la façade d'Evoke.
Enregistrements programmés
Vous pouvez utiliser la fonction d'enregistrements programmés pour planifier un enregistrement à partir
d'une station radio Internet qui a été ajoutée à vos favoris.
1. Appuyez sur Accueil pour afficher le menu d'accueil.
2. Appuyez sur le bouton Settings (Paramètres) puis tournez et appuyez sur le bouton Select
(Sélectionner) pour sélectionner Timed recordings (Enregistrements programmés).
3. Tournez et appuyez sur le bouton Select (Sélectionner) pour sélectionner un emplacement
d'enregistrement.
4. Appuyez sur le bouton Edit (Modifier).
5. Tournez et appuyez sur le bouton Select (Sélectionner) pour démarrer (On) ou arrêter (Off)
l'enregistrement.
6. Tournez le bouton Select (Sélectionner) pour régler l'heure à laquelle l'enregistrement doit commencer,
puis appuyez pour confirmer. Répétez l'opération pour régler les minutes.
7. Tournez le bouton Select (Sélectionner) pour régler l'heure à laquelle l'enregistrement doit se terminer,
puis appuyez pour confirmer. Répétez l'opération pour régler les minutes.
8. Tournez le bouton Select (Sélectionner) pour définir les jours auxquels l'enregistrement programmé
doit se faire. Choisissez entre Once only (Une seule fois), Daily (Quotidiennement), Weekdays (Jours
de semaine), Weekends, Every Monday (Chaque lundi), Every Tuesday (Chaque mardi), Every
Wednesday (Chaque mercredi), Every Thursday (Chaque jeudi), Every Friday (Chaque vendredi),
Every Saturday (Chaque samedi) et Every Sunday (Chaque dimanche) puis appuyez sur le bouton
Select (Sélectionner) pour confirmer.
9. Appuyez sur le bouton Select (Sélectionner) pour confirmer que vous souhaitez enregistrer du contenu
à partir de Pure Connect.
10. Tournez et appuyez sur le bouton Select (Sélectionner) pour sélectionner la station radio que vous
souhaitez enregistrer à partir de votre liste de favoris.
11
. Un enregistrement programmé est indiqué par R dans la barre d'icônes.
Page 45

17
FR
Paramétrage des alarmes et minuteries
Evoke dispose de deux alarmes ainsi que deux types de minuterie (de cuisine et de mise en veille). Pour
régler une alarme ou une minuterie, appuyez sur Home (Accueil) pour afficher l'écran d'accueil. Appuyez
sur Settings (Paramètres). Tournez et appuyez sur le bouton Select (Sélectionner) pour sélectionner
Alarms and timers (Alarmes et minuteries).
Paramétrage d'une alarme
1. À partir du menu Alarms and timers (Alarmes et minuteries), tournez et appuyez sur le bouton
Select (Sélectionner) pour sélectionner Alarm 1 settings (Paramétrer l’alarme 1) ou Alarm 2 settings
(Paramétrer l’alarme 2) et appuyez sur Edit (Modifier).
2. Tournez et appuyez sur le bouton Select (Sélectionner) pour activer ou désactiver l'alarme.
3. Tournez le bouton Select (Sélectionner) pour régler l'heure, puis appuyez pour valider. Répétez
l'opération pour régler les minutes.
4. Tournez le bouton Select (Sélectionner) pour définir les jours où l'alarme doit retentir. Choisissez Once
only (Une seule fois), Daily (Quotidiennement), Weekdays (Jours de semaine), Weekends, Every
Saturday (Chaque samedi) ou Every Sunday (Chaque dimanche) puis appuyez sur le bouton
Select (Sélectionner) pour confirmer.
5. Tournez le bouton Select (Sélectionner) pour définir le type d'alarme. Choisissez Pure Connect station
(Station Pure Connect), FM radio (Radio FM) ou Tone (Sonnerie) puis appuyez sur le bouton Select
(Sélectionner) pour valider votre choix.
6. Si vous avez défini le type d'alarme Pure Connect station (Station Pure Connect) ou FM radio (Radio
FM), tournez le bouton Select (Sélectionner) pour choisir Last tuned (Dernière station syntonisée) ou
sélectionner une station Pure Connect ou une présélection FM favorite si vous en avez enregistré une.
7. Tournez le bouton Select (Sélectionner) pour modifier le volume de l'alarme, puis appuyez pour valider.
8. Une alarme programmée est indiquée par dans la barre d'icônes.
Remarque: si Evoke est alimenté par une batterie ChargePAK, les alarmes programmées ne sont pas
désactivées sauf si Evoke est sous tension.
Programmation de la minuterie de mise en veille
La minuterie de mise en veille fait passer votre radio en mode veille/veille prolongée après une durée
spécifiée. À partir du menu Alarms and timers (Alarmes et minuteries) , sélectionnez Sleep timer
(Minuterie de mise en veille). Utilisez le bouton Select (Sélectionner) pour ajuster la durée de l'alarme de
mise en veille selon des intervalles de 15minutes, entre 15minutes et 1heure 30minutes. Appuyez sur
Save (Enregistrer) pour valider.
Une minuterie de mise en veille programmée est indiquée par
dans la barre d'icônes.
Programmation de la minuterie de cuisine
La minuterie de cuisine retentit à l'échéance d'un délai programmé.
A partir du menu Alarm or timer (Alarme ou minuterie) sélectionnez Kitchen timer (Minuterie de cuisine) et
utilisez le bouton Select (Sélectionner) pour régler la durée. Appuyez sur Mins (Minutes) pour passer des
minutes aux heures (et vice-versa). Appuyez sur Save (Enregistrer) pour valider.
Une minuterie de cuisine programmée est indiquée par
dans la barre d'icônes.
Annulation d'une alarme ou d'une minuterie qui retentit
Pour arrêter complètement une alarme ou une minuterie qui retentit, appuyez sur le bouton Select
(Sélectionner) ou Volume. Toute alarme qui retentit s'arrête automatiquement après 1 heure.
Remarque: le fait d'appuyer sur le bouton Volume n'annule pas une alarme par sonnerie.
Avertissement: lorsque votre radio est alimentée par une batterie ChargePAK F1, appuyer sur
Standby (Mise en veille) met la radio hors tension, ce qui empêchera toutes les alarmes ou minuteries
programmées de retentir.
Page 46

18
Interruption d'une alarme qui retentit
Appuyez sur le bouton Snooze ou sur SnoozeHandle (Répétition) pour répéter une alarme selon un
intervalle spécifique (9minutes par défaut).
Modification du délai avant rappel d'alarme
À partir du menu Alarms and timers (Alarmes et minuteries), sélectionnez Snooze time (Temps de
répétition). Utilisez le bouton Select (Sélectionner) pour ajuster la durée de l'arrêt momentané de 5 à 15,
puis sur 20/25/30/40minutes ou 1heure.
Annulation d'une répétition d'alarme
Pour annuler une répétition d'alarme, appuyez sur le bouton Select (Sélectionner) ou Volume.
Paramètres de Pure Connect
Ces paramètres sont uniquement disponibles lors de l'écoute de Pure Connect. Appuyez sur Home
(Accueil) pour afficher le menu d'accueil, puis appuyez sur Settings (Paramètres). Tournez et appuyez sur le
bouton Select (Sélectionner) pour sélectionner Pure Connect.
Pure Music - Mode Répétition
Tournez et appuyez sur le bouton Select pour sélectionner une option de répétition pour le service
musique à la demande. Sélectionnez All (Toutes) pour spécifier que toutes les pistes doivent être répétées.
Sélectionnez Track (Piste) pour spécifier que la piste actuellement lue sur Evoke doit être répétée.
Sélectionnez Off (Désactiver) pour désactiver l’option de répétition.
Pure Music - Mode Aléatoire
Tournez et appuyez sur le bouton Select pour sélectionner une option de aléatoire pour le service musique
à la demande. Sélectionnez On (Activer) pour lire les pistes de façon aléatoire. Sélectionnez Off (Désactiver)
pour désactiver la lecture aléatoire.
Effacer les favoris
Sélectionnez Clear favourites (Effacer les favoris) pour supprimer toutes les stations, tous les podcasts ou
les sons Pure de votre liste de favoris, qui seront également supprimés de Pure Connect si votre radio est
connectée.
M'inscrire à Pure Connect
Saisissez votre code d'enregistrement à Pure Connect si vous ne l'avez pas encore fait. Reportez-vous à la
page 10 pour obtenir plus d'informations.
Paramètres FM
Ces paramètres sont uniquement disponibles lorsque vous écoutez une radio FM. Appuyez sur Home
(Accueil) pour afficher le menu d'accueil, puis appuyez sur Settings (Paramètres). Tournez et appuyez sur le
bouton Select (Sélectionner) pour sélectionner FM.
FM stereo (FM stéréo)
Vous avez le choix entre les modes de réception de stations FM Mono (valeur par défaut) ou Stereo
(Stéréo). Si vous utilisez des écouteurs ou un haut-parleur auxiliaire, vous voudrez peut-être passer en mode
stéréo pour ce paramètre.
Options et paramètres
Page 47

19
FR
Réseau/clé USB
Ces paramètres sont uniquement disponibles lorsque vous écoutez une source Réseau/clé USB. Appuyez
sur le bouton Home (Accueil) pour afficher le menu d'accueil, puis appuyez sur Settings (Paramètres).
Tournez et appuyez sur le bouton Select (Sélectionner) pour sélectionner Network/USB media (Réseau/
clé USB).
Répéter
Sélectionnez le type de répétition.
Off (Désactivé) (valeur par défaut): les titres sont lus jusqu'à la fin de l'album, du dossier ou de la liste de
lecture en cours.
All (Tous): votre radio répète en boucle l'album, le dossier, la liste de lecture ou les résultats de votre
recherche en cours.
Track (Titre): votre radio répète le titre en cours d'écoute.
Lecture aléatoire
Sélectionnez l'ordre dans lequel les titres sont lus dans l'album, le dossier, la liste de lecture ou les résultats
de votre recherche en cours:
Off (Désactivé) (valeur par défaut): les titres sont lues dans l'ordre de leur affichage à l'écran.
On (Activé): les titres sont lues de façon aléatoire.
Infos média
Affichez les détails techniques concernant votre serveur multimédia ou procédez à un nouveau balayage
des serveurs alternatifs:
Current details (Détails actuels): tournez le bouton Select (Sélectionner) pour afficher des informations
sur le serveur multimédia, y compris le nom du serveur multimédia, la version logicielle, l'adresse IP et le
numéro du port.
Options d'affichage
Réglez les paramètres d'affichage (tels que la durée d'affichage à l'écran, les informations qui s'affichent
à l'écran) lorsque vous écoutez une source audio. Appuyez sur le bouton Home (Accueil) pour afficher
le menu d'accueil, puis appuyez sur Settings (Paramètres). Tournez et appuyez sur le bouton Select
(Sélectionner) pour sélectionner Display (Affichage).
Informations
Différents écrans d'informations sont accessibles pour chaque source audio :
Radio FM
Scrolling text (Texte défilant): texte d'information de l'émission diffusée par la station actuelle. Peut
inclure des textes de chanson, des détails de programme, des nouvelles, etc.
Reception info (Informations sur la réception): affiche la fréquence et l'intensité du signal actuels.
Time and date (Date et heure): l'appareil affiche l'heure et la date actuelles.
Page 48

20
Pure Connect
Description: émission diffusée par la station actuelle. Peut inclure des textes de chanson et des détails
de programme. Si le flux diffusé est une piste musique à la demande, ce champ affiche le nom d’artiste
et le nom d’album qui y sont associés.
Location and Genre (Localisation et genre): informations concernant la station actuelle; par ex., US
Rock.
Time offset (Décalage): la plupart des stations sont diffusées en direct, mais si ce n'est pas le cas,
la radio indique la position de lecture au sein du flux diffusé. Si le flux diffusé est une piste musique à la
demande, ce champ affiche la position de lecture au sein de la piste diffusée.
Wi-Fi signal strength (Intensité du signal Wi-Fi): affiche une barre indiquant la force du signal Wi-Fi
actuel.
Station URL (URL de la station): affiche l'adresse URL de la station actuelle. Si le flux diffusé est une
piste musique à la demande, ce champ affiche l'URL du titre.
Time and date (Date et heure): affiche la date via une horloge plein écran (comme en mode de veille).
Lecteur multimédia
Track info (Informations sur le titre): affiche les informations concernant l'artiste et l'album (balises
id3).
Time offset/duration (Décalage/durée) affiche une barre de progression et des minuteries indiquant la
position actuelle du titre.
Wi-Fi signal strength (Intensité du signal Wi-Fi): affiche une barre indiquant la force du signal Wi-Fi
actuel.
Time and date (Date et heure): affiche la date via une horloge plein écran (apparence similaire au
mode veille).
Rétroéclairage en fonctionnement et en veille
Vous pouvez régler la durée d'illumination de l'écran lorsque la radio est en utilisation et lorsqu'elle est
en veille. Sélectionnez Active backlight (En fonctionnement) pour ajuster les paramètres d'affichage
lorsque la radio est allumée, ou Standby (En veille) pour ajuster les paramètres d'affichage lorsqu'elle est
en veille. Sélectionnez l'option Always on (Toujours allumé) ou Off after 7 seconds (Extinction après 7
secondes).
Luminosité en fonctionnement et en veille
Vous pouvez régler la luminosité de l'écran lorsqu'Evoke est en utilisation et en veille. Sélectionnez Active
brightness (En fonctionnement) pour ajuster les paramètres de luminosité lorsqu'Evoke est allumée, ou
Standby (En veille) pour ajuster les paramètres de luminosité lorsqu'Evoke est en veille.
Paramètres audio
Vous pouvez utiliser ce menu pour régler les basses et les aigus.
1. Appuyez sur le bouton Home (Accueil) pour afficher le menu
d'accueil, puis appuyez sur Settings (Paramètres). Tournez et
appuyez sur le bouton Select (Sélectionner) pour sélectionner
Audio.
2. Tournez le bouton Select (Sélectionner) pour régler le niveau des
basses.
3. Appuyez sur Treble (Aigus), puis tournez le bouton Select
(Sélectionner) pour régler le niveau des aigus.
4. Appuyez sur OK lorsque vous avez terminé de régler les
paramètres audio.
OK Treble
Bass 0
Treble 0
- Bass Audio
Page 49

21
FR
Réglage de l’horloge
L'horloge se programme automatiquement à l'aide de votre signal radio FM ou de votre réseau. Si toutefois
vous ne parvenez pas à recevoir une heure mise à jour ou que vous voyez apparaître le message «Time
not available» (Heure non disponible), l'heure et la date peuvent être réglées manuellement. Pour régler
l'heure/la date manuellement:
1. Appuyez sur Home (Accueil) pour afficher le menu Home (Accueil), puis appuyez sur Settings (Paramètres).
2. Tournez et appuyez sur le bouton Select (Sélectionner) pour sélectionner Alarms and timers (Alarmes
et minuteries) > Set clock (Réglage de l'heure).
3. Tournez et appuyez sur le bouton Select (Sélectionner) pour régler l'heure et la date.
4. Appuyez sur ou pour passer au paramètre précédent ou suivant.
5. Appuyez sur Save (Enregistrer) lorsque vous avez terminé de régler l'heure et la date.
Modification de la langue affichée
Pour choisir entre différentes options de langue d’affichage (anglais, espagnol et français):
1. Appuyez sur Home (Accueil) pour afficher le menu Home (Accueil), puis appuyez sur Settings (Paramètres).
2. Tournez et appuyez sur le bouton Select (Sélectionner) pour sélectionner Miscellaneous (Divers) >
Language (Langue).
3. Tournez et appuyez sur le bouton Select (Sélectionner) pour définir la langue d’affichage.
Modification du nom de votre Evoke
Un nom a été attribué à votre Evoke. Ce nom vous permet de facilement identifier votre radio sur le site de
Pure Connect pour gérer votre écoute. Il sert également à identifier Evoke comme haut-parleur disponible
dans Pure Connect et Bluetooth. Par défaut, ce nom est Evoke F4 ******, mais vous pouvez le remplacer par
le nom de votre choix afin de vous le rappeler plus facilement.
Remarque: ****** représente un code à six chiffres, propre à chaque Evoke, qui est basé sur les six
derniers chiffres de l'adresse MAC d'Evoke.
Pour attribuer un nom personnalisé à Evoke:
1.
Appuyez sur Home (Accueil) pour afficher le menu Home (Accueil), puis appuyez sur Settings (Paramètres).
2.
Tournez et appuyez sur le bouton Select (Sélectionner) pour sélectionner Miscellaneous (Divers) > View/
change device name (Afficher/modifier le nom de l'appareil). Le nom actuellement attribué à Evoke
apparaît en haut de l'écran.
3. Tournez et appuyez sur le bouton Select (Sélectionner) pour saisir un nouveau nom.
4. Appuyez sur Save (Enregistrer) lorsque vous avez terminé de définir le nom de la radio.
Paramètres Bluetooth
Vous pouvez utiliser le menu Bluetooth pour rendre Evoke visible ou invisible pour d’autres appareils
Bluetooth.
1. Appuyez sur Home (Accueil) pour afficher le menu Home (Accueil), puis appuyez sur Settings
(Paramètres).
2. Tournez et appuyez sur le bouton Select (Sélectionner) pour sélectionner Miscellaneous (Divers) >
Bluetooth
3. Tournez et appuyez sur le bouton Select (Sélectionner) pour sélectionner l’une des options suivantes:
Activé (découvrable)
Activé (masqué)
Désactivé
Page 50

22
Mise à jour de votre Evoke
Des mises à jour logicielles peuvent être proposées ultérieurement pour vous fournir de nouvelles
fonctionnalités ou fonctions. Nous vous recommandons de procéder à des mises à jour logicielles
automatiques pour votre Evoke, qui sont fournies via la connexion Wi-Fi. Lorsqu'une mise à jour logicielle est
disponible, Evoke affiche un message vous invitant à installer la mise à jour logicielle.
Pour une mise à jour manuelle à partir de votre réseau
1. Appuyez sur Home (Accueil) pour afficher le menu Home (Accueil), puis appuyez sur Settings (Paramètres).
2. Tournez et appuyez sur le bouton Select (Sélectionner) pour sélectionner Miscellaneous (Divers) >
Upgrade (Mise à niveau).
3. Evoke recherchera toutes les mises à jour disponibles. Si une mise à jour est disponible, le message
«New version available: vX.X» (Nouvelle version disponible: vX.X) apparaît (X.X correspondant au
numéro de version, c'est-à-dire v2.1).
4. Appuyez sur OK pour télécharger et installer le nouveau logiciel. Cette opération peut prendre jusqu'à
5minutes.
Pour procéder à la mise à jour via un lecteur USB (en l'absence de réseau accessible)
Contactez le support technique de Pure (http://support.pure.com/us) pour obtenir davantage d'informations
sur la mise à jour de votre Evoke à la dernière version logicielle.
Avertissement: n'éteignez pas votre Evoke lorsqu'il est en cours de mise à jour.
Réinitialisation Evoke aux réglages d’usine
1. Appuyez sur Home (Accueil) pour afficher le menu Home (Accueil), puis appuyez sur Settings (Paramètres).
2. Tournez et appuyez sur le bouton Select (Sélectionner) pour sélectionner Miscellaneous (Divers) >
Factory reset (réglages d’usine).
4. Appuyez sur Yes (Oui) pour pour démarrer la réinitialisation.
Paramètres réseau
Evoke peut être connecté à votre réseau en utilisant une liaison Wi-FI ou Ethernet. Les paramètres que
vous modifiez varient selon le type de connexion utilisée. Appuyez sur Home (Accueil) pour afficher le
menu Home (Accueil), puis appuyez sur Settings (Paramètres). Tournez et appuyez sur le bouton
Select (Sélectionner) pour sélectionner Network (Réseau).
Paramètres de réseau sans fil
Connection wizard (Assistant de connexion)
Procédez à un balayage des réseaux sans fil où vous connecter.
View details (Afficher les détails)
Affiche les détails de configuration de votre réseau.
Network name (SSID) (Identifiant réseau)
Encryption method (Méthode de cryptage: WEP, WPA ou WPA2)
IP Address (Adresse IP)
Network mask (Masque réseau)
DNS IP address (Adresse IP DNS)
Router IP address (Adresse IP du routeur)
Adresse MAC WI-FI de l'appareil
Access point MAC address (Adresse MAC de point d'accès)
Page 51

23
FR
Manual setup (Configuration manuelle)
Permet de configurer manuellement votre réseau sans fil (pour les utilisateurs avancés uniquement).
Retry connection (Tenter de se connecter à nouveau): l'appareil essaie à nouveau d'établir la
connexion avec le réseau sélectionné.
Network name (Identifiant réseau): choisissez entre les options Scan for networks (Balayage des
réseaux) ou Enter SSID manually (Saisir manuellement le SSID) pour indiquer un nouveau SSID pour
votre réseau sans fil.
Encryption mode (Mode de cryptage): cette option permet de changer de mode de cryptage, entre
WEP, WPA (PSK), WPA2 (PSK) ou None (Aucun). Evoke détecte automatiquement le mode de
cryptage de votre réseau. Modifiez ce paramètre uniquement si vous pensez que le mode de cryptage
est incorrect.
Key or password (Clé ou mot de passe): Permet de saisir une nouvelle clé de cryptage ou un
nouveau mot de passe.
IP address (Adresse IP): vous avez le choix entre DHCP (dynamique) ou Static (Statique). Si vous
sélectionnez Static (Statique), un autre menu apparaîtra. Vous devrez indiquer les paramètres d'adresse
IP pour Evoke dans ce menu.
Ethernet network settings (Paramètres réseau Ethernet)
View details (Afficher les détails)
Affiche les détails de configuration de votre réseau.
IP Address (Adresse IP)
Network mask (Masque réseau)
DNS IP address (Adresse IP DNS)
Router IP address (Adresse IP du routeur)
Adresse MAC WI-FI de l’appareil
Ethernet MAC address (Adresse MAC Ethernet)
Manual setup (Configuration manuelle)
Permet de configurer manuellement votre réseau sans fil (pour les utilisateurs avancés uniquement).
IP address (Adresse IP): vous avez le choix entre DHCP (dynamique) ou Static (Statique). Si vous
sélectionnez Static (Statique), un autre menu apparaîtra. Vous devrez indiquer les paramètres d’adresse
IP pour Evoke dans ce menu.
General network settings (Paramètres réseau généraux)
Clear network settings (Effacer les paramètres de réseau)
Evoke supprimera toutes les connexions WI-FI précédentes et tous les mots de passe et autres
paramètres réseaux précédents. Si vous utilisez le mode de connexion sans fil, un nouveau balayage des
réseaux existants sera également effectué.
Page 52

24
ChargePAK F1 rend votre radio Evoke réellement portative et vous permet de profiter de vos programmes
préférés depuis votre jardin ou à la plage.
Rechargeable, ChargePAK est bien moins onéreuse que les batteries standard. Elle est également plus
écologique car elle réduit le nombre de substances toxiques envoyées dans les décharges. Par ailleurs,
ChargePAK est une solution simple qui peut se charger à tout endroit pourvu d'une connexion au secteur,
bien plus pratique que les batteries rechargeables standard.
Installation d'une batterie ChargePAK
1. Éteignez votre Evoke et débranchez-le de la prise secteur.
2. Ouvrez le compartiment batterie et placez la batterie ChargePAK de sorte que l'étiquette Pure soit
visible avant de remettre le capot et que les contacts de la batterie ChargePAK soient alignés sur les
trois bornes du compartiment batterie.
3. Refermez la trappe du compartiment batterie et reliez votre appareil à une prise secteur.
4. La batterie ChargePAK entre alors en charge. Si vous chargez votre batterie ChargePAK pour
la première fois ou suite à une période prolongée sans utilisation, nous vous recommandons de
respecter un temps de charge d'environ 24heures afin que la batterie soit chargée à son maximum.
Remarque: il est normal que votre ChargePAK s'échauffe, surtout pendant la charge. Votre ChargePAK
fonctionnera sans problème pendant de longues années dans des conditions d'utilisation normales, mais
comme toutes les batteries rechargeables, son efficacité diminuera progressivement au fil du temps.
Important: Evoke accepte uniquement les batteries ChargePAK F1 de Pure et n'est pas compatible
avec les autres piles et batteries, qu'elles soient jetables ou rechargeables, ni avec aucun autre modèle
ChargePAK.
Utilisation d'un bloc-batterie ChargePAK
F1 proposé en option
Page 53

25
FR
Aide et conseils
Je rencontre des problèmes de connexion à mon réseau
• Votre radio est incapable de se connecter aux réseaux sans fil dont les accès sont protégés (tels que
les réseaux de bureau) sans une clé WEP, WPA ou WPA2 ou un mot de passe.
• Votre radio doit être à portée effective de votre réseau sans fil, laquelle est réduite dès lors qu'un mur
en dur sépare le routeur de la radio. Votre Evoke est très performant pour détecter les réseaux sans fil,
cependant la puissance du signal Wi-Fi varie selon le routeur et l'environnement. Si Evoke n'arrive pas
à trouver votre réseau sans fil ou si le signal s'affaiblit, rapprochez-le du routeur.
• Sauf dans le cas où votre réseau sans fil est totalement «ouvert» (ce qui est généralement déconseillé
compte tenu du risque d'accès non-autorisé), assurez-vous d'avoir à portée de main votre clé WEP,
WPA ou WPA2.
• Assurez-vous d'avoir saisi correctement la clé WEP, WPA ou WPA2 ou le mot de passe pour votre
réseau.
• Si vous rencontrez des difficultés pour vous connecter au réseau avec l'adaptateur Ethernet, vérifiez
votre connexion Internet à l'aide d'un ordinateur. Si celle-ci est correcte, essayez de redémarrer votre
routeur ou votre modem.
L'écran affiche le message ‘Station not available’ (Station non disponible)
• Si une station ne peut être diffusée, rendez-vous sur http://support.pure.com/us pour obtenir de l'aide.
Je n’arrive pas à voir Evoke dans la liste des appareils Bluetooth disponibles sur
mon appareil mobile
Cela peut être venir du fait que votre paramètre de visibilité Evoke Bluetooth est défini sur « On (Hidden) »
(Activé (masqué)) ou sur « Off » (Désactivé) (voir la page 21). Votre paramètre Evoke doit être défini sur
« On (visible) » (Activé (visible)) pour être associé à votre appareil mobile.
Mon appareil mobile m’invite à saisir un mot de passe lorsque je tente de l’associer
à Evoke
Certains appareils Bluetooth existants vous invitent à saisir un mot de passe lorsque vous tentez d’associer
votre Evoke. Si tel est le cas, saisissez le code « 0000 ».
Page 54

26
Radio Radio FM et Internet (via une connexion Wi-Fi ou Ethernet).
Fréquences
FM 87,9-107,9MHz.
Réseau Wi-Fi : Normes 802.11b et 802.11g prises en charge avec cryptage WEP
et WPA/WPA2.
2.412GHz ~ 2.462GHz (canaux 1 - 11).
Ethernet (nécessite un adaptateur en option): 10/100Mo/s.
Minimum 0,5Mo de vitesse de bande passante recommandé.
Bluetooth: A2DP pris en charge via le dongle USB, fourni.
Diffusion en continu Prise en charge des codecs audio WMA (version 9 standard), AAC, MP3,
MP2. Le streaming requiert un serveur UPnP ou un PC/MAC exécutant le
logiciel serveur UPnP (fourni lors de l'enregistrement sur le portail
connect.pure.com).
Haut-parleur 3,5" à gamme étendue.
Connectique d'entrée Prise 5,5 Vc.c. pour adaptateur secteur (fourni). Entrée ligne format mini-
jack pour appareils auxiliaires. USB (type A) pour l'enregistrement/la lecture
USB, les mises à jour produits (également disponibles via le Wi-Fi), dongle
Bluetooth ou adaptateur Ethernet USP facultatif.
Connectique de sortie Prise casque stéréo format mini-jack. Prise mini-jack stéréo pour haut-
parleur auxiliaire stéréo Evoke F4.
Présélections 10favoris radio FM et nombre illimité de favoris radio Internet (requiert une
inscription sur connect.pure.com).
Affichage Large écran graphique OLED à fort taux de contraste, blanc sur noir, 128 x
64 pixels.
Adaptateur secteur
Entrée: 100-240VCA, 50/60Hz, 0,8A
Sortie: 5,5VCC, 3,57mA
ChargePAK Bloc-batterie rechargeable ChargePAK F1 Pure (disponible séparément).
Consommation électrique En veille: <1W, en fonctionnement: 3,4W.
Marquage C-Tick et de sécurité électrique pour l'Australie.
Dimensions 8.23" (209mm) de largeur x 4.33" (110mm) de profondeur x
6.89" (175mm) de hauteur
Poids 3.31 lbs (1,5kg)
Garantie Garantie complète de deux ans.
Homologations
Certifié CE. Pure déclare par la présente que cet appareil LPD bande II est
conforme aux exigences essentielles et autres dispositions applicables de
la directive 1999/5/CE. La déclaration de conformité peut être consultée à
l'adresse http://www.pure.com/R&TTE-DoC.
Conformité ETSIEN300401.
Spécifications
Page 55

27
FR
NOTIFICATION DE LA COMMISSION FÉDÉRALE DES COMMUNICATIONS (FCC) À TOUT
UTILISATEUR AUX ÉTATS -UNIS
Avertissement ! Tous changements ou modifications apportés à cet appareil sans l’autorisation expresse de
Pure annuleront le droit de faire fonctionner l’appareil.
NOTE: Cet équipement a été testé et déclaré conforme aux limites établies pour les appareils numériques de
la classe B, conformément à la partie 15 des règlements FCC. Ces limites ont été établies pour fournir une
protection raisonnable contre toute interférence nuisible dans une installation résidentielle. Cet équipement
produit, utilise et peut irradier une énergie de radiofréquence et, s’il n’est pas installé et utilisé conformément
aux instructions, peut causer des interférences nuisibles pour les radiocommunications.
Cependant, il n’y a aucune garantie qu’il ne produira pas d’interférences dans une installation particulière. Si
cet appareil provoque une interférence nuisible à la réception radio ou télévision, laquelle peut être déterminée
en allumant et en éteignant l’appareil, il est recommandé que l’utilisateur tente de corriger l’interférence à l’aide
d’une ou plusieurs des mesures suivantes :
• Réorienter ou déplacer l’antenne réceptrice.
• Augmenter la distance entre l’appareil et le récepteur.
• Brancher l’appareil dans une prise de courant ou un circuit autre que celui utilisé pour le récepteur.
• Consulter le revendeur ou un technicien compétent en radio/TV pour obtenir de l’aide.
Cet appareil est conforme à la partie 15 des règlements FCC. L’utilisation est soumise aux deux conditions
suivantes : (1) Cet appareil ne doit pas provoquer d’interférences nuisibles, et (2) cet appareil doit accepter toute
interférence reçue, y compris une interférence pouvant provoquer un fonctionnement non voulu.
Déclaration de
la Commission Fédérale des Communications (FCC) RF de l’exposition aux
radiations
Avertissement ! Une distance de séparation d’au moins 20 cm doit être maintenue entre l’antenne du produit et
les personnes.
NOTICE IC POUR UN UTILISATEUR AU CANADA
Les circuits numériques pouvant occasionner des interférences avec d'autres syntoniseurs radio ou de télévision
placés à proximité, éteignez cette unité lorsque vous ne l'utilisez pas et éloignez-la des syntoniseurs radio ou de
télévision concernés.
REMARQUE: le présent appareil numérique n'émet pas de bruits radioélectriques dépassant les limites
applicables aux appareils numériques de classe B prescrites dans le Règlement sur le brouillage radioélectrique
édicté par le ministère des Communications du Canada. Ces limites ont été établies pour fournir une protection
raisonnable contre toute interférence nuisible dans une installation résidentielle. Cet équipement produit, utilise
et peut irradier une énergie de radiofréquence et, s'il n'est pas installé et utilisé conformément aux instructions,
peut causer des interférences nuisibles pour les radiocommunications. Cependant, il n'y a aucune garantie
qu’il ne produira pas d’interférences dans une installation particulière. Si cet appareil provoque une interférence
nuisible au fonctionnement de la radio ou de la télévision, laquelle peut être déterminée en allumant et en
éteignant l'appareil, il est recommandé que l’utilisateur tente de corriger l’interférence à l'aide d'une ou plusieurs
des mesures suivantes:
• Réorienter ou déplacer l'antenne réceptrice.
• Augmenter la distance entre l'appareil et le récepteur.
• Brancher l'appareil dans une prise de courant ou un circuit autre que celui utilisé pour le récepteur.
• Consulter le revendeur ou un technicien compétent en radio/TV pour obtenir de l'aide.
Cet appareil numérique de la classe B est conforme à la norme canadienne ICES-003.
Page 56

28
Copyright
Copyright 2014 Imagination Technologies Limited. Tous droits réservés. Aucune partie de cette publication ne
peut être copiée, distribuée, transmise, transcrite, stockée dans un système de restauration ou traduite dans un
langage humain ou informatique, en tout ou partie, sous quelque forme et par quelque procédé que ce soit, électronique, mécanique, magnétique, manuel ou autre, ni divulguée à des tiers, sans le consentement écrit préalable
d'Imagination Technologies Limited. Version du 2janvier 2014.
Marques déposées
Evoke F4 with Bluetooth, ChargePAK, Pure, le logo Pure, Imagination Technologies et le logo Imagination
Technologies sont des marques ou des marques déposées d'Imagination Technologies Limited. Tous les autres
noms de produit sont des marques déposées de leurs détenteurs respectifs.
Informations sur la garantie
Imagination Technologies Limited garantit à l’utilisateur final que le présent produit est exempt de défauts de
matière et de main-d’œuvre dans le cadre d’une utilisation normale, pour une période de deux ans à compter de
la date d’achat. La présente garantie couvre les pannes dues à un défaut de conception ou de fabrication; elle
n'est pas applicable aux dommages accidentels, quelle qu'en soit la cause, à l'usure normale du produit, ainsi
qu'à tous les dommages dus à la négligence et aux interventions, modifications ou réparations effectuées sans
notre autorisation.
Connectez-vous sur www.pure.com/register pour enregistrer votre produit. Pour tout problème, veuillez vous
adresser à votre revendeur ou prendre contact avec l'assistance technique de Pure, à l'adresse indiquée au dos
du présent manuel d'utilisation.
Avis de non-responsabilité
Imagination Technologies Limited décline toute responsabilité et n'accorde aucune garantie quant au contenu du
présent document, notamment en ce qui concerne les garanties implicites de valeur marchande ou d’adéquation
à un usage spécifique. En outre, Imagination Technologies Limited se réserve le droit de réviser la présente
publication et d’y apporter des modifications, quand elle le souhaite, sans obligation de sa part d'aviser les
personnes physiques ou morales desdites révisions ou modifications.
Déclaration des accords de licence
Des parties du code utilisé dans Evoke F4 sont soumises à des licences GPL, LPGL, BSD et d'autres licences
open source. Pour plus de détails, veuilles consulter la page: http://www.pure.com/licensing
Élimination en fin de vie des appareils électriques et électroniques
Ce symbole, apposé directement sur le produit ou sur son emballage, indique que le produit ne
doit pas être éliminé avec les déchets ménagers. Il doit être remis à un point de collecte agréé pour
le recyclage des équipements électriques et électroniques. En veillant à éliminer comme il se doit
ce produit en fin de vie, vous contribuez à prévenir les conséquences potentiellement négatives
pour l'environnement et la santé. Le recyclage des matériaux contribue à la préservation des
ressources naturelles. Pour tout complément d'information sur le recyclage de ce produit, n'hésitez
pas à contacter votre municipalité, votre déchetterie ou le magasin dans lequel vous avez acheté le
produit.
Page 57

1
FR
ESPAÑOL
EN
Gracias por elegir Evoke F4. Este sistema de transmisión de
música y radio en flujo continuo trae a su alcance un mundo
de escucha de una manera sencilla y fácil. Puede usarlo para
disfrutar música transmitida en forma inalámbrica desde su
dispositivo iOS o Android, o desde su PC o Mac; para escuchar
una amplia gama de estaciones de radio por Internet o radio FM;
y para reproducir miles de podcasts, programas de radio bajo
demanda y evocadores sonidos de ambiente. También puede
acceder a transmisión por flujo continuo de música, un servicio
de suscripción bajo demanda basado en la nube, que le ofrece
acceso instantáneo a millones de pistas de música. Este manual
le ayudará a comenzar a usar su Evoke F4 lo antes posible, y le
explicará cómo sacar el máximo provecho de este dispositivo.
Constantemente estamos mejorando y añadiendo nuevas
características a nuestros productos. Para aprovechar todas las
mejoras que se han realizado desde que se envió su producto,
visite la página support.pure.com, en donde podrá descargar la
última versión de esta guía del usuario en formato PDF.
SelectVolume
Evoke
F4 with Bluetooth
Page 58

2
Instrucciones de seguridad importantes
1. Lea estas instrucciones. Antes de utilizar este producto se deben leer todas las instrucciones de
seguridad y de funcionamiento.
2. Conserve estas instrucciones. Conserve las instrucciones de seguridad y de funcionamiento para
consultarlas más adelante.
3. Respete todas las advertencias. Siga todas las advertencias que figuran en el aparato y en las
instrucciones de funcionamiento.
4. Siga todas las instrucciones. Se deben seguir todas las instrucciones de funcionamiento y de uso.
5. No use este aparato cerca de fuentes de agua.
6. Limpie sólo con un trapo seco.
7. No bloquee las aberturas de ventilación. Instale de acuerdo con las instrucciones del fabricante.
8. No instale cerca de fuentes de calor, como radiadores, estufas u otros aparatos que generen calor.
9. Use sólo los aparatos adicionales y accesorios especificados por el fabricante.
10. Desconecte el aparato durante tormentas eléctricas o cuando no se utilice por periodos prolongados de
tiempo.
11. No use el adaptador de alimentación eléctrica al aire libre.
12. Tenga cuidado con los niveles de volumen al usar los audífonos, un volumen excesivamente alto podría
dañar su oído.
13. Deje de usar de inmediato si el aparato presenta cualquier indicio de daño mecánico, temperatura
excesiva, dilatación o resquebrajamiento.
14. Remita todas las reparaciones al personal de servicio calificado. Se requerirán reparaciones cuando el
aparato se dañe de cualquier forma, como cuando se dañe el cable de alimentación o el enchufe, cuando
se derrame líquido o hayan caído objetos sobre el aparato, cuando éste haya quedado expuesto a la lluvia
o la humedad, cuando no funcione en forma normal o se haya caído al suelo.
15. Para reducir el riesgo de descarga eléctrica, no quite la cubierta (o parte posterior), ya que no hay piezas
que puedan ser reparadas por el usuario. Remita las reparaciones al personal calificado.
16. Use únicamente las fuentes de alimentación eléctricas enumeradas en las instrucciones del usuario (con
el núm. de modelo DSA-24CA-05 055357, fabricado por Pure).
17. Se requerirán reparaciones cuando el aparato se dañe de cualquier forma, como cuando se dañe el cable
de alimentación o el enchufe, cuando no funcione en forma normal o se haya caído al suelo.
18. ADVERTENCIA: para reducir el riesgo de incendio o de descarga eléctrica, no exponga este aparato a la
lluvia ni a fuentes de humedad. No exponga el aparato a fuentes de goteo o de salpicaduras. Asimismo,
no coloque encima del aparato ningún recipiente que contenga líquido como, por ejemplo, un jarrón.
19. PRECAUCIÓN: si la batería se coloca de forma incorrecta, existe riesgo de explosión. Reemplace la
batería con un tipo similar o equivalente.
20. ADVERTENCIA: El adaptador de conexión directa se utiliza como dispositivo de desconexión, el cual debe
poder operarse fácilmente.
21. El equipo es un aparato eléctrico Clase II, o con doble aislamiento. Se diseñó de tal forma que no
requiere una conexión de seguridad a la tierra eléctrica.
Pueden producirse lesiones del oído tras una exposición constante a un volumen elevado al usar los
audífonos. Compruebe siempre el nivel de volumen antes de colocarse los audífonos en los oídos.
No se recomienda usar audífonos mientras conduce un vehículo, y en ciertas zonas es ilegal. Absténgase
de escuchar su radio si le parece que podría distraerlo cuando conduzca cualquier tipo de vehículo o
realice cualquier otra actividad que requiera de su total atención.
Page 59

3
ES
Contenido
4 Aspectos preliminares
4 Inicio rápido
5 Controles y sensores
6 Panel trasero
6 Cambio entre Sleep, Standby y On
(suspensión, espera y encendido)
7 Iconos en pantalla
8 Escucha de radio por
Internet a través de Pure
Connect
8 Escuchar radio por Internet
9 Escuchar otro contenido de Internet
11 Transmisión por flujo continuo de
música
11 Servicio de etiquetado de Pure Connect
12 SiriusXM
13 Streaming desde el
aplicación Pure Connect
13 Descargue la aplicación Pure Connect
13 Seleccionar Evoke u otro dispositivo
compatible con Pure Jongo en la
aplicación Pure Connect
14 Transmisión por flujo
continuo de música desde
una PC o Mac
14 Escuchar pistas transmitidas por flujo
continuo en Evoke
15 Escuchar radio FM
15 Cambiar estaciones de FM
15 Almacenar una presintonía
15 Escuchar una presintonía
16 Escuche audio desde una
unidad de memoria USB
16 Utilización de Bluetooth
17 Grabe programas de radio
17 Grabaciones instantáneas
17 Grabaciones temporizadas
18 Configurar alarmas y
temporizadores
18 Configurar una alarma
18 Configurar el temporizador de repetición
18 Configurar el temporizador de cocina
19 Cancelar una alarma o temporizador
acústicos
19 Repetición de una alarma acústica
19 Cambiar el tiempo de repetición de la
alarma
19 Cancelar la repetición de una alarma
acústica
20 Opciones y configuración
20 Configuración de Pure Connect
20 Configuración de FM
20 Medios de red/USB
22 Configuración del reloj
22 Cambiar el idioma mostrado en la
pantalla
22 Configuración de Bluetooth
22 Configuración de audio
23 Cambiar el nombre de Evoke
23 Actualizar Evoke
23 Restaurar valores de fábrica
24 Configuración de red
26 Utilización de un ChargePAK
F1 opcional
26 Instalación de un ChargePAK
27 Ayuda y asesoría
28 Especificaciones
Page 60

4
Extienda la antena e inserte el conector del adaptador de corriente incluido en la entrada de
5.5 V CC en la parte trasera del Evoke. Conecte el adaptador a la fuente de alimentación.
Pure aparecerá brevemente en la pantalla.
Aspectos preliminares
Inicio rápido
Nota: Si tiene una batería recargable ChargePAK F1 (se vende por separado), colóquela ahora antes de
conectar el Evoke. Vea página 26 para obtener más información.
Seleccione su idioma de visualización (inglés, francés o español) girando la perilla Select
(Seleccionar) para resaltar el idioma que desee. Presione la perilla Select (Seleccionar) para
confirmar su elección. Repita este proceso para seleccionar la zona horaria y la región más
cercanas a usted.
1
2
3
Stereo Out
Aerial
Aux Speaker
Stereo OutAux Speaker
5.5V DC
Network/USB media
OK
Pure Connect
FM radio
Auxiliary input
Settings
Aparecerá la pantalla de Home (Inicio):
Gire la perilla Select (Seleccionar) para resaltar y presione para seleccionar una de las
siguientes opciones:
Pure Connect
Vea página 8
Medios de red/USB Vea página 14
Radio FM Vea página 15
Entrada auxiliar Vea página 6
Para modificar cualquier configuración de Evoke, toque el botón Settings (Configuración) (vea
página 20).
Page 61

5
ES
Controles y sensores
N.° Control Descripción
1 Inicio Toque para regresar a la pantalla de Home (Inicio).
2
Botones táctiles
sensibles al contexto
Toque el botón que corresponda a la función mostrada en pantalla que
desee utilizar.
3 Retroceso Toque para regresar a la pantalla anterior.
4 Perilla Volume/mute
(Volumen/silencio)
Gire par ajustar el volumen. Presione para alternar entre silenciar y reactivar
volumen.
5 Perilla de selección
Gire para navegar por los menús, estaciones u opciones y presione para
seleccionar un elemento. Presione para poner en pausa una pista o podcast.*
6 Tecla táctil de
Standby (Espera)
Toque
para cambiar entre los modos Sleep (Suspensión), Standby
(Espera) y On (Encendido). Vea página 6 para obtener más información.
7 Sensor de luz No cubrir. Ajusta el brillo de la pantalla de acuerdo con los niveles de luz
en su habitación (sólo funciona cuando el nivel de brillo se establece en
‘Automático’).
8 Botón Record
(Grabar)
Toque para empezar a grabar al instante la estación de radio por Internet
que se esté reproduciendo. Vea página 17 para obtener más información.
9
SnoozeHandle (Asa
de repetición de la
alarma)
Presione para activar la alarma en modo de repetición. Sujétela sin soltarla para
aumentar el brillo de la pantalla al máximo durante 3 segundos.
Nota: La alarma no sonará si Evoke está apagado o si se encuentra
desconectado de la alimentación eléctrica.
* El símbolo > indica que deberá usar el mismo control para navegar por las distintas opciones del menú.
SelectVolume
1
2
3
4
5
6
7
8
9
Page 62

6
Panel trasero
Cambio entre Sleep, Standby y On (suspensión, espera y encendido)
Evoke tiene tres modos de activación, Standby (Espera), Sleep (Suspensión) y On (Encendido).
Cuando está en Standby (Espera), Evoke consume un mínimo de energía. En el modo Sleep
(Suspensión), Evoke permanece conectado a la red inalámbrica (una vez conectado) y está listo para
transmitir música. Vea página 13 para obtener más información.
Para activar el modo de Standby (Espera), toque Standby (Espera).
Para activar el modo de Sleep (Suspensión), toque y mantenga presionado Standby (Espera).
Una vez activado el modo de Sleep/Standby (Suspensión/Espera), toque Standby (Espera) para cambiar
a On (Encendido).
Nota: Si presiona el botón de Standby (Espera) y Evoke está funcionando con el ChargePAK F1, Evoke
se apagará sin entrar en el estado de alimentación Sleep (Suspensión).
1.
Conector USB para adaptador USB Ethernet, adaptador Bluetooth o un dispositivo USB para
grabar/reproducir. También se utiliza para actualizar el software de Evoke cuando no hay una
conexión a Internet disponible.
2. Conector de salida para una bocina estéreo Evoke F4 (se vende por separado).
3. Conexión de salida para audífonos (3.5 mm).
4. Conexión de entrada auxiliar de 3.5 mm para iPod, reproductor MP3, etc.
5. Conexión de entrada de 5.5 V CC para el adaptador de alimentación eléctrica incluido.
6. Puerto de bajos optimizados (no cubrir).
7. Compartimiento para batería recargable ChargePAK F1 (se vende por separado).
8. Adaptador Bluetooth USB.
Aerial
5.5V DCStereo speaker Aux in
7
1 2 3 4 5
6
8
Page 63

7
ES
Welcome to Pure Connect
Add
Wide range of great content
PC
♥
Options
Iconos en pantalla
Fuente Iconos
*El ChargePAK F1 se vende por separado.
Fuente Iconos
PC
Pure Connect
Nivel de volumen
MP Media player (Reproductor de medios)
Silenciar
FM FM
Indicadores para establecer la alarma/temporizador
AUX Auxiliary input (Entrada auxiliar )
Reloj
PS Flujo continuo
Nivel de batería de ChargePAK*
Señal estéreo
Fuerza de la señal (FM o Wi-Fi)
Conexión Ethernet activa
Se perdió la conexión Ethernet
R
Indicador de grabación temporizada
Botones
sensibles al
contexto
BT Bluetooth
Page 64

8
Escucha de radio por Internet a través de
Pure Connect
Pure Connect es un portal de medios en línea que le proporciona un acceso fácil y rápido a miles de
estaciones de radio por Internet, programas bajo demanda, podcasts y sonidos ambientales. Puede
disfrutar todo este contenido en su dispositivo Evoke, en teléfonos inteligentes y tabletas que ejecuten
la aplicación Pure Connect, y en el sitio Web de Pure Connect. También puede usar Pure Connect para
acceder a servicios de suscripción adicionales como el servicio de transmisión por flujo continuo de
música basado en la nube* de Pure Connect, que le proporciona acceso instantáneo a millones de pistas
de música, y SiriusXM, que le proporciona acceso a más de 140 canales de radio satelital adicionales y
contenido bajo demanda.
Para acceder a Pure Connect desde Evoke, tendrá que conectar Evoke a su red. Vea más información a
continuación.
Después de conectar Evoke a su red, podrá registrar su Evoke en el sitio Web de Pure Connect. Le
recomendamos registrar su Evoke, ya que esto le permitirá administrar sus favoritos de Pure Connect y
acceder a servicios adicionales como como la transmisión por flujo continuo de música y SiriusXM.
Conectarse a Internet
Utilizar su red inalámbrica
1. Toque Home (Inicio) y seleccione Pure Connect en la pantalla
de Home (Inicio). Evoke buscará las redes inalámbricas y las
mostrará en una lista.
2. Seleccione su red. Si su red requiere una clave, siga los pasos 3 y 4.
3. Introduzca su clave de red o contraseña, girando y presionando la
perilla Select (Seleccionar) para resaltar y seleccionar caracteres.
Seleccione sp (esp) para insertar un espacio. Toque More...
(Más...) para introducir letras minúsculas; toque de nuevo para
introducir símbolos. Toque Delete (Borrar) para quitar el último
carácter.
4. Toque Save (Guardar) para terminar. Evoke se conectará a su red.
Sugerencia útil: Su clave Wi-Fi es susceptible al uso de mayúsculas/
minúsculas, por lo que debe asegurarse de introducirla exactamente
como se indica.
Usar una conexión Ethernet
También puede conectar el Evoke a Internet mediante el adaptador
opcional USB Ethernet de Pure.
Para usar el adaptador USB Ethernet de Pure, conecte su cable de red
al adaptador y después conecte el adaptador al enchufe USB en su
dispositivo Evoke. La luz del adaptador USB se encenderá y se creará
una conexión a su red en forma automática.
El estado de la conexión Ethernet se muestra en la pantalla (vea
página 7).
A B C DEFGHIJKLM
NOPQRSTUVWXYZ
sp0123456789
Enter key or password
Delete Save More...
6578616D706C
LAN
USB
100Mbps
LAN
USB
My favorites♥
Pure Music
SiriusXM
Live Radio
Listen Again
Podcasts
Menú de Pure Connect
Escuchar radio por Internet
Miles de estaciones de radio de todo el mundo transmiten en línea.
Para escuchar, seleccione Pure Connect en la pantalla Home (Inicio).
Su dispositivo Evoke sintonizará la última estación que escuchó, o
le mostrará la lista de estaciones. Gire la perilla Select (Seleccionar)
para entrar al menú de Pure Connect. Seleccione Live Radio (Radio
en vivo) para ver una lista de las estaciones de Internet actualmente
disponibles. Use la perilla Select (Seleccionar) para navegar por la
lista y presione para sintonizar. Puede agregar una estación a sus
Favorites (Favoritos) si toca Add (Añadir).
*Tendrá que suscribirse a nuestro nivel de suscripción Azul o Violeta para acceder a la transmisión por flujo continuo de música en Evoke.
Para obtener más información sobre los diversos niveles de suscripción, visite connect.pure.com
Page 65

9
ES
Buscar una estación
Toque Search (Buscar) al navegar por la lista de estaciones para
buscar estaciones por Name (Nombre), Genre (Género), Country
(País), Language (Idioma), Quality (calidad de sonido), o cualquier
combinación de estos parámetros. Use la perilla Select (Seleccionar)
para establecer sus opciones y toque en Go (Ir) para ver la lista de
resultados.
Buscar una estación de radio de Internet mediante Quick Jump
(Salto rápido)
La función Quick Jump (Salto rápido) le permite buscar estaciones que
comiencen por cierta letra. Para usar Quick jump (Salto rápido):
1. Toque el botón A-Z para abrir el cuadro de Quick Jump (Salto
rápido).
2. Gire y presione la perilla Select (Seleccionar) para seleccionar
la primera letra de la estación de radio que desea buscar.
Escuchar otro contenido de Internet
Toque Home (Inicio) y seleccione Pure Connect en la pantalla de
Home (Inicio), después elija uno de los siguientes tipos de contenido:
Listen again
Seleccione esta opción para acceder al servicio BBC Listen Again,
el cual le permite ponerse al tanto de todos los programas de radio
de la BBC que pudiera haberse perdido. Estos programas de radio
archivados están disponibles para escucharse por un periodo fijo de
tiempo después de haberse transmitido.
Podcasts
Los podcasts son programas de audio pregrabados sobre una amplia
variedad de temas, como comedia, artes, negocios y cultura, que
usted puede disfrutar en cualquier momento.
Pure Sounds
Nuestra biblioteca de evocadores sonidos de ambiente, incluyendo el
canto de aves, sonidos urbanos y las olas en la orilla del mar.
Clear all
Clear
Go Lounge
Name [All]
Genre [Classical]
Country [Netherlands]
Language [Dutch]
Quality [All]
Pantalla de búsqueda de
estaciones
Wind chimes in suburbs
Wooden lock
Accoustic guitar (E,A,D...
Active daytime birds
Arctic Blizzard
Navegar por Pure Sounds
Page 66

10
Crear una cuenta de Pure Connect
Lo único que necesita para crear una cuenta de Pure Connect y
registrar su Evoke es una dirección de correo electrónico válida.
Necesitaremos enviarle un par de correos electrónicos y no podrá
completar el proceso si no tiene acceso a ellos.
Para crear una cuenta de Pure Connect:
1. Abra su navegador de Internet.
2.
Vaya a connect.pure.com.
3. Haga clic en Create account (Crear una cuenta) y siga las
instrucciones en pantalla.
Registrar su Evoke en Pure Connect
1. Inicie sesión en Pure Connect, haga clic en Me (Yo) y
seleccione Devices (Dispositivos). A continuación verá su
código de registro.
2. En Pure Connect Settings (Configuración de Pure Connect)
en su radio, seleccione Register with Pure Connect
(Registrarse en Pure Connect) para introducir su código.
Use la perilla Select (Seleccionar) para resaltar y seleccionar
caracteres; toque Del (Borr) para borrar caracteres; y toque
Save (Guardar) para terminar.
¡Felicidades! Ha registrado su Evoke en Pure Connect. Los favoritos
que creó en Pure Connect estarán visibles en su Evoke, y los que creó
en Evoke aparecerán en Pure Connect.
connect.pure.com
Optional registration at
connect.pure.com adds
advanced features to your
radio. Register now?
Ye
sN
everLater
Enter registration code
DelSav
eM
ore...
QPZKE
A B C D E F G H I J K L M
N O P Q R S T U V W X Y Z
sp 0 1 2 3 4 5 6 7 8 9
Page 67

11
ES
Transmisión por flujo continuo de música
La transmisión por flujo continuo de música de Pure Connect es un servicio de suscripción bajo
demanda basado en la nube, que le ofrece acceso instantáneo a millones de pistas de música incluidas
en uno de los catálogos de música más grandes del mundo, que abarca prácticamente todos los
artistas y géneros que pueda imaginar. Puede escuchar en nuestros sistemas de transmisión por flujo
continuo de música y radio, en un dispositivo Apple o Android que ejecute la aplicación Pure Connect, o
en el sitio web de Pure Connect.
El servicio de transmisión por flujo continuo de música de Pure Connect sólo está disponible en ciertos países. Consulte http://www.pure.com/
availability/ para obtener información adicional.
Acceso a transmisión por flujo continuo de música en Evoke
1. Toque Home (Inicio) y seleccione Pure Connect en la pantalla Home (Inicio).
2. Gire y presione la perilla Select (Seleccionar) para seleccionar Pure Music.
3. Gire y presione la perilla Select (Seleccionar) para seleccionar una de las siguientes opciones:
My Tracks (Mis pistas): Seleccione esta opción para acceder a las pistas que compró en Pure
Connect.
Catalogue (Catálogo): Seleccione esta opción para navegar o buscar en el catálogo completo de
transmisión por flujo continuo de música con su dispositivo Evoke.
By playlist (Por lista de reproducción): Seleccione esta opción para escuchar las listas de
reproducción que haya creado en connect.pure.com o mediante la aplicación Pure Connect (vea
“Streaming desde el aplicación Pure Connect” en la página 13).
Servicio de etiquetado de Pure Connect
El servicio de etiquetado de Pure Connect puede usarse para identificar, marcar y comprar las pistas
que se estén reproduciendo en una estación de radio FM o de Internet. Además de acceder a sus pistas
de música favoritas, el servicio de etiquetado de Pure Connect busca automáticamente en catálogos
anteriores cualquier música de artistas similares que pudiera interesarle, lo que le permite explorar cosas
completamente nuevas o redescubrir a sus favoritos olvidados.
Nota: Para usar el servicio de etiquetado de Pure Connect, su Evoke deberá estar conectado a Internet
y necesitará una cuenta de Pure Connect. Vea página 10 para obtener más información sobre cómo
establecer una cuenta de Pure Connect.
1. Toque el botón Tag (Etiquetar).
2. Evoke identificará el nombre de la canción que esté en reproducción y le permitirá comprarla (o
transmitirla por flujo continuo si cuenta con una suscripción al servicio de transmisión por flujo
continuo de música).
Nota: Para acceder a su lista de pistas etiquetadas, tendrá que iniciar sesión en su cuenta de Pure
Connect en connect.pure.com.
Nota: El servicio de etiquetado de Pure Connect intentará identificar y vincular cualquier pista en
reproducción usando nuestro exhaustivo catálogo. La compra y transmisión de pistas está sujeta a su
disponibilidad.
Page 68

12
SiriusXM
SiriusXM es un servicio de suscripción disponible en Estados Unidos, que proporciona acceso a la radio
en vivo y contenidos de Listen Again provenientes de más de 140 estaciones de radio satelital.
Puede escuchar SiriusXM en nuestros sistemas de transmisión por flujo continuo de música y radio.
Vinculación de Evoke a su cuenta de SiriusXM
1. Inicie sesión en Pure Connect, haga clic en Me (Yo) y seleccione My Account (Mi cuenta).
2. Haga clic en el botón Add credentials (Agregar credenciales) en el panel SiriusXM Subscription
para abrir la página SiriusXM Subscription (Suscripción SiriusXM).
3. Escriba su nombre de usuario y contraseña de SiriusXM y haga clic en el botón Save credentials
(Guardar credenciales).
Ahora podrá acceder a SiriusXM en los productos compatibles que estén registrados en su cuenta de
Pure Connect.
Página Mi cuenta de Pure Connect
Acceso a Live Radio en
SiriusXM
Search
All
Howard Stern
Latin & World
Music
News & Issues
Acceso a SiriusXM en Evoke
1. Toque Home (Inicio) y seleccione Pure Connect.
2. Gire y presione la perilla Select (Seleccionar) para seleccionar
SiriusXM.
3. Gire y presione la perilla Select (Seleccionar) para seleccionar
una de las siguientes opciones:
Live radio (Radio en vivo): Seleccione esta opción para visualizar
la lista de estaciones de radio en vivo que están disponibles a través
del servicio SiriusXM. Puede elegir entre ver todas las estaciones de
radio disponibles o filtrar la lista por un género en específico.
On Demand (Bajo demanda): Seleccione esta opción para
ponerse al tanto de todos los programas de radio que pudiera
haberse perdido. Puede elegir entre ver todas las estaciones de
radio disponibles o filtrar la lista por un género en específico.
Page 69

13
ES
Streaming desde el aplicación Pure Connect
Descargue la aplicación Pure Connect
Descargue la aplicación Pure Connect en su dispositivo Android o iOS y conecte su Evoke a todo un
mundo de música.
Puede utilizar la aplicación Pure Connect para reproducir en streaming en Evoke la música almacenada
en su smartphone o tablet, además de emisoras de radio en Internet, programas de radio bajo demanda
y podcasts.
Nota: Cualquier dispositivo con el que quiera utilizar la función multisala inalámbrica de Pure deberá
estar conectado a la misma red..
desde el
App Store de Apple
desde
Google Play
Seleccionar Evoke u otro dispositivo compatible con Pure Jongo en
la aplicación Pure Connect
Con la aplicación Pure Connect le puede transmitir a un solo dispositivo Jongo o varios dispositivos
Jongo simultáneamente.
Para iniciar la transmisión de contenido:
1. Escoja la música que desee en la aplicación Pure Connect.
2. Oprima en la barra del reproductor para ver una lista de los dispositivos Jongo disponibles en
su red.
3. Oprima al lado de su dispositivo compatible con Pure Jongo.
Ahora ya podrá transmitir audio a su dispositivo compatible con Jongo.
Para obtener más información sobre la utilización de la aplicación Pure Connect, consulte la ayuda que
se suministra con la aplicación.
A
Aplicación Pure Connect
Page 70

14
Puede transmitir a su Evoke la música almacenada en su computadora o en un dispositivo de
almacenamiento conectado a la red (NAS) compatible con UPnP. Para transmitir música en flujo continuo
desde su computadora, tendrá que instalar software de servidor de medios en ella.
Escuchar pistas transmitidas por flujo continuo en Evoke
1. Toque Home (Inicio), luego gire y presione la perilla Select (Seleccionar) para seleccionar Network/USB
media player (Reproductor de medios de red/USB) en la pantalla de Home (Inicio).
2. Gire y presione la perilla Select (Seleccionar) para elegir el reproductor de medios del que desea
transmitir música por flujo continuo.
3. Gire y presione la perilla Select (Seleccionar) para navegar y seleccionar la pista o lista de reproducción.
Reproducir/poner en pausa la reproducción de audio
Presione la perilla Select (Seleccionar) para poner en pausa/reproducir una pista que se esté
reproduciendo en Evoke.
Buscar dentro de una pista
Mientras esté en pausa, puede mantener presionados los botones y para buscar dentro de la
pista.
Saltar hacia atrás y hacia delante entre pistas
Si está trasmitiendo audio en el dispositivo Evoke desde un servidor de medios, puede tocar los botones
para saltar hacia atrás/hacia delante entre las pistas.
Transmisión por flujo continuo de música
desde una PC o Mac
Page 71

15
ES
Escuchar radio FM
Cambiar estaciones de FM
Sintonización por búsqueda
1. Gire la perilla Select (Seleccionar).
2.
Toque los botones para sintonizar la estación de radio
FM siguiente o anterior que tenga una señal fuerte.
Sintonización manual
Gire la perilla Select (Seleccionar) a la derecha o a la izquierda para
sintonizar en forma ascendente o descendente en intervalos de
0.05 MHz.
Almacenar una presintonía
Sintonice la estación que desea almacenar como presintonía y
toque Presets (Presintonías). Gire la perilla Select (Seleccionar)
para resaltar un número de presintonía. Toque Add (Añadir)
para almacenar la presintonía. (Puede reemplazar presintonías
existentes.)
Escuchar una presintonía
Toque Presets (Presintonías), seleccione la estación que desee
recordar y toque Listen (Escuchar), o presione la perilla Select
(Seleccionar).
Extienda la antena, después toque Home (Inicio) y seleccione FM radio (Radio FM) en la pantalla
Home (Inicio).
Buzz FM
OK
Add
Empty 1
Empty 2
Empty 4
Empty 5
♥
Selección de una presintonía
Uso de la sintonización
mediante búsqueda para
sintonizar estaciones FM
103.30
Seek tune
Options
Page 72

16
Para escuchar pistas de una unidad de memoria USB:
1.
Toque Home (Inicio), después gire y presione la perilla Select (Seleccionar) para seleccionar Network/
USB Media (Medios de red/USB) en la pantalla Home (Inicio).
2.
Gire y presione la perilla Select (Seleccionar) para seleccionar el dispositivo USB.
3.
Gire y presione la perilla Select (Seleccionar) para especificar el tipo de audio (Playlists (Listas de
reproducción), Artists ( Artistas), Genres (Géneros) o Pure recordings (Grabaciones Pure)) que desee
escuchar.
4.
Gire y presione la perilla Select (Seleccionar) para seleccionar el audio que desee escuchar,
Reproducir/poner en pausa la reproducción de audio
Presione la perilla Select (Seleccionar) para poner en pausa/reproducir una pista que se esté
reproduciendo en Evoke.
Buscar dentro de una pista
Mientras esté en pausa, puede mantener presionados los botones y para buscar dentro de la pista.
Saltar hacia atrás y hacia delante entre pistas
Toque los botones para saltar hacia atrás/hacia delante entre las pistas.
Evoke puede reproducir música desde una unidad de memoria USB conectada al puerto USB en la parte
posterior del aparato. Evoke es compatible con archivos de audio WMA (Estándar V9), AAC, MP3 y MP2.
De manera predeterminada, Evoke busca el audio en su red si usted no ha conectado una unidad de
memoria USB a la parte posterior del dispositivo Evoke.
Escuche audio desde una unidad de
memoria USB
Utilización de Bluetooth
Si su teléfono o tablet es capaz de almacenar archivos de audio, puede usar Bluetooth para transmitir por
flujo continuo cualquier música almacenada en su teléfono o tablet a Evoke.
Nota: El procedimiento para añadir un dispositivo Bluetooth varía entre los distintos dispositivos móviles.
Consulte el manual de su dispositivo móvil Bluetooth para obtener información específica.
Preparación de Evoke para transmitir audio por flujo continuo usando
Bluetooth
1.
Asegúrese de que se haya insertado un adaptador Bluetooth en el conector USB del Evoke.
2.
Habilite Bluetooth en su dispositivo móvil.
3.
En su dispositivo móvil, seleccione la opción de añadir un nuevo dispositivo Bluetooth. En algunos dispositivos
móviles tal vez tenga que seleccionar la opción de búsqueda o exploración.
4.
Inicie el proceso de emparejamiento en su dispositivo móvil. Esto se hace seleccionando Evoke en la
lista de dispositivos disponibles que aparece en la pantalla del dispositivo móvil. Con esto se conectará
automáticamente, una vez que se haya emparejado.
Ahora podrá empezar a transmitir audio a Evoke desde su dispositivo Bluetooth.
Nota: Tendrá que desconectar todos los dispositivos móviles Bluetooth conectados al Evoke si desea
transmitir por flujo continuo a través de Wi-Fi o transmitir por flujo continuo desde otro dispositivo
Bluetooth. Si se aleja del rango de cobertura del Evoke, Bluetooth se desconectará en forma automática.
Para desconectarse en forma manual, por lo general tendrá que usar la configuración de Bluetooth de su
dispositivo móvil.
Nota: Para obtener más ayuda con Bluetooth, consulte nuestra sección de “Ayuda y asesoría” en la
página 27.
Page 73

17
ES
Grabe programas de radio
Evoke le permite grabar radio en vivo de una estación de radio por Internet (a través de Pure Connect).
Puede programar las grabaciones o empezar a grabar al instante. Para grabar, es necesario que conecte
una unidad de memoria USB al puerto USB en la parte posterior del dispositivo Evoke. La longitud de
tiempo que pueda grabar depende de la cantidad de espacio disponible en su unidad de memoria USB y
de la estación que vaya a grabar. Una unidad de memoria USB de 2 GB puede grabar entre 15 y 30 horas
de radio de Internet aproximadamente (con base en las velocidades de datos típicas para una estación,
que son de 128 kbps y 64 kbps, respectivamente). Si su unidad de memoria USB se queda sin espacio
durante una grabación, Evoke dejará de grabar y mostrará un mensaje.
Nota: Para poder grabar radio en vivo debe haber seleccionado Pure Connect como fuente de audio.
Nota: No se puede grabar radio en vivo ni escuchar contenido de Listen Again desde el servicio de
suscripción de SiriusXM.
Grabaciones instantáneas
Para grabar al instante, haga lo siguiente:
1.
Toque Home (Inicio) para mostrar el menú de inicio.
2. Gire y presione la perilla Select (Seleccionar) para seleccionar Pure Connect.
3. Sintonice la estación que desee grabar y toque el botón Record (Grabar) en la parte frontal del
dispositivo Evoke para empezar a grabar.
Para detener una grabación instantánea, toque el botón Record (Grabar) en la parte frontal del dispositivo
Evoke.
Grabaciones temporizadas
Puede usar la función de grabaciones temporizadas para programar la grabación de una estación de radio
de Internet que haya sido añadida a sus favoritos.
1. Toque Home (Inicio) para mostrar el menú Home (Inicio).
2. Toque en Settings (Configuración) y luego gire y presione la perilla Select (Seleccionar) para
seleccionar Timed recordings (Grabaciones temporizadas).
3. Gire y presione la perilla Select (Seleccionar) para elegir una ranura de grabación.
4. Toque el botón Edit (Editar).
5. Gire y presione la perilla Select (Seleccionar) para poner la grabación en On (Encendido) o en Off
(Apagado).
6. Gire la perilla Select (Seleccionar) para ajustar la hora en que debería comenzar la grabación y
presione para confirmar. Repita para establecer los minutos.
7. Gire la perilla Select (Seleccionar) para ajustar la hora en que debería finalizar la grabación y presione
para confirmar. Repita para establecer los minutos.
8. Gire la perilla Select (Seleccionar) para establecer los días en que debería activarse la grabación
temporizada. Seleccione entre Once only (Una sola vez), Daily (Diario), Weekdays (Días de la
semana), Weekends (Fines de semana), Every Monday (Cada lunes), Every Tuesday (Cada martes),
Every Wednesday (Cada miércoles), Every Thursday (Cada jueves), Every Friday (Cada viernes),
Every Saturday (Cada sábado) y Every Sunday (Cada domingo), y después presione la perilla Select
(Seleccionar) para confirmar.
9. Presione la perilla Select (Seleccionar) para confirmar que desea grabar contenido de Pure Connect.
10. Gire y presione la perilla Select (Seleccionar) para seleccionar la estación de radio en su lista de
favoritos que desee grabar.
11
. Una grabación temporizada activa se indica mediante R en la barra de iconos.
Page 74

18
Configurar alarmas y temporizadores
Evoke tiene dos alarmas y dos tipos de temporizadores (de cocina y de repetición automática). Para
configurar una alarma o un temporizador, toque Home (Inicio) para que se muestre la pantalla Home
(Inicio). Toque Settings (Configuración). Gire y presione la perilla Select (Seleccionar) para seleccionar
Alarms and timers (Alarmas y temporizadores).
Configurar una alarma
1. En el menú Alarms and timers (Alarmas y temporizadores), gire y presione la perilla Select
(Seleccionar) para seleccionar entre Alarm 1 settings (Configuración de alarma 1) o Alarm 2 settings
(Configuración de alarma 2) y toque Edit (Editar).
2. Gire y presione la perilla Select (Seleccionar) para activar o desactivar la alarma mediante On
(Encendido) u Off (Apagado).
3. Gire la perilla Select (Seleccionar) para ajustar las horas y presione para confirmar. Repita para
establecer los minutos.
4. Gire la perilla Select (Seleccionar) para establecer los días que sonará la alarma. Seleccione entre
Once only (Una sola vez), Daily (Diario), Weekdays (Días de la semana), Weekends (Fines de
semana), Every Saturday (Cada sábado) y Every Sunday (Cada domingo), y después presione la
perilla Select (Seleccionar) para confirma.
5. Gire la perilla Select (Seleccionar) para establecer el tipo de alarma. Seleccione entre Pure Connect
station (Estación de Pure Connect), FM radio (Radio FM) o Tone (Tono) y después presione la perilla
Select (Seleccionar) para confirmar.
6. Si estableció el tipo de alarma como Pure Connect o FM radio (Radio FM), gire la perilla Select
(Seleccionar) para elegir entre Last tuned (Última sintonizada) o seleccione entre sus favoritos una
estación de Pure Connect o presintonía de FM, si tiene alguna guardada.
7. Gire la perilla Select (Seleccionar) para cambiar el volumen de la alarma y presione para confirmar.
8. Una alarma activa se indica mediante en la barra de iconos.
Nota: Si Evoke está funcionando con un ChargePAK, ninguna de las alarmas configuradas sonará a
menos que Evoke esté encendido.
Configurar el temporizador de repetición
El temporizador de repetición cambia su radio al modo de espera/suspensión después de una cantidad de
tiempo especificada. En el menú Alarms and timers (Alarmas y temporizadores), seleccione Sleep timer
(Temporizador de repetición). Use la perilla Select (Seleccionar) para ajustar la duración del temporizador
de repetición en intervalos de 15 minutos, desde 15 mins. hasta 1 hora 30 mins. Toque Save (Guardar)
para almacenar.
Un temporizador de repetición activo se indica mediante
en la barra de iconos.
Configurar el temporizador de cocina
El temporizador de cocina emite un tono audible después de un periodo establecido de tiempo.
En el menú Alarms and timers (Alarmas y temporizadores), seleccione Kitchen timer (Temporizador de
cocina) y use la perilla Select (Seleccionar) para ajustar la duración. Toque Mins para alternar entre minutos
y horas. Toque Save (Guardar) para confirmar.
Un temporizador de cocina activo se indica mediante
en la barra de iconos.
Page 75

19
ES
Cancelar una alarma o temporizador acústicos
Para cancelar una alarma o temporizador en curso, presione la perilla Select (Seleccionar) o la perilla
Volume (Volumen). Una alarma que esté sonando se cancelará de manera automática después de 1 hora.
Nota: Si presiona la perilla Volume (Volumen) no se cancelará una alarma acústica.
Advertencia: Si el dispositivo está funcionando con el ChargePAK F1, al tocar Standby (Espera) el radio
se apagará y no sonará ninguna de las alarmas o temporizadores configurados.
Repetición de una alarma acústica
Toque el botón Snooze (Repetición de alarma) o el SnoozeHandle (Asa de repetición de la alarma) para
posponer la repetición de una alarma durante el tiempo especificado (el valor predeterminado es de 9
minutos).
Cambiar el tiempo de repetición de la alarma
En el menú Alarms and timers (Alarmas y temporizadores), seleccione Snooze time (Tiempo de
repetición). Use la perilla Select (Seleccionar) para ajustar la duración de la repetición de 5 a 15, después
de 20/25/30/40 minutos, o 1 hora.
Cancelar la repetición de una alarma acústica
Para cancelar una alarma con repetición, presione la perilla Select (Seleccionar) o Volume (Volumen).
Page 76

20
Configuración de Pure Connect
Esta configuración sólo está disponible mientras se esté escuchando Pure Connect. Toque Home
(Inicio) para mostrar el menú de inicio y después toque Settings (Configuración). Gire y presione la perilla
Select (Seleccionar) para seleccionar Pure Connect.
Repetición de Pure Music
Gire y presione la perilla Select (Seleccionar) para seleccionar una opción de repetición para el contenido
de transmisión por flujo continuo de música especificado. Seleccione All (Todas) para especificar que
todas las pistas deberán reproducirse de forma repetida. Seleccione Track (Pista) para especificar que
la pista actualmente en reproducción en el dispositivo Evoke deberá reproducirse de forma repetida.
Seleccione Off (Apagado) para deshabilitar la opción de repetición.
Reproducción aleatoria de Pure Music
Gire y presione la perilla Select (Seleccionar) para seleccionar una opción de reproducción aleatoria
para el contenido de transmisión por flujo continuo de música especificado. Seleccione On (Activado)
para reproducir todas las pistas en un orden aleatorio. Seleccione Off (Desactivado) para deshabilitar la
opción de reproducción aleatoria.
Borrar favoritos
Seleccione Clear favorites (Borrar favoritos) para eliminar todas las estaciones/podcasts/Pure Sounds
de su lista de favoritos, así como de Pure Connect si su radio está conectada.
Registrarse en Pure Connect
Introduzca su código de registro de Pure Connect, si aún no lo ha hecho. Vea página 10 para obtener
más información.
Configuración de FM
Esta configuración sólo está disponible mientras se esté escuchando la radio FM. Toque Home (Inicio)
para mostrar el menú de inicio y después toque Settings (Configuración). Gire y presione la perilla Select
(Seleccionar) para seleccionar FM.
FM stereo (Estéreo FM)
Alterna entre recibir las estaciones FM en Mono (valor predeterminado) o Stereo. Si escucha con
audífonos o tiene una bocina auxiliar conectada, tal vez prefiera cambiar esta configuración a estéreo.
Medios de red/USB
Esta configuración sólo está disponible mientras se esté escuchando la fuente de Network/USB media
(medios de red/USB). Toque Home (Inicio) para mostrar el menú de inicio y después toque Settings
(Configuración). Gire y presione la perilla Select (Seleccionar) para seleccionar Network/USB media
(Medios de red/USB).
Repeat (Repetición)
Seleccione el tipo de repetición.
Off (Desactivado, valor predeterminada): Las pistas se reproducen hasta el final del álbum, carpeta,
lista de reproducción o resultados de búsqueda actuales.
All (Todo): Repite de manera continua el álbum, la carpeta, lista de reproducción o sus resultados de
búsqueda actuales.
Track (Pista): Repite la pista actual.
Opciones y configuración
Page 77

21
ES
Shuffle (Aleatorio)
Seleccione el orden en el que se reproducen las pistas en el álbum, carpeta, lista de reproducción o
resultados de búsqueda actuales:
Off (Desactivado, valor predeterminado): Las pistas se reproducen en el orden en el que aparecen en
pantalla.
On (Activado): Las pistas se reproducen en orden aleatorio.
Detalles sobre los medios
Vea los detalles técnicos sobre su servidor de medios actual, o vuelva a explorar en busca de servidores
alternativos:
Current details (Detalles actuales): Gire la perilla Select (Seleccionar) para ver información sobre el
servidor de medios, incluyendo el nombre del servidor de medios, la versión del software, la dirección IP
y el número de puerto.
Opciones de visualización
Ajuste la configuración de visualización, como la duración de la pantalla y la información que se visualizará
mientras usted escuche cada fuente. Toque Home (Inicio) para mostrar el menú de inicio y después toque
Settings (Configuración). Gire y presione la perilla Select (Seleccionar) para seleccionar Display (Pantalla).
Información
Hay distintas pantallas de información disponibles para cada fuente de audio:
Radio FM
Scrolling text (Texto desplazable): Información de texto transmitida por la estación actual. Puede
incluir títulos de canciones, detalles de los programas, noticias, etc.
Reception info (Información de recepción): Muestra la frecuencia actual y la fuerza de la señal.
Time and date (Hora y fecha): Muestra la hora y fecha actuales.
Pure Connect
Description (Descripción): Transmitida por la estación actual. Puede incluir títulos de canciones y detalles
de los programas. Si está escuchando una pista de transmisión por flujo continuo de música, lo que se
muestra es el artista y el álbum de la pista.
Location and Genre (Ubicación y género): Información sobre la estación actual; por ejemplo, US Rock.
Time offset (Intervalo de tiempo): La mayoría de las estaciones serán transmisiones en vivo, pero de lo
contrario muestra qué tan avanzada está la transmisión de la estación. Si está escuchando una pista de
transmisión por flujo continuo de música, lo que se muestra es qué tan avanzada está la reproducción de
la pista.
Wi-Fi signal strength (Fuerza de la señal Wi-Fi): Muestra una barra que indica la fuerza actual de la
señal Wi-Fi.
Station URL (URL de la estación): Muestra la dirección del URL de la estación actual. Si está
escuchando una pista de transmisión por flujo continuo de música, lo que se muestra es el URL de la
pista.
Time and date (Hora y fecha): Muestra la fecha con un reloj de pantalla completa (como en modo
de espera).
Media player (Reproductor de medios)
Track info (Información de pista): Muestra información sobre artista y álbum (etiquetas id3).
Time offset/duration (Intervalo de tiempo/duración): Muestra una barra de progreso y temporizadores
que indican la posición de la pista actual.
Wi-Fi signal strength (Fuerza de la señal Wi-Fi): Muestra una barra que indica la fuerza actual de la
señal Wi-Fi.
Time and date (Hora y fecha): Muestra la fecha con un reloj de pantalla completa (como en modo
de espera).
Page 78

22
Luz de fondo activa y en espera
Puede ajustar el tiempo que se iluminará la pantalla cuando esté encendida o en modo de espera.
Seleccione Active backlight (Luz de fondo en Activo) para ajustar la configuración de visualización que
se aplicará cuando el radio esté encendido, o Standby backlight (Luz de fondo en Espera) para ajustar
la configuración de visualización que se aplicará cuando su radio esté en modo de espera. Seleccione
Always on (Siempre encendido) o Off after 7 seconds (Apagar después de 7 segundos).
Brillo en Activo y en Espera
Puede ajustar el brillo de la pantalla cuando el dispositivo Evoke está encendido o en modo de espera.
Seleccione Active brightness (Brillo en Activo) para ajustar el brillo de la pantalla cuando Evoke está
encendido, o Standby brightness (Brillo en Espera) para ajustar el brillo de la pantalla cuando Evoke
está en modo de espera.
Configuración de audio
Puede usar este menú para ajustar los graves y agudos.
1.
Toque Home (Inicio) para mostrar el menú de inicio y después
toque en Settings (Configuración). Gire y presione la perilla Select
(Seleccionar) para seleccionar Audio.
2.
Gire la perilla Select (Seleccionar) para ajustar el nivel de los bajos.
3. Toque en Treble (Agudos) y gire la perilla Select (Seleccionar)
para ajustar el nivel de los agudos.
4.
Toque en OK (Aceptar) cuando haya terminado de ajustar la
configuración de audio.
OK Treble
Bass 0
Treble 0
- Bass Audio
Configuración del reloj
El reloj se configurará de manera automática mediante su señal de radio FM o su red. Pero si no puede
recibir una señal de tiempo actualizada, o si ve el mensaje ‘Time not available’ (Hora no disponible),
puede ajustar la hora y fecha en forma manual. Para configurar la hora y fecha en forma manual:
1. Toque Home (Inicio) para mostrar el menú Home (Inicio) y después toque Settings (Configuración).
2. Gire y presione la perilla Select (Seleccionar) para seleccionar Alarms and timers > Set clock
(Alarmas y temporizadores > Configurar el reloj).
3. Gire y presione la perilla Select (Seleccionar) para ajustar la hora y fecha.
4. Toque o para desplazarse a la configuración anterior o siguiente.
5. Toque Save (Guardar) cuando termine de configurar la hora y fecha.
Cambiar el idioma mostrado en la pantalla
Para cambiar el idioma de visualización entre inglés, español y francés:
1. Toque Home (Inicio) para mostrar el menú Home (Inicio) y después toque Settings (Configuración).
2. Gire y presione la perilla Select (Seleccionar) para seleccionar Miscellaneous > Language
(Misceláneos > Idioma).
3. Gire y presione la perilla Select (Seleccionar) para establecer el idioma de visualización.
Configuración de Bluetooth
Puede usar el menú Bluetooth para hacer que su Evoke sea visible o invisible para otros dispositivos
Bluetooth.
1. Toque Home (Inicio) para mostrar el menú Home (Inicio) y después toque Settings (Configuración).
2. Gire y presione la perilla Select (Seleccionar) para seleccionar Miscellaneous > Bluetooth
(Misceláneos > Bluetooth)
3. Gire y presione la perilla Select (Seleccionar) para seleccionar una de las siguientes opciones:
Encendido (Detectable)
Encendido (Oculto)
Off (Apagado)
Page 79

23
ES
Cambiar el nombre de Evoke
Su Evoke tiene asignado un nombre. Este nombre se usa para que usted pueda encontrar su radio
fácilmente cuando utilice el sitio Web de Pure Connect para administrar lo que escucha. Este nombre
también se utiliza para identificar el dispositivo Evoke como un altavoz disponible en Pure Connect y
Bluetooth. De manera predeterminada, el nombre es Evoke F4 ******, pero aquí usted puede cambiarlo
como desee para recordarlo con mayor facilidad.
Nota: ****** representa un código de seis dígitos que será único para cada Evoke y que está basado en
los últimos seis dígitos de la dirección MAC del Evoke.
Para asignar un nombre personalizado a Evoke:
1.
Toque Home (Inicio) para mostrar el menú de Home (Inicio) y después toque Settings (Configuración).
2. Gire y presione la perilla Select (Seleccionar) para seleccionar Miscellaneous > View/change device
name (Misceláneos > Mostrar/cambiar el nombre del dispositivo). El nombre que actualmente está
asignado al Evoke se mostrará en la parte superior de la pantalla.
3. Gire y presione la perilla Select (Seleccionar) para introducir un nombre nuevo.
4. Toque Save (Guardar) cuando termine de establecer el nombre de la radio.
Actualizar Evoke
En el futuro podrían generarse actualizaciones de software que ofrezcan nuevas características y
funciones. Recomendamos usar las actualizaciones de software automáticas para su dispositivo Evoke,
que se suministran a través de la conexión Wi-Fi. Si hay una actualización de software disponible, el
dispositivo Evoke mostrará un mensaje en el que se le preguntará si desea instalar la actualización de
software.
Para actualizar en forma manual a través de su red
1. Toque Home (Inicio) para mostrar el menú de Home (Inicio) y luego toque Settings (Configuración).
2. Gire y presione la perilla Select (Seleccionar) para seleccionar Miscellaneous > Upgrade (Misceláneos
> Actualizar).
3. Evoke buscará las actualizaciones disponibles. Si hay una actualización disponible, el mensaje New
version available: vX.X (Nueva versión disponible) aparecerá en la pantalla (X.X es el número de
versión, por ejemplo v2.1).
4. Toque OK (Aceptar) para descargar e instalar el nuevo software. Esto puede tardar hasta 5 minutos.
Para actualizar usando un cable USB (cuando no haya una red disponible)
Póngase en contacto con el soporte técnico de Pure (http://support.pure.com/us) para obtener
información sobre cómo actualizar el dispositivo Evoke a la última versión de software.
Advertencia: No apague su dispositivo Evoke mientras éste se actualiza.
Restaurar valores de fábrica
1. Toque Home (Inicio) para mostrar el menú de Home (Inicio) y luego toque Settings (Configuración).
2. Gire y presione la perilla Select (Seleccionar) para seleccionar Miscellaneous > Factory reset
(Misceláneos > Restaurar valores de fábrica).
3. Toque Yes (Sí) para restaurar valores de fábrica
Page 80

24
Configuración de red
Evoke se puede conectar a su red utilizando una conexión Wi-Fi o Ethernet. Las configuraciones que
puede modificar varían según el tipo de conexión que esté usando. Toque Home (Inicio) para mostrar
el menú de Home (Inicio) y después toque Settings (Configuración). Gire y presione la perilla Select
(Seleccionar) para seleccionar Network (Red).
Configuración de red inalámbrica
Connection wizard (Asistente de conexión)
Explorar las redes inalámbricas a las que puede conectarse.
View details (Ver detalles)
Muestra los detalles de configuración de su red.
Network name (Nombre de red) (SSID)
Encryption method (Método de cifrado): WEP, WPA o WPA2
IP address (Dirección IP)
Network mask (Máscara de red)
DNS IP address (Dirección IP de DNS)
Router IP address (Dirección IP de router)
Dirección MAC Wi-Fi del dispositivo
Access point MAC address (Dirección MAC de punto de acceso)
Manual setup (Configuración manual)
Configure en forma manual su red inalámbrica (sólo para usuarios avanzados).
Retry connection (Reintentar conexión): Intentos de reconexión a la red seleccionada.
Network name (Nombre de red): Scan for networks (Explorar redes) o Enter SSID manually
(introducir SSID en forma manual) para especificar un nuevo SSID para su red inalámbrica.
Encryption mode (Modo de cifrado): Cambie el modo de cifrado entre WEP, WPA (PSK),
WPA2 (PSK) o None (Ninguno). Evoke detecta automáticamente el modo de la red. Cambie esta
configuración sólo si cree que el modo de cifrado es incorrecto.
Key or password (Clave o contraseña): Introduzca una nueva clave de cifrado o contraseña.
IP address (Dirección IP): Seleccione entre DHCP (dinámica) o Static (estática). Si selecciona Static
(estática) aparecerá otro menú en el que tendrá que especificar la configuración de la dirección IP para
el dispositivo Evoke.
Page 81

25
ES
Configuración de la red Ethernet
View details (Ver detalles)
Muestra los detalles de configuración de su red.
IP address (Dirección IP)
Network mask (Máscara de red)
DNS IP address (Dirección IP de DNS)
Router IP address (Dirección IP de router)
Dirección MAC Wi-Fi del dispositivo
Dirección MAC Ethernet
Manual setup (Configuración manual)
Configure en forma manual su red inalámbrica (sólo para usuarios avanzados).
IP address (Dirección IP): Seleccione entre DHCP (dinámica) o Static (estática). Si selecciona Static
(estática) aparecerá otro menú en el que tendrá que especificar la configuración de la dirección IP para
el dispositivo Evoke.
General network settings (Configuración general de red)
Clear network settings (Borrar configuración de red)
Evoke eliminará todas las conexiones Wi-Fi, contraseñas y otras configuraciones de red anteriores. Si
está usando el método de conexión inalámbrica, también se realizará una exploración nueva en busca
de redes disponibles.
Page 82

26
El ChargePAK hace que su dispositivo Evoke sea realmente portátil, de modo que pueda disfrutar sus
programas favoritos en su jardín o en la playa.
Debido a que es recargable, el ChargePAK es mucho más económico que las baterías regulares. También
es más respetuoso con el medio ambiente, ya que reduce la cantidad de substancias tóxicas que se
envían a los vertederos. Y, como es una solución fit-and-forget (listo para usarse) que se carga cada vez
que su radio se conecta a la toma de corriente, es mucho más conveniente que las baterías recargables
estándar.
Instalación de un ChargePAK
1. Apague su dispositivo Evoke y desconéctelo de la fuente de alimentación eléctrica.
2. Abra el compartimiento de baterías y coloque el ChargePAK con la etiqueta Pure volteada hacia
la tapa del compartimiento de baterías y con los contactos del ChargePAK alineados con los tres
terminales del compartimiento de baterías.
3. Vuelva a colocar la puerta de las baterías y conecte su producto a una toma de corriente.
4. El ChargePAK empezará a cargarse. Cuando cargue su ChargePAK por primera vez, o
después de un periodo prolongado de inactividad, le recomendamos cargarlo durante 24 horas
aproximadamente, para asegurar una carga completa de la batería.
Nota: Es normal que su ChargePAK se caliente, en especial durante la carga. Su ChargePAK le
dará años de uso sin problemas bajo circunstancias normales, pero al igual que todas las baterías
recargables, su eficiencia se reducirá gradualmente con el paso del tiempo.
Importante: El dispositivo Evoke solo puede ser operado con un ChargePAK F1 de Pure, y no es
compatible con ninguna otra batería, ya sea desechable o recargable, ni con ningún otro modelo de
ChargePAK.
Utilización de un ChargePAK F1 opcional
Page 83

27
ES
Ayuda y asesoría
Tengo problemas para conectarme a mi red
• Su radio no puede conectarse a redes inalámbricas que estén ocultas o cuyo acceso esté controlado,
como las redes de oficinas, sin una clave o contraseña WEP, WPA o WPA2.
• Su radio necesita posicionarse dentro del rango de su red inalámbrica, el cual se reducirá si hay
paredes entre su router y el radio. Aunque el dispositivo Evoke es muy eficiente para detectar redes
inalámbricas, la fuerza de la señal Wi-Fi variará dependiendo de su router y del entorno circundante.
Si el dispositivo Evoke no puede encontrar su red inalámbrica o la señal se pierde, acerque más el
radio al router.
• A menos que su red inalámbrica esté ‘abierta’ (lo cual por lo general no se recomienda, debido al
riesgo de acceso sin autorización), asegúrese de tener su clave WEP, WPA o WPA2 a la mano.
• Asegúrese de que ha introducido la clave o contraseña WEP, WPA o WPA2 correcta para su red.
• Si también experimenta problemas para conectarse a su red con el adaptador Ethernet, revise su
conexión a Internet usando una computadora. Si la conexión está bien, pruebe reiniciando su router o
módem.
La pantalla muestra el mensaje ‘Station not available’ (Estación no disponible)
• Si no puede reproducir una estación, visite el sitio http://support.pure.com/us para obtener asistencia
al respecto.
No puedo ver a Evoke en la lista de dispositivos Bluetooth disponibles en mi
dispositivo móvil
Esto puede ser debido a que su configuración de visibilidad de Bluetooth de Evoke está en ‘On (Hidden)’
(Activado (Oculto)) u ‘Off’ (Desactivado) (vea la página 22). Su configuración de Evoke necesita
ajustarse a ‘On (Visible)’ (Activado (Visible)) para emparejarse con su dispositivo móvil.
Mi dispositivo móvil me pide un código de acceso cuando trato de emparejarlo
con Evoke
Algunos dispositivos móviles Bluetooth antiguos (heredados) podrían solicitarle que ingrese un código de
acceso al intentar emparejar con el dispositivo Evoke. Si esto sucede, ingrese el código ‘0000’.
Page 84

28
Radio Radio FM y radio por Internet (a través de Wi-Fi o conexión Ethernet).
Frecuencias
FM 87.9 a 107.9 MHz.
Red Wi-Fi: 802.11b y 802.11 g soportados, con cifrado WEP y WPA/WPA2.
2.412GHz ~ 2.462GHz (canales 1 - 11).
Ethernet (requiere adaptador opcional): 10/100 Mbps.
Velocidad de 0.5 MB de banda ancha recomendada.
Bluetooth: Soporta A2DP mediante dongle USB incluido.
Transmisión de medios Los códecs de audio compatibles incluyen WMA (Estándar V9), AAC, MP3,
MP2. La transmisión de medios por flujo continuo requiere un servidor
UPnP o PC/MAC ejecutando software de servidor UPnP (se suministra al
momento de registrarse en connect.pure.com).
Altavoz Transductor de 3.5 pulg. de rango completo.
Conectores de entrada Enchufe para adaptador de CC de 5.5 V (se incluye el adaptador). Entrada
de línea de 3.5 mm para dispositivos auxiliares. USB (tipo A, tamaño
completo) para grabación/reproducción USB, actualizaciones de producto
(disponibles también a través de Wi-Fi), dongle Bluetooth o adaptador USB
Ethernet opcional.
Conectores de salida Enchufe para audífono estéreo de 3.5 mm. Enchufe estéreo de 3.5 mm
para bocina estéreo auxiliar Evoke F4.
Presintonías 10 estaciones de radio FM y estaciones favoritas de radio de Internet
ilimitadas (es necesario registrarse en connect.pure.com).
Pantalla Pantalla gráfica OLEAD grande de 128 x 64 y alto contraste en blanco
sobre negro.
ChargePAK
Paquete de batería recargable Pure ChargePAK F1 (disponible por
separado).
Consumo de energía Espera: <1 W, Activo: 3.4 W.
Norma C-Tick N1600 australiana y de seguridad eléctrica.
Medidas 8.23" (209 mm) ancho x 4.33" (110 mm) profundidad x 6.89" (175 mm) alto
Peso 3.31 lbs (1.5 kg)
Garantía Garantía amplia de dos años.
Homologaciones
Certificado CE. Por la presente, Pure declara que este dispositivo de baja
potencia (LPD, por sus siglas en inglés) y Banda II cumple los requisitos
esenciales y otras disposiciones pertinentes de la Directiva 1999/5/CE. La
Declaración de Conformidad puede consultarse en:
http://www.pure.com/R&TTE-DoC.
Cumple con la norma ETSI EN 300 401.
Especificaciones
Adaptador de alimentación
eléctrica
Entrada: 100-240C CC, 50/60 Hz, 0.8 A
Salida: 5.5 V CC, 3.57 A
Page 85

29
ES
AVISO DE LA FCC A LOS USUARIOS EN ESTADOS UNIDOS
¡Advertencia! Cualquier modificación o cambio a este dispositivo, a menos que lo apruebe Pure de manera explícita,
invalidará la autorización del dispositivo.
NOTA: Se ha comprobado que este equipo cumple los límites para dispositivos digitales de clase B, de
acuerdo con el apartado 15 de las normas de la FCC. Estos límites han sido diseñados para proporcionar
protección razonable contra interferencias perjudiciales en una instalación residencial. Este equipo genera,
utiliza y puede irradiar energía de radiofrecuencia y, si no se instala y se utiliza de acuerdo con las instrucciones
suministradas, podría ocasionar interferencias perjudiciales para las comunicaciones por radio.
Sin embargo, no hay garantía de que la interferencia no ocurrirá en una instalación específica. Si este equipo
produce interferencia perjudicial para la recepción de radio o televisión, lo cual se puede determinar al
encender y apagar el equipo, el usuario debe intentar corregir la interferencia mediante una o más de las
siguientes medidas:
• Reorientar o reubicar la antena receptora.
• Aumentar la separación entre el equipo y el receptor.
• Conectar el equipo en una toma de un circuito diferente al que está conectado el receptor.
• Consultar al concesionario o un técnico experimentado de radio/TV para obtener ayuda.
Este dispositivo cumple con la parte 15 de las reglas de la FCC. La operación está sujeta a las siguientes dos
condiciones: (1) Este dispositivo no puede provocar interferencia perjudicial, y (2) este dispositivo debe aceptar
cualquier interferencia recibida, incluyendo la interferencia que pueda provocar una operación no deseada.
Aviso RF de la FCC a los usuarios en Estados Unidos
¡Advertencia! Se debe mantener una distancia de separación de cuando menos 20 cm entre la antena del producto
y todas las personas.
AVISO DE LA IC A LOS USUARIOS EN CANADÁ
Puesto que los circuitos digitales pueden provocar interferencia con otros sintonizadores de radio o televisión cercanos,
apague esta unidad cuando no la utilice, o aléjela del sintonizador de radio/televisión afectado.
NOTA: Este aparato digital no excede los límites de la clase B para las emisiones de ruido de radio de aparatos
digitales, según lo establecido en las Regulaciones de interferencia de radio industrial de Canadá. Estos
límites han sido diseñados para proporcionar protección razonable contra interferencias perjudiciales en una
instalación residencial. Este equipo genera, utiliza y puede irradiar energía de radiofrecuencia y, si no se instala
y se utiliza de acuerdo con las instrucciones suministradas, podría ocasionar interferencias perjudiciales
para las comunicaciones por radio. Sin embargo, no hay garantía de que la interferencia no ocurrirá en una
instalación específica. Si este equipo produce interferencia perjudicial para la recepción de radio o televisión
(lo cual se puede determinar al encender y apagar el equipo), el usuario debe intentar corregir la interferencia
mediante una o más de las siguientes medidas:
• Reorientar o reubicar la antena receptora.
• Aumentar la separación entre el equipo y el receptor.
• Conectar el equipo en una toma de un circuito diferente al que está conectado el receptor.
• Consultar al concesionario o un técnico experimentado de radio/TV para obtener ayuda.
Este aparato digital clase B cumple con la norma canadiense ICES-003.
Page 86

30
Copyright
Copyright © 2014 Imagination Technologies Limited. Todos los derechos reservados. Ninguna parte de esta
publicación puede copiarse o distribuirse, transmitirse, transcribirse, almacenarse en un sistema de recuperación,
ni traducirse en cualquier lenguaje humano o de computadora, en cualquier forma o por cualquier medio, ya sea
electrónico, mecánico, magnético, manual o de otra clase, o revelado a terceras partes sin el permiso expreso por
escrito de Imagination Technologies Limited.
Marcas registradas
Evoke F4 with Bluetooth, ChargePAK, Pure, el logotipo de Pure, Imagination Technologies y el logotipo de
Imagination Technologies son marcas comerciales o marcas comerciales registradas de Imagination Technologies
Limited. Todos los demás nombres de productos son marcas comerciales de sus respectivas empresas.
Versión 2 enero 2014.
Información de la garantía
Imagination Technologies Ltd. garantiza al usuario final que este producto estará libre de defectos en materiales y
mano de obra, durante el curso de su uso normal y por un periodo de dos años a partir de la fecha de compra.
Esta garantía cubre descomposturas debido a fallas de fabricación o de diseño; No aplica en casos como daño
accidental, sin importar su causa, desgaste, desgarro, negligencia, ajuste, modificación o reparación que no
hayan sido autorizados por nosotros.
Visite www.pure.com/register para registrar su producto. Si tuviera problemas con su unidad, por favor póngase
en contacto con su proveedor o con Pure Support en la dirección que aparece en la parte posterior de este
manual.
Exención de responsabilidad
Imagination Technologies Limited no ofrece declaraciones ni garantías con respecto al contenido de este
documento, y rechaza de manera específica toda garantía implícita de comercialización o adecuación para
cualquier propósito específico. Además, Imagination Technologies Limited se reserva el derecho de revisar esta
publicación y realizar cambios en ella de vez en cuando, sin tener la obligación de notificar sobre estos cambios a
ninguna persona u organización.
Confirmación de los contratos de licencias
Determinadas partes del código utilizado en Evoke F4 están sujetas a las licencias GPL, LPGL, BSD y otras
licencias de código fuente abierto. Si desea obtener información adicional, consulte la información en:
http://www.pure.com/licensing
Eliminación de residuos de equipo eléctrico y electrónico
Este símbolo en el producto o en su empaque indica que este producto no deberá tratarse como
residuo doméstico. Por el contrario, deberá entregarse en un punto de recolección adecuado para
el reciclaje de equipo eléctrico y electrónico. Al asegurar que este producto se elimine en forma
correcta, usted ayudará a prevenir consecuencias negativas potenciales para el medio ambiente
y la salud humana, que de otra forma podrían ser provocados debido a un manejo inapropiado de
la eliminación de los residuos de este producto. El reciclaje de materiales ayudará a conservar los
recursos naturales. Para obtener información más detallada sobre el reciclaje de este producto,
contacte a la oficina de su ayuntamiento local, su servicio de eliminación de residuos domésticos o
la tienda en donde compró este producto.
Page 87

Pure UK Headquarters
Imagination Technologies Limited
Home Park Estate
Kings Langley
Herts, WD4 8LZ
United Kingdom
www.pure.com
http://support.pure.com
Pure North America
Imagination Technologies
955 East Arques Avenue
Sunnyvale, CA 94085
USA
www.pure.com/us
http://support.pure.com/us
Page 88

www.pure.com
connect.pure.com
www.facebook.com/pure
105DY
 Loading...