

Page 1
Owner’s manual
Page 2

Safety instructions
Keep the unit away from heat sources and do not place
sources of naked flames (such as can dles) o n the uni t.
Unit ventilation should not b e impeded by cove ring the
venti latio n openings wit h newsp apers, cur tains etc.
Do not place any object s cont aining liquids on the unit,
such as vases.
When plugged in, DMX-50 remains connecte d to mains
power, even in standby with the display backlight of f.
Ensur e that the mains plug is readily ac cessible in c ase
isola tion from the mains is r equired.
Do not re move sc rews from or op en the radio casing.
Sicherheitshinweise
Das Ger ät nich t in der Näh e von Heizquell en posi tionieren
und keine Vorrichtungen mit offenen Flammen (z. B.
brennende Kerzen) auf dem Gerät abstellen.
Die Ventilatorlüftung des Geräts nicht durch das Abdecken der
Lüftungsschlitze mit Zeitungen, Vorhängen usw. beeinträchtigen.
Keine Gefäße mit Flüssigkeit (z.B. Blume nvase n) auf das
Gerät stellen.
Das an eine Stromsteckdose angeschlossene System
DMX-50 steht auch im Standby-Modus und bei deaktivier ter
Hintergrundbeleuchtung des Displays unter Netzstrom.
Sicherstellen, dass der Netzstecker leicht zugänglich ist, um
das Gerät problemlos vom Netz trennen zu können.
Entf ernen Sie keine Schrauben vom G ehäuse und öffnen
Sie dieses nic ht.
Consignes de sécurité
Tenir l’appareil éloigné de toute source de chaleur et ne pas
poser d’objets susceptibles de provoquer des flammes nues
(par exemple des bougies) sur l’appareil.
La ventilation de l’appareil ne doit pas être bloquée en
couvrant les aérations de journaux, rideaux, etc.
Ne pas poser d’objets contenant des substances liquides sur
l’appareil (par exemple, des vases).
Lors qu’elle est branchée, la chaîne DMX-50 rest e
connectée à l’alimentation du sec teur, même si elle e st en
mode veille et que le rétroéclairage de l’écr an est éteint .
Veiller à ce que la pr ise secteur soit facilement acc essible
pour pouvoir la débrancher, si né cessaire.
Ne pas ouvrir le boîtier de la radio ou en e nlever les vis .
Istr uzioni di sicurezza
Tenere la radio lontana da font i di calore e non co llocare
sull’unità fiamme vi ve (come candele).
Non ostruir e le apertur e di ventilaz ione dell’unit à con
giornali, tende, ecc .
Non posizionare sull’unità oggetti contenenti liquidi come vasi.
Quando c ollegato, DM X-50 rimane connesso alla rete
d’alimentazione persino in modali tà di st andby con la
retr oilluminazione del display spenta. Assicurarsi che la
pres a d’alimentaz ione sia facilmente ac cessibile in caso
sia nec essario is olare l ’unità.
Non rimuovere le viti né aprire l’involucro della radio.
Sikkerhedsforskrifter
Hold enheden væ k fra varmeki lder, og anbring ikke åben
ild (so m f.eks. stear inlys) oven på e nheden.
Ventilation til enhe den må ik ke forhindre s ved at dække
venti latio nsåbningerne med aviser, gardiner o sv.
Anbri ng ikke beholde re med va nd som f.eks. vas er på
oven på enheden.
Når DMX-50 er tilslut tet, forbliver apparat et tilslut tet
strømfor syningen ogs å i standby-tilstand, hvor displayets
bagg rundslys er slukket. Sørg for, at der er nem adgang
til st ikkon takten, hvi s det bli ver nød vendig t at afbryde
tilslutningen.
Fjer n ikke sk ruer f ra og åbn ikke rad iokabinettet.
Veiligheids instructies
Houd het toestel uit de buurt van hit tebronnen en plaat s
geen open vuur (zoals kaarse n) op het t oest el.
De vent ilatie van het t oest el mag nie t worde n geblokkeer d
door de de ventilatie -openingen t e bedek ken met krant en,
gordijnen etc.
Plaat s geen voorwerpen die vloe istoffen b evat ten op he t
toes tel zoals vaze n.
Als de stekker van de DMX-50 is aangesloten op
de str oomvoorziening, dan is het t oest el met he t
elektric iteitsnet verbonden, ze lfs als het in st and-by staa t
en het lichtje van het display uit is. Zor g ervoor dat de
hoofdstekker makkelijk be reikbaar is in geval het apparaa t
moet worden af gesloten van d e elek tric iteit.
Verwijder ge en schroeven uit de omk asting van de radio
en open het niet.
Copyright
Copyright 2007 by Imagina tion Te ch nolog ies
Li mite d. All rig hts re ser ved . No part o f thi s
pu bli cati on ma y be cop ied o r dist ribu ted,
trans mitted, tr ans cribed, store d in a r etrieva l
system, or tra nslat ed into any human or computer
language, in any form or by any mean s, electronic,
mech anic al, magnetic, manua l or ot herwise, or
disclosed to third partie s without the express written
permi ssio n of Imagination Technologies Limite d.
Copyright
Copyr ight 20 07 by Ima gination Tec hnolo gies
Limit ed. Alle Rechte vorbe halte n. Kein Teil dieser
Publikation darf ohne ausdrückliche und schriftliche
Zustimmung von Imagination Technologies Limited
in irgendeiner Form (ele ktronisch, mechanisch,
mag neti sch, manu ell oder auf ande re Wei se )
kopi ert, vert eilt, überm ittelt, übers chrieb en, in
einem Such sys tem gespeichert , in eine andere
na tü rlich e oder Co mpu te rsp ra che üb ers etz t
od er D ritte n zu gän gl ic h ge mac ht we rde n.
Copyright
Copyr ight 2007 Imagination Technologie s Limited.
Tous droits réservé s. Aucune partie de la présent e
publicat io n ne doi t êt re copiée ou dif fus ée,
transmise, retransc rite, stockée dans un système
de récupérat ion de données ou traduite, que ce
soit dans une langue humaine ou dans un langage
infor matique, sous qu elque forme et p ar quelque
moy en que ce soi t, élec tr oni que, mécani que,
ma gn éti qu e, ma nuel ou aut re , ou e ncor e
diff usée auprès de tie rs sans au torisation é crite
expres se d e Imagination Technologi es L imited.
Copyright
Copyright 2007 by Imagina tion Te ch nolog ies
Lim ited. Tut ti i diritti rise rv ati. Nessuna part e
della presente pubblicazione può essere copiata
o distr ibuita, trasmes sa, trascritta, memorizzata
in un sist ema di arc hiviazion e, o t rado tta in
un for mat o nor mal men te co mp ren sib ile, in
qualsiasi forma o con qualsias i mezzo, elet tronico,
me cca nic o, ma gn etic o, manu ale o al tr o, o
di vulg ata a t er ze par ti se nz a il pe rm esso
sc rit to di Ima gi na ti on Tech nolo gie s Lim ite d.
Copyright
Copyr ight 2007 til hører Imagination Technologie s
Limit ed. Alle rettigheder forbehol des. Ingen dele af
denne publik ation må kopiere s elle r dis tribueres,
transmitteres, omskrives, gemmes i et system, hvor
den kan hente s, eller oversæt tes til menneske ligt
for ståelig t sp rog eller comput erspr og, i no gen
so m hel st f orm ell er me d no gen som hel st
mid ler, det være sig elek tronisk e, mekani ske ,
magnetiske, manuelle eller på anden måde, eller
fremvises til tredje parter uden udtryk kelig, skri ftlig
till adel se fra Imagina tion Techn olog ies L imited.
Copyright
Copy right 2007 door Imag inat ion Tech nolo gies
Limi ted. Alle rechte n ger eserv eer d. Geen enkel
gedee lte van de ze publicatie mag gekopieerd o f
gedis trib ueer d, uit gezo nden, over geschre ven,
opges lagen in een r etrieval syst em of ver taald in
om het e ven welke menselijke of compu tertaa l,
in geen enkele vorm of door ge en enkel middel,
elek tron isch, m echanisch, magnetisch, manueel
of anders of bekend gemaakt aan derde partijen
zonder de uit drukkelijke geschreven toes temming
van Imaginat ion Te chn ol og ie s L im it ed .
Trademarks
DMX -50, the DMX-5 0 logo, ReVu , Intel litex t, PUR E,
the PURE logo, PURE Digi tal, the PURE Digi tal logo,
Im agi nat ion Tec hno log ies , and t he Im agi nat ion
Tech nol og ies l ogo are trad emark s or re gi ste red
tr adem ark s of Ima ginat io n Tec hnolog ie s L imi te d.
Al l other pro duc t n ame s are t rademar ks of the ir
re sp ec ti ve co mpa nies . Vers ion 3 Jan uary 20 07.
Warenzeichen
DMX-50, das DMX-5 0 Logo, ReVu, Intellit ext, PURE,
da s PU RE Log o, PURE Dig ita l, das PUR E Di git al
Logo, Imagi nati on Technologies und das Imaginati on
Technologies Logo sind Warenzeichen oder eingetragene
Waren zeichen von Imagination Technologies Limite d.
Al le an der en Pr odu ktna men sin d War enz eic hen
ihre r jew eiligen Besi tzer. Version 03. Januar 2007
Marques commerciales
DMX-50, le logo DMX-50, ReVu, Intellitext, PURE, le logo
PURE, PURE Digital, le logo PURE Digit al, Imagination
Technologies et le logo Imaginati on Technologies sont
des marques commerciales ou d es mar ques déposées
de Imaginati on Technologies Limited. Tous les au tres
noms de produi ts sont des marques commerciales de
leurs détenteurs respectif s. Version 3 er janvier 2007.
Marchi
DM X-50, il logo DM X-50, ReVu, Intelli tex t, PURE ,
il lo go PUR E, PU RE Dig it al, il lo go PUR E Dig ita l,
Im agi nat ion Tec hno log ies e i l log o Im agi nat ion
Tech no logie s so no mar ch i o mar chi reg ist ra ti di
Im agi na tio n Tech nolog ies Lim ite d. Tut ti gl i alt ri
no mi di pr od ott i sono mar chi di prop ri età d el le
ri spe tt ive soc iet à. Ve rsi one 3 Gen naio 20 07.
Varemærker
DM X-50, DM X-5 0- log oe t, ReV u, Int el litex t, PURE ,
PU RE- log oe t, PU RE Di gi tal, PUR E Dig ita l-l ogo et,
Imagination Techn ologi es og Imag ination Technologieslogoet er vare mær ker eller reg ist rerede varemær ker,
der tilh ører Imag ina tion Technol ogie s L imit ed. Alle
andre produktn avne er varemærke r, der tilhør er deres
re spekt ive vi rks om he de r. Vers ion 3. ja nu ar 20 07.
Handelsme rken
DMX -50, het DMX-50 logo, ReVu, Inte lli tex t, PURE,
he t PUR E log o, PU RE Dig ital , het P URE D igi ta l
log o, I mag inati on Technolog ies en het Imagi natio n
Technologies logo zijn handelsmer ken of geregist reerde
handel smerken van Ima ginat ion Technol ogies Limited.
All e andere produc tname n zijn handelsme rken van
hun resp ectiev e f irma ’s. Ver sie 3 Januari 2007.
Page 3

Contents
Overview of the controls and connectors ........................................ 2
Overview of the display ................................................................... 4
Getting started ................................................................................5
Navigating menus .........................................................................................................5
Using DAB ........................................................................................6
Changing stations .........................................................................................................6
Changing the information displayed .............................................................................6
ReVu™ - Pausing and rewinding radio ..........................................................................6
Intellitext™ - news, sports and more ...........................................................................7
Setting and selecting presets .......................................................................................7
Using the EPG (Electronic Programme Guide) ..............................................................8
Changing DAB options ...................................................................................................9
Using FM ........................................................................................ 10
Changing stations .......................................................................................................10
Changing the information displayed ...........................................................................10
Setting and selecting presets .....................................................................................10
Changing FM options ...................................................................................................10
Playing a CD ................................................................................... 11
Selecting a track .........................................................................................................11
Changing the information displayed ........................................................................... 11
Changing CD options ...................................................................................................11
Using an SD memory card ............................................................. 12
Inserting and removing a card ....................................................................................12
Recording DAB radio ................................................................................................... 12
Playing a track ............................................................................................................12
Changing the information displayed ........................................................................... 12
Changing SD card options ...........................................................................................12
Setting alarms/timers ................................................................... 13
Setting an alarm ......................................................................................................... 13
Cancelling alarms .......................................................................................................14
Setting a timed event ..................................................................................................14
Cancelling a timed event .............................................................................................14
Setting a sleep timer ...................................................................................................14
Setting the clock .........................................................................................................15
General options ............................................................................. 15
Audio ...........................................................................................................................15
Screen .........................................................................................................................15
Upgrade ......................................................................................................................15
Hints and Tips ................................................................................ 16
Technical Specifications ................................................................ 16
1
Page 4
2
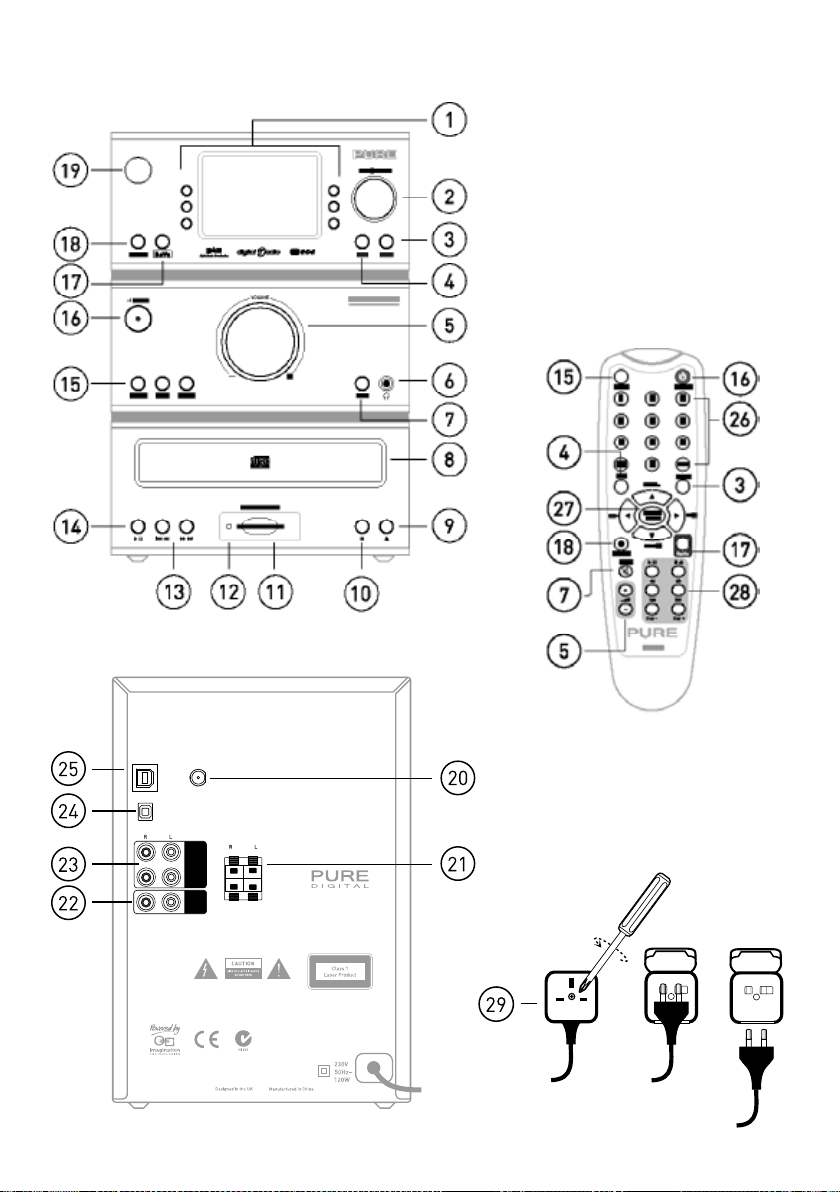
Overview of the controls and connectors
-878=.A98<.=8;*278;682<=>;.
)=@
)=@
416-
7=<
)-:1)4
=;*
78<1+)47=<
)=@16
)=@16
416-;=*
7=<
;8-)3-:;
Page 5

1. Six shortcut buttons provide quick access to radio presets, CD/SD controls and menu
options.
2. Turn to browse and push to select stations, tracks and menu options.
Push to access EPG in DAB.
3. Access alarms/timers, Intellitext and setup options.
4. Changes the information shown on the display.
5. Volume control.
6. 3.5mm headphone socket (mutes speakers).
7. Mutes speakers/headphones.
8. CD tray.
9. Eject/load CD.
10. Stop CD or SD playback.
11. Slot for SD card.
12. Light shows when recording or accessing SD card via USB.
13. Press for Previous/Next track on CD/SD.
Hold for Rewind/Fast forward on CD/SD.
14. Play/Pause CD or SD playback.
15. Switch between modes ( DAB/FM/CD/SD/AUX 1/AUX 2).
16. Switches between on and standby.
17. Enters ReVu for DAB pause and rewind.
18. Record DAB to SD card.
19. Receives signal from remote control.
20. F-type connector for DAB/FM aerial. Unscrew plastic cap and remove to access.
21. Spring loaded speaker connectors.
Connect red socket to red on speaker and black socket to black on speaker.
22. Configurable dual phono output giving fixed volume output for connection to an external
amplifier or recorder, or variable for connection to a powered subwoofer.
23. 2 x Dual phono stereo inputs from iPod/Minidisc etc.
24. S/PDIF optical digital out (DAB/FM/CD/SD). Remove plug to use.
25. Connect to a PC for software updates or to access an SD card.
26. Press Save + number or hold down number to store a preset. Press number to recall.
Press -/-- first for double digit presets.
Press to quickly access CD tracks.
27. Select and
Press Select to access DAB EPG and use arrows to navigate.
28. CD/SD controls, also used for FM tuning and ReVu.
29. UK power plug adapter removal.
select stations/tracks and menu options.
and change day in DAB EPG.
3
Page 6
4
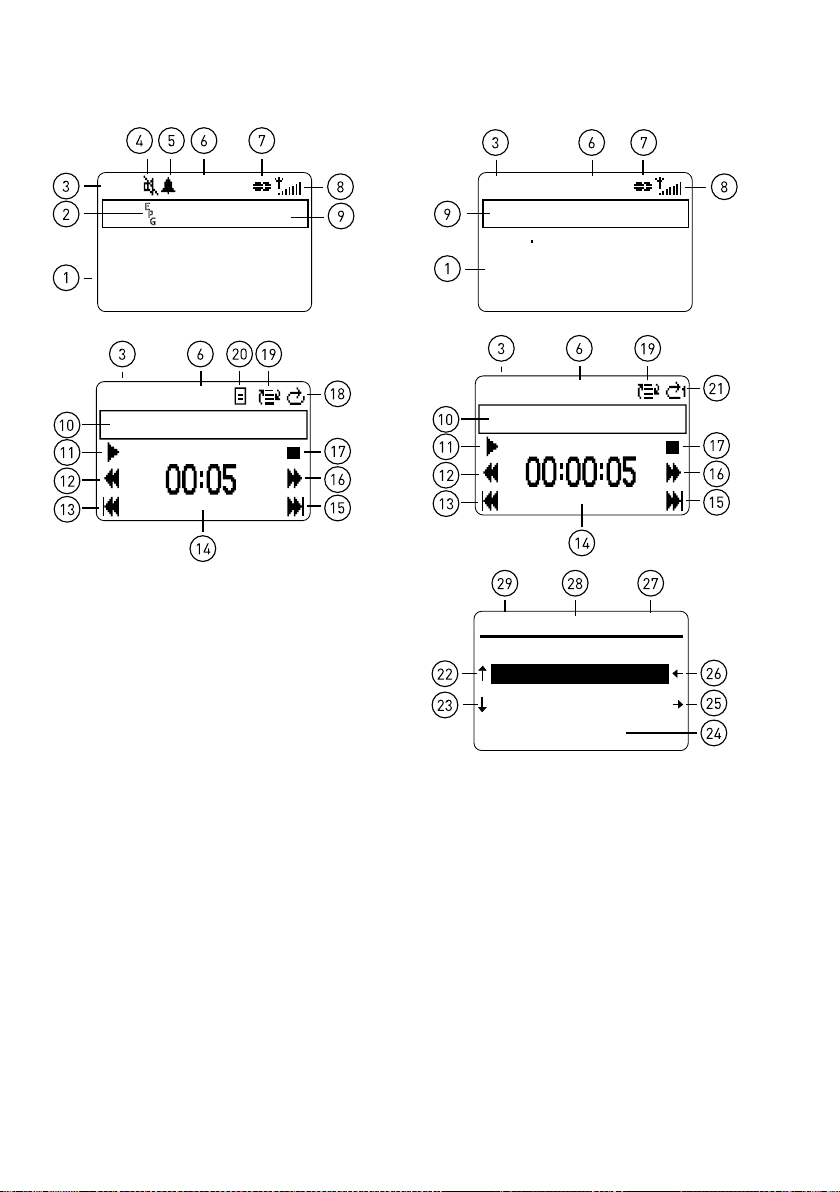
Overview of the display
J o W h i le y Cha n g in g
T r ac k s - go o nl i n e t o
n o mi n a te t he t un e s
BBC Rad io 1
0 9 :4 0
D AB
E
P
G
T r ac k 1
0 9 :4 0
CD
Ch i lt e r n
Toda y' s Best M ix fo r He r t s
Beds a nd Buc ks - 97 .6
Chil tern FM
0 9 :4 1
F M
P e rm a n en t Va c a t io n
0 9 :4 0
S
D
R a di o 1
13 :00 Co l in a n d E di t h
16 :00 Sc ot t M ills
17 :45 N e w sb ea t
18 :00 Sc ot t M ills
19 :00 Z a n e Lo w e
We d
0 9 /0 8
DAB FM
CD
1. Scrolling DAB or FM (RDS) text.
2. EPG available.
3. Audio source.
4. Audio muted.
5. Alarm (bell) /timer (clock) set.
6. Clock, updated by DAB or FM (RDS)
7. Stereo signal.
8. Signal strength.
9. Station name or frequency (FM)
10. Track number/name
11. Play/pause shortcut button
12. Rewind shortcut button
13. Skip back shortcut button
14. Time into track
15. Skip forward shortcut button
16. Fast forward shortcut button
17. Stop shortcut button
18. Repeat all
SD
EPG
19. Shuffle selected
20. Playlist in use
21. Repeat track
22. Previous day shortcut button
23. Next day shortcut button
24. Programme start times and names
25. Next station shortcut button
26. Previous station shortcut button
27. DAB station name
28. Listing day
29. Listing date
Page 7

Getting started
;8-)3-:;
-878=.A98<.=8;*278;682<=>;.
;8-)3-:;
-878=.A98<.=8;*278;682<=>;.
1. Connect the speakers using the supplied cables. Ensure that the bared ends of the wires
are securely gripped by the spring clips.
2. Fully extend the aerial, and plug in to your power supply.
3. Press the POWER button, if necessary, to switch the unit on.
An autotune finds the DAB stations available in your area and selects one.
4. To change stations, turn the TUNE/SELECT knob to scroll through the station list, then
push the knob to tune to the highlighted station.
Navigating menus
You turn the TUNE/SELECT knob to scroll through menus, station or track lists then push the
TUNE/SELECT knob to select. In most menus if you do not select anything you return to the
previous screen. Alternatively use the equivalent ( + Select) remote control buttons.
In many cases you can also press a shortcut button to select the option shown on screen next
to that button.
5
Page 8

6
Using DAB
D A B St a t i o n L i s t
BBC L o n d o n
BBC R a d i o 1
BBC R a d i o 2
1 X t r a - BBC
<=6-;-4-+<
J o W h i l e y ' s C h a n g i n g
T r a c k s - g o o n l i n e
n o m i n a t e t h e t u n e s
BBC Ra d i o 1
0 9 : 4 0
D A B
16.7
P a u s e d
D A B
0 9 : 4 0
BBC R a d i o 1
D A B
0 9 : 4 0
BBC R a d i o 1
D A B
0 9 : 4 2
BBC R a d i o 1
D A B
0 9 : 4 2
<=6-;-4-+<
Changing stations
Changing the information displayed
1. Scrolling text broadcast by most DAB stations
Channel and frequency for the current station
2.
Signal strength; maximum 16 bars, anything below the empty block and you may
experience audio distortion
Signal quality; 85 to 100 Good, 70 to 84 OK, 0 to 69 poor
3. Multiplex in which the current station is broadcast
Content being broadcast e.g. Pop music.
Signal data rate and a stereo or mono indicator.
4. Presets for quick access to your favourite stations using the six shortcut buttons.
5. Date and time updated regularly by the current DAB station.
ReVu™ - Pausing and rewinding radio
ReVu lets you pause and rewind live DAB digital radio.
DMX-50 constantly stores audio from the current station. You can access this audio and pause
or rewind radio for up to around 20 minutes depending on the broadcast. When full, ReVu
starts to overwrite the oldest stored audio.
Pause Play
Rewind/Fast Forward Exit
The timer shows how far behind the live broadcast you are.
Page 9

Intellitext™ - news, sports and more
BBC Radio 1
E
P
G
0 9: 40
D AB
P r e s e t s 0 1 - 04
- V ir gi n
Pln tR oc k Cla ss ic
J o Wh il ey ' s Cha ng in g
T ra ck s - g o o nl in e to
n om in at e t h e t un es
BBC Radio 1
0 9: 40
D AB
BBC Radio 1
E
P
G
0 9: 40
D AB
P r e s e t s 0 1 - 04
R ad io 1 Vi r g i n
Pln tR oc k Cla ss ic
J o Wh il ey ' s Cha ng in g
T ra ck s - g o o nl in e to
n om in at e t h e t un es
BBC Radio 1
0 9: 40
D AB
BBC Radio 1
E
P
G
0 9: 40
D AB
P r e s e t s 0 1 - 04
R ad io 1 Vi r g i n
Pln tR oc k Cla ss ic
BBC Radio 1
E
P
G
0 9: 40
D AB
P r e s e t s 0 1 - 04
- V ir gi n
Pln tR oc k Cla ss ic
Intellitext* provides on-demand text information such as sports headlines and news from
DAB stations. The text is stored in your radio while you listen to stations and is updated by
the broadcasters. Intellitext is listed by station and split into categories. For example, the
broadcaster may send information on Football, Cricket, Headlines etc.
When your unit is on, Intellitext will only appear for stations that you have been tuned to for a
while. While your radio is in standby it will collect updates (from the last station for which you
viewed Intellitext) ready for when you next switch on.
To access Intellitext
MENU > DAB > Intellitext
View Intellitext
Select a station and use the dial to browse and select Intellitext categories for that station.
e.g. talkSPORT > Football > Premiership. The selected information will scroll up the screen.
Press the MENU button to move back up the menu or any other button to exit.
Clear all
Deletes Intellitext immediately.
Set timeout
Delete Intellitext after 1 week (default) or 1 day.
Setting and selecting presets
Store up to 99 DAB radio stations in a list for easy access.
To set a preset
To select a preset
* from participating broadcasters
7
Page 10

8
Using the EPG (Electronic Programme Guide)
EPG provides programme schedules and information for DAB stations that broadcast it.
If a station belongs to a multiplex which has EPG available, an EPG icon is displayed next to
the station name. Programme schedules are displayed when sufficient information has been
received.
If the schedules are updated or you tune to a station in another multiplex with EPG, then the
schedules are refreshed so there may be a delay in displaying them.
If you use an SD card, it can be used to store the EPG information, enabling you to switch
between stations on different multiplexes without losing the information.
Without an SD card fitted, the information is lost if you change multiplex and you will need to
wait until the information is refreshed.
Note Updates are occasionally saved to the card and while saving you see a message and
temporarily cannot use buttons. To cancel the updates hold down the MENU button.
Displaying the EPG
Press the TUNE/SELECT dial or MENU > Guide.
Today’s listing for the current station is displayed showing programme start times and names.
Note There may be a delay in listings arriving for particular days.
Navigating the EPG
You can move around the EPG using the buttons on the remote or the shortcut buttons
indicated on screen. Press Info to see more information on a highlighted programme.
Using the EPG to set up a timed event
You can use the EPG to quickly set up a timed recording* or automatically tune in to a
programme. For more information on timed events, see page 14.
Turn the TUNE/SELECT dial to scroll through the programme list and push the dial or press the
RECORD button to select a programme and choose one of the following options:
Save to SD card Tunes in and saves the selected programme to SD card.
Send to digital out Tunes in and sends the programme to the OPTICAL OUT socket.
Tune in Tunes in to the programme. This will tune in immediately if the
programme is currently on-air.
Cancel Returns to the guide without taking any action.
Record function provided for per sonal use only
*
Page 11

Changing DAB options
MENU > DAB
Guide settings
Change the way the programme guide information is handled:
Current multiplex only Displays latest broadcast information from current multiplex only
Store guide to SD card Displays latest programme guide information on the SD card if
available. Programme guide information from all multiplexes is stored
to a folder called ‘GUIDE’ on the SD card and automatically updated
when new information is broadcast. This is also updated if the unit is
in standby.
Autotune
Scans for DAB stations and adds any new ones to the station list.
Station order
Alphanumeric Lists all stations in alphanumeric order.
Favourite Displays your eight most listened to stations first on the station list. Your
favourite stations display a heart next to the names in the station list.
Active Lists active stations first on the station list.
Multiplex Lists stations in groups according to their multiplex.
Trim stn list Removes inactive stations from the station list.
Favs presets Available only when Favourite station order (above) has been selected.
Transfers your eight favourite stations to presets.
Manual tune
Shows DAB signal level which can help you find the best position for your radio.
1. Select the channel you want from the list. You see a signal strength display.
The marker indicates the minimum required level for reception and the filled blocks
indicate the current level.
2. Move your aerial and try to raise the current level to the marker or beyond. You see the
multiplex name at the top of the screen if a good signal is received and the stations in
that multiplex are listed below and added to the station list.
3. Select a station or press INFO or MENU to exit manual tuning.
DRC
DRC (Dynamic Range Control) value makes the quieter sounds in a DAB broadcast easier to
hear at low volume or in a noisy environment. Check with the broadcasters to find out if they
use DRC.
DRC OFF DRC is switched off. Any DRC level broadcast is ignored.
DRC HALF
DRC FULL
DRC level is set to half that sent with the broadcast.
Applies the DRC level as sent with the broadcast.
9
Page 12

10
Using FM
16.7
The first time you switch to FM or after resetting your unit, select the FM tuning mode:
Autotune Finds all the stations available in your area and lists them in alphanumerical
order using RDS (Radio Data System) station names where available.
Manual tuning Tune manually either in steps of 0.05 MHz or seek to find the next station.
Changing stations
You select a station in different ways depending on tuning mode:
Autotune Turn the TUNE/SELECT dial to scroll through the station list, then push the
dial to tune to a station or use the shortcut buttons on screen.
Manual tuning Turn the TUNE/SELECT dial to step up or down the frequency range or use
the shortcut buttons on screen to step or scan to the next station.
Changing the information displayed
1. Scrolling text broadcast by most FM(RDS) stations.
2. Content being broadcast e.g. Pop music. (RDS)
Signal strength; maximum 16 bars.
Frequency and a stereo or mono indicator.
3. Presets for quick access to your favourite stations using the six shortcut buttons.
4. Date and time updated regularly by the current FM (RDS) station.
Setting and selecting presets
Store up to 24 FM radio stations in a list for easy access. Use the same method as for DAB
stations to set and select preset FM stations, see page 7.
Changing FM options
MENU > FM
Tune
Choose between [BYNAME] which shows stations in a station list (similar to the DAB station
list) using RDS station names or [MANUAL] to step or scan through the FM frequencies.
Station order
Alphanumeric Displays named stations at the top of the station list.
Named stations Displays stations with an RDS name only.
Stereo mode
Auto Uses stereo signal by default where available.
Mono Uses mono signal only. This may provide clearer audio for stereo stations
Autotune
Performs a scan to find all the stations available in your area and lists them in alphanumeric
order using RDS station names where available.
with poor reception.
Page 13

Playing a CD
16.7
Insert your CD label side up. DMX-50 checks the CD type and loads a track list. If you insert a CD
with MP3 files on it DMX-50 detects this and displays the MP3 icon on the screen.
MP3 files can be in folders on the CD and playlist files which usually have a .M3U file extension
are also supported. The following icons help you differentiate between files and folders:
MP3 files Playlist file Closed folder Open folder
Selecting a track
To change tracks on a CD, either:
• turn the TUNE/SELECT dial to scroll through tracks, push again to play the highlighted track
• use the skip forward or skip back buttons or shortcut buttons on screen
• select a track number using the numbered buttons on the remote. MP3 tracks are
numbered in the order they appear on the track list.
Changing the information displayed
Choose from the following options, depending on whether a normal or MP3 CD:
1. Time the current CD/MP3 track has been playing plus on normal CD, press Stop to view
total time and total tracks on the CD.
2. Time remaining of the current track.
3. Time remaining of current CD.
4. ID3 text – album name, track information artist etc., if included with file.
5. CD text – album name, track info, artist, etc., if included on the CD.
6. Date and time updated by the DAB or FM (RDS) signal.
Changing CD options
MENU > CD (or MP3)
Play (Not MP3 CD)
ALL plays all tracks on the CD, LIST plays tracks on a playlist you have created.
Shuffle
OFF plays tracks in the order they appear on the disc, ON plays tracks in a random order.
Repeat
OFF no repeat, TRACK repeats the current track, ALL repeats the whole CD or folder (MP3 CD).
Set playlist
To create a playlist, containing the order in which to play up to 20 tracks from the current CD:
1. Turn the TUNE/SELECT dial and
2. Repeat until you have completed your playlist and select one of the following options:
OK Set your playlist and exit. This automatically sets the Play mode to [LIST]. If you
play your CD it plays the tracks you specified in the order you specified.
Clear Delete the current playlist.
Cancel Exit the screen without saving any changes made.
A playlist remains available only for as long as the current CD is inserted.
push to set the first track on your playlist.
11
Page 14

12
Using an SD memory card
16.7
You can use an SD card (2GB maximum) for recording* and playing back DAB digital radio or
playing MP2/MP3 files recorded elsewhere. As a rough guide – a 2GB card will give you around 30
hours of DAB recording time from a 128 kbps broadcast data rate.
Note DMX-50 records files to SD cards in MP2 format. You may need to use a computer to
convert these files to a different format if you wish to use them in another SD card device.
Inserting and removing a card
To insert an SD memory card, push the card label side up into the slot on the
front panel with the gold pins towards the rear of the unit until it clicks.
To remove a card push the card in and it will pop out so you can remove it.
Note It is not recommended that you remove a card when the SD light is lit.
Recording DAB radio
You can record DAB radio* to SD card.
1. Press th
2. Press the RECORD button again to stop recording. You see the time, date and filename
that the recording has been saved under. The filename is made up of the month, date
and time. e.g. 10141020.mp2 means October the 14th, starting at 10:20 am. The
recording also stores the station and multiplex. DAB recordings are saved in a ‘TRACKS’
folder on your SD card so they can be found easily.
Note You can also record radio at a later time using a timed event, see page 14.
Playing a track
To select tracks on an SD card, either:
• turn the TUNE/SELECT dial to scroll through the track list, then push to play the
highlighted track, or open or close a folder.
• while playing, use the skip forward or skip back shortcut buttons.
• select a track number in the current folder using the numbered buttons on the remote.
Tracks are numbered in the order they appear on the track list.
e RECORD button to start recording. You see the record icon ( ) flashing.
Changing the information displayed
1. Time the current track has been playing.
2. ID3 text - Album name, track info, artist etc., if included with the file.
3. Date and time updated by the DAB or FM (RDS) signal.
Changing SD card options
MENU > SD Card
Status
Displays the total, used and available space on the SD card.
Shuffle
OFF play tracks in the order they appear in the current folder.
ON play tracks in a random order.
Record function provided for per sonal use only
*
Page 15

Repeat
TRACK Repeats the current track.
ALL Repeats all tracks in the current folder.
OFF No repeat.
Delete
Turn the TUNE/SELECT dial to browse a list of tracks and folders on the SD card and push
to delete the highlighted track or open/close a folder. Alternatively use the bottom shortcut
buttons or left/ right arrows on the remote.
Format
Deletes all files (including any non-audio files) and clears the card. This may be a good idea if
you have previously used the card in another device.
USB
Enables access to an SD card inserted in your DMX-50 using a USB connection to your PC.
This enables you to manage files on your SD card using Windows Explorer on your PC e.g.
move files to and from the SD card, delete files etc.
While USB access is enabled you can only access the files on the SD card through your PC.
Setting alarms/timers
You can set up to 20 alarms or timed events. Alarms switch DMX-50 on and tune to a station, play
a CD or SD card, or sound a tone. Timed events can record DAB to SD card, send to the Digital out
socket or tune to a station. You can also set a sleep timer after which DMX-50 will switch to standby.
Setting an alarm
MENU > Alarm/timer >Alarms> Add an alarm
Turn the TUNE/SELECT dial and push to accept a setting and move to the next. Set the time,
day and one of the following modes: Tone, DAB station (choose a station), FM station (last
tuned to), SD card track (from first track found) or CD (from first track).
You will see a bell symbol on the screen indicating that the alarm is set. The bell icon is filled
if an alarm is due within the next 24 hours.
Note When DMX-50 is switched on the unit displays either an alarm or timer icon on the top
line of the display depending on which is due first, in standby, an icon and time for both the
next alarm and timer set are displayed.
Changing an alarm
MENU > Alarm/timer >Alarms
1. Select the alarm you want to change.
2. Select Set to change the alarm settings, Turn off to switch the alarm off (Alarm will be
marked ‘Disabled’) or Remove from list to delete the alarm from the list.
Setting the alarm volume
MENU > Alarm/timer >Alarm volume
The alarm volume set will apply to all DAB, FM, CD or SD card alarms.
13
Page 16

14
Changing the alarm snooze time
MENU > Alarm/timer >Snooze period
Choose a snooze period between 5 and 59 minutes. The snooze period applies to all alarms.
Cancelling alarms
When an alarm goes off, the alarm icon flashes and you have several options:
Snooze Press the bottom left shortcut button or down arrow on the remote to
snooze the alarm for a set period (the default is 8 minutes). The alarm will
re-sound when the snooze period has elapsed.
Cancel Press the top left shortcut button or left arrow on the remote to cancel the
alarm and return unit to its previous power state (on/standby).
Cancel and off Press the POWER button to switch the unit off and cancel the alarm.
Cancel and on Press the top right shortcut button, press the TUNE/SELECT dial, or right
arrow or Select on the remote. Pressing any other button not listed above
will also cancel the alarm and perform its normal function.
Setting a timed event
You can use timed events to set up a DAB radio recording* or automatically tune in to a DAB
station. See page 8 for details of how to use EPG to set a timed event.
MENU > Alarm/timer > Timers > Add an event
Turn the TUNE/SELECT dial and push to accept a setting and move to the next. Set the time,
duration, day, station and one of the following actions: Save to SD card, Send to digital out,
Tune in, or Cancel to return to the list without setting an event.
You see a clock symbol on the screen if a record event is set or a musical note symbol if a ‘Tune
in’ event is set. A crossed out clock is shown if an event is not due in the next 24 hours.
Note When DMX-50 is switched on, the unit displays either an alarm or timer icon on the top
line of the display depending on which is due first, in standby, an icon and time for both the
next alarm and timer set are displayed.
Changing a timed event
MENU > Alarm/timer > Timers
1. Select the event you want to change.
2. Select Set to change the event settings, Turn off to switch the timed event off (event will
be marked ‘Disabled’) or Remove from list to delete the timed event from the list.
Cancelling a timed event
If a ‘Tune in’ event is underway you can cancel the end time of the event by pressing any
button. A record event can be cancelled by pressing the RECORD button.
Setting a sleep timer
Sleep Timer switches your unit into standby after a number of minutes.
MENU > Alarm/timer > Sleep
Select a sleep time. Set to zero or press the Clear shortcut button to cancel the sleep timer.
Return to the Sleep menu again to view the time remaining or to change the sleep time again.
Record function provided for per sonal use only
*
Page 17

Setting the clock
MENU > Alarm/timer > Set clock
In most cases the time and date on your DMX-50 comes from and is updated by the DAB or
FM (RDS) signal. If a good DAB or FM signal is not available or you want to manually set the
time/date you can use this option.
General options
Press the MENU button to access the following options:
Audio
Tone
Set the Bass output level. Push the dial to set the Treble level.
Balance
Adjust the audio balance between left and right channels.
Subwoofer
Specify if you have an active subwoofer connected to your LINE/SUB OUT socket:
YES variable level output and will mute if headphones are inserted.
NO fixed line level output and will not mute if headphones are inserted.
Digital out
On Switches the output on all the time. Select this option if connecting the
Digital out to the digital inputs of an external amplifier or a recorder without
synchro-record function.
Off/Timer Switches the output off until a timed event specifying the output is selected. Some
external recorders can be set to detect when a digital S/PDIF signal is present
(synchro-record) and start recording. If using a synchro-record method you should
select this option so that your recorder can detect when the recording is to start.
Screen
Active settings
Set the screen backlight brightness. Press the dial to set the contrast.
Standby settings
Set the standby screen brightness level.
Upgrade
Displays the current version of your unit and 16-digit serial number. Register your product
online to receive automatic e-mail notification of product updates or visit our website at www.
pure.com/support. To upgrade your product, press the Upgrade shortcut button and follow the
instructions on screen.
Note USB upgrade requires a PC (not Mac) running Windows XP and a suitable USB cable
(not included).
15
Page 18

Hints and Tips
I don’t see any Intellitext
This could be because you haven’t tuned to a participating station or the station hasn’t broadcast
any Intellitext since you tuned in. Try tuning to a participating station, wait and then check again.
(>>/<<) DAB Secondary services
Secondary services accompany some stations, providing extra information or alternative content
and may only be broadcast at certain times. If a station has secondary services available, the
station shows ‘>>’ next to its name in the station list and the secondary service appears next to
the station in the list. A secondary service has a ‘<<’ before its name in the station list.
(?) Inactive or unavailable DAB stations
Inactive or unavailable stations are those which appear on the station list but are not currently
available. Inactive stations have a ‘?’ before their name on the station list. If you select a station
which has this symbol, your radio tries to tune in or returns to the previous station.
Display says ‘No stations available’
Try adjusting your aerial or radio position. Use Autotune to search for stations.
Alarm bell icon has a cross through it
This happens if you set an alarm but no DAB or FM RDS time has been acquired yet. Check that
your aerial is extended, return to DAB/FM or standby and wait for a short period.
Resetting your radio
Resetting your DMX-50 removes all presets, stored stations and favourite stations, Intellitext and
alarm/timer settings and resets all options to defaults. To reset:
1. Press and hold the MENU button for three seconds. The screen shows ‘Do you want to reset?’.
2. Confirm the reset or press no buttons to cancel the reset.
Technical Specifications
General Fully compliant with ETS 300 401 and capable of decoding all DAB
transmission modes 1-4 up to and including 192 kbps.
Frequency range DAB Band III 174-240, FM 87.5-108
Amplifier power
CD Player CD-R and CD-RW playback compatible. Support for CD Text. MP3 playback,
SD card Record DAB radio and playback MP2/MP3. Red SD record warning LED.
Speakers 8 Ohms (nominal) impedance. 40W RMS power handling. Polypropylene
Connectors 3.5 mm headphone output. RF F-connector 75 Ohms DAB/FM aerial
Mains power supply 240V 60W with removeable Euro/UK power socket adapter.
Approvals CE marked. Compliant with the EMC and Low Voltage Directives (89/336/
Dimensions (mm) Main unit 166 (w) x 240 (h) x 252 (d); speaker 150 (w) x 240 (h) x 255 (d).
16
40W RMS per channel output (into 8 Ohms @10% THD+N, A-weighted).
including support for ID3 tags and M3U playlists.
Maximum supported capacity of SD card is 2GB.
mid-bass drivers. Two-way rear ported enclosure. Custom-tuned 2nd order
crossovers.
connection. Two dual-phono line-level inputs. Dual phono for stereo
analogue line-level or variable-level output. Optical Toslink connector for
digital S/PDIF output (IEC958 @ 48 kHz). USB (B type) connector for future
software upgrades and SD card access. Spring-clip terminals for speakers.
EEC and 73/23/EEC).
Page 19

Warranty infor mation
Imaginat ion Technologie s Ltd. warrants to the end user that this product will
be free from defects in materials and work manship in the course of normal
use for a period of two years from the date of purchase. This guarantee covers
breakdowns due to manufacturing or design faults; it does not apply in cases
such as accidental damage, however cau sed, wear and tear, neglige nce,
adjustment, modification or repair not authorised by us. Please ret urn your
warranty car d or visit ww w.pure.com/regist er to regis ter your product wi th
us. Shoul d you have a problem with your unit please contact your supplier
or contact PURE Support at the address shown on the rear of this manual.
Garantie-Info rmationen
Imagination Technologies Ltd. garantiert dem E ndbenutze r, dass dieses
Produkt für die Dauer von zwei Jahren ab Kaufdatum bei normalem Gebrauch
frei von Schäden an Material oder Verarbeitung ist. Diese Garantie umfas st
Ausfälle aufgrund von Herstellungs- und Konst rukt ionsfehlern ; sie gilt nicht
für Unf allschäden, wie auc h immer v erur sacht, Verschleiß, Fahr lässigkeit
und Veränderung oder Reparat ur durch von uns nicht autorisierte Pers onen.
Senden Sie Ihre Garantiekar te ein oder registr ieren Sie Ihr Produkt bei uns
unter www.pure.com/reg iste r. Sollt en Sie mit Ihrem Gerät ein Problem
habe n, we nden Sie s ich an Ihren Verk äufer oder den PURE Suppor t.
Die Adresse finden Sie auf d er Rückseit e dies er Bedienung sanleitung.
Disclaimer
Imagination Technologies L imited makes no repr esen tati on or war ranties
with respect to the content of this document and specifically disclaim s
any implied warrantie s of merchantability or fitnes s for any partic ular
purp ose. Fur ther, Ima gina tion Technologie s L imite d rese rves the
rig ht to revise this public ation and to make change s in i t fr om t ime
to time witho ut obligation of Ima ginat ion Techno logies Limited to
no tif y any per son or orga ni zat io n of su ch rev isi ons or changes .
Ausschlusshinweis
Imagination Technologies Limited gewährt keine Garant ien für den Inhalt
diese s Dokuments und lehnt insbesondere implizier te Garantien für die
allgemeine Gebrauchstauglichkeit bzw. die Eignung für spezielle Zwecke ab.
Weiterhin behält sich Imagination Technologies Limited das Recht vor, diese
Publikation von Zeit zu Zeit zu überarbeiten und zu ändern, ohne dass daraus
eine Verpflichtung für Imagination Technologies Limited entsteht, irgendeine
Pers on oder Organisatio n von solchen Änderungen in Kenn tnis zu s etzen.
Garantie
Imagination Technologies Ltd. garantit à l’utilisateur que le présent produit est
exempt de défauts en termes de matériaux et de main-d’œuvre, dans le cadre
d’une utilisation normale, pour une période de deux ans à compter de la date
d’achat. La présente garantie couvre les pannes dues à un défaut de conception
ou de fabrication ; elle ne prend pas en compte les dommages accidentels, quelle
que soit leur cause, l’usure normale du produit, ainsi que tous dommages dus à la
négligence, à la modification, au réglage ou à la réparation effectué(e) sur l’appareil
sans notre autorisation. Veuillez renvoyer votre carte de garantie ou visiter le site
www.pure.com/register pour enregistrer votre produit auprès de nos services.
En cas de problème avec votre appareil, veuillez contacter votre fournisseur ou
le centre d’assistance PURE, à l’adresse indiquée au dos du présent manuel.
Infor mazioni sulla garanzia
Imagination Technologies Ltd. garantisce all’utente finale che il presente
prodotto è e sente da difetti di materiale e fabbr icazione in condiz ioni
normali di utilizzo per un periodo di due anni a partire dalla data di acquist o.
La presente garanz ia copre i danni dovuti a difetti di fabb ricazione o
proge tta zione; non s i applica in casi quali danni accidentali, in qualsiasi
modo siano stati provocati, usura, negligenz a, regolazione, modifica o
ripar azione no n autoriz zate. Re stituire la sc heda della garanzia oppure
visitare il sit o www.pure.com/register per regis trar e il prodot to. In caso di
problemi relativi all’unità, contattare il proprio fornitore oppure contattare il
Suppor to tecnico PURE all’indiriz zo indicato sul retro del presente manuale.
Garantiop lysninger
Imagination Technologies Ltd. garanter er over f or s lutbruger en, at de tte
produkt ikke er fejlbehæftet , hvad angår mat erialer og håndvæ rksmæssig
udfør else ved normal brug i to år fra købsdatoen. Denne garanti dækker
sammenbrud, der sky ldes frems tillings- el ler designfejl. Den dækker ikke
i tilfælde, hvor enheden bes kadiges som følge af hændeligt uheld, uanset
hvordan dett e sker, samt slit age, uagtso mhed, juster ing, ændring eller
reparation, som ikke er godkendt af os. Du bedes returnere garantikor tet eller
besøge www.pur e.com /register for at regis trer e produktet hos os. Hvis der
skulle opstå problemer med enheden, bedes du kontakte leverandøren eller
PURE Support på adress en, der er angivet på bagsiden af denne vejledning.
Infor matie over de w aarborg
Imagination Technologies Ltd. waarborgt de eindgebruiker dat dit produc t
vrij is van defecten i n materi alen en werkuren bij normaal gebruik voor
een duu r van t wee jaar vanaf de datum van aankoop. Deze garantie dekt
defec ten door product ie- of ontwerpfouten ; het is ni et van toepas sing
in gev allen als accide ntel e scha de, hoe ook veroor zaak t, slijt age,
onachtzaa mheid, instelling, wijziging of repar atie die door ons niet wer d
goedgekeurd. Gelieve uw garant iekaart terug te sturen of bezoek www.
pure.c om om uw product bij ons te regist reren. Indien u een proble em
hebt met uw apparaa t, gelieve uw leverancier te contacteren of cont acteer
PURE Supp ort op he t adres op de a cht erzijd e van deze handleid ing.
Avis de non-responsabilité
Imagination Technolog ies Limi ted refuse toute représ entation ou garantie
vis -à- vis du conte nu du pré sent document et refus e sp éci fiq uement
tou te g arant ie implicite de valeur marcha nde ou d’adé qua tio n à un
us age spé cifique. En out re, Ima gina tion Tech no logies Limi ted se
réserve le droit de réviser la présent e publi cati on et d’ y appor ter des
modifications, quand elle le souhaite, sans obligat ion de sa part de notifier
toute personne ou organisation desdit es r évisions ou modi fications .
Dichiarazione di non responsabilità
Imagination Tec hnologies Limited non si assum e alcuna responsabili tà
rispetto al contenuto del presente documento, in particolare non riconosce
ness una garanzia imp licit a di commerciabilità o idoneità pe r uno scopo
speci fico. Inoltre, I magination Technol ogies Limited si rise rva il diritto di
revis ionare la prese nte pubblic azione e di apportarvi modifiche peri odiche
senz a alc un obbligo di notifica a qualsiasi perso na o or ganizza zione.
Ansvarsfraskrivels e
Imagination Technolog ies Limited afgiver ingen garantier eller erklæ ringe r
med hensyn til indhold et af dette dokument og fralæg ger sig i særdeleshed
event uelle stiltie nde garan tier for salgbarhed eller egnethed til et bestemt
formå l. Endvidere forbeholder Imagination Technolog ies Limited sig ret
til at revider e denne publikat ion og foretage ændringer fr a tid til anden,
uden at Imaginat ion Technologies Limited er for pligtet til at underr ette
nogen person ell er organisat ion om sådanne revideringer eller ændringer.
Vrijwaring
Imag ination Technolog ies Limit ed g eef t g een ver kla rin g of gar ant ies
met betrekk ing tot de inhoud van dit document en wijst specifiek elke
verantwoordelijkheid af met betrekking tot om het even welke onuitgesproken
garanties naar verhandelbaarheid of geschiktheid voor enig bijzonder doel.
Daarenboven behoudt Imagination Technologies Limited zich het recht voor
om deze publicatie te rev iser en en af en toe verander ingen aan te brengen
zonder de verplichting voor Imagination Techno logies Limited om personen
of organisaties van deze revisies of verander ingen op de hoogt e te brengen.
Page 20

www.pure.com
PURE Digital
Imagination Technologies Ltd.
Home Park Estate
Kings Langley
Herts, WD4 8DH
UK
PURE Digital
Karl-Marx Strasse 6
64589 Stockstadt/Rhein
GERMANY
PURE Digital - Vertrieb über:
TELANOR AG
Unterhaltungselektronik
Bachstrasse 42
4654 Lostorf
SCHWEIZ/SWITZERLAND
+44 (0)1923 277477 support
+44 (0)1923 277488 sales
+44 (0)1923 270188
support@pure.com
sales@pure.com
+49 (0) 6158 878872 sales
+49 (0) 6158 878874
sales_gmbh@pure.com
+41 (0)62 285 95 95 sales
+41 (0)62 285 95 85
info@telanor.ch
www.telanor.ch
 Loading...