

Page 1
Page 2

Page 3
1
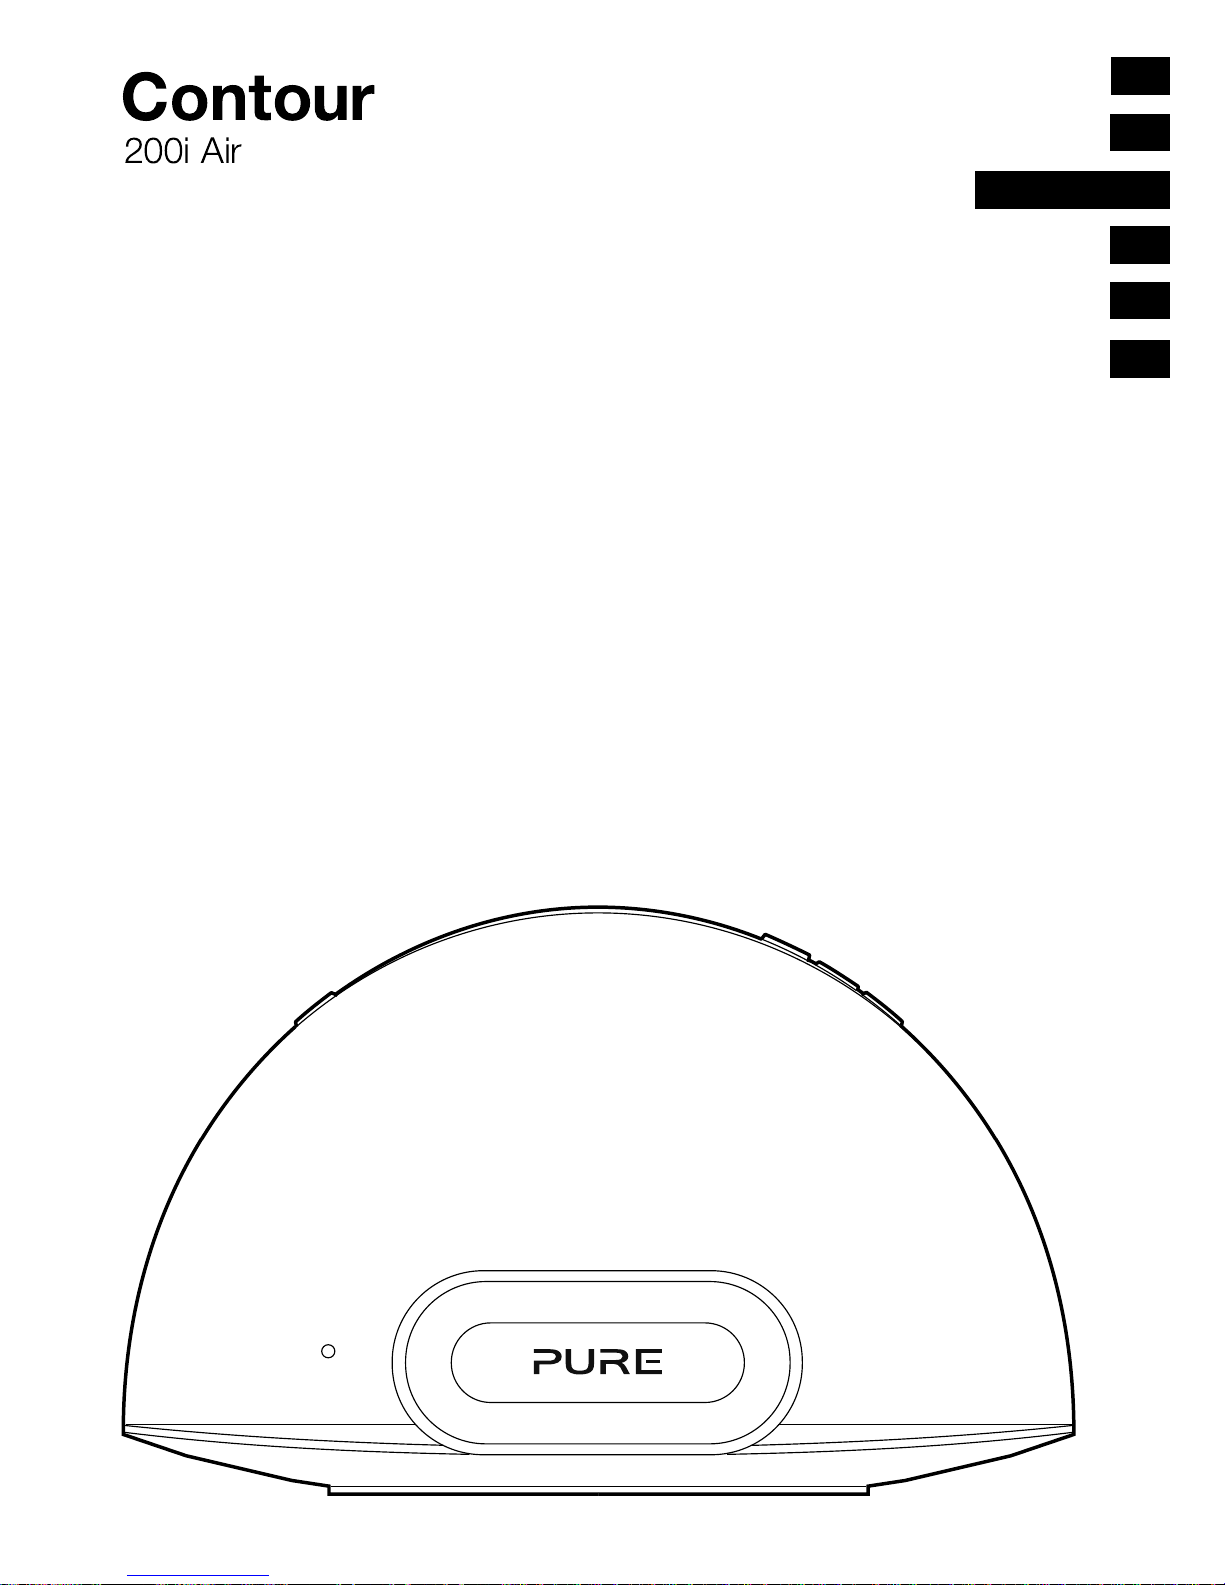
Thank you for choosing Contour 200i Air. This manual will get
you up and running in no time, and explains how to make the
most of your Contour 200i Air. We’re constantly improving
and adding new features to our products. To take advantage
of any enhancements made since your product was shipped,
please visit support.pure.com where you can download the
latest version of this user guide in PDF format.
Page 4

2
Safety Instructions
1. Read these instructions – All the safety and operating instructions should be read
before this product is operated.
2. Keep these instructions – The safety and operating instructions should be retained for
future reference.
3. Heed all warnings – All warnings on the appliance and in the operating instructions
should be adhered to.
4. Follow all instructions – All operating and use instructions should be followed.
5. Do not use this apparatus near water – The appliance should not be used near water or
moisture – for example, in a wet basement or near a swimming pool, and the like.
6. Clean only with dry cloth.
7. Do not block any ventilation openings. Install in accordance with the manufacturer’s
instructions.
8. Do not install near any heat sources such as radiators, heat registers, stoves, or other
apparatus (including amplifiers) that produce heat.
9. Do not defeat the safety purpose of the polarized or grounding plug. A polarized plug has
two blades with one wider than the other. A grounding plug has two blades and a third
grounding prong. The wide blade or the third prong is provided for your safety. If
the provided plug does not fit into your outlet, consult an electrician for replacement of the
obsolete outlet.
10. Only use attachments/accessories specified by the manufacturer.
11. Unplug the apparatus during lightning storms or when unused for long periods of time.
12. Refer all servicing to qualified personnel. Servicing is required when the apparatus has
been damaged in any way,such as power supply cord or plug is damaged, liquid has
been spilled or objects have fallen into the apparatus has been exposed to rain or
moisture, does not operate normally, or has been dropped.
13. Do not install this equipment in a confined or built-in space such as a bookcase or similar
unit. The ventilation should not be impeded by covering the ventilation openings with items
such as newspaper, tablecloths, curtains etc.
14. WARNING: To reduce the risk of fire or electric shock, do not expose this apparatus
to rain or moisture. The apparatus should not be exposed to dripping or splashing.
Objects filled with liquids, such as vases, should not be placed on apparatus.
15. WARNING: The direct plug-in adapter is used as disconnect device, the disconnect
device should remain readily operable.
16. WARNING: The remote batteries should not be exposed to excessive heat such as
sunshine, fire or the like.
17. This equipment is a Class II or double insulated electrical appliance. It has been
designed in such a way that it does not require a safety connection to electrical earth.
18. Separation distance of at least 20cm must be maintained between the antenna of the
product and all persons.
19. The power rating marking is located on the rear of the main unit.
Page 5

3
Contents
4 Getting started
4 Introduction
4 Pure Connect app
5 Remote control
6 Front/top panel controls and connectors
6 Front panel Status LED
7 Rear panel controls and connectors
8 Switching between Sleep, Standby and On
8 Network setup
9 Preparing Contour to connect to a wireless network
13 Preparing Contour to connect to an Ethernet network
14 Using AirPlay to play audio
14 Selecting AirPlay as a source
14 Playing audio from an iPod touch, iPhone or iPad
15 Playing audio from iTunes
15 Allowing commands to be sent back to iTunes from Contour
16 Streaming audio to multiple rooms
17 Listening to a docked iPod/iPhone/iPad
17 Compatibility
17 Docking your device
17 Selecting the dock
17 Controlling your device
18 Using the auxiliary input
18 Using the digital output
19 Using Contour Setup Manager
21 Contour name assignment
24 Help and specifications
Page 6
4
Getting started
Introduction
Contour 200i Air can be used in a number of different ways:
• As an AirPlay device for playing audio from iTunes on your computer or an
iPod touch, iPhone or iPad with AirPlay — via your wireless network. See
‘Network setup’ on page 8.
• As a docking station for an iPod, iPhone or iPad. See page 17.
• As a speaker for an audio device connected via the Aux In connector. See
page 18.
Note: Contour 200i Air will be referred to as Contour throughout the rest of this
user guide.
Pure Connect app
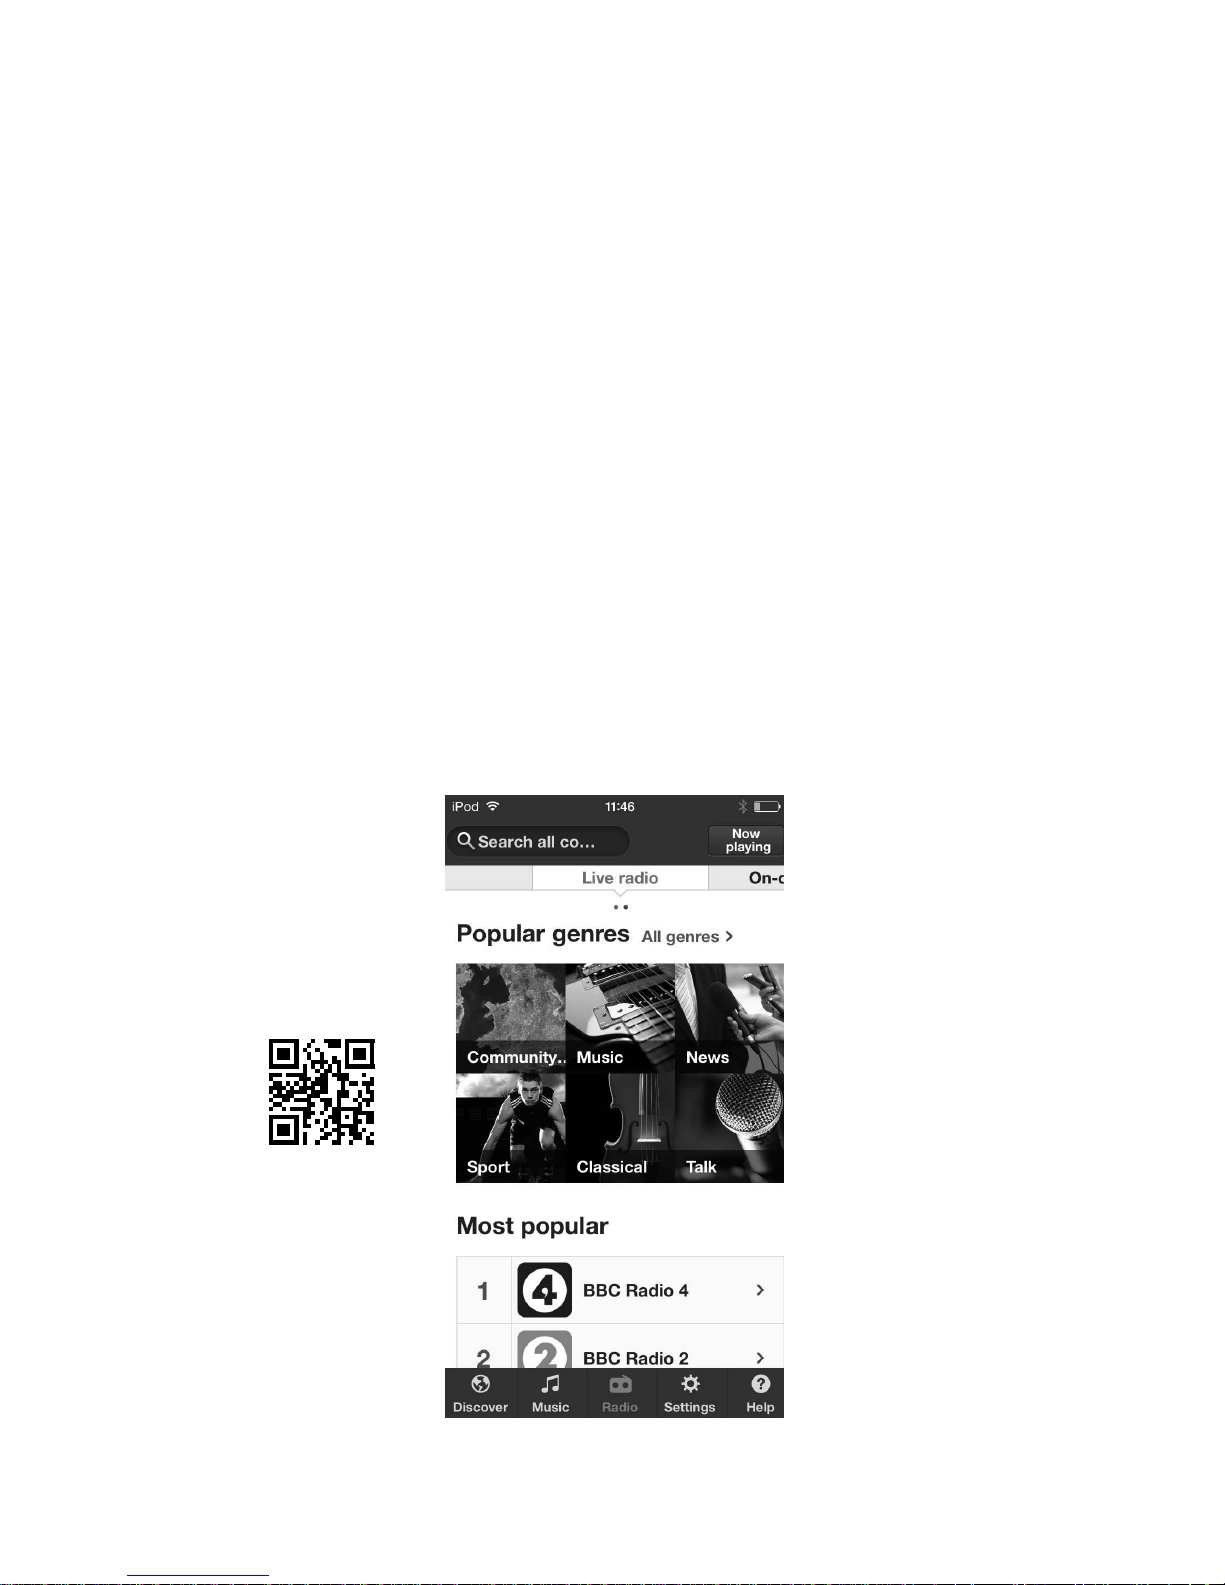
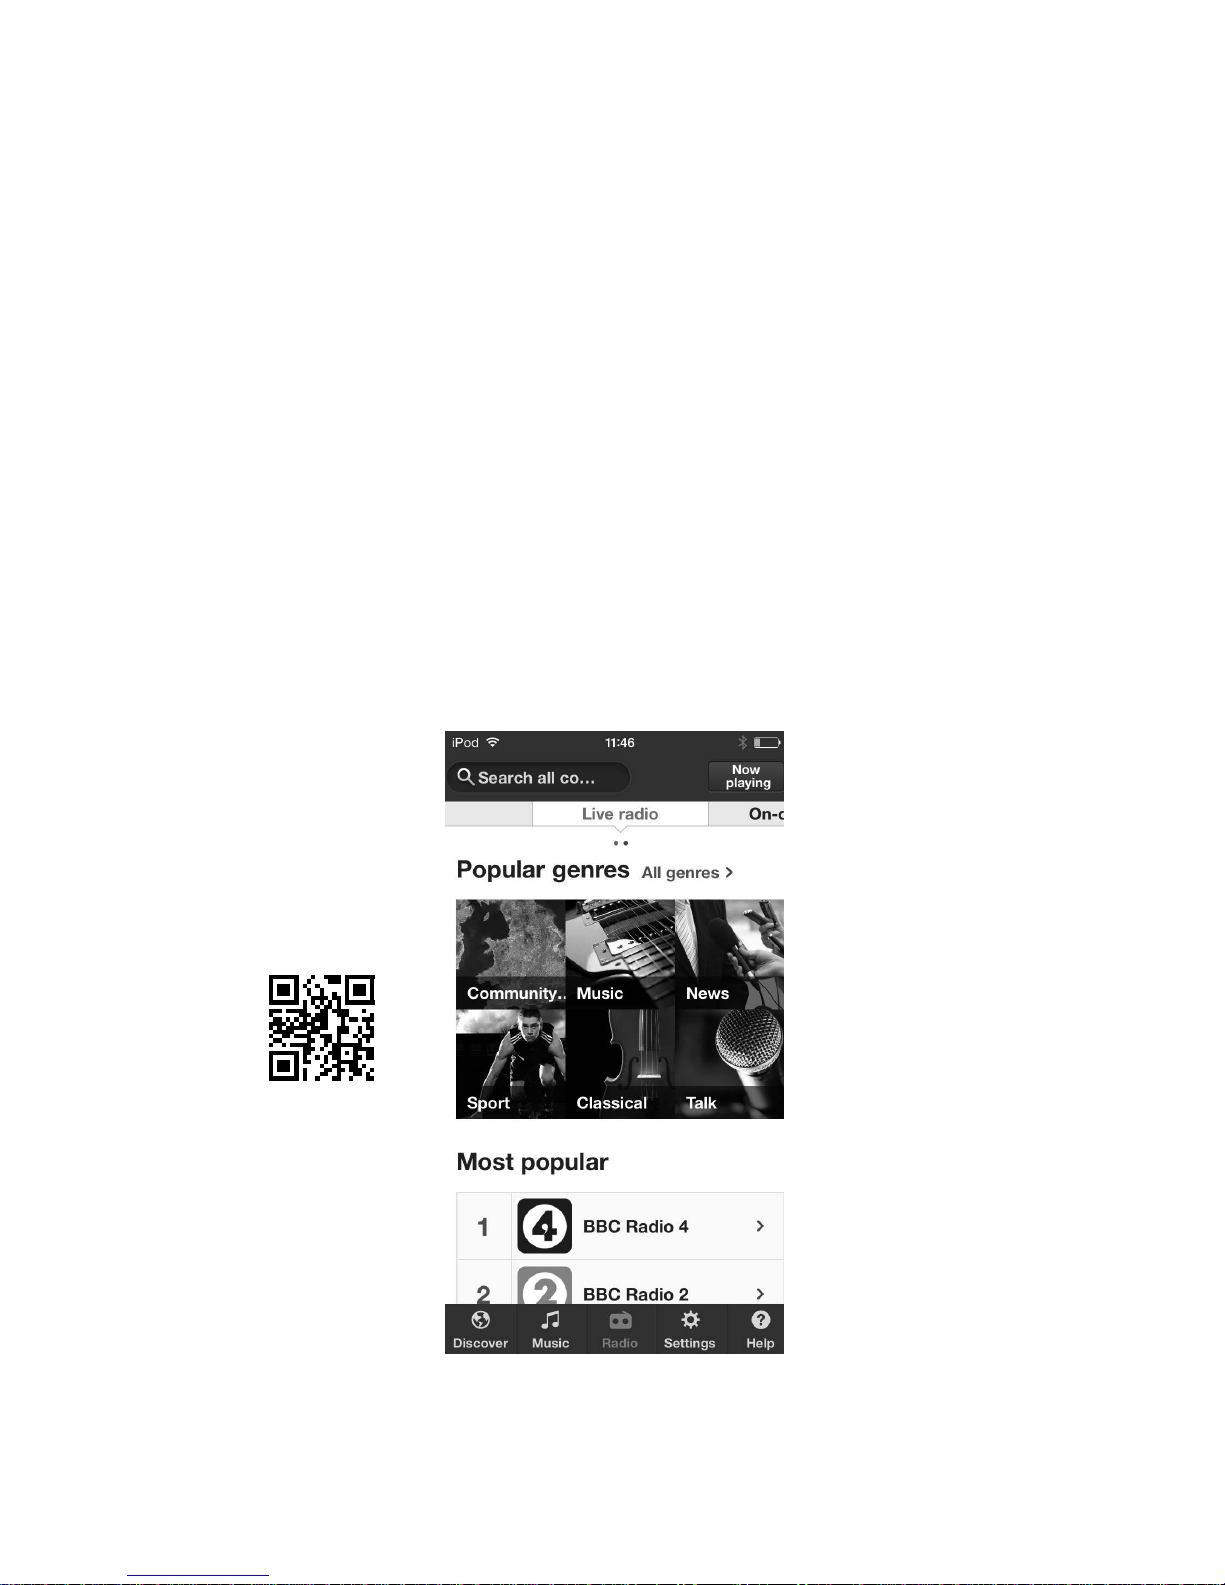
Make the most of Contour’s high quality audio by installing the free Pure Connect
app on your iPod touch or iPhone. The Pure Connect app gives you free access to
thousands of internet radio stations, on demand content (podcasts and listen again
programmes) and ambient sounds.
iOS Pure Connect App
Page 7
5
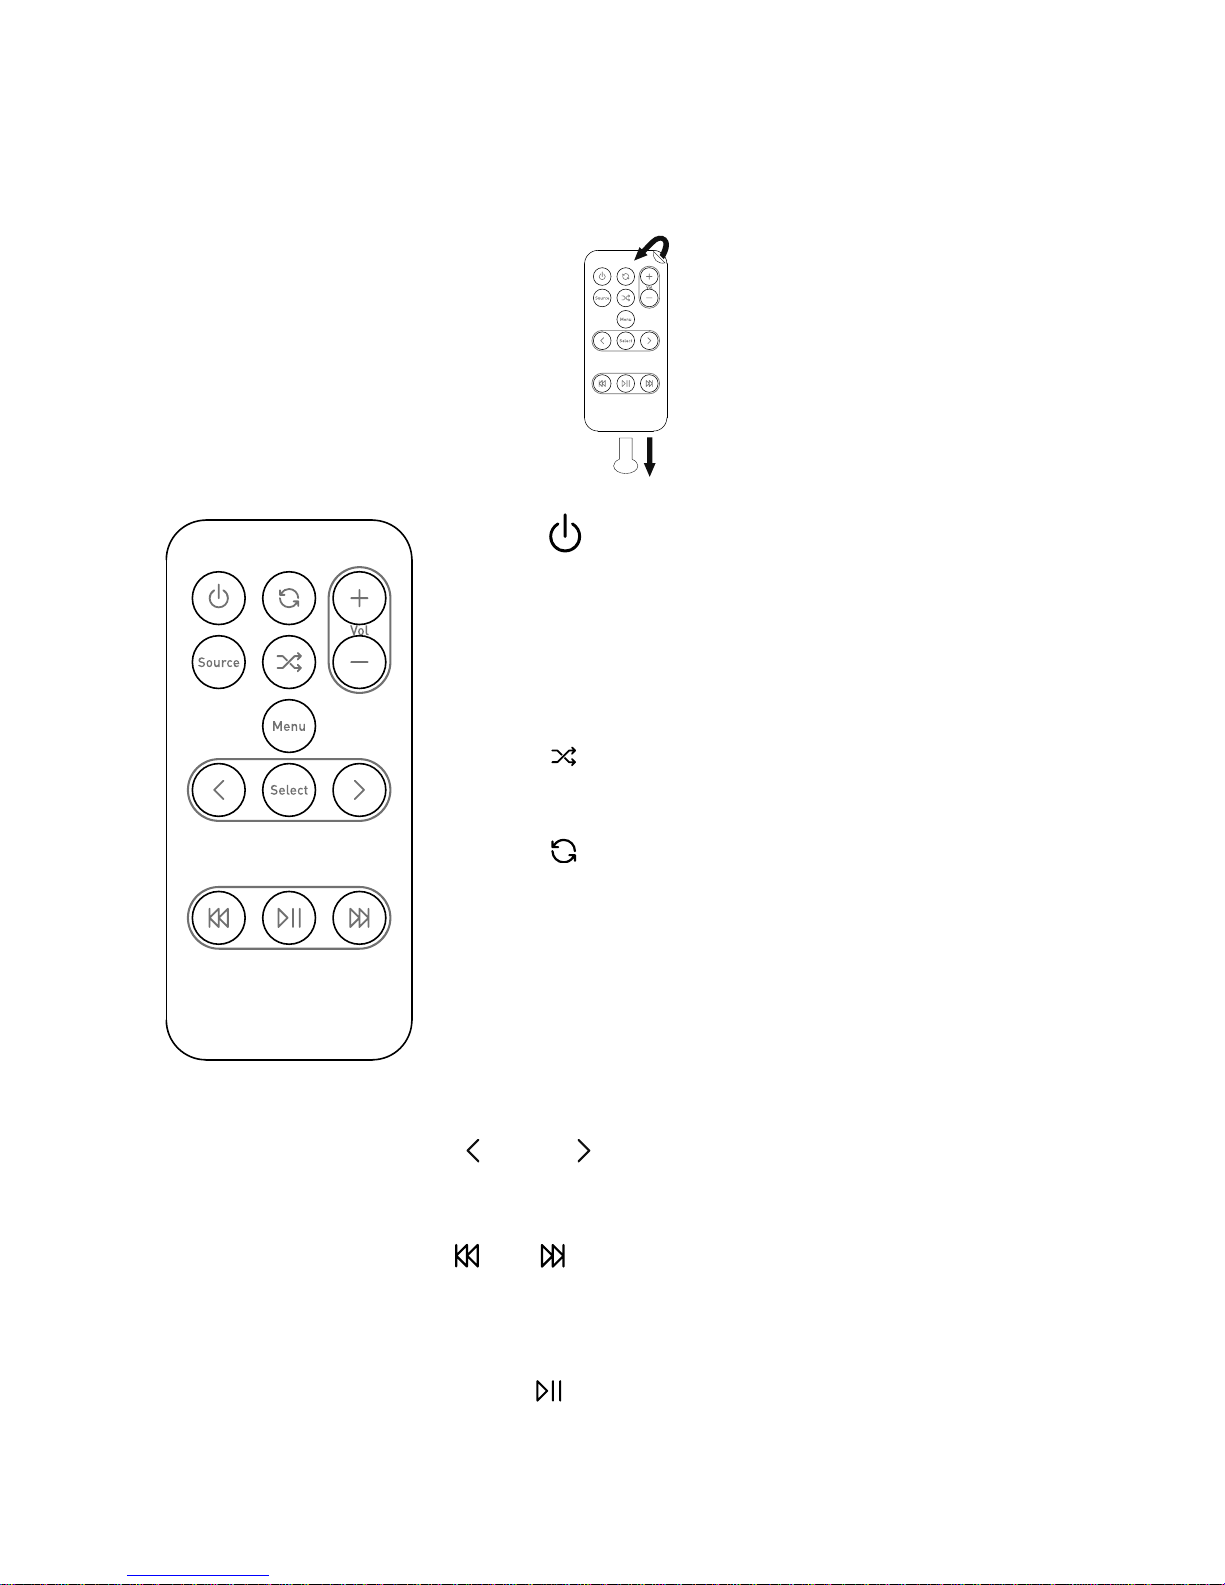
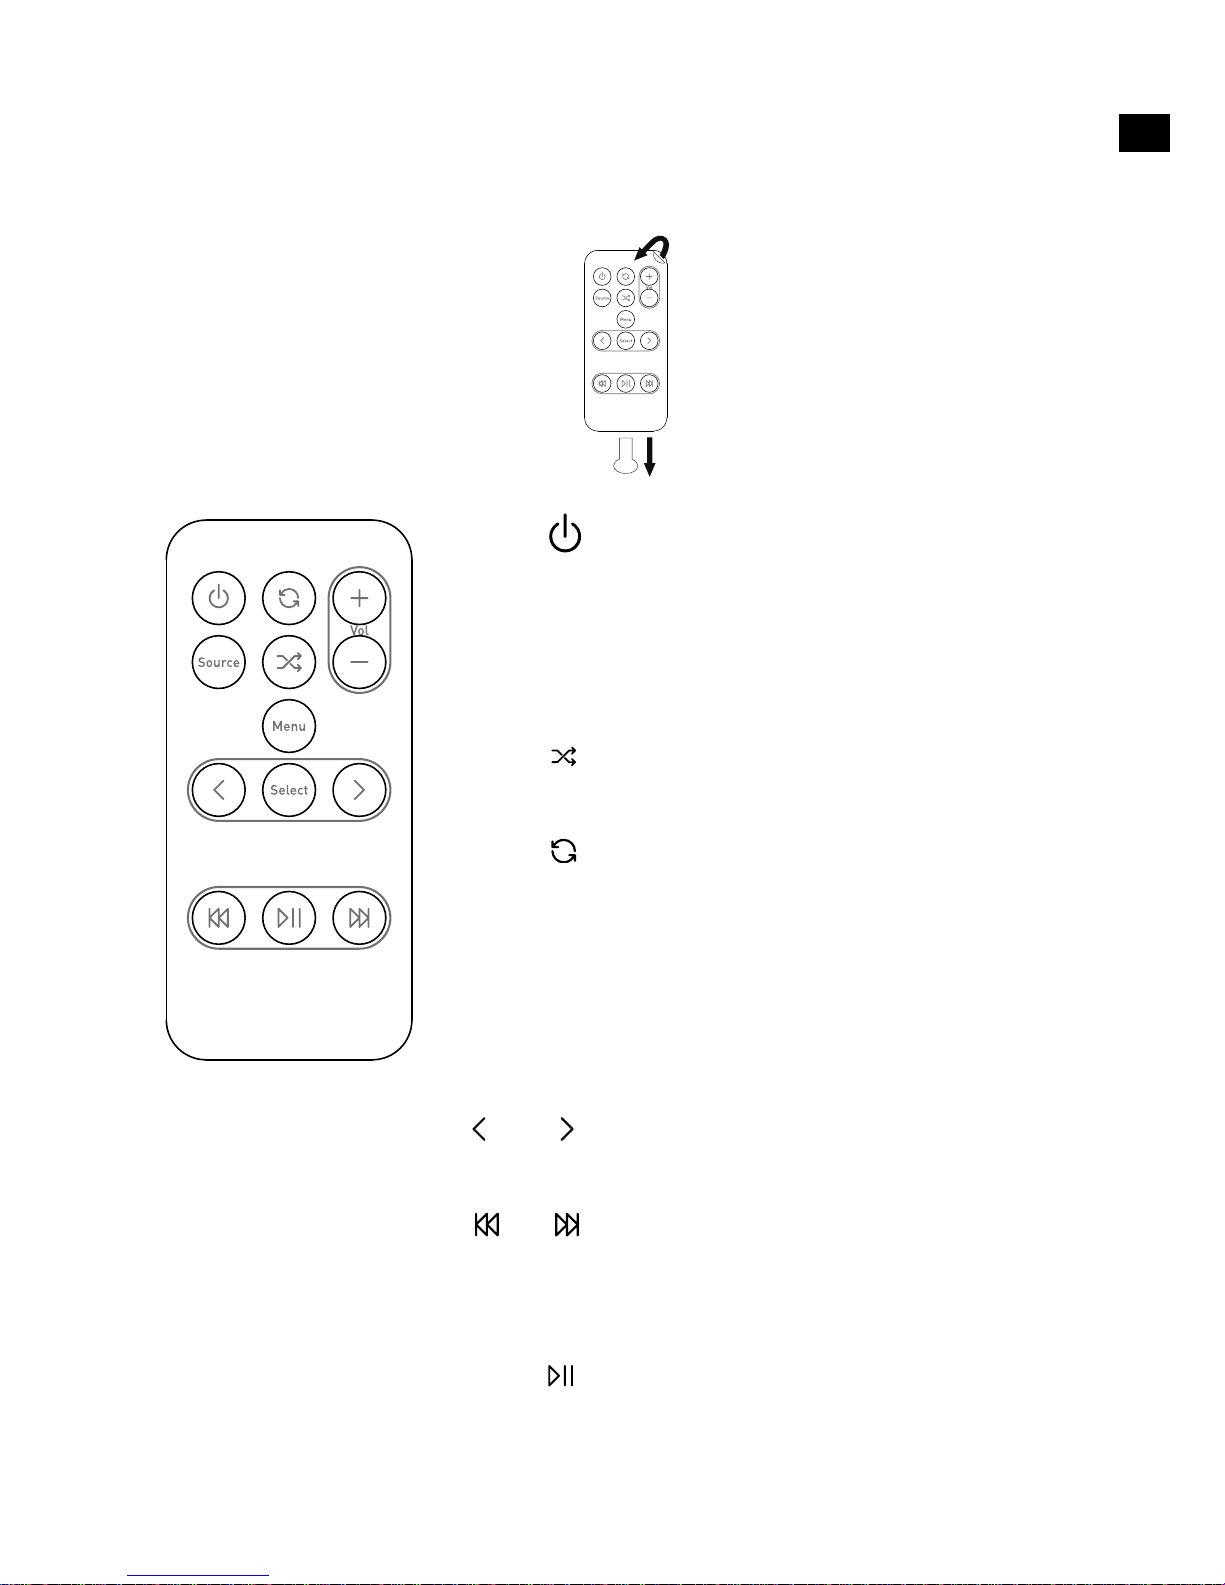
Standby
Press to switch between Sleep, Standby
and On. See page 8.
Source
Press to switch between AirPlay, Dock and
Auxiliary input sources.
Shuffle the track playback order (when
AirPlay/Dock is the input source).
Toggle to repeat current track, repeat all or
no repeat (when AirPlay/Dock is the input
source).
Vol
Menu
Press to access the menu on a docked
iPod or iPhone. Also steps back through
menus.
Select
Text & Symbols
Mirror Finish
Select tracks and menu options on your
iPod/iPhone (only when Dock is the input
source).
and
Skip to beginning of current track or go to
previous or next track. Hold to fast rewind
or fast forward (only when Dock is the input
source).
Play/pause current track (when AirPlay/
Dock is the input source).
Volume up/volume down
+
-
Remote control
Pull the plastic tab from the remote
control battery compartment and
remove the protective film from
remote buttons.
Page 8
6
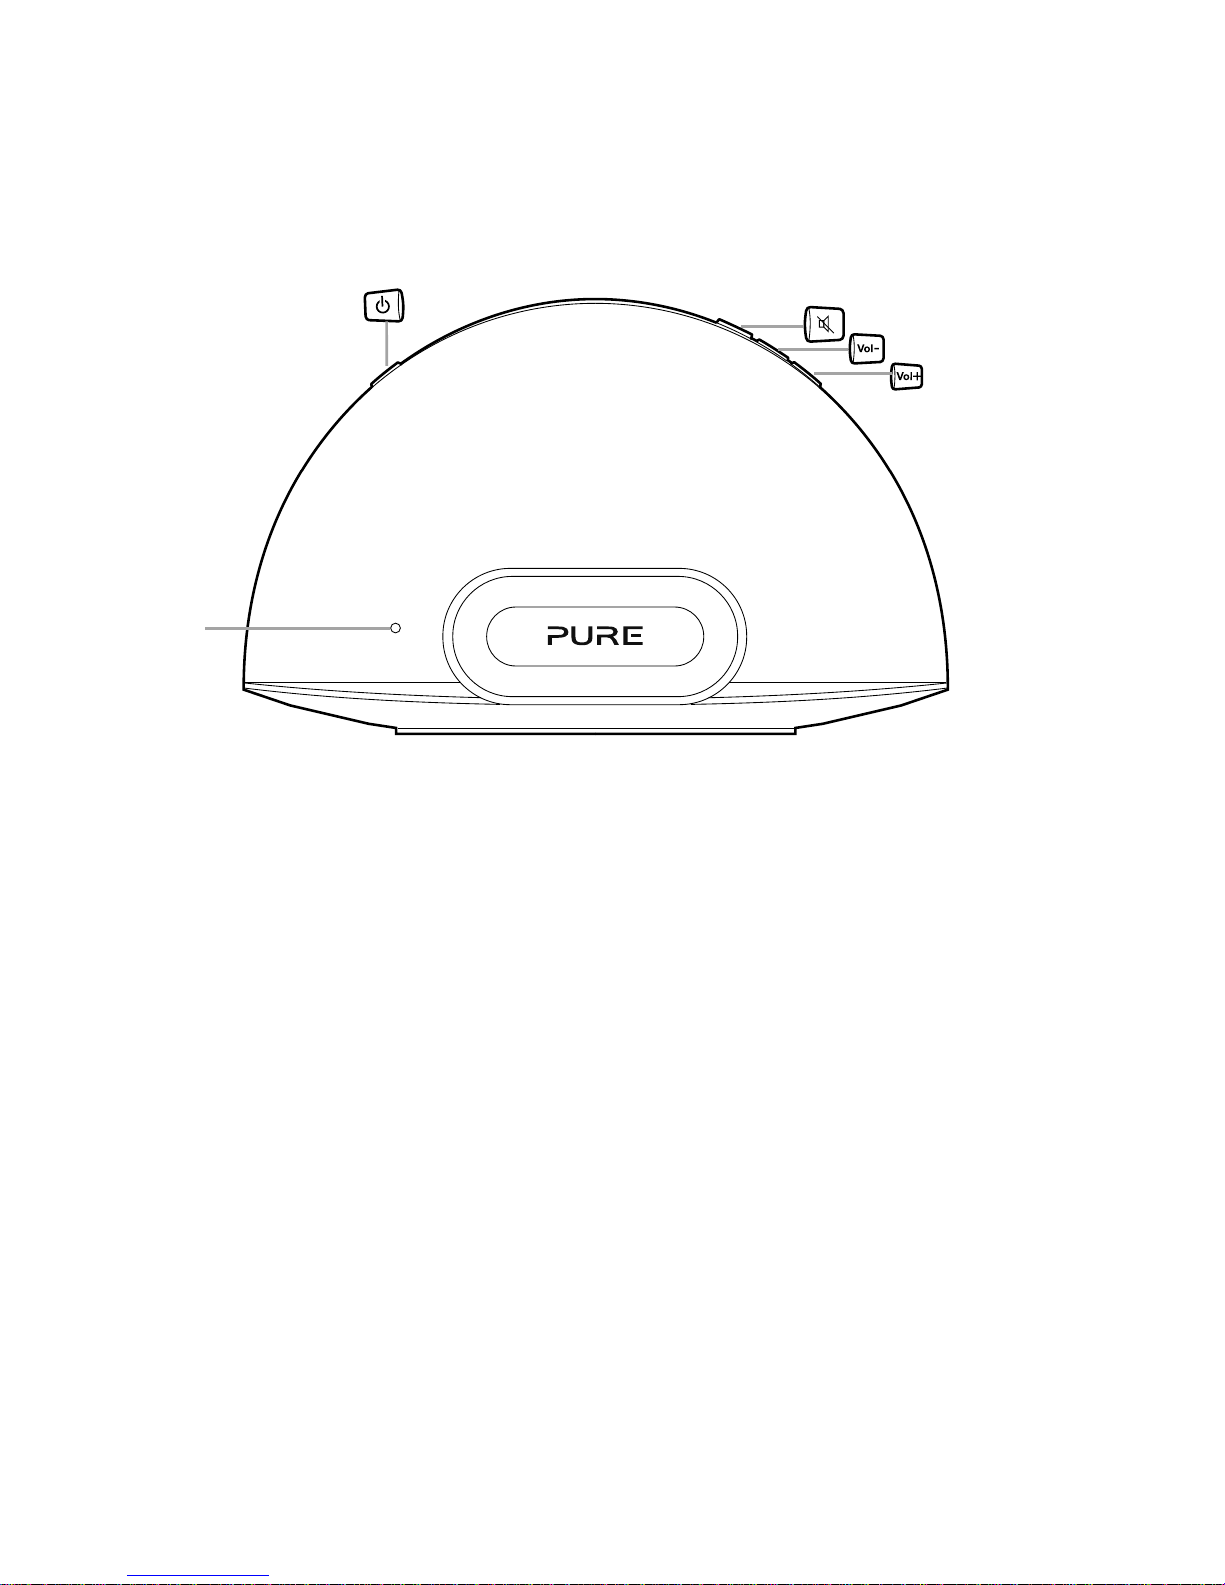
Standby
Press to switch
between Sleep,
Standby and On.
See page 8.
Mute
Volume down
Volume up
Status
LED
See
page 6.
Front/top panel controls and connectors
Front panel Status LED
When Contour is powered, the Status LED is visible through the front speaker
mesh. The Status LED is also used to indicate the various states of Contour, by
colour.
Red Standby (bright) / Starting up (bright flashing) / Sleep (dimmed)
Blue iPod/iPhone/iPad dock is active (flashing indicates that the
connection to the docked product is preparing and also indicates
remote activity)
White AirPlay is active (fast flashing indicates remote activity) (slow
flashing indicates network connectivity problems)
Pink Aux In is active (fast flashing indicates remote activity)
Blue/Green (Alternate flashing) Temporary wireless network setup
Cyan Flashing indicates a firmware error
Amber Updating firmware
Note: For quick reference, there is a sticker on the base of Contour which indicates
the most common Status LED states.
Page 9
7
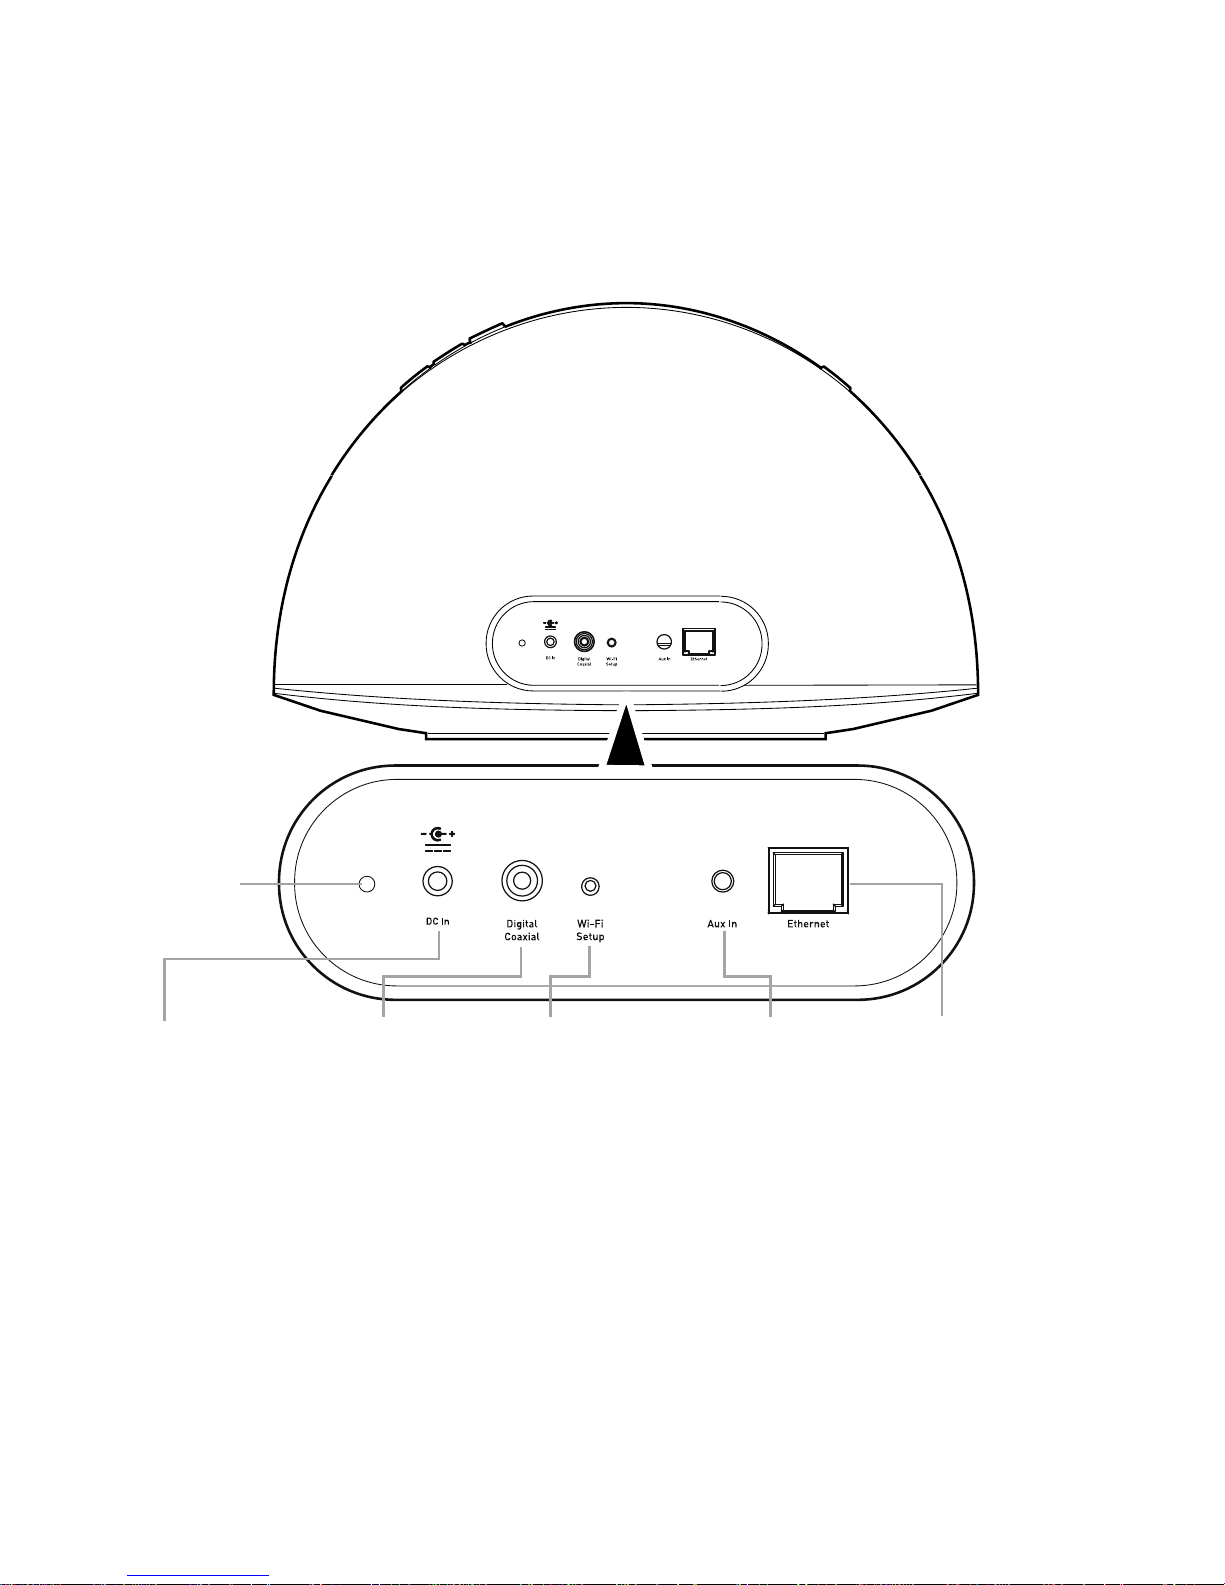
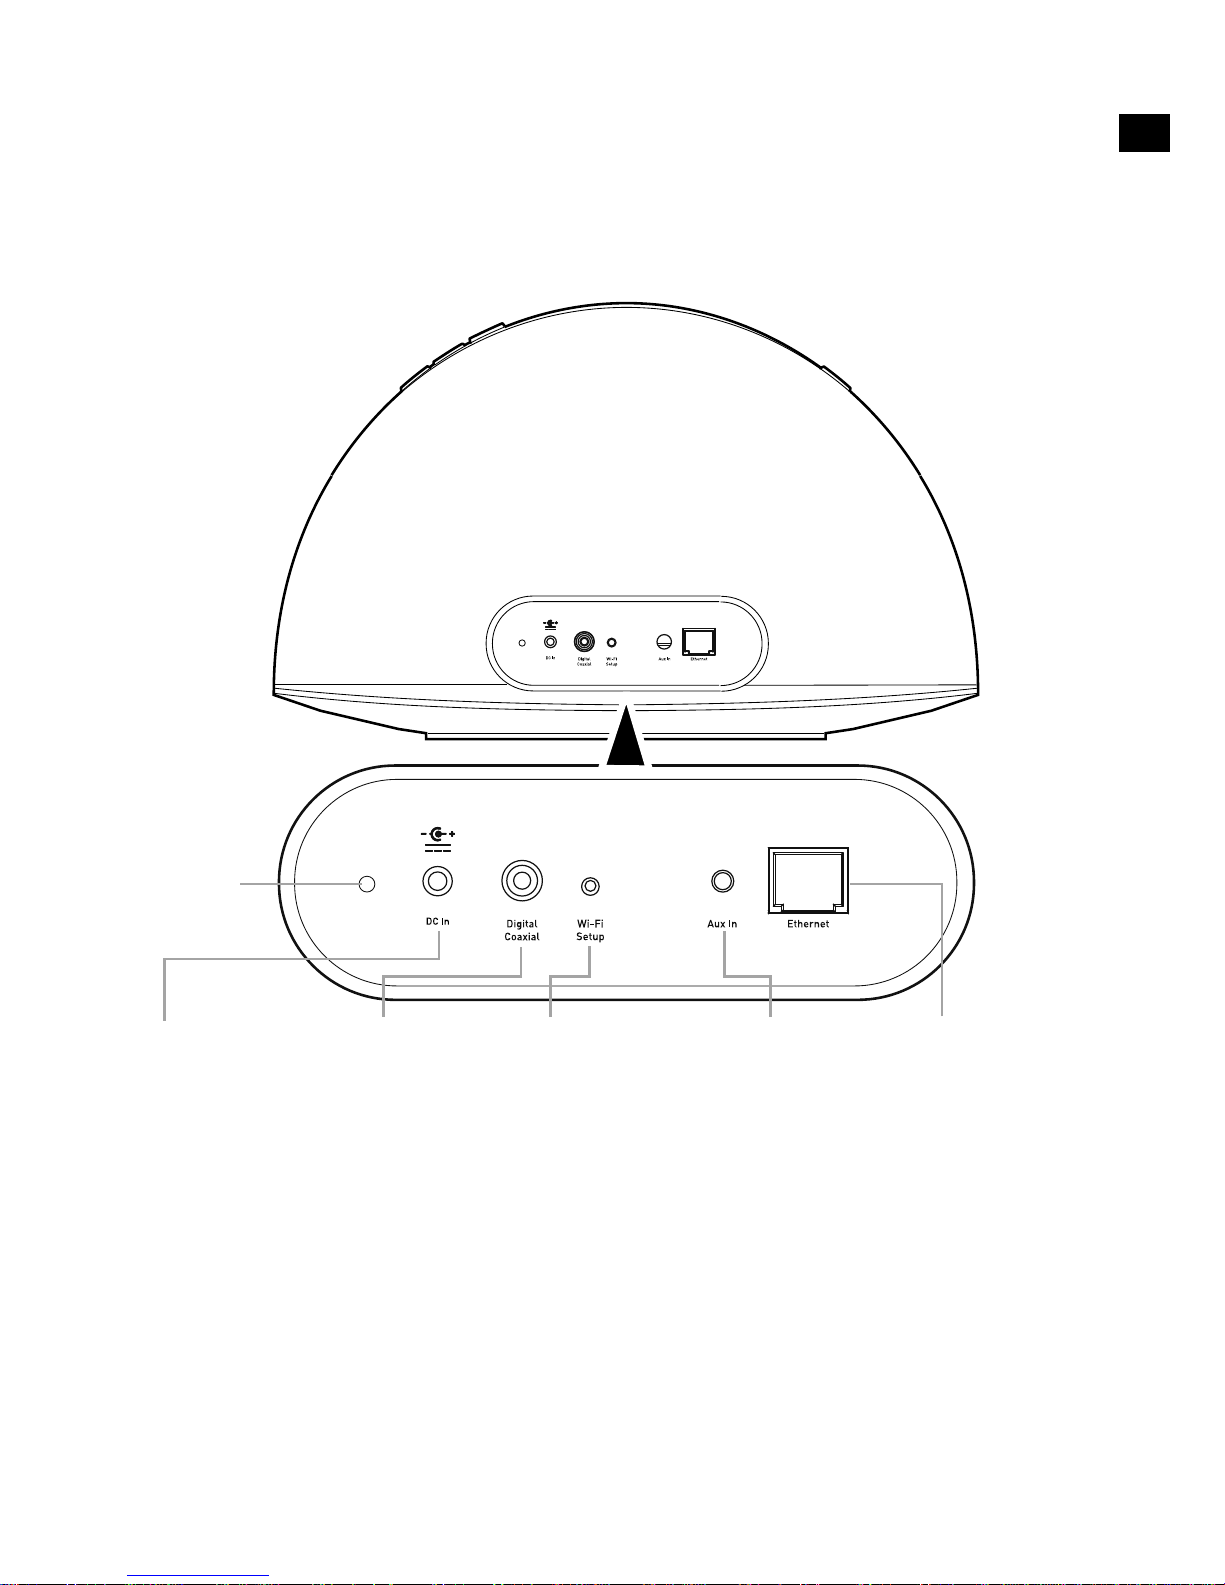
Rear panel controls and connectors
DC In
Connector
for supplied
mains power
adapter.
Aux In
Connector
for analogue
stereo input
for MP3 player
or similar. See
page 18.
Ethernet
Connector for
network cable.
Use as an
alternative to
Wi-Fi setup. See
page 13.
Digital
Coaxial
Connector
for output of
digital audio
signal. See
page 18.
Wi-Fi Setup
Button used
when setting up a
wireless network.
See page 11.
Firmware
Update
Status
LED*
*Diagnostics LED for use by Pure technical support.
Page 10

8
Switching between Sleep, Standby and On
Contour has three power modes, Standby, Sleep and On. In Standby, Contour
uses minimal power (Status LED is bright red). In Sleep mode, Contour remains
connected to the wireless network and waits for a source to be selected (Status
LED is dimmed red).
To enter Sleep mode, press Standby. Contour will automatically enter Sleep mode
after 15 minutes if it does not receive any audio from AirPlay or a docked iPod/
iPhone/iPad.
Once in Sleep mode, press Standby to switch to On.
To enter Standby, press and hold Standby for four seconds on Contour, or the
remote until the Status LED is bright red. Press Standby to switch straight to On.
Contour will flash red for around 30 seconds, pause, and then return to the state
that Contour was in before Standby.
Network setup
Contour can be connected to your network using a wireless or wired connection.
We recommend using the wireless connection method, which allows you to
position your Contour anywhere within range of your wireless network. Contour
can be connected to your wireless network using Wi-Fi Network Login Sharing or
manually. See page 9 for more information.
To use the wired connection method, connect an Ethernet cable between the
Ethernet port on the back of Contour and one of the available Ethernet ports on
your router. You might want to use this method if you experience sound quality
problems or if your Contour is located near your router. See page 13 for more
information.
Page 11
9
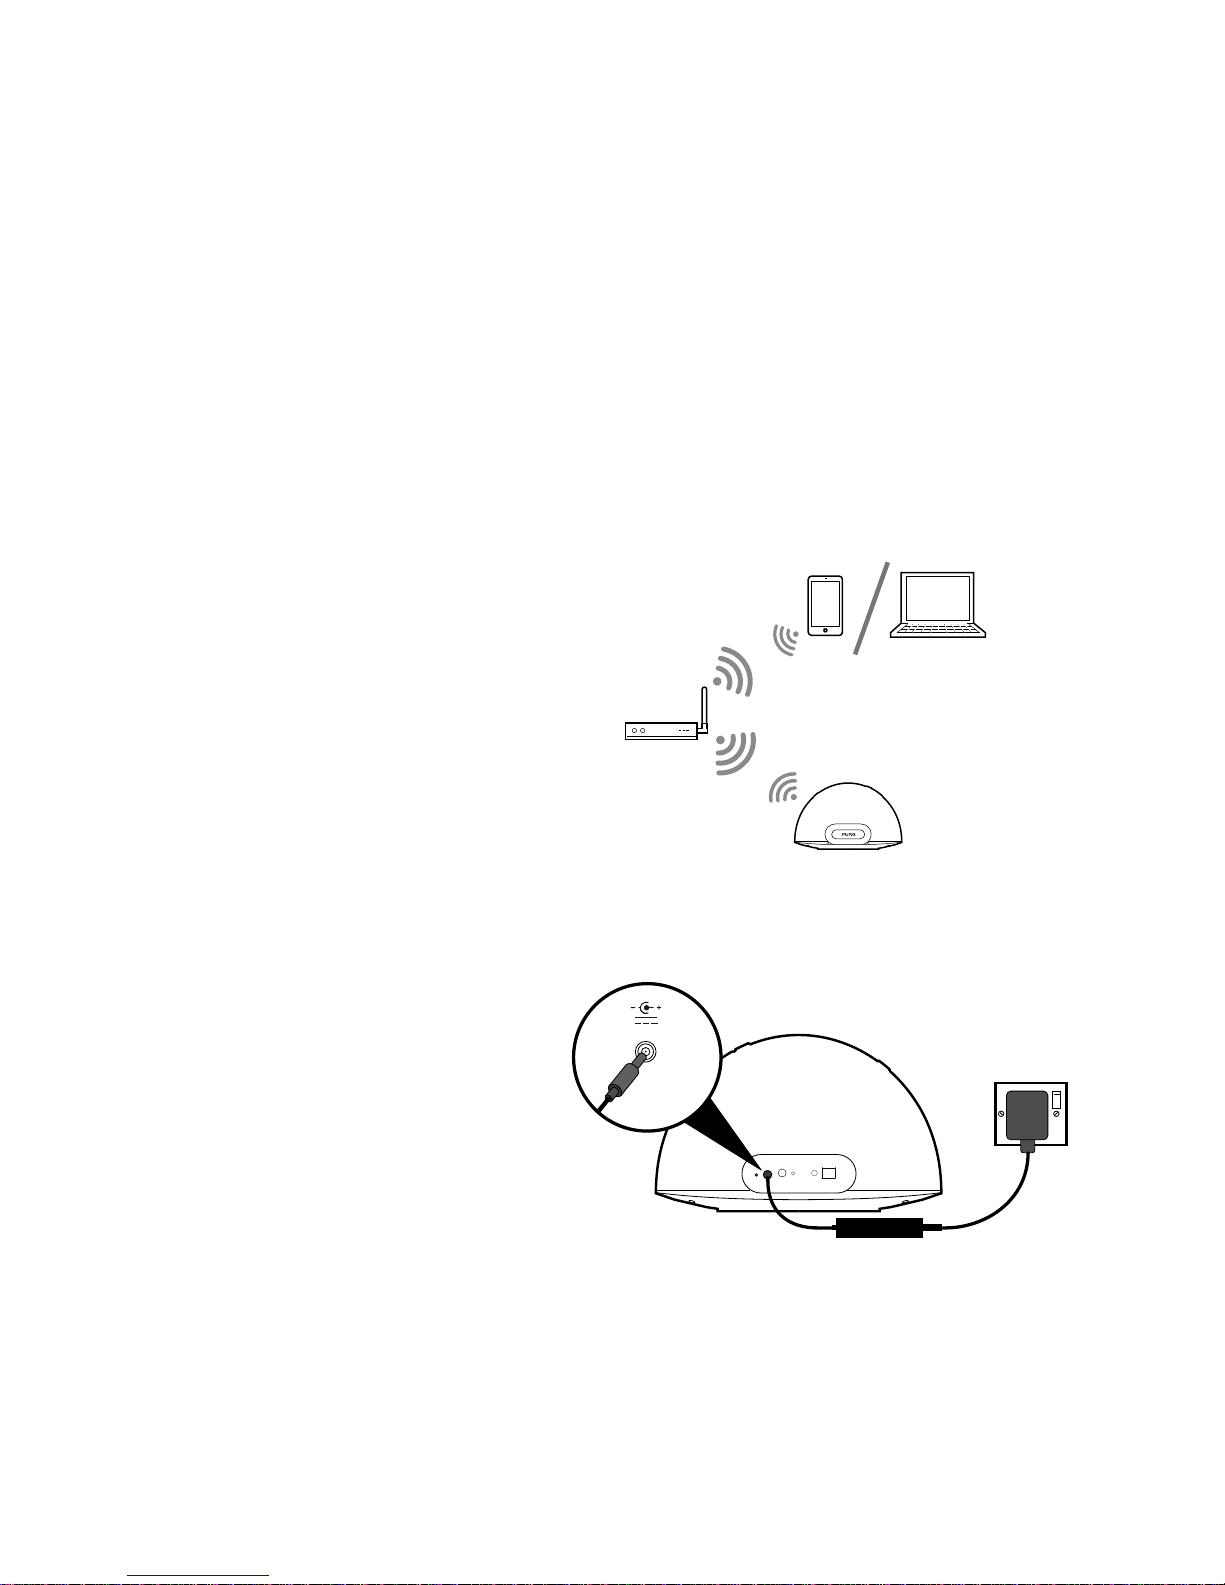
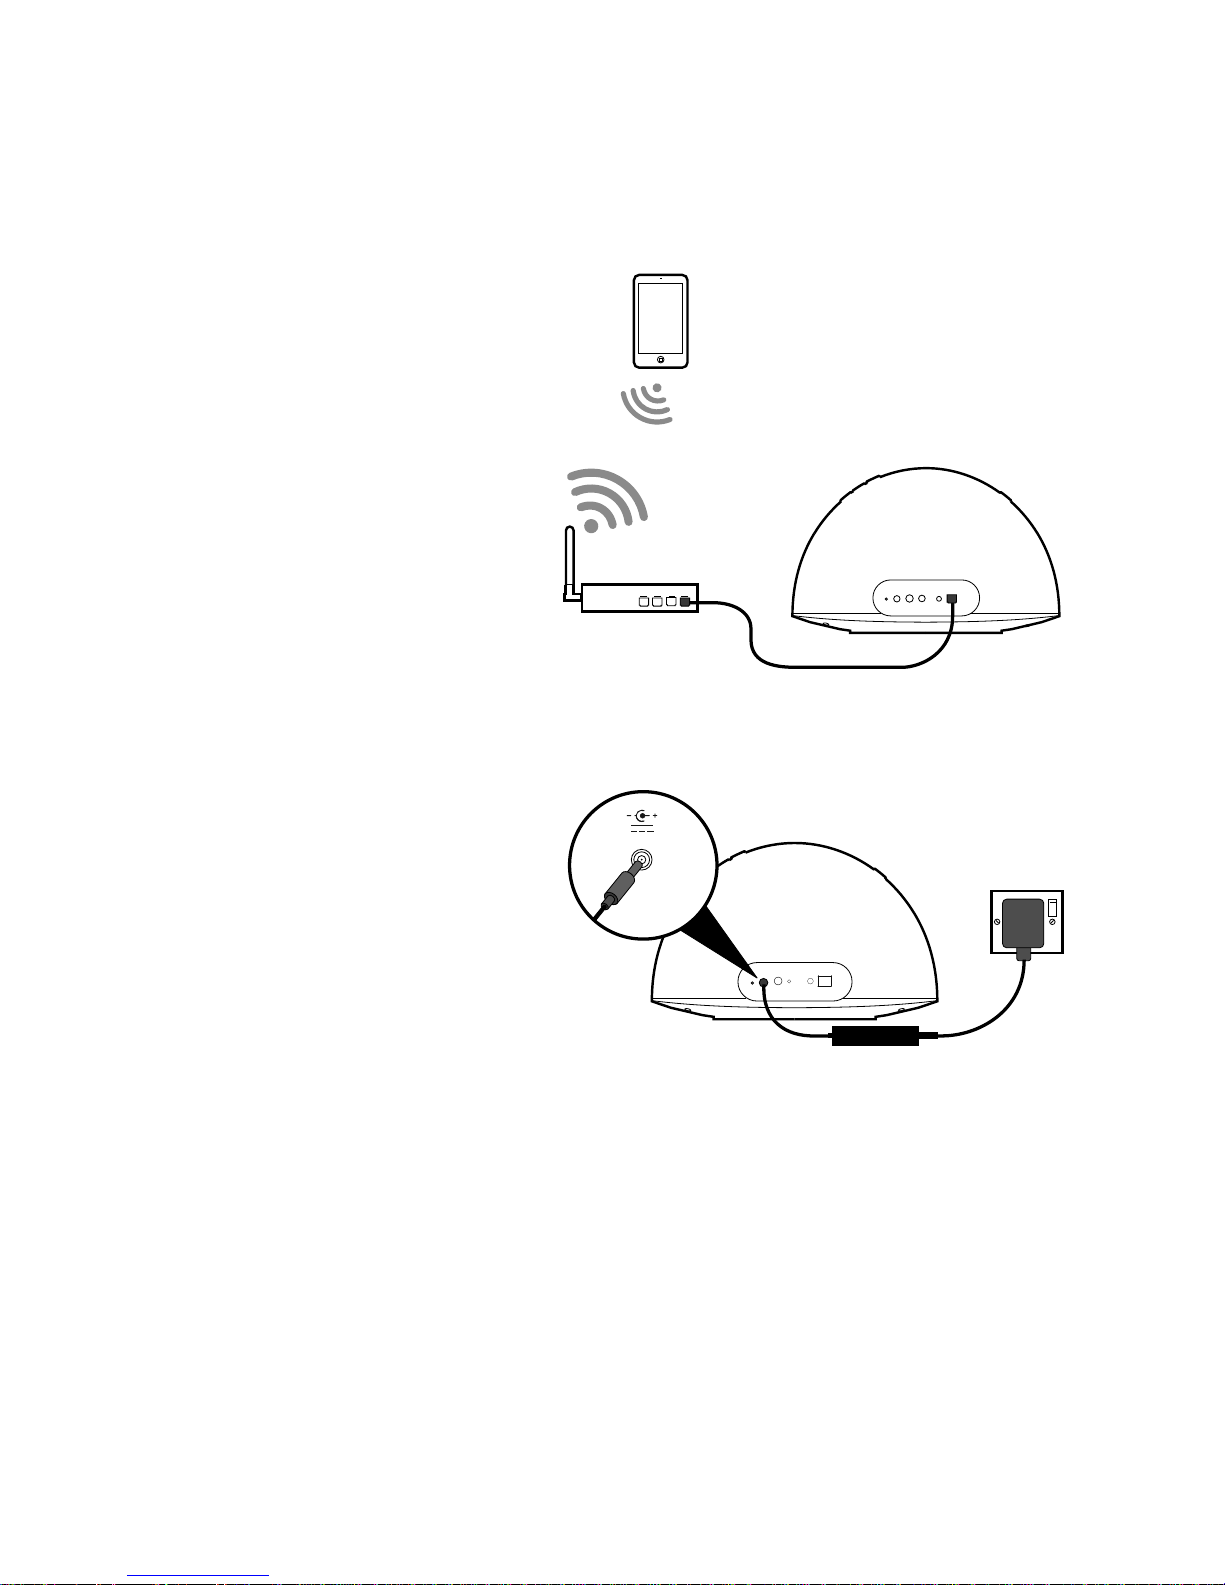
1. Position Contour in range of your
wireless network.
2. Insert the connector of the
mains power adapter into the
socket on the rear of Contour.
3. Plug in to the mains supply.
4. When the red Status LED on
the front has stopped flashing,
Contour is in Sleep mode.
5. See page 10 to setup your wireless connection using the Wi-Fi Network Login
Sharing method. See page 11 if you want to set up your wireless network
connection manually.
18V DC
Preparing Contour to connect
to a wireless network
Introduction
Contour can be connected to your wireless network using two different methods.
We recommend using Wi-Fi Network Login Sharing, which automatically connects
Contour to your wireless network using the Wi-Fi settings on your iPod, iPhone or
iPad*. Alternatively, you can connect Contour to your wireless network manually.
Before choosing a wireless connection method you will need to prepare Contour
for wireless setup.
Preparing Contour for wireless setup
Typical wireless setup
*To use Wi-Fi Network Login Sharing on your iPod touch, iPhone or iPad you will require iOS version 5.0 and above.
Page 12
10
Connecting Contour to your wireless network using Wi-Fi
Network Login Sharing
To connect Contour to your wireless network:
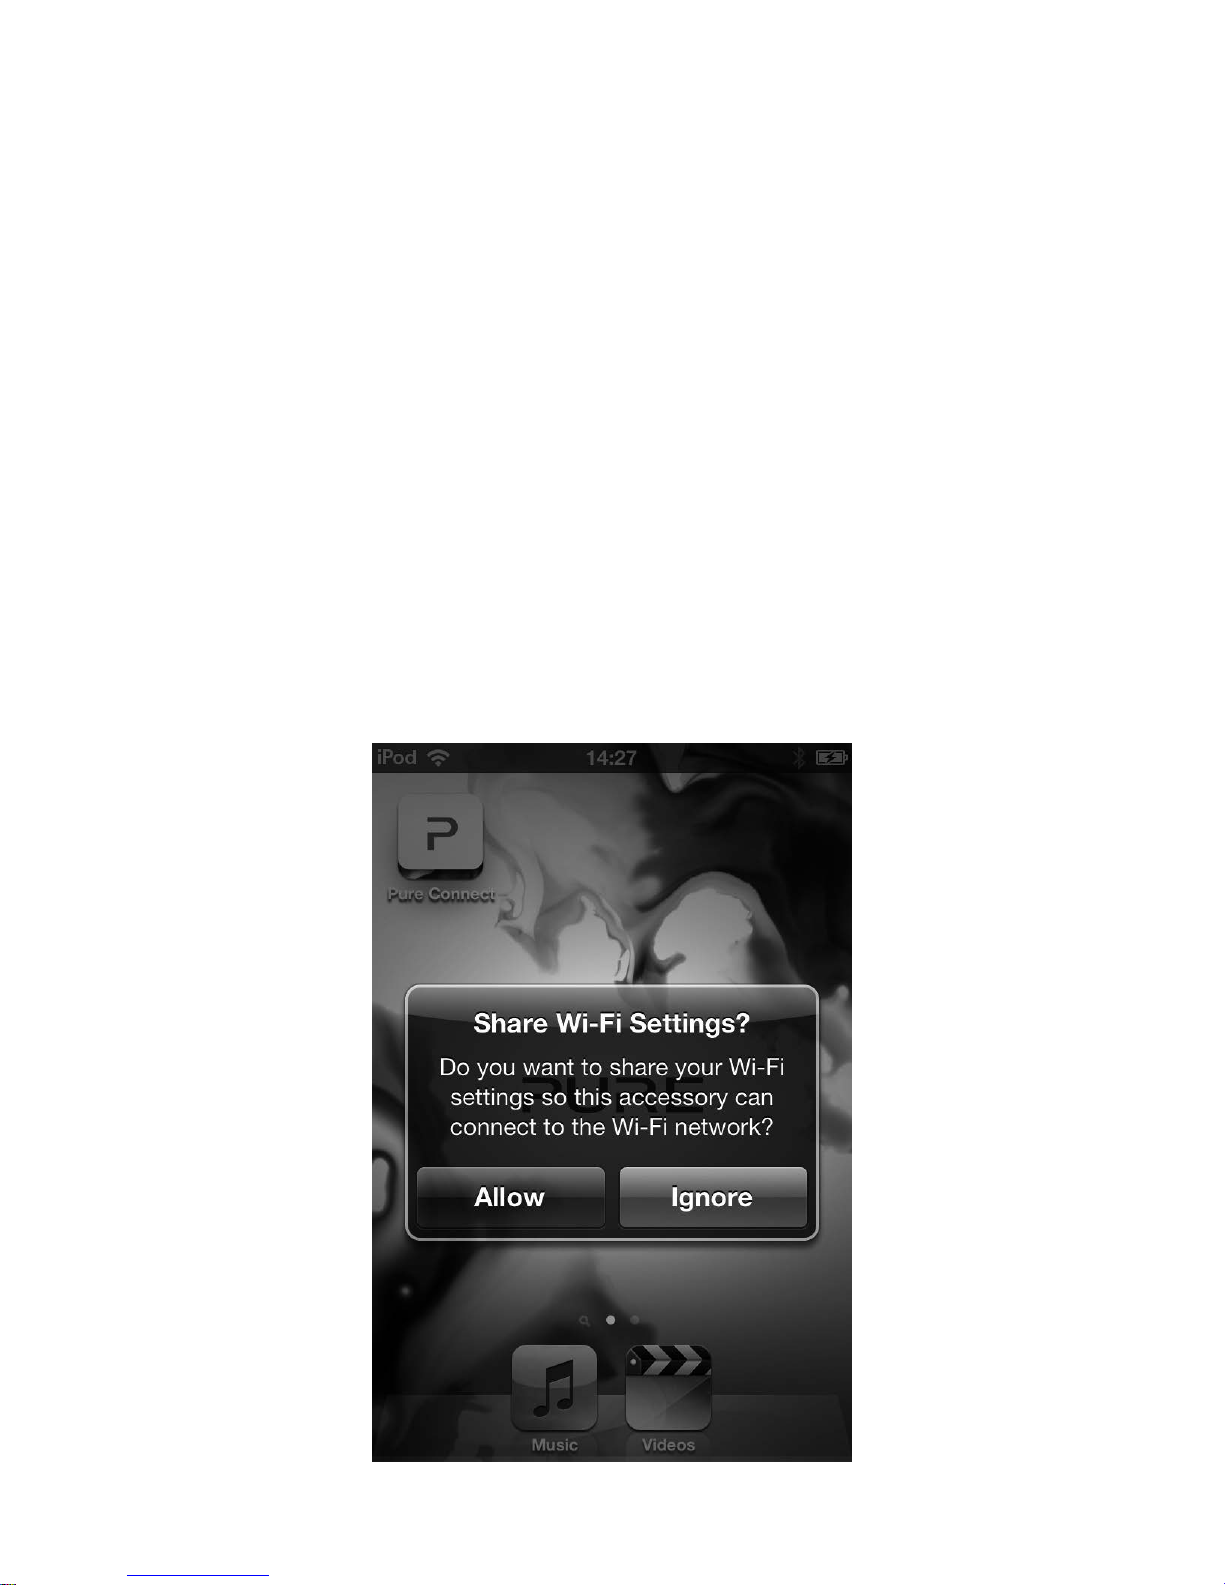
1. Dock your unlocked Apple device (iPod touch, iPhone or iPad) and wait a
few seconds while your Apple device authenticates. The Status LED will flash
blue and the Apple device will start sharing.
2. When the Status LED has stopped flashing blue, press the Wi-Fi connect
button on the back of Contour.
3. You will be prompted on the screen of your iPod/iPhone/iPad asking you if
you would like to share your Wi-Fi settings.
4. Tap Allow.
5. Your Contour should now connect to your network.
Note: To verify that Contour has connected to your network successfully using
Network Login Sharing, check that the Status LED is solid white in AirPlay mode.
See ‘Front panel Status LED’ on page 6 for more information.
Page 13
11
Manually connecting Contour to your wireless network
Stage 1: Connecting your setup device to Contour
In the first setup stage you need to establish a temporary connection between your
setup device and Contour. To do this, you need to create a temporary wireless
network to connect Contour to your iPod touch, iPhone, iPad or laptop.
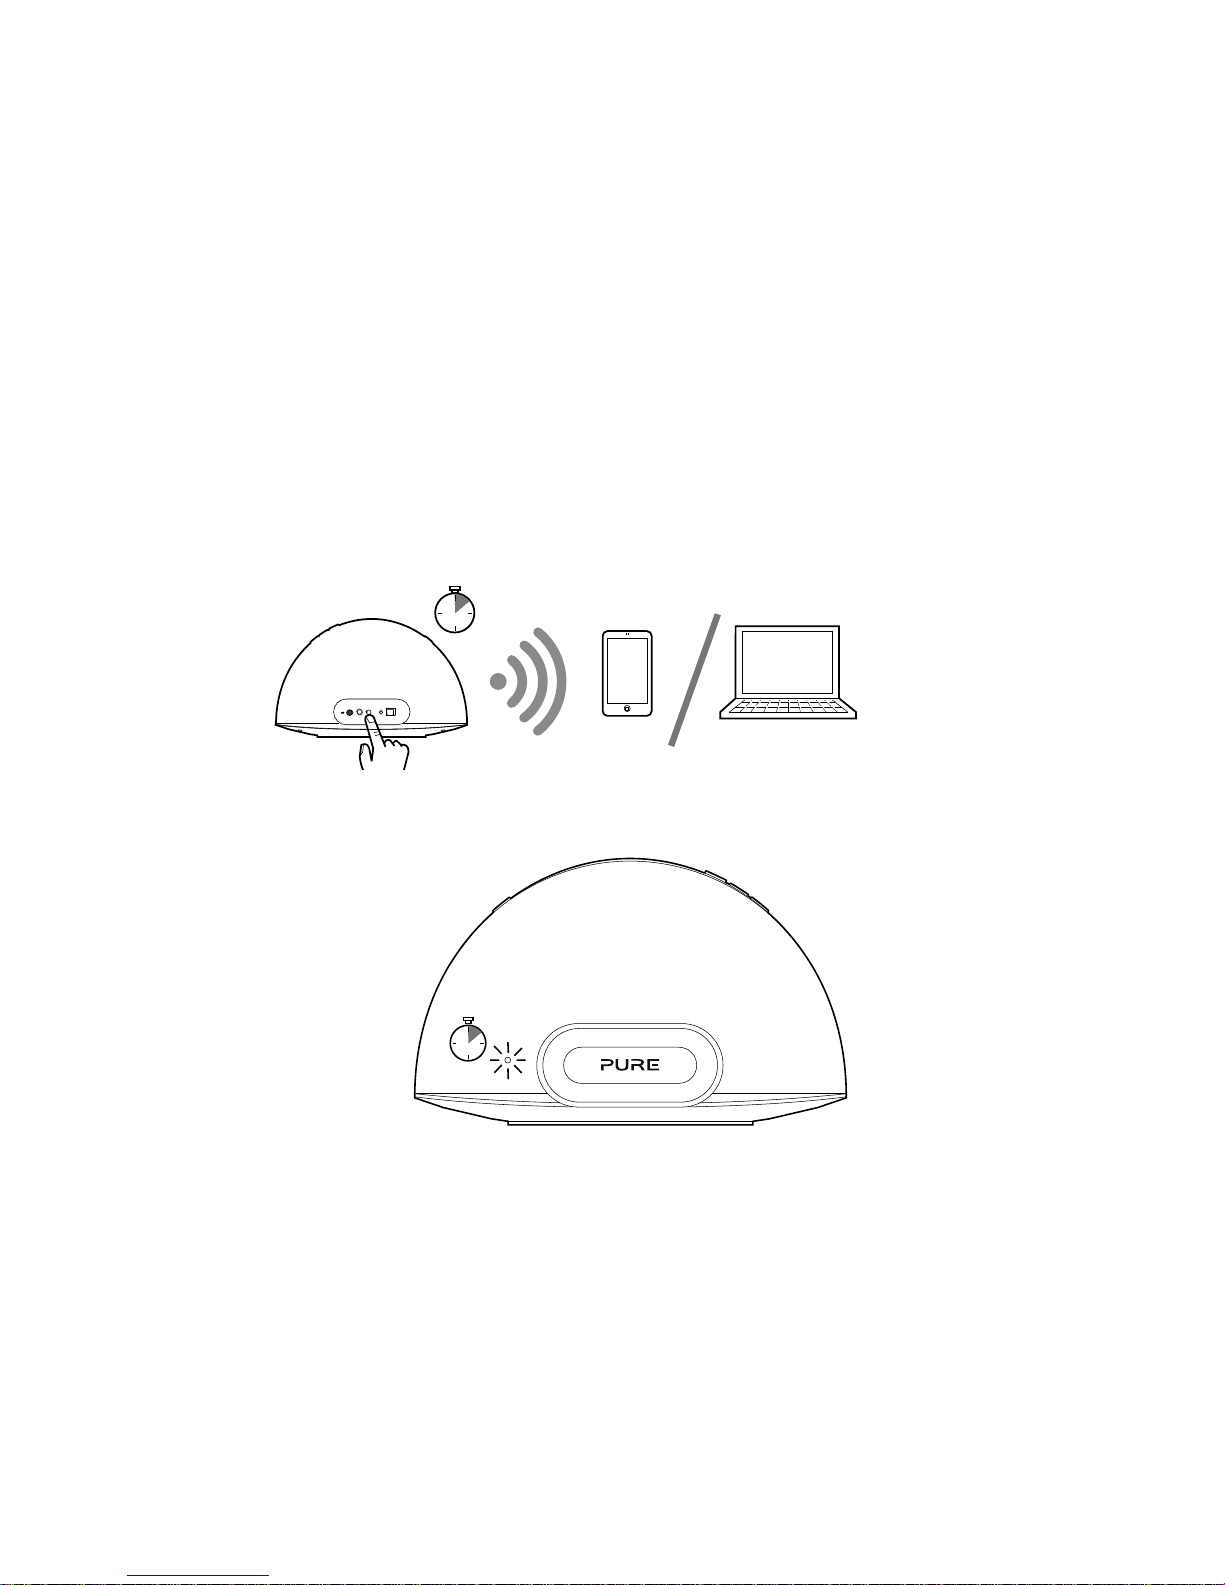
Connecting using a temporary wireless network
1. Ensure that Contour is in Sleep mode or switched On.
2. Press the Wi-Fi Setup button on the back of the Contour for five seconds. This
will turn on Contour’s temporary wireless network. The Status LED will flash red
while the temporary wireless network starts up.
20 secs
After around twenty seconds, the Status LED will then flash green and blue.
20 secs
3. On your setup device (iPhone, iPod touch, iPad, laptop etc), the Contour
200i Air ****** wireless network should now be visible. Select this network. No
password is required.
4. Once you have connected to the Contour 200i Air ****** wireless network, you
can access the Contour Setup Manager on your setup device’s web browser.
Use Contour Setup Manager to add Contour to your own wireless network.
Note: ****** represents a six digit code that will be unique to each Contour,
which is based on the last six digits of Contour’s MAC address. The MAC
address can be found on the label on the base of Contour.
Page 14

12
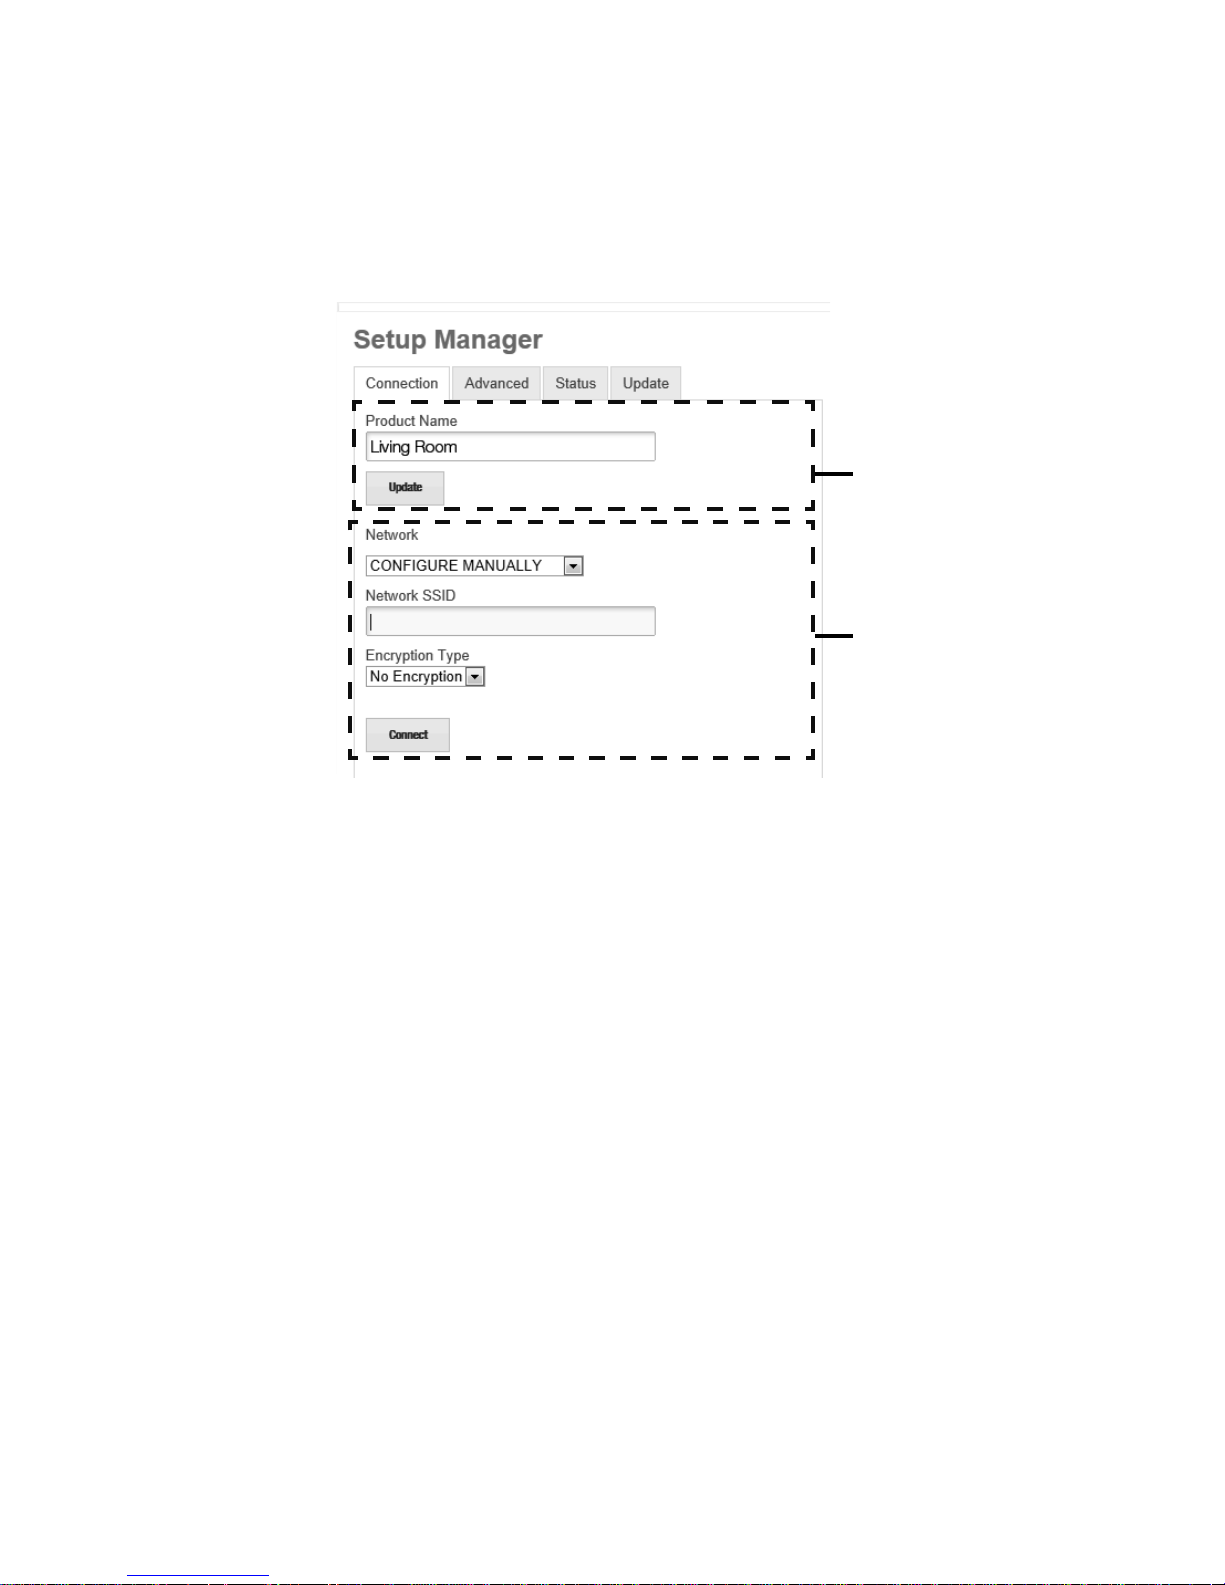
Stage 2: Accessing Contour Setup Manager
Once you have established the temporary connection between your setup device
and Contour, you can access Contour Setup Manager as follows:
1. On your setup device, start your web browser (e.g. Safari, Google Chrome,
Microsoft Internet Explorer, Mozilla Firefox).
2. Enter the following address:
http://192.168.1.12
3. The Contour Setup Manager will be displayed:
4. Click the Connection tab.
Stage 3: Adding Contour to your wireless network
Contour will automatically scan for available networks. If the automatic option does
not work, see ‘Manually connecting Contour to your wireless network’ on page
11 to manually add Contour to your wireless network:
1. Select the name of your own wireless network from the Network drop-down
list. The encryption method will automatically be detected.
2. If required, enter the security key used by your network.
3. Click Connect. The Status LED will then flash red to indicate that Contour is
rebooting. Contour will enter Sleep mode and the Status LED will be dim red.
4.
Contour is now ready to use with a wireless connection. See page 14.
Note: We recommend that you contact your IT department before attempting to
connect Contour to a corporate wireless network.
Page 15
13
Preparing Contour to connect
to an Ethernet network
1. Connect an Ethernet cable
from the Ethernet port on the
back of Contour to your router.
2. Insert the connector of the
mains power adapter into the
DC In socket on the rear of
Contour.
3. Plug in to the mains supply.
4. A network connection between your router and Contour will be established.
When the red Status LED on the front has stopped flashing, Contour is in Sleep
mode.
5. Contour is now ready to stream music using AirPlay with a wired connection.
18V DC
Typical Ethernet setup
Page 16
14
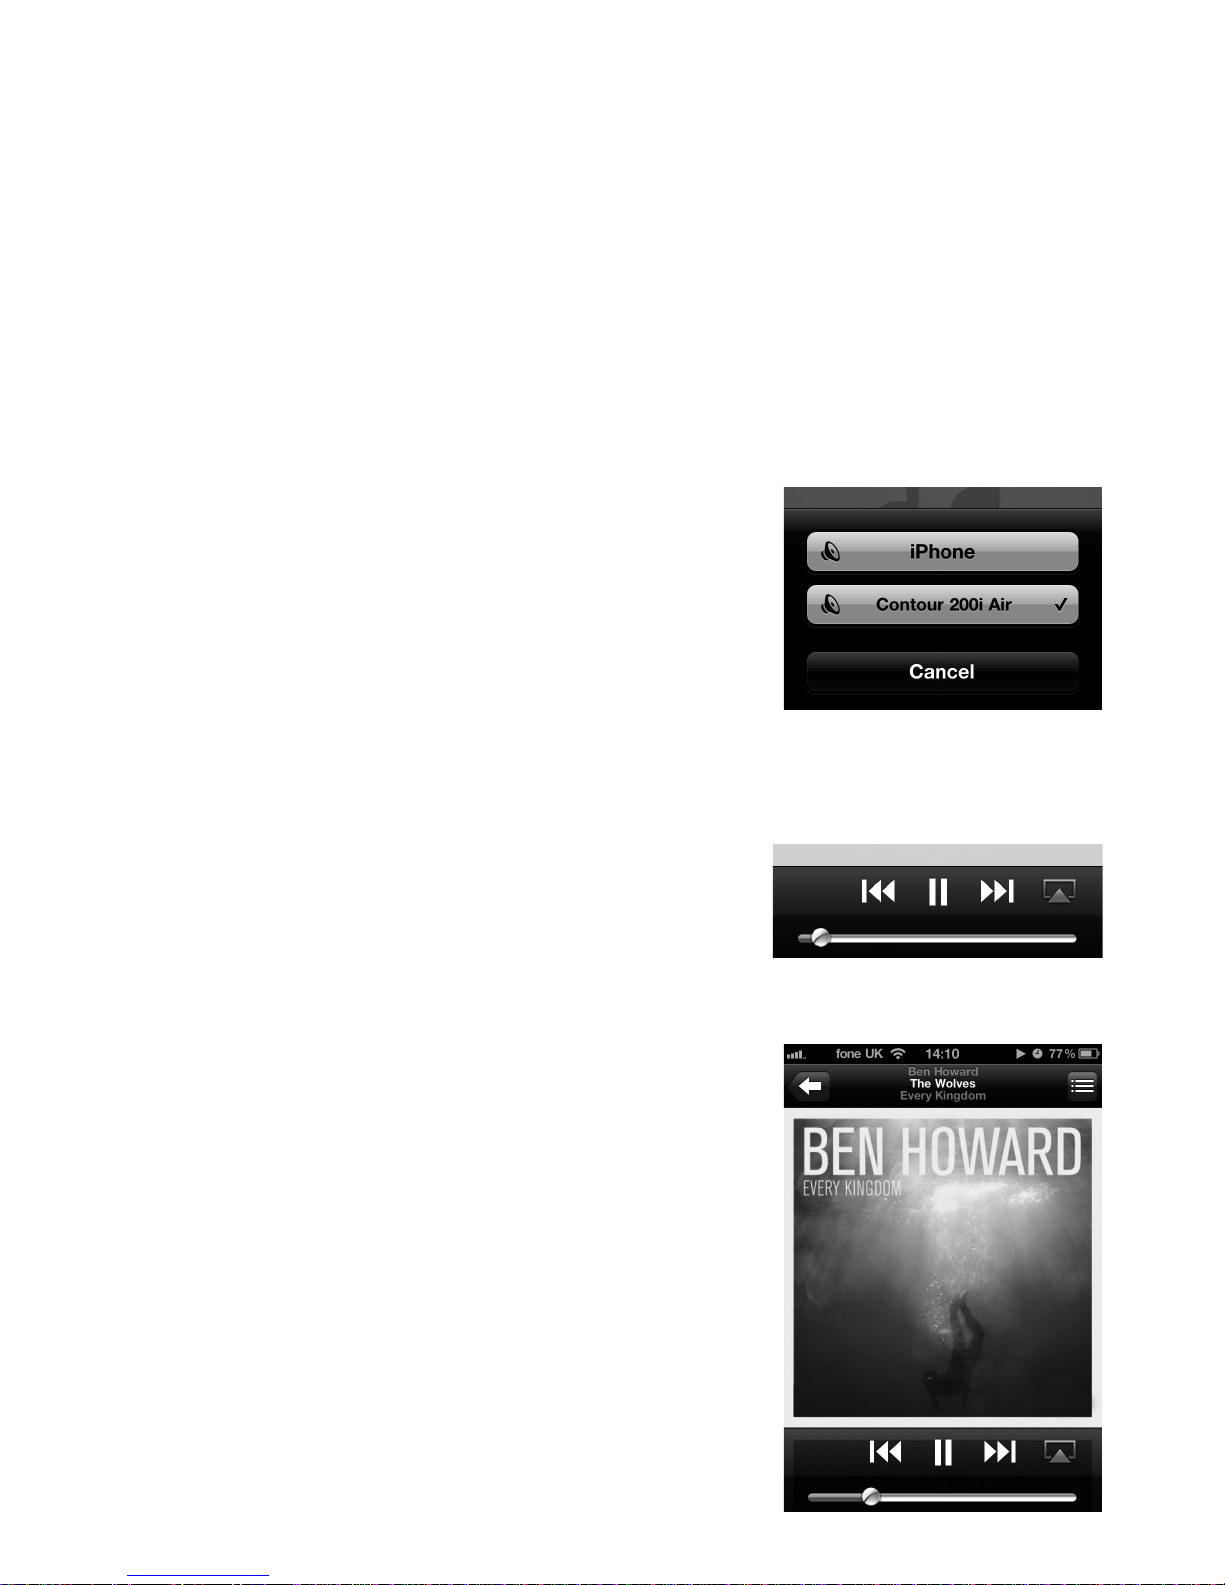
Playing audio from an iPod touch, iPhone or iPad
On your iPod touch, iPhone or iPad, ensure you
are connected to the same wireless network as the
Contour. You should then be able to select your
Contour from the list of AirPlay devices.
Note: The default name assigned to Contour
consists of the word ‘Contour’ followed by a six digit
code. This six digit code represents the last six digits
of Contour’s MAC address, which can be found on
the label on the base of Contour.
On your iPod touch, iPhone or iPad, the AirPlay
symbol will be white when any AirPlay device is
available on the network. The AirPlay symbol will
turn blue when the iPod touch or iPhone is using
Contour as a speaker accessory.
Select the track you wish to play. If Contour is in
Sleep mode, it will wake up and switch the source to
AirPlay. The Status LED will change to white when
AirPlay is active.
Using AirPlay to play audio
Selecting AirPlay as a source
Press Source on the remote control until the Status LED is white. If the Status
LED is steady white AirPlay has been set up successfully (this can take up to one
minute). If the Status LED is still flashing white after one minute, there is a problem
with Contour’s network connection.
Note: See ‘Hints and tips’ on page 24 for help with troubleshooting Contour
network connectivity issues.
Page 17
15
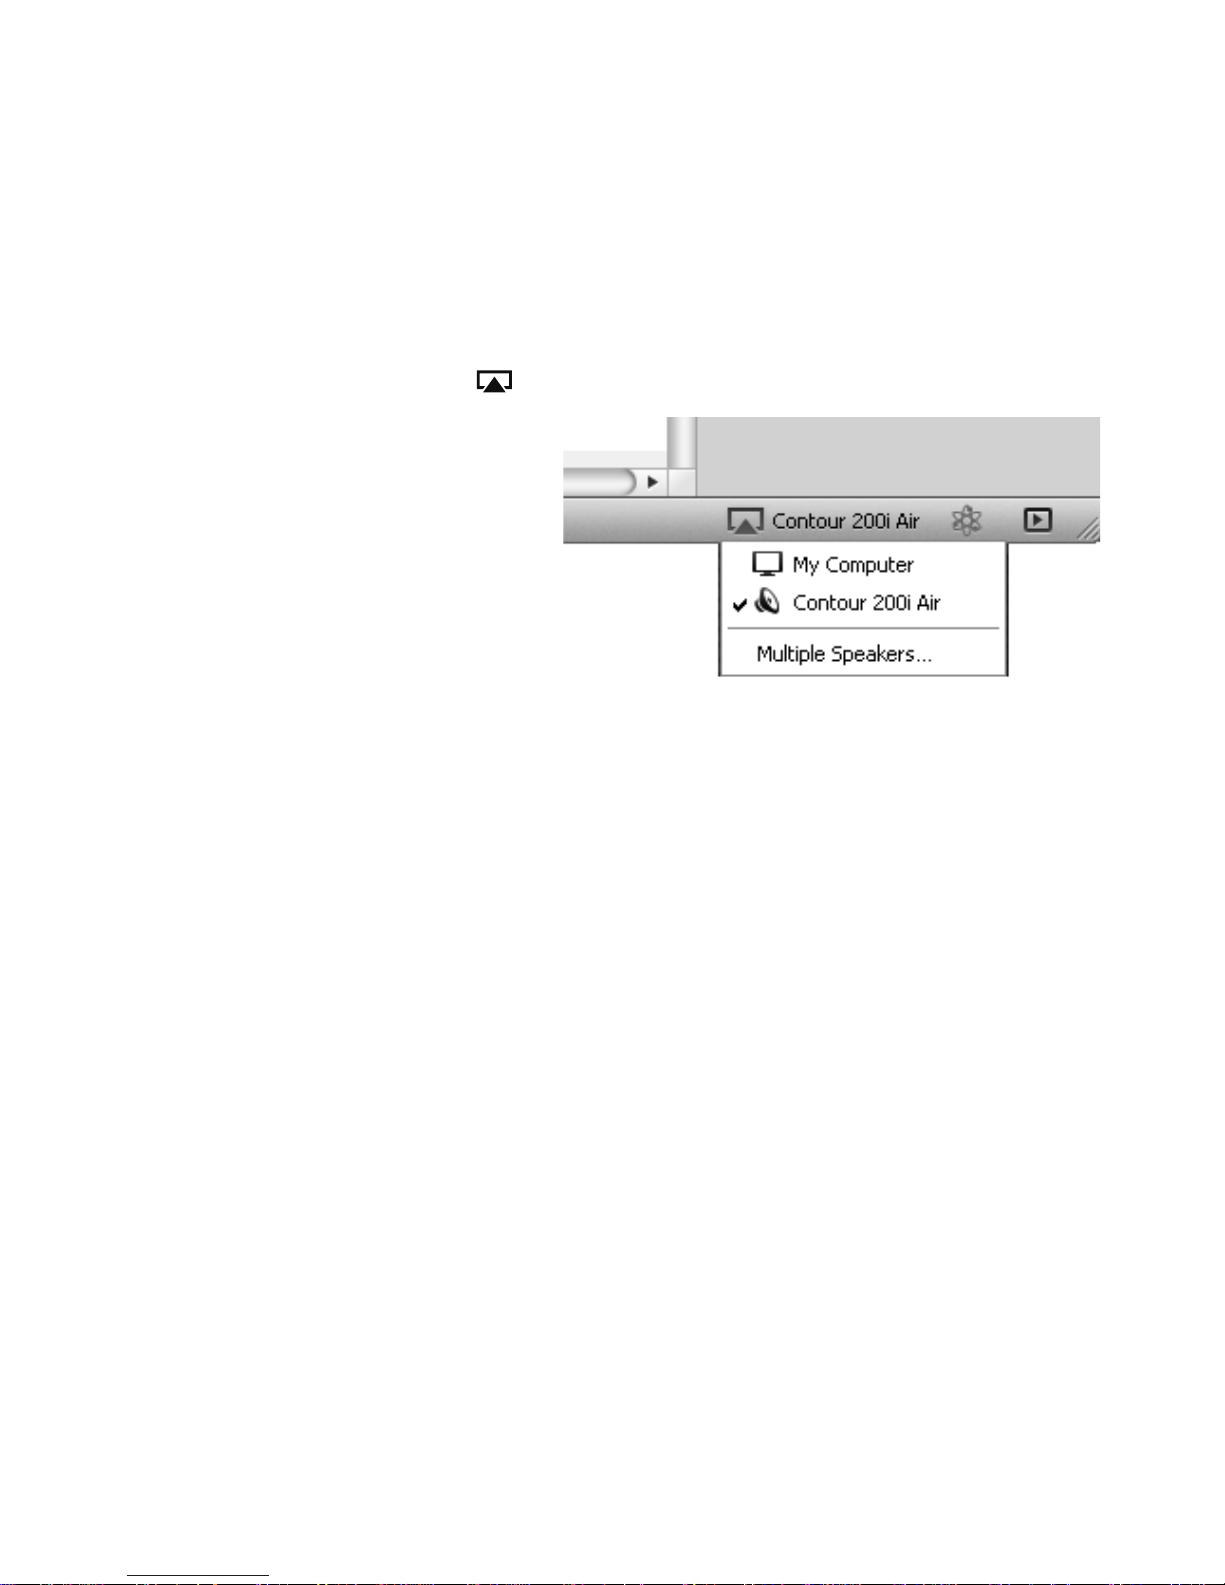
Playing audio from iTunes
Once you have successfully added Contour to the same network as your iTunes
computer, iPod touch, iPhone or iPad, it should be automatically detected. To
select Contour as an AirPlay device in iTunes:
1. Open iTunes.
2. Click the AirPlay symbol and select your Contour from the AirPlay list at the
bottom of the screen.
3. Select the track you wish
to play. If Contour is in
Sleep mode, it will wake up
and switch the source to
Airplay. The AirPlay symbol
will turn blue when iTunes is
using Contour as a speaker
accessory.
4. The Status LED on Contour
will change to white to indicate that AirPlay is active.
Allowing commands to be sent back to iTunes from Contour
If you want to send commands back to iTunes from Contour (such as play/pause)
you need to enable this option in iTunes.
For Windows systems:
1. Click Edit.
2. Click Preferences.
3. Select the Devices tab.
4. Tick Allow iTunes audio control from remote speakers.
For Apple Mac systems:
1. Click iTune s.
2. Click Preferences.
3. Select the Devices tab.
4. Tick Allow iTunes audio control from remote speakers.
Page 18
16
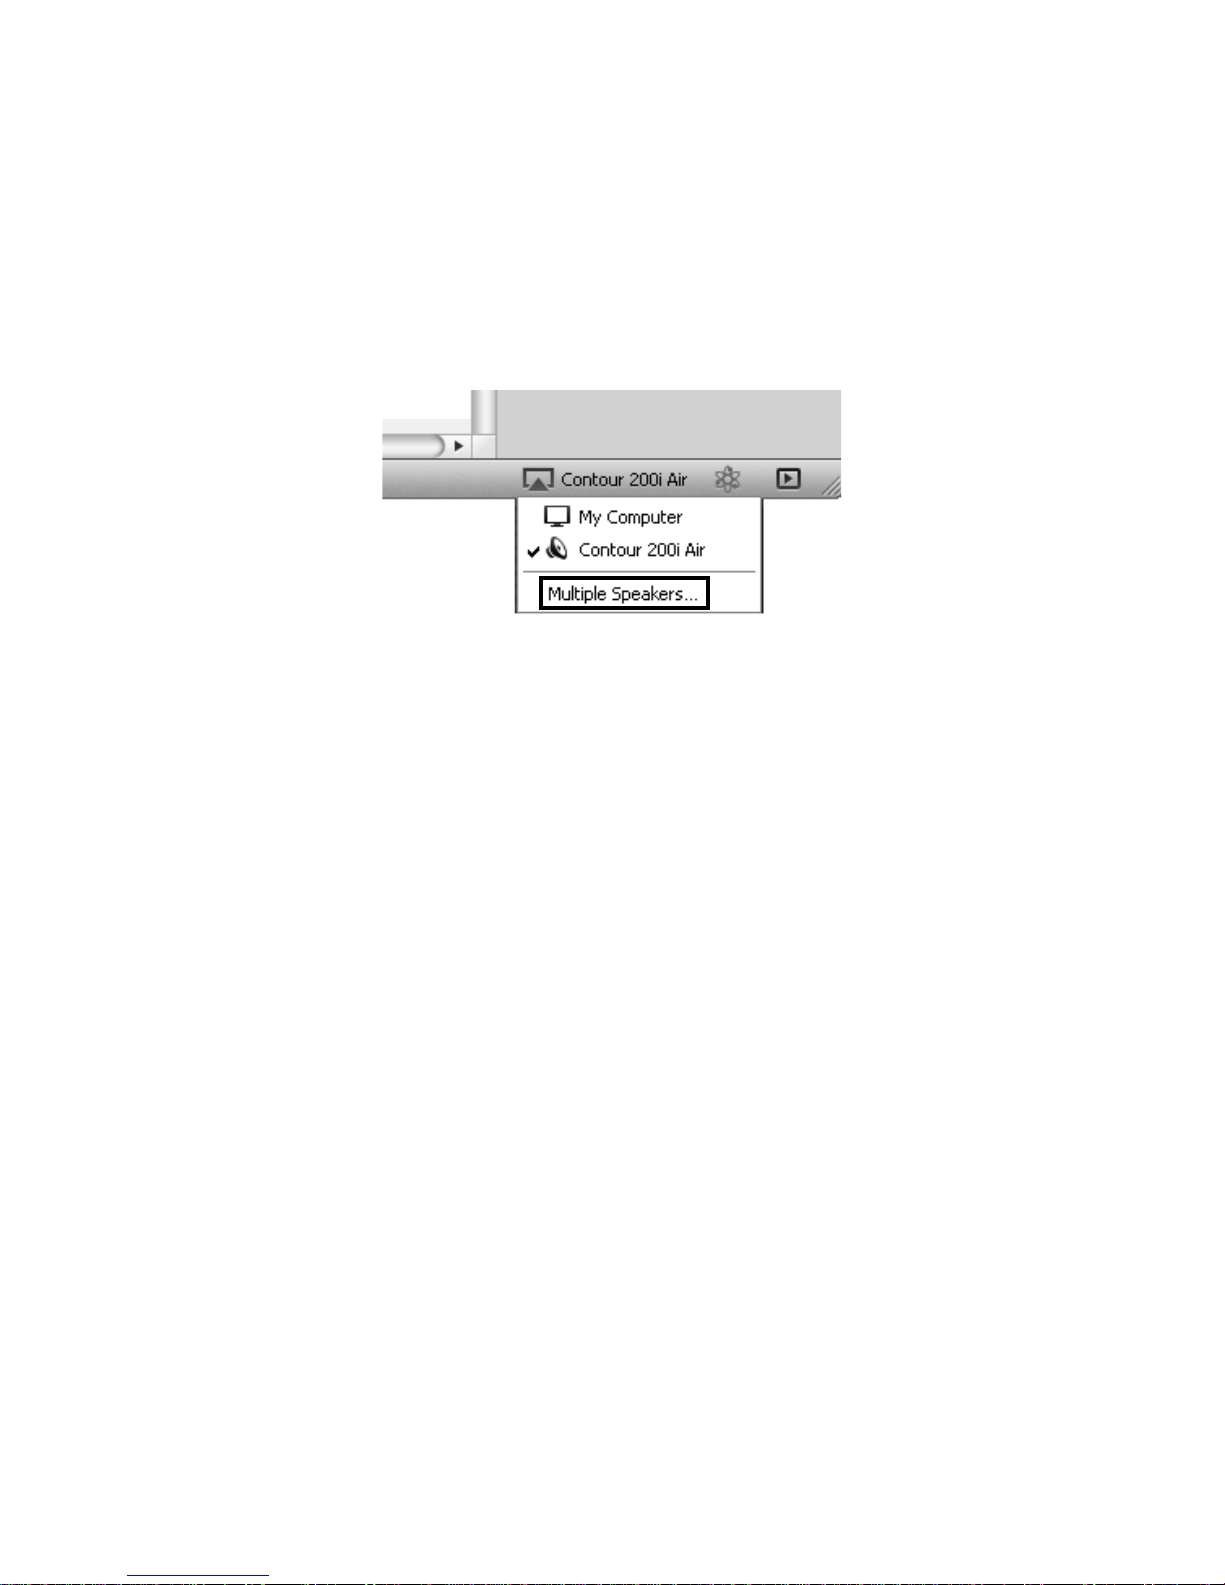
Streaming audio to multiple rooms
If you have more than one Contour, you can use AirPlay to simultaneously stream
the same audio to each Contour. You can set this up by using iTunes on your
computer. To enable AirPlay to simultaneously stream the same audio to each
Contour, click on the AirPlay icon and select the Multiple Speakers option.
You can control any of the functions in iTunes by instaling the Apple Remote app on
your iPod, iPhone or iPad. Once installed, you can use your iPod, iPhone or iPad as
a remote control for iTunes. The Apple Remote app can be downloaded from the
Apple App Store. Refer to the Apple website for more information.
Page 19

17
Listening to a docked iPod/
iPhone/iPad
Compatibility
The dock on Contour is compatible with most iPod, iPhone and iPad models. For
the latest information, check the compatibility table on our website:
www.pure.com/products/ipod-compatibility.
Docking your device
Dock your device onto the connector.
Your device will start charging as soon as it is docked and will continue charging
whether Contour is playing, in Standby or in Sleep mode.
Selecting the dock
Press Source until the Status LED is blue.
Controlling your device
When the iPod source is selected, your device will start playing the last track you
were listening to. Use the remote, or the controls on your device, to navigate
menus and control playback.
Page 20
18
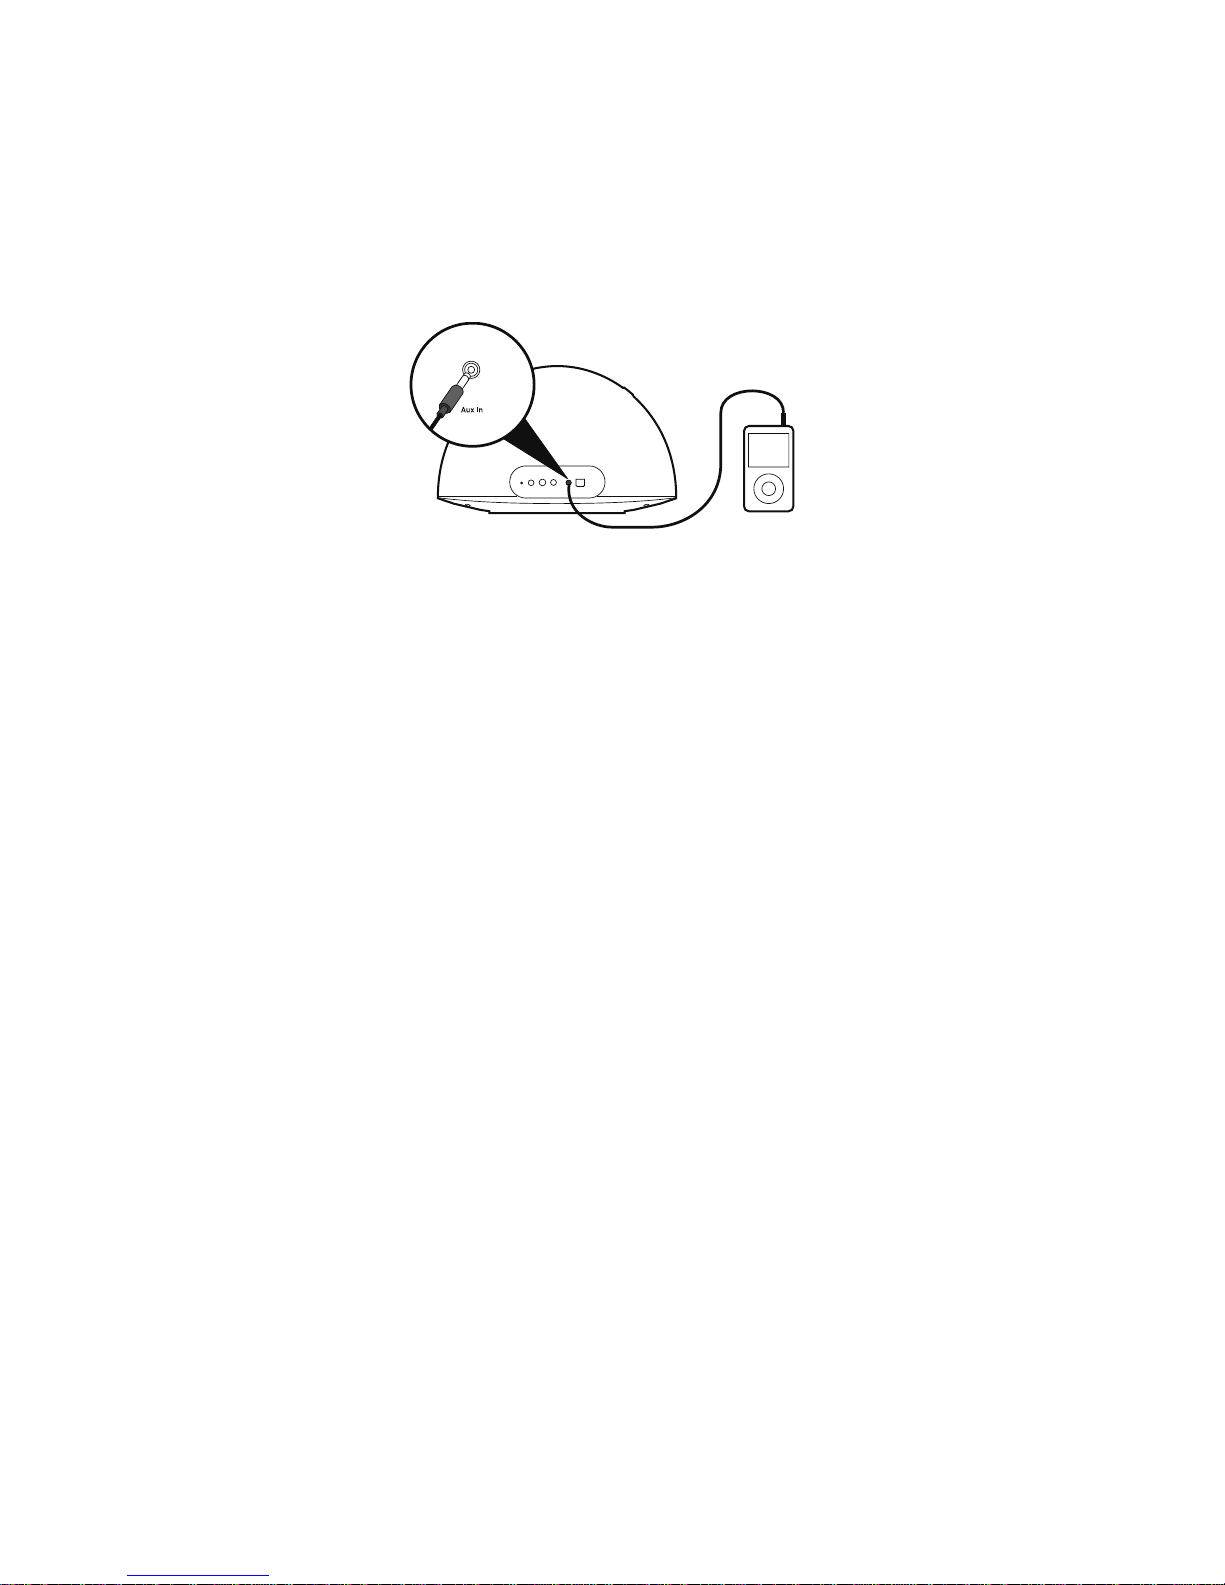
Using the auxiliary input
Connecting an auxiliary device
Connect the line out or headphone socket of your auxiliary device to the Aux In
socket on your Contour using a suitable cable.
Selecting the auxiliary input
Press Source until the Status LED is pink.
Using the digital output
Using an external digital output device
You can connect Contour to a digital output device, such as compatible hi-fi
system. Any audio playing through Contour will also be sent to the attached device
and your AirPlay source.
Note: The volume controls on Contour will not change the volume on the digital
device.
Connecting an external digital output device
Connect Contour to your digital output device using a suitable coaxial cable to
connect to the Digital Coaxial connector.
Page 21
19
Using Contour Setup Manager
Introduction
Contour features a Setup Manager. The Setup Manager allows you to change
various Contour settings, such as changing the name of the Contour speaker (see
page 21) and view Contour’s status. You can also use Setup Manager to carry
out a manual firmware update. You can access Contour Setup Manager by using
one of the following methods:
• During stage 2 of the manual network setup (page 12).
• Via Bonjour in Safari web browser (described below).
• By entering the IP address assigned to Contour into the address field of your
browser, consult your router documentation for more information.
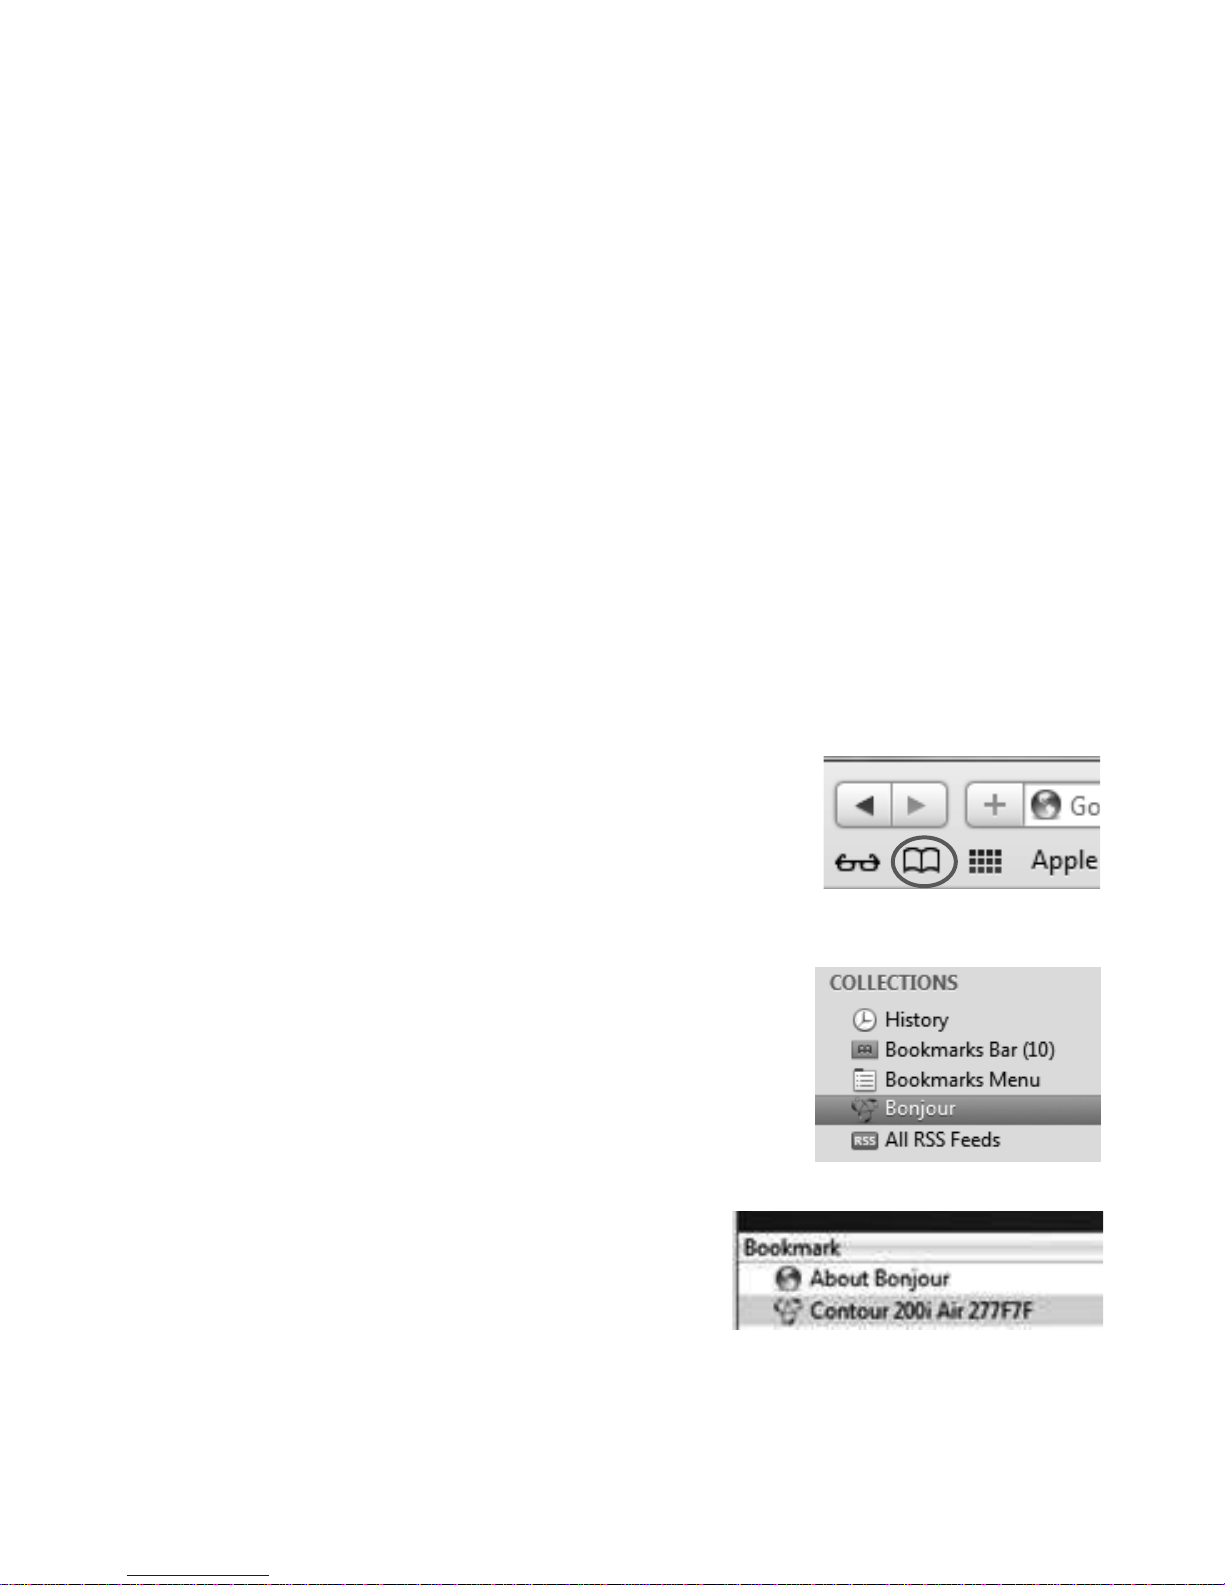
Accessing Contour Setup Manager using Bonjour
After successfully connecting Contour to your network, you can use the following
method to access Contour Setup Manager. You can download Safari from the
Apple website.
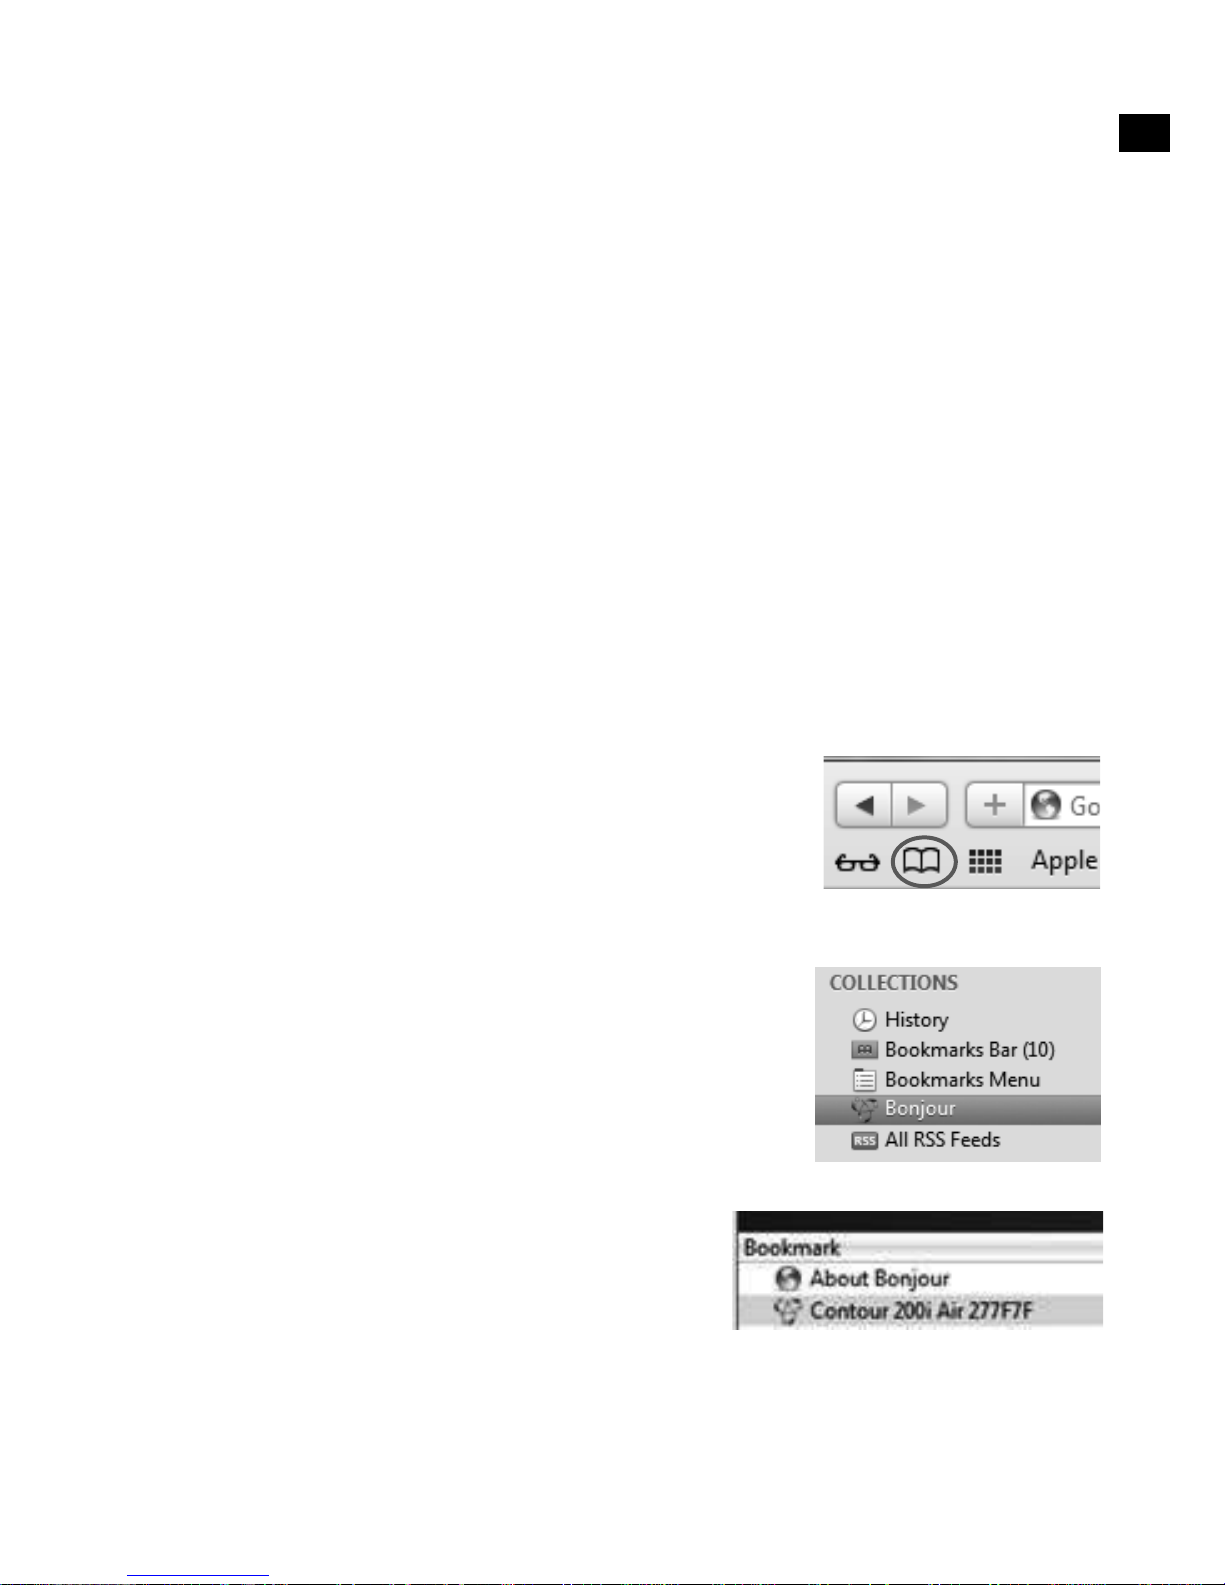
1. Open the Safari web browser.
2. Click the Book symbol in the top left corner to
open the bookmarks panel.
3. Click the Bonjour option from the ‘Collections’
menu on the left side of the screen.
4. Double click your Contour 200i Air from
the menu (underneath the cover flow) to
open Contour Setup Manager.
5. See ‘Using Contour Setup Manager’ on page 19 for more information.
Page 22

20
Menu structure
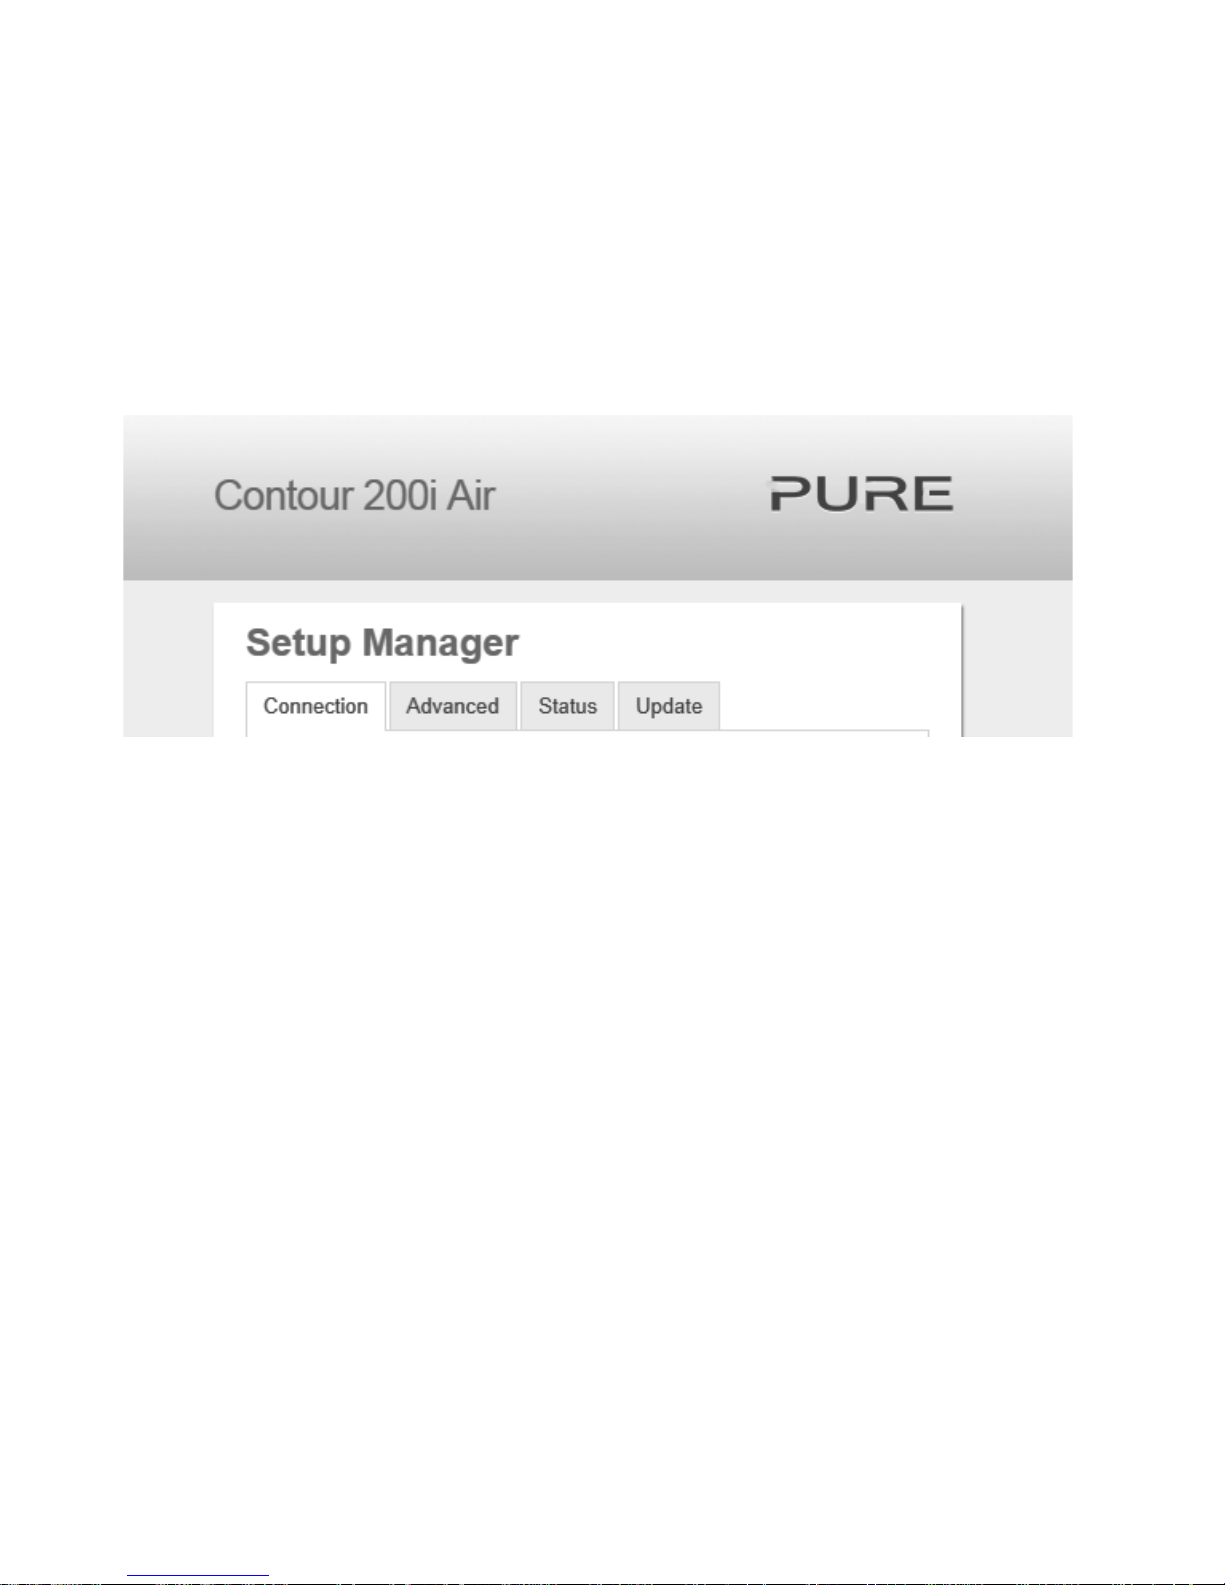
The Contour Setup Manager menus are accessed by clicking tabs at the top
of the window.
If accessing Contour Setup Manager using a PC or Mac four tabs
are visible. If accessing Contour Setup Manager using a mobile device (iPad, iPod,
iPhone), three tabs are visible.
The available tabs are:
Connection The Connection tab is used to configure Contour’s wireless
settings.
Advanced The Advanced tab opens the Manual Network Setup page.
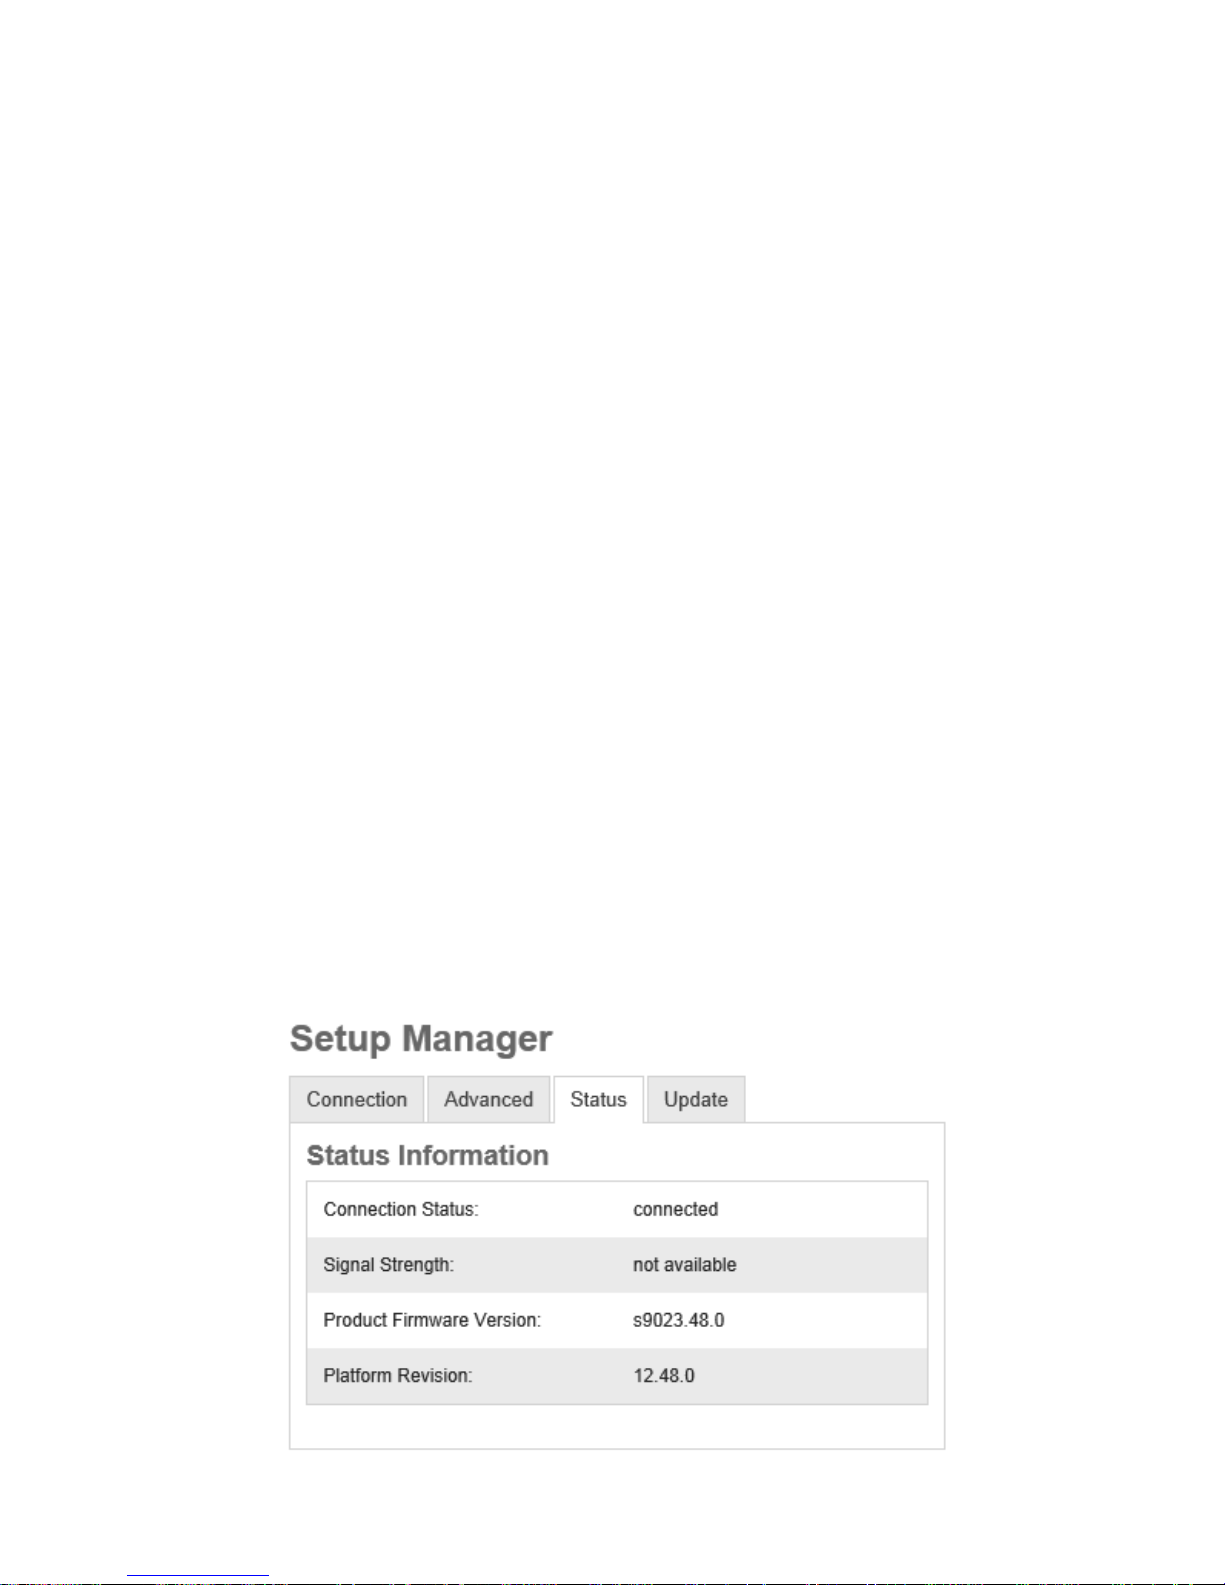
Status
The Status tab opens the Status Information page. This page
displays information about the firmware and the wireless
connection status.
Update
The Update tab opens the Firmware Update page. This page allows
you to update the firmware manually (only visible on a PC or Mac).
Page 23
21
Connection
The Connection tab is divided into two main sections, Product Name and Wireless
Network Setup.
Wireless
Setup
Contour name assignment
If you prefer, you can change the name that your network, iTunes and Apple device
uses for Contour:
1. Type the name (e.g. ‘Living Room’) that you want to assign Contour in the
Product Name box and click Update.
2. Wait for the page to refresh to confirm that the new name has been assigned to
Contour.
Wireless setup
See page 12 for more information on wireless setup.
Product Name
1. Enter the SSID of your router and select the encryption type of your wireless
network from the drop-down list below.
Note: Please check your wireless router configuration to find out the type of
encryption that is being used on your wireless network.
2. Enter the passphrase/key needed to connect to your network in the box below,
if one is required.
3. Click Connect. The Status LED will then flash red to indicate that Contour is
rebooting. When Contour has started up it will enter Sleep mode.
Manual wireless setup
If your wireless network is not broadcasting an SSID, you will need to configure
your wireless settings manually.
Page 24

22
Advanced
The Advanced tab is divided into two main sections, Proxy Server settings and IP
address settings.
Configuring Proxy Server settings
If your network uses a proxy server to connect to the internet, tick the Use Proxy
Server checkbox and enter your proxy server details. Click Connect at the bottom
of the window to save any changes made.
Configuring IP address settings
Contour supports both DHCP (default) and static IP address configuration. To use
DHCP, make sure that the DHCP checkbox is ticked and then click Connect.
To use a static IP address, make sure that the DHCP checkbox is not ticked and
configure the IP address settings in their respective fields. Click Connect to save
any changes made.
Note: Before applying any advanced settings, make sure that you select your
network SSID from the drop-down menu in the Connection tab, without clicking
the Connect button. After applying the settings in Advanced tab, click the
Connect button at the bottom of the Advanced tab to change the network SSID
and the advanced settings simultaneously.
Status
The Status tab displays a summary of Contour’s firmware/hardware information
and also displays information about the state of the wireless connection.
Page 25

23
Update
The Update tab is only visible when you connect to Contour using a PC or Mac.
We recommend using automatic firmware updates for your Contour, which are
delivered via the Wi-Fi connection when Contour is in Standby or Sleep mode. If
the Status LED on Contour is static amber, Contour is checking to see if a new
version of firmware is available or is installing a new version of firmware. A firmware
update takes between six to eight minutes.
If you want to manually carry out a firmware upgrade, click Update. Contact Pure
Technical Support at http://support.pure.com for more information
Note: Do not power off Contour while a firmware update is taking place. The
Status LED will light Amber while a firmware update is taking place.
Note: The controls on Contour and the remote control will not function during an
automatic firmware update.
Note: If you experience any problems with automatic firmware updates, contact
Pure Technical Support at http://support.pure.com.
Page 26

24
Help and specifications
Hints and tips
I cannot connect to my wireless network
Ensure that your Contour is within range of your wireless router and that you are not
located in a dead spot.
The Status LED is flashing white
Your Contour has AirPlay selected as the source but does not currently have a
connection to a network. See ‘Network setup’ on page 8 for more information.
The Status LED is flashing cyan
If the Status LED is flashing cyan, Contour has a firmware error. Contact Pure
technical support for assistance.
The audio and network connection keeps dropping when using Wi-Fi
If using an iPhone, iPod touch or iPad, make sure you’re running the latest version
of iOS. Your Wi-Fi may be congested by other networks on the same or close by
channels. Consult your router documentation or contact Pure support.
Technical specifications
Dock compatibility Supports most iPod, iPhone and iPad models. For the latest
information, check the compatibility table on our website:
www.pure.com/apple-compatibility.
Speakers
2 full-range 3.5" drive units with twin downward firing bass
ports.
Audio output 2 x 18W RMS.
Input connectors 18V DC, 3.61A power adapter socket. iPod/iPhone/iPad
connector. 3.5mm Aux-in for auxiliary devices. Ethernet
socket.
Output connectors Digital coaxial socket for digital audio.
Remote control
Infrared remote control. CR2025 button cell battery
included.
Mains power supply 100-240V, 50/60Hz 18V DC, 3.61A external power adapter.
Dimensions 371mm wide x 229mm high x 190mm deep.
Approvals CE marked. Hereby, Pure, declares that this Band II LPD
device is in compliance with the essential requirements
and other relevant provisions of Directive 1999/5/EC. The
Declaration of Conformity may be consulted at
http://www.pure.com/about/r-tte-doc.
ETSI EN 300 401 compliant.
Australian C-Tick N1600 and Electrical Safety.
Page 27

25
Copyright
Copyright 2015 by Imagination Technologies Limited. All rights reserved. No part of this publication may be copied
or distributed, transmitted, transcribed, stored in a retrieval system, or translated into any human or computer
language, in any form or by any means, electronic, mechanical, magnetic, manual or otherwise, or disclosed to
third parties without the express written permission of Imagination Technologies Limited.
Trademarks
Contour 200i Air, Pure, the Pure logo, Imagination Technologies, and the Imagination Technologies logo are
trademarks or registered trademarks of Imagination Technologies Limited. iPad, iPod , iPod touch, iPhone, iTunes
and AirPlay are trademarks of Apple Inc., registered in the U.S. and other countries.
“Made for iPod”, “Made for iPhone”, and “Made for iPad” mean that an electronic accessory has been designed to
connect specifically to iPod, iPad or iPhone, respectively, and has been certified by the developer to meet Apple
performance standards. Apple is not responsible for the operation of this device or its compliance with safety and
regulatory standards. Please note that the use of this accessory with iPod, iPad or iPhone may affect wireless
performance. All other product names are trademarks of their respective companies. Version 8 November 2015.
Warranty Information
Imagination Technologies Ltd. warrants to the end user that this product will be free from defects in materials and
workmanship in the course of normal use for a period of two years from the date of purchase. This guarantee
covers breakdowns due to manufacturing or design faults; it does not apply in cases such as accidental damage,
however caused, wear and tear, negligence, adjustment, modification or repair not authorised by us. Please visit
www.pure.com/register to register your product with us. Should you have a problem with your unit please contact
your supplier or contact Pure Support at the address shown on the rear of this manual. If you need to return your
product please use the original packaging and include all parts and accessories. We reserve the right to refuse
incomplete or badly packaged returns.
Disclaimer
Imagination Technologies Limited makes no representation or warranties with respect to the content of this document and specifically disclaims any implied warranties of merchantability or fitness for any particular purpose.
Further, Imagination Technologies Limited reserves the right to revise this publication and to make changes in it
from time to time without obligation of Imagination Technologies Limited to notify any person or organization of
such revisions or changes.
Disposal of Waste Electrical & Electronic Equipment
This symbol on the product or on its packaging indicates that this product should not be treated as
household waste. Instead it should be handed over to a suitable collection point for the recycling
of electrical and electronic equipment. By ensuring this product is disposed of correctly, you will
help prevent potential negative consequences for the environment and human health, which could
otherwise be caused by inappropriate waste handling of this product. The recycling of materials will
help to conserve natural resources. For more detailed information about recycling of this product,
please contact your local council office, your household waste disposal service or the shop where you
purchased the product.
Page 28

26
Page 29
Vielen Dank, dass Sie sich für Contour 200i Air entschieden
haben. Mit diesem Handbuch ist das Gerät in kürzester
Zeit betriebsbereit, und es beschreibt Ihnen, wie Sie die
fantastischen Funktionen des Contour 200i Air optimal
nutzen. Wir arbeiten ständig daran, unsere Produkte weiter
zu verbessern und um neue Funktionen zu erweitern. Um
die vielen Erweiterungen zu nutzen, die seit der Auslieferung
Ihres Geräts vorgenommen wurden, besuchen Sie bitte
www.pure.com. Hier können Sie die neueste Version dieses
Benutzerhandbuchs im PDF-Format herunterladen.
ES
FR
IT
DEUTSCH
ES
NL
DA
EN
1
Page 30

Sicherheitsanweisungen
1. Lesen Sie diese Anweisungen. Die Sicherheits- und Bedienungsanweisungen sind zu lesen, bevor
das Gerät in Betrieb genommen wird.
2. Bewahren Sie die Anweisungen auf. Die Sicherheits- und Betriebsanleitungen sind für die spätere
Einsichtnahme aufzubewahren.
3. Beachten Sie die Warnungen. Alle Warnungen am Gerät und in der Bedienungsanweisung sind zu
befolgen.
4. Befolgen Sie alle Anweisungen. Alle Betriebs- und Gebrauchsanweisungen sind zu befolgen.
5. Verwenden Sie dieses Gerät nicht in der Nähe von Wasser – das Gerät sollte nicht in der Nähe
von Wasser oder Feuchtigkeit eingesetzt werden, z. B. in feuchten Kellern, in der Nähe von
Schwimmbecken etc.
6. Reinigen Sie das Gerät nur mit einem trockenen Tuch.
7. Versperren Sie nicht die Lüftungsöffnungen. Installieren Sie das Gerät gemäß den Anweisungen des
Herstellers.
8. Stellen Sie das Gerät nicht in der Nähe von Wärmequellen, z. B. Radiatoren, Heizkörpern, Öfen oder
anderen Apparaten (einschließlich Verstärkern) auf.
9. Zerstören Sie nicht die Sicherheitsfunktion des gepolten oder des Erdungssteckers. Ein polarisierter
Stecker besitzt zwei Messerkontakte, der eine ist breiter als der andere. Ein Erdungsstecker besitzt
zwei Messerkontakte und einen dritten Erdungsstift. Der breite Messerkontakt bzw. der dritte Stift
dient zu Ihrer Sicherheit. Falls der beigefügte Stecker nicht in Ihre Steckdose passt, bitten Sie einen
Elektriker, die veraltete Steckdose zu ersetzen.
10. Verwenden Sie ausschließlich vom Hersteller vorgegebenes Zubehör.
11. Ziehen Sie bei Gewitter oder wenn Sie das Gerät längere Zeit nicht benutzen den Netzstecker aus
der Steckdose.
12. Verweisen Sie Wartungsarbeiten an qualifiziertes Personal. Wartungsarbeiten sind erforderlich, wenn
das Gerät auf irgendeine Weise beschädigt wurde, z. B. wenn Netzkabel oder Netzstecker defekt
sind, Flüssigkeit auf das Gerät verschüttet wurde oder Gegenstände darauf gefallen sind, das Gerät
Regen oder Feuchtigkeit ausgesetzt war, nicht ordnungsgemäß funktioniert oder fallen gelassen
wurde.
13. Installieren Sie dieses Gerät nicht in eng umgrenzten Räumen wie an Bücherregalen, in Wandnischen
oder ähnlichen Stellen. Die Belüftungsschlitze des Geräts dürfen nicht etwa mit Papier, Decken oder
Vorhängen versperrt werden.
14. WARNUNG: Setzen Sie das Gerät nicht Regen oder Feuchtigkeit aus, um das Risiko eines Brandes
oder elektrischen Schlags zu verringern. Der Apparat sollte keinem Spritzwasser ausgesetzt werden.
Mit Wasser gefüllte Gegenstände wie etwa Blumenvasen dürfen nicht auf den Apparat gestellt
werden.
15. WARNUNG: Der direkte Netzadapter dient als Trennvorrichtung. Diese Trennvorrichtung muss immer
betriebsbereit sein.
16. WARNUNG: Die Batterien der Fernbedienung dürfen nicht extremer Hitze wie direkter
Sonneneinstrahlung, Feuer oder ähnlichen Einflüssen ausgesetzt werden.
17. Bei diesem Gerät handelt es sich um ein eigensicheres, schutzisoliertes Elektrogerät. Es wurde so
entwickelt, dass eine Sicherheitsverbindung zur elektrischen Masse nicht erforderlich ist.
18. Zwischen der Antenne des Produkts und Personen muss ein Mindestabstand von 20 cm eingehalten
werden.
19. Das Etikett zu den Strom-Kenndaten ist an der Rückseite des Geräts angebracht.
2
Page 31

Inhalt
4 Erste Schritte
4 Einführung
4 Pure Connect App
5 Fernbedienung
6 Schalter und Anschlüsse vorn und oben
6 Bedienfeld Status-LED
7 Schalter und Anschlüsse auf der Rückseite
8 Wechsel zwischen Sleep, Standby-Betrieb und Wiedergabe
8 Netzwerkeinrichtung
9 Vorbereiten des Contour zum Anschluss an ein Drahtlosnetzwerk
13 Vorbereiten des Contour zum Anschluss an ein Ethernet-
Netzwerk
14 Verwendung von AirPlay zum Abspielen von Audio
14 Auswahl von AirPlay als Quelle
14 Abspielen von Audio von einem iPod Touch, iPhone oder iPad
15 Abspielen von Audio von iTunes
15 Zurücksenden von Befehlen an iTunes vom Contour aus zulassen
16 Audio-Streaming in mehrere Räume
17 Anhören von einem angedockten iPod/iPhone/iPad
17 Kompatibilität
17 Andocken des Geräts
17 Auswählen des Dock
17 Kontrolle über das Gerät
18 Verwendung des Zusatzeingangs
18 Verwenden des digitalen Ausgangs
19 Verwendung des Contour Setup Managers
21 Contour Namenszuordnung
24 Hilfe und Spezifikationen
DE
3
Page 32
Erste Schritte
Einführung
Contour 200i Air kann auf viele verschiedene Arten verwendet werden:
• Als AirPlay-Gerät zur Wiedergabe von Audio von iTunes auf Ihrem Computer oder
einem iPod Touch, iPhone oder iPad mit AirPlay — über Ihr Drahtlosnetzwerk.
Siehe ‘Netzwerkeinrichtung’ auf Seite 8.
• Als Dockingstation für ein iPod, iPhone oder iPad. Siehe Seite 17.
• Als Lautsprecher für ein am Zusatzeingang angeschlossenes Audiogerät.
Siehe Seite 18.
Anmerkung: Contour 200i Air wird im weiteren Verlauf dieses Handbuchs als
Contour bezeichnet.
Pure Connect App
Nutzen Sie die Hi-Fi-Audioqualität des Contour optimal, indem Sie die kostenlose Pure
Connect App auf Ihrem iPod Touch oder iPhone installieren. Die Pure Connect App bietet Ihnen
kostenlosen Zugang zu Tausenden von Internet-Radiosendern, On-Demand-Inhalten (Podcasts
und Listen-Again-Programmen) und Geräuschkulissen.
iOS Pure Connect App
4
Page 33
Standby
Drücken Sie diese Taste, um zwischen Sleep,
Standby und On umzuschalten. Siehe Seite 8.
Source Drücken Sie diese Taste, um zwischen AirPlay,
Dock und Zusatzeingang umzuschalten.
Titel-Wiedergabereihenfolge mischen (wenn
AirPlay/Dock die Eingangsquelle ist).
Umschalten, um den aktuellen Titel, alle Titel
oder keine Titel zu wiederholen (wenn AirPlay/
Dock die Eingangsquelle ist).
Vol
Menu Drücken Sie diese Taste, um auf das Menü
an einem angedockten iPod oder iPhone
zuzugreifen. Mit dieser Taste wird auch in den
Menüs zurückgeblättert.
Select
Text & Symbols
Mirror Finish
Auswahl von Titeln und Menüoptionen auf Ihrem
iPod/iPhone (nur wenn Dock die Eingangsquelle
ist).
und
Überspringen zum Anfang des aktuellen Titels
oder zum vorigen/nächsten Titel. Halten Sie die
Taste zum schnellen Vor- oder Zurückspulen
gedrückt (nur wenn Dock als Eingangsquelle
verwendet wird).
Wiedergabe/Pause des aktuellen Tracks (wenn
AirPlay/Dock als Eingangsquelle verwendet wird).
Lautstärke plus/minus
+
-
Fernbedienung
Ziehen Sie den Plastikstreifen vom
Batteriefach der Fernbedienung ab
und ziehen Sie die Schutzfolie von den
Fernbedienungstasten ab.
DE
5
Page 34

Standby
Drücken Sie diese
Taste, um zwischen
Sleep, Standby und
On umzuschalten.
Siehe Seite 8.
Stummschalten
Lautstärkeregelung (leiser)
Lautstärkeregelung
(lauter)
StatusLED
Siehe Seite
6.
Schalter und Anschlüsse vorn und oben
Bedienfeld Status-LED
Beim Einschalten des Contour ist die Status-LED durch das vordere Lautsprechergitter
erkennbar. Die Status-LED wird auch zum Anzeigen des Status des Contour nach Farbe
verwendet.
Rot Standby (hell) / Start (blinkt hell) / Sleep (gedämpft)
Blau iPod/iPhone/iPad-Dock ist aktiv (Blinken bedeutet, dass die Verbindung zum
angedockten Produkt vorbereitet wird und dass eine Fernaktivität erfolgt)
Weiß AirPlay ist aktiv (schnelles Blinken weist auf Fernaktivitäten hin, langsames
Blinken auf Netzwerk-Verbindungsprobleme)
Rosa Zusatzeingang ist aktiv (schnelles Blinken weist auf Fernaktivität hin)
Blau/Grün (Abwechselndes Blinken) Vorübergehende Einrichtung des
Drahtlosnetzwerks
Cyan Blinken weist auf einen Firmware-Fehler hin
Gelb Firmware aktualisieren
Anmerkung: Als schnelle Referenz finden Sie am Boden des Contour einen Aufkleber mit
den wichtigsten LED-Statusangaben.
6
Page 35
Schalter und Anschlüsse auf der Rückseite
DC In
(Gleichstromeingang)
Anschluss für das
mitgelieferte Netzteil.
Aux In
Anschluss für
den analogen
Stereoeingang, für
MP3-Player und
ähnliche Geräte
Siehe Seite 18.
Ethernet
Anschluss für
Netzwerkkabel.
Als Alternative zur
WLAN-Einrichtung
verwenden
Siehe Seite 13.
Digital Coaxial
(Digital Koaxial)
Anschluss
für Ausgang
des digitalen
Audiosignals
Siehe Seite 18.
Wi-Fi Setup
(WLAN-Einrichtung)
Taste wird beim
Einrichten eines
Drahtlosnetzwerks
verwendet.
Siehe Seite 11.
Firmware-
Update
Status-LED
*
*Diagnose-LED zur Verwendung durch den technischen Support von Pure
DE
7
Page 36

Wechsel zwischen Sleep, Standby-Betrieb und Wiedergabe
Contour kennt drei Betriebsmodi: Standby, Sleep und On. Im Standby-Betrieb benötigt
Contour nur sehr wenig Strom (die Status-LED leuchtet rot). Im Sleep-Modus, bleibt
Contour mit dem Drahtlosnetzwerk verbunden und wartet auf die Auswahl eines Eingangs
(die Status-LED leuchtet gedämpft rot).
Zum Aktivieren des Sleep-Modus drücken Sie auf Standby. Contour geht nach 15 Minuten
automatisch in den Sleep-Modus, wenn es keine Audiodaten von AirPlay oder von einem
angedockten iPod/iPhone/iPad erhält.
Sobald es im Sleep-Modus ist, drücken Sie zum Einschalten Standby.
Zum Aufrufen des Standby-Modus halten Sie die Taste Standby am Contour oder an der
Fernbedienung vier Sekunden lang gedrückt, bis die Status-LED hell und rot leuchtet.
Drücken Sie Standby, um direkt in den Betriebsmodus zu wechseln. Contour blinkt ca.
30 Sekunden lang rot, pausiert dann und kehrt in den zuvor aktiven Status zurück.
Netzwerkeinrichtung
Contour kann über eine drahtlose oder kabelgebundene Verbindung an Ihr Netzwerk
angeschlossen werden.
Wir empfehlen die Verwendung der drahtlosen Methode, da Ihr Contour somit überall in
Reichweite des WLAN aufgestellt werden kann. Contour kann über WLAN Login Sharing
oder manuell an Ihr Drahtlosnetzwerk angeschlossen werden. Weitere Informationen siehe
Seite 9.
Zur Verwendung der kabelgebundenen Methode schließen Sie ein Ethernet-Kabel zwischen
dem Ethernet-Port an der Rückseite des Contour und einem der verfügbaren Ethernet-Ports
an Ihrem Router an. Diese Methode kann hilfreich sein, wenn Probleme mit der Tonqualität
auftreten oder Ihr Contour sich in der Nähe des Routers befindet. Weitere Informationen
siehe Seite 13.
8
Page 37

1. Positionieren Sie den Contour in
Reichweite Ihres Drahtlosnetzwerks.
2.
Stecken Sie den Stecker des
Netzteils in den Anschluss auf der
Rückseite des Contour.
3.
Schließen Sie das Kabel an einer
Netzsteckdose an.
4.
Wenn die rote Status-LED an der
Vorderseite nicht mehr blinkt, ist der Contour im Sleep-Modus.
5.
Auf Seite 10 finden Sie Informationen zum Einrichten einer Drahtlosverbindung
über WLAN Login Sharing. Siehe Seite 11, wenn Sie Ihr Drahtlosnetzwerk manuell
einrichten wollen.
18V DC
Vorbereiten des Contour zum
Anschluss an ein Drahtlosnetzwerk
Einführung
Contour kann über zwei verschiedenen Methoden an Ihr Drahtlosnetzwerk angeschlossen
werden. Wir empfehlen die Verwendung des WLAN Login Sharing; damit wird Contour
automatisch mit den WLAN-Einstellungen Ihres iPod, iPhone oder iPad* mit Ihrem
Drahtlosnetzwerk verbunden. Alternativ dazu können Sie Contour auch manuell mit Ihrem
Drahtlosnetzwerk verbinden. Bevor Sie sich für eine drahtlose Verbindungsmethode
entscheiden, müssen Sie Contour für die drahtlose Verbindung einrichten.
Vorbereiten des Contour für die drahtlose Verbindung
Typische Dahtlos-Einrichtung
*Zur Verwendung von WLAN Login Sharing mit Ihrem iPod Touch, iPhone oder iPad benötigen Sie iOS Version 5.0
oder höher.
DE
9
Page 38

Anschließen des Contour an ein Drahtlosnetzwerk über WLAN
Login Sharing
So schließen Sie Contour an Ihr Drahtlosnetzwerk an:
1. Docken Sie Ihr freigegebenes Apple-Gerät (iPod Touch, iPhone oder iPad) an und
warten Sie ein paar Sekunden, während das Apple-Gerät eine Authentifizierung
durchführt. Die Status-LED blinkt blau, und das Apple-Gerät beginnt mit der Freigabe.
2. Wenn die Status-LED nicht mehr blau blinkt, drücken Sie die WLAN-Verbindungstaste
an der Rückseite des Contour.
3. Auf der Anzeige Ihres iPod/iPhone/iPad erscheint die Frage, ob Sie Ihre WLANEinstellungen freigeben wollen.
4. Tippen Sie auf Allow (Zulassen).
5. Ihr Contour ist jetzt bereit für die Verbindung mit Ihrem Netzwerk.
Anmerkung: Stellen Sie sicher, dass Contour über Network Login Sharing eine
Verbindung mit Ihrem Netzwerk aufgebaut hat, indem Sie prüfen, ob die Status-LED im
AirPlay-Modus stetig leuchtet. Weitere Informationen siehe ‘Bedienfeld Status-LED’ auf
Seite 6.
10
Page 39

Manuelle Verbindung Ihres Contour mit Ihrem Drahtlosnetzwerk
Stufe 1: Anschließen des Einrichtungsgeräts an den Contour
In der ersten Einrichtungsstufe müssen Sie eine temporäre Verbindung zwischen dem
Einrichtungsgerät und dem Contour einrichten. Hierzu müssen Sie ein temporäres
Drahtlosnetzwerk erstellen, um Contour mit Ihrem iPod Touch, iPhone, iPad oder Laptop
zu verbinden.
Anschließen mit Hilfe eines temporären Drahtlosnetzwerks
1. Stellen Sie sicher, dass der Contour im Sleep-Modus oder eingeschaltet ist.
2. Drücken Sie die Taste Wi-Fi Setup (WLAN-Einrichtung) an der Rückseite des Contour
fünf Sekunden lang. Dadurch wird das temporäre Drahtlosnetzwerk des Contour
eingeschaltet. Die Status-LED blinkt rot, während das temporäre Drahtlosnetzwerk
gestartet wird.
20 secs
Nach ca. zwanzig Sekunden blinkt die Status-LED grün und blau.
20 secs
3. An Ihrem Einrichtungsgerät (iPhone, Laptop etc.) sollte das Contour 200i Air ******
Drahtlosnetzwerk jetzt sichtbar sein. Wählen Sie dieses Netzwerk aus. Es wird kein
Kennwort benötigt.
4. Sobald Sie eine Verbindung zum Contour 200i Air ****** Drahtlosnetzwerk hergestellt
haben, können Sie im Web-Browser Ihres Einrichtungsgeräts auf den Contour Setup
Manager zugreifen. Verwenden Sie den Contour Setup Manager, um den Contour Ihrem
eigenen Drahtlosnetzwerk hinzuzufügen.
Anmerkung: ****** steht für einen für jeden Contour eindeutigen sechsstelligen Code,
der den letzten sechs Stellen der MAC-Adresse des Contour entspricht. Sie finden die
MAC-Adresse auf dem Etikett an der Unterseite des Contour.
DE
11
Page 40
Stufe 2: Aufrufen des Contour Setup Managers
Nachdem Sie eine temporäre Verbindung zwischen Ihrem Einrichtungsgerät und Contour
eingerichtet haben, können Sie den Contour Setup Manager wie folgt aufrufen:
1. Starten Sie auf Ihrem Einrichtungsgerät den Web-Browser (z. B. Safari, Google Chrome,
Microsoft Internet Explorer, Mozilla Firefox).
2. Geben Sie die folgende Adresse ein:
http://192.168.1.12
3. Der Contour Setup Manager wird angezeigt:
4. Klicken Sie auf die Registerkarte Connection (Verbindung).
Stufe 3: Contour dem Drahtlosnetzwerk hinzufügen
Contour scannt automatisch nach verfügbaren Netzwerken. Wenn die Automatik-Option
nicht funktioniert, schlagen Sie unter ‘Manuelle Verbindung Ihres Contour mit Ihrem
Drahtlosnetzwerk’ auf Seite 11 nach, wie Sie Contour Ihrem Drahtlosnetzwerk manuell
hinzufügen können:
1. Wählen Sie den Namen Ihres eigenen Drahtlosnetzwerks in der Dropdown-Liste
Network (Netzwerk) aus. Die Kodierungsmethode wird automatisch erkannt.
2. Falls erforderlich, geben Sie den von Ihrem Netzwerk verwendeten Sicherheitsschlüssel
ein.
3. Klicken Sie auf Connect (verbinden). Die Status-LED blinkt daraufhin rot, um darauf
hinzuweisen, dass Contour neu startet. Contour geht in den Sleep-Modus, und die
Status-LED leuchtet gedämpft rot.
4.
Contour ist jetzt für die Verwendung mit einer Drahtlosverbindung bereit. Siehe Seite 14.
Anmerkung: Am besten nehmen Sie mit Ihrer IT-Abteilung Kontakt auf, bevor Sie
versuchen, Ihr Contour mit einem Unternehmens-Drahtlosnetzwerk zu verbinden.
12
Page 41

Vorbereiten des Contour zum
Anschluss an ein Ethernet-Netzwerk
1. Schließen Sie ein EthernetKabel vom Ethernet-Port an der
Rückseite des Contour an Ihrem
Router an.
2.
Stecken Sie den Stecker
des Netzteils in den
Gleichstromeingang auf der
Rückseite des Contour.
3.
Schließen Sie das Kabel an
einer Netzsteckdose an.
4.
Daraufhin wird eine Verbindung zwischen Ihrem Router und dem Contour eingerichtet.
Wenn die rote Status-LED an der Vorderseite nicht mehr blinkt, ist der Contour im SleepModus.
5.
Contour ist jetzt bereit zum Streamen von Musik mit AirPlay über eine Kabelverbindung.
18V DC
Typische Ethernet-Einrichtung
DE
13
Page 42

Abspielen von Audio von einem iPod Touch,
iPhone oder iPad
Vergewissern Sie sich an Ihrem iPod Touch, iPhone oder iPad,
dass Sie eine Verbindung zum gleichen Drahtlosnetzwerk wie
Contour haben. Es sollte möglich sein, Ihr Contour in der Liste
der AirPlay-Geräte auszuwählen.
Anmerkung: Der dem Contour zugeordnete
Standardname besteht aus dem Wort ‘Contour’, gefolgt
von einem sechsstelligen Code. Dieser sechsstellige Code besteht aus den letzten sechs
Ziffern der MAC-Adresse des Contour; Sie finden diese Adresse auf dem Etikett an der
Unterseite des Contour.
An Ihrem iPod Touch, iPhone oder iPad wird das AirPlaySymbol weiß angezeigt, wenn ein AirPlay-Geräte am
Netzwerk verfügbar ist. Das AirPlay-Symbol erscheint
blau, wenn der iPod Touch oder iPhone Contour als
Lautsprecher-Zubehör nutzt.
Wählen Sie den Titel aus, den Sie abspielen wollen. Wenn
Contour im Sleep-Modus ist, wacht er auf und schaltet die
Quelle auf AirPlay um. Die Status-LED wechselt zu weiß,
wenn AirPlay aktiv ist.
Verwendung von AirPlay zum
Abspielen von Audio
Auswahl von AirPlay als Quelle
Drücken Sie Source (Quelle) an der Fernbedienung, bis die Status-LED weiß leuchtet. Wenn
die Status-LED stetig weiß leuchtet, wurde AirPlay erfolgreich eingerichtet (dies kann bis zu
einer Minute dauern). Wenn die Status-LED nach einer Minute noch immer weiß blinkt, liegt
ein Problem mit der Netzwerkverbindung des Contour vor.
Anmerkung: Siehe ‘Tipps und Tricks’ auf Seite 24, um Hilfe zur Fehlerbehebung mit dem
Contour zu erhalten Netzwerkverbindungsprobleme.
14
Page 43

Abspielen von Audio von iTunes
Sobald Sie Contour erfolgreich mit dem gleichen Netzwerk wie Ihren iTunes-Computer,
iPod Touch, iPhone oder iPad verbunden haben, sollte er automatisch erkannt werden. So
wählen Sie Contour als AirPlay-Gerät in iTunes aus:
1.
Öffnen Sie iTunes.
2. Klicken Sie auf das AirPlay-Symbol und wählen Sie Ihren Contour in der AirPlayListe am unteren Rand des Bildschirms aus.
3. Wählen Sie den Titel aus, den Sie
abspielen wollen. Wenn Contour
im Sleep-Modus ist, wacht er auf
und schaltet die Quelle auf Airplay
um. Das AirPlay-Symbol erscheint
blau, wenn iTunes Contour als
Lautsprecher-Zubehör nutzt.
4. Die Status-LED am Contour
wechselt zu weiß, um darauf
hinzuweisen, dass AirPlay aktiv ist.
Zurücksenden von Befehlen an iTunes vom Contour aus zulassen
Wenn Sie Befehle wie z. B. Wiedergabe/Pause vom Contour an iTunes zurücksenden
wollen, müssen Sie diese Option in iTunes aktivieren.
Für Windows-Systeme:
1. Klicken Sie auf Edit (Bearbeiten).
2.
Klicken Sie auf Preferences (Einstellungen).
3.
Wählen Sie das Register Devices (Gerät) aus.
4.
Markieren Sie Allow iTunes audio control from remote speakers
(iTunes-Audiosteuerung von externen Lautsprechern zulassen).
Für Apple Mac-Systeme:
1. Klicken Sie auf iTunes.
2.
Klicken Sie auf Preferences (Einstellungen).
3.
Wählen Sie das Register Devices (Gerät) aus.
4.
Markieren Sie Allow iTunes audio control from remote speakers
(iTunes-Audiosteuerung von externen Lautsprechern zulassen).
DE
15
Page 44

Audio-Streaming in mehrere Räume
Wenn Sie mehr als einen Contour haben, können Sie mit AirPlay die gleichen Audiodaten auf alle
Contour-Geräte streamen. Sie können dies über iTunes auf Ihrem Computer einrichten. Wenn Sie
AirPlay so aktivieren wollen, dass die gleichen Audiodaten auf jedem Contour gestreamt werden,
klicken Sie auf das AirPlay-Symbol und wählen Sie die Option Multiple Speakers (mehrere
Lautsprecher) aus.
Sie können alle Funktionen in iTunes steuern, wenn Sie die Apple Remote App auf Ihrem iPod,
iPhone oder iPad installieren. Nach der Installation können Sie Ihren iPod, Ihr iPhone oder iPad
als Fernbedienung für iTunes verwenden. Die Apple Remote App kann vom Apple App Store
heruntergeladen werden. Weitere Informationen hierzu finden Sie auf der Apple-Website.
16
Page 45

Anhören von einem angedockten
iPod/iPhone/iPad
Kompatibilität
Das Dock am Contour ist kompatibel mit den meisten iPod-, iPhone- und iPad-Modellen.
Aktuelle Informationen finden Sie in der Kompatibilitätstabelle auf unserer Website:
www.pure.com/products/ipod-compatibility.
Andocken des Geräts
Docken Sie das Gerät an den Anschluss an.
Der Ladevorgang beginnt, sobald das Gerät angedockt ist, und er wird auch während der
Wiedergabe, im Standby- oder im Sleep-Modus fortgesetzt.
Auswählen des Dock
Drücken Sie Source (Quelle), bis die Status-LED blau leuchtet.
Kontrolle über das Gerät
Bei Auswahl der iPod-Quelle beginnt Ihr Gerät mit dem Abspielen des zuletzt abgespielten
Tracks. Verwenden Sie die Fernbedienung oder die Bedienelemente an Ihrem Gerät zum
Navigieren in Menüs und zum Steuern der Wiedergabe.
DE
17
Page 46

Verwendung des Zusatzeingangs
Externes Gerät anschließen
Verbinden Sie über ein geeignetes Kabel die Buchse Line-Out oder Kopfhörer Ihres
Zusatzgeräts mit dem Zusatzeingang an Ihrem Contour.
Zusatzeingang auswählen
Drücken Sie Source (Quelle), bis die Status-LED pink leuchtet.
Verwenden des digitalen Ausgangs
Verwenden eines externen digitalen Ausgangsgeräts
Sie können Contour an ein digitales Ausgangsgerät wie z. B. ein kompatibles Hi-FiSystem anschließen. Über das Contour abgespielte Audiodaten werden auch an das
angeschlossene Gerät und Ihre AirPlay-Quelle gesendet.
Anmerkung: Die Lautstärkeregelung am Contour hat keinen Einfluss auf die Lautstärke an
dem Digitalgerät.
Anschließen eines externen digitalen Ausgangsgeräts
Schließen Sie den Contour mit einem geeigneten Koaxialkabel an Ihrem digitalen
Ausgangsgerät an.
18
Page 47
Verwendung des Contour Setup
Managers
Einführung
Contour ist mit einem Setup Manager ausgestattet. Der Setup Manager ermöglicht die
Änderung verschiedener Contour-Einstellungen, wie z. B. die Änderung des Namens des
Contour-Lautsprechers (siehe Seite 21) und die Anzeige des Contour-Status. Sie können
mit dem Setup Manager auch ein manuelles Firmware-Update durchführen. Sie können über
eine der folgenden Methoden auf den Contour Setup Manager zugreifen:
• Während Phase 2 der manuellen Netzwerkeinrichtung (Seite 12).
• Über Bonjour im Safari Webbrowser (siehe folgende Beschreibung).
• Durch die Eingabe der Contour zugeordneten IP-Adresse in das Adressfeld Ihres
Browsers; schlagen Sie hierzu weitere Informationen in der Dokumentation Ihres
Browsers nach.
Aufrufen des Contour Setup Managers über Bonjour
Nach dem erfolgreichen Verbindungsaufbau zwischen Contour und Ihrem Netzwerk können
Sie auf die folgende Weise den Contour Setup Manager aufrufen. Sie können Safari von der
Apple-Website herunterladen.
1. Öffnen Sie den Safari Webbrowser.
2. Klicken Sie auf das Buchsymbol in der linken oberen
Ecke, um das Lesezeichen-Feld zu öffnen.
3. Klicken Sie auf die Bonjour-Option im Menü
‘Sammlungen’ auf der linken Seite des Bildschirms.
4. Doppelklicken Sie auf Ihr Contour 200i Air vom
Menü aus (unter der Abdeckung), um den
Contour Setup Manager zu öffnen.
5. Weitere Informationen siehe ‘Verwendung des Contour Setup Managers’ auf Seite 19.
DE
19
Page 48
Menüstruktur
Die Menüs des Contour Setup Managers werden durch Klicken auf Registerkarten
oben im Fenster aufgerufen.
Wenn Sie den Contour Setup Manager mit einem PC oder
Mac aufrufen, stehen vier Register zur Verfügung. Wenn Sie den Contour Setup Manager
über ein Mobilgerät (Android-Telefon, iPad, iPod, iPhone) aufrufen, stehen drei Register zur
Verfügung.
Folgende Registerkarten sind verfügbar:
Connection Die Registerkarte Connection (Verbindung) wird zur Konfiguration der
Contour Drahtlos-Einstellungen verwendet.
Advanced Mit der Registerkarte Advanced (Erweitert) wird die Seite Manual Network
Setup (manuelle Netzwerkeinrichtung) geöffnet.
Status
Über die Registerkarte Status wird die Status-Informationsseite geöffnet.
Diese Seite zeigt Informationen über die Firmware sowie den DrahtlosVerbindungsstatus an.
Update
Über die Registerkarte Update wird die Seite Firmware Update geöffnet.
Diese Seite ermöglicht die manuelle Aktualisierung der Firmware (nur auf
einem PC oder Mac sichtbar).
20
Page 49

Connection
Die Registerkarte Connection (Verbindung) ist in die beiden Hauptabschnitte Product Name
(Produktname) und Wireless Network Setup (Einstellungen Drahtlosnetzwerk ) gegliedert.
Einstellungen
Drahtlosnetzwerk
Contour Namenszuordnung
Wenn Sie wollen, können Sie den Namen ändern, den Ihr Netzwerk, iTunes und AppleGeräte für den Contour verwenden:
1. Geben Sie den Namen (z. B. ‘Wohnzimmer’), den Sie dem Contour zuordnen wollen, im
Feld Product Name (Produktname) ein und klicken Sie auf Update (Aktualisierung).
2. Warten Sie, bis die Seite aktualisiert wird, und überprüfen Sie, ob der neue Name dem
Contour zugeordnet wurde.
Einstellungen Drahtlosnetzwerk
Informationen zur Einrichtung des Drahtlosnetzwerks finden Sie auf Seite 12.
Produktname
1. Geben Sie die SSID Ihres Routers ein und wählen Sie den Verschlüsselungstyp Ihres
Drahtlosnetzwerks in der Verschlüsselungs-Dropdown-Liste unten aus.
Anmerkung: Überprüfen Sie die Konfiguration Ihres Drahtlos-Routers, um festzustellen,
welcher Kodierungstyp in Ihrem Drahtlosnetzwerk verwendet wird.
2. Geben Sie die Passphrase / den Schlüssel für die Verbindung zu Ihrem Netzwerk, sofern
erforderlich, in dem Feld unten ein.
3. Klicken Sie auf Connect (verbinden). Die Status-LED blinkt daraufhin rot, um darauf
hinzuweisen, dass Contour neu startet. Nach dem Neustart geht Contour in den
Sleep-Modus.
Manuelle Einstellungen der Drahtlosnetzwerks
Wenn Ihr Drahtlosnetzwerk keine Übertragung über SSID durchführt, müssen Sie Ihre
Einstellungen manuell konfigurieren.
DE
21
Page 50
Advanced
Die Registerkarte Advanced (erweitert) ist in zwei Abschnitte gegliedert, Proxy Server
Settings (Proxyserver-Einstellungen) und IP Address Settings (IT-Adresseinstellungen).
Proxy Server Settings konfigurieren
Wenn Ihr Netzwerk einen Proxyserver für die Verbindung zum Internet verwendet, markieren
Sie das Kontrollkästchen Use Proxy Server (Proxyserver verwenden) und geben Sie
die Details Ihres Proxyservers ein. Klicken Sie auf Connect unten im Fenster, um die
vorgenommenen Änderungen zu speichern.
Konfigurieren der IP-Adresseinstellungen
Contour unterstützt die DHCP (Standard) wie auch die Konfiguration statischer IP-Adressen.
Vergewissern Sie sich bei der Verwendung von DHCP, dass das Kontrollkästchen DHCP
markiert ist, und klicken Sie anschließend auf Connect (verbinden). Vergewissern Sie sich bei
der Verwendung einer statischen IP-Adresse, dass das Kontrollkästchen DHCP nicht markiert
ist, und konfigurieren Sie die IP-Adresseinstellungen in den entsprechenden Feldern. Klicken
Sie auf Connect (verbinden), um alle vorgenommenen Änderungen zu speichern.
Anmerkung: Bevor Sie erweiterte Einstellungen anwenden, vergewissern Sie sich, dass Sie
Ihre Netzwerk-SSID im Dropdown-Menü im Register Connection (Verbindung) auswählen, ohne
auf die Schaltfläche Connect (verbinden) zu klicken. Nach dem Anwenden der Einstellungen
im Register Advanced (erweitert) klicken Sie auf die Schaltfläche Connect unten im Register
Advanced, um die Netzwerk-SSID und die erweiterten Einstellungen gleichzeitig zu ändern.
Status
Die Registerkarte Status zeigt zusammenfassende Informationen zur Firmware/Hardware
des Contour an sowie Informationen zum Status der Drahtlosverbindung.
22
Page 51

Update
Das Register Update (Aktualisierung) ist nur sichtbar, wenn Sie eine Verbindung zu Contour
mit einem PC oder Mac herstellen. Wir empfehlen die Verwendung automatischer FirmwareUpdates für Ihr Contour. Diese Updates werden über die WLAN-Verbindung bereitgestellt,
wenn Contour im Standby- oder Sleep-Modus ist. Wenn die Status-LED an Contour gelb
leuchtet, prüft Contour, ob eine neue Version der Firmware verfügbar ist, oder es wird eine
neue Version der Firmware installiert. Ein Firmware-Update dauert zwischen sechs und zehn
Minuten.
Wenn Sie manuell ein Firmware-Upgrade durchführen wollen, klicken Sie auf Aktualisieren.
Weitere Informationen hierzu erhalten Sie vom technischen Support von Pure unter
http://support.pure.com
Anmerkung: Schalten Sie Contour nicht aus, während ein Firmware-Update durchgeführt
wird. Die Status-LED leuchtet gelb, während ein Firmware-Update durchgeführt wird.
Anmerkung: Die Bedienelemente am Contour und die Fernbedienung funktionieren
während eines automatischen Firmware-Updates nicht.
Anmerkung: Wenn Probleme mit automatischen Firmware-Updates auftreten, wenden Sie
sich an den technischen Support von Pure unter http://support.pure.com.
DE
23
Page 52

Hilfe und Spezifikationen
Tipps und Tricks
Ich kann keine Verbindung zu meinem Drahtlosnetzwerk herstellen.
Vergewissern Sie sich, dass Ihr Contour innerhalb der Reichweite Ihres Drahtlos-Routers
liegt und nicht in einem "weißen Fleck".
Die Status-LED blinkt weiß.
Ihr Contour hat AirPlay als Quelle ausgewählt, verfügt jedoch momentan nicht über
eine Verbindung zu einem Netzwerk. Weitere Informationen siehe ‘Netzwerkeinrichtung’ auf
Seite 8.
Die Status-LED blinkt cyanfarben.
Wenn die Status-LED cyanfarben blinkt, weist Contour einen Firmware-Fehler auf. Wenden
Sie sich an den technischen Support von Pure.
Die Audio- und Netzwerkverbindung fällt bei Verwendung einer
WLAN-Verbindung ständig aus.
Vergewissern Sie sich bei Verwendung eines iPhone, iPod Touch oder iPad, dass Sie mit der
neuesten Version von iOS arbeiten. Wenn Sie ein Android-Telefon verwenden, empfehlen wir,
Android Version 2.2 oder höher zu verwenden. Ihr WLAN ist möglicherweise durch andere
Netzwerk am gleichen Kanal oder an benachbarten Kanälen verstopft. Schlagen Sie in der
Dokumentation zu Ihrem Router nach oder wenden Sie sich an den Pure Support.
Technische Daten
Dock-Kompatibilität Unterstützt die meisten iPod-, iPhone- und iPad-Modelle. Aktuelle
Informationen finden Sie in der Kompatibilitätstabelle auf unserer
Website: www.pure.com/apple-compatibility.
Lautsprecher
2 Vollbereichslautsprecher 3,5” mit nach unten gerichteten Doppel-Bass-
Ports.
Audioausgang 2 x 18 W RMS.
Eingänge 18 V DC, 3,61 A DC Netzanschluss. iPod/iPhone/iPad-
Anschluss.
3,5-mm-AUX-Eingangsbuchse für Zusatzgeräte. Ethernet-
Buchse.
Ausgänge: Digital-Koaxialbuchse für Digital-Audio.
Fernbedienung Infrarot-Fernbedienung CR2025-Knopfbatterie im
Lieferumfang
enthalten.
Stromversorgung 100-240 V, 50/60 Hz 18 V DC, 3,61 A externer Netzadapter.
Abmessungen 371 mm Breite x 229 mm Höhe x 190 mm Tiefe.
Zulassungen CE-Zeichen. Pure erklärt hiermit, dass dieses Band-II-LPD-Gerät die
wesentlichen Anforderungen und anderen relevanten Bestimmungen
der Richtlinie 1999/5/EG erfüllt. Die Konformitätserklärung ist unter
http://www.pure.com/about/r-tte-doc einzusehen.
Gemäß ETSI EN 300 401.
Australian C-Tick N1600 and Electrical Safety.
24
Page 53

Copyright
Copyright 2015, Imagination Technologies Limited. Alle Rechte vorbehalten. Ohne ausdrückliche schriftliche
Zustimmung durch Imagination Technologies Limited ist jede Vervielfältigung dieser Publikation auch
auszugsweise sowie ihre Verbreitung, Übermittlung, Abschrift, Speicherung in einem Datenverarbeitungssystem
oder Übersetzung in eine natürliche Sprache oder Programmiersprache in jeglicher Form, sei sie elektronisch,
mechanisch, magnetisch, manuell oder anderweitig, und jegliche Offenlegung an Dritte verboten.
Marken
Contour 200i Air, Pure, das Pure Logo, Imagination Technologies und das Imagination Technologies Logo sind
Warenzeichen oder eingetragene Warenzeichen von Imagination Technologies Limited. iPad, iPod , iPod touch,
iPhone, iTunes und AirPlay sind in den USA und in anderen Ländern eingetragene Warenzeichen von Apple Inc.
“Made for iPod”, “Made for iPhone” und “Made for iPad” bedeuten, dass elektronisches Zubehör eigens für
den Anschluss an einen iPod, ein iPhone oder iPad entwickelt wurde und der Entwickler die Erfüllung der
Leistungsstandards von Apple bestätigt. Apple ist nicht für die Funktion dieses Geräts und für die Einhaltung der
Sicherheits- und sonstigen Auflagen verantwortlich. Bitte beachten Sie, dass die Verwendung dieses Zubehörs
mit iPod, iPad und iPhone sich auf die Wireless-Leistung auswirken kann. Alle anderen Produkte sind Marken der
jeweiligen Unternehmen. Version: 8. November 2015.
Garantieerklärung
Imagination Technologies Limited garantiert dem Endverbraucher, dass dieses Gerät frei von Material- und
Herstellungsfehlern im Rahmen des normalen Gebrauchs ist. Diese Garantie gilt für einen Zeitraum von zwei
Jahren ab Kaufdatum. Die Garantie umfasst Störungen aufgrund von Herstellungs- oder Ausführungsfehlern.
Sie gilt jedoch nicht für Unfallschäden jeglicher Art und Schäden, die auf Verschleiß, Fahrlässigkeit oder von uns
nicht autorisierte Anpassungen, Änderungen oder Reparaturen zurückzuführen sind. Bitte registrieren Sie Ihr
Produkt unter www.pure.com/register. Sollten Probleme mit Ihrem Gerät auftauchen, wenden Sie sich bitte an
Ihren Händler oder an den Pure Support unter der Adresse, die auf der Rückseite dieses Handbuchs aufgeführt
wird. Verwenden Sie bei Rücksendungen bitte die Originalverpackung und fügen Sie alle Teile und das vollständige
Zubehör bei. Wir behalten uns das Recht vor, unvollständige oder unzureichend verpackte Rücksendungen
abzulehnen.
Haftungsausschluss
Imagination Technologies Limited übernimmt keine Verantwortung oder Garantie bezüglich des Inhalts dieses
Dokuments und weist insbesondere alle konkludenten Zusagen der Marktgängigkeit und der Eignung für einen
bestimmten Zweck zurück. Weiterhin behält sich Imagination Technologies Limited das Recht vor, diese Veröffentlichung
zu überarbeiten und von Zeit zu Zeit Änderungen vorzunehmen, ohne dass Imagination Technologies Limited dazu
verpflichtet ist, Personen oder Organisationen über solche Überarbeitungen oder Änderungen zu benachrichtigen.
Entsorgung von elektrischen und elektronischen Geräten
Dieses Symbol auf dem Produkt oder der Verpackung zeigt an, dass dieses Produkt nicht als
Hausmüll behandelt werden soll. Stattdessen sollte es an einer Sammelstelle für wiederverwertbare
elektrische und elektronische Geräte abgegeben werden. Durch die richtige Entsorgung dieses
Produkts helfen Sie, negative Auswirkungen auf Umwelt und menschliche Gesundheit zu vermeiden,
die bei einer unangemessenen Behandlung des Produkts auftreten könnten. Die Wiederverwertung
von Materialien trägt zur Erhaltung natürlicher Rohstoffe bei. Für weitere Informationen über die
Wiederverwertung dieses Produkts wenden Sie sich bitte an Ihre Gemeindeverwaltung, Ihren
Müllabfuhrbetrieb oder das Geschäft, in dem Sie das Produkt gekauft haben.
DE
25
Page 54

26
Page 55
EN
1
Merci d'avoir choisi Contour 200i Air. L'objectif de ce
manuel est de vous permettre de mettre en service votre
appareil en un rien de temps et de tirer parti de la plupart
des fonctionnalités de Contour 200i Air. Nous améliorons
et ajoutons de nouvelles fonctionnalités à nos produits en
permanence. Pour tirer parti des améliorations apportées
depuis la sortie de notre produit, veuillez visiter le site
www.pure.com à partir duquel vous pouvez télécharger la
dernière version de ce guide utilisateur au format PDF.
ES
ES
FRANÇAIS
IT
NL
ES
DE
IT
NL
ES
DA
Page 56

2
Instructions de sécurité
1. Veuillez lire les présentes instructions – vous devez lire toutes les instructions de sécurité et
d'utilisation avant d'utiliser le présent produit.
2. Veuillez conserver les présentes instructions – vous devez conserver les instructions de sécurité
et d'utilisation en lieu sûr pour toute référence ultérieure.
3. Veuillez observer tous les avertissements – vous devez observer tous les avertissements
figurant sur l'appareil ou dans le mode d'emploi.
4. Veuillez suivre toutes les instructions – vous devez suivre toutes les instructions d'utilisation.
5. N'utilisez pas cet appareil à proximité de l'eau ou d'une source d'humidité – par exemple, dans
un sous-sol humide, à proximité d'une piscine, etc.
6. Nettoyez l'appareil uniquement avec un chiffon sec.
7. N'obstruez pas les orifices d'aération. Installez l'appareil conformément aux instructions du
fabricant.
8. N'installez pas l'appareil à proximité de sources de chaleur, telles que les radiateurs, registres de
chaleur, poêles, ou tout autre appareil (y compris des amplificateurs) produisant de la chaleur.
9. Ne détruisez pas le dispositif de sécurité de la fiche polarisée ou de mise à la terre. Une fiche
polarisée est constituée de deux lames dont l'une est plus large que l'autre. Une prise de mise à
la terre est constituée de deux lames et d'une troisième broche de mise à la terre. La lame large
ou la troisième broche sont fournies pour votre sécurité. Si la fiche fournie ne passe pas dans
votre prise, veuillez consulter un électricien qui se chargera de remplacer la prise obsolète.
10. N'utilisez que des fixations/accessoires spécifiés par le fabricant.
11. Débranchez l'appareil en cas d'orages ou avant toute inutilisation prolongée.
12. Faites exécuter toutes les tâches de service après-vente par un personnel qualifié. Il est
nécessaire de procéder à un entretien quand l'appareil a subi des dommages, de quelque
manière que ce soit ; par exemple, si une prise ou un cordon électrique est endommagé, si du
liquide a éclaboussé l'appareil ou des corps étrangers y ont pénétré, si l'appareil a été exposé
à la pluie ou à l'humidité, s'il ne fonctionne pas correctement ou s'il est tombé.
13. N'installez pas cet équipement dans un espace intérieur confiné, tel qu'une bibliothèque ou
tout autre espace similaire. Ne couvrez et n'obstruez pas les orifices de ventilation de l'appareil
avec des éléments tels que du journal, une nappe ou des rideaux.
14. AVERTISSEMENT: afin de réduire le risque d'incendie ou de choc électrique, n'exposez pas
l'appareil à la pluie ou à l'humidité. L'appareil ne doit pas être exposé à des égouttements ou
éclaboussures. Aucun objet rempli d'eau (tel qu'un vase) ne doit être placé sur l'appareil.
15. AVERTISSEMENT: l'adaptateur directement enfichable est utilisé comme appareil de
sectionnement, l'appareil de sectionnement doit être prêt à fonctionner à tout moment.
16. AVERTISSEMENT: les piles de la télécommande ne doivent pas être exposées à une source
de chaleur excessive (telle que les rayons du soleil, du feu, etc.).
17. Cet appareil est de classe 2 ou dispose d'un équipement à double isolation électrique. Il a
été conçu de sorte à ne requérir aucune connexion de sécurité pour la mise à la terre.
18. Une distance de séparation d'au moins 20 cm doit être maintenue entre l'antenne du produit et
les personnes.
19. La mention de puissance nominale figure sur la base de l'appareil.
Page 57

3
Table des matières
4 Pour commencer
4 Introduction
4 L’application Pure Connect
5 Télécommande
6 Commandes et connectique du panneau avant/supérieur
6 DEL d'état du panneau avant
7 Connectique et commandes du panneau arrière
8 Basculer entre les modes Veille prolongée, Veille et Marche
8 Paramètres réseau
9 Préparation de Contour pour la connexion à un réseau sans fil
13 Préparation de Contour pour la connexion à un réseau Ethernet
14 Utilisation de AirPlay pour lire du contenu audio
14 Sélection de AirPlay en tant que source
14 Diffuser du contenu audio depuis un iPod Touch, un iPhone ou un iPad
15 Lire du contenu audio depuis iTunes
15 Basculer les commandes d'iTunes sur Contour
16 Diffuser du contenu audio dans plusieurs pièces
17 Écoute d'un iPod/iPhone/iPad connecté
17 Compatibilité
17 Installation de votre appareil sur la station d'accueil
17 Sélection de la station d'accueil
17 Contrôle de votre appareil
18 Utilisation de l'entrée auxiliaire
18 Utilisation de la sortie numérique
19 Utilisation du Contour Setup Manager
21 Attribution d'un nom à Contour
24 Assistance et caractéristiques techniques
ES
ES
FR
Page 58

4
Pour commencer
Introduction
Contour 200i Air peut être utilisé de différentes façons :
• Comme périphérique AirPlay pour lire du contenu audio provenant d'iTunes sur votre
ordinateur, d'un iPod Touch, d'un iPhone ou d'un iPad équipé de la fonction AirPlay,
via votre réseau sans fil. Voir ‘Paramètres réseau’ en page 8.
• Comme station d'accueil pour iPod, iPhone ou iPad. Voir page 17.
• Comme haut-parleur d'un périphérique audio connecté via la prise Aux In. Voir page 18.
Remarque: le terme Contour utilisé dans le reste du présent manuel fait référence à la
station d'accueil Contour 200i Air.
L’application Pure Connect
Exploitez pleinement le son de qualité hi-fi de votre station d’accueil Contour en installant
sur votre iPod touch ou votre iPhone l’application gratuite Pure Connect. L’application Pure
Connect vous permet d’accéder gratuitement à des milliers de radios Internet, de contenus
à la demande (podcasts et programmes de radio de rattrapage) et de sonorités d’ambiance.
L’application Pure Connect sous iOS
Page 59

5
Standby (Mise en veille)
Permet de basculer entre les modes Veille
prolongée (Sleep), Veille (Standby) et Marche (On).
Voir page 8.
Source Permet de basculer entre les sources AirPlay,
Station d'accueil (Dock) et Entrée auxiliaire
(Auxiliary).
Permet de mettre les pistes en lecture aléatoire
(lorsque la source d'entrée est AirPlay/Station
d'accueil).
Permet de répéter la piste actuelle, toutes les
pistes ou de désactiver la fonction répétition
(lorsque la source d'entrée est AirPlay/Station
d'accueil).
Vol
Menu Permet d'accéder au menu d'un iPod ou d'un
iPhone connecté. Permet également de revenir en
arrière dans les menus.
Select
Text & Symbols
Mirror Finish
Permet de sélectionner les pistes et les options de
menu de votre iPod/iPhone (uniquement lorsque la
source d'entrée est Station d'accueil).
et Permet de revenir au début de la piste en cours ou
de sélectionner la piste précédente ou suivante.
Permet d'avancer rapidement ou de rembobiner
rapidement (uniquement lorsque la source d'entrée
est Station d'accueil).
Lecture/mise en pause de la piste actuelle (lorsque la
source d'entrée est AirPlay/Station d'accueil).
Volume plus/moins fort
+
-
Télécommande
Tirez sur la languette en plastique
du compartiment à piles et retirez le
film de protection des boutons de la
télécommande.
ES
ES
FR
Page 60

6
Mise en veille
Permet de basculer
entre les modes Veille
prolongée (Sleep),
Veille (Standby) et
Marche (On).
Voir page 8.
Silence
Volume moins fort
Volume
plus fort
DEL
d'état
Cf. page 6.
Commandes et connectique du panneau avant/supérieur
DEL d'état du panneau avant
Lorsque Contour est mis sous tension, la DEL d'état est visible à travers la grille du hautparleur avant. Les différentes couleurs de la DEL d'état reflètent les différents états de
Contour.
Rouge Veille (fixe) / Marche (clignotant) / Veille prolongée (atténué)
Bleu La connexion de l'iPod/iPhone/iPad sur la station d'accueil est active (le
voyant clignotant indique que la connexion du périphérique sur la station est
en cours. Indique également une activité à distance)
Blanc AirPlay est actif (le voyant clignotant rapidement indique une activité à
distance) (le voyant clignotant lentement signale des problèmes de connexion
au réseau)
Rose Aux In est active (le voyant clignotant rapidement indique une activité à
distance)
Bleu/Vert (Le voyant clignote en alternance) Configuration temporaire du réseau sans fil
Cyan Le voyant clignotant signale une erreur au niveau du firmware
Jaune Mise à jour du firmware en cours
Remarque: pour mémoire, les états les plus courants de la DEL d'état sont répertoriés sur
l'étiquette placée sur la base de votre Contour.
Page 61
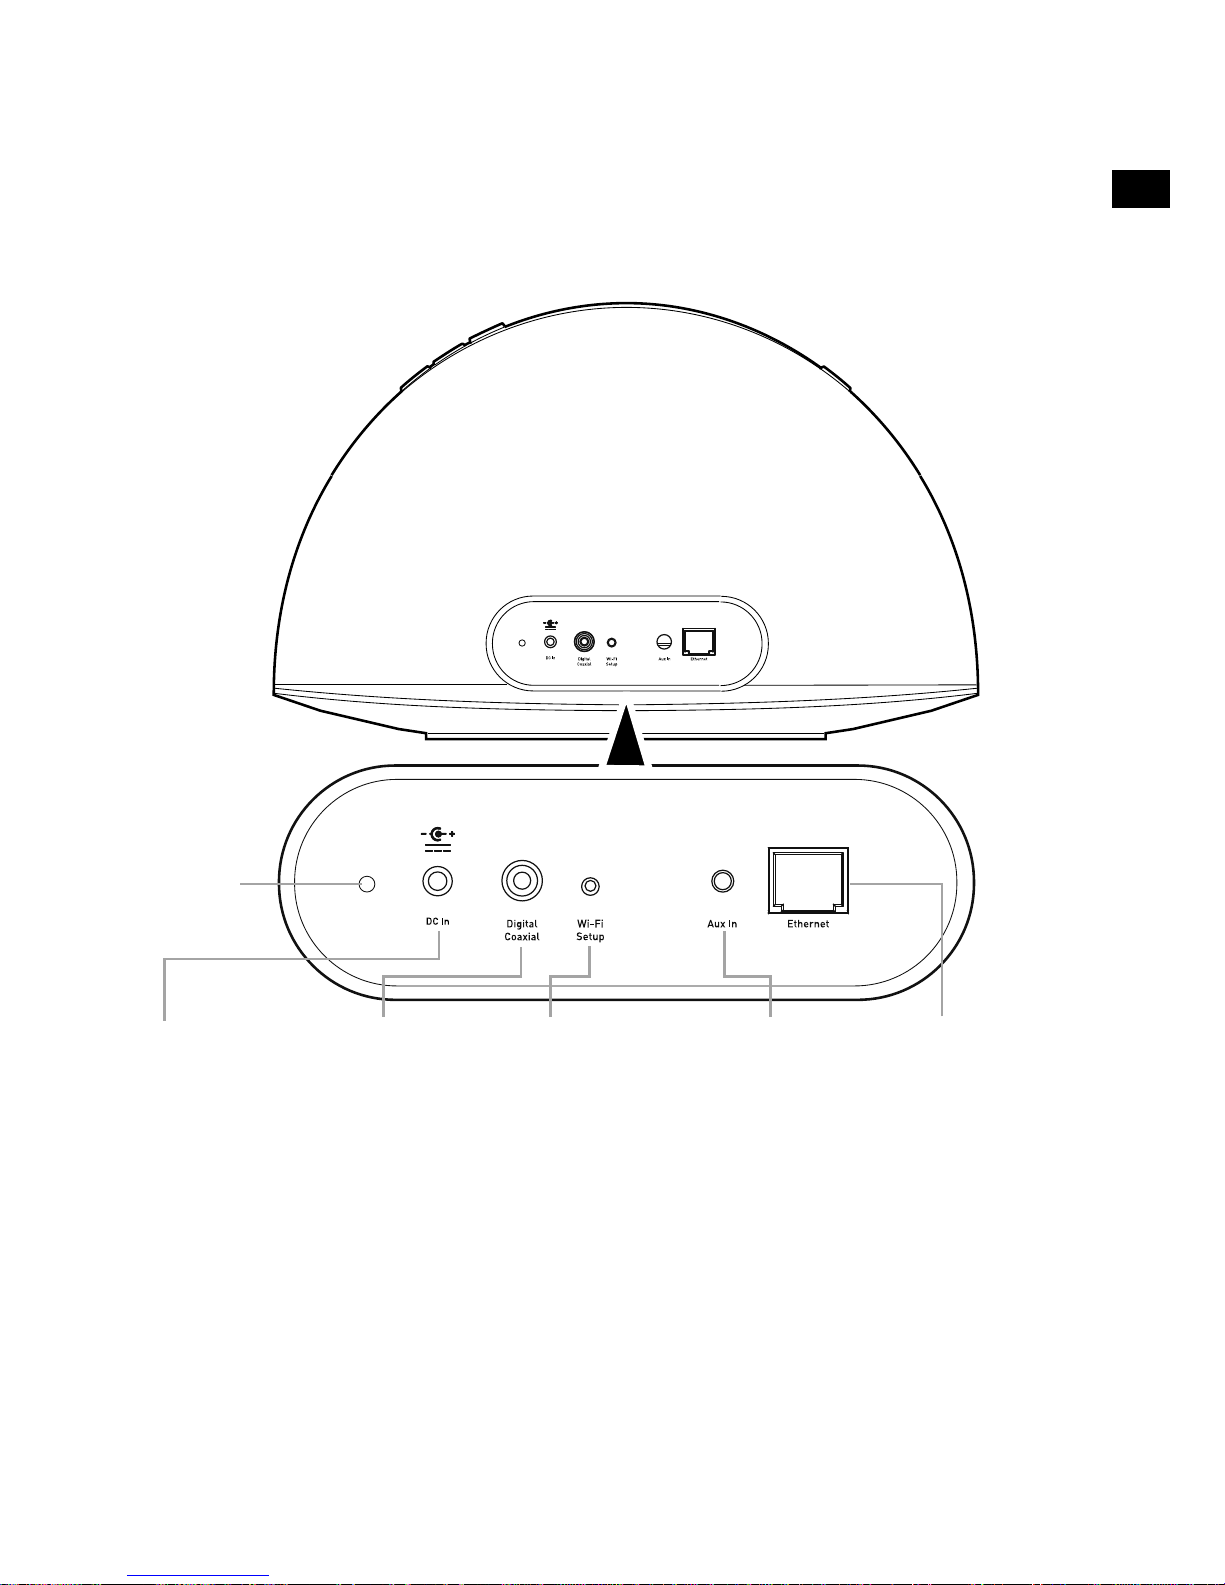
7
Connectique et commandes du panneau arrière
DC In
(Connecteur CC)
Prise pour relier
l'adaptateur
secteur fourni.
Aux In
(Entrée AUX)
Connecteur pour
l'entrée stéréo
analogique
auxiliaire pour les
lecteurs MP3 ou
similaires. Voir
page 18.
Ethernet
Prise pour
câble réseau.
Utilisée comme
alternative à la
configuration
Wi-Fi. Voir page
13.
Digital Coaxial
(Prise numérique
coaxiale)
Prise de sortie
du signal audio
numérique. Voir
page 18.
Wi-Fi Setup
(Configuration
du Wi-Fi)
Bouton utilisé lors
de la configuration
d'un réseau sans
fil. Voir page 11.
DEL d'état
de la mise
à jour du
firmware*
*DEL de diagnostic utilisée par le support technique de Pure.
ES
ES
FR
Page 62

8
Basculer entre les modes Veille prolongée, Veille et Marche
Contour propose trois modes de fonctionnement: Veille (Standby), Veille prolongée (Sleep)
et Marche (On). En mode Veille, Contour fonctionne à une puissance minime (la DEL d'état
est rouge vif). En mode Veille prolongée, Contour reste connecté au réseau sans fil et attend
qu'une source soit sélectionnée (la DEL d'état est rouge atténué).
Pour passer en mode Veille prolongée, appuyez sur le bouton Standby (Veille). Au bout de
15 minutes, Contour passe automatiquement en mode Veille prolongée s'il n'a reçu aucun
signal audio d'un périphérique AirPlay ou d'une station d'accueil iPod/iPhone/iPad.
En mode Veille prolongée, appuyez sur Standby pour passer au mode Marche.
Pour passer en mode Veille, appuyez pendant quatre secondes sur le bouton de Standby
de votre Contour ou de la télécommande jusqu'à ce que la DEL d'état soit rouge vif.
Appuyez sur le bouton de Standby pour passer directement en mode Marche. La DEL
clignote en rouge pendant environ 30 secondes, s'arrête, puis la station revient à l'état
dans lequel elle était avant de passer en mode Veille.
Paramètres réseau
Contour peut se connecter à votre réseau au moyen d'une connexion sans fil ou filaire.
Nous vous recommandons d'utiliser la méthode de connexion sans fil qui vous permet de
placer votre Contour à l'endroit de votre choix. Contour peut être connecté à votre réseau
sans fil à l'aide du partage de connexion de votre réseau Wi-Fi ou manuellement.
Reportez-vous à la page 9 pour obtenir plus d'informations.
Pour utiliser la méthode de connexion filaire, raccordez un câble Ethernet entre le port
Ethernet situé à l'arrière de votre Contour et l'un des ports Ethernet disponibles sur votre
routeur. Cette méthode peut s'avérer utile si vous rencontrez des problèmes de qualité
audio ou si votre Contour est placé à proximité de votre routeur. Pour plus d'informations,
reportez-vous à la page 13.
Page 63
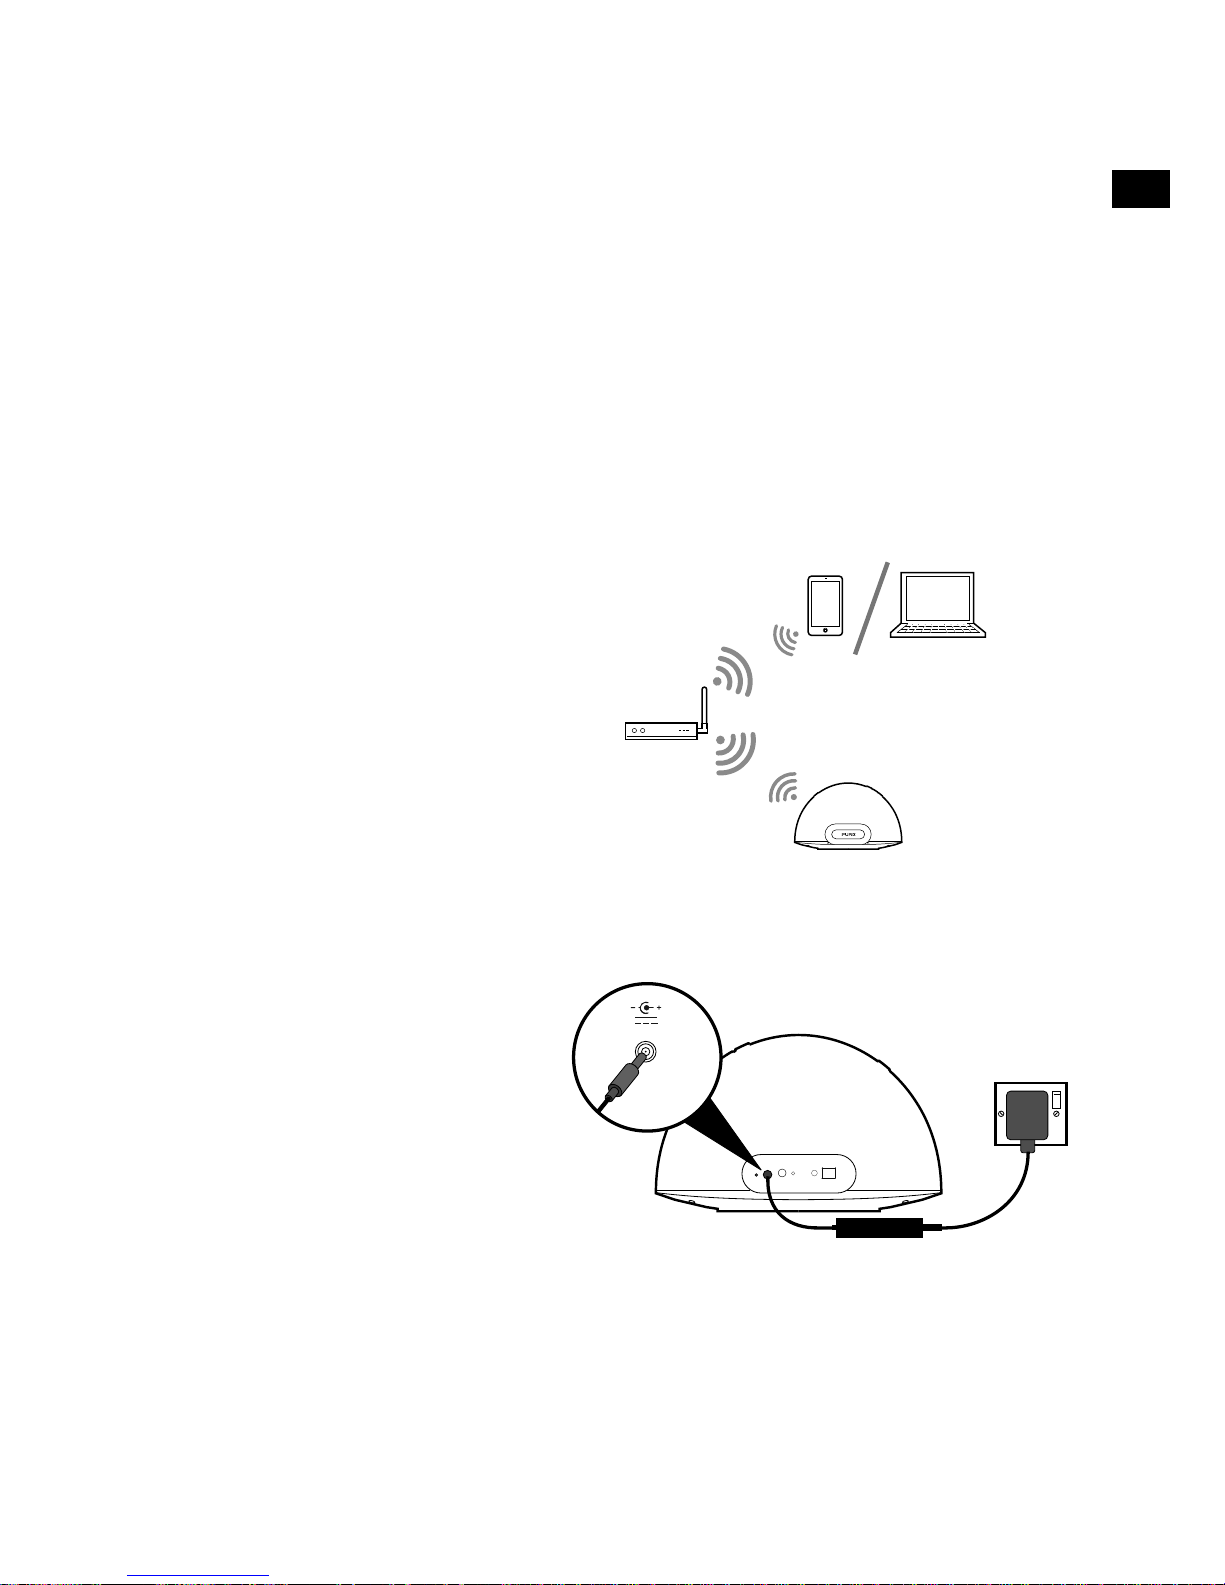
9
1. Placez votre Contour dans le
périmètre de portée de votre réseau
sans fil.
2.
Branchez le connecteur de
l'adaptateur secteur dans la prise
correspondante à l'arrière de
votre Contour.
3.
Branchez sur une prise de
courant.
4.
Lorsque la DEL d'état rouge située à l'avant ne clignote plus, Contour est en mode Veille
prolongée.
5.
Reportez-vous à la page 10 pour configurer votre connexion sans fil en utilisant la
méthode de partage de connexion du réseau Wi-Fi. Reportez-vous à la page 11 si
vous souhaitez configurer votre connexion réseau sans fil manuellement.
18V DC
Préparation de Contour pour la
connexion à un réseau sans fil
Introduction
Contour peut se connecter à votre réseau sans fil au moyen de deux méthodes de connexion
différentes. Nous vous recommandons d'utiliser la méthode de partage de connexion de
votre réseau Wi-Fi, qui connecte automatiquement Contour à votre réseau sans fil à l'aide
des paramètres Wi-Fi de votre iPod, iPhone ou iPad*. Sinon, vous pouvez connecter Contour
manuellement à votre réseau sans fil. Avant de choisir l'une de ces méthodes de connexion,
vous devez préparer votre Contour à une configuration sans fil.
Préparation de Contour pour une configuration sans fil
Configuration sans fil classique
*Pour utiliser le partage de connexion réseau Wi-Fi sur votre iPod touch, iPhone ou iPad, vous devez disposer de l'iOS
version 5.0 et supérieure.
ES
ES
FR
Page 64

10
Connexion de Contour à votre réseau sans fil à l'aide du partage de
connexion réseau Wi-Fi
Pour connecter Contour à votre réseau sans fil :
1. Placez votre appareil Appel non verrouillé (iPod touch, iPhone ou iPad) sur la station
d'accueil, puis patientez quelques secondes le temps que votre appareil Apple soit
authentifié. La DEL d'état clignote en bleu et l'appareil Apple commence le partage.
2. Lorsque la DEL d'état arrête de clignoter en bleu, appuyez sur le bouton de
connexion Wi-Fi à l'arrière de Contour.
3. Un message apparaît alors sur l'écran de votre iPod/iPhone/iPad vous invitant à
partager vos paramètres Wi-Fi.
4. Appuyez sur Allow (Autoriser).
5. Votre Contour doit à présent se connecter à votre réseau.
Remarque: pour vérifier si Contour s'est connecté à votre réseau avec succès à l'aide
du partage de connexion réseau, vérifiez que la DEL d'état est blanche sans clignoter en
mode AirPlay. Reportez-vous à ‘DEL d’état du panneau avant’ en page 6 pour obtenir
plus d'informations.
Page 65

11
Connexion manuelle de Contour à votre réseau sans fil
Étape1: connexion de votre appareil configuré à Contour
Dans la première étape de configuration, vous devez établir une connexion temporaire entre
votre appareil configuré et votre Contour. Pour ce faire, vous devez créer une connexion
sans fil temporaire pour connecter Contour à votre iPod Touch, iPhone ou iPad ou à votre
ordinateur portable.
Connexion au moyen d'un réseau sans fil temporaire
1. Assurez-vous que Contour est en mode Veille prolongée ou Marche.
2. Appuyez pendant cinq secondes sur le bouton Wi-Fi Setup (Configuration du Wi-Fi)
situé à l'arrière de votre Contour. Cela permet d'activer le réseau sans fil temporaire de
Contour. La DEL d'état clignote en rouge pendant la mise en route du réseau sans fil
temporaire.
20 secs
Après une vingtaine de secondes, la DEL d'état clignote en vert et bleu.
20 secs
3. Le réseau sans fil Contour 200i Air ****** devrait maintenant être visible sur votre
appareil configuré (iPhone, ordinateur portable, etc.). Sélectionnez ce réseau. Aucun
mot de passe n'est requis.
4. Une fois connecté au réseau sans fil Contour 200i Air ******, vous pouvez accéder à
Contour Setup Manager via le navigateur Web de votre appareil configuré. Utilisez le
Contour Setup Manager pour ajouter Contour à votre propre réseau sans fil.
Remarque: ****** représente un code à six chiffres, propre à chaque Contour, qui est
basé sur les six derniers chiffres de l'adresse MAC de Contour. L'adresse MAC se trouve
sur l'étiquette apposée à la base de Contour.
ES
ES
FR
Page 66

12
Étape2: accès à Contour Setup Manager
Une fois que vous avez établit une connexion temporaire entre votre appareil configuré et
Contour, vous pouvez accéder au Contour Setup comme suit:
1. Sur votre appareil configuré, lancez le navigateur Web (ex.: Safari, Google Chrome,
Microsoft Internet Explorer, Mozilla Firefox).
2. Entrez l'adresse suivante:
http://192.168.1.12
3. Le Contour Setup Manager apparaît:
4. Cliquez sur l'onglet Connection (Connexion).
Étape3: ajout de Contour à votre réseau sans fil
Contour recherchera automatiquement les réseaux disponibles. Si la recherche automatique
ne fonctionne pas, reportez-vous à ‘Connexion manuelle de Contour à votre réseau sans fil’
en page 11 pour ajouter manuellement Contour à votre réseau sans fil:
1. Sélectionnez le nom de votre réseau sans fil dans la liste déroulante Network (Réseau).
La méthode de cryptage sera automatiquement détectée par Contour.
2. Si nécessaire, saisissez la clé de sécurité utilisée par votre réseau.
3. Cliquez sur Connect (Connecter). La DEL d'état clignote en rouge, indiquant que
Contour est en train de redémarrer. Contour entrera en mode veille et la DEL d'état sera
en rouge atténué.
4.
Contour est maintenant prêt à utiliser avec une connexion sans fil. Voir page 14.
Remarque: avant de tenter de connecter votre Contour à un réseau sans fil d'entreprise,
nous vous recommandons de prendre contact avec votre service informatique.
Page 67
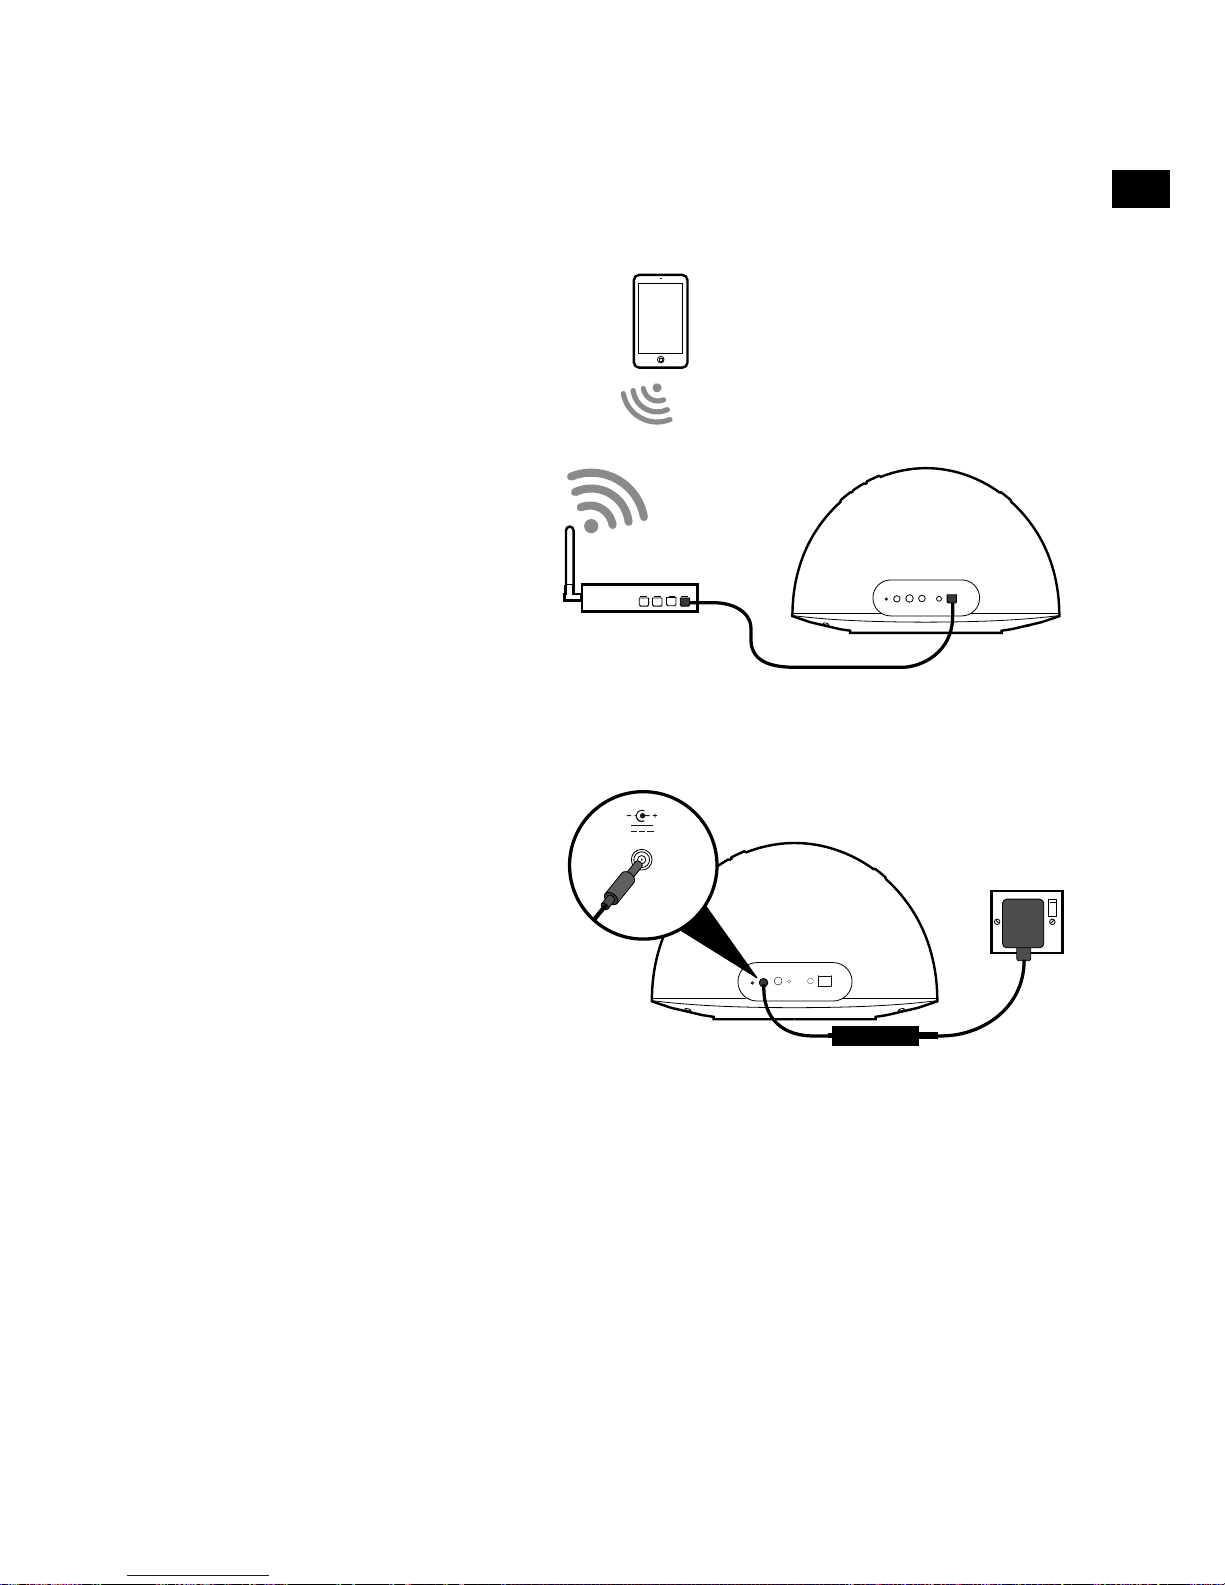
13
Préparation de Contour pour la
connexion à un réseau Ethernet
1. Raccordez un câble Ethernet
entre le port Ethernet situé à
l'arrière de votre Contour et le
port de votre routeur.
2.
Branchez le connecteur de
l'adaptateur secteur dans la
prise DC In située à l'arrière de
votre Contour.
3.
Branchez sur une prise de
courant.
4.
Une connexion réseau entre votre routeur et Contour est alors établie. Lorsque la DEL
d'état rouge située à l'avant ne clignote plus, Contour est en mode Veille prolongée.
5.
Contour est maintenant prêt à diffuser de la musique en continu à l'aide de AirPlay avec
une connexion filaire.
18V DC
Configuration Ethernet classique
ES
ES
FR
Page 68

14
Diffuser du contenu audio depuis un iPod Touch, un iPhone ou un iPad
Assurez-vous que votre iPod Touch, iPhone ou iPad
est connecté au même réseau sans fil que votre station
Contour. Vous devriez pouvoir sélectionner votre Contour
dans la liste des périphériques AirPlay disponibles.
Remarque: le nom par défaut attribué à Contour est
constitué du mot «Contour» suivi d'un code à six
caractères. Ce code à six caractères représente les six
derniers caractères de l'adresse MAC de Contour, qui
se trouve sur l'étiquette apposée à la base de Contour.
Lorsqu'un périphérique AirPlay est disponible sur votre
réseau, le symbole AirPlay apparaît en blanc sur votre
iPod Touch, iPhone ou iPad. Il deviendra bleu pour
indiquer que l'iPod Touch ou l'iPhone utilise Contour
comme haut-parleur.
Sélectionnez la piste que vous souhaitez lire. Si Contour
est en mode Veille prolongée, il s'activera et basculera
la source sur AirPlay. La DEL d'état deviendra blanche
lorsque AirPlay sera activé.
Utilisation de AirPlay pour lire
du contenu audio
Sélection de AirPlay en tant que source
Appuyez sur Source sur la télécommande jusqu'à ce que la DEL d'état soit blanche. Si la DEL
d'état est blanche statique, cela signifie que AirPlay a bien été configuré (cette opération peut
prendre jusqu'à une minute). Si après une minute la DEL d'état continue de clignoter en blanc,
cela signifie qu'il y a un problème avec la connexion réseau de Contour.
Remarque: reportez-vous aux conseils et astuces de la page 24 pour obtenir de l'aide sur
le dépannage des problèmes de connectivité réseau de Contour.
Page 69

15
Lire du contenu audio depuis iTunes
Une fois que vous avez ajouté Contour au réseau utilisé par votre ordinateur, votre iPod
Touch, iPhone ou iPad, ce dernier est automatiquement détecté. Pour sélectionner Contour
en tant qu'appareil AirPlay dans iTunes:
1.
Ouvrez iTunes.
2. Cliquez sur le symbole AirPlay , et sélectionnez votre Contour parmi la liste des
périphériques AirPlay qui s'affiche
en bas de l'écran.
3. Sélectionnez la piste que vous
souhaitez lire. Si Contour est en
mode Veille prolongée, il s'active
et bascule la source sur AirPlay.
Le symbole AirPlay devient bleu
pour indiquer que iTunes utilise
Contour comme haut-parleur.
4. La DEL d'état de Contour devient
blanche pour indiquer que AirPlay
est activé.
Basculer les commandes d'iTunes sur Contour
Si vous souhaitez basculer les commandes (ex.: lecture/pause) d'iTunes sur votre Contour,
vous devez activer cette fonction dans iTunes.
Pour les systèmes Windows:
1. Cliquez sur Edit (Modifier).
2.
Cliquez sur Preferences.
3. Sélectionnez l'onglet Devices (Appareils).
4. Cochez la case Allow iTunes audio control from remote speakers (Autoriser la
commande audio d'iTunes à partir de haut-parleurs distants).
Pour les systèmes Appel Mac:
1. Cliquez sur iTunes.
2.
Cliquez sur Preferences.
3. Sélectionnez l'onglet Devices (Appareils).
4. Cochez la case Allow iTunes audio control from remote speakers (Autoriser la
commande audio d'iTunes à partir de haut-parleurs distants).
ES
ES
FR
Page 70
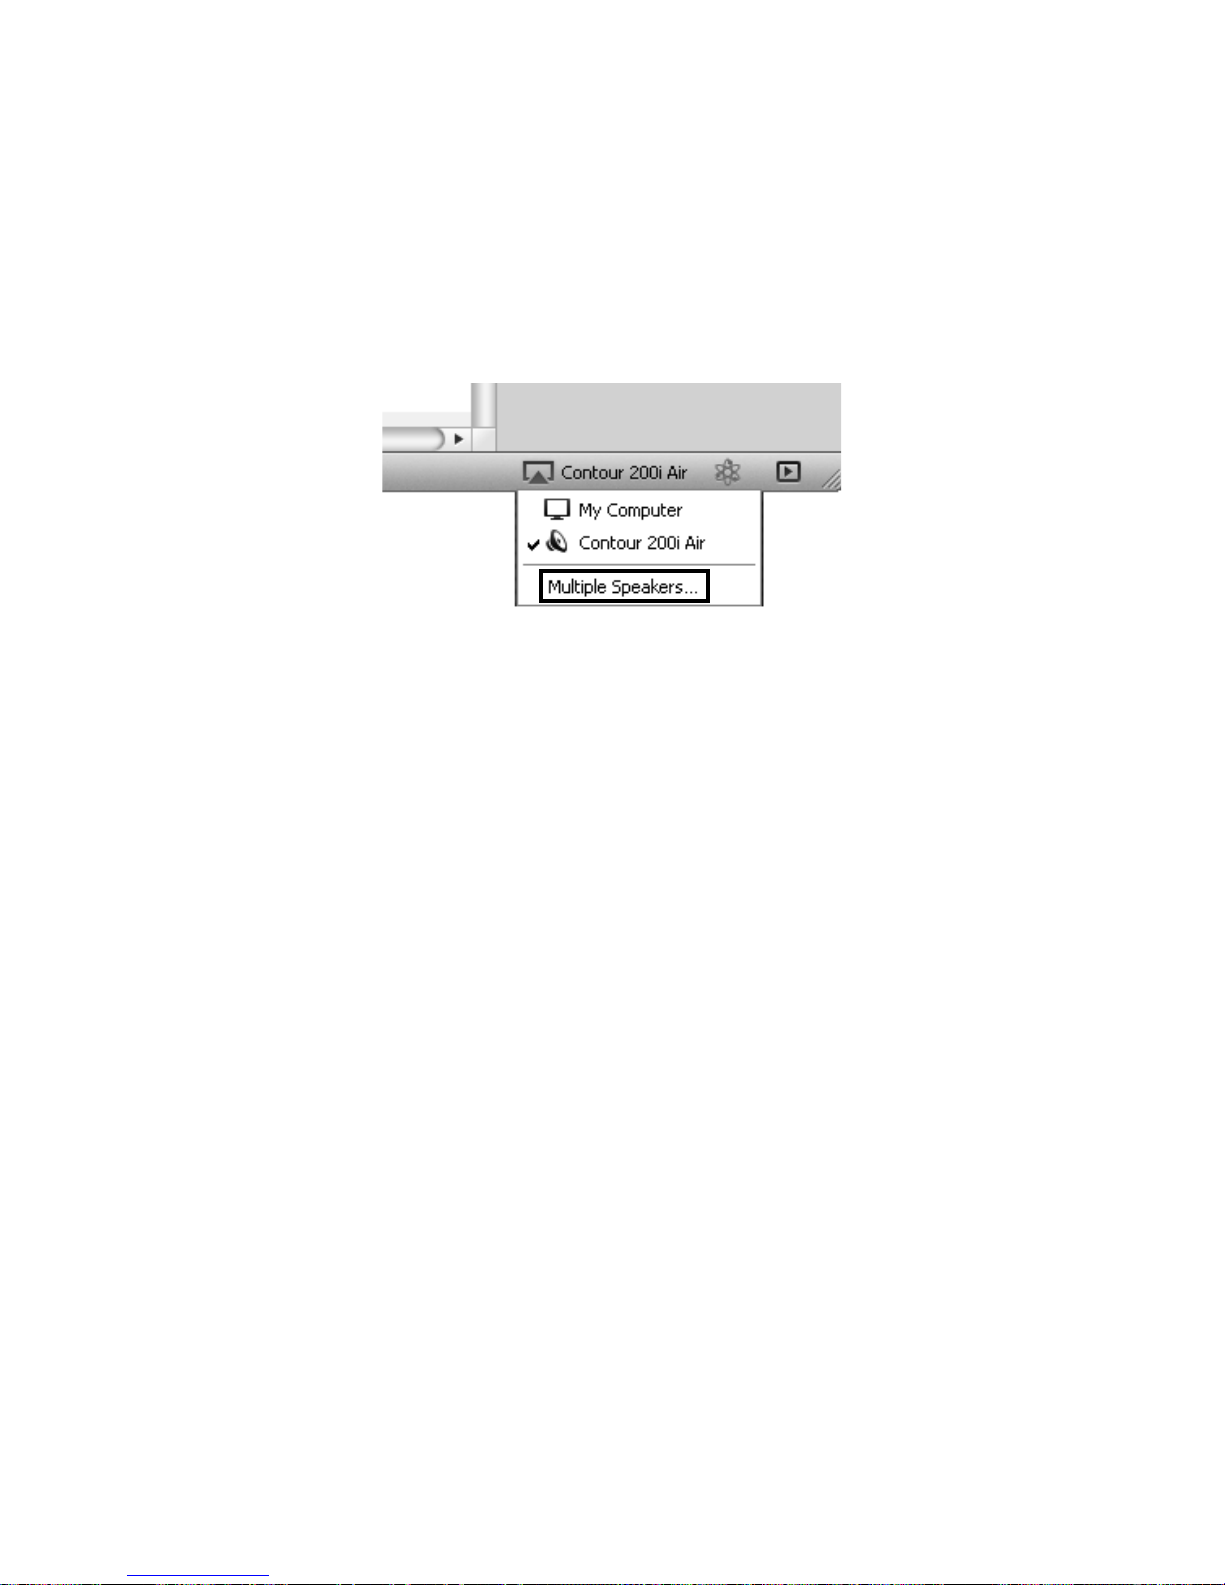
16
Diffuser du contenu audio dans plusieurs pièces
Si vous disposez de plusieurs stations Contour, vous pouvez utiliser AirPlay pour diffuser
simultanément le même contenu audio sur chaque station. Vous pouvez paramétrez cela
en utilisant iTunes sur votre ordinateur. Pour activer AirPlay afin de diffuser simultanément le
même contenu audio sur chaque station Contour, cliquez sur l'icône AirPlay, puis sélectionnez
l'option Multiple Speakers (Haut-parleurs multiples).
Vous pouvez contrôler toutes les fonctions d'iTunes en installant l'application Apple Remote
sur votre iPod, iPhone ou iPad. Une fois installée, vous pouvez utiliser votre iPod, iPhone
ou iPad comme une télécommande pour iTunes. L'application Apple Remote peut être
téléchargée à partir de l'App Store d'Apple. Reportez-vous au site Web Apple pour obtenir
plus d'informations.
Page 71

17
Écoute d'un iPod/iPhone/iPad
connecté
Compatibilité
La station Contour est compatible avec la plupart des modèles d'iPod, iPhone et iPad.
Pour obtenir les informations les plus récentes, consultez le tableau de compatibilité
disponible sur notre site Web
www.pure.com/products/ipod-compatibility.
Installation de votre appareil sur la station d'accueil
Placez votre appareil sur le connecteur de la station.
Votre appareil commence à se recharger dès qu'il est placé sur la station d'accueil et
continue à le faire, qu'il soit en mode Marche, Veille ou Veille prolongée.
Sélection de la station d'accueil
Appuyez sur Source jusqu'à ce que la DEL d'état soit bleue.
Contrôle de votre appareil
Lorsque l'iPod est sélectionné en tant que source, votre appareil lit la dernière piste écoutée.
Utilisez la télécommande ou les commandes de votre appareil pour naviguer entre les
menus et contrôler la lecture.
ES
ES
FR
Page 72

18
Utilisation de l'entrée auxiliaire
Connexion d'un appareil auxiliaire
À l'aide d'un câble adapté, connectez la prise de sortie audio ou casque de votre appareil
auxiliaire à la prise d'entrée auxiliaire de votre Contour.
Sélection de l'entrée auxiliaire
Appuyez sur Source jusqu'à ce que la DEL d'état soit rose.
Utilisation de la sortie numérique
Utilisation d'un périphérique de sortie numérique externe
Vous pouvez connecter votre Contour à un périphérique de sortie numérique, par exemple
une chaîne hi-fi. Tout le contenu audio diffusé sur Contour sera également envoyé vers
l'appareil relié et votre source AirPlay.
Remarque: les commandes de volume de Contour n'agiront pas sur le volume de l'appareil
numérique.
Connexion d'un périphérique de sortie numérique externe
À l'aide d'un câble coaxial adapté, raccordez Contour à votre périphérique de sortie
numérique disposant d'une prise coaxiale numérique.
Page 73

19
Utilisation du Contour Setup Manager
Introduction
Contour comprend un gestionnaire d'installation (Contour Setup Manager). Ce gestionnaire
d'installation vous permet de changer divers paramètres Contour, par exemple le nom
du haut-parleur Contour (voir page 21) et d'afficher l'état de Contour. Vous pouvez
également utiliser le gestionnaire d'installation pour effectuer une mise à jour du firmware
manuelle. Vous pouvez accéder au Contour Setup Manager à l'aide d'une des méthodes
suivantes:
• Pendant l'étape 2 de la configuration réseau manuelle (page 12).
• Via Bonjour dans le navigateur Web Safari (décrit ci-dessous).
• En saisissant l'adresse IP affectée à Contour dans le champ d'adresse de
votre navigateur, consultez la documentation de votre routeur pour obtenir plus
d'informations.
Accès au Contour Setup Manager via Bonjour
Après avoir réussi à connecter Contour à votre réseau, vous pouvez utiliser la méthode
suivante pour accéder au Contour Setup Manager. Vous pouvez télécharger Safari à partir
du site Web Apple.
1. Ouvrez le navigateur Web Safari.
2. Cliquez sur le symbole du livre dans le coin supérieur
gauche pour ouvrir le panneau des marque-pages.
3. Cliquez sur l'option Bonjour à partir du menu
«Collections» sur la gauche de l'écran.
4. Double-cliquez sur Contour 200i Air à partir du
menu (en-dessous du cover flow) pour ouvrir
Contour Setup Manager.
5. Reportez-vous à ‘Utilisation du Contour Setup Manager’ en page 19 pour obtenir
plus d'informations.
ES
ES
FR
Page 74

20
Structure des menus
Vous pouvez accéder aux menus du Contour Setup Manager en cliquant sur les onglets
situés en haut de la fenêtre.
Si vous accédez à Contour Setup Manager depuis un PC ou
un Mac, quatre onglets apparaissent. Si vous accédez à Contour Setup Manager depuis un
appareil mobile (téléphone Android, iPad, iPod, iPhone), trois onglets apparaissent.
Les onglets disponibles sont les suivants:
Connection L'onglet Connection (Connexion) est utilisé pour configurer les
paramètres sans fil de Contour.
Advanced L'onglet Advanced (Avancé) ouvre la page Manual Network Setup
(Configuration manuelle du réseau).
Status
L'onglet Status (État) ouvre la page Status Information (Informations sur
l'état). Cette page affiche des informations relatives au firmware et à l'état
de la connexion sans fil.
Update
(Mettre à jour)
L'onglet Update (Mise à jour) ouvre la page Firmware Update (Mise à
jour du firmware). Cette page vous permet de mettre à jour le firmware
manuellement (uniquement visible sur un PC ou un Mac).
Page 75

21
Connexion
L'onglet de connexion comprend deux sections principales: Product name assignment
(Attribution d'un nom au produit) et Wireless Network setup (Configuration réseau sans fil).
Configuration
sans fil
Attribution d'un nom à Contour
Si vous le souhaitez, vous avez la possibilité de modifier le nom qui s'affiche sur votre
réseau, sur iTunes et sur les appareils Apple pour identifier Contour:
1. Saisissez le nom (par exemple: «Salon») que vous souhaitez attribuer à votre Contour
dans la zone de texte Product Name (Nom du produit), puis cliquez sur Update (Mise
à jour).
2. Attendez que la page s'actualise pour confirmer que le nouveau nom a bien été attribué
à votre Contour.
Configuration sans fil
Reportez-vous à la page 12 pour plus d'informations sur la configuration sans fil automatique.
Nom du produit
1. Saisissez le SSID de votre routeur et sélectionnez le type de cryptage de votre réseau
sans fil à partir de la liste déroulante Encryption (Cryptage) ci-dessous.
Remarque: veuillez vérifier la configuration de votre routeur sans fil pour connaître le
type de cryptage utilisé sur votre réseau sans fil.
2. Le cas échéant, entrez la phrase de chiffrement/clé nécessaire pour vous connecter à
votre réseau dans la zone de texte prévue à cet effet.
3. Cliquez sur Connect (Connecter). La DEL d'état clignote en rouge, indiquant que
Contour est en train de redémarrer. Une fois que Contour a démarré, il passe en mode
Veille prolongée.
Configuration sans fil manuelle
Si votre réseau sans fil ne diffuse pas le SSID, vous devrez configurer vos paramètres sans fil
manuellement.
ES
ES
FR
Page 76
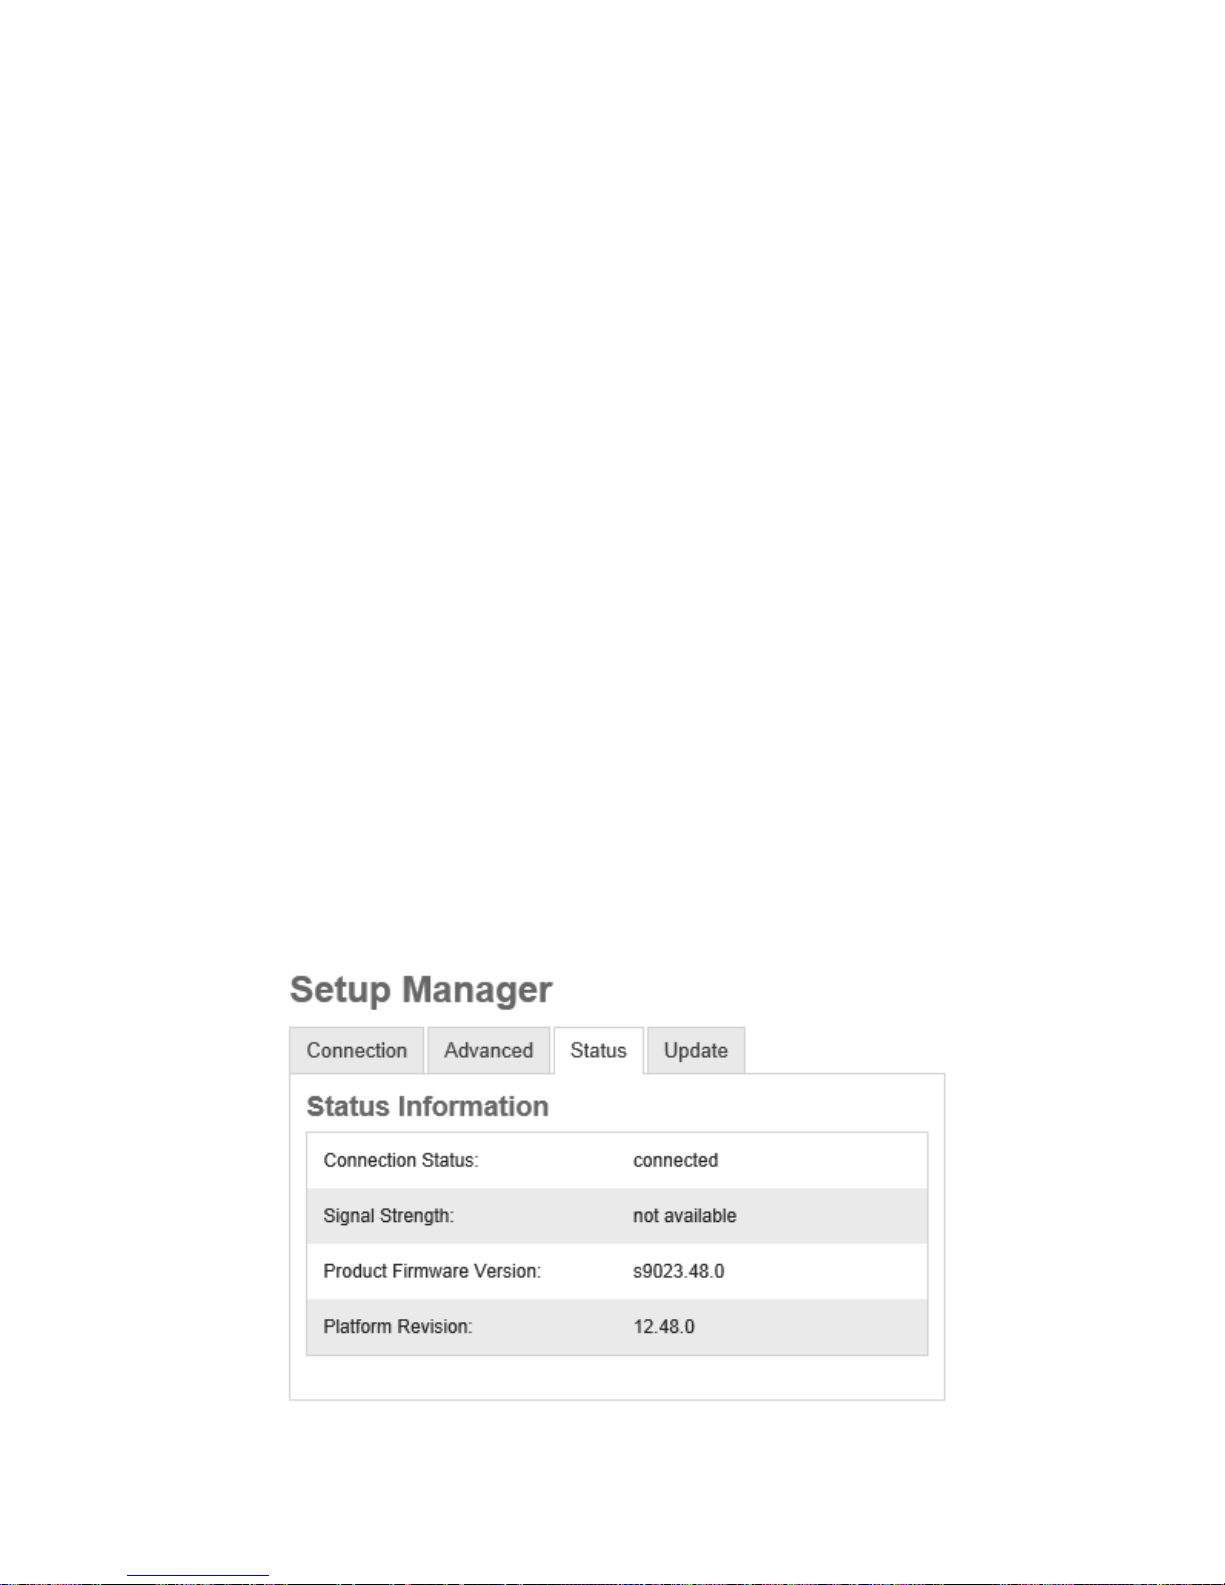
22
Avancé
L'onglet Advanced (Avancé) comprend deux sections principales: Proxy Server settings
(Paramètres du serveur proxy) et IP address settings (Paramètres de l'adresse IP).
Configuration des paramètres du serveur proxy
Si votre réseau utilise un serveur proxy pour se connecter à Internet, cochez la case Use
Proxy Server (Utiliser le serveur proxy) et saisissez les détails de votre serveur proxy.
Cliquez sur Connect (Connecter) en bas de la fenêtre pour enregistrer les modifications.
Configuration des paramètres de l'adresse IP
Contour prend en charge la configuration d'adresse IP DHCP (par défaut) et statique. Pour
utiliser DHCP, assurez-vous que la case DHCP est cochée, puis cliquez sur Connect
(Connecter). Pour utiliser une adresse IP statique, assurez-vous que la case DHCP n'est
pas cochée, puis configurez les paramètres d'adresse IP dans leurs champs respectifs.
Cliquez sur Connect (Connecter) pour enregistrer les modifications.
Remarque: avant d'appliquer des paramètres avancés, assurez-vous de sélectionner
votre SSID réseau à partir du menu déroulant dans l'onglet Connection (Connexion), sans
cliquer sur le bouton Connect (Connecter). Après avoir appliqué les paramètres dans
l'onglet Advanced (Avancé), cliquez sur le bouton Connect (Connecter) au bas de l'onglet
Advanced (Avancé) pour modifier simultanément le SSID réseau et les paramètres avancés.
État
L'onglet Status (État) affiche un résumé des informations sur le firmware, la configuration
matérielle de Contour, et l'état de la connexion sans fil.
Page 77
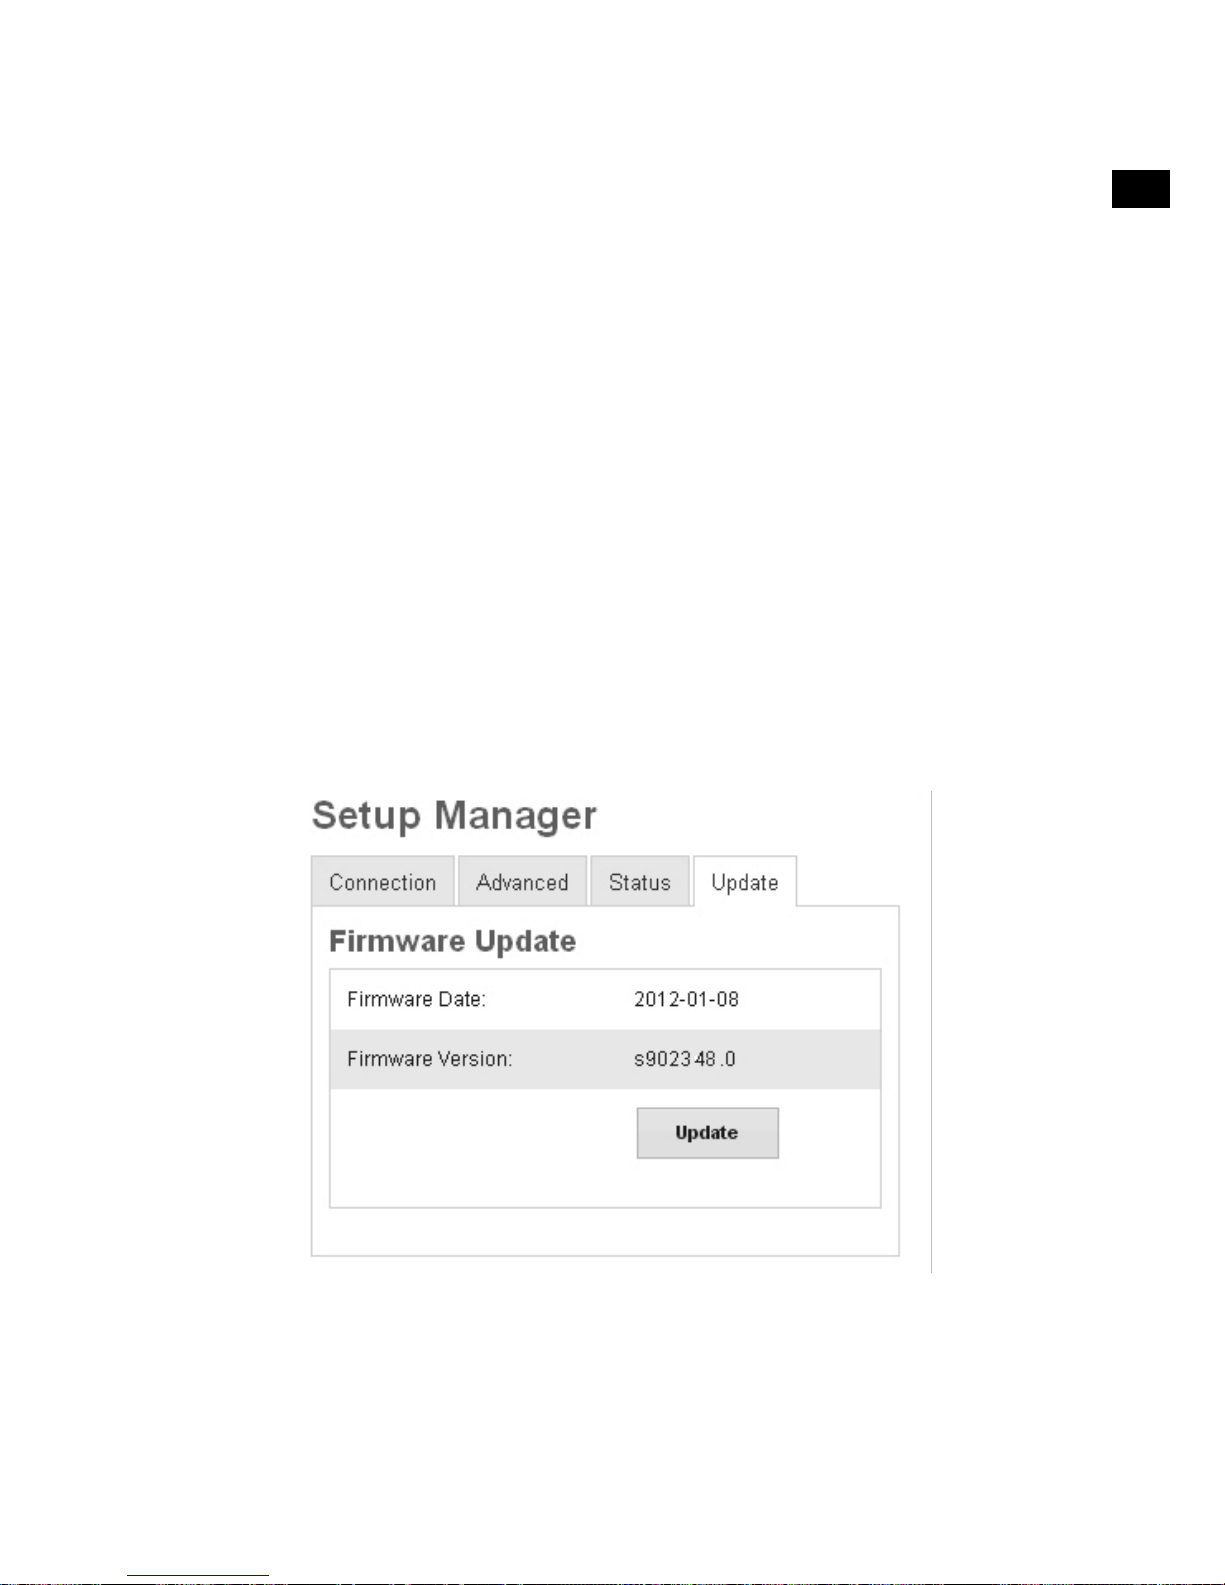
23
Mise à jour
L'onglet Update (Mise à jour) est uniquement visible lorsque vous vous connectez à
Contour à l'aide d'un PC ou d'un Mac. Nous vous recommandons d'utiliser les mises à
jour automatiques du firmware pour votre Contour. Ces dernières sont acheminées via la
connexion Wi-Fi lorsque la station est en mode Veille ou Veille prolongée. Si la DEL d'état
sur Contour reste orange, Contour vérifie si une nouvelle version du firmware est disponible
ou installe une nouvelle version du firmware. La mise à jour du firmware peut prendre entre
six à huit minutes.
Si vous souhaitez effectuer manuellement une mise à jour du firmware, cliquez sur
Update
(Mise à jour). Contactez le support technique de Pure à l'adresse
http://support.pure.com pour obtenir plus d'informations.
Remarque: n'éteignez pas votre Contour pendant la mise à jour du firmware. La DEL d'état
s'allume en orange pendant la mise à jour d'un firmware.
Remarque: les commandes de Contour et de la télécommande ne fonctionnent pas
pendant la mise à jour automatique du firmware.
Remarque: en cas de problème lors des mises à jour automatiques de firmware, contactez
le support technique de Pure à l'adresse http://support.pure.com.
ES
ES
FR
Page 78

24
Assistance et caractéristiques
techniques
Conseils et astuces
Je n'arrive pas à me connecter à mon réseau sans fil
Assurez-vous que Contour est placé dans le périmètre de portée de votre routeur sans fil et
que vous ne vous trouvez pas dans une zone sans réception.
La DEL d'état clignote en blanc
AirPlay est sélectionné en tant que source sur votre Contour, mais ce dernier ne dispose
pas d'une connexion à un réseau. Reportez-vous à ‘Paramètres réseau’ en page 8 pour
obtenir plus d'informations.
La DEL d'état clignote en cyan
Si la DEL d'état clignote en cyan, cela signifie que Contour rencontre un problème de
firmware. Contactez le support technique Pure pour obtenir de l'aide.
La connexion réseau et l'écoute audio subissent des coupures lorsque j'utilise
une connexion Wi-Fi
Si vous utilisez un iPhone, un iPod touch ou un iPad, assurez-vous d'utiliser la dernière
version de l'iOS. Si vous utilisez un téléphone Android, nous vous recommandons d'exécuter
la version Android 2.2 ou supérieure. Votre Wi-Fi peut être encombré par d'autres réseaux
sur les mêmes canaux ou des canaux proches. Consultez la documentation de votre routeur
ou contactez le support technique de Pure.
Caractéristiques techniques
Compatibilité de la Prend en charge la plupart des modèles d'iPod, iPhone et iPad.
station d’accueil Pour obtenir les informations les plus récentes, consultez le tableau de
compatibilité disponible sur notre site Web
www.pure.com/apple-compatibility.
Enceintes
2 haut-parleurs 3,5” de gamme complète avec double
port de haut-parleur
tourné vers le bas.
Sortie audio 2x18W RMS.
Connectique d'entrée Prise pour adaptateur secteur 18V CC, 3,61A. Connecteur
iPod/
iPhone/iPad. Entrée auxiliaire format mini-jack pour appareils auxiliaires.
Prise
Ethernet.
Connectique de sortie Prise numérique coaxiale pour audio numérique.
Télécommande Télécommande infrarouge. Pile bouton CR2025
incluse.
Alimentation secteur Adaptateur secteur externe 100-240V, 50/60Hz 18V CC, 3,61A.
Dimensions 371mm x 229mm x 190mm (l x H x P).
Homologations Certifié CE. Pure déclare par les présentes que cet appareil
BandIILPD est conforme aux principales exigences et aux autres
dispositions pertinentes de la directive 1999/5/CE.
La déclaration de conformité peut être consultée sur :
http://www.pure.com/about/r-tte-doc.
Conformité ETSIEN300401.
Marquage C-Tick et de sécurité électrique pour l'Australie.
Page 79

25
Copyright
Copyright 2015 Imagination Technologies Limited. Tous droits réservés. Aucune partie de cette publication ne
peut être copiée, distribuée, transmise, transcrite, stockée dans un système de restauration ou traduite dans
un langage humain ou informatique, en tout ou partie, sous quelque forme et par quelque procédé que ce soit,
électronique, mécanique, magnétique, manuel ou autre, ni divulguée à des tiers, sans le consentement écrit
préalable d'Imagination Technologies Limited.
Marques déposées
Contour 200i Air, Pure, le logo Pure, Imagination Technologies et le logo Imagination Technologies sont des
marques, déposées ou non, d'Imagination Technologies Limited. iPad, iPod, iPod Touch, iPhone, iTunes et AirPlay
sont des marques déposées d'Apple Inc., enregistrées aux États-Unis et dans d'autres pays.
Les termes «Made for iPod», «Made for iPhone» et «Made for iPad» signifient qu'un accessoire électronique
a été conçu spécialement pour être connecté à un iPod, un iPad ou un iPhone, respectivement et a été certifié
par le développeur comme répondant aux normes de performances d'Apple. Apple n'est pas responsable du
fonctionnement de ce dispositif ni de sa conformité avec les normes de sécurité et réglementaires. Notez que
l'usage de cet accessoire avec un iPod, un iPhone ou un iPad peut avoir des conséquences sur les performances
du sans fil. Tous les autres noms de produit sont des marques déposées de leurs détenteurs respectifs. Version
du 8 novembre 2015.
Informations sur la garantie
Imagination Technologies Ltd. garantit à l’utilisateur final que le présent produit est exempt de défauts de matière
et de main d’œuvre dans le cadre d’une utilisation normale, pour une période de deux ans à compter de la date
d’achat. La présente garantie couvre les pannes dues à un défaut de conception ou de fabrication; elle n'est
pas applicable aux dommages accidentels, quelle qu'en soit la cause, à l'usure normale du produit, ainsi qu'à
tous les dommages dus à la négligence et aux interventions, modifications ou réparations effectuées sans notre
autorisation. Veuillez vous connecter sur www.pure.com/register pour enregistrer votre produit auprès de nous.
Pour tout problème, veuillez vous adresser à votre revendeur ou prendre contact avec l'assistance technique de
Pure, à l'adresse indiquée au dos du présent manuel d'utilisation. Si vous avez besoin de retourner votre article,
veuillez le renvoyer dans son emballage d'origine et ne pas oublier de retourner également tous les éléments/
accessoires. Nous nous réservons le droit de refuser tout article retourné qui serait incomplet ou mal emballé.
Avis de non-responsabilité
Imagination Technologies Limited décline toute responsabilité et n'accorde aucune garantie quant au contenu du
présent document, notamment en ce qui concerne les garanties implicites de valeur marchande ou d’adéquation
à un usage spécifique. En outre, Imagination Technologies Limited se réserve le droit de réviser la présente
publication et d’y apporter des modifications, quand elle le souhaite, sans obligation de sa part d'aviser les
personnes physiques ou morales desdites révisions ou modifications.
Élimination en fin de vie des appareils électriques et électroniques
Ce symbole, apposé directement sur le produit ou sur son emballage, indique que le produit ne
doit pas être éliminé avec les déchets ménagers. Il doit être remis à un point de collecte agréé pour
le recyclage des équipements électriques et électroniques. En veillant à éliminer comme il se doit
ce produit en fin de vie, vous aiderez à prévenir les conséquences potentiellement négatives pour
l'environnement et la santé humaine. Le recyclage des matériaux aidera à préserver les ressources
naturelles. Pour tout complément d'information sur le recyclage de ce produit, n'hésitez pas à
contacter votre municipalité, votre déchetterie ou le magasin dans lequel vous avez acheté le produit.
ES
ES
FR
Page 80

26
Page 81
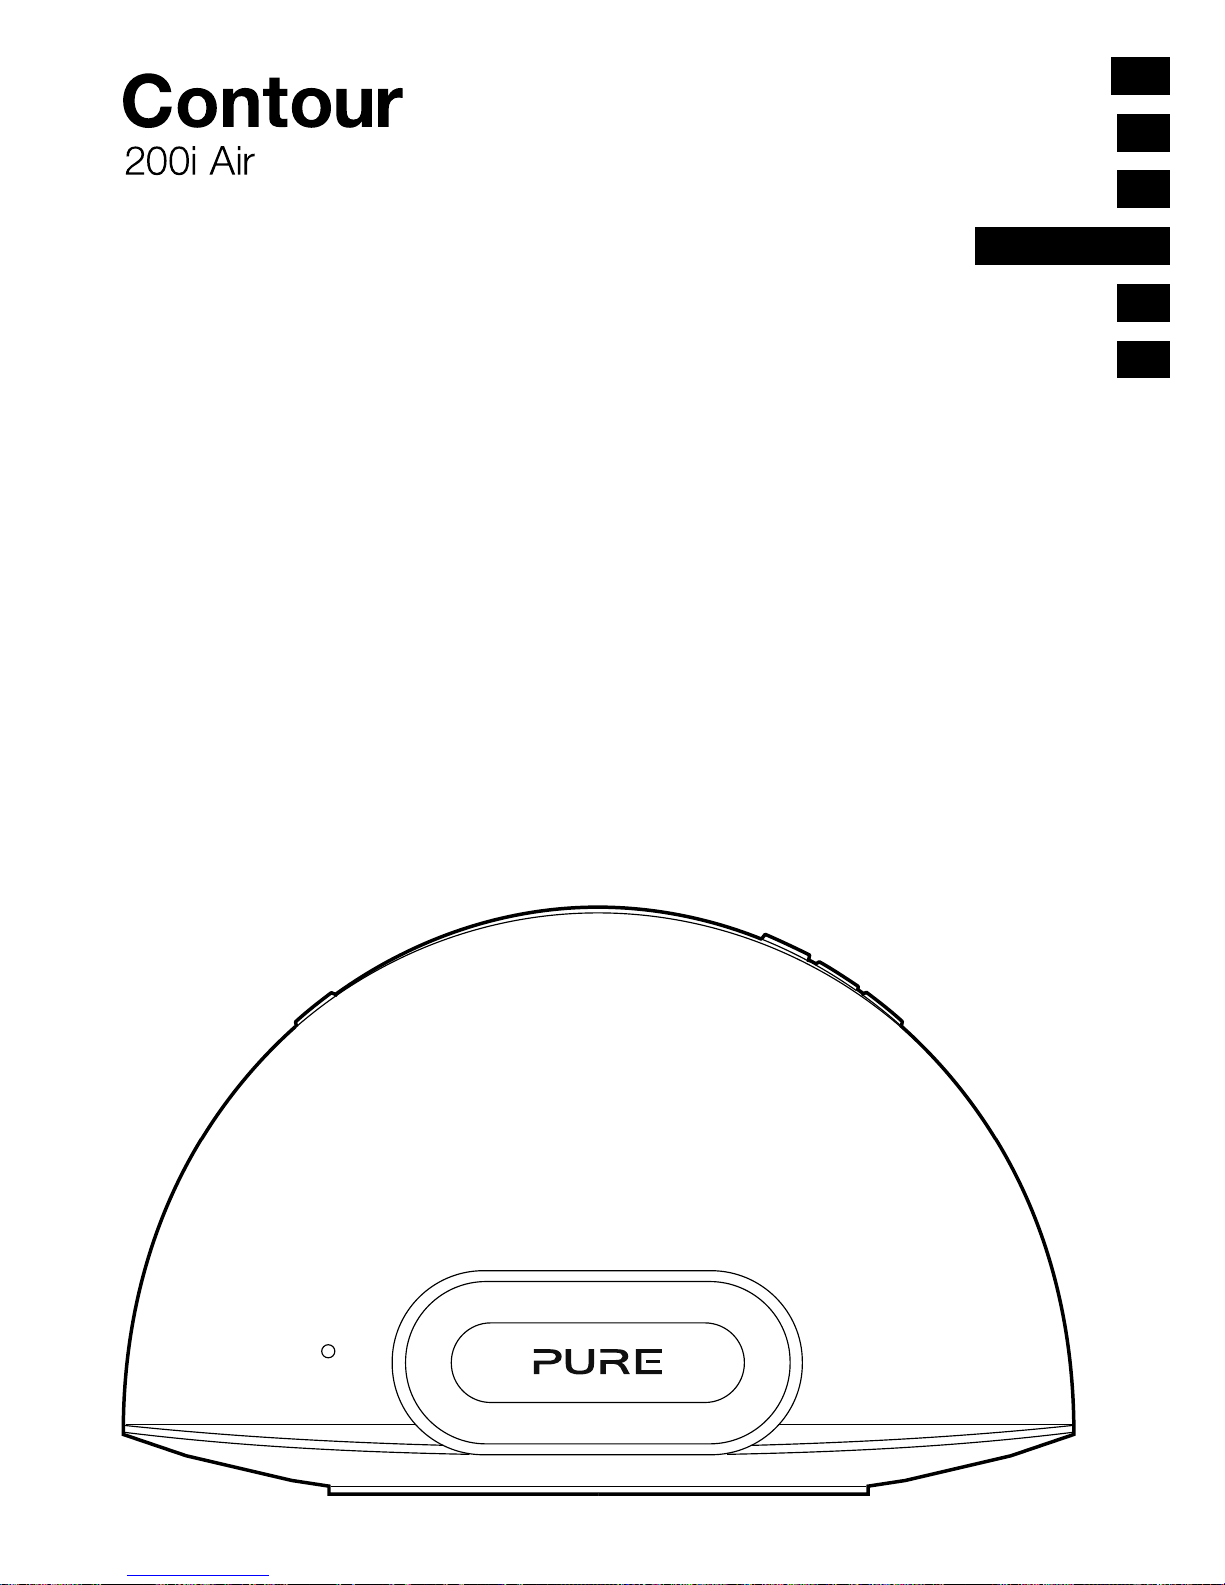
EN
1
Grazie per aver scelto Contour 200i Air. Il presente manuale
spiega come accendere e attivare in breve tempo Contour 200i
Air e come sfruttarne al massimo le caratteristiche. Miglioriamo
continuamente e aggiungiamo sempre nuove funzioni ai nostri
prodotti. Per sfruttare tutti gli aggiornamenti successivi alla
consegna del prodotto, visitare support.pure.com, dove è
possibile scaricare la versione più recente della presente guida
per l'utente in formato PDF.
ES
FR
ITALIANO
ES
NL
DA
ES
DE
Page 82

2
Istruzioni di sicurezza
1. Leggere queste istruzioni – Prima di utilizzare questo prodotto, è necessario leggere tutte le
istruzioni di sicurezza e di funzionamento.
2. Conservare queste istruzioni – Le istruzioni di sicurezza e di funzionamento devono essere
conservate per successiva consultazione.
3. Prestare attenzione a tutte le avvertenze – Tutte le avvertenze presenti sull'apparecchio e nelle
istruzioni di funzionamento devono essere rispettate.
4. Seguire tutte le istruzioni – Tutte le istruzioni di funzionamento e di utilizzo devono essere
rispettate.
5. Non impiegare questo apparecchio in prossimità dell'acqua – L'apparecchio non va utilizzato in
prossimità di umidità o acqua – ad esempio in locali umidi o vicino a una piscina o simili.
6. Pulire solo con un panno asciutto.
7. Non bloccare nessuna apertura di ventilazione. Eseguire l'installazione conformemente alle
istruzioni del produttore.
8. Non collocare il prodotto vicino a fonti di calore, quali radiatori, bocchette d'aria calda, stufe o
altri apparecchi (compresi gli amplificatori) che generano calore.
9. Non escludere la funzione di sicurezza della spina polarizzata o di messa a terra. La spina
polarizzata è provvista di due lamelle, una più larga dell'altra. La spina di messa a terra è provvista
di due lamelle più un terzo spinotto per la messa a terra. La lamella larga e il terzo spinotto sono
presenti per ragioni di sicurezza. Se la spina fornita in dotazione non è adatta alla presa elettrica
che si intende utilizzare, rivolgersi a un elettricista per fare sostituire la presa di vecchio tipo.
10. Utilizzare esclusivamente accessori specificati dal produttore.
11. Scollegare l'apparecchio in caso di temporale o quando non viene utilizzato per lunghi periodi
di tempo.
12. Affidare tutte le operazioni di riparazione a personale qualificato. Qualora l'apparecchio abbia
subito qualsiasi tipo di danno, come ad esempio al cavo di alimentazione o alla spina, per
versamento di liquido o caduta di oggetti sull'apparecchio, o per esposizione a pioggia o
umidità, in caso non funzioni correttamente o sia caduto, sarà necessario ripararlo.
13. Non installare questo apparecchio in uno spazio chiuso o circondato da altri oggetti come in una
libreria o simili. Deve essere consentita una corretta aerazione, pertanto le aperture di ventilazione
non devono essere coperte o ostruite con oggetti come giornali, tovaglie, tende, ecc.
14. AVVERTENZA: Per ridurre il rischio di incendi o scosse elettriche, non esporre l'apparecchio
a pioggia o umidità. L'apparecchio non deve essere esposto a gocciolamenti o schizzi.
Sull'apparecchio non devono essere collocati oggetti contenenti liquidi, come ad esempio vasi.
15. AVVERTENZA: L'adattatore di collegamento diretto è utilizzato come dispositivo di
disconnessione; tale dispositivo deve rimanere sempre pronto per l'uso.
16. AVVERTENZA: Non esporre le batterie del telecomando a fonti di calore, come luce solare
diretta, fuoco o simili.
17. Questo apparecchio elettrico è di classe II o a doppio isolamento. È stato progettato in
modo da non richiedere un collegamento di sicurezza con messa a terra.
18. L'antenna del prodotto deve essere mantenuta a una distanza minima di 20 cm dalle persone.
19. L'etichetta con la dicitura di potenza nominale è situata sul retro dell'unità centrale.
Page 83

3
Sommario
4 Per iniziare
4 Introduzione
4 App Pure Connect
5 Telecomando
6 Comandi e connettori del pannello anteriore/superiore
6 LED di stato del pannello anteriore
7 Comandi e connettori del pannello posteriore
8 Cambio tra Sleep, Standby e On
8 Configurazione della rete
9 Preparazione di Contour per la connessione a una rete wireless
13 Preparazione di Contour per la connessione a una rete Ethernet
14 Utilizzo di AirPlay per
riprodurre l'audio
14 Selezione di AirPlay come sorgente
14 Riproduzione audio da un iPod touch,
iPhone o iPad
15 Riproduzione audio da iTunes
15 Rinvio dei comandi ad iTunes da Contour
16 Streaming audio in diverse stanze
17 Ascolto di un iPod/iPhone/iPad tramite dock
17 Compatibilità
17 Sincronizzazione del dispositivo
17 Selezione del dock
17 Controllo del dispositivo
18 Utilizzo dell'ingresso ausiliario
18 Utilizzo dell'uscita digitale
19 Utilizzo del Contour Setup Manager
21 Assegnazione del nome di Contour
24 Guida e specifiche tecniche
IT
Page 84

4
Per iniziare
Introduzione
Contour 200i Air può essere utilizzata in diversi modi:
• Come dispositivo AirPlay per riprodurre audio da iTunes sul computer o un iPod touch,
iPhone o iPad con AirPlay, attraverso la rete wireless. Vedere ‘Configurazione della
rete’ a pagina 8.
• Come dock per iPod, iPhone o iPad. Vedere pagina 17.
• Come speaker per un dispositivo audio collegato attraverso il connettore Aux In.
Vedere pagina 18.
Nota: nelle restanti sezioni della presente guida per l'utente, per riferirsi a Contour 200i Air
sarà usata l'espressione Contour.
App Pure Connect
Sfruttate al meglio l’audio con qualità hi-fi dell’Contour, installando gratuitamente la app Pure
Connect su iPod touch o iPhone. La app Pure Connect consente di accedere a migliaia di
stazioni radio Internet, contenuti on-demand (podcast e programmi “Listen again”), e suoni.
App Pure Connect per iOS
Page 85

5
Standby
Premere per cambiare tra Sleep, Standby e On.
Vedere pagina 8.
Source Premere per cambiare tra le sorgenti AirPlay,
dock e ingresso ausiliario.
Ordine casuale di riproduzione delle tracce
(quando la sorgente è AirPlay/dock).
Premere in sequenza per ripetere la traccia
corrente, ripetere tutto o non ripetere (quando la
sorgente è AirPlay/dock).
Vol
Menu Premere per accedere al menu su un iPod o
iPhone collegati al dock. Torna anche indietro
attraverso i menu.
Select
Text & Symbols
Mirror Finish
Selezionare le tracce e le opzioni del menu su
iPod/iPhone (solo quando la sorgente è il dock).
e
Tornare all'inizio della traccia corrente o passa
alla traccia precedente o successiva. Tenere
premuto per avanzamento o riavvolgimento
rapido (solo quando la sorgente è dock).
Riprodurre/mettere in pausa la traccia corrente
(quando la sorgente è AirPlay/dock).
Aumento/riduzione del volume
+
-
Telecomando
Tirare la linguetta di plastica dal vano
batterie del telecomando e rimuovere
la pellicola di protezione dai tasti del
telecomando.
IT
Page 86
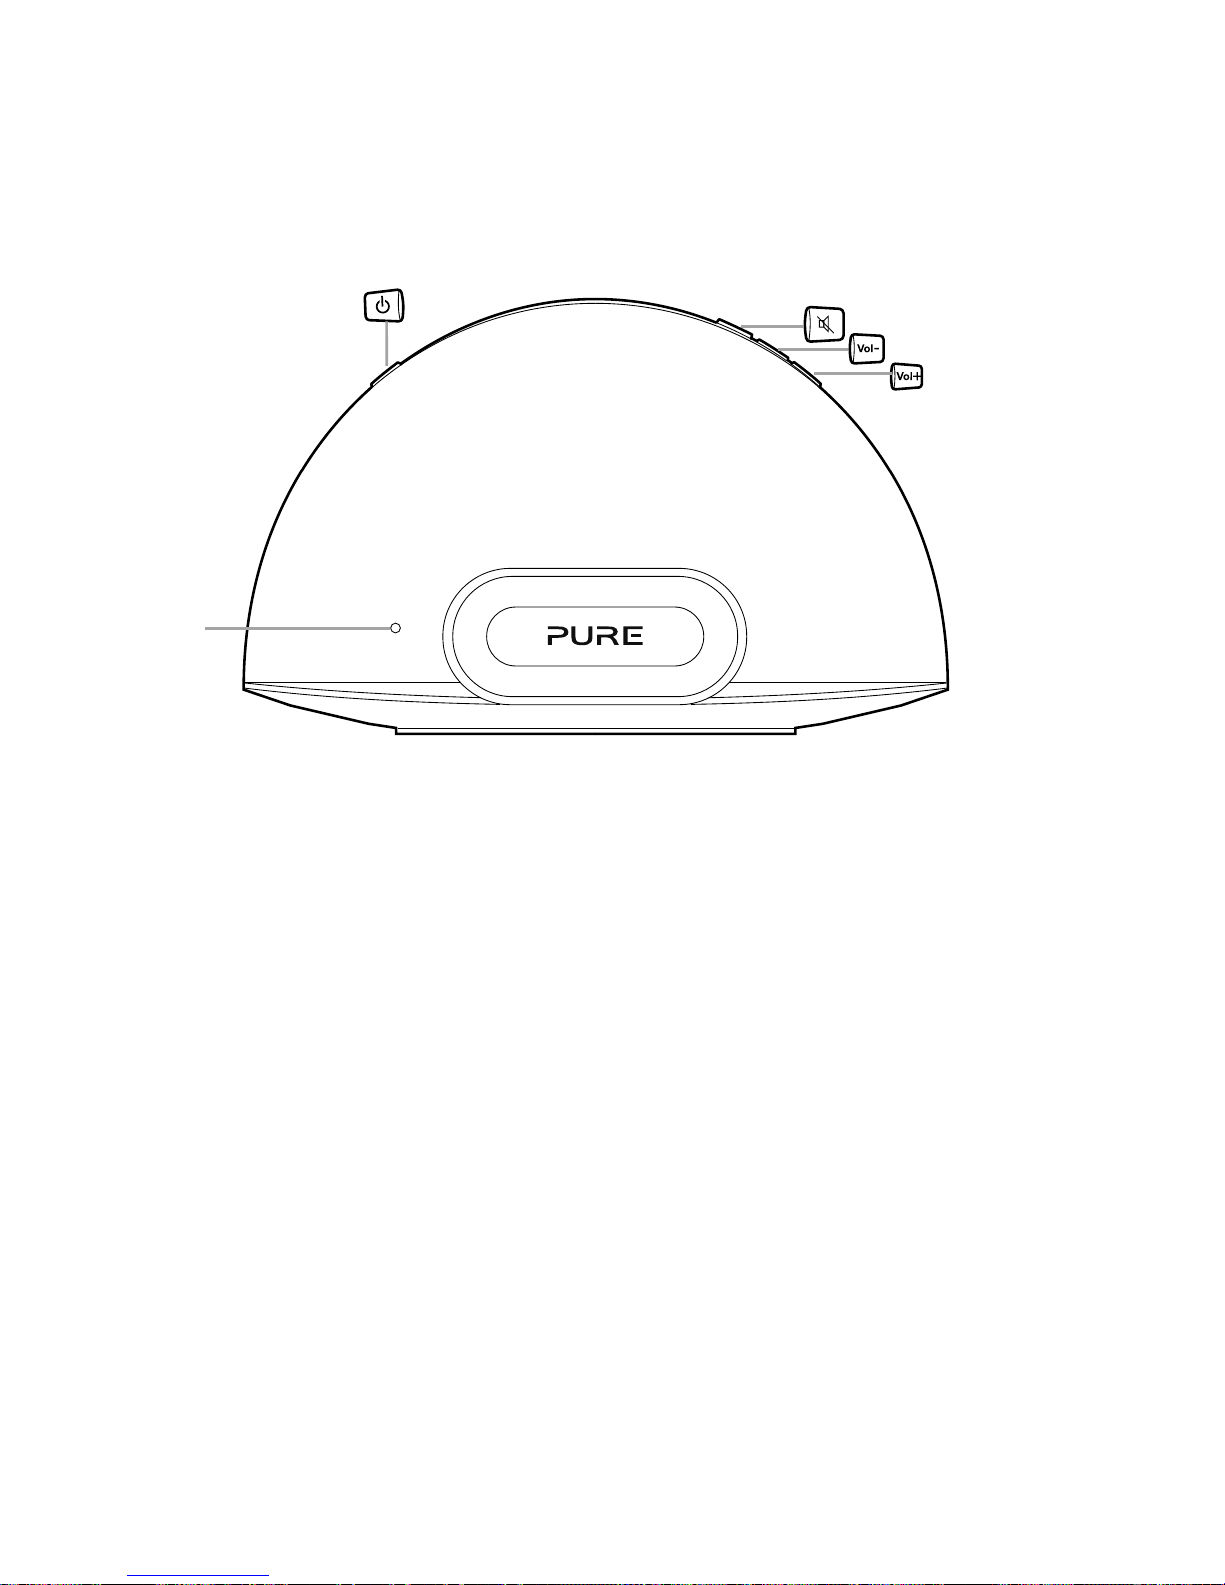
6
Standby
Premere per
cambiare tra Sleep,
Standby e On.
Vedere pagina 8.
Muto
Riduzione volume
Aumento
volume
LED di
stato
Vedere
pagina 6.
Comandi e connettori del pannello anteriore/superiore
LED di stato del pannello anteriore
Quando Contour è alimentato, il LED di stato è visibile attraverso la griglia dell'altoparlante
anteriore. Il LED di stato serve anche per indicare i vari stati di Contour, secondo il colore.
Rosso Standby (brillante) / Avvio in corso (brillante lampeggiante) / Sleep (tenue)
Blu Il dock iPod/iPhone/iPad è attivo (se lampeggiante indica che la
connessione al prodotto tramite dock è in corso e indica inoltre
un'attività remota)
Bianco AirPlay è attivo (un lampeggio veloce indica un'attività remota)
(un lampeggio lento indica problemi di connettività di rete)
Rosa Aux In è attivo (un lampeggio veloce indica attività remota)
Blu/Verde (lampeggio alternato) Configurazione temporanea della rete wireless
Ciano Se lampeggiante indica un errore del firmware
Ambra Aggiornamento del firmware in corso
Nota: per avere un riferimento immediato, sulla base di Contour è posto un adesivo che
indica gli stati più comuni del LED di stato.
Page 87

7
Comandi e connettori del pannello posteriore
DC In
(Ingresso CC)
Connettore
per adattatore
di rete in
dotazione.
Aux In
Connettore per
ingresso stereo
analogico per
lettore MP3 o
simile. Vedere
pagina 18.
Ethernet
Connettore per
cavo di rete. Usare
come alternativa
alla configurazione
Wi-Fi. Vedere
pagina 13.
Digital Coaxial
(Coassiale
digitale)
Connettore
per l'uscita del
segnale audio
digitale. Vedere
pagina 18.
Wi-Fi Setup
(Configurazione
Wi-Fi)
Pulsante utilizzato
per configurare una
rete wireless. Vedere
pagina 11.
LED di stato
aggiornamento
firmware*
*LED di diagnostica per utilizzo da parte del supporto tecnico di Pure.
IT
Page 88

8
Cambio tra Sleep, Standby e On
Contour ha tre modalità di funzionamento: Standby, Sleep e On. In Standby, Contour ha un
utilizzo minimo di energia (LED di stato rosso brillante). In modalità Sleep, Contour rimane
collegata alla rete wireless e attende che venga selezionata una sorgente (il LED di stato è
rosso tenue).
Per entrare in modalità Sleep, premere Standby. Se non riceve alcun segnale audio da
AirPlay o da un iPod/iPhone/iPad collegato, Contour entrerà automaticamente in modalità
Sleep dopo 15 minuti.
Una volta in modalità Sleep, premere Standby per passare a On.
Per entrare in Standby, premere e tenere premuto Standby per quattro secondi su Contour
o sul telecomando, finché il LED di stato diventa rosso brillante. Premere Standby per
tornare direttamente alla modalità On. Contour lampeggerà per 30 secondi con luce rossa,
quindi, dopo una pausa, tornerà nello stato in cui si trovava prima della modalità di Standby.
Configurazione della rete
Contour può essere collegata alla rete utilizzando una connessione wireless o cablata.
La connessione consigliata è quella wireless, che consente di posizionare Contour in
qualsiasi punto nel raggio di azione della rete stessa. Contour può essere collegata alla rete
wireless utilizzando Wi-Fi Network Login Sharing o manualmente. Vedere pagina 9 per
ulteriori informazioni.
Per utilizzare il metodo di connessione cablata, collegare un cavo Ethernet tra la porta
Ethernet nella parte posteriore di Contour e una delle porte Ethernet sul router. Questo
metodo può essere selezionato se in precedenza si sono verificati problemi di qualità
del suono o se Contour è posizionato vicino al router. Vedere pagina 13 per ulteriori
informazioni.
Page 89
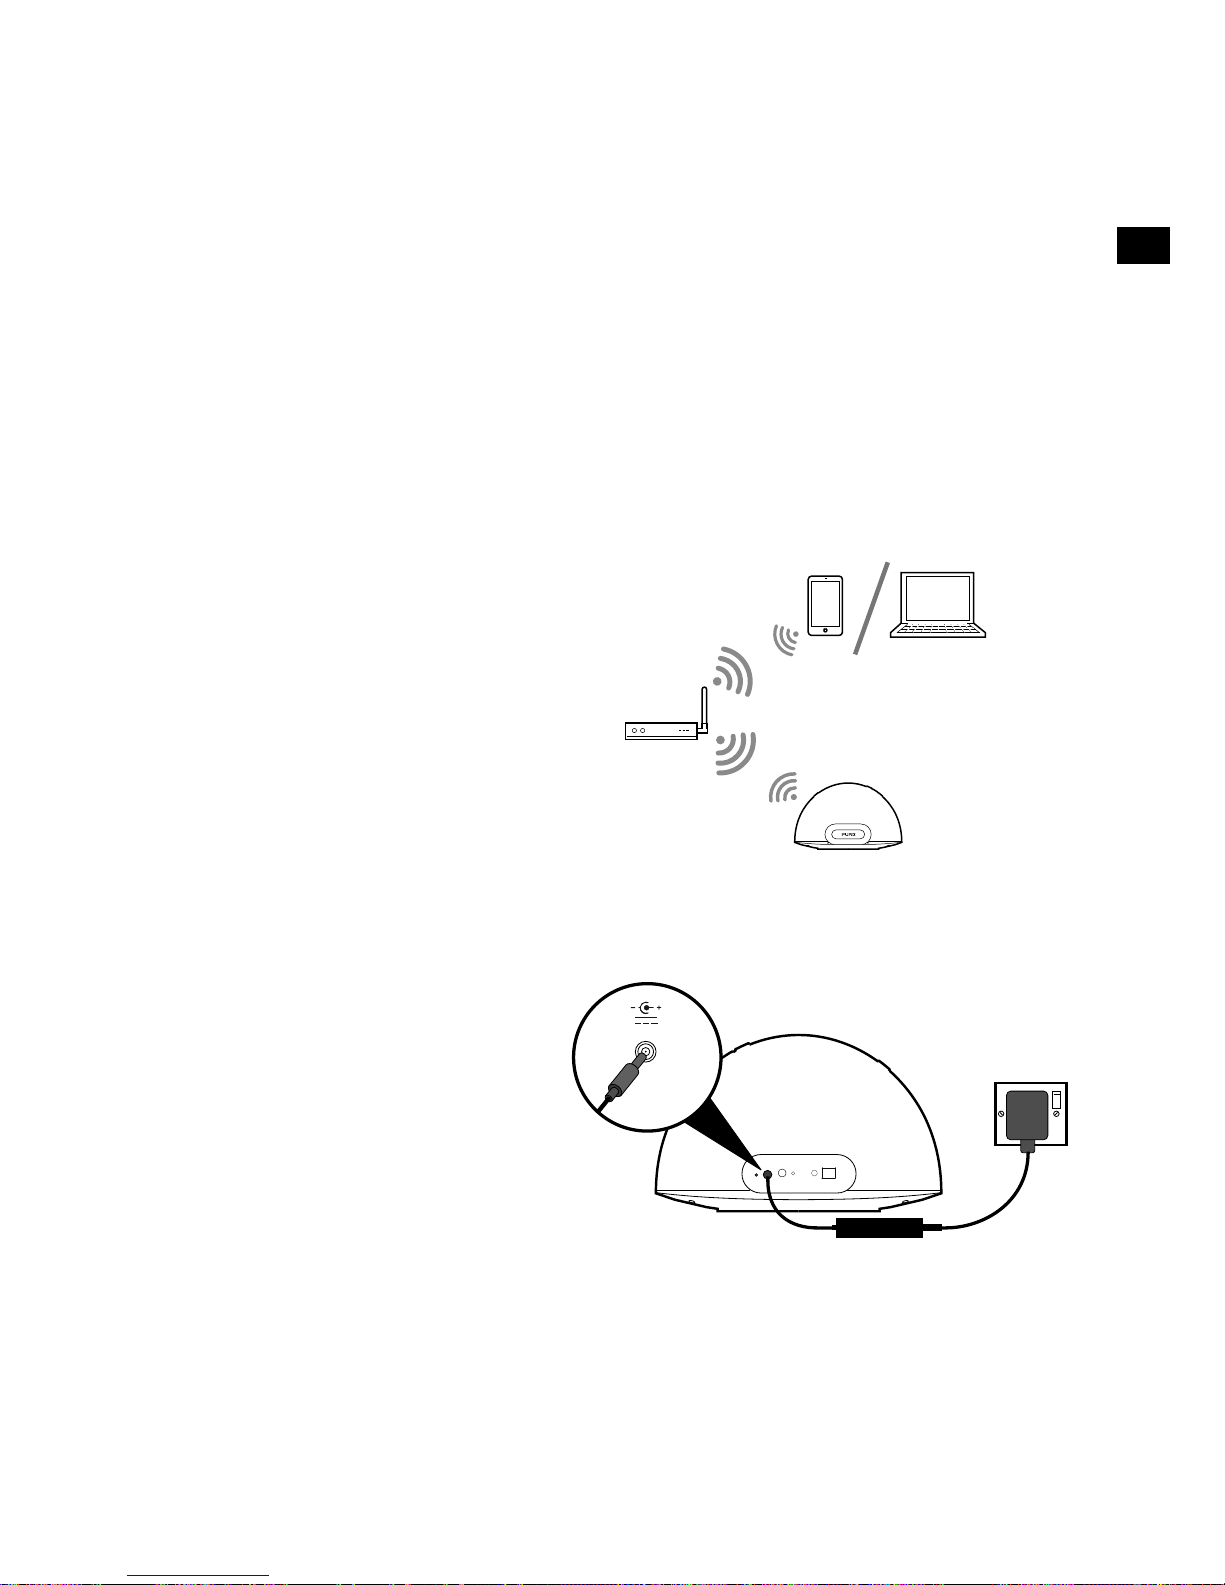
9
1. Posizionare Contour nel raggio di
azione della rete wireless.
2.
Inserire il connettore
dell'adattatore di corrente nella
presa nella parte posteriore di
Contour.
3.
Collegare alla rete elettrica.
4.
Quando il LED di stato rosso
nella parte anteriore smette di
lampeggiare, Contour è in modalità Sleep.
5.
Vedere pagina 10 per configurare la connessione wireless utilizzando il metodo Wi-
Fi Network Login Sharing. Vedere pagina 11 per configurare la connessione alla rete
wireless manualmente.
18V DC
Preparazione di Contour per la
connessione a una rete wireless
Introduzione
Contour può essere collegata alla rete wireless utilizzando due metodi diversi. Consigliamo
di utilizzare Wi-Fi Network Login Sharing, che collega automaticamente Contour alla rete
wireless utilizzando le impostazioni Wi-Fi dell'iPod, iPhone o iPad*. In alternativa, Contour
può essere collegato alla rete wireless manualmente. Prima di scegliere un metodo di
connessione occorre preparare Contour per la configurazione wireless.
Preparazione di Contour per la configurazione wireless
Tipica configurazione wireless
*Per utilizzare Wi-Fi Network Login Sharing su iPod touch, iPhone o iPad è necessaria la versione 5.0 o superiore di iOS.
IT
Page 90

10
Connessione di Contour alla rete wireless utilizzando Wi-Fi Network
Login Sharing
Per collegare Contour alla rete wireless:
1. Posizionare il dispositivo Apple non bloccato (iPod touch, iPhone o iPad) e attendere
qualche secondo affinché venga autenticato. Il LED di stato sarà blu lampeggiante e il
dispositivo Apple avvierà la condivisione.
2. Quando il LED di stato non è più blu lampeggiante, premere il pulsante di
connessione Wi-Fi sul retro di Contour.
3. Sulla schermata dell'iPod/iPhone/iPad viene chiesto se si desidera condividere le
impostazioni Wi-Fi.
4. Selezionare Allow (Consenti).
5. Contour dovrebbe ora collegarsi alla rete.
Nota: per verificare che Contour si sia connessa alla rete correttamente utilizzando
Network Login Sharing, verificare che il LED di stato sia bianco fisso in modalità AirPlay.
Vedere ‘LED di stato del pannello anteriore’ a pagina 6 per ulteriori informazioni.
Page 91
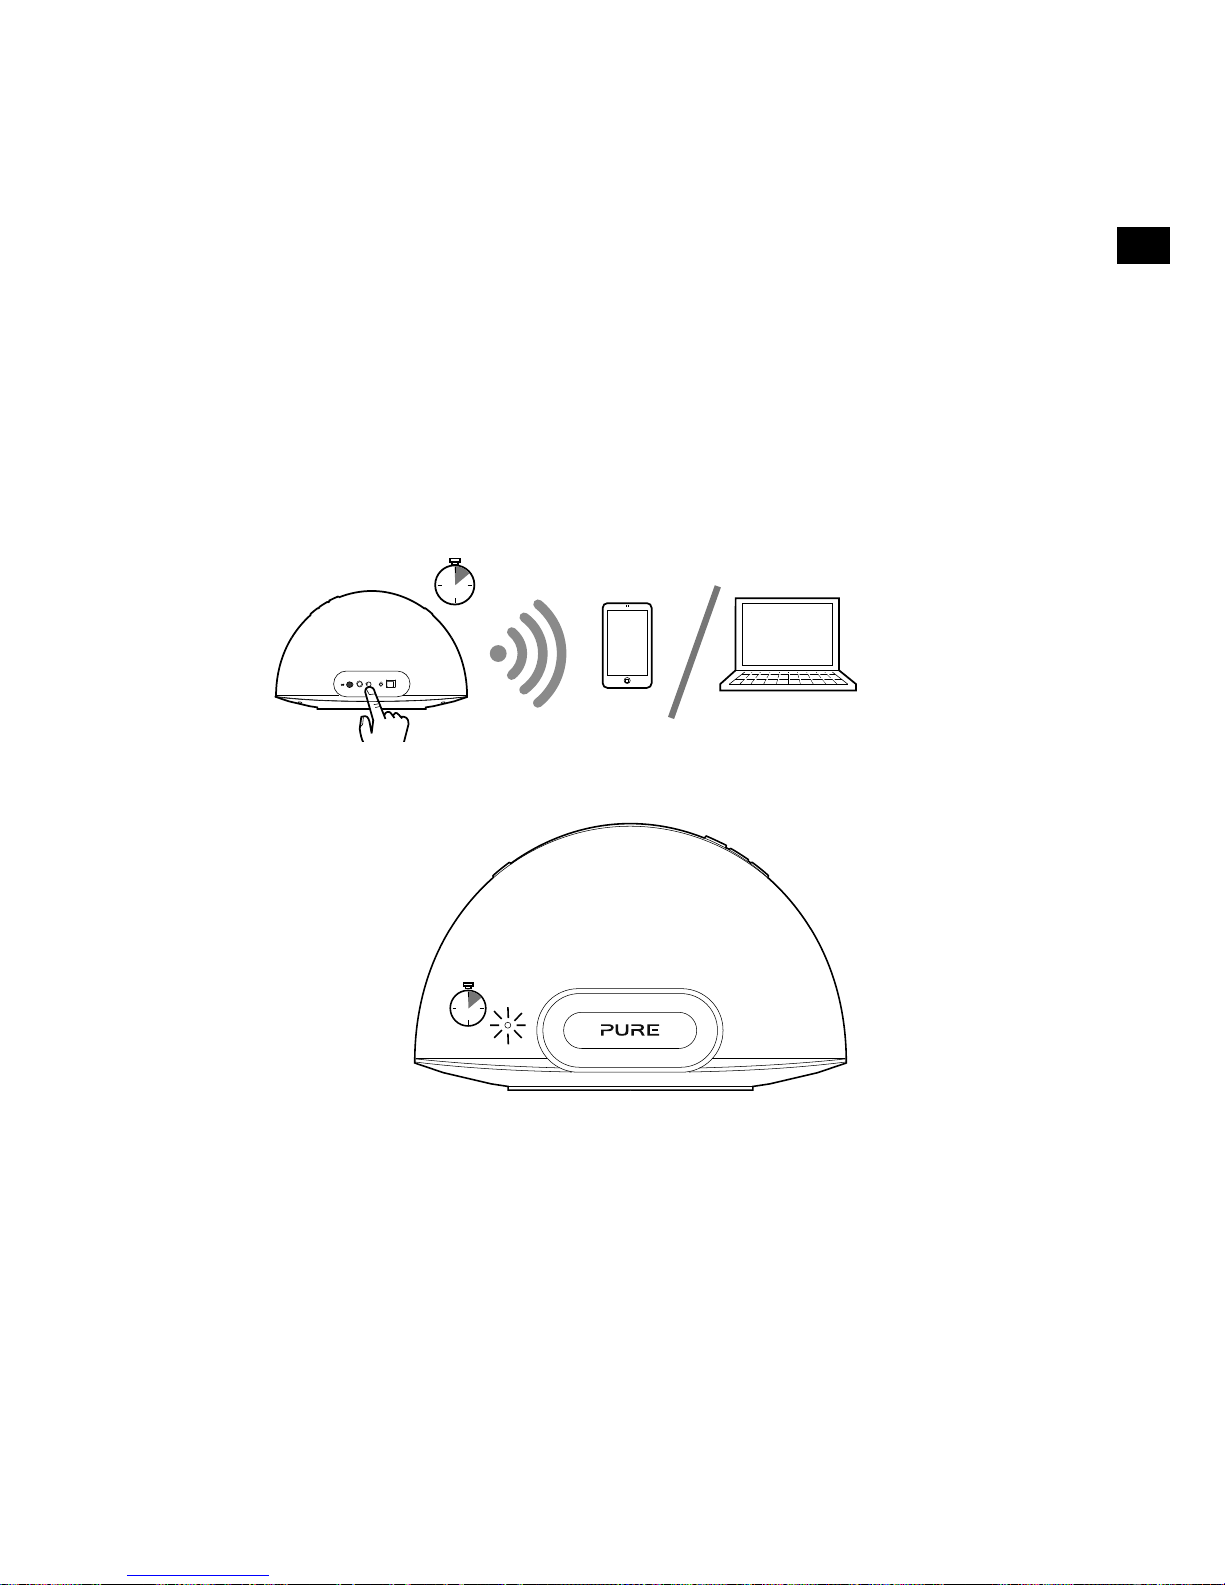
11
Connessione manuale di Contour alla rete wireless
Fase 1: connessione del dispositivo di configurazione a Contour
Nella prima fase di configurazione occorre stabilire una connessione tra il dispositivo di
configurazione e Contour. Per farlo, occorre creare una rete wireless temporanea per
collegare Contour all'iPod touch, iPhone, iPad o laptop.
Connessione utilizzando una rete wireless temporanea
1. Assicurarsi che Contour sia in modalità Sleep o On.
2. Premere il pulsante Wi-Fi Setup (Configurazione Wi-Fi) nella parte posteriore di Contour
per cinque secondi. Questo abiliterà la rete wireless temporanea di Contour. Mentre la
rete wireless temporanea è in preparazione, il LED di stato è rosso lampeggiante.
20 secs
Dopo circa venti secondi, il LED di sarà verde e blu lampeggiante.
20 secs
3. Ora sul dispositivo di configurazione (iPhone, laptop, ecc.) dovrebbe essere visibile la
rete wireless Contour 200i Air ******. Selezionare questa rete. Non è richiesta alcuna
password.
4. Dopo aver collegato la rete wireless Contour 200i Air ****** è possibile accedere al
Contour Setup Manager sul browser web del dispositivo di configurazione. Utilizzare il
Contour Setup Manager per aggiungere Contour alla rete wireless.
Nota: ****** rappresenta un codice a sei cifre che sarà univoco per ogni Contour e
basato sulle ultime tre cifre dell'indirizzo MAC di Contour. L'indirizzo MAC è riportato
sull'etichetta alla base di Contour.
IT
Page 92
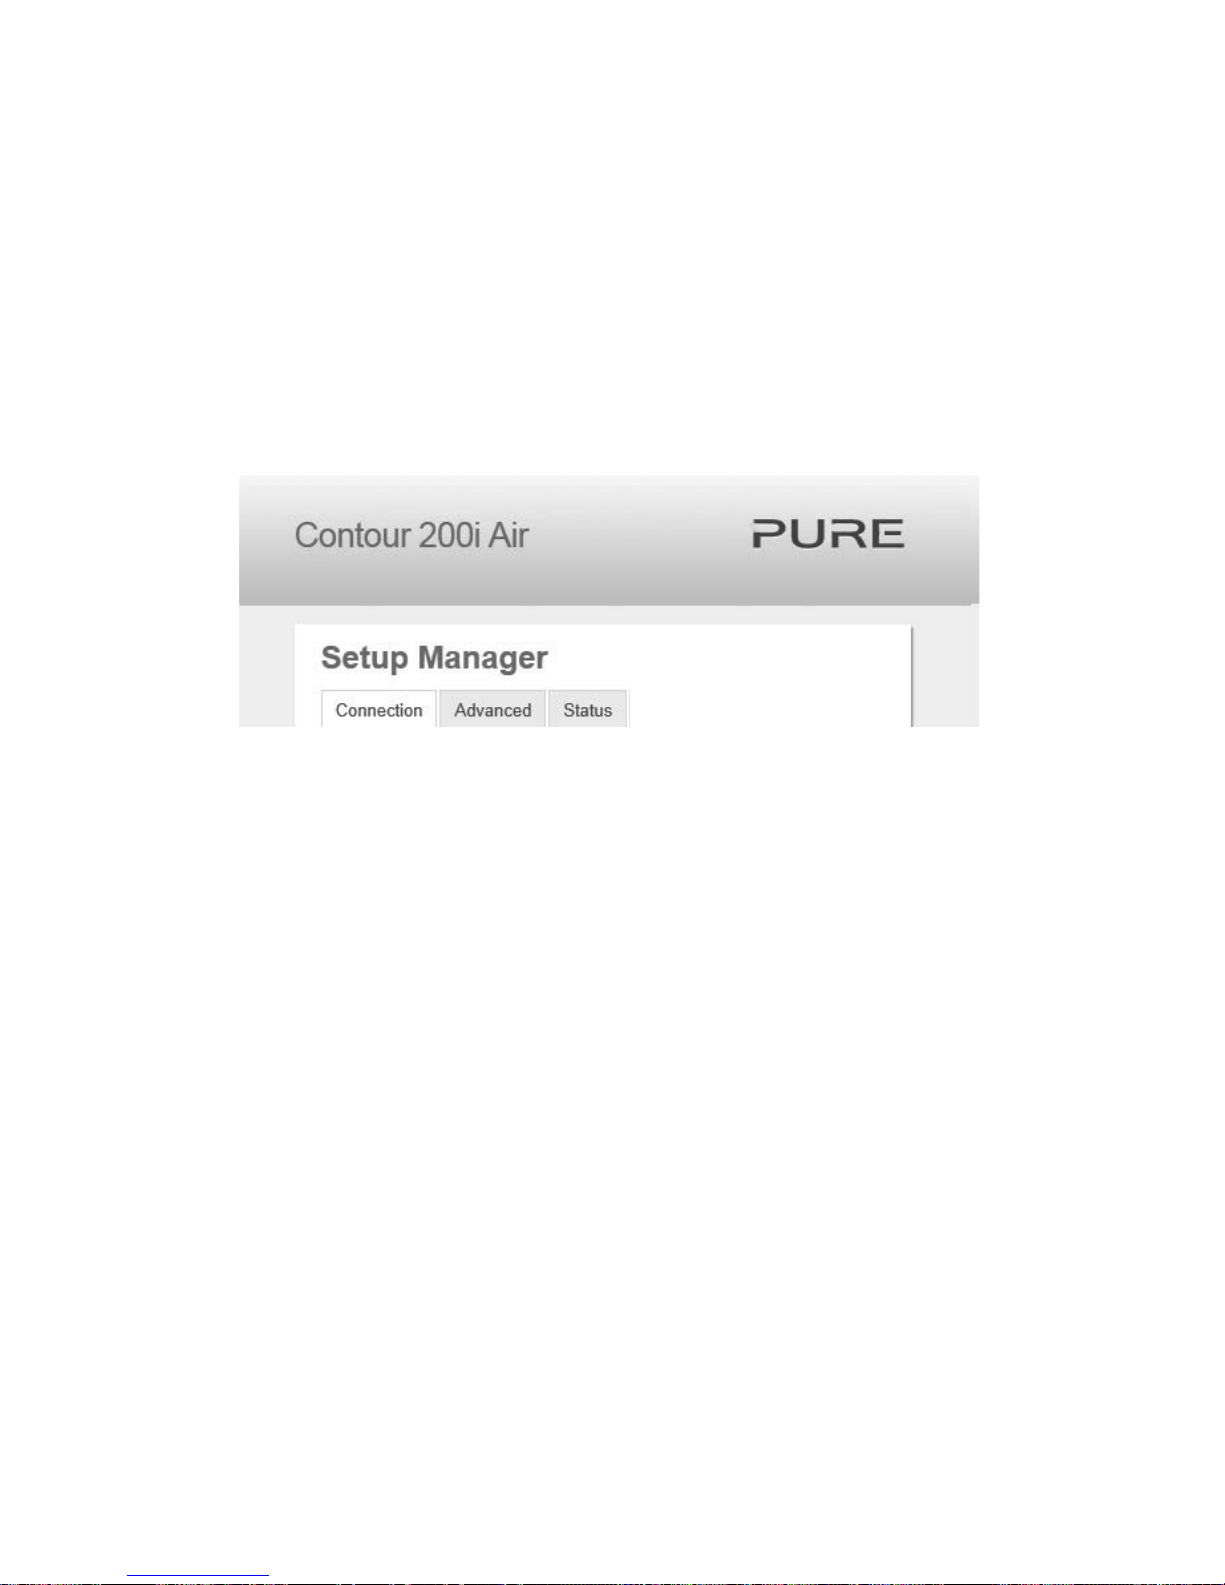
12
Fase 2: accesso al Contour Setup Manager
Dopo aver stabilito la connessione temporanea tra il dispositivo da configurare e Contour, è
possibile accedere al Contour Setup Manager come segue:
1. Avviare il browser web (ad es. Safari, Google Chrome, Microsoft Internet Explorer,
Mozilla Firefox) sul dispositivo di configurazione.
2. Inserire l'indirizzo seguente:
http://192.168.1.12
3. Verrà visualizzato il Contour Setup Manager:
4. Fare clic sulla scheda Connection (Connessione).
Fase 3: aggiunta di Contour alla rete wireless
Contour cercherà automaticamente le reti disponibili. Se l'opzione automatica non funziona,
vedere ‘Connessione manuale di Contour alla rete wireless’ a pagina 11 per aggiungere
manualmente Contour alla rete wireless:
1. Selezionare il nome della rete wireless dall'elenco a discesa Network (Rete). Il metodo
di codifica verrà rilevato automaticamente.
2. Se richiesto, inserire la chiave di sicurezza di rete.
3. Fare clic su Connect (Connetti). Il LED di stato sarà quindi rosso lampeggiante per
indicare che Contour si sta riavviando. Contour entrerà in modalità Sleep e il LED di
stato sarà rosso tenue.
4.
Contour è ora pronto per l'utilizzo con una connessione wireless. Vedere pagina 14.
Nota: si suggerisce di contattare il reparto IT prima di tentare di collegare Contour a una rete
wireless aziendale.
Page 93

13
Preparazione di Contour per la
connessione a una rete Ethernet
1. Collegare un cavo Ethernet
dalla porta Ethernet nella parte
posteriore di Contour al router.
2.
Inserire il connettore
dell'adattatore di corrente CC
nella presa nella parte posteriore
di Contour.
3.
Collegare alla rete elettrica.
4.
Verrà stabilita una connessione
di rete tra il router e Contour. Quando il LED di stato rosso nella parte anteriore smette di
lampeggiare, Contour è in modalità Sleep.
5.
Contour è ora pronta per trasmettere in streaming utilizzando AirPlay con una
connessione cablata.
18V DC
Configurazione Ethernet tipica
IT
Page 94

14
Riproduzione audio da un iPod touch,
iPhone o iPad
Sull'iPod touch, iPhone o iPad, assicurarsi di essere
connessi alla stessa rete wireless di Contour. Dovrebbe
quindi essere possibile selezionare il Contour da un elenco
di dispositivi AirPlay.
Nota: il nome predefinito assegnato a Contour è costituito
dalla parola "Contour" seguita da un codice a sei cifre. Tale
codice rappresenta le ultime sei cifre dell'indirizzo MAC di
Contour, riportato sull'etichetta alla base di Contour.
Sull'iPod touch, iPhone o iPad, il simbolo di AirPlay
sarà bianco quando un qualsiasi dispositivo AirPlay è
disponibile sulla rete. Il simbolo di AirPlay diventa blu
quando l'iPod touch o l'iPhone utilizza Contour come
accessorio altoparlante.
Selezionare la traccia che si desidera riprodurre. Se
Contour è in modalità Sleep, si accenderà e cambierà la
sorgente in AirPlay. Il LED di stato diventerà bianco quando
AirPlay è attivo.
Utilizzo di AirPlay per
riprodurre l'audio
Selezione di AirPlay come sorgente
Premere Source (Sorgente) sul telecomando finché il LED di stato diventa bianco. Se il
LED di stato è bianco fisso, AirPlay è stato configurato correttamente (questa operazione
può richiedere fino a un minuto). Se il LED di stato è ancora bianco lampeggiante dopo un
minuto, si è verificato un problema con la rete di Contour.
Nota: vedere "Domande e risposte" a pagina 24 per la risoluzione dei problemi di
connettività di rete di Contour.
Page 95
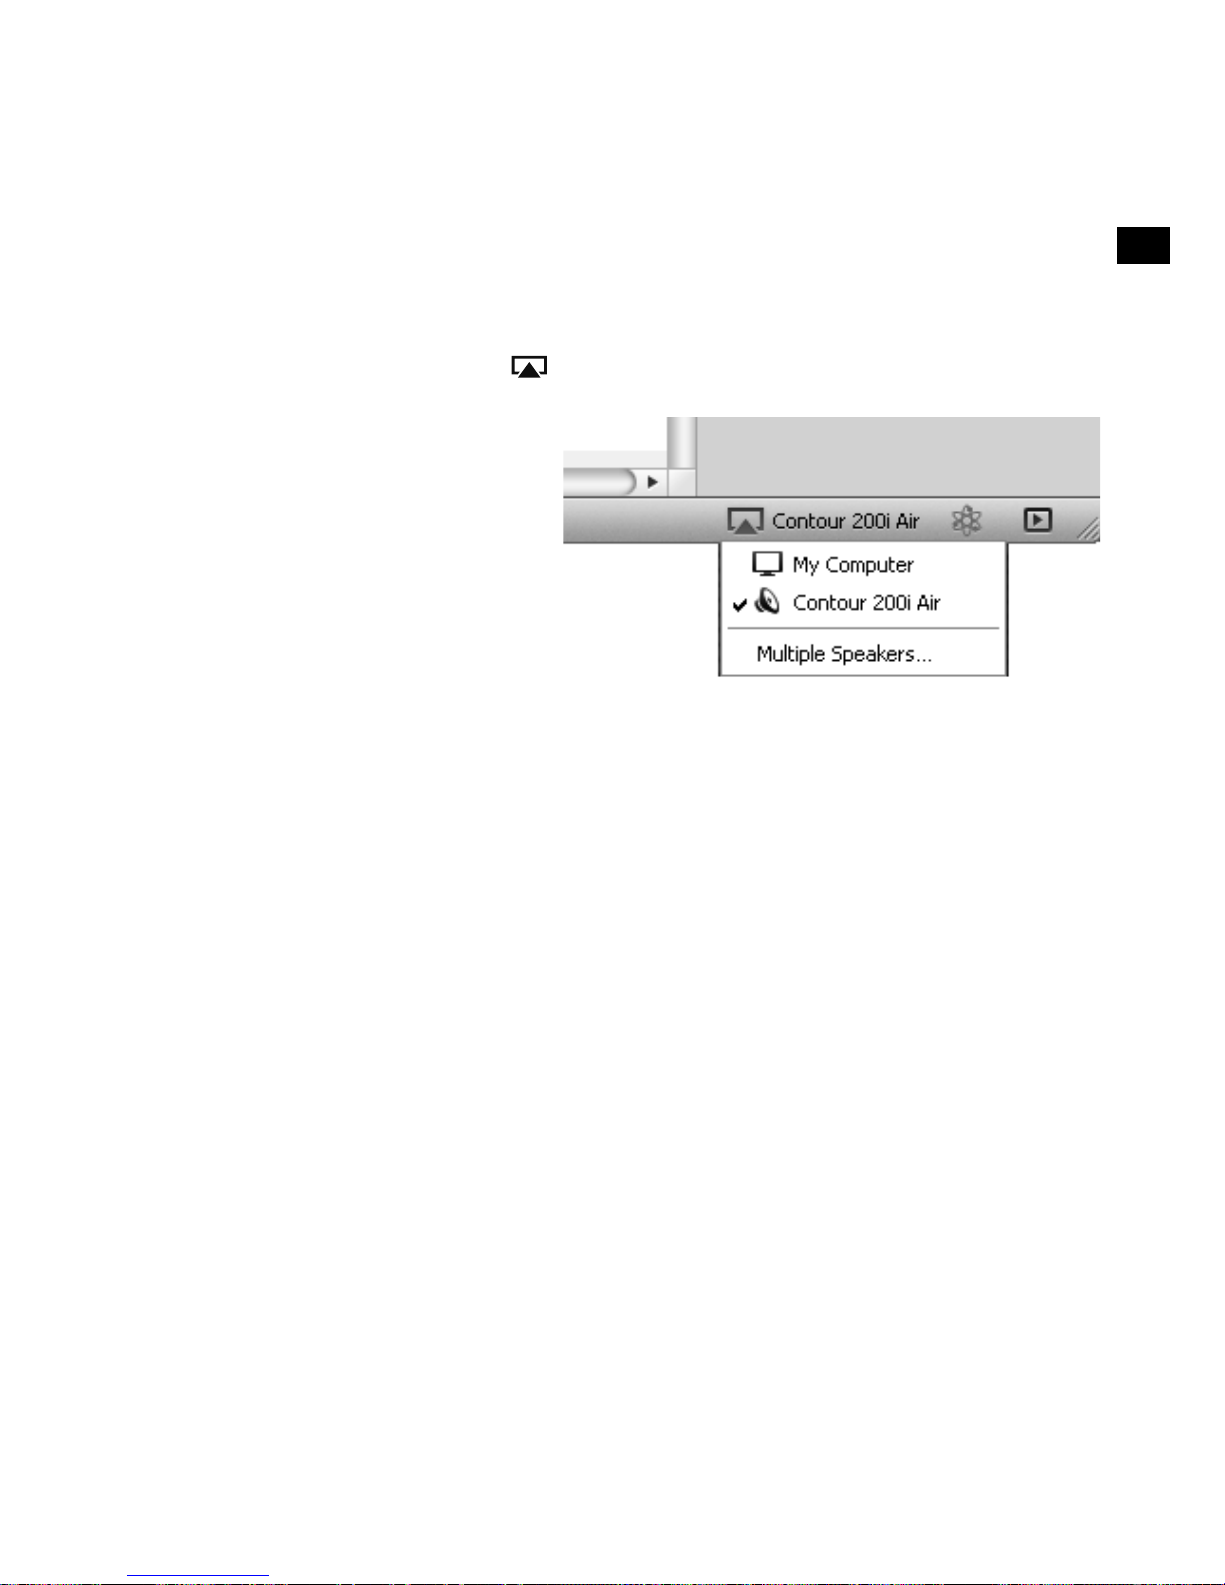
15
Riproduzione audio da iTunes
Dopo aver aggiunto correttamente Contour alla stessa rete del computer con iTunes, iPod
touch, iPhone o iPad, l'unità verrà rilevata automaticamente. Per selezionare Contour come
dispositivo AirPlay in iTunes:
1.
Aprire iTunes.
2. Fare clic sul simbolo di AirPlay e selezionare Contour dall'elenco AirPlay in fondo
alla schermata.
3. Selezionare la traccia che si
desidera riprodurre. Se Contour
è in modalità Sleep, si accenderà
e cambierà la sorgente in AirPlay.
Il simbolo di AirPlay diventa blu
quando iTunes utilizza Contour
come accessorio altoparlante.
4. Il LED di stato su Contour diventa
bianco ad indicare che AirPlay è
attivo.
Rinvio dei comandi ad iTunes da Contour
Se si desidera rinviare i comandi ad iTunes da Contour (come riproduci/pausa) occorre
abilitare questa opzione in iTunes.
Per sistemi Windows:
1. Fare clic su Edit (Modifica).
2.
Fare clic su Preferences (Preferenze).
3.
Selezionare la scheda Devices (Dispositivi).
4.
Fare un segno di spunta su Allow iTunes audio control from remote speakers
(Consenti il controllo dell'audio iTunes da altoparlanti remoti).
Per sistemi Apple Mac:
1. Fare clic su iTunes.
2.
Fare clic su Preferences (Preferenze).
3.
Selezionare la scheda Devices (Dispositivi).
4.
Fare un segno di spunta su Allow iTunes audio control from remote speakers
(Consenti il controllo dell'audio iTunes da altoparlanti remoti).
IT
Page 96

16
Streaming audio in diverse stanze
Se si possiede più di un'unità Contour, è possibile utilizzare AirPlay per trasmettere gli stessi
contenuti audio in streaming contemporaneamente su ogni unità Contour; questo può
essere configurato utilizzando iTunes sul computer. Per consentire ad AirPlay di trasmettere in
streaming gli stessi contenuti audio su ciascuna unità Contour, fare clic sull'icona di AirPlay e
selezionare l'opzione Multiple Speakers (Altoparlanti multipli).
È possibile controllare qualsiasi funzione in iTunes installando l'app Apple Remote sull'iPod,
iPhone o iPad. Dopo l'installazione, è possibile utilizzare l'iPod, iPhone o iPad come
telecomando per iTunes. L'app Apple Remote può essere scaricata dall'App Store di Apple.
Fare riferimento al sito web di Apple per ulteriori informazioni.
Page 97

17
Ascolto di un iPod/iPhone/iPad
tramite dock
Compatibilità
Il dock su Contour è compatibile con gran parte dei modelli di iPod, iPhone e iPad. Per le
informazioni più aggiornate, controllare la tabella di compatibilità sul nostro sito web:
www.pure.com/products/ipod-compatibility.
Sincronizzazione del dispositivo
Posizionare con cautela il dispositivo sul connettore.
Il dispositivo inizierà a caricarsi appena viene posizionato sul dock e continuerà a caricarsi
sia che Contour sia in modalità di riproduzione, in Standby o in modalità Sleep.
Selezione del dock
Premere Source (Sorgente) finché il LED di stato diventa blu.
Controllo del dispositivo
Quando viene selezionata la sorgente iPod, il dispositivo inizia a riprodurre l'ultima traccia
ascoltata. Per sfogliare i menu e controllare la riproduzione, utilizzare il telecomando o i
comandi sul dispositivo.
IT
Page 98

18
Utilizzo dell'ingresso ausiliario
Connessione di un dispositivo ausiliario
Con un cavo adeguato, collegare la presa "line out" o la presa cuffie del dispositivo ausiliario
alla presa Aux In di Contour.
Selezione dell'ingresso ausiliario
Premere Source (Sorgente) finché il LED di stato diventa rosa.
Utilizzo dell'uscita digitale
Utilizzo di un dispositivo di uscita digitale esterno
È possibile collegare Contour a un dispositivo di uscita digitale, ad esempio un sistema
hi-fi compatibile. Qualsiasi audio riprodotto su Contour verrà inviato anche al dispositivo
collegato e alla sorgente AirPlay.
Nota: i comandi del volume su Contour non regolano il volume sul dispositivo digitale.
Connessione di un dispositivo di uscita digitale esterno
Collegare Contour al dispositivo digitale in uscita utilizzando un cavo coassiale adatto da
collegare al connettore coassiale digitale.
Page 99

19
Utilizzo del Contour Setup
Manager
Introduzione
Contour è dotata di un Setup Manager. Il Setup Manager permette di cambiare le varie
impostazioni di Contour, ad esempio cambiare l'altoparlante (vedere pagina 21) e
visualizzare lo stato dell'unità. È inoltre possibile utilizzare il Setup Manager per eseguire un
aggiornamento manuale del firmware. Accedere al Contour Setup Manager utilizzando uno
dei seguenti metodi:
• Durante la fase 2 della configurazione di rete manuale (pagina 12).
• Tramite Bonjour nel browser web Safari (descritto di seguito).
• Inserendo l'indirizzo IP assegnato a Contour nel campo indirizzo del browser;
consultare la documentazione del proprio router per ulteriori informazioni.
Accesso al Contour Setup Manager utilizzando Bonjour
Dopo aver collegato correttamente Contour alla rete, è possibile accedere al Contour Setup
Manager con il seguente metodo. Safari può essere scaricato dal sito web di Apple.
1. Aprire il browser web Safari.
2. Fare clic sul simbolo del libro nell'angolo in alto a sinistra
per aprire il pannello dei segnalibri.
3. Fare clic sull'opzione Bonjour dal menu "Collections"
(Raccolte) sul lato sinistro dello schermo.
4. Fare doppio clic su Contour 200i Air dal menu
(sotto cover flow) per aprire il Contour Setup
Manager.
5. Vedere ‘Utilizzo del Contour Setup Manager’ a
pagina 19 per ulteriori informazioni.
IT
Page 100
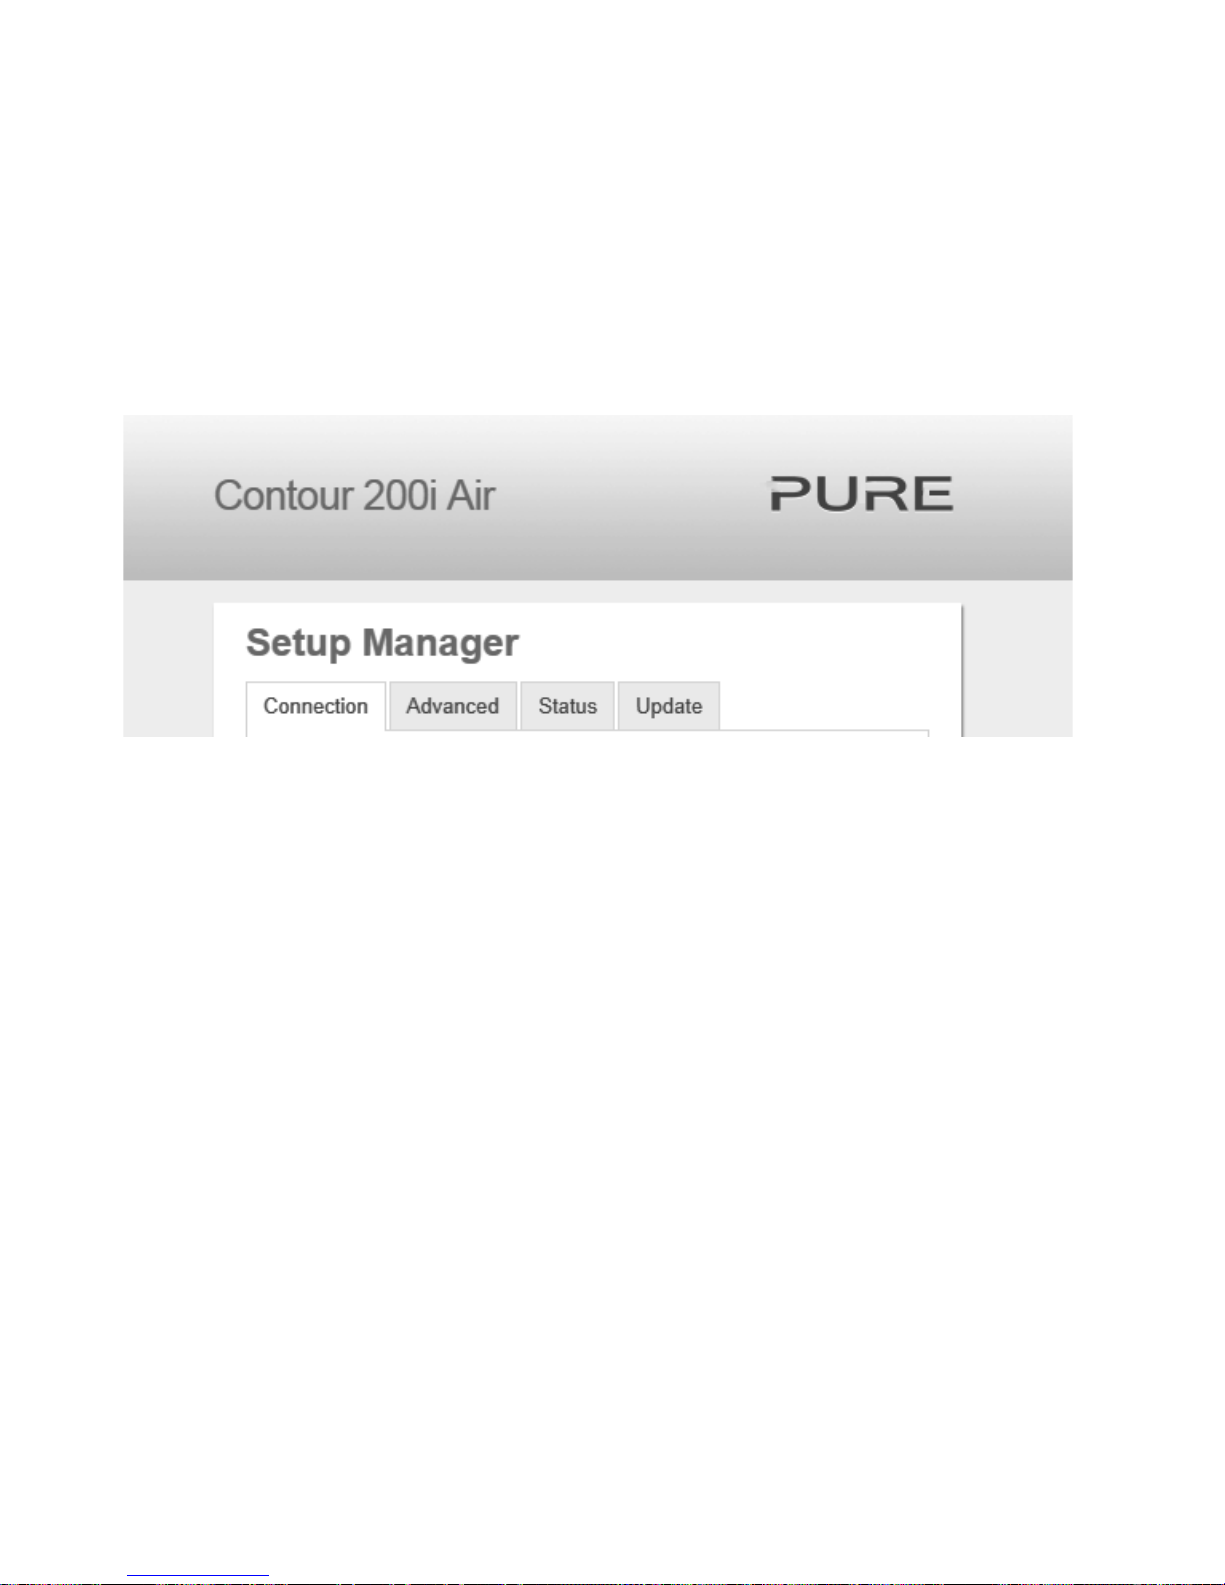
20
Struttura del Menu
L'accesso ai menu del Contour Setup Manager avviene facendo clic sulle schede nella
parte superiore della finestra.
Se si accede al Contour Setup Manager utilizzando un PC
o Mac sono visibili quattro schede. Se si accede al Contour Setup Manager utilizzando un
dispositivo mobile (telefono Android, iPad, iPod, iPhone), sono visibili tre schede.
Le schede disponibili sono:
Connection La scheda Connection (Connessione) serve per configurare le
impostazioni wireless di Contour.
Advanced La scheda Advanced (Avanzate) apre la pagina Manual Network Setup
(Configurazione rete manuale).
Status
La scheda Status (Stato) apre la pagina Status Information (Informazioni di
stato). Questa pagina visualizza informazioni sul firmware e sullo stato della
connessione wireless
Update
La scheda Update (Aggiornamento) apre la pagina Firmware Update
(Aggiornamento firmware). Questa pagina consente di aggiornare
manualmente il firmware (visibile solo su un PC o Mac).
 Loading...