

Page 1
This is the Owner’s Manual for your
Contour. It expands on the Quickstart
provided with the radio and covers more
functions.
You can click on any section in the
bookmarks list on the left to jump to
that page, or use PDF search to find a
specific word or phrase in the manual.
Owner’s Manual
Page 2

Important Safety Instructions
1. Read these instructions – All the safety and operating instructions should be read before this product is operated.
2. Keep these instructions – The safety and operating instructions should be retained for future reference.
3. Heed all warnings – All warnings on the appliance and in the operating instructions should be adhered to.
4. Follow all instructions – All operating and use instructions should be followed.
5. Clean only with dry cloth.
6. Do not block any ventilation openings. Install in accordance with the manufacturer’s instructions.
7. Do not install near any heat sources such as radiators, heat registers, stoves, or other apparatus (including amplifiers) that produce heat.
8. If the provided plug does not fit into your outlet, consult an electrician for replacement of the obsolete outlet.
9. Only use attachments/accessories specified by the manufacturer.
10. Unplug the apparatus during lightning storms or when unused for long periods of time.
11. Refer all servicing to qualified personnel. Servicing is required when the apparatus has been damaged in any way, such as power supply cord or
plug is damaged, does not operate normally, or has been dropped.
12. Do not install this equipment in a confined space. The ventilation should not be impeded by covering the ventilation openings.
13. To reduce the risk of electric shock, do not remove cover as there are no user-serviceable parts inside. Refer servicing to qualified personnel.
14. Should not be immersed in water, used in shower or bathroom.
15. Separation distance of at least 20cm must be maintained between the antenna of the product and all persons.
2
Page 3

Contents
Quick guide to controls and connectors ........................................................................................4
Using the alarm and timers ............................................................................................................6
Setting the clock ............................................................................................................................7
Using a Pure mini USB adapter to connect to your network ...........................................................8
Pure Connect (The Lounge) ...........................................................................................................9
Connecting Contour to Pure Connect (The Lounge) .......................................................................9
The Lounge settings (Pure Connect settings) ...............................................................................10
Pure Flowserver ...........................................................................................................................11
Media player settings ...................................................................................................................12
Network settings .........................................................................................................................13
FM settings ..................................................................................................................................14
Autotune .....................................................................................................................................14
Display settings ...........................................................................................................................15
Audio settings ..............................................................................................................................17
Additional settings .......................................................................................................................17
Help and advice ...........................................................................................................................18
Technical Specifications ...............................................................................................................19
3
Page 4
20 V DC Aux In Composite
Video Out
Component
/S-Video
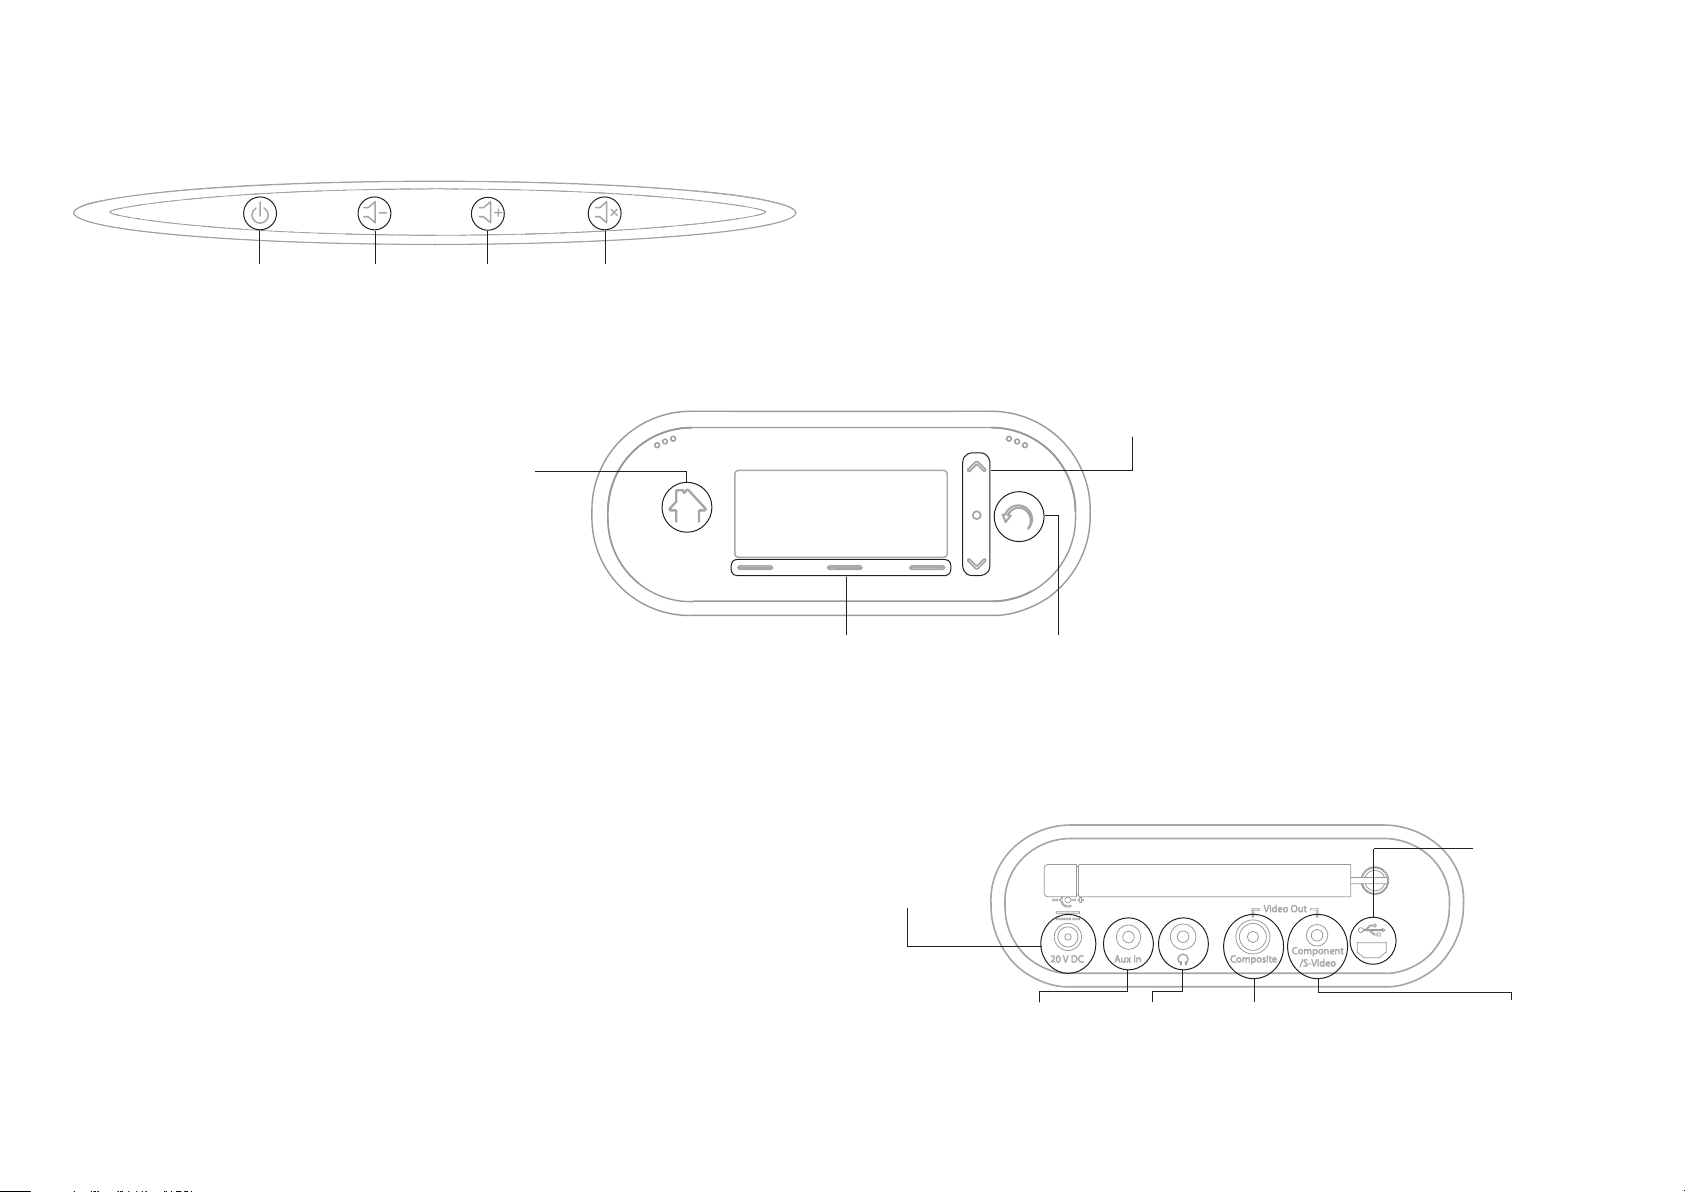
Quick guide to controls and connectors
Top panel
Standby
Tap to switch
between on and
standby
Volume down
Tap or hold to
lower volume
Volume up
Tap or hold to
raise volume
Front panel
Home
Tap to return
to the audio
source screen
Mute
Tap to mute
Context-sensitive buttons
Active buttons are lit and the
function is displayed on-screen
above the button
Rear connectors
20V DC input
Input for mains
adapter
Navigation buttons
Tap to navigate and
select menu options
Back
Tap to go back
one step
Mini USB
For software
updates and
optional Pure
Ethernet adapter
4
Aux In
3.5 mm
connection
for auxiliary
devices
Headphones
3.5 mm socket
for stereo
headphones
Composite
Phono video output
from a docked iPod/
iPhone. Connect to a
TV or monitor
Component/S-Video
3.5mm video output from a
docked iPod/iPhone. (Pure
Choice accessory cables
available separately.)
Page 5
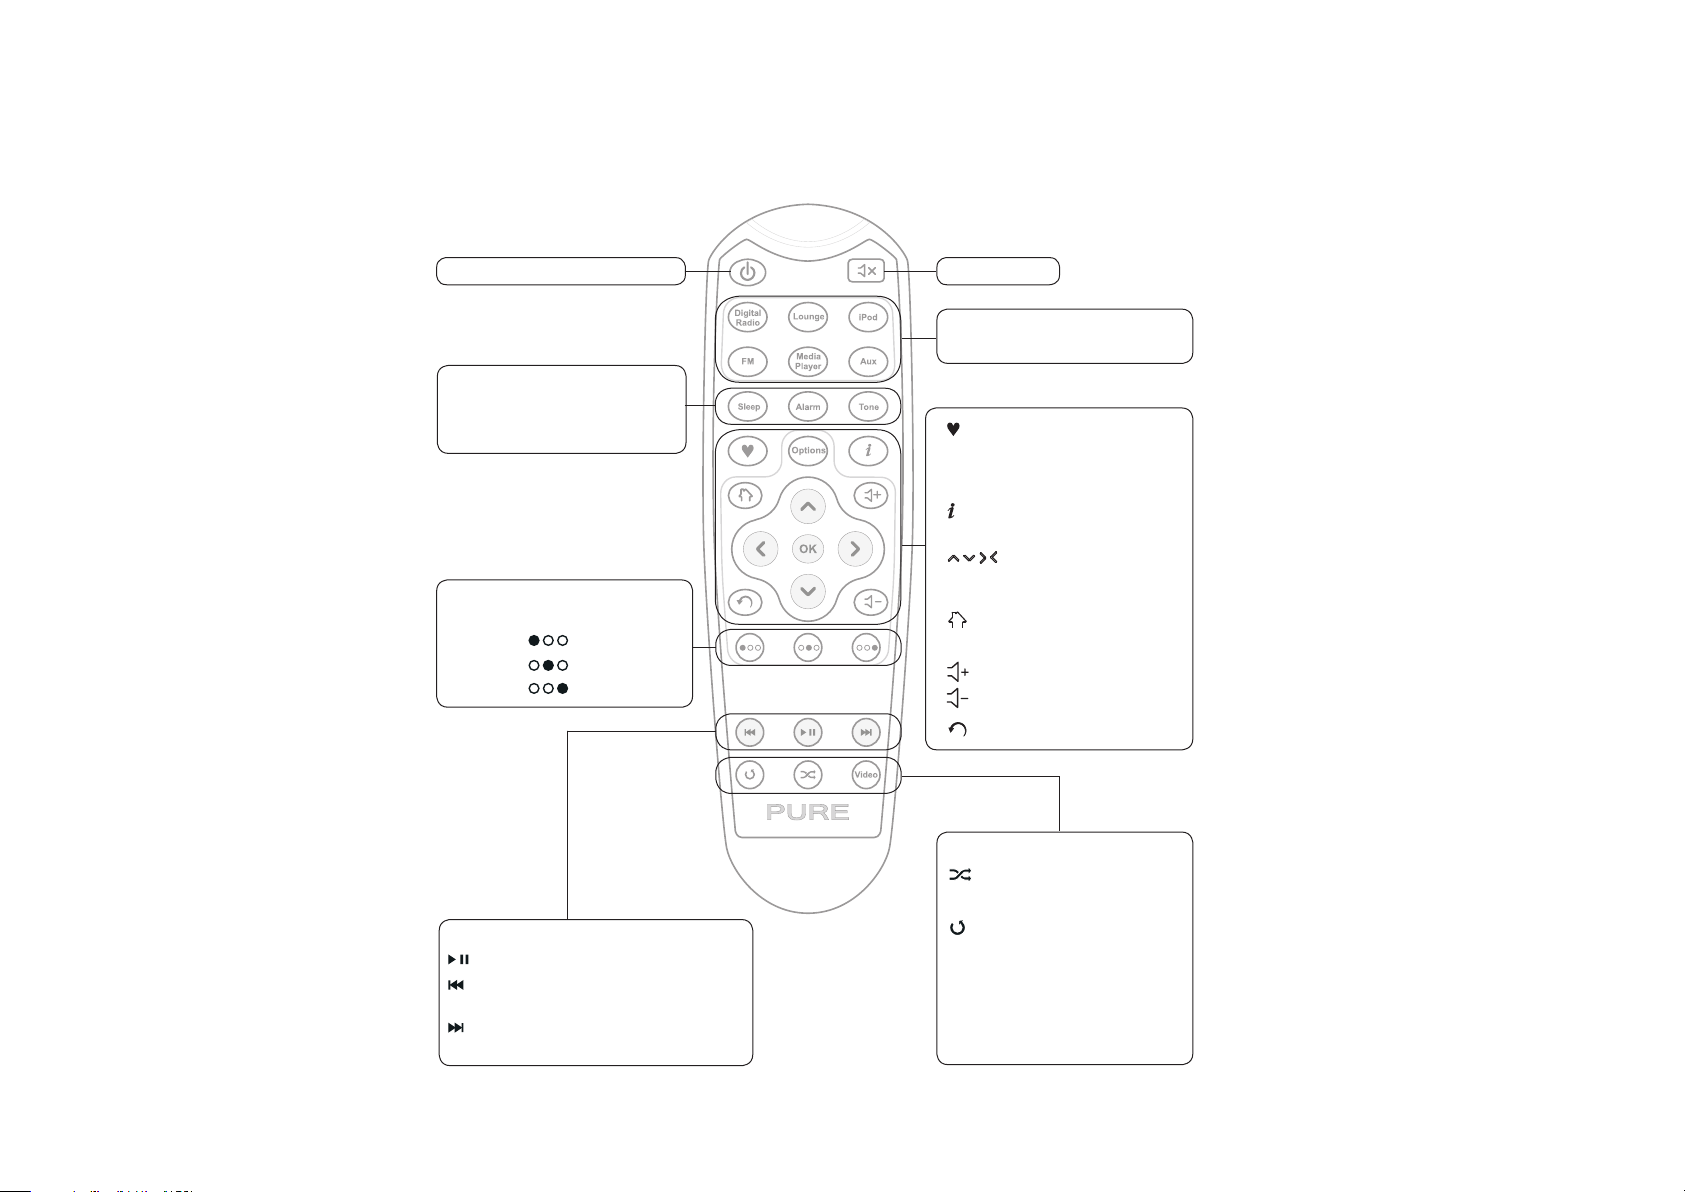
Remote control
Switch between On and Standby
Sleep Press to start sleep timer
Repeat to increase time
Alarm Set and adjust alarms
Tone Adjust bass and treble
Context-sensitive
(match buttons on front panel)
Left [ ]
Centre [ ]
Right [ ]
Media player/Podcast/Listen Again/iPod
Play/pause current track.
Skip to start of current track or go to
previous track. Hold to rewind.
Skip to end of current track or start of
the next track. Hold to fast forward.
Mute audio
Sources Select a source to
listen to
Add or recall a
favourite station
Options Change setup options
Change on-screen
information
Navigate menus
OK Confirm a selection
Home. Display the
audio source screen
Increase the volume
Decrease the volume
Back. Go back one step
Media Player/iPod only
Shuffle - play tracks in a
random order
Repeat – Toggle repeat
all or repeat current track
Video Switch between
Component/S-Video
and Composite
video output.
5
Page 6

Alarm 1 On
Using the alarm and timers
Contour has two alarms, a kitchen timer and sleep timer. To access the alarm and timers, tap
Options and select Alarm or timer.
07:00 DR
Last tuned
Daily (Mon-Sun)
Current alarm settings
Edit
Setting an alarm
1. Select Alarm 1 settings or Alarm 2 settings. The current settings for that alarm will be displayed.
2. Tap Edit to adjust the alarm settings.
3. Use the navigation buttons to change settings. Tap the arrows at the bottom of the screen to
move forward or back through the settings.
4. To save settings and exit at any time, tap Save (this is useful if you want to change a single
setting, such as the alarm time).
Setting an alarm step-by-step
1. Select On to switch the alarm on or Off to switch the alarm off. The current status is displayed
on the top line of the screen.
2. Adjust the hours and minutes for your alarm time using the navigation buttons.
3. Select when you want the alarm to sound: Once, Daily, Weekdays, Weekends, Every Saturday
or Every Sunday
4. Choose either Lounge station (Pure Connect), Digital radio, FM, iPod or Tone for your alarm:
Lounge station (Pure Connect) Select a station from your Lounge favourites, or choose Last
tuned and the alarm will tune to the most recent Lounge station you listened to.
Digital radio Select a station or Last tuned to tune to the most recent digital station you
listened to.
FM Plays the last FM station that Contour was tuned to.
iPod Plays the last track listened to on your iPod or iPhone. Sounds a tone alarm if
no iPod or iPhone is detected.
Tone Sounds a beeping tone.
5. Tap Save – your alarm is now set. The icon is displayed when an alarm is set. Alarm time(s)
are displayed on-screen in standby.
An alarm will sound for a maximum of one hour before canceling automatically.
6
Page 7

Snoozing or canceling a sounding alarm
OKClear Save Menu
Clear Save Hours
Sleep timer (hh:mm)
00:15
Adjusting the sleep timer
Kitchen timer: set mins
00:45
Setting the kitchen timer
Cancel the alarm by tapping Standby ( ), or snooze the alarm for 9 minutes by tapping Snooze.
Adjusting the Snooze timer
From the Alarm or timer menu, select Snooze time. Use the navigation buttons to adjust the
duration of the snooze from 5 to 15, then either 20/25/30/40 minutes, or 1 hour.
Setting the sleep timer
The sleep timer switches Contour into standby after a set period of time. From the Alarm or timer
menu, select Sleep timer. Use the navigation buttons to adjust the length of the sleep timer in 15
minute steps from 15 mins to 1 hour 30 mins. A set sleep timer is indicated by in the icon bar.
Setting the kitchen timer
The kitchen timer sounds a beeping tone after a set period of time.
From the Alarm or timer menu select Kitchen timer and use the navigation buttons to adjust the
length of time. Tap mins to toggle between minutes and hours. Tap Save to confirm.
A set kitchen timer is indicated by in the icon bar.
Canceling a sounding timer
To cancel a sounding timer, tap Standby ( ). A sounding timer will automatically cancel after 1 hour.
Setting the clock
The clock will automatically set itself using your Wi-Fi or Ethernet connection, or a digital radio
signal. However, if you cannot receive an updated time, or see the message ‘Time not available’,
the time and date can be manually set by selecting Set Clock from the Alarm or timer menu.
Use the navigation buttons to adjust the time and date. Tap or to move to the previous or
next setting.
7
Page 8

Using a Pure mini USB adapter to connect to your network
The Pure mini USB adapter provides a wired connection for Contour. Connect an Ethernet (RJ45)
cable from your network router to the socket on the adapter and connect the adapter to the mini
USB port on the rear of Contour.
Setup your connection
If you selected USB Ethernet as your connection type during the first start up of Contour (or after a
factory reset), you should now be connected to your network.
If you wish to change your connection type to USB Ethernet, please do the following:
From either the Lounge (Pure Connect) or Media Player, tap Options and navigate to Network
settings > Select Network type. Select USB Ethernet. Contour will apply the new setting and connect
to your network.
The status of your connection is indicated by the network status icon on Contour’s display:
Active wired connection Wired connection inactive/disconnected
Adapter status lights
100Mbps Lit when adapter is working at full connection speed (100 Megabits per second)
LAN Flashes on and off to indicate network activity
USB Lit when correctly connected to Contour USB port
Status lights
Lit when active (see above)
RJ45 Socket
Connect the cable from your
internet router here
Mini USB connector
For connecting the adapter to
Contour
Troubleshooting
• If any of the status lights do not light up, check that all cable connections are secure, and that
both Contour and your internet connection are working correctly.
• We recommend performing a Factory reset on Contour (Press and hold Options until you see
the Factory reset confirmation screen). This will restore Contour’s network settings to their
default and you will be able to reselect Ethernet as your connection type.
8
Page 9

Pure Connect (The Lounge)
DelSaveMore...
QPZKE
Pure Connect (formerly known as The Lounge) is an online media portal that provides you with
quick and easy access to thousands of internet radio stations, on-demand programmes, podcasts
and ambient sounds. You can enjoy all this content on your Contour, on smartphones and tablets
running the Pure Connect app, and on the Pure Connect website. You can also use Pure Connect
to access additional subscription services such as the Pure Connect’s cloud-based music
streaming service*, which provides you with instant access to millions of music tracks.
To access Pure Connect on Contour, you will need to connect Contour to your network. See below
for more information.
After connecting Contour to your network, you can register your Contour on the Pure Connect
website. We recommend registering your Contour as this allows you to manage your Pure Connect
favourites and access additional services like music streaming and Pure Tag.
Pure Connect home page
Connecting Contour to Pure Connect (The Lounge)
1. Log in to Pure Connect, click Me and select Devices. You’ll see your registration code.
2. From Lounge settings on Contour, select Register with The Lounge to enter your code.
Use the navigation buttons to highlight and select characters; tap Del to erase characters; and
tap Save to finish.
Congratulations! You’ve registered your Contour on Pure Connect. The favourites you’ve created
on Pure Connect will be visible on your Contour, and those you’ve created on Contour will appear
on Pure Connect.
Enter registration code
A BCDE FGHIJKLM
NOPQRSTUVWXYZ
sp0123456789
1. Add Contour as a new device 2. Enter the code on Contour 3. Contour is connected to
Pure Connect
*Requires a Pure Connect subscription.
9
Page 10

The Lounge settings
DelSaveMore...
QPZKE
DelSaveMore...
Jenny’s Room
The Lounge settings (Pure Connect settings)
Tap Options from The Lounge (Pure Connect),then select Network settings to view options for
your Lounge (Pure Connect) preferences.
Clear favourites
View/change radio name
Register with the Lounge
Lounge (Pure Connect)
settings screen
Enter radio name
A BCDE FGHIJKLM
NOPQRSTUVWXYZ
sp0123456789
Changing your Contour’s name
Enter registration code
Clear favourites
Select Clear favourites to remove all stations/podcasts/Pure Sounds from your favourites list, as
well as from Pure Connect if Contour is connected.
View/Change radio name
You can rename Contour to help identify it more easily when using Pure Connect website. By
default this name is ‘My Contour’. To change this, Select View/Change radio name. The current
name is at the top of the screen. Use the navigation buttons to enter a new name and tap Save to
confirm.
Register with the Lounge (Pure Connect)
Enter your Pure Connect registration code if you have not already done so.
A BCDE FGHIJKLM
NOPQRSTUVWXYZ
sp0123456789
Lounge (Pure Connect) registration
code entry screen
10
Page 11

Viewing Contour’s details on Pure Connect.
(Flowserver license key highlighted)
Pure Flowserver – stream your music
If you have music stored on your computer, you can stream it to Contour so you can listen
wherever you like using the Media Player source. To do this you can download our media server
software, Flowserver. It is available for:
Microsoft® Windows XP, Windows Vista, Windows 7
Apple Mac OS® X 10.5 or higher
To download a copy of Flowserver:
1. Go to the Pure Connect website at connect.pure.com.
2. Click the Downloads link at the bottom of the page.
3. Choose the version of Pure FlowServer that’s suitable for your computer.
Find and enter your Flowserver license key
When you install FlowServer, or on first start up (depending on your operating system) you will
be asked to enter a license key. You can find your FlowServer key by logging into Pure Connect,
clicking Me and selecting Devices. Your key will be listed in the table alongside your radio (see
illustration).
For a step-by-step guide to installing and setting up Flowserver, visit our support website at
http://support.pure.com
11
Page 12

Media player settings
Repeat
Shue
Media server
Media player settings screen
Media player settings
These settings are only available when listening to the Media player source. Tap Options, then
select Media player settings.
Repeat
Select the repeat type:
Off (default) Tracks are played until the end of the current album, folder, playlist or search results.
All Continuously repeats the current album, folder, playlist, or your search results.
Track Repeats the current track.
Shuffle
Select the order that tracks in the current album, folder, playlist or search results are played:
Off (default) Tracks play in the order that they are displayed on-screen.
On Tracks play in random order.
When Shuffle is on, tapping or selects a random track from the current album, folder,
playlist or search results.
Media server
View technical details about your media server or re-scan for alternative servers.
Current details The name of your media server.
The name of the server software you are currently using, e.g., Flowserver.
The software version of the server software you are currently using.
The IP address and port of your media server.
A web address for further information or software updates.
Scan for servers Scans for all available media servers.
12
Page 13

Wi-Fi settings
Connection wizard
View details
Manual setup
Wi-Fi settings screen
Network settings
Tap Options from either The Lounge (Pure Connect) or Media player, then select Network settings
to view options for configuring your network.
Connection wizard
Scan for and connect to available wireless networks.
View details
Displays the configuration of the wireless network that Contour is connected to:
Network name
Encryption The encryption method is listed (WEP, WPA or WPA2).
IP address Contour’s IP address.
Net mask The configured network mask.
DNS Domain Name Server IP address.
Router Gateway router IP address.
Radio Name The name used to identify your Contour on the Pure Connect website
MAC address MAC address (a fixed address that identifies your Contour).
Access point
Manual setup
The Network Name (SSID) is shown at the top of the screen.
e.g., ‘My Contour’.
MAC address of the wireless router that Contour is connected to.
Manually configure your wireless network settings (for advanced users only).
Retry connection
Network name Scan for networks or Enter SSID manually to specify a new SSID for your
Encryption mode Change the encryption mode between WEP, WPA (PSK), WPA2 (PSK) or
Key or password Enter a new encryption key or password.
IP address Choose between DHCP (dynamic) or Static.
Attempts to reconnect to the selected network.
wireless network.
None. Contour automatically detects the mode for your network. Only change
this setting if you think the encryption mode is incorrect.
Clear network settings
Contour will delete all previous connections, passwords and settings and perform a fresh scan for
available networks.
Select network type
Chang
e your internet connection type between Wi-Fi and Ethernet (for Pure mini USB Ethernet adapter).
13
Page 14

FM settings
These settings are only available when listening to FM radio. Tap Options, then select FM settings.
FM settings
FM tuning
FM stereo
FM settings
FM tuning
Switch between Seek tune and Manual tune.
Seek tune Automatically tunes to the next station with a strong signal.
Manual tune Tunes up or down in steps of 0.5MHz.
FM stereo
Switch between receiving FM stations in Mono or Stereo (default).
Autotune
This setting is only available when listening to digital radio. Tap Options, then select Autotune. This
searches for new digital radio stations and removes inactive stations. For the best results, extend
the aerial. You can stop an autotune before it has finished by tapping Cancel. When an autotune
has finished Contour will tune to the last station you listened to.
14
Page 15

Display settings
Adjust display options, such as screen duration, brightness and the information displayed while
you are listening to each source. Tap Options then Display to open the menu.
Information
Different information displays are available for each audio source:
Digital radio
Scrolling text Text information broadcast by the current station. May include song titles,
programme details, news, etc.
Broadcast info The Multiplex to which the station belong, a description of the station’s
content (e.g., ‘Pop music’), the bit rate (audio quality) of the broadcast in
kbps and a Stereo/Mono indicator.
Reception info The current channel and frequency, signal quality and signal strength.
Time and date Displays the date with a full-screen clock (as in standby mode).
The Lounge (Pure Connect)
Description Broadcast by current station. May include song titles/programme details.
Location and Genre Information about the current station, e.g., UK Gospel.
Time offset Most stations will be live streams, but otherwise displays how far into a
broadcast the station is.
Wi-Fi signal strength A bar indicating the current Wi-Fi signal strength.
Station URL The URL address of the current station.
Time and date The date with a full-screen clock (as in standby mode).
Media player
Track info Artist and album information (id3 tags).
Time offset/duration Progress bar and timers indicating the current track position.
Wi-Fi signal strength A bar indicating the current Wi-Fi signal strength.
Time and date The date with a full-screen clock (as in standby mode).
FM radio
Scrolling text Text information broadcast by the current station. May include song titles,
programme details, news, etc.
Reception info The current frequency and signal strength.
There are no Information options for the AUX or iPod audio sources.
15
Page 16

Active and Standby operation
You can adjust the brightness level and the duration that the screen is illuminated when switched
on or in standby. Select Active operation to adjust the display settings that apply when Contour
is switched on or Standby operation to adjust the display settings that apply when Contour is in
standby.
Brightness By default, the display brightness is set to ‘Automatic’ in active and standby
modes, which means the that the brightness adjusts to suit the lighting level
around Contour. If you want to change this setting, tap Manual and use the
navigation buttons to adjust the brightness from 1 (low) to 10 (high), then tap
OK. You can switch back to automatic brightness by tapping Automatic.
Screen duration The length of time the screen is illuminated after a button is pressed. Choose
between Always on (default) or Off after 7 seconds.
16
Page 17

Bass & Treble
- Bass -
Treble
Bass
-1
5
Setting audio levels
Additional settings
Audio settings
Press Tone on your remote, then use the buttons to adjust the individual Bass and Treble
settings of Contour between -5 (low) and 5 (high).
TrebleOK
Additional settings
Upgrade
Software updates may be issued in the future to provide new features and functions.
Upgrade
Bind remote
Language
Additional settings menu
To upgrade over your wireless or Ethernet network (recommended)
1. Tap Options, select Additional settings > Upgrade > Network
2. Contour will search for any available upgrades. If an update is available the message ‘New
version available: vX.X’ will appear on screen (X.X is the version number, i.e. v2.1).
3. Tap OK to download and install the new software. This can take up to 5 minutes.
To upgrade using a USB cable (when your network is not available)
1. Visit http://support.pure.com to check if an update is available for Contour.
2. If updates are listed on the website, download the most recent update to your computer.
3. Connect Contour to your PC’s USB port using a USB cable (not supplied). Run the update
software on your computer and follow the on-screen instructions.
Warning: do not switch Contour off while it is updating.
Language
Switch the display language between English, French, German and Italian.
17
Page 18

Help and advice
I am having trouble connecting to my network (Wi-Fi and Ethernet)
• Contour cannot connect to wireless networks that are hidden or protected, such as office networks, without a WEP, WPA or WPA2 key or
password. Unless your network is ‘open’ (this is generally not recommended due to the risk of unauthorised access), make sure you have your
WEP, WPA or WPA2 key or password to hand.
• Contour needs to be positioned within the range of your wireless network, which will be reduced if there are walls between your router and
Contour. Although Contour is very good at picking up wireless networks, the strength of the Wi-Fi signal will vary depending on your router and
the surrounding environment. If Contour fails to find your wireless network, or the signal drops off, move the radio closer to the router.
• Ethernet connection using Pure mini USB adapter: Ensure your Ethernet cable is securely connected to the adapter and that the adapter is fully
connected to Contour. Check that the status indicator lights are working. Test your Ethernet connection using another device.
Screen displays ‘Station not available’
• If a particular station will not play, visit http://support.pure.com for more help.
Media player is not working
• To share music files with Contour, we recommend that you download and install Flowserver from connect.pure.com (available as a free download
when you register with Pure Connect).
• Make sure that your computer is switched on.
• Make sure your music files are saved as a supported file format: MP2, MP3, WMA4, WMA7, WMA8, WMA9, AAC (including .m4a) or Real Audio.
• Contour cannot play files which are restricted by Digital Rights Management (DRM).
Video is not playing
• Check that you are viewing the correct source on your TV or monitor. You can usually change this using your TV remote or monitor control panel.
• Check that Contour is outputting the correct signal. Use the Video button on your remote to switch between component/S-Video and composite
video output.
Video suffers from interference
• Ensure that the video cable is connected. When using the Pure Choice component or S-Video cable, there should be an audible click when
correctly inserted.
• We recommend only having one video cable inserted at any time, as unused cables can cause minor interference with the signal.
Factory reset
• If you experience any problems that cannot be resolved by the above, you can reset Contour to its default settings. This is particularly useful if
you are having network trouble. To reset Contour: Press and hold Options until you see the Factory reset screen. Tap Ye s to confirm the reset.
Contour will now restart with default settings.
18
Page 19

Technical Specifications
Radio Digital (DAB/DAB+/DMB-Radio), FM and internet (Wi-Fi or Ethernet).
Wi-Fi 802.11b and 802.11g supported with WEP and WPA/WPA2 encryption.
Ethernet Pure mini USB adapter (available separately) supports 100Mbps LAN connection.
iPod/iPhone support iPod nano 2nd generation, 3rd generation with video, iPod nano 4th generation, iPod nano 5th generation (video camera),
iPod nano 6th generation, iPod classic, iPod touch, iPod touch 2nd generation, iPod touch 3rd generation, iPod touch 4th
generation, iPhone, iPhone 3G, iPhone 3GS and iPhone 4.
Media Streaming Audio codecs supported include WMA (Standard V9), AAC, MP3, MP2, Real Audio (cook). Media streaming requires UPnP
server or PC/MAC running UPnP server software (supplied upon registration to connect.pure.com).
Speakers 2 x full-range 3½" drive units.
Audio output 2 x 18W @ <1% THD+N, twin downward firing bass ports.
Input connectors 20V DC power adapter socket. iPod/iPhone connector with adapters. 3.5mm Aux-in for auxiliary devices. USB (mini-B type) for
software updates and Ethernet adapter. (Software updates also available over Wi-Fi/Ethernet.)
Output connectors 3.5mm stereo output for headphones.
Composite video out Composite RCA*.
Component video out 3.5mm 4-pole TRRS connector* (Pure Choice cable available separately).
S-Video out 3.5mm 4-pole TRRS connector* (Pure Choice cable available separately).
Controls Touch-sensitive controls including 3 context-sensitive keys, back, home, select, up/down, volume up/down/mute and standby.
LCD display 128 x 64 pixel graphical LCD auto-dimming display, large clock and feature icons, light sensor.
Remote control Infrared remote control. 2 x AAA (LR03) batteries included.
Mains power supply 100-240V, 50/60Hz 20V DC 2.25A external power adapter with interchangeable pins.
Dimensions 370mm (14.56") wide x 220mm (8.7") high x 180mm (7.08") deep.
Aerial Telescopic aerial. Internal Wi-Fi aerial.
Approvals CE marked. Compliant with the EMC and Low Voltage Directives (2004/108/EC and 2006/95/EC). ETSI EN 300 401 compliant
Australian C-Tick N1600 and Electrical Safety
* Video output is dependant on the source file quality. iPod and iPhone video output resolution varies, please see your model’s specifications at http://support.apple.com/specs.
19
Page 20

Trademarks
Contour, the Contour logo, Pure, the Pure Lounge, Pure Connect, Pure sounds, Pure Flowserver, the Pure logo,
Imagination Technologies, and the Imagination Technologies logo are trademarks or registered trademarks of
Imagination Technologies Limited.
iPhone and iPod are trademarks of Apple Inc., registered in the U.S. and other countries.
“Made for iPod,” and “Made for iPhone,” mean that an electronic accessory has been designed to connect specifically
to iPod and iPhone, and has been certified by the developer to meet Apple performance standards. Apple is not
responsible for the operation of this device or its compliance with safety and regulatory standards. Please note that the
use of this accessory with iPod and iPhone may affect wireless performance.
All other product names are trademarks of their respective companies. Version 2 January 2014.
Copyright
Copyright © 2014 Imagination Technologies Limited. All rights reserved. No part of this publication may be copied or
distributed, transmitted, transcribed, stored in a retrieval system, or translated into any human or computer language,
in any form or by any means, electronic, mechanical, magnetic, manual or otherwise, or disclosed to third parties
without the express written permission of Imagination Technologies Limited.
Warranty information
Imagination Technologies Limited warrants to the end user that this product will be free from defects in materials and
workmanship in the course of normal use for a period of two years from the date of purchase. This guarantee covers
breakdowns due to manufacturing or design faults; it does not apply in cases such as accidental damage, however
caused, wear and tear, negligence, adjustment, modification or repair not authorised by us. Should you have a
problem with your unit please contact your supplier or contact Pure Support at http://support.pure.com. If you need
to return your product please use the original packaging and include all parts and accessories. We reserve the right to
refuse incomplete or badly packaged returns.
20
Disclaimer
Imagination Technologies Limited makes no representation or warranties with respect to the content of this document
and specifically disclaims any implied warranties of merchantability or fitness for any particular purpose. Further,
Imagination Technologies Limited reserves the right to revise this publication and to make changes in it from time to
time without obligation of Imagination Technologies Limited to notify any person or organisation of such revisions or
changes.
Acknowledgement of License Agreements
Portions of the code used in Contour are subject to the following licenses and copyright:
GNU General Public License Version 2 (GPLv2). For the full text of the license agreement see
www.gnu.org/licenses/gpl-2.0.txt
GNU Lesser General Public License Version 2.1 (LGPLv2.1). For the full text of the license agreement see
www.gnu.org/licenses/lgpl-2.1.txt
Page 21

21
Page 22

United Kingdom
Pure (headquarters)
Imagination Technologies Limited
Home Park Estate,
Kings Langley
Herts, WD4 8LZ
United Kingdom
www.pure.com
http://support.pure.com
Schweiz
Pure - Vertrieb über:
TELANOR AG
Unterhaltungselektronik
Bachstrasse 42
4654 Lostorf
Schweiz/Switzerland
www.telanor.ch
info@telanor.ch
Deutschland
Pure
Friedrich-Ludwig-Jahn-Straße
2-14
64589 Stockstadt am Rhein
Deutschland
sales_gmbh@pure.com
http://support.pure.com/de
Australasia
Pure Australasia Pty Ltd
PO Box 5049
Wonga Park
Victoria 3115
Australia
sales.au@pure.com
http://support.pure.com/au
Contour is a member of the Pure EcoPlus™ product family. All EcoPlus products are designed and manufactured
to minimize their environmental impact.
This manual is supplied as a PDF to save paper.
The accompanying Quickstart Guide is printed on 100% recycled paper using soya-based ink.
The retail carton protecting your product is printed on at least 70% recycled card, finished using a water-based
varnish and sized for maximum transport efficiency.
For more information please visit www.pure.com/ecoplus
105FU
 Loading...