

Page 1
PTQ-104C
Quantum Platform
IEC 60870-5-104 Client
March 4, 2013
USER MANUAL
Page 2

Your Feedback Please
We always want you to feel that you made the right decision to use our products. If you have suggestions, comments,
compliments or complaints about our products, documentation, or support, please write or call us.
ProSoft Technology
5201 Truxtun Ave., 3rd Floor
Bakersfield, CA 93309
+1 (661) 716-5100
+1 (661) 716-5101 (Fax)
www.prosoft-technology.com
support@prosoft-technology.com
Copyright © 2013 ProSoft Technology, Inc., all rights reserved.
PTQ-104C User Manual
March 4, 2013
ProSoft Technology
®
, ProLinx ®, inRAx ®, ProTalk®, and RadioLinx ® are Registered Trademarks of ProSoft
Technology, Inc. All other brand or product names are or may be trademarks of, and are used to identify products
and services of, their respective owners.
In an effort to conserve paper, ProSoft Technology no longer includes printed manuals with our product shipments.
User Manuals, Datasheets, Sample Ladder Files, and Configuration Files are provided on the enclosed DVD-ROM,
and are available at no charge from our web site: http://www.prosoft-technology.com
Content Disclaimer
This documentation is not intended as a substitute for and is not to be used for determining suitability or reliability of
these products for specific user applications. It is the duty of any such user or integrator to perform the appropriate
and complete risk analysis, evaluation and testing of the products with respect to the relevant specific application or
use thereof. Neither ProSoft Technology nor any of its affiliates or subsidiaries shall be responsible or liable for
misuse of the information contained herein. Informat ion in thi s docu ment in clud ing illustr at i o ns, spe cif icat ion s and
dimensions may contain technical inaccuracies or typographical errors. ProSoft Technology makes no warranty or
representation as to its accuracy and assumes no liability for and reserves the right to correct such inaccuracies or
errors at any time without notice. If you have any suggestions for improvements or amendments or have found errors
in this publication, please notify us.
No part of this document may be reproduced in any form or by any means, electronic or mechanical, including
photocopying, without express written permission of ProSoft Technology. All pertinent state, regional, and local safety
regulations must be observed when installing and using this product. For reasons of safety and to help ensure
compliance with documented system data, only the manufacturer should perform repairs to components. When
devices are used for applications with technical safety requirements, the relevant instructions must be followed.
Failure to use ProSoft Technology software or approved software with our hardware products may result in injury,
harm, or improper operating results. Failure to observe this information can result in injury or equipment damage.
© 2013 ProSoft Technology. All rights reserved.
Page 3

Information for ProTalk® Product Users
The statement "power, input and output (I/O) wiring must be in accordance with Class I, Division 2 wiring methods
Article 501-10(b) of the National Electrical Code, NFPA 70 for installations in the U.S., or as specified in section 181J2 of the Canadian Electrical Code for installations within Canada and in accordance with the authority having
jurisdiction".
The following or equivalent warnings shall be included:
A Warning - Explosion Hazard - Substitution of components may Impair Suitability for Class I, Division 2;
B Warning - Explosion Hazard - When in Hazardous Locations, Turn off Power before replacing Wiring Modules,
and
C Warning - Explosion Hazard - Do not Disconnect Equipment unless Power has been switched Off or the Area is
known to be Nonhazardous.
D Caution: The Cell used in this Device may Present a Fire or Chemical Burn Hazard if Mistreated. Do not
Disassemble, Heat above 100°C (212°F) or Incinerate.
WARNING - EXPLOSION HAZARD - DO NOT DISCONNECT EQUIPMENT UNLESS POWER HAS BEEN
SWITCHED OFF OR THE AREA IS KNOWN TO BE NON-HAZARDOUS.
AVERTISSEMENT - RISQUE D'EXPLOSION - AVANT DE DÉCONNECTER L'ÉQUIPEMENT, COUPER LE
COURANT OU S'ASSURER QUE L'EMPLACEMENT EST DÉSI GNÉ NON DANGEREUX.
Class I, Division 2 GPs A, B, C, D
II 3 G
Ex nA IIC X
0° C <= Ta <= 60° C
II - Equipment intended for above ground use (not for use in mines).
3 - Category 3 equipment, investigated for normal operation only.
G - Equipment protected against explosive gasses.
Warnings
North America Warnings
A Warning - Explosion Hazard - Substitution of components may impair suitability for Class I, Division 2.
B Warning - Explosion Hazard - When in hazardous locations, turn off power before replacing or rewiring modules.
Warning - Explosion Hazard - Do not disconnect equipment unless power has been switched off or the area is
known to be non-hazardous.
C Suitable for use in Class I, Division 2 Groups A, B, C and D Hazardous Locations or Non-Hazardous Locations.
ATEX Warnings and Conditions of Safe Usage:
Power, Input, and Output (I/O) wiring must be in accordance with the authority having jurisdiction.
A Warning - Explosion Hazard - When in hazardous locations, turn off power before replacing or wiring modules.
B Warning - Explosion Hazard - Do not disconnect equipment unless power has been switched off or the area is
known to be non-hazardous.
C These products are intended to be mounted in an IP54 enclosure. The devices shall provide external means to
prevent the rated voltage being exceeded by transient disturbances of more than 40%. This device must be used
only with ATEX certified backplanes.
D DO NOT OPEN WHEN ENERGIZED.
Electrical Ratings
Backplane Current Load: 1100 mA maximum @ 5 Vdc ± 5%
Operating Temperature: 0°C to 60°C (32°F to 140°F)
Storage Temperature: -40°C to 85°C (-40°F to 185°F)
Shock: 30 g operational; 50 g non-operational; Vibration: 5 g from 10 to 150 Hz
Relative Humidity: 5% to 95% (without condensation)
All phase conductor sizes must be at least 1.3 mm(squared) and all earth ground conductors must be at least
4mm(squared).
Page 4
CSA/cUL
CSA CB Certified
ATEX
Markings:
Important Notice:
CAUTION: THE CELL USED IN THIS DEVICE MAY PRESENT A FIRE
OR CHEMICAL BURN HAZARD IF MISTREATED. DO NOT
DISASSEMBLE, HEAT ABOVE 100°C (212°F) OR INCINERATE.
Maximum battery load = 200 μA.
Maximum battery charge voltage = 3.4 VDC.
Maximum battery charge current = 500 μA.
Maximum battery discharge current = 30 μA.
Page 5

49TPTQ-104C ♦ 48TQuantum Platform Contents
47TIEC 60870-5-104 Client
12TUser Manual
Contents
Your Feedback Please ........................................................................................................................ 2
Information for ProTalk® Product Users .............................................................................................. 3
Warnings ............................................................................................................................................. 3
Important Notice: ................................................................................................................................. 4
Guide to the PTQ-104C User Manual 9
1 Start Here 11
1.1 Hardware and Software Requirements ................................................................... 12
1.1.1 Package Contents ................................................................................................... 12
1.1.2 Quantum Hardware ................................................................................................. 12
1.1.3 PC and PC Software ............................................................................................... 13
1.2 Deployment Checklist .............................................................................................. 13
1.3 Installing the ProTalk Module in the Quantum Rack ............................................... 14
1.4 Installing ProSoft Configuration Builder Software ................................................... 15
1.5 Connecting the PC to the ProTalk Configuration/Debug Port ................................. 17
1.5.1 Ethernet Configuration ............................................................................................ 19
2 Configuring the Processor with Unity Pro 21
2.1 Creating a New Project ........................................................................................... 22
2.2 Adding the PTQ Module to the Project .................................................................... 24
2.3 Building the Project ................................................................................................. 26
2.4 Connecting a PC to the Processor .......................................................................... 27
2.4.1 Connecting to the Processor with TCP/IP ............................................................... 29
2.5 Downloading the Project to the Proces s or .............................................................. 29
3 Configuring the Processor with Concept 31
4 Configuring the Processor with ProWORX 33
5 Module Configuration 37
5.1 Using ProSoft Configuration Builder ....................................................................... 38
5.1.1 Creating a Project .................................................................................................... 38
5.1.2 Setting Module Parameters ..................................................................................... 41
5.2 Backplane Data Transfer......................................................................................... 42
5.2.1 Read Register Start ................................................................................................. 43
5.2.2 Read Register Count ............................................................................................... 43
5.2.3 Write Register Start ................................................................................................. 43
5.2.4 Write Register Count ............................................................................................... 43
5.2.5 3X Register Start ..................................................................................................... 44
5.2.6 4X Register Start ..................................................................................................... 44
5.2.7 Initialize Output Data ............................................................................................... 44
ProSoft Technology, Inc. Page 5 of 136
March 4, 2013
Page 6

Contents 49TPTQ-104C ♦ 48TQuantum Platform
12TUser Manual 47TIEC 60870-5-104 Client
5.2.8 Pass-Through Events ............................................................................................. 44
5.3 Data Exchange ....................................................................................................... 44
5.3.1 Data Type Mapping and Addressing ...................................................................... 46
5.3.2 Read Status (Block 9250) ....................................................................................... 52
5.3.3 User-Constructed Command Block (9901) ............................................................. 54
5.3.4 Command Control Block (9902) ............................................................................. 55
5.3.5 Event Pass-Through Block (9903) .......................................................................... 56
5.3.6 Read Command Error List Block (9950) ................................................................. 58
5.3.7 Get Module Date and Time Block (9970) ............................................................... 59
5.3.8 Set Module Time Block (9971) ............................................................................... 59
5.3.9 Cold Boot Block (9999) ........................................................................................... 59
5.4 [SNTP CLIENT]....................................................................................................... 60
5.4.1 NTP Server IP Address .......................................................................................... 60
5.4.2 Time Zone ............................................................................................................... 61
5.4.3 Use Daylight Savings Time ..................................................................................... 61
5.4.4 Database Register .................................................................................................. 61
5.5 [IEC-104 Client Module] .......................................................................................... 61
5.6 [IEC-104 Client/Session x] ...................................................................................... 62
5.6.1 [IEC-104 Client/Session x > IEC-104 Client x] section ........................................... 63
5.6.2 [IEC-104 Client/Session x > IEC-104 Client x Sector 0] section ............................ 64
5.6.3 [IEC-104 Client/Session x > IEC-104 Client x Sector 0] section ............................ 65
5.6.4 [IEC-104 Client/Session x > IEC-104 Client x Sector 1] section ............................ 66
5.6.5 [IEC-104 Client/Session x > IEC-104 Client x Sector 1] section ............................ 67
5.7 [IEC-104 Client Commands] section....................................................................... 68
5.8 [Ethernet Configuration] section ............................................................................. 73
5.9 To Create Optional Comment Entries .................................................................... 73
5.10 To print a configuration file ..................................................................................... 74
6 Downloading the PCB File to the Module 75
6.1 Downloading the Project via Serial Connection ...................................................... 76
6.2 Downloading the Project via Ethernet Connection ................................................. 77
7 Hot Standby Support 81
7.1 Hot Standby Overview ............................................................................................ 82
7.1.1 Identical Configurations .......................................................................................... 82
7.1.2 Primary and Standby Controller s ............................................................................ 83
7.1.3 System Components .............................................................................................. 84
7.1.4 Modicon Quantum Hot Standby with Unity and IEC Logic ..................................... 85
7.1.5 Understanding System Scan Time in Modicon Quantum Hot Standby with Unity
Systems 85
7.2 Setting Up the Modicon Quantum Hot Standby with Unity System ........................ 88
7.2.1 Overview ................................................................................................................. 88
7.2.2 Mapping the Backplane Extensions ....................................................................... 88
7.2.3 PTQ-104C Hot Standby Considerations ................................................................. 88
8 Diagnostics and Troubleshooting 93
8.1 LED Status Indicators ............................................................................................. 94
8.1.1 Ethernet LED Indicators .......................................................................................... 94
Page 6 of 136 ProSoft Technology, Inc.
March 4, 2013
Page 7

49TPTQ-104C ♦ 48TQuantum Platform Contents
47TIEC 60870-5-104 Client
12TUser Manual
8.2 Diagnostics Menu .................................................................................................... 95
8.2.1 Required Hardware ................................................................................................. 95
8.2.2 Serial Connection to Diagnostics Menu .................................................................. 96
8.2.3 Ethernet Connection to Diagnostics Menu .............................................................. 98
8.2.4 Navigation in Diagnostics Window ........................................................................ 101
9 Reference 105
9.1 Product Specifications ........................................................................................... 106
9.1.1 Standards .............................................................................................................. 106
9.1.2 Hot Standby Support ............................................................................................. 106
9.1.3 General Specifications .......................................................................................... 106
9.1.4 Hardware Specifications........................................................................................ 107
9.1.5 Functional Specifications....................................................................................... 107
9.2 IEC-60870-5-104 Protoc ol I mplementation ........................................................... 109
9.2.1 Module Address .................................................................................................... 110
9.2.2 Monitor Direction and Control Direction: Point Definition ...................................... 111
9.2.3 Events.................................................................................................................... 113
9.3 Cable Connections ................................................................................................ 115
9.3.1 Ethernet Connection .............................................................................................. 115
9.3.2 RS-232 Configuration/Debug Port ........................................................................ 116
9.4 General Module Status (Block 9250) Table .......................................................... 116
9.5 Client Status (Block 9251) Table ........................................................................... 117
9.6 IEC 60870-5-104 Client Interoperability Statement .............................................. 119
9.6.1 System or device ................................................................................................... 119
9.6.2 Application Layer ................................................................................................... 119
9.6.3 Selection of standard ASDUs ................................................................................ 120
9.6.4 Type identifier and cause of transmission assignments ....................................... 123
9.6.5 Basic Application Functions .................................................................................. 125
9.7 Frequently Asked Questions ................................................................................. 129
9.7.1 How do I configure the module? ........................................................................... 129
9.7.2 What kind of data transfer rates can I expect between the PLC and the module?129
9.7.3 Does the module work in a remote rack? .............................................................. 129
9.7.4 Can I use the module in a hot backup system? .................................................... 129
10 Support, Service & Warranty 131
Contacting Technical Support ......................................................................................................... 131
10.1 Warranty Information ............................................................................................. 132
Index 135
ProSoft Technology, Inc. Page 7 of 136
March 4, 2013
Page 8

49TPTQ-104C ♦ 48TQuantum Platform
47TIEC 60870-5-104 Client
12TUser Manual
ProSoft Technology, Inc. Page 8 of 136
March 4, 2013
Page 9

49TPTQ-104C ♦ 48TQuantum Platform
Details
This section introduces the customer to the
system requirements, hardware installation, and
This section describes Diagnostic and
(page 106)
These sections contain general references
associated with this product, Specifications, and
Index
This section contains Support, Service and
47TIEC 60870-5-104 Client
12TUser Manual
Guide to the PTQ-104C User Manual
Function
Introduction
→
(Must Do)
Diagnostic and
→
Troubleshooting
Reference
→
Product Specifications
Functional Overview
Support, Service, and
→
Warranty
Index
Section to Read
Start Here (page 10)
Diagnostics and
Troubleshooting
(page 93)
Reference (page
104)
Product
Specifications (page
106)
Functional Overview
Support, Service
and Warranty (page
131)
module. Included are: package contents,
basic configuration.
Troubleshooting procedures.
the Functional Overview.
Warranty information.
Index of chapters.
ProSoft Technology, Inc. Page 9 of 136
March 4, 2013
Page 10

49TPTQ-104C ♦ 48TQuantum Platform
12TUser Manual 47TIEC 60870-5-104 Client
Page 10 of 136 ProSoft Technology, Inc.
March 4, 2013
Page 11

49TPTQ-104C ♦ 48TQuantum Platform Start Here
47TIEC 60870-5-104 Client
12TUser Manual
1 Start Here
In This Chapter
Hardware and Software Requirements ................................................. 12
Install ProSoft Configuration Builder Software ....................................... 13
Setting Up the ProTalk Module .............................................................. 16
This document is intended to guide the user through the ProTalk module setup
process. The user will learn how to:
Set up the processor environment for the PTQ module
View how the PTQ module exchanges data with the processor
Edit and download configuration files from the PC to the PTQ module
Monitor the operation of the PTQ module
ProSoft Technology, Inc. Page 11 of 136
March 4, 2013
Page 12
Start Here 49TPTQ-104C ♦ 48TQuantum Platform
Null Modem Serial Cable
12TUser Manual 47TIEC 60870-5-104 Client
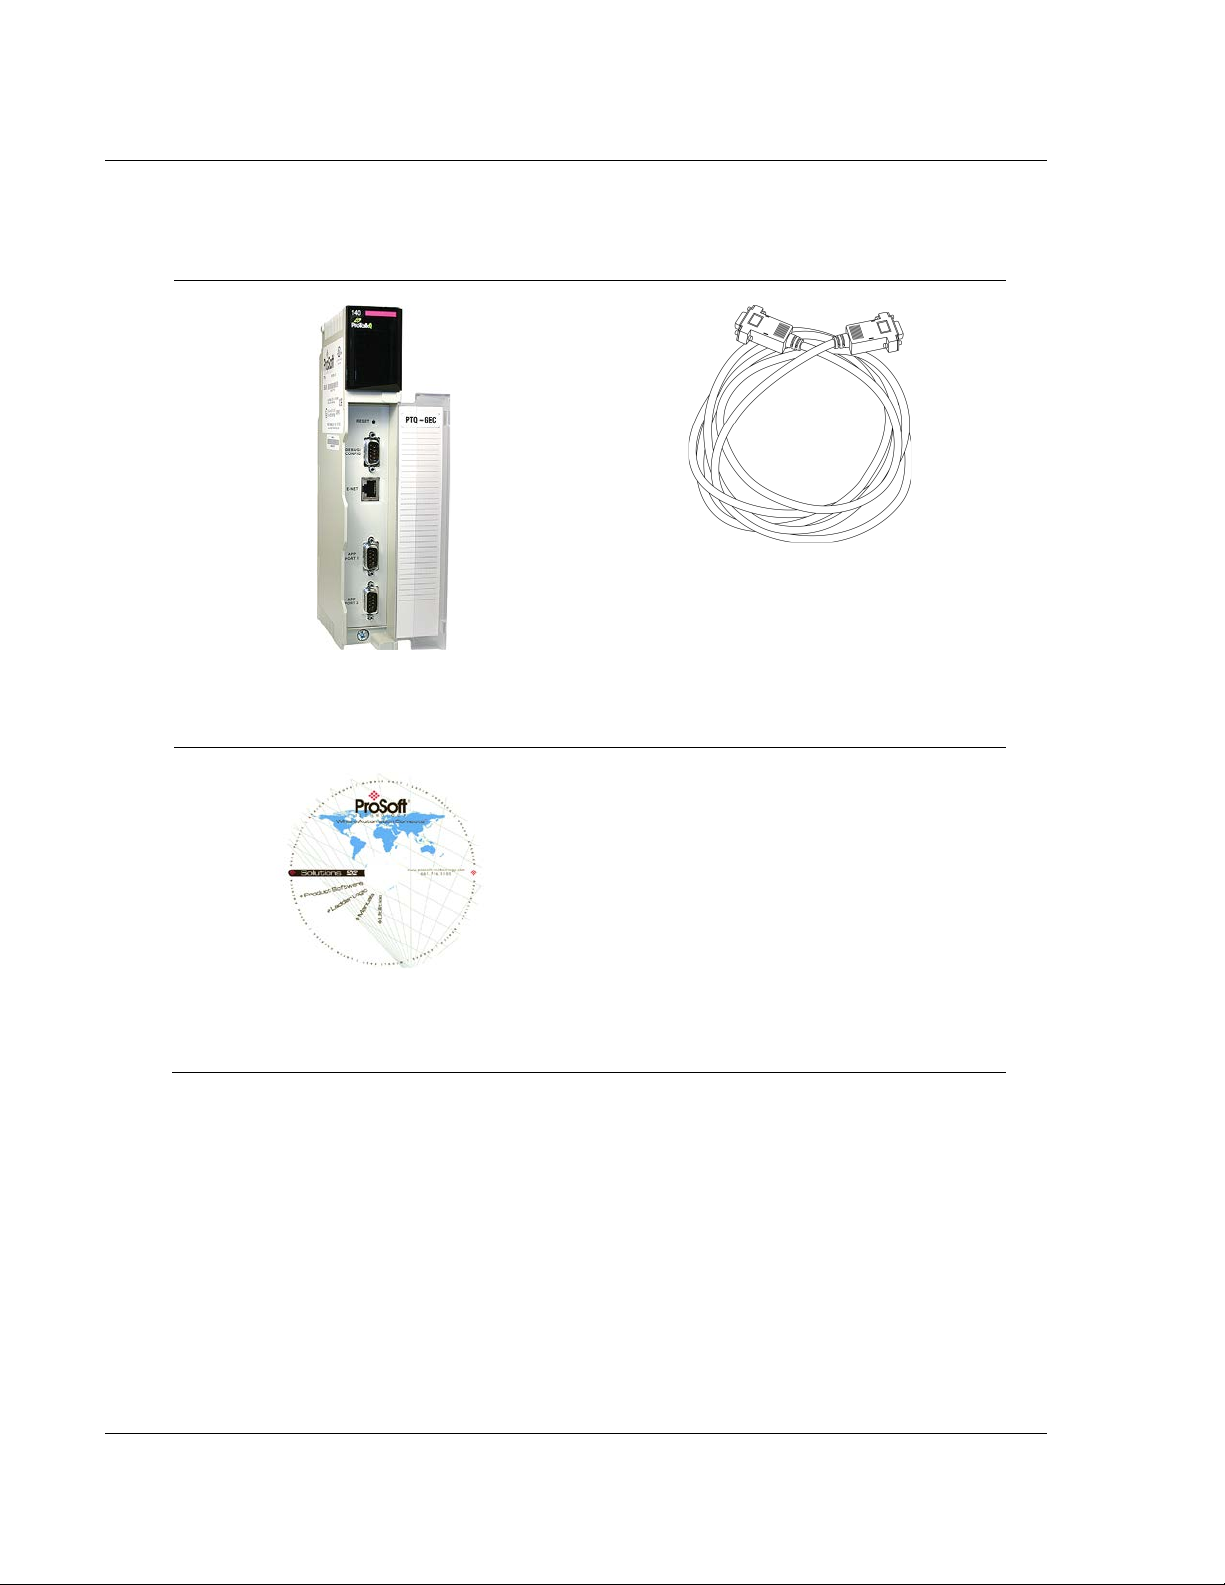
1.1 Hardware and Software Requirements
1.1.1 Package Contents
ProTalk Module
ProSoft Solutions DVD
1.1.2 Quantum Hardware
This guide assumes the familiarity of the installation and setup of the Quantum
hardware. The following should be installed, configured, and powered up before
proceeding:
Quantum Processor
Quantum rack
Quantum power supply
Quantum Modbus Plus Network Option Module (NOM Module) (optional)
Quantum to PC programming hardware
NOM Ethernet or Serial connection to PC
Page 12 of 136 ProSoft Technology, Inc.
March 4, 2013
Page 13

49TPTQ-104C ♦ 48TQuantum Platform Start Here
47TIEC 60870-5-104 Client
12TUser Manual
1.1.3 PC and PC Software
Windows-based PC with at least one COM port
Quantum programming software installed on machine
or
Concept™ PLC Programming Software version 2.6
or
ProWORX PLC Programming Software
or
Unity™ Pro PLC Programming Software
Note: ProTalk modules are compatible with common Quantum programming applications,
including Concept and Unity Pro. For all other programming applications, please contact technical
support.
1.2 Deployment Checklist
These steps are used for the installation of the ProTalk module.
The example programs are designed to allow the module and the process or to
communicate with each other over the backplane. After this initial installation,
additional steps may be needed for the specific needs of the application.
These steps must be completed in the following order:
1 Install the ProSoft Configuration Builder software on the PC
Important: Earlier versions of ProSoft Configuration Builder do not support the Hot Standby
(HSBY) feature on the PTQ-104C module. To make full use of the HSBY feature, please download
the latest version of ProSoft Configuration Builder and review the readme files from the ProSoft
Technology website at www.prosoft-technology.com/pcb.
2 Install the ProTalk module in the rack
3 Configure the module
4 Configure the 104 Client including client commands
5 Configure the processor
6 Verify communication between the processor and the module
ProSoft Technology, Inc. Page 13 of 136
March 4, 2013
Page 14

Start Here 49TPTQ-104C ♦ 48TQuantum Platform
12TUser Manual 47TIEC 60870-5-104 Client
1.3 Installing the ProTalk Module i n the Quantum Rack
1 Place the Module in the Quantum Rack. The ProTalk module must be placed
in the same rack as the processor.
2 Tilt the module at a 45° angle and align the pegs at the top of the module with
slots on the backplane.
3 Push the module into place until it seats firmly in the backplane.
Caution: The PTQ module is hot-swappable; it can be installed and removed while the rack is
powered up. Do not assume that this is the case for all types of modules unless the user manual
for the product explicitly states that the module is hot-swappable. Failure to observe this precaution
could result in damage to the module and any equipment connected to it.
Page 14 of 136 ProSoft Technology, Inc.
March 4, 2013
Page 15
49TPTQ-104C ♦ 48TQuantum Platform Start Here
47TIEC 60870-5-104 Client
12TUser Manual
1.4 Installing ProSoft Configuration Builder Software
The ProSoft Configuration Builder (PCB) software is used to configure the
module. The latest version of PCB can be found at the ProSoft Technology web
site.
Installing ProSoft Configuration Builder from the ProSoft Web Site
1 Open the web browser and navigate to http://www.prosoft-
technology.com/pcb
2 Click the D
Configuration Builder.
3 Choose S
4 Save the file to the Windows Desktop.
5 When the download is complete, locate and open the file, and follow the
instructions on the screen to install the program.
If there is no access to the Internet, ProSoft Configuration Builder can be
installed from the ProSoft Solutions DVD, included in the package with the
module.
To install ProSoft Configuration Builder from the Product DVD
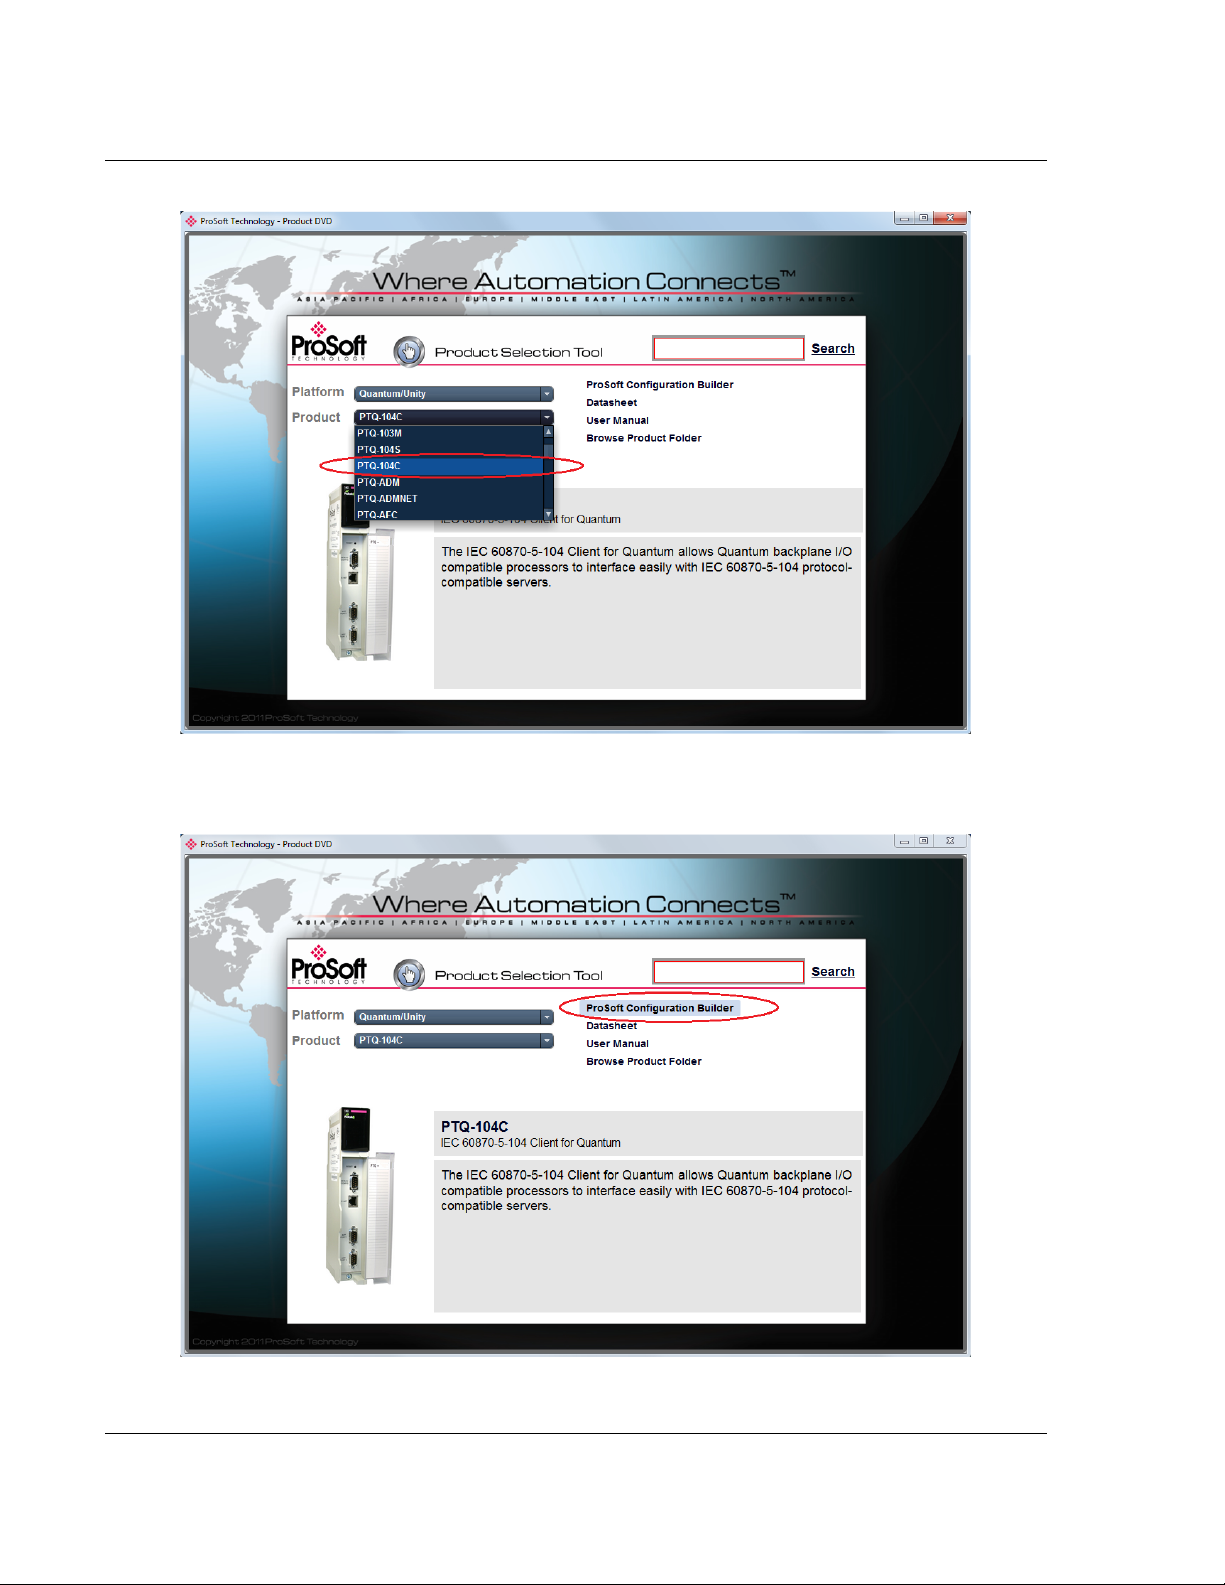
1 Insert the ProSoft Solutions Product DVD into the PC. Wait for the startup
screen to appear.
2 On the startup screen, click P
OWNLOAD HERE link to download the latest version of ProSoft
AVE or SAVE FILE when prompted.
LATFORM and select Quantum/Unity.
ProSoft Technology, Inc. Page 15 of 136
March 4, 2013
Page 16
Start Here 49TPTQ-104C ♦ 48TQuantum Platform
12TUser Manual 47TIEC 60870-5-104 Client
3 Click PRODUCT and select PTQ-104C.
4 Click the P
the PC.
ROSOFT CONFIGURATION BUILDER option to install the software on
Page 16 of 136 ProSoft Technology, Inc.
March 4, 2013
Page 17
49TPTQ-104C ♦ 48TQuantum Platform Start Here
47TIEC 60870-5-104 Client
12TUser Manual
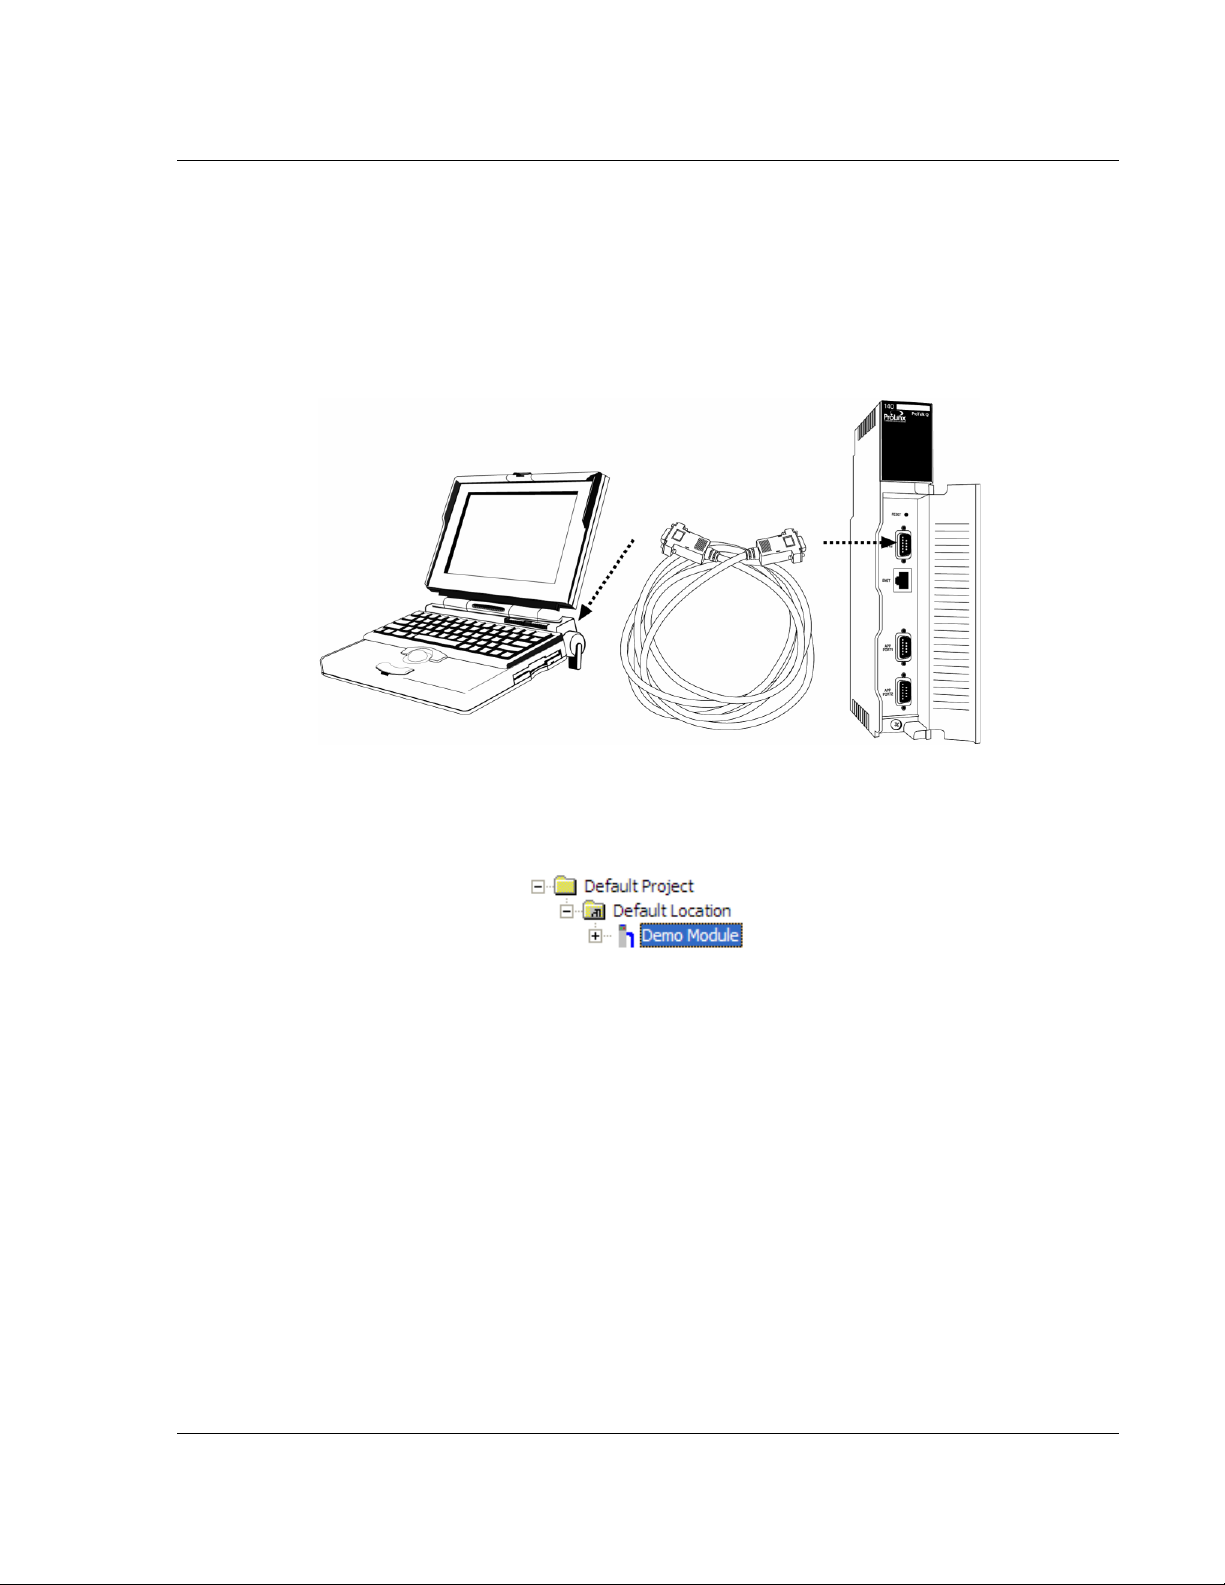
1.5 Connecting the PC to the ProTalk Configuration/Debug Port
Make sure the Quantum programming softwa re is closed before performing
these steps. This action will avoid serial port conflict.
Using the supplied Null Modem cable, connect the PC to the
Configuration/Debug port on the ProTalk module as shown
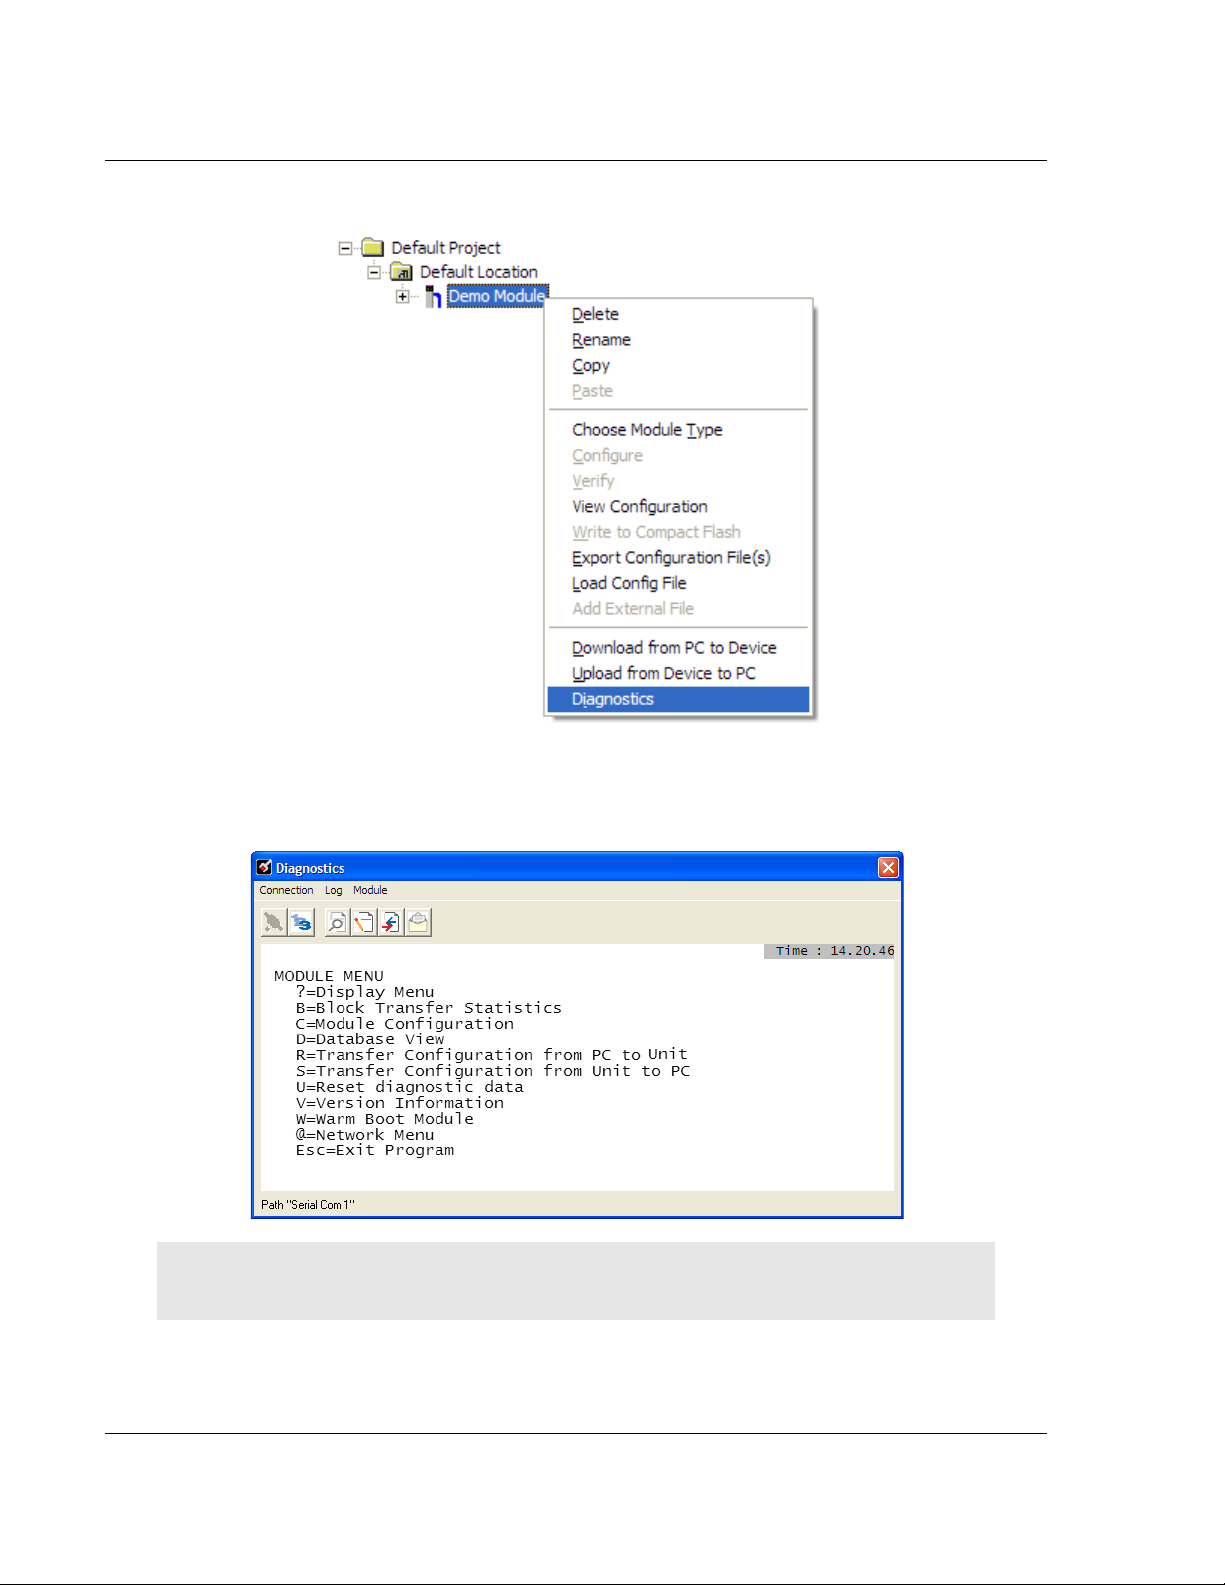
To connect to the module’s Configuration/Debug serial port
1 Start PCB, and then select the module to test. Click the right mouse button to
open a shortcut menu.
ProSoft Technology, Inc. Page 17 of 136
March 4, 2013
Page 18
Start Here 49TPTQ-104C ♦ 48TQuantum Platform
12TUser Manual 47TIEC 60870-5-104 Client
2 On the shortcut menu, choose DIAGNOSTICS.
This action opens the D
IAGNOSTICS dialog box.
3 Press [?]
to open the Main Menu.
Important: The illustrations of configuration/debug menus in this section are intended as a general
guide, and may not exactly match the configuration/debug menus in the own modu le.
Page 18 of 136 ProSoft Technology, Inc.
March 4, 2013
Page 19
49TPTQ-104C ♦ 48TQuantum Platform Start Here
47TIEC 60870-5-104 Client
12TUser Manual
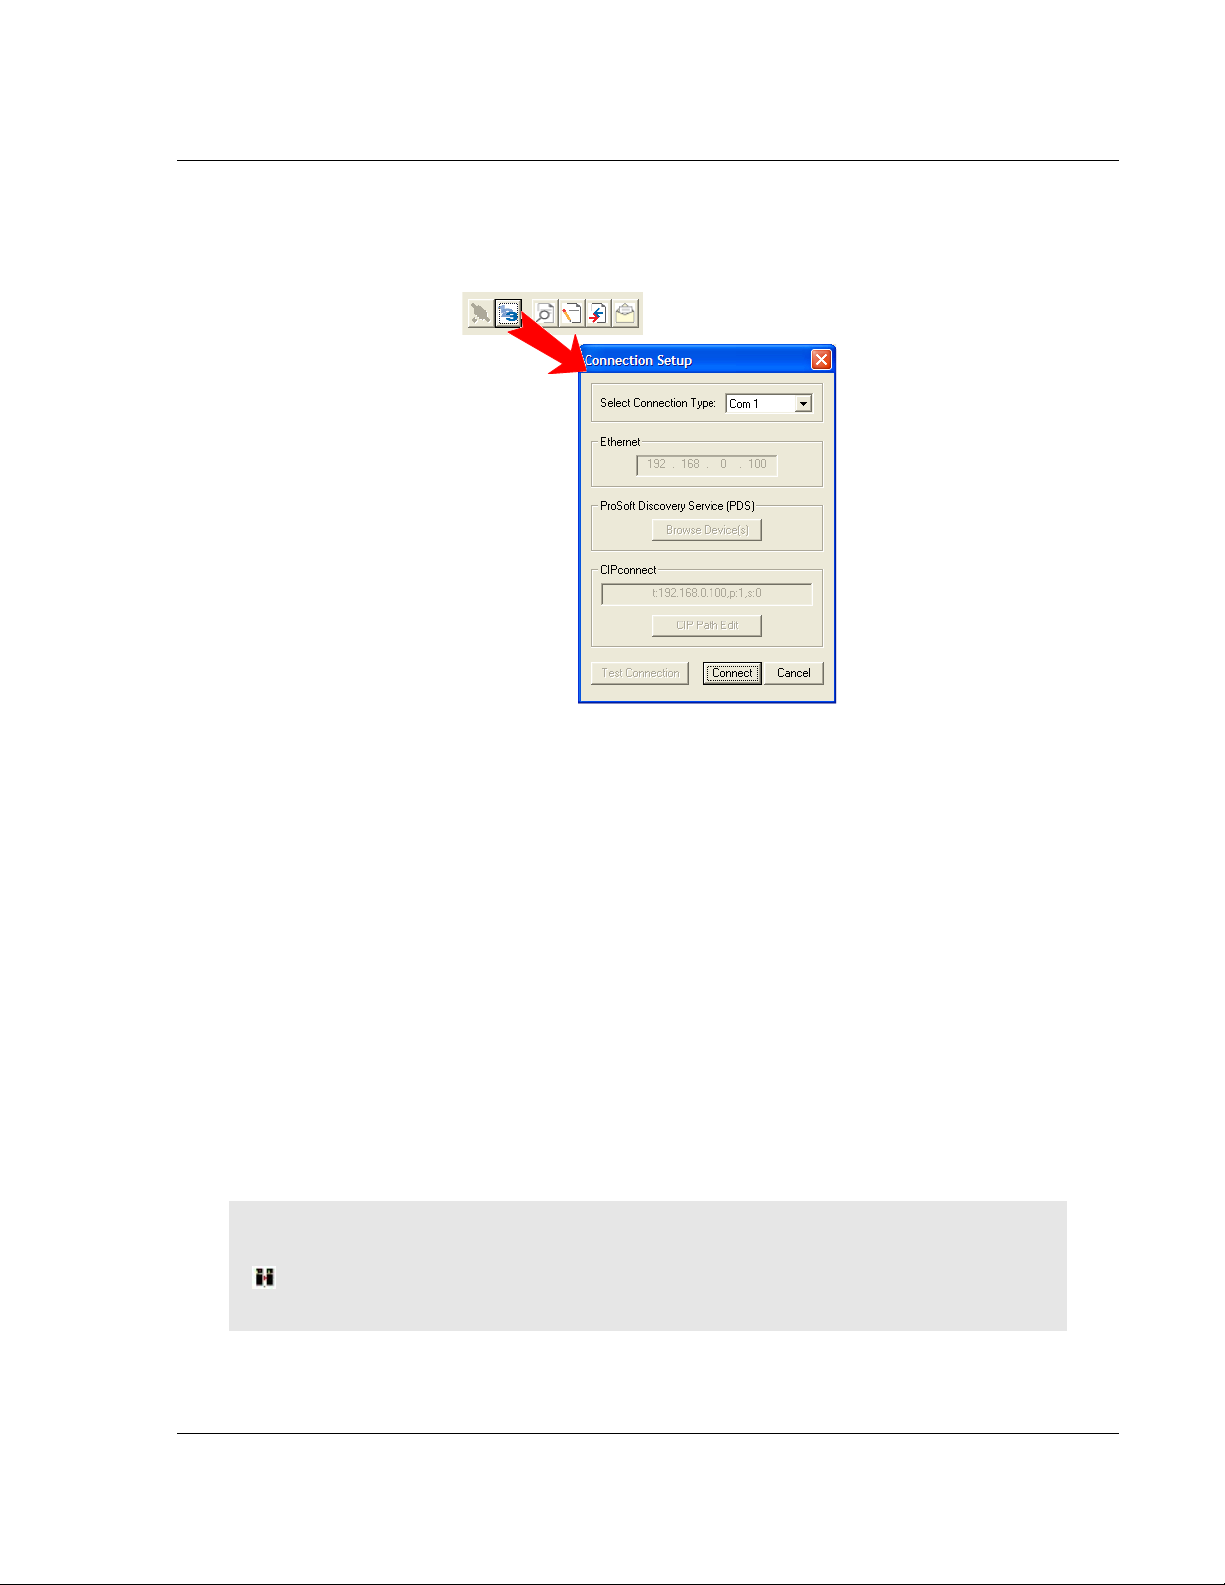
If there is no response from the module, follow these steps:
1 Click to configure the connection. On the Connection Setup dialog box, select
a valid com port or other connection type supported by the module.
2 Verify that the null modem cable is connected properly between the
computer’s serial port and the module. A regular serial cable will not work.
3 On computers with more than one serial port, verify that the communication
program is connected to the same port that is connected to the module.
4 If a connection is still not established, contact ProSoft Technology for
assistance.
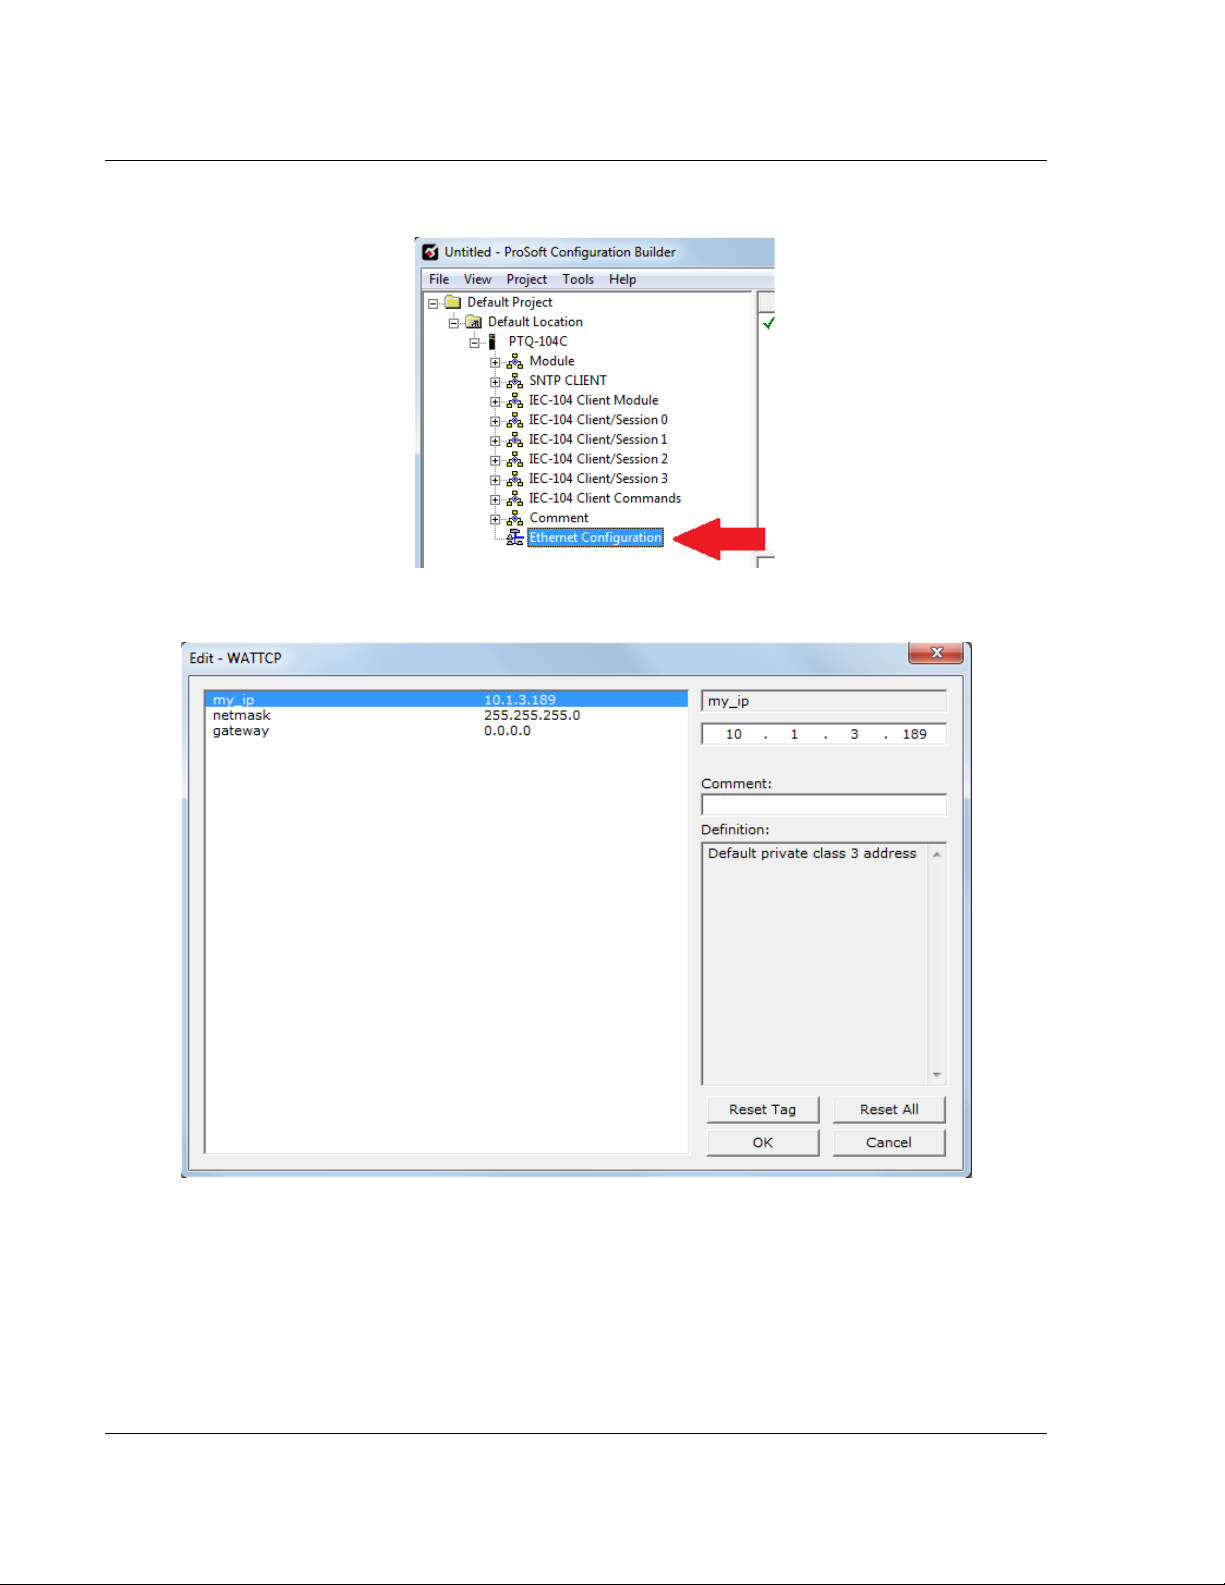
1.5.1 Ethernet Configuration
Use this procedure to configure the Ethernet settings for the module. An IP
address, subnet mask and module address must be assigned. After com pleting
this step, the module can be connected with an Ethernet cable.
1 Determine the network settings for the module, with the help of the network
administrator if necessary. The following information is needed:
o IP Address (fixed IP required) _____ . _____ . _____ . _____
o Subnet Mask _____ . _____ . _____ . _____
o Gateway Address _____ . _____ . _____ . _____
Note: The module Address is optional, and is not required for networks that do not use a default
module.
HSBY Note: Hot Standby Primary IP is entered. The Standby IP address will always be the
Primary IP address plus 1.
ProSoft Technology, Inc. Page 19 of 136
March 4, 2013
Page 20
Start Here 49TPTQ-104C ♦ 48TQuantum Platform
12TUser Manual 47TIEC 60870-5-104 Client
2 Double-click the ETHERNET CONFIGURATION icon.
3 This action opens the E
DIT dialog box.
4 Edit the values for my_ip, netmask (subnet mask) and gateway (default
gateway).
5 When finished editing, clic k OK
Configuration Builder window.
to save the changes and return to the ProSoft
Page 20 of 136 ProSoft Technology, Inc.
March 4, 2013
Page 21

49TPTQ-104C ♦ 48TQuantum Platform Configuring the Processor with Unity Pro
47TIEC 60870-5-104 Client
12TUser Manual
2 Configuring the Processor with Unity Pro
In This Chapter
Create a New Project ............................................................................ 22
Add the PTQ Module to the Project ....................................................... 24
Build the Project .................................................................................... 26
Connect The PC to the Processor ......................................................... 27
Download the Project to the Processor ................................................. 29
The following steps are designed to ensure the processor (Quantum or Unity) is
able to transfer data successfully with the PTQ module. As part of this procedure,
Unity Pro will be used to create a project, add the PTQ module to the project, set
up data memory for the project, and download the project to the processor.
ProSoft Technology, Inc. Page 21 of 136
March 4, 2013
Page 22
Configuring the Processor with Unity Pro 49TPTQ-104C ♦ 48TQuantum Platform
12TUser Manual 47TIEC 60870-5-104 Client
2.1 Creating a New Project
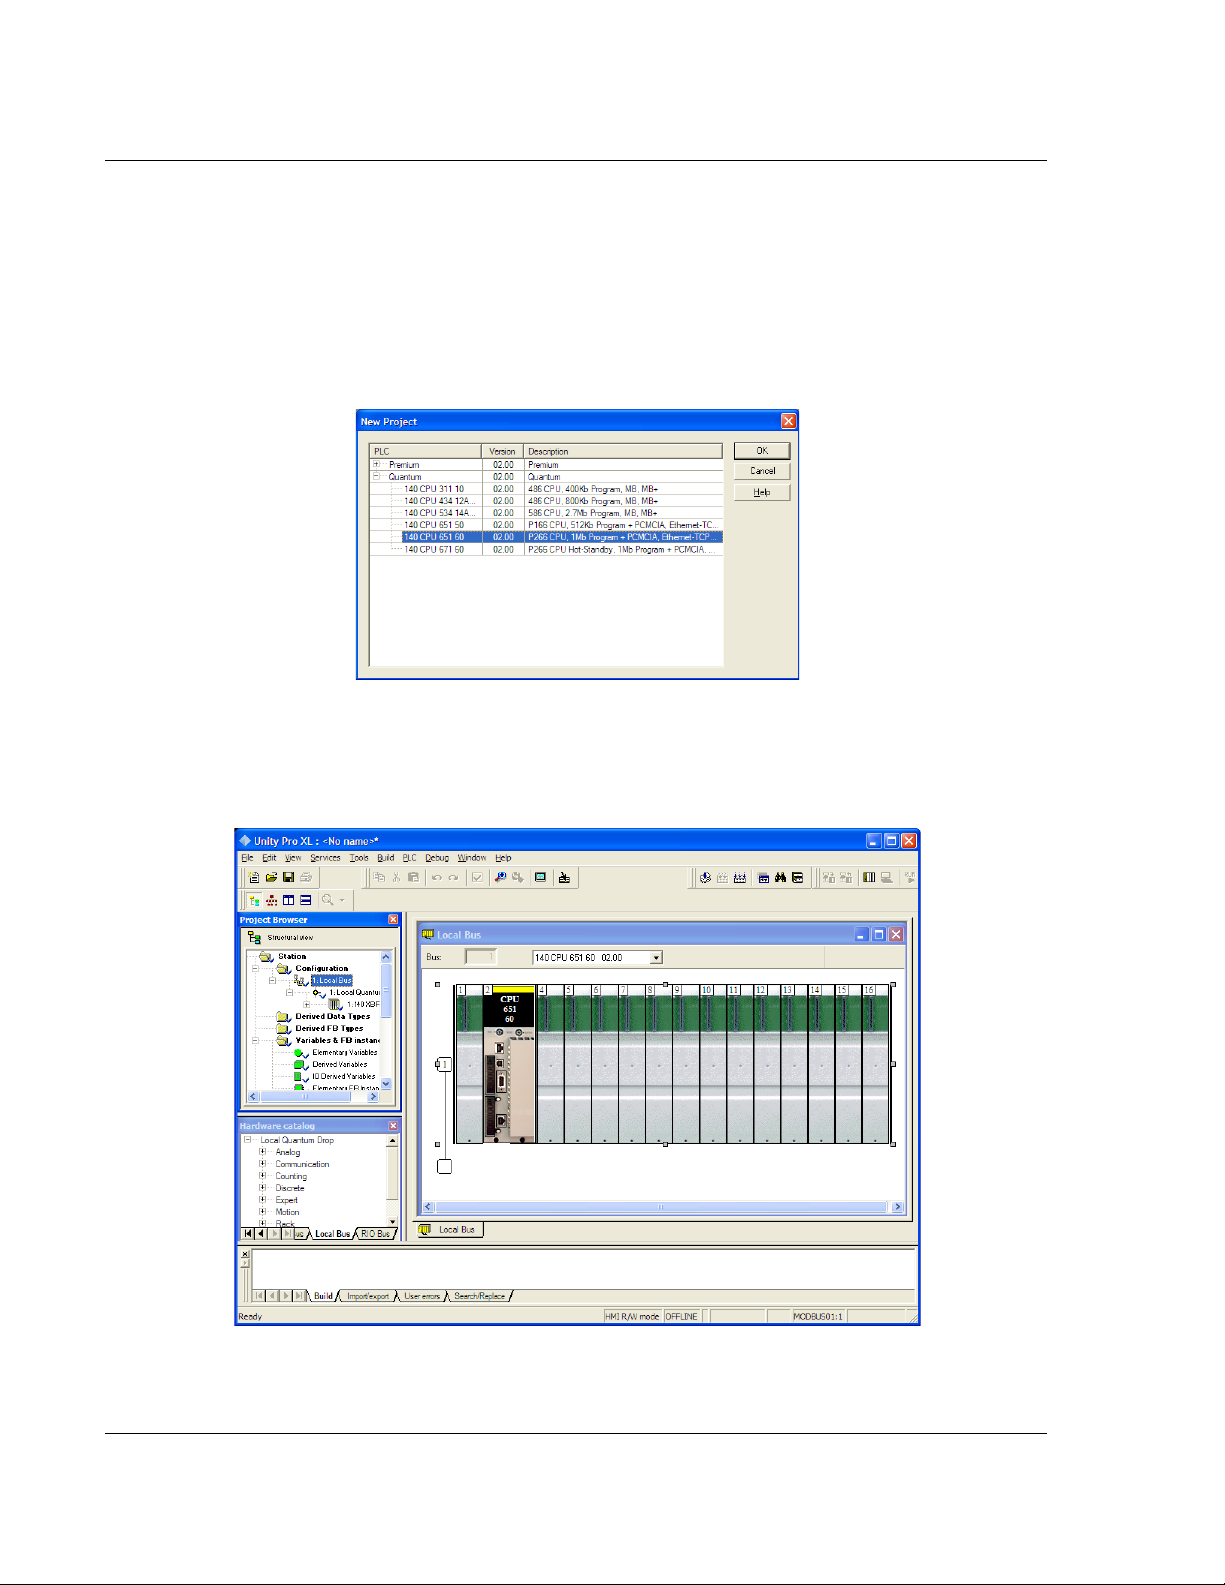
The first step is to open Unity Pro and create a new project.
1 In the New Project dialog box, choose the CPU type. In the following
illustration, the CPU is 140 CPU 651 60. Choose the processor type that
matches the hardware configuration of the processor in the rack, if it differs
from the example.
2 Click OK
3 Next, add a power supply to the project. In the Project Br owser, expand
the Configuration
action opens a graphical window showing the arrangement of devices in the
Quantum rack.
to continue.
folder, and then double-click the 1:LOCALBUS icon. This
Page 22 of 136 ProSoft Technology, Inc.
March 4, 2013
Page 23
49TPTQ-104C ♦ 48TQuantum Platform Configuring the Processor with Unity Pro
47TIEC 60870-5-104 Client
12TUser Manual
4 Select the rack position for the power supply, and then click the right mouse
button to open a shortcut menu. On the shortcut menu, choose N
EW DEVICE.
5 Expand the Supply folder, and select the power supply from the list.
6 Click OK
to continue.
7 Repeat these steps to add any additional devices to the Quantum Rack.
ProSoft Technology, Inc. Page 23 of 136
March 4, 2013
Page 24

Configuring the Processor with Unity Pro 49TPTQ-104C ♦ 48TQuantum Platform
12TUser Manual 47TIEC 60870-5-104 Client
2.2 Adding the PTQ Module to the Project
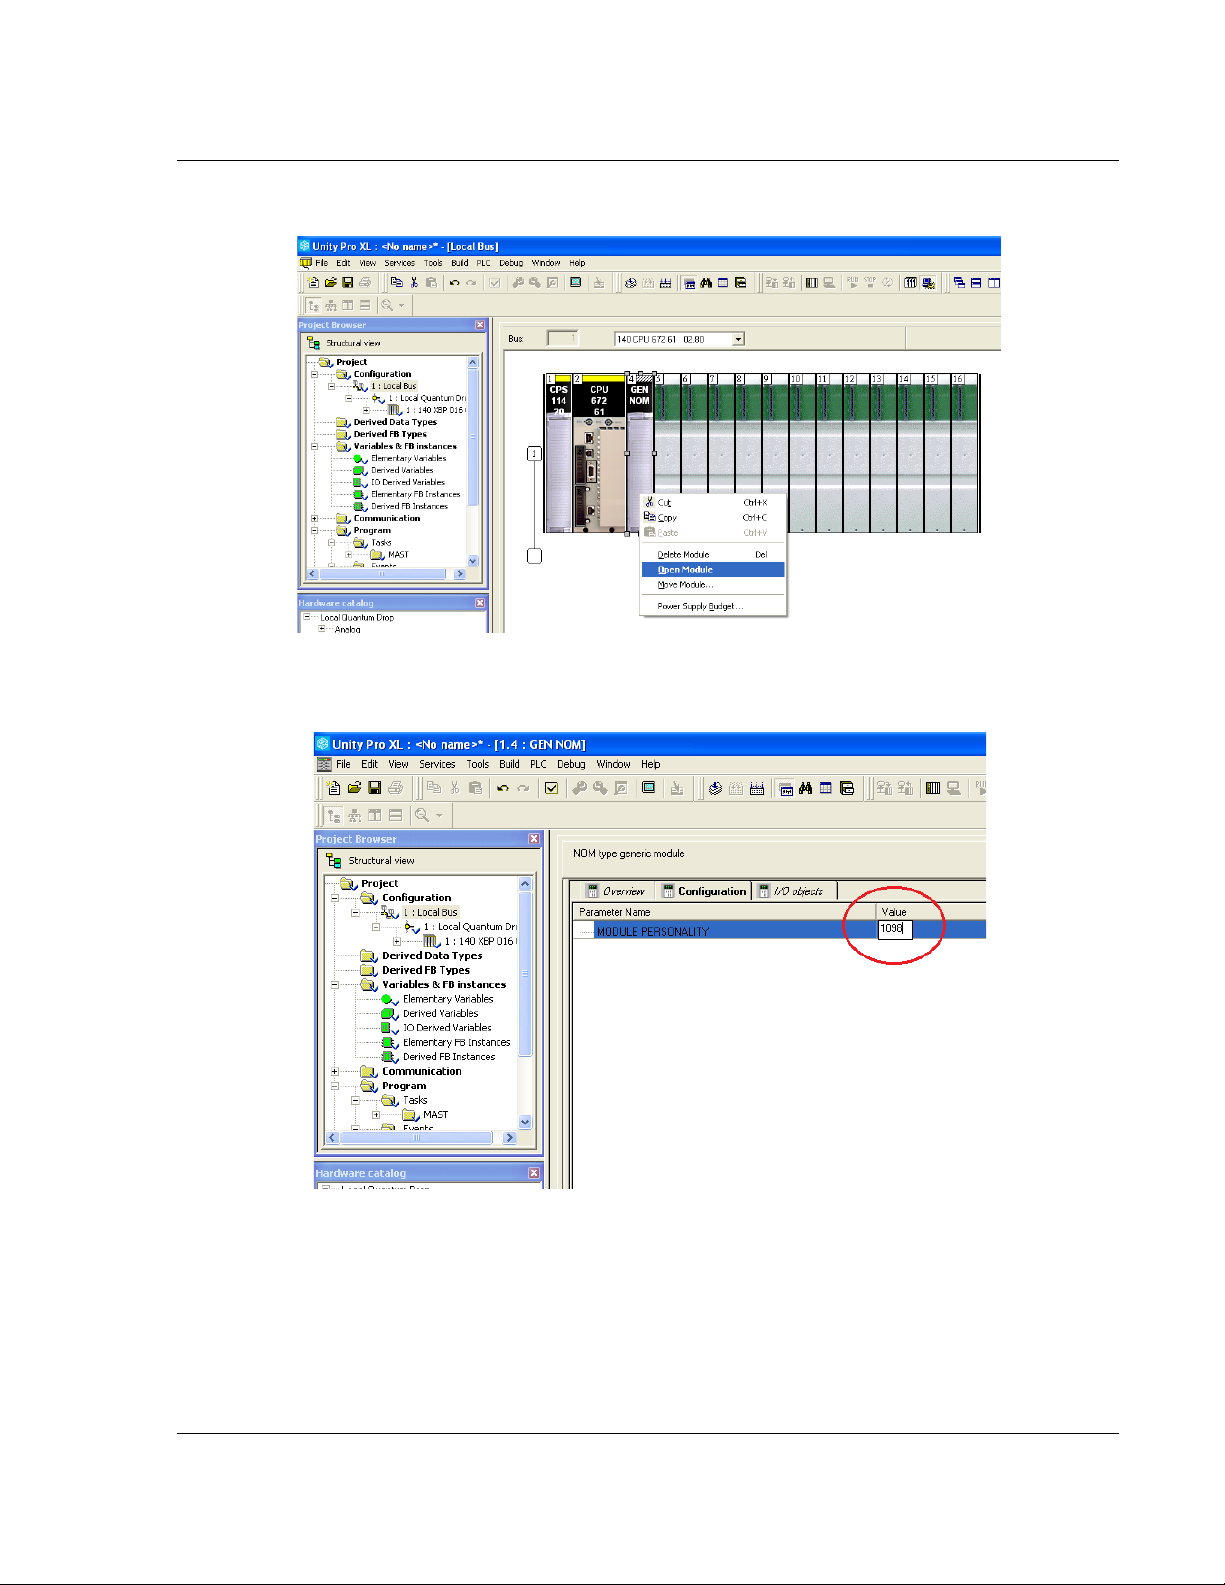
1 When adding a new device, expand the Communication tree, and select GEN
NOM. This module type provides extended communication capabilities for the
Quantum system, and allows communication between the PLC and the PTQ
module without requiring additional programming. Click OK.
Page 24 of 136 ProSoft Technology, Inc.
March 4, 2013
Page 25
49TPTQ-104C ♦ 48TQuantum Platform Configuring the Processor with Unity Pro
47TIEC 60870-5-104 Client
12TUser Manual
2 Right click the GEN NOM icon and select Open Module.
3 Enter the module personality value. The correct value for ProTalk modules is
1098 decimal (044A hex).
4 Before the project can be saved in Unity Pro, the modifications must be
validated. Open the E
DIT menu, and choose VALIDATE. If no errors are
reported, the project can be saved.
5 S
AVE the project.
ProSoft Technology, Inc. Page 25 of 136
March 4, 2013
Page 26
Configuring the Processor with Unity Pro 49TPTQ-104C ♦ 48TQuantum Platform
12TUser Manual 47TIEC 60870-5-104 Client
2.3 Building the Project
Whenever the configuration of the PTQ module or the processor is updated, the
changed configuration must be imported from the module. The project must be
built (compiled) before downloading it to the processor.
Note: The following steps show how to build the project in Unity Pro. This is not intended to
provide detailed information on using Unity Pro, or debugging the programs. Refer to the
documentation for the processor and for Unity Pro for specialized information.
To build (compile) the project
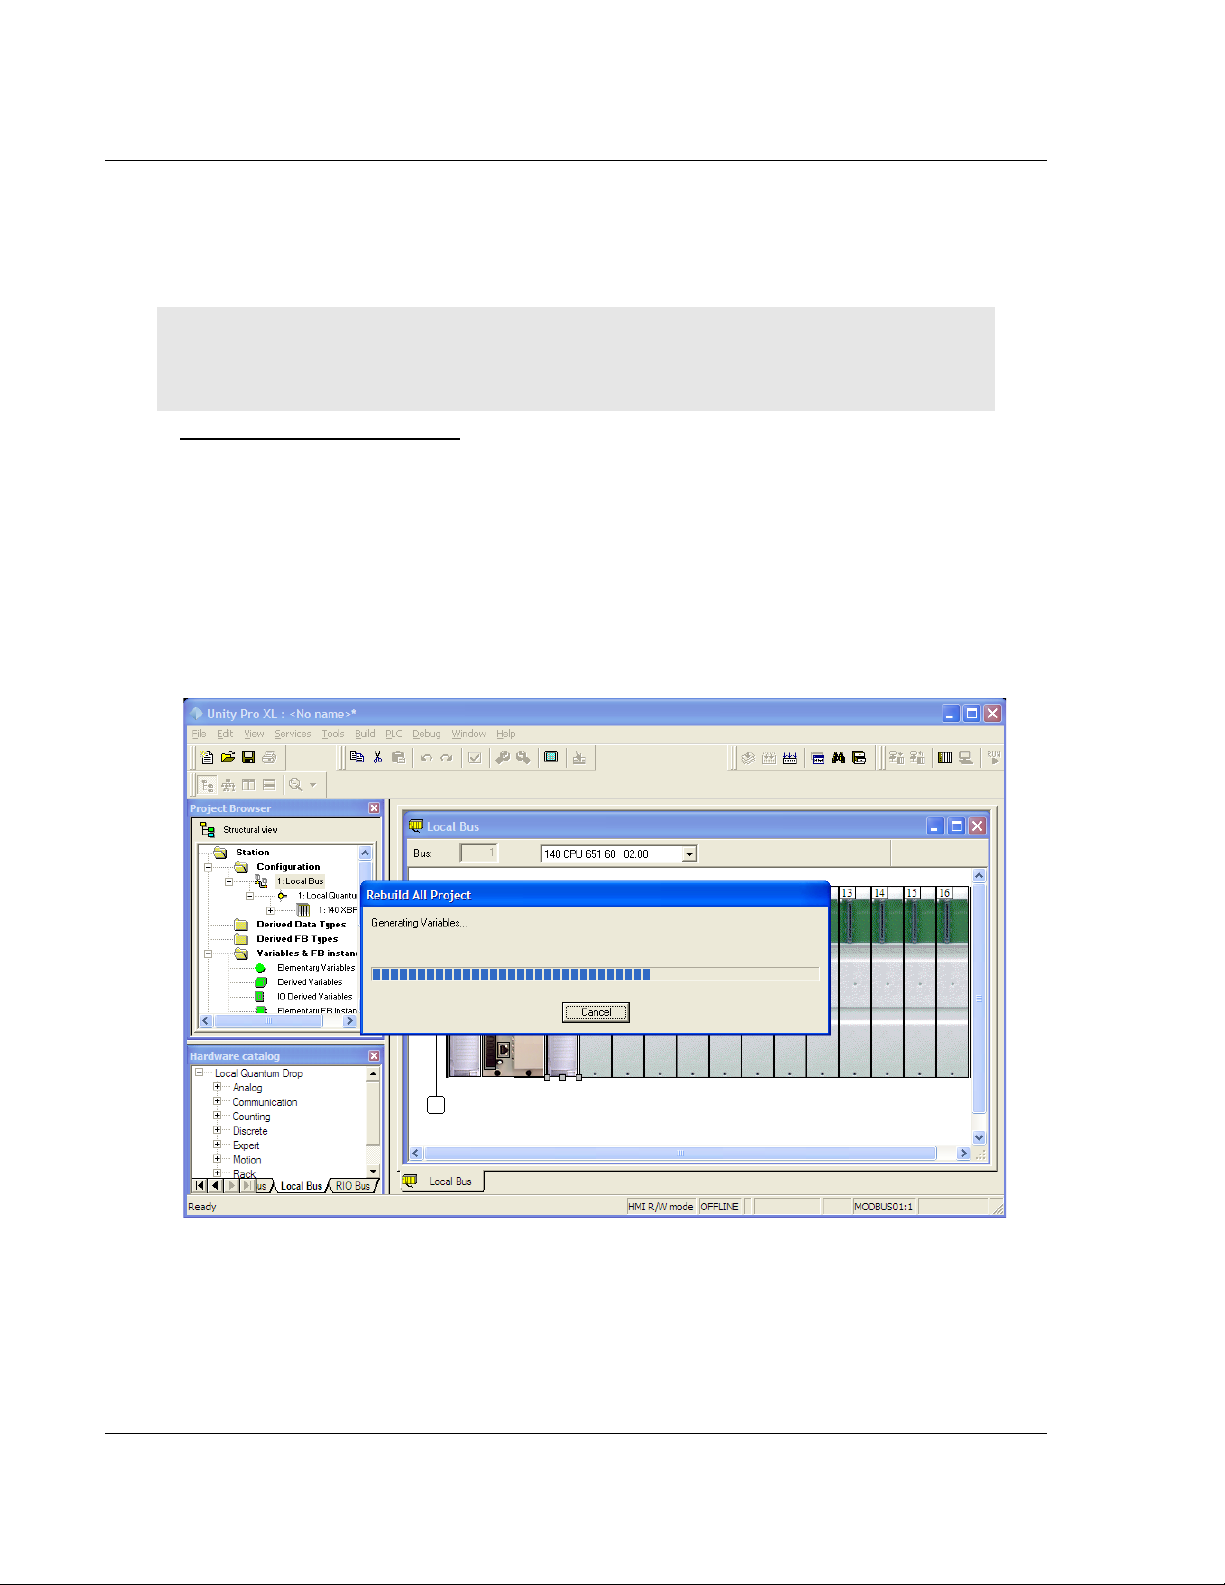
1 Review the elements of the project in the Project Browser.
2 When the project is ready to be downloaded, open the B
choose R
EBUILD ALL PROJECT. This action builds (compiles) the project into a
form the processor can use to execute the instructions in the project file. This
task may take several minutes, depending on the complexity of the project
and the resources available on the PC.
3 As the project is built, Unity Pro reports its process in a Progress
with details appearing in a pane at the bottom of the window. The following
illustration shows the build process under way.
UILD menu, and
dialog box,
After the build process is completed successfully, the next step is to download
the compiled project to the processor.
Page 26 of 136 ProSoft Technology, Inc.
March 4, 2013
Page 27

49TPTQ-104C ♦ 48TQuantum Platform Configuring the Processor with Unity Pro
47TIEC 60870-5-104 Client
12TUser Manual
2.4 Connecting a PC to the Processor
The next step is to connect to the processor so the project file can be
downloaded. The processor uses this project file to communicate over the
backplane to modules identified in the project file.
Note: If a connection between the PC to the processor has not been established, verify the port
drivers are installed and are available to Unity Pro.
Verifying the address and driver settings in Unity Pro
1 Open the PLC menu, and choose STANDARD MODE. This action turns off the
PLC Simulator. It allows the user to communicate directly with the Quantum
or Unity hardware.
2 Open the PLC
Address dialog box. Open the M
menu, and choose SET ADDRESS... This action opens the Set
EDIA dropdown list and choose the
connection type (TCPIP or USB).
ProSoft Technology, Inc. Page 27 of 136
March 4, 2013
Page 28
Configuring the Processor with Unity Pro 49TPTQ-104C ♦ 48TQuantum Platform
12TUser Manual 47TIEC 60870-5-104 Client
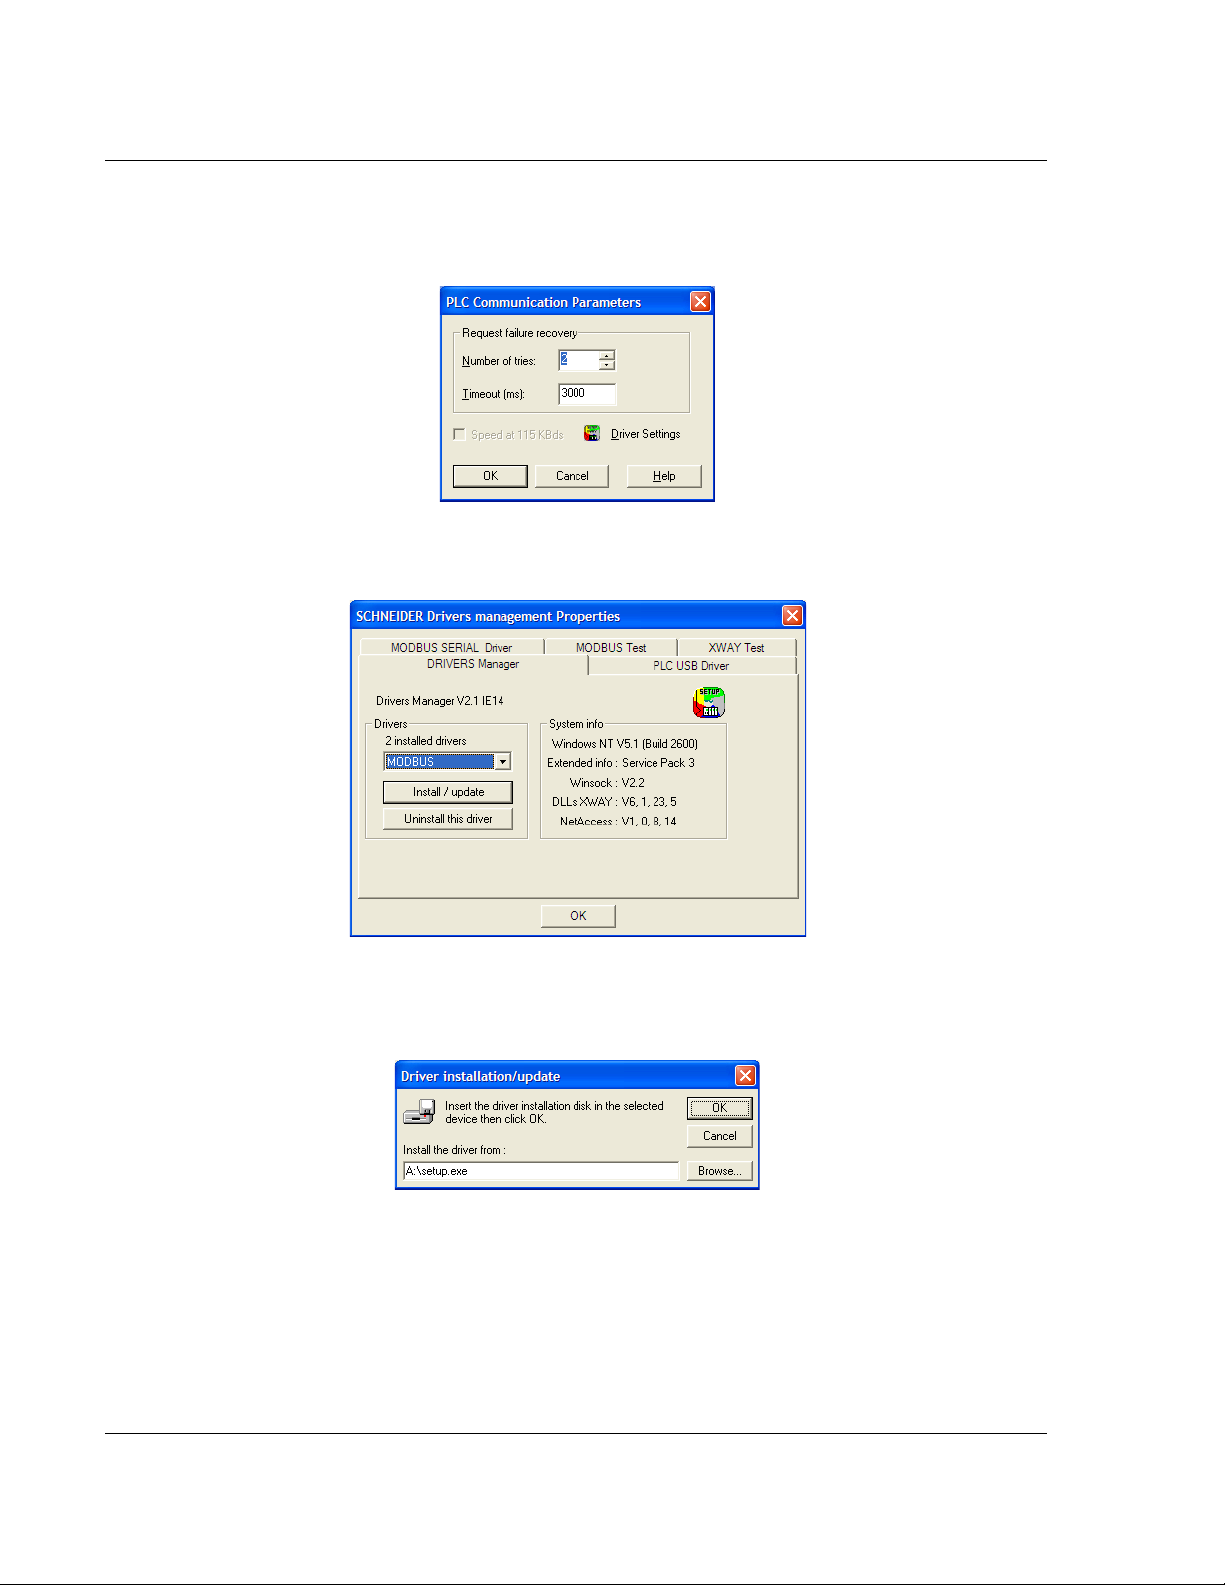
3 If the MEDIA dr opdown list does not contain the desired connection method,
click the C
OMMUNICATION PARAMETERS butt on in the PLC area of the dialog
box. This action opens the PLC Communication Parameters dialog box.
4 Click the D
RIVER SETTINGS button to open the SCHNEIDER Drivers
management Properties dialog box.
5 Click the I
NSTALL/UPDATE button to specify the location of the Setup.exe file
containing the drivers to use. The Unity Pro installation disks will be needed
for this step.
6 Click the B
ROWSE button to locate the Setup.exe file to execute, and execute
the setup program. After the installation, restart the PC. Refer to the
Schneider Electric documentation for more information on installing drivers
for Unity Pro.
Page 28 of 136 ProSoft Technology, Inc.
March 4, 2013
Page 29
49TPTQ-104C ♦ 48TQuantum Platform Configuring the Processor with Unity Pro
47TIEC 60870-5-104 Client
12TUser Manual
2.4.1 Connecting to the Processor with TCP/IP
The next step is to download (copy) the project file to the processor. The
following steps demonstrate how to use an Ethernet cable connected from the
Processor to the PC through an Ethernet hub or switch. Other connection
methods may also be available, depending on the hardware configuration of the
processor and the communication drivers installed in Unity Pro.
1 Connect the PC and the processor to an Ethernet hub.
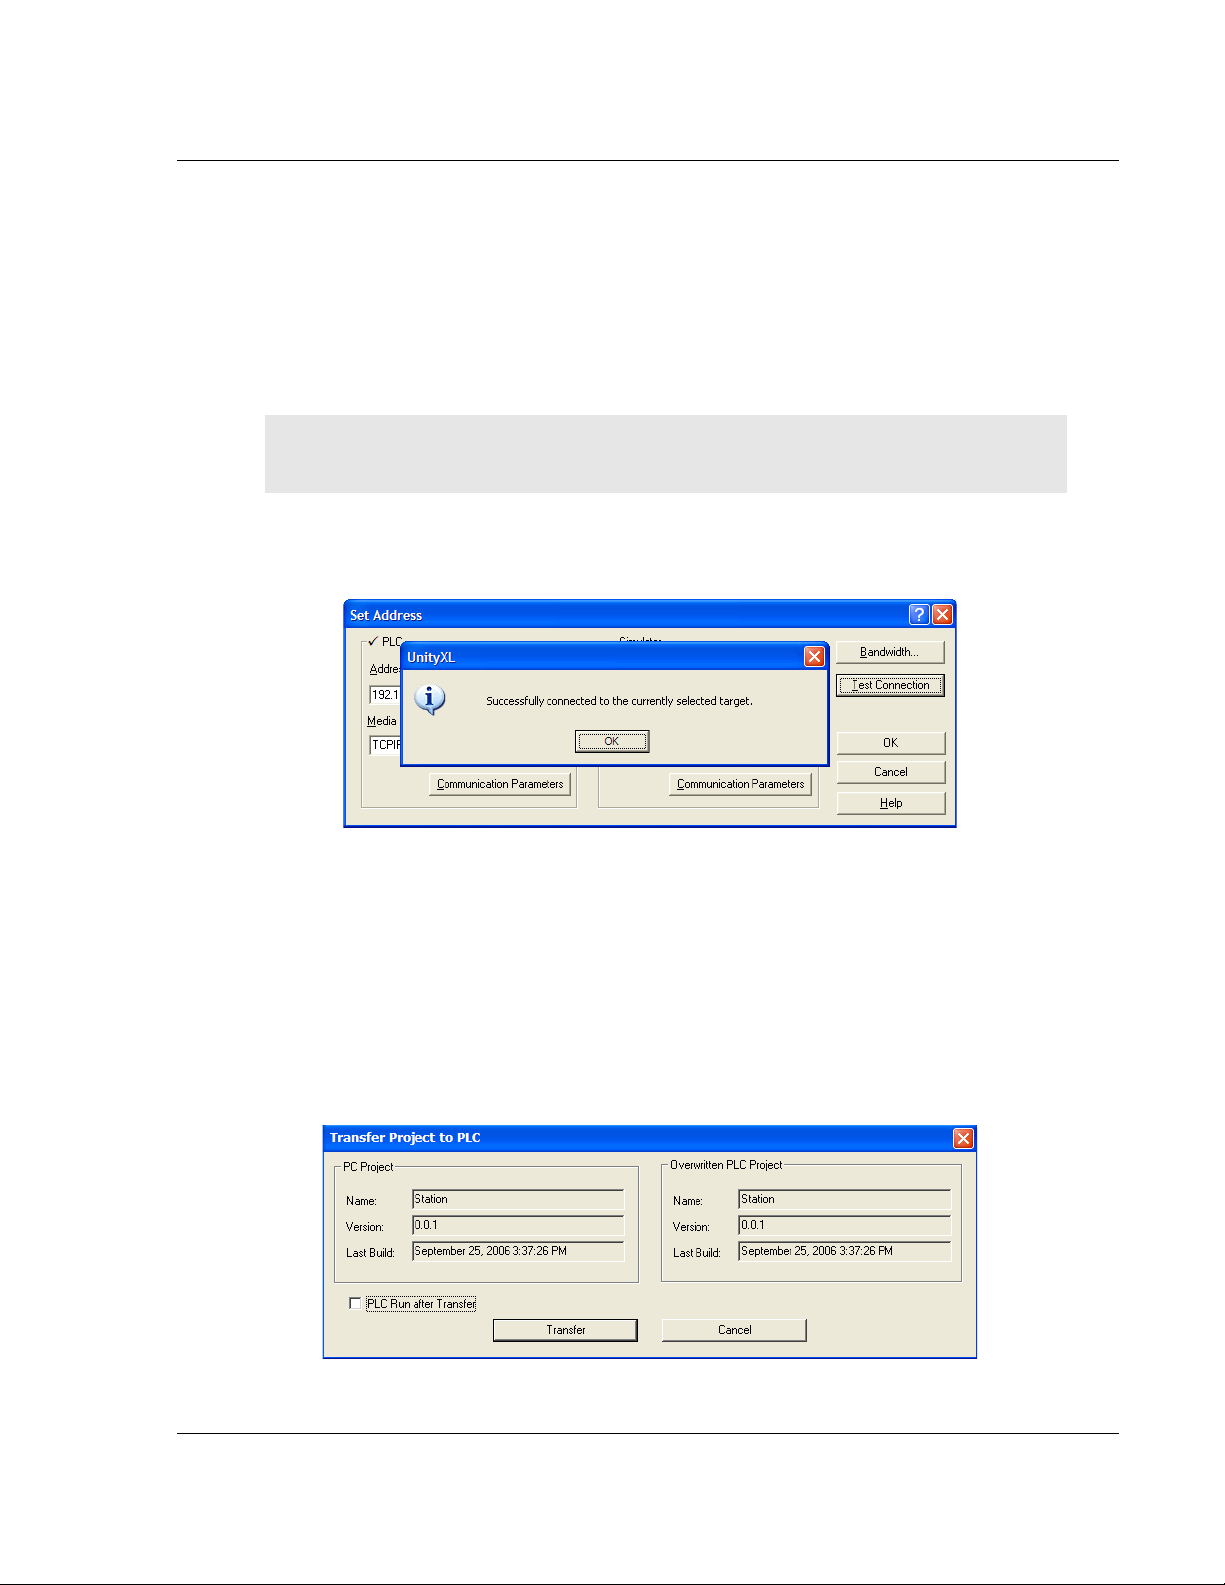
2 Open the PLC
Important: The Set Address dialog box is divided into two areas. Enter the address and media
type in the PLC area of the dialog box, not the SIMULATOR area.
3 Enter the IP address in the address field. In the MEDIA dr opdown list, choose
‘TCPIP’.
4 Click the
menu, and select SET ADDRESS.
TEST CONNECTION button to verify that the settings.
2.5 Downloading the Project to the Processor
1 Open the PLC menu and then choose CONNECT. This action opens a
connection between the Unity Pro software and the processor, using the
address and media type settings that were configured in the previous step.
2 On the PLC
the
TRANSFER PROJECT TO PLC dialog box. If the PLC needs to go to "Ru n"
mode immediately after the transfer is complete, select (check) the PLC
AFTER
menu, choose TRANSFER PROJECT TO PLC. This action opens
TRANSFER check box.
RUN
ProSoft Technology, Inc. Page 29 of 136
March 4, 2013
Page 30

Configuring the Processor with Unity Pro 49TPTQ-104C ♦ 48TQuantum Platform
12TUser Manual 47TIEC 60870-5-104 Client
3 Click the TRANSFER button to download the project to the processor. As the
project is transferred, Unity Pro reports its process in a P
ROGRESS dialog box,
with details appearing in a pane at the bottom of the window.
Place the processor in Run mode when the transfer completes.
Page 30 of 136 ProSoft Technology, Inc.
March 4, 2013
Page 31

49TPTQ-104C ♦ 48TQuantum Platform Configuring the Processor with Concept
47TIEC 60870-5-104 Client
12TUser Manual
3 Configuring the Processor with Concept
Please contact ProSoft Technical Support (+1 (661) 716-5100) for more
information when configuring with Concept v2.6.
ProSoft Technology, Inc. Page 31 of 136
March 4, 2013
Page 32

Configuring the Processor with Concept 49TPTQ-104C ♦ 48TQuantum Platform
12TUser Manual 47TIEC 60870-5-104 Client
Page 32 of 136 ProSoft Technology, Inc.
March 4, 2013
Page 33

49TPTQ-104C ♦ 48TQuantum Platform Configuring the Processor with ProWORX
47TIEC 60870-5-104 Client
12TUser Manual
4 Configuring the Processor with ProWORX
When the ProWORX 32 software is used to configure the processor, use the
example SAF file provided on the ProSoft Solutions DVD.
Important Note: ProWORX software does not report whether the PTQ module is present in the
rack, and therefore is not able to report the health status of the module when the module is online
with the Quantum processor. Please consider this when monitoring the status of the PTQ module.
1 Run the S
ProWORX 32 software:
CHNEIDER_ALLIANCES.EXE application that is installed with the
2 Click on I
MPORT…
ProSoft Technology, Inc. Page 33 of 136
March 4, 2013
Page 34

Configuring the Processor with ProWORX 49TPTQ-104C ♦ 48TQuantum Platform
12TUser Manual 47TIEC 60870-5-104 Client
3 Select the .SAF File that is located on the DVD shipped with the PTQ
module.
4 After clicking O
the M
ODULE as PTQ:
PEN, select the I/O SERIES as QUANTUM SERIES. Also, select
Page 34 of 136 ProSoft Technology, Inc.
March 4, 2013
Page 35

49TPTQ-104C ♦ 48TQuantum Platform Configuring the Processor with ProWORX
47TIEC 60870-5-104 Client
12TUser Manual
5 Close the Schneider Alliances application.
6 Run the ProWORX 32 software. Whether a new or existing project is used,
click on theTraffic Cop section to display the rack to be edited.
7 Highlight Slot x by clicking on the slot in the rack display. In this case, the
PTQ module will be placed in slot 3.
ProSoft Technology, Inc. Page 35 of 136
March 4, 2013
Page 36

Configuring the Processor with ProWORX 49TPTQ-104C ♦ 48TQuantum Platform
12TUser Manual 47TIEC 60870-5-104 Client
Below the rack display is the Properties drop-down box for slot 3, click and select
PTQ.
8 Save the project. It is now ready to be downloaded to the Processor.
Page 36 of 136 ProSoft Technology, Inc.
March 4, 2013
Page 37

49TPTQ-104C ♦ 48TQuantum Platform Module Configuration
47TIEC 60870-5-104 Client
12TUser Manual
5 Module Configuration
In This Chapter
Using ProSoft Configuration Builder ...................................................... 38
Backplane Data Transfer ....................................................................... 42
Data Exchange ...................................................................................... 44
Modify the [Backplane Data Exchange] Section .................................... 52
[SNTP CLIENT] ..................................................................................... 60
[IEC-104 Client Module] ........................................................................ 61
[IEC-104 Client/Session x] ..................................................................... 62
[Ethernet Configuration]......................................................................... 73
To Create Optional Comment Entries.................................................... 73
To print a configuration file .................................................................... 74
ProSoft Technology, Inc. Page 37 of 136
March 4, 2013
Page 38

Module Configuration 49TPTQ-104C ♦ 48TQuantum Platform
12TUser Manual 47TIEC 60870-5-104 Client
5.1 Using ProSoft Configuration Builder
ProSoft Configuration Builder (PCB) provides a way to manage module
configuration files customized to meet the application needs. PCB is not only a
powerful solution for new configuration files, but also allows information to be
imported from previously installed (known working) configurations to new
projects.
5.1.1 Creating a Project
To begin, start ProSoft Configuration Builder. If other Windows configuration
tools have been used before, the screen layout is found to be familiar. ProSoft
Configuration Builder’s window consists of a tree view on the left, an information
pane and a configuration pane on the right side of the window. The following
illustration shows the ProSoft Configuration Builder window with a new project.
Page 38 of 136 ProSoft Technology, Inc.
March 4, 2013
Page 39

49TPTQ-104C ♦ 48TQuantum Platform Module Configuration
47TIEC 60870-5-104 Client
12TUser Manual
The first task is to add the PTQ-104C module to the project.
1 Use the mouse to select D
EFAULT MODULE in the tree view, and click the right
mouse button to open a shortcut menu. On the shortcut menu,
select C
HOOSE MODULE TYPE.
2 This action opens the CHOOSE MODULE TYPE dialog box.
ProSoft Technology, Inc. Page 39 of 136
March 4, 2013
Page 40

Module Configuration 49TPTQ-104C ♦ 48TQuantum Platform
12TUser Manual 47TIEC 60870-5-104 Client
3 In the PRODUCT LINE FILTER area of the dialog box, select PTQ. In the SELECT
MODULE TYPE dropdown list, select PTQ-104C.
4 If Hot Standby is required, click the Enable Hot Standby button.
5 Click OK
BUILDER window.
to save the settings and return to the PROSOFT CONFIGURATION
Page 40 of 136 ProSoft Technology, Inc.
March 4, 2013
Page 41

49TPTQ-104C ♦ 48TQuantum Platform Module Configuration
47TIEC 60870-5-104 Client
12TUser Manual
5.1.2 Setting Module Parameters
Notice the contents of the information pane and the configuration pane updated
when the PTQ-104C module was added to the project.
Renaming the "Default Project" and "Default Location" folders can be done in the
tree view.
Renaming an object
1 Select the object and click the right mouse button to open a shortcut menu.
From the shortcut menu, choose R
ENAME.
2 Type the name to assign to the object.
3 Click away from the object to save the new name.
Configuring module parameters
1 Click on the plus sign next to the icon to expand module information.
2 Double-click the icon to open the Edit
dialog box.
3 To edit a parameter, select the parameter in the left pane and make the
changes in the right pane.
4 Click OK
to save the changes.
HSBY Note: For Hot Standby modules, a double module icon will be displayed.
ProSoft Technology, Inc. Page 41 of 136
March 4, 2013
Page 42

Module Configuration 49TPTQ-104C ♦ 48TQuantum Platform
12TUser Manual 47TIEC 60870-5-104 Client
Printing a configuration file
1 Select the module icon, and then click the right mouse button to open a
shortcut menu.
2 On the shortcut menu, choose V
IEW CONFIGURATION. This action opens
the View Configuration window.
3 On the View Configuration window, open the F
choose P
RINT. This action opens the Print dialog box.
ILE menu, and
4 On the Print dialog box, choose the printer to use from the dropdown list,
select printing options, and then click OK.
5.2 Backplane Data Transfer
On every scan, the PTQ-104C transfers all Read and Write database values
between the module and the processor.
The module will hold the processor scan for a certain period of time to complete
the transfer. Therefore, the larger the read and write areas, the longer the
processor scan time will be.
The [Module] section of PCB def ines t he starting registers for read and write
operations. It also defines the length of each data area.
Page 42 of 136 ProSoft Technology, Inc.
March 4, 2013
Page 43

49TPTQ-104C ♦ 48TQuantum Platform Module Configuration
47TIEC 60870-5-104 Client
12TUser Manual
Double click the [Module] icon to edit.
5.2.1 Read Register Start
0 through 3999
Database start register to move to processor
5.2.2 Read Register Count
0 through 3999
Number of words moved from module to processor
5.2.3 Write Register Start
0 through 3999
Database start register where data placed from processor
5.2.4 Write Register Count
0 through 3999
Number of words moved from processor to module
ProSoft Technology, Inc. Page 43 of 136
March 4, 2013
Page 44

Module Configuration 49TPTQ-104C ♦ 48TQuantum Platform
12TUser Manual 47TIEC 60870-5-104 Client
5.2.5 3X Register Start
1 through 65535
3x start register where data moved from module to processor
5.2.6 4X Register Start
1 through 65535
4x start register where data moved from processor to module
5.2.7 Initialize Output Data
Yes or No
This parameter determines if the output data for the module should be initialized
with values from the processor. If the value is set to No (0), the output data will
be initialized to 0. If the value is set to Yes (1), the data will be initialized with
data from the processor. Use of this option requires associated ladder logic to
pass the data from the processor to the module.
5.2.8 Pass-Through Events
Yes or No
This parameter specifies if event messages received on the clients will be
passed to the processor. If the parameter is set to N, event messages will not be
passed to the processor. If the parameter is set to Y, the module will pass all
events received to the processor using block identifier 9903.
5.3 Data Exchange
The module transfers all Read and Write data between the module and the
processor on every scan. Up to 4000 total words can be configured in the module
database. The more data that is configured, the longer the processor scan will
take.
The [Module] section of PCB defines the starting registers for read and write
operations. It also defines the numb er of registers to u se for each data area.
The values in the example PCB configuration file from the previous section are
illustrated in the following diagram.
Read Register Start: 1000
Read Register Count: 100
Write Register Start: 0
Page 44 of 136 ProSoft Technology, Inc.
March 4, 2013
Page 45

49TPTQ-104C ♦ 48TQuantum Platform Module Configuration
Module Database
Register
Unity Register
Description
Read Data
3x
%IW
Input Register
Write Data
4x
%MW
Holding Register
Processor Memory Address
Module Database Address
40065
0
40066
1
40067
2
40068
3
47TIEC 60870-5-104 Client
12TUser Manual
Write Register Count: 100
Note: The diagram above shows the memory addresses for a Quantum processor. If using a Unity
processor, substitute %MW for read only data, and %IW for read/write data.
Words 0 through 63 in each read/write block are reserved for special functions.
Refer to Command Control (Page 50) for more information on special function
blocks. The following table shows the relationship between the processor
memory and the module database areas.
The data mapping in the following example shows the relationship between
processor and PTQ-104C memory addresses, assuming a 4x register start value
of 40001 and a PTQ-104C database start value of 0.
ProSoft Technology, Inc. Page 45 of 136
March 4, 2013
Page 46

Module Configuration 49TPTQ-104C ♦ 48TQuantum Platform
Processor Memory Address
Module Database Address
40069
4
…
…
40164
99
Processor Memory Address
Module Database Address
30065
2000
30066
2001
30067
2002
30068
2003
30069
2004
…
…
30164
2099
Type ID
Type
Description
Data representation
1
M_SP_NA_1
Monitored Single-point Information: This data
(30).
Single bit value (7.2.6.1) with 0=Off and
3
M_DP_NA_1
Monitored Dual-point Information: This data
and M_DP_TB_1 (31).
Dual-bit status (7.2.6.2) with 00b (0
5
M_ST_NA_1
Monitored Step-point Information: This data
(32).
Step data (7.2.6.5) is stored in a single
12TUser Manual 47TIEC 60870-5-104 Client
The data mapping in the following example shows the relationship between
processor and PTQ-104C memory addresses, assuming a 3x register start value
of 30001 and a PTQ-104C database start value of 2000.
5.3.1 Data Type Mapping and Addressing
When interfac ing data in the processor to that of the IEC 60870-5-104 protocol, it
is important the user understands the mapping of the data types to their
corresponding representation in the modules database. The table that follows
lists the data types supported by the module and their associated storage
representation.
IEC-870-5-104 Data Types
(7.3.1.1)
(7.3.1.3)
(7.3.1.5)
type stores a single binary input point.
Associated time-tagged event information for
this type are M_SP_TA_1 (2) and M_SP_TB_1
type stores a dual-point binary input value (that
is, valve status). Associated time-tagged event
information for this type are M_DP_TA_1 (4)
type is used for step position of transformers
or other step position information. The value
for the position ranges from -64 to 63.
Associated time-tagged event information for
this type are M_ST_TA_1 (6) and M_ST_TB_1
1=On.
decimal) = indeterminate or intermediate,
01b (1 decimal) = Off, 10b (2 decimal) =
On and 11b (3 decimal) = indeterminate.
character value with bits 0 to 6 (-64 to
+63) representing the step position and bit
7 representing the following states: 0 =
Equipment is not in transient state 1 =
Equipment in transient state
Page 46 of 136 ProSoft Technology, Inc.
March 4, 2013
Page 47

49TPTQ-104C ♦ 48TQuantum Platform Module Configuration
Type ID
Type
Description
Data representation
7
M_BO_NA_1
Monitored Bitstring of 32-bit data --This data
M_BO_TA_1 (8) and M_BO_TB_1 (33).
Each of the 32 bits in the bitstring has a
9
M_ME_NA_1
Monitored Normalized Measured Value: This
M_ME_TD_1 (34).
Normalized values (7.2.6.6) are stored in
11
M_ME_NB_1
Monitored Scaled Measured Value --This data
M_ME_TB_1 (12) and M_ME_TE_1 (35).
Scaled values (7.2.6.7) are stored in a
13
M_ME_NC_1
Monitored Measured Value, Short Floating-
and M_ME_TE_1 (36).
Short floating-point number stored in IEEE
15
M_IT_NA_1
Monitored Integrated Total-point Inf o r mation --
and M_IT_TB_1 (37).
Binary counter data (7.2.6.9) is stored in a
45
C_SC_NA_1
(7.3.2.1)
Single-point Command: This command
controls a single binary point such as a relay.
Single bit value (7.2.6.15) with 0 = Off and
1 = On
46
C_DC_NA_1
Double-point Command: This command
such as a trip/close relay.
Double Command (7.2.6.16) with 0 = Not
permitted
47
C_RC_NA_1
Regulating Step Command: This command
transformer.
Regulating Step Command (7.2.6.17) with
Next step higher 3 = Not permitted
48
C_SE_NA_1
Setpoint Command, Normalized Value: This
Normalized values (7.2.6.6) are stored in
1..+1-2
49
C_SE_NB_1
Setpoint Command, Scaled Value: This
Scaled values (7.2.6.7) are stored in a
215.. +215-1
50
C_SE_NC_1
Setpoint Command, Short Floating-Point
point format value.
Short floating-point number stored in IEEE
51
C_BO_NA_1
(7.3.2.7)
Setpoint Command, 32-bit Bitstring: This
command controls a bitstring in a device.
Each of the 32 bits in the bitstring has a
value of 0 or 1 (7.2.6.13).
100
C_IC_NA_1
Group interrogation command
NA
101
C_CI_NA_1
Counter interrogation command
NA
NA
NA
NA
NA
110
P_ME_NA_1
Parameter, normalized measured value
Word address
47TIEC 60870-5-104 Client
12TUser Manual
(7.3.1.7)
(7.3.1.9)
(7.3.1.11)
(7.3.1.13)
(7.3.1.15)
type stores 32-bit data in binary form. Each bit
in the string has a value of 0 or 1. Associated
time-tagged event information for this type are
data type is used for analog input data.
Associated time-tagged event information for
this type are M_ME_TA_1 (10) and
type is used for analog input data. Associated
time-tagged event information for this type are
Point Number: This data type is used for
analog input data stored in floating point
format according to the IEEE STD 754, QDS
format. Associated time-tagged event
information for this type are M_ME_TC_1 (14)
This data type stores meter or other count
data. Associated time-tagged event
information for this type are M_IT_TA_1 (15)
value of 0 or 1 (7.2.6.13).
a word (16-bit) data area with a range of -
-15
15
.. +215-1
31
..+231-1.
1..+1-2
word (16-bit) data area with a range of 2
STD 754 format (Fraction, Exponent,
Sign) (7.2.6.8)
double-word (32-bit) value with a range of
-2
(7.3.2.2)
(7.3.2.3)
(7.3.2.4)
(7.3.2.5)
(7.3.2.6)
102 C_RD_NA_1 Read command
103 C_CS_NA_1 Clock Synchronization
105 C_RP_NA_1 Reset process command
107 C_TS_TA_1 Test command (104 standard)
controls a dual-point binary control device
controls a stepping device such as a
command controls an analog device.
command controls an analog device.
Format: This command controls an analog
device accepting an IEEE STD 754 floating-
permitted 1 = Off 2 = On 3 = Not
0 = Not permitted 1 = Next step lower 2 =
a word (16-bit)data area with a range of -
-15
word (16-bit) data area with a range of -
STD 754 format (Fraction, Exponent,
Sign) (7.2.6.8)
ProSoft Technology, Inc. Page 47 of 136
March 4, 2013
Page 48

Module Configuration 49TPTQ-104C ♦ 48TQuantum Platform
Type ID
Type
Description
Data representation
111
P_ME_NB_1
Parameter, scaled measured value
Word address
112
P_ME_NC_1
Parameter, short float value
Double-word address
113
P_AC_NA_1
Parameter activation command
NA
Data
Size
Example
Single Point
1 bit
Address 1600 refers to word 100, bit 1 in database
Dual Point
2 bits
Address 1600 refers to word 100, bits 1 and 2 in database
Step Point
1 byte
Address 200 refers to word 100, lower byte in database
Bitstring 32 bit
2 words
Address 50 refers to word 100 and 101 in database
Normalized Measured Value
1 word
Address 100 refers to word 100 in database
Scaled Measured Value
1 word
Address 100 refers to word 100 in database
Short Float Point Measured Value
2 words
Address 50 refers to words 100 and 101 in database
Integrated Total Point
2 words
Address 50 refers to words 100 and 101 in database
Write Data
Output Data Types
C_SC_NA_1
C_DC_NA_1
C_RC_NA_1
C_SE_NA_1
C_SE_NB_1
C_SE_NC_1
C_BO_NA_1
12TUser Manual 47TIEC 60870-5-104 Client
The data addressing is resumed in the following table.
Another important concept to understand is the direction of data transfer for the
different data types with reference to the controller. The following illustration
shows the data types (monitored data) that are transferred from the module to
the processor.
The next diagram shows the movement of control data from the processor to the
module. This data is then sent to the controlled devices on the serial networks.
Page 48 of 136 ProSoft Technology, Inc.
March 4, 2013
Page 49

49TPTQ-104C ♦ 48TQuantum Platform Module Configuration
Block Range
Descriptions
9250
Status Data
9251
Client X Status Data
9901
User Constructed Command
9902
Command Control Block (Add command to Command List Queue)
9903
Event Messages
9950
Command List Error data
9970
Set PLC time using module’s time
9971
Set module’s time using PLC time
9998
Warm Boot Request from PLC (Block contains no data)
9999
Cold Boot Request from PLC (Block contains no data)
Offset
Description
Length
0
Sequence Counter
1
1
Block ID
1
2 to 63
Command Response Data
62
64 to n
Read Data
0 to 3999
Offset
Description
Length
0
Sequence Counter
1
1
Block ID
1
2 to 63
Command Data
62
64 to n
Write Data
0 to 3999
47TIEC 60870-5-104 Client
12TUser Manual
As blocks are transferred between the module and the processor, each block
contains block identification codes that define the content or function of the block
of data transferred. The control blocks used by the module are displayed in the
following table.
Block identification codes 9901 to 9999 are used for special control blocks to
control the module. Each of these blocks is discussed in the following topics.
Normal Data Transfer Blocks
These data are transferred through read (input image) and write (output image)
blocks. Refer to Module Configuration for a description of the data objects used
with the blocks and the ladder logic required. The following topics discuss the
structure and function of each block.
Input Data (3x Register Data)
These blocks of data transfer information from the module to the Quantum
processor. The following table describes the structure of the input image.
Output Data (4x Register Data)
These blocks of data transfer information from the Quantum processor to the
module. The following table describes the structure of the output image.
ProSoft Technology, Inc. Page 49 of 136
March 4, 2013
Page 50

Module Configuration 49TPTQ-104C ♦ 48TQuantum Platform
Command Codes
Descriptions
9250
Status Block
9251
Client X Status Data
9901
User Constructed Command
9902
Command Control Block (Add command to Command List Queue)
9903
Event Messages from Master port
9950
Command List Error data
9970
Set PLC time using module's time
9971
Set module's time using PLC time
9999
Cold Boot Request from PLC (Block contains no data)
12TUser Manual 47TIEC 60870-5-104 Client
Command Control Blocks
Block identification codes greater than 9900 are utilized to perform special
functions in the module. Each control block recognized and used by the module
is defined in the following topics.
Note: The command code in the I/O area is also referred to as the block ID.
Implementing Ladder to Support Special Functions
In order to use Special Functions, some form of control logic must be
implemented. The following section uses structured text language to illustrate
how a typical function might be implemented.
Example: Rebooting the Module.
MyTrigger is a variable that triggers this logic
OutputControl variable array starts at register 4000001
The first instruction guarantees that the processor requests this block for only
one scan.
The second instructions sets the Block Number (9999 = ColdBoot) and then sets
the sequence number to 1.
IF MyTrigger>0 AND OutputControl1[1]> 0 THEN
OutputControl1[0]:= InputData[0];
OutputControl1[1]:=0;
MyTrigger :=0;
END_IF;
IF (MyTrigger=9999)OR (MyTrigger=9998) OR (MyTrigger=9250) THEN
OutputControl1[1] :=MyTrigger;
Temp:=WORD_TO_INT(OutputControl1[0]);
Temp:=Temp+1;
OutputControl1[0]:=INT_TO_WORD(Temp);
END_IF;
Page 50 of 136 ProSoft Technology, Inc.
March 4, 2013
Page 51

49TPTQ-104C ♦ 48TQuantum Platform Module Configuration
47TIEC 60870-5-104 Client
12TUser Manual
Example: Retrieving the time of day from the module.
This logic shows an example on how to request a block 9970 from the module
(Read Module’s Time) and read the response to the processor.
Assumptions:
MyTrigger is a variable that triggers this logic
OutputControl variable array starts at register 400,001
InputControl variable array starts at register 300,001
MyTime variables store the date and time values to be read from the module
Sets the Block Number (9970=Read Module’s Time) and then increments the
output sequence number (OutputControl[1]) by one. Once the module reads a
new output sequence number from the processor it will process this request. So
remember that the actual trigger is moving a new output block sequence number
value to the module. Moving the block number (9970) is not the trigger to request
this task from the module.
MyTrigger is set to -1 as an indication that the logic is waiting for the response
from the module.
IF (MyTrigger=9970) THEN
OutputControl1[1] :=MyTrigger;
Temp:=WORD_TO_INT(OutputControl1[0]);
Temp:=Temp+1;
OutputControl1[0]:=INT_TO_WORD(Temp);
END_IF;
When the request is processed, the module will send the block response and
increment the received output sequence number by 1. So the output sequence
number is one less than the input sequence number the module has sent a new
block. Once the block is received the processor logic copies the received data to
the appropriate variables. The logic also clears the trigger for the next request.*)
IF (InputData[1]=9970) THEN
GetTime.MyYear :=InputData[2];
GetTime.MyMonth :=InputData[3];
GetTime.MyDay :=InputData[4];
GetTime.MyHour :=InputData[5];
GetTime.MyMinute :=InputData[6];
GetTime.MySecond :=InputData[7];
GetTime.MyMillisecond :=InputData[8];
END_IF
Example: Setting the time of day to the module.
This logic shows an example on how to request a block 9971 from the module
(Read Module’s Time).
Assumptions:
MyTrigger is a variable that triggers this logic
OutputControl variable array starts at register 400,001
InputControl variable array starts at register 300,001
MyTime variables store the date and time values to be written to the module
ProSoft Technology, Inc. Page 51 of 136
March 4, 2013
Page 52

Module Configuration 49TPTQ-104C ♦ 48TQuantum Platform
Word Offset in Block
Data Field(s)
Description
Sequence
This field contains a new value each time the user
Block ID
This field contains the block identification code of 9250
2 to 63
Spare
Not used.
12TUser Manual 47TIEC 60870-5-104 Client
Sets the Block Number (9971=Write Module’s Time) and then increments the
output sequence number (OutputControl[1]) by one. Once the module reads a
new output sequence number from the processor it will process this request. So
remember that the actual trigger is moving a new output block sequence number
value to the module. Moving the block number (9970) is not the trigger to request
this task from the module. MyTrigger is set to -1 as an indication that the logic is
waiting for the response from the module.
IF (MyTrigger=9971) THEN
OutputControl1[1] :=MyTrigger;
OutputControl1[2] :=SetTime.MyYear;
OutputControl1[3] :=SetTime.MyMonth;
OutputControl1[4] :=SetTime.MyDay;
OutputControl1[5] :=SetTime.MyHour;
OutputControl1[6] :=SetTime.MyMinute;
OutputControl1[7] :=SetTime.MySecond;
OutputControl1[8] :=SetTime.MyMillisecond;
Temp:=WORD_TO_INT(OutputControl1[0]);
Temp:=Temp+1;
OutputControl1[0]:=INT_TO_WORD(Temp);
END_IF;
Once the request was processed the module will send the block response and
increment the received output sequence number by 1. So the output sequence
number is one less than the input sequence number the module has sent a new
block. *).
5.3.2 Read Status (Block 9250)
This block is used to request status data from the module by the processor.
Block Format from Processor (4x Register Data) sent to module
0
Counter
1
Page 52 of 136 ProSoft Technology, Inc.
March 4, 2013
wishes to request a new command block.
for the block.
Page 53

49TPTQ-104C ♦ 48TQuantum Platform Module Configuration
Word Offset in Block
Data Field
Description
Scan Count
This status value contains a counter incremented on
Product Name
This two-word data area contains the text values
Revision
This two-word data area contains the text values for the
Op Sys #
This two-word data area contains the text values for the
Run Number
This two-word data area contains the text values for the
Read Blk Cnt
This word contains the total number of block read
Write Blk Cnt
This word contains the total number of block write
11
Reserve
This word is reserved for future use.
Error Blk Cnt
This word contains the total number of block transfer
Event Msg Cnt
This word contains the number of event messages
Event Msg
This word contains a value of 0 if the event message
Session Count
This word contains the number of sessions configured
Current Cmd
This word contains the index of the current command
Cmd Busy Flag
This word is set to zero if no command is currently
Cmd Count
This word contains the count of the number of
Cmd Delay
This word contains the command delay counter preset.
Cmd Queue
This word is set to zero if the command executing is
Cmd Queue
This word contains the number of active commands in
Online Status
This double word value contains a bit for each of the 32
24
SNTP Valid
NTP time is valid (0=No, 1=Yes)
47TIEC 60870-5-104 Client
12TUser Manual
Block Format from Module (3x Register Data) from the module to Processor
0
1 to 2
3 to 4
5 to 6
7 to 8
9
10
12
13
14
15
16
17
18
19
20
21
22 to 23
Overflow
Count
each scan of the module's main loop.
representing the product name. These words contain
the text 'I4MQ' for the PTQ platform.
revision number.
operating system number.
run number.
operations successfully executed.
operations successfully executed.
errors.
waiting to send to the processor.
buffer has not overflowed. If the event buffer overflows,
this word will be set to a value of 1.
in the module.
being executed in the command list.
being executed and waiting on a response. If the word
is set to 1, a command is currently executing.
commands configured for the module.
There is a fixed delay between each command to
permit the module to perf or m other oper a tion s.
from the command list. If the executing command is
from the command queue, the word will be set to 1.
the command queue for the module. Up to 100
commands can be buffered in this queue. These
commands are transferred from the processor to the
module using special command blocks.
potential sessions in the module. If the bit is set for a
session in the double word, the station is online. If the
bit is clear, the station is offline. Use this value to
determine if commands sent from the processor will
have a chance of succeeding.
ProSoft Technology, Inc. Page 53 of 136
March 4, 2013
Page 54

Module Configuration 49TPTQ-104C ♦ 48TQuantum Platform
25
NTP Request
Number of requests to NTP server
26
NTP Response
Number of responses from NTP server
SNTP
Computation
Number of times SNTP time computed
28
SNTP Set
Number of times SNTP time set
29
NTP Timeout
Number of NTP response timeouts
Word Offset in Block
Data Field(s)
Description
Sequence
This field contains a new value each time the user
Block ID
This field contains the block identification code of
Command Count
This field defines the number of user commands
Command #1
Data required to build the user defined command in
Command #2
Data required to build the user defined command in
Command #3
Data required to build the user defined command in
Command #4
Data required to build the user defined command in
Command #5
Data required to build the user defined command in
Command #6
Data required to build the user defined command in
Command #7
Data required to build the user defined command in
Command #8
Data required to build the user defined command in
Command #9
Data required to build the user defined command in
Command #10
Data required to build the user defined command in
63
Spare
Not used.
12TUser Manual 47TIEC 60870-5-104 Client
27
5.3.3 User-Constructed Command Block (9901)
Block identification code 9901 is used to issue one or more user-constructed
commands. When the module receives a block 9901 identification code, it will
place the included commands into the command queue.
Block Format from Processor (4x Register Data) to module
0
1
2
3 to 8
9 to 14
15 to 20
21 to 26
27 to 32
33 to 38
39 to 44
45 to 50
51 to 56
57 to 62
Counter
wishes to request a new command block.
9901 for the block.
contained in the block. The valid range for the field is
1 to 10.
the command queue.
the command queue.
the command queue.
the command queue.
the command queue.
the command queue.
the command queue.
the command queue.
the command queue.
the command queue.
Page 54 of 136 ProSoft Technology, Inc.
March 4, 2013
Page 55

49TPTQ-104C ♦ 48TQuantum Platform Module Configuration
Word Offset
Definitions
Description
0
Database Index
Address in module to associate with the command
Session Index
Session index defined in the module to associate
2
Sector Index
Sector index for session as defined in the module.
3
Data Type
ASDU data type associated with the command.
Point Index
Information object address for the point on which
Qualifier
Qualifier as defined for the command list. This
Word Offset in Block
Data Field(s)
Description
Sequence
This field contains a new value each time the block is
Block ID
This field contains the block identification code of
2 to 63
Spare
Not used.
Word Offset in Block
Data Field(s)
Description
Sequence
This field contains a new value each time the user
Block ID
This field contains the value of 9902 identifying the
Command
This field contains the number of commands to enable
Command
These 60 words of data contain the command numbers
processing by the module. The first command in the list
63
Spare
Not Used
Word Offset in Block
Data Field(s)
Description
Sequence
This field contains a new value each time the block is
Block ID
This field contains the block identification code of 9902
47TIEC 60870-5-104 Client
12TUser Manual
The following fields are used for each 6-word record in the command list:
1
4
5
with the command.
command operates.
parameter is data type dependent.
Block Format from Module (3x Register Data) to Processor
0
Counter
1
handled.
9901 for the block.
5.3.4 Command Control Block (9902)
The block 9902 identification code is used by the PLC to send a list of commands
to be placed in the command queue. Commands placed in the queue with this
method need not have their enable bit set.
Block Format from Processor (4x Register Data) to module
0
1
2
3 to 62
Block Format from Module (3x Register Data) to Processor
0
1
ProSoft Technology, Inc. Page 55 of 136
March 4, 2013
Counter
count
Numbers to
enable
Counter
wishes to request a new command block.
enable command to the module.
in the command list. Valid values for this field are 1 to
60.
in the command list to enable. The commands in the
list will be placed in the command queue for immediate
has an index of 0.
handled.
for the block.
Page 56

Module Configuration 49TPTQ-104C ♦ 48TQuantum Platform
12TUser Manual 47TIEC 60870-5-104 Client
5.3.5 Event Pass-Through Block (9903)
The event pass-through functionality allows the module to pass events to the
processor after they are received from the IEC-8707-5-101 slave devices. Events
are considered messages associated to supported ASDU types that contain
timestamp (Hour:Minute:Seconds:Milliseconds).
The event pass-through functionality must be initially enabled by the user in PCB.
The ‘Pass-Through Events’ parameter will need to be set to ‘Yes’.
The following illustration shows the basic idea of the event pass-through
functionality. When the module receives the event from the remote device, it will
build block 9903, which will be copied to the processor at the configured memory
address:
Page 56 of 136 ProSoft Technology, Inc.
March 4, 2013
Page 57

49TPTQ-104C ♦ 48TQuantum Platform Module Configuration
Word Offset in Block
Data Field(s)
Description
Sequence Counter
This field contains a new value each time the
Block ID
This field contains the block identification code of
Event Count
This field contains the number of events present
3 to 16
Event 1
Event message
17 to 30
Event 2
Event message
31 to 44
Event 3
Event message
45 to 58
Event 4
Event message
59 to 61
Spare
Not used
62
Event count in queue
Number of messages left in event buffer
63
Event Overflow
Event buffer overflow
Word Offset
Definitions
Description
Session Index
This field contains the session index used to
Sector Index
This field contains the sector index used to
COT
This field contains the COT for the event
Reserved
This field is reserved for future use and is added
Point Index
This field contains the point index in the remote
ASDU Type
This field contains the ASDU type code for the
Milliseconds and
This word contains the seconds and milliseconds
Minutes and Hours
This field contains the minutes and hours the
47TIEC 60870-5-104 Client
12TUser Manual
Event Pass-Through Block Format
The block that is copied from the module to the processor has the following
format. Each block can contain up to 4 events. The number of events per block
will typically depend on the rate between how fast the module receives the
events and how fast these can be passed to the processor (typically depends on
the processor scan rate).
Block Format for Read
Block Format from Module (%IW or 3x Register Data)
0
1
2
block is handled.
9903 for the block.
in the block. Values of 1 to 4 are valid.
The format of each 14 word data region in the block is shown in the following
table.
0
1
2
3
4 to 5
6
7
Seconds
8
define the controlled unit in the module from
which the event was generated.
define the database within the controlled unit
from which the event was generated.
message received from the IED. If the size of the
COT is a single byte, the originator address will
always be zero. The COT is in the LSB and the
originator address is in the MSB.
here to keep the structure double-word aligned
for all platforms.
device that generated the event.
data contained in the message.
when the event occurred.
event occurred.
ProSoft Technology, Inc. Page 57 of 136
March 4, 2013
Page 58

Module Configuration 49TPTQ-104C ♦ 48TQuantum Platform
Word Offset
Definitions
Description
Month and Day
This field contains the month and day of the
10
Year
This field contains the year the event occurred.
Qualifier
This field contains the point qualifier, quality or
Value
This field contains the double word value for the
Word Offset in Block
Data Field(s)
Description
Sequence
This field contains a new value each time the user
Block ID
This field contains the value of 9950 identifying the
Number of
This field contains the number of commands to report
Start Index of
This parameter sets the index in the command list
rst command in the list has a value
4 to 63
Spare
Not Used
Word Offset in Block
Data Field(s)
Description
Sequence
This field contains a new value each time the block is
Block ID
This field contains the value of 9950 identifying the
Number of
This field contains the number of commands contained
Start Index of
This field contains the index in the command list for the
Command List
Each word of this area contains the last error value
12TUser Manual 47TIEC 60870-5-104 Client
9
11
12 to 13
month the event occurred.
sequence value as described in the protocol
specification.
point associated with the event message.
The processor logic should recognize the event count value greater than zero
and read all events in the block. This value should be reset to zero to prepare the
logic for the next incoming block.
5.3.6 Read Command Error List Block (9950)
Block 9950 requests the Command List Error Table from the module. The
following table describes the format of the block.
Block Format from Processor (4x Register Data) to module
0
1
2
3
Counter
Commands to
report
First Command
wishes to request a new command block.
block type to the module.
in the response message. The value has a range of 1
to 60.
where to start. The fi
of 0. The last index in the list has a value of
MaxCommands - 1.
Block Format from module to Processor:
0
1
2
3
4 to 63
Counter
Commands
reported
First Command
Errors
Page 58 of 136 ProSoft Technology, Inc.
March 4, 2013
handled.
block type to the PLC.
in the block that need to be processed by the PLC. This
field will have a value of 1 to 60.
first value in the file. This field will have a value of 0 to
MaxCommands-1.
recorded for the command. The command index of the
first value (offset 4) is specified in word 3 of the block.
The number of valid command errors in the block is set
in word 2 of the block. Refer to the command error list
to interpret the error codes reported.
Page 59

49TPTQ-104C ♦ 48TQuantum Platform Module Configuration
Word Offset in Block
Data Field(s)
Description
Sequence
This field contains a new value each time the user
Block ID
This field contains the block identification code of 9971
Year
This field contains the four-digit year for the new time
Month
This field contains the month value for the new time.
Day
This field contains the day value for the new time. Valid
Hour
This field contains the hour value for the new time.
Minute
This field contains the minute value for the new time.
Seconds
This field contains the second value for the new time.
Milliseconds
This field contains the millisecond value for the new
9 to 63
Spare
Not Used
Word Offset in Block
Data Field(s)
Description
Sequence
This field contains a new value each time the block is
Block ID
This field contains the block identification code of 9971
2 to 63
Spare
Not Used
Offset
Description
Length
0
9999
1
1 to 63
Spare
63
47TIEC 60870-5-104 Client
12TUser Manual
5.3.7 Get Module Date and Time Block (9970)
Block 9970 requests the module’s date and time. This data can be used to set
the PLC clock.
5.3.8 Set Module Time Block (9971)
Block identification code 9971 is used to pass the clock time in the PLC to the
module. The date and time provided will be used to set the module’s clock.
Block Format from Processor (4x Register Data) to module
0
Counter
1
2
3
4
5
6
7
8
wishes to request a new command block.
for the block.
value.
Valid entry for this field is in the range of 1 to 12.
entry for this field is in the range of 1 to 31.
Valid entry for this field is in the range of 0 to 23.
Valid entry for this field is in the range of 0 to 59.
Valid entry for this field is in the range of 0 to 59.
time. Valid entry for this field is in the range of 0 to 999.
Block Format from Module (3x Register Data) to Processor
0
Counter
1
handled.
for the block.
5.3.9 Cold Boot Block (9999)
Block 9999 performs a cold-boot operation on the module. The following table
describes the format of the block constructed by the processor.
The warm and cold boot processes perform the same operation. Many of the
variables that must be initialized are fixed when the module first boots. They
cannot be changed after the application starts.
ProSoft Technology, Inc. Page 59 of 136
March 4, 2013
Page 60

Module Configuration 49TPTQ-104C ♦ 48TQuantum Platform
12TUser Manual 47TIEC 60870-5-104 Client
5.4 [SNTP CLIENT]
The [SNTP CLIENT] section of PCB is used to specify the parameters for the
Simple Network Time Protocol (SNTP) Client provided with the protocol driver.
This client is read in order to keep the driver's internal clock set correctly. This
version of the driver supports SNTP Revision 3 and stratum between 1 and 14.
The SNTP driver will compute a new clock value every 5 minutes using the
average value of 10 samples each collected over an approximate 6-second
period. This new value will be used to adjust the clock maintained by the SNTP
driver and used by the application.
If a valid database register is specified, the driver will place the time value into
the module's database. The first two registers will contain the number of seconds
and the next two registers will contain the number of microseconds since January
1, 1970.
A list of some of the common NTP servers can be obtained at http://www.ntp.org/
or, http://support.ntp.org/bin/view/Servers/WebHome
Other server lists can be found by searching the World Wide Web for "NTP
Servers".
5.4.1 NTP Server IP Address
Enter in dotted notation
This parameter sets the IP address of the NTP server to utilize for time
acquisition. Select an NTP server with the greatest accuracy that can be
accessed all the time from the network. Setting this IP address to 0.0.0.0
disables SNTP server requests.
Page 60 of 136 ProSoft Technology, Inc.
March 4, 2013
Page 61

49TPTQ-104C ♦ 48TQuantum Platform Module Configuration
47TIEC 60870-5-104 Client
12TUser Manual
5.4.2 Time Zone
-11 to 11
This parameter specifies the time zone offset to be used from the UTC time
zone. A value of zero uses UTC time. If the value entered is positive, the time
zone is west of the UTC time zone (that is, Eastern Standard Time is 5). If the
value entered is negative, the time zone is east of the UTC time zone (that is,
Continental Europe is -1).
5.4.3 Use Daylight Savings Time
Yes or No
This parameter specifies if daylight savings time will be used in the time
computation.
5.4.4 Database Register
-1 or 0 to 3992 as an even value
This parameter specifies if the NTP time computed by the driver is to be placed
into the module’s database. If a value of -1 is specified, the time will not be
placed into the database. If the value is between 0 and 3992, the time will be
placed in the database. The first 4 bytes will represent the seconds since
1/1/1970, and the second 4 bytes will represent the number of microseconds. An
even value should be used for the register value in order for the data to be stored
correctly.
5.5 [IEC-104 Client Module]
The [IEC-104 Client Module] section of PCB includes the general configuration of
the 104C driver.
ProSoft Technology, Inc. Page 61 of 136
March 4, 2013
Page 62

Module Configuration 49TPTQ-104C ♦ 48TQuantum Platform
Item
Range
Description
-1 to 3994
-1: Disable
-1 to 3970
-1: Disable
12TUser Manual 47TIEC 60870-5-104 Client
Time DB Offset
Driver Status Offset:
5.6 [IEC-104 Client/Session x]
The [IEC-104 Client/Session x] section of PCB includes the client configuration
for up to four IEC-104C Clients on the module.
0-3994: Database location of IEC time
NOTE: Requires 6 registers
0-3970: Database location of general client
driver status data
NOTE: Requires 30 registers
Page 62 of 136 ProSoft Technology, Inc.
March 4, 2013
Page 63

49TPTQ-104C ♦ 48TQuantum Platform Module Configuration
Item
Range
Description
IP dotted
IP address for the server to connect this client to
1 or 2
This parameter sets the number of sectors
1 to 30
Number of seconds to wait for connection to be
1 to 255
Number of seconds until a timeout occurs to send
1 to 255
Number of seconds until timeout for non-data
1 to 300
Timeout for test frame on idle state in seconds
1 to 12
Maximum number of messages to hold in queue
1 to 8
Threshold value when to send ack. This
0 to 255
Originator address in the COT (Cause of
500 to 2^32-1
This parameter sets the maximum number of
47TIEC 60870-5-104 Client
12TUser Manual
5.6.1 [IEC-104 Client/Session x > IEC-104 Client x] section
Server IP Address
Sector Count
T0 timeout
T1 timeout
T2 timeout
T3 timeout
k (maximum queue)
w (latest ack threshold)
Originator address for
COT
Response Timeout
notation
with 0.0.0.0 used to disable the client.
contained in this controlled device. The range of
values is from 1 to 2. A sector section is required
for each sector in a session to define its database
and settings.
established with server in seconds (default=30)
or test APDU's (Application Protocol Data Units)
(default = 15)
acknowledgement (t2 < t1) (default=10)
(default=20)
parameter should be less than or equal to twothirds of k.
Transmission) to use in all messages from the
client
milliseconds to wait for a confirmation from the
controlled station to a request from this module to
application level messages.
ProSoft Technology, Inc. Page 63 of 136
March 4, 2013
Page 64

Module Configuration 49TPTQ-104C ♦ 48TQuantum Platform
Y or N
This parameter specifies what the last message
-1 to 3956
-1: Disable
Item
Range
Description
0 to 65535
This parameter sets the common ASDU address
Y or N
This parameter specifies if the sector in the
Y or N
This parameter specifies if the sector in the
Y or N
This parameter specifies if the sector in the
12TUser Manual 47TIEC 60870-5-104 Client
ACTTERM with
setpoint
Status Offset
will be in the response to a setpoint command. If
the parameter is set to Y, an ACTTERM will be
the last response. If set to N, ACTCON will be the
last response.
0-3956: Database location of client status data
NOTE: requires 44 registers and should be placed
in a location of the module memory that is being
used for read data to transfer this information
back to the processor.
5.6.2 [IEC-104 Client/Session x > IEC-104 Client x Sector 0] section
Common ASDU
Address
Online Time Sync
Online General Int
EOI Time Sync
Page 64 of 136 ProSoft Technology, Inc.
March 4, 2013
to associate with this sector of the specified
session.
controlled device will be sent a time
synchronization command when the unit is first
recognized as being online.
controlled device will be sent a general
interrogation command when the unit is first
recognized as being online.
controlled device will be sent a time
synchronization command after this module
receives an EOI message from the controlled unit.
Page 65

49TPTQ-104C ♦ 48TQuantum Platform Module Configuration
Y or N
This parameter specifies if the sector in the
Y or N
This parameter specifies if a time tag field is to be
Item
Range
Description
Data Type
ASDU type code in message
0 to 65535
Value for the Information Object Address (IOA)
0 to 64000
Database address in the module associated to
Step-point: byte-addressing
47TIEC 60870-5-104 Client
12TUser Manual
EOI General Int
controlled device will be sent a general
interrogation command after this module receives
an EOI message from the controlled unit.
Use Time Tag
Commands
included with commands. This is as specified in
the IEC-870-5-104 specification and should only
be utilized if the controlled device supports these
new data types. If the parameter is set to Y, a time
tag will be added to all commands. If the
parameter is set to N, the normal IEC-870-5-101
data type messages will be utilized
5.6.3 [IEC-104 Client/Session x > IEC-104 Client x Sector 0] section
This section defines the Data Type distribution of the module database for Client
x Sector 0.
Point Index
Database Address
ProSoft Technology, Inc. Page 65 of 136
March 4, 2013
this point according to ASDU type:
Single-point: bit-addressing
Double-point: bit-addressing
Page 66

Module Configuration 49TPTQ-104C ♦ 48TQuantum Platform
Bitstring: double-word-addressing
Item
Range
Description
0 to 65535
This parameter sets the common ASDU address
Y or N
This parameter specifies if the sector in the
Y or N
This parameter specifies if the sector in the
12TUser Manual 47TIEC 60870-5-104 Client
Setpoint normalized: word-addressing
Setpoint scaled: word-addressing
Setpoint floating: double-word-addressing
Parameter normalized: word-addressing
Parameter scaled: word-addressing
Parameter float: double-word-address
Integrated BCD: 3-word-addressing
5.6.4 [IEC-104 Client/Session x > IEC-104 Client x Sector 1] section
This section defines Sector 1 of Session x.
Common ASDU
Address
Online Time Sync
Online General Int
Page 66 of 136 ProSoft Technology, Inc.
March 4, 2013
to associate with this sector of the specified
session.
controlled device will be sent a time
synchronization command when the unit is first
recognized as being online.
controlled device will be sent a general
interrogation command when the unit is first
recognized as being online.
Page 67

49TPTQ-104C ♦ 48TQuantum Platform Module Configuration
Item
Range
Description
Y or N
This parameter specifies if the sector in the
Y or N
This parameter specifies if the sector in the
Y or N
This parameter specifies if a time tag field is to be
47TIEC 60870-5-104 Client
12TUser Manual
EOI Time Sync
EOI General Int
Use Time Tag
Commands
controlled device will be sent a time
synchronization command after this module
receives an EOI message from the controlled unit.
controlled device will be sent a general
interrogation command after this module receives
an EOI message from the controlled unit.
included with commands. This is as specified in
the IEC-870-5-104 specification and should only
be utilized if the controlled device supports these
new data types. If the parameter is set to Y, a time
tag will be added to all commands. If the
parameter is set to N, the normal IEC-870-5-101
data type messages will be utilized
5.6.5 [IEC-104 Client/Session x > IEC-104 Client x Sector 1] section
This section defines the Data Type distribution of the module database for Client
x Sector 1.
ProSoft Technology, Inc. Page 67 of 136
March 4, 2013
Page 68

Module Configuration 49TPTQ-104C ♦ 48TQuantum Platform
Item
Range
Description
Data Type
ASDU type code in message
0 to 65535
Value for the Information Object Address (IOA)
0 to 64000
Database address in the module associated to
12TUser Manual 47TIEC 60870-5-104 Client
Point Index
Database Address
this point according to ASDU type:
Single-point: bit-addressing
Double-point: bit-addressing
Step-point: byte-addressing
Bitstring: double-word-addressing
Setpoint normalized: word-addressing
Setpoint scaled: word-addressing
Setpoint floating: double-word-addressing
Parameter normalized: word-addressing
Parameter scaled: word-addressing
Parameter float: double-word-address
Integrated BCD: 3-word-addressing
5.7 [IEC-104 Client Commands] section
This section defines the 104C Client commands to send to the remote
servers.
Page 68 of 136 ProSoft Technology, Inc.
March 4, 2013
Page 69

49TPTQ-104C ♦ 48TQuantum Platform Module Configuration
Item
Range
Description
Enable/Disable
Disable = Disables command
This field specifies the location in the module's
Data Type
Description
45
Bit address, Single point command
46
Bit address, Double point command
47
Byte address, Regulating step point command
48
Word address, Setpoint normalized point
49
Word address, Setpoint scaled point command
50
Double-Word address, Setpoint short float point
51
Double-Word address, Bitstring (32-bits) point
100
*Word address, Group interrogation command
101
*Word address, Counter interrogation command
102
*Word address, Read command
103
*Word address, Clock synchronization
105
*Word address, Reset proces s command
107
*Word address, Test command (IEC-870-5-104
110
Word address, Normalized measured value
111
Word address, Scaled measured value
112
Float (double-word), Short float value
113
*Word address, Activati on co mmand
1 to 65535
This parameter is used if the Enable Code field
0 to 3
This parameter is utilized to associate the
0 to 1
This parameter is used to associate the
47TIEC 60870-5-104 Client
12TUser Manual
Enable Code
Database Address
Enable = Enables command with Poll Interval in
seconds
Conditional = Executes command when point
value in database changes
internal database to associate with the
command. The Data Type (page 46) used in the
command determines addressing of the index
as follows:
command
command
command
Poll Interval
Session Index
Sector Index
command
type)
*Word address = Value only used to signal
when to send event (Enable Code = 2)
is set to a value of 1. Delay (in seconds) to
execute this command since its last execution.
To be used if this command is to be executed
every X seconds.
command with one of the sessions defined for
the module.
command with the proper sector of the selected
session.
ProSoft Technology, Inc. Page 69 of 136
March 4, 2013
Page 70

Module Configuration 49TPTQ-104C ♦ 48TQuantum Platform
Item
Range
Description
ASDU Type
This parameter is used to set the ASDU data
1 to 65535
This parameter is the value for the Information
1 to 1023
This parameter is dependent on the Data Type
Data Type
Description
Qualifier Parameter
Bit address, Single point command
Single Point Value:
Bit address, Double point command
Double Point Value:
Byte address, Regulating step point
Regulating Point Value:
Qualifier Code
0=No additional definition (slave dependent)
Select/Execute
0=Direct execution without select
12TUser Manual 47TIEC 60870-5-104 Client
Data Type
type to be used with the message. The codes
specified are those defined for the IEC-870-5101 protocol. The following is a listing of
command control data types supported in this
module:
Type: 45, 46, 47, 48, 49, 50, 51, 100, 101, 102,
103, 105, 107, 110, 111, 112, 113. (Full
descriptions on page 46)
Point Index
Object Address (IOA) in the target device
Qualifier
selected. See below for details.
Qualifier Parameter configuration
The Qualifier Parameter is based on a combination of parameters each with their
own value, based on the Type used in the command. The corresponding
parameters for each Data Type have a numerical code assigned to them. The
Qualifier Parameter value is the sum of these numerical codes.
45
46
47
command
0=Off
1=On
0=Not permitted
1=Off
2=On
3=Not Permitted
0=Not permitted
1=Next step lower if database point is set to -1
2=Next step high if database point set to +1
3=Not Permitted
The following parameters apply to each Data Type (45, 46, 47)
Page 70 of 136 ProSoft Technology, Inc.
March 4, 2013
4=Short pulse duration
8=Long pulse duration
12=Persistent output
128=Select executed followed by execute
256=Deselect command
Page 71

49TPTQ-104C ♦ 48TQuantum Platform Module Configuration
Use Override Flag
0=Use value in database for value
Data Type
Description
48
Word address, Setpoint normalized point command
49
Word address, Setpoint scaled point command
50
Double-Word address, Setpoint short float point command
Qualifier Code
0=Direct execution without select
Data Type
Description
Qualifier Parameter
Double-Word address, Bitstring (32bits) point command
No Qualifier used
47TIEC 60870-5-104 Client
12TUser Manual
512=Use override value for state
Example - Enabling a Data Type 45 Single Point Value with:
Single Point value: 1 (On)
Qualifier Code: 4 (Short pulse duration)
Select/Execute: 0 (Direct execution without Select)
Use Override Flag: 512 (Use override value for state)
1 + 4 + 0 + 512 = 517
A value of ‘517’ would need to be entered in the Qualifier Parameter for this
command.
The following parameter applies to each Data Type (48, 49, 50)
1=Select executed followed by
execute
2=Deselect command
Example – Each of the Setpoint Command Data Types (48, 49, 50) can be
executed with a value of 0, 1, or 2.
51
ProSoft Technology, Inc. Page 71 of 136
March 4, 2013
Page 72

Module Configuration 49TPTQ-104C ♦ 48TQuantum Platform
Data Type
Description
Qualifier Parameter
*Word address, Group interrogation
0=Not used
*Word address, Counter interrogation
Counter Interrogation Group:
102
*Word address, Read command
No Qualifier used
*Word address, Clock synchronization
command
0=Clock synchronization
*Word address, Reset proces s
0=Not used
12TUser Manual 47TIEC 60870-5-104 Client
100
101
command
command
1 to 19 = Reserved by standard
20=Station interrogation (gl ob al)
21=Interrogation group 1
22=Interrogation group 2
23=Interrogation group 3
24=Interrogation group 4
25=Interrogation group 5
26=Interrogation group 6
27=Interrogation group 7
28=Interrogation group 8
29=Interrogation group 9
30=Interrogation group 10
31=Interrogation group 11
32=Interrogation group 12
33=Interrogation group 13
34=Interrogation group 14
35=Interrogation group 15
36=Interrogation group 16
37 to 63 = Reserved by standard
64 to 255 = Reserved for special use
(private range)
0=No counter requested
1=Request counter group 1
2=Request counter group 2
3=Request counter group 3
4=Request counter group 4
5=Request general counter group
6 to 31 = Reserved by standard
32 to 63 = Reserved for special use
(private range)
Freeze/Reset Qualifier:
0=No freeze or reset
64=Counter freeze without reset
128=Counter freeze with reset
192=No freeze with counter reset
103
105
Page 72 of 136 ProSoft Technology, Inc.
March 4, 2013
command
1=General reset of process
2=Reset pending information with time
tag of the event buffer
3 to 127 = Reserved by standard
128 to 255 = Reserved for special use
(private range)
Page 73

49TPTQ-104C ♦ 48TQuantum Platform Module Configuration
Data Type
Description
Qualifier Parameter
Word address, Normalized measured
The following applies to Type 110, 111,
*Word address, Activati on co mmand
Parameter Qualifier:
47TIEC 60870-5-104 Client
12TUser Manual
110
111
112
113
value
Word address, Scaled measured value
Float (double-word), Short float value
112:
Type of parameter:
0=Not used
1=Threshold value
2=Smoothing factor (filter time constant)
3=Low limit for transmission of measured
values
4=High limit for transmission of
measured values
5 to 31 = Reserved by standard
32 to 63 = Reserved for special use
(private range)
Local parameter change:
0=No change
64=Change
Parameter in operation:
0=Operation
128=Not in operation
0=Not used
1=Act/Deact of previously loaded
parameters (point index = 0)
2=Act/Deact of the parameter of the point
index specified
3=Act/Deact of persistent cyclic or
periodic transmission of the addressed
object
4 to 127 = Reserved by standard
128 to 255 = Reserved for special use
(private range)
Activation Qualifier:
0=Deactivate
256=Activate
5.8 [Ethernet Configuration] section
See page 19 for more information.
5.9 To Create Optional Comment Entries
1 Click the plus sign to the left of the icon to expand the module
ProSoft Technology, Inc. Page 73 of 136
March 4, 2013
Comments.
Page 74

Module Configuration 49TPTQ-104C ♦ 48TQuantum Platform
12TUser Manual 47TIEC 60870-5-104 Client
2 Double-click the icon. The Edit - Module Comment dialog
appears.
3 Enter the comment and click OK
5.10 To print a configuration file
1 Select the module icon, and then click the right mouse button to open a
shortcut menu.
2 On the shortcut menu, choose V
the View Configuration window.
3 On the View Configuration window, open the F
choose P
4 On the Print dialog box, choose the printer to use from the dropdown list,
select printing options, and then click OK.
RINT. This action opens the Print dialog box.
to save the changes.
IEW CONFIGURATION. This action opens
ILE menu, and
Page 74 of 136 ProSoft Technology, Inc.
March 4, 2013
Page 75

49TPTQ-104C ♦ 48TQuantum Platform Downloading the PCB File to the Module
47TIEC 60870-5-104 Client
12TUser Manual
6 Downloading the PCB File to the Module
In This Chapter
Downloading via Serial Connection ....................................................... 76
Downloading via Ethernet Connection ................................................. 77
For the module to use the configured settings, download the updated
configuration file from the PC to the module. This can be done over Ethernet or
Serial connection.
Note: The processor (Quantum) must be in "Stop" mode before the file is downloaded to the
module. Use the processor’s configuration tool or the softkeys on the processor to stop the
processor.
ProSoft Technology, Inc. Page 75 of 136
March 4, 2013
Page 76

Downloading the PCB File to the Module 49TPTQ-104C ♦ 48TQuantum Platform
12TUser Manual 47TIEC 60870-5-104 Client
6.1 Downloading the Project via Serial Connection
1 In the tree view in ProSoft Configuration Builder, click once to select the PTQ-
104C module.
2 Open the P
over M
ROJECT menu from the top of the PCB window, and mouse-
ODULE. Select DOWNLOAD FROM PC TO DEVICE.
Or, right-click the PTQ-104C icon in PCB and select D
DEVICE.
OWNLOAD FROM PC TO
Page 76 of 136 ProSoft Technology, Inc.
March 4, 2013
Page 77

49TPTQ-104C ♦ 48TQuantum Platform Downloading the PCB File to the Module
47TIEC 60870-5-104 Client
12TUser Manual
3 The program will scan the PC for a valid com port (this may take a few
seconds). When PCB has found a valid com port, the D
OWNLOAD dialog box
will open.
4 Choose the com port to use from the dropdown list, and then click
the D
OWNLOAD button.
The module will perform a platform check to read and load its new settings.
When the platform check is complete, the status bar in the D
box will display the message Module Running.
6.2 Downloading the Project via Ethernet Connection
OWNLOAD dialog
This procedure cannot be done unless the IP address has been initially
configured and downloaded serially (page 19) to the module. In the tree view in
ProSoft Configuration Builder, left-click once to select the PTQ-104C module.
ProSoft Technology, Inc. Page 77 of 136
March 4, 2013
Page 78

Downloading the PCB File to the Module 49TPTQ-104C ♦ 48TQuantum Platform
12TUser Manual 47TIEC 60870-5-104 Client
1 Open the PROJECT menu from the top of the PCB window, and mouse-
over M
ODULE. Select DOWNLOAD FROM PC TO DEVICE.
Or right-click the PTQ-104C icon in PCB and select D
DEVICE.
OWNLOAD FROM PC TO
Page 78 of 136 ProSoft Technology, Inc.
March 4, 2013
Page 79

49TPTQ-104C ♦ 48TQuantum Platform Downloading the PCB File to the Module
47TIEC 60870-5-104 Client
12TUser Manual
2 The DOWNLOAD dialog box will open. Select Ethernet as the Connection Type
and enter the IP Address that was assigned in the [Ethernet Configuration]
section of PCB.
3 Click the D
OWNLOAD button.
The module will perform a platform check to read and load its new settings.
When the platform check is complete, the status bar in the D
OWNLOAD dialog
box will display the message Module Running.
ProSoft Technology, Inc. Page 79 of 136
March 4, 2013
Page 80

49TPTQ-104C ♦ 48TQuantum Platform
12TUser Manual 47TIEC 60870-5-104 Client
Page 80 of 136 ProSoft Technology, Inc.
March 4, 2013
Page 81

49TPTQ-104C ♦ 48TQuantum Platform Hot Standby Support
47TIEC 60870-5-104 Client
12TUser Manual
7 Hot Standby Support
In This Chapter
Hot Standby Overview ........................................................................... 82
Setting Up the Modicon Quantum Hot Standby with Unity System ....... 88
ProSoft Technology, Inc. Page 81 of 136
March 4, 2013
Page 82

Hot Standby Support 49TPTQ-104C ♦ 48TQuantum Platform
12TUser Manual 47TIEC 60870-5-104 Client
7.1 Hot Standby Overview
This section describes the PTQ-104C IEC 870-5-104 Client module
specifications and startup support for Modicon Quantum Hot Standby system.
A Modicon Quantum Hot Standby with Unity system can be used when downtime
cannot be tolerated. Hot standby systems deliver high availability through
redundancy. A hot standby system consists of two identical configurations.
Modicon Quantum 140 CPU 671 60
Modicon Quantum Power Supply Module
Modicon Quantum RIO Head
ProSoft Technology PTQ-104C module hardware version 1.05 or higher
Modicon Optional Modules (NOE, NOM)
One of the 140 CPU 67160s acts as the Primary controller and the other acts as
the Standby controller. The Primary controller runs the application program and
operates the remote I/O.
Note: The Modicon Quantum RIO Head is required even if the Remote I/O will not be used.
This feature is enabled by clicking the Enable Hot Standby button in the
Choose Module Type window.
7.1.1 Identical Configurations
Two backplanes are configured with identical hardware and software. One of the
programmable logic controllers (PLCs) functions as the Primary controller and
the other as a Standby controller, and either controller can be put in the Primary
state, but the other must be in the Standby state or offline.
Page 82 of 136 ProSoft Technology, Inc.
March 4, 2013
Page 83

49TPTQ-104C ♦ 48TQuantum Platform Hot Standby Support
47TIEC 60870-5-104 Client
12TUser Manual
7.1.2 Primary and Standby Controllers
The Primary controller executes the application program, controls the remote I/O,
and updates the Standby controller after every scan (program cycle). If the
Primary controller fails, the Standby controller takes control within one scan. To
determine if the Primary controller failed note controller’s status displayed in the
HE CPU LCD screen and the RIO Head’s status displayed by the RIO Head’s
LEDs.
The Standby controller does not execute the full application program but only the
first section, and the Standby controller does not control the remote I/O but
checks out the availability of the Modicon Quantum Hot Standby with Unity
equipment.
Note: For additional information on Quantum Hot Standby support, refer to the Unity Pro Hot
Standby User Guide.
ProSoft Technology, Inc. Page 83 of 136
March 4, 2013
Page 84

Hot Standby Support 49TPTQ-104C ♦ 48TQuantum Platform
12TUser Manual 47TIEC 60870-5-104 Client
7.1.3 System Components
The following illustration shows the components required for a Modicon Quantum
Hot Standby with Unity system.
1 Primary PLC
2 Standby PLC
3 Modicon Quantum Hot Standby with Unity controller with integrated
coprocessor
4 Fiber Optic Cable to connect to both controllers
5 Modicon Quantum power supply module: Install power supply in first slot for
better rack layout.
6 Modicon Quantum RIO head
7 Coaxial cable with splitters (7A) (MA-0186-100), trunk terminators (7B) (52-
0422-000), and tap (7C) (MA-0185-100) for connecting the RIO heads (6)
with the RIO drops (8). The dashed connections represent a redundant
connection in the RIO network, which is not required for the Modicon
Quantum Hot Standby with Unity system.
8 Modicon Quantum RIO drop
Page 84 of 136 ProSoft Technology, Inc.
March 4, 2013
Page 85

49TPTQ-104C ♦ 48TQuantum Platform Hot Standby Support
47TIEC 60870-5-104 Client
12TUser Manual
9 Unity Pro computer connected to both controllers via Modbus or Modbus Plus
(9A)
10 PTQ-104C HSBY modules
11 PTQ-104C Ethernet redundancy communication cable
12 IEC 60870-5-104 network.
Note: The 140 CRP 932 00 RIO Head unit is required for Hot Standby System to work.
7.1.4 Modicon Quantum Hot Standby with Unity and IEC Logic
Overview
A Modicon Quantum Hot Standby with Unity system requires two backplanes
configured with identical hardware, software, and firmware. One of the controllers
(PLC) functions as the Primary controller and the other as a Standby controller.
The Primary updates the Standby after every scan.
The Primary and Standby communicate constantly monitoring the health of
the system.
If the Primary fails, the Standby takes control within one scan.
7.1.5 Understanding System Scan Time in Modicon Quantum Hot Standby with Unity Systems
Effect on System Scan Time
The scan time of any Modicon Quantum Hot Standby with Unity system depends
on the amount of data transferred. Because data must be transferred from
Primary to Standby, any Modicon Quantum Hot Standby with Unity system
always has a higher scan time than a comparable stand-alone system.
Performance Considerations
A Modicon Quantum Hot Standby with Unity system increases the length of a
MAST scan, creating system overhead.
Note: System overhead is the time required to copy the application data to the communication link
layer.
The network scan (communication between Primary and Standby "copros")
1 Exchanges data between both controllers
2 Runs in parallel with the application program.
ProSoft Technology, Inc. Page 85 of 136
March 4, 2013
Page 86

Hot Standby Support 49TPTQ-104C ♦ 48TQuantum Platform
12TUser Manual 47TIEC 60870-5-104 Client
A Hot Standby system
Most of the time, the MAST scan hides the network scan. However, when some
application programs are processed, additional system overhead may occur.
Example #1
Stand-alone application scan time: 80 ms
Data (state RAM + unallocated variables): 100 Kb
Page 86 of 136 ProSoft Technology, Inc.
March 4, 2013
Page 87

49TPTQ-104C ♦ 48TQuantum Platform Hot Standby Support
47TIEC 60870-5-104 Client
12TUser Manual
Example #2
Stand-alone application scan time: 80 ms
Data (state RAM + unlocated variables): 300 Kb
Note: In addition to the above times for system overhead, the PTQ-104C module may acquire from
100 ms to 300 ms of switch-over time. All configured data is to be updated as fast as the combined
asynchronous events occur based on the processor scan time, backplane transfer time, PTQ data
handling time and IEC 60870-5-104 bus cycle time. The IEC 60870-5-104 bus cycle time is based
on slave reaction time, sync time, baud rate and other bus delay times for a given number of
servers on the network.
ProSoft Technology, Inc. Page 87 of 136
March 4, 2013
Page 88

Hot Standby Support 49TPTQ-104C ♦ 48TQuantum Platform
12TUser Manual 47TIEC 60870-5-104 Client
7.2 Setting Up the Modicon Quantum Hot Standby with Unity System
7.2.1 Overview
Schneider Electric is a leader in offering fault-tolerant, redundant systems, and
Hot Standby. Setting up a Modicon Quantum Hot Standby with Unity system
involves a number of processes.
7.2.2 Mapping the Backplane Extensions
A Modicon Quantum Hot Standby with Unity requires two backplanes with at
least four slots. The two backplanes must be mapped in an identical manner:
same Modicon Quantum Hot Standby with Unity HE CPU with integrated
coprocessor (Copro)
same firmware
o same revision level
o same Modicon Quantum power supply module
o same Modicon Quantum RIO Head
If other modules are used, for example local I/Os, NOMs, NOEs, these modules
must be identical.
For additional information on Modicon Quantum Hot Standby Startup support,
refer to the Unity Pro User Guide.
7.2.3 PTQ-104C Hot Standby Considerations
Limitations
The solution allows for up to six PTQ modules per rack (for both Primary and
Standby).
The PTQ-104C module cannot be installed in a RIO drop.
HSBY Operating Modes
Generally, the user will have full control over the switchover via the command
register through application program control. This is accomplished by the user
application through the SW60 command register.
Page 88 of 136 ProSoft Technology, Inc.
March 4, 2013
Page 89

49TPTQ-104C ♦ 48TQuantum Platform Hot Standby Support
47TIEC 60870-5-104 Client
12TUser Manual
PLC HSBY Command Register
The following illustration identifies the operating options provided by the
Command Register (%SW60). The Command Register defines the operation of
the Hot Standby application. That means both the Primary and Standby.
Therefore the Command Register is transferred to the Standby PLC each scan.
As a result, any changes made to the Command Register on the Standby PLC
will have no effect since the value transfer from the Primary side will overwrite it.
%SW60 Hot Standby Command Register
%SW60.0: This bit, if set to 1, allows the Command Register RUN status of the
PLC to be set through the LCD Keypad.
Warning: If the keypad override is enabled while the Hot Standby system is running, the Primary
PLC will immediately read bits 14 and 15 to determine its own state and the state of the Standby. If
both bits are set to 0, a switchover will occur and the former Primary will go offline. The new
Primary will continue to operate.
%SW60.1: Setting this bit = 1 will put PLC A in RUN mode. Setting the bit = 0 will
put PLC A in OFFLINE mode. This bit takes effect only if b it 16 is set = 1.
%SW60.2: Setting this bit = 1 will put PLC B in RUN mode. Setting the bit = 0 will
put PLC B in OFFLINE mode. This bit takes effect only if bit 16 is set = 1.
ProSoft Technology, Inc. Page 89 of 136
March 4, 2013
Page 90

Hot Standby Support 49TPTQ-104C ♦ 48TQuantum Platform
12TUser Manual 47TIEC 60870-5-104 Client
%SW60.3: Setting this bit = 0 will force the Standby PLC offline if a logic
mismatch is detected. Logic mismatch is defined as either the MID, LID or CID
being different on Primary and Standby sides. Setting this bit = 1 will allow the
Standby PLC to continue to operate normally even if the MID is different on the
Primary and Standby.
%SW60.4: Setting this bit = 1 allows the executive to upgrade on the Standby
without having to stop the application. This means the Hot Standby system is
allowed to operate with different versions of the OS running on the Primary and
Standby. This option is provided to allow upgrades to be done without shutting
down the process. Clearly, the Standby PLC must be stopped to do the executive
upgrade, but it will be able to operate as a valid Standby when started again.
%SW60.5: Setting this bit = 1 commands the standby station to initiate an
application transfer. That function is not required in UNITY V1.
%SW60.8: If this bit is set = 1 the Modbus address on port 1 will be swapped
when a switchover occurs. Swapping means to change address by ± 128 to keep
the address in the range of 1 to 247. The purpose of this is to allow the P-unit of
an HMI to always use the same address to connect to the Primary or
Standby/Offline PLC.
PLC HSBY Status Register
The Status Register provides user information relative to the state of the two
PLCs in the Hot Standby system. The Status Register is %SW61.
Both the Primary and Standby/Offline PLCs have their own copies of the Status
register. The Status register is not transferred from Primary to Standby each
scan. Each PLC must maintain its local Status Register based on the regular
communication between the two PLCs.
The following illustration identifies the operating options provided by the
Command Register.
%SW61 Hot Standby Status Register
The following gives additional detail on the various parts of the Status Register.
Page 90 of 136 ProSoft Technology, Inc.
March 4, 2013
Page 91

49TPTQ-104C ♦ 48TQuantum Platform Hot Standby Support
47TIEC 60870-5-104 Client
12TUser Manual
%SW61.0 to 3: These bits display the state of the local and remote Hot Standby
PLCs.
%SW61.4: This bit is set = 1 whenever a logic mismatch is detected between the
Primary and Standby PLCs. This means that either the MID, CID or LID is
different on the two PLCs. Under this condition, if bit 13 of the Command
Register is set = 0, bit 1 of the Status Register will be set = 1.
%SW61.5: This bit identifies the order reported by the Copro at start time
depends on the range of the MAC addresses.
If the A/B designation is A, then bit 5 will be set = 0.
If the A/B designation is B, then bit 5 will be set = 1.
%SW61.14: If set = 1 it indicates that a logic mismatch has been detected that
disallows Unlocated Variables to be transferred from Primary to Standby. This
feature was canceled for UNITY V1.1 because it was determined that a
switchover with a partial application context posed too great a hazard.
%SW61.15: If set = 1 it indicates that the Copro device is set up correctly and
working.
ProSoft Technology, Inc. Page 91 of 136
March 4, 2013
Page 92

49TPTQ-104C ♦ 48TQuantum Platform
12TUser Manual 47TIEC 60870-5-104 Client
Page 92 of 136 ProSoft Technology, Inc.
March 4, 2013
Page 93

49TPTQ-104C ♦ 48TQuantum Platform Diagnostics and Troubleshooting
47TIEC 60870-5-104 Client
12TUser Manual
8 Diagnostics and Troubleshooting
In This Chapter
LED Indicators ....................................................................................... 94
Diagnostics Menu .................................................................................. 95
The module provides information on diagnostics and troubleshooting in the
following forms:
LED status indicators on the front of the module provide general information
on the module's status.
Status Data can be viewed through the Configuration/Debug port using
ProSoft Configuration Builider (PCB) software.
Status data values can be transferred from the module to processor controller
tags and can be monitored manually or by customer-created logic.
ProSoft Technology, Inc. Page 93 of 136
March 4, 2013
Page 94

Diagnostics and Troubleshooting 49TPTQ-104C ♦ 48TQuantum Platform
LED
Color
Status
Description
Green
On
Data is being transferred between the module and a remote
Off
No data is being transferred on the Configuration/Debug port.
Green
On
Port not used in application
Off
Port not used in application
Green
On
Port not used in application
Off
Port not used in application
Red
Off
The PTQ-104C is working normally.
On
The PTQ-104C module program has recognized an application
N/A
Not used in application
ERR3
Red
On
Configuration Error
Green
On
The LED is on when the module recognizes a processor and is
Off
The LED is off when the module is unable to communicate with the
Red
Off
The battery voltage is OK and functioning.
On
The battery voltage is low or the battery is not present. The battery
will illuminate briefly upon the first installation of the module or
LED
State
Description
Off
No activity on the Eth ernet port.
Green Flash
The Ethernet port is actively transmitting or receiving data.
Off
No physical network connection is detected. No Ethernet
Green Solid
Physical network connection detected. This LED must be on
12TUser Manual 47TIEC 60870-5-104 Client
8.1 LED Status Indicators
PRT1
PRT2
PRT3
ERR1
ERR2
Active
BAT
terminal using the Configuration/Debug port.
error.
able to communicate if the [Backplane Data Movement] section
specifies data transfer comma nds.
processor. The processor either absent or not running.
LED
if the unit has been un-powered for an extended period of time.
This behavior is normal, however should the LED come on in a
working installation please contact ProSoft Technology.
If the module is not operating and the status LEDs are not illustrated in the table
above, please call ProSoft Technology for technical assistance.
8.1.1 Ethernet LED Indicators
Data
Link
Page 94 of 136 ProSoft Technology, Inc.
March 4, 2013
communication is possible. Check wiring and cables.
solid for Ethernet communication to be possible.
Page 95

49TPTQ-104C ♦ 48TQuantum Platform Diagnostics and Troubleshooting
47TIEC 60870-5-104 Client
12TUser Manual
8.2 Diagnostics Menu
The Diagnostics menu in ProSoft Configuration Builder (PCB) for this module is
arranged as a tree structure, with the Main Menu at the top of the tree, and one
or more sub-menus for each menu command. The first menu displayed when
connected to the module is the Main menu.
Because this is a text-based menu system, commands are entered by typing the
command letter from the computer keyboard in the Diagnostics window. The
module does not respond to mouse movements or clicks.
8.2.1 Required Hardware
There are two ways to connect the module with PCB – Serial or Ethernet.
When connecting serially to the module, ProSoft Technology recommends the
following minimum hardware to connect the computer to the module:
80486 based processor (Pentium preferred)
1 megabyte of memory
At least one UART hardware-based serial communications port available.
USB-based virtual UART systems (USB to serial port adapters) often do not
function reliably, especially during binary file transfers, such as when
uploading/downloading configuration files or module firmware upgrades.
Note: When connecting for the first time, a serial connection is required since the
IP address of the module has not been configured yet. Setting the IP addres s
of the module is detailed on page 19.
Once the IP address parameters have been configured in PCB and downloaded
(serially) to the module, PCB connectivity over Ethernet can be established.
ProSoft Technology, Inc. Page 95 of 136
March 4, 2013
Page 96

Diagnostics and Troubleshooting 49TPTQ-104C ♦ 48TQuantum Platform
12TUser Manual 47TIEC 60870-5-104 Client
8.2.2 Serial Connection to Diagnostics Menu
Connect to the module’s Configuration/Debug serial port.
1 In the PCB project tree, right-click the PTQ-104C icon to open a shortcut
menu.
On the shortcut menu, choose D
IAGNOSTICS.
This action opens the D
IAGNOSTICS dialog box.
Page 96 of 136 ProSoft Technology, Inc.
March 4, 2013
Page 97

49TPTQ-104C ♦ 48TQuantum Platform Diagnostics and Troubleshooting
47TIEC 60870-5-104 Client
12TUser Manual
2 Press [?] to open the Main Menu.
ProSoft Technology, Inc. Page 97 of 136
March 4, 2013
Page 98

Diagnostics and Troubleshooting 49TPTQ-104C ♦ 48TQuantum Platform
12TUser Manual 47TIEC 60870-5-104 Client
If there is no response from the module, follow these steps when trying to
connect serially:
1 Click to configure the connection. On the Connection Setup dialog box, select
a valid com port or other connection type supported by the module.
2 Verify that the null modem cable is connected properly between the
computer’s serial port and the module. A regular serial cable will not work.
3 On computers with more than one serial port, verify that the communication
program is connected to the same port that is connected to the module.
If a connection cannot be established, contact ProSoft Technology for
assistance.
8.2.3 Ethernet Connection to Diagnostics Menu
This connection can only be made if an IP address has been configured and
downloaded to the module.
Connect the module’s Ethernet port to the Ethernet network.
Page 98 of 136 ProSoft Technology, Inc.
March 4, 2013
Page 99

49TPTQ-104C ♦ 48TQuantum Platform Diagnostics and Troubleshooting
47TIEC 60870-5-104 Client
12TUser Manual
1 In the PCB project tree, right-click the PTQ-104C icon to open a shortcut
menu.
On the shortcut menu, choose D
IAGNOSTICS.
This action opens the D
IAGNOSTICS dialog box.
ProSoft Technology, Inc. Page 99 of 136
March 4, 2013
Page 100

Diagnostics and Troubleshooting 49TPTQ-104C ♦ 48TQuantum Platform
12TUser Manual 47TIEC 60870-5-104 Client
2 If the bottom of the window reveals a Serial connection, the connection path
will need to be adjusted to an Ethernet connection.
3 Click the Setup Connection icon or select Connection>Setup Connection on
the window. Select Ethernet as the Connection Type and enter the IP
address in the field below.
Page 100 of 136 ProSoft Technology, Inc.
March 4, 2013
 Loading...