

Presonus StudioLive CS18AI Owner’s Manual
StudioLive™ CS18AI
Control Surface for StudioLive RM-Series mixers
and Studio One
Owner’s Manual
®
www.presonus.com
English

Table of Contents
1 Overview — 1
1.1 Introduction — 1
3.2.6 Panning and Stereo Linking — 38
3.2.7 Mix Bus Assignments — 39
3.2.8 Copying, Loading, and Saving
Fat Channel Settings — 39
1.2 About This Manual — 1
1.3 Features — 2
1.4 What is in the Box — 3
1.5 What You Will Need — 4
1.6 Optional Accessories — 4
1.7 Technical Support — 4
2 Getting Started — 5
2.1 Step 1: Register Your CS18AI — 5
2.2 Step 2: Update CS18AI Firmware — 6
2.3 Step 3: Network Your CS18AI — 10
2.3.1 Direct Connection to one StudioLive RM
Mixer — 12
2.3.2 Direct Connection to Studio One — 13
2.3.3 Wireless Networking — 15
3.2.9 A/B Fat Channel Settings — 42
3.2.10 Metering — 42
3.3 Channel Strip Controls — 43
3.4 Global Mixer Controls — 45
3.4.1 Talkback — 45
3.4.2 Solo Bus — 46
3.4.3 Graphic Equalizer (GEQ) — 47
3.4.4 Mute Groups — 48
3.4.5 Monitor Bus Controls — 49
3.5 Channel and Mix Settings — 50
3.5.1 Channel Settings — 50
3.5.2 Mix Settings — 51
3.6 Home Screen — 52
3.6.1 System Menu — 53
3.6.2 Utilities — 57
2.3.4 LAN Networking — 17
2.3.5 AVB Networking — 18
2.4 Step 4: Connecting the CS18AI Networked
Audio — 19
2.4.1 Mic and Line Inputs — 19
2.4.2 Headphone and Monitor Outputs — 20
3 Controlling StudioLive
RM-series Mixers — 22
3.1 Layers, Filter DCAs, and Mixes — 22
3.1.1 Navigating Layers — 22
3.1.2 Filter DCA Groups — 22
3.1.3 Accessing Mixes — 28
3.2 Basic Channel Operation — 31
3.2.1 Input — 32
3.2.2 Noise Gate and Expander — 33
3.2.3 Compressor — 35
3.2.4 Limiter — 36
3.2.5 Equalizer — 37
3.7 UCNET — 58
3.7.1 Wired Settings Menu — 58
3.8 Scenes and Quick Scenes — 59
3.8.1 Recalling a Mix Scene — 60
3.8.2 Quick Scene Recall — 61
3.8.3 Scene Filters — 63
3.9 Internal Effects Mixes — 63
4 Controlling Studio One — 69
4.1 Channel Controls — 69
4.2 Flex Fader — 71
4.3 Mix Navigation — 72
4.4 Automation Modes — 72
4.5 Transport — 73
4.6 FX Inserts / Sends — 73
4.6.1 Editing Plugins — 74
4.6.2 Editing FX Sends — 75

5 Rear Panel — 76
5.1 Physical Connections and Controls — 76
6 Reference — 78
6.1 StudioLive CS18 Technical Specifications — 78
7 Warranty Information — 80
7.1 How Consumer Law Relates
To This Warranty — 80

1 Overview
1.1 Introduction
1 Overview
1.1 Introduction
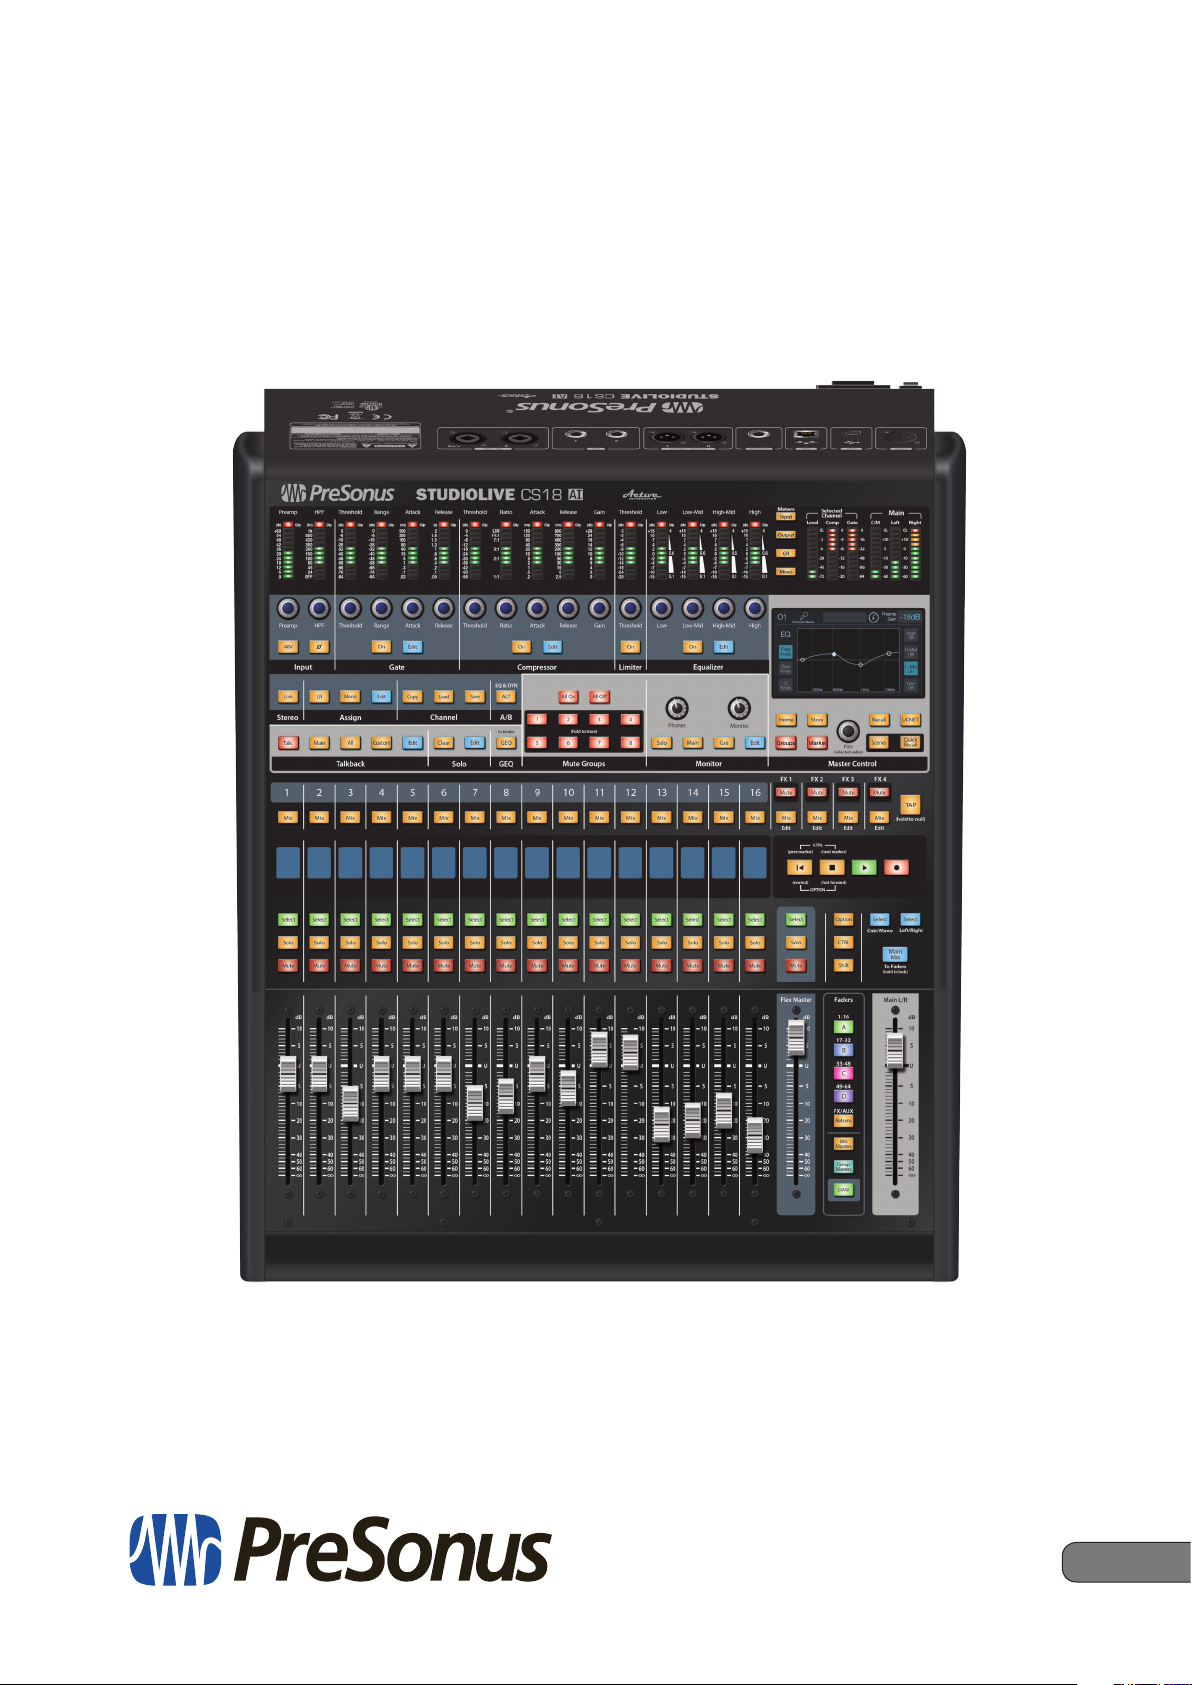
StudioLive™ CS18AI
Owner’s Manual
Thank you for purchasing a PreSonus®
StudioLive™ CS18AI control surface for StudioLive
RM-series mixers and Studio One. PreSonus
Audio Electronics has designed the CS18AI
utilizing high-grade components to ensure
optimum performance that will last a lifetime.
The CS18AI provides fast and comprehensive
control over StudioLive RM-series digital
mixers (RM32, RM16, RML32, and RML16) as
well as Studio One® DAW software for Mac®
and Windows®. It combines touch-sensitive,
motorized faders, a color touchscreen, and a
carefully designed selection of controls with
AVB networking in a rack-mountable package.
The StudioLive CS18AI is perfectly suited for
a variety of applications, including live-sound
mixing, fixed installations, theaters, broadcast,
houses of worship, and professional recording.
We encourage you to contact us with questions
or comments regarding this product. PreSonus
Audio Electronics, Inc., is committed to
constant product improvement, and we value
your suggestions highly. We believe the best
way to achieve our goal of constant product
improvement is by listening to the real experts: our valued customers. We
appreciate the support you’ve shown us through the purchase of this product.
1.2 About This Manual
We suggest that you use this manual to familiarize yourself with the
features, applications, and correct connection procedures for your CS18AI
before trying to connect it to your StudioLive RM-series mixer, computer, or
network. This will help you avoid problems during installation and setup.
Throughout this manual you will find Power User Tips that can quickly make
you a CS18AI expert and help you get the most out of your investment.
Information on StudioLive RM-series mixers, UC Surface, and QMixUC can be found in the StudioLive RM-series Owner’s Manual and
StudioLive Software Library Reference Manual. Both documents
are available as downloads at www.PreSonus.com
1

1 Overview
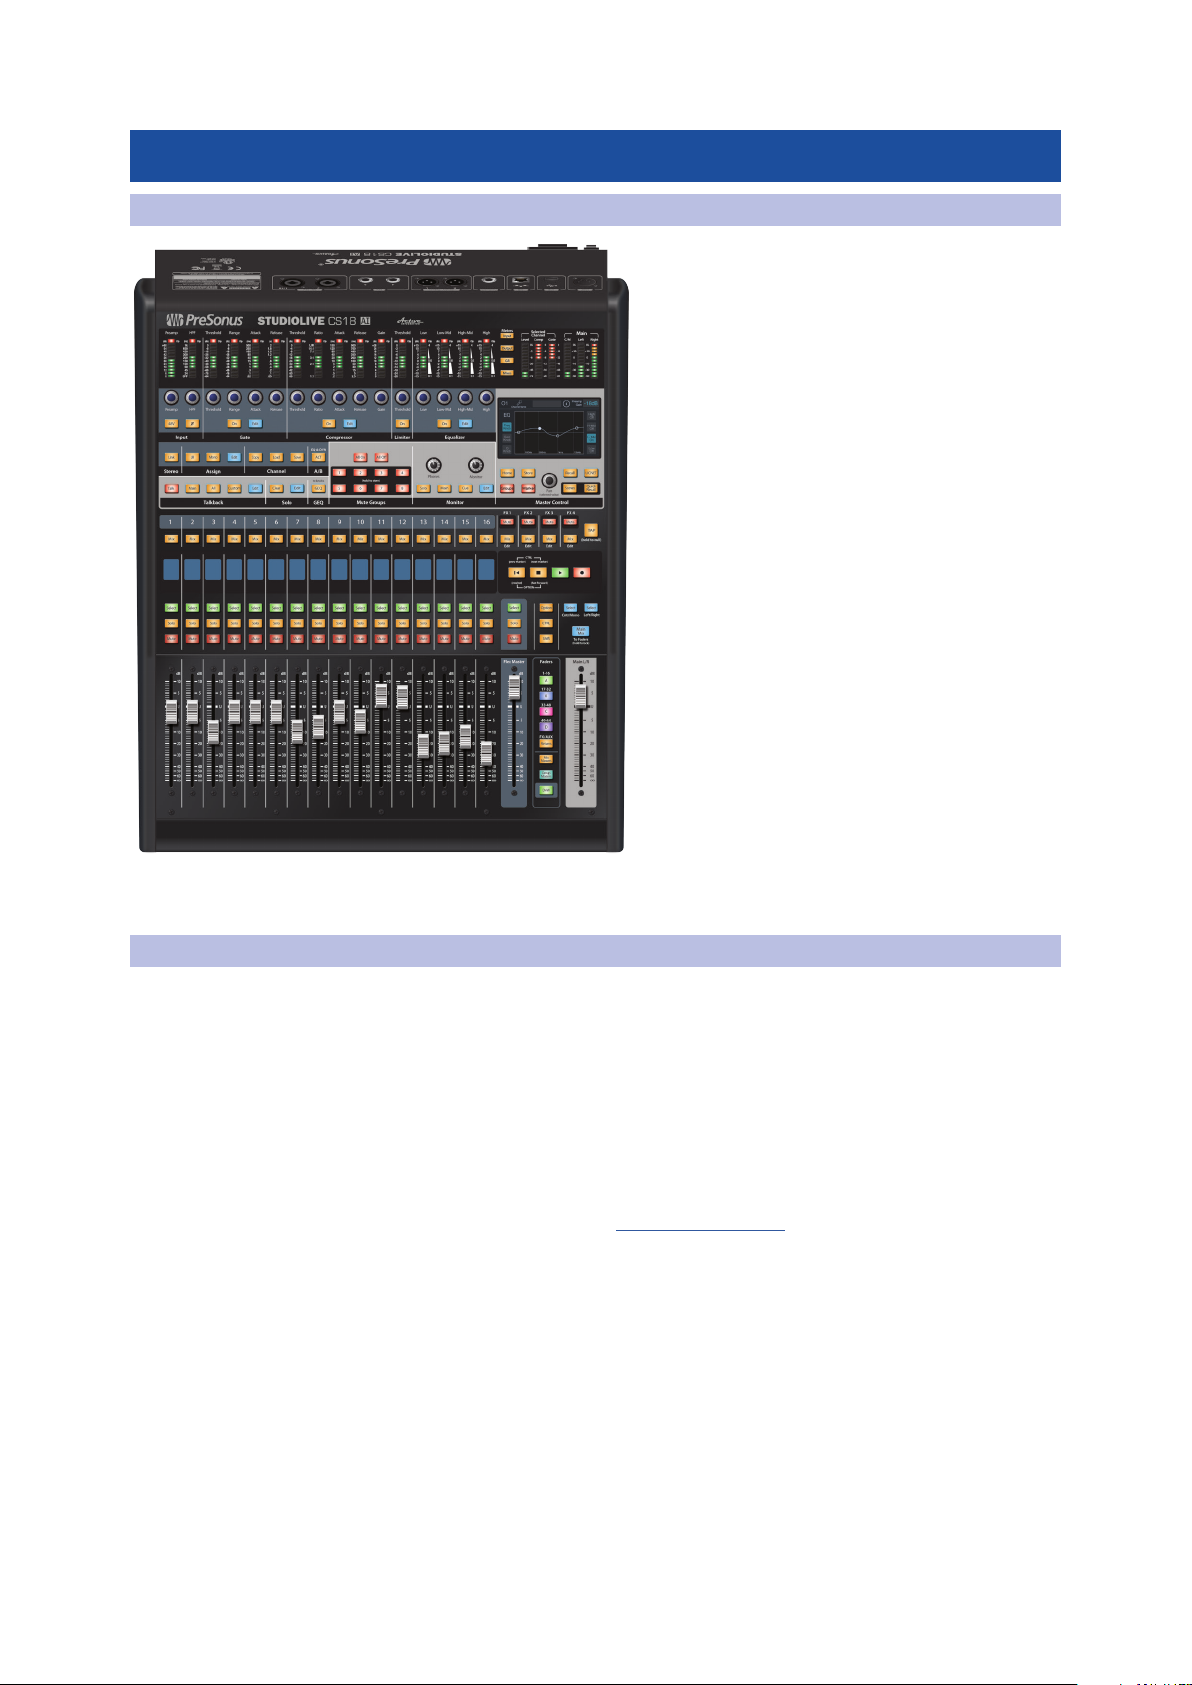
1.3 Features
1.3 Features
StudioLive™ CS18AI
Owner’s Manual
• 18 touch-sensitive, motorized faders
• 18 customizable, multi-color Select buttons for easy channel identification
• 16-channel scribble strip display
• 4.3-inch color touchscreen
• Full control over every StudioLive RM-series mixer function including
Fat Channel processing, Filter DCAs, Mix Managment, and more
• 4-pin XLR lamp connection
• Footswitch input
• 19" rack mountable
• Internal power supply with no fans
• Supports PreSonus UC Surface software
• Control over PreSonus Studio One DAW software
• Built-in Ethernet AVB audio interface with:
- 2 mic/line inputs with recallable XMAX preamps for
talkback, room mic, or other local inputs
- 2 balanced TRS line inputs
- 2 XLR line outputs
- Stereo headphone output
2
1 Overview
Deutsch EspañolFrançais
English
StudioLive™ CS18AI
Ethernet/AVB Control Surface for
StudioLive RM mixers and Studio One
®
DAW
Visual Quick Start Guide
www.presonus.com
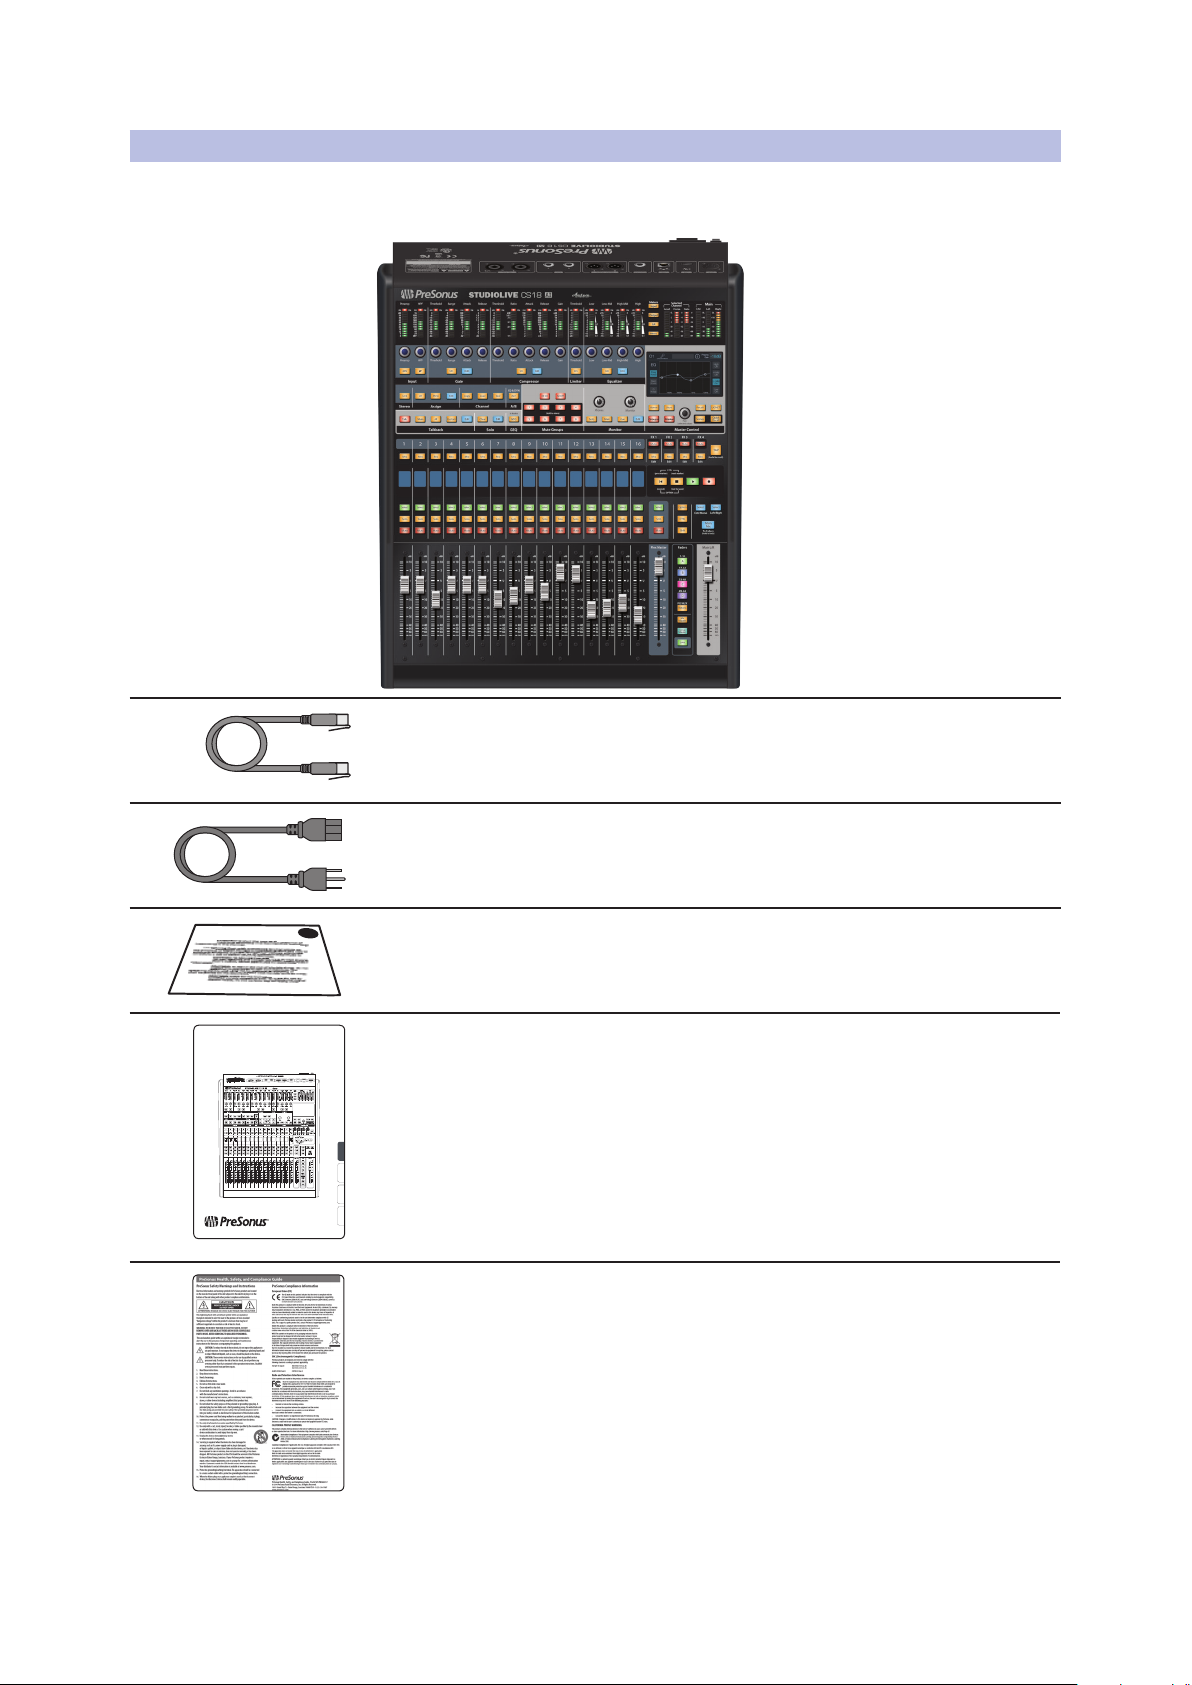
1.4 What is in the Box
1.4 What is in the Box
Your StudioLive CS18AI package contains the following:
• PreSonus StudioLive CS18AI Ethernet AVB control surface
StudioLive™ CS18AI
Owner’s Manual
• 3-foot (1m) Ethernet cable
• IEC power cord
• Product registration and software authorization card
• StudioLive CS18AI Quick Start Guide
• PreSonus Health Safety and Compliance Guide
3
1 Overview
1.5 What You Will Need
1.5 What You Will Need
You will need a network connection with Internet access or a USB flash
drive (SanDisk brand recommended) for firmware updates.
Depending on your system configuration and intended uses, you may also need
the following items, which are not included with your CS18AI control surface:
• Wireless router. For information on wireless routers we know work
well with the CS18AI control surface, see http://support.presonus.
com/entries/22338274. In our testing, we have also encountered
some wireless routers that can be problematic, which are discussed
here: http://support.presonus.com/entries/22338264.
• AVB-compatible network switch. The latest information on
compatible switches can be found here: http://support.presonus.
com/entries/67281460-Supported-AVB-network-switches.
• A Mac or Windows computer or iPad running UC Surface, with a wired or
wireless connection to a network router that is, in turn, connected to the mixer.
1.6 Optional Accessories
• USB Wi-Fi LAN adapter
StudioLive™ CS18AI
Owner’s Manual
1.7 Technical Support
Many technical issues can arise when using a standard computer as a digital
audio workstation (DAW) and when networking wireless devices. PreSonus can
only provide support for issues that directly relate to the StudioLive CS18AI, RMseries mixers, UC Surface control software, QMix-UC, Capture, and Studio One.
PreSonus does not provide support for computer hardware, iOS hardware, wireless
networks, operating systems, and non-PreSonus hardware and software, and it may
be necessary to contact the manufacturer of these products for technical support.
Please check our Web site www.presonus.com regularly for
software information and updates, firmware updates, and
support documentation for frequently asked questions.
Online technical support is available to registered users through their My
PreSonus account. Visit my.presonus.com to register. PreSonus telephone
technical support is available to customers in the USA on Monday through
Friday from 9 a.m. to 5 p.m. Central Time by calling 1-225- 216-7887.
Customers outside of the USA should contact their national or regional
distributor for telephone technical support. A list of international distributors
is provided at www.presonus.com/buy/international_distributors.
Advanced troubleshooting guides can be found at
http://support.presonus.com/forums.
4

2 Getting Started
2.1 Step 1: Register Your CS18AI
2 Getting Started
This section will guide you through connecting your CS18AI to a network
so that you can begin controlling your StudioLive RM-series mixer, Studio
One, or both. Please review the brief networking tutorial located in
Section 2.3 to familiarize yourself with networking best practices.
Visit www.presonus.com for the latest system requirements
and an updated list of compatible hardware.
In general, you will need the following:
• AVB compatible Ethernet connection for control and audio
transport. (If using a non-AVB network connection you’ll still have
control but will not have audio transport over Ethernet.)
• Internet connection for registration and firmware download.
2.1 Step 1: Register Your CS18AI
1. Go to my.presonus.com.
StudioLive™ CS18AI
Owner’s Manual
2. Log in or create a new account if you don’t already have one.
3. Once you have logged into your My PreSonus account, click
the Register a Product button at the top of the page.
5
2 Getting Started
To Internet
2.2 Step 2: Update CS18AI Firmware
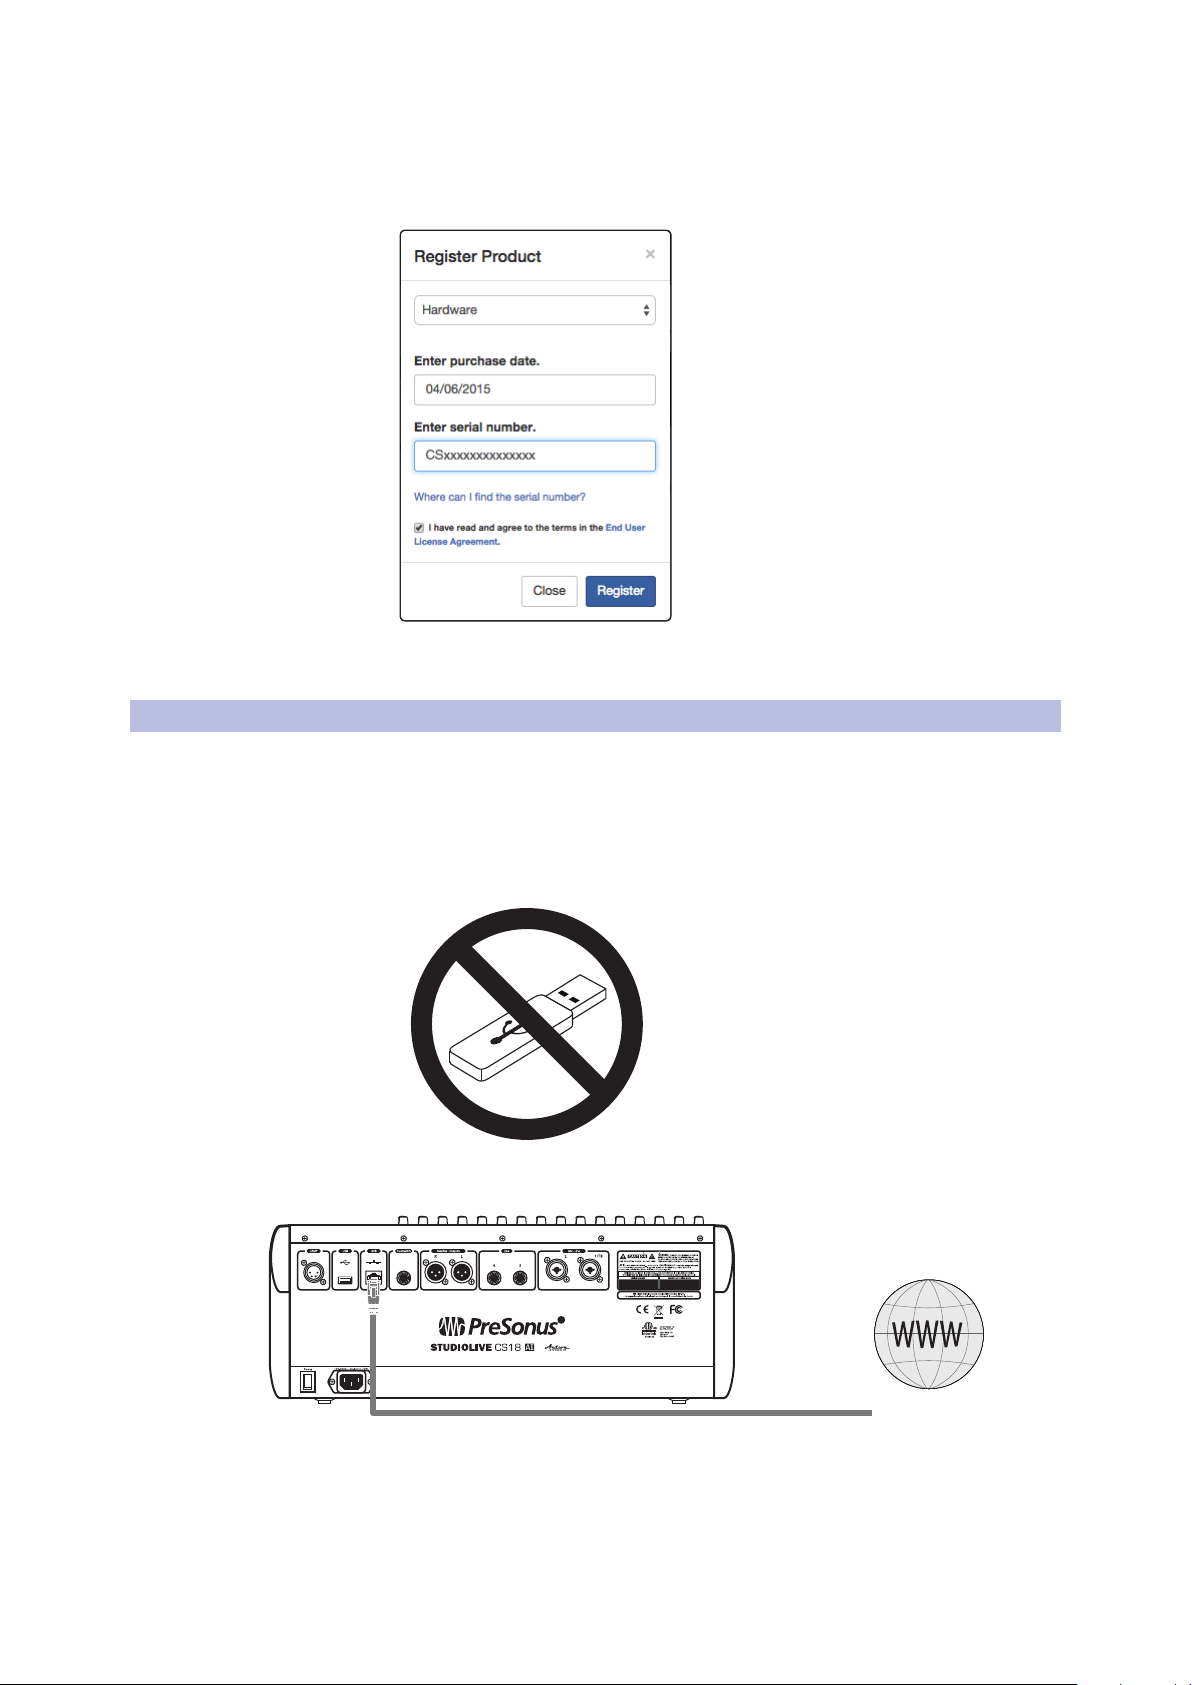
4. Select “Hardware” from the drop-down menu in the dialog, enter the
information for your CS18AI controller, and check the box stating
you have read and agree to the license agreement. Click/tap the
Register button when you are done to register your controller.
StudioLive™ CS18AI
Owner’s Manual
5. You can now download firmware updates or update the firmware directly
with your StudioLive CS18AI connected to an Internet-connected network.
2.2 Step 2: Update CS18AI Firmware
If Your CS18AI is Registered and Connected to the Internet
All registered StudioLive CS18AI controllers have the ability to
connect to a My PreSonus account and download firmware updates
over the Internet. To check online for new firmware updates:
• Be sure no USB flash drive is inserted in the USB port on the CS18AI.
• Connect your registered CS18AI to a network with Internet access.
• Skip steps 1 through 11 below and follow the instructions in steps 12 through 17.
6

2 Getting Started
2.2 Step 2: Update CS18AI Firmware
If Your CS18AI is Not Connected to the Internet
If your CS18AI is not connected directly to the Internet, follow
all of the instructions below to download the firmware files to a
USB flash (“thumb”) drive and install them from there.
Power User Tip: Make sure the drive is freshly formatted FAT, FAT16 or FAT32 and does not
have any other data on it. Drives that are 64GB or higher cannot be formatted FAT32 and
therefore will not work. Make sure you’re using a drive that is 1GB, 2GB, 4GB, 8GB, 16GB or
32GB in size. We strongly recommend SanDisk-brand flash drives for firmware updates.
1. Log in to your my.presonus.com account.
2. Once you have logged in, click the My Products button at the top of the page.
3. Click on the Hardware tab to view your registered hardware products.
StudioLive™ CS18AI
Owner’s Manual
4. Find your CS18AI on the page and click the View More Details link.
5. Click on the Update Firmware button to download the files to your computer.
IMPORTANT: The StudioLive CS18AI control surface, StudioLive AI console
mixers, and StudioLive AI RM mixers each use different firmware files. Loading
the wrong firmware can cause a device to function improperly and potentially damage
the unit.
7
2 Getting Started
2.2 Step 2: Update CS18AI Firmware
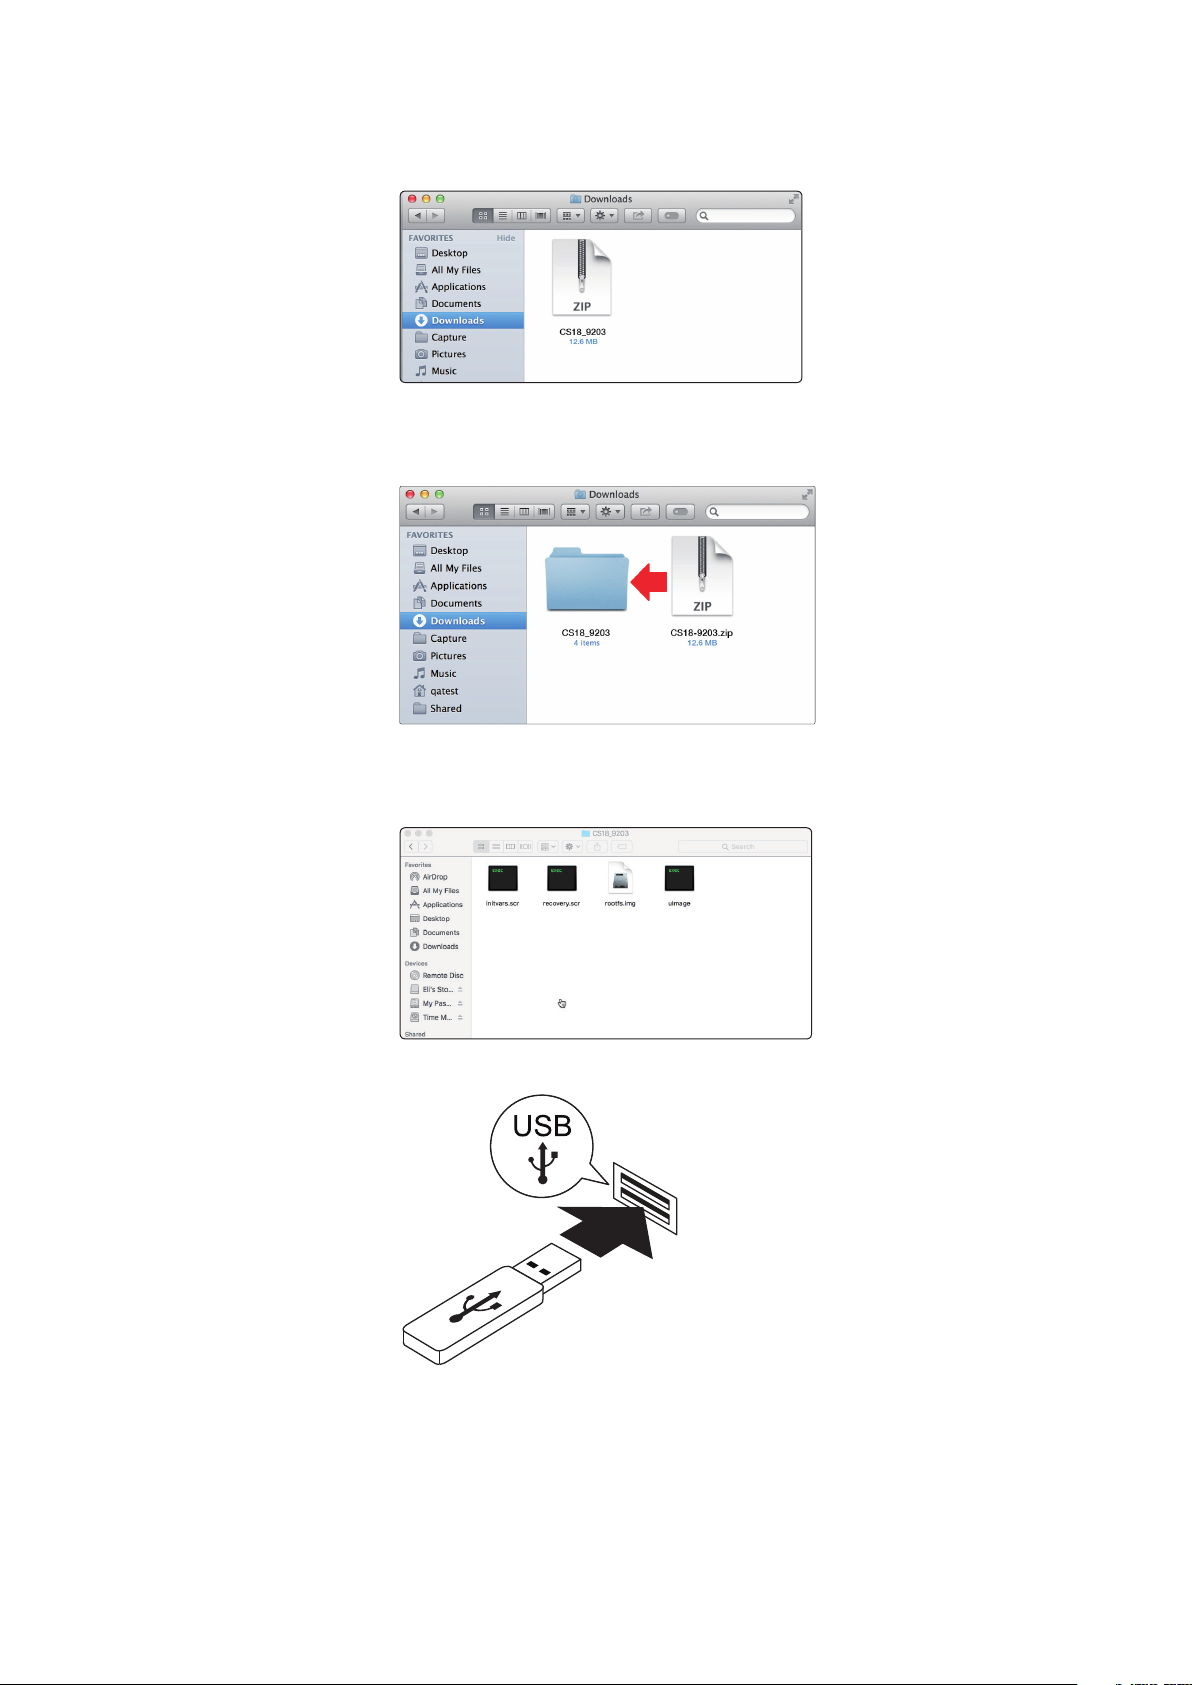
6. When the download completes, open your Downloads
folder and CS18AI firmware folder.
7. Depending on your computer’s system preferences, the
firmware .zip archive file might not automatically decompress.
If it doesn’t, double-click the file, and it will decompress.
StudioLive™ CS18AI
Owner’s Manual
8. Open the firmware folder; you will find five files inside:
initvars.scr, recovery.scr, rootfs.img, and ulmage. You
will need all five files to upgrade your controller.
9. Connect a FAT32-formatted USB thumb drive to your computer.
8
2 Getting Started
USB Drive
2.2 Step 2: Update CS18AI Firmware
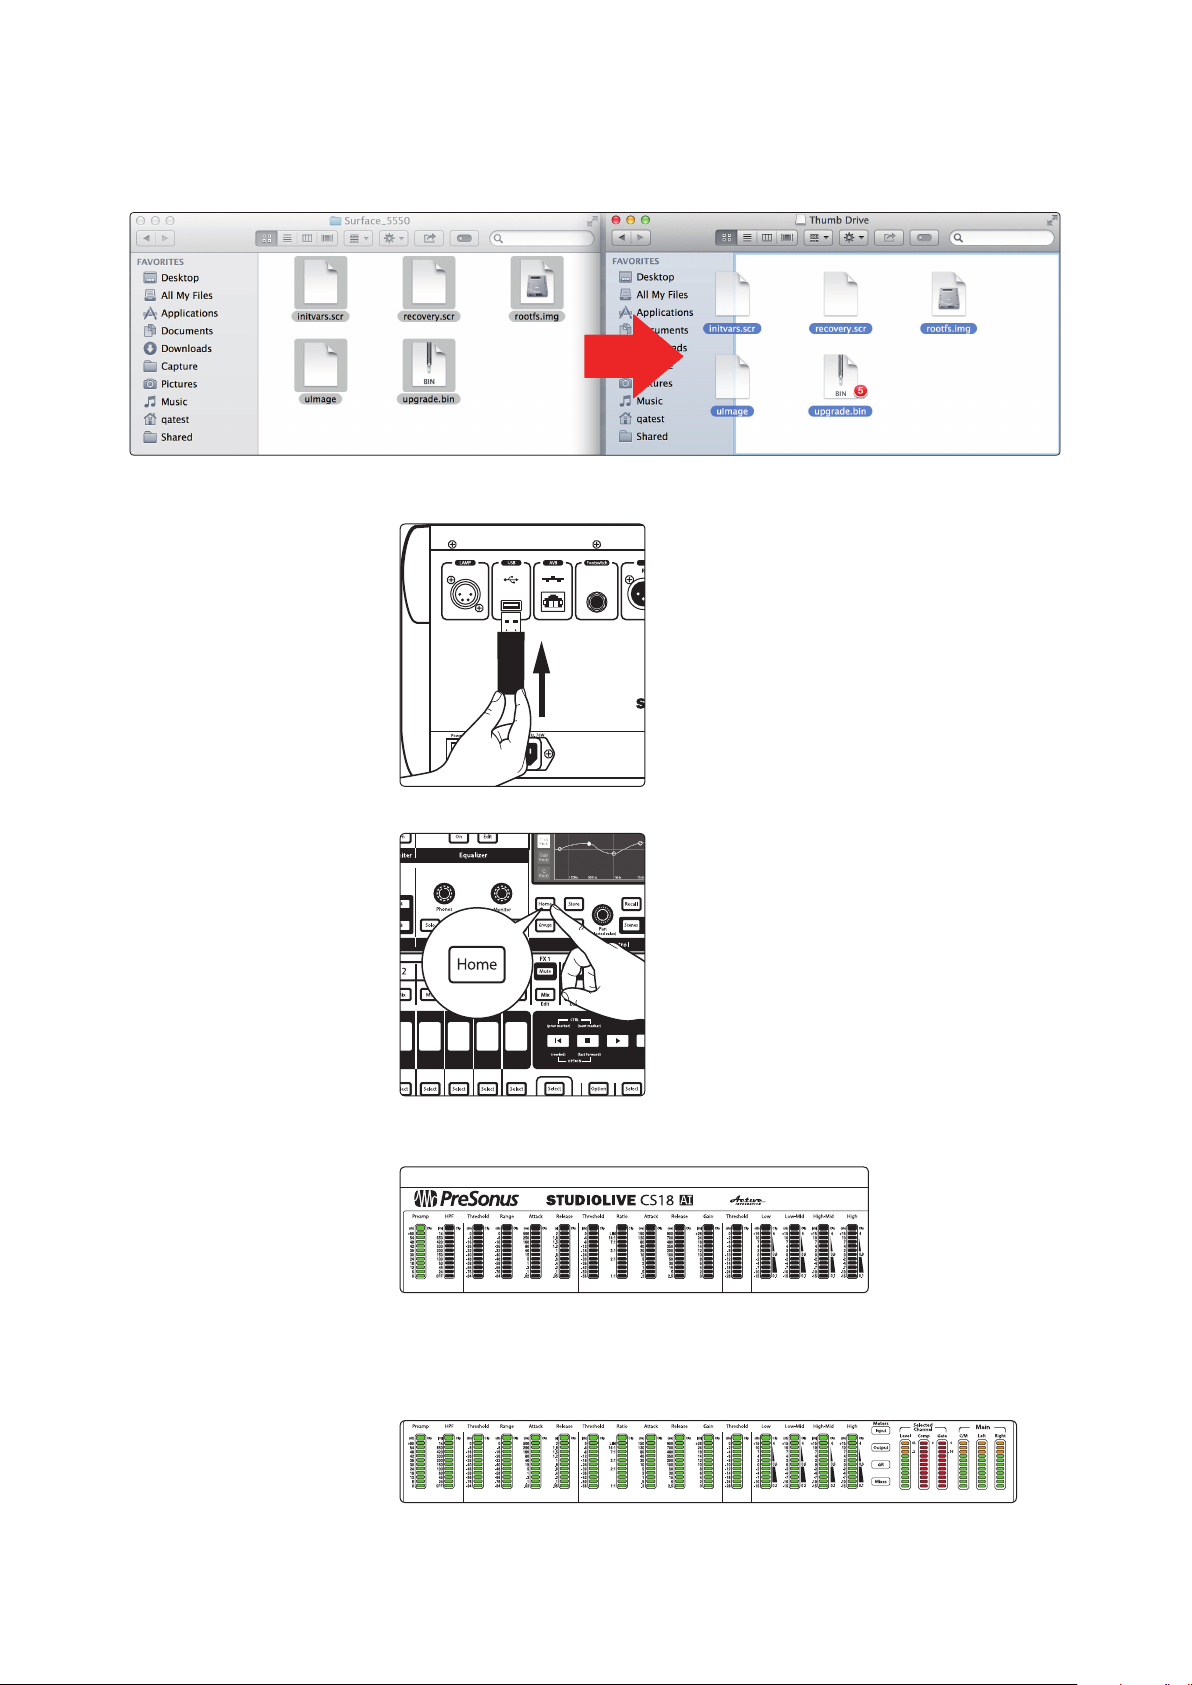
10. Select and copy/paste or drag the five firmware files to the root directory of
your thumb drive. If the files are inside a folder, the update will not execute
correctly. Eject the flash drive and disconnect it from your computer.
11. Insert the thumb drive into the USB slot on the rear of your
CS18AI controller. Make sure your CS18AI is powered off.
StudioLive™ CS18AI
Owner’s Manual
12. Press and hold the Home button while you power on your CS18AI.
13. Continue to hold the Home button until only the Channel 1 Meter is
illuminated. This is your indication that the firmware update has begun.
14. The Meters will continue to illuminate updating the progress of the
firmware update. When all 22 meters are fully lit, the update is complete.
Note: This process can take up to 10 minutes. Do not power
off your CS18AI until all 22 meters are illuminated.
9
2 Getting Started
2.3 Step 3: Network Your CS18AI
Power User Tip: Most small USB drives (16 GB or less) should be formatted correctly,
but if your CS18AI does not detect your thumb drive at first, we suggest reformatting
it, even if it’s already formatted as FAT32. On Windows, be sure to do a “Full” format
as opposed to a “Quick” format. On Macs, the choice will be listed as MS-DOS (FAT).
Please refer to the list of suggested drives that can be found on our Knowledge Base.
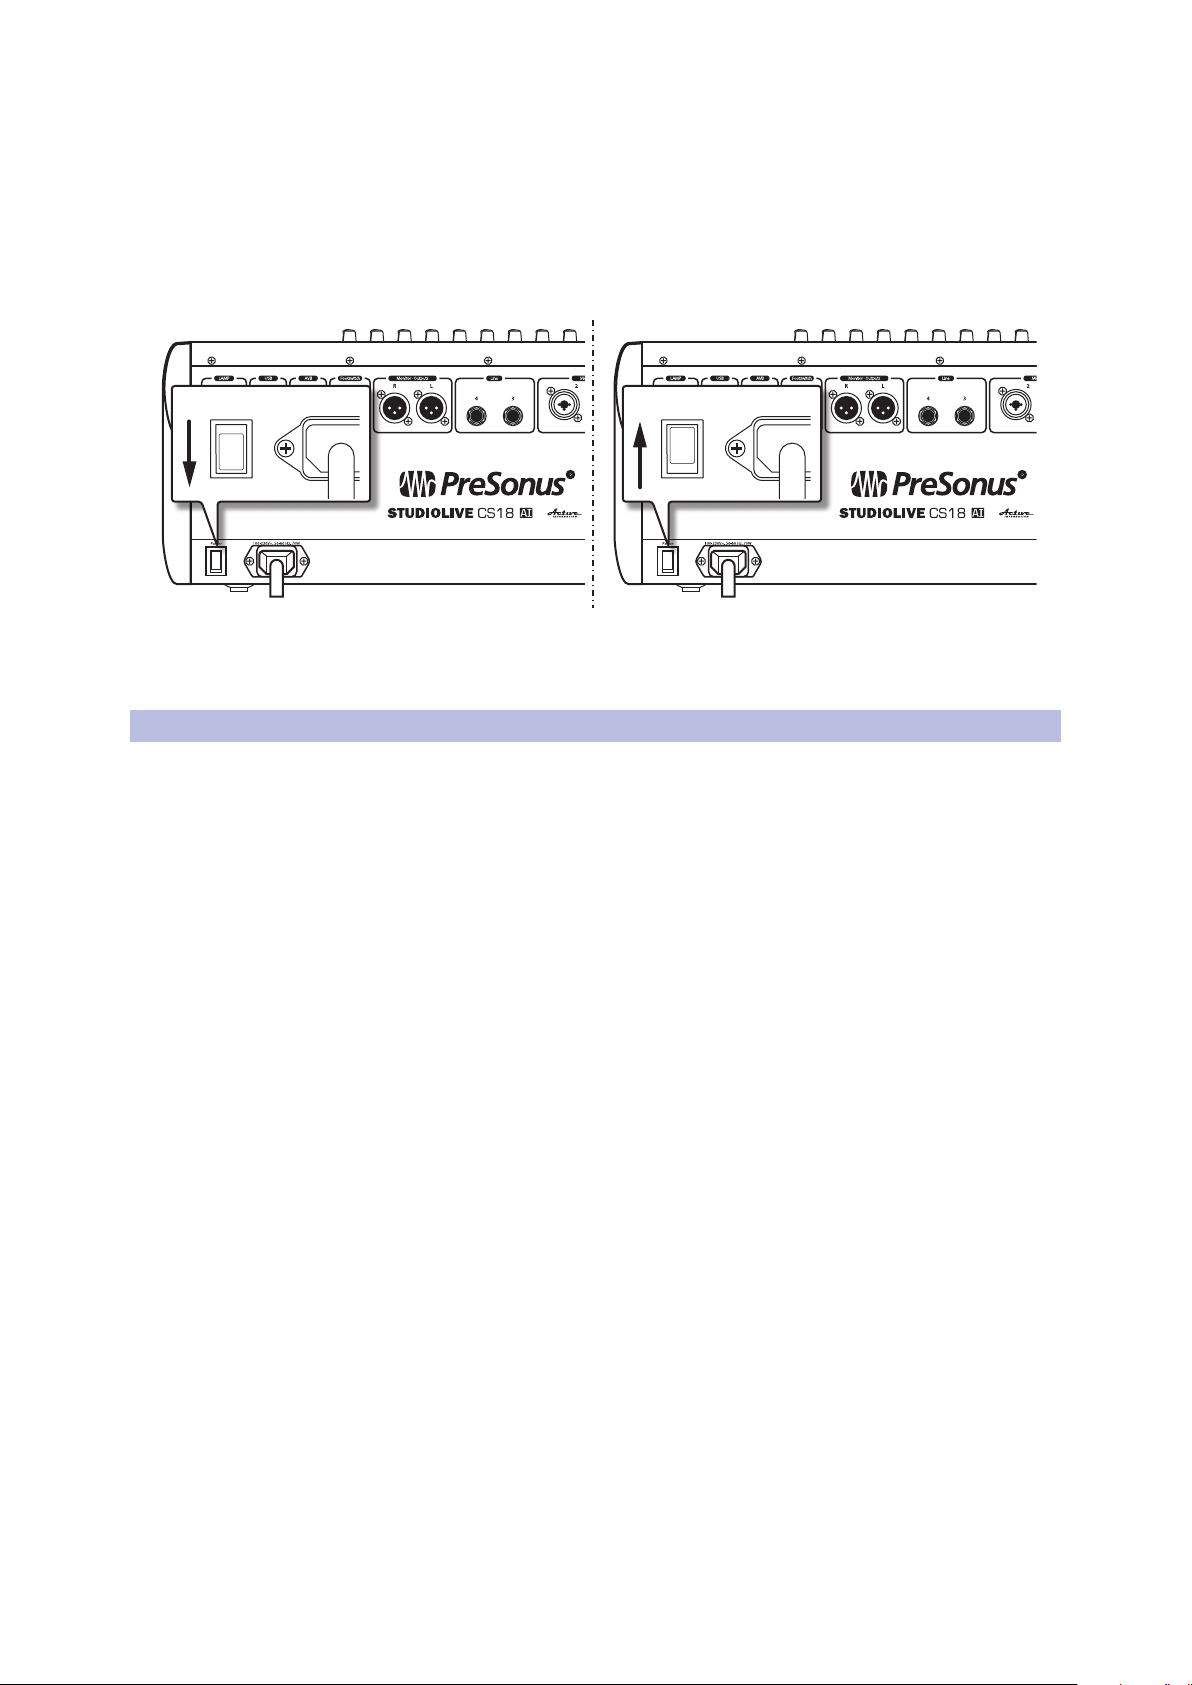
15. Once all 22 meters are illuminated, reboot the
CS18AI and remove the thumb drive.
16. When you restart the CS18AI, go to the Firmware Version page
and verify that the last four digits of the firmware version on your
CS18AI are the same as the firmware files you downloaded.
StudioLive™ CS18AI
Owner’s Manual
2.3 Step 3: Network Your CS18AI
Control and Audio Data Connections
There are two types of data flowing between your CS18AI control surface and your
RM mixer or computer: control and audio. Control connections can be made over
standard Ethernet networks, including WiFi networks. Sending and receiving audio
requires an AVB network. Unlike control, AVB audio cannot be sent wirelessly.
• Control: This is the primary communication between the CS18AI controller
and your StudioLive RM-series mixer or your computer. When connected to
RM-series mixers, the CS18AI controls the mixers’ functions. When connected
to a computer, the CS18AI can control Studio One or Capture software.
• Audio: An AVB network connection enables routing audio to and from
the CS18AI’s audio inputs and outputs with an RM-series mixer. Note that
audio networking between the CS18AI and a computer is not possible.
Power User Tip: Network connections occasionally require troubleshooting,
especially when a lot of wireless networks are in use. Because of this, it is
always a good idea to get your networked devices and CS18AI control surface
happily communicating before the pressure is on and you have a singer
trying to dial in a monitor mix while you’re trying to mic the drum kit.
About AVB Networking
AVB (Audio Video Bridging) is an extension to the Ethernet standard designed
to provide “guaranteed quality of service,” which simply means that audio
samples will reach their destinations on time. AVB has been adopted by
numerous audio companies, and more companies are adding it all the time.
10

2 Getting Started
2.3 Step 3: Network Your CS18AI
AVB networking offers a number of features that make it ideal for audio applications:
• Long, light cable runs. A single lightweight CAT5e or CAT6 cable can
be run up to 100 meters (300 feet). This makes it easy to have audio
I/O located in different rooms (or even different venues in the same
building) and run multichannel audio between them in real time.
• Low, predictable latency. The AVB specification states latency
of no longer than 2 ms sending an audio stream point-topoint over up to seven “hops” (trips through switches or other
devices) at 1x (less than or equal to 48 kHz) sample rates.
• Scalable, with high channel counts. AVB’s bandwidth is sufficient to carry
hundreds of real-time channels using a single Ethernet cable. This offers the
future possibility of expanding your system with additional devices that contain
different kinds of audio I/O, multiple controllers, and other useful functions.
• Integrated clock signal. In a digital audio system with multiple devices,
having a master clock is absolutely critical. The AVB specification defines
such a clock to be accurately distributed to all devices in the system.
• High sample rates. AVB is capable of operating at high
sample rates for high-resolution recording.
Power User Tip: The most important rule to keep in mind when setting
up an AVB network is that the talker (device sending audio) and listener
(device receiving audio) must be connected to an AVB-compatible
switch. Connecting the CS18AI to a standard LAN network will disable its
audio functions, however it can still be used to send control data.
StudioLive™ CS18AI
Owner’s Manual
StudioLive CS18AI Controller System Configurations
You can connect your CS18AI controller as follows:
• Wired directly to an RM-series mixer.
• Wirelessly using the USB WiFi LAN adapter (control only).
• Wired to an AVB (control and audio) network.
• Wired to a standard LAN network (control only).
In the sections that follow, we will describe all of these configurations in detail.
Every time you turn on your StudioLive CS18AI, it will:
1. Look for a wired Ethernet connection and use it if one is found.
2. If no wired connection is found, the CS18AI will check for the
USB Wi-Fi LAN adapter. It is available, the CS18AI will then scan
for the wireless network to which is was last connected.
Note: StudioLive RM-series mixers ad CS18AI support only WPA and WPA2 security.
Please be sure that your router is configured using one of these security protocols.
Power User Tip: WPA and WPA2 are protocols created to make wireless
networks secure. WPA stands for “Wi-Fi Protected Access,” and WPA2 is a
later version that conforms to the IEEE 802.11i networking standard. Most
routers have settings that manage their security protocols; consult the
documentation for your router to learn how to change these settings.
11
2 Getting Started
32313029282726252423222120191817 32313029282726252423222120191817
1 2 3 4 5 6 7 8 9 10 11 12 13 14 15 16
17 18 19 20 21 22 23 24 25 26 27 28 29 30 31 32
Power
1 2 3 4 5 6 7 8 9 10 11 12 13 14 15 16
1 2 3 4 5 6 7 8 9 10 11 12 13 14 15 16
USB
MIC / LINEINPUT
M
IXOUTPUT
32X25 Digital Mix er
32 XMAX Preamps
96k/24bit Audio
Level
-80 +6
Level
-80
RightLeft
R
L
Phones Tape In Mono Out Main Out
STUDIOLIVE RML32
+6
2.3 Step 3: Network Your CS18AI
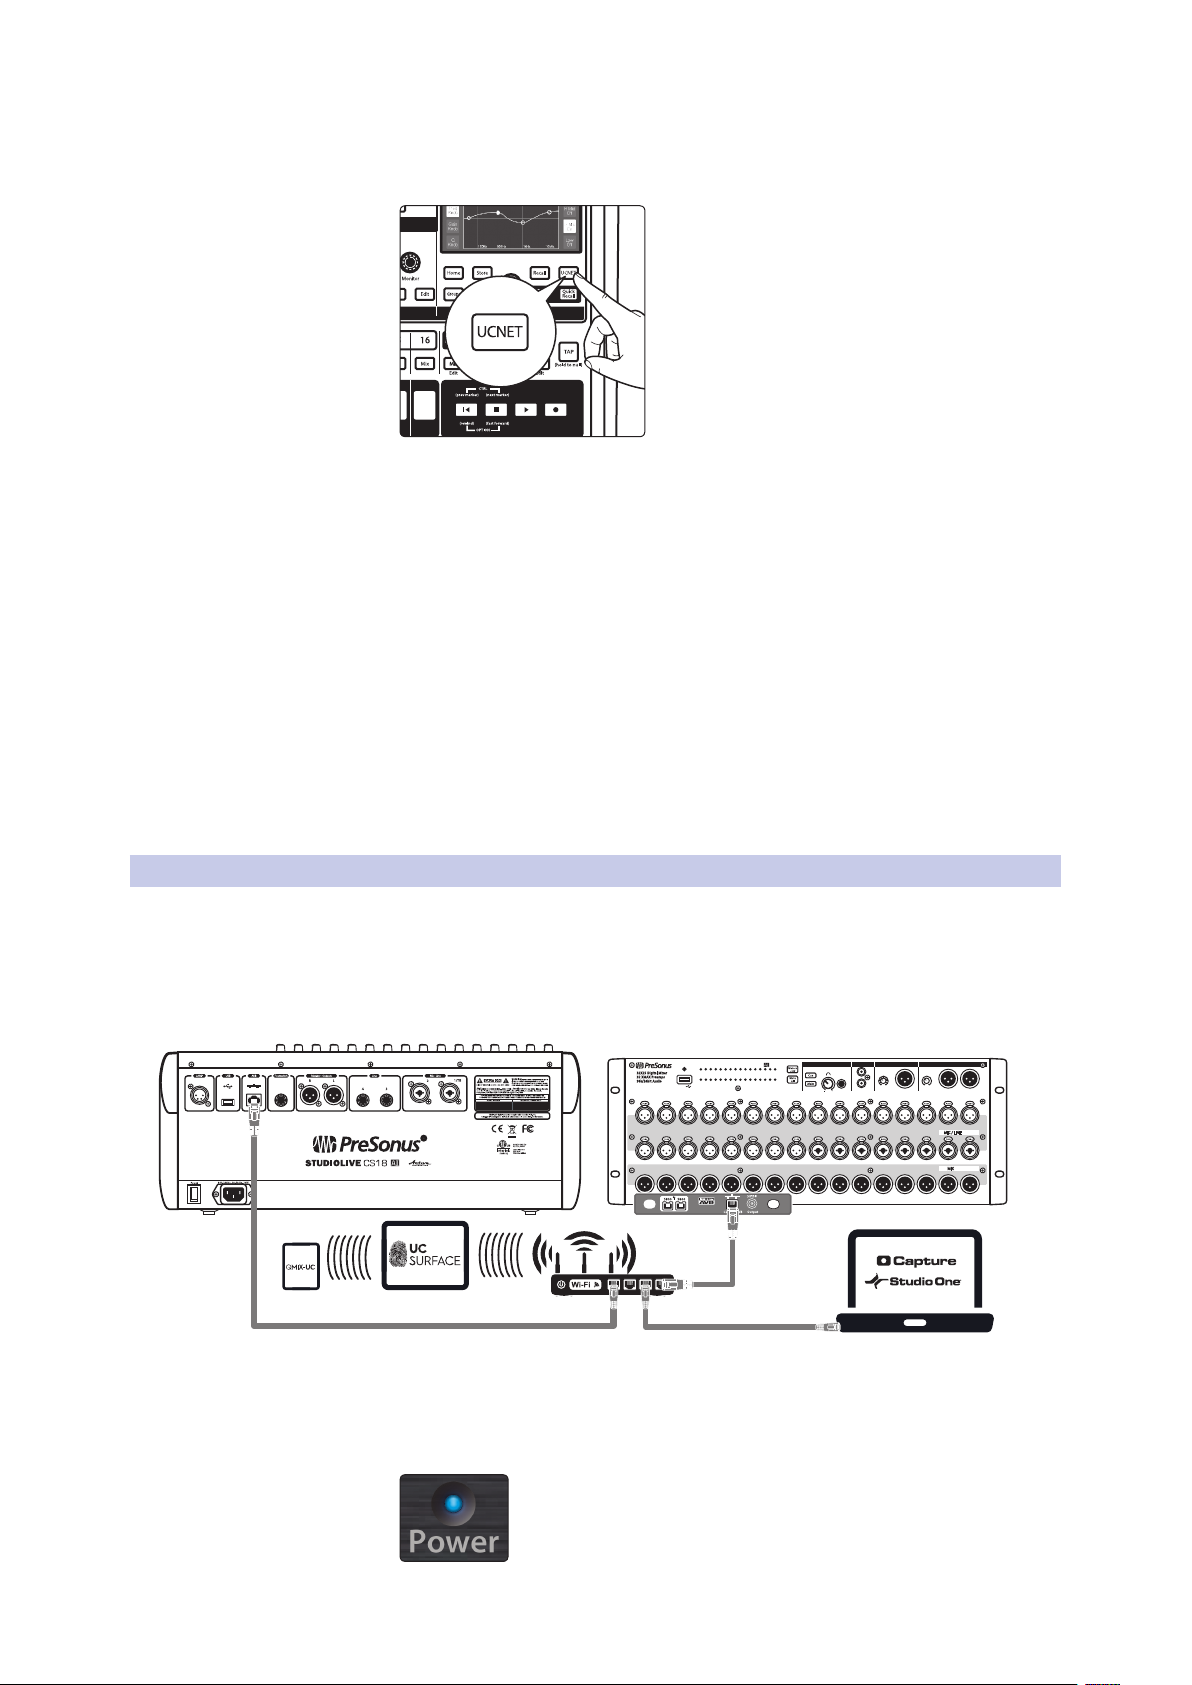
2.3.1 Direct Connection to one StudioLive RM Mixer
Your StudioLive CS18AI can be connected to a single StudioLive RM-series
mixer without the need for a switch or router between the two devices.
To connect directly between an RM-series mixer and a CS18AI, you must first connect
the RM-series mixer to UC Surface and select a self-assigned IP address. Please refer
to the StudioLive Software Library Reference manual for complete instructions.
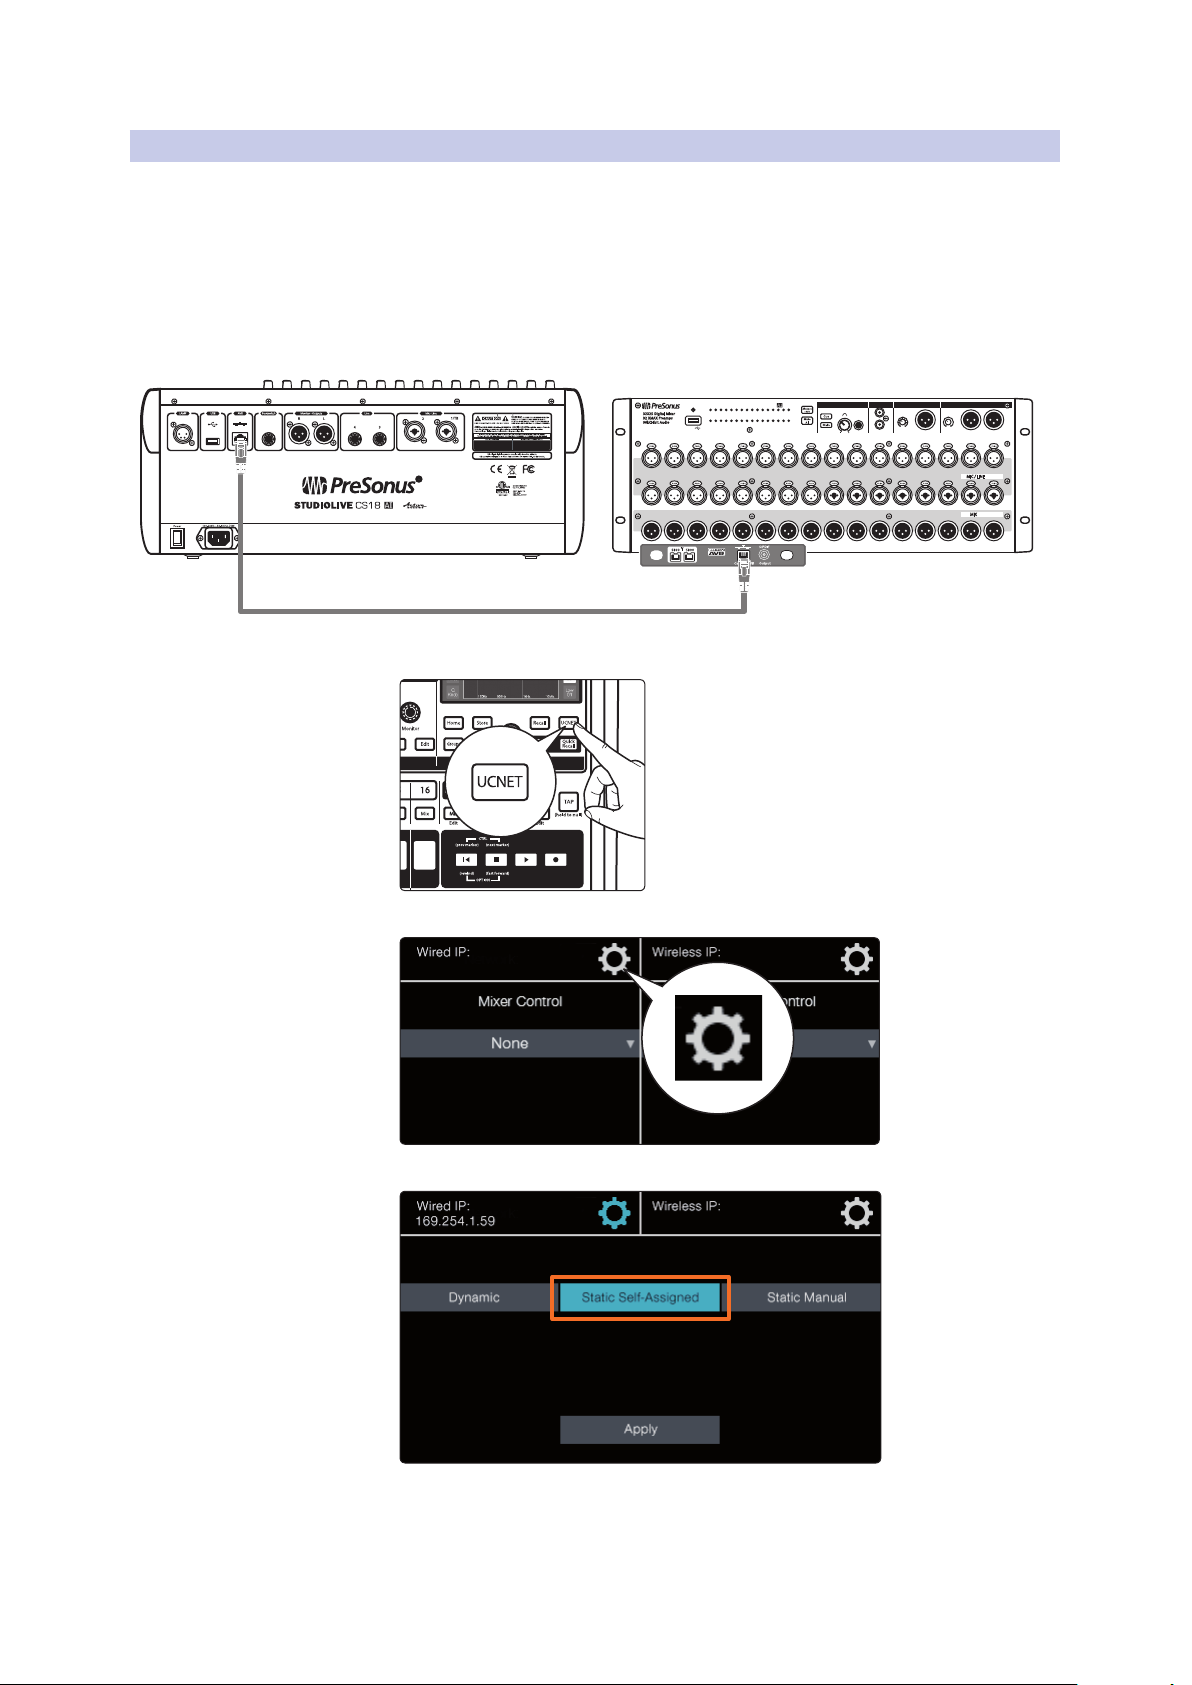
1. Connect a CAT5e or CAT6 cable from the AVB port on the rear panel
of the CS18AI to the Control port on the RM-series mixer.
StudioLive™ CS18AI
Owner’s Manual
2. Press the UCNET button in the Master Control area.
3. On the CS18AI touchscreen, press the Settings button in the Wired IP column.
4. On the CS18AI touchscreen, select the “Static Self-Assigned” tab.
12
2 Getting Started
Ethernet Switch
2.3 Step 3: Network Your CS18AI
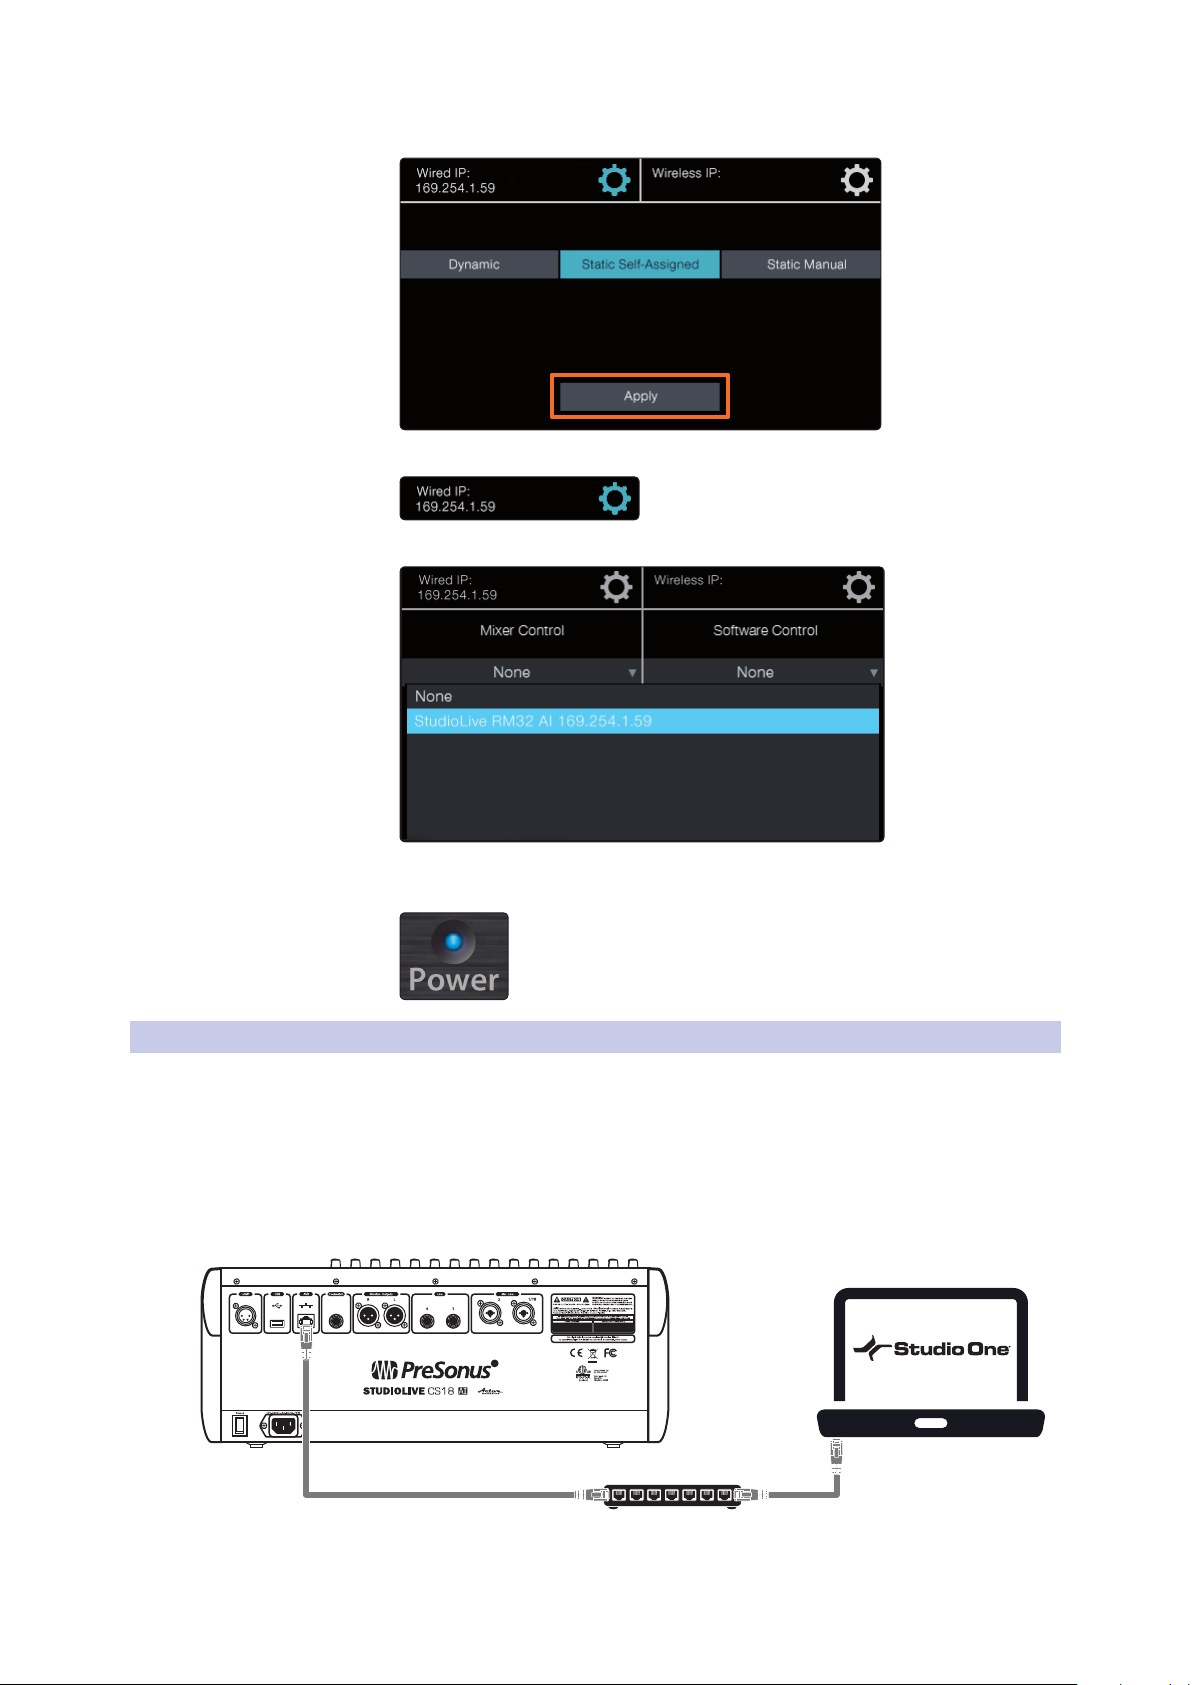
5. Press the “Apply” button.
6. When the IP address is displayed below Wired IP, close the Settings menu.
7. Select your RM-series mixer from the drop-down menu in the Mixer control field.
StudioLive™ CS18AI
Owner’s Manual
8. The power LED on the RM-series mixer will turn blue once
its connected and communicating to the CS18AI.
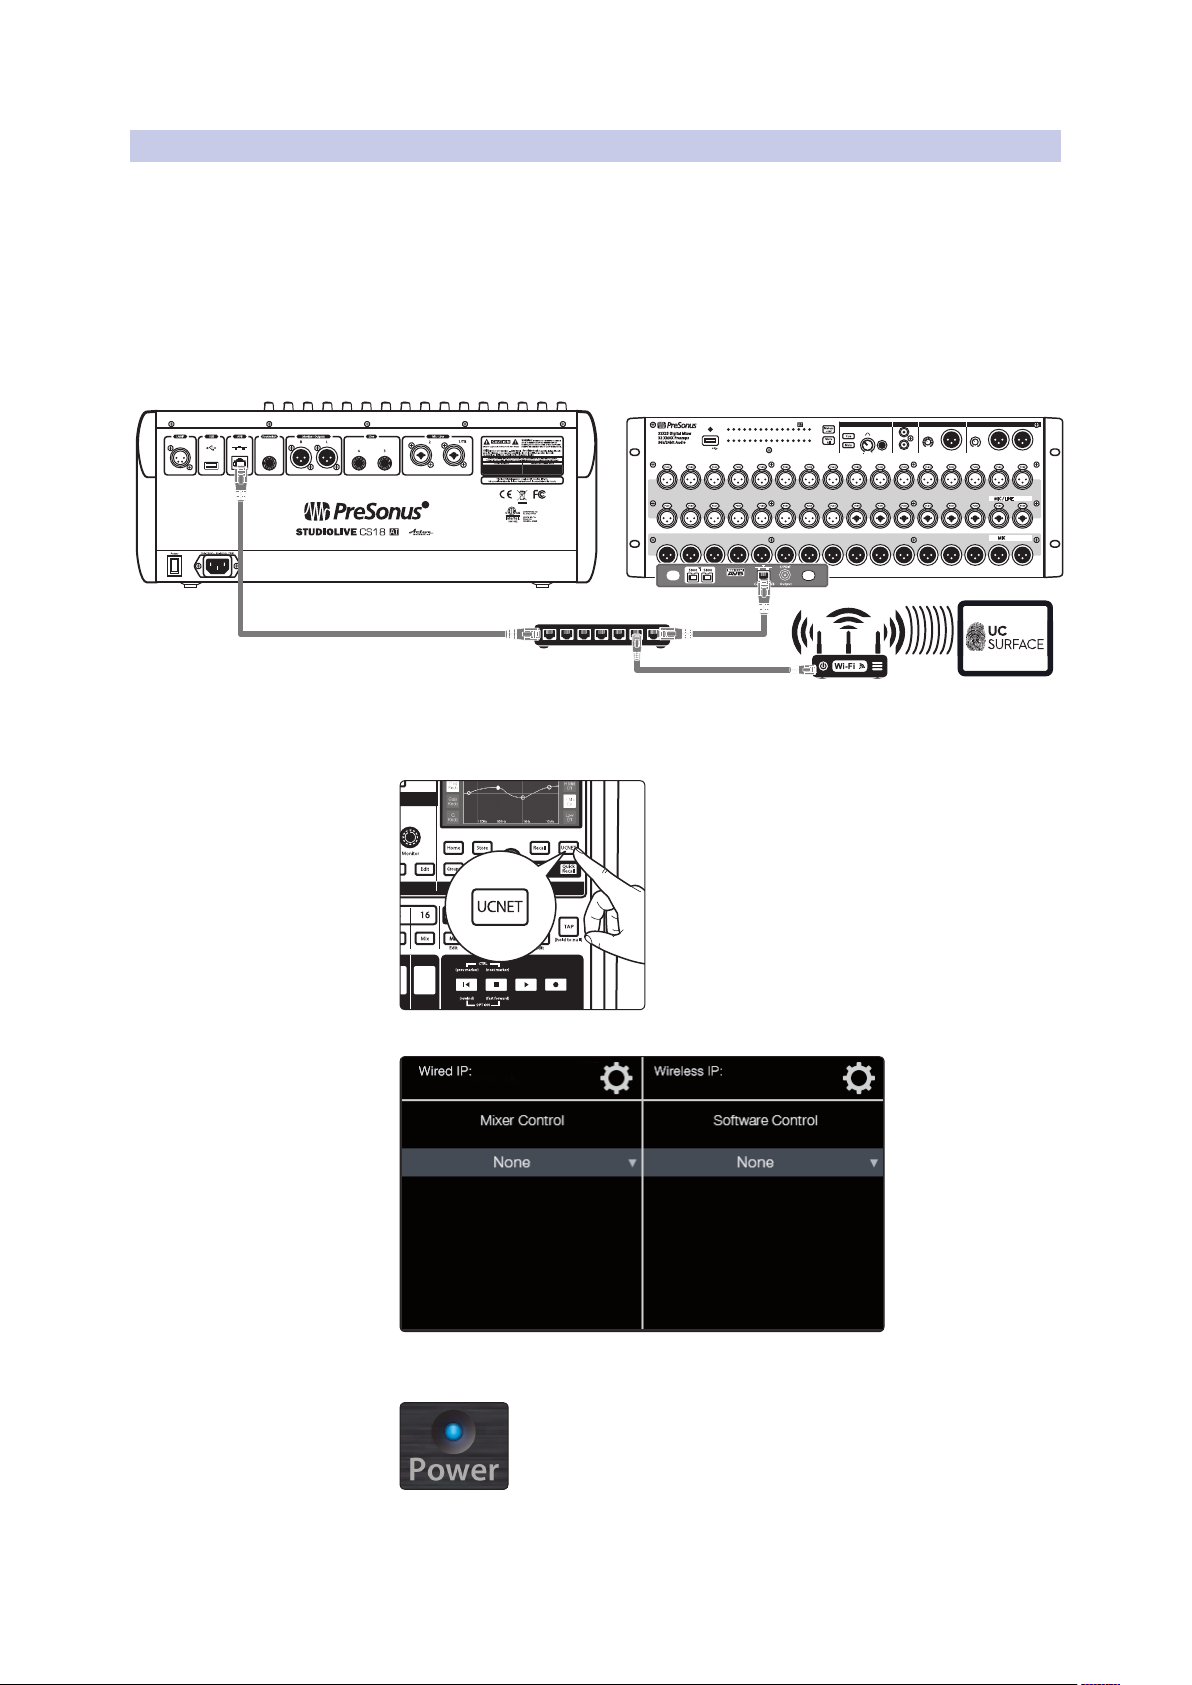
2.3.2 Direct Connection to Studio One
To directly connect your CS18AI to your computer, you will need to use a
crossover Ethernet cable, or to connect both your computer and your CS18AI
to a standard Ethernet switch. This section will describe the latter. This setup
is only recommended if you do not require Internet or extended network
access for your computer to access printers and other network devices.
1. Connect both your CS18AI and your computer to
an Ethernet switch. Power both on.
13

2 Getting Started
2.3 Step 3: Network Your CS18AI
2. Press the UCNET button on the CS18AI.
3. On the CS18AI touchscreen, press the Settings button in the Wired IP column.
StudioLive™ CS18AI
Owner’s Manual
4. On the CS18AI touchscreen, select the “Static Self-Assigned” tab.
5. Press the “Apply” button.
6. When the IP address is displayed below Wired IP, close the Settings menu.
7. Disable WiFi on your computer (if applicable) and make sure your computer
has a self-assigned IP address. If you are unsure of how to verify this,
please check your operating system’s networking documentation.
8. Launch Studio One.
14
2 Getting Started
2.3 Step 3: Network Your CS18AI
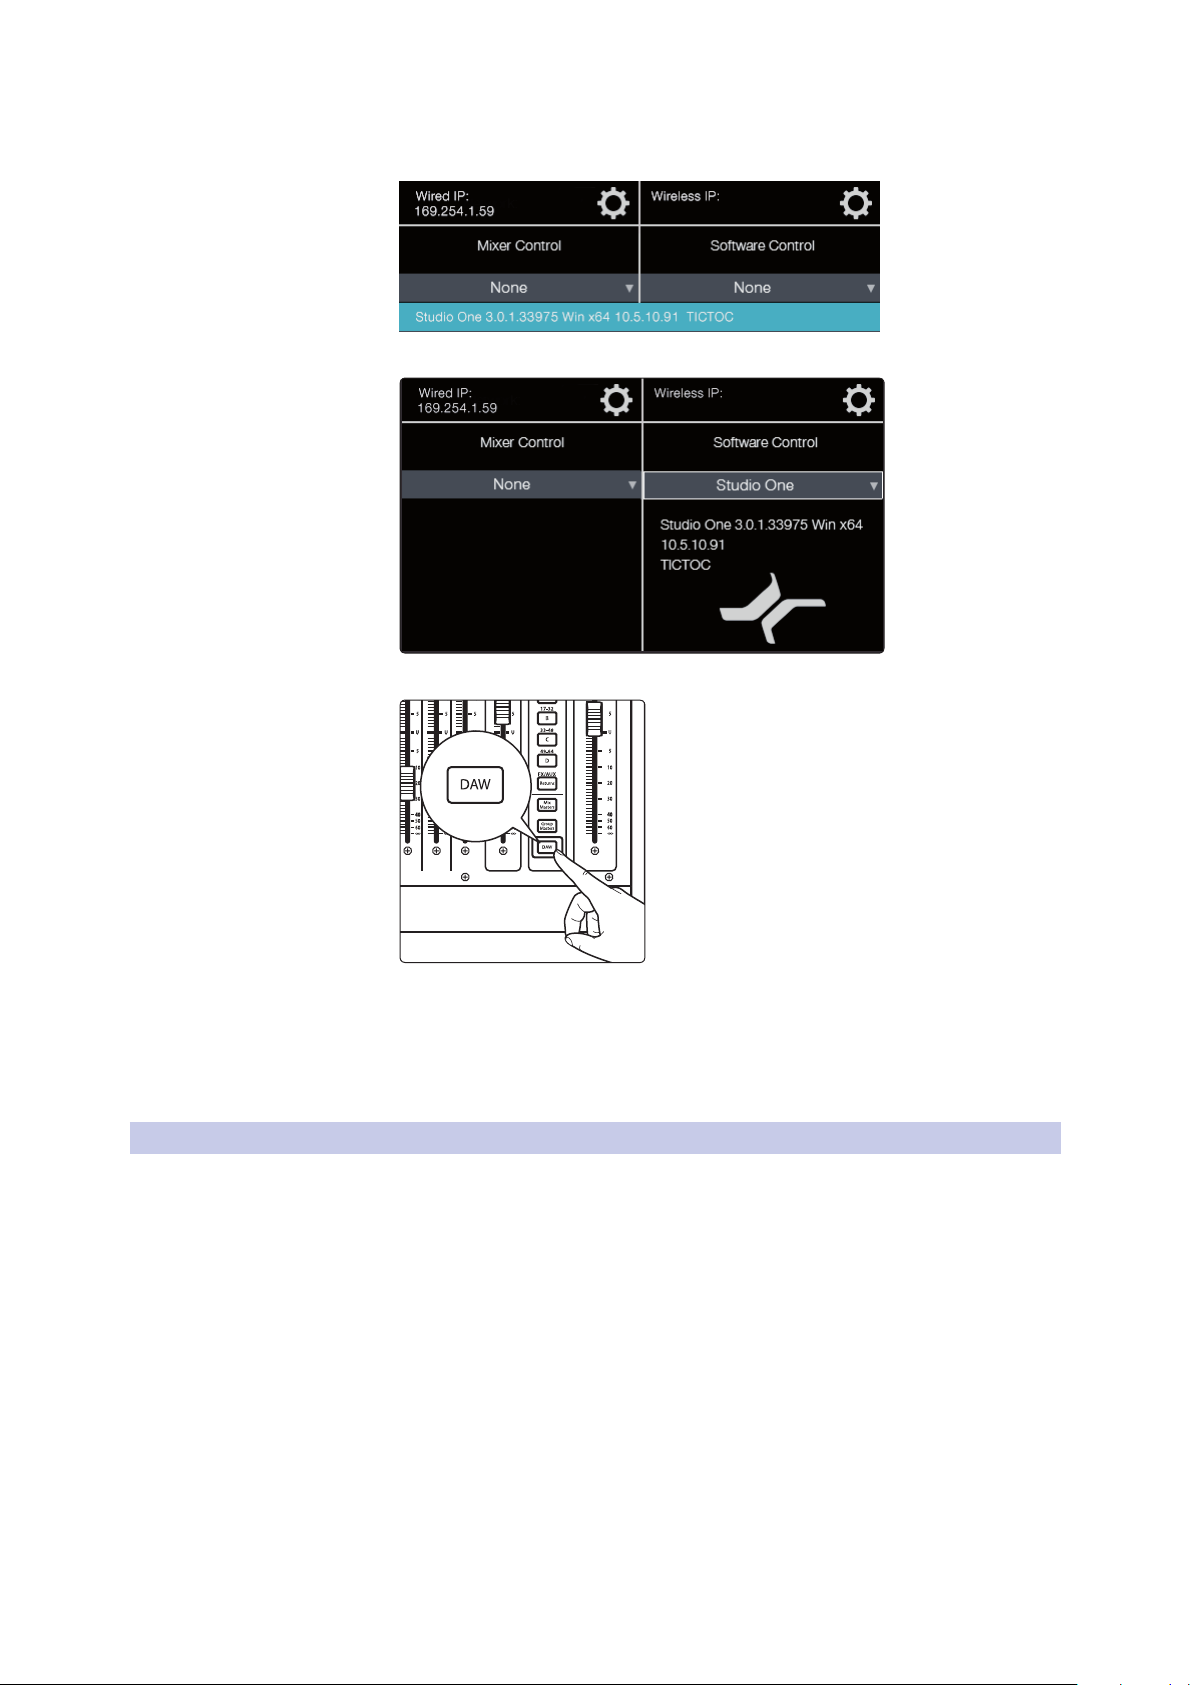
9. On the touchscreen of your CS18AI, you will see your
computer’s IP address and description.
10. Touch to select.
StudioLive™ CS18AI
Owner’s Manual
11. On the CS18AI, press the DAW button.
Your CS18AI is now ready to control Studio One!
Power User Tip: After you have launched Studio One and successfully connected
your CS18AI, you can re-enable WiFi on your computer. However, because WiFi
must be disabled for Studio One to pair to your CS18AI initially, it is recommended
that you use a router if you want to use WiFi functionality on your computer.
2.3.3 Wireless Networking
Your CS18AI can be connected to a standard LAN network wirelessly,
using the PreSonus WF-150 USB Wi-Fi LAN adapter and a standard
wireless router. A wireless connection can only carry control data, which
is useful for controlling Studio One software or any application where
the CS18AI’s onboard audio inputs and outputs are not needed.
Note: The StudioLive CS18AI does not support hot-swapping the Wi-Fi LAN
adapter. The LAN adapter must be connected when you power up your
CS18AI. Once you make the connection, the CS18AI will automatically
see the RM-series mixer and will show it in the UCNET page.
15
2 Getting Started
2.3 Step 3: Network Your CS18AI
To connect a StudioLive CS18AI wirelessly to a network, first
make sure the USB Wi-Fi LAN adapter is inserted in the USB
port on the rear of the CS18AI, then power on the unit.
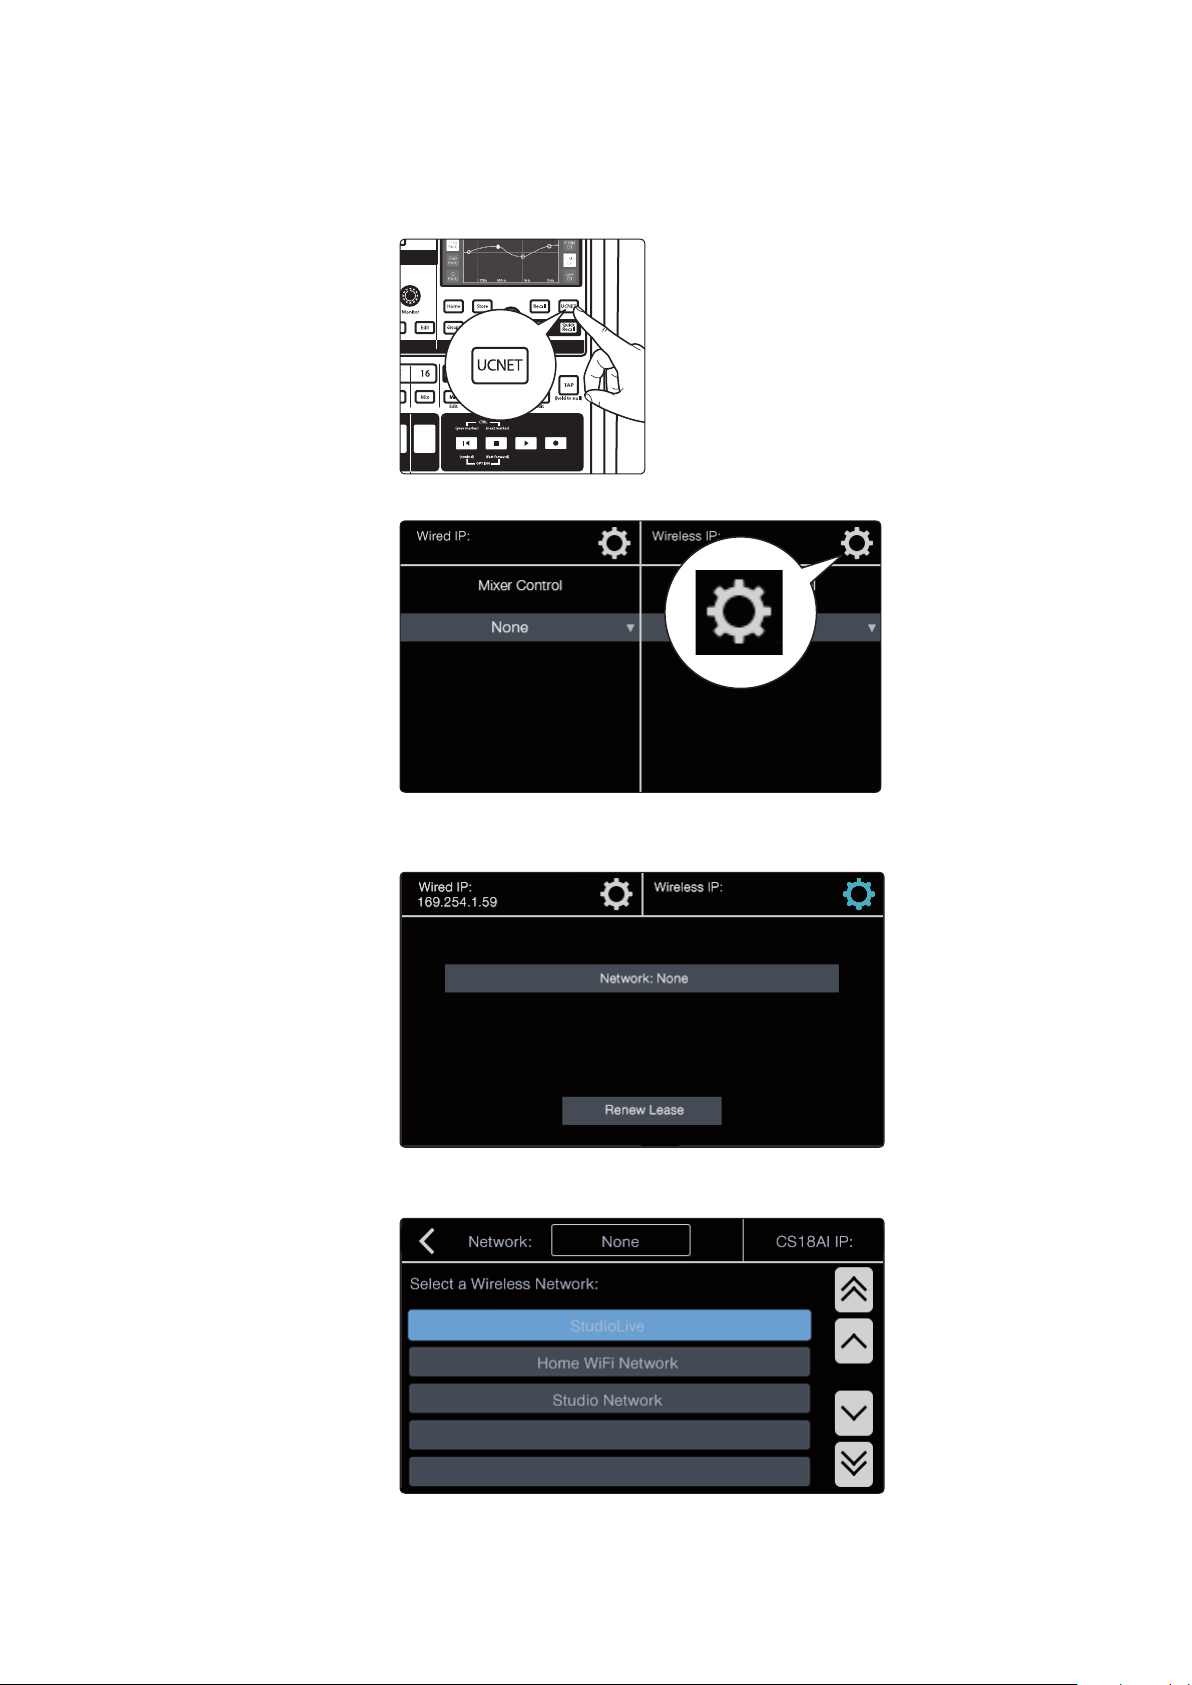
1. Press the UCNET button to open the Network Connection screen.
2. Press the Wireless IP settings button at the top of the touchscreen.
StudioLive™ CS18AI
Owner’s Manual
3. Press the network button in the middle of the screen.
Note: Scanning for networks can take a little time.
4. Press the name of the wireless network you want to use,
from the list of available wireless networks.
5. Type the network password when prompted and press the Enter button.
16
2 Getting Started
32313029282726252423222120191817 32313029282726252423222120191817
1 2 3 4 5 6 7 8 9 10 11 12 13 14 15 16
17 18 19 20 21 22 23 24 25 26 27 28 29 30 31 32
Power
1 2 3 4 5 6 7 8 9 10 11 12 13 14 15 16
1 2 3 4 5 6 7 8 9 10 11 12 13 14 15 16
USB
MIC / LINEINPUT
M
IXOUTPUT
32X25 Digital Mix er
32 XMAX Preamps
96k/24bit Audio
Level
-80 +6
Level
-80
RightLeft
R
L
Phones Tape In Mono Out Main Out
STUDIOLIVE RML32
+6
Wireless Router
iPad running
UC Surface
Android running
QMix-UC
2.3 Step 3: Network Your CS18AI
6. Press the UCNET button; the name of the network you just joined should be
displayed at the top of the screen. If it is not, you did not successfully join the
network and must try again or troubleshoot the network connections.
Your system is now configured to connect to the new wireless network.
Connecting to an RM Mixer
1. Connect your RM-series mixer to the same wireless router network,
either using an Ethernet cable, or the USB WiFi LAN adapter.
2. Press the UCNET button on the CS18AI and select the mixer
from drop-down list in the Mixer Control section.
StudioLive™ CS18AI
Owner’s Manual
Connecting to Studio One
1. Connect your computer to same wireless router network.
2. Launch Studio One
3. Press the UCNET button on the CS18AI and select your computer
4. Press the DAW button on the CS18AI.
2.3.4 LAN Networking
The easiest way to configure your control network is to connect both your RMseries mixer and CS18AI to a wireless router. This allows you to quickly connect
wireless mobile devices for remote control using UC Surface and QMix-UC.
1. Connect your StudioLive CS18AI and your StudioLive
from the drop-down list in the Software Control section.
RM mixer to the same wireless router.
2. Power on the router and then power on both the CS18AI and the RM mixer.
3. The power LED on the RM mixer will turn blue once it is
connected and communicating properly to the CS18AI.
4. Connect your Android and iOS device to the wireless network.
17
2 Getting Started
32313029282726252423222120191817 32313029282726252423222120191817
1 2 3 4 5 6 7 8 9 10 11 12 13 14 15 16
17 18 19 20 21 22 23 24 25 26 27 28 29 30 31 32
Power
1 2 3 4 5 6 7 8 9 10 11 12 13 14 15 16
1 2 3 4 5 6 7 8 9 10 11 12 13 14 15 16
USB
MIC / LINEINPUT
M
IXOUTPUT
32X25 Digital Mi xer
32 XMAX Preamps
96k/24bit Audio
Level
-80 +6
Level
-80
RightLeft
R
L
Phones Tape In Mono Out Main Out
STUDIOLIVE RML32
+6
AI Mixer AVB Card
AVB Switch
Wireless Router iPad running UC Surface
2.3 Step 3: Network Your CS18AI
2.3.5 AVB Networking
When connecting using an AVB switch, you can also connect a wireless router to
the AVB switch for wireless control from UC Surface and QMix-UC. For the most
current list of compatible AVB switches please refer to www.presonus.com.
Note: A standard Ethernet switch allows control of an RM-series mixer
from the CS18AI but routing audio to and from the CS18AI’s audio
inputs and outputs requires an AVB-compatible switch.
1. Connect your StudioLive CS18AI and your StudioLive RM mixer using
an AVB switch, as shown, before powering on your system.
StudioLive™ CS18AI
Owner’s Manual
2. Power on the switch and then power on both the CS18AI and the RM mixer.
3. On the CS18AI, press the UCNET button in the Master Control area.
4. Select the RM-series mixer from the drop-down list in the Mixer Control section.
5. The power LED on the RM mixer will turn blue once it is
connected and communicating properly to the CS18AI.
Note: If you also want wireless control of your RM-series mixer from UC Surface or
QMix-UC software, you’ll need to connect a wireless router to the AVB switch.
18
2 Getting Started
12
3
+ GND–
2.4 Step 4: Connecting the CS18AI Networked Audio
2.4 Step 4: Connecting the CS18AI Networked Audio
The CS18AI is primarily a control surface, but its rear panel includes
a selection of audio inputs and outputs. These are convenient for
providing talkback and for playing source audio from front-ofhouse and from the CS18AI headphone/monitor outputs.
By default, CS18AI audio is routed as follows to a StudioLive
RM mixer, no additional set-up is required:
Mic/Line input 1/TB is assigned as the source for the StudioLive RM mixer Talkback.
It will also be available as the network source for Input 31 of the RM mixer.
Mic/Line input 2 is unassigned by default but will be available
as the network source for Input 32 of the RM mixer.
Line inputs 3 and 4 are assigned as the stereo Digital Return input of the RM mixer.
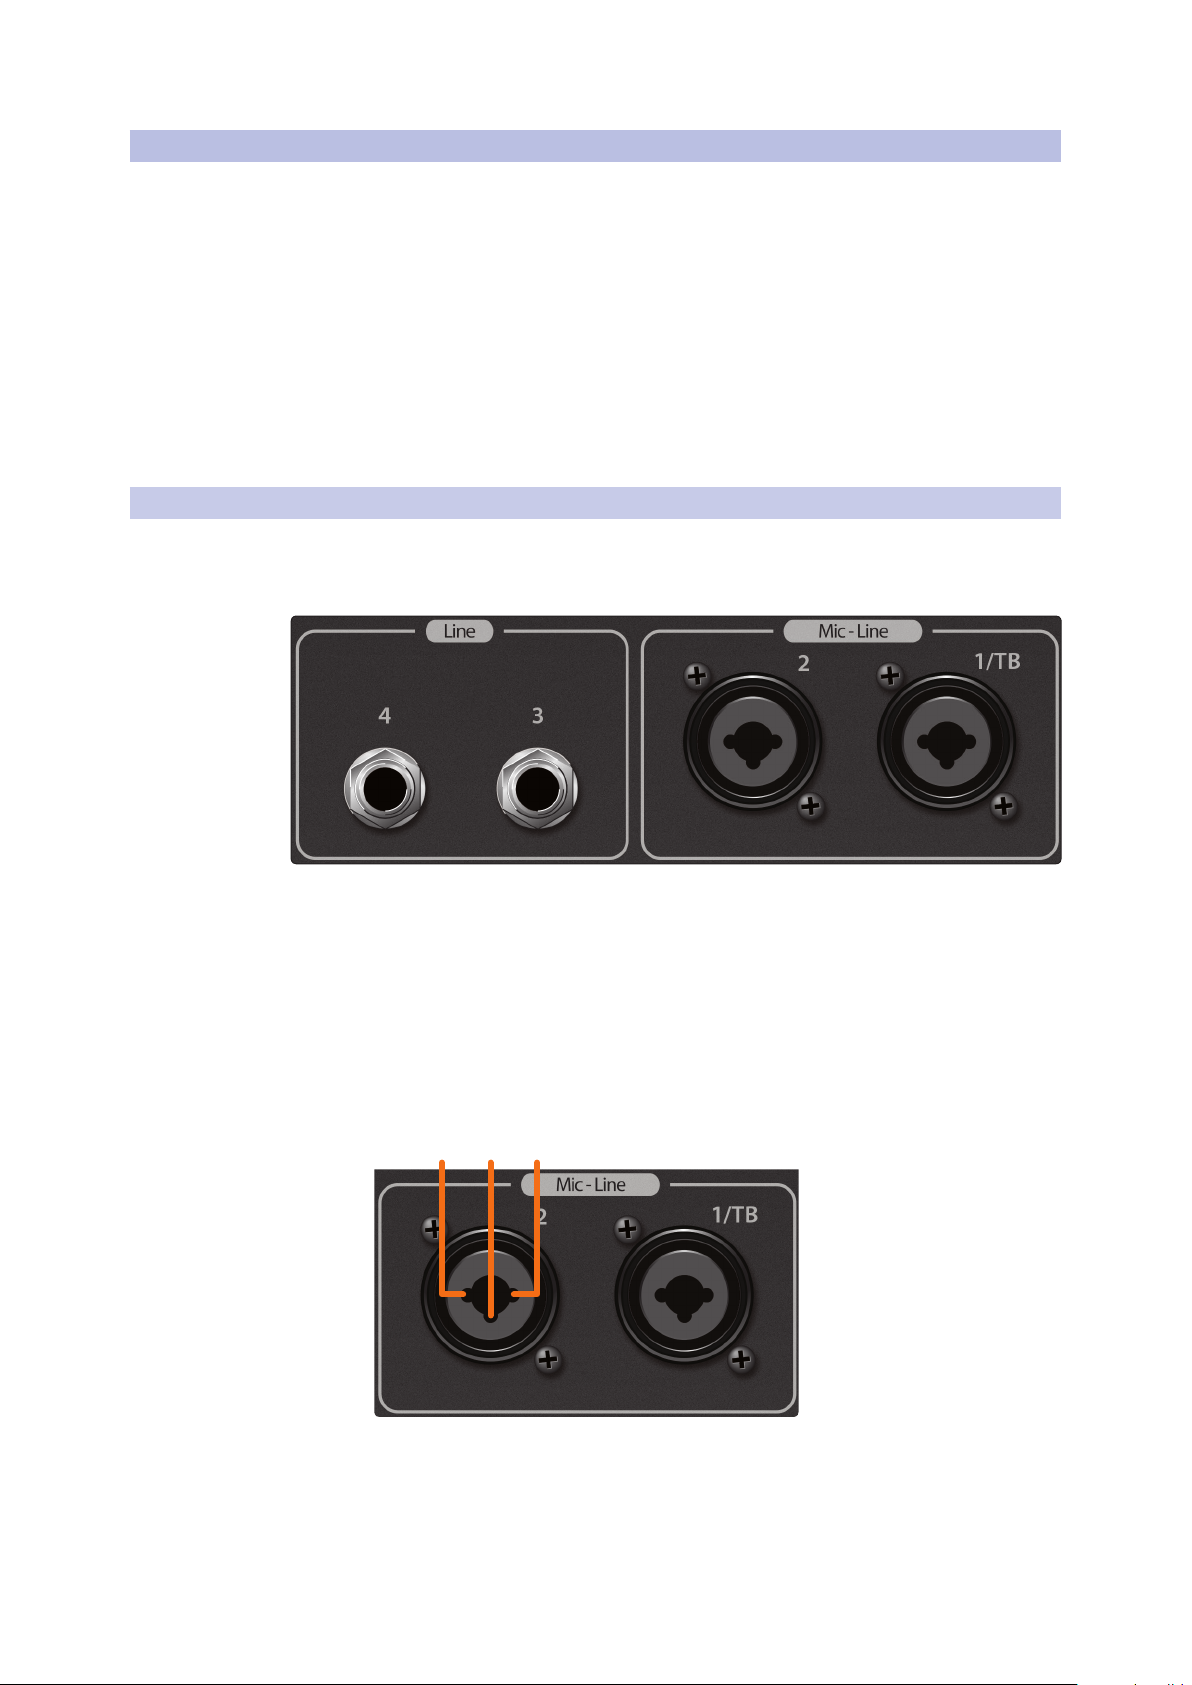
2.4.1 Mic and Line Inputs
The StudioLive CS18AI has two line inputs on TRS jacks and two
combo jack inputs that accept either microphone-level signals on
XLR connectors or line-level signals on ¼-inch TRS jacks.
StudioLive™ CS18AI
Owner’s Manual
The microphone inputs on the CS18AI utilize the same recallable
XMAX preamps as RM-series mixers, ensuring you have highquality audio that’s sonically matched with your mixer.
Connecting Microphones
Your CS18AI control surface is equipped with two recallable PreSonus
XMAX microphone preamplifiers for use with all types of microphones.
The XMAX preamplifier has a Class A input buffer, allowing you
to boost signals without increasing background noise.
The microphone inputs are wired as follows:
Pin 1 = GND; Pin 2 = Signal +; Pin 3 = Signal –
19
2 Getting Started
2.4 Step 4: Connecting the CS18AI Networked Audio
+48V Phantom Power
The +48V phantom power can be individually enabled for each mic input.
Power User Tip: Phantom power is a system for powering condenser
microphones, DI boxes, and other devices by supplying a DC voltage
over a mic cable. The StudioLive CS18AI controller supplies +48V,
which is the most commonly used phantom power voltage.
Note: Always be sure that phantom power is disabled for an
input before plugging or unplugging a microphone.
Connecting Line-Level Sources to the Combo Jacks
Line-level sources can be connected to the combo jacks instead of microphones. The
line inputs bypass the preamps, going directly to the analog-to-digital converters.
Connecting Line-Level Sources to the TRS Jacks
StudioLive™ CS18AI
Owner’s Manual
The CS18AI rear panel includes two TRS Line Input jacks. These jacks provide
additional line inputs for sources from front-of-house, such as 2-track or
computer playback. On a StudioLive RM-series mixer connected to the
CS18AI via AVB, these two inputs show up as digital returns 33 and 34.
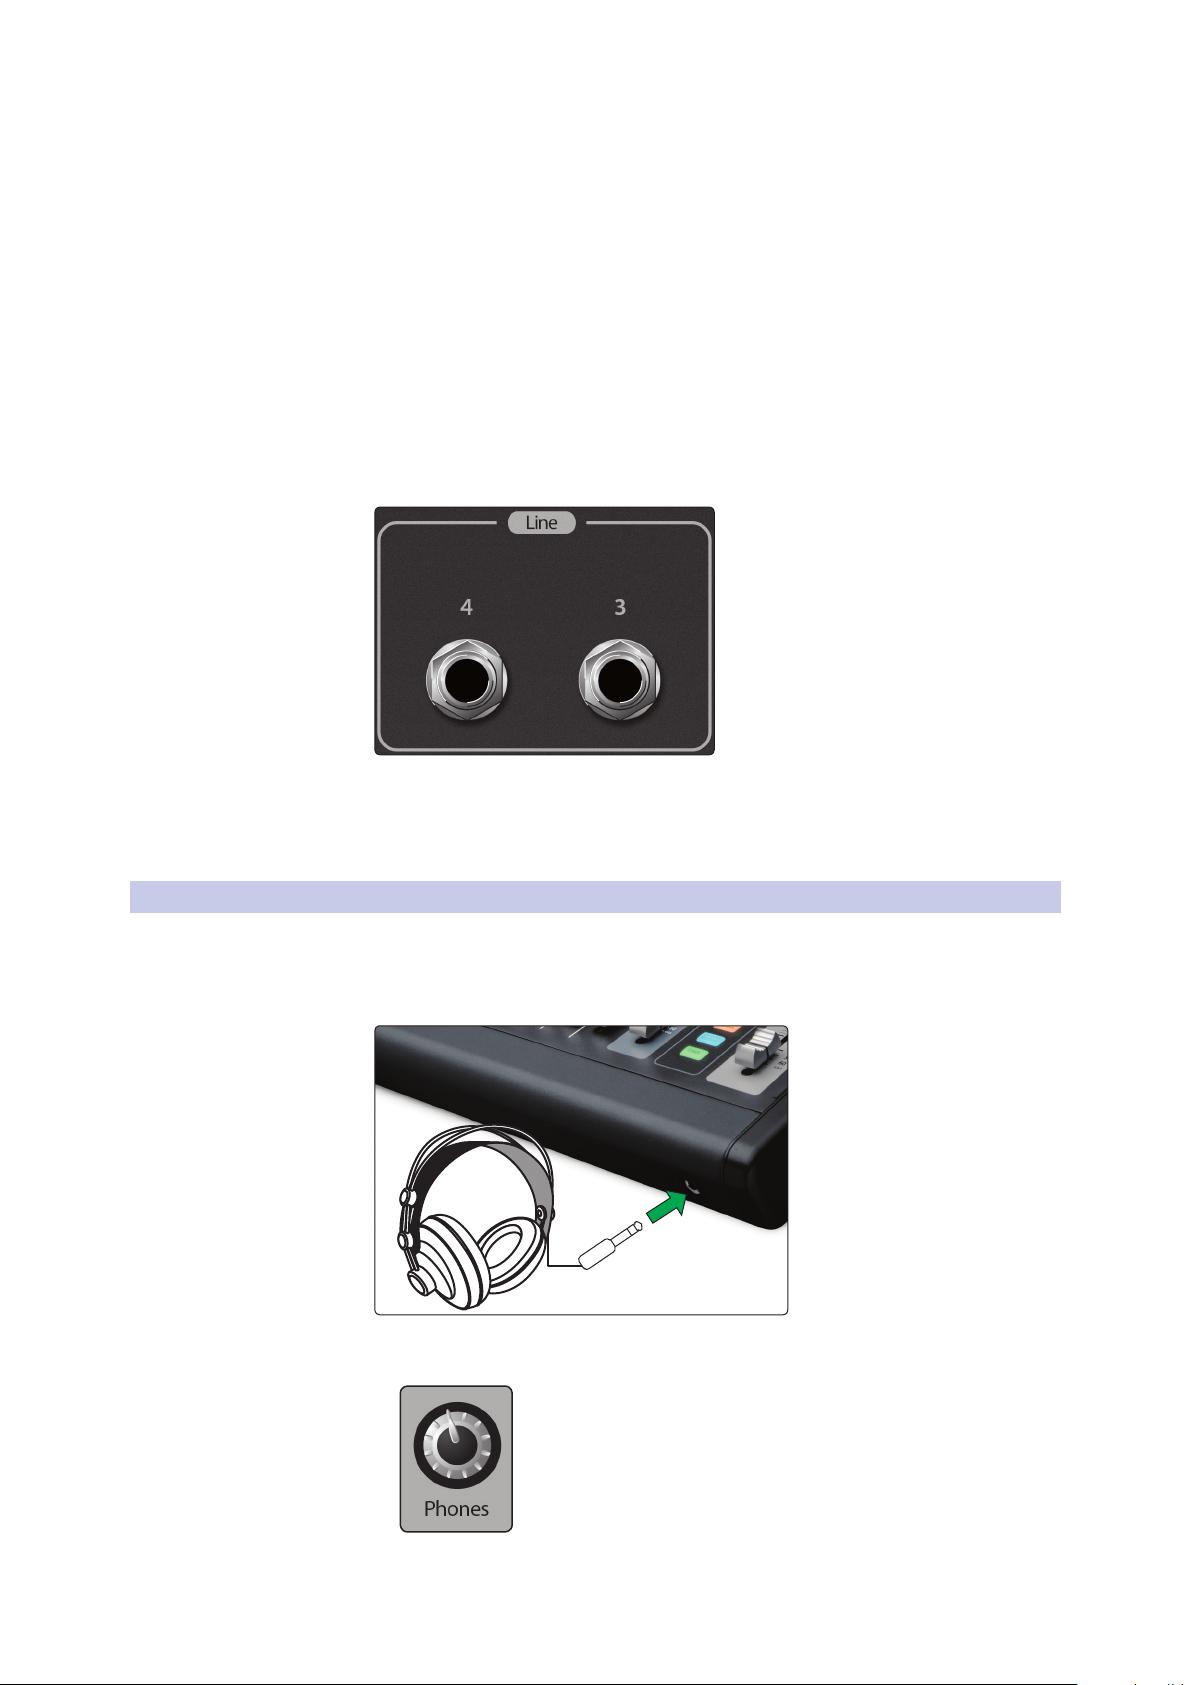
2.4.2 Headphone and Monitor Outputs
Headphone Output
A ¼-inch stereo headphone jack is located on the front right
corner of the CS18AI front panel, just under the armrest.
• To control the level of the Phones output, adjust the Phones
knob in the Monitor area of the CS18AI’s front panel.
20
2 Getting Started
2.4 Step 4: Connecting the CS18AI Networked Audio
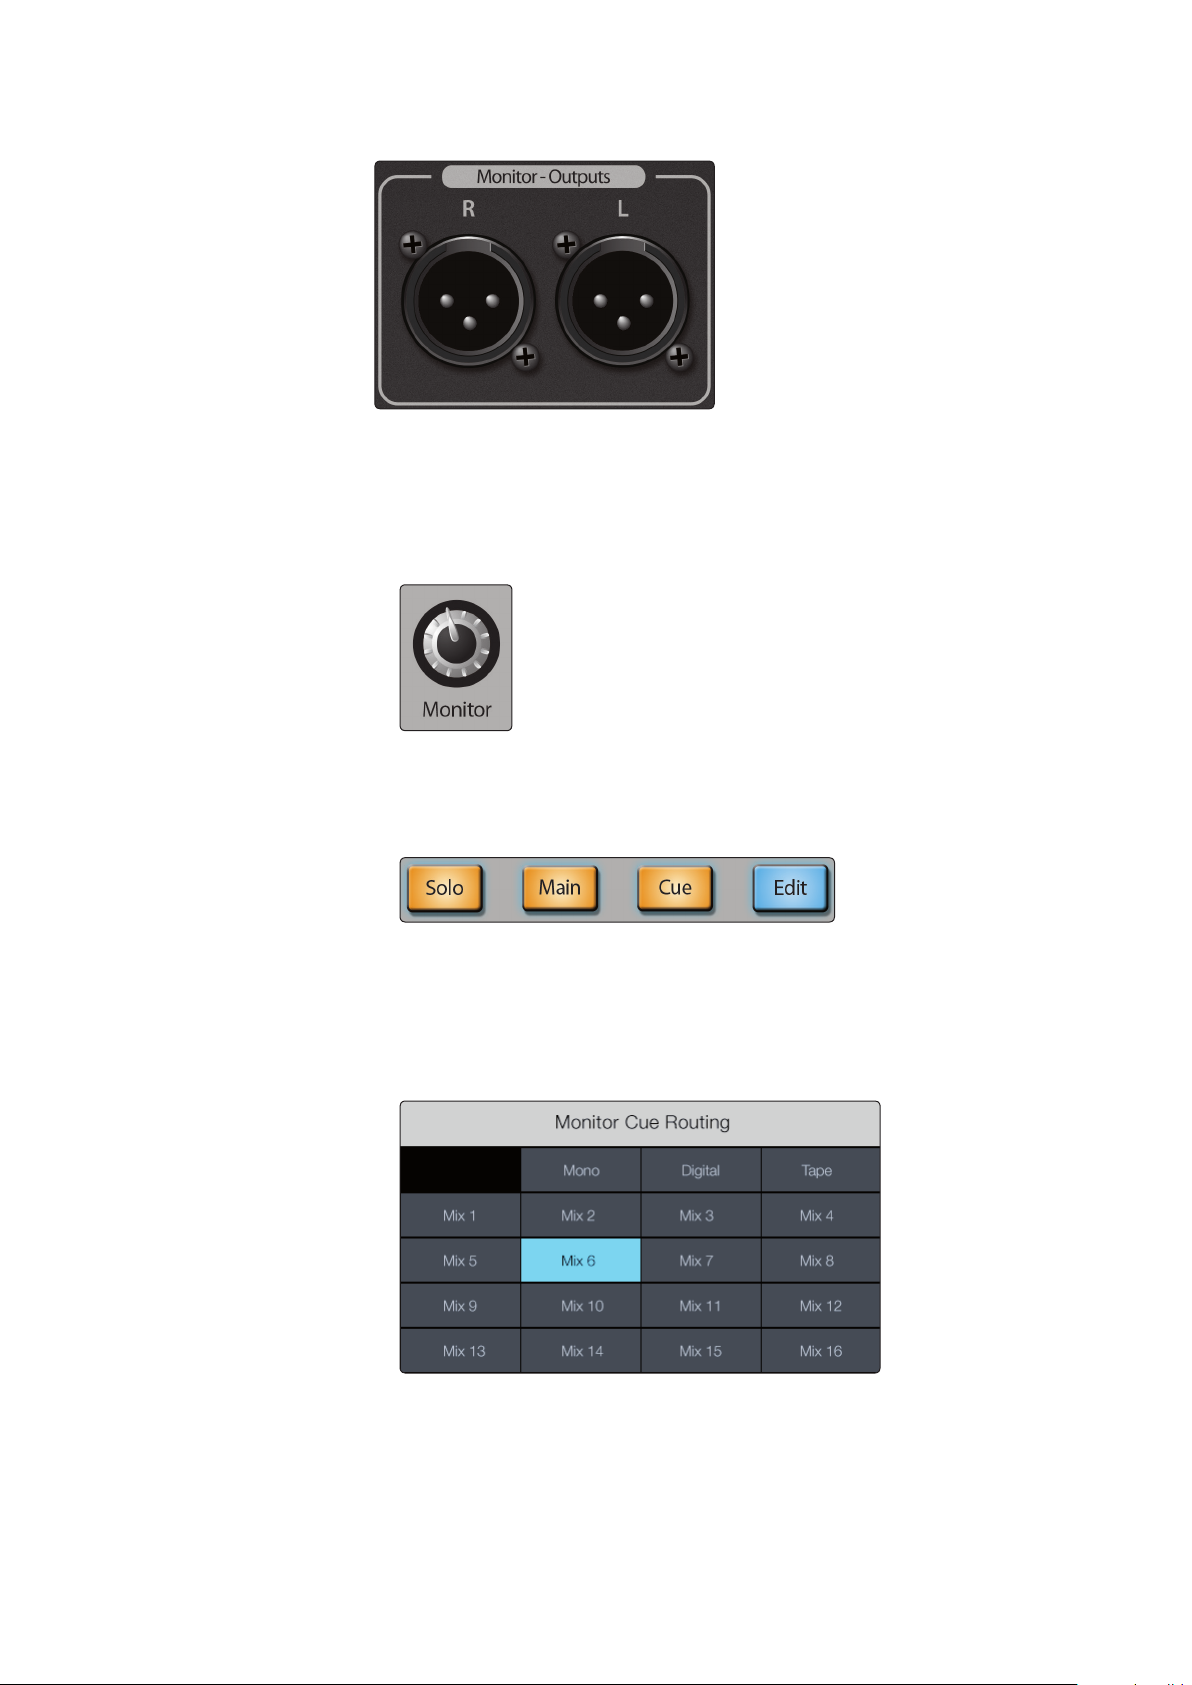
Monitor Outputs
The monitor outputs are balanced XLR-M jacks and are convenient for
control room monitoring when the CS18AI is used to control Studio
One or for monitoring in broadcast applications. The signal routed to
these outputs is the same as what is sent to headphone outputs.
• To control the level of the Monitor outputs, adjust the Monitor
knob in the Monitor area of the CS18AI’s front panel.
StudioLive™ CS18AI
Owner’s Manual
Selecting a Headphone/Monitor Source
The phones jack and monitor outputs on the CS18AI carry the same source.
To select a monitor source:
• Press the Solo button in the Monitor area to select the Solo bus as the source.
• Press the Main button in the Monitor area to select the main mix as the source.
• Press the Cue button in the Monitor area to select the cue source.
To set the cue source:
• Press the Edit button in the Monitor area to open the Monitor Cue Routing page.
• Touch the source you want to monitor.
21
3 Controlling StudioLive RM-series Mixers
3.1 Layers, Filter DCAs, and Mixes
3 Controlling StudioLive RM-series Mixers
3.1 Layers, Filter DCAs, and Mixes
The StudioLive CS18AI is capable of controlling up to 64 StudioLive RMseries mixer channels and provides active access to 16 channels at a time:
Power User Tip: The scribble strips indicate the active channel numbers and names.
Refer to these to know which channels are shown on the CS18AI channel strips.
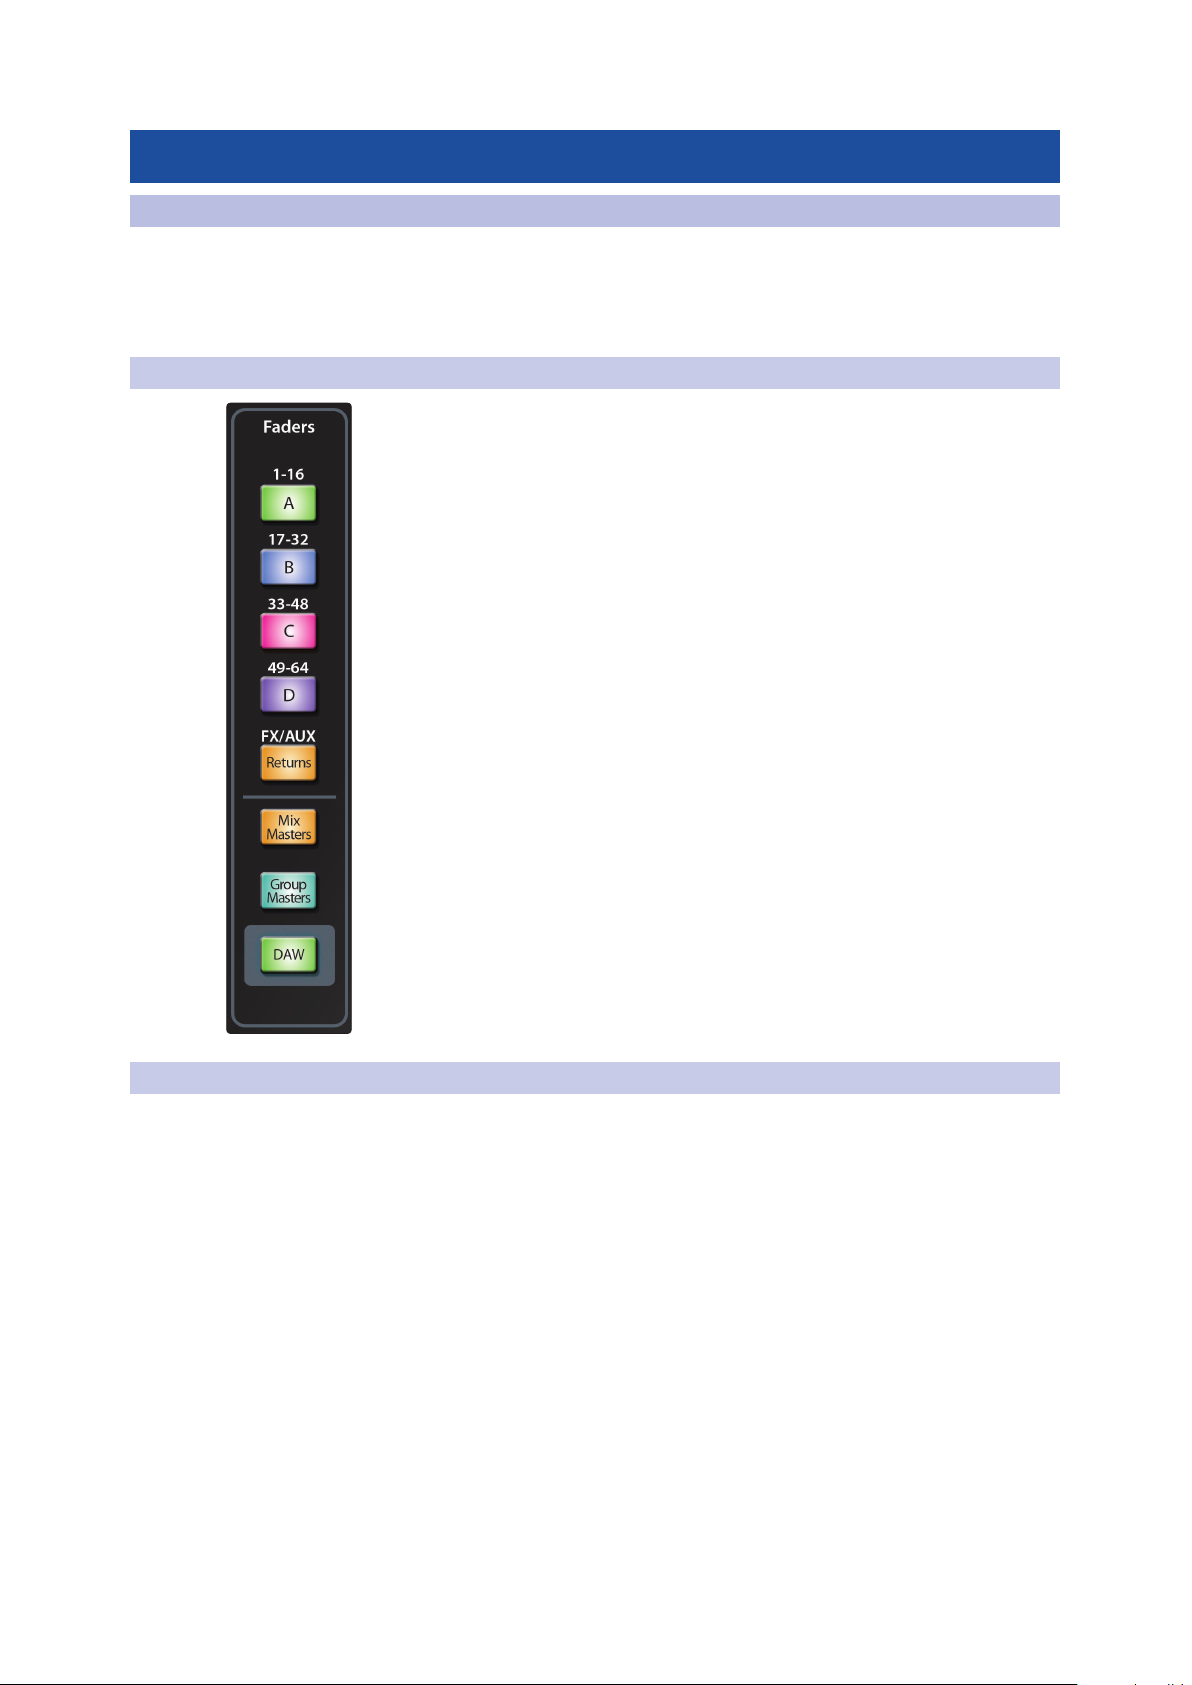
3.1.1 Navigating Layers
The CS18AI has eight layers for accessing all available channels for
control. Using the buttons in the Faders area you can switch between
the channel layers. Once a layer has been selected, it remains active
on the channel strips until you navigate to another layer.
Layer A (1-16). Displays Channels 1-16 on the channel strips.
Layer B (17-32). Displays Channels 17-32 on the channel strips.
Layer C (33-48). Displays Channels 33-48 on the channel strips.
Layer D (49-64). Displays Channels 49-64 on the channel strips.
Returns. Displays the returns from the four stereo effects processors, talkback
source, stereo digital return, and stereo Tape In on the channel strips.
Mix Masters. Displays the master send channels for
the 16 mix buses on the channel strips.
Group Masters. Displays the Filter DCA group masters on your
channel strips. For information on Filter DCA Groups .
DAW. Switches your CS18AI between controlling your RM mixer and controlling
Studio One DAW software.
StudioLive™ CS18AI
Owner’s Manual
3.1.2 Filter DCA Groups
Professional mixing consoles have addressed the problem of managing
complex mixes with population groups that reduce the channels you’re viewing
at one time and DCAs to control the overall level of a group of channels.
We’ve combined the best aspects of these solutions with Filter DCAs. A Filter DCA
can contain any combination of the available input channels and effects returns,
and you can create as many Filter DCA Groups as you need. You can even include
the same channel in multiple Filter DCAs so you can manage your mixes in multiple
ways. Each group is given a master level control, so you can control the overall
level of the group while maintaining each channel’s relative balance in the mix.
In this way, for example, you can create a single fader to control every drum in a
monitor mix and maintain the relative level of the drum mix that you created.
Once selected, a Filter DCA group stays active until exited regardless of which mix is
selected. This allows you to adjust the group independently across different mixes.
You can also flip between groups on the fly to change the view of a selected mix.
22
3 Controlling StudioLive RM-series Mixers
3.1 Layers, Filter DCAs, and Mixes
Here are some of the things Filter DCA Groups can do that make your job easier:
• Channels are automatically grouped based on channel type. Drums,
Vocals, Guitars, and Keyboards are just a few of the factory-supplied
channel types for tagging channels. The act of designating a channel
type for a channel automatically puts the channel into the Filter DCA
group for the chosen channel type. Fast and easy, that’s how we like it.
• Custom grouping is available when needed. It’s easy to create and
name your own group and then add the channels you want.
• Visual filtering of Filter DCA Groups brings the channels in the group
to the surface, while channels you don’t need are filtered out of the
way. Flipping between groups is the fastest and cleanest way of
getting to exactly the channels that need adjustment without having
to navigate multiple layers regardless of what’s in the layer.
• The Filter DCA Group Masters layer provides a custom layer of control
groups. Creating a group with just one channel, such as lead vocals,
is a great way to setup your custom Group Masters layer. Once you’ve
established your groups, you can run your mix from the Group Masters
layer and simply dig into groups to adjust individual channels as needed.
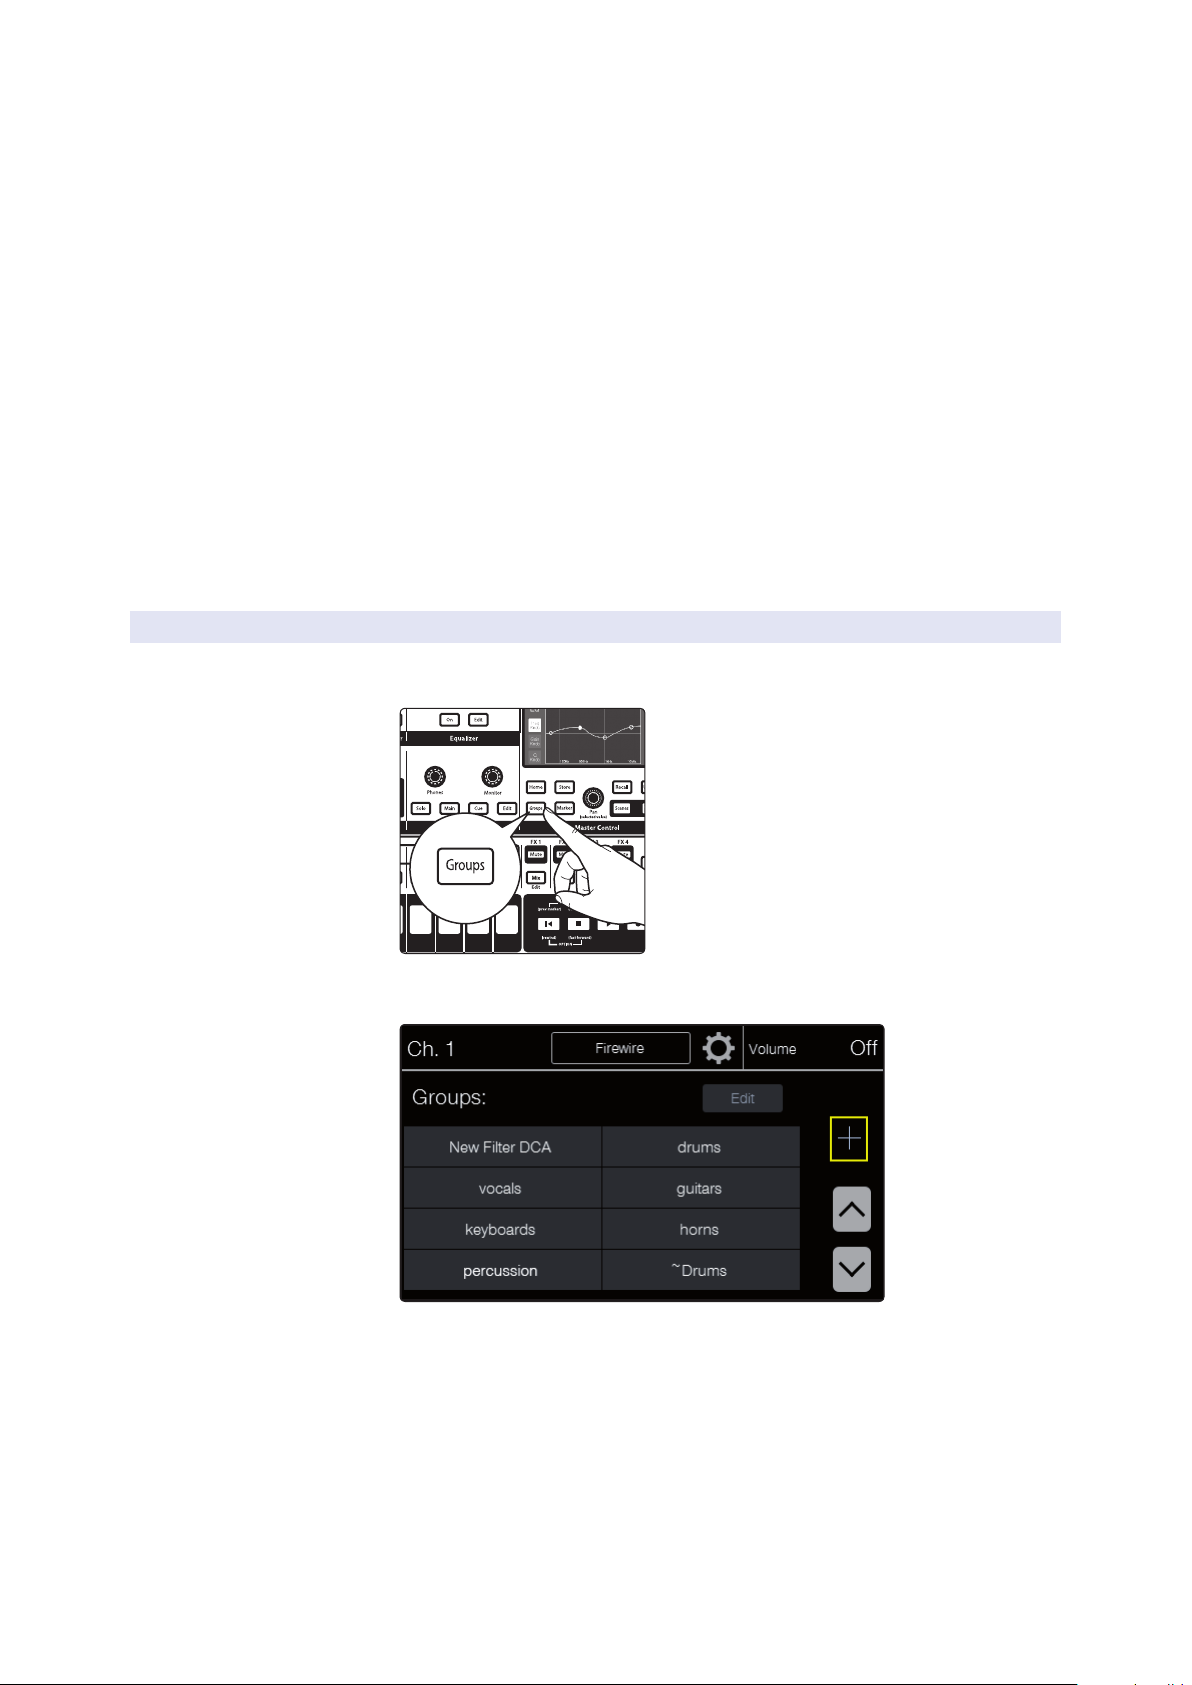
3.1.2.1 Creating a New Filter DCA Group
StudioLive™ CS18AI
Owner’s Manual
1. Press the Groups button in the Master Control
section to open the main Groups screen.
2. Touch the + (plus sign) in the touchscreen to create a new
Filter DCA group to open the Group Edit page.
23
 Loading...