

Presonus Studiolive AR16 USB, Studiolive AR22 USB, Studiolive AR8 USB, Studiolive AR12 USB Owner’s Manual
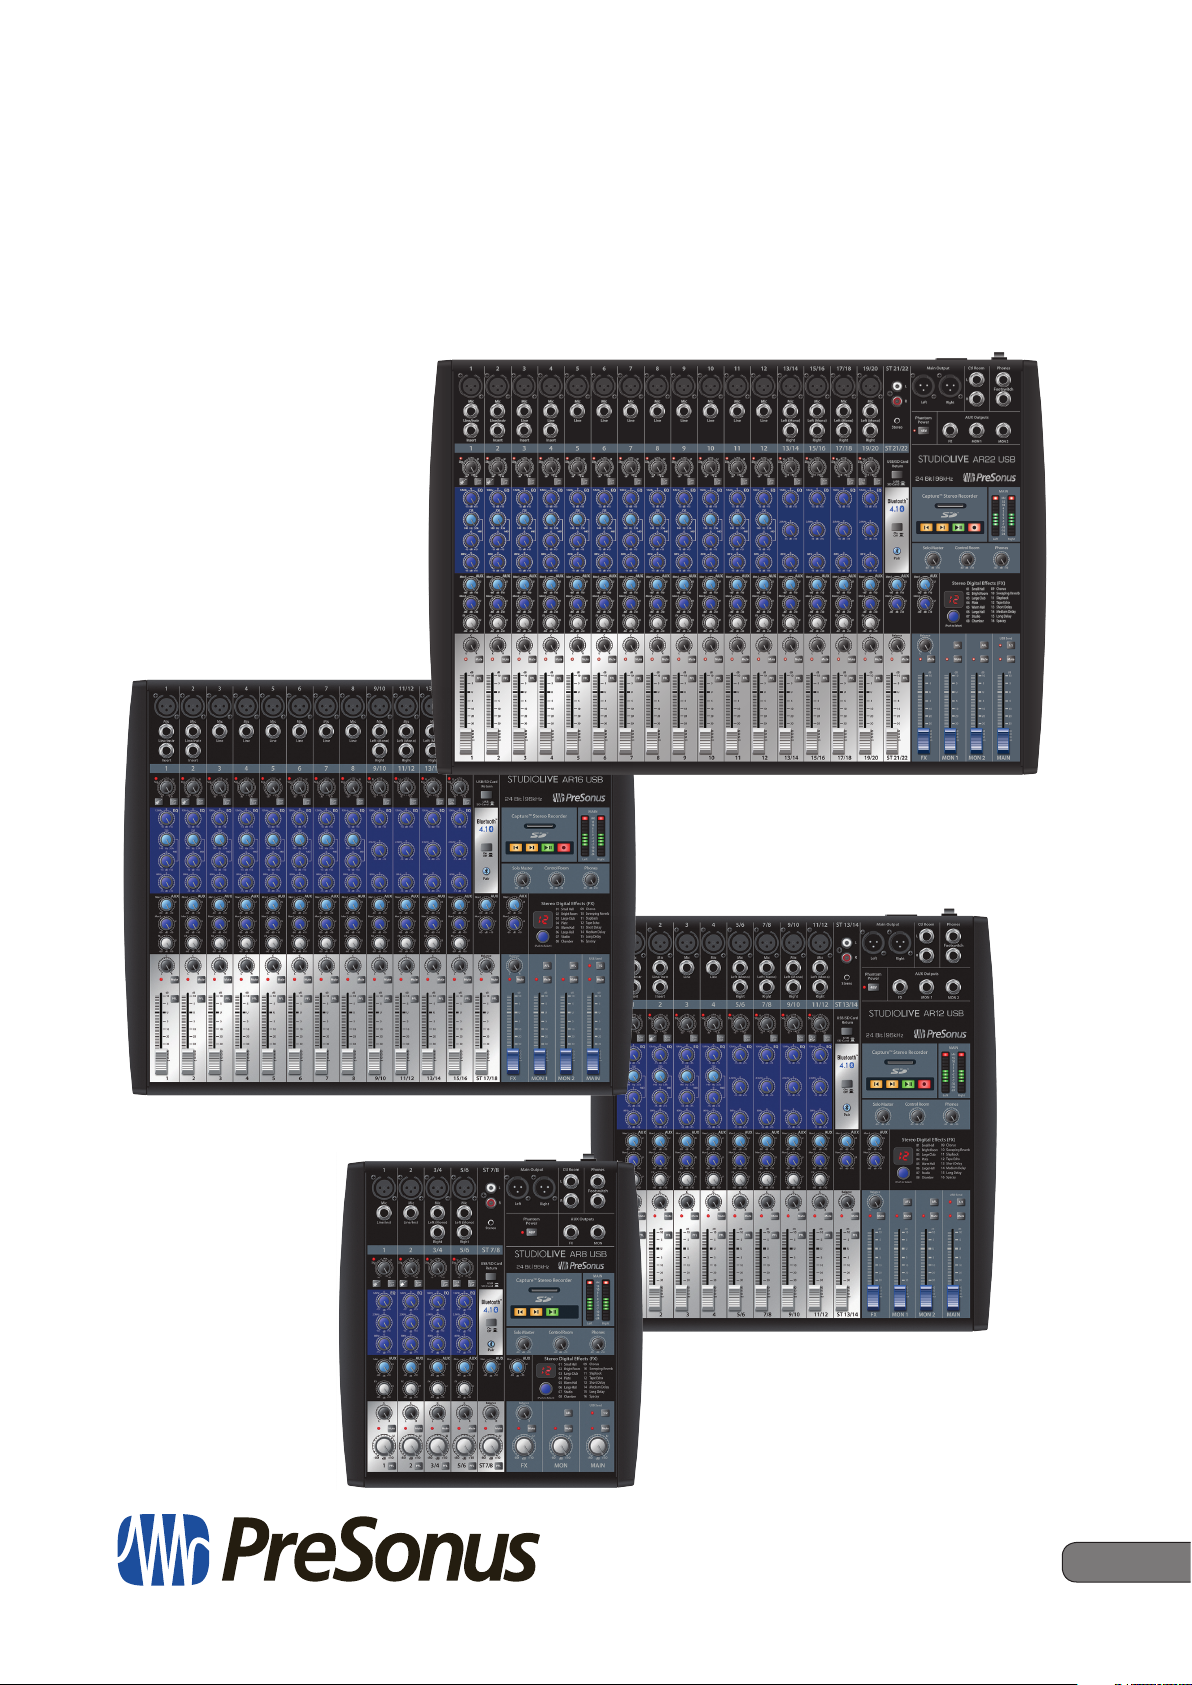
StudioLive™ AR-Series
Hybrid Digital/Analog Production Mixers
Owner’s Manual
®
www.presonus.com
English

Table of Contents
1 Overview — 1
1.1 Introduction — 1
1.2 About This Manual — 1
1.3 Summary of Features — 2
1.3.1 Hardware Features — 2
1.4 What is in the Box — 3
1.5 What is in your My PreSonus Account — 3
2 Getting Started — 4
2.1 Level-Setting Procedure — 4
3 Hookup — 6
3.1 Connections and Controls — 6
3.1.1 Inputs — 6
3.1.2 Outputs — 7
3.1.3 Rear Panel Connections — 8
3.2 Channel Controls — 8
3.2.1 Digital Returns — 9
4 SD Recording and Playback — 18
4.1 SD Recording — 18
4.2 SD Playback — 19
5 Resources — 20
5.1 EQ Frequency Guides — 20
5.2 Block Diagrams — 22
5.2.1 StudioLive AR22, AR16 USB,
and AR12 USB Block Diagram — 22
5.2.2 StudioLive AR8 USB Block Diagram — 24
5.3 Recall Sheets — 26
5.3.1 AR22 USB, AR16 USB and AR12 USB
Recall Sheet — 26
5.3.2 AR8 USB Recall Sheet — 28
5.4 Technical Specifications — 29
6 Troubleshooting
and Warranty — 32
6.1 Troubleshooting — 32
3.3 The Super Channel — 9
3.3.1 Pairing a Bluetooth Device — 10
3.4 Monitor Buses — 10
3.4.1 Monitor Bus Controls — 10
3.4.2 Creating Monitor Mixes — 11
3.5 Internal FX Bus — 12
3.5.1 Effects Presets — 12
3.5.2 Internal FX Bus Return — 13
3.5.3 Creating Internal Effects Mixes — 13
3.5.4 Using an External Effects Processor — 14
3.6 Master Section Controls — 15
3.6.1 Control Room Levels — 15
3.7 Typical Band Setup Diagram — 16
3.8 Typical Home Studio Setup Diagram — 17
6.2 Warranty Information — 33
6.2.1 How Consumer Law Relates
To This Warranty — 33

1 Overview
1.1 Introduction
1 Overview
1.1 Introduction
StudioLive™ AR Series
Owner’s Manual
Thank you for purchasing a PreSonus® StudioLive™ AR-series mixer, the world’s
most advanced hybrid digital/analog production mixer. PreSonus Audio
Electronics has designed the StudioLive AR-series mixers utilizing high-grade
components to ensure optimum performance. Loaded with high-headroom
microphone preamplifiers; a built-in USB 2.0 recording and playback engine;
parametric EQ on every channel; onboard Bluetooth™ playback; integrated
stereo SD recording and playback; a multi-effects processor with a dedicated
mix bus; monitor mixes; extensive LED metering; and more, StudioLive AR
breaks new boundaries for live and studio performance and production. All you
need are a few microphones and cables, speakers, and your instruments, and
you are ready to mix and record in the studio or in front of a live audience!
We encourage you to contact us with questions or comments regarding
this product. PreSonus Audio Electronics is committed to constant
product improvement, and we value your suggestions highly. We believe
the best way to achieve our goal of constant product improvement is by
listening to the real experts: our valued customers. We appreciate the
support you have shown us through the purchase of this product.
For technical support, please see Section 6.1: Troubleshooting.
1.2 About This Manual
We suggest that you use this manual to familiarize yourself with the features,
applications, and connection procedures before using your StudioLive AR-series
mixer. This will help you avoid problems during installation and setup. This manual
covers the hardware functions and features of all three StudioLive AR-series mixers.
When functional differences are called out, the AR22 USB will be mentioned
first, followed by the AR16 USB, then the AR12 USB, and then the AR8 USB.
Information on using your StudioLive AR mixer as an audio interface,
as well as your licenses and installers for Capture™ and Studio One®
Artist, can be found in your My PreSonus user account.
Throughout this manual you will find Power User Tips. These tips provide
mixing tricks, some of which are unique to the StudioLive AR mixers,
as well as explanations of various audio terms. In addition, you will
find an assortment of audio tutorials throughout this manual.
Thank you, once again, for buying our product. We are confident
that you will enjoy your StudioLive AR mixer!
1

1 Overview
1.3 Summary of Features
1.3 Summary of Features
1.3.1 Hardware Features
• 22/18/14/8-channel mixer with 12/8/4/2 mono, 4/4/4/2
stereo, and one super stereo channel
• 16/12/8/4 high-quality microphone preamps with global 48V
• 2 instrument inputs
• 20/16/12/6 balanced line inputs
• 4/2/2 unbalanced inserts (AR22 USB, AR16 USB and AR12 USB)
• 2 (L/R) RCA inputs
• 1/8-inch stereo input
• Highpass filter on every channel
• 3-band semi-parametric EQ
• 22/18/14/8 x 4 USB 2.0 audio interface
• Bluetooth playback
• 2x2 SD recorder
• Internal power supply
• Pan, mute, and PFL soloing on every channel
• XLR Main outputs
• Control Room outputs (stereo TRS, plus headphone)
• 2/2/2/1 Auxiliary monitor buses with TRS outputs and AFL soloing
• Dedicated effects bus with TRS output
• Onboard effects processor with 16 presets
• Stereo effects return
• Footswitch effects bypass
• 19-inch rack-mount kit (optional for AR12 USB and
AR8 USB, AR22 USB is not rack mountable)
• Capture multitrack-recording application included
• Studio One Artist DAW included
StudioLive™ AR Series
Owner’s Manual
2
1 Overview
Front Cover »»»
OverviewGetting Started
StudioLive™ AR-Series
Hybrid Digital/Analog Production Mixers
Quick Start Guide
StudioLive™ serie AR
Consolas híbridas digitales/analógicas para producción
Manual de usuario
StudioLive
™
AR-Series
Hybrider Digital/Analog-Produktionsmixer
Kurzanleitung
StudioLive
™
AR
Mélangeurs de production hybrides
numériques/analogiques
Guide de prise en main
www.presonus.com
English
Français
Español
Deutsch
®
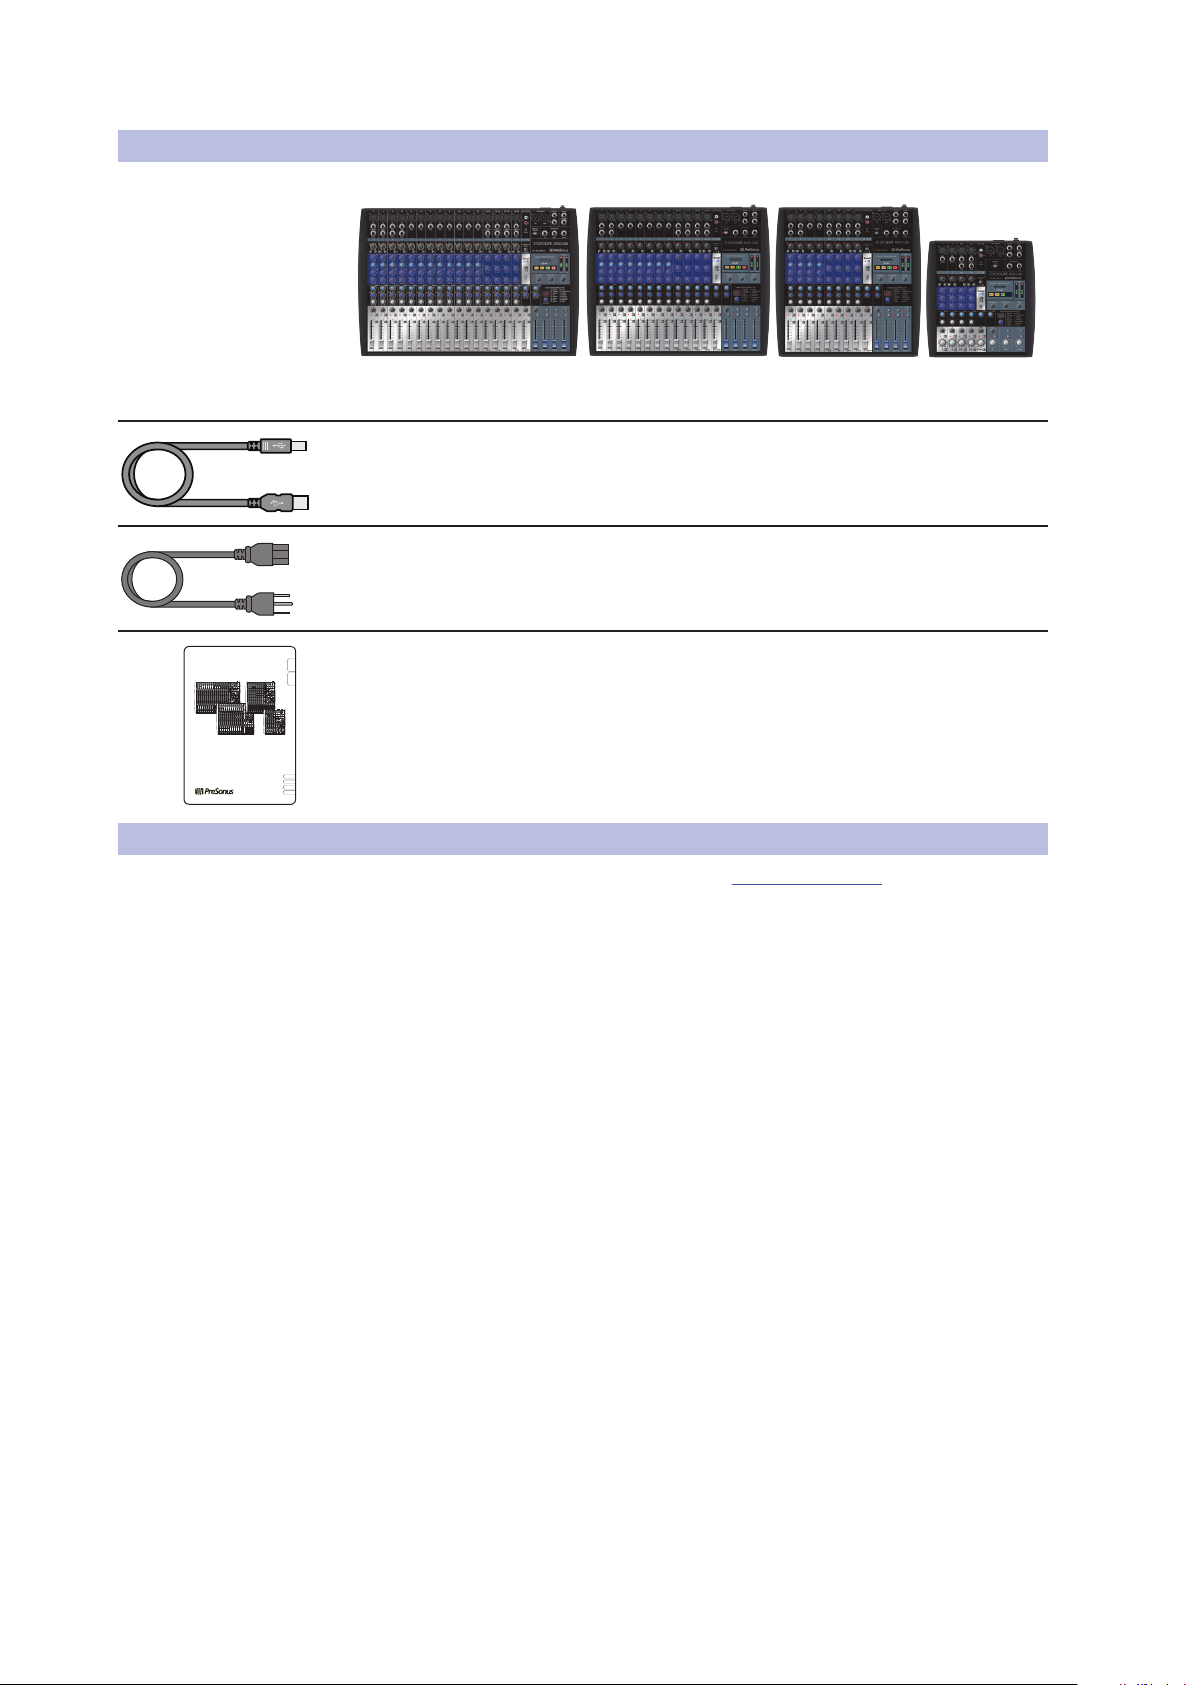
1.4 What is in the Box
1.4 What is in the Box
In addition to this manual, your StudioLive package contains the following:
• PreSonus StudioLive AR22 USB, AR16 USB, AR12 USB, or
• 6-foot (1.8-meter), USB cable
• IEC power cord
StudioLive™ AR Series
Owner’s Manual
AR8 USB hybrid digital/analog performance mixer
• StudioLive AR-Series Quick Start Guide
1.5 What is in your My PreSonus Account
Once you register your StudioLive AR mixer at My.PreSonus.com, you will
find the following software available for download in your user account:
• StudioLive AR-Series Owners Manual
• StudioLive AR-Series Software Reference Manual
• Capture multitrack-recording software
• Studio One Artist DAW software and bundled content
• ASIO drivers for Windows systems (macOS users do not require a driver)
3
2 Getting Started
2.1 Level-Setting Procedure
2 Getting Started
Before you begin, here are a few general rules of thumb:
• Always turn down the Main, Control Room, and Phones
level controls before making connections.
• Before plugging or unplugging a microphone while other channels
are active, mute the channel to which you are connecting.
• Channel levels should be set on or near the “U” mark whenever possible. The
“U” indicates unity gain, meaning the signal is neither boosted nor attenuated.
• Do not allow your inputs to clip. Watch the signal indicators and make sure
the red Clip indication illuminates rarely, if ever. Clipping (overloading)
the inputs can result in digital distortion, which sounds terrible.
Warning: Engaging phantom power or connecting sources without muting the channels
can result in a very loud pop that can potentially damage your sound equipment.
Always mute your channels before engaging Phantom power or connecting sources.
P.A. and studio equipment should be powered on in the following order:
• Sound sources (keyboards, direct boxes, microphones,
etc.) connected to the StudioLive AR inputs
• StudioLive AR mixer
• Computer (if applicable)
• Power amplifiers or powered monitors
When it’s time to power down, your system should be turned off in the reverse
order. Now that you know what not to do, let’s get some audio going!
StudioLive™ AR Series
Owner’s Manual
2.1 Level-Setting Procedure
1. Grab a microphone and a mic cable and plug them into the
Channel 1 mic input.
2. Connect the Main outputs of your StudioLive AR to your power amplifier or
powered monitors.
3. Bring down all the level controls on your StudioLive AR to the lowest setting.
4. Make sure that the Mic/Line knob on Channel 1 is
turned all the way counter-clockwise.
5. Plug your StudioLive AR-series mixer into a power outlet and turn it on.
4
2 Getting Started
2.1 Level-Setting Procedure
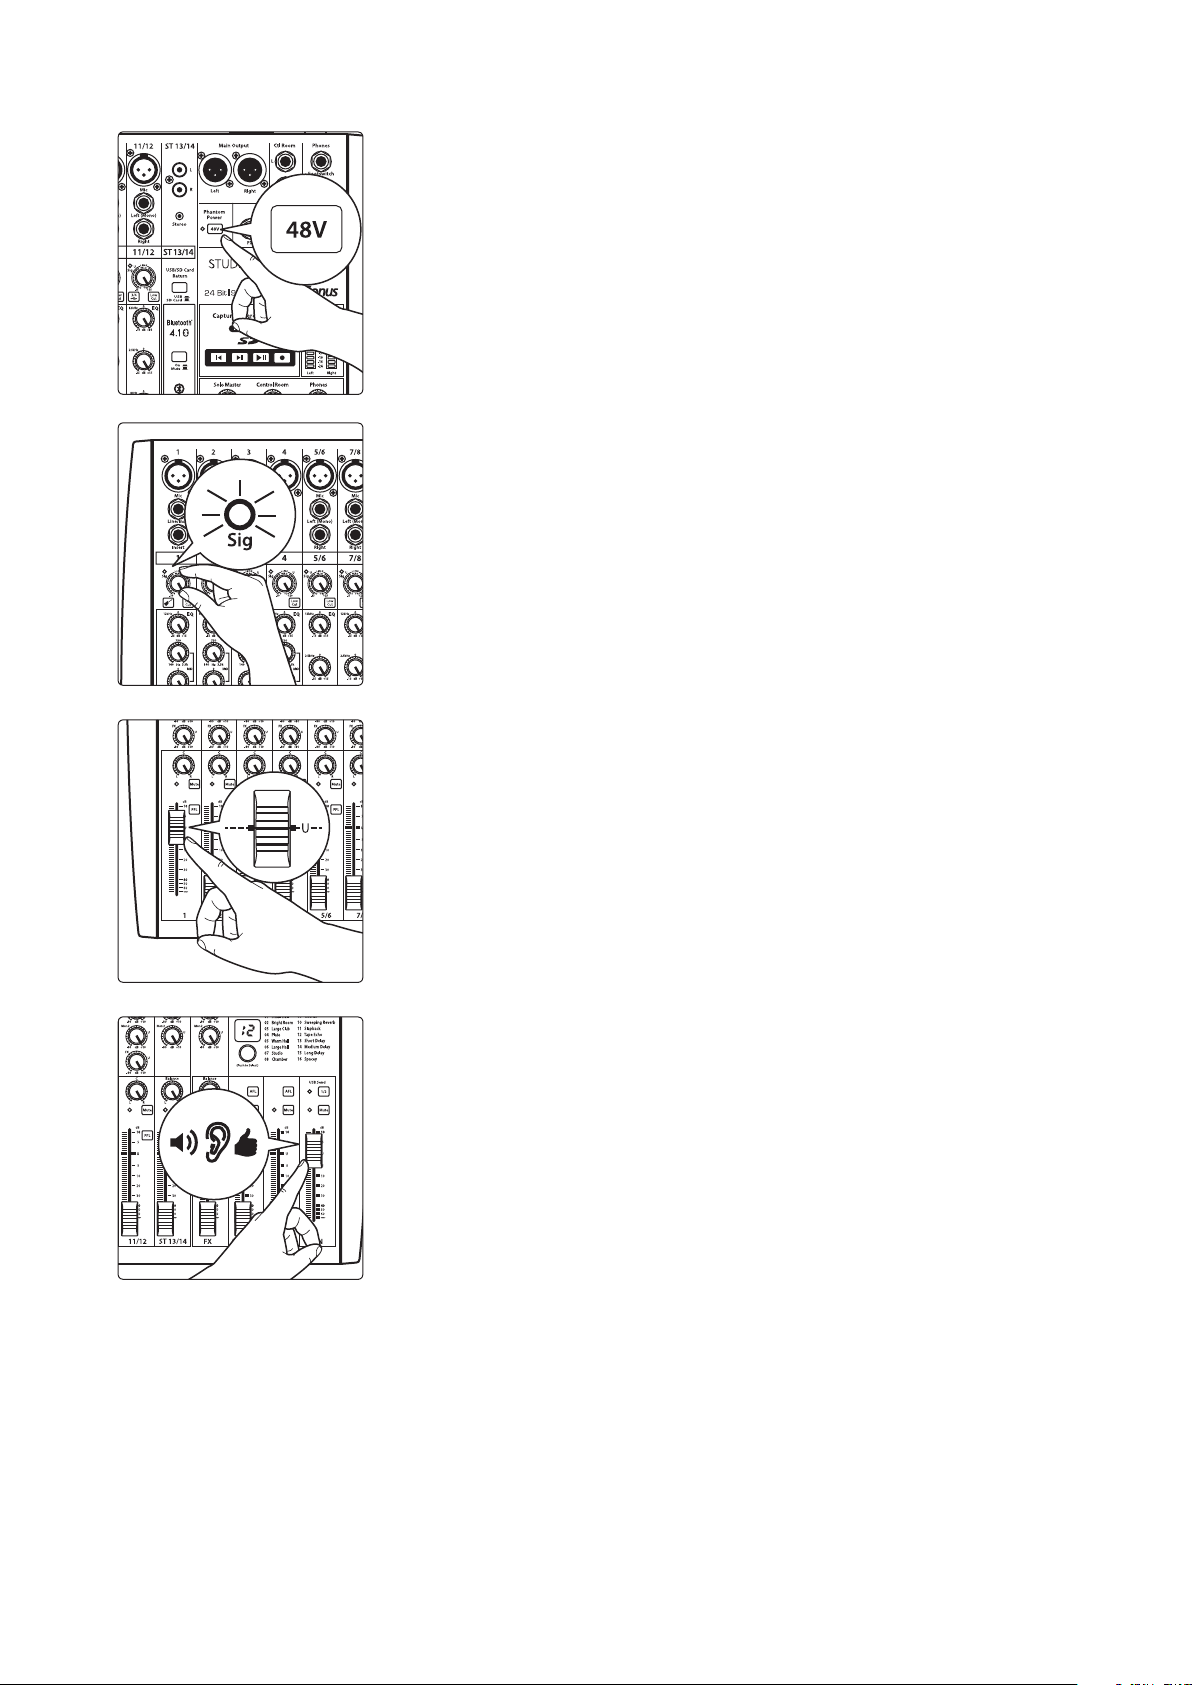
6. If your microphone requires phantom power, engage the 48V button on
7. Turn on your amplifier or powered monitors.
8. Speak or sing into your microphone at approximately the same volume you
9. Turn the trim knob on Channel 1 clockwise while watching the signal
StudioLive™ AR Series
Owner’s Manual
your StudioLive AR mixer.
expect during the performance.
indicator. Adjust the Channel 1 trim knob until the signal/clip indicator is
red, then back down until it is green and just below clipping at the loudest
input level.
10. Raise the Channel 1 level control to unity gain (denoted with a “U”).
11. Bring up the Main level until you can comfortably listen to your microphone
through your speakers.
12. Sculpt the sound by adding EQ to taste.
5
3 Hookup
3.1 Connections and Controls
3 Hookup
3.1 Connections and Controls
3.1.1 Inputs
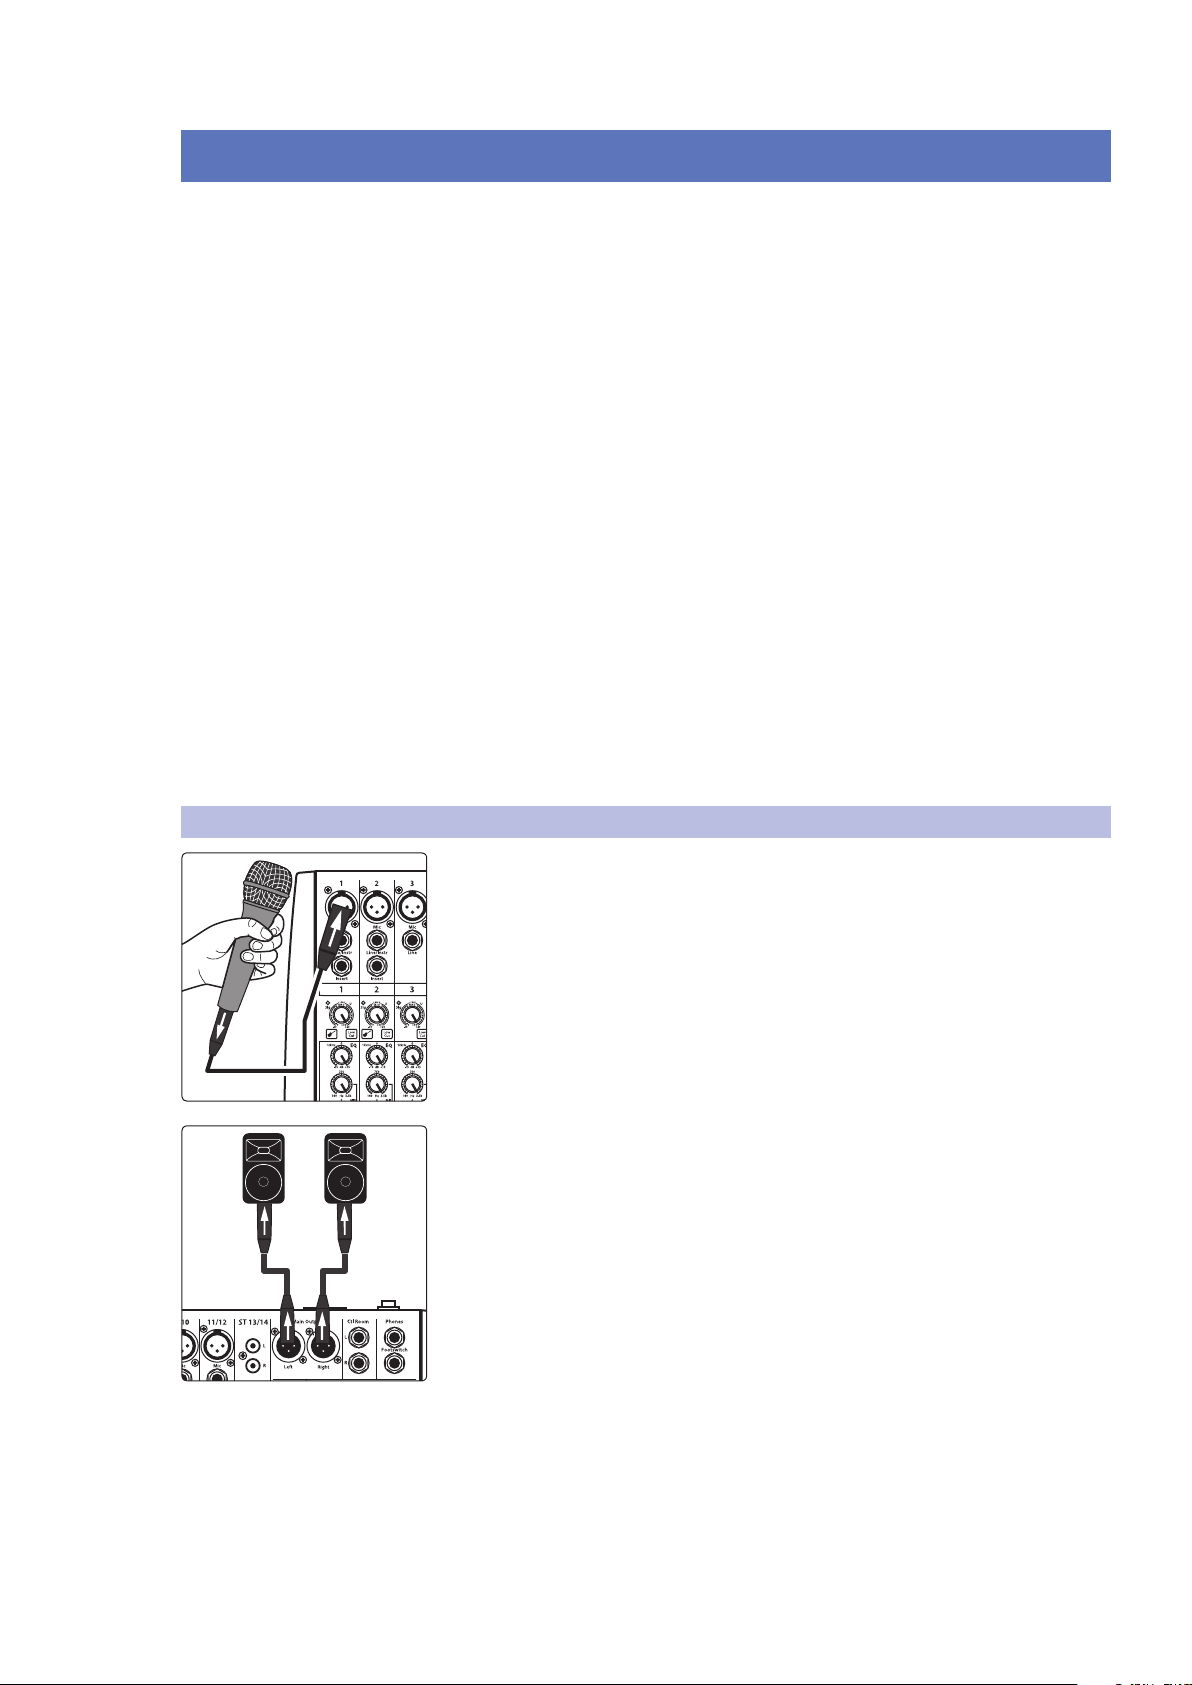
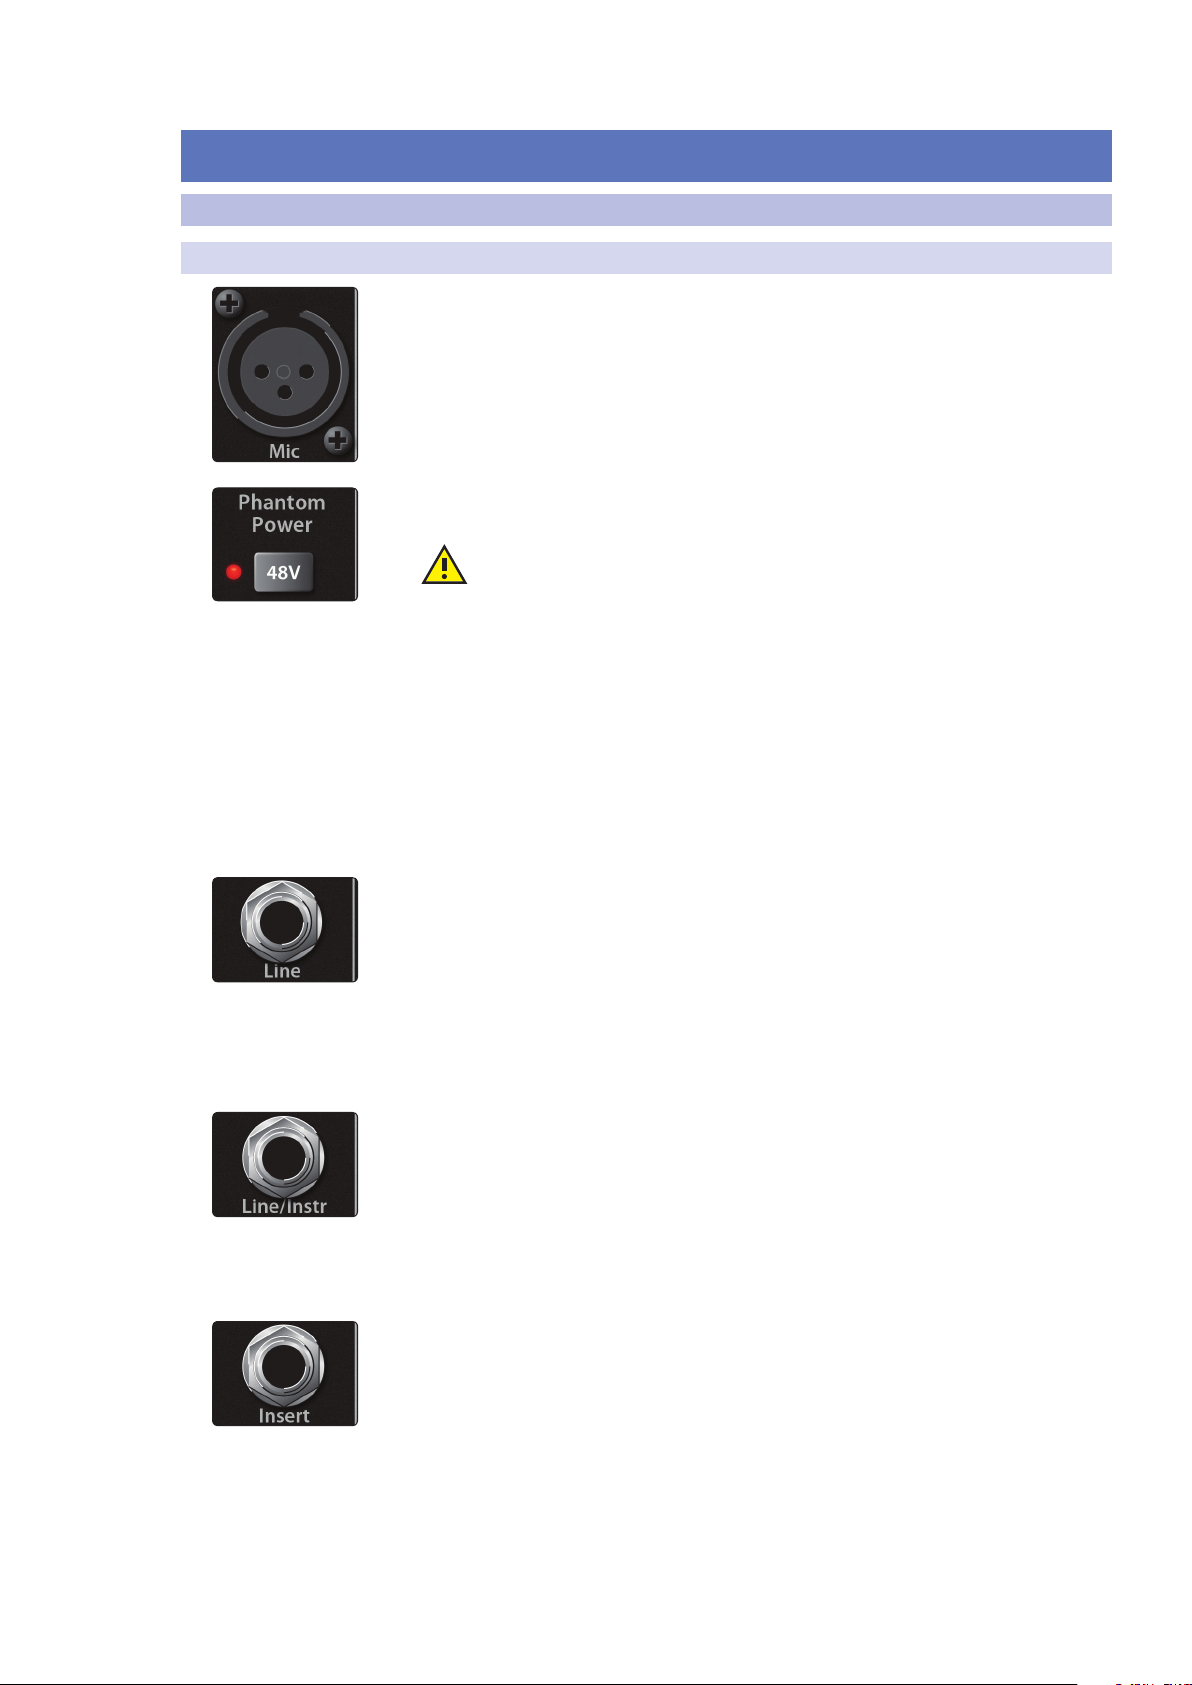
Microphone Inputs. Your StudioLive AR-series mixer is equipped with high-quality
microphone preamplifiers for use with all types of microphones.
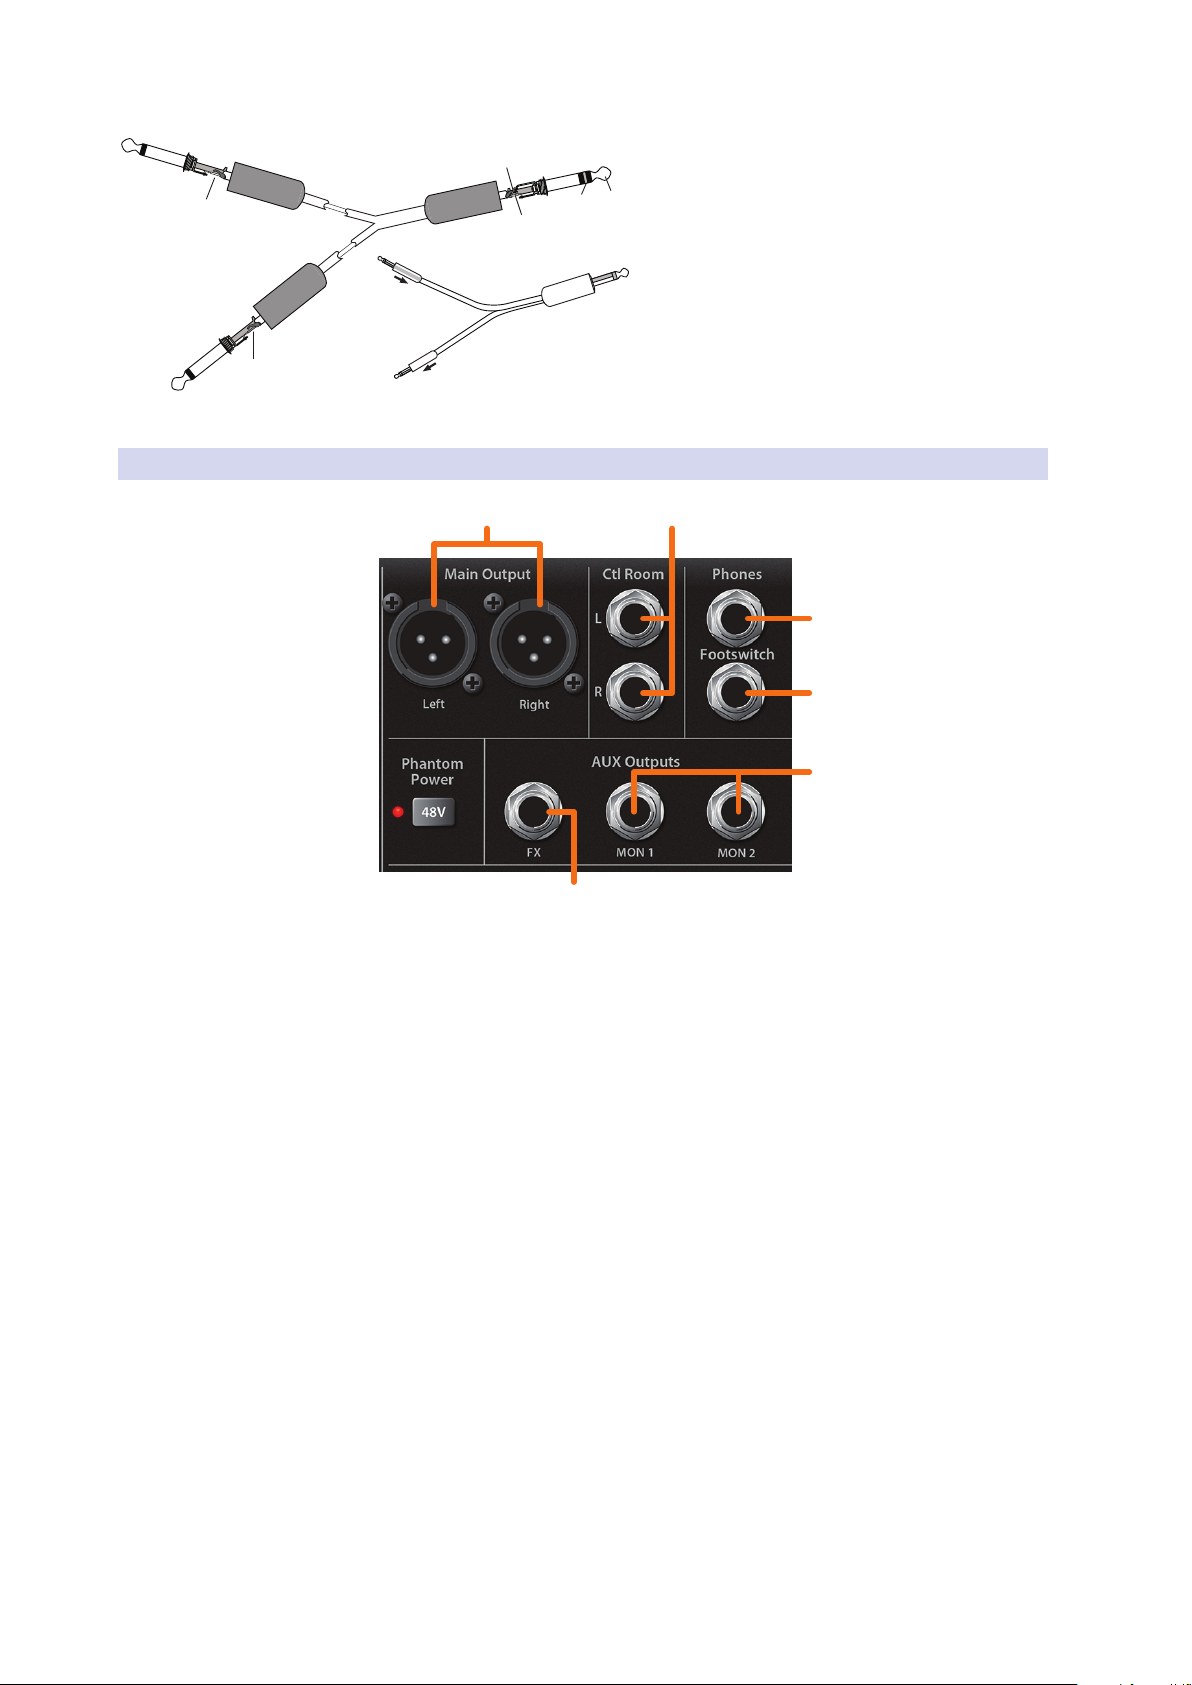
48-volt Phantom Power. The StudioLive AR mixers provide global 48V phantom
power for all microphone inputs.
WARNING: Phantom power is required for condenser microphones but can
severely damage some dynamic mics, especially ribbon mics. Therefore, unless
the manufacturer of your dynamic mics clearly states that phantom power will not
damage them, you should use condenser mics only, with phantom power on, or
dynamic mics only, with phantom power off.
Power User Tip: Dynamic microphones and ribbon microphones are generally
lower-output devices and require no external power source. The most important
thing to note about ribbon microphones is that they very rarely require phantom
power. In fact, unless a ribbon microphone calls specifically for phantom power,
sending phantom power to it can cause severe damage. Condenser microphones
are generally more sensitive than dynamic and ribbon microphones and typically
require external +48V phantom power. Always review your microphone’s
documentation to ascertain the manufacturer’s recommended operating practices.
Line-level Inputs. Each channel of your StudioLive AR-series mixer has a ¼-inch,
balanced TRS connection for line-level input. Typical examples of line-level
connections are synthesizer outputs, CD/DVD-player outputs, and (with exceptions)
signal-processor inputs and outputs.
Note: As with any mixer, plugging in a microphone or a line-level input device, or
turning phantom power on or off, will create a momentary spike in the audio output
of your StudioLive AR mixer. Because of this, it is highly recommended that you mute
or turn down the channel trim before changing connections or turning phantom
power on or off. This simple step will add years to life of your audio equipment.
Instrument Inputs. Channels 1 and 2 are equipped with an input that can be
switched between line and instrument. Use these ¼-inch connections for
instruments that don’t have internal preamps (guitar, bass, etc.). See Input Source
button in Section 3.2 for more information.
Power User Tip: Active instruments have an internal preamp and a line-level
output. This type of instrument should be plugged into a line input, rather than
an instrument input. Plugging a line-level source into an instrument input risks
damage to the input and results in a very loud and often distorted audio signal.
Insert (A22 USB, AR16 USB and AR12.USB). Channels 1-4 on the StudioLive AR22
USB are equipped with a direct-insert point. Channels 1 and 2 on the StudioLive
AR16 USB and AR12 USB also have inserts. These unbalanced, ¼-inch connectors can
be used to connect external processors (such as compressors, EQs, de-essers, and
filters) to the channel inputs.
StudioLive™ AR Series
Owner’s Manual
6
3 Hookup
Tip
(Return)
Tip
(Send)
To mixer
channel
insert
From
processor
output
To
processor
input
Tip
(Out)
Ring (In)
Ring
(Return)
Tip
(Send)
3.1 Connections and Controls
3.1.2 Outputs
StudioLive™ AR Series
Owner’s Manual
Insert-connector wiring:
Tip = send (output to inserted device)
Ring = return (input from inserted device)
Sleeve = common ground
1 2
3
4
5
6
1. Main. The StudioLive AR-series mixers feature with XLR main outputs.
2. Control Room. These are the balanced control-room outputs.
The Control Room knob on the top panel controls the level.
3. Phones. This ¼-inch TRS connection is for use with headphones.
The Phones knob on the top panel controls the level.
4. Footswitch. This connection allows you to use an external
footswitch (not included) to mute the effects return.
Power User Tip: Your StudioLive will follow the behavior of the type of footswitch
you use. A latching footswitch allows you to mute the effects return until you
engage the footswitch a second time. A momentary footswitch will allow
you to mute the effects return only while the footswitch is depressed.
5. Monitor. The StudioLive AR-series mixers are equipped with 2/2/2/1 monitor
mix (Mon) outputs. Monitor mixes are routed to these outputs. See Section
3.4 for more information on creating monitor mixes for monitoring.
6. FX. The FX send mix is routed to this output, allowing you to create
an additional monitor mix. When this output is engaged, the internal
effects processor is bypassed. More information about creating effects
mixes and the effects processor can be found in Section 3.5.
7
3 Hookup
1
3 4
2
5
6
7
8
9
10
11
12
13
14
3.2 Channel Controls
3.1.3 Rear Panel Connections
USB 2.0 port. Use this port to connect your StudioLive AR-series mixer to a USB port
on your computer when using the mixer as an audio interface. See your StudioLive
AR-series Software Reference Manual for further information.
Power-input. Plug in the provided IEC power cable here.
Power switch. Push the top part of the switch ( | ) to turn on your StudioLive AR
mixer. Push the bottom part of the switch ( O ) to turn it off.
StudioLive™ AR Series
Owner’s Manual
3.2 Channel Controls
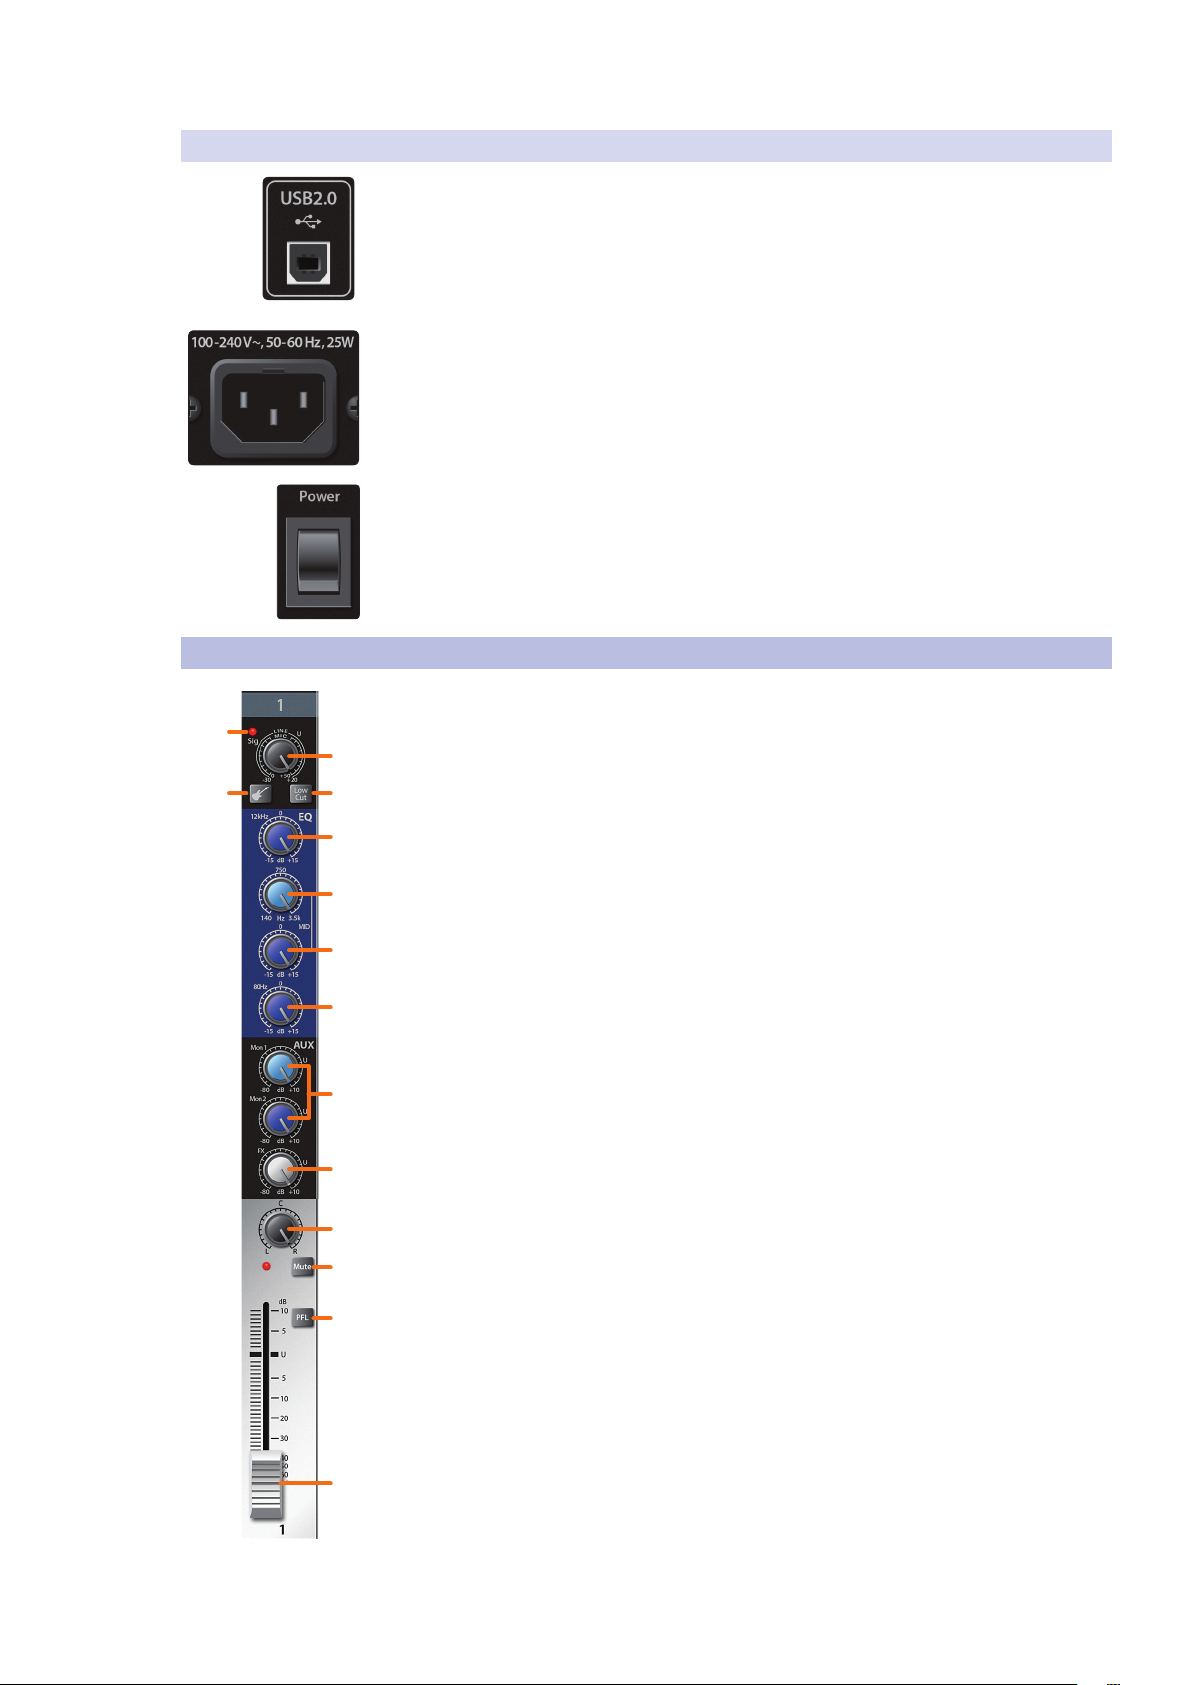
1. Input-signal indicator. Each channel features an LED next to the trim control that
illuminates green whenever an input signal is present. The LED color will change to
red if the signal (pre- or post-EQ) reaches -3 dB.
2. Input Gain control. These knobs provide 50 dB of variable gain for mono
channels (0 to +50 dB mic/instrument, -20 to +30 dB line) and 40 dB of variable
gain for stereo channels (+5 to +45 dB mic/instrument, -15 to +25 dB line).
3. Input Source button. Channels 1 and 2 offer an Input Source button
that lets you select instrument- or line-level for the ¼-inch inputs
on these channels. Press this button to engage the instrument
preamp when connecting guitars or a passive bass.
Note: Engaging the Instrument preamp will disable the
microphone preamp on the XLR connection.
4. Low Cut filter. When engaged, all frequencies below 100 Hz
will be attenuated (cut) at a slope of -18 dB/octave.
Power User Tip: Use the Low Cut filter to remove unwanted low-frequencies
from your source signal, rather than trying to EQ them out.
5. High shelving EQ Gain control. Sets the level of the high-
band center frequency (12 kHz) from -15 to +15 dB.
Power User Tip: A high shelving EQ is like a treble-control knob on a stereo. In
this mode, the Center Frequency control selects the shelving frequency.
the center frequency of the Mid EQ. You can adjust the center frequency from
140 Hz to 3.5 kHz. This control is available on the Mono input channels only.
6. Mid peaking EQ frequency control (AR2 USB, AR16 USB and AR12 USB). Sets
7. Mid peaking EQ gain control. Sets the level of the mid-band
center frequency from -15 to +15 dB. The center frequency can
be adjusted on the mono inputs of the AR16 USB and AR12 USB.
All other inputs have fixed center frequency at 2.5 kHz.
8. Low shelving EQ gain control. Sets the level of the low-
band center frequency (80 Hz) from -15 to +15 dB.
Power User Tip: A low shelving EQ is like a bass-control knob on a stereo. In
this mode, the Center Frequency control selects the shelving frequency.
8
3 Hookup
1
2
3
4
5
3.3 The Super Channel
9. Monitor sends. These are the level controls for each channel to the
10. FX send. This is the level control for each channel for the effects mix.
11. Pan. This sets the channels position in the Main stereo mix.
Power User Tip: Panning can be a great way to achieve better separation
in your main mix. Using pan in conjunction with level will allow you to
create more definition and space between each channel’s signal.
12. Mute button and indicator. This button mutes its channel in all outputs.
13. PFL (Pre-Fader Listen) button. This button will solo its channel to
StudioLive™ AR Series
Owner’s Manual
corresponding monitor mix. The AR22 USB, AR16 USB and AR12 USB
provide two monitor mixes, and the AR8 USB provides one monitor mix.
See Section 3.4 for more information on creating monitor mixes.
See Section 3.5 for more information on creating effects mixes.
The LED to the left of it will illuminate red when the channel is muted.
the Control Room and Headphone outputs, pre-fader. When no PFL
button is engaged, the Main mix is routed to these outputs.
Power User Tip: If you can’t hear the main mix or a channel in your
headphones, make sure that PFL is not engaged on an unused channel.
3.2.1 Digital Returns
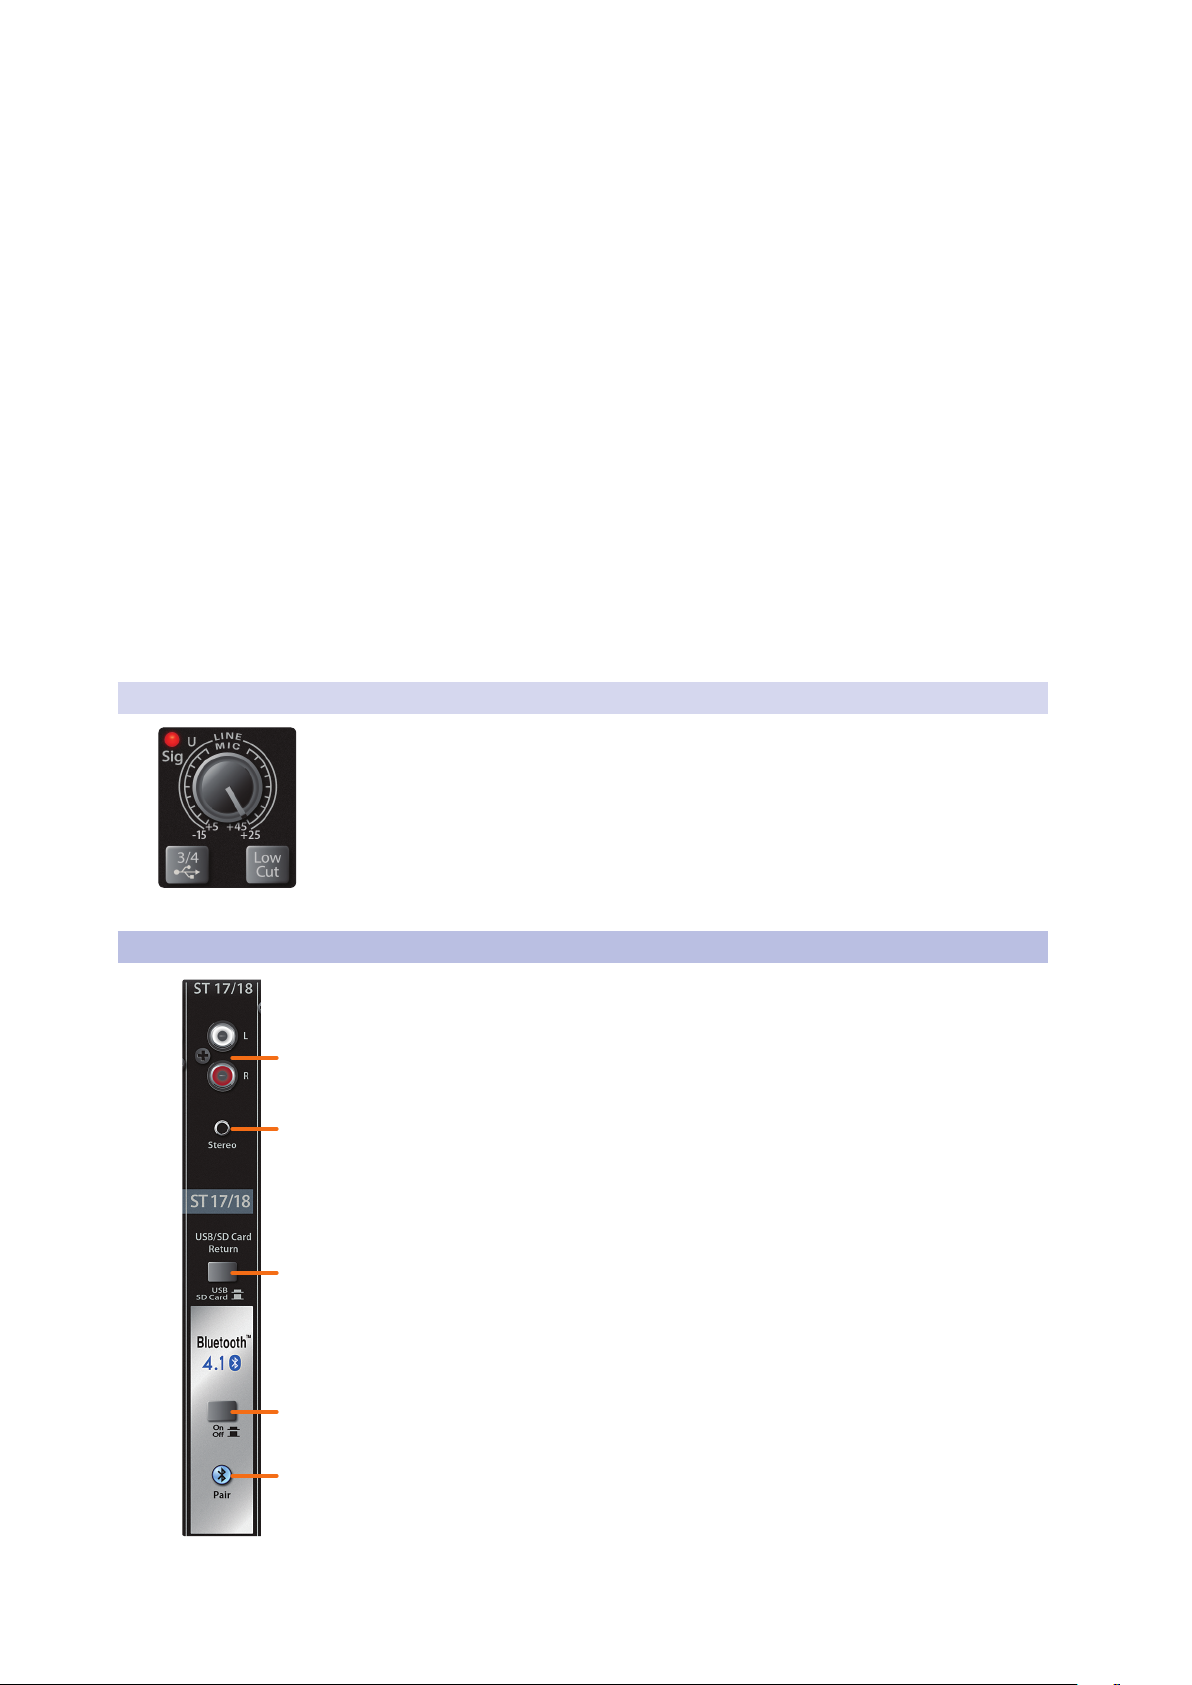
3.3 The Super Channel
14. Channel level. Controls the overall level of the channel.
The last stereo channel (19/20, 15/16, 11/12, 5/6) provides a digital playback
streaming option. The Digital Return button routes playback streams 3 and 4 from
your audio software to this channel. When engaged, the analog source will be
bypassed; however, the signal will still be routed to the digital send so that it can be
recorded or processed by a plug-in. For more information, see your StudioLive
AR-series Software Reference Manual in your My PreSonus account.
Each StudioLive AR-series mixer features a unique Super Channel that allows you to
connect several analog and digital sources at once so you can get the most out of
your mixer.
1. RCA inputs. These unbalanced inputs allow you to connect a stereo
line-level device, such as a Blu-ray player or karaoke machine.
2. 1/8-inch stereo input. This is an unbalanced, stereo, 1/8-inch
connection for line-level devices such as smartphones and tablets.
3. USB / SD Card Return. By default, playback for the onboard SD recorder is
routed to the Super Channel. Engaging this button will route USB playback
streams 1-2 to the Super Channel instead. More information on using your
StudioLive AR-series mixer as an audio interface can be found in the StudioLive
AR-series Software Reference Manual in your My PreSonus user account.
4. Bluetooth On/Off. By default, Bluetooth playback is muted. Engaging this
button will allow you to play audio through the Super Channel wirelessly.
5. Bluetooth pairing. Use this button to pair your Bluetooth device with
your AR-series mixer. See Section 3.3.1 for pairing instructions.
Power User Tip: All available sources are summed into the Super Channel. Because this
channel only selects line-level devices, the majority of which have onboard level controls,
you can use this channel to expand the input flexibility of your StudioLive AR-series mixer.
9
3 Hookup
Hold 3 sec
3
2
1
3.4 Monitor Buses
3.3.1 Pairing a Bluetooth Device
To pair a new device to your StudioLive AR-series mixer:
1. Press and hold the Bluetooth pairing button for three seconds.
2. The Bluetooth button will flash once every second.
3. Search for new Bluetooth devices from the device to
which you’d like to pair (smartphone, tablet, etc).
4. Select “StudioLive AR22/16/12/8 USB” from the available
Bluetooth devices list on the pairing device.
5. The Bluetooth button will illuminate solid when paired successfully.
Note: If previously paired, your StudioLive AR mixer will connect
automatically. The Bluetooth pairing button will flash rapidly (two to
three times per second) while the Bluetooth module detects connected
devices and will illuminate solid when it is successfully paired.
3.4 Monitor Buses
StudioLive™ AR Series
Owner’s Manual
The monitor bus provides outputs to route auxiliary mixes that are separate
from the main mix. StudioLive AR-series mixers are equipped with 2/2/2/1
monitor buses, which have physical output jacks, and one internal effects bus.
Monitor buses can be used for many applications, the two most common of which
are creating monitor mixes and inserting external effects processors into the mix.
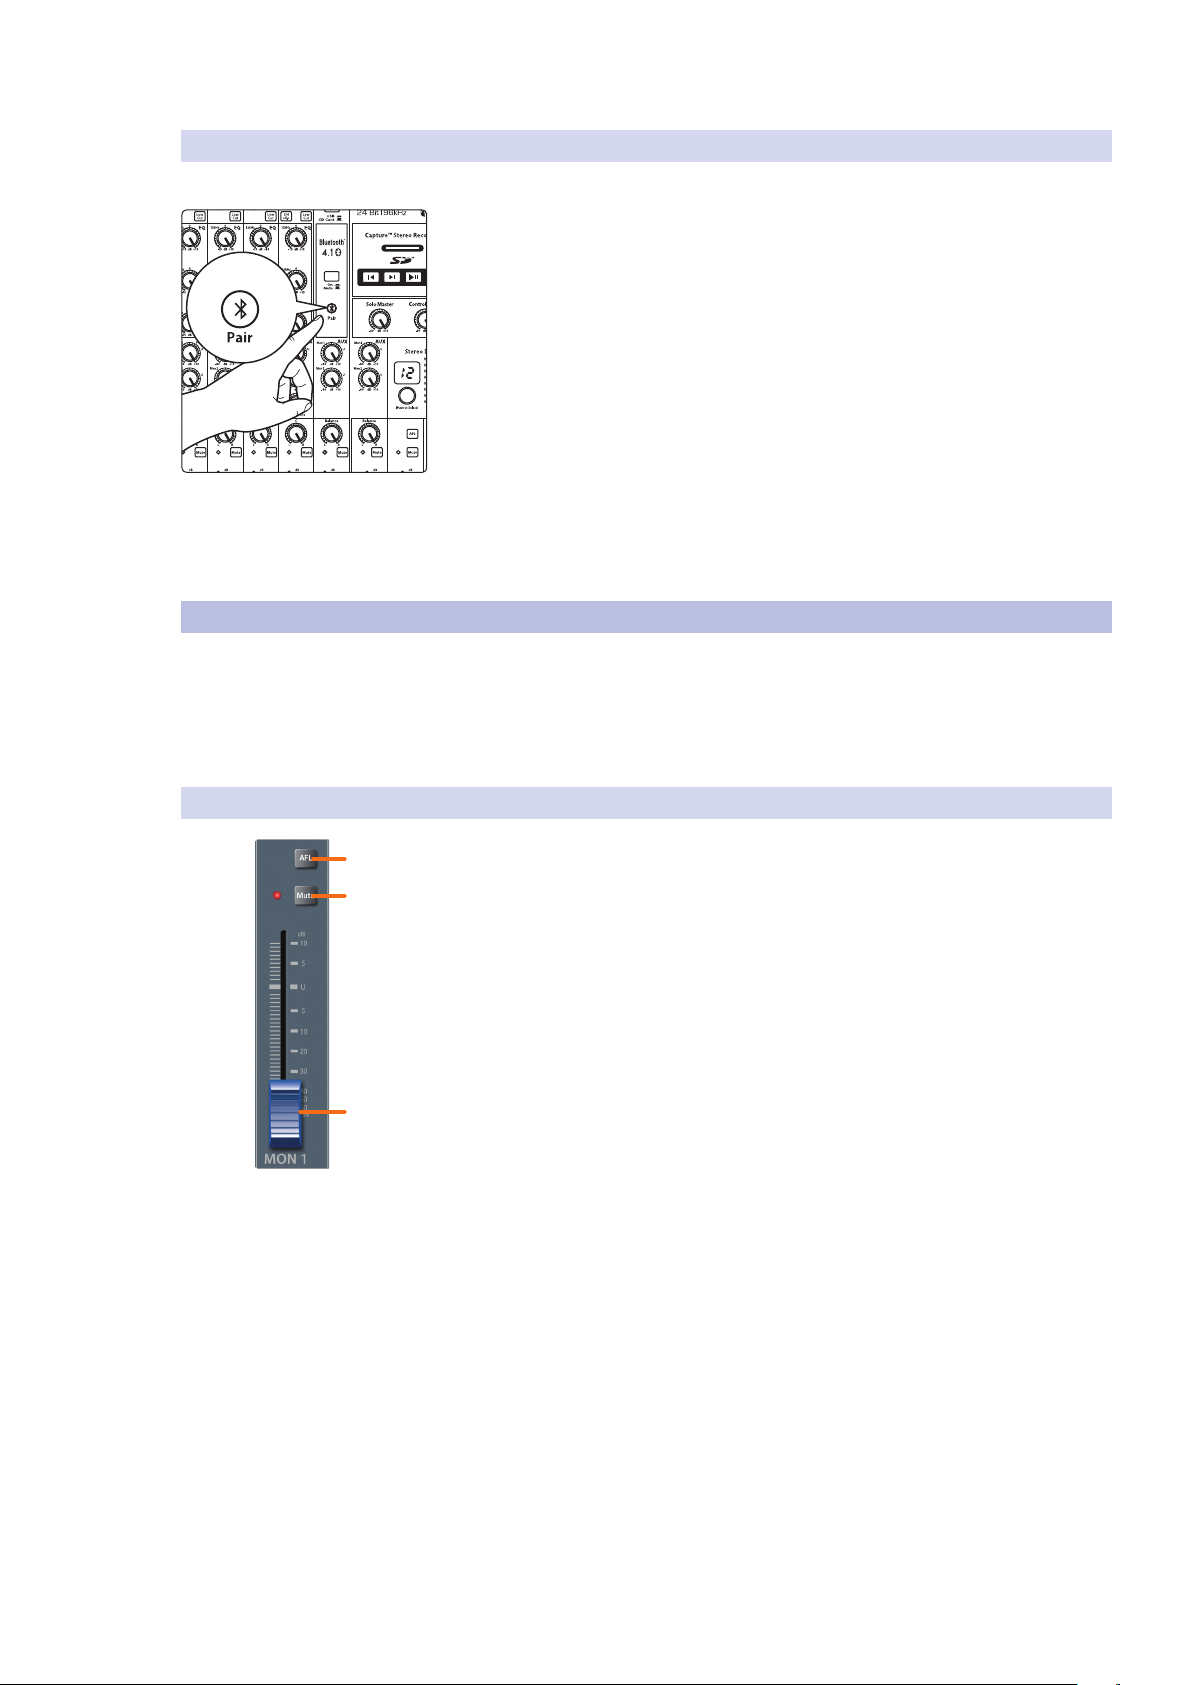
3.4.1 Monitor Bus Controls
1. AFL button. This button will solo the aux bus to the monitor outputs after the
fader.
Power User Tip: Using this control to listen in on a performer’s monitor
mix can be a great way to quickly dial in just the right amount of
each signal and get to a great monitor mix more quickly.
2. Mute button. This button will mute or unmute its monitor bus. The LED
to the left of it will illuminate red when the monitor output is muted.
Power User Tip: Muting a monitor mix output during performance breaks is
a quick and easy way to prevent accidental signal spikes or feedback.
3. Output level. Adjusts the master level of the Monitor output.
10
 Loading...