

Presonus StudioLive 32R Series III, StudioLive 24R Series III, StudioLive 16R Series III Owner’s Manual
™
StudioLive
Series III Rack Mixers
Rackmount Digital Mixing
and Remote I/O System with AVB
Owner’s Manual
®
www.presonus.com
English

Table of Contents
1 Overview — 1
1.1 Introduction — 1
1.2 About This Manual — 1
1.3 Features — 1
1.4 What is in the Box — 2
1.5 What You Will Need — 3
2 Getting Started — 4
2.1 Step 1: Register Your StudioLive Series III
Rackmount Mixer — 4
2.2 Step 2: Add a Control Device — 5
2.2.1 Wired LAN Networking (Ethernet) — 5
2.2.2 Wired to a Computer (USB) — 6
2.3 Step 3: Update Firmware — 6
2.3.1 Direct Updating over the Internet — 6
5 Resources — 18
5.1 Stereo Microphone Placement — 18
5.2 Compression Setting Suggestions — 21
5.3 EQ Frequency Guides — 23
5.4 EQ Setting Suggestions — 24
5.5 Technical Specifications — 26
5.6 StudioLive Series III Rackmount Mixer
Block Diagrams — 27
6 Warranty — 28
6.1 Warranty Information — 28
2.3.2 Manual Firmware Updates — 7
2.4 Step 4: Set Up an AVB Network — 8
3 Hookup — 9
3.1 Front Panel — 9
3.2 Rear Panel — 10
4 Connecting Your
Audio System — 12
4.1 Level Setting Procedure — 12
4.2 Typical Setup Diagrams — 14
4.2.1 Typical Band Setup
(StudioLive 32R) — 14
4.2.2 Typical Band Setup
(StudioLive 16R) — 15
4.2.3 Typical Church Setup
(StudioLive 32R) — 16
4.2.4 Typical Church Setup
(StudioLive 16R) — 17


1 Overview
1.1 Introduction
1 Overview
1.1 Introduction
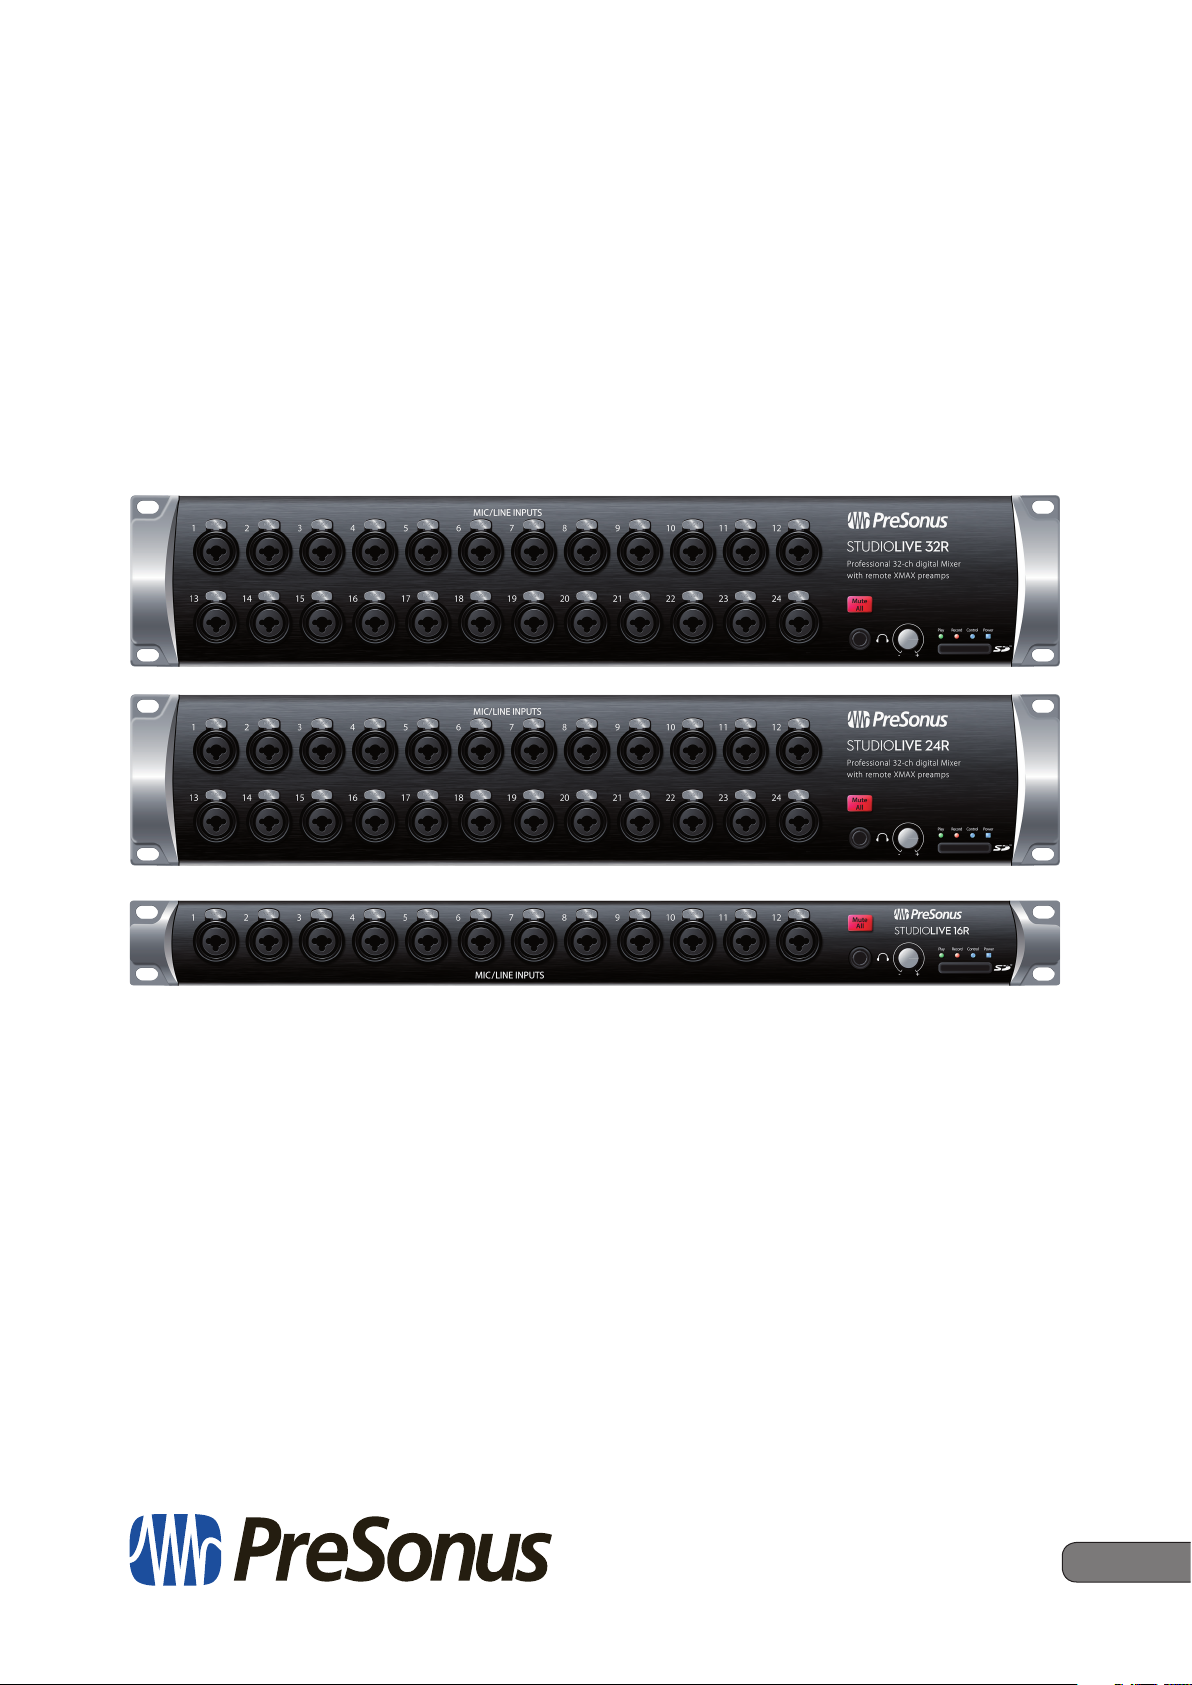
StudioLive™ Series III Rack Mixers
Owner’s Manual
Thank you for purchasing a PreSonus® StudioLive™ Series III rackmount digital
mixer. PreSonus Audio Electronics, Inc., has designed the StudioLive 32R, StudioLive
24R and StudioLive 16R utilizing high-grade components to ensure optimum
performance that will last a lifetime. PreSonus Audio Electronics has built your
StudioLive mixer with high-grade components to ensure optimum performance for
many years to come. Loaded with 32, 24, or 16 high-headroom XMAX™ microphone
preamplifiers, a built-in multitrack USB recording and playback interface, powerful
Fat Channel signal processing, high quality effects, extensive routing, stereo SD
recording, and more, StudioLive Series III rack mixers break new boundaries for
music performance and production. All you need is a compatible computer with a
USB connection or an SD card, a few microphones and cables, speakers, and your
instruments, and you are ready to record in the studio or in front of a live audience!
We encourage you to contact us with questions or comments regarding
this product. PreSonus Audio Electronics is committed to constant
product improvement, and we value your suggestions highly. We believe
the best way to achieve our goal of constant product improvement is by
listening to the real experts: our valued customers. We appreciate the
support you have shown us through the purchase of this product.
1.2 About This Manual
We suggest that you use this manual to familiarize yourself with the features and
correct connection procedures for your mixer before trying to use it. This will help
you avoid problems during installation and setup. Throughout this manual you
will find Power User Tips. These tips provide useful hints on how to best use your
StudioLive mixer and take advantage of unique workflow functions and features.
When frame size differences occur, the StudioLive 32R will be called out
first, followed by the StudioLive 24R, and then the StudioLive 16R.
This manual only covers the hardware and basic setup. Complete information
regarding Universal Control, UC Surface, QMix-UC, and Capture as well as a
Quick Start Guide for Studio One Artist can be found in StudioLive Software
Library Reference Manual, available as a download from www.PreSonus.com.
For more information on using Series III rackmount mixers as
stageboxes and remote monitor mixers for Series III console mixers,
please review the StudioLive Series III Stagebox Mode Addendum,
available as a download from www.PreSonus.com as well.
1.3 Features
4 34/26/18 total analog inputs
4 32/24/16 mic/line channel inputs plus 2 RCA inputs
4 16/12/6 TRS FlexMix outputs
4 2 XLR (Left/Right) Main outputs
4 Stereo headphone output
4 32/32/16 input channels
4 32R and 24R: 2 stereo aux inputs (AVB or USB)
4 1 stereo digital return (SD Card, AVB, or USB)
1
1 Overview
StudioLive™ Series III Rack Mixers
Rack-Mount Digital Performance/Recording Mixers
Quick Start Guide
www.presonus.com
®
Mezcladoras montables en rack
StudioLive™ Series III
Mezcladoras digitales montables en rack para presentaciones
en vivo/grabación
Guía de inicio rápido
StudioLive™ Series III Rackmixer
Rackfähige Digitalmixer für den Live- und Studioeinsatz
Kurzanleitung
StudioLive™ Série III – Mélangeurs en rack
Mélangeurs numériques de sonorisation et d’enregistrement en rack
Guide de prise en main
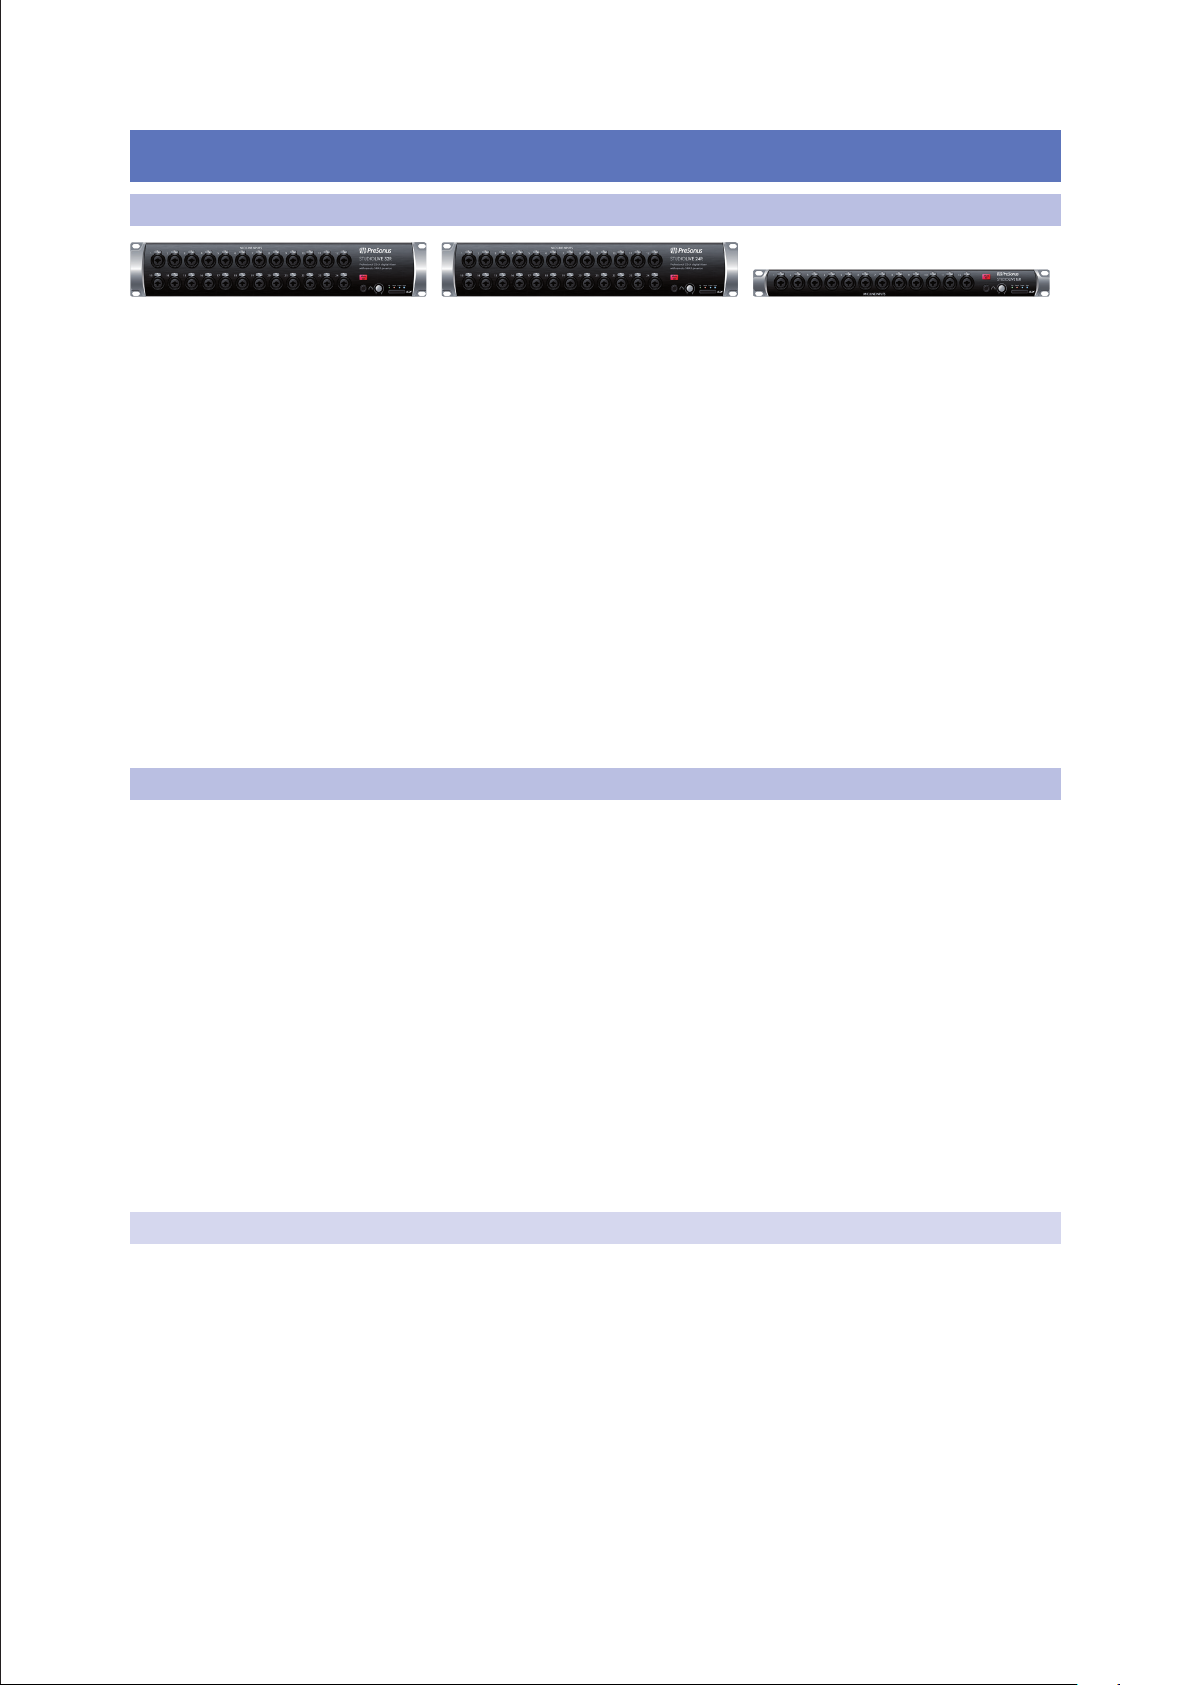
1.4 What is in the Box
StudioLive™ Series III Rack Mixers
Owner’s Manual
4 26/26/10 buses:
9 16/16/6 FlexMixes
9 4/4/2 internal effects buses
9 32R and 24R: 4 dedicated subgroups
4 24/24/8 Filter DCAs
4 1 Ethernet control network port with Dynamic, Self
Assigned, and Manual IP address modes
4 1 Ethercon AVB audio network port
4 Onboard stereo SD recorder
4 38x38 (32R and 24R) / 18x18 (16R) USB recording interface
4 55x55 (32R and 24R) / 32x32 (16R) AVB recording interface
4 Studio-quality converters with 115 dB dynamic range
4 48 kHz operation with 24-bit resolution (44.1 kHz option coming soon)
4 UC Surface touch control software for Mac®, Windows®, iPad®, and Android™
available free from Apple App Store, Google Play, and Amazon App Store
4 Studio One® Artist digital audio workstation software for Mac and Windows
4 Capture™ multitrack recording software for Mac and Windows
4 QMix®-UC aux-control software for iOS® and Android™
available free from Apple App Store, and Google Play
1.4 What is in the Box
Your StudioLive Series III rackmount mixer package contains the following:
PreSonus StudioLive 32R, StudioLive 24R, and StudioLive
16R digital recording and performance mixer
USB cable
IEC power cord
Product registration and software authorization card
StudioLive Series III Rackmount mixer Quick Start Guide
2

1 Overview
1.5 What You Will Need
What is not in the box:
StudioLive™ Series III Rack Mixers
Owner’s Manual
PreSonus Health Safety and Compliance Guide
4 This manual
4 StudioLive Software Library Manual
4 StudioLive Software Library
4 StudioLive Series III Stagebox Mode Addendum
Once you’ve registered your mixer, you can download UC Surface for macOS and
Windows, Capture, and Studio One Artist from your My PreSonus account.
UC Surface for iPad and QMix-UC for iPhone/iPod touch
can be downloaded from the Apple App Store.
UC Surface and QMix-UC for Android can be downloaded from the Google Play Store.
More details on the StudioLive Software Library can found
in the Reference Manual at www.presonus.com.
1.5 What You Will Need
The following items are not included with your StudioLive Series III
rackmount mixer, but are needed to complete your new mixing system:
4 LAN network with Internet access or an SD or SDHC card
with at least 2 GB capacity for firmware updates.
4 Wireless router. Visit www.PreSonus.com for recommended routers.
4 UC Surface running on a computer (macOS or Windows), Android device, or iPad
connected either wired or wirelessly to the same LAN network as your mixer.
3
2 Getting Started
2.1 Step 1: Register Your StudioLive Series III Rackmount Mixer
2 Getting Started
This section will guide you through registering your mixer, updating
its firmware and connecting it to a network. Please review the brief
networking tutorial located in Section 2.2 to familiarize yourself with
networking best practices. Visit www.presonus.com for the latest system
requirements and an updated list of compatible hardware.
In general, you will need the following:
4 LAN network connection and router
4 Internet connection for registration and firmware download.
4 A device running UC Surface
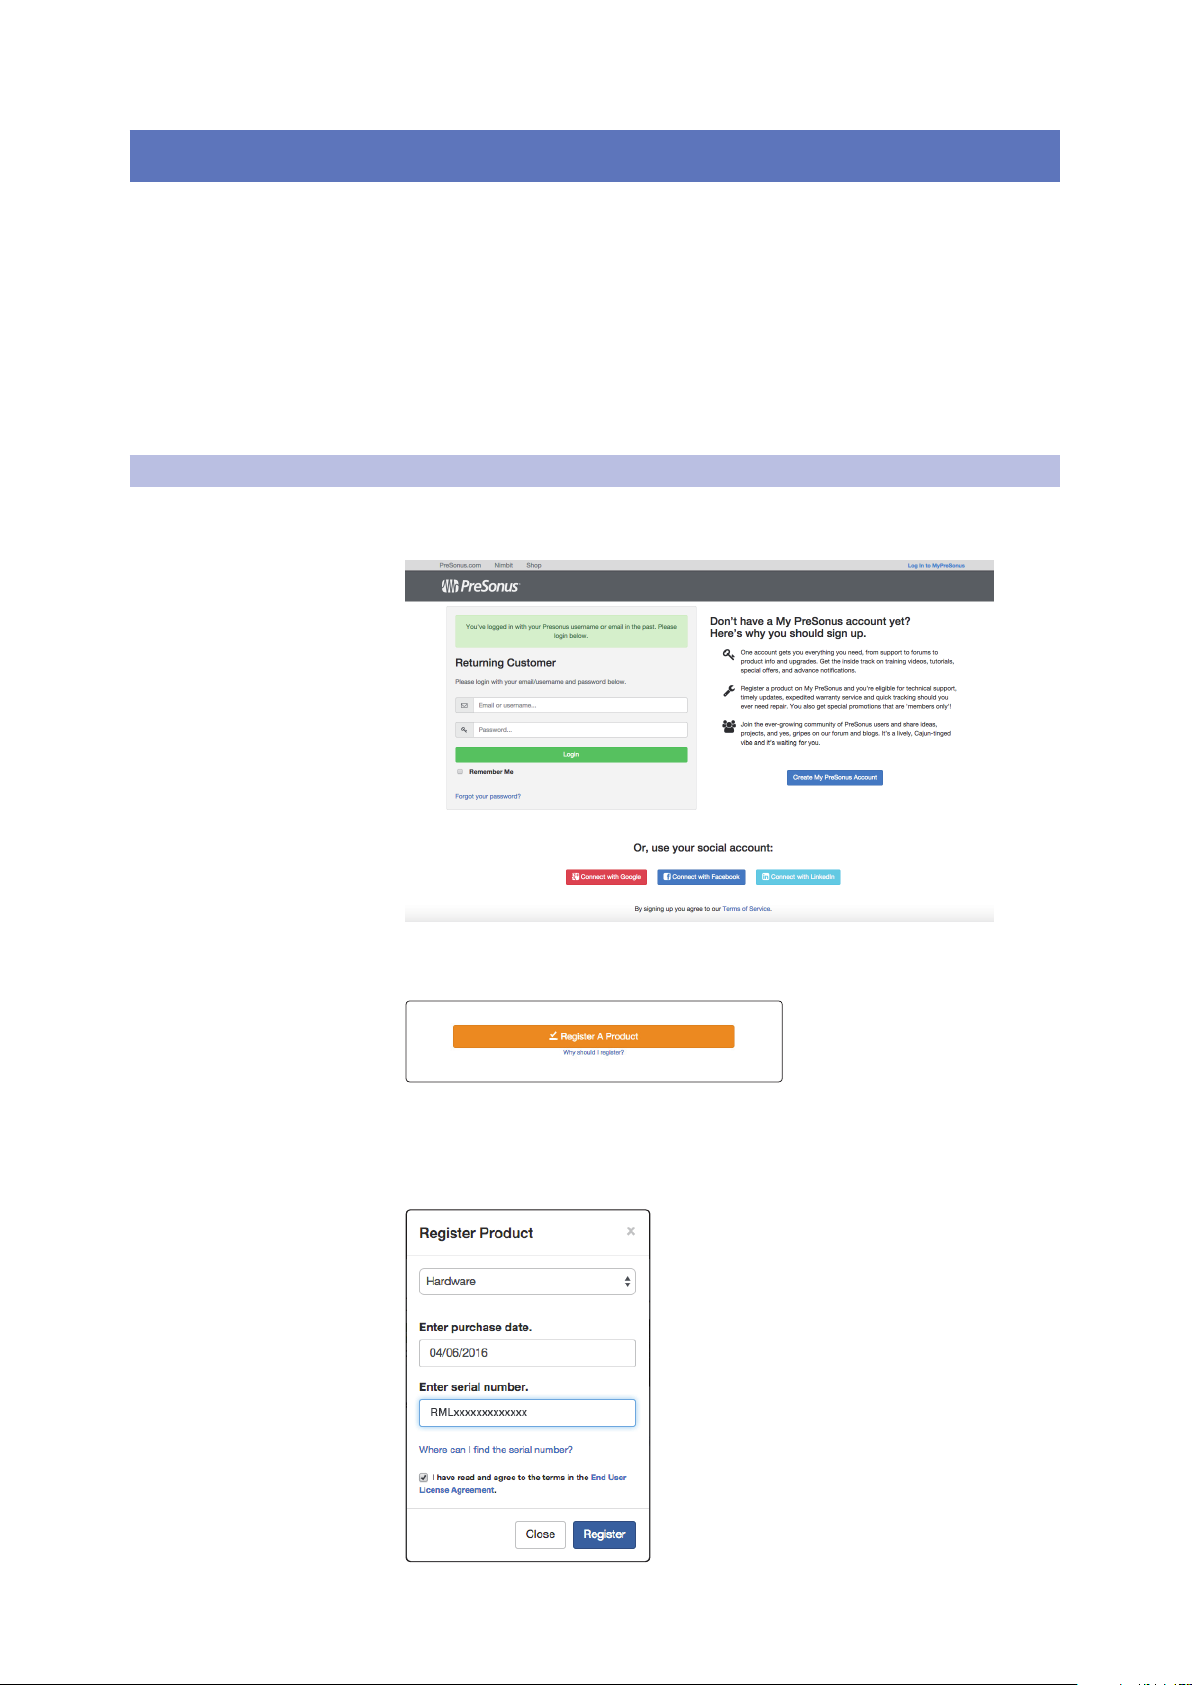
2.1 Step 1: Register Your StudioLive Series III Rackmount Mixer
1. Go to my.presonus.com and log in or create a new
user account, if you don’t have one.
StudioLive™ Series III Rack Mixers
Owner’s Manual
2. Once you have logged into your my PreSonus account, click
the Register a Product button at the top of the page.
3. Select “Hardware” from the drop-down menu in the dialog, enter
the information for your mixer, and check the box stating you have
read and agree to the license agreement. Click/tap the Register
button when you are done to register your controller.
4
2 Getting Started
Laptop with
UC Surface
Tablet control
UC Surface
Ethernet cable
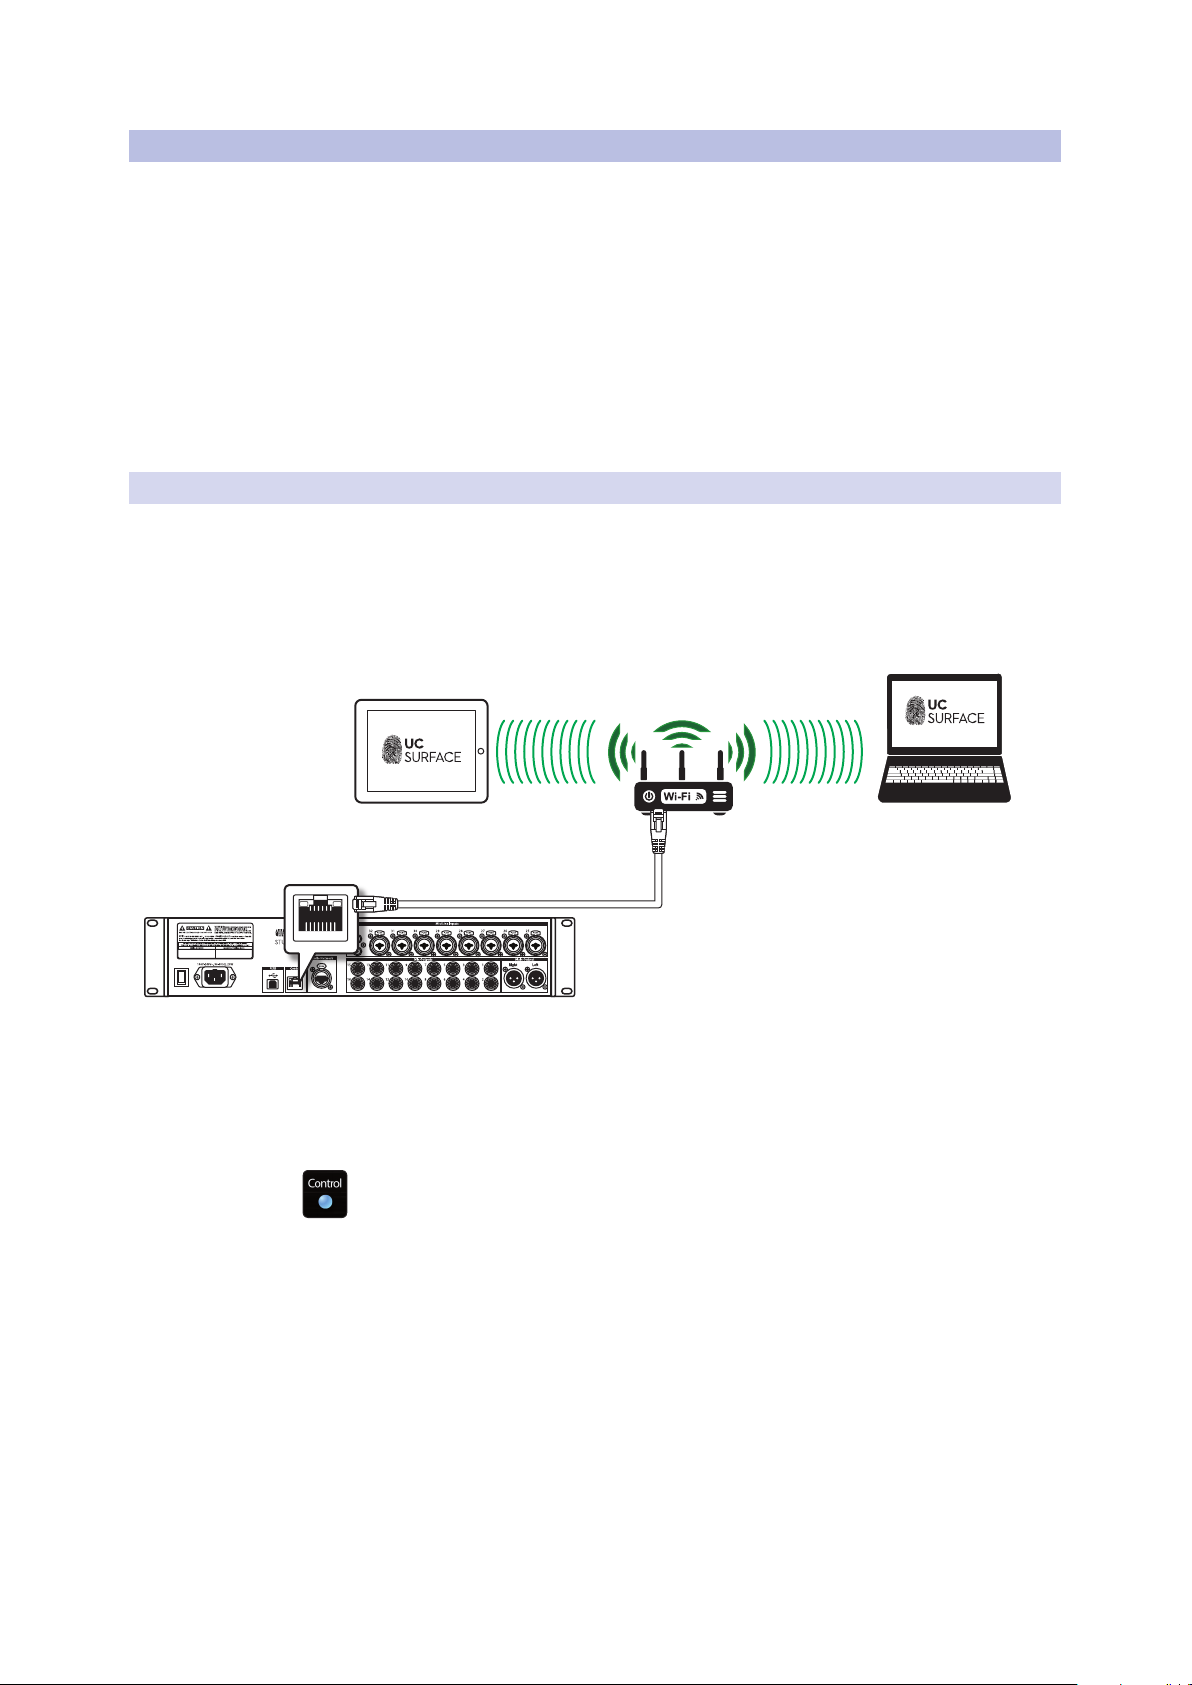
2.2 Step 2: Add a Control Device
2.2 Step 2: Add a Control Device
Control and Audio Data Connections
You can connect your mixer to UC Surface as follows:
4 Wired to a standard LAN network (control only).
4 Wired to a computer via USB (control and audio).
In the sections that follow, we will describe all these configurations in detail.
Power User Tip: WPA and WPA2 are protocols created to make wireless networks secure.
WPA stands for “Wi-Fi Protected Access,” and WPA2 is a later version that conforms to the
IEEE 802.11i networking standard. Most routers have settings that manage their security
protocols; consult the documentation for your router to learn how to change these
settings.
2.2.1 Wired LAN Networking (Ethernet)
The easiest way to configure your control network is to connect your mixer
and devices (computer, iPad, or Android) to a wireless router. This allows you to
quickly connect devices for remote control using UC Surface and QMix-UC.
1. Connect your StudioLive Series III Rackmount mixer
to a wireless router with an Ethernet cable.
StudioLive™ Series III Rack Mixers
Owner’s Manual
2. Power on the router and then power on the mixer.
3. Connect your computer, Android and iOS device to the wireless
network. You can also connect your computer directly to the
wireless router using an Ethernet cable if you prefer.
4. The Control LED on the front of your StudioLive mixer will turn blue once it is
connected and communicating properly to the network.
5
2 Getting Started
Laptop with
UC Surface
Tablet control
UC Surface
Ethernet cable
To Internet
2.3 Step 3: Update Firmware
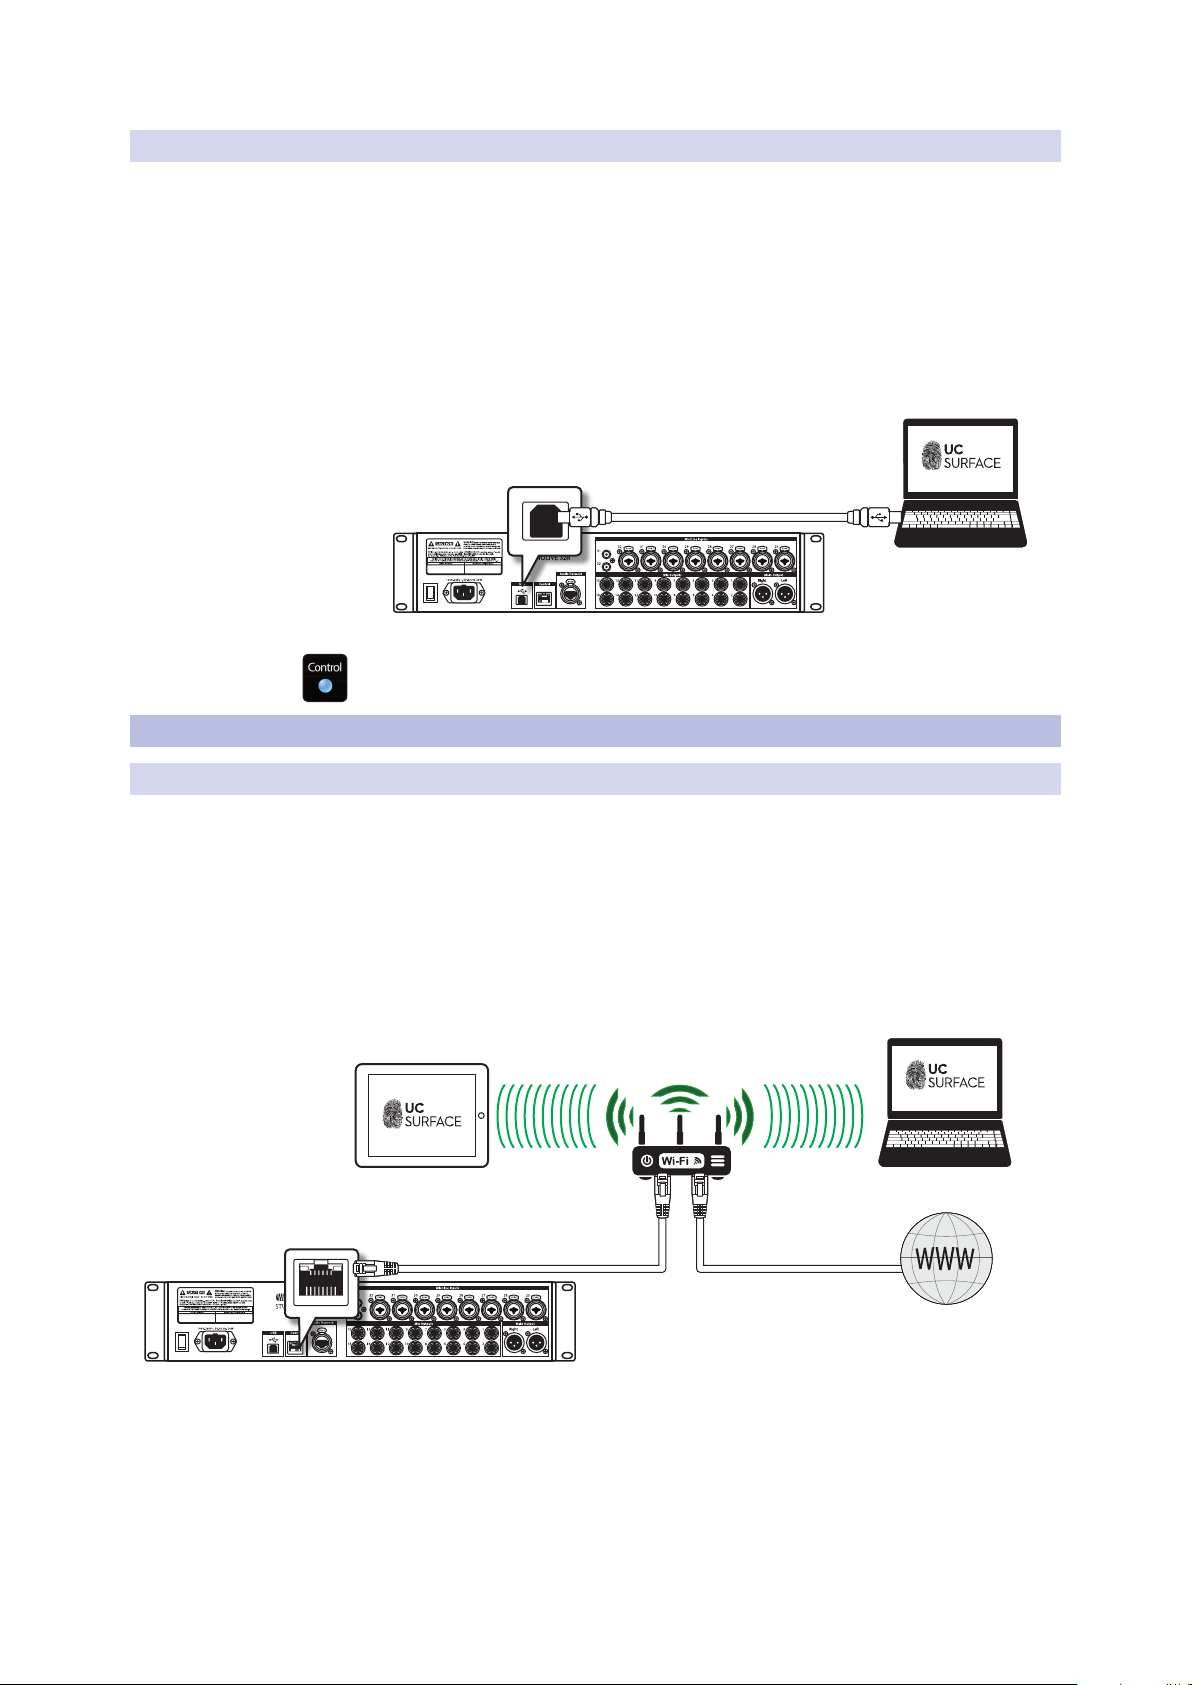
2.2.2 Wired to a Computer (USB)
Your StudioLive Series III rackmount mixer can be connected
directly to UC Surface running on a computer using USB.
Please note: In this configuration, you can only use one device – your computer – to
control your StudioLive mixer.
To begin, you have to install Universal Control and UC Surface on your computer.
Please review the StudioLive Software Library Reference Manual for complete details.
Once Universal Control has been installed, connect your
StudioLive mixer using USB and launch Universal Control.
StudioLive™ Series III Rack Mixers
Owner’s Manual
USB cable
The Control LED on the front of your StudioLive mixer will turn blue once it is
connected and communicating properly to the computer.
2.3 Step 3: Update Firmware
2.3.1 Direct Updating over the Internet
The easiest way to update your StudioLive Series III rackmount mixer firmware is to
connect your mixer to a device running UC Surface that also has Internet access
Power User Tip: Because direct updating from the Internet is the safest and fastest
method of updating your mixer’s firmware, it is highly recommended that you use this
method whenever possible.
IMPORTANT: To use Internet updates, your PreSonus hardware must be registered to your
My PreSonus account.
From UC Surface
Laptop with
UC Surface
1. Connect both your mixer and your UC Surface device to a
network with Internet access (wired or wireless).
2. Open UC Surface and connect to your mixer.
6
2 Getting Started
2.3 Step 3: Update Firmware
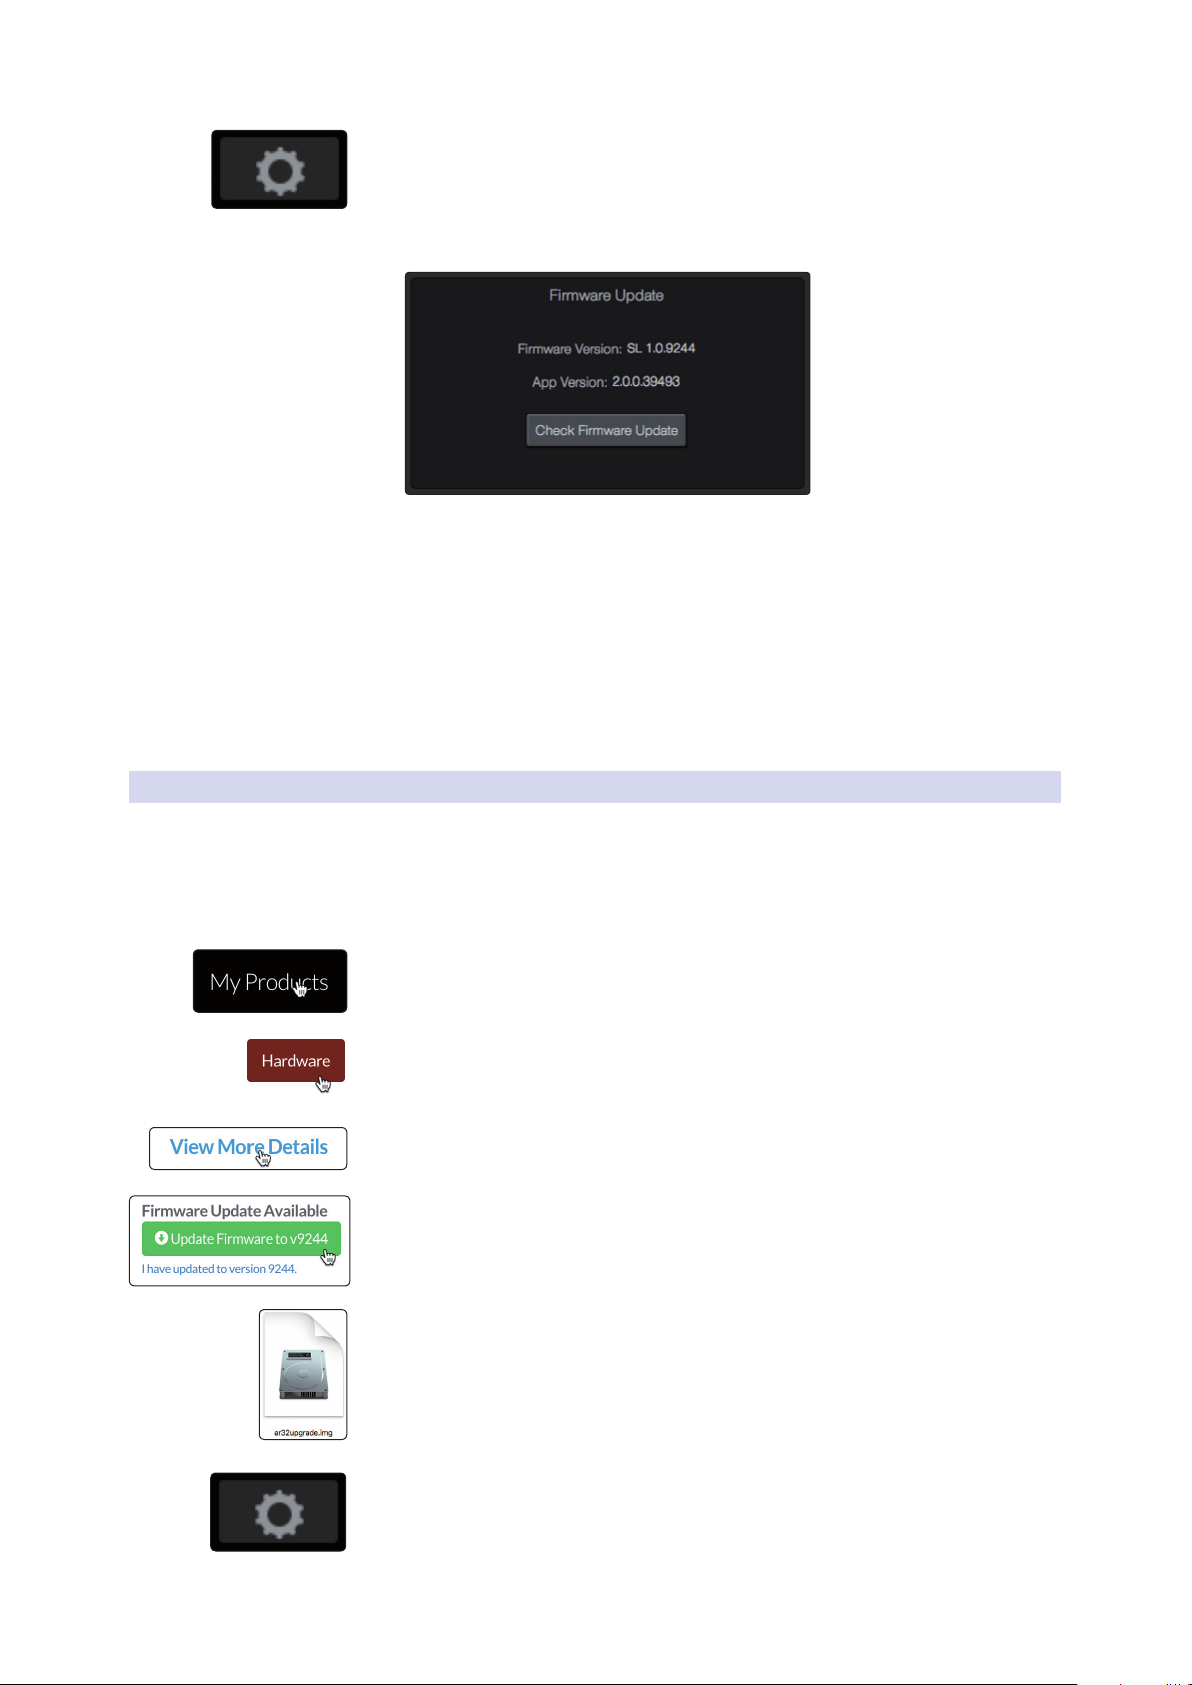
3. Click or touch the Settings icon at the top right of the UC Surface window.
4. On the Device Settings tab, click “Check Firmware Update.”
5. You will be asked if you would like to proceed
with the firmware update. Click “OK.”
6. A progress bar will be shown in UC Surface during the first part of
the firmware update. Once it is complete, UC Surface will inform you
that it is finished and will ask you to power-cycle the mixer.
StudioLive™ Series III Rack Mixers
Owner’s Manual
7. When you restart your mixer, verify that the last four digits of the firmware
version on it are the same as the firmware files you downloaded.
For more information, see the StudioLive Software Library Reference Manual.
2.3.2 Manual Firmware Updates
To manually update your mixer’s firmware, you will need a computer
with Internet access and a method to transfer the file from one
computer to another (USB Thumb drive, SD card, etc.).
1. Log in to your my.presonus.com account.
2. Once you have logged in, click the My Products button at the top of the page.
3. Click on the Hardware tab to view your registered hardware products.
4. Find your mixer model on the page and click the View More Details link.
5. Click on the update Firmware button to download the files to your computer.
6. When the download completes, open your Downloads folder. Depending on
your computer’s system preferences, the firmware .zip archive file might not
automatically decompress. If it doesn’t, double-click the file, and it will
decompress. You will find a single .img file inside. Drag it to your
removable media.
7. On the computer connected to your mixer, launch UC Surface and click on the
Settings page button.
7
 Loading...