

Page 1

RATCHET STRAP (MODEL NO. HG00921A)
LUGGAGE STRAP SET
(MODEL NO. HG00921B)
RATCHET STRAPS WITH qUICK-RELEASE
fASTENING
RATCHET STRAP / LUGGAGE
STRAP SET / RATCHET STRAPS
WITH qUICK-RELEASE
fASTENING
Operation and Safety Notes
NAPENJALNI TRAK Z RAGLJO/
KOMPLET JERMENOV
ZA ZATEGOVANJE IN
POVEZOVANJE/ POVEZOVALNA
TRAKOVA S HITRIM ZAPIRALOM
Navodila za upravljanje in varnostna opozorila
UPÍNACÍ POPRUH S
ROHATKOU / SÚPRAVA
NAPÍNACÍCH A
UPÍNACÍCH POPRUHOV
/ NAPÍNACIE POPRUHy S
RýCHLOUZáVEROM
Pokyny pre obsluhu a bezpečnostné pokyny
(MODEL NO. HG00921C)
RACSNIS RÖGZÍTŐHEVEDER/
RÖGZÍTŐHEVEDER
KÉSZLET/ GyORSZáRAS
RÖGZÍTŐHEVEDER
Kezelési és biztonsági utalások
UPÍNACÍ PáS S RáČNOU /
SADA NAPÍNACÍCH A
UPÍNACÍCH PáSŮ / UPÍNACÍ
POPRUHy S RyCHLOUZáVěREM
Pokyny pro obsluhu a bezpečnostní pokyny
SPANNGURT MIT RATSCHE /
SPANN- UND ZURRGURTSET / SPANNGURTE
MITSCHNELLVERSCHLUSS
Bedienungs- und Sicherheitshinweise
IAN 285009
Page 2

GB Operation and Safety Notes Page 5
HU Kezelési és biztonsági utalások Oldal 14
SI Navodila za upravljanje in varnostna opozorila Stran 23
CZ Pokyny pro obsluhu a bezpečnostní pokyny Strana 32
SK Pokyny pre obsluhu a bezpečnostné pokyny Strana 40
DE / AT / CH Bedienungs- und Sicherheitshinweise Seite 49
Page 3

HG00921A
HG00921B
HG00921C
Page 4

I
II
Page 5
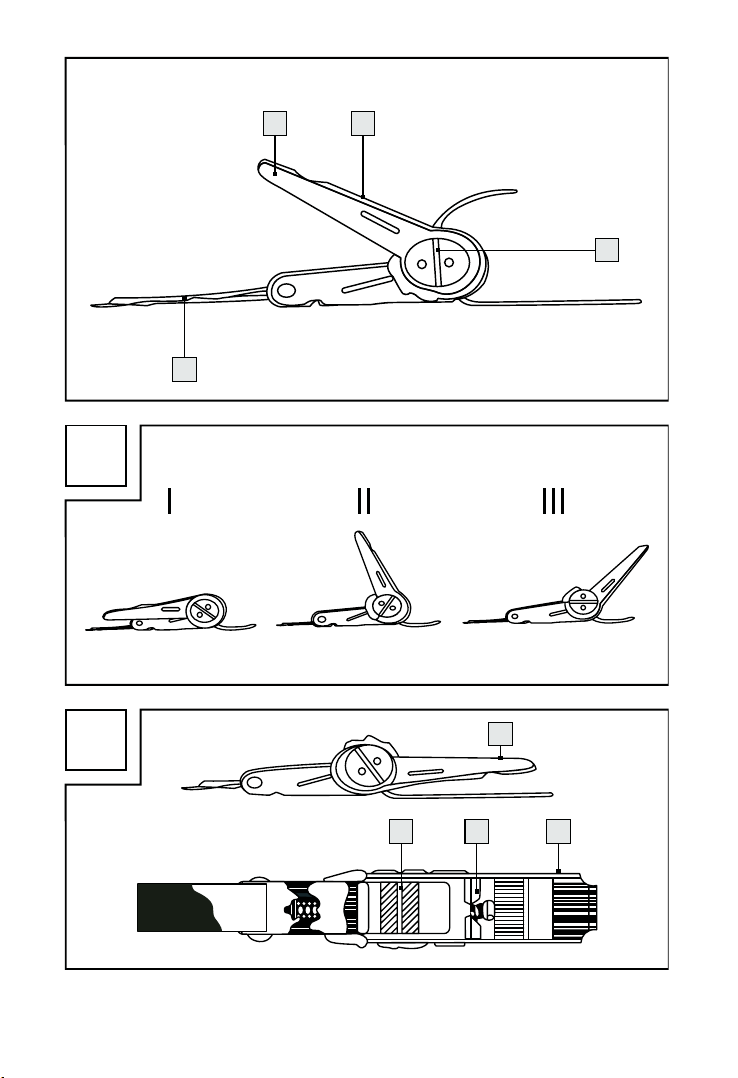
A
1
4
2
3
B
1
123
Page 6

C
5
6
Page 7

Introduction .......................................................................................................... Page 6
Intended use ............................................................................................................... Page 6
Technical data ............................................................................................................ Page 6
Scope of Delivery ......................................................................................................Page 7
Safety instructions .......................................................................................... Page 7
General Safety Instructions .......................................................................................Page 7
Safety instructions for lashing straps ......................................................................... Page 7
Practical information regarding the use
and care of lashing straps ....................................................................... Page 9
Use ............................................................................................................................... Page 10
Attaching the lashing strap ........................................................................................ Page 10
Releasing the lashing strap ........................................................................................ Page 11
Cleaning and care ........................................................................................... Page 12
Disposal ................................................................................................................... Page 12
Warranty ................................................................................................................ Page 12
5 GB
Page 8

Ratchet strap (HG00921A)
Luggage strap set (HG00921B)
Ratchet straps with quick-release fastening (HG00921C)
Q
Introduction
The instructions for use are to be considered as part of the product. They contain
important information concerning safety, use and disposal. Before using the product,
please familiarise yourself with all of the safety information and instructions for
use. The product must only be used as described and for the stated fields of application. If
you pass the product on to third parties, please give them all of the documentation as well.
Q
Intended use
The product is designed to lash, attach and secure loads. The lashing straps serve to “press“
the load down to the loading surface of a vehicle or to connect it directly with the vehicle.
They are not designed to lift or carry loads. The permissible load must not be exceeded.
Any use other than previously mentioned or any product modification is prohibited and can
lead to injuries and / or product damage. The manufacturer is not liable for any damages
caused by any use other than for the intended purpose. The product is not intended for
commercial use.
Q
Technical data
HG00921A
Length: approx. 5m (L
Permissible load (LC): 350 daN / Looped: 700 daN / S
Material: Polyester (PES)
)
G
25daN
HF
HG00921B
Length: LGF (length – fixed end): 0.26 m
LGL (length – adjustable end): 4.7 m
Permissible load (LC): 350 daN (3500 N = Newton / 350 kg (m / s
Material: Polyester (PES)
HG00921C
Length: approx. 2.5 m
Permissable load (LC): 100 daN (1000 N = Newton / 100 kg (m / s
Looped: 200 daN
Material: Polyester (PES)
6 GB
2
)) / SHF 25daN
2
)) /
Page 9

Q
Scope of Delivery
Check the delivery for completeness and condition of the product immediately after
opening and ensure all parts are included.
1 x Ratchet strap, approx. 5 m (HG00921A)
1 x Lashing strap with ratchet tensioner and S hook, approx. 0.26 m (HG00921B)
1 x Lashing strap with S-hook, approx. 4.7 m (HG00921B)
2 Lashing straps with clamping lock, approx. 2.5 m (HG00921C)
1 x Directions for use
Q
Safety instructions
Keep all the safety advice and instructions in a safe place for future
reference!
General Safety Instructions
J
of life due to strangulation. Children often underestimate this danger. Always keep
children away from this product. This product is not a toy.
J Do not use the product if you see it is damaged in any way.
J Check that all parts have been assembled correctly. Improper assembly may result in injury.
WARNING!
INFANTS AND CHILDREN! Never leave children unattended with the
packaging material. The packaging poses a risk of suffocation and danger
DANGER TO LIFE AND RISK OF ACCIDENTS FOR
Safety instructions for lashing straps
J Always check the lashing strap for damage before using it. On no account use the
lashing strap if the strap is damaged.
J Carefully check dirty straps or straps that have been contaminated with corrosive or other
materials that may damage them. You may have to ask the manufacturer to check them.
J Have the lashing straps and all components checked by an expert at least once a year.
In accordance with the conditions of use and the operational circumstances, further
checks by a professional may be necessary from time to time.
J On no account use the lashing strap if:
- there are broken threads or cuts in the thread, especially if the edges have been
nicked or there are other alarming cases of damage
- the labelling is missing or is no longer legible
- there is damage to the connections, or deformation due to exposure to heat (friction,
7 GB
Page 10

radiation)
- there is damage due to the effect of corrosive substances.
J On no account use the ratchets if:
- there are incipient tears, breakages or considerable cases of or damage from corrosion
- there is widening > 5 % (5 % in the hook mouth or general deformation)
- there is visibly permanent deformation of load-bearing parts
J Repairs to the lashing straps may only be carried out if the information regarding the
manufacturer, material and maximum permissible tensile load is clearly designated on
the label. They may only be carried out by the manufacturer or a person specified by
him. Following repair, the manufacturer or the person designated by the manufacturer
must ensure that the maximum permissible tensile load of the lashing straps as originally
specified on the label is maintained.
J Never exceed the permissible tensile load of the lashing strap as stated on the label.
(see also “Technical data”).
J Choose the most suitable lashing strap in accordance with the intended load that needs
to be lashed down, the tensile load and loading surface (see label).
CAUTION! DANGER OF ACCIDENT! When lashing using additional fittings and
lashing devices, make sure that they are suitable for the lashing strap.
J Check that the vehicle parts you wish to strap the load to are sturdy enough.
CAUTION! In addition to the accelerating forces, wind may cause lateral forces to arise
during the journey.
J Never pull the lashing strap over rough surfaces or sharp edges if they are not furnished
with suitable protection.
J Make sure that the lashing straps are not twisted and that the load is distributed across
their entire width.
J Do not place any objects onto the lashing strap if this may damage it.
J Keep lashing strap away from hot surfaces.
J Evenly distribute the lashing straps on the load to be secured.
J Never use the lashing straps to lift loads.
J Make sure you do not put any load on the tip of the S hook unless it is a hook that is
designed for such a purpose. To avoid detachment of a lashing hook without a lock in
a lashing point on the loading surface, suspend from the inside outwards.
J Never attach S hooks and ratchets to edges.
J Never extend the ratchet handle to achieve greater tensioning forces if this is not
expressly allowed by an instruction.
CAUTION! DANGER OF ACCIDENT! Always choose suitable lashing straps, lashing
points and lashing methods. The size, shape and weight of the cargo as well as the
intended mode of use, the transport environment and the type of cargo determine the
correct choice.
J To ensure the load is secured properly, the webbing needs to be wrapped around the
ratchet at least 1.5 times.
J Tighten the webbing manually as far as possible so that the belt does not need to be
8 GB
Page 11

wrapped more than 3 times around the ratchet to tighten the load.
J Do not exceed the roof load indicated by the vehicle manufacturer.
CAUTION! DANGER OF ACCIDENT! When lashing down, pay attention to the
required preload force. At least 2 lashing straps are required. For reasons of stability,
at least two lashing straps of the same kind must be used for lashing down and two
pairs of lashing straps of the same kind used for diagonal lashing.
CAUTION! DANGER OF ACCIDENT! During transportation, regularly check that
the cargo is correctly lashed and tighten the lashing strap if necessary.
Q
Practical information regarding the use
and care of lashing straps
1. In selecting and using lashing equipment, you must consider the required lashing force,
the mode of use and the type of cargo to be lashed. The size, shape and weight of
the cargo as well as the intended mode of use, the transport environment and the type
of cargo determine the correct choice. For stability reasons, at least two lashing straps
must be used for lashing down and two pairs of lashing straps used for diagonal lashing.
2. Due to different characteristics and because of different changes in length under load,
only identical lashing device combinations (e.g. lashing chains and lashing strap made
of synthetic fibres) may be used in parallel for lashing the same load. When using
additional fittings and lashing devices, make sure that they fit the lashing strap.
3.
During use, flat hooks must engage over the entire width of the bearing surface of the hook.
4. Opening the lashing: Before opening, make sure that the cargo is stable even without
being secured and does not endanger unloading personnel by falling down. If necessary,
attach blocking devices to the cargo that has been planned for further transport
beforehand in order to prevent the load falling or tipping over. This also applies if
one uses tensioning elements that make safe removal possible.
5. Before starting to unload, you must loosen the lashing until the load is free.
6. During loading and unloading attention has to be paid to proximity of any low
overhead power lines.
7. The materials from which lashing straps are made have selective resistance to chemical
attacks. Seek the advice of the manufacturer or supplier if exposure to chemicals is
anticipated. It should be noted that the effects of chemicals may increase with rising
temperatures. The resistance of synthetic fibres to chemical reactions is summarised
below:
- Polyester is affected less by mineral acids but is attacked by alkaline solutions.
- Harmless acid solutions or alkalis can become so concentrated through evaporation
that they cause damage. Contaminated lashing straps should immediately be taken
out of use, rinsed in cold water and dried in the open air.
8. This lashing straps are suitable for the following temperature ranges:
– –40 °C to +120 °C for Polyester (PES);
These temperature ranges may alter depending on the chemical environment. In this
9 GB
Page 12

event, you must seek the advice of the manufacturer or supplier. A change in the
environmental temperature during transport may affect the forces in the webbing.
Check the lashing force after entering warm regions.
9. Lashing straps must be taken out of use or returned to the manufacturer for repair if
they show any signs of damage. The following points are considered to be signs of
damage:
- for webbing (that must be taken out of use): tears, cuts, nicks and breaks in load-
bearing fibres and stitches; deformations resulting from exposure to heat.
- with end fittings and tensioning devices: deformations, cracks, pronounced signs of
wear, signs of corrosion. Only lashing straps bearing identification labels shall be
repaired. If there is any accidental contact with chemical products, the lashing strap
must be removed from service and the manufacturer or supplier consulted.
10. Care should be taken that the lashing strap is not damaged by the sharp edges of
the load on which it is used. Regular visual inspection before and after each use is
recommended.
11. Only legibly marked and labelled lashing straps may be used.
12. Lashing straps must not be overloaded: The maximum hand force of 250 N (25 daN
on the label; 1 daN ≈ 1 kg) may be applied with only one hand. Mechanical aids
such as bars or levers etc. may not be used unless they are part of the tensioning
device. (HG00921A, HG00921B)
13. Lashing straps may not be used when knotted.
14. Damage to labels must be prevented by keeping them away from sharp edges of
the load and, if possible, from the load.
15. Webbing must be protected against friction, abrasion and damage from loads with
sharp edges by using protective sleeves and / or corner protectors.
Q
Use
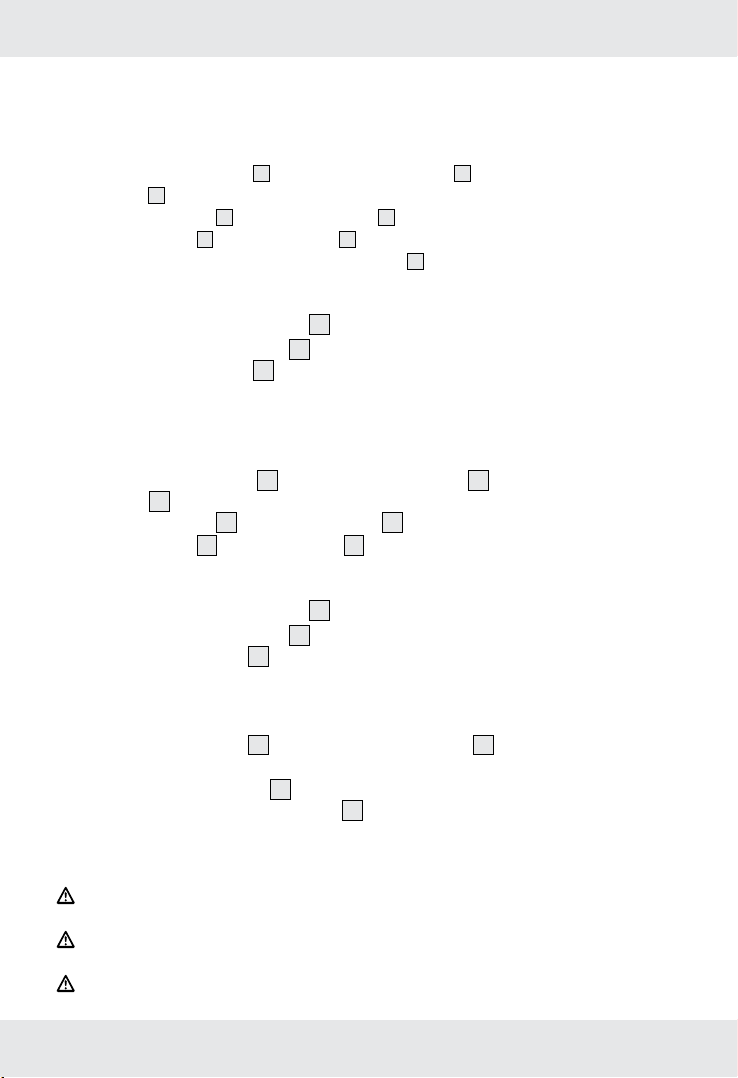
Lashing down (HG00921A, HG00921B, HG00921C):
With lashing straps stretched over it, the load is pressed down onto the loading area
(see Fig. I).
Diagonal lashing (HG00921B):
The load is secured by 4 lashing straps and directly connected to the vehicle (see Fig. II).
Q
Attaching the lashing strap
The selected lashing equipment must be strong and long enough for the intended purpose
and have the correct length for the type of lashing. Responsible users plan cargo security in
advance: they plan the attachment and removal of the lashing devices before the start of
the journey. With longer trips, partial unloading must be considered. Calculate the number
of lashing devices according to EN 12195-1. Only lashing systems labelled for lashing down
10 GB
Page 13
with STF (standard tension force) may be used for friction lashing.
HG00921A:
j Place the lashing strap around the load
j Open the ratchet handle
webbing
can be inserted into it (see Fig. A III).
4
j Insert the webbing
the slotted shaft
3
j Tighten the lashing strap by moving the handle
and place the slotted shaft 3 into the position so that the
1
into the slotted shaft 3 of the ratchet. Carefully pull it through
4
until the webbing 4 lies snug against the load.
of the ratchet backwards and
1
forwards (see Fig. A I - III). Tighten the lashing strap until you have obtained the tension
you wish to have.
Note: Make sure that webbing
times around the slotted shaft
j Bring the ratchet handle
4
is wound at least 1.5 times to a maximum of 3
.
3
into the basic position (see Fig. A I). The load is now
1
secure.
HG00921B:
j Use the S hook to securely attach the lashing strap to the load.
j Open the ratchet handle
webbing
4
can be inserted into it (see Fig. A III).
j Insert the webbing
the slotted shaft
3
until the webbing 4 lies snug against the load.
and place the slotted shaft 3 into the position so that the
1
4
into the slotted shaft 3 of the ratchet. Carefully pull it through
j Tighten the lashing strap by moving the handle of the ratchet backwards and forwards (see
Fig. A I - III). Tighten the lashing strap until you have obtained the tension you wish to have.
Note: Make sure that webbing
times around the slotted shaft
j Bring the ratchet handle
1
4
is wound at least 1.5 times to a maximum of 3
.
3
into the basic position (see Fig. A I). The load is now secure.
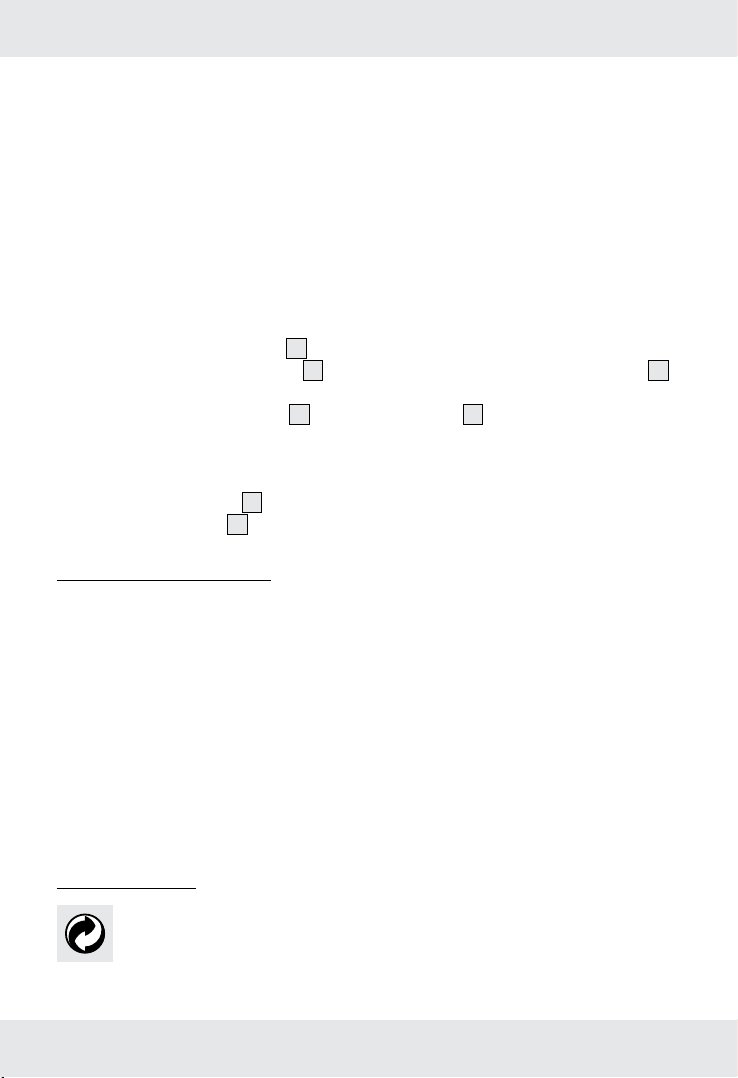
HG00921C:
j Loop the lashing strap around the load.
j Press the clamping lock
down and pass the webbing 6 through the clamping lock
5
from below (see Fig. C).
j Carefully pull the webbing
want. Then release the clamping lock
Q
Releasing the lashing strap
through the clamping lock until you get the tension you
6
.
5
CAUTION! Check before releasing the strap that the load is stable. Make sure that
the load is stable even without the lashing strap and that it cannot fall down.
CAUTION! RISK OF INJURY! Make sure that nobody is near the load when you
release the lashing strap. Falling parts could cause injuries.
CAUTION! RISK OF INJURY! When opening the lashing equipment, the preload
11 GB
Page 14

force is released at a stroke. That is why you should open the lashing strap with the utmost
caution.
Note: Before starting to unload, make sure that the lashing equipment is released so that
the load can be lifted freely.
HG00921A & HG00921B:
j Open the ratchet handle
j Press the ratchet lock
1
into the maximum position (see Fig. A III).
2
and open the ratchet handle 1 until the end stop
(see Fig. B).
j Pull the webbing
4
completely out of the slotted shaft 3 .
j Release the S hook and thus the lashing strap from the load.
HG00921C:
j Press the clamp
j Pull the webbing
Q
Cleaning and care
5
down (see Fig. C).
out of the clamping lock completely.
6
Note: Regular care will maintain the quality and functionality of the lashing strap.
j Clean the lashing strap with lukewarm water and pH-neutral cleaning agents. Avoid
corrosive detergents.
j The ratchet tensioner should be regularly cleaned and then lightly greased. When greasing
it, make sure that parts that come into contact with the webbing are not greased.
j Store the lashing strap in a dry, well-ventilated cool place.
j Avoid contact with chemicals, acids and alkalis as they may damage the lashing strap.
Q
Disposal
The packaging is made entirely of recyclable materials, which you may dispose
of at local recycling facilities.
Contact your local refuse disposal authority for more details of how to dispose of your wornout product.
Q
Warranty
The product has been manufactured to strict quality guidelines and meticulously examined
before delivery. In the event of product defects you have legal rights against the retailer of
this product. Your legal rights are not limited in any way by our warranty detailed below.
The warranty for this product is 3 years from the date of purchase. Should this product
show any fault in materials or manufacture within 3 years from the date of purchase, we
will repair or replace it – at our choice – free of charge to you.
12 GB
Page 15

The warranty period begins on the date of purchase. Please keep the original sales receipt
in a safe location. This document is required as your proof of purchase. This warranty
becomes void if the product has been damaged, or used or maintained improperly.
The warranty applies to defects in material or manufacture. This warranty does not cover
product parts subject to normal wear, thus possibly considered consumables (e.g. batteries)
or for damage to fragile parts, e.g. switches, rechargeable batteries or glass parts.
13 GB
Page 16

Bevezető .............................................................................................................. Oldal 15
Rendeltetésszerű használat ....................................................................................Oldal 15
Műszaki adatok ......................................................................................................Oldal 15
A szállítmány tartalma ............................................................................................ Oldal 16
Biztonsági tudnivalók .............................................................................. Oldal 16
Általános biztonsági tudnivalók ............................................................................. Oldal 16
A rögzítő hevederre vonatkozó biztonsági tudnivalók ......................................... Oldal 16
A rögzítő heveder használatára és
ápolására vonatkozó tudnivalók .................................................. Oldal 18
Kezelés .................................................................................................................. Oldal 19
A rögzítő heveder felhelyezése .............................................................................. Oldal 20
A rögzítő heveder kioldása .................................................................................... Oldal 21
Tisztítás és ápolás ........................................................................................ Oldal 21
Mentesítés .......................................................................................................... Oldal 21
Garancia .............................................................................................................. Oldal 22
14 HU
Page 17

Racsnis rögzítőheveder (HG00921A)
Rögzítőheveder készlet (HG00921B)
Gyorszáras rögzítőheveder (HG00921C)
Q
Bevezető
Gratulálunk új termékének vásárlása alkalmából. Ezzel egy magas minőségű
termék mellett döntött. Az első üzembevétel előtt ismerkedjen meg a készülékkel.
Ehhez figyelmesen olvassa el a következő Használati utasítást és a biztonsági
tudnivalókat. A terméket csak a leírtak szerint és a megadott felhasználási területeken
alkalmazza. Őrizze meg ezt az utasítást. A termék harmadik félnek történő továbbadása
esetén mellékelje a termék a teljes dokumentációját is.
Q
Rendeltetésszerű használat
A termék rakományok leszorítására, rögzítésére és biztosítására készült. A rögzítő hevederek
arra valók, hogy egy jármű rakományát a rakodó felületre rászorítsák, vagy közvetlenül a
járművel összekössék. Nem valók terhek megemelésére vagy hordozására. A megengedett
terhelést nem szabad túllépni. Az előbb leírtaktól eltérő alkalmazások, vagy a termék
megváltoztatása nem megengedett és sérülésekhez és / vagy a termék megkárosításához
vezethetnek. A rendeltetésétől eltérő alkalmazásokból származó károkért a gyártó nem áll
jót. A termék nem ipari használatra készült.
Q
Műszaki adatok
HG00921A
Hossza: kb. 5 m (L
Megengedett terhelés (LC): 350 daN / Hurokba kötve: 700 daN / S
Anyaga: poliészter (PES)
)
G
25daN
HF
HG00921B
Méretek: LGF (rögzített rész hossza): 0,26 m
LGL (szabad rész hossza): 4,7 m
Megengedett terhelés (LC) : 350 daN (3500 N = Newton / 350 kg (m / s
S
25daN
HF
Anyaga: poliészter (PES)
HG00921C
Długość L
: ok. 2,5 m
G
Siła maks. (LC): 100 daN (1000 N = Newton / 100 kg (m / s
Hurokba kötve: 200 daN
Materiał: Poliester (PES)
2
)) /
2
)) /
15 HU
Page 18

Q
A szállítmány tartalma
A kicsomagolás után azonnal ellenőrizze a csomagolás tartalmát, annak teljességét,
valamint a termék és az elemek kifogástalan állapotát.
1 x Racsnis rögzítőheveder, kb. 5 m (HG00921A)
1 x rögzítő heveder racsnis feszítővel és S-kampóval, kb. 0,26 m (HG00921B)
1 x rögzítő heveder S-kampóval, kb. 4,7 m (HG00921B)
2 x heveder feszítő csattal, kb. 2,5 m (HG00921C)
1 x használati utasítás
Q
Biztonsági tudnivalók
ŐriZZe MeG valaMennyi BiZtonsÁGi tudnivalÓt És utasÍtÁst a JÖvŐ
idŐ sZÁMÁra!
Általános biztonsági tudnivalók
J
veszély és a termék által stranguáció miatti életveszély áll fenn. A gyerekek gyakran lebecsülik
a veszélyeket. Tartsa a gyerekeket a terméktől mindig távol. A termék nem játékszer.
J Ne használja a terméket, ha azon károsodásokat fedez fel.
J Vizsgálja meg, hogy mindegyik részt szabályszerűen szerelték e össze. Szakszerűtlen
szerelés esetén sérülésveszély áll fenn.
FIGYELMEZTETÉS!
ÉS GYEREKEK SZÁMÁRA! Sohase hagyja a gyerekeket felügyelet nélkül
a csomagolóanyagokkal és a termékkel. A csomagolóanyagok által fulladás-
ÉLET- ÉS BALESETVESZÉLY KISGYEREKEK
A rögzítő hevederre vonatkozó biztonsági tudnivalók
J Vizsgálja meg minden egyes használat előtt a rögzítő hevedert esetleges sérülések
szempontjából. A heveder sérülései esetén a rögzítő hevedert semmiképpen se használja.
J Vizsgálja meg gondosan azokat a rögzítő hevedereket, amelyekre agresszív vagy más
a használatát veszélyeztető anyagok tapadtak, vagy azt megszennyezték. Esetleg
vizsgéltassa meg azokat a gyártóval.
J Vizsgáltassa meg a rögzítő hevedert és annak valamennyi alkotó részét évente legalább
egyszer egy szakemberrel. A használati feltételektől és az üzemelési adottságokktól
függően további szakember általi vizsgálatokra is szükség lehet.
J Sohase használja a rögzítő hevedert:
- ha a hevederben szálak elszakadtak vagy benne elvágott szálak vannak, különösen
ha a szélek vannak bevágva, vagy más aggasztó sérüléseknél
16 HU
Page 19

- hiányzó vagy már nem olvasható megjelölések esetén
- csatlakozások megkárosodása, hő hatása (surlódások, hősugarak) miatti deformációk
esetén
- agresszív anyagok hatása által bekövetkezett károsodásoknál.
J Semmiképpen se alkalmazza a racsnis feszítőt:
- repedések, törések vagy jelentős korróziós jelenségek ill. károsodások esetén
- > 5 % tágulások (5 % a kampónyílásban vagy általános deformálódások) esetén
- a teherviselő részek felismerhető deformálódásánál
J A rögzítő hevederek javítását csak akkor szabad elvégezni, ha a gyártó, az anyag és
a megengedett húzási terhelés megjelölései a címkén egyértelműen megállapíthatók. A
javításokat csak a gyártó, vagy az általa megbízott személyek végezhetik el. Azoknak
biztosítaniok kell, hogy a javítás után újra használható rögzítő heveder az eredetileg a
címkén megadott maximális feszítő erőt elérte.
J Sohase terhelje meg a rögzítő hevedert a címkén megadott megengedett feszítő erő
felett (lásd a „Műszaki adatokat“).
J Válassza ki a rögzítés módja, feszítő erő és rakodó felület szerint a megfelelő rögzítő
hevedert (lásd az megjelölő címkét).
m
VIGYÁZAT! BALESETVESZÉLY! Válassza ki mindig a megfelelő rögzítő hevedereket, rögzítési
pontokat és rögzítési módokat. A helyes kiválasztást a rakomány alakja, és súlya határozza meg,
de a szándékolt alkalmazási mód, a szállítás környezete és a rakomány jellege is.
J Bizonyosodjon meg arról, hogy a járműnek az a része, amelyhez a rakományt rögzíteni
kell elég szilárd e.
m VIGYÁZAT! A szállítás közbeni gyorsulási erők mellett oldalirányú, a szél által okozott
erők is felléphetnek.
J Sohase húzza át a rögzítő hevedert érdes felületeken vagy éles széleken, ha azok
nincsenek megfelelően védve.
J Ügyeljen arra, hogy a rögzítő hevederek legyenek elcsavarodva és a terhelést teljes
szélességükben hordozzák.
J Ne helyezzen tárgyakat a rögzítő hevederre, ha azok által megkárosodhat.
J Tartsa a rögzítő hevedert forró felületektől távol.
J Helyezze a rögzítő hevedert egyenletesen a biztosítandó rakományra.
J Sohase használja a rögzítő hevedert ütköző részként.
J Ügyeljen arra, hogy az S-kampók hegye ne legyen megterhelve: hacsak nem egy
olyan kampóról van szó, amely erre a különleges célra alkalmas. Akassza a rögzítő
kampót mindig belülről kifelé, hogy a rakodó felület egyik rögzítési pontján a biztosítás
nélküli kiakadást elkerülhesse.
J Sohase helyezze az S-kampót és a racsnis feszítőt szélekre.
J Sohase hosszabbítsa meg, magasabb feszítő erők elérésére a racsnis feszítő karját,
vagy csak akkor, ha azt egy megfelelő használati utasítás határozottan engedélyezi.
m VIGYÁZAT! BALESETVESZÉLY! A rögzítésnél kiegészítő fémeszközök és rögzítő
szerkezetek alkalmazása esetén ügyeljen arra, hogy azok a rögzítő hevederhez találjanak.
J A rakomány biztonságos rögzítéséhez a racsnis feszítőre minimum 1,5-szer kell a
17 HU
Page 20

hevedert rátekerni.
J Feszítse meg előre kézzel a racsnis feszítőt annyira, hogy a racsnis feszítőre a hevedert ne
kelljen több mint 3-szorosan feltekerni ahhoz, hogy a rakomány jól rögzítve legyen.
J Tetőterhelésnél semmiképpen se lépje túl a gyártó megadásait.
m VIGYÁZAT! BALESETVESZÉLY! A lerögzítésnél vegye figyelembe a szükséges
előfeszítő erőt. Minimum 2 rögzítő hevederre van szükség. Stabilitási okok miatt a
lerögzítéshez minimum két azonos rögzítő hevederre és az átlós irányú rögzítéshez két
pár azonos rögzítő hevederre van szükség.
m VIGYÁZAT! BALESETVESZÉLY! Ellenőrizze útközben rendszeresen a rakomány
szabályszerű rögzítését és esetleg húzza után a rögzítő hevedert.
Q
A rögzítő heveder használatára és ápolására vonatkozó
tudnivalók
1. A rögzítő hevederek kiválasztásánál és használatánál figyelembe kell venni a
szükséges leszorító erőt, valamint a használat módját és a rögzítendő rakomány
jellegét. A helyes kiválasztást a rakomány méretei, alakja, és súlya határozza meg,
de a szándékolt alkalmazási mód, a szállítás környezete és a rakomány jellege is. A
lerögzítéshez minimum két azonos rögzítő hevederre és az átlós irányú rögzítéshez
két pár azonos rögzítő hevederre van szükség.
2. A külömböző viselkedési módok és a terhelés alatti külömböző hosszúságváltozások
miatt ugyananak a rakománynak a rögzítésére külömböző rögzítő eszközöket (pld.
rögzítő láncokat és műanyagrostokból készült rögzítő hevedereket) használni nem
szabad. A rögzítésnél kiegészítő fémrészek és rögzítő szerkezetek alkalmazása esetén
ügyeljen arra, hogy azok a rögzítő hevederhez találjanak.
3.
Használat közben a lapos kampónak a teljes szélességében kell a kampóalapra felfeküdni.
4. A rögzítés felnyitása: A felnyitás előtt meg kell arról bizonyosodni, hogy a rakomány
biztosítás nélkül is a rakodási felületen biztosan álljon és a lerakót egy esetleges leesés
nem veszélyezteti. Ha szükséges, a rakomány leesésének és / vagy felborulásának a
megakadályozására máris felhasználhatók a további szállításhoz szükséges
fémeszközök. Ez akkor is érvényes, ha olyan rögzítő elemeket alkalmaz amelyek
biztonságos eltávolítást tesznek lehetővé.
5. A lerakodás előtt a rögzítést annyira kell feloldani, hogy a rakomány szabadon álljon.
6. A rakodás és lerakodás alatt ügyelni kell az esetleges mélyre lenyúló felső vezetékekre.
7. A nyersanyagok amelyekből a rögzítő hevederek készülnek, a vegyi behatásokkal
szemben külömböző ellenállóképességekkel rendelkeznek. Ha a rögzítő heveder
vegyi hatásoknak van kitéve, a gyártó vagy a forgalmazó erre vonatkozó utasításait
figyelembe kell venni. Eközben figyelembe kell venni, hogy a vegyi hatások kihatása
növekvő hőmérsékleteknél megnövekszik. A műszálak vegyi hatásokkal szembeni
ellenállóképességét a következőkben foglaltuk össze:
- A poliésztert az ásványi savak kevésbbé támadják meg. Az alkáli oldatok viszont
megkárosíthatják.
18 HU
Page 21

- Ártalmatlan sav- vagy lúg-oldatok párolgások által annyira töménnyé válhatnak,
hogy károkat okozhatnak. A szennyezett rögzítő hevedereket azonnal helyezze
üzemen kivül, mossa át hideg vizben és szárítsa meg a levegőn.
8. Ezek a rögzítő hevederek a következő hőmérsékleti tartományokban való használatra
alkalmasak:
- poliészter számára (PES)–40 °C-tól +120 °C-ig.
Ezek a hőmérsékleti tartományok a vegyi környezettől függően megváltozhatnak.
Ebben az esetben be kell szerezni a gyártó vagy a forgalmazó javaslatait. A
környezeti hőmérséklet változásai befolyásolhatják a heveder rögzítő hatását.
Melegebb területekre való érkezés esetén vizsgálja meg a heveder szorító erejét.
9. A rögzítő hevedereket üzemen kívül kell helyezni, vagy helyreállítás céljából vissza kell
küldeni a gyártóhoz, ha rajta károsodások jelei mutatkoznak. A következő pontokban
felsoroltakat lehet károsodások jeleinek minősíteni:
- a hevedereken (amelyeket üzemen kívül helyeztek): szakadások, vágások, teherviselő
rostok bemetszése és törése és hő hatására keletkezett varratok,ill. alakváltozások;
- a végek vasalt részein és a rögzítő elemeken előállt deformálodások, repedések,
erős kopási és korróziós jelek. Csak olyan rögzítő hevedereket szabad helyreállítani,
amelyek azonosítási cimkékkel rendelkeznek. Ha a rögzítő heveder véletlenül
vegyszerekkel érintkezik, helyezze azt üzemen kívül, és forduljon tanácsért a
gyártóhoz vagy a forgalmazóhoz.
10. Ügyeljen arra, hogy a rögzítő hevedert a rögzített rakomány szélei ne károsítsák
meg. A használat előtt és után rendszeres szemléléses vizsgálat elvégzését ajánljuk.
11. Csak olvasható megjelölésekkel rendelkező és cimkével ellátott rögzítő hevedereket
használjon.
12. A rögzítő hevedereket nem szabad túlterhelni: A maximális 250 N-os kézi erőt
(25 daN a cimkén; 1 daN ≈ 1 kgs) csak egy kézzel szabad alkalmazni. Mechanikai
segédeszközöket mint pld. rudakat vagy emelőkarokat stb. használni nem szabad,
vagy csak akkor, ha azok a feszítő elem részei. (HG00921A, HG00921B)
13. Bogozott rögzítő hevedereket használni nem szabad.
14. Gátolja meg a cimkék sérülését úgy, hogy azt a rakomány széleitől, és ha lehet, a
rakománytól távol tartja.
15. Óvja a hevedereket súrlódástól és dörzsöléstől, valamint éles szélekkel rendelkező
rakományoktól, védőburkolatok és / vagy élvédők használatával.
Q
Kezelés
Leszorítás (HG00921A, HG00921B, HG00921C):
A rakományt felülről rögzítő hevederekkel a rakodó felületre préselik (lásd a I ábrát).
Átlós rögzítés (HG00921B):
A rakományt 4 rögzítő hevederrel biztosítják és közvetlenül a járműhöz kötik (lásd a II ábrát).
19 HU
Page 22

Q
A rögzítő heveder felhelyezése
A kiválasztott rögzítő heveder az alkalmazás céljának megfelelően erősnek és megfelelően
hosszúnak kell lennie, hogy a hosszúsága a rögzítés módjának megfeleljen. A rögzítési
eljárásnál mindig jó ha figyelembe veszi hogy: A rögzítő hevederek felhelyezését és
eltávolítását az utazás előtt kell eltervezni. Egy hosszabb út alkalmával esetleges részleges
lerakodásokat is figyelembe kell venni. A szükséges rögzítő hevederek számát az EN 12195-1
szerint kell kiszámítani. Csak olyan rögzítési rendszereket szabad alkalmazni, amelyeket a
címkén megadott a lerögzítéshez szükséges STF-re (normál feszítő erő) készítettek.
HG00921A:
j Helyezze a rögzítő hevedert a rakomány köré.
j Nyissa fel a racsnis feszítő-kart
hevedert
j Fűzze be a hevedert
4
be tudja fűzni (lásd az A III ábrát).
4
át a hornyos tengelyen
j
Feszítse meg a rögzítő hevedert úgy, hogy a racsnis feszítő karját ide-oda mozgatja
1
és állítsa be úgy a hornyos tengelyt 3, hogy a
a racsnis feszítő hornyos tengelyébe 3. Húzza azt óvatosan
3
addig, amíg a heveder 4 a rakományon szorosan fekszik.
(lásd az A I-III ábrát). Feszítse a rögzítő hevedert addig, amíg a kívánt ráfeszülést elérte.
Utalás: Ügyeljen arra, hogy a heveder 4 legalább 1,5-szeresen és maximálisan
3-szorosan legyen a hornyos tengelyre
j Állítsa a racsnis feszítő karját
1
3
rátekerve.
az alaphelyzetébe (lásd az A I ábrát). A rakomány
most biztosítva van.
HG00921B:
j Rögzítse a rögzítő hevedert az S-kampóknál fogva biztosan a rakományra.
j Nyissa fel a racsnis feszítő-kart
hevedert
j Fűzze be a hevedert
4
be tudja fűzni (lásd az A III ábrát).
4
át a hornyos tengelyen
j
Feszítse meg a rögzítő hevedert úgy, hogy a racsnis feszítő karját ide-oda mozgatja
1
és állítsa be úgy a hornyos tengelyt 3, hogy a
a racsnis feszítő hornyos tengelyébe 3. Húzza azt óvatosan
3
addig, amíg a heveder 4 a rakományon szorosan fekszik.
(lásd az A I-III ábrát). Feszítse a rögzítő hevedert addig, amíg a kívánt ráfeszülést elérte.
Utalás: Ügyeljen arra, hogy a heveder 4 legalább 1,5-szeresen és maximálisan
3-szorosan legyen a hornyos tengelyre
j Állítsa a racsnis feszítő karját
1
3
rátekerve.
az alaphelyzetébe (lásd az A I ábrát). A rakomány
most biztosítva van.
HG00921C:
j Hurkolja a rögzítő hevedert a rakomány köré.
j Nyomja a csat nyelvét
5
lefelé és vezesse át a hevedert 6 alulról át a feszítő csaton
(lásd az C ábrát).
j Húzza át óvatosan a hevedert
engedje el a csat nyelvét
20 HU
6
a szorító csaton, amíg a kívánt feszítést elérte. Utána
5
.
Page 23
Q
A rögzítő heveder kioldása
m
VIGYÁZAT! A kioldás előtt bizonyosodjon meg róla, hogy a rakomány biztosan áll e.
Ügyeljen arra, hogy a rakomány rögzítő heveder nélkül is biztosan álljon és ne eshessen le.
m
VIGYÁZAT! SÉRÜLÉSVESZÉLY! Ügyeljen arra, hogy amikor a rögzítő hevedert leoldja,
a rakomány közelében személyek ne tarozkódjanak. Leeső részek sérüléseket okozhatnak.
m VIGYÁZAT! SÉRÜLÉSVESZÉLY! A rögzítés kioldásánál a feszítő erő egy csapásra
felszabadul. Ezért a rögzítő hevedert nagyon óvatosan nyissa fel.
Utalás: A lerakodás előtt ügyeljen arra, hogy a rögzítés annyira ki legyen oldva, hogy a
rakomány szabadon álljon.
HG00921A & HG00921B:
j Állítsa a racsnis feszítő karját
j Nyomja meg a racsni biztosítót
1
a legszélsőbb helyzetébe (lásd az A III ábrát).
2
és billentse át ütközésig a racsnis feszítő karját 1
(lásd a B ábrát).
j Húzza ki egészen a hevedert
4
a hornyos tengelyből 3.
j Oldja le az S-kampót és ezáltal a rögzítő hevedert a rakományról.
HG00921C:
j Nyomja a csat nyelvét
j Húzza ki a hevedert
Q
Tisztítás és ápolás
5
lefelé (lásd az C ábrát).
6
teljesen a csatból.
Utalás: A rendszeres ápolás biztosítéka a rögzítő heveder minőségének és
funkcionalitásának a megőrzésére.
j Tisztítsa a rögzítő hevedert langyos vizzel és ph-semleges mosószerrel. Kerülje az
agresszív tisztítószereket.
j A racsnis feszítőt rendszeresen kell tisztítani és a végén enyhén kenőzsírral bekenni. A
kenés alkalmával ügyeljen arra, hogy azokat a részeket, amelyek a hevederrel
kapcsolatba kerülnek, ne kenje be.
j Tárolja a feszítő hevedert egy száraz, jól szellőző, hűvös helyiségben.
j Kerülje el annak a vegyszerekkel, savakkal, lúgokkal való kapcsolatba kerülését, mivel
azok a rögzítő hevedert megkárosíthatják.
Q
Mentesítés
A csomagolás környezetbarát anyagokból áll, amelyeket a helyi újraértékesítési
helyeken mentesíthet.
A kiszolgált termék leselejtezési lehetőségeiről tájékozódjon a községi vagy a városi
21 HU
Page 24

önkormányzatnál.
Q
Garancia
A terméket szigorú minőségi előírások betartásával gondosan gyártottuk, és szállítás előtt
lelkiismeretesen ellenőriztük. Ha a terméken hiányosságot tapasztal, akkor a termék
eladójával szemben törvényes jogok illetik meg Önt. Ezeket a törvényes jogokat a
következőkben ismertetett garancia vállalásunk nem korlátozza.
A termékre 3 év garanciát adunk a vásárlás dátumától számítva. A garanciális idő a
vásárlás dátumával kezdődik. Kérjük, jól őrizze meg a pénztári blokkot. Ez a bizonylat
szükséges a vásárlás tényének az igazolásához.
Ha a termék vásárlásától számított 3 éven belül anyag- vagy gyártási hiba merül fel, akkor
a választásunk szerint a terméket ingyen megjavítjuk vagy kicseréljük. A garancia
megszűnik, ha a terméket megrongálták, nem szakszerűen kezelték vagy tartották karban.
A garancia az anyag- vagy gyártáshibákra vonatkozik. A garancia nem terjed ki azokra a
termékrészekre, melyek normál kopásnak vannak kitéve és ezért fogyóeszköznek
tekinthetők (pl. elemek), vagy a törékeny részekre sérülésére, pl. kapcsolók, akkuk, vagy
üvegből készült részek.
22 HU
Page 25

Uvod ............................................................................................................................ St ran 24
Namen uporabe ......................................................................................................... Stran 24
Tehnični podatki .......................................................................................................... Stran 24
Obseg dobave ............................................................................................................ Stran 25
Varnostna opozorila ..................................................................................... Stran 25
Splošna varnostna navodila ....................................................................................... Stran 25
Varnostna opozorila za privezovalne trakove ...........................................................Stran 25
Praktična navodila za uporabo
in nego privezovalnih trakov ................................................................ Stran 27
Uporaba ................................................................................................................... Stran 28
Nameščanje privezovalnega traku ............................................................................ Stran 28
Odstranjevanje privezovalnega traku ........................................................................ Stran 29
Čiščenje in nega ................................................................................................. S tran 30
Odstranjevanje .................................................................................................. Stran 30
Garancijski list .................................................................................................... Stran 31
23 SI
Page 26

Napenjalni trak z ragljo (HG00921A)
Komplet jermenov za zategovanje in povezovanje (HG00921B)
Povezovalna trakova s hitrim zapiralom (HG00921C)
Q
Uvod
Iskrene čestitke ob nakupu vašega novega izdelka. Odločili ste se za kakovosten
izdelek. Pred prvo uporabo se seznanite z izdelkom. V ta namen pozorno preberite
naslednja navodila za uporabo in varnostne napotke. Izdelek uporabljajte samo
tako, kot je opisano in samo za navedena področja uporabe. To navodilo shranite. V primeru
izročitve izdelka tretjim, jim predajte tudi vso dokumentacijo.
Q
Namen uporabe
Ta izdelek je predviden za privezovanje, pritrjevanje in varovanje tovora. Privezovalni trakovi
služijo za „pritiskanje“ tovora ob tovorno površino vozila ali direktno povezovanje z vozilom.
Niso namenjeni za dvigovanje ali nošenje tovora. Dopustne sile se ne sme prekoračiti.
Kakršnakoli drugačna uporaba, od zgoraj opisane, ali spreminjanje izdelka ni dovoljeno in
lahko vodi do povzročitve poškodb in / ali škode na izdelku. Za škodo, nastalo pri
nestrokovni uporabi, proizvajalec ne prevzame jamstva. Izdelek ni namenjen za
profesionalno uporabo.
Q
Tehnični podatki
HG00921A
Dolžina: pribl. 5 m (L
Dopustna sila (LC): 350daN / V zanki: 700 daN / S
Material: Poliester (PES)
)
G
25daN
HF
HG00921B
Dolžina: LGF (dolžina fiksnega konca): 0,26 m
LGL (dolžina premičnega konca): 4,7 m
Dopustna sila (LC): 350 daN (3500 N = Newton / 350 kg (m / s
2
)) / SHF 25daN
Material: Poliester (PES)
HG00921C
Méretek L
: kb. 2,5 m
G
Megengedett terhelés (LC) : 100 daN (1000 N = Newton / 100 kg (m / s
V zanki: 200 daN
Anyaga: poliészter (PES)
24 SI
2
)) /
Page 27
Q
Obseg dobave
Takoj ko odvijete embalažo, preverite popolnost in nepoškodovanost izdelka ter vseh delov.
1 x Napenjalni Trak Z Ragljo, pribl. 5 m (HG00921A)
1 x Privezovalni trak z ragljo in z S-kavljem, pribl. 0,26 m (HG00921B)
1 x Privezovalni trak z S-kavljem, pribl. 4,7 m (HG00921B)
2 x Privezovalni trak z vpenjalno sponko, pribl. 2,5 m (HG00921C)
1 x Navodilo za uporabo
Q
Varnostna opozorila
varnostna navodila in opoZorila shranite Za prihodnJo uporaBo!
Splošna varnostna navodila
J
embalažnega materiala in življenjska nevarnost zaradi strangulacije. Otroci pogosto
podcenjujejo nevarnosti. Otrokom nikoli ne dovolite zadrževanja v bližini izdelka. Ta
izdelek ni igrača.
J Izdelka ne uporabljajte, če kaže znake poškodb.
J Preverite, če so vsi deli pravilno montirani. Pri nepravilni montaži obstaja nevarnost poškodb.
OPOZORILO!
NESREČ ZA MALČKE IN OTROKE! Otrok z embalažnim materialom in
izdelkom nikoli ne pustite nenadzorovanih. Obstaja nevarnost zadušitve zaradi
ŽIVLJENJSKA NEVARNOST IN NEVARNOST
Varnostna opozorila za privezovalne trakove
J Pred vsako uporabo privezovalni trak prekontrolirajte, ali kaže znake poškodb.
Privezovalnega traku na noben način ne uporabljajte, če opazite poškodbe traku.
J Privezovalne trakove, ki so umazani z agresivnimi ali drugimi snovmi, ki bi lahko ogrožale
uporabo, skrbno prekontrolirajte. Eventualno jih dajte prekontrolirati proizvajalcu.
J Privezovalne trakove in vse konstrukcijske dele dajte vsaj enkrat na leto v kontrolo
strokovnjaku. Odvisno od pogojev uporabe in delovnim danostim so lahko vmes
potrebne dodatne kontrole s strani strokovnjaka.
J Privezovalnega traku na noben način ne uporabljajte pri:
-
raztrganih ali prerezanih nitih, še posebno pri zarezanih robovih ali drugih spornih poškodbah
- manjkajoči ali nečitljivi oznaki
- poškodbah spojev, spremembi oblike zaradi vpliva toplote (drgnjenje, sevanje)
- škodi, ki je posledica vpliva agresivnih snovi.
J Ragelj na noben način ne uporabljajte pri:
25 SI
Page 28

- razpokah, prelomih ali znatnim pojavom korozije oz škodi zaradi korozije
- razširitvi > 5 % (5 % v zevu kavlja ali splošnih spremembah oblike)
- opazno nepopravljivih spremembah oblike na nosilnih delih
J Popravila na privezovalnih trakovih se sme opravljati samo takrat, kadar se da oznako
proizvajalca, material in najvišjo dopustno natezno silo z etikete jasno razbrati. Popravila
sme izvajati samo proizvajalec ali od njega pooblaščeno osebje. Le-to mora zagotoviti,
da privezovalni trakovi po popravilu, ko so zopet pripravljeni na uporabo, dosežejo
najvišjo dopustno natezno silo, ki je bila prvotno navedena na etiketi.
J Privezovalnega traku nikoli ne obremenjujte preko dopustne natezne sile, navedene na
etiketi (glejte tudi „Tehnični podatki“).
J Skladno s predvideno vrsto privezovanja, natezno silo in tovorno površino izberite
ustrezni privezovalni trak (glejte označevalno etiketo).
m POZOR! NEVARNOST NESREČ! Izberite ustrezne privezovalne trakove, privezovalne
točke in privezovalne metode. Pravilno izbiro določajo velikost, oblika in teža tovora,
pa tudi nameravana vrsta uporabe, transportni pogoji in vrsta tovora.
J Prepričajte se, da so deli vozila, na katere nameravate pritrditi tovor, dovolj stabilni.
m POZOR! Poleg sil pospeška se lahko med vožnjo pojavijo tudi stranske sile zaradi vetra.
J Privezovalnega traku nikoli ne vlecite preko grobih površin ali ostrih robov, če le-ti niso
ustrezno zaščiteni.
J Pazite na to, da privezovalni trakovi niso zaviti in nosijo s celotno širino.
J Na privezovalni trak ne postavljajte predmetov, če bi le-ti privezovalni trak lahko
poškodovali.
J Privezovalni trak držite stran od vročih površin.
J Privezovalne trakove enakomerno razporedite na tovoru, ki ga želite zavarovati.
J Privezovalnih trakov nikoli ne uporabljajte kot sredstev za zadrževanje.
J Pazite na to, da S-kavlji niso obremenjeni na konici: če ne gre za kavelj, ki je primeren za
ta poseben namen uporabe. Kavelj vedno pritrdite od znotraj navzven, da preprečite
snemanje brez varovala na neki privezovalni točki na tovorni površini.
J S-kavljev in ragelj nikoli ne polagajte na robove.
J Ročaja raglje nikoli ne podaljšujte, da bi dosegli večji napon, če to ni izrecno
dovoljeno z ustreznim navodilom za uporabo.
m POZOR! NEVARNOST NESREČ! Pri uporabi dodatnih delov okovja in privezovalnih
priprav za pritrjevanje je treba paziti na to, da se le-ti ujemajo s privezovalnim pasom.
J Za varno pritrditev tovora mora biti na raglji najmanj 1,5 navitja traku.
J Trak z roko že vnaprej tako napnite, da na raglji za napenjanje tovora niso potrebni
več kot 3 navoji traku.
J Pri tovoru na strehi nikakor ne prekoračite podatkov proizvajalca.
m POZOR! NEVARNOST NESREČ! Pri privezovanju upoštevajte potrebno silo
prednapenjanja. Potrebna sta najmanj 2 privezovalna trakova. Zaradi stabilnosti je
treba za privezovanje uporabljati najmanj dva enaka privezovalna trakova in dva para
enakih privezovalnih trakov za diagonalno privezovanje.
m POZOR! NEVARNOST NESREČ! Med vožnjo redno kontrolirajte, ali je tovor še
26 SI
Page 29

vedno pravilno pritrjen in privezovalni trak po potrebi naknadno zategnite.
Q
Praktična navodila za uporabo in nego privezovalnih
trakov
1. Pri izbiri in uporabi privezovalnih trakov je treba upoštevati potrebno vlečno silo kot
tudi vrsto uporabe in vrsto tovora, ki ga nameravamo pritrditi. Pravilno izbiro določajo
velikost, oblika in teža tovora, pa tudi nameravana vrsta uporabe, transportni pogoji
in vrsta tovora. Zaradi stabilnosti je treba za privezovanje uporabljati najmanj dva
privezovalna trakova in dva para privezovalnih trakov za diagonalno privezovanje.
2.
Zaradi različnih načinov obnašanja in spreminjanja dolžine pod obremenitvijo se za isti
tovor ne sme uporabljati različnih privezovalnih sredstev (npr. privezovalnih verig in
privezovalnih trakov iz kemijskih vlaken). Pri uporabi dodatnih delov okovja in privezovalnih
priprav za pritrjevanje je treba paziti na to, da se le-ti ujemajo s privezovalnim trakom.
3. Med uporabo morajo ploščati kavlji s celotno širino ležati na tleh kavlja.
4. Odpiranje priveza: Pred odpiranjem se je treba prepričati, da tovor tudi brez varovanja
še varno stoji in razkladalca ne ogroža s padcem na tla. Če je potrebno, je treba
sredstva za zadrževanje za nadaljnji transport že predhodno pritrditi na tovor, da se
prepreči padanje in / ali prevračanje tovora. To velja tudi takrat, kadar se uporablja
napenjalne elemente, ki omogočajo varno odstranjevanje.
5. Pred začetkom raztovarjanja je treba privezovalne priprave toliko sprostiti, da tovor
prosto stoji.
6. Med natovarjanjem in raztovarjanjem je treba paziti na vse nizko viseče nadzemne
vode v bližini.
7. Materiali, iz katerih so izdelani privezovalni trakovi, razpolagajo z različno odpornostjo
proti kemičnim vplivom. Upoštevati je treba navodila proizvajalca ali dobavitelja, če
bodo privezovalni trakovi verjetno izpostavljeni kemikalijam. Pri tem je treba upoštevati,
da se posledice kemičnih vplivov pri naraščajočih temperaturah povečajo. Odpornost
umetnih vlaken proti kemičnim vplivom je povzeta v nadaljevanju:
- Poliester mineralne kisline malo načenjajo. Alkalne raztopine ga lahko poškodujejo.
- Nenevarne raztopine kislin ali lužin se lahko zaradi izhlapevanja tako skoncentrirajo,
da povzročijo škodo. Onesnažene privezovalne trakove je treba takoj vzeti iz uporabe,
sprati v hladni vodi in posušiti na zraku.
8. Ti privezovalni trakovi so primerni za uporabo v naslednjih temperaturnih območjih:
- –40 °C do +120 °C za Poliester (PES);
Ta temperaturna območja se lahko odvisno od kemičnega okolja spremenijo. V tem
primeru je treba pridobiti priporočila proizvajalca ali dobavitelja. Spreminjanje
temperature okolice med transportom lahko vpliva na moč traku. Vlečno silo je treba
po vstopu v topla območja prekontrolirati.
9. Privezovalne trakove je treba vzeti iz uporabe ali poslati nazaj proizvajalcu v popravilo,
če kažejo znake poškodb. Naslednje točke je treba obravnavati kot znake poškodb:
- pri trakovih (ki jih je treba vzeti iz uporabe): razpoke, prerezi, vrezi in prelomi vlaken
27 SI
Page 30

in šivov, ki nosijo tovor, spremembe oblike zaradi vpliva toplote;
- pri končnih delih okovja in napenjalnih elementih: spremembe oblike, razpoke, močni
znaki obrabe in korozije. Popravljati se sme samo privezovalne trakove, ki imajo etiketo
za identifikacijo. Če pride do naključnega stika s kemikalijami, je treba privezovalni
trak vzeti iz uporabe in vprašati proizvajalca ali dobavitelja o nadaljnjem ravnanju.
10. Paziti je treba na to, da se privezovalni trak na robovih tovora, na katerem je pritrjen,
ne poškoduje. Priporočeni so redni kontrolni pregledi pred vsako uporabo.
11. Uporabljati se sme samo privezovalne trakove, ki so označeni s čitljivimi etiketami.
12. Privezovalnih trakov se ne sme preobremenjevati: Maksimalno ročno silo 250 N
(25 daN na etiketi; 1 daN ≈ 1 kg) se sme izvajati samo z eno roko. Ne sme se
uporabljati mehanskih pomagal kot so palice ali vzvodi itn., razen v primeru, če so
le-te del napenjalnega elementa. (HG00921A, HG00921B)
13. Zavozlanih privezovalnih trakov se ne sme uporabljati.
14. Poškodbe etikete je treba preprečiti tako, da se etikete drži, če je to mogoče, stran
od robov tovora in stran od tovora.
15. Trakove je treba z uporabo zaščitnih prevlek in / ali ščitnikov za robove zaščititi pred
drgnjenjem in obrabo ter pred poškodbami zaradi tovora z ostrimi robovi.
Q
Uporaba
Privezovanje ob podlago (HG00921A, HG00921B, HG00921C):
Privezovalne trakove se napne preko tovora in tovor pritisne ob tovorno površino (glejte sl. I).
Diagonalno privezovanje (HG00921B):
Tovor se zavaruje s 4 privezovalnimi trakovi in pritrdi direktno na vozilo (glejte sl. II).
Q
Nameščanje privezovalnega traku
Izbrani privezovalni trak mora biti za namen uporabe tako dovolj močan kot tudi dovolj dolg
in imeti pravo dolžino glede na vrsto privezovanja. Vedno se je treba ozirati na dobro prakso
privezovanja: Nameščanje in odstranjevanje privezovalnih trakov je treba načrtovati pred
začetkom vožnje. Med daljšo vožnjo je treba upoštevati delno raztovarjanje. Število
privezovalnih trakov je treba izračunati skladno z EN 12195-1. Za privezovanje ob
podlago se sme uporabljati samo takšne privezovalne sisteme, ki so na etiketi označeni s
STF (normalna napenjalna sila) za privezovanje ob podlago.
HG00921A:
j Privezovalni trak s pomočjo S-kavlja varno pritrdite na tovor.
j Odprite ročaj raglje
4
traku
j Trak
(glejte sl. A III).
4
vdenite v gred z ozko odprtino 3 raglje. Previdno ga potegnite skozi gred z
ozko odprtino
28 SI
1
in gred z ozko odprtino 3 postavite v položaj za vdevanje
3
, dokler se trak 4 tesno ne prilega tovoru.
Page 31

j Privezovalni trak napnite, tako da ročaj raglje premikate sem in tja (glejte sl. A I-III).
Privezovalni trak napenjajte toliko časa, dokler ne dosežete želenega napona.
Opozorilo: Upoštevajte, da morajo biti na na gredi z ozko odprtino
1,5 in največ 3 navitja traku
j Ročaj raglje
1
postavite v osnovni položaj (glejte sl. A I). Tovor je zdaj zavarovan.
4
.
3
najmanj
HG00921B:
j Privezovalni trak s pomočjo S-kavlja varno pritrdite na tovor.
j Odprite ročaj raglje
4
traku
j Trak
(glejte sl. A III).
4
vdenite v gred z ozko odprtino 3 raglje. Previdno ga potegnite skozi gred z
ozko odprtino
1
in gred z ozko odprtino 3 postavite v položaj za vdevanje
3
, dokler se trak 4 tesno ne prilega tovoru.
j Privezovalni trak napnite, tako da ročaj raglje premikate sem in tja (glejte sl. A I-III).
Privezovalni trak napenjajte toliko časa, dokler ne dosežete želenega napona.
Opozorilo: Upoštevajte, da morajo biti na na gredi z ozko odprtino
1,5 in največ 3 navitja traku
j Ročaj raglje
1
postavite v osnovni položaj (glejte sl. A I). Tovor je zdaj zavarovan.
4
.
3
najmanj
HG00921C:
j Privezovalni trak ovijte okrog tovora.
j Sponko
5
pritisnite navzdol in trak 6 od spodaj speljite skozi vpenjalno sponko
(glejte sl. C).
j Trak
Q
6
previdno potegnite skozi vpenjalno sponko, dokler ne dosežete želenega
napona. Sponko
5
spustite.
Odstranjevanje privezovalnega traku
m POZOR! Pred odstranjevanjem se prepričajte, da je tovor varno stoji. Pazite na to, da
tovor tudi brez privezovalnega traku varno stoji in ne more pasti na tla.
m
POZOR! NEVARNOST POŠKODB! Pazite na to, da se v bližini tovora ne nahajajo
osebe, če bi se privezovalni trak odvezal. Na tla padajoči deli lahko povzročijo poškodbe.
m POZOR! NEVARNOST POŠKODB! Pri odpiranju privezovalne opreme se
prednapetostna sila naenkrat sprosti. Zato privezovalni trak odprite skrajno previdno.
Opozorilo: Pred začetkom raztovarjanja pazite na to, da je privez tako daleč odvezan,
da tovor prosto stoji.
HG00921A & HG00921B:
j Ročaj raglje
j Pritisnite varovalo raglje
j Trak
1
postavite v najbolj skrajni položaj (glejte sl. A III).
2
in ročaj raglje 1 odprite do konca (glejte sl. B).
4
v celoti potegnite ven iz gredi z ozko odprtino 3.
j S tovora snemite S-kavelj in s tem odstranite privezovalni trak.
29 SI
Page 32
HG00921C:
j Sponko
j Trak
Q
Čiščenje in nega
5
pritisnite navzdol (glejte sl. C).
6
v celoti potegnite ven iz vpenjalne sponke.
Opozorilo: Redna nega zagotavlja kvaliteto in delovanje privezovalnega traku.
j Privezovalni trak čistite z mlačno vodo in ph-nevtralnim pralnim sredstvom. Izogibajte se
uporabi agresivnih čistil.
j Napenjalno ragljo je treba redno čistiti in nato rahlo namazati. Pri podmazovanju pazite
na to, da se delov, ki pridejo v stik s trakom, ne maže.
j Napenjalni trak skladiščite na suhem, dobro zračenem in hladnem mestu.
j Preprečite stik s kemikalijami, kislinami in lužinami, ker le-te lahko poškodujejo
privezovalni trak.
Q
Odstranjevanje
Embalaža je sestavljena iz ekoloških materialov, ki jih lahko odlagate na
lokalnim lokacijah za recikliranjem.
O možnostih odstranjevanja izrabljenih električnih naprav vprašajte na vaši občinski ali
mestni upravi.
30 SI
Page 33

Pooblaščeni serviser:
OWIM GmbH & Co. KG
Stiftsbergstraβe 1
DE-74167 Neckarsulm
NEMČIJA
Servisna telefonska številka: 00386 (0) 80 28 60
Garancijski list
1. S tem garancijskim listom jamčimo OWIM GmbH & Co. KG da bo izdelek v garan-
cijskem roku ob normalni in pravilni uporabi brezhibno deloval in se zavezujemo, da
bomo ob izpolnjenih spodaj navedenih pogojih odpravili morebitne pomanjkljivosti in
okvare zaradi napak v materialu ali izdelavi oz. po svoji presoji izdelek zamenjali ali
vrnili kupnino.
2. Garancija je veljavna na ozemlju Republike Slovenije.
3. Garancijski rok za proizvod je 3 leta od dneva izročitve blaga. Dan izročitve blaga je
enak dnevom prodaje, ki je razviden iz računa.
4. Kupec je dolžan okvaro javiti pooblaščenemu servisu oz. se informirati o nadaljnjih
postopkih na zgoraj navedeni telefonski številki. Svetujemo vam, da pred tem natančno
preberete navodila o sestavi in uporabi izdelka.
5. Kupec je dolžan pooblaščenemu servisu predložiti garancijski list in račun, kot potrdilo
in dokazilo o nakupu.
6. V primeru, da proizvod popravlja nepooblaščeni servis ali oseba, kupec ne more
uveljavljati zahtevkov iz te garancije.
7. Vzroki za okvaro oz. nedelovanje izdelka morajo biti lastnosti stvari same, in ne vzroki,
ki so zunaj proizvajalčeve oz. prodajalčeve sfere. Kupec ne more uveljavljati zahtevkov
iz te garancije, če se ni držal priloženih navodil za sestavo in uporabo izdelka ali, če je
izdelek kakorkoli spremenjen ali nepravilno vzdrževan.
8. Jamčimo servisiranje in rezervne dele za minimalno dobo, ki je zahtevana s strani
zakonodaje.
9. Obrabni deli oz. potrošni material so izvzeti iz garancije.
10. Vsi potrebni podatki za uveljavljanje garancije se nahajajo na dveh ločenih
dokumentih (garancijski list, račun).
11. Ta garancija proizvajalca ne izključuje pravic potrošnika, ki izhajajo iz odgovor-
nosti prodajalca za napake na blagu.
Prodajalec:
Lidl Slovenija d.o.o.k.d., Pod lipami 1, SI-1218 Komenda
31 SI
Page 34

Úvod ........................................................................................................................ Strana 33
Použití ke stanovenému účelu ................................................................................. Strana 33
Technické údaje .......................................................................................................Strana 33
Rozsah dodávky ...................................................................................................... Strana 34
Bezpečnostní pokyny ............................................................................... Strana 34
Všeobecné bezpečnostní pokyny ..........................................................................Strana 34
Bezpečnostní pokyny pro zajišťovací pásy ............................................................Strana 34
Praktické pokyny kpoužití a
ošetřování zajišťovacích popruhů ................................................. Strana 36
Obsluha ................................................................................................................ Strana 37
Přiložení zajišťovacího popruhu ............................................................................. Strana 37
Uvolnění zajišťovacího popruhu .............................................................................Strana 38
Čistění a ošetřování .................................................................................... Strana 39
Likvidace ............................................................................................................. Strana 39
Záruka ................................................................................................................... Strana 39
32 CZ
Page 35

Upínací pás s ráčnou (HG00921A)
Sada napínacích a upínacích pásů (HG00921B)
Upínací popruhy s rychlouzávěrem (HG00921C)
Q
Úvod
Blahopřejeme Vám ke koupi nového výrobku. Rozhodli jste se pro kvalitní
výrobek. Před prvním uvedením do provozu se seznamte s výrobkem. K tomu si
pozorně přečtěte následující návod k obsluze a bezpečnostní pokyny. Používejte
výrobek jen popsaným způsobem a pouze pro uvedené oblasti použití. Uschovejte si,
prosím, tento návod. Všechny podklady vydejte při předání výrobku i třetí osobě.
Q
Použití ke stanovenému účelu
Výrobek je stanoven k připevnění, upevnění a zajištění nákladu. Zajišťovací pásy slouží k
tomu, aby úložnou plochu vozidla „přitlačily“ nebo přímo s vozidlem svázaly. Nejsou určeny
ke zvedání nebo nošení břemen. Nesmí se překročit přípustná síla. Kterékoliv jiné použití než
předtím popsané použití nebo změna na výrobku nejsou přípustné a mohou vést kporaněním
a / nebo poškozením výrobku. Za škody vzniklé z použití k nestanovenému účelu nepřevezme
výrobce ručení. Výrobek se nehodí pro průmyslové použití.
Q
Technické údaje
HG00921A
Délka: cca. 5 m (LG)
Přípustná síla (LC): 350 daN / Ve smyčce: 700 daN (dekanewtonů) / S
Materiál: polyester (PES)
25daN
HF
HG00921B
Délka: LGF (délka pevný konec): 0,26 m
LGL (délka volný konec): 4,7 m
Přípustná síla (LC): 350 daN ( 3500 N = newton / 350 kg ( m / s
Materiál: polyester (PES)
HG00921C
Délka L
: cca. 2,5 m
G
Přípustná síla (LC): 100 daN (1000 N = newton / 100 kg (m / s
Ve smyčce: 200 daN (dekanewtonů)
Materiál: polyester (PES)
2
)) / SHF 25daN
2
)) /
33 CZ
Page 36

Q
Rozsah dodávky
Bezprostředně po rozbalení zkontrolujte úplnost dodávky a bezvadný stav výrobku a všech
jeho částí.
1 x Upínací pás s ráčnou, cca. 5 m (HG00921A)
1 x zajišťovací popruh snapínací řehtačkou a s hákem S, cca. 0,26 m (HG00921B)
1 x zajišťovací popruh s hákem S, cca. 4,7 m (HG00921B)
2 x připevňovací popruh se svěracím zámkem, cca. 2,5 m (HG00921C)
1 x návod k obsluze
Q
Bezpečnostní pokyny
uschoveJte BeZpeČnostnÍ poKyny a nÁvody pro Budoucnost!
Všeobecné bezpečnostní pokyny
J
života strangulací. Děti často podcení nebezpečí. Chraňte výrobek před dětmi. Výrobek
není hračkou.
J Výrobek už více nepoužívejte, vykazuje-li poškození.
J Zkontrolujte, jsou-li všechny díly odborně namontovány. Při neodborné montáži existuje
nebezpečí poranění.
VÝSTRAHA!
MALÉ DĚTI A DĚTI!
a výrobkem. Existuje nebezpečí udušení obalovým materiálem a ohrožení
NEBEZPEČÍ OHROŽENÍ ŽIVOTA A ÚRAZU PRO
Nikdy nenechejte děti bez dozoru sobalovým materiálem
Bezpečnostní pokyny pro zajišťovací pásy
J Před každým použitím přezkoušejte zajišťovací popruh vzhledem kpravděpodobným
poškozením. Nikdy nepoužívejte zajišťovací popruh při poškození pásu.
J Přezkoušejte pečlivě zajišťovací popruhy, jsou-li na nich přilnuté agresivní nebo jinak použití
ohrožující látky nebo jsou-li znečištěny. Nechejte je případně přezkoušet výrobcem.
J Nechejte zajišťovací popruhy a všechny konstrukční díly aspoň jednou za rok přezkoušet
odborníkem. Podle podmínek použití a provozních vlastností mohou být čas od času
žádoucí další zkoušky odborníkem.
J Nikdy nepoužívejte zajišťovací popruh při:
- lomech nebo řezech příze, zejména při zářezech na hranách nebo jiných povážlivých
poraněních
- chybějící nebo už více nečitelné značce
- poškození spojení, deformaci působením tepla (tření, záření)
34 CZ
Page 37

- poškozeních působením agresivních látek.
J Nikdy nepoužívejte řehtačky při:
- trhlinách, lomech nebo značných jevech koroze, popř. poškození
- rozšíření > 5 % (5 % v rozevření háku nebo všeobecných deformacích)
- rozpoznatelné trvalé deformace na nosných dílech
J
Opravy na zajišťovacích popruzích se smí provést jen tehdy, lze-li jednoznačně zjistit značku
výrobce, surovinu a přípustnou nejvyšší sílu vtahu na etiketě. Smějí je vykonat jen výrobce
nebo jím pověřené osoby. Tyto musí zajistit, aby po opravě znovu kpoužití připravené
zajišťovací popruhy dosáhly nejvyšší přípustnou sílu vtahu původně danou na etiketě.
J Zajišťovací popruh nikdy nezatěžujte povolenou silou v tahu uvedenou na etiketě (viz
také „Technické údaje“).
J Zvolte podle plánovaného druhu připevnění, síly v tahu, povrchu nákladu vhodný
zajišťovací popruh (viz značku na etiketě).
m POZOR! NEBEZPEČÍ ÚRAZU! Zvolte vždy vhodné zajišťovací popruhy, zajišťovací
body a zajišťovací metodu. Velikost, tvar a hmotnost nákladu určují správný výběr, ale i
zamýšlený způsob použití, okolí přepravy a druh nákladu.
J Ujistěte se, že jsou díly vozidla, na nichž se má náklad upevnit, dostatečně stabilní.
m POZOR! Ksilám zrychlení během jízdy se mohou navíc vyskytnout boční síly vzhledem
květru.
J Nikdy netahejte zajišťovací popruh před drsné povrchy nebo ostré hrany, nejsou-li tyto
opatřeny vhodnou ochranou.
J Dbejte na to, aby nebyly zajišťovací popruhy zkroucené a nesly po celé šířce.
J Na zajišťovací popruh nestavte předměty, může-li se jimi poškodit.
J Zajišťovací popruh chraňte před horkými povrchy.
J Zajišťovací popruhy rozložte pravidelně na břemeno, které se má zajistit.
J Nikdy nepoužívejte zajišťovací popruhy jako prostředek kdorazu.
J Dbejte na to, aby nebyl hák Szatížen na špičce: pokud se nejedná o hák, který se hodí
k tomuto zvláštnímu účelu. Zavěste zajišťovací háky vždy zevnitř směrem ven, aby se
zabránilo vyvěšení bez zajištění vzajišťovacím bodě na úložné ploše.
J Nikdy nepřiložte háky Sa řehtačky na hrany.
J Nikdy neprodlužte rukojeť řehtačky, aby se dosáhlo větších napínacích sil, není-li to
výslovně podle příslušného návodu k obsluze povoleno.
m POZOR! NEBEZPEČÍ ÚRAZU! Dbejte při použití přídavných dílů kování a
zajišťovacích zařízení na to, aby se kzajišťovacímu popruhu hodily.
J K bezpečnému upevnění nákladu se musí na řehtačku umístit aspoň 1,5 vinutí pásu
popruhu.
J Přednapněte pás popruhu rukou už tak daleko, aby se kupnutí nákladu nemusela více
než 3 vinutí pásu umístit na řehtačku.
J Při střešní zátěži nikdy nepřekročte údaje výrobce.
m POZOR! NEBEZPEČÍ ÚRAZU! Při připevnění dolů dbejte na požadovanou
předpjatou sílu. Jsou zapotřebí aspoň 2 zajišťovací popruhy. Zdůvodů stability se musí
použít aspoň dva stejné zajišťovací popruhy připevnit dolů a dva páry stejných
35 CZ
Page 38

diagonálních zajišťovacích popruhů.
m POZOR! NEBEZPEČÍ ÚRAZU! Během jízdy pravidelně zkontrolujte, je-li náklad
ještě náležitě připevněn a případně zajišťovací popruh dodatečně napněte.
Q
Praktické pokyny kpoužití a
ošetřování zajišťovacích popruhů
1. Při volbě a použití zajišťovacích popruhů se musí vzít zřetel na požadovanou sílu vtahu,
jakož i na způsob použití a druh zajišťovaného nákladu. Velikost, tvar a hmotnost
nákladu určují správný výběr, ale i zamýšlený způsob použití, okolí přepravy a druh
nákladu. Zdůvodů stability se musí použít aspoň dva stejné zajišťovací popruhy
kzajištění stlačením a dva páry zajišťovacích popruhů při diagonálním zajištění.
2. Kvůli různému chování a kvůli změně délky při zátěži se nesmí různé zajišťovací
prostředky (např. zajišťovací řetězy a zajišťovací popruhy z chemických vláken)
používat k zajištění téhož břemene. Při použití přídavných dílů kování a zajišťovacích
zařízení se musí dbát na to, aby se kzajišťovacímu popruhu hodily.
3. Během použití se musí ploché háky položit scelou šířkou vzákladu háku.
4. Otevření zajištění: Před otevřením by se mělo ujistit, že náklad i bez zabezpečení
bezpečně stojí a neohrožuje vykládající osobu spadnutím dolů. Je-li třeba, musí se už
pro další přepravu plánované prostředky k dorazu na náklad umístit, aby se zabránilo
spadnutí dolů a / nebo překlopení nákladu. To se přihodí i tehdy, použijí-li se napínací
prvky, které umožňují bezpečné odstranění.
5.
Před zahájením vykládání musí být zajištění tak dalece uvolněna, aby stálo břemeno volně.
6. Během nakládání a vykládání se musí dbát na blízkost všech nízko zavěšených
venkovních vedení.
7. Suroviny, znichž jsou zajišťovací popruhy vyrobeny, disponují různou odolností proti
chemickým působením. Je třeba dbát na pokyny dodavatele, jsou-li zajišťovací popruhy
pravděpodobně vystaveny chemikáliím. Přitom je třeba mít na paměti, že se působení
chemických vlivů při vzrůstajících teplotách zvýší. Odolnost umělohmotných vláken
vůči chemickým působením je shrnuto vnásledujícím:
- Polyester je málo agresivně napaden minerálními kyselinami. Alkalická ředidla jej
mohou poškodit.
- Nevinné roztoky kyselin a louhů se mohou difúzním odpařováním koncentrovat tak,
že vyvolají škody. Znečištěné zajišťovací popruhy je zapotřebí okamžitě uvést mimo
provoz, opláchnout je ve studené vodě a na vzduchu osušit.
8. Tyto zajišťovací popruhy se hodí pro použití vnásledujících teplotních rozsazích:
- –40 °C až +120 °C pro polyester (PES);
Tyto teplotní rozsahy se mohou podle chemického okolí měnit. Vtomto případě
doporučujeme se řídit doporučeními výrobce nebo dodavatele. Změna teploty okolí
během přepravy může ovlivnit sílu vzajišťovacím popruhu. Sílu vtahu je třeba
přezkoušet po vstupu do teplých oblastí.
9. Zajišťovací popruhy se musí vzít zprovozu nebo poslat zpět výrobci kopravě,
36 CZ
Page 39

vykazují-li známky poškození. Následující body lze považovat za známky poškození.
- u pásů popruhů (které se mají vzít zprovozu): trhliny, řezy, zápichy a lomy ve
vláknech a švech nosících zátěž, deformace působením tepla;
- u koncových dílů kování a napínacích prvků: deformace, trhliny, zjevné známky
opotřebení a koroze. Opravit se smějí jen zajišťovací popruhy, které vykazují etikety
kjejich identifikaci. Dojde-li knáhodnému kontaktu schemikáliemi, musí se zajišťovací
popruh vzít zprovozu a informovat výrobce nebo dodavatel.
10. Je třeba dbát na to, aby se zajišťovací popruh nepoškodil hranami nákladu, na nichž
je umístěn. Doporučuje se pravidelná vizuální kontrola před každým použit a po něm.
11. Je třeba použít čitelně označené a etiketami opatřené zajišťovací popruhy.
12. Zajišťovací popruhy se nesmí přetížit. Maximální ruční síla 250 N (25 daN na etiketě;
1 daN ≈ 1 kg) se smí vyvinout jednou rukou. Nesmí se použít mechanické pomocné
prostředky, jako jsou tyče nebo páky atd., ledažeby tyto byly částí napínacího prvku.
(HG00921A, HG00921B)
13. Nesmí se použít zauzlené zajišťovací popruhy.
14. Poškozením na etiketách je třeba zabránit tím, že se chrání před hranami nákladu a
pokud je možné, před nákladem.
15. Pásy popruhů je třeba chránit před třením a oděrem, jakož i před poškozeními náklady
sostrými hranami použitím ochranných povlaků a / nebo chráničů hran.
Q
Obsluha
Zajištění stlačením (HG00921A, HG00921B, HG00921C):
Náklad se stlačí zajišťovacími popruhy s přepnutím na úložnou plochu (viz obr. I).
Diagonální zajištění (HG00921B):
Náklad se zajistí 4 zajišťujícími popruhy a přímo sváže s vozidlem (viz. II).
Q
Přiložení zajišťovacího popruhu
Zvolený zajišťovací popruh musí být pro účel použití jak silný, tak i dostatečně dlouhý a
vzhledem kzajišťovanému způsobu vykazovat správnou délku. Je třeba vždy dbát na dobrou
praxi zajištění. Umístění a odstranění zajišťovacích popruhů je třeba plánovat před začátkem
jízdy. Během delší jízdy je třeba přihlédnout kdílčím vykládáním. Počet zajišťovacích popruhů
je třeba počítat podle EN 12195-1. Smějí se používat k zajištění stlačením jen takové
zajišťovací popruhy, které jsou dimenzovány k zajištění stlačením s STF (běžná napínací
síla) na etiketě.
HG00921A:
j Oviňte zajišťovací pás kolem nákladu.
j Otevřete rukojeť řehtačky
pás popruhu
4
(viz obr. A III).
1
a uveďte hřídel s drážkou 3 do zaváděcí polohy pro
37 CZ
Page 40
j Zaveďte zajišťovací popruh 4 do hřídele s drážkou 3 řehtačky. Protáhněte jej oparně
hřídelem s drážkou
3
, až zajišťovací popruh 4 pevně přiléhá k nákladu.
j Zajišťovací popruh napnete tím, že pohybujete rukojetí řehtačky sem a tam (viz obr. A
I - III). Napínací pás napínejte tak dlouho, až se dosáhne požadovaného napnutí.
Upozornění: Dbejte na to, aby aspoň 1,5 až maximálně 3 vinutí zajišťovacího
popruhu
j Uveďte rukojeť řehtačky
4
byla umístěna na hřídeli s drážkou 3.
1
do základní polohy (viz obr. A I). Náklad je nyní zajištěn.
HG00921B:
j Připevněte zajišťovací popruh prostřednictvím háku S na náklad.
j Otevřete rukojeť řehtačky
pás popruhu
4
(viz obr. A III).
j Zaveďte zajišťovací popruh
hřídelem s drážkou
1
a uveďte hřídel s drážkou 3 do zaváděcí polohy pro
4
do hřídele s drážkou 3 řehtačky. Protáhněte jej oparně
3
, až zajišťovací popruh 4 pevně přiléhá k nákladu.
j Zajišťovací popruh napnete tím, že pohybujete rukojetí řehtačky sem a tam (viz obr. A
I - III). Napínací pás napínejte tak dlouho, až se dosáhne požadovaného napnutí.
Upozornění: Dbejte na to, aby aspoň 1,5 až maximálně 3 vinutí zajišťovacího
popruhu
j Uveďte rukojeť řehtačky
4
byla umístěna na hřídeli s drážkou 3.
1
do základní polohy (viz obr. A I). Náklad je nyní zajištěn.
HG00921C:
j Oviňte připevňovací pás kolem nákladu.
j Přitlačte svěrku
j Veďte pás popruhu
Pak svěrku
Q
Uvolnění zajišťovacího popruhu
5
dolů a veďte pás popruhu 6 zdola svěracím zámkem (viz obr. C).
6
opatrně svěracím zámkem, až se dosáhne požadovaného na
5
uvolněte.
m POZOR! Před uvolněním se ujistěte, že náklad bezpečně stojí. Dbejte na to, aby náklad
stál i bez zajišťovacího pásu a nemohl spadnout dolů.
m
POZOR! NEBEZPEČÍ PORANĚNÍ! Dbejte na to, aby se žádné osoby nenacházely
vblízkosti nákladu, uvolňujete-li zajišťovací popruh. Dolů spadlé díly mohou způsobit poranění.
m POZOR! NEBEZPEČÍ PORANĚNÍ! Při otevření zajištění se předpjatá síla jedním
rázem uvolní. Zajišťovací popruh proto otevřete snejvětší opatrností.
Upozornění: Před zahájením vykládání dbejte na to, aby bylo zajištění tak dalece
uvolněno, aby stál náklad volně.
HG00921A & HG00921B:
j Uveďte rukojeť řehtačky
j Stiskněte pojistku řehtačky
1
do nejkrajnější polohy (viz obr. A III).
2
a překlopte dolů rukojeť řehtačky 1 až na koncový
doraz (viz obr. B).
j Vytáhněte pás popruhu
38 CZ
4
úplně zhřídele sdrážkou 3.
Page 41
j Uvolněte hák Sa tím zajišťovací popruh znákladu.
HG00921C:
j Přitlačte svěrku
j Vytáhněte pás popruhu
Q
Čistění a ošetřování
5
dolů (viz obr. C).
6
úplně ze svěracího zámku.
Upozornění: Pravidelné ošetřování zajišťuje jakost a funkčnost zajišťovacího popruhu.
j Zajišťovací popruh čistěte vlažnou vodou a mycím prostředkem sneutrálním pH.
Vyhněte se agresivním čisticím prostředkům.
j Napínací řehtačka by se měla čistit pravidelně a pak mírně namazat. Při mazání dbejte na
to, aby oblasti, které přijdou do styku se zajišťovacím popruhem, nebyly namazány.
j Zajišťovací popruh skladujte na suchém, dobře větraném, chladném místě.
j Vyhněte se kontaktu schemikáliemi, kyselinami a louhy, neboť tyto mohou zajišťovací
popruh poškodit.
Q
Odstranění do odpadu
Obal se skládá z ekologicky vhodných materiálů, které můžete jednoduše
zlikvidovat prostřednictvím místních recyklačních středisek.
Informujte se o možnostech odstranění použitého výrobku do odpadu u Vaší místní obecní
nebo městské správy.
Q
Záruka
Výrobek byl vyroben s nejvyšší pečlivostí podle přísných kvalitativních směrnic a před
odesláním prošel výstupní kontrolou. V případě závad máte možnost uplatnění zákonných
práv vůči prodejci. Vaše práva ze zákona nejsou omezena naší níže uvedenou zárukou.
Na tento artikl platí 3 záruka od data zakoupení. Záruční lhůta začíná od data zakoupení.
Uschovejte si dobře originál pokladní stvrzenky. Tuto stvrzenku budete potřebovat jako
doklad o zakoupení.
Pokud se do 3 let od data zakoupení tohoto výrobku vyskytne vada materiálu nebo výrobní
vada, výrobek Vám – dle našeho rozhodnutí – bezplatně opravíme nebo vyměníme. Tato
záruka zaniká, jestliže se výrobek poškodí, neodborně použil nebo neobdržel pravidelnou
údržbu.
Záruka platí na vady materiálu a výrobní vady. Tato záruka se nevztahuje na díly výrobku
podléhající opotřebení (např. na baterie), dále na poškození křehkých, choulostivých dílů,
např. vypínačů, akumulátorů nebo dílů zhotovených ze skla.
39 CZ
Page 42

Úvod ........................................................................................................................ Strana 41
Používanie v súlade s určením ................................................................................Strana 41
Technické údaje .......................................................................................................Strana 41
Obsah dodávky ...................................................................................................... Strana 42
Bezpečnostné pokyny.............................................................................. Strana 42
Všeobecné bezpečnostné pokyny ......................................................................... Strana 42
Bezpečnostné pokyny k upevňovacím popruhom ................................................Strana 42
Praktické pokyny k používaniu
a údržbe upevňovacích popruhov .................................................Strana 44
Obsluha ................................................................................................................ Strana 45
Založenie upevňovacieho popruhu .......................................................................Strana 46
Uvoľnenie upevňovacieho popruhu .......................................................................Strana 47
Čistenie a údržba .......................................................................................... Strana 47
Likvidácia ............................................................................................................ Strana 48
Záruka ................................................................................................................... Strana 48
40 SK
Page 43

Upínací popruh s rohatkou (HG00921A)
Súprava napínacích a upínacích popruhov (HG00921B)
Napínacie popruhy s rýchlouzáverom (HG00921C)
Q
Úvod
Blahoželáme Vám ku kúpe Vášho nového výrobku. Kúpou ste sa rozhodli pre
vysoko kvalitný produkt. Pred prvým uvedením do prevádzky sa oboznámte s
výrobkom. Za týmto účelom si pozorne prečítajte nasledujúci návod na obsluhu a
bezpečnostné pokyny. Výrobok používajte iba v súlade s popisom a v uvedených oblastiach
používania. Tento návod na obsluhu si uschovajte. Ak výrobok odovzdáte ďalšej osobe,
priložte k nemu aj všetky podklady.
Q
Používanie v súlade s určením
Výrobok je určený na prichytenie, upevnenie a zaistenie nákladu. Upevňovacie popruhy
slúžia na „pritlačenie“ nákladu k ložnej ploche vozidla alebo na jeho priame spojenie s
vozidlom. Nie sú určené na dvíhanie alebo prenášanie bremien. Prípustná sila sa nesmie
prekročiť. Iné použitie, ako je opísané vyššie, alebo úprava výrobku je neprípustná a môže
viesť k poraneniam a / alebo k poškodeniam výrobku. Výrobca nepreberá ručenie za škody
vzniknuté v dôsledku používania v rozpore s určením. Výrobok nie je určený na komerčné
použitie.
Q
Technické údaje
HG00921A
Dĺžka: cca 5 m (L
Prípustná sila (LC): 350 daN / Slučkové: 700 daN / S
Materiál: polyester (PES)
)
G
25daN
HF
HG00921B
Dĺžka: LGF (dĺžka pevného konca): 0,26 m
LGL (dĺžka voľného konca): 4,7 m
Prípustná sila (LC): 350 daN ( 3500 N = Newton / 350 kg ( m / s
Materiál: polyester (PES)
HG00921C
Délka L
: cca. 2,5 m
G
Přípustná síla (LC): 100 daN (1000 N = newton / 100 kg (m / s
Materiál: polyester (PES)
2
)) / SHF 25daN
2
)) / Slučkové: 200 daN
41 SK
Page 44

Q
Obsah dodávky
Bezprostredne po rozbalení skontrolujte rozsah dodávky čo sa týka kompletnosti i bezchybnosti
stavu výrobku a všetkých jeho častí.
1 x Upínací popruh s račňou, cca 5 m (HG00921A)
1 x Upevňovací popruh s upínacou račňou a hákom v tvare S, cca 0,26 m (HG00921B)
1 x Upevňovací popruh s hákom v tvare S, cca 4,7 m (HG00921B)
2 x Připevňovací popruh se svěracím zámkem, cca. 2,5 m (HG00921C)
1 x Návod na obsluhu
Q
Bezpečnostné pokyny
vŠetKy BeZpeČnostnÉ aostatnÉ poKyny si uschovaJte pre prÍpad
potreBy vBudÚcnosti!
Všeobecné bezpečnostné pokyny
J
nebezpečenstvo zadusenia obalovým materiálom a nebezpečenstvo ohrozenia života v
dôsledku uškrtenia. Deti často podceňujú nebezpečenstvá. Deti držte vždy mimo dosahu
výrobku. Výrobok nie je určený na hranie.
J Výrobok nepoužívajte, ak je poškodený.
J Skontrolujte, či sú všetky časti správne namontované. Pri nesprávnej montáži existuje
nebezpečenstvo poranenia.
VAROVANIE!
NEBEZPEČENSTVO ÚRAZU PRE MALÉ I STARŠIE DETI! Nikdy
nenechávajte deti bez dozoru s obalovým materiálom a výrobkom. Existuje
NEBEZPEČENSTVO OHROZENIA ŽIVOTA A
Bezpečnostné pokyny k upevňovacím popruhom
J Pred každým použitím skontrolujte možné poškodenia upevňovacieho popruhu.
Upevňovací popruh v žiadnom prípade nepoužívajte vtedy, ak je poškodený pás.
J Dôkladne skontrolujte zašpinené upevňovacie popruhy, alebo popruhy napadnuté
agresívnymi látkami či inými látkami ohrozujúcimi ich použitie. V prípade potreby
poverte ich kontrolou výrobcu.
J Upevňovacie popruhy a všetky konštrukčné časti dajte raz ročne skontrolovať odborníkovi.
V závislosti od podmienok použitia a prevádzkových daností môžu byť medzičasom
potrebné ďalšie kontroly zo strany odborníka.
J Upevňovací popruh v žiadnom prípade nepoužívajte v nasledujúcich prípadoch:
- pretrhnuté alebo prerezané vlákna, najmä zárezy na hranách alebo iné podozrivé
42 SK
Page 45

narušenia
- chýbajúce alebo nečitateľné označenie
- poškodenie spojov, deformácia vplyvom tepla (trenie, žiarenie)
- škody v dôsledku pôsobenia agresívnych látok.
J Račne v žiadnom prípade nepoužívajte v nasledujúcich prípadoch:
- natrhnuté miesta, pretrhnutia alebo výrazné prejavy korózie, resp. škody spôsobené
koróziou
- natiahnutie > 5 % (5 % v hrdle háčika alebo všeobecné deformácie)
- zjavne trvalá deformácia nosných častí
J Opravy upevňovacích popruhov sa smú vykonávať len vtedy, ak na etikete možno
jednoznačne stanoviť označenie výrobcu, materiálu a prípustnej maximálnej ťažnej sily.
Opravy smie vykonávať len výrobca alebo ním poverené osoby. Tie musia zabezpečiť,
aby upevňovacie popruhy, ktoré sú po oprave opäť pripravené na použitie, dosahovali
prípustnú maximálnu ťažnú silu pôvodne uvedenú na etikete.
J Upevňovací popruh nikdy nezaťažujte nad prípustnú ťažnú silu uvedenú na etikete
(pozri taktiež „Technické údaje“).
J V súlade s plánovaným spôsobom upnutia, ťažnou silou a povrchom nákladu zvoľte
vhodný upevňovací popruh (pozri etiketu s označeniami).
m POZOR! NEBEZPEČENSTVO NEHODY! Vždy zvoľte vhodné upevňovacie popruhy,
miesta na upevnenie nákladu a metódu upevnenia. Veľkosť, tvar a hmotnosť nákladu určuje
správny výber, ale aj plánovaný spôsob použitia, prepravné prostredie a druh nákladu.
J Uistite sa, že časti vozidla, ku ktorým sa má náklad pripevniť, sú dostatočne stabilné.
m POZOR! Okrem síl zrýchlenia počas jazdy sa môžu vyskytnúť bočné sily spôsobené
vetrom.
J Upevňovací popruh nikdy nepreťahujte cez drsné povrchy alebo ostré hrany, ak nie sú
vybavené vhodnou ochranou.
J Dávajte pozor na to, aby upevňovacie popruhy neboli pretočené a niesli záťaž celou šírkou.
J Na upevňovací popruh neklaďte žiadne predmety, ak by sa pritom popruh mohol poškodiť.
J Upevňovací popruh držte mimo dosahu horúcich povrchov.
J Upevňovacie popruhy rozdeľte rovnomerne na zaisťovaný náklad.
J Upevňovacie popruhy nikdy nepoužívajte ako viazací prostriedok.
J Dávajte pozor na to, aby háky v tvare S neboli zaťažené na hrote: pokiaľ nejde o hák, ktorý
je vhodný na tento osobitný účel. Upevňovací hák vešajte vždy zvnútra smerom von, aby
sa zabránilo vypnutiu bez zaistenia v mieste na upevnenie nákladu na ložnej ploche,
J Háky v tvare S a račne nikdy neprikladajte k hranám.
J Nikdy nepredlžujte račňovú rukoväť, aby ste dosiahli vyššie upínacie sily, pokiaľ to nie
je výslovne dovolené v príslušnom návode na obsluhu.
m POZOR! NEBEZPEČENSTVO NEHODY! Pri používaní dodatočných častí kovania
a upevňovacích zariadení pri upevňovaní dbajte na to, aby boli kompatibilné s
upevňovacím popruhom.
J Pre bezpečné upevnenie nákladu treba na račňu natočiť minimálne 1,5 vinutia pásu
popruhu.
43 SK
Page 46

J Pás popruhu vopred napnite rukou tak, aby sa na račňu nemuseli natočiť viac ako 3
vinutia pásu pre upnutie nákladu.
J Pri zaťažení strechy v žiadnom prípade neprekračujte údaje výrobcu.
m POZOR! NEBEZPEČENSTVO NEHODY! Pri upevňovaní nákladu o podklad
nezabúdajte na potrebnú napínaciu silu. Potrebné sú minimálne 2 upevňovacie
popruhy. Z dôvodov stability sa musia použiť minimálne dva rovnaké upevňovacie
popruhy na upevnenie o podklad a dva páry rovnakých upevňovacích popruhov pri
diagonálnom upevňovaní.
m POZOR! NEBEZPEČENSTVO NEHODY! Počas jazdy pravidelne kontrolujte, či je
náklad stále riadne upevnený a v prípade potreby upevňovací pás dotiahnite.
Q
Praktické pokyny k používaniu a údržbe upevňovacích
popruhov
1. Pri výbere a používaní upevňovacích popruhov sa musí zohľadniť potrebná upevňovacia
sila, ako aj spôsob použitia a druh upevňovaného nákladu. Veľkosť, tvar a hmotnosť
nákladu určuje správny výber, ale aj plánovaný spôsob použitia, prepravné prostredie
a druh nákladu. Z dôvodov stability sa musia použiť minimálne dva upevňovacie
popruhy na upevnenie o podklad a dva páry upevňovacích popruhov pri
diagonálnom upevňovaní.
2. Vzhľadom na rozdielne správanie a zmenu dĺžky pri zaťažení sa rozdielne upevňovacie
prostriedky (napr. upevňovacie reťaze a upevňovacie popruhy z chemických vlákien)
nesmú používať na upevňovanie toho istého nákladu. Pri používaní dodatočných častí
kovania a upevňovacích zariadení pri upevňovaní dbajte na to, aby boli kompatibilné
s upevňovacím popruhom.
3. Počas používania musia ploché háky celou šírkou priliehať k spodnej časti háku.
4. Otváranie upevnenia: Pred otvorením by ste sa mali uistiť, či je náklad aj bez zaistenia
stále stabilný a či neohrozuje pádom osoby vykonávajúce vykládku. V prípade potreby
pripevnite k nákladu už vopred prostriedky na viazanie určené pre ďalšiu prepravu, aby
sa zabránilo pádu a / alebo prevrhnutiu nákladu. Platí to aj vtedy, keď sa používajú
upínacie prvky, ktoré umožňujú bezpečné odstránenie.
5. Pred začiatkom vykládky sa upevnenia nákladu musia uvoľniť natoľko, aby náklad
voľne stál.
6. Počas nakládky a vykládky treba dávať pozor na blízkosť akýchkoľvek nízko visiacich
nadzemných vedení.
7. Materiály, z ktorých sú upevňovacie popruhy vyrobené, disponujú rozdielnou
odolnosťou voči chemickým vplyvom. Riaďte sa pokynmi výrobcu alebo dodávateľa,
pokiaľ budú upevňovacie popruhy pravdepodobne vystavené chemikáliám. Pritom by
sa malo zohľadniť, že účinky chemického vplyvu sa zvyšujú pri stúpajúcich teplotách.
Odolnosť umelých vlákien voči chemickým vplyvom je zhrnutá v nasledujúcich riadkoch:
- Polyester málo napádajú minerálne kyseliny. Alkalické roztoky ho môžu poškodiť.
44 SK
Page 47

- Neškodné roztoky kyselín alebo zásad môžu v dôsledku odparovania nadobudnúť
takú koncentráciu, že spôsobia škody. Zašpinené upevňovacie popruhy treba ihneď
vyradiť z prevádzky, opláchnuť ich v studenej vode a vysušiť na vzduchu.
8. Tieto upevňovacie popruhy sú vhodné na použitie v rámci nasledujúcich teplotných
intervalov:
- –40 °C až +120 °C pre polyester (PES);
Tieto teplotné intervaly sa môžu meniť v závislosti od chemického prostredia. V takom
prípade sa riaďte odporúčaniami výrobcu alebo dodávateľa. Zmena teploty okolia
počas prepravy môže ovplyvniť silu v páse popruhu. Upevňovaciu silu je potrebné
skontrolovať pred vstupom do teplých regiónov.
9. Upevňovacie popruhy sa musia vyradiť z prevádzky alebo odoslať výrobcovi na
opravu vtedy, keď sa na nich objavia príznaky poškodenia. Za príznaky poškodenia
treba považovať nasledujúce body:
- pri pásoch popruhov (ktoré sa majú vyradiť z prevádzky): trhliny, zárezy, vruby a
pretrhnutia nosných vlákien a švov, deformácie v dôsledku pôsobenia tepla;
- pri koncových častiach kovania a upínacích prvkoch sú to deformácie, trhliny, výrazné
príznaky opotrebovania a korózie. Opravovať sa smú len upevňovacie popruhy,
ktoré sú vybavené identifikačnými etiketami. Ak dôjde k náhodnému kontaktu s
chemikáliami, musí sa upevňovací popruh vyradiť z prevádzky a treba sa
skontaktovať s výrobcom alebo dodávateľom.
10. Dávajte pozor na to, aby sa upevňovací popruh nepoškodil na hranách nákladu, ku
ktorému je pripevnený. Odporúča sa pravidelná vizuálna kontrola pred a po každom
použití.
11. Používajte len čitateľne označené upevňovacie popruhy vybavené etiketou.
12. Upevňovacie popruhy sa nesmú preťažovať: Maximálna manuálna sila 250 N
(25 daN na etikete; 1 daN ≈ 1 kg) sa smie vyvinúť len s použitím jednej ruky. Nesmú
sa používať mechanické pomôcky, ako napr. tyče alebo páky, atď., okrem prípadov,
ak sú súčasťou upínacieho prvku. (HG00921A, HG00921B)
13. Zauzlené upevňovacie popruhy sa nesmú používať.
14. Vyhýbajte sa poškodeniu etikiet, tým že ich nebudete umiestňovať do blízkosti hrán
nákladu a podľa možnosti ani do blízkosti samotného nákladu.
15. Pásy popruhov chráňte pred trením a otieraním, ako aj pred poškodením nákladom s
ostrými hranami používaním ochranných poťahov a / alebo chráničov hrán.
Q
Obsluha
Upevňovanie o podklad (HG00921A, HG00921B, HG00921C):
Náklad sa upne pomocou upevňovacích popruhov a pritlačí sa k ložnej ploche (pozri obr. I).
Diagonálne upevňovanie (HG00921B):
Náklad sa zaistí 4 upevňovacími popruhmi a priamo sa spojí s vozidlom (pozri obr. II).
45 SK
Page 48
Q
Založenie upevňovacieho popruhu
Zvolený upevňovací popruh musí byť pre daný účel použitia silný a dostatočne dlhý a musí
mať správnu dĺžku z hľadiska spôsobu upevnenia. Vždy je potrebné vziať do úvahy zaužívanú
prax upevňovania: Montáž a odstraňovanie upevňovacích popruhov treba naplánovať
pred začiatkom jazdy. Počas dlhšej jazdy treba zohľadniť čiastkové vykládky. Počet
upevňovacích popruhov treba vypočítať podľa EN 12195-1. Na upevňovanie o podklad
sa smú používať len také upevňovacie systémy, ktoré sú podľa údajov na etikete
konštruované na upevňovanie o podklad pomocou STF (bežná upínacia sila).
HG00921A:
j Upevňovací popruh bezpečne pripevnite pomocou háku v tvare S k nákladu.
j Otvorte račňovú rukoväť
pásu popruhu
j Pás popruhu
4
4
navlečte do drážkového hriadeľa 3 račne. Pretiahnite ho opatrne
cez drážkový hriadeľ
1
a drážkový hriadeľ 3 presuňte do polohy pre navlečenie
(pozri obr. A III).
3
, až kým nebude pás popruhu 4 tesne priliehať k nákladu.
j Napnite upevňovací popruh, tým že budete račňovou rukoväťou pohybovať sem a tam
(pozri obr. A I - III). Upevňovací popruh napínajte dovtedy, kým sa nedosiahne požadované napnutie.
Upozornenie: Dbajte na to, aby na drážkovom hriadeli
1,5 a maximálne 3 vinutia pásu popruhu
j Račňovú rukoväť
1
presuňte do základnej polohy (pozri obr. A I). Náklad je teraz
4
.
3
boli natočené minimálne
zaistený.
HG00921B:
j Upevňovací popruh bezpečne pripevnite pomocou háku v tvare S k nákladu.
j Otvorte račňovú rukoväť
pásu popruhu
j Pás popruhu
4
4
navlečte do drážkového hriadeľa 3 račne. Pretiahnite ho opatrne
cez drážkový hriadeľ
1
a drážkový hriadeľ 3 presuňte do polohy pre navlečenie
(pozri obr. A III).
3
, až kým nebude pás popruhu 4 tesne priliehať k nákladu.
j Napnite upevňovací popruh, tým že budete račňovou rukoväťou pohybovať sem a tam
(pozri obr. A I - III). Upevňovací popruh napínajte dovtedy, kým sa nedosiahne požadované napnutie.
Upozornenie: Dbajte na to, aby na drážkovom hriadeli
1,5 a maximálne 3 vinutia pásu popruhu
j Račňovú rukoväť
1
presuňte do základnej polohy (pozri obr. A I). Náklad je teraz
4
.
3
boli natočené minimálne
zaistený.
HG00921C:
j Upevňovací popruh obtočte okolo nákladu.
j Zvierku
5
zatlačte nadol a pás popruhu 6 prevlečte zdola cez zvierací zámok
(pozri obr. C).
46 SK
Page 49
j Pás popruhu 6 pretiahnite opatrne cez zvierací zámok, až kým nedosiahnete poža-
dované napnutie. Zvierku
Q
Uvoľnenie upevňovacieho popruhu
5
následne pustite.
m POZOR! Pred uvoľňovaním sa uistite, že náklad je stabilný. Dbajte na to, aby bol
náklad stabilný aj bez upevňovacieho popruhu a nemohol spadnúť.
m POZOR! NEBEZPEČENSTVO PORANENIA! Dbajte na to, aby sa v blízkosti
nákladu pri uvoľňovaní upevňovacieho popruhu nenachádzali žiadne osoby. Padajúce
časti môžu viesť k poraneniam.
m POZOR! NEBEZPEČENSTVO PORANENIA! Pri otváraní upevňovacieho
popruhu sa napínacia sila uvoľní jedným úderom. Upevňovací popruh preto otvárajte s
maximálnou opatrnosťou.
Upozornenie: Pred začiatkom vykládky dbajte na to, aby bolo upevnenie uvoľnené
natoľko, aby náklad stál voľne.
HG00921A & HG00921B:
j Račňovú rukoväť
j Stlačte račňovú poistku
1
presuňte do krajnej polohy (pozri obr. A III).
2
a račňovú rukoväť 1 preklopte až do koncového dorazu
(pozri obr. B).
j Pás popruhu
4
vytiahnite z drážkového hriadeľa 3.
j Uvoľnite hák v tvare S, a tým aj upevňovací popruh z nákladu.
HG00921C:
j Zvierku
j Pás popruhu
5
zatlačte nadol (pozri obr. C).
6
úplne vytiahnite zo zvieracieho zámku.
Q
Čistenie a údržba
Upozornenie: Pravidelná údržba zabezpečuje kvalitu a funkčnosť upevňovacieho popruhu.
j Upevňovací popruh čistite vlažnou vodou a prostriedkom na umývanie s neutrálnym
pH. Vyhýbajte sa agresívnym čistiacim prostriedkom.
j Upínacia račňa by sa mala pravidelne čistiť a následne jemne namazať. Pri mazaní
dbajte na to, aby sa nemazali časti prichádzajúce do styku s pásom popruhu.
j Upínací pás skladujte na suchom, dobre vetranom, chladnom mieste.
j Vyhýbajte sa kontaktu s chemikáliami, kyselinami a zásadami, pretože tie môžu upevňovací
popruh poškodiť.
47 SK
Page 50

Q
Likvidácia
Obal sa skladá z ekologických materiálov, ktoré môžete likvidovať prostredníctvom
miestnych recyklačných stredísk.
Informácie o možnostiach likvidácie opotrebovaného produktu získate na Vašej správe
obce alebo mesta.
Q
Záruka
Tento výrobok bol dôkladne vyrobený podľa prísnych akostných smerníc a pred dodaním
svedomito testovaný. V prípade nedostatkov tohto výrobku Vám prináležia zákonné práva
voči predajcovi produktu. Tieto zákonné práva nie sú našou nižšie uvedenou zárukou
obmedzené.
Na tento produkt poskytujeme 3-ročnú záruku od dátumu nákupu. Záručná doba začína
plynúť dátumom kúpy. Starostlivo si prosím uschovajte originálny pokladničný lístok. Tento
doklad je potrebný ako dôkaz o kúpe.
Ak sa v rámci 3 rokov od dátumu nákupu tohto výrobku vyskytne chyba materiálu alebo
výrobná chyba, výrobok Vám bezplatne opravíme alebo vymeníme – podľa nášho výberu.
Táto záruka zaniká, ak bol produkt poškodený, neodborne používaný alebo neodborne
udržiavaný.
Poskytnutie záruky sa vzťahuje na chyby materiálu a výrobné chyby. Táto záruka sa
nevzťahuje na časti produktu, ktoré sú vystavené normálnemu opotrebovaniu, a preto ich je
možné považovať za opotrebovateľné diely (napr. batérie) alebo na poškodenia na
rozbitných dieloch, napr. na spínači, akumulátorových batériach alebo častiach, ktoré sú
zhotovené zo skla.
48 SK
Page 51

Einleitung ................................................................................................................. Seite 50
Bestimmungsgemäße Verwendung ............................................................................Seite 50
Technische Daten ........................................................................................................ Seite 50
Lieferumfang ................................................................................................................ Seite 51
Sicherheitshinweise ........................................................................................ Seite 51
Allgemeine Sicherheitshinweise ................................................................................. Seite 51
Sicherheitshinweise für Zurrgurte ............................................................................... Seite 51
Praktische Hinweise zur Benutzung
und Pflege von Zurrgurten ...................................................................... Seite 53
Bedienung .............................................................................................................. Seite 55
Zurrgurt anlegen ......................................................................................................... Seite 55
Zurrgurt lösen .............................................................................................................. Seite 56
Reinigung und Pflege ................................................................................... Seite 57
Entsorgung ............................................................................................................. Seite 57
Garantie ................................................................................................................... Seite 57
49 DE/AT/CH
Page 52

Spanngurt mit Ratsche (HG00921A)
Spann- und Zurrgurt-Set (HG00921B)
Spanngurte mit Schnellverschluss (HG00921C)
Q
Einleitung
Die Bedienungsanleitung ist Bestandteil dieses Produkts. Sie enthält wichtige
Hinweise für Sicherheit, Gebrauch und Entsorgung. Machen Sie sich vor der
Benutzung des Produkts mit allen Bedien- und Sicherheitshinweisen vertraut.
Benutzen Sie das Produkt nur wie beschrieben und für die angegebenen Einsatzbereiche.
Händigen Sie alle Unterlagen bei Weitergabe des Produkts an Dritte mit aus.
Q
Bestimmungsgemäße Verwendung
Das Produkt ist zum Verzurren, Befestigen und Sichern von Ladung vorgesehen. Die Zurrgurte
dienen dazu, Ladung an die Ladefläche eines Fahrzeugs zu „pressen“ oder direkt mit dem
Fahrzeug zu verbinden. Sie sindw nicht zum Heben oder Tragen von Lasten bestimmt. Die
zulässige Kraft darf nicht überschritten werden. Eine andere Verwendung als zuvor
beschrieben oder eine Veränderung des Produkts ist nicht zulässig und kann zu
Verletzungen und / oder Beschädigungen des Produkts führen. Für aus bestimmungswidriger
Verwendung entstandene Schäden übernimmt der Hersteller keine Haftung. Das Produkt ist
nicht für den gewerblichen Einsatz bestimmt.
Q
Technische Daten
HG00921A
Länge: ca. 5m (L
Zulässige Kraft (LC): 350 daN / mit Schleife: 700 daN / S
Material: Polyester (PES)
)
G
25daN
HF
HG00921B
Länge: LGF (Länge Festende): 0,26 m
LGL (Länge Losende): 4,7 m
Zulässige Kraft (LC): 350 daN ( 3500 N = Newton / 350 kg ( m / s
Material: Polyester (PES)
HG00921C
Länge L
: ca. 2,5 m
G
Zulässige Kraft (LC): 100 daN (1000 N = Newton / 100 kg (m / s
mit Schleife: 200 daN
Material: Polyester (PES)
50 DE/AT/CH
2
)) / SHF 25daN
2
)) /
Page 53

Q
Lieferumfang
Kontrollieren Sie unmittelbar nach dem Auspacken den Lieferumfang auf Vollständigkeit sowie
den einwandfreien Zustand des Produkts und aller Teile.
1 x Spanngurt mit Ratsche, ca. 5 m (HG00921A)
1 x Zurrgurt mit Spannratsche und S-Haken, ca. 0,26 m (HG00921B)
1 x Zurrgurt mit S-Haken, ca. 4,7 m (HG00921B)
2 x Zurrgurte mit Klemmschloss ca. 2,5 m (HG00921C)
1 x Bedienungsanleitung
Q
Sicherheitshinweise
BeWahren sie alle sicherheitshinWeise und anWeisunGen fÜr die
ZuKunft auf!
Allgemeine Sicherheitshinweise
J
Erstickungsgefahr durch Verpackungsmaterial und Lebensgefahr durch Strangulation.
Kinder unterschätzen häufig die Gefahren. Halten Sie Kinder stets vom Produkt fern.
Das Produkt ist kein Spielzeug.
J Verwenden Sie das Produkt nicht, wenn es Beschädigungen aufweist.
J Kontrollieren Sie, ob alle Teile sachgerecht montiert sind. Bei unsachgemäßer Montage
besteht Verletzungsgefahr.
WARNUNG!
KLEINKINDER UND KINDER! Lassen Sie Kinder niemals
unbeaufsichtigt mit Verpackungsmaterial und Produkt. Es besteht
LEBENS- UND UNFALLGEFAHR FÜR
Sicherheitshinweise für Zurrgurte
J Überprüfen Sie den Zurrgurt vor jedem Gebrauch auf mögliche Beschädigungen.
Verwenden Sie den Zurrgurt keinesfalls bei Bandschäden.
J Prüfen Sie mit aggressiven oder sonstigen die Verwendung gefährdenden Stoffen
behaftete oder verschmutzte Zurrgurte sorgfältig. Lassen Sie diese ggf. durch den
Hersteller prüfen.
J Lassen Sie die Zurrgurte und alle Bauteile mindestens einmal pro Jahr durch einen
Fachmann überprüfen. Entsprechend den Einsatzbedingungen und den betrieblichen
Gegebenheiten können zwischenzeitlich weitere Prüfungen durch einen Fachmann
erforderlich werden.
J Verwenden Sie den Zurrgurt keinesfalls bei:
51 DE/AT/CH
Page 54

- Garnbrüchen oder Garnschnitten, insbesondere Kanteneinschnitten oder anderen
bedenklichen Verletzungen
- fehlender oder nicht mehr lesbarer Kennzeichnung
- Beschädigung der Verbindungen, Verformung durch Wärmeeinfluss (Reibung, Strahlung)
- Schäden infolge der Einwirkung aggressiver Stoffe.
J Verwenden Sie die Ratschen keinesfalls bei:
- Anrissen, Brüchen oder erheblichen Korrosionserscheinungen bzw. -schäden
- Aufweitung > 5 % (5 % im Hakenmaul oder allgemeinen Verformungen)
- erkennbar bleibender Verformung an tragenden Teilen
J Reparaturen an Zurrgurten dürfen nur dann durchgeführt werden, wenn die
Kennzeichnung von Hersteller, Werkstoff und zulässiger Höchstzugkraft auf dem Etikett
eindeutig festzustellen ist. Sie dürfen nur vom Hersteller oder von ihm beauftragten
Personen durchgeführt werden. Diese müssen sicherstellen, dass die nach der
Reparatur wieder gebrauchsfertigen Zurrgurte die ursprünglich auf dem Etikett
angegebene zulässige Höchstzugkraft erreichen.
J Belasten Sie den Zurrgurt niemals über die auf dem Etikett angegebene zulässige
Zugkraft (siehe auch „Technische Daten“).
J Wählen Sie entsprechend der vorgesehenen Verzurrart, Zugkraft und Ladeoberfläche
den geeigneten Zurrgurt aus (siehe Kennzeichnungs-Etikett).
VORSICHT! UNFALLGEFAHR! Wählen Sie stets geeignete Zurrgurte, Zurrpunkte
und Zurrmethode aus. Die Größe, die Form und das Gewicht der Ladung bestimmen die
richtige Auswahl, aber auch die beabsichtigte Verwendungsart, die Transportumgebung
und die Art der Ladung.
J Vergewissern Sie sich, dass die Fahrzeugteile, an denen die Ladung befestigt werden
soll, ausreichend stabil sind.
VORSICHT! Zusätzlich zu den Beschleunigungskräften während der Fahrt können
Seitenkräfte durch Wind auftreten.
J Ziehen Sie den Zurrgurt niemals über raue Oberflächen oder scharfe Kanten, wenn
diese nicht mit einem geeigneten Schutz versehen sind.
J Achten Sie darauf, dass die Zurrgurte nicht verdreht sind und mit der ganzen Breite tragen.
J Stellen Sie keine Gegenstände auf den Zurrgurt, wenn dieser dadurch beschädigt
werden kann.
J Halten Sie den Zurrgurt von heißen Oberflächen fern.
J Verteilen Sie die Zurrgurte gleichmäßig auf die zu sichernde Last.
J Verwenden Sie die Zurrgurte niemals als Anschlagmittel.
J Achten Sie darauf, dass die S-Haken nicht auf ihrer Spitze belastet werden: sofern es
sich nicht um einen Haken handelt, der für diesen besonderen Zweck geeignet ist. Hängen
Sie den Zurrhaken immer von innen nach außen ein, um ein Aushängen ohne Sicherung
in einem Zurrpunkt auf der Ladefläche zu vermeiden.
J Legen Sie die S-Haken und Ratschen niemals an Kanten an.
J Verlängern Sie niemals den Ratschengriff , um höhere Spannkräfte zu erzielen, wenn
dies nicht ausdrücklich durch eine entsprechende Bedienungsanleitung erlaubt ist.
52 DE/AT/CH
Page 55

VORSICHT! UNFALLGEFAHR! Achten Sie bei der Verwendung von zusätzlichen
Beschlagteilen und Zurrvorrichtungen beim Zurren darauf, dass diese zum Zurrgurt passen.
J Zur sicheren Befestigung der Ladung müssen mindestens 1,5 Wicklungen des
Gurtbandes auf die Ratsche aufgebracht werden.
J Spannen Sie das Gurtband per Hand bereits soweit vor, dass nicht mehr als 3
Bandwindungen auf die Ratsche, aufgebracht werden müssen, um die Ladung zu spannen.
J Überschreiten Sie bei Dachlast keinesfalls die Herstellerangaben.
VORSICHT! UNFALLGEFAHR! Beachten Sie beim Niederzurren die erforderliche
Vorspannkraft. Es sind mindestens 2 Zurrgurte nötig. Es müssen aus Stabilitätsgründen
mindestens zwei gleiche Zurrgurte zum Niederzurren und zwei paar gleiche Zurrgurte
beim Diagonalzurren verwendet werden.
VORSICHT! UNFALLGEFAHR! Kontrollieren Sie während der Fahrt regelmäßig, ob
die Ladung noch ordnungsgemäß verzurrt ist und spannen Sie den Zurrgurt ggf. nach.
Q
Praktische Hinweise zur Benutzung und Pflege von
Zurrgurten
1. Bei der Auswahl und dem Gebrauch von Zurrgurten müssen die erforderliche Zurrkraft
sowie die Verwendungsart und die Art der zu zurrenden Ladung berücksichtigt werden.
Die Größe, Form und das Gewicht der Ladung bestimmen die richtige Auswahl, aber
auch die beabsichtigte Verwendungsart, die Transportumgebung und die Art der
Ladung. Es müssen aus Stabilitätsgründen mindestens zwei Zurrgurte zum Niederzurren
und zwei Paare Zurrgurte beim Diagonalzurren verwendet werden.
2. Wegen unterschiedlichen Verhaltens und wegen Längenänderung unter Belastung dürfen
verschiedene Zurrmittel (z. B. Zurrketten und Zurrgurte aus Chemiefasern) nicht zum
Verzurren derselben Last verwendet werden. Bei der Verwendung von zusätzlichen
Beschlagteilen und Zurrvorrichtungen beim Zurren muss darauf geachtet werden,
dass diese zum Zurrgurt passen.
3. Während des Gebrauchs müssen Flachhaken mit der gesamten Breite im
Hakengrund aufliegen.
4. Öffnen der Verzurrung: Vor dem Öffnen sollte man sich vergewissern, dass die Ladung
auch ohne Sicherung noch sicher steht und den Abladenden nicht durch Herunterfallen
gefährdet. Falls nötig, sind die für den weiteren Transport vorgesehenen Anschlagmittel
bereits vorher an der Ladung anzubringen, um ein Herunterfallen und / oder Kippen
der Ladung zu verhindern. Dies trifft auch zu, wenn man Spannelemente verwendet,
die ein sicheres Entfernen ermöglichen.
5. Vor Beginn des Abladens müssen die Verzurrungen so weit gelöst sein, dass die Last
frei steht.
6. Während des Be- und Entladens muss auf die Nähe jeglicher tiefhängender
Oberleitungen geachtet werden.
7. Die Werkstoffe, aus denen Zurrgurte hergestellt sind, verfügen über eine unterschiedliche
Widerstandsfähigkeit gegenüber chemischen Einwirkungen. Die Hinweise des Herstellers
53 DE/AT/CH
Page 56

oder Lieferers sind zu beachten, falls die Zurrgurte wahrscheinlich Chemikalien
ausgesetzt werden. Dabei sollte berücksichtigt werden, dass sich die Auswirkungen
des chemischen Einflusses bei steigenden Temperaturen erhöhen. Die
Widerstandsfähigkeit von Kunstfasern gegenüber chemischen Einwirkungen ist im
Folgenden zusammengefasst:
- Polyester wird wenig von mineralischen Säuren angegriffen. Alkalische Lösungen
können es beschädigen.
- Harmlose Säure- oder Laugen-Lösungen können durch Verdunstung so konzentriert
werden, dass sie Schäden hervorrufen. Verunreinigte Zurrgurte sind sofort außer Betrieb
zu nehmen, in kaltem Wasser zu spülen und an der Luft zu trocknen.
8. Diese Zurrgurte sind für die Verwendung in den folgenden Temperaturbereichen
geeignet:
- – 40°C bis +120°C für Polyester (PES);
Diese Temperaturbereiche können sich je nach chemischer Umgebung ändern. In diesem
Fall sind die Empfehlungen des Herstellers oder Lieferers einzuholen. Eine Veränderung
der Umgebungstemperatur während des Transportes kann die Kraft im Gurtband
beeinflussen. Die Zurrkraft ist nach Eintritt in warme Regionen zu überprüfen.
9. Zurrgurte müssen außer Betrieb genommen oder dem Hersteller zur Instandsetzung
zurückgeschickt werden, falls sie Anzeichen von Schäden zeigen. Die folgenden
Punkte sind als Anzeichen von Schäden zu betrachten:
- bei Gurtbändern (die außer Betrieb zu nehmen sind): Rissen, Schnitte, Einkerbungen
und Brüche in lasttragenden Fasern und Nähten, Verformungen durch
Wärmeeinwirkung;
- bei Endbeschlagteilen und Spannelementen, Verformungen, Risse, starke Anzeichen
von Verschleiß und Korrosion. Es dürfen nur Zurrgurte instand gesetzt werden, die
Etiketten zu ihrer Identifizierung aufweisen. Falls es zu einem zufälligen Kontakt mit
Chemikalien kommt, muss der Zurrgurt außer Betrieb genommen werden, und der
Hersteller oder Lieferer muss befragt werden.
10. Es ist darauf zu achten, dass der Zurrgurt durch die Kanten der Ladung, an der er
angebracht wird, nicht beschädigt wird. Eine regelmäßige Sichtprüfung vor und nach
jeder Benutzung wird empfohlen.
11. Es sind nur lesbar gekennzeichnete und mit Etiketten versehene Zurrgurte zu verwenden.
12. Zurrgurte dürfen nicht überlastet werden: Die maximale Handkraft von 250 N
(25 daN auf Etikett; 1 daN ≈ 1 kg) darf nur mit einer Hand aufgebracht werden. Es
dürfen keine mechanischen Hilfsmittel wie Stangen oder Hebel usw. verwendet
werden, es sei denn, diese sind Teil des Spannelementes. (HG00921A,
HG00921B)
13. Geknotete Zurrgurte dürfen nicht verwendet werden.
14. Schäden an Etiketten sind zu verhindern, indem man sie von den Kanten der Ladung
und, falls möglich, von der Ladung fern hält.
15. Gurtbänder sind vor Reibung und Abrieb sowie vor Schädigungen durch Ladungen
mit scharfen Kanten durch die Verwendung von Schutzüberzügen und / oder
54 DE/AT/CH
Page 57

Kantenschonern zu schützen.
Q
Bedienung
Niederzurren (HG00921A, HG00921B, HG00921C):
Die Ladung wird mit Zurrgurten überspannt auf die Ladefläche gepresst (siehe Abb. I).
Diagonalzurren (HG00921B):
Die Ladung wird durch 4 Zurrgurte gesichert und direkt mit dem Fahrzeug verbunden
(siehe Abb. II).
Q
Zurrgurt anlegen
Der ausgewählte Zurrgurt muss für den Verwendungszweck sowohl stark als auch lang genug
sein und hinsichtlich der Zurrart die richtige Länge aufweisen. Es ist immer gute Zurrpraxis
zu berücksichtigen: Das Anbringen und das Entfernen der Zurrgurte sind vor dem Beginn
der Fahrt zu planen. Während einer längeren Fahrt sind Teilentladungen zu berücksichtigen.
Die Anzahl der Zurrgurte ist nach EN 12195-1 zu berechnen. Es dürfen nur solche Zurrsysteme, die zum Niederzurren mit STF (normale Spannkraft) auf dem Etikett ausgelegt sind,
zum Niederzurren verwendet werden.
HG00921A:
j Befestigen Sie den Zurrgurt um die Ladung herum.
j Öffnen Sie den Ratschengriff
Einfädlungsposition für das Gurtband
j Fädeln Sie das Gurtband
vorsichtig durch die Schlitzwelle
1
und bringen Sie die Schlitzwelle 3 in
(siehe Abb. A III).
4
in die Schlitzwelle 3 der Ratsche ein. Ziehen Sie es
4
3
, bis das Gurtband 4 stramm an der Ladung
anliegt.
j Spannen Sie den Zurrgurt, indem Sie den Ratschengriff hin- und herbewegen (siehe
Abb. A I - III). Spannen Sie den Zurrgurt so lange, bis die gewünschte Spannung
erreicht ist.
Hinweis: Beachten Sie, dass mindestens 1,5 und maximal 3 Wicklungen des
Gurtbandes
j Bringen Sie den Ratschengriff
4
auf der Schlitzwelle 3 aufgebracht sind.
in die Grundstellung (siehe Abb. A I).
1
Die Ladung ist nun gesichert.
HG00921B:
j Befestigen Sie den Zurrgurt mittels der S-Haken sicher an der Ladung.
j Öffnen Sie den Ratschengriff
Einfädlungsposition für das Gurtband
j Fädeln Sie das Gurtband
vorsichtig durch die Schlitzwelle
1
und bringen Sie die Schlitzwelle 3 in
(siehe Abb. A III).
4
in die Schlitzwelle 3 der Ratsche ein. Ziehen Sie es
4
3
, bis das Gurtband 4 stramm an der Ladung
55 DE/AT/CH
Page 58
anliegt.
j Spannen Sie den Zurrgurt, indem Sie den Ratschengriff hin- und herbewegen (siehe
Abb. A I - III). Spannen Sie den Zurrgurt so lange, bis die gewünschte Spannung
erreicht ist.
Hinweis: Beachten Sie, dass mindestens 1,5 und maximal 3 Wicklungen des
Gurtbandes
j Bringen Sie den Ratschengriff
4
auf der Schlitzwelle 3 aufgebracht sind.
in die Grundstellung (siehe Abb. A I).
1
Die Ladung ist nun gesichert.
HG00921C:
j Schlingen Sie den Zurrgurt um die Ladung.
j Drücken Sie die Klemme
5
nach unten und führen Sie das Gurtband 6 von unten
durch das Klemmschloss (siehe Abb. C).
j Ziehen Sie das Gurtband
Spannung erreicht ist. Lassen Sie dann die Klemme
Q
Zurrgurt lösen
VORSICHT! Vergewissern Sie sich vor dem Lösen, dass die Ladung sicher steht. Achten Sie
6
vorsichtig durch das Klemmschloss, bis die gewünschte
los.
5
darauf, dass die Ladung auch ohne Zurrgurt sicher steht und nicht herunterfallen kann.
VORSICHT! VERLETZUNGSGEFAHR! Achten Sie darauf, dass sich keine
Personen in der Nähe der Ladung befinden, wenn Sie den Zurrgurt lösen.
Herunterfallende Teile können zu Verletzungen führen.
VORSICHT! VERLETZUNGSGEFAHR! Beim Öffnen der Verzurrung wird die
Vorspannkraft mit einem Schlag freigegeben. Öffnen Sie den Zurrgurt daher mit
äußerster Vorsicht.
Hinweis: Achten Sie vor Beginn des Abladens darauf, dass die Verzurrung soweit gelöst
ist, dass die Ladung frei steht.
HG00921A & HG00921B:
j Bringen Sie den Ratschengriff
j Drücken Sie die Ratschensicherung
1
in die äußerste Position (siehe Abb. A III).
2
und klappen Sie den Ratschengriff 1 bis zum
Endanschlag um (siehe Abb. B).
j Ziehen Sie das Gurtband
4
vollständig aus der Schlitzwelle 3 .
j Lösen Sie den S-Haken und somit den Zurrgurt von der Ladung.
HG00921C:
j Drücken Sie die Klemme
j Ziehen Sie das Gurtband
56 DE/AT/CH
5
nach unten (siehe Abb. C).
6
vollständig aus dem Klemmschloss.
Page 59

Q
Reinigung und Pflege
Hinweis: Regelmäßige Pflege sichert die Qualität und Funktionalität des Zurrgurtes.
j Reinigen Sie den Zurrgurt mit lauwarmem Wasser und ph-neutralem Waschmittel.
Vermeiden Sie aggressive Reinigungsmittel.
j Die Spannratsche sollte regelmäßig gereinigt werden und anschließend leicht geschmiert
werden. Achten Sie beim Schmieren darauf, dass Bereiche, die mit dem Gurtband in
Verbindung kommen, nicht geschmiert werden.
j Lagern Sie den Zurrgurt an einem trockenen, gut belüfteten, kühlen Ort.
j Vermeiden Sie den Kontakt mit Chemikalien, Säuren und Laugen, da diese den Zurrgurt
beschädigen können.
Q
Entsorgung
Die Verpackung besteht aus umweltfreundlichen Materialien, die Sie über die
örtlichen Recyclingstellen entsorgen können.
Möglichkeiten zur Entsorgung des ausgedienten Produkts erfahren Sie bei Ihrer Gemeindeoder Stadtverwaltung.
Q
Garantie
Das Produkt wurde nach strengen Qualitätsrichtlinien sorgfältig produziert und vor
Anlieferung gewissenhaft geprüft. Im Falle von Mängeln dieses Produkts stehen Ihnen
gegen den Verkäufer des Produkts gesetzliche Rechte zu. Diese gesetzlichen Rechte
werden durch unsere im Folgenden dargestellte Garantie nicht eingeschränkt.
Sie erhalten auf dieses Produkt 3 Jahre Garantie ab Kaufdatum. Die Garantiefrist beginnt
mit dem Kaufdatum. Bitte bewahren Sie den Original-Kassenbon gut auf. Diese Unterlage
wird als Nachweis für den Kauf benötigt.
Tritt innerhalb von 3 Jahren ab dem Kaufdatum dieses Produkts ein Material- oder
Fabrikationsfehler auf, wird das Produkt von uns – nach unserer Wahl – für Sie kostenlos
repariert oder ersetzt. Diese Garantie verfällt, wenn das Produkt beschädigt, nicht
sachgemäß benutzt oder gewartet wurde.
Die Garantieleistung gilt für Material- oder Fabrikationsfehler. Diese Garantie erstreckt sich
nicht auf Produktteile, die normaler Abnutzung ausgesetzt sind (z. B. Batterien) und daher
als Verschleißteile angesehen werden können oder für Beschädigungen an zerbrechlichen
Teilen, z. B. Schalter, Akkus oder die aus Glas gefertigt sind.
57 DE/AT/CH
Page 60

OWIM GmbH & Co. KG
Stiftsbergstraße 1
DE-74167 Neckarsulm
GERMANY
Model No.: HG00921A / HG00921B / HG00921C
Version: 03/2017
IAN 285009
 Loading...