


MagniFi MAX SR

Quick Start Guide
Maximum-Performance Home Theater Sound Bar System
™
MAX
SR

2
Thank you for your Polk purchase. If you have a question or comment,
please feel free to call or email us.
Technical Assistance
In North America, call Polk Customer Service at
800-377-POLK(7655) (M–F, 9 a.m.–5:30 p.m. EST)
Outside the US, call +1-410-358-3600
email polkcs@polkaudio.com
Polk Audio
1 Viper Way, Vista, CA 92081
U.S.A.
The complete owner’s manual can be found online at
www.polkaudio.com/products/magnifimaxsr
Polk Audio is a DEI Holdings, Inc. Company. Polk Audio and Polk, are registered trademarks of Polk Audio, LLC.
Chromecast Built-in is a trademark of Google Inc.
All other trademarks, product names, logos, and brands referenced herein are the property of their respective owners.
3
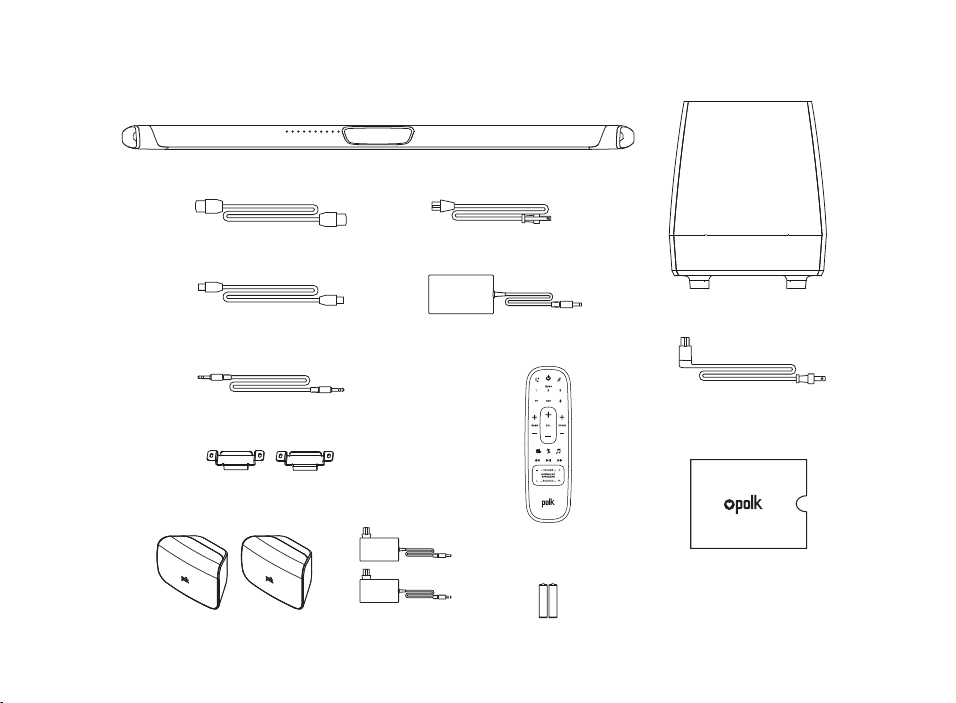
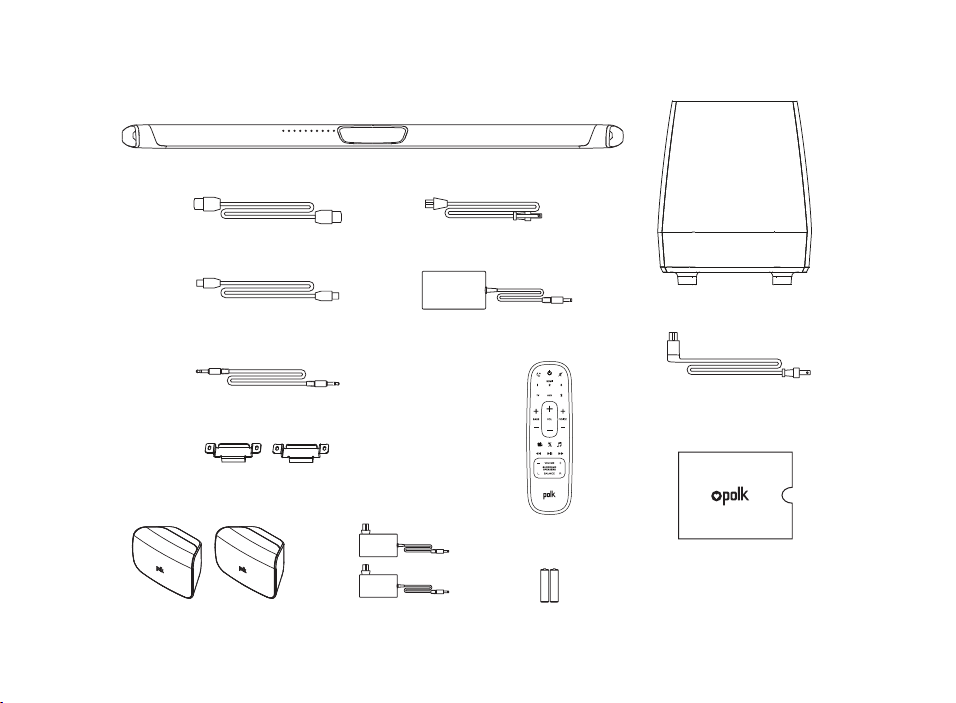
What’s in the Box
Sound bar
Subwoofer
Sound bar power cord
6’ (1.8m) Optical cable
6.5’ (2m) high-speed HDMI cable
6’ (1.8m) 3.5mm AUX cable
(2) SR1 Wireless Surrounds (2) Surrounds
Power Supplies
Product Literature
Subwoofer power cord
Sound bar power supply
Remote
control
2(AAA) Batteries
(2) wall mounting brackets
(screws and fasteners not included)
AAA
AAA

4
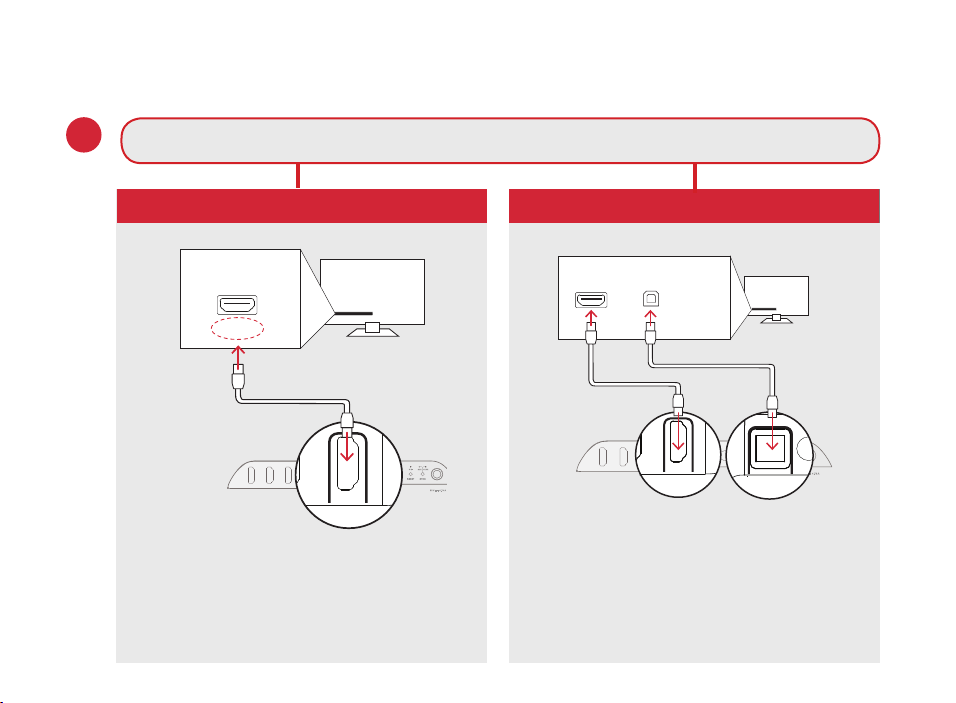
Setup
Connecting to Your TV
Connect the included HDMI cable to
the HDMI jacks labeled with “ARC”
on both the TV and the sound bar.
Connect the included Optical cable
between the TV and sound bar.
Connect the included HDMI cable
to any available HDMI jack on the
TV and to the “TV ARC” connector
on the sound bar.
YES
NO
TV
ARC
HDMI
TV OPTICAL
TV (ARC)
HDMI 1
HDMI 2
HDMI 3
AUX
NETWORK
SERVICE
ONLY
RESET
SYNC
POWER
TV
OPTICAL
HDMI
TV OPTICAL
TV (ARC)
AUX NETWORK SERVICE
ONLY
RESET SYNC
POWER
TV OPTICAL
TV (ARC)
AUX NETWORK
TV OPTICAL
AUX NETWORK
TV
OPTICAL
HDMI
ONLY
RESET SYNC
POWER
TV OPTICAL
TV (ARC)
HDMI 1
HDMI 2
HDMI 3
AUX
NETWORK
SERVICE
ONLY
RESET
SYNC
POWER
TV OPTICAL
TV (ARC)
AUX NETWORK
TV OPTICAL
AUX NETWORK
1.
Is an HDMI input jack on your TV labeled “ARC”?
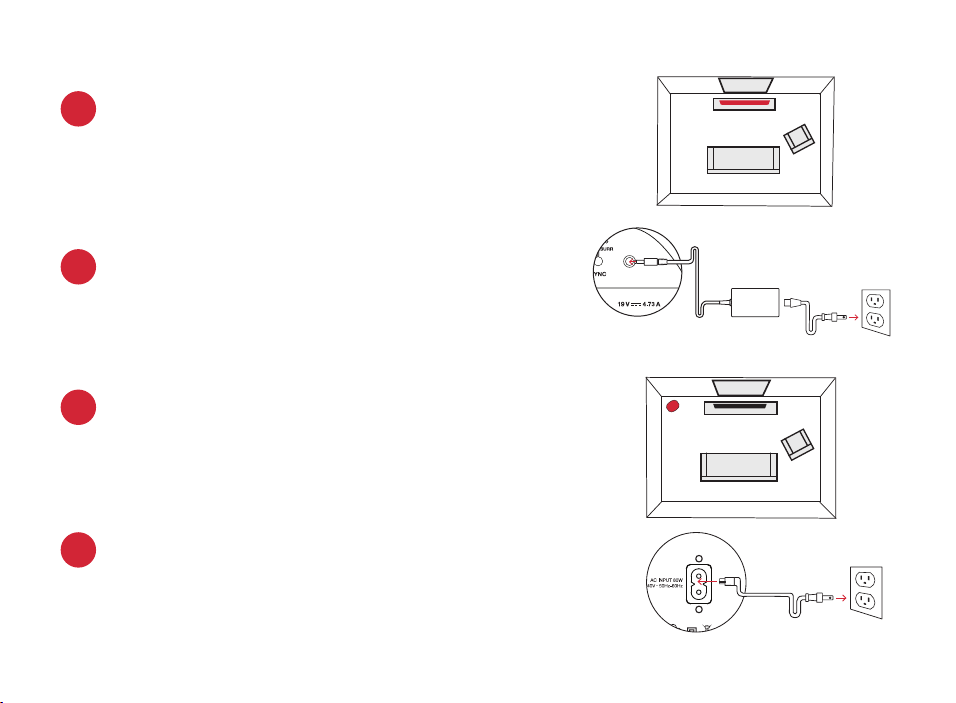
5
Connecting the sound bar to an AC outlet
During startup, you will see a blinking orange light
on the front.
2.
3.
Placing the sound bar
For the best listening experience, position the sound
bar centered under your TV.
Note: For wall mounting instructions, see Advanced
Setup on p.17 and included wall mounting template
Sound Bar
TV
Subwoofer
TV
Placing the subwoofer
For best performance place on the same wall as the
TV, no more than 30ft (10m) from the bar.
4.
5.
Connecting the subwoofer to an AC outlet
A solid green light will be visible on the back of the
subwoofer to indicate that it is paired to the sound bar.
6
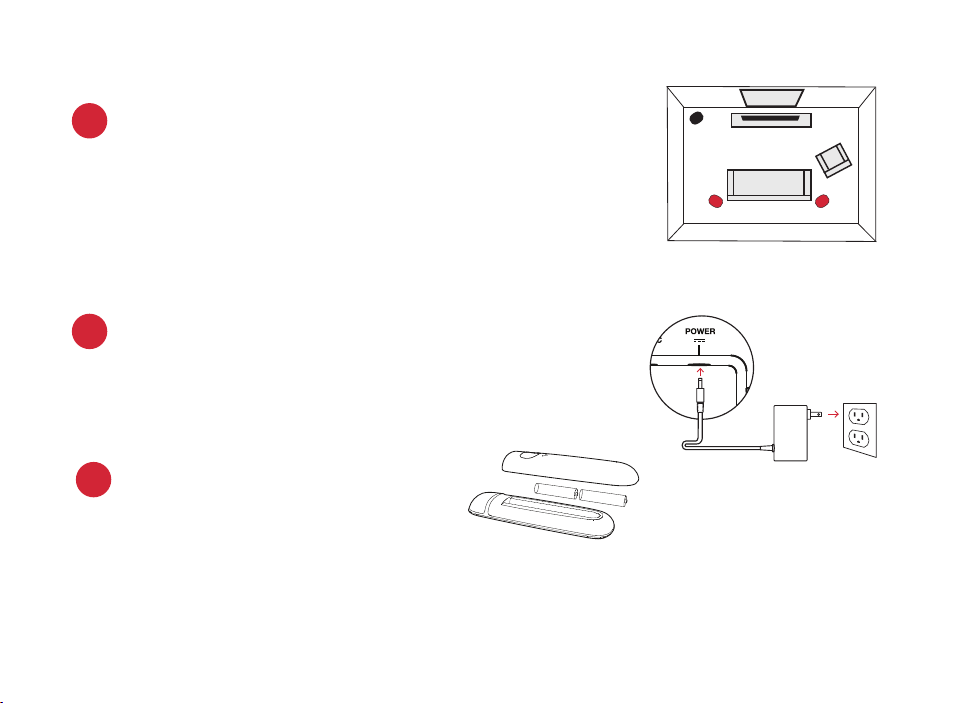
Installing remote batteries
Insert the provided AAA batteries.
8.
15V 1.2A
Placing or mounting the surrounds
Place the surround speakers on the left and right
sides and equidistant from the main listening
position. Make sure you place the speaker marked
“L” on the left and the speaker marked “R” on
the right. If you decide to mount the surrounds,
Please refer to the wall mounting template for
instructions.
6.
7.
Connecting the surrounds to an AC outlet
A flashing green light will be visible on the back of the
surrounds.
Surrounds
TV
L R
7
Using your TV remote to control the volume
The MagniFi MAX comes pre-confi gured to respond to volume and mute commands from the
most popular TV remotes including: Samsung, LG, Sony, Vizio, and other major brands.*
*
All other trademarks, product names, logos, and brands referenced herein are the property of their respective owners
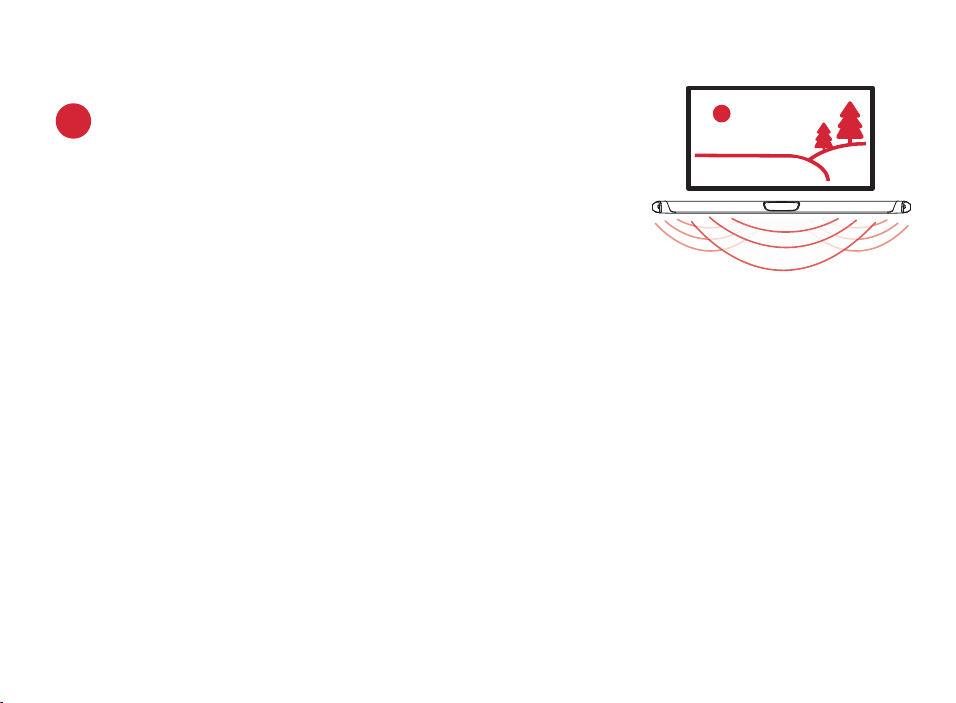
Verifying your connections
Turn on your TV and verify that you are seeing video and
hearing sound from the sound bar.
If you do not hear sound and do not see any lights on the
front of your sound bar, press the power button on the
sound bar to turn it on.
Note: If you are hearing sound from both your TV and your sound bar, you
must manually turn o your TV speakers using the Settings Menu on your TV.
Please refer to your TV’s owner’s manual for instructions.
9.
NOTE: If the MagniFi MAX remote does not work with your TV, follow the instructions on page 15 to get the MagniFi
MAX to learn your TV remote control commands.
8
Listening to Music via Chromecast Built-in
Chromecast Built-in Benefi ts
MagniFi MAX features Chromecast Built-in which lets you easily:
1. Stream music from your favorite apps over Wi-Fi or Ethernet.
2. Create a whole-home audio experience. Multi-room sync let’s you play the same song
across Chromecast built-in compatible speakers in your house at the same time.
3. Use Google Assistant on a Google Home speaker to control music playback on the
MagniFi MAX using voice commands.
Chromecast Built-in Setup
1. Download the free Google Home app and follow the in-app instructions to connect the
Polk MagniFi MAX to your Wi-Fi or Ethernet network.
2. For more detailed setup information about Google Home and Chromecast Built-in
for audio, visit: https://support.google.com/googlehome and https://support.google.
com/chromecastbuiltin
3. When streaming from a Chromecast-enabled app, a white light will appear on the
sound bar.

9
Receiving Automatic Updates - Highly Recommended
Occasionally Polk may provide periodic software updates via the Intenet which improve
product performance and expand the list of built-in TV remote controls.
We highly recommend that you connect your sound bar to your home
network. To receive automatic updates, you do not need to register your
product or provide your email address. Simply connect your sound bar to
your network via Wi-Fi or Ethernet (cable not included) using the free Google
Home app on iOS or Android devices.
Listening to Music via Bluetooth®
1. To connect your device using Bluetooth, press the Bluetooth button on the sound bar
or remote. A blue light will slowly pulse on the sound bar as it waits to connect to your
bluetooth device.
2. Go to the Bluetooth settings section in your phone, tablet or computer and select
“Polk MagniFi MAX”. The light will turn solid blue when your Bluetooth device is
connected.

10
Remote Control
Power On/O
Mute
Play/Pause
Sport Mode
Surround Volume
Up/Down
(available when wireless surrounds
are used)
Surround Balance
Left/Right
(available when wireless
surrounds are used)
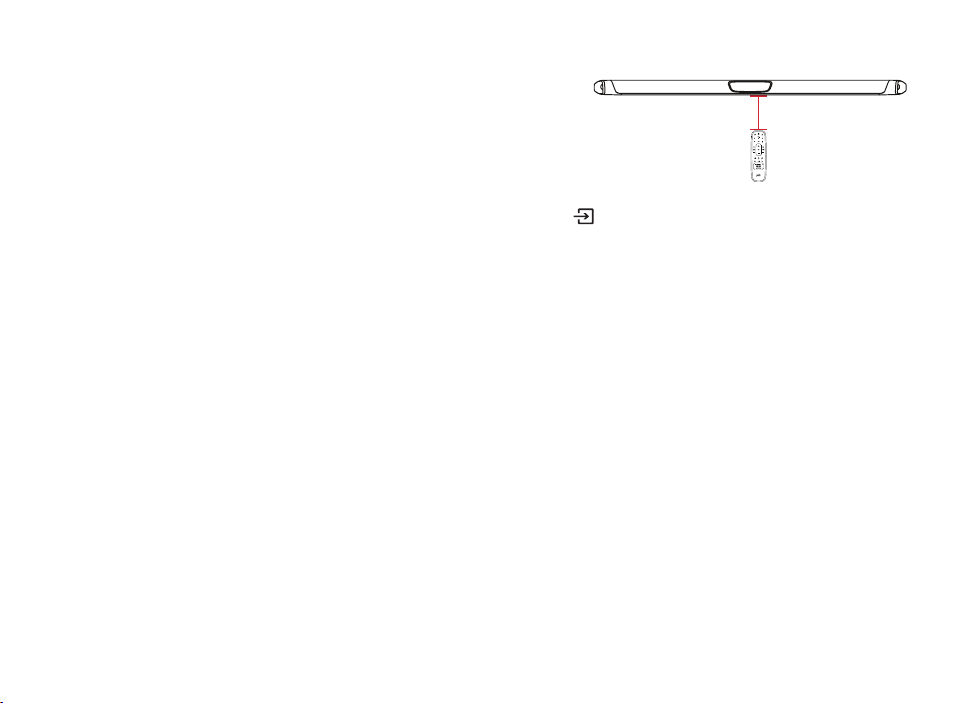
AUX Input
Bluetooth®
VoiceAdjust
Up/Down
TV Input
Night Mode
HDMI Inputs
Back
Bass
Up/Down
Movie Mode
Forward
Master Volume
Up/Down
Music Mode
11
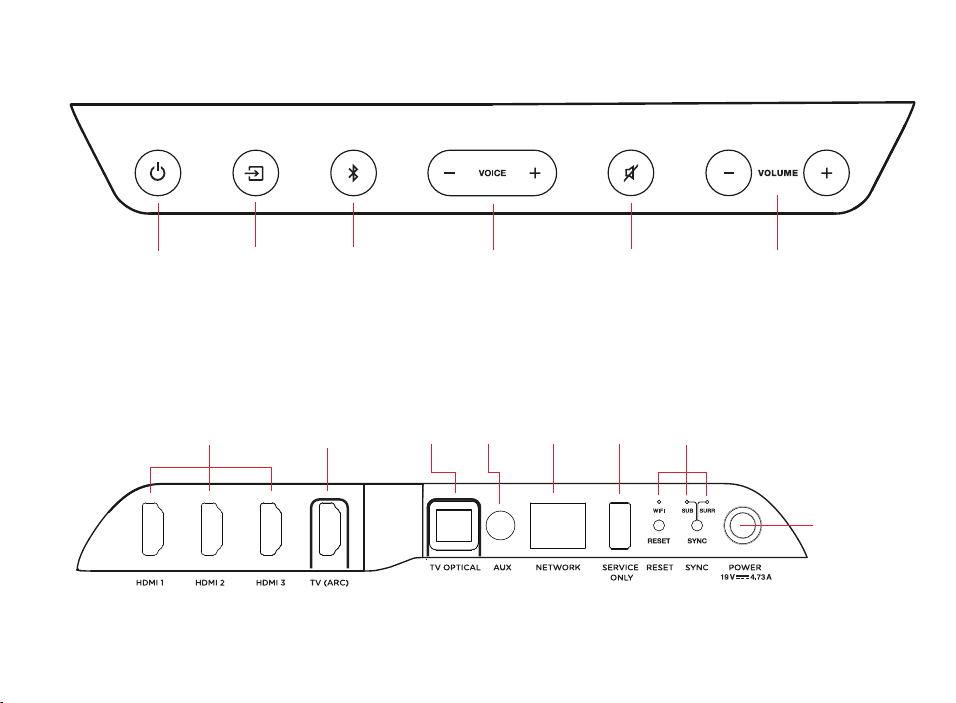
Sound Bar Top Panel
Sound Bar Back Panel
Power
On/O
Source
Master Volume
Down/Up
Mute
VoiceAdjustBluetooth®
Power
Connector
Ethernet
LAN
*Factory use only
HDMI Out
(ARC)
HDMI
Inputs
AUX
In
USB*
Optical
In
Status
LEDs
12
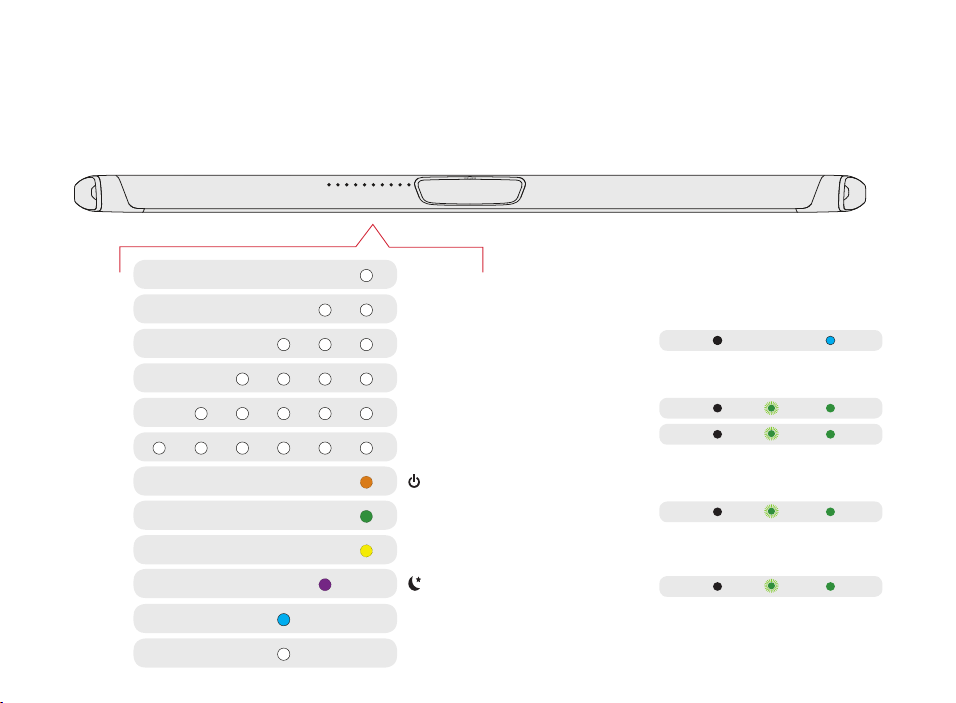
Visual Indicators
The front of the sound bar contains a horizontal row of lights that provide status indications,
such as source, volume and listening modes.
HDMI 1
WI-FI
OFF
NOT CONNECTED
FLASHING
PAIRING MODE
SOLID
CONNECTED
SUB
SUB
SURROUNDS
SURROUNDS
HDMI 2
HDMI 3
HDMI (ARC)
OPTICAL
AUX
ON
NIGHT MODE
DOLBY CONTENT
DTS CONTENT
CHROMECAST BUILT-IN
BLUETOOTH
Back of Bar
Back of Subwoofer
Back of Surround Speakers
13
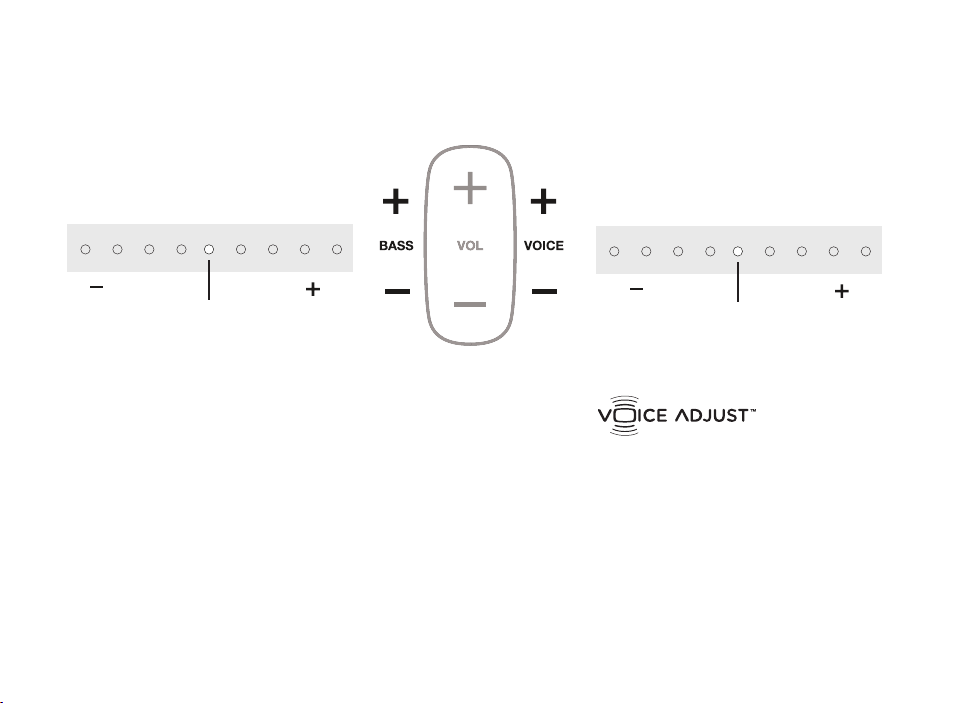
Optimizing Your Listening Experience
Easily adjust dialogue levels to
improve clarity when watching
TV shows, movies, and sports.
Bass Control
Easily adjust low-frequency volume
for more or less impact.
Louder VoiceMore Bass Quieter VoiceLess Bass
DEFAULT
LEVEL
DEFAULT
LEVEL
Sound Bar Lights
Sound Bar Lights
14
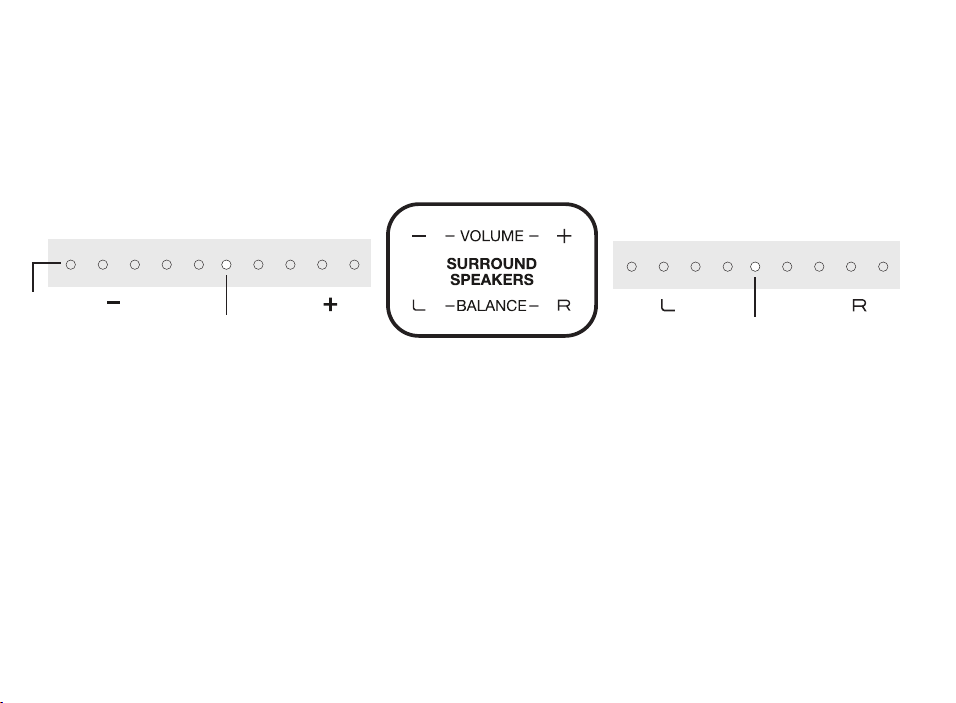
Optimizing Your Surround Speakers
Volume Control
Easily adjust volume for more or
less impact.
Balance Control
Easily adjust the balance for left
and right weighted sound.
More Volume
Balance Left
Less Volume
DEFAULT
LEVEL
DEFAULT
LEVEL
Sound Bar Lights
Sound Bar Lights
Surround
mute

15
HDMI CEC CONTROL
If your TV is connected via HDMI and your TV supports CEC (and it is enabled in the TV settings menu),
you can control the volume and mute functions on MagniFi MAX from your TV without any further setup.
PRELOADED IR CODES
If your TV is connected via optical or your TV is connected via HDMI but your TV does not support CEC,
you may be able control the volume and mute functions on MagniFi MAX from your TV without any
further setup if your TV is one of supported brands and was manufactured within the last 5 years. Visit
the Polk web site for details.
IR LEARNING FUNCTION
If your TV is connected via optical and it is not one of the more popular brands, you can teach your IR
(infrared) remote to control volume, mute and other functions (such as source selection or bass volume)
on your sound bar.
Using Your TV or Cable/Satellite Remote to
Control the MagniFi MAX
There are several ways to use your TV, cable, or satellite remote to control MagniFi Max
16
Using the IR Learning Function
IMPORTANT: Hold both remotes about 12” (30cm) directly in
front of the MagniFi MAX when pressing their respective buttons and make sure your
remotes have fresh batteries.
Entering IR Learn Mode
Make sure your sound bar is powered on, then press and hold the
Source button on the sound bar for
about 3 seconds. When you hear a two-note tone release the button. You should now see white lights on
the front of the sound bar bouncing left and right.
STEP 1: Select a button on your MagniFi Max remote
Press and release the button on the MagniFi MAX remote that you want to learn (ex: Volume Up). You will
hear a single tone and see all white lights fading in and out together.
STEP 2: Select a button on your TV remote
Briefly tap the corresponding button on your TV remote. You will hear a two-note tone and see white
lights counting down from left to right as the received IR command is processed.
STEP 3: Verify the results
• If you see the white lights fading in and out again, repeat step 2.
• If you hear a two-note tone and see
•••••••••
•
the command was not learned.
Please try again.
• If you hear a single tone and see
•••••••••
•
the command was successfully learned.
12” (30cm)

17
STEP 4: Learn Another Code
When you see the white lights on the front of the sound bar bouncing left and right again, you are ready
to select your next function to learn by repeating steps 1-3.
Exiting IR Learn Mode
Press and hold the
Source button on the sound bar again for about 3 seconds. When you hear a
two-note tone release the button.
NOTE: The soundbar will automatically exit IR learn mode if it has not received any IR commands for 60 seconds. All
learned IR commands will automatically be saved.
CLEARING ALL LEARNED IR CODES
Press and hold the
Source button on the sound bar for about 10 seconds. You will hear a two-note
tone. Continue holding the button and release the button after you hear a three-note tone.
18
Advanced Setup
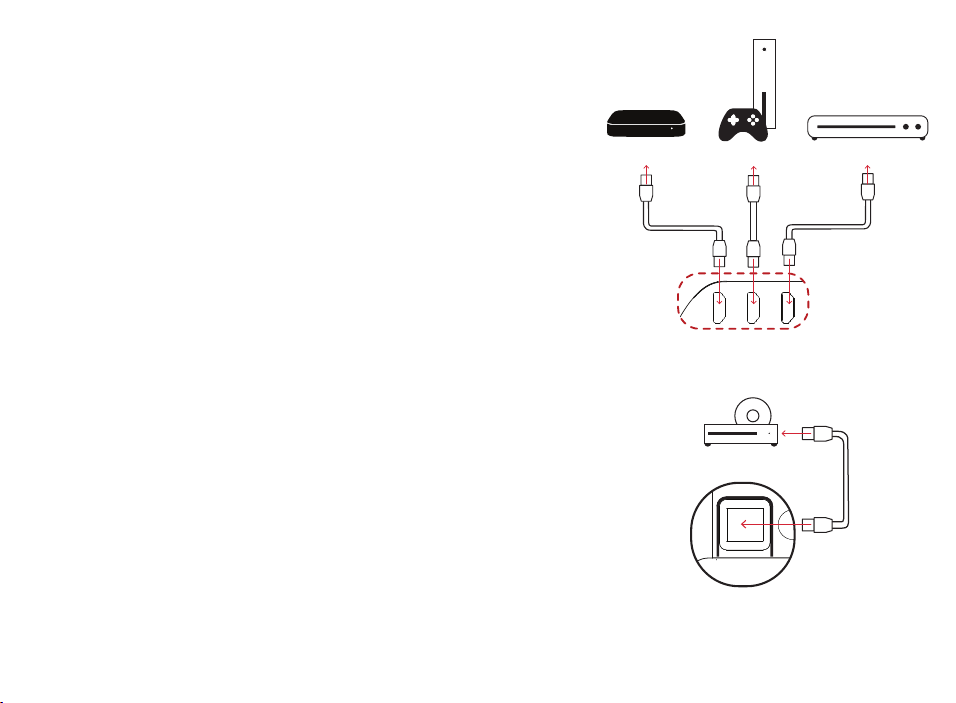
Connecting a cable box, game console or other
HDMI sources to your MagniFi MAX (figure 1)
Magnifi MAX supports up to three HDMI sources. It
will pass-through 4K and HDR signals to your TV if
you are using the HDMI-ARC connection between the
sound bar and TV. You will need to use High Speed
HDMI cables for 4K content.
Using the optical input for an audio source (figure 2)
If you want to use the Optical input on the sound bar for
another audio source such as a CD player, follow these steps:
1) Connect your TV to MagniFi MAX using HDMI-ARC.
2) Connect the supplied Optical cable between the CD player
and sound bar.
3) The TV button on the remote will toggle between the
HDMI-ARC (4 white lights) and Optical (5 white lights)
input sources as long as audio is available.
TV OPTICAL
AUX NETWORK SERVICE
ONLY
Sound Bar HDMI Inputs
Sound Bar Optical Input
Media Player Blu-ray
Gaming
TV OPTICAL
AUX NETWORK SERVICE
ONLY
Sound Bar Optical Input
FIGURE 1
FIGURE 2
19
TV OPTICAL
AUX NETWORK SERVICE
ONLY
Sound Bar Optical Input
Wall mounting your MagniFi MAX & SR1 Wireless
Surround Speakers
Wall mounting templates are provided for both
the bar and the surround speakers. For proper
installation, please refer to the instructions printed on
the templates. Screws for attaching the brackets to
the wall are not included. Choose the screw type and
length appropriate to your home’s construction.
If in doubt, consult a professional.
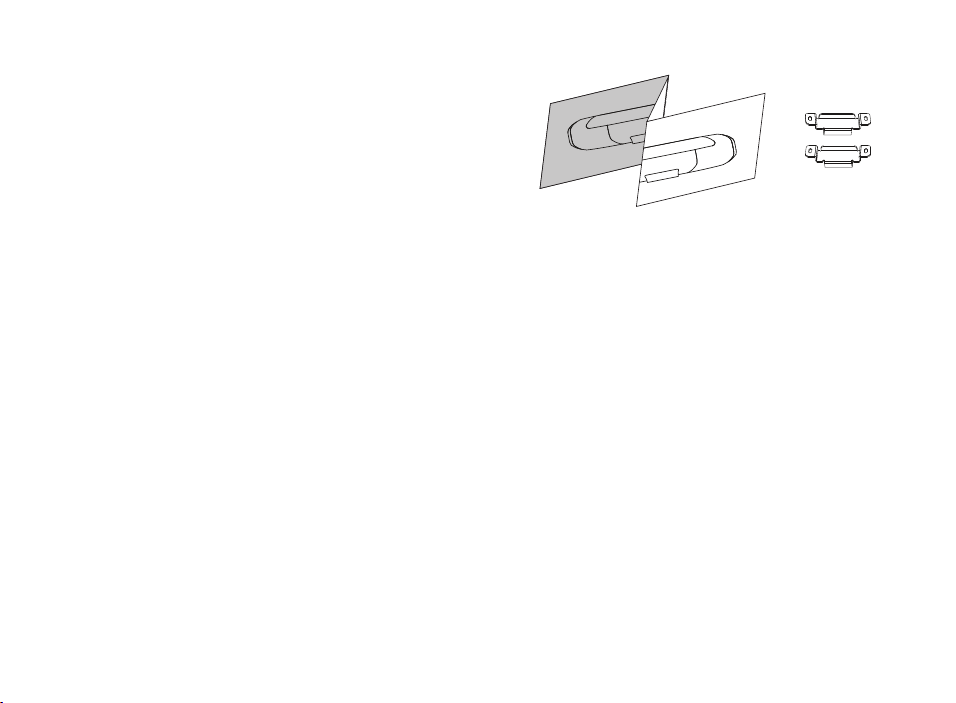
My TV doesn’t have an HDMI or Optical outputs
If your TV does not have an HDMI ARC or Optical output you can connect the sound
bar to your TV using the included 3.5mm analog AUX cable.
1) Connect the included AUX cable between your TV’s audio output and the AUX input on
the back of the sound bar.
2) Select AUX on the sound bar remote control.
3) Turn up the volume and make sure you hear sound from the sound bar.
4) Turn o the TV’s speakers using your TV’s Settings menu under “audio” or “speakers”.
Note: Dolby 5.1 and DTS audio decoding are not supported when using the AUX input.

20
I Don’t Hear Sound from my Subwoofer
1) Verify that the Subwoofer is plugged in to a power source.
2) Check the green light on the back of the subwoofer.
• If it is solid green, turn up the Bass using the remote control.
• If it is flashing green you need to sync the subwoofer to the soundbar using the following
instructions
Syncing the Subwoofer to the Soundbar
1) Press the power button on the soundbar to turn it on.
2) On the back of the SOUNDBAR, press and hold the SYNC button until you hear a tone (about 3-4
seconds) and then release the button. The SUB and SURR lights above the SYNC button will flash
green
3) On the back of the SUBWOOFER, press and hold the SYNC button until you hear a tone (about 10
seconds) and the light on the back of the subwoofer turns solid green.
Syncing the Surround Speakers to the Soundbar
Note: You must sync BOTH surround speakers AND the subwoofer.
1) Press the power button on the soundbar to turn it on.
2) Sync the subwoofer using the instructions above.
3) On the back of EACH of the SURROUND SPEAKERS, press and hold the SYNC button until the light on
the bottom of the speaker turns solid green (about 10 seconds).
4) When BOTH LEFT and RIGHT surround speakers are paired to the bar you will hear a tone from the
bar.
Note: If you hear a two note descending tone from the bar syncing failed. Please try again.

21
Sport Mode
Enhances dialogue-rich content, like
sporting events, news casts and talk shows.
Uses Voice Adjust to boost dialogue clarity
and optimizes the subwoofer volume levels.
Night Mode
Reduces bass and volume dynamics
while improving voice intelligibility for
low-volume listening.
Movie Mode
Acoustically optimized for both movie and TV
content. It also provides a bass boost, increased
spatialization and enhances Voice Adjust levels for
improved dialogue clarity. It is the default sound
mode for HDMI and Optical input sources.
Music Mode and All Stereo mode
Music Mode Gives you balanced sound and smoother
bass while minimizing spatialization eects to ensure
more natural sound reproduction.
All Stereo Mode provides room filling sound by mirroring
the front left and right channels to the surround left and
right speakers. Use the Music button to toggle between
Music Mode and All Stereo mode when listening
to 2 channel
audio.
Sound Modes

22
About Polk SDA® Technology
The MagniFi MAX features patented Polk SDA Surround technology creating an
expansive multi-dimensional soundstage and detailed stereo image. SDA both
heightens and widens the sound stage providing an immersive room-filling sound
without sacrificing clarity. SDA also compliments Dolby and DTS encoded content
creating an incredible cinematic experience.
About Built-in Polk VoiceAdjust® Technology
The MagniFi MAX features customizable voice levels in the sound bar allowing you to
tailor your listening experience however you prefer, to reproduce clear, crisp dialogue
and never miss a single word of your favorite movie, TV show or sporting event.

23
Merci pour votre achat d’un produit Polk. Si vous avez des questions ou des commentaires,
n’hésitez pas à nous appeler ou à nous envoyer un courriel.
Assistance technique
En Amérique du Nord, contactez le service à la clientèle de Polk au
800-377-POLK(7655) (L–V, 9 h –17 h 30 HNE)
À l’extérieur des États-Unis, composez le +1-410-358-3600
Courriel polkcs@polkaudio.com
Polk Audio
1 Viper Way, Vista, CA 92081
U.S.A.
Vous trouverez le manuel du propriétaire complet au
www.polkaudio.com/products/magnifimaxsr
Polk Audio est une entreprise DEI Holdings, Inc. Polk Audio et Polk sont des marques déposées de Polk Audio, LLC.
Chromecast Built-in est une marque déposée de Google Inc.
Toutes les autres marques déposées, nom de produits, marques et logos qui sont mentionnés dans ce document sont la
propriété de leurs détenteurs respectifs .
FR
24
Contenu de la boîte
Barre audio
Subwoofer
Câble d’alimentation de la barre audio
Câble optique 6 pi (1,8 m)
Câble HDMI haute vitesse 6,5 pi (2 m)
Câble aux 6 pi (1,8 m) 3,5 mm
(2) haut-parleurs
ambiophoniques
sans fil SR1
(2) blocs d’alimentation pour
haut-parleurs ambiophoniques
Documentation sur le produit
Subwoofer câble
d’alimentation
basse de la barre de son
Télécommande
2 piles (AAA)
(2) Supports de fixation murale
(vis et fixations non comprises)
AAA
AAA
25
Installation
Branchement au téléviseur
Connectez le câble HDMI inclus aux
prises HDMI étiquetées « ARC » sur
le téléviseur et la barre audio.
Connectez la barre audio et le
téléviseur avec le câble optique inclus.
Connectez le câble HDMI inclus
dans n’importe quelle prise HDMI du
téléviseur et à la prise « TV ARC » de
la barre audio.
OUI
NON
TV
ARC
HDMI
TV OPTICAL
TV (ARC)
HDMI 1
HDMI 2
HDMI 3
AUX
NETWORK
SERVICE
ONLY
RESET
SYNC
POWER
TV
OPTICAL
HDMI
TV OPTICAL
TV (ARC)
AUX NETWORK SERVICE
ONLY
RESET SYNC
POWER
TV OPTICAL
TV (ARC)
AUX NETWORK
TV OPTICAL
AUX NETWORK
TV
OPTICAL
HDMI
ONLY
RESET SYNC
POWER
TV OPTICAL
TV (ARC)
HDMI 1
HDMI 2
HDMI 3
AUX
NETWORK
SERVICE
ONLY
RESET
SYNC
POWER
TV OPTICAL
TV (ARC)
AUX NETWORK
TV OPTICAL
AUX NETWORK
1.
Y a-t-il une entrée HDMI étiquetée « ARC » sur votre éléviseur?

26
Connexion de la barre audio à une prise AC
Pendant le démarrage, vous verrez un clignotant
orange sur le panneau avant. La barre audio sera
prête lorsque le feu orange cessera de clignoter.
2.
3.
Positionnement de la barre audio
Pour profiter au maximum de votre expérience d’écoute,
centrez la barre audio sous le téléviseur.
Remarque : Pour des instructions de montage mural,
consultez la section Installation avancée à la page 15
et le diagramme d’installation compris.
Barre audio
TV
Extrême-grave
TV
Positionnement du caisson de basse
Pour les meilleurs résultats, appuyez le caisson contre le
même mur que le téléviseur à 10 m et moins de la barre
4.
5.
Connexion du caisson de basse à une prise AC
Vous verrez un feu vert fixe à l’arrière du caisson
de basse lorsqu’il sera jumelé à la barre audio.

27
Installation des piles de la
télécommande
Insérez les piles AAA incluses.
8.
15V 1.2A
Placer ou installer les haut-parleurs
ambiophoniques
Placez les haut-parleurs ambiophoniques sur les
côtés gauche et droit à distance égale de la position
d’écoute principale. Assurez-vous de placer le haut-
parleur marqué « L » sur la gauche et le haut-parleur
marqué « R » sur la droite. Si vous décidez d’installer
les haut-parleurs ambiophoniques au mur, veuillez
lire les instructions sur le gabarit d’installation
murale.
6.
7.
Branchement des haut-parleurs à une sortie AC
Un feu vert fixe apparaîtra à l’arrière des haut-
parleurs ambiophoniques afin d’indiquer qu’ils sont
correctement branchés à la barre audio.
haut-parleurs
ambiophoniques
TV
L R

28
Utiliser la télécommande pour régler le volume
MagniFi MAX est préconfi guré pour répondre aux commandes de volume et du mode muet des
télécommandes de la plupart des téléviseurs populaires, y compris Samsung, LG, Sony, Vizio.* et
marques a liées.
*
Tous les autres noms de produits, marques déposées, logos, et marques mentionnés dans ce document sont la propriété
de leurs détenteurs respectifs.
Vérifi cation de vos connexions
Allumez votre télé et vérifi ez si vous voyez la vidéo et si
vous entendez le son à partir de votre barre de son.
Si vous n’entendez pas le son et vous ne voyez pas les
lumières sur le devant de votre barre de son, appuyez sur le
bouton d’alimentation sur la barre de son pour l’allumer.
Remarque : Si vous entendez des sons en provenance de votre téléviseur et de la barre
audio, vous devez manuellement désactiver les haut-parleurs du téléviseur à partir du
menu des réglages du téléviseur. Veuillez consulter le manuel du propriétaire de votre
téléviseur pour des instructions.
9.
Remarque: Si la télécommande MagniFi MAX ne fonctionne pas avec votre téléviseur, suivez les instructions à la page 15
afi n que MagniFi MAX puisse apprendre les commandes de la télécommande de votre téléviseur.

29
Écouter de la musique au moyen de Chromecast intégré
Avantages de Chromecast Built-in
MagniFi MAX comprend Chromecast Built-in:
1. Écoutez de la musique en direct à partir de vos applications préférées
2. Créez une expérience audio partout dans la maison. La synchronisation dans des pièces
multiples vous permet de jouer la même chanson simultanément dans n’importe quel
haut-parleur compatible à Chromecast Built-in.
3. Utilisez l’assistant Google sur un haut-parleur Google Home pour contrôler la lecture de
la musique dans MagniFi MAX à l’aide de commandes vocales.
Confi guration de Chromecast Built-in
1. Téléchargez l’application Google Home gratuite et suivez les instructions fournies pour
connecter le Polk MagniFi MAX à votre réseau WiFi ou Ethernet.
2. Pour des renseignements plus détaillés au sujet Google Home et Chromecast Built-in
concernant l’audio, visitez: https://support.google.com/googlehome et https://support.
google.com/chromecastbuiltin
3. Lorsque vous écoutez de la musique en continu à partir d’une application compatible
avec Chromecast, un feu DEL apparaîtra sur la barre audio.

30
Réception de mises à jour automatiques – Fortement recommandé
Occasionnellement, Polk peut fournir des mises jour de logiciel au moyen d’Internet qui
améliorent la performance du produit et ajoutent des télécommandes intégrées aux
téléviseurs.
Nous vous recommandons de connecter votre barre audio à votre réseau
maison. Pour recevoir des mises à jour automatiques, il n’est pas nécessaire
d’enregistrer votre produit ou de fournir une adresse courriel. Il sut de
connecter votre barre audio avec WiFi ou Ethernet à l’aide de l’application
Google Home (câble non inclus).
Écouter de la musique au moyen de Bluetooth
MD
1. Pour connecter votre appareil à l’aide de Bluetooth, appuyez sur le bouton Bluetooth
de la barre audio ou de la télécommande. Une DEL bleue commencera à clignoter
lentement sur la barre audio pendant qu’elle attend de se connecter à votre appareil
Bluetooth.
2. Rendez-vous à la section Bluetooth de votre téléphone, tablette ou ordinateur et
sélectionnez « Polk MagniFi MAX ». La lumière deviendra bleue fixe lorsque votre
appareil Bluetooth sera connecté.
 Loading...