


The Sound Bar with Amazon Alexa Built-in
Quick Start Guide
Thank you for your Polk purchase. If you have a question or comment, please feel free to call or email us.
Headquarters
Polk Audio
1 Viper Way, Vista, CA 92081 U.S.A.
Technical Assistance
In North America, call Polk Customer Service at 800-377-POLK(7655) (M–F, 9 a.m.–5:30 p.m. EST) Outside the US, call +1-410-358-3600 Email polkcs@polkaudio.com
In the United Kingdom or Ireland , call Polk Customer Service at +44 202890279830
Dutch-speaking customers, call +31 402507800
In all other countries, please refer to polk-eu@mailmw.custhelp.com for support contact details.
The complete owner’s manual can be found online at
www.polkaudio.com/products/command-sound-bar
2
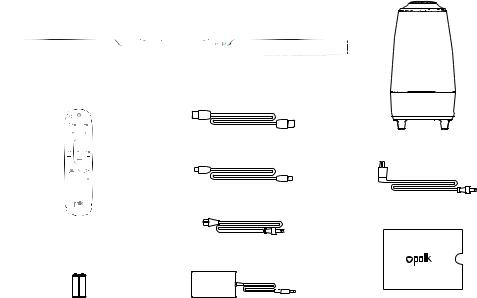
What’s in the Box
Sound bar
|
6.5’ (2m) high-speed HDMI cable |
Subwoofer |
|
|
|
|
6’ (1.8m) Optical cable |
|
|
|
Subwoofer power cord |
Remote control |
|
|
|
Sound bar power cord |
|
AAA AAA |
|
|
2 (AAA) batteries |
Sound bar power supply |
Product Literature |
3

Connecting Your TV
1.Is an HDMI port on your TV labeled “ARC”?
|
YES |
NO |
|
HDMI |
TV |
HDMI OPTICAL |
TV |
ARC |
|
|
|
Connect the included HDMI cable to the HDMI ports labeled with “ARC” on both the TV and the sound bar.
Connect the included Optical cable between the TV and sound bar.
Connect the included HDMI cable to any available HDMI port on the TV and to the “TV ARC” port on the sound bar.
4
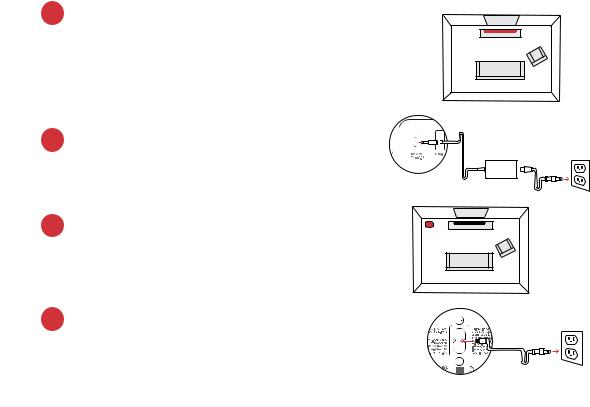
2.Position the sound bar
For the best listening experience, position the sound bar centered under your TV.
Note: For wall-mounting instructions, please refer to the included wall-mounting template.
3.Connect the sound bar to an AC outlet
During startup, you will see a blinking orange light on the front of the sound bar and the Alexa light ring will spin.
4.Position the subwoofer
For best performance, place the subwoofer on the same wall as the TV, no more than 30ft (10m) from the sound bar.
TV
Sound Bar
TV
Subwoofer
5.Connect the subwoofer to an AC outlet
A solid green light will be visible on the back of the subwoofer to indicate that it is paired to the sound bar.
5

6. Install remote control batteries
Insert the provided AAA batteries.
7. Verify your connections
Turn on your TV to verify that you are seeing video on the TV and hearing sound from the sound bar. You may have to select the appropriate HDMI source on your TV.
Note: If you are hearing sound from both your TV and your sound bar, you must manually turn off your TV speakers using the Settings Menu on your TV. Please refer to your TV’s owner’s manual for instructions.
Using Your TV Remote to Control the Volume
The Command Bar comes pre-configured to respond to volume and mute commands from the most popular TV remotes including: Samsung, LG, Sony, Vizio and other major brands.*
*All other trademarks, product names, logos and brands referenced herein are the property of their respective owners.
NOTE: If the Command Bar remote does not work with your TV, follow the instructions on page 15 to get the Command Bar to learn your TV remote control commands.
6

Download the Polk Connect App from the App Store
Use the Polk Connect app to connect the Polk Command sound bar to your network and enable Amazon Alexa voice services. You’ll need your Wi-Fi password.
Talking to Your Polk Command Sound Bar
Once connected to your network, use the Polk Command Bar to ask Alexa to perform many useful tasks. To get the attention of your Polk Command Bar, simply say “Alexa.” You can ask Alexa for sports updates, weather reports, cooking questions and more.
You can also ask Alexa to control your sound bar — switch inputs, change sound modes, adjust the bass and customize Voice Adjust® center channel levels.
7

Listening to Music via Bluetooth®
1. To pair your device via Bluetooth, press the Bluetooth button on the remote or say, “Alexa, pair my phone.”
2.To connect your device to the Command Bar, go to the Bluetooth settings section in your phone, tablet or computer and select “Polk Command Bar.” The light will turn solid blue when your Bluetooth device is connected.
8

Remote Control
Night Mode 

HDMI Sources 


Action Button
Press to lower the volume and use Alexa Voice Services
Mute
TV Source |
Bluetooth® |
|
Master Volume |
||
HDMI-ARC/Optical |
Up/Down |
|
|
||
Bass |
VoiceAdjust |
|
Up/Down |
Up/Down |
|
|
Sport Mode |
|
Movie Mode |
Music Mode |
|
Back |
Forward |
|
Play/Pause |
||
|
9

Sound Modes
Movie Mode
Acoustically optimized for both movie and TV content. It also provides a bass boost, increased spatialization and enhances Voice Adjust levels for improved dialogue clarity. It is the default sound mode for HDMI and Optical input sources.
Music Mode
Music Mode gives you balanced sound and smoother bass while minimizing spatialization effects to ensure
more natural sound reproduction.
Sport Mode
Enhances dialogue-rich content, like sporting events, news casts and talk shows. Uses Voice Adjust to boost dialogue clarity and optimizes the subwoofer volume levels.
Night Mode
Reduces bass and volume dynamics while improving voice intelligibility for low-volume listening.
10
Optimizing Your Listening Experience
Adjusting the Bass
Easily adjust low-frequency volume for more or less impact.
Adjusting the Dialogue or Center Channel
Use the Polk Voice Adjust feature to adjust dialogue levels to improve clarity when watching TV shows, movies and sports.
About Built-in Polk VoiceAdjust® Technology
The Command Bar features customizable voice levels in the sound bar, letting you tailor your listening experience however you prefer to reproduce clear, crisp dialogue
and never miss a single word of your favorite movie, TV show or sporting event.
11

Sound Bar Top Panel
Volume Up
Microphone Mute |
Action Button |
Volume Down
Sound Bar Back Panel
Power
Connector
USB Subwoofer HDMI 1 |
HDMI (ARC) Optical |
HDMI 2 |
Sync Button |
|
|
12

Visual Indicators
The front of the sound bar contains a single light that changes color and flashes to provide status information about the sound bar, like audio decoder modes and sound bar power status.
Front of Bar
STEREO (PCM)
DOLBY CONTENT
DTS CONTENT
 NIGHT MODE
BLUETOOTH
SINGLE FLASH
SOURCE SELECTION
HDMI 1, HDMI 2, TV ARC, TV OPTICAL
SINGLE FLASH
SOUND MODES
Back of Subwoofer
OFF |
ON |
NOT CONNECTED |
STANDBY MODE |
Back of Bar
SUBWOOFER SYNC LIGHT
OFF
NOT CONNECTED
SOLID
CONNECTED
FLASHING
PAIRING MODE
ON |
FLASHING |
CONNECTED |
PAIRING MODE |
13
Using Your TV or Cable/Satellite Remote to Control the Command Bar
There are several ways to use your TV, cable or satellite remote to control the Command Bar.
HDMI CEC CONTROL
If your TV is connected via HDMI and your TV supports CEC (and it is enabled in the TV settings menu), you can control the volume and mute functions on the Command Bar from your TV without any further setup.
PRELOADED IR CODES
If your TV is connected via Optical or your TV is connected via HDMI but your TV does not support CEC, you may be able control the volume and mute functions on the Command Bar from your TV without any further setup if your TV is one of the supported brands and was manufactured within the last 5 years. Visit the Polk website for details.
IR LEARNING FUNCTION
If your TV is connected via Optical and it is not one of the more popular brands, you can teach your IR (infrared) remote to control volume, mute and other functions (such as source selection or bass volume) on your Command Bar.
14

Using the IR Learning Function |
|
|
IMPORTANT: Hold both remotes about 12” (30cm) directly |
12” (30cm) |
|
in front of the Command Bar when pressing their respective |
||
|
||
buttons. Make sure your remotes have fresh batteries. |
|
Entering IR Learn Mode
Make sure your sound bar is powered on, then press and hold the mic mute button  on the sound bar for about 3 seconds. Release the button when you hear “Entering IR learn mode.” You should now see a slow blinking white light on the front of the sound bar.
STEP 1: Select a button on your Command Bar remote
Press and release the button on the Command Bar remote that you want to learn (ex: Volume Up).
STEP 2: Select a button on your TV remote
Very slowly tap the corresponding button on your TV remote until you hear “IR Command learned.”
STEP 3: Learn another code
Continue learning additional functions by repeating steps 1-3.
Exiting IR Learn Mode
Press and hold the mic mute button  on the sound bar again for about 3 seconds.
NOTE: The sound bar will automatically exit IR learn mode if it has not received any IR commands for 60 seconds. All learned IR commands will automatically be saved.
15
CLEARING ALL LEARNED IR CODES
Press and hold the mic mute button  on the sound bar for about 10 seconds.
Troubleshooting
I Don’t Hear Sound From My Subwoofer
1)Verify that the subwoofer is plugged into a power source.
2)Check the green light on the back of the subwoofer.
•If it is solid green, turn up the Bass using the remote control.
•If it is flashing green, you need to sync the subwoofer to the sound bar using the instructions below. If both lights are off, you need to connect the subwoofer to a power source.
Syncing the Subwoofer to the Sound Bar
1)Verify that the sound bar and subwoofer are plugged into a power source.
2)On the back of the sound bar, press and hold the SYNC button until you hear “Entering subwoofer pairing mode,” then release the button. The SUB light above the SYNC button will flash green.
3)On the back of the SUBWOOFER, press and hold the SYNC button until you hear “Subwoofer paired,” (about 10 seconds) and the light on the back of the subwoofer turns solid green.
16

Listen out loud with Spotify Connect
1.Connect your Polk Command Bar to your wifi network.
2.Open up the Spotify app on your phone, tablet or laptop using the same wifi network.
3.Play a song and select Devices Available.
4.Select your Polk Command Bar and start listening.
The Spotify software is subject to third party licenses found here: www.spotify.com/connect/third-party-licenses
17

FR
Merci pour votre achat d’un produit Polk. Si vous avez des questions ou des commentaires, n’hésitez pas à nous appeler ou à nous envoyer un courriel.
Quartier Général
Polk Audio
1 Viper Way, Vista, CA 92081
U.S.A.
Assistance technique
En France, contactez le service à la clientèle de Polk au +33 141383238
Le service consommateur est à votre disposition depuis la page d’accueil de ce site polk-eu@mailmw.custhelp.com
18

Contenu de la Boîte
Barre de son
Câble HDMI High speed de 2 m (6,5’) |
Caisson de basse |
|
Câble optique 1,8 m (6’) 

 Cordon d’alimentation du
caisson de basse
Télécommande
Cordon d’alimentation de la barre de son
AAA AAA |
|
|
2 piles (AAA) |
Alimentation de la barre de son |
Documentation du produit |
19

Brancher Votre Téléviseur
1.Y a-t-il une entrée HDMI étiquetée « ARC » sur votre éléviseur?
OUI
HDMI TV
ARC
Connectez le câble HDMI inclus aux prises HDMI étiquetées « ARC » sur le téléviseur et la barre audio.
NON
HDMI OPTICAL |
|
|
|
|
||||||||
|
|
TV |
||||||||||
|
|
|
|
|
|
|
|
|
|
|
|
|
|
|
|
|
|
|
|
|
|
|
|
|
|
|
|
|
|
|
|
|
|
|
|
|
|
|
|
|
|
|
|
|
|
|
|
|
|
|
|
Connectez la barre audio et le téléviseur avec le câble optique inclus.
Connectez le câble HDMI inclus dans n’importe quelle prise HDMI du téléviseur et à la prise « TV ARC » de la barre audio.
20
2.Déterminez l’emplacement de la barre de son
Pour la meilleure expérience d’écoute qui soit, centrez la barre de son sous le téléviseur.
Remarque : pour des directives d’installation murales, référez-vous au modèle d’installation murale inclus.
3.Branchez la barre de son à une prise de AC
Durant le démarrage, un voyant orange situé sur
le devant de la barre de son clignotera et l’éclairage circulaire du Amazon Alexa se mettra en fonction.
4.Déterminez l’emplacement du caisson de basse
Pour les meilleurs résultats possibles, installez le hautparleur d’extrêmes graves sur le même mur que celui du téléviseur et à une distance maximale de 30 pi (10 m) de la barre de son.
5.Connectez le caisson de basse à une prise de AC
Un voyant vert fixe derrière le haut-parleur d’extrêmes graves indique qu’il est jumelé à la barre de son.
TV
Sound Bar
TV
Subwoofer
21

6. Installez les piles de la télécommande à distance
Insérez les piles AAA fournies.
7. Vérifiez vos connexions
Allumez votre téléviseur pour vous assurer que vous voyez une image et que vous entendez du son provenant de la barre de son. Vous pourriez devoir sélectionner l’entrée HDMI appropriée sur votre téléviseur.
Remarque : si vous entendez du son provenant simultanément de votre téléviseur et de votre barre de son, vous devez éteindre manuellement les haut-parleurs du téléviseur à partir du menu Paramètres. Consultez le manuel de l’utilisateur pour obtenir des directives à cet effet.
Contrôler le Volume à l’aide de la Télécommande du Téléviseur
La Command Bar est préconfigurée pour répondre aux commandes de volume et de mise en sourdine à l’aide de télécommandes à distance pour téléviseur les plus populaires, y compris: Samsung, LG, Sony, Vizio et autres grandes marques.
**Tout autre marque de commerce, nom de produit, logo et marque auxquelles il est fait référence aux présentes sont la propriété de leurs détenteurs respectifs.
REMARQUE : si la barre de son ne fonctionne pas avec la télécommande de votre téléviseur, suivez les directives fournies à la page 30 pour qu’elle puisse apprendre les contrôles de votre télécommande.
22

Téléchargez l’application Polk Connect à Partir de la Boutique d’applications
Utilisez l’application Polk Connect pour connecter la Command Bar à votre réseau et activer les services vocaux Amazon Alexa. Vous aurez besoin
de votre mot de passe Wi-Fi.
Communiquer avec votre Polk Command Bar
Une fois connectée à votre réseau, la barre de son vous permet de demander à Alexa d’effectuer une gamme de tâches utiles. Pour attirer l’attention de votre Polk Command Bar, dites simplement « Alexa ». Posez-lui des questions pour obtenir les plus récentes nouvelles du sport, les bulletins météorologiques, des réponses à des questions de cuisine, et bien plus.
23

Écouter de la Musique via Bluetooth®
1.Pour jumeler votre appareil à l’aide de Bluetooth, appuyez sur le bouton Bluetooth de la télécommande ou dites « Alexa, pair my phone »
2.Pour connecter votre appareil à la Command Bar, rendez-vous aux réglages Bluetooth de votre téléphone, tablette ou ordinateur, puis sélectionnez « Polk Command Bar ». Le voyant tourne au bleu lorsque votre appareil Bluetooth est connecté.
24

Télécommande
Mode Nocturne 

Entrées HDMI 


Bouton Action
Appuyez sur ce bouton pour diminuer le volume et utiliser les services vocaux Alexa
Muet
Entrée TV |
Bluetooth® |
|
Volume principal |
||
Câble HDMI-ARC/Câble audio optique |
En haut/Vers le bas |
|
|
||
Basse |
VoiceAdjust |
|
En haut/Vers le bas |
En haut/Vers le bas |
|
|
Mode Sport |
|
Mode Cinéma |
Mode Musique |
|
Retour |
Avance Rapide |
|
Lecture/Pause |
||
|
25

Modes Sonores
Mode Cinéma |
Mode Sport |
Le mode sonore par défaut est conçu pour améliorer le contenu télévisuel et les films. Il permet aussi d’amplifier les basses, d’accroître la spatialisation et d’optimiser les niveaux de Voice Adjust afin d’améliorer la clarté des dialogues. C’est le mode par défaut pour les entrées HDMI et optique.
Mode Musique
Le mode Musique vous offre un son équilibré et des sons graves plus doux tout en minimisant les effets de spatialisation sonore afin d’assurer une reproduction plus naturelle du son. Le mode Tout stéréo offre un son ambiophonique en reproduisant les sons des canaux avant-gauche et avant-droit dans les haut-parleurs ambiophoniques de gauche et de droite. Utilisez le bouton Musique pour basculer entre le mode Musique et le mode Tout stéréo lors de l’écoute de données audio à 2 canaux.
Rehausse le contenu riche en dialogues, comme les événements sportifs, les bulletins d’informations et les talk-shows. Fait appel à Voice Adjust pour améliorer les dialogues.et les basses.
Mode nocturne
Réduit les basses et les variations de volume, tout en améliorant l’intelligibilité des dialogues lors de l’écoute à volume réduit.
26
 Loading...