


Polaroid ID Systems Weblink
Configurator Utility Guide
Polaroid ID Systems
4650 Executive Blvd
Fort Wayne, IN 46808
260.484.0611
Toll-free 1.866.ID Photo
Fax 260.483 4287

The design and information contained in these materials is protected by US and international copyright law. Polaroid and Polaroid & Pixel are trademarks of Polaroid Corporation. 9007685 0764-1-06-1 12/05
This guide may not be copied, photocopied, reproduced, translated, or reduced to machine readable form without the express written permission of Polaroid Corporation. No copies of this guide or of the accompanying software may be sold or given to any other person or entity.
Information in this guide is subject to change without notice. Polaroid Corporation assumes no responsibility for any errors that may appear in this guide.
All drawings and information herein are the property of Polaroid Corporation. All unauthorized use and reproduction is prohibited.
All other product names are trademarks of their respective owners.

Table of Contents |
|
Configurator Utility Overview............................................................................................ |
1 |
Configurator Installation Options .............................................................................. |
2 |
What You Will Need .................................................................................................... |
2 |
Using this Guide ......................................................................................................... |
3 |
Weblink Configurator Modes ............................................................................................. |
4 |
Using Configurator in Tab Mode ............................................................................... |
4 |
Using Configurator in Wizard Mode .......................................................................... |
5 |
Application Definition ........................................................................................................ |
6 |
Group Definition................................................................................................................. |
8 |
Table Definition ................................................................................................................ |
10 |
ODBC Connection .................................................................................................... |
11 |
LDAP Connection ..................................................................................................... |
13 |
Drop-Down List Definition (Optional) ............................................................................. |
14 |
Values Stored in the Weblink Configuration ............................................................ |
15 |
Values Stored in a Look-up Table............................................................................. |
16 |
Search Definition .............................................................................................................. |
19 |
Search Table Definition ............................................................................................ |
20 |
Search Field Definition............................................................................................. |
21 |
List Field Definition .................................................................................................. |
22 |
Data View Definition ........................................................................................................ |
24 |
Data View Pages Definition...................................................................................... |
26 |
Data View Image Definition ..................................................................................... |
33 |
Data View Header Definition ................................................................................... |
35 |
Menu Item Definition ....................................................................................................... |
37 |
Window Location Definition ............................................................................................ |
39 |
After Each Configuration Change .................................................................................... |
41 |
Appendix A – Weblink Software License ........................................................................ |
42 |
Appendix B - End-user License Agreement for Microsoft Software ............................... |
43 |

Configurator Utility Overview
The Weblink Configurator utility is used to configure the Weblink application to meet your particular needs. You may modify applications, as well as user accessibility to those applications. You may also modify the way screens are presented to users. Seven components of the sample application may be configured. Each is briefly described below:
Applications are sets of pages that allow a user to search for, display, and edit records in a database. Each Weblink application has its own Virtual Directory (Web site) in Internet Information Server. Therefore, an application is equivalent to a Weblink site.
Groups control user access to various features of Weblink. Groups must first be defined in the initial security setup and then in the Configurator utility.
Tables are the database tables to be used with Weblink.
Drop-down List Boxes refer to preset list boxes that can be placed in Search or Data View screens and can be pre-populated from Weblink or external databases.
Searches define how Weblink searches records. A search definition contains table names, list fields, and search fields.
List Views define the fields to be displayed in a list when more than one matching record is found. The user selects records from this list to view.
Data Views define what the user sees after a record is located. This includes page fields, images, and ActiveX components.
Menu Items relate searches and data views. A menu item may have multiple searches.
Window Locations are screen positions for certain items such as the menu and toolbar.
1
Polaroid Commercial ID Systems Weblink Configurator Utility Guide

Configurator Installation Options
You may choose to configure Weblink off site or on a workstation other than the server. To do so, select the “Configurator Only” option during the Weblink installation. Once you have configured your application, copy the workstation version of IDCardMakerWeblink.mdb (usually in the Program Files\Polaroid\IDCardMakerWeblink\Design folder) to the appropriate folder on the Web server (usually the Program Files\Polaroid\IDCardMakerWeblink\Design folder).
Your configured application is stored in several tables of the Microsoft® Access™ 97 database, named “IDCardMakerWeblink.mdb.” It has an ODBC data source entry of “Weblink.” Never edit this file directly, unless directed to do so by Polaroid personnel. Configuring Weblink on a server or workstation that has an ODBC connection to the database is highly recommended. The user may then take advantage of drop-down edit boxes and test connection buttons to verify that the database columns are entered correctly.
What You Will Need
You will need to know the following items before configuring your application:
Database table schema including all field names, types, and keys.
Group names defined in the User Manager that identify Weblink functions.
Fields to search including which fields are required and their particular case.
Fields to display in a list.
Fields to display in data views grouped in logical subsets. You should decide which fields are editable.
Images to display.
2
Polaroid Commercial ID Systems Weblink Configurator Utility Guide

Using this Guide
The Weblink Demo Microsoft Access database installed during setup is provided as a sample application. You may refer to this information as necessary to observe how information in dialog boxes is to be completed. The name of the demo database is DEMO32BLOB.MDB. A table from the database is shown below. This demo database should not be edited.
The steps in this guide instruct you on how to add information to your application. Use the Add button, as directed throughout this guide, to build a new application. Use the Edit button to modify information in an existing application. The text boxes in the Add and Edit dialog boxes are identical, although the Edit dialog boxes automatically display previously entered information. A Copy button is also provided for use in copying a selected item. By clicking the Copy button, you copy the selected item, add it to the list, and label it “Copy of <item>.” You may also select an existing entry and then select the Delete button to delete the entry. Upon deleting an entry, you are presented with a confirmation dialog box. If you still wish to delete, click the Yes button.
3
Polaroid Commercial ID Systems Weblink Configurator Utility Guide
Weblink Configurator Modes
The Configurator utility is available in three modes: the Configurator Tab mode; the Configurator Wizard mode; and the Configurator EZ Wizard mode.
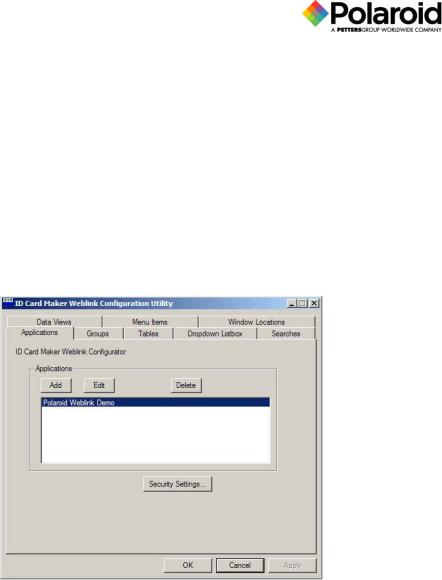
Using Configurator in Tab Mode
The Configurator utility Tab mode is used for fast editing once you are familiar with Weblink. The Tab mode allows you to tab through each of the eight components in any order you choose. Use the following procedure to use the utility in the Tab mode:
1.From the Start menu select > Programs > Polaroid > IDCardMakerWeblink > Configurator. The Weblink Configurator utility is displayed in Tab mode.
4
Polaroid Commercial ID Systems Weblink Configurator Utility Guide
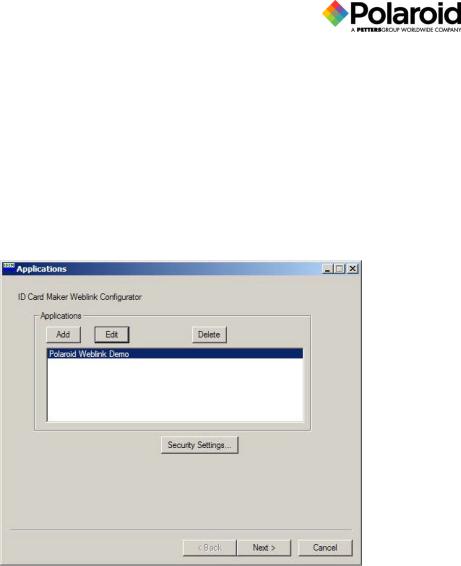
Using Configurator in Wizard Mode
The Wizard mode is recommended for familiarizing yourself with the Configurator utility. The Wizard mode prompts you through each step of the application and is used as examples in this guide to take you through each available function. The Next button takes you to the next Weblink component. The Back button returns to the previous component. The Cancel button exits the Weblink application.
To start the Configurator utility in Wizard mode:
1.From the Start menu, select Programs > Polaroid > IDCardMakerWeblink > Configurator Wizard . The Applications dialog box is displayed.
5
Polaroid Commercial ID Systems Weblink Configurator Utility Guide
Application Definition
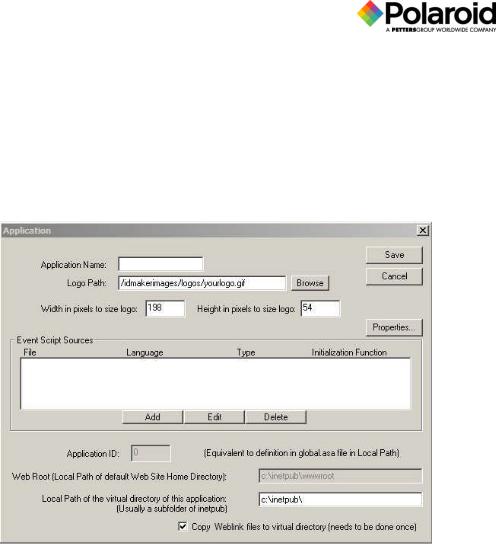
The application definition feature allows you to enter the application name, script source, and logo information. You may also add hypertext information. Use the following procedure to add an application:
1.In Configurator Wizard mode, click the Add button in the Applications dialog box. The Application dialog box is displayed.
2.Enter the Application Name. This will be displayed in the Web browser title bar.
3.In the Event’s Script Source text box enter “capture.js” only if using Image Capture. This file is located in the virtual directory of the application and can be optionally used for other events defined in the Events dialog box. You may also select the Browse button to the right of the text box to search for a file.
4.Enter the logo path from the Inetpub\wwwroot folder. This is the logo to be placed in the upper right corner of each screen. You may also select the Browse button to the right of the text box to search for a logo.
5.Enter the logo width and height in pixels. This sets the lower left position of the logo on the browser, not the size of the logo. Use an image editing application to determine your logo size.
6.The internal application ID is shown for information purposes only. The global.asa function in your Web site folder, under the inetpub folder, should reference this ID.
7.The Web Root is shown for informational purposes only. This lists the web root defined by the Internet Information Server.
8.Enter the Local Path of the Virtual Directory of this application. This is the Physical Local Path specified in Internet Server Manager or Personal Server Manager, and it is usually a subfolder of inetpub. The following example is from the Internet Server Manager:
6
Polaroid Commercial ID Systems Weblink Configurator Utility Guide

9.Click the OK button.
10.Click the Save button.
For each application created with Weblink, certain .asp (Active Server Page) files must be stored in a separate physical folder. This is the physical folder of the virtual directory that you set up in the Microsoft Internet Information Server. See the Getting Started Guide for details. If these files are not up-to-date, the Copy Files dialog box appears.
11.If you click the Copy Files button, the files are copied and a global.asa file is created in your specified folder containing the line: ApplicationValue ( “AppID” ) = <the application ID of your app>. You may also click the Cancel button to avoid copying the files.
IMPORTANT: You must set up a new Web site (Virtual Directory) for each site that you create. Refer to the Getting Started Guide, the “Setting up the Internet Information Server” section.
12.Click the Next button. You are ready to configure groups.
7
Polaroid Commercial ID Systems Weblink Configurator Utility Guide
Group Definition
You may add, edit, or delete groups created for the Weblink application to provide or restrict user access to features. Refer to the Getting Started Guide for additional information.
Click the Next button to display the Groups dialog box.
Notice how the groups in the Configurator utility match the groups defined in the NT User Manager, or in the Windows 95/98 Security Manager, during the Getting Started process. In Configurator, you may accept the defaults.
The suggested groups are:
WEBLINK_SEARCH: Defined in User Manager and assigned to users with data viewing privileges.
WEBLINK_EDIT: Defined in User Manager and assigned to users who require data edit privileges.
WEBLINK_DELETE: Defined in User Manager and assigned to users who require data delete privileges.
WEBLINK_PRINT: Defined in User Manager and assigned to users who require print privileges. This group requires Weblink Card Issuance.
WEBLINK_INSERT: Defined in User Manager and assigned to users who require data insert privileges.
WEBLINK_NONE: Should not be defined in User Manager. Assign functions to this group if you don’t want them to be viewable or editable. Users should not be assigned to this group.
WEBLINK_CAPTURE: Defined in User Manager and assigned to users who require capture privileges. This group requires Weblink Image Capture.
8
Polaroid Commercial ID Systems Weblink Configurator Utility Guide
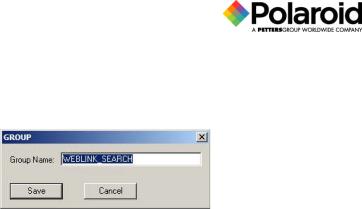
To add a group:
1.Click the Add button in the Groups dialog box. A Group dialog box with edit capability is displayed.
2.Enter the Group Name.
3.Click the Save button.
4.Click the Next button in the Groups dialog box.
9
Polaroid Commercial ID Systems Weblink Configurator Utility Guide
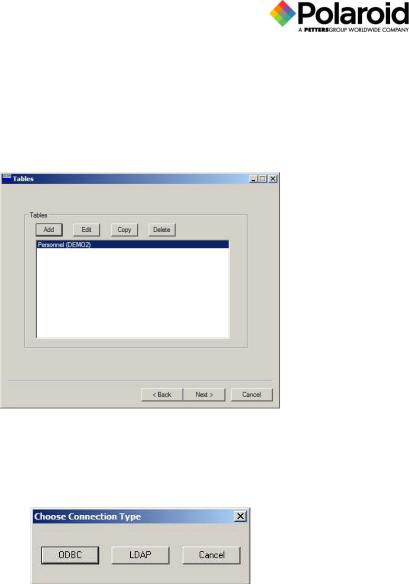
Table Definition
You may add, edit, copy, or delete database table connections. This is where you define the database tables to connect to Weblink. When you click the Next button in the Groups dialog box, the Tables dialog box is displayed.
Use the following procedure to add tables:
1. Click the Add button. The Choose Connection Type dialog box appears.
2.Click either the ODBC button to connect to an ODBC database connection or the LDAP button to connect to a Novell Directory Services data source. Both types of connections are discussed in the following sections. You may also click the Cancel button to return to the Tables dialog box.
10
Polaroid Commercial ID Systems Weblink Configurator Utility Guide
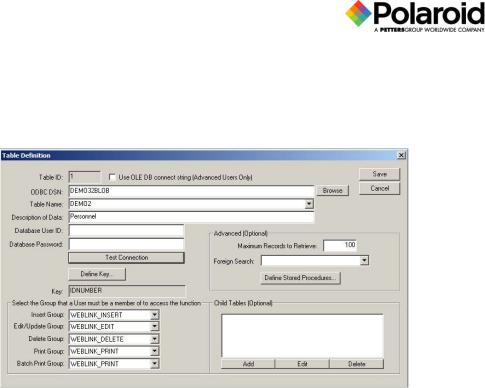
ODBC Connection
Click the ODBC button on the Choose Connection Type dialog box to display the Table Definition dialog box.
1.Enter the 32-bit ODCB Data Source Name (DSN). You may click the Browse button to the right of the text box to select an ODBC DSN from a list. You must choose a system
DSN.
2. Select or enter a name from the Table Name drop-down list. The name may be the schema if necessary, such as “DEMO2” for an Access database such as DEMO32BLOB, or “SCHEMA.TABLE” for Oracle.
3. Enter the Description of Data, such as personnel, employee, or auto. This is displayed in the Data Retrieval Menu dialog box as “NEW <description of data>.”
4. If necessary, enter the Database User ID. This is the user ID whose permissions will be used to access the database for each search, update, insert, and delete.
5. If necessary, enter the Database Password for the user.
6. Click the Test Connection button to verify that the connection to the database is successful. If not, refer to the Weblink Troubleshooting Guide included on the Weblink CD-ROM.
7. Select the primary Key Column Name of the database from the drop-down list.
8. Select the primary Key Column Type from the drop-down list. The options in this field include Text, Number, or Date.
9. Enter the maximum number of records to retrieve on a search.
10.Select the Group that the user must be a member of to access the function from the dropdown list for each function.
11.Click the Save button. The Tables Definition dialog box is displayed.
12.Repeat steps 1 to 12 for each table.
If required, Weblink will retrieve data from both the parent and child tables. A table must already be defined before adding it as a child table.
11
Polaroid Commercial ID Systems Weblink Configurator Utility Guide
 Loading...