


USER MANUAL

CONTENTS
Contents |
2 |
Get Started |
9 |
PolarM460UserManual |
9 |
Introduction |
9 |
Takefull advantageof yourM460 |
9 |
Set upyourM460 |
9 |
Set UpinthePolarFlow WebService |
10 |
ChargetheBattery |
10 |
Battery OperatingTime |
11 |
Low Battery Notifications |
11 |
Buttonfunctions andmenustructure |
12 |
ButtonFunctions |
12 |
Light |
12 |
Back |
12 |
Start |
13 |
Up/ Down |
13 |
MenuStructure |
13 |
Diary |
13 |
Settings |
13 |
Tests |
14 |
Interval Timer |
14 |
Favorites |
14 |
Pairingsensors withM460 |
14 |
PairingCompatibleBluetoothSmart ® Sensors withM460 |
14 |
2

PolarCadenceSensorBluetooth® Smart |
14 |
PairCadenceSensorwithM460 |
15 |
PolarSpeedSensorBluetooth® Smart |
15 |
PairaSpeedSensorwithM460 |
15 |
MeasuringWheel Size |
16 |
PolarH10Heart RateSensor |
17 |
PairHeart RateSensorwithM460 |
17 |
PolarLOOK KéoPowerSensorBluetooth® Smart |
18 |
PairKéoPowerwithM460 |
18 |
PowerSettings onM460 |
19 |
CalibrateKéoPowerbeforestartingatrainingsession |
19 |
PairaMobileDevicewithM460 |
19 |
DeleteaPairing |
20 |
PolarAdjustableBikeMount |
20 |
Settings |
22 |
Sport ProfileSettings |
22 |
Settings |
22 |
Physical Settings |
23 |
Weight |
23 |
Height |
23 |
Dateof Birth |
23 |
Sex |
23 |
TrainingBackground |
23 |
MaximumHeart Rate |
24 |
General Settings |
24 |
PairandSync |
24 |
3

Front Light Settings |
25 |
Flight Mode |
25 |
Time |
25 |
Date |
25 |
Week's StartingDay |
25 |
ButtonSounds |
25 |
ButtonLock |
25 |
Units |
25 |
Language |
26 |
About YourProduct |
26 |
Quick Menu |
26 |
FirmwareUpdate |
27 |
How toUpdateFirmware |
28 |
Training |
29 |
WearHeart RateSensor |
29 |
Start aTrainingSession |
29 |
Start aSessionwithTrainingTarget |
30 |
Start aSessionwithInterval Timer |
31 |
Functions DuringTraining |
31 |
TakeaLap |
31 |
Lock aHeart Rate, SpeedorPowerZone |
31 |
ChangePhaseDuringaPhasedSession |
32 |
ChangeSettings inQuick Menu |
32 |
Pause/StopaTrainingSession |
32 |
AfterTraining |
32 |
TrainingSummary onYourM460 |
33 |
4

PolarFlow App |
35 |
PolarFlow WebService |
35 |
Features |
36 |
AssistedGPS (A-GPS) |
36 |
A-GPS Expiry Date |
36 |
GPS Features |
36 |
Back toStart |
36 |
Barometer |
37 |
Smart Coaching |
37 |
TrainingBenefit |
38 |
TrainingLoadandRecovery |
39 |
Fitness Test |
39 |
BeforetheTest |
39 |
PerformingtheTest |
40 |
Test Results |
40 |
Fitness Level Classes |
40 |
Men |
40 |
Women |
41 |
Vo2max |
41 |
Orthostatic Test |
41 |
BeforetheTest |
41 |
Performingthetest |
42 |
Test Results |
42 |
Heart RateZones |
43 |
Smart Calories |
44 |
Smart Notifications (iOS) |
45 |
5

Settings |
45 |
M460 |
45 |
Phone |
45 |
Use |
45 |
Dismiss Notifications |
46 |
Smart Notifications (Android) |
46 |
Settings |
46 |
M460 |
46 |
Flow App |
47 |
Phone |
47 |
Use |
47 |
Dismiss Notifications |
47 |
Block apps |
47 |
SpeedandPowerZones |
48 |
Settings |
48 |
TrainingTarget withSpeedandPowerZones |
48 |
DuringTraining |
48 |
AfterTraining |
48 |
Sport Profiles |
48 |
How canI activateStravaLiveSegments® onmy M460? |
49 |
M460compatibility withTrainingPeaks |
50 |
Polar Flow |
52 |
PolarFlow webservice |
52 |
Feed |
52 |
Explore |
52 |
Diary |
52 |
6

Progress |
52 |
TrainingTargets |
53 |
CreateaTrainingTarget |
53 |
Quick Target |
53 |
PhasedTarget |
53 |
Favorites |
53 |
Favorites |
54 |
AddaTrainingTarget toFavorites: |
54 |
Edit aFavorite |
54 |
RemoveaFavorite |
54 |
PolarFlow App |
54 |
Sport Profiles inPolarFlow |
55 |
AddaSport Profile |
55 |
InthePolarFlow webservice: |
55 |
InthePolarFlow mobileapp: |
55 |
Edit aSport Profile |
56 |
InthePolarFlow webservice |
56 |
InthePolarFlow mobileapp: |
56 |
Basics |
56 |
Heart Rate |
56 |
TrainingViews |
56 |
Syncing |
58 |
Sync withFlow WebServiceviaFlowSync |
58 |
Sync withFlow App |
59 |
Important Information |
60 |
CaringforYourM460 |
60 |
7

M460 |
60 |
Heart RateSensor |
60 |
Storing |
60 |
Service |
60 |
Batteries |
61 |
ChangingHeart RateSensorBattery |
61 |
Precautions |
62 |
InterferenceDuringTraining |
62 |
MinimizingRisks WhenTraining |
62 |
Technical Specification |
63 |
M460 |
63 |
H10Heart RateSensor |
64 |
PolarFlowSync SoftwareandUSB Cable |
64 |
PolarFlow MobileApplicationCompatibility |
64 |
Waterresistanceof Polarproducts |
65 |
LimitedInternational PolarGuarantee |
66 |
Regulatory information |
66 |
RFExposureInformation |
67 |
Disclaimer |
67 |
8
GET STARTED
POLAR M460 USER MANUAL
INTRODUCTION
Congratulations onyournew M460! ThePolarM460all-roundGPS bikecomputeris fully compatiblewithseveral Bluetooth powermeters andmakes cyclingevenmoreexcitingwithStrava Live Segments®. YourM460is compatiblewithTrainingPeaks® coachingandanalyzingplatformandthefollowingadvancedTrainingPeaks powermetrics forcyclingareavailableonyourM460: NORMALIZED POWER® (NP®), INTENSITY FACTOR® (IF®)andTRAINING STRESS SCORE® (TSS®).
Whencombinedwithaheart ratesensor, PolarM460offers access touniqueheart ratebasedfeatures, suchas Fitness Test, Orthostatic Test, TrainingLoadandRecovery Status. It is splash-proof (IPX7)andhas abattery lifeforupto16hours of training. GPS andbarometerenableyoutotrack yourspeed, distance, altitudeandgradient. PolarM460keeps youconnectedwherever, wheneverwithsmart notifications fromyourphone. It evenlooks afteryoursafety withafront LED light. Get aninstant overview of yourtrainingright afterasessionwiththeFlow app. Planandanalyzeyourtrainingindetail with theFlow webservice.
This usermanual helps youget startedwithyournew trainingcompanion. Furthersupport is availableat sup- port.polar.com/en/M460.
TAKE FULL ADVANTAGE OF YOUR M460
Seelive, accurateheart rateonyourM460duringtrainingwithPolarH10heart ratesensor. Yourheart rateis information usedtoanalyzehow yoursessionwent. If youbought aset that does not includeaheart ratesensor, not toworry, youcan always buy onelater.
View yourtrainingdataat aglanceafterevery sessionwithPolarFlow mobileapp. Flow appsyncs yourtrainingdatawirelessly tothePolarFlow webservice. Downloadit fromtheAppStoreorGooglePlay.
PolarFlowsync softwareallows youtosync databetweenyourM460andtheFlow webserviceonyourcomputerviathe USB cable. Gotoflow.polar.com/start todownloadandinstall PolarFlowSync software. Planandanalyzeevery detail of yourtraining, customizeyourdeviceandlearnmoreabout yourperformancewithPolarFlow webserviceat flow.polar.com.
NORMALIZED POWER®, INTENSITY FACTOR® andTRAINING STRESS SCORE® aretrademarks of TrainingPeaks, LLC andareusedwiththepermission. Learnmoreat http://www.trainingpeaks.com.
SET UP YOUR M460
PleasedothesetupinthePolarFlow webservice. Thereyoucanfill inall thephysical details requiredforaccuratetraining dataat once. Youcanalsoselect languageandget thelatest firmwareforyourM460. TodothesetupintheFlow webservice, youneedacomputerwithanInternet connection.
 M460is deliveredinsleepmode. It wakes upwhenyouplugit intoacomputeroraUSB charger. If thebattery is completely empty, it takes acoupleof minutes forthecharginganimationtoappear.
9
SET UP IN THE POLAR FLOW WEB SERVICE
1.Gotoflow.polar.com/start anddownloadthePolarFlowSync software, whichyouneedtoconnect yourM460tothe Flow webservice.
2.Opentheinstallationpackageandfollow theon-screeninstructions forinstallingthesoftware.
3.Oncetheinstallationis complete, FlowSync opens automatically andasks youtopluginyourPolardevice.
4.PlugM460intoyourcomputer’s USB port withtheUSB cable. M460wakes upandstarts charging. Let yourcomputerinstall any USB drivers if it suggests so.
5.TheFlow webserviceopens automatically onyourinternet browser. CreateaPolaraccount orsigninif youalready haveone. Fill inyourphysical settings precisely as they haveaneffect oncaloriecalculationandotherSmart Coachingfeatures.
6.Start synchronizationby clickingDone, andthesettings will besynchronizedbetweenM460andtheservice. FlowSync status will changetocompleted, oncethesynchronizationis done.
7.YouarerequestedtoupdateyourM460software. Click Yestoupdatethelatest softwareversiontoyourM460. It may take20-30minutes tocomplete. PleaseupdateyourM460toget it fully operational withcompleteset of features.
CHARGE THE BATTERY
TheM460has aninternal, rechargeablebattery. UsetheUSB cableincludedintheproduct set tochargeit viatheUSB port onyourcomputer. Youcanalsochargethebattery viaawall outlet. Whenchargingviaawall outlet useaUSB power adapter(not includedintheproduct set). If youuseanAC adapter, makesurethat theadapteris markedwith"output 5Vdc" andthat it provides aminimumof 500mA. Only useanadequately safety approvedAC adapter(markedwith"LPS", "Limited PowerSupply" or"ULlisted").
1.Lift therubbercoveroff theUSB port. PlugthemicroUSB connectorintotheUSB port intheM460, andplugthe otherendof thecableintoyourPC.
10
2.Charging appears onthedisplay.
3.WhenM460is fully charged, Charging completed is displayed.
Don't leavethebattery fully dischargedforalongperiodof timeorkeepit fully chargedall thetime, becauseit might affect thebattery lifetime. KeeptheUSB port coverclosedwhennot inuse.
 Donot chargethebattery whentheM460is wet.
 Donot chargethebattery intemperatures under0°C / 32°F orover+50°C / 122°F. ChargingyourM460inanenvironment wheretemperatureis not withinthis temperaturerangemay permanently damagethebattery capacity - especially if thetemperatureis higher.
BATTERY OPERATINGTIME
Thebattery operatingtimeis upto16hours withGPS andheart ratesensor. Theoperatingtimedepends onmany factors, suchas thetemperatureof theenvironment inwhichyouuseyourM460, thefeatures youselect anduse(e.g. theuseof the front light reduces theoperatingtime), andbattery aging. Theoperatingtimeis significantly reducedintemperatures well below freezing.
LOW BATTERY NOTIFICATIONS
Battery low. Charge
Thebattery chargeis low. It is recommendedtochargeM460.
Charge before training
Thechargeis toolow forrecordingatrainingsession.
11
A new trainingsessioncannot bestartedbeforechargingM460.
When the display is blank, M460has eithergonetosleepmodeorits battery is empty. M460goes tosleepmodeautomatically whenit's intimeview andyouhaven't pressedany buttonfortenminutes. It wakes upfromsleepmodewhenyou press any button. If it doesn't wakeup, it's timetocharge.
BUTTON FUNCTIONS AND MENU STRUCTURE
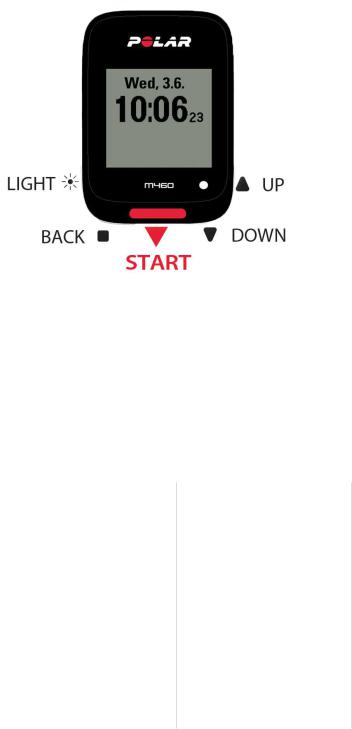
BUTTON FUNCTIONS
M460has fivebuttons that havedifferent functionalities dependingonthesituationof use. Seethetables below tofindout what functionalities thebuttons haveindifferent modes.
LIGHT |
|
|
|
|
|
|
|
TIME VIEW AND MENU |
|
PRE-TRAINING MODE |
|
DURING TRAINING |
|||
|
|
||||||
• |
Illuminatethedisplay |
|
• |
Illuminatethedisplay |
|
• |
Illuminatethedisplay |
• |
Press andholdto |
|
• |
Press andholdto |
|
• |
Press andholdto |
|
lock buttons |
|
|
entersport profileset- |
|
|
enterQuick Menu |
|
|
|
|
tings |
|
|
|
BACK |
|
|
|
|
|
|
|
|
|
|
|
|
|
|
|
TIME VIEW AND MENU |
|
PRE-TRAINING MODE |
|
DURING TRAINING |
|||
• |
Exit themenu |
|
• |
Returntotimeview |
|
• |
Pausetrainingby |
• |
Returntothepre- |
|
|
|
|
|
pressingonce |
|
|
|
|
|
|
||
|
vious level |
|
|
|
|
• |
Press andholdfor3 |
• |
Leavesettings |
|
|
|
|
|
seconds tostoptrain- |
|
|
|
|
|
ingrecording |
||
|
unchanged |
|
|
|
|
|
|
|
|
|
|
|
|
|
|
•Cancel selections
•Press andholdto returntotimeview frommenu
•Press andholdto
12
TIME VIEW AND MENU |
PRE-TRAINING MODE |
|
DURING TRAINING |
|||
|
sync withFlow appin |
|
|
|
|
|
|
timeview |
|
|
|
|
|
START |
|
|
|
|
|
|
|
|
|
|
|
|
|
TIME VIEW AND MENU |
|
PRE-TRAINING MODE |
|
DURING TRAINING |
||
|
|
|||||
• |
Confirmselections |
|
• Start atrainingses- |
|
• |
Press andholdtoset |
• |
Enterpre-training |
|
sion |
|
|
zonelock on/off |
|
|
|
|
|
||
|
mode |
|
|
|
• |
Continuetraining |
• |
Confirmtheselection |
|
|
|
|
recordingwhen |
|
|
|
|
paused |
||
|
shownonthedisplay |
|
|
|
|
|
|
|
|
|
|
Press torecordalap |
|
|
|
|
|
|
• |
|
|
|
|
|
|
|
|
UP / DOWN |
|
|
|
|
||
TIME VIEW AND MENU |
PRE-TRAINING MODE |
|
DURING TRAINING |
|||
• |
Movethroughselec- |
• Movethroughsports |
|
• |
Changetrainingview |
|
|
tionlists |
list |
|
|
|
|
•Adjust aselected value
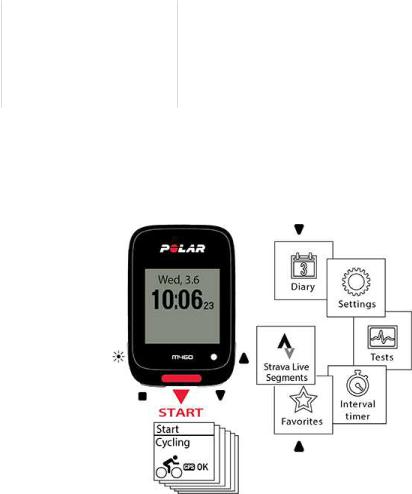
MENU STRUCTURE
Enterandbrowsethroughthemenuby pressingUP orDOWN. Confirmselections withtheSTARTbutton, andreturnwith theBACK button.
Inthemenuyou'll find:
•Diary
•Settings
•Tests
•Interval timer
•Favorites
•Strava Live Segments
DIARY
InDiaryyou'll seethecurrent week, past fourweeks andnext fourweeks. Select aday toseeyourtrainingsessions of that day, thetrainingsummary of eachsessionandthetests youhavedone.Youcanalsoseeyourplannedtrainingsessions.
SETTINGS
InSettingsyoucanedit:
13
•Sport profiles
•Physical settings
•General settings
•Watch settings
Formoreinformation, seeSettings.
TESTS
InTests, you'll find:
Orthostatic test
Fitness test
Formoreinformation, seeFeatures.
INTERVAL TIMER
Set timeand/ordistancebasedinterval timers toprecisely timework andrecovery phases inyourinterval trainingsessions.
Formoreinformation, seeStart aTrainingSession.
FAVORITES
InFavoritesyou'll findtrainingtargets that youhavesavedas favorites intheFlow webservice.
Formoreinformation, seeFavorites.
PAIRING SENSORS WITH M460
Enhanceyourtrainingexperience, andachieveamorecompleteunderstandingof yourperformancewithBluetooth® Smart sensors. Beforetakinganew Bluetooth Smart ® heart ratesensor, cyclingsensorormobiledevice(smartphone, tablet)into use, it has tobepairedwithyourM460. Pairingonly takes afew seconds, andensures that yourM460receives signals from yoursensors anddevices only, andallows disturbance-freetraininginagroup. Beforeenteringanevent orrace, makesure that youdothepairingat hometoprevent interferenceduetodatatransmission.
PAIRINGCOMPATIBLE BLUETOOTH SMART ® SENSORS WITH M460
Inadditiontoanumberof Polarsensors yourM460is fully compatiblewithseveral third-party Bluetoothpowermeters. Pleasecheck thefull compatibility tablefrom support.polar.com. Pleasemakesurethat youhavethelatest firmwarebothin yourM460andinthethird-party powersensor. Follow themanufacturer's instructions tocalibratethepowersensor.
POLAR CADENCE SENSOR BLUETOOTH® SMART
Themost practical way of measuringyourcyclingsessionis withouradvancedwireless cadencesensor. It measures your real-time, averageandmaximumcyclingcadenceas revolutions perminutesoyoucancomparethetechniqueof yourride against previous rides.
14
•Improves yourcyclingtechniqueandidentifies youroptimal cadence
•Interference-freecadencedatalets youevaluateyourindividual performance
•Designedtobeaerodynamic andlight
PAIR CADENCE SENSOR WITH M460
Makesurethecadencesensorhas beencorrectly installed. Formoreinformationoninstallingthecadencesensorreferto theusermanual of thecadencesensor.
Therearetwoways topairacadencesensorwithyourM460:
1.GotoGeneral Settings > Pair and sync > Pair other deviceandpress START.
2.M460starts searchingforthecadencesensor. Rotatethecrank afew times toactivatethesensor. Theflashingred light onthesensorindicates that thesensoris activated.
3.Oncethecadencesensoris found, Polar CAD xxxxxxxxis displayed.
4.Press START, Pairing is displayed.
5.Pairing completed is displayedwhenthepairingis ready.
6.Sensor linked to:is displayed. ChooseBike 1, Bike 2orBike 3. ConfirmwithSTART.
 Thefirst cyclingsensoryoupairwill automatically belinkedto Bike 1.
or
1.Press STARTintimeview toenterpre-trainingmode.
2.M460starts searchingforyourcadencesensor. Rotatethecrank afew times toactivatethesensor. Theflashingred light onthesensorindicates that thesensoris activated.
3.ThedeviceID Pair Polar CAD xxxxxxxxis displayed. ChooseYes.
4.Pairing completed is displayedwhenthepairingis ready.
5.Sensor linked to:is displayed. ChooseBike 1, Bike 2orBike 3. ConfirmwithSTART.
POLAR SPEED SENSOR BLUETOOTH® SMART
Therearearangeof factors that canaffect yourcyclingspeed. Obviously fitness is oneof them, however, weatherconditions andthevaryinggradients of theroadplay ahugepart too. Themost advancedway of measuringhow thesefactors affect yourperformancespeedis withtheaerodynamic speedsensor.
•Measures yourcurrent, averageandmaximumspeeds
•Track youraveragespeedtoseeyourprogress andperformanceimprove
•Light yet tough, andeasy toattach
PAIR A SPEED SENSOR WITH M460
Makesurethespeedsensorhas beencorrectly installed. Formoreinformationoninstallingthespeedsensorrefertothe usermanual of thespeedsensor.
Therearetwoways topairaspeedsensorwithyourM460:
15
1.GotoGeneral Settings > Pair and sync > Pair other deviceandpress START.
2.M460starts searchingforthespeedsensor. Rotatethewheel afew times toactivatethesensor. Theflashingred light onthesensorindicates that thesensoris activated.
3.Oncethespeedsensoris found, Polar SPD xxxxxxxxis displayed.
4.Press START, Pairing is displayed.
5.Pairing completed is displayedwhenthepairingis ready.
6.Sensor linked to:is displayed. ChooseBike 1, Bike 2orBike 3. ConfirmwithSTART.
7.Set wheel sizeis displayed. Set thesizeandpress START.
 Thefirst cyclingsensoryoupairwill automatically belinkedto Bike 1.
or
1.Press STARTintimeview toenterpre-trainingmode.
2.M460starts searchingforyourspeedsensor. Rotatethewheel afew times toactivatethesensor. Theflashingred light onthesensorindicates that thesensoris activated.
3.ThedeviceID Pair Polar SPD xxxxxxxxis displayed. ChooseYes.
4.Pairing completed is displayedwhenthepairingis ready.
5.Sensor linked to:is displayed. ChooseBike 1, Bike 2orBike 3. ConfirmwithSTART.
6.Set wheel sizeis displayed. Set thesizeandpress START.
MEASURING WHEEL SIZE
Wheel sizesettings areaprerequisiteforcorrect cyclinginformation. Therearetwoways of determiningthewheel sizeof yourbike:
Method 1
Look forthediameterininches orinETRTOprintedonthewheel. Matchit tothewheel sizeinmillimeters intheright column of thechart.
ETRTO |
|
Wheel size diameter (inches) |
Wheel size setting (mm) |
25-559 |
26x |
1.0 |
1884 |
|
|
|
|
23-571 |
650x 23C |
1909 |
|
|
|
|
|
35-559 |
26x |
1.50 |
1947 |
|
|
|
|
37-622 |
700x 35C |
1958 |
|
|
|
|
|
52-559 |
26x |
1.95 |
2022 |
|
|
|
|
20-622 |
700x 20C |
2051 |
|
|
|
|
|
52-559 |
26x |
2.0 |
2054 |
|
|
|
|
23-622 |
700x 23C |
2070 |
|
|
|
|
|
25-622 |
700x 25C |
2080 |
|
|
|
|
|
16
ETRTO |
Wheel size diameter (inches) |
Wheel size setting (mm) |
|
28-622 |
700x |
28 |
2101 |
|
|
|
|
32-622 |
700x |
32C |
2126 |
|
|
|
|
42-622 |
700x |
40C |
2189 |
|
|
|
|
47-622 |
700x |
47C |
2220 |
|
|
|
|
 Wheel sizes onthechart areadvisory as wheel sizedepends onthewheel typeandairpressure.
Method 2
•Measurethewheel manually forthemost accurateresult.
•Usethevalvetomark thepoint wherethewheel touches theground. Draw alineonthegroundtomark that point. Moveyourbikeforwardonaflat surfaceforonecompleterotation. Thetireshouldbeperpendiculartotheground. Draw anotherlineonthegroundat thevalvetomark afull rotation. Measurethedistancebetweenthetwolines.
•Subtract 4mm/0'16'' toaccount foryourweight onthebiketoget yourwheel circumference.
POLAR H10 HEART RATE SENSOR
Polarheart ratesensorconsists of comfortablestrapandconnector. It detects yourheart rateaccurately andsends thedata totheM460inreal time. Furtherinformationabout thePolarH10heart ratesensoris availableat support.polar.com. Your M460is compatiblealsowithPolarH6andH7heart ratesensors.
Heart ratedatagives youaninsight intoyourphysical conditionandhow yourbody responds totraining. Althoughthereare many subjectiveclues as tohow yourbody is doingduringexercise(perceivedexertion, breathingrate, physical sensations), noneis as reliableas measuringheart rate. It is objectiveandis affectedby bothinternal andexternal factors - meaningyouwill haveadependablemeasureof yourphysical state.
PAIR HEART RATE SENSOR WITH M460
Wearyourheart ratesensoras instructedinWearHeart RateSensor. Therearetwoways topairaheart ratesensorwith yourM460:
1.GotoGeneral Settings > Pair and sync > Pair other deviceandpress START.
2.M460starts searchingforyourheart ratesensor.
3.Oncetheheart ratesensoris found, thedeviceID, forexample, Pair Polar H10 xxxxxxxx, is displayed. Choosethe heart ratesensoryouwant topair.
4.Press START, Pairing is displayed.
5.Pairing completed is displayedwhenyouaredone.
or
1.Press STARTintimeview toenterpre-trainingmode.
2.To pair, touch your sensor with M460is displayed, touchyourheart ratesensorwithM460, andwait forit tobe found.
3.M460lists theheart ratesensors it finds.ThedeviceID, forexample, Pair Polar H10 xxxxxxxx, is displayed.
17
Choosetheheart ratesensoryouwant topairandthenchooseYes.
4. Pairing completed is shownwhenyouaredone.
POLAR LOOK KÉOPOWER SENSOR BLUETOOTH® SMART
WithPolarLOOK KéoPower, youcantruly developyourcyclingperformanceandtechnique. Perfect forambitious cyclists, this systemuses Bluetooth® Smart technology andconsumes only alittleenergy.
•Measures yourpoweroutput (inWatts)andforce(inNewton).
•Easy toset upandswitchbetweenbikes.
•M460shows yourpoweroutput inWatts, Watts/kgor% of FTP (functional thresholdpower).
•M460shows yourleft/right balanceandcurrent, averageandmaximumcadence.
Kéo Power Bluetooth® Smartset includes twopedals andtwopowertransmitters.
Kéo Power Essential Bluetooth® Smartis aneconomical choiceforbasic powermeasurement. It measures yourpower output andforcewiththeleft handpedal andprovides yourtotal power/forceby multiplyingthemeasurement by two. Theset includes twopedals andonepowertransmitter.
PAIR KÉO POWER WITH M460
BeforepairingKéoPowermakesureyouhaveinstalledit correctly. Forinformationonmountingthepedals andinstallingthe transmitters seethePolarLOOK KéoPowerusermanual that cameintheproduct box, orthevideotutorial.
If youhavetwopowertransmitters, youneedtopairthetransmitters oneat atime. Afterpairingthefirst transmitter, youcan immediately pairthesecondone. Check thedeviceID onthebacksideof eachtransmittertomakesureyoufindthecorrect transmitters fromthelist.
Therearetwoways topairKeóPowerwithyourM460:
1.GotoGeneral Settings > Pair and sync > Pair other deviceandpress START.
2.Rotatethecranks towakeupthetransmitters. M460starts searchingforKéoPower.
3.Oncetheit is found, Polar PWR xxxxxxxxis displayed.
4.Press START, Pairing is displayed.
5.Pairing completed is displayedwhenyouaredone.
6.Sensor linked to:is displayed. ChooseBike 1, Bike 2orBike 3. ConfirmwithSTART. Do you have another pedal to pair? is displayed. If youhavetwotransmitters, chooseYestopairtheotherone.
7.Set crank length: Set thecrank lengthinmillimeters.
 Thefirst cyclingsensoryoupairwill automatically belinkedto Bike 1.
or
1.Press STARTintimeview toenterpre-trainingmode.
2.Rotatethecranks towakeupthetransmitters.
3.ThedeviceID Pair Polar PWR xxxxxxxxis displayed. ChooseYes.
4.Pairing completed is shownwhenyouaredone.
18
5.Sensor linked to:is displayed. ChooseBike 1, Bike 2orBike 3. ConfirmwithSTART. Do you have another pedal to pair? is displayed. If youhavetwotransmitters, chooseYestopairtheotherone.
6.Set crank length: Set thecrank lengthinmillimeters.
POWER SETTINGS ON M460
Adjust thepowersettings tobest suit yourtrainingneeds. Edit thepowersettings inSettings > Sport profiles. Choosethe profileyouwant toedit, andthenchooseBike power settings.
IntheBike power settings, you'll find:
•Power view: ChooseWatts (W), Watts/kg (W/kg)or% of FTP.
•Power, rolling average: Choose1, 3, 5, 10, 15, 30or60secondrollingaverageof powerdata.
•Set FTP value: Set yourFTP value. Thesettingrangeis 60to600watts.
•Check power zone limits: Check yourpowerzonelimits.
CALIBRATE KÉO POWER BEFORE STARTING A TRAINING SESSION
TocalibrateKéopower:
1.Wakeupthetransmitters by rotatingthecranks.
2.InM460timemode, press STARTtoenterpre-trainingmode, andthenchooseoneof thecyclingsport profiles.
3.Accuracy of power changed. Recalibrate? is displayedonyourM460. ChooseYestostart calibration.
4.Keepthebikeupright andcranks inplaceuntil calibrationis completed. Thecalibrationtakes acoupleof seconds.
5.Whenthecalibrationis completeagreenLED will blink onthetransmitters, andyoucanstart yoursession.
Toensurethecalibrationis doneproperly:
•Donot put any weight onthepedals duringcalibration.
•Donot interrupt thecalibration.
Whenthecalibrationis completeagreenLED will blink onthetransmitters, andyoucanstart yoursession.
 Thetemperatureof yourtrainingenvironment affects calibrationaccuracy. If you'regoingtotrainoutdoors, forexample, takeyourbikeoutdoors half anhourbeforedoingthecalibration. This way yourbike's temperatureis about thesameas that of yourtrainingenvironment.
PAIR A MOBILE DEVICE WITH M460
Beforepairingamobiledevice, createaPolaraccount if youdonot already haveone, anddownloadFlow appfromtheApp StoreorGooglePlay. MakesureyouhavealsodownloadedandinstalledFlowSync softwareontoyourcomputerfrom flow.- polar.com/start, andregisteredyourM460intheFlow webservice.
Beforetryingtopair, makesureyourmobiledevicehas Bluetooth turnedon, andairplanemode/flight modeis not turnedon.
Topairamobiledevice:
19
1.InM460, gotoSettings > General settings > Pair and sync > Pair and sync mobile deviceandpress START.
2.Onceyourdeviceis found, thedeviceID Polar mobile xxxxxxxxis displayedonM460.
3.Press START, Connecting to deviceis displayed, followedby Connecting to app.
4.Accept theBluetoothpairingrequest onyourmobiledeviceandtypeinthepincodeshownonyourM460.
5.Pairing completed is displayedwhenyouaredone.
or
1.Onyourmobiledevice, openFlow appandsigninwithyourPolaraccount.
2.Wait fortheConnect product view toappearonyourmobiledevice(Searching for Polar M460)is displayed.
3.InM460timemode, press andholdBACK.
4.Connecting to deviceis displayed, followedby Connecting to app.
5.Accept theBluetoothpairingrequest onyourmobiledeviceandtypeinthepincodeshownonyourM460.
6.Pairing completed is displayedwhenyouaredone.
DELETE A PAIRING
Todeleteapairingwithasensorormobiledevice:
1.GotoSettings > General settings > Pair and sync > Paired devicesandpress START.
2.Choosethedeviceyouwant toremovefromthelist andpress START.
3.Delete pairing? is displayed, chooseYesandpress START.
4.Pairing deleted is displayedwhenyouaredone.
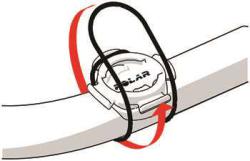
POLAR ADJUSTABLE BIKE MOUNT
Youcaninstall thePolarAdjustableBikeMount eitheronthestemof yourbike, orontheleft orright handsideof thehandle bar.
1.Placetherubberbaseonthestem/handlebar.
2.Positionthebikemount ontherubberbasesothat thePOLAR logois inlinewiththehandlebar.
3.Securethebikemount ontothestem/handlebarwiththeO-ring.
4. Aligntheledges ontheback of theM460withtheslots onthebikemount andturnclockwiseuntil theM460is inplace.
20
 Forthebest GPS performance, makesurethedisplay is facingup.
21
 Loading...