


 Loading...
V650 USER MANUAL

CONTENTS
Contents |
2 |
Introduction |
7 |
V650 |
7 |
USB cable |
7 |
Bluetooth® Smart Heart RateSensor* |
8 |
PolarFlowSync Software |
8 |
PolarFlow WebService |
8 |
Get started |
9 |
ChargetheBattery |
9 |
Basic Settings |
9 |
MenuandFunctions |
10 |
MenuItems |
11 |
ButtonFunctions |
12 |
TouchScreenFunctions |
12 |
PairingSensors withV650 |
13 |
Settings |
14 |
General Settings |
14 |
Pairing |
14 |
UseGPS time |
15 |
Time |
15 |
Date |
15 |
Language |
15 |
2

Units |
15 |
Pincodelock |
15 |
Frontlight |
16 |
Display backlight |
16 |
Automatic PowerOff |
17 |
About V650 |
17 |
Sport ProfileSettings |
17 |
Trainingviews |
17 |
HR view |
18 |
SpeedView |
18 |
Trainingsounds |
18 |
GPS |
18 |
Automatic pause |
18 |
Automatic lap |
18 |
Front buttontakes lap |
18 |
HR zones |
19 |
BikeSettings |
19 |
Measuringthewheel size |
19 |
Physical Settings |
20 |
Sex |
21 |
Height |
21 |
Weight |
21 |
Dateof birth |
21 |
3

HR max |
21 |
RestingHR |
21 |
VO2max |
22 |
FirmwareUpdate |
22 |
Compatible Sensors |
24 |
PolarHeart rateSensorBluetooth® Smart |
24 |
PairaHeart RateSensorwithV650 |
24 |
PolarSpeedSensorBluetooth® Smart |
24 |
PairSpeedsensorwithV650 |
25 |
PolarCadenceSensorBluetooth® Smart |
25 |
PairCadencesensorwithV650 |
25 |
Install Bike Mount |
27 |
PolarAdjustableBikeMount |
27 |
Training |
28 |
WeartheHeart RateSensor |
28 |
Start aTrainingSession |
28 |
DuringRide |
30 |
TrainingViews |
31 |
Time |
31 |
Environment |
32 |
Body Measurement |
32 |
Distance |
33 |
Speed |
33 |
4

Cadence |
34 |
LapInformation |
34 |
Back toStart |
35 |
PauseandStopTraining |
35 |
After Training |
37 |
Summary |
37 |
History |
37 |
Sessions |
37 |
Totals |
38 |
Features |
39 |
GPS |
39 |
Barometer |
39 |
Sport Profiles |
39 |
Smart Coaching |
39 |
PolarHeart RateZones |
40 |
Smart Calories |
42 |
TrainingBenefit |
42 |
Polar Flow Web Service |
44 |
Syncing |
46 |
Caring for Your V650 |
47 |
PolarV650 |
47 |
Heart RateSensor |
47 |
SpeedSensorBluetooth® Smart andCadenceSensorBluetooth® Smart |
47 |
5

Storing |
48 |
Service |
48 |
Important Information |
49 |
Batteries |
49 |
ChangetheHeart RateSensorBattery |
49 |
Precautions |
50 |
InterferenceDuringTraining |
50 |
MinimizingRisks WhenTraining |
50 |
Technical Specifications |
52 |
PolarV650 |
52 |
Heart RateSensor |
53 |
PolarFlowSync SoftwareandUSB Cable |
53 |
WaterResistance |
53 |
LimitedInternational PolarGuarantee |
54 |
Disclaimer |
55 |
6
INTRODUCTION
Congratulations onyournew V650! Designedforthemost ambitious cyclist, theV650helps youridewithconfidenceandreachyourpeak performance.
This usermanual includes completeinstructions tohelpyouget themost out of yournew ridingcompanion. Tocheck thevideotutorials andthelatest versionof this usermanual, pleasegotowww.- polar.com/en/support/v650.
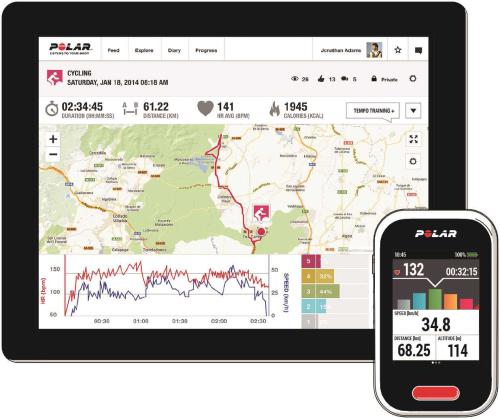
V650
View yourtrainingdata, suchas heart rate, speed, distanceandaltitudeat aglancefromthebigscreen.
USB CABLE
UsetheUSB cabletochargethebattery andtosync databetweenyourV650andthePolarFlow webservice viaFlowSync software.
7
BLUETOOTH® SMART HEART RATE SENSOR*
Seelive, accurateheart rateonyourV650duringyourtrainingsessions. Yourheart rateis usedtoanalyze how yoursessionwent.
*Only includedinV650withheart ratesensorsets. If youbought yourV650without aheart ratesensor, not to worry, youcanbuy oneat any time.
POLAR FLOWSYNC SOFTWARE
Flowsync softwareallows youtosync databetweenyourV650andtheFlow webserviceonyourcomputer viatheUSB cable. Gotoflow.polar.com/start todownloadandinstall PolarFlowSync software.
POLAR FLOW WEB SERVICE
Planandanalyzeevery detail of yourtraining, customizeyourdeviceandlearnmoreabout yourperformance at polar.com/flow.
8
GET STARTED
Tomakesureyouget toenjoy yourV650at its best, pleasegotoflow.polar.com/start wheresimpleinstructions will guideyouthroughsettingupyourV650, downloadingthelatest firmwareandtakingtheFlow webserviceintouse.
If you’reinahurry foryourfirst runwithV650, youcandoaquick set upby enteringthebasic settings onthe device, as instructedinBasic Settings.
CHARGE THE BATTERY
AfterunboxingyourV650, thefirst thingyouneedtodois chargethebattery. Let yourV650fully chargebefore takingit intouseforthefirst time.
TheV650has aninternal, rechargeablebattery. UsetheUSB cableincludedintheproduct set tochargeyour V650viatheUSB connectoronyourcomputer. Youcanalsochargethebattery viaawall outlet. Whenchargingviaawall outlet useaUSB poweradapter(not includedintheproduct set). If youuseanAC adapter, makesurethat theadapteris markedwith"output 5Vdc 1A-2A max". Only useanAC adapterwhichis adequately safety approved(markedwith"LPS", "LimitedPowerSupply" or"ULlisted").
1.Pushdowntoopenthecap.
2.Lift thecapandplugthemicroUSB connectorintotheUSB port.
3.Plugtheotherendof thecableintoyourPC.
4.Thecharginganimationappears onthedisplay. Chargingthebattery fully takes uptofivehours.
Theoperatingtimeof thebattery is approximately 10hours. Theoperatingtimedepends onmany factors, suchas thetemperatureof theenvironment inwhichyouuseyourV650, thefeatures youselect anduse, and battery aging. Theoperatingtimeis significantly reducedintemperatures well below freezing.
 Don't leavethebattery fully dischargedforalongperiodof timeorkeepit fully chargedall thetime, becauseit might affect thebattery lifetime.
BASIC SETTINGS
WakeyourV650by pressingthesidebutton. Thefirst timeyoudothis, yourV650will takeyouthroughaninitial set upprocess.
Start by choosingyourlanguagefromthefollowingoptions: Dansk, Deutsch, English, Español, Français,
Italiano, Nederlands, Norsk, Português, Suomi, Svenska, or .
If yourlanguageis not visible, swipeuptoscroll thelist. Choosealanguageby tappingit. Thefieldturns red. Confirmandcontinuetothefollowingsettingby tapping at thebottomof thescreen.
9
 Toget themost accurateandpersonal trainingdata, it’s important that you’reprecisewithphysical settings likeyourage, weight andsex.
Units: ChooseMetric (kg/cm)orImperial (lb/ft)units.
Use GPS time: If youwant theV650toreadtheCoordinatedUniversal Time(UTC)fromtheGPS satellites, tick thebox andchoosetheUTC TimeZonethat is closest toyou.
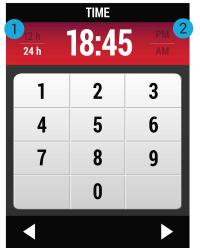
Time of day: Changethetimeformat by touching12h/24h(1). Thechosentimeformat is writteninwhite. If youchoosethe12h timeformat, alsoselect AM orPM (2). Thenenterthelocal time.
Date: Entercurrent date.
Sex: Select Male orFemale.
Height: Enteryourheight.
Weight: Enteryourweight.
Date of birth: Enteryourdateof birth.
Tochangeyoursettings, tap at thebottomof thescreentoreturntothedesiredsetting. Toaccept thesettings, tap
 . TheV650enters themainview.
MENU AND FUNCTIONS
10
MENU ITEMS
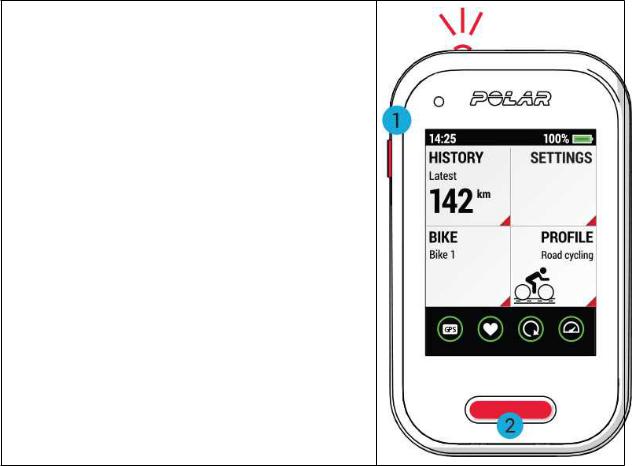
1.HISTORY: Seethedetails of yoursessions andthe totals of yourcyclinghistory.
2.PULL-DOWN MENU: Swipedowntoopenthepulldownmenu. Thereyoucanadjust thefrontlight, thetrainingsounds andthedisplay brightness.
3.SETTINGS: Modify thesettings tosuit yourneeds.
4.BIKE:Choosethebikeforyourride.
5.PROFILE : Choosetheprofileforyourride.
6.Theindicators displayedat thebottomof thedisplay provideinformationabout thestatus of thesensors.
11
BUTTON FUNCTIONS
Thereis onephysical buttononthesideof theV650andanother buttononthefront.
Press thesidebutton(1)toview thefollowingoptions:
o Calibrate altitude
o Lock display
o Turn off V650
oSearch sensor: Searchforaheart ratesensororcycling sensor.
Press thefront button(2)tostart recording, press andholdit to pause.
 Takelapwitharegularpress. See Sport Profilesettings for instructions onsetting FRONT BUTTON TAKES LAP functionon/off.
TOUCH SCREEN FUNCTIONS
Tap
•Openwhat youtap.
•Chooseanitem.
•Confirmandreturntotheprevious level by tapping .
.
•Continuefurtherby tapping .
.
Swipe right or left
•Switchtrainingviews duringtraining.
•Browsetrainingview layouts insport profilesettings.
•Scroll details of yourridingsessioninHISTORY.
Swipe down from the top edge of the screen
Openthepull-downmenu. Thereyoucanadjust thefrontlight, thetrainingsounds andthedisplay brightness.
12
Swipe up or down
Scroll throughwhat’s onthescreen.
PAIRING SENSORS WITH V650
Sensors compatiblewithV650useBluetoothSmart ® wireless technology. Beforetakinganew heart rate sensororcyclingsensorintouse, it has tobepairedwithyourV650. Pairingonly takes afew seconds, and ensures that yourV650receives signals fromyoursensors anddevices only, andallows disturbance-free traininginagroup. Beforeenteringanevent orrace, makesurethat youdothepairingat hometoprevent interferenceduetodatatransmission.
Formoreinformationonpairingspecific sensors, seeCompatibleSensors.
13
SETTINGS
GENERAL SETTINGS
Toview andedit yourgeneral settings, gotoSettings > General settings.Thereyou'll find:
•Pairing
•Use GPS time
•Time
•Date
•Language
•Units
•Pin code lock
•Frontlight
•Display backlight
•Automatic power off
•About V650
Taptoopenthesettingyouwant tochange, andedit as youlike. Confirmandreturntoprevious menuby tapping .
.
Incertainsettings (e.g. UNITS), tapthefielduntil youseethecorrect value.
PAIRING
Beforetakinganew sensorintouse, it has tobeintroducedtoyourV650. This is calledpairingandonly takes afew seconds. Pairingensures that theV650receives signals fromyoursensoronly, andenables dis- turbance-freetraininginagroup.
Pair new device: PairasensorwithyourV650. Formoreinformationonpairingspecific sensors, seeCom- patibleSensors.
Paired devices: View all thedevices youhavepairedwithyourV650.
Toremovepairingwithasensor:
1.GotoSettings > General settings > Pairing > Paired devices.
2.Tapthedeviceyouwant toremovefromthelist andtapRemove pairing.
14
USE GPS TIME
If youwant theV650toreadtheCoordinatedUniversal Time(UTC)fromtheGPS satellites, tick thebox in USE GPS TIME field, andchoosetheUTC TimeZonethat is closest toyou.
TIME
Set thetimeof day.
 If youwant tochangethetimeformat, tap12h/24h(image).Thecurrently selectedformat is writtenin white. If youchoosethe 12h timeformat, alsoselect AM or PM.
DATE
Set thedate.
LANGUAGE
Choose: Dansk, Deutsch, English, Español, Français, Italiano, Nederlands, Norsk, Português, Suomi, Svenska, or .
UNITS
Choosemetric orimperial. Set theunits usedtomeasureweight, height, distanceandspeed.
PIN CODE LOCK
Keepyourtraininginformationsafeby settingaPIN codeonyourV650. It's ahandy way tomakesurethat only youhaveaccess toyourtraininginformation.
TapPIN CODE LOCK toturnthefunctionon. Enterafour-digit PIN codeandtap . Re-enterandtap
 to confirm.
TheV650will ask foryourPIN codeevery timeit is turnedon.
 If youforget yourPIN code, youcandoaFactory reset onyourV650. It removes V650’s connectionto youruseraccount anddeletes any saveddataonit.
1.PluginyourV650toyourcomputer’s USB port andgotoPolarFlowSync software. ThePolar FlowSync softwaretransfers yourtraininginformationtothePolarFlow webservice.
2.GotoSettings andchooseFactory Reset.
3.GotothePolarFlow webservice(flow.polar.com/V650)andrepeat what youdidwhenyoufirst started usingtheproduct.
15
FRONTLIGHT
Thefunctionof thefrontlight onthetopedgeof theV650is tooptimizeyourcyclingsecurity indark conditions. It's anintelligent featurethat youcanset toturnonautomatically whenit gets dark andtoturnoff whenit gets bright. Alternatively, youcanmanageit manually fromthepull-downmenu.
Manual: Managethefrontlight manually fromthepull-downmenu. Adjust theBlink rate*by draggingthe slider.
Automatic: TheV650turns thefrontlight onandoff accordingtolight conditions. Adjust theActivation level andtheBlink rate*by draggingtheslider.
Frontlight settings in pull-down menu
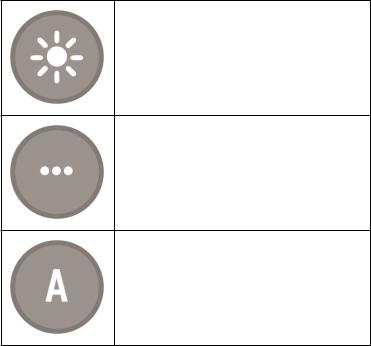
Taptoturnthefrontlight onoroff.
Taptoset blink modeonoroff.
Taptoset theautomatic frontlight onoroff.
DISPLAY BACKLIGHT
Manual: Thebacklight turns oneachtimeyoutouchthescreen, press abutton, get anotificationoranalarm. It remains bright for15seconds, thengoes dimagain.
Always on: Thebacklight is always on.
Automatic: Thebacklight turns onandoff automatically accordingtolight conditions whenyou'rerecordinga session. Inothermodes it works thesameway as manual backlight. Youcanadjust theActivation level by draggingtheslider.
16
AUTOMATIC POWER OFF
Set On/Off: Thepowerswitches off automatically whenyouhaven't touchedthebuttons/touchscreenin15 minutes (except whentheV650is recordingatrainingsessions orinthepausemode).
ABOUT V650
Check thedeviceID, firmwareversionandHW model of yourV650.
SPORT PROFILE SETTINGS
Toview ormodify sport profilesettings, gotoSettings > Sport profiles andchoosetheprofileyouwant to edit.
You'll findthefollowingsettings foreachprofile:
•Training views
•HR view
•Speed view
•Training sounds
•GPS
•Automatic pause
•Automatic lap
•Front button takes lap
•HR zones
Taptoopenthesettingyouwant tochange, andedit as youlike. Confirmandreturntoprevious menuby tapping .
.
Incertainsettings (e.g. Trainingsounds), tapthefielduntil youseethecorrect value.
TRAINING VIEWS
Youcanchoosetohaveuptosix trainingviews foreachprofile, eachtrainingview containinguptoeight items. Inadditiontothetrainingviews, youcanchoosetohavealapview.
1.Tick thebox ontheleft sideof thedisplay toactivateView 1, View 2, View 3, View 4, View 5 orView 6.
2.Taptheview youwant toedit.
3.Choosethelayout fortheview. Therearemany layout options; simply swipeleft orright until youseea layout youlike.
17
Loading...