


FT60
Table of contents
 Loading...
Polar FT60 User Manual
ENGLISH

CONTENTS
1. GET STARTED. ................ ....... ......... ....... ................ ....... ................ ....... ......... ....... ................ 3
Get to Know Your Polar FT60.............. ....... ................ ....... ................ ...... . ......... ....... ................ 3
Start With Basic Settings............... ....... ................ ....... ......... ....... ................ ....... ................ .... 3
Buttons and Menu Structure ................. ....... ................ ....... ......... ....... ................ ....... .............. 4
Symbols on the Display.............. ....... ......... ....... ................ ....... ................ ....... ......... ....... ....... 4
2. BEFORE TRAINING ............... ....... ................ ....... ................ ...... . ......... ....... ................ ....... ..... 5
Activate Your Polar Star Training Program............... ....... ................ ....... ......... ....... ................ ...... 5
Change/End your program ................................................................................................... 6
Test Your Fitness Level ........... ......... .................. ......... ......... .................. ......... .................. . 6
3. TRAINING............... ....... ................ ...... . ......... ....... ................ ....... ................ ....... ................ 8
Wear the Heart Rate Sensor ................ ....... ......... ....... ................ ....... ................ ....... ......... ...... 8
Start Training................ ....... ......... ....... ................ ....... ................ ....... ................ ...... . ......... . 8
Start Training With OwnZone ... . ......... ....... ................ ....... ................ ....... ......... ....... ...... . ......... . 8
During Training . ......... ....... ................ ....... ................ ....... ......... ....... ................ ....... ............. 9
Stop Training Recording. ......... ....... ................ ....... ................ ....... ................ ...... . ......... ....... ... 10
4. AFTER TRAINING .. ................ ....... ......... ....... ................ ....... ................ ....... ......... ....... ...... . .... 11
Training Feedback . ......... ....... ................ ....... ................ ....... ......... ....... ................ ....... .......... 11
Weekly Follow-up........ ....... ...... . ......... ....... ................ ....... ................ ....... ......... ....... ............. 11
Program Update............... ....... ......... ....... ................ ....... ................ ....... ......... ....... ............... 13
Weight Diary.............. ...... . ......... ....... ................ ....... ................ ....... ......... ....... ................ .... 13
Follow Your fitness Test Results ............... ...... . ......... ....... ................ ....... ................ ....... ......... .. 13
Review Training Data .. ................ ...... . ......... ....... ................ ....... ................ ....... ......... ....... ..... 13
Transfer Data ........ ....... ................ ....... ......... ....... ...... . ......... ....... ................ ....... ................ .. 14
5. SETTINGS . ................ ...... . ......... ....... ................ ....... ................ ....... ......... ....... ...... . ......... .... 15
Watch Settings ............. ...... . ......... ....... ................ ....... ................ ....... ................ ...... . ......... .. 15
Training Settings . ......... ....... ................ ....... ................ ....... ......... ....... ................ ....... ........... 15
User Information ............. ...... . ......... ....... ................ ....... ................ ....... ......... ....... ................ 15
General Settings .. ................ ...... . ......... ....... ................ ....... ................ ....... ......... ....... ...... . .... 16
Accessory Settings ............. ...... . ......... ....... ................ ....... ................ ....... ......... ....... ............. 16
Footpod Calibration* ...................................................................................... .................. . 16
6. IMPORTANT INFORMATION... ................ ...... . ......... ....... ................ ....... ................ ....... ......... ..... 17
Caring for Your Product . ......... ....... ................ ....... ................ ....... ................ ...... . ......... ....... ... 17
Service ......................................................................... .................. ......... .................. ..... 17
Changing Batteries.................................................................................... ......... ...............17
Precautions.............. ....... ......... ....... ................ ....... ................ ....... ......... ....... ................ ..... 18
Troubleshooting................ ...... . ......... ....... ................ ....... ................ ....... ................ ...... . ....... 20
Technical Specifications ......... ....... ................ ....... ................ ....... ................ ...... . ......... ....... ... 20
Limited International Polar Guarantee . ................ ....... ......... ....... ................ ....... ................ ....... .. 21
ENGLISH

1. GET STARTED
Get to Know Your Polar FT60
The Polar FT60 training
computer records and
displays your heart rate and
other data during training.
The Polar H1 heart rate
sensor transmits the heart
rate signal to the training
computer. The heart rate
sensor consists of a
connector and a strap.
The latest version of this
user manual can be
downloaded at
www.polar.com/support.
Register your Polar product
at http://register.polar.fi,
and help us improve our
products and services to
better meet your needs.
Start With Basic Settings
To a ctiv ate you r Po lar FT6 0, p res s an d ho ld a ny butt on f or one sec o nd. On c e t he F T60 is acti vat e d, it
cannot be switched off.
1. Language: Select Deutsch, English, Español, Français, Italiano, Português or Suomi with UP/DOWN.
Press OK.
2. Please enter basic settings is displayed. Press OK.
3. Select Time format.
4. Enter Time.
5. Enter Date.
6. Select Units, metric (KG, CM) or imperial (LBS, FT). By selecting lbs/ft, calories are displayed as CAL,
otherwise they are shown as KCAL. Calories are measured as kilocalories.
7. Enter Weight.
8. Enter Height.
9. Enter Date of birth.
10. Select Sex.
11. Settings OK? is displayed.
Select Yes to accept and save the settings. Basic settings complete is displayed and the FT60 enters
Time mode.
Select No if you want to change the settings. Please enter basic settings is displayed. Re-enter your
basic settings.
To m odif y y o ur pers ona l se tti n gs l ate r, se e Se tti n gs.
ENGLISH
Get Started 3
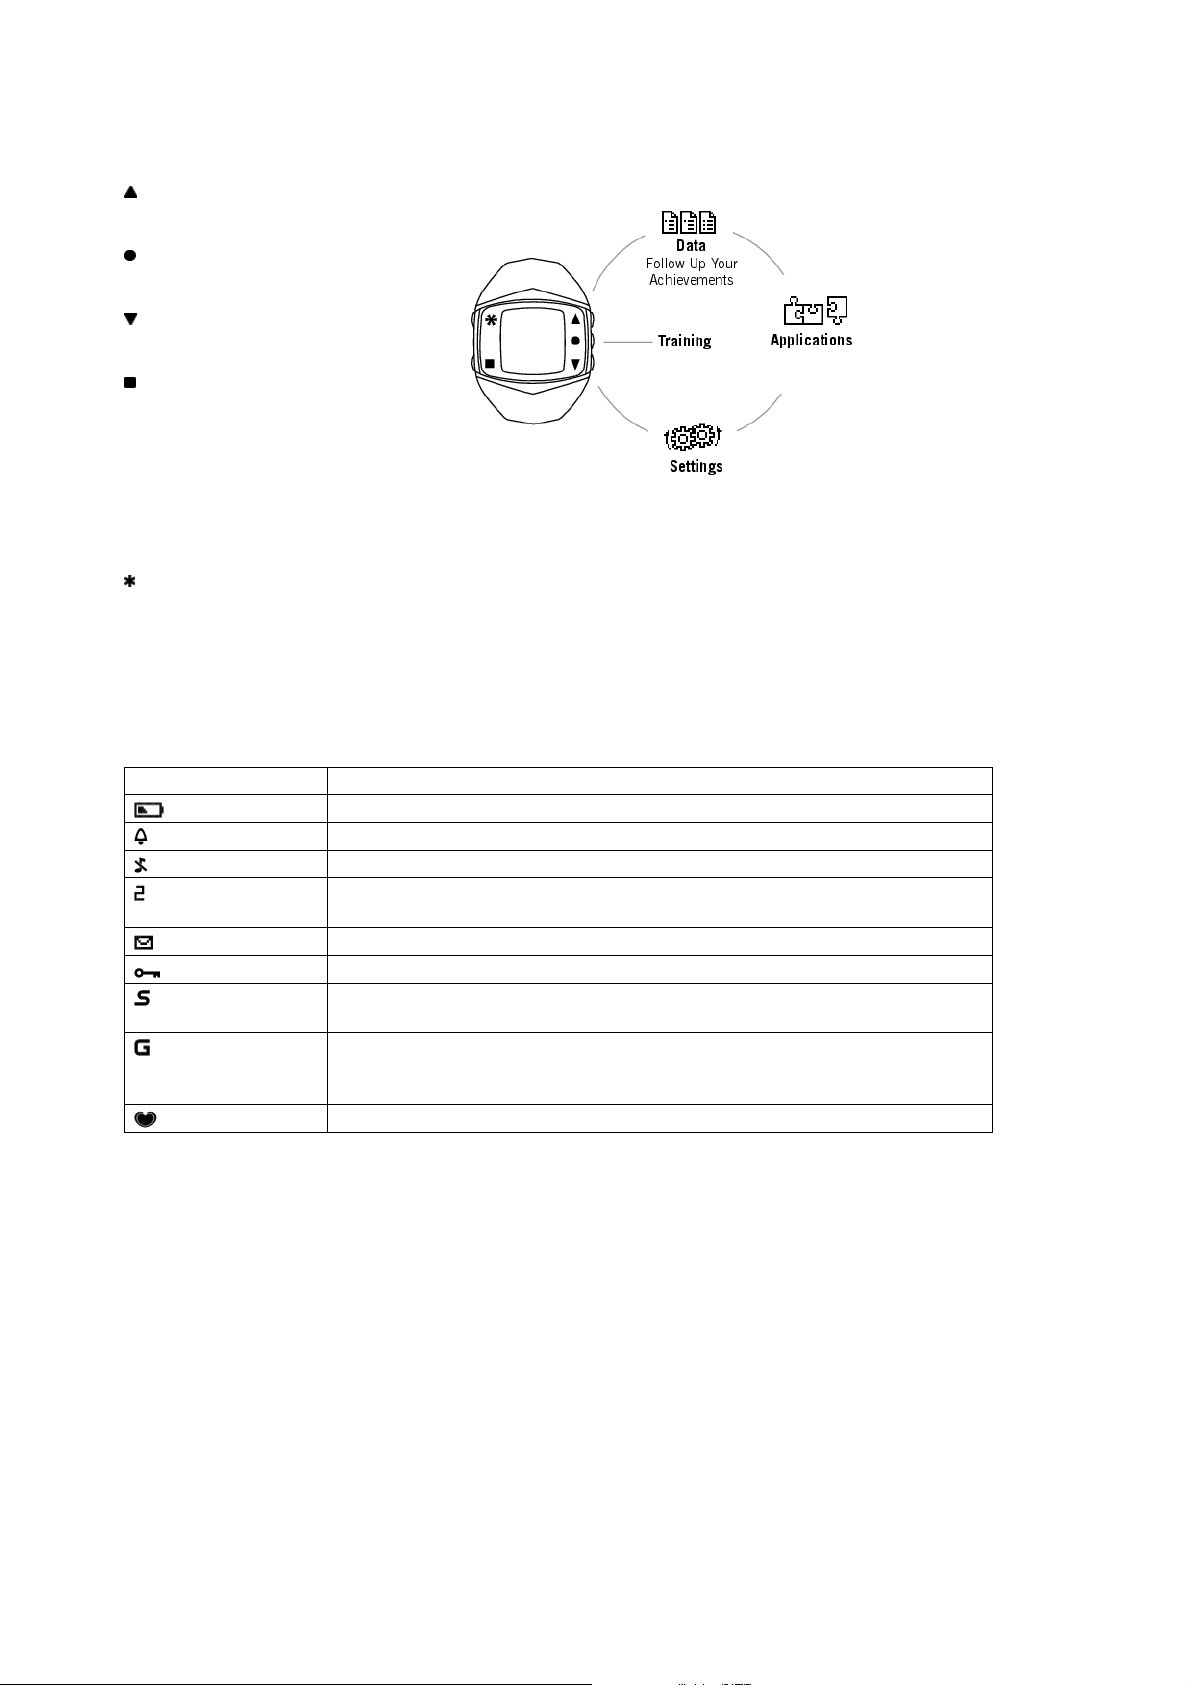
Buttons and Menu Structure
UP:Enterthemenuandmove
through selection lists, adjust values
OK:Confirmselections,select
training type or training settings
DOWN:Enterthemenuandmove
through selection lists, adjust values
BACK:
• Exit the menu
• Return to the previous level
• Cancel selection
• Leave settings unchanged
• With a long press, return to Time
view
LIGHT:
• Illuminate the display
• With a long press, enter quick menu in Time view (to lock buttons, set alarm or select time zone) or during
training (to adjust training sounds or lock buttons)
Symbols on the Display
The following table presents the display symbols and their descriptions.
Symbol Description
The battery of the training computer is low.
The alarm is active.
Sounds are off.
Time 2 i s i n us e. N umb e r t wo i s d i spl aye d at the low er r igh t c o rne r of th e
display.
You have on e or mor e new mess ages.
The button lock is active.
The footpod is in use. If the symbol is blinking, the FT60 is trying to establish
aconnectionwiththefootpod.
The GPS sensor is in use. If the symbol is blinking, the FT60 is trying to
establish a connection with the GPS sensor, or the GPS sensor is trying to
establish a connection with the satellites.
Heart rate is transmitted.
ENGLISH
4 Get Started
2. BEFORE TRAINING
Activate Your Polar Star Training Program
The adaptive, personalized and in-built Polar Star Training Program gives you the optimal intensity and
time targets for your training. The training computer gives feedback on your performance after each
training session and once a week.
The Polar FT60 creates a training program based on your user information (weight, height, age, sex),
fitness level, activity level, and training goal.
By analyzing your weekly training results and fitness level, the training computer gives you training
guidance for the following week. The training program adapts to your training habits and to your changing
fitness level.
1. In Time mode, select Menu > Applications > Training program > Create new program .
2. Perfom Polar Fitness Test. For more information, see Test Your Fitness Level.
3. Select your training goal:
• Improve fitness if your target is to improve your current cardiovascular fitness level and you are able
to train regularly.
• Maximize fitness if your target is to maximize your current cardiovascular fitness level, and if you have
been training regularly for at least 10-12 weeks and training nearly every day is not a problem for you.
• Lose weight if your target is to lose some weight.
4. Training program created! is displayed.
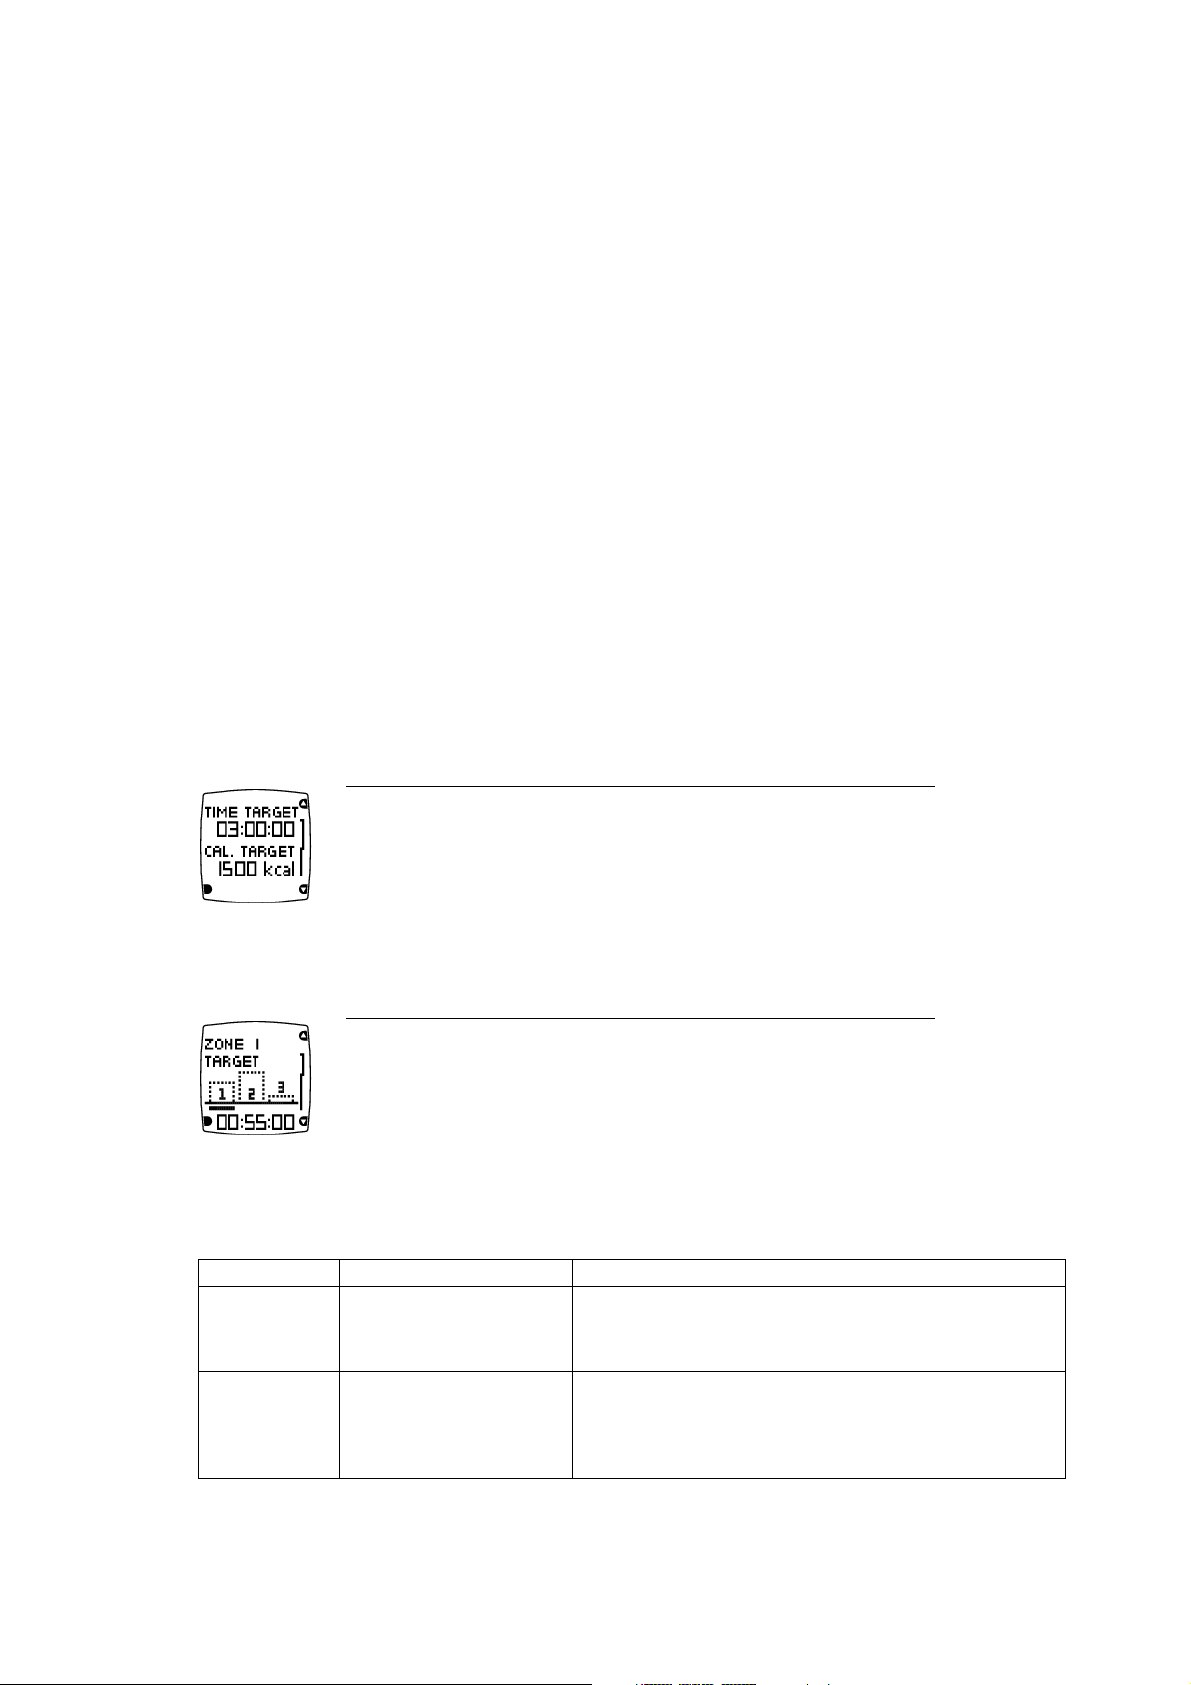
5. Next, View week targets? is displayed. Select YES to view the time and calorie targets for your first
training week. If you select No, Training program active! is displayed and the training computer returns
to Time view.
Time target
The amount of time you should train during this week.
Calorie target
The number of calories you should burn this week.
6. Press DOWN and OK to view your target training time in three different heart rate zones (intensity
targets). Press DOWN to change the display.
Time target for intensity zone 1
The bars indicate the target times in different intensities. The bars fill up as you
train. The target time for intensity zone 1 for the week is displayed in the lowest row.
7. You have now activated your training program. Press BACK to return to Time mode.
To v iew you r we ek t arg e ts late r, se lec t Menu > Applications > Training Program > View week targets .
Zone Intensity % of HR
max
Tra ini ng be ne fit
Zone 3
80-90%
• Benefits: Increases maximum performance capacity
• Feels like: Tiredness in muscles and heavy breathing
• Recommended for: Fit users for short training sessions
Zone 2
70-80%
• Benefits: Improves aerobic fitness
• Feels like: Good, easy breathing, moderate sweating
• Recommended for: Everybody for typical training
sessions with moderate length
ENGLISH
Before Training 5

Zone 1
60-70%
• Benefits: Improves basic endurance and helps recovery
• Feels like: Comfortable, easy breathing, low loading for
muscles, light sweating
• Recommended for: Everybody
Tro ubl es hooti ng
• User information missing is displayed > Enter the missing user information.
• Fitness test result required is displayed > You need to perform the Fitness Test.
Read more about training in Training Articles at http://articles.polar.fi.
Change/End your program
• To change your fitness goal, create a new program in Menu > Applications > Training program > Change
program. For instance, if you have started with weight loss program and have achieved your goal, change
your goal to Improve Fitness or Maximize Fitness.
• To end your active training program, select Menu > Applications > Training program > End program >
End Program? Select Yes.
To v iew the res ults of you r pr evi o us prog ram :
Select Menu > Applications > Training program > Results of past prog. The following information is
displayed:
• Start date and Duration: The start date and the duration of the training program.
• Excel. wks and Calories: The number of excellent training weeks (100% of target reached) vs. total
number of training weeks and the calories expended during the program.
• Before/After: Your Fitness Test result (OwnIndex) or your weight (when weight loss program active)
before and after the program.
Test Your Fitness Level
To t rain ri g ht and to m oni tor you r pr ogr e ss, it is i mpo rtan t t o kn ow y our cur rent fi t nes s le vel . Th e Po lar
Fitness Test
TM
is an easy and quick way to measure your cardiovascular fitness. The test is performed at
rest.
As a result you will get a value called OwnIndex. OwnIndex is comparable to maximal oxygen uptake
(VO2max ), which is a commonly used aerobic fitness measure. Read more on how to interpret the results in
Interpret Your Fitness Test Results.
The OwnIndex value also affects the accuracy of the training program and calorie calculation during
training.
The test is developed for healthy adults. To make sure the test is reliable, take the following issues into
consideration:
• Avoid distractions. The more relaxed you are and the more peaceful the testing environment is, the more
accurate the test result will be (for instance, no television, telephone or talking).
• Avoid heavy physical effort, alcohol and unprescribed pharmacological stimulants on the test day and the
day before.
• Avoid eating a heavy meal or smoking 2-3 hours prior to the test.
• Always perform the test in similar conditions and at the same time.
• Make sure that your user information is correct.
Perform Polar Fitness Test
1. Wear the heart rate sensor, lie down and relax for 1-3 minutes.
ENGLISH
6 Before Training

2. In Time mode, select Menu > Applications > Fitness test > Start test. The fitness test begins instantly
once the FT60 has located your heart rate.
3. About 5 minutes later, a beep will indicate the end of the test, and your test result will appear on the
display.
4. Press OK. UPDATE VO
2max
? is displayed.
5. Select Yes to save the test result in your User information and OwnIndex results. If you know your
laboratory measured VO2max value and have entered it in User information , select No to save your test
result in OwnIndex results only.
Tro ubl es hooti ng
• Set activity lev. of past 3 months is displayed > Set your activity level (see Settings for more information
on activity levels). Activity set! is displayed and the test begins.
• Test Failed is displayed or no heart rate shown > Test fails. Check that the heart rate sensor electrodes are
moist enough and that the elastic strap is snug enough around your chest. If the fitness test fails, your
previous OwnIndex value is not replaced.
Interpret your fitness test results
Interpret the OwnIndex
values by comparing your
individual values and their
progression over time.
OwnIndex can also be
interpreted based on gender
and age. Locate your
OwnIndex on the table, and
find out your fitness level
class and how your aerobic
fitness compares to others
of the same gender and age.
This classification is based on a
literature review of 62 studies
where VO
2max
was measured
directly in healthy adult subjects
in the USA, Canada and 7
European countries. Reference:
Shvartz E, Reibold RC: Aerobic
fitness norms for males and
females aged 6 to 75 years: a
review. Av iat Sp ace Envi ron
Med;61:3-11,1990.
ENGLISH
Before Training 7

3. TRAINING
Wear the Heart Rate Sensor
Wear the heart rate sensor to measure heart rate.
1. Moisten the electrode area of the strap.
2. Attach the connector to the strap.
3. Tie the strap around your chest, just below the chest
muscles, and attach the hook to the other end of the
strap.
4. Adjust the strap length to fit tightly but comfortably.
Check that the moist electrode areas are firmly
against your skin and that the Polar logo of the
connector is in a central and upright position.
Detach the connector from the strap and rinse the strap
under running water after every use. Sweat and moisture
may keep the electrodes wet and the heart rate sensor
activated. This will reduce the heart rate sensor battery
life. For more detailed washing instructions, see Important
Information.
For video tutorials, go to http://www.polar.com/en/support/video_tutorials.
Start Training
1. Wear the training computer and heart rate sensor.
2. In Time mode press OK and select Start or long-press OK once when you want to start recording your
training session.
To m odif y s o und , he art rat e vi ew o r o ther tr a ini ng s ett i ngs be f ore rec ord i ng your tr a ini ng s ess i on, sel ect
Training Settings.SeeSettingsformoreinformation
Your training s es sion is r ec orded only if the stopwatch ha s been on for more t han one m in ute.
Start Training With OwnZone
Starting every training session with the OwnZone guarantees safe and effective heart rate zones for your
daily condition. Check your OwnZone at least
• when changing training environment or sport.
• when training for the first time after a week's break.
• If you have not recovered from the previous training or if you are not feeling well or are stressed.
• after changing user information.
Determining OwnZone limits take five minutes, and can be performed as a warm-up. Start slowly keeping
your heart rate below 100 bpm/ 50% HR
max
.Aftereachminute,increaseyourspeedgraduallyabout10
bpm/ 5% HR
max
.
If you have activated your training program and you actively use the OwnZone determination, the training
computer unit takes into account your long-term OwnZone results when updating the program targets.
1. Wear the training computer and heart rate sensor.
2. Press OK and select Start with OwnZone.
• Walk slowly for 1 min.
• Walk at a normal pace for 1 min.
ENGLISH
8 Training

• Walk fast for 1 min.
• Jog for 1 min.
• Run for 1 min.
• Speed up.
3. At some point during OwnZone determination, New limits in use is displayed. Proceed normally with your
training.
Tro ubl es hooti ng
• If OwnZone determination fails, and you have determined your OwnZone limits earlier, Previous limits in
use is displayed. If you have not determined your OwnZone limits, Age-based limits in use is displayed.
The OwnZone determination fails if the heart rate rises too fast during the OwnZone determination, or if
the heart rate is too high at the beginning of the test.
During Training
The following information can be displayed during training recording. Press UP/DOWN to change the view.
Session duration is displayed in all views.
Heart rate
Your he ar t rate du ring t ra ining.
Calories
Burned calories.
In zone 1, 2 or 3
Training t ime in zone an d your heart rate. Smiley f ace me ans th at Ow nZone
determination was succesfull.
If your heart rate is not within the zones, NOT IN ZONE is displayed.
Week target (displayed if training program is active)
Weekly target for each zone and the actual training time.
Speed
Optional GPS sensor or footpod required to view speed data.
Distance
Optional GPS sensor or footpod required to view distance data.
ENGLISH
Training 9

Time of day
Lock a zone: Depending on your goal for a training session, you can lock zone 1, 2 or
3duringthesession.Whenyouaretraininginadesiredzone,lockitbypressingOK
for one second. For instance, when you have achieved your weekly target for zones 2
and 3, you can lock zone 1. The zone alarm helps you stay inside the locked zone.
For example, zone 2 is locked in this image.
Quick Menu: Long pressing LIGHT during recording brings you to Quick menu.TheQuick menu is a short
cut to locking buttons, adjusting training sounds, and if footpod is in use, calibrating it.
Heart Touch: Check the time during training recording by bringing the training computer near the heart
rate sensor. Set Heart Touch function On/Off in Settings > Training Settings > HeartTouch .
Stop Training Recording
To p ause yo u r t rain ing ses sion , p r ess BACK.
To s top the tra inin g s e ssi on p res s BACK twice and Stopped is displayed.
For more information on instant, training session feedback, see Follow-Up Your Achievements.
Training feedback will be shown o nly if th e training se ssion has l as ted for t en minutes or longer.
ENGLISH
10 Training

4. AFTER TRAINING
Training Feedback
The training computer provides you with the following feedback after a training session.
Effect
Training e ffect feedback. See Ta ble 1 for more i nf ormation.
Intensity
Time sp en t in zones 1, 2, an d 3.
Zone limits
OwnZone limits (displayed if OwnZone in use).
Calories
Expended calories during the session, and fat percentage.
Average /Maximum
Average and maximum heart rate during training session.
Average /Maximum*
Average and maximum speed of training session (displayed only if optional
GPS/footpod in use).
Distance*
Distance and duration of training session (displayed only if optional
GPS/footpod in use).
This week
Your ta rg ets fo r the curren t trai ni ng week a nd th e resu lts you have achieved
so far. This information is only visible when the program is active.
*Optional GPS sensor or Footpod required to view speed and distance data.
Tabl e 1.
Feedback
Fat burn improving Training a t low intens it y is improvin g your body's ability to bu rn fat.
Fitness improving Training a t mode rate i nt ensity is im proving y our fi tness.
Maximal perform. improving Training a t hard inte nsity i s improv ing yo ur ma ximal p er formance.
If you are training enough at more than one intensity level, training will have several effects.
Fat burn and fitness improving Training i s prim arily im proving your bo dy's a bility to bu rn fa t, bu t it also
improves your fitness.
Fitness and fat burn improving Training i s prim arily im proving your fi tness, but a lso yo ur bo dy's a bility t o burn
fat.
Max. perf. and fitness improving Training i s impr oving yo ur fitness a nd ma ximal p erformance.
Weekly Follow-up
Every Sunday at midnight, an envelope with the week's results will appear on the display of your training
computer. Press UP to view.
Week targets achieved
Tells y ou wh ether or no t you have achieved the w eek's targets.
ENGLISH
After Training 11

Results
Excellent! / Well done! / Nice! / Fitness maintained / Incomplete training
week / Good recovery week / Excellent recovery week
If your result is excellent, the FT60 rewards you with a trophy. The
trophy appears in the time mode display.
Achieved/Week target
Achieved training duration vs. week target duration
Achieved/Week target
Expended calories vs. week target
Sessions
The number of training sessions achieved this week (also displayed without a
program).
Achieved time per zone
Time sp en t in intensit y zones 1, 2 , and 3.
This week
Training g uidance f or the st ar ting w eek di splayed o nly wh en ac cessed from
the envelope. See Table 2 for more information.
Tabl e 2.
Tra ini ng gu id ance for the start in g w ee k
Train a lot more You ne ed to tr ain a lot more t o get effects.
Train more You do no t trai n enough fo r improv ement.
Train more in zone X You ne ed to tr ain mo re in th is zo ne.
Train like last week! You di d a good j ob last week. Keep i t up!
Train less in zone X You sh ould d ecrease t raining i n this zo ne .
Train much less in zone 3 You sh ould t rain l ess in hard inte nsity z on e this we ek .
Recovery week You ne ed recovery to av oid ov erreaching.
Recovery week still needed You ha ve not re co vered y et; last we ek wa s stil l too hard.
Train as planned You ha ve had a good start, c ontinue t raining a ccording to the pr og ram.
Weight Update
If you are following the weight loss program, the FT60 will remind you to update your weight by displaying
an envelope once a week.
1. Time to check your weight is displayed. Press OK.
2. Set current weight? appears. Select Yes to update your weight.
Fitness Test
As soon as you reach your training targets, the FT60 will post an envelope reminding you to take a fitness
test. The result of the test is taken into account in the weekly program update.
1. Time to test fitness is displayed.
2. Test fitness? appears. Select Yes or No.
3. If you decide to take a new test, see Test Your Fitness Level for more information.
ENGLISH
12 After Training
Program Update
Polar FT60 continuously analyzes your progress and adjusts by increasing or decreasing weekly targets. An
envelope appears on the display to notify you when the program has been updated. Press UP to open the
envelope.
1. Program has been updated is displayed: the FT60 has analyzed your progress and adapted your program
targets accordingly.
2. Time for a recovery week is displayed: To optimize your training, you need to have an ideal balance
between training and recovery. Recovery week allows your body to improve and adapt to the stimulus that
training has provided.
Weight Diary
In the weight diary, you can monitor your weight loss and view your progress over a period of time. To
update your weight, select Menu > Applications > Weight diary > Set current weight.Setyourweightand
press OK.YourcurrentweightwillalsobeupdatedinUser information .
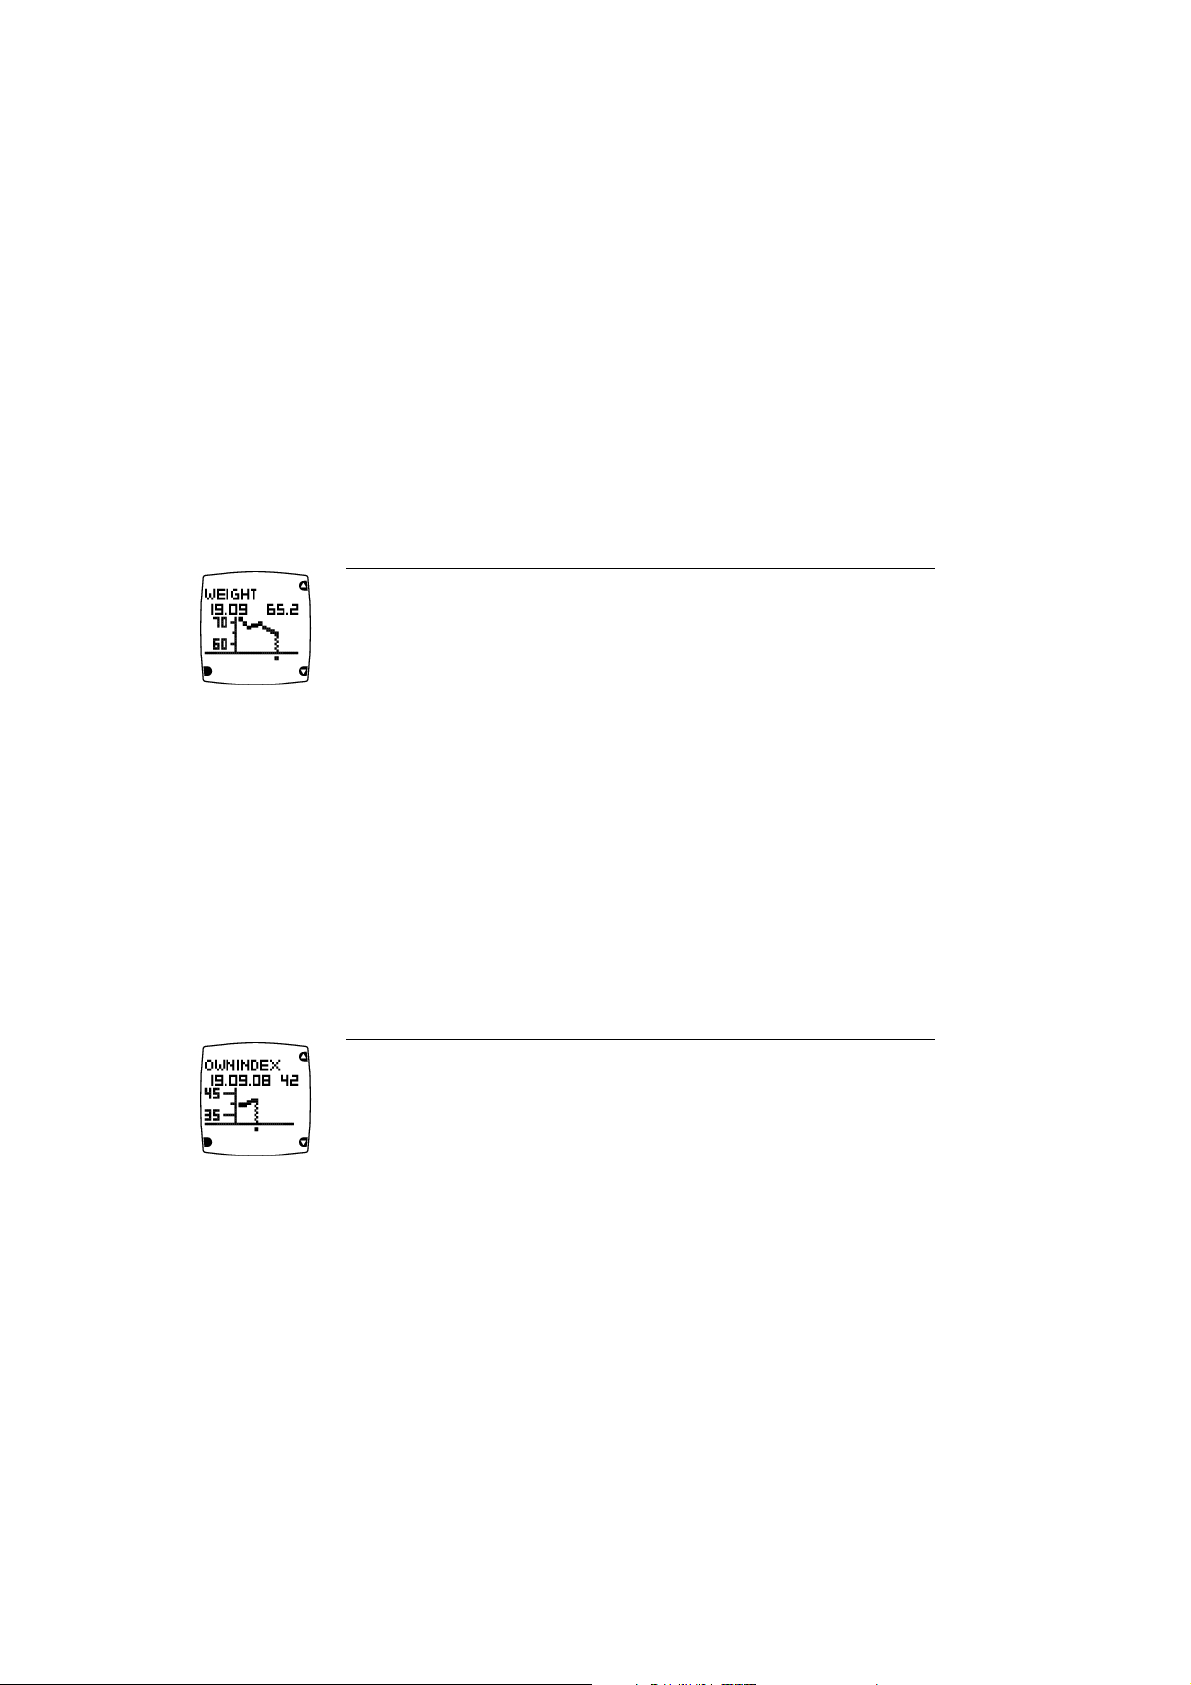
To v iew you r we ight tr e nd, sel ect Menu > Applications > Weight diary > Weight trend and press OK.
Weight trend
The weight and the date on which it was entered.
The weight trend including the lowest and highest weight.
To d elet e a val ue, sel e ct the val u e y ou w ant to del e te with UP/DOWN.Whenthevalueisdisplayed,press
and hold LIGHT until Delete this value? is displayed. Select Yes.
Follow Your fitness Test Results
On average, it takes six weeks of regular training to improve your aerobic fitness noticeably. To improve
your aerobic fitness most efficiently, you need to train large muscle groups. Monitor your long-term test
results under the OwnIndex results,containing47ofyourlatestOwnIndexvaluesandthedatethetests
were performed.
1. Select Menu > Applications > Fitness test > OwnIndex results.
2. The latest OwnIndex result and the date of the test is displayed. Press UP/DOWN to view the previous
OwnIndex results.
OwnIndex
The date and the result of the test
Your Ow nI ndex r esult g ra ph with t he lo west a nd hi ghest OwnIndex value
To d elet e a n Ow nInd ex v alu e, s ele c t t he v alu e yo u w a nt to d ele t e w ith UP/DOWN.Whenthevalueis
displayed, press and hold LIGHT until Delete this value? is displayed. Select Yes.
Review Training Data
Review your training data in Training files , Week summaries and Totals.
1. Select Data > Training files to view detailed training information on your 100 most recent training
sessions. The information is similar to what is displayed after each training session.
ENGLISH
After Training 13

Each bar represents one training session. Select a training session you
wish to view.
Upper row: Date and time of day when the file was created
Lower row: Training time
When Training files becomes full, the oldest training file is replaced by the most recent one. If you want
to save the file for a longer period, transfer it to Polar web service on www.polarpersonaltrainer.com. For
further information, see Transfer Data.
To delete a training file, select Data > Delete files and the file you want to delete. Delete file? is
displayed. Select Yes. Remove from total? is displayed. To remove the file from totals, as well, select
Yes.
2. Select Data > Week summaries to view the training data and results for the last 16 weeks.
Each bar represents one training week. Select a week you wish to view with
UP/DOWN.
Upper row: Week start / Week end date
Lower row: Total training time
To reset week summaries select Data > Reset weeks?. Select Yes to reset week summaries.
3. Select Data > Totals since xx.xx.xxxx to view the total cumulative duration, number of training sessions
and calories starting from the last reset.
To reset totals, select Data > Reset totals and select Yes.
Transfer Data
How to transfer data from your FT60 to polarpersonaltrainer.com
For long-term follow-up, you can store all your training files at polarpersonaltrainer.com. There you can see
graphs and more of your training data and get a better understanding of your training. With Polar
FlowLink* it is easy to transfer the training files to the web service.
1. Register in polarpersonaltrainer.com
2. Follow instructions to download and install WebSync data transfer software onto your computer.
3. Polar WebSync software is automatically activated and instructions for downloading the data are
displayed on your computer. Follow the instructions and your training data is transferred to
polarpersonaltrainer.com web service.
4. Place your FT60 onto FlowLink display facing down.
5. Follow data transfer process from the WebSync Software on your computer screen. For further
instructions on data transfer, see polarpersonaltrainer.com "Help".
*Optional Polar FlowLink required.
ENGLISH
14 After Training

5. SETTINGS
Watch Settings
Select the value you want to change and press OK.AdjustthevalueswithUP/DOWN and accept with OK.
Select Settings > Watch, time and date.
• Alarm: Set the alarm to go on Once, from Monday to Friday, Every day , or turn it Off. Press BACK to stop
the alarm or UP/DOWN to snooze for 10 minutes. The alarm cannot be used during training.
• Time: Select Time 1 and set the time format, hours and minutes. Select Time 2 to set time for another time
zone by adding or substracting hours. In the Time view, you can quickly change from Time 1 to Time 2 by
pressing and holding DOWN.
• Time zone: Select time zone 1 or 2.
• Date: Set the date.
• Watch face: Select Time and logo, Time and trophy or Time only.
Training Settings
Select Settings > Training settings .
• Training sounds : Select Very loud, Loud, Soft or Off.
• Speed sensor: Activate or deactivate speed and distance sensor by selecting GPS sensor, Footpod or Off.
• Heart rate view : Set the FT60 to display your heart rate as Beats per minute or as Percent of maximum.
• Speed view: Select Kilometres per hour (KM/H) / Minutes per kilometre (MIN/KM) or Miles per hour
(MPH) / Minutes per mile (MIN/M)
• Footpod calib. factor: For more information, see Accessory settings.
• HeartTouch: Select On or Off.
• Zone lock: Select Zone 1, 2 0r 3 to train on a specific heart rate zone or set the zone lock Off.
• Zone 1 Limits: Adjust your zone 1 limits manually. When setting the upper limit, the lower limit of zone 2
is set automatically.
• Zone 2 limits: Adjust your zone 2 limits manually. When setting the lower limit, the upper limit of zone 1
is set automatically. When setting the upper limit, the lower limit of zone 3 is set automatically.
• Zone 3 limits: Adjust your zone 3 limits manually. When setting the lower limit, the upper limit of zone 2
is set automatically.
Change the zone limits defined by Polar FT60 only if you know your limits for burning fat, improving fitness and
maximizing fitness. If the training program is active, the FT60 will incorporate your new zone limits when updating
the program targets.
User Information
Select Settings > User Information and press OK.
• Weight: Enter your weight.
• Height: Enter your height.
• Date of birth: Enter your date of birth
• Sex : Select MALE or FEMALE.
• Maximum heart rate is the highest number of heartbeats per minute (bpm) during maximum physical
exertion. Change the default value only if you know your laboratory-measured value.
• Activity: Select the alternative that best describes the overall amount and intensity of your physical
activity during the past three months.
1. TOP (5+ hours per week) : You participate in heavy physical exercise at least 5 times a week, or you
exercise to improve performance for competitive purposes.
2. HIGH (3-5 hours per week) : You participate at least 3 times a week in heavy physical exercise, e.g.
you run 20-50 km or 12-31 miles per week or spend 3-5 hours per week in comparable physical
activity.
3. MODERATE (1-3 hours per week) : You participate regularly in recreational sports, e.g. you run 5-10 km
ENGLISH
Settings 15
Loading...