


DVD/CD Receiver
XV-DV535W
Speaker System
S-DV535W
Digital Wireless Speaker System
XW-DV535W
Operating Instructions

Location: rear of the unit
IMPORTANT
CAUTION
RISK OF ELECTRIC SHOCK
DO NOT OPEN
The lightning flash with arrowhead symbol, within an equilateral triangle, is intended to alert the user to the presence of uninsulated "dangerous voltage" within the product's enclosure that may be of sufficient magnitude to constitute a risk of electric shock to persons.
CAUTION:
TO PREVENT THE RISK OF ELECTRIC SHOCK, DO NOT REMOVE COVER (OR BACK). NO USER-SERVICEABLE PARTS INSIDE. REFER SERVICING TO QUALIFIED SERVICE PERSONNEL.
The exclamation point within an equilateral triangle is intended to alert the user to the presence of important operating and maintenance (servicing) instructions in the literature accompanying the appliance.
D3-4-2-1-1_En-A
Replacement and mounting of an AC plug on the power supply cord of this unit should be performed only by qualified service personnel.
IMPORTANT |
The cut-off plug should be disposed of and must |
Do not connect either wire to the earth terminal of a |
||
not be inserted into any 13 amp socket as this can |
three pin plug. |
|||
result in electric shock. The plug or adaptor or the |
|
|||
FOR USE IN THE UNITED |
distribution panel should be provided with 5 A fuse. |
NOTE |
||
As the colours of the wires in the mains lead of this |
After replacing or changing a fuse, the fuse cover in |
|||
KINGDOM |
||||
appliance may not correspond with coloured |
the plug must be replaced with a fuse cover which |
|||
The wires in this mains lead are coloured in |
markings identifying the terminals in your plug, |
corresponds to the colour of the insert in the base |
||
accordance with the following code: |
proceed as follows ; |
of the plug or the word that is embossed on the |
||
Blue |
: Neutral |
The wire which is coloured blue must be connected |
base of the plug, and the appliance must not be |
|
Brown |
: Live |
to the terminal which is marked with the letter N or |
used without a fuse cover. If lost replacement fuse |
|
If the plug provided is unsuitable for your socket |
coloured black. |
covers can be obtained from your dealer. |
||
outlets, the plug must be cut off and a suitable plug |
The wire which is coloured brown must be |
Only 5 A fuses approved by B.S.I or A.S.T.A to |
||
fitted. |
|
connected to the terminal which is marked with the |
B.S.1362 should be used. |
|
|
|
letter L or coloured red. |
D3-4-2-1-2-2_En |
|
WARNING
This equipment is not waterproof. To prevent a fire or shock hazard, do not place any container filed with liquid near this equipment (such as a vase or flower pot) or expose it to dripping, splashing, rain or moisture.
VENTILATION CAUTION
When installing this unit, make sure to leave space around the unit for ventilation to improve heat radiation (at least 10 cm at top, 10 cm at rear, and 10 cm at each side).
WARNING
Before plugging in for the first time, read the following section carefully.
The voltage of the available power supply differs according to country or region. Be sure that the power supply voltage of the area where this unit will be used meets the required voltage (e.g., 230V or 120V) written on the rear panel.
WARNING
Slots and openings in the cabinet are provided for ventilation to ensure reliable operation of the product, and to protect it from overheating. To prevent fire hazard, the openings should never be blocked or covered with items (such as newspapers, table-cloths, curtains) or by operating the equipment on thick carpet or a bed.
WARNING
To prevent a fire hazard, do not place any naked flame sources (such as a lighted candle) on the equipment.
This product complies with the Low Voltage Directive (73/23/EEC, amended by 93/68/EEC), EMC Directives (89/336/EEC, amended by 92/31/EEC and 93/68/EEC).
Operating Environment
Operating environment temperature and humidity:
+5 ºC – +35 ºC (+41 ºF – +95 ºF); less than 85 %RH (cooling vents not blocked)
Do not install this unit in a poorly ventilated area, or in locations exposed to high humidity or direct sunlight (or strong artificial light)
[XV-DV535W only]
CAUTION
This product is a class 1 laser product, but this product contains a laser diode higher than Class 1. To ensure continued safety, do not remove any covers or attempt to gain access to the inside of the product. Refer all servicing to qualified personnel.
The following caution label appears on your unit. Location: top of the unit
CLASS 1
LASER PRODUCT
D3-4-2-1-8_A_En
[XV-DV535W only]
CAUTION
The STANDBY/ON switch on this unit will not completely shut off all power from the AC outlet. Since the power cord serves as the main disconnect device for the unit, you will need to unplug it from the AC outlet to shut down all power. Therefore, make sure the unit has been installed so that the power cord can be easily unplugged from the AC outlet in case of an accident. To avoid fire hazard, the power cord should also be unplugged from the AC outlet when left unused for a long period of time (for example, when on vacation).
[XW-DV535W only]
CAUTION
The POWER switch on this unit will not completely shut off all power from the AC outlet. Since the power cord serves as the main disconnect device for the unit, you will need to unplug it from the AC outlet to shut down all power. Therefore, make sure the unit has been installed so that the power cord can be easily unplugged from the AC outlet in case of an accident. To avoid fire hazard, the power cord should also be unplugged from the AC outlet when left unused for a long period of time (for example, when on vacation).
If the AC plug of this unit does not match the AC outlet you want to use, the plug must be removed and appropriate one fitted. Replacement and mounting of an AC plug on the power supply cord of this unit should be performed only by qualified service personnel. If connected to an AC outlet, the cut-off plug can cause severe electrical shock. Make sure it is properly disposed of after removal.
The equipment should be disconnected by removing the mains plug from the wall socket when left unused for a long period of time (for example, when on vacation).
DRM (digital rights management) copy protection is a technology designed to prevent unauthorized copying by restricting playback, etc. of material on devices other than the PC (or other WMA recording equipment) used to record it. For detailed information, please see the instruction manuals or help files that came with your PC and/or software.
[XV-DV535W only]
CAUTION
These speaker terminals carry HAZARDOUS LIVE voltage. To prevent the risk of electric shock when connecting or disconnecting the speaker cables, disconnect the power cord before touching any uninsulated parts.
POWER CORD CAUTION
Handle the power cord by the plug. Do not pull out the plug by tugging the cord and never touch the power cord when your hands are wet as this could cause a short circuit or electric shock. Do not place the unit, a piece of furniture, etc., on the power cord, or pinch the cord. Never make a knot in the cord or tie it with other cords. The power cords should be routed such that they are not likely to be stepped on. A damaged power cord can cause a fire or give you an electrical shock. Check the power cord once in a while. When you find it damaged, ask your nearest PIONEER authorized service center or your dealer for a replacement.

[XW-DV535W only]
Declaration of Conformity with regard to the R&TTE Directive 1999/5/EC
Manufacturer: |
Pioneer Corporation |
|
|
|
4-1, 1-chome, Meguro, Meguro-ku |
|
|
153-8654 TOKYO, JAPAN |
EU Representative’s: Pioneer Europe NV |
||
|
|
Haven 1087, Keetberglaan 1, |
|
|
9120 MELSELE, BELGIUM |
|
|
http://www.pioneer-eur.com |
|
|
|
English |
|
Hereby, Pioneer, declares that this Wireless Speaker System XW-DV535W |
|
|
is in compliance with the essential requirements and other relevant |
|
|
provisions of Directive 1999/5/EC. |
|
|
|
Suomi |
|
Pioneer vakuuttaa täten että Wireless Speaker System XW-DV535W |
|
|
tyyppinen laite on direktiivin 1999/5/EY oleellisten vaatimusten ja sitä |
|
|
koskevien direktiivin muiden ehtojen mukainen. |
|
|
|
Nederlands |
|
Hierbij verklaart Pioneer dat het toestel Wireless Speaker System |
|
|
XW-DV535W in overeenstemming is met de essentiële eisen en de andere |
|
|
relevante bepalingen van richtlijn 1999/5/EG |
|
|
|
Français |
|
Par la présente Pioneer déclare que l'appareil Wireless Speaker System |
|
|
XW-DV535W est conforme aux exigences essentielles et aux autres |
|
|
dispositions pertinentes de la directive 1999/5/CE |
|
|
|
Svenska |
|
Härmed intygar Pioneer att denna Wireless Speaker System XW-DV535W |
|
|
står I överensstämmelse med de väsentliga egenskapskrav och övriga |
|
|
relevanta bestämmelser som framgår av direktiv 1999/5/EG. |
|
|
|
Dansk |
|
Undertegnede Pioneer erklærer herved, at følgende udstyr Wireless |
|
|
Speaker System XW-DV535W overholder de væsentlige krav og øvrige |
|
|
relevante krav i direktiv 1999/5/EF |
|
|
|
Deutsch |
|
Hiermit erklärt Pioneer, dass sich dieses Wireless Speaker System |
|
|
XW-DV535W in Übereinstimmung mit den grundlegenden |
|
|
Anforderungen und den anderen relevanten Vorschriften der Richtlinie |
|
|
1999/5/EG befindet". (BMWi) |
|
|
|
Ellinika |
|
ȂǼ ȉǾȃ ȆǹȇȅȊȈǹ Pioneer ǻǾȁȍȃǼǿ ȅȉǿ Wireless Speaker System |
|
|
XW-DV535W ȈȊȂȂȅȇĭȍȃǼȉǹǿ ȆȇȅȈ ȉǿȈ ȅȊȈǿȍǻǼǿȈ |
|
|
ǹȆǹǿȉǾȈǼǿȈ Ȁǹǿ ȉǿȈ ȁȅǿȆǼȈ ȈȋǼȉǿȀǼȈ ǻǿǹȉǹȄǼǿȈ ȉǾȈ |
|
|
ȅǻǾīǿǹȈ 1999/5/ǼȀ |
|
|
|
Italiano |
|
Con la presente Pioneer dichiara che questo Wireless Speaker System |
|
|
XW-DV535W è conforme ai requisiti essenziali ed alle altre disposizioni |
|
|
pertinenti stabilite dalla direttiva 1999/5/CE. |
|
|
|
Español |
|
Por medio de la presente Pioneer declara que el Wireless Speaker System |
|
|
XW-DV535W cumple con los requisitos esenciales y cualesquiera otras |
|
|
disposiciones aplicables o exigibles de la Directiva 1999/5/CE |
|
|
|
Português |
|
Pioneer declara que este Wireless Speaker System XW-DV535W está |
|
|
conforme com os requisitos essenciais e outras disposições da Directiva |
|
|
1999/5/CE. |
|
|
|

Czech |
Pioneer tímto prohlašuje, že tento Wireless Speaker System XW-DV535W |
||||||
|
je ve shodČ se základními požadavky a dalšími pĜíslušnými ustanoveními |
||||||
|
smČrnice 1999/5/ES |
|
|
|
|
|
|
|
|
|
|
|
|
|
|
Estonian |
Käesolevaga |
kinnitab |
Pioneer |
seadme |
Wireless |
Speaker |
System |
|
XW-DV535W vastavust direktiivi 1999/5/EÜ põhinõuetele ja nimetatud |
||||||
|
direktiivist tulenevatele teistele asjakohastele sätetele. |
|
|
||||
|
|
|
|
|
|||
Hungarian |
Alulírott, Pioneer nyilatkozom, hogy a |
Wireless |
Speaker |
System |
|||
|
XW-DV535W megfelel a vonatkozó alapvetõ követelményeknek és az |
||||||
|
1999/5/EC irányelv egyéb elõírásainak. |
|
|
|
|||
|
|
||||||
Latvian |
Ar šo Pioneer deklarƝ, ka Wireless Speaker System XW-DV535W atbilst |
||||||
|
DirektƯvas 1999/5/EK bnjtiskajƗm prasƯbƗm un citiem ar to saistƯtajiem |
||||||
|
noteikumiem. |
|
|
|
|
|
|
|
|
||||||
Lithuanian |
Šiuo Pioneer deklaruoja, kad šis Wireless Speaker System XW-DV535W |
||||||
|
atitinka esminius reikalavimus ir kitas 1999/5/EB Direktyvos nuostatas. |
||||||
|
|
|
|
|
|
|
|
Malti |
Hawnhekk, |
Pioneer |
jiddikjara |
li dan |
Wireless |
Speaker |
System |
|
XW-DV535W jikkonforma mal-ƫtiƥijiet essenzjali u ma provvedimenti |
||||||
|
oƫrajn relevanti li hemm fid-Dirrettiva 1999/5/EC |
|
|
||||
|
|
||||||
Slovak |
Pioneer týmto vyhlasuje, že Wireless Speaker System XW-DV535W spĎĖa |
||||||
|
základné požiadavky a všetky príslušné ustanovenia Smernice 1999/5/ES. |
||||||
|
|
||||||
Slovene |
Šiuo Pioneer deklaruoja, kad šis Wireless Speaker System XW-DV535W |
||||||
|
atitinka esminius reikalavimus ir kitas 1999/5/EB Direktyvos nuostatas. |
||||||
|
|
|
|
|
|
|
|

Thank you for buying this Pioneer product.
Please read through these operating instructions so that you will know how to operate your model properly. After you have finished reading the instructions, put them in a safe place for future reference.
Contents
01 Getting started
Home theater sound setup . . . . . . . . . . . . .8 Setting the channel levels . . . . . . . . . . . . .8 Using the on-screen displays . . . . . . . . . . . .9
Playing discs . . . . . . . . . . . . . . . . . . . . . . . .9
Basic playback controls. . . . . . . . . . . . . . .9 Resume and Last Memory. . . . . . . . . . . .10 DVD-Video disc menus . . . . . . . . . . . . . .10 Video CD/Super VCD PBC menus . . . . . .10 Listening to the radio . . . . . . . . . . . . . . . . .11 Improving poor FM reception . . . . . . . . .11 Memorizing stations . . . . . . . . . . . . . . . .11 Listening to station presets . . . . . . . . . . .11 Listening to other sources . . . . . . . . . . . . .11 Setting the sleep timer. . . . . . . . . . . . . . . .12
Dimming the display . . . . . . . . . . . . . . . . .12
02 Listening to your system
Auto listening mode . . . . . . . . . . . . . . . . .13
Listening in surround sound . . . . . . . . . . .13
Listening in stereo . . . . . . . . . . . . . . . . . . .13
Listening with headphones . . . . . . . . . . .13
Using the SFC modes . . . . . . . . . . . . . . . .13
Adjusting the bass and treble . . . . . . . . . .14 Boosting the bass level . . . . . . . . . . . . . . .14
03 Playing discs
Scanning discs . . . . . . . . . . . . . . . . . . . . .15
Playing in slow motion. . . . . . . . . . . . . . . .15 Frame advance/frame reverse . . . . . . . . . .15 Playing a JPEG slideshow . . . . . . . . . . . . .15 Browsing DVD or Video CD/Super VCD
discs with the Disc Navigator . . . . . . . . . .16 Browsing WMA, MP3, DivX video and
JPEG files with the Disc Navigator . . . . . . .16 Looping a section of a disc . . . . . . . . . . . .17
Using repeat play. . . . . . . . . . . . . . . . . . . .17 Using random play . . . . . . . . . . . . . . . . . .18
Creating a program list . . . . . . . . . . . . . . . 18 Other functions available from the program menu . . . . . . . . . . . . . . . . . . . . 19
Searching a disc . . . . . . . . . . . . . . . . . . . . 19 Switching subtitles . . . . . . . . . . . . . . . . . . 19
Switching language/audio channels . . . . . 19
Zooming the screen . . . . . . . . . . . . . . . . . 20
Switching camera angles . . . . . . . . . . . . . 20 Displaying disc information. . . . . . . . . . . . 20
04 More tuner features: RDS
An introduction to RDS . . . . . . . . . . . . . . . 21 Displaying RDS information . . . . . . . . . . 21 Searching for RDS programs . . . . . . . . . 21
05 Audio Settings and Video Adjust menus
Audio Settings menu. . . . . . . . . . . . . . . . . 22 Audio DRC . . . . . . . . . . . . . . . . . . . . . . . 22 Video Adjust menu . . . . . . . . . . . . . . . . . . 22
06 Initial Settings menu
Using the Initial Settings menu . . . . . . . . . 23 Video Output settings . . . . . . . . . . . . . . . . 23
Language settings. . . . . . . . . . . . . . . . . . . 23 Display settings. . . . . . . . . . . . . . . . . . . . . 24 Options settings . . . . . . . . . . . . . . . . . . . . 24 Speakers settings . . . . . . . . . . . . . . . . . . . 24 Parental Lock . . . . . . . . . . . . . . . . . . . . . 24
About DivX® VOD content . . . . . . . . . . . 25
Speaker Distance . . . . . . . . . . . . . . . . . . 26
07 Other connections
Connecting auxiliary components . . . . . . . 27
Recording mode . . . . . . . . . . . . . . . . . . . 27
Connecting external antennas. . . . . . . . . . 27 Using the SCART AV output . . . . . . . . . . . 28
6
En

08 Controls and displays
Display . . . . . . . . . . . . . . . . . . . . . . . . . . . 29 Front panel. . . . . . . . . . . . . . . . . . . . . . . . 30 Remote control . . . . . . . . . . . . . . . . . . . . 30 Transmitter. . . . . . . . . . . . . . . . . . . . . . . . 32 Wireless speaker . . . . . . . . . . . . . . . . . . . 32
09 Additional information
Disc/content format playback
compatibility . . . . . . . . . . . . . . . . . . . . . . 33
Disc compatibility table . . . . . . . . . . . . . 33
About DivX. . . . . . . . . . . . . . . . . . . . . . . 34
DivX video compatibility . . . . . . . . . . . . . 34
About WMA . . . . . . . . . . . . . . . . . . . . . . 35
Using and taking care of discs . . . . . . . . . 35
DVD Video regions. . . . . . . . . . . . . . . . . 35 Handling discs. . . . . . . . . . . . . . . . . . . . 35 Storing discs . . . . . . . . . . . . . . . . . . . . . 35 Discs to avoid . . . . . . . . . . . . . . . . . . . . 35
Installation and maintenance. . . . . . . . . . 36 Hints on installation. . . . . . . . . . . . . . . . 36 Cleaning the pickup lens . . . . . . . . . . . . 36 Problems with condensation . . . . . . . . . 36 Moving the system unit . . . . . . . . . . . . . 36
Screen sizes and disc formats . . . . . . . . . 37
TV system setting . . . . . . . . . . . . . . . . . . . 37
Wireless speaker system maintenance
and precautions . . . . . . . . . . . . . . . . . . . . 37
Cleaning the exterior . . . . . . . . . . . . . . . 37 Moving the wireless speaker . . . . . . . . . 38 Radio wave reflections . . . . . . . . . . . . . . 38
Radio wave caution . . . . . . . . . . . . . . . . 38 Scope of operation. . . . . . . . . . . . . . . . . 39
For safety in operation . . . . . . . . . . . . . . 39
Static electricity . . . . . . . . . . . . . . . . . . . 39 Troubleshooting . . . . . . . . . . . . . . . . . . . . 40 General . . . . . . . . . . . . . . . . . . . . . . . . . 40
DVD/CD/Video CD player . . . . . . . . . . . . 41
Tuner . . . . . . . . . . . . . . . . . . . . . . . . . . . 42
Wireless speaker system . . . . . . . . . . . . 42
Error Messages . . . . . . . . . . . . . . . . . . . 43
Resetting the system . . . . . . . . . . . . . . . . 43 Using the language code list . . . . . . . . . . 43
Language code list . . . . . . . . . . . . . . . . . . 44
Country/Area code list . . . . . . . . . . . . . . . 44
Specifications . . . . . . . . . . . . . . . . . . . . . 45
Español Nederlands Italiano Français Deutsch English
7
En
01 Getting started
Chapter 1
Getting started
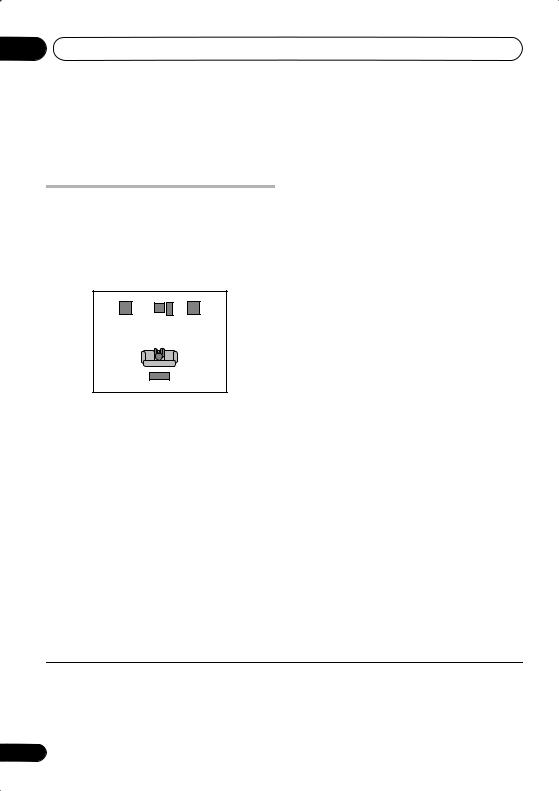
Home theater sound setup
In addition to the diagram below, also make sure to review the supplied setup guide for more helpful speaker placement guidelines.
This is a standard multichannel surround sound speaker setup:
Front left |
Center |
Front right |
Subwoofer
Listening position
Wireless speaker
 Important
•Placing the transmitter and the wireless speaker too close together will result in an unstable signal. Make sure they are more than 1m apart for the best reception.
•The radio waves sent from the transmitter to the wireless speaker may reflect off any number of surfaces in your listening area (for example, walls or cabinets). If you are experiencing poor reception due to this phenomenon, try moving the position of the transmitter or the wireless speaker for better reception.
After placing your speakers, switch on the
wireless speaker system1 then complete
Setting the channel levels below. Refer to
Speakers settings on page 24 to complete your surround sound setup.
Setting the channel levels
Set the relative channel levels from your main listening position.2
1 Press SHIFT+TEST TONE.
The test tone is output in the following order (from the speakers active in the current listening mode):
•L – Front left speaker
•C – Center speaker
•R – Front right speaker
•SR – Right surround (wireless) speaker
•SL – Left surround (wireless) speaker
•SW – Subwoofer3
2Use the VOLUME +/– button to adjust the volume to an appropriate level.
3Use the / (cursor up/down) buttons to adjust the speaker levels in turn.
You should hear the test tone at the same volume from each speaker when seated in the main listening position. The channel level range is ± 10 dB.
4When you’re done, press ENTER to exit test tone setup.
 Note
Note
1The wireless speaker system must be switched on for multichannel surround sound.
2• This is only available when DVD/CD is selected and playback is stopped. Also make sure headphones are unplugged.
•The speaker volume can be adjusted while listening to any sound source you want: Press SHIFT+SYSTEM SETUP, use the / (cursor left/right) buttons to select the channel level setting, then press ENTER. Use / (cursor up/down) to adjust the channel levels; / (cursor left/right) to move to the next channel. Press ENTER when you’re finished.
3Since the subwoofer produces ultra-low frequencies its sound may seem quieter than it actually is.
8
En
Getting started
Using the on-screen displays
For ease of use, this system makes extensive use of graphical on-screen displays (OSDs).
All the screens are navigated in basically the same way, using the cursor buttons ( , , ,) to change the highlighted item and
pressing ENTER to select it.1
 Important
•Throughout this manual, ‘Select’ means use the cursor buttons to highlight an item on-screen, then press ENTER.
Button What it does
HOME Displays/exits the on-screen display
MENU
Changes the highlighted menu item
ENTER Selects the highlighted menu item
RETURN Returns to the main menu without saving changes
 Tip
Tip
•The button guide at the bottom of every OSD screen shows you which buttons you’ll need to use for that screen.
Playing discs
The basic playback controls for playing DVD, CD, Video CD/Super VCD, DivX video and MP3/ WMA discs are covered here. Further functions are detailed in chapter 3.
1 If the player isn’t already on, switch it on.
If you’re playing a disc with video, also turn on your TV and make sure that it is set to the correct video input.
2 Press OPEN/CLOSE to load a disc.
01
Load a disc with the label side facing up, using |
English |
||||||
the disc tray guide to align the disc (if you’re |
|||||||
|
|||||||
loading a double-sided DVD disc, load it with |
|
||||||
the side you want to play face down). |
|
||||||
|
|
|
|
|
|
|
|
|
|
|
|
|
|
|
|
|
|
|
|
|
|
|
|
|
|
|
|
|
|
Deutsch |
|
3 |
Press (play) to start playback. |
|
|
||||
|
|
||||||
|
|
||||||
If you’re playing a DVD or Video CD/Super VCD, |
|
|
|||||
|
Français |
||||||
a menu may appear. See DVD-Video disc |
|
||||||
|
|
||||||
menus and Video CD/Super VCD PBC menus on |
|
|
|||||
page 10 to navigate these. |
|
|
|||||
If you’re playing a DivX video or WMA/MP3 |
|
|
|||||
|
|
||||||
disc, it may take a few seconds before playing. |
|
||||||
Italiano |
|||||||
If you loaded a CD/CD-R/RW containing |
|||||||
|
|||||||
JPEGs, a slideshow will start. See Playing a |
|
||||||
JPEG slideshow on page 15 for more on this. |
|
||||||
|
• If a disc contains a mixture of DivX video |
|
|||||
|
and other media file types (MP3, for |
|
|||||
|
example), first select whether to play the |
|
|
Nederlands |
|||
|
|
|
|||||
|
DivX video files (DivX) or the other media |
|
|
||||
|
file types (MP3 / WMA / JPEG) from the |
|
|
||||
|
on-screen display. |
|
|
||||
|
|
|
|
|
|
||
4 |
Adjust the volume. |
|
|||||
Use the VOLUME control. |
Español |
||||||
The following table shows the basic controls on |
|||||||
Basic playback controls |
|
||||||
the remote for playing discs2. You can find other playback features in the chapter 3.
Button What it does
Starts/resumes normal playback.
• If the display shows RESUME or LAST MEM playback starts from the resume or last memory point (see
Resume and Last Memory below).
Pauses/unpauses a disc.
 Note
Note
1The screen saver will appear after five minutes of inactivity.
2You may find with some DVD discs that some playback controls don’t work in certain parts of the disc.
9
En

01 Getting started
Button What it does
Stops playback or cancels the resume function (if the display shows RESUME).
Press to start fast reverse scanning.
Press to start fast forward scanning.
Skips to the start of the current track or chapter, then previous tracks/chapters.
Skips to the next track or chapter.
Numbers Use to enter a title/chapter/track number. Press ENTER to select.
•If the disc is stopped, playback starts from the selected title (for DVD) or track (for CD/Video CD/Super VCD).
•If the disc is playing, playback jumps to the start of the selected title (VR mode DVD-RW), chapter (DVD-Video) or track (CD/Video CD/Super VCD).
Resume and Last Memory
When you stop playback of a disc, RESUME shows in the display indicating that you can resume playback from that point.
With DVDs and Video CD/Super VCDs, even if
ejected, the play position is stored in memory.1 The next time you load the disc, the display shows LAST MEM and you can resume playback.
If you want to clear the resume point, press (stop) while RESUME is displayed.
DVD-Video disc menus
Many DVD-Video discs contain menus from which you can select what you want to watch.
Sometimes DVD-Video menus are displayed automatically when you start playback; others only appear when you press DVD MENU or
TOP MENU.
Button |
What it does |
SHIFT+TOP Displays the ‘top menu’ of a DVD MENU disc—this varies with the disc.
DVD |
Displays a DVD disc menu—this |
MENU |
varies with the disc and may be |
|
the same as the ‘top menu’. |
|
|
|
Moves the cursor around the |
|
screen. |
|
|
ENTER |
Selects the current menu option. |
|
|
RETURN |
Returns to the previously |
|
displayed menu screen. |
|
|
Numbers |
Highlights a numbered menu |
|
option (some discs only). Press |
|
ENTER to select. |
|
|
Video CD/Super VCD PBC menus
Some Video CD/Super VCDs have menus from which you can choose what you want to watch. These are PBC (Playback control) menus.
You can play a PBC Video CD/Super VCD without having to navigate the PBC menu by starting playback using a number button to select a track, rather than the (play) button.
Button |
What it does |
RETURN |
Displays the PBC menu. |
|
|
Numbers |
Selects numbered menu options. |
|
Press ENTER to select. |
|
|
|
Displays the previous menu page |
|
(if there is one). |
|
|
|
Displays the next menu page (if |
|
there is one). |
|
|
 Note
Note
1• The Last Memory function may not work with some discs.
• For DVD-Video discs (except VR mode DVD-RW), the player stores the play position of the last five discs.
10
En
Getting started |
01 |
Listening to the radio
The tuner can receive both FM and AM broadcasts, and lets you memorize your favorite stations so you don’t have to manually tune in every time you want to listen. See also
More tuner features: RDS on page 21.
1Press TUNER to switch to the tuner, then press repeatedly to select the AM or FM band.
The display shows the band and frequency.
2Tune to a frequency.
There are three tuning modes—manual, auto, and high-speed:
•Manual tuning: Press TUNE +/– repeatedly to change the displayed frequency.
•Auto tuning: Press and hold TUNE +/– until the frequency display starts to move, then release. The tuner will stop on the next station it finds. Repeat to keep searching.
•High-speed tuning: Press and hold TUNE +/– until the frequency display starts to move rapidly. Keep the button held down until you reach the frequency you want. If necessary, fine tune the frequency using the manual tuning method.
Improving poor FM reception
If you’re listening to an FM station in stereo but the reception is weak, you can improve the sound quality by switching to mono.
1Tune to an FM radio station then press SHIFT+SYSTEM SETUP.
2Use /(cursor left/right) to choose FM
MODE then press ENTER.
3Use / (cursor up/down) to select FM
MONO then press ENTER.
The mono indicator ( ) lights when the tuner is in mono reception mode.
Select FM AUTO above to switch back to autostereo mode (the stereo indicator ( ) lights when receiving a stereo broadcast).
Memorizing stations
You can save up to 30 station presets so that you always have easy access to your favorite stations without having to tune in manually each time.
1 Tune to an AM or FM radio station.
For the FM band, select mono or auto-stereo reception as necessary. This setting is saved along with the preset.
2Press SHIFT+SYSTEM SETUP.
3Use / (cursor left/right) to choose
‘ST.MEM.’ then press ENTER.
4Use / (cursor up/down) to select the station preset you want then press ENTER.
Listening to station presets
1Make sure the TUNER function is selected.
2Use the ST +/– buttons to select a station preset.
•You can also use the number buttons to do this.
Listening to other sources
You can connect up to two external sources (TV, satellite receiver, etc.) to this system. See
Connecting auxiliary components on page 27.
FM/AM
DVD/CD TUNER LINE
1Make sure that the external source (TV, satellite receiver, etc.) is switched on.
2Press LINE to select the source.
Press repeatedly to switch between LINE1 and
LINE2.
3 If necessary, start playback of the source.
Español Nederlands Italiano Français Deutsch English
11
En

01 Getting started
Setting the sleep timer
The sleep timer switches off the system after a specified time so you can fall asleep without
worrying about it.1
• Press SLEEP repeatedly to select an option then press ENTER.
Choose between the following options:2
•SLP AUTO – Switches off automatically after the currently playing CD, Video CD or DivX disc has finished.
•SLP ON – Switches off after about an hour
•SLP OFF – Cancels the sleep timer
After selecting SLP ON, you can press SLEEP again to check how much time is left. Each line indicates approximately 12 minutes (remaining):
S L P - - - - -
Dimming the display
You can choose to dim the display if you find it too bright.
1Press SHIFT+SYSTEM SETUP.
2Use / (cursor left/right) then ENTER to choose the dimmer setting.
This is shown in the front panel display.
3Use / (cursor up/down) to select
LIGHT or DARK then press ENTER.
 Note
Note
1The display dims when the sleep timer is set.
2Sleep Auto will not work with WMA/MP3 discs, Video CD/Super VCDs during PBC playback, or CDs in repeat play.
12
En
Listening to your system
Chapter 2
Listening to your system
Auto listening mode
The Auto listening mode is the simplest way to listen to any source as it was mastered: the output from the speakers mirrors the channels in the source material.
CLEAR |
SLEEP |
DISPLAY |
SHIFT |
SURROUND |
FRONT |
|
|
SURROUND |
• Press SHIFT+SURROUND to select the AUTO listening mode.1
Listening in surround sound
You can listen to stereo or multichannel
sources in surround sound.2 Surround sound is generated from stereo sources using one of the Dolby Pro Logic decoding modes.
CLEAR |
SLEEP |
DISPLAY |
SHIFT |
SURROUND |
FRONT |
|
|
SURROUND |
•Press SHIFT+SURROUND repeatedly to
select a listening mode.1
The choices that appear in the display will vary according to the type of source that’s playing.
•AUTO – Auto listening mode (see above)
•DOLBY DIGITAL/DTS – Dolby Digital or DTS decoding (depending on the source).3 For a multichannel source, this will be the same as AUTO.
•PROLOGIC – 4.1 channel surround sound for use with any two-channel source
•MOVIE – Pro Logic II 5.1 channel surround sound, especially suited to movie sources (use with any two-channel source)
•MUSIC – Pro Logic II 5.1 channel surround sound, especially suited to music sources, for use with any two-channel source
•STEREO – See Listening in stereo below
Listening in stereo
You can listen to any source—stereo or multichannel—in stereo. When playing a multichannel source, all channels are downmixed to the front left/right speakers and the subwoofer.
CLEAR |
SLEEP |
DISPLAY |
SHIFT |
SURROUND |
FRONT |
|
|
SURROUND |
• Press SHIFT+SURROUND repeatedly until STEREO shows in the display.
Listening with headphones
When headphones are connected, only the STEREO mode is available.
Using the SFC modes
The SFC (Sound Field Control) modes can be used with any multichannel or stereo source for a variety of additional surround sound effects.
HOME |
DVD |
MENU |
MENU |
SYSTEM |
TOP |
SETUP |
MENU |
|
ENTER |
SOUND |
RETURN |
MODE |
TESTTONE
02
Español Nederlands Italiano Français Deutsch English
 Note
Note
1If the source is Dolby Digital or DTS, the front panel 2 D or DTS indicator lights.
2• Note that the input source must be switched to DVD/CD for multichannel playback.
•If you’re planning on recording a multichannel source, refer to Recording mode on page 27.
3When listening in DOLBY DIGITAL/DTS mode, two-channel material will automatically be played in surround sound using Dolby Pro Logic II decoding.
13
En

02 Listening to your system
1Press SOUND MODE.
2Use / (cursor left/right) to select SFC
MODE then press ENTER.
3Press / (cursor up/down) then ENTER to select an SFC Sound Mode.
Select between OFF, ACTION, DRAMA,
ROCK, POP, HALL or LIVE.
Adjusting the bass and treble
Use the bass and treble controls to adjust the overall tone.
1Press SOUND MODE.
2Use / (cursor left/right) to select
BASS or TREBLE then press ENTER.
3Use / (cursor up/down) to adjust the sound then press ENTER to confirm.
Boosting the bass level
There are two bass modes you can use to enhance the bass in a source.
1Press SOUND MODE.
2Use / (cursor left/right) to select
BASSMODE then press ENTER.
3Use / (cursor up/down) to adjust the sound then press ENTER to confirm.
Select between OFF, MUSIC or CINEMA.
14
En

Playing discs
Chapter 3
Playing discs
 Important
•Many of the functions covered in this chapter apply to DVD discs, Video CDs/ Super VCDs, CDs, DivX video and WMA/ MP3/JPEG discs, although the exact operation of some varies slightly with the kind of disc loaded.
•Some DVDs restrict the use of some functions (random or repeat, for example) in some or all parts of the disc. This is not a malfunction.
•When playing Video CD/Super VCDs, some of the functions are not available during PBC playback. If you want to use them, start the disc playing using a number button to select a track.
1 |
During playback, press |
(pause). |
|
2 |
Press and hold |
or |
until slow |
motion playback starts. |
|
|
|
Press repeatedly to change the slow motion speed (shown on-screen).
• To resume playback, press (play).2
Frame advance/frame reverse
You can advance or back up DVD discs frame- by-frame. With Video CD/Super VCDs and DivX video you can only use frame advance.
1 |
During playback, press |
(pause). |
|
2 |
Press |
or |
to reverse or |
advance a frame at a time.
• To resume playback, press (play).2
Scanning discs
You can fast-scan discs forward or backward at various different speeds.1
• During playback, press |
or |
to start |
scanning. |
|
|
Press repeatedly to increase the scanning speed (shown on-screen).
• To resume playback, press (play).2
Playing a JPEG slideshow
After loading a CD/CD-R/RW containing JPEG pictures, press to start a slideshow from the
first folder/picture on the disc.3 The player displays the pictures in each folder in alphabetical order.
Pictures are automatically adjusted so that they fill as much of the screen as possible.
While the slideshow is running:
Playing in slow motion |
|
|
|
Button |
What it does |
|
|
You can play DVDs, Video CD/Super VCDs and |
|
|
|
|
Pauses the slideshow; press |
|
|
DivX video at four different forward slow |
|
|
|
|
again to restart. |
|
|
motion speeds. DVD discs can also be played |
|
|
|
|
|
|
|
in reverse slow motion. |
|
Displays the previous picture. |
|
|
|
|
|
|
|
|
|
 Note
Note
1Only one speed is available for DivX video discs.
2• Depending on the disc, normal playback may automatically resume when a new chapter is reached on a DVD disc.
•With Video CD/Super VCDs in PBC mode or a WMA/MP3 track, playback automatically resumes at the end or beginning of the track.
3The time it takes for the player to load a file increases with large file sizes.
03
Español Nederlands Italiano Français Deutsch English
15
En
 Loading...