


XW-BTS3-K/-W
WIRELESS SPEAKER SYSTEM Enceinte sans fil
Sistema de Altavoces Inalámbrico
Operating Instructions Mode d’emploi
Manual de instrucciones
IMPORTANT
CAUTION
RISK OF ELECTRIC SHOCK
DO NOT OPEN
The lightning flash with arrowhead symbol, within an equilateral triangle, is intended to alert the user to the presence of uninsulated “dangerous voltage” within the product’s enclosure that may be of sufficient magnitude to constitute a risk of electric shock to persons.
CAUTION:
TO PREVENT THE RISK OF ELECTRIC SHOCK, DO NOT REMOVE COVER (OR BACK). NO USER-SERVICEABLE PARTS INSIDE. REFER SERVICING TO QUALIFIED SERVICE PERSONNEL.
The exclamation point within an equilateral triangle is intended to alert the user to the presence of important operating and maintenance (servicing) instructions in the literature accompanying the appliance.
D3-4-2-1-1_A1_En
WARNING
This equipment is not waterproof. To prevent a fire or shock hazard, do not place any container filled with liquid near this equipment (such as a vase or flower pot) or expose it to dripping, splashing, rain or moisture.
D3-4-2-1-3_A1_En
WARNING
Before plugging in for the first time, read the following section carefully.
The voltage of the available power supply differs according to country or region. Be sure that the power supply voltage of the area where this unit will be used meets the required voltage (e.g., 230 V or 120 V) written on the AC adapter label.
D3-4-2-1-4*_A1_En
WARNING
To prevent a fire hazard, do not place any naked flame sources (such as a lighted candle) on the equipment.
D3-4-2-1-7a_A1_En
VENTILATION CAUTION
When installing this unit, make sure to leave space around the unit for ventilation to improve heat radiation (at least 15 cm at top, 10 cm at rear, and 10 cm at each side).
WARNING
Slots and openings in the cabinet are provided for ventilation to ensure reliable operation of the product, and to protect it from overheating. To prevent fire hazard, the openings should never be blocked or covered with items (such as newspapers, table-cloths, curtains) or by operating the equipment on thick carpet or a bed.
D3-4-2-1-7b*_A1_En
WARNING
Store small parts out of the reach of children and infants. If accidentally swallowed, contact a doctor immediately.
Operating Environment
Operating environment temperature and humidity: +5 °C to +35 °C (+41 °F to +95 °F); less than 85 %RH (cooling vents not blocked)
Do not install this unit in a poorly ventilated area, or in locations exposed to high humidity or direct sunlight (or strong artificial light)
D3-4-2-1-7c*_A1_En
If the AC plug of this unit does not match the AC outlet you want to use, the plug must be removed and appropriate one fitted. Replacement and mounting of
an AC plug on the power supply cord of this unit should be performed only by qualified service personnel.
If connected to an AC outlet, the cut-off plug can cause severe electrical shock. Make sure it is properly disposed of after removal.
The equipment should be disconnected by removing the mains plug from the wall socket when left unused for a long period of time (for example, when on vacation).
D3-4-2-2-1a_A1_En
CAUTION
The STANDBY/ON switch on this unit will not completely shut off all power from the AC outlet. Since the power plug serves as the main disconnect device for the unit, you will need to unplug it from the AC outlet to shut down all power. Therefore, make sure the unit has been installed so that the power plug can be easily unplugged from the AC outlet in case of an accident. To avoid fire hazard, the power plug should also be unplugged from the AC outlet when left unused for a long period of time (for example, when on vacation).
D3-4-2-2-2a*_A1_En
This product is for general household purposes. Any failure due to use for other than household purposes (such as long-term use for business purposes in a restaurant or use in a car or ship) and which requires repair will be charged for even during the warranty period.
K041_A1_En
2
POWER-CORD CAUTION
Handle the power cord by the plug. Do not pull out the plug by tugging the cord and never touch the power cord when your hands are wet as this could cause a short circuit or electric shock. Do not place the unit, a piece of furniture, etc., on the power cord, or pinch the cord. Never make a knot in the cord or tie it with other cords. The power cords should be routed such that they are not likely to be stepped on. A damaged power cord can cause a fire or give you an electrical shock. Check the power cord once in a while. When you find it damaged, ask your nearest PIONEER authorized service center or your dealer for a replacement.
S002*_A1_En
AC adapter CAUTION
•Make sure to grasp the body of the AC adapter when removing it from the power outlet. If you pull the power cord, it may become damaged which could lead to fire and/or electrocution.
•Do not attempt to plug in or remove the AC adapter with wet hands. This may result in electrocution.
•Do not insert the power cord of AC adapter into a power outlet where the connection remains loose despite inserting the prongs all the way into the outlet. Heat may be generated which could lead to fire. Consult with the retailer or an electrician regarding replacement of the power outlet.
Store the AC adapter out of the reach of children and
infants.
The AC adapter cord may accidentally wind around the neck and it may cause suffocation.
Radio wave caution
This unit uses a 2.4 GHz radio wave frequency, which is a band used by other wireless systems (Microwave ovens and Cordless phones, etc.). In this event noise appears in your television image, there is the possibility this unit (including products supported by this unit) is causing signal interference with the antenna input connector of your television, video, satellite tuner, etc. In this event,
increase the distance between the antenna input connector and this unit (including products supported by this unit).
•Pioneer is not responsible for any malfunction of the compatible Pioneer product due to communication error/malfunctions associated with your network connection and/or your connected equipment. Please contact your Internet service provider or network device manufacturer.
•A separate contract with/payment to an Internet service provider is required to use the Internet.
[For American Users]
WARNING
DO NOT INGEST BATTERY. CHEMICAL
BURN HAZARD.
The remote control supplied with this product contains a coin/button cell battery. If the coin/button cell battery is swallowed, it can cause severe internal burns in just 2 hours and can lead to death.
Keep new and used batteries away from children. If the battery compartment does not close securely, stop using the product and keep it away from children.
If you think batteries might have been swallowed or placed inside any part of the body, seek immediate medical attention.
D3-11-13-80_A1_En
Perchlorate Material – special handling may apply. See www.dtsc.ca.gov/hazardouswaste/perchlorate.
(Applicable to California, U.S.A.)
K059_A1_En
This device complies with part 15 of the FCC Rules. Operation is subject to the following two conditions: (1) This device may not cause harmful interference, and (2) this device must accept any interference received, including interference that may cause undesired operation.
English
FEDERAL COMMUNICATIONS COMMISSION DECLARATION OF CONFORMITY
This device complies with part 15 of the FCC Rules. Operation is subject to the following two conditions: (1) This device may not cause harmful interference, and (2) this device must accept any interference received, including interference that may cause undesired operation.
Product Name: WIRELESS SPEAKER SYSTEM Model Number: XW-BTS3-K, XW-BTS3-W
Responsible Party Name: PIONEER ELECTRONICS (USA) INC. SERVICE SUPPORT DIVISION
Address: 1925 E. DOMINGUEZ ST. LONG BEACH, CA 90810-1003, U.S.A. Phone: 1-800-421-1404
URL: http://www.pioneerelectronics.com
D8-10-4*_C1_En
3
[For American Users]
1)Read these instructions.
2)Keep these instructions.
3)Heed all warnings.
4)Follow all instructions.
5)Do not use this apparatus near water.
6)Clean only with dry cloth.
7)Do not block any ventilation openings. Install in accordance with the manufacturer’s instructions.
8)Do not install near any heat sources such as radiators, heat registers, stoves, or other apparatus (including amplifiers) that produce heat.
9)Do not defeat the safety purpose of the polarized or grounding-type plug. A polarized plug has two blades with one wider than the other. A grounding type plug has two blades and a third grounding prong. The wide blade or the third prong are provided for your safety. If the provided plug does not fit into your outlet, consult an electrician for replacement of the obsolete outlet.
10)Protect the power cord from being walked on or pinched particularly at plugs, convenience receptacles, and the point where they exit from the apparatus.
11)Only use attachments/accessories specified by the manufacturer.
12)Use only with the cart, stand, tripod, bracket, or table specified by the manufacturer, or sold with the apparatus. When a cart is used, use caution when moving the cart/apparatus combination to avoid injury from tip-over.
13)Unplug this apparatus during lightning storms or when unused for long periods of time.
14)Refer all servicing to qualified service personnel. Servicing is required when the apparatus has been damaged in any way, such as power-supply cord or plug is damaged, liquid has been spilled or objects have fallen into the apparatus, the apparatus has been exposed to rain or moisture, does not operate normally, or has been dropped.
D3-7-13-69_En
NOTE:
This equipment has been tested and found to comply with the limits for a Class B digital device, pursuant to Part 15 of the FCC Rules. These limits are designed to provide reasonable protection against harmful interference in a residential installation. This equipment generates, uses, and can radiate radio frequency energy and, if not installed and used
in accordance with the instructions, may cause harmful interference to radio communications. However, there is no guarantee that interference will not occur in a particular installation. If this equipment does cause harmful interference to radio or television reception, which can be determined by turning the equipment off and on, the user is encouraged to try to correct the interference by one or more of the following measures:
—Reorient or relocate the receiving antenna.
—Increase the separation between the equipment and receiver.
—Connect the equipment into an outlet on a circuit different from that to which the receiver is connected.
—Consult the dealer or an experienced radio/TV technician for help.
D8-10-1-2_A1_En
This equipment complies with FCC radiation exposure limits set forth for an uncontrolled environment and meets the FCC radio frequency (RF) Exposure Guidelines in Supplement C to OET65. This equipment has very low levels of RF energy that it deemed to comply without maximum permissive exposure evaluation (MPE). But it is desirable that it should be installed and operated keeping the radiator at least 20cm or more away from person’s body (excluding extremities: hands, wrists, feet and ankles).
CAUTION
Alterations or modifications carried out without appropriate authorization may invalidate the user’s right to operate the equipment.
D8-10-2_A1_En
WARNING: Handling the cord on this product or cords associated with accessories sold with the product may expose you to chemicals listed on proposition
65 known to the State of California and other governmental entities to cause cancer and birth defect or other reproductive harm.
Wash hands after handling.
D36-P5_B1_En
This transmitter must not be co-located or operated in conjunction with any other antenna or transmitter.
IMPORTANT NOTICE
THE MODEL NUMBER AND SERIAL NUMBER OF THIS EQUIPMENT ARE ON THE REAR OR BOTTOM. RECORD THESE NUMBERS ON YOUR ENCLOSED WARRANTY CARD AND KEEP IN A SAFE PLACE FOR FUTURE REFERENCE.
D36-AP9-1_A1_En
4
[For Canadian Users]
This Class B digital apparatus complies with Canadian ICES-003.
D8-10-1-3_A1_En
This device complies with Industry Canada licenceexempt RSS standard(s). Operation is subject to the following two conditions: (1) this device may not cause interference, and (2) this device must accept any interference, including interference that may cause undesired operation of the device.
This equipment complies with IC radiation exposure limits set forth for an uncontrolled environment and meets RSS-102 of the IC radio frequency (RF) Exposure rules. This equipment has very low levels of RF energy that it deemed to comply without
maximum permissive exposure evaluation (MPE). But it is desirable that it should be installed and operated keeping the radiator at least 20cm or more away from person’s body (excluding extremities: hands, wrists, feet and ankles).
[For American Users and Canadian Users]
The Safety of Your Ears is in Your Hands
Get the most out of your equipment by playing it at a safe level – a level that lets the sound come through clearly without annoying blaring or distortion and, most importantly, without affecting your sensitive hearing.
Sound can be deceiving. Over time, your hearing “comfort level” adapts to higher volumes of sound, so what sounds “normal” can actually be loud and harmful to your hearing. Guard against this by setting your equipment at a safe level BEFORE your hearing adapts.
ESTABLISH A SAFE LEVEL:
•Set your volume control at a low setting.
•Slowly increase the sound until you can hear it comfortably and clearly, without distortion.
•Once you have established a comfortable sound level, set the dial and leave it there.
BE SURE TO OBSERVE THE FOLLOWING GUIDELINES:
•Do not turn up the volume so high that you can’t hear what’s around you.
•Use caution or temporarily discontinue use in potentially hazardous situations.
•Do not use headphones while operating a motorized vehicle; the use of headphones may create a traffic hazard and is illegal in many areas.
S001a_A1_En
[For European Users]
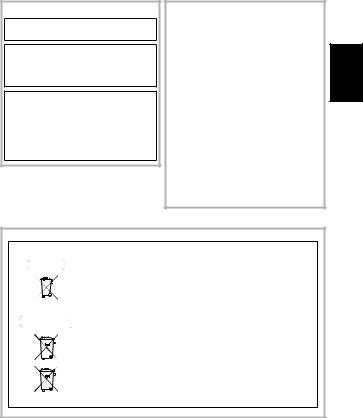
Information for users on collection and disposal of old equipment and used batteries
Symbol for |
These symbols on the products, packaging, and/or accompanying documents mean |
|||||
equipment |
that used electrical and electronic products and batteries should not be mixed with |
|||||
|
|
|
|
|
|
general household waste. |
|
|
|
|
|
|
For proper treatment, recovery and recycling of old products and used batteries, |
|
|
|
|
|
|
|
|
|
|
|
|
|
please take them to applicable collection points in accordance with your national |
|
|
|
|
|
|
legislation. |
|
|
|
|
|
|
By disposing of these products and batteries correctly, you will help to save valuable |
|
|
|
|
|
|
|
Symbol examples |
resources and prevent any potential negative effects on human health and the |
|||||
for batteries |
environment which could otherwise arise from inappropriate waste handling. |
|||||
|
|
|
|
|
|
For more information about collection and recycling of old products and batteries, |
|
|
|
|
|
|
please contact your local municipality, your waste disposal service or the point of sale |
|
|
|
|
|
|
where you purchased the items. |
|
|
|
|
|
|
These symbols are only valid in the European Union. |
|
|
|
|
|
|
For countries outside the European Union: |
|
|
|
|
|
|
If you wish to discard these items, please contact your local authorities or dealer and |
|
|
|
|
|
|
ask for the correct method of disposal. |
Pb
K058a_A1_En
English
5

[For American Users and Canadian Users]
Register your product at: http://www.pioneerelectronics.com (US) http://www.pioneerelectronics.ca (Canada)
•Protect your new investment
The details of your purchase will be on file for reference in the event of an insurance claim such as loss or theft.
•Receive free tips, updates and service bulletins on your new product
•Improve product development
Your input helps us continue to design products that meet your needs.
•Receive a free Pioneer newsletter
Registered customers can opt in to receive a monthly newsletter.
[For European Users]
Discover the benefits of registering your product online at http://www.pioneer.co.uk (or http://www.pioneer.eu).
6

Table Of Contents |
|
Before Start..................................................................................... |
8 |
Accessory Check Up |
|
Remote Control Check Up |
|
Connect DC Power |
|
Part names and functions ............................................................ |
10 |
Remote control |
|
Top Panel |
|
Back Panel |
|
Getting started.............................................................................. |
13 |
Turning on |
|
APS mode |
|
iPod/iPhone playback................................................................... |
14 |
Bluetooth Audio playback ........................................................... |
16 |
Other Connections........................................................................ |
20 |
Additional Information ................................................................ |
21 |
Troubleshooting |
|
Cautions on use |
|
About iPod/iPhone |
|
Specifications |
|
*There will not be additional notification in this booklet if there is/ or will be any design change to the product itself.
*Thank you for the purchase of Pioneer product, please read Operating Instructions before use for the 1st time for correct operation. Keep this Operating Instructions for your future reference.
English
7
Before Start
1. Accessory Check Up
Check the following items when opening the package:
•AC adapter × 1
•Remote control × 1
•Rubber foot × 4
•Warranty card × 1
•Operating Instructions (This Document)
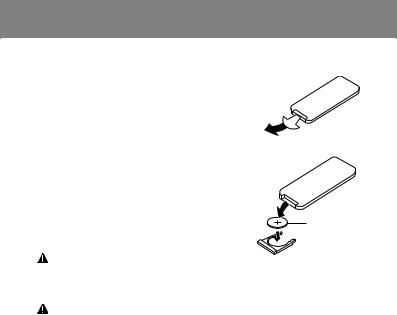
2. Remote Control Check Up
•Remove the insulation insert as shown in illustration (a) before 1st time use.
•To replace battery, open the battery drawer in the direction as shown in illustration (b).
WARNING
a
b
● CR2025,3V
•Do not use or store batteries in direct sunlight or other excessively hot place, such as inside a car or near a heater. This can cause batteries to leak, overheat, explode or catch fire. It can also reduce the life or performance of batteries.
CAUTION
•Do not use any batteries other than the ones specified.
•When loading the battery into the remote control, set it in the proper direction, as indicated by the polarity marks ( and ).
•Do not heat batteries, disassemble them, or throw them into flames or water.
•Batteries may have different voltages, even if they look similar.
•To prevent leakage of battery fluid, remove the battery if you do not plan to use the remote control for a long period of time (1 month or more). If the fluid should leak, wipe it carefully off the inside of the case, then insert new battery. If a battery should leak and the fluid should get on your skin, flush it off with large quantities of water.
•When disposing of used batteries, please comply with governmental regulations or environmental public institution’s rules that apply in your country / area.
•Danger of explosion if battery is incorrectly replaced. Replace only with the same or equivalent type recommended by the manufacturer.
•Dispose of used battery cells immediately after replacement. Keep away from children.
•If swallowed, please contact a doctor immediately.
•Lithium batteries may present a fire or chemical burn hazard if misused. Do not disassemble, heat above 100 °C, or incinerate.
8
Before Start
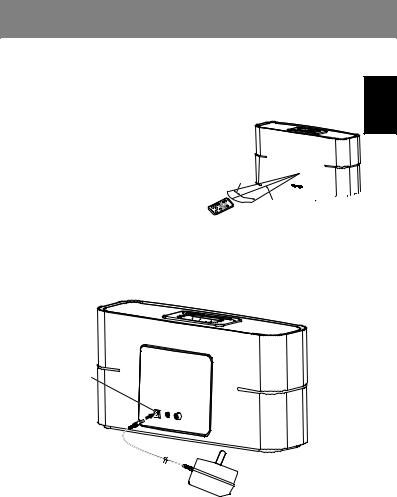
Using the remote control
The remote has a range of about 5 m (17 ft.) at an angle of about 30° from the remote sensor.
Keep in mind the following when using the remote control:
• Make sure that there are no obstacles between |
|
the remote and the remote sensor on the unit. |
|
• Remote operation may become unreliable if |
|
strong sunlight or fluorescent light is shining |
|
on the unit’s remote sensor. |
|
• Remote controllers for different devices can |
30° |
interfere with each other. Avoid using remotes |
|
for other equipment located close to this unit. |
|
• Replace the batteries when you notice a fall |
|
off in the operating range of the remote. |
|
30°


5 m (17 ft.)
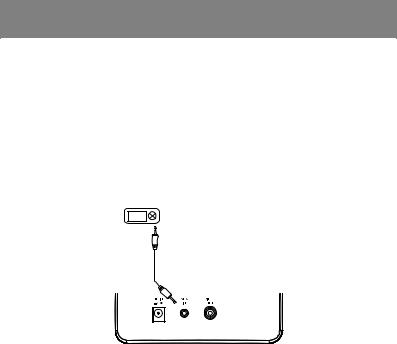
3. Connect DC Power
•Connect the AC adaptor’s DC plug to the DC IN jack on the back panel. Then connect the power plug on the other end to the power outlet.
•Use only the AC adapter included in this package, do not use the power adapter of different specification.
DC IN
English
9

Part names and functions
Remote control
1.STANDBY/ON
Switch between standby and on.
2.Shuffle
Random playback of music tracks.
3. Fast backward / Previous
• Press and hold to fast reverse of the current track.
•Skip backward to the beginning of the track or to the previous track.
4.MENU
Access iPod/iPhone menu.
5.VOL +
Increase the volume.
6.VOL –
Decrease the volume.
|
8 |
1 |
9 |
2 |
12 |
3 |
13 |
4 |
10 |
5 |
14 |
6 |
11 |
7 |
15 |
7.Mute
Silence the unit or restore the sound.
8.Up
Navigate up to select an item on iPod/iPhone menu screen.
9.ENTER
Confirm the selection on iPod/iPhone menu screen.
10.Down
Navigate down to select an item on iPod/iPhone menu screen.
11.Play / Pause
• Play/pause/resume playback.
PAIRING
•Press and hold to perform pairing with Bluetooth device
12.Repeat
Repeat one or repeat all
13.Forward / Next
•Press and hold to fast forward of the current track.
•Skip forward to the next track.
14.iPod Bluetooth
Switch to iPod Bluetooth mode.
15.AUX
Switch to AUX mode.
10
Part names and functions
Top Panel
English
7
6
1 |
2 |
3 |
4 |
5 |
1.MODE Indicator
•Light up Indicate green when the unit is in iPod Bluetooth mode.
•Light up Indicate orange when the unit is in AUX mode.
•In the standby mode, light up Indicate red for 3 seconds when APS*1 is OFF.
•In the standby mode, light up Indicate green for 3 seconds when APS is ON.
2.STANDBY/ON
•Switch between standby and on. Press and hold to go into standby.
INPUT
•Switch the mode of iPod Bluetooth and AUX.
3.Play / Pause
•Play/pause/resume playback.
PAIRING
•Press and hold to perform pairing with
Bluetooth device.
4.Mute
•Silence the unit or restore the sound.
Blink MODE Indicator during Mute.
•In the standby mode, press and hold to switch between APS on and off.
5.VOL + / -
•Adjust the listening volume.
The listening volume has a range from 0 to 30 (however, the unit is not equipped with a display to visually indicate the volume level). (Default setting: 10)
6.Bluetooth Indicator
•Light up Indicate blue when Bluetooth device is connected.
•Blink during waiting for Bluetooth connection.
•Blink quickly for Bluetooth pairing.
7.Dock for iPod/iPhone
Connect to the iPod/iPhone.
*1 Refer to page13 for APS.
11
Part names and functions
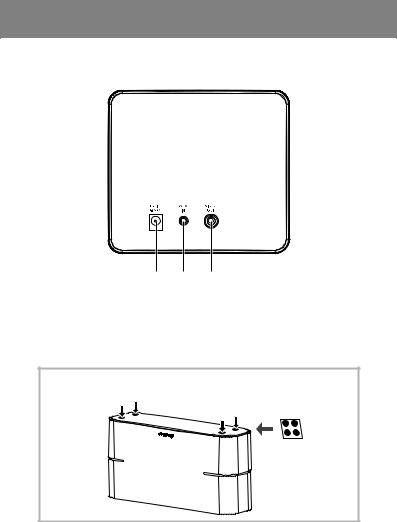
Back Panel
1 2 3
1.DC IN Jack
Connect the AC adapter.
2.AUX IN Jack
Connect auxiliary components.
3.VIDEO OUT Jack
Attaching Rubber feet
Apply the accessory rubber feet to the bottom surface of the unit.
12

Getting started
Turning on
Press  [STANDBY/ON] button. The indicator would light.
This unit switches to the last select mode.
APS mode
•After this unit is kept inactive for 20 minutes, it automatically switches to the standby mode.
•When 5 minutes before switching to the standby mode automatically, the indicator starts to blink.
How to turn off the APS mode
•Press and hold  [Mute] button to turn off the APS mode in the standby mode and the indicator lights red for about 3 seconds.
•If the APS mode is turned on again, Press and hold  [Mute] button in the standby mode and the indicator lights green for about 3 seconds.
 Note
Note
•When you play at low volume, this unit might switch to the standby mode automatically. Please increase the volume, or turn off the APS mode.
English
13

iPod/iPhone playback
Merely by connecting your iPod/iPhone to this unit, you can enjoy high-quality sound from your iPod/iPhone. This unit can also be connected to a television set, letting you view images from your iPod/iPhone.
Playback and volume level setting for iPod/iPhone music and images can be performed from this unit or the iPod/iPhone itself.
Confirming what iPod/iPhone models are supported
The iPod/iPhone playable on this unit are shown below.*1
iPod/iPhone |
Audio |
Control |
Video |
iPhone 4/4S |
|
|
|
iPhone 3G/3GS |
|
|
|
iPod touch 2/3/4G |
|
|
|
iPod nano 3/4/5/6G |
|
|
*2 |
iPod classic |
|
|
|
*2 The iPod nano 6G cannot play back video, but can play slide shows only.
•This system has been developed and tested for the software version of iPod/iPhone indicated on the website of Pioneer.
(http://pioneer.jp/homeav/support/ios/na/)
(http://pioneer.jp/homeav/support/ios/eu/)
•Installing software versions other than the ones indicated on the website of Pioneer to your iPod/iPhone may result in incompatibility with this system.
•When using an iPod/iPhone not supported by this unit, use a commercially available cable to connect the iPod/iPhone to the AUX IN jack of this unit.
 Note
Note
*1 • Pioneer does not guarantee that this unit plays iPod/iPhone models other than the ones specified.
•Some functions may be restricted depending on the model or software version.
•iPod/iPhone is licensed for reproduction of non-copyrighted materials or materials the user is legally permitted to reproduce.
•Features such as the equalizer cannot be controlled using this unit, and we recommend switching the equalizer off before connecting.
•Pioneer cannot under any circumstances accept responsibility for any direct or indirect loss arising from any inconvenience or loss of recorded material resulting from iPod/iPhone failure.
•For detailed instructions on using the iPod/iPhone, please refer to the manual supplied with the iPod/iPhone.
14

iPod/iPhone playback
CAUTION
•When your iPod/iPhone is connected to this unit and you wish to operate the iPod/ iPhone directly, be sure to hold the iPod/iPhone steady with the other hand to prevent malfunctions due to faulty contacts.
•An iPod/iPhone universal dock adapter is not supplied with this unit.
1.Connect your iPod/iPhone to the dock.
2.To play an iPod/iPhone, press  [iPod] button on the remote control. (Mode indicator : green)
3.This unit plays your iPod/iPhone automatically. If you cannot hear any sound after 20 seconds, reconnect your iPod/iPhone to the dock. (Before you connect your iPod/iPhone to the dock, make sure you are not playing a video.)
4.You can browse and control your iPod/iPhone with the dedicated iPod control keys under the grey circle area of the remote control.
Connecting your TV
To watch iPod/iPhone images on a television, connect it using a composite video cable.
Charging
iPod/iPhone recharging occurs whenever an iPod/iPhone is connected to this unit. (This function is supported in the standby mode as well. When iPod/iPhone is charging in the standby mode, the Green indicator blinks.)
important
If this unit cannot play your iPod/iPhone, perform the following troubleshooting checks:
•Check whether the iPod/iPhone is supported by this unit.
•Reconnect the iPod/iPhone to the unit. If this doesn’t seem to work, try resetting your iPod/iPhone.
•Check the iPod/iPhone software is supported by this unit.
English
15
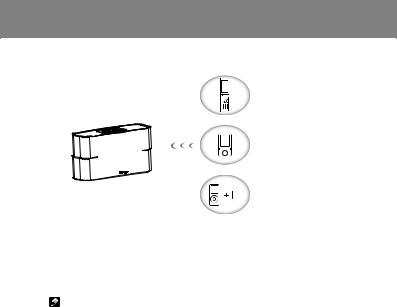
Bluetooth Audio playback
Bluetooth wireless technology enabled device:
Cell phone
Bluetooth wireless technology enabled device:
Digital music player
Device not equipped with Bluetooth wireless technology:
Digital music player
+
Bluetooth audio transmitter (commercially available)
This product enables you to enjoy listening to music wirelessly from a Bluetooth wireless technology enabled device (cell phone, digital music player, etc.).*1 You can also enjoy music from a non-Bluetooth wireless technology enabled device using a Bluetooth audio transmitter available in stores. For details, refer to the user manual for the Bluetooth wireless technology enabled device.
Note
*1 • The Bluetooth wireless technology enabled device must support A2DP profiles.
•Pioneer does not guarantee proper connection and operation of this unit with all Bluetooth wireless technology enabled devices.
•The Bluetooth® word mark and logos are registered trademarks owned by Bluetooth SIG, Inc. and any use of such marks by PIONEER CORPORATION is under license. Other trademarks and trade names are those of their respective owners.
Pairing this unit and Bluetooth wireless technology device
To enjoy music from a Bluetooth wireless technology enabled device, pairing is required with this product. Make sure to perform pairing first time you operate the system or any time pairing data is cleared.
“Pairing” is the step necessary to register Bluetooth wireless technology device to enable Bluetooth communications. For more details, see also the operating instructions of your Bluetooth wireless technology device.
•Pairing is required when you first use Bluetooth wireless technology device and this unit.
•To enable Bluetooth communication, pairing should be done with both of your system and Bluetooth wireless technology device.
16

|
Bluetooth Audio playback |
|
|
|
|
|
|
1. |
Press [Bluetooth] button on the remote control. (Mode indicator : |
|
|
English |
|||
|
green) |
||
|
|
||
2. |
Make sure the dock is empty. |
|
|
3. |
Press and hold [PAIRING] button until you hear 2 consecutive |
|
|
|
“beep” sounds. Then, the blue indicator on the top panel blinks |
|
|
|
|
||
|
quickly and the unit will enter the pairing mode. |
|
|
4. |
Switch on the Bluetooth wireless technology device that you want |
|
|
|
to perform pairing with, place the device within 1 m (3.2 ft.) of the |
|
system, and set it to the pairing mode.
Pairing begins.
•In case of entering PIN code, use “0000”.
( Only “0000” works for PIN code in this product. )
5.When Bluetooth wireless technology device is connected, the blue indicator on the top panel will change from blinking to lit.
6.Start playback of music contents stored in Bluetooth wireless technology device.
Connect the Latest Paired Bluetooth wireless technology Device
When the unit is switch on again to Bluetooth mode next time, it will be connected automatically with equipment that has the latest connected device already.
Connect previous Paired Bluetooth Device
1.If you want to connect other paired device instead of the latest paired one, please make sure the Bluetooth connection of the latest device dis-connect. Then, the blue indicator on the top panel blinks
slowly and the unit will change the waiting for connection mode.
*Alternatively, there is also a way to switch the unit in pairing mode.
2.Switch on other paired device, and select this unit from this device
Bluetooth list.
3.Connection with other devices is successful, the blue indicator will
change from blinking to lit.
•Operating range of Bluetooth audio is up to 10 m (32 ft.). (Measured in open space. Walls and structures may affect range of device.)
17

Bluetooth Audio playback
Radio wave caution
This unit uses a 2.4 GHz radio wave frequency, which is a band used by other wireless systems (see list below). To prevent noise or interrupted communication, do not use this unit nearby such devices, or make sure these devices are switched off during use.
•Cordless phones
•Cordless facsimiles
•Microwave ovens
•Wireless LAN devices
•Wireless AV equipment
•Wireless controllers for game systems
•Microwave-based health aids
•Some baby monitors
Other, less common, equipment that may operate on the same frequency:
•Anti-theft systems
•Amateur radio stations (HAM)
•Warehouse logistic management systems
•Discrimination systems for train or emergency vehicles
 Note
Note
•In the event noise appears in your television image, there is the possibility that a Bluetooth wireless technology enabled device or this unit (including products supported by this unit) are causing signal interference with the antenna input connector of your television, video, satellite tuner, etc. In this event, increase the distance between the antenna input connector and the Bluetooth wireless technology enabled device or this unit (including products supported by this unit).
•If there is something obstructing the path between this unit (including devices supported by this unit) and the device equipped with Bluetooth wireless technology (such as a metal door, concrete wall, or insulation containing tinfoil), you may need to change the location of your system to prevent signal noise and interruptions.
18

Bluetooth Audio playback
Scope of operation
Use of this unit is limited to home use. (Transmission distances may be reduced depending on communication environment).
In the following locations, poor condition or inability to receive radio waves may cause the audio to be interrupted or stopped:
•In reinforced concrete buildings or steel framed or ironframed buildings.
•Near large metallic furniture.
•In a crowd of people or near a building or obstacle.
•In a location exposed to the magnetic field, static electricity or radio wave interference from radio communication equipment using the same frequency band (2.4 GHz) as this unit, such as a 2.4 GHz wireless LAN device or microwave oven.
•If you live in a heavily populated residential area(apartment, townhouse, etc.) and if your neighbor’s microwave is placed near your system, you may experience radio wave
interference. If this occurs, move your unit to a different place. When the microwave is not in use, there will be no radio wave interference.
Radio wave reflections
The radio waves received by this unit include the radio wave coming directly from the device equipped with Bluetooth wireless technology (direct wave) and waves coming from various directions due to reflections by walls, furniture and building (reflected waves). The reflected waves (due to obstacles and reflecting objects) further produce a variety of reflected waves as well as variation in reception condition depending on locations. If the audio cannot be received properly due to this phenomenon, try moving the location of the device equipped with Bluetooth wireless technology a little. Also note that audio may be interrupted due to the reflected waves when a person crosses or approaches the space between this unit and the device equipped with Bluetooth wireless technology.
English
19
Other Connections
•Before making or changing the connections, switch off the power and disconnect the power plug from the power outlet.
•When playing music through AUX mode, the music volume will vary depending on the volume of the music player. If there is distortion when the volume is set at max, lower the music player’s volume and to avoid distortion.
1. Connecting auxiliary components
Connect the back panel AUX IN jack to your auxiliary playback component.
•This method can be used to play music on this unit from iPod/iPhone that do not support use of the dock.
Digital audio player, etc.
Stereo mini-plug cable (commercially available)
This unit’s back panel
2.Press  [AUX] button on the remote control. (Mode indicator : orange)
3.Start playback of the auxiliary component.
20
Additional Information
Troubleshooting
WARNING
• Never remove the casing of this apparatus.
Incorrect operation is often mistaken for trouble or malfunction. If you think that there is something wrong with this component, check the points below. Sometimes the trouble may lie in another component. Inspect the other components and electrical appliances being used. If the trouble cannot be rectified even after checking the points below, ask your nearest Pioneer authorized service center or your dealer to carry out repair work.
•If the unit does not operate normally due to external effects such as static electricity, disconnect the power plug from the outlet and insert it again to return to normal operating conditions.
Problem |
Remedy |
The power does not turn on. |
• Disconnect the power plug from the outlet, and |
|
insert again. |
Power automatically switches |
• When no device is connected to the selected |
to standby without user action. |
the dock or the AUX IN jack and this unit is not |
|
operated for 20 minutes or more after the respective |
|
mode is selected, power will automatically turn |
|
OFF. (Only when APS mode (page13) is ON.) |
|
|
No sound is output when a |
• Make sure the component is connected correctly. |
mode is selected. |
|
Can’t operate the remote |
• Replace the battery. |
control. |
• Operate within 5 m, 30° of the remote sensor on the |
|
front panel. |
|
• Remove the obstacle or operate from another |
|
position. |
|
• Avoid exposing the remote sensor on the front to |
|
direct light. |
Can’t operate the iPod/iPhone. |
• Make sure the iPod/iPhone is connected correctly. |
|
• If the iPod/iPhone is experiencing a hangup, try |
|
resetting the iPod/iPhone, and reconnect it to the |
|
unit. |
English
21

Additional Information
Problem |
Remedy |
The Bluetooth wireless technology device cannot be connected or operated. Sound from the Bluetooth wireless technology device is not emitted or the sound is interrupted.
•Check that no object that emits electromagnetic waves in the 2.4 GHz band (microwave oven, wireless LAN device or Bluetooth wireless technology apparatus) is near the unit. If such an object is near the unit, set the unit far from it. Or, stop using the object emitting the electromagnetic waves.
•Check that the Bluetooth wireless technology device is not too far from the unit and that obstructions are not set between the Bluetooth wireless technology device and the unit. Set the Bluetooth wireless technology device and the unit so that the distance between them is less than about 10 m* and no obstructions exist between them.
•The Bluetooth wireless technology device may not be set to the communication mode supporting the Bluetooth wireless technology.
Check the setting of the Bluetooth wireless technology device.
•Check that pairing is correct. The pairing setting was deleted from this unit or the Bluetooth wireless technology device. Reset the pairing.
•Check that the profile is correct. Use a Bluetooth wireless technology device that supports A2DP profile.
*The line-of-sight transmission distance is an estimate. Actual transmission distances supported may differ depending on surrounding conditions.
22
 Loading...