


DVD/CD Receiver
XV-DV525
Speaker System
S-DV525
Digital Wireless Speaker System
XW-DV525 XW-DV1WS
Operating Instructions

Location: underside of the unit (XV-DV525) / rear of the unit (XW-DV525/XW-DV1WS)
IMPORTANT
CAUTION
RISK OF ELECTRIC SHOCK
DO NOT OPEN
The lightning flash with arrowhead, within an equilateral triangle, is intended to alert the user to the presence of uninsulated "dangerous voltage" within the product's enclosure that may be of sufficient magnitude to constitute a risk of electric shock to persons.
CAUTION:
TO PREVENT THE RISK OF ELECTRIC SHOCK, DO NOT REMOVE COVER (OR BACK). NO USER-SERVICEABLE PARTS INSIDE. REFER SERVICING TO QUALIFIED SERVICE PERSONNEL.
The exclamation point within an equilateral triangle is intended to alert the user to the presence of important operating and maintenance (servicing) instructions in the literature accompanying the appliance.
D3-4-2-1-1_En
Replacement and mounting of an AC plug on the power supply cord of this unit should be performed only by qualified service personnel.
IMPORTANT |
The cut-off plug should be disposed of and must |
Do not connect either wire to the earth terminal of a |
||
not be inserted into any 13 amp socket as this can |
three pin plug. |
|||
result in electric shock. The plug or adaptor or the |
NOTE |
|||
FOR USE IN THE UNITED |
distribution panel should be provided with 5 A fuse. |
|||
As the colours of the wires in the mains lead of this |
After replacing or changing a fuse, the fuse cover in |
|||
KINGDOM |
||||
appliance may not correspond with coloured |
the plug must be replaced with a fuse cover which |
|||
The wires in this mains lead are coloured in |
markings identifying the terminals in your plug, |
corresponds to the colour of the insert in the base |
||
accordance with the following code: |
proceed as follows ; |
of the plug or the word that is embossed on the |
||
Blue |
: Neutral |
The wire which is coloured blue must be connected |
base of the plug, and the appliance must not be |
|
Brown |
: Live |
to the terminal which is marked with the letter N or |
used without a fuse cover. If lost replacement fuse |
|
If the plug provided is unsuitable for your socket |
coloured black. |
covers can be obtained from your dealer. |
||
outlets, the plug must be cut off and a suitable plug |
The wire which is coloured brown must be |
Only 5 A fuses approved by B.S.I or A.S.T.A to |
||
fitted. |
|
connected to the terminal which is marked with the |
B.S.1362 should be used. |
|
|
|
letter L or coloured red. |
D3-4-2-1-2-2_En |
|
WARNING: The apparatus is not waterproofs, to prevent fire or shocks hazard, do not expose this apparatus to rain or moisture and do not put any water source near this apparatus, such as vase, flower pot, cosmetics container and medicine bottle etc.
WARNING:
BEFORE PLUGGING IN THE UNIT FOR THE FIRST TIME, READ THE FOLLOWING SECTION CAREFULLY. The voltage of the available power supply differs according to country or region. Be sure that the power supply voltage of the area where this unit will be used meets the required voltage (e.g., 230V or 120V) written on the rear panel.
WARNING: No naked flame sources, such as lighted candle, should be placed on the apparatus. If naked flame sources accidentally fall down, fire spread over the apparatus then may cause fire.
[XV-DV525 only] VENTILATION:
European, UK, Australian, New Zealand, Hong Kong and Taiwanese models:
When installing this unit, make sure to leave space around the unit for ventilation to improve heat radiation (at least 10 cm at top, 10 cm at rear, and 10 cm at each side).
All other models:
When installing this unit, make sure to leave space around the unit for ventilation to improve heat radiation (at least 20 cm at top, 15 cm at rear, and 15 cm at each side).
[XW-DV525/XW-DV1WS only] VENTILATION:
When installing this unit, make sure to leave space around the unit for ventilation to improve heat radiation (at least 10 cm at top, 10 cm at rear, and 10 cm at each side).
D3-4-2-1-7a_En
CAUTION
These speaker terminals can be under HAZARDOUS VOLTAGE. When you connect or disconnect the speaker cables, to prevent the risk of electric shock, do not touch uninsulated parts before disconnecting the power cord.
WARNING: Slot and openings in the cabinet are provided for ventilation and to ensure reliable operation of the product and to protect it from overheating, to prevent fire hazard, the openings should never be blocked and covered with items, such as newspapers, table-cloths, curtains, etc. Also do not put the apparatus on the thick carpet, bed, sofa, or fabric having a thick pile.
[Excluding XW-DV525/XW-DV1WS]
CAUTION
This product contains a laser diode of higher class than 1. To ensure continued safety, do not remove any covers or attempt to gain access to the inside of the product.
Refer all servicing to qualified personnel.
The following caution label appears on your unit.
CLASS 1
LASER PRODUCT
D3-4-2-1-8_En
CAUTION : USE OF CONTROLS OR ADJUSTMENTS OR PERFORMANCE OF PROCEDURES OTHER THAN THOSE SPECIFIED HEREIN MAY RESULT IN HAZARDOUS RADIATION EXPOSURE.
CAUTION : THE USE OF OPTICAL INSTRUMENTS WITH THIS PRODUCT WILL INCREASE EYE HAZARD. D6-8-2-1_En
The channel, fr equency, output power , and other featur es and functions of the equipment shall not be changed after appr oval.
The equipment shall safely use only a channel fr equency that is legally appr oved and shall not cause inter ference on other channels. If the equipment fails to meet these r equirements, use of the equipment will be pr ohibited until compliance can be attained.
[Excluding XW-DV525/XW-DV1WS]
This product complies with the Low Voltage Directive (73/23/EEC, amended by 93/68/EEC), EMC Directives (89/336/EEC, amended by 92/31/EEC and 93/68/EEC).
Operating Environment
Operating environment temperature and humidity: +5 ºC – +35 ºC (+41 ºF – +95 ºF); less than 85 %RH (cooling vents not blocked)
Do not install in the following locations
•Location exposed to direct sunlight or strong artificial light
•Location exposed to high humidity, or poorly
ventilated location
[XV-DV525 only]
[XW-DV525/XW-DV1WS only]
CAUTION
The POWER switch does not completely separates the unit from the MAINS in off position. Therefore install the unit suitable places easy to disconnect the MAINS plug in case of the accident. The MAINS plug of unit should be unplugged from the wall socket when left unused for a long period of time.
D3-4-2-2-2b_En
Energy-saving design
This system is designed to use 0.5W of electricity when power is switched to standby.
[For XV-DV525 only]
For U.S. and Australia Model
The STANDBY/ON switch is secondary connected and therefore, does not separate the unit from mains power in STANDBY position. Therefore install the unit suitable places easy to disconnect the MAINS plug in case of the accident. The MAINS plug of unit should be unplugged from the wall socket when left unused for a long period of time.
C67-7-3_En

[ XW-DV525 only ]
Declaration of Conformity with regard to the R&TTE Directive 1999/5/EC
Manufacturer: |
Pioneer Corporation |
|
|
|
|
4-1, 1-chome, Meguro, Meguro-ku |
|
|
|
153-8654 TOKYO, JAPAN |
|
EU Representative’s: |
Pioneer Europe NV |
|
|
|
|
Haven 1087, Keetberglaan 1, |
|
|
|
9120 MELSELE, BELGIUM |
|
|
|
||
English |
Hereby, Pioneer, declares that this Digital Wireless Speaker System XW-DV525 is in |
||
|
compliance with the essential requirements and other relevant provisions of Directive 1999/ |
||
|
5/EC. |
|
|
|
|
||
Suomi |
Pioneer vakuuttaa täten että Digital Wireless Speaker System XW-DV525 tyyppinen laite on |
||
|
direktiivin 1999/5/EY oleellisten vaatimusten ja sitä koskevien direktiivin muiden ehtojen |
||
|
mukainen. |
|
|
|
|
||
Nederlands |
Hierbij verklaart Pioneer dat het toestel Digital Wireless Speaker System XW-DV525 in |
||
|
overeenstemming is met de essentiële eisen en de andere relevante bepalingen van richtlijn |
||
|
1999/5/EG. |
|
|
|
|
||
Français |
Par la présente Pioneer déclare que l'appareil Digital Wireless Speaker System XW-DV525 |
||
|
est conforme aux exigences essentielles et aux autres dispositions pertinentes de la directive |
||
|
1999/5/CE. |
|
|
|
|
||
Svenska |
Härmed intygar Pioneer att denna Digital Wireless Speaker System XW-DV525 står I |
||
|
överensstämmelse med de väsentliga egenskapskrav och övriga relevanta bestämmelser som |
||
|
framgår av direktiv 1999/5/EG. |
|
|
|
|
||
Dansk |
Undertegnede Pioneer erklærer herved, at følgende udstyr Digital Wireless Speaker System |
||
|
XW-DV525 overholder de væsentlige krav og øvrige relevante krav i direktiv 1999/5/EF. |
||
|
|
||
Deutsch |
Hiermit erklärt Pioneer, dass sich dieses Digital Wireless Speaker System XW-DV525 in |
||
|
Übereinstimmung mit den grundlegenden Anforderungen und den anderen relevanten |
||
|
Vorschriften der Richtlinie 1999/5/EG befindet". (BMWi) |
||
|
|
|
|
Ellinika |
ΜΕ ΤΗΝ ΠΑΡ |
ΥΣΑ Pioneer ∆ΗΛΩΝΕΙ |
ΤΙ Digital Wireless Speaker System XW- |
|
DV525 ΣΥΜΜ |
ΡΦΩΝΕΤΑΙ ΠΡ Σ ΤΙΣ |
ΥΣΙΩ∆ΕΙΣ ΑΠΑΙΤΗΣΕΙΣ ΚΑΙ ΤΙΣ |
|
Λ ΙΠΕΣ Σ ΕΤΙΚΕΣ ∆ΙΑΤΑ ΕΙΣ ΤΗΣ |
∆ΗΓΙΑΣ 1999/5/EK. |
|
|
|
||
Italiano |
Con la presente Pioneer dichiara che questo Digital Wireless Speaker System XW-DV525 è |
||
|
conforme ai requisiti essenziali ed alle altre disposizioni pertinenti stabilite dalla direttiva |
||
|
1999/5/CE. |
|
|
|
|
||
Español |
Por medio de la presente Pioneer declara que el Digital Wireless Speaker System XW- |
||
|
DV525 cumple con los requisitos esenciales y cualesquiera otras disposiciones aplicables o |
||
|
exigibles de la Directiva 1999/5/CE. |
|
|
|
|
||
Português |
Pioneer declara que este Digital Wireless Speaker System XW-DV525 está conforme com os |
||
|
requisitos essenciais e outras disposições da Directiva 1999/5/CE. |
||
|
|
|
|

Thank you for buying this Pioneer product.
Please read through these operating instructions so that you will know how to operate your model properly. After you have finished reading the instructions, put them in a safe place for future reference.
Contents
01 Before you start
Features . . . . . . . . . . . . . . . . . . . . . . . . . . . 8
Disc / content format playback
compatibility . . . . . . . . . . . . . . . . . . . . . . . 8
CD-R/RW compatibility . . . . . . . . . . . . . . 8 DVD-R/RW compatibility . . . . . . . . . . . . . 9 PC-created disc compatibility . . . . . . . . . 9 Compressed audio compatibility . . . . . . . 9
About WMA . . . . . . . . . . . . . . . . . . . . . . . 9
JPEG file compatibility . . . . . . . . . . . . . . . 9
02 Controls and displays
Front panel. . . . . . . . . . . . . . . . . . . . . . . . 10 Display . . . . . . . . . . . . . . . . . . . . . . . . . . . 11 Remote control . . . . . . . . . . . . . . . . . . . . 12 Transmitter. . . . . . . . . . . . . . . . . . . . . . . . 16 Wireless speaker . . . . . . . . . . . . . . . . . . . 16
04 Listening to your system
About the listening modes. . . . . . . . . . . . .29
Auto listening mode . . . . . . . . . . . . . . . . .29
Listening in surround sound . . . . . . . . . . .30 Dolby Pro Logic II Music settings . . . . . .30 Using the Advanced Surround effects . . . .31 Using Front Surround . . . . . . . . . . . . . . . .31
Adjusting the Advanced and Front Surround effect level . . . . . . . . . . . . . . . .32
Listening in stereo . . . . . . . . . . . . . . . . . . .32
Listening with headphones . . . . . . . . . . . .32
Enhancing dialogue. . . . . . . . . . . . . . . . . .33
Listening with a virtual surround back speaker . . . . . . . . . . . . . . . . . . . . . . . . . . .33
Using Quiet and Midnight listening
modes . . . . . . . . . . . . . . . . . . . . . . . . . . . .33
Adjusting the bass and treble . . . . . . . . . .34 Boosting the bass level . . . . . . . . . . . . . . .34
03 Getting started
Switching on and setting up. . . . . . . . . . . 18
Setting the clock . . . . . . . . . . . . . . . . . . 19
Home theater sound setup. . . . . . . . . . . . 20 Using the Room Setup . . . . . . . . . . . . . . . 20 Setting up the remote to control your TV . 21 Using the on-screen displays . . . . . . . . . . 21
Playing discs . . . . . . . . . . . . . . . . . . . . . . 22
Basic playback controls . . . . . . . . . . . . . 22 Resume and Last Memory . . . . . . . . . . . 23 DVD-Video disc menus . . . . . . . . . . . . . 24 Video CD/Super VCD PBC menus . . . . . 25 Listening to the radio . . . . . . . . . . . . . . . . 25 Improving poor FM reception. . . . . . . . . 26 Memorizing stations . . . . . . . . . . . . . . . 26 Listening to station presets . . . . . . . . . . 27 Listening to other sources . . . . . . . . . . . . 27 Using the wireless speaker system. . . . . . 27
05 Playing discs
Scanning discs . . . . . . . . . . . . . . . . . . . . .35
Playing in slow motion. . . . . . . . . . . . . . . .35 Frame advance/frame reverse . . . . . . . . . .35 Using the Disc Navigator to browse the contents of a disc . . . . . . . . . . . . . . . . . . .36
Looping a section of a disc . . . . . . . . . . . .37
Using repeat play. . . . . . . . . . . . . . . . . . . .37 Using random play . . . . . . . . . . . . . . . . . .38
Creating a program list . . . . . . . . . . . . . . .39
Using the OSD . . . . . . . . . . . . . . . . . . . .39
Other functions available from the program menu . . . . . . . . . . . . . . . . . . . .39
Using the front panel display. . . . . . . . . .40 Clearing the program list. . . . . . . . . . . . .40
Searching a disc . . . . . . . . . . . . . . . . . . . .40 Switching subtitles . . . . . . . . . . . . . . . . . .41
Switching the DVD audio language . . . . . .41
Español Nederlands Italiano Français Deutsch English
5
En

Switching the Video CD/Super VCD
audio channel . . . . . . . . . . . . . . . . . . . . . .41 Zooming the screen. . . . . . . . . . . . . . . . . .42
Switching camera angles . . . . . . . . . . . . .42 Displaying disc information . . . . . . . . . . . .42 OSD disc information . . . . . . . . . . . . . . .42 Front panel display information . . . . . . . .42
06 Viewing JPEG discs
Playing a JPEG slideshow . . . . . . . . . . . . .44 Using the JPEG Disc Navigator and
Photo Browser . . . . . . . . . . . . . . . . . . . . . .44 Zooming the screen. . . . . . . . . . . . . . . . . .45
07 More tuner features: RDS
An introduction to RDS . . . . . . . . . . . . . . .46 Displaying RDS information . . . . . . . . . .47 Searching for RDS programs . . . . . . . . .47
08 Using the timer
Setting the wake-up timer . . . . . . . . . . . . .48 Turning the wake-up timer on/off. . . . . . .48 Setting the sleep timer. . . . . . . . . . . . . . . .49
09 Surround sound and other settings
Using the System Setup menu . . . . . . . . .50 Surround and sound setup options . . . . .50 SR+ control options for Pioneer plasma displays . . . . . . . . . . . . . . . . . . . . . . . . . .51
Setting the channel levels . . . . . . . . . . . . .52
10 Video Adjust menu
Video Adjust . . . . . . . . . . . . . . . . . . . . . . .54
Creating your own presets. . . . . . . . . . . .54
11 Initial Settings menu
Using the Initial Settings menu . . . . . . . . .55 Video Output settings . . . . . . . . . . . . . . . .55
Language settings . . . . . . . . . . . . . . . . . . .56 Display settings . . . . . . . . . . . . . . . . . . . . .57 Options . . . . . . . . . . . . . . . . . . . . . . . . . . .57 Parental Lock . . . . . . . . . . . . . . . . . . . . .57
12 Other connections
Connecting external antennas. . . . . . . . . . 59 Connecting auxiliary components . . . . . . . 59
Recording mode . . . . . . . . . . . . . . . . . . . 60
Connecting using the S-video output. . . . . 61 Connecting using the component video output . . . . . . . . . . . . . . . . . . . . . . . . . . . . 61
About progressive scan video . . . . . . . . . 61 Using the SCART AV output . . . . . . . . . . . 62
Switching the TV audio input from
SCART to RCA . . . . . . . . . . . . . . . . . . . . 63
Using this unit with a Pioneer plasma display. . . . . . . . . . . . . . . . . . . . . . . . . . . . 63
Using the SR+ mode with a Pioneer plasma display . . . . . . . . . . . . . . . . . . . . 64
13 Additional information
Optional system settings . . . . . . . . . . . . . . 65 System Setup menu options in
standby . . . . . . . . . . . . . . . . . . . . . . . . . . 65
Watching NTSC on a PAL TV
(MOD. PAL) . . . . . . . . . . . . . . . . . . . . . . . . 66 Resetting the system. . . . . . . . . . . . . . . . . 66
Using and taking care of discs . . . . . . . . . 67 Titles, chapters and tracks . . . . . . . . . . . 67
DVD Video regions . . . . . . . . . . . . . . . . . 67 Handling discs . . . . . . . . . . . . . . . . . . . . 67 Storing discs. . . . . . . . . . . . . . . . . . . . . . 68 Discs to avoid . . . . . . . . . . . . . . . . . . . . . 68
Proper installation and maintenance of
this system . . . . . . . . . . . . . . . . . . . . . . . . 68
Hints on installation . . . . . . . . . . . . . . . . 68 Cleaning the pickup lens . . . . . . . . . . . . 69 Problems with condensation . . . . . . . . . 69 Moving the system unit. . . . . . . . . . . . . . 69
Power cord caution. . . . . . . . . . . . . . . . . 69
Wireless speaker system maintenance
and precautions . . . . . . . . . . . . . . . . . . . . 69
Cleaning the exterior. . . . . . . . . . . . . . . . 69 Moving the wireless speaker . . . . . . . . . . 70 Radio wave reflections . . . . . . . . . . . . . . 70
Radio wave caution. . . . . . . . . . . . . . . . . 70 Scope of operation . . . . . . . . . . . . . . . . . 71
For safety in operation . . . . . . . . . . . . . . 71
Static electricity . . . . . . . . . . . . . . . . . . . 71
6
En

Troubleshooting . . . . . . . . . . . . . . . . . . . . 72 General . . . . . . . . . . . . . . . . . . . . . . . . . 72
DVD/CD/Video CD player . . . . . . . . . . . . 73 WMA/MP3/JPEG discs . . . . . . . . . . . . . 74
Tuner . . . . . . . . . . . . . . . . . . . . . . . . . . . 74
Wireless speaker system . . . . . . . . . . . . 75
Error Messages . . . . . . . . . . . . . . . . . . . 76
Screen sizes and disc formats . . . . . . . . . 77 Widescreen TV users . . . . . . . . . . . . . . . 77
Standard TV users . . . . . . . . . . . . . . . . . 77
Selecting languages using the language code list . . . . . . . . . . . . . . . . . . . . . . . . . . 77 Language code list . . . . . . . . . . . . . . . . . . 78 Country code list . . . . . . . . . . . . . . . . . . . 78 Preset code list . . . . . . . . . . . . . . . . . . . . 79 Glossary . . . . . . . . . . . . . . . . . . . . . . . . . . 80 Specifications . . . . . . . . . . . . . . . . . . . . . 81
Español Nederlands Italiano Français Deutsch English
7
En

01 Before you start
Chapter 1
Before you start
Features
•24-bit/96kHz compatible DAC
This system is fully compatible with high sampling-rate discs, capable of delivering exceptional sound quality in terms of dynamic range, low-level resolution and high-frequency detail.
•Surround sound entertainment with Dolby Digital and DTS software
The built-in Dolby Digital and DTS decoders let you enjoy great surround sound with Dolby Digital and DTS discs.
Disc / content format playback compatibility
This player is compatible with a wide range of disc types (media) and formats. Playable discs will generally feature one of the following logos on the disc and/or disc packaging. Note however that some disc types, such as recordable CD and DVD, may be in an unplayable format—see below for further compatibility information.
• Pure Cinema progressive scan video
Not applicable to the European model
When connected to a progressive scancompatible TV or monitor using the component video outputs, you can enjoy extremely stable, flicker free images, with the same frame refresh rate as the original movie.
•Picture zoom
See Zooming the screen on page 42.
•MP3 and WMA compatibility
See Compressed audio compatibility on page 9.
•JPEG compatibility
See JPEG file compatibility on page 9.
•Graphical on-screen displays
Setting up and using your DVD home theater system is made very easy using the graphical on-screen displays.
•Energy saving design
This system is designed to use 0.5 W of power when in standby.
DVD-Video DVD-R DVD-RW
Audio CD Video CD |
CD-R |
CD-RW |
Fujicolor CD
• is a trademark of Fuji Photo Film Co. Ltd.
•Also compatible with KODAK Picture CD
This player supports the IEC’s Super VCD standard for superior picture quality, dual soundtracks, and widescreen support.
VIDEO

 CD
CD
Super Video CD (Super VCD)
CD-R/RW compatibility
• Compatible formats: CD-Audio, Video CD/
8
En
Before you start |
01 |
Super VCD, ISO 9660 CD-ROM* containing MP3, WMA or JPEG files
* ISO 9660 Level 1 or 2 compliant. CD physical format: Mode1, Mode2 XA Form1. Romeo and Joliet file systems are both compatible with this player.
•Multi-session playback: No
•Unfinalized disc playback: Yes
DVD-R/RW compatibility
•Compatible formats: DVD-Video, Video Recording (VR)*
*Edit points may not play exactly as edited; screen may go momentarily blank at edited points.
•Unfinalized playback: No
•WMA/MP3/JPEG file playback on DVD-R/ RW: No
PC-created disc compatibility
Discs recorded using a personal computer may not be playable in this unit due to the setting of the application software used to create the disc. In these particular instances, check with the software publisher for more detailed information.
Discs recorded in packet write mode (UDF format) are not compatible with this player.
Check the DVD-R/RW or CD-R/RW software disc boxes for additional compatibility information.
Compressed audio compatibility
•Compatible formats: MPEG-1 Audio Layer 3 (MP3), Windows Media Audio (WMA)
•Sampling rates: 32, 44.1 or 48kHz
•Bit-rates: Any (128Kbps or higher recommended)
•VBR (variable bit rate) MP3 playback: Yes
•VBR WMA playback: No
•WMA lossless encoding compatible: No
•DRM (Digital Rights Management) compatible: Yes (DRM-protected audio files will not play in this player). See also DRM in the Glossary on page 80.
•File extensions: .mp3, .wma (these must be used for the player to recognize MP3 and WMA files – do not use for other file types)
•File structure: Up to 999 files per folder
About WMA
The Windows Media® logo printed on the box indicates that this player can playback Windows Media Audio content.
WMA is an acronym for Windows Media Audio and refers to an audio compression technology developed by Microsoft Corporation. WMA content can be encoded by using Windows
Media® Player version 7, 7.1, Windows Media®
Player for Windows® XP, or Windows Media® Player 9 Series.
Microsoft, Windows Media, and the Windows logo are trademarks, or registered trademarks of Microsoft Corporation in the United States and/ or other countries.
JPEG file compatibility
•Compatible formats: Baseline JPEG and EXIF 2.1* still image files up to 8 megapixels are supported (maximum vertical and horizontal resolution is 5120 pixels). *File format used by digital still cameras
•File extensions: .jpg (must be used for the player to recognize JPEG files – do not use for other file types)
•File structure: Up to 999 files per folder
Español Nederlands Italiano Français Deutsch English
9
En
02 Controls and displays
Chapter 2
Controls and displays
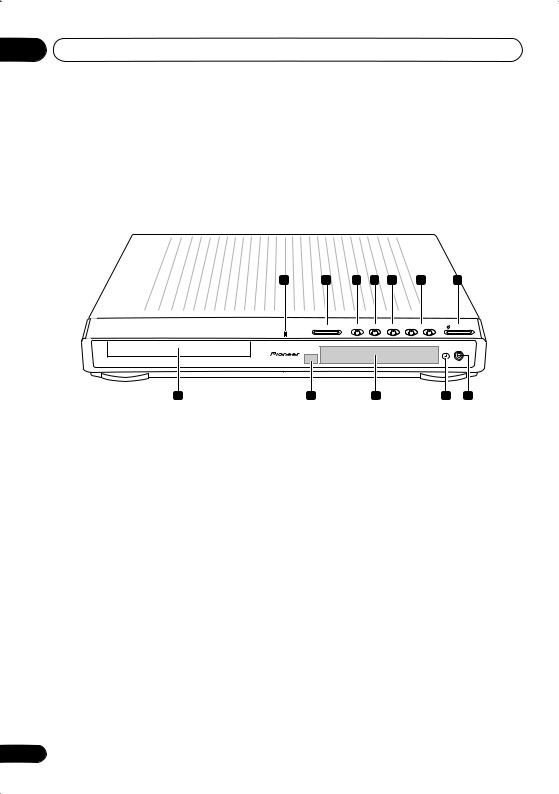
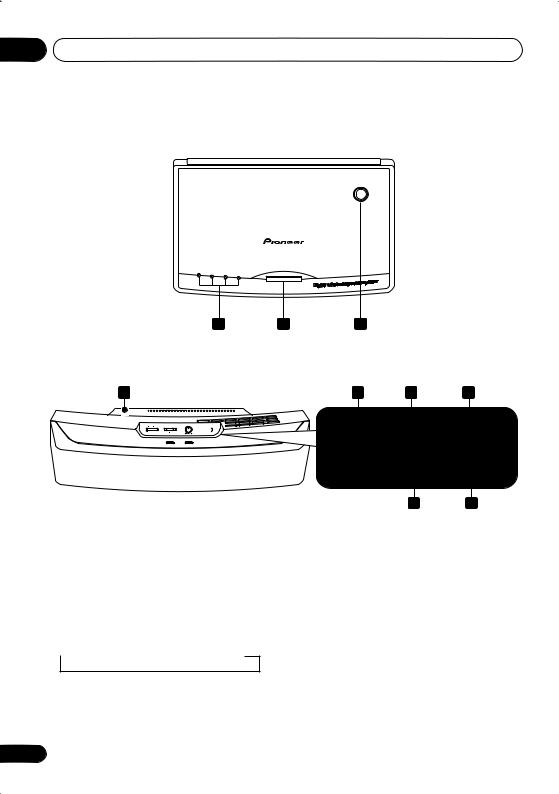
Front panel
1 |
2 |
3 |
4 |
5 |
6 |
|
7 |
|
0 OPEN/CLOSE |
6 DVD/CD |
7 |
FM/AM |
– DOWN VOL. UP + |
|
STANDBY/ON |
|
|
|
|
|
|
|
PHONES |
12 |
11 |
|
10 |
|
|
9 |
8 |
1Operation indicator
2OPEN/CLOSE
Press to open/close the disc tray.
3 DVD/CD
Press to switch to the DVD/CD function. Also press to start/pause/resume playback.
4
Press to stop playback.
5 FM/AM
Press to switch to the tuner function, then to toggle between the FM and AM bands.
6VOLUME buttons
Use to adjust the volume.
7STANDBY/ON
Press to switch the system on or into standby.
8PHONES jack
Headphone jack.
9Timer indicator
Lights when the wake-up timer is set (page 48).
10 Display
See Display on page 11 for detailed information.
11Remote sensor
12Disc tray
10
En
Controls and displays |
02 |
Display |
|
|
|
|
|
|
|
|
|
|
|
|
|
|
1 |
2 |
3 |
|
4 |
5 |
6 |
7 |
8 |
9 |
10 |
|
11 |
12 |
13 |
|
|
MIDNIGHT |
QUIET |
PGM |
RPT-1 |
RDM |
ATT |
REC MODE |
PRO LOGIC |
|
|
|||
|
|
|
|
|
|
|
|
|
|
|
|
DIGITAL |
|
|
|
|
WIRELESS |
|
|
|
|
|
|
|
kHz |
|
ADV.SURR. |
|
|
|
|
|
|
|
|
|
|
|
MHz |
|
PRGSVE |
|
||
|
|
20 |
19 |
|
|
18 |
|
|
17 16 |
15 |
14 |
|
||
1Tuner indicators
European model only
Lights when in one of the RDS display or search modes.
Lights when a broadcast is being received.
Lights when a stereo FM broadcast is being received in auto stereo mode.
Lights when FM mono reception is selected.
2
Lights when a disc is playing.
3 MIDNIGHT
Lights when the Midnight mode is selected (page 33).
4 QUIET
Lights when the Quiet mode is selected (page 33).
5 PGM
Lights when a program list has been programmed (page 39).
6 RPT and RPT-1
RPT lights during repeat play. RPT-1 lights during repeat one-track play (page 37).
7 RDM
Lights during random play (page 38).
8 ATT
Lights when the input attenuator is active for the currently selected analog input (page 65).
9 REC MODE
Lights when the Rec Mode is on (page 60).
10Timer indicators
Lights when the wake-up timer is set (page 48).
Lights when the sleep timer is active (page 49).
112 PRO LOGIC II
Lights during Dolby Pro Logic II decoding (page 30).
12 2 DIGITAL
Lights during playback of a Dolby Digital source (page 30).
Español Nederlands Italiano Français Deutsch English
11
En
02 Controls and displays
13 Speaker indicators
These show which speakers are being used to output the current source (they are not placement diagrams). The illustrations below show some example displays.
5.1 channel surround sound
Stereo (2.1 channel) sound
3.1 channel sound with Dialogue enhancement on the center channel
5.1 channel surround sound with Virtual Surround Back mode active
14 PRGSVE
Not applicable to the European model
Lights when progressive scan video output is selected (page 56).
15 ADV.SURR.
Lights when one of the Advanced or Front Surround listening modes is selected (page 31).
16
Lights during playback of a DTS source (page 30).
17 kHz / MHz
Indicates the unit of the frequency shown in the character display (kHz for AM, MHz for FM).
18Character display
19
Lights during multi-angle scenes on a DVD disc (page 42).
12
20 WIRELESS
Lights when the W.Surr. mode is selected (see
Using the wireless speaker system on page 27).
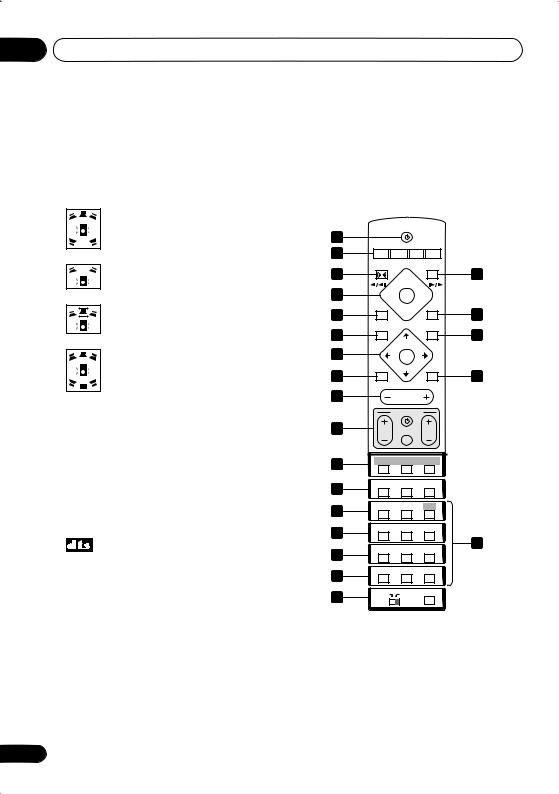
Remote control
STANDBY/ON
1
2 |
CD |
FM/AM |
L1/L2 |
|
|
DVD |
TUNER TV LINE |
|
|||
|
FRONT |
|
|
OPEN/CLOSE |
|
3 |
SURROUND |
|
11 |
||
|
|
8 |
0 |
||
4 |
1 |
3 |
¡ |
|
|
5 |
4 |
|
|
4 |
12 |
|
|
7 |
|
||
6 |
DVD MENU |
|
RETURN |
13 |
|
|
|
TUNE+ |
|
||
|
|
|
|
|
|
7 |
ST– |
|
ST+ |
|
|
|
|
ENTER |
|
|
|
8 |
MUTE |
|
TUNE– |
SOUND |
14 |
|
|
|
|
||
9 |
|
|
MASTER |
|
|
|
|
VOLUME |
|
|
|
|
|
TV CONTROL |
|
||
10 |
CH |
|
INPUT |
VOL |
|
15 |
BASS MODE |
DIALOGUE |
CH LEVEL |
|
|
SURROUND |
ADVANCED |
VIRTUAL SB |
|
||
16 |
PROGRAM |
REPEAT |
RANDOM |
|
|
AUDIO |
|
SUBTITLE |
ANGLE |
|
|
17 |
ZOOM |
|
TOP MENU |
HOME |
|
|
MENU |
|
|||
1 |
|
2 |
3 |
|
|
18 |
SYSTEM |
|
TEST TONE |
QUIET/ |
|
SETUP |
|
MIDNIGHT |
|
||
4 |
|
5 |
6 |
22 |
|
19 |
DIMMER |
|
DISPLAY |
TIMER/ |
|
|
CLOCK |
|
|||
7 |
|
8 |
9 |
|
|
20 |
SR+ |
|
FOLDER– |
FOLDER+ |
|
CLR |
|
0 |
ENTER |
|
|
21 |
|
|
|
WIRELESS |
|
MAIN |
|
SUB |
ROOM SETUP |
|
|
|
|
|
|
|
|
 Important
•Functions printed in green on the remote control are accessed by switching the
MAIN/SUB switch to SUB.
1 STANDBY/ON
Press to switch the system on or into standby.
En

Controls and displays |
02 |
2 Function select buttons
Press to select the source you want to listen to (DVD (CD). TUNER, TV, LINE)
3 FRONT SURROUND
Use to select a Front Surround listening mode (page 31).
4 Disc playback controls
Press to start or resume playback.
and
Use for reverse slow motion playback, frame reverse and reverse scanning.
and
Use for forward slow motion playback, frame advance and forward scanning.
Press to pause playback; press again to restart.
Press to stop playback.
5
Press to jump to the beginning of the current chapter/track, then to previous chapters/ tracks.
6 DVD MENU
Press to display a DVD disc menu, or the Disc Navigator if a VR format DVD-RW, CD, Video CD/Super VCD, MP3, WMA or JPEG disc is loaded.
7 Cursor buttons, ENTER and tuning buttons
Cursor buttons
Use the cursor buttons (/ / /) to navigate on-screen displays and menus.
ENTER
Press to select an option or execute a command.
TUNE +/–
Use to tune the radio.
ST +/–
Use to select station presets when listening to the radio.
8MUTE
Press to mute all sound from the speakers and headphones (press again to cancel).
9MASTER VOLUME
Use to adjust the volume.
10TV CONTROL (page 21)
Press to switch the TV on or into standby.
INPUT
Press to switch the TV input.
CH +/–
Use to select channels on the TV.
VOL +/–
Use to adjust the volume on the TV.
11OPEN/CLOSE
Press to open/close the disc tray.
12
Press to jump to the next chapter/track.
13 RETURN
Press to return to a previous menu screen.
14 SOUND
Press to access the sound menu, from which you can adjust the DSP effect level, bass and treble, etc.
15 Surround sound mode/sound enhancement buttons
SURROUND
Use to select a Surround mode (page 30).
ADVANCED
Use to select an Advanced Surround mode (page 31).
Español Nederlands Italiano Français Deutsch English
13
En

02 Controls and displays
VIRTUAL SB
Press to switch the Virtual Surround Back speaker effect on/off (page 33).
BASS MODE
Use to select a Bass Mode (page 34).
DIALOGUE
Use to select a Dialogue mode (page 33).
CH LEVEL
Use to adjust the speaker level (page 52).
16DVD/CD buttons
AUDIO
Press to select an audio channel or language (page 41).
SUBTITLE
Press to display/change the DVD subtitle display (page 41).
ANGLE
Press to change camera angle during DVD multi-angle scene playback (page 42).
PROGRAM
Use to program/play a program list (page 39–40).
REPEAT
Use to select a repeat play mode (page 37).
RANDOM
Use to select a random play mode (page 38).
17ZOOM
Press to change the screen zoom level (page 42).
TOP MENU
Use to display the top menu of a DVD disc in the play position (this may be the same as pressing DVD MENU).
HOME MENU
Press to display (or exit) the on-screen menu for Initial Settings, Play Mode functions, etc.
14
18SYSTEM SETUP
Use to make various system and surround sound settings (page 50).
TEST TONE
Use to output the test tone (for speaker setup) (page 52).
QUIET/MIDNIGHT
Use to select the Quiet and Midnight modes (page 33).
19DIMMER
Press to switch between normal and dimmed front panel display.
DISPLAY
Press to display/change disc information shown on-screen (page 42).
TIMER/CLOCK
Press to display the clock and to access the timer menu (page 19 and page 48).
20SR+
Press to switch the SR+ mode on/off (page 64).
FOLDER –
Press to jump to previous folders.
FOLDER +
Press to jump to the next folder.
CLR
Press to clear an entry.
ENTER
Selects menu options, etc. (works exactly the same as the ENTER button in 7 above).
21MAIN/SUB
Change from MAIN to SUB to access the functions/commands printed in green on the remote.
ROOM SETUP
Press to start Room Setup (page 20).
En

Controls and displays
WIRELESS
Press to switch between surround modes with the wireless speaker system (see
Using the wireless speaker system on page 27).
22 Number buttons
Use the number buttons for selecting chapters/tracks from a disc directly.
02
Español Nederlands Italiano Français Deutsch English
15
En
02 Controls and displays
Transmitter
1 |
|
|
CHANNEL |
2 |
3 |
4 |
1 2 3
Wireless speaker
4
1 CHANNEL indicators
Light to indicate the selected channel.
2 CHANNEL
In case of poor reception due to interference from other electrical devices, you can improve reception by selecting another channel. Each time you press the button, the channel changes sequentially:
 CH 1
CH 1  CH 2
CH 2  CH 3
CH 3  CH 4
CH 4
5 |
|
6 |
|
7 |
POWER |
WIRELESS |
STEREO MODE |
||
|
VOLUME |
|||
MODE |
|
|||
OFF ON |
|
|
||
|
W.SURROUND |
W.STEREO |
MIN |
MAX |
|
POWER |
|
TUNED |
|
8 9
 Note
Note
•Poor reception may cause the audio to be interrupted or disappear completely. This is not a malfunction. Try changing the location or orientation of the transmitter and/or the wireless speaker to improve reception.
•The wireless speaker can be used at distances of up to 10m from the transmitter. This range may change depending on the environment.
3 Transmitter antenna
Transmits signals to the wireless speaker.
16
En

Controls and displays |
02 |
4Wireless speaker antenna
Receives signals from the transmitter.
5POWER
Press to switch the unit on or off.
6 WIRELESS MODE switch
Slide to select either W.SURROUND or
W.STEREO mode. See Using the wireless speaker system on page 27 for more on these modes.
•W.SURROUND — Sounds going to the surround left and right channels are heard through the wireless speakers.
•W.STEREO — Any source playing through the main system is heard in stereo through the wireless speakers (multichannel sources will be downmixed to stereo).
 Note
Note
•The system should be in standby when switching between modes (see Using the wireless speaker system on page 27).
•If the mode of the wireless speaker system and the mode of the DVD receiver do not match, loud noise may be output from the wireless speaker system.
•The STEREO MODE VOLUME control can be used to adjust the volume when W.STEREO is selected.
7 STEREO MODE VOLUME
Turn to adjust the speaker volume when the
WIRELESS MODE is set to W.STEREO.
When set to W.SURROUND, the volume control does not operate. The volume changes automatically.
8 POWER indicator
Lights when the wireless speaker is switched on.
9 TUNED indicator
Lights when the signal from the transmitter is properly received.
Note
•For more on using the wireless speaker system Using the wireless speaker system on page 27.
Español Nederlands Italiano Français Deutsch English
17
En
03 Getting started
Chapter 3
Getting started
Switching on and setting up
After making sure everything is connected up properly, you’re ready to switch on. The first thing to do is to tell the system what kind of TV you’re using, standard or widescreen.
After that you can set up the surround sound for your room, and set the clock so that you can use the timer features.
|
|
STANDBY/ON |
|
CD |
FM/AM |
L1/L2 |
|
DVD |
TUNER TV |
LINE |
|
FRONT |
|
|
OPEN CLOSE |
SURROUND |
|
||
|
|
8 |
0 |
1 |
3 |
¡ |
|
4 |
|
|
4 |
|
|
7 |
|
DVD MENU |
|
RETURN |
|
|
|
TUNE+ |
|
|
ST– |
ST+ |
|
|
|
ENTER |
|
MUTE |
|
TUNE– |
SOUND |
|
|
MASTER |
|
|
|
VOLUME |
|
|
TV CONTROL |
||
CH |
|
INPUT |
VOL |
1 Press STANDBY/ON (on the remote or the front panel) to switch the system on.
Also make sure that your TV is switched on and that the video input is set to this system (for example, if you connected this system to the VIDEO 1 input on your TV, switch your TV to
VIDEO 1).
18
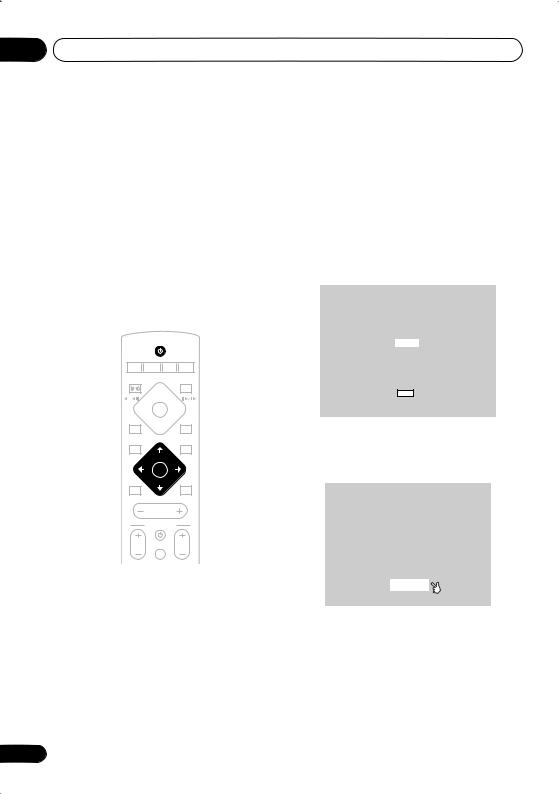
2 Follow the directions that appear on the on-screen display.
European model:
•Use the / (cursor up/down) buttons to choose a language, then press ENTER.
Let's Get Started Menu
Select the display language
using the cursor keys on the remote
English
français Deutsch Italiano Español
Choose one then press Enter
All other models:
•After you’re finished reading the welcome screen, press ENTER to move on.
Welcome to Pioneer DVD!
Thank you for purchasing this Pioneer DVD player.
Before using, please take a little time to setup your DVD player
Put the batteries into the remote control
Next, press the [ENTER] button on the remote control and start the Let's Get Started Menu
Next
En
Getting started |
03 |
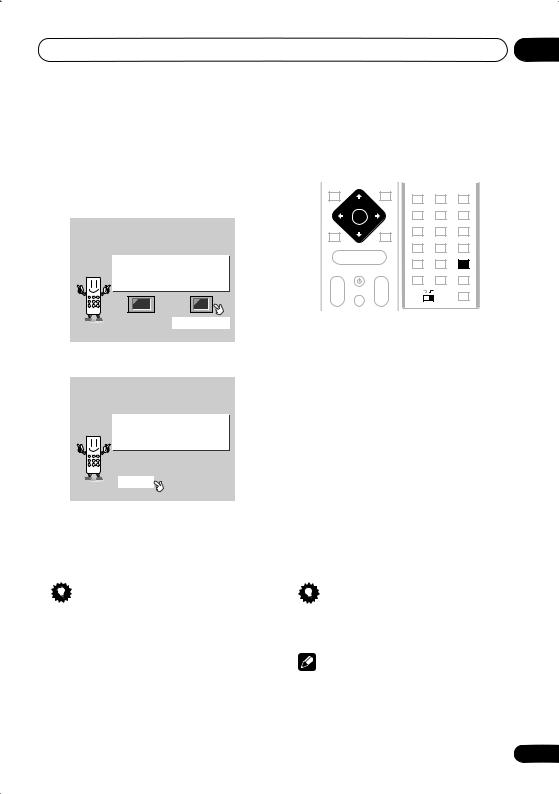
3 Use the /(cursor left/right) buttons to select either ‘Wide screen (16:9)’ or ‘Standard size screen (4:3)’ according to the kind of TV you have, then press ENTER.
See also Screen sizes and disc formats on page 77 if you’re not sure which one to choose.
Let's Get Started Menu
What kind of TV do you have? Use the  /
/ cursor buttons to choose, then press [ENTER]
Wide screen (16:9) Standard size screen (4:3)
4 Press ENTER again to finish setting up.
Let's Get Started Menu
Setup complete
If you're finished setting up, choose [Complete],
to start again choose [Back]
Complete |
Back |
•Use the (cursor right) button to select Back then press ENTER if you want to go back and change the setting you just made.
Tip
• You can also use the function buttons (DVD/CD, TUNER, etc.) or the OPEN/ CLOSE button to switch the system on from standby.
Setting the clock |
|
|
|
|
|
|
|
|
|
English |
|||||||||||||||
Setting the clock allows you to use the timer |
|||||||||||||||||||||||||
|
|||||||||||||||||||||||||
features. |
|
|
|
|
|
|
|
|
|
|
|
|
|
|
|||||||||||
|
|
|
|
|
|
|
|
|
|
|
|
|
|
|
|
|
|
|
|
|
|
|
|||
|
|
DVD |
|
|
|
|
|
|
|
|
|
|
|
||||||||||||
|
|
|
|
|
|
|
BASS MODE DIALOGUE |
VIRTUALCHLEVELSB |
|
|
|
||||||||||||||
|
|
|
|
|
|
|
|
|
|
|
|
|
|
|
|
SURROUND SURROUNDADVANCE VIRTUALADVANCEDSB |
|
|
|
||||||
|
|
|
|
|
|
|
|
|
|
|
|
|
|
|
|
PROGRAM |
REPEAT |
RANDOM |
|
|
|
||||
|
|
|
|
|
|
|
|
|
|
|
|
|
|
|
|
AUDIO |
SUBTITLE |
|
ANGLE |
|
|
Deutsch |
|||
|
|
|
|
|
|
|
|
VOLUME |
|
|
|
|
|
|
|
|
|
|
|
|
|
||||
|
|
|
|
|
|
|
|
ENTER |
|
|
|
|
|
|
|
|
|
|
|
|
|
|
|||
|
|
|
|
|
|
|
|
|
|
|
|
|
|
|
|
ZOOM |
TOP MENU |
|
HOME |
|
|
|
|
|
|
|
|
|
|
|
|
|
|
|
|
|
|
|
|
|
|
|
MENU |
|
|
|
|
|
|||
|
|
|
|
|
|
|
|
|
|
|
|
|
|
|
1 |
2 |
3 |
|
|
|
|
|
|||
|
|
|
|
|
|
|
|
|
|
|
|
|
|
|
|
SYSTEM |
TEST TONE |
|
QUIET/ |
|
|
|
|||
|
|
|
|
|
|
|
|
|
|
|
|
|
|
|
|
SETUP |
MIDNIGHT |
|
|
|
|||||
|
|
|
|
|
|
|
|
|
|
|
|
|
|
|
4 |
5 |
6 |
|
|
|
|
|
|||
|
|
|
|
|
|
|
|
MASTER |
|
|
|
|
|
|
|
DIMMER |
|
|
TIMER/ |
|
|
|
|||
|
|
|
|
|
|
|
|
|
|
|
|
|
|
|
|
DISPLAY |
|
CLOCK |
|
|
|
||||
|
|
|
|
|
|
|
|
|
|
|
|
|
|
|
7 |
8 |
9 |
|
|
|
|
|
|||
|
|
|
|
|
|
|
|
TV CONTROL |
|
|
|
|
|
|
SR+ |
FOLDER– |
FOLDER+ |
|
|
||||||
|
|
|
|
|
|
|
|
|
|
|
|
|
|
||||||||||||
|
|
|
|
|
|
|
|
|
|
|
|
|
|
|
|
CLR |
0 |
|
ENTER |
|
|
|
|||
|
|
|
|
|
|
|
|
|
|
|
|
|
|
|
|
|
|
WIRELESS |
|
|
Français |
||||
|
|
|
CH INPUT VOL |
|
|
MAIN |
SUB |
ROOM SETUP |
|
|
|||||||||||||||
|
|
|
|
|
|
|
|
|
|
|
|
|
|
|
|
|
|
|
|
|
|
|
|
|
|
|
|
|
|
|
|
|
|
|
|
|
|
|
|
|
|
|
|
|
|
|
|
|
|
|
|
|
|
|
|
|
|
|
|
|
|
|
|
|
|
|
|
|
|
|
|
|
|
|
|
|
|
1 |
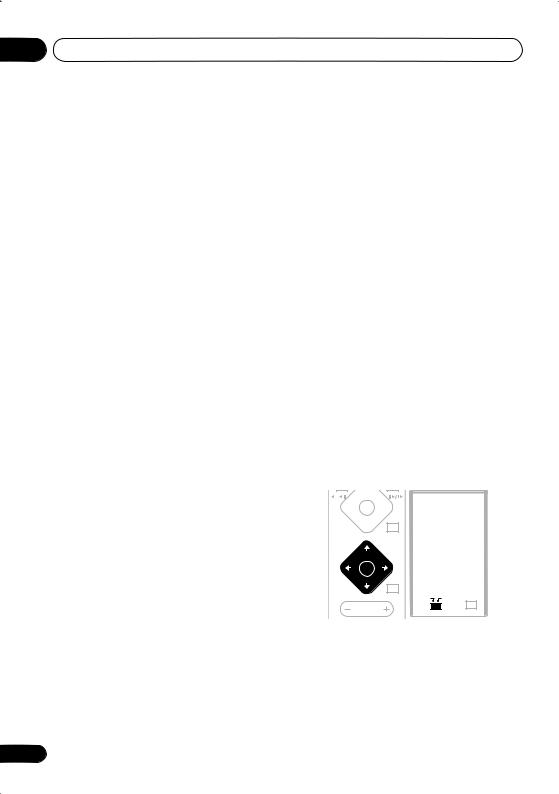
Press TIMER/CLOCK. |
|
|
|
|
|
|
|
|
||||||||||||||||
|
• If you are adjusting the clock, rather then |
|
|
||||||||||||||||||||||
|
|
|
|||||||||||||||||||||||
|
setting it for the first time, press TIMER/ |
|
|||||||||||||||||||||||
|
CLOCK again. |
|
|
|
|
|
|
|
|
|
|
|
|
|
Italiano |
||||||||||
the display, press |
or (cursor left or |
||||||||||||||||||||||||
2 If ‘Clock ADJ?’ isn’t already showing in |
|
||||||||||||||||||||||||
right) until you see it. |
|
|
|
|
|
|
|
|
|
|
|||||||||||||||
3 |
Press ENTER. |
|
|
|
|
|
|
|
|
|
|
|
|
|
|
||||||||||
|
|
|
|
|
|
|
|
|
|
|
|
|
Nederlands |
||||||||||||
4 Use the / (cursor up/down) buttons |
|
||||||||||||||||||||||||
|
|
||||||||||||||||||||||||
to set the hour. |
|
|
|
|
|
|
|
|
|
|
|
|
|
|
|||||||||||
5 |
Press ENTER. |
|
|
|
|
|
|
|
|
|
|
|
|
|
|
||||||||||
6 Use the / (cursor up/down) buttons |
Español |
||||||||||||||||||||||||
to set the minute. |
|
|
|
|
|
|
|
|
|
|
|
|
|
||||||||||||
|
|
|
|
|
|
|
|
|
|
|
|
|
|
||||||||||||
7 Press ENTER to confirm.
The display flashes to indicate the clock is set.
Tip
•Press TIMER/CLOCK anytime to display the clock.
Note
•If you unplug the system from the wall outlet, or there is a power outage, you will need to set the clock again.
19
En
03 Getting started
Home theater sound setup
After setting up your front speakers as shown below, refer to the supplied setup guide, or
Using the wireless speaker system on page 27 for more wireless speaker placement options.
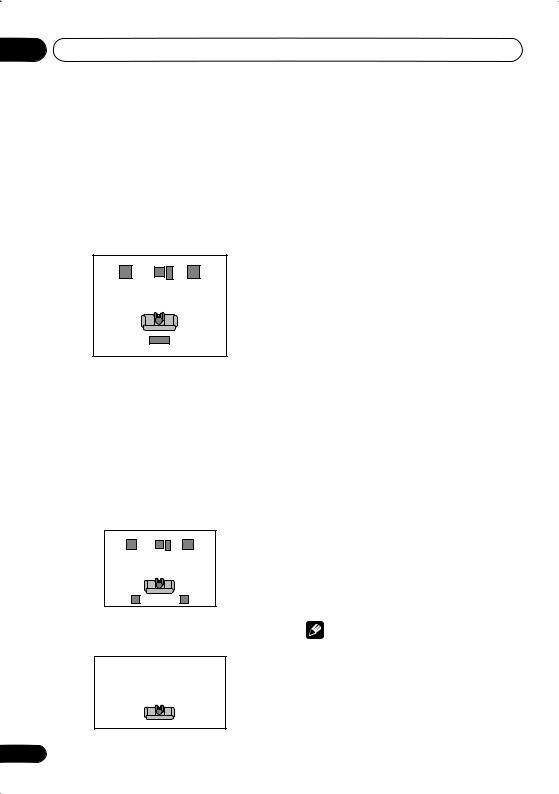
•Standard surround setup – This is a standard multichannel surround sound speaker setup.
Front left |
Center |
Front right |
Subwoofer
Listening position
Wireless speaker
The following speaker placement options are only possible if you have connected a pair of speakers (not supplied) to the surround speaker terminals (refer to the setup guide to do this) and you are using the the wireless speaker as a second stereo system (see Using the wireless speaker system on page 27 for more on this).
•Standard surround 5-spot setup –
Provides enveloping surround sound by using additional surround speakers.
Front left |
Center |
Front right |
|
Subwoofer |
|
Listening position |
|
|
Surround |
|
Surround |
left |
|
right |
•Front surround 3-spot setup – See Using Front Surround on page 31 for more on this.
|
|
|
|
|
Center |
|
|
||||
|
|
|
|
|
|
|
|
|
|
|
|
Surround |
Front |
|
|
|
Surround |
||||||
|
Subwoofer Front |
||||||||||
|
left |
left |
|
|
right |
right |
|||||
(not supplied) |
|
|
|
|
|
|
|
(not supplied) |
|||
Listening position
20
Using the Room Setup
After you have set up your speakers to your liking (see Home theater sound setup above), make sure you calibrate your system for surround sound. This is a quick and easy way to get good surround sound for your room.
For a more detailed surround sound setup, see
Using the System Setup menu on page 50.
1If the system isn’t already on, press STANDBY/ON to switch it on.
2Press ROOM SETUP.
•If you have previously set up the room type and seating position, the display will show the current room settings.
3Press ENTER.
4Use the / (cursor up/down) buttons to select a room type then press ENTER.
Choose one of the following:
•S – Smaller than average room
•M – Average room
•L – Larger than average room
5Use the / (cursor up/down) buttons to select a seating position. Press ENTER.
Choose one of the following depending on where your main listening position is:
•Fwd – If you are nearer to the front speakers than the surround speakers
•Mid – If you are equal distance from the front and surround speakers
•Back – If you are nearer to the surround speakers than the front speakers
Note
•The Room Setup automatically sets up both channel level and channel delay. If you have already set the channel levels manually (see Setting the channel levels on page 52), you will see Room Set? in the display when you first press the ROOM SETUP button.
En
Getting started
Setting up the remote to control your TV
You can set up the supplied remote to control your TV using the TV CONTROL buttons.
1Switch on your TV.
2Find the name of the manufacturer of your TV in the Preset code list on page 79.
Next to each manufacturer is one or more three digit codes. These tell the remote what kind of TV you have.
If the name of the manufacturer of your TV does not appear in the table, you won’t be able to set up this remote to control your TV.
3 Point the remote at your TV, hold down the CLR button, then enter the three digit code for your TV.
The remote transmits an on/off signal to the TV. If you’ve entered the correct code, your TV should switch off.
If your TV doesn’t turn off, repeat the procedure using the next code in the list until your TV switches off successfully. Once set, you can use the individual TV controls shown below.
MASTER
VOLUME
 TV CONTROL
|
CH |
INPUT |
VOL |
|
BASS MODE DIALOGUE |
CH LEVEL |
|
|
SURROUND |
ADVANCED VIRTUAL SB |
|
|
PROGRAM |
REPEAT |
RANDOM |
Button |
What it does |
||
Switches your TV on or into standby.
CH +/– Changes the TV channel.
VOL +/– Adjusts the volume.
INPUT Switches the TV’s input between the built in TV tuner and an external video source.
03
Note |
English |
|
• The default setting is for a Pioneer TV. |
||
|
Using the on-screen displays
For ease of use, this system makes extensive |
|
Deutsch |
||||||||||||||||||||||
use of graphical on-screen displays (OSDs). |
|
|||||||||||||||||||||||
|
|
|||||||||||||||||||||||
You should get used to the way these work as |
|
|
||||||||||||||||||||||
you’ll need to use them when setting up the |
|
|
||||||||||||||||||||||
system, using some of the playback features, |
|
|
||||||||||||||||||||||
|
|
|||||||||||||||||||||||
such as program play, and when making more |
|
|||||||||||||||||||||||
|
||||||||||||||||||||||||
advanced settings for audio and video. |
Français |
|||||||||||||||||||||||
All the screens are navigated in basically the |
||||||||||||||||||||||||
|
||||||||||||||||||||||||
same way, using the cursor buttons ( , , , |
|
|||||||||||||||||||||||
) to change the highlighted item and |
|
|||||||||||||||||||||||
pressing ENTER to select it. |
|
|
|
|
|
|
|
|
||||||||||||||||
|
|
|
|
|
|
|
|
|
|
|
|
|
|
|
|
Italiano |
||||||||
• |
|
Throughout this manual, ‘Select’ means |
||||||||||||||||||||||
|
|
|
Important |
|
|
|
|
|
|
|
|
|
|
|
||||||||||
|
use the cursor buttons to highlight an item |
|
||||||||||||||||||||||
|
on-screen, then press ENTER. |
|
|
|
|
|
|
|
||||||||||||||||
|
|
|
|
|
|
Nederlands |
||||||||||||||||||
|
|
|
|
|
|
|
|
|
|
|
|
|
|
|
|
|
|
|
|
|
|
|
||
|
|
|
|
|
|
|
|
|
|
|
|
|
|
|
|
|
|
|
|
|
|
|
||
|
|
|
|
|
|
|
|
|
|
|
|
|
|
|
BASS MODE DIALOGUE |
CH LEVEL |
|
|
|
|||||
|
|
|
1 |
3 ¡ |
|
|
|
SURROUND ADVANCED |
VIRTUAL SB |
|
|
|
|
|||||||||||
|
|
|
|
|
|
PROGRAM |
REPEAT |
RANDOM |
|
|
|
|||||||||||||
|
|
|
4 |
|
|
4 |
|
|
|
|
|
|
||||||||||||
|
|
|
|
|
|
AUDIO |
SUBTITLE |
|
ANGLE |
|
|
|
||||||||||||
|
|
|
|
|
|
|
|
7 |
|
|
|
|
|
|
|
|
|
|
|
|
|
|
|
|
|
|
|
|
|
|
|
|
|
|
|
|
|
|
|
|
|
|
|
|
|
|
|
|
|
|
|
|
|
|
|
|
|
|
|
|
|
|
|
|
ZOOM |
TOP MENU |
|
HOME |
|
|
|
|||
|
|
|
DVD |
|
|
|
|
|
|
|
|
MENU |
|
|
|
|
|
|||||||
|
|
|
|
|
|
|
|
|
|
|
|
|
|
|
|
|
|
|
||||||
|
|
|
|
|
|
|
|
|
1 |
2 |
|
3 |
|
|
|
|
|
|||||||
|
|
|
|
|
|
|
|
|
|
|
|
|
|
|
SYSTEM |
|
|
QUIET/ |
|
|
|
|
||
|
|
|
|
|
|
|
|
|
|
|
|
|
|
|
SETUP |
TEST TONE |
MIDNIGHT |
|
|
|||||
|
|
|
|
|
|
|
|
|
|
|
|
|
|
4 |
5 |
6 |
|
|
|
|
Español |
|||
|
|
|
|
|
|
|
|
ENTER |
|
|
DIMMER |
DISPLAY |
|
TIMER/ |
|
|
||||||||
|
|
|
|
|
|
|
|
|
|
|
CLOCK |
|
|
|||||||||||
|
|
|
|
|
|
|
|
|
|
|
|
|
|
7 |
8 |
9 |
|
|
|
|
|
|||
|
|
|
|
|
|
|
|
|
|
|
|
|
|
|
SR+ |
FOLDER– |
FOLDER+ |
|
|
|||||
|
|
|
|
|
|
|
|
|
|
|
|
|
|
|
CLR |
0 |
|
ENTER |
|
|
||||
|
|
|
|
|
|
|
|
|
|
|
|
|
|
|
|
|
WIRELESS |
|
|
|||||
|
|
|
|
|
|
|
|
MASTER |
|
|
|
|
|
|
MAIN |
SUB |
ROOM SETUP |
|
|
|||||
|
|
|
|
|
|
|
|
|
|
|
|
|
|
|
|
|
|
|
|
|
|
|
||
|
|
|
|
|
|
|
|
VOLUME |
|
|
|
|
|
|
|
|
|
|
|
|
|
|
|
|
|
|
|
|
|
|
|
|
|
|
|
|
|
|
|
|
|
|
|
|
|
|
|||
|
|
|
|
|
|
|
|
|
|
|
|
|
|
|
|
|
|
|
|
|
|
|
|
|
Button |
What it does |
|
|
|
|
|
|
|
|
|||||||||||||||
HOME |
Displays/exits the on-screen |
|
||||||||||||||||||||||
MENU |
display |
|
|
|
|
|
|
|
|
|
|
|
||||||||||||
Changes the highlighted menu item
ENTER Selects the highlighted menu item (both ENTER buttons work in exactly the same way)
21
En
03 Getting started
Button |
What it does |
RETURN Returns to the main menu without saving changes
Tip
•The button guide at the bottom of every OSD screen shows you which buttons you’ll need to use for that screen.
Playing discs
The basic playback controls for playing DVD, CD, Video CD/Super VCD and WMA/MP3 discs are covered here. Further functions are detailed in chapter 5.
1 If the player isn’t already on, press STANDBY/ON to switch it on.
If you’re playing a DVD or Video CD/Super VCD, also turn on your TV and make sure that it is set to the correct video input.
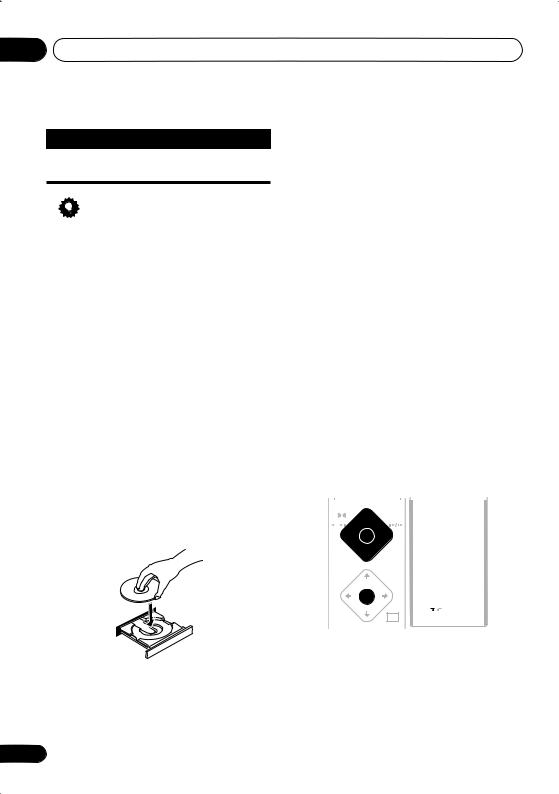
2 Press OPEN/CLOSE to open the disc tray.
3 Load a disc.
Load a disc with the label side facing up, using the disc tray guide to align the disc (if you’re loading a double-sided DVD disc, load it with the side you want to play face down).
4 Press (play) to start playback.
If you’re playing a DVD or Video CD/Super VCD, a menu may appear. See DVD-Video disc menus on page 24 and Video CD/Super VCD PBC menus on page 25 for how to navigate these.
If you’re playing an WMA/MP3 disc, it may take a few seconds before playback starts, depending on the complexity of the file structure on the disc.
If you loaded a CD/CD-R/RW containing JPEGs, a slideshow will start. See Viewing JPEG discs on page 44 for more on playing these discs.
•See also Options on page 57 if the disc contains both WMA/MP3 audio files and JPEG picture files.
5 Use the MASTER VOLUME – / + button (or the front panel VOLUME buttons) to adjust the volume.
Basic playback controls
The following table shows the basic controls on the remote for playing discs. You can find other playback features in the chapter 5.
|
|
FRONT |
|
|
|
|
|
|
|
|
|
|
|
|
|
|
|
|
|
|
|
|
|
|
|
|
|
|
|
|
|
|
|
|
|
|
|
|
|
||
SURROUND |
|
|
CLOSE |
|
BASS MODE |
DIALOGUE |
CH LEVEL |
|
||||||||||||
|
|
|
|
8 |
|
|
|
|
|
SURROUND |
ADVANCED |
VIRTUAL SB |
|
|||||||
|
|
|
|
|
|
|
|
|
|
|
|
|
|
|
|
|
|
|
|
|
|
|
|
|
|
|
|
|
|
|
|
|
|
|
|
|
|
|
|
|
|
|
|
|
|
|
|
|
|
|
|
|
PROGRAM |
|
|
REPEAT |
RANDOM |
|||||
|
|
|
|
|
|
|
|
|
|
|
AUDIO |
|
SUBTITLE |
|
ANGLE |
|||||
1 |
3 |
¡ |
|
|
|
|
|
|
|
|
|
|
|
|
|
|
||||
|
|
|
|
|
|
|
|
|
|
|
ZOOM |
TOP MENU |
|
HOME |
|
|
||||
|
|
|
|
|
|
|
|
|
|
|
|
MENU |
|
|
||||||
4 |
|
|
4 |
|
|
|
|
1 |
|
|
2 |
|
|
3 |
|
|
||||
|
|
|
|
7 |
|
|
|
|
|
|
|
|
|
|
|
|
|
|
|
|
|
|
|
|
|
|
|
|
|
SYSTEM |
|
|
|
|
|
QUIET/ |
|||||
|
|
|
|
|
|
|
|
|
|
|
SETUP |
TEST TONE |
MIDNIGHT |
|||||||
|
|
|
|
|
|
|
|
|
||||||||||||
DVD MENU |
|
RETURN |
|
|
4 |
|
|
5 |
|
|
6 |
|
|
|||||||
|
|
DIMMER |
|
DISPLAY |
|
TIMER/ |
||||||||||||||
|
|
|
|
|
|
|
|
|
|
|
|
CLOCK |
||||||||
|
|
|
|
TUNE+ |
|
|
|
|
|
|
7 |
|
|
8 |
|
|
9 |
|
|
|
|
|
|
ST– |
ST+ |
||||||||||||||||
|
|
|
|
|
|
SR+ |
|
FOLDER– |
FOLDER+ |
|||||||||||
|
|
|
|
ENTER |
|
|
|
|
|
|
CLR |
|
|
0 |
|
|
ENTER |
|
|
|
|
|
|
|
|
|
|
|
|
|
|
|
|
|
|
|
|
|
WIRELESS |
|
|
|
|
MUTE |
TUNE– |
SOUND |
|
|
MAIN |
|
SUB |
ROOM SETUP |
||||||||||
|
|
|
|
|
|
|
|
|
|
|
|
|
|
|
|
|
|
|
|
|
|
|
|
|
|
|
|
|
|
|
|
|
|
|
|
|
|
|
|
|
|
22
En

Getting started |
03 |
Button |
What it does |
|
|
Starts playback. |
|
|
DVD and Video CD: If the display |
|
|
shows Resume or Last Mem |
|
|
playback starts from the resume |
|
|
or last memory point (see also |
|
|
Resume and Last Memory |
|
|
below.) |
|
|
|
|
|
Pauses a disc that’s playing, or |
|
|
restarts a paused disc. |
|
|
|
|
|
Stops playback. |
|
|
DVD and Video CD: The display |
|
|
shows Resume. Press again if |
|
|
you want to cancel the resume |
|
|
function. (See also Resume and |
|
|
Last Memory below.) |
|
|
|
|
|
Press to start fast reverse |
|
|
scanning. Press |
(play) to |
|
resume normal playback. |
|
|
|
|
|
Press to start fast forward |
|
|
scanning. Press |
(play) to |
|
resume normal playback. |
|
Skips to the start of the current track or chapter, then to previous tracks/chapters.
Skips to the next track or chapter.
FOLDER +/– Skips to the next/previous folder when playing an WMA/MP3 disc.
Button |
What it does |
Numbers • If the disc is stopped, playback starts from the selected title (for DVD) or track number (for CD/ Video CD/Super VCD/WMA/ MP3) after a few seconds (or after pressing ENTER).
• If the disc is playing, playback jumps to the start of the selected chapter or track after a few seconds (or after pressing
ENTER).
 Note
Note
•You may find with some DVD discs that some playback controls don’t work in certain parts of the disc. This is not a malfunction.
•Track skip and number buttons for track selection do not work with unfinalized CD- R/RW discs.
Using the front panel controls
The |
OPEN/CLOSE, |
DVD/CD, FM/AM |
and |
(stop) buttons work the same way as the |
|
remote control equivalents.
Resume and Last Memory
When you stop playback of a DVD or Video CD disc, Resume shows in the display indicating that you can resume playback from that point. If the disc tray is not opened, the next time you start playback the display shows Resume and playback resumes from the resume point.
For DVD discs only: If you take the disc out of the player, the play position is stored in memory. When you load the disc next time, the display shows Last Mem and you can resume playback (this works for up to five discs).
If you want to clear the resume/last memory point, press (stop) while Resume or Last Mem is displayed.
Español Nederlands Italiano Français Deutsch English
23
En
03 Getting started
 Note
Note
•When a Video CD is loaded, the Resume point is lost if the system is switched off, or switched to a function other than DVD (CD).
•For the Last Memory function to work, you
must press (stop) to stop playback before opening the disc tray.
•The Last Memory function doesn’t work with VR format DVD-RW discs.
 FAQ
FAQ
•After I load a DVD disc, it ejects automatically after a few seconds!
Most likely, the disc is the wrong region for your system. The region number should be printed on the disc; check it against the region number of the system (which you can find on the rear panel). See also DVD Video regions on page 67.
If the region number is OK, it may be that the disc is damaged or dirty. Clean the disc and look for signs of damage. See also
Using and taking care of discs on page 67.
•Why won’t the disc I loaded play?
First check that you loaded the disc the right way up (label side up), and that it’s clean and not damaged. See Using and taking care of discs on page 67 for information on cleaning discs.
If a disc loaded correctly won’t play, it’s probably an incompatible format or disc type, such as DVD-Audio or DVD-ROM. See
Disc / content format playback compatibility on page 8 for more on disc compatibility.
•I have a widescreen TV so why are there black bars at the top and bottom of the screen when I play some discs?
Some movie formats are such that even when played on a widescreen TV, black bars are necessary at the top and bottom of the screen. This is not a malfunction.
•I have a standard (4:3) TV and set the system to show widescreen DVDs in pan & scan format, so why do I still get black bars top and bottom with some discs?
Some discs override the display preferences of the system, so even if you have 4:3 (Pan & Scan) selected, those discs will still be shown in letterbox format. This is not a malfunction.
DVD-Video disc menus
Many DVD-Video discs contain menus from which you can select what you want to watch. They may give access to additional features, such as subtitle and audio language selection, or special features such as slideshows. See the disc packaging for details.
Sometimes DVD-Video menus are displayed automatically when you start playback; others only appear when you press DVD MENU or
TOP MENU.
|
|
|
|
|
|
|
BASS MODE |
DIALOGUE |
CH LEVEL |
||||||
|
|
|
|
|
|
|
SURROUND |
ADVANCED |
VIRTUAL SB |
||||||
1 |
3 |
¡ |
|
|
|
|
|
|
|
|
|
|
|||
|
|
|
|
|
|
|
|
|
|
|
|
|
|
|
|
|
|
|
|
|
|
|
|
PROGRAM |
|
|
REPEAT |
|
|
RANDOM |
|
4 |
|
|
4 |
|
|
AUDIO |
SUBTITLE |
|
ANGLE |
||||||
|
|
|
7 |
|
|
|
|
|
|
|
|
|
|
|
|
|
|
|
|
|
|
|
|
ZOOM |
TOP MENU |
|
HOME |
|
|||
|
|
|
|
|
|
|
|
|
MENU |
|
|||||
DVD |
|
|
|
|
|
1 |
|
|
2 |
|
|
3 |
|
||
|
|
|
|
|
|
|
|
|
|
|
|
|
|
|
|
|
|
|
|
|
|
SYSTEM |
TEST TONE |
QUIET/ |
|||||||
|
|
|
|
|
|
|
|
SETUP |
MIDNIGHT |
||||||
|
|
|
|
|
|
|
|
4 |
|
|
5 |
|
|
6 |
|
|
|
|
|
|
|
|
DIMMER |
DISPLAY |
|
TIMER/ |
|
||||
|
|
|
ENTER |
|
|
|
|
CLOCK |
|||||||
|
|
|
|
|
|
|
|
7 |
|
|
8 |
|
|
9 |
|
|
|
|
|
|
|
|
|
SR+ |
FOLDER– |
FOLDER+ |
|||||
|
|
|
|
|
|
|
|
CLR |
|
|
0 |
|
|
ENTER |
|
|
|
|
|
|
|
|
|
|
|
|
|
|
|
WIRELESS |
|
|
|
|
|
|
|
|
|
MAIN |
SUB |
ROOM SETUP |
|||||
MASTER
VOLUME
24
En
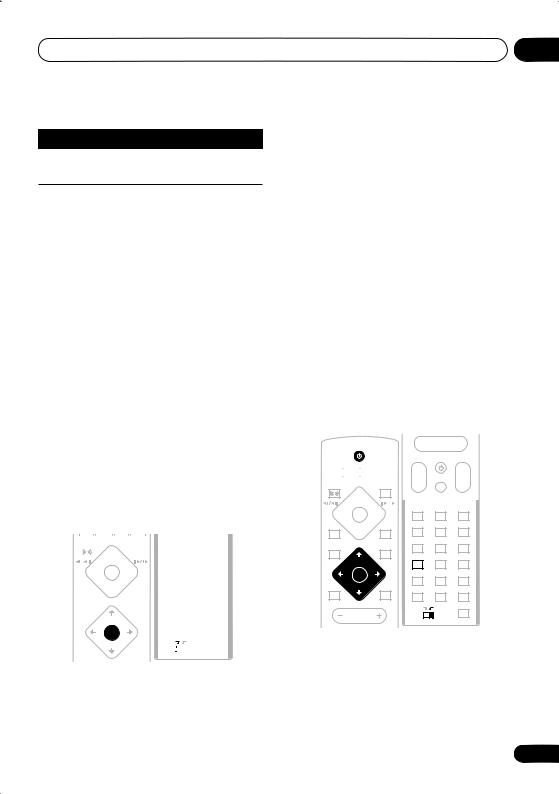
Getting started |
03 |
Button |
What it does |
TOP MENU Displays the ‘top menu’ of a DVD disc—this varies with the disc.
DVD |
Displays a DVD disc menu—this |
MENU |
varies with the disc and may be |
|
the same as the ‘top menu’. |
|
|
|
Moves the cursor around the |
|
screen. |
|
|
ENTER |
Selects the current menu option. |
|
|
RETURN |
Returns to the previously |
|
displayed menu screen. |
|
|
Numbers |
Highlights a numbered menu |
|
option (some discs only). Press |
|
ENTER to select. |
|
|
Video CD/Super VCD PBC menus
Some Video CD/Super VCDs have menus from which you can choose what you want to watch. These are called PBC (Playback control) menus.
You can play a PBC Video CD/Super VCD without having to navigate the PBC menu by pressing (stop) then starting playback using a number button to select a track, rather than
(play) (or |
|
on the front panel). |
||||||||||||||||||
|
|
|
|
|
|
|
|
|
|
|
|
|
|
|
|
|
|
|
|
|
|
|
|
|
|
|
|
|
|
|
|
|
|
|
|
|
|
|
|
||
|
|
|
FRONT |
|
|
|
|
|
|
|
BASS MODE |
DIALOGUE |
CH LEVEL |
|||||||
|
SURROUND |
|
OPEN CLOSE |
|
|
SURROUND |
ADVANCED |
|
VIRTUAL SB |
|
||||||||||
|
|
|
|
|
8 |
|
0 |
|
|
|
|
|
|
|
|
|
|
|
|
|
|
|
|
|
|
|
|
|
|
|
|
|
PROGRAM |
REPEAT |
RANDOM |
||||||
|
|
|
|
|
|
|
|
|
|
|
|
AUDIO |
SUBTITLE |
|
ANGLE |
|||||
|
1 |
3 |
¡ |
|
|
|
|
|
|
|
|
|
|
|
|
|
||||
|
|
|
|
|
ZOOM |
TOP MENU |
|
HOME |
|
|
||||||||||
|
|
|
|
|
|
|
|
|
|
|
|
|
MENU |
|
||||||
|
4 |
|
|
4 |
|
|
|
|
1 |
|
|
2 |
|
|
3 |
|
|
|||
|
|
|
|
|
7 |
|
|
|
|
|
|
SYSTEM |
|
|
TEST TONE |
|
QUIET/ |
|
|
|
|
|
|
|
|
|
|
|
|
|
|
|
SETUP |
|
MIDNIGHT |
||||||
|
|
|
|
|
|
|
|
|
|
|
|
4 |
|
|
5 |
|
|
6 |
|
|
|
DVD MENU |
|
RETURN |
|||||||||||||||||
|
|
|
|
DIMMER |
DISPLAY |
|
TIMER/ |
|
|
|||||||||||
|
|
|
|
|
|
|
|
|
|
|
|
|
CLOCK |
|||||||
|
|
|
|
|
TUNE+ |
|
|
|
|
|
|
7 |
|
|
8 |
|
|
9 |
|
|
|
|
|
|
ST– |
ST+ |
|
|
SR+ |
FOLDER– |
FOLDER+ |
||||||||||
|
|
|
|
|
|
|
||||||||||||||
|
|
|
|
|
ENTER |
|
|
|
|
|
|
CLR |
|
|
0 |
|
|
ENTER |
|
|
|
|
|
|
|
|
|
|
|
|
|
|
|
|
|
|
|
|
WIRELESS |
|
|
|
|
|
MUTE |
TUNE– |
SOUND |
|
|
MAIN |
SUB |
ROOM SETUP |
||||||||||
|
|
|
|
|
|
|
|
|
|
|
|
|
|
|||||||
|
|
|
|
|
|
|
|
|
|
|
|
|
|
|
|
|
|
|
|
|
|
|
|
|
|
|
|
|
|
|
|
|
|
|
|
|
|
|
|
|
|
|
|
|
|
|
|
|
|
|
|
|
|
|
|
|
|
|
|
|
|
|
Button |
What it does |
|
English |
|
|
|
|
||
RETURN |
Displays the PBC menu. |
|||
|
||||
|
|
|
|
|
Numbers |
Selects a numbered menu |
|
||
|
option. |
|
||
|
|
|||
|
|
|
|
|
|
Displays the previous menu page |
Deutsch |
||
|
(if there is one). |
|||
|
|
|||
|
|
|
|
|
|
Displays the next menu page (if |
|
||
|
there is one). |
|
||
|
|
|
|
|
ENTER |
Press to select highlighted menu |
Français |
||
|
option. |
|||
|
|
|||
|
|
|
|
|
Listening to the radio
The tuner can receive both FM and AM |
|
||||||||||||||||||||
broadcasts, and lets you memorize your |
Italiano |
||||||||||||||||||||
on using the radio, see More tuner features: |
|||||||||||||||||||||
favorite stations so you don’t have to manually |
|
||||||||||||||||||||
tune in every time you want to listen. For more |
|
||||||||||||||||||||
RDS on page 46. |
|
|
|
|
|
|
|
|
|
|
|
|
|
|
|
|
|
|
|||
|
|
|
|
|
|
|
|
|
|
|
|
|
|
|
|
|
|
||||
|
|
|
|
|
|
|
|
|
|
|
|
|
|
|
|
|
|
|
|
|
|
|
|
|
|
|
|
|
|
|
|
|
|
|
MASTER |
|
|
|
|
|
|
|
Nederlands |
|
|
STANDBY/ON |
|
|
|
|
|
|
VOLUME |
|
|
|
|
|
|
|
|
||||
|
CD |
FM/AM |
|
L1/L2 |
|
|
|
|
|
|
TV CONTROL |
|
|
|
|
|
|
||||
|
|
|
|
|
|
|
|
|
|
|
|||||||||||
|
|
|
|
|
|
|
|
|
|
|
|
|
|
|
|
|
|||||
|
DVD |
TUNER |
TV |
|
LINE |
|
|
|
|
|
|
|
|
|
|
|
|
|
|
|
|
|
|
|
|
|
|
CH |
INPUT |
|
VOL |
|
|||||||||||
|
FRONT |
|
|
|
|
|
|
|
|
|
|
||||||||||
|
|
|
|
|
|
|
|
|
|
|
|
|
|
|
|
|
|
|
|
|
|
SURROUND |
OPEN CLOSE |
|
|
|
|
|
|
|
|
|
|
|
|
|
|
|
|||||
|
|
8 |
|
0 |
|
|
|
|
|
|
|
|
|
|
|
|
|
|
|
|
|
|
|
|
|
|
|
|
|
|
|
|
|
|
|
|
|
|
|||||
|
|
|
|
|
|
|
|
|
|
|
|
||||||||||
|
|
|
|
|
|
|
|
BASS MODE DIALOGUE |
CH LEVEL |
|
|||||||||||
1 3 |
¡ |
|
|
SURROUND |
ADVANCED |
VIRTUAL SB |
|
Español |
|||||||||||||
|
|
|
|
|
|
|
|
|
|
|
|
|
|
|
|||||||
|
|
|
|
|
|
|
|
|
SETUP |
TEST TONE |
MIDNIGHT |
||||||||||
|
|
|
|
|
|
|
|
PROGRAM |
REPEAT |
RANDOM |
|
||||||||||
4 |
|
|
4 |
|
|
|
AUDIO |
SUBTITLE |
|
ANGLE |
|
||||||||||
|
|
7 |
|
|
|
|
|
|
|
|
|
|
|
|
|
|
|
|
|
|
|
|
|
|
|
|
|
|
|
|
ZOOM |
TOP MENU |
|
HOME |
|
|
|
||||||
|
|
|
|
|
|
|
|
|
|
MENU |
|
|
|
||||||||
DVD |
|
|
|
|
|
1 |
|
|
2 |
3 |
|
|
|
|
|
|
|||||
|
|
|
|
|
|
|
|
SYSTEM |
|
|
QUIET/ |
|
|||||||||
|
|
TUNE+ |
|
|
|
|
|
|
|
|
|
|
|
|
|
|
|
|
|
|
|
|
|
ST– |
ST+ |
|
|
4 |
|
|
5 |
6 |
|
|
|
|
|
|
|||||
|
|
|
|
DIMMER |
|
|
TIMER/ |
|
|||||||||||||
|
|
ENTER |
|
|
|
|
|
DISPLAY |
|
CLOCK |
|
||||||||||
|
|
|
|
|
|
|
7 |
|
|
8 |
9 |
|
|
|
|
|
|
||||
|
|
TUNE– |
|
|
|
|
|
|
SR+ |
FOLDER– |
FOLDER+ |
|
|||||||||
|
|
|
|
|
|
|
|
|
|
|
|||||||||||
|
|
|
|
|
|
|
|
|
|
CLR |
0 |
|
ENTER |
|
|||||||
|
|
|
|
|
|
|
|
|
|
|
|
|
|
WIRELESS |
|
||||||
|
|
|
|
|
|
|
|
|
|
MAIN |
SUB |
ROOM SETUP |
|
||||||||
MASTER
VOLUME
1 If the system isn’t already on, press STANDBY/ON to switch on.
25
En
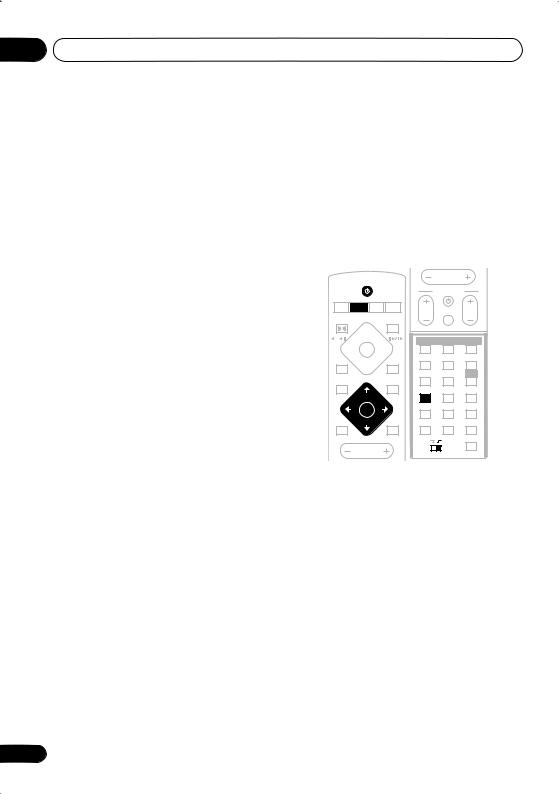
03 Getting started
2Press TUNER to switch to the tuner, then press repeatedly to select the AM or FM band.
The display shows the tuner band and frequency.
•If you’re using the front panel controls, the TUNER button switches between FM, AM and station presets (see Memorizing stations below).
3Tune to a frequency.
There are three tuning modes—manual, auto, and high-speed:
•Auto tuning: Press and hold TUNE +/– until the frequency display starts to move, then release. The tuner will stop on the next station it finds. Repeat to search for other stations.
•Manual tuning: Press TUNE +/– repeatedly to change the displayed frequency.
•High-speed tuning: Press and hold TUNE +/– until the frequency display starts to move rapidly. Keep the button held down until you reach the frequency you want. If necessary, fine tune the frequency using the manual tuning method.
Improving poor FM reception
If you’re listening to an FM station in stereo but the reception is weak, you can improve the sound quality by switching to mono.
1Tune to an FM radio station.
2Press SYSTEM SETUP.
3Use the /(cursor left/right) buttons to choose ‘FM Mode?’ then press ENTER.
4Use the / (cursor up/down) buttons to select ‘FM Mono’ then press ENTER.
The mono indicator ( ) lights when the tuner is in mono reception mode.
26
Select Auto above to switch back to auto-
stereo mode (the stereo indicator ( ) lights when receiving a stereo broadcast).
Memorizing stations
You can save up to 30 station presets so that you always have easy access to your favorite stations without having to tune in manually each time.
|
|
|
|
|
MASTER |
|
|
|
STANDBY/ON |
|
VOLUME |
|
|
|
|
|
|
|
||
|
|
|
|
TV CONTROL |
||
CD |
FM/AM |
L1/L2 |
|
|
|
|
DVD |
TUNER TV |
LINE |
CH |
INPUT |
VOL |
|
|
|
|
|
|||
FRONT |
|
|
OPEN CLOSE |
|
|
|
SURROUND |
|
|
|
|
||
|
|
8 |
0 |
|
|
|
|
|
|
|
BASS MODE |
DIALOGUE |
CH LEVEL |
|
|
|
|
SURROUND |
ADVANCED |
VIRTUAL SB |
1 |
3 |
¡ |
|
|
|
|
|
|
|
|
PROGRAM |
REPEAT |
RANDOM |
4 |
|
|
4 |
AUDIO |
SUBTITLE |
ANGLE |
|
|
|
|
|
||
|
|
7 |
|
|
|
|
|
|
|
|
ZOOM |
TOP MENU |
HOME |
|
|
|
|
MENU |
||
DVD |
|
|
|
1 |
2 |
3 |
|
|
|
|
SYSTEM |
TEST TONE |
QUIET/ |
|
|
|
|
SETUP |
MIDNIGHT |
|
|
|
TUNE+ |
|
4 |
5 |
6 |
|
ST– |
ST+ |
DIMMER |
DISPLAY |
TIMER/ |
|
|
|
ENTER |
|
CLOCK |
||
|
|
|
7 |
8 |
9 |
|
|
|
|
|
|||
|
|
TUNE– |
|
SR+ |
FOLDER– |
FOLDER+ |
|
|
|
|
CLR |
0 |
ENTER |
|
|
|
|
|
|
WIRELESS |
|
|
|
|
MAIN |
SUB |
ROOM SETUP |
|
|
MASTER |
|
|
|
|
|
|
VOLUME |
|
|
|
|
1Tune to an AM or FM radio station.
For the FM band, select mono or auto-stereo reception as necessary. This setting is saved along with the preset.
2Press SYSTEM SETUP.
3Use the /(cursor left/right) buttons to choose ‘St. Memory?’ then press ENTER.
4Use the / (cursor up/down) buttons to select the station preset you want.
There are 30 preset locations; each can store one station preset.
5Press ENTER to save the station preset.
En
 Loading...