

Pioneer XV-BD922FSW Operating Instruction
ENGLISH
HTZ-BD52
HTZ-BD32
HTZ-BD92HW
HTZ-BD82HF
XV-BD422W
XV-BD122W
XV-BD922FSW
XV-BD822FSW
S-BD422
S-BD122
S-BD922HW
S-BD822HF
S-BD922SW
Blu-ray Disc surround system
Système de cinéma maison Blu-ray Disc
Sistema surround de Blu-ray Disc
Blu-ray Disc receiver
Récepteur Blu-ray Disc
Receptor de Blu-ray Disc
Speaker System
Enceintes acoustiques
Sistemas de parlantes
Subwoofer
Enceinte d’extrêmes graves
Altavoz de subgraves
FRANÇAIS
ESPAÑOL
Register your product on
http://www.pioneerelectronics.com (US)
http://www.pioneerelectronics.ca (Canada)
•
Protect your new investment
The details of your purchase will be on file for reference in the event of an
insurance claim such as loss or theft.
•
Receive free tips, updates and service bulletins on
your new product
•
Improve product development
Your input helps us continue to design products that meet your needs.
•
Receive a free Pioneer newsletter
Registered customers can opt in to receive a monthly newsletter.
http://www.pioneerelectronics.com (US)
http://www.pioneerelectronics.ca (Canada)
Thank you for buying this Pioneer product.
Safety Information
Please read through these operating instructions so you will know how to operate your model properly.
After you have finished reading the instructions, put them away in a safe place for future reference.
IMPORTANT
The lightning flash with arrowhead symbol,
within an equilateral triangle, is intended to
alert the user to the presence of uninsulated
“dangerous voltage” within the product’s
enclosure that may be of sufficient
magnitude to constitute a risk of electric
shock to persons.
When using this product, confirm the safety
information shown on the bottom of the unit.
CAUTION
This product is a class 1 laser product classified
under the Safety of laser products, IEC 60825-1:2007.
CLASS 1 LASER PRODUCT
WARNING
This equipment is not waterproof. To prevent a fire or
shock hazard, do not place any container filled with
liquid near this equipment (such as a vase or flower pot)
or expose it to dripping, splashing, rain or moisture.
WARNING
Before plugging in for the first time, read the following
section carefully.
The voltage of the available power supply differs
according to country or region. Be sure that the
power supply voltage of the area where this unit
will be used meets the required voltage (e.g., 230 V
or 120 V) written on the rear panel.
CAUTION
RISK OF ELECTRIC SHOCK
DO NOT OPEN
CAUTION:
TO PREVENT THE RISK OF ELECTRIC
SHOCK, DO NOT REMOVE COVER (OR
BACK). NO USER-SERVICEABLE PARTS
INSIDE. REFER SERVICING TO QUALIFIED
SERVICE PERSONNEL.
VENTILATION CAUTION
When installing this unit, make sure to leave space
D3-4-2-2-4_B1_En
D58-5-2-2a_A1_En
D3-4-2-1-3_A1_En
D3-4-2-1-4*_A1_En
around the unit for ventilation to improve heat radiation
(at least 10 cm at top, 10 cm at rear, and 10 cm at each
side).
WARNING
Slots and openings in the cabinet are provided for
ventilation to ensure reliable operation of the product,
and to protect it from overheating. To prevent fire
hazard, the openings should never be blocked or
covered with items (such as newspapers, table-cloths,
curtains) or by operating the equipment on thick carpet
or a bed.
Operating Environment
Operating environment temperature and humidity:
+5 °C to +35 °C (+41 °F to +95 °F); less than 85 %RH
(cooling vents not blocked)
Do not install this unit in a poorly ventilated area, or in
locations exposed to high humidity or direct sunlight (or
strong artificial light)
The exclamation point within an equilateral
triangle is intended to alert the user to the
presence of important operating and
maintenance (servicing) instructions in the
literature accompanying the appliance.
D3-4-2-1-1_A1_En
D3-4-2-1-7b*_A1_En
D3-4-2-1-7c*_A1_En
11)
Read these instructions.
1)
Keep these instructions.
2)
Heed all warnings.
3)
Follow all instructions.
4)
Do not use this apparatus near water.
5)
Clean only with dry cloth.
6)
Do not block any ventilation openings. Install in
7)
Only use attachments/accessories specified by
the manufacturer.
12)
Use only with the cart, stand, tripod, bracket, or
table specified by the manufacturer, or sold with
the apparatus. When a cart is used, use caution
when moving the cart/apparatus combination to
avoid injury from tip-over.
accordance with the manufacturer’s
instructions.
Do not install near any heat sources such as
8)
radiators, heat registers, stoves, or other
apparatus (including amplifiers) that produce
heat.
Do not defeat the safety purpose of the polarized
9)
or grounding-type plug. A polarized plug has two
blades with one wider than the other. A
grounding type plug has two blades and a third
grounding prong. The wide blade or the third
prong are provided for your safety. If the provided
plug does not fit into your outlet, consult an
electrician for replacement of the obsolete outlet.
Protect the power cord from being walked on or
10)
pinched particularly at plugs, convenience
13)
Unplug this apparatus during lightning storms
or when unused for long periods of time.
14)
Refer all servicing to qualified service personnel.
Servicing is required when the apparatus has
been damaged in any way, such as power-supply
cord or plug is damaged, liquid has been spilled
or objects have fallen into the apparatus, the
apparatus has been exposed to rain or moisture,
does not operate normally, or has been dropped.
receptacles, and the point where they exit from
the apparatus.
NOTE:
This equipment has been tested and found to comply with the limits for a Class B digital device, pursuant to Part 15
of the FCC Rules. These limits are designed to provide reasonable protection against harmful interference in a
residential installation. This equipment generates, uses, and can radiate radio frequency energy and, if not installed
and used in accordance with the instructions, may cause harmful interference to radio communications. However,
there is no guarantee that interference will not occur in a particular installation. If this equipment does cause
harmful interference to radio or television reception, which can be determined by turning the equipment off and on,
the user is encouraged to try to correct the interference by one or more of the following measures:
— Reorient or relocate the receiving antenna.
— Increase the separation between the equipment and receiver.
— Connect the equipment into an outlet on a circuit different from that to which the receiver is connected.
— Consult the dealer or an experienced radio/TV technician for help.
D3-7-13-69_En
D8-10-1-2_A1_En
WARNING: Handling the cord on this product or
cords associated with accessories sold with the
product may expose you to chemicals listed on
proposition 65 known to the State of California and
other governmental entities to cause cancer and
birth defect or other reproductive harm.
D36-P5_B1_En
This Class B digital apparatus complies with
Canadian ICES-003.
D8-10-1-3_A1_En

If the AC plug of this unit does not match the AC
outlet you want to use, the plug must be removed
and appropriate one fitted. Replacement and
mounting of an AC plug on the power supply cord of
this unit should be performed only by qualified
service personnel. If connected to an AC outlet, the
cut-off plug can cause severe electrical shock. Make
sure it is properly disposed of after removal.
The equipment should be disconnected by removing
the mains plug from the wall socket when left unused
for a long period of time (for example, when on
vacation).
D3-4-2-2-1a_A1_En
CAUTION
The STANDBY/ON switch on this unit will not
completely shut off all power from the AC outlet.
Since the power cord serves as the main disconnect
device for the unit, you will need to unplug it from the
AC outlet to shut down all power. Therefore, make
sure the unit has been installed so that the power
cord can be easily unplugged from the AC outlet in
case of an accident. To avoid fire hazard, the power
cord should also be unplugged from the AC outlet
when left unused for a long period of time (for
example, when on vacation).
D3-4-2-2-2a*_A1_En
Condensation
If the player is moved suddenly from a cold place into a
warm room (in winter, for example) or if the
temperature in the room in which the player is installed
rises suddenly due to a heater, etc., water droplets
(condensation) may form inside (on operating parts and
the lens). When condensation is present, the player will
not operate properly and playback is not possible. Let
the player stand at room temperature for 1 or 2 hours
with the power turned on (the time depends on the
extent of condensation). The water droplets will
dissipate and playback will become possible.
Condensation can also occur in the summer if the
player is exposed to the direct wind from an
air-conditioner. If this happens, move the player to a
different place.
This product is for general household purposes. Any
failure due to use for other than household purposes
(such as long-term use for business purposes in a
restaurant or use in a car or ship) and which requires
repair will be charged for even during the warranty
period.
S005_A1_En
K041_A1_En
POWER-CORD CAUTION
Handle the power cord by the plug. Do not pull out the
plug by tugging the cord and never touch the power
cord when your hands are wet as this could cause a
short circuit or electric shock. Do not place the unit, a
piece of furniture, etc., on the power cord, or pinch the
cord. Never make a knot in the cord or tie it with other
cords. The power cords should be routed such that they
are not likely to be stepped on. A damaged power cord
can cause a fire or give you an electrical shock. Check
the power cord once in a while. When you find it
damaged, ask your nearest PIONEER authorized
service center or your dealer for a replacement.
S002*_A1_En
WARNING
To prevent a fire hazard, do not place any naked flame
sources (such as a lighted candle) on the equipment.
D3-4-2-1-7a_A1_En
IMPORTANT NOTICE
THE MODEL NUMBER AND SERIAL NUMBER OF
THIS EQUIPMENT ARE ON THE REAR OR BOTTOM.
RECORD THESE NUMBERS IN THE SPACE BELOW
FOR FUTURE REFERENCE.
MODEL NO.
SERIAL NO.
D36-AP9-2_A1_En
The Safety of Your Ears is in Your Hands
Get the most out of your equipment by playing it at a
safe level – a level that lets the sound come through
clearly without annoying blaring or distortion and, most
importantly, without affecting your sensitive hearing.
Sound can be deceiving. Over time, your hearing
“comfort level” adapts to higher volumes of sound, so
what sounds “normal” can actually be loud and
harmful to your hearing. Guard against this by setting
your equipment at a safe level BEFORE your hearing
adapts.
ESTABLISH A SAFE LEVEL:
• Set your volume control at a low setting.
• Slowly increase the sound until you can hear it
comfortably and clearly, without distortion.
• Once you have established a comfortable sound
level, set the dial and leave it there.
BE SURE TO OBSERVE THE FOLLOWING
GUIDELINES:
• Do not turn up the volume so high that you can’t
hear what’s around you.
• Use caution or temporarily discontinue use in
potentially hazardous situations.
• Do not use headphones while operating a motorized
vehicle; the use of headphones may create a traffic
hazard and is illegal in many areas.
S001a_A1_En

WARNING
Changes or modifications not expressly approved by the party responsible for compliance could
void the user's authority to operate the equipment.
NOTE :
THE MANUFACTURER IS NOT RESPONSIBLE FOR ANY RADIO OR TV INTERFERENCE
CAUSED BY UNAUTHORIZED MODIFICATIONS TO THIS EQUIPMENT. SUCH MODIFICATIONS
COULD VOID THE USER’S AUTHORITY TO OPERATE THE EQUIPMENT.
FCC warning
This device complies with Part 15 of the FCC Rules. Operation is subject to the following two
conditions: (1) this device may not cause harmful interference, and (2) this device must accept any
interference received, including interference that may cause undesired operation.
FCC RF Radiation Exposure Statement
This equipment complies with FCC RF radiation exposure limits set forth for an uncontrolled
environment. This device and its antenna must not be co-located or operating in conjunction with
any other antenna or transmitter.
“To comply with FCC RF exposure compliance requirements, this grant is applicable to only Mobile
Configurations. The antennas used for this transmitter must be installed to provide a separation
distance of at least 20 cm from all persons and must not be co-located or operating in conjunction
with any other antenna or transmitter.”
Canada IC warning
This device complies with Industry Canada licence-exempt RSS standard(s). Operation is subject
to the following two conditions: (1) this device may not cause interference, and (2) this device must
accept any interference, including interference that may cause undesired operation of the device.
IC Radiation Exposure Statement
This equipment complies with IC RSS-102 radiation exposure limits set forth for an uncontrolled
environment. This equipment should be installed and operated with minimum distance 20 cm
between the radiator and your body.
Cautions on 3D Viewing
• If you should experience any fatigue or discomfort while viewing 3D images, stop viewing them.
• Children, particularly those under 6, may be more prone to sensitivity, so guardians should watch for
any signs of fatigue or discomfort.
• When viewing 3D images, rest periodically.
Extendedviewingof3Dimageswithoutrestperiodscouldcausefatigueordiscomfort.

Notes on Copyrights
• Because AACS (Advanced Access Content
System) is approved as content protection
system for Blu-ray Disc format, similar to use
of CSS (Content Scramble System) for DVD
format, certain restrictions are imposed on
playback, analog signal output, etc., of AACS
protected contents. The operation of this
product and restrictions on this product may
vary depending on your time of purchase
as those restrictions may be adopted and/
or changed by AACS after the production of
this product.
• Furthermore, BD-ROM Mark and BD+ are
additionally used as content protection
systems for Blu-ray Disc format, which
imposes certain restrictions including
playback restrictions for BD-ROM Mark
and/or BD+ protected contents. To obtain
additional information on AACS, BD-ROM
Mark, BD+, or this product, please contact
an authorized Customer Service Center.
• Many BD-ROM/DVD discs are encoded with
copy protection. Because of this, you should
only connect your player directly to your TV,
not to a VCR. Connecting to a VCR results
in a distorted picture from copy-protected
discs.
• This item incorporates copy protection
technology that is protected by U.S. patents
and other intellectual property rights of
Rovi Corporation. Reverse engineering and
disassembly are prohibited.
• Under the U.S. Copyright laws and Copyright
laws of other countries, unauthorized
recording, use, display, distribution, or
revision of television programs, videotapes,
BD-ROM discs, DVDs, CDs and other
materials may subject you to civil and/or
criminal liability.

Important Notice for TV colour
system
The colour system of this player differs
according to currently playing discs.
For example, when the player plays the disc
recorded in the NTSC colour system, the image
is output as an NTSC signal.
Only the multi system colour TV can receive all
signals output from the player.
• If you have a PAL colour system TV, you will
see just distorted images when using discs
or video contents recorded in NTSC.
• The multi system colour TV changes the
colour system automatically according to
input signals. In case that the colour system
is not changed automatically, turn it off and
then on to see normal images on screen.
• Even if the disc recorded in NTSC colour
system are well displayed on your TV, these
may not be recorded correctly on your
recorder.

Table of Contents
1 Before you start
10 Introduction
10 – Supplied accessories
10 – Accessories of speaker box (HTZ-BD52)
10 – Accessories of speaker box (HTZ-BD32)
10 – Accessories of speaker box (HTZ-BD92HW)
11 – Accessories of speaker box (HTZ-BD82HF)
12 – Putting the batteries in the remote control
12 – Software update
13 – Types of discs/les that can be played
19 – Trademarks and licenses
20 Remote control
22 Front panel
23 Rear panel
23 – HTZ-BD52/HTZ-BD32
23 – HTZ-BD92HW/HTZ-BD82HF
2 Connecting
24 Assemble the speakers
24 – Speaker setup for HTZ-BD52
25 – Wall mounting the speaker for HTZ-BD52
26 – Additional notes on speaker for HTZ-BD52
26 – Positioning the system for HTZ-BD52
27 – Speaker setup for HTZ-BD32
27 – Wall mounting the speaker for HTZ-BD32
28 – Additional notes on speaker for HTZ-BD32
28 – Positioning the system for HTZ-BD32
29 – Speaker setup for HTZ-BD92HW
30 – Wall mounting the speaker for HTZ-
BD92HW
31 – Additional notes on speaker for HTZ-
BD92HW
31 – Positioning the system for HTZ-BD92HW
32 – Speaker setup for HTZ-BD82HF
34 – Wall mounting the speakers for HTZ-
BD82HF
35 – Additional notes on speaker for HTZ-
BD82HF
35 – Positioning the system for HTZ-BD82HF
36 Connecting to Your TV
36 – HDMI connection
37 – Video connection
37 Antenna connection
38 Connections with external device
38 – AUX connection
38 – PORTABLE IN connection
39 – OPTICAL IN 1/2 connection
39 – HDMI IN 1/2 connection
40 – Connecting optional Bluetooth® ADAPTER
40 Connecting to your Home Network
40 – Wired network connection
41 – Wireless network connection
42 – Wireless network setup
43 – WPS setup (Wi-Fi Protected Setup)
45 USB device connection
45 – About USB devices
45 – Connecting the USB device
3 Getting Started
46 Making settings using the Setup Navigator
menu
47 Operating the TV with the player’s remote
control
48 – TV preset code list
4 Playback
49 Playing discs or les
50 – Forward and reverse scanning
50 – Playing specic chapters, tracks or les
50 – Skipping content
50 – Playing in slow motion
50 – Step forward and step reverse
50 – Playing a specic section within a title or
track repeatedly (A-B Repeat)
50 – Playing repeatedly (Repeat Play)
51 – Playing in the desired order (Programmed
Play)
51 – Making bookmarks
51 – Zoom
52 – Playing photos as slideshows
52 – Switching the camera angles
52 – Switching the subtitles
53 – Switching the audio
53 – Switching the CD/SACD playback area
53 – Displaying the disc information

54 – Enjoying BONUSVIEW or BD-LIVE
55 – Playback functions
56 Using the TOOLS menu
56 – Playing from a specic time (Time Search)
57 – Playing a specic title, chapter, track or le
(Search)
57 – Playing specied range of discs, titles or
chapter (track/le) in random order
57 – Continuing playback from a specied
position (Continued Viewing Playback)
5 Playback from Home Media
Gallery
58 About Home Media Gallery
58 – About network playback
60 Playback le on the network
60 Disc/USB playback
60 – Playing back image les
61 Playing in the desired order (Playlist)
61 – Adding tracks/les
61 – Playing the playlist
61 – Deleting tracks/les from the playlist
6 Playing the web contents
62 Available web contents
62 Playing the items
8 Advanced settings
71 Changing the settings
71 – Operating the initial setup screen
78 – Software updating
79 – Restoring all the settings to the factory
default settings
80 – Language code table and country/area
code table
9 Troubleshooting
81 – Picture
82 – Sound
82 – Playback
83 – Network
85 – Others
10 Appendix
86 Specications
89 Maintenance
89 – Handling the unit
89 – Notes on discs
90 Important Information Relating to Network
Services
1
2
3
4
5
6
7 Other Operating
64 Recording Audio CD to a USB device
65 iPod/iPhone playback
66 – Playing your iPod/iPhone
67 Radio Operations
67 – Listening to the radio
67 – Presetting the radio stations
67 – Deleting all the saved stations
67 – Improving poor FM reception
68 Bluetooth® ADAPTER for Wireless Enjoyment
of Music
68 – Wireless music play
68 – Listen to music on a Bluetooth wireless
technology enabled device
69 Karaoke
70 Sound
7
8
9
10
Before you start10
En
Chapter 1
Before you start
1
Before you start
Introduction
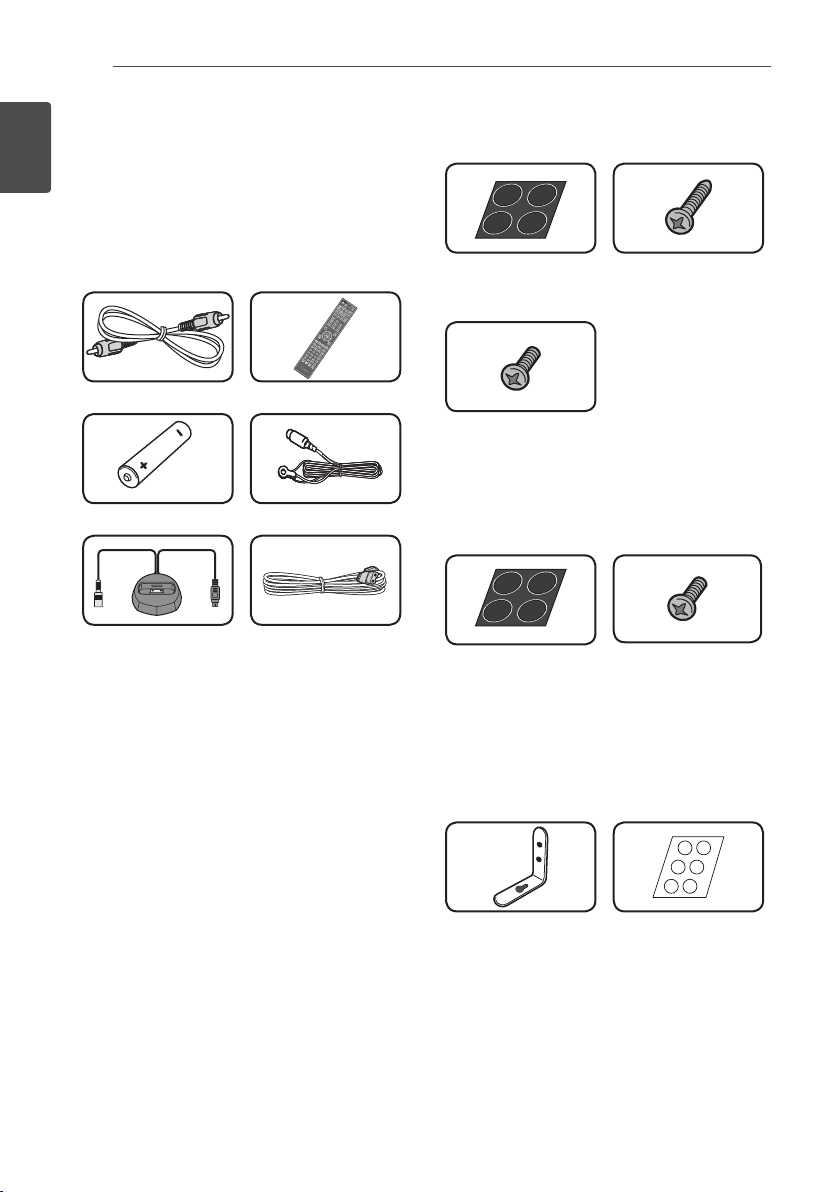
Supplied accessories
Video cable (1) Remote control (1)
Battery (2)
iPod cradle (1) Power cord
•Operatinginstructions(Thisdocument)
FM antenna (1)
Accessories of speaker box
(HTZ-BD52)
Non-skid pads (1) Screws M4 x 16 (16)
(They are used to fix to the
base and lower cabinet.)
Screws M4 x 12 (8)
(They are used to fix the
upper and lower cabinet.)
Accessories of speaker box
(HTZ-BD32)
Non-skid pads (5)
Screws M3.5x12
[Taping type] (4)
(These screws are used
to fix the speakers to the
stands.)
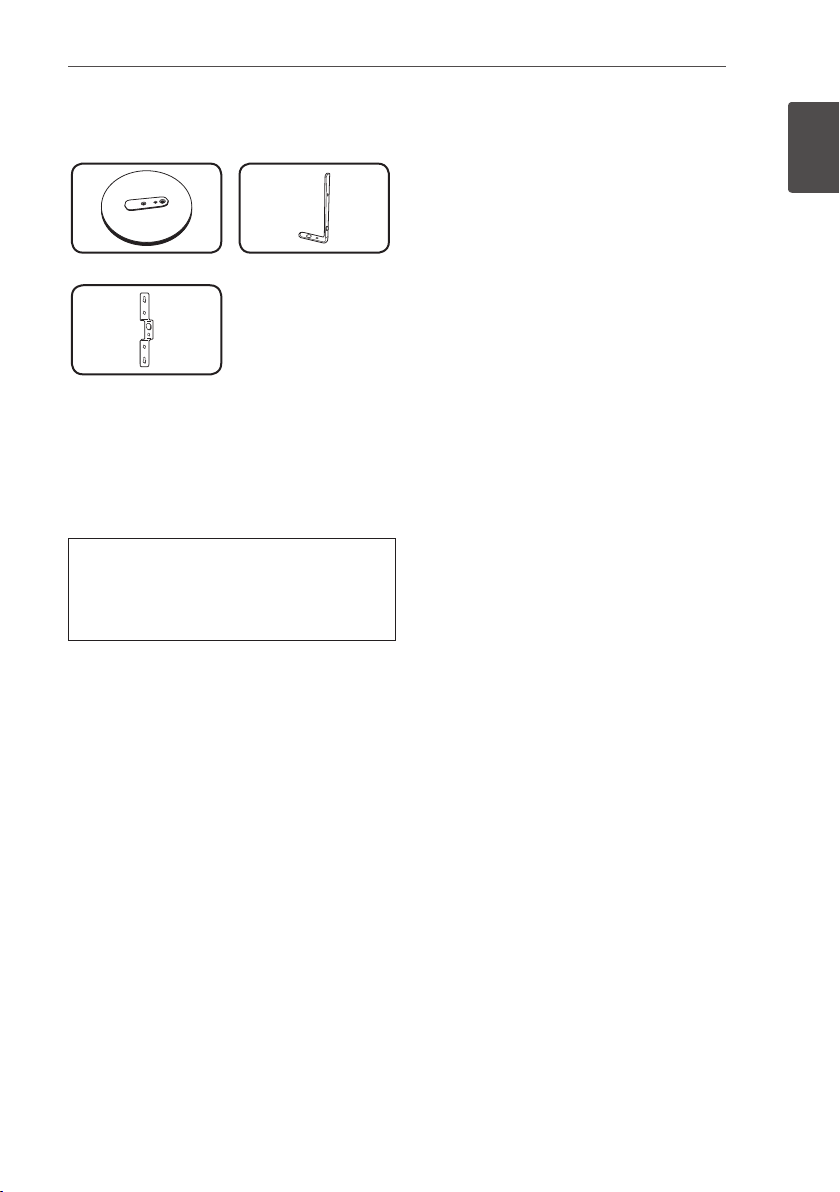
Accessories of speaker box
(HTZ-BD92HW)
Bracket (2) Non-skid pads (1)
• Wire stays (4)
Accessories of speaker box
(HTZ-BD82HF)
Base (2) Stand arm (2)
Bracket (2)
• Screw (Bind head) (2)
• Screw (Flat head) (4)
• Hexagonal nut (2)
• Seal (1)
WARNING
Store small parts out of the reach of
children and infants. If accidentally
swallowed, contact a doctor immediately.
Before you start 11
En
1
Before you start
Before you start12
En
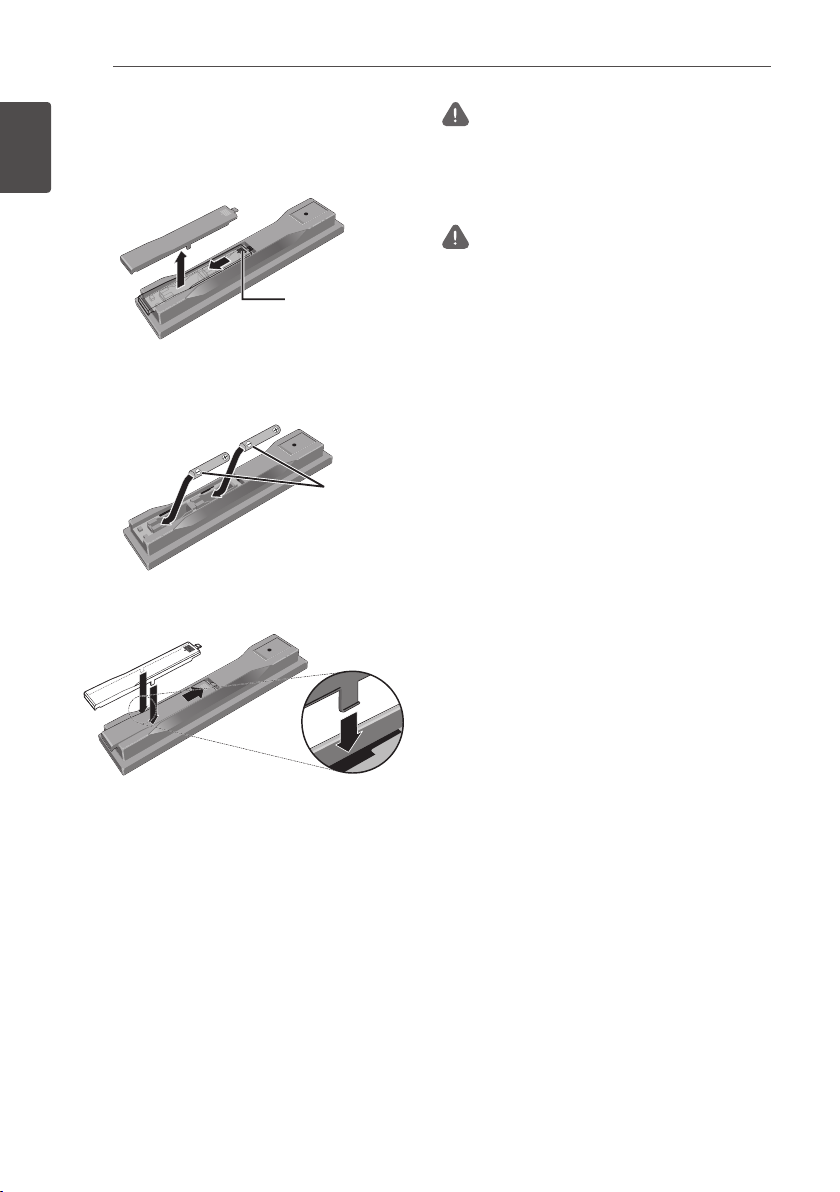
Putting the batteries in the
remote control
1. Open the rear cover.
1
Before you start
2. Insert the batteries (AAA/R03 x 2).
Insert as indicated by the +/* marks into
the battery compartment.
3. Close the rear cover.
Close securely (a click should be heard).
The batteries included with the player
have been provided to allow you to check
product operation and may not last long. We
recommend using alkaline batteries that have
a longer life.
Press lightly on
this part and slide
into the direction
of the arrow.
Insert the
negative (*)
side first.
WARNING
• Do not use or store batteries in direct sunlight or
other excessively hot place, such as inside a car
or near a heater. This can cause batteries to leak,
overheat, explode or catch fire. It can also reduce
the life or performance of batteries.
Caution
• Do not use any batteries other than the ones
specified. Also, do not use a new battery together
with an old one.
• When loading the batteries into the remote control,
set them in the proper direction, as indicated by
the polarity marks (+ and *).
• Do not heat batteries, disassemble them, or throw
them into flames or water.
• Batteries may have different voltages, even if they
look similar. Do not use different kinds of batteries
together.
• To prevent leakage of battery fluid, remove the
batteries if you do not plan to use the remote
control for a long period of time (1 month or more).
If the fluid should leak, wipe it carefully off the
inside of the case, then insert new batteries. If a
battery should leak and the fluid should get on your
skin, flush it off with large quantities of water.
• When disposing of used batteries, please comply
with governmental regulations or environmental
public institution’s rules that apply in your country/
area.
Software update
Product information on this product is provided
on the Pioneer website. Check this website
for update and service information on this
product.
http://www.pioneerelectronics.com
Before you start 13
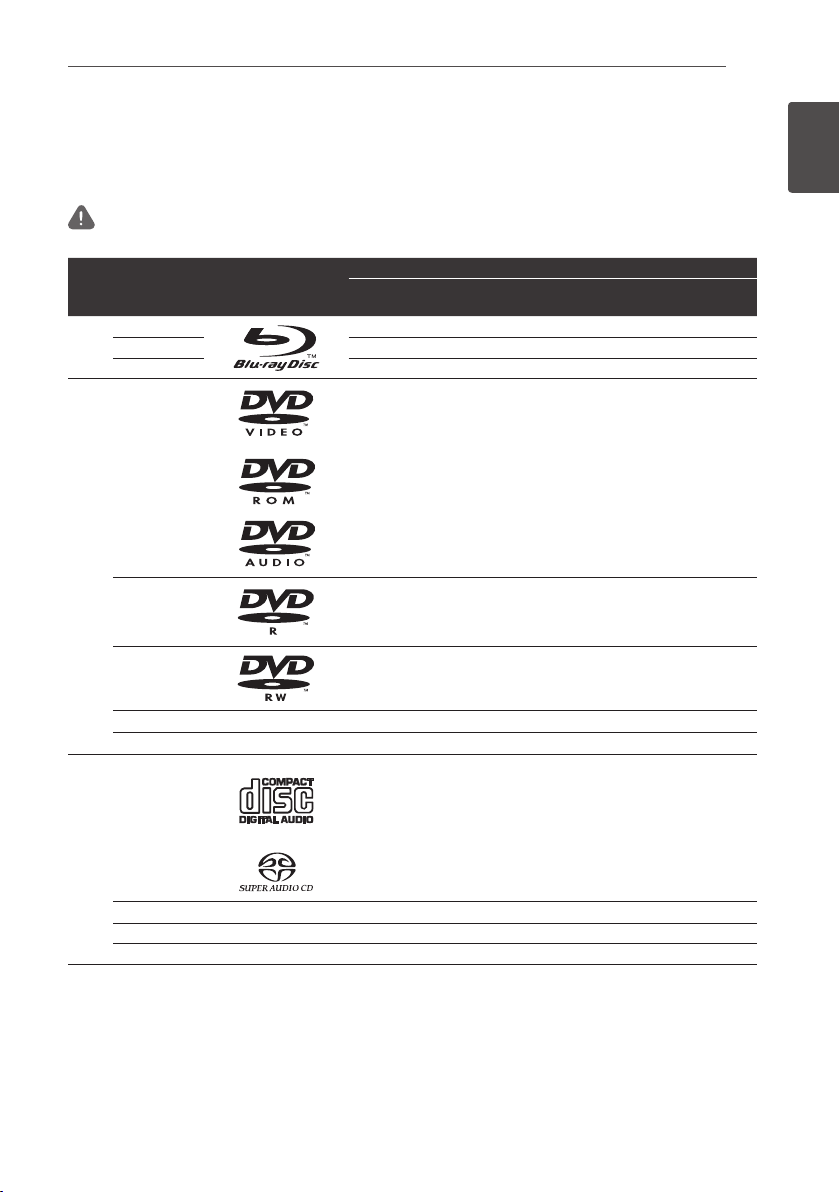
Types of discs/les that can be played
Playable discs
Discs with the logo marks below indicated on the disc label, package or jacket can be played.
Caution
• Only the discs that have been finalized can be played.
Disc type Logo
BD-ROM
2
BD
BD-R
BD-RE
BDMV BDAV
1 1
1 1
1 1
Application format
DVD-
DVD VR
Video
CD-DA
DTS-CD
DATA-
DISC
En
1
Before you start
1
DVD-ROM
1 1 1
DVD
2,3,4
DVD-R
DVD-RW
DVD+R
DVD+RW
CD-DA
(Audio CD)
3,7
2,3
3
8
6
1
6
1
7
1
1
1 1 1
7
1 1 1
1 1 1
1 1 1
1
CD
3
CD-R
3
CD-RW
CD-ROM
1. Discs on which video, image or audio files are recorded. This player does not support multisession discs or multiborder
recording.
2 Including dual-layered discs.
3. Finalize them before playing them on this player.
4 DVD-R for Authoring discs (3.95 and 4.7 GB) cannot be played.
5. Including the AVCHD format.
6. Including the AVCREC format.
7. Version 1.0 DVD-RW discs cannot be played.
8. Including Video CDs.
1 1
1 1
1 1

Before you start14
En
• "Blu-ray Disc", "Blu-ray" and "Blu-ray Disc" logo
are trademarks of Blu-ray Disc Association.
•
1
Before you start
• HD DVDs
• DVD-RAM discs
It is possible that some discs other than the
ones listed above may not be playable either.
• Some discs cannot be played, even if one of the
• To play 8 cm discs, set the disc in the 8 cm disc
is a trademark of DVD Format/Logo
Licensing Corporation.
Discs that cannot be played
Note
logo marks on the previous page is indicated.
depression in the center of the disc tray. No
adapter is necessary. 8 cm BD-ROMs cannot be
played.
About playback of unauthorized
copies
Cinavia Notice
This product uses Cinavia technology to
limit the use of unauthorized copies of some
commercially-produced film and videos and
their soundtracks. When a prohibited use of an
unauthorized copy is detected, a message will
be displayed and playback or copying will be
interrupted.
More information about Cinavia technology
is provided at the Cinavia Online Consumer
Information Center at http://www.cinavia.com.
To request additional information about Cinavia
by mail, send a postcard with your mailing
address to: Cinavia Consumer Information
Center, P.O. Box 86851, San Diego, CA, 92138,
USA.
Copyright 2004-2010 Verance Corporation.
Cinavia™ is a Verance Corporation trademark.
Protected by U.S. Patent 7,369,677 and
worldwide patents issued and pending under
license from Verance Corporation. All rights
reserved.
About audio formats
The following audio formats are supported on
this player:
• Dolby TrueHD
• Dolby Digital Plus
• Dolby Digital
• DTS-HD Master Audio
• DTS-HD High Resolution Audio
• DTS Digital Surround
• MPEG audio (AAC)
• Linear PCM
Manufactured under license from Dolby
Laboratories. Dolby and the double-D symbol are
trademarks of Dolby Laboratories.
Manufactured under license under U.S. Patent
Nos: 5,956,674; 5,974,380; 6,226,616; 6,487,535;
7,392,195; 7,272,567; 7,333,929; 7,212,872 &
other U.S. and worldwide patents issued &
pending. DTS-HD, the Symbol, & DTS-HD and
the Symbol together are registered trademarks &
DTS-HD Master Audio | Essential is a trademark
of DTS, Inc. Product includes software. © DTS,
Inc. All Rights Reserved.
Playing BDs
• BDs (BDMV) compatible with the formats
below can be played.
– Blu-ray Disc Read-Only (ROM) Format
Version 2
– Blu-ray Disc Recordable (R) Format
Version 2
– Blu-ray Disc Rewritable (RE) Format
Version 3
This player supports BD-ROM Profile 5.
"Blu-ray 3D" and "Blu-ray 3D" logo are
trademarks of Blu-ray Disc Association.
BONUSVIEW functions such as playback
of secondary video (Picture-in-Picture) and
secondary audio can be used. The data
used with the BONUSVIEW functions (the
secondary video (Picture-in-Picture) and
secondary audio data) may be stored in the
storage. For details on secondary video and
secondary audio playback, refer to the disc’s
instructions.
Playing DVDs
Before you start 15
En
"BONUSVIEW" is trademark of Blu-ray Disc
Association.
BD-LIVE functions such as downloading
movie trailers or additional audio and
subtitle languages and playing on-line
games can be enjoyed over the Internet. The
data downloaded with the BD-LIVE function
(trailers, etc.) is stored in the storage. Refer
to the disc’s instructions for details about
BD-LIVE functions.
"BD-LIVE" logo is trademark of Blu-ray Disc
Association.
With BD-ROMs, it is possible to use
BD-J (Java) applications to create highly
interactive titles, for example including
games.
This label indicates playback compatibility with
DVD-RW discs recorded in VR format (Video
Recording format). However, for discs recorded
with a record-only-once encrypted program,
playback can only be achieved using a CPRM
compatible device.
The AVCHD is a high definition (HD) digital
video camera recorder format recording highdefinition onto certain media by using highly
efficient codec technologies.
"AVCHD" and the "AVCHD" logo are trademarks
of Panasonic Corporation and Sony Corporation.
About region numbers
Blu-ray Disc Player and BD-ROM or DVD-Video
discs are assigned region numbers according
to the region in which they are sold.
This player’s region numbers are:
• BD-ROM: A
• DVD-Video: 1
Discs not including these numbers cannot be
played. Discs playable on this player are as
shown below.
• BDs: A (including A) and ALL
• DVDs: 1 (including 1) and ALL
1
Before you start
Oracle and Java are registered trademarks of
Oracle and/or its affiliates. Other names may
be trademarks of their respective owners.
• BDs (BDAV) compatible with the formats
below can be played.
– Blu-ray Disc Recordable (R) Format
Version 1
– Blu-ray Disc Rewritable (RE) Format
Version 2
Playing CDs
Regarding copy protected CDs: This player
is designed to conform to the specifications
of the Audio CD format. This player does not
support the playback or function of discs that
do not conform to these specifications.
Before you start16
Root
En
DualDisc playback
A DualDisc is a two-sided disc, one side of
which contains DVD content - video, audio,
etc. - while the other side contains non-DVD
1
content such as digital audio material.
Before you start
The DVD side of a DualDisc can be played on
this player.
The non-DVD, audio side of the disc is not
compatible with this player.
It is possible that when loading or ejecting
a DualDisc, the opposite side to that being
played will be scratched. Scratched discs may
not be playable.
For more detailed information on the DualDisc
specification, please refer to the disc
manufacturer or disc retailer.
Playing discs created on computers or
BD/DVD recorders
• It may not be possible to play discs recorded
using a computer due to the application
settings or computer’s environment settings.
Record discs in a format playable on this
player. For details, contact the dealer.
• It may not be possible to play discs
recorded using a computer or a BD/DVD
recorder, if burn quality is not good due to
characteristics of the disc, scratches, dirt on
the disc, dirt on the recorder’s lens, etc.
About video, audio, and image files
and folders
Audio and image files can be played on this
player when the folders on the disc or USB
device are created as described below.
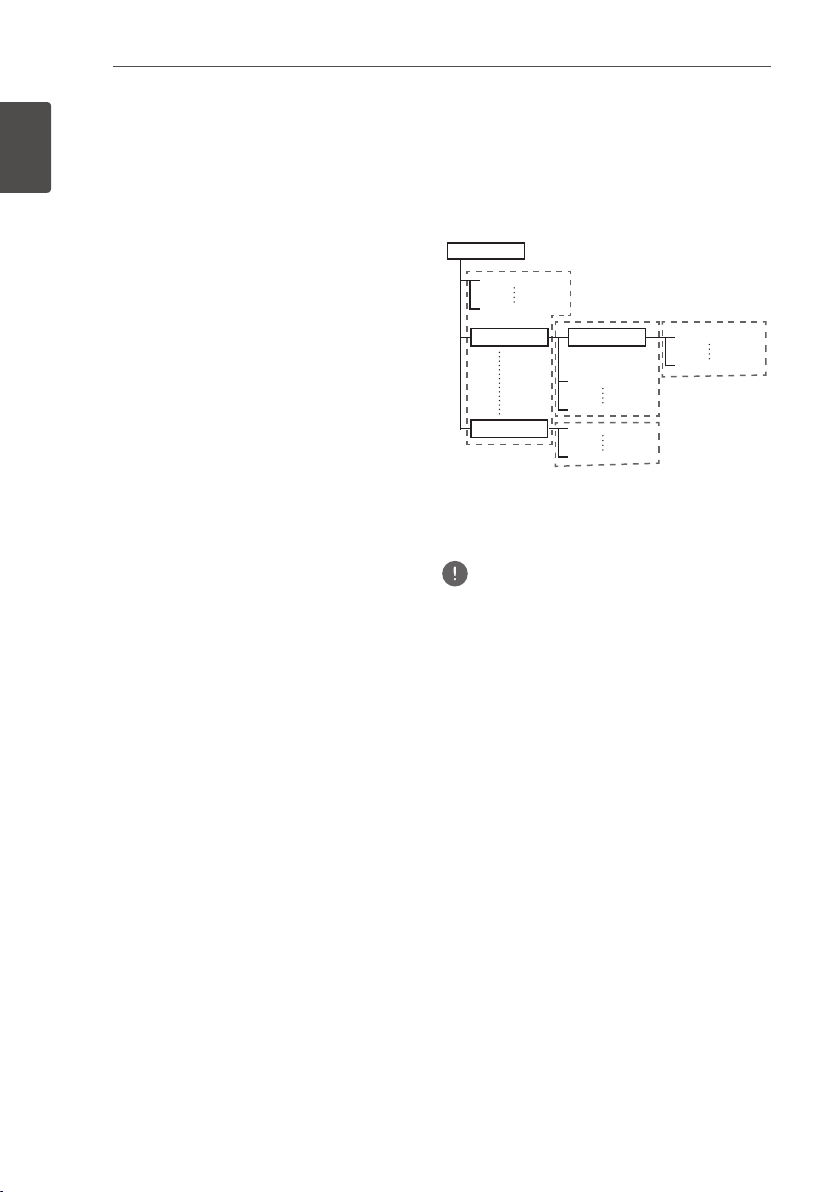
Example of folder structure:
001.jpg/001.mp3
xxx.jpg/xxx.mp3
01 Folder
XX Folder
* The number of folders and files within a
single folder (including the root directory) is
limited to a maximum of 256. Also, keep the
number of folder layers to a maximum of 5.
Note
• The file and folder names displayed on this player
may differ from those displayed on a computer.
*
Folder
001.jpg/001.mp3
xxx.jpg/xxx.mp3
001.jpg/001.mp3
xxx.jpg/xxx.mp3
*
001.jpg/001.mp3
xxx.jpg/xxx.mp3
*
*

Before you start 17
En
Playable les
Video, image and audio files recorded on
DVDs, CDs or USB devices can be played.
Supported video file formats
• DivX Plus HD
DivX Certified
PlusTM HD (H.264/MKV) video up to 1080p
HD including premium content.
ABOUT DIVX VIDEO: DivX
format created by DivX, LLC, a subsidiary
of Rovi Corporation. This is an official DivX
Certified® device that plays DivX video. Visit
divx.com for more information and software
tools to convert your files into DivX videos.
ABOUT DIVX VIDEO-ON-DEMAND: This DivX
Certified
to play purchased DivX Video-on-Demand
(VOD) movies. To obtain your registration
code, locate the DivX VOD section in your
device setup menu. Go to vod.divx.com for
more information on how to complete your
registration.
DivX®, DivX Certified®, DivX PlusTM HD and
associated logos are trademarks of Rovi
Corporation or its subsidiaries and are used
under license.
®
to play DivX® and DivX
®
is a digital video
®
device must be registered in order
Note
• This DivX® Certified device must be registered
in order to play DivX Video-on-Demand (VOD)
content. First generate the DivX VOD registration
code for your device and submit it during the
registration process. Important: DivX VOD content
is protected by a DivX DRM (Digital Rights
Management) system that restricts playback to
registered DivX Certified devices. If you try to play
DivX VOD content not authorized for your device,
the message
and your content will not be played. Learn more at
www.divx.com/vod.
– This player’s DivX VOD registration code can
be checked at
Playback
Code
– The number of views is restricted for some
DivX VOD files. When such files are played on
this player, the remaining number of views is
displayed. Files for which the remaining number
of views has reached 0 cannot be played (
DivX rental has expired is displayed
which the number of views is not restricted
can be played as many times as you like (the
remaining number of views is not displayed).
Authorization Error
HOME MENU
DivX(R) VOD DRM
d
(page 73).
will be displayed
Initial Setup
d
Registration
d
). Files for
1
Before you start
d
This
Before you start18
En
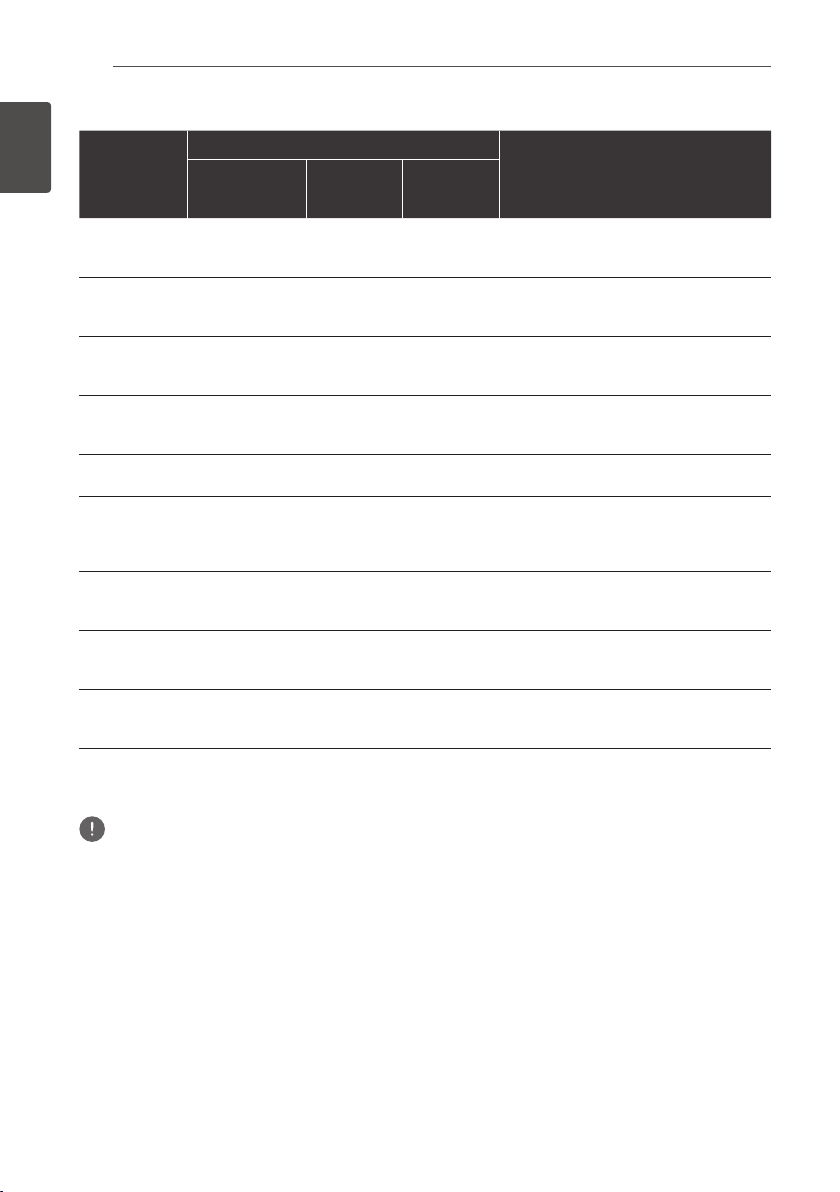
Table of Playable Files
Playable media
1
Before you start
Playable files
(Extensions)
MP3
(.mp3)
WMA
(.wma)
LPCM
(.wav)
FLAC
(.flac)
JPEG
(.jpg/.jpeg)
DivX
(.avi/.divx/.mkv)
MP4
(.mp4)
WMV
(.wmv)
AVI
(.avi)
1. This unit supports FAT16, FAT32 and NTFS file systems.
2. A requirement for playing files as a DMP. For details, see page 58.
DVD-R/RW/-R DL/
+R/+RW/+R DL,
CD-R/RW
1 1 1
1 1 1
1 1 1
1 1
1 1 1
1 1 1
1 1 1
1 1 1
1 1 1
USB devices
1
Network
2
Sampling frequencies: Up to 48 kHz
Bit rate: Up to 320 kbps
Audio type: MPEG-1 Audio Layer 3
Sampling frequencies: Up to 48 kHz
Bit rate: Up to 192 kbps
Audio type: WMA version 9
Sampling frequencies: Up to 192 kHz
Quantization bitrate: 16 bit
Channel: 2ch
Sampling frequencies: Up to 192 kHz
Quantization bitrate: 16 bit, 24 bit
Channel: 2ch
Maximum resolution: 4 000 x 3 000 pixels
Supported versions: Through DivX
Maximum resolution:
Up to 1 920 x 1 080 (DivX® PLUS HD)
Up to 1 280 x 720 (MKV)
Maximum resolution: Up to 1 920 x 1 080
Video: MPEG4, MPEG-4 AVC (level 4.1)
Audio: AAC, MP3
Maximum resolution: Up to 1 280 x 720
Video: WMV9, WMV9AP (VC-1)
Audio: WMA
Maximum resolution: Up to 1 920 x 1 080
Video: MPEG4
Audio: MP3, AAC, AC-3
File specifications
®
PLUS HD
Note
• Depending on the file structure and server capacity, it may not be possible to play certain files, even for files
indicated on the table of playable files above.
• Copyright-protected files and contents recorded from digital broadcasts (satellite, cable or digital terrestrial)
cannot be played via LAN.
• Files protected by DRM (Digital Rights Management) cannot be played.
• AVCHD contents cannot be played via LAN.

Trademarks and licenses
The terms HDMI and HDMI High-Definition
Multimedia Interface, and the HDMI Logo are
trademarks or registered trademarks of HDMI
Licensing, LLC in the United States and other
countries.
Manufactured under license from Dolby
Laboratories. “Dolby” and the double-D symbol
are trademarks of Dolby Laboratories.
Manufactured under license under U.S. Patent
Nos: 5,956,674; 5,974,380; 6,226,616; 6,487,535;
7,392,195; 7,272,567; 7,333,929; 7,212,872 &
other U.S. and worldwide patents issued &
pending. DTS-HD, the Symbol, & DTS-HD and
the Symbol together are registered trademarks
& DTS-HD Master Audio | Essential is a
trademark of DTS, Inc. Product includes
software. © DTS, Inc. All Rights Reserved.
Before you start 19
“x.v.Colour”, and are
trademarks of Sony Corporation.
“Made for iPod” and “Made for iPhone”
mean that an electronic accessory has been
designed to connect specifically to iPod, or
iPhone, respectively, and has been certified
by the developer to meet Apple performance
standards. Apple is not responsible for the
operation of this device or its compliance with
safety and regulatory standards. Please note
that the use of this accessory with iPod or
iPhone may affect wireless performance.
iPhone, iPod, iPod classic, iPod nano, and iPod
touch are trademarks of Apple Inc., registered in
the U.S. and other countries.
YouTube™ is a trademark of Google Inc.
En
1
Before you start
DLNA®, the DLNA Logo and DLNA CERTIFIED®
are trademarks, service marks, or certification
marks of the Digital Living Network Alliance.
The Wi-Fi CERTIFIED Logo is a certification
mark of the Wi-Fi Alliance.
The Wi-Fi Protected Setup Mark is a trademark
of the Wi-Fi Alliance.
Picasa™ Web Albums is a trademark of
Google Inc.
This product includes technology owned by
Microsoft Corporation and cannot be used or
distributed without a license from Microsoft
Licensing, Inc.
Before you start20
En
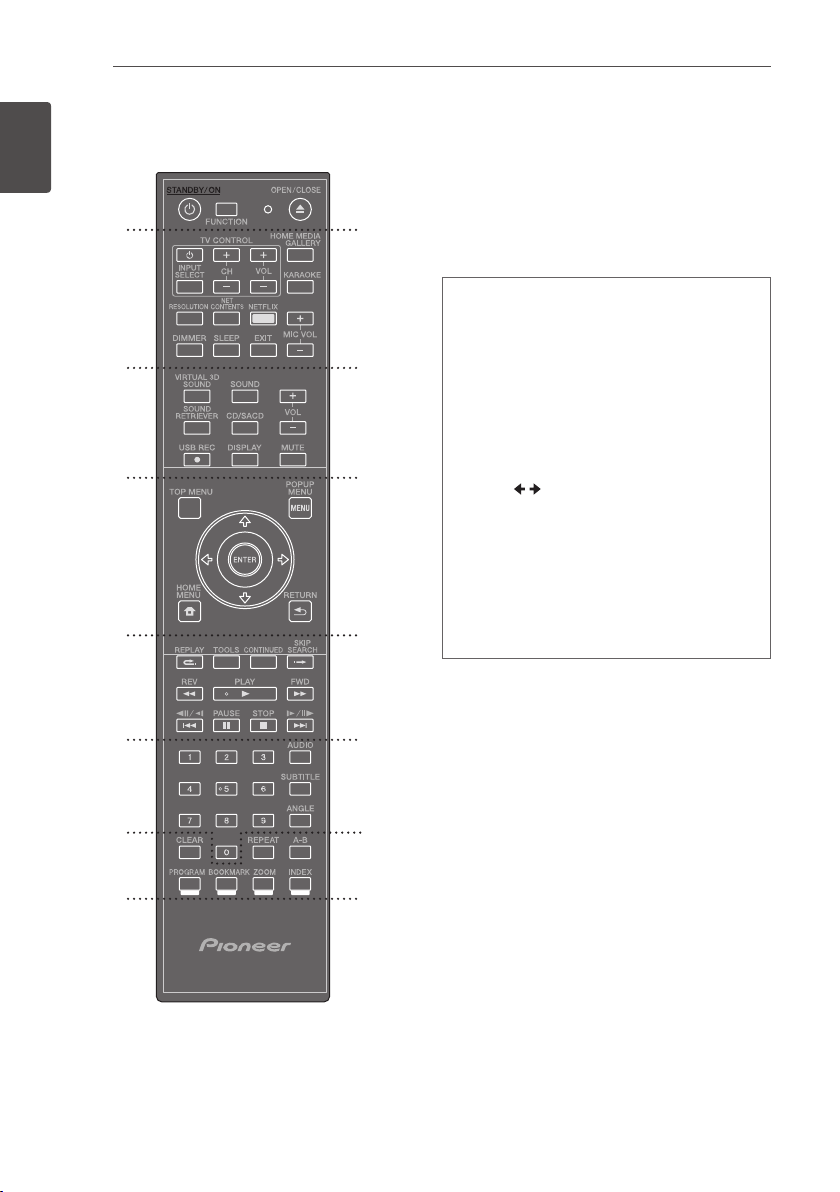
Remote control
1
Before you start
1
•••••••••1• • • • • • • • •
(STANDBY/ON):
Press to turn the power on
and off.
FUNCTION:
Changes the input source or
function.
2
3
4
5
When switching while viewing the display window
on the player
1. The input source switches every time the
FUNCTION
2. Select the desired input source and press
ENTER
When switching while viewing the TV monitor
1. Press
2. The input source switches every time the
FUNCTION
cursor
3. Select the desired input source and press
ENTER
* The Source Menu screen can also be displayed
by
pressing
The
for the
to playback disc. (page 49)
OPEN/CLOSE:
is pressed.
.
FUNCTION
.
[HOME MENU]
FUNCTION
[Source Menu]
to display the
is pressed. You can also use the
to switch the input source.
/
[Source Menu]
d
ENTER
.
button switches the input source
. Select
Opens and closes the disc
[Source Menu]
and
Home Media Gallery
tray.
.
•••••••••2• • • • • • • • •
6
TV Control Buttons:
HOME MEDIA GALLERY:
KARAOKE:
Press to display the Karaoke
See page 47.
See page 58.
Settings screen.
7
RESOLUTION:
HDMI (See page 72).
NET CONTENTS:
Sets the output resolution for
Enhances the picture quality
of network video contents.
NETFLIX:
MIC VOLUME:
DIMMER:
SLEEP:
See page 62.
Adjust mic volume.
Dims the light on the unit.
Sets a certain period of time after which
the unit will switch to off.
EXIT:
See page 62.
Before you start 21
En
•••••••••3• • • • • • • • •
VIRTUAL 3D SOUND:
SOUND effects (See page 70).
SOUND:
Switches to Sound settings (See page
70).
VOL +/– :
SOUND RETRIEVER:
setting (See page 70).
CD/SACD:
DISPLAY:
MUTE:
•••••••••4• • • • • • • • •
TOP MENU:
the BD-ROM or DVD-Video.
POPUP MENU/MENU:
ROM or DVD-Video menus.
on-screen displays.
ENTER:
Menu]
screen.
•••••••••5• • • • • • • • •
REPLAY:
TOOLS:
CONTINUED:
specified position.
SKIP SEARCH:
when
playback.
//,
PLAY ():
REV/FWD (
PAUSE ():
STOP ():
Adjusts speaker volume.
See page 53.
USB REC:
/ / /
HOME MENU:
Records an audio.
Displays or exits On- Screen Display.
Mute the unit.
Press to display the top menu of
(up/ down/ left/ right):
Acknowledges menu selection.
.
RETURN:
Press to jump back 10 seconds when
REPLAY
is pressed during playback.
See page 56.
SKIP SEARCH
Starts playback.
Pauses playback.
Stops playback or recording.
Switch VIRTUAL 3D
Switches Sound Retriever
Press to display the BD-
Used to navigate
Displays or exits the
Press to return to the previous
Use to continue playback from a
Press to skip 30 seconds ahead
is pressed during
//:
):
See page 50.
See page 50.
[Home
•••••••••6• • • • • • • • •
0-9 numerical buttons:
options in a menu or inputs letters in the
keypad menu.
AUDIO:
See page 53.
SUBTITLE:
ANGLE:
•••••••••7• • • • • • • • •
CLEAR:
REPEAT:
A-B:
Color buttons:
menus.
PROGRAM:
BOOKMARK:
51).
ZOOM:
INDEX:
See page 52.
See page 52.
Press to clear the numeric number, etc.
See page 50.
See page 50.
Registers FM radio stations.
Create a BOOKMARK (See page
Will zoom in or zoom out.
Slideshow playback (See page 52).
Selects numbered
Use these to navigate BD-ROM
1
Before you start
En
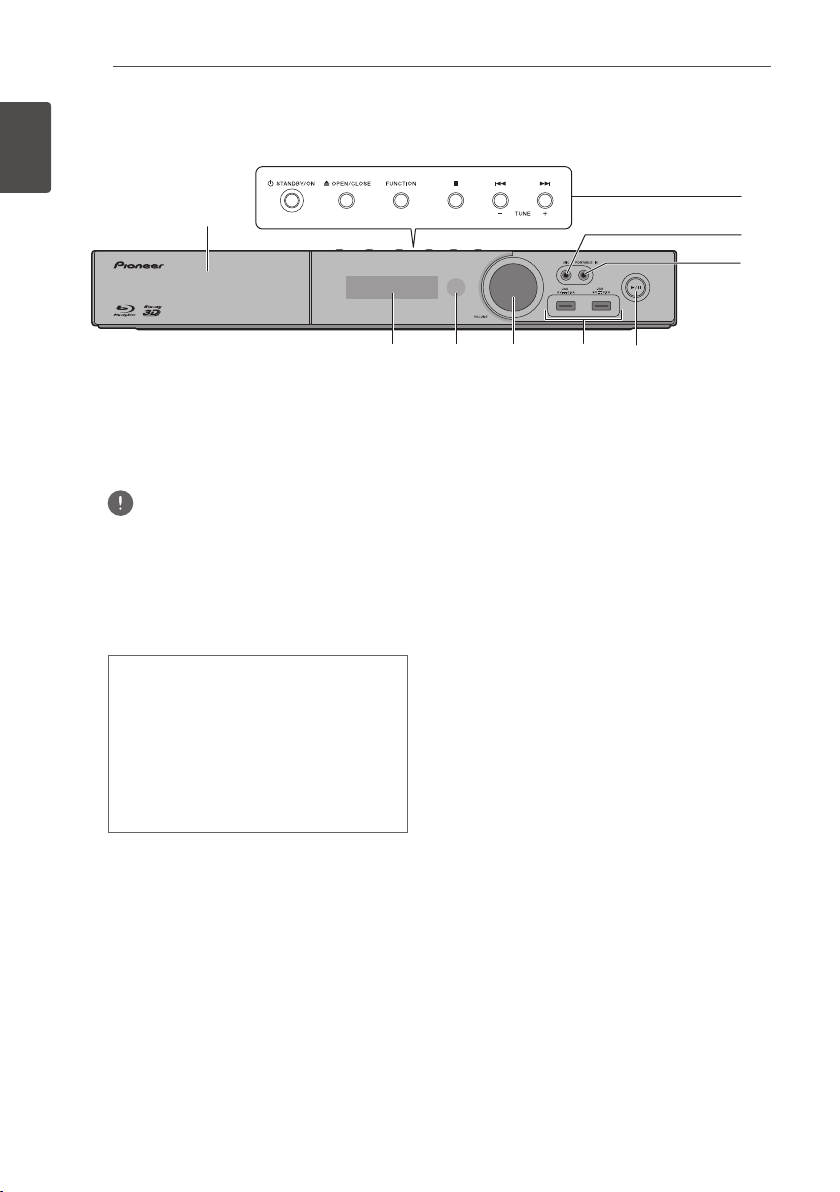
Front panel
1
Before you start
Before you start22
2
1
3
4
Disc tray
1
Operation buttons
2
(STANDBY/ON)
Switches the unit ON or OFF.
Note
If the power does not turn OFF, pressing the
(STANDBY/ON)
reboots the unit and the operation becomes
possible.
(OPEN/CLOSE)
button for more than 5 seconds
FUNCTION
Changes the input source or function.
When switching while viewing the display
window using the button on the front panel
1. The input source switches every time the
FUNCTION
2. Select the desired input source and press
The
source for the
Media Gallery
(STOP)
– TUNE +
is pressed.
(PLAY/PAUSE)
FUNCTION
button switches the input
[Source Menu]
to playback disc. (page 49)
(SKIP)
(Radio tuning)
.
. Select
Home
89 6
MIC
3
PORTABLE IN
4
(PLAY/PAUSE)
5
USB port
6
Volume control
7
Remote control sensor
8
57
Point the remote control to this, then
operate it within approximately 7 m. The
player may have trouble capturing remote
control signals if there is a fluorescent light
nearby. If this happens, move the player
away from the fluorescent light.
Display Window
9
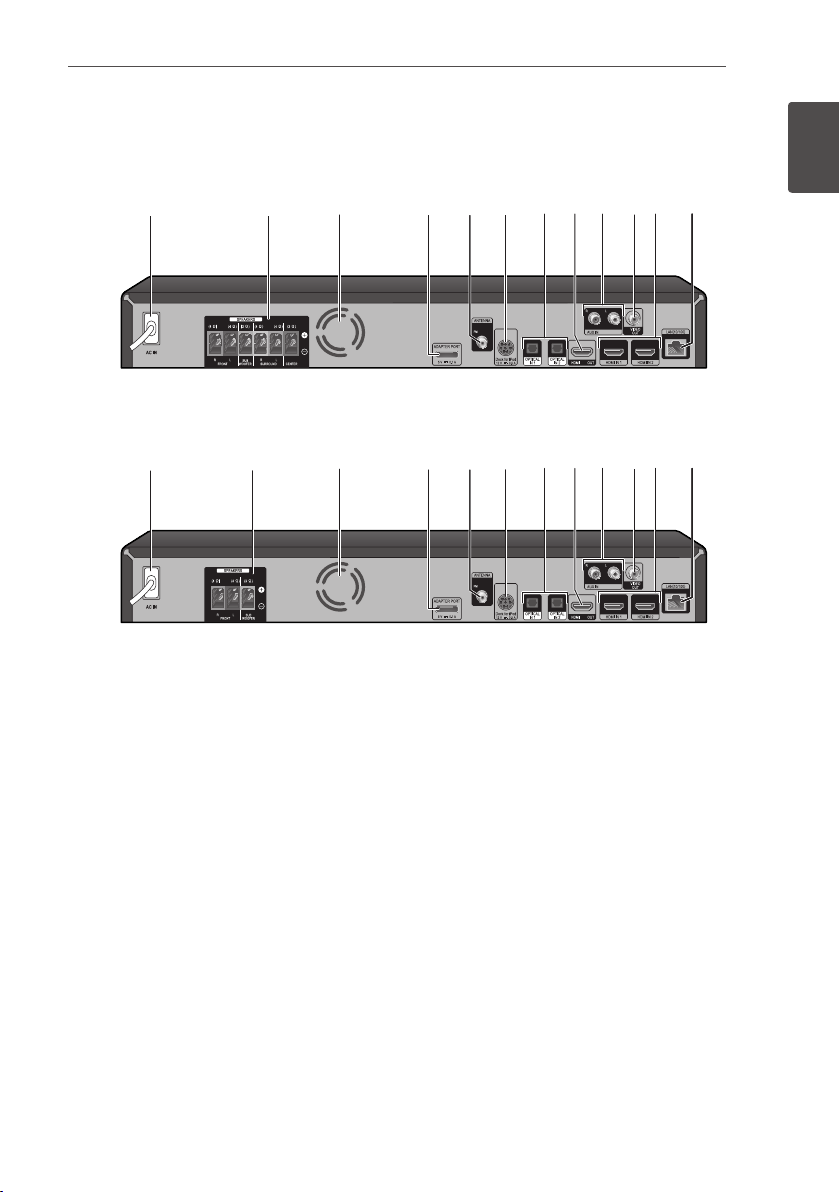
Rear panel
Before you start 23
En
HTZ-BD52/HTZ-BD32
1 2 3 46 7 8 a c59 b
HTZ-BD92HW/HTZ-BD82HF
1 2 3 46 7 a c59 b8
AC IN
1
Plug into the power source.
SPEAKERS connectors
2
Cooling Fan
3
VIDEO OUT
4
AUX IN (L/R)
5
ADAPTER PORT
6
Antenna Connector
7
iPod
8
Connect to the furnished iPod cradle.
OPTICAL IN 1/2
9
HDMI OUT
a
HDMI IN 1/2
b
LAN port
c
1
Before you start
Connecting24
En
Chapter 2
Connecting
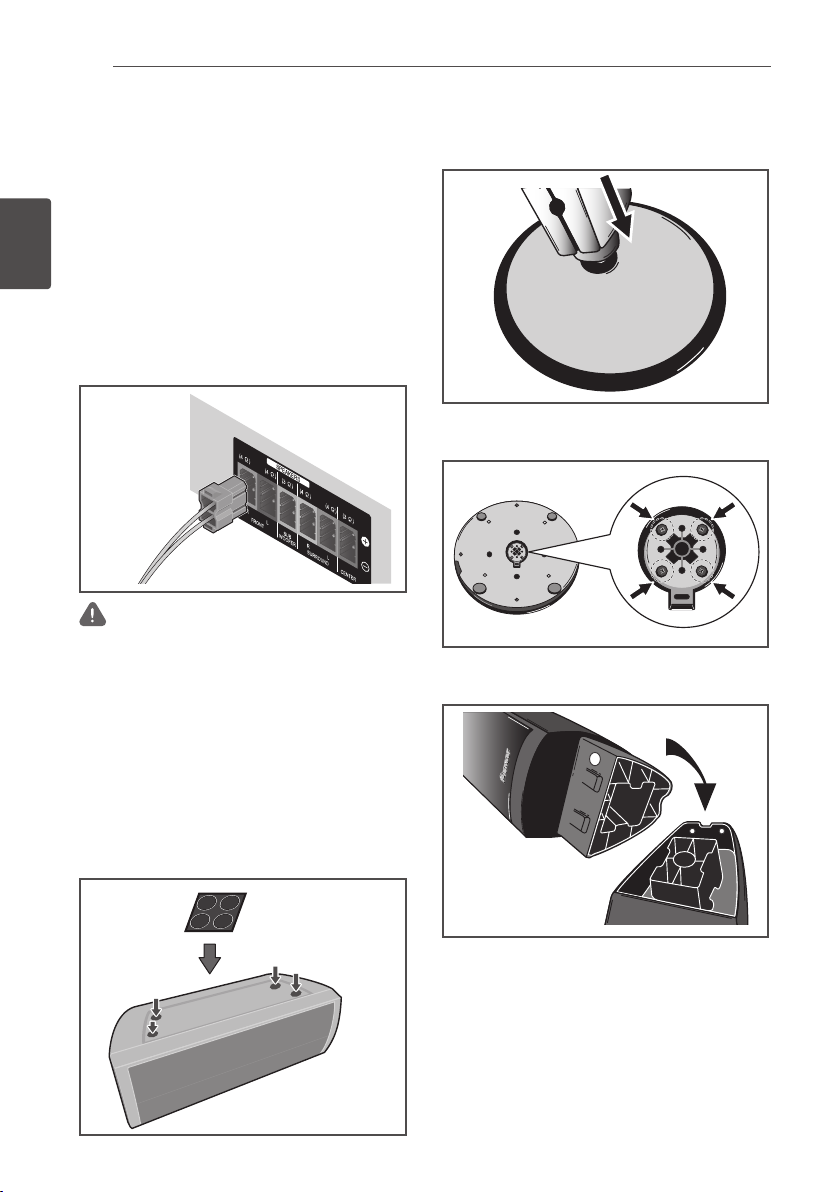
Assemble the speakers
Speaker setup for HTZ-BD52
2
Connecting
Preparing the speakers
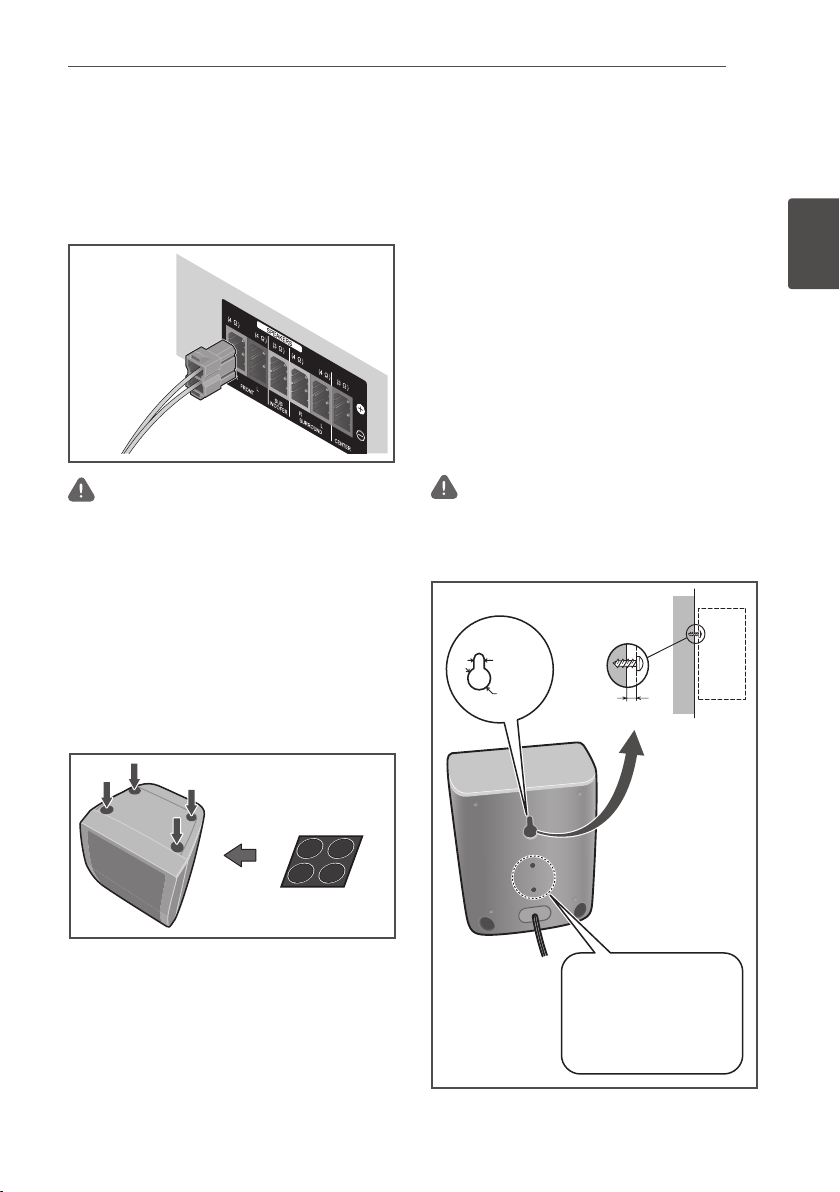
1. Connect the wires to the player.
Insert the cables connected to the player to
the same colored connector on the speaker.
Caution
• These speaker terminals carry HAZARDOUS LIVE
voltage. To prevent the risk of electric shock when
connecting or disconnecting the speaker cables,
disconnect the power cord before touching any
uninsulated parts.
• Do not connect any speakers other than those
supplied to this system.
• Do not connect the supplied speakers to any
amplifier other than the one supplied with this
system. Connection to any other amplifier may
result in malfunction or fire.
2. Attach the non-skid pads to the base of
each speaker.
3. Mount the front/surround speaker.
Insert the lower cabinet to the base so that
1
the cable hole is positioned at the backside.
Fix the base to the lower cabinet from the
2
underside, using the four screws (M4 x 16).
Insert the upper cabinet to the lower
3
cabinet.
Non-skid pads
Fix the upper cabinet and the lower cabinet
4
from the backside of the speaker using the
two screws (M4 x 12).
Caution
• Be careful not to tighten screws excessively.
If excessive force is used to tighten screws, the
threads of screw and/or nut may be damaged. Use
a middle-sized manual screwdriver during assembly.
Do not use power screwdrivers or oversized
screwdrivers that may exert excessive force on the
screws and nuts. Confirm that no foreign matter
is stuck to the base or the lower cabinet during
assembly. If the unit is assembled with foreign matter
stuck between the base and lower cabinet, the unit
may not be assembled securely, resulting in tipping
or falling.
• Do not stand on the speaker stand base of the tall
speaker to push or swing the speaker. The speaker
may fall and break, or someone may be injured.
Pay special attention to children.
.
Connecting 25
En
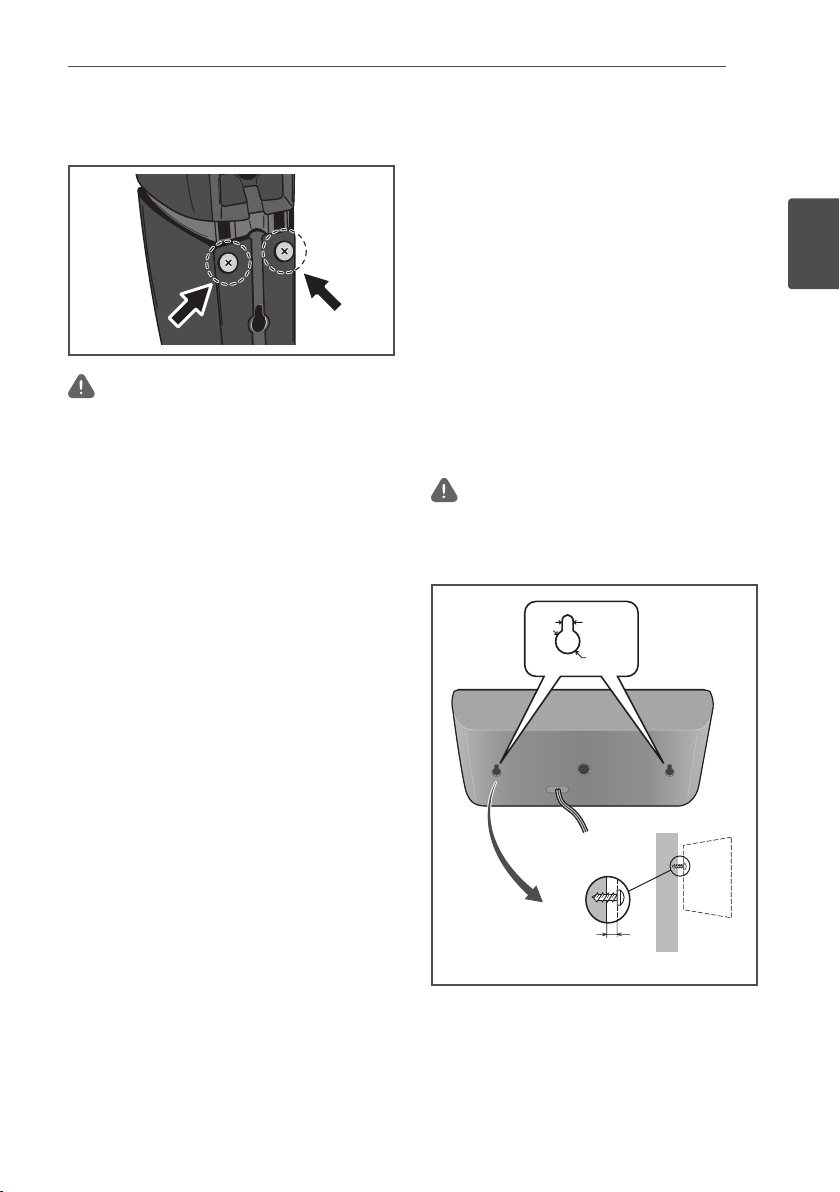
Wall mounting the speaker for
HTZ-BD52
The center speaker have a mounting hole
which can be used to mount the speaker on
the wall.
Before mounting
Remember that the speaker system is heavy
and that its weight could cause the screws
to work loose, or the wall material to fail to
support it, resulting in the speaker falling.
Make sure that the wall you intend to mount
the speakers on is strong enough to support
them. Do not mount on plywood or soft surface
walls.
Mounting screws are not supplied. Use screws
suitable for the wall material and support the
weight of the speaker.
Caution
• If you are unsure of the qualities and strength of
the wall, consult a professional for advice.
• Pioneer is not responsible for any accidents or
damage that result from improper installation.
5 mm
(0.2 in.)
10 mm
(0.4 in.)
2
Connecting
Mounting screw
(not supplied)
5 mm to 7 mm
(0.2 in. to 0.3 in.)
Connecting26
A
A
B
C
D
E
F
G
En
Additional notes on speaker
for HTZ-BD52
Install the main front left and right speakers at
an equal distance from the TV.
Precautions:
The center speaker supplied with this system
are magnetically shielded. However, depending
2
on the installation location, color distortion
Connecting
may occur if the speaker is installed extremely
close to the screen of a television set. If this
case happens, turn the power switch of the
television set OFF, and turn it ON after 15 min.
to 30 min. If the problem persists, place the
speaker system away from the television set.
The subwoofer is not magnetically shielded and
so should not be placed near a TV or monitor.
Magnetic storage media (such as floppy discs
and tape or video cassettes) should also not be
kept close to the subwoofer.
Do not attach the front/surround speakers and
subwoofer to a wall or ceiling. They may fall off
and cause injury.
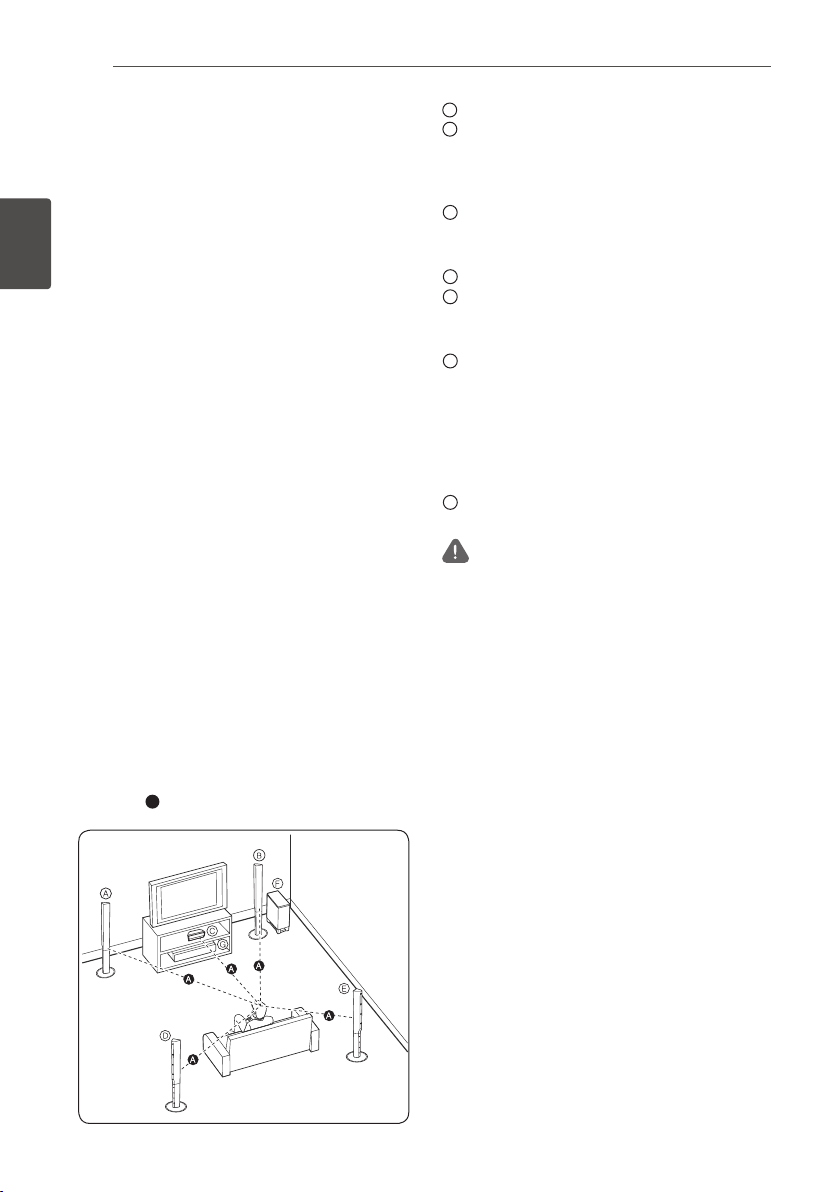
Positioning the system for
HTZ-BD52
The following illustration shows an example
of positioning the system. Note that the
illustrations in these instructions differ from
the actual unit for explanation purposes. For
the best possible surround sound, all the
speakers other than the subwoofer should be
placed at the same distance from the listening
position (
).
Front left speaker (L)/
Front right speaker (R):
Place the front speakers to the sides of the
monitor or screen and as flush with the screen
surface as possible.
Center speaker:
Place the center speaker below or in front of
the monitor or screen.
Surround left speaker (L)/
Surround right speaker (R):
Place these speakers behind your listening
position, facing slightly inwards.
Subwoofer:
The position of the subwoofer is not so
critical, because low bass sounds are not
highly directional. But it is better to place the
subwoofer near the front speakers. Turn it
slightly toward the center of the room to reduce
the wall reflections.
Unit
Caution
• Be careful to make sure children do not put their
hands or any objects into the *subwoofer duct.
*subwoofer duct: A hole for plentiful bass sound
on subwoofer cabinet (enclosure).
• Place the centre speaker at a safe distance from
the child’s reach.
Otherwise it may result in the speaker falling
down and causing personal injury and/or property
damage.
• The speakers contain magnet parts, so color
irregularity may occur on the TV screen (CRT) or
PC monitor screen. Please use the speakers away
from the TV screen (CRT) or PC monitor screen.
Connecting 27
En
Speaker setup for HTZ-BD32
Preparing the speakers
1. Connect the wires to the player.
Insert the cables connected to the player to
the same colored connector on the speaker.
Caution
• These speaker terminals carry HAZARDOUS LIVE
voltage. To prevent the risk of electric shock when
connecting or disconnecting the speaker cables,
disconnect the power cord before touching any
uninsulated parts.
• Do not connect any speakers other than those
supplied to this system.
• Do not connect the supplied speakers to any
amplifier other than the one supplied with this
system. Connection to any other amplifier may
result in malfunction or fire.
2. Attach the non-skid pads to the base of
each speaker.
Wall mounting the speaker for
HTZ-BD32
All speakers have a mounting hole which can
be used to mount the speaker on the wall.
Before mounting
Remember that the speaker system is heavy
and that its weight could cause the screws
to work loose, or the wall material to fail to
support it, resulting in the speaker falling.
Make sure that the wall you intend to mount
the speakers on is strong enough to support
them. Do not mount on plywood or soft surface
walls.
Mounting screws are not supplied. Use screws
suitable for the wall material and support the
weight of the speaker.
Caution
• If you are unsure of the qualities and strength of
the wall, consult a professional for advice.
• Pioneer is not responsible for any accidents or
damage that result from improper installation.
Mounting screw
(not supplied)
5 mm
(0.2 in.)
10 mm
(0.4 in.)
5 mm to 7 mm
(0.2 in. to 0.3 in.)
2
Connecting
Non-skid pads
This hole is used to x the
unit to the speaker stand.
Caution: Do not use this hole
to mount on walls or ceilings.
The speaker may fall resulting
in injury.
Connecting28
A
A
B
C
D
E
F
G
En
Additional notes on speaker
for HTZ-BD32
Install the main front left and right speakers at
an equal distance from the TV.
Precautions:
The center speaker supplied with this system
are magnetically shielded. However, depending
2
on the installation location, color distortion
Connecting
may occur if the speaker is installed extremely
close to the screen of a television set. If this
case happens, turn the power switch of the
television set OFF, and turn it ON after 15 min.
to 30 min. If the problem persists, place the
speaker system away from the television set.
The subwoofer is not magnetically shielded and
so should not be placed near a TV or monitor.
Magnetic storage media (such as floppy discs
and tape or video cassettes) should also not be
kept close to the subwoofer.
Do not attach the subwoofer to a wall or
ceiling. They may fall off and cause injury.
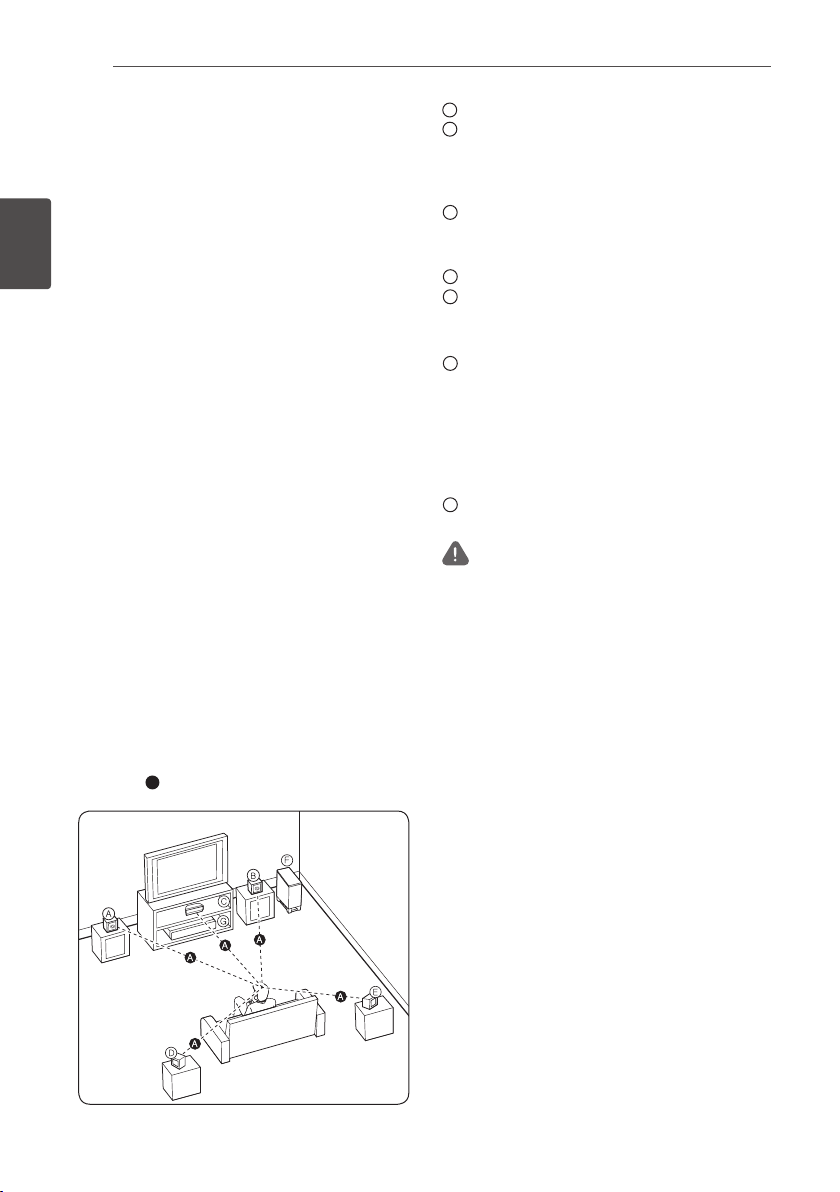
Positioning the system for
HTZ-BD32
The following illustration shows an example
of positioning the system. Note that the
illustrations in these instructions differ from
the actual unit for explanation purposes. For
the best possible surround sound, all the
speakers other than the subwoofer should be
placed at the same distance from the listening
position (
).
Front left speaker (L)/
Front right speaker (R):
Place the front speakers to the sides of the
monitor or screen and as flush with the screen
surface as possible.
Center speaker:
Place the center speaker below or in front of
the monitor or screen.
Surround left speaker (L)/
Surround right speaker (R):
Place these speakers behind your listening
position, facing slightly inwards.
Subwoofer:
The position of the subwoofer is not so
critical, because low bass sounds are not
highly directional. But it is better to place the
subwoofer near the front speakers. Turn it
slightly toward the center of the room to reduce
the wall reflections.
Unit
Caution
• Be careful to make sure children do not put their
hands or any objects into the *subwoofer duct.
*subwoofer duct: A hole for plentiful bass sound
on subwoofer cabinet (enclosure).
• Place the centre speaker at a safe distance from
the child’s reach.
Otherwise it may result in the speaker falling
down and causing personal injury and/or property
damage.
• The speakers contain magnet parts, so color
irregularity may occur on the TV screen (CRT) or
PC monitor screen. Please use the speakers away
from the TV screen (CRT) or PC monitor screen.
Connecting 29
En
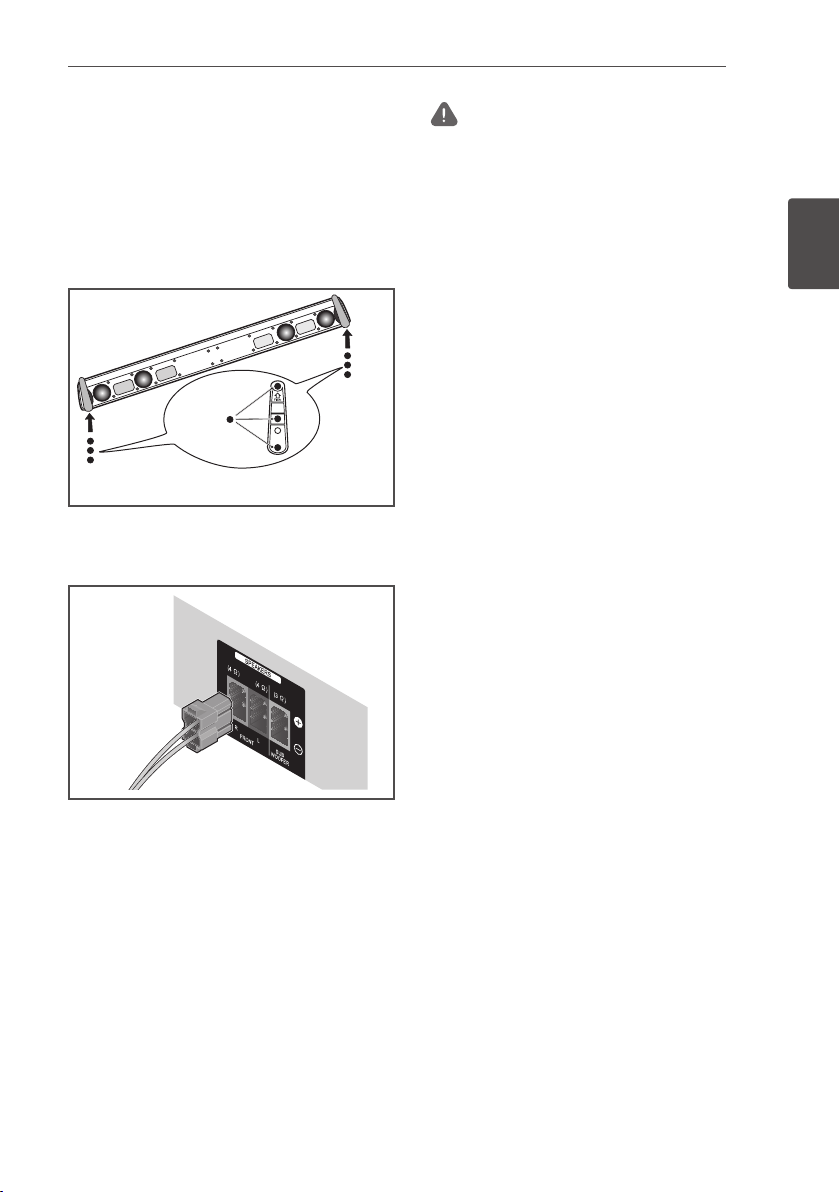
Speaker setup for HTZ-BD92HW
Preparing the speakers
1. Attach the non-skid pads to the base of
each speaker.
For front speaker:
Use the supplied adhesive to attach six
pads to the base (bottom) of speaker.
Non-skid pad
Affix to
three locations
Non-skid pad
(for front)
2. Connect the wires to the player.
Insert the cables connected to the player to
the same colored connector on the speaker.
(for front)
Caution
• Do not connect any speakers other than those
supplied to this system.
• Do not connect the supplied speakers to any
amplifier other than the one supplied with this
system. Connection to any other amplifier may
result in malfunction or fire.
• Please connect the speaker cable of subwoofer
(purple) to orange of the player.
• These speaker terminals carry HAZARDOUS LIVE
voltage. To prevent the risk of electric shock when
connecting or disconnecting the speaker cables,
disconnect the power cord before touching any
uninsulated parts.
2
Connecting

Connecting30
En
Wall mounting the speaker for
HTZ-BD92HW
Before mounting
• Remember that the speaker system is heavy
and that its weight could cause the screws
to work loose, or the wall material to fail to
2
Connecting
support it, resulting in the speaker falling.
Make sure that the wall you intend to mount
the speaker on is strong enough to support
them. Do not mount on plywood or soft
surface walls.
• Mounting screws are not supplied. Use
screws suitable for the wall material and
support the weight of the speaker.
Caution
• If you are unsure of the qualities and strength of
the wall, consult a professional for advice.
• Pioneer is not responsible for any accidents or
damage that result from improper installation.
1 Remove the base plates.
The base plates are held in position by the
use of 2-sided tape. While holding the leg in
place, strongly press the base plate in the
direction indicated by the arrow to remove
the base plate. Be careful not to damage
the front speaker while doing this.
3. Using the two screws removed in step 1,
fasten the wall mounting fixtures to the
speaker.
4. Affix the supplied wire stays to the top of the
unit as shown and collect the cable there.
Press until a “click” is
heard.
5. Mount on wall.
Base plate
Leg
2. Use a Phillips screwdriver to remove the
two screws holding the legs to the speaker.
Wall
mounting
screws
(available
commercially)*
5 mm
(0.2 in.)
10 mm
6 mm to 8 mm
(0.2 in. to 0.3 in.)
* Wall mounting screws are not included. Purchase
appropriate screws taking into consideration the
type of wall and the weight of the speaker system.
Open two holes in the wall 818 mm (32.2 in.) apart.
818 mm (32.2 in.)
(0.4 in.)
 Loading...