


X-HM76D X-HM76 X-HM86D
Downloaded XCfrom-HM86D www . vandenborre . be
Language select / Sélection de la langue / Selección de idioma / Selezione lingua /
Sprachauswahl / Taal selecteren / Выбор языка
English |
|
Français |
|
Español |
|
|
|
|
|
Italiano |
|
Deutsch |
|
Nederlands |
|
|
|
|
|
Русский

> Before Start > Part Names > Install > Initial Setup
NETWORK CD RECEIVER SYSTEM
X-HM76D
X-HM76
X-HM86D
NETWORK CD RECEIVER
XC-HM86D
Instruction
Manual
>
Downloaded |
|
|
|
|
|
|
|
|
|
|
|
|
|
Playback |
|
|
|
|
|
|
|
|
|
|
|
|
|
from |
|
Advanced Setup |
| Firmware Update | Others |
|
||
www |
|
|||||
|
|
|
|
|
||
|
. |
|
|
|
|
|
Before Start |
vandenborre |
|
|
|
|
|
|
. |
|
|
|
|
|
What's in the box |
|
be |
|
2 |
|
E |
.......................................................................... |
|
|
|
|||
Part Names |
|
|
|
|
|
|
|
|
|
4 |
|
N |
|
Front Panel ................................................................................... |
|
|
|
|
|
|
Rear Panel (X-HM76D, X-HM86D, XC-HM86D) |
.......................... |
5 |
|
|
||
Rear Panel (X-HM76) ................................................................... |
|
|
6 |
|
|
|
Remote Controller ......................................................................... |
|
|
7 |
|
|
|
Display .......................................................................................... |
|
|
|
8 |
|
|
Speakers System (X-HM76D, X-HM76) ....................................... |
|
9 |
|
|
||
Speakers System (X-HM86D) .................................................... |
|
10 |
|
|
||
Install |
|
|
|
|
|
|
Connect the Speakers ................................................................ |
|
|
11 |
|
|
|
Connecting the antennas and power cord, etc. .......................... |
|
12 |
|
|
||
Initial Setup |
|
|
|
|
|
|
Power On & Initial Setup ............................................................. |
|
|
13 |
|
|
|
Time settings .............................................................................. |
|
|
|
16 |
|
|
Playback |
|
|
|
|
|
|
Playing CDs ................................................................................ |
|
|
|
17 |
|
|
USB Storage Device/HDD .......................................................... |
|
|
19 |
|
|
|
Internet Radio ............................................................................. |
|
|
|
21 |
|
|
Spotify ......................................................................................... |
|
|
|
22 |
|
|
Listening to the FM Radio ........................................................... |
|
|
23 |
|
|
|
Listening to DAB Digital Radio (X-HM76D, X-HM86D, XC-HM86D) ...... |
26 |
|
|
|||
BLUETOOTH® ............................................................................ |
|
|
|
27 |
|
|
AirPlay® ...................................................................................... |
|
|
|
29 |
|
|
Playing audio from an external device ........................................ |
|
30 |
|
|
||
Music Server ............................................................................... |
|
|
|
31 |
|
|
Using the alarm to start play ....................................................... |
|
33 |
|
|
||
Entering text, adjusting sound quality, etc. ................................. |
|
34 |
|
|
||
Advanced Setup |
|
|
|
|
|
|
Advanced Settings....................................................................... |
|
|
35 |
|
|
|
Firmware Update |
|
|
|
|
|
|
Firmware Update |
........................................................................ |
|
|
39 |
|
|
Others |
|
|
|
|
|
|
Troubleshooting .......................................................................... |
|
|
|
41 |
|
|
General Specifications ................................................................ |
|
|
44 |
|
|
|
License and Trademark Information ........................................... |
|
46 |
|
|
||
> Before Start > Part Names > Install > Initial Setup
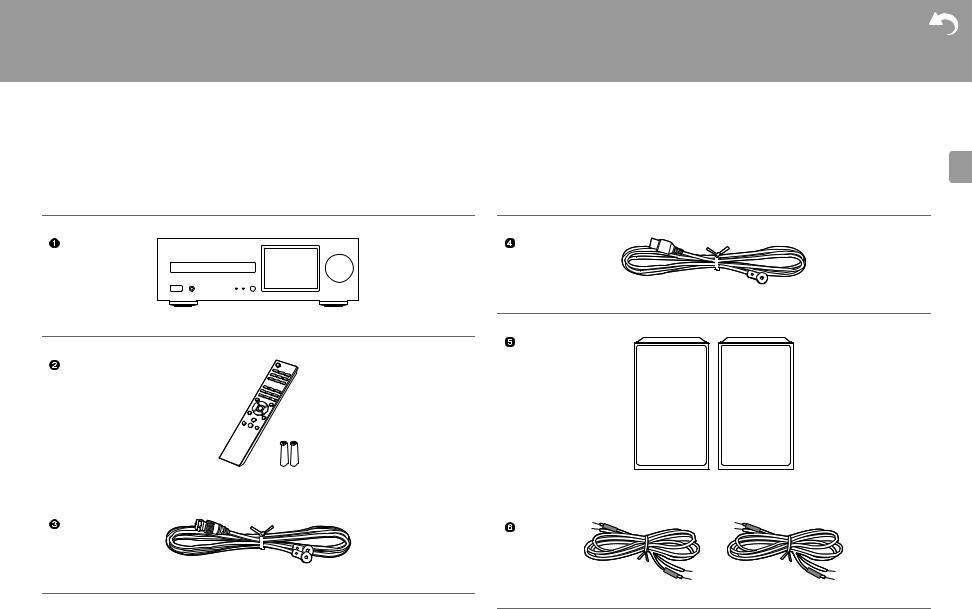
What's in the box
X-HM76D : 12356
X-HM76 : 12456
X-HM86D : 123567
XC-HM86D : 123
>
Downloaded |
|
|
|
Playback |
|
|
|
from |
|
|
Advanced Setup | Firmware Update | Others |
www |
|||
|
. |
|
|
|
vandenborre |
||
|
. |
|
|
|
be |
||
|
|
|
|
|
|
|
|
E N
Indoor FM antenna (1)
Main unit (1)
Remote controller (RC-945S) (1), Batteries (AAA/R03) (2) |
|
Speaker system (2) |
||
|
|
|
|
|
|
|
|
|
|
|
|
|
|
|
|
|
|
|
|
DAB/FM wire antenna (1)
Speaker cable (1.5 m) (2)
2

> Before Start > Part Names > Install > Initial Setup
>
Downloaded |
|
Playback |
|
from |
Advanced Setup | Firmware Update | Others |
www |
|
|
. |
|
vandenborre |
|
. |
|
be |
E N
Non-skid pads (8)
0The power cord must be connected only after all other cable connections are completed.
0Connect speakers with 4 Ω to 16 Ω impedance.
0We will not accept responsibility for damage arising from the connection of equipment manufactured by other companies.
0Functionality may be introduced by firmware updates and service providers may cease services, meaning that some network services and content may become unavailable in the future.
0Specifications and appearance are subject to change without prior notice.
3
> Before Start |
> Part Names |
> Install |
> Initial Setup |
> Playback |
|
|||||||||
|
|
|
|
|
|
|
|
|
|
|
|
|
Downloaded |
|
|
|
|
|
|
|
|
|
|
|
|
|
|
from |
Advanced Setup | Firmware Update | Others |
|
|
|
|
|
|
|
|
|
|
|
|
|
www |
|
|
|
|
|
|
|
|
|
|
|
|
|
|
|
|
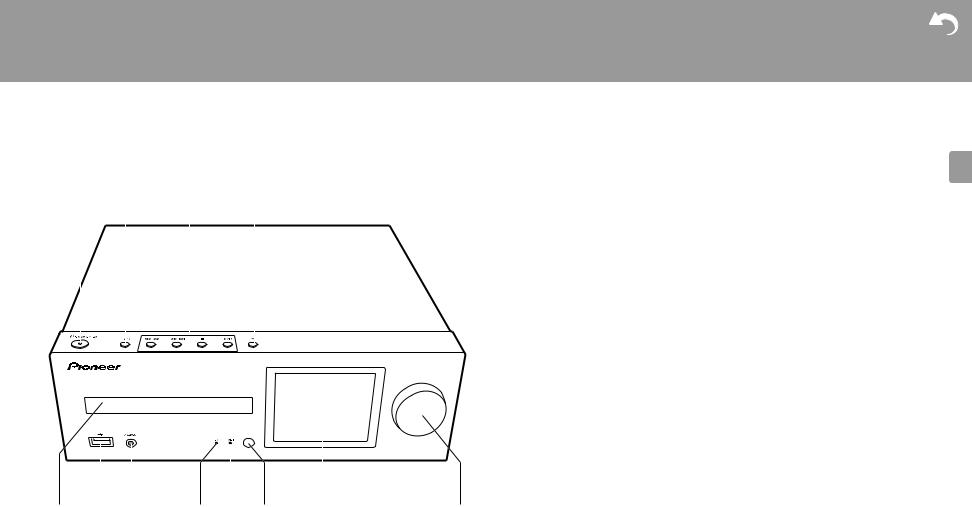
Front Panel |
|
|
|
|
|
|
. |
|
||||||
|
|
|
|
|
|
vandenborre |
|
|||||||
|
|
|
|
|
|
|
|
|
|
|
|
|
|
|
|
|
|
|
|
|
|
|
|
|
|
|
|
. |
|
|
|
|
|
|
|
|
|
|
|
|
1. |
|
be |
|
|
|
|
|
|
|
|
|
|
|
|
Í STANDBY/ON button: Turns the unit on or to standby mode. |
|||
|
|
|
|
|
|
2. INPUT button: Switches the input to be played. |
||||||||
|
|
|
|
|
|
|
|
|
|
|
3. |
Play button: |
|
|
|
|
|
|
|
|
|
|
|
|
|
|
|||
|
|
|
|
|
|
|
|
|
|
|
|
:6 : Return to the beginning of the track being played. Press and hold to rewind the |
||
|
|
|
|
|
|
|
|
|
|
|
|
|
track quickly. (CD) |
|
|
|
|
|
|
|
|
|
|
|
|
|
|
Move to the previous track. (USB, Music Server) |
|
|
|
|
|
|
|
|
|
|
|
|
|
59 : Move to the next track. Press and hold to fast-forward through the track. (CD) |
||
|
|
|
|
|
|
|
|
|
|
|
|
|
Move to the next track. (USB, Music Server) |
|
|
|
|
|
|
|
|
|
|
|
|
|
∫ : This button stops playback. |
|
|
|
|
|
|
|
|
|
|
|
|
|
|
1/; : This button pauses the playback. |
|
|
|
|
|
|
|
|
|
|
|
|
|
|
0 Depending on the input, the operation may not start. |
||
|
|
|
|
|
|
|
|
|
|
|
4. |
< button: Open or close the disc tray. |
|
|
|
|
|
|
|
|
|
|
|
|
|
5. |
Disc tray: Place discs here. 8-cm discs can also be used. |
||
|
|
|
|
|
|
|
|
|
|
|
6. |
USB port: Connect a USB storage device or HDD (hard disk drive) to play music files. You can |
||
|
|
|
|
|
|
|
|
|
|
|
|
also supply power (maximum 5 V/0.5 A) to USB devices with a USB cable. |
||
|
|
|
|
|
|
|
|
|
|
|
|
|||
|
|
|
|
|
|
|
|
|
|
|
|
0 When connecting a HDD that requires more than 5 V/0.5 A, connect to the USB port |
||
|
|
|
|
|
|
|
|
|
|
|
|
(maximum 5 V/1 A) on the rear of the unit. |
|
|
|
|
|
|
|
|
|
|
|
|
|
7. |
PHONES jack: Connect stereo headphones with a mini plug. |
||
|
|
|
|
|
|
|
|
|
|
|
8. |
Power indicator: This lights blue when the unit is on. |
||
|
|
|
|
|
|
|
|
|
|
|
9. |
TIMER indicator: This lights when the alarm is set. |
||
|
|
|
|
|
|
|
|
|
|
|
10.Remote control sensor |
|
||
|
|
|
|
|
|
|
|
|
|
|
11.Display (ÄP8) |
|
||
|
|
|
|
|
|
|
|
|
|
|
12.VOLUME dial: Adjust the volume. Adjust between 0 and 50. |
|||
|
|
|
|
|
|
|
|
|
|
|
|
|
|
|
E N
|
|
|
|
|
4
> Before Start > Part Names > Install > Initial Setup
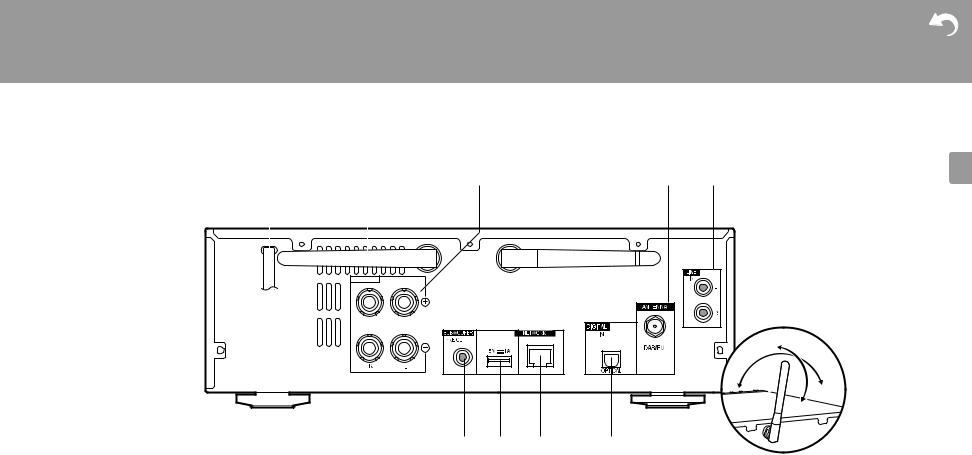
Rear Panel (X-HM76D, X-HM86D, XC-HM86D)
|
|
|
|
|
|
|
|
|
|
|
|
||||
|
|
|
|
|
|
|
|
|
|
|
|
|
|
|
|
|
|
|
|
|
|
|
|
|
|
|
|
|
|
|
|
|
|
|
|
|
|
|
|
|
|
|
|
|
|
|
|
|
|
|
|
|
|
|
|
|
|
|
|
|
|
|
|
|
|
|
|
|
|
|
|
|
|
|
|
|
|
|
|
|
|
|
|
|
|
|
|
|
|
|
|
|
|
|
|
|
|
|
|
|
|
|
|
|
|
|
|
|
|
|
|
|
|
|
|
|
|
|
|
|
|
|
|
|
|
|
|
|
|
|
|
|
|
|
|
|
|
|
|
|
|
|
|
|
|
|
|
|
|
|
|
|
|
|
|
|
|
|
|
|
|
|
|
|
|
|
|
|
|
|
|
|
|
|
|
|
|
|
|
|
|
|
|
|
|
|
|
|
|
|
|
|
|
|
|
|
|
|
|
|
|
|
|
|
|
|
|
|
|
|
|
|
|
|
|
|
|
|
|
|
|
|
|
|
|
|
|
|
|
|
|
|
|
|
|
|
|
|
|
|
|
|
|
|
|
|
|
|
|
|
|
|
|
|
|
>
Downloaded |
|
Playback |
|
from |
Advanced Setup | Firmware Update | Others |
www |
|
|
. |
|
vandenborre |
|
. |
|
be |
90°
180°
E N
|
|
|
1.Power cord
2.Wireless antenna: Used for Wi-Fi connection or when using a BLUETOOTH enabled device. Adjust their angles according to the connection status.
3.Speaker terminals: Connect speakers with speaker cables.
4.DAB/FM ANTENNA jack: Connect the supplied DAB/FM wire antenna.
5.LINE IN jack: You can play the audio from an external device such as a television connected with an analogue audio cable.
6.SUBWOOFER PRE OUT jacks: Connect a subwoofer with built-in amplifier.
7.USB port: Connect a USB storage device or HDD (hard disk drive) to play music files. You can also supply power (maximum 5 V/1 A) to USB devices with a USB cable.
8.NETWORK jack: Connect to the network with an ethernet cable.
9.DIGITAL IN OPTICAL jack: You can play the digital audio from an external device such as
a television connected with a digital optical cable.
5
> Before Start > Part Names > Install > Initial Setup
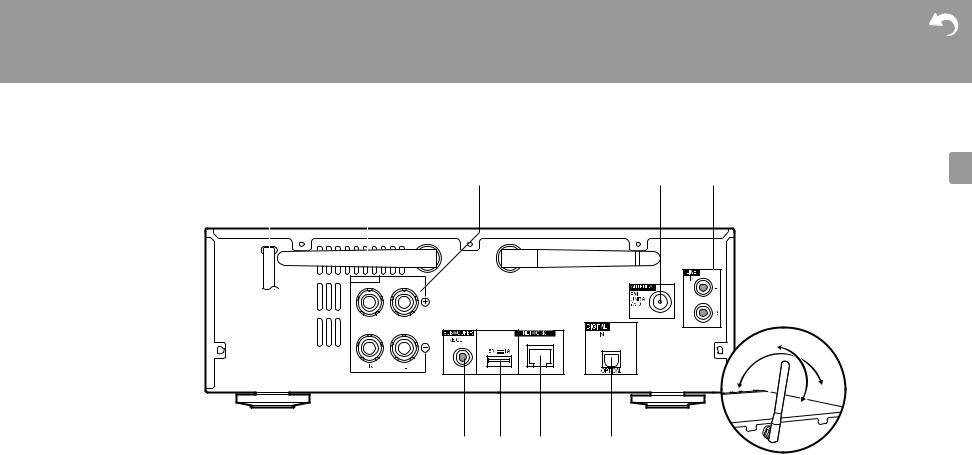
Rear Panel (X-HM76)
|
|
|
|
|
|
|
|
|
||||
|
|
|
|
|
|
|
|
|
|
|
|
|
|
|
|
|
|
|
|
|
|
|
|
|
|
|
|
|
|
|
|
|
|
|
|
|
|
|
|
|
|
|
|
|
|
|
|
|
|
|
|
|
|
|
|
|
|
|
|
|
|
|
|
|
|
|
|
|
|
|
|
|
|
|
|
|
|
|
|
|
|
|
|
|
|
|
|
|
|
|
|
|
|
|
|
|
|
|
|
|
|
|
|
|
|
|
|
|
|
|
|
|
|
|
|
|
|
|
|
|
|
|
|
|
|
|
|
|
|
|
|
|
|
|
|
|
|
|
|
|
|
|
|
|
|
|
|
|
|
|
|
|
|
|
|
>
Downloaded |
|
Playback |
|
from |
Advanced Setup | Firmware Update | Others |
www |
|
|
. |
|
vandenborre |
|
. |
|
be |
90°
E N
|
|
|
180° |
|
|
|
|
1.Power cord
2.Wireless antenna: Used for Wi-Fi connection or when using a BLUETOOTH enabled device. Adjust their angles according to the connection status.
3.Speaker terminals: Connect speakers with speaker cables.
4.FM ANTENNA jack: Connect the supplied indoor FM antenna.
5.LINE IN jack: You can play the audio from an external device such as a television connected with an analogue audio cable.
6.SUBWOOFER PRE OUT jacks: Connect a subwoofer with built-in amplifier.
7.USB port: Connect a USB storage device or HDD (hard disk drive) to play music files. You can also supply power (maximum 5 V/1 A) to USB devices with a USB cable.
8.NETWORK jack: Connect to the network with an ethernet cable.
9.DIGITAL IN OPTICAL jack: You can play the digital audio from an external device such as
a television connected with a digital optical cable.
6
> Before Start > Part Names > Install
Remote Controller


> Initial Setup |
> Playback |
|
|
|
|
Downloaded |
|
|
|
from |
Advanced Setup | Firmware Update | Others |
|
|
www |
|
|
|
|
|
|
|
. |
|
|
|
vandenborre |
|
|
|
. |
|
1. |
|
be |
|
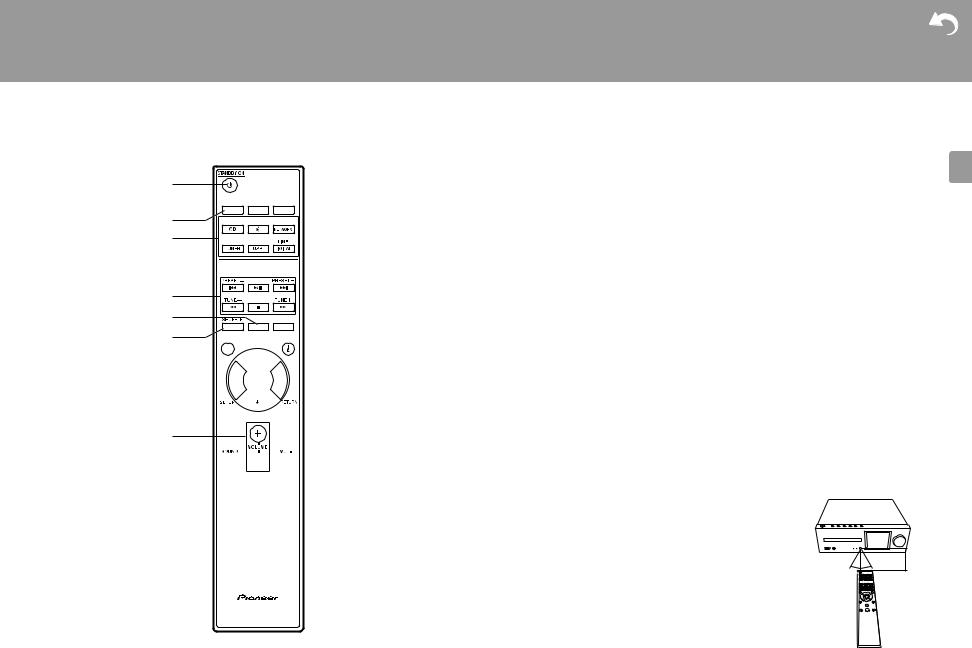
Í STANDBY/ON button: Turns the unit on or into standby mode. |
|||
2. |
TIMER button: Used to set the time and set the alarm. |
||
3. |
SLEEP button: Set the sleep timer. When the time set (30, 60, or 90 minutes) has |
||
|
elapsed, the unit switches to standby. If SLEEP button is pressed after setting, the time |
||
|
remaining until sleep is displayed. |
|
|
4. |
INPUT SELECTOR buttons: Switches the input to be played. |
||
5. |
Play buttons: |
|
|
|
:: Return to the beginning of the track being played. (CD) |
||
|
|
Move to the track before the one being played. (USB, Music Server) |
|
|
X/;: Play or pause play. |
|
|
|
9: Move to the next track. |
|
|
|
22: Rewind the track quickly. (CD only) |
|
|
|
∫: Stop playback. |
|
|
|
11: Fast-forward the track. (CD only) |
|
|
|
0 Depending on the input, the operation may not start. |
||
|
PRESET i/j buttons: Used to select stations that have been registered or to give names |
||
|
to stations. |
|
|
|
TUNE i/j buttons: Used to select radio stations. |
||
6. |
MEMORY button: Used to register favorite radio stations. |
||
7. |
SHUFFLE/REPEAT button: Set repeat play and shuffle play. |
||
8. |
MODE button: Used for program play of CDs. |
||
9. |
Cursors, ENTER button: Select the item with the cursors and press ENTER to confirm. |
||
10.SETUP button: Displays the Setup menu.
11.VOLUME i/j buttons: Adjust the volume. Adjust between 0 and 50. 12.SOUND button: Adjust the sound quality.
13.DIMMER button: Switch the display off or adjust the brightness of the display in three steps.
14.CLEAR button: Used when entering text, etc.
15.  (NOW PLAYING) button: Switches the information on the display.
16.RETURN button: Returns the display to the previous state. |
|
|
|
17.MUTE button: Temporarily mutes audio. Press again to cancel |
30° |
30° |
|
muting. |
|||
|
|
||
|
|
Approx.7 m |
E N
7
> Before Start > Part Names > Install > Initial Setup
Display
Downloaded |
|
> Playback |
|
from |
Advanced Setup | Firmware Update | Others |
www |
|
|
. |
|
vandenborre |
|
. |
|
be |
E N
USB Front
Song
Artist
Album
|
|
|
|
|
|
|
|
|
|
|
|
|
|
|
|
|
|
|
|
||
|
|
|
|
|
|
|
|
|
|
|
|
|
|
|
|
|
|
|
|
||
|
|
|
|
FLAC |
|
|
|
|||
|
|
|
44.1kHz/24bit |
|
|
|
|
|
|
|
|
|
|
|
|
|
|
|
|||
|
|
|
|
|
|
|
|
|||
|
|
|
|
|
|
|
|
|
|
|
|
|
|
|
|
|
|
|
|
||
|
|
|
00:01:45 / 00:03:23 |
|
|
|
|
|||
|
|
|
||||||||
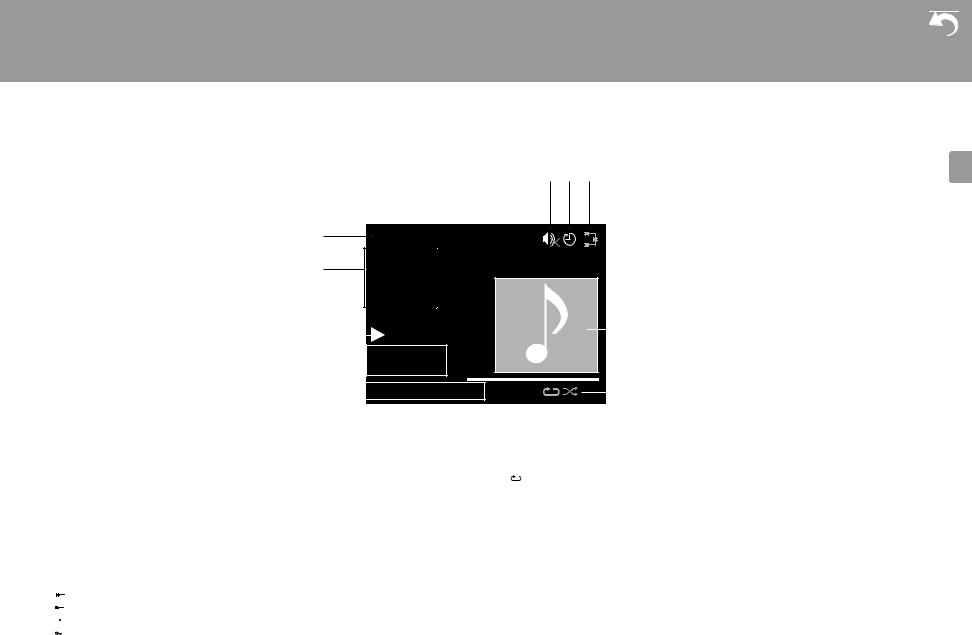
1.The input mode is displayed.
(USB Front / USB Rear / CD / Bluetooth / Network / Digital In / Line / Tuner DAB / Tuner FM)
X-HM76D, X-HM86D, XC-HM86D
2.The name of the file, artist, album, station, etc., is displayed.
3.Displays the play status.
4.Displays file format, sampling frequency, and quantization bit information.
5.The file play status is displayed. This may not be displayed depending on the input or file.
6.This is displayed when muting is on.
7.Displayed when the sleep timer is set.
8.Lights in the following conditions.


 : When the connection setting on the unit is "Wired" and the unit is connected to the network.


 : When the connection setting on the unit is "Wired" and the unit is not connected to the network.
 : When the connection setting on the unit is "Wi-Fi" and the unit is connected to the network.
 : When the connection setting on the unit is "Wi-Fi" and the unit is not connected to the network. 9. If an album jacket is recorded for the file being played, it is displayed here.
10.Lights in the following conditions.
 : When all track repeat play is on
1 : When one track repeat play is on  : When shuffle play is on
0When DIMMER is pressed to turn off the display, the unit may appear the same as if you had unplugged the unit from the power outlet, but electricity is still being supplied to the unit. To completely cut the unit off from the power supply, you need to unplug the power plug (shutoff device) unit from the power outlet.
8
> Before Start > Part Names > Install > Initial Setup
Speakers System (X-HM76D, X-HM76)
>
Downloaded |
|
Playback |
|
from |
Advanced Setup | Firmware Update | Others |
www |
|
|
. |
|
vandenborre |
|
. |
|
be |
E N
|
|
|
|
2 |
1 |
|
1 |
2 |
|
|
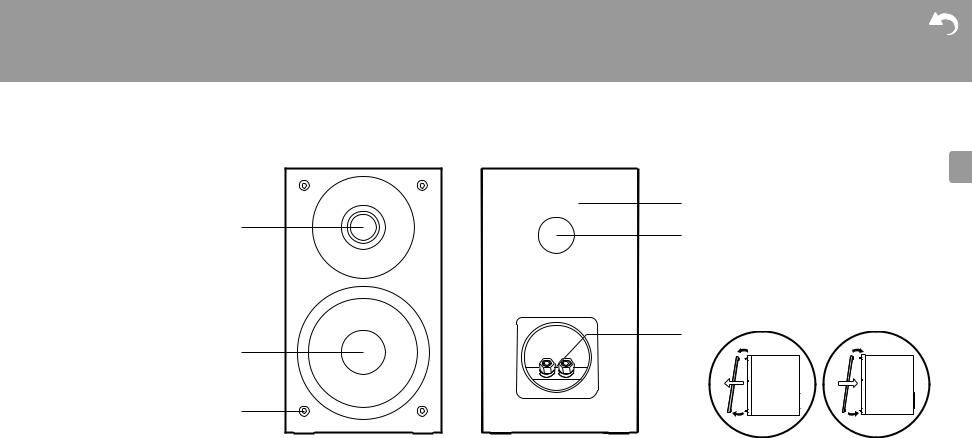
There is no distinction between left and right with the included speaker system. There will be no difference in sound quality whichever side you choose to put each speaker.
1.Tweeter: Plays the mid range and treble.
2.Woofer: Plays the bass.
3.Grill net fittings: Used to attach the grill nets. When removing the grill net, hold the bottom of the grill net with both hands and pull gently forward, then gently pull the top of the grill out to remove. To attach again, attach the top first, then the bottom.
4.Speaker cabinet
5.Bass ref duct: This releases the reverberations that occur within the cabinet to enhance the reproductive capabilities of the bass range. Do not block the ducts.
6. Speaker terminals: Connect speakers to the main unit with speaker cables.
9
> Before Start > Part Names > Install > Initial Setup
Speakers System (X-HM86D)
Downloaded |
|
> Playback |
|
from |
Advanced Setup | Firmware Update | Others |
www |
|
|
. |
|
vandenborre |
|
. |
|
be |
|
|
|
|
|
|
2 |
1 |
1 |
2 |
E N
There is no distinction between left and right with the included speaker system. There will be no difference in sound quality whichever side you choose to put each speaker.
1.Tweeter: Plays the mid range and treble.
2.Woofer: Plays the bass.
3.Grill net fittings: Used to attach the grill nets. When removing the grill net, hold the bottom of the grill net with both hands and pull gently forward, then gently pull the top of the grill out to remove. To attach again, attach the top first, then the bottom.
4.Speaker cabinet
5.Bass ref duct: This releases the reverberations that occur within the cabinet to enhance the reproductive capabilities of the bass range. Do not block the ducts.
6. Speaker terminals: Connect speakers to the main unit with speaker cables.
10

> Before Start |
> Part Names > Install > Initial Setup |
> Playback |
|
|
|
Downloaded |
|
|
|
from |
Advanced Setup | Firmware Update | Others |
|
|
www |
|
Connect the Speakers |
|
. |
|
|
vandenborre |
||
|
|
|
|
|
|
|
. |
|
|
|
be |
1 X-HM86D only |
2 |
|
When connecting the speaker system for X-HM76D, X- |
|
HM76 or X-HM86D, connect the included speaker cables |
||
|
with ends with the red tubing attached to the i jacks on the |
||
a |
a |
|
main unit and the speaker. If connection is wrong, the phase |
|
a |
|
reverses and this makes it harder to output bass. |
|
|
|
For XC-HM86D, use the illustration as a reference to |
a |
|
|
connect your own speakers. |
|
|
|
After inserting the speaker cables, tighten the terminals |
|
|
|
firmly by turning to the right. Also make sure the exposed |
|
|
|
wires of the speakers do not stick out of the speaker |
|
|
|
terminals when connecting. If the exposed wires of the |
|
|
|
speakers touch the rear panel or the i and s wires touch |
|
|
|
each other, the protection circuit may be activated and the |
|
|
|
power may turn off. |
3 |
4 |
RED |
RED |
|
RED |
b |
b |
RED |
You can also connect a subwoofer with a built-in amplifier to boost bass playback even more. Use a subwoofer cable for connection.
E N
a Non-Skid pads, b Speaker cable
11
> Before Start > Part Names > Install > Initial Setup
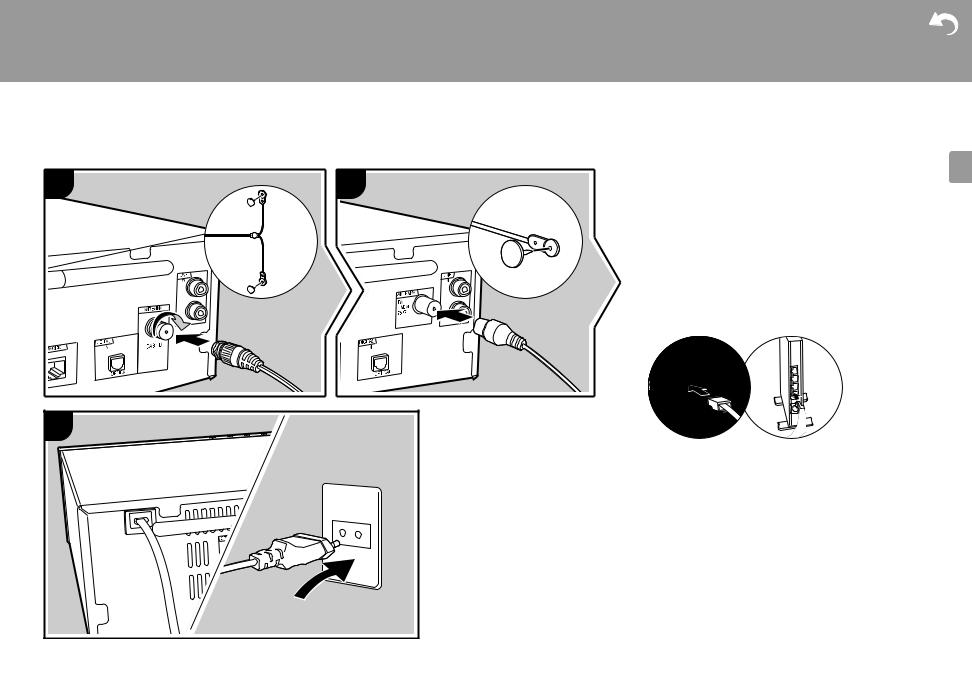
Connecting the antennas and power cord, etc.
X-HM76D, X-HM86D, XC-HM86D |
X-HM76 |
1 |
1 |
a |
b |
|
2 |
|
c |
c |
a DAB/FM wire antenna, b Indoor FM antenna, c Power cord |
|
>
Downloaded |
|
Playback |
|
from |
Advanced Setup | Firmware Update | Others |
www |
|
|
. |
|
vandenborre |
|
. |
|
be |
Antenna Hookup
Move the antenna around while playing the radio to find the position with the best reception.
Power Cord Hookup
Connect the power cord to the power outlet after completing all other connections.
To connect to the network with an ethernet cable, use the NETWORK jack. When using Wi-Fi connection, make settings in initial settings (ÄP13). You can enjoy features such as internet radio and AirPlay by connecting to the network.
E N
12
> Before Start > Part Names > Install > Initial Setup
Power On & Initial Setup
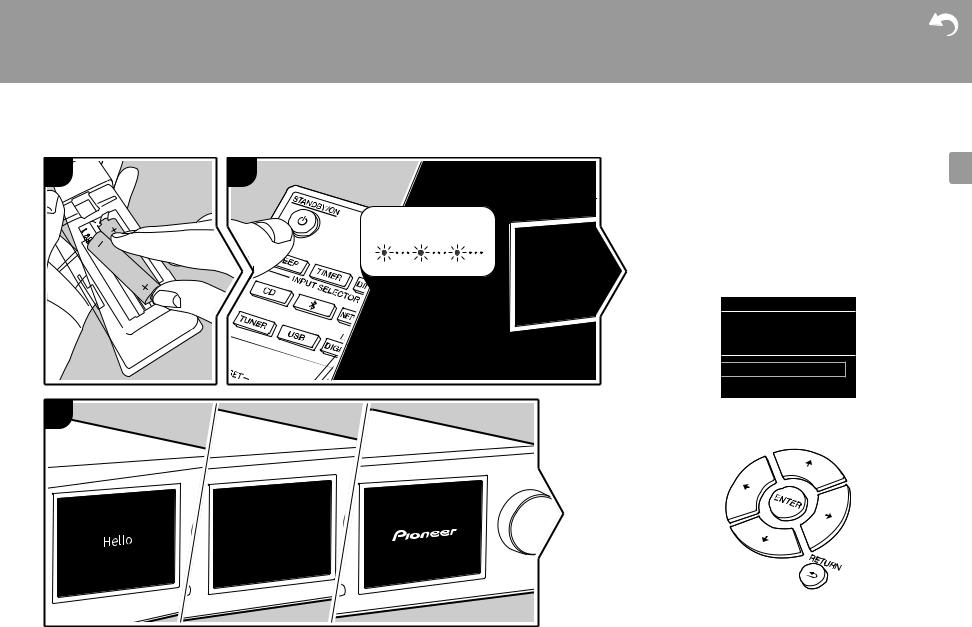
1 |
2 |
BLUE BLINKING
3
> DownloadedPlayback
from
www . vandenborre . be Starting up: When you press Í STANDBY/ON, the power
indicator on the main unit slowly blinks blue, then "Hello" is displayed on the display about 20 seconds later. After this, the display goes blank, then after the Pioneer logo is displayed, you can start operating the unit.
Wi-Fi connection settings
When you first turn the power on, the initial setup screen is displayed automatically, allowing you to easily make Wi-Fi connection settings.
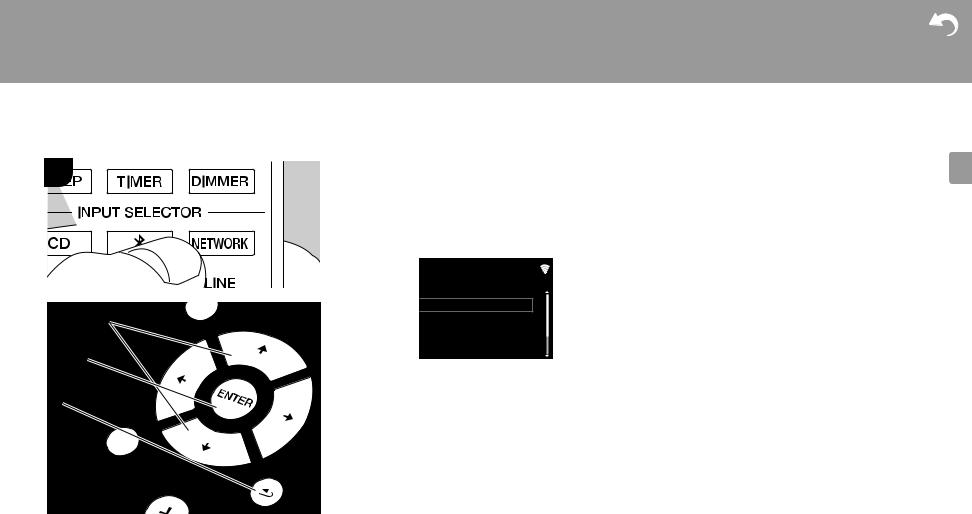
Initial Setup
Selects the method of network connection
Wi-Fi
Wired (Exit)
To set, select the item with the cursors on the remote controller and press ENTER to confirm. To return to the previous display, press RETURN.
E N
13
> Before Start > Part Names > Install > Initial Setup
To make Wi-Fi settings, select "Wi-Fi". If you have connected with an ethernet cable, select "Wired(Exit)" and confirm. If you select "Wi-Fi", select the method for setting in the next screen (for example "Scan Networks").
Wireless
Wireless
Enter Password
Push Button
> Playback |
|
|
|
Downloaded |
|
|
|
from |
Advanced Setup | Firmware Update | Others |
||
www |
|||
|
. |
|
|
|
vandenborre |
||
|
. |
|
|
|
be |
||
|
XXXXXX". |
||
3. After establishing the connection, select "Done" on the |
|||
|
screen of the iOS device. |
||
4. |
is displayed on the display of the unit when the |
||
|
settings are complete. |
||
|
|
|
|
|
|
|
|
Scan Networks
Use iOS Device
Input SSID
0To redo the initial settings, press SETUP on the remote controller, select "Wi-Fi" in "Network Setting" - "Connection", then select "Wi-Fi Setup".
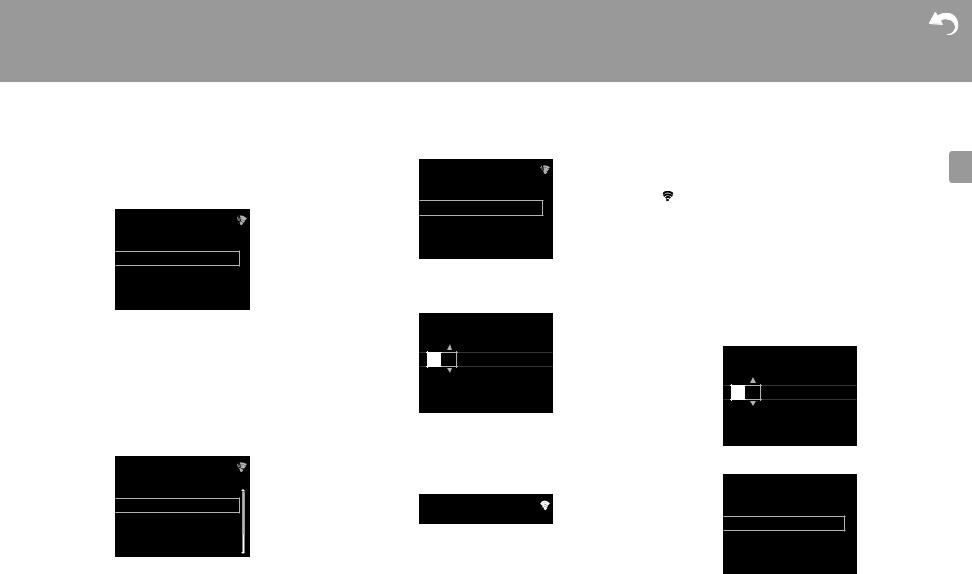
■ Scan Networks
From the list of SSID for access points such as wireless LAN routers, select the required SSID and make the settings.
1.Select the SSID of the access point you want to connect and then confirm.
Wireless
aaaaaaaaaaaaaaaa
bbbbbbbbbbbbbbbbb
ccccccccccccccccccc ddddddddddddddddd
2.Select either "Enter Password" or "Push Button" and confirm. If the access point has an automatic setting button, by selecting "Push Button" you can connect without entering a password.
3.If you select "Enter Password", enter the password of the access point and press ENTER. For details on how to enter text, refer to "Entering text" (ÄP34).
Password
A

[REPEAT] Change Text
[CLEAR] Delete One Character
If you select "Push Button", then after pressing and holding the automatic setting button on the access point for the required amount of time, press ENTER on the remote controller.
4. is displayed when the settings are complete.
■Use iOS Device
Set by sharing the iOS device's Wi-Fi settings with this unit.
1.Connect the iOS device by Wi-Fi.
2.Select this device in the "SET UP NEW AIRPLAY SPEAKER..." item on the screen of the iOS device and select "Next".
0 This unit is displayed as "Pioneer HM76D (76 or 86D)
■ Enter SSID of the access point
Set by entering the SSID of the access point you want to connect.
1.Enter the SSID. For details on how to enter text, refer to "Entering text" (ÄP34).
SSID
A

[REPEAT] Change Text
[CLEAR] Delete One Character
2. Select and confirm the authentication method.
Security Method
None
WEP
WPA
WPA2
0If you select "None", proceed to step 3. If you select "WEP", "WPA", or "WPA2", enter the password and confirm.
3. is displayed when the settings are complete.
E N
14

> Before Start > Part Names > Install > Initial Setup
>
Downloaded |
|
Playback |
|
from |
Advanced Setup | Firmware Update | Others |
www |
|
|
. |
|
vandenborre |
|
. |
|
be |
E N
15
> Before Start > Part Names > Install
Time settings
1
Downloaded |
|
|
|
|
> Initial Setup > Playback |
|
|
|
|
from |
Advanced Setup | Firmware Update | Others |
|||
www |
|
|
||
|
|
. |
|
|
|
|
vandenborre |
|
|
|
|
. |
|
|
|
|
be |
|
|
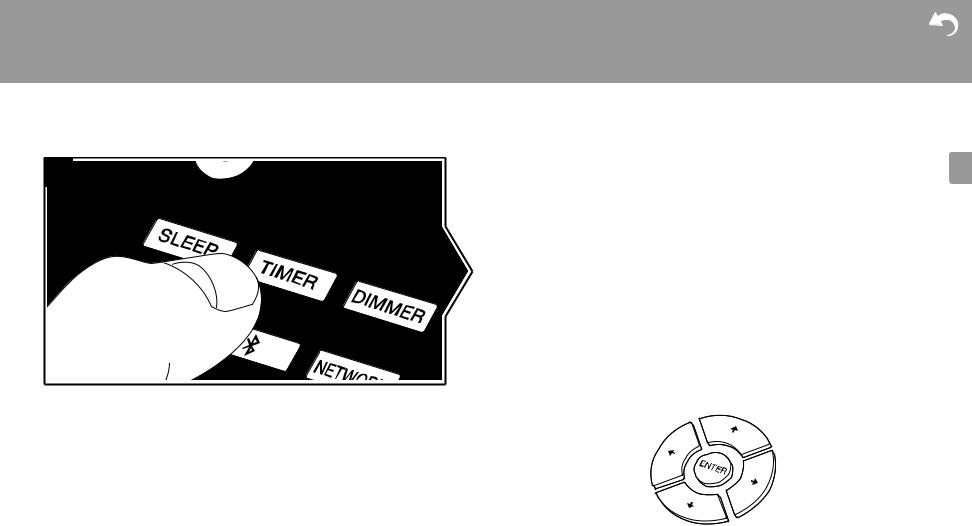
By setting the time, you can use the alarm to start play (ÄP33). |
||||
1. Press TIMER. |
|
|
|
|
|
|
|
|
|
|
|
CLOCK |
|
|
|
|
|
|
|
|
|
Sun |
0:00 |
|
|
|
|
|
|
2.Press ENTER.
3.Set the day of the week with w/x, then press ENTER.
4.In the next screen, use w/x to select either "24H" (24-hour display) or "12H" (12-hour display) and press ENTER.
5.In the next screen, set the time with w/x, then press ENTER.
6.In the next screen, set the minutes with w/x, then press ENTER. Setting ends automatically after a short time.
0Once you have completed the setting, the set time can be displayed for about 10 seconds by pressing TIMER.
E N
16
> Before Start > Part Names > Install > Initial Setup
Playing CDs
1
2
c
Downloaded |
|
|
> Playback |
|
|
from |
Advanced Setup |
| Firmware Update | Others |
www |
|
|
|
. |
|
|
vandenborre |
|
|
. |
|
|
be |
|
|
This unit can also play CD-R recorded with MP3 or WMA |
|
|
format files, along with commercially available music CDs. |
|
|
0 The supported sampling rates for MP3 files are 8 kHz to |
|
a48 kHz, and supported bitrates are between 64 kbps and
384 kbps.
0 The supported sampling rates for WMA files are 32 kHz, 44.1 kHz, and 48 kHz, and supported bitrates are between 64 kbps and 320 kbps.
b0 Play of CDs not conforming to the CD standards, such as copy control CDs, is not guaranteed.
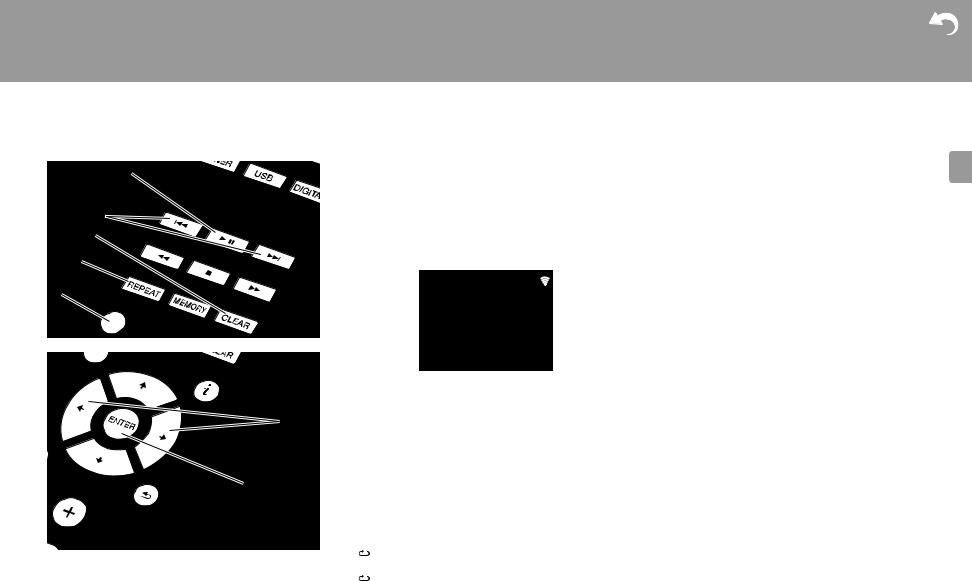
Playing music CDs
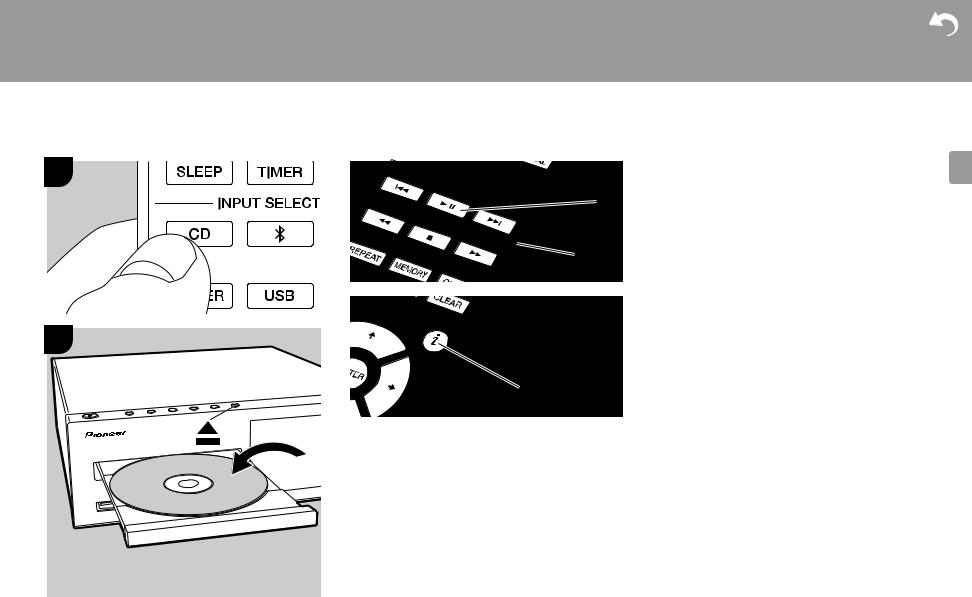
1.Turn the unit on.
2.Press CD to change input to CD.
3.Press < on the main unit to open the disc tray.
4.Put the disc on the tray, then press < to close the tray.
5.Press X/; (a) on the remote controller to start play. Use other play buttons (b) to stop play or choose tracks to
play. If you press  (NOW PLAYING) (c), you can switch the display to show the elapsed time or remaining time of the track.
E N
17
> Before Start > Part Names
a
b
c
d
e
f
g
> Install > Initial Setup
Playing MP3/WMA discs
>
Downloaded |
|
Playback |
|
from |
Advanced Setup | Firmware Update |
www |
|
|
. |
|
vandenborre |
|
. |
|
be |
|
Program play (Music CDs) |
| Others
1. |
Turn the unit on. |
You can program up to 32 tracks to play. |
||||
2. |
Press CD to change input to CD. |
1. Press MODE (e). |
||||
3. |
Press < on the main unit to open the disc tray. |
2. The track number (T--) flashes on the display. |
||||
4. |
Put the disc on the tray, then press < to close the tray. |
|
|
|
|
|
|
|
CD |
|
|||
5. |
When reading of the disc is complete, the numbers of |
|
|
|
||
|
folders containing MP3/WMA files and track numbers are |
|
|
|
|
|
|
displayed. |
|
|
|
|
|
|
CD |
|
|
|
|
|
|
|
|
|
|
PROGRAM |
|
|
|
|
|
|
P-01<T-- |
|
|
|
|
|
|
|
|
|
|
|
|
|
|
|
 F019 T159
0If MP3/WMA files are stored in two or more folders, each folder is automatically allocated a number.
6.To start play, press X/; (a) on the remote controller. To select a folder to play, press w/x (f) to select the folder. Play starts automatically when you select a folder.
0Folders that do not contain music files this unit can play are skipped.
0A maximum of 255 folders can be read. This includes folders that contain files this unit cannot play.
3.Press :/9 (b) to select the track to register and press ENTER (g). Repeat this step to register other tracks. The last track in the program is deleted if you press CLEAR (c).
4.Press X/; (a) to start play.
0If you press MODE (e) again while play is stopped, the entire program is cleared.
0Shuffle play and 1 track repeat play cannot be used while playing a program.
Repeat play/Shuffle play
1. Repeatedly press SHUFFLE/REPEAT (d) to display  ,
,
1 , or  on the display.
  : Repeat play of all tracks.
1 : Repeat play of the selected individual track.  : Play tracks randomly.
To cancel repeat or shuffle play, press SHUFFLE/ REPEAT (d) several times until the icons disappear.
E N
18
> Before Start |
> Part Names |
> Install |
> Initial Setup |
Downloaded |
|
> Playback |
|
||||
|
|
|
|
from |
Advanced Setup | Firmware Update | Others |
|
|
|
|
www |
|
USB Storage Device/HDD |
|
|
. |
||
|
|
vandenborre |
|||
|
|
|
|
|
|
|
|
|
|
|
. |
|
|
|
|
|
be |
1 |
|
|
|
|
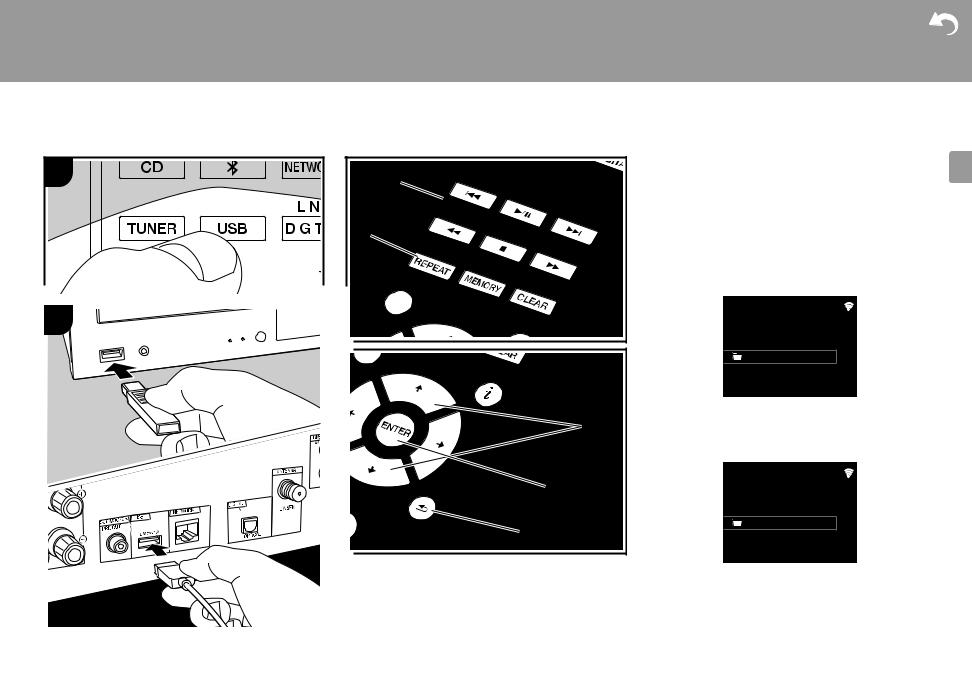
Basic operations |
|
|
a |
|
You can play music files by connecting a USB storage |
|
|
|
|
|
|
device or HDD (hard disk drive) to the USB port on the front |
|
|
|
|
|
or rear of the unit. |
|
|
b |
|
|
0 The USB port on the front supports a maximum 5 V/0.5 A |
|
|
|
|
power supply. If the HDD requires more than this, |
|
|
|
|
|
|
connect to the USB port (maximum 5 V/1 A) on the rear |
|
|
|
|
|
of the unit. |
|
|
|
|
|
1. Turn the unit on. |
|
|
|
|
|
2. Press USB to select either "USB Front" or "USB Rear". |
2 |
|
|
|
|
USB Front |
|
|
|
|
USB |
|
|
|
|
|
|
|
|
|
|
|
|
No Storage |
|
|
|
|
c |
3. Plug your USB storage device or HDD into the USB port |
|
|
|
|
on the front or rear. |
|
|
|
|
|
|
4. Folders and music files are displayed on the display |
|
|
|
|
|
when loading is complete. |
|
|
|
|
|
USB Front |
|
|
|
|
d |
|
|
|
|
|
|
USB |
|
|
|
e |
|
USB Storage |
|
|
|
|
|
|
|
|
|
|
|
5. Select the folder or music file with the cursors (c) of the |
|
|
|
|
|
remote controller and press ENTER (d) to confirm. To |
|
|
|
|
|
return to the previous display, press RETURN (e). |
|
|
|
|
|
6. Use play buttons (a) to stop play or choose tracks to play. |
|
|
|
|
|
0 The display of album name, artist name, and album art is |
|
|
|
|
|
supported with MP3/WMA/Apple Lossless/FLAC/AAC/ |
E N
19
> Before Start |
> Part Names |
> Install |
> Initial Setup |
Downloaded |
|
|||
> Playback |
|
|||||||
|
|
|
|
|
|
|
from |
Advanced Setup | Firmware Update | Others |
|
|
|
|
|
|
|
www |
|
|
|
|
|
|
|
|
|
. |
|
|
|
|
|
|
|
|
vandenborre |
|
|
|
|
|
|
|
|
. |
|
DSD (DSF only) format music files. The formats for |
|
0 |
USB storage devices with security function are not |
be |
|||
|
|
AIFF (.aiff/.aif/.aifc/.afc/.AIFF/.AIF/.AIFC/.AFC): |
||||||
|
embedded images are JPEG and PNG. |
|
|
supported on this unit. |
|
AIFF files include uncompressed PCM digital audio. |
||
0 |
Characters that cannot be displayed by this unit appear |
0 |
If the USB storage device or HDD comes with an AC |
0 Supported sampling rates: 44.1 kHz, 48 kHz, 88.2 kHz, |
||||
|
as "¢". |
|
|
|
adapter, we recommend that you use its AC adapter to |
96 kHz, 176.4 kHz, 192 kHz |
||
0 |
The USB port of this unit conforms with the USB 2.0 |
|
|
power it. |
|
|
0 Quantization bit: 8 bit, 16 bit, 24 bit |
|
|
standard. The transfer speed may be insufficient for |
|
0 |
Media inserted to the USB card reader may not be |
AAC (.aac/.m4a/.mp4/.3gp/.3g2/.AAC/.M4A/.MP4/.3GP/ |
|||
|
some content you play, which may cause some |
|
|
available in this function. Furthermore, depending on the |
||||
|
interruption in sound. |
|
|
|
USB storage device, proper reading of the contents may |
.3G2): |
||
|
|
|
|
|
not be possible. |
|
0 Supported formats: MPEG-2/MPEG-4 Audio |
|
Repeat/Shuffle |
|
|
0 |
We accept no responsibility whatsoever for the loss or |
0 Supported sampling rates: 44.1 kHz, 48 kHz, 88.2 kHz, |
|||
|
|
96 kHz |
||||||
|
|
|
|
|
damage to data stored on a USB storage device when |
|||
1. |
Repeatedly press SHUFFLE/REPEAT (b) during play to |
|
that device is used with this unit. We recommend that you |
0 Supported bitrates: Between 8 kbps and 320 kbps and |
||||
|
display , 1 or |
on the display. |
|
|
back up your important music files beforehand. |
VBR. |
||
|
: Repeat play of all tracks. |
|
|
|
|
|
FLAC (.flac/.FLAC): |
|
|
1 : Repeat play of the selected individual track. |
|
Supported Audio Formats |
|
||||
|
: Play tracks in a folder randomly. |
|
|
0 Supported sampling rates: 44.1 kHz, 48 kHz, 88.2 kHz, |
||||
|
To cancel repeat or shuffle play, press SHUFFLE/ |
|
For server playback and playback from a USB storage |
96 kHz, 176.4 kHz, 192 kHz |
||||
|
|
0 Quantization bit: 8 bit, 16 bit, 24 bit |
||||||
|
REPEAT (b) several times until the icons disappear. |
|
||||||
|
|
device, this unit supports the following music file formats. |
Apple Lossless (.m4a/.mp4/.M4A/.MP4): |
|||||
|
|
|
|
Note that sound files that are protected by copyright cannot |
||||
USB Storage / HDD Device Requirements |
|
be played on this unit. |
|
0 Supported sampling rates: 44.1 kHz, 48 kHz, 88.2 kHz, |
||||
|
|
|
|
MP3 (.mp3/.MP3): |
|
96 kHz, 176.4 kHz, 192 kHz |
||
0 |
Note that operation is not guaranteed with all USB |
|
|
0 Quantization bit: 16 bit, 24 bit |
||||
|
storage devices or HDD. |
|
0 |
Supported formats: MPEG-1/MPEG-2 Audio Layer 3 |
DSD (.dsf/.dff/.DSF/.DFF): |
|||
0 |
This unit can use USB storage devices that comply with |
0 |
Supported sampling rates: 44.1 kHz, 48 kHz |
|||||
|
the USB mass storage device class standard. (However, |
0 |
Supported bitrates: Between 8 kbps and 320 kbps and |
0 Supported formats: DSF/DSDIFF |
||||
|
there are still devices that cannot be played by this unit |
|
VBR. |
|
|
0 Supported sampling rates: 2.8 MHz, 5.6 MHz, 11.2 MHz |
||
|
even if they comply with the USB mass storage class |
|
WMA (.wma/.WMA): |
|
|
|||
|
standard.) |
|
|
|
|
|||
|
|
|
0 |
Supported sampling rates: 44.1 kHz, 48 kHz |
|
|||
0 |
The unit is also compatible with USB storage devices |
|
|
|||||
|
0 |
Supported bitrates: Between 5 kbps and 320 kbps and |
|
|||||
|
using the FAT16 or FAT32 file system formats. Other |
|
|
|||||
|
|
|
VBR. |
|
|
|
||
|
formats such as exFAT, NTFS, and HFS cannot be |
|
|
|
|
|
||
|
|
0 |
WMA Pro/Voice/WMA Lossless formats are not |
|
||||
|
played by this unit. |
|
|
|
||||
|
|
|
|
supported |
|
|
||
0 |
If the USB storage device has been partitioned, each |
|
|
|
|
|||
|
|
|
|
|
|
|||
|
section will be treated as an independent device. |
|
WAV (.wav/.WAV): |
|
|
|||
0 |
Up to 20,000 tracks per folder can be displayed, and |
|
WAV files include uncompressed PCM digital audio. |
|
||||
|
folders may be nested up to 16 levels deep. |
|
0 |
Supported sampling rates: 44.1 kHz, 48 kHz, 88.2 kHz, |
|
|||
0 |
USB hubs and USB storage devices with hub functions |
|
96 kHz, 176.4 kHz, 192 kHz |
|
|
|||
|
are not supported. Do not connect these devices to the |
0 |
Quantization bit: 8 bit, 16 bit, 24 bit |
|
|
|||
|
unit. |
|
|
|
|
|
|
|
E N
20
> Before Start > Part Names
Internet Radio
1
a
b
c
> Install > Initial Setup
Basic operations
>
Downloaded |
|
Playback |
|
from |
Advanced Setup | Firmware Update | Others |
www |
|
|
. |
|
vandenborre |
|
. |
|
be |
When this unit is connected to a network, you can listen to TuneIn or other preregistered Internet radio services. Depending on the internet radio service, the user may need to register from their computer first.
1.Turn the unit on.
2.Press NETWORK.
Network
TuneIn Radio
Spotify
Deezer
TIDAL
3.Select "TuneIn Radio" with the cursors (a) of the remote controller and press ENTER (b) to confirm. After switching the display to the internet radio service, you can select stations with the cursors (a) on the remote controller and press ENTER (b) to confirm. To return to the previous display, press RETURN (c).
TuneIn
You can register a station you have played as a favorite.
1.Press ENTER (b) while playing TuneIn.
2.Select "Add to My Presets" on the display and confirm.
3.To play a favorite, in the top screen of TuneIn, select the registered station in "My Presets" and confirm. To delete favorites, press ENTER (b) during play, select "Remove from My Presets" and confirm.
E N
21
> Before Start > Part Names > Install > Initial Setup
Spotify |
|
1 |
a |
|
Wi-Fi |
|
b |
|
c |
2 |
d |
|
3
4
PioneerHMXXxxxxxx
>
Downloaded |
|
Playback |
|
from |
Advanced Setup | Firmware Update | Others |
www |
|
|
. |
|
vandenborre |
|
. |
|
be |
|
Basic Operation |
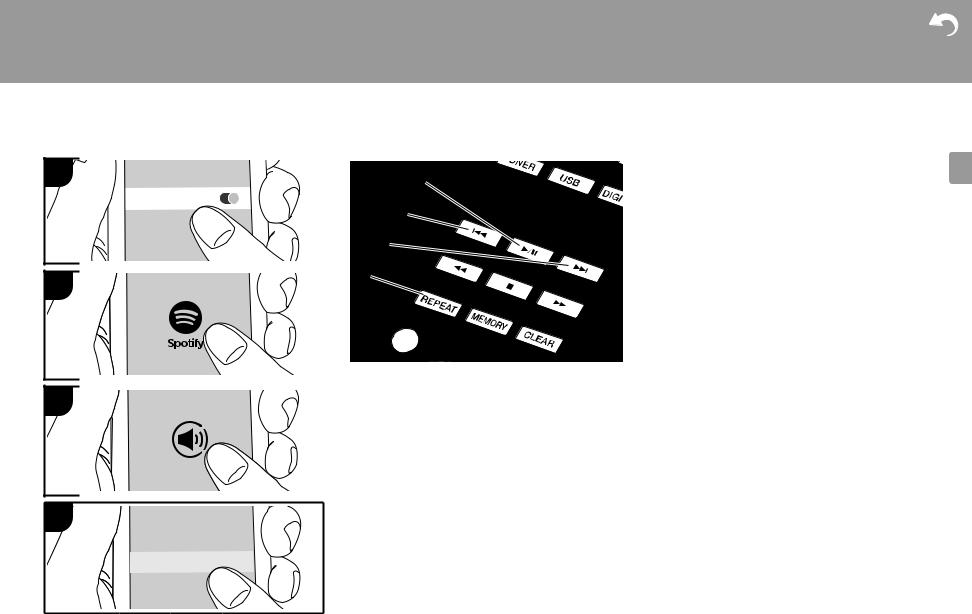
Spotify Connect play is possible by connecting this unit to the same network as a smart phone or tablet. To enable Spotify Connect, install the Spotify application on your smartphone or tablet and create a Spotify premium account.
1. Connect the smartphone to the network that this unit is connected to.
2. Click the Connect icon in the track play screen of the Spotify app.
3. Select this unit.
0This unit is displayed as "Pioneer HM76D (76 or 86D) XXXXXX"
4.This unit turns on automatically and the input selector changes to NETWORK and streaming of Spotify starts.
0If "Option Setting" - "Power Off Setting" - "Network Standby" is set to "Off" in the Setup menu, manually turn the unit on and then press NETWORK on the
remote controller.
0Refer to the following for Spotify settings: www.spotify.com/connect/
0The Spotify software is subject to third party licenses found here: www.spotify.com/connect/third-party-licenses
The following remote controller operations are also possible.
(a)Pressed during play this button pauses playback. Pressed while paused, and it restarts play.
(b)This button plays the previous track.
(c) This button plays the next track.
(d)Start Repeat or Shuffle play. Pressing this button repeatedly cycles through the repeat/shuffle modes.
E N
22
> Before Start > Part Names > Install > Initial Setup
Listening to the FM Radio
1
a
d
b e
c
d
f
e
f
g
h
>
Downloaded |
|
Playback |
|
from |
Advanced Setup | Firmware Update | Others |
www |
|
|
. |
|
vandenborre |
|
. |
|
be |
|
Tuning Automatically |
1.Turn the unit on.
2.Repeatedly press TUNER to switch input to Tuner FM.
Tuner FM
AUTO
87.50MHz
3.When you press TUNE i/j (b) on the remote controller, automatic tuning starts, and searching stops when a station is found. "Tuned Stereo" or "Tuned Mono" is displayed when FM stations are being received.
When FM broadcasts are difficult to receive: Perform the procedure for "Tuning Manually". If the "Tuning Mode" is set to "Manual", the reception for FM broadcasts will be monaural rather than stereo, irrespective of the sensitivity of the reception.
Tuning Manually
You will need to change the initial settings. Press SETUP
(h) on the remote controller and select "Option Setting" - "Tuner Setting" - "Tuning Mode" - "Manual" on the display and confirm. Press SETUP (h) to finish the settings.
1.Turn the unit on.
2.Repeatedly press TUNER to switch input to Tuner FM.
E N
23

> Before Start > Part Names > Install > Initial Setup |
> Playback |
|
|
Downloaded |
|
|
from |
Advanced Setup | Firmware Update | Others |
|
www |
|
|
|
. |
|
|
vandenborre |
|
|
. |
Selecting registered stations |
|
be |
|
receives unsupported characters. However, this is not a |
|
Tuner FM |
|
malfunction. Also, if the signal from a station is weak, |
|
|
information may not be displayed. |
87.50MHz
3.Select the station you want to listen to while pressing TUNE i/j (b) on the remote controller.
0 The frequency changes by 1 step each time you press the button. The frequency changes continuously if the button is held down and stops when the button is released. Tune by looking at the display.
Registering a station
You can register a maximum of 40 stations.
1.Tune into the radio station you want to register.
2.Press MEMORY (c) on the remote controller so that the preset number on the display flashes.
Tuner FM
87.50MHz
 P01
P01 
3.While the preset number is flashing (about 8 seconds), repeatedly press PRESET i/j (a) on the remote controller to select a number between 1 and 40.
4.Press MEMORY (c) on the remote controller again to register the station. When registered, the preset number stops flashing.
Search for stations by Program Type
1.While the name of the station is being displayed on the display, press MODE (e) on the remote controller twice.
2.Press the PRESET i/j (a) on the remote controller to select the Program Type you want to find, then press ENTER (g) to start the search.
The Program Types displayed are as follows: None
News (News reports) Current affair Information
Sport Education Drama Cultures
Science (Science and technology) Varied speech
Pop music Rock music Easy listening Light classics
Serious classi (Serious classics) Other music
Weather & metr Finance
Children's pro (Children's programmes) Social affairs
Religion Phone in Travel & touri Leisure & hobb Jazz music Country music Nation music Oldies music
E N
24

> Before Start > Part Names > Install > Initial Setup
Folk music
Documentary
0The information displayed may sometimes not match the content being broadcast by the station.
3."FINISH" is displayed when a station is found and the frequency display flashes. Press ENTER (g) while this is happening to start receiving that station. If you don't press ENTER (g), the unit continues to search for another station.
0If no stations are found, the message "Not Found" is displayed.
0Unusual characters may be displayed when the unit receives unsupported characters. However, this is not a malfunction. Also, if the signal from a station is weak, information may not be displayed.
>
Downloaded |
|
Playback |
|
from |
Advanced Setup | Firmware Update | Others |
www |
|
|
. |
|
vandenborre |
|
. |
|
be |
E N
25
> Before Start |
> Part Names |
> Install |
> Initial Setup |
Downloaded |
|
|
> Playback |
|
|||||
|
|
|
|
from |
Advanced Setup | Firmware Update | Others |
|
|
|
|
|
www |
||
Listening to DAB Digital Radio (X-HM76D, X-HM86D, XC-HM86D) |
. |
|||||
vandenborre |
||||||
|
|
|
|
|
||
|
|
|
|
|
. |
|
1 |
|
Tuning |
|
|
be |
|
|
|
|
Tuner DAB |
|||
|
1. Turn the unit on. |
|
||||
|
|
|
||||
|
|
2. Repeatedly press TUNER to switch input to Tuner DAB. |
|
|||
|
|
0 The very first time you select Tuner DAB, the Auto |
|
|||
|
|
Tuning function automatically scans the DAB Band 3 |
|
|||
|
|
for the multiplexes (i.e., stations) available in your |
ABCD-Station |
|||
|
|
area. |
|
|
||
|
|
|
|
News |
||
|
|
|
|
|
||
|
|
|
Tuner DAB |
|
DLS (Dynamic Label Segment) : When tuned to a |
|
|
|
|
|
|
||
|
|
|
|
|
station that's broadcasting DLS text data, the text will |
|
a |
|
|
|
|
scroll across the display. |
|
|
|
|
|
Program Type : Displays the type of program. |
||
|
|
|
|
|
Bit Rate and Audio Mode : Displays the station's bit rate |
|
b |
|
|
|
|
and audio mode (Stereo, Mono). |
|
|
|
Scan: 100% |
|
Quality : Displays the signal quality. |
||
|
|
|
|
|
||
|
|
0 Once the scanning process is complete, the first |
0 - 59: Poor reception |
|||
c |
|
60 - 79: Good reception |
||||
|
station that was detected is selected. |
|
80 - 100: Excellent reception |
|||
|
|
0 If a new DAB station is introduced, or you move to a |
Multiplex Name : Displays the name of the current |
|||
|
|
new area, press SETUP on the remote controller, then |
multiplex. |
|||
|
|
use "DAB Scan" in "Option Setting" - "Tuner Setting". |
Multiplex Number and Frequency : Displays the |
|||
|
|
3. Select the desired radio station with the cursors (c) on |
number and frequency of the current multiplex. |
|||
|
|
the remote controller. |
|
|
||
Changing the order stations are displayed
You can sort the abailable stations alphabetically or by multiplex.
1.Press MODE (a) repeatedly to set the method for sorting the display order from the following.
Alphabet (default setting) : Sort stations alphabetically. Multiplex : Sort stations by multiplex.
Displaying DAB Radio Information
1.Press the  (NOW PLAYING) button (b) repeatedly to display more information about the selected DAB station.
E N
26
> Before Start > Part Names > Install > Initial Setup
BLUETOOTH®
Pairing |
Playing Back |
1 |
1 |
>
Downloaded |
|
|
|
Playback |
|
|
|
from |
|
Advanced Setup | Firmware Update | Others |
|
www |
|||
|
|||
|
. |
|
|
|
vandenborre |
||
|
|
. |
|
|
Pairing |
be |
|
|
|
||
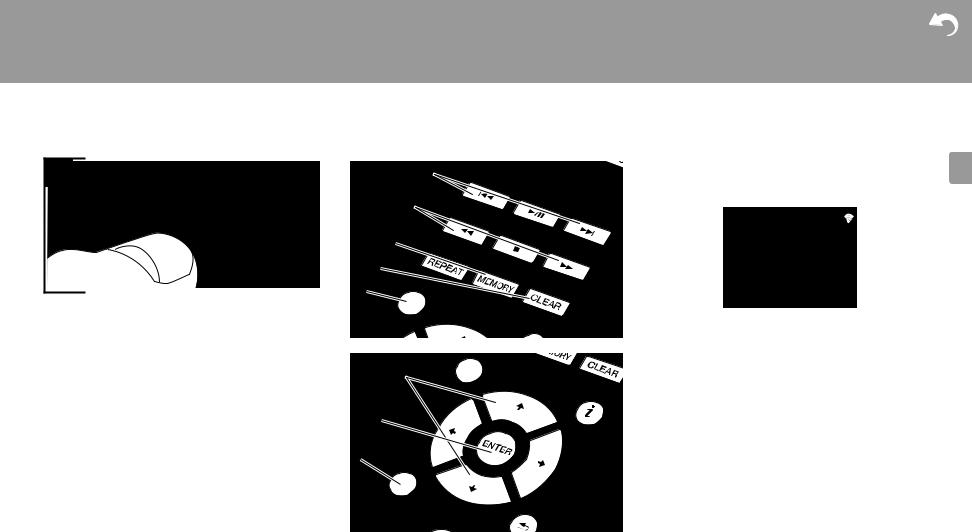
1.Turn the unit on.
2.When you press the  button on the remote controller, "Now Pairing... " is displayed on the display, and the pairing mode is enabled.
Bluetooth
Now Pairing...
2 |
PioneerHMXX |
|
--:--:-- / --:--:-- |
|
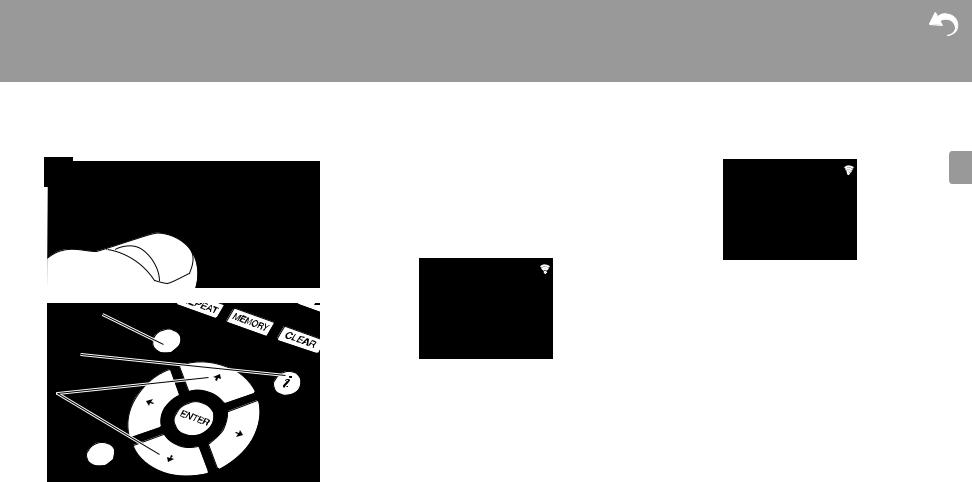
3. |
Enable (turn on) the BLUETOOTH function of the |
|||
|
|
|||
|
|
|
BLUETOOTH enabled device, then select this unit from |
|
|
2 |
|
amongst the devices displayed. If a password is |
|
|
|
requested, enter "0000". |
||
|
|
0 This unit is displayed as "Pioneer HM76D (76 or 86D) |
||
|
|
|
XXXXXX". |
|
|
|
4. |
"Now Pairing... " on the display changes to the name of |
|
|
|
|
the BLUETOOTH enabled device. |
|
|
|
0 To connect another BLUETOOTH enabled device, press |
||
|
PioneerHMXX |
|
and hold the button until "Now Pairing... " is displayed, |
|
|
|
then perform step 3 above. This unit can store the data of |
||
|
|
up to eight paired devices. |
||
|
|
0 The coverage area is 10 meters. Note that connection is |
||
|
|
|
not always guaranteed with all BLUETOOTH enabled |
|
|
|
|
devices. |
|
|
|
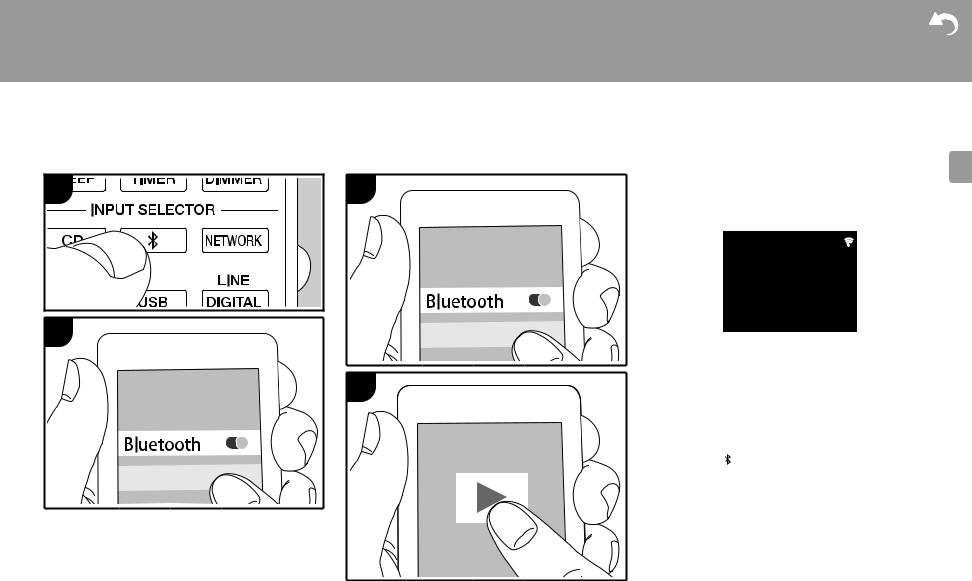
Playing Back |
||
|
|
1. |
Turn the unit on. |
|
|
|
2. |
Perform the connection procedure on the BLUETOOTH |
|
|
|
|
enabled device. |
|
|
|
3. |
The input selector on this unit automatically switches to |
|
|
|
|
"Bluetooth". |
|
E N
27

> Before Start > Part Names > Install > Initial Setup
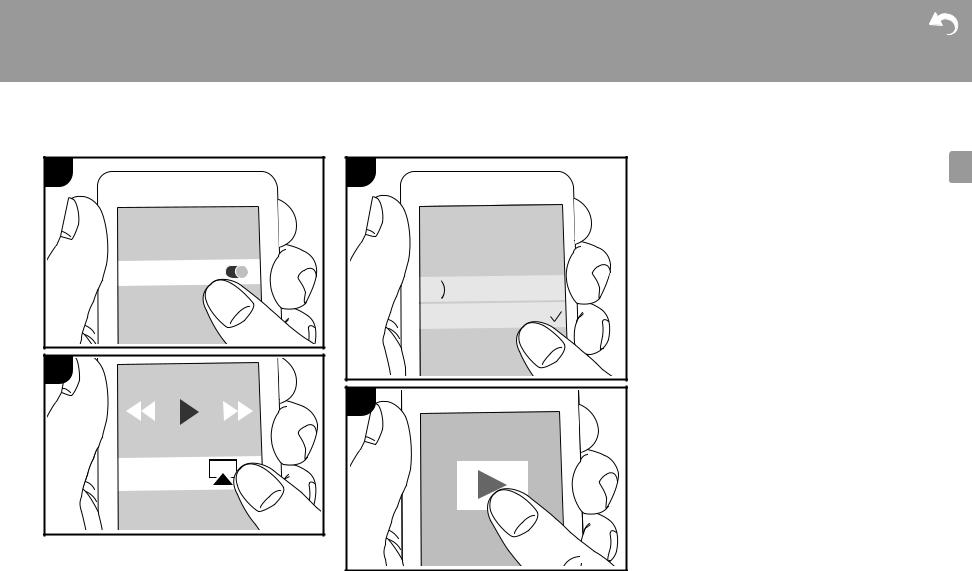
4. Play the music files. Increase the volume of the BLUETOOTH enabled device to an appropriate level.
0Due to the characteristics of BLUETOOTH wireless technology, the sound produced on this unit may slightly be behind the sound played on the BLUETOOTH enabled device.
>
Downloaded |
|
Playback |
|
from |
Advanced Setup | Firmware Update | Others |
www |
|
|
. |
|
vandenborre |
|
. |
|
be |
E N
28
> Before Start > Part Names > Install > Initial Setup
AirPlay®
1 |
3 |
Wi-Fi

 iPhone
 Pioneer HMXX
2
4
>
Downloaded |
|
|
Playback |
|
|
from |
Advanced Setup |
| Firmware Update | Others |
www |
|
|
|
. |
|
|
vandenborre |
|
|
. |
|
|
be |
|
|
Basic Operation |
|
|
You can wirelessly enjoy the music files on an iPhone®, |
|
|
iPod touch®, or iPad® connected to the same access point |
|
|
as this unit. Update the OS version on your iOS device to |
|
|
the latest version. |
|
1.Turn the unit on.
2.Connect the iOS device to the same network as this unit.
3.Tap the AirPlay icon  in the control center of the iOS device and select this unit from the list of devices displayed, and tap "Done".
0 This unit is displayed as "Pioneer HM76D (76 or 86D) XXXXXX".
0 If an "AirPlay Password" has been set on this unit, enter the password you set.
4. Play the music files on the iOS device.
0In the Setup menu displayed by pressing SETUP on the remote controller, when "Option Setting" - "Power Off Setting" - "Network Standby" is set to "On", when play of AirPlay starts, this unit turns on automatically and play starts.
0Due to the characteristics of AirPlay wireless technology, the sound produced on this unit may slightly be behind the sound played on the AirPlay-enabled device.
0SHUFFLE/REPEAT on the remote controller does not work. Operate from the iOS device.
You can also play the music files on a computer with iTunes (Ver. 10.2.2 or later). Make sure this unit and the computer are connected to the same network, click the AirPlay icon  in iTunes, select this unit from the list of devices displayed, and start play of a music file.
E N
29
 Loading...