

Page 1

Quick Start Guide
Guide rapide
Kurzanleitung
Guida di avvio rapido
Snelstartgids
Guía de inicio rápido
Краткое руководство пользователя
AV Receiver
Amplificateur AV
AV Receiver
Register your product at
http://www.pioneerelectronics.com (US)
http://www.pioneerelectronics.ca (Canada)
VSX-1130-K
Sintoamplificatore AV
AV Receiver
Receptor AV
AV-ресивер
VSX-930-K/-S
Page 2

English
Thank you for buying this Pioneer product. This Quick Start Guide includes instructions for basic connections and operations to
allow simple use of the receiver. For detailed descriptions of the receiver, see the “Operating Instructions” provided on the
included CD-ROM ( ).
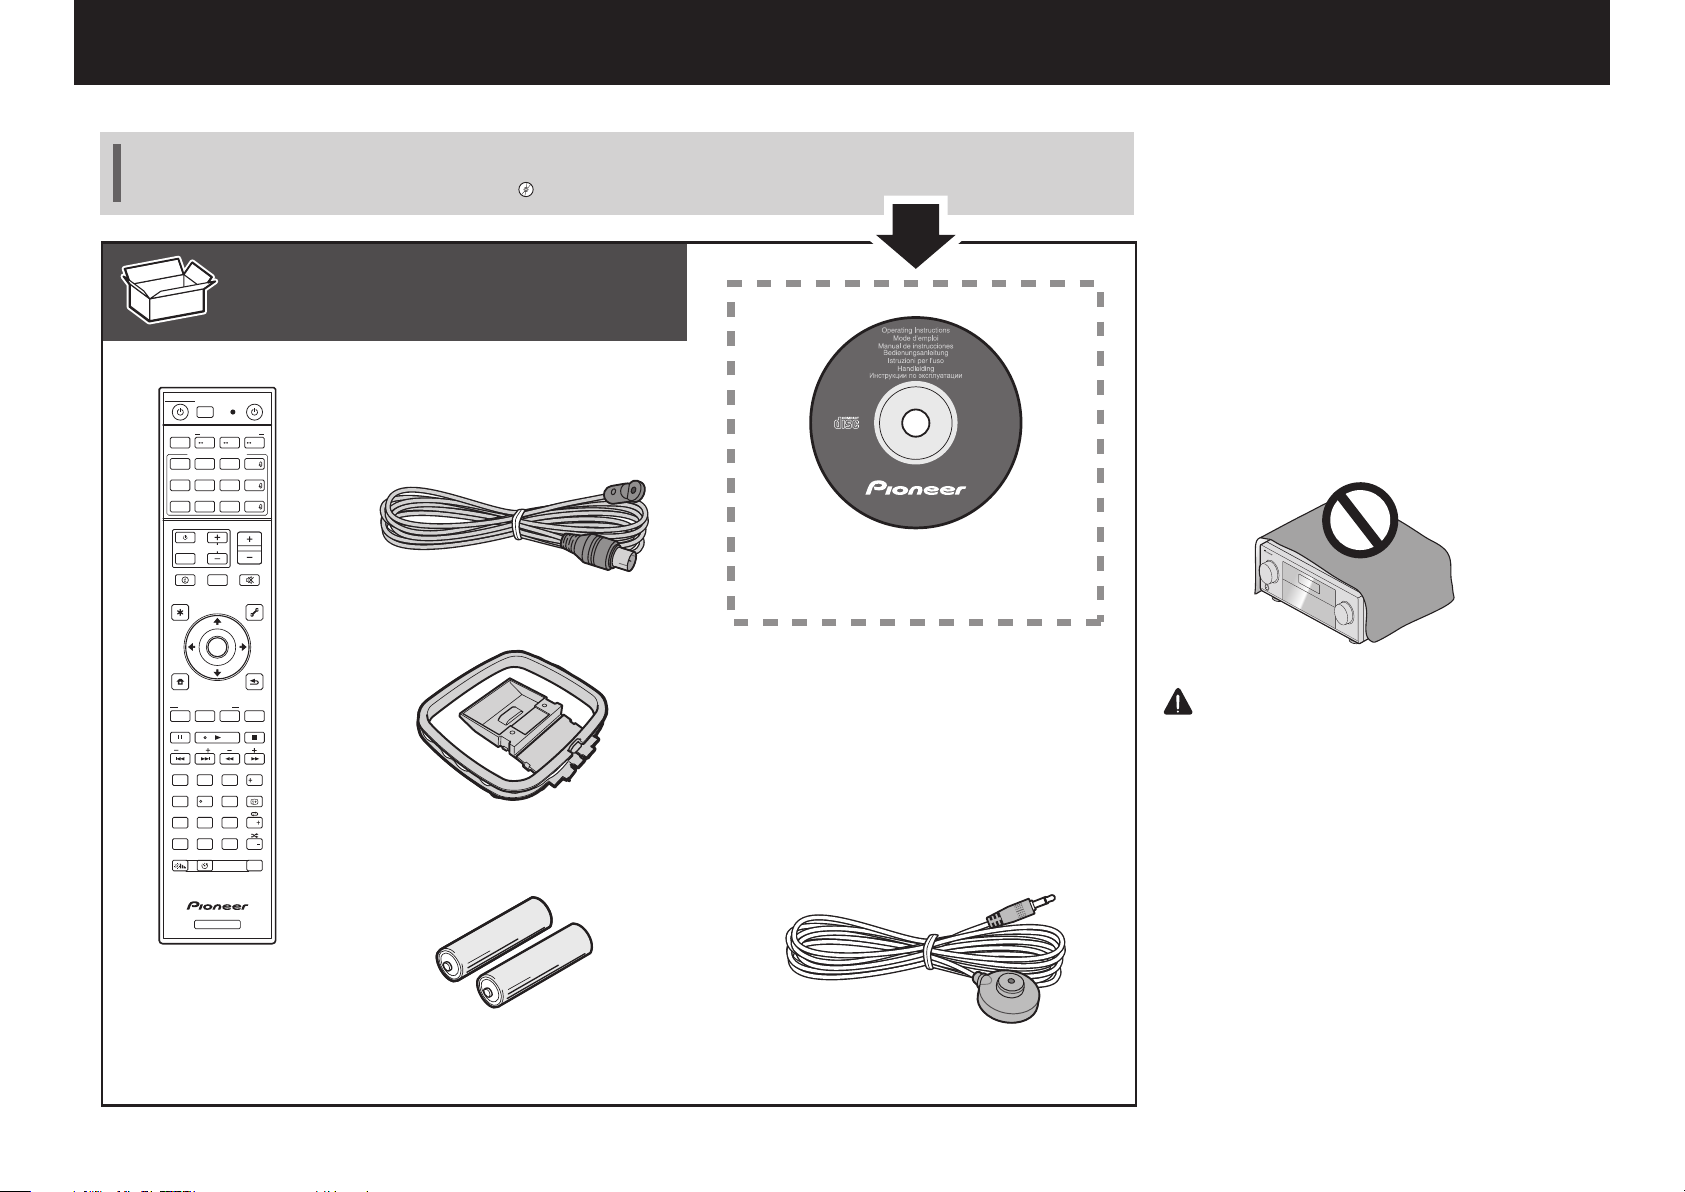
What’s in the box
STANDBY/ON
RECEIVER
MAIN
USB ADPT ROKU
iPod
TUNER
TV
INPUT
STATUS
AUDIO P. VIDEO P.
TOP
MENU
HOME
MENU
LISTENING MODE
MPX
PRESET TUNE
13
D.ACCESS
CLR
DIMMER SLEEP
ALL ZONE STBY
SUB ZONE CONTROL
Z2 Z3 HDZ
SOURCE CONTROL
SAT
DVDBD
BT
MHL
TV
CD
VOL
OUT P.
ENTER
SURRAUTO
ADV
BAND PTY
2
546
8079
CLASS
ENTER
SOURCE
Remote Control
HDMI
NET
ALL
VOLUME
MUTE
TOOLS
MENU
RETURN
CH LV.
AUDIO
Fav
DISP
CH
CH
RCU SETUP
FM wire antenna
AM loop antenna
VSX-1130-K
VSX-930-K/-S
VSX-830-K/-S
CD-ROM
Power cord
Safety Brochure
Warranty sheet
These quick start guide
VENTILATION CAUTION
When installing this unit, make sure to leave space
around the unit for ventilation to improve heat radiation
(at least 40 cm at top, 10 cm at rear, and 20 cm at each
side).
WARNING
Slots and openings in the cabinet are provided for
ventilation to ensure reliable operation of the product,
and to protect it from overheating. To prevent fire
hazard, the openings should never be blocked or
covered with items (such as newspapers, table-cloths,
curtains) or by operating the equipment on thick carpet
or a bed.
D3-4-2-1-7b*_A1_En
CAUTION
・Do not use or store batteries in direct sunlight or
otherexcessively hot place, such as inside a car
or near a heater. This can cause batteries to leak,
overheat, explode or catch fire. It can also
reduce the life or performance of batteries.
・
When disposing of used batteries, please
comply with governmental regulations or
environmental public institution’s rules that
apply in your country/area.
RECEIVER
Setup microphoneAAA size IEC R03 dry cell batteries x2
2
Page 3
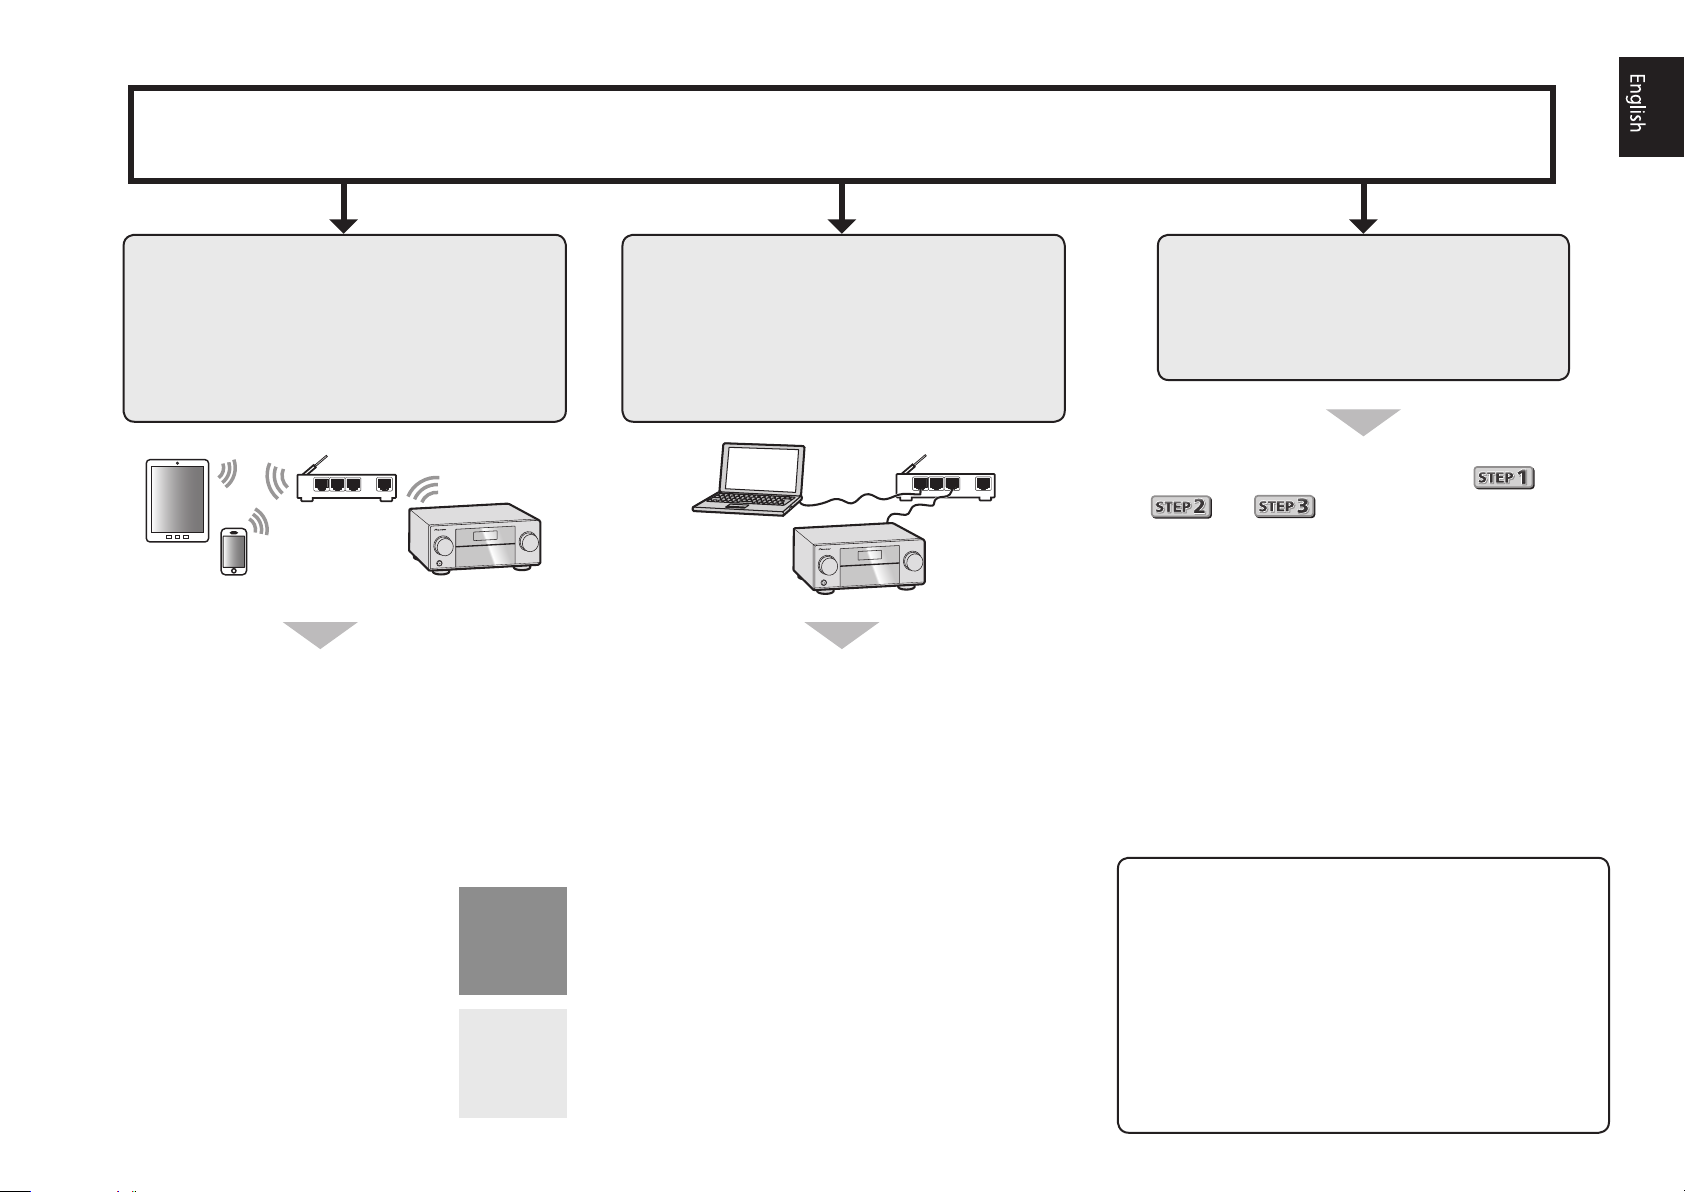
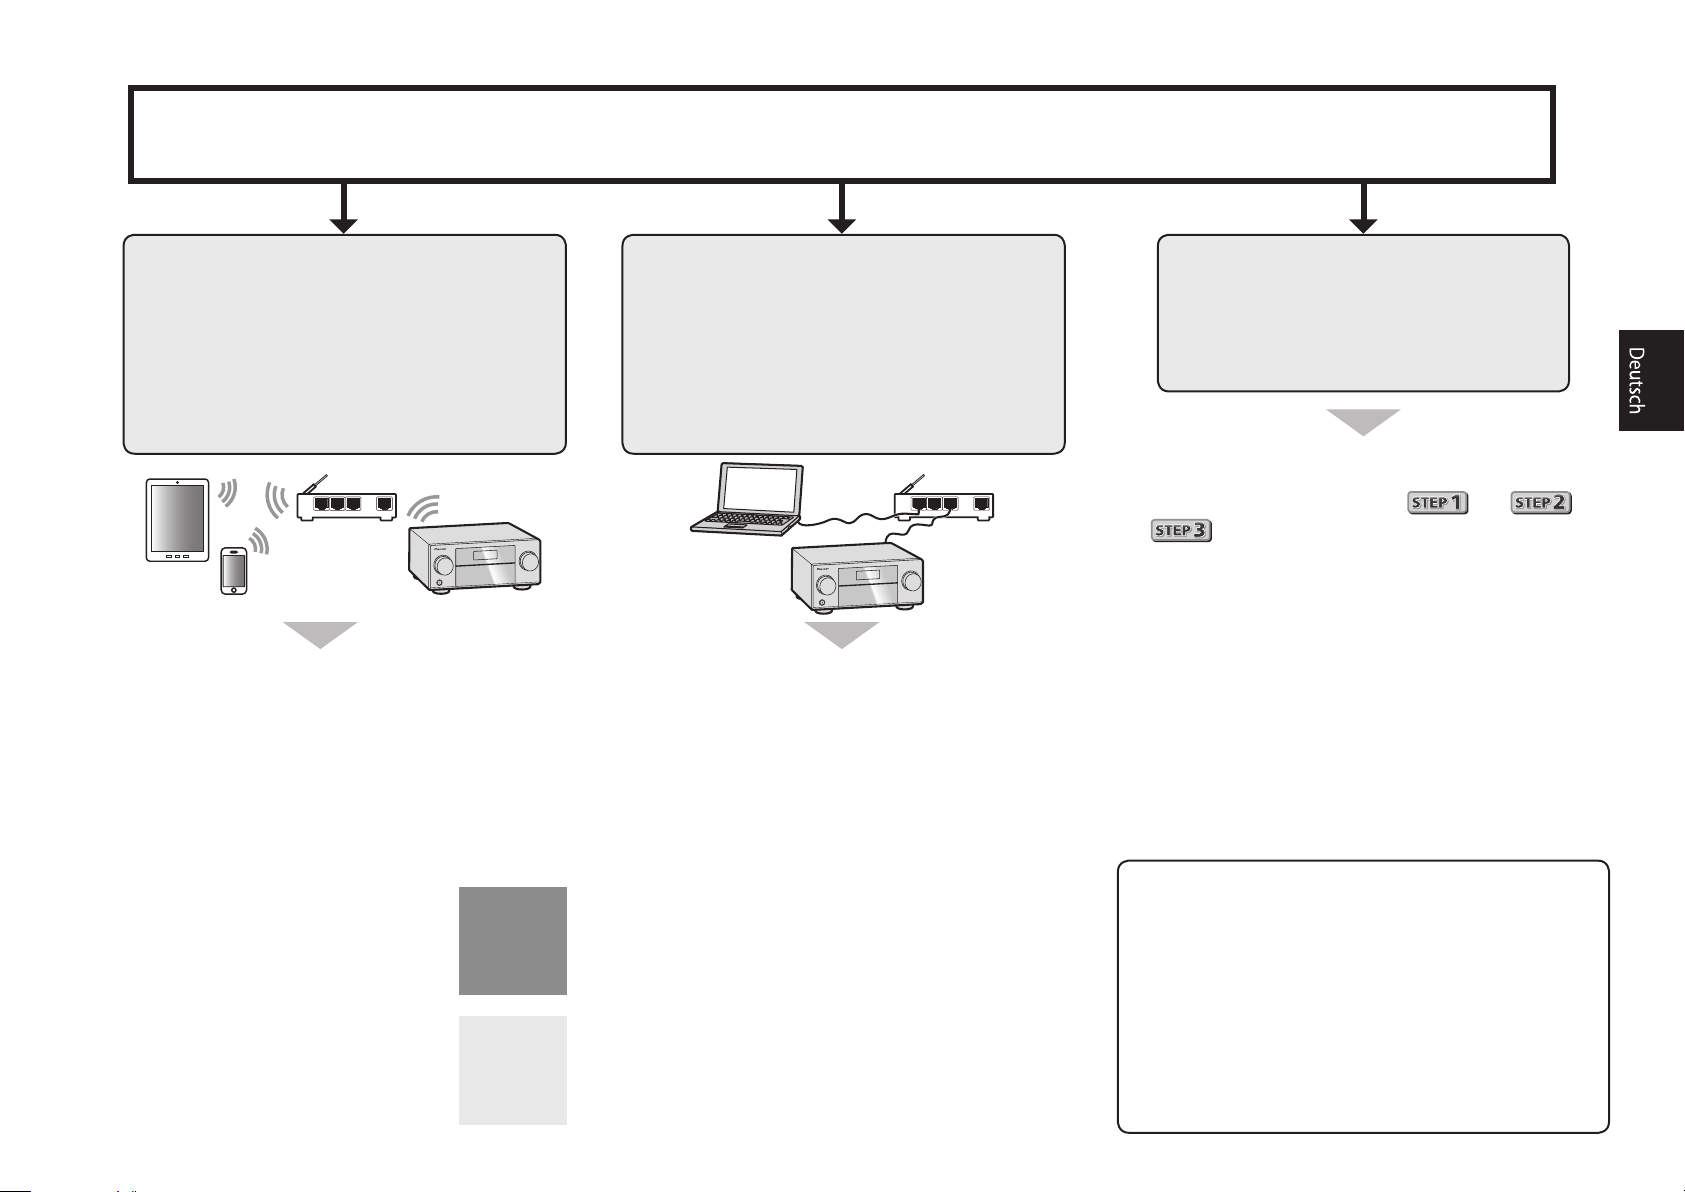
Connection and initial setup
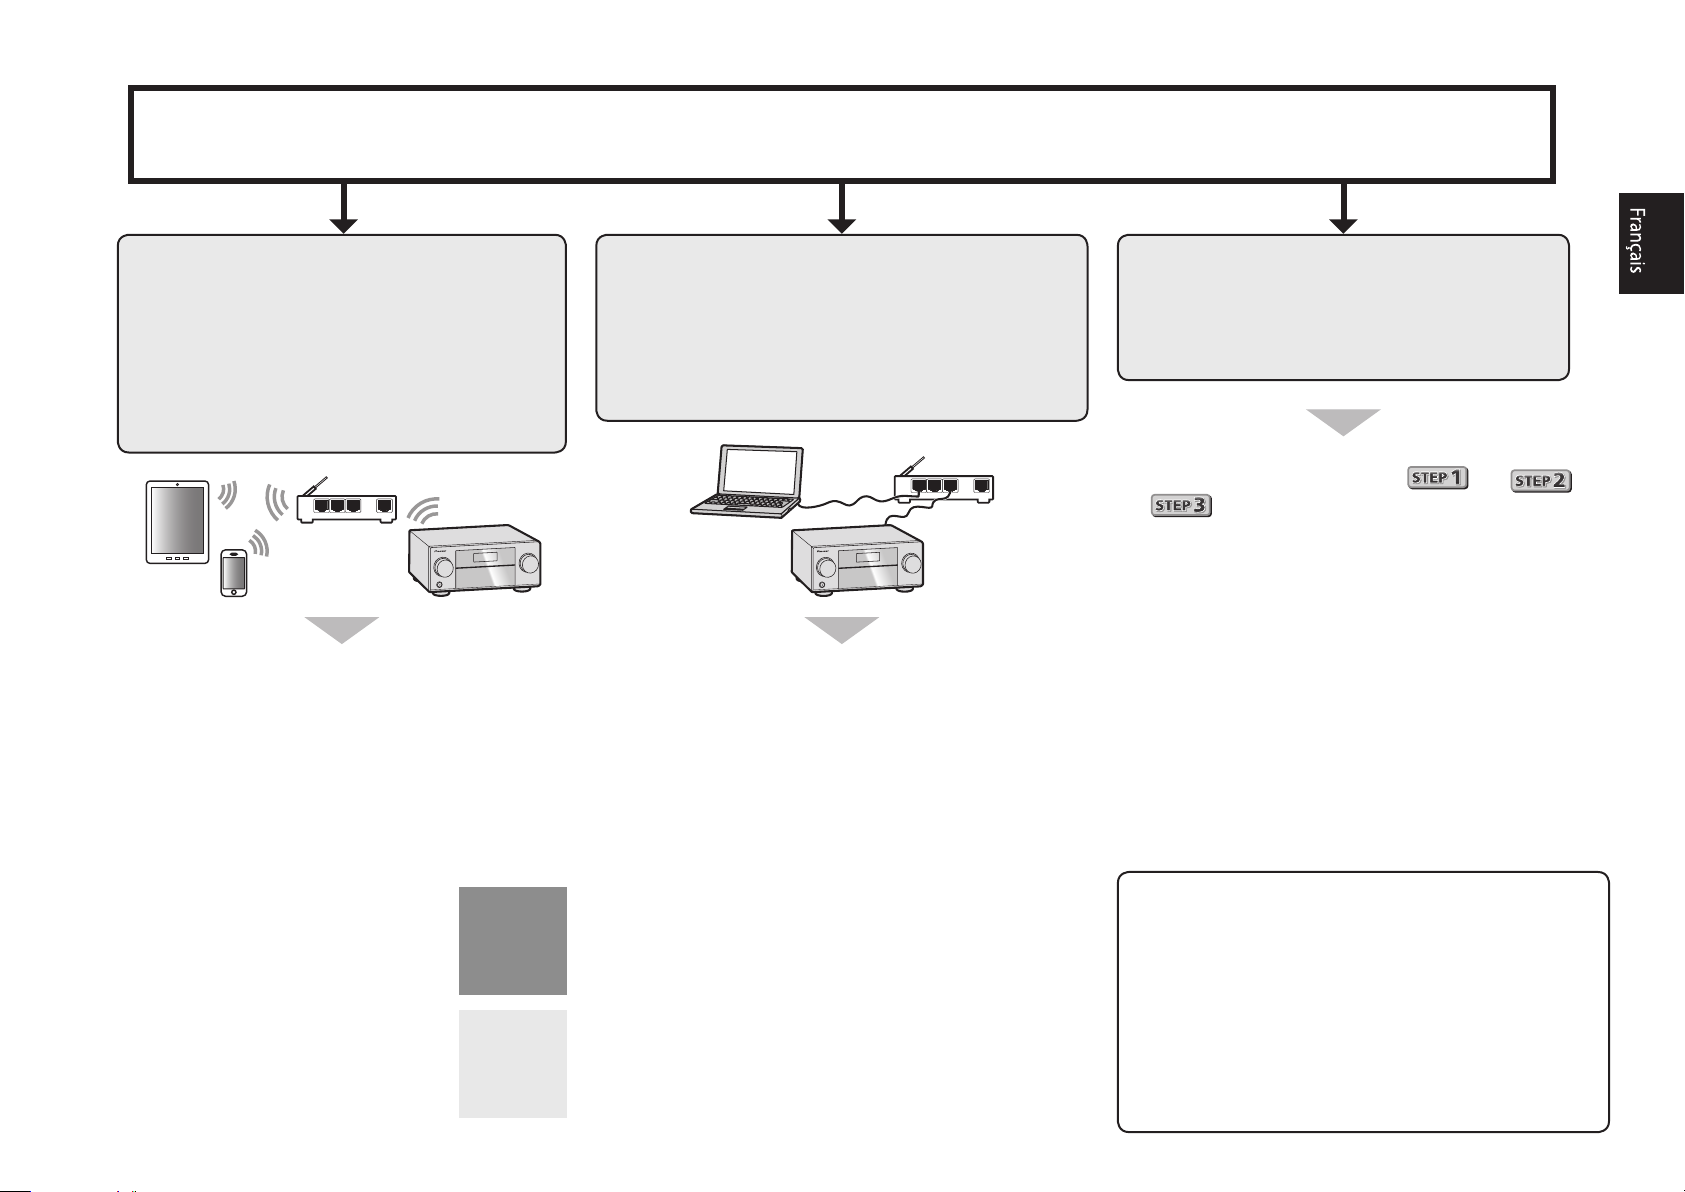
Perform connection and initial settings in any of the ways listed below.
Use
“Start-up Navi”
app to perform
connection and initial settings
• Use a smartphone/tablet.
• Network connection is required.
LAN
Download and start “Start-up Navi” app.
1
Proceed along with the app guidance to
2
perform connection and initial settings.
Follow the guidance of the built-in
AVNavigator to perform connection
and initial settings
• Use a Mac/PC.
• Network connection is required.
LAN
Please read the booklet “If you have a Mac/
1
PC”.
Follow the guidance of the AVNavigator
2
built into the receiver to proceed with the
connection and initial settings.
Follow the instructions in the
booklet to perform connection
and initial settings
1
Read the booklet in the order of
Follow the instructions of each step to
2
proceed.
.
Download “Start-up Navi” app from here.
If you have an iPhone or iPad
Please search for “Start-up Navi” app in the App
Store.
If you have an Android device
Please search for “Start-up Navi” app in Google
Play.
Regarding WIRELESS indicator flashing
• Flashes when using WAC Mode. (Mode where network
settings can be changed by iPhone, iPad and iPod
touch, when this receiver is being used as a Wi-Fi
Access point)
When switching on the unit after network setup or a
LAN cable is connected, the WIRELESS indicator will
not flash.
• When not making a network connection, there is no
problem using it as is.
3
Page 4
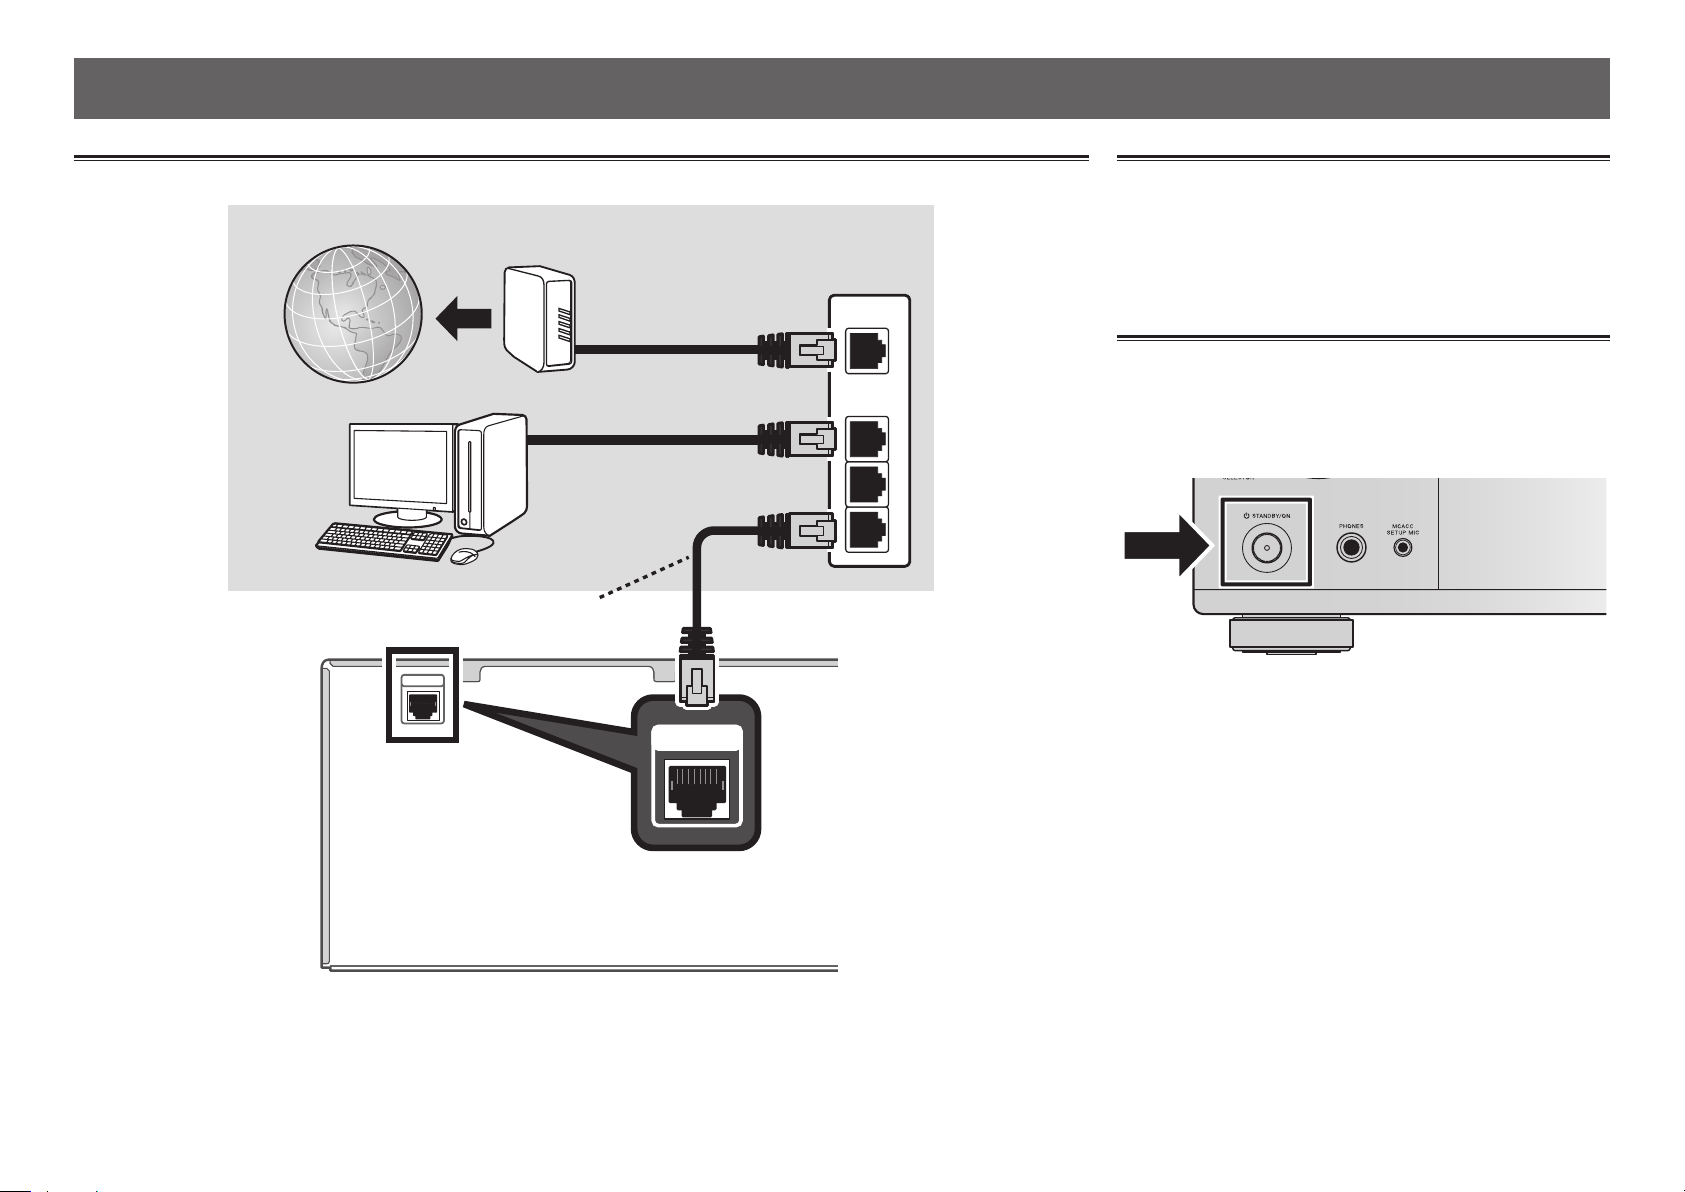
If you have a Mac/PC
Connecting to the network through LAN interface
Internet
Computer
LAN cable (sold separately)
NETWORK
Modem
1
NETWORK
Router
WAN
LAN
Plugging in the receiver
After connecting to a LAN, connect the power cord of the
receiver to a power outlet.
Plug the supplied power cord into the AC IN socket on the
1
back of the receiver.
Plug the other end into a power outlet.
2
Turning the power on
Press
computer.
1
2
3
Wait a few minutes after turning the power on before
performing the following operation.
STANDBY/ON
to switch on the receiver and your
When connecting this receiver to a wireless LAN router by Wi-Fi, refer to the “Setting network connection” in the CD-ROM’s
operating instructions.
4
Page 5
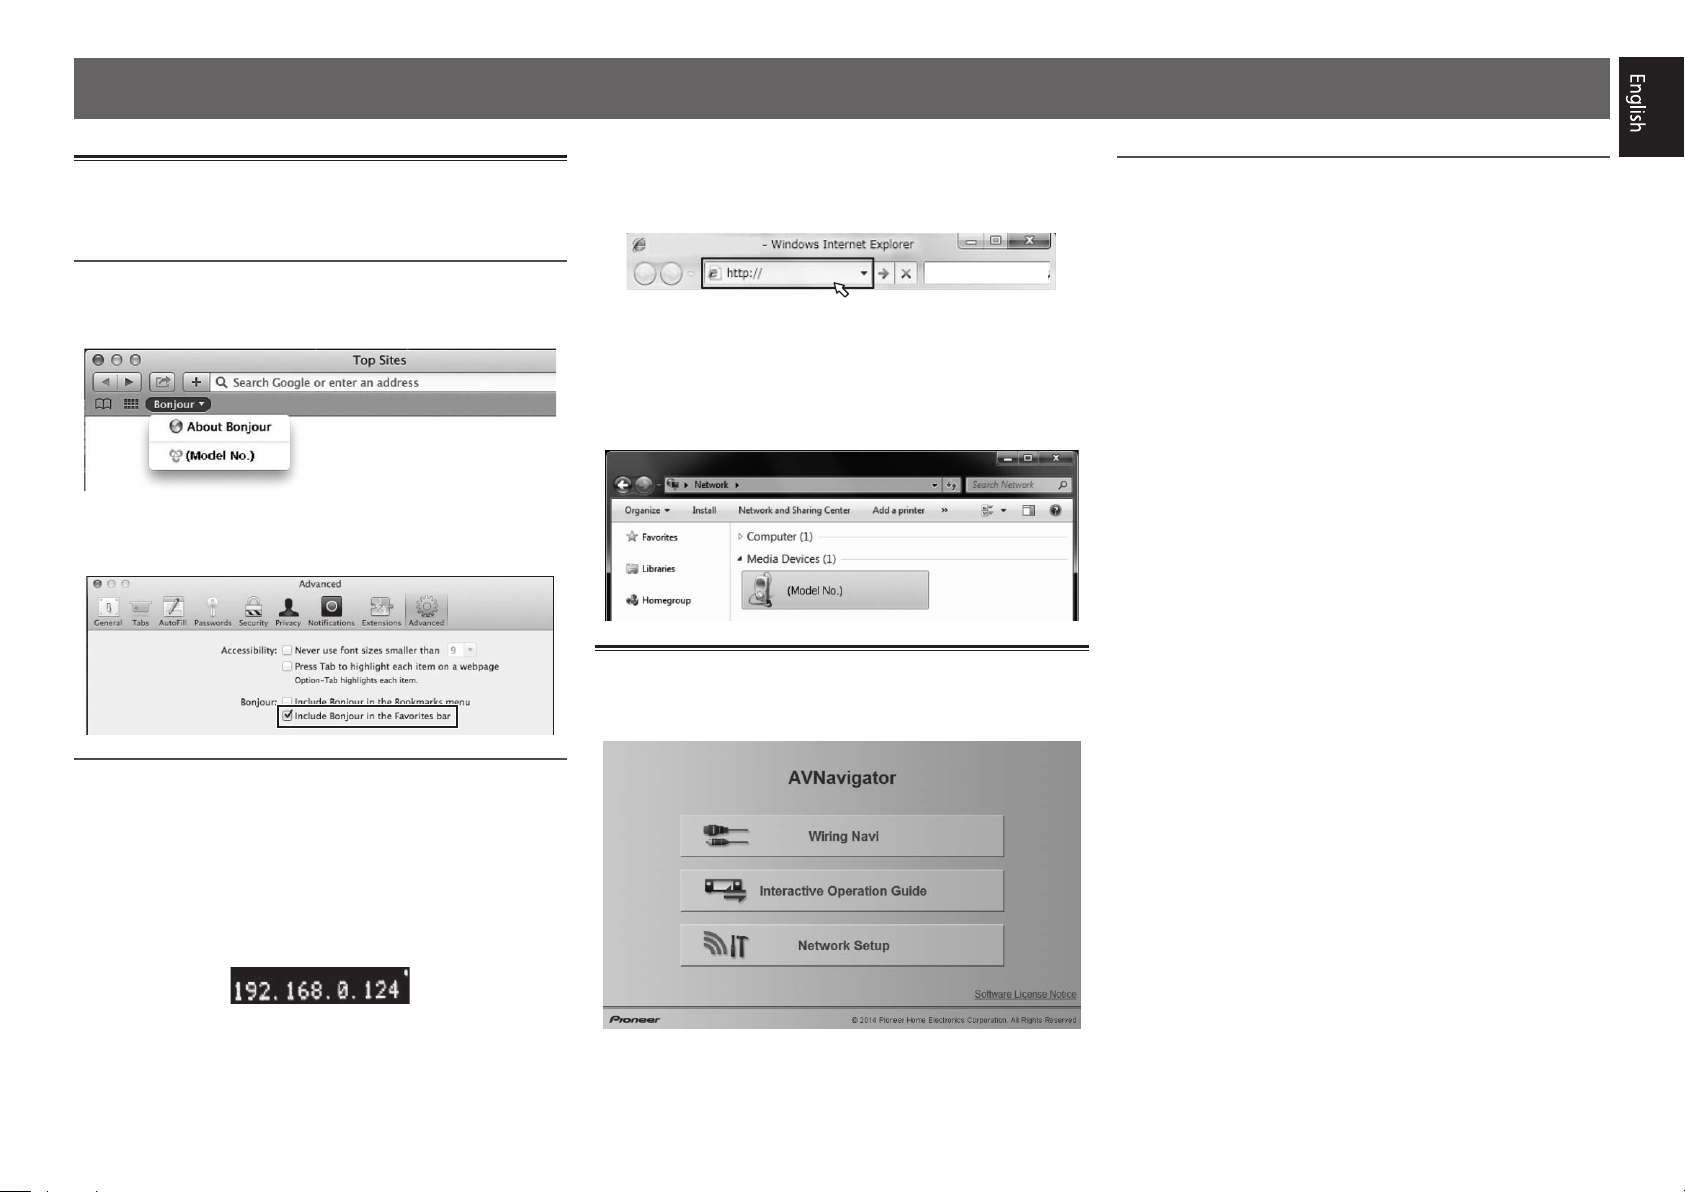
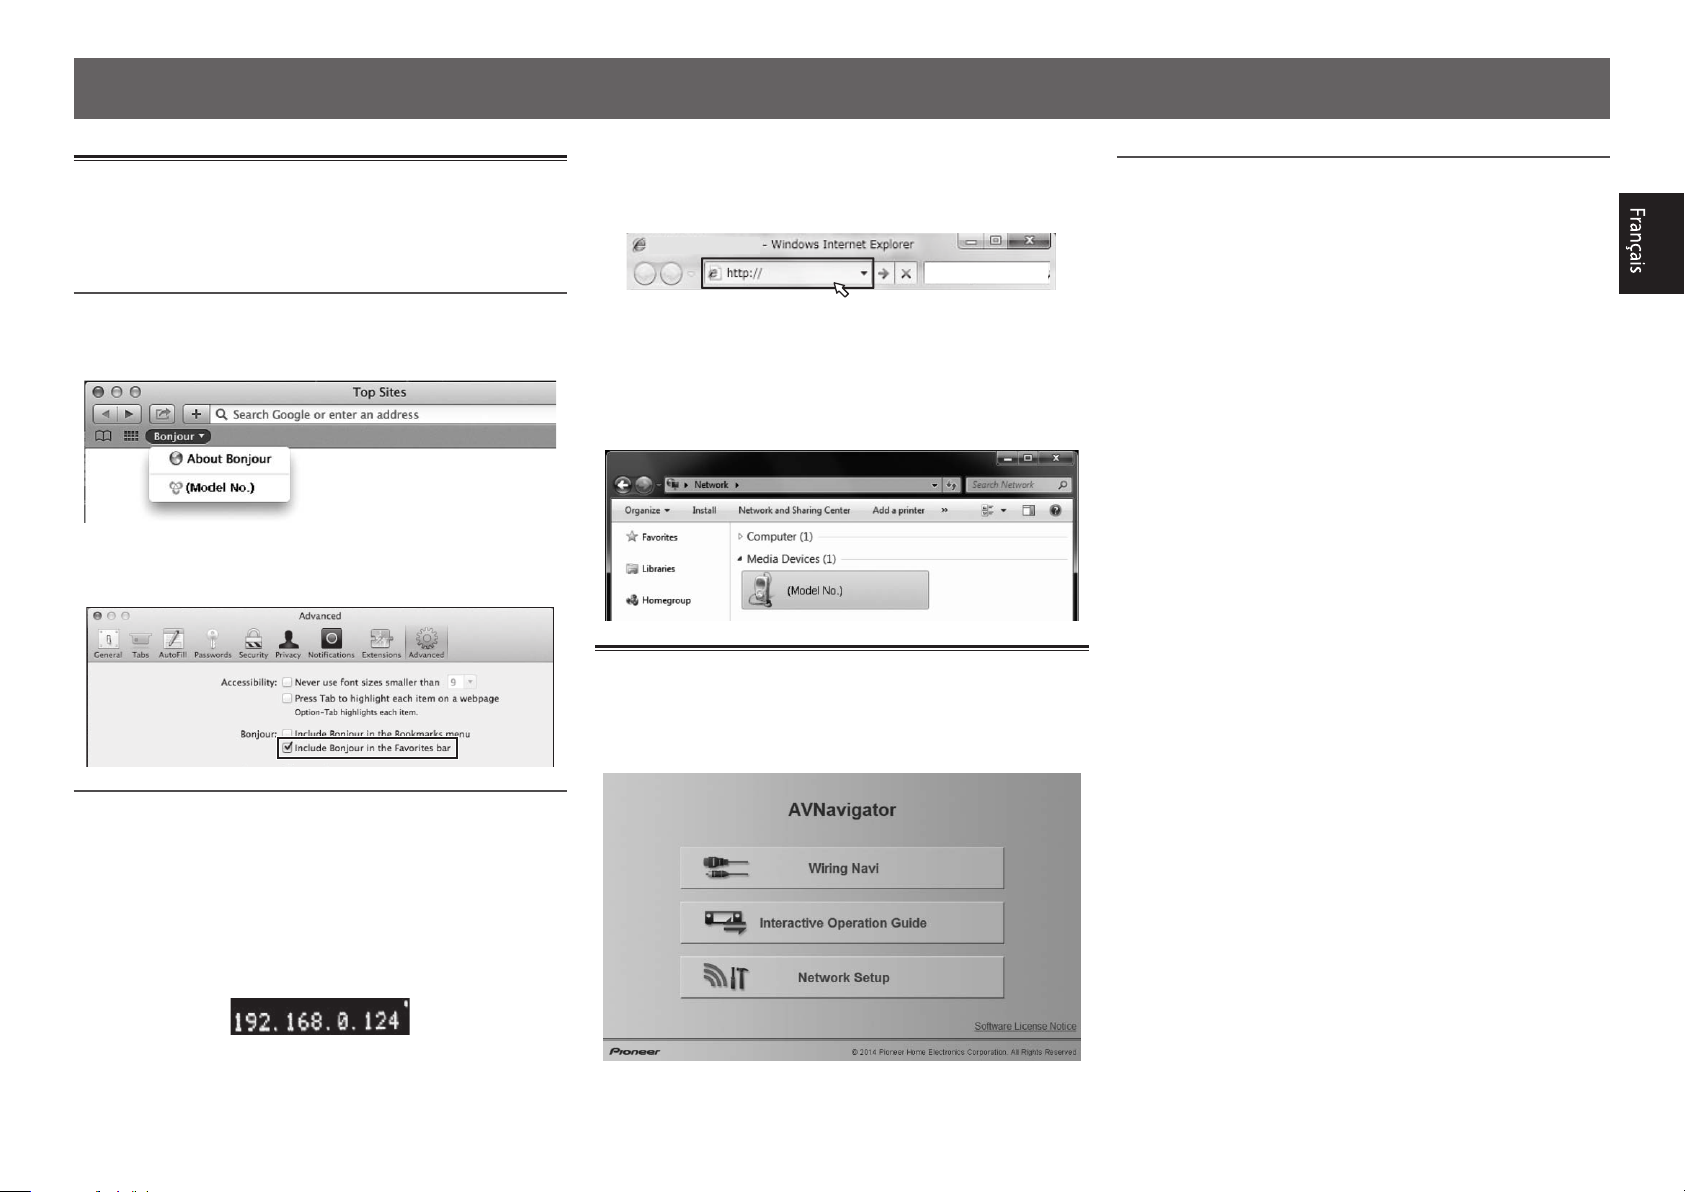
Launching the built-in AVNavigator
Operate AVNavigator by following the screen prompts of your
computer.
Using Mac
launch Safari and click <VSX-1130> or <VSX-930> displayed
Bonjour
in ‘
’ on the Bookmarks bar.
Enter number in 2 above in the field in
3
Internet Explorer shown below and then press
the ENTER key.
(Example Input Format) 192.168.0.124
• With a Windows PC, you can use the following method to
launch AVNavigator.
Launch Explorer and then right-click <VSX-1130> or
’.
Network
’ folder, then click
<VSX-930> displayed in the ‘
View device webpage
‘
Operating environment
• AVNavigator can be used in the following environments.
–Windows PC: Microsoft
Windows
–Mac: OS X v 10.9 or 10.8
• Some AVNavigator functions use an Internet browser. The
following browsers are supported:
–Windows PC: Internet Explorer
–Mac OS: Safari 6.0, 7.0
• Depending on the computer network setting or security
setting, AVNavigator may not operate.
®
8/Windows® 8.1
®
Windows Vista®/Windows® 7/
®
8, 9, 10, 11
Bonjour
• If ‘
the Favorites bar
the Safari ‘
’ is not displayed, tick the ‘
Preferences...
’ check box on the ‘
’ menu.
Include Bonjour in
Advanced
’ tab in
Using Windows PC
Start up Internet Explorer on your PC (open
1
any random Internet page).
Press STATUS on the remote control and check
2
the front panel display on the receiver (the IP
address of the receiver will appear).
(Example Text Display)
If 0.0.0.0 or 169.254.112.202 appears in the address, it
indicates that the receiver is not connected to the network.
Check to make sure that the receiver and router are
properly connected.
About using Wiring Navi
Wiring Navi starts when ‘
AVNavigator screen.
• When connection navigation is finished, proceed to
Interactive Operation Guide
Wiring Navi
.
’ is pressed on the
5
Page 6

Follow the booklet instructions to perform connection and initial settings
Connecting up
Placing the Speakers
L
– Front Left
C
– Center
TMdL TMdR
R
– Front Right
SL
– Surround Left
SR
– Surround Right
SBL
– Surround back Left
SBR
– Surround back Right
L
C
R
TMdL
TMdR
SW
SW
SBL
6
SBR
SRSL
– Top middle Left
– Top middle Right
– Subwoofer
Notes
• There are also other speaker connection
patterns (front wide, etc.). For details, see
“Connecting your equipment” of the operating
instructions.
• To play Dolby Atmos, you need to connect the
speaker of either the Top middle, Surround
back, or Front wide.
• The sound is produced from one of the Top
middle and Surround back speakers depending
on the listening mode, etc.
• The Dolby Enabled Speaker can be used in
place of the Top middle speaker. Refer to the
operating instructions for details.
Page 7
Connecting up
12 3
Connecting the speakers
Be sure to complete all connections before
1
connecting this unit to the AC power source.
You can use speakers with a nominal
2
impedance between 6 Ω and 16 Ω.
Connecting the speakers.
3
Bare wire connections
Twist exposed wire strands together.
1
Loosen terminal and insert exposed wire.
2
Tighten terminal.
3
10 mm
Front Right
(R)
Subwoofer
(SW)
LINE LEVEL
INPUT
AUDIO OUT
1
SUBWOOFER
PRE OUT
2
FRONT
RL
A
5.2ch
5.2.2ch
CENTER
Center
(C)
SURROUND
RL
HDZONE / BI-AMP
7.2ch
SURROUND BACK
(
Single
)
Front Left
(L)
SPEAKER B
TOP MIDDLE
RLRL
B
5.2.2ch
Top middle Right
TMdR
(
)
Surround Right
(SR)
Surround back Right
SBR
(
)
Surround back Left
SBL
(
)
Surround Left
(SL)
CAUTION
• These speaker terminals carry
disconnecting the speaker cables, disconnect the power cord before touching any uninsulated parts.
HAZARDOUS LIVE voltage
. To prevent the risk of electric shock when connecting or
Top middle Left
TMdL
(
)
7
Page 8
AC
A
Connecting up
Connecting a TV and playback components
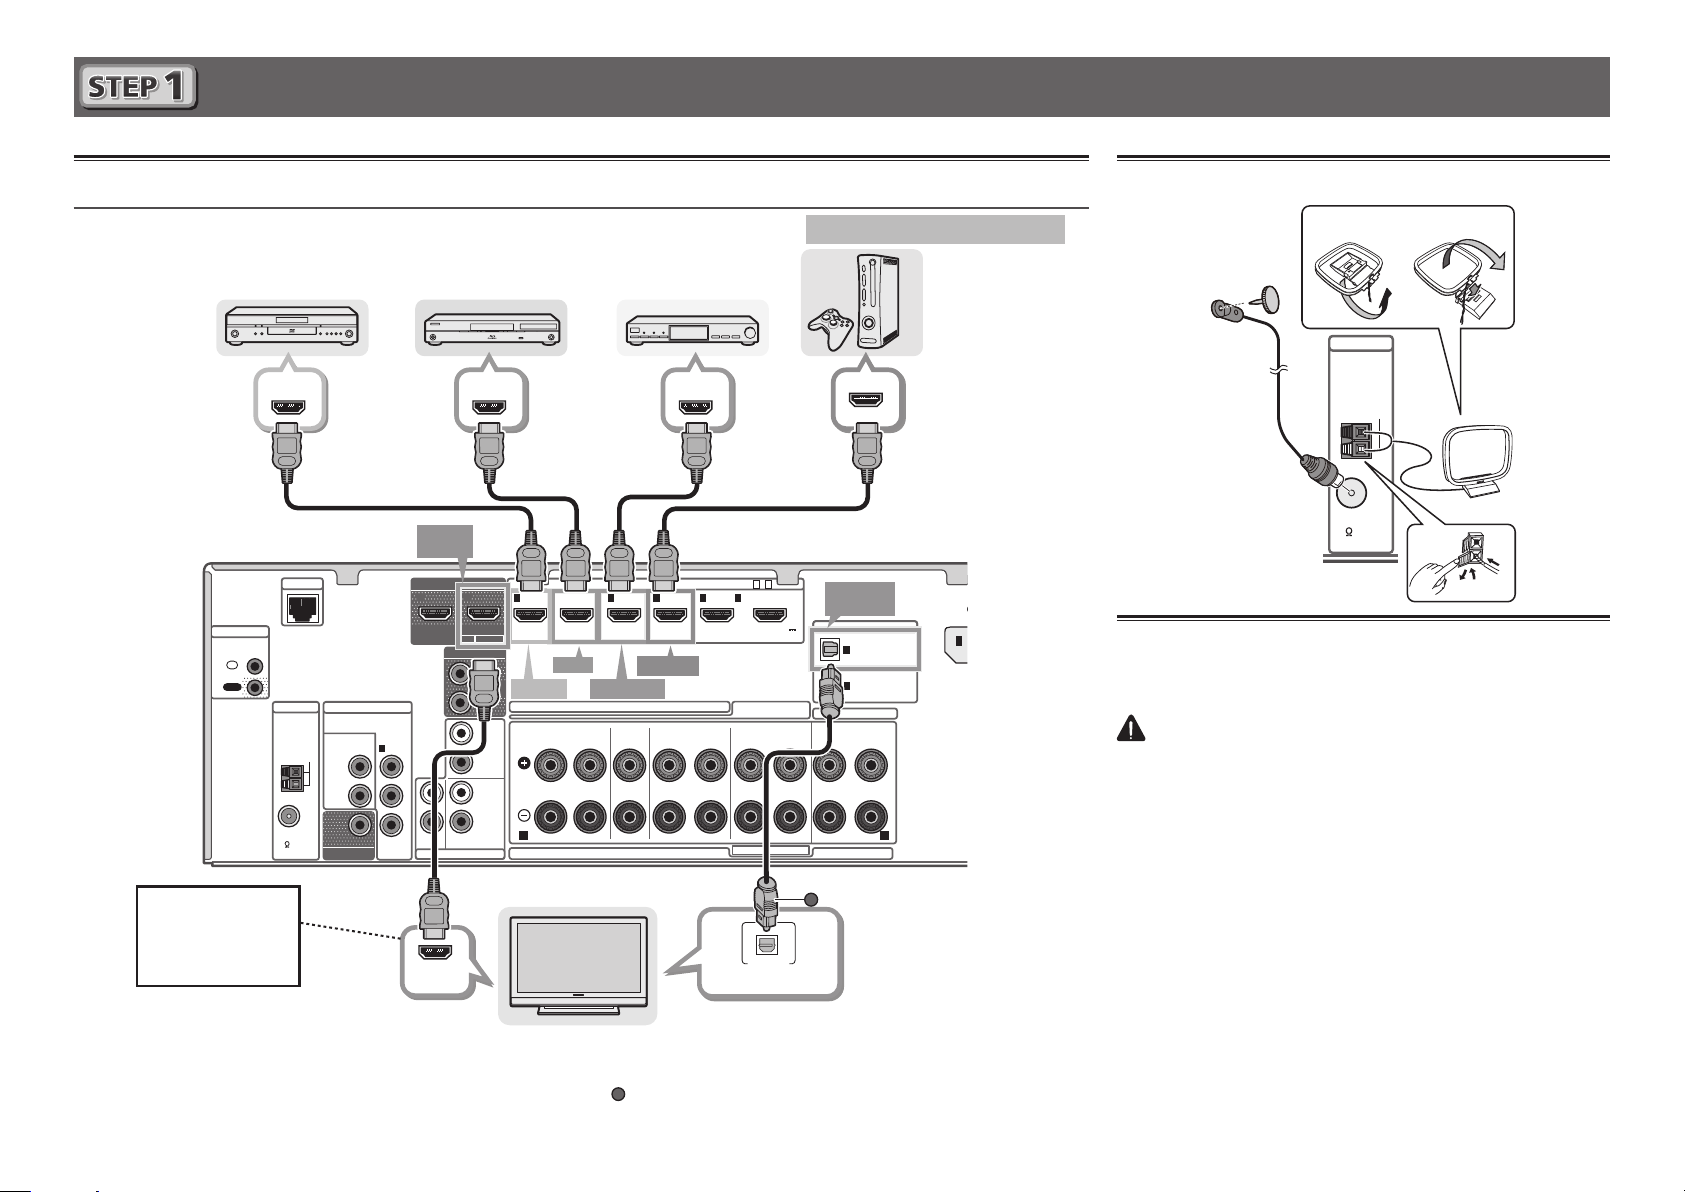
Connecting using HDMI
DVD player,
HDD/DVD recorder
HDMI OUT HDMI OUT
NETWORK
CONTROL
IR
IN
OUT
ANTENNA
AM LOOP
FM UNBAL
75
VIDEO IN
COMPONENT VIDEO
ASSIGNABLE
VIDEO
DVD
SAT/
CBL
MONITOR OUT
You will not be
able to view the
setting screen from
the TV unless this
cable is connected.
• If the TV supports the HDMI Audio Return Channel function, the sound of the TV is input to the receiver via the HDMI
terminal, so there is no need to connect an optical digital cable (
see “HDMI Setup” of the operating instructions.
8
• Please refer to the TV’s operation manual for directions on connections and setup for the TV.
Blu-ray Disc player,
Blu-ray Disc recorder
HDMI
OUT
HDMI OUT
12
HDZONE/MAIN
ARCCONTROL
SELECTABLE
AUDIO OUT
SUBWOOFER
(SAT/CBL)
1
P
R
P
B
Y
ANALOG
SAT/CBL
AUDIO IN
HDMI IN
1
MAIN
(
)(
DVD
DVD IN
RL
A
BD IN
SAT/CBL IN
FRONT
5.2.2ch
1
PRE OUT
2
L
DVD
R
L
R
ASSIGNABLE
1
(CD)
HDMI/DVI-compatible TV
Set-top box
HDMI OUT
HDMI IN
SAT/CBL
)
ASSIGNABLE
4321
GAME IN
5.2ch
SURROUND
CENTER
RL
). In this case, set
16-
6
/MHLBD
(
OUTPUT 5 V
)
0.9 A MAX
7.2ch
SURROUND BACK
(
)
Single
HDZONE / BI-AMP
OPTICAL
DIGITAL AUDIO OUT
ARC
at
HDMI/DVI-compatible components
Game console
OPTICAL
IN1 (TV)
DIGITAL IN
OPTICAL
(TV)
1
ASSIGNABLE
COAXIAL
(
)
1
SAT/CBL
ASSIGNABLE
SPEAKER B
TOP MIDDLE
RLRL
B
5.2.2ch
A
HDMI Setup
to ON. For details,
Connecting antennas
21
ANTENNA
AM LOOP
AM loop antenna
FM wire antenna
FM UNBAL
75
Plugging in the receiver
Only plug in after you have connected all your components to
this receiver, including the speakers.
CAUTION
• Handle the power cord by the plug. Do not pull out the plug
by tugging the cord and never touch the power cord when
your hands are wet as this could cause a short circuit or
electric shock. Do not place the unit, a piece of furniture,
etc., on the power cord, or pinch the cord. Never make
a knot in the cord or tie it with other cords. The power
cords should be routed such that they are not likely to be
stepped on. A damaged power cord can cause a fire or give
you an electrical shock. Check the power cord once in a
while. When you find it damaged, ask your nearest Pioneer
authorized service center or your dealer for a replacement.
• The receiver should be disconnected by removing the
mains plug from the wall socket when not in regular use,
e.g., when on vacation.
Plug the supplied power cord into the AC IN socket on the
1
back of the receiver.
Plug the other end into a power outlet.
2
Page 9
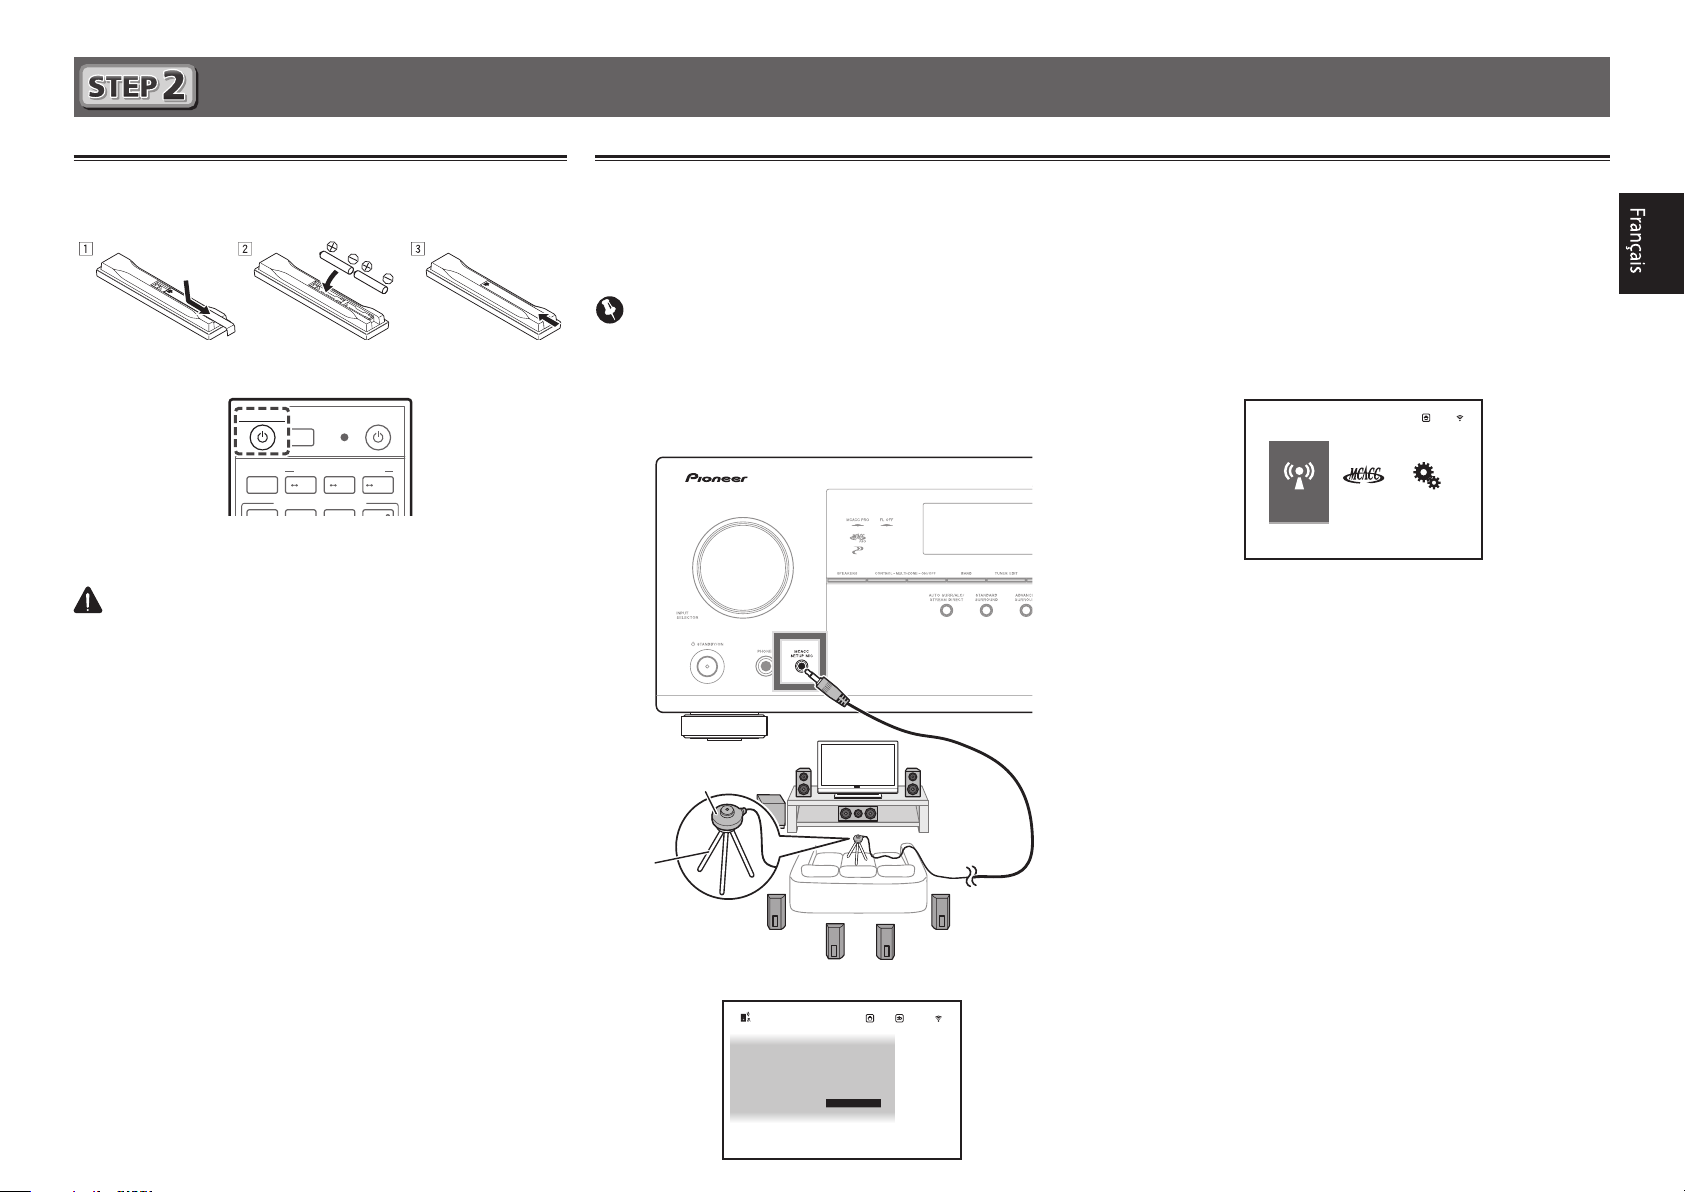
Initial Setup
Before you start
Put the batteries in the remote control.
1
Switch on the receiver and your TV.
2
STANDBY/ON
ALL ZONE STBY
SUB ZONE CONTROL
RECEIVER
MAIN
SOURCE CONTROL
Turn the subwoofer on and turn up the
3
volume.
CAUTION
• When inserting the batteries, make sure not to damage
the springs on the battery’s * terminals. This can cause
batteries to leak or overheat.
SOURCE
Z2 Z3 HDZ
Automatically setting up for surround sound (MCACC)
Press MAIN RECEIVER on the remote control,
The Auto Multi-Channel ACoustic Calibration (MCACC) setup
uses the supplied setup microphone to measure and analyze
the test tone that is outputted by the speakers.
Important
• Measure in a quiet environment.
Connect the supplied setup microphone.
1
• Set to ear height when using a tripod etc., for the
microphone.
Setup microphone
Tripod
2
then press the ENTER button.
• Automatic measuring will start.
• Measuring will take about 3 to 12 minutes.
Follow the instructions on-screen.
3
• Automatic setting is complete when the Home Menu
screen appears.
HOME MENU
Network,
Bluetooth
Reverse Phase
• If
is displayed, the speaker’s wiring (+ and –)
may be inverted. Check the speaker connections.
Even if the connections are correct,
displayed, depending on the speakers and the surrounding
environment. This does not affect measurements, however,
so select
• If
Go Next
ERR
is displayed, check that speaker is properly connected.
.
• When the power turns off, refer to the “Frequently asked
questions” in the booklet.
Make sure the setup microphone is
4
disconnected.
MCACC
PRO
Exit
System
Setup
Reverse Phase
may be
Full Auto MCACC
The
screen appears on your TV.
2a.Full Auto MCACC
Speaker System : 7.2ch/5.2.2ch
EQ Type : SYMMETRY
MCACC : M1.MEMORY 1
Dolby Enabled Speaker
SP to ceiling : – – –
Measurement Type : Expert
START
: NO
Exit
Return
9
Page 10
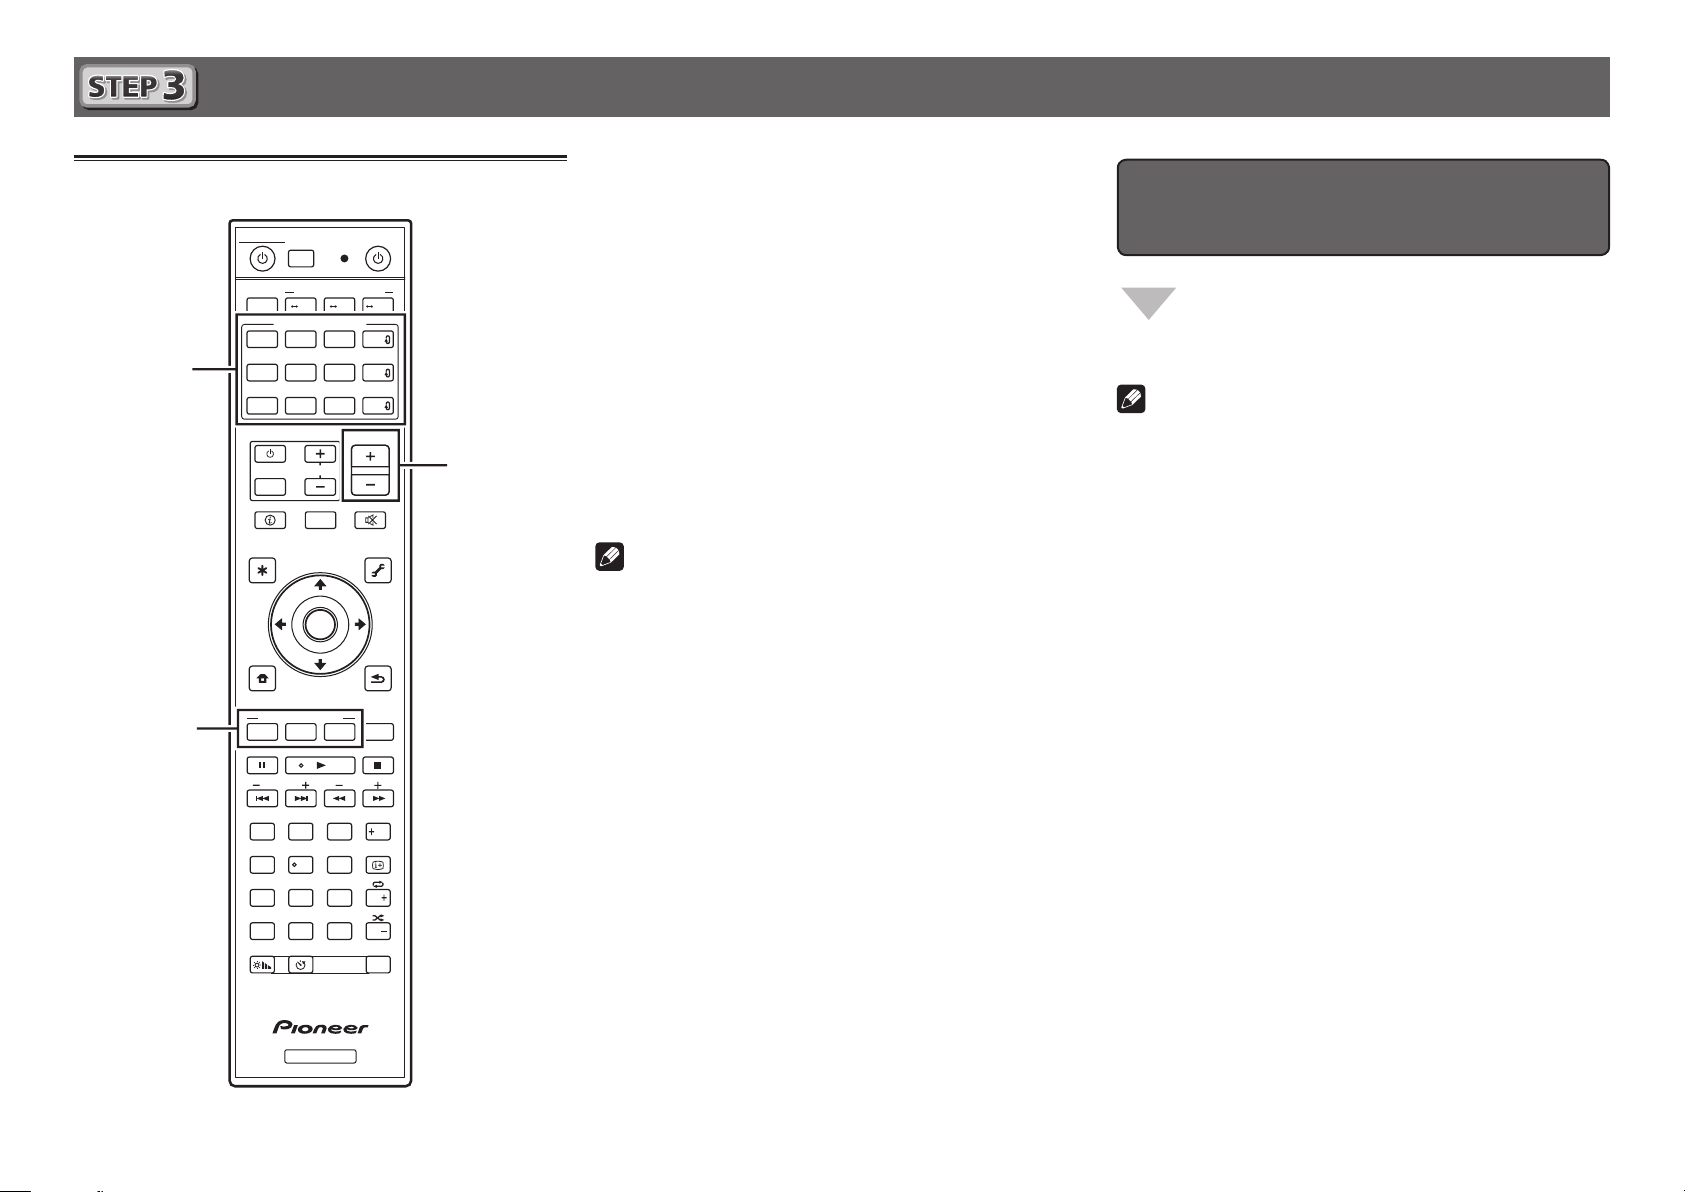
Basic playback
2
5
Switch on the playback component.
Multichannel playback
STANDBY/ON
ALL ZONE STBY
SUB ZONE CONTROL
RECEIVER
MAIN
SOURCE CONTROL
DVDBD
USB ADPTROKU
BT
iPod
TV
TUNER
TV
INPUT
STATUS
AUDIO P. VIDEO P.
TOP
MENU
HOME
MENU
LISTENING MODE
3
SURRAUTO
MPX
PRESET TUNE
2
13
546
8
79
D.ACCESS
CLR
0
DIMMER SLEEP
SOURCE
Z2 Z3 HDZ
HDMI
SAT
NET
MHL
ALL
CD
VOLUME
VOL
MUTE
OUT P.
TOOLS
MENU
ENTER
RETURN
CH LV.
ADV
BAND PTY
AUDIO
DISP
CH
CLASS
ENTER
CH
RCU SETUP
Fav
1
E.g.) Turn the Blu-ray Disc player connected to the
BD IN
terminal on.
Switch the input of the receiver.
2
E.g.) Press BD to select the BD input.
Press AUTO to select ’AUTO SURROUND’.
3
Also press
SURR
your preferred listening mode.
Start the playback component’s playback.
4
E.g.) Start playback of the Blu-ray Disc player.
Use VOLUME +/– to adjust the volume level.
5
• When no sound is emitted, increase the volume to
approximately –30 dB.
Notes
• When the sound is not produced from the center speaker,
rear speaker and subwoofer, refer to “Frequently asked
questions” in the booklet.
• When the remote control does not work, refer to the
“Frequently asked questions” in the booklet.
or
ADV
for multichannel playback. Select
HDMI
To enjoy the many functions of the
unit to the fullest extent
Load the CD-ROM into your computer and see
the “Operating Instructions” (PDF) from the
menu screen to read.
Notes
• This unit supports AirPlay. For details, see “Using AirPlay
on iPod touch, iPhone, iPad, and iTunes” of the operating
instructions and the Apple website (http://www.apple.
com).
• This unit’s software can be updated (“Software Update”
of the operating instructions). With Mac OS, it can
be updated using Safari (“Using Safari to update the
firmware” of the operating instructions).
10
RECEIVER
Page 11
Frequently asked questions
The center speaker or rear speaker does not produce sound
Cause Solution
AUTO SURROUND (mode
that outputs the number
of input channels as it is)
is selected upon 2-channel
audio input such as TV,
music, etc.
To play a stereo sound source in multichannel, press the
SURR
button or the
Example) Press the
STEREO
].
ADV
button to select your favorite mode.
SURR
button several times to select [
The subwoofer does not produce sound
Cause Solution
The front speaker is set to
LARGE.
(The low frequency
component will be produced
from the front speaker
instead of the subwoofer
when 2-channel audio input
such as TV, music, etc.)
To produce output from the subwoofer, change the speaker
setting. (There are two ways.)
Method 1
Change the front speaker to SMALL.
• The low frequency component will be produced from
the subwoofer instead of the front speaker. When the
front speaker has a high capability to play low frequency
components, we recommend not to change.
Method 2
Change the subwoofer to PLUS.
• The low frequency component of the front speaker will be
produced from both the front speaker and the subwoofer.
Therefore, the bass sound may be too powerful. In that case,
we recommend not to change or to change using Method 1.
For the procedure to change, refer to the “Speaker Setting” in the
CD-ROM’s operating instructions.
HDMI, network, etc. operations become unresponsive
Cause Solution
The operations of this
receiver and connecting
devices are unresponsive.
Try resetting. To reset, turn off the power, and press down
STANDBY/ON
the
or more. (The power turns off in 5 seconds after the power is
turned on. The receiver’s setting will be maintained.)
Also try replugging the power cord of the connecting devices.
button on the front panel for 5 seconds
EXT.
To produce sound from TV
Refer to page 8 of the booklet to perform connection and setting.
To play, press the TV button to switch to TV input.
The remote control does not work
Cause Solution
The operation mode of
the remote control is not
switched.
When setting initial settings for the HOME MENU and
AUDIO PARAMETER etc. and when performing replay
settings
• Start the operation after pressing the
button.
To operate functions such as network and iPod
• Start the operation after pressing the button of each function
NET, iPod
(
• If still not working, press the
then press the button of each function.
, etc.).
MAIN RECEIVER
MAIN RECEIVER
button first and
2 TVs (projector) are connected but video and audio are sometimes
interrupted or not produced
Cause Solution
They may be interrupted or
not produced when affected
by the TV in power standby.
Press the
output connected with that TV is not selected. Refer to
“Switching the HDMI output” in the CD-ROM’s operating
instructions for details.
OUT P.
button and
button so that HDMI
/
The power suddenly turns off and the WIRELESS indicator flashes
Cause Solution
The conductive wire of the
speaker cord is contacting
the rear panel, or positive and
negative of the conductive
wire are contacting and
the protection circuit is
activated.
Twist the conductive wire of the speaker cord once again, and
connect it so that it will not stick out from the speaker terminal
on the amplifier or speaker side.
© 2015 PIONEER HOME ELECTRONICS CORPORATION.
All rights reserved.
11
Page 12

Français
Merci pour l’achat de ce produit Pioneer. Ce guide rapide contient les instructions relatives aux raccordements et opérations de
base permettant une utilisation simple de ce récepteur. Pour des descriptions plus détaillées du récepteur, référez-vous au
“Mode d’emploi” sur le CD-ROM ( ) fourni.
Contenu du carton d’emballage
STANDBY/ON
RECEIVER
MAIN
USB ADPT ROKU
iPod
TUNER
TV
INPUT
STATUS
AUDIO P. VIDEO P.
TOP
MENU
HOME
MENU
LISTENING MODE
MPX
PRESET TUNE
13
D.ACCESS
CLR
DIMMER SLEEP
ALL ZONE STBY
SUB ZONE CONTROL
Z2 Z3 HDZ
SOURCE CONTROL
SAT
DVDBD
BT
MHL
TV
CD
VOL
OUT P.
ENTER
SURRAUTO
ADV
BAND PTY
2
546
8079
CLASS
ENTER
SOURCE
Télécommande
HDMI
NET
ALL
VOLUME
MUTE
TOOLS
MENU
RETURN
CH LV.
AUDIO
Fav
DISP
CH
CH
RCU SETUP
Antenne filaire FM
Antenne cadre AM
VSX-1130-K
VSX-930-K/-S
VSX-830-K/-S
CD-ROM
Cordon d’alimentation
Brochure sur la Sécurité
Feuille de garantie
Le présent Guide rapide
PRÉCAUTION DE VENTILATION
Lors de l’installation de l’appareil, veillez à laisser un
espace suffisant autour de ses parois de manière à
améliorer la dissipation de chaleur (au moins 40 cm sur
le dessus, 10 cm à l’arrière et 20 cm de chaque côté).
AVERTISSEMENT
Les fentes et ouvertures du coffret sont prévues pour la
ventilation, pour assurer un fonctionnement stable de
l’appareil et pour éviter sa surchauffe. Pour éviter les
risques d’incendie, ne bouchez jamais les ouvertures et
ne les recouvrez pas d’objets, tels que journaux, nappes
ou rideaux, et n’utilisez pas l’appareil posé sur un tapis
épais ou un lit.
D3-4-2-1-7b*_A1_Fr
ATTENTION
・N’utilisez ni ne conservez les piles sous la
lumière directe du soleil ou dans un endroit
excessivement chaud, comme une voiture ou à
proximité d’un appareil de chauffage. Les piles
risqueraient de fuir, de surchauffer, d’exploser ou
de s’enflammer. Leur durée de vie et/ou leur
performance pourrait également être réduite.
・Lorsque vous jetez des piles usagées, veuillez
vous conformer aux normes et/ou aux
règlements gouvernementaux et environnementaux en vigueur dans votre pays ou région.
RECEIVER
Microphone de configurationPiles à anode sèche AAA IEC R03 x 2
2
Page 13
Raccordement et configuration initiale
Procédez à la connexion et aux réglages initiaux selon l’une des méthodes énumérées ci-dessous.
Utilisez l’application “Start-up Navi”
pour effectuer la connexion et les
réglages initiaux
• Utilisez un smartphone ou une tablette.
• Une connexion réseau est
nécessaire.
LAN
Téléchargez et démarrez l’application “Start-up
1
Navi”.
Continuez avec les directives de l’app pour
2
procéder à la connexion et aux réglages
initiaux.
Suivez les directives du AVNavigator
intégré pour procéder à la connexion et
aux réglages initiaux
• Utilisez un Mac ou un PC.
• Une connexion réseau est nécessaire.
LAN
Lisez le livret “Si vous avez un Mac ou un PC”.
1
Suivez les directives du AVNavigator intégré
2
dans le récepteur pour procéder à la connexion
et aux réglages initiaux.
Suivez les instructions dans le livret
pour procéder à la connexion et aux
réglages initiaux
1
Lisez le livret dans l’ordre
.
Suivez les instructions de chaque étape pour
2
continuer.
Téléchargez l’application “Start-up Navi”
à partir d’ici.
Si vous avez un iPhone ou un iPad
Se il vous plaît rechercher l’application “Start-up
Navi” sur l’App Store.
Si vous avez un appareil Android
Se il vous plaît rechercher l’application “Start-up
Navi” sur Google Play.
Concernant le voyant WIRELESS clignotant
• Clignote lors de l’utilisation du Mode WAC. (Mode
selon lequel les paramètres réseau peuvent être
modifiés par iPhone, iPad et iPod touch lorsque ce
récepteur est utilisé en tant que point d’accès Wi-Fi)
Lorsque l’appareil est mis sous tension après avoir
configuré le réseau ou branché un câble LAN, le voyant
WIRELESS ne clignote pas.
• Si vous ne procédez pas à une connexion réseau,
l’utiliser en l’état ne pose pas de problème.
3
Page 14

Si vous avez un Mac ou un PC
Raccordement au réseau par l’interface LAN
Internet
Ordinateur
Câble LAN (vendu séparément)
NETWORK
Modem
1
NETWORK
Routeur
WAN
LAN
Branchement du récepteur
Après la connexion à un réseau LAN, branchez le cordon
d’alimentation du récepteur à une prise électrique.
Branchez le cordon d’alimentation fourni à la prise AC IN
1
située à l’arrière du récepteur.
Branchez l’autre extrémité sur une prise électrique.
2
Mise en marche
Appuyez sur
votre ordinateur.
1
2
3
Après la mise en marche, patientez quelques minutes avant
d’effectuer l’opération suivante.
STANDBY/ON
pour allumer le récepteur et
Lors de la connexion de ce récepteur à un routeur de réseau sans fil par Wi-Fi, reportez-vous à “Réglage du raccordement au
réseau” dans le mode d’emploi du CD-ROM.
4
Page 15
Lancement de l’AVNavigator
intégré
Utilisez AVNavigator en suivant les invites sur l’écran de votre
ordinateur.
Utilisation d’un Mac
Lancez Safari et cliquez sur <VSX-1130> ou <VSX-930> affichés
dans ‘Bonjour’ sur la barre des Signets.
Bonjour
• Si ‘
Include Bonjour in the Favorites bar
‘
Advanced
‘
’ n’apparaît pas, cochez la case à cocher
’ de l’onglet
’ dans le menu ‘
Preferences...
’ de Safari.
Saisissez le numéro de l’étape 2 ci-dessus
3
dans le champ d’Internet Explorer indiqué cidessous, puis appuyez sur la touche ENTER.
(Exemple de format d’entrée) 192.168.0.124
• Avec un PC sous Windows, vous pouvez utiliser la
méthode suivante pour lancer AVNavigator.
Lancez l’explorateur puis faites un clic droit sur
<VSX-1130> ou <VSX-930> qui s’affiche dans le dossier
Network
‘
’, puis cliquez sur ‘
View device webpage
Environnement d’exploitation
• L’AVNavigator peut être utilisé dans les environnements
suivants.
–PC sous Windows: Microsoft
7/Windows
–Mac: OS X v 10.9 or 10.8
• Certaines fonctions de l’AVNavigator emploient un
navigateur Internet. Les navigateurs suivants sont pris en
charge :
–PC sous Windows: Internet Explorer
’.
–Mac OS: Safari 6.0, 7.0
• AVNavigator risque de ne pas fonctionner avec certains
paramétrages du réseau informatique ou de la sécurité.
®
8/Windows® 8.1
®
Windows Vista®/Windows®
®
8, 9, 10, 11
Utilisation d’un PC sous Windows
Démarrez Internet Explorer sur votre ordinateur
1
(ouvrez n’importe quelle page Internet).
Appuyez sur STATUS de la télécommande et
2
vérifiez l’afficheur du panneau avant sur le
récepteur (l’adresse IP du récepteur apparaîtra).
(Exemple d’affichage de texte)
Si 0.0.0.0 ou 169.254.112.202 apparaît dans l’adresse,
cela signifie que le récepteur n’est pas raccordé au
réseau. Assurez-vous que le récepteur et le routeur sont
correctement raccordés.
À propos de l’utilisation de Wiring
Navi
Wiring Navi démarre lorsque vous appuyez sur ‘
sur l’écran d’AVNavigator.
• Lorsque la navigation de connexion est terminée, passez
Interactive Operation Guide
au
.
Wiring Navi
’
5
Page 16

Suivez les instructions dans le livret pour procéder à la connexion et aux réglages initiaux
Raccordement
Installation des enceintes
L
– Avant Gauche
C
– Centre
TMdL TMdR
R
– Avant Droite
SL
– Surround Gauche
SBL
L
C
SW
R
SBR
SR
– Surround Droite
SBL
– Surround arrière Gauche
SBR
– Surround arrière Droite
TMdL
TMdR
SW
SRSL
– Moyen haut Gauche
– Moyen haut Droit
– Caisson de grave
Remarques
• Il existe aussi d’autres modes de connexion
des enceintes (avant en position large, etc.).
Pour les détails, voir “Raccordement de votre
équipement” dans le mode d’emploi.
• Pour lire Dolby Atmos, vous devez connecter
l’enceinte Moyen haut, Surround arrière, ou
Avant large.
• Le son est produit à partir de l’une des
enceintes Moyen haut et Surround arrière selon
le mode d’écoute, etc.
• L’enceinte compatible avec Dolby peut être
utilisée à la place de l’enceinte Moyen haut.
Reportez-vous au mode d’emploi pour les
détails.
6
Page 17

Raccordement
12 3
Raccordement des enceintes
Assurez-vous que tous les branchements ont
1
été effectués correctement avant de raccorder
cet appareil au secteur.
Vous pouvez utiliser des enceintes ayant une
2
impédance nominale comprise entre 6 Ω et 16 Ω.
Raccordement des enceintes.
3
Raccordement des ls dénudés
Torsadez les fils ensemble.
1
Dévissez la borne et insérez la partie dénudée des fils.
2
Serrez la borne.
3
10 mm
Avant Droite
(R)
Caisson de grave
(SW)
LINE LEVEL
INPUT
AUDIO OUT
1
SUBWOOFER
PRE OUT
2
FRONT
RL
A
5.2ch
5.2.2ch
CENTER
Centre
(C)
SURROUND
RL
HDZONE / BI-AMP
7.2ch
SURROUND BACK
(
Single
)
Avant Gauche
(L)
SPEAKER B
TOP MIDDLE
RLRL
B
5.2.2ch
Moyen haut Droit
TMdR
(
)
Surround Droite
(SR)
Surround arrière
Droite
SBR
(
)
Surround arrière
Gauche
SBL
(
)
Surround Gauche
(SL)
Moyen haut Gauche
TMdL
(
)
ATTENTION
• Les bornes des haut-parleurs sont sous une
lors du branchement et du débranchement des câbles de haut-parleur, débranchez le cordon d’alimentation avant de toucher
des parties non isolées.
tension ACTIVE DANGEREUSE
. Pour éviter tout risque de décharge électrique
7
Page 18
AC
A
Raccordement
Raccordement d’un téléviseur et de périphériques de lecture
Connexion au moyen de l’interface HDMI
Lecteur DVD,
enregistreur HDD/DVD
Lecteur de Blu-ray Disc,
enregistreur de Blu-ray Disc
Boîtier décodeur
Équipements compatibles HDMI/DVI
Console de jeu
Raccordement des antennes
21
ANTENNA
HDMI OUT HDMI OUT
HDMI OUT
AM LOOP
Antenne cadre AM
Antenne FM à fil
FM UNBAL
75
CONTROL
IR
IN
OUT
NETWORK
ANTENNA
AM LOOP
FM UNBAL
75
VIDEO IN
COMPONENT VIDEO
ASSIGNABLE
(SAT/CBL)
VIDEO
1
DVD
SAT/
CBL
MONITOR OUT
HDMI
OUT
HDMI OUT
HDZONE/MAIN
SELECTABLE
P
R
P
B
Y
SAT/CBL
AUDIO IN
12
MAIN
ARCCONTROL
AUDIO OUT
1
SUBWOOFER
PRE OUT
2
L
DVD
R
L
R
ASSIGNABLE
ANALOG
1
1
(
)(
DVD
DVD IN
A
(CD)
HDMI IN
SAT/CBL
BD IN
SAT/CBL IN
FRONT
RL
5.2.2ch
5.2ch
CENTER
)
GAME IN
SURROUND
RL
ASSIGNABLE
4321
16-
6
/MHLBD
(
OUTPUT 5 V
)
0.9 A MAX
7.2ch
SURROUND BACK
(
Single
HDZONE / BI-AMP
)
OPTICAL
IN1 (TV)
DIGITAL IN
(TV)
1
(
1
SAT/CBL
SPEAKER B
TOP MIDDLE
RLRL
5.2.2ch
OPTICAL
ASSIGNABLE
COAXIAL
)
ASSIGNABLE
B
Branchement du récepteur
N’effectuez le branchement qu’après avoir raccordé tous les
composants au récepteur, y compris les enceintes.
ATTENTION
• Tenir le câble d’alimentation par la fiche. Ne pas
débrancher la prise en tirant sur le câble et ne pas
toucher le câble avec les mains mouillées. Cela risque
de provoquer un court-circuit ou un choc électrique. Ne
pas poser l’appareil ou un meuble sur le câble. Ne pas
pincer le câble. Ne pas faire de noeud avec le câble ou
ll est nécessaire
de connecter ce
câble pour pouvoir
afficher l
’
écran de
configuration sur le
HDMI IN
DIGITAL AUDIO OUT
A
OPTICAL
téléviseur.
Téléviseur compatible HDMI/DVI
• Si le téléviseur prend en charge la fonction HDMI Audio Return Channel, le son du téléviseur est envoyé vers le récepteur via
la prise HDMI et il n’est alors pas nécessaire de connecter un câble optique numérique (
ARC
dans le menu de configuration
HDMI Setup
. Pour les détails, voir “Réglage de l’HDMI” dans le mode d’emploi.
). Dans ce cas, activez (ON) l’option
• Veuillez vous reporter au Guide d’utilisation du téléviseur pour consulter les instructions concernant les connexions et la
8
configuration du téléviseur.
l’attacher à d’autres câbles. Les câbles d’alimentation
doivent être posés de façon à ne pas être écrasés. Un
câble abîmé peut provoquer un risque d’incendie ou un
choc électrique. Vérifier le câble d’alimentation de temps
en temps. Contacter le service après-vente Pioneer le plus
proche ou le revendeur pour un remplacement.
• Lorsque le récepteur n’est pas utilisé régulièrement
(pendant les vacances, par exemple), il doit être débranché
de la prise d’alimentation murale.
Branchez le cordon d’alimentation fourni à la prise AC IN
1
située à l’arrière du récepteur.
Branchez l’autre extrémité sur une prise électrique.
2
Page 19
Configuration initiale
Préparatifs
Insérez les piles dans la télécommande.
1
Allumez le récepteur et votre téléviseur.
2
STANDBY/ON
ALL ZONE STBY
SUB ZONE CONTROL
RECEIVER
MAIN
SOURCE CONTROL
Mettez le caisson de basse sous tension et
3
augmentez le volume.
ATTENTION
• Lors de l’installation des piles, veillez à ne pas
endommager les ressorts situés en face des bornes *
des piles. Les piles risqueraient de fuir ou de surchauffer.
SOURCE
Z2 Z3 HDZ
Confi guration automatique du son surround (MCACC)
Appuyez sur MAIN RECEIVER de la télécommande,
Le système de calibrage acoustique multicanaux (MultiChannel ACoustic Calibration, MCACC) utilise le microphone
de configuration fourni pour mesurer et analyser la tonalité de
test émise par les enceintes.
Important
• La procédure doit être effectuée dans un environnement
calme.
Raccordez le microphone de configuration fourni.
1
• Régler à hauteur d’oreille lors de l’utilisation d’un trépied,
etc. pour le microphone.
Microphone de
configuration
Trépied
2
puis appuyez sur la touche ENTER.
• La mesure automatique commence.
• La mesure dure de 3 à 12 minutes.
Suivez les instructions affichées à l’écran.
3
• Le réglage automatique est terminé lorsque la page Home
Menu apparaît.
HOME MENU
Network,
Bluetooth
Reverse Phase
• Si
s’affiche, les fils du cordon d’enceinte
(+ et –) ont peut-être été inversés. Vérifiez les liaisons des
enceintes.
Même si les liaisons sont correctes,
peut s’afficher, selon les enceintes et l’environnement
surround. Ceci n’a cependant aucun effet sur les mesures,
et vous pouvez sélectionner
ERR
• Si
s’affiche, vérifiez si l’enceinte est bien raccordée.
• Lorsque l’alimentation est coupée, reportez-vous à la “Foire
aux questions” dans le livret.
Assurez-vous de débrancher le microphone de
4
configuration.
MCACC
PRO
System
Setup
Go Next
Exit
Reverse Phase
.
L’écran
Full Auto MCACC
2a.Full Auto MCACC
Speaker System : 7.2ch/5.2.2ch
EQ Type : SYMMETRY
MCACC : M1.MEMORY 1
Dolby Enabled Speaker
SP to ceiling : – – –
Measurement Type : Expert
START
: NO
apparaît sur votre téléviseur.
Exit
Return
9
Page 20

Lecture de base
2
5
Allumez le lecteur.
Lecture multicanaux
STANDBY/ON
ALL ZONE STBY
SUB ZONE CONTROL
RECEIVER
MAIN
SOURCE CONTROL
DVDBD
USB ADPTROKU
BT
iPod
TV
TUNER
TV
INPUT
STATUS
AUDIO P. VIDEO P.
TOP
MENU
HOME
MENU
LISTENING MODE
3
SURRAUTO
MPX
PRESET TUNE
2
13
546
8
79
D.ACCESS
CLR
0
DIMMER SLEEP
SOURCE
Z2 Z3 HDZ
HDMI
SAT
NET
MHL
ALL
CD
VOLUME
VOL
MUTE
OUT P.
TOOLS
MENU
ENTER
RETURN
CH LV.
ADV
BAND PTY
AUDIO
DISP
CH
CLASS
ENTER
CH
RCU SETUP
Fav
1
Ex.) Allumez le lecteur de disque Blu-ray raccordé à la
HDMI BD IN
prise
Sélectionnez l’entrée du récepteur.
2
Ex.) Appuyez sur BD pour sélectionner l’entrée BD.
Appuyez sur AUTO pour sélectionner ‘AUTO
3
SURROUND’.
Appuyez aussi sur
multicanaux. Sélectionnez votre mode d’écoute préférée.
Démarrez la lecture sur le lecteur.
4
Ex.) Démarrez la lecture sur le lecteur de disque Blu-ray.
Utilisez VOLUME +/– pour régler le volume.
5
• Si aucun son n’est émis, augmentez le volume à environ
–30 dB.
Remarques
• Lorsque le son ne provient pas de l’enceinte centrale, de
l’enceinte arrière et du caisson de grave, reportez-vous à la
“Foire aux questions” dans le livret.
• Lorsque la télécommande ne fonctionne pas, reportezvous à la “Foire aux questions” dans le livret.
.
SURR
ou
ADV
pour la lecture
Pour proter au maximum des
nombreuses fonctions de l’appareil
Insérez le CD-ROM dans votre ordinateur et
consultez le “Mode d'emploi” (PDF) dans l'écran
de menu.
Remarques
• Cet appareil prend en charge AirPlay. Pour les détails,
reportez-vous à la rubrique “Utilisation d’AirPlay sur un
iPod touch, iPhone, iPad et iTunes” du mode d’emploi et
au site d’Apple (http://www.apple.com).
• Le logiciel de cet appareil peut être mis à jour (“Mise à
jour du logiciel” dans le mode d’emploi). Avec Mac OS, il
peut être mis à jour avec Safari (“Utilisation de Safari pour
mettre à jour le micrologiciel” dans le mode d’emploi).
10
RECEIVER
Page 21
Foire aux questions
L'enceinte centrale ou arrière ne produit pas de son
Cause Solution
AUTO SURROUND (mode
qui émet le nombre de
canaux en entrée tel qu’il
est) est sélectionné sur
entrée audio 2 canaux
comme TV, musique, etc.
Pour lire une source de son stéréo en mode multi-canaux,
appuyez sur le bouton
mode favori.
Exemple) Appuyez sur le bouton
sélectionner [
EXT.STEREO
SURR
].
Le caisson de grave ne produit pas de son
Cause Solution
L’enceinte avant est réglée
sur LARGE.
(La composante basse
fréquence sera produite à
partir de l’enceinte avant au
lieu du caisson de grave en
mode entrée audio 2 canaux
comme TV, musique, etc.)
Pour produire une sortie du caisson de grave, modifiez le
réglage de l’enceinte. (Deux méthodes possibles.)
Méthode 1
Faites passer l’enceinte avant sur SMALL.
• La composante basse fréquence sera produite à partir
du caisson de grave au lieu de l’enceinte avant. Lorsque
l’enceinte avant a une forte capacité de diffuser les
composantes basse fréquence, nous recommandons de ne
rien changer.
Méthode 2
Faites passer le caisson de grave sur PLUS.
• La composante basse fréquence de l’enceinte avant sera
produite depuis l’enceinte avant et le caisson de grave. Par
conséquent, les graves seront trop puissantes. Dans ce cas,
nous recommandons de ne rien changer ou d’utiliser la
Méthode 1.
Pour que la procédure change, reportez-vous à “Réglage des
enceintes” dans le mode d’emploi du CD-ROM.
Le HDMI, le réseau, etc. ne fonctionnent plus
Cause Solution
Le récepteur et les appareils
connectés ne fonctionnent
plus.
Essayez de réinitialiser. Pour réinitialiser, coupez l’alimentation,
et appuyez sur le bouton
pendant 5 secondes ou plus. (L’alimentation s’interrompt
5 secondes après la mise sous tension. Les réglages du
récepteur seront conservés.)
Essayez également de rebrancher le cordon d’alimentation des
appareils connectés.
STANDBY/ON
ou
ADV
pour sélectionner votre
SURR
plusieurs fois pour
sur le panneau avant
Pour produire du son à partir du téléviseur
Reportez-vous à la page 8 du livret pour procéder à la connexion et au réglage.
Pour lire, appuyez sur le bouton TV pour passer en mode entrée TV.
La télécommande ne fonctionne pas
Cause Solution
Le mode de fonctionnement
de la télécommande n’est
pas activé.
Lors de la définition des réglages initiaux pour le HOME
MENU et AUDIO PARAMETER etc. et lors de l’exécution
des réglages de relecture
• Démarrez l’opération après avoir appuyé sur le bouton
RECEIVER
Pour utiliser des fonctions telles que réseau et iPod
• Démarrez l’opération après avoir appuyé sur le bouton de
chaque fonction (
• Si cela ne fonctionne toujours pas, appuyez d’abord sur
le bouton
chaque fonction.
.
NET, iPod
MAIN RECEIVER
, etc.).
puis appuyez sur le bouton de
MAIN
2 téléviseurs (projecteur) sont connectés mais la vidéo et l'audio sont parfois
interrompus ou non générés
Cause Solution
Ils peuvent être interrompus
ou non générés lorsqu’ils
sont affectés par le téléviseur
en mode veille.
Appuyez sur le bouton
sortie HDMI connectée à ce téléviseur ne soit pas sélectionnée.
Reportez-vous à “Commutation de la sortie HDMI” dans le
mode d’emploi du CD-ROM pour les détails.
OUT P.
et le bouton
/
afin que la
L'alimentation est brusquement interrompue et le témoin WIRELESS clignote
Cause Solution
Le fil conducteur du cordon
de l’enceinte est en contact
avec le panneau arrière, ou
le fil conducteur positif et
négatif sont en contact et
le circuit de protection est
activé.
Tordez une fois de plus le fil conducteur du cordon de l’enceinte,
et connectez-le de sorte qu’il ne dépasse pas de le borne de
l’enceinte du côte de l’amplificateur ou de l’enceinte.
© 2015 PIONEER HOME ELECTRONICS CORPORATION.
Tous droits de reproduction et de traduction réservés.
11
Page 22
Deutsch
Vielen Dank, dass Sie sich für dieses Pioneer-Produkt entschieden haben. Die Kurzanleitung enthält Anweisungen für grundlegende Verbindungen und Bedienvorgänge, um eine einfache Bedienung des Receivers zu ermöglichen. Detaillierte Beschreibungen des Receivers finden Sie in der
„Bedienungsanleitung“ auf der mitgelieferten CD-ROM ( ).
Lieferumfang
STANDBY/ON
RECEIVER
MAIN
USB ADPT ROKU
iPod
TUNER
TV
INPUT
STATUS
AUDIO P. VIDEO P.
TOP
MENU
HOME
MENU
LISTENING MODE
MPX
PRESET TUNE
13
D.ACCESS
CLR
DIMMER SLEEP
ALL ZONE STBY
SUB ZONE CONTROL
Z2 Z3 HDZ
SOURCE CONTROL
SAT
DVDBD
BT
MHL
TV
CD
VOL
OUT P.
ENTER
SURRAUTO
ADV
BAND PTY
2
546
8079
CLASS
ENTER
RECEIVER
SOURCE
Fernbedienung
HDMI
NET
ALL
VOLUME
MUTE
TOOLS
MENU
RETURN
CH LV.
AUDIO
Fav
DISP
CH
CH
RCU SETUP
UKW-Drahtantenne
MW-Rahmenantenne
VSX-1130-K
VSX-930-K/-S
VSX-830-K/-S
CD-ROM
Netzkabel
Sicherheritsbroshüre
Garantieblatt
Diese Kurzanleitung
VORSICHTSHINWEIS ZUR BELÜFTUNG
Bei der Aufstellung dieses Gerätes muss für einen
ausreichenden Freiraum gesorgt werden, um eine
einwandfreie Wärmeabfuhr zu gewährleisten
(mindestens 40 cm oberhalb des Gerätes, 10 cm hinter
dem Gerät und jeweils 20 cm an der Seite des Gerätes).
WARNUNG
Im Gerätegehäuse sind Ventilationsschlitze und andere
Öffnungen vorgesehen, die dazu dienen, eine
Überhitzung des Gerätes zu verhindern und einen
zuverlässigen Betrieb zu gewährleisten. Um
Brandgefahr auszuschließen, dürfen diese Öffnungen
auf keinen Fall blockiert oder mit Gegenständen (z.B.
Zeitungen, Tischdecken und Gardinen) abgedeckt
werden, und das Gerät darf beim Betrieb nicht auf
einem dicken Teppich oder Bett aufgestellt sein.
D3-4-2-1-7b*_A1_De
ACHTUNG
・Verwenden oder lagern Sie Batterien nicht in
direktem Sonnenlicht oder an sehr heißen Orten
wie im Inneren eines Fahrzeugs oder in der Nähe
von Heizkörpern. Dadurch können Batterien leck
werden, sich überhitzen oder in Brand geraten.
Außerdem kann die Lebensdauer oder Leistung
von Batterien beeinträchtigt werden.
・Beachten Sie bei der Entsorgung verbrauchter
Batterien und Akkus die gesetzlichen und
umweltrechtlichen Bestimmungen Ihres
Wohnortes.
Mikrofon für die EinstellungAAA/IEC/R03 Trockenbatterien x2
2
Page 23
Anschluss und Anfangseinstellungen
Anschluss und Grundeinstellungen in der nachfolgend aufgeführten Weise vornehmen.
Verwenden Sie zum Einrichten
von Verbindung und
Grundeinstellungen die App „Startup Navi“
• Ein Smartphone/Tablet verwenden.
• Netzwerkverbindung erforderlich.
LAN
Laden Sie die App „Start-up Navi“ herunter,
1
und starten Sie die Anwendung.
Entsprechend den Anweisungen in der
2
App vorgehen, um den Anschluss und die
Grundeinstellungen vorzunehmen.
Befolgen Sie die Anweisungen
des integrierten AVNavigator,
um den Anschluss und die
Grundeinstellungen vorzunehmen
• Verwenden Sie einen Mac/PC.
• Netzwerkverbindung erforderlich.
LAN
Lesen Sie bitte das Heft „Wenn Sie einen Mac/
1
PC haben“.
Befolgen Sie die Anweisungen des im
2
Receiver eingebauten AVNavigator, um mit
dem Anschluss und der Grundeinstellungen
fortzufahren.
Befolgen Sie die Anweisungen in
der Broschüre, um den Anschluss
und die Grundeinstellungen
vorzunehmen
Lesen Sie die Anweisungen in der Broschüre
1
in folgender Reihenfolge:
.
Befolgen Sie die Anweisungen eines jeden
2
Schrittes, um fortzufahren.
Laden Sie die App „Start-up Navi“
von hier herunter.
Falls Sie ein iPhone oder einen iPad
haben
Bitte suchen Sie nach der App „Start-up Navi“ im
App Store.
Falls Sie ein Android Gerät haben
Bitte suchen Sie nach der App „Start-up Navi“ in
Google Play.
Wenn die Anzeige WIRELESS blinkt
• Blinkt im WAC-Modus. (In diesem Modus können
Netzwerkeinstellungen per iPhone, iPad und iPod
touch geändert werden, wenn der Receiver als Wi-FiZugangspunkt genutzt wird)
Wenn beim Einschalten des Geräts ein Netzwerk
eingerichtet ist oder ein LAN-Kabel verbunden ist, blinkt
die WIRELESS-Anzeige nicht.
• Wenn keine Netzwerkverbindung aufgebaut wird, kann
der Modus im bestehenden Status verwendet werden.
3
Page 24

Wenn Sie einen Mac/PC haben
Herstellen der Verbindung zum Netzwerk über die LAN-Schnittstelle
Internet
Computer
LAN-Kabel (getrennt erhältlich)
NETWORK
Modem
Router
WAN
LAN
1
2
3
1
NETWORK
Anschluss des Receivers an das
Stromnetz
Stellen Sie eine LAN-Verbindung her und verbinden Sie das
Netzkabel des Receivers mit einer Steckdose.
Schließen Sie das mitgelieferte Netzkabel an die AC IN-
1
Buchse auf der Rückseite des Receivers an.
Schließen Sie das andere Ende an eine Steckdose an.
2
Einschalten des Geräts
Drücken Sie auf
Computer einzuschalten.
Warten Sie nach dem Einschalten einige Minuten, bevor Sie
folgende Bedienschritte vornehmen.
STANDBY/ON
um den Receiver und Ihren
Den Anschluss dieses Receivers an einen WLAN-Router über Wi-Fi lesen Sie in der Bedienungsanleitung auf der CD-ROM
„Einrichten der Netzwerkverbindung“ nach.
4
Page 25

Starten des integrierten AVNavigator
Bedienen Sie AVNavigator entsprechend den Anweisungen
auf dem Bildschirm Ihres Computers.
Verwenden eines Mac
Starten Sie Safari und klicken Sie auf <VSX-1130> oder <VSX930>, welche in der Lesezeichenleiste in ‚
wird.
Bonjour
• Wenn ‚
Kontrollkästchen ‚
der Registerkarte ‚
‘ nicht angezeigt wird, markieren Sie das
Include Bonjour in the Favorites bar
Advanced
‘ im Safarimenü ‚
Bonjour
Preferences...
‘ angezeigt
‘ in
‘.
Geben Sie in den Internet Explorer, im unten
3
angezeigten Feld, die Nummer von Schritt
2 ein, und drücken Sie dann auf die ENTERTaste.
(Example Input Format) 192.168.0.124
• Bei einem Windows PC können Sie die folgende Methode
verwenden, um AVNavigator zu starten.
Starten Sie den Explorer und klicken Sie im ‚
Ordner mit der rechten Maustaste auf <VSX-1130>
oder <VSX-930> und klicken Sie dann auf ‚
webpage
‘.
Network
View device
Betriebsumgebung
• Der AVNavigator kann in den folgenden Umgebungen
verwendet werden.
–Windows-PC: Microsoft
Windows
–Mac: OS X v 10.9 or 10.8
• Einige AVNavigator Funktionen benutzen einen InternetBrowser. Die folgenden Browser werden unterstützt:
–Windows-PC: Internet Explorer
‘-
–Mac OS: Safari 6.0, 7.0
• AVNavigator funktioniert je nach den ComputerNetzwerkeinstellungen oder Sicherheitseinstellungen
eventuell nicht.
®
8/Windows® 8.1
®
Windows Vista®/Windows® 7/
®
8, 9, 10, 11
Verwenden eines Windows-PCs
Starten Sie Internet Explorer auf Ihrem PC
1
(öffnen Sie eine beliebige Internetseite).
Drücken Sie auf der Fernbedienung auf
2
STATUS und überprüfen Sie das vordere
Bedienfeld des Receivers (die IP-Adresse des
Receivers wird angezeigt).
(Beispiel für Textanzeige)
Wenn für die Adresse 0.0.0.0 oder 169.254.112.202 angezeigt
wird, dann ist der Receiver nicht mit einem Netzwerk
verbunden. Überprüfen Sie, ob der Receiver und Router
ordnungsgemäß miteinander verbunden sind.
Über die Verwendung von Wiring
Navi
Wiring Navi wird gestartet, wenn ‚
AVNavigator-Bildschirm gedrückt wird.
• Wenn die Navigation zur Verbindung abgeschlossen ist,
fahren Sie mit
Interactive Operation Guide
Wiring Navi
‘ auf dem
fort.
5
Page 26

Befolgen Sie die Anweisungen in der Broschüre, um den Anschluss und die Grundeinstellungen vorzunehmen
Anschlüsse
Lautsprecher aufstellen
L
– Vorne links
C
– Center
TMdL TMdR
R
– Vorne rechts
SL
– Surround links
SR
– Surround rechts
SBL
– Surround hinten links
SBR
– Surround hinten rechts
L
C
R
TMdL
TMdR
SW
SW
SBL
6
SBR
SRSL
– Oben Mitte links
– Oben Mitte rechts
– Subwoofer
Hinweise
• Es gibt auch andere
Lautsprecherverwendungsmuster (Front-Wide
usw.). Weitere Informationen entnehmen Sie
dem Kapitel „Anschluss der Geräte“ in der
Bedienungsanleitung.
• Um Dolby Atmos abzuspielen, müssen Sie
die Lautsprecher entweder an Top-Middle,
Surround-Back oder Front-Wide anschließen.
• Der Ton wird von Top-Middle und SurroundBack erzeugt, je nach Wiedergabemodus usw.
• Der Dolby-fähige Lautsprecher kann an Stelle
des Top-Middle Lautsprechers verwendet
werden. Weitere Informationen finden Sie in der
Bedienungsanleitung.
Page 27

Anschlüsse
12 3
Anschluss der Lautsprecher
Achten Sie darauf, dass alle Verbindungen
1
angeschlossen sind, bevor Sie das Gerät an die
Netzstromquelle anschließen.
Sie können Lautsprecher mit einer
2
Nennimpedanz von 6 Ω bis 16 Ω verwenden.
Lautsprecher anschließen.
3
Kabel mit nicht isolierten Drahtenden
Drehen Sie freiliegende Drahtstränge zusammen.
1
Lösen Sie die Klemme und setzen Sie den freiliegenden
2
Draht ein.
Ziehen Sie die Klemme fest.
3
10 mm
Vorne rechts
(R)
Subwoofer
(SW)
LINE LEVEL
INPUT
AUDIO OUT
1
SUBWOOFER
PRE OUT
2
FRONT
RL
A
5.2ch
5.2.2ch
CENTER
Center
(C)
SURROUND
RL
HDZONE / BI-AMP
7.2ch
SURROUND BACK
(
Single
)
Vorne links
(L)
SPEAKER B
TOP MIDDLE
RLRL
B
5.2.2ch
Oben Mitte rechts
TMdR
(
)
Surround rechts
(SR)
Surround hinten
rechts
SBR
(
)
Surround hinten
links
SBL
(
)
Surround links
(SL)
Oben Mitte links
TMdL
(
ACHTUNG
• Diese Lautsprecheranschlüsse führen
Lautsprecherkabel Stromschlaggefahr zu vermeiden, ziehen Sie den Netzstecker, bevor Sie nicht isolierte Teile berühren.
LEBENSGEFÄHRLICHE
Spannung. Um beim Anschließen oder Trennen der
)
7
Page 28

AC
A
Anschlüsse
Anschluss eines Fernsehgeräts und von Wiedergabe-Komponenten
Anschluss der Antennen
21
Anschluss mit HDMI
DVD-Player,
HDD/DVD-Recorder
HDMI OUT HDMI OUT
Blu-ray-Disk-Player,
Blu-ray Disc-Recorder
Set-Top-Box
HDMI OUT
HDMI/DVI kompatible Komponenten
Spielekonsole
ANTENNA
AM LOOP
MWRahmenantenne
UKW-Drahtantenne
FM UNBAL
75
CONTROL
IR
IN
OUT
NETWORK
ANTENNA
AM LOOP
FM UNBAL
75
VIDEO IN
COMPONENT VIDEO
ASSIGNABLE
(SAT/CBL)
VIDEO
1
DVD
SAT/
CBL
MONITOR OUT
HDMI
OUT
HDMI OUT
HDZONE/MAIN
SELECTABLE
P
R
P
B
Y
SAT/CBL
AUDIO IN
12
MAIN
ARCCONTROL
AUDIO OUT
1
SUBWOOFER
PRE OUT
2
L
DVD
R
L
R
ASSIGNABLE
ANALOG
1
1
(
)(
DVD
DVD IN
A
(CD)
HDMI IN
SAT/CBL
BD IN
SAT/CBL IN
FRONT
RL
5.2.2ch
5.2ch
CENTER
)
GAME IN
SURROUND
RL
ASSIGNABLE
4321
16-
6
/MHLBD
(
OUTPUT 5 V
)
0.9 A MAX
7.2ch
SURROUND BACK
(
Single
HDZONE / BI-AMP
)
OPTICAL
IN1 (TV)
DIGITAL IN
(TV)
1
(
1
SAT/CBL
SPEAKER B
TOP MIDDLE
RLRL
5.2.2ch
OPTICAL
ASSIGNABLE
COAXIAL
)
ASSIGNABLE
B
Anschluss des Receivers an das
Stromnetz
Schließen Sie den Receiver erst an das Stromnetz an, nachdem
Sie alle gewünschten Komponenten an diesen Receiver
angeschlossen haben, einschließlich der Lautsprecher.
ACHTUNG
• Fassen Sie das Netzkabel immer am Stecker. Ziehen Sie
nicht am Kabel selbst, und fassen Sie das Netzkabel niemals
mit nassen Händen an, da dies einen Kurzschluss oder
elektrischen Schlag verursachen kann. Stellen Sie nicht das
Gerät, Möbelstücke o.ä. auf das Netzkabel; sehen Sie auch
zu, dass es nicht eingeklemmt wird. Machen Sie niemals
Die Einstellungen
werden im TV nicht
angezeigt, wenn
dieses Kabel nicht
angeschlossen ist.
HDMI IN
OPTICAL
DIGITAL AUDIO OUT
A
einen Knoten in das Netzkabel, und binden Sie es nicht mit
anderen Kabeln. Das Netzkabel sollte so gelegt werden,
dass niemand darauf tritt. Ein beschädigtes Netzkabel kann
einen Brand oder elektrischen Schlag verursachen. Prüfen
Sie das Netzkabel von Zeit zu Zeit. Sollte es beschädigt
sein, wenden Sie sich an Ihre nächste autorisierte PioneerKundendienststelle oder Ihren Händler, um es zu ersetzen.
HDMI/DVI kompatibles TV
• Wenn dieser Receiver über einen längeren Zeitraum nicht
verwendet werden soll (z. B. wenn Sie verreisen), sollte er
• Wenn der Fernseher die HDMI Audio Return Channel-Funktion unterstützt, wird der Ton des Fernsehers über den HDMI-Anschluss zum
ARC
Receiver eingespeist, sodass Sie kein optisches Digitalkabel (
) anschließen müssen. Stellen Sie in diesem Fall
HDMI Setup
im
auf ON. Einzelheiten siehe „HDMI Setup“ in der Bedienungsanleitung.
8
• Beachten Sie auch die Bedienungsanleitung des Fernsehgeräts für Anweisungen zum Anschließen und Einrichten für das Fernsehgerät.
vom Stromnetz getrennt werden, indem der Netzstecker
aus der Wandsteckdose herausgezogen wird.
Schließen Sie das mitgelieferte Netzkabel an die AC IN-
1
Buchse auf der Rückseite des Receivers an.
Schließen Sie das andere Ende an eine Steckdose an.
2
Page 29

Anfangseinstellungen
Vor der Inbetriebnahme
Legen Sie die Batterien in die Fernbedienung
1
ein.
Schalten Sie den Receiver und Ihr
2
Fernsehgerät ein.
STANDBY/ON
ALL ZONE STBY
SUB ZONE CONTROL
RECEIVER
MAIN
SOURCE CONTROL
Schalten Sie den Subwoofer ein und steigern
3
die Lautstärke.
ACHTUNG
• Stellen Sie beim Einsetzen der Batterien sicher, dass nicht die
Federn an den *-Batteriepolen beschädigt werden. Dadurch
können die Batterien auslaufen oder sich überhitzen.
SOURCE
Z2 Z3 HDZ
Automatische Einstellung des Surround-Klangs (MCACC)
Auf der Fernbedienung MAIN RECEIVER
Die Auto Multi-Channel ACoustic Calibration (MCACC)
Einrichtung verwendet das mitgelieferte Setup-Mikrofon, um
den von den Lautsprechern ausgegebenen Testton zu messen
und zu analysieren.
Wichtig
• Führen Sie die Messung in einer leisen Umgebung aus.
Schließen Sie das mitgelieferte Setup-Mikrofon an.
1
• Auf Ohrhöhe einstellen, wenn ein Stativ oder dergleichen
für das Mikrofon verwendet werden soll.
Mikrofon für die
Einstellung
Stativ
2
drücken, anschließend die ENTER Taste.
• Die automatische Messung beginnt.
• Die Messung dauert etwa 3 bis 12 Minuten.
Befolgen Sie die Anweisungen auf der
3
Bildschirmanzeige.
• Die automatische Einstellung ist beendet, wenn die
Bildschirmansicht Home Menu erscheint.
HOME MENU
Network,
Bluetooth
Reverse Phase
• Wenn
Verdrahtung (+ und –) des Lautsprechers invertiert sein.
Überprüfen Sie die Lautsprecheranschlüsse.
Selbst wenn die Verbindungen korrekt sind, wird eventuell
je nach den Lautsprechern und der Umgebung
Phase
angezeigt. Dies beeinflusst die Messung nicht,
wählen Sie deshalb
ERR
• Wenn
angezeigt wird, überprüfen Sie bitte, ob der
Lautsprecher richtig angeschlossen ist.
• Schaltet die Stromversorgung ab, siehe „Häufig gestellte
Fragen“ in der Broschüre.
Stellen Sie sicher, dass das Setup-Mikrofon
4
nicht angeschlossen ist.
MCACC
PRO
angezeigt wird, kann die
Go Next
.
System
Setup
Exit
Reverse
Die Bildschirmansicht
Ihrem Fernsehgerät.
2a.Full Auto MCACC
Speaker System : 7.2ch/5.2.2ch
EQ Type : SYMMETRY
MCACC : M1.MEMORY 1
Dolby Enabled Speaker
SP to ceiling : – – –
Measurement Type : Expert
START
Full Auto MCACC
Exit
Return
: NO
erscheint auf
9
Page 30

Grundlegende Wiedergabe
2
5
Schalten Sie die Wiedergabekomponente ein.
Mehrkanalwiedergabe
STANDBY/ON
ALL ZONE STBY
SUB ZONE CONTROL
RECEIVER
MAIN
SOURCE CONTROL
DVDBD
USB ADPTROKU
BT
iPod
TV
TUNER
TV
INPUT
STATUS
AUDIO P. VIDEO P.
TOP
MENU
HOME
MENU
LISTENING MODE
3
SURRAUTO
MPX
PRESET TUNE
2
13
546
8
79
D.ACCESS
CLR
0
DIMMER SLEEP
SOURCE
Z2 Z3 HDZ
HDMI
SAT
NET
MHL
ALL
CD
VOLUME
VOL
MUTE
OUT P.
TOOLS
MENU
ENTER
RETURN
CH LV.
ADV
BAND PTY
AUDIO
DISP
CH
CLASS
ENTER
CH
RCU SETUP
Fav
1
Z.B.) Schalten Sie den Blu-ray Disc-Player, der an den
HDMI BD IN
Schalten Sie den Eingang des Receivers ein.
2
Z.B.) Drücken Sie BD, um den BD-Eingang zu wählen.
Drücken Sie AUTO zur Wahl von ‚AUTO SURROUND‘.
3
Drücken Sie auch
Wählen Sie ihre bevorzugte Hörbetriebsart.
Starten Sie die Wiedergabe der
4
Wiedergabekomponente.
Z.B.) Starten Sie die Wiedergabe des Blu-ray Disc-Players.
Mit dem VOLUME +/– können Sie die
5
Lautstärke einstellen.
• Wenn kein Ton ausgegeben wird, erhöhen Sie die
Lautstärke auf ca. –30 dB.
Hinweise
• Wird im mittleren, hinteren Lautsprecher und im
Subwoofer kein Ton erzeugt, siehe „Häufig gestellte
Fragen“ in der Broschüre.
• Funktioniert die Fernbedienung nicht, siehe „Häufig
gestellte Fragen“ in der Broschüre.
-Anschluss angeschlossen ist, ein.
SURR
oder
ADV
für Mehrkanalwiedergabe.
Um die zahlreichen Funktionen des
Geräts zum größten Umfang zu genießen
Legen Sie die CD-ROM in den Computer ein und
öffnen Sie die „Bedienungsanleitung“ (PDF) im
Bildschirm.
Hinweise
• Dieses Gerät unterstützt AirPlay. Einzelheiten siehe
„Verwenden von AirPlay auf iPod touch, iPhone, iPad
und iTunes“ in der Bedienungsanleitung und der AppleWebsite (http://www.apple.com).
• Die Software des Geräts kann aktualisiert werden
(„Software Update“ in der Bedienungsanleitung). Bei Mac
OS kann sie mit Safari aktualisiert werden („Verwenden
Sie Safari zum Aktualisieren der Firmware“ in der
Bedienungsanleitung).
10
RECEIVER
Page 31

Häufig gestellte Fragen
Der mittlere oder hintere Lautsprecher erzeugt keinen Ton
Ursache Abhilfe
AUTO SURROUND (Modus,
der die Anzahl der default
Eingangskanäle ausgibt)
wird über den 2-KanalAudioeingang ausgewählt
wie Fernsehen, Musik, usw.
Um eine Stereo-Signalquelle in Mehrkanal wiederzugeben,
drücken Sie die Taste
Modus auszuwählen.
Beispiel) Drücken Sie mehrmals die Taste
STEREO
] auszuwählen.
SURR
oder
ADV
Der Subwoofer erzeugt keinen Ton
Ursache Abhilfe
Der vordere Lautsprecher ist
auf LARGE eingestellt.
(Die
Niederfrequenzkomponente
wird vom vorderen
Lautsprecher statt dem
Subwoofer erzeugt, wenn
2-Kanal-Audioeingang - wie
Fernsehen, Musik, usw. angeschlossen wird.)
Um den Ausgang aus dem Subwoofer zu erzeugen, ändern
Sie die Lautsprechereinstellungen. (Hierzu gibt es gibt zwei
Möglichkeiten.)
Methode 1
Vorderen Lautsprecher auf SMALL ändern.
• Die Niederfrequenzkomponente wird vom Subwoofer statt dem
vorderen Lautsprecher erzeugt. Hat der vordere Lautsprecher
eine höhere Kapazität, um Niedrigfrequenzkomponenten
abzuspielen, wird empfohlen die Einstellungen nicht zu ändern.
Methode 2
Subwoofer auf PLUS ändern.
• Die Niederfrequenzkomponente des vorderen Lautsprechers
wird von dem vorderen Lautsprecher und dem Subwoofer
erzeugt. Daher kann der Bass zu stark werden. In diesem
Fall wird empfohlen, die Einstellungen nicht zu ändern oder
entsprechend Methode 1 zu ändern.
Wie die Änderungen vorzunehmen sind entnehmen Sie dem Kapitel
„Speaker Setting“ der Bedienungsanleitung auf der CD-ROM.
Die Betriebsart HDMI, Netzwerk usw. antwortet nicht
Ursache Abhilfe
Die Betriebsart dieses
Empfängers und der
angeschlossenen Geräte
antwortet nicht.
Versuchen Sie ein Zurücksetzen. Zum Zurücksetzen schalten sie
den Strom ab und drücken Sie die Taste
Vorderseite für ca. 5 Sekunden oder länger. (Der Strom wird 5
Minuten nachdem der Strom eingeschaltet wurde abgeschaltet.
Die Einstellungen des Empfängers werden beibehalten.)
Versuchen Sie auch, das Netzkabel der angeschlossenen
Geräte umzustecken.
, um Ihren Lieblings-
SURR
, um [
STANDBY/ON
auf der
EXT.
So erzeugen Sie den Ton des TV
Für Anschluss und Einstellungen siehe Seite 8 der Broschüre.
Zum Abspielen drücken Sie die Taste TV, um den Eingang auf TV umzustellen.
Die Fernbedienung funktioniert nicht
Ursache Abhilfe
Der Betriebsmodus der
Fernbedienung ist nicht
eingeschaltet.
Zum Einstellen der Grundeinstellungen im HOME MENU
und AUDIO PARAMETER usw. und zum Einstellen der
Replay-Einstellungen
• Durch Drücken der Taste
Zum Betreiben der Funktionen wie Netzwerk und iPod
• Um den Betrieb zu starten, drücken Sie die Taste der
jeweiligen Funktion (
• Wenn es immer noch nicht funktioniert, drücken Sie zunächst
die Taste
jeweilige Funktion.
MAIN RECEIVER
MAIN RECEIVER
NET, iPod
, usw.).
und anschließend die Taste für die
den Betrieb starten.
2 TVs (Projektoren) sind angeschlossen, aber Video und Audio sind manchmal
unterbrochen oder werden gar nicht erzeugt
Ursache Abhilfe
Sie werden möglicherweise
unterbrochen oder nicht
erzeugt, weil das TV sich im
Standby-Modus befindet.
Drücken Sie die Tasten
Ausgang, der mit dem TV verbunden ist nicht angewählt ist. Für
weitere Informationen entnehmen Sie dem Kapitel „Umschalten
zum HDMI-Ausgang“ in der Bedienungsanleitung auf der CDROM.
OUT P.
und
, damit der HDMI-
/
Der Strom schaltet sich plötzlich ab und die Anzeige WIRELESS blinkt
Ursache Abhilfe
Das Leitungskabel des
Lautsprechers berührt die
Rückwand, oder die positiven
und negativen Enden des
Leitungskabels berühren sich
und die Schutzschaltung ist
eingeschaltet.
Verdrillen Sie das Leitungskabel des Lautsprecherkabels
erneut, und schließen Sie es so an, dass es nicht aus
dem Lautsprecheranschluss am Verstärker oder aus der
Lautsprecherseite herausragt.
© 2015 PIONEER HOME ELECTRONICS CORPORATION.
Alle Rechte vorbehalten.
11
Page 32

Italiano
Vi ringraziamo per avere acquistato questo prodotto Pioneer. Questa Guida di avvio rapido comprende istruzioni per i collegamenti fondamentali e per le operazioni essenziali di questo ricevitore. Per una descrizione dettagliata del ricevitore, vedere le “Istruzioni per l’uso” contenute nel
CD-ROM ( ) accluso.
Contenuto della confezione
STANDBY/ON
RECEIVER
MAIN
USB ADPT ROKU
iPod
TUNER
TV
INPUT
STATUS
AUDIO P. VIDEO P.
TOP
MENU
HOME
MENU
LISTENING MODE
MPX
PRESET TUNE
13
D.ACCESS
CLR
DIMMER SLEEP
ALL ZONE STBY
SUB ZONE CONTROL
Z2 Z3 HDZ
SOURCE CONTROL
SAT
DVDBD
BT
MHL
TV
CD
VOL
OUT P.
ENTER
SURRAUTO
ADV
BAND PTY
2
546
8079
CLASS
ENTER
RECEIVER
SOURCE
Telecomando
HDMI
NET
ALL
VOLUME
MUTE
TOOLS
MENU
RETURN
CH LV.
AUDIO
Fav
DISP
CH
CH
RCU SETUP
Antenna FM a filo
Antenna AM a telaio
VSX-1130-K
VSX-930-K/-S
VSX-830-K/-S
CD-ROM
Cavo di alimentazione
Volantino sulla sicurezza
Foglio di garanzia
Guida per l’avvio rapido
AVVERTENZA PER LA VENTILAZIONE
Installare l’apparecchio avendo cura di lasciare un
certo spazio all’intorno dello stesso per consentire una
adeguata circolazione dell’aria e migliorare la
dispersione del calore (almeno 40 cm sulla parte
superiore, 10 cm sul retro, e 20 cm su ciascuno dei lati).
ATTENZIONE
L’apparecchio è dotato di un certo numero di fessure e
di aperture per la ventilazione, allo scopo di garantirne
un funzionamento affidabile, e per proteggerlo dal
surriscaldamento. Per prevenire possibili pericoli di
incendi le aperture non devono mai venire bloccate o
coperte con oggetti vari (quali giornali, tovaglie, tende o
tendaggi, ecc.), e l’apparecchio non deve essere
utilizzato appoggiandolo su tappeti spessi o sul letto.
D3-4-2-1-7b*_A1_It
ATTENZIONE
・Non usare o conservare batterie in luce solare
diretta o in altri luoghi eccessivamente caldi, ad
esempio in un’automobile o vicino ad una
sorgente di calore. Questo potrebbe causare
perdite di acido, farle surriscaldare esplodere o
prendere fuoco. Può anche ridurne la durata o le
prestazioni.
・
Quando si smaltiscono le batterie esauste, si
raccomanda di rispettare la normativa vigente o
le regole degli enti pubblici in materia di
ambiente applicabili alla propria
nazione/regione.
Impostazione microfonoPile a secco AAA IEC R03 x2
2
Page 33

Collegamento ed impostazione iniziali
Effettuare il collegamento e le impostazioni iniziali in uno dei modi elencati di seguito.
Utilizzare l’applicazione “Start-up
Navi” per eseguire il collegamento
e le impostazioni iniziali
• Utilizzare uno smartphone/tablet.
• È richiesto il collegamento alla rete.
LAN
Scaricare e avviare l’applicazione “Start-up
1
Navi”.
Procedere seguendo le istruzioni
2
dell’applicazione per effettuare il
collegamento e le impostazioni iniziali.
Seguire la guida dell’AVNavigator
incorporato per eseguire il
collegamento e le impostazioni
iniziali
• Utilizzare un Mac/PC.
• È richiesto il collegamento alla rete.
LAN
Leggere l’opuscolo “Se si possiede un Mac/
1
PC”.
Seguire la guida dell’AVNavigator incorporato
2
nel ricevitore per passare al collegamento e
alle impostazioni iniziali.
Seguire le istruzioni nell’opuscolo
per effettuare il collegamento e
le impostazioni iniziali
1
Leggere l’opuscolo nell’ordine
Seguire le istruzioni di ogni passo per
2
.
procedere.
Scaricare l’applicazione “Start-up Navi” da qui.
Se si possiede un iPhone o un iPad
L’applicazione “Start-up Navi” è disponibile
nell’App Store.
Se si possiede un dispositivo
Android
L’applicazione “Start-up Navi” è disponibile in
Google Play.
Informazioni relative al lampeggio della
spia WIRELESS
• Lampeggia quando si utilizza la modalità WAC.
(Modalità in cui le impostazioni di rete possono essere
modificate tramite iPhone, iPad e iPod touch, quando
questo ricevitore viene usato come punto di accesso
Wi-Fi)
Quando si accende l’unità dopo aver impostato la rete
o quando viene collegato un cavo LAN, l’indicatore
WIRELESS non lampeggia.
• Quando non si esegue un collegamento alla rete, non
vi sono problemi nell’utilizzarla così com’è.
3
Page 34

Se si possiede un Mac/PC
Collegamento alla rete LAN via l’interfaccia LAN
Internet
Computer
Cavo LAN (venduto separatamente)
NETWORK
Modem
1
NETWORK
Router
WAN
LAN
Collegamento del ricevitore
Dopo aver stabilito la connessione a una rete LAN, collegare il
cavo di alimentazione del ricevitore a una presa di corrente.
Collegare il cavo di alimentazione in dotazione alla presa
1
AC IN nella parte posteriore del ricevitore.
Collegare l’altra estremità a una presa a muro.
2
Accensione
Premere
computer.
1
2
3
Attendere alcuni minuti dopo l’accensione prima di effettuare
l’operazione seguente.
STANDBY/ON
per accendere il ricevitore e il
Durante il collegamento di questo ricevitore a un router LAN wireless mediante connessione Wi-Fi, fare riferimento a “Impostazione
del collegamento di rete” nelle istruzioni per l’uso del CD-ROM.
4
Page 35

Avvio dell’applicazione
AVNavigator incorporata
Utilizzare AVNavigator seguendo le schermate del computer.
Mac
Lanciare Safari e fare clic su <VSX-1130> o <VSX-930>
visualizzato in ‘
• Se ‘
controllo ‘
scheda ‘
Bonjour
Bonjour
Include Bonjour in the Favorites bar
Advanced
’ sulla barra dei Segnalibri.
’ non è visualizzato, selezionare la casella di
’ nel menu ‘
Preferences...
’ della
’ di Safari.
Immettere il numero del punto 2 sopra descritto
3
nel campo del browser Internet Explorer
indicato sotto, quindi premere il tasto INVIO.
(Esempio del formato di immissione) 192.168.0.124
• Con un PC Windows, è possibile utilizzare il metodo
seguente per lanciare AVNavigator.
Avviare Esplora risorse e fare clic con il pulsante destro
del mouse su <VSX-1130> o <VSX-930> nella cartella
Network
‘
’, quindi fare clic su ‘
View device webpage
Ambiente operativo
• AVNavigator può essere utilizzato negli ambienti elencati
di seguito.
–PC Windows: Microsoft
Windows
–Mac: OS X v 10.9 or 10.8
• Alcune funzioni di AVNavigator utilizzano un browser
Internet. Sono supportati i seguenti browser:
–PC Windows: Internet Explorer
–Mac OS: Safari 6.0, 7.0
’.
• A seconda della configurazione di rete del computer o
delle impostazioni di sicurezza, AVNavigator potrebbe non
funzionare.
®
8/Windows® 8.1
®
Windows Vista®/Windows® 7/
®
8, 9, 10, 11
PC Windows
Avviare Internet Explorer sul PC (aprire una
1
qualsiasi pagina Internet).
Premere STATUS sul telecomando e controllare
2
il display del pannello anteriore sul ricevitore
(viene visualizzato l’indirizzo IP del ricevitore).
(Esempio di visualizzazione del testo)
Se nel campo dell’indirizzo appare 0.0.0.0 o 169.254.112.202,
ciò indica che il ricevitore non è collegato alla rete. Verificare
che il ricevitore e il router siano collegati correttamente.
Informazioni sull’uso di Wiring
Navi
Wiring Navi viene avviato quando si preme ‘
schermata di AVNavigator.
• Quando la navigazione del collegamento è terminata,
passare a
Interactive Operation Guide
Wiring Navi
.
’ nella
5
Page 36

Seguire le istruzioni dell’opuscolo per effettuare il collegamento e le impostazioni iniziali
Collegamenti
Posizionamento dei diffusori
L
– Anteriore sinistro
C
– Centrale
TMdL TMdR
R
– Anteriore destro
SL
– Surround sinistro
SR
– Surround destro
SBL
– Surround posteriore sinistro
SBR
– Surround posteriore destro
L
C
R
TMdL
TMdR
SW
SW
SBL
6
SBR
SRSL
– Centrale superiore sinistro
– Centrale superiore destro
– Subwoofer
Note
• Esistono anche altre disposizioni di collegamento
dei diffusori (anteriori di ampiezza, ecc.).
Per maggiori dettagli, vedere “Collegamento
all’attrezzatura” delle istruzioni per l’uso.
• Per riprodurre Dolby Atmos, è necessario
collegare il diffusore superiore centrale, posteriore
surround o anteriore di ampiezza.
• Il suono viene prodotto da uno dei diffusori
centrale superiore e posteriore surround a
seconda della modalità di ascolto, ecc.
• Il diffusore Dolby Enabled può essere usato
al posto del diffusore superiore centrale. Per
maggiori dettagli, fare riferimento alle istruzioni
operative.
Page 37

Collegamenti
12 3
Collegamento dei diffusori
Assicurarsi di completare tutti i collegamenti
1
prima di collegare questa unità alla presa
elettrica CA.
È possibile utilizzare diffusori con un'impedenza
2
nominale compresa tra 6 Ω e 16 Ω.
Collegamento dei diffusori.
3
Collegamenti con li nudi
Attorcigliare fra loro i fili esposti.
1
Allentare il terminale ed inserire il filo denudato.
2
Stringere il terminale.
3
10 mm
Anteriore destro
(R)
Subwoofer
(SW)
LINE LEVEL
INPUT
AUDIO OUT
1
SUBWOOFER
PRE OUT
2
FRONT
RL
A
5.2ch
5.2.2ch
CENTER
Centrale
(C)
SURROUND
RL
HDZONE / BI-AMP
7.2ch
SURROUND BACK
(
Single
)
Anteriore sinistro
(L)
SPEAKER B
TOP MIDDLE
RLRL
B
5.2.2ch
Centrale superiore
destro
TMdR
(
)
Surround destro
(SR)
Surround posteriore
destro
SBR
(
)
Surround posteriore
sinistro
SBL
(
ATTENZIONE
• Questi terminali contengono voltaggi
diffusori, scollegare il cavo di alimentazione prima di toccare parti non isolate.
PERICOLOSI
. Per evitare il rischio di folgorazioni nel collegare o scollegare i cavi dei
Centrale superiore
Surround sinistro
(SL)
)
sinistro
TMdL
(
)
7
Page 38

AC
A
Collegamenti
Collegamento di un televisore e componenti di riproduzione
Collegamento mediante HDMI
Lettore DVD,
registratore HDD/DVD
HDMI OUT HDMI OUT
NETWORK
CONTROL
IR
IN
OUT
ANTENNA
AM LOOP
FM UNBAL
75
Non sarà possibile
visualizzare la
schermata di
impostazione
dalla TV a meno
che il cavo non sia
collegato.
• Se il televisore supporta la funzione HDMI Audio Return Channel, l’audio del televisore arriva al ricevitore via terminale HDMI, ed
il cavo digitale a fibre ottiche non è necessario (
Setup” nelle istruzioni per l’uso.
8
• Per istruzioni sui collegamenti e le impostazioni del televisore, consultare il manuale d’uso del televisore.
VIDEO IN
COMPONENT VIDEO
ASSIGNABLE
VIDEO
DVD
SAT/
CBL
MONITOR OUT
Lettore dischi Blu-ray,
registratore dischi Blu-ray
HDMI
OUT
HDMI OUT
12
(SAT/CBL)
1
HDZONE/MAIN
P
R
P
B
Y
SELECTABLE
SAT/CBL
AUDIO IN
HDMI IN
MAIN
ARCCONTROL
AUDIO OUT
1
SUBWOOFER
PRE OUT
2
L
DVD
R
L
R
ASSIGNABLE
ANALOG
1
(CD)
(
DVD
DVD IN
A
TV compatibile con HDMI/DVI
). In tal caso, regolare
1
)(
HDMI IN
SAT/CBL
BD IN
SAT/CBL IN
5.2ch
FRONT
RL
CENTER
5.2.2ch
Set-top box
HDMI OUT
)
GAME IN
SURROUND
RL
ARC
in
ASSIGNABLE
4321
HDMI Setup
Componenti compatibili con HDMI/DVI
16-
6
/MHLBD
(
OUTPUT 5 V
0.9 A MAX
7.2ch
SURROUND BACK
HDZONE / BI-AMP
OPTICAL
DIGITAL AUDIO OUT
OPTICAL
IN1 (TV)
)
TOP MIDDLE
(
)
Single
RLRL
5.2.2ch
A
su ON. Per i dettagli, vedere “HDMI
DIGITAL IN
(TV)
1
(
1
SAT/CBL
SPEAKER B
OPTICAL
ASSIGNABLE
COAXIAL
)
ASSIGNABLE
B
Consolle
giochi
Collegamento delle antenne
21
ANTENNA
AM LOOP
Antenna
FM a filo
FM UNBAL
75
Collegamento del ricevitore
Collegare il ricevitore solo dopo avere collegato tutti i
componenti, compresi gli diffusori.
ATTENZIONE
• Prendete sempre il filo di alimentazione per la spina.
Non tiratelo mai agendo per il filo stesso e non toccate
mai il filo con le mani bagnati, perchè questo potrebbe
causare cortocircuiti o scosse elettriche. Non collocate
l’unità, oppure dei mobili sopra il filo di alimentazione e
controllate che lo stesso non sia premuto. Non annodate
mai il filo di alimentazione nè collegatelo con altri fili. I fili di
alimentazione devono essere collocati in tal modo che non
saranno calpestati. Un filo di alimentazione danneggiato
potrebbe causare incendi o scosse elettriche. Controllate il
filo di alimentazione regolarmente. Quando localizzate un
eventuale danno, rivolgetevi al più vicino centro assistenza
autorizzato della Pioneer oppure al vostro rivenditore per la
sostituzione del filo di alimentazione.
• Il ricevitore deve essere scollegato estraendo la spina dalla
presa elettrica quando non viene utilizzato, ad esempio
durante una vacanza.
Collegare il cavo di alimentazione in dotazione alla presa
1
AC IN nella parte posteriore del ricevitore.
Collegare l’altra estremità a una presa a muro.
2
Antenna AM a
telaio
Page 39

Impostazione iniziale
Prima di iniziare
Mettere le batterie nel telecomando.
1
Accendere il ricevitore e il televisore.
2
STANDBY/ON
ALL ZONE STBY
SUB ZONE CONTROL
RECEIVER
MAIN
SOURCE CONTROL
Accendere il subwoofer ed aumentare il
3
volume.
ATTENZIONE
• Nell’inserire le batterie, fare attenzione a non danneggiare le
molle del loro terminale *. Questo potrebbe causare perdite
o surriscaldamenti delle batterie.
SOURCE
Z2 Z3 HDZ
Impostazione automatica dell’audio surround (MCACC)
Premere MAIN RECEIVER sul telecomando,
L’impostazione Auto Multi-Channel ACoustic Calibration
(MCACC) usa il microfono di impostazione allegato per
misurare ed analizzare il tono di prova emesso dai diffusori.
Importante
• Fare la misurazione in un ambiente tranquillo.
Collegare il microfono di impostazione in dotazione.
1
• Impostare l’altezza rispetto all’orecchio quando si utilizza
un treppiedi, ecc., per il microfono.
Impostazione
microfono
Treppiedi
2
quindi premere il pulsante ENTER.
• La misurazione automatica ha inizio.
• La misurazione richiede da 3 a 12 minuti.
Seguire le istruzioni sullo schermo.
3
• L’impostazione automatica è completa se la schermata
Home Menu riappare.
HOME MENU
Network,
Bluetooth
Reverse Phase
• Se
potrebbero essere invertiti. Controllare i collegamenti dei
diffusori.
Anche se i collegamenti sono corretti,
potrebbe venire visualizzato a seconda dei diffusori usati
e dell’ambiente circostante. Questo però non influenza le
misurazioni e si può scegliere
• Se viene visualizzato
collegato correttamente.
• Quando l’alimentazione è disattivata, fare riferimento alle
“Domande frequenti” nell’opuscolo.
Controllare che il microfono di impostazione
4
sia collegato.
MCACC
PRO
appare, i cablaggi dei diffusori (+ e –)
ERR
, controllare se il diffusore è
Exit
System
Setup
Go Next
Reverse Phase
.
La schermata
Full Auto MCACC
2a.Full Auto MCACC
Speaker System : 7.2ch/5.2.2ch
EQ Type : SYMMETRY
MCACC : M1.MEMORY 1
Dolby Enabled Speaker
SP to ceiling : – – –
Measurement Type : Expert
START
: NO
appare sul televisore.
Exit
Return
9
Page 40

Riproduzione di base
2
5
Attivare il componente di riproduzione.
Riproduzione multicanale
STANDBY/ON
ALL ZONE STBY
SUB ZONE CONTROL
RECEIVER
MAIN
SOURCE CONTROL
DVDBD
USB ADPTROKU
BT
iPod
TV
TUNER
TV
INPUT
STATUS
AUDIO P. VIDEO P.
TOP
MENU
HOME
MENU
LISTENING MODE
3
SURRAUTO
MPX
PRESET TUNE
2
13
546
8
79
D.ACCESS
CLR
0
DIMMER SLEEP
SOURCE
Z2 Z3 HDZ
HDMI
SAT
NET
MHL
ALL
CD
VOLUME
VOL
MUTE
OUT P.
TOOLS
MENU
ENTER
RETURN
CH LV.
ADV
BAND PTY
AUDIO
DISP
CH
CLASS
ENTER
CH
RCU SETUP
Fav
1
Ad es.) Accendere il lettore Blu-ray Disc collegato al
terminale
Cambiare l’ingresso del ricevitore.
2
Ad es.) Premere BD per scegliere l’ingresso BD.
Premere AUTO per scegliere ‘AUTO
3
SURROUND’.
Per la riproduzione multicanale, premere
Scegliere la modalità di ascolto preferita.
Avviare la riproduzione del componente
4
desiderato.
Ad es.) Avviare la riproduzione del lettore di dischi Blu-ray
Disc.
Utilizzare VOLUME +/– per regolare il livello
5
del volume.
• Se non viene emesso alcun suono, aumentare il volume
fino a circa –30 dB.
Note
• Se non viene riprodotto alcun suono dal diffusore centrale,
dal diffusore posteriore e dal subwoofer, fare riferimento
alle “Domande frequenti” nell’opuscolo.
• Quando il telecomando non funziona, fare riferimento alle
“Domande frequenti” nell’opuscolo.
HDMI BD IN
.
SURR
o
ADV
Per godere al massimo delle molto
funzioni di questa unità
Caricare il CD-ROM nel computer e leggere le
“Istruzioni per l’uso” (PDF) dalla schermata del
menu.
.
Note
• Questa unità supporta AirPlay. Per i dettagli, vedere “Uso
di AirPlay con iPod touch, iPhone, iPad e iTunes” nelle
istruzioni per l’uso e il sito Web di Apple (http://www.
apple.com).
• Il software di questa unità può essere aggiornato
(“Aggiornamento del software” nelle istruzioni per l’uso). In
Mac OS, è aggiornabile mediante Safari (“Aggiornamento
del firmware con Safari” nelle istruzioni per l’uso).
10
RECEIVER
Page 41

Domande frequenti
Il diffusore centrale o il diffusore posteriore non emettono suoni
Causa Soluzione
Viene selezionata la
voce AUTO SURROUND
(modalità che emette il
numero di canali di ingresso
così com’è) rispetto
all’ingresso audio a 2 canali
come TV, musica, ecc.
Per riprodurre una sorgente sonora in multicanale, premere il
SURR
tasto
Esempio) Premere più volte il tasto
STEREO
ADV
o
per selezionare la propria modalità preferita.
SURR
per selezionare [
].
Il subwoofer non emette suoni
Causa Soluzione
Il diffusore anteriore è
impostato su LARGE.
(Il gruppo a bassa
frequenza verrà prodotto
dal diffusore anteriore
invece che dal subwoofer
con un segnale audio a 2
canali come TV, musica,
ecc.)
Per produrre un suono dal subwoofer, modificare le
impostazioni del diffusore. (Esistono due modi.)
Metodo 1
Portare le impostazioni del diffusore anteriore su SMALL.
• Il gruppo a bassa frequenza verrà prodotto dal subwoofer al
posto del diffusore anteriore. Quando il diffusore anteriore
presenta un’elevata capacità di riprodurre gruppi a bassa
frequenza, si consiglia di non cambiare le impostazioni.
Metodo 2
Portare le impostazioni del subwoofer su PLUS.
• Il gruppo a bassa frequenza del diffusore anteriore verrà
prodotto sia dal diffusore anteriore che dal subwoofer.
Pertanto, il suono dei bassi potrebbe essere troppo potente.
In tal caso, si consiglia di non modificare le impostazioni
oppure di modificarle secondo il Metodo 1.
Per la procedura di modifica, fare riferimento a “Speaker Setting”
nelle istruzioni per l’uso del CD-ROM.
Le operazioni di HDMI, rete, ecc. non rispondono
Causa Soluzione
Le operazioni di questo
ricevitore e dei dispositivi
di collegamento non
rispondono.
Provare a reimpostare. Per reimpostare, scollegare
l’alimentazione, quindi premere il tasto
pannello anteriore per almeno 5 secondi. (L’alimentazione viene
scollegata 5 secondi dopo il collegamento dell’alimentazione.
Le impostazioni del ricevitore verranno mantenute.)
Inoltre, provare a ricollegare il cavo di alimentazione dei
dispositivi di collegamento.
STANDBY/ON
sul
EXT.
Per produrre suono dalla TV
Fare riferimento alla pagina 8 dell’opuscolo per effettuare il collegamento e le impostazioni.
Per riprodurre, premere il tasto TV per passare all’ingresso della TV.
Il telecomando non funziona
Causa Soluzione
La modalità di
funzionamento del
telecomando non è stata
selezionata.
Per le impostazioni iniziali di HOME MENU e AUDIO
PARAMETER ecc. e quando si effettuano le impostazioni di
riproduzione
• Avviare il funzionamento dopo aver premuto il tasto
RECEIVER
Per attivare funzioni come la rete e l’iPod
• Avviare il funzionamento dopo aver premuto il tasto di ogni
funzione (
• Se non funziona, premere prima il tasto
quindi premere il tasto di ogni funzione.
.
NET, iPod
, ecc.).
MAIN RECEIVER
MAIN
2 TV (proiettore) sono collegate ma il filmato e l'audio a volte vengono
interrotti o non prodotti
Causa Soluzione
Potrebbero essere interrotti
o non prodotti se influenzati
dalla TV in standby.
Premere il tasto
uscita HDMI collegato a tale TV non venga selezionato. Fare
riferimento a “Impostazione del collegamento di rete” nelle
istruzioni per l’uso del CD-ROM per maggiori dettagli.
OUT P.
e
/
in modo che il segnale di
L’alimentazione viene improvvisamente disattivata e la spia WIRELESS
lampeggia
Causa Soluzione
Il filo conduttore del cavo
del diffusore contatta il
pannello posteriore, oppure
il positivo e il negativo del
cavo conduttore entrano
in contatto e il circuito di
protezione viene attivato.
Torcere un’altra volta il cavo conduttore del cavo del diffusore,
quindi collegarlo in modo che non fuoriesca dal terminale del
diffusore sull’amplificatore o sul lato del diffusore.
© 2015 PIONEER HOME ELECTRONICS CORPORATION.
Tutti i diritti riservati.
11
Page 42

Nederlands
Hartelijk dank voor de aanschaf van dit Pioneer product. In deze snelstartgids vindt u de instructies voor de basisaansluitingen en de basisbediening voor een eenvoudig gebruik van de receiver. Voor meer gedetailleerde informatie wordt u verwezen naar de “Handleiding” die op de
bijgeleverde CD-ROM ( ) staat.
Inhoud van de doos
STANDBY/ON
RECEIVER
MAIN
USB ADPT ROKU
iPod
TUNER
TV
INPUT
STATUS
AUDIO P. VIDEO P.
TOP
MENU
HOME
MENU
LISTENING MODE
MPX
PRESET TUNE
13
D.ACCESS
CLR
DIMMER SLEEP
ALL ZONE STBY
SUB ZONE CONTROL
Z2 Z3 HDZ
SOURCE CONTROL
SAT
DVDBD
BT
MHL
TV
CD
VOL
OUT P.
ENTER
SURRAUTO
ADV
BAND PTY
2
546
8079
CLASS
ENTER
RECEIVER
SOURCE
Afstandsbediening
HDMI
NET
ALL
VOLUME
MUTE
TOOLS
MENU
RETURN
CH LV.
AUDIO
Fav
DISP
CH
CH
RCU SETUP
FM-draadantenne
AM-raamantenne
VSX-1130-K
VSX-930-K/-S
VSX-830-K/-S
CD-ROM
Netsnoer
Veiligheidsbrochure
Garantiebewijs
Deze Quick Start-gids
BELANGRIJKE INFORMATIE BETREFFENDE
DE VENTILATIE
Let er bij het installeren van het apparaat op dat er
voldoende vrije ruimte rondom het apparaat is om een
goede doorstroming van lucht te waarborgen
(tenminste 40 cm boven, 10 cm achter en 20 cm aan de
zijkanten van het apparaat).
WAARSCHUWING
De gleuven en openingen in de behuizing van het
apparaat zijn aangebracht voor de ventilatie, zodat een
betrouwbare werking van het apparaat wordt verkregen
en oververhitting wordt voorkomen. Om brand te
voorkomen, moet u ervoor zorgen dat deze openingen
nooit geblokkeerd worden of dat ze afgedekt worden
door voorwerpen (kranten, tafelkleed, gordijn e.d.) of
door gebruik van het apparaat op een dik tapijt of een
bed.
D3-4-2-1-7b*_A1_Nl
WAARSCHUWING
・Batterijen mogen niet in direct zonlicht of op een
erg warme plaats, zoals in de buurt van een
verwarming of in een auto die in de zon staat,
gebruikt of opgeborgen worden. Dit kan
resulteren in lekkage, oververhitting, explosie of
in brand vliegen van de batterijen. Bovendien
kan de levensduur van de batterijen afnemen.
・Wanneer u lege batterijen weggooit, gelieve
daarbij de geldende wetgeving en bepalingen na
te leven.
Microfoon voor instellenAAA/IEC/R03 drogecelbatterijen x2
2
Page 43

Aansluitingen en eerste instellingen
Voer de verbindings- en begininstellingen uit op een van de onderstaande manieren.
Gebruik de app “Start-up Navi” om
de verbindings- en begininstellingen
uit te voeren
• Gebruik een smartphone/tablet.
• Een netwerkverbinding is vereist.
LAN
Download en start de app “Start-up Navi”.
1
Volg de richtlijnen van de app om de
2
verbindings- en begininstellingen uit te
voeren.
Volg de richtlijnen van de
ingebouwde AVNavigator om de
verbindings- en begininstellingen uit
te voeren
• Gebruik een Mac/PC.
• Een netwerkverbinding is vereist.
LAN
Lees het boekje “Als u een Mac/PC hebt”.
1
Volg de richtlijnen van de ingebouwde
2
AVNavigator van de receiver om verder te
gaan met de verbindings- en begininstellingen.
Volg de instructies in het
boekje om de verbindings- en
begininstellingen uit te voeren
1
Lees het boekje in de volgorde
Volg de instructies van elke stap om verder te
2
gaan.
.
Download de app “Start-up Navi” hier.
Als u een iPhone of iPad hebt
Zoek de app “Start-up Navi” in de App Store.
Als u een Android-apparaat hebt
Zoek de app “Start-up Navi” in Google Play.
Over het knipperen van de WIRELESS-aanduiding
• Knippert wanneer u de WAC-stand gebruikt. (Stand
waarin netwerkinstellingen kunnen worden gewijzigd
met een iPhone, iPad en iPod touch, wanneer deze
receiver wordt gebruikt als een Wi-Fi toegangspunt)
Wanneer u het toestel inschakelt na
netwerkinstellingen of na het aansluiten van een LANkabel, knippert de WIRELESS-indicator niet.
• Als u geen netwerkverbinding maakt, kunt u de receiver
in de huidige staat gebruiken.
3
Page 44

Als u een Mac/PC hebt
Aansluiten op het netwerk via de LAN-interface
Internet
Computer
LAN-kabel (los verkrijgbaar)
NETWORK
Modem
1
NETWORK
Router
WAN
LAN
De receiver aansluiten op het
stopcontact
Nadat u de receiver op het LAN hebt aangesloten, steekt u de
stekker van het netsnoer in het stopcontact.
Sluit het geleverde netsnoer aan op de AC IN-aansluiting
1
aan de achterkant van de receiver.
Steek het andere einde in het stopcontact.
2
Inschakelen
1
2
3
Druk op
te zetten.
Wacht na het inschakelen enkele minuten voordat u verdergaat
met de volgende handelingen.
STANDBY/ON
om de receiver en de computer aan
Voor verbinding van deze receiver met een draadloze LAN-router via Wi-Fi raadpleegt u “Netwerkverbinding instellen” in de
handleiding op de CD-ROM.
4
Page 45

De ingebouwde AVNavigator
starten
Bedien AVNavigator door de instructies op het scherm van uw
computer te volgen.
Gebruik op een Mac
Start Safari en klik op <VSX-1130> of <VSX-930>
weergegeven bij ‘
Bonjour
• Als ‘
vakje ‘
Advanced
‘
Bonjour
’ niet wordt weergegeven, selecteert u het
Include Bonjour in the Favorites bar
’ in het menu ‘
’ in de favorietenbalk.
Preferences...
’ van Safari.
’ in het tabblad
Voer het adres uit stap 2 in het veld in Internet
3
Explorer in zoals hieronder wordt getoond, en
druk op de ENTER-toets.
(voorbeeld van invoernotatie) 192.168.0.124
• Met een Windows-PC kunt u de volgende methode
gebruiken om AVNavigator te starten.
Start Explorer en klik met de rechtermuisknop op
<VSX-1130> of <VSX-930> in de map ‘
vervolgens op ‘
View device webpage
Network
’.
’. Klik
Gebruiksomgeving
• AVNavigator is beschikbaar op de volgende systemen.
–Windows-PC: Microsoft
Windows
–Mac: OS X v 10.9 or 10.8
• Sommige functies van AVNavigator gebruiken een
internetbrowser. De volgende browsers worden
ondersteund:
–Windows-PC: Internet Explorer
–Mac OS: Safari 6.0, 7.0
• Het is mogelijk dat AVNavigator niet werkt afhankelijk van
netwerk- of veiligheidsinstellingen op de computer.
®
8/Windows® 8.1
®
Windows Vista®/Windows® 7/
®
8, 9, 10, 11
Gebruik op een Windows-pc
Start Internet Explorer op de pc (open een
1
willekeurige internetpagina).
Druk op de afstandsbediening op STATUS en
2
controleer de weergave op het voorpaneel op
de receiver (het IP-adres van de receiver wordt
weergegeven).
(voorbeeld van tekst)
Als het adres 0.0.0.0 of 169.254.112.202 wordt weergegeven, is
de receiver niet verbonden met het netwerk. Controleer dit om
zeker te zijn dat de receiver en de router correct zijn verbonden.
Informatie over Wiring Navi
U start Wiring Navi door te drukken op ‘
scherm van AVNavigator.
• Wanneer de verbindingsnavigatie voltooid is, gaat u verder
Interactive Operation Guide
naar
Wiring Navi
.
’ op het
5
Page 46

Volg de instructies in het boekje om de verbindings- en begininstellingen uit te voeren
Aansluitingen
De luidsprekers opstellen
L
– Linksvoor
C
– Midden
TMdL TMdR
R
– Rechtsvoor
SL
– Surround links
SR
– Surround rechts
SBL
– Surround linksachter
SBR
– Surround rechtsachter
L
C
R
TMdL
TMdR
SW
SW
SBL
6
SBR
SRSL
– Boven-midden links
– Boven-midden rechts
– Subwoofer
Opmerkingen
• Er zijn ook andere patronen voor aansluiting
van de luidsprekers (breed-voor, enz.). Zie “Uw
apparatuur aansluiten” in de handleiding voor
meer informatie.
• Voor het afspelen van Dolby Atmos moet u de
luidspreker van boven-midden, surround-achter
of breed-voor aansluiten.
• Het geluid wordt weergegeven via een van de
boven-midden- en surround-achterluidsprekers
afhankelijk van de luisterstand, enz.
• De Dolby-luidspreker kan worden gebruikt
in plaats van de boven-middenluidspreker.
Raadpleeg de handleiding voor meer informatie.
Page 47

Aansluitingen
12 3
De luidsprekers aansluiten
Zorg dat alle aansluitingen zijn voltooid
1
voordat u dit toestel aansluit op de
netvoedingsbron.
U kunt luidsprekers met een nominale
2
impedantie tussen 6 Ω en 16 Ω gebruiken.
De luidsprekers aansluiten.
3
Aansluitingen met ontblote draad
Draai de losse kerndraadjes in elkaar.
1
Draai de aansluitschroef los en steek de kerndraad naar
2
binnen.
Draai de aansluitschroef weer vast.
3
10 mm
Rechtsvoor
(R)
Subwoofer
(SW)
LINE LEVEL
INPUT
AUDIO OUT
1
SUBWOOFER
PRE OUT
2
FRONT
RL
A
5.2ch
CENTER
5.2.2ch
Midden
(C)
SURROUND
RL
HDZONE / BI-AMP
7.2ch
SURROUND BACK
(
Single
)
Linksvoor
(L)
SPEAKER B
TOP MIDDLE
RLRL
B
5.2.2ch
Boven-midden
rechts
TMdR
(
)
Surround rechts
(SR)
Surround
rechtsachter
SBR
(
)
Surround
linksachter
SBL
(
)
Surround links
(SL)
Boven-midden
links
TMdL
(
)
WAARSCHUWING
• Deze luidsprekeraansluitingen hebben een
of losmaken van de luidsprekerkabels, moet u het netsnoer losmaken voordat u eventuele niet-geïsoleerde onderdelen aanraakt.
GEVAARLIJKE
spanning. Om een elektrische schok te voorkomen bij het aansluiten
7
Page 48

AC
A
Aansluitingen
Een TV en weergave-apparatuur aansluiten
Aansluiten via HDMI
DVD-speler,
HDD/DVD-recorder
HDMI OUT HDMI OUT
NETWORK
CONTROL
IR
IN
OUT
ANTENNA
AM LOOP
FM UNBAL
75
VIDEO IN
COMPONENT VIDEO
ASSIGNABLE
VIDEO
DVD
SAT/
CBL
MONITOR OUT
U kunt het
instelscherm alleen
weergeven via de
TV als deze kabel is
aangesloten.
• Als de TV de HDMI Audio Return Channel-functie ondersteunt, komt het geluid van de TV via de HDMI-aansluiting de receiver
binnen, dus hoeft er geen optische digitale kabel (
“HDMI-instellingen” van de handleiding voor details.
8
• Raadpleeg de handleiding van de TV voor aanwijzingen betreffende de aansluitingen en instellingen van de TV.
Blu-ray disc-speler,
Blu-ray disc-recorder
HDMI
OUT
HDMI OUT
12
HDZONE/MAIN
ARCCONTROL
SELECTABLE
AUDIO OUT
(SAT/CBL)
1
P
R
P
B
Y
ANALOG
SAT/CBL
AUDIO IN
HDMI IN
1
MAIN
(
)(
DVD
DVD IN
RL
A
BD IN
SAT/CBL IN
FRONT
1
SUBWOOFER
PRE OUT
2
L
DVD
R
L
R
ASSIGNABLE
1
(CD)
HDMI/DVI-compatibele TV
) te worden aangesloten. In dit geval zet u
HDMI IN
SAT/CBL
5.2ch
5.2.2ch
CENTER
Set-top box
HDMI OUT
)
GAME IN
SURROUND
RL
16-
ASSIGNABLE
6
4321
/MHLBD
(
OUTPUT 5 V
0.9 A MAX
SURROUND BACK
HDZONE / BI-AMP
OPTICAL
DIGITAL AUDIO OUT
HDMI/DVI-compatibele apparaten
OPTICAL
IN1 (TV)
DIGITAL IN
7.2ch
)
(
)
Single
A
ARC
(TV)
1
(
1
SAT/CBL
SPEAKER B
TOP MIDDLE
RLRL
5.2.2ch
HDMI Setup
bij
OPTICAL
ASSIGNABLE
COAXIAL
)
ASSIGNABLE
B
Spelconsole
ON
op
. Zie
De antennes aansluiten
21
ANTENNA
AM LOOP
AM-raamantenne
FM-draadantenne
FM UNBAL
75
Stopcontact
Steek de stekker pas in het stopcontact als u alle andere apparaten,
waaronder de luidsprekers, hebt aangesloten op de receiver.
WAARSCHUWING
• Pak het netsnoer beet bij de stekker. Trek de stekker er
niet uit door aan het snoer te trekken en trek nooit aan het
netsnoer met natte handen aangezien dit kortsluiting of
een elektrische schok tot gevolg kan hebben. Plaats geen
toestel, meubelstuk o.i.d. op het netsnoer, en klem het niet
vast. Maak er nooit een knoop in en en verbind het evenmin
met andere snoeren. De netsnoeren dienen zo te worden
geleid dat er niet per ongeluk iemand op gaat staan. Een
beschadigd netsnoer kan brand of een elektrische schok
veroorzaken. Kontroleer het netsnoer af en toe. Wanneer
u de indruk krijgt dat het beschadigd is, dient u bij uw
dichtstbijzijnde erkende Pioneer onderhoudscentrum of uw
dealer een nieuw snoer te kopen.
• Haal de stekker van dit apparaat uit het stopcontact
wanneer u het langere tijd niet gebruikt, bijvoorbeeld
wanneer u op vakantie gaat.
Plug the supplied power cord into the AC IN socket on the
1
back of the receiver.
Plug the other end into a power outlet.
2
Page 49

Eerste instellingen
Voordat u begint
Plaats batterijen in de afstandsbediening.
1
Zet de receiver en de TV aan.
2
STANDBY/ON
ALL ZONE STBY
SUB ZONE CONTROL
RECEIVER
MAIN
SOURCE CONTROL
Schakel de subwoofer in en verhoog het volume.
3
WAARSCHUWING
• Let er bij het plaatsen van de batterijen op dat u de veren van
de
aansluitingen voor de batterijen niet beschadigt. Dit kan
*
resulteren in lekkage of oververhitting van de batterijen.
SOURCE
Z2 Z3 HDZ
De instellingen voor surroundgeluid automatisch maken (MCACC)
Druk op MAIN RECEIVER op de
De automatische meerkanaals akoestische kalibratie (MCACC)
instelling maakt gebruik van de bijgeleverde instelmicrofoon om
de testtoon die door de luidsprekers wordt uitgevoerd te meten
en analyseren.
Belangrijk
• Meet in een stille omgeving.
Sluit de bijgeleverde instelmicrofoon aan.
1
• Stel in op oorhoogte wanneer u een statief enz. gebruikt
voor de microfoon.
Microfoon voor instellen
Statief
2
afstandsbediening en druk vervolgens op de
ENTER-knop.
• De automatische meting begint.
• De meting duurt ongeveer 3 tot 12 minuten.
Volg de instructies op het scherm.
3
• De automatische instelling is voltooid wanneer het scherm
Home Menu verschijnt.
HOME MENU
MCACC
PRO
wordt aangegeven, kunnen de
Reverse Phase
• Als
Network,
Bluetooth
luidsprekerdraden (+ en –) verwisseld zijn. Controleer
deaansluitingen van de luidsprekers.
Zelfs als de aansluitingen juist zijn, kan er
worden weergegeven, afhankelijk van de luidsprekers
en de omgevingsomstandigheden. Dit is echter niet van
invloed op de metingen, dus u kunt
ERR
• Als
wordt weergegeven, controleert u of de luidspreker
goed is aangesloten.
• Als de stroom wordt uitgeschakeld, raadpleegt u de
“Veelgestelde vragen” in het boekje.
Zorg dat de instelmicrofoon wordt
4
losgemaakt.
Exit
System
Setup
Go Next
Reverse Phase
selecteren.
Het scherm
Full Auto MCACC
2a.Full Auto MCACC
Speaker System : 7.2ch/5.2.2ch
EQ Type : SYMMETRY
MCACC : M1.MEMORY 1
Dolby Enabled Speaker
SP to ceiling : – – –
Measurement Type : Expert
START
: NO
verschijnt op uw TV.
Exit
Return
9
Page 50

Basisbediening voor afspelen
2
5
Schakel het weergave-apparaat in.
Meerkanaals weergave
STANDBY/ON
ALL ZONE STBY
SUB ZONE CONTROL
RECEIVER
MAIN
SOURCE CONTROL
DVDBD
USB ADPTROKU
BT
iPod
TV
TUNER
TV
INPUT
STATUS
AUDIO P. VIDEO P.
TOP
MENU
HOME
MENU
LISTENING MODE
3
SURRAUTO
MPX
PRESET TUNE
2
13
546
8
79
D.ACCESS
CLR
0
DIMMER SLEEP
SOURCE
Z2 Z3 HDZ
HDMI
SAT
NET
MHL
ALL
CD
VOLUME
VOL
MUTE
OUT P.
TOOLS
MENU
ENTER
RETURN
CH LV.
ADV
BAND PTY
AUDIO
DISP
CH
CLASS
ENTER
CH
RCU SETUP
Fav
1
Bijv.: Schakel de Blu-ray disc-speler in die op de
IN
-aansluiting is aangesloten.
Schakel de ingangsfunctie van de receiver om.
2
Bijv.: Druk op BD om de BD-ingang te selecteren.
Druk op AUTO om ‘AUTO SURROUND’ te
3
selecteren.
Druk ook op
SURR
kanalen. Selecteer uw gewenste luisterfunctie.
Start met afspelen van het weergave-
4
of
ADV
voor weergave via meerdere
apparaat.
Bijv.: Start met afspelen van de Blu-ray disc-speler.
Gebruik VOLUME +/– om het volume in te
5
stellen.
• Als er geen geluid wordt weergegeven, verhoogt u het
volume tot ongeveer –30 dB.
Opmerkingen
• Als er geen geluid wordt weergegeven via de
middenluidspreker, achterluidspreker en subwoofer,
raadpleegt u “Veelgestelde vragen” in het boekje.
• Als de afstandsbediening niet werkt, raadpleegt u de
“Veelgestelde vragen” in het boekje.
HDMI BD
Om optimaal te genieten van de vele
functies van het apparaat
Plaats de CD-ROM in uw computer en geef de
“Handleiding” (PDF) in het menuscherm weer om
ze te lezen.
Opmerkingen
• Dit toestel ondersteunt AirPlay. Zie voor details “Gebruiken
van AirPlay op iPod touch, iPhone, iPad en iTunes” van de
handleiding en de website van Apple (http://www.apple.
com).
• De software van dit apparaat kan worden bijgewerkt
(“Software Update” van de handleiding). Op Mac OS
kan de software worden bijgewerkt via Safari (“Gebruik
van Safari voor het updaten van de firmware” in de
handleiding).
10
RECEIVER
Page 51

Veelgestelde vragen
Er komt geen geluid uit de middenluidspreker of achterluidspreker
Oorzaak Oplossing
AUTO SURROUND
(stand waarbij het aantal
ingangskanalen onveranderd
wordt uitgevoerd) is
geselecteerd bij invoer van
2-kanaals audiosignalen
zoals TV, muziek, enz.
Voor het multikanaals afspelen van een stereogeluidsbron
drukt u op de
stand te selecteren.
Voorbeeld) Druk enkele keren op de
STEREO
SURR
-knop of de
] te selecteren.
ADV
-knop om uw favoriete
SURR
-knop om [
Er komt geen geluid uit de subwoofer
Oorzaak Oplossing
De voorluidspreker is
ingesteld op LARGE.
(Het bronapparaat met
lage frequentie wordt
weergegeven via de
voorluidspreker in plaats
van de subwoofer wanneer
2-kanaals audiosignalen
worden ingevoerd zoals TV,
muziek, enz.)
Voor weergave via de subwoofer wijzigt u de
luidsprekerinstelling.(Er zijn twee methoden.)
Methode 1
Zet de voorluidspreker op SMALL.
• Het bronapparaat met lage frequentie wordt weergegeven via de
subwoofer in plaats van de voorluidspreker. Als de voorluidspreker
bronapparaten met lage frequentie goed kan weergeven, raden
we u aan deze instelling niet te wijzigen.
Methode 2
Zet de subwoofer PLUS.
• Het bronapparaat met lage frequentie van de voorluidspreker
wordt weergegeven via de voorluidspreker en de subwoofer.
Hierdoor kan het basgeluid te sterk zijn. In dit geval raden we
u aan de instelling niet te wijzigen of ze te wijzigen volgens
Methode 1.
Voor de wijzigingsprocedure raadpleegt u “Speaker Setting” in de
handleiding op de CD-ROM.
Er is geen respons bij bediening van HDMI, netwerk enz.
Oorzaak Oplossing
Er is geen respons bij
bediening van deze receiver
en aangesloten apparaten.
Reset het apparaat. Om te resetten, schakelt u de stroom uit
en drukt u 5 seconden of langer op de
het voorpaneel. (De stroom wordt uitgeschakeld 5 seconden
na het inschakelen van de stroom. De instellingen van de
receiver blijven behouden.)
U kunt ook de stekker van het netsnoer van de aangesloten
apparaten uit het stopcontact halen en er weer insteken.
STANDBY/ON
EXT.
-knop op
Geluid weergeven via de TV
Raadpleeg pagina 8 van het boekje om de verbinding en instellingen uit te voeren.
Voor weergave drukt u op de TV-knop om over te schakelen naar de TV-ingang.
De afstandsbediening werkt niet
Oorzaak Oplossing
De bedieningsstand van de
afstandsbediening is niet
omgeschakeld.
Wanneer u begininstellingen maakt voor HOME MENU en
AUDIO PARAMETER enz. en wanneer u instellingen voor
opnieuw afspelen uitvoert
• Druk op de
bediening.
Voor het bedienen van functies zoals netwerk en iPod
• Druk op de knop van elke functie (
vervolgens de bediening.
• Als ze nog steeds niet werkt, drukt u eerst op de
RECEIVER
MAIN RECEIVER
-knop en vervolgens op de knop van elke functie.
-knop en start vervolgens de
NET, iPod
, enz.) en start
MAIN
Er zijn 2 TV’s (projectors) aangesloten maar video en audio worden soms
onderbroken of niet weergegeven
Oorzaak Oplossing
Ze worden mogelijk
onderbroken of niet
weergegeven onder invloed
van de TV die in stand-by
staat.
Druk op de
uitgang aangesloten op die TV niet geselecteerd is. Raadpleeg
“De HDMI-uitgang veranderen” in de handleiding op de CDROM voor meer informatie.
OUT P.
-knop en
-knop zodat de HDMI-
/
De stroom wordt plotseling uitgeschakeld en de WIRELESS-aanduiding knippert
Oorzaak Oplossing
De geleidende draad van het
luidsprekersnoer is in contact
met het achterpaneel, of plus
en min van de geleidende
draad raken elkaar en het
beschermingscircuit is
geactiveerd.
Verdraai de geleidende draad van het luidsprekersnoer
opnieuw, en sluit het snoer zo aan dat het niet uitsteekt uit
de luidsprekeraansluiting aan de kant van de versterker of de
luidspreker.
© 2015 PIONEER HOME ELECTRONICS CORPORATION.
Alle rechten voorbehouden.
11
Page 52

Español
Muchas gracias por haber adquirido este producto de Pioneer. Esta Guía de inicio rápido incluye instrucciones para hacer las
conexiones y operaciones básicas que le permitirán hacer un uso sencillo del receptor. Para conocer una descripción detallada
del receptor, consulte el “Manual de instrucciones” suministrado con el CD-ROM ( ) incluido.
Contenido de la caja
STANDBY/ON
RECEIVER
MAIN
USB ADPT ROKU
iPod
TUNER
TV
INPUT
STATUS
AUDIO P. VIDEO P.
TOP
MENU
HOME
MENU
LISTENING MODE
MPX
PRESET TUNE
13
D.ACCESS
CLR
DIMMER SLEEP
ALL ZONE STBY
SUB ZONE CONTROL
Z2 Z3 HDZ
SOURCE CONTROL
SAT
DVDBD
BT
MHL
TV
CD
VOL
OUT P.
ENTER
SURRAUTO
ADV
BAND PTY
2
546
8079
CLASS
ENTER
RECEIVER
SOURCE
Mando a distancia
HDMI
NET
ALL
VOLUME
MUTE
TOOLS
MENU
RETURN
CH LV.
AUDIO
Fav
DISP
CH
CH
RCU SETUP
Antena de hilos de FM
Antena de cuadro de AM
VSX-1130-K
VSX-930-K/-S
VSX-830-K/-S
CD-ROM
Cable de alimentación
Folleto de Seguridad
Hoja de garantía
Esta guía de inicio rápido
PRECAUCIÓN PARA LA VENTILACIÓN
Cuando instale este aparato, asegúrese de dejar
espacio en torno al mismo para la ventilación con el fin
de mejorar la disipación de calor (por lo menos 40 cm
encima, 10 cm detrás, y 20 cm en cada lado).
ADVERTENCIA
Las ranuras y aberturas de la caja del aparato sirven
para su ventilación para poder asegurar un
funcionamiento fiable del aparato y para protegerlo
contra sobrecalentamiento. Para evitar el peligro de
incendio, las aberturas nunca deberán taparse ni
cubrirse con nada (como por ejemplo, periódicos,
manteles, cortinas) ni ponerse en funcionamiento el
aparato sobre una alfombra gruesas o una cama.
D3-4-2-1-7b*_A1_Es
PRECAUCIÓN
・No use ni guarde pilas en lugares expuestos a la
luz solar directa o en lugares con un calor
excesivo, como el interior de un coche o cerca
de un calefactor. Esto puede ocasionar fugas en
las pilas, que se sobrecalienten, exploten o se
incendien. También puede reducir su duración o
rendimiento.
・
Al desechar pilas gastadas, deberá cumplir las
regulaciones gubernamentales o las normas de
las instituciones medioambientales públicas
que se apliquen en su país/área.
Micrófono de configuraciónPilas secas AAA, IEC R03 x 2
2
Page 53

Conexión y configuración inicial
Realice la conexión y la configuración inicial de cualquiera de las siguientes formas.
Use la aplicación
“Start-up Navi”
para
realizar la conexión y la configuración
inicial
• Utilice un smartphone/tablet.
• Es necesaria una conexión de red.
LAN
Descargue e inicie la aplicación “Start-up
1
Navi”.
Siga las instrucciones de la app para realizar
2
con conexión y la configuración inicial.
Siga las instrucciones de AVNavigator
incorporado para realizar la conexión y
la conguración inicial
• Utilice un Mac/PC.
• Es necesaria una conexión de red.
LAN
Lea el folleto “Si tiene un Mac/PC”.
1
Siga las instrucciones del AVNavigator
2
incorporado en el receptor para realizar la
conexión y la configuración inicial.
Siga las instrucciones del folleto
para realizar la conexión y la
conguración inicial
1
Lea el folleto siguiendo el orden
Siga las instrucciones de cada paso.
2
.
Descargar la aplicación “Start-up Navi” desde aquí.
Si tiene un iPhone o un iPad
Por Favor, buscar la aplicación “Start-up Navi” en
la App Store.
Si tiene un dispositivo Android
Por Favor, buscar la aplicación “Start-up Navi” en
Google Play.
Sobre el parpadeo del indicador WIRELESS
• Parpadea al utilizar el modo WAC. (modo en el que los
ajustes de red pueden cambiarse mediante un iPhone,
iPad o iPod touch si se utiliza el receptor como punto de
acceso Wi-Fi)
Al encender la unidad tras realizar los ajustes de red
o conectar un cable LAN, el indicador WIRELESS no
parpadeará.
• Cuando no se hace una conexión de red, no hay
problema en usarlo así.
3
Page 54

Si tiene un Mac/PC
Conexión a la red mediante la interfaz LAN
Internet
Ordenador
Cable LAN (vendido por separado)
NETWORK
Modem
1
NETWORK
Enrutador
WAN
LAN
Conexión del receptor
Tras la conexión a una LAN, conecte el cable de alimentación
del receptor a una toma de corriente.
Conecte el cable de alimentación suministrado a la toma
1
AC IN de la parte posterior del receptor.
Conecte el otro extremo a una toma de corriente.
2
Encendido
Pulse
ordenador.
1
2
3
Espere unos minutos tras el encendido antes de realizar la
siguiente operación.
STANDBY/ON
para encender el receptor y el
Cuando conecte este receptor al router de una LAN inalámbrica a través de Wi-Fi, consulte “Configuración de la conexión a la
red” en las instrucciones de funcionamiento del CD-ROM.
4
Page 55

Inicio del AVNavigator integrado
Controle AVNavigator siguiendo las instrucciones de la
pantalla del ordenador.
Uso de Mac
Inicie Safari y haga clic en <VSX-1130> o <VSX-930> que se
muestra en ‘Bonjour’ en la barra Favoritos.
Introduzca el número indicado en el paso 2
3
anterior en el campo de Internet Explorer
mostrado abajo y pulse a continuación la tecla
ENTER.
(Formato de entrada de ejemplo) 192.168.0.124
• Si está utilizando un PC con Windows, puede usar el
método siguiente para iniciar AVNavigator.
Inicie Explorer y haga clic con el botón derecho en <VSX1130> o <VSX-930> que se muestra en la carpeta ‘
y, a continuación, haga clic en ‘
View device webpage
Network
Entorno de funcionamiento
• AVNavigator se puede utilizar en los siguientes entornos.
–PC con Windows: Microsoft
Windows
–Mac: OS X v 10.9 or 10.8
• AVNavigator utiliza un navegador de Internet. Se admiten
los siguientes navegadores:
–PC con Windows: Internet Explorer
–Mac OS: Safari 6.0, 7.0
• En función de la configuración de red o la configuración
’
’.
de seguridad del ordenador, es posible que AVNavigator
no funcione.
®
8/Windows® 8.1
®
Windows Vista®/Windows® 7/
®
8, 9, 10, 11
• Si no se muestra ‘
Include Bonjour in the Favorites bar
‘
Advanced
‘
Bonjour
’ dentro del menú ‘
’ active la casilla de verificación
’ en la pestaña
Preferences...
’ de Safari.
Uso de un PC con Windows
Inicie Internet Explorer en su PC (abra una
1
página aleatoria de Internet).
Pulse STATUS en el mando a distancia y
2
compruebe la pantalla del panel frontal en el
receptor (aparecerá la dirección IP del receptor).
(Visualización de texto de ejemplo)
Si aparece 0.0.0.0 o 169.254.112.202 en la dirección, indica que
el receptor no está conectado a la red. Asegúrese de que el
receptor y el enrutador están conectados debidamente.
Acerca del uso de Wiring Navi
Wiring Navi se inicia cuando se pulsa ‘
pantalla de AVNavigator.
• Cuando finalice la exploración de la conexión, proceda
Interactive Operation Guide
con la
Wiring Navi
.
’en la
5
Page 56

Siga las instrucciones del folleto para realizar la conexión y la configuración inicial
Conexiones
Disposición de los altavoces
L
– Delantero izquierdo
C
– Central
TMdL TMdR
R
– Delantero derecho
SL
– Sonido envolvente izquierdo
SR
– Sonido envolvente derecho
SBL
–
Sonido envolvente trasero izquierdo
SBR
–
Sonido envolvente trasero derecho
L
C
R
TMdL
TMdR
SW
SW
SBL
6
SBR
SRSL
– Central superior izquierdo
– Central superior derecho
– Subwoofer
Notas
• También hay otros patrones de conexión de altavoces
(ancho delantero, etc.). Para conocer detalles, consulte
“Conexión del equipo” en el manual de instrucciones.
• Para reproducir Dolby Atmos, necesita conectar el altavoz
Central superior, de Sonido envolvente trasero o Ancho
delantero.
• El sonido se reproduce por uno de los altavoces Centrales
superior y de Sonido envolvente trasero, dependiendo del
modo de escucha, etc.
• El Dolby Enabled Speaker puede utilizarse en lugar del
altavoz Central superior. Para más información, consulte
las instrucciones de funcionamiento.
Page 57

Conexiones
12 3
Conexión de los altavoces
Asegúrese de completar todas las conexiones
1
antes de conectar este equipo a la fuente de
alimentación de CA.
Puede utilizar los altavoces con una
2
impedancia nominal de entre 6 Ω y 16 Ω.
Conexión de los altavoces.
3
Conexiones de cables desnudos
Trence los hilos expuestos del cable.
1
Aoje el terminal e inserte el hilo expuesto.
2
Apriete el terminal.
3
10 mm
Delantero derecho
(R)
Subwoofer
(SW)
LINE LEVEL
INPUT
AUDIO OUT
1
SUBWOOFER
PRE OUT
2
FRONT
RL
A
5.2ch
5.2.2ch
CENTER
Central
(C)
SURROUND
RL
HDZONE / BI-AMP
7.2ch
SURROUND BACK
(
Single
)
Delantero izquierdo
(L)
SPEAKER B
TOP MIDDLE
RLRL
B
5.2.2ch
Central superior
derecho
TMdR
(
)
Sonido envolvente
derecho
(SR)
Sonido envolvente
trasero derecho
SBR
(
)
Sonido envolvente
trasero izquierdo
SBL
(
)
Sonido envolvente
izquierdo
(SL)
Central superior
izquierdo
TMdL
(
)
PRECAUCIÓN
• Por estos terminales de altavoz circula
al conectar o desconectar los cables de altavoz, desenchufe el cable de alimentación antes de tocar las partes de los cables
que no están aisladas.
tensión ACTIVA que es PELIGROSA
. Para evitar el peligro de descargas eléctricas
7
Page 58

AC
A
Conexiones
Conexión de componentes de reproducción y de un TV
Conexión mediante HDMI
Reproductor de DVD,
grabadora de HDD/DVD
Reproductor de Blu-ray Disc,
grabadora de Blu-ray Disc
Módulo de conexión
Componentes compatibles con HDMI/DVI
Consola de
Conexión de antenas
21
videojuegos
ANTENNA
HDMI OUT HDMI OUT
HDMI OUT
AM LOOP
Antena de
cuadro de AM
Antena de hilo de FM
FM UNBAL
75
CONTROL
IR
IN
OUT
NETWORK
ANTENNA
AM LOOP
FM UNBAL
75
VIDEO IN
COMPONENT VIDEO
ASSIGNABLE
(SAT/CBL)
VIDEO
1
DVD
SAT/
CBL
MONITOR OUT
HDMI
OUT
HDMI OUT
HDZONE/MAIN
SELECTABLE
P
R
P
B
Y
SAT/CBL
AUDIO IN
12
MAIN
ARCCONTROL
AUDIO OUT
1
SUBWOOFER
PRE OUT
2
L
DVD
R
L
R
ASSIGNABLE
ANALOG
1
1
(
)(
DVD
DVD IN
A
(CD)
HDMI IN
SAT/CBL
BD IN
SAT/CBL IN
FRONT
RL
5.2.2ch
5.2ch
CENTER
)
GAME IN
SURROUND
RL
ASSIGNABLE
4321
16-
6
/MHLBD
(
OUTPUT 5 V
)
0.9 A MAX
7.2ch
SURROUND BACK
(
Single
HDZONE / BI-AMP
)
OPTICAL
IN1 (TV)
DIGITAL IN
(TV)
1
(
1
SAT/CBL
SPEAKER B
TOP MIDDLE
RLRL
5.2.2ch
OPTICAL
ASSIGNABLE
COAXIAL
)
ASSIGNABLE
B
Conexión del receptor
No conecte el receptor hasta que no haya conectado todos los
componentes de este receptor, incluidos los altavoces.
PRECAUCIÓN
• Tome el cable de alimentación por la clavija. No extraiga
la clavija tirando del cable. Nunca toque el cable de
alimentación cuando sus manos estén mojadas, ya que
esto podría causar cortocircuitos o descargas eléctricas.
No coloque la unidad, algún mueble, etc., sobre el cable
de alimentación. Asegúrese de no hacer nudos en el cable
ni de unirlo a otros cables. Los cables de alimentación
No podrá ver
la pantalla de
A
configuración del
televisor salvo que
este cable esté
conectado.
HDMI IN
OPTICAL
DIGITAL AUDIO OUT
Televisor compatible con HDMI/DVI
• Si el televisor soporta la soporta la función HDMI Audio Return Channel (Canal de retorno de audio HDMI), el sonido del televisor
llega al receptor a través del terminal HDMI, por lo que no hay necesidad de conectar un cable digital óptico (
ajuste
ARC
en el
HDMI Setup
(Configuración de HDMI) a ON. Consulte “Configuración de HDMI” en las instrucciones de
). En este caso,
funcionamiento del CD-ROM para obtener más información.
8
• Para obtener instrucciones sobre las conexiones y configuración del televisor, consulte el manual de funcionamiento del mismo.
deberán ser dispuestos de tal forma que la probabilidad de
que sean pisados sea mínima. Una cable de alimentación
dañado podrá causar incendios o descargas eléctricas.
Revise el cable de alimentación está dañado, solicite el
reemplazo del mismo al centro de servicio autorizado
Pioneer más cercano, o a su distribuidor.
• Cuando no vaya a usar el receptor durante un período de
tiempo prolongado (por ejemplo, durante las vacaciones),
desconecte la clavija de alimentación de la toma de
corriente mural.
Conecte el cable de alimentación suministrado a la toma
1
AC IN de la parte posterior del receptor.
Conecte el otro extremo a una toma de corriente.
2
Page 59

Configuración inicial
Antes de comenzar
Ponga las pilas en el mando a distancia.
1
Encienda el receptor y el televisor.
2
STANDBY/ON
ALL ZONE STBY
SUB ZONE CONTROL
RECEIVER
MAIN
SOURCE CONTROL
Active el subwoofer y suba el volumen.
3
PRECAUCIÓN
• Cuando introduzca las pilas, tenga cuidado de no
dañar los muelles situados en los terminales * del
compartimiento. Podría provocar que las baterías
experimenten alguna fuga o que se calienten en exceso.
SOURCE
Z2 Z3 HDZ
Confi guración automática para sonido envolvente (MCACC)
Pulse MAIN RECEIVER en el mando a distancia
La configuración de calibración acústica automática
multicanal (MCACC) utiliza el micrófono incluido de
configuración para medir y analizar el tono de prueba emitido
por los altavoces.
Importante
• Realice la medición en un entorno silencioso.
Conecte el micrófono de conguración
1
incluido en el equipo.
• Ajuste a la altura de la oreja cuando use un trípode u otro
elemento para el micrófono.
Micrófono de
configuración
Trípode
2
y luego pulse el botón ENTER.
• La medición automática empezará.
• La medición tardará entre 3 y 12 minutos aproximadamente.
Siga las instrucciones que aparecen en la pantalla.
3
• El ajuste automático se completa cuando aparece la
pantalla Home Menu.
HOME MENU
MCACC
PRO
• Si se visualiza
Network,
Bluetooth
Reverse Phase
cables de los altavoces (+ y –) pueden estar invertidas.
Compruebe las conexiones de altavoz.
Aunque las conexiones sean correctas, puede que se
visualice
Reverse Phase
, dependiendo de los altavoces y
del entorno circundante. Sin embargo, esto no afecta a las
mediciones, así que seleccione
• Si se visualiza
ERR
, verifique que los altavoces estén
conectados correctamente.
• Si la alimentación se desconecta, consulte las “Preguntas
frecuentes” del folleto.
Asegúrese de que el micrófono de
4
configuración esté desconectado.
Exit
System
Setup
, las conexiones de los
Go Next
.
La pantalla
Full Auto MCACC
2a.Full Auto MCACC
Speaker System : 7.2ch/5.2.2ch
EQ Type : SYMMETRY
MCACC : M1.MEMORY 1
Dolby Enabled Speaker
SP to ceiling : – – –
Measurement Type : Expert
START
: NO
aparece en su televisor.
Exit
Return
9
Page 60

Reproducción básica
2
5
Encienda el componente de reproducción.
Reproducción multicanal
STANDBY/ON
ALL ZONE STBY
SUB ZONE CONTROL
RECEIVER
MAIN
SOURCE CONTROL
DVDBD
USB ADPTROKU
BT
iPod
TV
TUNER
TV
INPUT
STATUS
AUDIO P. VIDEO P.
TOP
MENU
HOME
MENU
LISTENING MODE
3
SURRAUTO
MPX
PRESET TUNE
2
13
546
8
79
D.ACCESS
CLR
0
DIMMER SLEEP
SOURCE
Z2 Z3 HDZ
HDMI
SAT
NET
MHL
ALL
CD
VOLUME
VOL
MUTE
OUT P.
TOOLS
MENU
ENTER
RETURN
CH LV.
ADV
BAND PTY
AUDIO
DISP
CH
CLASS
ENTER
CH
RCU SETUP
Fav
1
Ej.) Encienda el reproductor de discos Blu-ray conectado
al terminal
Cambie la entrada del receptor.
2
Ej.) Pulse BD para seleccionar la entrada BD.
Pulse AUTO para seleccionar ’AUTO SURROUND’.
3
Plse también
multicanal. Seleccione su modo de audición preferido.
Inicie la reproducción del componente de
4
reproducción.
Ej.) Inicie la reproducción del reproductor de discos
Blu-ray.
Use VOLUME +/– para ajustar el nivel del
5
volumen.
• Cuando no se emita ningún sonido, aumente el volumen a
aproximadamente –30 dB.
Notas
• Cuando no se reproduce el sonido desde el altavoz
central, el trasero y el subwoofer, consulte las “Preguntas
frecuentes” del folleto.
• Si el mando a distancia no funciona, consulte las
“Preguntas frecuentes” del folleto.
HDMI BD IN
SURR
o
ADV
.
para la reproducción
Para disfrutar al máximo de las
muchas funciones de la unidad
Coloque el CD-ROM en el ordenador y consulte
el “Manual de instrucciones” (PDF) desde la
pantalla de menú.
Notas
• Esta unidad es compatible con AirPlay. Para conocer
los detalles, consulte “Usando AirPlay en iPod touch,
iPhone, iPad e iTunes” de las instrucciones del manual de
instrucciones y el sitio web de Apple (http://www.apple.com).
• El software de esta unidad se puede actualizar (“Actualización
de software” de las instrucciones de uso). Con Mac OS,
se puede actualizar mediante Safari (“Uso de Safari para
actualizar el firmware” de las instrucciones de uso).
10
RECEIVER
Page 61

Preguntas frecuentes
El altavoz central o el trasero no reproducen sonido
Causa Solución
AUTO SURROUND (modo
que reproduce el número
de canales de entrada) está
seleccionado en entrada de
audio de 2 canales, como
TV, música, etc.
Para reproducir una fuente de sonido estéreo en varios
canales, pulse el botón
el modo de escucha favorito.
Ejemplo) Pulse el botón
EXT.STEREO
[
].
SURR
SURR
El subwoofer no reproduce sonido
Causa Solución
El altavoz delantero está
ajustado como LARGE.
(El componente de baja
frecuencia se reproducirá
desde el altavoz delantero en
lugar de desde el subwoofer
cuando se encuentra la
entrada de audio de 2
canales como TV, música,
etc.)
Para reproducir sonido desde el subwoofer, cambie el ajuste
de los altavoces. (Hay dos maneras.)
Método 1
Cambie el altavoz delantero a SMALL.
• El componente de baja frecuencia se reproducirá desde el
subwoofer en lugar de desde el altavoz delantero. Cuando
éste tenga una gran capacidad para reproducir componentes
de baja frecuencia recomendamos no cambiarlo.
Método 2
Cambie el subwoofer a PLUS.
• El componente de baja frecuencia del altavoz delantero se
reproducirá tanto desde éste como desde el subwoofer. Por
tanto, el sonido grave puede ser demasiado potente. En
este caso recomendamos no cambiarlo o realizar el cambio
siguiendo el Método 1.
Para conocer el procedimiento de cambio, consulte “Ajuste de
altavoz” en las instrucciones de funcionamiento del CD-ROM.
o el botón
varias veces para seleccionar
ADV
para seleccionar
Reproducción de sonido de TV
Consulte la página 8 del folleto para realizar la conexión y el ajuste.
Para la reproducción, pulse el botón TV para activar la entrada de TV.
El mando a distancia no funciona
Causa Solución
El modo de funcionamiento
del mando a distancia no
está activado.
Cuando se efectúa la configuración inicial del HOME MENU
y del and AUDIO PARAMETER etc. y cuando se realiza la
configuración de reproducción
• Inicie el funcionamiento después de pulsar el botón
RECEIVER
Utilización de funciones como Red e iPod
• Inicie el funcionamiento después de pulsar el botón de cada
función (
• Si aún no funciona, pulse primero el botón
después el botón de cada función.
.
NET, iPod
, etc.).
MAIN RECEIVER
MAIN
Hay conectadas 2 TVs (proyector) pero el vídeo y el audio se interrumpen a
veces o no se reproducen
Causa Solución
Puede interrumpirse o no
reproducirse cuando la TV
está en modo de espera.
Pulse el botón
salida HDMI conectada a esa TV no quede seleccionada.
Consulte “Cambio de la salida HDMI” en las instrucciones de
funcionamiento del CD-ROM para obtener más información.
OUT P.
y el botón
de forma que la
/
La alimentación se desactiva inesperadamente y el indicador WIRELESS
parpadea
Causa Solución
y
Las operaciones de HDMI, red, etc. no responderán
Causa Solución
El receptor y los dispositivos
de conexión no responden.
Intente volver a ajustarlos. Para ello, apague la alimentación y
presione el botón
segundos o más. (La alimentación se desactiva 5 segundos después
de su activación. Se mantendrá la configuración del receptor.)
Pruebe a volver a conectar el cable de alimentación de los
dispositivos de conexión.
STANDBY/ON
del panel delantero durante 5
El hilo conductor del cable
del altavoz está en contacto
con el panel trasero o los
hilos positivo y negativo del
cable conductor están en
contacto y el circuito de
protección está activado.
Vuelva a retorcer el hilo conductor del cable del altavoz y
conéctelo de forma que no sobresalga del terminal del altavoz
del amplificador y del altavoz.
© 2015 PIONEER HOME ELECTRONICS CORPORATION.
Todos los derechos reservados.
11
Page 62

Русский
Благодарим вас за приобретение данного изделия Pioneer. В данном Кратком руководстве пользователя содержатся инструкции
по основным подключениям и операциям для упрощенного использования ресивера. Подробное описание ресивера см. в
«Инструкции по эксплуатации», содержащихся на поставляемом CD-ROM ( ).
Комплект поставки
STANDBY/ON
RECEIVER
MAIN
USB ADPT ROKU
iPod
TUNER
TV
INPUT
STATUS
AUDIO P. VIDEO P.
TOP
MENU
HOME
MENU
LISTENING MODE
MPX
PRESET TUNE
13
D.ACCESS
CLR
DIMMER SLEEP
ALL ZONE STBY
SUB ZONE CONTROL
Z2 Z3 HDZ
SOURCE CONTROL
SAT
DVDBD
BT
MHL
TV
CD
VOL
OUT P.
ENTER
SURRAUTO
ADV
BAND PTY
2
546
8079
CLASS
ENTER
RECEIVER
SOURCE
Пульт дистанционного
управления
HDMI
NET
ALL
VOLUME
MUTE
Проволочная антенна
TOOLS
MENU
RETURN
CH LV.
AUDIO
Fav
DISP
CH
CH
RCU SETUP
Рамочная антенна АМ
FM
VSX-1130-K
VSX-930-K/-S
VSX-830-K/-S
CD-ROM
Кабель питания
Брошюра по безопасноти
Гарантийный талон
Это краткое руководство пользователя
ОБЯЗАТЕЛЬНАЯ ВЕНТИЛЯЦИЯ
При установке устройства обеспечьте достаточное
пространство для вентиляции во избежание
повышения температуры внутри устройства (не
менее 40 см сверху, 10 см сзади и по 20 см слева и
справа).
ПРЕДУПРЕЖДЕНИЕ
В корпусе устройства имеются щели и отверстия
для вентиляции, обеспечивающие надежную
работу изделия и защищающие его от перегрева.
Во избежание пожара эти отверстия ни в коем
случае не следует закрывать или заслонять
другими предметами (газетами, скатертями и
шторами) или устанавливать оборудование на
толстом ковре или постели.
D3-4-2-1-7b*_A1_Ru
ПРЕДУПРЕЖДЕНИЕ
・Не используйте или храните батарейки в местах,
подвергнутых прямому падению солнечных
лучей, или других предельно жарких местах,
например, внутри машины или возле
обогревателя. Это может вызвать протекание,
перегрев, разрыв или возгорание батареек. Это
также может привести к уменьшению срока
службы и отразиться на работе батареек.
・Избавляясь от использованных батареек,
пожалуйста, выполняйте действующие в вашей
стране или регионе требования
правительственных предписаний или соблюдайте
правила, установленные общественной
природоохранной организацией.
Сухие батарейки размера
шт.
2
AAA IEC R03,
Установочный микрофон
2
Page 63

Подключение и первоначальная настройка
Выполните подключение и начальные настройки одним из приведенных ниже способов.
Для выполнения подключения и
начальных настроек используйте
приложение «Start-up Navi»
• Используйте смартфон/планшет.
• Необходимо подключение к сети.
LAN
Загрузите и установите приложение «Start-
1
up Navi».
Выполните подключение и начальные
2
настройки согласно инструкциям
приложения.
Загрузите приложение «Start-up Navi» по
этой ссылке.
Если у вас есть iPhone или iPad
Найдите приложение приложение «Start-up Navi»
в App Store.
Если у вас есть устройство
Android
Найдите приложение приложение «Start-up Navi»
в Google Play.
Для выполнения подключения
и начальных настроек следуйте
инструкциям встроенного
AVNavigator
• Используйте ПК/Mac.
• Необходимо подключение к сети.
LAN
Прочитайте буклет «Если у вас есть ПК/
1
Mac».
Для перехода к выполнению подключения
2
или начальных настроек следуйте
инструкциям встроенного в ресивер
AVNavigator.
Для выполнения подключения
и начальных настроек
следуйте инструкциям,
приведенным в буклете
1
Прочитайте буклет в порядке
Следуйте инструкциям каждого шага,
2
чтобы продолжить.
Замечания относительно мигающего
индикатора WIRELESS
•Мигает при использовании режима WAC. (Режим, в
котором можно изменить настройки сети с iPhone, iPad
и iPod touch, когда ресивер используется в качестве
точки доступа Wi-Fi)
При включении изделия после настройки сети или
подключения кабеля LAN индикатор WIRELESS не
мигает.
•При отсутствии подключения к сети его можно
использовать как есть.
.
3
Page 64

Если у вас есть ПК/Mac
Подключение к сети через интерфейс LAN
Интернет
Модем
Компьютеaр
LAN кабель (продается отдельно)
NETWORK
1
NETWORK
Router
WAN
LAN
Подключение ресивера к розетке
После подключения к беспроводной сети LAN подсоедините
кабель питания ресивера к сети питания.
П
1
одключите поставляемый кабель питания к
разъему AC IN на задней стороне ресивера.
П
2
одключите другой конец к розетке.
Включение питания
Нажмите
1
2
3
компьютер.
Прежде чем выполнить следующую операцию, подождите
несколько минут после включения питания.
STANDBY/ON
, чтобы включить ресивер и
При подключении ресивера к маршрутизатору беспроводной LAN по Wi-Fi см. раздел «Настройка сетевого подключения»
инструкции по эксплуатации на компакт-диске.
4
Page 65

Запуск встроенного AVNavigator
Используйте AVNavigator в соответствии с подсказками на
экране компьютера.
При использовании Mac
Запустите Safari и нажмите <VSX-1130> или <VSX-930> в
‘
Bonjour
’ на панели закладок.
Введите цифры, показанные на дисплее
3
в шаге 2, в командной строке Internet
Explorer, как показано ниже, и нажмите
клавишу ENTER.
(Пример формата ввода) 192.168.0.124
•Если у вас есть ПК под управлением Windows, можно
запустить AVNavigator следующим способом.
Запустите Проводник и щелкните правой кнопкой мыши
<VSX-1130> или <VSX-930> в папке
щелкните
View device webpage
‘
Network
‘
’.
затем
’,
Рабочее Окружение
•AVNavigator можно использовать в следующих средах.
–Windows: Microsoft
Windows
–Mac: OS X v 10.9 or 10.8
•Некоторые функции AVNavigator используют интернет-
браузер. Поддерживаются следующие браузеры:
–Windows: Internet Explorer
–Mac OS: Safari 6.0, 7.0
•В зависимости от настроек компьютерной сети или
настроек безопасности AVNavigator может не работать.
®
8/Windows® 8.1
®
Windows Vista®/Windows® 7/
®
8, 9, 10, 11
•Если ‘
Bonjour
‘
Include Bonjour in the Favorites bar
‘
Advanced
’ не отображается, установите флажок
’ на вкладке
’ в меню Safari ‘
Preferences...
’.
При использовании Windows PC
Запустите Internet Explorer на вашем
1
компьютере (откройте любую страницу в
Интернете).
Нажмите STATUS на пульте ДУ и проверьте
2
индикацию на дисплее на передней панели
ресивера (появится IP-адрес ресивера).
(Пример индикации на дисплее)
Если в качестве адреса отображается 0.0.0.0 или
169.254.112.202, это значит, что ресивер не подключен
к сети. Убедитесь, что ресивер и маршрутизатор
подсоединены друг к другу должным образом.
Об использовании Wiring Navi
Wiring Navi запускается при нажатии ‘
AVNavigator.
•По завершении навигации подключения перейдите к
Interactive Operation Guide
Wiring Navi
.
’ на экране
5
Page 66

Для выполнения подключения и начальных настроек следуйте инструкциям, приведенным в буклете
Подключение
Расположение громкоговорителей
– Передний левый громкоговоритель
L
– Центральный громкоговоритель
C
– Передний правый громкоговоритель
R
TMdL TMdR
– Левый громкоговоритель объемного
SL
звучания
– Правый громкоговоритель
SR
объемного звучания
– Задний левый громкоговоритель
SBL
объемного звучания
L
C
R
– Задний правый громкоговоритель
SBR
объемного звучания
SW
SRSL
TMdR
SW
TMdL
SBL
6
SBR
Примечания
•Существуют и другие схемы подключения громкоговорителей
(передние боковые и т. д.). Подробные сведения см. в разделе
«Подключение оборудования» инструкции по эксплуатации.
•Для воспроизведения Dolby Atmos необходимо подключить
громкоговоритель среднего верхнего канала, заднего канала
объемного звучания или переднего бокового канала.
•Звук будет подаваться из одного из верхних средних
громкоговорителей или одного из задних громкоговорителей
объемного звучания в зависимости от режима прослушивания
и т. д.
•Вместо верхнего среднего громкоговорителя можно
использовать громкоговоритель с поддержкой технологии
Dolby. Подробные сведения см. в инструкции по эксплуатации.
Верхний средний левый
–
Верхний средний правый
–
Низкочастотный громкоговоритель
–
Page 67

12 3
Подключение
Подключение громкоговорителей
Перед подключением этого блока к
1
источнику питания переменного тока
обязательно завершите все подключения.
Можно использовать громкоговорители с
2
номинальным полным сопротивлением от
6 Ω до 16 Ω.
Подключение громкоговорителей.
3
Подключение зачищенным проводом
Скрутите оголенные жилы провода.
1
Освободите терминал и вставьте оголенный провод.
2
Закрутите терминал.
3
10 mm
Передний правый
громкоговоритель
(R)
Низкочастотный
громкоговоритель
(SW)
LINE LEVEL
INPUT
AUDIO OUT
1
SUBWOOFER
PRE OUT
2
FRONT
RL
A
5.2ch
5.2.2ch
громкоговоритель
CENTER
Центральный
(C)
SURROUND
RL
7.2ch
SURROUND BACK
HDZONE / BI-AMP
(
Single
)
Передний левый
громкоговоритель
(L)
SPEAKER B
TOP MIDDLE
RLRL
B
5.2.2ch
Верхний
средний
правый
TMdR
(
)
ПРЕДУПРЕЖДЕНИЕ
Правый
громкоговоритель
объемного звучания
(SR)
громкоговоритель
объемного звучания
•Данные терминалы громкоговорителей содержат
Задний правый
(
)
SBR
Задний левый
громкоговоритель
объемного звучания
ОПАСНОЕ ДЛЯ ЖИЗНИ
Левый
громкоговоритель
объемного звучания
(SL)
(
)
SBL
напряжение. Во избежание риска электрошока
Верхний
средний
левый
TMdL
(
)
при подключении или отсоединении кабелей громкоговорителей, перед прикосновением к любым неизолированным частям,
отсоедините кабель питания.
7
Page 68

AC
A
Подключение
Подключение телевизора и компонентов воспроизведения
Подключение с помощью HDMI
Проигрыватель DVD,
HDD/DVD-рекордер
HDMI OUT HDMI OUT
NETWORK
CONTROL
IR
IN
OUT
ANTENNA
AM LOOP
FM UNBAL
75
VIDEO IN
COMPONENT VIDEO
ASSIGNABLE
VIDEO
DVD
SAT/
CBL
MONITOR OUT
Если кабель не
подключен, экран
настройки на
телевизоре не
отображается.
•Если телевизор поддерживает функцию Канала возврата аудиосигнала на HDMI, звучание телевизора поступает на ресивер через
терминал HDMI, поэтому нет необходимости подключать оптический цифровой кабель (
на
Setup
. Подробную информацию см. в разделе «HDMI Setup» инструкций по эксплуатации.
ON
•Указания по подключению и настройке телевизора, пожалуйста, смотрите в руководстве по эксплуатации к телевизору.
8
Проигрыватель/
рекордер дисков Blu-ray
HDMI
OUT
HDMI OUT
12
(SAT/CBL)
1
HDZONE/MAIN
P
R
P
B
Y
SELECTABLE
SAT/CBL
AUDIO IN
HDMI IN
MAIN
ARCCONTROL
AUDIO OUT
1
SUBWOOFER
PRE OUT
2
L
DVD
R
L
R
ASSIGNABLE
1
ANALOG
(CD)
Совместимый с HDMI/DVI телевизор
1
(
)(
DVD
BD IN
DVD IN
A
SAT/CBL IN
FRONT
RL
5.2.2ch
HDMI IN
SAT/CBL
5.2ch
CENTER
Спутниковая
приставка
HDMI OUT
ASSIGNABLE
4321
)
GAME IN
SURROUND
RL
Совместимые с HDMI/DVI компоненты
16-
6
/MHLBD
(
OUTPUT 5 V
)
0.9 A MAX
7.2ch
SURROUND BACK
(
Single
HDZONE / BI-AMP
OPTICAL
DIGITAL AUDIO OUT
). В таком случае установите
)
A
OPTICAL
IN1 (TV)
DIGITAL IN
(TV)
1
(
1
SAT/CBL
SPEAKER B
TOP MIDDLE
RLRL
5.2.2ch
Игровая консоль
OPTICAL
ASSIGNABLE
COAXIAL
)
ASSIGNABLE
B
ARC
в
HDMI
Подключение антенн
21
ANTENNA
AM LOOP
Рамочная
антенна АМ
Проволочная
антенна FM
FM UNBAL
75
Подключение ресивера к розетке
Подключайте ресивер к розетке только после подключения к
нему всех компонентов, в том числе и громкоговорителей.
ПРЕДУПРЕЖДЕНИЕ
•Держите сетевой шнур за вилку. Не вытаскивайте вилку,
взявшись за шнур, и никогда не касайтесь сетевого шнура, если
Ваши руки влажные, так как это может привести к короткому
замыканию или поражению электрическим током. Не ставьте
аппарат, предметы мебели и т.д. на сетевой шнур, не зажимайте
его. Не завязывайте узлов на шнуре и не связывайте его с
другими шнурами. Сетевые шнуры должны лежать так, чтобы
на них нельзя было наступить. Поврежденный сетевой шнур
может стать причиной возникновения пожара или поразить Вас
электрическим током. Время от времени проверяйте сетевой
шнур. В случае обнаружения повреждения обратитесь за
заменой в ближайший официальный сервисный центр фирмы
Pioneer или к Вашему дилеру.
•Если ресивер не используется постоянно (например, вы
уезжаете в отпуск), вытащите вилку кабеля питания из розетки.
П
1
одключите поставляемый кабель питания к
разъему AC IN на задней стороне ресивера.
П
2
одключите другой конец к розетке.
Page 69

Первоначальная настройка
Перед началом работы
Установите батарейки в пульт ДУ.
1
Включите ресивер и используемый телевизор.
2
STANDBY/ON
ALL ZONE STBY
SUB ZONE CONTROL
RECEIVER
MAIN
SOURCE CONTROL
Включите низкочатотный громкоговоритель
3
и поднимите уровень громкости.
ПРЕДУПРЕЖДЕНИЕ
•При установке батареек соблюдайте меры предосторожности,
чтобы не повредить пружины на терминалах батарейки
может привести к протеканию или перегреву.
SOURCE
Z2 Z3 HDZ
*
. Это
Автоматическая настройка объемного звучания (МСАСС)
Настройка Auto Multi-Channel ACoustic Calibration (MCACC)
с помощью поставляемого микрофона настройки измеряет
и анализирует тестовые тональные сигналы, выводимые
громкоговорителями.
Важное предупреждение
•Выполняйте измерения соблюдая тишину.
Подключите поставляемый микрофон
1
настройки.
•При использовании штатива и т. д. для микрофона
настройте высоту прослушивания.
Установочный
микрофон
Штатив
Нажмите кнопку MAIN RECEIVER на пульте
2
ДУ, а затем нажмите кнопку ENTER.
•Запускается автоматическое измерение.
•Измерение займет примерно от 3 до 12 минут.
Следуйте инструкциям, отображаемым на
3
экране.
•Автоматическая настройка завершается при отображении
экрана Home Menu.
HOME MENU
Bluetooth
•Если отображается
Network,
MCACC
Reverse Phase
громкоговорителя могли быть подключены наоборот (+ и –).
Проверьте подключения громкоговорителей.
Даже если подключения выполнены правильно, в
зависимости от громкоговорителей и окружающей среды
может отображаться
Reverse Phase
измерения, поэтому выберите
•Если отображается
, проверьте правильность
ERR
подключения громкоговорителя.
•Если питание выключается, см. раздел «Вопросы и ответы»
буклета.
Убедитесь, что микрофон настройки
4
отсоединен.
PRO
Go Next
Exit
System
Setup
, это значит, что провода
, это не влияет на
.
На телевизоре отображается экран
2a.Full Auto MCACC
Speaker System : 7.2ch/5.2.2ch
EQ Type : SYMMETRY
MCACC : M1.MEMORY 1
Dolby Enabled Speaker
SP to ceiling : – – –
Measurement Type : Expert
START
Exit
: NO
Full Auto MCACC
Return
.
9
Page 70

2
5
Основные операции воспроизведения
Включите компонент воспроизведения.
Многоканальное воспроизведение
STANDBY/ON
ALL ZONE STBY
SUB ZONE CONTROL
RECEIVER
MAIN
SOURCE CONTROL
DVDBD
USB ADPTROKU
BT
iPod
TV
TUNER
TV
INPUT
STATUS
AUDIO P. VIDEO P.
TOP
MENU
HOME
MENU
SOURCE
Z2 Z3 HDZ
HDMI
SAT
NET
MHL
ALL
CD
VOLUME
VOL
MUTE
OUT P.
TOOLS
MENU
ENTER
RETURN
1
Например, включите проигрыватель Blu-ray Disc,
подключенный к терминалу
Переключите вход на ресивере.
2
HDMI BD IN
Например, нажмите BD и выберите вход BD.
Нажимая AUTO, выберите ‹AUTO SURROUND›.
3
Также нажмите
SURR
или
для многоканального
ADV
воспроизведения. Выберите нужный режим прослушивания.
Запустите воспроизведение на компоненте
4
воспроизведения.
Например, запустите воспроизведение на проигрывателе
Blu-ray Disc.
С помощью VOLUME +/– отрегулируйте
5
уровень громкости.
•Если звук не выводится, увеличьте громкость до прибл. –30 дБ.
Примечания
•Если нет звука из центрального громкоговорителя, заднего
громкоговорителя или низкочастотного громкоговорителя,
.
Максимальное использование все-
возможных функций аппарата
Установите компакт-диск в компьютер и
найдите пункт «Инструкции по эксплуатации»
(PDF) в экранном меню, чтобы ознакомиться
с ней.
Примечания
• Данное устройство поддерживает AirPlay. Подробную
информацию см. в разделе «Использование AirPlay на iPod
touch, iPhone, iPad и iTunes» инструкций по эксплуатации и
на сайте Apple (http://www.apple.com).
• Программное обеспечение данного устройства можно
обновлять («Обновление программного обеспечения»
в инструкциях по эксплуатации). В Mac OS его можно
обновить с помощью Safari («Обновление встроенного
программного обеспечения с помощью Safari» в
инструкциях по эксплуатации).
см. раздел «Вопросы и ответы» буклета.
LISTENING MODE
3
SURRAUTO
MPX
PRESET TUNE
2
13
546
8
79
D.ACCESS
CLR
0
DIMMER SLEEP
CH LV.
ADV
BAND PTY
AUDIO
DISP
CH
CLASS
ENTER
CH
RCU SETUP
Fav
•Если пульт ДУ не работает, см. раздел «Вопросы и ответы»
буклета.
10
RECEIVER
Page 71

Вопросы и ответы
Нет звука из центрального или заднего громкоговорителя
Причина Решение
Для 2-канального
аудиовхода, например
телевизора, аудиоаппаратуры
и т. д., выбран режим
AUTO SURROUND (режим,
в котором выводится
количество каналов как есть).
Для воспроизведения стерео при многоканальном
прослушивании нажмите кнопку
необходимый режим.
Пример) Нажмите кнопку
STEREO
].
SURR
или
SURR
несколько раз и выберите [
Нет звука из низкочастного громкоговорителя
Причина Решение
Передний громкоговоритель
установлен на LARGE.
(При подаче 2-канального
аудиовхода, например,
от телевизора,
аудиоаппаратуры и
т. д. низкочастотная
составляющая будет
воспроизводиться
из переднего, а не
из низкочастотного
громкоговорителя.)
Чтобы воспроизведение шло из низкочастотного
громкоговорителя, измените настройки громкоговорителей. (Это
можно сделать двумя способами.)
Способ 1
Измените настройку переднего громкоговорителя на
SMALL.
• Низкочастотная составляющая будет воспроизводиться
из низкочастотного, а не из переднего громкоговорителя.
Не рекомендуем менять эту настройку, если передний
громкоговоритель хорошо воспроизводит низкие частоты.
Способ 2
Измените настройку низкочастотного
громкоговорителя на PLUS.
• Низкочастотная составляющая переднего громкоговорителя
будет воспроизводиться как из переднего, так и из
низкочастотного громкоговорителя. Следовательно, басы
могут быть слишком мощными. В этом случае рекомендуем не
изменять эту настройку или изменить ее Способом 1.
Порядок изменения настройки см. в разделе «Настройка
громкоговорителей» инструкции по эксплуатации на компакт-диске.
Функции HDMI, сети и т. д. не работают
Причина Решение
Функции ресивера и
подключенные устройства не
работают.
Попробуйте сбросить настройки. Чтобы сбросить настройки,
выключите питание и держите кнопку
передней панели нажатой в течение 5 секунд или больше.
(Питание будет выключено через 5 секунд после его
включения. Настройка ресивера будет сохранена.)
Также можно попробовать отключить и вновь подключить
кабель питания подключенных устройств.
STANDBY/ON
ADV
и выберите
EXT.
на
Вывод звука с телевизора
Порядок подключения и настройки см. на стр. 8 буклета.
Для воспроизведения нажмите кнопку TV, чтобы переключиться на вход от телевизора.
Пульт ДУ не работает
Причина Решение
Не выбран режим
управления от пульта ДУ.
При выполнении начальных настроек HOME MENU и
AUDIO PARAMETER и т. д., а также при выполнении
настроек повторного воспроизведения
• Перед началом работы нажмите кнопку
Использование сети и iPod
• Перед началом работы нажмите кнопку необходимой
функции (
• Если неисправность не устранена, сначала нажмите кнопку
MAIN RECEIVER
функции.
NET, iPod
и т. д.).
, а затем нажмите кнопку необходимой
MAIN RECEIVER
.
2 Телевизор (проектор) подключен, но изображение и звук иногда
прерываются или их нет
Причина Решение
Прерывание или отсутствие
изображения и звука могут
быть связаны с переходом
телевизора в режим
ожидания.
Нажмите кнопку
выхода HDMI, подключенного к телевизору. См. раздел
«Переключение выхода HDMI» инструкции по эксплуатации на
компакт-диске.
OUT P.
и кнопку
и отмените выбор
/
Питание внезапно выключается и мигает индикатор WIRELESS
Причина Решение
Провод кабеля
громкоговорителя
касается задней панели
или положительный и
отрицательный провод
соприкасаются между собой,
что вызывает срабатывание
схемы защиты.
Скрутите конец провода кабеля громкоговорителя еще
раз и подключите его так, чтобы он не выглядывал из
терминала громкоговорителя на усилителе или на стороне
громкоговорителя.
11
Page 72

Дополнительная информация
Устранение неполадок
Неправильные действия пользователя зачастую принимают за сбои и неполадки. Если вы
считаете, что в компоненте возникли неисправности, проверьте пункты, перечисленные в
Инструкциях по эксплуатации на диске CD-ROM, входящем в комплект поставки. Иногда
причиной неисправности может быть другой компонент. Внимательно проверьте остальные
используемые компоненты и электроприборы. Если неполадку не удается устранить даже после
выполнения указанных ниже действий, обратитесь в ближайшую независимую сервисную
компанию, уполномоченную компанией Pioneer для выполнения ремонта.
•В случае некорректной работы аппарата, вызванной внешними источниками, например
статическим электричеством, выньте вилку из розетки и подключите ее снова, чтобы
восстановить нормальные условия эксплуатации.
Если не удается устранить неисправность после выполнения шагов ниже, если экран внезапно
застывает или перестают полностью работать кнопки на пульте ДУ или передней панели,
выполните следующее:
•Нажмите
питание.
Если это не решило проблему, то снова отключите питание затем нажмите и удерживайте
нажатой кнопку
включается, затем отключается через 5 секунд.)
•Если невозможно отключить питание, нажмите и удерживайте
панели на более чем 5 секунд. Питание будет отключено. В таком случае могут быть удалены
различные настройки, произведенные на ресивере. (Однако настройки, выполненные тогда,
когда питание было отключено как обычно не удаляются.)
STANDBY/ON
STANDBY/ON
на передней панели и отключите питание, затем снова включите
на передней панели как минимум 5 секунд. (Питание
STANDBY/ON
на передней
12
Page 73

Технические характеристики
Раздел аудио
Номинальная выходная мощность (1 кГц, 6 Ω, 1 %)
Передний, центральный, объемного звучания, задний объемного звучания ............ 150 Ватт на канал
Номинальная выходная мощность (20 Гц до 20 кГц, 8 Ω, 0,09 %)
Передний, центральный, объемного звучания, задний объемного звучания ............ 105 Ватт на канал
У модели для Океании
Передний, центральный, объемного звучания, задний объемного звучания ............ 160 Ватт на канал
Полный коэффициент гармонических искажений ................. 0,06 % (от 20 Гц до 20 кГц, 50 Ватт/канал, 8 Ω)
Гарантированное сопротивление громкоговорителей .................................................................. 6 Ω до 16 Ω
Соотношение сигнал-шум (IHF, короткозамкнутый, сеть A)
LINE .................................................................................................................................................... 101 дБ
Частотная характеристика......................................................... 5 Гц до 100 000 Гц дБ (Режим Pure Direct)
Вход (Чувствительность/Сопротивление)
LINE ......................................................................................................................................... 315 мВ/47 кΩ
Раздел тюнера
Частотый диапазон (FM) ...................................................................................................87,5 МГц до 108 МГц
Вход антенны (FM) .................................................................................................. 75 Ω несбалансированный
Частотный диапазон (AM) ..................................................................................................531 кГц до 1 602 кГц
Антенна (AM) ......................................................................................Рамочная антенна (сбалансированная)
Раздел видео
Уровень сигнала
Композитное видео .................................................................................................................1 Vp-p (75 Ω)
Компонентный видеосигнал ..................................................... Y: 1,0 Vp-p (75 Ω), PB/PR: 0,7 Vp-p (75 Ω)
Соответствующее максимальное разрешение
Компонентный видеосигнал ................................................................................................. 1080p (1125p)
Раздел Bluetooth
Версия...........................................................................................Спецификация
Выход ...................................................................................................................... Стандарт
Приблизительная дальность передачи по линии прямой видимости* ................................... Примерно 10 м
* Дальность передачи по линии прямой видимости указана приблизительно. Реальные поддерживаемые
расстояния передачи могут различаться в зависимости от условий окружающей среды.
Диапазон частот .......................................................................................................................................2,4 ГГц
Поддержка профилей
Поддержка кодеков ................................................................................................SBC (Subband Codec), AAC
Раздел цифрового входа/выхода
Терминал HDMI .............................................................................................................19-контактный (Не DVI)
Выход HDMI ........................................................................................................................................ 5 В, 55 мА
Вход HDMI/терминал MHL ............................................................................................................... 5 В, 900 мА
Терминал USB ..........................................................................................USB2.0 High Speed (Type A) 5 В, 1 A
Разъем для iPod ...........................................................................................................................................USB
Раздел интегрированного управления
Терминал управления (IR) ......................................................................................... ø 3,5 мини-джек (MONO)
Сигнал IR ......................................................................................................... (Максимальный уровень: 2,0 В)
Раздел сети (проводная)
Терминал LAN ............................................................................................................ 10 BASE-T/100 BASE-TX
: Максимальная выходная мощность (1 кГц, 6 Ω, 10 %)
Bluetooth
.................................................................................................. A2DP, AVRCP
Bluetooth
версии. 2.1 + EDR
Bluetooth
класс 2
Раздел сети (беспроводная)
Стандарты WLAN ..................................................IEEE 802.11a, IEEE 802.11b, IEEE 802.11g, IEEE 802.11n
Диапазон частот
Диапазон 2,4 ГГц (от 2,412 ГГц до 2,472 ГГц) ............................................................... Канал 1–Канал 13
Диапазон 5 ГГц (от 5,180 ГГц до 5,240 ГГц) ................................................................ Канал 36–Канал 48
Защита ............................................................................................................... Отключена (без шифрования)
Смешанный WPA2 (WPA/WPA2, способ шифрования: TKIP/AES, способ распознавания: PSK)
WEP (длина ключа: 64 разряда/128 разрядов; формат ключа: ASCII/Hex)
Остальное
Требования к питанию ........................................................ от 220 В до 230 В переменного тока, 50 Гц/60 Гц
Энергопотребление ................................................................................................................................. 550 Вт
В режиме ожидания .........................................................................................................................0,1 Ватт
В режиме ожидания (управление HDMI включено) .......................................................................... 0,3 Вт
В режиме ожидания (сеть включена) ................................................................................................ 2,7 Вт
В режиме ожидания (беспроводная сеть подключена) .................................................................... 3,0 Вт
В режиме ожидания (управление HDMI включено, сеть включена) ................................................ 2,7 Вт
В режиме ожидания (управление HDMI включено, сеть включена, беспроводная сеть подключена)
............................................................................................................................................................. 3,0 Вт
Автоматическое отключение питания..................................15 мин. (по умолчанию), 30 мин., 60 мин., выкл.
Габариты ................................................................................................. 435 мм (Ш) x 168 мм (В) x 363 мм (Г)
Вес (без упаковки)
VSX-1130 .............................................................................................................................................10,2 кг
VSX-930 .................................................................................................................................................9,8 кг
Комплектация
Микрофон настройки MCACC .......................................................................................................................... 1
Пульт ДУ ............................................................................................................................................................ 1
Сухие батарейки IEC R03 размера ААА .......................................................................................................... 2
Рамочная антенна АМ ...................................................................................................................................... 1
Проволочная антенна FM ................................................................................................................................. 1
CD-ROM
Краткое руководство пользователя
Брошюра по безопасности
Гарантийный талон
Примечания
! Данные технические характеристики применимы при электропитании 230 В.
! В связи с усовершенствованиями технические характеристики и конструкция могут изменяться без
предварительного уведомления.
PIONEER HOME ELECTRONICS CORPORATION, 2015.
©
Все права защищены.
13
Page 74

Дату изготовления оборудования можно определить по серийному номеру, который содержит информацию о
меся
D3-7-10-7_A1_Ru
це и годе производства.
Серийный номер
12 цифр
2 цифры
10 цифр
P1 P2
Дата изготовления оборудования
P1 - Год изготовления
Год 2001A2002B2003C2004D2005E2006F2007G2008H2009I2010
Символ
Год 2011K2012L2013M2014N2015O2016P2017Q2018R2019S2020
Символ
P2 - Месяц изготовления
Месяц 1
Символ
A
2
B
3
C
4
D
5
E
6
F
J
T
7
G
8
H
9
10
I
11
J
12
K
L
14
Page 75

Português:
Slovenščina:
English:
Suomi:
Nederlands:
Français:
Svenska:
n
Declaration of Conformity with regard to the R&TTE Directive 1999/5/EC
Manufacturer:
PIONEER HOME ELECTRONICS
CORPORATION
1-1, Shin-ogura, Saiwai-ku,
Kawasaki-shi, Kanagawa
EU Representative’s:
Pioneer Europe NV
Haven 1087, Keetberglaan 1,
9120 Melsele, Belgium
http://www.pioneer.eu
212-0031, Japan
[*] VSX-1130-K,
VSX-930-K, VSX-930-S
Indoor use only
Utiliser à I’intérieur seulement
Nur für Betrieb in geschlossenen Räumen
Uso solo al coperto
Alleen voor gebruik binnenshuis
Sólo para empleo en interiores
Эксплуатировать только в помещениях
Dansk:
Hereby, Pioneer, declares that this [*] is
in compliance with the essential
requirements and other relevant
provisions of Directive 1999/5/EC.
Undertegnede Pioneer erklærer
herved, at følgende udstyr [*]
overholder de væsentlige krav og
øvrige relevante krav i direktiv 1999/5/EF
Deutsch:
Pioneer vakuuttaa täten että [*]
tyyppinen laite on direktiivin 1999/5/EY
oleellisten vaatimusten ja sitä
koskevien direktiivin muiden ehtojen
mukainen.
Hiermit erklärt Pioneer, dass sich
dieses [*] in Übereinstimmung mit den
grundlegenden Anforderungen und den
anderen relevanten Vorschriften der
Richtlinie 1999/5/EG befindet". (BMWi)
Ελληνικά:
Hierbij verklaart Pioneer dat het toestel
[*] in overeenstemming is met de
essentiële eisen en de andere
relevante bepalingen van richtlijn
1999/5/EG
ΜΕ ΤΗΝ ΠΑΡΟΥΣΑ Pioneer ΔΗΛΩΝΕΙ
[*] ΣΥΜΜΟΡΦΩΝΕΤΑΙ ΠΡΟΣ ΤΙΣ
ΟΤΙ
ΟΥΣΙΩΔΕΙΣ ΑΠΑΙΤΗΣΕΙΣ ΚΑΙ ΤΙΣ
ΛΟΙΠΕΣ ΣΧΕΤΙΚΕΣ ΔΙΑΤΑΞΕΙΣ ΤΗΣ
ΟΔΗΓΙΑΣ 1999/5/ΕΚ
Italiano:
Par la présente Pioneer déclare que
l’appareil [*] est conforme aux
exigences essentielles et aux autres
dispositions pertinentes de la directive
1999/5/CE
Con la presente Pioneer dichiara che
questo [*] è conforme ai requisiti
essenziali ed alle altre disposizioni
pertinenti stabilite dalla direttiva
1999/5/CE.
Español:
Härmed intygar Pioneer att denna [*]
står I överensstämmelse med de
väsentliga egenskapskrav och övriga
relevanta bestämmelser som framgår
av direktiv 1999/5/EG.
Por medio de la presente Pioneer
declara que el [*] cumple con los
requisitos esenciales y cualesquiera
otras disposiciones aplicables o
exigibles de la Directiva 1999/5/CE
Pioneer declara que este [*] está
conforme os requisitos essenciais e
outras disposições da Directiva
1999/5/CE.
Čeština:
Pioneer tímto prohlašuje, že tento [*] je
ve shodě se základními požadavky a
dalšími příslušnými ustanoveními
směrnice 1999/5/ES
Eesti:
Käesolevaga kinnitab Pioneer seadme
[*] vastavust direktiivi 1999/5/EÜ
põhinõuetele ja nimetatud direktiivist
tulenevatele teistele asjakohastele
sätetele.
Magyar:
Alulírott, Pioneer nyilatkozom, hogy a
[*] megfelel a vonatkozó alapvetõ
követelményeknek és az 1999/5/EC
irányelv egyéb elõírásainak.
Latviešu valoda:
Ar šo Pioneer deklarē, ka [*] atbilst
Direktīvas 1999/5/EK būtiskajām
prasībām un citiem ar to saistītajiem
noteikumiem.
Lietuvių kalba:
Šiuo Pioneer deklaruoja, kad šis [*]
atitinka esminius
reikalavimus ir kitas 1999/5/EB
Direktyvos nuostatas.
Malti:
Hawnhekk, Pioneer jiddikjara li dan [*]
jikkonforma mal-ħtiġijiet essenzjali u ma
provvedimenti oħrajn
fid-Dirrettiva 1999/5/EC
relevanti li hemm
Slovenčina:
Pioneer týmto vyhlasuje, že [*] spĺňa
základné požiadavky a všetky príslušné
ustanovenia Smernice
1999/5/ES.
Pioneer izjavlja, da je ta [*] v skladu z
bistvenimi zahtevami in ostalimi
relevantnimi določili direktive
1999/5/ES.
Română:
Prin prezenta, Pioneer declara ca acest
[*] este in conformitate cu cerintele
esentiale si alte prevederi ale Directivei
1999/5/EU.
български:
С настоящето, Pioneer декларира, че
този [*] отговаря на основните
изисквания и други съответни
постановления на Директива
1999/5/EC.
Polski:
Niniejszym Pioneer oświadcza, że
[*] jest zgodny z zasadniczymi wymogami oraz pozostałymi stosownymi
postanowieniami
Dyrektywy 1999/5/EC
Norsk:
Pioneer erklærer herved at utstyret [*]
er i samsvar med de grunnleggende
krav og øvrige relevante krav i direktiv
1999/5/EF.
Íslenska:
Hér með lýsir Pioneer yfir því að
[*] er í samræmi við
grunnkröfur og aðrar kröfur, sem gerðar
eru í tilskipun 1999/5/EC
Hrvatski:
Ovime tvrtka Pioneer izjavljuje da je
ovaj [*] u skladu osnovnim zahtjevima i
ostalim odredbama Direktive
1999/5/EC.
R-TTE-24L_C2_E
15
Page 76

Примечание:
В соответствии со статьей 5 Закона Российской Федерации “О защите прав
потребителя” и Указанием Правительства Российской Федерации № 720 от 16
июня 1997 года корпорация Pioneer Europe NV устанавливает условие на
следующую продолжительность срока службы официально поставляемых на
Российский рынок товаров.
Аудио и видеооборудование: 7 лет
Переносное аудиооборудование: 6 лет
Другое оборудование (наушники, микрофон и т.д.): 5 лет
Автомобильная электроника: 6 лет
D3-7-10-6_A1_Ru
Website for downloading AVNavigator for Mac:
Site pour télécharger l’AVNavigator pour Mac :
Website zum Herunterladen von AVNavigator für Mac:
Sito Web per scaricare AVNavigator per Mac:
Website voor downloaden van AVNavigator voor Mac:
Sitio web para descargar el AVNavigator para Mac:
Вебсайт для загрузки AVNavigator для Mac:
http://www.pioneer.eu/uk (for U.K.)
http://www.pioneer.com.sg (for Southeast Asia)
http://www.pioneer.com.au (for Australia)
http://www.pioneernz.co.nz (for New Zealand)
http://www.pioneer-mea.com (for the Middle East and Africa)
http://www.pioneerisrael.co.il (for Israel)
http://www.pioneer.eu/eur (for Europe)
PIONEER HOME ELECTRONICS CORPORATION
1-1, Shin-ogura, Saiwai-ku, Kawasaki-shi, Kanagawa 212-0031, Japan
Корпорация Пайонир Хоум Электроникс
1-1, Син-Огура, Сайвай-ку, г. Кавасаки, префектура Канагава, 212-0031, Япония
Импортер: ООО "ПИОНЕР РУС"
125040, Россия, г. Москва, ул. Правды, д.26 Тел.: +7(495) 956-89-01
PIONEER ELECTRONICS (USA) INC.
P. O. BOX 1540, Long Beach, California 90801-1540, U.S.A. TEL: (800) 421-1404
PIONEER ELECTRONICS OF CANADA, INC.
340 Ferrier Street, Unit 2, Markham, Ontario L3R 2Z5, Canada TEL: 1-877-283-5901, 905-479-4411
PIONEER EUROPE NV
Haven 1087, Keetberglaan 1, B-9120 Melsele, Belgium TEL: 03/570.05.11
PIONEER ELECTRONICS ASIACENTRE PTE. LT D.
253 Alexandra Road, #04-01, Singapore 159936 TEL: 65-6472-7555
PIONEER ELECTRONICS AUSTRALIA PTY. LTD.
5 Arco Lane, Heatherton, Victoria, 3202, Australia, TEL: (03) 9586-6300
PIONEER ELECTRONICS DE MEXICO S.A. DE C.V.
Blvd.Manuel Avila Camacho 138 10 piso Col.Lomas de Chapultepec, Mexico, D.F. 11000 TEL: 55-9178-4270
K002*_B5_Ru
http://www.pioneer-rus.ru
http://www.pioneer.eu
© 2015 PIONEER HOME ELECTRONICS CORPORATION.
All rights reserved.
<5707-00000-994-0S>
© 2015 PIONEER HOME ELECTRONICS CORPORATION.
Tous droits de reproduction et de traduction réservés.
Printed in Vietnam / Imprimé au VietnamСделано во Вьетнаме
 Loading...