

Page 1

Be sure to read Important Information for the User first!
Important Information for the User includes the important information that you
must understand before using this product.
AVIC-Z920DAB
AVIC-Z820DAB
AVIC-Z720DAB
AVIC-Z620BT
AVIC-Z7210DAB
AVIC-Z6210BT
NAVIGATION AV SYSTEM
Operation Manual
English
Page 2
English
Important
Contents
Thank you for buying this Pioneer
product.
Please read through these instructions
so you will know how to operate your
model properly. After you have finished
reading the instructions, keep this
document in a safe place for future
reference .
The screen shown in the examples may
differ from actual screens, which may be
changed without notice for
performance and function
improvements.
■Precaution ......................... 5
Notes on internal memor y.......................... .............. 5
About this man ual...... ............................. .................... 5
■Parts and controls ............. 6
Main unit ..................... ................................ .................... 6
Protecting your produc t against theft............ ...... 7
■Basic operation ................. 9
Notes on using the LCD panel ................... .............. 9
Adjusting the LCD pane l angle ......................... ...... 9
Resetting the mic roprocessor .......... ....................... 9
Remote control ................. ................................ .......... 10
Starting up the uni t............... ................................ .... 10
Starting up the navi gation system ..................... . 11
Using the touch panel ................... ........................... 12
Top menu screen...... ................................ .................. 15
■Navigation ....................... 17
Menu screen view and operations ....................... 17
Map Screen.. ................................ ................................ . 18
Searching for a destination. ................................ .... 24
Starting the navigat ion.............. .............................. 32
Checking and modifying t he current route..... . 32
Storing a location in [Saved Loc ation] ................ 38
Storing a route in [Saved Routes] ..... ................... 40
Receiving real-time traffic information
(TMC) ....................... ................................ ................ 41
Checking useful information about your
trip ............................... ................................ ............. 44
Navigation Settin gs ............................ ...................... 49
Updating the map .............. ............................. .......... 60
■Bluetooth ......................... 61
Bluetooth connec tion.......... ............................. ....... 61
Bluetooth setting s................. ............................. ....... 61
Hands-free phoning ............................... ................... 62
Bluetooth audio ...... ............................. ...................... 67
■Wi-Fi.................................. 69
Wi-Fi connection ....................... ............................... .. 69
Wi-Fi settings ........................... ................................ .... 69
Wi-Fi audio ................... ................................ ................ 70
■AV source ......................... 71
Supported AV source......... ................................ ....... 71
Displaying the AV operation sc reen.................... 71
Selecting a source ..... ................................ ................ 72
Changing the display order of s ource ................ 72
Adjusting the range of favourite source icons
area .................... ................................ ...................... 73
■Setup for iPod/iPhone or
smartphone..................... 74
iPod/iPhone .................... ................................ ............. 74
Smartphone (Andro id™ device) .................... ....... 75
■Digital Radio.................... 76
Digital Radio tuner ope rations.......................... .... 76
Starting procedu re................ ............................. ....... 76
Basic operation .......................... ............................... .. 77
DAB settings ................... ................................ ............. 78
■Radio ................................ 80
Starting procedu re................ ............................. ....... 80
Basic operation .......................... ............................... .. 80
Storing the strongest broadcast frequencies
(BSM) ................. ................................ ...................... 81
- 2 -
Page 3

English
Radio settings .................. ............................. ............... 81
■Disc................................... 83
Inserting and eje cting a disc............. ..................... 83
Basic operation ......... ................................ .................. 84
■Compressed files ............. 88
Inserting and eje cting media..................... ............ 88
Starting procedure ........ ................................ ............ 90
Basic operation ......... ................................ .................. 91
■iPod .................................. 96
Connecting your iPod ................................ ............... 96
Basic operation ......... ................................ .................. 96
■WebLink™ ...................... 100
Using WebLink .................. ................................ ....... 100
Starting procedure ........ ................................ ......... 1 00
Using the audio mix funct ion........... .................. 102
■Apple CarPlay................ 103
Using Apple CarPlay .......................... ..................... 103
Setting the driving position ................. ............... 103
Starting procedure ........ ................................ ......... 1 04
Adjusting the volume ....................... ..................... 105
■Android Auto™ .............. 106
Using Android Auto.... ................................ ............ 106
Setting the driving position ................. ............... 106
Starting procedure ........ ................................ ......... 1 07
Adjusting the volume ....................... ..................... 108
Setting the auto-l aunch function............... ....... 108
■HDMI .............................. 110
Starting procedure ........ ................................ ......... 1 10
Basic operation ......... ................................ ............... 110
■AUX ................................ 111
Starting procedure ........ ................................ ......... 1 11
Basic operation ......... ................................ ............... 112
■AV input......................... 113
Starting procedure ........ ................................ ......... 1 13
Basic operation ......... ................................ ............... 114
■Wireless Mirroring ........ 115
Starting procedure ........ ................................ ......... 1 15
Basic operation ......... ................................ ............... 116
■Vehicle equipment
information.................... 117
Using the Vehicle Bus adapter .............. .............. 117
Displaying obstacle detection information ... 118
Displaying the operating status of the climate
control panel ........... ............................. .............. 118
■Settings .......................... 119
Displaying the s etting screen.......... .................... 119
System settings .......... ................................ .............. 119
Theme settings ....................... ................................ .. 129
Audio settings ...................... ............................. ........ 132
Video settings ............. ................................ .............. 138
■Favourite menu ............. 142
Creating a shortcut ...... ................................ ........... 142
Selecting a shor tcut................. ............................... 142
Removing a shortcut ............... ............................... 142
■Other functions ............. 143
Setting the time and date ............................. ........ 143
Changing the wide screen mode ....................... 143
Selecting th e video for the rear display ........... 144
Setting the anti-thef t function................. ........... 145
Restoring this product to the default
settings ................... ............................. ................. 146
■Appendix ....................... 147
Troubleshooting......... ................................ .............. 147
Error messages... ............................. .......................... 149
Positioning technology .......... ............................... 153
Handling large errors ..... ................................ ........ 155
Route setting info rmation....... ............................. 159
Handling and care of discs ............ ....................... 160
Playable discs .............. ............................. ................. 1 60
Detailed information for playable media ........ 161
Bluetooth ............................ ................................ ........ 166
Wi-Fi...... ................................ ................................ ........ 166
SDXC..... ................................ ................................ ........ 166
WMA/WMV....... ................................ .......................... 167
FLAC............ ................................ ................................ .. 167
DivX ............... ................................ ............................... 167
AAC ........................ ................................ ....................... 1 67
WebLink .................. ................................ .................... 168
Waze ............................ ................................ ................. 168
Google™, Google Play, Android ..................... ..... 168
- 3 -
Page 4

English
Android Auto ..................... ................................ ....... 168
Detailed information regarding connected iPod
devices ............... ................................ .................. 168
Using app-based connected content .............. 169
HDMI ................................ ................................ ............ 170
IVONA Text-to-Speech.. ............................. ............ 170
Notice regarding video view ing ....................... . 170
Notice regarding DVD-Video vie wing. ............ 1 70
Notice regarding MP3 file usage ..... .................. 170
Notice regarding open so urce licenses........... 170
Map coverage ................................ ........................... 171
Using the LCD screen correctl y........ .................. 171
Specifications.... ................................ ........................ 172
- 4 -
Page 5
English
Precaution
Z000DAB
Notes on internal memory
• If the battery is disconnected or discharged, the memory will be erased and must be
reprogrammed.
• The information will be erased by disconnecting the yellow lead from the battery (or
removing the battery itself ).
• Some of the settings and recorded contents will not be reset.
About this manual
This manual uses diagrams of actual screens to describe operations. However, the
screens on some units may not match those shown in this manual depending on the
model used.
Meanings of symbols used in this manual
This indicates model names that are supported by the described operations.
This indicates to touch the appropriate soft key on the touch sc reen.
This indicates to touch and hold the appropr iate soft key on the touch s creen.
- 5 -
Page 6
English
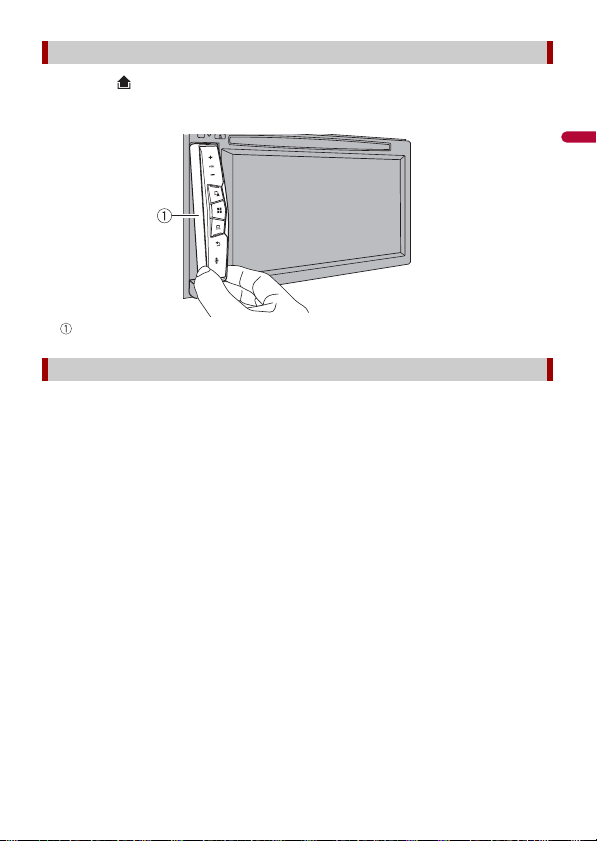
Parts and controls
Main unit
Z920DAB Z820DAB
Z720DAB Z620BT Z7210DAB Z6210BT
- 6 -
Page 7
English
CAUTION
LCD screen
NOTE
VOL (+/-)
RESET Press to reset the microprocessor (page 9).
SD card slot Refer to Inserting and ejecting an SD memory card (page 88).
Auto EQ
microphone
input ja ck
Disc-loading
slot
Detachable facepla te
Press to switch between the Application screen and the AV operation screen.
Press and hold to switch to the camera view mode.
To activate the camera view mode with this button, set [Back Camera Input] to
[On] or [AV Input] to [Camera] (page 120).
Press to display the top menu screen.
Press and hold to power off. To power back on, press any button.
Press to display the menu bar (page 13).
Press and hold to mute or unmute.
Press to display the top menu screen or back to previous screen.
Press and hold to turn off the display.
Press to activate the voice recognition mode with a connected iPhone or
smartp hone.
Press and hold to display the connectable device list screen or device search
screen.
Use to connect a microphone for acoustical measurement (sold separately).
Refer to Inserting and ejecting a disc (page 83).
Press to remove the detachable faceplate from this product.
Protecting your product against theft
Z720DAB Z620BT Z7210DAB Z6210BT
• Do not expose the detachable faceplate to excessive shock or disassemble it.
• Never grip the buttons tightly or use force when removing or attaching t he detachable faceplate.
• Keep the detachable faceplate out of reach of small children to prevent them from placing it in their
mouths.
• After removing the detachable faceplate, keep it in a safe place so it is not scratched or damaged.
• Do not exp ose the detachable faceplate to direct sunlight and high temperatures.
• When removing or atta ching the detachable facepl ate, do so after turning off the igni tion switch
(ACC OFF).
- 7 -
Page 8
English
Removing the detachable faceplate
1 Press the button.
2 Gently grip the bottom of the detachable faceplate and slowly pull it outward.
Detachable faceplate
Attaching the detachable faceplate
1 Slide the detachable faceplate all the way into this product.
2 Push the lower part of the detachable faceplate until you hear a click.
- 8 -
Page 9
English
WAR NIN G
CAUTION
CAUTION
Basic operation
Z920DAB
Z820DAB
Notes on using the LCD panel
Z920DAB Z820DAB
• Keep hands and fingers clear of this product when opening, closing, or adjusting the LCD panel. Be
especially cauti ous of children’s hands and fingers.
• Do not use with the LCD panel left open. It may result in injury in the event of an accident.
• Do not open or close the LCD panel forcefully. It may cause a malfunction.
• Do not operate this product until th e LC D panel has completely opened or closed . If this product i s
operated while the LCD panel is opening or closing, the LCD panel may stop at that angle for safety.
• Do not place glass or can on the open LCD panel.
Adjusting the LCD panel angle
1 Press .
2 Touch or to adjust the angle of the LCD panel.
3 Touch .
Returns to the previous screen.
Resetting the microprocessor
• Pressing the RESET button resets settings and recorded contents to the factory settings.
– Do not perform this operation when a device is connected to this product.
– Some of the settings and recorded contents will not be reset.
• The microprocessor must be reset under the following conditions:
– Prior to using this product for the first time after installation.
– If this product fails to ope rate properly.
– If there appe ars to be problems with the operation of the system.
– If your vehicle position is shown on the map with a significant positioning error.
1 Turn the ignition switch OFF.
2 Press RESET with a pen tip or other pointed tools.
- 9 -
Page 10
English
Settings and recorded contents are reset to the factory settings.
NOTES
WAR NIN G
Remote control
The remote control CD-R33 is sold separately. For details concerning operations, see the
remote control manual.
Starting up the unit
1 Start the engine to boot up the system.
The [Select Program Language] screen appears.
• From the second time on, the screen shown will differ depending on the previous conditions.
• From the second time on, enter the password for the anti-theft function if the password entry
screen appears.
2 Touch the language.
3 Touch .
The [Speaker Mode Settings] screen appears.
4 Touch the speaker modes.
[Standard Mode]
4-speaker system with front and rear speakers, or a 6-speaker system with front and
rear speakers and subwoofers.
[Network Mode]
3-way system with a high range speaker, middle range speaker and subwoofer (low
range speaker) for reproduction of high, middle and low frequencies (bands).
Do not use the unit in Standard Mode when a speaker system for 3-way Network Mode is
connected to th e unit. This may cause damage to the speakers.
5 Touch .
Z920DAB Z820DAB Z720DAB
The [DAB ANTENNA POWER SETTING] screen appears.
Z620BT
Z6210BT
Initial Legal Disclaimer screen appears. Skip to step 7.
Z7210DAB
6 Touch [Yes] then [OK] to use the DAB aerial power (page 79).
Initial Legal Disclaimer screen appears.
7 Touch [OK].
- 10 -
Page 11
English
The top menu screen appears.
NOTE
TIP
Once the speaker mode is set, the setting cannot be changed unless this product is restored to the
default settin gs. Restore the default settings to ch ange the speaker mode setting (page 146).
Switching the speaker mode
To change the speaker mode, you need to restore this product to the default settings.
1 Restore the default setting (page 146).
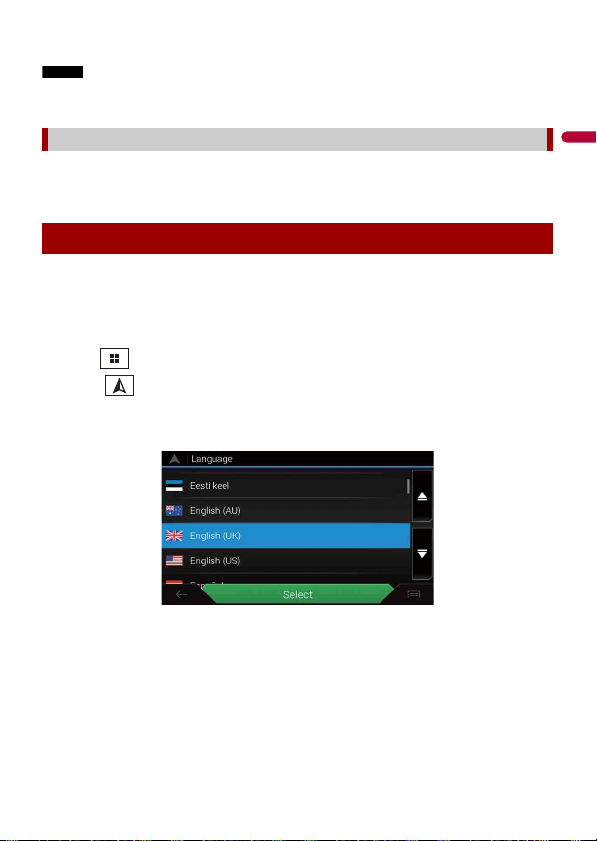
Starting up the navigation system
When you use the navigation function for the first time, an initial setup process starts
automatically. Follow the steps below.
You can change the language later using [Regional] in the [Settings] screen. Other settings can be
restarted late r using [Start Configuration Wizard] in the [Sett ings] screen.
1 Press .
2 Touch .
3 Touch the language that you want to use on the navigation screen, then touch
[Select].
4 Read the terms carefully, check the details, and then touch [Accept] if you agree
to the conditions.
5 Touch [Next].
6 Touch the language that you want to use for voice guidance messages, then
touch [Next].
7 If needed, modify the unit settings, then touch [Next].
- 11 -
Page 12
English
8 If needed, modify the default route planning options, then touch [Next].
NOTE
NOTE
9 Touch [Finish].
Using the touch panel
You can operate this product by touching the keys on the screen directly with your
fingers.
To protect the LCD screen from damage, be sure to touch the screen only with your finger gently.
Common touch panel keys
: Returns to the previous screen.
: Close the screen.
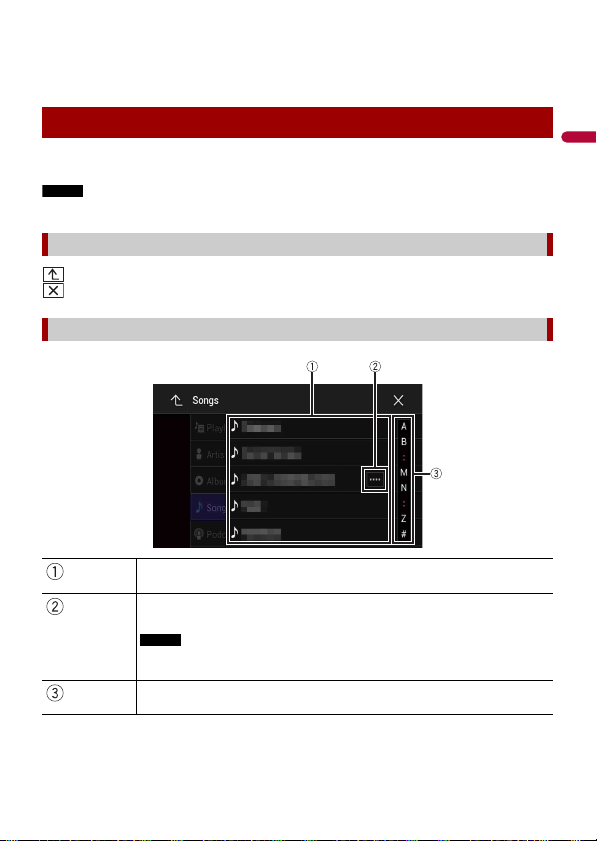
Operating list screens
Touching an item on the list allows you to narrow down the options and
proceed to the next operation.
Appears when all characters are not displayed on the display area.
If you touch the key, the rests are scrolled for display.
This function is available only when you stop your vehicle in a safe place and apply
the handbrake.
Appears when items cannot be displayed on a single page.
Drag the side bar, the initial search bar or the list to view any hidden items.
- 12 -
Page 13
English
NOTE
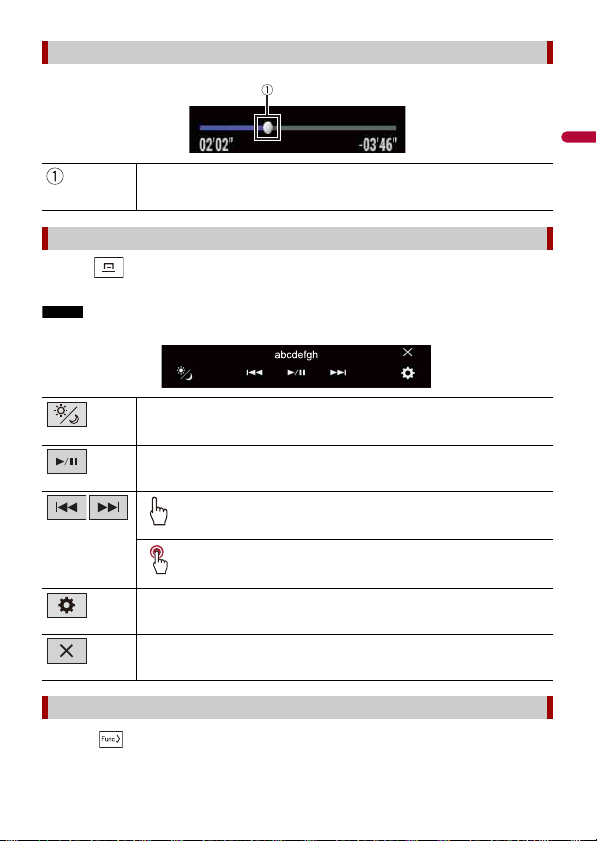
Operating the time bar
You can change the playback point by dragging the key.
The playback time co rresponding to the position of the key is displayed while
dragging the key.
Operating the menu bar
1
Press .
The menu bar pops up on the screen.
The menu bar availability may vary depending on the activating source.
Switches the dimmer duration by day or night.
Switches between playback an d pause.
Skips files forwards or backwards.
Performs fast reverse or fast forwards.
Displays setting menu screen (page 119).
Closes the menu bar.
Switching the operation panel
1 Touch .
- 13 -
Page 14

English
The hidden function keys appear.
NOTE
This key does not appear for some AV sources.
Operating the on-screen keyboard
Displays the characte rs that are entered.
Moves the cursor to the ri ght or left for a number of characte rs equivalent to the
number of touches.
Enters the characters in the text box.
Deletes the input tex t to the left of the cursor one l etter at a time.
Touching and holding the key deletes the letters to the left of the cursor in rapid
succession.
Confirms the entry and proceeds to the next step.
Enters a space.
Switches between alph abet and numbers/symbols.
Switches between capital and lower case letters.
- 14 -
Page 15
English
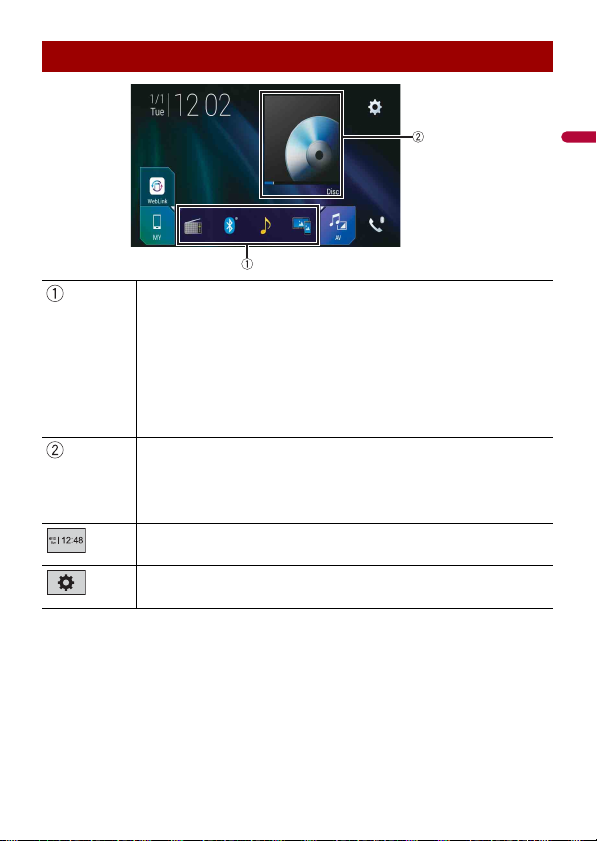
Top me n u scre en
TIPS
TIP
Favourite source icons
• When you connect the external navigation system to this unit, the navigation
mode key is displayed at the middle of the right side of the display.
• If you select [Power OFF], you can turn off almost all functions. The [Power OFF]
mode is released in the following cases.
– An incoming call is received (only for hands-free phoning via Bluetooth).
– A rear view camera image is input when the vehicle is in reverse.
– A button on this unit is pressed.
– The ignition switch is turned off (ACC OFF), then turned on (ACC ON).
AV/Device source operation key.
Displays the current source.
When the last source is displayed behind the key, you can switch the source by
touching the key.
Setting the time and date (page 143)
Settings (page 119) and Favourite menu (page 142)
- 15 -
Page 16
English
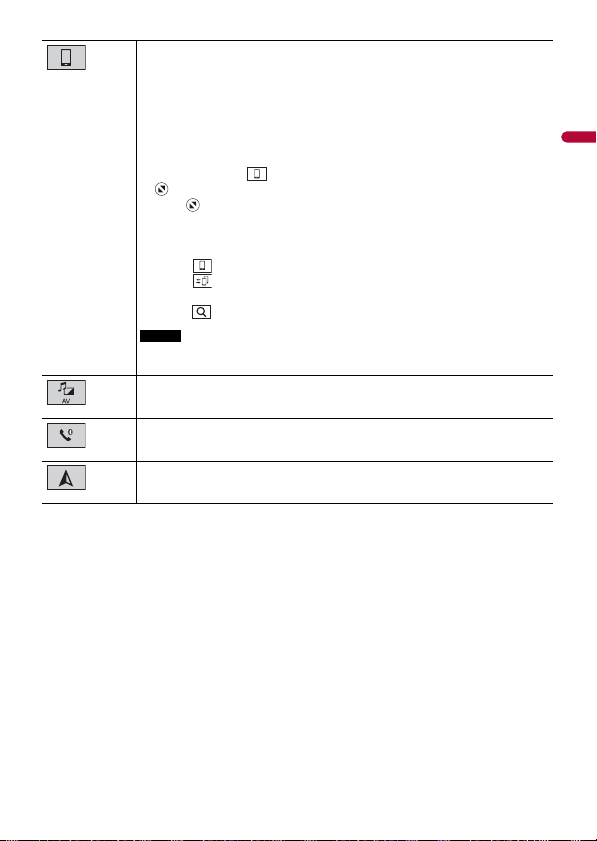
Connected device key
TIPS
NOTE
Displays connected device.
Switches the source or application with connected devices such as WebLink,
external navigation system, Apple CarPlay, Android Auto.
• When a device with a compatible application is connected, the favourite
application key appears. Once the key appears, you can adjust the range of the
favourite application key area with the following steps.
1 Tou ch an d ho ld .
appears at the top right of the favourite application key.
2 Drag to the desired position.
To finish the adjusting, touch any place of the display except for the
favourite application key.
• You can also switch the mobile device to be connected with the following steps.
1 Tou c h .
2 Tou c h .
3 Select des ired device then follow the instruction.
Touch for the first wireless connection with the device.
This function is available only when you stop your vehicle in a safe place and apply
the handbrake or the vehicle is completely stopped.
AV source (page 71)
Hands-free phonin g (page 62)
Displays the map screen.
- 16 -
Page 17
English
Navigation
Menu screen view and operations
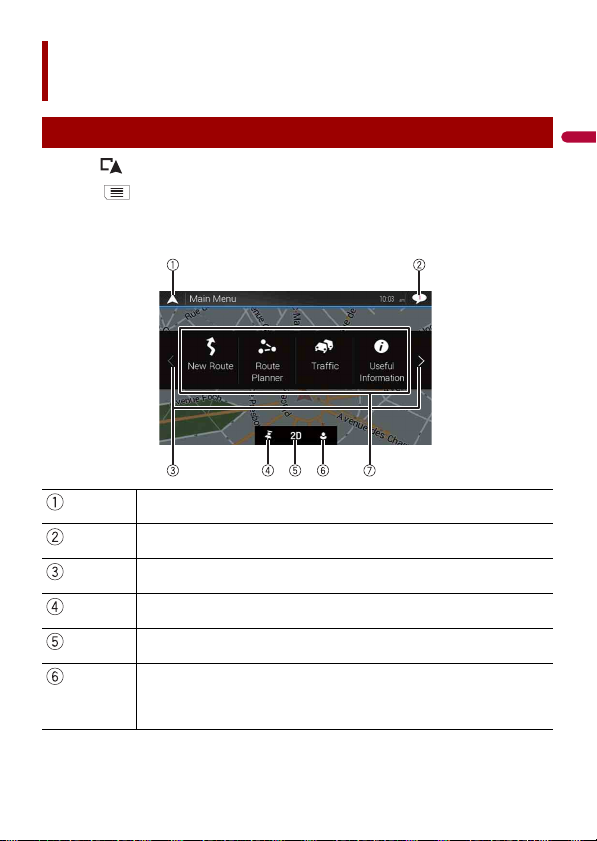
1 Press .
2 Touch .
The main menu screen appears.
Main screen
Returns to the map screen.
Notifications that co ntain important information.
Displays the previous or next page of the navigation menu.
The locations that you saved as favourites.
Switches between 2D, 3 D, and 2D North up view modes.
The [User Profiles] screen where you can create new profiles or edit the
existing profiles. If multiple drivers are using this product, they can create
their own profiles wit h their own settings. If you select a new profi le, this
product restarts so that the new settings can take effec t.
- 17 -
Page 18
English
Navigation items
Searches for a destination using various methods (page 24).
Builds your route or edits th e route currently set (page 32).
Displays the traffic screen (page 41).
Displays useful information to support your driving (page 44).
Configures the navigation -related settings (page 49).
Displays information about your navigation system (e.g. the version
information or licence).
Main menu screen icons with a planned route (only appear when a route
is planned)
Adds a waypoint (page 34).
Displays route alternatives, parts of the route to avoid, or specific
roads in your pl anned route to avoid.
Displays the rout e in its full length on the map, and displays route
parameters and ro ute alternatives.
Deletes your route or removes a waypoint.
Suspends and resumes the route guidance.
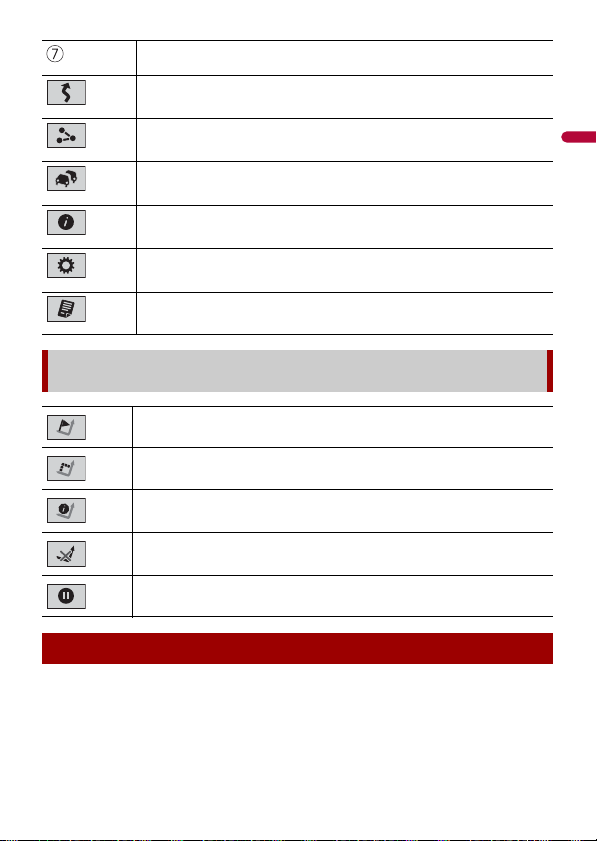
Map Screen
Most of the information provided by your navigation system can be seen on the map.
You need to become familiar with how information appears on the map.
- 18 -
Page 19
English
NOTE
How to read the map screen
NOTE
Depending on the conditions and settings, some items may not be displayed.
*
Shows the number and name of the street to be used (or next guidance point).
*
Shows the next guidance point ( manoeuvre). The type of the event (turn, roundab out,
exiting motorway, etc.) is d isplayed (page 22).
*
Shows the distance to the next guidance point (manoeuvre).
*
Shows the manoeuvre after the next manoeuvre.
Indicates the current location of your vehicle. The apex of the tr iangular mark
indicates your orientat ion and the display moves automatically as you drive.
When there is no GPS position, the triangular mark is transparent. It shows your last known
position.
Displays the data field.
Shows the name of the street (or city) that your vehicle is travelling on (or in).
*
Indicates the current route. The route currently set is highlighted in colour on the map.
*
Indicates the progress to the final destination.
* The information appears only when a route is set.
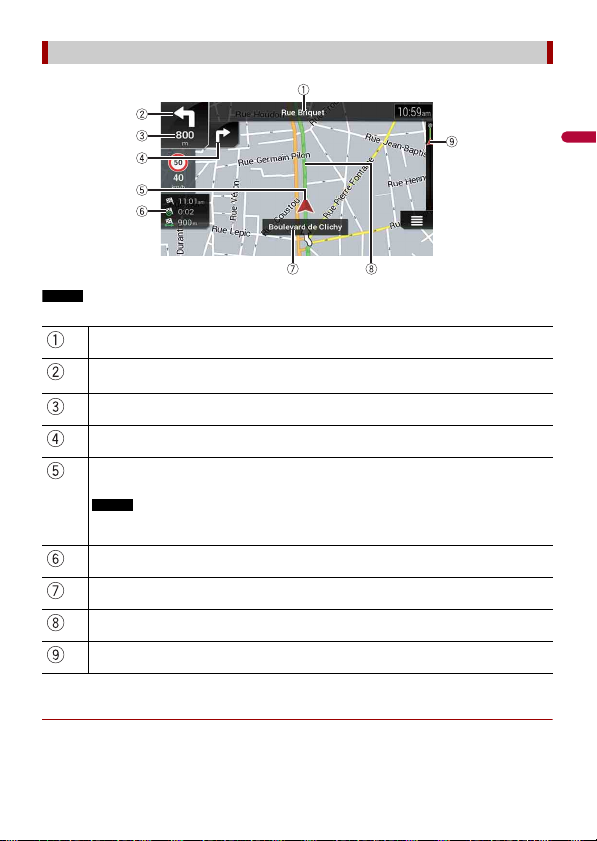
▶AV information bar
AV information is displayed at the bottom of the map screen.
- 19 -
Page 20
English
Touch to display the AV source list.
Shows the cur rent status of AV source bri efly.
Touch to display the phone menu screen (pa ge 62).
Changing the scale or the map manually
By default, even if the map scale is changed on the scrolled map, it will return to the
preset scale (according to the setting in [Viewpoint] of the [Navigation Map] settings)
when the current position map is displayed. To change the scale of the current position
map, perform the following procedure.
1 Press then touch .
2 Touch then [Settings].
3 Touch [Navigation Map] then [Map Display].
4 Touch [Viewpoint].
5 Drag the pop-up window and touch [Manual].
6 Press .
7 Touch or .
▶Smart Zoom
Your navigation system features "Smart Zoom" that works in two ways.
• When the route is set:
When approaching a turn, "Smart Zoom" will zoom in and raise the view angle to
enable you to easily recognise your manoeuvre at the next junction. If the next turn is
- 20 -
Page 21
English
at a distance, it will zoom out and lower the view angle to be flat so you can see the
NOTE
NOTE
road in front of you.
• When the route is not set:
"Smart Zoom" will zoom in if you drive slowly and zoom out when you drive at high
speed.
Switching between 2D, 3D, and 2D North up views
You can switch how the map is displayed. For 2D map view mode, you can select
between “Heading up” and “North up”.
Heading up The map display always shows the vehicle’s direction as proceeding towards
North up The map display always has nor th at the top of the screen.
the top of the screen.
The map orientation is fixed at “Heading up” when the 3D map screen is displayed.
1 Press .
2 Touch .
3 Touch the following key.
Each time you touch the key, the setting changes.
Indicates 2D Heading up view mode is currently selected.
Indicates 3D Heading up view mode is currently selected.
There is a limit to map scaling in 3D map view mode. If t he map scale is zoomed
out further, the map i s zoomed out in 2D map.
Indicates 2D North up view mode is currently sele cted.
Scrolling the map to the position you want to see
1 Press .
2 Touch anywhere on the map or touch and drag the map in the desired direction to
scroll.
If you place the cursor on the desired location, a brief overview about the location will
appear at the top of the screen, showing the street name and other information for
the location.
- 21 -
Page 22
English
3 Touch .
TIP
The map returns to the current position.
If you press , the map returns to the current position.
▶Control keys on the scrolled map
Map screen (scrolled map)
Changes the map view mode.
The current map mode is shown on the control key.
Zooms in or out on the map.
You can also zoom out or in by pinching or expanding the map.
Rotates the map clockwise or anticlockwise.
Cancels map rotation.
Tilts the map angle up or down.
You can change the vertical view angle of the map in 3D mode only.
Route guidance
Once the route guidance begins, the system provides various guides by voice, text
indications and signs.
▶Frequently shown route events
The following are some examples of the manoeuvre that are displayed.
Turn left, turn right, turn back.
Go left on the roun dabout, 3rd exit (next manoeuvre).
- 22 -
Page 23
English
NOTE
TIP
Enter roundabout (manoeuvre after the next manoeuvre).
Motorway entrance or mo torway exit.
Board ferry or leave ferr y.
Approaching the destin ation or a waypoint.
Lane information
When navigating on multilane roads, you will need to make sure to
take the proper lane for the recommended route.
Signposts
Signs are displayed at the top of the map.
Junction view
If you are approachi ng a complex junction, the map is replaced
with a 3D view of the junction.
If the data for these items is not contained in the map data, the information is not available even if
there are signs on the actual road.
When you set [Of fer Freeway Services] to on, appear s while you are driving on moto rways. Touch
the icon to open the details of the next few exits or service stations. In addition, touch an item to show
its location on the map. You can set it as a waypoint easily.
Browsing the data field
The data fields are different when you are navigating a route and when you have no
specified destination. For example, the data field provides the following information.
- 23 -
Page 24
English
• When the route is set:
NOTES
CAUTION
Distance to final destination, time needed to reach the final destination and estimated
arrival time are shown.
• When the route is not set:
Direction or altitude is shown.
• Touching and holding the field allows you to display the setting screen for the field. For details, refer
to page 56.
• The estimated time of arrival is an ideal value calculated based on the speed limit value set in [Max.
Speed] of vehicle type setting and the actual driving speed. The estimated time of arrival is only a
reference value, and does not guarantee arrival at that time. For details, refer to page 49.
Searching for a destination
Search for a destination or waypoint using the address or another method.
You can also set a destination by touching the map on the screen.
Once the destination is set, the system can start the navigation by touching [Start
Navigation] (page 32).
For safety reasons, these route-setting functions are not available while your vehicle is in motion. To
enable these functions, you must stop in a safe place and put on the handbrake.
- 24 -
Page 25
English
NOTE
Some information regarding traffic regulations depends on the time when the route calculation is
performed. T hus, the information may not correspond wi th a certain traffic regulation when your
vehicle actually passes through the location in question. Also, the information on the traffic regulations
provided applies for a passeng er vehicle, and not for a lorry or other delivery vehicles. Always follow
the actual traf fic regulations when drivi ng.
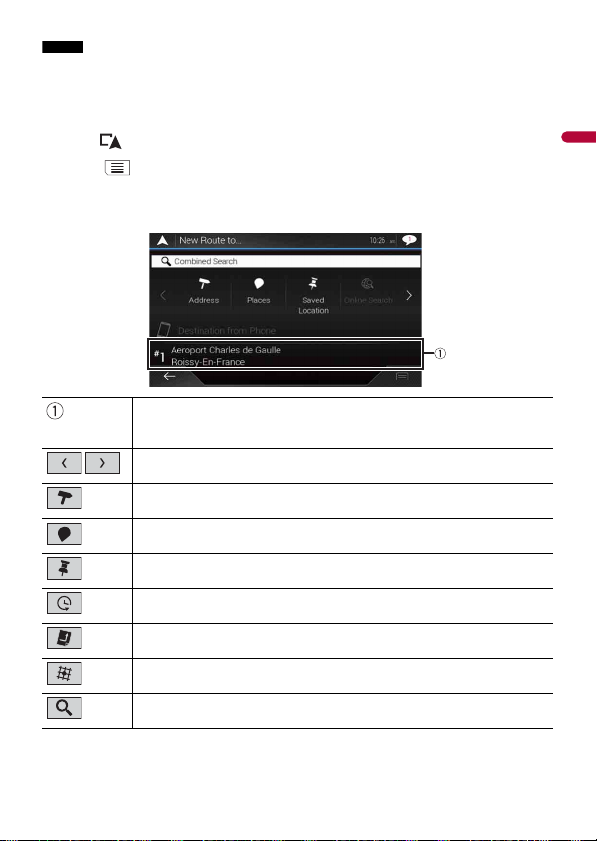
1 Press .
2 Touch .
3 Touch [New Route].
The following screen appears.
Suggests a destination based on your navigation habits, using
parameters such as current time of day, day of week and current
location.
Displays the previous or next page of the searc hing for a destination
menu.
Searches for a location by entering the specific address (page 26).
Searches for various facilities (Points Of Interest - POI) such as petrol
stations accommod ations, etc. by selecting the category (page 2 6).
Selects a destination from the sto red locations (page 28) .
Searches for a location from the recently visited places (page 29).
Selects a destination from the stored routes (page 28).
Searches for a location by entering a latitude and longitude
(page 29).
Searches for a location using multiple factors (page 29).
- 25 -
Page 26

English
TIP
Searching for a location by address
Search a destination in which the address is specified.
Depending on the search results, some steps may be skipped.
1 Touch [Address].
2 Select the [Country].
Proposes the country where you are as a default.
If you want to change the search area, set another country.
3 Select the [Town or Postcode].
Proposes the city/town where you are as a default.
You can select the city/town using its postal code instead of its name.
4 Select the [Street].
If the street name is not available, touch [Go to Town] and select the city/town. This
way the centre of the selected city/town becomes the destination of the route.
5 Select [Select House Number or Intersection].
This item will be displayed after a street is set. If the house number is not available,
touch [Go to Street] and select the street. This way the centre of the selected street
becomes the destination of the route.
After you touch the selected address to finish the address search, the searched
location appears on the map screen.
6 Touch [Select as Destination].
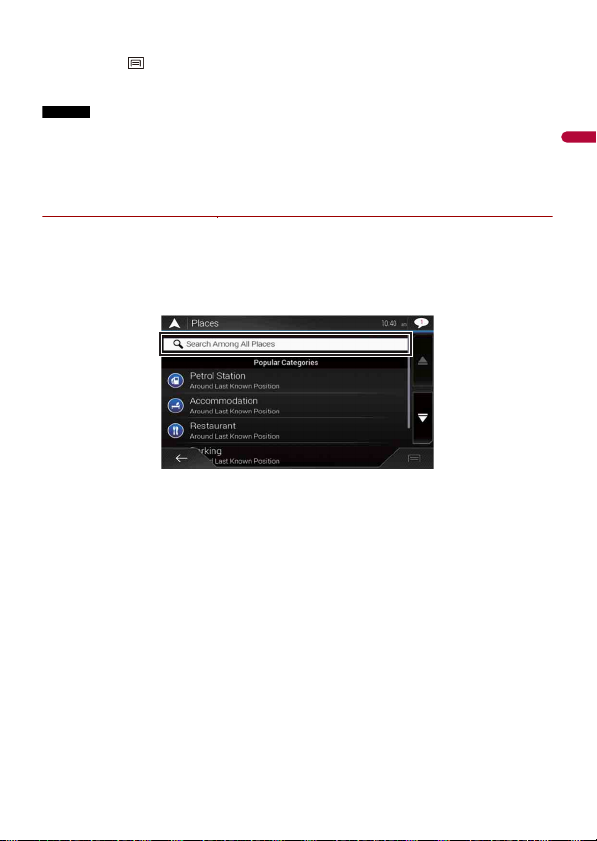
Searching for Points of Interest (POI)
You can search for various facilities (Points Of Interest – POI). by selecting the category
such as petrol stations, accommodation or restaurant.
▶Searching for POIs using preset categories
The preset search allows you to quickly find the most frequently selected types of POIs.
1 Touch [Places].
2 Touch the category.
The preset search categories are as follows.
• [Petrol Station]
• [Accommodation]
• [Restaurant]
• [Park ing]
3 To uch th e PO I.
The searched location appears on the map screen.
- 26 -
Page 27
English
TIP
If you touch , you can sort the results or show the locations of all facilit ies on the map.
NOTES
4 Touch [Select as Destination].
• When a route is not set, POIs are searched for around the current position.
• When the current position is not available either (no GPS signal), POIs are searched for around the last
known positio n.
• When a route is set, [Petrol Station] and [Restaurant] are searched for along the route, and
[Accommodation] and [Parking] are searched for around the destination.
▶Searching for POIs by category or directly from the name of the facilities
You can search for POIs by their categories and subcategories. You can also search for
POIs by their names in each of their categories.
1 Touch [Places].
2 Touch [Search Among All Places].
3 Touch [Around Here] and then select the area in which the POIs should be
searched for.
• [Category View]:
You can select whether or not POI categories are displayed.
• [Around Here]:
Searches around the current position. Or, around the last known position if the
current position is not available. The results will be listed in order of the distance
from this position.
• [In a Town]:
Searches for a place within a selected city/town. The results will be listed in order of
the distance from the centre of the selected city/town.
• [Around Destinat ion]:
Searches for a place around the destination of the current route. The results will be
listed in order of the distance from the destinat ion. (This key is a ctive only when
the route is set.)
- 27 -
Page 28

English
• [Along Route]:
TIP
TIP
NOTE
TIP
NOTE
Searches along the current route, and not around a point already set. This is useful
when searching for a stopover that results in a minimal detour, such as searching
for petrol stations or restaurants. The results will be listed in order of the length of
the necessary detour. (This key is active only when the route is set.)
4 Select one of the categories, subcategories or brands to narrow down the places.
Use the keyboard to enter the name of the place if you touch [Search by Name].
5 To uch th e PO I.
The searched location appears on the map screen.
If you touch , you can change th e sort method of the results.
6 Touch [Select as Destination].
Selecting a destination from stored locations
Storing locations you visit frequently saves time and effort.
Selecting an item from the list provides an easy way to specify the position.
This function is available if locations have been registered in [Saved Location] that contains two preset
categories: [Home] and [Work] (page 38).
1 Touch [Saved Location].
2 Touch the entry.
The searched location appears on the map screen.
3 Touch [Select as Destination].
You can edit the details of saved locatio ns by touching and the n [Edit].
Selecting a destination from stored routes
Storing routes you use frequently saves time and effort.
This function is available if routes have been registered in [Saved Routes] (page 4 0).
1 Touch [Saved Routes].
2 Touch the entry.
3 Touch [Show Route].
- 28 -
Page 29

English
Touch [Start Navigation].
TIP
TIP
TIP
4
You can change the final destination or add waypoints in [Route Planner] (page 32).
Selecting a destination from history
The places that were previously set as destinations or waypoints have been
automatically stored in [History].
1 To uch [H ist or y].
2 Touch the entry.
The searched location appears on the map screen.
3 Touch [Select as Destination].
Searching for a location using [Combined Search]
The [Combined Search] feature lets you quickly find a place by its name and search area.
The [Combined Search] function also searches your stored data.
1 To uch [Com bine d S ear ch].
2 Touch the right text box to enter the country and city/town.
3 Enter the name, address, or category of the destination to the left text box, then
touch .
4 Touch the entry.
The searched location appears on the map screen.
5 Touch the right of the list to narrow down the search results.
If you touch a map dat a provider logo, you can nar row down the list of results by showing the
results from the provider.
6 Touch [Select as Destination].
Searching for a location by the coordinates
Entering a latitude and longitude pinpoints the location.
1 Touch [Coordinates].
2 Enter the latitude value and touch [OK].
- 29 -
Page 30
English
TIP
When entering th e coordinates in UTM format, touch , then [UTM Coordinates ].
TIP
NOTE
TIP
3 Enter the longitude value and touch [GO!].
The searched location appears on the map screen.
4 Touch [Select as Destination].
You can change the display format of the latitude and longitude to any of the following formats:
decimal degrees; degrees and decimal minutes; or degrees, minutes and decimal seconds.
When a value is already entered in the text field, delete the value first.
Searching for a location by scrolling the map
Specifying a location after scrolling the map enables you to set the position as a
destination or waypoint.
1 Press .
2 Touch and drag the screen to scroll the map.
3 Touch the location that you want to select as your destination.
The cursor appears.
4 Touch [Select as Destination].
Selecting the route options
Once a location is searched, the [Map Location] screen appears. You can select some
options for the route or displayed map location before route calculation.
If you touch the map, the cursor is placed at that position. Also, you can scroll the map by dragging the
map.
- 30 -
Page 31

English
TIP
Zoom in/zoom out
You can also pinch or expand th e map to zoom in or out.
Cancels the [Map Location] screen and displays the map of the current
position.
Returns the cursor to the initial position and the map scale to the initial scale.
Shows the route setting preferences for route calculation. Touch the keys to
activate or deac tivate the preference.
: Calculates the route prioritising the use of motorways when the key is
activated.
: Calculates the route prioritising the use of per-use charged toll roads when
the key is ac tivated.
: Calculates the route prioritising the use of ferries when the key is activated.
: Calculates the route prioritising the use of carpool and HOV lanes when the
key is activa ted.
Returns to the previous screen.
Sets the cursor position to your destination (or waypoint).
Displays the shortcuts.
• [Detailed Information]:
Shows the detailed i nformation of the point.
• [Save Location]:
Saves the displayed location as your favourite location. The saved location can
be easily recalled later.
• [Places Around Cursor]:
Searches for POIs around the displayed location. To uch the POI to show the [Map
Location] screen, and also set the POI as the destination (or waypoint).
- 31 -
Page 32

English
TIP
TIP
Starting the navigation
1 Once the destination is selected, touch [Select as Destination].
The route summary screen appears and countdown begins. When the countdown
ends, the guidance automatically starts. If you touch the screen anywhere during the
countdown, the countdown stops and the screen will stay as it is.
2 Touch [Start Navigation].
Your navigation system starts the route guidance.
See page 22 for details on the route summary screen.
Checking and modifying the current route
When navigation is already started, there are several ways to modify the current route.
The following sections describe some of those options.
Building a route using [Route Planner]
The [Route Planner] (or [My Route]) feature lets you build your route using the list of
destinations.
Once you set t he route, you can edit your route using the menu displayed as [My Route].
1 Press then touch .
2 Touch [Route Planner] or [My Route].
3 Touch one of the options.
- 32 -
Page 33

English
Starting position (The current vehicle position is set as default and [Current GPS
Position] is displayed.) (page 33)
Calculates the route and shows the [Route Summary] screen.
Displays the options for the location.
[Move Up]/[Move Down]:
Edits the order you want to visit the locations.
[Delete]:
Deletes the destination or waypoint.
[Save Location]:
Stores the location in [Saved Location] (page 38).
[Change]:
Changes the destination or waypoint to another location.
[Show on Map]:
Shows the selected location on the map.
Displays the shortcuts.
[Delete All]:
Deletes all wa ypoints and the destination . Touc h [Continue Without Route] to can cel the
planned route.
[Optimise Waypoi nts]:
Changes the order of waypoints automatically so that the route can be easily travelled. (If
the resulting order is the same as the current order, this option is invalid.)
[Optimise Route]:
Changes the order of all waypoints and the destination automatically so that the route can
be easily travelled. (If the resulting order is the same as the current order, this option is
invalid.)
Inserts a new waypoint.
Adds a new destinatio n and changes the current destination to the last waypoint.
▶Changing the starting position
The starting position for route can be changed from the current position.
1 Press then touch .
2 Touch [Route Planner] or [My Route].
3 Touch [Current GPS Position].
4 Touch [Set Start Point] or [Change Star t Point] and then touch [OK].
5 Search for a location.
6 Touch [Set Start Point] or [Change Start Point].
The selected position is set as the starting position for route calculation.
7 Touch [Show Route] or [Continue Without Route].
- 33 -
Page 34

English
The system starts route recalculation after [Show Route] is touched, and then the
NOTE
[Route Summary] screen appears. After [Start Navigation] is touched, your navigation
system starts the route guidance.
After [Contin ue Without Route] is touched, the current posi tion map appears.
▶Changing the starting position
1 Press then touch .
2 Touch [Route Planner] or [My Route].
3 Touch [Current GPS Position].
4 Touch [Back to GPS Position] and then touch [Delete Start Point].
The starting position for route calculation returns to the current position.
Adding waypoints
1 Press then touch .
2 Touch [Add Waypoint].
3 Search for a location.
4 Touch [Select as Waypoint].
The route is recalculated, and the [Route Summary] screen appears. (When the
waypoint is already set, the [My Route] screen appears. Touch [Show Route] and
proceed to the next step.)
5 Touch [Start Navigation].
Your navigation system starts the route guidance.
Checking route alternatives
You can select another route and compare different route alternatives.
1 Press then touch .
2 Touch [Detours & Alternatives].
3 Touch [Alternative Routes].
4 Touch any of the route calculate conditions.
You can see the approximate time required and total distance of selected route
alternatives. Touch any of the route alternatives to see it on the map.
- 34 -
Page 35

English
TIP
If more than three route alternatives have been found, [More Results] appears. Touch [More
Results] to show the other routes.
5 Touch [Select].
The selected route is applied as your current route. For more information about route
calculation conditions, refer to [Route Planning Method] (page 51).
Checking detour routes
You can check for detour routes that avoid the selected sections or streets, or that avoid
the road ahead. You can also check for alternative routes.
1 Press then touch .
2 Touch [Detours & Alternatives].
3 Touch one of the options.
Menu Item Description
[Alternative Routes] Shows the alternative routes (page 34).
[Avoid Special Sections] Shows the route avoiding certain sections. Touch the list
[Avoid Specific Ro ad] Shows the route avoiding certain roads. Touch the list item
[Avoid Road Ahead] Shows the route avoiding the road ahead. Touch [+] or [-]
item to select the section you want to avoid. The distance
and time difference, suggested route, current route, and
the section avoided are shown. Touch [Accept] to apply the
suggested route.
to select the road you want to avoid. Distance and time
difference, suggested route, current route, section avoided
are shown. Touch [Accept] to apply the suggested route.
to set the distance you want to avoid. Touch [Avoid] to
apply the suggested route.
- 35 -
Page 36

English
NOTE
TIP
Menu Item Description
[Restore Original Route] Cancels the route with avoidances and restores the
The route set by [Alternative Routes] cannot be cancelled.
previous route.
Checking route information and preferences
Once you set the route, you can check a summary of the current route.
1 Press then touch .
2 Touch [Route Summary].
3 Touch one of the options.
The condition of the displayed route is shown in the upper left by an icon. The total
length of the route and approximate required time for the route are in the lower left.
You can scroll the map by dragging the ma p.
Shows the information for a tran sit point on the route.
Touch to see the location on the map. To uch [Avoid] and [Accept] to set the locatio n as a
location to avoid.
Shows alternative routes (page 34).
- 36 -
Page 37

English
NOTE
Displays the shortcuts.
[Route Preferences]:
Shows the route setting preferences. If you change the preferences, the route is recalculated.
[Itinerary]:
Shows all tran sit points in detail. Touch a trans it point to show its posi tion on the map. If you
touch [Avoid] and [Accept] on the map screen, the route is recalculated avoiding the transit
point (as much as possible).
[Save Route]:
Saves the displayed route. The saved route can be recalled later.
[Places Alo ng Route]:
Searches for POIs along the displayed route. Touch the POI to show the [Map Location]
screen, and also set the P OI as a waypoint.
[Simulation]:
You can run a simulation of the navigation for the cu rrent route, as a demonstration
(page 37).
Cancelling the current route guidance
If you no longer need to travel to your destination, follow the steps below to cancel the
route gu idance.
1 Press then touch .
2 Touch [Cancel Route] or [Delete Waypoint].
3 Touch one of the options.
If there are no waypoints on the route, touch [Cancel Route] to cancel the route.
If there are waypoints on the route, touch [Cancel Route] to cancel the route. Touch
[Delete Waypoint] to delete only the nearest waypoint. In such a case the route is
recalcu lated.
Watching the simulation of the route
You can run a simulation of the navigation for the current route, as a demonstration.
1 Set a route to your destination (page 24).
2 Press then touch .
3 Touch [Route Summary], and then touch .
4 Touch [Simulation].
The simulation starts from the starting point of the route, and using a realistic speed,
it leads you through the whole recommended route.
To stop the simulation, touch [Close].
- 37 -
Page 38

English
TIP
Storing a location in [Saved Location]
Storing your favourite locations in [Saved Location] allows you to save the time and
effort used on re-entering this information.
[Saved Location] can include your home location, workplace, and places you have
already registered.
Storing your home and your workplace location
You can store one home location and one workplace location.
1 Press then touch .
2 Touch [New Route], and then [Saved Location].
You can also display the [Saved Location] screen by touching on the bottom of
the screen when the navigation menu is displayed.
3 Touch [Home] or [Work] and then touch [OK].
When you have already stored your home or workplace, touch [Home] or [Work] to
show the location on the [Map Location] screen.
4 Search for a location (page 24).
5 Touch [Save Location].
The cursor position has been stored.
Storing your favourite locations
You can store a frequently visited location (such as a relative’s home) to allow easy
routein g.
1 Press then touch .
2 Touch [New Route], and then [Saved Location].
You can also display the [Saved Location] screen by touching on the bottom of
the screen when the navigation menu is displayed.
3 Touch [Add Location].
4 Search for a location (page 24).
5 Touch [Save Location].
6 Enter the name if needed and then touch .
The cursor position has been stored.
In the on-screen keyboard, touching or enables you to store the loca tion as your home or
workplace location.
- 38 -
Page 39

English
NOTE
NOTES
Important
Renaming stored locations
1 Press then touch .
2 Touch [New Route], and then [Saved Location].
3 Touch , and then touch [Edit].
The [Select Location to Edit] screen appears.
4 Touch the item you want to rename and touch [Rename].
5 Enter the name and then touch .
6 Touch [Done].
[Home] and [Work] cannot be renamed. The location can be set again.
Deleting stored locations
1 Press then touch .
2 Touch [New Route], and then [Saved Location].
3 Touch , and then touch [Edit].
The [Select Location to Edit] screen appears.
4 Touch the item you want to delete and touch [Delete].
A message will appear asking you to confirm the deletion.
• [Home] and [Work] canno t be deleted. The location can be set again.
• If you touch and then touch [Delete All], all entries (including the home and work place
locations) can be deleted.
5 Touch [OK].
6 Touch [Done].
Saving a location as an alert point
You can save any map location (such as a school zone or railroad crossing) as an alert
point.
The warning for road safety cameras (like speed cameras) is disabled when you are in certain countries
where warnings for road safety cameras are prohibited. However, you are fully responsible for ensuring
that this featu re is legal in th e country wh ere you intend to use it.
- 39 -
Page 40

English
NOTE
To use this function, activate the warnings beforehand and set the alert types (page53).
NOTE
1 Press .
2 Scroll the map and select a location.
The cursor appears at the selected point.
3 Touch .
4 Touch [Add Alert Points].
5 Set the necessary parameters.
Menu Item Description
[Alert Type] Set the type of the alert point.
[Speed Limi t] Set the speed limit for this alert point (if applicable).
[Direction] Set the direction from which you expect the alert to come
from.
6 Touch [Save].
In [Alert Type], speed camera alert cannot be selected when the cursor is placed on the map of France.
Editing the stored alert points
Stored alert points can be edited.
1 Press .
2 Scroll the map and move the cursor over the stored alert point, and then touch
.
3 Touch [Edit Alert Points].
4 Set the necessary parameters.
If you touch and then touch [Delete], the selected alert point will be deleted.
5 Touch [Edit].
Storing a route in [Saved Routes]
Storing your favourite routes in [Saved Routes] allows you to save the time and effort
used on re-entering this information.
Storing your favourite routes
1 Set a route to your destination (page 24).
- 40 -
Page 41

English
Press then touch .
NOTE
2
3 Touch [Route Summary], and then touch .
4 Touch [Save Route].
5 Enter the name if needed and then touch .
Renaming stored routes
1 Press then touch .
2 Touch [New Route], and then .
3 Touch [Saved Routes].
4 Touch , and then touch [Edit].
5 Touch the item you want to rename and touch [Rename].
6 Enter the name and then touch .
7 Touch [Done].
Deleting stored routes
1 Press then touch .
2 Touch [New Route], and then .
3 Touch [Saved Routes].
4 Touch , and then touch [Edit].
5 Touch the item you want to delete and touch [Delete].
If you touch a nd then touch [Delete All], al l entries can be deleted.
6 Touch [Delete].
Receiving real-time traffic information (TMC)
The Traffic Message Channel (TMC) provides real-time traffic reports. If the navigation
system is equipped with the TMC feature, you can check the traffic reports and
information received.
- 41 -
Page 42

English
NOTES
Displaying the [Traffic Summary] screen
1 Press then touch .
2 Touch [Traffic].
The [Traffic Summary] screen appears.
Viewing the traffic list
Traffic information is displayed onscreen in a list. This allows you to check how many
traffic incidents have occurred, the locations, and the distance from your current
position.
1 Press then touch .
2 Touch [Traffic].
The [Traffic Summary] screen appears.
3 Touch [Traffic Events].
A list with traffic information that has been received is shown. The list is sorted by
distance from your current position. Places (street names) where incidents have
occurred are displayed on the list.
• If a route is set, relevant events for your current route are shown in the upper section of the list.
• Touching the desired item allows you to check its position on the map. Touch or to show the
previous or next event.
Checking the traffic incidents on the map
Traffic event information can be displayed on the map.
1 Press then touch .
2 Touch [Traffic].
The [Traffic Summary] screen appears.
- 42 -
Page 43

English
Touch [Traffic Map].
3
Road segments affected by traffic incidents are displayed in an alternate colour on the
map, and small symbols above the road show the nature of the incident.
The traffic jam lines indicate the degree of the congestion by colour.
Traffic notification icon
The notification icon shows the status of traffic information reception.
1 Touch the relevant traffic event icon on the map.
Traffic notification icon
Indicates that there are no traffic incidents in your coverage area.
Indicates that information on traffic incidents are being received.
Indicates that there are no significant traffic incidents on your route.
Indicates t hat there are signif icant traffic incid ents on your route. The i con shows
the type of the next traffic incident.
- 43 -
Page 44

English
You can check the details of the traffic incidents. Touch the relevant event to display the
NOTE
TIPS
location on the map.
Turning the traffic information on or off
The traffic information feature is turned on by default. To enable or disable the TMC
feature, perform the following procedure.
If you turn the traffic information feature off, [Traffic] on the navigation menu disappears.
1 Press then touch .
2 Touch , and then touch [Settings].
3 Touch , and then touch [Traffic].
4 Touch [Traffic] to turn the switch on or off.
Checking useful information about your trip
About the [Useful Information] menu
The [Useful Information] menu contains various information to suppor t your driving.
1 Press then touch .
2 Touch [Useful Information].
The [Useful Information] screen appears.
Information on each option in the [Useful Information] menu
Menu Item Description
[Where Am I? ] Displays a special screen with information about the
current position and a key to search for nearby emergency
or roadside assistance services.
• To save the current position as a [Saved Location] destination,
touch (page38)
• To check the countr y information of your current position, touch
.
- 44 -
Page 45

English
NOTES
NOTE
Menu Item Description
[Help Nearby] Check for POIs in your surroundin gs.
[Country Information] Check for useful driving information about the selected
[Trip Monitor] Check the statistical data of your trips (for example, start
[GPS Inform ation] Displays the GPS information screen with satellite position
[Fuel Consumption] Estimates the fuel cost to your destination by entering the
The preset search categories are as follows.
• [C ar Repair]
• [H ealth]
• [Po lice]
• [Petrol Station]
country (for example, speed limits and maximum blood
alcohol level).
This information may not necessarily correspond to the actual
regulations, etc. Utilise the information for your reference.
time, end time, average speed, etc.) (page 45).
and signal strength information.
fuel consumption information in the navigation system.
Recording your travel history
Activating the trip logger enables you to record your driving history (hereinafter called
“trip log”). You can review your trip log later. The trip logger is set so that it can be started
manually by default. You can change the settings of this function in order to save the log
automatically. For details, refer to [Trip Monitor] (page 59).
▶Activating trip logger temporarily
One-time activation is useful if you want to create a log only for a particular trip.
1 Press then touch .
2 Touch [Useful Information].
3 Touch [Trip Monitor].
A list of trip logs already recorded appears. A blank list appears if you have not
recorded any trip logs yet.
4 Touch [Start New Recording].
The trip logger is activated. The touch key changes to [Stop Recording]. Touching
[Stop Recording] allows you to deactivate the trip logger.
• If there is not enough space in the built-in memory, the oldest trip log will be overwritten by the new
one.
- 45 -
Page 46

English
• If you want the system to always activate the trip logger whenever the GPS signal is available, turn on
TIP
TIP
[Enable Auto-Saving]. For details, refer to “Setting the trip logger” (page 46).
▶Browsing the trip log
1 Record the trip log.
2 Press then touch .
3 Touch [Useful Information].
4 Touch [Trip Monitor].
To export all trip logs, touch [Export All].
5 Touch any of the items to see the details.
To display the trip log on the map, touch [Visible on Map] to tick the check box. Touching allows
you to view the shortcuts and enables you to use the following functions.
Menu Item Description
[View on Map] Shows the trip log on the map screen.
[Export Track Log ] Exports the track log currently selected to an external
▶Setting the trip logger
storage device.
1 Record the trip log.
2 Press then touch .
3 Touch [Useful Information].
4 Touch [Trip Monitor].
5 Touch and then touch [Trip Monitor Settings].
6 Touch any of the items to change the settings.
Menu Item Description
[Enable Auto-Saving] Set whether automatic trip logging is activated or not.
[Save Track Log] Track logs, the sequence of the positions given by the GPS
receiver, can be saved together with trip logs. You can
activate the track logger whenever the trip logger is
activated.
[Trip database size] indicates the current data size of the trip log (track log included).
- 46 -
Page 47

English
Editing a trip log
TIP
TIPS
1 Press then touch .
2 Touch [Useful Information].
3 Touch [Trip Monitor].
4 Touch and then touch [Edit].
5 Touch any of the items to edit.
Menu Item Description
[Delete] Deletes the trip log.
[Rename] Renames the trip log.
[Change Colour] Changes the colour by selecting another colour from the
If you touch a nd then touch [Delete All], al l entries can be deleted.
colour table.
6 Touch [Done].
Using the Trip Computer mode
In the trip computer screen, the information received from the GPS receiver and your
vehicle is displayed like a metre for a vehicle.
1 Press .
2 Touch the data field key.
• If you touch [Trip Su mmary], the details of the current trip are displayed. Touch and then touch
[Save Trip] to store the current trip log.
• If you press , you can return to the map screen.
- 47 -
Page 48

English
TIP
Calculating the fuel consumption
The fuel consumption monitor helps you keep track of the fuel consumption of your car
even if you do not use the navigation system for all your journeys. Set the initial
odometer value and then record the distance driven and the amount of fuel whenever
you fill up your car. You can also set reminders for regular car maintenance.
These calculations are based only on the information that you provide and not on any
data from the vehicle. The fuel mileage displayed is only a reference value, and does
not guarantee that the fuel mileage displayed can be obtained.
▶Setting the initial odometer value
Before you use the fuel consumption feature, enter the initial odometer value from
which you want to start measuring the mileage.
1 Press then touch .
2 Touch [Useful Information].
3 Touch [Fuel Consumption].
4 Touch [Initial Milometer Value].
5 Enter the initial odometer value and then touch .
The initial odometer value has been set.
▶Entering the fuel consumption information
To calculate the fuel consumption for the distance you have travelled, enter the di stance
driven and the amount of fuel whenever you fill up your car.
1 Press then touch .
2 Touch [Useful Information].
3 Touch [Fuel Consumption].
4 Touch [Add].
5 Touch [Current Milometer Value] and then enter the current odometer value.
6 Touch [Fuel Amount] to enter the amount of fuel pumped this time.
7 Touch [Fuel Price / Unit] to enter the fuel unit price this time.
8 Touch [Add].
9 Touch [Done].
To delete an entry, touch to display the shortcut for deletion.
- 48 -
Page 49

English
▶Setting the car maintenance schedule
TIP
1 Press then touch .
2 Touch [Useful Information].
3 Touch [Fuel Consumption].
4 Touch .
5 Touch [Maintenance Schedule].
6 Touch [Add] or the one of entries.
7 Enter the name, date, and mileage for the reminder.
8 Touch [Done].
To delete an entry, touch to disp lay the shortcut for deleti on.
Navigation Settings
You can configure the navigation settings, and modify the behaviour of this system.
1 Press then touch .
2 Touch , and then touch [Settings].
The [Settings] screen appears.
3 Touch one of the following categories, then select the options.
[Route Preferences] (page 49)
[Sound] (page 52)
[Warnings] (page 53)
[Navigation Map] (page 55)
[Regional] (page 57)
[Display] (page 58)
[Traffic] (page 59)
[Trip Monitor] (page 59)
[Start Configuration Wizard] (page 60)
[SyncTool] (page 60)
[Route Preferences]
Sets the type of vehicle you are dr iving, the road types used in route planning, and the
route planning method.
- 49 -
Page 50

English
Menu Item Description
NOTES
TIPS
[Vehicle] Set the type of vehicle you will be using on the route.
• The route is planned based on the selected vehicle type.
• Depending on the type selected, the route planning may be
configured to incorporate dimension, weight, and freight hazard
restrictions for maps that contain su ch data. To enhance the
route accuracy, correctly se lect a vehicle type that i s similar to
the condition of your vehicle.
• To edit the name and estimated maximum speed of the selected
vehicle profile, touch .
• To add a new vehicle profile, touch [Add Profile]. Then select one
of the vehicle types and set the name and estimated maximum
speed.
[Car] • Manoeuvre restrictions and directional constraints are
[Emergency] • All manoeuvres available at junctions are taken into
[Bus] • Manoeuvre restrictions and directional constraints are
[Taxi] • Manoeuvre restrictions and directional constraints are
taken into account when planning a route.
• Roads are used only if access for cars is allowed.
• Private roads and resident- only roads are used only if they
are inevitable to reach the destination.
account.
• D irectional constraints are taken into account in the same
way as travel in the opposite direction is allowed at low
speeds.
• Only private roads that need to be used to access the
destination are included.
• Walkways are excluded from routes.
taken into account when planning a route.
• Roads are used only if access for buses is allowed.
• Private roads, resident- only roads and walkways are
excluded from routes.
taken into account when planning a route.
• Roads are used only if access for taxis is allowed.
• Private roads, resident- only roads and walkways are
excluded from routes.
- 50 -
Page 51

English
NOTE
Menu Item Description
[Lorry] • Manoeuvre restrictions and directional constraints are
[Route Planning Method] Set to change the route planning method. Route
[Fast] Calculates a route with the shortest travel time to your
[Easy] Result in a route with fewer turns and no difficult
[Short] Calculates a route with the shor test distance to your
taken into account when planning a route.
• Only roads that allow lorry access are included.
• Private roads, resident- only roads and walkways are
excluded from routes.
• U-turns are not used in routes (turning around on a
divided road is not considered a U-turn for the purpose of
this system).
calculation can be optimised for different situations and
vehicle types by changing the planning method.
destination as a priority. Usually the best selection for fast
and standard cars.
manoeuvre. With this option, you can make this system to
take, for example, the motorway instead of a series of
smaller roads or streets.
destination as a priority. Usually practical for slower
vehicles. Rarely practical to use to search for shorter routes
for normal vehicles regardless of the speed.
[Economical] Calculates a route that is quick and saves fuel.
[Navigation M ode] Enable or disable off-road navigation.
[On-road] The route is planned towards the destination along the
[Off-road] The route is planned towards the destination in a straight
[Motorways] Set to off to avoi d prioritising motorways for calculating
roads on the map.
line, not along the roads on the map.
the route.
This funct ion is useful when you want to avoid moto rways such as
when driving a slow car or towing another vehicle.
- 51 -
Page 52

English
NOTE
NOTE
Menu Item Description
[Period Charge] Set to off to avoi d prioritising toll roads for calculating the
[Per-use Toll] Set to off to avoid prioritisin g per-use charged toll roads for
[Ferries] Set to off to avoid prioritising ferries for calculating the
[Car Shuttle Trains]* Set to off to avoid prioritising car shuttle trains for
[Carpool Lane s] Set to off to avoid prioritising carpool and HOV lanes for
[Unpaved Roads] Set to off to avoid prioritising unpaved roads for
* Car shuttle trains are used to transport vehicles for relatively short distances and they usually
connect places that are not easily accessible by road.
route.
This function is useful when you want to avoid toll roads
with restricted time access that require you to purchase a
separate pass or vignette to ex tend the length of time
allotted for use.
This option can be enabled or disabled separately from the preuse toll road usage option.
calculating the route.
This function is useful when you want to avoid toll roads where
there is a per-use charge.
route.
calculating the route.
calculating the route.
calculating the route.
[Sound]
Adjusts the different sound volumes and changes the voice guidance profile.
Menu Item Description
[Voice] Adjust the volume of the guidance sounds (verbal
instructions).
[Alert Beeps] Adjust the volume of the non-verbal alert sounds (beeps).
[Ding] Adjust the volume of the sound (ding) that precedes the
verbal instructions.
[Voice Guidance] Enable or disable voice guidance.
[Announce Streets and
Roads in Native La nguage
Area]*
Select whether to have the navigation system announce
the street names in the native language of the area, only
the road numbers, or only the manoeuvres.
- 52 -
Page 53

English
Important
Menu Item Description
[Announce Streets and
Roads in Foreign
Language Area]*
[Early Indi cation of
Manouevres]
[Verbosity Level] Set the verbosity of the voice instructions.
Select whether to have the navigation system read the
street names in a foreign country, only the road numbers,
or only the manoeuvres.
Select whether you want an immediate announcement for
the next manoeuvre or to receive the information when
the manoeuvre is near.
(How much information is given and how often the
prompts occur.)
[Minimal] Given once right before the next manoeuvre.
[Medium] Given once as the vehicle approaches the next manoeuvre
[Verbose] Given once relatively far from the next manoeuvre, it is
[Announce Route
Summary]*
[Announce Country Info]* Select whether to read out information about the country
[Announce Traffic Info]* Select wheth er to have the navigation system announce by
[Announce System
Messages]*
* Enabled only when a TTS-voice is selected for the voice language.
and it is repeated right before the manoeuvre.
repeated as the vehicle approaches the next manoeuvre,
and it is repeated again right before the actual manoeuvre.
Select whether to have the navigation system announce by
voice a quick summary of the route whenever a route is
calculated.
you have just entered when crossing countr y borders.
voice the traffic information whenever a traffic incident on
your route is received.
Select whether to read out the message when a system
message appears.
[Warnings]
Enables or disables warnings and sets up the warning function.
• This system is able to warn you if you exceed the current speed limit. This information may not be
available for your region (ask your local dealer), or may not be fully correct for all roads on the map.
• You are liable for ensuring that using this feature is legal in the country where you intend to use it.
Menu Item Description
[Speed Warning] Set the type of speed and alert warnings.
[Warn When Speeding] Select whether to receive visible and/or audible warnings.
[Disabled] No warnings will go off.
- 53 -
Page 54

English
Important
Menu Item Description
[Visual] Visible warnings will go off when exceeding the speed
[Audio and Visual] Audible and visible warnings will go off when exceeding
[Speed Limit Always
Visib le]
[Outside Towns: ***%
of the Speed Limit]
[Within Towns: ***% of
the Speed Limit]
[Alert Points] This setting allows you to receive a warning when
[Alert Point Warnings] Set to on to enable to adjust a variety of alert warnings.
[Alert Types] Set the type of alert point.
[Speed Camera Types]* Set the type of speed camera.
[Warning Road Signs] Touch this key to turn on or off warnings and to set the
* When you are driving in France, [Dangerous Zone] is displayed instead of [Speed Camera Types].
▶Setting the alert point warnings
You can set an alert for the different alert point categories, individually.
The warning for road safety cameras (like speed cameras) is disabled when you are in certain countries
where warnings for road safety cameras are prohibited. However, you are fully responsible for ensuring
that this featu re is legal in th e country wh ere you intend to use it.
limit.
the speed limit.
Select whether to see the speed limit sign on the map all
the time. The colour of the speed limit sign changes as
exceeding the speed limit when selected.
Set the percentage of the speed limit warning message in
rural areas.
Set the percentage of the speed limit warning message in
urban areas.
approaching alert points like school zones or railroad
crossings (page 54).
distance from the hazard to receive the warning at. These
can be set individually for the different warning types.
1 Press then touch .
2 Touch , and then touch [Settings].
3 Touch [Warnings].
4 To uch [A ler t Po in ts] .
5 Touch [Alert Point Warnings] to turn it on.
6 Touch the item you want to set from [Alert Types] or [Speed Camera Types].
- 54 -
Page 55

English
NOTE
When you are driving in France, [Speed Camera Types] is not available and [Dangerous Zone]
NOTE
becomes available instead. If [Dangerous Zone ( HVA)] i s set to on, alert points that you set are also
alerted as dangerous zones. You can also set the distance of the pre-alert zone in [Pre-Alert Zone]
and turn the sound alert on or off in [Sound alert].
7 Touch any of the items to change the setting.
8 Touch [Warning Type] and then touch one of the options.
[Disabled] The system does not warn you of the alert points for this category.
[Visual] You will receive a visible warning while you are approaching the
[Audio and Visual] You will receive audible and visible warnings while you are
If you select [Audio and Visual] in the warning type setting, you can change the reception timing of
the audio alert. If you select [Only When Speeding], the audio alert is only played when you exceed
the given speed limit. If you select [When Approaching], the audio alert is always played when
approaching one of these alert points. In order to draw your attention, the alert is different when
you exceed the speed limit.
points in this ca tegory.
approaching the points in this category.
[Navigation Map]
Fine-tunes the appearance of the map screen and adjusts how the software helps you
navigate with different kinds of route-related information on the map screen.
Menu Item Description
[Map Display] See the effect when you change a setting.
[Viewpoint]
[Far] [Normal] [Close]
[Manual]
[Colour Mode]
[Auto] [Day] [Night]
Adjust the basic zoom and tilt levels to your needs. Some
preset levels are available. If you select [Manual], you can
store adjusted map scales and view angles.
Switches between daytime and nighttime colour modes or
let the software switch between the two modes
automatically a few minutes before sunrise and a few
minutes after sunset.
[Day Map Colour] Select the colour scheme used in the daytime map.
[Night Map Colour] Select the colour scheme used in the nighttime map.
[Landmarks]* Shows or hides 3D landmarks which are 3D ar tistic or block
[Buildings]* Shows or hides 3D city models which are 3D artistic or
representations of prominent or well-known objects.
block representations of complete city building data
containing actual building sizes and actual positions on the
map.
- 55 -
Page 56

English
Menu Item Description
[3D Terrain] Shows or hides the 3D elevation of the surrounding terrain.
[Track Logs] Turns on or off track log saving which saves the sequence
[Place Markers] Select which POI icons to show on the map while
[Data Fields] Choose to have different values displayed for when
[Route Progres s Bar] Turns on or off the route progress bar to display the current
[Offer Motorway Services] Select whether to stop by a petrol station or a restaurant
[Services Displayed] Select the service types displayed for the motorway exits or
[Automatic Overview] When select ed, the map zooms out to show an overview of
[Signposts ] Whenever adequate information is available, lane
[Junctio n View] If you are approaching a motorway exit or a complex
[Tunnel View] When entering tunnels, the surface roads and buildings
of the locations you go through on your journeys.
navigating.
navigating a route to a select destination and for when just
cruising around without any particular destination
(page 23).
[First], [Second] and [Third] selects items displayed in the
data fields shown when the route exists. [Without Route]
selects the items dis played in the data fiel ds shown when a
route does not exist.
route as a stra ight line located on the right side of the map.
The arrow represents your current position and moves up
the line as you travel along the route.
during your journey (page 22).
service stations. Choose from the POI categories.
the surrounding area if the next route event (manoeuvre) is
far. When you get close to the event, the map returns to the
normal map view.
information similar to the real ones on road signs above
the road is dis played at the top of the map. You can turn
this feature on or off.
junction and the necessary information is available, the
map is replaced with a 3D view of the junction.
can be distracting. This feature shows a generic picture of a
tunnel instead of the map. A top-down overview of the
tunnel and remaining distance are also displayed.
- 56 -
Page 57

English
Menu Item Description
[Offer Congestion Detour
on Highways]
[Offer Real Time
Alternative Routes]
[Offer Parking Aroun d
Destination]
[Offer Hints Upon Detour] If you leave the recommended route and suddenly exit the
* This function becomes effective only when the additional map data is installed (AVIC-Z720DAB/AVIC-
Z620BT/AVIC-Z7210DAB/AVIC-Z6210BT).
When you slow down while driving on a motorway due to
a traffic jam, this navigation system offers you a detour
using the next exit. The message shows you the distance to
the exit and the difference in the distance and estimated
time compared to the original route. You can choose from
one of the following options:
• Touch [Dismiss] or just ignore the message if you want to
keep the original route.
• Touch [Preview] to see an overview of the original route
and the detour to make the decision. You can accept the
detour as shown in the preview, or increase the
motorway segment bypassed before accepting.
• Turn to the suggested new direction.
Alternative routes can be suggested when driving on
normal roads. This navigation system will select a different
turn in the upcoming junction and offer you a different
route for the next section of the route. You cannot,
however, modify the offered detour.
Parking at the destination may not be easy to find in city
areas. As you approach the destination, this navigation
system can offer parking category places near your
destination. Touch to open a top-down map with the
destination and the offered parking places. The route is
calculated by selecting one of the parking places.
motorway, this navigation system offers different
alternatives near the exit like petrol stations or restaurants.
Also, if there are avoidable parts of t he original route ahead
(like a tunnel, a toll road or a ferry), you will find them in the
list in case you want to bypass them with the help of this
navigation system.
[Regional]
Changes the voice guidance language, the application language, and measurement
units.
- 57 -
Page 58

English
Menu Item Description
NOTE
NOTE
[Language] Displays the current language of the user inter face. By
[Voice Language] Displays the current voice guidance profile. By touching
touching the key, you can select a new language from the
list of available languages. This system will restart if you
change this setting.
the key, you can select a new voice guidance language
from the list of available languages and speakers. Touch
any of these keys to hear a sample voice prompt.
[Units and Formats] Set the various units to be used by this system.
This system may not support all the listed units in some voice
guidance languages.
[Time Zone] By default, the time zone is taken from the map
information and adjusted according to your current
location.
If a setti ng other than [Automa tic Time Zone] is selected, [Time
Zone] (the option to set the time difference manually) and
[Daylight Saving Time] (t he option to turn on or off daylight saving
time) can also be set.
[Automatic Time Zone] The time zone setting changes automatically.
[Manual Time Zone] The present setting value for the time difference and
[Manual Time Zone if
Auto Unavailable]
[Manual Time Zone in
Current Zone]
[Daylight Sav ing Time] Set daylight saving time as applying or not unless
daylight saving time that you set are used.
The time zone setting changes automatically if automatic
change is available. Otherwise, the present setting value
that you set is used.
The present setting value that you set is used in the current
time zone. If your vehicle moves to another time zone, the
time zone setting changes automatically.
[Automatic Time Zone] is set.
[Display]
Sets separate themes for daytime and nighttime use, adjusts the display backlight, and
enables or disables menu animations.
- 58 -
Page 59

English
Menu Item Description
[Menu Ani mations] When animation is turned on, the keys on the menus and
[Day Skin Theme] Select the style and colours of the navigation menu used in
[Night Skin Theme] Select the sty le and colours of the navigation menu used in
keyboard screens are animated. Screen transitions are also
animated.
the daytime.
the nighttime.
[Traffic]
Enables or disables the traffic information feature.
Menu Item Description
[Traffic] Enable or disable the TMC receiver that can receive real-
[Data Sour ce]
[Radio] [Online]
[Use Traffic Info] Select whether to have traffic incidents be taken into
[Show Traffic Info] Select whether to show icons relevant to traffic incidents
[Off] No traffic icons or lines indicating the traffic flow are
[Colour] Only the lines indicating traffic flow are shown on the map.
[Colour And Icon] Icons for the relevant traffic incidents and lines indicating
[Show Free Traffic Flow As
Well ]
[Offer Detour if it Saves at
Least:]
[Confirm Detours
Manually]
time traffic information.
Select which data source to receive real-time traffic
information from. [Online] is available only if the device is
enabled.
consideration when the route is calculated.
and lines indicating the traffic flow on the map.
shown.
the traffic flow are shown on the map.
Select whether to receive information on smooth traffic
flow.
Set the minimum time to be saved when having the system
suggest a detour route. If the estimated time saved by the
planned detour avoiding the traffic incidents is more than
the set time, the system suggests the new detour route.
Otherwise, the new route is not suggested.
Enable or disable the manual confirmation of every
recalculation.
[Trip Monitor]
Turns automatic trip log saving on or off and checks the current size of the trip database.
- 59 -
Page 60

English
Menu Item Description
[Enable Auto-Saving] Set whether automatic trip logging is activated or not
[Save Track Log] Track logs, the sequence of the positions given by the GPS
(page 46).
receiver, can be saved together with trip logs. You can
activate the track logger whenever the trip logger is
activated (page 46).
[Start Configuration Wizard]
Modifies the basic software parameters used during the initial setup process.
[SyncTool]
Starts the synchronisation tool, which makes it possible to update your maps (page 60).
Updating the map
You can update existing content, purchase additional maps and activate extra services
on your product. To update the content, download the update on your USB memory
storage by using the computer to which the Naviextras Toolbox is installed. Then,
transfer the data from connected USB memory storage to your navigation system by
using [SyncTool] on this product. For details, access the following URL and refer to “HOW
TO UPDATE?” GUID E.
http:/ /pioneer.navie xtras.com
- 60 -
Page 61

English
NOTES
TIP
CAUTION
Bluetooth
Bluetooth connection
1 Turn on the Bluetooth function on the device.
2 Press .
3 Touch then .
The Bluetooth screen appears.
4 Touch [Connection].
5 Touch .
The unit starts to search for available devices, then displays them in the device list.
6 Touch the Bluetooth device name.
After the device is successfully registered, a Bluetooth connection is established by
the system. Once the connection is established, the device name is displayed on the
list.
• If twenty devices are already paired, [Memory Full] is displayed. Delete a paired device first (page 62).
• If your device supports SSP (Secure Simple Pairing), a six-digit number appears on the display of this
product. Touch [Yes] to p air the device.
• If a PIN code inp ut is required, enter a PIN code. ( The default PIN code is "0000 ".)
The Bluetooth conn ection can also be made by detec ting this product from the Blueto oth device.
Before registration, make sure th at [Visibility] in the [Bluetooth] menu is set to [O n] (page 62). For
details on Bluetooth device operations, refer to the operating instructions supplied with the Bluetooth
device.
Bluetooth settings
1 Press .
2 Touch then .
Never turn this product off and disconnect the device while the Bluetooth setting operation is being
processed.
- 61 -
Page 62

English
CAUTION
NOTE
Menu Item Description
NOTE
ABC
[Connection] Connect, disconnect, or delete registered Bluetooth device
[Auto Connect]
[On] [Off]
[Visibility]
[On] [Off]
[PIN Code Input] Change the PIN code for Bluetooth connection.
[Device Information] Displaying the device name and address of this product.
[Bluetooth Memory Clear] Touch [Clear] then [OK] to clear the Bluetooth memory.
manually.
Touch to delete registered device.
To connect a registered Bluetooth device manually, touch
the name of the device.
To disconnect the device, touch the name of the connected
device in the list.
Connect the Bluetooth device manually in the following cases:
• Two or more Bluetooth devices are registered, and you want to
manually select the device to be used.
• You want to reconnect a disconnected Bluetooth device.
• Connecti on cannot be established auto matically for some
reason.
Select [On] to connect the last connecte d Bluetooth device
automatically.
Select [ On] to make this pro duct visible to the other device.
The default PIN code is “0000”.
1 Touch [0] to [9] to input the pin code (up to 8 digits).
2 Tou c h .
Hands-free phoning
To use this function you need to connect your mobile phone to this product via
Bluetooth in advance (page 61).
For your safety, avoid talking on the phone as much as possible while driving.
When the system lan guage is set to Russian, appears. If you want to change the cha racter, touch
the key repeatedly until the desired character appears.
Making a phone call
1 Press .
2 Touch .
- 62 -
Page 63

English
The phone menu screen appears.
TIPS
NOTE
3 Touch one of the call icons on the phone menu screen.
The following items are displayed.
• Name of the current mobile phone
• List number of the current mobile phone
• Reception st atus of the current mobile phone
• Battery status of the curre nt mobile phone
Using preset dial list (page 64)
Using phone book
Select a contac t from the phone book. Touch the desired name on the list then
select the phone number.
• The contacts on you r phone will be automatically transfer red to this product.
• Update the phone book manually.
[Visibility] of the [Bluetooth] screen should be on (page 62).
Using call history
Make a phone call from the received call , dialled call , or missed call .
Direct phone n umber input
Enter the number keys to enter the phone number then touch to make a call.
Switches to the voice reco gnition function (page 64 ).
▶To end the call
1 Touch .
- 63 -
Page 64

English
TIPS
NOTES
Using the preset dial lists
▶Registering a phone number
You can easily store up to six phone numbers per device as presets.
1 Press .
2 Touch .
3 Touch or .
On the [Phone Book] screen, touch the desired name to display the contact’s phone
number.
4 Touch .
▶Dialling from the preset dial list
1 Touch .
2 Touch the desired entry on the list to make a call.
The dial screen appears and dialling starts.
▶Deleting a phone number
1 Press .
2 Touch .
3 Touch .
4 Touch .
5 Touch [Yes].
Receiving a phone call
1 Touch to answer the call.
Touch to end the call.
• Touch while getting a call waiting, switch to the talking person.
• Touch while getting a call waiting to reject the call.
Voice recognition function
You can use the voice recognition function of iPhone or smartphone.
• When an iPhone running iOS 6.1 or higher is used, Siri Eyes Free Mode is available with this product.
- 64 -
Page 65

English
• For using this function with a smartphone, the device must be compatible with Android Auto. For
TIP
TIP
NOTES
using the voice re cognition function with a smartpho ne, launch Android Auto beforehand.
1 Press .
2 Touch .
3 Touch .
The voice recognition function launches and the voice control screen appears.
You can also launch the voice recognition function by pressing .
Minimising the dial confirmation screen
1 Touch .
To display the dial confirmation screen, touch again.
• The dial confirmation screen cannot be minimised on the AV operation screen.
• AV sources cannot be selected even if the dial confirmation screen is minimised while talking on the
phone or receiving an incoming call.
Phone settings
1 Press .
2 Touch then .
Menu Item Description
[Auto Answer]
[On] [Off]
[Ring Tone]
[On] [Off]
[Invert Name] Select [Yes] to change the order of the first and last names
Select [On] to answer an incoming call automatically.
Select [On] if the ring tone does not come out from the car
speakers.
in the phone book.
Setting the private mode
During a conversation, you can switch to private mode (talk directly on your mobile
phone).
1 Touch or to turn private mode on or off.
- 65 -
Page 66

English
Adjusting the other party’s listening volume
This product can be adjusted to the other party’s listening volume.
1 Touch to switch between the three volume levels.
Notes for hands-free phoning
▶General notes
• Connection to all mobile phones featuring Bluetooth wireless technology is not
guaranteed.
• The line-of-sight distance between this product and your mobile phone must be 10
metres or less when sending and receiving voice and data via Bluetooth technology.
• With some mobile phones, the ring sound may not be outpu t from the speakers.
• If private mode is selected on the mobile phone, hands-free phoning may be disabled.
▶Registration and connection
• Mobile phone operations vary depending on the type of mobile phone. Refer to the
instruction manual that came with your mobile phone for detailed instructions.
• When phone book transfer does not work, disconnect your phone and then perform
pairing again from your phone to this product.
▶Making and receiving calls
• You may hear a noise in the following situations:
– When you answer the phone using the button on the phone.
– When the person on the other end of the line hangs up the phone.
• If the person on the othe r end of the line cannot hear the conversation due to an echo,
decrease the volume level for hands-free phoning.
• With some mobile phones, even after you press the accept button on the mobile
phone when a call comes in, hands-free phoning may not be performed.
• The registered name will appear if the phone number is already registered in the
phone book. When the same phone number is registered under different names, only
the phone number will be displayed.
▶The received call and dialled number histories
• You cannot make a call to the entry of an unknown user (no phone number) in the
received call history.
• If calls are made by operating your mobile phone, no history data will be recorded in
this product.
▶Phone book transfers
• If there are more than 1 000 phone book entries on your mobile phone, not all entries
may download completely.
• Depending on the phone, this product may not display the phone book correctly.
- 66 -
Page 67

English
• If the phone book in the phone contains image data, the phone book may not be
NOTES
transferred correctly.
• Depending on the mobile phone, phone book transfer may not be available.
Bluetooth audio
Before using the Bluetooth audio player, register and connect the device to this product
(page 61).
• Depending on the B luetooth audio player connected to thi s product, the available operation s with
this product may be limited to the following two levels:
– A2DP (Advanced Audio Distribution Profile): Only playing back songs on your audio player is
possible.
– A2DP and AVRCP (Audio/Video Remote Control Profile): Playing back, pausing, selecting songs, etc.,
are possible.
• Depending on t he Bluetooth device connected to this product , the available operations with thi s
product may be limited or differ from the descriptions in this manual.
• While you are listening to songs on your Bluetooth device, refrain from operating the phone function
as much as possible. If you try operating, the signal may cause noise for song playback.
• When you are talk ing on the Bluetooth device co nnected to this product via Bl uetooth, it may pause
playback.
1 Press .
2 Touch then .
The system setting screen appears.
3 Touch [AV Source Settings].
4 Confirm that [Bluetooth Audio] is turned on.
5 Press .
6 Touch .
The AV source screen appears.
7 Touch [Bluetooth Audio].
The Bluetooth audio playback screen appears.
Basic operation
Bluetooth audio playback screen 1
- 67 -
Page 68

English
Switches between playback an d pause.
NOTE
Skips files forwards or backwards.
• By pressing then touch or , you can also skip files forwards or
backwards.
• By pressing then touch and hold or , you can also perform fast
reverse or fast forwa rds.
Selects a file or folder from the list to playback.
This function is available only when the AVRCP version of the Bluetooth device is
1.4 or higher.
Switches among the Blue tooth devices when the devices are conn ected to
this product via Bluetooth.
Bluetooth audio playback screen 2
Sets a repeat play range.
Plays files in random order.
- 68 -
Page 69

English
NOTE
Wi-Fi
You can connect your Wi-Fi certfied mobile device to this product via Wi-Fi connection.
Wi-Fi connection
1 Turn on the Wi-Fi function on the device.
2 Press .
3 Touch then .
4 Touch [Wi-Fi Settings].
5 Set [Wi-Fi] to [ON].
6 Touch [Device Information].
7 Connect this product with the dislayed network name in [Device Information]
from the mobile device.
Wi-Fi settings
1 Press .
2 Touch then .
3 Touch [Wi-Fi Settings].
This setting is available only when you stop your vehicle in a safe place and apply the handbrake.
The menu items vary according to the source.
Menu Item Description
[Wi-Fi]
[ON] [OFF]
[Device Information] Displays the network name and MAC address of this
Switches Wi-Fi connection on or off.
product.
- 69 -
Page 70

English
NOTES
Wi-Fi audio
Before using the Wi-Fi audio player, connect the device to this product via A pple CarPlay
(page 103) or Android Auto wirelessly (page 107).
1 Press then touch .
2 Touch [Wi-Fi Audio].
The Wi-Fi audio playback screen appears.
• [Wi-Fi Audio] is displayed as [Android Auto] when the Android Auto is in use.
• [Wi-Fi Audio] is displayed as [App le CarPlay] when the Apple CarPlay is in use.
Basic operation
Wi-Fi audio screen (Example: Apple CarPlay)
Wi-Fi audio with Apple CarPlay operation is same as the iPod source function. For details
of the operation, refer to the iPod operation (page 96).
- 70 -
Page 71

English
AV source
Supported AV source
You can play or use the following sources with this product.
• Radio
• Digital Radio*1
• CD
• ROM (compressed audio or video files on discs)
• DVD-Video
• Video-CD
The following sources can be played back or used by connecting an auxiliary device.
• USB
• SD*2
• iPod
• Bluetooth® audio
• Wi-Fi audio (Apple CarPlay, Android Auto)
• AV in put (AV )
• AUX
• HDMI*3
• Wireless Mirroring
*1 AVIC-Z920DAB/AVIC-Z820DAB/AVIC-Z720DAB/AVIC-Z7210DAB
*2 AVIC-Z920DAB/AVIC-Z82 0DAB
*3 AVIC-Z920DAB
Displaying the AV operation screen
1 Press then touch the AV operation key.
The AV operation screen appears.
- 71 -
Page 72

English
NOTE
Displays the source list.
Shows the navigation information.
This is not displayed for some sources.
Recalls equaliser curves (page 132).
Selecting a source
Source on the AV source selection screen
1 Press then touch .
2 Touch the source icon.
When you select [Source OFF], the AV source is turned off.
Source on the source list
1 Press then touch the AV operation key.
2 Touch .
3 To uch th e so urc e key .
When you select [Source OFF], the AV source is turned off.
Changing the display order of source
This func tion is available only when you stop your vehicle in a safe place and ap ply the handbrake.
- 72 -
Page 73

English
NOTE
Changing the display order of source icons
1 Press then touch .
2 Touch and hold the source icon and drag the icon to the desired position.
Changing the display order of source keys
1 Press then touch the AV operation key.
2 Touch .
3 Touch .
4 Drag the source key to the desired position.
Adjusting the range of favourite source icons area
This func tion is available only when you stop your vehicle in a safe place and ap ply the handbrake.
1 Press .
2 Touch and hold .
appears at the top left of the favourite source icons.
3 Drag to the desired position.
To finish the adjusting, touch any place of the display except for the favourite source
icons area.
- 73 -
Page 74

English
NOTES
Setup for iPod/iPhone or
smartphone
When using an iPod/iPhone or a smartphone with this product, configure setting s of this
product according to the device to be connected. This section describes the settings
required for each device.
• Operation methods may vary depending on the iPod/iPhone model or smartphone and its software
version.
• Depending on t he software version of iPod/iPhone or the version of smartphone OS, it may not be
compatible with this unit.
• The setting may not be operable right after it is changed.
• This setting is available only when a hands-free telephone is not used.
• The setting will change after the following processes are automatically executed.
– The source is turned off.
– WebLink, Apple CarPlay or Android Auto is exited.
– The smartphone connection (USB and Bluetooth) is disconnected.
iPod/iPhone
Compatible iPod/iPhone models
• iPhone 7
• iPhone 7 Plus
• iPhone SE
• iPhone 6s
• iPhone 6s Plus
• iPhone 6
• iPhone 6 Plus
• iPhone 5s
• iPhone 5c
• iPhone 5
• iPod touch (6th generation)
• iPod touch (5th generation)
• iPod nano (7th generation)
Depending on the iPod models, it may not be compatible with some AV sources. For
details about iPod/iPhone compatibility with this product, refer to the information on
our website.
1 Press .
2 Touch then .
- 74 -
Page 75

English
3 Touch [Smartphone -related Settings].
4 Touch [Smartphone Setup].
5 Touch [iPhone/iPod].
The available function icons are displayed.
6 Touch [OK].
Smartphone (Android™ device)
Compatible smartphones
Compatibility with all smartphones is not guaranteed. For details about smartphone
compatibility with this product, refer to the information on our website.
1 Press .
2 Touch then .
3 Touch [Smartphone -related Settings].
4 Touch [Smartphone Setup].
5 Touch [Others].
6 Touch [Android Auto] to use Android Auto.
Touch [WebLink] to use WebLink.
The available function icons are displayed.
7 Touch [OK].
- 75 -
Page 76

English
NOTES
NOTE
Digital Radio
Z920DAB Z820DAB Z720DAB Z7210DAB
Digital Radio tuner operations
For improved Digital Radio reception, make sure a Digital Radio aerial with phantom
power input (active type) is used. Pioneer recommends using AN-DAB1 (sold separately)
or CA-AN-DAB.001 (sold separately).
Current consumption of Digital Radio aerial should be 100 mA or less.
• High sound qual ity (nearly as high as for CDs, alth ough it may be reduced in some cases in order to
allow more services to be broadcast)
• Interference-free reception
• Some statio ns perform broadcast testin g.
MFN support
When some ensembles support the same service component, switches to another
ensemble that has better reception automatically.
Starting procedure
1 Press then touch .
2 Touch [Digital Radio].
The Digital Radio screen appears.
The service list will be automatically updated when the Digital Radio function is started for the first
time. If the update succeeds, the station listed at the top of the service list will be automatically
tuned in to.
- 76 -
Page 77

English
Basic operation
NOTES
Digital Radio screen
Displays the preset cha nnel list.
Select an item on the list to switch to the preset service.
Select s the DAB1, DAB2, o r DAB3 band.
Stores recent broadcasts to memory automatically (time shift mode).
Pause or listen to the stored broadcasts again by touching .
Touch to resume the live broadcast.
• Stored broadca st is overwritten by the lates t broadcast.
• If the duration that a selection is paused exceeds the length of the memory
capacity, playback will resume from the beginning of the selection in memory.
Recalls the pres et channel stored to a key from memor y.
Stores the current broadc ast frequency to a key.
Manual tuning
When there are multiple services in the same frequency, switches the
services one by on e.
Seek tuning
Skips to the nearest ensemble.
- 77 -
Page 78

English
TIPS
Selects a service component.
TIP
NOTES
Touch the following catego ry then select each ite m.
[Station]: Displays all service components.
[Program Type] (PTY label): Searches from programme type information.
[Station Group] (ensemble label): Displays the ensemble list.
If you touch [Update Stations], you can update station list information manually.
• Station lis t information is automatica lly updated, when you star t to use this
source.
• When there is any changes in the current station group, station list information
automatically updated.
• By pressing the n touch or , you can a lso switch the preset channels .
• By pressing then touch and hold or and releasing it, you can also perform seek tuning.
DAB settings
1 Press .
2 Touch then .
The system setting screen appears.
3 Touch [AV Source Settings].
4 Touch [DAB Settings].
The menu items vary according to the source.
Menu Item Description
[TA Interrupt]* Receives the traffic announcement from the las t
[DAB+RDS TA] Receive s current traffic information for DAB and
[RDS TA ONLY] Receives current traffic information for only RDS
selected frequency, interrupting the other
sources.
RDS (AN-DAB1 has priority) if available.
if available.
- 78 -
Page 79

English
NOTES
NOTE
Menu Item Description
[TA OFF] Disables this function.
[Service Foll ow]*
[On] [Off]
[Soft Link]*
[On] [Off]
[Antenna Power]
[On] [Off]
* This setting is available only when [Digital Radio] is selected as the source.
Searches for another ensemble that supports
the same service component with better
reception. If no alternative service component
can be found or reception remains poor, the
unit will automatically s witch to an identical FM
broadcast. (HARD LINK)
When HARD LINK is unsuccessful, tunes to
another ensemble that supports the similar
service component. If no alternative ser vice
component can be found or reception remains
poor, this funct ion will automatically swit ch to a
similar FM broadcast.
• This setting is available only when [Service Follow] is
set to [On].
• Only available in areas where SOFT LINK function is
supported.
• The broadcast content of the switched channel may
differ from the content of the original channel.
Select w hether to output power to a connected
Digital Radio aerial. For details on how to
connect a Digital Radio aerial, refer to the
Installation Manual.
This setting is available when the source is turned off.
- 79 -
Page 80

English
Radio
Starting procedure
1 Press then touch .
2 Touch [Radio].
The Radio screen appears.
Basic operation
Radio screen
Recalls the pres et channel stored to a key from memor y.
Stores the current broadc ast frequency to a key.
Displays the preset cha nnel list.
Select an item on the list ([1] to [6]) to switch to the preset channel.
Selects the FM1, FM2, FM3, MW , or LW band.
Manual tuning
Seek tuning or non stop see k tuning
Releasing the key in a few seconds skips to the nearest station from the
current frequency. Keep holding the key for long seconds to perform,
performs non stop seek tuning.
- 80 -
Page 81
English
TIPS
• By pressing the n touch or , you can a lso switch the preset channels .
NOTES
NOTE
• By pressing then touch and hold or and releasing it, you can also perform seek tuning.
Storing the strongest broadcast frequencies (BSM)
The BSM (best stations memory) function automatically stores the six strongest
broadcast frequencies under the preset channel keys [1] to [6].
• Storing broadcast frequencies with BSM may replace those you have already saved.
• Previously stored broadcast frequencies may remain stored if the number of frequencies stored has
not reached the limit.
1 Touch the preset channel list display key.
2 Touch to begin search.
While the message is displayed, the six strongest broadcast frequencies will be
stored under the preset channel keys in the order of their signal strength.
To cancel the storage process
1 Touch [Cancel].
Radio settings
1 Press .
2 Touch then .
The system setting screen appears.
3 Touch [AV Source Settings].
4 Touch [Radio Settings].
The menu items vary according to the source.
Menu Item Description
[Local]
[Off]
FM: [Level1] [Level2] [Level3] [Level4]
MW/LW: [Level1] [Level2]
Local seek tuning allows you to only tune into
radio stations with sufficiently strong signals.
[Level4] for FM and [Level2] for MW/LW are available
only with the stations with the strongest signals.
- 81 -
Page 82

English
NOTE
NOTE
TIP
Menu Item Description
[FM Step]*1
[100kHz] [50kHz]
[Regional] *2
[On] [Off]
[Alternative FREQ]*2
[On] [Off]
[Auto PI]*1
[On] [Off]
[TA Interrupt]*2*3 Receives the traff ic announcement from the last
[DAB+RDS TA] Receive s current traffic information for DAB and
[RDS TA ONLY] Receives current traffic information for only
Select the seek tuning step for the FM band.
The tuning s tep remains at [50kHz ] during manual
tuning.
Switches whether the area code is checked
during the Auto PI search.
Allow the unit to retune to a different frequency
providing the same station.
Searches for the same PI (Programme
Identification) code broadcast station from all
frequency bands automatically when the
broadcasting station contains RDS data.
Even if you set to [O ff], the PI search is automati cally
performed when the tuner cannot get a good
reception.
selected frequency, interrupting the other
sources.
The selected setting also applies to [TA Interrupt]
under [DAB Settings].
RDS (DAB has priority) if available.
DAB+RDS TA if available.
[TA OFF] Disables this function.
[News Interrupt]*2
[On] [Off]
Interrupt the currently selected source with
news programmes.
[Tuner Sound]*2 Switches the sound quality of the FM tuner.
[Talk] Gives priority to noise prevention.
[Standard] Gives no effect.
[Music] Gives priority to the sound quality.
*1 This setting is available when the source is turned off.
*2 This function is available only when you receive the FM band.
*3 AVIC-Z920DAB/AVIC-Z820DAB/AVIC-Z720DAB/AVIC-Z7210DAB
- 82 -
Page 83

English
WAR NIN G
CAUTION
NOTE
Disc
Z920DAB
Z820DAB
Inserting and ejecting a disc
You can play a normal music CD, Video-CD, or DVD-Video using the built-in drive of this
product.
Z920DAB Z820DAB
Keep hands and fingers clear of this product when opening, closing, or adju sting the LCD panel. Be
especially cautious of children’s hands and fingers.
Do not inser t anything other than a disc into the disc -loading slot.
Inserting a disc
Z920DAB Z820DAB
1 Press .
2 Touch to open the LCD panel.
3 Insert a disc into the disc-loading slot.
The source changes and then playback will start.
Z720DAB Z620BT Z7210DAB Z6210BT
1 Insert a disc into the disc-loading slot.
The source changes and then playback will start.
If the disc is already set, select [Disc] as the playing source.
Ejecting a disc
1 Press .
2 Touch to open the LCD panel.
3 Remove the disc and press .
Z720DAB Z620BT Z7210DAB Z6210BT
- 83 -
Page 84

English
1 Press .
TIPS
Basic operation
• By pressing then touch or , you can also skip files/chapters forwards or backwards.
• By pressing then touch and hold or , you can also perform fast reverse or fast forwards.
• If a Video-CD with PBC (playback control) On is being played, appears.
• You can set the screen size for the video image (page 143).
Audio source
Audio source screen 1
Switches between playback an d pause.
Skips files forwards or backwards.
Selects a trac k from the list.
Touch a track on the list to play back.
- 84 -
Page 85

English
Audio source screen 2
CAUTION
Sets a repeat play for t he current disc/the current track.
Plays or does not play trac ks in random order.
Video sou rce
For safety reasons, video images cannot be viewed while your vehicle is in motion. To view video
images, stop in a safe place and apply the handbrake.
Video source screen 1
Hides the touch panel keys.
To display the keys again, touch anywhere on the screen.
- 85 -
Page 86

English
Performs fast reverse or fast forwards.
NOTE
TIPS
Touch again to change the playback speed.
Stops playback.
Displays the DVD menu.
This functi on may not work properly wi th some DVD disc content. In that case, use
touch panel key s to operate the DVD menu.
Switches the audio/ subtitle language.
Searches for the pa rt you want to play.
Touch [Title], [Chapter], [10key], or [Track] then input the desired number from [0]
to [9].
To start playback from the number you registe red, touch .
• To cancel an input number, touch [C].
• For DVD-Videos, you can select [Title], [Chapter] or [10Key].
• For Video-CDs, you can select [Track] or [10key].*
* PBC (playback control) only
Performs frame-by-frame playback.
Performs slow-motion playback.
Each time you touch , it changes the speed in four steps in the
following order: 1/16 -> 1/8 -> 1/4 -> 1/2
Skips files/chapters forwards or backwards.
Performs fast reverse or fast forwards.
- 86 -
Page 87

English
Video source screen 2
NOTE
TIP
Selects the audio output from [L+R], [Left], [Right], [Mix].
This functi on is available for Video-CDs and D VDs recorded with LPCM audio.
Changes the viewing angle (Multi-angle).
This function is available for DVDs featuring multi-angle recordings.
Sets a repeat play for a ll files/the current chapter/the cu rrent title.
Displays the DVD menu keypad.
If items on the DVD men u appear, the touch panel keys may overlay them. If so,
select an item using these touch panel keys.
Touch , , , or to sele ct the menu item then touch .
The way to display the menu differs depending on the disc.
If you touch , you can operate the DV D menu directly.
Resumes playback (Bookmark).
This functi on is available for DVD-Video. You can memori se one point as a
Bookmark for a disc (up to five discs). To clear the bookmark on the disc, touch and
hold this key.
Returns and begins playback from the specified point.
This functi on is available for DVD-Video and V ideo-CDs featuring PBC (pla yback
control).
- 87 -
Page 88

English
WAR NIN G
CAUTION
NOTE
Compressed files
SD function is only available for AVIC-Z920DAB/AVIC-Z820DAB.
Inserting and ejecting media
You can play compressed audio, compressed video, or still image files stored in a disc or
an external storage device.
Z920DAB Z820DAB
Keep hands and fingers clear of this product when opening, closing, or adju sting the LCD panel. Be
especially cautious of children’s hands and fingers.
• Do not insert anything other than a disc into the disc-loading slot.
• Do not insert anything other than SD memory cards into the SD card slot.
• Ejecting an SD memory c ard during data transfer can damage the SD memory card. Be sure to eject
the SD memory card by the procedure described in this manual.
• Do not press when an SD memory card is no t fully inserted. Doing so may damage the card.
• Do not press before an SD memory card has been completely removed. Doing so may damage
the card.
Inserting a disc
Z920DAB Z820DAB
1 Press .
2 Touch to open the LCD panel.
3 Insert a disc into the disc-loading slot.
The source changes and then playback will start.
Z720DAB Z620BT Z7210DAB Z6210BT
1 Insert a disc into the disc-loading slot.
The source changes and then playback will start.
If the disc is already set, select [Disc] as the playing source.
Ejecting a disc
Z920DAB Z820DAB
- 88 -
Page 89

English
Press .
NOTES
NOTES
1
2 Touch to open the LCD panel.
3 Remove the disc and press .
Z720DAB Z620BT Z7210DAB Z6210BT
1 Press .
Inserting an SD memory card
Z920DAB Z820DAB
1 Press .
2 Touch to open the LCD panel.
3 Insert an SD memory card into the SD card slot.
4 Press .
• This system is not compatible with the Multi Media Card (MMC).
• Compatibility with all SD memory cards is not guaranteed.
• This product may not achieve optimum performance with some SD memory cards.
Ejecting an SD memory card
Z920DAB Z820DAB
1 Press .
2 Touch to open the LCD panel.
3 Press the middle of the SD memory card gently until it clicks.
4 Pull the SD memory card out straight.
5 Press .
Plugging a USB storage device
1 Pull out the plug from the USB port of the USB cable.
2 Plug a USB storage device into the USB cable.
• This product may not achieve optimum performance with some USB storage devices.
- 89 -
Page 90

English
• Connection via a USB hub is not possible.
NOTES
TIP
• A USB cable is required for connection.
USB cable
USB storage device
Unplugging a USB storage device
1 Pull out the USB storage device from the USB cable.
• Check that no data is being accessed before pulling out the USB storage device.
• Turn off (ACC OFF) the ignition switch before unplugging the USB storage device.
Starting procedure
For Disc
1 Insert the disc (page 88).
If the disc is already set, select [Disc] as the playing source.
For USB/SD
1 Insert the SD memory card into the SD card slot or plug the USB storage device
into the USB connec tor.
2 Press then touc h .
3 Touch [USB] or [SD].
Playback is performed in order of folder numbers. Folders are skipped if they contain
no playable files.
- 90 -
Page 91

English
NOTES
• For details on inserting SD card see on Inserting an SD memory card (page 89).
TIPS
TIP
NOTE
• For details on plugging USB storage device, see on Plugging a USB storage device (page 89).
Basic operation
• By pressing th en touch or , you can als o skip files/chapters forwards or backwards.
• By pressing then touch and hold o r on the audio or video fi le, you can also perform fast
reverse or fast forwards.
• You can set the screen size for the video and image files (page 143).
Audio source
Audio source screen 1 (Example: USB)
Displays the link search screen.
Touch the song to play back fol lowed by touching the song inform ation, after
switching to Music Browse mode (page 92).
If you touch the artwork, the list of songs in the album is displayed.
This function is available for the external storage device (USB, SD) only.
Switches between playback an d pause.
Switches the following media file types.
[Music]: Compressed audio files
[Video]: Compressed video files
[Photo]: Image files
Skips files forwards or backwards.
- 91 -
Page 92

English
NOTES
Switches the current music information display.
TIP
NOTE
Selects a file from the list.
Touch a file on the list to playback.
Touching a folder on the list shows its contents. You can play a file on the list by
touching it .
When you play compressed audio files stored in an external storage d evice (USB,
SD), you can search for a file using Music Browse ( page 92).
Audio source screen 2 (Example: USB)
Selects the p revious folder or the next folder.
Sets a repeat play range for all files/the current folder/the c urrent file.
Plays file s or does not pl ay in random orde r.
▶Selecting a file using Music Browse mode
You can select files to play back using the categor y list if the files contain tag
information.
• This function is available for the external storage device (USB, SD) only.
• Music Browse mode cannot be held once the power is turned off.
- 92 -
Page 93
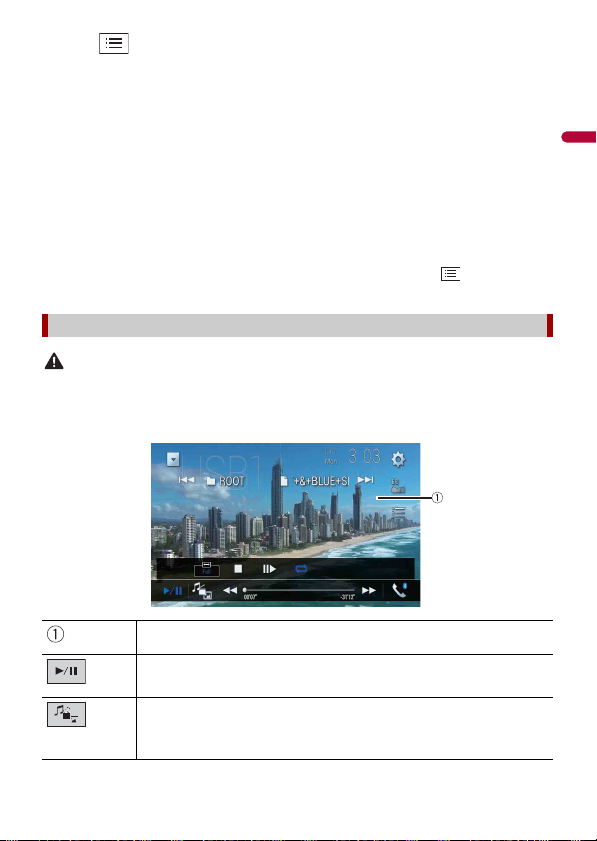
English
Touch .
TIP
CAUTION
1
2 Touch the [Tag] tab.
3 Touch the desired category to display the file list.
4 Touch the item.
Refine the item until the desired song title or file name is displayed on the list.
5 Touch the desired song title or file name to play back.
If the selection made with Music Browse has been cancelled, you can switch to Music
Browse mode again by touching the [Tag] tab on the file/folder list screen and
touching the desired track.
Once the database is created in the USB storage, there is no need to create the database again as long
as the same contents are saved. To enter the Music Browse mode directly, touch and then touch
[Tag] before selecting the song.
Video sou rce
For safety reasons, video images cannot be viewed while your vehicle is in motion. To view video
images, stop in a safe place and apply the handbrake.
Video source screen (Example: USB)
Hides the touch panel keys.
To display the keys again, touch anywhere on the screen.
Switches between playback an d pause.
Switches the following media file types.
[Music]: Compressed audio files
[Video]: Compressed video files
[Photo]: Image files
- 93 -
Page 94

English
TIPS
Performs fast reverse or fast forwards.
TIP
Touch again to change the playback speed.
Stops playback.
Performs frame-by-frame playback.
Performs slow-motion playback.
Sets a repeat play range for all files/the current folder/the c urrent file.
Switches the audio/ subtitle language.
Selects a file from the list.
Touch a file on the list to playback.
Touching a folder on the list shows its contents. You can play a file on the list by
touching it .
Skips files forwards or backwards.
Performs fast reverse or fast forwards.
Still image source
• Image files are not displayed in the rear display.
• By pressing then touch and hold or on the st ill image file, you can search through 10
image files at a time. If the file currently being played is the first or last file in the folder, the search is
not perform ed.
- 94 -
Page 95

English
Still image screen
TIP
Hides the touch panel keys.
To display the keys again, touch anywhere on the screen.
Switches between playback an d pause.
Switches the following media file types.
[Music]: Compressed audio files
[Video]: Compressed video files
[Photo]: Image files
Skips files forwards or backwards.
Selects the p revious folder or the next folder.
Rotates the displayed picture 90° clockwise.
Sets a repeat play range for all files/the current folder.
Plays all files in the current repeat play range or does not play th em in
random order.
Selects a file from the list.
Touch a file on the list to playback.
Touching a folder on the list shows its contents. You can play a file on the list by
touching it .
- 95 -
Page 96

English
NOTES
NOTE
TIPS
NOTE
iPod
Connecting your iPod
When connecting an iPod to this product, the settings are automatically configured
according to the device to be connected.
• Depending on t he generation or version of the iPod, so me functions may not be availabl e.
• Do not delete the Apple Music® app from your iPod since some functions may not be available.
• When connecting an iPhone or iPod touch, quit all applications before connecting the device.
1 Connect your iPod via USB.
2 Press then touch .
3 Touch [iPod].
For details on USB connection , refer to the Installation Manual.
Basic operation
• By pressing then touch or , you can also skip files forwards or backwards.
• By pressing then touch and hold or , you can also perform fast reverse or fast forwards.
Skipping backwards, fast reverse and fast forwards are not available while playing Apple Music Radio.
- 96 -
Page 97

English
Audio source
TIP
NOTE
TIPS
NOTES
Audio source screen 1
Displays the link search screen.
Select a song from the list related to the song currently playing.
If you touch the artwork, the list of songs in the album is displayed.
This function is not available while playing Apple Music Radio.
Switches between playback an d pause.
Skips files forwards or backwards.
Selects a song from the list.
Touch the category then the title of the list to playback of the selected list.
• If you use English as the system language, the alphabet search function is
available. Touch the initial search bar to use this function.
• When you touch Apple Music Radio station in the list screen, Apple Music Radio
screen appears (page 98).
• Depending on the generatio n or version of the iPod, some functions may not be
availa ble.
• Only 16 000 songs in the iPod are available in the list if the iPod has more than 16
000 songs. Available songs depend on the iPod.
- 97 -
Page 98

English
Audio source screen 2
Important
NOTE
NOTE
Changes the audio book speed.
Normal—Fast—Slow
The audiobook spe ed icon may not chang e depending on th e connected iPod/
iPhone.
Sets a repeat play range for all in the selected list/the c urrent song.
Plays songs within the selected list/album randomly.
Apple Music® Radio source
Apple Music R adio may not be available in your country or region. For details abo ut Apple Music Radio,
visit the following site: http://www.apple.com/music/
This func tion is only available w hen using the iPod func tion with an iPhon e 7, iPhone 7 Plus, iPho ne SE,
iPhone 6s, iPhone 6s Plus, iPhone 6, iPhone 6 Plus, iPhone 5s, iPhone 5c, iPhone 5 or iPod touch (5th
and 6th generation).
1 Touch .
2 To uch [R adi o].
- 98 -
Page 99

English
Apple Music Radio screen
NOTE
Switches between playback an d pause.
Displays the pop-up menu for Apple Music Radio.
• Touch [Play More Like This] to play back songs similar to the current song.
• Touch [Play Less Like Thi s] to set it not to play back the c urrent song again.
• Touch [Add to iTunes Wish List] to add the current song to the iTunes wish list.
This functi on may not be used depending on you r Apple Music account status.
Skips tracks forwards.
- 99 -
Page 100

English
NOTES
WAR NIN G
Important
TIPS
WebLink™
WebLink lets you enjoy compatible smartphones apps in the car. You can operate
WebLink compatible applications with finger gestures such as tapping, dragging,
scrolling, or flicking on the screen of this product.
• The supported finger gestures may vary depending on the WebLink compatible application.
• To use WebLink, you must first install the WebLink Host app on the iPhone or smartphone. For details
about the WebLink Host app, visit the following site: https://www.abaltatech.com/weblink/
• Be sure to read Using app-based connected content (page 169) before you perform this operation.
• Copyright protecte d files such as DRM cannot be played.
Certain uses of the iPhone or smartphone may not be legal while driving in your jurisdiction, so you
must be aware of and obey any such restrictions. If in doubt as to a particular function, only perform it
while the car is parked. No feature should be used unless it is safe to do so under the driving conditions
you are experiencing.
Using WebLink
• Pioneer is not liable for any issues that may arise from incorrect or flawed app-based content.
• The content and functionality of t he supported appli cations are the responsibi lity of the App
providers.
• In WebLink, functionality through the product is limited while driving, with available functions
determined by the App providers.
• Availability of WebLink functionality is determined by the App provider, and not determined by
Pioneer.
• WebLink allows access to applications other than those listed that are subject to limitations while
driving.
Starting procedure
When connecting an iPhone or a smartphone to this product, settings are required
according to the connected device. For details, refer to Setup for iPod/iPhone or
smartphone (page 74).
• Touch the desired application icon after the WebLink Host app is launched.
• The desired application is launched, and the application operation screen appears.
• Press to go back to the top men u screen.
- 100 -
 Loading...