


Pinnacle MovieBox DV
PROFESSIONAL QUALITY MOVIE MAKING
QUICK START GUIDE
GUIDE DE DEMARRAGE RAPIDE
MANUAL BREVE DE INSTRUCCIONES
GUIA DE INÍCIO RÁPIDO
41003775
MovieBox DV Quick Start Guide
USA/F/E/BR December 2003 41003775
© Pinnacle Systems 2003
All rights reserved.
No part of this manual may be reproduced or transferred to other media without explicit written permission from Pinnacle Sysrems., Braunschweig, Germany.
All brand or product names are trademarks or registered trademarks of their respective holders.
© Pinnacle Systems 2003
Tous droits réservés.
Toute reproduction ou représentation intégrale ou partielle, par quelque procédé que ce soit, du présent manuel est interdite sans l'autorisation expresse par écrit de Pinnacle Systems GmbH, Brunswick.
Tous les noms de marques et de produits sont des marques ou des marques déposées des constructeurs respectifs.
© Pinnacle Systems 2003
Todos los derechos reservados
No se permite reproducir o transferir parte alguna de este manual a otro tipo de soporte sin la autorización por escrito de Pinnacle Systems, Braunschweig, Alemania.
El resto de denominaciones de marca y de producto son marcas de fábrica o marcas registradas de los fabricantes correspondientes.
© Pinnacle Systems 2003
Todos os direitos reservados.
Nenhuma parte deste guia poderá ser copiada ou transferida para outro meio sem a autorização escrita da Pinnacle Systems GmbH, Braunschweig.
Todos os nomes de marcas e produtos são marcas ou marcas registradas de seus respectivos fabricantes.

Pinnacle MovieBox DV
PROFESSIONAL QUALITY MOVIE MAKING
QUICK START GUIDE

English

Before you begin
This chapter tells you which computer system components are required for the operation of MovieBox DV and what is included in the MovieBox DV package contents.
SYSTEM REQUIREMENTS
Please make sure your system meets the following requirements before installing MovieBox DV:
Computer using MS Windows operating system
Intel Pentium or AMD Athlon, 800 MHz (1.5 GHz or higher recommended)
256 MB RAM (512 MB recommended)
Windows 98SE, Windows Millennium, Windows 2000, Windows XP (Windows XP recommended)
1394/FireWire port
DirectX compatible Graphics Card
(ATI Radeon or Nvidia Geforce recommended)
DirectX compatible Sound Card (Creative Labs Audigy recommended)
500 MB of disk space to install software
Minimum 1 GB needed for project and temp files
Speakers
Mouse
CD-ROM drive
DVD drive required to install tutorial, electronic manual and some bonus content. If you do not have a DVD drive you may order the tutorial, electronic manual and bonus content separately on CD ROMs
Optional
y CD burner for creating Video CDs or Super Video CDs y DVD burner drive for creating DVDs
y ProLogic compatible audio system for preview of surround sound mixes
y Use of some features requires product activation via internet
English
Quick Start Guide 3

English
Computer using Apple Macintosh operating system
Apple Macintosh OS9 and above for iMovie
Apple Macintosh OS X for iMovie and FinalCut
Mouse
CD-ROM drive
1394/FireWire link
Video equipment
MovieBox DV can capture from and output video to:
Any DV or Digital8 camcorder or VCR. (To output to the camcorder, it must be enabled to record from DV Input.)
Any analog (8mm, Hi8, VHS, SVHS, VHS-C or SVHS-C) camcorder or VCR.
PACKAGE CONTENTS
Please make sure your MovieBox DV system is complete before you begin the installation. The system includes:
MovieBox DV* |
|
|
|
IEEE-1394 cable |
|||
|
6 x 6 |
|
6 x 4 |
Power supply |
Studio Manual and this Quick |
|
Install Guide |
Disks with Studio and Content software
If any parts are missing, please contact your retailer.
*Specifications are subject to change without notice or obligation.
4 Pinnacle MovieBox DV

Software Installation
INSTALLATION OF STUDIO SOFTWARE FOR THE PC
1.Insert the Studio CD-ROM into your CD-ROM drive.
If you have Autorun enabled for your CD-ROM, Setup will run automatically. If you do not have Autorun enabled, navigate to your CD-ROM drive, and double-click on Setup.exe.
2.Select the language of your choice.
3.Check for previous version.
If a previous version of Studio is not found on your system you will be asked to insert the CD-ROM of your previous version into your CDROM drive.
4.Personalise your Studio installation by entering your name, country, e-mail address (optional) and serial number.
5.Registration.
Next you will be given the opportunity to register your copy of Studio. You can quickly and easily register using your Internet connection. Registration is important for four reasons:
You will receive a free bonus effect pack upon registration.
Registration is required to receive technical support.
Registration allows Pinnacle Systems to inform you of free updates to the Studio software.
Registration makes you eligible for special offers and promotions from Pinnacle Systems.
6.Agree to the Studio software license terms (click I Agree).
If you do not accept or understand the terms, you should promptly return this product to your dealer.
7.Choose Typical installation (recommended).
Only advanced computer users should choose Custom.
8.Click Next until the installation is completed.
9.Restart.
In some cases, you may be instructed to restart your PC.
Quick Start Guide 5
English

English
10.Insert the Studio Content DVD into your DVD drive.
If you have Autorun enabled for your DVD drive, Setup will run automatically. If you do not have Autorun enabled, navigate to your DVD drive, and double-click on Setup.exe. If you do not have a DVD drive you may order the tutorial, electronic manual and bonus content separately on CD ROMs at http://www.pinnaclesys.com/studio9cd
11.Install additional software.
If you received any additional effects or content with your Studio upgrade, install it now by inserting the CD-ROM(s) or DVD into your CD-ROM or DVD drive. If you have Autorun enabled for your CDROM or DVD drive, Setup will run automatically. If you do not have Autorun enabled, navigate to your CD-ROM or DVD drive, and doubleclick on Setup.exe.
SOFTWARE FOR APPLE MACINTOSH
MovieBox DV supports the following Apple Macintosh applications:
iMovie
FinalCut
Please ensure that you have installed all necessary updates for your Apple
Macintosh before linking up to and running the MovieBox DV.
6 Pinnacle MovieBox DV

Connecting the MovieBox DV
and the Video Devices
The following chapter tells you how to connect your video devices to the MovieBox DV. To do so you will need the appropriate cables.
Important Be sure your computer system, your MovieBox DV and video equipment are all turned OFF before making any connections
HOW TO CONNECT THE DEVICES
The following illustrations show how to connect MovieBox DV to your computer system and video equipment.
English
|
|
|
|
Power |
|
|
|
|
Supply |
c |
d |
|
|
h |
|
|
|
||
|
e |
|
i |
|
|
|
|
||
|
|
f |
j |
|
|
|
|
||
|
|
|
k |
|
|
|
|
g |
|
|
|
|
• |
|
|
|
|
|
|
|
|
|
Reset |
Front panel |
|
|
|
Mode select |
|
|
|
|
|
Inputs |
Outputs |
Audio In |
Audio Out |
cLeft |
hRight |
dRight |
iLeft |
Video In |
Video Out |
eComposite |
jComposite |
fS-video |
kS-video |
g DV Port A |
• DV Port B |
Quick Start Guide 7
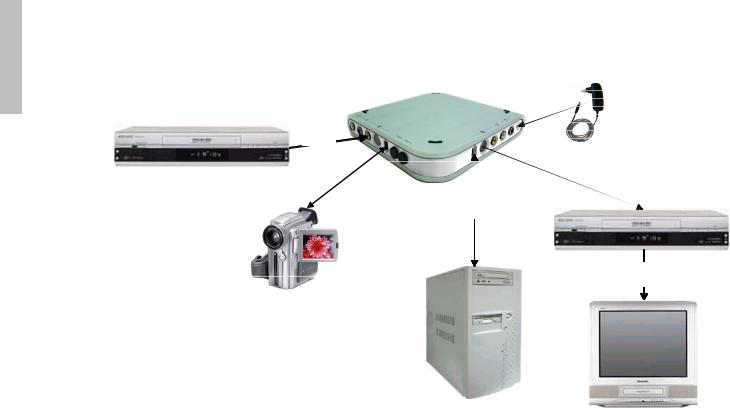
The following illustrations shows a sample configuration with the
MovieBox DV in combination with a computer system.
English
Power
Supply
Analog
In
Analog
Video Source
|
|
|
|
|
|
|
|
|
|
Analog |
|
||
DV Port A* |
|
|||||
|
|
|
Out |
|
VCR |
|
|
|
|
|
|
||
|
|
|
|
|
|
|
|
|
|
|
|
|
|
DV Port B
|
|
Analog |
|
PC/ |
Out |
|
|
|
Digital |
PC/ |
|
Apple |
|
|
Video Source |
Apple |
|
Macintosh |
|
|
|
Macintosh |
|
Video Monitor
*Special case: The digital camera can also be used as a target when data are downloaded from the computer system. If, on the other hand, the data come from an analogue input source, you will not have this option.
8 Pinnacle MovieBox DV
USER INTERFACE / CONTROLS
LEDs
Your MovieBox DV has one green LED for each video source (S video, Composite video, DV Port A, DV Port B). The two LEDs used for the DV ports are both enabled if the DV mode is selected as input via the source select button. The two LEDs are both „off“ if S-video or Composite video are used as input. Make sure that the Power LED is „on“ when you start working with the MovieBox DV.
Mode Select / Reset
Mode Select Via the Mode Select Button you can toggle between the different video sources, e.g. ”DV to analog video”, one click ”Composite to DV”, next click ”S-video to DV”, one more click ”DV to analog video”, ... .
Reset The Reset button resets the MovieBox DV to the last selected operating mode.
Note: If you switch on or reset the MovieBOX DV it takes a few seconds until it starts in the last selected operating mode.
Now, have some fun…
Now that you have installed Studio and Movie Box DV, you can use it immediately. We strongly recommend you to take this opportunity to experience Studio digital video editing.
English
Quick Start Guide 9

English
Technical Data
KEY FEATURES
Realtime video converter between DV (Blue book SD 625-50, SD 52560) video compression format and analog video (both directions, halfduplex)
CCIR 601 format, NTSC/PAL/SECAM: 50/60 fields, 720x480 / 720x576, YUV 4:1:1 / 4:2:0 chroma sub sampling, SECAM support on analog input only.
Video standard auto detection on analog inputs
Analog outputs use same TV standard as active input (PAL, if SECAM is used on input).
25 MBits/sec standard DV data rate for both directions.
Video standard auto detection on digital inputs
Digital output uses same video standard as active input
Stand-alone functionality (accessible w/ any DV enabled device):
DV-to-Analog
Analog-to-DV w/ default values for audio format and video settings
Manual selection of video and audio source (via Mode Select button). Automatic selection depending on available signal when box is switched on or resetted
Supports locked DV In/Out audio formats
32 kHz, 12 Bit, stereo (optional: channel A/B or C/D selectable)
48 kHz, 16 Bit, stereo
Supports unlocked DV In/Out audio formats
32 kHz, 16 Bit, stereo
44,1 kHz, 16 Bit, stereo
A/V connectors (input and output, one set each):
Composite and S-Video
Stereo audio, unbalanced
User Interface / Controls
One green LED for each video source (Y/C, Composite, DV ”port A”, DV ”port B”) – the two LEDs used for the DV ports are both enabled if DV is selected as input (via Mode Select button), the two LEDs are both ”off” if S-video or Composite are used as input; button for mode selection (everytime the Mode Select button is pressed, the ”next” mode will be used: Composite, S-video, DV, Composite, S-video, DV, … ), button for hardware reset
One green LED for power indication
Plug&Play installation (no need to install any software for access to basic functionality)
10 Pinnacle MovieBox DV

MovieBox DV as stand-alone solution
The following illustrations shows a sample configuration with MovieBox DV as a stand-alone solution. In stand-alone operation, the DV camcorder can be connected to DV Port A or DV Port B. DV Port A will be disabled automatically if an analog input is selected, it will be enabled if DV is selected as input. The DV Port B is always active.
Power
Supply
|
Analog |
|
|
|
Video Monitor |
|||
|
|
|
|
|
VCR |
|
||
Video Source |
|
|
|
|
||||
|
|
|
|
|
|
|||
|
|
|
|
DV camcorder |
||||
English
|
|
Front Panel |
|
Off Ï |
If you open the front panel you will see six dip switches. The default |
|
On Ð |
setting is ”Off”. |
|
|
|
|
|
Note: If you change the dip switch positions you will have to reset or |
|
|
power off / on the MovieBox DV to make these changes take effect. |
|
|
Quick Start Guide 11

English
Dip switches ”One” and ”Two”
The dip switches 1 and 2 modify the audio rate.
Audio Rate
1 |
2 |
|
Off |
Off |
48 kHz 16 Bit |
On |
Off |
32 kHz 12 Bit |
Off |
On |
44,1 kHz 16 Bit |
On |
On |
32 kHz 16Bit |
Note: These changes only take effect if you are working in the ”Analog to DV” mode!
Dip switch ”Three”
This dip switch is reserved.
Dip switch ”Four”
Dip switch 4 increases the audio input level. Default (dip switch ”Off”) is 1 V (RMS =Root-Means-Square). If your device connected to the MovieBox DV outputs a higher audio level overmodulation may occur. In this case, please switch the dip switch to ”On”, which means 2 V (RMS).
|
Audio Level |
4 |
|
Off |
1 V (RMS) |
On |
2 V (RMS) |
Dip switches ”Five” and ”Six”
Dip switch 5 and 6 allow you to select your country. The default settings include almost all countries with a few exceptions:
Country Selection
5 |
6 |
|
Off |
Off |
All countries except ... |
On |
Off |
Japan |
|
|
Paraguay |
|
|
Uruguay |
Off |
On |
Brasil |
On |
On |
Argentina |
If you select one of the exceptions MovieBox DV works with the country specific video standards for the analog inputs and outputs.
12 Pinnacle MovieBox DV

Pinnacle MovieBox DV
CRÉATION DE FILM DE QUALITÉ PROFESSIONNELLE
GUIDE DE DEMARRAGE RAPIDE

Français

Avant de commencer
Ce chapitre décrit le système informatique requis pour la MovieBox DV ainsi que le contenu du coffret MovieBox DV.
CONFIGURATION REQUISE
Avant d’installer la MovieBox DV, assurez-vous que votre système répond bien aux exigences suivantes :
Ordinateur avec système d’exploitation MS Windows
Intel Pentium ou AMD Athlon 800 MHz (1.5 GHz ou supérieur recommandé)
256 Mo RAM (512 Mo recommandé)
Windows 98SE, Windows Millennium, Windows 2000, Windows XP (Windows XP recommandé)
Port 1394/FireWire
Carte graphique compatible DirectX
(ATI Radeon ou Nvidia Geforce recommandée)
Carte son compatible DirectX (Creative Labs Audigy recommandée)
500 Mo d’espace libre sur le disque pour installer le logiciel
Au moins 1 Go requis pour les fichiers projet et temporaires
Haut-parleurs
Souris
Lecteur de CD-ROM
Lecteur de DVD requis pour installer le didacticiel, le manuel électronique et quelques bonus. Si vous ne possédez pas de lecteur de DVD vous pouvez commander le didacticiel, le manuel électronique et les bonus séparément sur des CD ROM
En option
y Graveur de CD pour créer des CD Vidéo ou CD Super Video
yGraveur de DVD pour créer des DVD
ySystème audio compatible ProLogic pour avoir un aperçu des mixages de son surround
yL’utilisation de certaines options nécessite une connexion Internet pour activer les produits
Guide de Démarrage Rapide 1
Français

Français
Ordinateur avec système d’exploitation Apple
Macintosh
Apple Macintosh OS9 et supérieur pour iMovie
Apple Macintosh OS X pour FinalCut
Souris
Lecteur de CD-ROM
Câble 1394/FireWire
Equipement vidéo
MovieBox DV permet l’acquisition vidéo et la sortie sur les dispositifs suivants :
tout caméscope ou magnétoscope DV ou Digital8. (Pour la sortie sur caméscope, activez la fonction d’enregistrement à partir d’une entrée DV Input.)
tout caméscope ou magnétoscope analogique (8mm, Hi8, VHS, SVHS, VHS-C ou SVHS-C).
CONTENU DU COFFRET
Assurez-vous que votre système MovieBox DV est complet avant de commencer l’installation. Ce système comprend :
MovieBox DV* |
|
|
|
Câble IEEE-1394 |
|||
|
6 x 6 |
|
6 x 4 |
Cordon d’alimentation |
Manuel Studio et ce guide de |
|
démarrage rapide |
Disques Pinnacle Studio « Programs » et « Content »
Si votre coffret ne contient pas tous ces éléments, veuillez contacter votre revendeur.
2 Pinnacle MovieBox DV

Logiciel
INSTALLATION DU LOGICIEL STUDIO POUR PC
1.Insérez le CD-ROM Studio dans votre lecteur de CD-ROM.
Si l’option Autorun est activée pour votre CD-ROM, l’installation se lancera automatiquement. Si Autorun n’est pas activé, recherchez votre lecteur de CD-ROM, et double cliquez sur Setup.exe.
2.Sélectionnez la langue de votre choix.
3.Vérifiez si vous avez une version précédente.
Si une version précédente de Studio est détectée, vous serez invité à insérer le CD-ROM de la version précédente dans votre lecteur de CDROM.
4.Personnalisez votre installation de Studio en entrant votre nom, votre pays, votre adresse électronique (facultatif) et le numéro de série.
5.Enregistrement.
Ensuite vous pourrez enregistrer votre copie de Studio. Vous pouvez vous enregistrer rapidement et facilement en vous connectant à Internet. Il est important de s’enregistrer pour quatre raisons :
Vous recevrez un pack d’effets gratuit en bonus lors de votre enregistrement.
L’enregistrement est obligatoire pour profiter de l’assistance technique.
L’enregistrement permet à Pinnacle Systems de vous informer des mises à jour gratuites du logiciel Studio.
L’enregistrement vous permettra de profiter d’offres réservées et de promotions spéciales de Pinnacle Systems.
6.Acceptez les termes de la licence du logiciel Studio (cliquez sur
Accepter).
Si vous n’acceptez pas ou ne comprenez pas les termes, retournez immédiatement ce produit à votre revendeur.
7.Sélectionnez l’installation Typical (recommandé).
Seuls les experts en informatique choisiront Personnalisée.
Français
*Les spécifications snt susceptibles d'être modifiées sans préavis ni obligations.
Guide de Démarrage Rapide 3
 Loading...