


Hollywood FX
for Studio
User’s Guide
Release 4.5 For Windows
Revision A
Pinnacle Systems, Inc. 280 N. Bernardo Ave Mountain View, CA 94043 www.pinnaclesys.com www.hollywoodfx.com
Table of |
|
Contents |
|
TABLE OF CONTENTS............................................................................... |
3 |
INTRODUCTION........................................................................................ |
11 |
BEFORE YOU START ............................................................................... |
11 |
INSTALLATION FOR WINDOWS 98/ME/2000....................................... |
12 |
CLUB HOLLYWOOD................................................................................. |
14 |
CHOOSING AND EDITING A TRANSITION WITHIN HOLLYWOOD FX16 |
|
TROUBLESHOOTING ................................................................................ |
17 |
ADDING A MULTIWINDOW IN PINNACLE STUDIO....................... |
21 |
TUTORIAL: ENVELOPES ......................................................................... |
25 |
TUTORIAL: PATH EDITING.................................................................... |
31 |
TUTORIAL: CREATING NEW FX FROM EXISTING FX................... |
39 |
TUTORIAL: WARP PLUGINS ................................................................. |
45 |
THE HOLLYWOOD FX DIALOG............................................................ |
51 |
THE HOLLYWOOD FX DIALOG ............................................................. |
52 |
THE EDIT LIST PANEL ............................................................................ |
52 |
Move Up/Move Down… .................................................................... |
53 |
Rename… ............................................................................................. |
54 |
Clone….................................................................................................54 |
|
Delete .................................................................................................... |
56 |
Save FX….............................................................................................56 |
|
Tool Bar…............................................................................................57 |
|
Plugins…..............................................................................................58 |
|
THE MONITOR PANEL ............................................................................ |
59 |
Looping Playback Button................................................................. |
60 |

Hollywood FX for Studio
Single Playback Button .................................................................... |
60 |
Step Buttons......................................................................................... |
60 |
Skip Buttons ........................................................................................ |
60 |
The Preview Slider ............................................................................. |
60 |
View Buttons........................................................................................ |
60 |
THE ITEM PANEL..................................................................................... |
61 |
THE ENVELOPE EDITOR PANEL ............................................................ |
61 |
THE BUTTONS PANEL............................................................................. |
61 |
Register Now/Upgrade Now............................................................. |
61 |
Undo...................................................................................................... |
61 |
Redo ...................................................................................................... |
61 |
Settings................................................................................................. |
62 |
About..................................................................................................... |
62 |
Ok .......................................................................................................... |
62 |
Cancel................................................................................................... |
62 |
THE FX CATALOG..................................................................................... |
63 |
ORGANIZING FX....................................................................................... |
64 |
BASIC OPTIONS........................................................................................ |
67 |
EASY FLIGHT CONTROLS........................................................................ |
67 |
Reverse Flight ..................................................................................... |
67 |
Flight Path........................................................................................... |
68 |
Rotate Object ....................................................................................... |
68 |
EASY LIGHTING CONTROLS.................................................................... |
68 |
Lighting ................................................................................................ |
68 |
Shadows ............................................................................................... |
68 |
Shine ..................................................................................................... |
68 |
Light Direction.................................................................................... |
68 |
EASY OPTIONS CONTROLS..................................................................... |
69 |
Render................................................................................................... |
69 |
Antialiasing ......................................................................................... |
69 |
Motion Blur ......................................................................................... |
69 |
Trails..................................................................................................... |
69 |
Pixel Blending..................................................................................... |
70 |
ADVANCED OPTIONS ............................................................................. |
71 |
SHADOW CONTROLS............................................................................... |
72 |
Shadow Type ....................................................................................... |
72 |
Opacity ................................................................................................. |
72 |
Distance................................................................................................ |
72 |
Softness ................................................................................................. |
72 |
4

License Agreement
MOTION BLUR CONTROLS..................................................................... |
73 |
Length ................................................................................................... |
73 |
Count .................................................................................................... |
73 |
HOLD TIMES ............................................................................................. |
73 |
Start....................................................................................................... |
73 |
End ........................................................................................................ |
73 |
MEDIA OPTIONS ....................................................................................... |
75 |
MEDIA SELECTION ................................................................................. |
76 |
Select Track ......................................................................................... |
76 |
Select File ............................................................................................ |
76 |
PREVIEW AND TRIMMING ...................................................................... |
76 |
The Preview Slider ............................................................................. |
76 |
In ............................................................................................................ |
76 |
Out......................................................................................................... |
76 |
INFORMATION .......................................................................................... |
77 |
PLAYBACK CONTROL ............................................................................. |
77 |
Interpret................................................................................................ |
77 |
Playback Rate (PRO only) ............................................................... |
78 |
Direction (PRO only)......................................................................... |
78 |
End Behavior (PRO only) ................................................................. |
78 |
CROPPING CONTROLS............................................................................. |
78 |
OBJECT OPTIONS .................................................................................... |
79 |
TYPES OF OBJECTS.................................................................................. |
79 |
TYPES OF OBJECTS.................................................................................. |
80 |
OBJECT HIERARCHIES............................................................................. |
80 |
SELECT FILE… (PRO ONLY) ................................................................. |
80 |
POSITIONING CONTROLS........................................................................ |
81 |
Tool Buttons ........................................................................................ |
81 |
The Axis Buttons ................................................................................. |
82 |
The Edit Fields.................................................................................... |
82 |
Size To Full .......................................................................................... |
82 |
Position To Full .................................................................................. |
82 |
MORPH & DISSOLVE................................................................................ |
83 |
Morph ................................................................................................... |
83 |
Dissolve ................................................................................................ |
83 |
PARENT OBJECT (PRO ONLY)............................................................... |
83 |
OBJECT FLAGS (PRO ONLY)................................................................... |
84 |
Shadow Cast........................................................................................ |
84 |
Shadow Receive .................................................................................. |
84 |
Transition Object ................................................................................ |
84 |
5

Hollywood FX for Studio
SURFACE OPTIONS.................................................................................. |
85 |
TEXTURE OPTIONS ................................................................................. |
85 |
Media .................................................................................................... |
85 |
COLOR OPTIONS ...................................................................................... |
86 |
Double-Sided....................................................................................... |
86 |
Smooth .................................................................................................. |
86 |
Base Color ........................................................................................... |
86 |
Luminosity............................................................................................ |
86 |
Shine Color.......................................................................................... |
87 |
Shine Spot ............................................................................................ |
87 |
THE ENVELOPE EDITOR......................................................................... |
88 |
THE SINGLE VALUE ENVELOPE ............................................................ |
88 |
MULTIPLE VALUE ENVELOPE .............................................................. |
90 |
THE ENVELOPE WINDOW ...................................................................... |
90 |
The Current Time Slider .................................................................... |
90 |
The Time Ruler .................................................................................... |
91 |
The Transition % Ruler ..................................................................... |
91 |
The Envelope ....................................................................................... |
91 |
THE ENVELOPE BUTTONS...................................................................... |
92 |
Save… ................................................................................................... |
92 |
Load… .................................................................................................. |
92 |
Remove.................................................................................................. |
92 |
KEY TYPE CONTROLS............................................................................. |
92 |
Spline Curve ........................................................................................ |
92 |
Linear.................................................................................................... |
93 |
Value Jump .......................................................................................... |
93 |
KEYFRAME CONTROLS........................................................................... |
93 |
Copy… .................................................................................................. |
93 |
Shift (PRO only).................................................................................. |
95 |
Scale (PRO only) ................................................................................ |
96 |
Create ................................................................................................... |
97 |
Delete .................................................................................................... |
97 |
Previous Key ........................................................................... |
97 |
Next Key ................................................................................... |
97 |
SPLINE CONTROLS (PRO ONLY) ........................................................... |
98 |
Presets Dropdown .............................................................................. |
98 |
< Save… ............................................................................................... |
98 |
Tension ................................................................................................. |
98 |
Continuity ............................................................................................ |
98 |
6

License Agreement
Bias........................................................................................................ |
99 |
PLUGINS.................................................................................................... |
101 |
MANAGING PLUGINS............................................................................. |
101 |
FILTER - CHROMA KEY (PRO ONLY) ................................................. |
103 |
Type .................................................................................................... |
103 |
Reverse Key....................................................................................... |
103 |
Threshold .......................................................................................... |
103 |
Fine Adjust ........................................................................................ |
103 |
FILTER - DIRECTIONAL WIPE (PRO ONLY) ...................................... |
104 |
Wipe Direction ................................................................................. |
104 |
Tie wipe percentage to transition ................................................ |
104 |
Tie direction to light direction ..................................................... |
105 |
Enable a border on the wipe ......................................................... |
105 |
Border Color .................................................................................... |
105 |
Wipe Percentage .............................................................................. |
105 |
Softness.............................................................................................. |
105 |
Border Size........................................................................................ |
105 |
FILTER – EDGE WIPE (PRO ONLY)..................................................... |
106 |
Border Color .................................................................................... |
106 |
Tie to transition ............................................................................... |
106 |
Enable Borders ................................................................................ |
107 |
Wipe Percentage .............................................................................. |
107 |
X and Y Offset.................................................................................... |
107 |
Softness .............................................................................................. |
107 |
Border Size........................................................................................ |
107 |
Corner Radius.................................................................................. |
107 |
FILTER - LUMA KEY (PRO ONLY)....................................................... |
108 |
Reverse Key....................................................................................... |
108 |
Cutoff.................................................................................................. |
108 |
Softness .............................................................................................. |
108 |
FILTER - GRADIENT WIPE (PRO ONLY)............................................ |
109 |
Select Gradient ................................................................................ |
109 |
Tie transition amount to effect transition ................................... |
110 |
Transition Amount........................................................................... |
110 |
Softness .............................................................................................. |
110 |
Border Size........................................................................................ |
110 |
Border Color .................................................................................... |
110 |
WARP – BASIC EXPLODE (PRO ONLY) .............................................. |
111 |
Reset ................................................................................................... |
111 |
Time .................................................................................................... |
111 |
Tie Time To Transition.................................................................... |
112 |
7

Hollywood FX for Studio
Enable Velocity Decay ................................................................... |
112 |
Enable Random Sliders .................................................................. |
112 |
Jagged Pieces................................................................................... |
112 |
Enable Rotation............................................................................... |
112 |
Enable Gravity ................................................................................. |
112 |
Decay Affects Rotation.................................................................... |
112 |
Maximum Number of Pieces........................................................... |
112 |
Velocity.............................................................................................. |
113 |
WARP – (PRO ONLY) ............................................................................ |
114 |
Reset ................................................................................................... |
114 |
Time .................................................................................................... |
114 |
Tie Time To Transition.................................................................... |
115 |
Enable Velocity Decay ................................................................... |
115 |
Enable Random Sliders .................................................................. |
115 |
Jagged Pieces................................................................................... |
115 |
Enable Rotation............................................................................... |
115 |
Enable Gravity ................................................................................. |
115 |
Decay Affects Rotation.................................................................... |
115 |
Maximum Number of Pieces........................................................... |
116 |
Velocity.............................................................................................. |
116 |
Velocity Decay ................................................................................. |
116 |
Rotation of Fragments .................................................................... |
116 |
Gravity Spinner................................................................................ |
116 |
Gravity Slider ................................................................................... |
116 |
Plane of Gravity ............................................................................... |
116 |
WARP – PEEL (PRO ONLY).................................................................. |
117 |
Peel Plane ......................................................................................... |
117 |
Tie Transition Amount to effect transition .................................. |
118 |
Tie peel direction to flight direction............................................ |
118 |
Peel Instead of Roll ......................................................................... |
118 |
Reverse Radius of Peel.................................................................... |
118 |
Percentage of Peel Completed ...................................................... |
118 |
Radius Of Peel.................................................................................. |
118 |
Angle of Peel..................................................................................... |
118 |
WARP – BASIC RIPPLE (PRO ONLY) .................................................. |
119 |
Height ................................................................................................ |
119 |
Tie X and Y frequency together ..................................................... |
120 |
Frequency ......................................................................................... |
120 |
Offset (X and Y) ................................................................................ |
120 |
Tie Phase to transition ................................................................... |
120 |
Phase.................................................................................................. |
120 |
Function ............................................................................................ |
120 |
8

License Agreement
Default Settings................................................................................ |
121 |
Clear all values to 0.0 .................................................................... |
121 |
WARP – RIPPLE (PRO ONLY).............................................................. |
122 |
Height ................................................................................................ |
122 |
Tie X and Y frequency together ..................................................... |
123 |
Frequency ......................................................................................... |
123 |
Offset (X and Y) ................................................................................ |
123 |
Tie Phase to transition ................................................................... |
123 |
Phase.................................................................................................. |
123 |
Function ............................................................................................ |
123 |
Default Settings................................................................................ |
124 |
Clear all values to 0.0 .................................................................... |
124 |
WARP - TWIST (PRO ONLY) ................................................................ |
124 |
Twist Axis .......................................................................................... |
125 |
Twist................................................................................................... |
125 |
THE SETTINGS DIALOG....................................................................... |
127 |
PREVIEW SETTINGS............................................................................... |
127 |
Maximum Resolution ...................................................................... |
128 |
Preview Type .................................................................................... |
128 |
Antialiasing In Preview.................................................................. |
128 |
EDIT SETTINGS ...................................................................................... |
128 |
Editing TimeCode............................................................................ |
129 |
RENDER PERFORMANCE ....................................................................... |
129 |
Render Type ...................................................................................... |
130 |
Sources Dropdown .......................................................................... |
130 |
9
Introduction
Thank you for purchasing Hollywood FX. Hollywood FX gives you an incredible collection of 3D transitions that you can quickly add to your video productions, and customize completely for your needs. This chapter will introduce you to Hollywood FX, provide instructions for installation and give contact information for customer support.
Before You Start
Before getting started with Hollywood FX you should have a good working knowledge of your Windows system. You should be able to use the mouse to select menu options and should understand and be able to use the common controls.
You should also be thoroughly familiar with your video editing software. You should be able to use clips in the timeline and understand how to add and modify transitions.
Throughout this document we use the term FX to refer to the transitions and effects in Hollywood FX. This term generically describes the following types of transitions and effects:
∙Transition. These are standard A-B transitions, where one video source transitions into a second.
∙Transition+ These are also A-B transitions; however, they may have additional video channels that can be mapped with video. For example, the FlipOver FX features the first video source flipping over like a card to reveal the second video source. There is a third video source that is visible in the background as the “card” flips over.
∙MultiWindow These effects are not transitions at all. Instead, windows of video may fly on or off the screen into various positions while playing your video.

Hollywood FX for Studio
Installation for Windows 98/ME/2000
Before installing Hollywood FX, verify that you have the correct minimum requirements:
∙PC compatible with at least a Pentium 166 MHz processor (or compatible equivalent).
∙Windows 98/ME/2000
∙64 MB RAM (more may be required by your video editing software). For multi-window effects, 128 to 256 MB (or more) is recommended.
∙At least 40 MB Hard Disk space.
∙16 or 24 bit display adapter. 3D Accelerator recommended.
·To iinstallll Hollllywood FX:
FInsert the Hollywood FX CD into your CD-ROM drive. The CDROM Welcome dialog will appear.
FEnter the serial number that came with your software (it can be found on the first page of this guide or on the CD-ROM sleeve). Enter the serial number exactly as shown, including dashes, then click Ok.
FThe Main Installation menu for your software will appear.
FSelect Install Hollywood FX. The installer will load, and the Setup Welcome dialog will appear.
FClick Next to continue. The Setup Path dialog will appear.
FNormally you should accept the default path for installation. Do not select your non-linear editor’s plug-in path for installation; the installer will automatically install the files needed into your non-linear editor’s folders. Click Next to continue. The Select Host Plugins dialog will appear.
FClick on the checkboxes for any host applications that the installer should search for and install a Hollywood FX plugin. Click Next to continue. Hollywood FX will be installed on your system.
FAt the end of the installation, you will be required to enter your
Serial Number. You will find the serial number on the paper sleeve that the Hollywood FX CD-ROM was packaged in.
12

Adding a MultiWindow in Pinnacle Studio
FAfter clicking OK, the Licensing Tool will open. This is where you can join Club Hollywood and get your permanent Keycode.
FAfter installation, you may be required to restart your system.
If you have an Internet connection on the system Hollywood FX is installed on, you will also have the option of registering your software and joining Club Hollywood quickly and easily from the Hollywood FX application.
13

Hollywood FX for Studio
Club Hollywood
When you register Hollywood FX online at www.hollywoodfx.com to get your permanent keycode, you will also receive a userid, password, and some initial credit that you can use in Club Hollywood, the Internet FX mall. Browse through and order new FX, plug-ins and more, either individually or in libraries that open a new world for Hollywood FX. Once you have used your initial credit, you can purchase additional credit at any time and continually expand your Hollywood FX.
You can also purchase and instantly download upgrades to Hollywood FX through Club Hollywood. Simply click on the Club icon after selecting the HFX transitions.
14

Adding a MultiWindow in Pinnacle Studio
Adding Your first FX in Pinnacle Studio
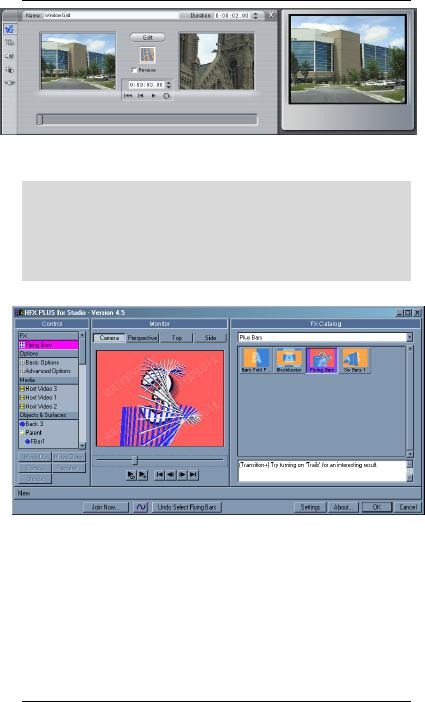
Prepare two video sources on the 1st and 2nd frames of the storyboard. Now drag any HFX Plus transition between them.
Two video clips ready with a Hollywood FX transition in the storyboard
· To add a transiitiion to the tiimelliine:
FMake sure the Transitions tab in the Album is visible.
FSwitch to the HFX Plus Flying Windows group from the drop down menu.
FDrag the desired transition to the timeline so that it is between the two video clips.
The Hollywood FX for Studio transition group
· To reverse or ediit a transiitiion:
FGo to the desired transition in the storyboard.
FDouble-click on the transition block. The Studio Transition Options should appear.
15

Hollywood FX for Studio
FYou can quickly reverse the direction by checking the Reverse check box.
The Studio Transition Options where you can edit your selection.
Choosing and Editing a transition within Hollywood FX
When the Hollywood FX dialog is displayed, you will immediately see the FX Catalog You can override any transition chosen within the Studio transition group, by simply selecting an FX from within Hollywood FX. Any changes will be updated upon returning to the Studio timeline.
· To Change an FX:
FClick on the Edit button and the powerful HFX Plus editor appears.
FSelect Plus Flying Windows group from the FX Group popup list.
FClick on the Spin Off icon.
The Hollywood FX Catalog Selection
16
Adding a MultiWindow in Pinnacle Studio
· To Ediit the llook of the FX:
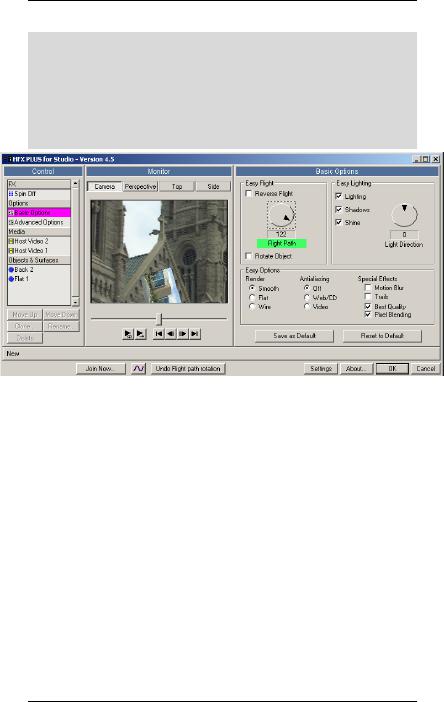
FClick on the Basic Option button in the Control panel.
FCheck the Shadows button.
FNow rotate the effect by selection the disk like button in the
Easy Flight area. Rotate to 128. The effect will spin off in a different direction. Its that easy! Now click OK.
Basic options – Shadows checked and Easy Flight modified
Troubleshooting
This section provides a list of common problems and their solutions. If you can’t find an answer to your problem in this list, or in the ReadMe file that is created during setup, then contact Hollywood FX customer support for more help.
My video editor crashes when I try to use Hollywood FX.
This usually indicates a conflict with your 3D graphics card. You should download and install the very latest drivers for your graphics card.
I never get a rendered transition, I just get the Hollywood FX Logo.
17
Hollywood FX for Studio
This indicates that Hollywood FX was not able to use OpenGL to render the effect. Check the following items to resolve this problem:
∙Check to make sure the files Opengl32.dll and
Glu32.dll are in your Windows\System folder (Winnt\System32). If they are not present, Windows 95 users should download the OpenGL libraries from the Support area of the Hollywood FX website. Windows 98, NT, and 2000 users should check their operating system installation, and reinstall any service packs.
∙Make sure you are using the very latest drivers for your graphic display card.
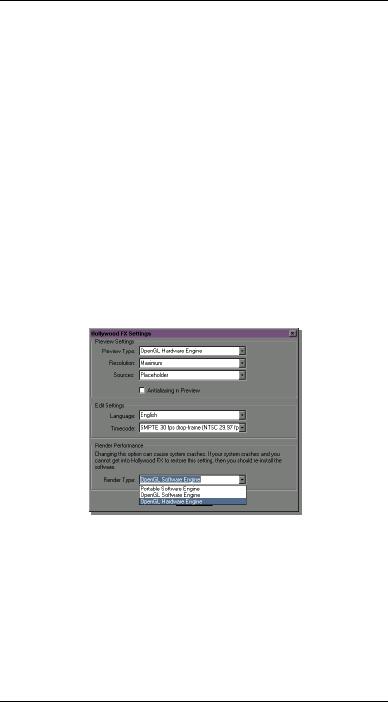
∙Click on the Settings button in the Hollywood FX dialog and try changing the Render Type to
OpenGL Software Engine. If it is already set to OpenGL Software change it to Portable Software.
Hollywood FX Setting Requester
When I select video or images in the Media Options panel I get a white object instead of video.
Generally this indicates you have run low on memory. If you are doing MultiWindow effects with more than 3 video sources, you should have a minimum of 128 MB of RAM (with at least 256 MB highly recommended). If you are using images you scanned in, you should lower the resolution of those scanned images.
18
Advanced
Tutorials
Adding a
MultiWindow in
Pinnacle Studio
Plus & PRO
Prepare two video sources on the 1st and 2nd frames of the storyboard. Now drag any HFX Plus transition between them.
Two video clips ready with a Hollywood FX transition in the storyboard
· To ediit the transiitiion:
FGo to the desired transition in the storyboard.
FDouble-click on the transition block. The Studio Transition Options should appear.
FNow click the Edit button.
Hollywood FX for Studio
The Studio Transition Options where you can edit your selection.
· To Change an FX:
FClick on the Edit button and the powerful HFX Plus/PRO editor appears.
FSelect Plus or PRO Bars group from the FX Group popup list.
FClick on the Flying Bars icon.
The Hollywood FX Plus Bars for Studio transition group
22

Adding a MultiWindow in Pinnacle Studio
· Now add the 3rd Source:
FClick on the Host Video 3 button in the Control panel.
FClick the Select File button and choose a media clip from where it resides on your hard drive.
FNow you can trim the In and Out point by dragging the preview bar and click the In and Out buttons for the desired length.
Basic options – Shadows checked and Easy Flight modified
23

Tutorial:
Envelopes
Plus & PRO (PRO envelope editor shown)
This tutorial demonstrates the way you can keyframe any option in Hollywood FX to create advanced results.
Hollywood FX uses the term Envelope to describe a set of keyframes that describe how an option’s value will change over time in Hollywood FX.
· Prepare for the Tutoriiall and Sellect the FX:
FCreate a new project in your host application.
FAdd two video clips and create a two second transition between them.
FAdd Hollywood FX as a transition between the two video clips.
FFrom the Hollywood FX dialog, select the Tumble 2 transition in the Flying Window Transitions group.
The Envelope Editor is normally hidden when you first begin using Hollywood FX (to keep life simple).
· To diispllay the Envellope Ediitor:
FClick on the Envelope Editor button at the bottom of the Hollywood FX dialog.
The Envelope Editor Button
The Envelope Editor will appear. We are going to modify the Tumble 2 transition by making the tumbling video dissolve as it tumbles into the distance. We will do this by creating an envelope for the object’s Dissolve option.
Hollywood FX for Studio
· Sellect the Object and Optiion:
FClick on the Flat Window object in the Edit List panel.
FClick on the Dissolve slider in the Object Options panel so that it is highlighted.
Notice that the word Dissolve under the slider is highlighted in green. This is an indicator that it is the current option that can be modified in the Envelope Editor. Whenever you select a control that can have an envelope in Hollywood FX, it will be highlighted in green.
Hollywood FX makes it extremely easy to create envelopes by simply clicking and dragging in the envelope window. We want to create an envelope for dissolve that makes the object disappear over the entire length of the transition.
· To create a siimplle envellope:
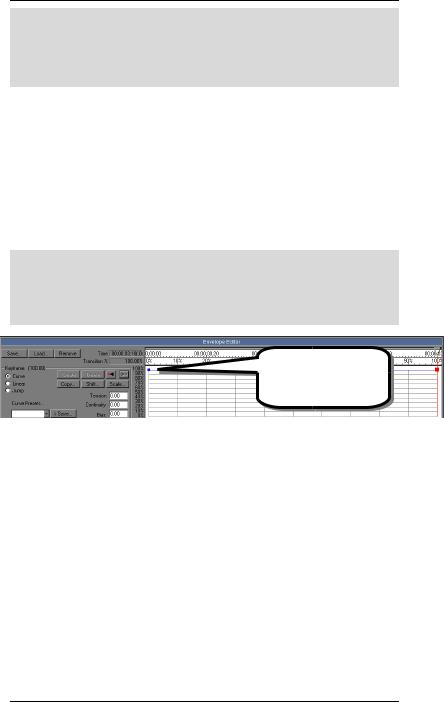
FClick-and-drag in the envelope window at 100% in time, and 100% in value. Drag the keyframe you create all the way to 100% value and release the mouse.
A second keyframe is created automatically at time 0%
The envelope after creating the first keyframe
Notice that there are two keyframes (indicated by blocks). The one at 100% is the one you created. The keyframe at 0% is created automatically, since all envelopes in Hollywood FX must at a minimum have keyframes at 0% and 100%.
Also notice that the preview and the current time slider at the top of the envelope window both moved to 100%, and that the keyframe at 100% is highlighted in red to indicate that it is the current keyframe.
The way the envelope is currently designed, the value of Dissolve will remain 100% for the entire effect. What we want is for the value to start at 0%, so lets change the first keyframe.
26

Tutorial: Envelopes
· To change the fiirst keyframe:
FClick-and-drag on the blue block that represents the keyframe at time 0%.
FDrag the blue block to the bottom of the envelope window (value 0%). Notice the Dissolve slider (in the Object Options panel) while you are dragging. Its value is “tied” to the current envelope.
FRelease the mouse button.
Click and drag the keyframe at time 0%.
The first keyframe is adjusted
Now our envelope will work correctly, causing the object to dissolve over the entire length of the transition. Try playing the preview to see the results.
Let’s add one more keyframe to this envelope, so that the object becomes transparent more quickly. We will create this key in a different way.
· To create the new keyframe:
FDrag the current time slider at the top of the envelope window until it is at 50%.
FNow drag the Dissolve slider in the Object Options panel up to
90%.
After creating the new keyframe
The new keyframe is created automatically when you change the value of Dissolve. This shows how the original value slider for Dissolve and the Envelope Editor are tied together.
27

Hollywood FX for Studio
This feature makes it extremely easy to create keyframes for any value in Hollywood FX.
Before concluding this tutorial, lets play around with some of the other envelope controls. First, let’s move quickly between the keyframes in this envelope.
· To move between keyframes:
FClick on the Prev button in the Envelope Editor. The current time slider (and preview) will move to the keyframe at 0%.
FClick on the Next button in the Envelope Editor. The current time slider will move to the keyframe at 50%.
FClick on the Next button. The current time slider will move to the keyframe at 100%.
FFinally, click on the Prev button to return to the 50% keyframe.
Using the Prev and Next buttons can quickly get you to the keyframe you need, especially when you have keyframes close together and one of them is hard to select by clicking on it with the mouse.
Now, let’s save our current envelope to disk. If you create an interesting envelope that you might want to use again, you can save it to disk.
· To save the envellope:
FClick on the Save… button in the Envelope Editor.
FType tutorial for the filename in the file requester.
FClick Ok in the file requester to save the envelope.
Now let’s say we don’t really like having the keyframe at 50%, so we will get rid of it.
· To dellete the current keyframe:
FClick on the Delete button in the Envelope Editor.
The keyframe at 50% disappears, and the envelope returns to a straight line between 0% and 100%.
If we decide we don’t want the envelope at all (we want to return to a single value for the entire duration of the FX), then we can remove the envelope.
28

Tutorial: Envelopes
· To remove the envellope:
FClick on the Remove button at the top of the Envelope Editor.
The envelope will disappear, and the Dissolve slider now controls the dissolve value for the entire duration of the FX.
For our final trick, let’s load back in the envelope we saved above.
· To lload an envellope:
FClick on the Load button in the Envelope Editor.
FDouble-click the tutorial file in the file requester.
Our envelope is back. Exit the Hollywood FX dialog and try rendering the FX with the dissolve envelope.
Remember, envelopes can be created for almost any value in Hollywood FX. If a control is highlighted in green when you use it, that means you can control that value with an envelope and create exciting results.
29
 Loading...