


Pinnacle MovieBox USB
Professional Quality Movie Making
QUICK START GUIDE
KURZANLEITUNG
GUIDE DE DEMARRAGE RAPIDE
KORTE HANDLEIDING
GUIDA RAPIDA
MANUAL BREVE DE INSTRUCCIONES
GUIA DE INÍCIO RÁPIDO
41002286
© Pinnacle Systems 2003
All rights reserved.
No part of this manual may be reproduced or transferred to other media without explicit written permission from Pinnacle Sysrems., Braunschweig, Germany.
All brand or product names are trademarks or registered trademarks of their respective holders.
© Pinnacle Systems 2003
Alle Rechte vorbehalten.
Kein Teil dieses Handbuchs darf ohne ausdrückliche schriftliche Genehmigung von Pinnacle Systems, Braunschweig, reproduziert oder anderweitig übertragen werden.
Alle Markenund Produktnamen sind Warenzeichen oder eingetragene Warenzeichen der jeweiligen Hersteller.
© Pinnacle Systems GmbH 2003
Tous droits réservés.
Toute reproduction ou représentation intégrale ou partielle, par quelque procédé que ce soit, du présent manuel est interdite sans l'autorisation expresse par écrit de Pinnacle Systems GmbH, Brunswick.
Tous les noms de marques et de produits sont des marques ou des marques déposées des constructeurs respectifs.
© Pinnacle Systems 2003
Alle rechten voorbehouden.
Geen enkel deel van deze handleiding mag zonder uitdrukkelijke schriftelijke toestemming van Pinnacle Systems, Braunschweig, gereproduceerd of op enige andere wijze overgenomen worden.
Alle andere merken productnamen zijn handelsmerken of gedeponeerde handelsmerken van de betreffende fabrikant.
© Pinnacle Systems 2003
Tutti i diritti sono riservati.
Nessuna parte di questo manuale può essere riprodotta o trasmessa in qualsiasi forma o mezzo senza la preventiva autorizzazione scritta di Pinnacle Systems, Braunschweig.
Tutti gli altri nomi di marche e prodotti sono marchi o marchi registrati dei vari produttori.
© Pinnacle Systems 2003
Todos los derechos reservados
No se permite reproducir o transferir parte alguna de este manual a otro tipo de soporte sin la autorización por escrito de Pinnacle Systems, Braunschweig, Alemania.
El resto de denominaciones de marca y de producto son marcas de fábrica o marcas registradas de los fabricantes correspondientes.
© Pinnacle Systems GmbH 2003
Todos os direitos reservados.
Nenhuma parte deste guia poderá ser copiada ou transferida para outro meio sem a autorização escrita da Pinnacle Systems GmbH, Braunschweig.
Todos os nomes de marcas e produtos são marcas ou marcas registradas de seus respectivos fabricantes.

Pinnacle MovieBox USB
Professional Quality Movie Making
QUICK START GUIDE

English
|
Contents |
||
|
BEFORE YOU BEGIN |
1 |
|
|
SYSTEM REQUIREMENTS |
1 |
|
|
PACKAGE CONTENTS |
2 |
|
|
INSTALLING THE SOFTWARE |
3 |
|
|
SOFTWARE INSTALLATION |
3 |
|
|
CONNECTING THE MOVIEBOXUSBANDTHEVIDEODEVICES |
5 |
|
|
HOW TO CONNECT THE DEVICES |
5 |
|
|
TECHNICAL SUPPORT |
7 |
|
|
TECHNICAL DATA |
9 |
|
|
KEY PARTS |
9 |
|
|
KEY FEATURES |
9 |
|
|
TIPS & TRICKS |
10 |
|
|
HARDWARE REQUIREMENTS |
10 |
|
|
ENHANCED-IDE HARD DISKS |
10 |
|
|
HINTS FOR IMPROVING THE CAPTURE PERFORMANCE OF YOUR HARD DISK |
11 |
|
|
SETTINGS IN WINDOWS ME |
12 |
|
|
SETTINGS IN WINDOWS 2000 AND WINDOWS XP |
13 |
|
|
REDUCING NONCAPTURE-RELATED MACHINE ACTIVITY |
14 |
|
|
WARRANTY |
I |
|
About this Quick Start Guide
This Quick Start Guide explains how to install the Pinnacle hardware and software.
Important text passages are marked with the “notepad” and this format.
Numbers mark step by step instructions: 1. Start Windows.
All keyboard commands appear in this font:
Setup
Menus, commands, options, or buttons which the user can select are written in italics.

Before you begin
This chapter tells you which computer system components are required for the operation of MovieBox USB and what is included in the MovieBox USB package contents.
SYSTEM REQUIREMENTS
Please make sure your system meets the following requirements before installing MovieBox USB:
Computer
Intel Pentium or AMD Athlon 500 MHz or higher (1 GHz recommended)
USB 1.1 or USB 2.0 port (USB2.0 recommended)
Windows 98SE, Windows Millennium, Windows 2000 or Windows XP (Windows XP recommended)
DirectX 8 or higher compatible graphics card
(ATI Radeon 9700 or Nvidia Geforce 3 or higher with at least 32 MB RAM recommended)
DirectX 8 or higher compatible sound card
128 MB of RAM (256 MB recommended)
CD-ROM drive (optional: CD or DVD burner required to create Video CD, S-Video CD or DVD)
Speakers
Mouse
A microphone, if you want to record voice-overs
300 MB of free hard disk space to install software.
45 MB of disk space for every minute of video captured at DVD quality.
Video equipment
MovieBox USB can capture from and output video to:
Any analog (8mm, Hi8, VHS, SVHS, VHS-C or SVHS-C) camcorder or VCR.
Any DV, Digital8 or MicroMV camcorder with analog outputs (capture only)
English
Quick Start Guide 1
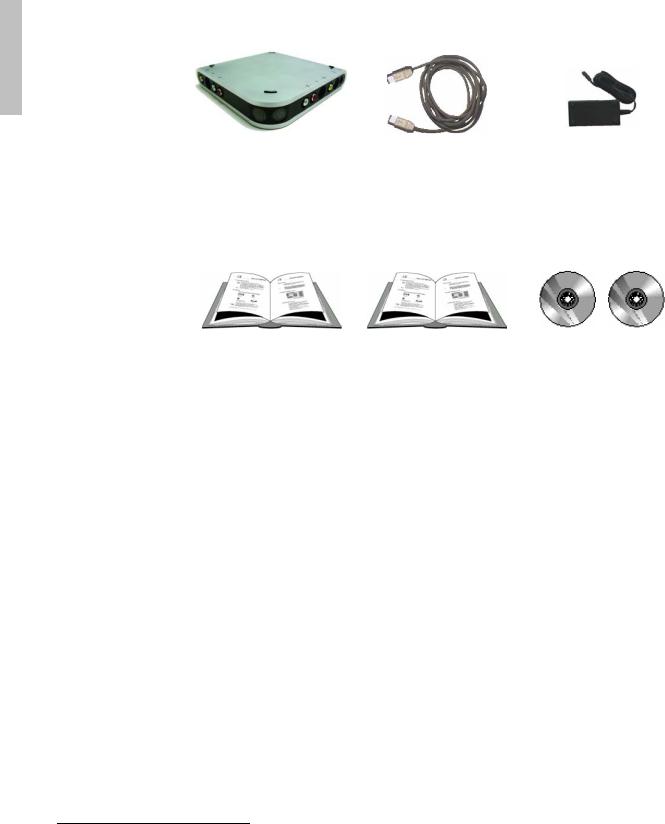
PACKAGE CONTENTS
Please make sure your MovieBox USB system is complete before you begin the installation. The system includes*:
English
MovieBox USB |
USB-cable |
Power supply with |
|
|
separate power cable |
|
|
(no illustration) |
Pinnacle Studio Manual |
This Quick Start Guide |
Pinnacle Studio “Programs” |
|
|
and “Content” |
|
|
CD-ROMs |
If any parts are missing, please contact your retailer.
*Depending on the delivery scope, the actual package contents may be different from the package contents listed in the manual. Specifications are subject to change without notice or obligation.
2 Pinnacle MovieBox USB

Installing the Software
SOFTWARE INSTALLATION
Please be sure to read the license agreement in the appendix of the Studio manual before opening the CD-ROM packaging and installing the software, as by opening the CD-ROM packaging you will be expressing your absolute agreement with the conditions contained in the said license agreement.
If you do not agree, do not open the software package and return the complete package to the point of purchase.
You have received 2 CD-ROMs, named “Programs” and “Content”. The Programs-CD is containing all the necessary data to install the Studio software and tools. The Content-CD is containing the Motion Menus which are video standard dependent (PAL, NTSC) and 3rd Party software (Adobe Acrobat Reader and Real Player).
To install the software, please proceed as follows:
SERIAL NUMBER: During installation you will be asked for your serial number . You will find this number on the Studio CD “Programs” or on the accompanying documentation. Please make a note of this number before putting the CD in your CD-ROM drive.
1. Switch your computer on.
Switch on your computer. Windows is started automatically.
If your computer is configured in such a way, that Windows is not started automatically, start Windows now.
Important for Windows 2000 and Windows XP: log in with administrator rights.
2.Insert the CD-ROM “Programs”.
Insert the CD-ROM “Programs” into the CD-ROM drive of your computer.
Now, the setup program will start automatically or you start setup.exe or Welcome.exe from your CD-ROM.
Quick Start Guide 3
English

English
3.Follow the instructions.
Follow the instructions of the Pinnacle installation program.
When the hardware installation program is started, please select “MovieBox USB” as your device. Then again follow the instructions.
After the Studio installation and the reboot of the system, the installation program normally asks for the “Content-CD” to be inserted.
On some systems, this will not happen. In this case you should install the “Content-CD” before starting Studio.
4 Pinnacle MovieBox USB

Connecting the MovieBox USB
and the Video Devices
The following chapter tells you how to connect your video devices to the MovieBox USB. To do so you will need the appropriate cables.
Important Be sure your PC, MovieBox USB and video equipment are all turned OFF before making any connections.
English
HOW TO CONNECT THE DEVICES
The following illustrations show how to connect MovieBox USB to your PC and video equipment.
|
Power supply |
|
USB connector |
1 2 3 4 |
6 5 |
8 |
7 |
Inputs |
Outputs |
||
Video IN |
Video OUT |
||
1 |
Composite |
5 |
Composite |
2 |
S-Video |
6 |
S-Video |
Audio IN |
Audio OUT |
||
3 |
Left |
7 |
Right |
4 |
Right |
8 |
Left |
Quick Start Guide 5

English
|
Audio |
Audio |
|
|
|
|
|
|
||||||
|
|
Out |
|
In |
|
|
|
|
|
Power |
||||
|
|
|
|
|
|
|
|
|
|
|
|
|
|
|
|
|
|
|
|
|
|
|
|
|
|
|
|
|
Supply |
|
|
|
|
Composite or |
|
|
|
|
|
|
|
|||
|
|
|
|
|
S-Video In |
|
|
|
|
|
|
|
|
|
|
Composite or |
|
|
|
|
|
Audio |
|
|
|
|
|
|
|
|
|
|
|
|
|
|
|
|
|
|
|
|||
|
|
|
|
|
|
|
|
Composite |
|
|||||
Analog S-Video Out |
|
|
|
|
||||||||||
|
|
|
|
|
Out |
|
|
|
|
|
|
|||
|
|
|
|
|
|
|
or S-Video |
Out |
USB |
|||||
Video Source |
|
|
|
|
|
Audio |
|
|
Composite |
|
||||
|
|
|
|
|
|
|
|
|
|
|
||||
|
|
|
|
|
|
|
|
In |
|
|
or S-Video In |
|
||
|
|
|
|
|
|
VCR |
|
|
|
|
|
|
||
|
|
|
|
|
|
|
|
Audio |
|
|
Composite |
PC |
||
|
|
|
|
|
|
|
|
|
|
|||||
|
|
|
|
|
|
|
|
Out |
|
|
or S-Video Out |
|||
|
|
|
|
|
|
|
|
Audio |
|
|
Composite |
|
||
|
|
|
|
|
|
|
|
In |
|
|
or S-Video In |
|
||
Video Monitor
Now, have some fun…
Now that you have installed the MovieBox USB, you can use it immediately. We strongly recommend you take this opportunity to experience Studio digital video editing.
6 Pinnacle MovieBox USB
Technical Support
Pinnacle Systems has FREE 24 x 7, self-service troubleshooting assistance. 24 hours a day, 7 days a week, you have three ways to find answers to your questions.
To access technical support got to http://www.pinnaclesys.com/support/studio8
From here you may choose the following support options:
1. FAQ’s (Frequently Asked Questions).
View 100's of technical questions and their solutions on a wide range of subjects. This is the best way to get your questions answered. Here you can easily find answers to the most common questions, as well as download the latest updates. They are sorted with the 20 most commonly read questions listed. It is also easy to sort the documents by problem category, by using the "Category" pull down menu.
2. Ask a Question, Find an Answer.
Simply type in your question to see a list of the most likely solutions. Using this natural language search, you can type in your question or the symptom of your problem, such as "I am having problems outputting to tape" or "I get an error message when I try to capture". If you do not get relevant solutions, try rephrasing your question. For example, instead of entering "I get an error", try "I get an error that states that my data rate is below 4000 kbs when I capture".
You can also select a Category from the pull down list to see questions/issues grouped together. For example, if you have a question about installing the hardware or software, choose the Category "Setup, Install and Configuration Issues" to see the top 10 installation questions. The categories follow the main features of Studio 8, Capture, Edit, Make and Output, along with some other general categories.
3. Discussion Forum.
There are over 100,000 users that have registered to use this FREE service. Search Pinnacle Systems’ online Discussion Forum to see if someone has already encountered your question. Post your question on the Discussion Forum and get help from Pinnacle Systems and other users. This forum is also searchable so you can—for example—type in “dropping frames and discussions with solutions on this topic will be displayed.
English
Quick Start Guide 7

English
Once you post to the Discussion Forum, you can get an email notification when someone has replied to your question. To get email notification, after you post your question, simply click on the Email button in the upper right hand corner of the Discussion Forum browser window, then click OK.
4. Email Support.
If you are unable to find answers to your questions using our website, Pinnacle Systems also offers troubleshooting and technical support by email. Email is usually responded to within 48 hours (excluding weekends and holidays). Use the Ask a Question section of the support web site to submit an email. Before the email is submitted, 5 suggested solutions to your issue will be presented to you. Please review them. Over 70% of customer that begin to submit their question, find their answer in these suggested solutions.
8 Pinnacle MovieBox USB

Technical Data
KEY PARTS
Hardware
External Video Capture and Output device
HiSpeed USB 2.0 (USB 1.1 compatible) -Interface
MPEG1/2 Video/Audio compression hardware
Composite, S-Video Right and Left Audio Inputs and Outputs
Power Supply
USB Cable
Software
Drivers for Windows XP, 2000, Me
Installation program
Studio Application
KEY FEATURES
Capture in MPEG2 ML@MP (4:2:0) program stream muxed with MPEG1 Layer II audio
Capture in MPEG1 system stream muxed with MPEG1 Layer II audio
Playback to PC Monitor and/or to tape
English
Quick Start Guide 9

English
Tips & Tricks
This chapter gives you important hints as well as tips & tricks on the subject video capturing.
HARDWARE REQUIREMENTS
Hard disk speed
If the hard disk works too slow, the PC cannot save the digitised images fast enough and the drop-out rate increases. The drop-out rate is the number of images which are not saved during capturing. This results in jerky playback. Your hard disk should offer a transfer rate of 5 MBytes/sec under Windows.
To take advantage of the full transfer rate, the option "DMA" should be checked in the Device Manager for your hard disk (see “Settings in Windows Me” or “Settings in Windows 2000 and Windows XP”).
Memory
In general: The more memory available, the better.
Video source requirements
If you can choose between the Compositeand the S-Video input, for quality reasons prefer the S-Video input.
ENHANCED-IDE HARD DISKS
With some E-IDE hard disks, high data rates result in an unsmooth playback when playing back video files, because the hard disk is recalibrated while a file is read. This is not a malfunction of our product but is due to the functionality of your hard disk and the other system components.
If you have received a disk with special busmaster drivers with your E-IDE hard disk and/or motherboard, please install these drivers in your system, because the disk performance will be improved considerably.
For accelerating the transmission of large amounts of data like in this case the video data, activate the DMA (Direct Memory Access) for all hard disks of your computer (see “Settings in Windows Me” or “Settings in
Windows 2000 and Windows XP”).
10 Pinnacle MovieBox USB

HINTS FOR IMPROVING THE CAPTURE PERFORMANCE OF YOUR
HARD DISK
General
During capturing of videos a large amount of data is transferred from the capture board to the hard disk. You might find that your system cannot keep up with the required amount of data transfer for the settings you have chosen.
When capturing, your system might pause, the video might be jerky or jitter (not smooth), and some of the frames might be dropped (not saved to disk). Playback quality of such a video is typically unsatisfactory.
To avoid such problems, we herein have described a number of practices to optimise your system.
Please, bear in mind that each system is reacting different. Something that improves performance on one system might not be effective on another system.
Installing hard disks
The Windows operating systems support 32-bit hard disk access. Please check in Start/Settings/Control Panel/System/Device Manager whether your hard disk drive or your SCSI controller has been detected by Windows correctly (no yellow or red warnings in the Device Manager behind the device groups). If not, the data transfer rate of your hard disk will not suffice for a satisfying quality when recording and playing back video.
If possible, install a second hard disk for capturing and saving all of your video clips. For recording and playing back video a SCSI hard disk with SCSI controllers should be preferred.
You can save temporary files to your system hard disk or another partition. The Windows operating systems access system files during recording and playback. If these files are located on the same hard disk as the video clips, the head has to be repositioned, which leads to one or more dropped frames (unsmooth playback).
Optimising the hard disk(s)
Because capturing of videos is a very hard-disk intensive procedure, optimising the files on the hard disk that you will use for capturing is the most important task in optimising capture performance. In the following you will find some detailed suggestions for doing this.
Partitioning the hard disk
You can reserve a complete hard disk or a partition of the hard disk exclusively for digitising video clips.
Quick Start Guide 11
English

English
When you format such a hard disk/partition, please do not use the format type Quick (erase) as this leaves old data on the disk. Format the hard disk/partition with the option Full.
Defragmenting the hard disk(s)
Usually, the hard disk is searched for free spaces. If a hard disk is in use for some time, the files are fragmented and saved in different segments of the disk. During the video digitising process the hard disk tries to fill the free gaps. This increases the access time and the drop-out rate. In this way some images are missing and the video playback is jerky. After defragmentation the images are saved on a contiguous segment, i.e. they are not separated any more.
For this purpose, Windows offers a defragmenting tool.
If you have two hard drives - a system drive for the operating system and the programs and a drive for the video data to be saved - you should defragment both. The system drive is carrying out important tasks during video editing and therefore should be optimised, too.
To reach an optimal performance, the capture drive should be defragmented before each capture session and the drive containing your saved images should be defragmented before each playback.
SETTINGS IN WINDOWS ME
The system applet of the Windows Me Control Panel contains several options you can enable or disable for optimal capture performance. During capturing the drive should write as much data as possible and not spend time with software optimisations or checking for system changes.
To access these options in Windows, click the Start menu. Under Settings click Control Panel, and double-click the System applet. In the window System Properties you can make the desired settings.
Device Manager tab:
Click CD-ROM and select your CD-ROM drive. Click the Properties button, select the Settings tab and clear the Auto insert notification check box. Click OK.
Additionally, in the list under Disk Drives click on the available disk(s) of your computer (one after the other). For each drive activate the checkbox DMA under Properties in the Settings tab and confirm with
OK.
Performance tab:
Click the File System button and drag the Read-ahead optimisation slider to None ( the default is Full).
12 Pinnacle MovieBox USB

While still on the File System Properties dialog, select the
Troubleshooting tab and check Disable write-behind caching for all drives. Confirm with OK.
You will have to restart your machine now for the new settings to take effect.
SETTINGS IN WINDOWS 2000 AND WINDOWS XP
The system applet of the Windows 2000/Windows XP Control Panel contains several options you can enable or disable for optimal capture performance. During capturing the drive should write as much data as possible and not spend time with software optimisations or checking for system changes.
To access these options in Windows, click the Start menu. Under Settings click Control Panel, and double-click the System applet. In the window System Properties you can make the desired settings.
Click on the Hardware tab, then on the Device Manager... button under Device Manager:
In the list under IDE ATA/ATAPI Controller first click on Primary IDE Channel using the right mouse button and choose Properties from the context menu. Then go to the Further Settings tab.
If two devices are shown, carry out the following settings for both devices.
Pay attention to what appears in the Current transmission mode box at the bottom. If Ultra DMA mode is displayed, the correct setting is already active and you do not need to make any changes.
If this is not the case, choose the DMA, if available setting from the Transmission mode list box. Ultra DMA mode will then appear after the computer has been restarted.
Confirm with OK.
Now click on Secondary IDE channel in the list with the right mouse button and carry out the same settings as for the primary IDE channel.
You will have to restart your machine now for the new settings to take effect.
Quick Start Guide 13
English

English
REDUCING NONCAPTURE-RELATED MACHINE ACTIVITY
Anything that interrupts the system or consumes CPU time for purposes other than capture can potentially decrease capture performance. Consider performing the following tasks to see if they affect performance on your system.
Close all applications except the capture application
Turn off the screen saver
To do so, right-click the desktop, click Properties, select the Screen Saver tab, choose (None) from the screen saver drop-down combo box and confirm with OK.
Turn off TSR (Terminate and Stay Resident) programs
TSR programs are programs that perform certain operations after the computer has been started and install a part of the program permanently into the memory. The resident (still active) part is continuously performing certain background operations now, for example virus scan operations.
TSR programs displayed in the taskbar
If there are TSR programs displayed at the right bottom of your taskbar, you can turn them off in the following way:
Right-click the corresponding symbol in the taskbar and select the option Exit or Close from the context menu that appears now.
TSR programs not displayed in the taskbar
In this case start the Task Manager with the keyboard command CTRL + ALT + DEL. Select the applications to be turned off one after the other and click the button End Task.
The corresponding symbols disappear from the taskbar now or they are indicated with a red "Warning" sign.
Turn off your printer
Disable your network card
If you have a network card in your computer, disable it. Sending and receiving data over the network can interrupt the system, even if you are not actively doing anything over the network.
14 Pinnacle MovieBox USB

Pinnacle MovieBox USB
Filmerstellung in höchster Qualität
KURZANLEITUNG

Deutsch
|
Inhalt |
||
|
BEVOR SIE BEGINNEN |
1 |
|
|
SYSTEMVORAUSSETZUNGEN |
1 |
|
|
LIEFERUMFANG |
2 |
|
|
SOFTWARE INSTALLIEREN |
3 |
|
|
SOFTWARE INSTALLIEREN |
3 |
|
|
ANSCHLIEßEN VON MOVIEBOXUSBUNDVIDEOGERÄTEN |
5 |
|
|
ANSCHLIEßEN DER GERÄTE |
5 |
|
|
TECHNISCHER SUPPORT |
7 |
|
|
TECHNISCHE DATEN |
9 |
|
|
HAUPTBESTANDTEILE |
9 |
|
|
HAUPTFUNKTIONEN |
9 |
|
|
TIPS & TRICKS |
10 |
|
|
HARDWARE-PROFIL |
10 |
|
|
ENHANCED-IDE FESTPLATTEN |
10 |
|
|
TIPS ZUR VERBESSERUNG DER FESTPLATTEN-AUFNAHMELEISTUNG |
11 |
|
|
EINSTELLUNGEN UNTER WINDOWS ME |
12 |
|
|
EINSTELLUNGEN UNTER WINDOWS 2000 UND WINDOWS XP |
13 |
|
|
NICHT ERFORDERLICHE RECHNER-AKTIVITÄTEN REDUZIEREN |
14 |
|
|
GEWÄHRLEISTUNG |
II |
|
Über diese Kurzanleitung
Diese Kurzanleitung erklärt die Installation der Pinnacle Hardund Software.
Besonders wichtige Textpassagen sind durch den „Notizzettel“ und dieses Format gekennzeichnet.
Handlungsanweisungen, die Ihnen Schritt für Schritt vorgeben, was in bestimmten Situationen zu tun ist, erkennen Sie an der Numerierung:
1. Starten Sie Windows.
Alle vom Benutzer einzugebenden Befehle erscheinen in einem bestimmten Schrifttyp:
Setup
Vom Benutzer anzuwählende Menüs, Befehle, Optionen, Schaltflächen, etc. werden kursiv dargestellt.
Bevor Sie beginnen
In diesem Kapitel erfahren Sie, welche Systemkomponenten für den Betrieb von MovieBox USB benötigt werden und welche Produktteile sich im Lieferumfang von MovieBox USB befinden.
SYSTEMVORAUSSETZUNGEN
Bitte stellen Sie vor Installation von MovieBox USB sicher, daß Ihr
Computersystem die nachfolgend genannten Voraussetzungen erfüllt:
Computer
Intel Pentium oder AMD Athlon 500 MHz oder höher (1 GHz empfohlen)
USB 1.1- oder USB 2.0-Anschluß (USB 2.0 empfohlen)
Windows 98SE, Windows Millennium, Windows 2000 oder Windows XP (Windows XP empfohlen)
DirectX 8 oder höher-kompatible Grafikkarte
(ATI Radeon 9700 bzw. Nvidia Geforce 3 oder höher mit mindestens 32 MB RAM empfohlen)
DirectX 8 oder höher-kompatible Soundkarte
128 MB RAM (256 MB empfohlen)
CD-ROM-Laufwerk (optional: CDoder DVD-Brenner zur Erstellung von Video CD, S-Video CD oder DVD erforderlich)
Lautsprecher
Maus
Mikrofon für eventuelle Sprachaufnahmen
300 MB freien Festplattenspeicher für die Software-Installation
45 MB freien Festplattenspeicher/Minute für das Einlesen von Videomaterial in DVD-Qualität.
Videoausrüstung
MovieBox USB ist in der Lage, über die folgenden GeräteVideomaterial einzulesen und auszugeben:
Jeder beliebige analoge (8mm, Hi8, VHS, SVHS, VHS-C oder SVHS-C) Camcorder bzw. Videorecorder.
Jeder beliebige DV-, Digital8oder MicroMV-Camcorder mit Analogausgängen (nur Aufnahme)
Kurzanleitung 1
Deutsch
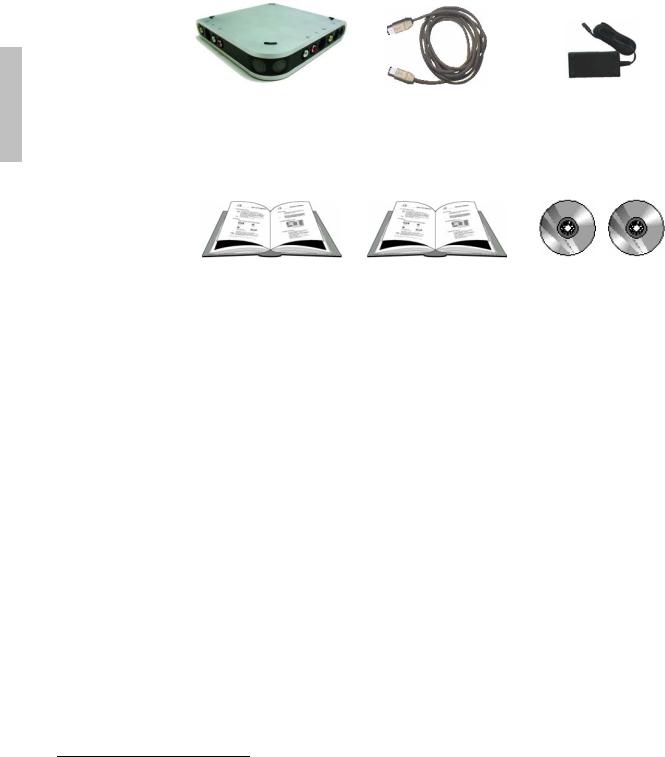
LIEFERUMFANG
Bitte vergewissern Sie sich, daß Ihr MovieBox USB-Equipment vollständig ist, bevor Sie mit der Installation beginnen. Folgende Teile befinden sich im MovieBox USB-Lieferumfang*:
Deutsch
MovieBox USB |
USB-Kabel |
Netzteil mit separatem |
|
|
Netzkabel (ohne Abb.) |
Pinnacle Studio Handbuch |
Diese Kurzanleitung |
Pinnacle Studio“Programs“ |
|
|
und „Content” |
|
|
CD-ROMs |
Falls Teile fehlen sollten, wenden Sie sich bitte an Ihren Händler.
*Je nach Ausliefervariante kann der Lieferumfang von dem hier geschilderten abweichen. Änderungen von Design/Technik vorbehalten.
2 Pinnacle MovieBox USB

Software installieren
SOFTWARE INSTALLIEREN
Bitte lesen Sie noch vor dem Öffnen der CD-Verpackung und dem Installieren der Software die Lizenzvereinbarung im Studio-Handbuch, zumal Sie mit dem Öffnen der CD-ROM-Verpackung Ihr uneingeschränktes Einverständnis mit den in der Lizenzvereinbarung enthaltenen Bedingungen zum Ausdruck bringen.
Sollten Sie damit nicht konform gehen, so öffnen Sie bitte die Verpackung nicht, sondern geben Sie das komplette Paket dahin zurück, wo Sie es gekauft haben.
Im Lieferumfang befinden sich die beiden 2 CD-ROMs “Programs” und “Content”. Auf der Programs-CD befinden sich alle für die Installation der Studio-Software und der Tools benötigten Dateien und die Content-CD enthält die von der jeweiligen Videonorm (PAL, NTSC) abhängigen Motion-Menüs und Programme von Drittherstellern (Adobe Acrobat Reader sowie Real Player).
Um die Software zu installieren, gehen Sie bitte folgendermaßen vor:
SERIENNUMMER: Während der Installation wird Ihre Seriennummer abgefragt. Sie finden diese Nummer auf der Studio-CD „Programs“ oder auf einem Begleitdokument aufgedruckt. Bitte notieren Sie sich diese Nummer, bevor Sie die CD in das CD-ROM Laufwerk legen.
1.Computer einschalten.
Schalten Sie Ihren Computer ein. Windows wird automatisch gestartet. Sollte Ihr Computer so konfiguriert sein, daß Windows nicht automatisch gestartet wird, starten Sie bitte Windows.
Wichtig für Windows 2000 und Windows XP: loggen Sie sich mit
Administratorrechten ein.
2.CD „Programs“ in das CD-ROM-Laufwerk einlegen.
Legen Sie die CD „Programs“ in das CD-Laufwerk Ihres Computers ein.
Nun startet das Setup-Programm entweder automatisch oder Sie starten setup.exe oder Welcome.exe von der CD.
Kurzanleitung 3
Deutsch

Deutsch
3.Anweisungen folgen.
Folgen Sie den Anweisungen des Pinnacle Installationprogramms.
Beim Start des HW-Installationsprogrammes wählen Sie bitte „MovieBox USB“ als Ihr Gerät aus. Dann folgen Sie wiederum den Anweisungen.
Nach Installation der Studio-Software und dem Wiederhochfahren des Systems werden Sie normalerweise dazu aufgefordert, die “Content-CD” in das CD-ROM-Laufwerk Ihres Computers einzulegen. Sollte dies einmal nicht der Fall sein, empfehlen wir Ihnen vor dem Starten der StudioAnwendung die manuelle Installation Ihrer “Content-CD”.
4 Pinnacle MovieBox USB

Anschließen von MovieBox USB und Videogeräten
Unter diesem Abschnitt erfahren Sie, wie Sie Ihre Videogeräte an die MovieBox USB anschließen können, wobei die dafür geeigneten Kabel verfügbar sein müssen.
ACHTUNG Achten Sie unbedingt darauf, daß PC, MovieBox USB sowie sämtliche Videogeräte AUSGESCHALTET sind, bevor Sie die Geräte miteinander verbinden.
ANSCHLIEßEN DER GERÄTE
In den folgenden Abbildungen können Sie sehen, wie die MovieBox USB mit Ihrem PC und den betreffenden Videogeräten verbunden werden müssen.
Deutsch
|
Netzteil |
|
USB |
1 2 3 4 |
6 5 |
8 |
7 |
Eingänge |
Ausgänge |
||
Video-Eingänge |
Video-Ausgänge |
||
1 |
Composite |
5 |
Composite |
2 |
S-Video |
6 |
S-Video |
Audio-Eingänge |
Audio-Ausgänge |
||
3 |
Links |
7 |
Rechts |
4 |
Rechts |
8 |
Links |
Kurzanleitung 5

Deutsch
|
|
Audio- |
Audio- |
|
|
|
|
|
|
|
||||||
|
Ausgang |
Eingang |
|
|
|
|
|
|
|
Netzteil |
|
|||||
|
|
|
|
|
|
|
|
|
|
|
|
|
|
|
||
|
|
|
|
|
|
|
|
|
|
|
|
|||||
|
|
|
|
|
|
|
|
|
|
|
|
|
|
|||
|
|
|
|
Compositeoder |
|
|
|
|
|
|
|
|
|
|||
|
|
|
|
S-Video-Eingang |
|
|
|
|
|
|
|
|
USB |
|||
|
|
|
|
|
|
Audio- |
|
|
Composite- |
|
|
|||||
|
Compositeoder |
|
|
|
|
|
|
|
|
|
|
|
||||
|
|
|
|
|
|
|
|
|
|
|
|
|||||
|
|
|
|
|
|
|
|
|
|
|
|
|
||||
|
|
|
|
|
|
|
|
|
|
oder S-Video- |
|
|
||||
|
|
|
|
|
|
|
|
|
Ausgang |
|
|
|
|
|||
|
S-Video-Ausgang |
|
|
|
|
|
|
|||||||||
|
|
|
|
|
|
|
|
|
|
Ausgang |
|
|||||
Analoge |
|
|
|
|
|
|
|
|
|
|||||||
Videoquelle |
|
|
|
|
|
|
|
|
Composite- |
|
||||||
|
|
|
|
|
|
|
|
|
|
Audio- |
|
|
oder S-Video- |
|
||
|
|
|
|
|
|
|
|
|
|
Eingang |
|
|
Eingang |
|
||
|
|
|
|
|
|
|
VCR |
|
|
|
|
|
|
|
||
|
|
|
|
|
|
|
|
|
|
Audio- |
|
Composite- |
PC |
|||
|
|
|
|
|
|
|
|
|
|
|
||||||
|
|
|
|
|
|
|
|
|
|
Ausgang |
|
oder S-Video- |
||||
|
|
|
|
|
|
|
|
|
|
|
|
Ausgang |
|
|||
|
|
|
|
|
|
|
|
|
|
Audio- |
|
|
Composite- |
|
||
|
|
|
|
|
|
|
|
|
|
|
|
oder S-Video- |
|
|||
|
|
|
|
|
|
|
|
|
|
Eingang |
|
|
Eingang |
|
||
Video Monitor
Und nun wünschen wir Ihnen viel Spaß…
Nach erfolgreicher Installation der MovieBox USB können Sie sofort beginnen. Wir empfehlen Ihnen sogar, diese Gelegenheit zu nutzen und sich ein wenig mit Ihrem neuen digitalen Videoschnittsystem Pinnacle Studio vertraut zu machen.
6 Pinnacle MovieBox USB

Technischer Support
Pinnacle Systems bietet rund um die Uhr einen KOSTENLOSEN Service, der es Anwendern erlaubt, Probleme selbst ohne Fremdhilfe zu beheben. 7 Tage die Woche haben Sie rund um die Uhr die Möglichkeit, Antworten auf Ihre Fragen zu finden. Pinnacle Systems bietet Ihnen dazu folgende Lösungen:
Technischen Support erhalten Sie unter http://www.pinnaclesys.com/support/studio8
Von hier aus können Sie unter den folgenden Support-Optionen auswählen:
1. Häufig gestellte Fragen (FAQ).
Hier finden Sie zu einer großen Anzahl von Themengebieten Hunderte von technischen Fragen und deren Lösungen. Dies ist der beste Weg, um Antworten auf Ihre Fragen zu finden. Hier erhalten Sie ganz einfach die Antworten zu den gängigsten Problemen. Die neuesten Updates können Sie hier ebenfalls herunterladen. Die Fragen werden in der Reihenfolge der 20 meistgelesenen Fragen angezeigt. Sie können die Dokumente aber auch einfach nach Problemkategorie sortieren. Verwenden Sie dazu das „Kategorie“-Pulldown-Menü.
2. Stellen Sie eine Frage und erhalten Sie eine Antwort.
Geben Sie einfach Ihre Frage ein, um eine Liste der naheliegendsten Lösungen zu erhalten. Mit Hilfe dieser natürlichen Sprachsuche können Sie Ihre Frage oder das Symptom Ihres Problems eingeben, wie etwa „Ich habe Probleme bei der Ausgabe auf Band“ oder „Ich erhalte Fehlermeldungen, wenn ich versuche, eine Aufnahme zu machen“. Sollten Sie keine zufriedenstellenden Lösungen erhalten, formulieren Sie bitte Ihre Frage anders. Zum Beispiel könnten Sie statt „Ich erhalte Fehlermeldungen“ folgende Formulierung verwenden „Ich erhalte Fehlermeldungen, die anzeigen, daß meine Datenrate unter 4000 KB liegt, wenn ich aufnehme“
Eine weitere Möglichkeit bietet Ihnen die Pulldown-Liste für „Kategorie“, wo Sie die Fragen und Probleme in Gruppen unterteilt finden. Wenn Sie zum Beispiel eine Frage zur Installation von Hardware oder Software haben, wählen Sie die Kategorie „Setup-, Installationsund Konfigurationsprobleme“, um die 10 meistgestellten Fragen dazu zu erhalten. Die Kategorien behandeln die Hauptfunktionen von Studio 8, Aufnahme, Bearbeiten, Erstellen und Ausgabe, aber ebenso einige andere allgemeine Kategorien.
Deutsch
Kurzanleitung 7

Deutsch
3. Diskussionsforum.
Es sind mehr als 100.000 Nutzer registriert, die diesen KOSTENLOSEN Service nutzen. Besuchen Sie das Online-Diskussionsforum von Pinnacle Systems, um zu sehen, ob Ihre Frage schon von jemand anderem gestellt wurde. Platzieren Sie Ihre Frage im Diskussionsforum und Sie erhalten Hilfe von Pinnacle Systems oder anderen Nutzern. Sie können in diesem Forum aber auch die Suchfunktion anwenden. Geben Sie zum Beispiel „ausgelassene Einzelbilder“ ein und es werden Diskussionsbeiträge zu diesem Thema mit entsprechenden Lösungen angezeigt.
Sobald Sie eine Frage im Diskussionsforum platziert haben, erhalten Sie eine E-Mail-Benachrichtigung, wenn jemand auf Ihre Frage geantwortet hat. Um eine E-Mail-Benachrichtigung nach dem Einreichen einer Frage zu erhalten, klicken Sie einfach auf den E-Mail-Button im rechten oberen Eck des Browserfensters. Bestätigen Sie anschließend mit OK.
4. E-Mail-Support.
Falls Sie mit Hilfe unserer Website keine Antworten auf Ihre Fragen finden konnten, bietet Ihnen Pinnacle Systems ebenfalls Troubleshooting und technischen Support per E-Mail. E-Mails werden gewöhnlich innerhalb von 48 Stunden beantwortet (mit Ausnahme von Wochenenden und Feiertagen). Bitte verwenden Sie den Abschnitt „Eine Frage stellen“ auf unserer SupportWebsite, um eine E-Mail einzureichen. Bevor die E-Mail eingereicht wird, werden Ihnen 5 Lösungen zu Ihrem Problem vorgeschlagen. Bitte lesen Sie diese genau. Mehr als 70% der Kunden finden bereits in diesen vorgeschlagenen Lösungen Antworten auf deren Fragen.
8 Pinnacle MovieBox USB

Technische Daten
HAUPTBESTANDTEILE
Hardware
Externes Gerät für die Aufnahme und Ausgabe von Videomaterial
HiSpeed USB 2.0-Anschluß (USB 1.1-kompatibel)
Hardware für die MPEG1/2-Video-/Audio-Komprimierung
Composite, S-Video Audio-Eingänge und -Ausgänge (links/rechts)
Stromversorgung
USB-Kabel
Software
Treiber für Windows XP, 2000, Me
Installationsprogramm
Studio-Anwendung
HAUPTFUNKTIONEN
Aufnahme im MPEG2 ML@MP (4:2:0)-Program Stream mit MPEG1 Layer II-Audio (multiplexed)
Aufnahme im MPEG1-System Stream mit MPEG1 Layer II-Audio (multiplexed)
Wiedergabe auf PC-Monitor und/oder Band
Deutsch
Kurzanleitung 9

Deutsch
Tips & Tricks
In diesem Kapitel finden Sie wichtige Hinweise sowie Tips & Tricks zum Thema Video-Aufnahme.
HARDWARE-PROFIL
Festplattengeschwindigkeit
Arbeitet die Festplatte zu langsam, kann der PC die digitalisierten Bilder nicht schnell genug ablegen, die Dropout-Rate steigt. Darunter versteht man das Ausmaß der bei der Aufnahme weggelassenen Bilder. In der Praxis bedeutet dies, daß die Videos sprunghaft ablaufen. Ihre Festplatte sollte über eine Übertragungsrate von 5 MByte/sec unter Windows verfügen.
Um die volle Übertragungsrate auszunutzen, sollte im Geräte-Manager für Ihre Festplatte die Option "DMA" aktiviert sein (siehe „Einstellungen unter Windows Me“ oder „Einstellungen unter Windows 2000 und Windows XP“).
Arbeitsspeicher
Generell gilt: Je mehr Arbeitsspeicher zur Verfügung steht, desto besser.
Anforderungen an die Videoquelle
Bei der Wahl zwischen Compositeund S-Video-Eingang sollte aus
Qualitätsgründen der S-Video-Eingang bevorzugt werden.
ENHANCED-IDE FESTPLATTEN
Im Zusammenspiel mit einigen E-IDE Festplatten kann es bei höheren Datenraten dazu kommen, daß beim Abspielen einer Video-Datei die Wiedergabe "ruckt". Dieses ist darauf zurückzuführen, daß die Festplatte während des Lesens der Datei eine Rekalibrierung durchführt die zu diesen Aussetzern führt. Dieses ist keine Fehlfunktion unseres Produktes, sondern liegt technisch bedingt an der Funktionsweise der Festplatte im Zusammenspiel mit den restlichen Systemkomponenten.
Falls Sie zu Ihrer E-IDE Festplatte und/oder Motherboard eine Diskette mit speziellen BusmasterTreibern erhalten haben, so installieren Sie bitte auch diese Treiber in Ihrem System, da sich dadurch die Plattenleistung merklich erhöht.
Zur Beschleunigung der Übertragung von großen Datenmengen, wie in diesem Fall die Videodaten, aktivieren Sie das DMA (Direct Memory Access) für alle Festplatten Ihres Rechners (siehe „Einstellungen unter Windows Me“ oder „Einstellungen unter Windows 2000 und Windows XP“).
10 Pinnacle MovieBox USB
 Loading...