

Page 1

PH I LI PS
English
FW-C380
/j
Toll Free Help Line
Ligne d'assistance en service libre
Linea de ayuda telefònica sin cargo
800-531-0039
PHILIPS
Page 2

Page 3

TABLE OF CONTENTS
President Message
iniportant Safety Instructions...
Limited Warranty .
Model Illustration
General Information
Safety Information...........................
Preparation
Controls..................................
Operating The System
CD
..........................................
...........
.........................
..........................
............................
........................
........................
.......
...................
......
......
............
............
............
............
............
......
... 10- 12 Troubleshooting
.
... 12 - IS
.
2-3 AUX
4 Recording
5 Clock
6 Timer
7
7
8-9 Maintenance
Sleep Timer...........................
Specifications
......................................
.............................
....................................
....................................
....................
.............
... 16- 18
.
............
....................
...................
...........
22 - 23
...................
...........
........
.......
.
.............
24 - 25
........
.......
....26
.....
.... .. 27 -28
22
24
25
27
Tuner
Tape
............................................
.............................................
... 19-20
...20-21
.
Page 4

TA»L6 or
/Щ^ЛЛя. « * 1
« i>'*9
*,
-------------
CONTENTS
<V<. • ^ ^
•V' •.
• ^
«>p* .<•<».
ЖН/^.тт ЯЯ
:» .•
^ ^ —
_ . /.
V miâ»4.'
. « ••*
w .Jl ir
w . :<
. /•
u
Page 5

Return your Warranty Registration card today to
ensure you receive all the benefits you’re entitled to.
Once your Philips purchase is registered, you’re eligible to receive
all the privileges of owning a Philips product.
^Warranty i Verification
Regstering your product within 10 days
confirms your right to maximum protection
under the terms and conditions of your
Philips warranty.
Know these
symbols
^ Owner I
Confirmation
Your completed Warranty Registration
Card serves as verification of ownership in
the event of product theft or loss.
RISK OF ELECTRIC SHOCK
A
CAUTION; TO REDUCE THE RISK OF ELECTRIC SHOCK, DO NOT
REMOVE COVER (OR BACK). NO USER-SERVICEABLE PARTS
INSIDE. REFER SERVICING TO QUALIFIED SERVICE PERSONNEL.
DO NOT OPEN
So complete and return the Warranty Registration Card enclosed
with your purchase at once. And take advantage of these
important benefits.
^ Model I
Registration
Returning your Warranty Registration Card
right away guarantees you’ll receive all
the information and special offers which you
qualify for as the owner of your model.
For Customer Use
Enter below the Serial No. which is located on the
rear of the cabinet. Retain this information for
A
future reference.
Model No. _________________________________
Serial No.__________________________________
A
A
This “bolt of lightning” indicates uninsulated material
within your unit may cause an electrical shock. For the
safety of everyone in your household, please do not
remove product covering.
The “exclamation point” calls attention to features for
which you should read the enclosed literature closely to
prevent operating and maintenance problems.
WARNING: to prevent fire or shock
HAZARD, DO NOT EXPOSE THIS EQUIPMENT TO RAIN
OR MOISTURE.
CAUTION: To prevent electric shock, match wide
blade of plug to wide slot, and fully insert.
MACS097
Page 6

Page 7

o
PHILIPS Visit our World Wide Web Site at http://www.philipsusa.com
PHILIPS
Congratulations on your purchase,
and welcome to the ‘^family!**
Dear Philips product owner:
Thank you for your confidence in Philips.YouVe selected one
of the best-built, best-backed products available today. And
we’ll do everything in our power to keep you happy with
your purchase for many years to come.
As a member of the Philips “family,” you’re entitled to
protection by one of the most comprehensive warranties
and outstanding service networks in the industry.
What’s more, your purchase guarantees you’ll receive all
the information and special offers for which you qualify,
plus easy access to accessories from our convenient home
shopping network.
And most importantly you can count
on our uncompromising commitment to your total
satisfaction.
All of this is our way of saying welcome-and thanks for
investing in a Philips product.
Sincerely,
Robert Minkhorst
President and Chief Executive Officer
P.S. Remember, to get the most from your Philips
product, you must return your Warranty
Registration Card within 10 days. So please mail
it to us right now!
Page 8

»MtlIPS
Cv<^v
'ч5г
Page 9
O IMPORTANT SAFETY INSTRUCTIONS - Read before operating equipment
This product was designed and
manufactured to meet strict quality and
safety standards.There are, however; some
installation and operation precautions which
you should be particularly aware of
1. Read these instructions - All the safety
and operating instructions should be read
before the appliance is operated.
2. Keep these instructions - The safety
and operating instructions should be
retained for future reference.
3. Heed all warnings - All warnings on the
appliance and in the operating instructions
should be adhered to.
4. Follow all instructions - All operating
and use instructions should be followed.
5. Do not use this apparatus near water
- for example, near a bathtub, washbowl,
kitchen sink, laundry tub, in a wet basement
or near a swimming pool, etc.
6. Clean only with a damp cloth. The
appliance should be cleaned only as
recommended by the manufacturer
Install in accordance with the
7.
manufacturer’s instructions. Do not
block any of the ventilation openings.
For example, the appliance should not be
situated on a bed, sofa, rug, or similar
surface or placed in a built-in installation,
such as a bookcase or cabinet that may
impede the flow of air through the
ventilation openings.
Do not install near any heat sources
8.
such as radiators, heat registers, stoves, or
other apparatus (including amplifiers) that
produce heat.
Do not defeat the
9.
safety purpose of the
polarized or
grounding-type plug. A
polarized plug has two blades with one
wider than the other. A grounding type plug
has two blades and a third grounding prong.
The wide blade or the third prong are
provided for your safety. When the provided
plug does not fit into your outlet, consult an
electrician for replacement of the obsolete
outlet.
10.Protect the power cord from being
walked on or pinched particularly at plugs,
convenience receptacles, and the point
where they exit from the apparatus.
AC Polarized
Plug
11.Only use attachments/accessories
specified by the manufacturer.
12. Use only with a cart, stand,
tripod, bracket, or table specified
by the manufacturer; or sold with
the apparatus. When a cart is used, use
caution when moving the cart/apparatus
combination to avoid injury from tip-over
13. Unplug this apparatus during lightning
storms or when unused for long periods of
time.
14. Refer all servicing to qualified service
personnel. Servicing is required when the
apparatus has been damaged in any way,
such as power-supply cord or plug is
damaged, liquid has been spilled or objects
have fallen into the apparatus, the apparatus
has been exposed to rain or moisture, does
not operate normally, or has been dropped.
15. Battery usage CAUTION -To
prevent battery leakage which may result in
bodily injury or damage to the unit:
• Install all batteries correctly, + and - as
marked on the unit.
• Do not mix batteries (old and new or
carbon and alkaline, etc.).
• Remove batteries when the unit is not used
for a long time.
EL 6475-E001:00/8
Page 10

...........
ш^г^т
..........
Г?:.--'
*'•" ••* '•?.** '*,*••*«****
• . -л-.' •;;
^^•"Ч■.:•■:
’•.■sur'
....
Page 11

Oi
AUDIO SYSTEM
One Year Free Labor
One Year Free Service on Parts
This product must be carried in for repair.
WHO IS COVERED?
You must have proof of purchase to receive warranty
service. A sales receipt or other document showing that
you purchased the product is considered proof of purchase.
WHAT IS COVERED?
Warranty coverage begins the day you buy your product.
For one year thereafter, all parts will be repaired or replaced,
and labor is free. After one year from the day of purchase,
you pay for the replacement or repair of all parts, and for
all labor charges.
All parts, including repaired and replaced parts, are covered
only for the original warranty period. When the warranty
on the product expires, the warranty on all replaced and
repaired parts also expires.
WHAT IS EXCLUDED?
Your warranty does not cover:
• labor charges for installation or setup of the product,
adjustment of customer controls on the product, and
installation or repair of antenna systems outside of the
product.
• product repair and/or part replacement because of misuse,
accident, unauthorized repair or other cause not within
the control of Philips Consumer Electronics Company.
• reception problems caused by signal conditions or cable
or antenna systems outside the unit.
• a product that requires modification or adaptation to
enable it to operate in any country other than the
country for which it was designed, manufactured,
approved and/or authorized, or repair of products
damaged by these modifications.
• incidental or consequential damages resulting from the
product. (Some states do not allow the exclusion of
incidental or consequential damages, so the above
exclusion may not apply to you.This includes, but is not
limited to, prerecorded material, whether copyrighted or
not copyrighted.)
LIMITED WARRANTY
• a product that is used for commercial or institutional
purposes.
WHERE IS SERVICE AVAILABLE?
Warranty service is available in all countries where the
product is officially distributed by Philips Consumer
Electronics Company. In countries where Philips Consumer
Electronics Company does not distribute the product, the
local Philips service organization will attempt to provide
service (although there may be a delay if the appropriate
spare parts and technical manual(s) are not readily
available).
MAKE SURE YOU KEEP...
Please keep your sales receipt or other document showing
proof of purchase. Attach it to this owner’s manual and
keep both nearby. Also keep the original box and packing
material in case you need to return your product.
BEFORE REQUESTING SERVICE...
Please check your owner’s manual before requesting
service. Adjustments of the controls discussed there may
save you a service call.
TO GET WARRANTY SERVICE IN
U.S.A., PUERTO RICO OR U.S. VIRGIN
ISLANDS...
Take the product to a Philips factory service center (see
enclosed list) or authorized service center for repair. When
the product has been repaired, you must pick up the unit at
the center. Centers may keep defective parts.
(In U.S.A., Puerto Rico and U.S.Virgin Islands, all implied
warranties, including implied warranties of merchantability
and fitness for a particular purpose, are limited in duration
to the duration of this express warranty. But, because some
states do not allow limitations on how long an implied
warranty may last, this limitation may not apply to you.)
TO GET WARRANTY SERVICE IN
CANADA...
Please contact Philips at:
1-800-661-6162 (French Speaking)
1-800-363-7278 (English Speaking)
(In Canada, this warranty is given in lieu of all other
warranties. No other warranties are expressed or implied,
including any implied warranties of merchantability or
fitness for a particular purpose. Philips is not liable under
any circumstances for any direct, indirect, special, incidental
or consequential damages, howsoever incurred, even if
notified of the possibility of such damages.)
REMEMBER...
Please record the model and serial numbers found on the
product below. Also, please fill out and mail your warranty
registration card promptly, it will be easier for us to notify
you if necessary.
MODEL# __________________________________________
SERIAL# __________________________________________
This warranty gives you specific legal rights. Too may have other
rights which vary from state/province to stote/province.
Philips Service Solutions Group, P.O. Box 2976,
Longview,Texas 75606, USA, (903) 242-4800
EL4965E006 I MAC 4110/ 1Z-98
Page 12

!?.• •..• '.•••.^r. '• •“!• •.*.•!* •?_*.ft.;--^..,
i- -T."* rv'^T^se. i*--”
>~;-;sT... ••’“ '•
i"!*r.S-". !• •
'■г:-.%л.Ул ! ■ • iszfi ^ ••«•
'* .
-------------------------------
------
..............
■ • -
•/
Page 13
0
CAUTION
A
CAUTION: TO REDUCE THE RISK OF ELECTRIC SHOCK,
REFER SERVICING TO QUALIFIED SERVICE PERSONNEL.
A
A
RISK OF ELECTRIC SHOCK
DO NOT OPEN
DO NOT REMOVE COVER (OR BACK).
NO USER-SERVICEABLE PARTS INSIDE.
This symbol warns the user that uninsulated voltage
within the unit may have sufficient magnitude to cause
electric shock. Therefore, it is dangerous to make
any kind of contact with any inside part of this unit.
This symbol alerts the user that important literature
concerning the operation and maintenance of this
unit has been included. Therefore, it should be read
carefully in order to avoid any problems.
A
WARNING
To reduce the risk of fire or electric shock, do
not expose this appliance to rain or moisture.
CAUTION
Use of controls or adjustments or
performance of procedures other than herein
may result in hazardous radiation exposure.
The set complies with the FCC-Rules, Part 15 and with
21 CFR 1040.10.
Canada
This digital apparatus does not exceed the Class B limits
for radio noise emissions from digital apparatus as set
out in the Radio Interference Regulations of the
Canadian Department of Communications.
Read this first!
Congratulations on your purchase of this Philips product!
Everything you need to get started is in this box.
If you have any problems, Philips Representatives can help
you get the most from your new product by explaining:
^Hookup
^ FirstTime Setup
^ Feature Operation
Do not attempt to return
this product to the store.
For Fast Help, Call Us First!
1-800-531-0039
Thank you for making Philips part of your home!
PLUG & PLAY
Page 14

1
/Ч Г* TVfm
V. WA."-i..у,•,"***_ W
mMCSIIQQBB
Page 15

e
GENERAL INFORMATION
General Information
• The typeplate (which contains
the serial number) is located at
the rear of the system.
• Recording is permissible if
copyright or other rights of third
parties are not infringed.
• This device complies with the
Federal Communications
Commission (FCC) rules, part 15
and with 21 CFR 1040.10.
Operation is subject to the
following two conditions:
- This device may not cause
harmful interference, and
- This device must accept any
interference received, including
interference that may cause
undesired operation.
Environmental
Information
All unnecessary packaging has been
omitted. We have tried to make the
packaging easy to separate into three
materials: cardboard (box), polystyrene
foam (buffer) and polyethylene (bags,
protective foam sheet).
Your system consists of materials which
can be recycled and reused if
disassembled by a specialized company.
Please observe the local regulations
regarding the disposal of packaging
materials, exhausted batteries and old
equipment.
SAFETY INFORMATION
Accessories (Supplied)
- Remote control
- AM loop antenna
- FM wire antenna
- AC power cord
Safety Information
• Before operating the system, check
that the operating voltage indicated
on the typeplate (or the voltage
indication beside the voltage
selector) of your system is identical
with the voltage of your local power
supply. If not, please consult your
dealer.The typeplate is located at the
rear of your system.
• When the system is switched on, do
not move it around.
• Place the system on a solid base (e.g.
a cabinet).
• Place the system in a location with
adequate ventilation to prevent
internal heat build-up in your system.
Allow at least 10cm (4 inches)
clearance from the rear and the top
of the unit and 5cm (2 inches) from
each side
• The system incorporates a built-in
safety feature that prevents
overheating.
• Do not expose the system to
excessive moisture, rain, sand or heat
sources.
• Under no circumstances should you
repair the system yourself as this will
invalidate the warranty!
• If the system is brought directly from
a cold to a warm location, or is
placed in a very damp room,
moisture may condense on the lens
of the CD unit inside the system.
Should this occur; the CD player will
not operate normally. Leave the
power on for about one hour with
no disc in the system until normal
playback is possible.
• Electrostatic discharge may cause
unexpected problems. See whether
these problems disappear if you
unplug the AC power cord and plug
it in again after a few seconds.
• To disconnect the system from
the power supply completely,
remove the AC power plug
from the wall socket.
Page 16

,s«;;r.C г,-ir... "
штшш
Page 17
o
PREPARATION
Page 18

о
-------
^_=-
If:-
I г ■
Page 19
I t=:!kuii.iii%f ii«../iii uiic
p
r/ffnts wnicn vary jrom scote/pruvincc to bLaLc/p/uriiitc.
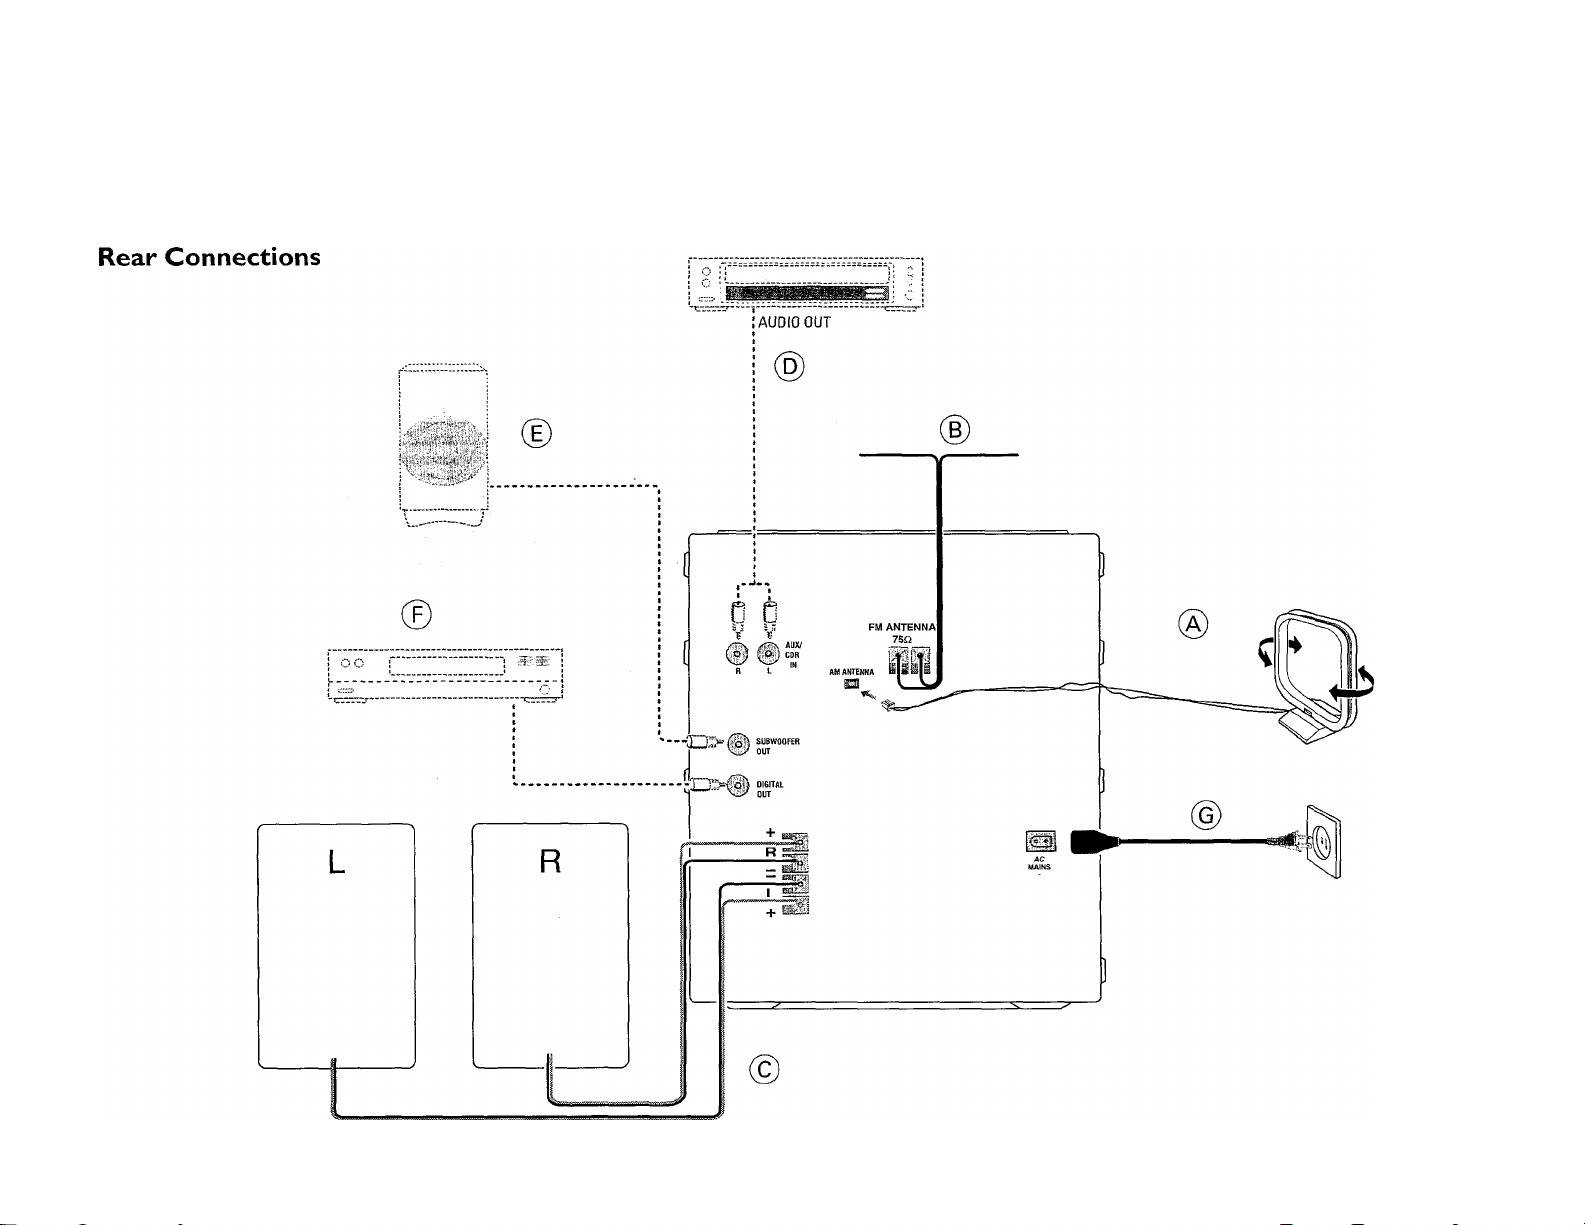
PREPARATION
o
(a) am Loop Antenna
Connection
Connect the supplied loop antenna to
the AM ANTENNA terminal. Place the
AM loop antenna far away from the
system and adjust its position for the
best reception.
(D FM Wire Antenna
Connection
Connect the supplied FM wire antenna
to the FM AERIAL (FM ANTENNA)
75 Q terminal. Adjust the position of
the FM antenna for the best reception.
Outdoor Antenna
For better FM stereo reception,
connect an outdoor FM antenna to the
FM AERIAL (FM ANTENNA) 75 ii
terminal using a 75 O dipole wire.
FM AERIAL 75Q
as
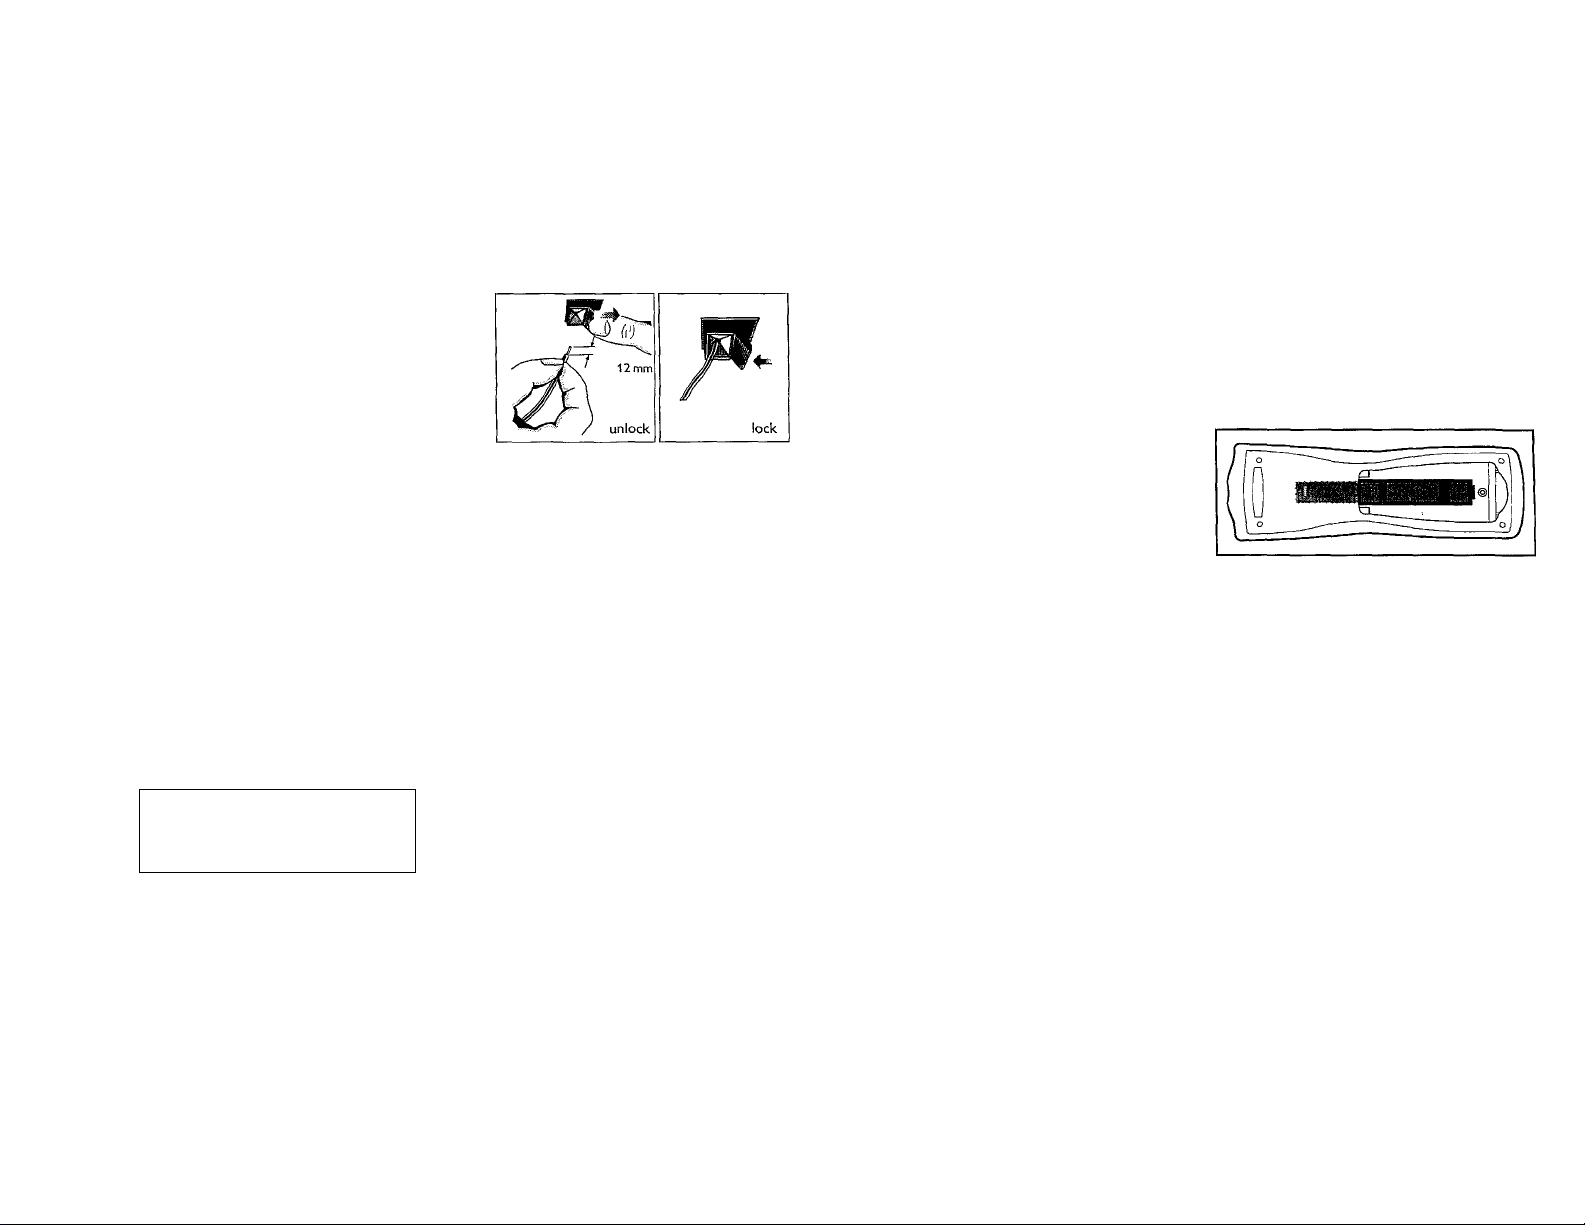
(c) Speakers Connection
• Connect the right speaker to Front
terminal R, with the colored wire to
+ and the black wire to —.
• Connect the left speaker to Front
terminal L, with the colored wire to
+ and the black wire to —.
FM ANTENNA 75Q
OR
Clip the stripped portion of the
speaker wire as shown.
CAUTION:
- For optimal sound performance, it is
recommended to use the supplied
speakers.
- Do not connect more than one speaker
to any one pair of + /— speaker
terminal.
- Do not connect speakers with
impedance lower than the speakers
supplied. Please refer to
SPECIFICATION section of this manual.
@ Connecting Other
equipment to your
system
You can connect the audio left and right
OUT terminals of a P7,VCR, Laser Disc
player, DVD player or CD Recorder to
the AUX IN terminals at the rear of the
system.
(E) Subwoofer Out
Connection
Connect the optional active subwoofer
to the SUBWOOFER OUT terminal.
The subwoofer reproduces just the low
bass sound effect (e.g. explosions, the
rumble of spaceships, etc.). Be sure to
follow the instructions supplied with the
subwoofer
0
Digital Out Connection
You can record the digital sound from
the CD, through this output, on any
audio equipment with digital input (e.g.
CD Recorder Digital Audio Tape (DAT)
deck. Digital to Analog Converter and
Digital Signal Processor).
Connect one end of the cinch cable
(not supplied) to the DIGITAL OUT
socket and the other end to the audio
equipment with digital input.When
connecting the cinch cable, make sure it
is fully inserted.
© AC Power Supply
After all other connections have been
made, connect the AC power cord to
the system and to the wall outlet
Inserting batteries into the
Remote Control
• Insert the batteries (not supplied) into
the remote control as shown in the
battery compartment (Type R06 or
AA).
CAUTION
- Remove batteries if they are
exhausted or not to be used for a
long time.
- Do not use old and new or
different types of batteries in
combination.
- Batteries contain chemical
substances, so they should be
disposed off properly.
Page 20

/Cl'- v"..;:>:v> : ...
-y.-i- :;.í
•Л. V'-
.... • .^-.í c£;r.--;'
.......
- ,.......................
Page 21
V^dlldUian L./t;pd.I U i ici IL (Ji \^t^miiiuiii\.auv^iio.
CONTROLS
@
®-^-0 lQj C-
@
Page 22

.-ITL 'I-
I
Л . w*"- *•
r ' :. > •
Page 23

o
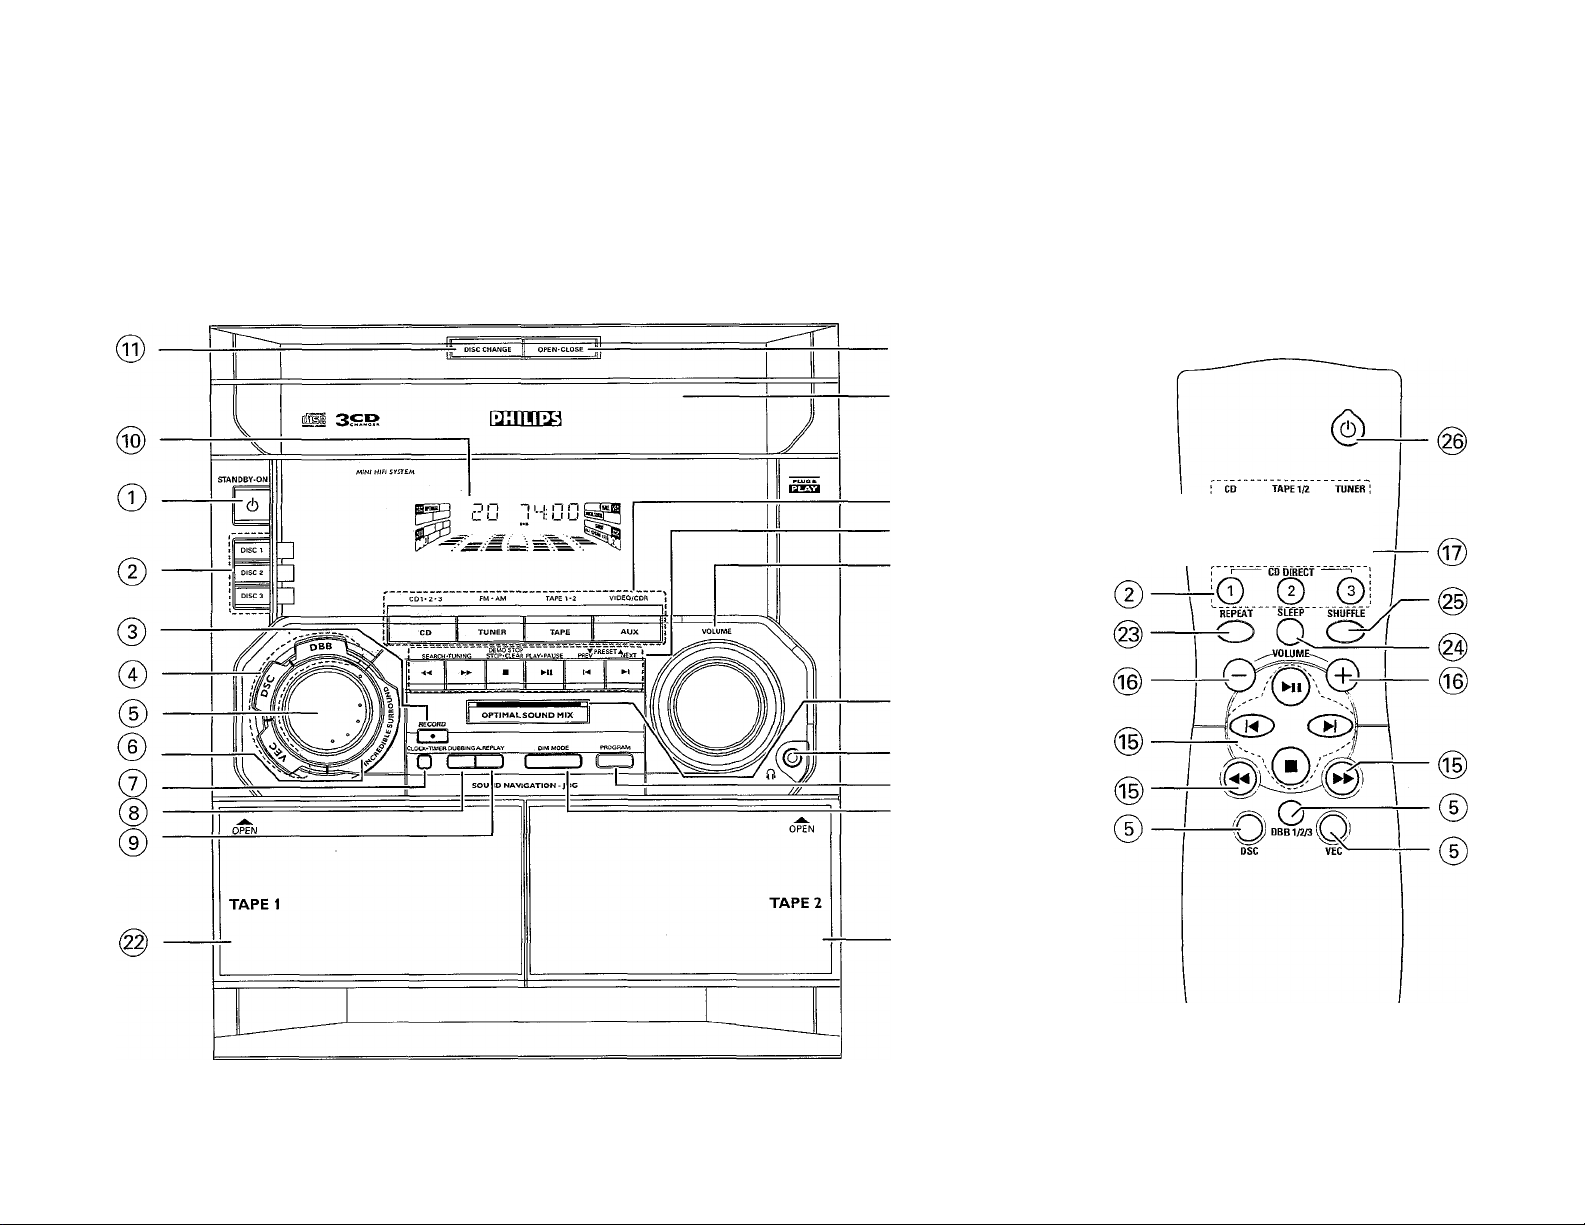
Controls on the player and remote control
@ STANDBY-ON 0
“ switches the system to standby/on.
(D DISC 1 / DISC 2 / DISC 3
(DISC DIRECT PLAY)
- to select a disc tray for playback.
(3) RECORD
- to start recording on tape deck 2.
0 SOUND CONTROL
- to select the desired sound feature:
DSC.VEC, or DBB.
® JOG
- to select the desired sound effect
of DSC/VEC/DBB setting. You
must select the respective sound
feature first.
DBB (DYNAMIC BASS
BOOST)
- to select the desired bass effect:
DBB 1, DBB 2, DBB 3, DBB OFF.
DSC (DIGITAL SOUND
CONTROL)
- to select the desired Digital Sound
Control effect: OPTIMAL, JAZZ,
ROCK orTECHNO.
VEC
to select the desired Virtual
Environment Control effect:
CINEMA. HALL or CONCERT
® INCREDIBLE SURROUND
- to switch on or off the surround
sound effect.
CONTROLS
CLOCK‘TIMER
- to view the clock, set the clock or
set the timer
(D DUBBING
- to dub a tape.
® AUTO REPLAY
- to select playback mode either in
continuous AUTO REPLAY or
ONCE only.
(io) DISPLAY SCREEN
- to view the current setting of the
system.
@ DISC CHANGE
- to change disc(s).
@ OPEN»CLOSE
- to open or close the CD changer
tray.
(g) CD CHANGERTRAY
(g) SOURCE - to select the
following:
CD/(CD 1‘2»3)
to select CD mode. When disc
playback is stopped, press to select
disc tray 1,2 or 3.
TUNER/(FM'AM)
- to selectTuner mode.When in
tuner mode, press to select the
waveband: FM or AM.
TAPE / (TAPE 1* 2)
- to select Tape mode. When tape
playback is stopped, press to select
either tape deck 1 or 2.
AUX (VIDEO/CDR)
- to select sound from an external
source (e.g.TyVCR, Laser Disc
player DVD player or CD
Recorder) .When in AUX mode,
press to select either AUX or
CDR.
® MODE SELECTION
SEARCH ◄◄ ►► (TUNING
◄◄►►)
for CD
...........
to search backward/
forward,
forTUNER .... to tune to a lower or
higher radio frequency.
forTAPE........to rewind or fast
forward a tape.
for CLOCK.. to set the hour (on
the system only).
STOP«CLEAR ■
for CD...........to stop disc playback
or to clear a program.
forTUNER ...to stop programming.
forTAPE........to stop playback or
recording.
for DEMO .... to start or stop
demonstration mode
(on the system only).
for CLOCK ..to exit clock setting
or cancel timer (on
the system only).
for PLUG & PLAY
....................
to exit plug & play
mode and return to
standby mode (on the
system only).
PLAY ►/PAUSE II
for CD
...........
to start or interrupt
playback.
forTAPE
for PLUG & PLAY
....................
PREV \< / NEXT W (PRESET
▼ A)
for CD...........to skip to the
forTUNER ...to select a preset
for CLOCK ..to set the minute (on
@ VOLUME
- to increase or decrease the
volume.
(g) OPTIMAL SOUND MIX
- optimal mix of various sound
features of the set to create the
most impressive listening
experience at one touch of a
button.
- to connect headphones.
........
to start playback.
to initiate and start
plug & play from
standby/demo mode
(on the system only).
beginning of the
current, previous, or
next track.
station in memory,
the system only).
Page 24

i i VV
'7^7..-:
*•: 'v: %
ЧЖ..
iú^riK.
•V.’lr7.‘
7. y- "
■'.*-ГлГ..^- "■•""■•
..iVy. Д ••*
....
■'■."v'v ViP-
• ■ -.-л"' ■ .■ ■ .■
Page 25

CONTROLS OPERATING THE SYSTEM
PROGRAM
for CD
...........
to program disc
tracks.
forTUNER ...to program preset
radio stations.
for CLOCK ..to select 12 or 24
hour in clock setting
mode.
DIM
to select different brightness for
the display screen : DIM 1, DIM 2,
DIM 3 or DIM OFF.
TAPE DECK 2
TAPE DECK 1
REPEAT
to repeat a disc track, a disc, or all
available discs.
SLEEP
to switch the system to standby
mode at a selected time.
SHUFFLE
to play all the available discs and
their tracks in random order
(!)
to switch the system to standby
mode.
Notes for remote control:
- First select the source you wish
to control by pressing one of the
source select keys on the remote
control (e.g. CD orTUNER).
- Then select the desired function
(►, !◄, ►!, etc.).
STANOBY-ON
MINI H/fl SrSTEM
►►
RECORC
- q :
3 ---------------------------------------
:lock*time
DUBBING AREPLAY DIM MODE PROGRAM
□ ( T j n 1 1 1
Important:
Before you operate the system,
complete the preparation
procedures.
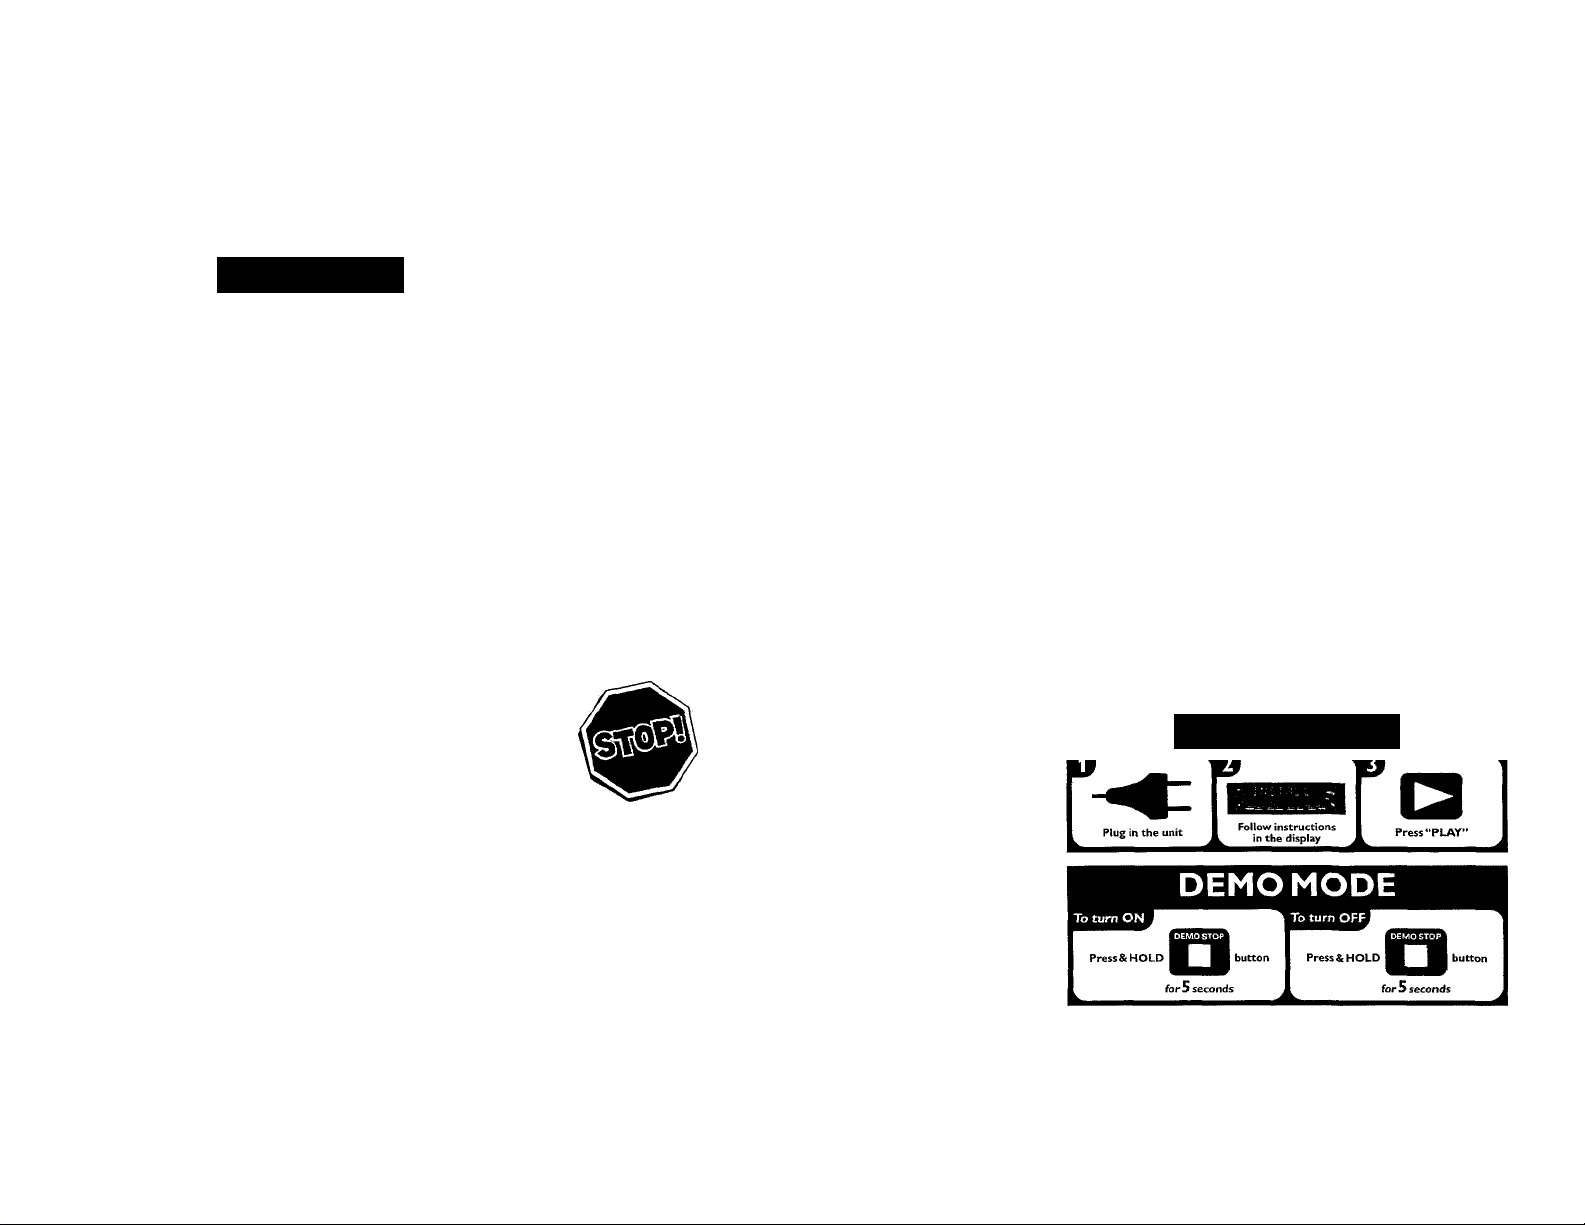
Plug and Play
The system provides PLUG and PLAY
feature that allows you to store all
available radio stations automatically
upon power up.
If the PLUG and PLAY has not
been installed
1 Upon power up, “Ru ID J.M5TRLL
' will be displayed.
i b‘ b b* d b
►fi ►i
'..'i
'<>RTmAt SOUND MIX
1‘" II 1 ' ■" ' — II
___________
SOUND NAVIGATION - JOG
1
Press PLAY (on the system only) to
start installation.
“IMS fRLL” will be displayed and
followed by “ I uMFR” and then
iiQt irnii
nu I u .
-»The PROGRAM starts flashing.
-» PLUG and PLAY will start
searching for all radio stations on
FM band and then followed by
radio stations on AM band.
-»All available radio stations with
sufficient signal strength will be
stored. Up to 40 presets may be
stored.
^The last preset radio station will
appear on the display when PLUG
and PLAY is completed.
Page 26

If. ' "ÿ • хм
Page 27

O
• Connect the left speaker to Front
terminal L, with the colored wire to
+ and the black wire to —.
To reinstall the PLUG & PLAY
1 In Standby or Demostration mode,
press and hold PLAY for five
seconds (on the system only) “RilTD
IfJSTHLL - PPE55 PLRy’willbe
displayed.
2 Press PLAY (on the system only)
again to start installation.
• To exit without storing the PLUG
and PLAY, press ■ button (on the
system only).
Notes:
- PLUG and PLAY will be reinitiated
again during the next power up if:
i) PLUG and PLAY installation was not
completed.
il) No stereo frequency being detected
during PLUG and PLAY, THU LA
HHTEHHPi" will be displayed.
- You can store any radio stations
manually or automatically after PLUG
and PLAY
- When PLUG and PLAY is used, all
previously stored radio stations will be
replaced.
- During PLUG and PLAY, if no button is
pressed within 15 seconds, the system
will go to demonstration mode (if
demonstration mode is enable)
OPERATINGTHE SYSTEM
Demonstration mode
The system has a demonstration mode
that shows the various features offered
by the system.
To enable the demonstration
mode
• Press and hold ■ (on the system
only) for five seconds when the
system is in standby mode.
->The demonstration will begin.
To disable the demonstration
mode
• Press and hold ■ (on the system
only) for five seconds when the
system is in demonstration mode.
-♦"IlEr'ID uFP" is displayed.
^The system will switch to standby
mode.
Notes:
- If the demonstration mode has not been
disabled. It will resume five seconds later
after the system switches to standby
mode.
- When the system is switched on from
the main power outlet, the CD changer
tray may open and close again to
initialize the set.
- Even though the AC power cord is
removed from and reconnected to the
wall socket, the demonstration will
remain off until it is switched on again.
Switching the system ON
• Press CD, TUNER, TAPE or AUX
You can also switch on the system by
pressing any one of the CD DIRECT
PLAY buttons.
Switching the system to standby mode
• Press STANDBY-ON or (¡) on the
remote control.
->The system will switch to standby
mode.
Selecting the Source
• Press the respective source selection
button: CD, TUNER. TAPE or
AUX
-♦The display indicates the selected
source.
Note:
— For an external source, make sure you
have connected the audio left and right
OUT terminals of the external
equipment (TV, VCR, Laser Disc player,
DVD player or CD Recorder) to the
AUX IN terminals.
Page 28

Page 29
o
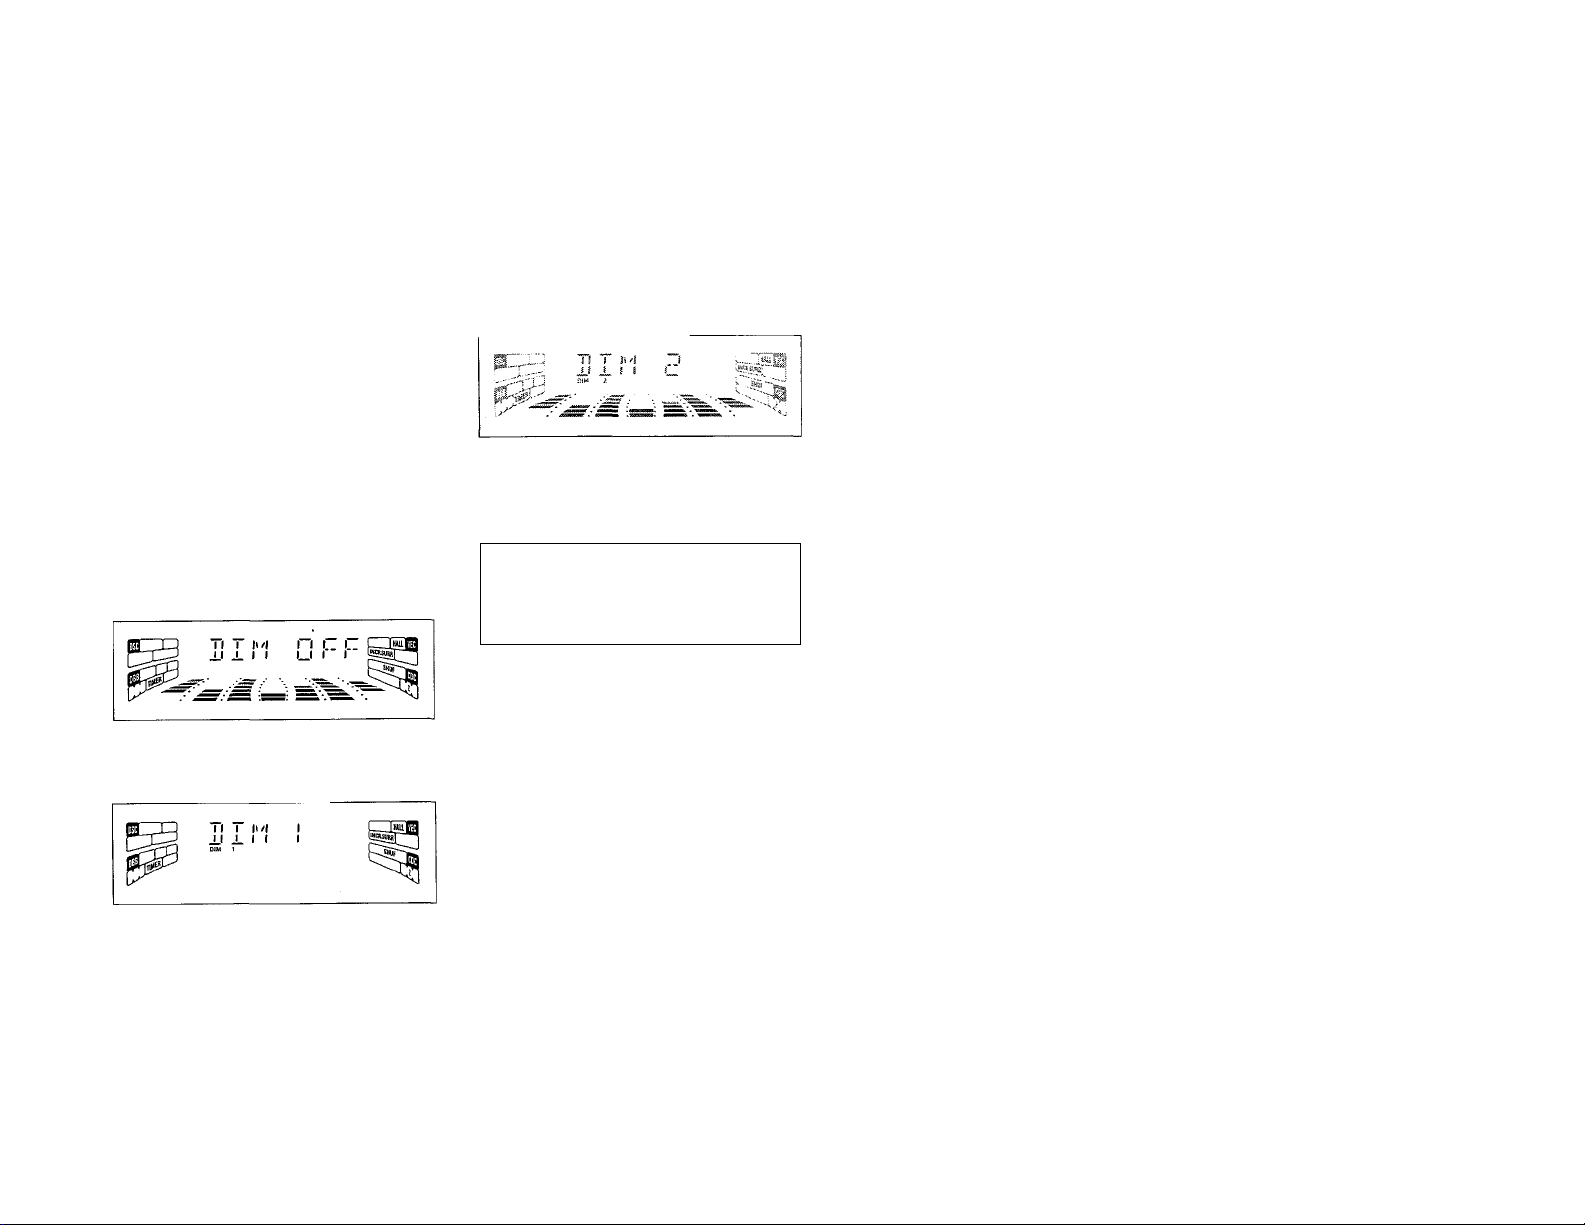
DIM mode
You can select the desired brightness
for the display.
• Press DIM to select DIM 1, DIM 2,
DIM 3 or DIM OFF display mode.
-►The DIM appears on the display.
J.IXI I or
will be displayed
depending on the mode selected.
DIM OFF - normal brightness with
Spectrum Analyzer On
DIM 1 - normal brightness with
Spectrum Analyzer Off
OPERATING THE SYSTEM
DIM 2 - half brightness with
Spectrum Analyzer On
DIM 3 - half brightness with
Spectrum Analyzer Off and all
LEDs off
n i l>
±1 i. 1
Volume Control
Adjust VOLUME to increase or
decrease the sound level.
For Personal Listening
Connect the headphones plug to the
0 socket at the front of the system.
The speakers will be muted.
D
Sound Control
For Optimal sound listening, you
can only select one of the following
sound control at a time : DSC, VEC
or OPTIMAL SOUND MIX
DIGITAL SOUND CONTROL
(DSC)
The DSC feature enables you to adjust
the system to suit your type of music.
1 Press to select the DSC feature.
-► DSC led lights up.
2 Adjust the JOG to select the desired
Digital Sound Control setting :
OPTIMAL, JAZZ, ROCK, or
TECHNO.
-►The selected digital sound is
encircled.
-►"nPfiriRL, JPZZ, PLJCK or
FlCMiJu" will be displayed.
Note:
- For neutral setting, select JAZZ.
VIRTUAL ENVIRONMENT
CONTROL (VEC)
The VEC feature enables you to adjust
the system to select a type of
environment.
1 Press to select the VEC feature.
^VEC led lights up.
2 Adjust the JOG to select the desired
Virtual Environment Control setting :
CINEMA, HALL or CONCERT.
^The selected environment is
encircled.
Ilf” Tr« (iri'/in (.JDI ' /-Vk- 11“ C“ O T II
^ m, m IL_l_ or L-UIML-Llv I
will be displayed.
DYNAMIC BASS BOOST (DBB)
The DBB mode enhances the bass
response.
1 Press to select the DBB feature.
^ DBB led lights up.
2 Adjust the JOG to select the desired
DBB level onto switch off DBB.
^The selected bass response is
encircled.
-►"ZSS I, 222 2, 222 3 or
222 Orr" will be displayed.
Note:
- If DBB 1/213 is selected, the
corresponding number flag will be
displayed.
Page 30

Page 31

o
TO seiecx me aesireu vir Luai
INCREDIBLE SURROUND
Normal stereo sound is determined by
the distance between the front
speakers. When Incredible Surround is
switched on, it magnifies the virtual
distance between the front speakers for
an incredibly wide, enveloping, stereo
effect.
• Press INCREDIBLE
SURROUND to switch on.
-»The INCREDIBLE SURROUND
led lights up.
-»“Udii,9 SURROUr.']]'' and the INC.
SUR flag will be displayed.
To switch off Incredible Surround
• Press INCREDIBLE
SURROUND again
-»The INCREDIBLE SURROUND
led is switched off.
-»“15 Orr” will be displayed.
^ The INC. SUR flag disappear from
the display.
waveoana: hn or An.
OPERATING THE SYSTEM
OPTIMAL SOUND MIX
The Optimal Sound Mix features gives a
various sound features of the set to
create the most impressive listening
experience at one touch of a button.
To switch on Optimal Sound Mix
• Press OPTIMAL SOUND MIX
-»The OPTIMAL SOUND MIX
button lights up.
V “DOTTh/in* C”ni l^lT^^rIT wii
(_ll I 1.1 lllL_ JlLJUl'JJJI drlQ
(((OSM))) flag will be displayed.
To switch off Optimal Sound Mix
• Press OPTIMAL SOUND MIX
again.
-»The OPTIMAL SOUND MIX
button light is switched off
urr''will be displayed.
^ (((OSM))) flag dissappear from
the display.
• Press any of the sound button
(DBB,DSC,VEC,IS)
^The sound feature message will be
displayed.
(((OSM))) flag dissappear from
the display.
■! |i
Page 32

Page 33

IVUIO /Uf rtílllULtí LUflirUI.'
CD
1 I I
nrs\A/Or I
Warning!
1) This system is designed for
conventional discs. Do not use
any accessories such as disc
stabilizer rings or disc treatment
sheets, etc., which may damage
the disc mechanism.
2) Do not load more than one disc
into each tray.
3) When the CD changer is loaded
with discs, do not turn over or
shake the system. This may jam
You may load three discs in the
CD changer for continuous
playback without interruption.
Discs for playback
This system can play all digital audio
disc, finalized digital audio CDRecordable and finalized digital audio
CD-Rewritable format discs.
nCOMPACT nCOMPACT nCOMPACT
ɧ(@ MSi
DIGITAL AUDIO DIGITAL AUDIO DIGITAL AUDIO
iReWritablel
Loading the CD Changer
1 Press CD to select CD mode.
2 Press OPEN*CLOSE.
->The CD changer tray slides out.
3 Load a disc with the printed side up
in the right tray.
• You can load another disc in the left
tray.
• To load the third disc, press the
DISC CHANGE button
^The CD changer tray will rotate
until the empty tray is ready for
loading.
4 Press OPEN'CLOSE to close the
CD changer tray.
^The total number of traciss and
the playing time of the selected
disc appear on the display.
Note;
- To ensure good system performance,
wait until the CD changer completely
reads the disc(s) before proceeding.
Disc Direct Play
• You can play a disc directly by
pressing the DISC 1, DISC 2 or
DISC 3 button.The CD player will
stop at the end of playback of the
selected disc.
A lit button indicates that a disc is
loaded in the disc tray.
A flashing button indicates that a
disc is playing.
Playing a Disc
1 Press PLAY ►II to start playback.
“>The disc tray, track number and
elapsed playing time of the current
track appear on the display.
• To interrupt playback, press
PAUSE ►!!
-♦The playing time flashes.
• To resume playback, press
PLAY ► II again.
2 To stop playback, press ■.
Note:
- All the available discs will play once,
then stop.
Page 34

'îÿ'-iiv.™. * t .*
Page 35

JJ/CiiCU VV/U IK I
will go to demonstration mode (if
demonstration mode is enable)
CD
O
Disc Change
You can change the outer two discs
while the third inner disc is stopped or
is playing.
1 Press DISC CHANGE
-♦The CD changer tray slides out.
2 Replace the discs in the left and right
disc trays.
• If you wish to change the inner disc
during playback, press DISC
CHANGE again.
•♦"UIGlI will; be
displayed.
-♦The disc will stop playing.
-♦ The CD changer tray will close to
retrieve the inner disc and then
open again with the inner disc
accessible.
3 Press OPEN-CLOSE to close the
CD changer tray.
Selecting a desired track
Selecting a desired track when
playback is stopped
1 Press N or ►! until the desired
track appears on the display.
Selecting a desired track during
playback
• Press W or H until the desired
track appears on the display.
-♦ The selected track number and
elapsed playing time appear on
the display.
• If you press M once it will skip to
the beginning of the current track
and play the track again.
Note:
- Pressing M during shuffling can only
skip to the beginning of the current
track
Searching for a particular passage during playback
• Press and hold or ►► until the
desired passage is located.
-♦The volume will be reduced.
• Play returns to normal when or
►► is released.
Programming Tracks
Programming tracks of a loaded disc is
possible when playback is stopped.The
display will indicate the total tracks
stored in the program. Up to 40 tracks
can be stored in the memory in any
order When 40 tracks are stored and
you attempt to store another track, the
display will show'T LiLL ’.
1 Load the desired discs in the disc
trays.
2 Press PROGRAM to start
programming.
-♦The PROG flag starts flashing.
3 Press the CD (CD 1 •2*3) or DISC
1/2/3 button to select the disc.
4 Press N or H to select the desired
track.
5 Press PROGRAM to store the
track.
• Repeat steps 3 to 5 to store other
discs and tracks.
6 Press ■ once to end programming.
-♦ The total number of tracks
programmed and total playing
time appear on the display.
2 Press PLAY ►llto start playback.
-♦The selected track number and
elapsed playing time appear on
the display.
Notes:
- If the total playing time is more than
'S3;53" or If one of the programmed
tracks has a number greater than 30,
then --" appears on the display
instead of the total playing time.
- If the system is reading the discs,
programming is not possible,
“F?Ei3IIIR'G" will be displayed and
followed by "DIGlI ”". "L" is the
current read disc number.
- During programming, if no button is
pressed within 20 seconds, the system
will exit program mode automatically.
- 'SELECT R nISE"will be displayed
when programming an empty disc slot
Reviewing the program
Reviewing of the program is possible
only when playback is stopped.
• Press M or ►! repeatedly to review
the programmed tracks.
• Press ■ to exit review mode.
Page 36

:-.v"
^■1£-;.. ,:r.ïï::i":;-.
:n :.■
•Лк""' ‘rj-V-
•• 'T':' ••
.•f .. .
••
Page 37

CD
Playing the program
1 Press PLAY ► II to start program
playback.
-♦“PLRy PPGGPRI'I” will be
displayed.
^The track number and elapsed
playing time of the current track
will appear on the display.
• If you press REPEAT during
program playback, the current track
or all programmed tracks will be
played repeatedly.
^ I iTi iL-f' or I MLJUi'i II I WIN Dc
displayed.
"♦The REP and PROG flags appear
on the display.
2 Press ■ to stop program playback.
Notes:
- If you press any of the DISC DIRECT
PLAY buttons, the system will play the
selected disc and the stored program
will be ignored temporarily. The PROG
display also will disappear temporarily
from the display. It will reappear when
playback of the selected disc ends.
- REPEAT DISC mode will be cancelled
when program playback begins.
Erasing the program (when
playback Is stopped)
Press
PLPRiPEIi” will be
displayed.
Note:
- The program will be erased when the
system Is disconnected from the power
supply or when the CD changer tray is
opened.
Shuffle (only on remote control)
In shuffle mode, the system plays all the
available discs and their tracks in
random order Shuffle may be used also
when tracks are programmed.
To shuffle all the discs and tracks
1 Press SHUFFLE
“♦‘SMuPf i_u”will be displayed.
"♦The SHUF flag, the disc and the
track selected at random appear
on the display.
• The discs and the tracks will be
played in random order until you
press ■.
• If you press REPEAT during
shuffling, the current track or all
available discs will be played
repeatedly
-♦‘TPRCK” or“PLL HI5C”will be
displayed.
^The REP and SHUF flags appear
on the display.
2 Press SHUFFLE again to resume
normal playback.
^The SHUF flag disappears from
the display.
Note:
- REPEAT DISC mode will be cancelled
when shuffle is selected.
Repeat (only on remote control)
You can play the current track, a disc or
all available discs repeatedly.
1 Press REPEAT on the remote
control to select the various repeat
modes.
^ “Toori'” "TiTcr ” “Oi I TiTcr>’
^ ri,]||_l' , ±IXOl_ , I ILL JJ±jL
or“Grr”will be displayed.
^The REP flag appears on the
display.
• The selected track, selected disc or
all available discs will now be played
repeatedly until you press ■ .
2 Press REPEAT until the "DPr"
mode is displayed to resume normal
playback.
-♦The REP flag disappears from the
display.
Notes:
- REPEAT DISC mode is not available
during program play or shuffle mode.
- You can also repeat shuffling a
program.
i) “TRRCK " or ‘PRRGRRfr will be
displayed.
ii) The RER PROG, and SHUF flags
appear on the display.
Page 38

rii! ■
: il' *¿i * I,
;:i .'l'/líi i I ^ i v}
•'y.\ î'-îv*
Page 39

o
Note:
- For 'PLUG & PLAY' feature, please refer
to page 12.
Tuning to radio stations
1 Press TUNER (FM*AM) to select
TUNER mode.
will be displayed.
A few seconds later; the current radio
frequency will be displayed.
2 Press TUNER (FM*AM) again to
select the desired waveband : FM or
AM.
3 Press or ►► for more than one
second, then release.
-♦The display will show'SERRCM”
until a radio station with sufficient
signal strength is found.
TUNER
• Repeat this procedure until the
desired station is reached.
• To tune to a weak station, briefly
press or ►► repeatedly until the
display shows the desired frequency
and/or when the best reception has
been obtained.
Storing Preset Stations
You can store up to 40 radio stations in
the memory.When a preset radio
station is selected, the preset number
appears next to the frequency on the
display
Automatic programming
1 Press TUNER (FM*AM).
2 Press PROGRAM for more than
one second.
-♦The PROG flag starts flashing and
“nLlfu”will be displayed.
-♦The system will search for every
available station in the FM
waveband first, then search the
AM waveband.
-♦All available stations will be stored
automatically.The frequency and
preset number will be displayed
briefly.
^ The system will stop searching
when all the available radio
stations are stored or when the
memory for 40 preset radio
stations is used.
^The system will remain tuned to
the last stored preset radio
station.
Notes:
- You can cancel the automatic
programming by pressing PROGRAM or
■ (on the system only).
- If you want to reserve a section of
preset numbers, for example preset
numbers 1 to 9, select preset 10
before starting automatic programming,
only the preset numbers 10 to 40 will
be programmed.
Manual programming
1 Press TUNER (FM*AM).
2 Press TUNER (FM*AM) again to
select the desired waveband : FM or
AM.
3 Press PROGRAM for less than one
second.
^The PROG flag starts flashing.
-♦The next available preset number
will be displayed for selection.
4 Press or ►► to tune to the
desired frequency.
• If you wish to store the radio station
to another preset number; press T
or A to select the desired preset
number
5 Press PROGRAM again.
^The PROG flag disappears and
the radio station will be stored.
• Repeat steps 3 - 5 to store other
preset radio stations.
Notes:
- When 40 radio stations are stored and
you attempt to store another radio
station, the display will show TuLL ”. If
you want to change an existing preset
number, repeat steps 3-5.
- You can cancel manual programming
by pressing H (on the system only).
- During programming if no button is
pressed within 20 seconds, the system
will exit program mode automatically.
Page 40

. ЖУ
ж.:'
- гГ:;.. •. ..’Л«-' • • 4-:;v-л
.v-.i-í «.1.......
-••J-:-;;».
••ViTTv..,
•:.■ -V.
т- Ш-
Page 41

Tuning to Preset Radio Stations
• Press T or A to select the desired
preset number
-♦The preset number radio
frequency, and waveband appear
on the display.
TUNER
TAPE
oil-.
.'it.'., 'i.'i:
Loading a tape
1 Press OPEN.
2 The tape deck door opens.
3 Load the tape with the open side
downward and the full spool to the
left.
4 Close the tape deck door
.
.....
...
Page 42

I-
Page 43

TAPE
Auto Replay
• Press A. REPLAY to select either
continuous AUTO REPLAY or
ONCE during tape playback.
-» "HLITG RGPLFIbl "(CD) or
"uGGG "(—) will be displayed.
Notes:
- This feature is availabie during tape
playback only.
- When'PuTO RGPiRG" is selected,
the tape will rewind automatically at
the end of playback for the selected
side. Then it will start playing again. It
will replay up to a maximum of 20
times until you press M.
- When "uhlGP" is selected, the tape will
play the selected side once and then
stop.
Tape Playback
1 Press TAPE (TAPE 1*2) to select
TAPE mode.
-»"TRPP .'"or'TRPEI c?" will be
displayed and followed by " I '
>»"or"Tc? »>".
2 Load the tape into the selected tape
deck.
3 Press ► to start playback.
^"f I" or "fp" with ">" scrolling
right will be displayed.
• Press A.REPLAY to select the
different type of playback mode (see
Auto Replay)
4 Press ■ to end playback.
-»"T I" or TP" with "»>" will be
displayed.
Rewind/Fast Forward
When playback is stopped
1 You can rewind or fast forward the
tape by pressing or ►►
respectively.
If rewinding,I < or I c' <" with
“<” scrolling left will be displayed.
If fast fotAvarding, "f I Torfc? >"
with scrolling right will be
displayed.
^The tape will stop automatically at
the end of rewinding or fast
forwarding.
2 Press ■ to stop rewinding or fast
forwarding.
During playback
• Press and hold or ►► until the
desired passage is located.
-♦‘T I or Td” with "« or »”"
scrolling left or right will be
displayed depending on which
button is pressed.
^ During searching, the sound is
reduced to a low volume.
^When you release or ►►.the
tape continues playing.
Notes:
- During rewinding or fast forwarding of
a tape, it is also possible to select
another source (e.g. CD,TUNER, or
AUX).
- Before playing a tape, check and
tighten slack tape with a pencil. Slack
tape may get jammed or may burst in
the mechanism.
- C-120 tape is extremely thin and is
easily deformed or damaged. It Is not
recommended for use in this system.
- Store the tapes at room temperature
and do not put them too close to a
magnetic feld (for example, a
transformer, TV, or speaker).
Page 44

Page 45

AUX
RECORDING
STANDBY-ON
SfASCH-TUKilNfl
« m ►li K ►!
1 OPTIMAL SOUND MIX
RECORD
—
-cn
OUBBINGA.REPLAY DIM MODE
:lock-tim£
U 1 1 i 1
__________________________
SOUND NAVIGATION -JOG
Selecting External Equipment
If you have connected the audio out
terminals of the external equipment
(TV,VCR, Laser Disc playen DVD player
or CD Recorder) to the AUX/CDR IN
terminals, you can hear the enhanced
sound from the system.
DEMO STOP
PAR PIflV.PAUSE
1
PROGRAM
STANDBY-ON
Ò
M/NI Hid STSTEM
SFARO -lAY.PAUSF
1 OPTIMAL SOUND MIX |j
RECORD
-cn
3
- - - - - - - - - - - - - - - - - - - - - - - - - - - - - - - - - - - - - - - -
OUBBINGA.REPLAY DIM MODE PROGRAM
:lock-time
SOUND NAVIGATION • JOG
►il
1-4 ►!
• Press AUX (VIDEO/CDR) to select
external equipment.
-♦"RLi;'" or "II5R" will be displayed.
Note:
- All the sound control features (e.g. DSC,
VEC, DBB, etc.) are available for
selection.
Notes:
- For recording, use only tape of lEC type
I (normal tape).
- The tape Is secured at both ends with
leader tape. At the beginning and end
of tape, nothing will be recorded for six
to seven seconds.
The recording level Is set automatically,
regardless of the position of VOLUME,
DBB, Incredible Surround, DSC, VEC or
Optimal Sound Mix.
To prevent accidental recording, break
out the tab on the left shoulder of the
tape side that you want to protect
Page 46

'V.-.4
.".•^*V ..
■H . .:—-
-. •'... Л.М 1
1‘ ' :-[.-^~~7‘
^:. "t
•. .i
........
:.. V.•••"; •
Page 47

RECORDING
- If "CHECK TREE" is displayed, the
protection tab has been broken. Put a
piece of clear adhesive tape over the
opening.
One Touch Recording
• For One Touch Recording, as soon as
you press RECORD, the current
source (CD,TUNER or AUX) will be
recorded on tape deck 2.
1 Load a blank tape in tape deck 2.
2 Press RECORD to start recording.
-►The REC starts flashing.
3 Press ■ to stop recording.
Note:
- When you press RECORD while in
TAPE mode, 'SELECT SEILIEEE" will
be displayed. One Touch Recording is
not possible in TAPE mode.
CD Synchro Start
Recording
1 Load a blank tape into tape deck 2
and a disc into a disc tray.
2 Press CD to select CD mode.
• You can program the tracks in the
order you want them to be recorded
(see ProgrammingTracks). If not,
select the disc by pressing CD (CD
1 *2*3) and the tracks are recorded
according to the order on the
selected disc.
3 Press RECORD to start recording.
“♦The REC starts flashing.
• Disc will start playback automatically.
4 Press ■ to stop recording.
------------------------------------------------------------ ^
Dubbing tapes (from tape deck 1
to tape deck 2)
1 Press TAPE (TAPE 1 *2 ) to select
tape deck 2.
2 Load the prerecorded tape into tape
deck 1 and a blank tape into tape
deck 2 with full spool to the left.
3 Press DUBBING
with ">" scrolling right will
be displayed.
• Dubbing will start immediately.
-♦The REC starts flashing.
4 Press ■ to stop dubbing.
Notes:
- At the end of side A, flip the tapes to
side B and repeat the procedure.
- Dubbing of tapes is only possible from
tape deck 1 to tape deck 2.
- To ensure good dubbing, use tapes of
the same length.
- You can switch to other source while
dubbing.
Recording from other
sources (only on tape deck 2)
1 Load a blank tape into tape deck 2
with the open side downward.
2 Press CD, TUNER or AUX
• Start playback of the selected source.
3 Press RECORD to start recording.
-♦The REC starts flashing.
4 Press ■ to stop recording.
Notes:
- During recording, it Is not possible to
listen to another source.
Digital Recording via Digital Out
For CD digital recording, please refer to
the Instructions Manual of the CD
Recorder, digital audio equipment, etc.
Page 48

Page 49

■■I I UI 1 i_ vviLi I /
right will be displayed.
CLOCK
View Clock
You can view the clock (if it is set) if the
system is in Standby mode or when any
sound source is selected (CD,TUNER,
etc.). The clock will be displayed for
about seven seconds.
• Press CLOCK-TIMER briefly (on
the system only).
“Gi'" in - GO ^^-GG•GO” /'fko
n I lU’-iiG ori_u-_iu (^ine
current time) will be displayed
depending on whether you have
selected 12- or 24-hour mode.
will be displayed if the
dock is not set.
Clock Setting
The clock can be set in either 12- or
24-hour mode, e.g. ‘‘Rl''l Id ■[][]“ or
“uu'uu“. Before setting the clock, you
must be in the View Clock mode.
1 Press CLOCK-TIMER to select
clock mode.
2 Press PROGRAM to select 12- and
24- hour mode.
If 12-hour mode is selected,
"Fir'l IdublQ“ starts flashing.
“♦ If 24-hour mode is selected,
“Du-ulj” starts flashing.
3 Set the hour with or ►► on the
system.
4 Set the minute with M or H on the
system.
TIMER
5 Press CLOCK-TIMER again to
store the setting.
^The clock starts.
• To exit without storing the setting,
press ■ on the system.
Notes:
- During clock setting, if no button is
pressed within 90 seconds, the system
will exit clock setting mode
automatically.
- When a power interruption occurs, the
clock setting Is erased.
Timer Setting
• The system can switch on to CD ,
TUNER orTAPE mode automatically
at a preset time. It can serve as an
alarm to wake you up.
• Before setting the timer make sure
the clock is set correctly.
• The timer will always be switched on
once it is set.
• The volume of the timer will
increase from the minimum
level to the most recently
selected volume level.
1 Press and hold CLOCK-TIMER
for more than two seconds to
select timer mode.
"T I II r ic-uu or UU'UU Ortn6)3St
timer setting starts flashing
depending on whether you have
selected 12- or 24-hour mode.
^The TIMER starts flashing.
->The selected source is lit while
other available sources are
flashing.
2 Press CD . TUNER or TAPE to
select the desired source.
• Before selecting CD orTAPE, make
sure a disc or tape is loaded in the
CD tray or tape deck 2.
3 Press or ►► on the system to set
the hour for the timer to start.
4 Press M or W on the system to set
the minute for the timer to start
5 Press CLOCK-TIMER to store
the start time.
->The timer is now set
^The TIMER remains on the display.
• At the preset time, the timer will be
activated.
^The selected source will be
played.
Page 50

.......
I '■..Vii.--
I w.v -■■■ ■■ .. .:.v; •.
v.^- - • ;^ -5v-l ,«:v .. .
'Щг; ж. ■ ÿ^S;
Page 51

All the sound control features (e.g. DSC,
VEC, DB6, etc.) are available for
selection.
me tape is securea at ootn enas wiui
leader tape. At the beginning and end
of tape, nothing will be recorded for six
to seven seconds.
uyulliui JLIUI lU /VIIA.
To prevent accidental recording, break
out the tab on the left shoulder of the
tape side that you want to protect.
TIMER
SLEEP TIMER
O
Notes:
- During tinner setting if no button is
pressed within 90 seconds, the system
will exit timer setting mode
automatically.
- If the source selected is TUNER, the
last tuned frequency will be switched
on.
- If the source selected is CD, playback
will begin with the first track of the
selected disc or program. If the disc
trays are empty, the TUNER will be
selected instead.
- The timer will not activate if a recording
is in progress.
To switch off theTIMER
1 Press and hold CLOCK'TIMER
for more than two seconds.
2 Press ■ on the system to cancel the
timer.
-♦ The timer is now switched off.
“♦The display will show "000" and
the TIMER disappears.
To start theTIMER again ffor the
same preset time and source)
1 Press and hold CLOCK*TIMER
for more than two seconds.
2 Press CLOCK'TIMER again to
store the start time.
^The timer is now on.
-♦The TIMER appears on the display.
Sleep Timer (only on remote
control)
This feature allows you to select a
length of time after which the system
will switch to the standby mode
automatically.
1 Press SLEEP on the remote control
repeatedly to select a period of time.
-♦The selections are as follows (time
in minutes): lb —■ 30 bb — uG
Dr "000" will be
displayed.
minutes.
is the time in
When you reach the desired length
of time, stop pressing the SLEEP
button.
^The SLEEP display lights up.
^The Sleep Timer is now set. Before
the system switches to standby
mode, a countdown of 10
seconds will be displayed.
While SLEEP mode Is activated
• Press SLEEP once to view the
remaining length of time.
• Press SLEEP twice to change the
pre-selected period of time.
■^The display will show the
remaining time followed by the
sequence of sleep timer options.
To switch off the Sleep Timer
• Press SLEEP repeatedly until "uGr"
is displayed, or press the
STANDBY-ON button
Page 52

Page 53

• Dubbing will start immediately.
-»The REC starts flashing.
Recorder, digital audio equipment, etc.
4 Press ■ to stop dubbing.
SPECIFICATIONS
О
Specifications
AMPLIFIER
Output power.... 2 X 60 W RMS ('’> / 2 x 45 W FTC
Total power.......................................................120 W
Signal-to-noise ratio
Frequency response
Input sensitivity
AUX In............................................................500 mV
CDR In
................................................................
Output
Speakers.........................................................> 6 D
Headphones......................................32 Q - 1000 Q
Subwoofer Out....................................................1.5 V
Digital (Coax) out
(1) (6ft1 kHz.10?tTHD)
...............................
..............................
............................
> 67 dBA (lEC)
60-16,000 Hz
1.0 V
lEC 958, 44.1kHz
TAPE DECK
Frequency response
Normal tape (type I)...............80-12,500 Hz (8 dB)
Signal-to-noise ratio
Normal tape (type I)....................................> 48 dBA
Wow and flutter............................................< 0.4% DIN
SPEAKERS
System......................... 2 way; double port bass reflex
Impedance
Woofer.............................................................. 1 x 5.25"
Tweeter.............................................................. 1 x 2.5"
Dimensions (wxhxd)
Weight
................................................................
............
.............................................
.................................................
............................................................ 2.5 kg each
8.27 x 12.20 x 9.25 (inch)
21 Ox 31 Ox 235(mm)
5.5 pounds each
6 Q.
CD PLAYER
Number of programmable tracks
Frequency response..............................20 - 20,000 Hz
Signal-to-noise ratio
Channel separation...............................> 60 dB (1 kHz)
Total harmonic distortion.................................................< 0.003%
TUNER
FM wave range.....................................87.5 - 108 MHz
AM wave range.....................................530 - 1700 kHz
Number of presets.......................................................40
Antenna
FM........................................................... dipole wire
AM..........................................................Loop antenna
.........................................
.................................
> 80 dBA
40
GENERAL INFORMATION
Material
AC Power
Power Consumption
Dimensions (wxhxd)
Weight (without speakers)
Subject to modification
.........................................................
.................................................
Active
................................................................
Standby..........................................................< 15 W
...........
10.43 x 12.20 x 15 (inch)
............................................
.......................................................................7.1 kg
265x 310x 381 (mm)
.........................
Polystyrene
120 V / 60 Hz
90 W
15.62 pounds
Page 54

Page 55

will be displayed if the
clock is not set.
zn-nout iTioue IS seiecLeu,
“uu-uLj” starts flashing.
3 Set the hour with or ►► on the
system.
I i^ress and hold CLUt-iv* I intK
for more than two seconds to
select timer mode.
4 Set the minute with N or H on the
system.
MAINTENANCE TROUBLESHOOTING
O
Maintenance
Cleaning the Cabinet
• Use a soft cloth slightly moistened
with a mild detergent solution. Do
not use a solution containing alcohol,
spirits, ammonia or abrasives.
Cleaning Discs
• When a disc
becomes dirty, clean
it with a cleaning
cloth. Wipe the disc
from the center out.
• Do not use solvents
such as benzine,
thinnen commercially available
cleaners, or antistatic spray intended
for analog records.
Cleaning the CD lens
• After prolonged use, dirt or dust may
accumulate at the CD lens.To ensure
good playback quality, clean the CD
lens with Philips CD Lens Cleaner or
any commercially available cleaner
Follow the instructions supplied with
cleaner
Cleaning the Heads and the Tape
Paths
• To ensure good recording and
playback quality, clean the heads, the
capstan(s), and pressure roller(s)
after every 50 hours of tape
operation.
• Use a cotton swab slightly moistened
with cleaning fluid or alcohol.
• You can also clean the heads by
playing a cleaning tape once.
Demagnetizing the heads
• Use a demagnetizing tape available at
your dealer
Warning! Under no
circumstances should you try to
repair the set yourself as this will
invalidate the guarantee. Do not
open the set as there is a risk of
electric shock.
• If a fault occurs, check the points
listed below before taking the system
for repair
• Should any problems persist after
you have made these checks, consult
your nearest dealer or service center
CD Player Operation
“MD Ii'IBlI” is displayed.
• The disc is inserted upside down.
Place CD with printed side up.
• Moisture condensation at the lens.
^ Wait until lens has adjusted to normal
room temperature.
• There is no disc in the CD tray.
-> Insert a CD.
• The CD is dirty, badly scratched or
warped.
^ Clean or replace the CD.
• The CD lens is dirty or dusty.
^ See section under Maintenance (page
27).
displayed.
• The CD-RW or CD-R disc is not
properly recorded for use with a
standard CD player
Read the Instruction booklet of your
CD-Rewritable or CD-Recorder on how
to finalize a recording.
• The CD is badly scratched or dirty.
Replace or clean CD.
Radio Reception
Poor radio reception.
• The signal is too weak.
Adjust the antenna.
^ Connect an external antenna for
better reception.
• The TV or VCR is too close to the
stereo system.
^ Separate the stereo system from the
TV or VCR.
Page 56

.^. ..
< :.i- f -7
. .'.i..
'.тХГ-з.. .
'» \i. •
Ar—••
.••/*4. V
* .. • A
Page 57

TROUBLESHOOTING
Tape Deck Operation
Recording or playback cannot be
made or there is a decrease in
audio level.
• Dirty tape heads, capstans or
pressure rollers.
See section on tape deck maintenance
(page 27).
• Magnetic build-up in the record/
playback head.
Use demagnetizing tape.
Tape deck door cannot open.
• Power failure or AC power plug
disconnect from the wall outlet
during tape playback.
Reconnect the AC power plug and
switch on the system again.
General
System does not react when any
button is pressed.
• Electrostatic discharge.
Press STANDBY-ON to switch the
system off. Remove the AC power plug
from the wall outlet, then reconnect
the power plug and switch on the
system again.
No or poor sound.
• Volume is not turned up.
Adjust VOLUME.
• The headphones are connected.
“♦ Disconnect the headphones.
• Speakers are not connected or are
connected wrongly.
Check that the speakers are
connected correctly.
Make sure the stripped speaker wire is
clamped.
Reversed left and right sound.
• Speakers are connected wrongly.
Check the speaker connections and
location.
Lack of bass sound or apparently
imprecise physical location of
musical instruments.
• Speakers are connected wrongly.
^ Check the speaker connection for
proper phasing, colored/black wires to
colored/black terminals.
Remote control has no effect on
the system.
• Wrong source is selected.
Select the source (CD, TUNER, etc.)
before pressing the function button,
( k-, M, H, etc.).
• The distance to the system is too
large.
Reduce the distance.
• Batteries are inserted incorrectly.
Insert the batteries with their polarities
(+/- signs) as indicated.
• Batteries are exhausted.
^ Replace the batteries.
Timer is not working.
• Clock is not set.
Set the clock.
• Timer is not switched on.
Press CLOCK •T/A/IER to switch on the
timer.
• Recording or dubbing is in progress.
-♦ Stop recording.
Clock setting is erased.
• There was a power failure.
^ Reset the clock.
System displays features
automatically.
• Demonstration mode is switched
on.
Press and hold M (on the system^ for
five seconds to switch off the
demonstration.
All lighted buttons are not lit.
• Display is switch on in DIM 3 mode.
Press DIM until DIM OFF display mode
Is shown.
Page 58

?Т.Л-Ч' 4:JÍ—•
.••:*. ‘- v' .. -i"- ■
.»..'•.i.,
.....
у .ÿc ■•.:■. ■ ■
■- ■
.......
Page 59

FW-C380
A>
Philips Consumer Electronics Company
A Division of Philips Electronics North America Corporation, Knoxville,Tennessee 37914-1810, USA
3139 115 20466 (ENG)
Printed In China
«;i _nn4i
Page 60

г
Page 61

PHILIPS
\
Espan
FW-C380
m
M!n
Toll Free Help Line Q|]
Ligne d’assistance en service libre
Linea de a/uda telefonica sin cargo \
800-531-0039
Page 62

Page 63

INDICE
Mensaje del presidente
Instrucciones Importantes de
Seguridad................................................. 4
Garantia Limitada
Ilustración mocíe/o
Información General
Información de Seguridad
Preparativos...........................................8-9
Controles
Funcionamiento del sistema
..................................... 10 ~ 12
....................................
...........................
....
............................... 6
..................................
..........................
.............
12-15
2-3
5
7
7
Cinta......................
Grabación........................................22 - 23
AUX
Reloj.......................................................24
Temporizador
Sleep Timer
Especificaciones.....................................26
Mantenimiento
Solución de problemas.....................27-28
.........................................
..........................................
........................................
.........................
20-21
25
25
27
23
CD
.................................................
16- 18
Sintonizador............................................19-20
Page 64

Page 65

Envíe hoy su Tarjeta de Registro de la Garantía
para recibir todas las ventajas correspondientes.
Una vez que se registre la compra de su aparato Philips, Ud.
tiene derecho a todos las ventajas correspondientes al dueño de
un producto Philips.
Verificación i
•----------------------------------------'
de la garantía
Regstre su producto dentro de 10 días para
confirmar su derecho a máxima protección
bajo los términos y condiciones de la
garantía de Philips.
Confirmación i
•----------------------—
del dueño
Su Tarjeta de Registro de la Garantía
comprueba que Ud. es el dueño del aparato
en caso de robo o pérdida del producto
l-J=j=|.IAIl.j|.Kir
Conozca estos símbolos de
RIESGO DE SACUDIDA ELECTRICA
A
PRECAUCION: PARA REDUCIR EL RIESGO DE SACUDIDA ELECTRICA,N0 RETIRE
LA CUBIERTA (NI EL PANEL POSTERIOR]. ESTE APARATONO CONTIENE NINGUNA
PARTE QUE PUEDA SER REPARADA PDREL USARIO. DE SER NECESARIO ALGUN
SERVICIO 0 REPARACIONDEL APARATO, LLEVELO UN TECNICO CALIFICADO.
Sírvase llenar y devolver en seguida la Tarjeta de Registro de la
Garantía empacada con su aparato. Saque provecho de estas
ventajas importantes.
--------------------
NO ABRIR
'
del modelo
La devolución inmediata de su Tarjeta de
Registro de la Garantía le garantiza que
recibirá toda la información y todas las
promociones especiales que le corresponden
por ser el dueño de su modelo.
Para uso del cliente:
Escriba abajo el número de serie que se
^ Registro I
A
encuentra en el panel posterior. Guarde esta
información para el futuro.
No. de modelo
No. de serie
__________________________
A
A
El símbolo del “rayo” indica que algún material no aislado
dentro de su unidad podría resultar en una sacudida
eléctrica. Para la seguridad de todos, favor de no remover
la cubierta del producto.
El “signo de exclamación” le llama la atención a
características sobre las que Ud. debe leer la información
adjunta detenidamente para evitar problemas de
funcionamiento y mantenimiento.
ADVERTENCIA: para evitar el riesgo de
SACUDIDA ELECTRICA O INCENDIO, NO EXPONGA
ESTE EQUIPO A LLUVIA NI A HUMEDAD.
PRECAUCION: Para evitar sacudida eléctrica,
introduzca la patilla ancha del enchufe al fondo de la ranura
ancha.
Page 66

.^.. - ^..v ^j^SSÁ ? t . y ‘tVt!-.
, - <> ^ ••
!K:i-üïb:i-
Av™ -X-'*
Page 67

Ol
La dirección Worid Wide Web de PHILIPS es: http://www.philipsusa.com
PHILIPS
¡Felicidades por su compra у
bienvenido а la **familia**!
Estimado dueño del producto Philips:
Gracias por su confianza en Philips. Ud. ha elegido uno de
los mejores productos disponibles hoy en cuanto a
fabricación y respaldo después de la venta. Haremos todo
lo posible para que Ud. quede satisfecho con su producto
por muchos años.
Como miembro de la “familia” Philips, Ud. está protegido
por una de las garantías más completas y una de las redes
de servicio más sobresalientes de la industria.
Y además, gracias a su compra, Ud. recibirá toda la
información y todas las promociones especiales que le
corresponden, y también tendrá acceso fácil a los
accesorios a través de nuestra conveniente red de compras
a domicilio.
Y lo más importante es que Ud. puede
contar con nuestro compromiso incondicional de lograr su
satisfacción total.
Todo esto es nuestra manera de darle la bienvenida y las
gracias por invertir en un producto Philips.
Atentamente,
Robert Minkhorst
Presidente y Director General
RD. Recuerde que para sacar máximo provecho de
su producto Philips, Ud. debe devolver su Tarjeta
de Registro de la Garantía dentro de 10 días.
¡Sírvase enviárnosla ahora mismo!
Page 68

I MIILIVS
%
Page 69

o
INSTRUCCIONES IMPORTANTES DE SEGURIDAD - Léalas antes de poner en marcha el equipo
Este producto ha sido diseñado y fabricado
para cumplir normativas rigurosas en materia
de calidad y seguridad. No obstante, deberán
adoptarse ciertas precauciones en cuanto a su
instalación y manejo, que Ud. debe conocer
1. Lea estas instrucciones - Antes de poner
en funcionamiento el equipo, deberá leer todas
las instrucciones relativas a su manejo y
seguridad.
2. Conserve estas instrucciones - Las
instrucciones relativas al manejo y a la
seguridad del equipo deberán conservarse para
su posterior utilización como material de
referencia.
3. Lea todos los aviisos - Deberán respetarse
todos los avisos existentes tanto en las
instrucciones de manejo como en el propio
equipo.
4. Siga todas las instrucciones - Deberán
seguirse todas las instrucciones relativas al
funcionamiento y a la utilización del equipo.
5. No utilice este aparato cerca del agua -
Por ejemplo, cerca de bañeras, lavabos,
fregaderos, lavaderos, superficies mojadas, zonas
próximas a piscinas, etc.
6. Para limpiar el aparato utilice sólo un
trapo húmedo - Para limpiar el equipo
deberán seguirse estrictamente las
instrucciones del fabricante.
7. Proceda a su instalación de acuerdo con
las instrucciones del fabricante. No tape
las aperturas de ventilación - Por
ejemplo, el equipo no deberá situarse sobre
camas, sofás, alfombras, etc. ni en espacios
cerrados, como estanterías, armarios, etc. si con
ello se impidiese la libre circulación de aire por
las aperturas de ventilación.
8. No instale el equipo cerca de fuentes de
calor - Como radiadores, calentadores, estufas
o cualquier otro aparato (incluyendo los
amplificadores) generador de calor
9. No anule la seguridad o—^ , iiiTr^’
de la clavija de
corriente (ya sea de tipo ^^ip^ianzada de ca
polarizado o con toma de tierra).
Las clavijas polarizadas tienen dos patillas, una
más ancha que la otra.
Las que disponen de toma de tierra tienen dos
patillas y una tercera que es la de conexión a
tierra.Tanto la patilla más ancha como la toma
de tierra han sido incorporadas a la clavija para
su seguridad personal. Si la clavija suministrada
con el equipo no es compatible con su toma
de corriente, consulte a un electricista para
sustituir la toma de corriente obsoleta.
10. Proteja debidamente el cable
impidiendo que pueda pisarse o incluso
perforarse, especialmente en la parte más
próxima a la clavija y en el punto de salida del
equipo.
11. Utilice exclusivamente aquellos
dispositivos/ accesorios recomendados por
el fabricante.
12. Coloque el equipo
exclusivamente sobre aquellos
carros, bases, trípodes, soportes o
mesas especificados por el comerciante o
vendidos con el equipo. Cuando utilice un
carro, tenga cuidado al desplazar el conjunto
carro/ equipo para evitar posibles daños por
vuelco.
13. Desenchufe el aparato durante tormentas
eléctricas o cuando no vaya a ser utilizado
durante largo tiempo.
14. Confíe el mantenimiento y las
reparaciones a personal técnico
especializado. El equipo deberá repararse
siempre que haya resultado dañado de alguna
manera, como por ejemplo por daños en el
cable o en la clavija, por derrame de líquido
sobre el equipo, por objetos que hubieran
podido introducirse en su interior por
exposición del equipo a la lluvia o a ambientes
húmedos, cuando el equipo no funcione con
normalidad o cuando hubiera sufrido algún tipo
de caída.
15. Uso de las pilas - PRECAUCION:
Para prevenir escapes en las pilas, que pueden
ocasionar lesiones físicas o daños en la unidad:
• Instale todas las pilas correctamente, + y -
como está marcado en la unidad.
• No mezcle las pilas (viejas con nuevas o de
carbono y alcalinas, etc.),
• Extraiga las pilas cuando no vaya a usar la
unidad durante largo tiempo,
EL 6475-5001:00/8
Page 70

Page 71

Ol
■'Щй
SISTEMA DE AUDIO
Mano de obra gratis por un año
Servido gratis por un año para piezas
Para reparaciones, hay que presentarse en persona
con este producto.
¿QUIEN TIENE PROTECCION?
Usted debe tener su comprobante de venta para recibir
servicio bajo la garantía. Una nota de venta u otro
documento mostrando que usted compró el producto se
considera un comprobante de venta.
¿QUE CUBRE?
La protección bajo la garantía comienza el mismo día en que
usted compra el producto. Durante un año a partir de esta
fecha, todas las piezas serán reparadas o reemplazadas gratis
y no se cobrará mano de obra. Después de este plazo de un
año. usted tendrá que pagar el costo del reemplazo o
reparación de las piezas y también toda mano de obra.
Todas las piezas, inclusive las piezas reparadas y de
repuesto, denen cobertura sólo durante el período de la
garantía original. Una vez que venza la garantía del
producto, la garantía de cualquier pieza reemplazada o
reparada también habrá vencido.
¿QUE EXCLUYE LA GARANTIA?
Su garantía no cubre:
• cobros por mano de obra durante la instalación o
montaje del producto, ajuste de los controles del cliente
o de preferencia e instalación o reparación de los
sistemas con antena fuera de la unidad.
^ reparación del producto y/o reemplazo de piezas, a raíz
de uso indebido, accidente, reparación no autorizada u
otra causa no bajo el control de Philips Consumer
Electronics Company.
• problemas de recepción ocasionados por condiciones de
señales o sistemas de cable o de antena fuera de la unidad.
• un producto que requiera modificación o adaptación para
que opere en un país que no sea el país para el que fue
concebido, fabricado, aprobado y/o autorizado, o la
reparación de productos dañados por tales
modificaciones.
GARANTIA LIMITADA
• daños incidentales o consecuentes que resulten del
producto. (Algunos estados no permiten la exclusión por
daños incidentales o consecuentes, de modo que es
posible que la exclusión arriba indicada no le sea aplicable
a usted. Esto incluye, sin limitarse, materiales pregrabados
con o sin amparo de derechos de autor.)
• Una unidad que se ha comprado, usado o reparado fuera
de los EE.UU., Puerto Rico, las Islas Vírgenes y el Canadá,
o que se ha usado para fines comerciales o institucionales
(inclusive productos usados con fines de arrendamiento,
pero sin limitarse a éstos.)
¿DONDE SE OBTIENE SERVICIO?
El servicio de garantía está disponible en todos los países
con distribución oficial del producto por Philips Consumer
Electronics Company. En países donde Philips Consumer
Electronics Company no distribuye el producto, la entidad
local de servicio Philips tratará de brindar servicio (aunque
puede haber demora si las piezas de repuesto o manuales
técnicos correspondientes no están fácilmente disponibles.
NO SE OLVIDE DE GUARDAR...
Favor de guardar su nota de venta y otros materiales para
comprobar la compra del producto.Adjúntelos a este
manual de instrucciones y reténgalo a la mano. Favor de
retener también la caja y material de empaque originales en
caso de tener que devolver el producto.
ANTES DE LLAMAR PARA OBTENER
SERVICIO...
Sírvase chequear su manual de instrucciones. Algunos
ajustes de los controles según las indicaciones en el manual
podrían ahorrarle una llamada para servicio.
PARA SERVICIO DE GARANTIA EN
LOS EE.UU., PUERTO RICO O LAS
ISLAS VIRGENES...
Lleve el producto a un centro de servicio Philips (ver lista
adjunta) o a un centro de servicio autorizado para
reparaciones. Una vez terminada la reparación del producto,
usted debe recogerlo del centro. Los centros tienen
derecho a guardar toda pieza defectuosa.
(En los EEUU., Puerto Rico o las Islas Vírgenes, toda garantía
implícita, inclusive las garantías implícitas de comerciabilidad
y aptitud para un propósito en particular, están limitadas en
cuanto a duración al plazo de esta garantía expresa. Puesto
que algunos estados no permiten limitaciones sobre la
duración de una garantía implícita, es posible que la limi
tación arriba indicada no le sea aplicable a usted.)
PARA SERVICIO DE GARANTIA EN
EL CANADA...
Favor de comunicarse con Philips al:
1-800-661-6162 (francófono)
1-800-363-7278 (anglòfono)
(En el Canadá, esta garantía es otorgada en lugar de toda
otra garantía. No se otorga ninguna otra garantía expresa ni
implícita, comprendiéndose aquí ninguna garantía implícita
de comerciabilidad o aptitud para propósito alguno. Philips
no será responsable bajo circunstancia alguna por daños y
perjuicios directos, indirectos, especiales, incidentales o
consecuentes, independientemente de la manera
ocasionada, aún con notificación de la posibilidad de los
mismos.).
RECUERDE...
Favor de anotar los números de modelo y serie del
producto en el espacio abajo.También, sírvase llenar y
enviar oportunamente su tarjeta de registro de la garantía.
Así nos será más fácil notificarle en caso de ser necesario.
Modelo No.
Serie No. ___________________________________
Esto garantía le otorga derechos legales específicos y Usted
podría gozar de otros derechos que varían de un estado a otro.
________________________________________
Philips Service Solutions Group, P.O. Box 2976,
Longview,Texas 75606, USA,
(903) 242-4800
EL4965E006 / MAC 4110 /12-98
sL_ ___I
Page 72

Page 73

О
El “signo de exclamación” le llama la atención a
características sobre las que Ud. debe leer la información
A
A
Atención: Para reducir el riesgo de choque elécrico,
En su interior no hay piezas que el usuario pueda reparar.
adjunta detenidamente para evitar problemas de
funcionamiento y mantenimiento.
AVISO
RIESGO DE CHOQUE ELECTRICO
N0 ABRIR
no quite la tapa (o el panel posterior).
Para servicio dirijase a personal calificado.
A
PRECAUCION: Para evitar sacudida eléctrica,
introduzca la patilla ancha del enchufe al fondo de la ranura
ancha.
MAC5097
Este símbolo tiene por finalidad advertir al usuario de
la presencia de tensión peligrosa no aislada dentro de
A
A
la caja del aparato, que puede ser lo suficientemente
fuerte para constituir un peligro de choque eléctrico.
Este símbolo sirve para advertir ai usuario de la
presencia de instrucciones de manejo y
mantenimiento (servicio) importantes en el manual
que acompaña al aparato.
AVISO
Para reducir el riesgo de fuego o choque
eléctrico, no exponga el aparato a la lluvia o
humedad.
ATENCIÓN
El uso de mando o ajustes o la ejecucción de
métodos que no sean los aquí descritos puede
ocasionar peligro de exposición a radiación.
El aparato cumple las normas FCC, Parte 15 y 21 CFR
1040.10.
Antes de todo lea esto!
¡Se le felicita por su compra de este producto Philips!
Esta caja contiene todo lo que necesita para empezar.
Si tiene algún problema, los representantes de Philips
pueden ayudarle a obtener el máximo rendimiento de su
producto explicándole lo siguiente:
^ La conexión
Sf La primera configuración
^ La utilización de las funciones
No intente devolver este
producto a la tienda.
¡Para obtener ayuda rápida, antes de
todo llámenos!
1-800-531-0039
¡Gracias por hacer que Philips forme parte de su hogar!
MODO DE DEMOSTRACION
■
Mantenga apretado el botón Mantenga apretado el botón
h
Conecte la unidad 1 " en la pantalla 1 P“'®® PLAY
durante 5 segundos durante 5 segundos^
PLUG & PLAY
. ... I Siga (as instÉ4iccìones I „ ,
DESACnVARLO
I
1
Page 74

►
ГГ:
Page 75

INFORMACION GENERAL
INFORMACION DE SEGURIDAD
Información general
I La placa tipo (con el número de
serie) está situada en la parte
posterior de la unidad.
t Las grabaciones están permitidas
siempre que no infrinjan los
derechos de autor u otros
derechos a terceros.
B Este aparato cumple con la
sección 15 de /as normas de la
Federal Communications
Commission (FCC). Su manejo
está sujeto a las dos condiciones
siguientes:
- Este aparato no puede causar
interferencias dañinas, y
- Este aparato debe aceptar
cualquier interferencia
recibida, incluyendo
lasinterferencias que puedan
causar un funcionamiento
indeseado.
Información
medioambiental
Se ha prescindido de cualquier material
de embalaje innecesario. Hemos
puesto el mayorempeño en que el
embalaje sea fácilmente separable en
tres materiales: cartón (caja),
poliestireno expandióle (amortiguación)
y polietileno (bolsas, plancha protectora
de espuma).
Los materiales que componen el
equipo son reciclables y reutilizables si
son desmontados poruña empresa
especializada. Observe las normas
locales concernientes a la eliminación
de los materiales de embalaje, pilas
usadas y equipos desechadles.
Accesorios (incluidos)
- Mando a distancia
- Antena de cuadro de AM
- Antena monofilar de FM
- Cable de alimentación AC
Información de seguridad
• Antes de poner en funcionamiento
el equipo, compruebe que la tensión
indicada en la placa tipo (o la
indicación de tensión junto al
selector de voltaje) coincide con la
tensión de redde su zona. En caso
contrario, consulte a su distribuidor
La placa tipo se encuentra situada en
la parte posterior de la unidad.
• No cambie el equipo de lugar
mientras está encendido.
• Coloque el equipo sobre una
superficie sólida (por ejemplo, un
mueble).
• Instale el equipo en un lugar
debidamente ventilado para evitar la
acumulación de calor en su interior
Deje al menos 10cm de espacio libre
en la parte trasera y la parte
superior de la unidad y 5cm en cada
lado.
• El equipo incorpora un sistema de
protección que evita el
sobrecalentamiento.
• No exponga el equipo a la lluvia,
exceso de humedad, arena o fuentes
generadoras decalor.
• Bajo ninguna circunstancia deberá
reparar el equipo por su cuenta, o de
lo contrario quedará invalidada la
garantía.
• Si la unidad se traslada directamente
de un entorno frío a otrocaliente, o
se instala en una habitación con
exceso de humedad, ésta puede
condensarse en la lente del
reproductor de CD, en el interior del
equipo. En tal caso el reproductor
de CD no funcionará con
normalidad. Deje (a unidad
encendida durante una hora sin
ningún disco insertado, hasta que
pueda restablecerse el
funcionamiento normal.
• Las descargas electrostáticas pueden
ocasionar problemas inesperados.
Compruebe silas anomalías
desaparecen desconectando el cable
de la red y volviéndolo a conectar
después de unos instantes.
• Para interrumpir por completo
el suministro de corriente,
desconecte el cable de
alimentación de la toma de la
red.
Page 76

wt.
Шг-ä, ЖЯ/Ш.
•.T.WVÍ' r.rr:r
:w.:-ï:
Яг '5ä;
•»гТГ
Page 77

o
PREPARATIVOS
Conexiones del panel posterior
Page 78

Page 79

o
(A) Conexión de la antena
de cuadro de AM
Conecte la antena de cuadro
suministrada al terminal AM
ANTENNA. Sitúe la antena AM alejada
del equipo, y oriéntela para lograr la
mejor recepción posible.
(D Conexión de la antena
monofilar de FM
Conecte la antena monofilar incluida de
FM al terminal FM AERIAL (FM
ANTENNA) 75 Q. Oriente la antena
de FM para lograr la mejor recepción
posible.
Antena exterior
Para mejorar la recepción estéreo en
FM, conecte una antena de FM exterior
al terminal FM AERIAL (FM
ANTENNA) 75 Q , utilizando para ello
un cable coaxial de 75 Q.
FWI AERIAL 75D
o . c
FKI ANTENNA 75n
(c) Conexiones de los
altavoces
• Conecte el altavoz derecho al
terminal Front R, con el hilo
coloreado al positivo ( + ) y el hilo
negro al negativo ( — )
PREPARATIVOS
• Conecte el altavoz izquierdo al
terminal Front L, con el hilo
coloreado al positivo ( + ) y el hilo
negro al negativo ( — )
• Asegure la porción desnuda del cable
de altavoz como se indica en la
ilustración.
ATENCION:
- Para obtener unas prestaciones
óptimas de sonido, se recomienda
utilizar los altavoces suministrados.
- No conecte más de un altavoz a cada
uno de los pares del terminal de
altavoces +/ —.
- No conecte altavoces con una
impedancia inferior a la de los
altavoces suministrados. Diríjase a la
sección de ESPECIFICACIONES de este
manual.
(d ) Conexión de otros
equipos
Puede conectar las salidas de audio
derecha e izquierda de un TV, vídeo,
reproductor de discos láser LD, DVD o
grabador de CD a los terminales de
entrada AUX IN del panel posterior del
(D Conexión de la salida
Subwoofer
Puede conectar opcionalmente un
subwoofer activo o un subwoofer
activo inalámbrico a lasalida
SUBWOOFER OUT El subwoofer
reproduce los sonidos de bajas
frecuencias másprofundos (explosiones,
ruido de naves espaciales, etc.). Procure
seguir las instruccionesfadlitadas con el
subwoofer
0
Conexión de salida
digital
Por medio de esta salida, puede grabar
el sonido digital de un CD, a cualquier
equipo de audiocon entrada digital (ej.
un grabador de CD, un grabador de
cintas audio digitales (DAT),
unconvertidor digital-analógico DAC y
un procesador de señales digitales).
Conecte un extremo del cable (no
incluido) a la salida DIGITAL OUT y el
otro extremo alequipo de audio con
entrada digital. Cuando conecte el
cable, asegúrese de introducirlo bien.
© Suministro de
corriente
Conecte el cable de alimentación a la
unidad y a (a toma mural después de
haber realizado el resto de las
conexiones.
Inserción de las pilas en el
mando a distancia
• Introduzca las pilas (no suministrado)
en el mando a distancia como se
indica en el compartimento de las
pilas (tipo R06 o AA).
Precaución
- Quite las pilas cuando se gasten
o si no va a utilizar el mando a
distance durante un período
prolongado de tiempo.
- No ut/ice a la vez pilas usadas y
nuevas o de tipos diferentes.
- Las pilas contienen sustancias
químicas, por lo tanto deben
desecharse correctamente.
Page 80

•í rr¿; *
Wsr'r-л ;
^v7¿ '
iï_ï£:
-^ÍT'..y- P.
'УЛЖ
m^'
!»*.? .
- v
•r¿rrr.:.:
i;y¿gí-
Ï1S-
Page 81

CONTROLES
12
@
15)
Page 82

i^Efâh^
i’ Г "'•I '•
Page 83

■ti/'
¡L'"
jif';
garantía.
CONTROLES
9
Controles del sistema y mando a distancia
(T) STANDBY-ON
- para encender la unidad o activar
el modo de espera.
(2)
DISC 1 / DISC 2 / DISC 3
(REPRODUCCIÓN CD
DIRECTA)
- selecciona la bandeja de disco de
CD para la reproducción.
RECORD
(D
para comenzar la grabación en la
platina de cinta 2.
SOUND CONTROL - para
seleccionar la función de sonido
deseada : DSC.VEC o DBB.
JOG
para ajustar el efecto de sonido
DSC/VEC/DBB deseado. Debe
seleccionar primero la función de
sonido respectiva.
DBB (DYNAMIC BASS
BOOST)
para seleccionar el efecto de bajos
deseado: DBB 1, DBB 2, DBB 3,
DBB OFF (DBB desactivada).
DIGITAL SOUND CONTROL
para seleccionar el efecto deseado del
control de sonido digital ; OPTIMAL,
JAZZ, ROCK oTECHNO.
VEC
para seleccionar el efecto deseado
del control virtual del ambiente :
CINEMA, HALL o CONCERT .
(6) INCREDIBLE SURROUND
- para activar o desactivar el efecto
de sonido envolvente,
(7) CLOCK*TIMER
- para visualizar y poner en hora el
reloj o programar el temporizador.
(8) DUBBING
- para doblar una cinta.
AUTO REPLAY
- para seleccionar los modos de
reproducción continuo (AUTO
REPLAY) o una sola vez (ONCE).
(g) DISPLAY SCREEN
- para visualizar el modo actual del
sistema.
(íi) DISC CHANGE
- para cambiar el discos.
(g) OPEN«CLOSE
- para abrir y cerrar la bandeja del
cambiador CD.
@ CAMBIADOR CD
(g) FUENTE^ para seleccionar los
siguientes modos:
CD / (CD 1«2*3)
- para seleccionar el modo de CD.
Una vez detenida la reproducción
de un discos, púlselo para
seleccionar la bandeja de disco 1, 2
Ó3.
TUNER / (FM«AM)
- para seleccionar el modo de
sintonización. En este modo, pulse
para seleccionar las bandas FM o AM.
TAPE / (TAPE 1-2)
- para seleccionar el modo de cinta.
Una vez que haya detenido la
reproducción de la cinta, presione
para seleccionar la platina 1 o la 2.
AUX/ (VIDEO)
- para seleccionar una fuente
externa de sonido (ej.TV.VCR,
Reproductor de discos láser,
reproductor DVD o grabador de
CD). Cuando se está en el modo
AUX se pulsa para seleccionar
AUX o CDR.
@ SELECCIÓN DE MODO
SEARCH ◄◄ ►►(TUNING
◄◄ ►►)
para CD
para TUNER ... para sintonizar con
para TAPE
para CLOCK.... para ajustar la hora
STOP-CLEAR ■
para CD
para TUNER... para detener la
..........
para buscar hada atrás/
hacia adelante.
una emisora de
frecuencia más baja
o más alta.
......
para activar el
rebobinado o
avance rápido.
(sólo en el sistema).
..........
para detener la
reproducción de
CD o borrar un
programa.
programación (sólo
en el sistema).
para TAPE
DEMO.............para iniciar o parar
para CLOCK., para salir del ajuste
para PLUG & PLAY
......................
PLAY ► / PAUSE II
para CD
para TAPE
para PLUG & PLAY
.......................
PREY !◄ / NEXT H
(PRESET T À)
para CD
......
para detener la
reproducción o la
grabación de una
cinta.
el modo de
demostración (sólo
en el sistema).
de reloj o cancelar
el temporizador (sólo
en el sistema).
para salir del modo
Plug & Play y volver
al modo de espera
(sólo en el sistema).
........
para iniciar o
interrumpir la
reproducción.
......
para iniciar la
reproducción,
para iniciar y activar
Plug & Play desde el
modo de espera/
demostración (sólo
en el sistema).
..........
para saltar al
principio de la pista
actual, anterior o
siguiente.
Page 84

% ■:•>. . 'x'W’- .г '•' -
X ;;лч» Г V ;í‘..................................................................-/
\ .Л •. «í- ■. .V 4< ...Л -
7 Í:
' Л« -
’■ 'Ъ л "
............
?•, ••
'
Page 85

l J i i
1
i
.
......
.....
.....................
.
______
i
...................
] 1
J
CONTROLES
para TUNER... para seleccionar un
emisora
presintonizada de la
memoria.
para CLOCK., para ajustar los
minutos (sólo en el
sisíema).
@ VOLUME
- para aumentar o disminuir el
volumen.
@ OPTIMAL SOUND MIX
- mezcla óptima de varias funciones
de sonido del aparato para crear
una experiencia de escucha
realmente impresionante sólo con
un toque de un botón.
® íT?.
- para conectar los auriculares.
(§) PROGRAM
para CD
paraTUNER... para presintonizar
para CLOCK., para seleccionar el
@) DIM
- para seleccionar la luminosidad en
la pantalla: DIM 1, DIM 2, DIM 3 o
DIM OFF (apagado).
..........
para programar
pistas de CD.
emisoras.
reloj de 12 o de 24
horas.
(21) PLATINE 2
@) PLATINE 1
(2|) REPEAT
- para repetir una pista del CD, un
disco, o todos los discos
disponibles en la bandeja.
(g) SHUFFLE
- para reproducir todos los discos y
pistas en orden aleatorio.
(||) SLEEP
- para activar el sistema y ponerlo en
modo de espera (standby) a una
hora determinada.
@ ü
- para activar el modo de espera.
Observaciones del mando a
distancia
- Seleccione primero la fuente que
desea manejar presionando uno
de los botones de selección de
fuente en el mando a distancia
(porej.CDoTUNER,).
- A continuación, seleccione la
función deseada ( ►, M,
etc.)
FUNCIONAMIENTO DEL SISTEMA
STANDBY-ON
è
Importante:
Antes de poner en funcionamiento
el sistema, asegúrese de haber
realizado correctamente todos los
preparativos.
Plug and Play
El sistema proporciona la función PLUG
and PLAY que permite almacenar
automáticamente todas las emisoras de
radios disponibles al encender el
aparato.
MIN/ HiFi SYSTEM
I TUNER I
•4-4
1 .';OPTlMAL5C4Jl№ '
RECORD
—
-CU
;LOCK-nM£
OUSeilVGA-REPLAV OlM MOOE PfiOGRAM
□ [T-rn ( 1
SOUND NAVIGATION JOG
| ; » 1 wi ►1
Si PLUG & PLAY no ha sido
instalado
1 Al encenderse el aparato, aparecerá,
|‘ OI tro rorTOl I oorcrc OI QU
nu I U J.I'UIOLL -I l'LJJ I l_Oj
(instalación automática - pulse
PLAY).
2 Pulse PLAY (sólo en el sistema) para
iniciar la instalación.
Aparecerá “IflS í RL L ”
(instalación), seguida de “I uRER’’
(sintonizador) y“RufLl"
(automático).
-♦program empieza a destellan
Page 86

• •—Í*/ .
т:^.
■
Page 87

altavoces
Conecte el altavoz derecho al
terminal Front R, con el hilo
coloreado al positivo ( + ) y el hilo
negro al negativo ( — )
rueae coneciar' las saiiuas ue duuiu
derecha e izquierda de un TV, vídeo,
reproductor de discos láser LD, DVD o
grabador de CD a los terminales de
entrada AUX IN del panel posterior del
equipo.
FUNCIONAMIENTO DEL SISTEMA
desecharse correctamente.
► PLUG and PLAY empezará a
buscar todas las emisoras de radio
de la banda FM y después todas
las estaciones de radio de la
banda AM.
Todas las emisoras disponibles con
señal suficientemente potente
serán almacenadas. Pueden
almacenarse hasta 40 emisoras
preestablecidas.
Cuando se haya finalizado PLUG
and PLAY la última emisora
preestablecida aparecerá en la
pantalla.
Para reinstalar PLUG & PLAY
1 En el modo de espera o de
demostración, pulse y mantenga
apretado PLAY (sólo en el sistema) y
aparecerá" flUTO liJ51 RLL -
55 PLRb" (instalación
automática - pulse PLAY).
2 Pulse PLAY durante cinco segundos
(sólo en el sistema) de nuevo para
iniciar la instalación.
• Para salir sin almacenar las emisoras
encontradas por PLUG and PLAY
pulse el botón ■ (sólo en el sistema).
Observaciones:
- PLUG and PLAY se reiniciará de nuevo
la próxima vez que se encienda el
aparato si :
i) La instalación de PLUG and PLAY no
fue finalizada,
ii) No se detectó frecuencia de estéreo
durante PLUG and PLAY. Aparecerá
TMEEK RLJ TE L'IL'i'P " (comprobar
antena).
- Después de PLUG and PLAY, puede
almacenar manualmente o
automáticamente las emisoras que
desee.
- Cuando se utiliza PLUG and PLAY,
todas las emisoras almacenadas
previamente serán sustituidas por las
nuevas.
- Durante PLUG and PLAY, si no se
pulsan botones durante 15 segundos,
el sistema pasará al modo de
demostración (si el modo de
demostración está activado).
Modo de demostración
El sistema dispone de un modo de
demostración de las diversas funciones
que posee.
Para detener el modo de
demostración
• En el modo de demostración,
mantenga pulsado ■ (sólo en el
sistema) durante cinco segundos.
^Aparece en pantalla "SEfiu ¡jrr".
El sistema activa el modo de
espera (standby).
Para activar el modo de
demostración
• En el modo de espera, mantenga
pulsado ■ (sólo en el sistema)
durante cinco segundos.
La demostración se iniciará.
Observación:
- Si el modo de demostración no ha sido
desactivado, se reanudará 5 segundos
después de que el sistema pase al
modo de espera.
- Cuando el sistema se enciende con la
alimentación de red, la bandeja
giratoria para CD puede cerrarse y
abrirse de nuevo para inicializar el
equipo.
- El modo de demostración
permanecerá desactivado hasta que lo
active de nuevo,incluso si desconecta el
cable de alimentación y lo vuelve a
conectar.
Encendido del equipo
• Pulse CD, TUNER, TAPE o AUX
• Pulse STANDBY-ON en modo de
demostración.
También se puede encender el equipo
si pulsa cualquiera de los botones de
CD DIRECT PLAY (sólo en el sistema).
Modo de espera
• Pulse STANDBY-ON otra vez o
(!) en el mando a distancia
El sistema se pondrá en el modo
de espera.
Selección de la fuente
• Pulse el botón de selección de
fuente deseado CD, TUNER, TAPE
o AUX
En la pantalla se visualiza la fuente
seleccionada.
Observación:
- Si se trata de una fuente externa,
asegúrese de haber conectado los
terminales de salida(OUT) de audio
derecho e izquierdo del equipo externo
(TV, VCR, reproductor de discos láser,
reproductor DVD o grabador de CD) a
los terminales de entrada AUX IN.
Page 88

:*;.v ..
V:V-:. £->V i^:Vv.
¿,«гГ--
Page 89

o
Modo DIM (sólo en el mando a
distancia)
Esta función le permite seleccionar la
luminosidad en la pantalla.
• Pulse DIM para seleccionar la
luminosidad en la pantalla; D1M1,
DIM2, DIM3 o DIM OFF (apagado).
^ Se ilumina la pantalla dim.
^ Según la indicación elegida,
aparece en pantalla“íÍm í”,
JJiM L_ , JJXII -J o XIXM Ull
DIM OFF (apagado) - brillo normal
con el Analizador de Gamas
encendido.
DIM 1- brillo normal con el
Analizador de Gamas apagado.
nrr”
FUNCIONAMIENTO DEL SISTEMA
DIM 2 - brillo medio con el
Analizador de Gamas encendido.
DIM 3 - brillo medio con el
Analizador de Gamas apagado con
todos los indicadores en el sistema
m
..........
;
ÍSÉiA—T—
X M
Control de sonido
Utilice el mando VOLUME para elevar o
reducir el nivel de sonido.
Para utilización personal
Conecte los auriculares a la toma íi7i
del panel frontal del equipo. Los
altavoces se silenciarán.
"1
□
Z'-m
Control de sonido
Para obtener un sonido óptimo,
solamente puede seleccionar uno
de los siguientes controles de
sonido al mismo tiempo: DSC, VEC
0 OPTIMAL SOUND MIX
CONTROL DE SONIDO DIGITAL
(DSC)
La función DSC le. permite ajustar el
sistema al tipo de música que le guste.
1 Pulse para seleccionar la función
DSC
^ El indicador LED DSC se
enciende.
2 Ajuste el botón JOG para
seleccionar el ajuste deseado del
control de sonido digital : OPTIMAL,
JAZZ, ROCK oTECHNO.
^ El sonido digital seleccionado
queda enmarcado.
-♦ En la pantalla se visualiza
"ППTT^-1Пl ip~~ Onr"l/ ^
ur 1 J.I lili., I^UL-Fy O
T f~ í~ i It' inii
I L. I_ ill MU .
Observación:
- Para elegir un ajuste neutral, seleccione
JAZZ
CONTROL VIRTUAL DEL
AMBIENTE (VEC)
La función VEC le permite seleccionar
en el sistema un tipo de ambiente.
1 Pulse para seleccionar la función
VEC
^ El indicador LED VEC se enciende.
2 Ajuste el botón JOG para
seleccionar el ajuste deseado del
control virtual del ambiente :
CINEMA, HALL o CONCERT .
El ambiente seleccionado queda
enmarcado.
^ En la pantalla se visualiza
"LIiMEnR, MHLL o CDWIILRT".
REALCE DINÁMICO DE GRAVES
(DBB)
El modo DBB refuerza la respuesta de
graves.
1 Púlselo para seleccionar la función
DBB
El indicador LED DBB se
enciende.
2 Ajuste JOG para seleccionar el nivel
de DBB deseado o para desactivar
DBB.
La respuesta de bajos
seleccionada aparece rodeada por
un círculo.
Aparecerá " 555 I, IPSS P, SSS
3 o 3S5 í]nL'(DBB desactivada)".
Page 90

''ЛЛТ/-- тгТГГ.”.':
7:;.";
Page 91

O
- para seleccionar el etecto deseado del
control de sonido digital : OPTIMAL,
JAZZ, ROCK oTECHNO.
VEC
- para seleccionar el efecto deseado
del control virtual del ambiente :
CINEMA, HALL o CONCERT .
Nota:
- Sí se selecciona DBB 11213, aparecerá
el indicador de número
correspondiente.
INCREDIBLE SURROUND
Le son stereo normal est determiné par
la distance entre les haut-parleurs avant.
Lorsque le son Incredible Surround a
été sélectionné, il amplifie la distance
virtuelle entre les haut-parleurs avant
pour un effet stéréo incroyablement
large et enveloppant. Il existe 12
niveaux différents Incredible Surround
disponibles en sélection.
• Puise INCREDIBLE
SURROUND para activar el modo.
•^El indicador LED INCREDIBLE
SURROUND se enciende.
^ En la pantalla se visualiza “j.rJL'2
5ufff?uLÍÍ''ÍIÍ” y el icono IS.
seleccionar la bandeja de disco 1, 2
ó 3.
TUNER / (FM«AM)
para seleccionar el modo de
sintonización. En este modo, pulse
para seleccionar las bandas FM o AM.
FUNCIONAMIENTO DEL SISTEMA
Para desactivar el modo
Incredible Surround
• Pulse de nuevo INCREDIBLE
SURROUND
^El indicador LED INCREDIBLE
SURROUND se apaga.
En la pantalla se visualiza “15
nrr ”
Ul I
El icono IS desaparece de la
pantalla.
OPTIMAL SOUND MIX - mezcla
de sonido óptima
La función de mezcla de sonido óptima
(Optimal Sound Mix) mezcla las
diversas funciones de sonido del
aparato para crear una experiencia de
escucha realmente impresionante sólo
con un toque de un botón.
Para activar la función de mezcla
de sonido óptima
• Pulse OPTIMAL SOUND MIX
-»El botón OPTIMAL SOUND MIX
se enciende.
^Aparecen “ QPIIMRL SuLIK']]
f'II“ ” y el indicador (((OSM))).
reproducción de
CD o borrar un
programa.
para TUNER... para detener la
programación (sólo
en el sistema).
Para desactivar la función de
mezcla de sonido óptima
• Pulse OPTIMAL SOUND MIX de
nuevo.
^ La luz del botón OPTIMAL
SOUND MIX se apaga
^Aparecerá“ uBiT uPP ” (OSM
desactivada).
^ El indicador (((OSM))) desaparece
de la pantalla.
• Pulse cualquiera de los botones de
sonido (DBB, DSC,VEC, IS).
“♦Aparecerá el mensaje de la
función de sonido.
-♦ El indicador (((OSM))) desaparece
de la pantalla.
(PRESET ▼
para CD
..........
para saltar al
principio de la pista
actual, anterior o
siguiente.
Page 92

Page 93

Ф
la pantalla: DIM 1, DIM 2, DIM 2 о
DIM OFF (apagado).
ucdcu ifluiicjui cdii/ifuiiuw uiiw
de los botones de selección de
fuente en el mando a distancia
(por ej. CD o TUNER,).
A continuación, seleccione la
función deseada ( ►, H, H,
etc.)
DISCÇHAN6E j OPái'CLO^
3SS
MINI HJfl SrSTEM
-1 -1 •
:lock-timer oubbing a.R£play
m
.....................................
ЕИСПЕН
I Ti
L. il
DEMO STOP
OPTIMAL SOUND MIX
DIM MODE
SOUND navigation - JOG
.''.I ►*
PROGRAM
Advertencia
1) Este equipo está diseñado para discos compactos convencionales. No
utilice accesorios tales como anillos estabilizadores o láminas de
tratamiento, ya que podrían dañar el mecanismo dei CD.
2) No cargue más de un disco en cada bandeja.
3) Cuando el cambiador de CD tenga cargados los discos, no gire ni
aplique sacudidas al equipo, ya que podría quedar bloqueado.
El cambiador de CD admite tres discos para su reproducción
ininterrumpida.
IJg-Vi
CD
Reproducción de discos
Este sistema puede reproducir todos
los CD audio-digitales, discos de
grabador CD audio-digitales y discos
de formato CD-Rewritable audio
digitales.
_n COMPACT nCOMPMT
Ш (ojD§E ШШ
DIBITAL AUDIO
Carga del cambiador de CD
1 Pulse CD para seleccionar el modo
CD.
2 Pulse OPEN-CLOSE
La bandeja de CD se desliza hacia
afuera.
3 Cargue un CD con la cara impresa
hacia arriba en la bandeja derecha.
• Si lo desea puede cargar otro disco
en la bandeja izquierda.
• Para cargar el tercer disco pulse el
botón DISC CHANGE
El carga del cambiador girará hasta
que la bandeja vacía se sitúe a la
derecha,preparada para aceptar
un disco.
4 Pulse OPEN-CLOSE para cerrar el
cambiador
En la pantalla se visualiza el
número total de pistas y el tiempo
de renroducción del último disco
QlgTALAUDIO DIGITAL AUDIO
iReWritablel
* rrVV/4JrVMI'l
Observación:
- Para asegurar el buen funcionamiento
del sistema, espere a que el cambiador
CD complete la operación de lectura del
disco o los discos antes de proceder.
Reproducción Disco directa
• Puede reproducir directamente un CD
pulsando los botones DISC 1,
DISC 2 о DISC 3. El reproductor se
detendrá al final del disco seleccionado.
-♦Un botón encendido indica que el
disco está cargado en la bandeja
de los discos.
^Un botón parpadeante indica que
un disco se encuentra en modo
de reproducción.
Reproducción de un Disco
1 Pulse PLAY ►II para dar comienzo
a la reproducción.
-♦ En la pantalla se visualiza la
bandeja del disco, el número de
pista y el tiempo transcurrido de
la pista actual.
• Para interrumpir la reproducción,
pulse PAUSE ►!!
-♦ El tiempo de reproducción
parpadea.
• Para volver a reproducir, pulse
PLAY ► II de nuevo.
2 Para detener la reproducción, pulse
Page 94

/ " _7
j I •' '.!,{u-r\'.
V.^ -.Tv-.s
... ’riVT^v
Page 95

equipo.
El modo de demostración
permanecerá desactivado hasta que lo
active de nuevo,incluso si desconecta el
cable de alimentación y lo vuelve a
conectar.
¡CfJIUUULLUI LyVLy U ^ÍUUUUUI UC J U
los terminales de entrada AUX IN.
CD
O
Observación:
- Todos los discos disponibles se
reproducirán una vez, y la unidad se
detendrá.
Cambio de disco
Es posible cambiar los dos discos
exteriores mientras el tercero se
encuentra en los modos de parada o
de reproducción.
1 Pulse DISC CHANGE
El compartimento del CD se
desliza hacia afuera.
2 Cambie los discos de las bandejas
derecha e izquierda.
• Pulse de nuevo DISC CHANGE
para cambiar el disco interior en
modo de reproducción.
En la pantalla aparece '
-*■ El CD se detiene.
La bandeja giratoria para CD se
cerrará para recuperar el CD
interior y se abrirá de nuevo para
poder acceder a él.
3 Pulse OPEN*CLOSE para cerrar el
compartimento de los CD.
. Ol_
Selección de una pista determinada
Desde la posición de parada
1 Pulse M O ►! hasta que en la
pantalla aparezca la pista deseada.
2 Pulse PLAY ►II para dar comienzo
a la reproducción.
^ En la pantalla aparece el número
de pista seleccionado y el tiempo
de reproducción transcurrido.
Durante la reproducción
• Pulse N o ►! hasta que en la
pantalla aparezca la pista deseada.
^Se visualiza el número de pista
seleccionado y el tiempo de
reproducción transcurrido.
• Si pulsa una vez N, saltara al
principio de la pista actual y se
reproducirá de nuevo.
Observación:
- Si pulsa M durante la reproducción al
azar, saltará sólo al principio de la
pista en curso.
Búsqueda de un fragmento determinado durante la reproducción
• Mantenga pulsado ◄◄ o ►► hasta
localizar el fragmento deseado.
•^El volumen se reducirá.
• La reproducción normal se restablece
Programación de pistas
La programación de pistas de un disco
cargado se realiza desde la posición de
parada. La pantalla indicará las pistas
totales programadas. Se pueden
almacenar en la memoria hasta 40
pistas, en cualquier orden. Si ya hay 40
pistas programadas e intenta almacenar
otra, la pantalla indicará 'T U1_L".
1 Cargue ios discos deseados en las
bandejas.
2 Pulse PROGRAM para iniciar la
programación.
^ El icono PROG comenzará a
parpadear
3 Pulse el botón CD (CD 1 •2*3) o
DISC 1/2/3 para seleccionar el
disco.
4 Pulse N o ►! para seleccionar la
pista deseada.
5 Pulse PROGRAM para almacenar
la pista en el programa.
• Repita los pasos 3 a 5 para
programar otros discos y pistas.
6 Pulse una vez ■ para salir del modo
de programación.
“♦ En la pantalla se visualizará el
número total de pistas
programadas y el tiempo totalde
reproducción del programa.
Observaciones:
- Si el tiempo total de reproducción
excede de
pistas programadas posee un número
mayor de 30, en la pantalla aparecerá
■- •' ■■ ■■" en lugar del tiempo total de
reproducción.
- Si el sistema está leyendo el disco, no
se podrá programar. En la pantalla
aparecerá "REFtHII'Jlj", seguido por
"UIEiE y", siendo "i;" el número del
disco que se esté leyendo.
- La unidad abandonará
automáticamente el modo de
programación si no se pulsa ningún
botón durante 20 segundos.
- Cuando se programe una ranura de
disco vacía, aparecerá ‘SELECT R
ÜI5E" (seleccionar un disco).
"oq • qqii
3", o sí una de las
Revisión del programa
La revisión del programa sólo es posible
desde la posición de parada.
• Pulse M o ►! repetidas veces para
revisar las pistas programadas.
• Pulse ■ para finalizar la revisión.
Page 96

•• Y-.vv.v ■ "ïji:: :
>л...
i ¡V
\"vi/, i.'.-'
. '-i- ■
.-.••jrt'U-. .
‘.Ï., .v.fb- ..
Page 97

№
CD
Reproducción del
programa
1 Pulse PLAY ► 11 para dar comienzo
a la reproducción del programa.
^En la pantalla se visualiza "PLñy
ODпг:;oD^^''
I r'UijrN riM .
^ La pantalla indica también el
número de pista y el tiempo
transcurrido de la pista encurso.
• Si pulsa REPEAT durante la
reproducción de un programa, la
pista actual se reproducirá de forma
repetida.
^Aparecerá en pantalla RPCK" o
"PPDGRRrr'.
En la pantalla aparecerá las
indicaciones iconos REP y PROG.
2 Pulse ■ para detener la
reproducción del programa.
Observaciones:
- SI pulsa uno de los botones
reproducción DISC DIRECT PLAY
directa, la unidad reproducirá el disco
seleccionada e ignorará
momentáneamente el programa. La
Indicación PROG también
desaparecerá de la pantalla, y
reaparecerá cuando finalice la
reproducción del disco seleccionado.
- Cuando comience la reproducción del
programa se cancelará el modo de
REPEAT DISC.
Borrado de un programa
(desde la posición de parada)
• Pulse ■.
En la pantalla se visualizará
"PRDBRRn CLERRE]]" (programa
borrado).
Observación:
- El programa también se borra cuando
se interrumpe la alimentación del
equipo ocuando se abre el carrusel.
Shuffic (Reproducción al azar)
(sólo desde el mando a distancia)
En el modo de Shuifle el sistema
reproduce todas las pistas de los discos
cargados en un orden aleatorio.
También puede usarse para reproducir
las pistas programadas.
Para reproducir al azar todos los
discos Y pistas
1 Pulse SHUFFLE
En la pantalla aparece "SHuTrLE".
En la pantalla también aparece el
icono SHUF, la pista seleccionada
alazar
• Los discos y pistas se reproducirán
en un orden aleatorio hasta que se
pulse ■.
• Si pulsa REPEAT durante la
reproducción al azar, las pistas
actuales de todos los discos
disponibles se reproducirán de forma
repetida,
-♦Aparecerá en pantalla "fRRuK" o
»Oí í Tirrr»
I ll_L_ XU. .
^ En la pantalla aparecerá los iconos
REP y SHUF.
2 Pulse de nuevo SHUFFLE para
restablecer la reproducción normal.
-♦El icono SHUF desaparece de la
pantalla.
Observación:
~ Cuando comience Shuffle se cancelará
el modo REPEAT DISC.
Repetición (sólo desde el mando a
distancia)
Puede reproducir la pista actual, un
disco o todos los discos disponibles
repetidamente.
1 Presione REPEAT en el mando a
distancia durante la reproducción de
un CD para seleccionar los
diferentes modos de repetición.
^"TOOE~L''" nTíTCr'" "Ol J TITCT" ^
^ I r^nur< , JJJ.OL. , n(_l_ Jjxtju O
"Orr" aparecerán en pantalla.
*♦ En la pantalla aparece el icono
REP.
• La pista seleccionada, el disco
seleccionado o todos los discos
disponibles se reproducirán
repetidamente hasta que pulse ■ .
2 Pulse REPEAT hasta que aparezca
en pantalla el modo "Crr" para
restablecer la reproducción normal.
-♦ El icono REP desaparece de la
pantalla.
Observaciónes:
- En los modos de Shufle o reproducción
de programa no se puede accionar el
modo REPEAT DISC.
- También se puede repetir la mezcla de
un programa.
i) Aparecerá en pantalla "TRHCK" o
"PRQGRRfr',
ii) Los Iconos REP, PROG y SHUF
aparecen en pantalla.
Page 98

"V'. /- ■'•‘•..•i.v-,.
"к:. V
1-. г:л
Ж:/”
й-vvr
Page 99

o
MINI Hlfl SYSTEM
I I I l‘ 11._ r
I u Í 'I *_ r»
i^-t
■A I M- i ■>';
RECORD ' —■
-CZ3
:lOCK*T)MER DUBSINCA.REPLAY DIM MODE
U ( l„ ) 1
Observación:
- Para la modalidad 'Plug & Play’, por
favor vea la página 12.
ir OPTIMALSOUNDMIX
---------------------
______________________
SOUND NAVIGATION • JOG
Sintonización de emisoras de radio
1 Pulse TUNER (FM*AM) para
seleccionar el modo de sintonizador
-♦ En la pantalla se visualiza "i iliJER".
Unos segundos más tarde, en la
pantalla se visualizará la frecuencia
de la emisora actual.
2 Pulse TUNER (FM*AM) de nuevo
para seleccionar la banda deseada;
FM o AM,
3 Pulse o ►► durante más de un
segundo, y después libere el botón.
SINTONIZADOR
fJWA'i
PROGRAM
J
^ La pantalla indicará'
mientras localiza una emisora con
suficiente intensidad de señal.
• Repita la operación hasta encontrar
la emisora deseada.
• Para sintonizar una emisora débil,
pulse brevemente o ►► hasta
que la pantalla ofrezca la frecuencia
deseada o se consiga la mejor
recepción posible.
Almacenamiento de presintonías
En la memoria pueden almacenarse un
total de 40 emisoras. Cuando se
selecciona una presintonía, su número
aparece en la pantalla junto a la
frecuencia.
Programación automática
1 Pulse TUNER (FM*AM).
2 Pulse PROGRAM durante más de
un segundo.
El icono PROG comienza a
parpadear y se visualiza la
indicación "Rufu".
El sistema iniciará primero la
búsqueda de todas las emisoras
disponibles en la banda FM y
pasará luego a las bandas AM.
•♦Todas las emisoras de radio
disponibles de la banda
selecionada quedarán almacenadas
de forma automática. La
frecuencia y el número de
presintonía se visualizan durante
unos instantes.
El equipo detendrá la búsqueda
cuando haya programado todas
las emisoras disponibles o cuando
haya completado las 40 posiciones
de memoria.
-♦ El equipo quedará sintonizado en
la última presintonía memorizada.
Observaciones:
~ Puede cancelar la programación
automática pulsando PROGRAM o ■
(sólo en la unidad principal).
- Si desea reservar una parte de los
números de presintonía, por ej. los
números del1 al 9, seleccione la
presintonía 10 antes de comenzar la
programación automática. De esta
forma, únicamente se programarán los
números de presintonía del 10 al 40.
Programación manual
1 Pulse TUNER (FM*AM).
2 Pulse TUNER (FM*AM) para
seleccionar la banda deseada: FM o
AM.
3 Pulse PROGRAM durante menos
de un segundo.
-♦El icono PROG comienza a
parpadear.
-♦Se visualizará el siguiente número
de presintonía disponible para la
selección.
4 Pulse o ►► para sintonizar la
frecuencia deseada.
• Si desea programar la emisora en
otro número de presintonía, pulse T
o A para seleccionar el número.
5 Pulse de nuevo PROGRAM.
■♦ El icono PROG desaparecerá, y la
emisora quedará almacenada.
• Repita los pasos 3 a 5 para
presintonizar otras emisoras.
Page 100

► тт---- '¡"
п:- :-.л '■
. . í”,v-v
* ’ ” • .XA'¿ ''
ü. :íi.’.;..
•.iv’r-/."
1>V«."
 Loading...