


FC8932, FC8832,
FC8830


Wheels stuck
ݓઁሂ
Top cover or dust container not placed properly
רۆࠋࠦӧ٦ݾ
Bumper stuck
ߓԎሑᇆሂ
Robot lifted up from floor
՚ֽϴุఓᇊୃስײᆋ༏ӧచ
Colour of floor too dark
ֽϴဂ೨ขτ
Battery not inserted properly / Charging error (switch is off)
ԁሑݾԍմ༆IJܵၜܵтij
5
6
4
3
2
1
7
8
9
10
16
14
13
15
12
11
17
19
18
20
22
21
2625
24
27
23


English 6
Dansk 28
Deutsch 51
Español 75
Français 99
Italiano 123
Nederlands 147
Norsk 171
Português 193
Suomi 217
Svenska 238

1
1110 129
234
5 6 7 8
6
English
Introduction
Introduction
Congratulations on your purchase and welcome to Philips! To fully benefit
from the support that Philips offers, register your product at
www.philips.com/welcome.
General description
1 Handle of dust container lid
2 Dust container lid
3 Filter
4 Dust container
5 Top cover
6 Error code table
7 Fan
8 Bumper
9 Docking station sensor
10 Display
11 Power switch (to switch the robot on or off)
12 Front wheel
13 Side brush shafts
14 Drop-off sensors
15 Wheels
16 TriActive XL nozzle
17 Side brushes
18 Fixation blocks for dry wipes
19 Dry wipe holder
20 Dry wipes
21 Battery holder
22 Remote control
23 AA batteries for invisible wall
24 Invisible wall
25 Docking station
26 Adapter
27 Small plug
Remote control and display
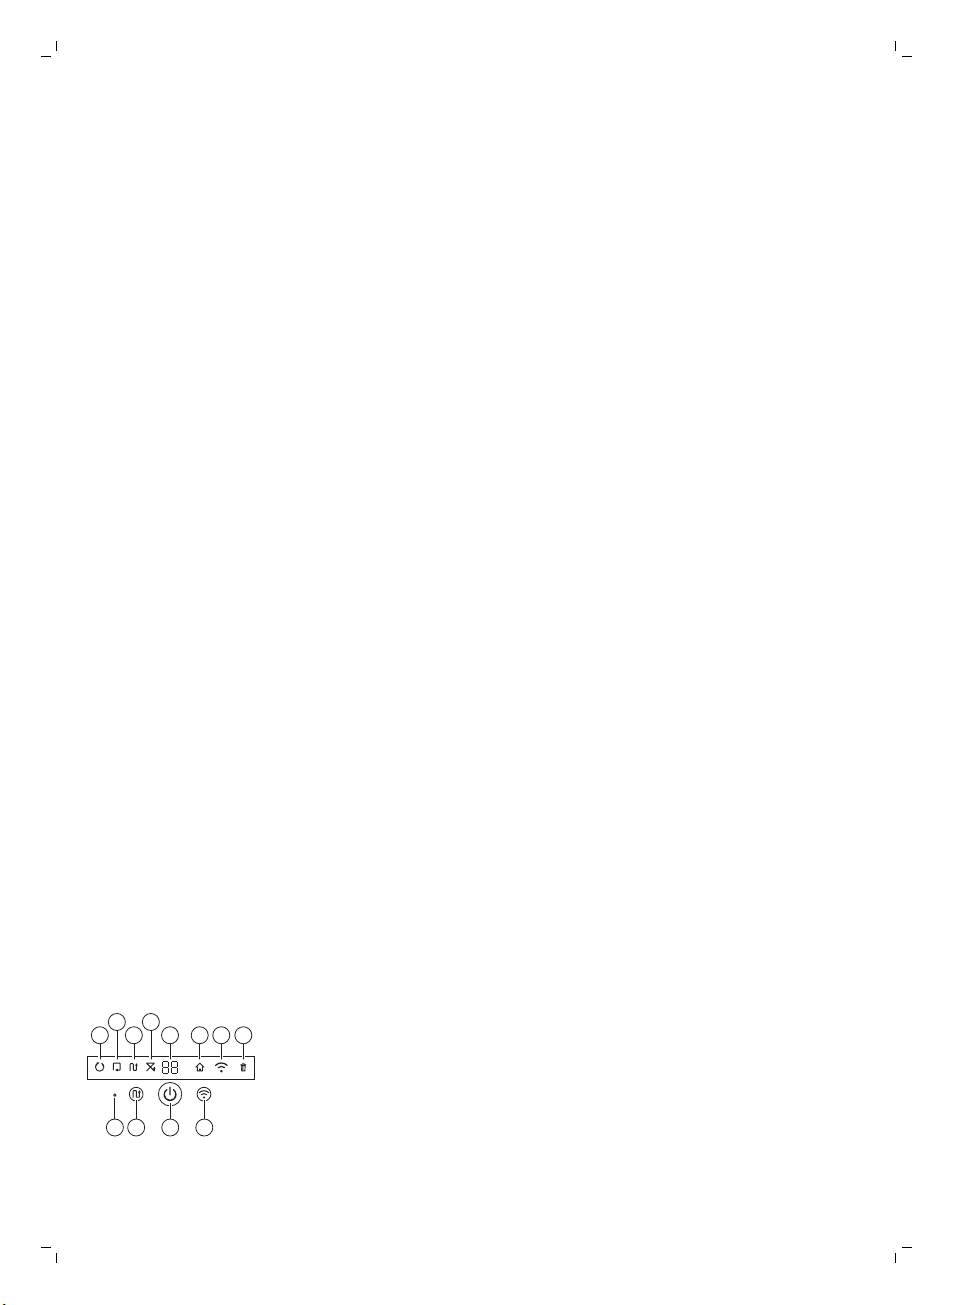
Display
1 Spiral mode indicator
2 Wall-following mode indicator
3 Zigzag pattern mode indicator
4 Random mode indicator
5 Cleaning time
6 Docking icon
7 WiFi icon
8 Dustbin full indicator
9 Sound sensor
10 Mode selection button
11 Start/stop button
English

12 WiFi button
2
1
3
45
Remote control (FC8932)
1 Navigation buttons and start/stop
2 Cleaning time buttons
3 Cleaning mode buttons
4 Fan speed buttons
5 Docking button
How your robot works
What your robot cleans
This robot is equipped with features that make it a suitable cleaner to help
you clean the floors in your home.
The robot is especially suitable for cleaning hard floors, such as wooden,
tiled or linoleum floors. It may experience problems cleaning soft floors,
such as carpet or rugs. If you use the robot on a carpet or rug, please stay
close by the first time to see if the robot can deal with this type of floor. The
robot also needs supervision when you use it on very dark or shiny hard
floors.
English
7
How your robot cleans
Cleaning system
The robot has a 3-stage cleaning system to clean your floors efficiently.
-
The two side brushes help the robot clean in corners and along walls.
They also help to remove dirt from the floor and move it towards the
suction opening.

8
English
-
The suction power of the robot picks up loose dirt and transports it
through the suction opening into the dust container.
-
The robot comes with a dry wipe holder that allows you to clean your
hard floor even more thoroughly with dry wipes.
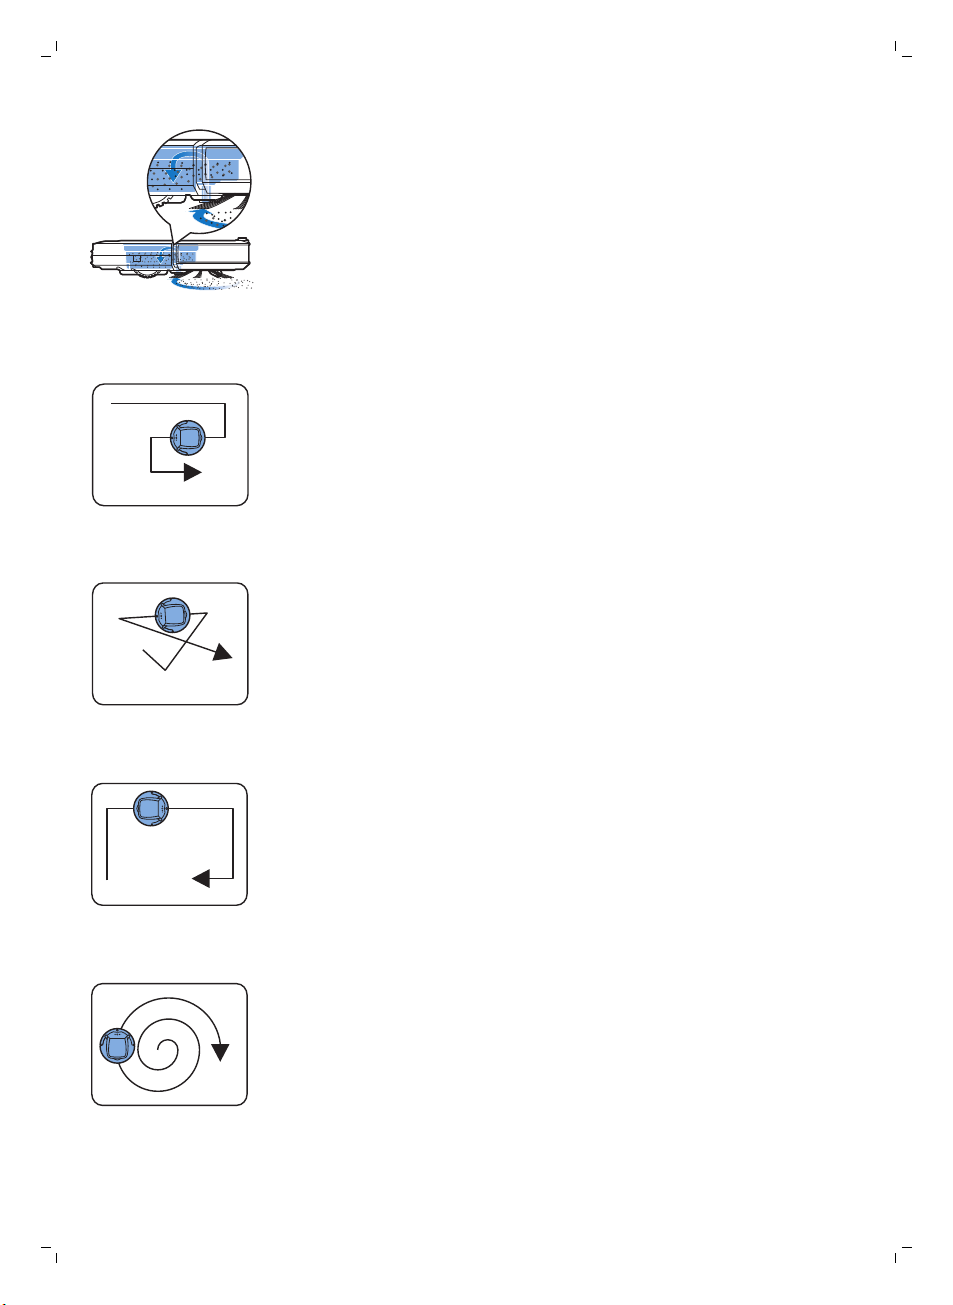
Cleaning patterns
In its auto cleaning mode, the robot uses an automatic sequence of cleaning
patterns to clean each area of the room optimally. The cleaning patterns it
uses are:
1 Z-pattern or zigzag pattern
2 Random pattern
3 Wall-following pattern
4 Spiral pattern
In its auto cleaning mode, the robot uses these patterns in a fixed
sequence:z-pattern, random pattern, wall-following pattern, and spiral
pattern.
When the robot has completed this sequence of patterns, it starts moving in
Z-pattern again. The robot continues to use this sequence of patterns to
clean the room until the rechargeable battery runs low, or until it is switched
off manually.
If the robot detects a particularly dirty area during its cleaning run, it
switches to spiral mode and switches to turbo fan speed (FC8820 only) to
ensure thorough dirt removal.

Note: You can also select each mode individually by pressing the
appropriate button on the remote control (FC8932 only). The manually
selected modes are only active for a couple of minutes. After that, the robot
switches back to auto-cleaning mode.
For more details, see chapter 'Using your robot', section 'Cleaning modes'.
How your robot avoids height differences
The robot has three drop-off sensors in its bottom. It uses these drop-off
sensors to detect and avoid height differences such as staircases.
Note: It is normal for the robot to move slightly over the edge of a height
difference, as its front drop-off sensor is located behind the bumper.
Caution: In some cases, the drop-off sensors may not detect a staircase or
other height difference in time. Therefore monitor the robot carefully the
first few times you use it, and when you operate it near a staircase or
another height difference. It is important that you clean the drop-off
sensors regularly to ensure the robot continues to detect height
differences properly (see chapter ' Cleaning and maintenance' for
instructions).
Before first use
English
9
Mounting the side brushes
1 Unpack the side brushes and place the robot upside down on a table or
on the floor.
2 Push the side brushes onto the shafts on the bottom of the robot.
Note: Make sure you attach the side brushes properly. Press them onto
the shaft until you hear them lock into position with a click.
Removing the tag from the remote control
The remote control works on a CR2025 coin-shaped battery. This battery is
protected with a protection tag that has to be removed before use.

1
2
100 cm
30 cm
80 c
m
10
English
1 Pull the battery protection tag out of the battery compartment of the
remote control. Now the remote control is ready for use.
Preparing for use
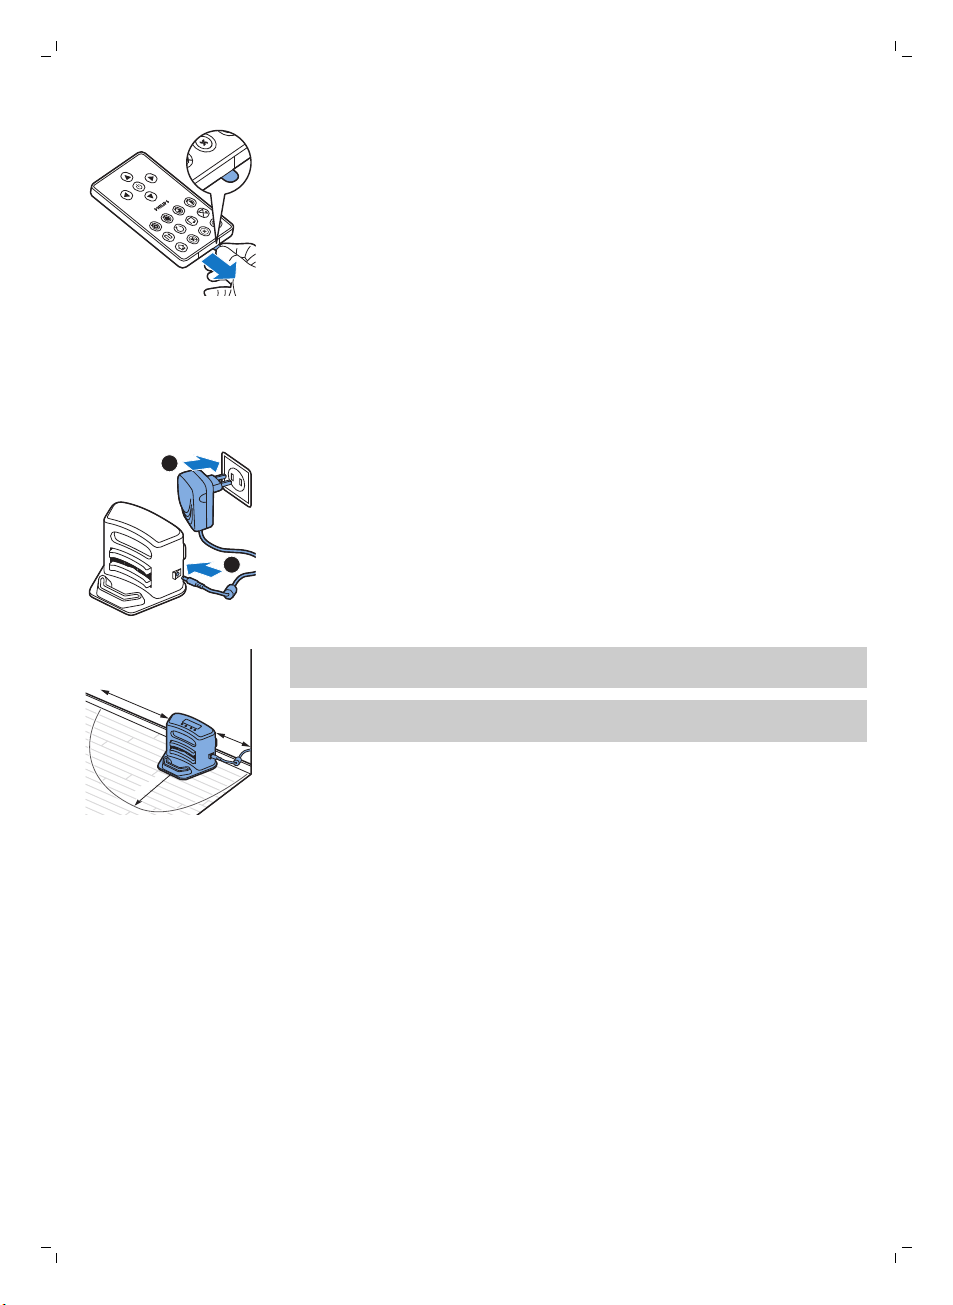
Installing the docking station
1 Insert the small plug of the adapter into the socket on the docking station
(1) and insert the adapter into the wall socket (2).
-
The display of the docking station comes on.
2 Place the docking station on a horizontal, level floor against the wall.
Note: Make sure that there are no obstacles or height differences 80 cm
in front, 30 cm to the right and 100 cm to the left of the docking station.
Tip: To ensure the docking station stays firmly in the selected spot, fasten
it to the wall with screws or with two strips of double-sided tape.

Charging
English
When charging for the first time and when the rechargeable battery of the
robot is empty, the charging time is four hours.
Your robot can be charged in two ways:
-
On the docking station, either manually or automatically during use;
-
By connecting the robot directly to the mains.
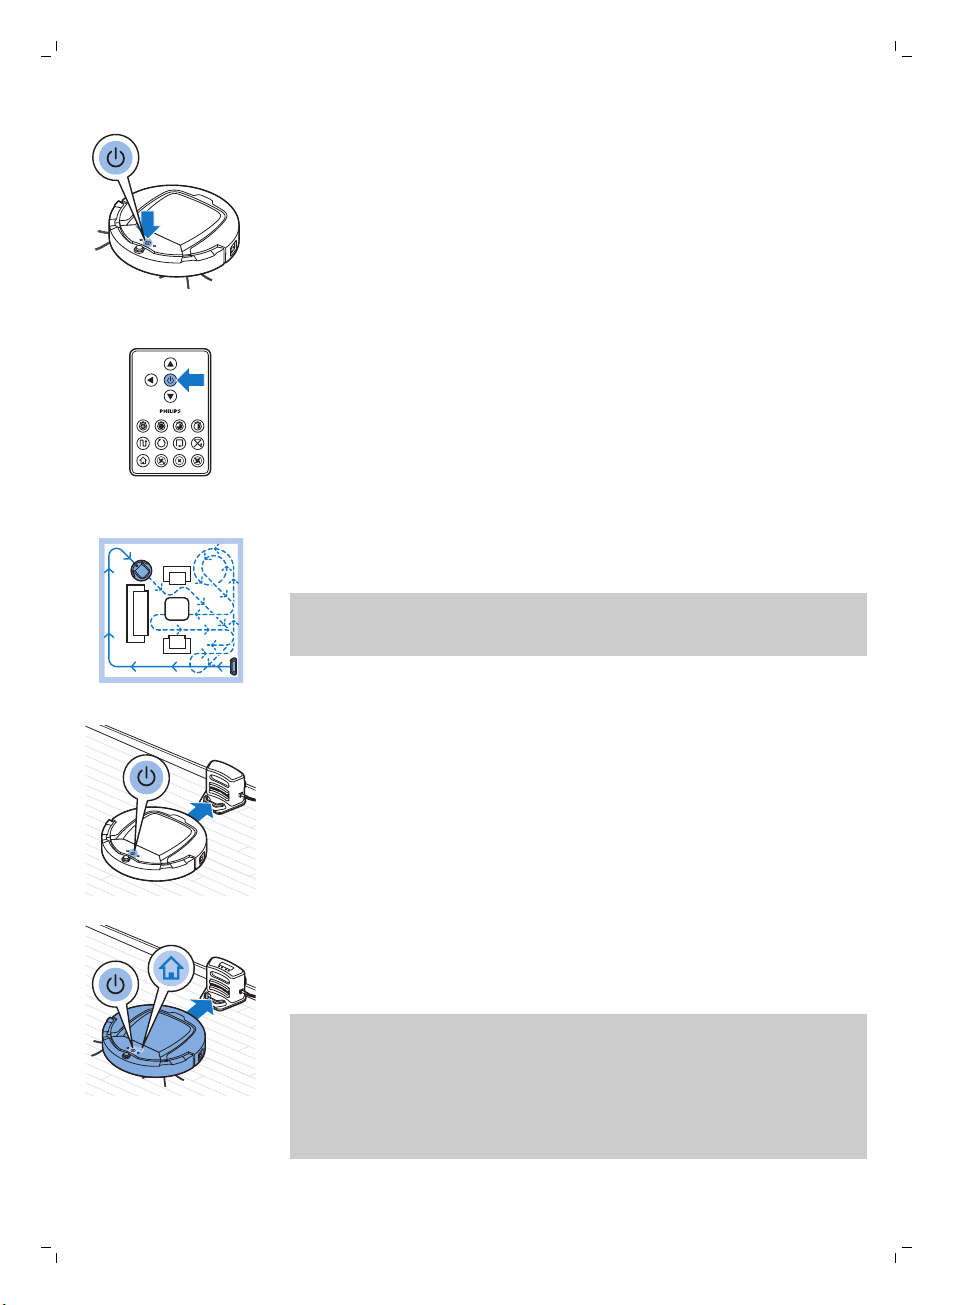
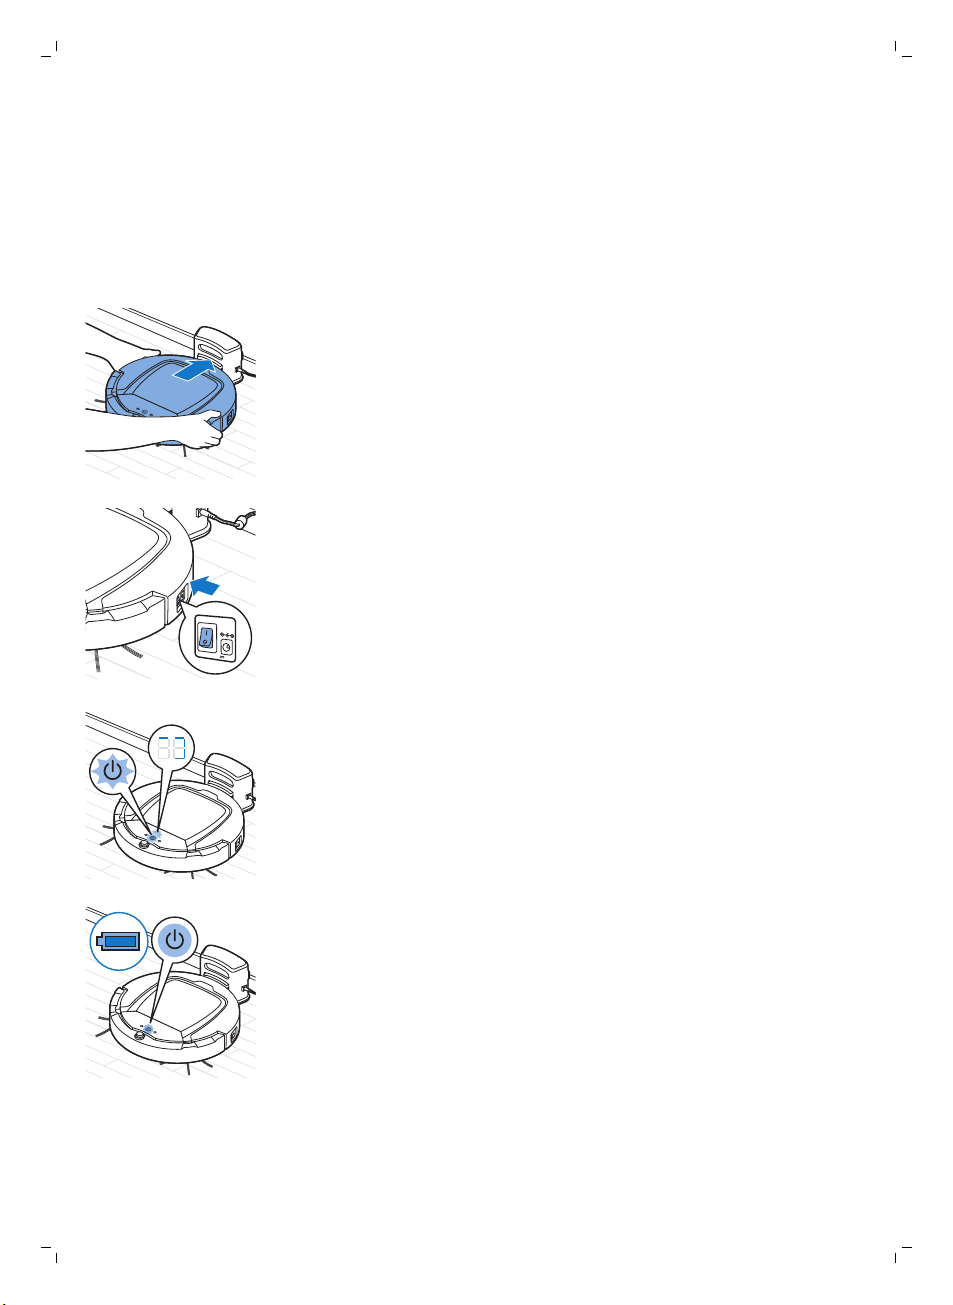
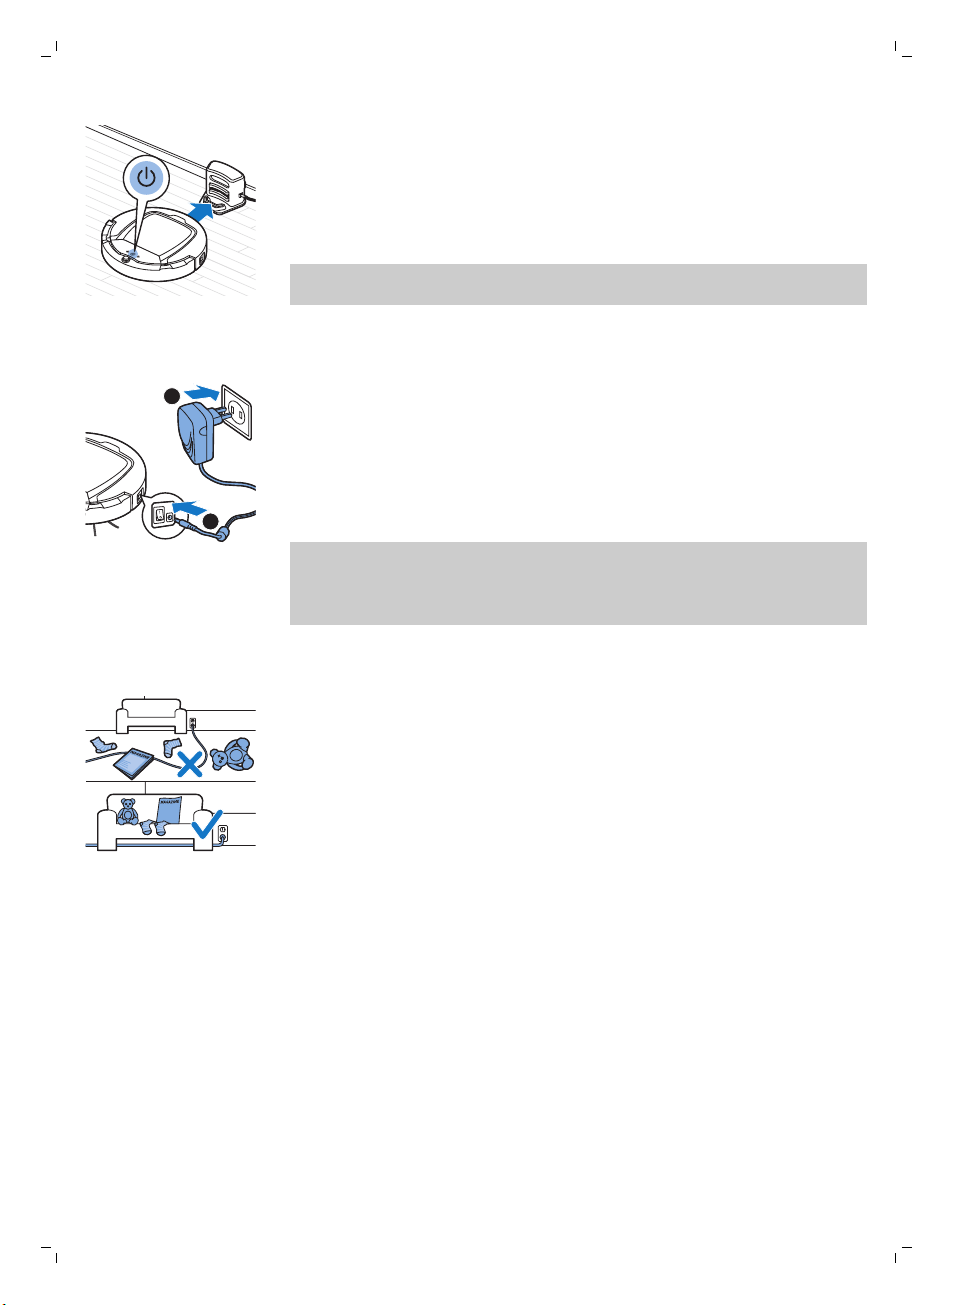
Charging on the docking station
1 Place the robot on the plugged-in docking station.
2 Press the power switch to switch on the robot.
11
3 The start/stop button starts flashing. The charging indicator will be visible
on the display during the first 3 minutes of charging.
4 When the rechargeable battery is fully charged, the start/stop button
lights up continuously.
Charging automatically during use

1
2
12
English
1 When the robot has finished cleaning or when only 15% of the battery
power remains, it automatically searches for the docking station to
recharge. When the robot searches for the docking station, the light in the
start/stop button turns orange.
2 When the rechargeable battery is fully charged, the start/stop button
lights up continuously.
Note: The robot only searches for the docking station automatically when it
started cleaning from the docking station.
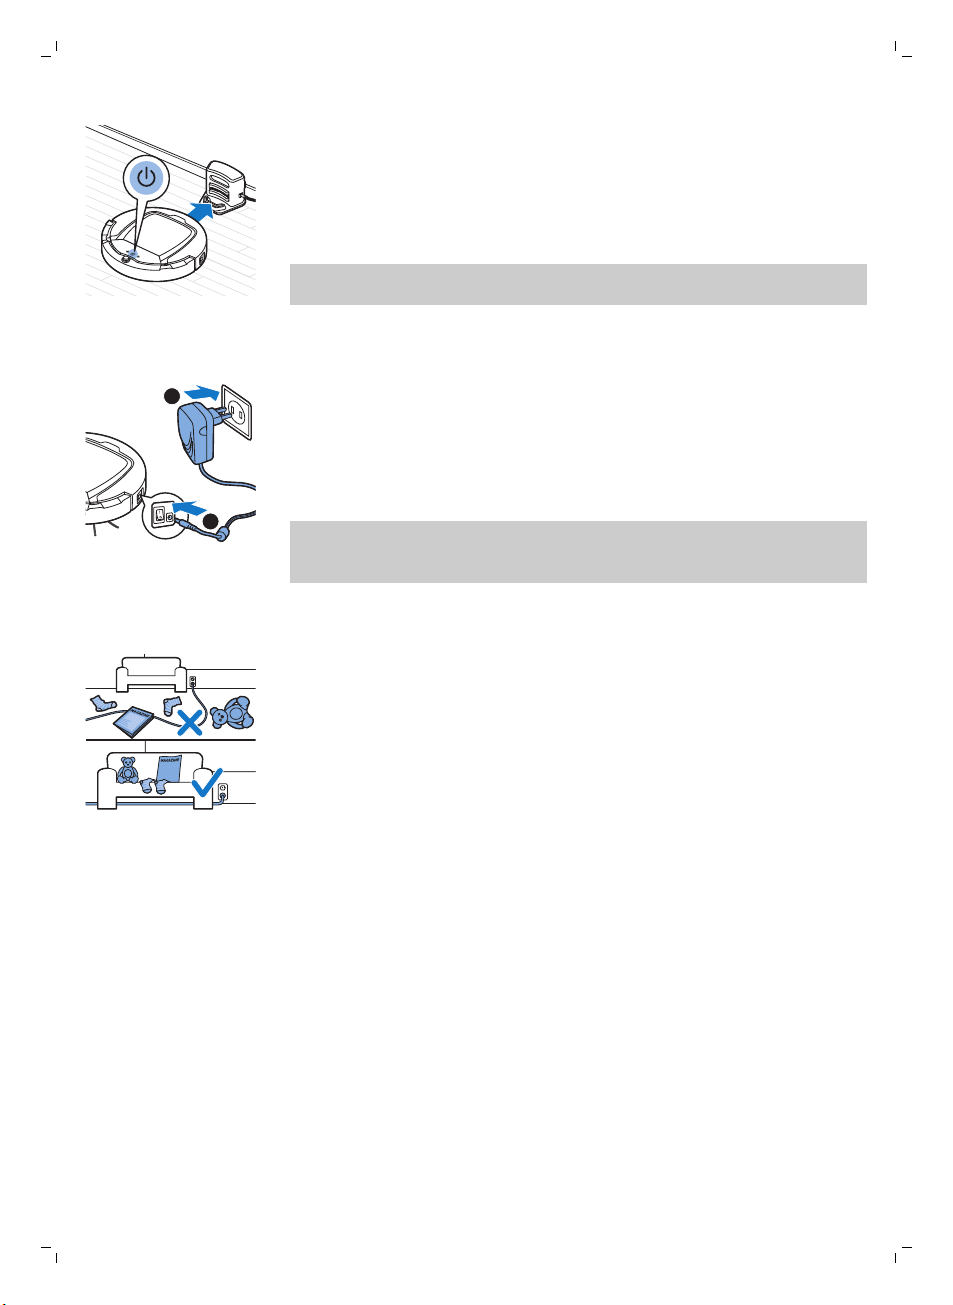
Charging directly from the mains
1 Press the power switch to switch on the robot.
2 Insert the small plug of the adapter into the socket on the robot (1). Insert
the adapter into a wall socket (2).
3 When the robot is connected to the mains correctly, the start/stop button
starts flashing slowly. This indicates that the robot is charging.
4 When the rechargeable battery is fully charged, the start/stop button
lights up continuously.
Note: After charging, remove the small plug from the socket on the robot
and remove the adapter from the wall socket. The robot does not start
cleaning when it is still connected to a wall socket.
Preparing the room for a cleaning run
Before you start the robot on its cleaning run, make sure that you remove all
loose and fragile objects from the floor. Also remove all cables, wires and
cords from the floor.
Using your robot
You can also operate your robot with the remote control (FC8932 only) or
with the buttons on the user interface of the robot.
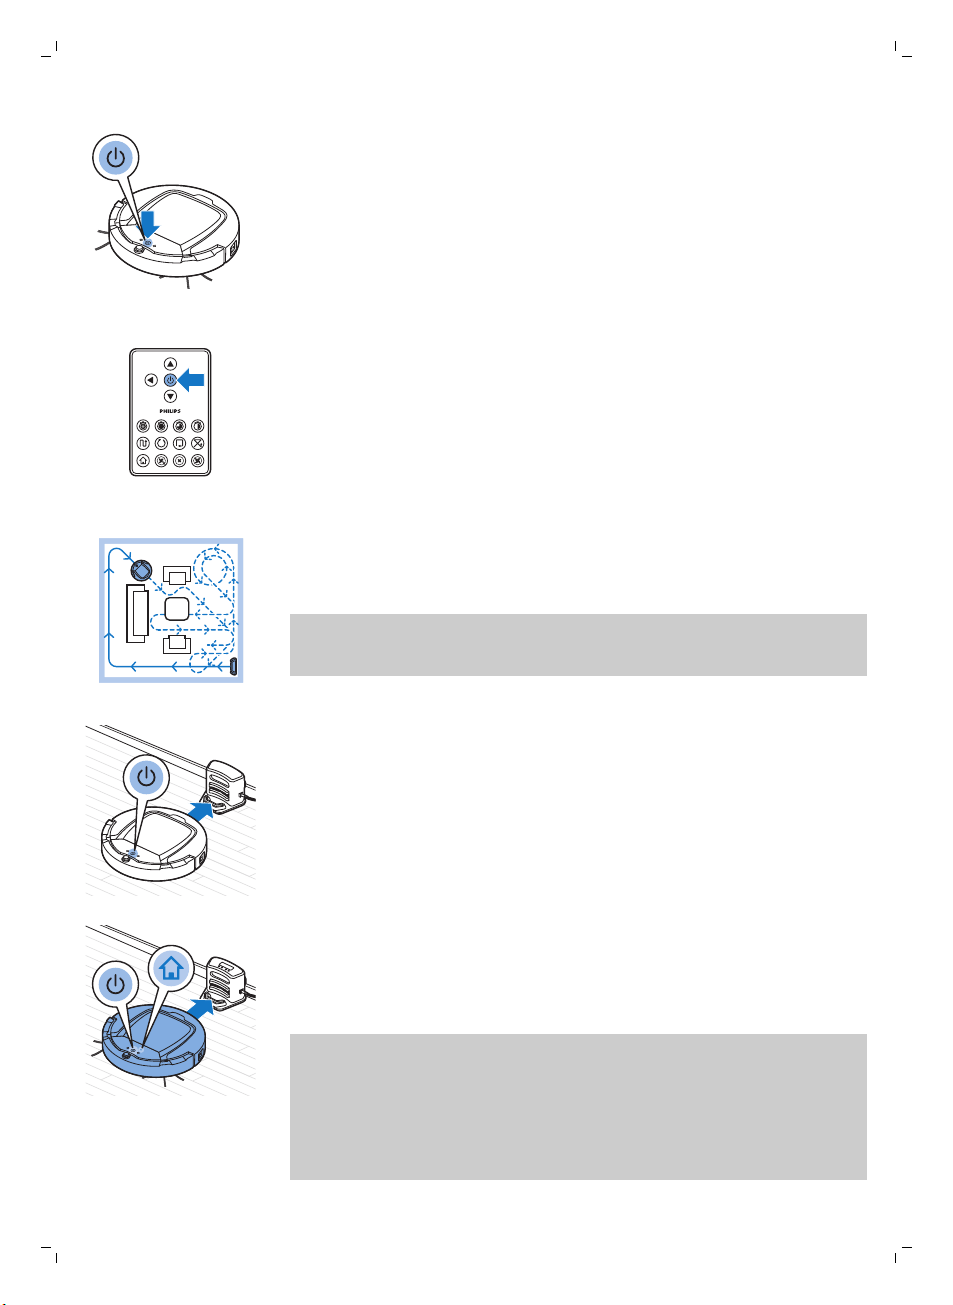
Starting and stopping
1 Set the power switch on the side of the robot to the 'on' position.
2 Press the start/stop button.
English
-
You can press the start/stop button on the robot.
-
You can also press the start/stop button on the remote control
(FC8932 only)
3 The start/stop button is continuously on and the robot starts cleaning.
4 The robot cleans in the auto-cleaning mode until its battery runs low. In
the auto-cleaning mode, it follows repeated sequences of Z-pattern,
random, wall-following and spiral patterns.
Note: To select an individual mode, press one of the mode buttons on
the remote control. See section 'Cleaning mode selection' for more
details.
13
5 When the battery runs low, the start/stop button turns orange and the
robot searches for the docking station to recharge.
6 You can also press the start/stop button to interrupt or stop the cleaning
run. If you press the start/stop button again and there is still enough
energy in the rechargeable battery, the robot continues cleaning in the
auto-cleaning mode.
7 To make the robot return to the docking station before the rechargeable
battery runs low, press the docking button on the remote control
(FC8932 only). The docking indicator on the display of the robot comes
on and the robot returns to the docking station.
Note: If you did not start the robot from the docking station, it does not
search for the docking station automatically when the rechargeable
battery runs low. If there is still enough energy in the rechargeable
battery, you can press the docking button on the remote control (FC8932
only) to make the robot return to the docking station. If the rechargeable
battery is completely empty, you have to place the robot on the docking
station manually.

14
English
Cleaning mode selection
Next to the auto-cleaning mode, this robot has four individual cleaning
modes that can each be activated by pressing the appropriate button on the
remote control.
Note: The manually selected modes are only active for a couple of minutes.
After that, the robot switches back to auto-cleaning mode.
Z-pattern mode
In Z-pattern mode, the robot cleans by making Z-shaped loops through the
room to clean large areas.
Random mode
In this mode, the robot cleans the room in a mixed pattern of straight and
crisscross movements.
Wall-following mode
In this mode, the robot follows the walls of the room to give the area
alongside the walls an extra clean.
Spiral mode
In this mode, the robot moves in a spiral pattern to clean a small dirty area
thoroughly. In spiral mode, the fan operates at turbo speed.
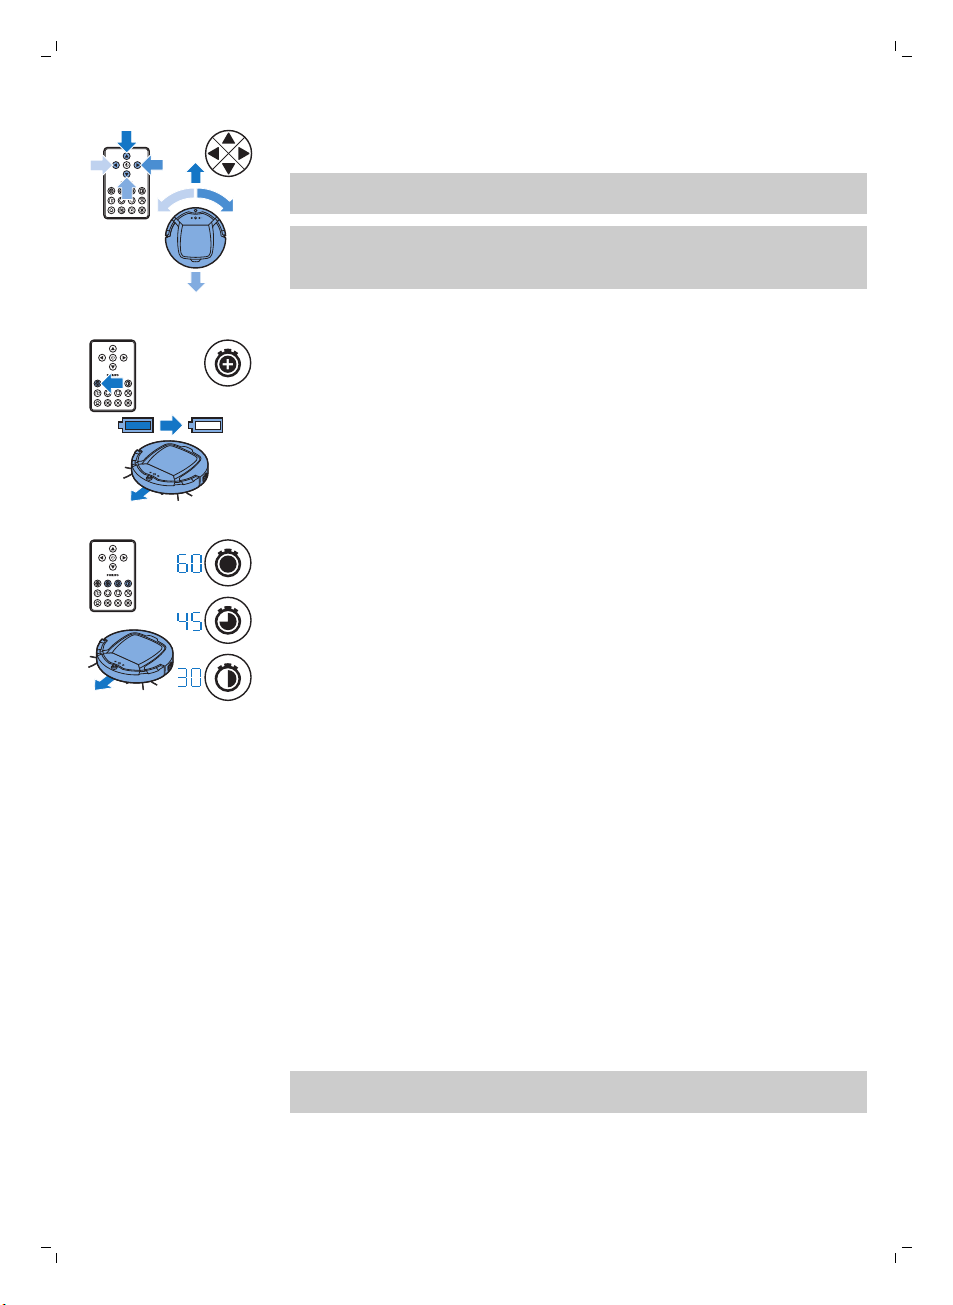
Manual driving

English
1 Use the arrow buttons above and below and to the left and right of the
start/stop button on the remote control to navigate the robot through the
room.
Note: Be careful when you drive the robot manually close to height
differences and staircases.
Note: The vacuuming function and the side brushes only work when the
robot is driven forward. The left, right or back buttons are only for
maneuvering the robot.
Using the cleaning time buttons (FC8932)
-
Press the maximum cleaning time button to make the robot clean in auto
cleaning mode until its rechargeable battery runs low. When the robot
has finished cleaning, it returns to the docking station automatically if it
started from the docking station. If the robot started from another point in
the room, press the docking button to send it back to the docking station.
-
The other cleaning time buttons allow you to let the robot operate for 60,
45 and 30 minutes respectively. When the cleaning time is finished, the
robot automatically returns to the docking station when it started from
the docking station. If the robot started from another point in the room,
press the docking button to send it back to the docking station.
15
Clap response
The clap response is enabled when the robot enters sleep mode in the
following situations:
-
when it stops cleaning due to an error
-
when it cannot find its docking station in 20 minutes
If you do not see the robot, you can locate it by clapping your hands once.
The robot will respond by beeping and by lighting up all icons on its display.
Using the dry wipe attachment
The dry wipe attachment is a feature that allows you to clean hard floors
with dry wipes.
Note: If you use the dry wipe attachment, the robot may have trouble
crossing thresholds or climbing onto rugs.
Preparing the dry wipe attachment for use
1 Turn the robot upside down and place it on the floor or on a table.

1
2
16
English
2 Place the dry wipe on a table and place the dry wipe attachment on the
wipe with its fixation lugs pointing towards you.
3 Fold both ends of the dry wipe around the dry wipe attachment and
fasten the dry wipe onto the attachment by pushing the fixation blocks
into the recesses.
4 Insert the fixation lug of the dry wipe attachment into the opening just
behind the wheel on one side of the robot and push until you hear it lock
into place with a click. Then repeat these actions on the other side.
5 Turn the robot and place it on the floor on its wheels with the dry wipe
attachment touching the floor.
Using the robot with the dry wipe attachment
When the dry wipe attachment is attached, you can use the robot in any
mode and on all hard floors. Do not use the dry wipe attachment on carpet
or rugs.
Removing the dry wipe attachment
1 Remove the dry wipe attachment as soon as you have finished wiping
the floor.
2 Turn the robot upside down and place it on the floor or on a table.
3 Push one end of the dry wipe attachment towards the wheel on the
other side of the robot to release it. Then pull the attachment off the
robot.

Using the invisible wall
1
2
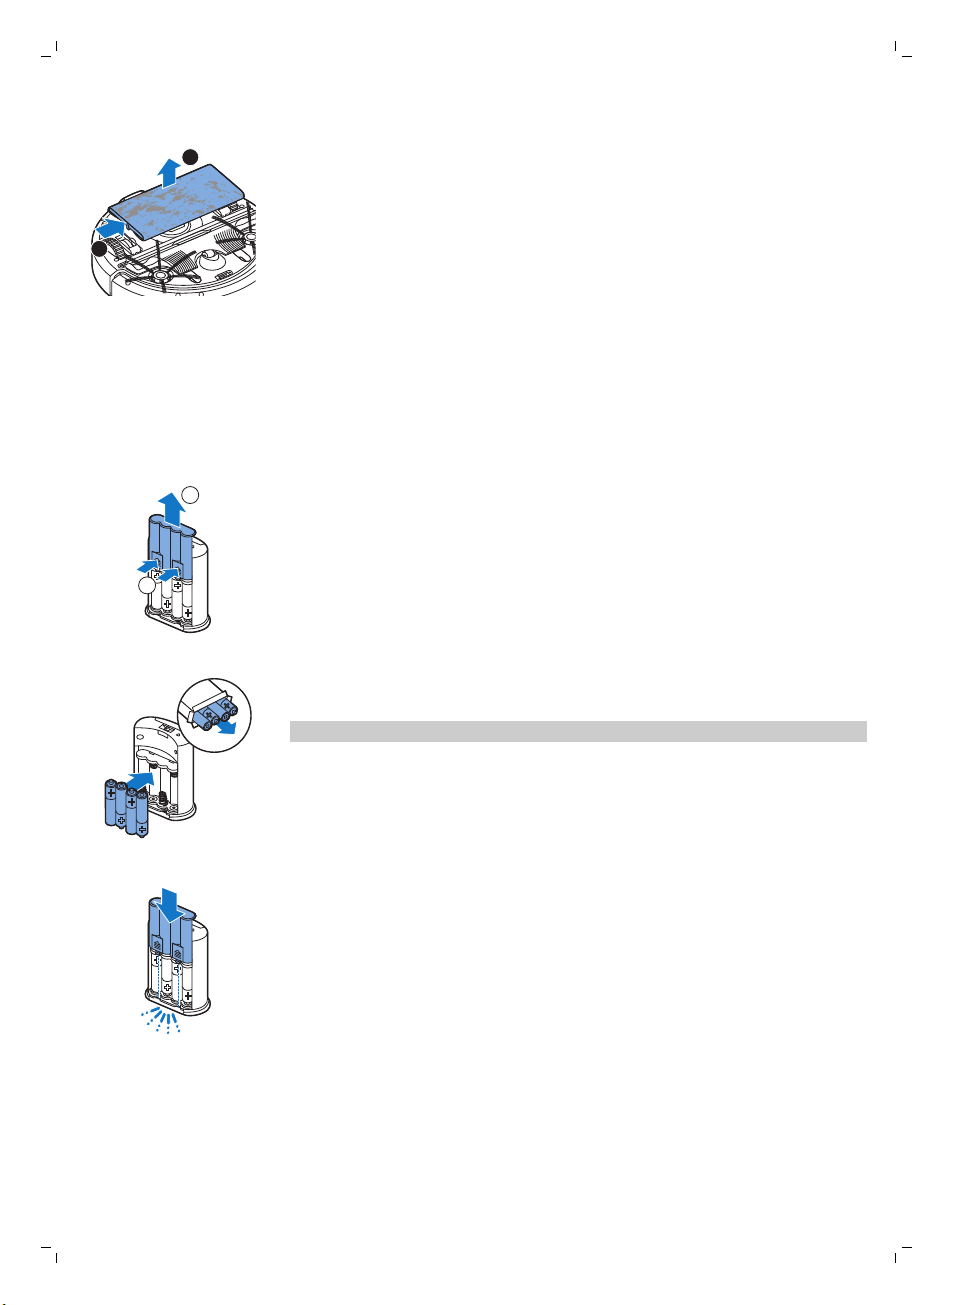
Placing the batteries in the invisible wall
The invisible wall operates on four AA batteries.
1 Push the two release tabs at the bottom of the back cover (1) and slide
the back cover upwards and off the invisible wall (2).
2 Take four new AA batteries from the pack and insert them into the
battery compartment of the invisible wall.
Note: Make sure the + and - poles of the batteries point in the right
direction.
3 Slide the back cover onto the invisible wall again.
English
17
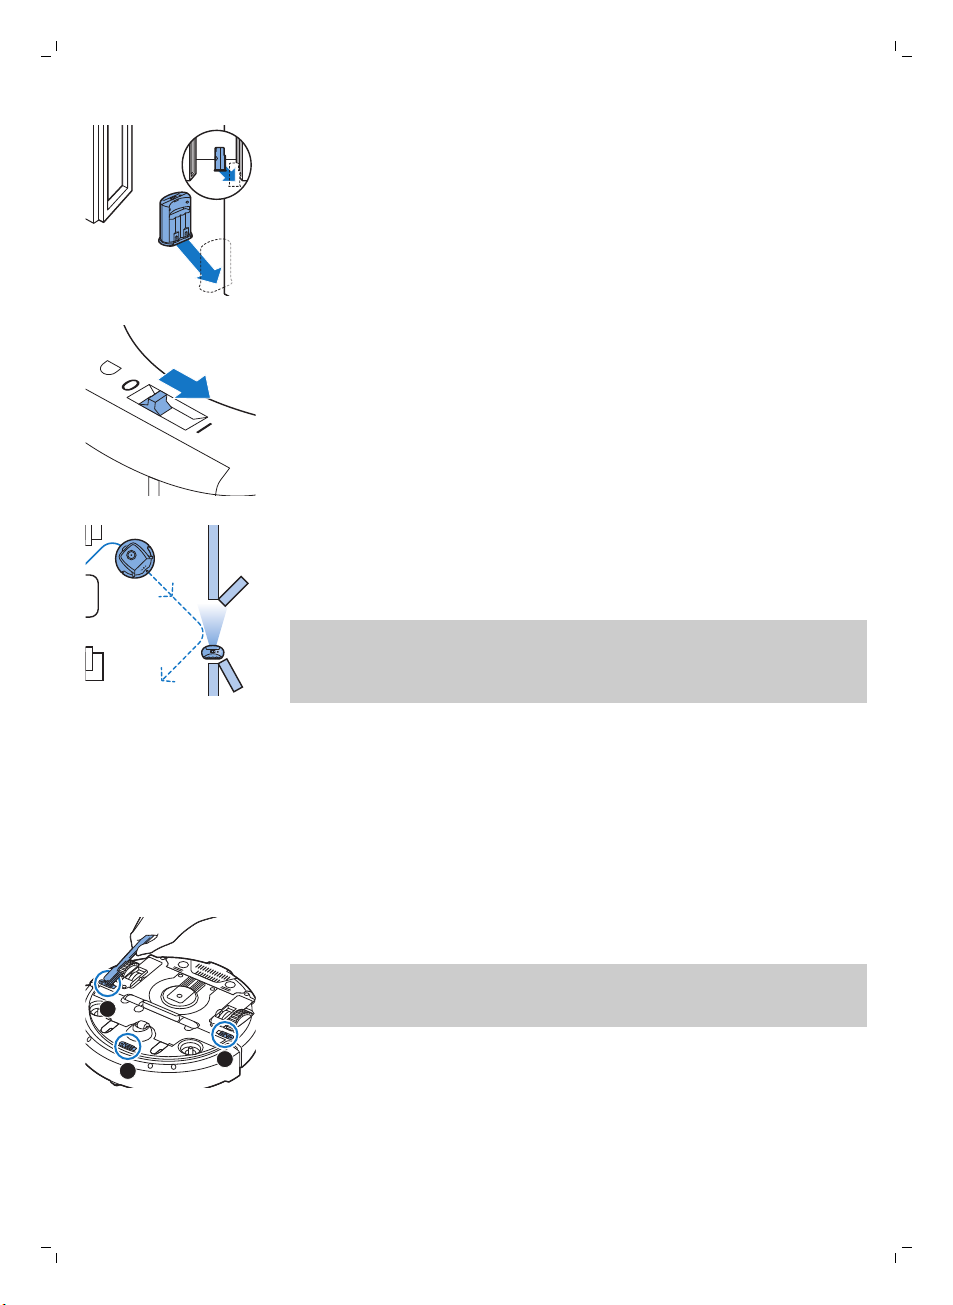
Positioning the invisible wall to stop the robot
You can use the invisible wall to prevent the robot from entering a room or
area that you want to keep it out of.
1 Place the unit at a point you do not want the robot to cross, e.g at an
open door to a room that is off-limits to the robot.
3
1
2
1
2
3
18
English
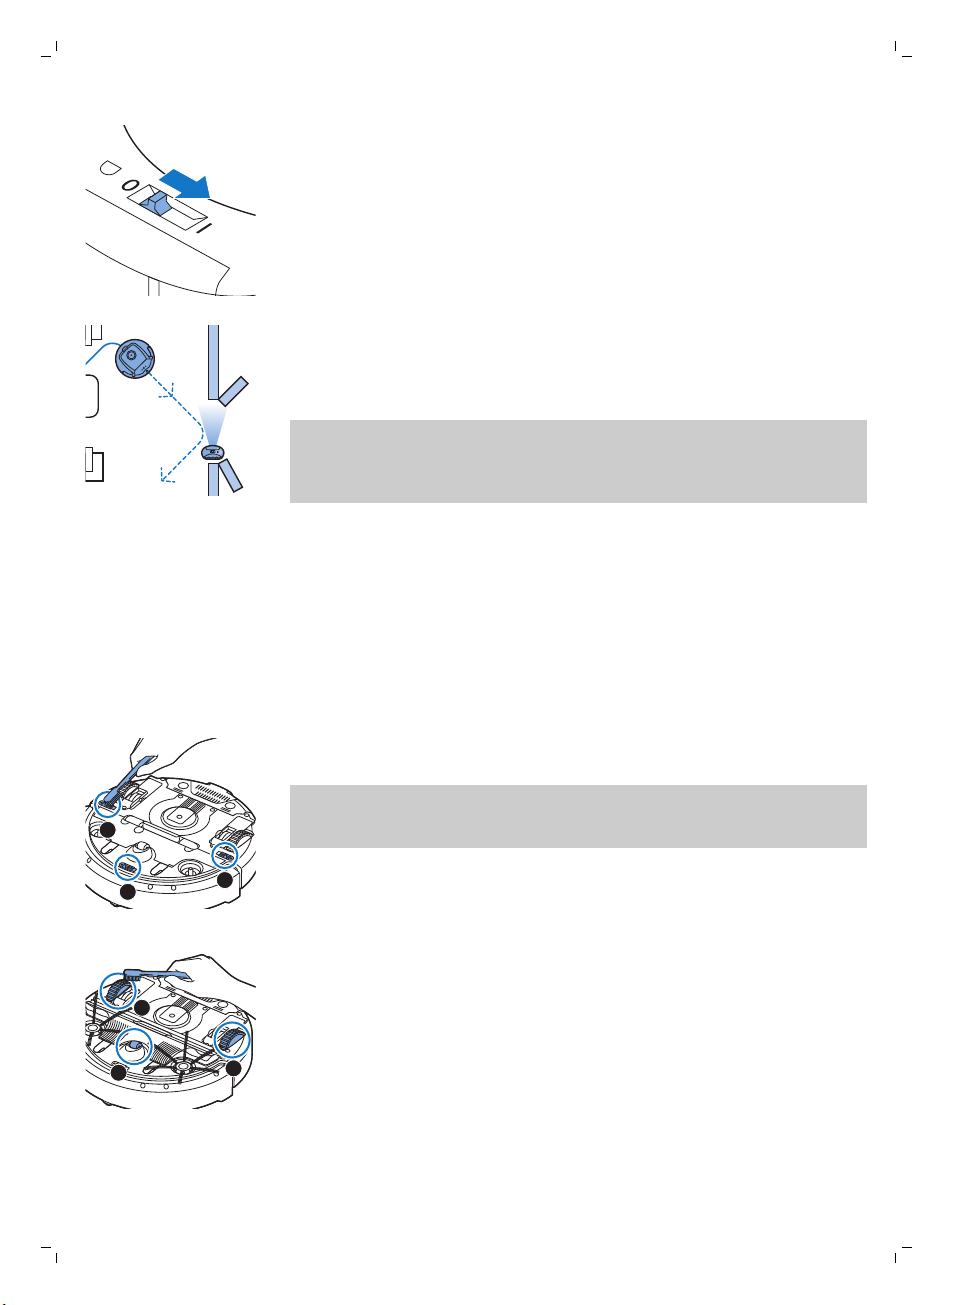
2 Switch on the invisible wall with the on/off slide on top of the unit.
3 Start the robot.
4 When the robot comes too close to the invisible wall, the light on the
invisible wall starts flashing and the invisible wall emits a beam of
infrared light. This beam of infrared light makes the robot change its
course and move away from the invisible wall.
Note: If you use the invisible wall, regularly check if the batteries still contain
sufficient power. You can check this by switching the virtual wall off and on
again. If there is enough energy in the batteries, the LED on the invisible wall
will light up briefly.
Cleaning and maintenance
Cleaning the robot
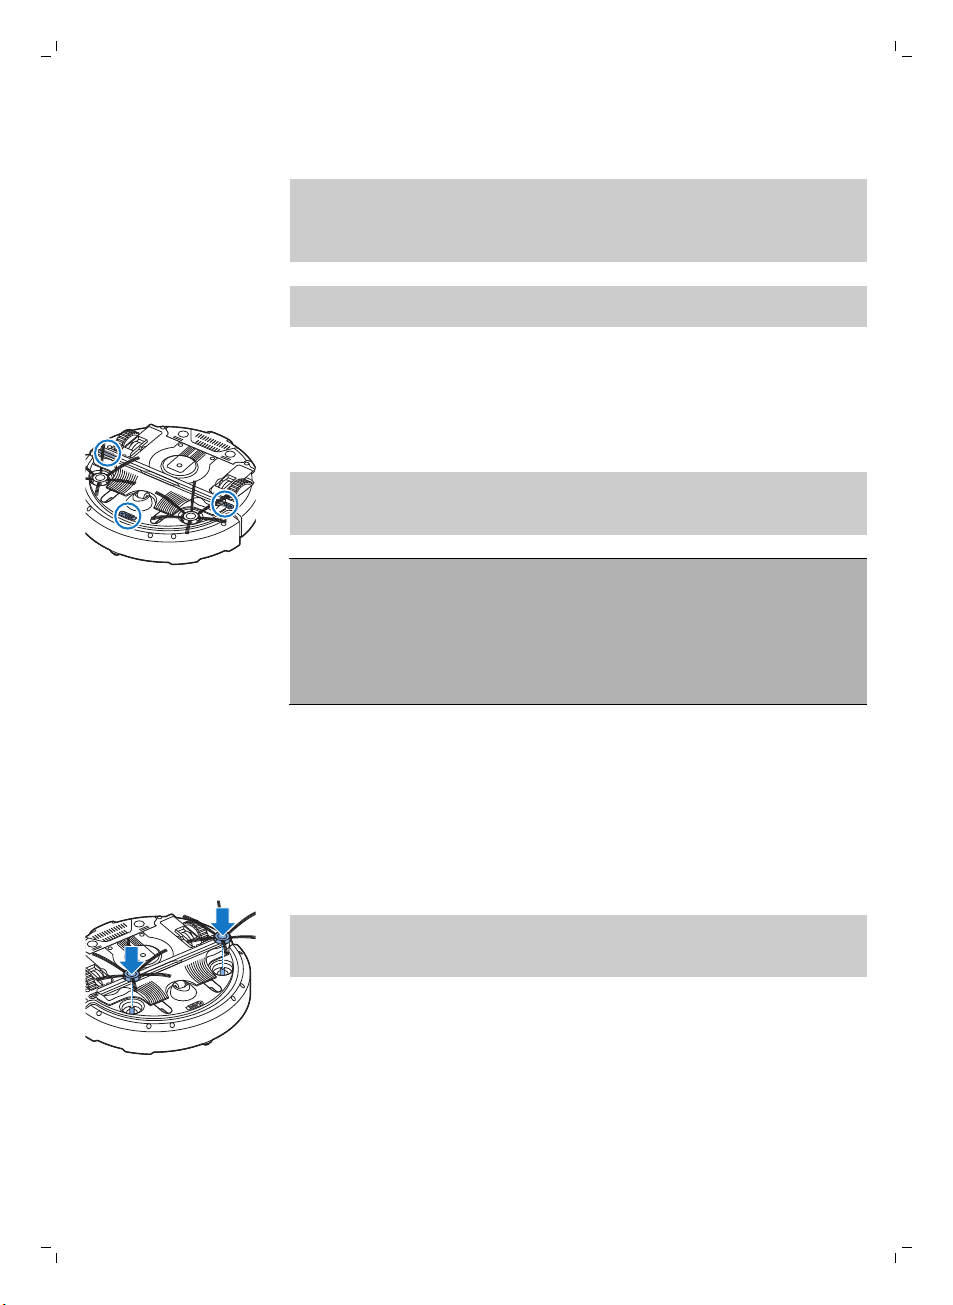
To maintain good cleaning performance, you have to clean the drop-off
sensors, the wheels, the side brushes and the suction opening from time to
time.
1 Place the robot upside down on a flat surface
2 Use a brush with soft bristles (e.g. a toothbrush) to remove dust or fluff
from the drop-off sensors.
Note: It is important that you clean the drop-off sensors regularly. If the
drop-off sensors are dirty, the robot may fail to detect height differences
or staircases.
3 Use a brush with soft bristles (e.g. a toothbrush) to remove dust or fluff
from the front wheel and side wheels.

1
2
English
19
4 To clean the side brushes, grab them by the bristles and pull them off
their shafts.
5 Remove fluff, hairs and threads from the shaft and from the side brush
with a soft brush (e.g. a toothbrush) or a cloth.
6 Check the side brushes and the bottom of the robot for any sharp objects
that could damage your floor.
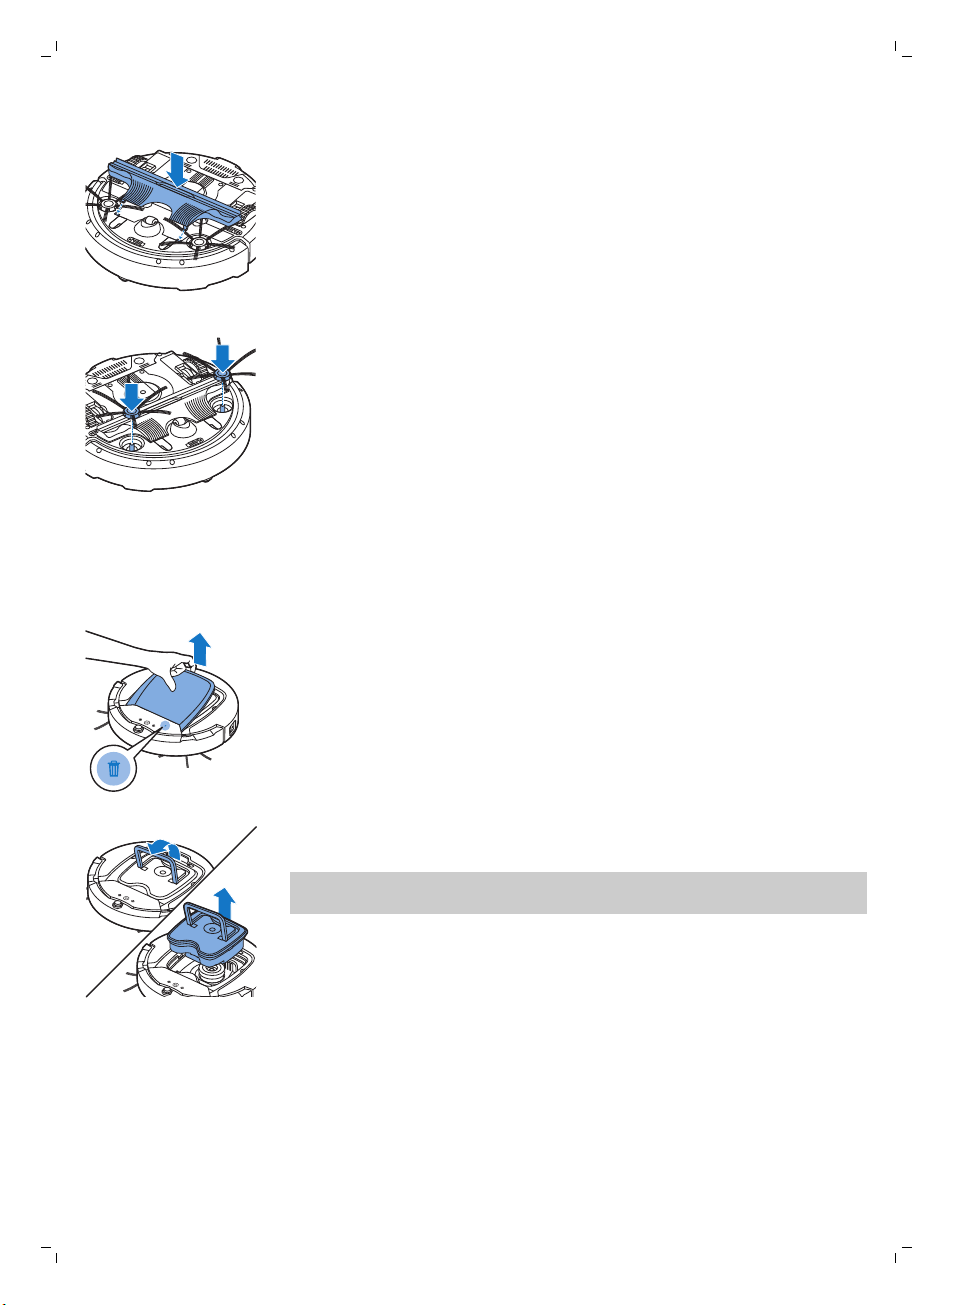
7 Undo the snap connections of the TriActive XL nozzle by inserting by
inserting your fingers at the places marked with arrows and pull the
TriActive nozzle off the robot.
8 Clean the suction opening with a soft brush (e.g. a toothbrush).
9 Remove all visible dirt from the TriActive nozzle.
20
English
10 Insert the snap hooks of the TriActive nozzle into the holes in the bottom
of the robot. Push the TriActive nozzle back into position. Check if the
nozzle can move a few millimeters up and down freely.
11 Push the side brushes onto the shafts on the bottom of the robot again.
Emptying and cleaning the dust container
Empty and clean the dust container when the dust container full indicator
lights up continuously.
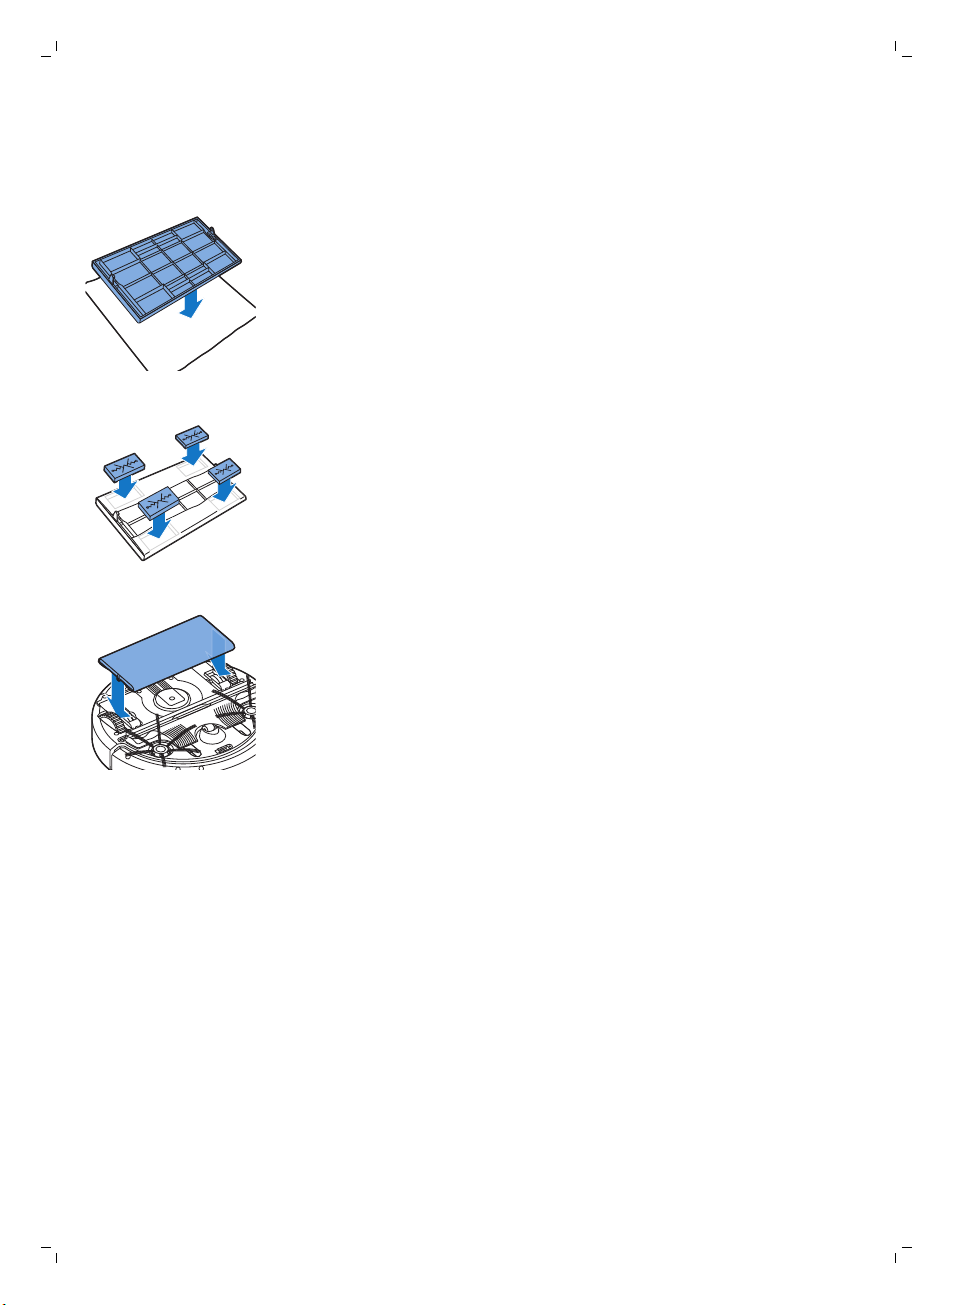
1 Remove the cover.
2 Pull up the handle of the dust container lid and lift the dust container out
of the dust container compartment.
Note: When you remove or reinsert the dust container, take care not to
damage the blades of the fan.

1
2
English
3 Carefully lift the lid off the dust container and take out the filter.
4 Shake the dust container over a dustbin to empty it. Clean the filter and
the inside of the dust container with a cloth or a toothbrush with soft
bristles. Also clean the suction opening in the bottom of the dust
container.
Caution: Do not clean the dust container and the filter with water or in
the dishwasher.
5 Put the filter back into the dust container. Then place the lid on the dust
container.
21
6 Put the dust container back into the dust container compartment (1), fold
down the handle (2), and put the top cover back on the robot.
Caution: Always make sure the filter is present inside the dust
container. If you use the robot without the filter inside the dust
container, the fan will be damaged.
Ordering accessories
To buy accessories or spare parts, visit www.shop.philips.com/service or go
to your Philips dealer. You can also contact the Philips Consumer Care
Center in your country (see the international warranty leaflet for contact
details).
Open source software
Your robot runs on open source software. Philips offers to make available
upon request a complete machine-readable copy of the source code on a

22
English
medium customarily used for software exchange at a charge not higher than
the cost of physically transferring a copy.
This offer is valid for a period of 3 years after the date of purchase of this
product. To obtain a copy of the source code, please write to:
Open Source Team, Philips Intellectual Property and Standards
P.O. Box 220, 5600 AE Eindhoven, Netherlands
Email address: open.source@philips.com
Replacement
Replacing the filter
Replace the filter if it is very dirty or damaged. You can order a new filter kit
under type number FC8066. See 'Emptying and cleaning the dust container'
in chapter 'Cleaning and maintenance' for instructions on how to remove
the filter from the dust container and how to place it in the dust container.
Replacing the side brushes
Replace the side brushes after some time to ensure proper cleaning results.
Always replace the side brushes when you notice signs of wear or damage.
We also recommend that you replace both side brushes at the same time.
You can order spare side brushes as part of replacement kit FC8068. This kit
also contains two filters and three dry wipes.
1 To replace the side brushes, grab the old side brushes by the bristles and
pull them off their shafts.
2 Push the new side brushes onto the shafts.
Replacing dry wipes
You can order new dry wipes. They are part of replacement kit FC8068. This
replacement kit also contains two side brushes and two filters.

Replacing the battery of the remote control
2
3
1
The remote control works on a CR2025 coin-shaped battery. Replace the
battery when the robot no longer responds when you press the buttons on
the remote control.
1 Hold the remote control upside down. Push the release button on the
battery holder and at the same time slide the battery holder out of the
remote control.
2 Remove the empty battery from the battery holder and place a new
battery in the battery holder. Then slide the battery holder back into the
remote control.
Replacing the rechargeable battery
The rechargeable battery of the robot may only be replaced by qualified
service engineers. Take the robot to an authorized Philips service center to
have the battery replaced when you can no longer recharge it or when it
runs out of power quickly. You can find the contact details of the Philips
Consumer Care Center in your country in the international warranty leaflet.
English
23
Recycling
-
This symbol means that this product shall not be disposed of with normal
household waste (2012/19/EU).
-
This symbol means that this product contains a built-in rechargeable
battery which shall not be disposed of with normal household waste
(2006/66/EC). We strongly advise you to take your product to an official
collection point or a Philips service center to have a professional remove
the rechargeable battery.
-
Follow your country’s rules for the separate collection of electrical and
electronic products and rechargeable batteries. Correct disposal helps
prevent negative consequences for the environment and human health.

1
3
2
this side up
24
English
Removing the rechargeable battery
Warning: Only remove the rechargeable battery when you discard
the appliance. Make sure the battery is completely empty when
you remove it.
To remove the rechargeable battery, follow the instructions below. You can
also take the robot to a Philips service center to have the rechargeable
battery removed. Contact the Philips Consumer Care Center in your country
for the address of a service center near you.
1 Start the robot from a place somewhere in the room and not from the
docking station.
2 Let the robot run until the rechargeable battery is empty to make sure
that the rechargeable battery is completely discharged before you
remove it and dispose of it.
3 Undo the screws of the battery compartment lid and remove the lid.
4 Lift out the rechargeable battery and disconnect it.
5 Take the robot and the rechargeable battery to a collection point for
electrical and electronic waste.
Troubleshooting
This chapter summarizes the most common problems you could encounter
with the appliance. If you are unable to solve the problem with the
information below, visit www.philips.com/support for a list of frequently
asked questions or contact the Consumer Care Center in your country.

Troubleshooting
Problem
The robot does not start
cleaning when I press the
start/stop button.
Possible cause Solution
The rechargeable battery is
empty.
The small plug is still inserted
in the socket on the robot.
Charge the rechargeable battery (see
chapter 'Preparing for use').
The robot does not work on mains power.
It only works on its rechargeable battery.
Therefore, always disconnect the adapter
from the robot and the mains before use.
English
25
The warning indicator
flashes quickly.
The power switch is not set to
'on' (I) position.
One or both wheels are stuck. Set the power switch to 'off'. Remove the
One or both side brushes are
stuck.
The top cover is not present
or is not closed properly.
The bumper is stuck. Press the start/stop button. Lift the robot
The robot was lifted while it
was cleaning.
Press the power switch. Press the
start/stop button on the robot or on the
remote control to start cleaning.
fluff, hair, thread or wire that is caught
around the wheel suspension.
Clean the side brushes (see chapter
'Cleaning and maintenance').
When the top cover is not present or is not
closed properly, the robot does not work.
Place the top cover on the robot properly.
so that its bumper comes free. Place the
robot at some distance from the obstacle
and press the start/stop button to make it
resume cleaning.
Press the start/stop button. Place the
robot on the floor. Then press the
start/stop button to make the robot
resume cleaning.

26
English
Problem Possible cause Solution
The robot does not clean
properly.
The bristles of one or both
side brushes are crooked or
bent.
Soak the brush or brushes in warm water
for a while. If this does not restore the
bristles to their proper shape, replace the
side brushes (see chapter 'Replacement').
The filter in the dust container
is dirty.
The suction opening in the
bottom of the dust container
is clogged.
The front wheel is jammed
with hair or other dirt.
The robot is cleaning a very
dark or shiny surface, which
triggers the drop-off
sensors.This causes the robot
to move in an unusual
pattern.
The robot is cleaning a floor
that reflects sunlight quite
strongly. This triggers the
drop-off sensors and causes
the robot to move in an
unusual pattern.
Clean the filter in the dust container with a
cloth or a toothbrush with soft bristles.You
can also clean the filter and dust container
with a regular vacuum cleaner at a low
suction power setting.
If brushing or vacuuming does not help to
clean the filter, replace the filter with a
new one. We advise you to replace the
filter at least once a year.
Clean the suction opening (see chapter
'Cleaning and maintenance').
Clean the front wheel (see chapter
'Cleaning and maintenance').
Press the start/stop button and then move
the robot to a lighter colored piece of the
floor. If the problem continues to occur on
lighter colored floors, please go to
www.philips.com/support or contact the
Consumer Care Center in your country.
Close the curtains to block sunlight from
entering the room. You can also start
cleaning when the sunlight is less bright.
The rechargeable battery
can no longer be charged
or runs empty very fast.
The battery of the remote
control runs empty too
fast.
The rechargeable battery has
reached the end of its life.
Perhaps you did not insert
the correct type of battery.
Replace the rechargeable battery (see
chapter 'Replacement').
For the remote control, you need a
CR2025 coin-shaped battery. If the
problem persists, go to
www.philips.com/support or contact the
Consumer Care Center in your country.

Problem Possible cause Solution
The robot is moving in
circles.
The robot is in spot-cleaning
mode.
This is normal behavior. The spiral mode
can be activated when a lot of dirt is
detected on the floor for a thorough clean.
It is also part of the auto cleaning mode.
After approximately one minute the robot
resumes its normal cleaning pattern. You
can also stop the spiral mode by selecting
a different cleaning mode on the remote
control.
English
27
The robot cannot find the
docking station.
The robot beeps when it
is on the docking station.
There is not enough room for
the robot to navigate towards
the docking station.
The robot is still actively
searching.
The robot was not started
from the docking station.
You try to charge the robot
with the power switch is in off
position.
Try to find another place for the docking
station. See 'Installing the docking station'
in chapter 'Preparing for use'.
Give the robot around 20 minutes to return
to the docking station.
If you want the robot to return to the
docking station after a cleaning run, start it
from the docking station.
Press the power switch to switch on the
robot.
Error codes
Error code
E1 Wheels stuck Remove robot from the obstacle and press the
E2 Top cover or dust
E3 Bumper stuck Remove the robot from the obstacle. The error
E4 Robot lifted from floor Put the robot back on the floor to make the
Possible cause Solution
starts/stop button to resume cleaning.
container not placed
properly
Place the dust container in and the top cover
on the robot properly. The error code
disappears from the display automatically.
code disappears from the display
automatically.
error code disappear.
E5 Color of floor too dark Place robot on a lighter area of the floor. Clean
E6
Battery not inserted
properly
Charging error Check if the power switch is in ‘on’ position
the drop-off sensors.
Read the instructions in ‘Inserting the
rechargeable battery into the robot’ in chapter
‘Before first use’.
when the robot is on the docking station

1
1110 129
234
5 6 7 8
28
Dansk
Introduktion
Introduktion
Tillykke med dit køb, og velkommen til Philips! For at få fuldt udbytte af den
support, Philips tilbyder, skal du registrere dit produkt på
www.philips.com/welcome.
Generel beskrivelse
1 Håndtag på låg til støvbeholder
2 Låg til støvbeholder
3 Filter
4 Støvbeholder
5 Topdæksel
6 Fejlkodetabel
7 Ventilator
8 Stødfanger
9 Sensor til dockingstationen
10 Display
11 Tænd/sluk-kontakt (tænder/slukker robotten)
12 Forhjul
13 Sidebørsteaksler
14 Sensorer
15 Hjul
16 TriActive XL mundstykke
17 Sidebørster
18 Fastgørelsesblokke til tørservietter
19 Holder til tørservietter
20 Tørservietter
21 Batteriholder
22 Fjernbetjening
23 AA-batterier til den usynlige væg
24 Usynlig væg
25 Dockingstation
26 Adapter
27 Lille stik
Fjernbetjening og display
Display
1 Indikator for spiraltilstand
2 Indikator for væg-følgende tilstand
3 Indikator for zigzag-mønster tilstand
4 Indikator for tilstanden tilfældige bevægelser
5 Rengøringstid
6 Ikon for docking
7 WiFi-ikon
8 Indikator for fuld støvpose
9 Lydsensor
10 Funktionsknap
11 Start/stop-tast
Dansk

12 WiFi-knap
2
1
3
45
Fjernbetjening (FC8932)
1 Navigationsknapper og start/stop
2 Knapper til rengøringstid
3 Knapper til rengøringstilstand
4 Knapper til ventilatorhastighed
5 Dockingknap
Sådan fungerer din robot
Det kan din robot rengøre
Robotten er udstyret med funktioner, som gør den til et nyttigt
rengøringsredskab, der hjælper med at rengøre gulvene i dit hjem.
Robotten er især velegnet til rengøring af hårde gulve, som f.eks. trægulve,
flisegulve eller linoleumsgulve. Den kan have svært ved at rengøre bløde
gulve, som f.eks. tæpper. Hvis robotten skal bruges på et tæppe, skal man
holde øje med den i starten for at se, om robotten kan klare den
pågældende type gulvbelægning. Hold også øje med robotten, når den skal
bruges på meget mørke eller blanke og hårde gulve.
Dansk
29
Sådan udfører din robot rengøring
Rengøringssystem
Robotten har et 3-trins rengøringssystem til effektiv rengøring af dine gulve.
-
De to sidebørster hjælper robotten med at gøre rent i hjørnerne og langs
vægge. De hjælper også med at fjerne urenheder fra gulvet og flytte
støvet hen mod sugeåbningen.

30
Dansk
-
Sugekraften i robotten opsamler løst snavs og transporterer det gennem
sugeåbningen ind i støvbeholderen.
-
Robotten leveres med en holder til tørservietter, hvilket gør det muligt at
rengøre dine hårde gulve endnu grundigere med tørservietter.
Rengøringsmønstre
I auto-rengøringstilstanden anvender robotten en automatisk rækkefølge i
sine rengøringsmønstre, således at alle områder i rummet rengøres bedst
muligt. De anvendte rengøringsmønstre er:
1 Z-mønster eller zigzag-mønster
2 Tilfældigt mønster
3 Væg-følgende mønster
4 Spiralformet mønster
I auto-rengøringstilstand benytter robotten disse mønstre i en fast sekvens:
z-mønster, tilfældigt mønster, væg-følgende mønster og spiralmønster.
Når robotten har gennemført denne sekvens af mønstre, vil den begynde at
bevæge sig i Z-mønster igen. Robotten fortsætter med at benytte denne
sekvens af mønstre til rengøring af gulvet, indtil det genopladelige batteri er
næsten opbrugt, eller indtil den slukkes manuelt.
Hvis robotten registrerer et særligt snavset område under rengøringen,
skifter den til spiraltilstand og til turboventilatorhastighed (kun FC8820) for
at sikre en grundig fjernelse af snavs.
Bemærk: Du kan også vælge hver tilstand individuelt ved at trykke på den
rette knap på fjernbetjeningen (kun FC8932). De manuelt valgte tilstande er

kun aktive i et par minutter. Derefter skifter robotten tilbage til autorengøringstilstand.
Der er flere oplysninger i kapitlet "Sådan bruges din robot" i afsnittet
"Rengøringstilstande".
Sådan undgår din robot højdeforskelle
Robotten har tre sensorer i bunden. Disse sensorer bruges til at registrere og
undgå højdeforskelle, som f.eks. trapper.
Bemærk: Det er normalt, at robotten bevæger sig lidt ud over kanten på en
højdeforskel, da den forreste sensor er placeret bag stødfangeren.
Forsigtig: I visse tilfælde kan sensorerne ikke registrere en trappe eller en
anden højdeforskel i tide. Du skal derfor nøje holde øje med robotten de
første par gange, den anvendes, samt når den betjenes i nærheden af en
trappe eller en anden højdeforskel. Det er vigtigt at rengøre sensorerne
regelmæssigt for at sikre, at robotten fortsat kan registrere højdeforskelle
korrekt (se anvisninger i kapitlet "Rengøring og vedligeholdelse").
Før apparatet tages i brug
Dansk
31
Montering af sidebørsterne
1 Pak sidebørsterne ud, og anbring robotten med bunden opad på et bord
eller på gulvet.
2 Skub sidebørsterne på akslerne på robottens bund.
Bemærk: Sørg for at få sat sidebørsterne korrekt på robotten. Skub dem
ind på akslen, indtil de "klikker" hørbart på plads.
Sådan fjernes mærket fra fjernbetjeningen
Til fjernbetjeningen skal bruges et CR2025 knapbatteri. Dette batteri er
beskyttet med en beskyttelsesstrimmel, der skal fjernes før brug.
1
2
100 cm
30 cm
80 c
m
32
Dansk
1 Træk batteriets beskyttelsesmærke ud af fjernbetjeningens batterirum.
Nu er fjernbetjeningen klar til brug.
Klargøring
Installing the docking station
1 Insert the small plug of the adapter into the socket on the docking station
(1) and insert the adapter into the wall socket (2).
-
The display of the docking station comes on.
2 Place the docking station on a horizontal, level floor against the wall.
Note: Make sure that there are no obstacles or height differences 80 cm
in front, 30 cm to the right and 100 cm to the left of the docking station.
Tip: To ensure the docking station stays firmly in the selected spot, fasten
it to the wall with screws or with two strips of double-sided tape.
Opladning
Dansk
Når apparatet oplades første gang, og når robottens genopladelige batteri er
brugt op, er opladningstiden fire timer.
Din robot kan oplades på to måder:
-
På dockingstationen, enten manuelt eller automatisk under brug;
-
Ved tilslutning af robotten direkte til lysnettet.
33
Opladning i dockingstationen
1 Anbring robotten i den tilsluttede dockingstation.
2 Tryk på tænd/sluk-kontakten for at tænde for robotten.
3 Start/stop-knappen begynder at blinke. Ladeindikatoren kan ses i
displayet de første 3 minutter af opladningstiden.
4 Når det genopladelige batteri er fuldt opladet, lyser start/stop-knappen
konstant.
Automatisk opladning under brug
1
2
34
Dansk
1 Når robotten er færdig med rengøringen, eller når der kun er 15 % tilbage
af batteriet, vil den automatisk søge tilbage til dockingstationen for at
blive opladet. Når robotten søger tilbage til dockingstationen, bliver lyset i
start/stop-knappen orange.
2 Når det genopladelige batteri er fuldt opladet, lyser start/stop-knappen
konstant.
Bemærk: Robotten søger kun automatisk tilbage til dockingstationen, hvis
den startede rengøringen fra dockingstationen.
Opladning direkte fra lysnettet
1 Tryk på tænd/sluk-kontakten for at tænde for robotten.
2 Sæt adapterens lille stik ind i stikket på robotten (1). Sæt adapteren i en
stikkontakt (2).
3 Når robotten er tilsluttet korrekt til lysnettet, begynder start/stop-
knappen at blinke langsomt. Dette angiver, at robotten lader op.
4 Når det genopladelige batteri er fuldt opladet, lyser start/stop-knappen
konstant.
Bemærk: Efter opladning tages det lille stik ud af stikket på robotten. Tag
derefter adapteren ud af stikkontakten. Robotten starter ikke på
rengøringen, når den er sluttet til en stikkontakt.
Rummet gøres klar til rengøring
Inden du sætter robotten til at rengøre, skal du sikre dig, at alle løse og
skrøbelige genstande er fjernet fra gulvet. Fjern ligeledes alle kabler og
snore fra gulvet.
Sådan bruges din robot
Du kan også betjene robotten med fjernbetjeningen (kun FC8932) eller ved
hjælp af knapperne på robottens betjeningspanel.
Start og stop
1 Sæt tænd/sluk-kontakten på siden af robotten på "on".
2 Tryk på start/stop-knappen.
Dansk
-
Du kan trykke på start/stop-knappen på robotten.
-
Du kan også trykke på start/stop-knappen på fjernbetjeningen (kun
FC8932).
3 Start/stop-knappen er konstant på "on", og robotten begynder på
rengøring.
4 Robotten rengør i auto-rengøringstilstand, indtil batteriets kapacitet
bliver lav. I auto-rengøringstilstand følger den gentagne sekvenser med
Z-mønster og tilfældige bevægelser, væg-følgende bevægelser og
spiralformede mønstre.
Bemærk: For at vælge en individuel tilstand skal du trykke på en af
tilstandsknapperne på fjernbetjeningen. Se afsnittet "Valg af
rengøringstilstand" for at få flere oplysninger.
35
5 Når batteriet begynder at blive afladet, bliver start/stop-knappen orange,
og robotten søger tilbage til dockingstationen for at blive ladet op.
6 Du kan også trykke på start/stop-knappen for at afbryde eller stoppe
rengøringsarbejdet. Hvis du trykker på start/stop-knappen igen, og der
stadig er batterikapacitet nok på det genopladelige batteri, fortsætter
robotten med at gøre rent i auto-rengøringstilstand.
7 For at få robotten til at vende tilbage til dockingstationen, inden det
genopladelige batteri når et lavt niveau, skal du trykke på
dockingknappen på fjernbetjeningen (kun FC8932). Dockingindikatoren
på robottens display tændes, og robotten vender tilbage til
dockingstationen.
Bemærk: Hvis robotten ikke blev startet fra dockingstationen, vil den ikke
automatisk søge tilbage til dockingstationen, når det genopladelige
batteri trænger til opladning. Hvis der stadigvæk er strøm nok på det
genopladelige batteri, kan du trykke på dockingknappen på
fjernbetjeningen (kun FC8932) for at få robotten til at vende tilbage til
dockingstationen. Hvis det genopladelige batteri er fuldstændigt afladet,
skal du sætte robotten hen i dockingstationen manuelt.

36
Dansk
Valg af rengøringstilstand
Ud over auto-rengøringstilstanden har robotten fire individuelle
rengøringstilstande, som hver kan aktiveres ved at trykke på den
pågældende knap på fjernbetjeningen.
Bemærk: De manuelt valgte tilstande er kun aktive i et par minutter. Derefter
skifter robotten tilbage til auto-rengøringstilstand.
Tilstanden Z-mønster
I tilstanden Z-mønster rengør robotten ved at lave Z-formede mønstre i
rummet for derved at rengøre store arealer.
Tilstanden tilfældige bevægelser
I denne tilstand rengør robotten rummet i et kombineret mønster af lige og
krydsgående bevægelser.
Væg-følgende tilstand
I denne tilstand følger robotten rummets vægge for ekstra rengøring af
arealerne langs væggene.
Spiraltilstand
I denne tilstand bevæger robotten sig i et spiralformet mønster for at
foretage en grundig rengøring af et begrænset areal med urenheder. I
spiraltilstand kører ventilatoren ved turbohastighed.
Manuel kørsel
Dansk
1 Brug piletasterne over, under og til højre og venstre for start/stop-
knappen på fjernbetjeningen for at navigere robotten gennem rummet.
Bemærk: Vær forsigtig, når du kører robotten manuelt i nærheden af
højdeforskelle og trapper.
Bemærk: Støvsugningsfunktionen og sidebørsterne fungerer kun, når
robotten kører fremad. Knapperne venstre, højre eller tilbage bruges kun
til at manøvrere robotten.
Brug af knapperne til rengøringstid (FC8932)
-
Tryk på knappen til maksimal rengøringstid for at få robotten til at gøre
rent i auto-rengøringstilstand, indtil det genopladelige batteri er ved at
være tomt. Når robotten har afsluttet rengøringen, vender den automatisk
tilbage til dockingstationen, hvis den startede rengøringen fra
dockingstationen. Hvis robotten startede fra et andet sted i rummet, skal
du trykke på dockingknappen for at sende den tilbage til
dockingstationen.
-
De andre knapper til rengøringstid gør det muligt for dig at lade robotten
køre i henholdsvis 60, 45 og 30 minutter. Når rengøringstiden er
overstået, vender robotten automatisk tilbage til dockingstationen, hvis
den startede fra dockingstationen. Hvis robotten startede fra et andet
sted i rummet, skal du trykke på dockingknappen for at sende den tilbage
til dockingstationen.
37
Klappereaktion
Klappereaktionen aktiveres, når robotten går i sleep-mode i følgende
situationer:
-
Når den stopper rengøring på grund af en fejl
-
Når den ikke kan finde dockingstationen på 20 minutter
Hvis du ikke kan få øje på robotten, kan du finde den ved at klappe én gang.
Robotten vil svare ved at udsende et bip og ved at lade alle ikoner lyse på
displayet.
Brug af tilbehøret til tørservietter
Tilbehøret til tørservietter er en funktion, der gør det muligt at rengøre hårde
gulve med tørservietter.
Bemærk: Hvis du bruger tilbehøret til tørservietter, kan robotten have svært
ved at passere dørtrin eller køre op på tæpper.
38
Dansk
Klargøring af tilbehøret til tørservietter
1 Vend robotten med bunden opad, og placer den på gulvet eller på et
bord.
2 Anbring tørservietten på et bord, og placer tilbehøret til tørservietter på
tørservietten. Fastgørelsestapperne skal pege ud mod dig.
3 Fold begge ender af tørservietten omkring tilbehøret til tørservietter, og
fastgør tørservietten på tilbehøret ved at skubbe fastgørelsesblokkene
ned i fordybningerne.
4 Sæt fastgørelsestappen på tilbehøret til tørservietter ind i åbningen lige
bag hjulet på den ene side af robotten, og skub, indtil du kan høre, at den
bliver låst på plads med et klik. Gentag dette på den anden side.
5 Vend robotten, og sæt den på hjulene på gulvet. Tilbehøret til
tørservietter skal røre gulvet.
Brug af robotten med tilbehøret til tørservietter
Når tilbehøret til tørservietter er sat på, kan du bruge robotten i alle tilstande
og på alle hårde gulve. Tilbehøret til tørservietter må ikke anvendes på
tæpper.
Fjernelse af tilbehøret til tørservietter
1 Fjern tilbehøret til tørservietter, så snart du er færdig med at aftørre
gulvet.
2 Vend robotten med bunden opad, og placer den på gulvet eller på et
bord.
1
2
3 Skub den ene ende af tilbehøret til tørservietter hen mod hjulet på den
1
2
anden side af robotten for at frigøre det. Træk derefter tilbehøret af
robotten.
Brug af den usynlige væg
Isætning af batterierne i den usynlige væg
Den usynlige væg bruger fire AA-batterier.
1 Skub på de to frigørelsestapper nederst på bagdækslet (1), og skub
bagdækslet opad og af den usynlige væg (2).
Dansk
39
2 Tag fire nye AA-batterier ud af pakken, og sæt dem ind i batterirummet
på den usynlige væg.
Bemærk: Sørg for, at batteriernes poler (+ og -) vender den rigtige vej.
3 Skub bagdækslet tilbage på den usynlige væg.
Placering af den usynlige væg, der skal standse robotten
Du kan bruge den usynlige væg til at undgå, at robotten kører ind i et rum
eller ind på et område, hvor du ikke ønsker den ind.
3
1
2
40
Dansk
1 Anbring enheden et sted, som du ikke ønsker robotten skal passere, f.eks
ved en åben dør til et rum, hvor robotten ikke skal have adgang.
2 Tænd for den usynlige væg med on/off-skydekontakten øverst på
enheden.
3 Start robotten.
4 Når robotten kommer for tæt på den usynlige væg, begynder lyset på
den usynlige væg at blinke, og den usynlige væg udsender en stråle med
infrarødt lys. Denne infrarøde lysstråle får robotten til at ændre retning og
fjerne sig fra den usynlige væg.
Bemærk: Hvis du benytter den usynlige væg, skal du regelmæssigt
kontrollere, om der er tilstrækkeligt strøm på batterierne. Det kan du
kontrollere ved at slukke den usynlige væg og tænde den igen. Hvis der er
strøm nok på batterierne, vil LED'en på den usynlige væg lyse i kort tid.
Rengøring og vedligeholdelse
Rengøring af robotten
For at opretholde den gode rengøringsevne skal du rengøre sensorerne,
hjulene, sidebørsterne og sugeåbningen fra tid til anden.
1 Anbring robotten med bunden opad på et fladt underlag.
2 Brug en børste med bløde børstehår (f.eks. en tandbørste) for at fjerne
støv eller fnuller fra sensorerne.
Bemærk: Det er vigtigt at rengøre sensorerne regelmæssigt. Hvis
sensorerne er tilsmudsede, kan robotten ikke registrere højdeforskelle
eller trapper.

1
2
3
1
2
Dansk
3 Brug en børste med bløde børstehår (f.eks. en tandbørste) til at fjerne
støv og fnuller fra forhjulet og sidehjulene.
4 For at rengøre sidebørsterne skal du tage fat om dem ved børstehårene
og trække dem ud af deres aksler.
5 Fjern fnuller, hår og tråde fra akslen og fra sidebørsten med en blød
børste (f.eks. en tandbørste) eller en klud.
6 Kontroller sidebørsterne og bunden af robotten for skarpe genstande,
der kan beskadige dit gulv.
41
7 Frigør "snap-on"-tapperne på TriActive XL-dysen ved at sætte fingrene
på de steder, der er markeret med pile og derefter trække TriActivedysen af robotten.
8 Rengør sugeåbningen med en blød børste (f.eks. en tandbørste).

42
Dansk
9 Fjern alle synlige urenheder fra TriActive-dysen.
10 Sæt "snap-on"-tapperne på TriActive-dysen ind i hullerne i bunden af
robotten. Skub TriActive-dysen tilbage i normal position. Kontrollér, om
dysen frit kan bevæge sig et par millimeter op og ned.
11 Skub sidebørsterne på akslerne på robottens bund.
Tømning og rengøring af støvbeholderen
Tøm og rengør støvbeholderen, når indikatoren for fuld støvbeholder lyser
konstant.
1 Fjern dækslet.

1
2
Dansk
43
2 Træk håndtaget på støvbeholderens låg op, og løft støvbeholderen ud af
dens rum.
Bemærk: Når du fjerner eller sætter støvbeholderen på plads, skal du
passe på ikke at beskadige ventilatorbladene.
3 Løft forsigtigt låget af støvbeholderen, og tag filteret ud.
4 Ryst støvbeholderen over en skraldespand for at tømme den. Rengør
filteret og støvbeholderen indvendigt med en klud eller med en
tandbørste med bløde børstehår. Rengør ligeledes sugeåbningen i
bunden af støvbeholderen.
Forsigtig: Rengør ikke støvbeholderen og filteret med vand eller i
opvaskemaskinen.
5 Sæt filteret tilbage i støvkammeret. Tag derefter låget på støvbeholderen.
6 Sæt støvbeholderen tilbage i dens rum (1), fold håndtaget (2) ned, og sæt
topdækslet tilbage på robotten.
Forsigtig: Sørg altid for, at der er et filter i støvbeholderen. Hvis du
bruger robotten uden et filter i støvbeholderen, kan ventilatoren blive
beskadiget.

44
Dansk
Bestilling af tilbehør
Du kan købe tilbehør og reservedele på www.shop.philips.com/service eller
hos din Philips-forhandler. Du kan også kontakte det lokale Philipskundecenter (du kan finde kontaktoplysninger i folderen "World-Wide
Guarantee").
Open source-software
Robotten anvender open source-software. Philips tilbyder efter anmodning
at stille en komplet maskinlæsbar kopi af kildekoden til rådighed på et
almindeligt benyttet medie til softwareudveksling mod et gebyr, der ikke er
højere end omkostningerne ved fysisk overdragelse af en kopi.
Dette tilbud gælder i en periode på 3 år efter købsdatoen for dette produkt.
For at modtage en kopi af kildekoden bedes du skrive til:
Open Source Team, Philips Intellectual Property and Standards
P.O. Box 220, 5600 AE Eindhoven, Holland
E-mailadresse: open.source@philips.com
Udskiftning
Udskiftning af filteret
Udskift filteret, hvis det er meget tilsnavset eller beskadiget. Du kan bestille
et nyt filtersæt under typenummer FC8066. Se "Tømning og rengøring af
støvbeholderen" i kapitlet "Rengøring og vedligeholdelse" for instruktioner
om, hvordan filteret tages ud af støvbeholderen, og hvordan det placeres i
støvbeholderen.
Udskiftning af sidebørsterne
Udskift sidebørsterne efter et stykke tid for at sikre ordentlige
rengøringsresultater.
Udskift altid sidebørsterne, når du bemærker tegn på slitage eller
beskadigelse. Vi anbefaler også, at du udskifter begge sidebørster på
samme tid. Du kan bestille ekstra sidebørster som en del af
udskiftningssættet FC8068. Dette sæt indeholder også to filtre og tre
tørservietter.
1 For at udskifte sidebørsterne skal du tage fat i de gamle sidebørster ved
børstehårene og trække dem ud af deres aksler.

2 Skub de nye sidebørster ned på akslerne.
2
3
1
Udskiftning af tørservietter
Du kan bestille nye tørservietter. De indgår i udskiftningssættet FC8068.
Dette udskiftningssæt indeholder også to sidebørster og to filtre.
Udskiftning af batteriet i fjernbetjeningen
Til fjernbetjeningen skal bruges et CR2025 knapbatteri. Udskift batteriet, når
robotten ikke længere reagerer, når du trykker på knapperne på
fjernbetjeningen.
1 Vend bagsiden af fjernbetjeningen opad. Tryk på udløserknappen på
batteriholderen, og lad samtidig batteriholderen glide ud af
fjernbetjeningen.
Dansk
45
2 Tag det brugte batteri ud af batterirummet, og sæt et nyt batteri i. Skub
derefter batteriholderen tilbage på fjernbetjeningen.
Udskiftning af det genopladelige batteri
Robottens genopladelige batteri må kun udskiftes af uddannede
serviceteknikere. Tag robotten med hen på et autoriseret Philipsservicecenter for at få batteriet udskiftet, når du ikke længere kan genoplade
det, eller når det hurtigt løber tør for strøm. Du kan finde
kontaktoplysningerne til det lokale Philips-kundecenter i den internationale
garantifolder.

1
3
2
46
Dansk
Genanvendelse
-
Dette symbol betyder, at dette produkt ikke må bortskaffes sammen med
almindeligt husholdningsaffald (2012/19/EU).
-
Dette symbol betyder, at dette produkt indeholder et indbygget
genopladeligt batteri, som ikke må bortskaffes sammen med almindeligt
husholdningsaffald (2006/66/EF). Vi anbefaler på det kraftigste, at du
afleverer produktet på et officielt indsamlingssted eller hos en Philipsforhandler, hvor du kan få en fagmand til at tage det genopladelige
batteri ud.
-
Følg den nationale lovgivning om særskilt indsamling af elektriske og
elektroniske produkter og genopladelige batterier. Korrekt bortskaffelse
er med til at forhindre negativ påvirkning af miljøet og menneskers
helbred.
Udtagning af det genopladelige batteri
Advarsel: Det genopladelige batteri må kun tages ud af
apparatet, når det skal bortskaffes. Sørg for, at batteriet er
fuldstændig tomt, når du tager det ud.
Følg nedenstående vejledning for at fjerne det genopladelige batteri. Du kan
også tage robotten med hen på et Philips-servicecenter for at få batteriet
taget ud. Kontakt dit lokale Philips kundecenter, hvor de kan oplyse
adressen på et servicecenter i nærheden.
1 Start robotten et sted i rummet og ikke fra dockingstationen.
2 Lad robotten køre, indtil det genopladelige batteri er tomt, for at sikre, at
det genopladelige batteri er helt afladet, inden du fjerner det og afleverer
det til bortskaffelse.
3 Skru skruerne af låget til batterirummet, og tag låget af.

this side up
Fejlfinding
Fejlfinding
Problem
Robotten begynder ikke
at gøre rent, når jeg
trykker på start/stopknappen.
Dansk
4 Tag det genopladelige batteri ud, og tag stikket ud.
5 Aflever robotten og det genopladelige batteri på et indsamlingssted for
elektrisk og elektronisk affald.
Dette afsnit opsummerer de mest almindelige problemer, der kan
forekomme ved brug af apparatet. Har du brug for yderligere hjælp og
vejledning, så besøg www.philips.com/support for at se en liste med ofte
stillede spørgsmål, eller kontakt dit lokale Philips Kundecenter.
Mulig årsag Løsning
Det genopladelige batteri er
afladet.
Det lille stik sidder stadig i
stikdåsen på robotten.
Oplad det genopladelige batteri (se
kapitlet "Klargøring").
Robotten fungerer ikke, når den er tilsluttet
lysnettet. Den fungerer kun med det
genopladelige batteri. Tag derfor altid
adapteren ud af robotten og stikkontakten
inden brug.
47
Tænd/sluk-kontakten er ikke
sat i "on" (I) position.
Tryk på tænd/sluk-kontakten. Tryk på
start/stop-knappen på robotten eller på
fjernbetjeningen for at starte rengøring.
48
Dansk
Problem Mulig årsag Løsning
Advarselsindikatoren
blinker hurtigt.
Et eller begge hjul sidder fast. Sæt tænd/sluk-kontakten på "off". Fjern
fnuller, hår, tråde eller snor, der sidder fast
omkring hjulophænget.
En eller begge sidebørster
sidder fast.
Topdækslet er ikke påsat eller
er lukket forkert.
Stødfangeren sidder fast. Tryk på start/stop-knappen. Løft robotten,
Robotten blev løftet, mens
den gjorde rent.
Rengør sidebørsterne (se kapitlet
"Rengøring og vedligeholdelse").
Hvis topdækslet er ikke sat på eller er ikke
ordentligt lukket, fungerer robotten ikke.
Sæt topdækslet korrekt på robotten.
så dens stødfanger kommer fri. Sæt
robotten i afstand fra forhindringen, og
tryk på start/stop-knappen for at få den til
at genoptage rengøringen.
Tryk på start/stop-knappen. Sæt robotten
på gulvet. Tryk derefter på start/stopknappen for at få robotten til at genoptage
rengøringen.
Problem Mulig årsag Løsning
Robotten rengør ikke
ordentligt.
Børstehårene på en eller
begge sidebørster er skæve
eller bøjede.
Læg børsten eller børsterne i blød i varmt
vand i et stykke tid. Hvis dette ikke
gendanner børsternes oprindelige form,
skal du udskifte sidebørsterne med et nyt
sæt (se kapitlet "Udskiftning").
Dansk
49
Det genopladelige batteri
kan ikke længere oplades
eller aflades meget
hurtigt.
Filteret i støvbeholderen er
snavset.
Sugeåbningen i bunden af
støvbeholderen er tilstoppet.
Forhjulet er tilstoppet af hår
eller snavs.
Robotten rengør en meget
mørk eller blank overflade,
hvilket udløser sensorerne.
Dette bevirker, at robotten
bevæger sig i et mærkeligt
mønster.
Robotten gør rent på et gulv,
som reflekterer sollys kraftigt.
Dette udløser sensorerne og
bevirker, at robotten bevæger
sig i et mærkeligt mønster.
Det genopladelige batteri er
slidt op.
Rengør filteret i støvbeholderen med en
klud eller en tandbørste med bløde
børstehår. Du kan også rengøre filteret og
støvbeholderen med en almindelig
støvsuger indstillet til lav sugestyrke.
Hvis børstningen eller støvsugning ikke
hjælper med at få filteret rengjort, skal du
udskifte filteret med et nyt. Vi anbefaler at
udskifte filteret mindst én gang om året.
Rengør sugeåbningen (se kapitlet
"Rengøring og vedligeholdelse").
Rengør forhjulet (se afsnittet "Rengøring
og vedligeholdelse").
Tryk på start/stop-knappen, og flyt
derefter robotten til et sted på gulvet, der
ikke er så mørkt. Hvis problemet fortsætter
på lysere gulvoverflader, skal du gå til
www.philips.com/support eller kontakte
det lokale Consumer Care Center.
Træk gardinerne for for at blokere sollyset
fra at komme ind i rummet. Du kan også
udføre rengøringen, når der ikke er så
meget sollys.
Udskift det genopladelige batteri (se
kapitlet "Udskiftning").
Batteriet i
fjernbetjeningen aflades
for hurtigt.
Måske har du ikke isat den
korrekte batteritype.
Til fjernbetjeningen skal bruges et CR2025
knapbatteri. Hvis problemet fortsætter,
skal du gå til www.philips.com/support
eller kontakte det lokale Consumer Care
Center.
50
Dansk
Problem Mulig årsag Løsning
Robotten kører i cirkler. Robotten er i
rengøringstilstanden SPOT.
Det er normalt, at den kører i cirkler.
Spiraltilstanden kan aktiveres, når der skal
opsamles en stor mængde snavs på
gulvet, og der skal gøres grundigt rent.
Spiraltilstanden er også en del af autorengøringstilstanden. Efter ca. ét minut
vender robotten tilbage til sit normale
rengøringsmønster. Du kan også stoppe
spiraltilstanden ved at vælge en anden
rengøringstilstand på fjernbetjeningen.
Robotten kan ikke finde
dockingstationen.
Robotten udsender biplyde, når den er i
dockingstation.
Der er ikke plads for robotten
til at komme tilbage til
dockingstationen.
Robotten søger stadigt aktivt. Giv robotten ca. 20 minutter til at finde
Robotten startede ikke fra
dockingstationen.
Du forsøger at oplade
robotten med tænd/slukkontakten i slukket position.
Prøv at anbringe dockingstationen et
andet sted. Se "Installation af
dockingstationen" i kapitlet "Klargøring".
tilbage til dockingstationen.
Hvis du vil have robotten til at vende
tilbage til dockingstationen efter afsluttet
rengøring, skal den også starte fra
dockingstationen.
Tryk på tænd/sluk-kontakten for at tænde
for robotten.
Fejlkoder
Fejlkode
E1 Hjulene sidder fast Fjern robotten fra forhindringen, og tryk på
E2 Topdækslet eller
E3 Stødfangeren sidder fast Tag robotten væk fra forhindringen. Fejlkoden
Mulig årsag Løsning
start/stop-knappen for at genoptage
rengøringen.
støvbeholderen er ikke
placeret korrekt
Monter støvbeholder og topdæksel korrekt på
robotten. Fejlkoden forsvinder automatisk fra
displayet.
forsvinder automatisk fra displayet.
E4 Robotten er løftet op fra
E5 Gulvfarven er for mørk Anbring robotten på et lysere område på
E6
gulvet
Batteriet er ikke sat
korrekt i
Fejl i opladning Kontroller, om tænd/sluk-kontakten står på
Sæt robotten tilbage på gulvet for at få
fejlkoden til at forsvinde.
gulvet. Rengør sensorerne.
Læs instruktionerne i afsnittet "Isætning af det
genopladelige batteri i robotten" i kapitlet "Før
apparatet tages i brug".
"on", når robotten er i dockingstationen.
Einführung
1
1110 129
234
5 6 7 8
Einführung
Herzlichen Glückwunsch zu Ihrem Kauf und willkommen bei Philips! Um die
Unterstützung von Philips optimal nutzen zu können, sollten Sie Ihr Produkt
unter www.philips.com/welcome registrieren.
Allgemeine Beschreibung
1 Griff des Staubbehälterdeckels
2 Staubbehälterdeckel
3 Filter
4 Staubbehälter
5 Obere Abdeckung
6 Fehlercodetabelle
7 Ventilator
8 Stoßfänger
9 Sensor Docking-Station
10 Display
11 Netzschalter (um den Roboter ein- oder auszuschalten)
12 Vorderrad
13 Seitenbürstenschäfte
14 Stopp-Sensoren
15 Laufräder
16 TriActive XL-Düse
17 Seitenbürsten
18 Befestigungsblöcke für Trockenreinigungstücher
19 Halterung für Trockenreinigungstücher
20 Trockenreinigungstücher
21 Batteriehalterung
22 Fernbedienung
23 AA-Batterien für die unsichtbare Wand
24 Unsichtbare Wand
25 Docking-Station
26 Ladegerät
27 Gerätestecker
Deutsch
51
Fernbedienung und Display
Display
1 Spiralmodusanzeige
2 "Den Wänden entlang"-Anzeige
3 Zickzackmuster-Modusanzeige
4 Zufallsmodusanzeige
5 Reinigungszeit
6 Docking-Symbol
7 WLAN-Symbol
8 Staubfüllanzeige
9 Geräuschsensor
10 Moduswahltaste
11 Start/Stopptaste
Deutsch

2
1
3
45
52
Deutsch
12 WLAN-Taste
Fernbedienung (FC8932)
1 Navigationstasten und Start/Stopp
2 Tasten für die Reinigungszeit
3 Tasten für den Reinigungsmodus
4 Tasten für die Ventilatorgeschwindigkeit
5 Docking-Taste
So funktioniert Ihr Roboter
Das reinigt Ihr Roboter
Dieser Roboter ist mit Funktionen ausgestattet, die ihn zu einem idealen
Reinigungsgerät machen, um Sie beim Reinigen der Böden in Ihrem Heim zu
unterstützen.
Der Roboter ist besonders zum Reinigen harter Böden, wie etwa Holz-,
Kachel- oder Linoleum-Böden, geeignet. Beim Reinigen weicher Böden,
zum Beispiel Teppichböden oder Teppiche, können Probleme auftreten.
Wenn Sie den Roboter auf einem Teppichboden oder Teppich verwenden,
bleiben Sie beim ersten Mal in der Nähe, sodass Sie erkennen, ob der
Roboter mit diesem Bodentyp zurechtkommt. Der Roboter muss auch bei
Verwendung auf sehr dunklen oder glänzenden harten Böden überwacht
werden.
So reinigt Ihr Roboter
Reinigungssystem
Der Roboter weist ein 3-stufiges Reinigungssystem zur effizienten Reinigung
Ihrer Böden auf.
-
Die beiden Seitenbürsten unterstützen den Roboter bei der Reinigung
von Ecken und entlang Wänden und Möbelstücken. Sie helfen auch,
Schmutz vom Boden zu beseitigen und ihn Richtung Ansaugöffnung zu
bewegen.
Deutsch
-
Mit der Saugkraft des Roboters wird loser Schmutz aufgesaugt und durch
die Ansaugöffnung in den Staubcontainer transportiert.
-
Der Roboter ist mit einer Halterung für Trockenreinigungstücher
ausgestattet, sodass Sie Ihre Hartböden noch gründlicher mit
Trockenreinigungstüchern reinigen können.
Reinigungsmuster
Im automatischen Reinigungsmodus verwendet der Roboter eine
automatische Abfolge von Reinigungsmustern, sodass jeder Bereich des
Raums optimal gereinigt wird. Die folgenden Reinigungsmuster werden
verwendet:
1 Z-Muster oder Zickzack-Muster
2 Zufälliges Muster
53
3 Den Wänden entlang
4 Spiralförmige Bewegungen
Im automatischen Reinigungsmodus verwendet der Roboter diese Muster in
einer bestimmten Reihenfolge: Z-Muster, zufälliges Muster, den Wänden
entlang und Spiralmuster.
Wenn der Roboter mit dieser Muster-Abfolge fertig ist, beginnt er wieder mit
dem Z-Muster. Der Roboter verwendet diese Muster-Abfolge zur Reinigung
des Raums, bis der Akku fast leer ist oder das Gerät manuell ausgeschaltet
wird.
Wenn der Roboter einen besonders verschmutzten Bereich während der
Reinigung erkennt, schaltet er in den Spiralmodus und aktiviert die Turbo-
54
Deutsch
Ventilatorgeschwindigkeit (nur FC8820), um eine gründliche
Schmutzbeseitigung zu garantieren.
Hinweis: Sie können jeden Modus auch einzeln auswählen, indem Sie die
entsprechende Taste auf der Fernbedienung drücken (nur FC8932). Manuell
ausgewählte Modi sind nur für einige Minuten aktiv. Danach wechselt der
Roboter zurück zum automatischen Reinigungsmodus.
Weitere Hinweise finden Sie im Kapitel "Ihren Roboter verwenden",
Abschnitt "Reinigungsmodus auswählen".
So vermeidet Ihr Roboter Höhenunterschiede
Der Roboter hat drei Stopp-Sensoren an der Unterseite. Er verwendet diese
Stopp-Sensoren, um Höhenunterschiede, wie z. B. Stufen, zu erkennen und
zu vermeiden.
Hinweis: Es ist normal, dass sich der Roboter etwas über den Rand eines
Höhenunterschieds bewegt, da sich der vordere Stopp-Sensor hinter dem
Stoßfänger befindet.
Achtung: In einigen Fällen können die Stopp-Sensoren einen
Treppenabsatz oder anderen Höhenunterschied nicht rechtzeitig
erkennen. Beobachten Sie den Roboter bei den ersten Einsätzen also
sorgfältig, sowie bei Nutzung in der Nähe einer Treppe oder eines
sonstigen Höhenunterschieds. Es ist wichtig, dass Sie die Stopp-Sensoren
regelmäßig reinigen, damit der Roboter Höhenunterschiede korrekt
erkennt (siehe Anweisungen im Kapitel „Reinigung und Wartung“).
Vor dem ersten Gebrauch
Die Seitenbürsten montieren
1 Packen Sie die Seitenbürsten aus, und legen Sie den Roboter umgekehrt
auf einen Tisch oder auf dem Boden.
2 Drücken Sie die Seitenbürsten auf die Metallschäfte unten am Roboter.
Hinweis: Vergewissern Sie sich, dass die Seitenbürsten ordnungsgemäß
angebracht sind. Drücken Sie sie auf den Schaft, bis sie mit einem Klicken
einrasten.
Lasche von der Fernbedienung abnehmen
Die Fernbedienung funktioniert mit einer CR2025-Knopfzelle. Diese Batterie
ist mit einer Schutzlasche versehen, die vor dem Gebrauch entfernt werden
muss.

1 Ziehen Sie die Batterieschutzlasche aus dem Batteriefach der
1
2
100 cm
30 cm
80 c
m
Fernbedienung. Jetzt ist die Fernbedienung einsatzbereit.
Für den Gebrauch vorbereiten
Docking-Station aufstellen
1 Stecken Sie den kleinen Stecker des Adapters in die entsprechende
Buchse der Docking-Station (1) und den Adapter in die Steckdose (2).
-
Das Display der Docking-Station wird eingeschaltet.
2 Stellen Sie die Docking-Station auf einen ebenen Untergrund an eine
Wand.
Hinweis: Achten Sie darauf, dass sich 80 cm vor der Docking-Station,
30 cm rechts davon und 100 cm links von der Docking-Station keine
Hindernisse oder Höhenunterschiede befinden.
Tipp: Um sicherzustellen, dass die Docking-Station stabil in Position
bleibt, befestigen Sie sie mit Schrauben oder zwei Streifen doppelseitigen
Klebebands an der Wand.
Deutsch
55

56
Deutsch
Laden
Wenn Sie den Akku des Roboters zum ersten Mal aufladen, und wenn der
Akku leer ist, dauert der Ladevorgang vier Stunden.
Es gibt zwei Möglichkeiten zum Aufladen des Roboters:
-
An der Docking-Station entweder manuell oder automatisch während
des Betriebs
-
Durch direktes Anschließen des Roboters an das Stromnetz
An der Docking-Station aufladen
1 Stellen Sie den Roboter in die eingesteckte Docking-Station.
2 Drücken Sie den Netzschalter, um den Roboter einzuschalten.
3 Die Start-/Stopp-Taste beginnt zu blinken. Die Ladeanzeige bleibt
während des ersten drei Minuten des Ladevorgangs auf dem Display
sichtbar.
4 Ist der Akku vollständig geladen, leuchtet die Start-/Stopp-Taste
dauerhaft.
Automatisches Aufladen während des Betriebs
1
2
Deutsch
1 Wenn der Roboter die Reinigung beendet hat oder der Akku nur noch
15 % Kapazität aufweist, sucht der Roboter zum Aufladen automatisch die
Docking-Station. Wenn der Roboter die Docking-Station sucht, wechselt
die Farbe der LED in der Start-/Stopp-Taste zu Orange.
2 Ist der Akku vollständig geladen, leuchtet die Start-/Stopp-Taste
dauerhaft.
Hinweis: Der Roboter sucht nur dann automatisch die Docking-Station,
wenn die Reinigung an der Docking-Station gestartet wurde.
Direkt über das Stromnetz aufladen
1 Drücken Sie den Netzschalter, um den Roboter einzuschalten.
2 Stecken Sie den kleinen Stecker des Adapters in die Buchse am Roboter
(1). Stecken Sie den Adapter in die Steckdose (2).
3 Wenn der Roboter ordnungsgemäß an das Stromnetz angeschlossen
wird, beginnt die Start-/Stopp-Taste langsam zu blinken. Dies zeigt an,
dass der Roboter geladen wird.
4 Ist der Akku vollständig geladen, leuchtet die Start-/Stopp-Taste
dauerhaft.
Hinweis: Trennen nach dem Ladevorgang den kleinen Gerätestecker vom
Anschluss des Roboters, und ziehen Sie den Adapter aus der
Netzsteckdose. Der Roboter beginnt nicht mit der Reinigung, wenn er noch
an eine Steckdose angeschlossen ist.
57
Den Raum für die Reinigung vorbereiten
Bevor Sie mit dem Roboter die Reinigung starten, sollten Sie sich
vergewissern, dass sich keine losen und zerbrechlichen Gegenstände auf
dem Boden befinden. Bringen Sie auch alle Kabel, Drähte und Schnüre in
Sicherheit.
Ihren Roboter verwenden
Sie können den Roboter auch über die Fernbedienung (nur FC8932) oder
mit den Tasten auf der Benutzeroberfläche des Roboters betreiben.
Ein- und Ausschalten
1 Schalten Sie den Netzschalter auf der Seite des Roboters in die Position
"on" (Ein).
2 Drücken Sie die Start-/Stopp-Taste.

58
Deutsch
-
Sie können die Start-/Stopp-Taste auf dem Roboter drücken.
-
Sie können auch die Start-/Stopp-Taste auf der Fernbedienung
drücken (nur FC8932).
3 Die Start-/Stopp-Taste leuchtet dauerhaft und der Roboter beginnt mit
der Reinigung.
4 Der Roboter reinigt im automatischen Reinigungsmodus, bis der Akku fast
leer ist. Im automatischen Reinigungsmodus wird eine bestimmte
Muster-Abfolge wiederholt: Z-Muster, zufälliges Muster, den Wänden
entlang und Spiralmuster.
Hinweis: Um einen einzelnen Modus auszuwählen, drücken Sie eine der
Modus-Tasten auf der Fernbedienung. Weitere Hinweise finden Sie im
Abschnitt „Reinigungsmodus auswählen“.
5 Wenn der Akku fast leer ist, wechselt die Start-/Stopp-Taste zu Orange,
und der Roboter sucht zum Aufladen die Docking-Station.
6 Sie können auch die Start-/Stopp-Taste, um den Reinigungsvorgang
vorübergehend anzuhalten oder ganz zu stoppen. Wenn Sie die Start/Stopp-Taste erneut drücken und der Akku noch ausreichend Energie
hat, fährt der Roboter mit der Reinigung im automatischen Modus fort.
7 Wenn der Roboter zur Docking-Station zurückkehren soll, bevor der Akku
zur Neige geht, drücken Sie die Docking-Taste auf der Fernbedienung
(nur FC8932). Die Docking-Anzeige auf dem Display des Roboters
schaltet sich ein, und der Roboter kehrt zur Docking-Station zurück.
Hinweis: Wenn Sie den Roboter nicht von der Docking-Station aus
gestartet haben, sucht er nicht automatisch nach ihr, wenn der Akku fast
leer ist. Wenn der Akku noch ausreichend Energie hat, können Sie die
Docking-Taste auf der Fernbedienung drücken (nur FC8932), damit der
Roboter zur Docking-Station zurückkehrt. Falls der Akku komplett leer ist,
müssen Sie den Roboter manuell an der Docking-Station platzieren.

Reinigungsmodus auswählen
Neben dem automatischen Reinigungsmodus hat dieser Roboter vier
einzelne Reinigungsmodi. Jeder Modus kann durch Drücken der
entsprechenden Taste auf der Fernbedienung aktiviert werden.
Hinweis: Manuell ausgewählte Modi sind nur für einige Minuten aktiv.
Danach wechselt der Roboter zurück zum automatischen Reinigungsmodus.
Z-Muster-Modus
Im Z-Muster-Modus zieht der Roboter Z-förmige Schleifen im Raum, um
große Flächen zu reinigen.
Zufallsmodus
In diesem Modus reinigt der Roboter den Raum mit einem gemischten
Muster aus geraden und zickzackförmigen Bewegungen.
Den Wänden entlang
Deutsch
59
In diesem Modus folgt der Roboter dem Verlauf der Wände, um den Bereich
an den Wänden zusätzlich zu reinigen.
Spiralmodus
In diesem Modus bewegt sich der Roboter in einem spiralförmigen Muster,
um einen kleinen verschmutzten Bereich gründlich zu reinigen. Im
Spiralmodus wird der Lüfter mit maximaler Drehzahl betrieben.
Manuelle Steuerung

60
Deutsch
1 Verwenden Sie die Pfeiltasten oberhalb und unterhalb bzw. rechts und
links der Start-/Stopp-Taste auf der Fernbedienung, um den Roboter
durch den Raum zu navigieren.
Hinweis: Seien Sie vorsichtig, wenn Sie den Roboter in der Nähe eines
Höhenunterschieds bzw. einer Treppe manuell steuern.
Hinweis: Die Saugfunktion und die Seitenbürsten funktionieren nur, wenn
der Roboter vorwärts fährt. Die Tasten nach links, rechts und zurück
dienen nur zum Manövrieren des Roboters.
Die Tasten zur Reinigungszeit verwenden (FC8932)
-
Drücken Sie die Taste für die maximale Reinigungszeit, wenn der Roboter
so lange im automatischen Reinigungsmodus reinigen soll, bis die
Akkukapazität zur Neige geht. Wenn der Roboter den Reinigungsvorgang
abgeschlossen hat, kehrt er automatisch zur Docking-Station zurück,
sofern er die Reinigung dort begonnen hatte. Wenn der Roboter von
einer anderen Stelle im Raum gestartet ist, können Sie ihn durch Drücken
der Docking-Taste zur Docking-Station zurückschicken.
-
Mit den anderen Tasten für die Reinigungszeit können Sie den Roboter
60, 45 oder 30 Minuten lang betreiben. Wenn die Reinigungszeit
abgelaufen ist, kehrt der Roboter automatisch zur Docking-Station
zurück, sofern er die Reinigung dort begonnen hatte. Wenn der Roboter
von einer anderen Stelle im Raum gestartet ist, können Sie ihn durch
Drücken der Docking-Taste zur Docking-Station zurückschicken.
Klatsch-Funktion
Die Klatsch-Funktion wird aktiviert, wenn der Roboter in den folgenden
Situationen in den Ruhemodus wechselt:
-
wenn er aufgrund eines Fehlers anhält
-
wenn Sie eine kurze Reinigungszeit programmiert haben
-
wenn er die Docking-Station nicht innerhalb von 20 Minuten finden kann
Wenn Sie den Roboter nicht sehen, können Sie ihn durch einmaliges
Klatschen finden. Der Roboter reagiert durch einen Piepton und
Aufleuchten aller Symbole auf dem Display.
Den Trockenwischaufsatz verwenden
Der Trockenwischaufsatz ermöglicht es Ihnen, Hartböden mit
Trockenreinigungstüchern zu reinigen.
Hinweis: Wenn Sie den Trockenwischaufsatz verwenden, hat der Roboter
möglicherweise Schwierigkeiten dabei, Schwellen zu überwinden oder auf
Teppiche zu gelangen.

Deutsch
Den Trockenwischaufsatz für den Gebrauch vorbereiten
1 Legen Sie den Roboter umgekehrt auf den Boden oder einen Tisch.
2 Legen Sie das Trockenreinigungstuch auf einen Tisch, und setzen Sie den
Trockenwischaufsatz so auf das Reinigungstuch, dass die
Befestigungslaschen in Ihre Richtung zeigen.
3 Falten Sie beide Enden des Trockenreinigungstuchs um den
Trockenwischaufsatz, und befestigen Sie das Reinigungstuch auf dem
Aufsatz, indem Sie die Befestigungsblöcke in die Aussparungen drücken.
4 Stecken Sie die Befestigungslasche des Trockenwischaufsatzes in die
Öffnung direkt hinter dem Laufrad auf einer Seite des Roboters, und
drücken Sie diese nach unten, bis sie hörbar einrastet. Wiederholen Sie
diesen Vorgang dann auf der anderen Seite.
5 Drehen Sie den Roboter um, und setzen Sie ihn mit den Rädern auf den
Boden. Der Trockenwischaufsatz berührt dabei den Boden.
61
Den Roboter mit dem Trockenwischaufsatz verwenden
Wenn der Trockenwischaufsatz angebracht ist, können Sie den Roboter mit
einem beliebigen Modus auf allen Hartböden einsetzen. Verwenden Sie den
Trockenwischaufsatz nicht auf Teppichen.
Den Trockenwischaufsatz abnehmen
1 Nehmen Sie den Trockenwischaufsatz ab, sobald Sie den Boden fertig
gewischt haben.
2 Legen Sie den Roboter umgekehrt auf den Boden oder einen Tisch.

1
2
1
2
62
Deutsch
3 Drücken Sie eine Seite des Trockenwischaufsatzes in Richtung des
Laufrades auf der anderen Seite des Roboters, um die Verriegelung zu
lösen. Ziehen Sie dann den Aufsatz vom Roboter.
Die unsichtbare Wand verwenden
Die Batterien in die unsichtbare Wand einsetzen
Die unsichtbare Wand wird mit vier AA-Batterien betrieben.
1 Drücken Sie die beiden Entriegelungslaschen an der Unterseite der
hinteren Abdeckung (1), und schieben Sie die hintere Abdeckung nach
oben aus der unsichtbaren Wand (2) heraus.
2 Nehmen Sie vier neue AA-Batterien aus der Verpackung, und legen Sie
sie in das Batteriefach der unsichtbaren Wand ein.
Hinweis: Achten Sie darauf, dass die Polung (+) bzw. (–) auf den
Batterien mit den Markierungen im Batteriefach übereinstimmt.
3 Schieben Sie die Abdeckung wieder zurück auf die unsichtbare Wand.
Die unsichtbare Wand zum Stoppen des Roboters aufstellen
Sie können mit der unsichtbaren Wand verhindern, dass sich der Roboter in
einen Raum oder Bereich bewegt, der keine Reinigung benötigt.

3
1
2
Deutsch
1 Stellen Sie die Einheit an eine Stelle, die der Roboter nicht überschreiten
soll, z. B. an eine Tür zu einem Raum, der für den Roboter tabu sein soll.
2 Schalten Sie die unsichtbare Wand am Ein-/Ausschalter auf der
Oberseite der Einheit ein.
3 Starten Sie den Roboter.
4 Wenn der Roboter zu nah an die unsichtbare Wand gerät, blinkt das Licht
an der unsichtbaren Wand, und aus der Wand wird ein Strahl infraroten
Lichts ausgegeben. Durch den infraroten Lichtstrahl ändert der Roboter
seinen Kurs und bewegt sich weg von der unsichtbaren Wand.
Hinweis: Wenn Sie die unsichtbare Wand verwenden, überprüfen Sie
regelmäßig, ob die Batterien noch ausreichend geladen sind. Dies können
Sie prüfen, indem Sie die unsichtbare Wand aus- und wieder einschalten.
Wenn die Batterien ausreichende Energie aufweisen, leuchtet die LED der
unsichtbaren Wand kurz auf.
63
Reinigung und Wartung
Den Roboter reinigen
Um weiterhin eine gute Reinigungsleistung zu gewährleisten, müssen Sie die
Stopp-Sensoren, die Räder, die Seitenbürsten und die Ansaugöffnung von
Zeit zu Zeit reinigen.
1 Legen Sie den Roboter umgekehrt auf eine ebene Oberfläche.
2 Verwenden Sie eine Bürste mit weichen Borsten (z. B. eine Zahnbürste),
um Staub oder Fusseln von den Stopp-Sensoren zu entfernen.
Hinweis: Sie müssen die Stopp-Sensoren unbedingt regelmäßig reinigen.
Wenn die Stopp-Sensoren verschmutzt sind, kann der Roboter
Höhenunterschiede oder Treppenabsätze eventuell nicht rechtzeitig
erkennen.
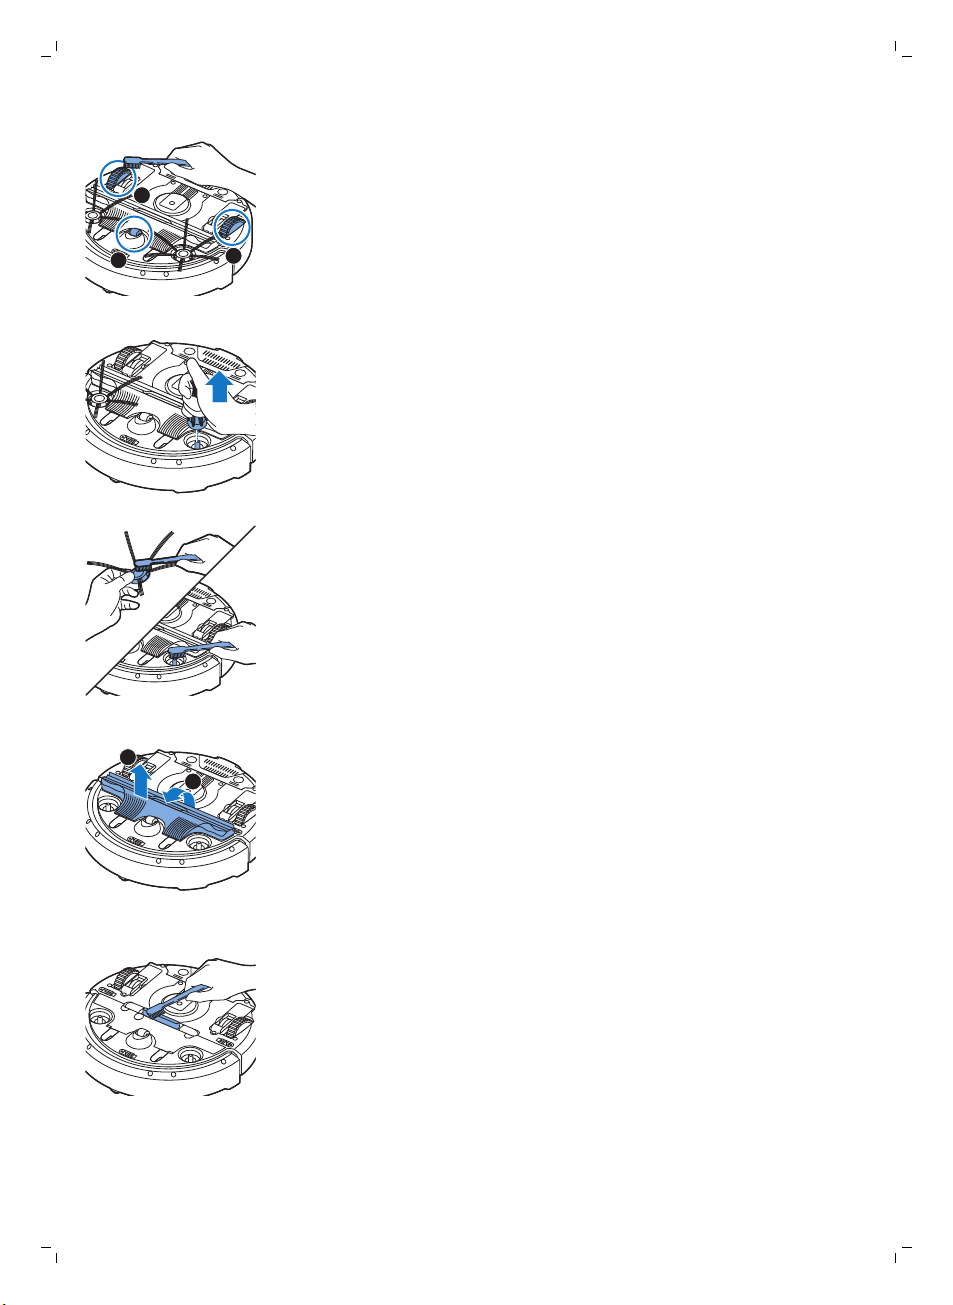
1
2
3
1
2
64
Deutsch
3 Verwenden Sie eine Bürste mit weichen Borsten (z. B. eine Zahnbürste),
um Staub oder Fussel vom Vorderrad und den Seitenrädern zu entfernen.
4 Um die Seitenbürsten zu reinigen, fassen Sie sie an den Borsten, und
ziehen Sie sie vom Schaft.
5 Entfernen Sie mit einer weichen Bürste (z. B. einer Zahnbürste) oder
einem Tuch Fusseln, Haare und Fäden vom Schaft und von der
Seitenbürste.
6 Überprüfen Sie die Seitenbürsten und die Unterseite des Roboters auf
spitze Gegenstände, die den Boden beschädigen könnten.
7 Öffnen Sie die Schnappverschlüsse der TriActive XL-Düse. Halten Sie sie
dazu an den mit Pfeilen markierten Stellen, und ziehen Sie die TriActiveDüse vom Roboter ab.
8 Reinigen Sie die Ansaugöffnung mit einer weichen Bürste (z. B. einer
Zahnbürste).
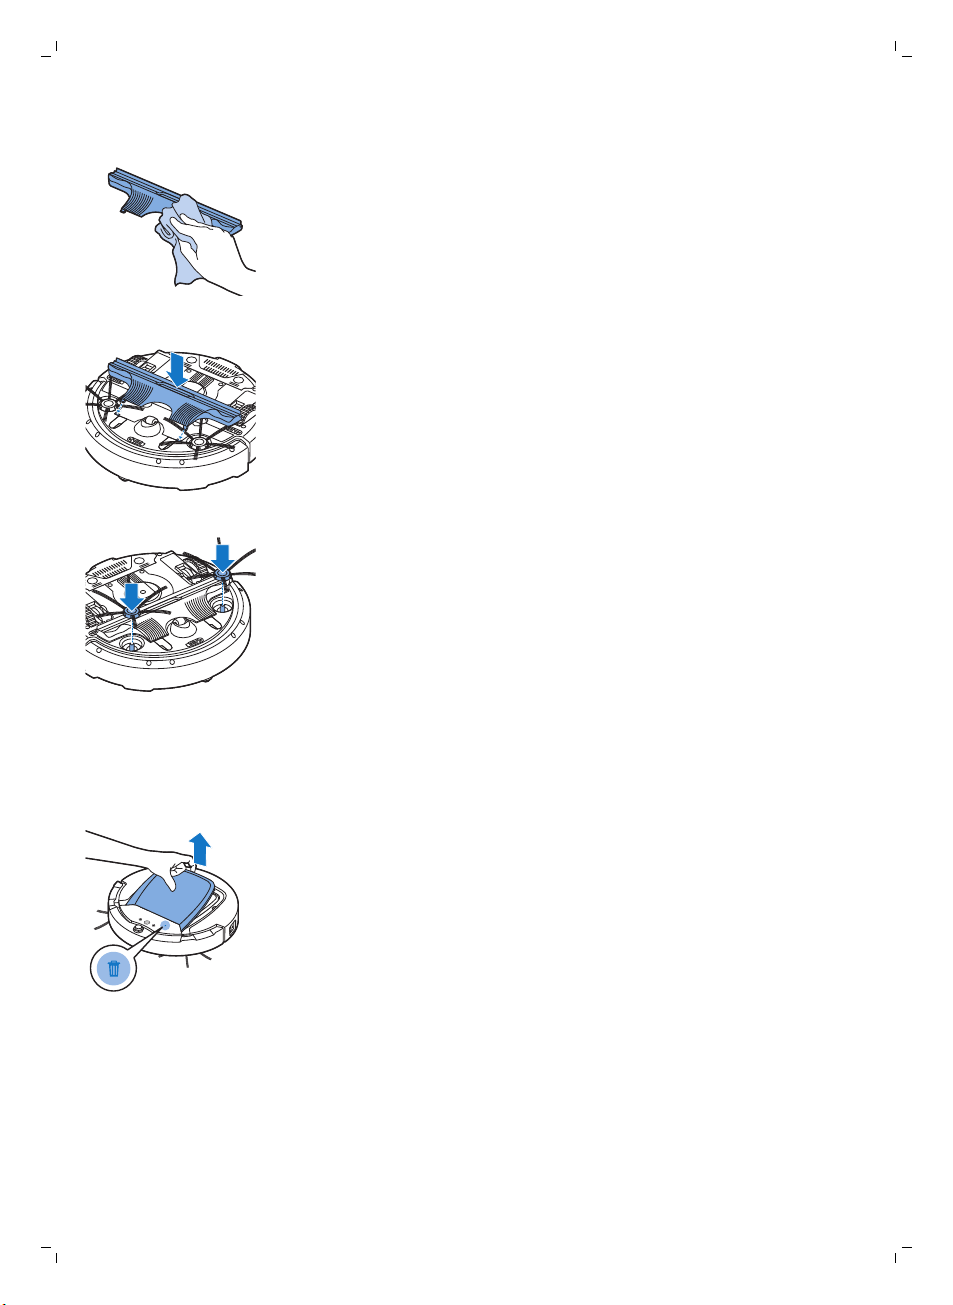
Deutsch
9 Entfernen Sie sämtlichen sichtbaren Schmutz von der TriActive-Düse.
10 Setzen Sie die Schnapp-Klammern der TriActive-Düse in die Löcher
unten am Roboter. Drücken Sie die TriActive-Düse wieder in Position.
Prüfen Sie, dass die Bürste sich einige Millimeter nach oben und unten
frei bewegen kann.
11 Drücken Sie die Seitenbürsten wieder auf die Metallschäfte unten am
Roboter.
65
Den Staubbehälter entleeren und reinigen
Leeren und reinigen Sie den Staubbehälter, wenn die Anzeige für den vollen
Staubbehälter dauerhaft leuchtet.
1 Nehmen Sie die Abdeckung ab.
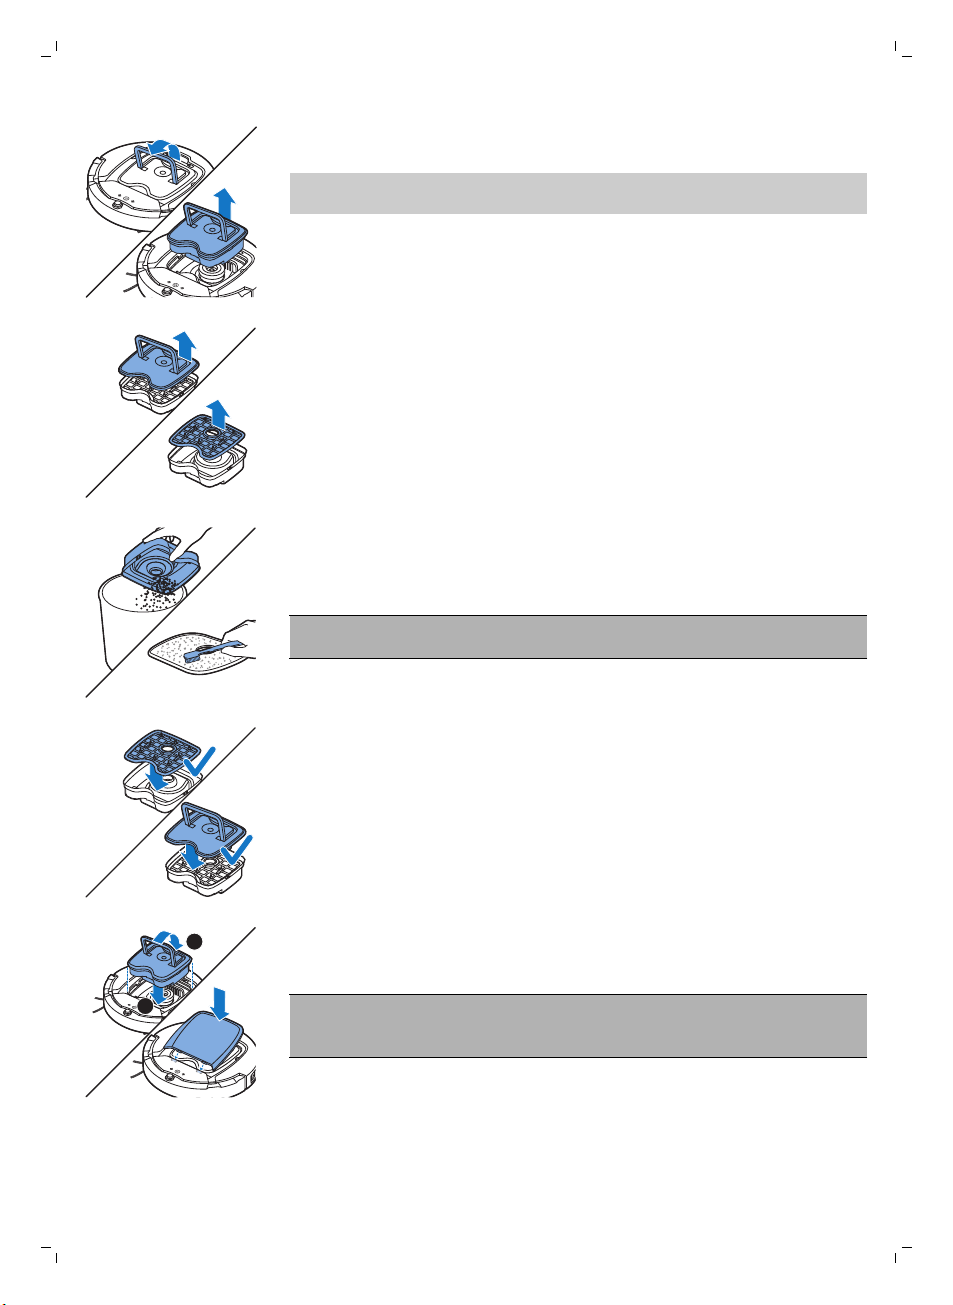
1
2
66
Deutsch
2 Ziehen Sie den Griff am Staubbehälterdeckel nach oben, und heben Sie
den Staubbehälter aus der Staubbehälterkammer.
Hinweis: Achten Sie beim Entnehmen oder Wiedereinsetzen des
Staubbehälters darauf, nicht die Flügel des Lüfters zu beschädigen.
3 Nehmen Sie den Deckel vorsichtig vom Staubbehälter, und nehmen Sie
den Filter heraus.
4 Schütteln Sie den Staubbehälter über einen Papierkorb aus, um ihn zu
entleeren. Reinigen Sie den Filter sowie das Innere des Staubbehälters
mit einem Tuch oder einer Zahnbürste mit weichen Borsten. Reinigen Sie
auch die Ansaugöffnung unten am Staubbehälter.
Achtung: Reinigen Sie den Staubbehälter und den Filter nicht mit
Wasser oder in der Spülmaschine.
5 Setzen Sie den Filter wieder in den Staubbehälter ein. Setzen Sie dann
den Deckel auf den Staubbehälter.
6 Setzen Sie den Staubbehälter wieder in die Staubbehälterkammer (1) ein,
klappen Sie den Griff (2) ein, und setzen Sie die obere Abdeckung wieder
auf den Roboter.
Achtung: Achten Sie immer darauf, dass der Filter ordnungsgemäß in
den Staubbehälter eingesetzt ist. Wenn Sie den Roboter ohne Filter im
Staubbehälter verwenden, wird der Lüfter beschädigt.
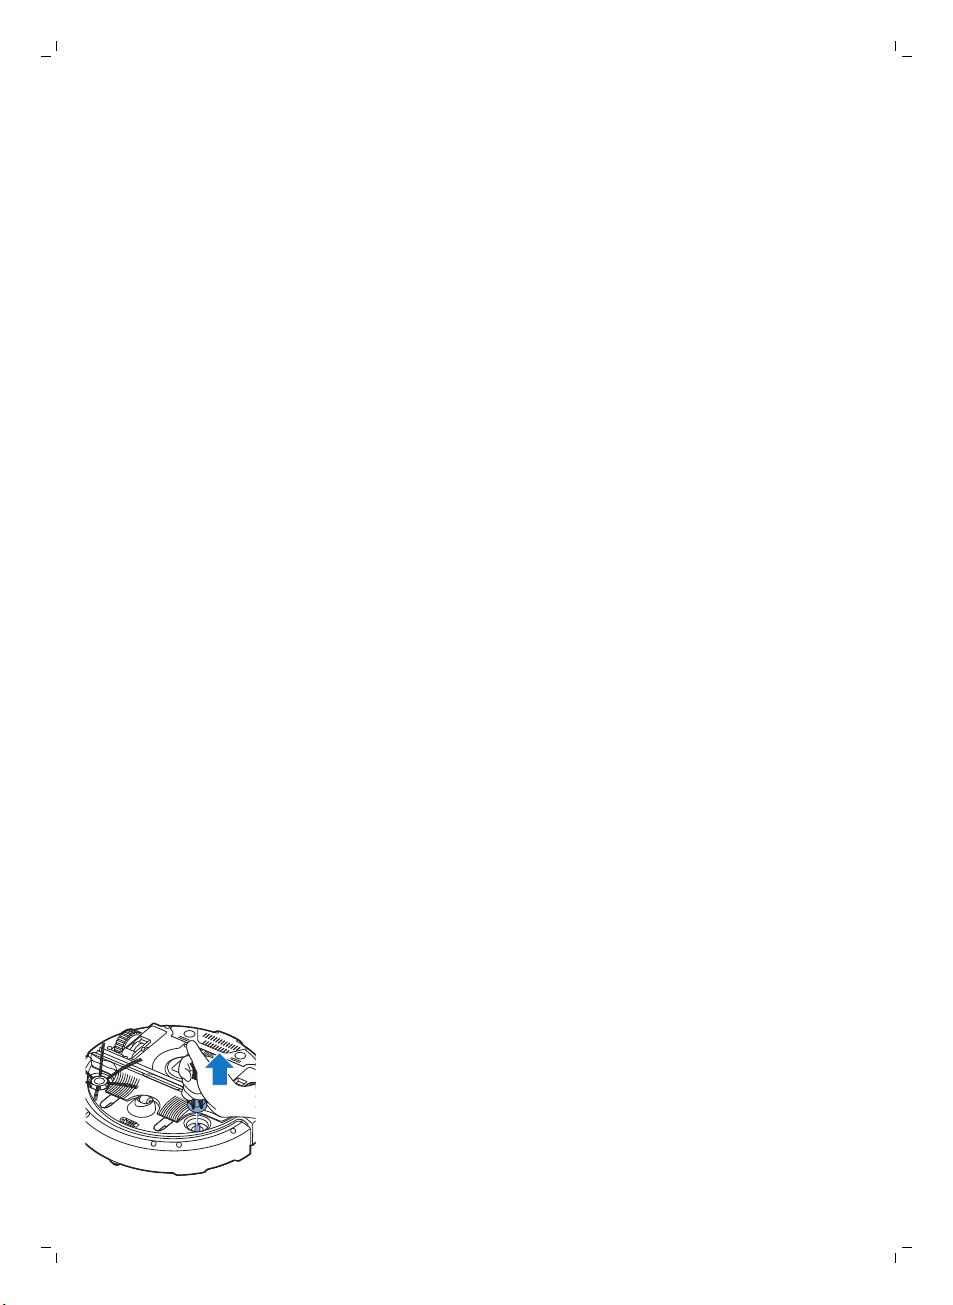
Bestellen von Zubehör
Um Zubehör oder Ersatzteile zu kaufen, gehen Sie auf
www.shop.philips.com/service, oder suchen Sie Ihren Philips Händler auf.
Sie können sich auch an ein Philips Service-Center in Ihrem Land wenden.
Die Kontaktdaten finden Sie in der internationalen Garantieschrift.
Open Source Software
Der Roboter wird mit Open Source Software betrieben. Auf Anfrage stellt
Philips eine vollständige maschinenlesbare Kopie des Quellcodes auf einem
Medium zur Verfügung, das üblicherweise für den Softwareaustausch
verwendet wird. Dabei wird eine Gebühr erhoben, die die Kosten einer
physischen Übertragung der Kopie nicht übersteigt.
Dieses Angebot gilt für drei Jahre ab dem Kaufdatum des Produkts.
Schreiben Sie an folgende Adresse, um eine Kopie des Quellcodes zu
erhalten:
Open Source Team, Philips Intellectual Property and Standards
P.O. Box 220, 5600 AE Eindhoven, Niederlande
E-Mail-Adresse: open.source@philips.com
Austausch
Deutsch
67
Den Filter auswechseln
Wechseln Sie den Filter, wenn er stark verschmutzt oder beschädigt ist. Sie
können ein neues Filterset unter der Typennummer FC8066 bestellen.
Anweisungen zum Entfernen des alten Filters aus dem Staubbehälter und
zum Einsetzen des neuen Filters in den Staubbehälter finden Sie unter "Den
Staubbehälter entleeren und reinigen“ im Kapitel "Reinigung und Wartung“.
Die Seitenbürsten auswechseln
Wechseln Sie die Seitenbürsten nach einiger Zeit aus, um optimale
Reinigungsergebnisse sicherzustellen.
Ersetzen Sie die Seitenbürsten immer, sobald sie Anzeichen von Abnutzung
oder Beschädigung aufweisen. Wir empfehlen auch, beide Seitenbürsten zur
gleichen Zeit auszuwechseln. Sie können Ersatz-Seitenbürsten als Teil des
Ersatzsets FC8068 bestellen. Dieses Set enthält außerdem zwei Filter und
drei Trockenreinigungstücher.
1 Um die Seitenbürsten auszuwechseln, greifen Sie die alten Seitenbürsten
an den Borsten, und ziehen Sie sie vom Schaft.
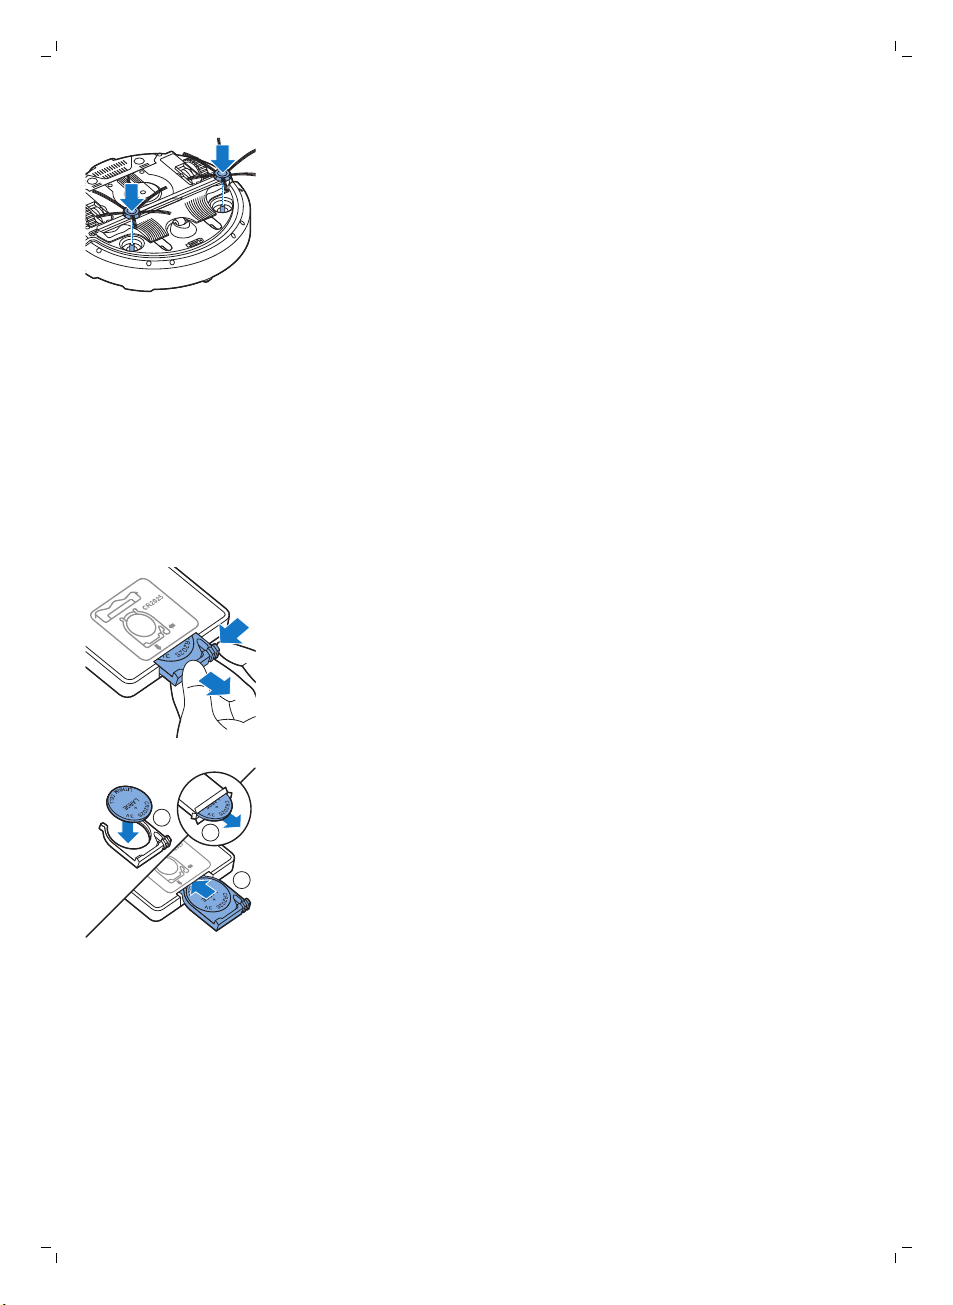
2
3
1
68
Deutsch
2 Drücken Sie dann die neuen Seitenbürsten auf den Schaft.
Trockenreinigungstücher austauschen
Sie können neue Trockenreinigungstücher bestellen. Diese sind Teil des
Ersatzsets FC8068. Dieses Ersatzset enthält außerdem zwei Seitenbürsten
und zwei Filter.
Die Batterie der Fernbedienung austauschen
Die Fernbedienung funktioniert mit einer CR2025-Knopfzelle. Wechseln Sie
die Batterie, wenn der Roboter beim Drücken der Tasten auf der
Fernbedienung nicht mehr reagiert.
1 Drehen Sie die Fernbedienung um. Drücken Sie die Entriegelungstaste
der Batterie-Halterung und schieben Sie diese dabei gleichzeitig aus der
Fernbedienung.
Den Akku ersetzen
2 Nehmen Sie die leere Batterie aus der Batterie-Halterung und setzen Sie
eine neue Batterie ein. Schieben Sie die Batterie-Halterung zurück in die
Fernbedienung.
Der Akku des Roboters darf nur von qualifizierten Servicetechnikern
ausgetauscht werden. Lassen Sie den Akku des Roboters bei einem
autorisierten Philips Service-Center austauschen, wenn Sie ihn nicht mehr
aufladen können oder er sich schnell entlädt. Die Kontaktdaten des Philips
Consumer Care-Centers in Ihrem Land finden Sie in der internationalen
Garantieschrift.
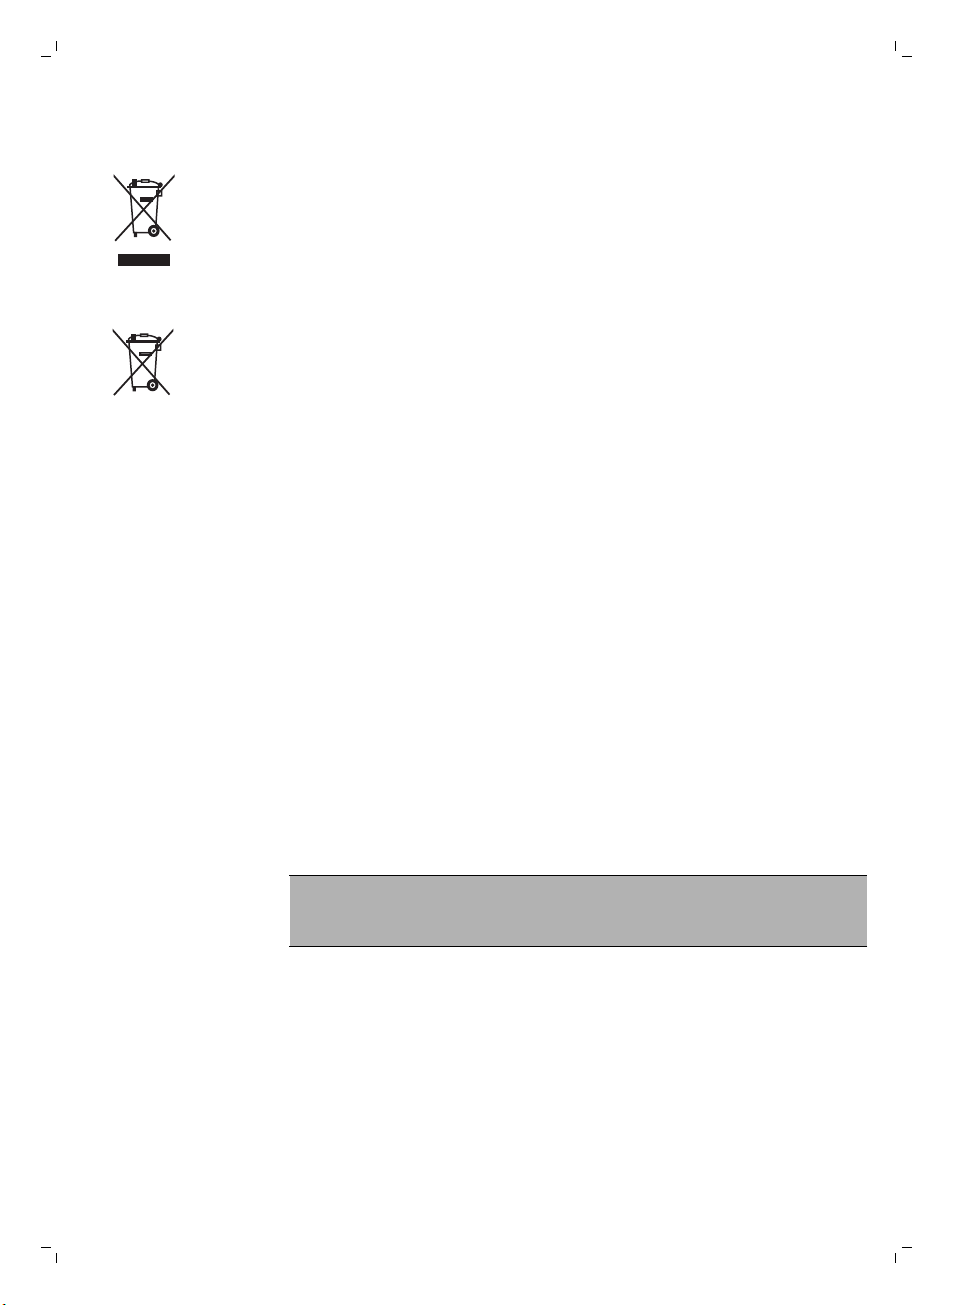
Recycling
Deutsch
-
Dieses Symbol bedeutet, dass das Produkt nicht mit dem normalen
Hausmüll entsorgt werden kann (2012/19/EU).
-
Dieses Symbol bedeutet, dass das Produkt einen eingebauteten Akku
enthält, der nicht mit dem normalen Hausmüll entsorgt werden darf
(2006/66/EG). Wir empfehlen dringend, das Produkt bei einer offiziellen
Sammelstelle oder einem Philips Service-Center abzugeben, um den
Akku fachgerecht ausbauen zu lassen.
1 Altgeräte/Altakkus/Batterien können kostenlos an geeigneten
Rücknahmestellen abgegeben werden.
2 Diese werden dort fachgerecht gesammelt oder zur Wiederverwendung
vorbereitet. Altgeräte/Altakkus/Batterien können Schadstoffe enthalten,
die der Umwelt und der menschlichen Gesundheit schaden können.
Enthaltene Rohstoffe können durch ihre Wiederverwertung einen Beitrag
zum Umweltschutz leisten.
3 Die Löschung personenbezogener Daten auf den zu entsorgenden
Altgeräten muss vom Endnutzer eigenverantwortlich vorgenommen
werden.
4 Hinweise für Verbraucher in Deutschland: Die in Punkt 1 genannte
Rückgabe ist gesetzlich vorgeschrieben. Altgeräte mit Altbatterien
und/oder Altakkus, die nicht vom Altgerät umschlossen sind, sind vor der
Abgabe an einer Rücknahmestelle von diesen zu trennen. Dies gilt nicht,
falls die Altgeräte für eine Wiederverwendung noch geeignet (d.h.
funktionstüchtig) sind und von den anderen Altgeräten getrennt werden.
Sammel- und Rücknahmestellen in DE: https://www.stiftung-ear.de/;
für Batterien auch Rückgabe im Handel möglich.
69
Den Akku entfernen
Warnhinweis: Bauen Sie den wiederaufladbaren Akku nur zur
Entsorgung des Geräts aus. Vergewissern Sie sich, dass der Akku
ganz leer ist, bevor Sie ihn ausbauen.
Gehen Sie folgendermaßen vor, um den Akku zu entfernen: Sie können den
Roboter auch zu einem Philips Service-Center bringen, um den Akku
entfernen zu lassen. Wenden Sie sich an das Philips Consumer Care-Center
in Ihrem Land, um die Adresse eines Service-Centers in Ihrer Nähe zu
erfragen.
1 Starten Sie den Roboter an einem Ort im Zimmer und nicht in der
Docking-Station.
2 Lassen Sie den Roboter so lange laufen, bis der Akku leer ist, um
sicherzustellen, dass der Akku vollständig entladen ist, bevor Sie ihn
entfernen und entsorgen.
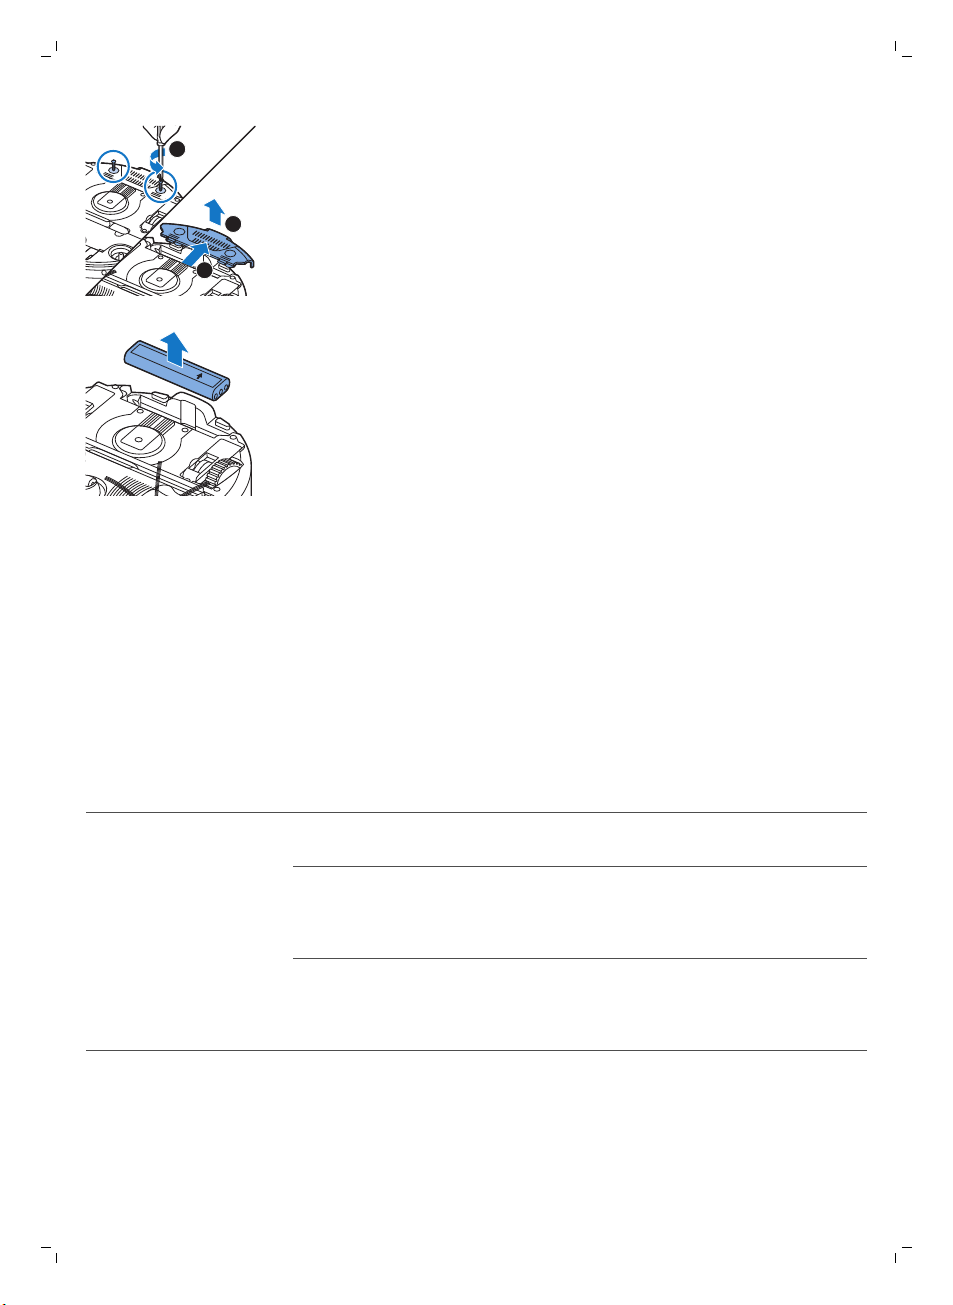
1
3
2
this side up
70
Deutsch
3 Lösen Sie die Schrauben an der Akkufachabdeckung, und entfernen Sie
die Abdeckung.
4 Heben Sie den Akku heraus, und trennen Sie ihn ab.
5 Bringen Sie den Roboter und den Akku zu einer Sammelstelle für
elektrische und elektronische Abfälle.
Fehlerbehebung
In diesem Kapitel sind die häufigsten Probleme aufgeführt, die beim
Gebrauch des Geräts auftreten können. Sollten Sie ein Problem mithilfe der
nachstehenden Informationen nicht beheben können, besuchen Sie unsere
Website unter: www.philips.com/support und ziehen Sie die Liste „Häufig
gestellte Fragen“ hinzu, oder wenden Sie sich an das Philips Consumer
Care-Center in Ihrem Land.
Fehlerbehebung
Problem
Der Roboter fängt nicht
an zu reinigen, wenn ich
auf die Start-/StoppTaste drücke.
Mögliche Ursache Die Lösung
Der Akku ist leer. Laden Sie den Akku auf (siehe Kapitel "Für
Der kleine Stecker ist immer
noch in der Buchse am
Roboter eingesteckt.
Der Netzschalter ist nicht auf
Position "On" (I, Ein) gestellt.
den Gebrauch vorbereiten").
Der Roboter arbeitet bei Netzspannung
nicht. Er arbeitet nur mit seinem Akku.
Daher vor Benutzung immer den Adapter
vom Netz und vom Roboter trennen.
Drücken Sie den Netzschalter. Drücken Sie
die Start-/Stopp-Taste am Roboter oder
an der Fernbedienung, um mit der
Reinigung zu starten.
Problem Mögliche Ursache Die Lösung
Die Warnanzeige blinkt
schnell.
Ein oder beide Räder sind
stecken geblieben.
Schalten Sie den Netzschalter auf "Off"
(Aus). Entfernen Sie Fusseln, Haare, Fäden
oder Drähte, die sich an der
Radaufhängung angesammelt haben.
Deutsch
71
Eine oder beide
Seitenbürsten sind blockiert.
Die obere Abdeckung wurde
nicht aufgesetzt bzw. nicht
ordnungsgemäß geschlossen.
Der Stoßfänger ist blockiert. Drücken Sie die Start-/Stopp-Taste.
Der Roboter wurde während
des Reinigens hochgehoben.
Reinigen Sie die Seitenbürsten (siehe
Kapitel "Reinigung und Wartung").
Wenn der obere Deckel nicht eingesetzt
oder korrekt geschlossen wurde,
funktioniert der Roboter nicht. Setzen Sie
den oberen Deckel ordnungsgemäß auf
den Roboter.
Heben Sie den Roboter an, damit sein
Stoßfänger freikommt. Platzieren Sie den
Roboter in einiger Entfernung vom
Hindernis und drücken Sie die Start/Stopp-Taste, um mit der Reinigung
fortzufahren.
Drücken Sie die Start-/Stopp-Taste.
Stellen Sie den Roboter auf den Boden.
Drücken Sie dann auf die Start-/StoppTaste, damit der Roboter mit der
Reinigung fortfährt.
72
Deutsch
Problem Mögliche Ursache Die Lösung
Der Roboter reinigt nicht
ordnungsgemäß.
Die Borsten auf einer oder auf
beiden Seitenbürsten sind
krumm oder verbogen.
Weichen Sie die Bürste oder Bürsten
einige Zeit in warmem Wasser ein. Wenn
die Bürsten dadurch nicht zu ihrer
ursprünglichen Form zurückkehren,
ersetzen Sie die Seitenbürsten (siehe
Kapitel "Austausch").
Der Filter im Staubbehälter ist
schmutzig.
Die Ansaugöffnung auf der
Unterseite des
Staubbehälters ist verstopft.
Das Vorderrad ist von Haaren
oder anderem Schmutz
blockiert.
Der Roboter reinigt eine sehr
dunkle oder glänzende
Oberfläche, sodass die
Stopp-Sensoren ausgelöst
werden. Das führt dazu, dass
sich der Roboter in einem
ungewöhnlichen
Reinigungsmuster bewegt.
Der Roboter reinigt einen
Boden, auf dem Sonnenlicht
sehr stark reflektiert wird.
Dadurch werden die StoppSensoren ausgelöst und der
Roboter bewegt sich in
ungewöhnlichen Mustern.
Reinigen Sie den Filter im Staubbehälter
mit einem Tuch oder einer Zahnbürste mit
weichen Borsten. Sie können die Filter und
den Staubbehälter auch mit einem
handelsüblichen Staubsauger bei niedriger
Ansaugstärke reinigen.
Wenn sich der Filter nicht mit einer Bürste
reinigen oder aussaugen lässt, ersetzen Sie
den Filter durch einen neuen. Sie sollten
den Filter mindestens einmal pro Jahr
austauschen.
Reinigen Sie die Ansaugöffnung (siehe
Kapitel "Reinigung und Wartung").
Reinigen Sie das Vorderrad (siehe Kapitel
"Reinigung und Wartung").
Drücken Sie die Start-/Stopp-Taste und
verschieben Sie den Roboter an eine
hellere Stelle des Bodens. Wenn das
Problem auch bei helleren Böden
weiterhin auftritt, gehen Sie zu
www.philips.com/support oder wenden
Sie sich an das Philips Service-Center in
Ihrem Land.
Ziehen Sie die Vorhänge zu, damit kein
Sonnenlicht in den Raum dringt. Sie
können auch mit der Reinigung beginnen,
wenn das Sonnenlicht nicht so hell ist.
Der Akku kann nicht
länger aufgeladen
werden, oder die
Akkuleistung lässt schnell
nach.
Der Akku hat das Ende seiner
Lebensdauer erreicht.
Ersetzen Sie den Akku (siehe Kapitel
„Austausch“).
Problem Mögliche Ursache Die Lösung
Die Batterie der
Fernbedienung wird zu
schnell leer.
Möglicherweise haben Sie
nicht den richtigen
Batterietyp eingesetzt.
Für die Fernbedienung brauchen Sie eine
CR2025-Knopfzelle. Sollte das Problem
fortbestehen, gehen Sie zu
www.philips.com/support oder wenden
Sie sich an das Philips Service-Center in
Ihrem Land.
Deutsch
73
Der Roboter bewegt sich
im Kreis.
Der Roboter findet die
Docking-Station nicht.
Der Roboter piept, wenn
er auf der DockingStation steht.
Der Roboter befindet sich im
Modus zur punktuellen
Reinigung.
Es ist nicht genug Platz, damit
der Roboter sich zur DockingStation bewegen kann.
Der Roboter sucht noch aktiv. Warten Sie rund 20 Minuten, bis der
Der Roboter wurde nicht von
der Docking-Station aus
gestartet.
Sie versuchen, den Roboter
aufzuladen, aber der
Netzschalter befindet sich in
der Position „off“ (Aus).
Das ist normales Verhalten. Der
Spiralmodus kann zur gründlichen
Reinigung aktiviert werden, wenn auf dem
Boden eine starke Verschmutzung erkannt
wird. Er ist auch Teil des automatischen
Reinigungsmodus. Nach ungefähr einer
Minute fährt der Roboter mit seinem
normalen Reinigungsmuster fort. Sie
können den Spiralmodus auch stoppen,
indem Sie auf der Fernbedienung einen
anderen Reinigungsmodus auswählen.
Versuchen Sie eine andere Stelle für die
Docking-Station zu finden. Siehe
"Docking-Station aufstellen" im Kapitel
"Für den Gebrauch vorbereiten".
Roboter zur Docking-Station zurückkehrt.
Wenn der Roboter nach einer Reinigung
zur Docking-Station zurückkehren soll,
starten Sie ihn von der Docking-Station
aus.
Drücken Sie den Netzschalter, um den
Roboter einzuschalten.
Fehlercodes
Fehlercode
E1 Räder blockiert Nehmen Sie den Roboter vom Hindernis, und
E2 Obere Abdeckung oder
E3 Stoßfänger blockiert Nehmen Sie den Roboter vom Hindernis. Der
Mögliche Ursache Die Lösung
drücken Sie die Start-/Stopp-Taste, um die
Reinigung fortzusetzen.
Staubbehälter nicht
richtig auf- bzw.
eingesetzt
Setzen Sie den Staubbehälter ordnungsgemäß
ein und die obere Abdeckung auf den Roboter.
Der Fehlercode wird automatisch nicht mehr
auf dem Display angezeigt.
Fehlercode wird automatisch nicht mehr auf
dem Display angezeigt.

74
Deutsch
Fehlercode Mögliche Ursache Die Lösung
E4 Roboter vom Boden
gehoben
Stellen Sie den Roboter wieder auf den
Boden; der Fehlercode wird ausgeblendet.
E5 Farbe des Bodens zu
E6
dunkel
Akku nicht richtig
eingelegt
Fehler beim Laden Überprüfen Sie, ob der Netzschalter in der
Setzen Sie den Roboter auf einen helleren
Bereich des Bodens. Reinigen Sie die StoppSensoren.
Lesen Sie die Anweisungen im Abschnitt "Den
Akku in den Roboter einsetzen" im Kapitel "Vor
dem ersten Gebrauch".
Position "on" (Ein) ist, wenn sich der Roboter in
der Docking-Station befindet.

Introducción
1
1110 129
234
5 6 7 8
Introducción
Enhorabuena por la adquisición de este producto, y bienvenido a Philips
Para sacar el mayor partido a la asistencia que Philips le ofrece, registre el
producto en www.philips.com/welcome.
Descripción general
1 Asa de la tapa del depósito del polvo
2 Tapa del depósito del polvo
3 Filtro
4 Depósito del polvo
5 Cubierta superior
6 Tabla de códigos de error
7 Ventilador
8 Paragolpes
9 Sensor de estación base
10 Pantalla
11 Interruptor de encendido (para encender o apagar el robot)
12 Rueda delantera
13 Ejes de los cepillos laterales
14 Sensores de interrupción
15 Ruedas
16 Cepillo TriActive XL
17 Cepillos laterales
18 Bloques de fijación de las toallitas secas
19 Soporte de las toallitas secas
20 Toallitas secas
21 Compartimento de la batería
22 Mando a distancia
23 Pilas AA para la pared invisible
24 Pared invisible
25 Estación base
26 Adaptador de corriente
27 Clavija pequeña
Español
75
Pantalla y mando a distancia
Pantalla
1 Indicador de modo en espiral
2 Indicador del modo de seguimiento de la pared
3 Indicador del modo de patrón en zigzag
4 Indicador de modo aleatorio
5 Tiempo de limpieza
6 Icono de la base
7 Icono WiFi
8 Indicador de cubo de basura lleno
9 Sensor de sonido
10 Botón de selección de modo
11 Botón de inicio/parada
Español

2
1
3
45
76
Español
12 Botón WiFi
Mando a distancia (modelo FC8932)
1 Botones de direccionamiento e inicio/parada
2 Botones de tiempo de limpieza
3 Botones de modo de limpieza
4 Botones de velocidad del ventilador
5 Botón de base
Cómo funciona el robot
Qué puede limpiar el robot
Este robot dispone de funciones que lo convierten en un aparato adecuado
para limpiar los suelos de su hogar.
El robot es adecuado especialmente para la limpieza de suelos duros, como
suelos de madera, baldosas o linóleo. Puede experimentar problemas al
limpiar suelos blandos, como moquetas o alfombras. Si utiliza el robot en
una moqueta o alfombra, quédese cerca la primera vez para ver si el robot
funciona bien con ese tipo de suelo. Compruebe el funcionamiento del
robot cuando lo utilice en suelos duros muy oscuros o brillantes.
Cómo limpia el robot
Sistema de limpieza
El robot cuenta con un sistema de limpieza de 3 etapas para limpiar el suelo
de forma eficiente.
-
Los dos cepillos laterales permiten al robot limpiar en rincones y a lo
largo de paredes. También ayudan a eliminar la suciedad suelta del
suelo y moverla hacia la abertura de succión.

Español
-
La potencia de succión del robot recoge la suciedad suelta y la
transporta a través de la abertura de succión hasta el depósito del polvo.
-
El robot cuenta con un soporte para toallitas secas que le permite limpiar
suelos duros en mayor profundidad con toallitas secas.
77
Patrones de limpieza
En el modo de limpieza automática, el robot utiliza una secuencia
automática de patrones de limpieza para limpiar cada zona de la habitación
de forma óptima. Estos son los patrones de limpieza que utiliza:
1 Patrón en z o patrón en zigzag
2 Patrón aleatorio
3 Patrón de seguimiento de la pared
4 Patrón espiral
En el modo de limpieza automática, el robot utiliza los patrones en una
secuencia fija: patrón en z, patrón aleatorio, patrón de seguimiento de la
pared y patrón en espiral.
Cuando el robot completa esta secuencia de patrones, comienza a moverse
de nuevo según el patrón en z. El robot sigue utilizando esta secuencia de
patrones para limpiar la habitación hasta que la batería recargable se agota
o hasta que se apaga manualmente.
Si el robot detecta una zona muy sucia durante la limpieza, cambia al modo
en espiral y enciende la velocidad del ventilador turbo (solo FC8820) para
garantizar una eliminación profunda de la suciedad.

78
Español
Nota: También puede seleccionar cada modo de forma individual pulsando
el botón correspondiente en el mando a distancia (solo FC8932). Los
modos que seleccione manualmente solamente estarán activos durante
unos minutos. Después, el robot volverá al modo de limpieza automática.
Para obtener más información, consulte la sección "Modos de limpieza" del
capítulo "Uso del robot".
Cómo evita el robot las diferencias de altura
El robot está equipado con tres sensores de interrupción en la parte inferior.
Estos sensores de interrupción se utilizan para detectar y evitar las
diferencias de altura, por ejemplo, unas escaleras.
Nota: Es normal que el robot avance ligeramente sobre el borde de una
diferencia de altura, ya que su sensor de interrupción delantero se
encuentra detrás del paragolpes.
Precaución: En algunos casos, puede que los sensores de interrupción no
detecten unas escaleras u otras diferencias de altura a tiempo. Por lo
tanto, le recomendamos que controle el robot con atención las primeras
veces que lo usa y cuando lo utilice cerca de escaleras o zonas con
diferentes alturas. Es importante limpiar los sensores de interrupción
regularmente para garantizar que el robot sigue detectando las
diferencias de altura adecuadamente (siga las instrucciones del capítulo
"Limpieza y mantenimiento").
Antes de utilizarlo por primera vez
Montaje de los cepillos laterales
1 Desembale los cepillos laterales y coloque el robot boca abajo sobre
una mesa o en el suelo.
2 Presione los cepillos laterales sobre los ejes de la parte inferior del robot.
Nota: Asegúrese de que coloca los cepillos laterales correctamente.
Presiónelos sobre el eje hasta que oiga que encajan en su posición con
un clic.
Extracción de la pestaña del mando a distancia
El mando a distancia funciona con una pila CR2025 con forma de moneda.
La pila está protegida con una pestaña protectora que se debe retirar antes
del uso.

1 Tire de la pestaña protectora de la pila para extraerla del compartimento
1
2
100 cm
30 cm
80 c
m
de la pila del mando a distancia. El mando a distancia está listo para su
uso.
Preparación para su uso
Instalación de la estación base
1 Inserte la clavija pequeña del adaptador en la toma de la estación base
(1) e inserte el adaptador en una toma de corriente (2).
-
Se muestra la pantalla de la estación base.
2 Coloque la estación base en un suelo horizontal y nivelado contra la
pared.
Nota: Asegúrese de que no hay obstáculos o diferencias de altura a
80 cm por delante, 30 cm a la derecha y 100 cm a la izquierda de la
estación base.
Consejo: Para asegurarse de que la estación base permanece estable en
el punto seleccionado, fíjela a la pared con tornillos o con dos tiras de
cinta de doble cara.
Español
79
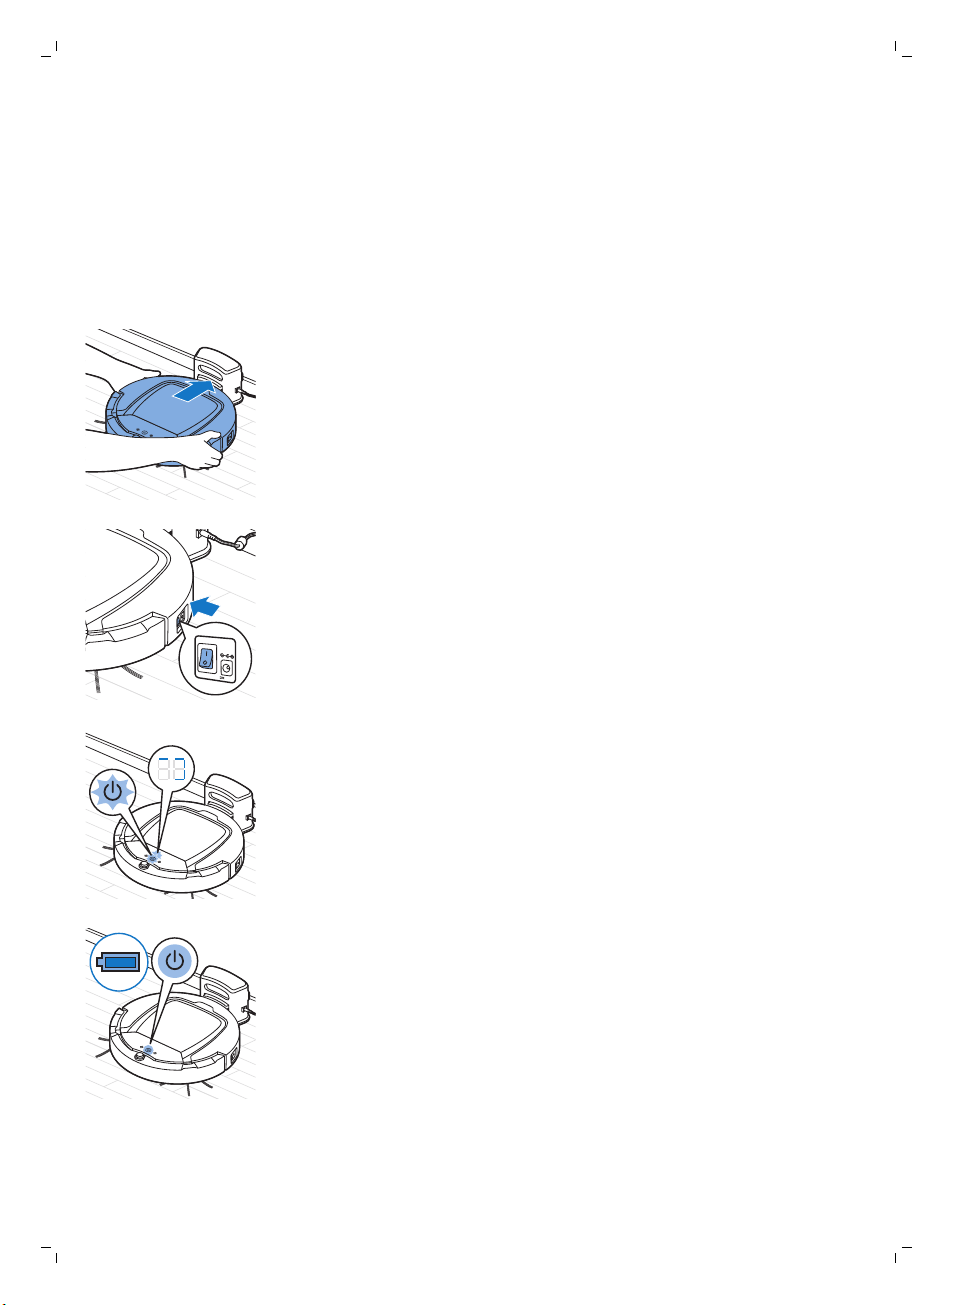
80
Español
Carga
Cuando se carga por primera vez o cuando la batería recargable del robot
está agotada, el tiempo de carga es de cuatro horas.
El robot se puede cargar de dos maneras:
-
En la estación base, bien de forma manual o automáticamente durante
el uso.
-
Conectando el robot directamente a la red eléctrica.
Carga de la estación base
1 Coloque el robot en la estación base enchufada.
2 Pulse el interruptor de encendido para encender el robot.
3 El botón de inicio/parada empieza a parpadear. Durante los tres
primeros minutos de carga, el indicador de carga se mostrará en la
pantalla.
4 Cuando la batería recargable está completamente cargada, el botón de
inicio/parada se ilumina de forma continua.
Carga automática durante el uso
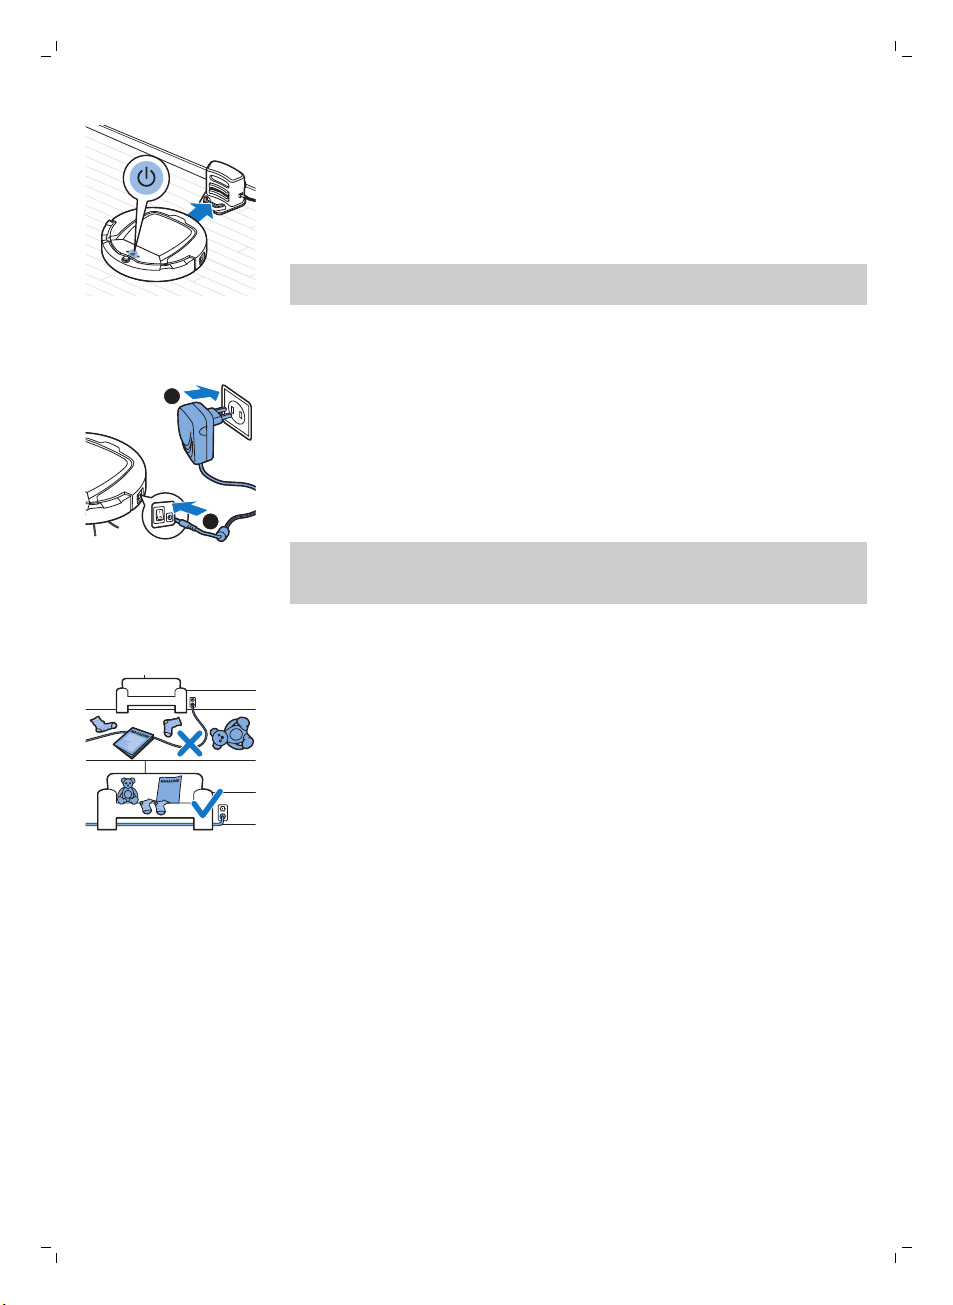
1
2
Español
1 Cuando el robot haya terminado de limpiar o cuando solo quede el 15 %
de la energía de la batería, buscará automáticamente la estación base
para recargarse. Cuando el robot busque la estación base, la luz del
botón de inicio/parada se muestra en color naranja.
2 Cuando la batería recargable está completamente cargada, el botón de
inicio/parada se ilumina de forma continua.
Nota: El robot solo busca la estación base automáticamente cuando ha
empezado a limpiar desde esta.
Carga directa desde la red eléctrica
1 Pulse el interruptor de encendido para encender el robot.
2 Inserte la clavija pequeña del adaptador en la toma del robot (1). Enchufe
el adaptador de corriente a la red (2).
3 Si el robot se ha conectado a la red eléctrica correctamente, el botón de
inicio/parada empezará a parpadear lentamente. Esto indica que el
robot se está cargando.
4 Cuando la batería recargable está completamente cargada, el botón de
inicio/parada se ilumina de forma continua.
Nota: Después de la carga, saque la clavija pequeña del soporte del robot y
desenchufe el adaptador de la toma de corriente. El robot no empieza a
limpiar si sigue conectado a la toma de corriente.
Preparación de la habitación para un ciclo de limpieza
Antes de iniciar un ciclo de limpieza en el robot, asegúrese de retirar todos
los objetos sueltos o frágiles del suelo. Retire también todos los cables del
suelo.
81
Uso del robot
Inicio y parada
También puede accionar el botón con el mando a distancia (modelo
FC8932 solo) o con el botón de la interfaz de usuario del robot.
1 Ponga el interruptor de encendido del lateral del robot en la posición de
encendido.
2 Pulse el botón de inicio/parada.
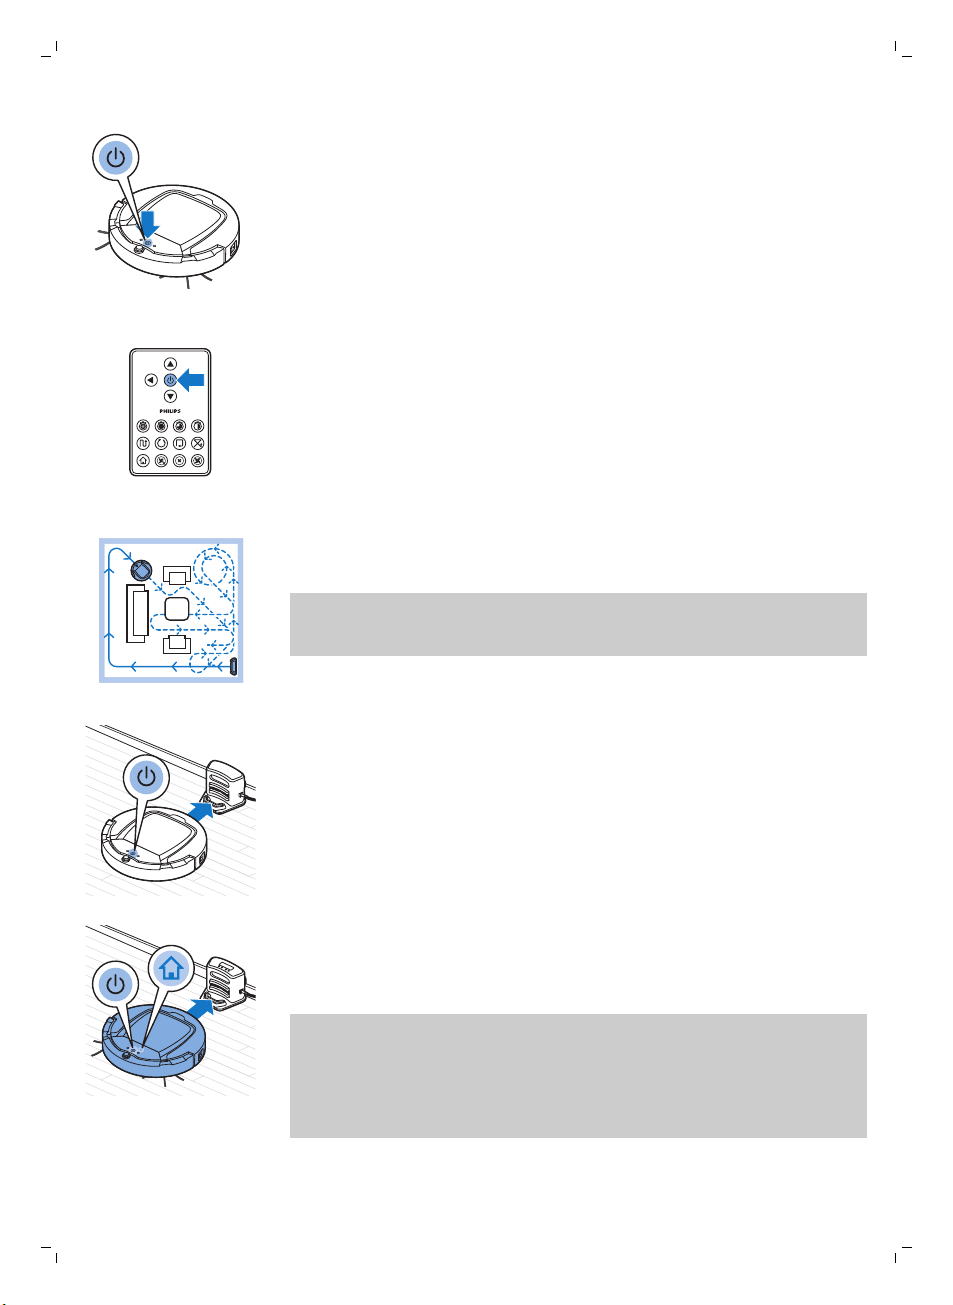
82
Español
-
Puede pulsar el botón de inicio/parada en el robot.
-
También puede pulsar el botón de inicio/parada en el mando a
distancia (FC8932 solo)
3 El botón de inicio/parada se mantiene encendido y el robot comienza a
limpiar.
4 El robot limpia en el modo de limpieza automática hasta que se agota la
batería. En el modo de limpieza automática, sigue secuencias repetidas
de movimientos en z, aleatorios, de seguimiento de la pared y en espiral.
Nota: Para seleccionar un modo individual, pulse uno de los botones de
modo del mando a distancia. Consulte la sección "Selección del modo
de limpieza" para obtener más información.
5 Cuando la batería se está agotando, el botón de inicio/parada se
enciende en color naranja y el robot busca la estación base para
recargarse.
6 También puede pulsar el botón de inicio/parada para interrumpir o
detener el ciclo de limpieza. Si pulsa el botón de inicio/parada de nuevo
y queda suficiente energía en la batería recargable, el robot seguirá
limpiando en el modo de limpieza automática.
7 Para que el robot vuelva a la estación base antes de que se agote la
batería recargable, pulse el botón de base en el mando a distancia (solo
FC8932). El indicador de la estación base de la pantalla del robot se
enciende y el robot vuelve a la estación base.
Nota: Si no ha iniciado el robot desde la estación base, no volverá a esta
automáticamente cuando la batería recargable se agote. Si queda
suficiente energía en la batería recargable, puede pulsar el botón de
base en el mando a distancia (FC8932 solo) para que el robot vuelva a la
estación base. Si la batería recargable está totalmente agotada, deberá
colocar el robot en la estación base manualmente.
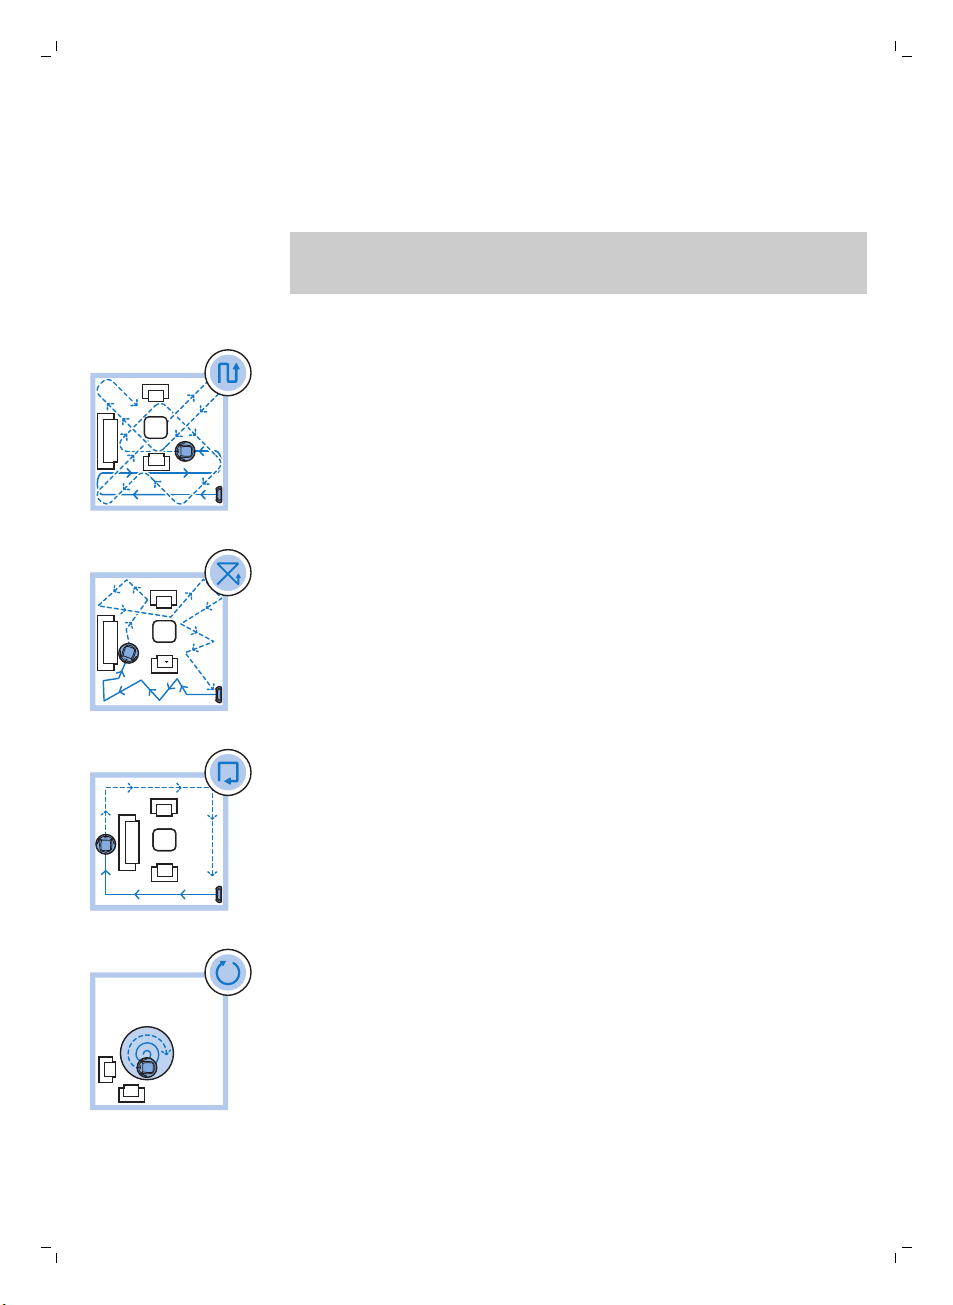
Selección del modo de limpieza
Además del modo de limpieza automática, este robot cuenta con cuatro
modos de limpieza individuales que se pueden activar pulsando el botón
correspondiente en el mando a distancia.
Nota: Los modos que seleccione manualmente solamente estarán activos
durante unos minutos. Después, el robot volverá al modo de limpieza
automática.
Modo de patrón en z
En el modo de patrón en z, el robot limpia realizando bucles en forma de z
por la habitación para limpiar zonas grandes.
Modo aleatorio
En este modo, el robot limpia la habitación con un patrón mixto de
movimientos rectos y entrecruzados.
Modo de seguimiento de la pared
Español
83
En este modo, el robot sigue las paredes de la habitación para limpiar mejor
la zona que hay a lo largo de las paredes.
Modo en espiral
En este modo, el robot se mueve en espiral para limpiarla en profundidad
un área reducida. En el modo de espiral, el ventilador funciona a velocidad
turbo.
Conducción manual
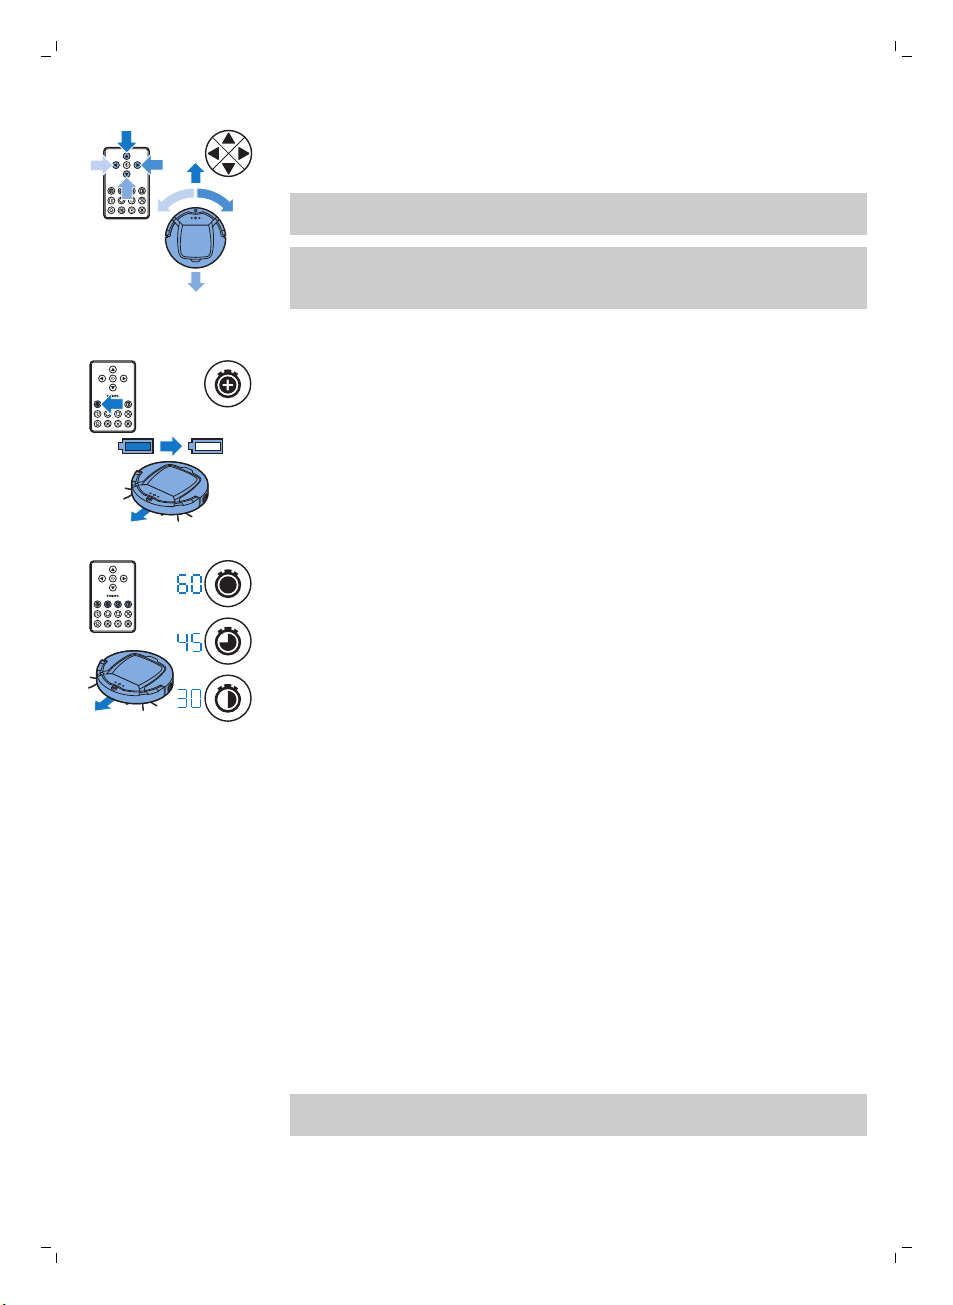
84
Español
1 Utilice los botones de flecha que hay encima y debajo y a la izquierda y
derecha del botón de inicio/parada del mando a distancia para dirigir el
robot por la habitación.
Nota: Tenga cuidado al dirigir el robot manualmente cerca de escaleras o
espacios con diferencia de altura.
Nota: La función de aspiración y los cepillos laterales solo funcionan
cuando el robot avanza hacia delante. Los botones izquierdo, derecho y
trasero son solo para maniobrar el robot.
Uso de los botones de tiempo de limpieza (FC8932)
-
Pulse el botón de tiempo máximo de limpieza para que el robot siga
limpiando en el modo de limpieza automática hasta que la batería
recargable se agote. Cuando termina de limpiar, el robot vuelve a la
estación base automáticamente si ha empezado a limpiar desde ahí. Si el
robot comenzó en otro lugar de la estancia, pulse el botón de la base
para que vuelva a la estación base.
-
Con los otros botones de tiempo de limpieza puede hacer que el robot
funciones durante 60, 45 y 30 minutos respectivamente. Cuando termina
el tiempo de limpieza, el robot vuelve a la estación base
automáticamente si ha empezado a limpiar desde ahí. Si el robot
comenzó en otro lugar de la estancia, pulse el botón de la base para que
vuelva a la estación base.
Respuesta a palmada
La respuesta a palmada se habilita cuando el robot entra en el modo sueño
en las situaciones siguientes:
-
cuando deja de limpiar debido a un error
-
cuando se ha programado un tiempo de limpieza corto
-
cuando no encuentra la estación base en 20 minutos
Si no ve el robot, puede localizarlo dando una palmada. El robot emitirá un
pitido y se iluminarán todos los iconos de su pantalla.
Uso del accesorio para toallitas secas
El accesorio para toallitas secas es una función que le permite limpiar
suelos duros con toallitas secas.
Nota: Si utiliza el accesorio para toallitas secas, el robot puede tener
problemas para cruzar los umbrales o acceder a las alfombras.
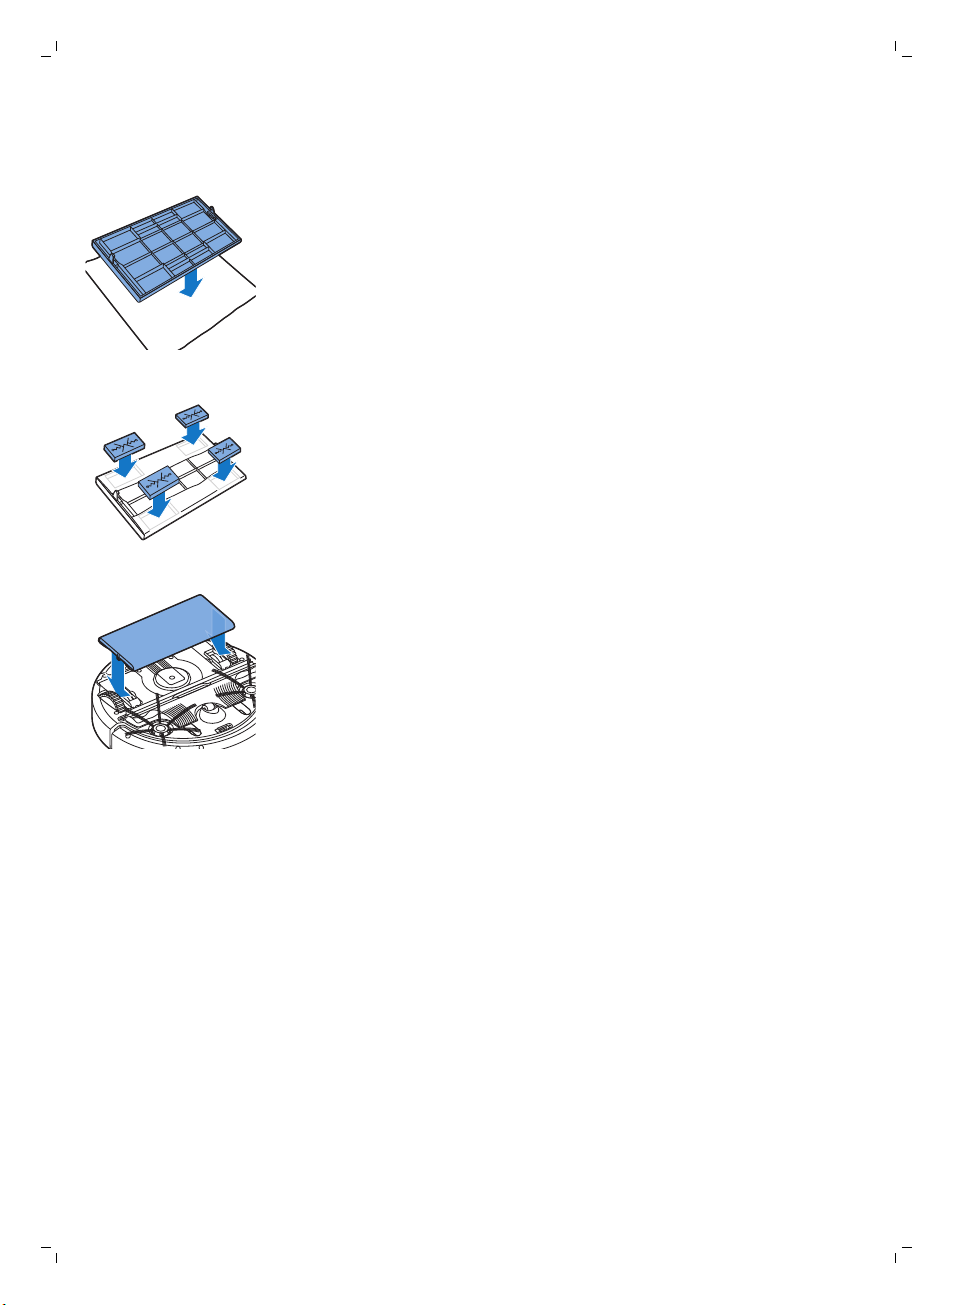
Español
Preparación del accesorio para toallitas secas para su uso
1 Ponga el robot boca abajo y colóquelo en el suelo o en una mesa.
2 Coloque la toallita seca sobre una mesa y ponga el accesorio para
toallitas secas sobre la toallita con los salientes de fijación hacia usted.
3 Pliegue los extremos de la toallita seca alrededor del accesorio para
toallitas secas y fije la toallita seca sobre el accesorio presionando los
bloques de fijación hacia el interior de los huecos.
4 Inserte el saliente de fijación del accesorio para toallitas secas en la
abertura que hay justo detrás de la rueda en un lado del robot y presione
hasta que oiga que encaja en su lugar con un clic. A continuación, repita
estas acciones en el otro lado.
5 Gire el robot y colóquelo en el suelo sobre sus ruedas con el accesorio
para toallitas secas tocando el suelo.
85
Uso del robot con el accesorio para toallitas secas
Cuando el accesorio para toallitas secas está colocado, puede utilizar el
robot en cualquier modo y en todos los suelos duros. No utilice el accesorio
para toallitas secas en alfombras ni moquetas.
Extracción del accesorio para toallitas secas
1 Retire el accesorio para toallitas secas en cuanto termine de limpiar el
suelo.
2 Ponga el robot boca abajo y colóquelo en el suelo o en una mesa.
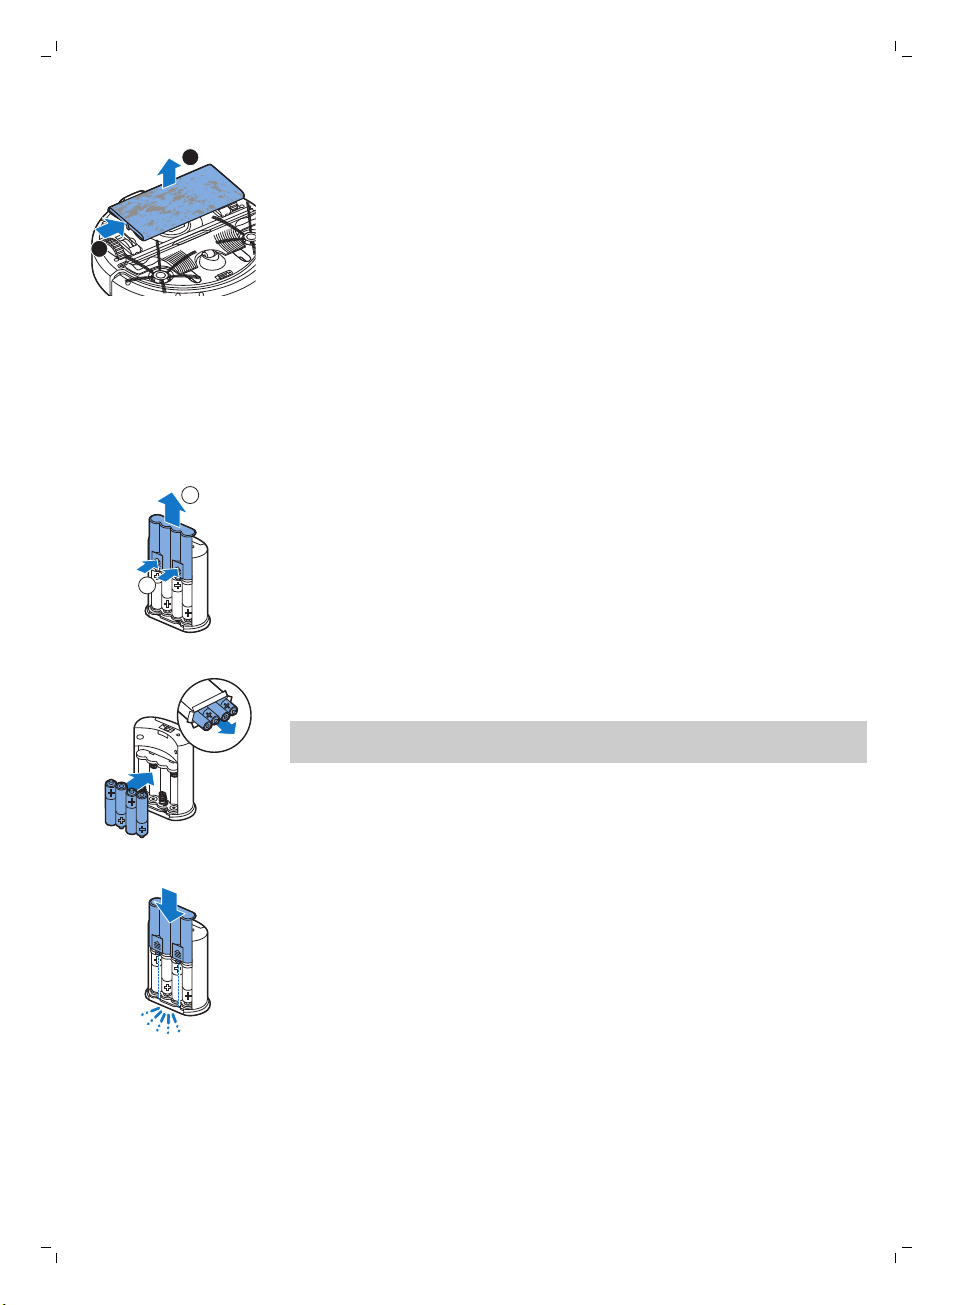
1
2
1
2
86
Español
3 Presione un extremo del accesorio para toallitas secas hacia la rueda del
otro lado del robot para liberarlo. A continuación, tire del accesorio para
extraerlo del robot.
Uso de la pared invisible
Colocación de las pilas en la pared invisible
La pared invisible funciona con cuatro pilas AA.
1 Presione las dos pestañas de liberación de la parte inferior de la cubierta
posterior (1) y deslice la cubierta posterior hacia arriba hasta sacarla de la
pared invisible (2).
2 Utilice cuatro pilas AA nuevas e insértelas en el compartimento de las
pilas de la pared invisible.
Nota: Asegúrese de que los polos + y - de las pilas estén en la posición
correcta.
3 Deslice la cubierta posterior de nuevo sobre la pared invisible.
Colocación de la pared invisible para detener el robot
Puede utilizar la pared invisible para evitar que el robot entre en una
habitación o zona en la que no desea que lo haga.

3
1
2
Español
1 Coloque la unidad en un punto que no desea que el robot entre, por
ejemplo, cerca de una puerta abierta de una habitación que está fuera
de los límites del robot.
2 Encienda la pared invisible con el botón de encendido/apagado de la
parte superior de la misma.
3 Inicie el robot.
4 Cuando el robot se acerca demasiado a la pared invisible, el piloto de la
pared invisible empieza a parpadear y esta emite un haz de luz infrarroja.
Este haz de luz infrarroja hace que el robot cambie su curso y se aleje de
la pared invisible.
Nota: Si utiliza la pared invisible, compruebe las pilas con regularidad para
comprobar si contienen suficiente energía. Puede hacerlo apagando la
pared virtual y encendiéndola seguidamente. Si las baterías tienen carga
suficiente, el piloto LED de la pared invisible se encenderá durante unos
segundos.
87
Limpieza y mantenimiento
Limpieza del robot
Para mantener un rendimiento de limpieza adecuado, debe limpiar los
sensores de interrupción, las ruedas, los cepillos laterales y la abertura de
succión de vez en cuando.
1 Coloque el robot boca abajo sobre una superficie plana
2 Utilice un cepillo de cerdas suaves (por ejemplo, un cepillo de dientes)
para eliminar el polvo o las pelusas de los sensores de interrupción.
Nota: Es importante limpiar los sensores de interrupción regularmente. Si
los sensores de interrupción están sucios, el robot puede fallar al
detectar las diferencias de altura o las escaleras.

1
2
3
1
2
88
Español
3 Utilice un cepillo de cerdas suaves (por ejemplo, un cepillo de dientes)
para eliminar el polvo o las pelusas de la rueda delantera y las ruedas
laterales.
4 Para limpiar los cepillos laterales, sujételos por las cerdas y tire para
extraerlos de sus ejes.
5 Elimine las pelusas, pelos o hilos del eje y el cepillo lateral con un cepillo
suave (por ejemplo, un cepillo de dientes) o un trapo.
6 Compruebe los cepillos laterales y la parte inferior del robot para ver si
hay objetos afilados que pueden dañar el suelo.
7 Deshaga las conexiones internas del cepillo TriActive XL introduciendo
los dedos en los lugares marcados con flechas y tire del cepillo TriActive
para extraerlo del robot.
8 Limpie la abertura de succión con un cepillo de cerdas suaves (por
ejemplo, un cepillo de dientes).

Español
9 Limpie la suciedad visible del cepillo TriActive.
10 Introduzca los ganchos de cierre del cepillo TriActive en los agujeros de
la parte inferior del robot. Vuelva a colocar el cepillo TriActive en su
posición. Compruebe que el cepillo pueda moverse unos milímetros
arriba y abajo libremente.
11 Vuelva a presionar los cepillos laterales sobre los ejes de la parte inferior
del robot.
89
Vaciado y limpieza del depósito del polvo
Vacíe y limpie el depósito del polvo cuando el indicador de depósito del
polvo lleno se ilumine de forma continua.
1 Quite la cubierta.

1
2
90
Español
2 Tire hacia arriba del asa de la tapa del depósito del polvo y levante el
depósito del polvo hasta extraerlo de su compartimento.
Nota: Cuando quite o vuelva a introducir el depósito del polvo, tenga
cuidado de no dañar las cuchillas del ventilador.
3 Levante con cuidado la tapa del depósito del polvo y saque el filtro.
4 Sacuda el depósito del polvo sobre un cubo de la basura para vaciarlo.
Limpie el filtro y el interior del depósito del polvo con un paño o un
cepillo de dientes de cerdas suaves. Limpie también la abertura de
succión de la parte inferior del depósito del polvo.
Precaución: No limpie el depósito del polvo y el filtro con agua ni en el
lavavajillas.
5 Vuelva a colocar el filtro en el depósito del polvo. Coloque la tapa en el
depósito del polvo.
6 Vuelva a introducir el depósito del polvo en su compartimento (1),
pliegue hacia abajo el asa (2) y coloque la cubierta superior de nuevo
sobre el robot.
Precaución: Asegúrese siempre de que el filtro se encuentre en el
interior del depósito del polvo. Si utiliza el robot sin el filtro instalado
en el depósito del polvo, el ventilador podría dañarse.

Solicitud de accesorios
Para comprar accesorios o piezas de repuesto, visite
www.shop.philips.com/service o acuda a su distribuidor de Philips.
También puede ponerse en contacto con el Servicio de Atención al Cliente
de Philips en su país (consulte los datos de contacto en el folleto de la
garantía mundial).
Software de código abierto
El robot se ejecuta en software de código abierto. El robot HomeRun
funciona con un software de código abierto. Philips puede poner a su
disposición (previa solicitud) una copia completa del código legible
mediante ordenador a través de un soporte multimedia comercial para el
intercambio de software y con un cargo no superior al coste de la
transferencia física de una copia.
Esta oferta tiene una validez de tres años después de la fecha de compra.
Para obtener una copia del código abierto, diríjase por escrito a:
Open Source Team, Philips Intellectual Property and Standards
Apartado de Box 220, 5600 AE Eindhoven, Netherlands
Correo electrónico: open.source@philips.com
Sustitución
Español
91
Sustitución del filtro
Sustituya el filtro si está muy sucio o dañado. Puede solicitar un nuevo kit de
filtros con el número de modelo FC8066. Consulte "Vaciado y limpieza del
depósito del polvo" en el capítulo "Limpieza y mantenimiento" para obtener
instrucciones sobre cómo retirar el filtro del depósito del polvo y cómo
colocarlo en el mismo.
Sustitución de los cepillos laterales
Sustituya los cepillos laterales después de un tiempo para garantizar unos
resultados de limpieza correctos.
Sustituya siempre los cepillos laterales cuando note signos de desgaste o
daños. También es recomendable que sustituya ambos cepillos al mismo
tiempo. Puede solicitar un juego de cepillos laterales de repuesto como
parte del kit de reemplazo FC8068. Este kit contiene también dos filtros y
tres toallitas secas.

2
3
1
92
Español
1 Para sustituir los cepillos laterales, sujete los cepillos laterales usados por
las cerdas y tire para extraerlos de sus ejes.
2 Presiones los nuevos cepillos laterales sobre los ejes.
Sustituir las toallitas secas
Puede solicitar nuevas toallitas secas. Se incluyen en el kit de recambio
FC8068 Este kit contiene también dos cepillos laterales y dos filtros.
Sustitución de la pila del mando a distancia
El mando a distancia funciona con una pila CR2025 con forma de moneda.
Sustituya la pila cuando el robot deje de responder al pulsar los botones del
mando a distancia.
1 Sujete el mando a distancia boca abajo. Presione el botón de liberación
del soporte de la pila y, al mismo tiempo, deslice el soporte de la pila
fuera del mando a distancia.
2 Retire la pila descargada del soporte y coloque una nueva. Vuelva a
deslizar el soporte de la pila en el mando a distancia.

Sustitución de la batería recargable
Únicamente los ingenieros cualificados del servicio pueden reemplazar la
batería recargable del robot. Lleve el robot a un centro de servicio
autorizado de Philips para que cambien la batería cuando ya no pueda
recargarla o cuando se quede sin energía rápidamente. Encontrará los datos
de contacto del Servicio de Atención al Cliente de Philips de su país en el
folleto de la garantía internacional.
Reciclaje
-
Este símbolo significa que este producto no debe desecharse con la
basura normal del hogar (2012/19/UE).
-
Este símbolo significa que este producto contiene una batería recargable
integrada, que no debe desecharse con los residuos domésticos
normales (2006/66/EC). Recomendamos encarecidamente que se lleve
la batería a un punto de recogida oficial o a un centro de asistencia de
Philips, para desecharla de forma profesional.
-
Siga la normativa de su país para la recogida selectiva de productos
eléctricos y electrónicos y de baterías recargables. El desechado correcto
ayuda a evitar consecuencias negativas para el medio ambiente y la
salud humana.
Español
93
Cómo extraer la batería recargable
Advertencia: No quite la batería recargable hasta que deseche el
aparato. Asegúrese de que la batería está completamente
agotada cuando la quite.
Siga las siguientes instrucciones para quitar la batería recargable. También
puede llevar el robot a un centro de servicio autorizado de Philips para que
cambien la batería. Póngase en contacto con el Servicio de Atención al
Cliente de su país para obtener la dirección de un servicio próximo a usted.
1 Inicie el robot en algún lugar de la habitación, no desde la estación base.
2 Deje que el robot funcione hasta que la batería recargable esté vacía
para asegurarse de que la batería recargable está completamente
descargada antes de quitarla y desecharla.

1
3
2
this side up
94
Español
3 Desenrosque los tornillos y quite la tapa del compartimento de la batería.
4 Saque la batería recargable y desconéctela.
5 Lleve el robot y la batería recargable a un punto limpio para reciclaje de
componentes eléctricos y electrónicos.
Resolución de problemas
En este capítulo se resumen los problemas más comunes que pueden surgir
al usar el aparato. Si no puede resolver el problema con la siguiente
información, visite www.philips.com/support para consultar una lista de
preguntas frecuentes o comuníquese con el servicio de atención al cliente
en su país.
Resolución de problemas
Problema
El robot no empieza a
limpiar cuando pulso el
botón de inicio/parada.
Posible causa Solución
La batería recargable está
descargada.
La clavija pequeña sigue
insertada en la toma del
robot.
El interruptor de encendido
no está colocado en la
posición de encendido (I).
Cargue la batería recargable (consulte el
capítulo "Preparación para su uso").
El robot no funciona conectado a la red
eléctrica. Solo funciona con su batería
recargable. Por lo tanto, desconecte
siempre el adaptador de corriente del
robot y de la red eléctrica antes de usarlo.
Pulse el interruptor de encendido. Pulse el
botón de inicio/parada del robot o del
mando a distancia para empezar a limpiar.

Problema Posible causa Solución
El indicador de
advertencia parpadea
rápidamente.
Una o ambas ruedas se han
atascado.
Coloque el interruptor de encendido en la
posición de apagado. Quite las pelusas,
pelos o hilos que estén atrapados
alrededor de la suspensión de las ruedas.
Español
95
Uno o ambos cepillos
laterales se han atascado.
La cubierta superior no está
colocada o no se ha cerrado
correctamente.
El paragolpes se ha atascado. Pulse el botón de inicio/parada. Levante
El robot ha sido levantado
durante la limpieza.
Limpie los cepillos laterales (consulte el
capítulo "Limpieza y mantenimiento").
Cuando la cubierta superior no está
colocada o no se ha cerrado
correctamente, el robot no funciona.
Coloque la cubierta superior sobre el robot
correctamente.
el robot para que el paragolpes se libere.
Coloque el robot a cierta distancia del
obstáculo y pulse el botón de
inicio/parada para que reanude la
limpieza.
Pulse el botón de inicio/parada. Coloque
el robot en el suelo. Después, pulse el
botón de inicio/parada para que el robot
reanude la limpieza.
96
Español
Problema Posible causa Solución
El robot no limpia
correctamente.
Las cerdas de uno o ambos
cepillos laterales están
dobladas o torcidas.
Sumerja el cepillo o los cepillos en agua
caliente durante un rato. Si las cerdas no
recuperan su forma adecuada, sustituya
los cepillos laterales (consulte el capítulo
"Sustitución").
El filtro del depósito del
polvo está sucio.
La abertura de succión de la
parte inferior del depósito del
polvo está obstruida.
La rueda delantera está
atascada con pelos u otra
suciedad.
El robot está limpiando una
superficie muy negra o
brillante, lo cual activa los
sensores de interrupción.
Esto provoca que el robot se
mueva con un patrón inusual.
El robot está limpiando un
suelo que refleja
intensamente la luz del sol.
Esto activa los sensores de
interrupción y provoca que el
robot se mueva con un
patrón inusual.
Limpie el filtro del interior del depósito del
polvo con un paño o un cepillo de dientes
de cerdas suaves. También puede limpiar
el filtro y el depósito del polvo con una
aspiradora corriente a una potencia de
aspirado baja.
Si el cepillado o aspirado no ayuda a
limpiar el filtro, sustituya el filtro por uno
nuevo. Recomendamos sustituir el filtro al
menos una vez al año.
Limpie la abertura de succión (consulte el
capítulo "Limpieza y mantenimiento").
Limpie la rueda delantera (consulte el
capítulo "Limpieza y mantenimiento").
Pulse el botón de inicio/parada y coloque
el robot sobre una superficie más clara. Si
el problema persiste en una superficie más
clara, visite www.philips.com/support o
póngase en contacto con el Servicio de
Atención al Cliente en su país.
Cierre las cortinas para impedir que la luz
del sol entre en la habitación. También
puede empezar a limpiar cuando la luz del
sol sea menos intensa.
La batería recargable no
se puede cargar más o se
agota con mucha rapidez.
La pila del mando a
distancia se agota
demasiado rápido.
La batería recargable ha
llegado al final de su vida útil.
Puede que no haya
introducido el tipo de pila
correcto.
Sustituya la batería recargable (consulte el
capítulo "Sustitución").
Para el mando a distancia, necesita una
pila CR2025 con forma de moneda. Si el
problema persiste, visite
www.philips.com/support o póngase en
contacto con el Servicio de Atención al
Cliente en su país.
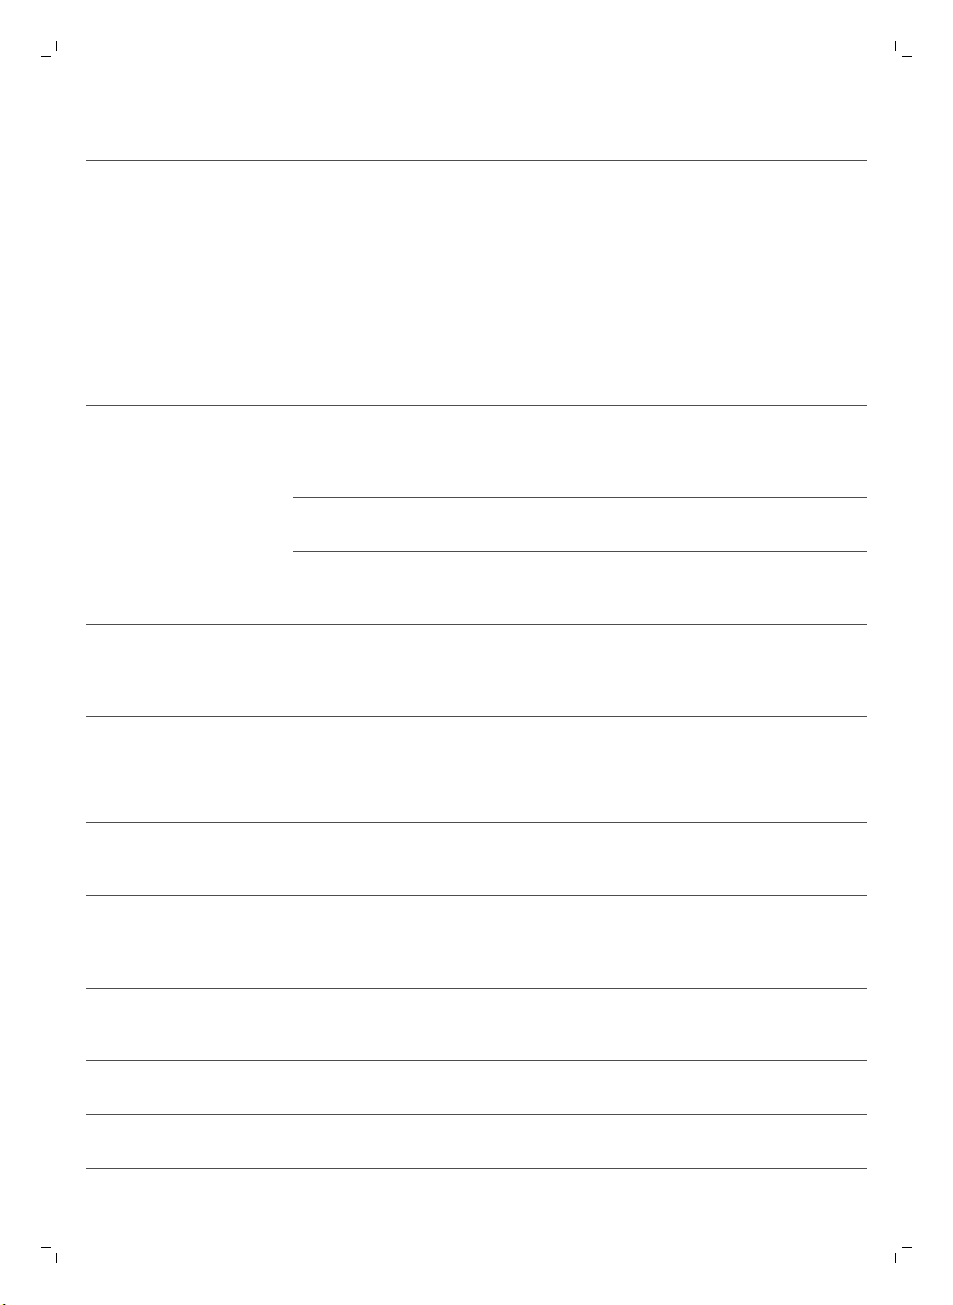
Problema Posible causa Solución
El robot se mueve en
círculos.
El robot está en el modo de
limpieza de zona.
Esto es normal. El modo en espiral se
puede activar cuando se detecta una gran
cantidad de suciedad en el suelo para
realizar una limpieza en profundidad.
También es parte del modo de limpieza
automática. Después de
aproximadamente un minuto el robot
reanuda su patrón de limpieza normal.
También puede detener el modo en
espiral de zona seleccionando un modo
de limpieza diferente en el mando a
distancia.
Español
97
El robot no encuentra la
estación base.
El robot emite un pitido
cuando se encuentra en
la estación base.
No hay suficiente espacio
para que el robot llegue a la
estación base.
El robot sigue buscando. Dele al robot unos 20 minutos para volver
El robot no se ha iniciado
desde la estación base.
Intente cargar el robot con el
interruptor de encendido
colocado en la posición de
apagado.
Intente encontrar otro sitio donde colocar
la estación base. Consulte "Instalación de
la estación base" en el capítulo
"Preparación para su uso".
a la estación base.
Si quiere que el robot vuelva a la estación
base tras un ciclo de limpieza, inícielo
desde la estación base.
Pulse el interruptor de encendido para
encender el robot.
Códigos de error
Código de error
E1 Ruedas atascadas Retire el robot del obstáculo y pulse el botón
E2 Cubierta superior o
Posible causa Solución
de encendido/apagado para reanudar la
limpieza.
depósito del polvo mal
colocados
Coloque el contenedor del polvo y la cubierta
superior en el robot correctamente. El código
de error desaparece de la pantalla de forma
automática.
E3 Paragolpes atascado Quite el robot del obstáculo. El código de error
E4 Robot levantado del
suelo
E5 Color del suelo
demasiado oscuro
desaparece de la pantalla de forma
automática.
Coloque el robot de nuevo sobre el suelo para
que el código de error desaparezca.
Coloque el robot en una zona más clara del
suelo. Limpie los sensores de interrupción.
98
Español
Código de error Posible causa Solución
E6
Batería no insertada
correctamente
Consulte las instrucciones de la sección
"Inserción de la batería recargable en el robot"
del capítulo "Antes de utilizarlo por primera
vez".
Error de carga Compruebe que el interruptor de encendido
está en la posición de encendido cuando el
robot se encuentra en la estación base.

Introduction
1
1110 129
234
5 6 7 8
Introduction
Félicitations pour votre achat et bienvenue dans l'univers Philips ! Pour
profiter pleinement de l'assistance offerte par Philips, enregistrez votre
produit à l'adresse suivante : www.philips.com/welcome.
Description générale
1 Poignée du couvercle du compartiment à poussière
2 Couvercle du compartiment à poussière
3 Filtre
4 Compartiment à poussière
5 Couvercle supérieur
6 Tableau des codes d’erreur
7 Ventilateur
8 Pare-chocs
9 Capteur de la station d’accueil
10 Afficheur
11 Interrupteur (pour mettre le robot sous tension et l’éteindre)
12 Roue avant
13 Axes des brossettes latérales
14 Capteurs de chute
15 Roulettes
16 Brosse TriActive XL
17 Brossettes latérales
18 Blocs de fixation pour lingettes sèches
19 Porte-lingette sèche
20 Lingettes sèches
21 Compartiment à pile
22 Télécommande
23 Piles AA de l’unité murale invisible
24 Unité murale
25 Station d’accueil
26 Adaptateur
27 Petite fiche
Français
99
Télécommande et afficheur
Écran
1 Voyant du mode spirale
2 Voyant du mode de déplacement le long des murs
3 Voyant du mode zigzag
4 Voyant de mode aléatoire
5 Durée de nettoyage
6 Icône d’accueil
7 Icône Wi-Fi
8 Voyant de sac plein
9 Capteur sonore
10 Bouton de sélection de mode
11 Bouton marche/arrêt
Français
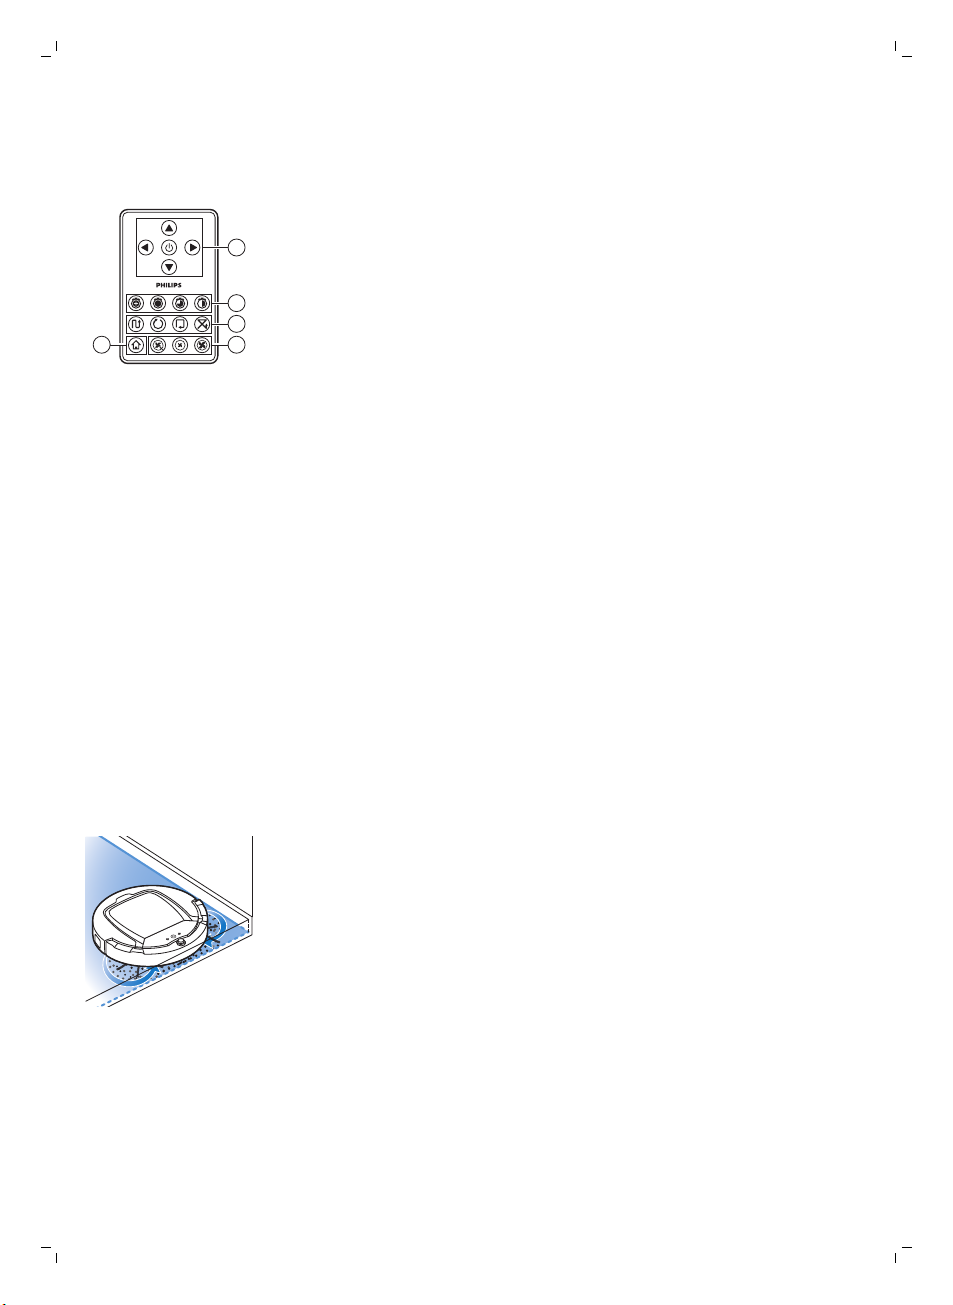
2
1
3
45
Français
12 Bouton Wi-Fi
Télécommande (FC8932)
1 Touches de navigation et marche/arrêt
2 Boutons d’heure d’aspiration
3 Boutons de mode d’aspiration
4 Boutons de vitesse du ventilateur
5 Bouton d’accueil
Fonctionnement de votre robot
Ce que nettoie votre robot
Ce robot dispose de fonctionnalités qui en font l’appareil approprié pour
nettoyer les sols de votre maison.
Le robot est particulièrement adapté au nettoyage des sols durs, tels que les
planchers, le carrelage et le lino. Il pourrait avoir des difficultés à nettoyer les
sols textiles, comme les tapis et la moquette. Restez à proximité du robot la
première fois que vous l’utilisez sur un tapis ou une moquette afin de vérifier
qu’il fonctionne sur ce type de sol. Il faut également superviser le robot
lorsque vous l’utilisez sur un sol dur très sombre ou brillant.
Comment fonctionne votre robot
Système de nettoyage
Le robot présente un système de nettoyage en 3 étapes pour nettoyer vos
sols efficacement.
-
Les deux brossettes latérales permettent à votre robot de nettoyer les
angles ainsi que le long des murs. Elles permettent aussi de décoller les
saletés du sol et de les déplacer vers l’orifice d’aspiration.
 Loading...