

Page 1
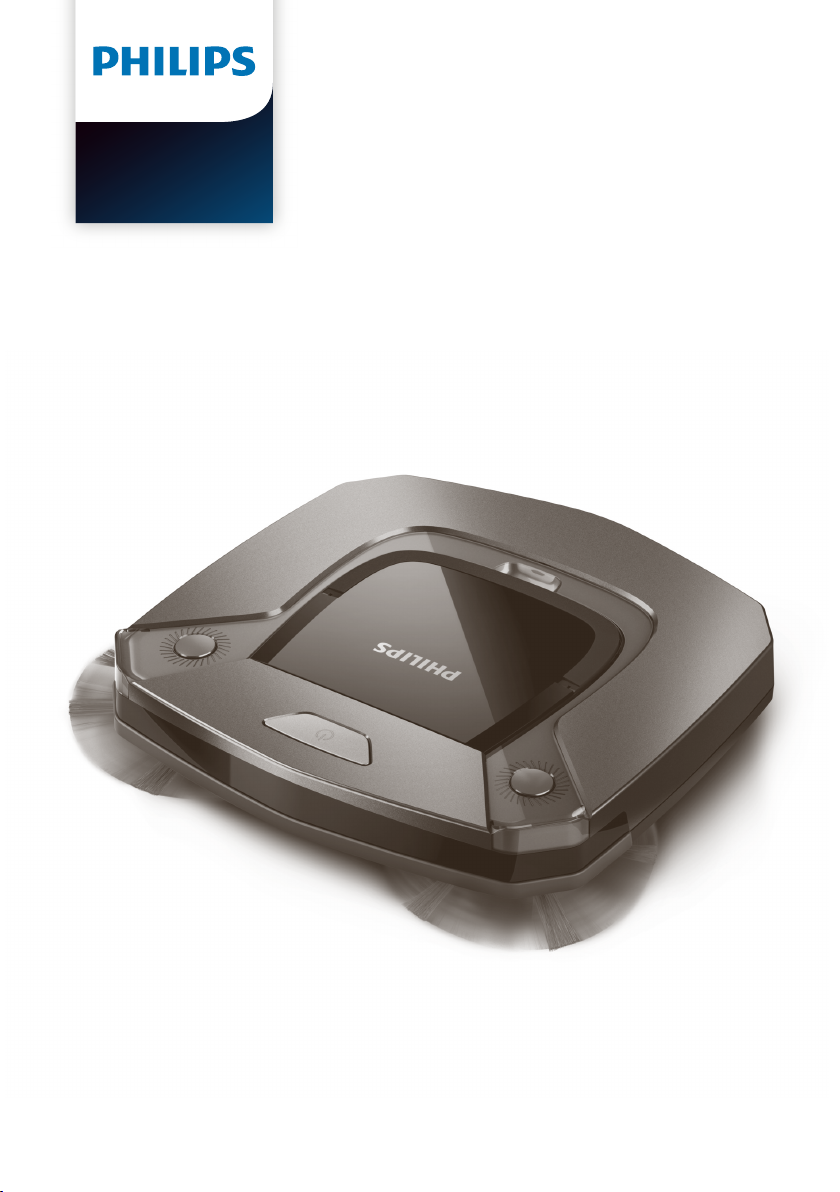
FC8796, FC8795,
FC8794, FC8792
Page 2
Page 3
2
3 4
21
2224
10
11
5
6
7 8
9
20
25
23
1
18
19
16
17
15
13 14
12
1
Page 4

Page 5

English 6
Bahasa Melayu 15
简体中文
繁體中文
한국어
25
36
44
Page 6

6
English
Introduction
Congratulations on your purchase and welcome to Philips! To fully benefit from the support that
Philips offers, register your product at www.philips.com/welcome.
General description
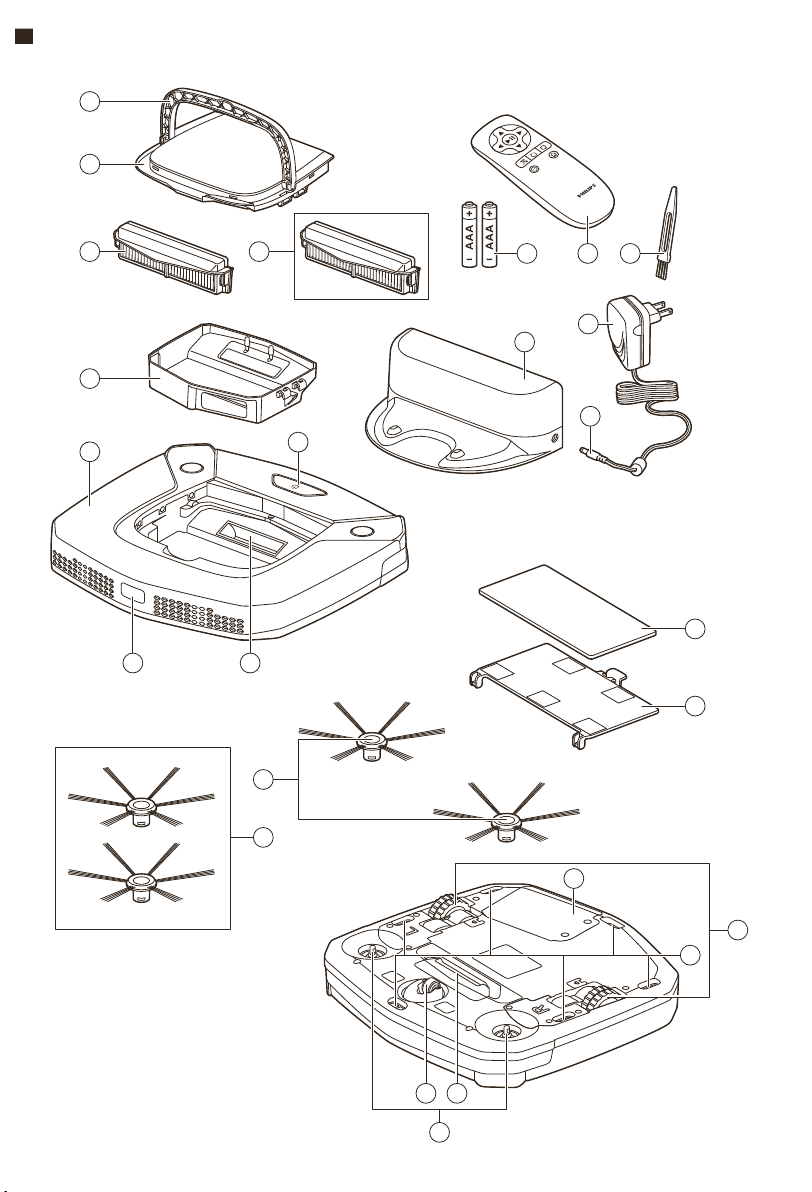
1 Handle of dust container lid
2 Dust container lid
3 Filter unit
4 Extra filter unit (FC8796, FC8795, FC8794)
5 Dust container
6 Edge of top cover
7 Docking station sensor
8 Suction opening
9 Start/stop button
10 Side brushes
11 Extra set side brushes (FC8796 only)
12 Shafts for mounting the side brushes
13 Front wheel
14 Suction opening
15 Side wheels
16 Drop-off sensors
17 Cover of the battery compartment
18 Mopping attachment (FC8796, FC8795, FC8794)
19 Mopping pad (FC8796, FC8795, FC8794)
20 Small plug
21 Adapter
22 Cleaning brush
23 Remote control
24 AAA batteries for remote control
25 Docking station
Remote control
You can operate the robot with the remote control (Fig. 2). It has the following buttons:
1 Start/stop button
2 Navigation buttons
3 Cleaning mode buttons
4 Docking button
5 24-hour scheduler
How your robot works
What your robot cleans
This robot is equipped with features that make it a suitable cleaner to help you clean the floors in your
home.
The robot is especially suitable for cleaning hard floors, such as wooden, tiled or linoleum floors. It
may experience problems cleaning soft floors, such as carpet or rugs. If you use the robot on a carpet
or rug, please stay close by the first time to see if the robot can deal with this type of floor.
Page 7

English
Because the robot uses infrared sensors to navigate, it may run into difficulties on very dark and shiny
floors. If you use the robot on such surfaces, please stay close by the first time to see if the robot can
deal with such a dark and shiny floor.
How your robot cleans
Cleaning system
The robot has a 3-stage cleaning system to clean your floors efficiently.
-
The two side brushes help the robot clean in corners and along walls. They also help to remove dirt
from the floor and move it towards the suction opening (Fig. 3).
-
The suction power of the robot picks up loose dirt and transports it through the suction opening
into the dust container (Fig. 4).
-
Models FC8796, FC8795 and FC8794 come with a mopping attachment that can be attached to the
robot to mop your hard floor.
Cleaning patterns
In its auto cleaning mode, the robot uses an automatic sequence of bounce and wall-following
patterns to clean each area of the room optimally. It continues to clean until its battery runs low or
until it is switched off.
You can also select one of the three individual cleaning modes by pressing the appropriate button on
the remote control (see 'Cleaning mode selection'). The robot continues cleaning in the selected
cleaning mode for a few minutes and then returns to auto cleaning mode.
1 Bounce mode (Fig. 5)
2 Wall-following mode (Fig. 6)
3 Spiral mode (Fig. 7)
7
How your robot avoids height differences
The robot has five drop-off sensors in its bottom. It uses these drop-off sensors to detect and avoid
height differences such as staircases.
Note: It is normal for the robot to move slightly over the edge of a height difference, as its front dropoff sensor is located behind the bumper.
Caution: In some cases, the drop-off sensors may not detect a staircase or other height difference
in time. Therefore monitor the robot carefully the first few times you use it, and when you operate it
near a staircase or another height difference. It is important that you clean the drop-off sensors
regularly to ensure the robot continues to detect height differences properly.
Before first use
Mounting the side brushes
1 Unpack the side brushes and place the robot upside down on a table or on the floor.
2 Push the side brushes onto the shafts on the bottom of the robot (Fig. 8).
Note: Make sure you attach the side brushes properly. Press them onto the shaft until you hear
them lock into position with a click.
Placing the batteries in the remote control
The remote control works on two AAA batteries.
Page 8

8
English
1 Push the tab (1) to unlock the battery compartment lid (2) and remove the battery compartment lid
(Fig. 9).
2 Insert two AAA batteries (Fig. 10).
Note: Make sure the + and - poles point in the right direction.
3 To reattach the battery compartment lid, first insert the lug into the opening in the rim of the
compartment (1) and then push down the lid (2) until it locks with a click (Fig. 11). Now the remote
control is ready for use.
Preparing for use
Installing the docking station
1 Insert the small plug of the adapter into the socket on the docking station (1) and insert the adapter
into the wall socket (2) (Fig. 12).
2 Place the docking station on a horizontal, level floor against a wall.
Note: Make sure that there are no obstacles or height differences 150 cm in front, 30 cm to the right
and 100 cm to the left of the docking station (Fig. 13).
Charging
1 Place the robot on the plugged-in docking station (Fig. 14).
2 The start/stop button starts flashing (Fig. 15).
3 When the rechargeable battery is fully charged, the start/stop button lights up continuously (Fig.
16).
Note: After charging, model FC8796 has a run time of around 115 minutes. After charging, models
FC8794 and FC8795 have a run time of around 105 minutes.
Preparing the room for a cleaning run
-
Before you start the robot on its cleaning run, make sure that you remove all loose and fragile
objects from the floor (Fig. 17).
-
Remove all cables, wires and cords from the floor to prevent the robot from getting entangled in
them.
-
If there is a rug with tassels in the room you want the robot to clean, fold the tassels under the rug
to prevent the robot from getting stuck on the tassels and to prevent the rug from getting damaged
(Fig. 18).
Using your robot
Using the remote control
1 Place the robot on the docking station or press the start/stop button on the robot (Fig. 19) to
activate the robot.
-
Now you can use the remote control to operate the robot.
Starting and stopping
1 Press the start/stop button on the remote control (Fig. 20).
Page 9

English
2 The start/stop button on the robot lights up continuously and the robot starts cleaning (Fig. 21).
3 The robot cleans in auto-cleaning mode until its battery runs low. In auto cleaning mode, it follows
repeated sequences of random, wall-following and spiral movements.
4 When the battery runs low, the start/stop button starts flashing quickly and the robot starts
searching for the docking station to charge (Fig. 22).
5 You can also press the start/stop button to interrupt or stop the cleaning run. If you press the
start/stop button again and there is still enough energy in the rechargeable battery, the robot
continues cleaning in the auto cleaning mode.
6 To make the robot return to the docking station before the rechargeable battery runs low, press
the docking button on the remote control (Fig. 23).
7 The start/stop button starts flashing and the robot returns to the docking station.
Cleaning mode selection
This robot has four cleaning modes. Its standard cleaning mode is the auto cleaning mode, which is an
automatic sequence of bounce and wall-following patterns (Fig. 24). Next to this auto cleaning mode,
the robot has three individual cleaning modes that can each be activated by pressing the appropriate
button on the remote control.
Bounce mode
In this mode, the robot cleans the room in a mixed pattern of straight and crisscross movements (Fig.
25).
Wall-following mode
In this mode, the robot follows the walls of the room to give the area alongside the walls an extra
clean (Fig. 26).
9
Spiral mode
In this mode, the robot moves in an expanding spiral from a central point to clean the area thoroughly
(Fig. 27).
Note: The manually selected modes are only active for a couple of minutes. After that, the robot
switches to auto-cleaning mode.
Manual driving
You can drive the robot manually with buttons on the remote control.
1 Use the arrow buttons above and below and to the left and right of the start/stop button on the
remote control to navigate the robot through the room (Fig. 28).
Note: Be careful when you drive the robot manually close to height differences and staircases.
Using the 24-hour scheduler
The 24-hour scheduler can be activated with the remote control. Make sure the robot is in standby
mode and is placed on the docking station.
1 Press the 24-hour scheduler button (Fig. 29) on the remote control to activate the 24-hour
scheduler.
-
When you activate the 24-hour scheduler, you hear a sound and the display starts to flash
briefly every few seconds.
Page 10

10
English
-
The robot will start a cleaning run 24 hours after you activated the 24-hour scheduler. It will
continue to start a cleaning run at the same time every 24 hours until you deactivate the
24-hour scheduler.
2 To deactivate the 24-hour scheduler, press the 24-hour scheduler button. You will hear a sound
and the display will light up continuously to show the robot is in standby mode and the 24-hour
scheduler is no longer active.
Mopping with the robot
Models FC8796,FC8795 and FC8794 come with a mopping attachment and a mopping pad for wet
cleaning of hard floors.
Attaching the mopping pad
1 Soak the mopping pad in water or wet the mopping pad under the tap. You can add a few drops of
a readily available floor cleaner that is suitable for your floor.
2 Squeeze the mopping pad thoroughly to ensure it is only damp instead of wet.
3 Attach the damp mopping pad to the mopping attachment by pushing the Velcro fasteners of the
mopping pad onto Velcro fasteners of the mopping attachment (Fig. 30).
4 Insert the attachment lugs of the mopping attachment into the two attachment holes located just
behind the wheels. Then press down until you hear a click (Fig. 31).
Cleaning floors with the mopping attachment
Note: To clean hard floors with the mopping attachment, you have to start the robot from a point in
the room you wish to clean. You cannot start the robot from its docking station with the mopping pad
attached.
1 Just press the start/stop button on the remote control to start the robot.
-
The robot continues mopping until its battery runs low and the robot stops.
Note: Detach the mopping pad and the mopping attachment before you send the robot to the
docking station with the docking button on the remote control or before you place the robot on the
docking station manually.
Detaching the mopping attachment
1 To detach the mopping attachment, press the tab (1) and pull up the mopping attachment to
remove it (2) (Fig. 32).
2 Pull the mopping pad off the mopping attachment.
3 To clean the mopping pad, wash it in the washing machine on a gentle cycle at a temperature of
60°C max.
Alarm signal
If the robot gets into trouble while cleaning (e.g., because a wheel jams or is no longer in contact with
the floor, or because a sensor can no longer detect the floor), you will hear a sound and the robot
stops. Press the start/stop button to switch the robot to standby mode and solve the problem that
causes the alarm signal, for instance by removing the obstacle that blocks the wheel, cleaning the
sensors, or picking up the robot and putting it down in a different place.
Page 11

English
Cleaning and maintenance
Emptying and cleaning the dust container
Empty and clean the dust container when the dust container is full.
1 Pull up the handle of the dust container lid and lift the dust container out of the dust container
compartment (Fig. 33).
2 Pull the tab on the side of the dust container to open the lid (Fig. 34).
3 Remove the filter unit from the dust container (Fig. 35).
4 Shake the dust container over a dustbin to empty it (Fig. 36).
5 You can clean the dust container under a lukewarm tap.
Caution: Do not clean the dust container in the dishwasher.
6 To clean the filters thoroughly, take the filter unit apart by pressing the tabs located on both sides
of the filter unit and taking the dust filter off the EPA filter. Then clean the EPA filter with the
cleaning brush supplied (Fig. 37).
7 Reassemble the filter unit, snap the EPA filter into the dust filter. Then place the filter unit back into
the dust container (Fig. 38).
Note: If you cleaned the dust container under the tap, please make sure it is dry before you reinsert
the filter unit.
8 Put the lid on the dust container and make sure it locks into place with a click (Fig. 39).
9 Put the dust container back into the dust container compartment and fold down the dust
container handle (Fig. 40).
Caution: Always make sure the filter unit is present inside the dust container. If you use the robot
without the filter unit inside the dust container, the motor will be damaged.
11
Cleaning the robot
To maintain good cleaning performance, you have to clean the drop-off sensors, the wheels, the side
brushes, the suction opening and the contact points of the robot and docking station from time to
time.
1 Place the robot upside down on a flat surface.
2 To clean the side brushes, grab them by the bristles and pull them off their shafts (Fig. 41).
3 Clean the side brushes and the shafts of the side brushes with the cleaning brush supplied (Fig. 42).
4 Remove dust or fluff from the front wheel and side wheels with the cleaning brush supplied (Fig.
43).
5 If hair or fluff has become entangled around the front wheel, remove the front wheel with a
screwdriver (Fig. 44).
6 After cleaning the front wheel with the cleaning brush (Fig. 45), push the front wheel back into the
robot with your thumb (Fig. 46).
7 Remove dust or fluff from the dust or fluff from the drop-off sensors with the cleaning brush
supplied (Fig. 47).
Note: It is important that you clean the drop-off sensors regularly. If the drop-off sensors are dirty,
the robot may fail to detect height differences or staircases.
8 Use the cleaning brush supplied to clean the suction opening (Fig. 48).
9 Check the side brushes and the bottom of the robot for any sharp objects that could damage your
floor.
10 Use a dry cloth or a cotton bud to clean the contact points of the docking station (Fig. 49).
Page 12

12
English
11 Use a dry cloth or a cotton bud to clean the contact points on the bottom of the robot (Fig. 50).
Ordering accessories
To buy accessories or spare parts, visit www.philips.com/parts-and-accessories or go to your Philips
dealer. You can also contact the Philips Consumer Care Center in your country (see the international
warranty leaflet for contact details).
Replacement
Replacing the filter
Replace the EPA filter if it is very dirty or damaged (see 'Emptying and cleaning the dust container'). To
obtain a new EPA filter, go to www.philips.com/parts-and-accessories.
Replacing the rechargeable battery
The rechargeable battery of the robot may only be replaced by qualified service engineers. Take the
robot to an authorized Philips service center to have the battery replaced when you can no longer
recharge it or when it runs out of power quickly. You can find the contact details of the Philips
Consumer Care Center in your country in the international warranty leaflet or on the website at
www.philips.com/support.
Replacing the side brushes
Replace the side brushes after some time to ensure proper cleaning results.
Note: Always replace the side brushes when you notice signs of wear or damage. We also recommend
that you replace both side brushes at the same time. To obtain new side brushes, go to
www.philips.com/parts-and-accessories.
1 To replace the side brushes, grab the old side brushes by the bristles and pull them off their shafts.
2 Push the new side brushes onto the shafts.
Replacing the batteries of the remote control
1 Push the tab (1) to unlock the battery compartment lid (2) and remove the battery compartment lid
(Fig. 9).
2 Remove the empty AAA batteries from the battery compartment.
3 Insert two new AAA batteries (Fig. 10).
Note: Make sure the + and - poles point in the right direction.
4 To reattach the battery compartment lid, first insert the lug into the opening in the rim of the
compartment (1) and then push down the lid (2) until it locks with a click (Fig. 11). Now the remote
control is ready for use.
Note: Dispose of empty disposable batteries according to the local rules in your country.
Recycling
-
Do not throw away the product with the normal household waste at the end of its life, but hand it
in at an official collection point for recycling. By doing this, you help to preserve the environment.
Page 13

English
-
This product contains a built-in rechargeable battery which shall not be disposed of with normal
household waste. Please take your product to an official collection point or a Philips service center
to have a professional remove the rechargeable battery.
-
Follow your country’s rules for the separate collection of electrical and electronic products and
rechargeable batteries. Correct disposal helps prevent negative consequences for the environment
and human health.
Removing the rechargeable battery
Only remove the rechargeable battery when you discard the product. Before you remove
the battery, make sure that the product is disconnected from the wall socket and that
the battery is completely empty.
Take any necessary safety precautions when you handle tools to open the product and
when you dispose of the rechargeable battery.
Removing the rechargeable battery
Warning: Only remove the rechargeable battery when you discard the appliance. Make
sure the battery is completely empty when you remove it.
To remove the rechargeable battery, follow the instructions below. You can also take the robot to a
Philips service center to have the rechargeable battery removed. Contact the Philips Consumer Care
Center in your country for the address of a service center near you.
1 Let the robot run until the rechargeable battery is empty to make sure that the rechargeable
battery is completely discharged before you remove it and dispose of it.
2 Undo the screws of the battery compartment lid and remove the lid (Fig. 51).
3 Lift out the rechargeable battery and disconnect it (Fig. 52).
4 Take the robot and the rechargeable battery to a collection point for electrical and electronic
waste.
13
Troubleshooting
This chapter summarizes the most common problems you could encounter with the appliance. If you
are unable to solve the problem with the information below, visit www.philips.com/support for a list
of frequently asked questions or contact the Consumer Care Center in your country.
Problem Possible cause Solution
The robot does not start
cleaning when I press the
start/stop button.
The robot does not
respond when I press
one of the buttons.
The robot beeped and
stopped.
The rechargeable battery is
empty.
The robot could not find the
docking station and the
battery ran out.
One or both wheels are stuck. Press the start/stop button. Remove the
Charge the rechargeable battery (see
'Preparing for use').
Place the robot on the plugged-in
docking station. After a few seconds, the
robot beeps and the display lights up.
fluff, hair, thread or wire that is caught
around the wheel suspension.
Page 14
14
English
Problem Possible cause Solution
One or both side brushes are
stuck.
Clean the side brushes.
The robot does not clean
properly.
The robot was lifted while it
was cleaning.
The bristles of one or both side
brushes are crooked or bent.
The filter in the dust container
is dirty.
The suction opening in the
bottom of the dust container is
clogged.
The front wheel is jammed
with hair or other dirt.
The robot is cleaning a very
dark or shiny surface, which
triggers the drop-off sensors.
This causes the robot to move
in an unusual pattern.
Press the start/stop button. Place the
robot on the floor. Then press the
start/stop button to make the robot
resume cleaning.
Soak the brush or brushes in warm
water for a while. If this does not restore
the bristles to their proper shape,
replace the side brushes (see 'Replacing
the side brushes').
Disassemble the filter unit. Clean the
dust filer and the EPA filter with a
toothbrush with soft bristles. You can
also rinse the dust filter under a tap.
If cleaning the EPA filter does not help
anymore, replace the filter with a new
one. We advise you to replace the EPA
filter at least once a year.
Clean the suction opening.
Clean the front wheel (see 'Cleaning the
robot').
Press the start/stop button and then
move the robot to a lighter colored
piece of the floor. If the problem
continues to occur on lighter colored
floors, please go to
www.philips.com/support or contact the
Consumer Care Center in your country.
The rechargeable battery
can no longer be charged
or runs empty very fast.
The robot cannot find the
docking station.
The robot is cleaning a floor
that reflects sunlight quite
strongly. This triggers the dropoff sensors and causes the
robot to move in an unusual
pattern.
The rechargeable battery has
reached the end of its life.
There is not enough room for
the robot to navigate towards
the docking station.
The robot is still actively
searching.
Close the curtains to block sunlight from
entering the room. You can also start
cleaning when the sunlight is less bright.
Have the rechargeable battery replaced
by a Philips service center (see
'Replacing the rechargeable battery').
Try to find another place for the docking
station (see 'Installing the docking
station').
Give the robot around 20 minutes to
return to the docking station.
Page 15

Bahasa Melayu
Pengenalan
Tahniah atas oembelian anda dan selamat menggunakan barangan berjenama Philips! Untuk
memanfaatkan sepenuhnya sokongan yang ditawarkan oleh Philips, daftar produk anda di
www.philips.com/welcome.
Huraian umum
1 Pemegang penutup bekas habuk
2 Tudung bekas habuk
3 Unit penuras
4 Unit penapis tambahan (FC8796, FC8795, FC8794)
5 Bekas habuk
6 Hujung penutup atas
7 Sensor stesen dok
8 Bukaan sedutan
9 Butang mula/henti
10 Berus tepi
11 Set berus sisi tambahan (FC8796 sahaja)
12 Batang untuk memasang berus tepi
13 Roda depan
14 Bukaan sedutan
15 Roda tepi
16 Sensor jatuh
17 Penutup petak bateri
18 Alat tambahan mengelap (FC8796, FC8795, FC8794)
19 Pad mengelap (FC8796, FC8795, FC8794)
20 Plag kecil
21 Penyesuai
22 Berus pembersih
23 Unit kawalan jauh
24 Bateri AAA untuk unit kawalan jauh
25 Stesen dok
15
Unit kawalan jauh
Anda boleh mengendalikan robot dengan unit kawalan jauh (Raj. 2). Ia mempunyai butang yang
berikut:
1 Butang mula/henti
2 Butang navigasi
3 Butang mod pembersihan
4 Butang dok
5 Penjadual 24 jam
Bagaimana robot anda berfungsi
Apa yang dibersihkan oleh robot anda
Robot ini dilengkapi dengan ciri-ciri yang membuatnya pembersih yang sesuai untuk membantu anda
membersihkan lantai di rumah anda.
Robot ini paling sesuai untuk membersihkan lantai keras, seperti lantai kayu, berjubin atau linoleum.
Robot mungkin mengalami masalah membersihkan lantai lembut, seperti karpet atau ambal. Jika
Page 16

16
Bahasa Melayu
anda menggunakan robot di atas karpet atau ambal, harap berada dekat dengannya pada kali
pertama untuk melihat sama ada robot itu boleh menangani lantai jenis ini.
Disebabkan robot menggunakan sensor inframerah untuk menavigasi, ia mungkin mengalami
kesukaran pada permukaan yang sangat gelap dan berkilat. Jika anda menggunakan robot pada
permukaan sedemikian, harap berada dekat dengannya pada kali pertama untuk melihat sama ada
robot boleh menangani lantai yang gelap dan berkilat tersebut.
Bagaimana robot anda membersihkan kawasan
Sistem pembersihan
Robot mempunyai sistem pembersihan 3 tahap untuk membersihkan lantai anda dengan cekap.
-
Dua berus tepi membantu robot membersihkan sudut dan sepanjang dinding. Berus itu juga
membantu untuk mengeluarkan habuk daripada lantai dan menggerakkannya ke arah bukaan
sedutan (Raj. 3).
-
Kuasa sedutan robot mengutip habuk yang bertebaran dan mengangkutnya melalui bukaan
sedutan ke dalam bekas habuk (Raj. 4).
-
Model FC8796, FC8795 dan FC8794 disediakan dengan alat tambahan mengelap yang boleh
disambungkan ke robot untuk mengelap lantai keras anda.
Corak pembersihan
Dalam mod pembersihan automatik, robot menggunakan urutan automatik bagi corak lantun dan
mengikuti dinding untuk membersihkan setiap kawasan bilik secara optimum. Robot terus
membersihkan sehingga bateri robot menjadi lemah atau sehingga dimatikan.
Anda juga boleh memilih salah satu daripada tiga mod pembersihan individu dengan menekan
butang yang sesuai pada unit kawalan jauh (lihat 'Pemilihan mod pembersihan'). Robot meneruskan
pembersihan dalam mod pembersihan yang dipilih selama beberapa minit dan kemudian kembali
kepada mod pembersihan automatik.
1 Mod lantun (Raj. 5)
2 Mod mengikut dinding (Raj. 6)
3 Mod pilin (Raj. 7)
Bagaimana robot anda mengelak perbezaan ketinggian
Robot mempunyai lima sensor jatuh di bawahnya. Robot menggunakan sensor jatuh ini untuk
mengesan dan mengelakkan perbezaan ketinggian seperti anak tangga.
Catatan: Memang lumrah untuk robot bergerak lebih sedikit dari hujung perbezaan ketinggian kerana
sensor jatuh depannya terletak di belakang bampar.
Awas: Dalam sesetengah kes, sensor jatuh mungkin tidak dapat mengesan tangga atau perbezaan
ketinggian lain tepat pada masanya. Oleh itu awasi robot dengan teliti pada beberapa kali pertama
anda menggunakannya dan apabila anda menggunakannya berhampiran anak tangga atau
perbezaan ketinggian lain. Penting untuk anda membersihkan sensor jatuhnya secara tetap bagi
memastikan robot terus dapat mengesan perbezaan ketinggian dengan betul.
Sebelum penggunaan pertama
Memasang berus tepi
1 Buka berus tepi daripada bungkusannya dan terbalikkan robot di atas meja atau lantai.
2 Tolak berus tepi ke aci di bawah robot (Raj. 8).
Page 17

Bahasa Melayu
Catatan: Pastikan anda menyambungkan berus tepi dengan sempurna. Tekannya ke aci sehingga
anda mendengarnya terkancing ke kedudukannya dengan bunyi klik.
Meletakkan bateri dalam unit kawalan jauh
Unit kawalan jauh berfungsi menggunakan dua bateri AAA.
1 Tolak tab (1) untuk membuka penutup petak bateri (2) dan tanggalkan penutup petak bateri (Raj.
9).
2 Masukkan dua bateri AAA (Raj. 10).
Catatan: Pastikan kutub + dan - baterimenghala ke arah yang betul.
3 Untuk memasang semula penutup petak bateri, masukkan dahulu cuping ke dalam bukaan dalam
bingkai petak (1) dan kemudian tolak ke bawah penutup (2) sehingga ia terkunci dengan bunyi klik
(Raj. 11). Kini unit kawalan jauh sudah bersedia untuk digunakan.
Membuat persediaan untuk guna
Memasang stesen dok
1 Masukkan palam kecil penyesuai ke dalam soket pada stesen dok (1) dan masukkan penyesuai ke
dalam soket dinding (2) (Raj. 12).
2 Letakkan stesen dok di atas lantai rata dan mendatar ke dinding.
Catatan: Pastikan tiada halangan atau perbezaan ketinggian 150 cm di depan, 30 cm ke kanan dan
100 cm ke kiri stesen dok (Raj. 13).
17
Mengecas
1 Tempatkan robot pada stesen dok yang dipasangkan palamnya (Raj. 14).
2 Butang mula/henti mula berkelip (Raj. 15).
3 Apabila bateri boleh cas semula telah dicas sepenuhnya,butang mula/henti menyala secara
berterusan (Raj. 16).
Nota: Selepas mengecas, model FC8796 mempunyai masa pengendalian sekitar 115 minit. Selepas
mengecas, model FC8794 dan FC8795 mempunyai masa pengendalian sekitar 105 minit.
Menyediakanbilik untuk aktiviti pembersihan
-
Sebelum anda memulakan robot bagi aktiviti pembersihan, pastikan anda mengetepikan semua
objek yang longgar dan mudah pecah daripada lantai (Raj. 17).
-
Tanggalkan semua kabel, wayar dan kord daripada lantai untuk mencegah robot daripada terbelit
padanya.
-
Jika terdapat ambal dengan rambu dalam bilik yang anda mahu dibersihkan oleh robot, masukkan
rambu ke bawah ambal untuk mencegah robot daripada tersangkut pada rambu dan mencegah
ambal daripada rosak (Raj. 18).
Page 18

18
Bahasa Melayu
Menggunakan robot anda
Menggunakan kawalan jauh
1 Letakkan robot pada stesen dok atau tekan butang mula/henti pada robot (Raj. 19) untuk
mengaktifkan robot.
-
Kini anda boleh menggunakan kawalan jauh untuk mengendalikan robot.
Bermula dan berhenti
1 Tekan butang mula/henti pada unit kawalan jauh (Raj. 20).
2 Butang mula/henti pada robot menyala secara berterusan dan robot memulakan pembersihan
(Raj. 21).
3 Robot membersihkan kawasan dalam mod auto-pembersihan sehingga baterinya kurang kuasa.
Dalam mod auto-pembersihan, robot mengikuti urutan berulang secara rambang, mengikuti
dinding dan gerakan pilin.
4 Apabila kuasa bateri berkurangan, butang mula/henti mula berkelip dengan pantas dan robot
mula mencari stesen dok untuk mengecas (Raj. 22).
5 Anda juga boleh menekan butang mula/henti untuk mengganggu atau menghentikan aktiviti
pembersihan. Jika anda menekan butang mula/henti sekali lagi dan masih mempunyai tenaga
yang mencukupi dalam bateri boleh cas semula, robot akan terus membersihkan dalam mod autopembersihan.
6 Untuk membuat robot kembali ke stesen dok sebelum bateri boleh cas semula kurang kuasa,
tekan butang dok pada unit kawalan jauh (Raj. 23).
7 Butang mula/henti mula berkelip dan robot kembali ke stesen dok.
Pemilihan mod pembersihan
Robot ini mempunyai empat mod pembersihan. Mod pembersihan standard robot ialah mod
pembersihan automatik, yang merupakan urutan automatik bagi corak lantun dan mengikuti dinding
(Raj. 24). Di sebelah mod pembersihan automatik ini, robot tersebut mempunyai tiga mod
pembersihan individu yang setiap daripadanya boleh diaktifkan dengan menekan butang yang sesuai
pada unit kawalan jauh.
Mod lantun
Dalam mod ini, robot membersihkan bilik dalam corak campuran pergerakan lurus dan silangmenyilang (Raj. 25).
Mod mengikut dinding
Dalam mod ini, robot mengikuti dinding bilik untuk memberi kawasan sepanjang dinding pembersihan
tambahan (Raj. 26).
Mod pilin
Dalam mod ini, robot bergerak dalam corak pilin yang berkembang dari titik tengah untuk
membersihkan kawasan dengan teliti (Raj. 27).
Nota: Mod yang dipilih secara manual hanya aktif untuk beberapa minit. Selepas itu, robot bertukar
kepada mod auto-pembersihan.
Pemanduan manual
Anda boleh memandu robot secara manual dengan butang pada unit kawalan jauh.
Page 19

Bahasa Melayu
1 Gunakan butang anak panah atas dan bawah serta kiri dan kanan butang mula/henti pada unit
kawalan jauh untuk mengemudi robot dalam bilik (Raj. 28).
Catatan: Berhati-hati apabila anda memandu robot rapat dengan perbezaan ketinggian dan anak
tangga.
Menggunakan penjadual 24 jam
Penjadual 24 jam boleh diaktifkan dengan unit kawalan jauh. Pastikan robot berada dalam mod sedia
dan diletakkan pada stesen dok.
1 Tekan butang (Raj. 29) penjadual 24 jam pada unit kawalan jauh untuk mengaktifkan penjadual 24
jam.
-
Apabila anda mengaktifkan penjadual 24 jam, anda akan mendengar bunyi dan paparan mula
berkelip sekejap setiap beberapa saat.
-
Robot akan mula menjalankan pembersihan 24 jam selepas anda mengaktifkan penjadual 24
jam. Ia akan terus memulakan pembersihan pada masa yang sama setiap 24 jam sehingga anda
menyahaktifkan penjadual 24 jam.
2 Untuk menyahaktifkan penjadual 24 jam, tekan butang penjadual 24 jam. Anda akan mendengar
bunyi dan paparan akan menyala secara berterusan untuk menunjukkan robot berada dalam mod
sedia dan penjadual 24 jam tidak lagi aktif.
Mengelap dengan robot
Model FC8796,FC8795 dan FC8794 disediakan dengan alat tambahan mengelap dan pad mengelap
untuk pembersihan basah lantai keras.
Menyambungkan pad mengelap
1 Rendamkan pad mengelap dalam air atau basahkan pad mengelap di bawah air paip. Anda boleh
menambah beberapa titisan pembersih lantai yang tersedia dan sesuai untuk lantai anda.
2 Perah pad mengelap dengan rapi untuk memastikan ia hanya lembap dan bukan basah.
3 Sambungkan pad mengelap yang lembap itu pada alat tambahan mengelap dengan menolak
kancing Velcro pad mengelap ke kancing Velcro alat tambahan mengelap (Raj. 30).
4 Masukkan cuping sambungan alat tambahan mengelap ke dalam dua lubang sambungan yang
terletak di belakang roda. Kemudian tekan ke bawah sehingga anda mendengar bunyi klik (Raj. 31).
19
Membersihkan lantai dengan alat tambahan mengelap.
Catatan: Untuk membersihkan lantai keras dengan alat tambahan mengelap, anda perlu memulakan
robot dari titik dalam bilik yang anda ingin bersihkan. Anda tidak boleh memulakan robot dari stesen
doknya dengan pad mengelap disambungkan.
1 Hanya tekan butang mula/henti pada unit kawalan jauh untuk memulakan robot.
-
Robot terus mengelap sehingga baterinya kurang kuasa dan robot berhenti.
Catatan: Tanggalkan pad mengelap dan alat tambahan mengelap sebelum anda menghantar robot
ke stesen dok dengan menggunakan butang dok pada unit kawalan jauh atau sebelum anda
meletakkan robot di stesen dok secara manual.
Menanggalkan alat tambahan mengelap.
1 Untuk menanggalkan alat sambungan mengelap, tekan tab (1) dan tarik alat sambungan mengelap
untuk menanggalkannya (2) (Raj. 32).
2 Tarik pad mengelap daripada alat sambungan mengelap.
Page 20

20
Bahasa Melayu
3 Untuk membersihkan pad mengelap, cucinya dalam mesin basuh pada kitaran lembut pada suhu
60°C maksimum.
Bunyi amaran
Jika robot menghadapi masalah semasa membersihkan (contoh kerana roda tersangkut atau tidak
lagi mencecah lantai atau kerana sensor tidak boleh mengesan lagi lantai), anda akan mendengar
bunyi dan robot akan berhenti. Tekan butang mula/henti untuk menukar robot kepada mod sedia
dan selesaikan masalah yang menyebabkan bunyi amaran itu, sebagai contoh dengan mengeluarkan
halangan yang menghalang roda, membersihkan sensor atau mengangkat robot dan meletakkannya
di tempat lain.
Pembersihan dan penyelenggaraan
Mengosongkandan membersihkan bekas habuk
Kosongkan dan bersihkan bekas habuk apabila bekas habuk penuh.
1 Tarik pemegang penutup bekas habuk dan angkat keluar bekas habuk itu daripada petak bekas
habuk (Raj. 33).
2 Tarik tab di tepi bekas habuk untuk membuka penutup (Raj. 34).
3 Keluarkan unit turas daripada bekas habuk (Raj. 35).
4 Goncang bekas habuk di atas tong sampah untuk mengosongkannya (Raj. 36).
5 Anda boleh membersihkan bekas habuk di bawah air paip suam.
Awas: Jangan bersihkan bekas habuk dalam mesin basuh pinggan.
6 Untuk membersihkan penuras dengan rapi, tanggalkan unit penuras dengan menekan tab yang
terletak di kedua-dua belah unit penuras dan mengeluarkan penuras habuk daripada penuras
EPA. Kemudian bersihkan penuras EPA dengan berus pembersih yang dibekalkan (Raj. 37).
7 Pasang semula unit penuras, masukkan penuras EPA ke dalam penuras habuk. Kemudian letakkan
semula unit turas ke dalam bekas habuk (Raj. 38).
Catatan: Jika anda membersihkan bekas habuk di bawah air paip, pastikan ia kering sebelum
dimasukkan semula ke dalam unit penuras.
8 Letakkan penutup pada bekas habuk itu dan pastikan ia terkunci di tempatnya dengan bunyi klik
(Raj. 39).
9 Letakkan bekas habuk semula ke dalam petak bekas habuk dan lipatkan pemegang bekas habuk
(Raj. 40).
Awas: Sentiasa pastikan ada unit penuras dalam bekas habuk. Jika anda menggunakan robot
tanpa unit penuras dalam bekas habuk, motor akan rosak.
Membersihkan robot
Untuk mengekalkan prestasi pembersihan yang baik, anda perlu membersihkan sensor jatuh, roda,
berus sisi, bukaan sedutan dan titik hubungan robot serta stesen dok dari semasa ke semasa.
1 Letakkan robot terbalik di atas permukaan yang rata.
2 Untuk membersihkan berus tepi, genggam bulu kejurnya dan keluarkannya daripada acinya (Raj.
41).
3 Bersihkan berus tepi dan batang berus tepi dengan berus pembersih yang dibekalkan (Raj. 42).
4 Tanggalkan habuk atau bulu-bulu daripada roda hadapan dan roda tepi dengan berus pembersih
yang dibekalkan (Raj. 43).
Page 21

Bahasa Melayu
5 Jika rambut atau gegebu tersangkut di sekitar roda depan, tanggalkan roda depan menggunakan
pemutar skru (Raj. 44).
6 Selepas membersihkan roda dengan menggunakan berus (Raj. 45) pembersih, tolak masuk roda
depan kembali ke dalam robot menggunakan ibu jari (Raj. 46) anda.
7 Tanggalkan habuk atau bulu-bulu daripada sensor jatuh dengan berus pembersih yang dibekalkan
(Raj. 47).
Catatan: Penting untuk anda bersihkan sensor jatuh secara tetap. Jika sensor jatuh kotor, robot
mungkin tidak dapat mengesan perbezaan ketinggian atau anak tangga.
8 Gunakan berus pembersih yang dibekalkan untuk membersihkan bukaan (Raj. 48) sedutan.
9 Periksa berus tepi dan bawah robot untuk sebarang objek tajam yang boleh merosakkan lantai
anda.
10 Gunakan kain kering atau kapas untuk membersihkan titik sentuhan stesen (Raj. 49) dok.
11 Gunakan kain kering atau kapas untuk membersihkan titik sentuhan di bahagian bawah robot (Raj.
50).
Memesan aksesori
Untuk membeli aksesori atau alat ganti, lawati www.philips.com/parts-and-accessories atau pergi ke
wakil penjual Philips anda. Anda juga boleh menghubungi Pusat Perkhidmatan Pengguna Philips di
negara anda (lihat risalah jaminan antarabangsa untuk maklumat perhubungan).
Penggantian
21
Menggantikan penuras
Gantikan penuras EPA jika terlalu kotor atau rosak (lihat 'Mengosongkandan membersihkan bekas
habuk'). Untuk memperoleh penapis EPA baharu, pergi ke www.philips.com/parts-and-accessories.
Menggantikan bateri boleh cas semula
Jurutera servis yang bertauliah sahaja boleh menggantikan bateri robot yang boleh cas semula. Bawa
robot ke pusat servis Philips yang sah untuk menggantikan bateri tersebut apabila anda tidak boleh
mengecas semula bateri atau apabila kuasa bateri itu habis dengan cepat. Anda boleh menemui
butiran hubungan Pusat Khidmat Pengguna Philips di negara anda dalam risalah jaminan
antarabangsa atau di laman web www.philips.com/support.
Menggantikan berus tepi
Gantikan berus tepi selepas sedikit masa untuk memastikan hasil pembersihan yang baik.
Nota: Sentiasa gantikan berus tepi apabila anda melihat tanda-tanda kelusuhan atau kerosakan. Kami
juga mengesyorkan anda untuk menggantikan kedua-dua berus tepi pada masa yang sama. Untuk
memperoleh berus sisi baharu, pergi ke www.philips.com/parts-and-accessories.
1 Untuk menggantikan berus tepi, genggam bulu kejur berus tepi yang lama dan tariknya keluar
daripada acinya.
2 Tolak berus tepi yang baharu ke dalam acinya.
Page 22

22
Bahasa Melayu
Menggantikan bateri unit kawalan jauh
1 Tolak tab (1) untuk membuka penutup petak bateri (2) dan tanggalkan penutup petak bateri (Raj.
9).
2 Keluarkan bateri AAA yang telah kehabisan daripada petak bateri.
3 Masukkan dua bateri AAA baharu (Raj. 10).
Catatan: Pastikan kutub + dan - baterimenghala ke arah yang betul.
4 Untuk memasang semula penutup petak bateri, masukkan dahulu cuping ke dalam bukaan dalam
bingkai petak (1) dan kemudian tolak ke bawah penutup (2) sehingga ia terkunci dengan bunyi klik
(Raj. 11). Kini unit kawalan jauh sudah bersedia untuk digunakan.
Catatan: Buangkan bateri pakai buang yang sudah kehabisan mengikut peraturan tempatan di
negara anda.
Mengitar semula
-
Jangan buang produk bersama sampah rumah biasa di akhir hayatnya, sebaliknya bawanya ke
pusat pungutan rasmi untuk dikitar semula. Dengan berbuat demikian, anda membantu untuk
memelihara persekitaran.
-
Produk ini mengandungi bateri boleh cas semula bina dalam yang tidak harus dibuang bersama
sampah rumah biasa. Kami menasihatkan anda untuk membawa produk anda ke pusat pungutan
rasmi atau pusat khidmat Philips supaya bateri boleh cas semula itu dikeluarkan oleh seorang
profesional.
-
Ikuti peraturan negara anda bagi pemungutan produk elektrik dan elektronik serta bateri kitar
semula secara berasingan. Pembuangan secara betul membantu mengelakkan akibat negatif bagi
kesihatan manusia dan persekitaran.
Mengeluarkan bateri boleh cas semula
Hanya keluarkan bateri boleh cas semula apabila anda membuang produk ini. Sebelum
anda mengeluarkan bateri, pastikan produk dicabut daripada soket dinding dan bateri
kosong sepenuhnya.
Lakukan sebarang langkah berjaga-jaga yang perlu apabila anda mengendalikan alat
untuk membuka produk dan apabila anda membuang bateri boleh cas semula.
Mengeluarkan bateri boleh cas semula
Amaran: Hanya keluarkan bateri boleh cas semula apabila anda membuang perkakas
tersebut. Pastikan bateri kosong sepenuhnya apabila anda mengeluarkannya.
Untuk mengeluarkan bateri boleh cas semula, ikut arahan di bawah. Anda juga boleh membawa robot
ke pusat khidmat Philips untuk mengeluarkan bateri boleh cas semula. Hubungi Pusat Khidmat
Pelanggan Philips di negara anda untuk alamat pusat khidmat berdekatan dengan anda.
1 Biarkan robot itu berjalan sehingga bateri boleh cas semula kosong untuk memastikan bateri boleh
cas semula dinyah cas sepenuhnya sebelum anda mengeluarkan dan membuangnya.
2 Buka skru dan penutup petak bateri dan keluarkan penutup (Raj. 51).
3 Angkat keluar bateri boleh cas semula dan putuskan sambungannya (Raj. 52).
4 Bawa robot dan bateri boleh cas semula ke pusat kutipan bagi sisa elektrik dan elektronik.
Page 23

Bahasa Melayu
Penyelesai Masalah
Bab ini meringkaskan masalah paling lazim yang anda mungkin hadapi dengan perkakas ini. Jika anda
tidak dapat menyelesaikan masalah dengan maklumat di bawah, lawati www.philips.com/support
untuk mendapatkan senarai soalan lazim atau hubungi Pusat Penjagaan Pengguna di negara anda.
Masalah Punca yang
berkemungkinan
Robot tidak mula
membersihkan kawasan
apabila saya menekan
butang mula/henti.
Bateri boleh cas semula telah
habis.
Penyelesaian
Cas bateri boleh cas semula (lihat
'Membuat persediaan untuk guna').
23
Robot tidak memberikan
respons apabila saya
menekan salah satu
butangnya.
Robot mengeluarkan
bunyi bip dan berhenti.
Robot tidak
membersihkan kawasan
dengan baik.
Robot tidak dapat mencari
stesen dok dan sudah
kehabisan bateri.
Salah satu atau kedua-dua
roda tersangkut.
Salah satu atau kedua-dua
berus tepi tersangkut.
Robot diangkat semasa
membersihkan kawasan.
Bulu kejur pada salah satu
atau kedua-dua berus tepi
bengkok atau melengkung.
Penuras dalam bekas habuk
sudah kotor.
Tempatkan robot pada stesen dok yang
dipasangkan palamnya. Selepas
beberapa saat, robot mengeluarkan
bunyi bip dan paparan akan menyala.
Tekan butang mula/henti. Keluarkan
bulu-bulu halus, rambut, benang atau
wayar yang tersangkut sekitar ampaian
roda.
Bersihkan berus tepi.
Tekan butang mula/henti. Letakkan
robot di atas lantai. Kemudian tekan
butang mula/henti untuk membuat
robot meneruskan pembersihan.
Rendamkan berus atau berus-berus itu
dalam air untuk sementara waktu. Jika
ini tidak memulihkan bulu kejur itu
kepada bentuk yang sepatutnya,
gantikan berus tepi (lihat 'Menggantikan
berus tepi').
Tanggalkan unit penuras. Bersihkan
penuras habuk dan penuras EPA
dengan berus gigi yang mempunyai
berus kejur yang lembut. Anda juga
boleh membilas penuras habuk di
bawah air paip.
Bukaan sedutan di bawah
bekas habuk tersumbat.
Jika membersihkan penuras EPA tidak
membantu lagi, gantikan penuras
dengan yang baharu. Kami
menasihatkan anda untuk
menggantikan penuras EPA sekurangkurangnya sekali setahun.
Bersihkan bukaan sedutan.
Page 24

24
Bahasa Melayu
Masalah Punca yang
berkemungkinan
Roda depan tidak bergerak
kerana mempunyai rambut
atau kotoran lain.
Robot membersihkan
permukaan yang sangat gelap
atau kilat, yang mencetuskan
sensor jatuh. Ini menyebabkan
robot untuk bergerak dalam
corak yang luar biasa.
Robot membersihkan lantai
yang memantulkan cara
matahari dengan agak kuat. Ini
mencetuskan sensor jatuh dan
menyebabkan robot untuk
bergerak dalam corak yang
luar biasa.
Bateri boleh cas semula
tidak boleh dicas lagi
atau sangat pantas
kehabisan kuasa.
Robot tidak dapat
mencari stesen dok.
Bateri boleh cas semula telah
mencapai akhir hayatnya.
Terdapat ruang yang
mencukupi untuk robot
mengemudi ke atas stesen
dok.
Penyelesaian
Bersihkan roda hadapan (lihat
'Membersihkan robot').
Tekan butang mula/henti dan kemudian
gerakkan robot ke bahagian lantai yang
berwarna terang. Jika masalah tersebut
terus berlaku pada lantai berwarna
terang, sila pergi ke
www.philips.com/support atau hubungi
Pusat Khidmat Pelanggan di negara
anda.
Tutupkan langsir untuk menghalang
cahaya matahari daripada memasuki
bilik itu. Anda juga boleh memulakan
pembersihan apabila cahaya matahari
kurang terang.
Dapatkan bateri boleh cas semula itu
digantikan oleh pusat perkhidmatan
Philips (lihat 'Menggantikan bateri boleh
cas semula').
Cuba cari tempat lain untuk stesen dok
(lihat 'Memasang stesen dok').
Robot masih aktif mencari. Berikan robot lebih kurang 20 minit
untuk kembali ke stesen dok.
Page 25

简体中文
简介
感谢您的惠顾,很高兴您选择飞利浦!为了让您能充分享受飞利浦提供的支持,请
在 www.philips.com/welcome 上注册您的产品。
基本说明
1 集尘桶盖手柄
2 集尘桶盖
3 滤网部件
4 附加过滤装置(FC8796、FC8795、FC8794)
5 集尘桶
6 顶盖边缘
7 底座传感器
8 吸口
9 启动/停止按钮
10侧毛刷
11附加侧毛刷(仅限 FC8796)
12用于安装侧毛刷的轴
13前轮
14吸口
15侧轮
16跌落传感器
17电池仓盖
18拖地附件(FC8796、FC8795、FC8794)
19清洁布(FC8796、FC8795、FC8794)
20小插头
21适配器
22清洁刷
23遥控器
24遥控器的 AAA 电池
25底座
25
遥控器
您可以使用遥控器 (图 2)操作智能自动真空吸尘器。 它具有以下按钮:
1 启动/停止按钮
2 导航按钮
3 清洁模式按钮
4 插接按钮
5 24 小时调度器
Page 26

26
简体中文
扫地机器人如何工作
智能自动真空吸尘器清洁哪些物体
本智能自动真空吸尘器具有许多功能,是一款适合帮助您在家中清洁地板的理想清
洁工具。
此智能自动真空吸尘器尤其适合清洁硬地板,例如木制、瓷砖或油毡地板。 清洁软
地板时可能会出现问题,例如地毯或地垫。 如果想在地毯或地垫上使用该智能自动
真空吸尘器,请在首次使用时留心观察它能否在此类地板上工作。
本智能自动真空吸尘器使用红外线传感器进行导航,因此在颜色非常深或光亮的地
板上工作时可能会遇到障碍。 如果想在这种表面使用该智能自动真空吸尘器,请在
首次使用时留心观察它能否在此类深色和光亮的地板上工作。
智能自动真空吸尘器如何清洁
清洁系统
智能自动真空吸尘器利用 3 重清洁系统来高效清洁地面。
-
两个侧毛刷有助于智能自动真空吸尘器清洁角落以及墙角沿线。 它们还可帮助清
除地板上的灰尘,并将其移向吸口 (图 3)。
-
智能自动真空吸尘器的吸力可吸入松动的污垢,然后通过吸口将污垢输送到集尘
桶 (图 4)。
-
FC8796、FC8795 和 FC8794 这几款型号都附带一个可连接到智能自动真空吸尘
器的拖地附件,用于对硬地板进行拖地清洁工作。
清洁方向图
在自动清洁模式下,智能自动真空吸尘器会使用自动触边反弹和沿墙方向图顺序,
以最适宜的方式清洁房间内的各个区域。 智能自动真空吸尘器会持续进行清洁,直
至电池电量不足或被关闭。
您还可以按遥控器 (请参见 '清洁模式选择')上的相应按钮,选择三种单独清洁模式中
的一种。 智能自动真空吸尘器将持续以选定的清洁模式清洁数分钟,然后返回自动
清洁模式。
1 触边反弹模式 (图 5)
2 沿墙模式 (图 6)
3 螺旋模式 (图 7)
智能自动真空吸尘器如何避开高度差
智能自动真空吸尘器底部配有五个跌落传感器。 智能自动真空吸尘器使用这些跌落
传感器检测和避开楼梯等有高度差的地方。
Page 27

简体中文
注意: 智能自动真空吸尘器轻轻移动以越过高度差的边缘是正常现象,因为正面的
跌落传感器位于缓冲装置后面。
警告: 在某些情况下,跌落传感器可能无法及时检测到楼梯或其他有高度差的地
方。 因此,在最初几次使用以及在楼梯或其他有高度差的地方附近使用时,应密切
监控智能自动真空吸尘器的工作。 请务必定期清洁跌落传感器,以确保智能自动真
空吸尘器能继续正确检测到高度差。
首次使用之前
安装侧毛刷
1 打开侧毛刷包装,将智能自动真空吸尘器翻转过来,置于桌子或地板上。
2 将侧毛刷推入智能自动真空吸尘器 (图 8)底部的轴上。
注意: 确保您已正确安装侧毛刷。 将侧毛刷按在轴上,直至您听到其咔哒一声锁
定到位。
将电池装入遥控器
遥控器由两节 AAA 电池供电。
1 按释放钮 (1) 打开电池舱盖 (2),并卸下电池仓盖 (图 9)。
2 插入两节 AAA 电池 (图 10)。
27
注意: 确保电池的正负极没有装反。
3 要重新安装电池仓盖,请先将凸缘插入仓盖边缘 (1) 中的开口,然后向下推仓盖
(2),直至锁定到位并发出“咔哒”一声 (图 11)。 遥控器就可以使用了。
使用准备
安装底座
1 将适配器的小插头插入底座上的插座 (1),将适配器插入电源插座 (2) (图 12)。
2 将底座放在靠墙的水平地板上。
注意: 确保底座 (图 13)正面 150 厘米、右侧 30 厘米、左侧 100 厘米没有障碍
物或高度差。
充电
1 将智能自动真空吸尘器置于接通电源的底座 (图 14)上。
2 启动/停止按钮开始闪烁 (图 15)。
3 当充电电池充满电时,启动/停止按钮将持续亮起 (图 16)。
Page 28

28
简体中文
注意: 型号 FC8796 充电后大约可运行 115 分钟。 型号 FC8794 和 FC8795 充电
后大约可运行 105 分钟。
准备房间以进行清洁操作
-
在启动智能自动真空吸尘器进行清洁操作之前,确保清除地板上的 (图 17)所有散
乱和易碎物体。
-
移除地板上的所有电缆、电线和绳索,以防止智能自动真空吸尘器被缠绕在其
中。
-
如果您要使用智能自动真空吸尘器清洁的房间里铺有带流苏的地毯,请将流苏折
叠到地毯下方,以防止智能自动真空吸尘器被流苏卡住,或损坏 (图 18)地毯。
使用扫地机器人
使用遥控器
1 将智能自动真空吸尘器置于底座,或按智能自动真空吸尘器 (图 19)上的启动/停止
按钮以激活智能自动真空吸尘器。
-
现在您可以使用遥控器操作智能自动真空吸尘器。
启动和停止
1 按遥控器 (图 20)上的启动/停止按钮。
2 智能自动真空吸尘器上的启动/停止按钮持续亮起,吸尘器开始清洁 (图 21)。
3 智能自动真空吸尘器会以自动清洁模式进行清洁,直至电池电量不足。 在自动清
洁模式下,智能自动真空吸尘器会重复按照随机、沿墙和螺旋移动的顺序进行清
洁。
4 如果电池电量不足,启动/停止按钮将开始快速闪烁,智能自动真空吸尘器会开始
搜索底座进行充电 (图 22)。
5 您也可以按启动/停止按钮中断或停止清洁操作。 如果再次按启动/停止按钮且充
电电池仍有足够的电量,则智能自动真空吸尘器将继续以自动清洁模式进行清
洁。
6 要使智能自动真空吸尘器在充电电池电量不足前返回到底座,请按遥控器 (图
23)上的插接按钮。
7 启动/停止按钮开始闪烁,同时智能自动真空吸尘器会返回到底座。
清洁模式选择
智能自动真空吸尘器有四种清洁模式。 其标准的清洁模式为自动清洁模式,即采用
自动触边反弹和沿墙方向图 (图 24)顺序。 除了自动清洁模式,这款智能自动真空吸
尘器还提供三种单独清洁模式,每种模式均可通过按遥控器上的相应按钮启动。
Page 29

简体中文
触边反弹模式
在该模式下,智能自动真空吸尘器将使用直线运动和交叉运动 (图 25)的混合模式清
洁房间。
沿墙模式
在该模式下,智能自动真空吸尘器将沿着房间的墙壁对墙边区域进行特别清洁 (图
26)。
螺旋模式
在该模式下,智能自动真空吸尘器将按照从一个中心点向外延伸螺旋移动,以彻底
(图 27)清洁区域。
注意: 手动选定的模式仅处于启用状态数分钟。 之后,智能自动真空吸尘器会切换
到自动清洁模式。
29
手动驱动
您可以使用遥控器上的按钮手动驱动智能自动真空吸尘器。
1 使用遥控器启动/停止按钮的上、下、左、右箭头按钮在房间 (图 28)内对智能自动
真空吸尘器进行导航。
注意: 当您手动驱动吸尘器靠近有高度差的地方和楼梯时,请小心谨慎。
使用 24 小时调度器
您可以使用遥控器激活 24 小时调度器。 请确保智能自动真空吸尘器处于待机模
式,并且位于底座之上。
1 按遥控器上的 24 小时调度器按钮 (图 29),激活 24 小时调度器。
-
激活 24 小时调度器后,您将听到声音并且显示屏会开始每隔几秒短暂闪烁一
次。
-
在激活 24 小时调度器的 24 小时后,智能自动真空吸尘器会开始清洁操作。
它会每隔 24 小时在同一时间开始清洁操作,直至您禁用 24 小时调度器。
2 如需禁用 24 小时调度器,请按 24 小时调度器按钮。 您将听到声音并且显示屏会
持续亮起,表示智能自动真空吸尘器已处于待机模式,而 24 小时调度器也不再
处于激活状态。
使用智能自动真空吸尘器拖地
FC8796、FC8795 和 FC8794 这几款型号都附带一个拖地附件和一块清洁布,用于
对硬地板进行湿拖清洁。
安装清洁布
1 将清洁布浸泡在水中,或在水龙头下打湿。 您可以滴上几滴适合您地板的现成的
地板清洁剂。
Page 30

30
简体中文
2 彻底挤干清洁布的水,确保只潮不湿。
3 将潮而不湿的清洁布安装到拖地附件,方法是将清洁布的维可牢紧固件推动到拖
地附件 (图 30)的维可牢紧固件上。
4 将拖地附件的附件凸缘插入正好位于滚轮后面的两个附件孔中。 然后向下按直到
您听到“咔哒”一声 (图 31)。
使用拖地附件清洁地板
注意: 要使用拖地附件清洁硬地板,您必须从要清洁的房间中的某个位置启动智能
自动真空吸尘器, 而不能从安装有清洁布的底座来启动吸尘器。
1 只需按遥控器上的启动/停止按钮,即可启动智能自动真空吸尘器。
-
智能自动真空吸尘器会一直拖地,直至电池电量不足才会停止工作。
注意: 在使用遥控器上的插接按钮将智能自动真空吸尘器引导至底座前,或在您手
动将吸尘器置于底座前,请卸下清洁布和拖地附件。
卸下拖地附件
1 要卸下拖地附件,请按释放钮 (1),并向上提拖地附件 (2) 以将其卸除 (图 32)。
2 将清洁布从拖地附件中抽出。
3 要清洗清洁布,请将其放入洗衣机中使用轻柔模式和最高 60°C 的水温清洗。
警报信号
如果智能自动真空吸尘器在清洁过程中出现故障(例如,由于滚轮阻塞或不再与地
板接触,或者由于传感器无法再检测到地板),您将会听到声音,吸尘器将会停止
工作。 按启动/停止按钮将智能自动真空吸尘器切换到待机模式,然后解决导致发出
警报信号的问题,例如采用移除阻塞滚轮的障碍物,清洁传感器,或提起智能自动
真空吸尘器将其放在其他位置等方法。
清洁和保养
倒空并清洁集尘盒
集尘桶已满时,倒空并清洁集尘桶。
1 向上拉集尘桶盖手柄,从集尘桶仓 (图 33)中提出集尘桶。
2 抽出集尘桶侧面的卡舍,以打开盖子 (图 34)。
3 从集尘桶 (图 35)中取出滤网部件。
4 在垃圾箱上晃动集尘桶将其倒空 (图 36)。
5 您可以在微温水龙头下清洗集尘桶。
警告: 切勿在洗碗机中清洗集尘桶。
Page 31

简体中文
6 要彻底清洁滤网,请分离滤网部件,方法是按滤网部件两侧的卡舍,并从 EPA 过
滤网中取出灰尘滤网。 然后,使用随附的清洁刷 (图 37)清洁 EPA 过滤网。
7 重新组装滤网部件,并将 EPA 过滤网卡入灰尘滤网。 然后,将滤网部件重新装
回集尘桶 (图 38)。
注意: 如果您在水龙头下清洗了集尘桶,请确保在重新插入滤网部件前,集尘桶
是干燥的。
8 将盖子放在集尘桶上,并确保盖子锁定到位并听到“咔哒”一声 (图 39)。
9 将集尘桶放回集尘桶仓,并折叠集尘桶手柄 (图 40)。
警告: 务必确保集尘桶内已放置好滤网部件。 如果您在集尘桶内未放置滤网部件
的情况下使用智能自动真空吸尘器,则马达将会受损。
清洁智能自动真空吸尘器
为保持良好的清洁效果,您必须经常清洁跌落传感器、滚轮、侧毛刷、吸口以及智
能自动真空吸尘器和底座的触点。
1 将吸尘器倒置在平面上。
2 要清洁侧毛刷,请抓住刷毛并将其从轴 (图 41)上取下。
3 使用随附的 (图 42)清洁刷来清洁侧毛刷及侧毛刷轴。
4 使用随附的 (图 43)清洁刷来清除前轮和侧轮的灰尘或绒毛。
5 如果毛发或绒布缠绕在前轮上,请用螺丝刀取下前轮 (图 44)。
6 用清洁刷清洁前轮 (图 45),然后用拇指将前轮推回至智能自动真空吸尘器上 (图
46)。
7 使用随附的 (图 47)清洁刷来清除跌落传感器上的灰尘或绒毛。
31
注意: 务必定期清洁跌落传感器。 如果跌落传感器变脏,吸尘器可能无法检测到
高度差或楼梯。
8 使用随附的清洁刷来清洁吸口 (图 48)。
9 检查吸尘器的侧毛刷和底部是否存在可能会损坏地板的尖锐物体。
10使用干布或棉签清洁底座的触点 (图 49)。
11用干布或棉签清洁智能自动真空吸尘器底部的触点 (图 50)。
订购配件
如需购买附件或备件,请访问 www.philips.com/parts-and-accessories 或联系您的
飞利浦经销商。 您还可以联系所在国家/地区的飞利浦客户服务中心(请参阅保修卡
了解详细联系信息)。
Page 32

32
简体中文
更换
更换滤网
如果 EPA 过滤网很脏或损坏 (请参见 '倒空并清洁集尘盒'),请进行更换。 要获得新
的 EPA 过滤网,请访问 www.philips.com/parts-and-accessories。
更换充电电池
只有具备资格的服务工程师,才能更换智能自动真空吸尘器的充电电池。 当充电电
池无法继续充电或耗电很快时,请将智能自动真空吸尘器送往授权的飞利浦服务中
心,以更换电池。 您可以在国际保修卡或 www.philips.com/support 网站上找到您
所在国家/地区的飞利浦客户服务中心的详细联系信息。
更换侧毛刷
一段时间后,请更换侧毛刷,以确保正常的清洁效果。
注意: 发现磨损或损坏迹象时务必更换侧毛刷。 另外,建议您同时更换两个侧毛
刷。 要获得新的侧毛刷,请访问 www.philips.com/parts-and-accessories。
1 如需更换侧毛刷,请抓住旧侧毛刷的刷毛将其从轴上拆下。
2 将新侧毛刷推到轴上。
更换遥控器的电池
1 按释放钮 (1) 打开电池舱盖 (2),并卸下电池仓盖 (图 9)。
2 从电池仓中取出电量耗尽的 AAA 电池。
3 插入两节新的 AAA 电池 (图 10)。
注意: 确保电池的正负极没有装反。
4 要重新安装电池仓盖,请先将凸缘插入仓盖边缘 (1) 中的开口,然后向下推仓盖
(2),直至锁定到位并发出“咔哒”一声 (图 11)。 遥控器就可以使用了。
注意: 根据您所在国家/地区的当地规章制度弃置电量耗尽的一次性电池。
回收
-
弃置本产品时,请不要将其与一般生活垃圾放在一起,应将其交给政府指定的回
收中心。 这样做将有利于环保。
-
此产品包含内置充电电池;请勿将充电电池与一般生活垃圾一起弃置。 请您将产
品送到官方收集中心或飞利浦服务中心,请专业人士移除充电电池。
-
遵循您的国家/地区有关分类回收电子电气产品和充电电池的规定。 正确弃置产品
有助于避免对环境和人类健康造成不良后果。
Page 33

简体中文
拆下充电电池
必须在丢弃本产品前拆下充电电池。 卸下电池之前,请确保本产品与电源断开连接
并且电池电量已耗尽。
当您使用工具打开本产品时以及在您弃置充电电池时,请采取必要的安全保护措
施。
拆下充电电池
警告: 必须在丢弃产品前取出充电电池。在取出电池时请确保电池电量已耗尽并与
电源断开连接。
按照以下步骤拆下充电电池。 您也可以将智能自动真空吸尘器送往飞利浦服务中
心,由其拆下充电电池。 您可联系所在国家/地区的飞利浦客户服务中心,获取您附
近的服务中心地址。
1 让吸尘器运转,直至充电电池电量完全耗尽,以确保在您取出并弃置充电电池
前,其已完全放电。
2 拧下电池仓盖的螺丝,然后取下仓盖 (图 51)。
3 取出充电电池并断开连接 (图 52)。
4 将智能自动真空吸尘器和充电电池送往电子电器垃圾回收点。
33
故障种类和处理方法
本章归纳了使用本产品时最常见的一些问题。如果您无法根据以下信息解决问题,
请访问 www.philips.com/support 查阅常见问题列表,或联系您所在国家/地区的客
户服务中心。
问题 可能的原因 解决方法
按启动/停止按钮时
智能自动真空吸尘器
无法开始清洁。
随意按下一个按钮
时,智能自动真空吸
尘器没有反应。
智能自动真空吸尘器
发出“哔”声后停止
工作。
充电电池的电量已耗尽。 为充电电池 (请参见 '使用准备
')充电。
智能自动真空吸尘器无法
找到底座,而且电池电量
已经耗尽。
一个或多个滚轮被卡住。 按启动/停止按钮。 清除滚轮悬架
将智能自动真空吸尘器置于接通
电源的底座上。 几秒钟后,智能
自动真空吸尘器发出“哔”声,
显示器亮起。
周围吸附的绒毛、毛发、线头或
线丝。
Page 34

34
简体中文
问题 可能的原因 解决方法
智能自动真空吸尘器
无法正确清洁。
一个或两个侧毛刷被卡
清洁侧毛刷。
住。
清洁时智能自动真空吸尘
器被提起。
按启动/停止按钮。 将智能自动真
空吸尘器置于地板上。 然后按启
动/停止按钮使智能自动真空吸尘
器继续清洁。
一个或两个侧毛刷的刷毛
已变形或弯曲。
将毛刷在温水中浸泡一会儿。 如
果这样做不能使刷毛复原,则更
换侧毛刷 (请参见 '更换侧毛刷
')。
集尘盒中的滤网变脏。 拆卸滤网部件。 使用软毛牙刷清
洁灰尘滤网和 EPA 过滤网。 您
还可以在水龙头下冲洗灰尘滤
网。
如果清洁 EPA 过滤网不再有用,
请使用新过滤网更换。 我们建议
您至少每年更换一次 EPA 过滤
网。
集尘盒底部吸口被堵塞。 清洁吸口。
前轮被毛发或其他污垢卡
住。
清洁前轮 (请参见 '清洁智能自动
真空吸尘器')。
智能自动真空吸尘器在清
洁颜色极深或有光泽的地
面时会触发跌落传感器。
这将导致智能自动真空吸
尘器沿异常的方向图移
动。
智能自动真空吸尘器正在
清洁强烈反射太阳光的地
板。 这可能会触发跌落
传感器,导致智能自动真
空吸尘器沿异常的方向图
移动。
按启动/关闭按钮,然后将智能自
动真空吸尘器移至颜色较浅的地
板。 如果在颜色较浅的地板上问
题仍然存在,请访问
www.philips.com/support 或联系
您所在国家/地区的客户服务中
心。
关闭窗帘,阻止太阳光射入房
间。 您还可以在阳光不那么明亮
时开始清洁。
Page 35

问题 可能的原因 解决方法
简体中文
35
充电电池无法充电或
耗电极快。
智能自动真空吸尘器
无法找到底座。
充电电池达到了其寿命的
终点。
没有足够的空间供智能自
动真空吸尘器导航到底
座。
智能自动真空吸尘器仍在
积极搜索。
充电电池应由飞利浦服务中心 (请
参见 '更换充电电池')更换。
请尝试将底座 (请参见 '安装底座
')放置到其他地方。
给智能自动真空吸尘器约 20 分
钟时间让其返回到底座。
Page 36

36
繁體中文
簡介
感謝您購買本產品。歡迎來到飛利浦的世界! 為充分享受飛利浦為您提供的好處,請至下列位址註冊產
品:www.philips.com/welcome。
一般描述
1 集塵盒蓋把手
2 集塵盒蓋
3 濾網組件
4 備用濾網 (FC8796、FC8795、FC8794)
5 集塵盒
6 上蓋邊緣
7 機座感測器
8 吸塵開口
9 開始/停止按鈕
10 側邊刷毛
11 多一組側邊刷毛 (限 FC8796 機型)
12 安裝側邊刷毛的驅動軸
13 前輪
14 吸塵開口
15 側輪
16 掉落感測器
17 電池盒蓋
18 拖地配件 (FC8796、FC8795、FC8794)
19 拖地墊 (FC8796、FC8795、FC8794)
20 小插頭
21 電源轉換器
22 清潔刷
23 遙控器
24 遙控器 AAA 電池
25 機座
遙控器
您可以使用遙控器 (圖 2)操作自動吸塵機器人。 遙控器提供下列按鈕:
1 開始/停止按鈕
2 操控按鈕
3 清潔模式按鈕
4 返回機座按鈕
5 24 小時排程工具
自動吸塵機器人運作方式
自動吸塵機器人清潔項目
自動吸塵機器人具備絕佳清潔功能,能協助您清理您的居家地板,
特別適合清理硬質地板,例如木質、磁磚、亞麻地板。 若用於清潔地毯或毛毯等軟質地板,可能會發生問
題。 若在地毯或毛毯上使用自動吸塵機器人,則初次使用時請待在附近,查看自動吸塵機器人是否適用於該
類型地板。
由於機器人使用紅外線感測器進行導航,因此在深色和亮面地板上可能會難以行進。 若在這類地板上使用自
動吸塵機器人,則初次使用時請待在附近,查看自動吸塵機器人是否適用於深色和亮面的地板。
Page 37

繁體中文
自動吸塵機器人清潔方式
清潔系統
自動吸塵機器人採用 3 步驟清潔系統,有效清潔您的地板。
-
兩側刷毛可協助自動吸塵機器人清潔角落與牆緣, 亦可將灰塵掃離地板,並把灰塵移向吸塵開口 (圖 3)。
-
自動吸塵機器人透過吸力將灰塵由吸塵開口吸入集塵盒 (圖 4)中。
-
FC8796、FC8795 及 FC8794 機型附有拖地配件,可裝在自動吸塵機器人上拖硬質地板。
清潔模式
啟用自動清潔模式時,自動吸塵機器人會依循自動的回彈和沿牆模式順序,徹底清潔房間內所有區域。 它會
持續清潔,直到電池電力不足或關閉電源為止。
您也可以按下遙控器 (見 '清潔模式選擇')上適當的按鈕,選擇這三種個別清潔模式的其中一種。 自動吸塵機器
人將以選定的清潔模式繼續清潔數分鐘,然後回到自動清潔模式。
1 回彈模式 (圖 5)
2 沿牆模式 (圖 6)
3 螺旋模式 (圖 7)
自動吸塵機器人如何避開高度落差
自動吸塵機器人底部有五個掉落感測器。 它使用這些掉落感測器偵測及避開高度落差,例如樓梯。
注意: 自動吸塵機器人移動時會稍微超過高度落差的邊緣,此屬正常現象,因為其前方的掉落感測器位於緩
衝墊後方。
警告: 有時,掉落感測器可能會偵測不到樓梯或其他高度落差。 因此,在前幾次使用以及在靠近樓梯或其他
有高度落差的地點使用時,請謹慎監視自動吸塵機器人。 請務必定期清潔掉落感測器,以確保自動吸塵機器
人可持續正常偵測高度落差。
37
第一次使用前
安裝側邊刷毛
1 拆開側邊刷毛包裝,將自動吸塵機器人上下顛倒放置在桌面或地板上。
2 將側邊刷毛推入自動吸塵機器人 (圖 8)底部的驅動軸上。
注意: 請確定您正確安裝側邊刷毛。 將它們推到驅動軸上,直到聽到卡入定位的聲音為止。
將電池裝入遙控器中
遙控器使用兩個 AAA 電池。
1 按下拉片 (1) 鬆開電池盒蓋 (2),並打開電池盒蓋 (圖 9)。
2 裝入兩顆 AAA 電池 (圖 10)。
注意: 請確認正 (+) 負 (-) 極放置無誤。
3 要裝回電池盒蓋,首先將突耳插入電池盒邊緣的開口處 (1),然後按下蓋子 (2),直到聽到「喀噠」 (圖
11)一聲完全卡入定位為止。 您現在可以開始使用遙控器。
Page 38

38
繁體中文
使用前準備
安裝機座
1 將轉換器的小插頭插入機座上的插座 (1),然後將轉換器插入電源插座 (2) (圖 12)。
2 將機座靠牆擺放在平穩的水平地面上。
注意: 請確認機座 (圖 13)前方 150 公分、右方 30 公分與左方 100 公分內沒有任何障礙物或高度落差。
充電
1 將自動吸塵機器人放在已插電的機座 (圖 14)上。
2 開始/停止按鈕開始閃爍 (圖 15)。
3 當電池充飽電力後,開始/停止按鈕會持續亮燈 (圖 16)。
注意: FC8796 機型充電後的運轉時間約為 115 分鐘。 FC8794 和 FC8795 機型充電後的運轉時間約為 105
分鐘。
清潔房間前的準備工作
-
在啟動自動吸塵機器人進行清潔工作前,請確認您已將地板上所有鬆動和易碎的物品取走 (圖 17)。
-
移除地板上的所有纜線、電線及導線,避免自動吸塵機器人纏住。
-
要用自動吸塵機器人清潔的房間內有帶流蘇的地毯時,請將流蘇折入地毯下方,避免自動控制機器人吸塵
器因吸入流蘇而卡住,並且防止地毯受損 (圖 18)。
使用自動吸塵機器人
使用遙控器
1 將自動吸塵機器人放在機座上,或按下自動吸塵機器人 (圖 19)上的開始/停止按鈕,以啟動自動吸塵機器
人。
-
現在您可以使用遙控器操作自動吸塵機器人。
開始和停止
1 按下遙控器 (圖 20)上的開始/停止按鈕。
2 自動吸塵機器人上的開始/停止按鈕將持續亮起,自動吸塵機器人將開始清潔 (圖 21)。
3 自動吸塵機器人將以自動清潔模式進行清潔,直到電池電力不足為止。 在自動清潔模式下,則會依照隨
機、沿牆及螺旋移動順序重複執行清潔。
4 當電池電力不足時,開始/停止按鈕會開始快速閃爍,自動吸塵機器人會開始尋找機座以進行充電 (圖 22)。
5 您也可以按下開始/停止按鈕以中斷或停止清潔作業。 如果您再次按下開始/停止按鈕,而且充電式電池仍
有足夠的電力,自動吸塵機器人將以自動清潔模式繼續清潔。
6 在充電式電池電力尚未不足前,若要讓自動吸塵機器人返回機座,請按下遙控器 (圖 23)上的返回機座按
鈕。
7 開始/停止按鈕開始閃爍時,自動吸塵機器人會返回機座。
Page 39

繁體中文
清潔模式選擇
此款自動吸塵機器人有四種清潔模式。 標準的清潔模式是自動清潔模式,就是自動的回彈和沿牆模式 (圖
24)順序。 自動吸塵機器人在此自動清潔模式旁有三種個別清潔模式,只要按下遙控器上的適當按鈕即可啟動
各個模式。
回彈模式
使用此模式時,自動吸塵機器人會以直線和交叉移動 (圖 25)的混合模式清潔房間。
沿牆模式
使用此模式時,自動吸塵機器人會沿著房間牆壁清潔,讓牆壁邊緣區域更加乾淨 (圖 26)。
螺旋模式
使用此模式時,自動吸塵機器人會從中心點以螺旋形往外擴大,徹底 (圖 27)清潔此區域。
注意: 手動選擇的模式運作時間只有幾分鐘。 之後,自動吸塵機器人就會切換至自動清潔模式。
手動操縱
您可以使用遙控器上的按鈕手動操作自動吸塵機器人。
1 利用位於遙控器開始/停止按鈕的上方、下方、左邊、右邊的箭頭按鈕,操縱自動吸塵機器人於房 (圖 28)內
清潔。
注意: 在靠近高度落差與樓梯的位置,若以手動方式操作自動吸塵機器人,請特別小心。
使用 24 小時排程工具
您可以用遙控器啟動 24 小時排程工具。 請確認自動吸塵機器人處於待機模式,且放置在機座上。
1 按下遙控器上的 24 小時排程工具按鈕 (圖 29),啟動 24 小時排程工具。
-
啟動 24 小時排程工具時,您會聽到聲音,且顯示器會開始短暫閃爍幾秒鐘。
-
自動吸塵機器人會在 24 小時排程工具啟動的 24 小時後開始清潔。 自動吸塵機器人會持續每隔 24 小時
的同一時間再次啟動清潔,直到停用 24 小時排程工具。
2 要停用 24 小時排程工具,請按下 24 小時排程工具按鈕。 您會聽到聲音,且顯示器將持續亮起,表示自動
吸塵機器人進入待機模式且 24 小時排程工具已停用。
39
用自動吸塵機器人拖地
FC8796、FC8795 及 FC8794 機型附有拖地配件和拖地墊,可用濕布清潔硬質地板。
安裝拖地墊
1 將拖地墊放入水中,或將拖地墊放在水龍頭下沖水。 可添加幾滴手邊適合地板使用的地板清潔液。
2 將拖地墊完全擰乾,讓拖地墊保持濕潤但不會流出水。
3 將拖地墊的魔鬼黏扣裝到拖地配件 (圖 30)的魔鬼黏扣上,將濕潤的拖地墊裝到拖地配件上。
4 將拖地配件的安裝突耳插入輪子後方的兩個安裝孔內。 接著往下壓,直到聽到喀噠聲 (圖 31)。
使用拖地配件清潔地板
注意: 要用拖地配件清潔硬地板,您必須從房間內要清潔的位置啟動自動吸塵機器人。 安裝拖地墊時不能從
機座啟動自動吸塵機器人。
1 只要按下遙控器上的開始/停止按鈕即可啟動自動吸塵機器人。
-
自動吸塵機器人將持續拖地,直到電池電力不足,自動吸塵機器人便會停止。
Page 40

40
繁體中文
注意: 請先拆離拖地墊和拖地配件,再按下遙控器上的返回機座按鈕讓自動吸塵機器人返回機座,或用手動
方式將自動吸塵機器人放回機座。
拆離拖地配件
1 要拆離拖地配件,請按下拉片 (1),然後拉起拖地配件,將其拆離 (2) (圖 32)。
2 將拖地墊取下拖地配件。
3 要清潔拖地墊,請將拖地墊放入洗衣機,使用溫和的洗衣行程,水溫最高不超過 60°C,將其洗淨。
警示訊號
如果自動吸塵機器人在清潔時發生問題 (如輪子卡住或無法接觸到地板,或感測器無法偵測到地板),機器人將
發出聲音並停止。 按下開始/停止按鈕,將自動吸塵機器人切換為待機模式,解決造成警示訊號的問題,例如
除去卡住輪子的阻礙物、清潔感測器,或將機器人拿起再放到其他地方。
清潔與維護
清空和清潔集塵盒
集塵盒已滿時,應清空並清潔集塵盒。
1 拉起集塵盒蓋把手,將集塵盒自集塵室 (圖 33)拉出。
2 拉開集塵盒側邊的拉片,開啟蓋子 (圖 34)。
3 從集塵盒 (圖 35)拆下濾網。
4 在垃圾桶上抖動集塵盒,以清空集塵盒 (圖 36)。
5 可在常溫水的水龍頭下清潔集塵盒。
警告: 請勿使用洗碗機來清潔集塵盒。
6 要徹底清潔濾網,請按下濾網兩側的拉片使其脫離,然後將 EPA 濾網從濾網拿下。 接著用隨附的清潔刷
(圖 37)來清潔 EPA 濾網。
7 裝回濾網,並將 EPA 濾網卡入濾網內。 然後將濾網裝回集塵室 (圖 38)中。
注意: 如果將集塵盒放在水龍頭下沖洗,請先確認集塵盒是乾的再裝回濾網。
8 將蓋子蓋上集塵盒,確定發出喀噠 (圖 39)一聲卡入。
9 將集塵盒裝回集塵室中,並將集塵盒把手 (圖 40)向下折。
警告: 請務必確認已在集塵盒內部放入濾網。 如果您在集塵盒內沒有濾網的情況下使用自動吸塵機器人,
將會導致馬達損壞。
清潔自動吸塵機器人
為了維持良好的清潔效能,您必須不時清潔掉落感測器、輪子、側邊刷毛、吸塵開口,以及自動吸塵機器人和
機座的接點。
1 將自動吸塵機器人上下顛倒放置在平坦的表面上。
2 若要清潔側邊刷毛,請抓住刷毛並將其從驅動軸 (圖 41)拉出。
3 使用隨附的 (圖 42)清潔刷清理側邊刷毛和側邊刷毛驅動軸。
4 使用隨附的 (圖 43)清潔刷清除前輪和側輪的灰塵或毛絮。
5 如果毛髮或毛絮纏繞在前輪上,請使用螺絲起子 (圖 44)拆下前輪。
6 使用清潔刷 (圖 45)清潔前輪後,請以拇指 (圖 46)將前輪推回自動吸塵機器人中。
7 使用隨附的 (圖 47)清潔刷清除掉落感測器的灰塵或毛絮。
Page 41

繁體中文
注意: 請務必定期清潔掉落感測器。 如果掉落感測器髒污,自動吸塵機器人可能無法偵測高度落差或樓
梯。
8 使用隨附的清潔刷清潔吸塵開口 (圖 48)。
9 檢查側邊刷毛和自動吸塵機器人底部是否有任何可能損壞地板的尖銳物體。
10 使用乾布或棉花棒清潔機座 (圖 49)的接點。
11 使用乾布或棉花棒清潔自動吸塵機器人 (圖 50)底部的接點。
41
訂購配件
若要購買配件或備用零件,請造訪 www.philips.com/parts-and-accessories,或洽詢您的飛利浦經銷商。 您也
可以聯絡您所在國家/地區的飛利浦客戶服務中心 (詳細聯絡資料請參閱全球保固說明書)。
更換
更換濾網
EPA 濾網非常髒或受損 (見 '清空和清潔集塵盒')時,請予以更換。 若要取得新的 EPA 濾網,請造訪
www.philips.com/parts-and-accessories。
更換充電式電池
自動吸塵機器人的充電式電池只能請合格的服務工程師更換。 當您無法充電或是電池電力消耗過快時,請將
自動吸塵機器人送到授權的飛利浦服務中心,以便更換電池。 您可以在全球保固說明書中或我們的網站
www.philips.com/support 上,找到您所在國家/地區飛利浦客戶服務中心的詳細聯絡資訊。
更換側邊刷毛
使用一段期間後,請更換側邊刷毛,以確保適當的清潔效果。
注意: 當您發現側邊刷毛有磨損或損壞的跡象時,請務必予以更換。 此外,建議您同時更換兩側的側邊刷
毛。 若要取得新的側邊刷毛,請造訪 www.philips.com/parts-and-accessories。
1 若要更換側邊刷毛,請抓住舊側邊刷毛的刷毛部分,將其從驅動軸拉出。
2 將新的側邊刷毛推入驅動軸。
更換遙控器電池
1 按下拉片 (1) 鬆開電池盒蓋 (2),並打開電池盒蓋 (圖 9)。
2 自電池槽取出沒電的 AAA 電池。
3 裝入兩顆新的 AAA 電池 (圖 10)。
注意: 請確認正 (+) 負 (-) 極放置無誤。
4 要裝回電池盒蓋,首先將突耳插入電池盒邊緣的開口處 (1),然後按下蓋子 (2),直到聽到「喀噠」 (圖
11)一聲完全卡入定位為止。 您現在可以開始使用遙控器。
注意: 請根據您所在國家/地區的當地法規處理沒電的廢棄電池。
Page 42

42
繁體中文
回收
-
本產品使用壽命結束時請勿與一般家庭廢棄物一併丟棄。請將該產品放置於政府指定的回收站, 此舉能為
環保盡一份心力。
-
本產品包含內建充電式電池,不得與一般家用廢棄物一併丟棄。 請將產品攜至政府指定的回收站或飛利浦
服務中心,由專業人員取出充電式電池。
-
請按照您所在國家/地區的規定,分類與回收電子電器產品及充電式電池。 正確處理廢棄物有助避免對環境
和人類健康的負面影響。
取出充電式電池
棄置本產品前,才能取出充電式電池。 取出電池前,請確認已從牆上插座拔出產品插頭,且電池
電力已完全耗盡。
使用工具打開產品或棄置充電式電池時,請採取任何必要的安全預防措施。
取出充電式電池
警告: 請僅在棄置本產品前取出充電式電池。 取出電池前,請確認其電力已完全耗盡。
若要取出充電式電池,請遵照下列指示操作。 您也可以將自動吸塵機器人送到飛利浦服務中心,以取出充電
式電池。 請與您所在國家/地區的飛利浦客戶服務中心聯絡,找到離您最近的服務中心地址。
1 讓自動吸塵機器人持續轉動直到充電式電池電量耗盡,以確定充電式電池在您取下並棄置前已完全放電。
2 鬆開電池盒蓋的螺絲並取下電池盒蓋 (圖 51)。
3 請取出並卸除 (圖 52)充電式電池。
4 請將自動吸塵機器人及充電式電池送至電子電器廢棄物回收站。
疑難排解
本章概述了使用本產品最常遇到的問題。 如果無法利用以下資訊解決遇到的問題,請造訪
www.philips.com/support 瀏覽常見問題清單,或聯絡您所在國家/地區的飛利浦客戶服務中心。
問題 可能原因 解決方法
按下開始/停止按鈕時,自
動吸塵機器人沒有啟動。
按下其中一個按鈕時,自動
吸塵機器人無回應。
自動吸塵機器人發出嗶聲並
停止。
自動吸塵機器人未妥善清潔。單側 (或兩側) 側邊刷毛變形或彎曲。將刷毛浸泡在溫水中一段時間。 如果刷毛
充電式電池沒電。 為充電式電池 (見 '使用前準備')充電。
自動吸塵機器人無法找到機座,
電池也沒電了。
一或兩個輪子卡住。 按壓開始/停止按鈕。 將卡在輪子懸空處的
單側 (或兩側) 側邊刷毛阻塞。 清潔側邊刷毛。
自動吸塵機器人在清潔時被拿起。按壓開始/停止按鈕。 將自動吸塵機器人放
將自動吸塵機器人放在已插電的機座上。
幾秒鐘後,自動吸塵機器人會發出嗶聲,顯
示幕會亮起。
毛絮、毛髮、絲線或電線移除。
在地板上。 然後按下開始/停止按鈕讓自動
吸塵機器人繼續清潔。
仍無法恢復為正常形狀,請更換側邊刷毛
(見 '更換側邊刷毛')。
Page 43

問題 可能原因 解決方法
繁體中文
43
集塵盒內的濾網髒污。 拆解濾網。 用軟毛牙刷清潔濾網和 EPA 濾
集塵盒底部的吸塵開口阻塞。 清潔吸塵開口。
前輪卡有毛髮或其他灰塵。 清潔前輪 (見 '清潔自動吸塵機器人')。
自動吸塵機器人正在清潔極為暗
色或閃亮的表面,因而觸發掉落
感測器, 導致自動吸塵機器人以
異常模式移動。
自動吸塵機器人正在清潔強烈反
射陽光的地板, 因而觸發掉落感
測器,導致自動吸塵機器人以異
常模式移動。
充電式電池無法充電或耗電
快速。
自動吸塵機器人無法找到機座。沒有足夠的空間可讓自動吸塵機
充電式電池壽命結束。 請由飛利浦服務中心 (見 '更換充電式電池
器人返回機座。
自動吸塵機器人仍積極尋找中。 請等待約 20 分鐘,讓自動吸塵機器人返回
網。 也可在水龍頭下沖洗濾網。
如果無法將 EPA 濾網清乾淨,請更換新的
濾網。 建議您至少每年更換一次 EPA 濾
網。
按下開始/停止按鈕,然後將自動吸塵機器
人移至顏色較淺的地板上。 如果在顏色較
淺的地板上仍發生問題,請前往
www.philips.com/support 或聯絡您所在國
家/地區的客戶服務中心。
拉上窗簾阻隔陽光射入房間。 您亦可在陽
光較不強烈時開始進行清潔。
')協助更換充電式電池。
請嘗試尋找其他適合放置機座 (見 '安裝機座
')的位置。
機座。
Page 44

44
한국어
소개
필립스 제품을 구입해 주셔서 감사합니다! 필립스가 드리는 지원 혜택을 최대한 누리시려면
www.philips.com/welcome에서 제품을 등록하십시오.
기기 정보
1 먼지통 뚜껑 손잡이
2 먼지통 뚜껑
3 필터
4 여분의 필터 장치 (FC8796, FC8795, FC8794)
5 먼지통
6 상단 커버의 가장자리
7 도킹 스테이션 센서
8 흡입구
9 시작/중지 버튼
10 측면 브러시
11 여분의 사이드 브러시(FC8796 모델만 해당)
12 사이드 브러시 장착용 축
13 앞바퀴
14 흡입구
15 옆바퀴
16 낙하 방지 센서
17 배터리함 덮개
18 물걸레 어태치먼트 (FC8796, FC8795, FC8794)
19 물걸레 패드 (FC8796, FC8795, FC8794)
20 전원 플러그
21 어댑터
22 청소용 브러시
23 리모콘
24 리모콘용 AAA 배터리
25 도킹 스테이션
리모콘
리모콘 (그림 2)으로 로봇 청소기를 작동할 수 있습니다. 리모콘에는 다음 버튼이 있습니다.
1 시작/중지 버튼
2 탐색 버튼
3 청소 모드 버튼
4 도킹 버튼
5 24시간 스케줄러
로봇 청소기 작동 원리
로봇 청소기의 청소 기능
이 로봇 청소기는 집 바닥을 청소하는 데 적합한 기능을 갖추고 있습니다.
로봇 청소기는 특히 목재, 타일 또는 리놀륨 등의 재료로 된 청소하기 딱딱한 바닥에 적합합니다. 카펫 또는
러그 등의 청소하기 부드러운 바닥에는 어려움이 있을 수 있습니다. 카펫 또는 러그에서 로봇 청소기를
사용하려면 로봇 청소기가 그 바닥의 종류를 처리할 수 있는지 우선 가까이 지켜보십시오.
Page 45

한국어
이 로봇 청소기는 적외선 센서를 이용해 탐색하기 때문에 매우 어둡고 빛이 나는 바닥에는 어려움이 있을 수
있습니다. 이러한 표면에서 로봇 청소기를 사용하려면 로봇 청소기가 어둡고 빛이 나는 바닥에서 처리할 수
있는지 우선 가까이 지켜보십시오.
로봇 청소기 청소 원리
청소 시스템
로봇 청소기는 바닥을 효율적으로 청소하기 위한 3단계 청소 시스템을 갖추고 있습니다.
-
로봇 청소기는 두 개의 사이드 브러시로 벽을 따라 틈새까지 청소할 수 있습니다. 또한 이 브러시를
사용하여 바닥의 먼지를 제거하고 해당 먼지는 흡입구 (그림 3)로 이동합니다.
-
로봇 청소기의 흡입력으로 먼지를 빨아들여 흡입구를 통해 먼지통 (그림 4)으로 운반합니다.
-
모델 FC8796, FC8795 및 FC8794에는 바닥을 닦을 수 있도록 로봇 청소기에 부착할 수 있는 물걸레
어태치먼트가 장착되어 있습니다.
청소 패턴
자동 청소 모드에서 로봇 청소기는 자동 바운스 및 벽면 패턴 순서에 따라 공간의 각 부분을 최적화된
방식으로 청소합니다. 배터리 잔량이 낮아지거나 스위치가 꺼질 때까지 계속 청소합니다.
리모콘 (보기 '청소 모드 선택')의 버튼을 눌러 세 가지 청소 모드 중 하나를 선택할 수도 있습니다. 로봇
청소기는 선택한 청소 모드에서 몇 분 동안 청소를 계속한 다음 자동 청소 모드로 전환됩니다.
1 바운스 모드 (그림 5)
2 벽면 모드 (그림 6)
3 나선형 모드 (그림 7)
로봇 청소기가 낙차를 피하는 방법
로봇 청소기의 하단에는 다섯 개의 낙하 방지(drop-off) 센서가 있습니다. 이 센서를 사용하여 계단과 같이
낙차가 있는 공간을 감지하고 피합니다.
45
참고: 로봇 청소기의 전면 낙하 방지(drop-off) 센서는 범퍼 뒤에 있으므로 낙차가 있는 부분의 가장자리를
약간 비켜 가는 것은 일반적인 현상입니다.
주의: 경우에 따라 낙하 방지(drop-off) 센서가 제때에 계단 또는 낙차가 있는 공간을 감지하지 못할 수도
있습니다. 따라서 로봇 청소기를 계단 근처 또는 낙차가 있는 곳에서 작동할 때 처음 몇 번은 주의 깊게
지켜보십시오. 로봇 청소기가 낙차를 올바르게 감지할 수 있도록 낙하 방지(drop-off) 센서를 반드시
정기적으로 청소하십시오.
처음 사용 전
사이드 브러시 장착
1 사이드 브러시의 포장을 뜯고 로봇 청소기를 테이블 또는 바닥에 거꾸로 뒤집어 놓습니다.
2 사이드 브러시를 로봇 청소기 (그림 8) 하단의 축에 끼웁니다.
참고: 사이드 브러시를 올바르게 장착했는지 확인합니다. 딸깍 소리가 날 때까지 축에 브러시를 밀어
넣습니다.
리모콘 배터리 교체
리모콘에는 2개의 AAA 배터리가 사용됩니다.
1 탭을 눌러서(1) 배터리함 뚜껑의 잠금을 풀고(2) 배터리함 뚜껑 (그림 9)을 분리합니다.
2 AAA 배터리 (그림 10) 2개를 끼우십시오.
참고: 배터리의 극성(+/-)에 맞게 끼우십시오.
Page 46

46
한국어
3 배터리함 뚜껑을 다시 끼우려면 먼저 배터리함 가장자리의 입구에 뚜껑의 돌출부를 끼운 다음(1) 딸깍
(그림 11) 소리가 날 때까지 뚜껑을 아래로 누릅니다(2). 이제 리모콘을 사용할 수 있습니다.
사용 준비
도킹 스테이션 설치
1 어댑터의 소형 플러그를 도킹 스테이션의 소켓에 꽂고(1) 어댑터를 벽면 콘센트에 꽂습니다(2) (그림
12).
2 도킹 스테이션은 평평한 바닥에 벽 쪽으로 둡니다.
참고: 도킹 스테이션 (그림 13)의 앞쪽 150cm, 오른쪽 30cm 및 왼쪽 100cm 지점에 낙차 또는
장애물이 없는지 확인합니다.
충전
1 로봇 청소기를 플러그가 전원에 연결된 도킹 스테이션 (그림 14)에 놓습니다.
2 시작/중지 버튼이 깜박이기 (그림 15) 시작합니다.
3 충전식 배터리의 충전이 완료되면 시작/중지 버튼의 표시등이 계속 켜져 있습니다 (그림 16).
참고: 모델 FC8796은 충전이 끝나면 약 115분간 사용할 수 있습니다. 모델 FC8794 및 FC8795는 충전이
끝나면 약 105분간 사용할 수 있습니다.
청소 작업을 위한 공간 정리
-
로봇 청소를 시작하기 전에 바닥에 늘어 놓은 물건이나 깨지기 쉬운 물체를 바닥에서 (그림 17) 치워야
합니다.
-
모든 케이블, 전선 및 코드를 바닥에서 제거하여 로봇 청소기에 끼는 것을 방지해야 합니다.
-
로봇 청소기로 청소할 방에 술이 달린 러그가 있으면 러그 아래로 술을 접어 넣으십시오. 로봇 청소기가
술에 걸리거나 러그 손상 (그림 18)을 방지할 수 있습니다.
로봇 청소기 사용
리모콘 사용
1 로봇 청소기를 도킹 스테이션에 놓거나 로봇 청소기 (그림 19)의 시작/중지 버튼을 눌러 로봇 청소기를
작동합니다.
-
이제 리모콘으로 로봇 청소기를 작동할 수 있습니다.
시작 및 중지
1 리모콘 (그림 20)의 시작/중지 버튼을 누르십시오.
2 로봇 청소기의 시작/중지 버튼이 불이 켜진 상태로 유지되고 로봇 청소기가 청소를 시작 (그림
21)합니다.
3 배터리의 잔량이 낮아질 때까지 자동 청소 모드로 청소합니다. 자동 청소 모드에서 임의, 벽면 및 나선형
이동을 반복하면서 청소합니다.
4 배터리 잔량이 적으면 시작/중지 버튼이 빠르게 깜박이기 시작하고 로봇 청소기가 충전을 위해 (그림
22) 도킹 스테이션을 찾기 시작합니다.
5 시작/중지 버튼을 눌러 청소 작동을 일시 중단하거나 중지할 수도 있습니다. 시작/중지 버튼을 다시
눌렀을 때 충전식 배터리의 에너지가 아직 충분한 경우, 자동 청소 모드로 청소를 계속합니다.
Page 47

한국어
6 충전식 배터리 잔량이 낮아지기 전에 로봇 청소기가 도킹 스테이션으로 돌아가도록 하려면 리모콘 (그림
23)에서 도킹 버튼을 누릅니다.
7 시작/중지 버튼이 깜박이기 시작하고 로봇 청소기가 도킹 스테이션으로 돌아갑니다.
청소 모드 선택
이 로봇 청소기에는 네 가지 청소 모드가 있습니다. 표준 청소 모드는 자동 바운스 및 벽면 패턴 (그림 24)
순서의 자동 청소 모드입니다. 로봇 청소기의 이 자동 청소 모드 옆에는 세 가지 청소 모드가 있으며,
리모콘의 해당 버튼을 눌러 각각 작동할 수 있습니다.
바운스 모드
이 모드에서는 직진이나 열십자 모양 (그림 25) 등의 혼합 패턴으로 청소합니다.
벽면 모드
이 모드에서는 로봇 청소기가 실내 벽을 따라 이동하며 구석 (그림 26)을 청소합니다.
나선형 모드
이 모드에서는 로봇 청소기가 구역의 중심에서부터 나선형을 그려나가며 완전하게 (그림 27) 청소합니다.
참고: 수동으로 선택한 모드는 몇 분 동안만 작동합니다. 수동으로 선택한 모드 작동이 끝나면 로봇
청소기는 자동 청소 모드로 전환됩니다.
수동 작동
리모콘의 버튼으로 로봇 청소기를 수동 조작할 수 있습니다.
1 리모콘에 있는 시작/중지 버튼의 위, 아래 및 왼쪽, 오른쪽 화살표 버튼을 사용하여 실내 (그림 28)
전체를 탐색합니다.
참고: 로봇 청소기를 낙차가 있는 곳이나 계단 근처에서 작동할 경우 주의하십시오.
47
24시간 스케줄러 사용
24시간 스케줄러는 리모콘으로 작동할 수 있습니다. 로봇 청소기가 대기 모드에 있고 도킹 스테이션에
있는지 확인하십시오.
1 24시간 스케줄러를 작동하려면 리모콘의 24시간 스케줄러 버튼 (그림 29)을 누릅니다.
-
24시간 스케줄러를 작동하면 소리가 들리면서 디스플레이가 잠시 매초 깜빡이기 시작합니다.
-
24시간 스케줄러를 작동하면 로봇 청소기가 24시간 청소를 시작합니다. 24시간 스케줄러를 해제할
때까지 24시간 동안 청소를 계속합니다.
2 24시간 스케줄러를 해제하려면 24시간 스케줄러 버튼을 누르십시오. 로봇 청소기가 대기 모드이고
24시간 스케줄러가 더 이상 작동하지 않으면 소리가 들리면서 디스플레이가 켜진 상태로 유지됩니다.
로봇 청소기로 물걸레질하는 방법
모델 FC8796, FC8795 및 FC8794에는 바닥 물청소용 물걸레 어태치먼트 및 패드가 제공됩니다.
물걸레 패드 부착 방법
1 물걸레 패드를 물에 담그거나 수돗물에 물걸레 패드를 적십니다. 바닥에 적합한 바닥 세정제를 몇 방울
추가할 수 있습니다.
2 물걸레 패드를 완전히 짜서
3 물걸레 어태치먼트 (그림 30)의 벨크로 고정장치에 물걸레 패드의 벨크로 고정장치를 눌러서 물걸레
어태치먼트에 젖은 물걸레 패드를 부착하십시오.
4 바퀴 바로 뒤에 위치한 2개의 어태치먼트 구멍 안으로 물걸레 어태치먼트의 어태치먼트 돌출부를
삽입합니다. 그런 다음 딸깍 소리가 날 (그림 31) 때까지 누르십시오.
Page 48

48
한국어
물걸레 어태치먼트를 사용한 바닥 청소
참고: 물걸레 어태치먼트로 바닥을 청소하려면 청소하려는 방의 지점에서 로봇 청소기를 시작해야 합니다.
물걸레 패드를 장착한 상태로 도킹 스테이션에서 로봇 청소기를 시작할 수는 없습니다.
1 로봇 청소기를 시작하려면 리모콘의 시작/중지 버튼을 누르십시오.
-
배터리의 잔량이 낮아져서 로봇 청소기가 멈출 때까지 로봇 청소기는 물걸레질을 계속합니다.
참고: 리모컨의 도킹 버튼으로 로봇 청소기를 도킹 스테이션으로 보내거나 수동으로 로봇 청소기를 도킹
스테이션에 놓기 전에 물걸레 패드 및 물걸레 어태치먼트를 분리하십시오.
물걸레 어태치먼트 분리 방법
1 물걸레 어태치먼트를 분리하려면 탭을 누르고(1) 물걸레 어태치먼트를 위로 당겨 분리합니다(2). (그림
32)
2 물걸레 어태치치먼트에서 물걸레 패드를 떼어 내십시오.
3 물걸레 패드를 청소하려면 최대 60°C의 온도에서 부드럽게 세탁기로 세탁하십시오.
알람 신호
청소 과정에서 로봇 청소기에 문제가 생긴 경우(예: 바퀴가 움직이지 않거나 바퀴가 바닥에 더 이상
접촉하지 않거나 센서가 바닥을 감지할 수 없을 경우) 소리가 들리면서 로봇이 멈춥니다. 시작/멈춤 버튼을
눌러서 로봇을 대기 모드로 전환하고 알람 신호의 원인이 되는 문제를 해결합니다. 예를 들어 바퀴를
방해하는 장애물을 제거하거나, 센서를 청소하거나, 로봇을 들어 다른 곳에 내려놓습니다.
청소 및 유지관리
먼지통 비우기 및 청소
먼지통이 가득 차면 깜박이면 먼지통을 비우고 세척합니다.
1 먼지통 뚜껑 손잡이를 위로 당기고 먼지통 보관함 (그림 33)에서 먼지통을 들어 올립니다.
2 먼지통 옆면의 탭을 당겨 뚜껑 (그림 34)을 엽니다.
3 먼지통 (그림 35)에서 필터를 분리하십시오.
4 휴지통 위에서 먼지통을 털어내 비웁니다. (그림 36)
5 미지근한 물에 먼지통을 청소할 수 있습니다.
주의: 먼지통을 식기 세척기에서 세척하지 마십시오.
6 필터를 완전히 청소하려면 필터의 양면에 위치한 탭을 눌러 필터를 분리하고 EPA 필터의 먼지 필터를
벗겨냅니다. 그런 다음 제공된 청소용 브러시 (그림 37)로 EPA 필터를 청소하십시오.
7 필터를 다시 장착하여 먼지 필터 안으로 EPA 필터를 장착하십시오. 그런 다음 필터를 먼지통 (그림 38)
안으로 다시 넣으십시오.
참고: 수돗물로 먼지통을 청소한 경우 필터에 다시 넣기 전에 먼지통이 말랐는지 확인하십시오.
8 뚜껑을 먼지통에 끼우고 딸깍 소리가 나면서 (그림 39) 제자리에 고정되는지 확인합니다.
9 먼지통을 먼지통 보관함에 넣고 먼지통 손잡이 (그림 40)를 접으십시오.
주의: 먼지통 안에 필터가 있는지 항상 확인하십시오. 먼지통 안에 필터가 없는 상태로 로봇 청소기를
사용하는 경우 모터가 손상될 수 있습니다.
로봇 청소기 청소
우수한 청소 성능을 유지하려면 수시로 낙하 방지 센서, 바퀴, 사이드 브러시, 흡입구 및 로봇 청소기와 도킹
스테이션의 접촉부를 청소해야 합니다.
Page 49

한국어
1 로봇 청소기를 평평한 곳에 거꾸로 뒤집어 놓습니다.
2 사이드 브러시를 청소하려면 브러시를 잡고 축 (그림 41)에서 빼냅니다.
3 제공된 (그림 42) 청소용 브러시로 사이드 브러시와 사이드 브러시의 축을 청소하십시오.
4 제공된 (그림 43) 청소용 브러시로 앞바퀴 및 옆바퀴에서 먼지 또는 보풀을 제거하십시오.
5 머리카락이나 보풀이 앞바퀴 주위에 끼어 있는 경우 드라이버 (그림 44)로 앞바퀴를 분리하십시오.
6 청소용 브러시 (그림 45)로 앞바퀴를 청소한 후 엄지 손가락 (그림 46)으로 앞바퀴를 다시 눌러 로봇
청소기 안으로 밀어 넣으십시오.
7 제공된 (그림 47) 청소용 브러시로 낙하 방지 센서에서 먼지 또는 보풀을 제거하십시오.
참고: 낙하 방지(drop-off) 센서를 반드시 정기적으로 청소하십시오. 낙하 방지(drop-off) 센서가 더러운
경우 로봇 청소기가 낙차 또는 계단을 감지하지 못할 수 있습니다.
8 제공된 청소용 브러시로 흡입구 (그림 48)를 청소하십시오.
9 바닥을 손상시킬 수 있는 날카로운 물체가 있는지 사이드 브러시와 로봇 청소기 하단을 확인합니다.
10 마른 천이나 면봉을 사용하여 도킹 스테이션 (그림 49)의 접촉부를 청소하십시오.
11 마른 천이나 면봉을 사용하여 로봇 청소기 (그림 50)의 바닥에 있는 접촉부를 청소하십시오.
액세서리 주문
액세서리 또는 예비 부품을 구입하려면 www.philips.com/parts-and-accessories를 방문하거나 필립스
대리점에 문의하십시오. 또한 해당 국가의 필립스 고객 상담실에 문의하셔도 됩니다(연락처 정보는 국제
보증서 참조).
교체
49
필터 교체
EPA 필터가 매우 더럽거나 손상된 경우 (보기 '먼지통 비우기 및 청소') 교체하십시오. 새 EPA 필터를
구입하려면www.philips.com/parts-and-accessories를 참조하십시오.
충전식 배터리 교체
로봇 청소기의 충전식 배터리는 자격을 갖춘 서비스 엔지니어에 의해서만 교체될 수 있습니다. 충전식
배터리를 더 이상 재충전할 수 없거나 빨리 방전되는 경우 필립스 지정 서비스 센터에서 로봇 청소기의
배터리를 교체하십시오. 국제 보증서 또는 웹 사이트(www.philips.com/support)에 해당 국가의 필립스
서비스 센터 연락처 정보가 있습니다.
사이드 브러시 교체
적절한 청소 효과를 얻으려면 일정 시간이 지난 후 사이드 브러시를 교체합니다.
참고: 마모 또는 손상의 흔적이 발견되면 항상 사이드 브러시를 교체합니다. 또한 두 사이드 브러시를 한
번에 교체하는 것이 좋습니다. 새 사이드 브러시를 구입하려면www.philips.com/parts-and-accessories를
참조하십시오.
1 사이드 브러시를 교체하려면 오래된 사이드 브러시를 잡고 축에서 빼냅니다.
2 새로운 사이드 브러시를 축에 끼웁니다.
리모콘 배터리 교체
1 탭을 눌러서(1) 배터리함 뚜껑의 잠금을 풀고(2) 배터리함 뚜껑 (그림 9)을 분리합니다.
2 배터리함에서 방전된 AAA 배터리를 제거하십시오.
Page 50

50
한국어
3 새 AAA 배터리 (그림 10) 2개를 끼우십시오.
참고: 배터리의 극성(+/-)에 맞게 끼우십시오.
4 배터리함 뚜껑을 다시 끼우려면 먼저 배터리함 가장자리의 입구에 뚜껑의 돌출부를 끼운 다음(1) 딸깍
(그림 11) 소리가 날 때까지 뚜껑을 아래로 누릅니다(2). 이제 리모콘을 사용할 수 있습니다.
참고: 해당 국가의 현지 규정에 따라 방전된 일회용 배터리를 폐기하십시오.
재활용
-
수명이 다 된 제품은 일반 가정용 쓰레기와 함께 버리지 말고 지정된 재활용품 수거 장소에 버리십시오.
이를 준수함으로써 환경 보호에 동참할 수 있습니다.
-
본 제품에는 가정용 쓰레기와 함께 폐기하면 안 되는 충전식 배터리가 포함되어 있습니다. 제품을 지정된
재활용 수거 장소 또는 필립스 서비스 센터에 가져가 충전식 배터리를 전문적으로 처리하는 것이
좋습니다.
-
전기 및 전자 제품과 충전식 배터리의 분리 수거에 대한 해당 국가의 규정을 준수하십시오. 제품을
올바르게 폐기하면 환경과 인체 건강에 미치는 부정적인 영향을 예방할 수 있습니다.
충전식 배터리 분리
제품을 폐기할 때에만 충전식 배터리를 분리하십시오. 배터리를 분리하기 전에 제품을 벽면
콘센트에서 분리했고 배터리가 완전히 방전되었는지 확인하십시오.
도구를 사용하여 제품을 분해하고 충전식 배터리를 폐기할 때 필요한 안전 주의 사항을
준수하십시오.
충전식 배터리를 분리하는 방법
경고: 제품을 폐기할 때에만 충전식 배터리를 분리하십시오. 제거 시 배터리가 완전히
소모되었는지 확인하십시오.
충전식 배터리를 분리하려면 다음 지침을 따르십시오. 필립스 서비스 센터에서 로봇의 충전용 배터리를
분리할 수도 있습니다. 해당 국가의 주변 서비스 센터 주소를 참조하여 필립스 서비스 센터에 문의하십시오.
1 충전식 배터리를 버리기 전에 완전히 방전하려면 충전식 배터리가 방전될 때까지 로봇 청소기를
작동합니다.
2 나사를 풀고 배터리함 뚜껑 (그림 51)을 여십시오.
3 충전식 배터리를 꺼내어 분리 (그림 52)하십시오.
4 로봇 및 충전식 배터리를 전기 및 전자 제품용으로 분리 수거하십시오.
문제 해결
이 장에서는 제품을 사용하면서 접할 수 있는 가장 일반적인 문제를 다룹니다. 아래 정보를 통해 문제를
해결하지 못한 경우 www.philips.com/support를 방문하여 자주 묻는 질문(FAQ) 목록을 참조하거나 해당
국가의 필립스 서비스 센터로 문의하십시오.
문제점 예상 원인 해결책
시작/중지 버튼을 눌러도
로봇 청소기가 청소를
시작하지 않습니다.
충전식 배터리가
방전되었습니다.
충전식 배터리 (보기 '사용 준비')를
충전하십시오.
Page 51

문제점 예상 원인 해결책
버튼 하나를 누르기 전에는
로봇 청소기가 작동하지
않습니다.
로봇 청소기가 도킹 스테이션을
찾지 못하여 배터리가
방전되었습니다.
로봇 청소기를 플러그가 전원에 연결된
도킹 스테이션에 놓습니다. 몇 초 후 로봇
청소기의 신호음이 들리며 디스플레이가
켜집니다.
한국어
51
로봇 청소기가 신호음을
내며 멈춥니다.
청소가 제대로 되지
않습니다.
바퀴 하나 또는 둘 다
끼었습니다.
사이드 브러시 하나 또는 둘 다가
끼었습니다.
청소 중에 로봇 청소기가 들어
올려졌습니다.
사이드 브러시 하나 또는 둘 다의
모가 비뚤어지거나 구부러져
있습니다.
먼지통의 필터가 더럽습니다. 필터를 분리하십시오. 먼지 필터와 EPA
먼지통의 하단에 있는 흡입구가
막혀 있습니다.
앞바퀴에 머리카락이나 기타
먼지가 끼어 있습니다.
로봇 청소기가 매우 어둡거나
광이 나는 표면을 청소하면 낙하
방지(drop-off) 센서가
작동합니다. 이는 로봇 청소기가
비정상적인 패턴으로 움직이는
원인이 됩니다.
시작/중지 버튼을 누릅니다. 바퀴 서스펜션
주위에 걸려 있는 보풀, 머리카락, 실 또는
전선을 제거합니다.
사이드 브러시를 청소하십시오.
시작/중지 버튼을 누릅니다. 로봇 청소기를
바닥에 놓습니다. 그런 다음 시작/중지
버튼을 눌러 청소를 다시 시작합니다.
브러시를 잠시 동안 따뜻한 물에 담가
놓습니다. 모가 적절한 형태로 복원되지
않는 경우 사이드 브러시 (보기 '사이드
브러시 교체')를 교체합니다.
필터를 부드러운 칫솔로 청소하십시오.
수돗물로 먼지 필터를 헹구실 수 있습니다.
EPA 필터를 더 이상 청소할 수 없는 경우
필터를 새것으로 교체합니다. 최소 일 년에
한 번은 EPA 필터를 교체하는 것이
좋습니다.
흡입구를 청소하십시오.
앞바퀴 (보기 '로봇 청소기 청소')를
청소하십시오.
시작/중지 버튼을 누른 다음 로봇 청소기가
더 엷은 색상의 바닥으로 이동하도록
합니다. 엷은 색상의 바닥에서도 문제가
계속 발생하는 경우,
www.philips.com/support를 참조하거나
해당 국가의 필립스 서비스 센터로
문의하십시오.
충전식 배터리가 더 이상
충전되지 않거나 아주
빠르게 방전됩니다.
로봇 청소기가 햇빛이 강하게
반사되는 바닥을 청소하고
있습니다. 이는 낙하 방지 센서를
작동시키며, 청소기가
비정상적인 패턴으로 움직이는
원인이 됩니다.
충전식 배터리의 수명이
다했습니다.
커튼을 닫아 방으로 들어오는 햇빛을
차단합니다. 또는 햇빛이 덜 비출 때
청소를 시작합니다.
필립스 서비스 센터 (보기 '충전식 배터리
교체')에서 충전식 배터리를 교체하십시오.
Page 52

52
한국어
문제점 예상 원인 해결책
로봇 청소기가 도킹
스테이션을 찾지 못합니다.
로봇 청소기가 도킹
스테이션으로 이동하기 위한
충분한 공간이 없습니다.
도킹 스테이션 (보기 '도킹 스테이션
설치')을 다른 위치에 두십시오.
로봇 청소기가 도킹 스테이션을
아직 찾고 있습니다.
도킹 스테이션으로 돌아가기까지 약
20분간 기다립니다.
Page 53

Page 54
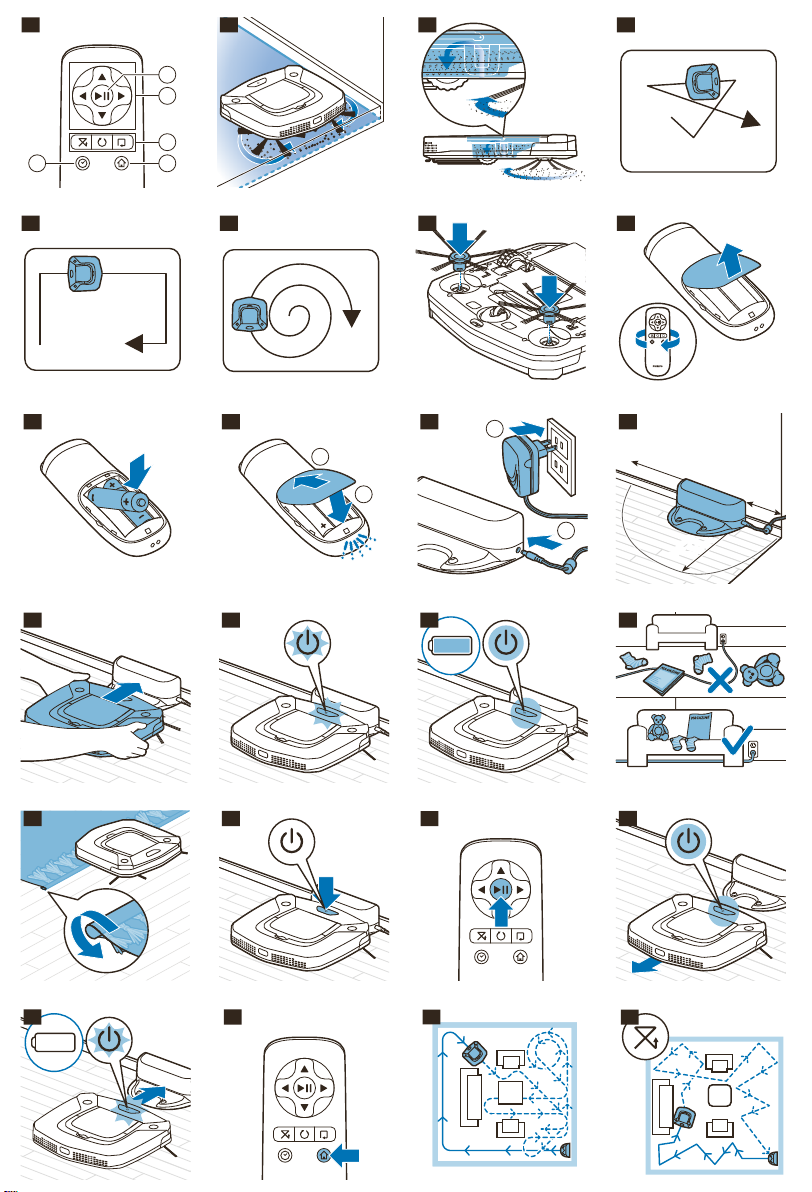
3
2
45
1
2345678910
1
2
11
1
2
12
1
米
1.5
米
30
厘米
1 m
3
0 cm
1.5 m
131415161718192021
22
23
24
25
Page 55
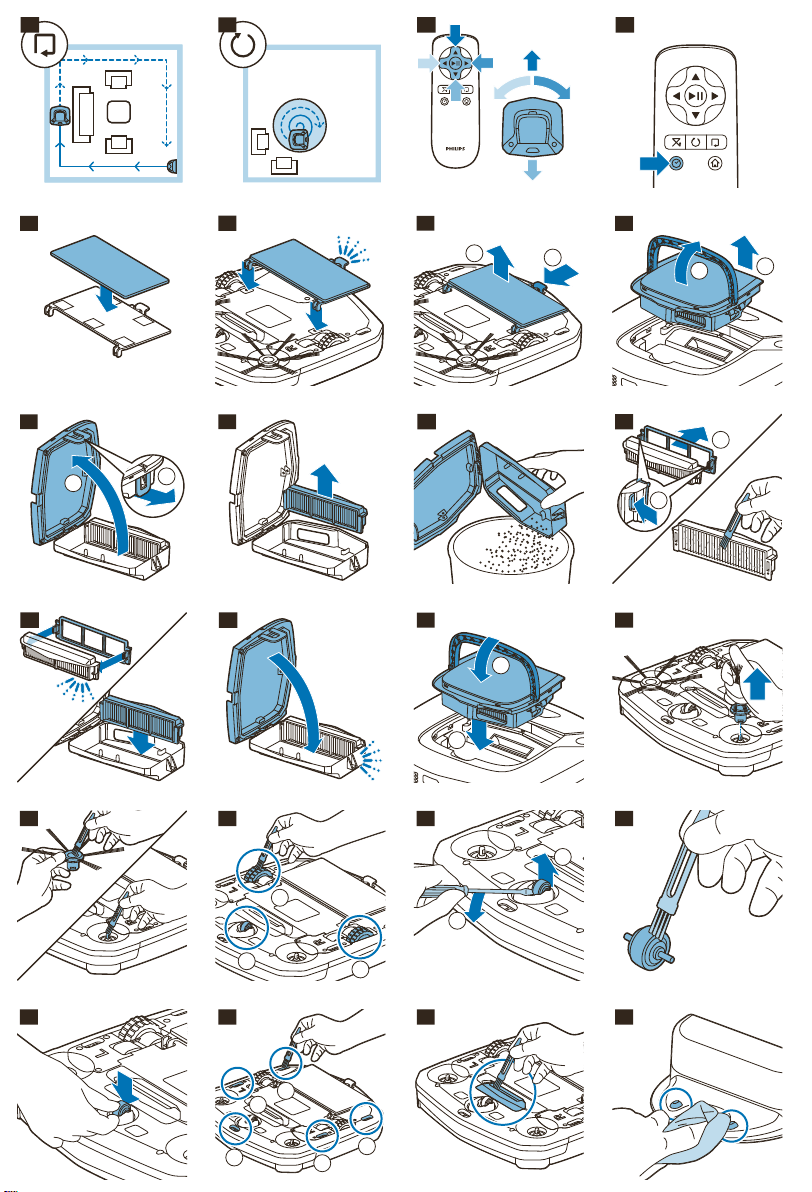
262728
29
30
31
1
2
32
1
1
33
2
1
34
35
36
2
1
37
38
39
1
2
40
41
42
1
2
3
43
1
2
44
45
46
1
2
3
4
5
474849
Page 56
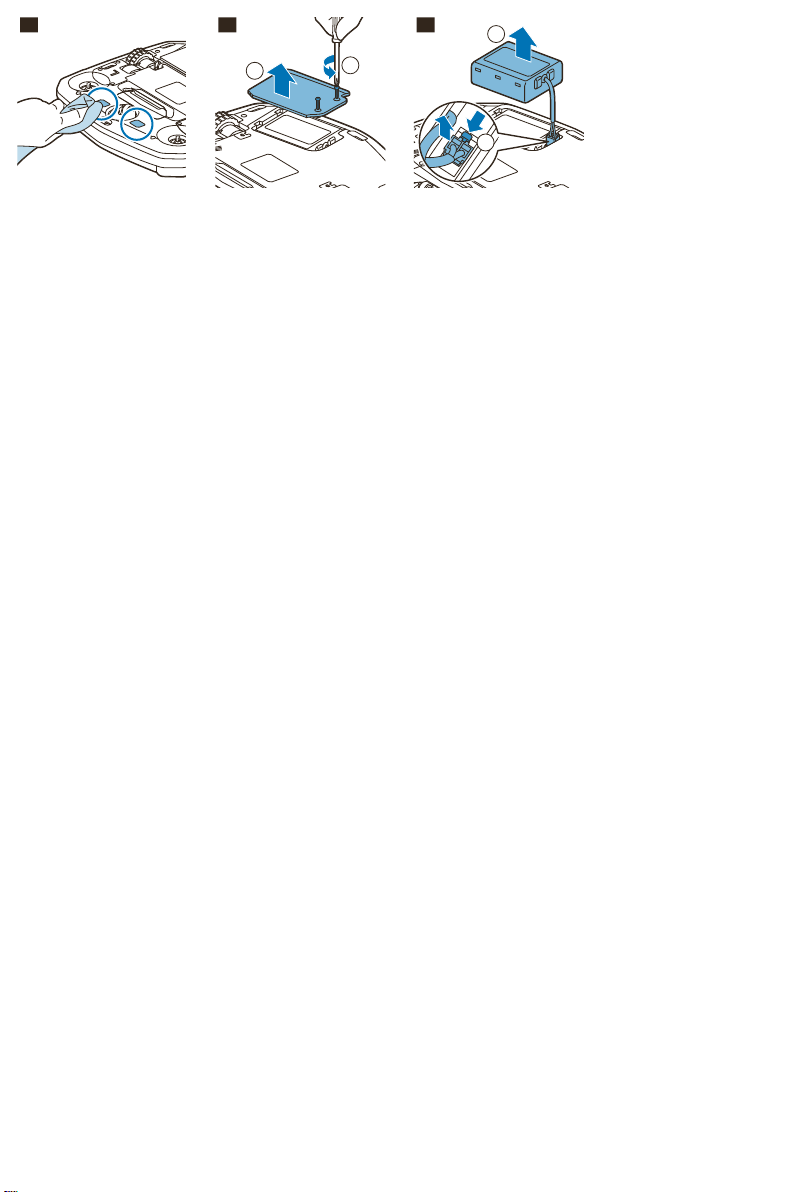
50
1
1
51
2
1
52
Page 57

Page 58

Page 59
Page 60

© 2019 Koninklijke Philips N.V.
All rights reserved
4222.003.4322.5 (24/10/2019)
>75 % recycled paper
>75 % papier recyclé
 Loading...