

Page 1

Page 2
17
13
2$
PFAFF
1016
hy
19
PFAFF
hohhy
106
Page 3

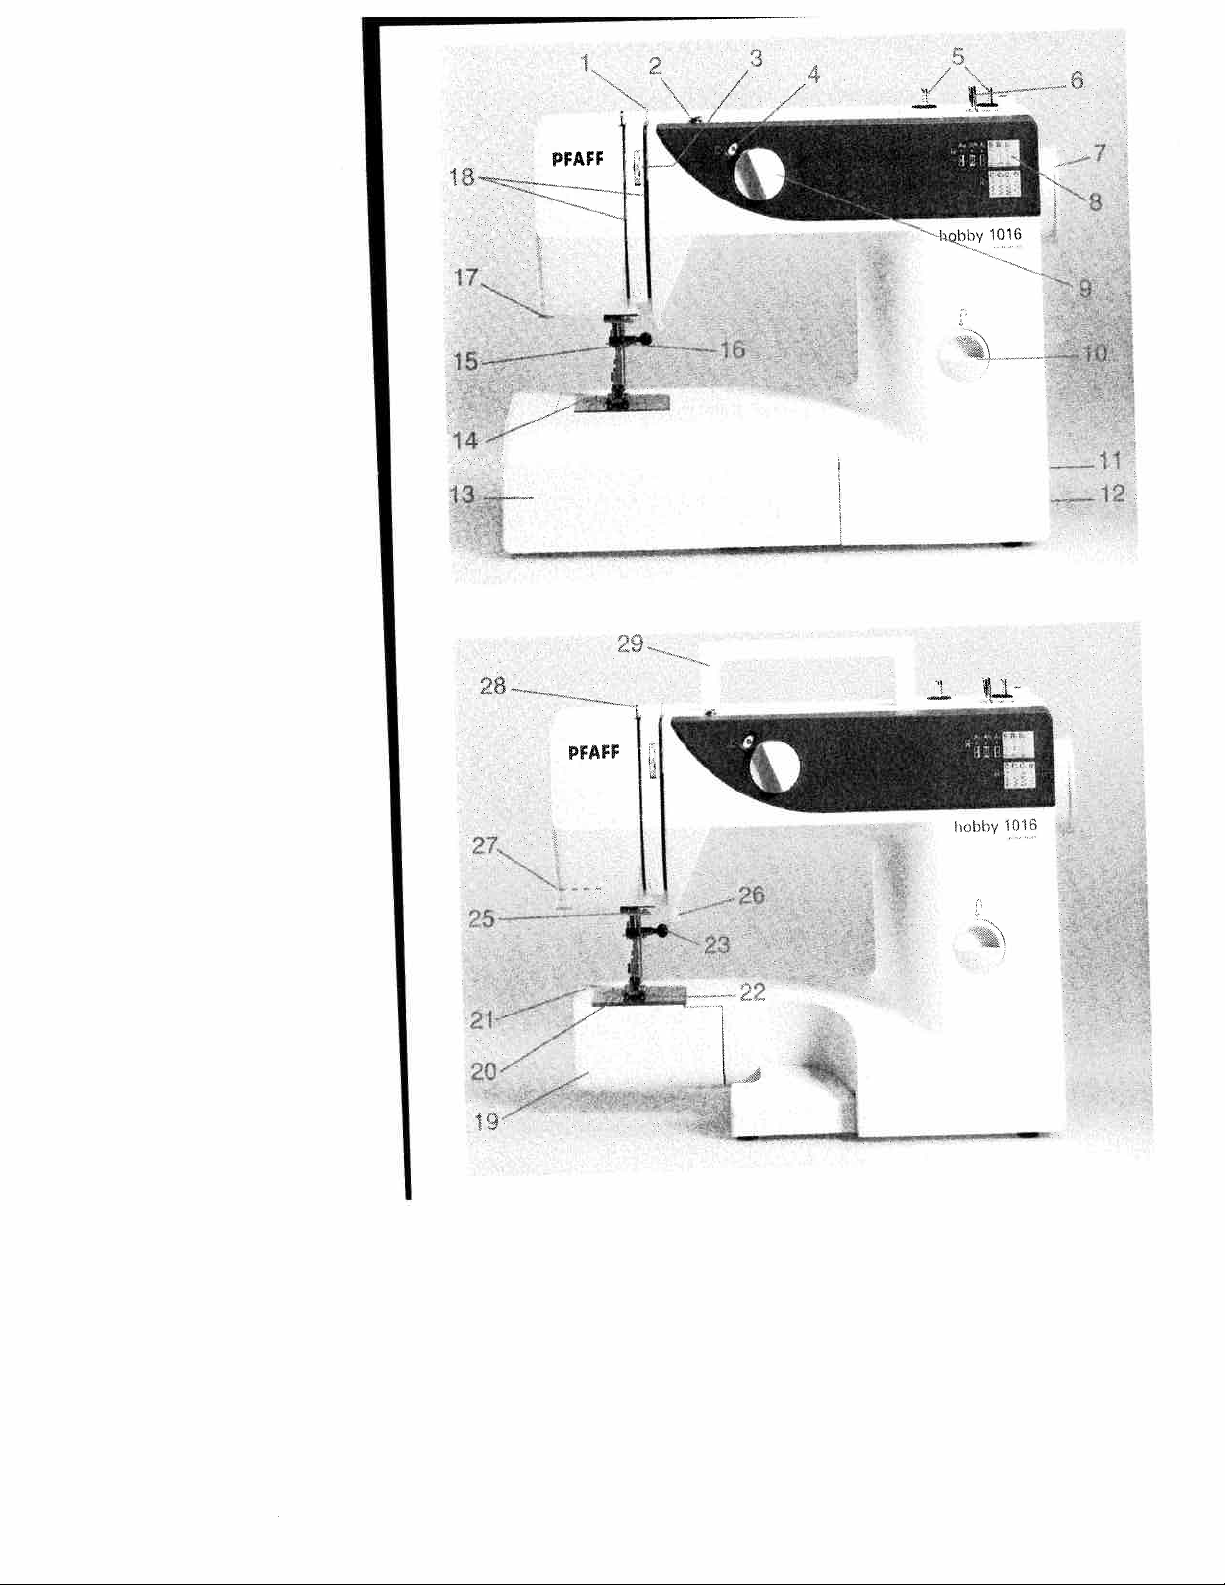
Parts
of
the
sewing
machine
hobby
1016
Thread
1
Bobbin
2
Needle
3
Adjustment
4
Spool
5
Bobbin
6
Handwheel
7
Stitch
8
Pattern
9
Reverse
10
Connection
11
Master
12
Detachable
13
Needle
14
Thread
15
Thread
16
Thread
17
Threading
18
Hook
19
Presser
20
Free-arm
21
Feed
22
Needle
23
Thread
25
Presser
26
Sewing
27
Take-up
28
29
guide
winder
thread
holder
winder
pattern
adjustment
switch
plate
cover
dog
Carrying
field
key
guide
guide
cutter
slot
foot
holder
guide
bar
lamp
lever
handle
tension
tension
chart
bushing
support
work
(enclosing
holder
with
lifter
(max.
with
button
sewing
with
fixing
15
presser
with
presser
screw
W)
foot
accessory
hook)
foot
box
Page 4

P’ease
standing
fold
of
this
this
open
page
instruction
simplify
to
manual
when
the
reading
under
it.
ndex
on
pages
5
—
4
Page 5
Sewing
for
fun
Congratulations!
Pfaff
made
hours
features
Furthermore,
which
instruction
Thg,
by
of
will
sewing
Your
please
carefully.
way
best
make
and
have
you
If
dealer,
advice.
or
wish
We
own
very
sewing
the
make
manual
take
is
It
find
to
full
any
who
you
fashion
very
mach
will
You
which
pleasure.
latest
has
sewing
the
out
use
further
be
numerous
The
is
of
happy
ideas.
it
certainly
many
bought
have
sure
is
Your
design
in
much
simple
as
is
follow.
to
to
time
time
what
just
features.
its
all
questions,
to
enjoyable
bring
to
new
practical
easier
Before
read
well
your
assist
hours
quality
a
sewmg
and
to
these
spent,
machine
just
you
product
countless
you
machThe
technology.
features
you.
for
operate
start
you
instructions
and
your
ask
with
creatmg
is
can
help
as
sew
the
Pfaff
your
this
do
Page 6

IMPORTANT
States
For
This
use
to:
United
the
machine
sewing
electric
an
Read
instructions
all
DANGER
sewing
The
1
appliance
Always
2.
Do
3.
Do
4.
place
WAR
Do
1.
by
Only
2.
Only
Never
3.
properly,
the
adjustment.
Never
4.
the
Never
5.
Do
6.
Do
7.
administered.
To
8
Never
9.
blocked.
Do
10.
Keep
11
needle.
Always
12.
Do
13.
14.
15.
16.
unplug
reach
not
place
not
in
NNG
allow
not
near
or
use
use
operate
nearest
operate
sewing
drop
not
not
disconnect
operate
not
fingers
not
Do
not
Switch
threading
Always
when
from
or
this
attachments
itithas
use
operate
unplug
use
use
pull
the
unplug
making
appliance,
To
machine
the
before
for
store
or
into
drop
be
to
children.
sewing
this
authorized
the
machine
insert
or
of
out
where
turn
on
by
away
the
bent
or
push
sewing
needle,
any
SAFETY
only
designed
is
the
before
the
reduce
should
electric
replacing
machine
sewing
a
sewing
a
water
reduce
To
as
used
machine
recommended
sewing
dropped
been
dealer
sewing
foot
and
anything
doors.
aerosol
controls
all
surface
soft
a
on
pulling
all
from
needle
proper
needles.
blunt
or
fabric
machine
changing
machine
sewing
other
user
and
following
using
risk
never
outlet
sewing
machine
other
or
risk
the
toy.
a
for
machine
or
or
machine
control
into
(spray)
to
cord.
moving
plate.
while
off
needle,
servicing
NSTRUCTONS
manufactured
basic
sewing
this
electric
of
left
be
immediately
light
has
that
where
liquid.
burns,
of
care
Great
its
intended
the
by
ifithas
damaged,
center
service
any
with
free
opening.
any
products
off
0
(
as
such
unplug.
To
parts
The
use
Only
stitching.
when
(0”)
threading
the
from
adjustments
unattended
from
)
position
bed
a
Special
wrong
It
making
electric
for
precautions
safety
machine.
shock:
using
after
Replace
bulb.
into
fallen
it
can
fire,
electric
necessary
is
purpose
manufacturer
damaged
a
dropped
or
for
examination
openings
air
accumulation
the
being
are
then
couch
or
the
hold
care
plate
needles
deflect
may
any
bobbin,
outlet
HOUSEHOLD
plugged
when
before
and
with
bulb
Unplug
water.
pulled
be
or
fall
shock,
when
described
as
contained
as
or
cord
water.
into
blocked.
used
remove
where
the
not
plug,
required
is
can
cause
recommended
needle,
the
adjustments
changing
or
removing
when
mentioned
should
this
plug,
repair
of
where
or
plug
the
the
in
in.
cleaning.
same
or
sewing
Return
Keep
lint
air
cord.
around
by
causing
in
presser
the
only.
use
always
Always
type
immediately.
tub
a
into
to
injury
machine
manual.
this
in
this
in
not
ifitis
the
electrical
ventilation
and
dust
oxygen
socket
from
openings
the
to
needle
manufacturer.
the
if
needle
the
foot,
covers,
instruction
When
adhered
be
unplug
rated
sink.
or
persons:
manual
working
appliance
mechanical
or
openings
loose
being
is
may
sewing
break.
break.
to
area,
etc.
lubricating,
manual,
you
this
Watts.
5
Do
used
is
cloth
be
machine
such
not
to
of
as
or
Please
KEEP
observe
also
THESE
notes
safety
general
the
NSTRUCTONS
3.
Page
on
N
A
SAFE
PLACE
Page 7
Notes
machines
The
requirements.
user
The
1.
with
regard
of
the
sewing
When
2.
nance
parts
machine
the
ging
maximum
The
3.
sewing
authorized
An
4.
adjust
machine
The
5.
cording
plate.
tion
not
Do
6
machine,
the
not
7.
Do
there
•
its’
it
•
is
when
cur
warm
To
unplug
8.
plug
the
main
If
the
9
pose
accepted
be
avoid
To
10.
open
side
This
fled
service
sure
11
Be
The
12.
supply
10%
+1-
1-
4
When
13.
outer
the
cally
85°C.
to
therefore
damage.
According
14.
magnetic
accepted
sed,
ged
on
meet
must
to
and
needle
during
area
leaving
or
work
or
accessories,
from
cord
lead
is
lamp
tension
the
the
to
insert
the
use
visible
is
functioning
i.e.
wet,
cold
a
room.
lead
close
out
plug
appliance
incorrectly
or
for
risk
the
machine
the
machine
the
solely
is
staff.
use
to
machine
with
a
and
%.
properly,
used
components
controlled
Constant
not
to
compatibility,
for
the
should
should
or
safety
relevant
the
exercise
up-and-down
the
constantly
work.
machine,
the
changing
when
always
main
the
from
permissible
watts.
15
mechanic
PFAFF
the
of
put
be
must
indications
any
oblects
machine
damage
disturbed,
is
condensation
machine
from
cord
wall.
the
to
wall
of
the
used
is
operated,
possible
any
electric
of
There
the
that
responsibility
the
PFAFF
only
designated
is
nominal
frequency
rated
a
the
control
foot
use
permitted
laws
the
mains
any
mains
changes
for
safety
adequate
observe
during
disconnect
by
power
wall
the
wattage
drive,
belt
operation
into
the
on
openings
into
if:
which
installed
is
socket,
wall
not
Do
socket
the
for
no
damage.
shock,
no
are
user
original
for
voltage
temperature
non-electroni
a
of
can
low
a
at
order
in
concerning
liability
no
interruptions
line
power
made
be
domestic
caution
movement
the
mainte-
mechanical
wrong
can
of
a
of
unplug-
outlet,
for
only
specifica-
can
pull
the
by
liability
do
parts
repair.
our
parts
mains
of
reach
speed
avoid
to
electro
can
be
it.
to
the
must
oc-
in
a
grasp
the
cord.
pur-
not
in
quail-
of
up
is
be
cau
chan
the
ac-
on
can
sewing
Environment
The
recommended
25°C)
(-
machine
not
appliances
machine
such
dampness,
heat-producing
or
cals
ventilation
For
used
on
Treatment
Always
tecting
Cleaning
Housing:
cleaning
For
lint-free
soft
cloth
a
Please
not
Do
such
ducts
micals
temperature
a
liquids.
an
avoid
it
cloth.
note!
use
for
Ambient
(40°C)
Humidity:
13°F
The
should
tronic
personal
This
mechanical
pervised
in
severe
tricity,
to
20%
+140°F
to
insensitive
is
used
be
computers,
is
a
appliance,
in
the
use
that
way
purposes
unobstructed,
damage
against
the
To
alcohol,
with
any
insecticides
petrol
as
cleaning
machines
environment
(10°C)
50°F
80%
Storage
(60°C).
to
in
direct
the
radios,
as
such
hitting
housing
remove
high
home.
it
direct
the
radio
quality
It
not
is
oblects,
to
(gas)
transmitters,
is
a
It
subjected
sunlight,
the
solid,
the
dropping.
or
use
any
or
housing.
is:
to
temperature
interference,
vicinity
televisions,
electronic-
machine
be
should
static
corrosive
machine
level
machine
clean.
a
dry,
stubborn
chemical
or
low-viscosity
104°F
of
etc.
for
operated
to:
dust,
elec
chemi
must
surface.
by
dirt,
pro
but
elec
su
pro-
-
it
be
soft
use
che
Page 8
Index
A
Accessories
Accessory
B
tape
Bias
Bobbin
case
thread
Bobbin
Buttonholes
Buttons
C
Changing
Changing
Cleaning
Control
Cording
panel
needles
and
compartment
binder
tension
needle
the
sewing
the
oiling
and
foot
lamp
hobby
12-13
26-27
—
Sewingforfun
41
9
44
13
24
18
51
50
19
45
F
Feed
dog,
foot
Felling
control
Foot
arm
Free
G
Gathering
General
H
Handwheel.
Hemming
removing
Hook,
K
Knit-edge
lowering
with
sewing
releasing
with
foot
the
aids
the
straight
twin
stitch
needle
18
45
8
9
30
22
10
28
50
46
D
Darning
Detachable
Drawing
E
guide
Edge
stitch
Elastic
Electrical
work
bobbin
the
up
connection
support
thread
31
9
16
22
25
8
L
Lace-work
buttonhole
Linen
buttonhole
Linen
M
Maintenance
switch
Master
with
gimp
thread
35
27
27
49
8
Page 9
hobby
Sewing
—
for
fun
N
Needle
Needle
Needle
O
the
Oiling
Optional
p
Patchwork
Practical
Presser
o
and
Quilt
R
Repairing
Reverse
Richelieu
Roll
hemming
Ruffler
charts
removing
plate,
thread
machine
accessories
quilt
sewing
lifter
bar
patchwork
tears
sewing
tension
foot
47-48
51
22
39-40
50
21
15
46
31
20
38
34
44
Setting
Sewing
Sewing
Sewing
Sewing
utility
feet
feet
lamp
patches
on
Sewing
Shell
Smocking
Special
Spool
Stitch
Straight
T
Thread
Thread
Threading
Threading
Topstitching
Traditional
problems
edging
accessories
placement
chart
stitch
cutter
tension
the
embroidery
Troubleshooting
needle
Twin
W
Winding
the
stitches
(normal
(special
needle
bobbin
accessories)
accessories)
their
and
chart
thread
techniques
solutions
20
42
43
51
31
52
36
29
43
10
6
23
16
12
14-15
14
22
37
52
28
10-11
S
Safety
Serging
notes
with
the
zigzag
stitch
23
z
stitch
Zigzag
2
Zippers
23
32-33
Page 10
hobby
—
Sewing
for
fun
hobby
Program
B
83
9
-“-“--“
C,
C
C
3
D
1
2
,.
,.
1016—
Name
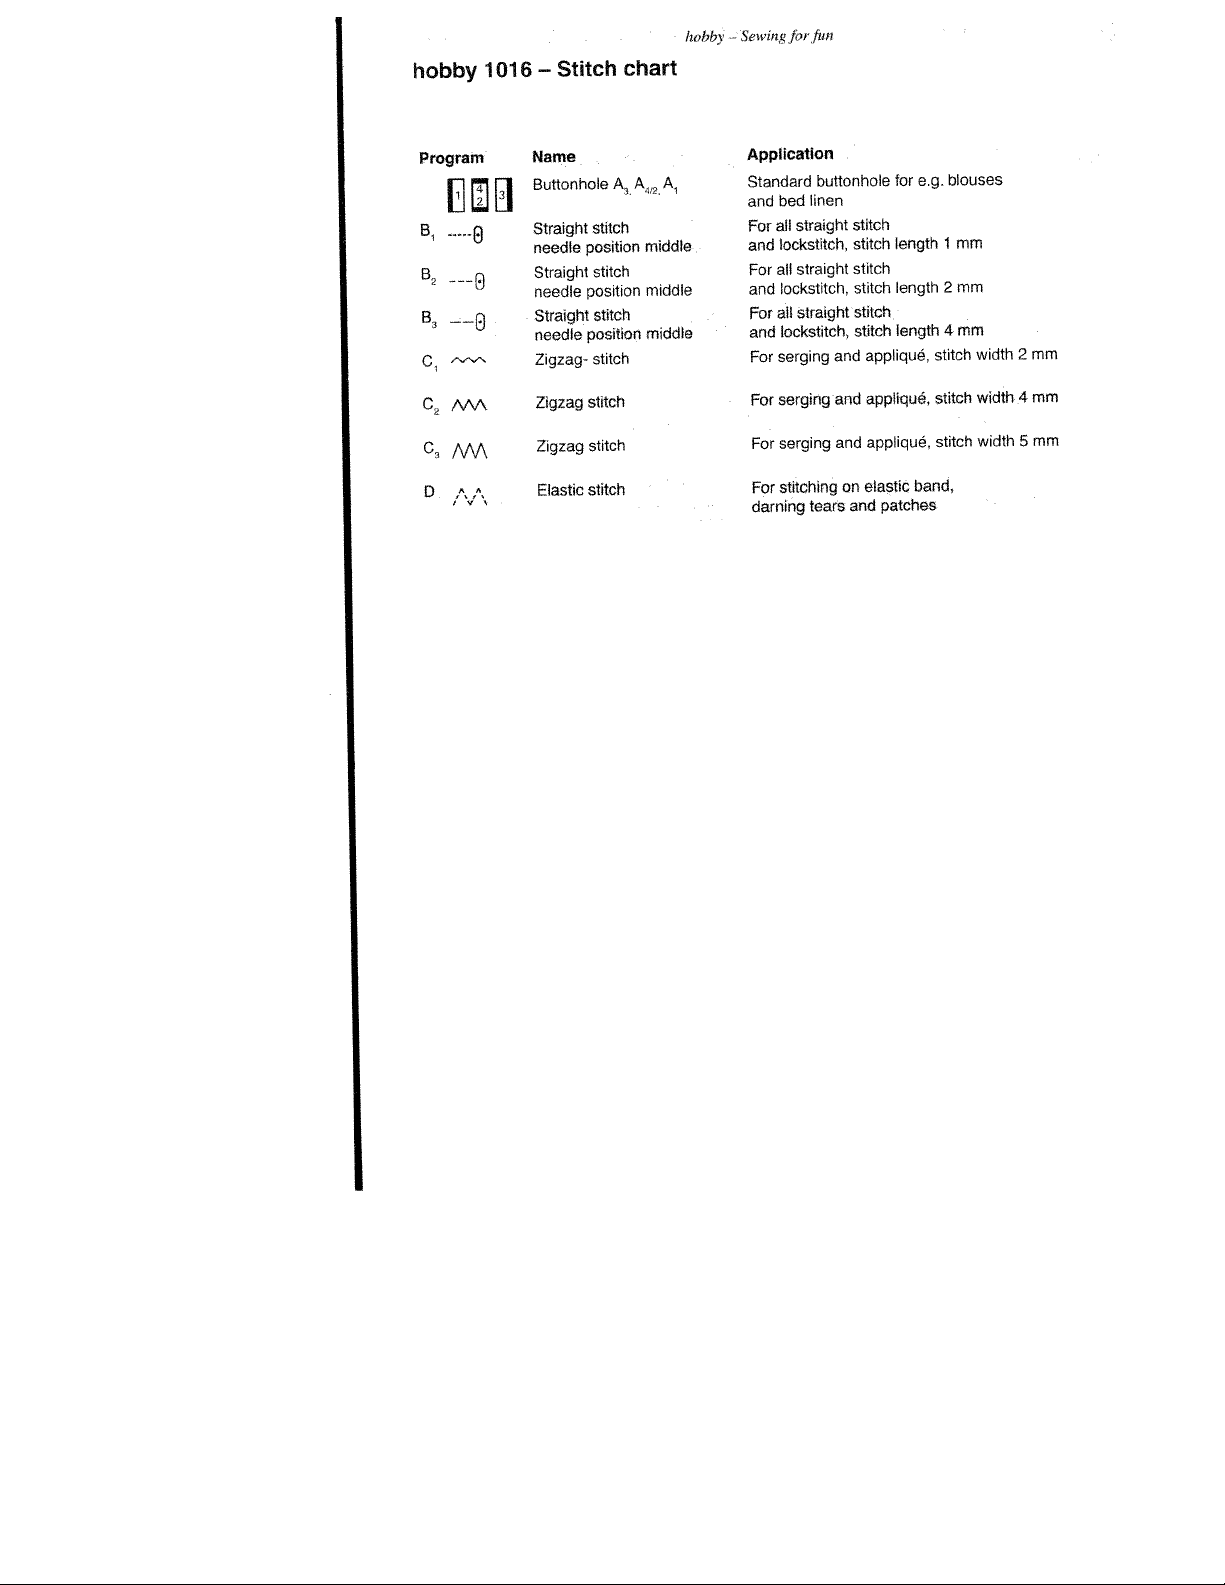
Buttonhole
3
Straight
needle
Straight
needle
Straight
needle
Zigzag-
Zigzag
Stitch
Zigzag
Elastic
A
3
stitch
position
stitch
position
stitch
position
stitch
stitch
stitch
stitch
chart
A
42
middle
middle
middle
Application
for
blouses
length
length
length
appliqué,
appliqué,
appliqué,
elastic
patches
e.g.
stitch
stitch
band,
1
2
4
stitch
mm
mm
mm
width
width
width
mm
2
4
mm
mm
5
A
1
Standard
and
For
and
For
and
For
and
For
For
For
For
darning
buttonhole
linen
bed
straight
all
lockstitch,
straight
all
lockstitch,
straight
all
lockstitch,
serging
serging
serging
stitching
tears
stitch
stitch
stitch
stitch
stitch
stitch
and
and
and
on
and
Page 11
Operating
Bobbin
winding
case
Bobbin
Bobbin
Changing
Changing
Control
thread
Detachable
Drawing
Electrical
arm
Free
Lowering
Needle
Presser
Reverse
Setting
Threading
Thread
panel
up
thread
bar
serging
the
cutter
the
tension
needle
the
presser
the
support
work
bobbin
the
connection
feed
the
tension
lifter
stitches
utility
needle
the
machine
foot
thread
dog
thread
10-11
12-13
13
18
17
19
9
16
8
9
18
18
15
20
20
14-15
16
Page 12
pFFF
Operating
machine
the
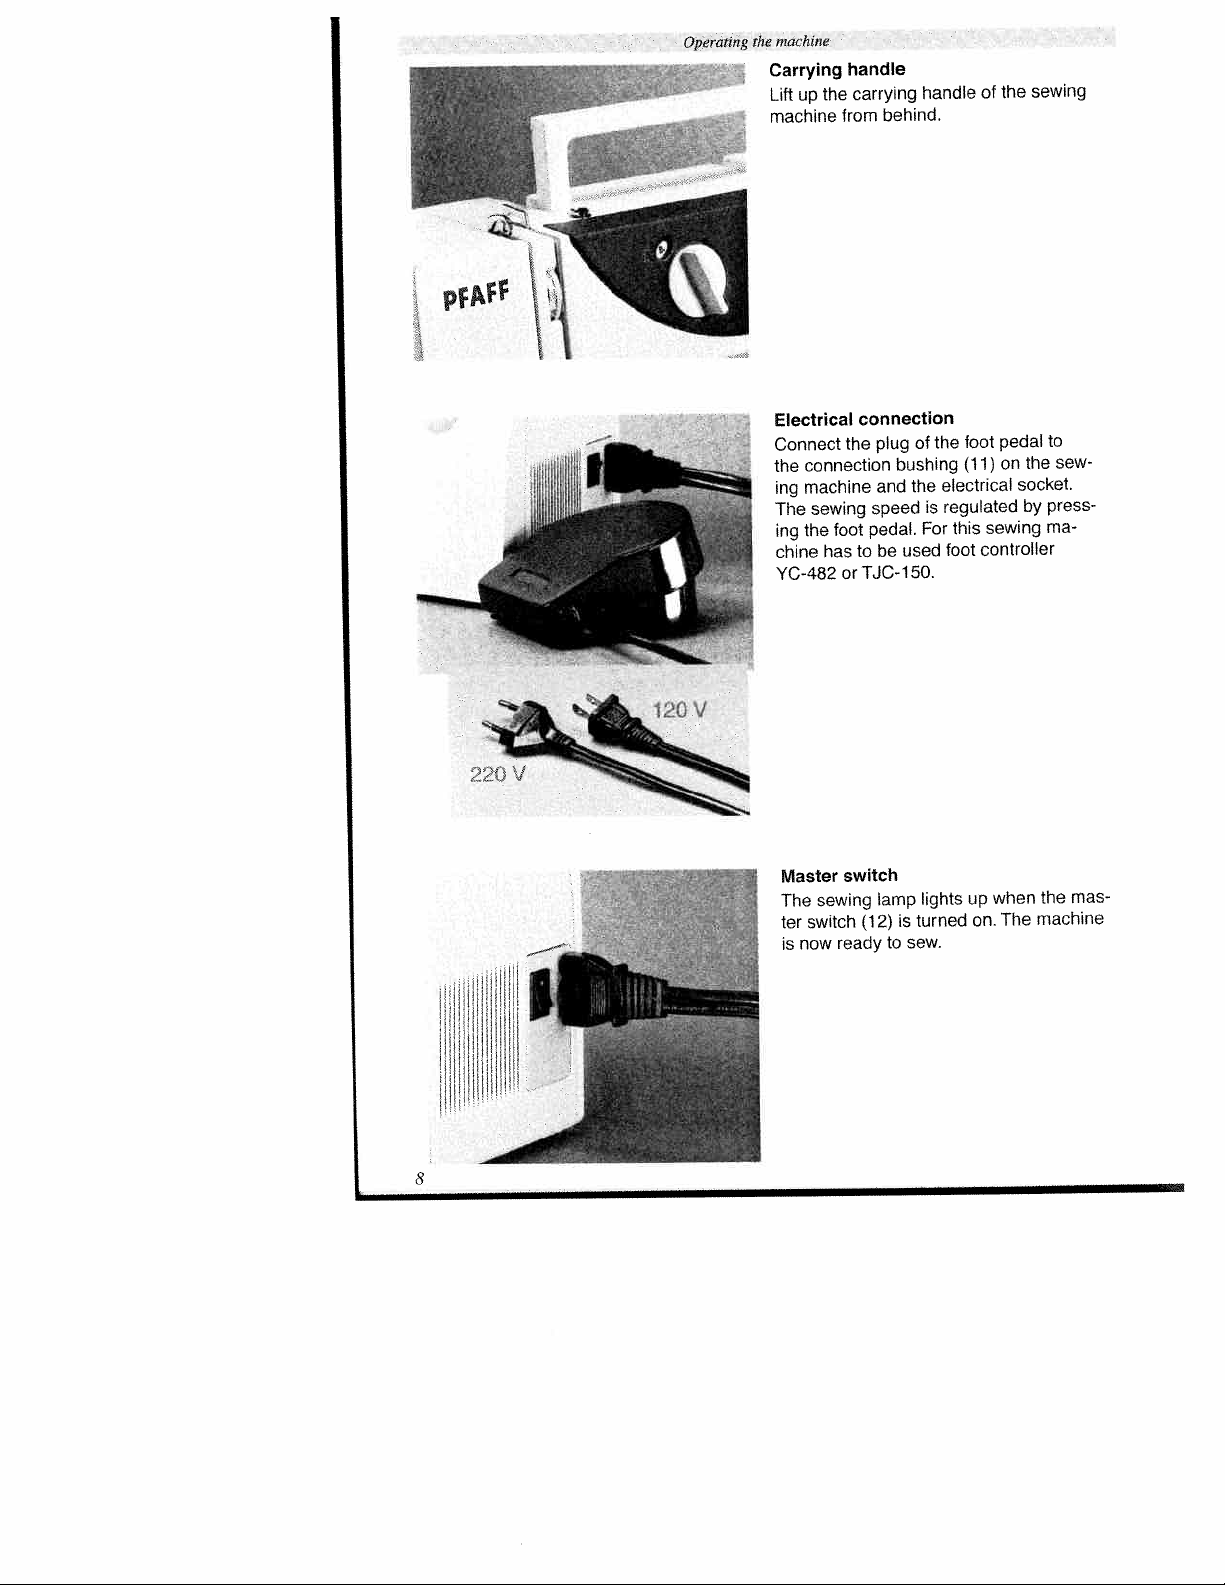
Carrying
Lift
machine
up
the
handle
carrying
from
behind.
handle
sewing
the
of
220
Electrical
Connect
the
ing
The
ing
chine
YC-482
connection
the
connection
machine
sewing
pedal.
foot
the
to
has
TJC-1
or
plug
bushing
and
speed
be
of
the
used
50.
the
electrical
regulated
is
this
For
foot
pedal
foot
on
(11)
sewing
controller
to
the
socket.
press
by
ma
sew
V
sewing
switch
now
switch
(12)
ready
lamp
to
is
sew.
lights
turned
up
on.
when
The
mas
the
machine
Master
The
ter
is
8
Page 13
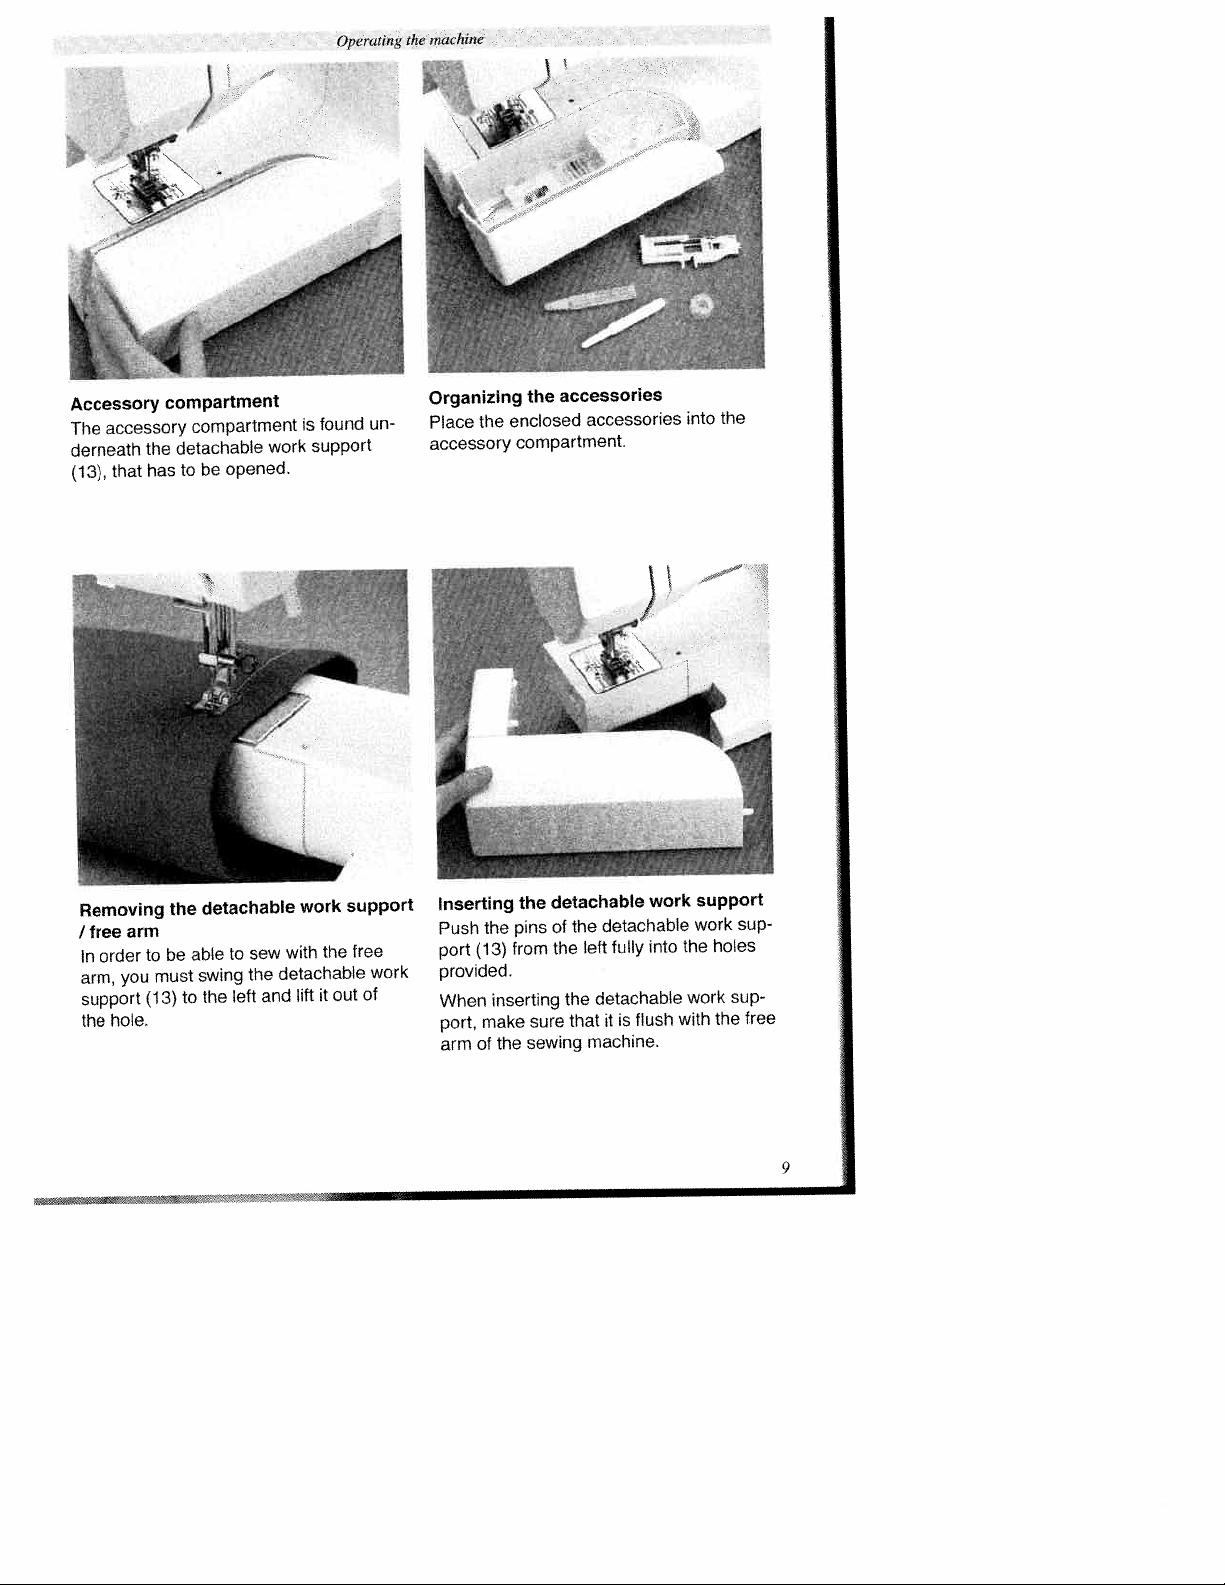
Accessory
accessory
The
derneath
that
(13),
)
compartment
compartment
detachable
the
be
to
has
opened.
work
found
is
support
Operating
un-
machine
the
Organizing
Place
accessory
the
enclosed
the
compartment.
accessories
accessories
into
the
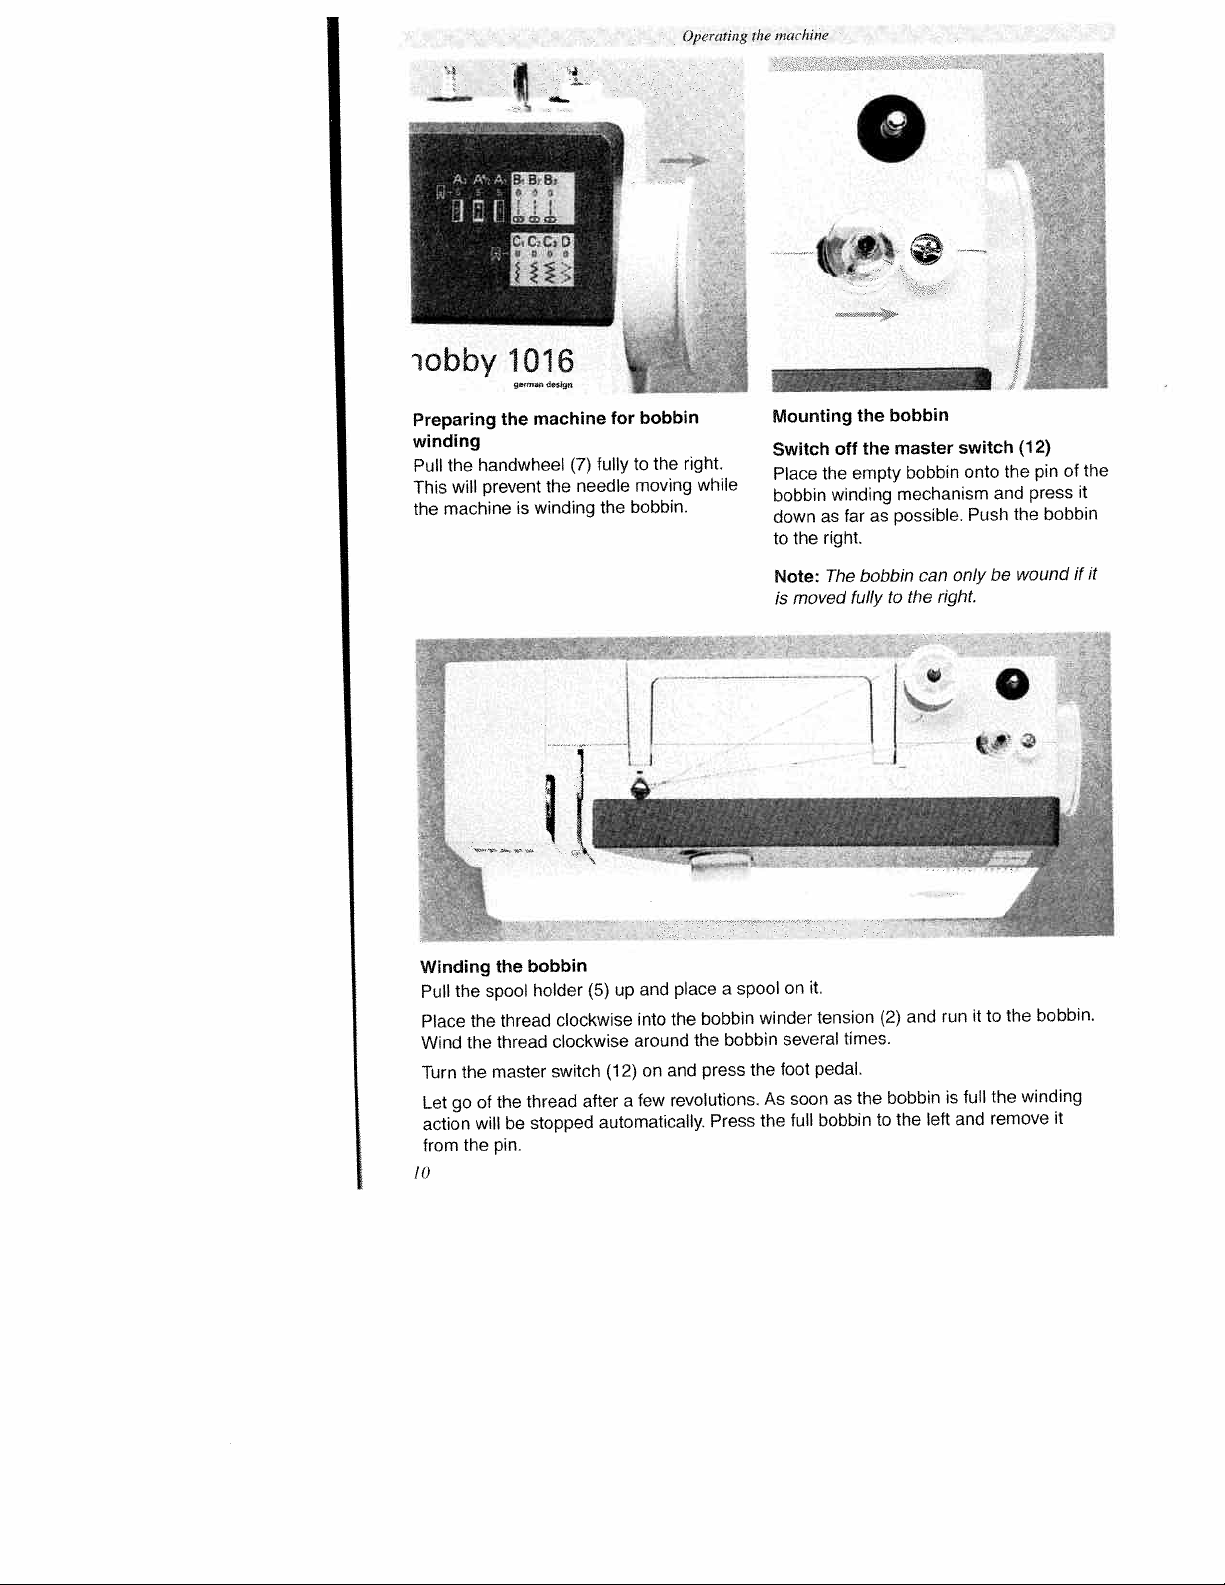
Removing
arm
free
I
order
In
you
arm,
support
hole.
the
to
must
(13>
the
be
able
to
detachable
sew
to
the
swing
left
the
work
with
detachable
lift
and
the
it
support
tree
out
work
of
Inserting
the
Push
(13)
port
provided.
When
make
port,
of
arm
the
pins
from
inserting
sure
sewing
the
detachable
detachable
the
of
fully
left
the
detachable
the
it
that
machine.
is
work
into
flush
support
work
the
work
with
holes
sup
the
sup
free
9
Page 14
iobbylOl6
handwheel
the
prevent
will
machine
the
is
Preparing
winding
Pull
This
the
machine
(7)
needle
the
winding
for
fully
the
bobbin
the
to
moving
bobbin.
Operating
a
right.
while
rncwhine
the
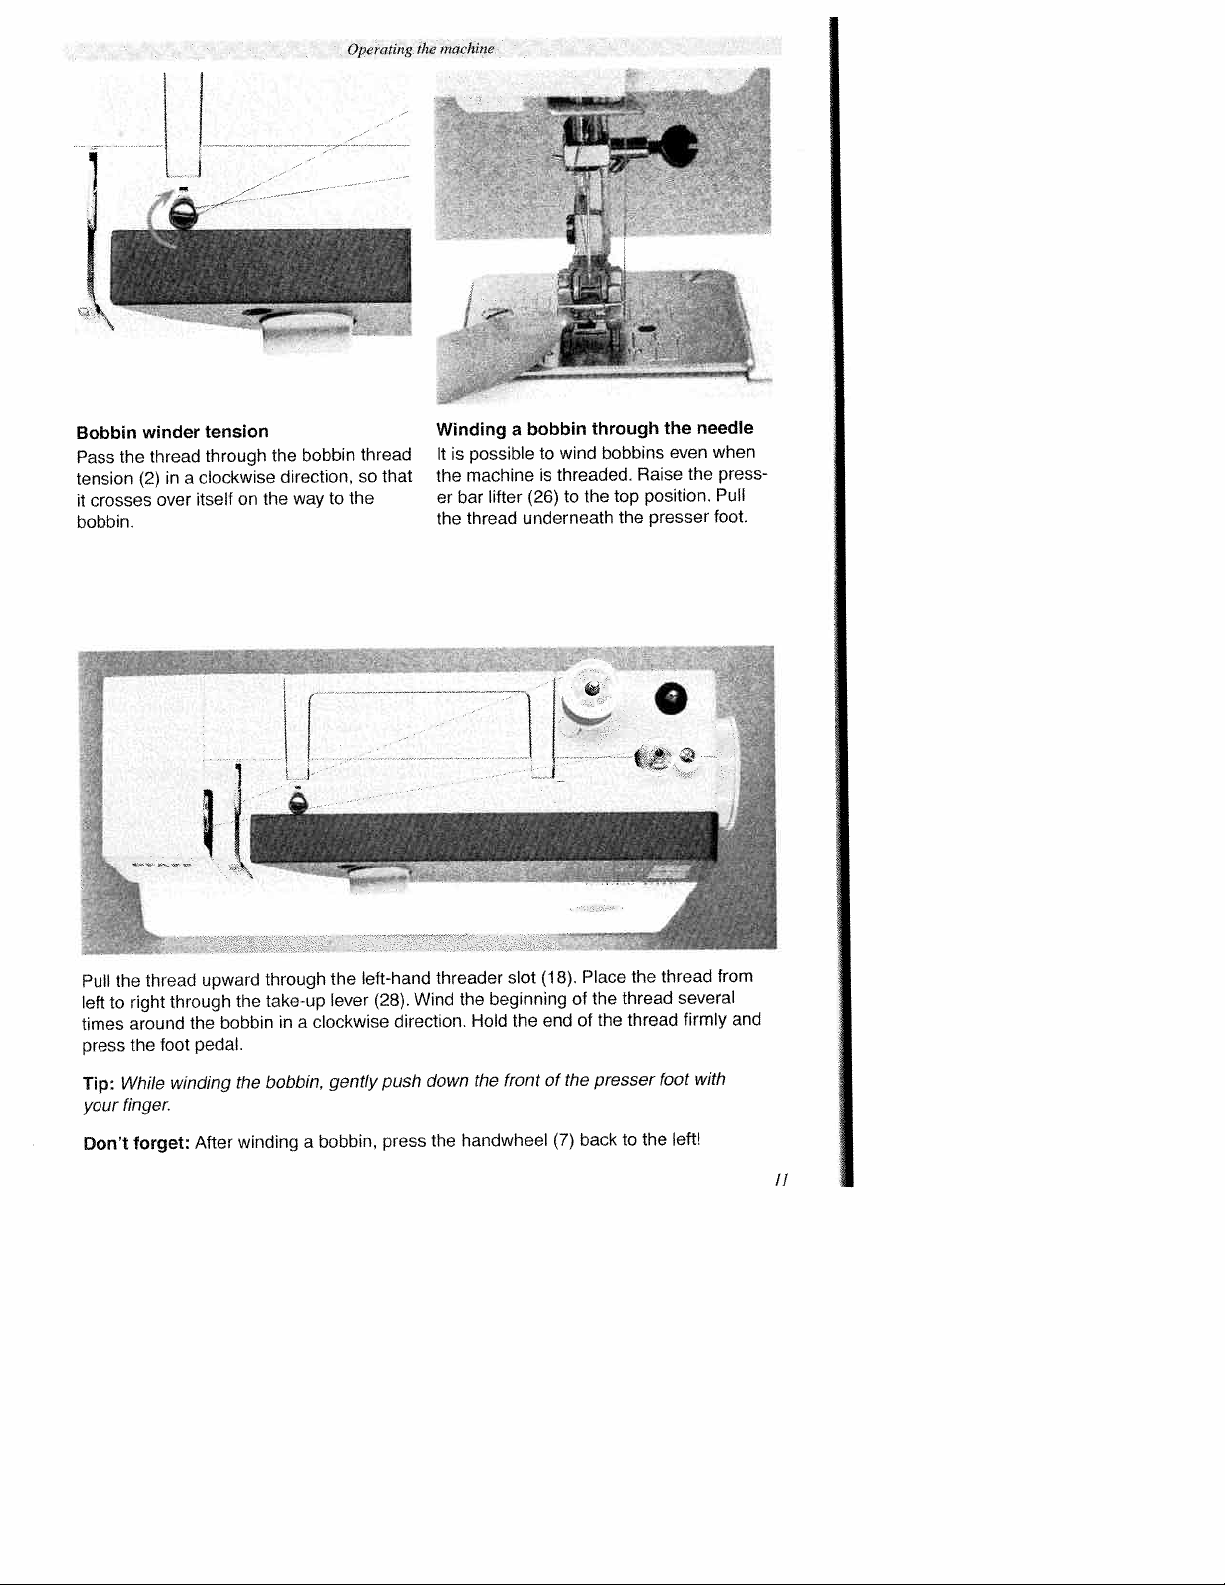
Mounting
Switch
Place
bobbin
down
to
Note:
is
the
as
right.
the
moved
off
winding
The
bobbin
the
master
the
bobbin
empty
mechanism
faraspossible.
can
bobbin
right.
the
to
fully
switch
onto
Push
only
(12)
the
and
the
wound/fit
be
pin
press
bobbin
the
of
it
C
C
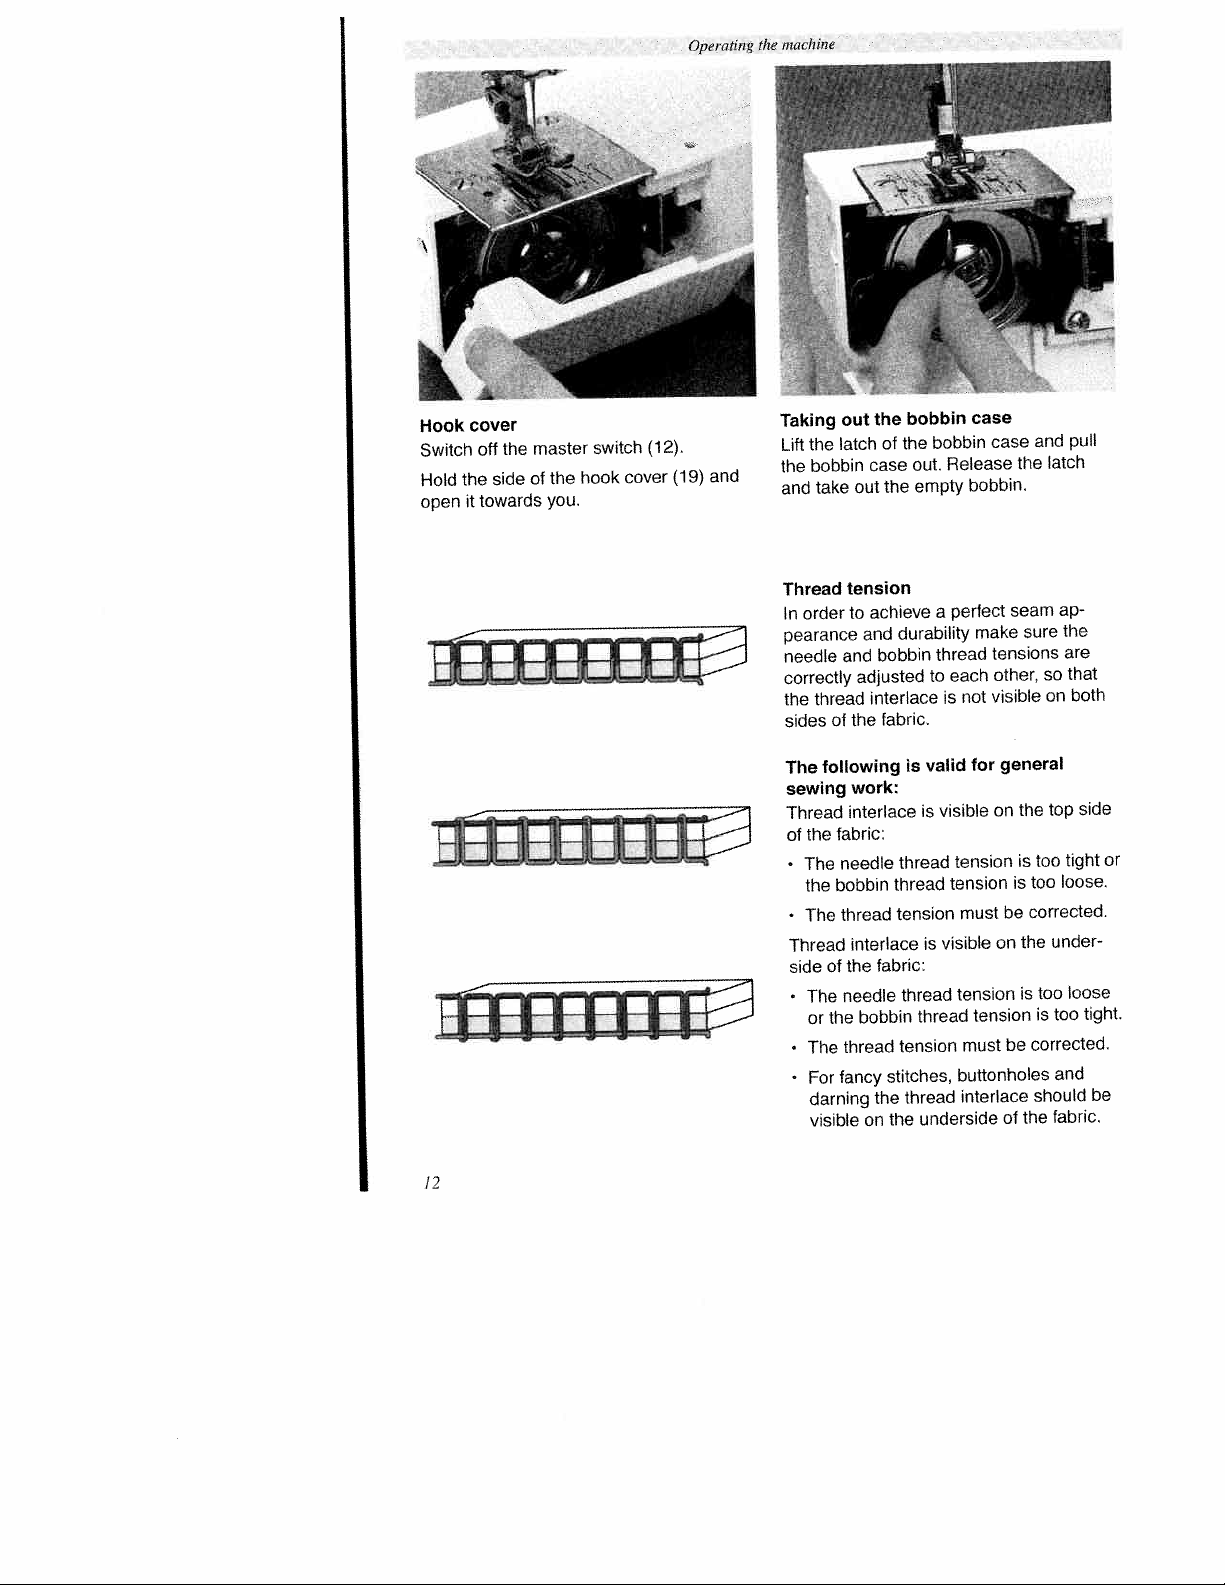
Winding
Pull
Place
Wind
Turn
Let
go
action
from
10
the
the
the
the
the
of
will
the
spool
thread
thread
master
the
be
pin.
bobbin
holder
clockwise
clockwise
switch
thread
stopped
and
(5)
up
into
around
on
(12)
few
after
a
automatically.
place
a
bobbin
the
bobbin
the
press
and
revolutions.
Press
spool
winder
the
As
the
on
it.
several
foot
soon
full
IH°
tension
pedal.
bobbin
times.
as
(2)
the
to
and
bobbin
the
left
run
is
full
and
to
it
the
remove
the
winding
bobbin.
it
Page 15
Bobbin
Pass
tension
it
crosses
bobbin.
the
winder
thread
in
(2)
over
tension
through
clockwise
a
itself
on
the
direction,
way
the
#i
bobbin
to
Operating
thread
that
so
the
the
I
machine
Winding
possible
It
is
machine
the
bar
er
the
thread
a
lifter
bobbin
wind
to
threaded.
is
the
to
(26)
underneath
through
bobbins
top
the
the
even
Raise
position.
presser
needle
the
when
press
Pull
foot.
Pull
left
times
press
Tip:
your
Don’t
the
to
While
finger.
thread
right
around
foot
the
forget:
upward
through
the
pedal.
winding
After
1
(L
the
bobbin
the
winding
i
through
take-up
in
a
bobbin,
a
I
the
lever
clockwise
gently
bobbin,
left-hand
(28).
direction.
push
press
threader
Wind
down
the
slot
beginning
the
the
Hold
front
the
handwheel
1
(18).
end
of
(7)
of
the
Place
the
of
presser
back
the
the
thread
thread
the
to
thread
several
firmly
foot
left!
from
and
with
II
Page 16
Operafi,1g
the
,ncu’hjne
Hook
Switch
Hold
open
cover
off
the
it
towards
the
side
master
the
of
you.
switch
hook
cover
(12).
(19)
and
Taking
Lift
the
the
bobbin
take
and
Thread
order
In
pearance
needle
correctly
thread
the
sides
following
The
sewing
Thread
the
of
The
•
the
The
•
Thread
side
The
•
or
The
•
For
darning
visible
out
latch
out
tension
to
and
the
of
work:
interlace
fabric:
needle
bobbin
thread
interlace
the
of
needle
the
thread
fancy
the
of
case
the
achieve
durability
and
bobbin
adjusted
interlace
fabric.
thread
thread
tension
fabric:
thread
bobbin
tension
stitches,
the
the
on
bobbin
bobbin
the
out.
empty
a
thread
to
valid
is
is
is
thread
thread
underside
case
Release
bobbin.
perfect
make
each
not
is
for
visible
tension
tension
must
visible
tension
tension
must
buttonholes
interlace
and
case
the
seam
sure
tensions
other,
visible
general
the
on
is
too
too
is
corrected.
be
the
on
is
corrected.
be
should
the
of
latch
so
on
top
under
too
is
fabric.
pull
ap
the
are
that
both
tight
loose.
loose
too
and
side
or
tight.
be
12
Page 17
Operating
the
machine
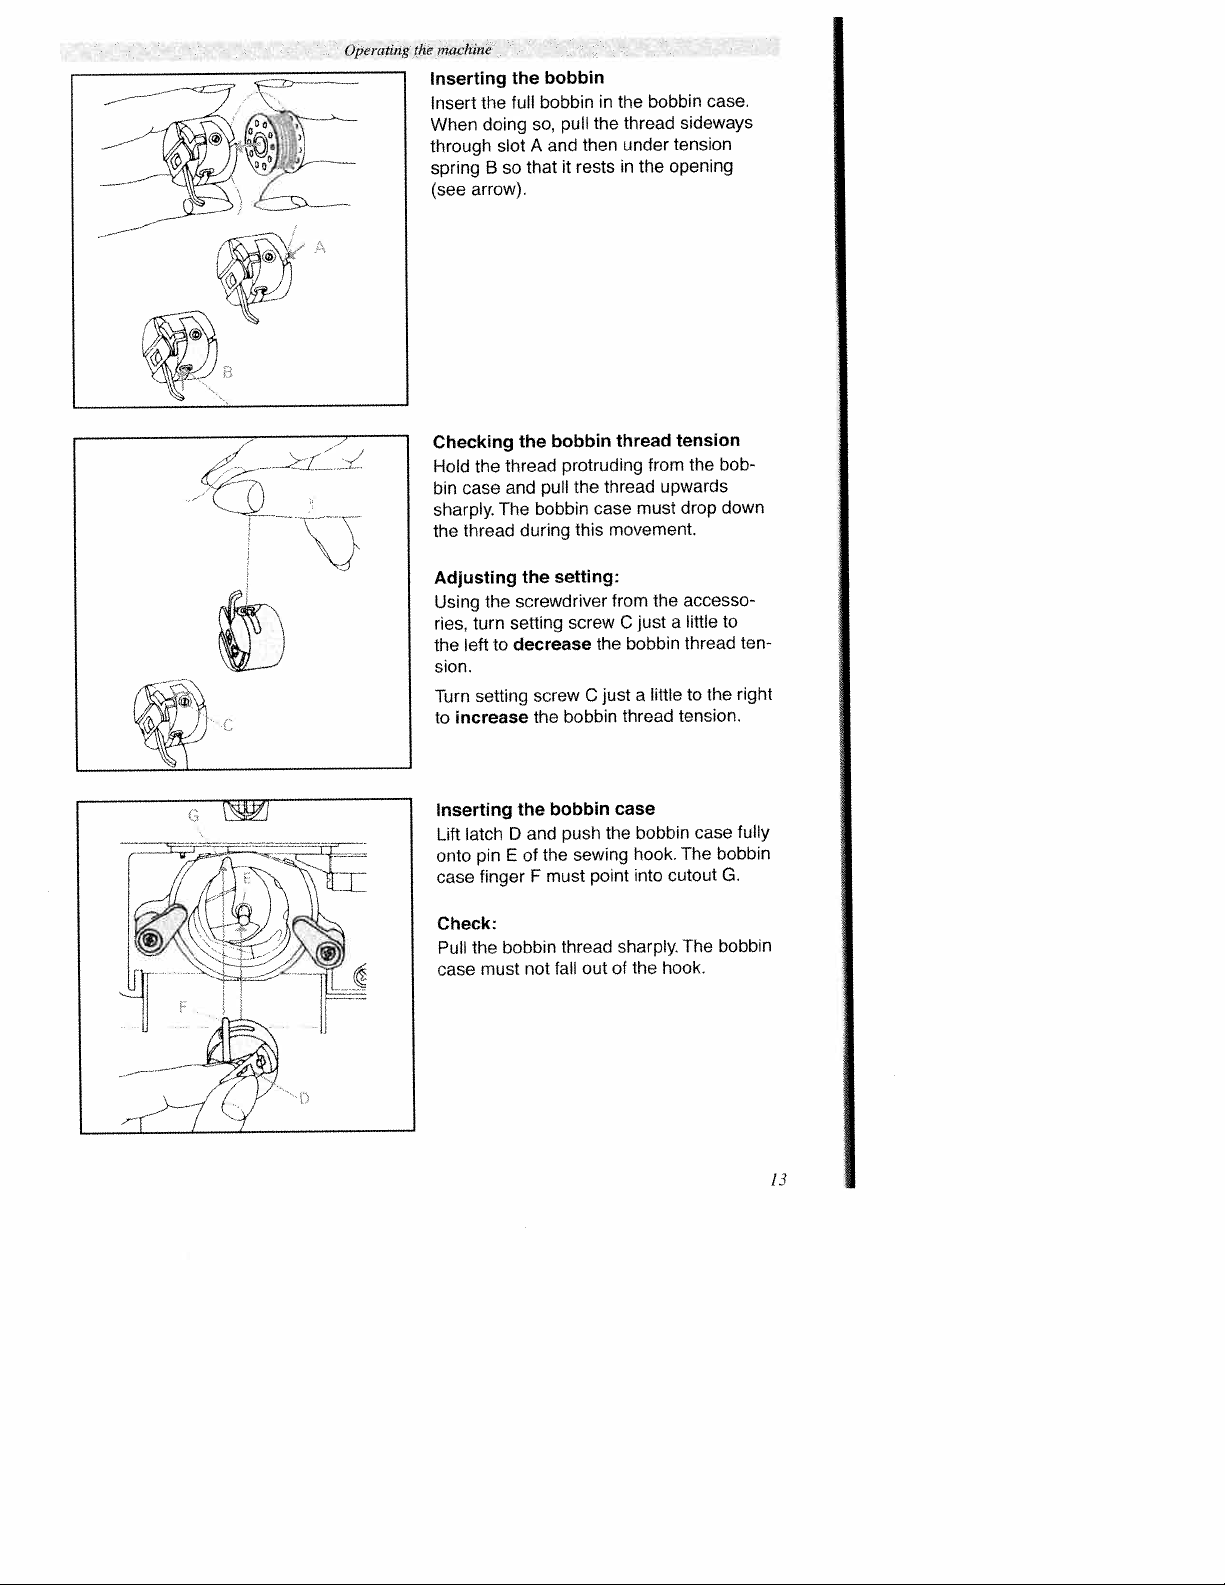
Inserting
Insert
When
through
springBso
(see
Checking
Hold
bin
case
sharply.
thread
the
Adjusting
Using
ries,
left
the
sion.
Turn
to
increase
the
doing
slot
arrow).
thread
the
and
The
the
turn
to
setting
bobbin
the
bobbininthe
full
pull
so,
A
and
it
that
bobbin
the
protruding
pull
the
bobbin
this
during
setting:
the
screwdriver
screw
setting
decrease
screw
bobbin
the
the
then
rests
thread
case
movement.
from
the
C
just
thread
under
in
the
thread
must
just
C
bobbin
a
thread
bobbin
sideways
tension
opening
tension
from
upwards
drop
the
a
little
tension.
case.
bob
the
down
accesso
little
to
thread
the
to
ten
right
Inserting
latch
Lift
pin
onto
finger
case
Check:
the
Pull
must
case
the
D
and
E
of
F
bobbin
not
bobbin
push
the
must
thread
fall
the
sewing
point
out
case
bobbin
hook.
into
sharply.
of
the
The
cutout
The
hook.
case
fully
bobbin
G.
bobbin
13
Page 18
Operating
machine
the
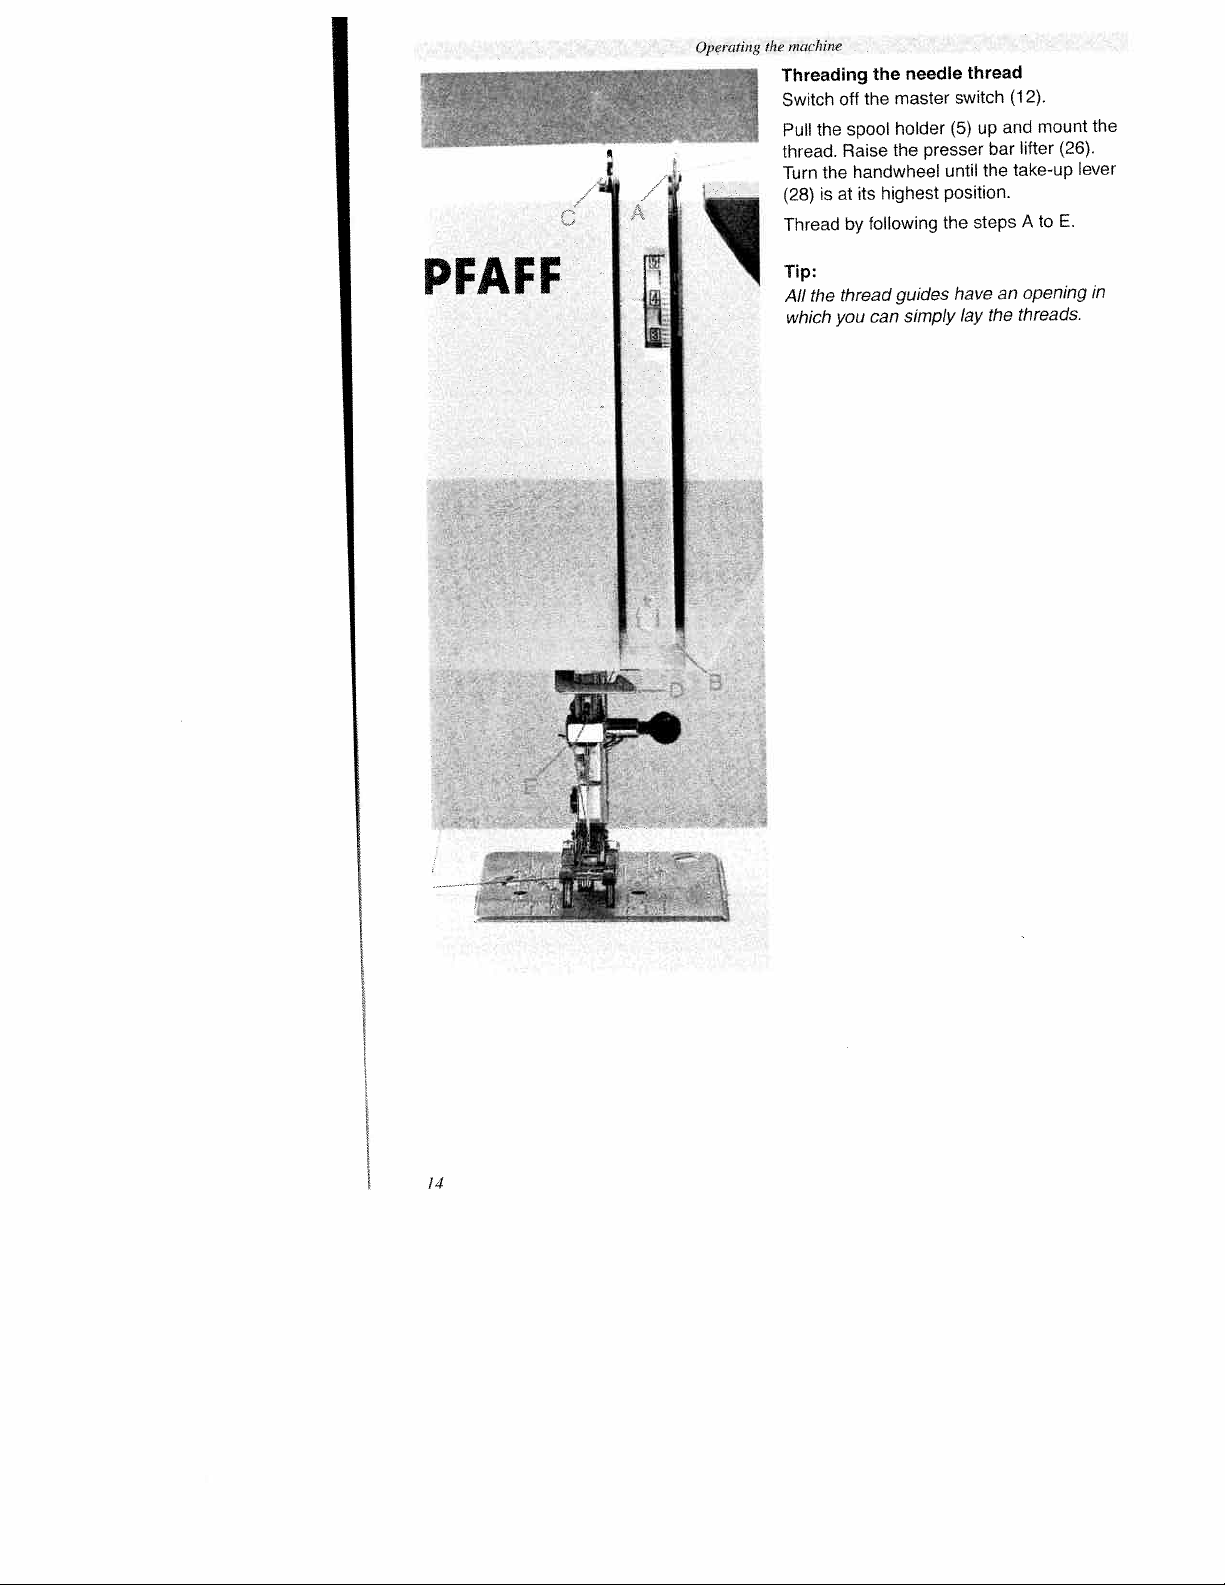
Threading
Switch
Pull
thread.
Turn
(28)
Thread
the
the
is
off
at
the
the
spool
the
Raise
handwheel
highest
its
following
by
needle
master
holder
presser
thread
switch
up
(5)
bar
the
until
position.
steps
the
2).
(1
and
lifter
take-up
A
mount
(26).
E.
to
the
lever
PFAFF
Tip:
the
All
which
J
thread
you
can
guides
simply
have
lay
an
the
opening
threads.
in
14
Page 19

Operating
machine
the
Threading
Thread
of
the
Presser
The
with
the
needle
bar
presser
presser
the
the
needle
from
lifter
foot
needle
thread
the
is
bar
front
raised
lifter
through
the
to
and
(26).
the
back.
lowered
eye
I’;
Page 20

1
_____
Operating
bQ’d
‘
nachine
the
Drawing
Raise
thread
you
tion
loop.
bobbin
the
until
and
Pull
up
presser
and
the
the
the
thread
the
turn
needle
bobbin
needle
bobbin
foot.
handwheel
the
thread
Hold
at
is
thread
thread
the
highest
its
has
to
needle
towards
formed
draw
posi
up
a
the
thread
the
under
hook
the
cover
presser
(19)
and
foot
to
pull
the
the
left.
I
Bobbin
Close
thread
I
-
I
L
/
the
the
cutter
thread
thread
from
cutter
the
back
(17).
front
the
to
Thread
Pull
over
]6
Page 21

Operatin.g
machhie
the
Removing
Switch
Raise
Press
the
disengages
(20).
rear
the
the
off
the
needle
front
of
the
the
master
presser
from
presser
to
the
of
the
switch
highest
its
presser
foot
presser
foot
(12).
foot
down
foot
position.
up
until
holder
and
it
c_4t
I
4
Attaching
the
Place
holder
foot
lifter
bar
engage
foot
Check:
Please
erly
attached
lifter.
the
presser
(20)
(26)
check
is
in
that
by
presser
the
foot
that
so
lowered,
presser
the
raising
foot
under
when
the
presser
the
the
the
pins
foot
presser
presser
presser
of
holder.
foot
is
the
prop
bar
17
Page 22

PFAFF
J
Operaüng
machine
the
Changing
Switch
remove:
To
the
set
fixing
the
downwards.
insert:
To
must
foot
far
as
tighten
Setting
Set
thread
the
tension
The
For
tween
the
the
off
Lower
needle
screw
The
the
to
face
insert
and
will
it
as
fixing
the
neecile
the
required
the
tension
dial.
normal
embroidery
setting
and
2
needle
master
to
its
(23)
flat
rear.
the
go.
screw
amount
(3)
and
3.
switch
presser
the
highest
and
A
side
Lower
needle,
the
Hold
(23)
thread
using
for
sewing
buttonhole
pull
of
pushing
needle
of
the
(12).
foot
point.
needle
the
needle
the
presser
the
firmly.
tension
needle
the
markings
4-5.
is
sewing
and
Loosen
up
it
and
on
be
18
I44IiiR
I
Lowering
certain
For
buttons,
on
lowered.
and
(19)
right-hand
and
wards
dog,
feed
into
the
feed
the
sewing
the
do
To
move
position
then
push
left-hand
feed
this,
the
to
down
dog
work,
dog
open
metallic
(B)
right.
the
the
position
such
(22)
the
by
slide
as
has
hook
slide
pushing
engage
To
and
(A).
sewing
to
cover
the
to
it
lock
be
down
the
it
Page 23

Operating
the
machine
—
Control
the
All
control
stitch
panel
sewing
panel
pattern
programs
sewing
your
of
adjustment
and
button
relevant
the
machine.
(9)
on
The
the
recommendations
foot
various
left.
programs
hobby
are
are
1016
depicted
selected
using
on
the
the
‘9
Page 24
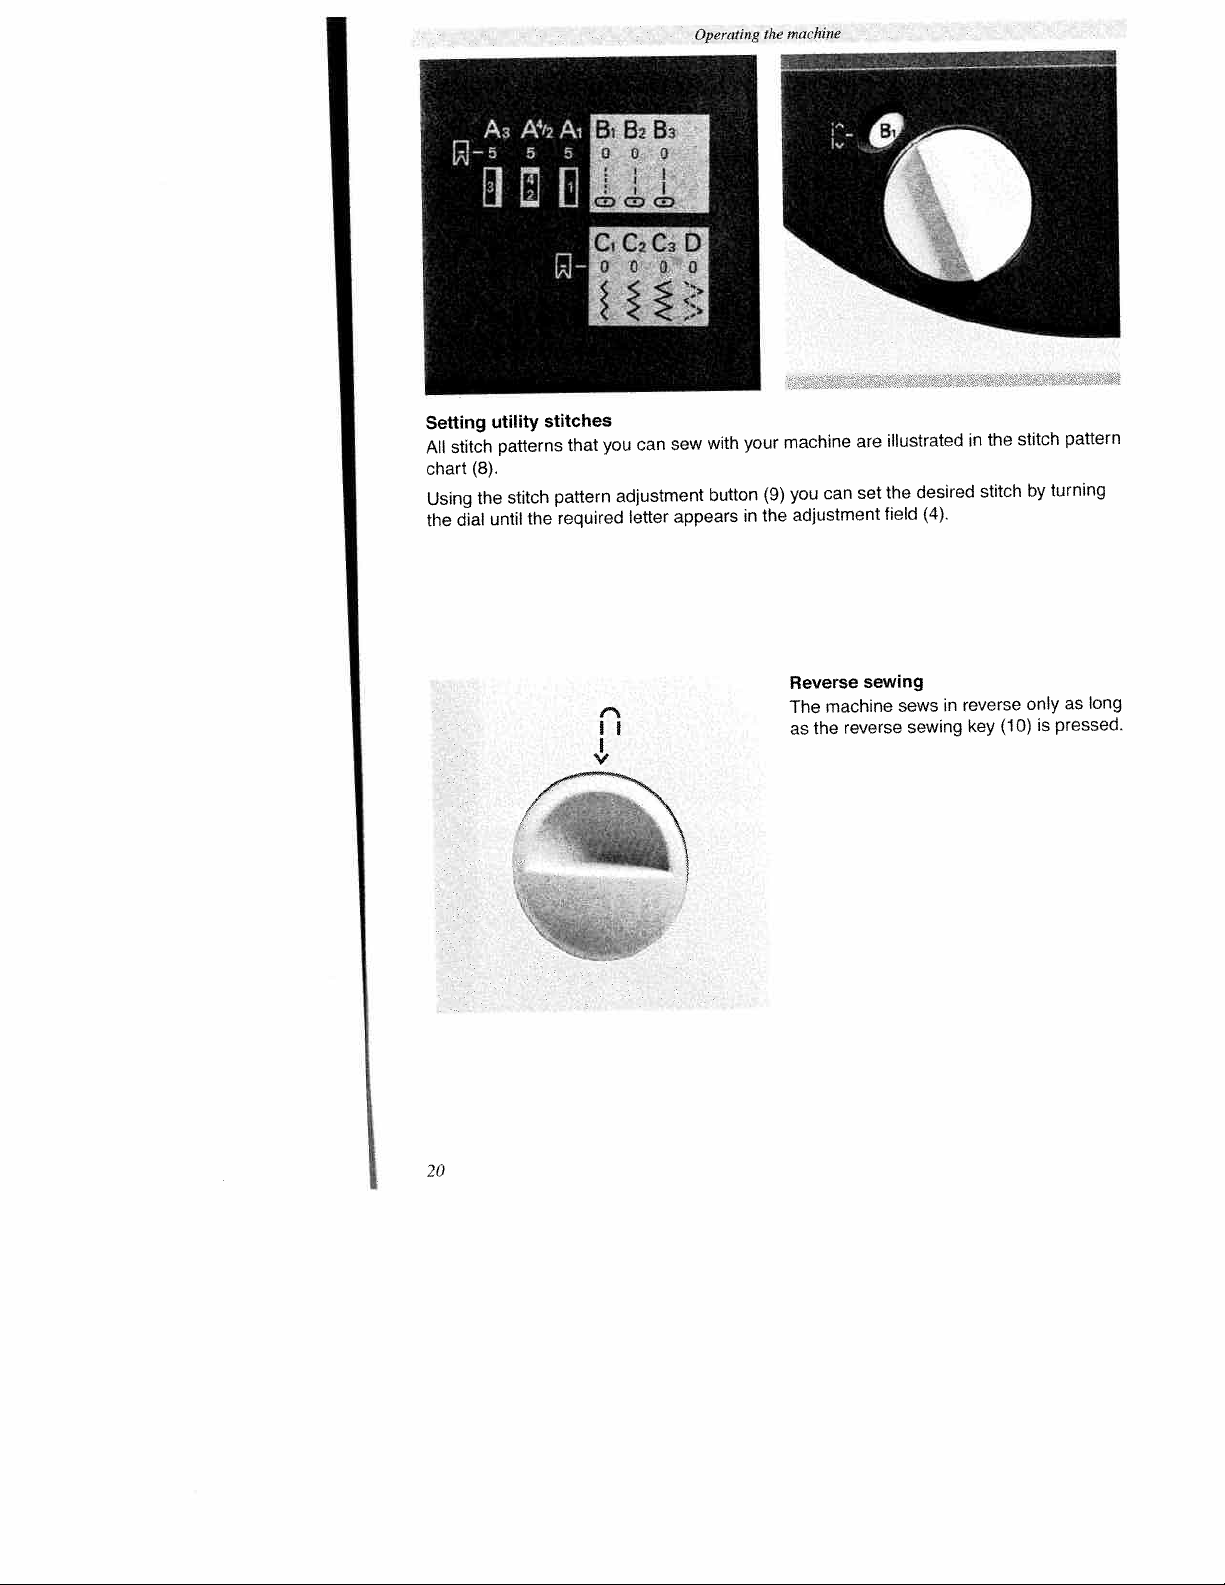
Setting
stitch
All
chart
Using
dial
the
(8).
the
utitity
patterns
stitch
until
stitches
the
that
pattern
required
can
you
adjustment
letter
Operating
sew
appears
with
button
your
in
the
machine
machine
you
(9)
adjustment
the
can
are
set
illustrated
the
desired
(4).
field
in
stitch
the
stitch
by
pattern
turning
20
Reverse
machine
The
the
as
sewing
reverse
sews
sewing
in
reverse
(10)
key
only
is
long
as
pressed.
Page 25
Utility
and
Buttonholes
Darning
Elastic
Gathering
General
Hemming
Lace
Non-elastic
Roll
Sewing
Shell
Smocking
Zippers
stitches
practical
stitch
sewing
work
hemming
on
edging
with
stitches
buttons
aids
the
sewing
twin
needle
26-27
31
25
30
22
28
35
32
23
34
24
36
29
33
2?
Page 26

P
FA
F
F
j
Utility
stitches
wid
4
pruc&aI
Needle
order
In
needle
the
sions
other.
in
is
Check
stitch.
tween
If
the
the
fabric.
If
the
loose,
side
The
sion
sewing
thread
achieve
to
thread
must
normal
The
the
range
tension
the
thread
The
two
the
needle
interlace
needle
interlace
the
the
of
adjustment
described
is
tension
correctly
be
from
layers
thread
will
thread
fabric.
perfectly
a
and
setting
4to5.
using
interlace
of
tension
on
be
tension
will
the
of
page
on
bobbin
adjusted
for
wide
a
fabric.
top
the
on
be
bobbin
15.
utility
must
is
is
sewn
thread
to
zigzag
be
too
side
set
the
thread
seam,
ten
each
stitches
be-
tight,
the
of
too
reverse
ten.
Topstitching
broad
using
guarantees
to
inserted
is
with
aid
ensure
ofathick
piece
a
sewing
accessories)
(special
For
mend
cessory
parallel
guide
cured
Feed
To
ning
ing
thickness
the
with
topstitching
edge
the
edge
the
into
fixing
screw
thick
for
of
toot
seam,
fabric
the
work
to
feeding
support
precise
as
the
edge
work
guide.
topstitching
fabric.
the
of
C
hole
F
seams
at
recommend
we
which
under
we
This
is
it.
guide
and
the
the
the
recom
ac
which
The
is
begin
same
back
is
edge
se
plac
of
22
Page 27
Utility
titches
and
practical
4
r.
sewing
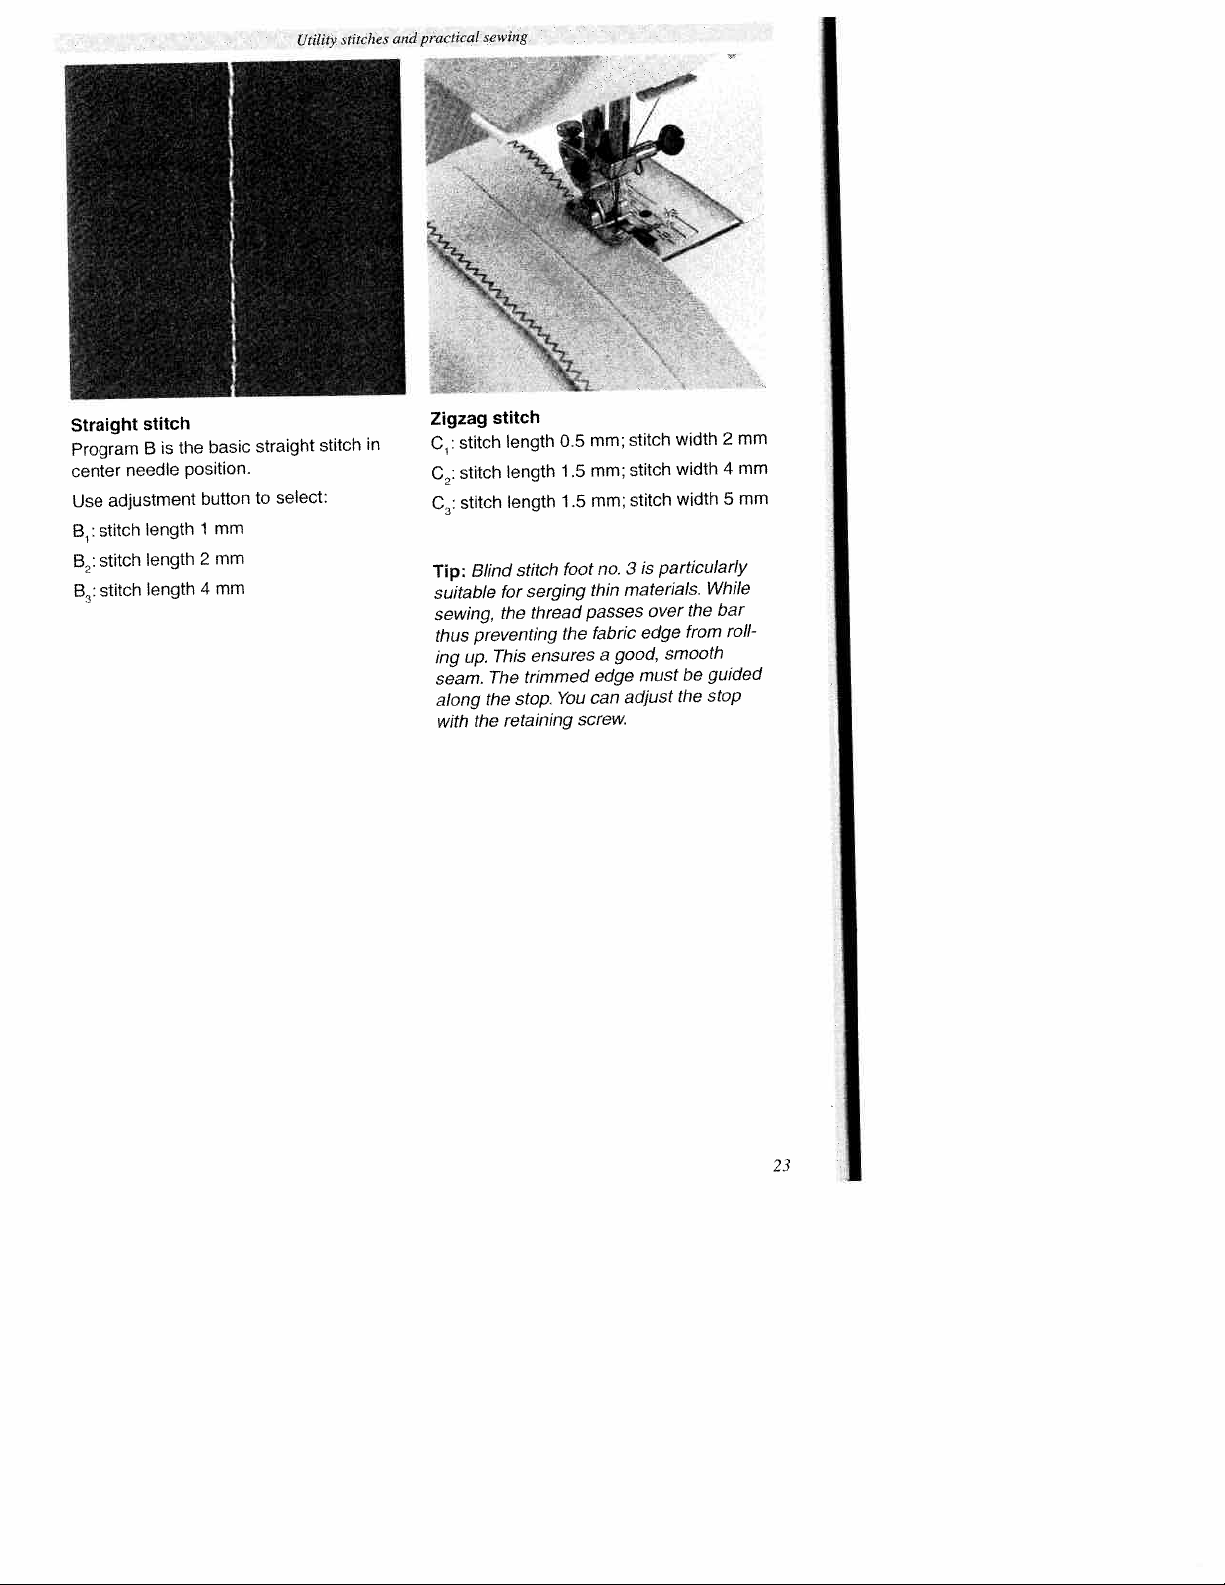
Straight
Program
center
adjustment
Use
stitch
B:
stitch
B2:
stitch
B:
stitch
B
needle
length
length
length
the
is
basic
position.
button
mm
1
mm
2
mm
4
straight
select:
to
stitch
stitch
stitch
stitch
Blind
suitable
sewing,
preventing
thus
ing
up.
seam.
along
the
with
stitch
length
length
length
stitch
for
the
This
The
the
stop.
retaining
0.5
1.5
1.5
foot
serging
thread
the
ensures
trimmed
You
mm;
mm;
mm;
no.
thin
passes
fabric
a
edge
can
screw.
stitch
stitch
stitch
particularly
is
3
materials.
over
edge
good,
must
adjust
width
width
width
the
from
smooth
be
the
mm
2
4
5
While
bar
roll
guided
stop
mm
mm
Zigzag
in
C:
02:
03:
Tip:
23
Page 28

practtctd
wtd
stitches
Utility
fi
sewing
Sewing
For
sewing
must
lowered
be
Select
02,
button
on
be
by
buttons
on
removed
(ci.
the
4
turning
(9).
buttons,
and
page
zigzag
mm
the
the
the
20).
stitch
presser
feed
dog
stitch
stitch,
adjustment
foot
must
Sewing
Attach
•
Place
•
button
hand
•
Remove
and
Wrap
•
and
on
the
match
a
and
column
the
the
knot
buttons
presser
sew
the
button
shank
it.
between
as
on
match
apart.
with
foot.
described
this
and
with
a
page.
the
thread
the
pull
sewing
holes
in
the
shank
in
the
fabric
thread
the
left
24
Page 29

4
Utility
stiteiws
prarticai
and
Elastic
Stitch
Because
used
underwear;
bands:
•
•
•
•
•
sewing
stitch
D
for
and
replacing
If
to
close
needed,
If
mm
4
Divide
mark.
and
if
you
dle
matching
the
Stretch
matching
Overlap
the
with
skirts
On
elastic
the
with
its
of
sewing
skirt,
cuffs.
its
long
fabric
pin
the
marks
the
elastic
and
is
sewn
elastic
high
on
elastic,
edge.
gather
straight
and
You
the
marks.
elastic
ends
pants
elasticity,
elastic
trouser
the
stitch
elastic
may
elastic
to
as
slightly
stitch.
onto
stitch.
band,
and
off
cut
fabric
into
it
find
to
fit
the
sew.
you
(trousers)
prepared
the
this
dress
old
edge
(c.f.
easier
the
fabric,
and
stitch
e.g.
waist
elastic
with
page
quarters
to
fabric
secure
the
edge
is
on
the
30).
han
at
25
Page 30

Utility
stitches
and
practical
sewing
Buttonholes
Sewing
not
buttonholes
have
buttonhole
Generally,
additionally
the
that
so
(from
Avalon
dissolves
that
poorly
can
it
efficiently
Embroidery
fabric
a
Using
test
a
sew
Note:
every
Before
will
it
as
red
The
is
It
Tip:
project.
your
rotated.
be
to
foot.
buttonholes
stabilize
fabric
Madeira)
in
be
the
by
and
marker
buttonhole
buttonhole
i.e.
go,
markings
important
is
some
does
water.
used
machine
darning
red
the
give
to
very
To
are
not
very
is
On
either
threads
pin,
or
first.
you
arrow
you
always
easy
make
sewn
materials
gather
good
materials
on
or
buttonholes
and
mark
must
isatthe
means
a
sew
all
with
sewing
lined,
onto
such
when
for
such
underneath
particularly
are
the
slide
of
test
a
hobby
the
of
buttonholes
doubled
silk,
as
sewn.
being
purpose.
this
velvet
as
the
much
are
starting
runner
the
red
first
determining
buttonhole
organza
fabric.
good
points
line.
models
even
fabric,
This
and
easier
of
the
of
The
the
on
easier
However,
and
isaspecial
thick
The
to
sewing
for
the
buttonholes
buttonhole
markings
red
length
same
the
because
recommend
we
it
with
rayon
type
fabrics
wool
material
sew.
attractive
foot
buttonhole.
of
the
fabric/stabilizer
is
the
is
thus
and
are
fabric
necessary
backing
stabilizer
of
feed
that
fed
seams.
always
forward
cm
0.5
does
the
paper
more
as
apart.
as
to
far
26
Page 31

Utility
stitches
mu!
practical
sewing
Program
Sewing
foot
hole
Linen
Attach
•
foot
Position
•
and
A
1
the
Select
•
for
stays
Select
-
buttonhole
and
Select
*
bartack
fabric
Select
•
few
a
fabric
Cut
pair
a
/A
412
A
3
buttonholes
buttonhole
the
forward
the
sew
desired
setting
bartack.
the
position
in
setting
the
in
setting
stitches
stays
straight
tying
stays
open
scissors
of
A
1
/
buttonhole
far
as
pattern
first
the
length.
and
A
112
Make
while
and
A
3
in
seam
length.
same
A
42
while
position.
in
stitch
stitches.
off
position.
in
buttonhole
the
the
with
foot
will
it
as
adjustment
buttonhole
sew
sure
doing
sew
reverse
the
and
again
making
setting
Make
slitting
a
or
and
go.
4-6
the
the
with
button
slide
dial
seam
stitches
fabric
this.
second
direction
sew
sure
and
B
1
sure
the
knife.
a
aid
the
at
few
the
sew
the
in
of
buttonhole
Linen
especially
sew
To
sportswear,
on
e.g.
thread.
gimp
a
elastic
On
particularly
tonhole
the
Lay
•
trusion
derneath
front.
Clamp
•
protrusion
of
Slide
•
wards
tonhole
column.
the
Pull
•
buttonhole
iwri
materials
important
stretching.
from
gimp
and
A
the
threads
the
buttonhole
the
possible
as
as
loop
with
durable
we
the
thread
pass
presser
B.
described
the
of
trim
and
gimp
buttonholes,
recommend
gimp
prevent
to
the
over
thread
the
towards
foot
left
the
to
runner
sew
and
in
the
thread
gimp
thread
the
.
thread
thread
the
rear
ends
and
far
as
the
left
using
but
pro
right
for
but
hand
into
ends.
is
un
the
the
Tip:
tack
a
pin
In
by
into
order
cutting
the
prevent
to
open
bartack.
damaging
buttonhole,
the
the
bar-
insert
27
Page 32

L’iihtv
stir
euH
ttci1
pru
u,id
s
he
•
Hemming
Topstitching
normal
and
needle.
Professional
cycling
and
easily
and
needle
twin
ensure
Please
for
needle
fold
First
desired
Topstitch
the
Cut
to
close
difficult
On
Tip:
wear
knit
topstitching
before
the
with
work
stretch
hems
shorts
the
with
available
is
that
stretch
iron
and
the
for
hem
the
protruding
seam.
the
advisable
it
is
Il
twin
be
can
materials
T-shirts,
on
can
twin
you
fabrics!
the
hem.
from
hem
materials
it.
needle
carried
sewn
be
needle.
various
in
use
width
the
edge
such
baste
to
—I—
with
knitwear
the
of
face
out
the
quickly
The
widths.
jersey
fabric
side.
fabric
ribbed
as
the
on
twin
hem
..—.
_,*•_,*.
*
/
I
Threading
Place
•
Pass
•
thread
the
Lay
•
guides
threads
the
needles.
left
I
spool
a
both
guides
threads
(15)
the
i
I
.
•.*
i*•
needle
twin
pins.
spool
the
of
each
on
thread
right
the
one
and
of
page
and
of
through
14).
the
thread
the
threads
the
of
(cf.
behind
(16)
and
each
into
28
Page 33
Utility
stifehet
and
practical
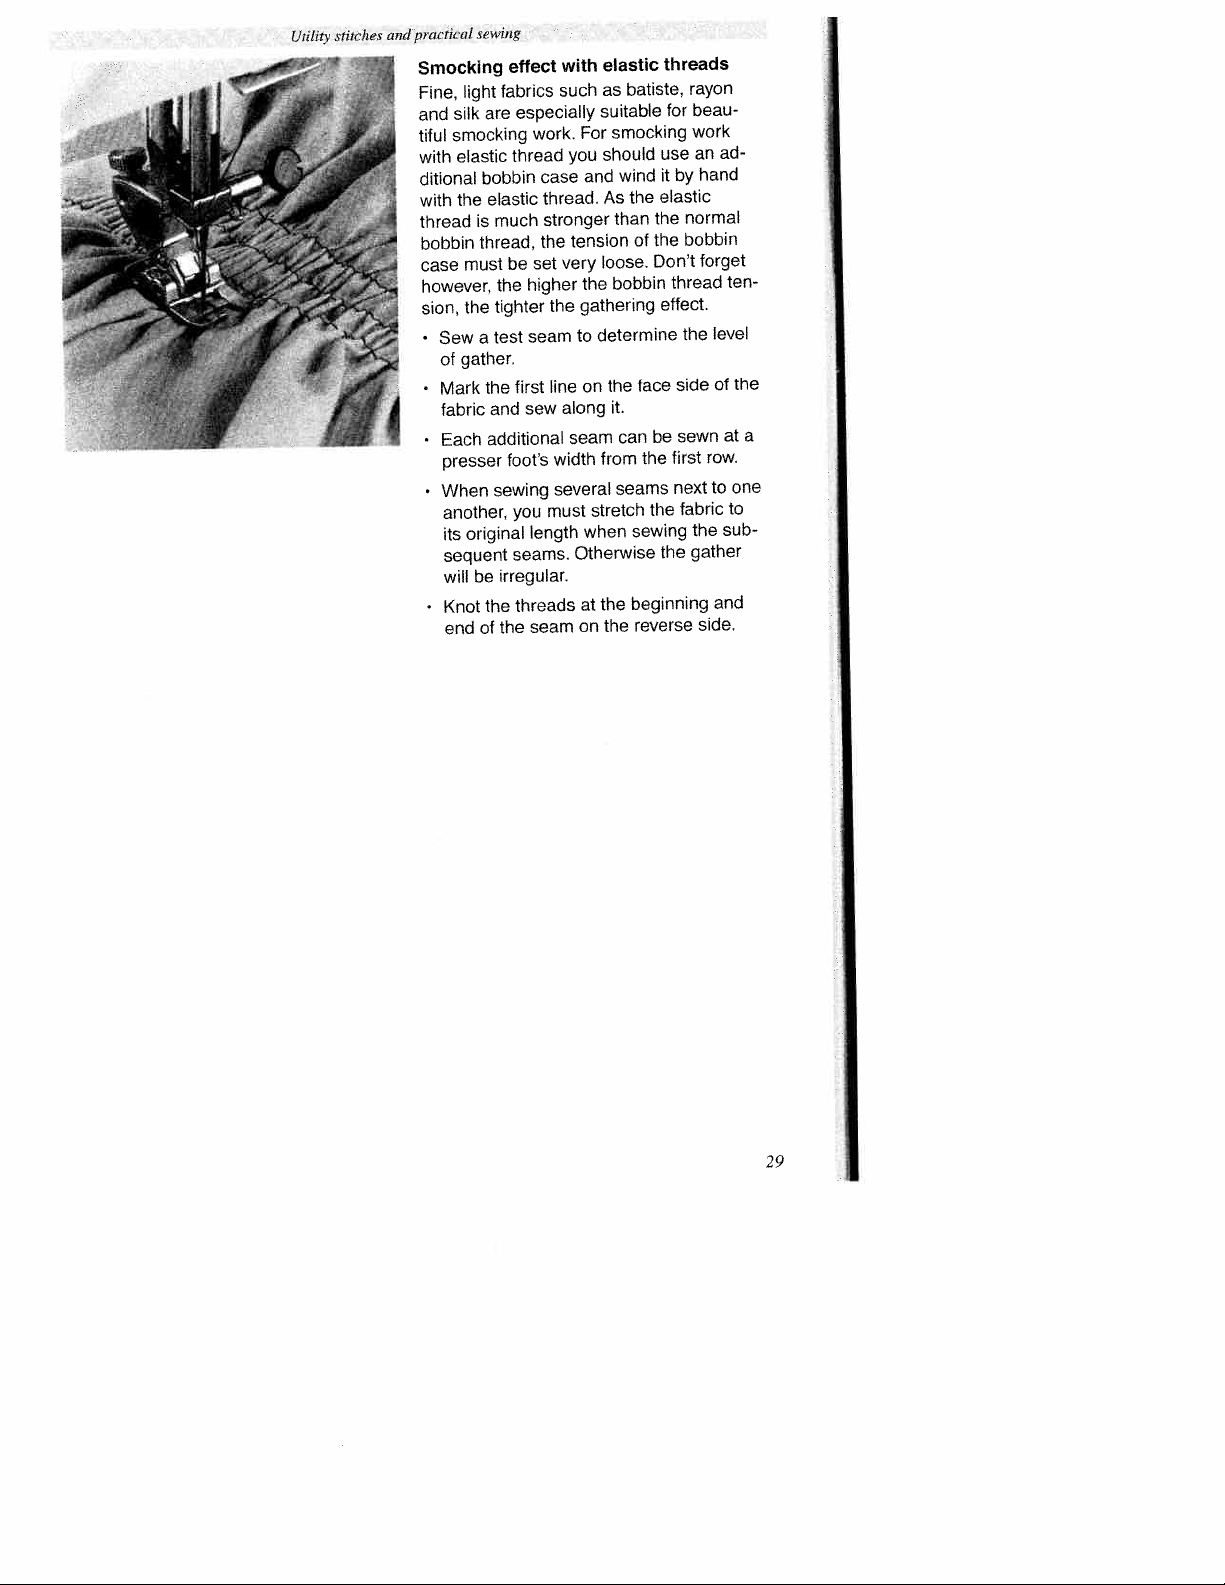
Smocking
light
Fine,
silk
and
smocking
tiful
elastic
with
ditional
the
with
thread
bobbin
must
case
however,
the
sion,
Sew
•
gather.
of
Mark
fabric
Each
•
presser
When
•
another,
its
sequent
will
Knot
end
sewing
fabrics
are
bobbin
elastic
much
is
thread,
the
tighter
test
a
the
and
additional
sewing
original
irregular.
be
the
the
of
effect
especially
work.
thread
case
thread.
stronger
the
set
be
higher
the
seam
line
first
sew
width
foot’s
several
must
you
length
seams.
threads
seam
elastic
with
as
such
suitable
For
should
you
and
As
tension
loose.
very
the
gathering
determine
to
on
along
seam
from
stretch
when
Otherwise
the
at
the
on
batiste,
smocking
wind
the
the
than
the
of
Dont
bobbin
face
the
it.
be
can
the
seams
the
sewing
beginning
reverse
threads
rayon
for
use
by
it
elastic
normal
bobbin
thread
effect.
the
side
sewn
first
next
fabric
gather
the
beau
work
an
hand
forget
level
row.
to
the
side.
ad
of
at
sub
and
ten
the
a
one
to
29
Page 34

Utilily
stirche.s
atid
practical
Gathering
program
With
and
skirts
4
mm.
effect
gathers.
of
Mark
•
the
threads
yond
Each
•
one
Gather
the
amount
the
Secure
thread
sewing
with
valances
ensure
To
should
you
first
the
and
fabric
to
ends
the
subsequent
presser
the
bobbin
of
thread.
the
ends.
the
you
B
3
line
sew
extend
foot
piece
thread.
gather
gathers
straight
can
withastitch
consistent
a
two
sew
the
on
along
approx.
the
fabric.
of
seam
width
fabric
of
You
how
by
by
stitch
gather
gathering
three
or
side
face
Allow
it.
10-20
be
can
the
from
pulling
by
determine
much
knotting
sleeves,
length
rows
of
the
cm
sewn
last.
the
you
the
of
be
pull
30
Page 35

Utility
titches
and
practical
Darning
Darning
suitable
Sew
•
til
that
it
sewing
with
for
over
well
is
the
with
repairing
the
rows
elastic
the
elastic
the
damaged
covered.
overlap.
stitch
stitch
damaged
area
Take
is
care
D
especially
areas.
rows
in
ensure
to
un
WW*
Repairing
tears,
On
useful
is
reverse
the
fabric
laid
ensures
a
Lay
•
material.
than
Sew
•
ance
Trim
•
the
to
Sewing
cover
To
sew
to
area.
aged
Baste
•
damaged
fabric.
Sew
•
stitch.
tic
Trim
-
seam
To
Tip:
patch,
the
in
is
the
pivot
tears
frayed
to
lay
reinforces
you
piece
damaged
the
over
with
underlaid
the
seam.
on
larger
new
a
the
over
the
from
simplify
turn
fabric.
fabric.
edges
piece
a
of
side
perfect
a
fabric
of
must
It
damaged
the
size
the
patches
holes
piece
new
area
fabric
the
damaged
the
turning
handwheel
the
Raise
the
the
always
area.
of
piece
well,
of
piece
the
of
area
reverse
small
or
fabric
of
The
fabric.
workpiece
repair.
underneath
a
be
area
tear.
the
fabric
of
is
it
onto
fabric
fabric
of
side
face
with
edges
back
side
corners
the
until
presser
the
holes
under
under
and
the
larger
little
accord
in
back
necessary
the
the
onto
the
of
the
the
to
fabric.
the
of
of
needle
the
foot
it
dam
elas
the
and
3’
Page 36

Sewing
are
There
skirts
For
zipper.
tered
(trousers),
types
ferent
stores:
retail
outerwear
and
ommend.
as
such
plastic
finish
softer
in
different
we
a
metal
jeans.
zipper
zippers
recommend
men’s
For
lapped
zippers
of
invisible,
to
zippers
For
will
your
to
ways
zipper
are
metal,
name
other
all
work
completed
A
to
inserting
or
ladies’
a
few.
for
well
Utility
in
sew
works
available
plastic,
We
heavier
materials
create
and
garment.
p
titche
zippers.
cen
a
pants
best.
in
jeans
rec
fabrics
all
For
it
pers
to
sew
teeth
the
The
per.
(optional
ry)
can
foot
the
in
left
the
pending
sewing
types
important
is
close
of
zipper
accesso
engaged
be
holder
right,
or
on
of
the
the
zip
to
foot
zip
to
de
method
insertion.
of
practical
and
Dif
a
a
Inserting
(concealed
•
Attach
sory)
Baste
•
position
that
presser
Sew
•
needle
foot
er
You
•
to
the
cross-wise
32
to
or
the
in
can
end
centered
on
zipper
the
the
pin
under
it
teeth
foot.
of
half
in
the
close
and
now
of
seam.
both
right
the
run
the
material.
sew
the
zippers
sides)
foot
side.
zipper
the
along
zipper,
the
the
zipper
(optional
place
in
presser
the
leaving
Raise
zipper.
rest
and
of
foot
side
the
the
stitch
acces
and
so
of
the
press
seam
the
the
•
•
Sew
the
lel,
seam
Stop
and
Raise
zipper.
You
seam.
the
same
as
shortly
leave
the
will
second
the
the
presser
now
half
distance
half.
first
before
needle
able
be
the
foot
the
of
from
end
the
in
and
complete
to
zipper
center
the
of
the
material.
open
paral
seam
the
the
Page 37

Trouser
Press
•
1I8
seam
Baste
•
edge
Engage
•
set
Stitch
•
teeth.
zippers
the
mm)
(4
allowance.
the
that
so
the
needle
the
close
front
left
narrower
zipper
the
zipper
to
to
the
1?
seam
under
teeth
foot
the
edge
Utility
-.
allowance
the
than
the
still
are
the
on
required
the
of
stitches
over
actual
overlapping
visible.
right
and
position.
zipper
and
practical
sewing
Shortly
the
open
seam.
the
Close
•
evenly
along
Stitch
•
To
Tip:
achieve
ommend
accessories).
before
zipper
zipper
onto
using
the
the
the
accurate
the
end
and
and
other
basted
edge
of
finish
baste
zipper
seam.
seams
guide
the
sewing
the
seam,
overlap
half.
we
(special
the
rec
33
Page 38

Utility
stitches
and
practical
hemming
Roll
the
With
you
ries)
scarves,
the
edges
edges
the
neat
Double-fold
•
(about
Place
•
hemmer
B,
Leave
•
presser
the
Lower
•
ing,
the
run
presser
sewing
roll
can
or
ruffles
beforehand.
from
durable
and
11872
the
and
to
secure.
the
foot
hemmer
the
guide
hemmer.
underneath
foot.
hemmer
finish
fraying
the
mm
folded
sew
needle
and
foot
presser
fabric
the
Ensure
(special
the
without
edge
fabric
per
fabric
a
in
insert
scroll.
foot
the
edge
having
Hemming
produces
and
finish.
edge
fold).
edge
straight
few
fabric,
the
the
and
evenly
edge
fabric
the
side
right
accesso
of
blouses,
under
fabric
while
of
iron
to
prevents
a
the
stitches
the
raise
into
sew
into
does
the
not
34
Tip:
the
zigzag
On
roll
silk,
hem
stitch.
viscose
particularly
is
and
chiffon
attractive
fabrics,
with
a
Page 39

Utility
stitches
practical
and
Lace-work
A
Lace
beautiful
achieved
clothes
serts.
Baste
•
fabric.
Stitch
lace
Carefully
•
at
wards
Overstitch
•
small
Cut
•
of
Lace
Tablecloths,
be
mings.
•
•
•
sewing
inserts
heirloom
christening
on
other
and
to
lace
the
close
very
straight
using
the
slit
Press
center.
the
garment.
the
both
stitch.
zigzag
excess
the
away
project.
your
with
edges
napkins
beautifully
enhanced
Serge/clean-finish
lace
the
Stitch
the
till
up
fabric
corners
the
over
Fold
diagonally.
Continue
until
effect
garments
face
the
both
to
stitch.
fabric
these
edges
fabric
corners
and
the
the
onto
corner.
first
edges
all
can
wear,
edges
behind
the
of
clothing
with
fabric
face
and
are
be
children’s
lace
with
side
the
edges
lace
on
lace
edges.
side
stitch
stitched.
of
the
of
can
trim
in
the
the
lace
to
with
back
of
them
a
all
the
35
Page 40

edging
Shell
shell
The
fabrics
soft
frequently
It
is
undergarments.
on
tension
thread
will
edge
Serge
allowance.
seam
sure
Make
•
presser
provides
This
edging
edge
such
pull
the
foot
effect.
is
used
is
in.
fabric
that
at
very
as
set,
half
a
silk
The
edge
the
more
effective
and
an
as
tighter
the
fabric
of
Utility
for
rayon
edge
the
farther
iron
and
runs
foot
the
prominent
stitches
thin,
fabric.
finish
bobbin
the
over
under
width.
shell
shell
the
the
and
practical
Tip:
thread
the
trast
cotton
ent
sewing
If
you
at
shell
the
at
thread
colored
add
the
edging
same
light
a
edge
you
colored
you
and
time.
can
fabric
pearl
strengthen
can
obtain
Instead
place
also
underneath.
a
cotton
pretty
of
pearl
differ
a
con
36
Page 41

Traditional
techniques
Patchwork
Richelieu
quilt
embroidery
39
40
38
37
Page 42

T,,dirionc,1
T
j
e1nb,y)derv
I
Iechniquev
Richelieu
very
This
embroidery
Transfer
the
of
Place
lizer
and
lizer.
Attach
•
make
To
•
sew
straight
mm).
Carefully
•
areas
mately
not
maintain
the
sewing.
Embroider
•
stitch
When
•
tear
stabilizer
areas
machine.
under
tightly
all
cut
areas
away
sewing
•
•
artistic
is
your
fabric
layers
two
foot
the
the
of
stitch
cut
that
1/8”
away
the
zigzag.
satin
all
and
water.
in
form
easy
pattern
using
area
the
hoop
number
embroidery
contours
(stitch
away
form
will
mm)
(2
the
shape
while
contours
the
stitching
large
dissolve
bar
of
create
to
onto
fabric
a
water-soluble
of
be
to
fabric
the
your
to
0
twice
length
fabric
the
cutouts
the
from
stabilizer
and
is
of
areas
remaining
eyelet
and
your
with
right
the
marker.
stabi
embroidered
stabi
and
machine,
stable,
more
using
approx.
the
from
approxi
stitching.
helps
it
—
stability
with
of
satin
a
completed,
water-soluble
small
side
the
1
Do
38
Page 43

rraditional
ernbividery
Patchwork
Quilting
nique.
ican
material
popular
thusiasts.
Patchwork
sively
have
ideas
A
of
pieces
continually
top
the
ting
the
uniform
techniques
The
settlers
by
the
a
always
quilt
material,
of
layer
middle
and
quilt.
quilt
traditional
is
a
method
developed
remnants
artistic
quilts
hand.
possibility
reality
Lots
material
changing
the
of
layer
connected
quilt
The
piece
that
has
hobby
used
Nowadays,
to
much
in
a
consists
geometrically
of
are
patterns
This
quilt.
polyester
of
to
backing
fabric.
of
hand
the
to
become
many
for
be
to
make
shorter
three
of
joined
is
the
sewing
wives
make
sewing
sewn
however,
your
together
to
tacked
or
back
usually
is
of
use
very
a
exclu
creative
time.
layers
shaped
form
onto
cotton
layer
tech
Amer
of
en
you
in
the
bat
of
one
3v
Page 44

Traditional
embroidery
And
When
simply
cushions,
projects.
iechniques
this
out
Cut
ing
templates
yourself.
mm)
should
templates.
Spread
in
accordance
small
squares
together.
together
sewn
quilt.
of
the
The
seam
not
ally
towards
the
Baste
batting
three
these
then
sewn
stitches.
small
more
and
machine,
Quilting
away
3
mm
number
foot
(see
the
bind
is
what
piecesofyour
the
you
A
seam
already
these
pieces
with
which
These
and
allowances
serged
darker
the
completed
backing.
and
layers
together
However,
practical
with
i.e.
usually
is
from
or
the
0
page
quilting
the
edges
wearable
do
you
have
allowance
be
the
squares
will
are
and
fabric
of
by
with
the
stitched
the
quilt
46).
finished
is
or
art
quilt
bought
included
in
out
pattern
can
you
will
form
of
quilts
always
side.
top
quilt
traditional
In
material
hand
it
the
straight
seam.
patchwork
and
make
other
or
us
top
or
made
1/4
of
(6.3
in
the
frontofyou
form
and
put
then
be
then
top
the
are
usu
pressed
the
to
quilts
are
with
is
quicker
sewing
stitch.
about
foot
Use
can
you
into
it
smaller
ply
4()
Page 45

Accessories
binder
Bias
Cording
Felling
Knit-edge
Needle
Quilting
Ruffler
Sewing
Optional
foot
foot
foot
chart
and
feet
accessories
and
patchwork
needles
foot
chart
44
45
45
46
47-48
46
44
42
43
-II
Page 46

needles
AccessorIe3
-
-
--
----.
)
--—
and
Sewing
O
3
4
feet
Standard
no:
Part
Blind-stitch
no
Part
Zipper
no
Part
presser
98-694
98
foot
98
847-00
foot
845
694
(optional)
843
694
(included)
foot
(optional)
00
00
(included)
98-694
no:
oil
system
H
foot
882-00
Part
Part
Part
Part
Part
no:
no:
no:
no:
no:
93-040
93-040
93-035
99-053
48-020
971-41
970-45
910-91
016-91
804-32
Buttonhole
5
Part
Screwdriver
Bobbins
Machine
Knife
Needle
1301705
42
Page 47

Sewing
The
dealer.
feet
optional
(optional
accessories
accessories)
for
are
Accessories
special
and
sewing
needles
work.
They
are
available
from
your
Designation
foot
Pintuck
foot,
PIntuck
needle
(twin
foot,
Pntuck
needle
(twin
stitch
Straight
guard
Finger
guide
Edge
foot
Felling
foot
Felling
stitch
Fancy
Ruff
Icr
(remove
foot
Cording
foot
Quilt
hemmer
Roll
foot
Roll
Hemmer
Hemmer
binder
Bias
Knit-edge
Non-stick
with
5
with
7
with
4,5
6.5
foot
presser
mm
4
toot
foot
guide
grooves
needle
grooves
needle
with
foot
mm
mm
foot
mm
2
spacing
spacing
round
holder)
hole
1.6-20)
1.6-2.0)
Order
93-036
93-042
93-042
(needle
98-694
93-036
98-802
93-042
93-042
98-694
98-999
93-036
93-036
98-694
91-046
98-694
98-694
98-053
93-042
93-036
no.
942-91
950-9
953-9
size
821
-00
910-91
422-00
946-91
948-9
864-0
650-00
915-91
925-91
873-00
703-03/001
823-00
818-00
484-91
957-91
7-91
91
1
1
80)
embroidering
For
between
pintucks
For
pintuck
pintuck
For
Attention!
straight
position
all
For
topstitching
For
flat
For
For
flat
Multiple
for
e.g.
sewing
For
broad
or
valances
cording
For
sewing
For
patchwork
quilting
and
hemming
For
materials
For
which
leather)
(e.g.
hemming
For
hemming
For
binding
For
bias
with
sewing
For
knitwear
sewing
For
work
work
work
Only
in
stitch
middle
sewing
seams
felled
seams
felled
uses
buttonholes
dense
pleats
etc.
parts
difficult
are
edges
tape
together
leather
use
needle
work
on
edges
edges
edges
feed
to
Sewing
areas
1
1
The
following
pages
contain
application
examples
optional
some
of
accessory
feet.
43
Page 48

Accessories
and
needles
tape
Bias
Binding
method
neat
and
unfolded
Remove
•
tach
Cut
•
diagonal.
Feed
•
and
er
Adjust
•
sition
fabric
from
Stitch
•
tape.
Insert
•
between
slot
enclose
ing
Tip:
rative
stitch.
binder
bias
with
giving
of
appearance.
tape
bias
the
bias
the
beginning
the
tape
the
pull
out
binder
the
that
so
approximately
folded
the
about
the
edge
the
binder.
the
of
the
sewing.
obtain
can
You
by
effect
tape
fabric
about
presser
binder.
into
to
the
edge
1,’
(2.5
of
bias
raw
edge
using
is
edges
For
toot
the
of
the
the
and/or
needle
1/16”
cm)
the
tape
The
an
a
back.
of
additional
zigzag
easy
very
a
smooth
a
need
you
this
mm)
1’
(24
holder.
and
tape
bias
of
needle
the
pierces
the
the
scroll
(1-1.5
tape.
bias
the
the
along
to
tape
be
into
will
fabric
edges
bias
automatically
deco
fancy
or
wide.
at
bind
po
mm)
bias
bound
the
dur
At
a
Ruffler
With
widely
sewing.
home
ruttIer
The
ways:
Folding
1.
Folding
2.
second
a
Folding
3.
and
operation.
When
dealer,
cluded.
ruttIer
the
spaced
This
textiles,
securing
you
full
you
pleats
very
is
etc.
can
be
securing
and
pleats
fabric
pleats
the
buy
operating
used
in
in
in
to
can
useful
fabric
one
fabric,
another
ruttIer
closely
make
automatically
ruffles,
for
three
in
in
pleats
securing
and
operation.
attaching
fabric
from
your
instructions
or
while
frills,
different
fabric.
lace
one
in
PFAFF
in
are
to
44
Page 49
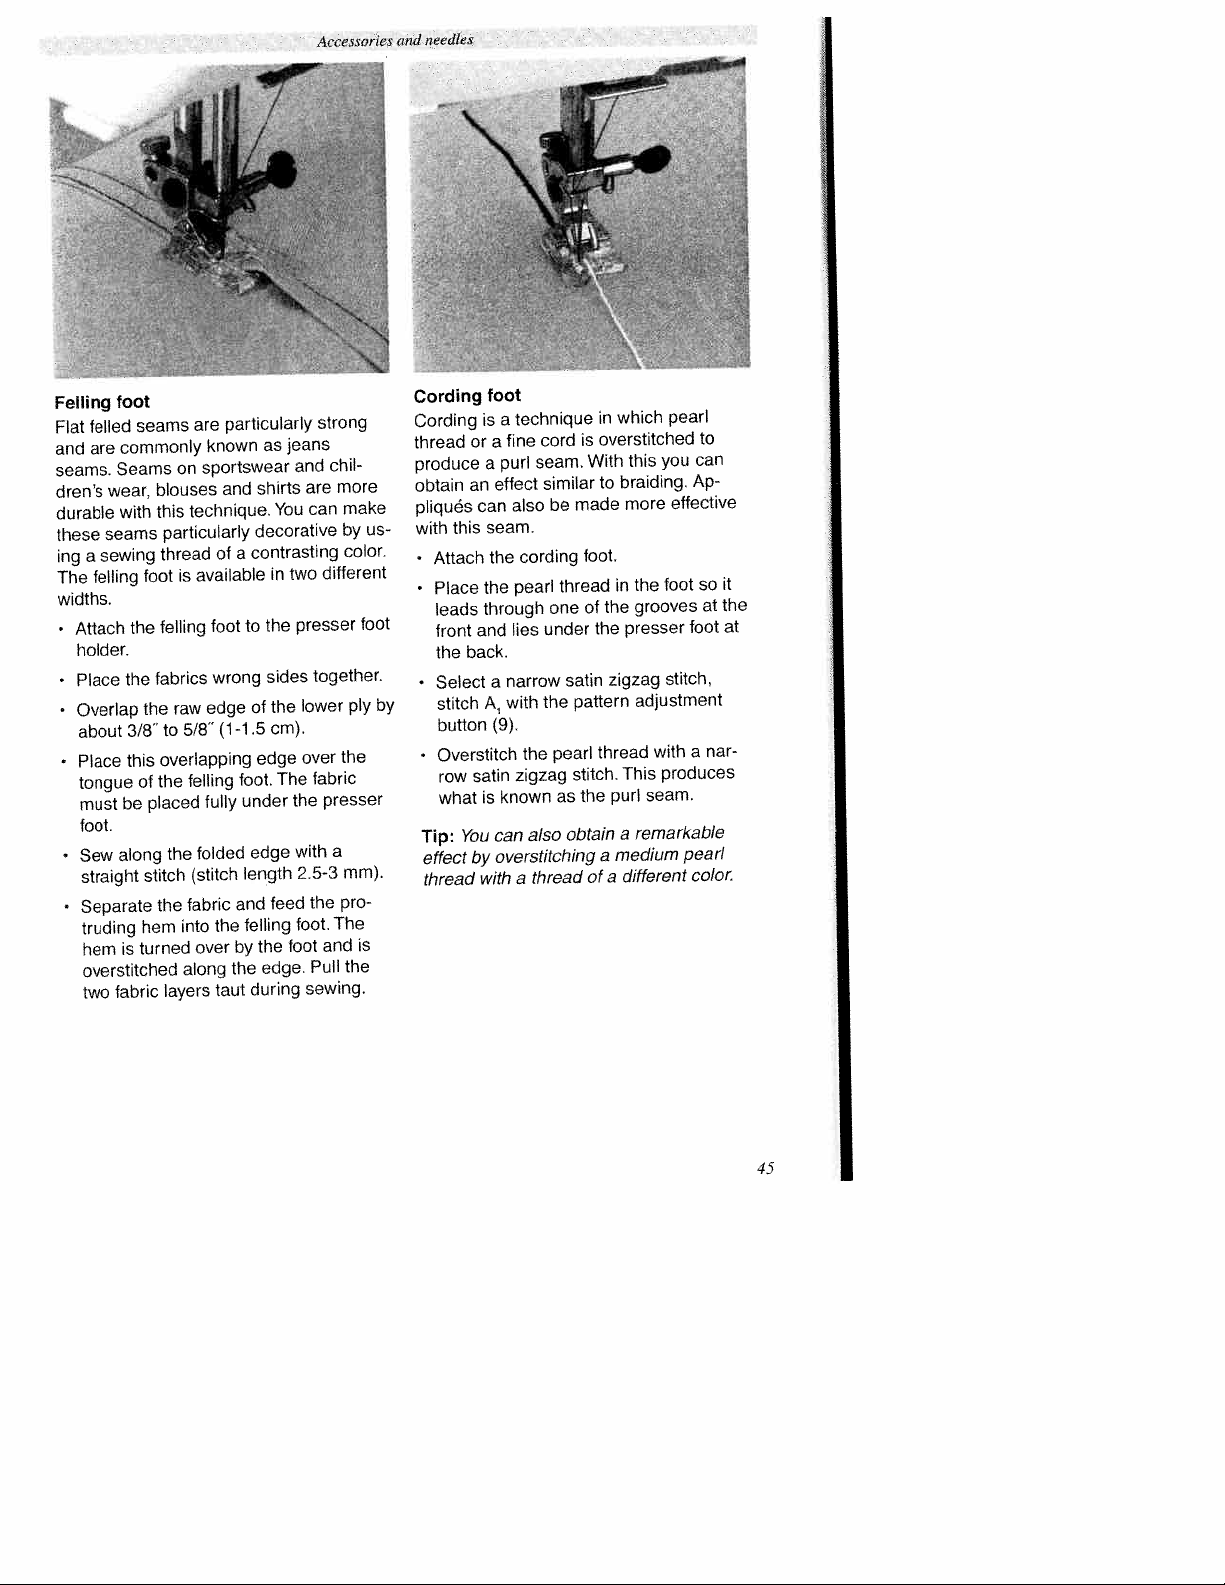
I
.
Felling
Flat
and
seams.
dren’s
durable
these
ing
The
widths.
foot
seams
felled
commonly
Attach
•
are
wear,
seams
sewing
a
felling
Seams
with
foot
the
on
blouses
technique.
this
particularly
thread
is
felling
holder.
fabrics
the
Place
•
raw
Overlap
•
the
about3f8to5/8(1-1.5cm).
Place
tongue
must
be
of
placed
the
felling
overlapping
this
foot.
the
along
Sew
hem
turned
is
fabric
stitch
the
layers
fabric
into
along
straight
Separate
•
truding
hem
overstitched
two
particularly
are
known
sportswear
and
of
a
available
foot
wrong
edge
foot.
fully
folded
(stitch
and
the
by
over
the
taut
jeans
as
and
shirts
You
decorative
contrasting
two
in
presser
the
to
sides
lower
the
of
over
edge
The
the
under
with
edge
2.5-3
length
feed
foot.
felling
foot
the
edge.
during
Accessories
strong
chil
more
are
make
can
by
color.
different
together.
ply
the
fabric
presser
a
mm).
the
pro
The
and
the
Pull
sewing.
us
foot
is
by
needles
and
Cording
Cording
thread
produce
obtain
pliqués
with
•
•
•
Tip:
effect
thread
foot
is
or
a
an
can
seam.
this
the
Attach
the
Place
through
leads
and
front
back.
the
a
Select
A
1
stitch
button
Overstitch
row
satin
is
what
You
by
with
technique
a
fine
cord
a
seam.
purl
similar
effect
be
also
cording
thread
pearl
one
under
lies
satin
narrow
the
with
(9).
pearl
the
zigzag
as
known
also
can
overstitching
thread
a
in
overstitched
is
With
to
made
foot.
the
of
the
pattern
thread
stitch.
the
obtain
a
a
of
,$
which
this
braiding.
more
in
the
grooves
presser
zigzag
adjustment
This
seam.
purl
remarkable
a
medium
different
2
-
pearl
can
you
Ap
effective
foot
foot
stitch,
a
with
produces
pear!
color.
to
so
at
it
the
at
nar
45
Page 50

,4ceesso,’ic,
and
need1e.
‘5.5
Knit-edge
As
the
of
sole
can
be
zigzag
the
perfect
oversewing
mend
slightly
seam
the
stretching
from
foot
knit-edge
varying
with
sewn
stitch.
on
seam
into
taut,
additional
foot
height,
ease.
In
knit
a
the
out
of
has
thick
To
order
fabrics,
wool
seam.
strength
shape.
presser
a
knitted
do
obtain
to
we
thread,
This
and
so
foot
fabrics
select
a
recom
pulled
will
keep
give
1/4
is
edge
or
needle
1/4”
1/8’
foot
1/8”
(0.63
foot
to
(0.31
allows
seams.
the
cm)
cm).
outer
and
you
The
right
to
Quilt
quilt
The
to
sew
distance
edge
inner
the
patchwork
and
and patchwork
accurate
from
the
foot
of
the
right
Patching
of
seam
along
a
fabric
foot.
fabric
allowance
the
seam
along
with
outer
allow
the
and
it
Attach
Sew
straight
the
1/4”.
of
right
ance
inner
together
guide
edge
1/8”.
of
right
stitch.
of
edge
quilt
the
your
your
the
guide
patchwork
pieces
For
fabric
foot.
your
of
the
a
For
foot.
Quilting
layer
fleece
of
stitch)
line.
the
top
layer,
quilt)
of
the
approx.
quilt
3
(e.g.
mm
(Sewing
bottom
and
Sew
•
with
from
through
the
the
the
layer
three
straight
seam
the
layers
46
Page 51

,4ccecsoriiy
and
needles
Need’e
Selection
Needle
System
130/705
Needle
130/705
Needle
130/705
Needle
130/705
Needle
130/705
Needle
130/705
Needle
chart
of
Fabric
Needle
60
points
No.
&
H
size
H-SUK
size
H-PS
size
H-SK1
size
HJ
size
H-LR
size
the
weight
light
70
70/80
70/110
75+90
70/110
90-110
70-120
right
75
needle
Profile
____—
__—
guarantees
Point
Light
ball
Medium
ball
Medium
ball
Large
ball
Sharp
round
Narrow
point
better
Fabric
medium
Needle
80
and
point
point
point
point
(right)
point
twist
sewing
weight
90
eye
the
of
Suitable
Universal
batiste,
fancy
Coarse
knit,
Stretch-fabric
suitable
Wide-meshed
arid
Twill,
blue
Leather,
for
organdy,
seams
knitted
jersey
for
Lastox.
workwear,
jeans,
suede,
chosen
needle
and
fabrics,
stretch
light
Fabric
100
for
woolens.
embroidery.
fabrics.
Quiana
needle
and
corsetry,
heavy
canvas
calf
material
weight
heavy
Needle
110
chiffon,
linen,
velvet.
Lastex.
and
particularly
knitted
Lycra,
linen-fabrics,
and
skin.
goat
120
double-
Simplex.
fabrics.
Simplex
sailcloth.
130/705
Needle
H-N
130
Needle
1301705
Needle
130/705
Needle
1301705
Needle
130/705
Needle
H-PCL
80-1
size
70-110
size
H-WING
size
H-E
75/90
size
H-O
size
H-M
size
100
75
60-80
plastics,
For
leather,
oilcloth.
and
threads
hemstitching
and
working
with
glass
embroidery.
for
seams
microtex
on
buttonhole
30/3.
no.
on
cambric.
quilting.
for
batiste,
fiber.
silk
or
47
wedge
Narrow
(left))
10
_.....
—wEFE
EEEE
point
ball
Light
with
point
long
eye
Hemstitching
point
Medium
point
bail
Small
point
ball
—
Sharp
z
round
point
Imitation
foils
Topatitching
synthetic
Effective
organdy
Especially
Top-stitched
Page 52

Accessories
and
needles
Needle
q
Fancy
Before
freely,
possible.
p
JJ
chart
Classification
130/705
80
Size:
130/705
Size:
80
90
Size:
100
Size:
patterns
sewing
turning
by
Ornamental
Classification
Size:
80
80
Size:
80
Size:
H-ZWI
H-ZW1
with
the
the
twin
desired
handwheel.
stitch
Stitch
2.5mm
mm
2,5
mm
2.5
mm
2.5
mm
3,0
needles
embroidery
In
patterns
Stitch
0.5-1.5
0.5-1.5
0.5-1.5
length
this
zigzag
I
length
mm
mm
mm
stitches,
way,
patterns
Stitch
needle
Stitch
wide
narrow
narrow
width
check
whether
breakage
width
Needle
spacing
1.6mm
mm
2.0
mm
2.5
mm
3.0
mm
4.0
needles
avoided
is
Needle
spacing
mm
1.6
mm
2.0
mm
2.5
Suitable
normal
normal
pintucks
wide
wide
extra
pintucks
penetrate
can
much
as
Suitable
embroidery
embroidery
embroidery
for
pintucks
pintucks
as
for
special
twin
Stitch
2.3-3.0
2.0-3.0
length
mm
mm
Stitch
verry
verry
width
narrow
narrow
Needle
spacing
—
—
Suitable
Decorative
hem
Well-finished
woven
and
batiste
particularly
suitable
for
stitch
fabric
tine
are
effect.
I
stitch
Hem
Classification
130/705
H-ZWI-HO
Size:
80
100
Size:
48
needle
Page 53

Maintenance
troubleshooting
sewing
Changing
Cleaning
Removing
Troubleshooting
the
and
the
oiling
needle
and
lamp
plate
51
50
51
52
49
Page 54

A4azntenancc
troubleshooting
wzd
Removing
Switch
off
unlock
To
the
bar
of
case.
Turn
Note:
needle
You
can
is
the
the
hook
at
now
the
the
its
remove
master
hook,
highest
hook
switch
fold
Take
race.
handwheel
position.
the
open
out
hook.
(7)
(12).
the
the
until
black
bobbin
the
Pull
the
Cleaning
•
Clean
•
Place
(every
The
machine
must
not
hook
and
the
hook
drop
one
15-20
oiledatany
be
ring
cover
out
oiling
with
race
of
oil
into
operation).
of
hours
maintenance-free
is
other
towards
brush.
the
hook
the
points.
you.
race
and
50
Page 55

Wainienance
troubleshooting
and
Removing
Raise
remove
be at
•
Remove
(13).
screwdriver
Clean
•
the
the
its
highest
Loosen
the
the
presser
presser
the
and
feed
needle
foot
foot.
position.
detachable
two
the
lift
the
(22)
dog
plate
holder
The
work
screws
needle
with
(26)
needle
support
with
plate
the
and
must
the
(14).
brush.
master
lamp
head
rotation
a
half
remove
reverse
maximum
is15watts.
lamp.
switch
work
(bulb)
of
the
the
order.
permissible
(12).
support
is
machine.
counter
bulb.
located
Insert
5’
off
the
of
the
the
the
detachable
sewing
needle
bulb
and
the
in
The
the
bulb
sewing
Changing
I
:
Switch
Remove
(13).
The
inside
the
Turn
clock-wise
bulb
the
Important!
wattage
Page 56
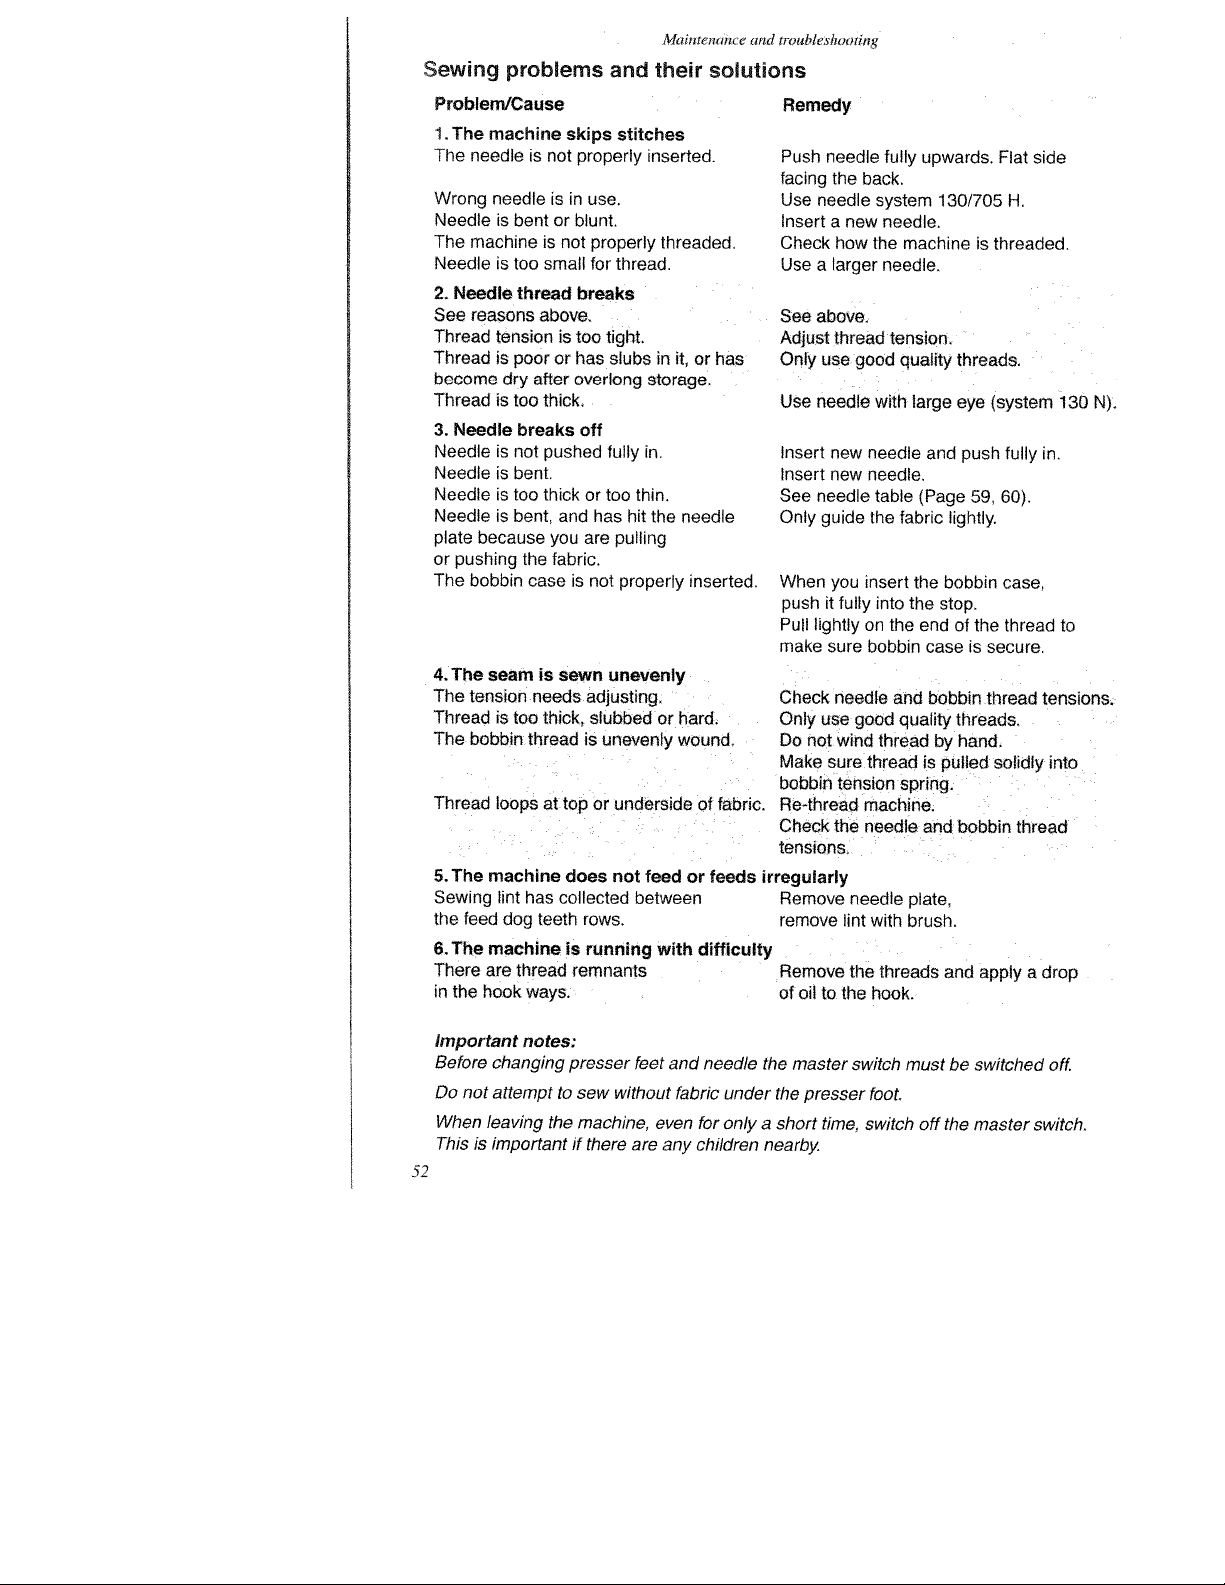
Sewing
problems
Problem/Cause
1.
The
machine
needle
The
Wrong
needle
Needle
The
Needle
2.
See
Thread
Thread
become
Thread
3.
Needle
Needle
Needle
Needle
plate
or
The
4.
machine
Needle
reasons
Needle
because
pushing
bobbin
The
seam
is
is
tension
is
dry
is
is
is
is
is
The tension
Thread
The
Thread
5.
Sewing
the
6.
There
in
The
feed
The
the
is
bobbin
loops
machine
lint
dog
machine
are
hook
skips
is
not
isinuse.
or
bent
not
is
too small
thread
above.
is
poor
or
after
too
thick.
breaks
pushed
not
bent.
too
thick
bent,
and
you
fabric.
the
is
case
is
sewn
needs
too
thick,
thread
at
toporunderside
does
has
collected
teeth
is
thread
remnants
ways.
and
stitches
properly
blunt.
properly
for
thread.
breaks
too
tight.
has
slubs
overlong
off
fully
or
too
has
pulling
are
not
properly
unevenly
adjusting,
slubbed
is
unevenly
not
rows,
running
Maintenance
their
inserted.
threaded.
in
storage.
in.
thin.
hit
the
or
feed
between
with
solutions
it,
or
needle
inserted,
hard.
wound.
of
feeds
or
difficulty
has
fabric.
and
troubleshooting
Remedy
Push
facing
Use
Insert
Check
Use
See
Adjust
Only
Use
Insert
Insert
See
Only
When
push
Pull
make
Check
Only
Do
Make
bobbin
Re4hread
Check
tensions.
irregularly
Remove
remove
Remove
oil
of
needle
the
needle
a
a
larger
above.
thread
use
needle
new
new
needle
guide
you
it
lightly
sure
use
not
sure
the
to
back.
new
how
good
needle
needle.
the
insert
fully
on
bobbin
needle
good
wind
thread
tension
machine.
needle
needle
lint
with
the
the
hook.
fully
system
needle.
the
machine
needle.
tension.
quality
with
table
fabric
into
the
and
quality
thread
spring.
threads
upwards.
130/705
large
and
(Page
lightly.
the
bobbin
the
stop.
endofthe
case
bobbin
by
pulled
is
and
plate,
brush.
and
threaded.
is
threads.
eye
(system
push
59,
is
secure.
thread
threads.
hand.
solidly
bobbin
apply
Flat
H.
fully
60).
case,
thread
thread
side
130
in.
to
tensions.
into
a
drop
N).
Important
Before
Do
When
This
52
not
leaving
is
notes:
changing
attempt
important
presser
to
the
without
sew
machine,
if
there
feet
are
and
even
any
needle
fabric
for
children
the
master
under
the
onlyashort
nearby
presser
time,
switch
foot.
switch
must
off
be
the
switched
master
off.
switch.
Page 57

TechncaI
Dimensions
Weight
Nominal
consumption
Power
Sewing
Sewing
Stitching
Stitching
Presser
Max.
Needle
lamp
speed
foot
presser
system
Data
(w
voltage
width
length
lift
foot
x h x
d)
height
149
392
x
kg
6,6
mm
11,5
130
W
900
mm
/
705
220.240
120V/
80
15W
max.
max.5mm
max.4mm
5
296
x
stitches
H
mm
V
/
mm.
Package
Sewing
Foot
Lead
Accessories
Instruction
machine
control
cord
contents
manual
Page 58

 Loading...