

User Manual and Installation Guide
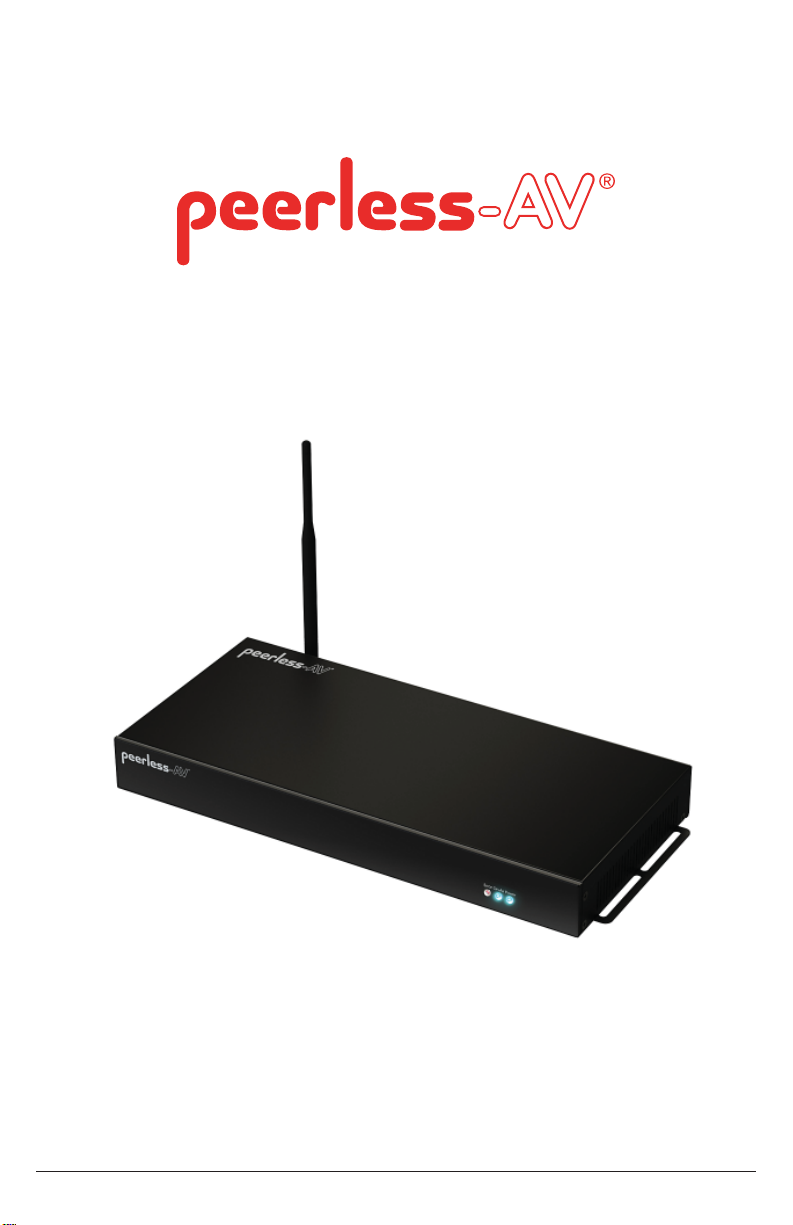
Pico Broadcaster
US Patent No.: 8,063,996. Other patents pending.
Models:
HDS-PB100AV
ISSUED: 11-07-13 SHEET #: 180-9049-1

2 of 20
ISSUED: 04-04-13 SHEET #: 180-9049-1

Contents
Important Safety Instructions ......................................................................................................... 4
Important Information ..................................................................................................................... 5
Unit Care Recommendations .........................................................................................................5
Introduction ...................................................................................................................................... 6
What are White Space Channels? ................................................................................................ 6
Broadcasting on White Space Channels ....................................................................................... 6
Items Needed for Installation ......................................................................................................... 6
Package Contents ......................................................................................................................... 6
Installation ........................................................................................................................................ 7
Product Overview .......................................................................................................................... 7
Setting up the HDS-PB100AV Pico Broadcaster ........................................................................... 9
Using the HDS-PB100AV with a Digital/Analog Video Source .................................................... 14
FAQs ...............................................................................................................................................15
Appendix ........................................................................................................................................ 17
Product Specifi cations ................................................................................................................. 17
Federal Communication Commission Interference Statement .................................................... 17
Limited Warranty ........................................................................................................................... 18
Contact Information ......................................................................................................................19
3 of 20
ISSUED: 04-04-13 SHEET #: 180-9049-1
Important Safety Instructions
Warnings/Safety
1. Read these instructions
2. Keep these instructions
3. Heed all warnings
4. Follow all instructions.
5. Do not use this apparatus near water.
6. Clean only with dry cloth.
7. Do not block any ventilation openings. Install in accordance with manufacturer’s instructions.
8. Do not install near any heat sources such as radiators, heat registers, stoves, or other apparatus
(including amplifi ers) that produce heat.
9. Do not defeat the safety purpose of the polarized or grounding-type plug. A polarized plug has two
blades with one wider than the other. A grounding type plug has two blades and a third grounding
prong. The wide blade or the third prong are provided for your safety. If the provided plug does not fi t
into your outlet, consult an electrician for replacement of the obsolete outlet.
10. Protect the power cord from being walked on or pinched particularly at plugs, convenience
receptacles, and the point where they exit from the apparatus.
11. Only use attachments/accessories specifi ed by the manufacturer.
12. Use only with the cart, stand, tripod, bracket, or table specifi ed by the manufacturer, or sold with
the apparatus. When a cart is used, use caution when moving the cart/apparatus combination to
avoid injury from tip-over.
13. Unplug this apparatus during lightning storms or when unused for long periods of time.
14. Refer all servicing to qualifi ed service personnel. Servicing is required when the apparatus has
been damaged in any way, such as power-supply cord or plug is damaged, liquid has been spilled or
objects have fallen into the apparatus, the apparatus has been exposed to rain or moisture, does not
operate normally, or has been dropped.
15. The product was submitted and evaluated for use at the maximum ambient (Tma)ἁ 40°C
16. WARNING: To reduce the risk of fi re or electrical shock do not place this apparatus in a position
where it is exposed to dripping or splashing liquid, rain, moisture, or exceedingly high humidity.
Objects containing liquid shall not be placed in proximity to the unit such that they present a risk of
spillage onto the apparatus.
CAUTION
RISK OF ELECTRIC SHOCK!
DO NOT OPEN!
ATTENTION ! RISQUE DE CHOC ! ÉLECTRIQUE PAS OUVRIR !
The lightning fl ash with arrowhead symbol, within an equilateral triangle, is intended to alert
the user to the presence of uninsulated dangerous voltage within the product's enclosure
that may be a suffi cient magnitude to constitute a risk of electric shock to persons.
The exclamation point within an equilateral triangle is intended to alert the user to the
presence of important operating and maintenance (servicing) instructions in the literature
accompanying the appliance.
Le symbole de l'éclair avec une fl èche à son extrémité, dans un triangle équilatéral, a pour
but de vous avertir de la présence d'une « tension électrique dangereuse » et non isolée à
l'intérieur de l'enceinte de l'appareil, qui peut être suffi samment puissante pour constituer
un risque d'élctrocution pour les personnes
Le point d'excalamation dans un triangle équilatéral vous avertit de l'existence d'instructions
importantes de fonctionnement et d'entretien (intervention) dans la documnetation
accompagnant l'appareil.
4 of 20
ISSUED: 04-04-13 SHEET #: 180-9049-1

Important Safety Instructions
17. To avoid electric shock, never stick anything in the slots on the case or remove the cover.
18. This product is intended for indoor use only.
Important Information
• Never use this product in an aircraft or a medical facility as it can cause interference or an
undesirable effect.
• The use of this product in the following locations may result in abnormal audio output (noise,
etc,).
º When the product is placed near a refrigerator or metal structure.
º A cluttered room where the wireless signals may be blocked.
• This product has been tested and manufactured to comply with each country’s safety rules.
However, there is no guarantee that interference will not occur in some installations. If
interference happens, decrease the distance between the product and receiving antenna.
• Optimal use of this product is for in-room/multi-room applications with a range of up to 350 ft.
(106m) away line of sight, up to 30ft (9m) through one structure.
• Any changes or modifi cations not expressly approved by the manufacturer of this device could
void the product warranty.
• This equipment must be installed and operated in accordance with the provided instructions.
The Transmitter must be installed to provide a separation distance of at least 8” (20cm) from all
persons and must not be operating near or in conjunction with any other Transmitter. End users
and installers must be provided with installation instructions and Transmitter operating conditions
for satisfying RF exposure compliance.
• This device should be used only as specifi ed within this manual to meet RF exposure
requirements. Use of this device in a manner inconsistent with this manual could lead to
excessive RF exposure conditions.
Unit Care Recommendations
To clean, use a soft, dry cloth only. Do not use water or other cleaning products as they may cause
electrical failure or damage the surface of the product.
5 of 20
ISSUED: 04-04-13 SHEET #: 180-9049-1
Introduction
The HDS-PB100AV is a personal broadcasting device that is capable of broadcasting HD quality
content from a computer or select media player(s) with IP transport output capabilities to any open
"white space channels" local to the area.
What are White Space Channels?
White space channels refer to the channels that were left over from the analog to digital conversion.
The FCC is the governing body over white space use in the US.
Broadcasting on White Space Channels
The HDS-PB100AV requires an internet signal in order for it to become enabled based upon its
registration with the FCC when installed. The FCC has delegated white space channels between
channels 21 to 51 for personal broadcast and requires a fee to use them. The annual fee is
approximately $55. Note: The fi rst years’ fee is included within the original purchase price of the unit.
Notifi cation is sent on an annual basis that further use will require payment of annual fee.
Items Needed for Installation
• Network connection that allows internet connectivity
• A source player that outputs video via HDMI and/or Component with Analog Audio
• Proper interconnects (HDMI, Component, and Audio)j
• Digital Television(s) that has/have ATSC tuner(s)
• Standard Over-The-Air Antenna(s) that are connected to the respective tuners
• Cat 5e/6 network cables for interconnections
• Mounting hardware (optional)
• Standard 120v AC outlet required for DC12v 3A power supply
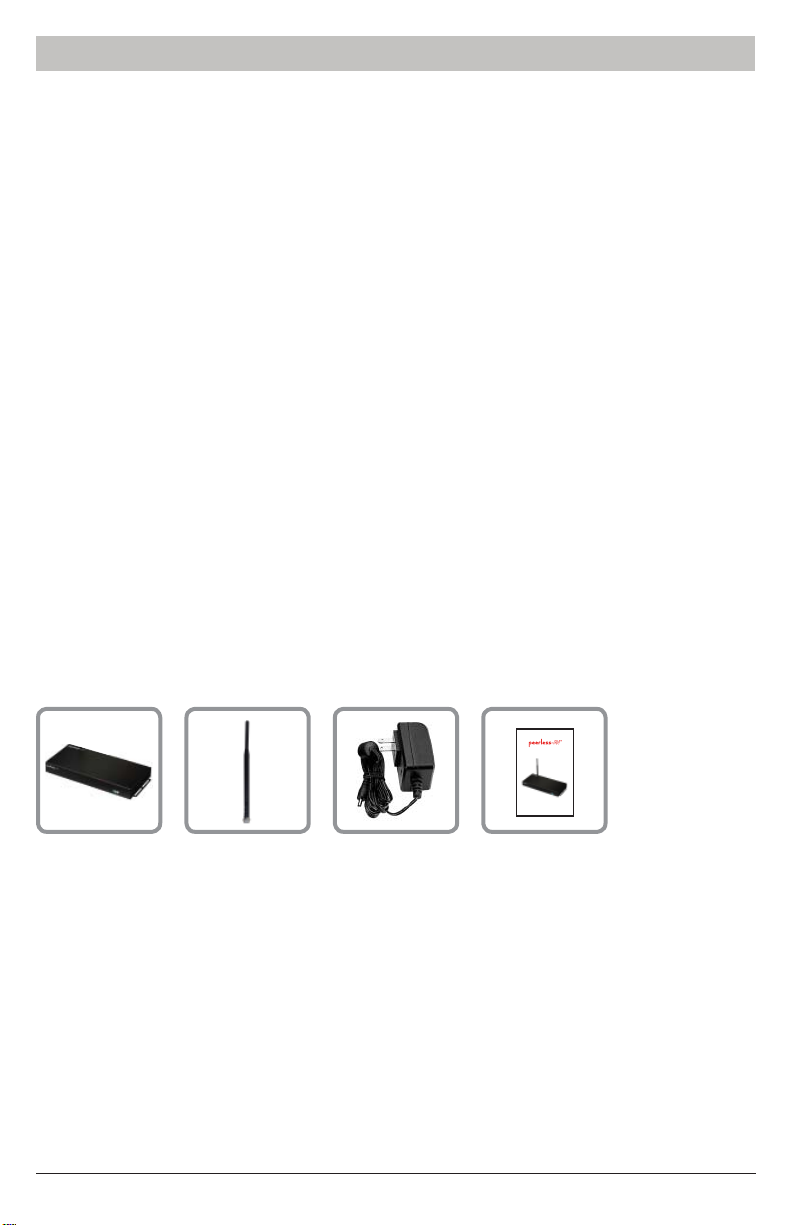
Package Contents
Ensure that the following items are present in the package. If any items are missing or damaged,
please call Peerless-AV Customer Care at 1-800-865-2112. (available 7:00am - 7:00pm (CST)
Monday - Friday).
Pico
Broadcaster
Antenna
Power
Adapter with
Inserts
6 of 20
User Manual and Installation Guide
Pico Broadcaster
US Patent No.: 8,063,996. Other patents pending.
Models:
HDS-PB100
Manual
ISSUED: 04-04-13 SHEET #: 180-9049-1

Installation
Product Overview
Front
1 234
1. SD Card
• SD card slot. (Factory use only)
2. Error
• The Error indicator light will be illuminated red if there is a problem with the Broadcaster.
3. On Air
• The On Air indicator light will be illuminated blue signaling that the Broadcaster is enabled.
4. Power
• The Power indicator light will be illuminated blue signaling that power is applied to the
Broadcaster.
7 of 20
ISSUED: 04-04-13 SHEET #: 180-9049-1

Back
1
2
1. DC 12V
• DC power input port.
2. HDMI Input
• HDMI input for connecting media source.
3. Component Input
• Component input for connecting media source.
4. USB
• USB port. (Factory use only)
5. RS232
• RS232 port. (Factory use only)
3
4 5 67
6. LAN
• Direct connection to LAN cable for product confi guration and data streaming.
7. RF/Ant
• RF antenna terminal.
8 of 20
ISSUED: 04-04-13 SHEET #: 180-9049-1

Step 1
Locate the Power Adapter and appropriate insert (US shown). Place insert into the Power Adapter as
shown and push to lock into place.
Step 2
Connect the Antenna to the RF/Ant terminal on the back of the Broadcaster.
9 of 20
ISSUED: 04-04-13 SHEET #: 180-9049-1

Step 3
The broadcaster needs to be as centrally located as possible to allow its’ omni-directional antenna
uniform coverage over the entire area that the DTV’s will be located within. Install the Broadcaster as
high in the air as possible to ensure that an unimpeded signal is transmitted down toward the DTV’s.
Proper positioning will allow the full radial distance potential of 350’ (106m).
The Broadcaster can be mounted to a vertical surface if required. The rubber pads on the bottom of
the Broadcaster may be removed prior to installation. Ideally, the Broadcaster should be installed in
one of the orientations pictured below (mounting hardware not included). Note: To ensure uniform
signal coverage, the antenna must point straight up.
Step 4
The Broadcaster will need to access the internet and receive its media content via a network
connection. Connect the broadcaster to the network before applying power to the device. Plug in
the power adapter into an available power outlet. Note: If the broadcaster becomes unplugged from
its power adapter, wait 30 seconds before applying power to allow it to reset.
The diagram below shows the typical Broadcaster installation.
Network Connection Diagram
Content Player HDS-PB100AV
Router
Internet
10 of 20
ISSUED: 04-04-13 SHEET #: 180-9049-1

Step 5
Allow the broadcaster to be connected to network for approx 30 seconds before accessing its IP
address. From a computer connected to the network, enter 192.168.1.194 in the address bar of the
web browser. This will bring you to the White Space Registration page.
Step 5a
Fill in all fi elds in the Who You Are section to register your unit with the White Space Database
(Contact Name, Owner Name, Phone Number, Email Address, Street Address, City, State, Zip
Code, Country). This contact information is what the FCC uses to send notifi cation regarding update
fees and information.
Step 5b
Fill in all fi elds in the Where You Are section (Latitude and Longitude). This information should
refl ect the physical location of the Broadcaster. You can fi nd this information by visiting websites such
as
http://www.getlatlon.com and http://www.fi ndlatitudeandlongitude.com or use the app “Show
My White Space” from Spectrum Bridge Inc. (available for Android and iOS). Data in the Device
Information section contains information specifi c to your Broadcaster.
Once all data fi elds are complete, click Save & Apply at the bottom right of the screen.
11 of 20
ISSUED: 04-04-13 SHEET #: 180-9049-1

Step 5c
Click on Status tab to open the Device Status page. This page contains information about Radio
Status and White Space Status.
Radio Status
• Operating Channel - The channel that the broadcaster has been set to.
• Transmitter status - Displays the status of the broadcaster.
White Space Status
• Registration Status - Displays the status of the Broadcasters registration. The status must
be displayed as Success in order for the broadcaster to become enabled.
• Last Registration Request - Displays the time and date that the broadcaster was registered.
• Channel Request Status - Displays whether the information regarding the location of the
user has been successfully applied to an open white space channel.
• Available Channels - Displays a list of channels that the database recommends based upon
the users latitude and longitude.
• Last Channel Request - Displays the time and date in which the broadcaster accessed the
database to search for available channels.
Step 5d
Click on the Advanced tab to display the Preferences, Networks and Upgrade sub tabs. The
Preferences sub tab contains information about RF Settings.
Power Level - Click on the pull down menu to set the required power level (1-11). Note: Keep power
level at 11 unless a shorter broadcast range is desired. For in-room and smaller spaces, it may be
necessary to change power level to 5 otherwise the broadcast power is too "hot" for DTV tuner.
Available Channels - Displays channels available for use.
Preferred Channels - Enter up to 3 comma separated channels between 21 and 51.
12 of 20
ISSUED: 04-04-13 SHEET #: 180-9049-1

Step 5e
Click on the Network sub tab to open the Network Confi guration page. This page contains
information about IP Settings and Streaming Settings. Fill in all fi elds in the IP Settings section to
match the existing network settings or create custom settings if needed.
Fill in the fi eld in the Streaming Settings section with the IP address set up for data streaming. If
multiple HDS-PB100AV devices are connected on the network, each device MUST have a unique
streaming IP address.
Once all data fi elds are complete, click on Save & Apply at the bottom right of the screen.
Note: If IP addresses are modifi ed, open a new web browser and enter the new IP address to confi rm
changes took place.
Step 5f
Click on the Tools sub tab to open the Software Tools page. This page contains information about
Software Upgrade and Factory Reset. If a software upgrade is needed, click on the browse button
in the Software Upgrade section and choose the upgrade fi le to install. Once the fi le is installed, click
on Save & Apply at the bottom right of the section. If a factory reset is needed, click on Reset at the
bottom right of the Factory Reset section. Once all settings have been saved and applied, content is
now ready to stream to the Broadcaster.
13 of 20
ISSUED: 04-04-13 SHEET #: 180-9049-1

Using the HDS-PB100AV with a Digital/Analog Video Source
1. If utilizing the HDMI* input to deliver content to the Pico Broadcaster:
• Plug the Video Source into the broadcaster with an HDMI cable
• Turn the Video Source ON
• Once you see the content appear on your display, navigate the source as you would to get the
content streaming
If the source incorporates Audio:
• Analog Audio cables will need to be connected
• Digital Audio is not supported on the HDS-PB100AV
• Pico Broadcaster will Mux together the Digital Video with the Analog Audio
*NOT HDCP Compliant
2. If utilizing the Component input to deliver content to the Pico Broadcaster:
• Plug the Video Source into the broadcaster with a Component Cable
• Turn the Video Source ON
• Once you see the content appear on your display, navigate the source as you would to get the
content streaming
If the source incorporates Audio:
• Analog Audio cables will need to be connected
• Digital Audio is not supported on the HDS-PB100AV
• Pico Broadcaster will Mux together the Digital Video with the Analog Audio
Note: The HDS-PB100AV Pico Broadcaster supports 480p, 720p, 1080i
14 of 20
ISSUED: 04-04-13 SHEET #: 180-9049-1

FAQs
Q. What type of media format does the HDS-PB100AV Pico Broadcaster accept?
A. The HDS-PB100AV needs the format of the media to be MPEG-2 TS. The Peerless-AV Streaming
Media software will determine if the given media fi le(s) need transcoding once the fi le is dropped into
the window.
Q. What type of input does the HDS-PB100AV Pico Broadcaster accept?
A. The HDS-PB100AV has HDMI and Component Video Inputs. The HDS-PB100AV supports analog
audio only via RCA jacks.
Q. What is the DB9 serial port used for?
A. The DB9 port is for factory use only.
Q. What is the USB port used for?
A. The USB port is for factory use only.
Q. What is the Composite Video Input used for?
A. The Composite Video Input is for factory use only.
Q. What is the Digital Audio Input used for?
A. The Digital Audio Jack is for factory use only.
Q. What is the “reset” toggle used for?
A. If information and setup need to return to factory settings, press the reset toggle briefl y while
power is applied. The RJ 45 lights will blink off and then on momentarily. Unit has now been rest. Wait
30 seconds to access webpage to continue setup.
Q. What is the “confi ” toggle used for?
A. The “confi ” toggle is used only for fi rmware updates. The user will hold down the “confi ” toggle as
power is applied. This will put the device into fi rmware update mode.
Q. What is the SD card slot used for?
A. The SD Card slot is for factory use only.
Q. What are white space channels?
A. White space channels are the frequencies available that allow for low power personal broadcast
devices. In any given geographical location there are from 1-10 or more available channels to
broadcast onto. These channels are within the frequencies 500 MHz - 700 MHz commonly known as
channels 21-51.
Q. How do I fi nd the longitude and latitude of my location?
A. Websites such as http://www.getlatlon.com and http://www.fi ndlatitudeandlongitude.com can
be used to fi nd Latitude and Longitude. For location searches from a tablet or smart-phone, the user
may use the app “Show My White Space” from Spectrum Bridge Inc. (available for Android and iOS).
Q. What bit rate is available to stream per white space channel?
A. Each stream has the ability to carry up to 19.2Mbps.
Q. What do the lights on the front of the HDS-PB100AV refer to?
A. When looking at the front of the device, the right most light is the Power indicator, illuminated
when power is applied. The center light is the On Air light used to signify the HDS-PB100AV is
operating properly and is in broadcast mode. Until the device is registered properly the On Air light
will remain off. The left most light is the Error light and will illuminate red when there is an error with
the device.
15 of 20
ISSUED: 04-04-13 SHEET #: 180-9049-1

Q. Can the antenna be placed behind the DTV? Where is it best to mount the antenna?
A. The Antenna can be placed behind the DTV, but placement of the HDS-PB100AV Pico
Broadcaster really dictates where the antenna can live. The higher up physically that the Pico
Broadcaster is mounted, the more options you have with antenna placement. Antennae need to “see”
the broadcast device, or have the ability to receive a refl ected signal from a device installed high off
the ground.
Q. Does the power level increase the distance of the HDS-PB100AV?
A. The adjustable power level will not increase distance, but rather increase signal intensity. For a
smaller deployment, not covering as much physical area, the power level may need to be decreased
as to not produce too ‘hot’ of a signal that is diffi cult to tune in.
Q. Why does the HDS-PB100AV need to be connected to the internet?
A. Due to the FCC requiring an annual fee to use licensed white space channels, internet
connectivity is required in order for the polling of the HDS-PB100AV to take place and verify the
current license.
Q. Can I remotely mount the transmitting antenna away from the HDS-PB100AV Pico Broadcaster?
A. If the HDS-PB100AV needs to be situated in a setting that does not allow for an elevated
installation (i.e. AV Rack, IT Closet etc), you may provide a run of coax between the device and the
antenna in order install the antenna at an appropriate location allowing for proper placement. Note
that as you add coax between the antenna and the device, you also add attenuation.
Q. Can I transmit a signal from my computer of a Presentation/File (i.e. PPTX, Spread sheets,
etc…)?
A. Currently the Peerless-AV streaming software allows preset AV fi les to be encoded properly and
streamed to the HDS-PB100AV. However, there is open source software that has the ability to stream
from a desktop, so no matter what is displayed on the desktop of a PC, the Broadcaster can transmit
the signal.
16 of 20
ISSUED: 04-04-13 SHEET #: 180-9049-1

Appendix
Product Specifi cations
HDS-PB100
Input
Output
Control
Broadcast Range
Broadcast Frequency
Channel Range
Power Supply
Operating Temperature
Compliance
Product Dimensions (W x D x H)
Product Weight
Federal Communication Commission Interference Statement
Audio/Video via LAN port (MPEG2 Transport)
ATSC modulated broadcast signal
HD Broadcast format TV signal
Stereo / AC3 audio
Output power variable up to 40mW
White space database compliant channel selection
LAN
350' maximum radius
500-700 MHz
21-51
Input: 100-240V, 50/60Hz, 1A
Output: 12V, 3A Wall adapter
+32° to +131°F (0° to 55°C)
Safety UL60065
FCC Class B
14.19" x 7.50" x 1.74" (360 x 190 x 44mm)
3.36lb (1.52kg)
Pico Broadcaster
This device complies with Part 15 of the FCC Rules. Operation is subject to the following two
conditions: (1) this device may not cause harmful interference, and (2) this device must accept
any interference received, including interference received, including interference that may cause
undesired operation.
FCC_Model: MT300v1
FCC ID: OKVMT300
17 of 20
ISSUED: 04-04-13 SHEET #: 180-9049-1

Limited Warranty
Peerless Industries, Inc. (“Peerless-AV®”) warrants to original end-users of Peerless-AV® products
that Peerless-AV® products will be free from defects in material and workmanship, under normal use,
for the periods listed below, from the date of purchase by the original end-user. At its option, PeerlessAV® will repair or replace with new or refurbished products or parts, or refund the purchase price of,
any Peerless-AV™ product which fails to conform with this warranty.
In no event shall the duration of any implied warranty of merchantability or fi tness for a
particular purpose be longer than the period of the applicable express warranty set forth
above. Some states do not allow limitations on how long an implied warranty lasts, so the above
limitation may not apply to you.
This warranty does not cover damage caused by (a) service or repairs by the customer or a person
who is not authorized for such service or repairs by Peerless-AV®, (b) the failure to utilize proper
packing when returning the product, (c) incorrect installation or the failure to follow Peerless-AV®’s
instructions or warnings when installing, using or storing the product, or (d) misuse or accident,
in transit or otherwise, including in cases of third-party actions and force majeure. This warranty
also does not cover corrosion or rust resulting from damaged, scratched or chipped paint or other
surfaces.
In no event shall Peerless-AV® be liable for incidental or consequential damages or damages
arising from the theft of any product, whether or not secured by a security device which may
be included with the Peerless-AV® product. Some states do not allow the exclusion or limitation of
incidental or consequential damages, so the above limitation or exclusion may not apply to you.
This warranty is in lieu of all other warranties, express or implied, and is the sole remedy with respect
to product defects. No dealer, distributor, installer or other person is authorized to modify or extend
this Limited Warranty or impose any obligation on Peerless-AV® in connection with the sale of any
Peerless-AV® product.
This warranty gives specifi c legal rights, and you may also have other rights which vary from state to
state.
Product Warranty Period
Mounts 5 years
Furniture 1 year
Cables 25 years
Cleaning Products 1 year
Electronic Products and components 1 year
18 of 20
ISSUED: 04-04-13 SHEET #: 180-9049-1

Contact Information
Customer Care
Need help with set up? Call Peerless-AV Customer Care
1-800-865-2112 (available 7:00am- 7:00pm CST, Monday - Friday), or
email us at info@peerless-av.com.
Peerless -AV
2300 White Oak Circle
Aurora, IL 60502 USA
peerair.peerless-av.com
19 of 20
ISSUED: 04-04-13 SHEET #: 180-9049-1

Peerless -AV
2300 White Oak Circle
Aurora, IL 60502 USA
peerair.peerless-av.com
©2013 Peerless-AV. All rights reserved. Peerless-AV is a trademark of Peerless Industries, Inc.
Other parties’ marks are the property of their respective owners.
 Loading...