


ASTEROID

Quick start guide
Hurtig brugervejledning
Hurtigstartguide
Pikaopas
Snabbmanual
Rychlý návod k použití
Skrócona instrukcja obsługi
Hızlı kullanım kılavuzu
Краткое руководство по эксплуатации


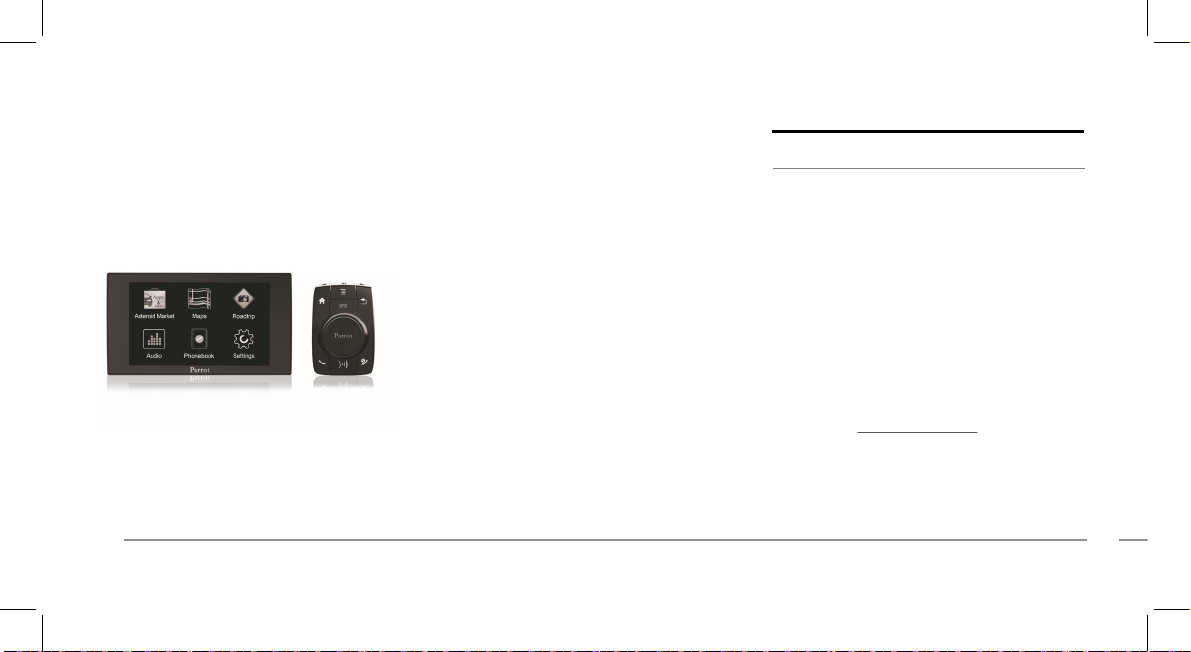
Parrot ASTEROID Mini
English ..........................................................................
Dansk ...........................................................................
Norsk ............................................................................
Suomi ...........................................................................
Svenska ........................................................................
česky .............................................................................
Polski ............................................................................
Türkçe ..........................................................................
РУССКИЙ ..................................................................
13
33
53
73
93
113
133
153
173
x2
x3
1
2
3
4
5
6
7
8
9
10
11
12
13
x3

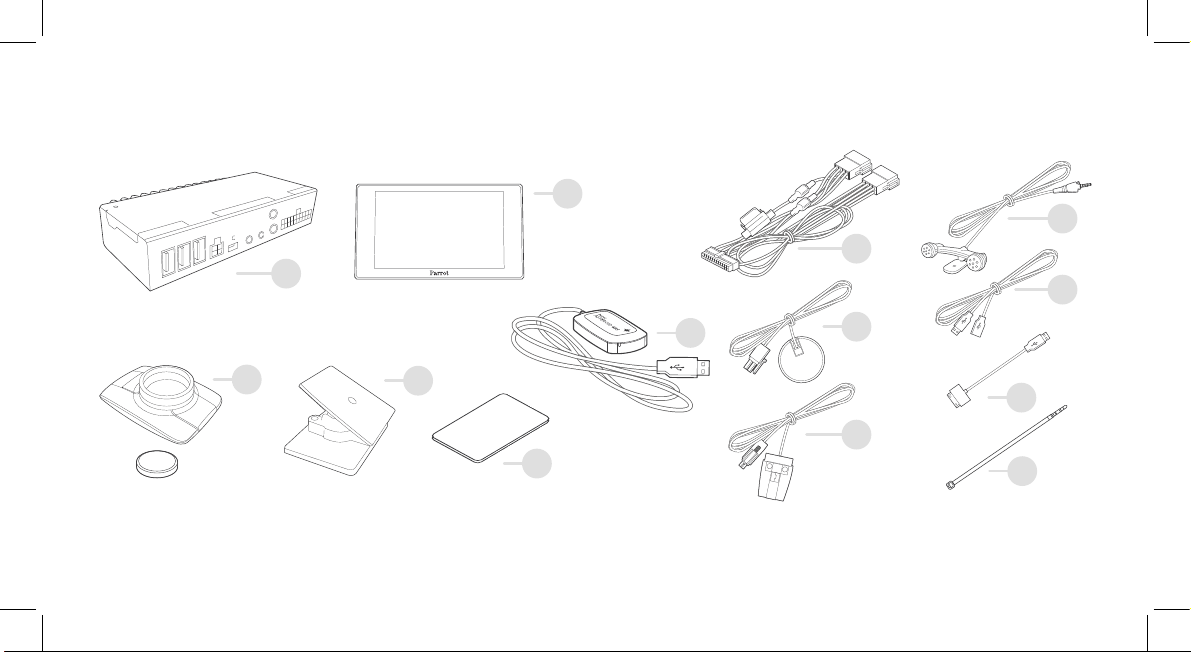
Screen / Skærm / Skjerm / Skärm / Näyttö / Displej / Wyświetlacz / Ekran / Дисплей
Electronic box / Styreboks / Elektronisk boks / Elektroniklåda / Elektroninen rasia / Elektronická jednotka / Skrzynka elektroniczna / Elektronik ünite / Электронный блок
Remote control ( 3 V - CR2032 battery ) / Fjernbetjening (batteri 3V - CR2032) / Fjernkontroll (3 V batteri - CR2032) / Fjärrkontroll (3-voltsbatteri – CR2032) / Kauk
osäädin (paristo 3 V - CR2032) /
Dálkové ovládání (baterie 3 V - CR2032) / Pilot (bateria 3 V - CR2032) / Uzaktan kumanda (3 V - CR2032 pil) /
Пульт дистанционного управления (элемент питания 3 В - CR2032)
Craddle / Holder til skærm / Holder til å feste skjermen / Skärmhållare / Näytön kiinnityskannatin / Držák pro upevnění displeje / Wspornik do mocowania ekranu
Ekran bağlantı desteği / Кронштейн крепления дисплея
ISO cable / ISO kabel / ISO-kabel / ISO-kabel / ISO-johto / ISO kabel / Kabel ISO / ISO kablosu / Кабель ISO
Screen cable / kærmkabel / Skjermkabel / Skärmkabel / Näytön johto / Kabel displeje / Kabel ekranu / Ekran kablosu / Кабель дисплея
Microphone / Mikrofon / Mikrofon / Mikrofon / Mikrofoni / Mikrofon / Mikrofon / Mikrofon / Микрофон
USB cable / USB kabel / USB-kabel / USB-kabel / USB-johto / USB kabel / Kabel USB / USB kablosu / Кабель USB
USB - iPod cable extension / USB - iPod forlængerkabel / Skjøteledning USB-iPod / USB-iPod-förlängningssladd / Jatkos USB - iPod / Propojovací kabel USB-iPod
Przedłużacz USB - iPod / USB - iPod uzatması / Удлинитель USB-iPod
Adhesive tape / Klæbestrimmel / Klebemiddel / Tarra / Klistermärke / Lepicí páska / Taśma samoprzylepna / Yapıştırıcı / Клейкая лента
GPS dongle / GPS-dongle / GPS-dongel / GPS-vastaanotin / GPS-dongel / GPS dongle / Antena GPS / GPS modülü / Аппаратный ключ GPS
Cable fastener / Kabelklemme / Klemskrue / Johtopidike / Kabelklämma / Kabelová příchytka / Zacisk do kabla / Kablo sıkıştırıcı / Кабельный зажим
Remote control cable / Kabel til ernbetjening / Kabel til ernkontroll / Kaukosäätimen johto / Kabel dálkového ovládání / Fjärrkontrollkabel / Kabel pilota / Uzaktan kumanda kablosu /
Кабель пульта дистанционного управления
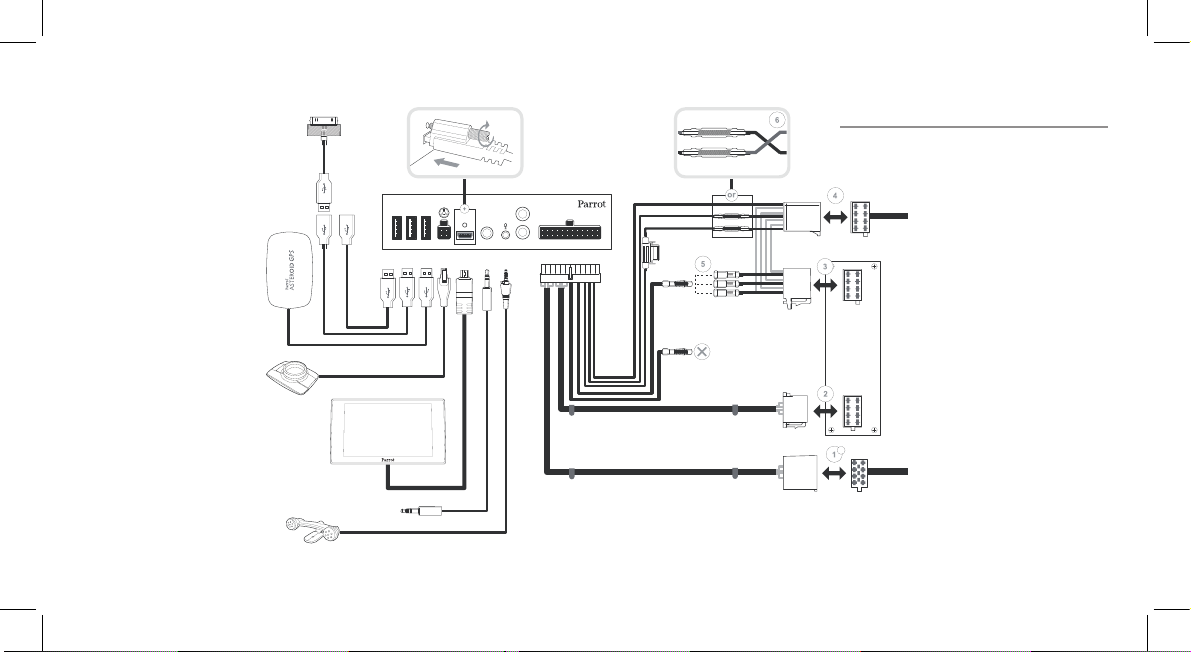
LINE IN
LINE OUT
REAR
FRONT
1 2 3
Remote control
(or steering wheel control interface)
Jack / Jack - Not provided
Screen
USB
Mute
Mute in
Parking Brake
Not used
CAR
STEREO
1
3
2
Vehicle
power supply
Vehicle
audio cable
a
Ground (black)
12V ignition (orange)
12V permanent (red)
iPod
GPS Dongle
ISO INSTALLATION
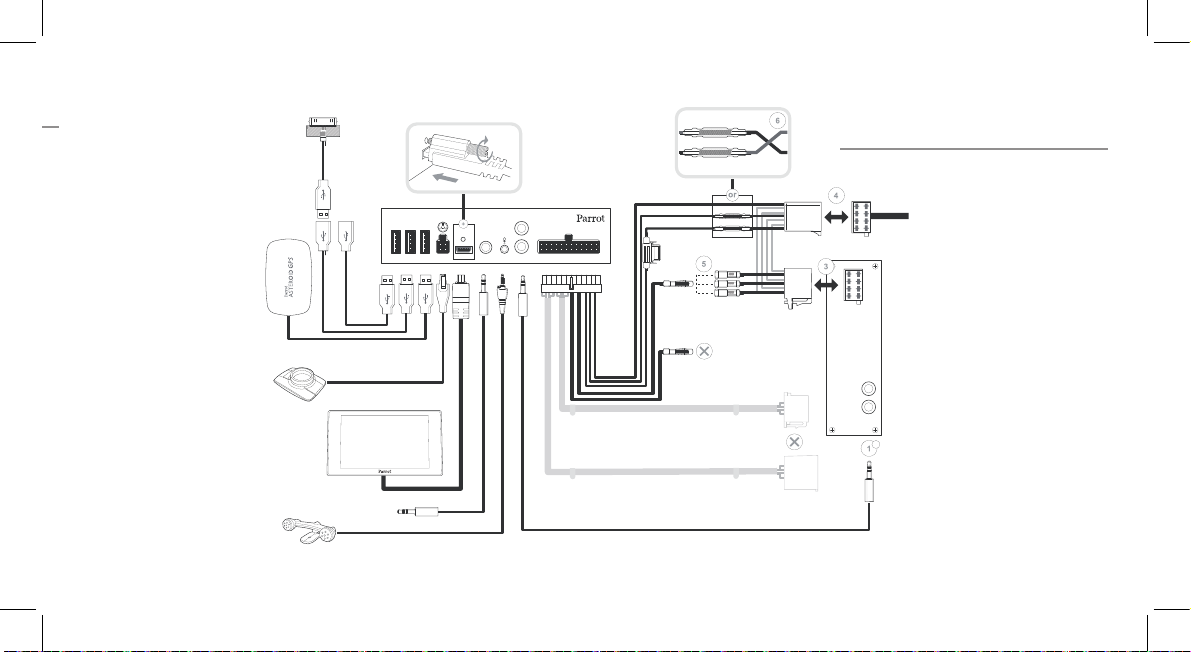
LINE IN
LINE OUT
REAR
FRONT
1 2 3
x2
Line in
Jack / Jack
Not provided
Jack / Jack - Not provided
Mute
Mute in
Parking Brake
Not used
CAR
STEREO
1
3
2
Vehicle
power supply
Ground (black)
12V ignition (orange)
12V permanent (red)
b
USB
iPod
Screen
GPS Dongle
Remote control
(or steering wheel control interface)
Not used
AUDIO SYSTEM
WITH AMPLIFIER
A
B
C
D
E
Quick start
guide
Content
Before you begin
Installation
Getting started
Phone
Music
Internet
Troubleshooting
General information
p.13
p.14
p.20
p.21
p.22
p.25
p.27
p.28
Before you begin
About this guide
In order to limit our paper consumption
and as part of our environmentally friendly
and responsible approach, Parrot prefers
to put user documents online rather than
print them out. This simplified guide to
the Parrot ASTEROID Mini is therefore
limited to providing you with the main
instructions that will make it easy for you
to use the device. More information can
be found
on the support section of our
website, www.parrot.co m: the full
manual, FAQs, tutorials, and more.
Note: iPod® and iPhone® (in iPod mode)
will be referred to as an "iPod" in this
English 13
Quick start
g
uide
Content
Before you begin
I
nstallation
G
etting started
P
hone
M
usic
I
nternet
T
roubleshooting
G
eneral information
p.13
p
.14
p
.20
p
.21
p
.22
p
.25
p
.27
p
.28
Before you begin
About this guide
In order to limit our paper consumption
and as part of our environmentally friendly
and responsible approach, Parrot prefers
to put user documents online rather than
print them out. This simplified guide to
the Parrot ASTEROID Mini is therefore
limited to providing you with the main
instructions that will make it easy for you
to use the device. More information can
be found on the support section of our
web
site, www.pa rrot.com: the full
manual, FAQs, tutorials, and more.
Note: iPod® and iPhone® (in iPod mode)
will be referred to as an "iPod" in this

14 English
manual.
Software updates
Download the latest update for free (and
consult the update procedure) on the
Parrot ASTEROID Mini support page on
our website www.parrot.co m
. These
updates will enable you to receive new
features and improve the product’s
compatibility.
Warnings
All functions requiring an increased
attention should only be used while the
vehicle is stationary. Your safety and the
one of the other road users prevails over
phone calls, music and driving assistance
applications. Be responsible: drive
carefully and pay full attention to your
surrounding. Parrot denies any liability
should you choose not to respect this
warning.
Use the Parrot ASTEROID Mini with a
reason
able volume level so that you can
hear all external noises while driving.
The Parrot ASTEROID Mini includes
NdFeB magnets which can damage objects
sensitive to magnetic fields (pacemakers,
credit cards, mechanical clocks…).
Installation
Note: We advise our customers to have the
Parrot ASTEROID Mini fitted by a certified
Parrot installer.
Before you begin
Installing the Parrot ASTEROID Mini is
done by inserting it between the car
stereo and the vehicle.
Note: If your car stereo is not fitted with ISO
connectors, you need to purchase an ISO
adapter cabl e to simpl ify the wiring
procedure. Refer to the Vehicle
compatibility section on the Parrot
ASTEROID Mini support page to check
whether an ISO adapter is necessary on your
vehicle.
Start by removing the car stereo from your
vehicle. You may need release keys to do
so.
Refer to your car stereo’s wiring diagram.
Before you install the individual
components, check that the installation
locations have been selected in such a way
that the cable length is sufficient to
connect every element. Once the
installation is complete, make sure that no
cables are pinched or trappe
d.
Use only the ISO cable provided with the
Parrot ASTEROID Mini.
The connection number indications in the
next sections correspond to the
connections represented on the diagrams
p.6 / 7.
Connecting the audio cable
Join the vehicle audio cable to the
connector of the Parrot ASTEROID Mini
(Connections 1A and 2).
If your vehicle is equipped with an
amplifier, use the Front and Rear Line Out
outputs on the elec
tronic box to avoid
saturation problems such as popping in the
speakers, background noise etc. Use one
or two jack cable(s) to connect the Parrot
ASTEROID Mini Line out outputs to your
vehicle audio system (Connection 1B on
the diagram p. 7).
Connecting the power cable
1.
Unplug the battery before installing
the power cable.
2.
Connect the ISO male connectors of
the Parrot ASTEROID Mini to the car
stereo (Con
nection 3).
3.
Join the vehicle’s power supply cable
to the ISO female connector of the
Parrot ASTEROID Mini (Connection
4).
The red wire of the Parrot ASTEROID
Mini cable must correspond to the
constant +12V supply, the orange wire to
the ignition +12V and the black wire to
ground. Check that the orange wire is not
connected to the constant +12V supply, as

English 15
vehicle.
Start by removing the car stereo from your
vehicle. You may need release keys to do
so.
Refer to your car stereo’s wiring diagram.
Before you install the individual
components, check that the installation
locations have been selected in such a way
that the cable length is sufficient to
connect every element. Once the
installation is complete, make sure that no
cables are pinched or trapped.
Use on
ly the ISO cable provided with the
Parrot ASTEROID Mini.
The connection number indications in the
next sections correspond to the
connections represented on the diagrams
p.6 / 7.
Connecting the audio cable
Join the vehicle audio cable to the
connector of the Parrot ASTEROID Mini
(Connections 1A and 2).
If your vehicle is equipped with an
amplifier, use the Front and Rear Line Out
outputs on the electronic box to avoid
saturation problems such as popping in the
speakers, background noise etc. Use one
or two jack cable(s) to connect the Parrot
ASTEROID Mini Line out outputs to your
vehicle audio system (Connec
tion 1B on
the diagram p. 7).
Connecting the power cable
1.
Unplug the battery before installing
the power cable.
2.
Connect the ISO male connectors of
the Parrot ASTEROID Mini to the car
stereo (Connection 3).
3.
Join the vehicle’s power supply cable
to the ISO female connector of the
Parrot ASTEROID Mini (Connection
4).
The red wire of the Parrot ASTEROID
Mini cable must correspond to the
constant +12V supply, the orange wire to
the ignition +12V and the black wi
re to
ground. Check that the orange wire is not
connected to the constant +12V supply, as

16 English
you could run down the vehicle’s battery.
Note: In order to check the wiring, connect
the screen before placing it on the
dashboard. Refer to the Checking the wiring
section for more informati on.
On some vehicles, there is no
ignition +12V on the vehicle’s connectors.
You must therefore connect the orange
power supply wire to the fuse box or
another ignition power source.
Connecting the mute cable
The mute function is used to cut the
sound of your car stereo to enable the
sound of the Parrot ASTEROID Mini
(music, phone calls etc.). Mute in 1, mute
in 2 and mute in 3 are only suggested mute
locations : the choice of the mute-in jack
depends on your car stereo’s
configuration. Test and verify the mute on
the vehicle then connect the free yellow
wire on the ISO cable to the audio
system’s corresponding
mute-in jack
(connection 5).
Installing the electronic box
Avoid installing the electronic box near
heating or air-conditioning system or on a
spot directly exposed to sunlight.
Make sure the electronic box stays fixed
once it is installed and that it will not move
while you are driving.
Carefully reinstall the car stereo. Do not
force. If you are short of space behind the
car stereo to install the electronic box,
consider installing it in the glove box.
Checkin
g the wiring
To perform the installation check, turn the
ignition on then off once the Parrot
ASTEROID Mini is installed: the message
“Goodbye!” must be displayed.
If it is not the case, it is necessary to
inverse the positions of the red and orange
wires. Indeed, the red wire of the power
cable must be connected to the
permanent 12V, the orange wire to the 12V
ignition and the black wire to the ground.
This can be don
e simply by reversing both
fuse holders located on the Parrot wiring
(connection 7).
Installing the microphone
The optimum location for the microphone
is in the centre of the vehicles roof near
the rear view mirror. The microphone
ideally needs to be less than 60cm’s from
the users mouth pointing directly towards
them with no obstructions.
Please take care when routing the
microphone cable through the vehicle to
the desired location, we recommend
routing alongside
existing manufacture’s
wiring looms securing as you go making
sure the microphone cable is not pinched
or trapped.
Warning: Do not run the microphone cable
in such a way as to obstruct or interfere
with the vehicles operati on or cause injury
to its occupants. In particular vehicle safety
device such as airbags and other SRS
systems.
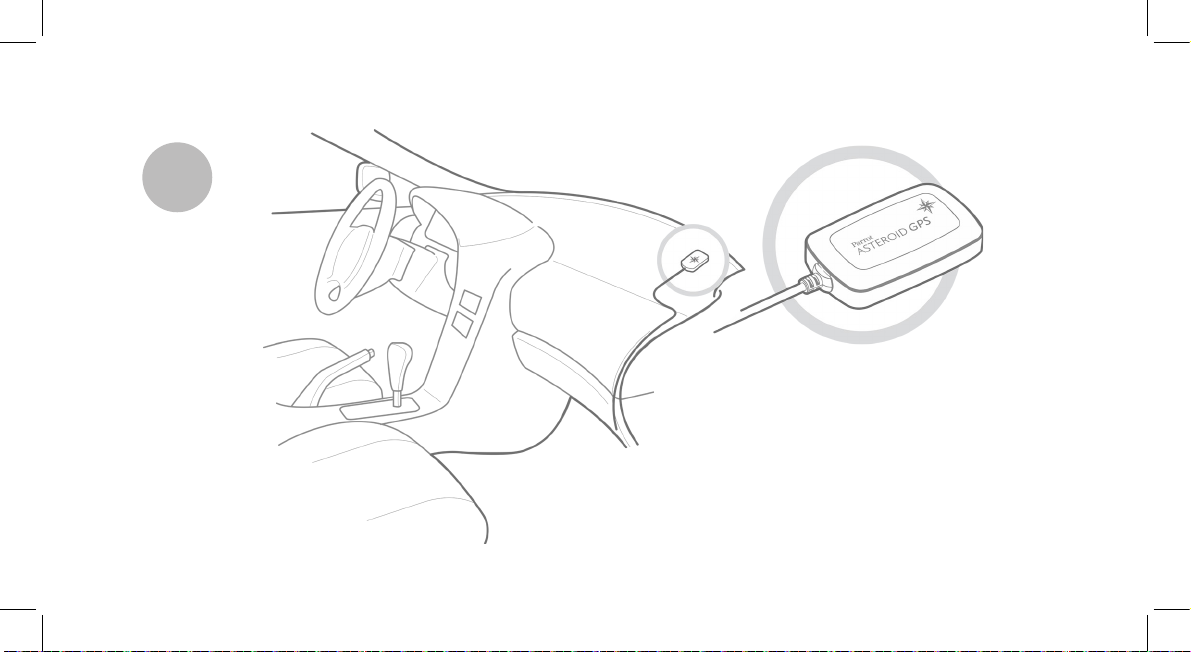
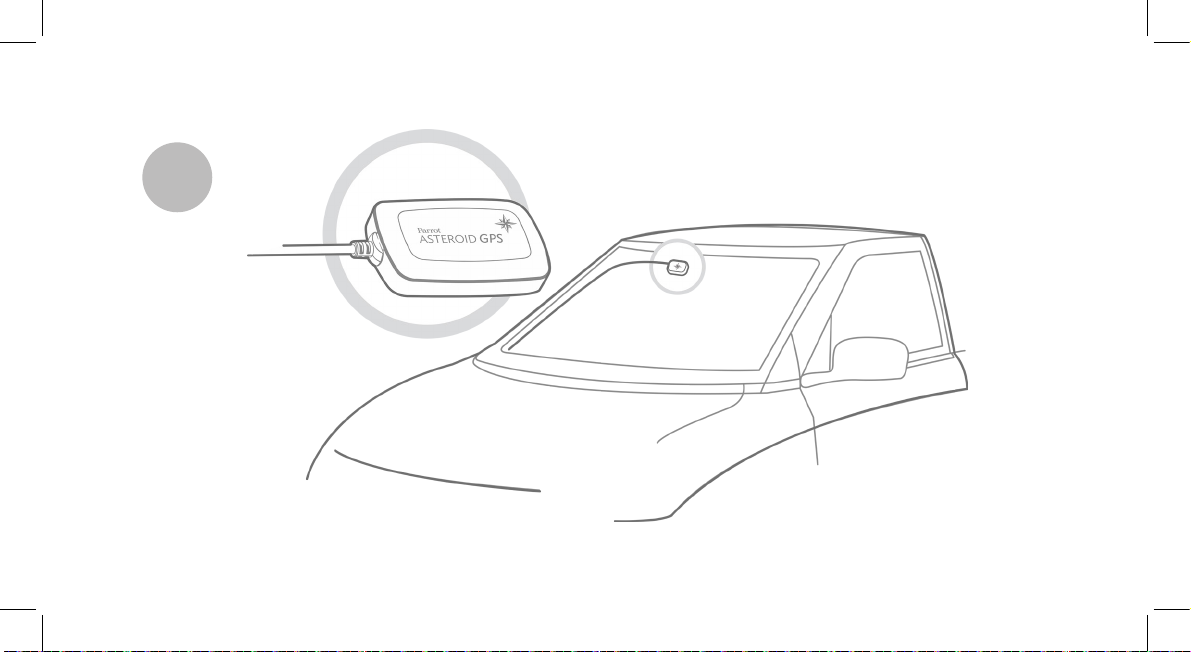
Installing the GPS receiver
Stick the GPS Receiver in an unobstructed
area
inside the car.
Athermic windshields and windows with a
built-in antenna can interfere with GPS
reception and reduce the reliability of
information from navigation applications.
The GPS antenna is located on
the side where "Parrot
ASTEROID GPS" is written and
where the star-shaped logo is.
This logo must always be
directed towards the sky.
If your vehicle has an athermic windshield,
stick the GPS Receiver on the windshield
on the non athermic area. The side where
the star-shaped logo is must be stuck on
the windshield (diagram B p.9).
Note : The non athermic area of the
windshield depends on the model of your
vehicle. It is usually located near the rear
view mirror.
If your vehicle does not have an athermic

English 17
(connection 7).
Installing the microphone
The optimum location for the microphone
is in the centre of the vehicles roof near
the rear view mirror. The microphone
ideally needs to be less than 60cm’s from
the users mouth pointing directly towards
them with no obstructions.
Please take care when routing the
microphone cable through the vehicle to
the desired location, we recommend
routing alongside existing manufacture’s
wiring looms securing as you
go making
sure the microphone cable is not pinched
or trapped.
Warning: Do not run the microphone cable
in such a way as to obstruct or interfere
with the vehicles operati on or cause injury
to its occupants. In particular vehicle safety
device such as airbags and other SRS
systems.
Installing the GPS receiver
Stick the GPS Receiver in an unobstructed
area inside the car.
Athermic windshields and windows with a
built-in antenna can interfere with GPS
reception and reduce the reliability of
information from navigation applications.
The GPS antenna is located on
t
he side where "Parro
t
A
STEROID GPS" is written an
d
w
here the star-shaped logo is.
T
his logo must always be
d
irected towards the sky.
If your vehicle has an athermic windshield,
stick the GPS Receiver on the windshield
on the non athermic area. The side where
the star-shaped logo is must be stuck on
the windshield (diagram B p.9).
Note : The non athermic area of the
windshield depends on the model of your
vehicle. It is usually located near the rear
view mirror.
If your vehicle does not have an athermic

18 English
windshield, stick the GPS Receiver on the
dashboard. The side where the star-
shaped logo is must be visible (diagram A
p.8).
To make sure the adhesive tape adheres
well :
clean the area with an appropriate
cleaning product before sticking the
support ;
once you have stuck the support on
the dashboard, wait for approximately
2 hours without handling it.
Installing the USB cables
Connect the USB cables to the Parrot
ASTEROID Mini. We recommend you
connect all audio cables to the Parrot
ASTEROID Mini even if you do not plan on
using them. Route the audio cables to a
suitable location in your vehicle such as
the glove box or arm rest compartment. It
may be necessary to drill a hole in your
dashboard to do so. Avoid using USB
extension cables.
Make sure you connect the iPod cable to
its
specific USB port. "iPod" is written
above it.
To guarantee an optimal reception quality
we recommend you do not connect your
internet USB key 3G on the Parrot
ASTEROID Mini directly : use the USB
cable to install your device on the
dashboard (or any other open area).
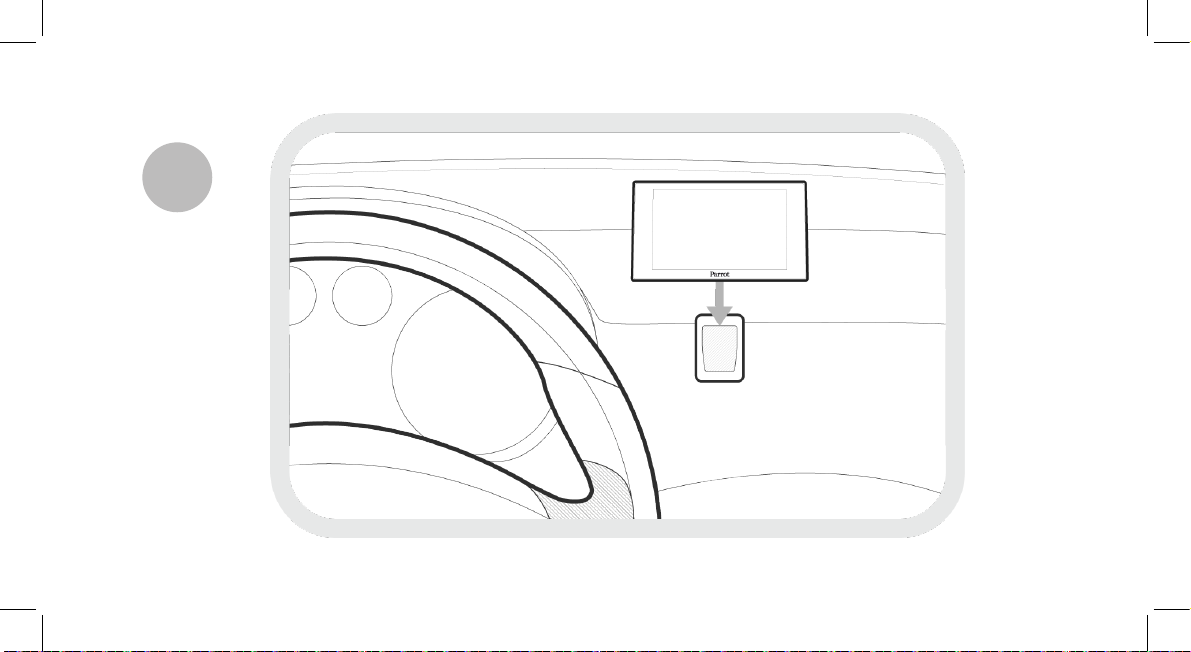
Installing the screen
Warning: Avoid any installati on which
could hinder the use of any important
command or hinder the dri ver's visibi li ty.
Do not install the Parrot ASTEROID Mini in
the airbag deployment area or in a possible
head impact area. Make sure it is not
exposed to the air stream from air vents.
Stick the support on the dashboard
(diagram C p.10).
To make sure the adhesive tape adheres
well :
clean the area with an appropriate
cleaning product before sticking the
support ;
once you have stuck the support on
the dashboard, wait for approximately
2 hours without handling it.
Remember to remove your screen when
leaving the vehicle to avoid tempting any
would-be thieves and to prevent
prolonged exposure to sunlight.
Installing the remote control
Stick the remote control support on your
dashboard. To do so, use the adhesive
tape located under the support.
To make sure the adhesive tape adheres
well :
clean the area with an appropriate
cleaning product before sticking the
support ;
once you have stuck the support on
the dashboard, wait for approximately
2 hours without handling it.
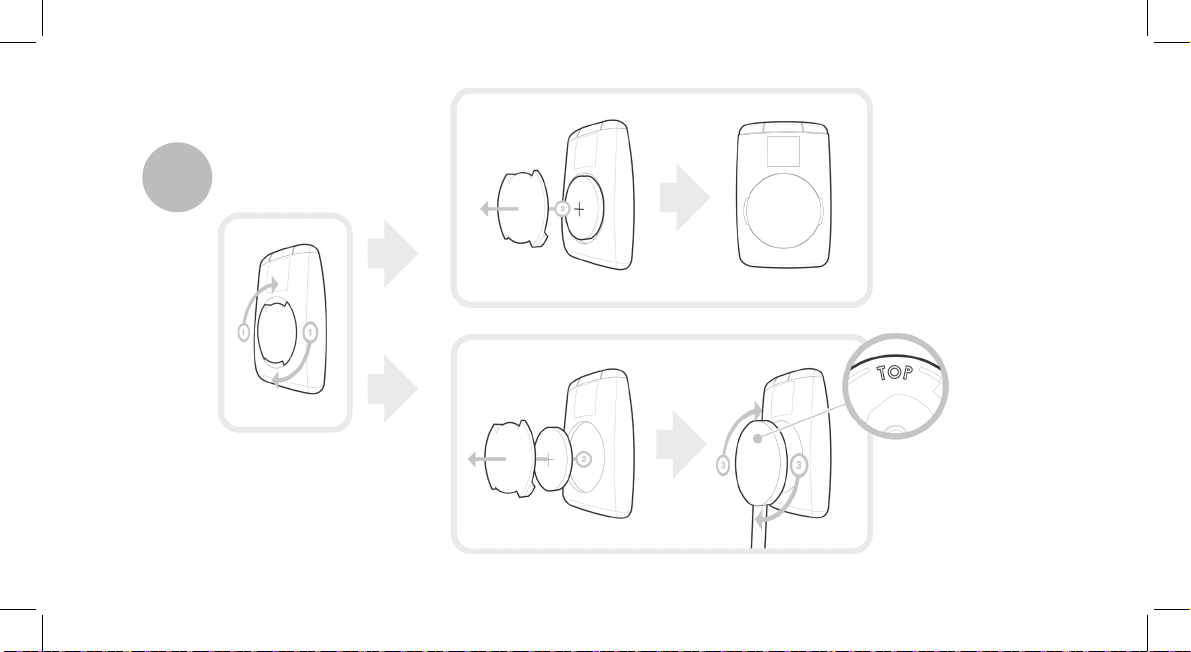
There are two ways to supply power to the
remote control : with a battery or by
connecting it to the electronic box.
To supply power with a battery (diagram D
p.11) :
1.
Remove the circular plastic part on
the back of the remote by turning it
clockwise.
2.
Insert a 3V CR2032 battery into the
remote control. Mak
e sure the
battery is correctly positioned.
3.
Put the circular plastic part back by
turning it counterclockwise.
To connect the remote control to the
electronic box (diagram D p.11) :
1.
Remove the circular plastic part on
the back of the remote by turning it
clockwise.
2.
Connect the remote control cable
into the battery compartment and
turn it counterclockwise.
3.
Connect the remote control cable to
the elec
tronic box, next to the USB
connectors (diagram p.6).

English 19
clean the area with an appropriate
cleaning product before sticking the
support ;
once you have stuck the support on
the dashboard, wait for approximately
2 hours without handling it.
Remember to remove your screen when
leaving the vehicle to avoid tempting any
would-be thieves and to prevent
prolonged exposure to sunlight.
Installing the remote control
Stick the remote control support on your
dashboard. To do so, use the adhesive
tape located under the support.
To make sure the adhesive tape adheres
well :
clean the area with an appropriate
cleaning product before sticking the
support ;
once you have stuck the support on
the dashboard, wait for approximately
2 hours without handling it.
There are two ways to supply power to the
remote control : with a battery or by
connecting it to the electronic box.
To supply power with a battery (diagram D
p.11) :
1.
Remove the circular plastic part on
the back of the remote by turning it
clockwise.
2.
Insert a 3V CR2032 battery into the
remote control. Mak
e sure the
battery is correctly positioned.
3.
Put the circular plastic part back by
turning it counterclockwise.
To connect the remote control to the
electronic box (diagram D p.11) :
1.
Remove the circular plastic part on
the back of the remote by turning it
clockwise.
2.
Connect the remote control cable
into the battery compartment and
turn it counterclockwise.
3.
Connect the remote control cable to
the elec
tronic box, next to the USB
connectors (diagram p.6).

20 English
Getting started
Navigating through the menus
Press the button to access the main
menu.
Browse through the menus by turning the
jogwheel and confirm by pressing the
jogwheel.
Press the
button to get back to previous
menu.
Press the
button to access the pop-up
menu corresponding to the current
application. The pop-up menu allows you
to change several settings or browse more
easily through the content of your audio
source or phonebook.
Press the
button to get to the track list if
a song is currently being played. While
navigating through the menus, press the
SRC button to get to the Now Playing
screen.
Connecting a phone via Bluetooth
Note : Refer to the compatibi li ty page of our
website to check if your phone is
compatible with the Parrot ASTEROID Mini
and to consul t the specific pairi ng
procedures for the most common phones :
www.parrot.com/uk/compati bility
.
If you are using the Parrot ASTEROID Mini
with your phone for the very first time, you
must initially pair both devices. Once your
telephone is paired with the Parrot
ASTEROID Mini, the 2 devices will
automatically connect when they are
turned on (as well as
Blu et ooth®
features)
and in proximity of each other.
1.
From your phone, start a
Blu et ooth
peripheral search and select «Parrot
ASTEROID Mini».
2.
The
pairing procedure depends on
your phone model:
If the phone asks you to enter
the
Blu et ooth
PIN code, enter
“0000”.
If the Parrot ASTEROID Mini
and your phone display two
codes, verify that the codes are
identical, then either confirm
or invalidate.
> The Parrot ASTEROID Mini
screen will display “Pairing
successful”.
Note: Depending on the model of your
phone, you may need to authorize the
connection to the Parrot ASTEROID Mini to
all ow further automatic connections. Refer
to the user guide of your phone for more
information.
Synchronising the phonebook
With most of the phones supporting
Bluetooth technology, the phonebook is
automatically synchronized in the system’s
memory. Each time you change your
directory, synchronisation will start
automatically the next time the Parrot
ASTEROID Mini and your phone are
connected.
Warning: Only the contacts stored in the
phone memory are synchronized. If your
contac ts are stored in your SIM card
memory, transfer them
onto your phone
memory.
Note: Depending on the model of your
phone, you may need to authorize the
access to your contacts to the Parrot
ASTEROID Mini. Refer to the user guide of
your phone for more information.
The automatic synchronization is limited
to 5000 contacts (or phone numbers) for
each paired phone.
Phone
Receiving a call
An incoming call is indicated by a ringtone.
The name of the caller is announc
ed if his
number is recorded in the phonebook of
the phone connected to the Parrot
ASTEROID Mini.
To answer the call, press the
button. Press the button to end
the call.
To refuse the call, press the
button.

English 21
or invalidate.
> The Parrot ASTEROID Mini
screen will display “Pairing
successful”.
Note: Depending on the model of your
phone, you may need to authorize the
connection to the Parrot ASTEROID Mini to
all ow further automatic connections. Refer
to the user guide of your phone for more
information.
Synchronising the phonebook
With most of the phones supporting
Bluetooth technology, the phonebook is
automatically synchronized in the system’s
memory. Each time you change your
directory, synchronisation will start
automatically the next time the Parrot
ASTEROID Mini and your phone are
connected.
Warning: Only the contacts stored in the
phone memory are synchronized. If your
contac ts are stored in your SIM card
memory, transfer them
onto your phone
memory.
Note: Depending on the model of your
phone, you may need to authorize the
access to your contacts to the Parrot
ASTEROID Mini. Refer to the user guide of
your phone for more information.
The automatic synchronization is limited
to 5000 contacts (or phone numbers) for
each paired phone.
Phone
Receiving a call
An incoming call is indicated by a ringtone.
The name of the caller is announced if his
number is recorded in the phonebook of
the phone connected to the Parrot
ASTEROID Mini.
To answer the call, press the
button. Press the button to end
the call.
To refuse the call, press the
button.
22 English
Making a call via voice recognition
You can make a call using voice recognition
directly after automatic synchronization.
The Parrot ASTEROID Mini will
automatically recognize the contact you
wish to call.
1.
Press the
button to launch the
voice recognition feature.
> The Parrot ASTEROID Mini asks
you the name of the contact you want
to call.
2.
Say the name of the contact and the
type of number («WORK»,
«MOBILE»...) if there are several
numbers associated to your contact.
> The call is automatically launched if
the voice tag is correctly understood.
If it is not the case, a confirmation
message is asked. Confirm by saying
«YES» or «CALL».
Note: At any time, press the
button to
exit voi ce recognition mode.
Music
Using vocal music search
The voice recognition function allows you
to select the artist / album you want to
hear via voice recognition. This function is
only available if you are using the Parrot
ASTEROID Mini with a USB / SD / iPod
peripheral.
1.
Press the
button.
2.
Say the name of the artist / album
when asked to do so.
> The list of audio sources connected
to the Parrot ASTEROID Mini and
applications compatible with the
vocal music search function which
contain the artist / album that you
selected will appear.
Note: Check the albums and artists names
in the metadatas of your music files. These
names may be different from the ones
displayed on your music files titles.
iPod
1.
Connect your iPod to the Parrot
ASTEROID Mini USB cable with the
USB / iPod extension lead.
2.
Press the SRC button until the iPod
source is selected.
3.
Select one of the classifi
cation
criteria (artist, album, songs, genres,
playlist) and press the jogwheel.
4.
Select the track and press the
jogwheel.
Note: To browse more easily through the
content of your iPod, press the button
and select the first letter of your trac k /
album / artist.
USB storage device
The Parrot ASTEROID Mini is compatible
with the majority of USB keys / MP3 audio
player / external hard drive. There is no
restric
tion in terms of capacity of USB
keys.
MP3 (mpeg1 layer3), AAC, WAV, OGG
and WMA formats are supported.
1.
Connect your USB device to the USB
cable.
2.
Press the SRC button until the USB
source is selected.
3.
Select one of the classification
criteria (artist, album, songs, genres,
playlist) and press the jogwheel.
4.
Select the track and press the
jogwheel.
Note: To browse more easily through the
content of your
USB storage devic e, press
the button and select the first letter of
your track / album / artist.

English 23
contain the artist / album that you
selected will appear.
Note: Check the albums and artists names
in the metadatas of your music files. These
names may be different from the ones
displayed on your music files titles.
iPod
1.
Connect your iPod to the Parrot
ASTEROID Mini USB cable with the
USB / iPod extension lead.
2.
Press the SRC button until the iPod
source is selected.
3.
Select one of the classification
criteria (artist, album, songs, genres,
playlist) and press the jogwheel.
4.
Select the track and press the
jogwheel.
Note: To browse more easily through the
content of your iPod, press the
button
and select the first letter of your trac k /
album / artist.
USB storage device
The Parrot ASTEROID Mini is compatible
with the majority of USB keys / MP3 audio
player / external hard drive. There is no
restriction in terms of capacity of USB
keys.
MP3 (mpeg1 layer3), AAC, WAV, OGG
and WMA formats are supported.
1.
Connect your USB device to the USB
cable.
2.
Press the SRC button until the USB
source is selected.
3.
Select one of the classification
criteria (artist, album, songs, genres,
p
laylist) and press the jogwheel.
4.
Select the track and press the
jogwheel.
Note: To browse more easily through the
content of your USB storage devic e, press
the
button and select the first letter of
your track / album / artist.

24 English
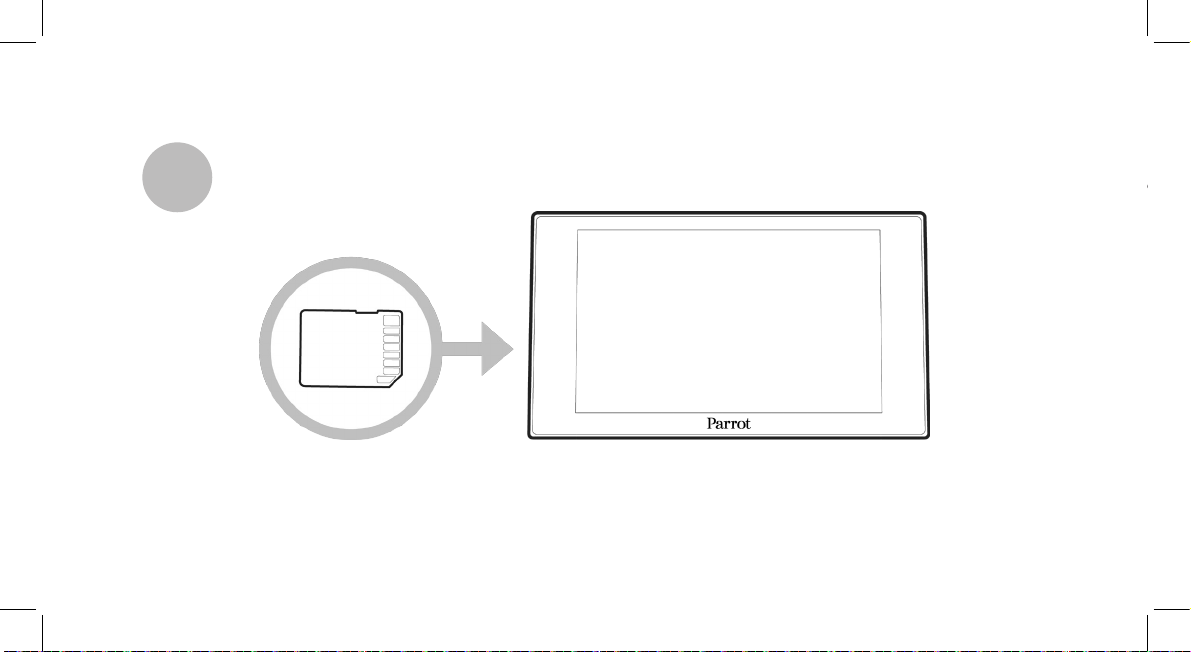
SD card
You can use the following SD cards (with
adapter if necessary) with the Parrot
ASTEROID Mini : SD, micro SD , mini SD,
SDHC, mini SDHC, micro SDHC. The SD
card capacity must not exceed 32Gb.
MP3 (Mpeg 1 Layer3), AAC, WAV, OGG
and WMA formats are supported.
1.
Insert the SD card into the
appropriate slot located on the right
of the screen, with the contact
surface facing you (diagram E p.12).
2.
Press the SRC
button until the SD
source is selected.
3.
Select one of the classification
criteria (artist, album, songs, genres,
playlist) and press the jogwheel.
4.
Select the track and press the
jogwheel.
Note: To browse more easily through the
content of your USB storage devic e, press
the
button and select the first letter of
your track / album / artist.
Audio player connected via Bluetooth
Note: The Parrot ASTEROID Mini allows you
to use the phone and audio streaming
functions from 2 different phones without
havi ng to disconnect one of them.
You can use the Parrot ASTEROID Mini to
listen to songs stored on your mobile
phone or
Blu et ooth
audio device. To do so,
your phone / audio device must support
the
Blu et ooth
A2DP profile (Advanced
Audio Distribution Profile).
If you are using a
Blu et ooth
audio player
for the first time, you have to pair both
devices. If both devices are already paired:
1.
Press the SRC button until the
Bluetooth Audio source is selected.
2.
Start playback on your
Blu et ooth
audio
player.
Internet
Connecting a 3G / 4G key
Note: Refer to the compatibility section of
the Parrot ASTEROID Mini on our website to
get the list of 3G / 4G keys compatibl e with
the Parrot ASTEROID Mini.
1.
Connect a 3G key to the Parrot
ASTEROID Mini using a USB cable.
> A pop-up will appear.
2.
Select OK to activate the 3G
connection.
> A Status of 3G connection pop-up
appears, followed by another pop-up
which asks for your PIN code.
3.
Enter your PIN c
ode using the
jogwheel, then select OK. Check the
Memorise PIN code option if you
would like your PIN code to be stored
each time you turn on the Parrot
ASTEROID Mini.
Note: You will be able to change this setti ng
by selecting
Set tings > N etw ork > 3G Key
.
4.
Select your APN (Access Point
Name) from the suggested list. This
information is available in the
documentation provided with your 3G
key. If your APN is
not in the list, you
can add it by selecting Settings >
Network > 3G Key > Configuration >
New access point.
> The message "3G key configured"
appears.
5.
Wait approximately 30 seconds until
the connection is established. You
can also press the
button and
browse the menus while the
connection is being established.
Sharing a phone 3G connection via Bluetooth
Note: Refer to the compatibility page of our
website
to check if your phone allows 3G
connection sharing via Bluetooth and to
consult the corresponding procedure :
www.parrot.com/uk/compati bility.
If you have a phone that supports the DUN
(Dial-Up Networking) or PAN (Personal

English 25
Internet
Connecting a 3G / 4G key
Note: Refer to the compatibility section of
the Parrot ASTEROID Mini on our website to
get the list of 3G / 4G keys compatibl e with
the Parrot ASTEROID Mini.
1.
Connect a 3G key to the Parrot
ASTEROID Mini using a USB cable.
> A pop-up will appear.
2.
Select OK to activate the 3G
connection.
> A Status of 3G connection pop-up
appears, followed by another pop-up
which asks for your PIN code.
3.
Enter your PIN c
ode using the
jogwheel, then select OK. Check the
Memorise PIN code option if you
would like your PIN code to be stored
each time you turn on the Parrot
ASTEROID Mini.
Note: You will be able to change this setti ng
by selecting
Set tings > N etw ork > 3G Key
.
4.
Select your APN (Access Point
Name) from the suggested list. This
information is available in the
documentation provided with your 3G
key. If your APN is
not in the list, you
can add it by selecting Settings >
Network > 3G Key > Configuration >
New access point.
> The message "3G key configured"
appears.
5.
Wait approximately 30 seconds until
the connection is established. You
can also press the
button and
browse the menus while the
connection is being established.
Sharing a phone 3G connection via Bluetooth
Note: Refer to the compatibility page of our
website to check if your phone allows 3G
connection sharing via Bluetooth and to
consult the corresponding procedure :
www.parrot.com/uk/compati bility
.
If you have a phone that supports the DUN
(Dial-Up Networking) or PAN (Personal

26 English
Area Network)
Blu et ooth
profiles, the
Blu et ooth
connecting your phone to the
Parrot ASTEROID Mini will allow for
sharing of the phone's 3G connection.
1.
Connect your phone to the Parrot
ASTEROID Mini via
Blu et ooth
.
2.
On the Parrot ASTEROID Mini,
select Settings > Network >
Bluetooth > Configuration.
3.
Select your APN (Access Point
Name) from the suggested list, then
check Select .
4.
Press the
button and select
Connect.
5.
Allow connection sharing on your
phone. This procedure will vary
according to your phone model.
Sharing a phone 3G connection via USB
Note: Refer to the compatibility page of our
website to check if your phone allows 3G
connection sharing via USB and to consult
the corresponding procedure :
www.parrot.com/uk/compati bility
.
1.
Make sure that your phone’s keypad is
unlocked.
2.
Connect the phone to the Parrot
ASTEROID Mini using a USB cable/
micro-USB and the USB extension
cable provided with the Parrot
ASTEROID Mini. This connection
also enables you to recharge your
phone’s battery.
3.
Select your APN (Access Point
Name) from the suggested list, then
check the Select option. You can then
modify this setting by selecting
Settings >
Mobile Networks settings
> Mobile Access device.
> A pop-up indicating that USB
connection sharing has been activated
will appear.
ASTEROID Market : Using the applications
Several types of applications are available
with the ASTEROID Market : music,
geolocation, driver assistance...
All applications may not be available in all
countries. The use of some applications
may need prior subscription.
The Parrot ASTEROID Mini is a
multitasking device: several applications
can run simultaneously. For example, you
can listen to a Webradio station and use a
driver assistance application at the same
time.
For more information about installing and
using the available applications, refer
to
the ASTEROID Market web page :
www.pa rrotasteroid .com/
as te roidma rket.
Troubleshooting
Before you begin
Make sure the “Goodbye” message is
displayed on the Parrot ASTEROID Mini
screen when you turn the ignition off.
Refer to the Checking the wiring section
for more information.
Reset the Parrot ASTEROID Mini. To do
so, select Settings > Advanced settings >
Restore factory settings.
Make sure you have the latest software
update on your Parrot ASTEROID Mini. To
do so, select Sett
ings > About > Device
Version. Compare this number with the
one on the Parrot ASTEROID Mini support
page on our website www.parrot.com.
Problems while using the phone function
Make sure your phone is compatible with
the Parrot ASTEROID Mini. To do so,
refer to the compatibility page on our
website : www.parrot.com/uk/
compatibility.
If your phone is compatible with the
Parrot ASTEROID Mini and if you
already
have the latest software update:
1.
Delete the pairing on the Parrot
ASTEROID Mini. To do so, tap
Settings > Advanced settings >
Factory settings.
2.
On your phone, erase the Parrot

English 27
All applications may not be available in all
countries. The use of some applications
may need prior subscription.
The Parrot ASTEROID Mini is a
multitasking device: several applications
can run simultaneously. For example, you
can listen to a Webradio station and use a
driver assistance application at the same
time.
For more information about installing and
using the available applications, refer to
the AST
EROID Market web page :
www.pa rrotasteroid .com/
as te roidma rket.
Troubleshooting
Before you begin
Make sure the “Goodbye” message is
displayed on the Parrot ASTEROID Mini
screen when you turn the ignition off.
Refer to the Checking the wiring section
for more information.
Reset the Parrot ASTEROID Mini. To do
so, select Settings > Advanced settings >
Restore factory settings.
Make sure you have the latest software
update on your Parrot ASTEROID Mini. To
do so, select Settings > About > Device
Version. Co
mpare this number with the
one on the Parrot ASTEROID Mini support
page on our website www.parrot.com
.
Problems while using the phone function
Make sure your phone is compatible with
the Parrot ASTEROID Mini. To do so,
refer to the compatibility page on our
website : www.parrot.com/uk/
compatibility.
If your phone is compatible with the
Parrot ASTEROID Mini and if you
already have the latest software update:
1.
Delete the pairing on the Parrot
ASTEROID Mini. To do so, tap
Settings > Advanced settings >
Factory settings.
2.
On your phone, erase the Parrot

28 English
system from the list of
Blu et ooth
peripherals (or reboot your iPhone).
3.
Repeat the pairing procedure for the 2
devices.
Problems while using the music function
Reboot your iPod / iPhone before
connecting it to the Parrot ASTEROID
Mini. To reboot your iPhone / iPod:
iPod: press Menu and the centre
button simultaneously until the iPod
reboots.
iPhone: Press the On/Off button and
the Home button simultaneously
until the iPhone reboots. Do not
touch the screen when the message
“Slide to shutdown” appears.
Note: this procedure will not erase any of
your data.
Some problems may occur if the iPod / SD
card / USB device is already connected to
the Parrot ASTEROID Mini before you
turn on the ignition. Connect the iPod / SD
card / USB device once the ign
ition is
turned on.
For more information
Refer to the Parrot ASTEROID Mini
support page on our website
www.parrot.com
.
General information
Warranty
Without prejudice of legal warranty, Parrot
contractually warrants during 12 months
from the date of initial purchase by the
consumer (except wearing parts
guaranteed for 6 months) that the product
is free from defects in materials and
workmanship, upon presentation of proof
of purchase (date, place of purchase,
serial number of the product) to the
retailer or Parrot. During the contractual
warranty
period, the defective product
must be returned in its original packaging
to the after-sales service of the retailer.
After inspection of the product, Parrot will
proceed, at its option, to the replacement
or the issue a credit note to the exclusion
of any other remedy.
Warranty does not cover: upgrading of the
software items of the Parrot products with
Bluetooth cell phones for compatibility
purpose, data recovery, deterioration of
the external aspect due to normal wear of
the product, any damage caused by
accide
nt, misuse, misapplication, or non-
Parrot products.
Parrot is not responsible for storage, loss
or damaged to data during transit or repair.
Any product wrongfully declared to be
defective will be returned to sender and
inspection, process and carriage costs will
be invoiced to him.
Modifications
The explanations and specifications in this
guide are given for information purposes
only and may be modified w
ithout prior
notice. They are deemed to be correct at
time of going to press. The utmost care
has been taken when writing this guide,as
part of the aim to provide you with
accurate information. However, Parrot
shall not be held responsible for any
consequences arising from any errors or
omissions in the guide, nor for any damage
or accidental loss of data resulting directly
or indirectly from the use of the
information herein. Parrot reserves the
right to amend or improve the product
design or user guide without any
restrictions and without any obligation to
notify users. As part of our ongoing
concern to upgrade and improve our
products, the product that you have
purchased may differ slightly from the
model described in this guide. If so, a later
version of this guide might be available in
electronic format a
t Parrot’s website at
www.pa rrot.com.
Correct disposal of This Product (Waste
Electrical & Electronic Equipment)
This marking shown on the product or
its literature, indicates that it should not
be disposed with other household wastes
at the end of its working life. To prevent
possible harm to the environment or

English 29
After inspection of the product, Parrot will
proceed, at its option, to the replacement
or the issue a credit note to the exclusion
of any other remedy.
Warranty does not cover: upgrading of the
software items of the Parrot products with
Bluetooth cell phones for compatibility
purpose, data recovery, deterioration of
the external aspect due to normal wear of
the product, any damage caused by
accident, misus
e, misapplication, or non-
Parrot products.
Parrot is not responsible for storage, loss
or damaged to data during transit or repair.
Any product wrongfully declared to be
defective will be returned to sender and
inspection, process and carriage costs will
be invoiced to him.
Modifications
The explanations and specifications in this
guide are given for information purposes
only and may be modified without pr
ior
notice. They are deemed to be correct at
time of going to press. The utmost care
has been taken when writing this guide,as
part of the aim to provide you with
accurate information. However, Parrot
shall not be held responsible for any
consequences arising from any errors or
omissions in the guide, nor for any damage
or accidental loss of data resulting directly
or indirectly from the use of the
informati
on herein. Parrot reserves the
right to amend or improve the product
design or user guide without any
restrictions and without any obligation to
notify users. As part of our ongoing
concern to upgrade and improve our
products, the product that you have
purchased may differ slightly from the
model described in this guide. If so, a later
version of this guide might be available in
electronic format at Parrot’
s website at
www.pa rrot.com
.
Correct disposal of This Product (Waste
Electrical & Electronic Equipment)
This marking
shown on the product or
its literature, indicates that it should not
be disposed with other household wastes
at the end of its working life. To prevent
possible harm to the environment or

30 English
human health from uncontrolled waste
disposal, please separate this from other
types of wastes and recycle it responsibly
to promote the sustainable reuse of
material resources.
Household users should contact either
the retailer where they purchased this
product, or their local government office,
for details of where and how they can take
this item for environmentally safe
recycling. Business users should
contact
their supplier and the terms and
conditions of the purchase contract. This
product should not be mixed with other
commercial wastes for disposal.
Registered Trademarks
Parrot and the Parrot logo are registered
trademarks of PARROT SA.
The Bluetooth word mark and logos are
registered trademarks owned by
Bluetooth SIG, Inc. and any use of such
marks by Parrot S.A. is under license.
Bluetooth QDID : B01
3841, B013839, [-]
"Made for iPod / iPhone" means that an
electronic accessory has been designed to
connect specifically to iPod or iPhone
respectively, and has been certified by the
developer to meet Apple performance
standards. Apple is not responsible for the
operation of this device or its compliance
with safety and regulatory standards.
iPod and iPhone are trademarks of Apple
Inc, registered in the US
and others
countries
All other trademarks mentioned in this
guide are protected and are the property
of their respective owners.
Gracenote, the Gracenote logo and
logotype and "Powered by Gracenote" are
either registered trademarks or
trademarks of Gracenote Inc. in the United
States and/or other countries.
Identification N. 394 149 496 R.C.S. PARIS
Parrot S.A.
Copyright © 2012 Parrot. All Rights
Reserved.
Th
is device complies with Industry Canada
licence-exempt RSS standard(s).
Operation is subject to the following two
conditions: (1) this device may not cause
interference, and (2) this device must
accept any interference, including
interference that may cause undesired
operation of the device.
This equipment complies with FCC’s and
IC’s RF radiation exposure limits set forth
for an uncontrolled environment.. The
antenna(s) used for this tr
ansmitter must
be installed and operated to provide a
separation distance of at least 20 cm from
all persons and must not be collocated or
operating in conjunction with.
 Loading...