


PARROT
MKi9200
Quick start guide
Guide d’utilisation rapide
Οδηγός γρήγορης εγκατάστασης


Parrot MKi9200
Installation diagrams ........................ |
p.04 |
English ............................................. |
p.12 |
Français ........................................... |
p.19 |
Ελληνικά ........................................... |
p.26 |
. .......................................... p.39 |
|
General Information......................... |
p.40 |
www.parrot.com

5
Not used
m
•A: 12V ignition (orange)
•B: 12V battery supply (red)
•C: Ground
•D: Connection to the vehicle’s power supply
•E : Connection to the vehicle’s speakers
1.Rear right speaker (purple / purple-black)
2.Front right speaker (grey / grey-black)
3.Front left speaker (white / white-black)
4.Rear left speaker (green / green-black)
•F : This wiring is not used.
-Car stereo with an ISO connector
-Autoradio avec connecteur ISO
-Ηχοσύστημα με βύσματα ISO
6
Not used |
m
-Car stereo with Line In input
-Autoradio avec entrées Line In
-Ηχοσύστημα με εισόδους Line
7
- Inserting the remote control battery
- Insertion de la pile de la télécommande
- Εισαγωγή της μπαταρίας του τηλεχειριστηρίου
The remote control only works with a 3V CR2032 battery.
L’autonomie de la télécommande est assurée par une pile de type 3V
CR2032 uniquement.
Η αυτονομία του τηλεχειριστηρίου πραγματοποιείται αποκλειστικά μέσω μίας μπαταρίας τύπου 3V CR2032.
8
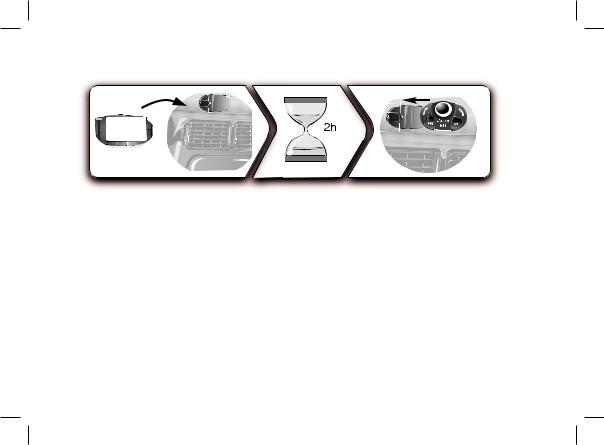
-Installing the remote control on the dashboard
-Installation de la télécommande sur le tableau de bord
-Εγκατάσταση του τηλεχειριστηρίου στο ταμπλό του αυτοκινήτου
9

clic |
-Do not install the remote control on the outside of the steering wheel
-N’installez pas la télécommande sur le côté extérieur du volant
-Μην εγκαταστείτε το τηλεχειριστήριο στο εξωτερικό τμήμα του τιμονιού
10
- Installing the screen
-Installation de l’écran
-Μην εγκαταστείτε το τηλεχειριστήριο στο εξωτερικό τμήμα του τιμονιού
-Using the Parrot MKi9200 with an SD card
-Utiliser le Parrot MKi9200 avec une carte SD
11

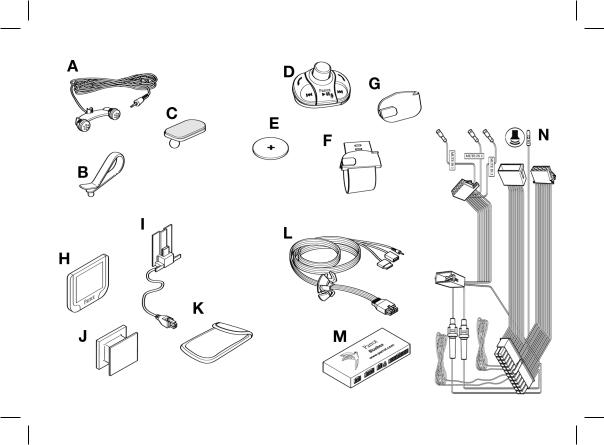
This simplified guide of the Parrot MKi9200 gives you the main instructions to easily use this product. For further information, refer to the user guide available on our website www.parrot.com.
Contents |
|
Installing the Parrot MKi9200.............................................. |
12 |
Installing the electronic box......................................... |
13 |
Car stereo with an ISO connector................................ |
13 |
Car stereo with line-in.................................................. |
13 |
Car stereo without ISO connectors.............................. |
13 |
Installing the kit’s power cable..................................... |
13 |
Checking the wiring...................................................... |
14 |
Installing the audio connectors.................................... |
14 |
Installing the remote control........................................ |
14 |
Installing the double microphone................................ |
15 |
Installing the screen..................................................... |
15 |
Using the Parrot MKi9200 for the 1st time......................... |
15 |
Associating the control unit with the remote control... |
15 |
Navigating through the menus..................................... |
15 |
Pairing and connecting a phone to |
|
the Parrot MKi9200...................................................... |
15 |
Using the telephone function.............................................. |
16 |
Synchronizing the phonebook..................................... |
16 |
Commands................................................................... |
16 |
Receiving a calll........................................................... |
17 |
Making a call................................................................ |
17 |
Making a call via voice recognition.............................. |
17 |
Using the magic words................................................ |
17 |
Using the Music function..................................................... |
17 |
Selecting an audio source............................................ |
17 |
Commands................................................................... |
18 |
EnglishEnglish
The availability of some functionality only depends on your mobile phone.
► Refer to our website www.parrot.com, in the Compatibility section, for further information.
Installing the PARROT MKi9200
We advise our customers to have the Parrot
MKi9200 fitted by a professional.
A steering wheel control interface can be used to connect your vehicle’s steering wheel controls to your Parrot hands-free kit. With this
interface, you will be able to make phone calls via the steering wheel controls while keeping your hands on the wheel. Refer to our website www.parrot.com for more information.
•Remove the audio system from your vehicles dashboard to access the wiring harness.
•The cables supplied with the kit feature ISO connectors and two pairs of line-out terminals. The line-out terminals can be used if your audio system features this option.
Several set-ups are therefore possible depending on the
12
type of car stereo and your vehicle.
•The mute function is used to cut the sound of your car stereo to enable a phone call or music playback. The choice of the mute-in terminal depends on your car stereo’s configuration.
•Make sure the cables are not pinched at the end of the installation process.
Installing the electronic box
Avoid installing the electronic box:
-near heating or air-conditioning system;
-on a spot directly exposed to sunlight;
-behind metal walls.
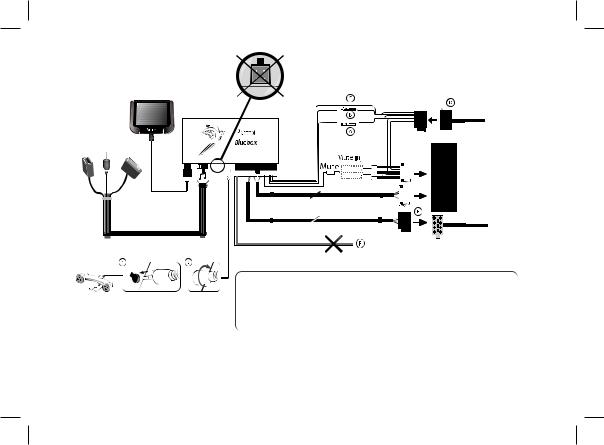
Car stereo with an ISO connector
► Refer to the installation diagram p.4.
1.Connect the male connectors of the hands-free kit to the car stereo.
2.Join the vehicle’s audio and power supply cables to the female connectors of the Parrot MKi9200.
3.On the installation cable, connect the free yellow wire to one of the audio system’s corresponding mute-input if available (mute in 1, mute in 2 or mute in 3).
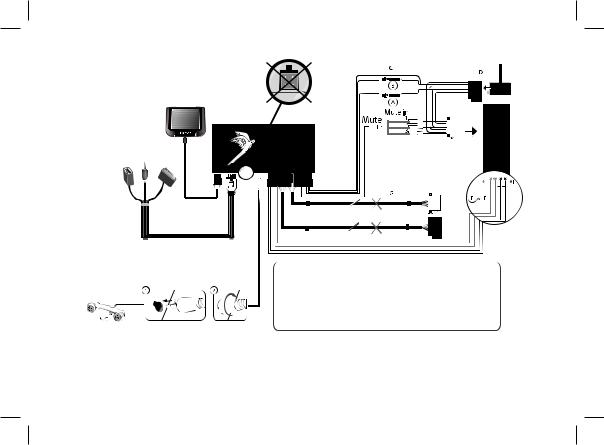
Car stereo with line-in
► Refer to the installation diagram p.5.
•Use this type of connection by wiring the line-out
(brown & white wire or red & black wire) to your car stereo’s line-in.
•Using the two pairs of line-out will enable you to take advantage of the streaming audio function in stereo over your vehicle’s speakers.
•On the installation cable, connect the free yellow wire
to the corresponding audio system’s mute-input if available (mute in 1, mute in 2 or mute in 3).
Car stereo without ISO connectors
If your car stereo is not equipped with ISO connectors, you will need to purchase an ISO adapter cable to simplify the wiring procedure. Refer to the range of ISO adapters on our website: www.parrot.com.
Installing the kit’s power cable
In order to check the wiring, connect the screen before placing it on the dashboard.
► Refer to the Checking the wiring section for more information.
13

•Refer to your car stereo’s wiring diagram.
•The red wire of the kit’s cable must correspond to the constant +12V supply, the orange wire to the ignition +12V and the black wire to ground.
•Check that the orange wire is not connected to the constant +12V supply, as you could run down the vehicle’s battery, preventing your hands-free kit from operating correctly.
On some vehicles, there is no ignition +12V on the vehicle’s connectors. You must therefore connect the orange power supply wire to the fuse box or another ignition power source.
Checking the wiring
To perform the installation check, turn the ignition on, wait a few seconds then turn it off once the Parrot MKi9200 is installed: the message “Good bye!” must be displayed.
If it is not the case, it is necessary to inverse the positions of the red and orange wires. Indeed, the red wire of the power cable must be connected to the permanent 12V, the orange wire to the 12V ignition and the black wire to the ground.
This can be done simply by reversing both fuse holders located on the Parrot wiring.
Installing the audio connectors
•Connect the music cable to the electronic box and place the USB / iPod / Jack connectors into the glove box, the central console or the parcel tray depending on the configuration of your dashboard. Make sure that the cable is accessible and not pinched.
•Use the provided protection cap to protect the connectors.
Installing the remote control
► Refer to the diagrams p.7/8.
•Choose the place for the remote control inside your vehicle. We would advise you to fit it in the center of the dashboard or close to the steering wheel.
•If you want to place the remote control on the steering wheel, make sure it is securely attached, so that it does not move when you are driving. Do not install the remote control on the outside of the steering wheel and ensure it does not get in the way when driving.
•If you want to place the remote control on the dashboard, stick the double-sided tape located on the flat side of the bracket to fix it against the dashboard. You can then insert the remote onto the bracket.
14
Once you have stuck the support on the dashboard, wait for approximately 2 hours to make sure the adhesive tape adheres well.
Installing the double microphone
Parrots microphones are directional and need to be pointed towards the user to pick up clear speech. The microphone should be installed near the front roof light cluster, in the centre of the vehicle with a clear path to the user.
Installing the screen
Remember to remove your screen when leaving the vehicle to avoid tempting any would-be thieves and to prevent prolonged exposure to sunlight.
Using the PARROT MKi9200 for the 1st time
Associating the control unit with the remote control
If the remote control doesn’t seem to be associated to the electronic box while using the Parrot MKi9200 for the first time, press several times the red button while holding down the green and Play buttons until the «Pairing remote control» message is displayed. This has to be done during a 30 seconds period once the ignition is turned on.
Navigating through the menus
•Press the central jog wheel to access the menus.
> The kit says and displays the name of the current menu.
•Browse through the menus by turning the wheel and confirm with the green button or by pressing the scroll wheel.
•To exit the menu, press the red button or wait for a few seconds.
Pairing and connecting a mobile phone to the Parrot MKi9200
Prior to using your Parrot MKi9200 with your phone for the very first time, you must initially pair both devices.
1.Make sure the Parrot MKi9200 is set so that it is visible by all Bluetooth ® devices. To do so, press the jog wheel and select Settings > Bluetooth > Visibility > Visible. The Parrot MKi9200 is visible by default.
2.Press the jog wheel and select Settings > Pair with...
>If your mobile phone’s model appears in the list, select it and confirm.
>If your mobile phone model doesn’t appear in the list, select the Other phones option.
3.From your phone, search for Bluetooth peripherals. Refer to your phone user guide for more information.
>The list of the available Bluetooth peripherals
15
 Loading...