


Quick start guide Hurtig brugerguide Hızlı kullanım kılavuzu Pikaopas
Краткое руководство по эксплуатации
Stručný návod na použitie Hitri vodnik za uporabo Ghid de utilizare rapidă
Σύντομος οδηγός χρήσης
Parrot Zikmu Solo
English .......................................................... |
9 |
Dansk ........................................................... |
35 |
Türkçe .......................................................... |
55 |
Suomi ........................................................... |
75 |
РУССКИЙ .................................................. |
95 |
Slovensky ..................................................... |
115 |
Slovenčina ................................................... |
135 |
Română ....................................................... |
155 |
Ελληνικά ..................................................... |
175 |

4
Reset
5
6
7
8

Quick start guide
About this guide
In order to limit our paper consumption and as part of our environmentally friendly and responsible approach, Parrot prefers to put user documents online rather than print them out. This simplified guide to the Parrot Zikmu Solo is therefore limited to providing you with the main instructions that will make it easy for you to use the device. More information can be found on the support section of our website, www.parrot.com: the full manual, FAQs, tutorials, and more.
Contents
Getting started |
p.10 |
iPod® |
p.13 |
Wi-Fi® |
p.15 |
Bluetooth® |
p.20 |
Jack |
p.23 |
Troubleshooting |
p.24 |
General information |
p.26 |
English 9

Getting started
Note : For the purpose of readability, the iPod touch® and iPhone® (in music mode) shall be designated by the term "iPod" in this manual. Compatible telephones or tablet PCs shall be designated by the term "Smartphone".
Connection to mains supply
Plug the speaker into an electrical outlet using the provided power cable (diagram p.4).
>The speaker turns on automatically. The  icon blinks for a few seconds then becomes steady.
Remote control
Insert the provided remote control battery into the specific battery compartment (diagram p.4).
Note : Use only a CR2032 battery.
Turning the Parrot Zikmu Solo on / off
Press the  of the remote control or control panel to turn the speaker on / off.
10 English
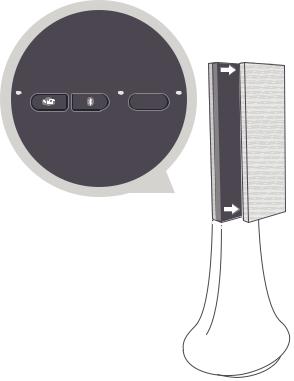
Removing the front grid
Wi-Fi, Bluetooth and Reset buttons are accessible by removing the magnetic Parrot Zikmu Solo front grid (diagram p.5).
Button Function
Short press : Establish Wi-Fi connection with a modem / router supporting WPS technology (refer to the Wi-Fi > Connection with WPS section).
Long press : Reset Wi-Fi and ethernet parameters.
Short press : Make the Parrot Zikmu Solo visible via Bluetooth. Press this button before connecting a Bluetooth device to the speaker for the first time (refer to the
Bluetooth > Connection section).
Long press : Delete all pairings (except the one of the currently connected device).
Reset Reboot the speaker.
English 11

Selecting an audio source
The Parrot Zikmu Solo allows you to use several types of audio sources: computer connected via Wi-Fi, computer or Smartphone connected via Bluetooth, iPod/ iPhone, analogue audio player, TV or DVD player with an optical audio output.
Press the SOURCE button of the remote control to switch among the active audio sources.
If you start playing a music file from a second source, this source is automatically selected. The music currently played from the first source is automatically suspended except if the first source is an analogue audio player connected via a Jack cable.
Controlling the volume
Button Function
Increase the volume.
Decrease the volume.
12 English

iPod
Note : Refer to the Parrot Zikmu Solo support page for more information about the compatible iDevice models.
Using the dock adapter
Two dock adapters provided with the Parrot Zikmu Solo allow you to use the speaker with iPhone 4S / iPhone 4 and iPhone 3GS / iPhone 3G. To use the Parrot Zikmu Solo with another iDevice, use the dock adaptor supplied with the Apple device.
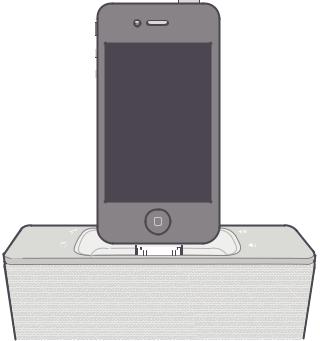
To insert the dock adapter, position it above the connector and press on both sides.
Connecting the iPod
Once the dock adapter is inserted on the speaker:
1.Unplug the earphones from your iPod.
2.Connect your iPod to the speaker (diagram p.6). >The iPod battery charges until it is fully charged. > You can now browse for a song on your iPod.
English 13

Downloading the application
Login to the App StoreSM or Google Play ® and download the free Parrot Audio
Suite application. This application will allow you to modify several audio settings and connect the speaker to your Wi-Fi network easily.
14 English

Wi-Fi
Before you begin
You can stream music via Wi-Fi to the Parrot Zikmu Solo from any computer with the following operating systems : Windows® XP (SP2 or SP3), Windows Vista®, Windows® 7 and Mac OS X 10 (and later versions).
To stream music via Wi-Fi on the Parrot Zikmu Solo while keeping an internet connection, you need to have a wireless access point and to connect the Parrot Zikmu Solo to your Wi-Fi network. If you do not need an Internet connection on the computer you are using with the Parrot Zikmu Solo, you can simply connect it to the Wi-Fi network generated by the Parrot Zikmu Solo: SoloNet-xx.xx.
Note : The performance of the Parrot Zikmu Solo depends highly on the performance of your modem / router. The sound quality of the Parrot Zikmu Solo may be affected if there is an obstacle or a wall between the speaker and your modem / router. Reposition your speakers if necessary.
There are several ways to connect the Parrot Zikmu Solo to your Wi-Fi network. The detailed connection procedures are available on the Parrot Zikmu Solo complete user guide on our website www.parrot.com.
English 15

Connection with WPS
If your modem / router supports the WPS technology:
1.Press the WPS button on your modem / router. Refer to the documentation of your device for more information.
2.Press the  button on the Parrot Zikmu Solo located behind the grid.
> The green light located next to this button blinks. It remains steady once the connection is established.
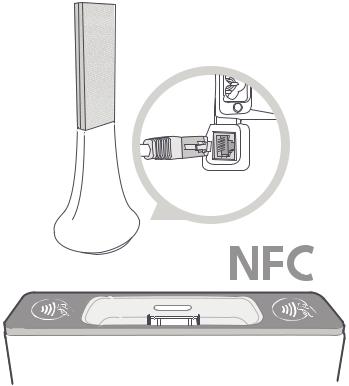
Connection with an RJ45 cable
Note : The RJ45 cable, also called ethernet cable, is not provided with the Parrot Zikmu Solo.
1.Connect your computer to the Parrot Zikmu Solo using an RJ45 cable (diagram p.8).
2.On your computer, launch your web browser and enter http://zikmu-solo.local/ wifi in the address bar.
> The list of available Wi-Fi networks will be displayed.
3.Select your Wi-Fi network.
4.Enter the WEP / WPA / WPA2 key if necessary then click on Apply.
16 English

Connection with an iPhone
If you have an iPod Touch 2G (or later version) or iPhone 3 (or later version):
1.Login to the App StoreSM and download the Parrot Audio Suite free application.
2.Install your iPhone on the Parrot Zikmu Solo (diagram p.6) or connect it to the speaker via Bluetooth (refer to the Bluetooth > Connection section).
3.Launch the Parrot Audio Suite application and press Wi-Fi.
>The list of available Wi-Fi networks will be displayed.
4.Select your Wi-Fi network. Enter the WEP / WPA / WPA2 key if necessary.
5.Press Join.
>The Parrot Zikmu Solo is now connected to your Wi-Fi network.
Manual connection
The Parrot Zikmu Solo creates a Wi-Fi network by default. You can connect your computer or Smartphone to this network in order to connect the Parrot Zikmu Solo to your Wi-Fi network.
Note : If the Parrot Zikmu Solo has already been connected to a Wi-Fi network, it will not create its own Wi-Fi network. To do so, you first need to reset the Parrot Zikmu Solo Wi-Fi parameters by holding down the  button for 2 seconds.
1. On your computer, scan for available Wi-Fi networks.
English 17

2.Join the "SoloNet-xx.xx" Wi-Fi network (as if you were trying to establish a connection with a router / modem).
Note : You will temporarily lose your Internet access. You can reconnect your computer to your Wi-Fi network at the end of this procedure.
3.Launch your web browser on your computer or Smartphone and enter http:// zikmu-solo.local (or http://[new-name].local if you changed the speaker name) in the address bar.
4.Click on Wi-Fi Configuration.
> The list of available Wi-Fi networks is displayed.
5.Select your Wi-Fi network.
6.Enter the WEP / WPA / WPA2 if necessary then click on Apply.
Using the web interface
The Parrot Zikmu Solo web interface allows you to control the playback of your audio files and modify several audio settings. You can access this interface from your computer, Smartphone or tablet.
1.Connect the Parrot Zikmu Solo to your Wi-Fi network using one of the previously described methods.
2.On your computer or Smartphone, launch your web browser.
3.Enter http://zikmu-solo.local (or http://[new-name].local if you changed the
18 English

speaker name) in the address bar.
Note : For more information about the web interface, refer to the corresponding tutorial available on the Parrot Zikmu Solo support page on our website www.parrot.com.
English 19

Bluetooth
Using the Parrot Zikmu Solo with a Smartphone
You can listen to music tracks stored on your Smartphone via the Parrot Zikmu Solo. Your Smartphone must support the Bluetooth® A2DP profile (Advanced Audio Distribution Profile).
Note: Depending on the model of your phone, you may need to authorize the connection to the Parrot Zikmu Solo to allow further automatic connections. Refer to the user guide of your phone for more information.
Using the Parrot Zikmu Solo with a computer
You can stream music via Bluetooth to the Parrot Zikmu Solo from any PC supporting Bluetooth technology and MAC OS X 10 (and later versions).
The detailed connection procedure depends on your computer and the Bluetooth software you are using. For more information, refer to your device user guide or to the Parrot Zikmu Solo complete user guide on our website www.parrot.com.
20 English
Connection
If you are using the Parrot Zikmu Solo with your Smartphone or computer, you need to connect both devices. But if you are using your Smartphone or computer with the Parrot Zikmu Solo for the first time, you need to pair both devices before connecting them. The pairing process is only necessary once.
1.Turn on the Parrot Zikmu Solo.
2.Remove the front grid (diagram p.5).
3.Press the  button.
>The blue light located next to the button starts blinking. The Parrot Zikmu Solo is now visible by the other Bluetooth devices for two minutes.
4.From your Smartphone or computer, launch a Bluetooth peripherals search.
5.Select « Zikmu-Solo ».
6.If your Smartphone or computer asks you to enter a Bluetooth PIN code, enter “0000”.
>The Parrot Zikmu Solo is now paired with your device. You can place the front grid back on the speaker.
7.Connect both devices.
>You can now start playing the track on your Smartphone or computer and the sound will come through the speaker.
English 21

If your Smartphone supports the NFC function, connection is also possible by touching the Parrot Zikmu Solo dock connector (diagram p.8). The area of the Smartphone which needs to touch the speaker depends on the phone model. Refer to your Smartphone user guide for more information.
22 English

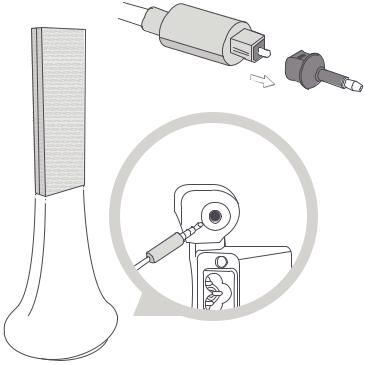
Jack
You can connect your analogue audio player (ex: CD player, TV) to the Parrot Zikmu Solo via a jack / jack cable to stream music. To do so, connect the cable to the jack connector located under the speaker (diagram p.7) and start playing a track.
If you wish to connect the Parrot Zikmu Solo to an audio player with an optical audio output (TV or DVD player), use the provided toslink / jack adapter (diagram p.7).
Note : Make sure that the connectors are inserted properly to avoid any disruption.
Note : To avoid any problem of sound saturation, increase the volume on the Parrot Zikmu Solo rather than on your audio player. The audio mixer available on the Parrot Audio Suite application allows you to define a volume level by default for each source to avoid problems such as a too high volume level after an audio source change.
English 23

Troubleshooting
Resetting the Parrot Zikmu Solo
If you have already configured your Parrot Zikmu Solo for Wi-Fi use and want to reset the Wi-Fi parameters to their factory settings, remove the front grid (diagram p.5) and hold down the  button.
If you are having an issue with an audio player connected to the Parrot Zikmu Solo via Bluetooth:
1.Turn off the audio player.
2.Remove the front grid (diagram p.5) and hold down the  button.
3.Reestablish the Bluetooth connection between the Parrot Zikmu Solo and the audio player.
If you are having an issue with your Parrot Zikmu Solo and need to reboot the speaker, remove the front grid (diagram p.5) and press the Reset button.
If you want to restore the Parrot Zikmu Solo factory settings, hold down the button.
Note: These resets can also be done using the Parrot Audio Suite application.
24 English

Pairing the remote control
If the Parrot Zikmu Solo remote control does not seem to work :
1.Make sure the battery is correctly installed (diagram p.4).
2.Restart the Parrot Zikmu Solo.
3.Press the SOURCE and  buttons simultaneously. You have one minute to perform this action once the Parrot Zikmu Solo is turned on.
Software update
Make sure you have the latest software update on your Parrot Zikmu Solo. Using the Web interface you can easily identify whether a new software update is available. If you require an update 'click' to download and install the latest version.
You can also check the software version displayed information if you have an iPod. To do so, install the iPod on the Parrot Zikmu Solo, then select Settings > General > Information if you have an iPhone or Settings > Information if you have an iPod. Browse through the displayed informations until "Parrot Zikmu Solo by Starck" is displayed.
English 25

Compatibility
If your phone does not seem to work with the Parrot Zikmu Solo, refer to the compatibility page on our website to check if your phone is compatible with the Parrot Zikmu Solo and to consult the corresponding pairing procedure : www.parrot.com/uk/compatibility.
For more information
Refer to the Parrot Zikmu Solo on our website : www.parrot.com/uk/support/ parrot-zikmu-solo.
26 English

General information
Warranty
Without prejudice of legal warranty, Parrot products are warranted during 1 year from the date of purchase for defects in materials and workmanship, provided that no deterioration to the product has been made, and upon presentation of proof of purchase (invoice) to the retailer. Warranty does not cover: upgrading of the software items of the Parrot products with Bluetooth cell phones for compatibility purpose, data recovery, deterioration of the external aspect due to normal wear of the product, any damage caused by accident, misuse, misapplication, or non-Parrot products. Parrot is not responsible for storage, loss or damaged to data during transit or repair. Any product wrongfully declared to be defective will be returned to sender and inspection, process and carriage costs will be invoiced to him.
Correct disposal of This Product (Waste Electrical & Electronic Equipment)
This marking  shown on the product or its literature, indicates that it should not be disposed with other household wastes at the end of its working life. To prevent possible harm to the environment or human health from uncontrolled waste disposal, please separate this from other types of wastes and recycle it responsibly
English 27

to promote the sustainable reuse of material resources.
Household users should contact either the retailer where they purchased this product, or their local government office, for details of where and how they can take this item for environmentally safe recycling. Business users should contract their supplier and the terms and conditions of the purchase contract. This product should not be mixed with other commercial wastes for disposal.
Modifications
The explanations and specifications in this guide are given for information purposes only and may be modified without prior notice. They are deemed to be correct at time of going to press. The utmost care has been taken when writing this guide,as part of the aim to provide you with accurate information. However, Parrot shall not be held responsible for any consequences arising from any errors or omissions in the guide, nor for any damage or accidental loss of data resulting directly or indirectly from the use of the information herein. Parrot reserves the right to amend or improve the product design or user guide without any restrictions and without any obligation to notify users. As part of our ongoing concern to upgrade and improve our products, the product that you have purchased may differ slightly from the model described in this guide. If so, a later version of this guide might be available in electronic format at Parrot’s website at www.parrot.com.
Registered Trademarks
28 English

Parrot, Parrot Zikmu Solo and the Parrot logo are registered trademarks of PARROT SA.
The Bluetooth ® word mark and logos are registered trademarks owned by Bluetooth SIG, Inc. and any use of such marks by Parrot S.A. is under license.
Bluetooth QDID : B013841, B013839, [-]
iPod, iPhone, Mac and Apple are trademarks of Apple Inc, registered in the US and others countries.
Windows XP, Windows Vista and Windows 7 are registered trademarks of Microsoft Corporation in the US and other countries.
Wi-Fi ® is a registered trademark of the Wi-Fi Alliance. The Wi-Fi CERTIFIED logo is a certification mark of the Wi-Fi Alliance.
Google Play is a trademark of Google Inc.
All other trademarks mentioned in this guide are protected and are the property of their respective owners.
Declaration of Conformity
We, Parrot S.A. of 174 quai de Jemmapes, 75010 Paris, France, declare under our sole responsibility that our product, the Parrot Zikmu Solo speaker to which this declaration relates are in conformity with appropriate standards EN300328, EN300220, EN301489-17, IEC60065 following the provision of EMC 204/108/EEC,
English 29

electrical security 2006/95/CE and R&TTE 1999/5/EC directives.
Identification N. 394 149 496 R.C.S. PARIS Parrot S.A.
Copyright © Parrot 2012. All rights reserved.
FCC Compliance Statement
This equipment has been tested and found to comply with the limits for a Class B Digital Device, pursuant to Part 15 of the FCC Rules. These limits are designed to provide reasonable protection against harmful interference in a residential installation. This equipment generates, uses and can radiate radio frequency energy and, if not installed and used in accordance with the instructions, may cause harmful interference to radio communications. However, there is no guarantee that interference will not occur in a particular installation. If this equipment does cause harmful interference to radio or television reception, which can be determined by turning the equipment off and on, the user is encouraged to try to correct the interference by one or more of the following measures:
-Reorient or relocate the receiving antenna.
-Increase the distance between the equipment and receiver.
-Connect the equipment to an outlet on a circuit different from that to which the receiver is connected.
30 English
 Loading...