


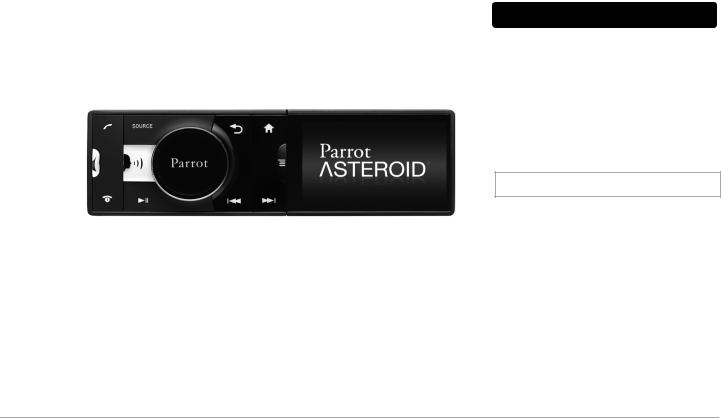
Parrot ASTEROID
Quick Start Guide Hurtig start guide
Краткое руководство по эксплуатации
Hurtig brugervejledning Pikakäyttöopas
Skrócona instrukcja obsługi Hızlı kullanı kılavuzu
Snabb bruksanvisning
Rychlý návod k použití

|
Parrot ASTEROID |
English..................................................................................... |
5 |
Norsk........................................................................................ |
13 |
РУССКИЙ................................................................................ |
21 |
Dansk....................................................................................... |
29 |
Suomi....................................................................................... |
37 |
Polski........................................................................................ |
45 |
Türkçe....................................................................................... |
53 |
Svenska.................................................................................... |
61 |
česky........................................................................................ |
69 |
|
www.parrot.com |
SOURCE |
GPS
10A
PARROT
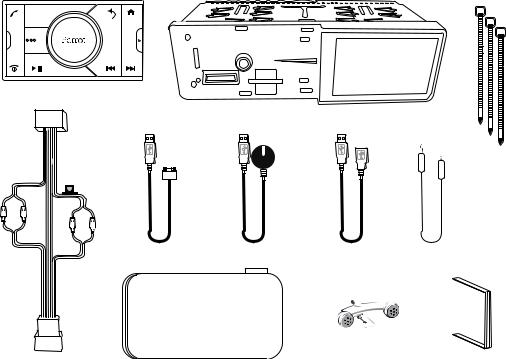
Kit content / Pakkens innhold / I förpackningen ingår / Sættets indhold / Obsah balení / Zawartość opakowania / Содержимое упаковки / Ambalajın içeriği
Quick start guide
Content
Before you begin................................................. |
p.5 |
Installation............................................................. |
p.7 |
Getting started....................................................... |
p.8 |
Phone.................................................................... |
p.9 |
Music..................................................................... |
p.9 |
Internet.................................................................. |
p.10 |
Troubleshooting..................................................... |
p.11 |
General information.............................................. |
p.11 |
Before you begin
About this guide
In order to limit our paper consumption, and as part of our environmentally friendly and responsible approach, Parrot prefers to put user documents online rather than print them out. This simplified guide to the Parrot
ASTEROID is therefore limited to providing you with the main instructions that will make it easy for you to use the device. More information can be found on the Support & Downloads section of our website, www. parrot.com: the full manual, FAQs, tutorials, and more.
Note: iPod and iPhone (in iPod mode) will be referred to as an «iPod» in this manual.
Warnings
•All functions requiring an increased attention should only be used while the vehicle is stationary . Your safety and the one of the other road users prevails over phone calls, music and navigation instructions. Be responsible: drive carefully and pay full attention to your surrounding. Parrot denies any liability should you choose not to respect this warning.
•Use the Parrot ASTEROID with a reasonable volume level so that you can hear all external noises while driving.
•The Parrot ASTEROID includes NdFeB magnets which can damage objects sensitive to magnetic fields (pacemakers, credit cards, mechanical clocks…).
English 5

6 English

Installation
Safety instructions
Note: We advise our customers to have the Parrot
ASTEROID fitted by a professional.
•Turn the ignition off before installing the Parrot ASTEROID.
•Install the Parrot ASTEROID only on vehicles with a 12 V battery .
•Place all cables away from hot places (heater outlet) and moving parts (gear shift, seat rails...).
Before you begin
•Remove your car stereo from your vehicle. You may need release keys to do so.
•Try to connect the audio and power connectors of the Parrot ASTEROID to the connectors of your vehicle. If this connection is impossible, you have to obtain an ISO adapter before installing the Parrot ASTEROID.
•Compare the Parrot ASTEROID antenna connector to the antenna connector of your vehicle. If an adapter is necessary, contact your local car audio specialist. Make sure you also supply power to your antenna if it is amplified. Power to the antenna can be supplied using the Parrot
ASTEROID ISO cable.
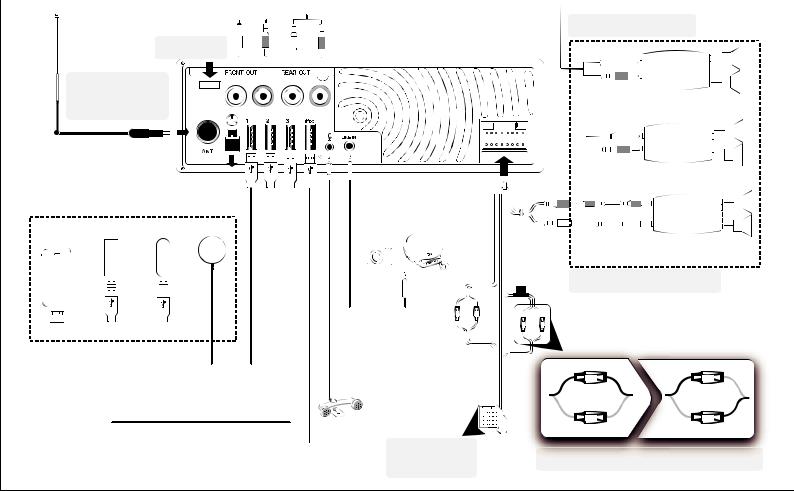
Installing the car stereo
1.Insert the cage and fix it into the dashboard using the bracket mounting tab.
2.Access the vehicles car stereo wiring harness from behind the dashboard.
3.Connect the audio and power connectors of the Parrot ASTEROID to the ones of your vehicle.
4.Check the wiring (as explained in the Final check section).
5.Install the audio cables (as explained in the Installing the cables section).
6.Install the double microphone (as explained in the
Installing the microphone section)
7.Slide the car stereo into the Parrot ASTEROID cage and install the faceplate.
Final check
•Once all the connections are made, turn the ignition on then off to perform the installation test. The “Goodbye” message must be displayed.
•If it is not the case, it is necessary to swap the positions of the red and yellow wires. Indeed, the red wire of the power cable must be connected to the 12V ignition, the yellow wire to the permanent 12V and the black wire to the ground. This can be done simply by reversing both fuse holders located on the Parrot wiring.
Installing the cables
•Connect the iPod / iPhone®, USB, Jack cables and the GPS dongle to the Parrot ASTEROID. We recommend you connect all audio cables to the Parrot ASTEROID even if you do not plan on using them. Route the audio cables to a suitable location in your vehicle such as the glove box or arm rest compartment. It may be necessary to drill a hole in your dashboard to do so. Avoid using USB extension cables.
•Make sure y ou connect the iPod / iPhone cable to its specific USB port. “iPod” is written above it. Use the dou- ble-sided tape to stick the GPS dongle to your dashboard. Once you have stuck the dongle to the dashboard, wait for approximately 2 hours to make sure the adhesive tape adheres well.
•To guarantee an optimal reception quality we recommend you do not connect your internet USB key 3G on the Parrot ASTEROID directly : use the USB cable to install your device on the dashboard (or any other open area).
•Use the provided cable ties to make sure the cables are well fixed to the car stereo. Insert one of the cable ties into the slot in the top left of the back of the car stereo (ref er to the diagram).
Installing the microphone
•Make sure the microphone is installed as close to the mouth of the user as possible. The ideal distance is 60 cm. The best possible location for the microphone is near the rearview mirror.
• The microphone needs to be pointed towards the user.
English 7

Basic operations
•To remove the faceplate, press the eject button on its left. Place the faceplate into the provided carrying case in order to protect it from scratches and dust.
•To attach the faceplate, put it on the right side of the car stereo. Once the faceplate and the car stereo magnets connect, press the left side.
•To remove the car stereo from the dashboard, insert the provided extraction key until they click into place.
Getting started
Navigating through the menus
•Press the  button to access the main menu.
•Browse through the menus by turning the wheel and confirm by pressing the wheel.
• Press the  button to get back to previous menu.
• Press the  button to access the pop-up menu corresponding to the current application. The popup menu allows you to change several settings or browse more easily through the content of your audio source or phonebook.
• Press the button to get to the track list if a song is currently being played. While navigating through the menus, press the SOURCE button to get to the Now Play ing screen.
Connecting a phone to the Parrot ASTEROID
•Bef ore pairing your phone with the Parrot ASTEROID, make sure that it is visible by all Bluetooth devices. To do so, select Settings >Telephony > Visibility then make sure the option is checked. If it is not the case, check it by pressing the jogwheel.
•Prior to using the Parrot ASTEROID with your phone for the very first time, you must initially pair both dev ices. To do so:
1.From y our phone, search f or Bluetooth® peripherals and select “Parrot ASTEROID “.
2.Enter «0 0 0 0» on your phone when prompted to do so.
> “Pairing successful” is displayed.
•Once y our phone is paired to the Parrot ASTEROID, the connection between both devices will be automatically
established each time the Parrot ASTEROID is turned on near your phone.
•You can pair up to 10 devices with the Parrot ASTEROID. If you attempt to pair an 11th phone, you will get the « Memory full » message. You must then delete a phone from the paired devices list. To do so:
1.Select Settings > Phone > Paired devices.
2.Select the phone then select Delete.
Synchronising the phonebook
•With most of the Bluetooth phones, the phonebook is automatically synchronized in the system’s memory .
Warning: Only the contacts stored in the phone memory are synchronized. If your contacts are stored in your SIM card memory, transfer them onto your phone memory.
•If your phone does not support automatic synchronization, you can also use the Object Push function of your phone to send contacts from your mobile to the Parrot ASTEROID via Bluetooth. To do so, select Settings > Telephony > Special pairing > Object Push.
8 English

Phone
Receiving a call
•An incoming call is indicated by a ringtone. The name of the caller is announced if his number is recorded in the phonebook of the phone connected to the Parrot ASTEROID.
-- If y ou want to answer the call, press the  button. Then press the
 button to end the call.
-- If y ou want to ref use this call, press the button.
Making a call
•To make a call vIa voice recognition:
1.Press the  button to launch the voice recognition feature.
>The Parrot ASTEROID asks y ou the name of the contact y ou want to call.
2.Say the name of the contact and the type of number («Work», «Cellphone»...) if there are several numbers associated to your contact.
>The call is automatically launched if the voice tag is correctly understood.
>If it is not the case, a conf irmation message is asked.
Confirm by saying «Yes» or «Call».
Note: At any time, press the  button to exit voice recognition mode
• Hold down the  button to redial the last dialled number.
Using the Parrot ASTEROID while on a call
•Use the jog wheel during a call to adjust the communication volume. The volume setting is saved for subsequent calls.
•During a call, if you want to continue the conversation on your phone (private conversation), press the  button.
•The Parrot ASTEROID allows you to send DTMF while on call. To do so, press the jogwheel.
Music
Using the voice recognition function
•The voice recognition function allows you to select the artist
/album you want to hear via voice recognition. This f unction is only av ailable If you are using the Parrot ASTEROID with a USB / SD / iPod peripheral.
Note : Several minutes of loading may be necessar when connecting your audio peripheral (USB / SD / iPod) to the Parrot ASTEROID for the first time, particularly if you are using audio peripheral with a large capacity or containing many audio files. This loading time will allow your audio files to be accessible via voice recognition.
• Press the 


 button then say the name of the artist / album.
•Check the albums and artists names in the metadatas of your music files. These names may be different from the ones displayed on your music files titles.
Radio
• To select a f requency:
1.Press the SOURCE button until the Radio source is selected.
2. Press briefly |
the |
. buttons |
to change |
manually the |
radio |
station. Hold down |
the |
buttons to tune to the next av ailable radio station.
English 9

•To get the list of all av ailable stations:
1.Press the SOURCE button until the Radio source is selected.
2.Press the  button and select Fullscan.
•To memorize a station:
1.Press the SOURCE button until the Radio source is selected.
2.Select the frequency manually or in Fullscan mode.
3.Press the  , button then select Add to presets.
> To select a stored station, select the Presets mode.
iPod
Connect your iPod using the iPod connector then press the SOURCE button until the iPod source is selected.
USB storage device
1.Connect your USB storage device to the Parrot ASTEROID using the USB cable or the USB connectors on the back of the car stereo
2.Press the SOURCE button until the USB source is selected.
SD card
1.Remov e the Parrot ASTEROID faceplate.
2.Insert the SD card into the appropriate slot with the contact surface facing down.
3.Reattach the faceplate.
4.Press the SOURCE button until the SD source is selected.
Analogue audio player
1.Connect the audio player using the Jack connector.
2.Press the SOURCE button until the Line in source is selected.
3. Start playing a song on your audio player.
Audio player connected via Bluetooth
•You can use the Parrot ASTEROID to listen to songs stored on your mobile phone or Bluetooth audio device. To do so, your phone / audio device must support the Bluetooth A2DP profile (Advanced Audio Distribution Profile).
•If you are using a Bluetooth audio player for the first time, you have to pair both devices.
•If both devices are already paired:
1.Press the SOURCE button until the Bluetooth Audio source is selected
2.Start playing a song on your audio player.
Internet
Connecting the Parrot ASTEROID to the internet
•Use a USB cable to connect an internet USB key to the Parrot ASTEROID. Then follow the displayed instructions.
Warning: Using the Parrot Asteroid applications require a USB internet key and an appropriate subscription offer.
Connecting the Parrot ASTEROID to Internet using an internet USB key may result in large additional roaming fees. Check the terms of use with your provider for more information. Make sure you check regularly your allowance and usage. Parrot is not responsible for any overcharge resulting in the use of the Parrot ASTEROID.
•If your phone supports the DUN Bluetooth profile (Dial-Up
Networking), connecting your phone to the Parrot ASTEROID via Bluetooth will also allow you to use the Internet applications.
Using the Parrot ASTEROID applications
•Several types of applications are available with the Parrot ASTEROID : music, geolocation, driver assistance... The available applications are listed in the Parrot Asteroid menu and displayed on the product packaging.
•All applications may not be available in all countries. The use of some applications may need prior subscription.
• Please refer to our website www.parrot.com for more information.
10 English
Troubleshooting
Before you begin
• Make sure the “Goodbye” message is displayed on the Parrot ASTEROID screen when you turn the ignition off . Refer to the Checking the wiring section for more information.
•Reset the Parrot ASTEROID. To do so, remove the faceplate then use a paper clip to press the Reset button. Hold down the Reset button for 3 seconds.
•Make sure you have the latest software update on your Parrot ASTEROID. To do so, select Settings > About > Version. Compare this number with the one on our website, Downloads section.
Problems while using the phone function
• Make sure your phone is compatible with the Parrot ASTEROID. To do so, refer to the compatibiity list of the Parrot ASTEROID available on our website www.parrot.com, in the Support & Downloads section.
•If y our phone is compatible with the Parrot ASTEROID and if you already have the latest software update:
•Erase the memory of the Parrot ASTEROID. To do so, select Settings > Advanced settings > Factory settings.
1.On your telephone, erase the Parrot system from the list of Bluetooth peripherals (or reboot your iPhone®).
2.Repeat the pairing procedure for the 2 devices.
Problems while using the music function
•Several minutes of loading may be necessary when connecting y our audio peripheral (USB / SD / iPod) to the Parrot ASTEROID for the first time, particularly if you are using audio peripheral with a large capacity or containing many audio files. This loading time will allow your audio files to be accessible via voice recognition.
•Reboot your iPod / iPhone bef ore connecting it to the Parrot
ASTEROID. To reboot your iPod / iPhone (this procedure will not erase any of your data) :
-- iPod: press Menu and the centre button simultaneously until the iPod reboots.
-- iPhone: Press the On/Of f button and the Home button simultaneously until the iPhone reboots. Do not touch the screen when the message “Slide to shutdown” appears.
•Some problems may occur if the iPod / SD card / USB device is already connected to the Parrot ASTEROID before you turn on the ignition. Connect the iPod / SD card / USB dev ice once the ignition is turned on.
General information
Warranty
Without prejudice of legal warranty , Parrot products are warranted during 1 year from the date of purchase for defects in materials and workmanship, provided that no deterioration to the product has been made, and upon presentation of proof of purchase (inv oice) to the retailer. Warranty does not cover: upgrading of the software items of the Parrot products with Bluetooth cell phones for compatibility purpose, data recovery ,deterioration of the external aspect due to normal wear of the product, any damage caused by accident, misuse, misapplication, or non-Parrot products. Parrot is not responsible for storage, loss or damaged to data during transit or repair. Any product wrongfully declared to be def ective will be returned to sender and inspection, process and carriage costs will be invoiced to him.
Correct disposal of This Product (Waste Electrical & Electronic Equipment)
This marking shown on the product or its literature, indicates that it should not be disposed with other household wastes at the end of its working life. To prevent possible harm to the environment or human health from uncontrolled waste disposal, please separate this from other ty pes of wastes and recycle it responsibly to promote the sustainable reuse of material resources. Household users should contact either the retailer where they purchased this product, or their local government of fice, for details of where and how they can take this item f or env ironmentally safe recycling. Business users should contract their supplier and the terms and conditions of the purchase contract. This product should not be mixed with other commercial wastes for disposal.
English 11

Modifications
The explanations and specifications in this guide are given for inf ormation purposes only and may be modified without prior notice. They are deemed to be correct at time of going to press. The utmost care has been taken when writing this guide,as part of the aim to provide you with accurate information. However, Parrot shall not be held responsible for any consequences arising from any errors or omissions in the guide, nor for any damage or accidental loss of data resulting directly or indirectly from the use of the information herein. Parrot reserves the right to amend or improve the product design or user guide without any restrictions and without any obligation to notify users. As part of our ongoing concern to upgrade and improve our products, the product that you have purchased may differ slightly f rom the model described in this guide. If so, a later v ersion of this guide might be available in electronic format at Parrot’s website at www.parrot.com.
FCC Compliance Statement
This device complies with part 15 of the FCC rules. Operation is subject to the following two conditions: (1). this device may not cause harmful interference, and (2). this device must accept any interference received, including interference that may cause undesired operation. Note: The manufacturer is not responsible for any radio or tv interference caused by unauthorized modifications to this equipment. Such modifications could void the user’s authority to operate the equipment. Canada
Class B statement: This Class B digital apparatus complies with Canadian ICES-003
Copyrights
Copy right © 2011 Parrot. All Rights Reserved
Declaration of Conformity
We, Parrot S.A. 174 quai de Jemmapes,75010 Paris, France, declare under our sole responsibility that our product, the Parrot ASTEROID to which
this declaration relates is in conformity with appropriate standards EN 60065 :2002/A1 :2006/A11 :2008, EN 50371 (2002),
EN 300328 v 1.7.1 and EN 301 489-17 v 1.3.2 following the provision of Radio Equipment and Telecommunication Equipment directive 1999/5/EC R&TTE and 2004/104/CE Automotive directive amended by the 2009/19/CE directive. http://www.parrot.com/fr/support/guidesdaideenligne/parrotasteroid/asteroid_ce_conformity _declaration.pdf
12 English

Hurtig start guide
Sammendrag |
|
Før du går i gang................................................................... |
s. 13 |
Montering............................................................................... |
s. 15 |
Første gang den brukes......................................................... |
s. 16 |
Telefon................................................................................... |
s. 17 |
Musikk.................................................................................... |
s. 17 |
Internett.................................................................................. |
s. 18 |
I tilfelle av problemer.............................................................. |
s. 19 |
Generell informasjon.............................................................. |
s. 19 |
Før du går i gang
Angående denne veiledningen:
For å begrense papirforbruket, i samsvar med vårt formål om å utvise ansvar og respekt for miljøet, foretrekker Parrot
ågjøre brukerveiledningene tilgjengelige online snarere enn
åtrykke dem. Denne forenklede veiledningen begrenser seg imidlertid til å gi deg de grunnleggende instruksjonene som gjør det mulig å bruke apparatet på en enkel måte. Du finner mer
informasjon i delen Support og nedlastinger på vår webside www.parrot.com: Komplett bruksanvisning, Ofte stilte spørsmål, veiledninger...
Merk: iPod og iPhone (i modusen iPod) vil bli betegnet som
«iPod» i denne håndboka.
Advarsel
•Funksjonene som krever lengre tids oppmerksomhet må kun benyttes når kjøretøyet står stille. Din og andre trafikanters sikkerhet har prioritet over telefonsamtaler, musikken og navigasjonsprogrammene. Vær ansvarlig: Kjør forsiktig, og ta hensyn til dine omgivelser. Parrot fraskriver seg ethvert ansvar dersom du velger å ignorere denne advarselen.
•Bruk Parrot ASTEROID med et fornuftig lydnivå, slik at du til enhver tid kan høre lyder utenfor under kjøringen.
•Parrot ASTEROID inneholder magneter av typen NdFeB som kan skade gjenstander som er følsomme overfor magnetfelt (pacemakere, kredittkort, mekaniske klokker osv.).
Norsk 13

Montering
Sikkerhetsinstruksjoner
Merk: Vi anbefaler at du kontakter en fagperson til denne monteringen, gjerne en i vårt nettverk av godkjente montører.
•Slå av motoren før du foretar monteringen.
•Parrot ASTEROID er kun beregnet til å fungere på et kjøretøy med et 12 V batteri. Hvis ditt kjøretøy (f.eks.: l lastebil) har et 24 V batteri, er det nødvendig å bruke et spenningsinverter.
• Forsikre deg om at ledningene er montert i god avstand fra varme områder (varmeapparat deler etc.) og bevegelige deler (girspake etc.)
Før du går i gang
• Ta ut den opprinnelige bilradioen fra kjøretøyet. Denne handlingen kan kreve bruk av uttrekksnøkler.
•Kontroller at kjøretøyets kontakter passer overens med lydog strømkontaktene til Parrot ASTEROID ved å sammenligne disse to kontaktene. Hvis de ikke passer overens, må man benytte ISO-adapter for å tilpasse Parrot
ASTEROID til kjøretøyets spesifikke kontakter. Kontakt en bilstereo forhandler for nærmere informasjon.
•Sammenlign antennekontakten til Parrot ASTEROID og den som tilhører kjøretøyet. Hvis det er nødvendig å bruke en antenneadapter, så kontakt en bilstereo forhandler for nærmere informasjon.
•Hvis antennen din er forsterket, har du muligheten til å tilføre den strøm via ISO-ledningen som følger med sammen med din Parrot ASTEROID.
Montering av bilradioen
1.Sett inn monteringskassen og fest den i rommet ved å trekke klaffene til side og utover. Trekk kjøretøyets lydog strømkabler mot utsiden av instrumentbordet, gjennom monteringskassen.
2.Forbind kjøretøyets lydkontakter og strømkontakter med kontaktene til Parrot ASTEROID.
3.Kontroller monteringen (se avsnittet Kontrollere monteringen).
4.Monter lydkablene (se avsnittet Montering av tilbehør).
5.Monter den dobbelte mikrofonen (se avsnittet Montering av dobbel mikrofon).
6.Bruk den medfølgende kabelstrammeren for å sikre at kablene er godt festet til bilradioen. Sett inn en av kabelstrammerne på plassen som er beregnet til dette, øverst til venstre på baksiden av bilradioen (se skjema).
7.Sett bilradioen inn i monteringskassen, og sett på frontstykket.
Kontrollere monteringen
•Slå på for deretter å slå av Parrot ASTEROID: Meldingen «Farvel» skal nå vises på skjemen.
•Dersom dette ikke skjer, må du bytte om plasseringene på den røde og gule ledningen. Den røde ledningen til strømkabelen skal være koblet til 12 V tenning, den gule ledningen til den permanente 12 V og den svarte ledningen til jord. Dette gjøres ganske enkelt ved å bytte om de tokabelskoene på kabelsystemet til Parrot.
Montering av tilbehør
• Koble iPod®-, USBog Jack-kablene så vel som GPS-don- gelen til Parrot ASTEROID. Vi anbefaler deg å koble til alle kablene til Parrot ASTEROID, selv om du ikke nødvendigvis har tenkt å bruke dem. Før lydkablene til et egnet sted som midtkonsollen eller hanskerommet. Det kan kreve at det lages et hull i instrumentbordet. Unngå om mulig bruk av USB-skjøteledninger.
•iPod-kabelen må kobles til den hvite USB-porten som er beregnet til dette. Det står “iPod”over denne.
• For å sikre en |
optimal |
mottakskvalitet, anbefaler |
vi at |
du ikke kobler |
ditt 3G |
USB-modem direkte til |
Parrot |
ASTEROID:Bruk den medfølgende USB-kabelen for å montere tilbehøret på instrumentbordet (eller et annet utildekt sted).
Montering av den doble mikrofonen
•Sørg for at mikrofonen er montert så nærme brukerens hode som mulig. Den ideelle avstanden er 60 cm. Det anbefales
åmontere mikrofonen nærme bakspeilet.
•Rett mikrofonen mot brukerens munn.
Montering av GPS-dongle
• Monter GPS-dongelen i en sone uten hindringer.
• Rengjør instrumentbordet, og bruk deretter klebeputen på baksiden av GPS-dongelen for å feste den til instrumentbordet. Vent deretter i omlag to timer uten å røre dongelen for å sikre at den sitter godt fast.
•Oppvarmede frontruter og vinduer med innlagt antenne kan påvirke GPS-mottakelsen og redusere påliteligheten til informasjonen fra navigasjonsprogrammene.
Norsk 15
Grunnleggende bruk
•For å ta ut frontplaten, trykk på eject-knappen. Bruk den medfølgende lommen til å beskytte frontplaten.
•For å sette frontplaten på plass igjen, plasser først den høyre siden mot bilradioen. Når magnetene på frontplaten og bilradioen får kontakt, trykk så på venstre side.
•For å ta bilradioen ut av rommet, så ta ut frontplaten og bruk deretter den medfølgende uttrekksnøkkelen
Første gang den brukes
Navigere i menyene
•Trykk på knappen  for å gå til hovedmenyen.
•Naviger i menyene ved å dreie på hjulet, og godkjenn ved
åtrykke på hjulet.
• For å gå tilbake til forrige meny, trykk på knappen  .
.
• Trykk på knappen  for å komme til pop up-menyen som svarer til det aktuelle programmet. Pop up-menyen gjør det især mulig for deg å få tilgang til programmets tilleggsfunksjoner, å endre visse innstillinger eller å bla raskere igjennom innholdet av din kontaktliste eller din lydkilde.
• Under avspilling av en musikkfil, trykk på knappen  for å gå tilbake til menyen. Når du navigerer i menyene, så trykk på knappen SOURCE for å gå tilbake til avspilleren.
Koble en telefon til Parrot ASTEROID
•Før du parer telefonen din med Parrot ASTEROID, så forsikre deg om at din Parrot ASTEROID er innstilt til å være synlig for alle Bluetooth-apparater. For å gjøre dette, velg Settings > Phone > Visibility og kontroller at alternativet er krysset av. Hvis ikke, så kryss det av ved å trykke på hjulet.
•Dersom det er første gang du bruker en telefon sammen med Parrot ASTEROID, må du først utføre en paring av de to apparatene. Når de to apparatene gjensidig har oppdaget hverandre, er det ikke lenger nødvendig å foreta denne operasjonen. Slik går du fram:
1.Fra telefonen søker du etter Bluetooth®-enheter og velger deretter «Parrot ASTEROID».
2.Paringsprosedyren avhenger altså av din telefonmodell:
-- Hvis telefonen ber deg skrive inn PIN-koden for Bluetooth, skriv inn «0000».
-- Hvis Parrot ASTEROID og telefonen viser to koder, så kontroller om kodene er identiske, og deretter bekreft eller annuller. > Skjermen til Parrot ASTEROID viser «Paring gjennomført».
• Når telefonen er paret med Parrot ASTEROID, vil forbindelsen mellom de to apparatene skje automatisk så snart de to apparatene er påslått og i nærheten av hverandre.
•Du kan pare inntil 10 apparater med Parrot ASTEROID. Hvis du prøver å pare en 11. telefon, vises meldingen «Memory full»: Du må altså slette en paret telefon. Slik går du fram:
1.Velg Settings > Phone > Paired devices.
2.Velg telefonen, og velg deretter Delete.
Synkronisere telefonens kontaktliste
Med de fleste Bluetooth-telefoner blir kontaktlisten automatisk synkronisert med systemets minne.
Advarsel: Kun kontaktene som er registrert i telefonens minne blir synkronisert. Hvis kontaktene dine er registrert i minnet på SIM-kortet, så overfør dem til telefonens minne. Se i brukerveiledningen til telefonen for mer informasjon.
16 Norsk
Telefon
Motta et anrop
•Et innkommende anrop angis med en ringetone. Navnet og nummeret til kontakten opplyses dersom nummeret til kontakten er registrert i kontaktlisten på telefonen som er forbundet til din Parrot ASTEROID.
-- Dersom du vil akseptere anropet, trykker du på knappen  Trykk på knappen
  for å avslutte anropet.
-- Dersom du vil avvise anropet, trykker du på knappen
 .
.
Foreta et anrop
Slik foretar du et anrop ved hjelp av stemmegjenkjenning:
1.Trykk på knappen  for å starte prosessen med stemmegjenkjenning.
>Parrot ASTEROID spør deg om navnet på kontakten som du ønsker å ringe til.
2.Si navnet på kontakten etterfulgt av nummertypen
(«Work», «Cellphone»...) Hvis flere nummer er tilknyttet denne kontakten.
>Anropet starter automatisk hvis stemmekommandoen har blitt riktig forstått.
>I motsatt fall utsender håndfrisystemet en bekreftelsesmelding. Bekreft ved å si «yes» eller «call».
Merk: Du kan når som helst trykke på knappen  for å avbryte anropsprosedyren.
•Dersom du ønsker å ringe opp det seneste inntastede nummeret, trykker du på knappen  i to sekunder.
Bruk mens en samtale pågår
•For å justere lydvolumet under en telefonsamtale, bruk hjulet. Volumet bevares ved de følgende telefonsamtalene.
•Hvis du vil overføre en pågående telefonsamtale til telefonen din, så trykk på knappen  .
.
•Parrot ASTEROID gjør det mulig for deg å sende DTMF under en samtale. For å gjøre dette, trykk på hjulet mens telefonsamtalen pågår.
Musikk
Bruke funksjonen stemmegjenkjenning av musikk
•Funksjonen stemmegjenkjenning av musikk gjør det mulig via stemmegjenkjenning å velge hvilke artister eller album du vil høre. Denne funksjonen er tilgjengelig hvis du bruker Parrot ASTEROID sammen med iPod / USB / SD, eller hvis du bruker programmet Deezer.
Merk: Lastingen kan ta flere minutter ved den først tilkoblingen av din lydenhet (iPod / USB / SD) til Parrot ASTEROID, især dersom lydenheten inneholder en stor mengde musikkfiler. Denne lastetiden lar lydfilene bli tilgjengelige via stemmegjenkjenning.
• Trykk på knappen 


 , og si deretter navnet på artisten eller albumet du vil lytte til.
•Kontroller navnene på artistene og albumene i taggene
(metadataen) til musikkfilene. Disse kan være annerledes enn de som vises i titlene på musikkfilene.
Bruke radiofunksjonen
•Slik velger du en frekvens:
1.Trykk på knappen SOURCE inntil Radio velges.
Bruk knappene


 for å velge en frekvens manuelt. Du kan også trykke i to sekunder på
knappene 


 for å starte et automatisk søk mot forrige / neste stasjon.
•Slik får du listen over alle tilgjengelige radiostasjoner:
1.Trykk på knappen SOURCE inntil Radio velges.
2.Trykk på knappen  og velg Fullscan.
Norsk 17

•Slik programmerer du en stasjon:
1.Trykk på knappen SOURCE inntil Radio velges.
2.Velg frekvensen manuelt eller ved bruk av funksjonen Fullscan.
3.Trykk på knappen  , og velg deretter alternativet Add to presets.
> Du finner deretter denne stasjonen ved å velge funksjonen Presets.
Bruk med iPod
Koble din iPod til iPod-kabelen, og trykk deretter på knappen SOURCE inntil iPod velges.
Bruk med en USB-nøkkel
1.Koble din USB-enhet til USB-kabelen eller på baksiden av bilradioen.
2.Trykk på knappen SOURCE inntil USB velges.
Bruk med et SD-kort
1.Ta av frontplaten til Parrot ASTEROID.
2.Sett SD-kortet inn i sporet som er beregnet til dette, med kontaktflaten pekende ned.
3.Sett frontplaten på plass igjen.
4.Trykk på knappen SOURCE inntil SD velges.
Bruk med en analog lydavspiller
Parrot ASTEROID gjør at du kan lytte til musikkfiler fra en lydavspiller som ikke er Bluetooth-kompatibel og som ikke er utstyrt med en USB-utgang (f.eks.: CD-spiller). Slik går du fram:
1.Koble til lydavspilleren ved bruk av Mini Jack-kontakten.
2.Trykk på knappen SOURCE inntil Line-inngang velges.
3.Start avspillingen fra din lydavspiller.
Bruk med en Bluetooth-lydavspiller
•Du kan bruke Parrot ASTEROID til å lytte til musikkfiler som er lagret på en Bluetooth-lydavspiller, dersom denne støtter
A2DP (Advanced Audio Distribution Profile).
•Hvis du bruker lydavspilleren for første gang, må du først pare den til din Parrot ASTEROID.
•Hvis lydavspilleren allerede er paret til Parrot ASTEROID :
1.Trykk på knappen SOURCE inntil Bluetooth Audio velges.
2.Start avspillingen av en musikkfil på lydavspilleren.
Internett
Koble Parrot ASTEROID til Internett
•Gå til vår webside for å finne listen over 3G USB-modem og telefoner som er kompatible med Parrot ASTEROID.
Advarsel: Internett-tilkobling via et 3G USB-modem krever et abonnementstilbud fra en telefonoperatør. Bruken av denne tjenesten kan medføre betydelige kostnader ved roaming. Undersøk dine abonnementsbetingelser og ditt forbruk hos din operatør. Parrot fraskriver seg ethvert ansvar for kostnader forbundet med slik bruk.
•Koble et 3G USB-modem til Parrot ASTEROID ved hjelp av en USB-kabel. Følg deretter instruksjonene på skjermen.
• Hvis du har en telefon som støtter Bluetooth-profilen DUN (Dial-Up Networking) eller PAN (Personal Area Network), gjør Bluetooth-tilkoblingen mellom din telefon og Parrot ASTEROID det mulig å dele telefonens 3G-tilkobling.
Bruke programmene til Parrot Asteroid
• Du har muligheten til å bruke flere typer programmer med Parrot ASTEROID: Musikk, geolokalisering, kjøreassistanse. Hvilke program som er tilgjengelige varierer avhengig av land. De tilgjengelige programmene i din Parrot ASTEROID vises i menyen og/eller er indikert på produktets emballasje.
•Visse programmer kan kreve et abonnement.
•For mer informasjon om bruken av de tilgjengelige programmene, gå til supportsiden til Parrot ASTEROID.
18 Norsk

Om problemer oppstår
Før du går i gang
• Forsikre deg om at meldingen “Goodbye” vises på skjermen til Parrot ASTEROID når du avbryter kontakten med kjøretøyet. Se avsnittet Kontrollere monteringen for mer informasjon.
•Restart apparatet. For å gjøre dette, ta av frontplaten og bruk en penn eller en annen spiss gjenstand til å trykke på knappen Reset. Trykk på knappen Reset i tre sekunder.
• Kontroller at du har den siste oppdateringen på Parrot ASTEROID. For å gjøre dette, velg Settings > About > Version. Sammenlign dette utgavenummeret med det som står på vår webside under avsnittet Nedlastinger.
Problemer knyttet til telefonfunksjonen
•Kontroller kompatibiliteten til telefonen med Parrot
ASTEROID. Du finner kompatibilitetslisten til Parrot
ASTEROID på vår |
webside www.parrot.com, avsnitt |
Support & Downloads. |
|
•Hvis telefonen din er indikert som kompatibel, og hvis din Parrot ASTEROID allerede har den siste oppdateringen, så slett paringen mellom de to apparatene på Parrot ASTEROID og på telefonen din, restart de to apparatene og gjenetabler tilkoblingen mellom de to apparatene.
Problemer knyttet til musikkfunksjonen
•Det kan ta flere minutter ved den første tilkoblingen av din lydenhet (USB / SD / iPod) til Parrot ASTEROID, især dersom lydenheten inneholder en stor mengde musikkfiler. Denne lastetiden lar lydfilene bli tilgjengelige via stemmegjenkjenning.
• Restart din iPod / iPhone® før du kobler den til Parrot
ASTEROID på nytt. Slik restarter du en iPod / iPhone (denne prosedyren sletter ingen data):
-- iPod: Trykk samtidig på Meny og på midtknappen inntil iPod-en starter på nytt.
-- iPhone / iPod touch: Trykk samtidig på av/på-knappen og på Home-knappen inntil iPhone-en starter på nytt. Ikke berør skjermen når meldngen “Slide to shutdown“ vises.
• Visse problemer kan oppstå dersom den eksterne enheten allerede er koblet til Parrot ASTEROID når du etablerer kontakt. Prøv på nytt ved å koble til den eksterne enheten etter å ha etablert kontakt.
Generelle opplysninger
Garanti
Parrots produkter er garantert med hensyn til deler og arbeid i ett (1) år fra innkjøpsdato, bortsett fra dersom produktet er endret. Kjøpsbevis (med angivelse av innkjøpsdato og produktets serienummer) må forelegges forhandler eller Parrot direkte.Garantien dekker ikke oppdatering av programvare som er lastet inn i Parrots produkter med Bluetooth®-mobiltelefoner med sikte på kompatibilitet eller gjenoppretting av data. Garantien dekker heller ikke utvendige skader på produktet ved normal bruk, skader grunnet ulykke, unormal eller uautorisert bruk eller bruk av produkter som ikke stammer fra Parrot. Parrot er ikke ansvarlig for lagring eller tap/ødeleggelse av data under transport eller reparasjon.
Hvis det viser seg at det innsendte produktet ikke er defekt, vil det bli returnert til avsenderen, og utgiftene forbundet med behandling, kontroll og transport vil bli fakturert vedkommende.
Korrekt avhending av dette produkt
(håndtering av elektrisk og elektronisk avfall) Denne merkingen som vises på produktet eller dens dokumentasjon, indikerer at den ikke skal kastes sammen med ordinært husholdningsavfall ved slutten av sin levetid. For å hindre mulige skade på miljøet eller menneskelig helse fra ukontrollert avfallsavhending, vennligst atskill dette fra andre typer avfall og resirkuler det ansvarlig for å fremme bærekraftig gjenbruk av materielle ressurser.
Norsk 19

Endringer
Forklaringene og spesifikasjonene i denne veiledningen gis kun i informasjonsøyemed og kan endres uten forvarsel. De anses for å være korrekte på trykketidspunktet. Ved utarbeidelsen av denne veiledningen har vi gått svært omhyggelig frem for å gi deg nøyaktig informasjon.
Men Parrot kan ikke holdes ansvarlig for eventuelle følger som oppstår ved feil eller utelatelser i veiledningen, eller for skader eller tap av data som direkte eller indirekte skyldes bruken av informasjonene i håndboken. Parrot forbeholder seg retten til å endre eller forbedre produktets utforming eller innholdet i brukerveiledningen uten forbehold og uten forpliktelse til å informere brukerne.
I rammen av vårt kontinuerlige arbeid med å oppgradere og forbedre våre produkter kan det være at produktet du kjøpte er noe forskjellig fra modellen som er beskrevet i denne veiledningen. Er dette tilfelle, kan en oppdatert versjon av denne veiledningen være tilgjengelig i elektronisk format på Parrots webområde på www.parrot.com.
Korrekt avhending av dette produkt (håndtering av elektrisk og elektronisk avfall)
Denne merkingen som vises på produktet eller dens dokumentasjon, indikerer at den ikke skal kastes sammen med ordinært husholdningsavfall ved slutten av sin levetid. For å hindre mulige skade på miljøet eller menneskelig helse fra ukontrollert avfallsavhending, vennligst atskill dette fra andre typer avfall og resirkuler det ansvarlig for å fremme bærekraftig gjenbruk av materielle res-surser. Husholdningsbrukere bør kontakte enten forhandleren der de kjøpte produktet, eller lokale myn- dig-heter, for detaljer om hvor og hvordan frakte denne artikkelen for miljømessig trygg resirkulering.Forretningsbrukere bør kontakte sin leverandør og undersøke vilkårene i kjøpekontrakten. Dette produktet skal ikke blandes med kommersielt avfall som skal kastes.
20 Norsk
Краткое
руководство по эксплуатации
Содержание |
|
Предварительные замечания................................................. |
стр.21 |
Установка................................................................................. |
стр.23 |
Первое включение................................................................... |
стр.24 |
Телефон................................................................................... |
стр.25 |
Музыка...................................................................................... |
стр.25 |
Интернет.................................................................................. |
стр.26 |
В случае проблемы................................................................. |
стр.27 |
Общая информация................................................................ |
стр.27 |
Предварительные замечания
Информация о руководстве
В целях снижения потребления бумаги и в рамках нашей программы ответственного и бережного отношения к окружающей среде, компания Parrot публикует документацию для пользователей в открытом доступе в Интернете, а не в печатном виде. В настоящем кратком руководстве даны основные инструкции по использованию аппарата. Более подробную информацию можно получить и скачать с сайта www.parrot.com в разделе “Поддержка”: полное руководство, ответы на часто задаваемые вопросы, обучающие программы…
Примечание: устройства iPod и iPhone (в режиме iPod) в данном руководстве будут названы iPod.
Внимание
•Функции, требующие повышенного внимания, должны использоваться только, когда автомобиль неподвижен.
Ваша безопасность и безопасность других участников дорожного движения важнее, чем телефонные звонки, музыка и навигационные приложения. Будьте ответственны: ведите автомобиль осторожно и следите за окружающей обстановкой. Parrot не несет никакой ответственности в том случае, если вы решили игнорировать это предупреждение.
•Устанавливайте на Parrot ASTEROID разумный уровень громкости, чтобы всегда слышать внешний шум во время движения.
•В Parrot ASTEROID используются неодимовые магниты (NdFeB), которые могут повредить предметы, чувствительные кмагнитномуполю (кардиостимуляторы, кредитные карты, механические часы и т.д.).
РУССКИЙ 21


Установка
Правила техники безопасности
Примечание: мы рекомендуем обратиться для установки к профессионалам, например, в один из наших сертифицированных установочных центров.
•Перед выполнением подключений выключите двигатель автомобиля.
•ParrotASTEROID предназначен только для автомобилей с напряжением бортовой сети 12 В. Если напряжение сети вашего автомобиля (например, грузовика) — 24 В, необходим понижающий трансформатор.
•Убедитесь,чтопроводапроложенывдалиотместнагрева (отверстий системы отопления и т.д.) и движущихся частей (рычага переключения передач и т.д.).
Подготовка
•Снимите автомагнитолу автомобиля. Для этого может потребоваться специальный съемник.
•Убедитесь, что разъемы аудиосистемы и питания Parrot ASTEROID и автомобиля совместимы. Если соединение невозможно, для включения Parrot ASTEROID в разъемы автомобиля необходимо использовать адаптер ISO. За дополнительной информацией обратитесь к профессиональному автомастеру.
•Сравните разъем антенны Parrot ASTEROID и автомобиля. Если необходим адаптер для антенны, обратитесь к профессиональному автомастеру .
•Если антенна имеет усилитель, вы можете обеспечить его питание по проводу ISO, входящему в комплект поставки Parrot ASTEROID.
Установка автомагнитолы
1.Вставьте на место монтажный кронштейн и зафиксируйте его, разведя язычки наружу. Вытяните провода аудиосистемы и питания из приборной панели автомобиля наружу, через монтажный кронштейн.
2.Соедините разъемы аудиосистемы и питания автомобиля и Parrot ASTEROID.
3.Проверьте установку (см. раздел Проверка установки).
4.Проложите провода аудиосистемы (см. раздел Установка аксессуаров).
5.Установите двойной микрофон (см. раздел Установка двойного микрофона).
6.Для правильной фиксации проводов на автомагнитоле используйте хомуты, входящие в комплект поставки. Один из хомутов вставьте в предусмотренное для него гнездо слева вверху на задней панели автомагнитолы (см. схему).
7.Вставьте автомагнитолу в монтажный кронштейн и установите переднюю панель.
Проверка установки
•ПослеустановкиParrotASTEROIDвключитеивыключите зажигание автомобиля: на дисплее должно появиться сообщение «Goodbye».
•Если это не так, поменяйте местами красный и желтый провода. Красный провод питания должен быть подключен к 12 В постоянного тока после замка зажигания, желтый — к 12 В до замка зажигания, а черный — к массе. Для этого достаточно поменять местами две клеммы на проводке Parrot.
Установка аксессуаров
• ПодключитекParrotASTEROIDпроводаiPod®,USBиJack,
а также модуль GPS. Мы рекомендуем подключить все провода, даже если вы не предполагаете использовать соответствующие функции. Выведите нужные разъемы из отделения для мелких предметов или перчаточного ящика. Для этого может потребоваться просверлить отверстие внутри приборной панели. По возможности не используйте USB-удлинители длиной несколько метров.
•ПроводiPodнеобходимоподключитькпредусмотренному для этого белому разъему USB. Над ним вы найдете маркировку «iPod».
•Для лучшего приема не включайте ключ 3G непосредственно в Parrot ASTEROID: используйте прилагаемый провод USB и установите ключ на приборной панели (или любой другой открытой поверхности).
Установка двойного микрофона
•Убедитесь, что микрофон находится как можно ближе к голове пользователя. Оптимальное расстояние равно 60 см. Желательно установить микрофон рядом с зеркалом заднего вида.
•Направьте микрофон в сторону рта пользователя.
Установка ключа GPS
•Установите ключ GPS на свободном пространстве.
•Протрите приборную панель и прикрепите ключ GPS, используя клейкий слой на его обратной стороне. Для надежной фиксации не перемещайте ключ в течение приблизительно двух часов.
•Атермические стекла и стекла со встроенной антенной могут затруднять прием сигналов GPS и снижать надежность работы навигационных приложений.
РУССКИЙ 23
Основные функции
•Чтобы снять переднюю панель, нажмите на кнопку выброса. Положите переднюю панель в приложенный футляр для защиты.
•Устанавливая переднюю панель, начинайте с правой стороны. Как только магниты передней панели и автомагнитолы соприкоснутся, нажмите на левую сторону.
•Чтобы снять автомагнитолу, снимите переднюю панель,
азатем используйте прилагающийся съемник.
Первое включение
Использование меню
•Для доступа к главному меню нажмите на кнопку .
.
•Для выбора пунктов меню вращайте ручку, для подтверждения выбора нажмите на нее.
• Для возврата к предыдущему меню нажмите кнопку  .
.
•Для доступа к контекстному меню текущего приложения нажмите кнопку  Контекстное меню дает, в частности, доступ к дополнительным функциям, некоторым настройкам, ускоренному просмотру содержимого каталога или аудиоустройства.
•Чтобы вернуться к меню во время воспроизведения музыкального файла, нажмите кнопку  И наоборот, для перехода от меню к воспроизведению, нажмите кнопку SOURCE.
Подключение мобильного телефона к Parrot
ASTEROID
• Перед сопряжением телефона с Parrot ASTEROID убедитесь, что Parrot ASTEROID настроен для обнаружения любыми устройствами Bluetooth. Для этого выберите Settings > Phone > Visibility и проверьте, стоит ли флажок для этой настройки. Если нет, поставьте флажок, нажав на ручку.
•При первом использовании телефона с Parrot ASTEROID следует выполнить сопряжение этих аппаратов. После того, как оба аппарата обнаружат друг друга, необходимости в повторном сопряжении не будет. Для этого:
1.На телефоне включите поиск устройств Bluetooth®,
затем выберите «Parrot ASTEROID».
2.Дальнейшая процедура соединения зависит от
модели телефона:
-- Если телефон предлагает ввести PIN-код Blu-
etooth, введите «0000».
-- Если Parrot ASTEROID и телефон показывают два кода, убедитесь, что они одинаковы, затем подтвердите или отмените. >На дисплее Parrot ASTEROID появится сообщение «Pairing successful».
•После сопряжения телефона с Parrot ASTEROID, соединение между аппаратами будет выполняться автоматически, каждый раз, когда они будут оказываться вблизи друг друга.
•Возможно сопряжение с Parrot ASTEROID до 10 аппаратов. При попытке сопряжения 11-го телефона появится сообщение «Memory full»: в этом случае нужно удалить сопряжение с одним из телефонов. Для этого:
1.Выберите Settings > Phone > Paired devices.
2.Выберите телефон и выберите Delete.
Синхронизация телефонной книги
При использовании большинства телефонов с Bluetooth телефонная книга автоматически синхронизируется с системной памятью.
Внимание! Синхронизируются только контакты, сохраненные в памяти телефона. Если контакты хранятся на SIM-карте, перенесите их в память телефона. За более подробной информацией обратитесь к руководству по эксплуатации телефона.
24 РУССКИЙ
 Loading...