


PARROT
MKi9100
Quick start guide
Guide d’utilisation rapide Guía de instalación rápida Bedienungsanleitung Guida all’uso Gebruikershandleiding Manual do utilizador


Parrot MKi9100
Installation diagrams........................ |
p.06 |
English............................................. |
p.13 |
Français........................................... |
p.21 |
Español........................................... |
p.29 |
Deutsch .......................................... |
p.37 |
Italiano ............................................ |
p.46 |
Nederlands ..................................... |
p.54 |
Português........................................ |
p.62 |
General Information......................... |
p.70 |
www.parrot.com

4

A
External double microphone
Double microphone Externe
Doble micrófono
Externes Doppelmikrofon
Doppio microfono esterno
Externe dubbele microfoon
Microfone duplo externo
B - C
mouting kit - Microphone
Accessoires de montage - Microphone Accesorios - Doble micrófono Zubehörteil - Doppelmikrofon Accessori - Microfono
Accessoires - Microfoon
Acessórios - Microfone
D
Remote control
Télécommande
Mando a distancia
Fernbedienung
Telecomando
Afstandsbediening
Telecomando
E
3V CR2032 battery. Pile de type 3V CR2032 Pila - 3V CR2032 Batterie - 3V CR2032 Pila - CR2032.
Batterij - 3V CR2032. Pilha - 3V CR2032
F – G
mouting kit – Remote control
Accessoires de montage – Télécommande Accesorios - Mando a distancia Zubehörteil - Fernbedienung
Accessori - Telecomando Accessoires - Afstandsbediening Acessórios - Telecomando
H
Screen
Ecran
Pantalla
Bildschirm
Display
Scherm
Ecrã
I
Screen cable
Câble écran
Cable de pantalla
Bildschirm -Kabel
Cavo per display
Schermkabel
Cabo para o ecrã
J-K
Accessories - Screen
Accessoires - Ecran
Accesorios - Pantalla
Zubehörteil - Bildschirm
Accessori - Display
Accessoires - Scherm
Acessórios - Ecrã
L
IPod / USB / Jack cable Câble iPod / USB / Jack
Cables iPod/iPhone Jack y USB iPod/iPhoneJack und USB-Kabel Cavi iPod/iPhone Jack e USB iPod/iPhone Jack en USB-kabels Cabos para iPod/iPhone Jack e USB
M
Electronic box
Boitier électronique
Caja electrónica
Elektronikgehäuse
Centralina elettronica
Kast
Caixa electrónica
N
Audio / Power / Mute cable Câble audio / Alimentation / Mute
Cable de atenuación con conectores ISO Mute-Kabel mit ISO-Anschlüssen
Cavo Mute con connettori ISO Mutekabel met ISO-connectoren Cabo mute com conectores ISO
5
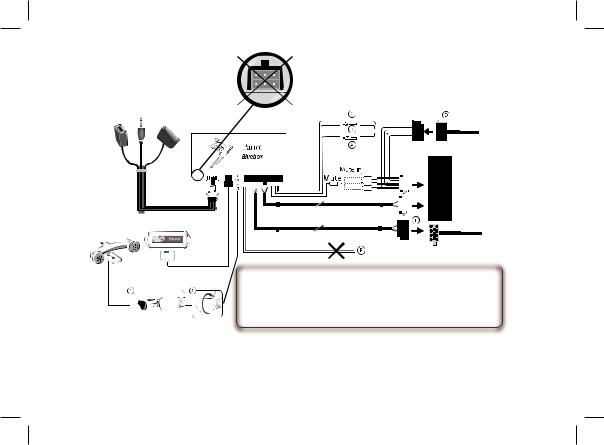
Not used
•A: 12V ignition (orange)
•B: 12V battery supply (red)
•C: Ground
•D: Connection to the vehicle’s power supply
•E : Connection to the vehicle’s speakers
1.Rear right speaker (purple / purple-black)
2.Front right speaker (grey / grey-black)
3.Front left speaker (white / white-black)
4.Rear left speaker (green / green-black)
•F : This wiring is not used.
- Car stereo with an ISO connector |
- Autoradio con connettore ISO |
- Autoradio avec connecteur ISO |
- Autoradio met ISO-connector |
- Autorradio con conector ISO |
- Auto-rádio com conector ISO |
- Autoradio mit ISO-Anschluss |
|
6
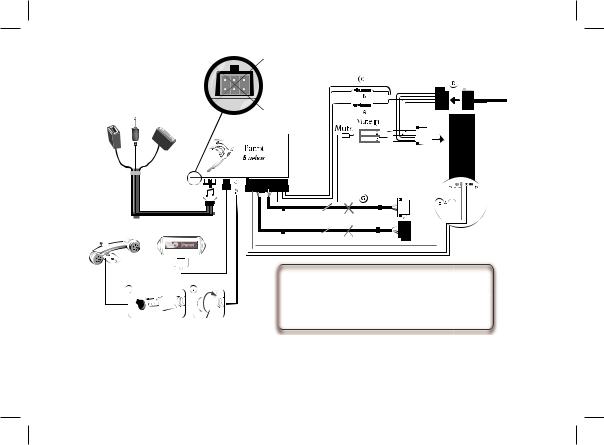
Not used |
-Car stereo with Line In input
-Autoradio avec entrées Line In
-Autorradio con entradas Line In
-Autoradio mit Leitungseingang
-Autoradio con ingresso Line In
-Autoradio met Line-In ingangen
-Auto-rádio com entradas Line In
7
clic
8
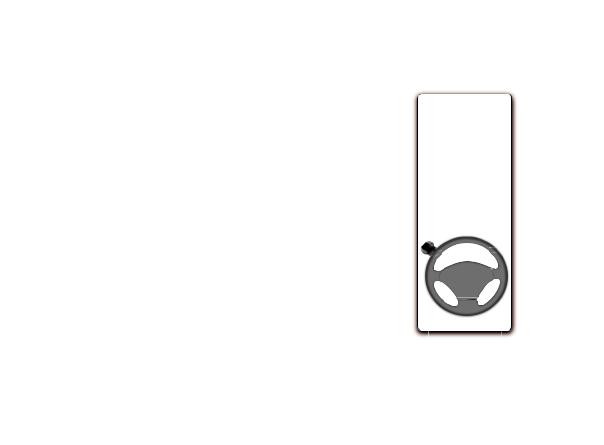
-Do not install the remote control on the outside of the steering wheel
-N’installez pas la télécommande sur le côté extérieur du volant
-No instale el mando en el lado exterior del volante
-Anbringen der Fernbedienung am Armaturenbrett
-Non installare il telecomando sul lato esterno del volante
-Installeer de afstandsbediening niet op de buitenzijde van het stuur
-Não instale o controlo remoto na parte exterior do volante
9
-The remote control only works with a 3V CR2032 battery.
-L’autonomie de la télécommande est assurée par une pile de type 3V CR2032 uniquement.
-La autonomía del mando a distancia se hace únicamente por una pila de tipo 3V CR2032.
-Die Autonomie der Fernbedienung wird ausschließlich durch eine Batterie des Typs 3V CR2032 sichergestellt.
-L’autonomia del telecomando è garantita esclusivamente da una pila da 3 V CR2032.
-De autonomie van de afstandsbediening wordt uitsluitend verzorgd door een batterij type 3V CR2032.
-A autonomia do controlo remoto é garantida apenas por uma pilha do tipo 3V CR2032.
10
1 |
2 |
3 |
4 |
5 |
11
12
English
Before you begin
About this guide
Software updates
ISO adapter
Contents
In order to limit our paper consumption, and as part of our environmentally friendly and responsible approach, Parrot prefers to put user documents online rather than print them out.
This simplified guide to the Parrot MKi9100 is there fore limited to providing you with the main instructions that will make it easy for you to use the device. More information can be found on the Support & Downloads section of our website, www.parrot.com: the full manual, FAQs, tutorials, and more.
Download the latest update for free (and check the update procedure) on our website www.parrot.com, in the Support & Downloads section. These updates will enable you to receive new features and improve the product’s compatibility.
If your car stereo is not fitted with ISO connectors, you need to purchase an ISO adapter cable to simplify the wiring procedure. Refer to the range of ISO adapters on our website.
Installation................................................. |
p.14 |
Getting started.......................................... |
p.16 |
Phone........................................................ |
p.18 |
Music......................................................... |
p.19 |
In case of problem..................................... |
p.20 |
http://www.parrot.com/uk/support
Complete user guide, tutorials, software updates...
13
Installation
We would advise our customers to have the Parrot MKi9100 fitted by a professional.
•The cables supplied with the kit feature ISO connectors and two pairs of line-out jacks. The line-out jacks can be used if your audio system features this option (use of an amplifier). Several set-ups are therefore possible depending on the type of car stereo and your vehicle.
•Prior to fixing the hands-free kit’s different components
inside the car, connect the installation cables, control keypad and double microphone to the electronic control unit.
•The mute function is used to cut the sound of your car stereo to enable a phone call. The choice of the mute-in jack depends on your car stereo’s configuration.
Car stereo with an ISO connector
►Diagram p.6.
1.Connect the male connectors of the hands-free kit to the car stereo.
2.Join the vehicle’s audio and power supply cables to the female connectors of the Parrot MKi9100.
3.On the installation cable, connect the free yellow wire to one of the audio system’s corresponding mute-in jacks if
available (mute in 1, mute in 2 or mute in 3).
If your car stereo is not equipped with ISO connectors, you will need to purchase an ISO adapter cable to simplify the wiring procedure. Refer to the range of ISO adapters on our website: www.parrot.com.
Car stereo with line-in jacks
► Diagram p.7.
•Use this type of connection by wiring a line-out jack (brown & white wire or red & black wire) to your car stereo’s line-in jack.
•Using the two pairs of line-out jacks will enable you to take advantage of the streaming audio function in stereo over your vehicle’s speakers.
•On the installation cable, connect the free yellow wire to one of the audio system’s corresponding mute-in jacks if available (mute in 1, mute in 2 or mute in 3).
Installing the kit’s power cable
Refer to your car stereo’s wiring diagram.
•The red wire of the kit’s cable must correspond to the constant +12V supply, the orange wire to the ignition +12V and the black wire to ground.
•Check that the orange wire is not connected to the constant
14
+12V supply, as you could run down the vehicle’s battery.
•On some vehicles, the red and orange power supply wires may need to be reversed. This can easily be done by reversing the two fuse holders on the Parrot MKi9100 installation cable.
•Many new vehicles do not have a 12 volt ignition supply. The 12 V ignition must then be taken elsewhere on the vehicle such as the fusebox or cigar lighter. An additional device generating an artificial ignition 12V signal may also be necessary.
Checking the wiring
In order to check the wiring, connect the screen before placing it on the dashboard.
•To perform the installation check, turn the ignition on, wait a few seconds then turn it off once the Parrot MKi9100 is installed: the message “Good bye!” must be displayed.
•If it is not the case, it is necessary to inverse the positions of the red and orange wires. Indeed, the red wire of the power cable must be connected to the permanent 12V, the orange wire to the 12V ignition and the black wire to the ground. This can be done simply by reversing both fuse holders located on the Parrot wiring.
Installing the audio connectors
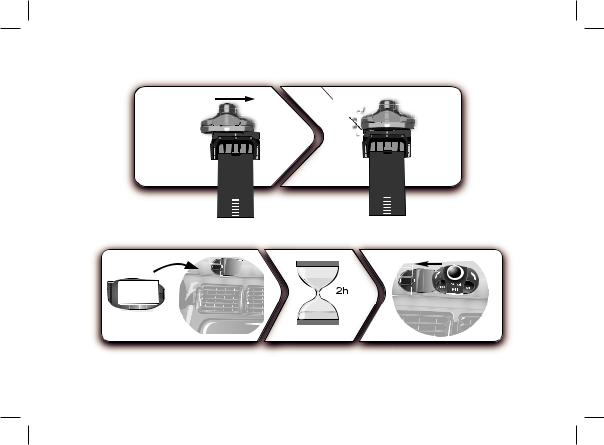
The music cable grommet system allows you to adjust the cable length while reducing its wear. ► Diagrams p.11.
1.Drill a 20 mm hole in your dashboard (glove compartment or parcel tray).
2.Insert manually two flexible arms of the grommet system.
3.Use a flat screwdriver in order to insert the last two arms. > You can now connect your music cable to the bluebox.
Installing the electronic box
•Avoid installing the electronic box near heating or air-con- ditioning system, on a spot directly exposed to sunlight or behind metal walls.
•Make sure the electronic box stays fixed once it is installed and that it will not move while you are driving.
•Do not reinstall the car stereo forcibly. If you are short of space behind the car stereo to install the electronic box, consider installing it in the glove box.
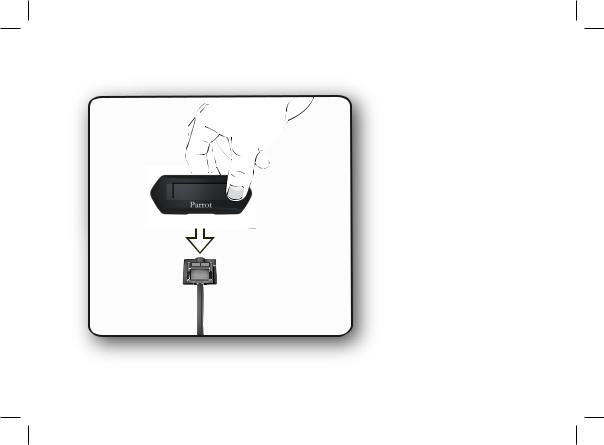
Installing the remote control
•If you want to place the remote control on the steering wheel, make sure it is securely attached, so it does not move when you are driving. Do not install the remote control on the outside of the steering wheel and ensure it does not get in the way when driving. ► Diagrams p.8/9.
15

•If you want to place the remote control on the dashboard, stick the double-sided tape located on the flat side of the bracket to fix it against the dashboard. You can then insert the remote onto the bracket. ► Diagrams p.8.
Once you have stuck the support on the dashboard, wait for approximately 2 hours to make sure the adhesive tape adheres well.
Installing the microphone
•Make sure the microphone is installed as close to the mouth of the user as possible. The ideal distance is 60 cm. The best possible location for the microphone is near the rear-view mirror.
•The microphone needs to be pointed towards the user.
Installing the screen
Install the screen in an easily accessible and visible location. Do not install the screen in the airbag deployment area or in a possible head impact area. ► Diagrams p.12.
Once you have stuck the support on the dashboard, wait for approximately 2 hours to make sure the adhesive tape adheres well.
Getting started
Associating the control unit with the remote control
If the remote control does not seem to be associated to the electronic box while using the Parrot MKi9100:
•After verifying the CR2032 battery is properly inserted in the remote unit, press and hold the Play and green buttons, then press the red button several times. This has to be done when you see the “Parrot MKi9100” Logo on the display screen.
•Within 1 to 2 seconds, you should then see a “Pairing Remote Control” message displayed on the screen. At that time, you can release the buttons and the remote should then be paired with the kit and the message will go away. You can verify remote operation by navigating through the menus.
•If you are unsuccessful on the first attempt, power off the unit until you see the “Goodbye” message, power it back on, and repeat the process.
Selecting the language
While using the Parrot MKi9100 for the first time, use the jog wheel to browse through the available languages and press the jog wheel to confirm your selection.
16

Navigating through the menus
•Press the central jog wheel to access the menus.
>The kit says the name of the current menu.
•Browse through the menus by turning the wheel and confirm with the green button or by pressing the wheel.
•Press the red button or wait a few seconds to exit the menu.
Pairing and connecting a phone to the Parrot MKi9100
Prior to using your Parrot MKi9100 with your phone for the very first time, you must initially pair both devices.
1.Make sure the Parrot MKi9100 is set so that it is visible by all Bluetooth ® devices. To do so, press the jog wheel and select Settings > Bluetooth > Visibility > Visible. The Parrot MKi9100 is visible by default.
2.Press the jog wheel and select Settings > Bluetooth >
Pair with...
>If your mobile phone’s model appears in the list, select it and confirm.
>If your mobile phone model doesn’t appear in the list, select the Other phones option.
3.From your phone, search for Bluetooth peripherals. Refer to your phone user guide for more information.
>The list of the available Bluetooth peripherals
is displayed.
4.Select «Parrot MKi9100» in the list.
>You are prompted to enter a PIN code.
5.Enter «0 0 0 0» on your phone.
>«Pairing successful» is displayed on the screen of the Parrot MKi9100.
>Once your phone is paired to the Parrot MKi9100, the connection between both devices will be automatically established each time you enter
your vehicle if your screen is plugged in.
Synchronising the phonebook
• With some Bluetooth phones, the phonebook is automatically synchronized in the kit’s memory. Only the contacts stored in the phone memory are synchronized.
•If your phone doesn’t support automatic synchronization, you can also use the Object Push function of your phone to send contacts from your mobile to the car kit via Bluetooth. To do so:
1.Press the jog wheel and select Telephone > Receive contacts.
> The kit says « Waiting for contact ».
2.Refer to your phones’ user guide for more information about sending contacts via Object Push.
17
Phone
The availability of some functionality only depends on your mobile phone. Refer to our website www.parrot. com, in the Support > Compatibility section,
for further information.
Receiving a call
•An incoming call is indicated by a ringtone. The name of the caller is announced if his number is recorded in the phonebook of the phone connected to the Parrot MKi9100.
-- If you want to answer the call, press the green button. Then press the red button to end the call.
-- If you want to refuse this call, press the red button.
•If the magic words are activated, you can use the voice recognition feature to pick up and reject a call:
-- The magic word «Accept» allows you to accept an incoming call.
-- The magic word «Reject» allows you to reject an incoming call.
•Magic words are activated by default. To deactivate / activate them:
1.Press the jog wheel and select Telephone > Voice commands > Magic words.
2.Press the jog wheel to activate/deactivate the magic words.
Making a call
•To make a call via voice recognition:
1.Press the green button to launch the voice recognition feature.
>The Parrot MKi9100 asks you the name of the contact you want to call.
2.Say the name of the contact and the type of number («Work», «Cellphone»...) if there are several numbers associated to your contact.
>The call is automatically launched if the voice tag is correctly understood.
>If it is not the case, a confirmation message is asked by the kit. Confirm by saying “Yes” or “Call”.
At any time, press the red key to exit voice recognition mode.
•To make a call manually:
1.Press the jog wheel to enter the main menu and select
Phonebook.
> You access the phonebook of the connected phone.
2.Select a letter and push the jog wheel.
3.Once the contact chosen:
-- Press the green key to call this contact;
-- Use the jog wheel to choose between different numbers of the same contact.
18
•Hold down the green key of the Parrot MKi9100 for two seconds to redial the last dialled number.
Using the Parrot MKi9100 while on a call
•Use the jog wheel during a call to adjust the communication volume. The volume setting is saved for subsequent calls.
•During a call, if you want to continue the conversation on your phone (private conversation), press the button of the Parrot MKi9100.
•During a call, the Parrot MKi9100 allows you to send DTMFs to manage your voice mail for example. To do so, press the jog wheel to access the DTMF menu.
Music
•Use the iPod, USB or Jack connectors to connect the Parrot MKi9100 to your iPod / USB stick / audio player.
•You can also use the Parrot MKi9100 to listen to songs stored on your mobile phone / PDA / smartphone. Your mobile phone must support the Bluetooth® A2DP profile.
•To change the music source, press the jog wheel to access the source menu and select it in the following order :
-- iPod (or iPhone) ;
-- USB (MP3 player / USB flash drive) ;
-- Audio Bluetooth (audio player supporting A2DPprofile connected via Bluetooth) ;
-- Line In (analogue audio player).
While playing a song, press the red button to get to main menu. While navigating through the menus, press the Play button to get to the Now Playing screen.
•There is no restriction in terms of capacity of USB stick. Only MP3 (Mpeg 1 Layer3) or WMA formats are supported.
19

In case of problem
Before you begin
•Make sure the “Good bye” message is displayed on the Parrot MKi9100 screen when you turn the ignition off.
► Refer to the Checking the wiring section for more information.
•Make sure you have the latest software update on your Parrot MKi9100. To do so, select Settings > Advanced settings > Information. Compare this number with the one on our website, Downloads section.
Problems while using the phone function
•Make sure your phone is compatible with the Parrot MKi9100. To do so, refer to the compatibility list of the Parrot MKi9100 available on our website www.parrot.com, in the Support & Downloads section.
•If your phone is compatible with the Parrot MKi9100 and if you already have the latest software update:
1.Erase the memory of the Parrot MKi9100. To do so, select Settings > Advanced settings > Factory settings.
2.On your telephone, erase the Parrot system from the list of Bluetooth peripherals (or reboot your iPhone).
3.Repeat the linking procedure for the 2 devices.
Problems while using the music function
•Reboot your iPod / iPhone before connecting it to the Parrot MKi9100. To reboot your iPod / iPhone (this procedure will not erase any of your data) :
-- iPod: press Menu and the centre button simultaneously until the iPod reboots.
-- iPhone: Press the On/Off button and the Home button simultaneously until the iPhone reboots. Do not touch the screen when the message “Slide to shutdown” appears.
•Some problems may occur if the iPod / USB device is already connected to the Parrot MKi9100 before you turn on the ignition. Connect the iPod / USB device once the ignition is turned on.
•If your Parrot MKi9100 is connected to an iPhone and an USB flash drive, the iPhone has priority: you can only browse through your iPhone content.
•Make sure that your iPod is updated.
For any other problem or for more information
•Refer to the Parrot MKi9100 FAQ available on our website, in the FAQ section.
• Consult the Parrot discussion & help forum on our website.
•Contact our support team (phone numbers / mail address on the last but one page).
20
|
|
|
Français |
|
|
|
|
|
|
|
|
||
|
|
|
|
|
|
|
|
|
|
Avant de commencer |
|
|
|
|
|
|
|
|
|
|
|
|
A propos de |
Afin de limiter notre consommation de papier et dans le cadre de notre démarche aussi respons- |
|
|
|
|
|
ce guide |
able et respectueuse que possible de l’environnement, Parrot privilégie la mise en ligne des docu- |
|
|
|
|
|
|
ments utilisateurs plutôt que leur impression. |
|
|
|
|
|
|
Ce guide simplifié du Parrot MKi9100 se limite donc à vous fournir les principales instructions qui vous |
|
|
|
|
|
|
permettront d’utiliser facilement cet appareil. Vous trouverez plus d’informations sur la section Support et |
|
|
|
|
|
|
téléchargement de notre site web www.parrot.com : notice complète, FAQ, didacticiels... |
|
|
|
|
|
Mise à jour |
Téléchargez gratuitement la dernière mise à jour de votre produit (et consultez la procédure de mise à |
|
|
|
|
|
|
jour) sur notre site web www.parrot.com section Support et téléchargements. Ces mises à jour vous |
|
|
|
|
|
|
permettront de bénéficier de nouvelles fonctionnalités et d’améliorer la compatibilité du produit. |
|
|
|
Câble adaptateur ISO
Sommaire
Si votre autoradio n’est pas équipé de connecteurs ISO, vous devez vous procurer un câble adaptateur ISO afin de faciliter le montage. Consultez la section installation de notre site internet.
Installation.............................................................. |
p.22 |
Première utilisation................................................. |
p.24 |
Téléphone............................................................... |
p.26 |
Musique.................................................................. |
p.27 |
En cas de problème................................................ |
p.28 |
http://www.parrot.com/fr/support
Notice complète, didacticiels, mises à jour...
21

Installation
Nous vous recommandons de faire appel à un professionnel pour l’installation du Parrot MKi9100.
•Avant de fixer les différents éléments du kit mains-libres dans l’habitacle, commencez par connecter les différents câbles sur le boîtier électronique. Retirez auparavant les connecteurs d’origine du système audio de votre véhicule.
•Les câbles fournis sont équipés de connecteurs ISO ainsi que de deux sorties Line. Les sorties Line peuvent être utilisées si votre système audio possède cette option. Plusieurs montages sont donc possibles selon le type de votre autoradio et de votre véhicule.
•La fonction Mute permet d’interrompre le son de votre autoradio pour laisser place à la communication. Le choix de l’entrée Mute dépend de la configuration de votre autoradio.
Autoradio avec connecteur ISO
► Schémas p.6.
Si votre autoradio n’est pas équipé de connecteurs ISO, vous devez vous procurer un câble adaptateur ISO afin de faciliter le montage. Consultez la gamme d’adaptateur ISO sur notre site internet.
1.Branchez les connecteurs mâles du kit mains-libres à l’autoradio.
2.Reliez les faisceaux audio et alimentation du véhicule aux connecteurs femelles du Parrot MKi9100.
3.Sur le câble d’installation, reliez le fil jaune libre à l’une des entrées mute correspondante du système audio s’il en est équipé (mute in1, mute in2 ou mute in3).
Autoradio avec entrées Line In
► Schémas p.7.
•Utilisez ce type de connexion en reliant une sortie « Line » (fils marron et blanc ou fils rouge et noir) sur l’entrée « Line » de votre système audio.
•L’utilisation des deux paires de sorties « Line » permet de bénéficier de la fonction Streaming Audio en stéréo sur les haut-parleurs de votre véhicule.
•Sur le câble d’installation, reliez le fil jaune libre à l’une des entrées mute correspondante du système audio s’il en est équipé (mute in1, mute in2 ou mute in3).
Installation du câble d’alimentation du kit
•Consultez le schéma électrique de votre autoradio.
•Le fil rouge du câble du kit doit correspondre au +12V permanent, le fil orange au 12V après-contact et le fil noir à la masse.
22
•Vérifiez que votre fil orange n’est pas connecté au 12V permanent, vous risqueriez de décharger la batterie du véhicule.
•Sur certains véhicules, il est nécessaire d’inverser les fils rouge et orange d’alimentation. Cette opération s’effectue simplement en inversant les deux portes fusibles situés sur le câble d’installation du Parrot MKi9100.
•Sur certains véhicules, il n’y a pas de +12V après contact sur les connecteurs du véhicule. Il est alors nécessaire de brancher le fil d’alimentation orange sur la boite à fusible ou sur une autre source d’alimentation après contact. Un accessoire supplémentaire générant un 12V après contact peut également être nécessaire.
Vérifier l’installation
Afin de procéder à la vérification de l’installation, connectez d’abord l’écran sans le placer sur le tableau de bord.
•Vérifiez la polarité de l’alimentation de votre kit mains-li- bres. Pour cela, coupez le contact de votre véhicule une fois le Parrot MKi9100 installé : le message « Au revoir » doit alors s’afficher à l’écran.
•Si ce n’est pas le cas, vous devez inverser les positions des fils rouge et orange. En effet, le fil rouge du câble d’alimentation doit être connecté au 12V permanent, le fil orange au 12V après-contact et le fil noir à la masse. Cette opération s’effectue simplement en
inversant les deux cosses situées sur le câblage Parrot.
Installation des connecteurs audio
Le système de fixation du câble musique vous permet d’ajuster la longueur du câble tout en réduisant considérablement son usure. ► Schémas p.11.
1.Percez un trou de 20 mm dans votre tableau de bord (vide-poche ou boite à gant).
2.Insérez manuellement deux des quatre bras flexibles du système de fixation.
3.Utilisez un tournevis plat pour insérer les deux derniers bras.
Installation du boitier électronique
•Evitez d’installer le boîtier près du chauffage ou de la climatisation, à un endroit exposé au soleil ou derrière des parois métalliques.
•Assurez-vous que le boitier reste immobile après son installation.
•Une fois le boitier installé, ne forcez pas lors de la remise en place de l’autoradio. Si la place derrière l’autoradio est insuffisante, envisagez le démontage de la boite à gants.
Installation de la télécommande
• Si vous souhaitez installer la télécommande sur le volant, veillez à ce qu’elle soit fermement attachée afin qu’elle ne
23
bouge pas durant la conduite. Ne l’installez pas du côté extérieur du volant afin de ne pas vous gêner lors de la conduite. ► Schémas p.8/9.
•Si vous utilisez le second support, utilisez l’adhésif double face situé au dos de celui-ci afin de le coller sur le tableau de bord. Vous pouvez ensuite insérer la télécommande sur ce support. ► Schémas p.8.
Patientez environ 2 heures après la fixation du support adhésif et assurez-vous qu’il soit bien fixé à votre tableau de bord.
Installation du double microphone
•Assurez-vous que le microphone soit installé le plus près possible de la tête de l’utilisateur. La distance idéale est de 60 cm. Installez de préférence le microphone près du rétroviseur.
•Orientez le microphone vers la bouche de l’utilisateur.
Installation de l’écran
Installez l’écran à un endroit facilement visible pour le conducteur. Evitez d’installer l’écran dans la zone d’action de l’airbag ainsi que dans une éventuelle zone d’impact de la tête. ► Schémas p.12.
Patientez environ 2 heures après la fixation du support adhésif et assurez-vous qu’il soit bien fixé à votre tableau de bord.
Première utilisation
Associer la télécommande et le boitier électronique
Si lors de votre première utilisation du Parrot MKi9100 la télécommande ne semble pas associée au boitier électronique, appuyez plusieurs fois sur le bouton rouge tout en maintenant enfoncés les boutons Play et vert. Cette manipulation doit être effectuée dans les 30 secondes suivant le démarrage de votre véhicule jusqu’à ce que le Parrot MKi9100 annonce «Réappairage de la télécommande».
Sélectionner la langue
Lors de votre 1ère utilisation du Parrot MKi9100, utilisez la molette pour parcourir la liste des langues disponibles, puis appuyez sur la molette pour valider votre sélection.
Naviguer dans les menus
•Appuyez sur la molette centrale pour accéder aux menus.
>Le kit énonce le nom du menu atteint.
•Naviguez dans les menus en tournant la molette, et validez avec le bouton vert ou en appuyant sur la molette.
•Pour sortir du menu, appuyez sur le bouton rouge ou attendez quelques secondes.
24

Jumeler et connecter un téléphone portable au Parrot MKi9100
Si vous utilisez votre téléphone avec le Parrot MKi9100 pour la 1ère fois, vous devez effectuer un jumelage des deux appareils : lorsque les deux appareils se seront détectés mutuellement, il ne sera plus nécessaire de procéder à cette opération. Pour cela :
1.Assurez-vous que votre Parrot MKi9100 soit réglé pour être visible par tous les appareils Bluetooth®. Pour cela, appuyez sur la molette et sélectionnez Préférences > Bluetooth > Visibilité > Visible. Le Parrot MKi9100 est visible par défaut.
2.Appuyez sur la molette et sélectionnez Préférences >
Bluetooth > Jumeler avec...
>Si le modèle de votre téléphone apparait dans la liste, sélectionnez le et appuyez sur la molette.
>Si le modèle de votre téléphone n’apparait pas dans la liste, sélectionnez l’option Autres téléphones...
3.Depuis votre téléphone, lancez une recherche de périphériques Bluetooth.
>La liste des périphériques Bluetooth s’affiche.
>Une fois la recherche terminée, sélectionnez «Parrot Parrot MKi9100».
4.Lorsque le téléphone vous invite à entrer le code PIN Bluetooth, entrez « 0 0 0 0 » .
>L’écran du Parrot MKi9100 affiche « Jumelage réussi».
> Une fois votre téléphone jumelé avec le Parrot MKi9100, la connexion entre les 2 appareils sera automatique à chaque fois que vous entrerez dans votre véhicule. Pour cela, l’écran du Parrot MKi9100 doit être branché.
Synchroniser le répertoire du téléphone
• Avec certains téléphones Bluetooth, le répertoire du téléphone est automatiquement synchronisé dans la mémoire du kit.
Seuls les contacts enregistrés dans la mémoire du téléphone se synchronisent.
•Si votre téléphone ne supporte pas la synchronisation automatique, vous pouvez aussi utiliser la fonctionnalité Object Push de votre téléphone afin d’envoyer des contacts de votre téléphone vers le Parrot MKi9100 par Bluetooth. Pour cela :
1.Appuyez sur la molette et sélectionnez Téléphone > Recevoir contacts.
2.Consultez la notice de votre téléphone pour connaître la procédure d’envoi de contacts par Object Push.
25
Téléphone
L’utilisation de certaines fonctionnalités dépend uniquement de votre téléphone.
Consultez notre site web www.parrot.com, section Support > Compatibilité pour plus d’informations.
Recevoir un appel
•Un appel entrant est indiqué par une sonnerie. Le nom du contact est annoncé si le numéro de ce contact est enregistré dans le répertoire du téléphone connecté au Parrot MKi9100.
-- Si vous souhaitez accepter cet appel, appuyez sur la touche verte. Appuyez ensuite sur la touche rouge pour terminer l’appel.
-- Si vous souhaitez refuser cet appel, appuyez sur la touche rouge.
•Si vous avez activé les mots magiques, vous pouvez utiliser les commandes vocales pour décrocher ou rejeter un appel entrant.
-- Le mot magique « Accepter » vous permet d’accepter un appel entrant.
-- Le mot magique « Rejeter » vous permet de refuser un appel entrant.
•Les mots magiques sont activés par défaut. Pour les activer ou les désactiver :
1.Appuyez sur la molette et sélectionnez Téléphone > Commandes vocales > Mots magiques.
2.Appuyez sur la molette pour activer/désactiver les mots magiques.
Emettre un appel
•Pour émettre un appel par reconnaissance vocale:
1.Appuyez sur le bouton vert pour initier le processus de reconnaissance vocale.
>Le Parrot MKi9100 vous demande le nom du contact que vous souhaitez appeler.
2.Prononcez le nom du contact que vous souhaitez appeler suivi du type de numéro («Bureau», «Portable»...) si ce contact dispose de plusieurs numéros.
>L’appel vers ce contact est automatiquement initié si la commande vocale a été bien comprise.
>Dans le cas contraire, le kit mains libres diffuse un message de confirmation. Confirmez en prononçant « oui », « appelle » ou « appeler ».
A tout moment, appuyez sur la touche rouge pour quitter le mode de reconnaissance vocale.
26
 Loading...