

Page 1
STAZIONE DI AFFILATURA PSS 65 A1
STAZIONE DI AFFILATURA
Traduzione delle istruzioni d’uso originali
SHARPENING STATION
Translation of the original instructions
IAN 102874
AFIADOR ELÉTRICO
Tradução do manual de instruções original
SCHÄRFSTATION
Originalbetriebsanleitung
Page 2

Prima di leggere aprire la pagina con le immagini e prendere confidenza con le diverse funzioni
dell’apparecchio.
Antes de começar a ler abra na página com as imagens e, de seguida, familiarize-se com todas as
funções do aparelho.
Before reading, unfold the page containing the illustrations and familiarise yourself with all
functions of the device.
Klappen Sie vor dem Lesen die Seite mit den Abbildungen aus und machen Sie sich anschließend
mit allen Funktionen des Gerätes vertraut.
IT / MT Traduzione delle istruzioni d’uso originali Pagina
PT Tradução do manual de instruções original Página
GB / MT Translation of the original instructions Page
DE / AT / CH Originalbetriebsanleitung Seite
4
19
35
49
Page 3
1 54
632
16
1415
10
13
78910111213
Page 4

IT MT
Indice
Introduzione ...............................4
Destinazione d‘uso .......................4
Descrizione generale .................... 5
Volume di fornitura ...........................5
Descrizione del funzionamento ..........5
Panoramica .....................................5
Dati tecnici ...................................5
Indicazioni di sicurezza ................6
Simboli e pittogrammi .......................6
Indicazioni di sicurezza generali per
utensili elettrici .................................6
Ulteriori indicazioni di sicurezza ........9
Rischi residui .................................10
Montaggio ................................. 10
Montaggio dei moduli di aflatura ...10
Comando ................................... 11
Accensione e spegnimento ..............11
Molatura .......................................11
Aflatura di punte da trapano .........11
Aflatura di ceselli e scalpelli da
legno ...........................................12
Aflatura di coltelli .........................12
Aflatura di forbici .........................13
Sostituzione della mola ...................13
Pulizia e manutenzione .............. 14
Pulizia ..........................................14
Conservacione ...........................14
Smaltimento/Tutela dell’ambiente .14
Pezzi di ricambio/Accessori ........15
Ricerca di guasti .........................16
Garanzia ...................................17
Servizio di riparazione ............... 18
Service-Center ............................18
Importatore ...............................18
Traduzione della dichiarazione
di conformità CE originale ..........65
Disegno esploso .........................69
Introduzione
Congratulazioni per l’acquisto del Suo
nuovo apparecchio. Ha scelto un prodotto
altamente pregiato.
Questo apparecchio è stato sottoposto a un
controllo di qualità durante la produzione
e quindi sottoposto a un controllo nale.
Quindi è garantito il funzionamento del
vostro apparecchio.
Le istruzioni per l’uso costituiscono
parte integrante di questo prodotto.
Contengono indicazioni importanti
per la sicurezza, l’uso e lo smaltimento. Prima dell’uso del prodotto,
si raccomanda di familiarizzare
con tutte le indicazioni di comando
e di sicurezza. Usare il prodotto
solo come descritto e per i campi
d’impiego specicati. Conservare le
istruzioni in un luogo sicuro e consegnare la documentazione in caso di
cessione del prodotto a terzi.
Destinazione d‘uso
L‘aflatrice è stata concepita per l‘aflatura
di utensili (come punte da trapano, coltelli,
forbici, ceselli, scalpelli da legno).
L’apparecchio non è concepito per qualsiasi altro tipo di utilizzo (ad esempio la
levigatura con utensili non adeguati, la levigatura con liquidi refrigeranti, la levigatura
di materiali nocivi come l’amianto).
L‘apparecchio è destinato all‘impiego domestico. Non è stato concepito per l‘impiego industriale permanente.
L‘apparecchio è destinato al‘uso da parte
di adulti. Giovani sopra i 16 anni possono
usare l‘apparecchio solo se sorvegliati
da un adulto. Il produttore declina ogni
responsabilità per danni causati da un uso
improprio o un comando errato.
4
Page 5

IT MT
Descrizione generale
Le gure si trovano sulle pagine
pieghevoli anteriori e posteriori.
Volume di fornitura
Rimuovere l‘apparecchio dall‘imballaggio
e controllare se è completo. Smaltire il
materiale di imballaggio secondo le disposizioni.
• Apparecchio
• Modulo di aflatura per
coltelli e forbici
• Modulo di aflatura per punte da trapano
• Modulo di aflatura per ceselli e scalpelli da legno
• Mola di riserva
• Traduzione delle istruzioni per l’uso in
originale
Descrizione del
funzionamento
L‘aflatrice è stata concepita per l‘aflatura
di utensili (come punte da trapano, coltelli,
forbici, ceselli, scalpelli da legno). A tal
ne, il prodotto comprende tre diversi moduli di aflatura, che fungono da guida e
da dispositivo di sicurezza, permettendo
al contempo di ottenere un‘aflatura e una
molatura precise.
Il funzionamento dei componenti è riportato nelle seguenti descrizioni.
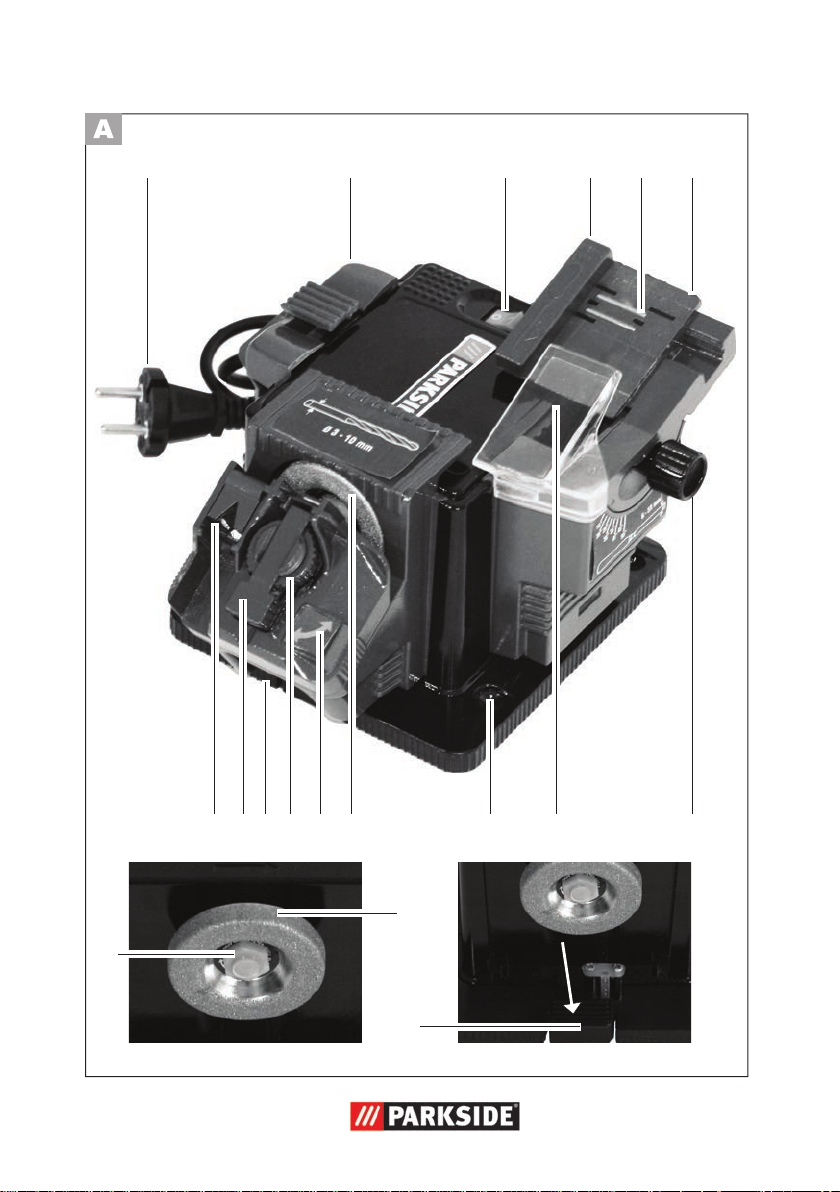
Panoramica
1 Spina
2 Modulo di aflatura per coltelli e
forbici
3 Interruttore di accensione/spe-
gnimento
4 Distanziatore
5 Porta magnete
6 Poggiapezzi
7 Vite di blocco per
regolazione angolo
8 Calotta protettiva
9 Fori di montaggio
installazione banco da lavoro
10 Mola
11 Sede girevole per punte
12 Ghiera di ssaggio punte
13 Leva di sblocco per
moduli di aflatura
14 Porta punte
15 Dispositivo di regolazione
16 Dado della mola
Dati tecnici
Tensione di entrata
nominale ................ 220 - 240 V~, 50 Hz
Potenza assorbita ......................... 65 W
(S2 10 min)*
Numero di giri a vuoto n
Classe di protezione ......................... II
Tipo di protezione .......................... IP 20
Peso .................................... ca. 1,25 kg
angolo di molatura ....................15° - 50°
Capacità di aflatura diametro
punte ...................................... 3 -10 mm
Capacità di aflatura larghezza coltelli
............................................. 6 - 51 mm
Livello di pressione acustica
(L
) ............. 59,3 dB (A); KpA= 3 dB (A)
pA
Livello di potenza sonora (L
misurato .........73,5 dB(A); K
* Dopo un servizio continuo di 10 minuti è
prevista una pausa da protrarsi nché l’apparecchio raggiunge una temperatura che si
discosta di meno di 2 K (2°C) dalla tempera-
tura ambiente.
........ 6700 min
0
)
wA
= 3 dB(A)
wA
-1
5
Page 6
IT MT
I valori di rumorosità e vibrazione sono
stati determinati conformemente alle prescrizioni e norme citate nella dichiarazione
di conformità. Ci si riserva il diritto di apportare variazioni tecniche ed ottiche senza preavviso nell’ambito dello sviluppo del
prodotto. Tutte le dimensioni, indicazioni e
dati delle presenti istruzioni per l’uso sono
pertanto non vincolanti. Non si accetta
pertanto alcuna rivendicazione di diritti a
fronte delle presenti istruzioni per l’uso.
Il valore di emissione di vibrazioni indicato
è stato misurato attraverso un procedimento di controllo standardizzato e può essere
utilizzato per il confronto di un apparecchio elettrico con un altro.
Il valore di emissione di vibrazioni indicato
può essere anche utilizzato per una prima
valutazione dell’esposizione alla quale si
è soggetti.
Avvertenza:
Durante l’uso effettivo dell’apparec-
chio elettrico, il livello di emissione
di vibrazioni può differire da quello
indicato a seconda della tipologia
e della modalità d’uso.
Per proteggere l’utilizzatore, è
necessario stabilire alcune misure
di sicurezza sulla base dei valori
d’esposizione alla quale si è sottoposti durante l’uso effettivo dell’apparecchio (qui bisogna considerare
tutte le fasi del ciclo di lavoro, ad
esempio i periodi in cui l’apparecchio è spento e quelli in cui invece
è acceso, ma senza sottoporre la
macchina a carico).
Indicazioni di sicurezza
Simboli e pittogrammi
Simboli sull‘apparecchio:
Attenzione!
Leggere e osservare le istruzioni
d‘uso allegate all‘apparecchio!
Indossare la protezione oculare.
Pericolo a causa di scosse elettri-
che! Prima di effettuare lavori di manutenzione e riparazione, staccare
la presa dalla spina.
Classe di protezione II
Le apparecchiature non si devono
smaltire insieme ai riuti domestici.
Simboli riportati nelle istruzioni
Simboli di pericolo con indica-
zioni relative alla prevenzione di danni a cose e persone.
Simboli di divieto (al posto del
punto esclamativo il divieto viene
delucidato) con indicazioni relative
alla prevenzione di danni.
Simboli di avvertenza con infor-
mazioni relative ad un uso corretto
dell’apparecchio.
Indicazioni di sicurezza generali per utensili elettrici
ATTENZIONE!
Durante l‘uso di utensili elettrici
devono essere osservate le seguenti
misure di sicurezza di base al ne
6
Page 7

IT MT
di evitare scosse elettriche e pericoli
di lesioni e incendi.
Prima di utilizzare il presente utensile elettrico leggere tutte le istruzioni,
conservare in buono stato le avvertenze di sicurezza.
Il termine usato nelle indicazioni di sicurezza „Utensile elettrico“ si riferisce a utensili
elettrici azionati con tensione di rete (con
cavo di rete) e a utensili elettrici azionati
con accumulatori (senza cavo di rete).
Lavorare in modo sicuro:
• Tenereinordinelazonadilavoro. Disordine nella zona di lavoro può
causare incidenti.
• Tenerecontodegliinussiambientali.
- Non esporre gli elettroutensili alla
pioggia. Non usare elettroutensili in
ambienti umidi o bagnati.
L’inltrazione d’acqua in un utensile
elettrico aumenta il rischio di scosse
elettriche.
- Garantire una buona illuminazione
dell’area di lavoro.
- Non usare elettroutensili in zone a
rischio di incendi o esplosioni.
Utensili elettrici generano scintille che
potrebbero inammare la polvere o i
vapori.
• Proteggersidascosseelettriche.
Evitare il contatto del corpo con le parti
collegate a terra (p. es. tubi, radiatori,
fornelli elettrici, frigoriferi).
• Tenerelontanealtrepersone.
Impedire che altre persone, in partico-
lare bambini, tocchino l’elettroutensile.
Tenerle lontane dalla zona di lavoro.
• Conservareelettroutensiliinutilizzati in un luogo sicuro. Elet-
troutensili inutilizzati devono essere
depositati in un luogo asciutto, sospeso
o chiuso, fuori dalla portata di bambini.
• Nonsovraccaricarel’elettroutensile. Si lavora meglio e in modo più si-
curo nel campo di potenza specicato.
• Usarel’elettroutensilegiusto.
- Non usare macchine a bassa potenza per lavori pesanti.
- Non usare l’elettroutensile per scopi
diversi da quelli per i quali è previsto.
Per esempio, non usare una sega circolare per tagliare tralicci o ceppi di
legno.
L’uso dell’utensile elettrico per scopi
diversi da quelli previsti può generare situazioni pericolose.
• Indossareunabbigliamento
adatto.
- Non indossare capi d’abbigliamento
larghi o gioielli, potrebbero essere
catturati dalle parti in movimento.
- In caso di lavori all’aperto si raccomanda di indossare scarpe antiscivolo.
- Usare una rete per raccogliere capelli
lunghi.
• Usareun’attrezzaturadiprotezione.
- Indossare occhiali di sicurezza. La
mancata osservanza di questa disposizione può provocare lesioni agli
occhi a causa di scintille o particelle.
- Per lavori che generano polveri indossare una maschera respiratoria.
• Collegareildispositivodiaspirazione polveri. In presenza di attacchi
per l’aspirazione di polveri e dispositivi
di raccolta, assicurarsi che questi siano
collegati e usati correttamente.
• Nonusarecaviperscopidiversi
da quelli previsti. Non usare il cavo
per staccare la spina dalla presa. Proteggere il cavo da fonti di calore, olio e
spigoli vivi.
7
Page 8

IT MT
• Bloccareilpezzo.Usare dispositivi
di serraggio o una morsa a vite per
bloccare il pezzo. In questo modo si
garantisce una presa più sicura che con
le mani.
• Evitarepostureanormali.Garan-
tire una posizione stabile e mantenere
l’equilibrio in ogni momento.
In questo modo è possibile controllare
meglio la sega elettrica nelle situazioni
impreviste.
• Manuteneregliutensiliconcura.
Molti infortuni sono causati da una
manutenzione non corretta degli utensili
elettrici.
- Tenere gli utensili di taglio sempre aflati e puliti per poter lavorare meglio
e in modo più sicuro.
- Controllare a intervalli regolari la
conduttura di allacciamento dell’elettroutensile e, in caso di danneggiamento, farla sostituire da un esperto
autorizzato.
- Controllare a intervalli regolari le
prolunghe e sostituirle quando sono
danneggiate.
- Tenere le impugnature asciutte, pulite
e prive di olio e grasso.
• Staccarelaspinadallapresa.In
caso di inutilizzo dell’elettroutensile,
prima di un intervento di manutenzione
e durante una sostituzione degli utensili.
Queste misure sono atte a impedire
l’avviamento involontario della sega
elettrica.
• Nonlasciareinseriteeventuali
chiavi per la sostituzione di utensili. Vericare prima dell’accensione se
le chiavi e gli utensili di regolazione
sono stati rimossi.
Un utensile o una chiave che si trova
all’interno di una parte rotante dell’apparecchio, può causare lesioni.
• Evitareunavviamentoinvolontario. Assicurarsi che l’interruttore sia
spento quando si inserisce la spina nella presa.
• Usarelaprolungaperambienti
esterni.
All’aperto usare solo prolunghe apposi-
tamente autorizzate e contrassegnate.
• Prestare attenzione ai propri mo-
vimenti e lavorare con l’utensile
elettrico usando raziocinio. Non
usare un utensile elettrico, quando si
è stanchi o si è sotto effetto di droghe,
alcol o farmaci. Un attimo di disattenzione durante l’uso dell’utensile elettrico
può causare lesioni gravi.
• Controllarel’elettroutensileper
vericarelapresenzadieventu-
ali danneggiamenti.
In questo modo si garantisce il mantenimento della sicurezza dell’utensile
elettrico.
- Prima di usare l’elettroutensile è
necessario controllare con cura i
dispositivi di sicurezza o le parti leg-
germente danneggiate per vericare
il loro funzionamento perfetto e a
regola d’arte.
- Controllare se le parti in movimento
sono perfettamente funzionanti e non
si inceppano oppure se sono dan-
neggiate. Tutte le parti devono essere
montate correttamente e soddisfare
tutti i requisiti, per garantire un funzionamento.
- Salvo diversamente specicato nelle
istruzioni per l’uso, i dispositivi di protezione e parti danneggiate devono
essere riparati o sostituiti da un’ofcina specializzata riconosciuta.
- Interruttori danneggiati devono essere
sostituiti presso un’ofcina per il servizio di assistenza clienti.
8
Page 9

IT MT
- Non usare elettroutensili, nei quali
non è possibile accendere o spegnere
l’interruttore. Pericolo di lesioni.
• Attenzione! L’uso di altri utensili e ac-
cessori può generare pericoli di lesioni.
• Fareripararel’elettroutensileda
parte di un elettricista esperto.
Questo elettroutensile corrisponde alle
disposizioni di sicurezza in materia. Riparazioni possono essere eseguite solo
da un’ofcina specializzata, nella quale
vengono usati ricambi originali; in caso
contrario possono vericarsi incidenti
per l’utilizzatore.
Ulteriori indicazioni di
sicurezza
• Collegare l’apparecchio solo a una
presa dotata di circuito di sicurezza per
correnti di guasto (interruttore FI) con
una corrente di guasto nominale di massimo 30 mA.
• Tenere il cavo di rete e la prolunga lontani dalla mola abrasiva e dalla catena
della sega. In caso di danneggiamento
o tranciatura staccare immediatamente
la spina dalla presa.
Non toccare la conduttura, prima che
sia stata staccata dalla rete.
Pericolo di schock elettrico
• La sostituzione della spina o del cavo
di alimentazione deve essere eseguita
esclusivamente dal costruttore dell’utensile elettrico o dal rispettivo centro assi-
stenza, al ne di evitare l’insorgere di
pericoli.
• Accendere l’apparecchio solamente
dopo averlo ssato saldamente al pia-
no di lavoro.
• Per la propria sicurezza si raccomanda
di utilizzare solamente gli accessori
e i dispositivi ausiliari indicati nelle
istruzioni d’uso o raccomandati, ovvero
indicati, dal costruttore dell’utensile.
• Utilizzare solo mole il cui numero di
giri indicato corrisponde almeno a
quello riportato sulla targa identicativa
dell’apparecchio.
• Sottoporre la mola a un’ispezione visiva prima dell’utilizzo. Non usare mole
danneggiate o deformate. Sostituire la
mola quando usurata.
• Assicurarsi che le scintille provocate
dalla levigatura non costituiscano un
pericolo, ad esempio che non colpiscano persone o incendino sostanze
inammabili.
• Durante la levigatura, la spazzolatura e
la troncatura usare sempre gli occhiali
protettivi, i guanti di sicurezza, un dispositivo di protezione delle vie respiratorie e le protezioni acustiche.
• Le parti rotanti dell’apparecchio non
possono essere coperte per non compromettere il funzionamento. Pertanto,
si raccomanda di procedere con attenzione e di tenere il pezzo da lavorare
ben saldo, in modo da evitare che scivoli e che le mani entrino conseguentemente in contatto con il nastro abrasivo
o la mola.
• Durante la levigatura il pezzo si surriscalda. Non afferrarlo dal lato di lavorazione, lasciarlo raffreddare. Pericolo
di ustione! Non usare refrigeranti o
sostanze simili.
• Non usare l’apparecchio in caso di
stanchezza o dopo l’assunzione di
alcol o di medicinali. Interrompere sempre il lavoro a tempo debito.
• Spegnere l’apparecchio ed estrarre la
spina
- per sbloccare un accessorio bloccato,
- se il cavo di alimentazione è danneggiato o si è ingarbugliato,
- in presenza di rumori inconsueti.
9
Page 10
IT MT
Rischi residui
Anche se questo utensile elettrico viene
usato conformemente alle disposizioni,
rimangono sempre rischi residui. I seguenti
pericoli possono vericarsi in relazione
alla tipologia costruttiva e al tipo di esecuzione di questo elettrodomestico:
a) Danni ai polmoni, in caso di mancato
utilizzo di un apposito dispositivo di
protezione delle vie respiratorie.
b) Danni all’udito, in caso di mancato
utilizzo di un’apposita protezione acustica.
c) Danni alla salute dovuti a
- il contatto con gli utensili di levigatura in un’area non coperta;
- la proiezione di parti del pezzo in
lavorazione o di una mola danneggiata.
d) Danni alla salute risultanti dalle oscil-
lazioni mano-braccio, quando l’apparecchio viene usato per un periodo
prolungato o non viene condotto o
manutenuto conformemente alle disposizioni.
Avvertenza! Questo utensile elet-
trico genera un campo magnetico
durante il funzionamento. In determinate condizioni questo campo
può compromettere gli impianti
medici attivi o passivi. Per ridurre
il pericolo di lesioni gravi o letali, consigliamo alle persone con
impianti medici di consultare il
medico e il produttore dell’impianto
medico prima di azionare la macchina.
Montaggio
Attenzione!Pericolodiferi-
mento!
- Assicurarsi di disporre di uno
spazio sufciente allo svolgimento del lavoro e di non compromettere la sicurezza di altre
persone.
- Prima della messa in funzione
montare correttamente tutte le
coperture e i dispositivi di protezione.
- Estrarre la spina prima di
regolare l’apparecchio
Installazione
Posizionare l‘aflatrice su una supercie
stabile e bloccarla. Se possibile, avvitare
l‘apparecchio alla supercie di appoggio.
A tal ne utilizzare i fori di montaggio per
l‘installazione del banco da lavoro (9) sulla piastra di base.
Le viti e i dadi di montaggio non
sono forniti con l’apparecchio.
Montaggio dei moduli di
aflatura
1. Selezionare uno dei tre moduli
di aflatura.
2. Per rimuovere il modulo di af-
latura dalla posizione di lavoro,
spingere verso il basso l‘apposita leva di sblocco (13).
3. Estrarre dalle scanalature il modulo di aflatura, tirando verso
l‘alto.
4. Nelle posizioni di conservazione
di destra e di sinistra, i moduli
di aflatura non sono bloccati e
10
Page 11
IT MT
possono essere facilmente estratti dalle scanalatura tirando verso
l‘alto.
5. Per bloccare il modulo di aflatura desiderato nella posizione di
lavoro, introdurlo dall‘alto nelle
scanalature. Spingere il modulo
di aflatura verso il basso no a
farlo scattare in posizione.
Imodulidiaflaturafungo-
no anche da dispositivo di
sicurezza.Nonutilizzaremai
l‘apparecchio senza modulo
diaflatura.Pericolodiferimento!
Comando
Attenzione!Pericolodilesioni!
- Staccare la spina elettrica prima
di eseguire qualsiasi lavoro
all‘apparecchio.
- Usare solo mole e accessori consigliati dal produttore. L’uso di
altri utensili e altri accessori può
generare pericoli di lesioni.
- Non azionare mai l’apparecchio
senza visiera
- Accendere l‘apparecchio solo
dopo che è stato montato in modo
sicuro sulla supercie di lavoro.
Anche se l‘apparecchio è do-
tato di parascintille, durante
l‘uso si raccomanda di usare
sempre occhiali protettivi per
evitare lesioni agli occhi.
Tenere le mani a distanza
dalla mola e dal nastro abrasivo durante il funzionamento dell’apparecchio. Pericolo
di ferimento.
Accensione e spegnimento
Prestare attenzione che la tensione
dell‘allacciamento alla rete corrisponda alla targhetta del tipo posta
sull‘apparecchio.
Collegare l‘apparecchio alla tensio-
ne di rete.
1. Per accendere l’apparecchio premere
l’interruttore di accensione „I“ (verde),
l’apparecchio viene avviato (vedi
2. Per spegnere l’apparecchio premere
l’interruttore di spegnimento „0“ (rosso),
l’apparecchio si spegne (vedi
Dopo l’accensione attendere nché l’apparecchio ha raggiunto la velocità massima.
Solo allora procedere con la levigatura.
La mola abrasiva continua a
ruotare, dopo che l‘apparecchio è stato spento. Pericolo
di lesioni.
Ciclo di prova:
Prima di eseguire il primo lavoro e dopo
ogni sostituzione della mola abrasiva, effettuare un ciclo di prova di minimo 60 secondi senza carico. Spegnere subito l‘apparecchio se la mola abrasiva non gira in modo
uniforme, si vericano notevoli oscillazioni
oppure si sentono rumori anormali.
3).
3).
Molatura
Aflaturadipunteda
trapano
L‘apparecchio può aflare punte da trapano di 3-10 mm di diametro.
11
Page 12

IT MT
1. Installare l‘apposito modulo di
aflatura (si veda „Montaggio
dei moduli di aflatura“).
2. Togliere il porta punte (14) dal
modulo di aflatura.
3. Inserire la punta nell‘apposito
porta punte (14).
4. Inserire il porta punte (14) nel
dispositivo di regolazione (15).
5. Spingere in avanti la punta nella
scanalatura a V, no all‘arresto
di metallo. I taglienti della punta
devono aderire alle superci di
metallo.
6. Bloccare la punta con l‘apposita
ghiera di ssaggio (12).
7. Togliere il porta punte (14) e
inserirlo nella sede girevole per
punte (11).
8. Vericare l‘allineamento della
punta. I taglienti devono toccare
la mola (10).
9. Accendere l‘apparecchio e molare la punta.
10. Spegnere l‘apparecchio e atten-
dere no all‘arresto della mola
(10).
11. Togliere il porta punte (14) e
reinserirlo ruotato di 180° nella
sede girevole per punte (11).
Mantenendo la stessa regolazione, si potrà quindi molare il
tagliente opposto.
12. Accendere l‘apparecchio e molare la punta.
13. Spegnere l‘apparecchio e atten-
dere no all‘arresto della mola
(10).
Aflaturadiceselli
e scalpelli da legno
1. Installare l‘apposito modulo di
aflatura (si veda „Montaggio
dei moduli di aflatura“).
2. Posizionare la lama sul poggiapezzi (6) in modo tale che
l‘estremità da aflare aderisca
al bordo del poggiapezzi (6). Il
porta magnete (5) mantiene la
lama in posizione.
3. Per i ceselli di piccole dimensioni
usare il distanziatore (4).
4. Scegliere l‘angolo in funzione
dell‘angolo di bisello già presente.
5. Allentare la vite di blocco per
la regolazione dell‘angolo (7) e
ruotare il poggiapezzi (6) per
portarlo in posizione.
6. Serrare nuovamente la vite
di blocco per la regolazione
dell‘angolo (7).
7. Accendere l‘apparecchio e
muovere avanti e indietro il poggiapezzi (6) sulla mola (10) in
modo uniforme.
8. Durante la molatura esercitare
sempre una lieve pressione e
spingere lentamente la lama verso la mola (10).
9. Ripetere la molatura no a ottenere un risultato completamente
omogeneo.
10. Spegnere l‘apparecchio e atten-
dere no all‘arresto della mola
(10).
Aflaturadicoltelli
1. Installare l‘apposito modulo di
aflatura (si veda „Montaggio
dei moduli di aflatura“).
2. Inserire a fondo la lama del coltello nell‘apposita fessura.
3. Con una lieve pressione spingere la lama verso la mola (10),
quindi tirare lentamente e in
12
Page 13
IT MT
modo uniforme il coltello verso
di sé.
4. Ruotare il coltello e inserire la
lama nella fessura per coltelli
posizionata sul lato opposto.
5. Ripetere la molatura anche per
l‘altro lato della lama.
6. Eseguire la molatura alternando
i due lati, nché il tagliente è
privo di sbavature e ben aflato.
7. Spegnere l‘apparecchio e atten-
dere no all‘arresto della mola
(10).
L‘apparecchio non è adatto alla
molatura di coltelli seghettati.
Aflaturadiforbici
1. Installare l‘apposito modulo di
aflatura (si veda „Montaggio
dei moduli di aflatura“).
2. Aprire completamente le forbici.
3. Introdurre una lama nella fessura
per forbici.
4. Con una lieve pressione spingere la lama dalla vite alla punta
verso la mola (10).
5. Estrarre le forbici dall‘aflatrice e
ruotarle per aflare l‘altra lama.
6. Introdurre l‘altra lama nella fessura per forbici.
7. Con una lieve pressione spingere la lama dalla vite alla punta
verso la mola (10).
8. Eseguire la molatura alternando
i due lati, nché il tagliente è
privo di sbavature e ben aflato.
9. Spegnere l‘apparecchio e atten-
dere no all‘arresto della mola
(10).
L‘apparecchio non è adatto alla
molatura di forbici con taglio ondulato. L‘apparecchio non è adatto
alla molatura di forbici seghettate.
Sostituzione della mola
Indicazioni per la sostituzione:
• Non usare mai l’apparecchio
senza i dispositivi di protezione.
• Assicurarsi che le dimensioni
della mola siano adatte all’apparecchio.
• Non usare una bussola di riduzione separata o un adattatore
per adattare le mole dotate di un
foro troppo grande.
• Non utilizzare lame da sega.
• Dopo avere sostituito la mola,
rimontare completamente l’apparecchio.
Spegnere l’apparecchio ed estrarre
la spina. Lasciarlo raffreddare.
1. Allentare il dado della mola (16)
ruotandolo in senso orario (lettatura sinistra).
2. Estrarre la mola (10).
3. Inserire la nuova mola (10).
Avvitare il dado della mola (16)
ruotandolo in senso antiorario
(lettatura sinistra)).
4. Ciclo di prova:
Prima di eseguire il primo lavoro e
dopo ogni sostituzione della mola
abrasiva, effettuare un ciclo di
prova di minimo 60 secondi senza
carico. Spegnere subito l‘apparecchio se la mola abrasiva non gira
in modo uniforme, si vericano
notevoli oscillazioni oppure si sentono rumori anormali.
13
Page 14
IT MT
Pulizia e manutenzione
Staccare la spina elettrica prima
di eseguire qualsiasi intervento di
regolazione, manutenzione o riparazione.
Fareeseguireillavoronon
descritti nelle presenti istru-
zionidaun‘ofcinaspecializzata.Usaresoloricambi
originali. Lasciare raffreddare l‘apparecchio prima di
eseguire qualsiasi lavoro di
manutenzione e riparazione.
Pericolodiustioni!
Controllare l‘apparecchio prima di ogni
uso per vericare la presenza di eventuali
difetti come parti allentate, consumate o
danneggiate, il corretto ssaggio delle viti
o la corretta sede delle altri parti. Controllare in particolare la mola abrasiva (
Sostituire le parti danneggiate.
Pulizia
Non usare detergenti o solventi ag-
gressivi. Le sostanze chimiche possono aggredire le parti di plastica
dell‘apparecchio. Non pulire mai
l‘apparecchio sotto acqua corrente.
10).
Conservacione
• Conservare l’apparecchio in un luogo
asciutto e privo di polvere, lontano dalla portata dei bambini.
• Le mole devono essere conservate in
posizione verticale in un luogo asciutto
e non devono essere accatastate.
Smaltimento/Tutela
dell’ambiente
Effettuare lo smaltimento dell’apparecchio,
degli accessori e della confezione nel
rispetto dell’ambiente presso un punto di
raccolta per riciclaggio.
Le apparecchiature non si devono
smaltire insieme ai riuti domestici.
Consegnare l’apparecchio presso un centro
di raccolte e ricupero. Le parti plastiche e
di metallo usate potranno essere selezionate e avviate al ricupero. Chiedere informazioni a riguardo al nostro centro assistenza
clienti.
Lo smaltimento degli apparecchio difettosi
consegnati viene effettuato gratuitamente.
• Pulire a fondo l‘apparecchio dopo ogni
uso.
• Pulire la supercie dell‘apparecchio con
una spazzola morbida, un pennello o
un panno.
14
Page 15

IT MT
Pezzi di ricambio/Accessori
È possibile ordinare pezzi di ricambio e accessori all’indirizzo
www.grizzly-service.eu
Se non si dispone di una connessione Internet, contattare telefonicamente il centro di
assistenza (vedere “Service-Center” a pag. 18). Tenere a portata di mano i numeri
d’ordine riportati in basso.
Pos. Position Denominazione Numeri
Istruzioni Vista d’ordine
per l’uso esplosa
10 19+20 Mola, Dado della mola 91103590
2 100 Modulo di aflatura per coltelli e forbici 91103591
101 Modulo di aflatura per punte da trapano 91103592
102 Modulo di aflatura per ceselli e scalpelli
da legno 91103593
15
Page 16
IT MT
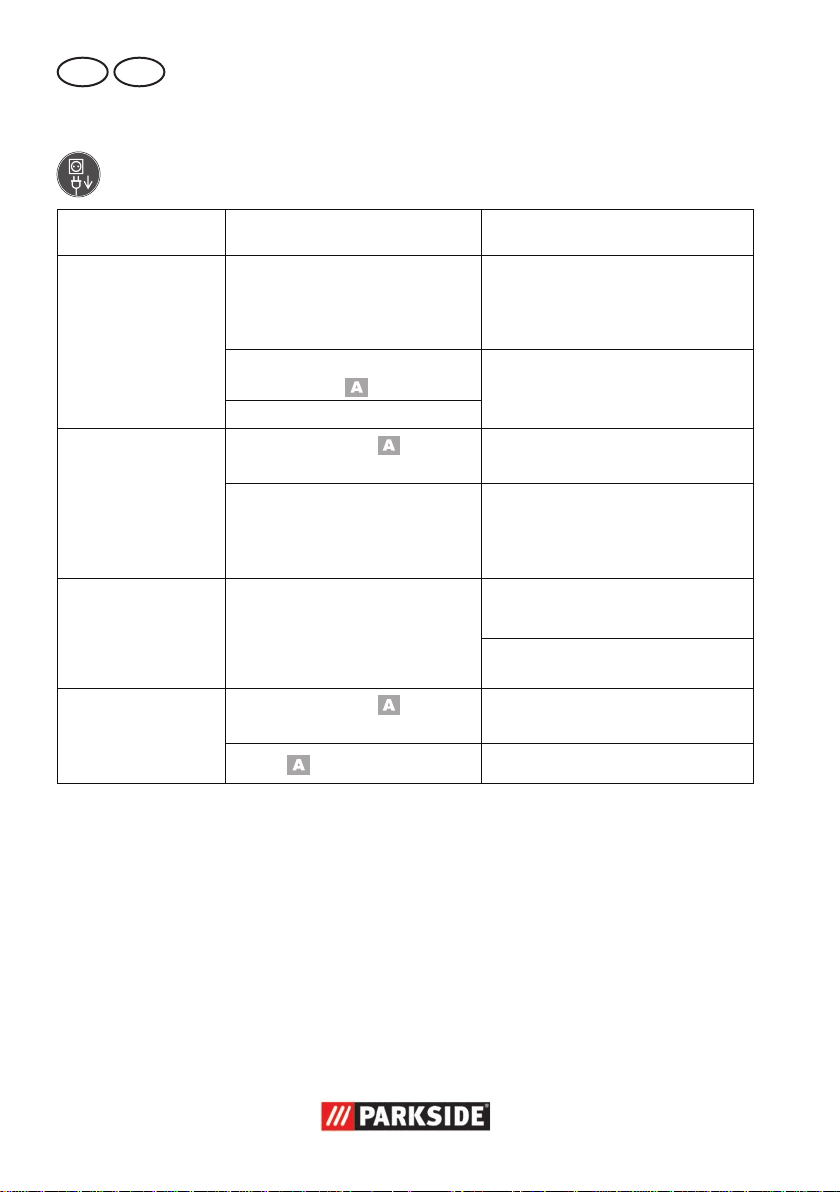
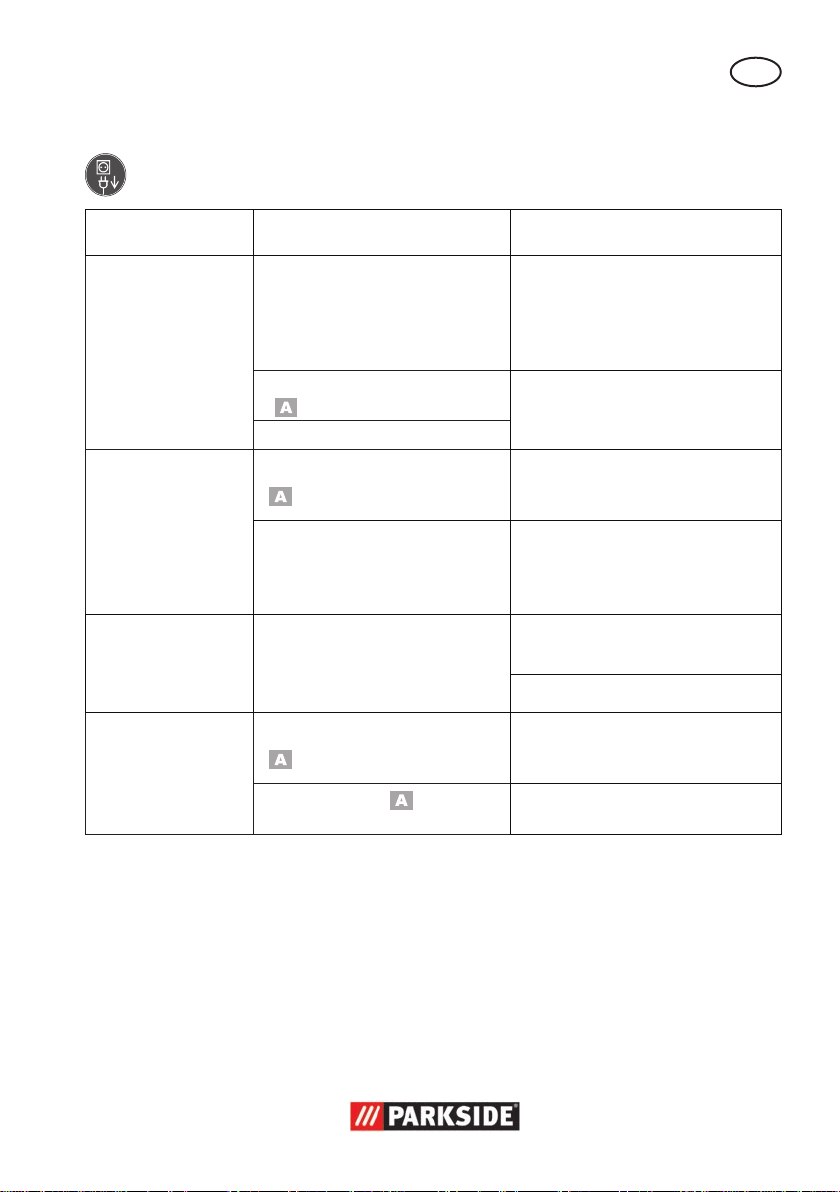
Ricerca di guasti
Spegnere l’apparecchio ed estrarre la spina. Lasciarlo raffreddare.
Problema Possibile causa Soluzione
Ispezionare la presa, il cavo di
L’apparecchio non
si accende
Gli utensili di
levigatura non si
muovono anche se
il motore gira
Il motore rallenta e
si ferma
La mola ruota in
modo irregolare,
si odono rumori
inconsueti
Manca la tensione di rete
Il salvavita si attiva
Interruttore di accensione/
spegnimento (
Motore difettoso
Dado della mola (
lentato
Il pezzo da lavorare, residui
dello stesso o degli utensili di
levigatura bloccano l’azionamento
Il pezzo sovraccarica l’apparecchio
Dado della mola (
lentato
Mola (
3) difettoso
16) al-
16) al-
10) difettosa
rete, la linea, la spina, eventuali
riparazioni dell’elettricista, il
salvavita.
Riparazione al centro assistenza
Stringere il dado della mola (si
veda “Sostituzione della mola”)
Rimuovere le cause di blocco
Ridurre la pressione sull’utensile
di levigatura
Il pezzo da lavorare non è
adatto
Stringere il dado della mola (si
veda “Sostituzione della mola”)
Sostituire la mola
16
Page 17

IT MT
Garanzia
Gentile cliente,
Su questo apparecchio Le viene concessa
una garanzia di 3 anni a partire dalla data
di acquisto.
In caso di difetti di questo prodotto può
avanzare diritti legali nei confronti del
venditore del prodotto. Tali diritti legali non
vengono limitati dalla nostra garanzia qui
di seguito rappresentata.
Condizioni di garanzia
Il termine di garanzia inizia con la data di
acquisto. La preghiamo di conservare in un
luogo sicuro lo scontrino scale originale.
Questo documento viene richiesto come
prova d’acquisto.
Qualora subentrasse un difetto di materiale
o di fabbricazione entro tre anni a partire
dalla data di acquisto di questo prodotto,
il prodotto verrà riparato o sostituito – a
nostra discrezione - gratuitamente da noi.
Questa prestazione di garanzia presuppone che venga presentato entro il termine di
tre anni l’apparecchio difettoso e la prova
d’acquisto (scontrino scale) e descritto
brevemente per iscritto in che cosa consiste
il difetto e quando si è vericato.
Se il difetto è coperto dalla nostra garanzia, riceverà il prodotto riparato oppure un
prodotto nuovo. Con la riparazione o la sostituzione del prodotto non inizia un nuovo
periodo di garanzia.
Tempo di garanzia e diritti legali
per vizi della cosa
Il periodo di garanzia non viene prolungato. Questo vale anche per parti sostituite
e riparate. Difetti e vizi presenti già al
momento dell’acquisto devono essere segnalati immediatamente dopo la rimozione
dall’imballaggio. Riparazioni che accorrono dopo il periodo di garanzia sono a
pagamento.
Volume di garanzia
L’apparecchio è stato prodotto accuratamente secondo severe direttive di qualità
e controllato con coscienza prima della
consegna.
La prestazione di garanzia vale per difetti
di materiale o di fabbricazione. Questa
garanzia non si estende ai componenti del
prodotto che sono soggetti a normale usura
e che quindi possono essere visti come
parti di usura (p. es. mole, spazzole di carbone, battuta, schermo protettivo) oppure
per danneggiamenti delle parti fragili (p.
es. interruttori, accumulatori).
Questa garanzia decade se il prodotto è
stato danneggiato, non usato correttamente
o non manutenuto. Per un uso corretto del
prodotto devono essere osservate tutte le indicazioni riportate nelle istruzioni per l’uso.
Destinazioni d’uso e azioni sconsigliate
nelle istruzioni d’uso o dalle quali si viene
avvertiti, sono tassativamente da evitare.
Il prodotto è destinato esclusivamente
all’uso commerciale. In caso di uso improprio, esercizio della forza e interventi non
effettuati dalla nostra liale di assistenza
tecnica autorizzata, decade la garanzia.
Svolgimento in caso di garanzia
Per garantire una rapida elaborazione della Sua pratica, La preghiamo di seguire le
seguenti indicazioni:
• Per tutte le richieste tenere a portata di
mano lo scontrino scale e il codice di
identicazione (IAN 102874) come pro-
va d’acquisto.
• I codici articolo sono riportati sulla targhetta del tipo.
• Nel caso in cui si dovessero vericare
difetti funzionali o altri vizi, La preghiamo di contattare telefonicamente o per
e-mail. Riceverà ulteriori informazioni
sullo svolgimento del Suo reclamo.
17
Page 18

IT MT
• Un prodotto rilevato come difettoso può
essere inviato con porto franco all’indirizzo di assistenza comunicato, previa
consultazione del nostro servizio di assistenza tecnica, allegando la prova d‘ac-
quisto (scontrini scali) e l’indicazione,
in che cosa consiste il difetto e quando
si è vericato. Per evitare problemi di
accettazione e costi aggiuntivi, usare
tassativamente solo l’indirizzo che Le
è stato comunicato. Assicurarsi che la
spedizione non avvenga in porto assegnato, con merce ingombrante, corriere
espresso o altro carico speciale. Spedire l’apparecchio inclusi tutti gli accessori
forniti insieme al momento dell’acquisto
e garantire un imballaggio di trasporto
sufcientemente sicuro.
Servizio di riparazione
Riparazioni non soggette alla garanzia
possono essere effettuate dietro fattura dal-
la nostra liale di assistenza tecnica previo
preventivo gratuito da parte della stessa.
Possiamo lavorare solo apparecchi che
vengono spediti sufcientemente imballati e
affrancati.
Attenzione: Spedire l’apparecchio alla
nostra liale in condizioni pulite e con l’indicazione del difetto.
Apparecchi spediti in porto assegnato - con
merce ingombrante, corriere espresso o altro carico speciale - non vengono accettati.
Lo smaltimento degli apparecchi difettosi spediti viene effettuato da noi gratuitamente.
Service-Center
Assistenza Italia
IT
Tel.: 02 36003201
E-Mail: grizzly@lidl.it
IAN102874
Assistenza Malta
MT
Tel.: 80062230
E-Mail: grizzly@lidl.com.mt
IAN102874
Importatore
Non dimenticare che il seguente indirizzo
non è un indirizzo di assistenza tecnica.
Contattare prima di tutto il centro di assistenza tecnica sopra nominato.
Grizzly Tools GmbH & Co. KG
Stockstädter Straße 20
63762 Großostheim
Germania
www.grizzly-service.eu
18
Page 19

PT
Índice
Introdução ................................. 19
Finalidadedeaplicação .............19
Descrição geral .......................... 20
Volume de fornecimento ..................20
Descrição do funcionamento ...........20
Vista de conjunto ...........................20
Especicaçõestécnicas ...............20
Indicaçõesdesegurança ............ 21
Símbolos e pictogramas ..................21
Indicações gerais de segurança para
equipamentos eléctricos ..................22
Indicações complementares em matéria
de segurança ................................24
Perigos residuais ............................25
Montagem ................................. 25
Montar dispositivos de aar ............26
Operação ................................... 26
Como ligar e desligar .....................26
Lixar com o disco abrasivo ..............27
Aar brocas ..................................27
Aar cinzéis e escopros ..................27
Aar facas ....................................28
Aar tesouras ................................28
Substituir o disco abrasivo ..............29
Limpeza e manutenção .............29
Limpeza ........................................29
Estoque ...................................... 30
Remoção do Aparelho/Protecção do
Meio Ambiente ........................... 30
Peças sobressalentes/Acessórios 30
Diagnóstico de falhas ................. 31
Garantia .................................... 32
Serviço de reparação ................. 33
Service-Center ............................33
Importador ................................ 33
Tradução do original da Decla-
-ração de conformidade CE ........66
Designação de explosão ............ 69
Introdução
Parabéns pela compra do seu novo aparelho. Com a sua compra, decidiu-se por um
produto de alta qualidade.
Em casos isolados, não é de excluir a
ausência total de quantidades residuais de
água ou lubricantes no ou dentro do aparelho, ou nas canalizações de mangueira.
Isto não representa contudo nenhuma
deciência ou defeito e não é motivo para
preocupações.
O manual de instruções é uma parte
integrante deste artigo. Ele contém
indicações importantes referentes à
segurança, utilização e eliminação.
Familiarize-se com todas as indicações de utilização e de segurança
do artigo. Utilize este artigo da for-
ma que é descrita e apenas para as
nalidades indicadas.
Guarde bem o manual e, se trans-
mitir o artigo a terceiros, entregue
também todos os respetivos documentos.
Finalidade de aplicação
O aador é apropriado para aar ferramentas (p.ex brocas, facas, tesouras, cin-
zéis, escalpelo).
Este aparelho não é adequado para todos
os outros tipos de aplicação (por exemplo,
lixar com ferramentas de reticação não
apropriadas, lixar com líquido de refrigeração, lixar materiais, como amianto,
prejudiciais à saúde).
O aparelho está previsto para aplicação
doméstica. Ele não foi concebido para uti-
lização contínua em indústrias.
O aparelho deve ser usado por adultos.
Jovens com mais de 16 anos só podem
usá-lo sob supervisão. O fabricante não se
19
Page 20

PT
responsabiliza por danos causados pela
utilização não correspondente às instruções ou pela operação incorrecta.
Descrição geral
As ilustrações podem ser en-
contradas no verso e reverso
da página destacável.
Volume de fornecimento
Retirar o equipamento da embalagem e
controlar a sua integralidade. Eliminar a
embalagem de maneira apropriada.
• Máquina
• Dispositivo para aar facas e tesouras
• Dispositivo para aar brocas
• Dispositivo para aar cinzel e escalpelo
• Disco de reticação adicional
• Manual de Instruções
Descrição do funcionamento
O aador é apropriado para aar ferramentas (p.ex brocas, facas, tesouras,
cinzéis, escopros). Fazem parte do volume
de fornecimento três dispositivos de aar
diferentes, que permitem, como guia e
dispositivo de segurança, um aação e
reticação precisa.
Para obter informações acerca do funcio-
namento da unidade de comando, é favor
ler as instruções a seguir.
Vista de conjunto
1 Ficha da tomada
2 Dispositivo para aar facas e
tesouras
3 Interruptor de ligar/desligar
4 Distanciador
5 Suporte magnético
6 Base para a ferramenta
7 Parafuso de ajuste para ajuste
do ângulo
8 Tampa de proteção
9 Furos de montagem para monta-
gem de bancada
10 Disco de reticação
11 Alojamento rotativo da broca
12 Porca serrilhada para xação
da broca
13 Alavanca de desbloqueio para
dispositivos de aar
14 Porta-brocas
15 Dispositivo de ajuste
16 Porca dos discos de reticação
Especicaçõestécnicas
Tensão de entrada nominal
............................. 220 - 240 V~, 50 Hz
Consumo de energia ..................... 65 W
(S2 10 min)*
Rotação à vazio
Classe de protecção ......................... II
Tipo de protecção .......................... IP 20
Peso .................................... ca. 1,25 kg
Área do ângulo de reticação ....15° - 50°
Capacidade de aação diâmetro
do furo ...................................3 -10 mm
Potência para aar largura da faca . 6 - 51
mm
Nível de pressão acústica
(L
) ............. 59,3 dB (A); KpA= 3 dB (A)
pA
Nível de potência acústica (L
medido ..........73,5 dB(A); K
* Num funcionamento ininterrupto de 10 minu-
tos ocorre uma pausa até que a temperatura
do aparelho atinja uma diferença de 2 K
(2°C) em relação à temperatura ambiente.
Os valores de ruído e de vibração foram
apurados de acordo com as normas e disposições mencionadas na declaração de
conformidade.
n0 ................. 6700 min
)
wA
= 3 dB(A)
wA
-1
20
Page 21
PT
Design e características técnicas sujeitos
a alterações sem aviso prévio. Não nos
responsabilizamos, por isso, por todas as
medidas, indicações e informações conti-
das neste manual de instruções. Títulos que
possam ser feitos valer devido às informações deste manual não poderão, por isso,
ser postos em vigor.
O valor de emissão de vibrações indicado
foi medido através de um método de ensaio
normalizado e pode ser usado para com-
parar uma ferramenta eléctrica com outra.
O valor de emissão de vibrações indicado
também pode ser usado para uma primei-
ra avaliação da exposição.
Aviso:
Durante a utilização real da ferra-
menta eléctrica, o valor de emissão
de vibrações pode divergir do
valor indicado, dependendo da
forma como a ferramenta eléctrica
for utilizada.
É necessário determinar medidas de
segurança para proteger o utilizador com base numa avaliação da
exposição em condições reais de
utilização (deverão ser ponderadas
todas as componentes do ciclo de
funcionamento, por exemplo, os
períodos durante os quais a ferra-
menta eléctrica está desligada e
também os períodos em que está
ligada, mas a trabalhar em vazio).
Indicaçõesdesegurança
Símbolos e pictogramas
Símbolos colocados no aparelho:
Atenção!
Ler e ter em conta as instruções
indicadas no manual de serviço do
aparelho..
Utilize proteção ocular.
Perigo de choque eléctrico!
Tirar sempre a cha da tomada de
corrente antes de executar serviços
de manutenção e reparações no
aparelho.
Classe de protecção II
Equipamentos eléctricos não devem
ser deitados no lixo doméstico.
Símbolos colocados no manual:
Sinais de perigo para a pre-
venção de danos físicos ou
de danos materiais.
Sinais ordenativos (neste caso, em
vez de aparecer o ponto de exclamação, vem explicada a ordem)
para a prevenção contra danos.
Sinais indicativos com informações
de como trabalhar melhor com o
aparelho.
21
Page 22

PT
Indicaçõesgeraisdesegurança para equipamentos
eléctricos
ATENÇÃO!
Ao utilizar equipamentos eléctricos,
ter em atenção as medidas básicas
de segurança indicadas a seguir
para protecção contra choques eléctricos e riscos de lesão e incêndio.
Leia todas estas indicações antes
de utilizar esta ferramenta elétrica e
guarde estas indicações de segurança num local seguro.
O conceito “equipamento eléctrico” utilizado nas indicações de segurança refere-se
aos equipamentos eléctricos alimentados a
partir da rede eléctrica (com cabo de ligação à rede) e aos equipamentos eléctricos
que funcionam com acumuladores (sem
cabo de ligação à rede).
Trabalho seguro:
• Mantenhaoseulocaldetrabalho sempre arrumado. A desar-
rumação no local de trabalho pode
provocar acidentes.
• Tenhaemconsideraçãoasinuências ambientais
- Não exponha as ferramentas eléctricas à chuva. Não use ferramentas
eléctricas em ambiente húmido ou
molhado.
A penetração de água em ferramen-
tas eléctricas aumenta o risco de
choques eléctricos.
- Assegure uma boa iluminação do
local de trabalho.
- Não use ferramentas eléctricas em
locais susceptíveis de incêndio ou
explosão. Ferramentas eléctricas
originam centelhas que podem ina-
mar o pó ou os vapores.
• Proteja-secontrachoqueseléctricos. Evite o contacto corporal com
peças ligadas à terra (por ex., canos,
radiadores, fogões eléctricos, sistemas
de refrigeração).
• Mantenhaasoutraspessoas
afastadas. Não deixe outras pessoas,
nomeadamente crianças, tocar na ferra-
menta eléctrica ou no cabo. Mantenha-as
afastadas do seu local de trabalho
• Quandonãoestiveremaser
usadas, guarde as ferramentas
eléctricasnumlocalseguro.
Quando não estiverem a ser usadas, as
ferramentas eléctricas devem ser guardadas num local seco, alto ou fechado,
fora do alcance de crianças.
• Nãosobrecarregueasuaferramentaeléctrica.É melhor e mais
seguro trabalhar dentro dos parâmetros
de potência especicados.
• Useaferramentaeléctricaadequada.
- Não use ferramentas com pouca
potência para realizar trabalhos pesados.
- Não use a ferramenta eléctrica para
ns não previstos. Por exemplo, não
use uma serra circular manual para
cortar ramos de árvores ou lenha.
A utilização do equipamento eléctrico para outros ns além daqueles
especicados pode acarretar situa-
ções perigosas.
• Usevestuárioadequado.
- Não use vestuário largo nem jóias,
pois podem ser apanhados pelas
partes rotativas da ferramenta.
- Sempre que trabalhar ao ar livre, é
recomendável usar calçado antiderrapante.
- Se tiver o cabelo comprido, use uma
rede para o apanhar.
• Useequipamentodeprotecção
22
Page 23

PT
individual.
- Use óculos de protecção. O incumprimento desta indicação pode resultar
em ferimentos nos olhos causados por
faíscas ou fragmentos de material.
- Sempre que realizar trabalhos que
produzam pó, use uma máscara respiratória.
• Ligueosistemadeaspiraçãode
poeiras. Se a máquina tiver pontos
de ligação para a aspiração de po-
eiras e para um colector, certique-se
de que estão ligados e são utilizados
correctamente.
• Nãouseocaboparansnão
previstos. Não use o cabo para puxar
a cha da tomada de corrente. Proteja o
cabo de calor, óleos e arestas cortantes.
• Fixeapeçadetrabalho.Use
dispositivos de xação ou um torno de
bancada para xar a peça que preten-
de trabalhar. Fica mais segura do que
se a segurar com a mão.
• Eviteumaposiçãoanormaldo
corpo. Finque bem os pés no chão e
mantenha sempre o equilíbrio.
Assim, poderá controlar melhor o equipamento eléctrico em situações inesperadas.
• Cuidebemdassuasferramentas
eléctricas.Muitos acidentes ocorrem
devido a ferramentas eléctricas mal
conservadas.
- Mantenha as ferramentas de corte
aadas e limpas para poder trabalhar melhor e com maior segurança.
- Respeite as indicações referentes à
lubricação e à troca de acessório.
- Controle regularmente o cabo de liga-
ção da ferramenta eléctrica e peça a
um electricista prossional para o substituir se vericar que está danicado.
- Controle regularmente os cabos de
extensão e substitua-os logo que detecte qualquer dano neles.
- Mantenha as pegas secas, limpas e
livres de óleo e massa lubricante.
• Tireachadatomadasempre que
não estiver a usar a ferramenta eléctrica,
antes de realizar trabalhos de manutenção e ao trocar de acessório.
Essa medida de precaução evita a ligação acidental do equipamento eléctrico.
• Nãodeixenenhumachavede
montagem metida na ferramenta. Antes de ligar a ferramenta,
certique-se de que as chaves e outros
meios de ajuste foram retirados.
Uma ferramenta ou uma chave que se
encontre numa parte móvel do equipamento pode causar ferimentos.
• Eviteumarranqueacidentalda
ferramenta. Certique-se de que o
interruptor está desligado quando ligar
a cha à tomada.
• Useoscabosdeextensãopara
trabalhos no exterior. Quando
trabalhar no exterior, use apenas cabos
de extensão autorizados e devidamente
identicados para utilização no exterior.
• Trabalharsempreatento,con-
centrar-senoqueestáafazere
ter sempre bom senso ao utilizar
umequipamentoeléctrico.Não
utilizar nenhum equipamento eléctrico
se estiver cansado ou sob a inuência
de drogas, álcool ou medicamentos.
Um momento de descuido durante o
uso do equipamento eléctrico pode
causar ferimentos graves.
• Inspeccioneaferramentaeléctrica para detectar eventuais
danos. Com isso, garante-se que a
segurança da ferramenta eléctrica será
mantida.
- Antes de continuar a usar a ferramenta
eléctrica, é preciso inspeccionar bem
os dispositivos de protecção ou peças
ligeiramente danicadas para vericar
23
Page 24

PT
se funcionam correctamente e para os
ns previstos.
- Verique se as peças móveis funciona-
mento correctamente e se não emperram ou se algumas peças estão dani-
cadas. Todas as peças têm de estar
montadas correctamente e satisfazer
todos os requisitos necessários para
assegurar o funcionamento correcto.
- Os dispositivos de protecção e peças
que estiverem danicados têm de ser
reparados ou substituídos, conforme
previsto, num reparador especializado
reconhecido, salvo indicação em contrário no manual de instruções.
- Os interruptores que estiverem danicados têm de ser substituídos num
reparador autorizado do serviço de
assistência.
- Não use ferramentas eléctricas se
não for possível ligar e desligar o
interruptor.
Existe perigo de ferimento!
• Atenção!A utilização de acessórios e
meios complementares diferentes pode
constituir um perigo de ferimentos para si.
• Deixeareparaçãodasuafer-
ramentaeléctricaporcontaum
electricistaprossional.Esta fer-
ramenta eléctrica satisfaz os requisitos
das regulamentações de segurança em
vigor. As reparações só podem ser realizadas num reparador especializado
e usando peças de substituição de origem. Caso contrário, o utilizador corre
o risco de sofrer algum acidente.
Indicaçõescomplementares
emmatériadesegurança
• Ligue a ferramenta exclusivamente
a uma tomada com disjuntor (RCD)
prevista para uma corrente diferencial
presumida não superior a 30 mA.
• Mantenha o cabo de ligação à rede
eléctrica afastado do disco abrasivo e da
corrente da serra. Se o cabo estiver dani-
cado ou se o cortar acidentalmente, tire
imediatamente a cha da tomada.
Não toque no cabo enquanto não esti-
ver desligado da tomada.
Perigo de choque eléctrico.
• A substituição da cha ou do cabo de
ligação deve ser sempre realizada pelo
fabricante da ferramenta elétrica ou
pelo respetivo serviço de assistência, a
m de evitar riscos.
• Ligue o aparelho apenas quando este
estiver montado de forma segura sobre
a superfície de trabalho.
• Para a sua própria segurança, utilize
apenas acessórios ou aparelhos que
estejam mencionados no manual de instruções ou que sejam recomendados ou
indicados pelo fabricante da ferramenta.
• Utilize apenas as ferramentas de
lixamento recomendadas pelo fabricante. Não utilize lâminas de serra.
Certique-se de que as dimensões são
adequadas ao aparelho.
• Utilize apenas discos abrasivos cujas
rotações impressas sejam tão elevadas,
pelo menos, quanto os valores indicados
na placa de características do aparelho.
• Realize uma vericação visual ao disco abrasivo antes da utilização. Não
utilize discos abrasivos danicados ou
deformados. Substitua o disco abrasivo
se este estiver desgastado.
• Nunca utilize o aparelho sem a proteção contra faíscas ou sem as tampas
de proteção. Reajuste regularmente
a proteção contra faíscas para compensar o desgaste do disco abrasivo
(distância máx. de 2mm).
• Substitua o disco abrasivo, o mais
tardar, se a proteção contra faíscas e
a base para a peça de trabalho não
24
Page 25

PT
puderem ser reajustadas para uma distância de, no máx. 2 mm.
• Certique-se de que as faíscas que
surgirem durante o lixamento não constituem qualquer perigo, por exemplo,
relativamente a pessoas ou substâncias
inamáveis.
• Durante os trabalhos de lixamento, es-
covagem e corte, utilize sempre óculos
de proteção, luvas de proteção, máscara de proteção e proteção auditiva.
• Nunca coloque os dedos entre o disco
abrasivo e a proteção contra faíscas ou
na proximidade das tampas de prote-
ção. Existe perigo de esmagamento.
• Por motivos relativos ao funcionamento,
não é possível cobrir as peças rotativas
do aparelho. Como tal, proceda com
prudência e segure bem o aparelho
para evitar que este escorregue e provoque o contacto das suas mãos com a
correia de lixa ou com o disco abrasivo.
• Durante o lixamento, a peça de trabalho
atinge temperaturas elevadas. Não toque
na peça de trabalho, deixe-a arrefecer.
Existe perigo de queimaduras. Não utilize líquido de refrigeração ou semelhante.
• Não utilize o aparelho se estiver cansado ou tiver consumido álcool ou me-
dicamentos. Efetue sempre uma pausa
durante o trabalho.
• Desligue o aparelho e retire a cha de
alimentação
- para libertar uma ferramenta de
aplicação bloqueada,
- se o cabo de ligação estiver danicado ou emaranhado,
- no caso de ruídos incomuns.
Perigos residuais
Mesmo que utilize esta ferramenta eléctrica em conformidade absoluta com as
prescrições, existem sempre alguns perigos
residuais. Relativamente à construção e à
versão desta ferramenta elétrica podem
surgir os seguintes perigos:
a) Lesões pulmonares, caso não seja uti-
lizada uma máscara de proteção adequada.
b) Lesões auditivas, caso não seja utiliza-
da uma proteção auditiva adequada.
c) Problemas de saúde devido
- ao contacto da ferramenta de lixamento numa zona não protegida;
- à projeção de partículas de peças
de trabalho ou de discos abrasivos
danicados.
d) Danos para a saúde, resultantes das
vibrações exercidas sobre as mãos
e os braços, se a máquina for usada
durante muito tempo, se não for usada
correctamente ou se a manutenção não
for realizada de forma adequada.
Aviso! Em funcionamento, esta fer-
ramenta eléctrica gera um campo
electromagnético. Em determinadas
situações, este campo pode in-
uenciar o funcionamento correcto
de dispositivos médicos activos ou
passivos implantados. Para reduzir
o perigo de ferimentos graves ou
mortais, recomendamos que as
pessoas portadoras deste tipo de
implantes consultem o seu médico
de família e o fabricante do respec-
tivo dispositivo médico implantado
antes de usar a máquina.
Montagem
Atenção!
Perigodeferimentos!
- Certique-se de que existe espaço suciente para o trabalho
e que outras pessoas não são
colocadas em perigo.
25
Page 26
PT
- Antes da colocação em funcionamento, todas as coberturas e
dispositivos de proteção devem
estar montados corretamente.
- Desligue a cha de alimentação
antes de realizar ajustes no aparelho.
Colocação
Coloque o aador numa base xa e xe o
aparelho. De preferência aparafuse a máquina à base. Para isso, utilize os furos de
montagem para a montagem da bancada
(9) na placa do chão.
O volume de fornecimento não
inclui os parafusos e porcas para a
montagem.
Montardispositivosdeaar
1. Selecione um dos dispositivos de
aar.
2. Para retirar um dispositivo de
aar da posição de trabalho
deve pressionar a alavanca de
desbloqueio para dispositivos de
aar (13) para baixo.
3. Retire para fora das calhas guia
o dispositivo de aar.
4. Nas posições de armazenamento do lado direito e esquerdo, os
dispositivos de aar não estão
xados e podem ser simplesmen-
te retirados por cima para fora
das calhas guia.
5. Para xar o dispositivo de aar
selecionado na posição de trabalho, desloque-o de cima para
dentro das calhas guia. Pressio-
ne o dispositivo de aar até ao
ponto de encaixe para baixo.
Osdispositivosdeaartam-
bémrepresentamumdispositivodesegurança.Nunca
utilize o aparelho sem dispo-
sitivodeaar.Existeperigo
de ferimentos.
Operação
Atenção!Perigodelesão!
- Antes de executar qualquer serviço no equipamento, retirar a
cha da tomada de corrente.
- Utilize unicamente os discos abrasivos e acessórios recomendados
pelo fabricante. A utilização de
acessórios e meios complementares diferentes pode constituir um
perigo de ferimentos para si.
- Nunca use a ferramenta sem
viseira de protecção
- Ligar o aparelho apenas quando
ele estiver montado com segurança sobre a superfície de trabalho.
Utilizeduranteotrabalho,
mesmo com proteção contra
faíscas, uns óculos de proteção para evitar ferimentos
nos olhos.
Mantenha as mãos afasta-
das do disco abrasivo e da
correia de lixa se o aparelho
estiver em funcionamento.
Existe perigo de ferimentos.
Como ligar e desligar
Cuidar para que a tensão da rede
coincida com aquela indicada na
chapa de identicação do aparelho.
26
Page 27

PT
Ligar o equipamento na rede de
alimentação.
1. Para acionar, prima o interruptor de
ligar “I” (
funcionar.
2. Para desligar, pressione o interruptor
de ligar/desligar “0” (
relho deixa de funcionar.
Depois de ligar o aparelho, aguarde até
que este atinja as suas rotações máximas.
O processo de lixamento só deverá começar depois deste passo.
O rebolo continua a girar
após o aparelho ter sido desligado. Perigo de ferimento.
Teste de funcionamento:
Antes dos primeiros serviços e toda vez
que substituir os rebolos, executar um teste
de funcionamento sem carga durante, pelo
menos, 60 segundos. Desligar imediatamente o aparelho se o disco girar de maneira irregular, se houver oscilações consideráveis ou emissão de ruídos estranhos.
3), o aparelho começa a
3) , o apa-
Lixar com o disco abrasivo
5. Desloque a broca para a frente
para dentro da ranhura V até
ao batente metálico. Os cantos
de corte da broca devem estar
encostados nas áreas metálicas.
6. Fixe a broca com a porca serri-
lhada para a xação da broca
(12).
7. Retire o porta-brocas (14) e coloque-o no alojamento da broca
rotativo (11).
8. Verique o alinhamento da broca. Os cantos de corte da broca
devem tocar no disco de retica-
ção (10).
9. Ligue o aparelho e ae a broca.
10. Desligue o aparelho e aguarde
a paragem do disco de reticação (10).
11. Retire o porta-brocas (14) e
coloque-o novamente com uma rotação de 180° no alojamento da
broca rotativo (11). Assim pode
aar com o mesmo ajuste, o canto
de corte oposto da broca.
12. Ligue o aparelho e ae a broca.
13. Desligue o aparelho e aguarde
a paragem do disco de reticação (10).
Aarbrocas
Podem ser aadas brocas com um diâmetro de 3-10 mm.
1. Instale o dispositivo de aar
selecionado (ver instalar disposi-
tivo de aar).
2. Retire o porta-brocas (14) do
dispositivo de aar.
3. Coloque a broca no porta-brocas (14).
4. Coloque o porta-brocas (14) no
dispositivo de ajuste (15).
Aarcinzéise
escopros
1. Instale o dispositivo de aar
selecionado (ver instalar disposi-
tivo de aar).
2. Coloque a lâmina no alojamento da ferramenta (6) de forma
a que a extremidade a aar
esteja colocada na margem do
alojamento da ferramenta (6). O
suporte magnético (5) segura a
lâmina na sua posição.
3. Utilize nos cinzéis estreitos o dis-
27
Page 28

PT
tanciador (4).
4. Selecione o ângulo de acordo
com o chanfro existente.
5. Solte o parafuso de ajuste (7) e
rode o alojamento da ferramenta (6) para a posição.
6. Fixe novamente o parafuso de
ajuste para o ajuste do ângulo (7).
7. Ligue o aparelho e mova o
alojamento da ferramenta (6)
uniformemente no disco de reti-
cação (10) de um lado para o
outro.
8. Exerça sempre um pouco de
força durante o processo de
reticação e desloque a lâmina
lentamente para o disco de reti-
cação (10).
9. Repita o processo de reticação
até que todas as irregularidades
estejam removidas.
10. Desligue o aparelho e aguarde
a paragem do disco de reticação (10).
Aarfacas
1. Instale o dispositivo de aar
selecionado (ver instalar disposi-
tivo de aar).
2. Coloque toda a lâmina da faca
no entalhe da faca.
3. Conduza a lâmina com pressão
ligeira para o disco de reticação (10) e puxe a faca de forma
uniforme e lentamente para si.
4. Rode a faca e coloque a lâmina
da faca no entalhe oposto da
faca.
5. Repita o processo de reticação
também para este lado da lâmi-
na.
6. Realize o processo de reticação dos dois lados até que o
canto de corte esteja sem rebarbas.
7. Desligue o aparelho e aguarde
a paragem do disco de reticação (10).
O aparelho não é apropriado para
polir facas com corte ondulado.
Aartesouras
1. Instale o dispositivo de aar
selecionado (ver instalar disposi-
tivo de aar).
2. Abra a tesoura na totalidade.
3. Insira uma das folhas da tesoura
no entalhe da tesoura.
4. Desloque a folha com ligeira
pressão do parafuso até à ponta
ao encontro do disco de retica-
ção (10).
5. Retire a tesoura do aador e
rode a tesoura para aar a ou-
tra folha.
6. Insira a outra folha da tesoura
no entalhe da tesoura.
7. Desloque a folha com ligeira
pressão do parafuso até à ponta
ao encontro do disco de retica-
ção (10).
8. Realize o processo de reticação dos dois lados até que os
cantos de corte estejam sem
rebarbas.
9. Desligue o aparelho e aguarde
a paragem do disco de reticação (10).
O aparelho não é apropriado para
reticar tesouras com corte ondulado. O aparelho não é apropriado
para polir tesouras dentadas.
28
Page 29
PT
Substituir o disco abrasivo
Indicaçõessobreasubsti-
tuição:
• Nunca utilize o aparelho sem
dispositivos de proteção.
• Certique-se de que as dimensões do disco abrasivo são adequadas ao aparelho.
• Não utilize buchas de redução
nem adaptadores para utilizar
discos abrasivos com um orifício
maior.
• Não utilize lâminas de serra.
• Volte a montar o aparelho com-
pletamente depois da substituição do disco abrasivo.
Desligue o aparelho e retire a cha
de alimentação.
Deixe o aparelho arrefecer.
1. Solte a porca do disco de re-
ticação (16) no sentido do
ponteiros do relógio (rosca à
esquerda).
2. Retire o disco de reticação
(10).
3. Coloque o novo disco de reticação (10). Aparafuse a porca
do disco de reticação (16) no
sentido contrário dos ponteiros
do relógio (rosca à esquerda).
Limpeza e manutenção
Retirar a cha da rede eléctrica an-
tes de executar qualquer serviço de
ajuste, manutenção ou reparação.
Todos os serviços de manu-
tenção não indicados neste
manual devem ser executados
unicamentenumaocinaespecializada.Utilizarunicamen-
te peças originais. Antes de
executar quaisquer serviços
de manutenção ou reparo,
deixar o equipamento arrefe-
cer. Perigodequeimadura!
Sempre que for utilizar o aparelho, controlar a existência de avarias nítidas, como
p. ex. peças soltas, gastas ou danicadas,
assim como o ajuste correcto dos parafusos ou de outras peças. Vericar especialmente os rebolos (
peças danicadas.
Limpeza
Não utilizar nenhum produto de
limpeza ou solvente. Determinadas
substâncias químicas podem atacar
as partes em plástico do aparelho.
Nunca limpar o aparelho sob água
corrente.
10). Substituir as
4. Teste de funcionamento:
Antes dos primeiros serviços e toda
vez que substituir os rebolos, executar um teste de funcionamento sem
carga durante, pelo menos, 60
segundos. Desligar imediatamente
o aparelho se o disco girar de
maneira irregular, se houver oscilações consideráveis ou emissão de
ruídos estranhos.
• Limpar cuidadosamente o aparelho
sempre depois de usá-lo.
• Limpe a superfície do aparelho com
uma escova macia, um pincel ou um
pano.
29
Page 30
PT
Estoque
• Guarde o aparelho num local sêco e
protegido de poeira, e longe do alcance de crianças.
• Os rebolos devem ser guardados em
local seco e ao alto, não podendo ser
empilhados.
Remoção do Aparelho/
• Entregue o seu aparelho num local de
reciclagem. As peças de material sin-
tético e de metal podem ser sujeitas a
uma escolha selectiva e, deste modo,
prontas para serem recicladas. Para
tal, dirija-se aos nossos Serviços de As-
sistência Técnica.
• A eliminação do aparelhos inutilizado
que nos enviar será realizada por nós
gratuitamente.
Protecção do Meio
Ambiente
Por favor, coloque o aparelho, os acessórios e a embalagem nos respectivos ecopontos para serem reciclados.
As máquinas não devem ser deita-
das para o lixo doméstico.
Peças sobressalentes/Acessórios
Pode obter as peças de reposição e os acessórios em
www.grizzly-service.eu
Caso não tenha internet entre em contacto, por telefone, com o centro de assistência (ver
“Service-Center “ página 33). Mantenha os números de encomenda, em baixo mencionados, disponíveis.
Pos. Pos. Designação Número de
Manual de Vista em encomenda
Instruções corte
10 19+20 Disco abrasivo + porca do disco abrasivo 91103590
2 100 Dispositivo para aar facas e tesouras 91103591
101 Dispositivo para aar brocas 91103592
102 Dispositivo para aar cinzel e escalpelo 91103593
30
Page 31
Diagnóstico de falhas
Desligue o aparelho e retire a cha de alimentação. Deixe o aparelho arrefecer.
Problema Possível causa Resolução da avaria
Verique a tomada, o cabo de
alimentação, o cabo e a cha
de alimentação, se necessário,
solicite a reparação a um técnico, verique o fusível.
Reparação pelo serviço de assistência
Aperte a porca do disco abrasivo (consulte „Substituir o disco
abrasivo“)
Remova os bloqueios
Reduza a pressão sobre a ferramenta de lixamento
Peça de trabalho inadequada
Aperte a porca do disco abra-
sivo (consulte „Substituir o disco
abrasivo“)
Substitua o disco abrasivo
O aparelho não
liga
As ferramentas de
lixamento não se
movem apesar de
o motor estar em
funcionamento
O motor torna-se
mais lento e permanece parado
O disco abrasivo
circula de forma
incorreta, ouvem-se
ruídos incomuns
Netzspannung fehlt
Haussicherung spricht an
Interruptor de ligar/desligar
(
3) avariado
Motor danicado
Porca do disco abrasivo
16) solta
(
A peça de trabalho, resíduos
de peças de trabalho ou das
ferramentas de lixamento bloqueiam o acionamento
O aparelho está sobrecarregado pela peça de trabalho
Porca do disco abrasivo
16) solta
(
Disco abrasivo (
cado
10) dani-
PT
31
Page 32

PT
Garantia
Prezada cliente, prezado cliente,
Este aparelho tem uma garantia de 3 anos
a contar a partir da data da compra.
Em caso de deciências vericadas neste
produto, estão à sua disposição direitos
legais face ao vendedor. Estes direitos legais não são restritos pela nossa garantia
a seguir descrita.
Termos de garantia
O período de garantia começa a contar
da data da compra. Mantenha guardado
o talão de compra original. Esse documento é exigido como comprovativo de
compra.
Se no decorrer de três anos a partir da
data de aquisição deste produto, ocorrer
uma falha de material ou defeito de fabrico, o produto será substituído ou reparado
gratuitamente, de acordo com a nossa
escolha. Esta garantia exige que o dispositivo defeituoso e o talão de compra (recibo) sejam apresentados no decorrer de um
prazo de três anos e que seja brevemente
descrito por escrito, qual o defeito e quan-
do é que ele ocorreu.
Se o defeito for coberto pela nossa garan-
tia é coberta, receberá de volta o produto
reparado ou um novo produto. Com a
reparação ou substituição do produto
não é iniciado nenhum novo período de
garantia.
Períododegarantiaereclamações
legais por defeitos
O período de garantia não é prolongado
pela prestação de garantia. Isto também
se aplica às peças substituídas e reparadas. Quaisquer danos e defeitos eventual-
mente existentes vericados na altura da
compra deverão ser comunicados imediatamente após se ter desembalado o produ-
to. Após decorrido o período de garantia,
as reparações necessárias estão sujeitas a
pagamento.
Âmbito da garantia
O aparelho foi cuidadosamente produzido
de acordo com diretivas de qualidade
rigorosas e devidamente testado antes da
entrega.
A prestação de garantia aplica-se a falhas
de material ou defeitos de fabrico. Esta garantia não cobre os componentes do produto que estão sujeitos a desgaste normal
e que são portanto consideradas como
peças de desgaste (por exemplo Rebolos,
escovas de carvão, encosto, anteparo),
nem os danos causados nas partes frágeis
(por exemplo, interruptores, baterias recarregáveis ou as peças feitas em vidro).
Esta garantia caduca, se o produto for danicado ou se não for devidamente usado
ou conservado. Para uma correta utilização do produto, deverão ser cumpridas todas as indicações descritas no manual de
instruções. Deverão ser impreterivelmente
evitados os usos e as ações desaconselhados no manual de instruções, ou para os
quais são feitas advertências.
Este produto foi concebido unicamente
para uso privado e não é indicado para
uso comercial. A garantia é anulada em
caso de uso abusivo e inadequado, do
uso de força, e em caso de intervenções
que não tenham sido realizadas pela nossa estação de serviço autorizada.
Procedimento em caso de reclamação de garantia
Para assegurar um processamento rápido
da sua reclamação, siga por favor as seguintes instruções:
• Mantenha à mão o talão de compra e o número do identicação
32
Page 33

PT
(IAN102874), como comprovativo da
compra.
• Pode consultar o número do artigo na
placa de identicação.
• Se ocorrerem erros na funcionalidade
ou outros defeitos, contate imediatamente por telefone ou e-mail o departamento de serviços a seguir designado.
Receberá informações adicionais acerca do processamento da sua reclamação.
• Após consulta do nosso serviço de
atendimento a clientes, pode enviar-nos
um produto defeituoso com despesas
de envio gratuitas para si, mediante a
anexação do talão de compra (recibo)
e indicando onde e quando surgiu o
defeito, para o endereço de serviço
que lhe for comunicado. Para evitar
problemas de receção e custos adicionais, use apenas o endereço que lhe
for comunicado. Certique-se de que o
envio não foi enviado livre de franquia,
através de serviço de transporte de
mercadorias pesadas, serviço de envio
expresso, ou qualquer outro serviço
de envio especial. Envie o aparelho
incluindo todas as peças acessórias
fornecidas aquando efetuada a compra
e use uma embalagem de transporte
sucientemente segura.
defeito para a nossa sucursal de serviços.
Não serão aceites máquinas ou aparelhos
não franqueados, devolvidos como merca-
dorias volumosas, ou através de serviços
postais por expresso ou especiais.
Efetuamos gratuitamente a eliminação das
suas máquinas defeituosas enviadas.
Service-Center
Assistência Portugal
PT
Tel.: 70778 0005
(0,12 EUR/Min.)
E-Mail: grizzly@lidl.pt
IAN102874
Importador
Tenha em conta que o endereço seguinte
não é nenhum endereço de serviço. Entre
em contacto com o centro de atendimento
acima referido.
Grizzly Tools GmbH & Co. KG
Stockstädter Straße 20
63762 Großostheim
Germany
www.grizzly-service.eu
Serviço de reparação
As reparações que não sejam abrangidas
pela garantia podem ser efetuadas pelo
nosso centro de serviço, mediante fatura-
ção. Ele apresentar-lhe-á de bom grado
um orçamento dos custos.
Podemos reparar apenas os aparelhos que
tenham sido devidamente embalados e
enviados com franquia suciente.
Atenção: Por favor, envie o seu aparelho
limpo e mediante referência da falha ou
33
Page 34

PT
34
Page 35

GB MT
Content
Introduction ............................... 35
Intended use .............................. 35
General description .................... 36
Scope of delivery ...........................36
Function description........................36
Summary ......................................36
Technical specications ............... 36
Safety Instructions......................37
Symbols and icons .........................37
General Safety Instructions for Power
Tools .............................................37
Further Safety Instructions ................39
Residual risks .................................40
Assembly ...................................40
Mount the sharpener ......................41
Operation ..................................41
Switching on and off ......................41
Grinding with the grinding disc .......42
Sharpening drills ............................42
Sharpening picks and chisels ...........42
Sharpening knives ..........................43
Sharpening scissors ........................43
Change grinding disc .....................43
Cleaning and maintenance .........44
Cleaning .......................................44
Storage ...................................... 44
Waste disposal and environmental
protection ..................................44
Replacement parts/accessories ...45
Trouble Shooting ........................ 46
Guarantee .................................47
Repair Service ............................48
Service-Center ............................48
Importer ....................................48
Translation of the original
EC declaration of conformity ......67
Exploded Drawing ..................... 69
Introduction
Congratulations on the purchase of your
new device. With it, you have chosen a
high quality product.
During production, this equipment has
been checked for quality and subjected to
a nal inspection.
The operating instructions constitute
part of this product. They contain
important information on safety, use
and disposal.
Before using the product, familiarise
yourself with all of the operating
and safety instructions. Use the
product only as described and for
the applications specied.
Keep this manual safely and in the
event that the product is passed on,
hand over all documents to the third
party.
Intended use
The sharpening station is suitable for sharpening tools (e.g. drills, knives, scissors,
picks, chisel).
The device is not intended for all other
types of applications (e.g. grinding with
unsuitable grinding tools, grinding with a
coolant solution, grinding hazardous materials such as asbestos).
The equipment is intended for use in the
eld of DIY. It is not designed for commercial use.
The equipment is designed for use by
adults. Young people under the age of 16
are permitted to use the equipment only
under supervision.
The manufacturer shall not be liable for
damages caused by use other than for the
intended purpose or by incorrect operation.
35
Page 36

GB MT
General description
The illustrations can be found
on the front and rear fold-out
pages.
Scope of delivery
Unpack the equipment and check that it is
complete. Dispose of the packaging material correctly.
• Appliance
• Sharpener for
knives and scissors
• Sharpener for drills
• Sharpener for picks and chisels
• Spare grinding wheel
• Translation of the original instructions
for use
Function description
The sharpening station is suitable for
sharpening tools (e.g. drills, knives, scissors, picks, chisels). The scope of delivery
contains three sharpeners for this purpose,
which, as a guide and safety device, enable precise sharpening and grinding.
Refer to the following descriptions for a
functional description of the controls.
Summary
8 Protective hood
9 Mounting holes for
work bench assembly
10 Grinding disc
11 rotatable drill mount
12 Knurled nut for drill-fastening
13 Release lever for
sharpener
14 Drill holder
15 Adjusting device
16 Grinding wheel nuts
Technical specications
Nominal input voltage
............................. 220 - 240 V~, 50 Hz
Power consumption ...................... 65 W
(S2 10 min)*
Measurement idling speed n
Safety class ..................................... II
Protection category......................... IP 20
Weight ................................ ca. 1,25 kg
Grinding angle range ................15° - 50°
Sharpness drill diameter ............ 3 -10 mm
Sharpness knife width .............. 6 - 51 mm
Sound pressure level
(L
) ............. 59,3 dB (A); KpA= 3 dB (A)
pA
Sound power level (L
wA
measured ........73,5 dB(A); K
* A break is introduced after 10 minutes of
uninterrupted operating duration until the
device temperature differs 2 K (2°C) less than
room temperature.
)
...6700 min
0
= 3 dB(A)
wA
-1
1 Mains plug
2 Sharpener for knives and
scissors
3 On/off switch
4 Spacer
5 Magnet holder
6 Tool table
7 Retaining screw for
angular adjustment
36
Noise and vibration values have been
determined according to the standards and
regulations mentioned in the declaration of
conformity.
Technical and optical changes may be
undertaken in the course of further development without notice. All dimensions, references and information in this instruction
manual are therefore not guaranteed. Legal
claims made on the basis of the instruction
Page 37

GB MT
manual can therefore not be considered as
valid.
The stated vibration emission value was
measured in accordance with a standard
testing procedure and may be used to compare one power tool to another.
The stated vibration emission value may
also be used for a preliminary exposure
assessment.
Warning!
The vibration emission value may
differ during actual use of the
power tool from the stated value
depending on the manner in which
the power tool is used.
Safety precautions aimed at protecting the user should be based on
estimated exposure under actual
usage conditions (all parts of the
operating cycle are to be considered, including, for example, times
during which the power tool is
turned off and times when the tool
is turned on but is running idle).
Do not dispose of electrical equip-
ment in household waste.
Symbols in the manual:
Warning symbols with in-
formation on damage and
injury prevention.
Instruction symbols (the instruction is
explained at the place of the exclamation mark) with information on
preventing damage.
Help symbols with information on
improving tool handling.
General Safety Instructions
for Power Tools
WARNING! Read all safety in-
structions and guidelines carefully. Failure to follow the safety
instructions and guidelines may result
in electric shock, re and/or serious
injuries.
Safety Instructions
Symbols and icons
Symbols on the device:
Warning!
Read the instruction manual.
Wear ear protection.
Risk of electric shock! Disconnect
from the mains before carrying out
maintenance and repair work.
Safety class II
The term „power tool“ used in the safety
instructions refers to mains-operated electric
tools (with a mains cable) and to battery-operated electric tools (without a mains cable.
Safe operation:
• Keep work area clear. Cluttered
areas and benches invite injuries.
• Consider work area environment.
- Do not expose tools to rain. Do not use
tools in damp or wet locations.
Water entering a power tool will increase the risk of electric shock.
- Keep work area well lit.
37
Page 38

GB MT
- Do not use tools in the presence of
ammable liquids or gases.
Power tools create sparks which may
ignite the dust or fumes.
• Guard against electric shock.
Avoid body contact with earthed or
grounded surfaces (e.g. pipes, radiators, ranges, refrigerators).
• Keep other persons away.
Do not let persons, especially children,
not involved in the work touch the tool
or the extension cord and keep them
away from the work area.
• Store idle tools. When not in use,
tools should be stored in a dry lockedup place, out of reach of children.
• Do not force the tool. It will do
the job better and safer at the rate for
which it was intended.
• Use the right tool.
- Do not force small tools to do the job
of a heavy duty tool.
- Do not use tools for purposes not in-
tended; for example do not use circular
saws to cut tree limbs or logs.
Use of the power tool for operations dif-
ferent from those intended could result in
a hazardous situation.
• Dress properly.
- Do not wear loose clothing or jewellery, they can be caught in moving
parts.
- Anti-slip footwear is recommended
when working outdoors.
- Wear protective hair covering to contain long hair.
• Use protective equipment.
- Use safety glasses.
- Use face or dust mask if working operations create dust.
• Connect dust extraction equipment. If the tool is provided for the
connection of dust extraction and col-
lecting equipment, ensure these are
connected and properly used.
• Do not abuse the cord. Never
yank the cord do disconnect it from the
socket. Keep the cord away from heat,
oil and sham edges.
• Secure work. Where possible use
clamps or a vice to hold the work. It is
safer than using your hand.
• Do not overreach. Keep proper
footing and balance at all times.
This enables better control of the power
tool in unexpected situations.
• Maintain tools with care.
Many accidents are caused by poorly
maintained power tools.
- Keep cutting tools sharp and clean for
better and safer performance.
- Follow instruction for lubricating and
changing accessories.
- Inspect tool cords periodically and if
damaged have them repaired by an
authorized service facility.
- Inspect extension cords periodically
and replace if damaged.
- Keep handles dry, clean and free from
oil and grease.
• Disconnect tools. When not in use,
before servicing and when changing
accessories disconnect tools from the
power supply.
Such preventive safety measures reduce
the risk of starting the power tool accidentaIly.
• Remove adjusting keys and
wrenches. Form the habit of check-
ing to see that keys and adjusting
wrenches are removed from the tool
before turning it on. A wrench or a key
left attached to a rotating part of the
power tool may result in personal injury.
• Avoid unintentional starting.
Ensure switch is in “off” position when
plugging in.
38
Page 39

GB MT
• Use outdoor extension leads.
When the tool is used outdoors, use
only extension cords intended for outdoor use and so marked.
• Stay alert, watch what you are
doing and use common sense
when operating a power tool.
Do not use a power tool while you are
tired or under the inuence of drugs,
alcohol or medication. A moment of
inattention white operating power tools
may result in serious personal injury.
• Check damaged parts. This will
ensure that the safety of the power tool
is maintained.
- Before further use of tool, it should be
carefully checked to determine that it
will operate properly and perform its
intended function.
- Check for alignment of moving parts,
binding of moving parts, breakage of
parts, mounting and any other conditions that may affect its operation.
- A guard or other part that is damaged should be properly repaired or
replaced by an authorized service centre unless otherwise indicated in this
instruction manual.
- Have defective switches replaced by
an authorized service centre.
- Do not use the tool if the switch does
not turn it on and off.
There is a risk of injury.
• Warning.
The use of any accessory or attach-
ment other than one recommended in
this instruction manual may present a
risk of personal injury.
• Have your tool repaired by a
qualied person. This electric tool
complies with the relevant safety rules.
Repairs should only be carried out by
qualied persons using original spare
parts, otherwise this may result in considerable danger to the user..
Further Safety Instructions
• Connect the device only to a power
point with a residual current protective
device (RCD) with a measured residual
current of not more than 30 mA.
• Keep the mains cable and extension
cable away from the grinding disk and
saw chain. In the event that it is damaged or severed, immediately disconnect the plug from the socket.
Do not touch the cable before it has
been disconnected from the mains.
Risk of electric shock.
• The replacement of the plug or the connection line must always be executed
by the manufacturer of the electric tool
or his/her customer service in order to
avoid any hazards.
• Only switch the device on once it is
safely xed to the worktop.
• For your own safety only use acces-
sories and attachments which were
stated in the operating instructions or
recommended or specied by the tool
manufacturer.
• Only use grinding discs where the
printed rotational speed is at least as
high as what has been specied on the
name plate of the device.
• Carry out a visual inspection of the
grinding disc before use. Do not use
any damaged or deformed grinding
discs. Replace any damaged or worn
grinding discs.
• Make sure that the sparks produced
by grinding do not present a danger,
e.g. reach people or ignite ammable
substances.
39
Page 40

GB MT
• Never keep the ngers between the
grinding disc and spark protection
or in close proximity to the protective
hoods. There is a risk of crushing.
• The rotating parts of the device cannot
be covered due to functional reasons.
Therefore, proceed cautiously and hold
the workpiece rmly in order to avoid
slipping which could cause your hands
to come into contact with the grinding
belt or grinding disc.
• The workpiece gets hot during grinding. Do not touch the machined area,
allow it to cool down. There is a risk
of burning. Do not use coolants or the
like.
• If you are tired or have consumed alcohol or tablets, do not work with the
device. Always have a break on time.
• Switch the device off and remove the
mains plug
- to loosen a blocked insertion tool,
- if the connection line is damaged or
entangled,
- in case of unusual sounds.
Residual risks
Even if properly operating and handling
this electric tool, some residual risks will
remain. Due to its construction and build,
this electric tool may present the following
hazards:
a) Lung damage, if suitable respiratory
protection is not worn.
b) Hearing damage, if suitable ear pro-
tection is not worn.
c) Damages to health due to
- touching the area of the grinding tool
which was not covered;
- the ejection of pieces from workpiece
or damaged grinding discs.
d) Damage to your health caused by
swinging your hands and arms when
operating the appliance for longer periods of time or if the unit is not held or
maintained properly.
Warning! During operation, this
electric tool generates an electro-
magnetic eld which, under certain
circumstances, may impair the
functionality of active or passive
medical implants. To reduce the risk
of serious or lethal injuries, we recommend that persons with medical
implants consult their doctor and the
manufacturer of their medical implant before operating the machine.
Assembly
Caution! Risk of injury!
- Ensure that you have sufcient
space in which to work, and that
you do not endanger other people.
- All covers and protective devices
must be assembled properly before commissioning.
- Disconnect the mains plug before
changing the setting on the device.
Setting up
Place the sharpening station on rm surface and fasten the device. Ideally, bolt the
drill to the surface. Use the mounting holes
for the work bench assembly (9) in the
baseplate for this.
The screws and nuts required for as-
sembly are not part of the scope of
delivery.
40
Page 41
GB MT
Mount the sharpener
1. Select one of the three sharpeners.
2. In order to remove a sharpener
from the working position, you
must press down the release lever for the sharpener (13).
3. Remove the sharpener from the
guide rails, upwards.
4. In the storage positions, the
sharpeners are not xed to the
right and left side and can be
easily removed from the guide
rails.
5. In order to fasten the selected
sharpener in the working position, from above push this into
the guide rails. Press the sharpener down until it snaps into
place.
The sharpeners also present
a safety device. Never use
this device without a sharpener. Risk of injury!
Despite spark protection, al-
ways wear safety goggles
while working in order to
avoid eye injuries.
Keep your hands away from
the grinding disc and grinding belt when the device is in
operation. Injury hazard!.
Switching on and off
Ensure that the mains voltage
matches the specications on the
rating plate.
Connect the equipment to the mains.
1. To switch on, press the “I” On switch
and the device starts up (see
2. To switch off, press the “0” off switch
and the device switches off (see
After switching on the device, wait until the
device has reached its max. speed. Only
then must you start with the grinding.
3).
3).
Operation
Caution! Risk of injury!
- Always disconnect the plug from
the mains socket before working.
- Use only grinding disks and accessories recommended by the manufacturer. The use of other insertion
tools and other accessories may
cause risk of injury.
- Never operate the device without
the visual protection disk.
- Switch on the equipment only when
it is safely installed on the work surface.
The disk will continue to
run after the equipment is
switched off. There is a risk
of injury.
Test run:
Before starting work and after each
change of grinding disk, carry out a test
run of at least 60 seconds with no load.
Switch off the equipment immediately if the
disk runs lumpy, substantial vibrations occur, or abnormal noises are generated.
41
Page 42

GB MT
Grinding with the grinding
disc
Sharpening drills
Drills with a diameter of 3-10 mm can be
sharpened.
1. Mount the selected sharpener
(see Mounting sharpener).
2. Remove the drill holder (14) from
the sharpener.
3. Insert the drill into the drill holder
(14).
4. Insert the drill holder (14) into
the adjusting device (15).
5. Push the drill to the front into the
V-nut up to the metal stop. The
cutting edges of the drill must t
closely to the metal surfaces.
6. Using the knurled nut fasten the
drill for drill-fastening (12).
7. Remove the drill holder (14) and
insert it into the rotatable drill
mount (11).
8. Check the alignment of the drill.
The cutting edges of the drill
must be touching the grinding
wheel (10).
9. Switch the device off and grind
the drill.
10. Switch the device off and wait
for the grinding wheel (10) to
stop.
11. Remove the drill holder (14)
and insert it into the rotatable
drill mount (11) by rotating in
by 180°. Using the same adjustment, you can grind the opposite
cutting edge of the drill.
12. Switch the device off and grind
the drill.
13. Switch the device off and wait
for the grinding wheel (10) to
stop.
Sharpening picks
and chisels
1. Mount the selected sharpener
(see Mounting sharpener).
2. Place the blade on the tool table
(6) so that the end to be sharp-
ened ts closely to the edge of
the tool table (6). The magnetic
holder (5) keeps the blade in
position.
3. For small picks, use the spacer
(4).
4. Select the angle according to the
existing bevel angle.
5. Release the retaining screw for
the angular adjustment (7) and
turn the tool table (6) into position.
6. Tighten the retaining screw for
angular adjustment (7) again.
7. Switch the device on and move
the tool table (6) equally back
and forth along the grinding
wheel (10).
8. Always use light pressure while
sharpening and slowly push
the blade towards the grinding
wheel (10).
9. Repeat the sharpening process
until all irregularities have been
removed.
10. Switch the device off and wait
for the grinding wheel (10) to
stop.
42
Page 43
GB MT
Sharpening knives
1. Mount the selected sharpener
(see Mounting sharpener).
2. Insert the blade of the knife right
into the knife sharpening slot.
3. Using light pressing guide the
blade along the grinding wheel
(10) and evenly and slowly pull
the knife towards you.
4. Turn the knife and insert the knife
blade into the opposite knife
sharpening slot.
5. Repeat this grinding process for
this side of the blade as well.
6. Execute the alternating grinding
process until the cutting edge is
burr-free and sharp.
7. Switch the device off and wait
for the grinding wheel (10) to
stop.
The device is not suitable for grind-
ing serrated knives.
Sharpening scissors
1. Mount the selected sharpener
(see Mounting sharpener).
2. Completely open the scissors.
3. Insert the scissor blades into the
scissor sharpening slot.
4. Using light pressure guide the
blade from the screw up to the
tip along the grinding wheel
(10).
5. Remove the scissors from the
sharpening station and turn the
scissors to sharpen the other
blade.
6. Insert the other scissor blade into
the scissor sharpening slot.
7. Using light pressure guide the
blade from the screw up to the
tip along the grinding wheel
(10).
8. Execute the alternating grinding
process until the cutting edges
are burr-free and sharp.
9. Switch the device off and wait
for the grinding wheel (10) to
stop.
The device is not suitable for grind-
ing serrated scissors. The device
is not suitable for grinding pinking
shears.
Change grinding disc
Information on replacement:
• Never operate the device without
protective equipment.
• Ensure that the grinding disc
dimensions match those of the
device.
• Never use separate bushings or
adapters in order to make grinding discs whose hole is too large
t the device.
• Do not use any saw blades.
• Always reassemble the device
completely after replacing the
grinding disc.
Switch the device off and remove
the mains plug.
Allow the device to cool down.
1. Release the grinding wheel nut
(16) in the clockwise direction
(left-handed thread).
2. Remove the grinding wheel (10).
43
Page 44

GB MT
3. Set up a new grinding wheel
(10). Screw the grinding wheel
nut (16) in the anti- clockwise direction (left-handed thread).
4. Test run:
Before starting work and after
each change of grinding disk,
carry out a test run of at least
60 seconds with no load. Switch
off the equipment immediately if
the disk runs lumpy, substantial
vibrations occur, or abnormal
noises are generated.
Cleaning and
maintenance
Disconnect the plug before adjust-
ment, maintenance or repair.
Have any work not described
in these instructions carried
out by a specialist workshop.
Use only original components.
Allow the equipment to cool
before carrying out any maintenance and cleaning work.
There is a risk of burns.
Before each use, check the equipment
for obvious defects such as loose, worn
or damaged components and check that
screws or other parts are sitting correctly.
In particular, check the grinding disk (
10). Replace damaged parts.
Cleaning
Do not use cleaning agents or sol-
vents. Chemical substances may
attack plastic parts of the equipment.
Never clean the equipment under
running water.
• Clean the equipment thoroughly after
each use.
• Clean the surface of the device with a
soft brush or cloth.
Storage
• Store the appliance in a dry place well
out of reach of children.
• Grinding disks must be stored dry and
upright and are not to be stacked.
Waste disposal and environmental protection
Be environmentally friendly. Return the
tool, accessories and packaging to a recy-
cling centre when you have nished with
them.
Machines are not to be place with
domestic waste.
Hand over the device at an utilization location. The plastic and metal parts employed
can be separated out into pure materials
and recycling can be implemented. Ask
your Service Center about this. Defective
units returned to us will be disposed of for
free.
44
Page 45

GB MT
Replacement parts/accessories
Spare parts and accessories can be obtained at
www.grizzly-service.eu
If you do not have internet access, please contact the Service Centre via telephone
(see “Service-Center” page 48). Please have the order number mentioned below ready.
Position Position Description Order
Instruction Exploded number
manual drawing
10 19+20 Grinding wheel with Grinding wheel nuts 91103590
2 100 Sharpener for knives and scissors 91103591
101 Sharpener for drills 91103592
102 Sharpener for picks and chisels 91103593
45
Page 46

GB MT
Trouble Shooting
Always disconnect the plug from the mains socket before working.
Danger of electric shock.
Problem Possible Cause Error correction
Check the socket, mains cable,
line, mains plug, repairs to be
carried out by qualied electrician if necessary, check main
circuit breaker.
Repair by Customer Care
Device doesn‘t start
Mains voltage missing
Main circuit breaker is tripped
On/off switch (
defective
Engine faulty
3) may be
Grinding tools do
not move although
the engine is running
Engine is slower
and stops
Grinding disc does
not rotate smoothly,
abnormal noises
can be heard
Grinding disc nut (
loose
Workpiece, remaining workpieces or remaining grinding
tools block drive
Device is overloaded through
workpiece
Grinding disc nut (
loose
Grinding disc (
16)
16)
10) faulty
Tighten grinding disc nut (see
„Changing the grinding disc“)
Remove blockages
Reduce pressure on grinding tool
Workpiece unsuitable
Tighten grinding disc nut (see
„Changing the grinding disc“)
Change grinding disc
46
Page 47

GB MT
Guarantee
Dear Customer,
This equipment is provided with a 3-year
guarantee from the date of purchase.
In case of defects, you have statutory rights
against the seller of the product. These
statutory rights are not restricted by our
guarantee presented below.
Terms of Guarantee
The term of the guarantee begins on the
date of purchase. Please retain the original
receipt. This document is required as proof
of purchase.
If a material or manufacturing defect
occurs within three years of the date of
purchase of this product, we will repair or
replace – at our choice – the product for
you free of charge. This guarantee requires
the defective equipment and proof of purchase to be presented within the three-year
period with a brief written description of
what constitutes the defect and when it occurred.
If the defect is covered by our guarantee,
you will receive either the repaired product
or a new product. No new guarantee period begins on repair or replacement of the
product.
Guarantee Period and Statutory
Claims for Defects
The guarantee period is not extended by
the guarantee service. This also applies for
replaced or repaired parts. Any damages
and defects already present at the time of
purchase must be reported immediately after unpacking. Repairs arising after expiry
of the guarantee period are chargeable.
Guarantee Cover
The equipment has been carefully produced in accordance with strict quality
guidelines and conscientiously checked
prior to delivery.
The guarantee applies for all material and
manufacturing defects. This guarantee
does not extend to cover product parts that
are subject to normal wear and may therefore be considered as wearing parts (e.g.
lters or attachments) or to cover damage
to breakable parts (e.g. switches, batteries,
or parts made of glass).
This guarantee shall be invalid if the product has been damaged, used incorrectly or
not maintained. Precise adherence to all of
the instructions specied in the operating
manual is required for proper use of the
product. Intended uses and actions against
which the operating manual advises or
warns must be categorically avoided.
The product is designed only for private
and not commercial use. The guarantee
will be invalidated in case of misuse or
improper handling, use of force, or interventions not undertaken by our authorised
service branch.
Processing in Case of Guarantee
To ensure quick handling of you issue,
please follow the following directions:
• Please have the receipt and item number (IAN 102874) ready as proof of
purchase for all enquiries.
• Please nd the item number on the rating plate.
• Should functional errors or other defects occur, please initially contact the
service department specied below by
telephone or by e-mail. You will then
receive further information on the processing of your complaint.
47
Page 48

GB MT
• After consultation with our customer
service, a product recorded as defective can be sent postage paid to the
service address communicated to you,
with the proof of purchase (receipt)
and specication of what constitutes
the defect and when it occurred. In order to avoid acceptance problems and
additional costs, please be sure to use
only the address communicated to you.
Ensure that the consignment is not sent
carriage forward or by bulky goods,
express or other special freight. Please
send the equipment inc. all accessories
supplied at the time of purchase and
ensure adequate, safe transport packaging.
Repair Service
For a charge, repairs not covered by the
guarantee can be carried out by our ser-
vice branch, which will be happy to issue
a cost estimate for you.
We can handle only equipment that has
been sent with adequate packaging and
postage.
Attention: Please send your equipment to
our service branch in clean condition and
with an indication of the defect.
Equipment sent carriage forward or by
bulky goods, express or other special
freight will not be accepted.
We will dispose of your defective devices
free of charge when you send them to us.
Service-Center
Service Great Britain
GB
Tel.: 0871 5000 720
(£ 0.10/Min.)
E-Mail: grizzly@lidl.co.uk
IAN 102874
Assistenza Malta
MT
Tel.: 80062230
E-Mail: grizzly@lidl.com.mt
IAN 102874
Importer
Please note that the following address is
not a service address. Please initially con-
tact the service centre specied above.
Grizzly Tools GmbH & Co. KG
Stockstädter Straße 20
63762 Großostheim
Germany
www.grizzly-service.eu
48
Page 49

AT CHDE
Inhalt
Einleitung ................................... 49
Bestimmungsgemäße
Verwendung ..............................49
AllgemeineBeschreibung ........... 50
Lieferumfang..................................50
Funktionsbeschreibung ....................50
Übersicht ......................................50
Technische Daten ........................ 50
Sicherheitshinweise .................... 51
Symbole und Bildzeichen ................51
Allgemeine Sicherheitshinweise für
Elektrowerkzeuge ...........................51
Weiterführende Sicherheitshinweise .54
Restrisiken .............................55
Montage .................................... 55
Schärfvorrichtungen montieren .........56
Bedienung .................................56
Ein- und Ausschalten .......................56
Schleifen mit der Schleifscheibe .......57
Schärfen von Bohrern .....................57
Schärfen von Meißeln und Beiteln ....57
Schärfen von Messern ....................58
Schärfen von Scheren .....................58
Schleifscheibe wechseln ..................58
Reinigung und Wartung ............. 59
Reinigung .....................................59
Lagerung ................................... 59
Entsorgung/Umweltschutz .......... 60
Ersatzteile/Zubehör ...................60
Fehlersuche ................................ 61
Garantie .................................... 62
Reparatur-Service ......................63
Service-Center ............................63
Importeur ..................................63
OriginalEG-Konformitäts-
erklärung ..................................68
Explosionszeichnung .................. 69
Einleitung
Herzlichen Glückwunsch zum Kauf Ihres
neuen Gerätes. Sie haben sich damit für
ein hochwertiges Gerät entschieden.
Dieses Gerät wurde während der Produktion auf Qualität geprüft und einer Endkontrolle unterzogen. Die Funktionsfähigkeit
Ihres Gerätes ist somit sichergestellt.
Die Betriebsanleitung ist Bestandteil
dieses Gerätes. Sie enthält wichtige
Hinweise für Sicherheit, Gebrauch
und Entsorgung. Machen Sie sich
vor der Benutzung des Gerätes mit
allen Bedien- und Sicherheitshinweisen vertraut. Benutzen Sie das
Gerät nur wie beschrieben und für
die angegebenen Einsatzbereiche.
Bewahren Sie die Betriebsanleitung
gut auf und händigen Sie alle Unterlagen bei Weitergabe des Gerätes
an Dritte mit aus.
Bestimmungsgemäße
Verwendung
Die Schärfstation ist zum Schärfen von
Werkzeugen (z.B. Bohrern, Messern, Scheren, Meißeln, Beitel) geeignet.
Für alle anderen Anwendungsarten (z.B.
Schleifen mit nicht geeigneten Schleifwerk-
zeugen, Schleifen mit einer Kühlüssigkeit,
Schleifen gesundheitsgefährdender Materialien wie Asbest) ist das Gerät nicht
vorgesehen.
Das Gerät ist für den Einsatz im Heimwerkerbereich bestimmt. Es wurde nicht für
den gewerblichen Dauereinsatz konzipiert.
Das Gerät ist zum Gebrauch durch Erwachsene bestimmt. Jugendliche über
16Jahre dürfen das Gerät nur unter Aufsicht benutzen.
49
Page 50

DE AT CH
Der Hersteller haftet nicht für Schäden, die
durch bestimmungswidrigen Gebrauch
oder falsche Bedienung verursacht wurden.
Allgemeine
Beschreibung
Die Abbildung der wichtigsten
Funktionsteile nden Sie auf
der vorderen und hinteren Ausklappseite.
Lieferumfang
Packen Sie das Gerät aus und kontrollieren
Sie, ob es vollständig ist. Entsorgen Sie das
Verpackungsmaterial ordnungsgemäß.
• Gerät
• Schärfvorrichtung für
Messer und Scheren
• Schärfvorrichtung für Bohrer
• Schärfvorrichtung für Meißel und Beitel
• Ersatzschleifscheibe
• Originalbetriebsanleitung
Funktionsbeschreibung
Die Schärfstation ist zum Schärfen von
Werkzeugen (z.B. Bohrern, Messern, Scheren, Meißeln, Beiteln) geeignet. Hierzu
sind drei verschiedene Schärfvorrichtungen
im Lieferumfang enthalten, die als Führung
und Sicherheitseinrichtung ein präzises
Schärfen und Schleifen ermöglichen.
Die Funktion der Bedienteile entnehmen Sie
bitte den nachfolgenden Beschreibungen.
Übersicht
4 Abstandhalter
5 Magnethalter
6 Werkzeugauage
7 Feststellschraube für
Winkeleinstellung
8 Schutzhaube
9 Montagelöcher für
Werkbankmontage
10 Schleifscheibe
11 drehbare Bohreraufnahme
12 Rändelmutter zur Bohrerxierung
13 Entriegelungshebel für
Schärfvorrichtungen
14 Bohrerhalterung
15 Justiervorrichtung
16 Schleifscheiben-Mutter
Technische Daten
Nenneingangsspannung
............................. 220 - 240 V~, 50 Hz
Leistungsaufnahme ....................... 65 W
(S2 10 min)*
BemessungsLeerlaufdrehzahl n
Schutzklasse .................................... II
Schutzart....................................... IP 20
Gewicht ............................... ca. 1,25 kg
Schleifwinkelbereich ..................15° - 50°
Schäreistung Bohrdurchmesser . 3 -10 mm
Schäreistung Messerbreite ...... 6 - 51 mm
Schalldruckpegel
(L
) ............. 59,3 dB (A); KpA= 3 dB (A)
pA
Schallleistungspegel (L
gemessen .......73,5 dB(A); K
* Auf die untunterbrochene Betriebsdauer von
10 Minuten erfolgt eine Ruhepause, bis die
Gerätetemperatur weniger als 2 K (2°C) von
der Raumtemperatur abweicht.
................. 6700 min
0
)
wA
= 3 dB(A)
wA
-1
1 Netzstecker
2 Schärfvorrichtung für Messer
und Scheren
3 Ein-/Ausschalter
50
Lärm- und Vibrationswerte wurden entsprechend den in der Konformitätserklärung
genannten Normen und Bestimmungen
ermittelt.
Page 51
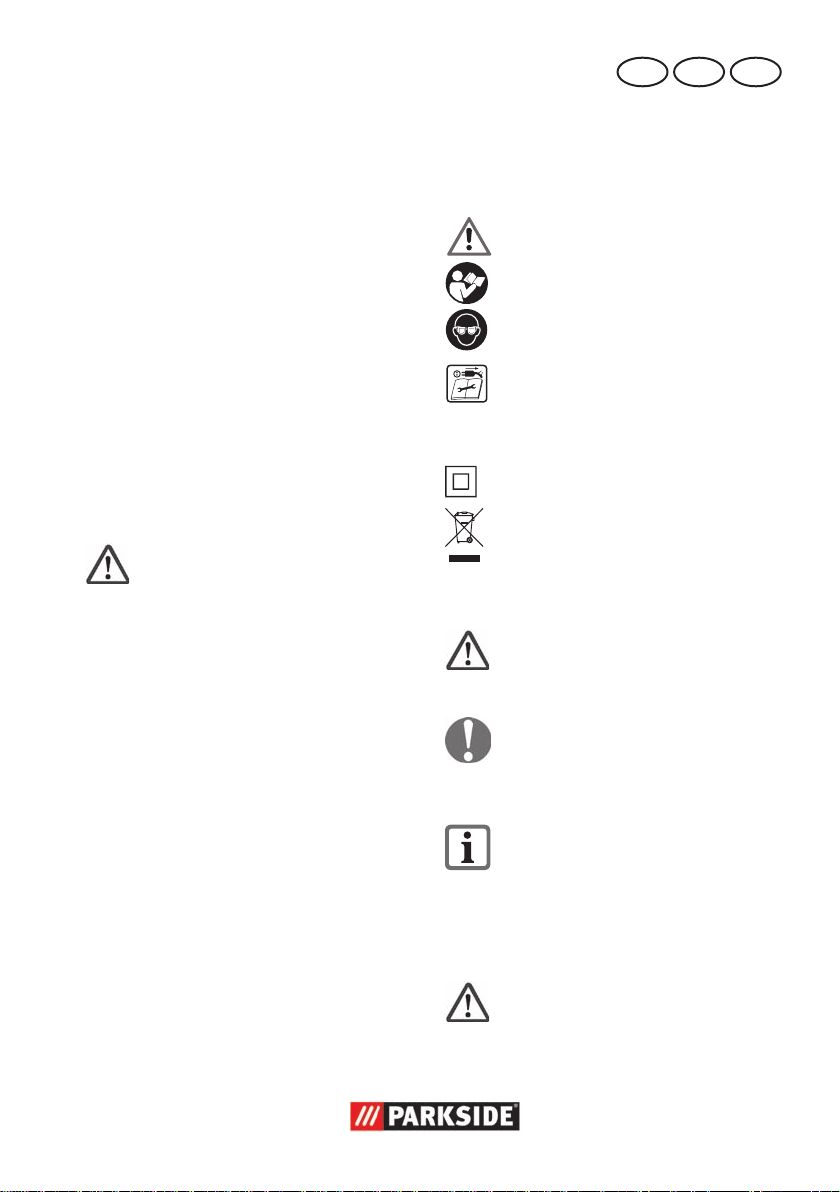
AT CHDE
Technische und optische Veränderungen
können im Zuge der Weiterentwicklung
ohne Ankündigung vorgenommen werden.
Alle Maße, Hinweise und Angaben dieser
sind deshalb ohne Gewähr. Rechtsansprüche, die aufgrund der Betriebsanleitung
gestellt werden, können daher nicht geltend
gemacht werden.
Der angegebene Schwingungsemissionswert ist nach einem genormten Prüfverfahren gemessen worden und kann zum
Vergleich eines Elektrowerkzeugs mit einem
anderen verwendet werden.
Der angegebene Schwingungsemissionswert kann auch zu einer einleitenden
Einschätzung der Aussetzung verwendet
werden.
Warnung:
Der Schwingungsemissionswert
kann sich während der tatsächlichen Benutzung des Elektrowerkzeugs von dem Angabewert unterscheiden, abhängig von der Art und
Weise, in der das Elektrowerkzeug
verwendet wird.
Es besteht die Notwendigkeit, Sicherheitsmaßnahmen zum Schutz
des Bedieners festzulegen, die auf
einer Abschätzung der Aussetzung
während der tatsächlichen Benutzungsbedingungen beruhen (hierbei
sind alle Anteile des Betriebszyklus
zu berücksichtigen, beispielsweise
Zeiten, in denen das Elektrowerkzeug abgeschaltet ist, und solche,
in denen es zwar eingeschaltet ist,
aber ohne Belastung läuft).
Sicherheitshinweise
Symbole und Bildzeichen
BildzeichenaufdemGerät:
Achtung!
Betriebsanleitung lesen.
Tragen Sie Augenschutz.
Gefahr durch elektrischen Schlag!
Ziehen Sie vor Wartungs- und Reparaturarbeiten den Netzstecker
aus der Steckdose.
Schutzklasse II
Elektrogeräte gehören nicht in den
Hausmüll.
SymboleinderBetriebsanleitung:
Gefahrenzeichen mit Anga-
ben zur Verhütung von Perso-
nen-oderSachschäden.
Gebotszeichen (anstelle des Ausru-
fungszeichens ist das Gebot erläutert) mit Angaben zur Verhütung von
Schäden.
Hinweiszeichen mit Informationen
zum besseren Umgang mit dem Gerät.
Allgemeine Sicherheitshinweise für Elektrowerkzeuge
ACHTUNG!
Beim Gebrauch von Elektrowerk-
zeugen sind zum Schutz gegen
elektrischen Schlag, Verletzungs- und
Brandgefahr folgende grundsätzliche
51
Page 52

DE AT CH
Sicherheitsmaßnahmen zu beachten.
Lesen Sie alle diese Hinweise, bevor
Sie dieses Elektrowerkzeug benutzen,
und bewahren Sie die Sicherheitshinweise gut auf.
Der in den Sicherheitshinweisen verwende-
te Begriff „Elektrowerkzeug“ bezieht sich
auf netzbetriebene Elektrowerkzeuge (mit
Netzkabel) und auf akkubetriebene Elektro-
werkzeuge (ohne Netzkabel).
Sicheres Arbeiten:
• Halten Sie Ihren Arbeitsbereich
in Ordnung.
Unordnung im Arbeitsbereich kann Un-
fälle zur Folge haben.
• BerücksichtigenSieUmgebungs-
einüsse.
- Setzen Sie Elektrowerkzeuge nicht
dem Regen aus.
- Benutzen Sie Elektrowerkzeuge nicht
in feuchter oder nasser Umgebung.
Das Eindringen von Wasser in ein
Elektrowerkzeug erhöht das Risiko
eines elektrischen Schlages.
- Sorgen Sie für gute Beleuchtung des
Arbeitsplatzes.
- Benutzen Sie Elektrowerkzeuge nicht,
wo Brand- oder Explosionsgefahr besteht. Elektrowerkzeuge erzeugen Fun-
ken, die den Staub oder die Dämpfe
entzünden können.
• SchützenSiesichvorelektrischem Schlag.
Vermeiden Sie Körperberührung mit ge-
erdeten Teilen (z.B. Rohren, Radiatoren,
Elektroherden, Kühlgeräten).
• HaltenSieanderePersonenfern.
Lassen Sie andere Personen, insbeson-
dere Kinder, nicht das Elektrowerkzeug
oder das Kabel berühren. Halten Sie sie
von Ihrem Arbeitsbereich fern.
• BewahrenSieunbenutzteElektrowerkzeuge sicher auf.
Unbenutzte Elektrowerkzeuge sind an
einem trockenen, hochgelegenen oder
abgeschlossenen Ort, außerhalb der
Reichweite von Kindern, abzulegen. Es
besteht Verletzungsgefahr.
• ÜberlastenSieIhrElektrowerkzeug nicht.
Sie arbeiten besser und sicherer im angegebenen Leistungsbereich.
• BenutzenSiedasrichtigeElektrowerkzeug.
- Verwenden Sie keine leistungsschwachen Maschinen für schwere Arbeiten.
- Benutzen Sie das Elektrowerkzeug
nicht für solche Zwecke, für die es
nicht vorgesehen ist. Benutzen Sie
zum Beispiel keine Handkreissäge
zum Schneiden von Baumästen oder
Holzscheiten.
Der Gebrauch von Elektrowerkzeugen
für andere als die vorgesehenen Anwendungen kann zu gefährlichen Situationen führen.
• TragenSiegeeigneteArbeitskleidung.
- Tragen Sie keine weite Kleidung oder
Schmuck, sie können von bewegli-
chen Teilen erfasst werden.
- Bei Arbeiten im Freien ist rutschfestes
Schuhwerk empfehlenswert.
- Tragen Sie bei langen Haaren ein
Haarnetz.
• BenutzenSieSchutzausrüstung.
- Tragen Sie eine Schutzbrille. Bei
Nichtbeachtung können Augenverletzungen durch Funken oder Schleifpartikel entstehen.
- Verwenden Sie bei stauberzeugenden
Arbeiten eine Atemmaske.
52
Page 53

AT CHDE
• SchließenSiedieStaubabsaug-
Einrichtung an.
Falls Anschlüsse zur Staubabsaugung
und Auffangeinrichtung vorhanden sind,
überzeugen Sie sich, dass diese angeschlossen und richtig benutzt werden.
• VerwendenSiedasKabelnicht
für Zwecke, für die es nicht bestimmt ist.
Benutzen Sie das Kabel nicht, um den
Netzstecker aus der Steckdose zu ziehen. Schützen Sie das Kabel vor Hitze,
Öl und scharfen Kanten. Beschädigte
oder verwickelte Kabel erhöhen das Risiko eines elektrischen Schlages.
• SichernSiedasWerkstück.
Benutzen Sie Spannvorrichtungen oder
einen Schraubstock, um das Werkstück
festzuhalten. Es ist damit sicherer gehalten als mit Ihrer Hand.
• VermeidenSieabnormaleKörperhaltung.
Sorgen Sie für sicheren Stand und halten
Sie jederzeit das Gleichgewicht.
Dadurch können Sie das Elektrowerk-
zeug in unerwarteten Situationen besser
kontrollieren.
• PegenSieIhreWerkzeugemit
Sorgfalt. Viele Unfälle haben ihre
Ursache in schlecht gewarteten Elektrowerkzeugen.
- Halten Sie die Schneidwerkzeuge
scharf und sauber, um besser und sicherer arbeiten zu können.
- Befolgen Sie die Hinweise zur Schmierung und zum Werkzeugwechsel.
- Kontrollieren Sie regelmäßig das
Netzkabel des Elektrowerkzeugs und
lassen Sie dieses bei Beschädigung
von einem anerkannten Fachmann
erneuern.
- Kontrollieren Sie Verlängerungsleitungen regelmäßig und ersetzen Sie
diese, wenn sie beschädigt sind.
- Halten Sie die Handgriffe trocken,
sauber und frei von Öl und Fett.
• ZiehenSiedenNetzsteckeraus
der Steckdose bei Nichtgebrauch
des Elektrowerkzeugs, vor der Wartung
und beim Wechsel von Werkzeugen.
Diese Vorsichtsmaßnahme verhindert
den unbeabsichtigten Start des Elektrowerkzeuges.
• LassenSiekeineWerkzeugschlüssel stecken.
Überprüfen Sie vor dem Einschalten,
dass Schlüssel und Einstellwerkzeuge
entfernt sind.
Ein Werkzeug oder Schlüssel, der sich
in einem drehenden Geräteteil bendet,
kann zu Verletzungen führen.
• VermeidenSieunbeabsichtigten
Anlauf.
Vergewissern Sie sich, dass der Schalter
beim Einstecken des Steckers in die
Steckdose ausgeschaltet ist.
• BenutzenSieVerlängerungskabelfürdenAußenbereich.
Verwenden Sie im Freien nur dafür zugelassene und entsprechend gekennzeichnete Verlängerungskabel.
• Seien Sie aufmerksam.
Achten Sie darauf, was Sie tun, und
gehen Sie mit Vernunft an die Arbeit.
Benutzen Sie das Elektrowerkzeug nicht,
wenn Sie unkonzentriert sind. Ein Mo-
ment der Unachtsamkeit beim Gebrauch
des Elektrowerkzeuges kann zu ernsthaften Verletzungen führen.
• ÜberprüfenSiedasElektrowerkzeugaufeventuelleBeschädi-
gungen.
Damit wird sichergestellt, dass die Si-
cherheit des Elektrowerkzeuges erhalten
bleibt.
- Vor weiterem Gebrauch des Elektrowerkzeugs müssen Schutzvorrich-
tungen oder leicht beschädigte Teile
53
Page 54

DE AT CH
sorgfältig auf ihre einwandfreie und
bestimmungsgemäße Funktion untersucht werden.
- Überprüfen Sie, ob die beweglichen
Teile einwandfrei funktionieren und
nicht klemmen oder ob Teile beschädigt sind. Sämtliche Teile müssen
richtig montiert sein und alle Bedingungen erfüllen, um den einwandfrei-
en Betrieb des Elektrowerkzeugs zu
gewährleisten.
- Beschädigte Schutzvorrichtungen
und Teile müssen bestimmungsgemäß
durch eine anerkannte Fachwerkstatt
repariert oder ausgewechselt werden,
soweit nichts anderes in der Betriebsanleitung angegeben ist.
- Benutzen Sie keine Elektrowerkzeuge,
bei denen sich der Schalter nicht einund ausschalten lässt. Beschädigte
Schalter müssen bei einer Kundendienstwerkstatt ersetzt werden.
• Achtung!
Der Gebrauch anderer Einsatzwerkzeu-
ge und anderen Zubehörs kann eine
Verletzungsgefahr für Sie bedeuten.
• LassenSieIhrElektrowerkzeug
durch eine Elektrofachkraft reparieren. Dieses Elektrowerkzeug ent-
spricht den einschlägigen Sicherheitsbestimmungen. Reparaturen dürfen nur von
einer Fachwerkstatt ausgeführt werden,
indem Originalersatzteile verwendet
werden; andernfalls können Unfälle für
den Benutzer entstehen.
Weiterführende
Sicherheitshinweise
• Schließen Sie das Gerät nur an eine
Steckdose mit Fehlerstrom-Schutzeinrichtung (FI-Schalter) mit einem Bemessungs-
fehlerstrom von nicht mehr als 30mA
an.
• Halten Sie Netzkabel und Verlängerungskabel von der Schleifscheibe fern.
Ziehen Sie bei Beschädigung oder Durchschneiden sofort den Netzstecker aus
der Steckdose. Berühren Sie die Leitung
nicht, bevor sie vom Netz getrennt ist. Es
besteht Gefahr durch elektrischen Schlag.
•Der Austausch des Steckers oder der
Anschlussleitung ist immer vom Hersteller
des Elektrowerkzeugs oder seinem Kundendienst auszuführen, um Gefährdungen zu vermeiden.
•Schalten Sie das Gerät erst ein, wenn es
sicher auf der Arbeitsäche montiert ist.
• Zu Ihrer eigenen Sicherheit, benutzen
Sie nur Zubehör und Zusatzgeräte, die
in der Betriebsanleitung angegeben
oder vom Werkzeug-Hersteller empfohlen oder angegeben werden.
• Verwenden Sie nur Schleifscheiben, deren aufgedruckte Drehzahl mindestens
so hoch ist wie die auf dem Typenschild
des Gerätes angegebene.
• Unterziehen Sie die Schleifscheibe vor
dem Gebrauch einer Sichtprüfung. Verwenden Sie keine beschädigten oder
verformten Schleifscheiben. Wechseln
Sie eine abgenutzte Schleifscheibe aus.
• Achten Sie darauf, dass beim Schleifen entstehende Funken keine Gefahr
hervorrufen, z. B. Personen treffen oder
entammbare Substanzen entzünden.
• Halten Sie nie die Finger zwischen
Schleifscheibe und Funkenschutz oder in
die Nähe der Schutzhauben. Es besteht
Gefahr durch Quetschen.
• Die rotierenden Teile des Gerätes können aus funktionellen Gründen nicht
abgedeckt werden. Gehen Sie daher
mit Bedacht vor und halten Sie das
Werkstück gut fest, um ein Verrutschen
zu vermeiden, wodurch Ihre Hände mit
der Schleifscheibe in Berührung kommen könnten.
54
Page 55

AT CHDE
• Das Werkstück wird beim Schleifen
heiß. Nicht an der bearbeiteten Stelle
anfassen, lassen Sie es abkühlen. Es
besteht Verbrennungsgefahr. Verwenden
Sie kein Kühlmittel oder ähnliches.
• Arbeiten Sie mit dem Gerät nicht, wenn
Sie müde sind oder nach der Einnahme
von Alkohol oder Tabletten. Legen Sie
immer rechtzeitig eine Arbeitspause ein.
• Schalten Sie das Gerät aus und ziehen
Sie den Netzstecker
- zum Lösen eines blockierten Einsatzwerkzeuges,
- wenn die Anschlussleitung beschädigt
oder verheddert ist,
- bei ungewöhnlichen Geräuschen.
Restrisiken
Auch wenn Sie dieses Elektrowerkzeug
vorschriftsmäßig bedienen, bleiben immer
Restrisiken bestehen. Folgende Gefahren
können im Zusammenhang mit der Bauweise und Ausführung dieses Elektrowerkzeugs
auftreten:
a) Lungenschäden, falls kein geeigneter
Atemschutz getragen wird.
b) Gehörschäden, falls kein geeigneter
Gehörschutz getragen wird.
c) Gesundheitsschäden durch
- Berührung der Schleifwerkzeuge im
nicht abgedeckten Bereich;
- Herausschleudern von Teilen aus
Werkstücken oder beschädigten
Schleifscheiben.
d) Gesundheitsschäden, die aus Hand-
Arm-Schwingungen resultieren, falls das
Gerät über einen längeren Zeitraum verwendet wird oder nicht ordnungsgemäß
geführt und gewartet wird.
Warnung! Dieses Elektrowerkzeug
erzeugt während des Betriebs ein
elektromagnetisches Feld. Dieses
Feld kann unter bestimmten Umständen aktive oder passive medizinische Implantate beeinträchtigen.
Um die Gefahr von ernsthaften oder
tödlichen Verletzungen zu verringern, empfehlen wir Personen mit
medizinischen Implantaten ihren
Arzt und den Hersteller des medizinischen Implantats zu konsultieren,
bevor die Maschine bedient wird.
Montage
Achtung!Verletzungsgefahr!
- Achten Sie darauf, zum Arbeiten
genügend Platz zu haben und
andere Personen nicht zu gefährden.
- Vor Inbetriebnahme müssen alle
Abdeckungen und Schutzvorrichtungen ordnungsgemäß montiert
sein.
- Ziehen Sie den Netzstecker, bevor Sie Einstellungen am Gerät
vornehmen.
Aufstellen
Stellen Sie die Schärfstation auf einen fes-
ten Untergrund und xieren Sie das Gerät.
Idealerweise verschrauben Sie die Maschine mit dem Untergrund. Nutzen Sie hierzu
die Montagelöcher für Werkbankmontage
(9) in der Bodenplatte.
Schrauben und Muttern zur Monta-
ge sind nicht im Lieferumfang enthalten.
55
Page 56

DE AT CH
Schärfvorrichtungen
montieren
1. Wählen Sie eine der drei Schärfvorrichtungen aus.
2. Um eine Schärfvorrichtung aus
der Arbeitsposition zu entfernen
müssen Sie den Entriegelungshebel für Schärfvorrichtungen (
13) nach unten drücken.
3. Ziehen Sie die Schärfvorrichtung
aus den Führungsschienen nach
oben heraus.
4. An den Aufbewahrungspositionen rechts und links sind die
Schärfvorrichtungen nicht xiert
und können einfach nach oben
aus den Führungsschienen herausgezogen werden.
5. Um die ausgewählte Schärfvorrichtung in der Arbeitsposition
zu xieren, schieben Sie diese
von oben in die Führungsschienen. Drücken Sie die Schärfvorrichtung bis über den Einrastpunkt nach unten.
DieSchärfvorrichtungen
stellen auch eine Sicherheits-
einrichtungdar.Benutzen
SiedasGerätnieohneeine
Schärfvorrichtung.Esbesteht
Verletzungsgefahr.
anderen Zubehörs kann eine Verletzungsgefahr für Sie bedeuten.
- Betreiben Sie das Gerät niemals
ohne Schutzeinrichtungen.
- Schalten Sie das Gerät erst ein,
wenn es sicher auf der Arbeits-
äche montiert ist.
Tragen Sie beim Arbeiten trotz
Funkenschutzimmereine
Schutzbrille, um Augenverletzungen zu vermeiden.
HaltenSieIhreHändevon
der Schleifscheibe fern, wenn
dasGerätinBetriebist.Es
besteht Verletzungsgefahr.
Ein- und Ausschalten
Achten Sie darauf, dass die Span-
nung des Netzanschlusses mit
dem Typenschild am Gerät über-
einstimmt.
Schließen Sie das Gerät an die
Netzspannung an.
1. Zum Einschalten drücken Sie den Ein-
schalter „I“(
2. Zum Ausschalten drücken Sie den
Ausschalter „0“ (
schaltet ab.
3), das Gerät läuft an.
3) , das Gerät
Bedienung
Achtung!Verletzungsgefahr!
- Ziehen Sie vor allen Arbeiten an
dem Gerät den Netzstecker.
- Verwenden Sie nur vom Hersteller empfohlene Schleifscheiben
und Zubehörteile. Der Gebrauch
anderer Einsatzwerkzeuge und
56
Warten Sie nach dem Einschalten ab, bis
das Gerät seine max. Drehzahl erreicht
hat. Beginnen Sie erst dann mit dem
Schleifen.
DieSchleifscheibeläuftnach,
nachdemdasGerätabge-
schaltet wurde. Es besteht
Verletzungsgefahr.
Page 57

AT CHDE
Probelauf:
Führen Sie vor dem ersten Arbeiten und
nach jedem Schleifscheibenwechsel einen
Probelauf von mindestens 1 Minute ohne
Belastung durch. Schalten Sie das Gerät
sofort aus, wenn die Schleifscheibe unrund
läuft, beträchtliche Schwingungen auftreten
oder abnorme Geräusche zu hören sind.
Schleifen mit der
Schleifscheibe
Schärfen von Bohrern
Es lassen sich Bohrer von 3-10 mm Durchmesser schärfen.
1. Montieren Sie die ausgewählte
Schärfvorrichtung (siehe Schärfvorrichtung montieren).
2. Entnehmen Sie die Bohrerhalterung (14) aus der Schärfvorrichtung.
3. Setzen Sie den Bohrer in die
Bohrerhalterung (14) ein.
4. Setzen Sie die Bohrerhalterung
(14) in die Justiervorrichtung
(15) ein.
5. Schieben Sie den Bohrer nach
vorne in die V-Nut, bis an den
Metallanschlag. Die Schneidkanten des Bohrers müssen dabei an
den Metallächen anliegen.
6. Fixieren Sie den Bohrer mit der
Rändelmutter zur Bohrerxierung
(12).
7. Entnehmen Sie die Bohrerhalterung (14) und setzen Sie diese
in die drehbare Bohreraufnahme
(11) ein.
8. Überprüfen Sie die Ausrichtung
des Bohrers. Die Schneidkanten
des Bohrers müssen die Schleifscheibe (10) berühren.
9. Schalten Sie das Gerät ein und
schleifen Sie den Bohrer.
10. Schalten Sie das Gerät aus und
warten Sie den Stillstand der
Schleifscheibe (10) ab.
11. Entnehmen Sie die Bohrerhalterung (14) und setzen Sie diese
um 180° gedreht in die drehbare Bohreraufnahme (11)wieder
ein. Sie können so mit der gleichen Justierung die entgegengesetzte Schneidkante des Bohrers
schleifen.
12. Schalten Sie das Gerät ein und
schleifen Sie den Bohrer.
13. Schalten Sie das Gerät aus und
warten Sie den Stillstand der
Schleifscheibe (10) ab.
Schärfen von Meißeln
und Beiteln
1. Montieren Sie die ausgewählte
Schärfvorrichtung (siehe Schärfvorrichtung montieren).
2. Legen Sie die Klinge so auf die
Werkzeugauage (6) auf, dass
das zu schärfende Ende am
Randabschluss der Werkzeugauage (6) anliegt. Der Magnethalter (5) hält die Klinge auf
ihrer Position.
3. Verwenden Sie bei schmalen
Meißeln den Abstandhalter (4).
4. Wählen Sie den Winkel entsprechend dem bereits bestehenden
Fasenwinkel aus.
5. Lösen Sie die Feststellschraube
für Winkeleinstellung (7) und
drehen Sie die Werkzeugauage (6) in Position.
6. Fixieren Sie die Feststellschraube
für Winkeleinstellung (7) wieder.
7. Schalten Sie das Gerät ein und
57
Page 58

DE AT CH
bewegen die Werkzeugauage
(6) gleichmäßig an der Schleifscheibe (10) hin und her.
8. Üben Sie beim Schleifvorgang
stets einen leichten Druck aus
und schieben Sie die Klinge
langsam zur Schleifscheibe (10).
9. Wiederholen Sie den Schleifvorgang, bis alle Ungleichmäßigkeiten entfernt sind.
10. Schalten Sie das Gerät aus und
warten Sie den Stillstand der
Schleifscheibe (10) ab.
Schärfen von Messern
1. Montieren Sie die ausgewählte
Schärfvorrichtung (siehe Schärfvorrichtung montieren).
2. Setzen Sie die Messerklinge
ganz in die Messerkerbe ein.
3. Führen Sie die Klinge mit leichtem Druck an die Schleifscheibe
(10) und ziehen Sie das Messer
gleichmäßig und langsam zu
sich heran.
4. Drehen Sie das Messer und setzen Sie die Messerklinge in die
gegenüberliegende Messerkerbe
ein.
5. Wiederholen Sie den Schleifvorgang auch für diese Klingenseite.
6. Führen Sie den wechselseitigen
Schleifvorgang aus, bis die
Schneidkante gratfrei und scharf
ist.
7. Schalten Sie das Gerät aus und
warten Sie den Stillstand der
Schleifscheibe (10) ab.
Das Gerät ist nicht geeignet, um
Messer mit Wellenschliff zu schleifen.
Schärfen von Scheren
1. Montieren Sie die ausgewählte
Schärfvorrichtung (siehe Schärfvorrichtung montieren).
2. Öffnen Sie die Schere ganz.
3. Führen Sie eines der Scherenblätter in die Scherenkerbe ein.
4. Führen Sie das Blatt mit leichtem
Druck von der Schraube bis zur
Spitze an die Schleifscheibe
(10).
5. Nehmen Sie die Schere von der
Schärfstation weg und drehen
Sie die Schere zum Schärfen des
anderen Blattes um.
6. Führen Sie das andere Scherenblatt in die Scherenkerbe ein.
7. Führen Sie das Blatt mit leichtem
Druck von der Schraube bis zur
Spitze an die Schleifscheibe
(10).
8. Führen Sie den wechselseitigen
Schleifvorgang aus, bis die
Schneidkanten gratfrei und
scharf sind.
9. Schalten Sie das Gerät aus und
warten Sie den Stillstand der
Schleifscheibe (10) ab.
Das Gerät ist nicht geeignet, um
Scheren mit Wellenschliff zu schleifen. Das Gerät ist nicht geeignet,
um Zackenscheren zu schleifen.
Schleifscheibe wechseln
Hinweise zum Wechseln:
• Betreiben Sie das Gerät niemals
ohne Schutzeinrichtungen.
• Vergewissern Sie sich, dass die
Maße der Schleifscheibe zum
Gerät passen.
58
Page 59
AT CHDE
• Verwenden Sie keine getrennten
Reduzierbuchsen oder Adapter,
um Schleifscheiben mit großem
Loch passend zu machen.
• Verwenden Sie keine Sägeblätter.
• Montieren Sie das Gerät nach
dem Schleifscheibenwechsel wieder vollständig.
Schalten Sie das Gerät aus und zie-
hen Sie den Netzstecker.
Lassen Sie das Gerät abkühlen.
1. Lösen Sie die SchleifscheibenMutter (16) im Uhrzeigersinn
(Linksgewinde).
2. Nehmen Sie die Schleifscheibe
(10) ab.
3. Setzen Sie die neue Schleifscheibe (10) auf. Verschrauben Sie
die Schleifscheiben-Mutter (16)
gegen den Uhrzeigersinn (Linksgewinde).
4. Probelauf: Führen Sie vor
dem ersten Arbeiten und nach
jedem Schleifscheibenwechsel
einen Probelauf von mindestens
1Minute ohne Belastung durch.
Schalten Sie das Gerät sofort
aus, wenn die Schleifscheibe unrund läuft, beträchtliche Schwingungen auftreten oder abnorme
Geräusche zu hören sind.
Reinigung und Wartung
Ziehen Sie vor jeglicher Einstellung,
Instandhaltung oder Instandsetzung
den Netzstecker.
Lassen Sie Arbeiten, die nicht
indieserBetriebsanleitungbeschriebensind,voneinerFach-
werkstatt durchführen. Verwenden Sie nur Originalteile.
LassenSiedasGerätvorallen
Wartungs- und Reinigungsarbeiten abkühlen. Es besteht
Verbrennungsgefahr!
Kontrollieren Sie das Gerät vor jedem
Gebrauch auf offensichtliche Mängel wie
lose, abgenutzte oder beschädigte Teile,
korrekten Sitz von Schrauben oder anderer
Teile. Prüfen Sie insbesondere die Schleifscheibe (
Teile aus.
10). Tauschen Sie beschädigte
Reinigung
Verwenden Sie keine Reinigungs-
bzw. Lösungsmittel. Chemische Substanzen können die Kunststoffteile
des Gerätes angreifen. Reinigen Sie
das Gerät niemals unter ießendem
Wasser.
• Reinigen Sie das Gerät nach jedem Gebrauch gründlich.
• Reinigen Sie die die Oberäche des
Gerätes mit einer weichen Bürste, ei-
nem Pinsel oder einem Tuch.
Lagerung
• Bewahren Sie das Gerät an einem
trockenen und staubgeschützten Ort
auf, und außerhalb der Reichweite von
Kindern.
• Schleifscheiben müssen trocken und
hochkant aufbewahrt werden und dürfen nicht gestapelt werden.
59
Page 60

DE AT CH
Entsorgung/
Umweltschutz
Führen Sie Gerät, Zubehör und Verpackung einer umweltgerechten Wiederverwertung zu.
Elektrogeräte gehören nicht in den
Hausmüll.
• Geben Sie das Gerät an einer Verwertungsstelle ab. Die verwendeten Kunststoff- und Metallteile können sortenrein
getrennt werden und so einer Wiederverwertung zugeführt werden. Fragen
Sie hierzu unser Service-Center.
• Die Entsorgung Ihrer defekten eingesendeten Geräte führen wir kostenlos durch.
Ersatzteile/Zubehör
Ersatzteile und Zubehör erhalten Sie unter
www.grizzly-shop.de oder www.grizzly-service.eu
Sollten Sie kein Internet haben, so wenden Sie sich bitte telefonisch an das ServiceCenter (siehe „Service-Center“ Seite 63). Halten Sie die unten genannten Bestellnummern
bereit.
Position Position Bezeichnung Bestell-Nr.
Betriebs- Explosionsanleitung zeichnung
10 19+20 Schleifscheibe mit Schleifscheiben-Mutter 91103590
2 100 Schärfvorrichtung für Messer und Scheren 91103591
101 Schärfvorrichtung für Bohrer 91103592
102 Schärfvorrichtung für Meißel und Beitel 91103593
60
Page 61

Fehlersuche
Ziehen Sie vor allen Arbeiten an dem Gerät den Netzstecker.
Gefahr durch elektrischen Schlag!
Problem Mögliche Ursache Fehlerbehebung
Steckdose, Netzkabel, Leitung,
Gerät startet nicht
Schleifwerkzeuge
bewegen sich
nicht, obwohl Motor läuft
Netzspannung fehlt
Haussicherung spricht an
Ein-/Ausschalter (
Motor defekt
Schleifscheiben-Mutter (
locker
Werkstück, Werkstückreste
oder Reste der Schleifwerkzeuge blockieren Antrieb
3) defekt
Netzstecker prüfen, ggf. Reparatur durch Elektrofachmann,
Haussicherung prüfen.
Reparatur durch Kundendienst
Schleifscheiben-Mutter anziehen
16)
(siehe „Schleifscheibe wechseln“)
Blockaden entfernen
AT CHDE
Motor wird langsamer und bleibt
stehen
Schleifscheibe läuft
unrund,
abnorme Geräusche sind zu hören
Gerät wird durch Werkstück
überlastet
Schleifscheiben-Mutter (
locker
Schleifscheibe (
10) defekt
Druck auf Schleifwerkzeug verringern
Werkstück ungeeignet
Schleifscheiben-Mutter anziehen
16)
(siehe „Schleifscheibe wechseln“)
Schleifscheibe wechseln
61
Page 62

DE AT CH
Garantie
Sehr geehrte Kundin, sehr geehrter Kunde,
Sie erhalten auf dieses Gerät 3 Jahre Garantie ab Kaufdatum.
Im Falle von Mängeln dieses Gerätes
stehen Ihnen gegen den Verkäufer des
Gerätes gesetzliche Rechte zu. Diese
gesetzlichen Rechte werden durch unsere
im Folgenden dargestellte Garantie nicht
eingeschränkt.
Garantiebedingungen
Die Garantiefrist beginnt mit dem Kaufdatum. Bitte bewahren Sie den Original Kassenbon gut auf. Diese Unterlage wird als
Nachweis für den Kauf benötigt.
Tritt innerhalb von drei Jahren ab dem Kaufdatum dieses Gerätes ein Material- oder
Fabrikationsfehler auf, wird das Gerät von
uns – nach unserer Wahl – für Sie kostenlos
repariert oder ersetzt. Diese Garantieleistung setzt voraus, dass innerhalb der DreiJahres-Frist das defekte Gerät und der Kaufbeleg (Kassenbon) vorgelegt und schriftlich
kurz beschrieben wird, worin der Mangel
besteht und wann er aufgetreten ist.
Wenn der Defekt von unserer Garantie
gedeckt ist, erhalten Sie das reparierte oder
ein neues Gerät zurück. Mit Reparatur oder
Austausch des Gerätes beginnt kein neuer
Garantiezeitraum.
Garantiezeit und gesetzliche
Mängelansprüche
Die Garantiezeit wird durch die Gewährleistung nicht verlängert. Dies gilt auch
für ersetzte und reparierte Teile. Eventuell
schon beim Kauf vorhandene Schäden und
Mängel müssen sofort nach dem Auspacken gemeldet werden. Nach Ablauf der
Garantiezeit anfallende Reparaturen sind
kostenpichtig.
Garantieumfang
Das Gerät wurde nach strengen Qualitätsrichtlinien sorgfältig produziert und vor
Anlieferung gewissenhaft geprüft.
Die Garantieleistung gilt für Material- oder
Fabrikationsfehler. Diese Garantie erstreckt
sich nicht auf Geräteteile, die normaler
Abnutzung ausgesetzt sind und daher als
Verschleißteile angesehen werden können
(z.B. Schleifscheiben, Spannansche) oder
für Beschädigungen an zerbrechlichen Tei-
len (z.B. Schalter, Akkus oder die aus Glas
gefertigt sind).
Diese Garantie verfällt, wenn das Gerät
beschädigt, nicht sachgemäß benutzt oder
nicht gewartet wurde. Für eine sachgemäße
Benutzung des Gerätes sind alle in der Betriebsanleitung aufgeführten Anweisungen
genau einzuhalten. Verwendungszwecke
und Handlungen, von denen in der Betriebsanleitung abgeraten oder vor denen gewarnt
wird, sind unbedingt zu vermeiden.
Das Gerät ist lediglich für den privaten
und nicht für den gewerblichen Gebrauch
bestimmt. Bei missbräuchlicher und unsachgemäßer Behandlung, Gewaltanwendung
und bei Eingriffen, die nicht von unserer
autorisierten Service-Niederlassung vorgenommen wurden, erlischt die Garantie.
Abwicklung im Garantiefall
Um eine schnelle Bearbeitung Ihres Anliegens zu gewährleisten, folgen Sie bitte den
folgenden Hinweisen:
• Bitte halten Sie für alle Anfragen den
Kassenbon und die Identikationsnummer (IAN102874) als Nachweis für
den Kauf bereit.
• Die Artikelnummer entnehmen Sie bitte
dem Typenschild.
• Sollten Funktionsfehler oder sonstige
Mängel auftreten kontaktieren Sie
62
Page 63

AT CHDE
zunächst die nachfolgend benannte
Serviceabteilung telefonisch oder per
E-Mail. Sie erhalten dann weitere Informationen über die Abwicklung Ihrer
Reklamation.
• Ein als defekt erfasstes Gerät können
Sie, nach Rücksprache mit unserem
Kundenservice, unter Beifügung des
Kaufbelegs (Kassenbons) und der
Angabe, worin der Mangel besteht
und wann er aufgetreten ist, für Sie
portofrei an die Ihnen mitgeteilte
Service-Anschrift übersenden. Um An-
nahmeprobleme und Zusatzkosten zu
vermeiden, benutzen Sie unbedingt nur
die Adresse, die Ihnen mitgeteilt wird.
Stellen Sie sicher, dass der Versand
nicht unfrei, per Sperrgut, Express oder
sonstiger Sonderfracht erfolgt. Senden
Sie das Gerät bitte inkl. aller beim Kauf
mitgelieferten Zubehörteile ein und
sorgen Sie für eine ausreichend sichere
Transportverpackung.
Reparatur-Service
Sie können Reparaturen, die nicht der Garantie unterliegen, gegen Berechnung von
unserer Service-Niederlassung durchführen
lassen. Sie erstellt Ihnen gerne einen Kostenvoranschlag.
Wir können nur Geräte bearbeiten, die
ausreichend verpackt und frankiert eingesandt wurden.
Achtung: Bitte senden Sie Ihr Gerät gereinigt und mit Hinweis auf den Defekt an
unsere Service-Niederlassung.
Nicht angenommen werden unfrei - per
Sperrgut, Express oder mit sonstiger Sonderfracht - eingeschickte Geräte.
Die Entsorgung Ihrer defekten eingesendeten Geräte führen wir kostenlos durch.
Service-Center
Service Deutschland
DE
Tel.: 0800 54 35 111
E-Mail: grizzly@lidl.de
IAN 102874
Service Österreich
AT
Tel.: 0820 201 222
(0,15 EUR/Min.)
E-Mail: grizzly@lidl.at
IAN 102874
Service Schweiz
CH
Tel.: 0842 665566
(0,08 CHF/Min.,
Mobilfunk max. 0,40 CHF/Min.)
E-Mail: grizzly@lidl.ch
IAN 102874
Importeur
Bitte beachten Sie, dass die folgende
Anschrift keine Serviceanschrift ist. Kontaktieren Sie zunächst das oben genannte
Service-Center.
Grizzly Tools GmbH & Co. KG
Stockstädter Straße 20
63762 Großostheim
Germany
www.grizzly-service.eu
63
Page 64

DE AT CH
64
Page 65

IT
MT
Traduzione della dichiarazione di
conformità CE originale
Con la presente dichiariamo che
STAZIONE DI AFFILATURA
serie PSS 65 A1
Numero di serie
201411000001 - 201411130680
corrisponde alle seguenti direttive UE in materia nella rispettiva versione valida:
2006/42/EC • 2004/108/EC • 2011/65/EU*
Per garantire la conformità sono state applicate le seguenti norme armonizzate e anche le
norme e disposizioni nazionali che seguono:
EN 61029-1/A11:2010 • EN ISO 12100:2010
EN 55014-1/A2:2011 • EN 55014-2/A2:2008
EN 61000-3-2/A2:2009 • EN 61000-3-3:2013
Il produttore è il solo responsabile della stesura della presente dichiarazione di conformità:
Grizzly Tools GmbH & Co. KG
Stockstädter Straße 20
63762 Großostheim
Germany
23.12.2014
Responsabile documentazione tecnica
* L’oggetto descritto sopra è conforme alle prescrizioni della Direttiva 2011/65/EU del Parlamento
Europeo e del Consiglio dell’8 giugno 2011 sulla restrizione dell’uso di determinate sostanze peri-
colose nelle apparecchiature elettriche ed elettroniche
Volker Lappas
65
Page 66

PT
Tradução do original da Declaração de conformidade CE
Vimos, por este meio, declarar que o
AFIADOR ELÉTRICO
da série PSS 65 A1
Número de série 201411000001 - 201411130680
corresponde às respectivas normas da UE na sua versão em vigor:
2006/42/EC • 2004/108/EC • 2011/65/EU*
Para garantir a conformidade, foram aplicadas as seguintes normas harmonizadas
bem como normas e disposições nacionais:
EN 61029-1/A11:2010 • EN ISO 12100:2010
EN 55014-1/A2:2011 • EN 55014-2/A2:2008
EN 61000-3-2/A2:2009 • EN 61000-3-3:2013
O fabricante é o único responsável pela emissão desta declaração de conformidade:
Grizzly Tools GmbH & Co. KG
Stockstädter Straße 20
63762 Großostheim
Germany
23.12.2014
Encarregado de documentação
* O objeto acima descrito da declaração cumpre as normas da diretiva 2011/65/UE do Parlamento Europeu e do Conselho do dia 8 de junho de 2011 sobre a restrição da utilização de
determinadas substâncias em aparelhos elétricos e eletrónicos
Volker Lappas
66
Page 67

GB
MT
Translation of the original EC declaration of conformity
We hereby conrm that the
Sharpening station
Design Series PSS 65 A1
Serial Number
201411000001 - 201411130680
conforms with the following applicable relevant version of the EU guidelines :
2006/42/EC • 2004/108/EC • 2011/65/EU*
In order to guarantee consistency, the following harmonised standards as well as national
standards and stipulations have been applied:
EN 61029-1/A11:2010 • EN ISO 12100:2010
EN 55014-1/A2:2011 • EN 55014-2/A2:2008
EN 61000-3-2/A2:2009 • EN 61000-3-3:2013
This declaration of conformity is issued under the sole responsibility of the manufacturer:
Grizzly Tools GmbH & Co. KG
Stockstädter Straße 20
63762 Großostheim
Germany
23.12.2014
Volker Lappas
Documentation Representative
* The object of the declaration described above satises the provisions of Directive 2011/65/EU
of the European Parliament and the Council of 8 June 2011 on limiting the use of certain harmful
substances in electrical and electronic appliances
67
Page 68

DE
AT
CH
OriginalEGKonformitätserklärung
Hiermit bestätigen wir,dass der
Schärfstation
Baureihe PSS 65 A1
Seriennummern 201411000001 - 201411130680
folgenden einschlägigen EU-Richtlinien in ihrer jeweils gültigen Fassung entspricht:
2006/42/EG • 2004/108/EG • 2011/65/EU*
Um die Übereinstimmung zu gewährleisten, wurden folgende harmonisierte Normen
sowie nationale Normen und Bestimmungen angewendet:
EN 61029-1/A11:2010 • EN ISO 12100:2010
EN 55014-1/A2:2011 • EN 55014-2/A2:2008
EN 61000-3-2/A2:2009 • EN 61000-3-3:2013
Die alleinige Verantwortung für die Ausstellung dieser Konformitätserklärung trägt der
Hersteller:
Grizzly Tools GmbH & Co. KG
Stockstädter Straße 20
63762 Großostheim
Germany
23.12.2014
Dokumentationsbevollmächtigter
* Der oben beschriebene Gegenstand der Erklärung erfüllt die Vorschriften der Richtlinie 2011/65/
EU des Europäischen Parlaments und des Rates vom 8. Juni 2011 zur Beschränkung der Verwendung bestimmter gefährlicher Stoffe in Elektro- und Elektronikgeräten
Volker Lappas
68
Page 69
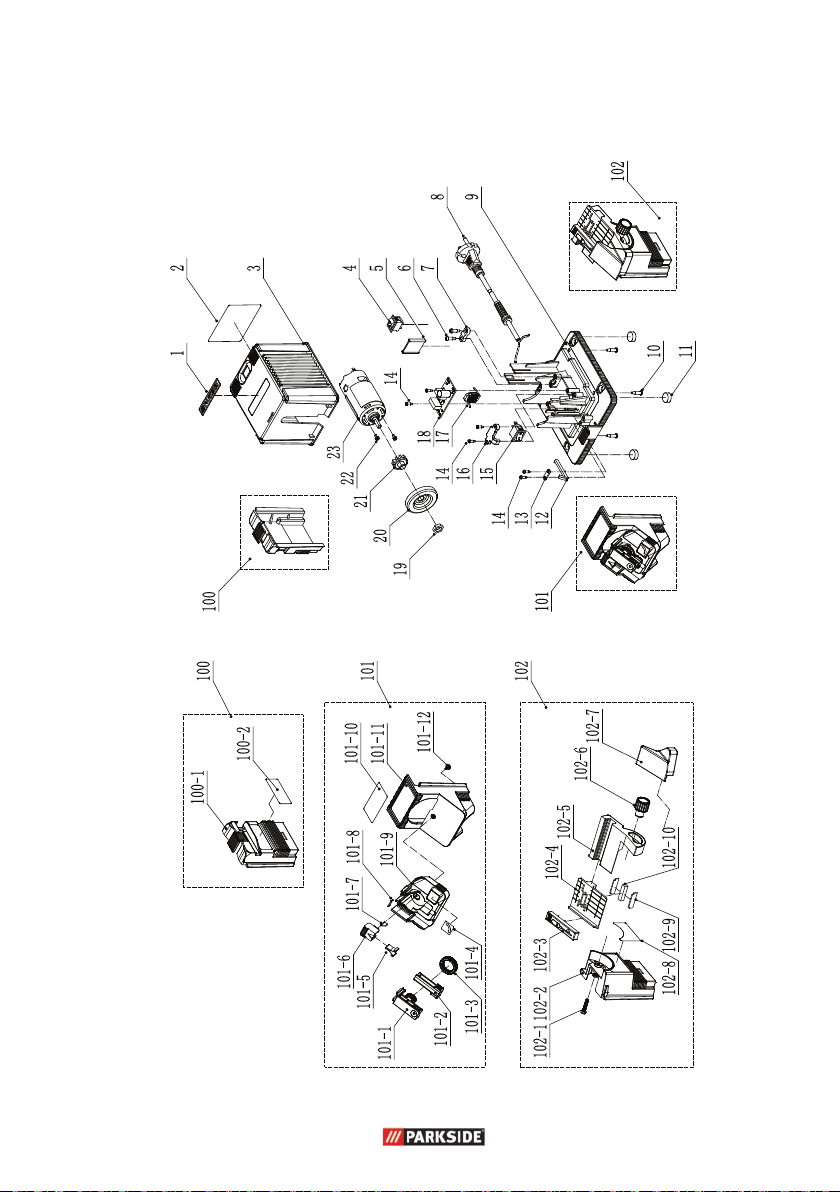
Vistaesplosa•Vistaencorte
ExplodedDrawing•Explosionszeichung
PSS 65 A1
informativo, informativo, informativ, informativ
69
Page 70
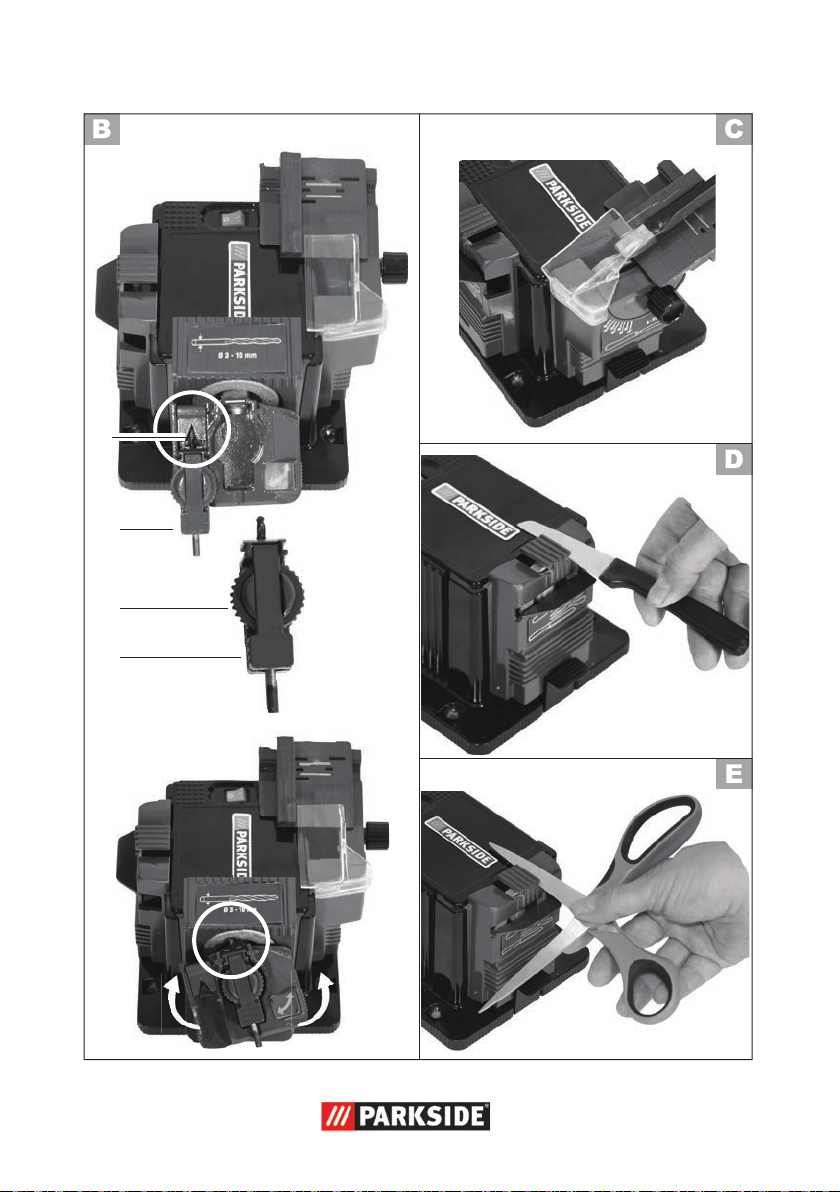
15
14
12
14
Page 71

Page 72

GRIZZLY TOOLS GMBH & CO. KG
Stockstädter Straße 20
D-63762 Großostheim
Versione delle informazioni · Estado das
informações · Last Information Update
Stand der Informationen: 11 / 2014
Ident.-No.: 75019405112014-IT/PT
IAN 102874
 Loading...