

Parkside PSHL 2 B1 Assembly Manual
AUTOMATIC WELDING HELMET PSHL 2 B1
GB
CY
AUTOMATIC WELDING HELMET
Assembly, operating and safety instructions
Translation of the original instructions
HR
AUTOMATSKA MASKA
ZA ZAVARIVANJE
Upute za posluživanje i za Vašu sigurnost
Prijevod originalnih uputa za uporabu
RS
AUTOMATSKA MASKA
ZA ZAVARIVANJE
Prevod originalnog uputstva za upotrebu
BG
АВТОМАТИЧЕН ЗАВАРЪЧЕН
ШЛЕМ
Указания за монтаж, работа и безопасност
Превод на оригиналното ръководство за
експлоатация
IAN 314800
RO
MASCĂ DE SUDURĂ,
AUTOMATĂ
Indicații de montare, operare și siguranță
Traducerea instrucţiunilor de utilizare originale
DE AT CH
AUTOMATIK - SCHWEISSHELM
Bedienungs- und Sicherheitshinweise
Originalbetriebsanleitung
HR
RO
RS
BG
GB
CY
Before reading, unfold the page containing the illustrations and familiarise yourself with all
functions of the device.
HR
Prije nego što pročitate tekst, otvorite stranicu sa slikama i upoznajte se na osnovu toga sa
svim funkcijama uređaja.
RS
Pre čitanja rasklopite obe strane sa slikama te se upoznajte sa svim funkcijama uređaja.
RO
Desfaceți înainte să citiți pagina cu ilustrații și apoi familiarizați-vă cu toate funcțiile
aparatului.
BG
Преди да прочетете отворете страницата с фигурите и след това се запознайте с
всички функции на уреда.
DE AT CH
Klappen Sie vor dem Lesen die beiden Seiten mit den Abbildungen aus und machen Sie sich
anschließend mit allen Funktionen des Gerätes vertraut.
GB / CY Operation and Safety Notes Page 5
HR Upute za montažu, uporabu i sigurnost Stranica 21
RS Prevod originalnog uputstva za upotrebu Strana 37
RO Indicații de montare, operare și siguranță Pagina 55
BG Указания за монтаж, работа и безопасност Страница 71
DE / AT / CH Montage-, Bedienungs- und Sicherheitshinweise Seite 91
A
1 2 53
4
9 7
8
B C
6
11 12 13 14 15
10
16 16
D
2.
1.
E
3
18
17


Table of contents
List of pictograms used ..................................................................................Page 6
Introduction .........................................................................................................Page 6
Intended use ...........................................................................................................Page 6
Parts Description ....................................................................................................Page 6
Technical Data ........................................................................................................ Page 7
Scope of delivery ...................................................................................................Page 7
Safety instructions ............................................................................................Page 7
Initial use ..............................................................................................................Page 11
Troubleshooting ................................................................................................. Page 14
Cleaning and Maintenance ..........................................................................Page 14
Storage ..................................................................................................................Page 14
Environmental instructions and disposal information ....................Page 14
Warranty and service information ..........................................................Page 15
Warranty terms ....................................................................................................... Page 15
Extent of warranty ..................................................................................................Page 15
Processing of warranty claims ................................................................................Page 15
Service ...................................................................................................................Page 16
Label meanings .................................................................................................Page 16
EU Declaration of Conformity .....................................................................Page 17
5GB/CY
List of pictograms used / Introduction
List of pictograms used
Caution!
Read instructions for use!
Do not dispose of electrical
equipment in household waste!
Attention: The welding helmet
does not provide any eye, ear
or face protection!
Made from recycling material
Automatic Welding Helmet
PSHL 2 B1
Introduction
Congratulations!
You have chosen a high-quality product from our company. Familiarise
yourself with the product before using it for
the first time. In addition, please carefully
refer to the instructions for use and the safety
instructions below.
KEEP OUT OF THE REACH OF
CHILDREN!
Attention, potential dangers!
Important notice!
Warning: arc rays can injure
the eye's retinas!
Dispose of batteries in an environmentally friendly manner!
adjustment wheel and is also adjustable for
flying sparks during grinding work. Only use
the product as described and for its indicated purpose. Keep these instructions in a safe
place.
When passing this product on to others,
please also include all the documents. Any
use other than the intended is prohibited and
potentially dangerous. Damages resulting
from noncompliance or misuse are not covered by the warranty and are not included
in the manufacturer‘s liability. This device
has been designed for household use and
may not be used for commercial or industrial
purposes.
Intended use
This welding helmet protects the eyes and
face from sparks, splashes and UV rays
while welding and automatically adapts to
the lighting conditions. It ensures an immediate, sensor-controlled darkening upon arc
ignition as well as automatic illumination at
the end of the welding procedure (including
a short delay to protect against afterglow).
This welding helmet provides a freely adjustable DIN protection level with a lateral
6 GB/CY
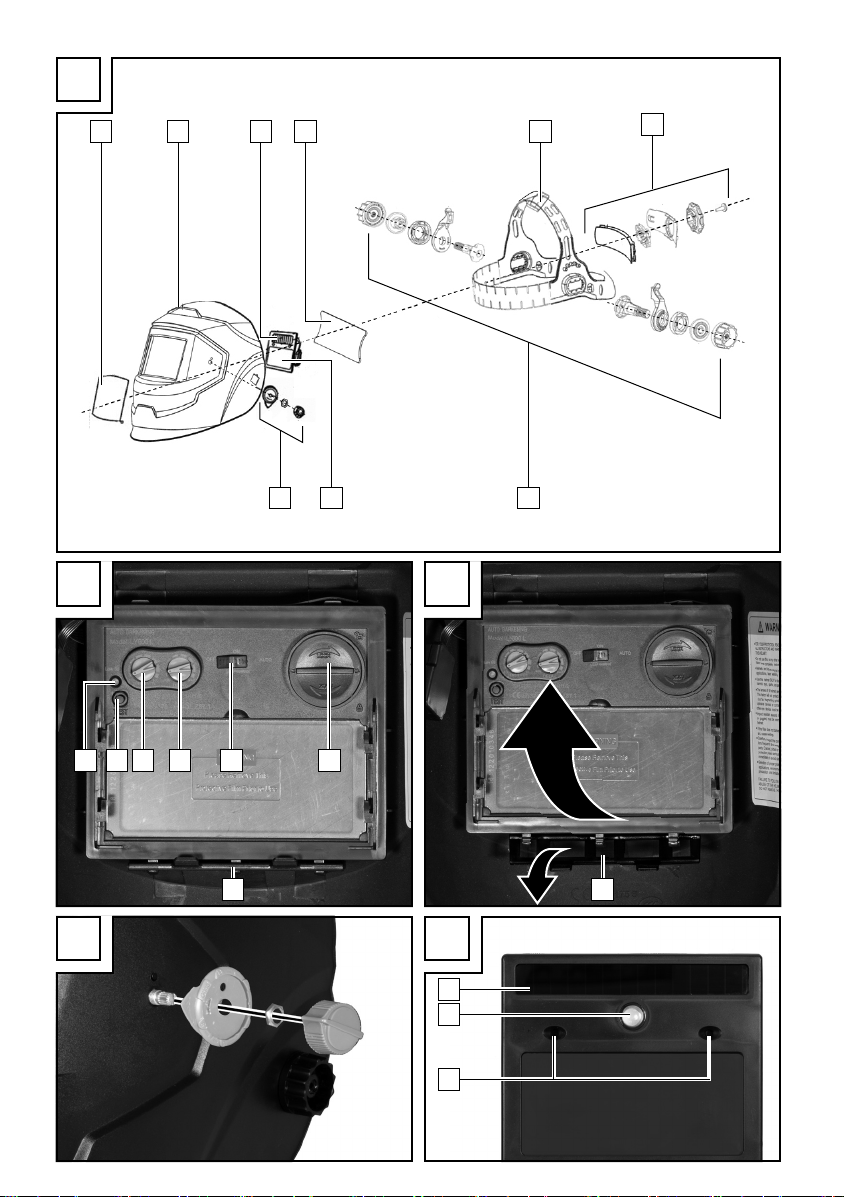
Parts Description
1
Viewing pane
2
Helmet casing
3
Solar cell
4
Rear pane
5
Headband
6
Rear control dial headband
7
Lateral control dial headband
8
UV filter
9
Darkening regulator
10
Low battery display
11
Test button

Introduction/ Safety instructions
12
Sensitivity setting
13
Delay setting
14
LED Lighting switch
15
Battery compartment
16
Bracket
17
Arc sensor
18
LED
19
Battery
Technical Data
Filter cartridge size: 110 x 90 x 9 mm
Field of vision: 9.2 x 4.2 cm
Bright state: DIN 4
Dark state: DIN 9–DIN 13
Switching times
Bright to dark: 0.23~0.72 ms
Dark to bright: 0.1~2 s
Switch on / off: Fully automatic
Energy supply: Solar cell
UV / IR protection: DIN 16
Operating temperature: -5 °C to +55 °C
Storage temperature: -20 °C to + 70 °C
Welding procedure: MMA, MIG, MAG,
TIG, plasma cutting
and plasma welding
Maximum service life: approx. 6 years
Scope of delivery
1 Auto-Darkening Welding Helmet
1 Set of instructions for use
Safety instructions
Please carefully read the
instructions for use and follow
the specified notices. Familiarise
yourself with the equipment, its
proper use and the safety notices
using these instructions for use.
All technical data about this
welding helmet is on the label,
please learn about this product‘s
technical facts.
The product is not suitable for
laser welding.
The product is only approved
for use within a temperature
range of between -5 °C to 55
°C.
The product is not fire-resistant.
Welding helmet and ADF filter
must not be exposed to any
heat or moisture.
Do not remove the ADF filter
from the welding helmet and
never open the housing of the
ADF filter without authorisation
from the manufacturer.
Prior to each use, check wheth-
er the Welding/Grinding setting was selected correctly.
The cover lens must be in-
stalled on the outer side of the
ADF filter. Otherwise, the ADF
filter can get damaged.
Do not carry out any
modifications/replacements on
the welding helmet and ADF
filter without consent.
If the filter does not darken
automatically whilst welding please stop the operation
immediately and contact the
dealers without delay.
7GB/CY

Safety instructions
Do not use any alcohol, fuel
or diluting agents to clean the
ADF filter. Do not place the
ADF filter in water.
The response time of the ADF
liquid crystal slows down if the
ambient temperature is lower,
however this does not have an
impact on the protective functions.
Please replace the housing
of the ADF filter immediately
if it is damaged or scratched
because this can impair visibility and the protective performance.
Please replace the viewing
pane immediately if it is broken or scratched. Do not use
any hard objects to replace
the viewing pane of the filter.
Regularly clean the surfaces
of the ADF filter, sensor and
solar cells.
The welding helmet cannot
withstand any damages that
are caused by a heavy blow,
explosion or abrasive liquids.
The useful life depends on
many different individual factors such as usage, cleaning,
storage and maintenance.
Regular inspections and replacement in the case of damage are recommended.
The material used to manufac-
ture the product will age over
time. This can result in breakages on the welding helmet,
for example. As a result of
these damages, the welding
helmet is no longer able to
provide effective protection.
In this case, the user should
replace the welding helmet immediately.
This product cannot be used
for overhead welding work
and cutting operations. If
this product is use for overhead welding or cutting, the
molten metal drops could burn
through the ADF filter and result in injuries to the user.
If the filter is faulty, the user
must stop using the welding helmet immediately. Slag
splashes can damage the surface of the filter and cause injury to the user’s skin or cause
other serious accidents.
This product is temperature re-
sistant and hardly inflammable
but in case of direct contact
with naked flames or in case
of access to an object with a
high temperature, the helmet
may begin to burn or melt.
Please store and only use the
welding helmet in the manner
described in order to reduce
such risks.
8 GB/CY

Safety instructions
The ADF filter is an electronic
product that is not waterproof.
Please ensure it is kept dry
and clean and not stored in a
damp environment.
Improper use could result in
injury to the user and cause
other types of diseases.
Please examine the filter prior
to each use. As soon as the
function and appearance seem
defective, they must no longer
be used.
The use of the welding helmet
is prohibited if the filter flickers
or if the level of darkening no
longer corresponds to the
standard value or there are
other abnormal working conditions.
Please do not expose this
product to unnecessary solar
radiation.
Please only use original spare
parts. The use of non-original
parts can cause problems with
regard to the protective function, serviceability and degree
of product protection.
Exceeding the service life
(insufficient protection) –
please check the protective
glasses prior to each use for
damage and durability.
Using eye protection without
the filter effect against radia-
tion (damages the eyes) – prior to each use check whether
the eye protection exhibits the
necessary scale number.
Using the product against
splashes (insufficient protection) – always check whether
the correct protective effect is
present.
Using the product against
large dust particles (injury,
accident). The eye protection
equipment must only be used
for the work described in the
operating instructions. Any deviation from the instructions in
the operating instructions can
result in injuries or accidents.
Using damaged products
(insufficient protection) –
prior to each use check the
protective glasses for damage
and durability.
Improper use of the eye protec-
tion (injury, accident). The eye
protection device must only be
used for the work described in
the operating instructions. Any
deviation from the instructions
can result in injuries or accidents.
This device may be used by
children aged 16 years and
up, as well as by persons with
reduced physical, sensory or
mental capacities, or lacking
9GB/CY

Safety instructions
experience and / or knowledge, so long as they are supervised or instructed in the
safe use of the device and understand the associated risks.
Do not allow children to play
with the product. Cleaning
and user main tenance should
not be performed by children
without supervision.
The welding helmet with auto-
matic darkening is not suitable
for laser and gas welding.
Never place the welding
helmet on hot surfaces.
Never open the welding
helmet. Never carry out repairs on or modifications to
the welding helmet. These may
only be carried out by trained
experts.
Please ensure that you have
set the automatic darkening
before each welding procedure.
The safety visor should not be
opened. It protects the filter
from dirt and damage.
If the filter does not automati-
cally darken, then immediately end the welding procedure
and contact the manufacturer.
Only use the welding helmet
in temperatures between -5 °C
and +55 °C. The filter‘s reaction time will slow down if this
temperature has not been
reached or is exceeded.
Clean the filter, the surface of
the helmet and the solar cells
regularly.
Replace the protective visor if
scratches or damages appear.
The welding helmet does not
provide protection against impact.
Frequent use, cleaning or stor-
age can mean that the service
life is less than 6 years. Replace the welding helmet immediately if the viewing panel
gets scratched or the viewing
panel is visibly damaged in
any other way.
ATTENTION! Materials
that come into contact with the
wearer‘s skin may cause allergic
reactions in people with sensitive
skin.
ATTENTION! Eye protection
can represent a hazard for the
wearer if it is worn over normal
corrective glasses due to the impact from high-speed particles.
ATTENTION! If protection
against high-speed particles at
extreme temperatures is required,
the eye protection chosen must
be labelled with the letter T direct-
10 GB/CY
Safety instructions / Initial use
ly after the letter for the impact
intensity, i. e. FT, BT or AT. If the
letter for the impact intensity is
not followed by the letter T, the
eye protection may only be used
against high-speed particles at
room temperature.
Initial use
Note: Only use the welding helmet with the
rear pane mounted
Note: Keep the UV filter‘s sensors
and clear.
After opening the package, immediately
check to ensure that the package contents
are complete and undamaged. Contact your
dealer immediately if the package contents
is incomplete or has any defects. Do not use
the device if it is defective
Check that the welding helmet and the
protective screen are intact before each use.
If the protective screen has scratches, cracks
or irregularities, it must be replaced before
use, as serious injuries may occur otherwise.
4
.
8
clean
Adjust the welding helmet with the help
of the headband
dial headband
welding helmet to the respective head
size and the lateral control dial head-
7
band
helmet. When adjusting, ensure that your
head is placed as far into the helmet as
possible and that it sits as close as
possible to your face.
Set the appropriate darkening shade
before the welding procedure (see the
following table). The darkening shade
may be manually adjusted from 9 to 13
by twisting the darkening regulator
the outside of the helmet.
ATTENTION! The darkening regulator
9
has the setting position “grind“. If the
darkening regulator
the automatic darkening is deactivated.
Only use this setting when you do not wish
to use the welding helmet for welding.
The automatic darkening is then no longer
active.
Check the light density before each use.
in order to lock the welding
5
. Turn the rear control
6
in order to adjust the
9
is set to this position
9
on
Remove the protective film from the in-
side and the outside of the visor.
11GB/CY

Initial use
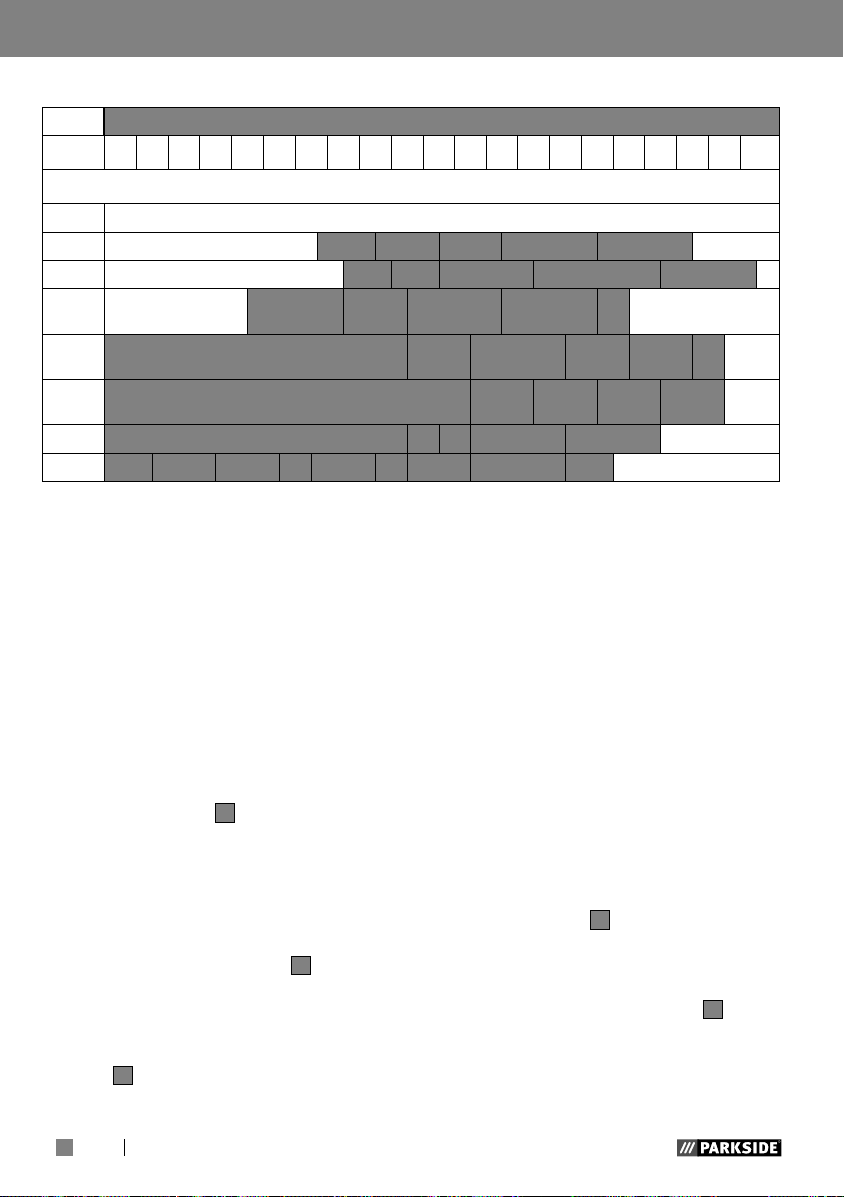
Table for setting the darkening shades
Arc current (ampere)
1,5 6 10 15 30 40 60 70 100 125 150 175 200 225 250 300 350 400 450 500 600
Grind
SMAW 8 9 10 11 12 13 14
MAG 8 9 10 11 12 13 14
TIG /
GTAW
MIG
(heavy)
MIG
(light)
PAC 9 10 11 12 13
PAW 4 5 6 7 8 9 10 11 12
8 9 10 11 12 13
SMAW: welding with coated
electrodes
MIG (heavy): MIG welding heavy metals
MIG (light): MIG welding light metals
and alloys
TIG / GTAW: welding with inert gases
Grinding function - automatic dimming not active
9 10 11 12 13 14
10 11 12 13 14
PAC: plasma cutting
PAW: plasma welding
Grind: Grinding function: Automatic dim-
ming not active. Only use the setting
if you do not use welding helmet for
welding.
MAG: welding with metal active
gass
Test procedure
You can use the test button
11
to check
whether the welding helmet's darkening
feature is working properly.
Bring the viewing panel closer to an ex-
ternal light source with a value of more
than 40 W and examine whether or
not the screen darkens or illuminates.
To do so, turn the darkening control
clockwise from "Grind" to the next position. This sets the filter to auto-darkening
mode.
If you turn the darkening control
9
an-
Change UV filter
Press the clip
Then remove the darkening control
9
Once you have removed the nut from the
16
downwards to change
the UV filter / solar cell. (see fig. C).
Subsequently you can remove the filter
(see fig. C).
9
from the exterior of the welding helmet by
simply pulling it away, and unscrew the
nut that is located beneath it (see fig. D).
thread, you can completely remove the filter from the welding helmet. (see fig. D)
ticlockwise back to "Grind", the filter's
auto-darkening feature is once again
deactivated.
12 GB/CY
Initial use
Delay setting
You can adjust the delay setting
13
to
configure whether or not the autodarkening feature should be switched
off immediately after stopping welding
work, depending on the type of welding
work. At the lowest setting, auto-darkening
is switched off immediately. Turn the
rotary switch clockwise towards the
highest setting to prolong the time the
auto-darkening feature remains active
after welding work. This feature is very
useful for handling afterglow.
Sensitivity setting
You can use the sensitivity setting
12
to
adjust the light sensitivity of the sensor.
With low incident light, the control can
be adjusted to the highest setting to ensure that the auto-darkening feature is
activated even for a weak light source.
Even with this additional feature, you
can also adjust the light sensitivity of the
sensor to suit your own personal requirements.
LED light with lowlight sensor
The LEDs
are controlled with the LED light switches
18
integrated in the welding helmet
14
. The LED 18 can be manually switched on
by pressing the LED light switch
14
(middle
position “ON”).
The welding helmet as a lowlight sensor. This
is activated by switching the LED light switch
14
to the right position “Auto”. The lowlight
sensor automatically switches the LED lamp
on in dark environments and off in brightly
lit environments. This helps to illuminate the
object being welded in dark working conditions. The LED light switch
14
should always
be switched of (left position “OFF”) at the
end of work and when storing the welding
helmet.
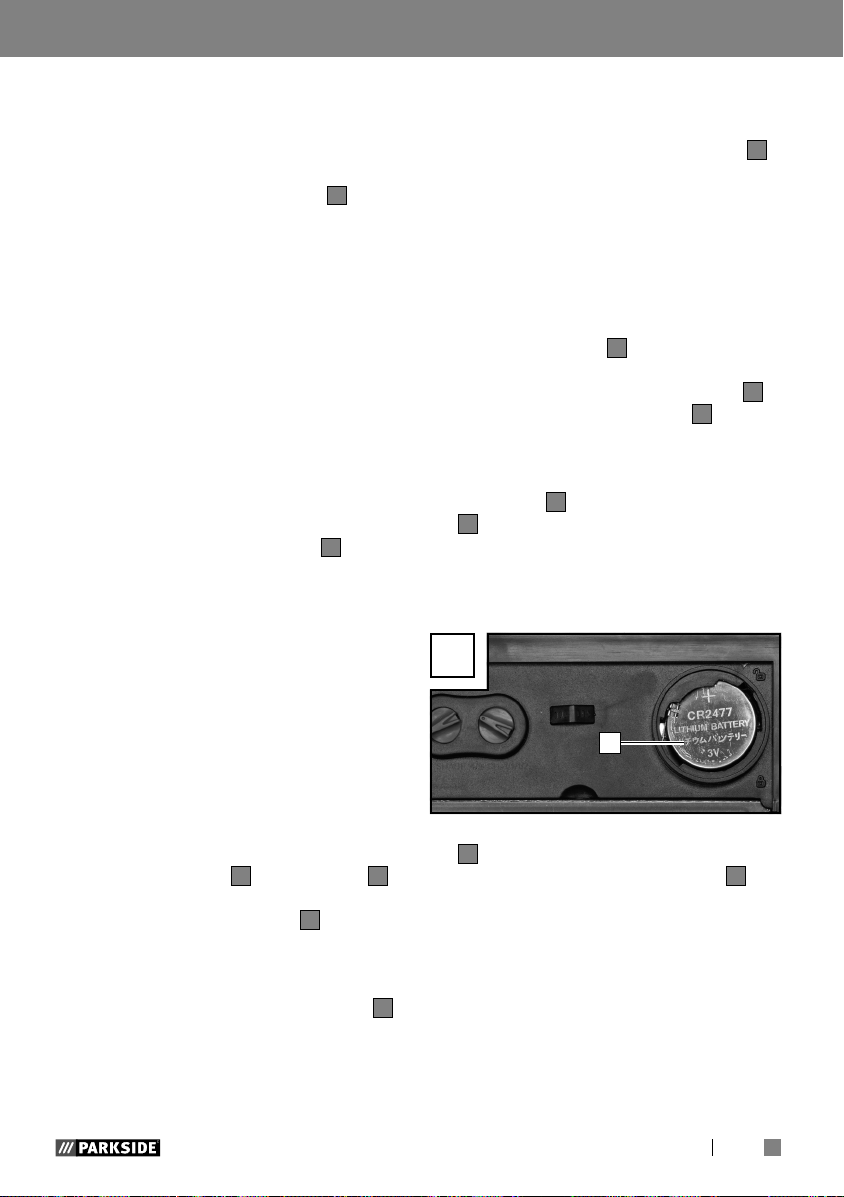
Battery replacement
If the battery charge level is too low you can
replace the batteries. A low battery charge
level is indicated with a red warning light on
the Battery display
In order to open the battery compartment
15
, you must turn the cover of the battery
compartment
10
.
15
counter-clockwise (see
image B).
You can remove the battery
19
, once you
have removed the battery compartment
15
.
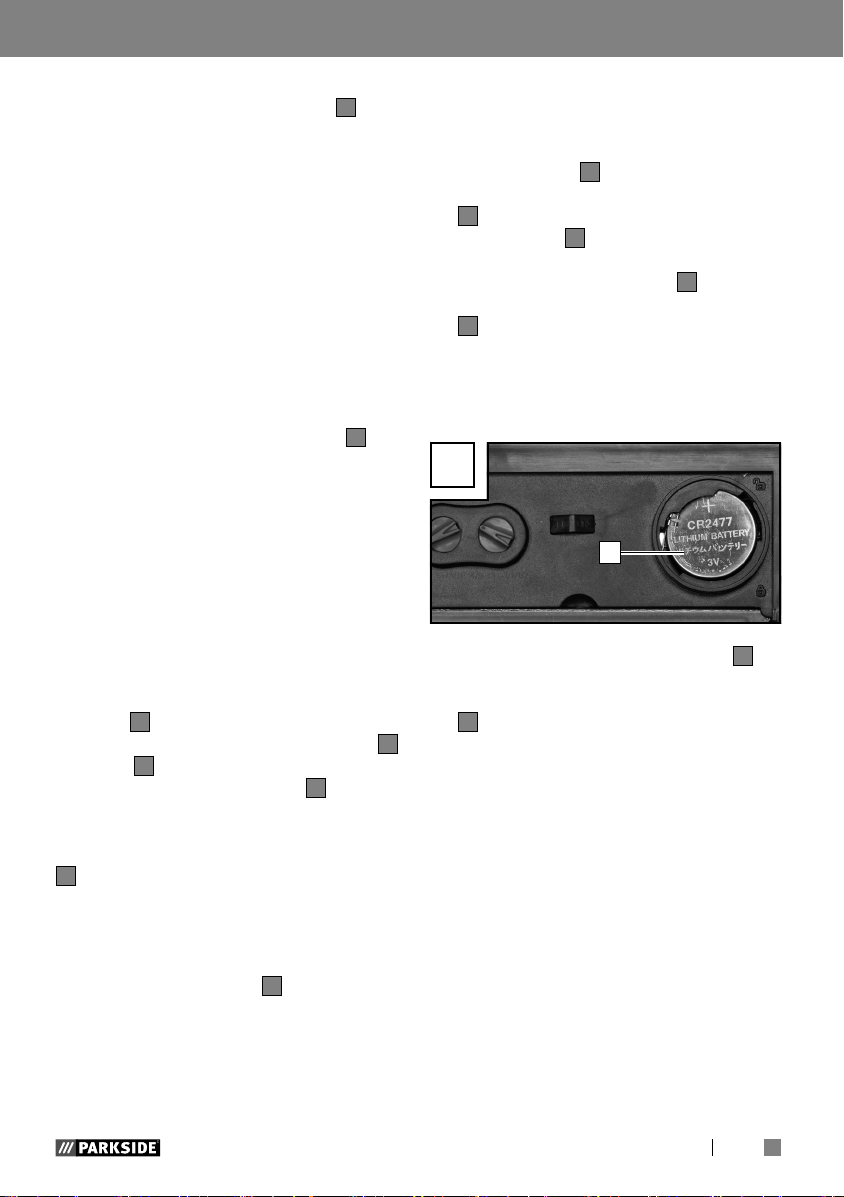
Observe the correct polarity when insert-
ing the new battery. The positive pole
marking “+” must face upwards (see following Figure F).
F
19
Then, close the battery compartment
close the battery compartment, you must
turn the position the battery compartment
15
and turn it clockwise.
15
. To
13GB/CY

Troubleshooting / Cleaning and ... / Storage / Environmental instructions ...
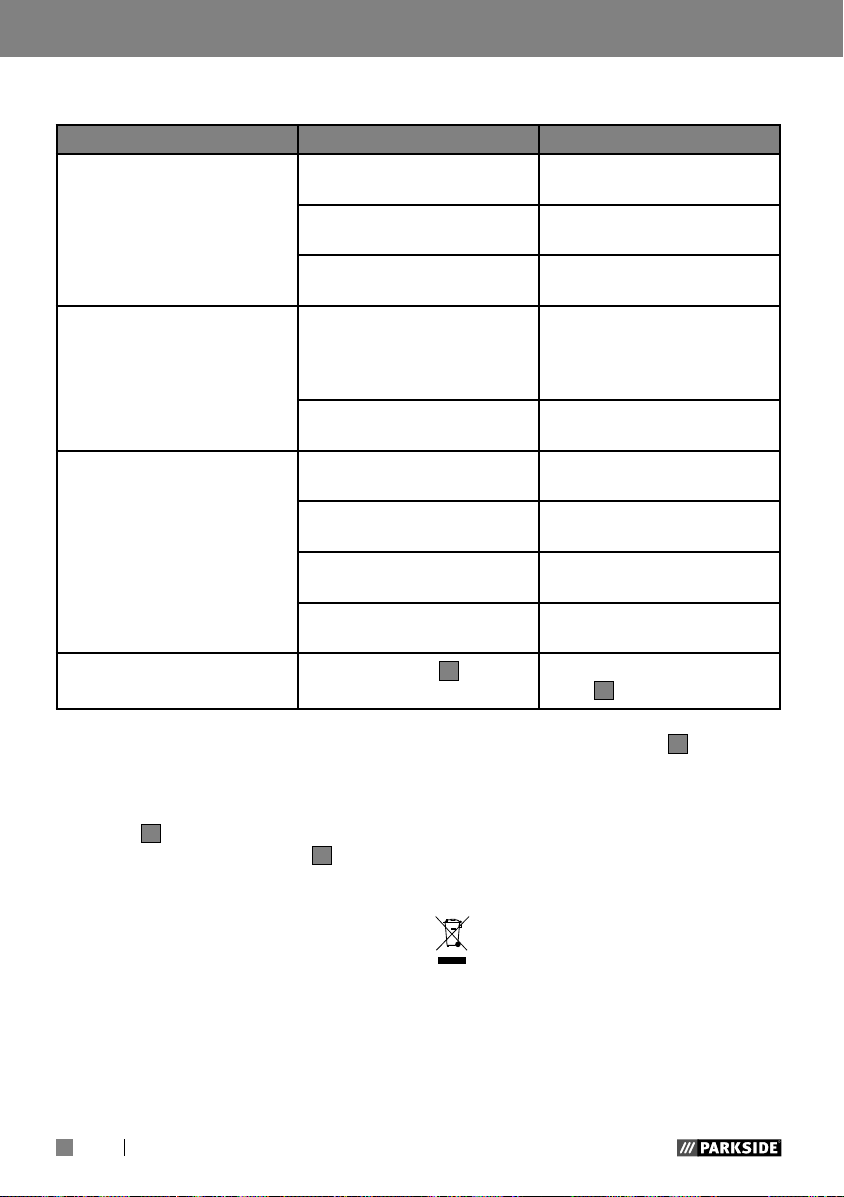
Troubleshooting
Error Cause Solution
The filter does not darken in a
normal way or flickers.
The reaction is slow. The ambient temperature is too
The visibility is poor. The protector / the protective
The welding helmet slips.
The protector does not darken in a
normal way or flickers.
The arc sensor is not clear. Clean the arc sensor's surface.
The welding current is
too low.
low / high.
The sensitivity is too low. Set the sensitivity to a
screen is dirty.
The protective film on the protec-
tive screen was not removed.
The ambient light is not sufficient. Apply more light to your work
The wrong darkening shade has
been set.
5
The headband
on incorrectly.
has been put
Clean the protector or replace it.
Set the sensitivity to the
maximum degree.
Only use the welding
helmet in temperatures
between -5 °C and +55 °C.
higher setting.
Clean the protector and the
protective screen.
Remove the protective film.
surroundings.
Reset the darkening shade.
Put on the headband
tighter.
5
again
Cleaning and Maintenance
Do not use any harsh cleaning agents to
clean the helmet casing
Never bring the UV filter
with water.
Clean the product with a soft and dry or
moistened cloth or clean it with a cloth
moistened with disinfectant.
2
.
8
into contact
Storage
Keep the device in a dry place and out
of the reach of children.
During storage, make sure the LED light
14
switch
is switched off [left position
“OFF”].
14 GB/CY
Environmental instructions
and disposal information
Don‘t waste, recycle!
The device, accessories and packaging
should be recycled in an environmentally
friendly manner.
Do not throw the auto-darkening welding helmet into household rubbish, fire or water. If
possible, non-operational equipment should
be recycled. Contact your local retailer for
information.
As the consumer you are legally
obliged (by the German Battery

... / Warranty and service information
Ordinance) to return any and all used
batteries. Batteries containing harmful
substances are labelled with the adjacent
symbol, which indicates the prohibition on
disposal in household waste. The abbreviations for the relevant heavy metals are: Cd =
cadmium, Hg = mercury, Pb = lead.
Take used batteries to a waste management
company in your city or community, or return
them to your dealer. This satisfies your legal
obligations while also making an important
contribution to protecting the environment.
Warranty and service
information
Creative Marketing & Consulting
GmbH warranty
Dear customer, the warranty for this device
is 3 years from the date of purchase. In the
event of product defects, you have legal
rights against the retailer of this product.
Your statutory rights are not limited in any
way by our warranty detailed below.
Warranty terms
The warranty period begins on the date of
purchase. Please keep the original receipt in
a safe place. This document is required as
your proof of purchase. Should this device
show any fault in materials or manufacture
within 3 years from the date of purchase, it
will be repaired or replaced – at our choice
– by us free of charge. This warranty is
conditional on the defective device and the
receipt of purchase being presented within
the 3 year warranty period, and that there
is a brief written description of the nature of
the defect and of the date it arose.
If the defect is covered by our warranty,
you will receive the product which has been
repaired or a new product. A repair or
exchange of the device does not begin a
new warranty period.
Extent of warranty
The appliance has been manufactured to
strict quality guidelines and meticulously
examined before delivery.
The warranty applies to defects in material
or manufacture. This warranty does not
apply to product parts subject to normal
wear and tear and which can therefore be
considered as wear items, or to damage to
fragile parts, e.g. switches, storage batteries
or glass parts.
This warranty becomes void if the device
has been damaged or improperly used or
maintained.
All instructions provided in the instructions
for use must be followed strictly to constitute
proper use of the product. Purposes and
practices which the operating instructions
warn of or advise against must be avoided
without fail.
This product is intended for private,
non-commercial use only. Any incorrect or
improper use of the device, use of force and
changes not performed by our authorized
service branch will void the warranty.
Processing of warranty
claims
Please follow the instructions below to ensure
your claim is processed quickly:
When inquiring about your product please
have your receipt and product number
(e.g. IAN) ready as your proof of purchase.
The product number can be found on the
type plate, an engraving, the cover page of
your instructions (bottom left) or the decal at
the back or bottom. In the event of malfunctions or other defects, please first contact
15GB/CY
... / Label meanings
the service department below by phone or
e-mail.
A product recorded as defective, along with
the proof of purchase (sales receipt) and
a description of the defect and when it
occurred, can then be returned free of
charge to you to the service address provided.
Note:
On www.lidl-service.com you can
download this as well as many other
manuals, product videos and software.
Service
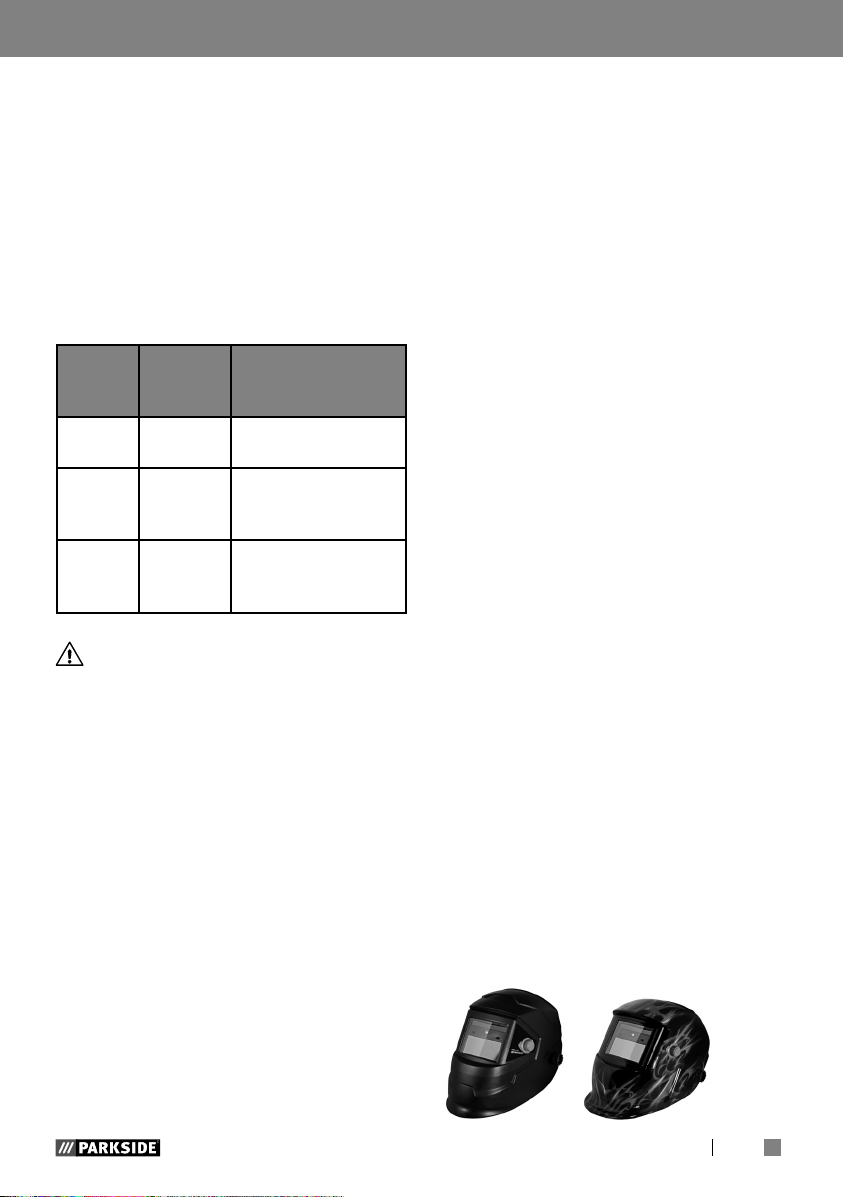
Only use original accessory parts:
Black variant / Variant with flames
(PSHL 2 B1, Item no.:2182/2183):
• Viewing pane (CMC 1F CE):
118 mm x 95 mm x 1.0 mm
• Rear lens (CMC 1F CE):
103.8 mm x 47.3 mm x 1.0 mm
How to contact us:
GB/CY
Name: C.M.C. Creative Marketing
& Consulting GmbH
Website: www.cmc-creative.de
E-mail: service.gb@cmc-creative.
de
Phone: 0-808-189-0652
Registered office: Germany
IAN 314800
Please note that the following address is not
a service address. Please first contact the
service point named above.
Address:
C.M.C. Creative Marketing & Consulting
GmbH
Katharina-Loth-Str. 15
DE-66386 St. Ingbert
DEUTSCHLAND
Ordering spare parts:
www.lidl.com/contact-us
Label meanings
Safety viewing panels approved
according to DIN EN 166
(CXXXXCMC, CXXXXCMC):
• Viewing pane: CMC 1 F CE
CMC = manufacturer code
1 = optical class
F = mechanical strength
(low-energy impact at 45 m/s)
CE = CE symbol)
• Rear pane: CMC 1 F CE
CMC = manufacturer code
1 = optical class
F = mechanical strength
(low-energy impact at 45 m/s)
CE = CE symbol)
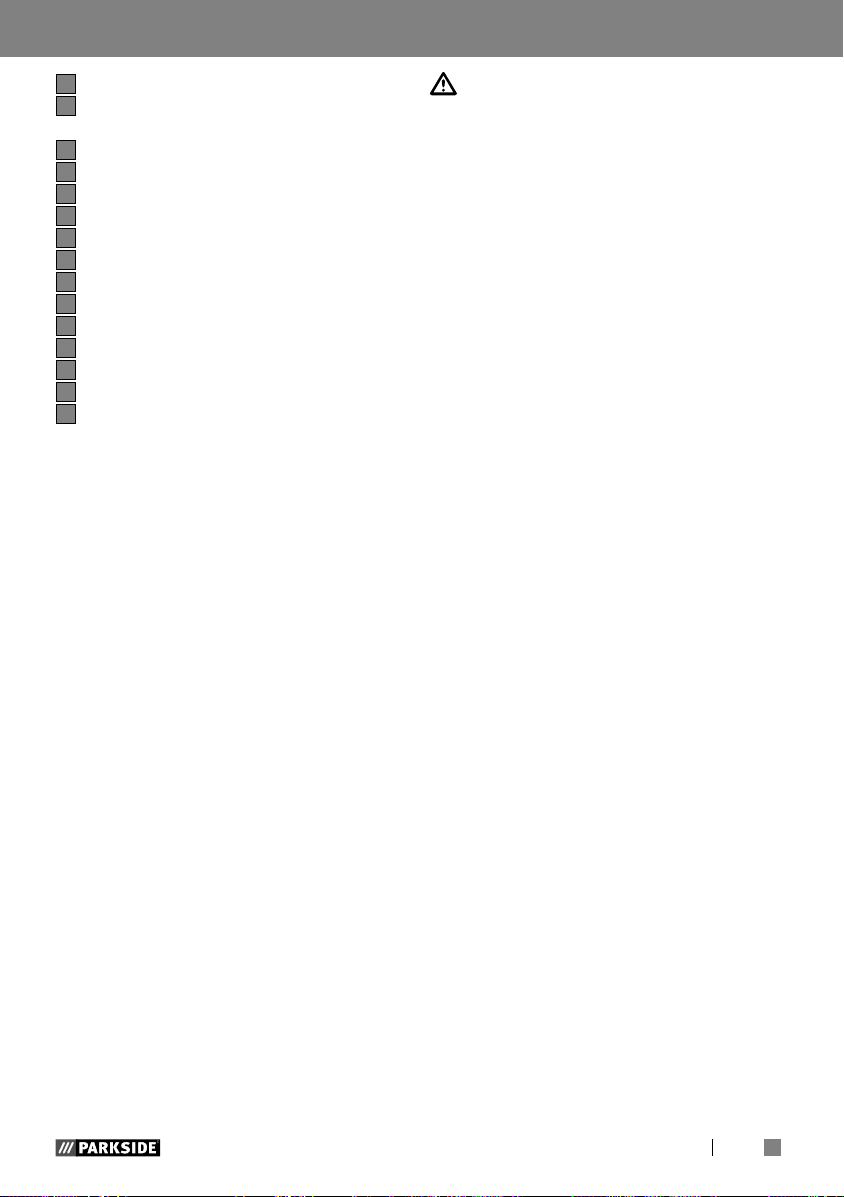
ADF approved according to
DIN EN 379: 4/9-13 CMC
1/1/1/2/379 CE (CXXXXCMC)
Legend:
4 = bright state
9–13 = dark state
CMC = manufacturer code
number 1 = optical class
number 2 = scattered light grade
number 3 = homo-geneity class
number 4 = angle dependency class
379 = test standard
CE = CE symbol
16 GB/CY
Label meanings / EU Declaration of Conformity
Welding helmet case:
CMC EN 175 F CE
(CXXXXCMC, CXXXXCMC):
Manufacturer identification: CMC
Number of the standard: EN 175
Area(s) of application (if required): S, F, B
Mass in grams (if required)
IP rating for welding helmet, order no.:
2182/2183: F
CE = CE symbol
Description
of scope
of application
Mechanical strength
Mechanical strength
Mechanical strength
Symbol
S
F
B
Protec-
tion type
increased
strength
Low
energy
impact
Medium
energy
impact
If the symbols F, B and S are not
obtained for the viewing panel as well as the
supporting body, the entire eye protection
device is to be conferred with a lower
rating.
Certification body:
DIN CERTCO Gesellschaft für
Konformitätsbewertung mbH
Alboinstrasse 56
12103 Berlin
Notified body number 0196
EU Declaration of Conformity
1. PSA (product, type, batch or serial number):
Automatic welding helmet
IAN: 314800
Serial number:
2182 (black variant) /
2183 (variant with flames)
Year of manufacture: 2019/25
Model: PSHL 2 B1
2. Name and address of the manufacturer
and his/her representative, if required:
C.M.C. Creative Marketing &
Consulting GmbH
Documentation Officer:
Alexander Hoffmann
Katharina-Loth-Str. 15
66386 St. Ingbert
GERMANY
3. The manufacturer is solely responsible for
the creation of the declaration of conformity.
C.M.C. Creative Marketing &
Consulting GmbH
4. The object of the declaration (identification of the PPE that enables traceability;
if necessary, it can contain a sufficient
sharp image if it is necessary for the
identification of the PPE):
Welder visor PSHL 2 B1,
item no. 2182, welder visor PSHL 2
B1, item no. 2183
17GB/CY
EU Declaration of Conformity
Viewing pane without filter effect
PSHL 2 B1, item no. 2182, 2183
Viewing pane without filter effect
PSHL 2 B1, item no. 2182, 2183
Automatic welder protective filter
with manually adjustable protection level PSHL 2 B1, item no. 2182,
2183
under number 4 corresponds to the
relevant harmonisation legislation of the
union:
Electromagnetic Compatibility
2014 / 30 / EU
RoHS directive
2011 / 65 / EU
Personal Protective Equipment Ordinance
(EU) / 2016/425
6. Indication of the relevant harmonised
standards used or other technical specifications in relation to which conformity is
declared, including the date of the standards
or other technical specifications:
EN 166:2001
EN 175:1997
EN 379:2009.
7. The notified certification body DIN CERTCO
Gesellschaft für Konformitätsbewertung
mbH, Alboinstrasse 56, 12103 Berlin,
Notified body number 0196, carried out the
EC type
examination and issued the EC type examination certificate CXXXXCMC/R0, CXXXXCMC/R0, CXXXXCMC/R0, CXXXXCMC/R0,
CXXXXCMC/R0.
St. Ingbert, 11.01.19
5. The object of the declaration described
18 GB/CY
On behalf of M. Sc. Alexander Hoffmann
– Quality Assurance –

19GB/CY

20 GB/CY

Popis sadržaja
Značenje korištenih simbola ........................................................................ Stranica 22
Uvod ................................................................................................................................. Stranica 22
Namjenska uporaba ..................................................................................................... Stranica 22
Opis dijelova................................................................................................................... Stranica 22
Tehnički podaci .............................................................................................................. Stranica 23
Opseg isporuke ............................................................................................................. Stranica 23
Sigurnosne upute .................................................................................................. Stranica 23
Stavljanje u pogon ................................................................................................ Stranica 27
Čišćenje i održavanje ......................................................................................... Stranica 30
Skladištenje ............................................................................................................... Stranica 30
Upute za okoliš i napomene za zbrinjavanje ................................... Stranica 30
Uklanjanje smetnji ................................................................................................ Stranica 30
Napomene za jamstvo i servisne postupke ...................................... Stranica 31
Uvjeti jamstva................................................................................................................. Stranica 31
Opseg jamstva ............................................................................................................... Stranica 31
Postupak u slučaju koji je pokriven jamstvom ......................................................... Stranica 32
Servis .............................................................................................................................. Stranica 32
Značenje oznaka .................................................................................................... Stranica 32
EU izjava o sukladnosti .................................................................................... Stranica 33
21HR
Značenje korištenih simbola / Uvod
Značenje korištenih simbola
Oprez!
Pročitajte upute za rad!
Pažnja, moguće opasnosti!
Ne zbrinjavajte električne uređaje preko kućnog otpada!
Pažnja: kacige za zavarivanje
ne nude zaštitu za oči,
uši i lice!
Izrađen od recikliranog
materijala
OPREZ
UPOZORENJE: Mogućnost strujnog udara !
Ne otvarati kućište proizvoda !
Automatska maska za
zavarivanje PSHL 2 B1
Uvod
Čestitamo! Time ste se
odlučili za jedan vrlo kvalitetan uređaj iz naše kuće. Prije prvog
korištenja upoznajte se s proizvodom.
Stoga pažljivo pročitajte slijedeće upute za
korištenje i sigurnost.
NE DOZVOLITE DA DOĐE U DJEČJE
RUKE!
Namjenska uporaba
Važna napomena!
Pažnja: zrake svjetlosnog luka
mogu ozlijediti mrežnicu očiju!
Odložite baterije na ekološki
prihvatljiv način!
zavarivanje (uključujući kratko vrijeme
zavlačenja za zaštitu od zaostalog žarenja).
Kaciga za zavarivanje ima kontinuirano
podesive DIN-stupnjeve zaštite pomoću
bočnog kotačića i može se namjestiti na
leteće iskre kod brušenja. Koristite proizvod
samo kako je opisano i u navedene svrhe.
Brižno čuvajte ove upute. Ako proizvod
dajete nekoj drugoj osobi, predajte joj i
sve upute. Svaka primjena koja odstupa
od navedenog korištenja je zabranjena i
potencijalo je opasna. Štete koje nastaju
zbog nepoštivanja uputa ili zloupotrebe
nisu pokrivene jamstvom i ne spadaju u
opseg odgovornosti koje snosi proizvođač.
Uređaj je dizajniran za kućnu upotrebu i
ne smije se koristiti u komercijalne svrhe ili
industrijski.
Ova kaciga za zavarivanje štiti za vrijema
zavarivanja oči i lice od iskra, štrcanja i
UV zračenja i automatski se prilagođava
uvjetima svjetla. Ona pruža neposredno,
senzorski kontrolirano zatamnjenje kod
paljenja svjetlosnog luka i automatsko
vraćanje svjetla na normalu na završetku
22 HR
Opis dijelova
1
prednje staklo
2
kućište kacige
3
solarna ćelija
4
unutarnje staklo
Uvod / Sigurnosne upute
5
traka za glavu
6
stražnji rotirajući prekidač na traci za
glavu
7
bočni rotirajući prekidač na traci za glavu
8
UV-ltar
9
regulator zatamnjenja
10
testna tipka
11
namještanje odgađanja
12
namještanje senzibilnosti
13
prikaz niske razine napunjenosti baterije
14
prekidač za LED rasvjetu
15
pretinac za baterije
16
luk
17
senzor električnog luka
18
LED
19
baterija
Tehnički podaci
Dimenzije kazete ltra 110 x 90 x 9 mm
Vidno polje: 9,2 x 4,2 cm
Svjetlo stanje: DIN 4
Tamno stanje: DIN 9–DIN 13
Vrijeme preklapanja
Svjetlo prema tamnom: 0,23~0,72 ms
Tamno prema svjetlomu: 0,1~2 s
Uključivanje / isključivanje: potpuno
automatski
Dovod energije: solarna ćelija
UV- / IR-zaštita: DIN 16
Radna temperatura: -5 °C do + 55 °C
Temperatura skladištenja: -20 °C do + 70
°C
Procesi zavarivanja: MMA, MIG,
MAG, TIG,
rezanje plazmom
i zavarivanje
plazmom
Maksimalni rok trajanja: cca. 6 godina
Opseg isporuke
1 automatska maska za zavarivanje
1 upute za korištenje
Sigurnosne upute
Molimo, pažljivo pročitajte upute
za korištenje i pridržavajte se
opisanih uputa. Pomoću ovih
uputa za korištenje upoznajte se
s uređajem, njegovom pravilnom
uporabom i sigurnosnim napomenama. Na tipskoj pločici stoje
svi tehnički podaci ove kacige za
zavarivanje, molimo, informirajte
se o tehničkim osobinama ovog
proizvoda.
Proizvod nije prikladan za
lasersko zavarivanje.
Proizvod je odobren samo za
uporabu u rasponu temperature od -5 °C do + 55 °C.
Proizvod nije otporan na va-
tru.
Ne izlažite masku za zavari-
vanje i samozatamnjujući ltar
toplini ili vlazi.
Nemojte uklanjati samozatam-
njujući ltar iz maske za zavarivanje i nikad ne otvarajte kućište samozatamnjujućeg ltra
bez dopuštenja proizvođača.
Prije svake uporabe provjerite
je li ispravno odabrana postavka Zavarivanje/brušenje.
Prednji podložni disk mora biti
postavljen na vanjskoj strani
samozatamnjujućeg ltra.
U suprotnom se samozatam-
23HR

Sigurnosne upute
njujući ltar može oštetiti.
Nemojte ništa mijenjati/zamje-
njivati na maski za zavarivanje i samozatamnjujućem ltru
bez odobrenja.
Odmah prestanite s radom
i smjesta se obratite prodavaču ako se tijekom zavarivanja
ltar automatski ne zatamni.
Samozatamnjujući ltar ne-
mojte čistiti alkoholom, benzinom ili razrjeđivačem. Samozatamnjujući ltar nemojte
stavljati u vodu.
Vrijeme reakcije samozata-
mnjujućeg tekućeg kristala
usporava se kada je temperatura okoline niža, ali ne utječe
na zaštitne funkcije.
Odmah zamijenite kućište sa-
mozatamnjujućeg ltra ako je
oštećen ili izgreben jer će
to znatno umanjiti vidljivost
i zaštitu.
Odmah zamijenite stakla ako
su slomljena ili izgrebana.
Nemojte upotrebljavati tvrde
predmete za zamjenu stakla
ltra.
Redovito čistite površine
samo zatamnjujućeg ltra,
senzora i solarnih ćelija.
Maska za zavarivanje ne pod-
nosi oštećenja uzrokovana
snažnim udarcem, eksplozijom ili korozivnim tekućinama.
Vrijeme uporabe ovisi o mno-
gim pojedinačno različitim
čimbenicima kao što su uporaba, čišćenje, skladištenje i
održavanje. Preporučuju se
redovita provjera i zamjena
u slučaju oštećenja.
S vremenom će materijal od
kojeg je proizvod izrađen stariti. Zato na maski za zavarivanje može doći do pucanja.
Zbog takvih oštećenja maska
za zavarivanje ne može
pružiti učinkovitu zaštitu.
U tom slučaju korisnik odmah
treba zamijeniti masku
za zavarivanje.
Ovaj se proizvod ne smije
upotrebljavati za zavarivanje
i rezanje na visini iznad glave.
Ako se ovaj proizvod upotrijebi za zavarivanje ili rezanje na
visini iznad glave, kapljice rastaljenih metala mogu izgorjeti
kroz samozatamnjujući ltar i
ozlijediti korisnika.
Ako je ltar neispravan, ko-
risnik mora odmah prestati
raditi s maskom za zavarivanje. Prskanje nečistoća može
oštetiti površinu ltra i ozlijediti
korisnikovu kožu ili uzrokovati
druge ozbiljne nesreće.
Ovaj je proizvod otporan na
temperaturu i teško zapaljiv,
ali u slučaju izravnog dodira
24 HR

Sigurnosne upute
s otvorenim plamenom ili pristupom objektu visoke temperature, maska za zavarivanje može početi goriti ili taliti
se. Spremate i upotrebljavajte
masku za zavarivanje samo
kako je opisano da bi se smanjili takvi rizici.
Samozatamnjujući ltar elek-
tronički je proizvod koji nije
vodootporan. Pazite da ostane suh i čist i nemojte ga skladištiti u vlažnu okolinu.
Nepravilna upotreba može re-
zultirati ozljedom korisnika
i uzrokovati druge vrste bolesti.
Prije svake upotrebe provjeri-
te ltar. Ako izgleda da nešto
nije u redu s radom i izgledom, ne smijete ga nastaviti
upotrebljavati.
Ako ltar treperi ili stupanj
zatamnjenja više ne zadovoljava standardnu vrijednost
ili postoje drugi neuobičajeni
radni uvjeti, masku za zavarivanje više ne smijete upotrebljavati.
Nemojte nepotrebno izlagati
ovaj proizvod suncu.
Upotrebljavajte samo
originalne dodatne proizvode.
Upotreba neoriginalnih dijelova pribora može uzrokovati probleme u smislu zaštitne
funkcije, iskoristivosti i stupnja
zaštite proizvoda.
Prekoračeni vijek trajanja (ne-
dovoljna zaštita) – Prije svake
upotrebe provjerite jesu li zaštitne naočale oštećene
i dokad vrijede.
Upotreba zaštite za oči bez
učinka ltra protiv optičkog
zračenja (oštećenje očiju) –
Prije svake upotrebe provjerite ima li zaštita za oči potrebni
broj ljestvice.
Upotreba proizvoda protiv pr-
skanja (nedovoljna zaštita) –
Uvijek provjerite ima li ispravno zaštitno djelovanje.
Upotreba proizvoda protiv
velikih čestica prašine
(ozljeda, nesreća). Uređaj za
zaštitu za oči smije se upotrebljavati samo za rad opisan
u uputama za uporabu. Svako
odstupanje od uputa iz rukovanje može uzrokovati ozljede
ili nesreće.
Upotreba oštećenih proizvo-
da (nedovoljna zaštita) – Prije
svake upotrebe provjerite jesu
li zaštitne naočale oštećene
i dokad vrijede.
nepravilna upotreba zašti-
te za oči (ozljeda, nesreća).
Uređaj za zaštitu za oči smije
se upotrebljavati isključivo za
rad opisan u instrukcijama za
uporabu. Svako odstupanje
25HR
Sigurnosne upute
od uputa može uzrokovati ozljede i nesreće.
Ovaj uređaj mogu koristiti dje-
ca od 16 godina i starija djeca, kao i osobe s umenjenom
psihičkom, senzoričkom
i mentalnom sposobnošću ili
s umanjenim iskustvom ako
su pod nadzorom ili ako su
upoznati sa sigurnom uporabom uređaja i razumiju opasnosti koje proizlaze iz upotrebe. Djeca se ne smiju igrati
uređajem. Čišćenje i održavanje ne smiju vršiti djeca bez
nadzora.
Kaciga za zavarivanje sa
automatskim zatamnjenjem
nije pogodna za lasersko i autogeno zavarivanje.
Nemojte položiti kacigu za
zavarivanje nikada na vruću
površinu.
Kacigu za zavarivanje ni
u kojem slučaju ne otvarajte.
Nemojte popravljati niti promijeniti kacigu za zavarivanje.
To smiju izvesti samo educirane stručne osobe.
Obratite pozornost na to,
da ste prije svake operacije
zavarivanja namjestili automatsko zatamnjenje.
Sigurnosni vizir se ne smije
otvoriti. On štiti ltar od prljavštine i oštećenja.
Ako ltar automatski ne pota-
mni, prekinite odmah postupak zavarivanja i kontaktirajte
proizvođača.
Koristite kacigu za zavariva-
nje samo kod temperatura između -5 °C i +55 °C. Vrijeme
reakcije ltera će se usporiti, ako je temperatura ispod /
iznad te temperature.
Redovito čistite ltar, površinu
kacige i solarne ćelije.
Zamijenite zaštitni vizir, ako
ima ogrebotine ili ako je oštećen.
Kaciga za zavarivanje ne štiti
od udarca.
Uporaba, čišćenje i skladište-
nje mogu umanjiti rok trajanja
od 6 godina. Izgrebanu ili na
drugi način vidljivo oštećenu
masku za gledanje tj. kacigu
za zavarivanje treba odmah
zamijeniti.
Pažnja! Materijali koji dola-
ze u kontakt s kožom nositelja,
mogu kod osjetljivih osoba izazvati alergijske reakcije.
Pažnja! Uređaji za zaštitu
očiju mogu za nosioca predstav
ljati opasnost od čestica velike
brzine zbog prenašanja udarca,
ako se nose iznad standardnih
naočala za korigiranje vida.
26 HR
Sigurnosne upute / Stavljanje u pogon
Pažnja! Ako je potrebna
zaštita od brzih čestica kod
ekstremnnih temperatura, mora
odabrani uređaj za zaštitu očiju
biti označen sa slovom T odmah
nakon slova za intenzitet udara, tj FT, BT ili AT. Ako slovu za
intenzitet udarca ne slijedi odmah slovo T, onda se uređaj za
zaštitu očiju može koristiti samo
na sobnoj temperaturi od čestice
velike brzine.
Stavljanje u pogon
Napomena: koristite kacigu za zavarivanje
samo sa ugrađenim unutarnjim staklom
Napomena: držite senzore
čiste i jasne.
Odmah nakon otvaranja pakiranja
provjerite je li sadržaj potpun i neoštećen.
Odmah se obratite prodajnom predstavniku
ako je isporuka nepotpuna ili ima nedostatke. Nemojte upotrebljavati uređaj ako je
neispravan.
17
UV-ltra 8
4
.
bočne rotirajuće prekidače trake za
7
glavu
zavarivanje.
podešavanja, da kaciga za zavarivanje
sjedi što je moguće dublje na glavi i što je
moguće bliže vašem licu.
Namjestite prije procesa zavarivanja
odgovarajući stupanj zatamnjenja (vidi
slijedeći tablicu). Stupanj zatamnjenja
se može ručno namjestiti od 9 do 13,
tako da okrečete na regulatoru zatamnjenja
Pažnja! Regulator zatamnjenja 9 ima
namješteni položaj „Grind“. Ako je regulator
zatamnjenja
automatsko zatamnjivanje je deaktivirano.
Koristite to podešavanje samo, ako kacigu
za zavarivanje ne želite koristiti za varenje.
Automatsko zatamnjivanje tada nije aktivno.
Pr ije svakog korištenja provjerite propu-
snost svjetla.
da biste zaključali kacigu za
Obratite pozornost kod
9
na vanjskoj strani kacige.
9
namješten na taj položaj,
Provjerite prije svakog puštanja u pogon, dali su kaciga za zavarivanje i zaštitna
stakla ispravni. Ako zaštitno staklo ima
ogrebotine, pukotine ili kvržice, mora se
obavezno zamijeniti prije uporabe, jer inače
može doći do teških ozljeda.
Uklonite zaštitnu foliju s unutarnje i vanj-
ske strane vizira.
Kacigu za zavarivanje postavite s
pomoću trake za glavu
stražnji rotirajući prekidač trake za glavu
6
da biste prilagodili kacigu za zavari-
vanje na odgovarajuću veličinu glave i
5
. Okrećite
27HR
Stavljanje u pogon
Tablica za podešavanje stupnjeva zatamnjenja
Struja svjetlosnog luka (ampera)
1,5 6 10 15 30 40 60 70 100 125 150 175 200 225 250 300 350 400 450 500 600
Grind
SMAW 8 9 10 11 12 13 14
MAG 8 9 10 11 12 13 14
TIG /
GTAW
MIG
(teško)
MIG
(lahko)
PAC 9 10 11 12 13
PAW 4 5 6 7 8 9 10 11 12
SMAW: zavarivanje s obučenom
MIG (teško): MIG zavarivanje teških
MIG (lahko): MIG zavarivanje laganih
TIG / GTAW: zavarivanje s inertnim pli-
Funkcija brušenja - automatsko zatamnjenje nije aktivno
8 9 10 11 12 13
9 10 11 12 13 14
10 11 12 13 14
PAC: rezanje plazmom
elektrodom
PAW: zavarivanje plazmom
Grind: Funkcija brušenja: Automatsko
metala
zatamnjenje nije aktivno. Postavkom se koristite samo ako kacigu
metala i legura
za zavarivanje ne upotrebljavate za
zavarivanje.
nom
MAG: zavarivanje s matal aktivnim
plinom
Provedba testnog postupka
Testnom tipkom
11
možete kontrolirati
automatsko zamračivanje ltra se pono-
vo deaktivira.
funkcionira li funkcija zatamnjenja kacige za zavarivanje.
Provođenje test procesa: približavajte
se s vizualnim staklom eksternom izvoru
svjetla s više od 40 W i provjerite da li
se staklo zatamnjuje ili dali je svjetlo. Za
to regulator zamračivanja
9
okrenite
u smjeru okretanja kazaljke na satu sa
„Grind“ na sljedeći stupanj.
Na taj način zamračivanje ltra nastupa
automatski. Ako regulator zamračiva-
9
nja
ponovo vratite natrag u smjeru
okretanja kazaljke na satu na „Grind“,
Zamjena UV ltra
Da biste zamijenili UV ltar/solarnu će-
liju, pritisnite luk
16
prema dolje. (vidjeti
sliku C). Zatim možete izvaditi ltar (vidjeti sliku C).
Zatim jednostavnim povlačenjem uklo-
nite regulator za zamračivanje
9
na
vanjskoj strani kacige za zavarivanje,
a potom otpustite maticu koja se nalazi
ispod (vidjeti sliku D).
Nakon što ste maknuli maticu s navoja
28 HR
Stavljanje u pogon
možete potpuno odvojiti ltar od kacige
za zavarivanje (vidjeti sliku D).
Postavljanje odgode
Preko namještanja odgađanja
13
sno o procesu zavarivanja možete
varirati, da li se automatsko zamračivanje treba ili ne treba isključiti direktno
nakon završetka procesa zavarivanja.
Automatsko zamračivanje se automatski isključuje na min. stupanj. Što više
prekidač okrećete u smjeru okretanja
kazaljke na satu tj. u smjeru maks. stupnja, to će zamračivanje nakon procesa
zavarivanja duže postojati. Ova funkcija
je veoma smislena prilikom naknadnog
bljeska.
Postavljanje senzibilnosti
S namještanjem senzibilnosti
12
regulirati svjetlosnu osjetljivost senzora.
U slučaju malog upada svjetla, regulator
je moguće namjestiti na maks. stupanj,
da bi automatsko zamračivanje također
nastupilo pri slabom izvoru svjetla. Također, kod ove dodatne funkcije, ovisno o
vlastitim potrebama, možete namjestiti
svjetlosnu osjetljivost senzora.
, ovi-
možete
u slučaju tamne okolice služi osvjetljivanju
predmeta koji se zavaruju. Nakon završetka
rada i za spremanje kacige za zavarivanje
prekidač LED lampice za osvjetljavanje
14
uvijek treba biti isključen (lijeva postavka
„OFF“).
Zamjena baterija
Preko pretinca za baterije možete izmijeniti
baterije sa slabom napunjenosti. Obavijest
o slaboj napunjenosti baterije dobivate
preko prikaza baterije
10
uz pomoć crvene
upozoravajuće lampice.
Da biste otvorili pretinac za baterije
poklopac pretinca za baterije
15
morate
15
,
okrenuti u smjeru suprotnom od kazaljke
na satu (vidjeti sliku B).
Nakon što ste uklonili poklopac pretinca
za baterije
19
.
15
, možete izvaditi baterije
Pri umetanju nove baterije, morate uzeti
u obzir polaritet. Oznaka pola plus „+“
mora pokazivati prema gore (vidjeti sljedeću sliku F).
F
19
LED svjetla sa senzorom za
prigušivanje
LED lampicom integriranom u kacigu za
zavarivanje [18] upravlja prekidač LED lampice za osvjetljavanje
14
. LED lampica 18
može se ručno uključiti tako da se prekidač
LED lampice za osvjetljavanje
14
uključi
(srednja postavka „ON“).
Kaciga za zavarivanje raspolaže senzorom
za prigušivanje. To se aktivira tako da se
prekidač LED lampice za osvjetljavanje
14
prebaci na desnu postavku „Auto“. Zatim
senzor prigušivanja u slučaju tamne okolice
automatski uključuje LED lampicu, a u slučaju svijetle okolice ponovo je isključuje. To
Zatim opet zatvorite poklopac pretinca
15
. Da biste zatvorili pretinac za baterije, poklopac pretinca za baterije
morate umetnuti i okrenuti u smjeru kazaljke na satu.
15
29HR
Uklanjanje smetnji / Čišćenje i održavanje / Skladištenje / Upute za ...
Uklanjanje smetnji
Greška Uzrok Rješenje
Filtar se ne zatamnjuje
redovito odnosno treperi.
Reakcija je usporena.
Vidljivost je loša.
Kaciga za zavarivanje klizi.
Protektor je zaprljan ili
defektan.
Senzor za svjetlosni luk nije
jasan.
Struja varenja je premala.
Temperatura okoline je
preniska / previsoka.
Osjetljivost je premala.
Protektor / zaštitno staklo je
zaprljano.
Zaštitna folija nije uklonjena
sa zaštitnog stakala.
Svjetlo okoline nije dovolj-
no.
Namješten je krivi stupanja
zatamnjenja.
5
Traka za glavu
namještena.
je krivo
Očistite protektor ili ga
zamijenite.
Očistite površinu senzora
svjetlosnog luka.
Ostavite osjetljivost na
maks. stupanj.
Koristite kacigu za
zavarivanje samo kod
temperatura između
-5 °C i +55 °C.
Postavite osjetljivost na
više.
Očistite protektor i zaštitno
staklo.
Uklonite zaštitnu foliju.
Namjestite više svjetla
u vašoj radnoj okolini.
Namjestite ponovo stupanj
zatamnjenja.
Namjestite traku za glavu
5
ponovo i uže.
Čišćenje i održavanje
Za čišćenje nemojte koristiti nagrizaju-
ća sredstava, kako ne bi oštetili kućište
kacige
Ne dovodite nikada UV-ltar
takt s vodom.
Proizvod očistite mekom i suhom kr-
pom, navlaženom krpom ili krpom navlaženom sredstvom za dezinfekciju.
2
.
8
u kon-
Skladištenje
Spremite uređaj na suho mjesto i izvan
dohvata djece.
Pritom pripazite da je prekidač LED
30 HR
lampice za osvjetljavanje
skladištenja isključen (lijeva postavka
„OFF“).
14
tijekom
Upute za okoliš i napo-
mene za zbrinjavanje
Recikliranje sirovina umjesto
otpada
Uređaj, oprema i ambalaža se trebaju
ekološki reciklirati.
Ne bacajte automatsku kacigu za zavarivanje ukućni otpad, vatru ili vodu. Ako
 Loading...