

Parkside PSHL 2 A2 Operation And Safety Notes Translation Of The Original Instructions
AUTOMATIC WELDING HELMET PSHL 2 A2
PDF
ONLINE
www.lidl-service.com
GB IE NI
AUTOMATIC WELDING HELMET
Operation and Safety Notes
Translation of the original instructions
DE
AT CH
AUTOMATIK-SCHWEIßHELM
Montage-, Bedienungs- und Sicherheitshinweise
Originalbetriebsanleitung
IAN 310884
DK
AUTOMATISK SVEJSEHJELM
Brugs- og sikkerhedsanvisninger
Oversættelse af den originale driftsvejledning
NI
IEGB
DK
GB
Before reading, unfold the page containing the illustrations and familiarise yourself with all
functions of the device.
DK
Før du læser, vend siden med billeder frem og bliv bekendt med alle apparatets funktioner.
DEIEATNICH
Klappen Sie vor dem Lesen die Seite mit den Abbildungen aus und machen Sie sich anschließend mit allen Funktionen des Gerätes vertraut.
GB / IE / NI Operation and Safety Notes Page 5
DK Brugs- og sikkerhedsanvisninger Side 19
DE / AT / CH Montage-, Bedienungs-, und Sicherheitshinweise Seite 33
E
16
16
17


Table of contents
List of pictograms used ..................................................................................Page 6
Introduction .........................................................................................................Page 6
Intended use ...........................................................................................................Page 6
Parts Description ....................................................................................................Page 6
Technical Data ........................................................................................................Page 7
Scope of delivery ...................................................................................................Page 7
Safety instructions ............................................................................................Page 7
Initial use ..............................................................................................................Page 11
Cleaning and Maintenance ..........................................................................Page 13
Storage ..................................................................................................................Page 13
Environmental instructions and disposal information ....................Page 13
Troubleshooting .................................................................................................Page 13
Warranty and service information ..........................................................Page 14
Warranty terms .......................................................................................................Page 14
Extent of warranty ..................................................................................................Page 14
Processing of warranty claims ................................................................................Page 14
Service ...................................................................................................................Page 15
Label meanings .................................................................................................Page 15
EU Declaration of Conformity .....................................................................Page 16
GB/IE/NI 5
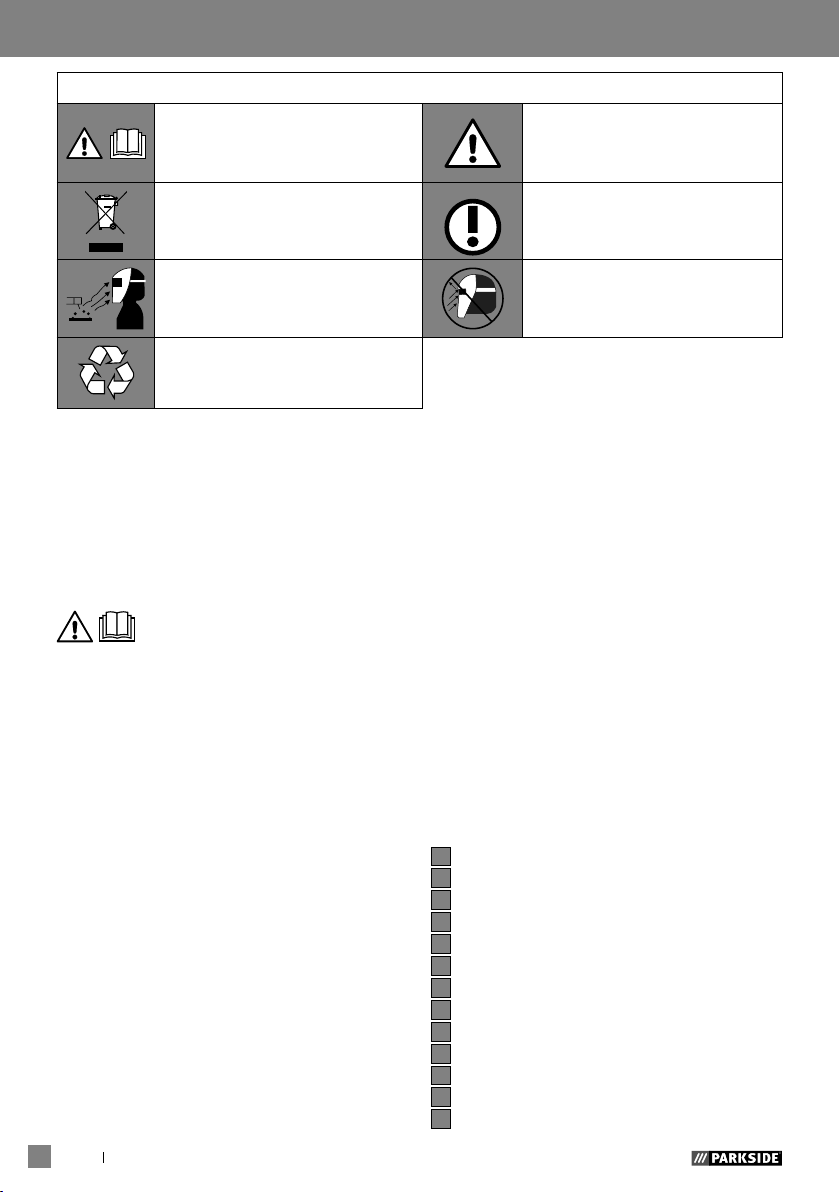
List of pictograms used / Introduction
List of pictograms used
Read instructions for use!
Do not dispose of electrical
equipment in household waste!
Attention: The welding helmet
does not provide any eye, ear
or face protection!
Made from recycling material
Automatic Welding Helmet
PSHL 2 A2
Introduction
Congratulations!
You have chosen a high-quality
product from our company. Familiarise
yourself with the product before using it for
the first time. In addition, please carefully
refer to the instructions for use and the safety
instructions below.
Caution!
Attention, potential dangers!
Important notice!
Warning: arc rays can injure
the eye's retinas!
wheel and is also adjustable for flying sparks
during grinding work. Only use the product
as described and for its indicated purpose.
Keep these instructions in a safe place.
When passing this product on to others,
please also include all the documents. Any
use other than the intended is prohibited and
potentially dangerous. Damages resulting
from noncompliance or misuse are not
covered by the
in the manufacturer‘s
warranty and are not included
liability. This device
has been designed for household use and
may not be used for commercial or industrial
purposes.
KEEP OUT OF THE REACH OF
CHILDREN!
Intended use
This welding helmet protects the eyes and
face from sparks, splashes and UV rays while
welding and automatically adapts to the
lighting conditions. It ensures an immediate,
sensor-controlled darkening upon arc ignition
as well as automatic illumination at the end
of the welding procedure (including a short
delay to protect against afterglow). This
welding helmet provides a freely adjustable
DIN protection level with a lateral adjustment
6 GB/IE/NI
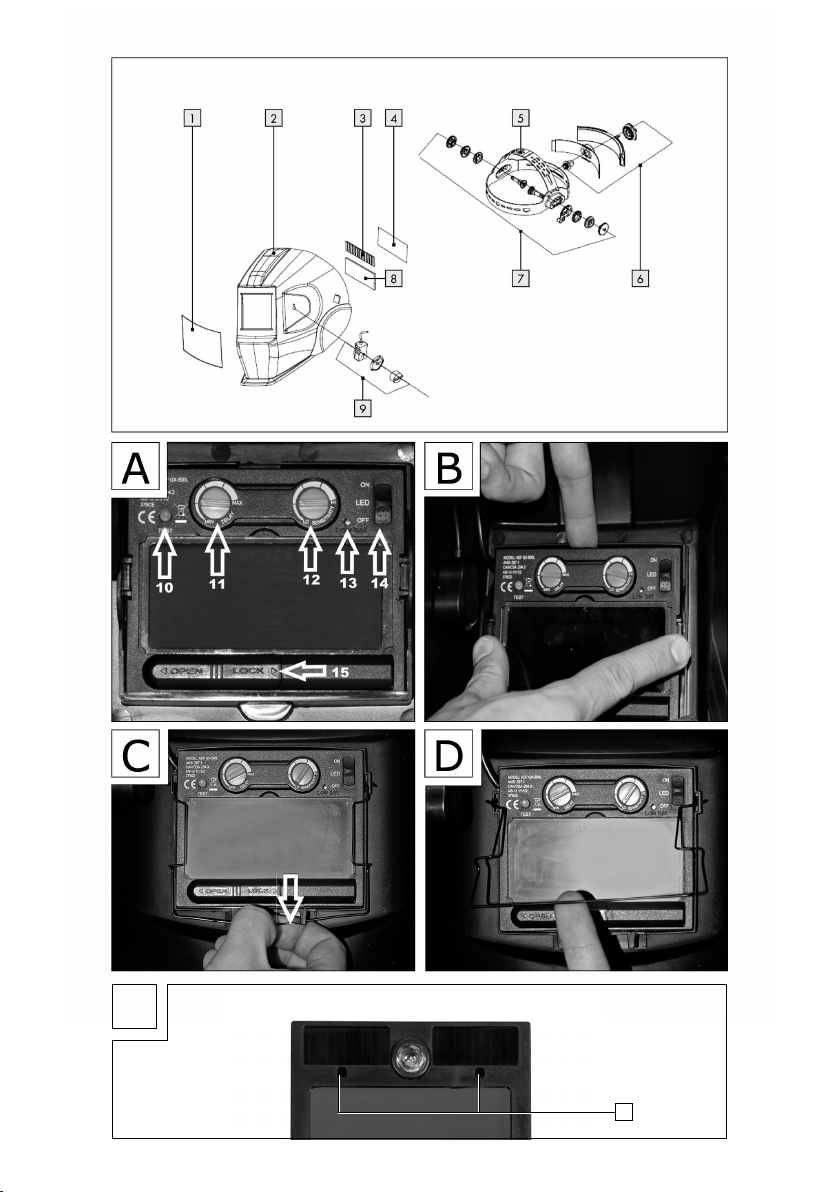
Parts Description
1
Viewing pane
2
Helmet casing
3
Solar cell
4
Rear pane
5
Headband
6
Rear control dial headband
7
Lateral control dial headband
8
UV filter
9
Darkening regulator
10
Test button
11
Delay setting
12
Sensitivity setting
13
Low battery display
Introduction/ Safety instructions
14
LED Lighting switch
15
Battery compartment
Bracket
16
17
arc sensor
Technical Data
Filter cartridge size: 110 x 90 x 10 mm
Field of vision: 9.2 x 4.2 cm
Bright state: DIN 4
Dark state: DIN 9–DIN 13
Switching times
Bright to dark: 0.23~0.72 ms
Dark to bright: 0.15~0.45 s
Switch on / off: Fully automatic
Energy supply: Solar cell
UV / IR protection: DIN 16
Operating temperature: -5 °C to +55 °C
Storage temperature: -20 °C to + 70 °C
Welding procedure: MMA, MIG, MAG,
TIG, plasma cutting
and plasma welding
Maximum service life: approx. 6 years
Scope of delivery
1 Auto-Darkening Welding Helmet
1 Set of instructions for use
Safety instructions
Please carefully read the
instructions for use and follow
the specified notices. Familiarise
yourself with the equipment, its
proper use and the safety notices
using these instructions for use.
All technical data about this
welding helmet is on the label,
please learn about this product‘s
technical facts.
The product is not suitable for
laser welding.
The product is only approved for
use within a temperature range
of between -5 °C to 55 °C.
The product is not fire-resistant.
Welding helmet and ADF filter
must not be exposed to any
heat or moisture.
Do not remove the ADF filter
from the welding helmet and
never open the housing of the
ADF filter without authorisation
from the manufacturer.
Prior to each use, check
whether the Welding/
Grinding setting was selected
correctly.
The cover lens must be installed
on the outer side of the ADF
filter. Otherwise, the ADF filter
can get damaged.
Do not carry out any
modifications/replacements on
the welding helmet and ADF
filter without consent.
If the filter does not darken
automatically whilst welding
please stop the operation
immediately and contact the
dealers without delay.
Do not use any alcohol, fuel or
diluting agents to clean the ADF
filter. Do not place the ADF filter
in water.
GB/IE/NI 7

Safety instructions
The response time of the ADF
liquid crystal slows down if the
ambient temperature is lower,
however this does not have
an impact on the protective
functions.
Please replace the housing of
the ADF filter immediately if it is
damaged or scratched because
this can impair visibility and the
protective performance.
Please replace the viewing
pane immediately if it is broken
or scratched. Do not use any
hard objects to replace the
viewing pane of the filter.
Regularly clean the surfaces
of the ADF filter, sensor and
solar cells.
The welding helmet cannot
withstand any damages that
are caused by a heavy blow,
explosion or abrasive liquids.
The useful life depends on many
different individual factors such
as usage, cleaning, storage
and maintenance. Regular
inspections and replacement
in the case of damage are
recommended.
The material used to manufac-
ture the product will age over
time. This can result in breakages on the welding helmet, for
example. As a result of these
damages, the welding helmet
is no longer able to provide
effective protection. In this case,
the user should replace the
welding helmet immediately.
This product cannot be used
for overhead welding work
and cutting operations. If this
product is use for overhead
welding or cutting, the molten
metal drops could burn through
the ADF filter and result in
injuries to the user.
If the filter is faulty, the user must
stop using the welding helmet
immediately. Slag splashes can
damage the surface of the filter
and cause injury to the user’s
skin or cause other serious
accidents.
This product is temperature
resistant and hardly inflammable
but in case of direct contact
with naked flames or in case of
access to an object with a high
temperature, the helmet may
begin to burn or melt. Please
store and only use the welding
helmet in the manner described
in order to reduce such risks.
The ADF filter is an electronic
product that is not waterproof.
Please ensure it is kept dry and
clean and not stored in a damp
environment.
8 GB/IE/NI

Safety instructions
Improper use could result in in-
jury to the user and cause other
types of diseases.
Please examine the filter prior
to each use. As soon as the
function and appearance seem
defective, they must no longer
be used.
The use of the welding helmet
is prohibited if the filter flickers
or if the level of darkening no
longer corresponds to the
standard value or there are
other abnormal working
conditions.
Please do not expose this
product to unnecessary solar
radiation.
Please only use original spare
parts. The use of non-original
parts can cause problems with
regard to the protective function, serviceability and degree
of product protection.
Exceeding the service life
(insufficient protection) – please
check the protective glasses
prior to each use for damage
and durability.
Using eye protection without
the filter effect against radiation
(damages the eyes) – prior to
each use check whether the
eye protection exhibits the
necessary scale number.
Using the product against
splashes (insufficient protection) –
always check whether the
correct protective effect is
present.
Using the product against large
dust particles (injury, accident).
The eye protection equipment
must only be used for the work
described in the operating
instructions.
Any deviation from
the instructions in the operating
instructions can result in injuries
or accidents.
Using damaged products
(insufficient protection) –
prior to each use check the
protective glasses for damage
and durability.
Improper use of the eye protec-
tion (injury, accident). The eye
protection device must only be
used for the work described
in the operating instructions.
Any deviation from the instructions can result in injuries or
accidents.
This device may be used by
children aged 16 years and up,
as well as by persons with
reduced physical, sensory or
mental capacities, or lacking
experience and / or knowledge,
so long as they are supervised
or instructed in the safe use
GB/IE/NI 9
Safety instructions
of the device and understand
the associated risks. Do not
allow children to play with the
product. Cleaning and user
main tenance should not be
performed by children without
supervision.
The welding helmet with auto-
matic darkening is not suitable
for laser and gas welding.
Never place the welding
helmet on hot surfaces.
Never open the welding
helmet. Never carry out repairs
on or modifications to the
welding helmet. These may
only be carried out by trained
experts.
Please ensure that you have set
the automatic darkening before
each welding procedure.
The safety visor should not be
opened. It protects the filter
from dirt and damage.
If the filter does not
automatically darken, then
immediately end the welding
procedure and contact the
manufacturer.
Only use the welding helmet
in temperatures between -5 °C
and +55 °C. The filter‘s reaction time will slow down if this
temperature has not been
reached or is exceeded.
Clean the filter, the surface of
the helmet and the solar cells
regularly.
Replace the protective visor if
scratches or damages appear.
The welding helmet does not
provide protection against
impact.
Frequent use, cleaning or
storage can mean that the
service life is less than 6 years.
Replace the welding helmet
immediately if the viewing
panel gets scratched or the
viewing panel is visibly
damaged in any other way.
ATTENTION! Materials
that come into contact with the
wearer‘s skin may cause allergic
reactions in people with sensitive
skin.
ATTENTION! Eye protection
can represent a hazard for the
wearer if it is worn over normal
corrective glasses due to the
impact from high-speed particles.
ATTENTION! If protection
against high-speed particles at
extreme temperatures is required,
the eye protection chosen must be
labelled with the letter T directly
after the letter for the impact
10 GB/IE/NI
Safety instructions / Initial use
intensity, i. e. FT, BT or AT. If the
letter for the impact intensity is not
followed by the letter T, the eye
protection may only be used
against high-speed particles at
room temperature.
Initial use
Note: Only use the welding helmet with the
rear pane mounted
Note: Keep the UV filter‘s sensors
and clear.
After opening the package, immediately
check to ensure that the package contents
are complete and undamaged. Contact your
dealer immediately if the package contents is
incomplete or has any defects. Do not use the
device if it is defective
Check that the welding helmet and the
protective screen are intact before each use.
If the protective screen has scratches, cracks
or irregularities, it must be replaced before
use, as serious injuries may occur otherwise.
Remove the protective film from the inside
and the outside of the visor.
Adjust the welding helmet with the help of
the headband
dial headband
welding helmet to the respective head
size and the lateral control dial headband
7
in order to lock the welding helmet.
When adjusting, ensure that your head is
placed as far into the helmet as possible
and that it sits as close as possible to your
face.
Set the appropriate darkening shade
before the welding procedure (see the
following table). The darkening shade
may be manually adjusted from 9 to 13
by twisting the darkening regulator
the outside of the helmet.
4
.
5
. Turn the rear control
6
in order to adjust the
8
clean
9
on
ATTENTION! The darkening regulator
9
has the setting position “grind“. If the
darkening regulator
9
is set to this position
the automatic darkening is deactivated.
Only use this setting when you do not wish
to use the welding helmet for welding. The
automatic darkening is then no longer active.
Check the light density before each use.
Test procedure: Bring the viewing panel
closer to an external light source with a
value of more than 40 W and examine
whether or not the screen darkens or
illuminates. To do so, turn the darkening
control
9
clockwise from "Grind" to
the next position. This sets the filter to
auto-darkening mode. If you turn the
darkening control
9
anticlockwise back
to "Grind", the filter's auto-darkening
feature is once again deactivated.
To replace the UV filter/solar cell, press
the locking lugs on both sides outwards
(Fig. B). Then lift the filter with your finger
to the upper edge.
the filter at the notch at the top of
Then use a finger to lift
the filter.
Then remove the darkening control
9
from the exterior of the welding helmet by
simply pulling it away, and unscrew the
nut that is located beneath it. Once you
have removed the nut from the thread,
you can completely remove the filter from
the welding helmet. (Variant: Black)
To replace the UV filter/solar cell, pull the
bracket
16
at the bottom edge of the filter
over the two protruding locking pins and
outwards (see figure C). Flip the bracket
upwards (see figure D). With your thumbs
centred underneath the filter, lift the filter
and pull it down to remove it.
Then remove the darkening control
9
from the exterior of the welding helmet by
simply pulling it away, and unscrew the nut
that is located beneath it. Once you have
removed the nut from the thread, you
can completely remove the filter from the
welding helmet.
You can use the test button
(Variant: With flames)
10
to check
whether the welding helmet's darkening
GB/IE/NI 11
Initial use
feature is working properly.
You can adjust the delay setting
11
to
configure whether or not the autodarkening feature should be switched
off immediately after stopping welding
work, depending on the type of welding
work. At the lowest setting, auto-darkening
is switched off immediately. Turn the
rotary switch clockwise towards the
highest setting to prolong the time the
auto-darkening feature remains active
after welding work. This feature is very
useful for handling afterglow.
You can use the sensitivity setting
12
to
adjust the light sensitivity of the sensor.
With low incident light, the control can be
adjusted to the highest setting to ensure
that the auto-darkening feature is activat
ed even for a weak light source. Even
with this additional feature, you can also
adjust the light sensitivity of the sensor to
suit your own personal requirements.
The lowlight sensor switches the LED lamp
on in dark environments and off in brightly
lit environments. This helps to illuminate
the object being welded in dark working
conditions. The LED lamp can be switched
on and off using the lamp control
14
. If
the battery charge level is too low, you
can replace the batteries. To do so, slide
the left side of the battery compartment
15
to the left (see figure A). A low battery
charge level is indicated with a red
warning light on the display 13.
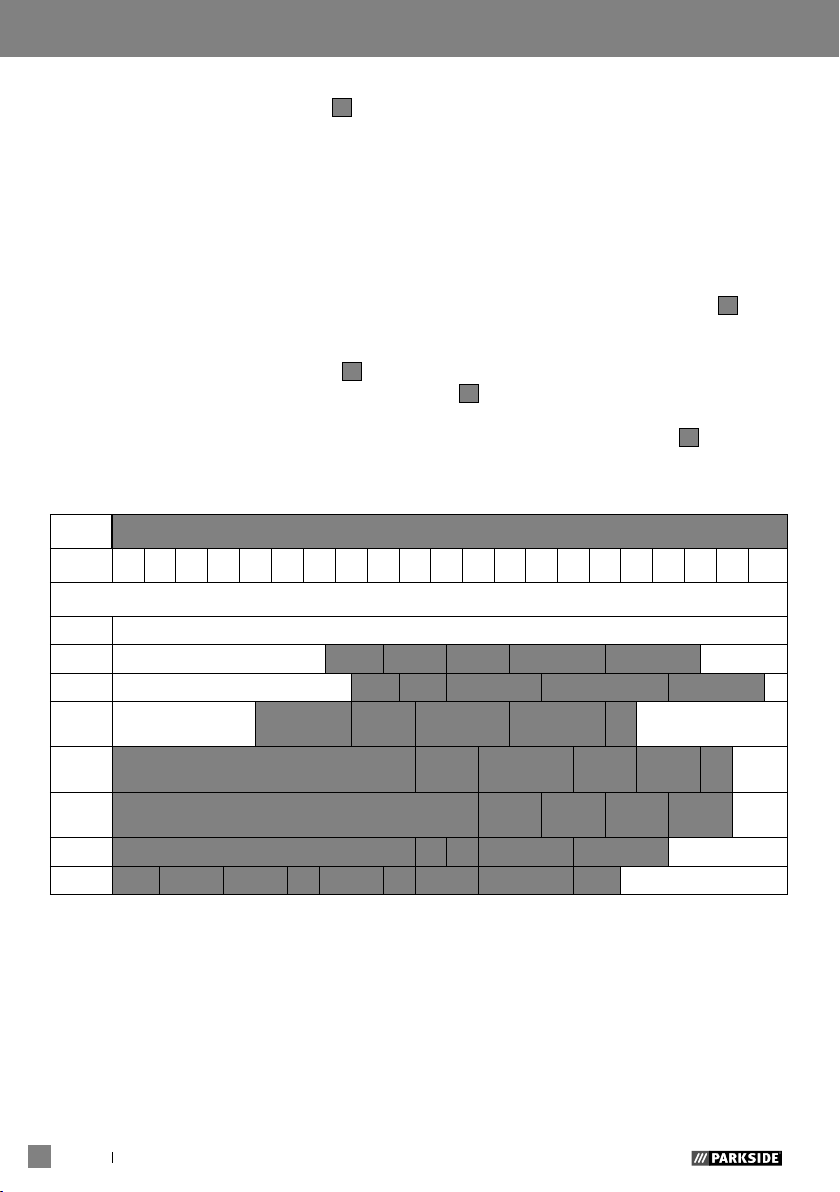
Table for setting the darkening shades
Arc current (ampere)
1,5 6 10 15 30 40 60 70 100 125 150 175 200 225 250 300 350 400 450 500 600
Grind
SMAW 8 9 10 11 12 13 14
MAG 8 9 10 11 12 13 14
TIG /
GTAW
MIG
(schwer)
MIG
(leicht)
PAC 9 10 11 12 13
PAW 4 5 6 7 8 9 10 11 12
8 9 10 11 12 13
Grinding function - automatic dimming not active
9 10 11 12 13 14
10 11 12 13 14
-
SMAW: welding with coated
electrodes
MIG (heavy): MIG welding heavy metals
MIG (light): MIG welding light metals
and alloys
TIG / GTAW: welding with inert gases
MAG: welding with metal active
gass
12 GB/IE/NI
PAC: plasma cutting
PAW: plasma welding
Grind:
Grinding function: Automatic
dimming not active. Only use the
setting if you do not use welding
helmet for welding.
Cleaning and ... / Storage / Environmental instructions ... / Troubleshooting
Cleaning and Maintenance
Environmental instructions
and disposal information
Do not use any harsh cleaning agents to
clean the helmet casing
Never bring the UV filter
with water.
Clean the product with a soft, dry
cloth, with a cloth dampened with pure
alcohol or with a cloth dampened with
disinfectant.
Storage
Keep the device in a dry place and out of
the reach of children.
2
.
8
into contact
Don‘t waste, recycle!
The device, accessories and packaging
should be recycled in an environmentally
friendly manner.
Do not throw the auto-darkening welding
helmet into household rubbish, fire or water.
If possible, non-operational equipment should
be recycled. Contact your local retailer for
information.
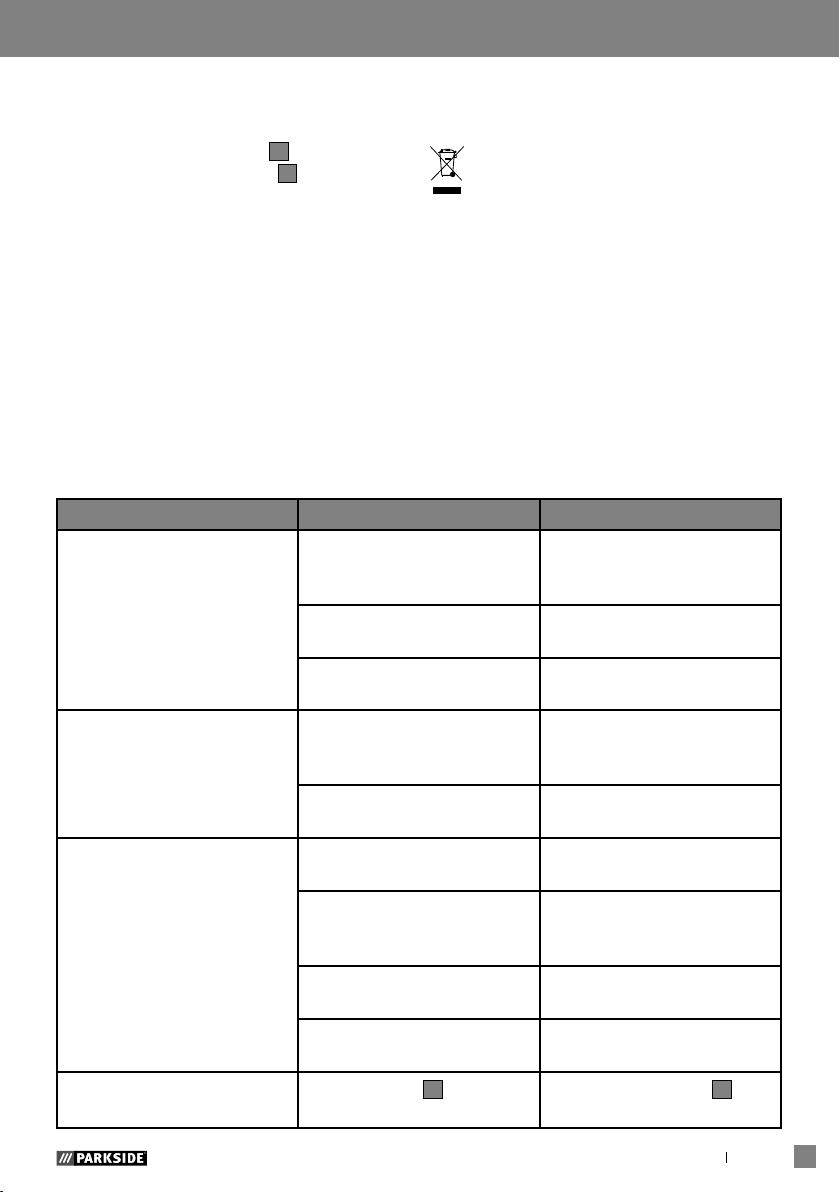
Troubleshooting
Error Cause Solution
The filter does not darken in
a normal way or flickers.
The reaction is slow. The ambient temperature is
The visibility is poor. The protector / the protective
The welding helmet slips.
The protector does not
darken in a normal way or
flickers.
The arc sensor is not clear. Clean the arc sensor's
The welding current is
too low.
too low / high.
The sensitivity is too low. Set the sensitivity to a
screen is dirty.
The protective film on the
protective screen was not
removed.
The ambient light is not
sufficient.
The wrong darkening shade
has been set.
The headband
put on incorrectly.
5
has been
Clean the protector or
replace it.
surface.
Set the sensitivity to the
maximum degree.
Only use the welding
helmet in temperatures
between -5 °C and +55 °C.
higher setting.
Clean the protector and the
protective screen.
Remove the protective film.
Apply more light to your
work surroundings.
Reset the darkening shade.
Put on the headband 5
again tighter.
GB/IE/NI 13

Warranty and service information
Warranty and service
information
Creative Marketing & Consulting
GmbH warranty
Dear customer, the warranty for this device
is 3 years from the date of purchase. In the
event of product defects, you have legal
rights against the retailer of this product.
Your statutory rights are not limited in any
way by our warranty detailed below.
Warranty terms
The warranty period begins on the date of
purchase. Please keep the original receipt in
a safe place. This document is required as
your proof of purchase. Should this device
show any fault in materials or manufacture
within 3 years from the date of purchase, it
will be repaired or replaced – at our choice
– by us free of charge. This warranty is
conditional on the defective device and the
receipt of purchase being presented within
the 3 year warranty period, and that there is
a brief written description of the nature of the
defect and of the date it arose.
If the defect is covered by our warranty,
you will receive the product which has been
repaired or a new product. A repair or
exchange of the device does not begin a
new warranty period.
Extent of warranty
This warranty becomes void if the device
has been damaged or improperly used or
maintained.
All instructions provided in the instructions
for use must be followed strictly to constitute
proper use of the product. Purposes and
practices which the operating instructions
warn of or advise against must be avoided
without fail.
This product is intended for private,
non-commercial use only. Any incorrect or
improper use of the device, use of force and
changes not performed by our authorized
service branch will void the warranty.
Processing of warranty
claims
Please follow the instructions below to ensure
your claim is processed quickly:
When inquiring about your product please
have your receipt and product number
(e.g. IAN) ready as your proof of purchase.
The product number can be found on the type
plate, an engraving, the cover page of your
instructions (bottom left) or the decal at the
back or bottom. In the event of malfunctions
or other defects, please first contact the ser
vice department below by phone or e-mail.
A product recorded as defective, along with
the proof of purchase (sales receipt) and
a description of the defect and when it
occurred, can then be returned free of charge
to you to the service address provided.
-
The appliance has been manufactured to
strict quality guidelines and meticulously
examined before delivery.
The warranty applies to defects in material or
manufacture. This warranty does not apply
to product parts subject to normal wear and
tear and which can therefore be considered
as wear items, or to damage to fragile parts,
e.g. switches, storage batteries or glass parts.
14 GB/IE/NI
Note:
On www.lidl-service.com you can
download this as well as many other
manuals, product videos and software.
Warranty and service information / Label meanings
Service
Only use original accessory parts:
Black variant
(PSHL 2 A2, Item no.:2169):
• Viewing pane (CMC 1B CE):
110.8 mm x 90 mm x 1.0 mm
• Rear lens (CMC 1F CE):
98.6 mm x 46 mm x 0.8 mm
Variant with flames
(PSHL 2 A2, Item no.:2170):
• Viewing pane (CMC 1B CE):
109.6 mm x 86 mm x 1.0 mm
• Rear lens (CMC 1F CE):
98.6 mm x 46 mm x 0.8 mm
How to contact us:
GB/IE/NI
Name: C.M.C. Creative Marketing
& Consulting GmbH
Website: www.cmc-creative.de
E-mail: service.gb@cmc-creative.de
Phone: 0-808-189-0652
Registered office: Germany
IAN 310884
Please note that the following address is not
a service address. Please first contact the
service point named above.
Address:
C.M.C. Creative Marketing & Consulting
GmbH
Katharina-Loth-Str. 15
DE-66386 St. Ingbert
DEUTSCHLAND
Ordering spare parts:
www.lidl.com/contact-us
Label meanings
Safety viewing panels approved
according to DIN EN 166
(CXXXXCMC, CXXXXCMC):
• Viewing pane: CMC 1 B CE
CMC = manufacturer code
1 = optical class
B = mechanical strength
(medium-energy impact at 120 m/s)
CE = CE symbol)
• Rear pane: CMC 1 F CE
CMC = manufacturer code
1 = optical class
F = mechanical strength
(low-energy impact at 45 m/s)
CE = CE symbol)
ADF approved according to
DIN EN 379:
1/1/1/2/379 CE (CXXXXCMC)
Legend:
4 = bright state
9–13 = dark state
CMC = manufacturer code
number 1 = optical class
number 2 = scattered light grade
number 3 = homo-geneity class
number 4 = angle dependency class
379 = test standard
CE = CE symbol
Welding helmet case:
CMC EN 175 F CE
(CXXXXCMC, CXXXXCMC)
Manufacturer identification: CMC
Number of the standard: EN 175
Area(s) of application (if required): S, F, B
Mass in grams (if required)
IP rating for welding helmet, order no.:
2169/2170: F
CE = CE symbol
4/9-13 CMC
:
GB/IE/NI 15
 Loading...