

Parkside PNTS 1400 G3 Translation Of Original Operation Manual
WET AND DRY VACUUM CLEANER
PNTS 1400 G3
IEGB NI CY
WET AND DRY VACUUM CLEANER
Translation of original operation manual
CH
NASS- UND TROCKENSAUGER
Originalbetriebsanleitung
IAN 304383
CYGR
ΗΛΕΚΤΡΙΚΗ ΣΚΟΥΠΑ ΥΓΡΩΝ / ΣΤΕΡΕΩΝ
Μετάφραση του πρωτότυπου εγχειριδίου χρήσης
IEGB NI CY

IEGB NI CY
Before reading, unfold the page containing the illustrations and familiarise yourself with all functions of the
device.
CYGR
Πριν από την ανάγνωση, ξεδιπλώστε τη σελίδα που περιλαμβάνει τις εικόνες και εξοικειωθείτε με όλες τις
λειτουργίες της συσκευής.
CH
Klappen Sie vor dem Lesen die Seite mit den Abbildungen aus und machen Sie sich anschließend mit allen
Funktionen des Gerätes vertraut.
6GB / IE / NI / CY Translation of original operation manual Page
DE / AT / CH Originalbetriebsanleitung
22GR / CY Μετάφραση του πρωτότυπου εγχειριδίου χρήσης
Σελίδα
Seite
40
A
4 5 6 7
38
17
3
89
2
1
10
36
37
35
11
12
34
33
13
32
31
14
30
16
15
29
18 19 20 21
23 2524 26 27 28
22

B
C
D
E
+
2
1
2
-
1
F
G
1
2
H
J
I
1
2
x5
K
M
L

IEGB NI CY
Contents
Introduction..................................6
Application.................................7
General description.....................7
Delivery Contents..................................7
Description of operation.........................7
Overview.............................................8
Technical data.............................8
Safety information......................9
Symbols used in the instructions...............9
General notes on safety ........................9
Assembly..................................... 12
Operation..................................13
Switching on/off...................................13
Vacuuming with a cartridge filter..............14
Cartridge filter self-cleaning..................14
Wet vacuuming.....................................15
Blowing function.........................15
Cleaning/Maintenance..................16
Storage.........................................16
Disposal/Environmental
protection...................................17
Trouble shooting...........................18
Guarantee....................................19
Repair Service...............................20
Service-Center...............................21
Importer.....................................21
Translation of the original EC
declaration of conformity............56
This appliance can be used by
children aged from 8 years and
above and persons with reduced
physical, sensory or mental
capabilities or lack of experience
and knowledge if they have been
given supervision or instruction
concerning use of the appliance
in a safe way and understand the
hazards involved.
Children shall not play with
the appliance. Cleaning and user
maintenance shall not be made by
children without supervision.
Introduction
Congratulations on the purchase of your
new device. With it, you have chosen a
high quality product.
During production, this equipment has
been checked for quality and subjected
to a final inspection. The functionality of
your equipment is therefore guaranteed. It
cannot be ruled out that residual quantities
of water or lubricants will remain on or in
the equipment/hose lines in isolated cases.
This is not a fault or defect and it represents
no cause for concern.
The operating instructions constitute part of
this product. They contain important
information on safety, use and disposal.
Before using the product, familiarise yourself
with all of the operating and safety
instructions. Use the product only as
described and for the applications specified.
Keep this manual safely and in the event
that the product is passed on, hand over
all documents to the third party.
6

IEGB NI CY
Application
The appliance is intended for domestic wet
and dry vacuuming in, for example, the
house, work room, car or garage.
This equipment is not suitable for commercial
use. Commercial use will invalidate the
guarantee.
Vacuuming of flammable or explosive
materials or those which endanger health
is prohibited. The manufacturer will not be
held responsible for injuries resulting from
use which does not comply with the
directions, or from incorrect use.
General description
The illustration of the principal
functioning parts can be found on
the front and back foldout pages.
Delivery Contents
Unpack the package and check that it is
complete.
The equipment is supplied with the motor
head on stainless steel container. To take off
the motor head and remove the accessories,
- Release the handle locking lever(4)
- remove the motor head(5) by motor head
handle(6).
- Motor head
- Stainless steel container
- upper machine handle
- 5 steering castor kits
- Telescopic tube
- Suction hose
- Air regulation handle
- Foam filter
- Cartridge filter with filter locking screw
(already mounted)
- Dry dust bag
- Switchable floor nozzle
- Crevice nozzle
- 8 cross-head screws
- Instruction Manual
Dispose of the packaging material in a
proper manner.
Description of operation
The equipment is fitted with a stable stainless
steel container to hold liquid and dust.
The steering castors allow for maximum
mobility of the device. For wet vacuuming,
the suction airflow is switched off by a float
when the stainless steel container is full. The
equipment also has a blow function.
To prevent electrostatic charging during
vacuuming, an anti-static chain is fitted on
the bottom of the equipment.
The following describes the function of the
operating parts.
7

IEGB NI CY
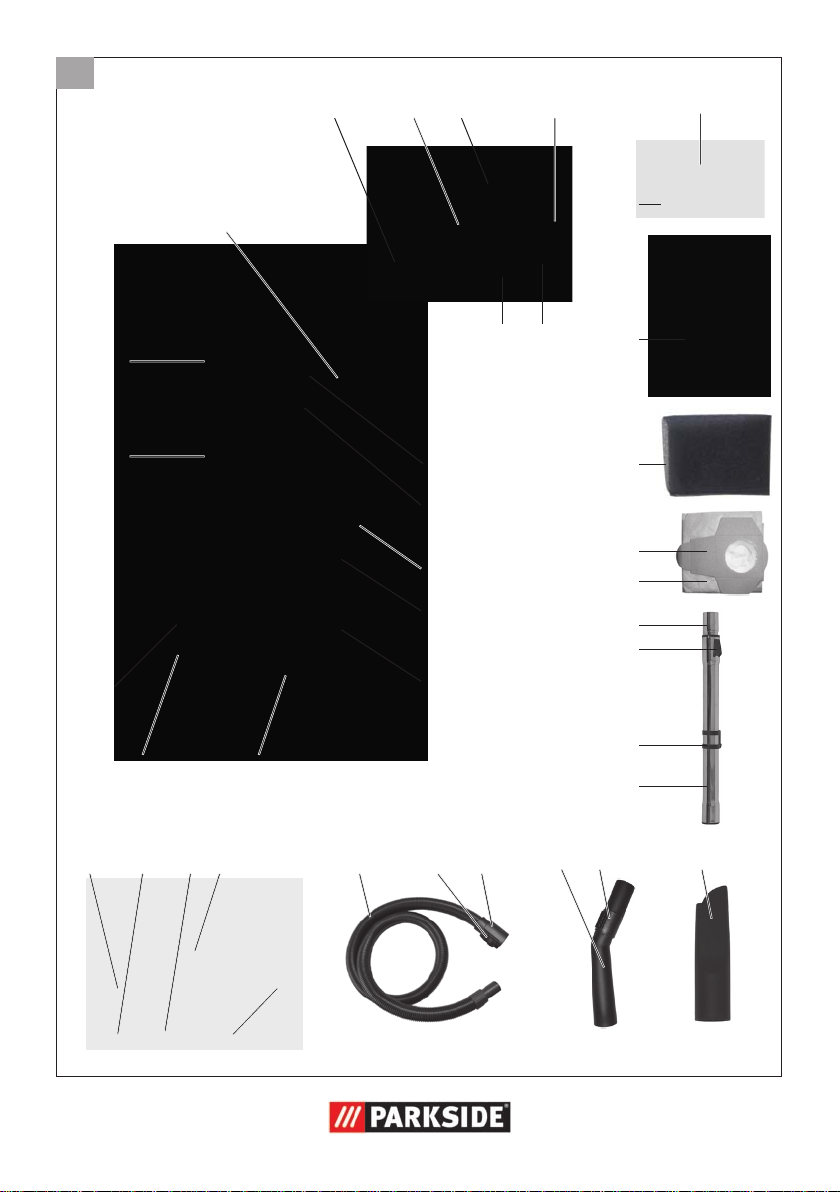
Overview (Fig.A)
1. Right machine handle
2. Upper machine handle
3. Left machine handle
4. Handle locking lever
5. Motor head
6. Motor head handle
7. Blowing connector
8. Power cord
9. Telescopic tube holder
10. Filter cleaning button
11. ON/OFF switch
12. Suction connector
13. Stainless steel container
14. Drain screw
15. Steering castor kit
16. Accessory mount
17. Anti-static chain
18. Switchable floor nozzle
19. Floor nozzle brush
20. Floor nozzle float
21. Switching lever
22. Floor nozzle squeegee
23. Suction hose
24. Hose connection release button
25. Hose connector
26. Air regulation handle
27. Air regulation cover
28. Crevice nozzle
29. Telescopic tube
30. Telescopic tube hook
31. Telescopic tube button
32. Telescopic inner tube
33. Dry dust bag
34. Dry dust bag collar
35 foam filter
36. Cartridge filter
37. Filter basket
38. Filter locking screw
Technical data
Rated voltage......... 220-240 V~, 50-60 Hz
Rated power input
(Power consumption).....................1400 W
Cable length........................................4 m
Safety class.......................................... II
Protection category.......................IP24
Suction force.................17 kPA, (170 mbar)
Stainless steel container capacity
brutto.................................... approx. 23 l
useful volume....................... approx. 15.5 l
Weight (incl. all accessories)..............7.7 kg
* Plug for indoor use only.
Technical and visual modifications may
be carried out due to further development
without prior notice. All dimensions,
information and statements provided in these
Operating Instructions are therefore subject
to amendment. Legal claims which are
based on the Operating Instructions can
therefore not be recognised.
*
8
IEGB NI CY
Safety information
Symbols used in the
instructions
Hazard symbols
with information
on prevention of
personal injury and
property damage.
Precaution symbol
with information on
prevention of harm /
damage.
Notice symbol with
information on how
to handle the device
properly.
basic safety measures for
the prevention of electric
shocks and the risk of
injury and fire:
To avoid accidents and
injuries:
• Never leave a machine
which is ready for operation
unattended at the workplace.
• People and animals must
not be vacuumed with the
machine.
• Do not aim the suction
hose and nozzle at yourself
or others during use,
particularly not at the eyes
and ears; there is a risk of
injury.
• Do not vacuum any hot,
General notes on safety
Caution! When using
electrical machines,
observe the following
incandescent, flammable,
explosive materials, or those
which endanger health. This
includes hot ashes, petrol,
solvents, acids or caustic
solutions. Personal injury
could occur.
9

IEGB NI CY
• Nozzles and suction tubes
must not reach head level
whilst in use. Personal injury
could occur.
To avoid accidents and
injuries from electric
shocks:
• Ensure that the mains cable
is not damaged by being
pulled over sharp edges, by
jamming, or by pulling on
the cable.
• Before each use, check the
power supply lead and the
extension cable for damage
and ageing. Do not use the
equipment if the cable is
damaged or worn. Danger
of electric shock hazard.
• If the power cable for this
equipment is damaged, it
must be replaced by the
manufacturer, a customer
service agent of the same or
a similarly qualified person
in order to prevent hazards.
• Switch the machine off
and pull the plug under the
following circumstances:
- when you are not using
the device,
- transporting it or leaving
it unattended;
- when you are checking
the device,
cleaning it or removing
blockages;
- when you are carrying out
cleaning or maintenance
work or replacing
accessories;
- when the power or
extension cable is
damaged; after contact
with foreign bodies or
in case of abnormal
vibration.
• Never use the mains lead
to pull the plug out of
the socket or to pull the
appliance. Protect the mains
lead from heat, oil and
sharp edges.
10

IEGB NI CY
• Make sure that the mains
voltage corresponds with
the information on the rating
plate.
• Only plug the appliance
into a socket which is
safeguarded by at least
16 A.
• The device must only be
connected to a mains socket
via a residual-current circuit
breaker (RCD) with a rated
leakage current of not more
than 30 mA.
The following states how
damage to the appliance
and possible injury to
accessories delivered and
recommended by our
Service Centre (see “Spare
parts/ Accessories”).
The use of parts by other
manufacturers immediately
renders the guarantee void.
• Only have repairs carried
out at our authorised
customer service points.
• Observe the instructions for
cleaning and maintenance
of the machine.
• Store the appliance in a dry
place and out of reach of
children.
people can be avoided:
• Ensure that the machine is
correctly assembled and the
filters are in the correct
position.
• Do not use without the filter.
This could damage the
machine.
• Only use Spare parts and
11

IEGB NI CY
Assembly
Pull out the mains plug.
Danger of electric shock.
The appliance is supplied with
the cartridge filter (36) fitted.
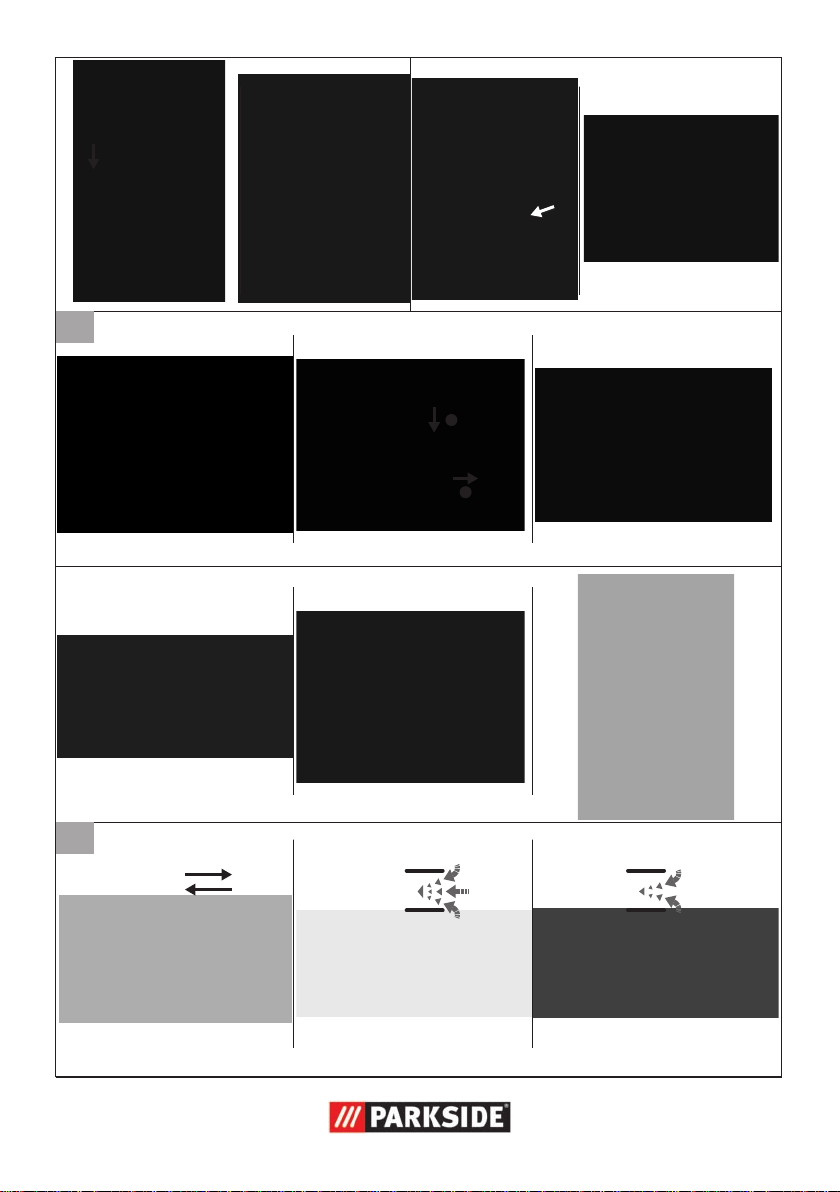
Steering castor kit assembling
(Fig. A, B)
1. Loosen the handle locking lever (4)
and remove the motor head (5), take
all accessories out of the stainless steel
container (13).
2. Turn the container (13) on the flat
surface, press in the steering castor
kit (15) in the openings at the base of
container (13)
3. Tighten the steering castor kit (15) with
screws supplied.
Assembling upper machine handle
(Fig. A, C)
1. Loosen the handle locking lever (4) and
turn the right / left machine handle (1, 3)
up, lock the handle locking lever (4).
2. Press in the wedge of right / left machine
handle (1, 3) in the slot of the upper
machine handle (2).
3. Tighten the connection with screws
supplied.
Motor head removing / assembling
(Fig. A, D)
1. Loosen the handle locking lever (4)
and turn the upper machine handle (2)
forward.
2. Remove the motor head (5) by motor
head handle (6).
3. Insert the motor head (5) into the stainless
steel container (13) with concave riding
on the suction connector (12).
4. Turn the upper machine handle (2) to the
right position and lock the handle locking
lever (4)
5. Turn the handle locking lever (4) clockwise
or anti-clockwise to adjust the tightness.
Cartridge filter / foam filter / dry
dust bag disassembling / assembling
(Fig. A, E)
1. Cartridge filter
• Remove the motor head (5) and place it
upside-down on a flat surface.
• Turn the filter locking screw (38) anticlockwise and pull out to remove.
• Pull out to remove the cartridge filter (36)
from the cartridge filter basket (37)
• Put and press in the new cartridge filter
(36) on the cartridge filter basket (37)
with position pins of the cartridge filter
(36) inside the holes of the cartridge filter
basket (37).
• Insert the filter locking screw (38)
and turn clockwise to tighten the new
cartridge filter (36).
2. Foam filter
• Remove the motor head (5) and place it
upside-down on a flat surface.
• Turn the filter locking screw (38)
anticlockwise to unlock the cartridge filter
(36). Remove both and store the parts
carefully for later use.
• Put the foam filter (35) on the cartridge
filter basket (37) till the end-point to
assemble.
• Pull the end of the foam filter (35) to
remove it from the cartridge filter basket
(37).
12
IEGB NI CY
To avoid tearing the foam filter:
- Use only dry foam filter
- Enlarge the foam filter slightly
and then roll it down
3. Dry dust bag
• Always work with the cartridge filter (36)
for dry dust only.
• Remove the motor head (5).
• Unfold the dry dust bag (33) and hold
the dry dust bag collar (34) to pull the
perforation over the internal connection
of suction connector (12)
• Make sure the sealing ring inside the dry
dust bag collar (34) to close the internal
cylinder connection of suction connector
(12) firmly.
• Hold the dry dust bag collar (34) to
remove the dry dust bag (33) when full.
Hose / tube connecting (Fig. A, F)
1. Hold the hose connector (24) and insert
it into the suction connector (12) to an
audible click for connecting, use the
thumb press the hose connection release
button and pull out the hose connector
(24) for disconnecting.
2. Insert the other end of suction hose (23)
into the air regulation handle (26), push
to the end to lock into place.
3. Insert the other end of the air regulation
handle (26) into the telescopic tube (29),
push to the end to lock into place.
4. Insert the other end of the telescopic
inner tube (32) into the switchable floor
nozzle (18), push to the end to lock into
place.
5. Both air regulation handle (26) and
telescopic tube (29) can be removed
from connection depending on the
application.
6. Crevice nozzle can be attached
depending on the application.
Operation
Fully unwind the suction hose (23)
before commencing work.
Switching on/off (Fig.A)
Connect the mains plug.
Do not vacuum without a filter!
How to assemble the filter is
described in the chapter" Cartridge
filter / foam filter / dry dust bag
disassembling / assembling"
Switching On:
On/Off Switch (11) In position “I“.
Switching Off:
On/Off Switch (11) In position “0”.
Dry vacuuming
Work with a cartridge filter only.
Check the filter for damage prior
to installation and replace as
necessary.
Vacuuming with a cartridge filter
(Fig. A,E, G, H, I)
1. Adjust the switchable floor nozzle (18)
between hard surface floor and carpeted
floor,
•
For vacuuming dry dirt off the hard
surface floor
13
IEGB NI CY
Push the switching lever (21) forward
by foot, the floor nozzle brush (19)
and the floor nozzle squeegee (22)
will extend to make perfect cleaning.
•
For vacuuming dry dirt off the
carpeted floor
Push the switching lever (21)
backward by foot, the floor nozzle
brush (19) and the floor nozzle
squeegee (22) will retract to make
deep vacuuming.
2. Use crevice nozzle (28) to clean edges,
joints, heaters and hard to reach
locations.
3. Hold the air regulation handle (26)
and push the nozzle back and forth to
vacuum / clean.
4. Push the Air regulation cover (27) back
(minimum force) and forth (maximum
force) to get the right suction force for
different surface.
5. Push the telescopic tube button (31) to
extend or retract the telescopic inner
tube (32) to have comfortable working
position.
6. Check the filling volume of stainless steel
container after certain usage, do not
allow the dust wrap the cartridge filter
(36).
7. Add a dry dust bag (33) if necessary.
(See” Cartridge filter / foam filter / dry
dust bag disassembling / assembling” )
The filling level of the dry dust bag
(33) can change on different dust.
Clogged dry dust bag (33) can
burst, replace the dry dust bag (33)
timely.
The dry dust bag (33) needs to
be replaced more frequently while
sucking in fine dust and sand etc.
Cartridge filter self-cleaning (Fig. A, J)
The cartridge filter self-cleaning
system is intended for vacuuming up
large volumes of fine dust without
dry dust bag (33).
Only operate the cartridge filter selfcleaning function without a dry dust
bag (33) inserted, otherwise the
filter bag can get damaged.
Do not operate the cartridge filter
self-cleaning function with wet
cartridge filter.
Do not operate the cartridge filter
self-cleaning function during wet
vacuuming.
1. Connect the suction hose (23) and switch
on the machine.
2. Insert the other end of suction hose (23)
into the accessory mount (16) of the
steering castor kit (15).
3. Push the filter cleaning button (10)
1-2 seconds x 5 while the machine is
switched on, wait 4 seconds between the
individual pushing.
4. Switch off the machine.
After operating the cartridge filter
self-cleaning function several times,
check the stainless steel container
(13) for its filling volume.
Do not allow the dust wrap the
cartridge filter.
14
IEGB NI CY
Wet vacuuming (Fig. A, E, G, H, I)
Never reach into the water
to be suction up. Danger of
electric shock.
Never push the filter cleaning
button (10). Danger of electric
shock.
Do not use the dry dust bag (33).
If liquid or wet dirt exits, switch off
the machine immediately.
1. Assemble the foam filter. (See” Cartridge
filter / foam filter / dry dust bag
disassembling / assembling” )
2. Adjust the switchable floor nozzle (18)
between hard surface floor and carpeted
floor,
•
For vacuuming wet dirt off the hard
surface floor
Push the switching lever (21) forward
by foot, the floor nozzle brush (19)
and the floor nozzle squeegee (22)
will extend to make perfect cleaning.
•
For vacuuming wet dirt off the
carpeted floor
Push the switching lever (21)
backward by foot, the floor nozzle
brush (19) and the floor nozzle
squeegee (22) will retract to make
deep vacuuming.
3. Use air regulation handle (26) to
vacuum the draining water, push the air
regulation cover (27) forward and insert
air regulation handle (26) into the water
pool to suction up the water.
4. Empty the stainless steel container (13)
immediately after wet vacuuming.
If the stainless steel container (13) is full,
a float will close the suction opening and
the machine will work at a higher speed.
Switch off the appliance immediately and
empty the container.
Blowing function (Fig. A, K)
Operation without the cartridge
filter is recommended.
Clean hard to reach location or
difficult vacuuming area, like leaves
from a gravel bed.
1. Connect the suction hose (23) to the
blowing connector (7) on the motor head
(5).
2. Connect the necessary accessories,
excepting for switchable floor nozzle
(18), to the suction hose (23).
3. Hold the accessory and switch on the
machine to blow.
15

IEGB NI CY
Cleaning/Maintenance
Pull out the mains plug.
Danger of electric shock.
Always check the appliance before
use for any obvious faults such as
a defective mains cable, and have
these repaired or replaced.
Cleaning the device (Fig. A, L) :
Never hose the device down with
water. Never use aggressive
cleaning agents or solvents. This
could damage the appliance.
• After use, empty the stainless steel
container (13):
- For liquid dirt, open the drain screw
(14) to allow the vacuumed liquid
to drain out. Use machine handle to
pour out the liquid residue inside the
container (13).
- remove the motor head (5)(see"Motor
head removing / assembling ")
- hold the upper machine handle (2)
with one hand and the other hand on
the bottom of stainless steel container
(13)
- pour out the liquid residue
- For dry dust, use machine handle
to pour out the dry dust inside the
container, same as above.
• Clean the waste tank with a damp cloth.
• Wash the foam filter (35) with lukewarm
water and soap, and allow to dry.
• Beat the dust out of the cartridge filter (36)
and clean it with a paint brush or hand
brush.
• Replace the dry dust bag (33) when full
(see" Cartridge filter / foam filter / dry
dust bag disassembling / assembling ")
Storage (Fig. A, M)
1. Unplug the power cord (8) and wind it
around the motor head handle (6).
2. Plug the telescopic tube (29) into the
telescopic tube holder (9) on the motor
head (5).
3. Wind the suction hose (23) around the
motor head handle (6).
4. Store the rest accessories on the
accessory mount (16) of the steering
castor kit (15).
5. Store the machine in a dry place and out
of reach of children.
16

Disposal/Environmental
protection
Be environmentally friendly. Return the
tool, accessories and packaging to a
recycling centre when you have finished with
them.
Machines must not be disposed of
with household refuse.
Take the machine to a recycling point. The
waste plastic and metal parts can be
separated, accurately graded and passed on
for recycling. Contact our Service Centre
for more details. Defective units returned to
us will be disposed of for free.
IEGB NI CY
17
 Loading...