

Page 1
ELEKTRO-SCHWEISSGERÄT PESG 120 A1
ELEKTRO-SCHWEISSGERÄT
Montage-, Bedienungs- und Sicherheitshinweise
Originalbetriebsanleitung
SALDA TRICE ELETTRICA
Istruzioni di montaggio, d’uso e di sicurezza
Traduzione delle istruzioni d’uso originali
POSTE DE SOUDURE
Instructions de montage, d‘utilisation et consignes de sécurité
Traduction des instructions d‘origine
ARC WELDER
Assembly, operating and safety instructions
Translation of the original instructions
IAN 103333
103333_Elektro-Schweissgeraet_cover_CH.indd 2 06.11.14 15:09
Page 2
Klappen Sie vor dem Lesen die Seite mit den Abbildungen aus und machen Sie sich anschließend mit allen
Funktionen des Gerätes vertraut.
Avant de lire le mode d‘emploi, ouvrez la page contenant les illustrations et familiarisez-vous ensuite avec
toutes les fonctions de l‘appareil.
Prima di leggere aprire la pagina con le immagini e prendere confidenza con le diverse funzioni
dell’apparecchio.
Before reading, unfold the page containing the illustrations and familiarise yourself with all functions of the
device.
DE / AT / CH Montage-, Bedienungs- und Sicherheitshinweise Seite 5
FR / CH Instructions de montage, d‘utilisation et consignes de sécurité Page 15
IT / CH Istruzioni di montaggio, d’uso e di sicurezza Pagina 25
GB Assembly, operating and safety instructions Page 35
103333_Elektro-Schweissgeraet_cover_CH.indd 3 06.11.14 15:09
Page 3
1
8
A
7
6
5
2
3
4
9
8 9
10
B
9
8
10
103333_Elektro-Schweissgeraet_cover_CH.indd 4 06.11.14 15:09
Page 4
103333_Elektro-Schweissgeraet_cover_CH.indd 5 06.11.14 15:09
Page 5
Inhaltsverzeichnis
Einleitung
Bestimmungsgemäße Verwendung .................................................................................................... Seite 6
Teilebeschreibung ............................................................................................................................... Seite 6
Symbole / Technische Daten ..............................................................................................................Seite 6
Lieferumfang ........................................................................................................................................ Seite 7
Sicherheitshinweise ................................................................................................................ Seite 7
Gefahrenquellen beim Lichtbogenschweißen ................................................................................... Seite 9
Schweißschirm-spezifische Sicherheitshinweise ................................................................................Seite 10
Enge und feuchte Räume .................................................................................................................... Seite 10
Schutzkleidung .................................................................................................................................... Seite 10
Schutz gegen Strahlen und Verbrennungen .....................................................................................Seite 11
Schweißschirm montieren ................................................................................................. Seite 11
Schweißen vorbereiten ....................................................................................................... Seite 11
Schweißen ...................................................................................................................................... Seite 11
Überhitzungsschutz ................................................................................................................ Seite 12
Wartung ........................................................................................................................................... Seite 12
Schaltplan ....................................................................................................................................... Seite 13
Hinweise zu Garantie und Serviceabwicklung ..............................................Seite 13
Garantiebedingungen
Garantieumfang .................................................................................................................................. Seite 13
Abwicklung im Garantiefall ................................................................................................................ Seite 13
Umwelthinweise und Entsorgungsangaben ..................................................... Seite 14
EG-Konformitätserklärung ............................................................................................... Seite 14
5 DE/AT/CH
103333_Elektro-Schweissgeraet_content_CH.indd 5 06.11.14 15:09
Page 6
Einleitung
Elektro-Schweißgerät PESG 120 A1
Einleitung
Herzlichen Glückwunsch! Sie haben sich
für ein hochwertiges Gerät aus unserem
Haus entschieden. Machen Sie sich vor
der ersten Inbetriebnahme mit dem Produkt vertraut.
Lesen Sie hierzu aufmerksam die nachfolgende Bedienungsanleitung und die Sicherheitshinweise. Die
Inbetriebnahme dieses Werkzeuges darf nur durch
unterwiesene Personen erfolgen.
NICHT IN DIE HÄNDE VON KINDERN
KOMMEN LASSEN!
Bestimmungsgemäße
Verwendung
Dieses Elektro-Schweißgerät eignet sich zum Lichtbogenhandschweißen unter Verwendung der entsprechenden Mantelelektroden. Eine unsachgemäße
Handhabung des Produkts kann gefährlich für
Personen, Tiere und Sachwerte sein. Der Schweißschirm darf nur mit Schweißerschutzgläsern sowie
Vorsatzgläsern, die entsprechend gekennzeichnet
sind, benutzt und grundsätzlich nur zum Schweißen
verwendet werden. Der Schweißschirm ist nicht für
das Laserschweißen geeignet! Benutzen Sie das
Produkt nur wie beschrieben und für die angegebenen Einsatzbereiche. Bewahren Sie diese Anleitung
gut auf. Händigen Sie alle Unterlagen bei Weitergabe des Produkts an Dritte ebenfalls mit aus. Jegliche
Anwendung, die von der bestimmungsgemäßen
Verwendung abweicht, ist untersagt und potentiell
gefährlich. Schäden durch Nichtbeachtung oder
Fehlanwendung werden nicht von der Garantie
abgedeckt und fallen nicht in den Haftungsbereich
des Herstellers. Das Gerät wurde für den Hausgebrauch konzipiert und darf nicht kommerziell oder
industriell genutzt werden.
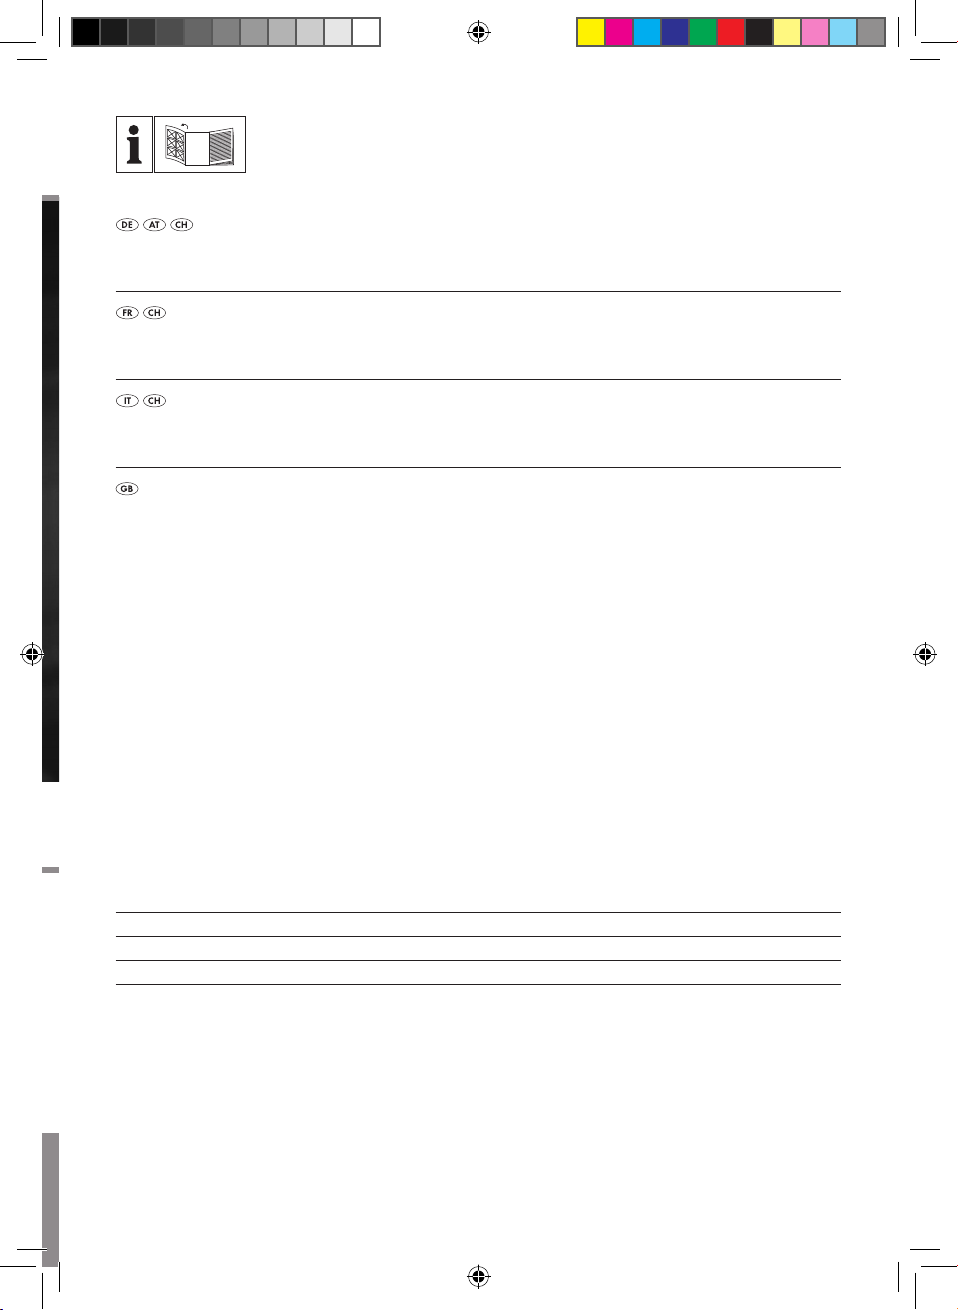
Teilebeschreibung
Elektro-Schweißgerät
1
Handgriff
2
EIN- / AUS-Schalter (ON / OFF)
3
Handrad
4
Masseklemme
5
Kombidrahtbürste mit Schlackehammer
6
Elektrodenhalter
7
Kontrolllampe für Überhitzung
Schweißschirm
8
Schweißschirm
9
Griff
10
Schutzglas
Symbole / Technische Daten
EN 60974-6 Europäische Norm für Schweiß-
geräte für Lichtbogenhandschweißen mit begrenzter
Einschaltdauer
50 Hz Netzfrequenz
U1 Netzspannung
I1 max höchster Netzstrom
Bemessungswert
U
Nennleerlaufspannung
0
I
Schweißstrom
2
φmm Elektrodendurchmesser
I
Effektivwert des größten
1eff
Netzstromes (A)
t
(S) Durchschnittliche Lastzeit (s)
w
t
(S) Durchschnittliche Rücksetzzeit (s)
r
IP21S Schutzart
H lsoIationsklasse
6 DE/AT/CH
103333_Elektro-Schweissgeraet_content_CH.indd 6 06.11.14 15:09
Page 7
Einleitung / Sicherheitshinweise
Netzeingang; Anzahl der Phasen
sowie
1 ~ 50 Hz Wechselstromsymbol und
Bemessungswert der Frequenz
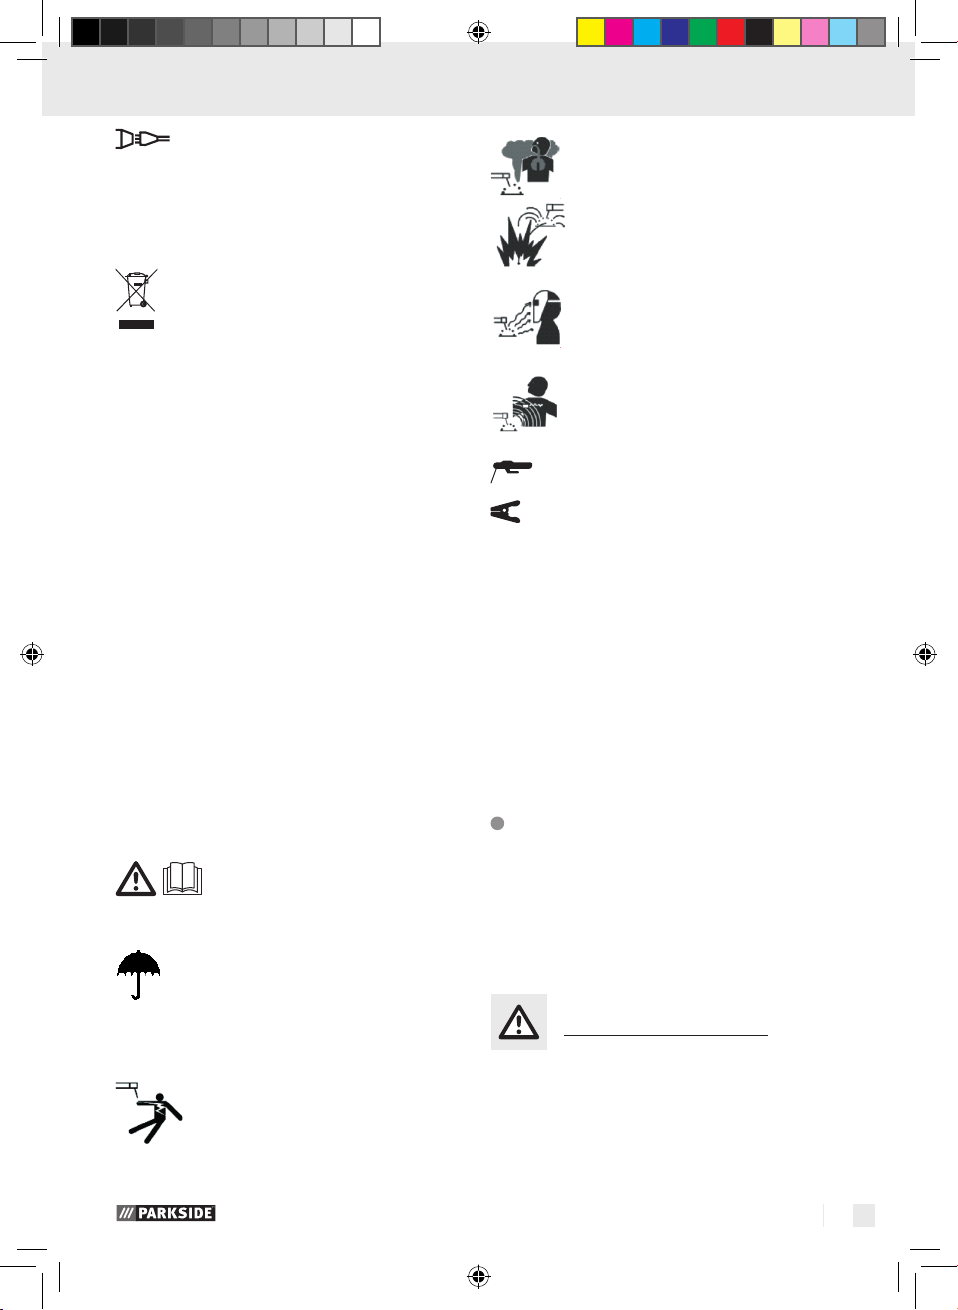
Entsorgen Sie Elektrogeräte nicht
über den Hausmüll. Gemäß
europäischer Richtlinie
2002 / 96 / EG über Elektro- und
Elektronik-Altgeräte und Umsetzung in nationales Recht müssen
verbrauchte Elektrogeräte getrennt
gesammelt und einer umweltgerechten Wiederverwertung
zugeführt werden. RecyclingAlternative zur Rücksendeaufforderung:
Der Eigentümer des Elektrogerätes
ist alternativ anstelle Rücksendung
zur Mitwirkung bei der sachgerechten Verwertung im Falle der
Eigentumsaufgabe verpflichtet.
Das Altgerät kann hierfür auch
einer Rücknahmestelle überlassen
werden, die eine Beseitigung im
Sinne des nationalen Kreislaufwirtschafts- und Abfallgesetzes
durchführt. Nicht betroffen sind
den Altgeräten beigefügte
Zubehörteile und Hilfsmittel ohne
Elektrobestandteile.
Einatmen von Schweißrauchen
kann Ihre Gesundheit gefährden.
Schweißfunken können eine
Explosion oder einen Brand
verursachen.
Lichtbogenstrahlen können die
Augen schädigen und die Haut
verletzen.
Elektromagnetische Felder können
die Funktion von Herzschrittmachern stören.
Anschluss Elektrodenhalter
Anschluss Masseklemme
Netzanschluss: 230 V ~50 Hz
Max. Schweißstrom
und die entsprechende
genormte Arbeitsspannung: 30 A / 19,2 V-80 A /
21,2 V
U
: 48 V
0
I2max: 80 A
U1: 230 V
I1max: 18 A
I
: 7,1 A
1eff
Lieferumfang
Vor Gebrauch der Maschine die
Bedienungsanleitung sorgfältig
lesen und beachten.
1 Schweißgerät
1 Schweißschirm
2 Schweißleitungen
1 Kombidrahtbürste mit Schlackehammer
Lagern order verwenden Sie das
1 Montage- und Bedienungsanleitung
Gerät nicht in nasser Umgebung
oder im Regen. Das Gerät ist nur
in geschlossenen Räumen zu
Sicherheitshinweise
verwenden.
Bitte lesen Sie die Gebrauchsanweisung sorgfältig
Elektrischer Schlag von der
Schweißelektrode kann tödlich
sein.
durch und beachten Sie die beschriebenen Hinweise.
Machen Sie sich anhand dieser Gebrauchsanweisung
mit dem Gerät, dessen richtigem Gebrauch sowie
den Sicherheitshinweisen vertraut. Auf dem Typen-
schild stehen alle techinschen Daten von diesem
7 DE/AT/CH
103333_Elektro-Schweissgeraet_content_CH.indd 7 06.11.14 15:09
Page 8
Sicherheitshinweise
Schweißgerät, bitte informieren Sie sich über die
technischen Gegebenheiten dieses Gerätes.
Lassen Sie Reparaturen oder / und Wartungsar-
beiten nur von qualifizierten Elektro-Fachkräften
durchführen.
Verwenden Sie nur die im Lieferumfang enthal-
tenen Schweißleitungen (PESG 120 A1
H01N2-D1x10 mm²).
Das Gerät sollte während des Betriebes nicht
direkt an der Wand stehen, nicht abgedeckt
oder zwischen andere Geräte eingeklemmt
werden, damit immer genügend Luft durch die
Lüftungsschlitze aufgenommen werden kann.
Vergewissern Sie sich, dass das Gerät richtig an
die Netzspannung angeschlossen ist. Vermeiden
Sie jede Zugbeanspruchung der Netzleitung.
Ziehen Sie den Netzstecker aus der Steckdose,
bevor Sie das Gerät an einem anderen Ort
aufstellen.
Wenn das Gerät nicht im Betrieb ist, schalten
Sie es immer mittels EIN- / AUS-Schalter aus.
Legen Sie den Elektrodenhalter auf einer isolierten Unterlage ab und nehmen Sie erst nach
15 Minuten Abkühlung die Elektroden aus dem
Halter.
Achten Sie auf den Zustand der Schweißkabel,
des Elektrodenhalters sowie der Masseklemmen.
Abnutzungen an der Isolierung und an den
stromführenden Teilen können Gefahren hervorrufen und die Qualität der Schweißarbeit
mindern.
Lichtbogenschweißen erzeugt Funken, geschmol-
zene Metallteile und Rauch. Beachten Sie daher:
Alle brennbaren Substanzen und / oder Materialien vom Arbeitsplatz und dessen unmittelbarer
Umgebung entfernen.
Sorgen Sie für eine Belüftung des Arbeitsplatzes.
Schweißen Sie nicht auf Behältern, Gefäßen
oder Rohren, die brennbare Flüssigkeiten oder
Gase enthalten oder enthalten haben.
Vermeiden Sie jeden direkten
Kontakt mit dem Schweißstromkreis. Die Leer-
laufspannung zwischen Elektrodenzange und
Masseklemme kann gefährlich sein, es besteht
die Gefahr eines elektrischen Schlages.
Lagern oder verwenden Sie das Gerät nicht in
feuchter oder in nasser Umgebung oder im
Regen. Hier gilt die Schutzbestimmung IP21S.
Schützen Sie die Augen mit dafür bestimmten
Schutzgläsern (DIN Grad 9- 10), die Sie auf dem
mitgelieferten Schweißschirm befestigen. Verwenden Sie Handschuhe und trockene Schutzkleidung, die frei von Öl und Fett ist, um die
Haut vor der ultravioletten Strahlung des Lichtbogens zu schützen.
Verwenden Sie die Schweiß-
stromquelle nicht zum Auftrauen von Rohren.
Beachten Sie:
Die Strahlung des Lichtbogens kann die Augen
schädigen und Verbrennungen auf der Haut
hervorrufen.
Das Lichtbogenschweißen erzeugt Funken und
Tropfen von geschmolzenem Metall, das geschweißte Werkstück beginnt zu glühen und
bleibt relativ lange sehr heiß. Berühren Sie das
Werkstück deshalb nicht mit bloßen Händen.
Beim Lichtbogenschweißen werden gesundheits-
schädliche Dämpfe freigesetzt. Achten Sie
darauf, diese möglichst nicht einzuatmen.
Schützen Sie sich gegen die gefährlichen Effekte
des Lichtbogens und halten Sie nicht an der
Arbeit beteiligte Personen mindestens 2 m vom
Lichtbogen entfernt.
Achtung!
Während des Betriebes des Schweißgerätes
kann es, abhängig von den Netzbedingungen
am Anschlusspunkt, zu Störungen in der
Spannungsversorgung für andere Verbraucher kommen.
Wenden Sie sich im Zweifelsfall an Ihr Energieversorgungsunternehmen.
Während des Betriebes des Schweißgerätes
kann es zur Funktionsstörungen anderer Geräte
kommen, z. B. Hörgerät, Herzschrittmachern
usw.
8 DE/AT/CH
103333_Elektro-Schweissgeraet_content_CH.indd 8 06.11.14 15:09
Page 9

Sicherheitshinweise
Gefahrenquellen beim
Lichtbogenschweißen
Beim Lichtbogenschweißen ergibt sich eine Reihe
von Gefahrenquellen. Es ist daher für den Schweißer
besonders wichtig, nachfolgende Regeln zu beachten,
um sich und andere nicht zu gefährden und Schäden
für Mensch und Gerät zu vermeiden.
Lassen Sie Arbeiten auf der Netzspannungsseite,
z. B. an Kabeln, Steckern, Steckdosen usw., nur
von einer Elektrofachkraft nach nationalen und
örtlichen Vorschriften ausführen.
Trennen Sie bei Unfällen das Schweißgerät
sofort von der Netzspannung.
Wenn elektrische Berührungsspannungen auf-
treten, schalten Sie das Gerät sofort aus und
lassen es von einer Elektrofachkraft überprüfen.
Auf der Schweißstromseite immer auf gute
elektrische Kontakte achten.
Beim Schweißen immer an beiden Händen
isolierende Handschuhe tragen. Diese schützen
vor elektrischen Schlägen (Leerlaufspannung des
Schweißstromkreises), vor schädlichen Strahlungen (Wärme und UV-Strahlung) sowie vor
glühendem Metall und Schlagspritzern.
Festes, isolierendes Schuhwerk tragen. Die
Schuhe sollen auch bei Nässe isolieren. Halbschule sind nicht geeignet, da herabfallende,
glühende Metalltropfen Verbrennungen verursachen können.
Geeignete Schutzkleidung tragen, keine syn-
thetischen Kleidungsstücke.
Nicht mit ungeschützten Augen in den Lichtbogen
sehen, nur Schweißer-Schweißschirm mit
schriftsmäßigem Schutzglas nach DIN verwenden
. Der Lichtbogen gibt außer Licht- und
Wärmestrahlen, die eine Blendung bzw. Verbrennung verursachen, auch UV-Strahlen ab. Diese
unsichtbare ultraviolette Strahlung verursacht
bei ungenügendem Schutz eine erst einige
Stunden später bemerkbare, sehr schmerzhafte
Bindehautentzündung. Außerdem ruft UV-Strahlung auf ungeschützte Körperstellen Verbrennung
wie bei einem Sonnenbrand hervor.
Auch in der Nähe des Lichtbogens befindlichen
Personen oder Helfer müssen auf die Gefahren
hingewiesen und mit den nötigen Schutzmitteln
vor-
ausgerüstet werden. Wenn erforderlich, Schutzwände aufstellen.
Beim Schweißen, besonders in kleinen Räumen,
ist für ausreichende Frischluftzufuhr zu sorgen,
da Rauch und schädliche Gase entstehen.
An Behältern, in denen Gase, Treibstoffe,
Mineralöle oder dgl. gelagert werden, dürfen auch wenn sie schon vor langer Zeit entleert
wurden - keine Schweißarbeiten vorgenommen
werden, da durch Rückstände Explosionsgefahr
besteht.
In feuer- und explosionsgefährdeten Räumen
gelten besondere Vorschriften.
Schweißverbindungen, die großen Beanspru-
chungen ausgesetzt sind und bestimmte Sicherheitsforderungen erfüllen müssen, dürfen nur
von besonders ausgebildeten und geprüften
Schweißern ausgeführt werden. Beispiele sind
Druckkessel, Laufschienen, Anhängerkuppelungen
usw.
ACHTUNG! Schließen Sie die Masseklemme
stets so nahe wie möglich an die Schweißstelle
an, so dass der Schweißstrom den kürzestmöglichen Weg von der Elektrode zur Masseklemme
nehmen kann. Verbinden Sie die Masseklemme
niemals mit dem Gehäuse des Schweißgerätes!
Schließen Sie die Masseklemme niemals an
geerdeten Teilen an, die weit vom Werkstück
entfernt liegen, z. B. einem Wasserrohr in einer
anderen Ecke des Raumes. Andernfalls könnte
es dazu kommen, dass das Schutzleitersystem
des Raumes, in dem Sie schweißen, beschädigt
wird.
Verwenden Sie das Schweißgerät nicht im Regen.
Verwenden Sie das Schweißgerät nicht in
feuchter Umgebung.
Stellen Sie das Schweißgerät nur auf einen
ebenen Platz.
Der Ausgang ist bei einer Umgebungstempera-
tuer von 20 °C bemessen. Die Schweißzeit darf
bei höheren Temperaturen reduziert werden.
Gefährdung durch elektrischen Schlag:
Elektrischer Schlag von einer Schweißelektrode kann tödlich sein. Nicht bei
Regen oder Schnee schweißen. Trockene
Isolierhandschuhe tragen. Die Elektrode nicht mit
bloßen Händen anfassen. Keine nassen oder
9 DE/AT/CH
103333_Elektro-Schweissgeraet_content_CH.indd 9 06.11.14 15:09
Page 10

Sicherheitshinweise / Schweißschirm montieren / Schweißen vorbereiten / Schweißen
Sicherheitshinweise
beschädigten Handschuhe tragen. Schützen Sie sich
vor einem elektrischen Schlag durch Isolierungen
gegen das Werkstück. Das Gehäuse der Einrichtung
nicht öffnen.
Gefährdung durch Schweißrauch:
Das Einatmen von Schweißrauch kann die Gesundheit gefährden. Den Kopf nicht in den Rauch halten.
Einrichtungen in offenen Bereichen verwenden. Entlüftung zum Entfernen des Rauches verwenden.
Gefährdung durch Schweißfunken:
Schweißfunken können eine Explosion oder einen
Brand verursachen. Brennbare Stoffe vom Schweißen
fernhalten. Nicht neben brennbaren Stoffen schweißen.
Schweißfunken können Brände verursachen. Einen
Feuerlöscher in der Nähe bereithalten und einen
Beobachter, der ihn sofort benutzen kann. Nicht
auf Trommeln oder irgendwelchen geschlossenen
Behältern schweißen.
Gefährdung durch Lichtbogenstrahlen:
Lichtbogenstrahlen können die Augen schädigen
und die Haut verletzen. Hut und Sicherheitsbrille
tragen. Gehörschutz und hoch geschlossenen
Hemdkragen tragen. Schweißerschutzhelme und
einwandfreie Filtergrößen tragen. Vollständigen
Körperschutz tragen.
Gefährdung durch elektromagnetische
Felder:
Schweißstrom erzeugt elektromagnetische Felder.
Nicht zusammen mit medizinischen Implantaten
verwenden. Niemals die Schweißleitungen um den
Körper wickeln. Schweißleitungen zusammenführen.
Schweißschirm-spezifische
Sicherheitshinweise
Ersetzen Sie beschädigte oder stark verschmutzte
bzw. verspritzte Komponenten unverzüglich.
Das Gerät darf nur von Personen betrieben
werden, die das 16. Lebensjahr vollendet haben.
Machen Sie sich mit den Sicherheitsvorschriften
für das Schweißen vertraut. Beachten Sie hierzu
auch die Sicherheitshinweise ihres Schweißgerätes.
Setzen Sie den Schweißschirm immer beim
Schweißen auf. Bei Nichtverwendung können
Sie sich schwere Netzhautverletzungen zuziehen.
Tragen Sie während des Schweißens immer
Schutzkleidung.
Verwenden Sie den Schweißschirm nie ohne
Schutzscheibe, da sonst die optische Einheit
beschädigt werden kann.
Tauschen Sie für gute Durchsicht und ermüdungs-
freies Arbeiten die Schutzscheibe rechtzeitig.
Enge und feuchte Räume
Bei Arbeiten in engen, feuchten oder heißen
Räumen sind isolierende Unterlagen und Zwischenlagen zu verwenden, ferner Stulpenhandschuhe aus Leder oder anderen isolierenden
Stoffen zu tragen, um den Körper gegen Erde
zu isolieren.
Bei Verwendung von Schweißgeräten unter
elektrisch gefährlichen Bedingungen, z. B. in
engen Räumen aus elektrisch leitfähigen Wandungen (Kessel, Rohre usw.), in nassen Räumen
(Durchfeuchten der Arbeitskleidung), darf die
Ausgangsspannung des Schweißgerätes im
Leerlauf nicht höher als 48 Volt (Effektivwert)
sein. Dieses Schweißgerät darf aufgrund der
Ausgangspannung in diesen Fällen verwendet
werden.
Überzeugen Sie sich mit Hilfe einer hellen Licht-
Schutzkleidung
quelle (z. B. Feuerzeug) immer vor Beginn der
Schweißarbeiten von der ordnungsgemäßen
Funktion des Schweißschirmes.
Durch Schweißspritzer kann die Schutzscheibe
beschädigt werden. Tauschen Sie beschädigte
oder zerkratzte Schutzscheiben sofort aus.
10 DE/AT/CH
103333_Elektro-Schweissgeraet_content_CH.indd 10 06.11.14 15:09
Während der Arbeit muss der Schweißer an
seinem ganzen Körper durch entsprechende
Kleidung und Gesichtsschutz gegen Strahlung
und Verbrennungen geschützt sein. Folgende
Schritte sollen beachtet werden:
Page 11

Sicherheitshinweise / Schweißschirm montieren / Schweißen vorbereiten / Schweißen
- Vor der Schweißarbeit die Schutzkleidung
anziehen.
- Handschuhe anziehen.
- Fenster oder Ventilator öffnen, um die Luftzufuhr zu garantieren.
- Schutzbrille und Mundschutz tragen.
An beiden Händen sind Stulpenhandschuhe
aus einem geeigneten Stoff (Leder) zu tragen.
Sie müssen sich in einem einwandfreien Zustand
befinden.
Zum Schutz der Kleidung gegen Funkenflug
und Verbrennungen sind geeignete Schürzen
zu tragen. Wenn die Art der Arbeiten, z. B. des
Überkopfschweißen, es erfordert, ist ein Schutzanzug und, wenn nötig, auch ein Kopfschutz
zu tragen.
Schutz gegen Strahlen und
Verbrennungen
An der Arbeitsstelle durch einen Aushang „Vor-
sicht! Nicht in die Flammen sehen!“ auf die
Gefährdung der Augen hinweisen. Die Arbeitsplätze sind möglichst so abzuschirmen, dass die
in der Nähe befindlichen Personen geschützt
sind. Unbefugte sind von den Schweißarbeiten
fernzuhalten.
In unmittelbarer Nähe ortsfester Arbeitsstellen
sollen die Wände weder hellfarbig noch glänzend sein. Fenster sind mindestens bis Kopfhöhe
gegen Durchlassen oder Zurückwerfen von
Strahlung zu sichern, z. B. durch geeigneten
Anstrich.
Schweißschirm montieren
Schweißen vorbereiten
Hinweis: Wenn Sie den Strom einstellen, über-
prüfen Sie, ob sich die Stromanzeige bewegt und
die Leitspindel nicht verklemmt ist.
Hinweis: Überprüfen Sie vor jedem Gebrauch, ob
die Befestigungsschrauben des Elektrodenhalters
und der Masseklemme
4
befestigt sind. Ziehen Sie
sie ggf. mit einem Kreuzschlitzschraubendreher fest.
Hinweis: Lässt die Spannkraft des Elektrodenhalters
6
und der Masseklemme 4 nach, tauschen Sie
diese sofort aus.
Schließen Sie die Stromkabel an.
Stellen Sie den EIN- / AUS-Schalter 2 auf
Position „ON“. Die Stromanzeige leuchtet, der
Arbeitsvorgang beginnt.
Um den Arbeitsvorgang zu beenden, stellen
Sie den EIN- / AUS-Schalter
2
auf Position
„OFF“.
Hinweis: Wenn die gelbe Kontrolllampe
leuchtet, deutet dies auf eine Überhitzung hin.
Der Stromkreis wird automatisch unterbrochen.
Der Arbeitsvorgang wird beendet.
Befestigen Sie die Masseklemme 4 direkt am
Werkstück oder an der Unterlage, auf der das
Werkstück abgestellt ist.
Hinweis: Sorgen Sie dafür, dass ein Direkt-
kontakt mit dem Werkstück besteht. Meiden Sie
daher lackierte Oberflächen und / oder Isolierstoffe.
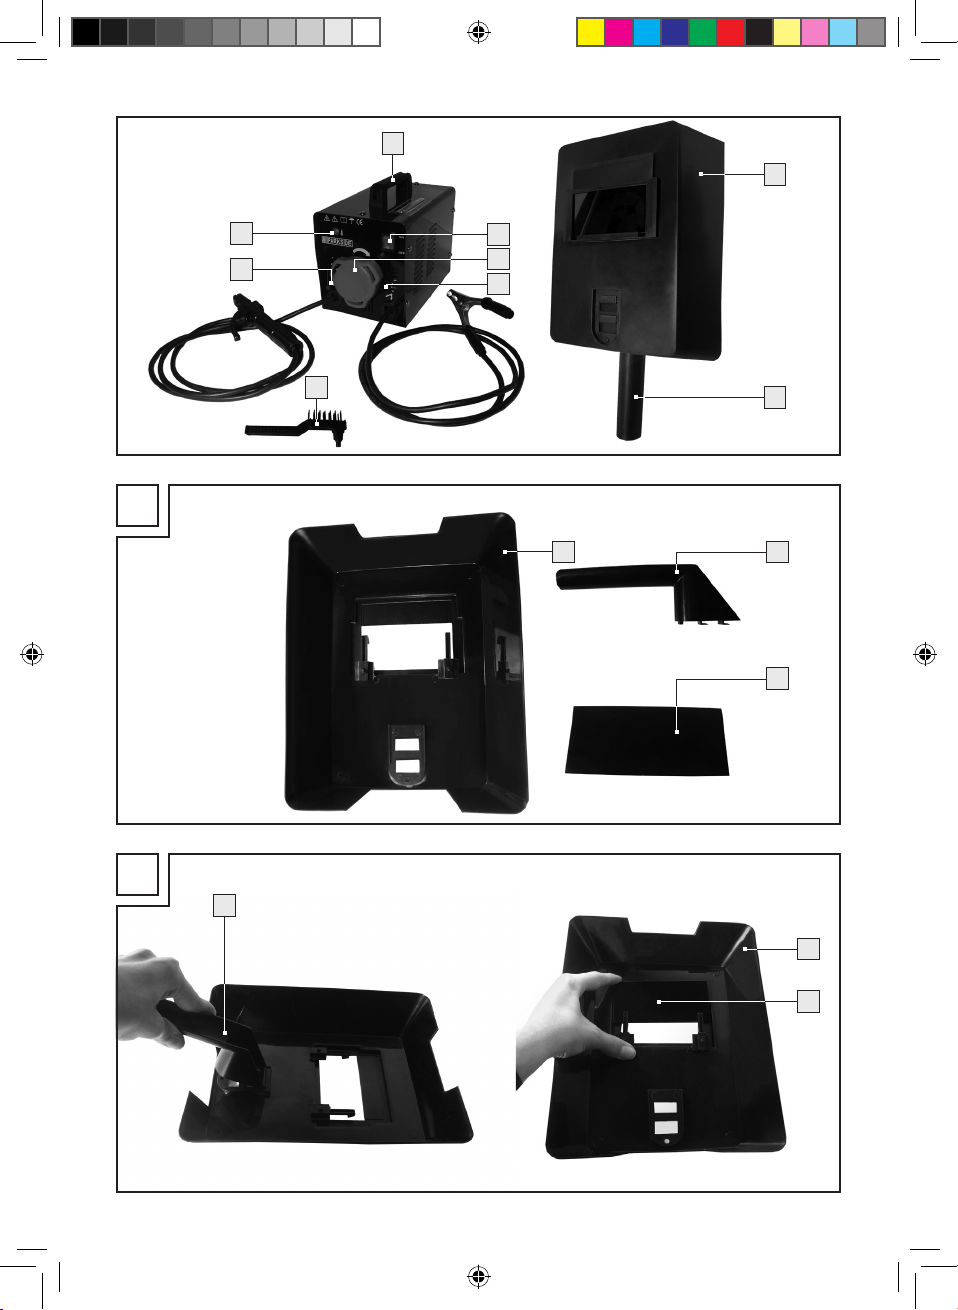
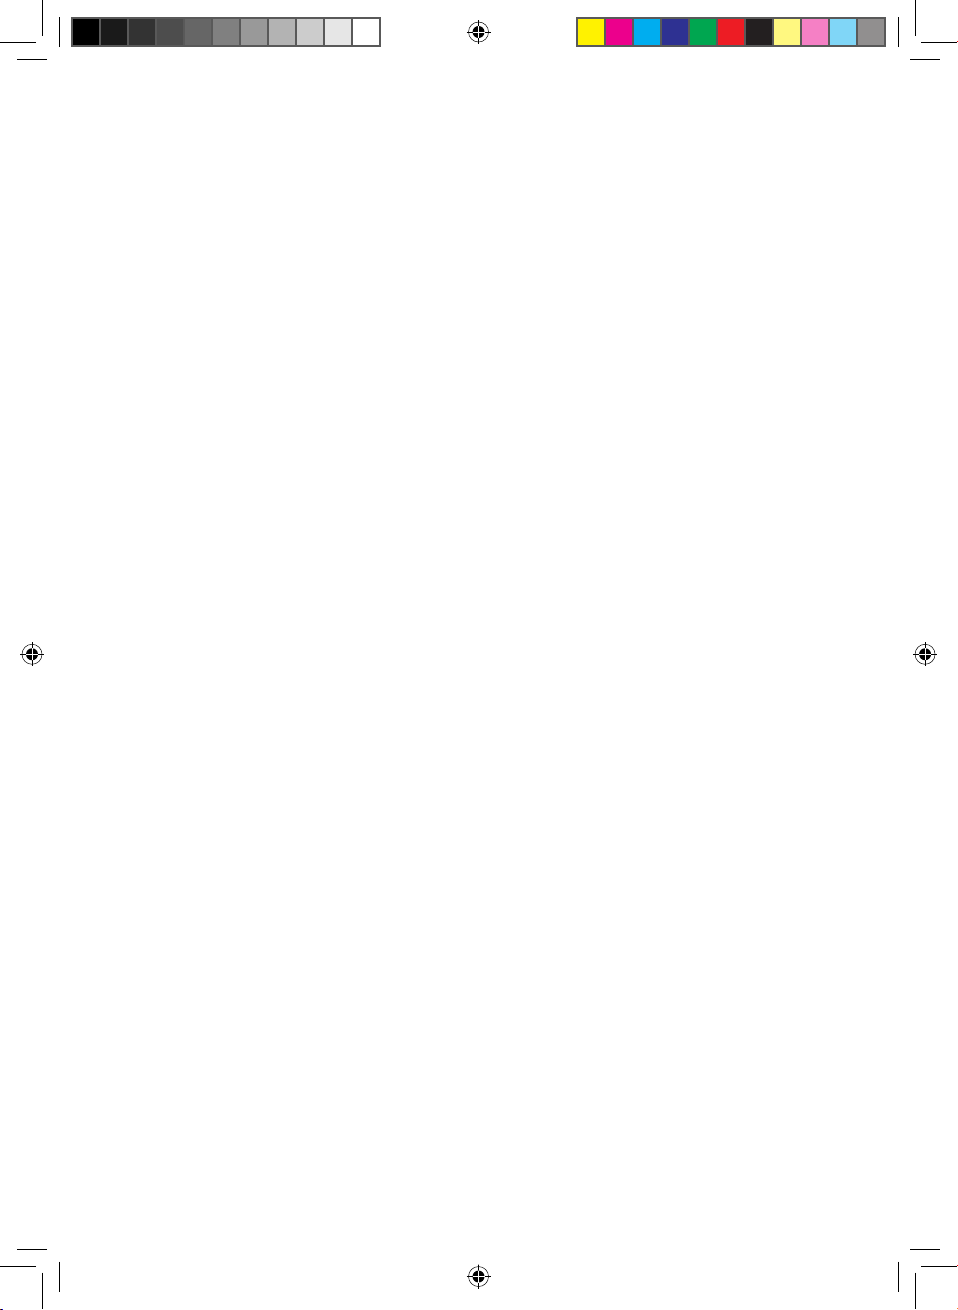
Hinweis: Der Schweißschirm
8
ist während
des Schweißens immer zu verwenden. Es schützt
die Augen vor der vom Lichtbogen ausgehenden
Lichtstrahlung und erlaubt dennoch deutliche
Sicht auf das Werkstück.
6
7
Montieren Sie den Griff 9 am Schweißschirm
8
, wie in Abb. B dargestellt.
Montieren Sie das Schutzglas 10 am Schweiß-
8
schirm
, wie in Abb. B dargestellt.
Schweißen
Nachdem Sie alle elektrische Anschlüsse für die
Stromversorgung sowie für den Schweißstromkreis
vorgenommen haben, gehen Sie folgendermaßen
vor:
Führen Sie das nicht ummantelte Ende der
Elektrode in den Elektrodenhalter
verbinden Sie die Masseklemme
103333_Elektro-Schweissgeraet_content_CH.indd 11 06.11.14 15:09
6
ein und
4
mit dem
11 DE/AT/CH
Page 12
Schweißen / Überhitzungsschutz / Wartung
Werkstück. Achten Sie darauf, dass ein guter
elektrischer Kontakt besteht.
Schalten Sie das Gerät ein, indem Sie den
EIN- / AUS-Schalter
2
auf Position „ON“
stellen.
Stellen Sie den Schweißstrom mit dem Hand-
3
rad
je nach verwendeter Elektrode ein.
Halten Sie den Schweißschirm 8 vor das
Gesicht und führen Sie die Elektrodenspitze so
über das Werkstück, als ob Sie ein Streichholz
anzünden wollen. Dies ist die beste Methode,
um den Lichtbogen zu zünden.
Testen Sie auf einem Probestück, ob Sie die
richtige Elektrode und Stromstärke gewählt
haben.
ACHTUNG!
Tupfen Sie nicht mit der Elektrode das Werkstück. Es
könnte beschädigt und die Zündung den Lichtbogen
erschwert werden. Sobald sich der Lichtbogen
entzündet hat, versuchen Sie eine Distanz zum
Werkstück einzuhalten, die dem verwendeten Elektrodendurchmesser entspricht. Der Abstand sollte
möglichst konstant bleiben, während Sie schweißen.
Die Elektrodenneigung in Arbeitsrichtung sollte
20 - 30 Grad betragen.
ACHTUNG!
Benutzen Sie immer eine Zange, um verbrauchte
Elektroden zu entfernen oder heiße Werkstücke zu
bewegen. Beachten Sie bitte, dass der Elektrodenhalter nach dem Schweißen immer auf eine isolierenden Unterlage abgelegt werden muss.
Die Schlacke darf erst nach dem Abkühlen von der
Naht entfernt werden. Wird eine Schweißung an
einer unterbrochenen Schweißnaht fortgesetzt, ist
erst die Schlacke an der Ansatzstelle zu entfernen.
ACHTUNG!
Die Schweißarbeit erzeugt Hitze. Deshalb muss
das Schweißgerät nach der Benutzung mindestens
eine halbe Stunde lang im Leerlauf betrieben werden.
Alternativ lassen Sie das Gerät eine Stunde lang
abkühlen. Das Gerät darf erst gepackt und gelagert
werden, wenn sich die Gerättemperatur normalisiert
hat.
Schalten Sie das Gerät aus, indem Sie den
EIN- / AUS-Schalter
2
auf Position „OFF“ stellen.
Überhitzungsschutz
Das Schweißgerät ist mit einem Überhitzungsschutz
ausgestattet. Sollte der Überhitzungsschutz ansprechen, so leuchtet die Kontrolllampe
7
auf. Lassen
Sie das Schweißgerät einige Zeit abkühlen.
PESG 120 A1 (mit AC 230 V 50 Hz Netzstecker):
Die Absicherungen der Zuleitungen zu den Netzsteckdosen muss den Vorschriften entsprechen
(VDE 0100). Schutzkontaktsteckdosen dürfen mit
max. 16 A (Typen und technische Daten: NDM1-63,
AC 230 / 400 V C16. IEC 60898. Träge auslösen.
Hersteller: Nader) abgesichert werden (Sicherungen
oder Leitungsschutzschalter). Höhere Absicherungen
können Leitungsbrand bzw. Gebäudebrandschäden
zur Folge haben.
Achtung: Das Gerät muss an eine Netzquelle
mit o. g. Sicherung angeschlossen werden. Wenn
Elektrodenhalter und Masseklamme kurzgeschlossen
ist, kann die Sicherung in 16-20 Sekunden auslösen.
Einstufung nach EMV Richtlinie: Klasse A gemäß
IEC 60974-10
Warnung: Als Klasse A eingestufte Geräte sind
für den Einsatz im industriellen Bereich vorgesehen.
Beim Einsatz in anderen Bereichen kann die elektromagnetische Vertäglichkeit unter Umständen nicht
gewährleistet werden, bzw. es kann zu Störfällen
kommen.
Wartung
Entfernen Sie Staub und Verschmutzungen
regelmäßig von dem Gerät.
Reinigen Sie das Gerät mit einer feinen Bürste
oder einem trockenen Tuch.
12 DE/AT/CH
103333_Elektro-Schweissgeraet_content_CH.indd 12 06.11.14 15:09
Page 13
… / Hinweise zu Garantie und Serviceabwicklung / Garantiebedingungen
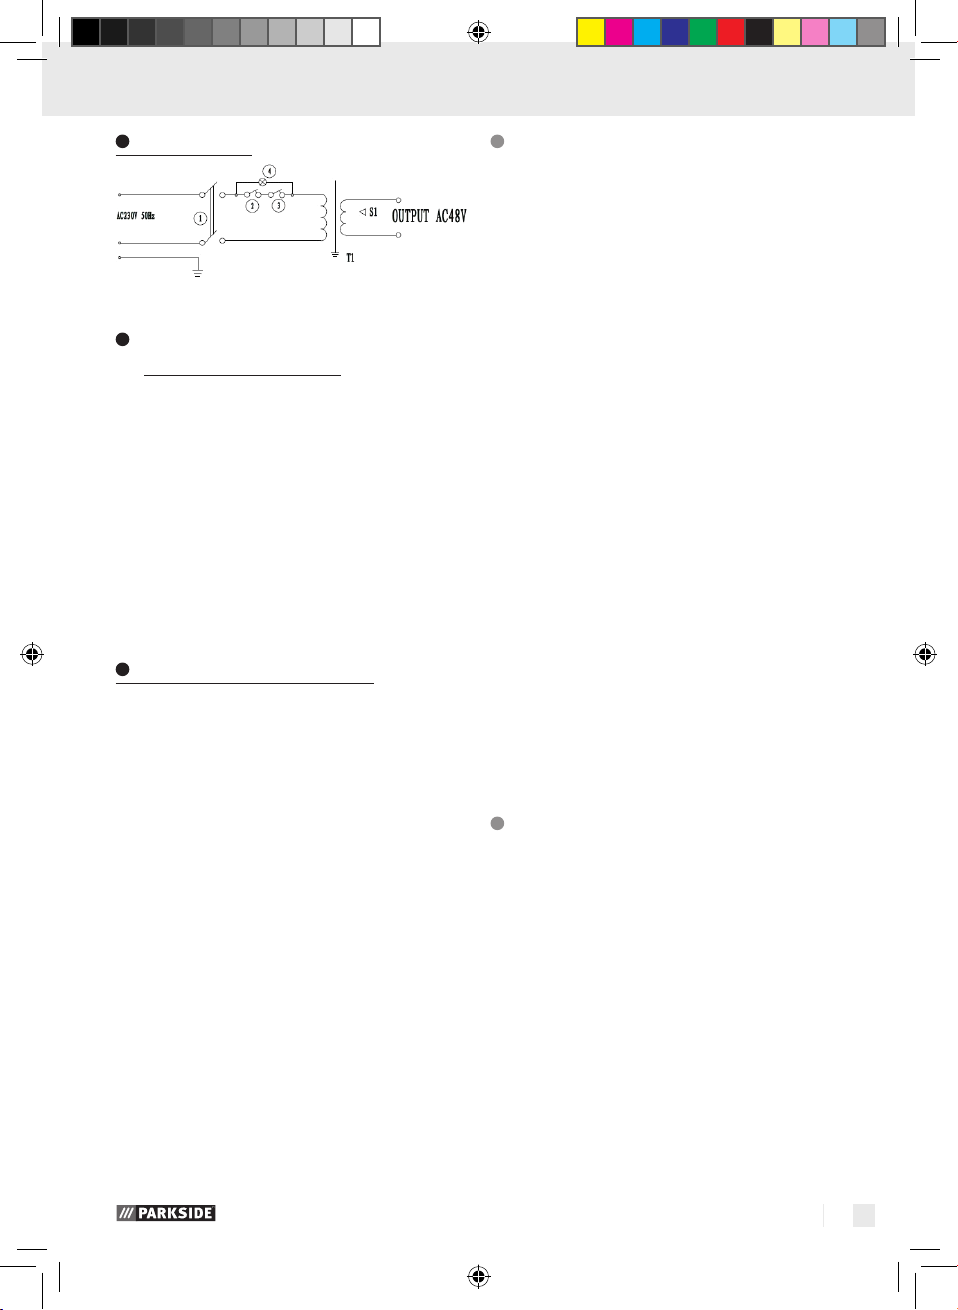
Schaltplan
Hinweise zu Garantie und
Serviceabwicklung
Garantie der Creative Marketing
Consulting GmbH
Sehr geehrte Kundin, sehr geehrter Kunde, Sie
erhalten auf dieses Gerät 3 Jahre Garantie ab
Kaufdatum. Im Falle von Mängeln dieses Produkts
stehen Ihnen gegen den Verkäufer des Produkts
gesetzliche Rechte zu. Diese gesetzlichen Rechte
werden durch unsere im Folgenden dargestellte
Garantie nicht eingeschränkt.
Garantiebedingungen
Die Garantiefrist beginnt mit dem Kaufdatum. Bitte
bewahren Sie den Original Kassenbon gut auf.
Diese Unterlage wird als Nachweis für den Kauf
benötigt.
Garantieumfang
Das Gerät wurde nach strengen Qualitätsrichtlinien
sorgfältig produziert und vor Anlieferung gewissenhaft geprüft.
Die Garantieleistung gilt für Material- oder Fabrikationsfehler. Diese Garantie erstreckt sich nicht auf
Produktteile, die normaler Abnutzung ausgesetzt
sind und daher als Verschleißteile angesehen werden
können oder für Beschädigungen an zerbrechlichen
Teilen, z.B. Schalter, Akkus oder solchen, die aus
Glas gefertigt sind.
Diese Garantie verfällt, wenn das Produkt beschädigt,
nicht sachgemäß benutzt oder gewartet wurde. Für
eine sachgemäße Benutzung des Produkts sind alle
in der Bedienungsanleitung aufgeführten Anweisungen genau einzuhalten. Verwendungszwecke und
Handlungen, von denen in der Bedienungsanleitung
abgeraten oder vor denen gewarnt wird, sind unbedingt zu vermeiden.
Das Produkt ist lediglich für den privaten und nicht
für den gewerblichen Gebrauch bestimmt. Bei missbräuchlicher und unsachgemäßer Behandlung,
Gewaltanwendung und bei Eingriffen, die nicht von
unserer autorisierten Service-Niederlassung vorgenommen wurden, erlischt die Garantie.
Tritt innerhalb von drei Jahren ab dem Kaufdatum
dieses Produkts ein Material- oder Fabrikationsfehler
auf, wird das Produkt von uns – nach unserer Wahl
– für Sie kostenlos repariert oder ersetzt. Diese
Garantieleistung setzt voraus, dass innerhalb der
Drei-Jahres-Frist das defekte Gerät und der Kaufbeleg
(Kassenbon) vorgelegt und schriftlich kurz beschrieben
wird, worin der Mangel besteht und wann er aufgetreten ist.
Wenn der Defekt von unserer Garantie gedeckt ist,
erhalten Sie das reparierte oder ein neues Produkt
zurück. Mit Reparatur oder Austausch des Produkts
beginnt kein neuer Garantiezeitraum.
103333_Elektro-Schweissgeraet_content_CH.indd 13 06.11.14 15:09
Abwicklung im Garantiefall
Um eine schnelle Bearbeitung Ihres Anliegens zu
gewährleisten, folgen Sie bitte den folgenden
Hinweisen:
Bitte halten Sie für alle Anfragen den Kassenbon
und die Artikelnummer (z.B. IAN) als Nachweis für
den Kauf bereit.
Die Artikelnummer entnehmen Sie bitte dem Typenschild, einer Gravur, dem Titelblatt Ihrer Anleitung
(unten links) oder dem Aufkleber auf der Rückoder Unterseite.
Sollten Funktionsfehler oder sonstige Mängel auftreten, kontaktieren Sie zunächst die nachfolgend
benannte Serviceabteilung telefonisch oder per
E-Mail.
13 DE/AT/CH
Page 14
Garantiebedingungen / Umwelthinweise und ... / EG-Konformitätserklärung
138180
Ein als defekt erfasstes Produkt können Sie dann
unter Beifügung des Kaufbelegs (Kassenbon) und
der Angabe, worin der Mangel besteht und wann
er aufgetreten ist, für Sie portofrei an die Ihnen mitgeteilte Service Anschrift übersenden.
Hinweis:
Auf www.lidl-service.com können Sie
diese und viele weitere Handbücher, Produktvideos und Software herunterladen.
So erreichen Sie uns:
DE, AT
Name: C. M. C. GmbH
Internetadresse: www.cmc-creative.de
E-Mail: service.de@cmc-creative.de
service.at@cmc-creative.de
Telefon: +49 (0) 6894 9989751
(Normal-Tarif dt. Festnetz)
Sitz: Deutschland
IAN 103333
Bitte beachten Sie, dass die folgende Anschrift
keine Serviceanschrift ist.
Kontaktieren Sie zunächst die oben benannte
Servicestelle.
Adresse:
C. M. C. GmbH
Katharina-Loth-Str. 15
66386 St. Ingbert
Deutschland
sollten nicht mehr funktionstüchtige Geräte recycelt
werden. Fragen Sie Ihren lokalen Händler um Hilfe.
EG-Konformitätserklärung
Wir, die
C. M. C. GmbH
Dokumentenverantwortlicher: Markus Zimmer
Katharina-Loth-Str. 15
66386 St. Ingbert
erklären in alleiniger Verantwortung, dass das Produkt
Elektro-Schweißgerät
Seriennummer: 1790
Herstellungsjahr: 2015 / 16
IAN: 103333
Modell: PESG 120 A1
den wesentlichen Schutzanforderungen genügt,
die in den Europäischen Richtlinien
EG-Niederspannungsrichtlinie
2006 / 95 / EG
EG-Richtlinie Elektromagnetische
Verträglichkeit
2004 / 108 / EG
und deren Änderungen festgelegt sind.
Für die Konformitätsbewertung wurden folgende
harmonisierte Normen herangezogen:
EN 60974-10:2007
Umwelthinweise und
EN 60974-6:2011
Entsorgungsangaben
Rohstoffrückgewinnung statt
Müllentsorgung!
Gerät, Zubehör und Verpackung sollten
einer umweltgerechten Wiederverwertung
zugeführt werden.
Werfen Sie das Elektro-Schweißgerät nicht in den
Hausmüll, ins Feuer oder ins Wasser. Wenn möglich,
14 DE/AT/CH
103333_Elektro-Schweissgeraet_content_CH.indd 14 06.11.14 15:09
St. Ingbert, 30.11.2014
Markus Zimmer
- Leiter Qualitätssicherung -
Page 15

Table des matières
Introduction
Utilisation conforme ............................................................................................................................Page 16
Descriptif des pièces ........................................................................................................................... Page 16
Symboles / Caractéristiques techniques ............................................................................................Page 16
Contenu de la livraison ....................................................................................................................... Page 17
Indications de sécurité .........................................................................................................Page 17
Source de danger pendant le soudage à l‘arc ................................................................................Page 18
Indications de sécurité spécifiques à l‘écran de soudeur ................................................................. Page 20
Locaux étroits et humides....................................................................................................................Page 20
Vêtements de protection ..................................................................................................................... Page 20
Protection contre les radiations et les brûlures .................................................................................. Page 21
Montage de l‘écran de soudeur .................................................................................. Page 21
Préparer le soudage .............................................................................................................. Page 21
Souder ...............................................................................................................................................Page 21
Protection anti-surchauffe ................................................................................................. Page 22
Maintenance ................................................................................................................................. Page 22
Schéma de commutation .................................................................................................... Page 22
Remarques sur la garantie et le service après-vente ................................ Page 23
Conditions de garantie
Étendue de la garantie ....................................................................................................................... Page 23
Faire valoir sa garantie ....................................................................................................................... Page 23
Indications relatives à l‘environ nement et à la mise au rebut ..........Page 24
Déclaration de conformité ................................................................................................ Page 24
15 FR/CH
103333_Elektro-Schweissgeraet_content_CH.indd 15 06.11.14 15:09
Page 16

Introduction
Poste de soudure PESG 120 A1
Introduction
Félicitations ! Vous avez opté pour un
appareil de grande qualité proposé par
notre entreprise. Avant la première mise
en service, vous devez vous familiariser avec toutes
les fonctions du produit. Veuillez lire attentivement
le mode d’emploi ci-dessous et les consignes de
sécurité. Seules des personnes instruites doivent
mettre en service cet outil.
TENIR HORS DE PORTÉE DES ENFANTS !
Utilisation conforme
Cet appareil de soudage électrique est adapté à
la soudure manuelle avec arc lumineux avec électrode enrobée correspondante. Une manipulation
non conforme du produit peut provoquer un danger
pour les personnes, les animaux ou les valeurs matérielles. L‘écran de soudeur doit être uniquement
utilisé avec une protection occulaire et des verres
de protection portant les marquages correspondant et uniquement pour les travaux de soudage.
L‘écran de soudeur n‘est pas adapté pour le soudage au laser ! Utilisez ce produit uniquement
conformément aux instructions et dans les domaines
d’application spécifiés. Veuillez conserver soigneusement ces instructions. Remettez tous les documents
aux utilisateurs lorsque vous prêtez ce produit.
Toute application divergeant de l‘utilisation conforme
à l‘usage prévu est interdite et potentiellement dangereuse. Les dommages résultant du non-respect
des consignes ou d‘une utilisation incorrecte ne
sont pas couverts par la garantie et ne relèvent pas
de la responsabilité du fabricant. L‘appareil est
conçu pour un usage à domicile et ne doit pas être
utilisé à des fins commerciales ou industrielles.
Descriptif des pièces
Appareil de soudage électrique
1
Poignée
2
Interrupteur (ON / OFF)
3
Volant
4
Borne de masse
5
Brosse
6
Porte-électrode
7
Voyant de contrôle
Écran de soudeur
8
Appareil de soudage
9
Poignée
10
Verre de protection
Symboles / Caractéristiques
techniques
EN 60974-6 Norme européenne pour soudeuses
destinées à la soudure manuelle
avec arc lumineux à service limité
50 Hz Fréquence secteur
U1 Tension de réseau
I1 max Valeur nominale maximale du
courant du réseau
U
Tension à vide
0
I
Courant de soudage
2
φmm Diamètre de l‘électrode
I
Valeur effective du courant de
1eff
t
(S) Temps de charge moyen (s)
w
t
(S) Temps de mise à zéro moyen (s)
r
réseau maximum (A)
IP21S Type de protection
H Classe d‘isolation
16 FR/CH
103333_Elektro-Schweissgeraet_content_CH.indd 16 06.11.14 15:09
Page 17

Introduction / Indications de sécurité
Entrée de réseau; Nombre de
phases et
1 ~ 50 Hz Symbole du courant alternatif et
valeur nominale de la fréquence
Ne jetez pas les appareils électriques
usés dans les ordures ménagères.
Conformément à la directive européenne 2002 / 96 / CE relative
aux appareils électriques et électroniques usés et leur transposition
dans les législations nationales, les
appareils électriques usés doivent
être collectés séparément et faire
l’objet d’un recyclage respectueux
de l’environnement. Autres mesures
de recyclage autres que la demande
de renvoi :
Le propriétaire de l‘appareil élec-
trique est tenu de procéder à un
recyclage adéquat de l‘appareil
s‘il veut s‘en débarrasser, au cas
où il décide de ne pas le renvoyer.
Cet appareil peut être confié à une
entreprise spécialisée dans l‘élimination et le recyclage ou à un point
de collecte aggréé, conformément
à la loi nationale sur la gestion du
recyclage et des déchets. Les
pièces et accessoires annexes non
électriques ne sont pas concernés.
Prière de lire le mode d‘emploi
avant l‘utilisation de la machine.
Ne jamais utiliser ou entreposer
l‘appareil dans un environnement
humide ou mouillé. N‘utilisez
l‘appareil que dans des pièces
fermées.
Un choc électrique de l‘électrode
de soudage peut être mortel.
L‘inhalation des fumées de soudure
est nocive pour la santé.
Les étincelles de soudage peuvent
provoquer une explosion ou un
incendie.
Les rayons d‘arc électrique peuvent
endommager les yeux et blesser la
peau.
Les champs électromagnétiques
peuvent perturber la fonction des
stimulateurs cardiaques.
Raccord porte-électrodes
Raccord borne de masse
Branchement secteur : 230 V ~50 Hz
Courant de soudage
maximum et la tension de
travail normalisée
correspondante : 30 A / 19,2 V-
80 A / 21,2 V
U
: 48 V
0
I2max : 80 A
U1 : 230 V
I1max : 18 A
I
: 7,1 A
1eff
Contenu de la livraison
1 appareil de soudage
1 écran de soudeur
2 câbles de soudage
1 brosse métallique avec marteau à piquer
1 notice de montage et mode d’emploi
Indications de sécurité
Veuillez lire entièrement ce manuel et en respecter
les instructions. Familiariser vous avec l‘appareil en
ce qui concerne son utilisation adéquate et les
consignes de sécurité en lisant ce mode d‘emploi.
Les données techniques de cet appareil de soudage sont indiquées sur la plaque signalétique,
17 FR/CH
103333_Elektro-Schweissgeraet_content_CH.indd 17 06.11.14 15:09
Page 18

Indications de sécurité
veuillez vous informer au sujet des caractéristiques
techniques de cet appareil.
Pour des réparations ou des travaux de mainte-
nance, ne confiez les réparations qu’à des
spéciales.
Utiliser uniquement les câbles de soudage
compris dans la livraison (PESG 120 A1
H01N2-D1x10 mm²).
Pendant la mise en service, cet appareil ne doit
pas se trouver directement contre le mur, ne
doit pas être recouvert ou bloqué entre d‘autres
appareils, afin que la circulation d‘air puisse
s‘effectuer par les fentes d‘aération.
Vérifier que l’appareil est bien raccordé à la
tension du secteur. Évitez toute tension de la
ligne d‘alimentation. Avant de placer l’appareil
à un autre endroit, toujours débrancher la fiche
secteur de la prise de courant.
Éteignez l‘appareil avec l‘interrupteur ON /
OFF lorsque vous ne l‘utilisez plus. Poser le
porte-électrode sur une surface isolée et ne le
retirez du support qu‘après l‘avoir laissé refroidir pendant 15 minutes.
Vérifiez l‘état du câble de soudage, du
porte-électrode et de la borne de masse. Des
dégradations au niveau de l‘isolant et des parties sous tension peuvent causer un risque et
amoindrir la qualité des travaux de soudage.
Le soudage à l‘arc provoque des étincelles, du
métal fondu et de la fumée. Veuillez donc tenir
compte de ceci: éliminez toutes substances et
matériaux inflammables de votre espace de
travail et de ses alentours immédiats.
Assurer une bonne aération de l‘espace de
travail.
Ne soudez pas sur des conteneur, récipients
ou tuyaux qui contiennent ou ont contenu des
liquides ou des gaz inflammables.
Évitez tout contact
direct avec le circuit de courant de soudage.
La tension à vide entre la pince porte-électrode
et la borne de masse peut être dangeureuse, il
y a un risque d‘électrocution.
Ne jamais utiliser l‘appareil dans un environne-
ment humide ou sous la pluie. La clause de
protection IP21S est de rigueur.
Protégez les yeux avec les verres de protection
(DIN Grad 9- 10) prévus à cet effet, que vous
fixez sur l‘écran de soudeur compris dans la
livraison. Utilisez des gants et des vêtements de
protection secs, exempts d‘huile et de graisse,
afin de protéger la peau des radiations ultraviolettes de‘arc électrique.
N‘utilisez pas la source
de courant de soudage pour décongeler des
tuyaux.
Veuillez noter :
La radiation de l‘arc électrique peut endomma-
ger les yeux et provoquer des brûlures de la
peau.
Le soudage à l‘arc provoque des étincelles et
des gouttes de métal fondu, la pièce à usiner
soudée commence à entrer en incandescence
et reste brûlante relativement longtemps. Ne
touchez jamais la pièce à usiner à main nue.
Pendant le soudage à l‘arc, des vapeurs no-
cives se dégagent. Veuillez éviter de les inhaler.
Protégez vous contre les effets nuisibles de
l‘arc et veuillez à ce que les personnes ne participant pas au travaux se tiennent éloignées
de l‘arc d‘au moins 2 m.
Attention !
Pendant la mise en service de l‘appareil de
soudage, il peut y avoir chez d‘autres consommateurs des perturbations électriques de la
tension du réseau au niveau du point de raccordement. En cas de doute, veuillez vous
adresser à votre fournisseur d‘énergie.
Pendant la mise en service de l‘appareil de
soudage, il peut y avoir des perturbations au
niveau d‘autres appareils, par ex. des aides
auditives, stimulateurs cardiaques, etc.
Source de danger pendant
le soudage à l‘arc
Pendant le soudage à l‘arc, il y a une série de sources
de dangers. Il est donc important que le soudeur
respecte les consignes suivantes, pour ne pas se
mettre en danger ou exposer les autres et éviter un
endommagement de personnes ou d‘appareil.
Faites effectuer les travaux au niveau de la ten-
sion réseau, par ex. travaux sur câbles, prises,
18 FR/CH
103333_Elektro-Schweissgeraet_content_CH.indd 18 06.11.14 15:09
Page 19

Indications de sécurité
fiches, etc. uniquement par des spécialistes
qualifiés, conformément aux règlementations
nationales et locales.
En cas d‘accident, déconnectez immédiatement
l‘appareil de soudage de la tension réseau.
En cas de tensions de contact, déconnectez
immédiatement l‘appareil et faites vérifier le
fonctionnement par un électricien agréé.
Veillez à de bons contacts électriques au
niveau du courant de soudage.
Pendant le soudage, porter toujours des gants
isolants. Ceux-ci protègent contre les chocs
électriques (tension à vide du circuit de courant
de soudage), contre les radiations nocives
(chaleur et rayons UV) et contre les gouttes de
métal incandescents.
Porter des chaussures solides et isolantes. Les
chaussures doivent également isoler contre
l‘humidité. Les chaussures basses ne sont pas
adaptées, étant donné que des gouttes de métal brûlantes peuvent provoquer des brûlures.
Porter des vêtements de protection adaptés et
non synthétiques.
Ne pas regarder dans l‘arc avec les yeux non
protégés, regarder uniquement à travers
l‘écran de soudeur équipé de verre de protection correspondant aux normes DIN. L‘arc
électrique irradie, en plus de la lumière et de la
chaleur, des rayons UV qui peuvent provoquer
l‘éblouissement ou des brûlures. En cas de protection insuffisante, la radiation UV invisible
provoque seulement plusieurs heures après une
conjonctivite très douloureuse. De plus, la radiation UV provoque sur les parties du corps
non protégées des brûlures, comparables aux
coups de soleil.
Les personnes ou aides se trouvant à proximité
de l‘arc électrique doivent être mises en garde
et porter l‘équipement de protection nécessaire.
Installer des parois de protection, si nécessaire.
Veillez lors du soudage à une aération suffi-
sante dans des espaces étroits, étant donné
que des fumées et des vapeurs nocives
peuvent s‘échapper.
Ne pas effectuer de travaux de soudage sur
des conteneurs ayant contenus des gaz, des
carburants, des huiles minérales ou autres
produits semblables, même s‘ils ont été vidés
depuis longtemps, étant donné que des résidus
peuvent provoquer une explosion.
Des consignes de sécurité spéciales sont de
rigueur dans les locaux exposés au danger
d‘incendie ou d‘explosion.
Les soudures soumises à des sollicitations
élevées et qui doivent correspondre à des
consignes de sécurité particulières, ne doivent
être effectuées que par des soudeurs spécialisés. Exemple: cuves sous pression, rails de
roulement, accouplement de remorquage, etc.
ATTENTION ! Connectez toujours la borne
de masse aussi près que possible de l‘emplacement de la soudure, de sorte que le courant
de soudage ait le trajet le plus court de l‘électrode vers la borne de masse. Ne connectez
jamais la borne de masse avec le boîtier de
l‘appareil de soudage !
Ne connectez jamais la borne de soudage
aux parties mises à terre se trouvant éloignées
de la pièce à usiner, par ex. un tuyau d‘eau se
trouvant à un autre endroit. Dans le cas
contraire, vous risquez l‘endommagement du
système de mise à la terre du local dans lequel
vous effectuez les travaux.
Ne jamais utiliser l‘appareil à souder sous la
pluie.
Ne jamais utiliser l‘appareil à souder dans un
environnement humide ou mouillé.
Placez l‘appareil à souder uniquement sur une
surface plane.
La mesure de la sortie est effectuée dans une
température ambiante de 20 °C. Le temps de
soudage peut être réduit en cas de températures plus élevées.
Risque de décharge électrique :
Un choc électrique de l‘électrode de
soudage peut être mortel. Ne pas sou-
der sous la pluie ou la neige. Porter des
gants isolants secs. Ne touchez jamais l‘électrode
à main nue. Ne pas porter des gants mouillés ou
endommagés. Protégez vous contre l‘électrocution
par isolement par rapport la pièce à usiner. Ne
pas ouvrir le boîtier.
19 FR/CH
103333_Elektro-Schweissgeraet_content_CH.indd 19 06.11.14 15:09
Page 20

Indications de sécurité
Danger dû aux fumées de soudure :
L‘inhalation des fumées de soudures est nocive
pour la santé. Ne pas tenir la tête dans la fumée.
Utiliser l‘équipement uniquement dans des espaces
ouverts. Utiliser l‘aération pour faire échapper la
fumée.
Danger dû aux étincelles de soudage :
Les étincelles de soudage peuvent provoquer une
explosion ou un incendie. Tenir les tissus inflammables éloignés des travaux de soudure. Ne pas
souder à proximité de tissus inflammables. Les étincelles de soudage peuvent provoquer un incendie.
Avoir un extincteur à portée de la main et une personne pouvant immédiatement le mettre en service.
Ne pas souder sur des tonneaux ou autres conteneurs fermés.
Danger dû aux poussières :
Les rayons d‘arc électrique peuvent endommager
les yeux et blesser la peau. Porter un chapeau et
des lunettes de protection. Porter une protection auditive et un col de chemise fermé. Porter un casque
de protection de soudeur et une taille de filtre parfaitement adaptée. Porter une protection du corps
intégrale.
Danger dû aux champs électromagnétiques
Le courant de soudage produit des champs électromagnétiques. Ne pas utiliser en cas d‘implants médicaux. Ne jamais enrouler les câbles de soudage
autour du corps. Rapprocher les câbles de soudage.
Indications de sécurité
spécifiques à l‘écran de soudeur
L‘appareil ne doit pas être utilisé par des
personnes de moins de 16 ans.
Familiarisez vous avec les consignes de
sécurité concernant la soudure. Respectez les
consignes de sécurité suivantes concernant
votre appareil de soudage.
Portez toujours l‘écran du soudeur lors du sou-
dage. En cas de non utilisation, vous risquez
de graves lésions de la rétine.
Portez toujours des vêtements de protection
lors du soudage.
N‘utiliser jamais l‘écran de soudeur sans la
vitre de protection. Dans le cas contraire, les
unités optiques risquent d‘être endommagées.
Veuillez remplacer à temps la vitre de protec-
tion pour une bonne visibilité et un travail sans
fatigue.
Locaux étroits et humides
En cas de travaux dans des locaux étroits et
humides, il est indispensable d‘utiliser des supports et des couches intermédiaires isolants,
des gants à manchettes longues en cuir ou
autres matériaux isolants, afin d‘isoler le corps
de la terre.
:
En cas d‘utilisation d‘appareil de soudage
sous des conditions électriques dangeureuses,
par ex. dans des locaux étroits aux paroies
électroconductrices (tonnaux, tuyaux, erc.),
dans des locaux humides (Humidification des
vêtements), la tension de sortie à vide ne doit
pas être supérieure à 48 Volt (valeur effective).
L‘appareil de soudage peut être utilisé dans
ces conditions en raison de la tension de sortie.
Avant d‘entamer les travaux de soudage, ne
manquez pas de vous convaincre du bon fonc-
Vêtements de protection
tionnement de votre écran de soudeur, à l‘aide
d‘une source lumineuse claire (briquet par ex.).
La vitre de protection peut être endommagée
par les giclées de soudure. Veuillez remplacer
immédiatemnt les vitres de protection endommagées ou rayées.
Remplacez immédiatement les éléments
endommagés ou fortement souillés.
20 FR/CH
103333_Elektro-Schweissgeraet_content_CH.indd 20 06.11.14 15:09
Pendant les travaux, le corps entier du soudeur
doit être protégé contre les radiations et les
brûlures par des vêtements et une protection
du visage adéquats. Veuillez observer les
étapes suivantes :
- Habillez vous avec des vêtements de protec-
tion avant d‘entamer les travaux de soudage.
Page 21

… / Montage de l‘écran de soudeur / Préparer le soudage / Souder
- Mettez vos gants.
- Ouvrer les fenêtres ou mettez le ventilateur en
marche afin de garantir une aération adéquate.
- Porter des lunettes de protection et un protège-bouche.
Portez aux deux mains des gants à manchettes
longues en cuir ou autres matériaux isolants. Ils
doivent être en parfait état.
Pour protéger les vêtements contre les étincelles
ou les brûlures, porter un tablier approprié.
Portez une tenue protectrice et, si nécessaire un
protège-tête, si les travaux, par ex. la soudure
en sous-face, l‘exigent.
Protection contre les
radiations et les brûlures
Au lieu de travail par une affiche „Attention“ !
Indiquer le risque pour les yeux par une affiche
„Ne pas regarder dans le faisceau lumineux !“.
si possible, installer une paroi-écran pour isoler
les locaux de travail, afin que les personnes se
trouvant à proximité soient protégées. Tenir les
personnes non autorisées à l‘écart.
Dans les espaces de travail immédiats fixes, les
parois ne doivent pas être de couleur claire ou
brillante. Assurez une protection des fenêtres au
moins à hauteur d‘homme contre la transmission de la radiation, par ex. par une peinture
appropriée.
Indication : Vérifier avant l‘emploi si les vis de
fixation du porte-électrode
4
masse
sont bien fixées. Serrer les bien, si néces-
6
et que la borne de
saire, à l‘aide d‘un tournevis cruciforme.
Indication : Remplacez immédiatement le porteelektrode
6
et la borne de masse 4 en cas de
relâchement de la force de serrage.
Connectez les câbles d‘alimentation.
Placez l‘interrupteur 2 en position «ON».
L‘affichage du courant est allumé, les travaux
peuvent commencer.
Pour arrêter le processus de travail, placez
l‘interrupteur
Indication : Si le voyant jaune
2
en position «OFF».
7
s‘allume, il
y a surchauffe. Le circuit électrique est automatiquement interrompu. Le processus de travail
s‘arrête.
Fixez la borne de masse 4 directement sur la
pièce à usiner ou sur le support sur lequel est
placée la pièce à usiner.
Indication : Veillez à ce qu‘il y ait un contact
direct avec la pièce à usiner. Éviter par conséquent les surfaces vernies ou les matériaux
isolants.
Indication : Utilisez chaque fois l‘écran de
soudeur
8
doit lors du soudage. Il protège les
yeux contre la lumière émise par l‘arc électrique
est permet malgré tout une bonne visibilité de
la pièce à usiner.
Souder
Montage de l‘écran
de soudeur
Après avoir connecté tous les raccords électriques
nécessaires à l‘alimentation en électricité et le cir-
cuit électrique, procédez de manière suivante :
Monter la poignée 9 sur l‘écran de soudeur 8,
comme indiqué sur la fig. B.
Monter la vitre de protection 10 sur l‘écran de
soudeur
8
, comme indiqué sur la fig. B.
Introduisez l‘extrémité dénudée de l‘électrode
dans le porte-électrode
borne de masse
6
et connectez la
4
avec la pièce à usiner.
Veillez à un bon contact électrique.
Allumez l‘appareil en plaçant l‘interrupteur
MARCHE- / ARRÊT
Préparer le soudage
Indication : Vérifiez, lorsque vous réglez le cou-
rant, que l‘affichage du courant varie et que la tige
filetée ne soit pas coincée.
103333_Elektro-Schweissgeraet_content_CH.indd 21 06.11.14 15:09
Réglez le courant de soudage à l‘aide du
3
volant
selon l‘électrode utilisée.
Tenez l‘écran de soudeur 8 devant votre vi-
sage et conduisez la pointe de l‘électrode sur
la surface de la pièce à usiner, comme si vous
2
en position «ON».
21 FR/CH
Page 22

Remarques sur la garantie et le service après-vente / Conditions de garantie
Souder / Protection anti-surchauffe / Maintenance / Schéma de commutation
vouliez allumer une allumette. C‘est la meilleure
méthode pour allumer un arc électrique.
Effectuez un essai sur un échantillon pour véri-
fier si vous avez sélectionné la bonne électrode
et la bonne tension électrique.
ATTENTION !
Ne tamponnez pas sur la pièce à usiner avec
l‘électrode. Cela pourrait l‘endommager et rendre
difficele l‘allumage de l‘arc. Dès que l‘arc électrique
est allumé, essayez de garder une distance par
rapport à la pièce à usiner, qui correspond au diamètre d‘électrode utilisé. La distance doit rester, autant que possible, constante pendant le soudage.
L‘inclinaison de l‘électrode dans le sens du travail
effectué doit être de 20–30 degrés.
ATTENTION !
Utilisez toujours une pince pour éliminer les électrodes usagées ou pour déplacer des pièces à usiner
brûlantes. Veillez à toujours placer le porte-électrode
sur un support isolant après le soudage.
Les scories ne doivent être éliminées du raccord
qu‘après le refroidissement. D‘abord enlever les
scories au point de raccordement avant de poursuivre le travail de soudage au niveau d‘un raccord
interrompu.
PESG 120 A1 (avec fiche secteur AC 230 V 50 Hz) :
Les dispositifs de sécurité des câbles reliés aux
prises électriques doivent correspondrent aux
consignes (VDE 0100). Les prises de courant de
sécurité doivent répondre à une masse inerte d‘au
maximum 16 A (Types et données techniques :
NDM1-63, AC 230 / 400 V C16. IEC 60898.
Fabricant : Nader) être protégées (fusibles ou
disjoncteur au régime nominal). Les protections
électriques supérieures peuvent provoquer un in-
cendie des câbles ou des locaux.
Attention : L‘appareil doit être connecté à une
source d‘énergie équipée de la protection mention-
née ci-dessus. Si le porte-électrode et la borne de
masse sont en court-circuit, le fusible peut être
déclanché en 16 à 20 secondes.
Classification selon la directive EMV : Classe A
selon IEC 60974-10
Mise en garde : Les appareils classifié classe A
sont adaptés à une utilisation dans le secteur indus-
triel. En cas d‘utilisation dans d‘autres secteurs, la
compatibilité électromagnétique risque de ne pas
être garantie ou bien il peut aussi y avoir des
pannes.
Maintenance
ATTENTION !
Le soudage produit de la chaleur. C‘est pourquoi
l‘appareil de soudage doit fonctionner en marche
à vide pendant au moins une demi-heure après
utilisation. Alternativement, vous pouvez laisser
l‘appareil refroidir pendant une heure. L‘appareil
ne peut être emballé et rangé que lorsque sa température s‘est normalisée.
Éteignez l‘appareil en plaçant l‘interrupteur
MARCHE- / ARRÊT
2
en position «OFF».
Otez régulièrement la poussière et les salissures
de l‘appareil.
Nettoyez l‘appareil à l’aide d‘une brosse fine
ou d’un chiffon doux et sec.
Schéma de commutation
Protection anti-surchauffe
Cet appareil à souder est équipé d‘un dispositif
anti-surchauffe. Le voyant
protection contre la surchauffe se met en marche.
Laisser l‘appareil à souder refroidir quelques instants.
22 FR/CH
103333_Elektro-Schweissgeraet_content_CH.indd 22 06.11.14 15:09
7
s‘allume, dès que la
Page 23

Remarques sur la garantie et le service après-vente / Conditions de garantie
Remarques sur la garantie et
le service après-vente
Garantie de Creative Marketing
Consulting GmbH
Chère cliente, cher client, Cet appareil bénéficie
d‘une garantie de 3ans à compter de sa date d’achat.
En cas de défaillance, vous êtes en droit de retourner ce produit au vendeur. La présente garantie ne
constitue pas une restriction de vos droits légaux.
Conditions de garantie
Indépendamment de la garantie commerciale
souscrite, le vendeur reste tenu des défauts de
conformité du bien et des vices rédhibitoires dans
les conditions prévues aux articles L211-4 et suivants
du Code de la consommation et aux articles 1641
et suivants du Code Civil.
La durée de garantie débute à la date d’achat.
Veuillez conserver le ticket de caisse original. Il
fera office de preuve d’achat.
Si un problème matériel ou de fabrication devait
survenir dans les trois ans suivant la date d‘achat
de ce produit, nous assurons à notre discrétion la
réparation ou le remplacement de l‘appareil sans
frais supplémentaires. Au cours de cette période de
garantie de trois ans, l‘appareil défectueux et la
preuve d’achat (ticket de caisse) doivent nous être
présentés accompagnés d’une brève description
écrite du problème rencontré précisant également
la date d‘apparition de ce problème.
Si le défaut est couvert par notre garantie, nous vous
renverrons le produit réparé ou un produit neuf. La
réparation ou le remplacement du produit n‘entraîne
pas le début d‘une nouvelle période de garantie.
Étendue de la garantie
L’appareil a été fabriqué selon des critères de qualité stricts et contrôlé consciencieusement avant sa
livraison.
La garantie couvre les vices matériels et de fabrica-
tion. Cette garantie ne s’étend pas aux pièces du
produit soumises à une usure normale et qui, par
conséquent, peuvent être considérées comme des
pièces d’usure, ni aux dommages sur des compo-
sants fragiles, comme des interrupteurs, des batteries
et des éléments fabriqués en verre.
La garantie prend fin si le produit est endommagé
suite à une utilisation inappropriée ou à un entretien
défaillant. Toutes les indications fournies dans le
manuel d‘utilisation doivent être scrupuleusement
respectées pour garantir une utilisation conforme
du produit. Il convient d‘éviter toute utilisation ou
manipulation déconseillée dans le présent mode
d’emploi ou faisant l‘objet d‘un avertissement.
Le produit est exclusivement destiné à un usage privé
et non commercial. Les manipulations incorrectes et
inappropriées, l‘usage de la force ainsi que les in-
terventions réalisées par toute autre personne que
notre centre de service après-vente agréé entraînent
l‘extinction de la garantie.
Faire valoir sa garantie
Pour garantir la rapidité d‘exécution de la procé-
dure de garantie, veuillez respecter les indications
suivantes:
Veuillez conserver le ticket de caisse et le numéro
de référence de l‘article (par ex. IAN) afin de les
produire à titre de preuves d‘achat pour toute
demande.
Le numéro de référence de l‘article est indiqué sur
la plaque signalétique, sur une gravure, sur la cou-
verture de votre manuel (en bas à gauche) ou sur un
autocollant placé sur la face arrière ou inférieure
de l‘appareil.
En cas de dysfonctionnement de l‘appareil ou de
tout autre défaut, contactez en premier lieu le ser-
vice après-vente par téléphone ou par e-mail aux
coordonnées indiquées ci-dessous.
Vous pouvez alors envoyer franco de port tout
produit considéré comme défectueux au service
clientèle indiqué, accompagné de la preuve d‘achat
(ticket de caisse) et d‘une description écrite du dé-
faut avec mention de sa date d‘apparition.
23 FR/CH
103333_Elektro-Schweissgeraet_content_CH.indd 23 06.11.14 15:09
Page 24

Conditions … / Indications relatives à … / Déclaration de conformité CE
Remarque :
Vous pouvez télécharger ce mode
d‘emploi et beaucoup d‘autres ainsi
que des vidéos produit et des logiciels
sur www.lidl-service.com.
Nous contacter :
FR
Nom: Ecos Office Forbach
Site Internet: www.cmc-creative.de
E-mail: service.fr@cmc-creative.de
Téléphone: 00 33 (0) 3 87 84 72 34
Siège: Allemagne
IAN 103333
Veuillez noter que les coordonnées fournies ci-après
ne sont pas des coordonnées d’un service après-vente.
Contactez d’abord le service après-vente mentionné
ci-dessus.
Adresse :
C. M. C. GmbH
Katharina-Loth-Str. 15
66386 St. Ingbert
Allemagne
Déclaration de conformité
Nous,
C. M. C. GmbH
Responsable des documents : Markus Zimmer
Katharina-Loth-Str. 15
66386 St. Ingbert
déclarons sous notre responsabilité exclusive que le
produit
Poste de soudure
Numéro de série: 1790
Année de fabrication: 2015 / 16
IAN: 103333
Modèle : PESG 120 A1
satisfait aux exigences de protection essentielles
indiquées dans les normes européennes
Directive «Basse tension» du Parlement
européen
2006 / 95 / CE
Compatibilité électromagnétique
2004 / 108 / CE
et leurs modifications.
Pour l‘évaluation de la conformité, les normes har-
Indications relatives à l‘environ-
monisées suivantes ont été prises comme références :
nement et à la mise au rebut
EN 60974-10:2007
Récupérer les matières premières
plutôt que d‘éliminer les déchets !
L‘appareil, les accessoires et l‘emballage
doivent être recyclés en respect de l‘environnement.
Ne vous débarrassez pas de l‘appareil de soudage
électrique avec les ordures ménagères, dans le feu
ou l‘eau. Si possible, les appareils n‘étant plus
fonctionnels doivent être recyclés. Adressez-vous à
votre revendeur local.
24 FR/CH
103333_Elektro-Schweissgeraet_content_CH.indd 24 06.11.14 15:09
EN 60974-6:2011
St. Ingbert, 30.11.2014
Markus Zimmer
- Responsable du service « assurance qualité » -
Page 25

Indice
Introduzione
Utilizzo secondo la destinazione d’uso ......................................................................................... Pagina 26
Descrizione dei componenti ........................................................................................................... Pagina 26
Simboli / Dati tecnici ....................................................................................................................... Pagina 26
Contenuto della confezione ........................................................................................................... Pagina 27
Indicazioni per la sicurezza ......................................................................................... Pagina 27
Fonti di pericolo nella saldatura ad arco elettrico ........................................................................ Pagina 28
Indicazioni di sicurezza specifiche per la maschera per saldatura............................................. Pagina 30
Luoghi umidi e stretti ....................................................................................................................... Pagina 30
Indumenti protettivi .......................................................................................................................... Pagina 30
Protezione da radiazioni e bruciature ........................................................................................... Pagina 31
Montaggio della maschera per saldatura ...................................................... Pagina 31
Preparare la saldatura .................................................................................................... Pagina 31
Saldare .......................................................................................................................................... Pagina 31
Protezione da surriscaldamento ............................................................................. Pagina 32
Manutenzione ......................................................................................................................... Pagina 32
Schema elettrico .................................................................................................................... Pagina 32
Indicazioni relative alla garanzia e all‘assistenza .................................. Pagina 32
Condizioni di garanzia
Condizioni di garanzia ................................................................................................................... Pagina 33
Disbrigo in caso di garanzia .......................................................................................................... Pagina 33
Indicazioni sull‘ambiente e sullo smaltimento ............................................ Pagina 34
Dichiarazione di conformità EU ................................................................................ Pagina 34
25 IT/CH
103333_Elektro-Schweissgeraet_content_CH.indd 25 06.11.14 15:09
Page 26

Introduzione
Saldatrice elettrica PESG 120 A1
Introduzione
Congratulazioni! Con questo acquisto,
avete optato per un apparecchio di
alta qualità. Prima della prima messa in
funzione, acquisire dimestichezza con il prodotto.
A tale scopo, leggere attentamente le seguenti istruzioni d‘uso e le avvertenze di sicurezza. La messa in
funzione di questo apparecchio deve essere eseguita da persone istruite in merito al suo utilizzo.
TENERE FUORI DALLA PORTATA
DEI BAMBINI!
Utilizzo secondo la
destinazione d’uso
Questa saldatrice elettrica è adatta per la saldatura
manuale ad arco elettrico con utilizzo di appositii
elettrodi rivestiti. Un utilizzo non corretto del prodotto
può essere pericoloso per persone, animali e cose.
La maschera per saldatura deve essere utilizzata
solo con vetro protettivo per saldature o con vetri
appositamente designati, e fondamentalmente solo
per saldature. La maschera per saldatura non è
idonea per saldature con laser. Utilizzate l‘apparecchio solo come descritto e per gli ambiti di funzione indicati. Conservare bene queste istruzioni.
In caso di utilizzo del prodotto da parte di terzi,
consegnare a questi anche tutti i documenti allegati
allo stesso. Qualsiasi applicazione diversa da
quelle previste nella destinazione d‘uso è vietata e
potenzialmente pericolosa. I danni causati dalla
mancata osservanza delle istruzioni o dall‘uso improprio non sono coperti da garanzia e il produttore
non può esserne ritenuto responsabile. L‘apparecch
è stato concepito per l‘uso domestico e non deve essere utilizzato in ambienti commerciali o industriali.
io
Descrizione dei componenti
Saldatrice elettrica
1
impugnatura
2
interruttore ON / OFF
3
manopola
4
morsetto di massa
5
spazzola
6
porta elettrodi
7
spia di controllo per surriscaldamento
Maschera per saldatura
8
maschera per saldatura
9
impugnatura
10
vetro protettivo
Simboli/Dati tecnici
EN 60974-6 Norma Europea per saldatrici per
saldatura manuale ad arco elettrico
a durata di funzionamento limitata
50 Hz frequenza di rete
U1 tensione di rete
I1 max valore massimo della tensione di
rete
U
tensione a vuoto secondaria
0
I
corrente di saldatura
2
φmm diametro degli elettrodi
I
valore effettivo della tensione di
1eff
rete più alta(A)
t
(S) durata media ciclo di lavoro (s)
w
t
(S) durata media per resettare (s)
r
IP21S classe di protezione
H classe di isolamento
26 IT/CH
103333_Elektro-Schweissgeraet_content_CH.indd 26 06.11.14 15:09
Page 27

Introduzione / Indicazioni per la sicurezza
entrata rete; numero di fasi e
1 ~ 50 Hz simbolo di corrente alternata e
valore della frequenza
non smaltire l‘apparecchio elettrico
con i rifiuti domestici. In base alla
norma europea CE 2002 / 96
relativa agli apparecchi elettrici ed
elettronici usati, ed in applicazione
delle norme nazionali, gli apparecchi elettrici usati devono essere raccolti separatamente e condotti ad
un loro riutilizzo non dannoso per
l’ambiente. Alternativa al riciclaggio con invito alla restituzione:
Il proprietario dell‘apparecchio
elettrico può restituire il prodotto
dopo un adeguato utilizzo in alternativa è obbligato dall‘abbandono
di proprietà. L‘apparecchio vecchio
può perciò essere lasciato in un
posto di ritiro designato, dove si
provvederà alla sua rimozione ai
sensi della legge sulla gestione a
ciclo chiuso dei prodotti e dei rifiuti
(KrW-/AbfG). Non si riferisce agli
apparecchi vecchi annessi accessori e mezzi di ausilio sprovvisti di
componenti elettrici.
Prima dell‘utilizzo del macchinario
leggere e osservare attentamente
le istruzioni d‘uso.
Le scintille da saldatura possono
causare esplosioni o incendi.
Le radiazioni dell‘arco elettrico
possono danneggiare gli occhi e
ferire la pelle.
I campi magnetici possono disturbare
il funzionamento di pacemaker.
Collegamento porta elettrodi
Collegamento morsetto di massa
alimentazione: 230 V ~50 Hz
max. corrente di saldatura
e corrispettiva tensione di
lavoro standardizzata: 30 A / 19,2 V-
80 A / 21,2 V
U
: 48 V
0
I2max: 80 A
U1: 230 V
I1max: 18 A
I
: 7,1 A
1eff
Contenuto della confezione
1 saldatrice
1 maschera per saldatura
2 cavi di saldatura
1 spazzola metallica con chipping martello
1 istruzioni d‘uso e di montaggio
Non conservare o utilizzare l‘ap-
parecchio in ambienti bagnati o
Indicazioni per
la sicurezza
con pioggia. L‘apparecchio deve
essere utilizzato solamente il luoghi
chiusi.
Si prega di leggere attentamente il manuale di istruzioni e osservare le indicazioni in esso contenute.
Familiarizzare sulla base del manuale di istruzioni
La scossa elettrica dell‘elettrodo
per saldatura può essere mortale.
con il prodotto, con il suo corretto utilizzo nonché
con le indicazioni per la sicurezza. La targhetta
identificativa riporta tutti i dati tecnici di questo pro-
L‘inalazione dei vapori dell‘elet-
trodo per saldatura può essere
dotto, la preghiamo di informarsi sulle caratteristiche
tecniche di questo apparecchio.
dannosi per la salute.
27 IT/CH
103333_Elektro-Schweissgeraet_content_CH.indd 27 06.11.14 15:09
Page 28

Indicazioni per la sicurezza
Lasciare eseguire eventuali riparazioni e/o
lavori di manutenzione a un elettricista qualificato e specializzato.
Utilizzare solamente i cavi da saldatura
contenuti nella confezione (PESG 120 A1
H01N2-D1x10 mm²).
L‘apparecchio durante il funzionamento non
deve essere posizionato direttamente al muro,
né coperto o incastrato tra altri apparecchi, in
modo tale che gli sfiati possano disporre sempre
dell‘aria necessaria. Assicurarsi che l’apparecchio sia correttamente collegato alla tensione
di rete. Evitare ogni sollecitazione da trazione
del cavo di alimentazione. Togliere la spina
dalla presa prima di installare l‘apparecchio
da un altra parte.
Quando l‘apparecchio è in funzione, spegnerlo
sempre con l‘interruttore ON / OFF. Collocare
il porta elettrodi su un piano isolato e togliere
l‘elettrodo solamente dopo 15 minuti di raffreddamento.
Prestare sempre attenzione alle condizioni del
cavo di saldatura, del porta elettrodi nonché del
morsetto di massa. Segni di usura nell‘isolamento
e parti elettriche possono rappresentare un pericolo e ridurre le prestazioni della saldatrice.
Saldare ad arco elettrico genera scintille, parti
in metallo fuse e fumo. Fare attenzione: allontanare tutte le sostanze e/o materiali infiammabili sul luogo di lavoro e nelle sue immediate
vicinanze.
Assicurarsi una sufficiente aerazione sul posto
di lavoro.
Non saldare su contenitori, recipienti o tubi,
che contengono o hanno contenuto gas o liquidi infiammabili.
Evitare ogni contatto diretto
con il circuito elettrico di saldatura. La tensione
a vuoto tra la pinza porta elettrodi e il morsetto
di massa può essere pericoloso, sussiste il pericolo di folgorazione.
Non conservare o utilizzare l‘apparecchio in
ambienti umidi o bagnati o in presenza di
pioggia. In questo caso è valido il provvedimento cautelare IP21S.
Proteggere gli occhi con gli appositi vetri di
protezione (DIN Grad 9-10) precedentemente
installati sulla maschera protettiva. Utilizzare
guanti e tuta protettiva asciutti, privi di olio o
grasso, per proteggere la pelle da radiazioni
ultraviolette emesse dall‘arco.
Utilizzare la fonte di
corrente della saldatura per lo scongelamento
di tubi.
Osservare attentamente:
Le radiazioni emesse dall‘arco elettrico può
danneggiare gli occhi e provocare bruciature
alla pelle.
La saldatura ad arco elettrico genera scintille e
gocce di metallo fuso, la parte saldata diventa
incandescente e resta estremamente calda a
lungo. Non maneggiare per questo motivo la
parte lavorata a mani nude.
Durante saldatura ad arco elettrico vengono
rilasciati vapori dannosi per la salute. Fare
attenzione, evitare possibilmente di respirarli.
Proteggersi contro gli effetti pericolosi dell‘arco
elettrico e mantenere le altre persone ad
almeno 2 m di distanza dall‘arco elettrico.
Attenzione!
Durante il funzionamento della saldatrice pos-
sono verificarsi problemi con l‘alimentazione per
altri utilizzatori, ciò dipendente dalla condizioni
di allaccio alla rete. Rivolgersi in caso di dubbio al Vostro fornitore di energia elettrica.
Durante il funzionamento della saldatrice pos-
sono verificarsi problemi nel funzionamento di
altri apparecchi, ad es. apparecchi acustici,
pacemaker ecc.
Fonti di pericolo nella
saldatura ad arco elettrico
Nella saldatura ad arco elettrico vi sono una serie
di fonti di pericolo. E‘ quindi particolarmente importante per il saldatore, osservare le seguenti regole,
per non mettere in pericolo se stessi e gli altri ed
evitare danni a persone e all‘apparecchio.
Far eseguire lavori sulle parti relative alla ten-
sione di rete, ad es. cavi, spine, prese ecc, solo
da un elettricista secondo le normative nazionali e locali.
28 IT/CH
103333_Elektro-Schweissgeraet_content_CH.indd 28 06.11.14 15:09
Page 29

Indicazioni per la sicurezza
In caso di incidenti disconnettere la saldatrice
elettrica immediatamente dalla rete elettrica.
In presenza di contatti elettrici , spegnere im-
mediatamente l‘apparecchio e far verificare
l‘apparecchio ad un elettricista.
Per la corrente di saldatura assicurarsi sempre
che tutti i contatti elettrici siano in buono stato.
Durante la saldatura indossare sempre guanti
isolanti su entrambe le mani. Questi proteggono
da scosse elettriche (tensione a vuoto del circuito elettrico di saldatura) da radiazioni dannose
(calde e raggi UV) nonché da metallo incandescente e schizzi.
Indossare calzature solide e isolanti. Le calza-
ture devono isolare anche dal bagnato. Calzature aperte non sono indicate, perchè gocce di
metallo possono cadere e causare bruciature.
Indossare indumenti protettivi, non indossare
alcun indumento in materiale sintetico.
Non guardare ad occhio nudo l‘arco elettrico,
solo il saldatore con l‘impiego della maschera
per saldatura con il vetro protettivo conforme
alle disposizioni DIN. L‘arco elettrico oltre che
emanare radiazioni di luce e calore, che causano accecamento ossia causare bruciature,
emana anche radiazioni UV. Queste radiazioni
ultraviolette non sicure causano senza un‘adeguata protezione, anche solo dopo un‘ora, una
significativa e dolorosa infiammazione della
congiuntiva. La bruciatura in parti sensibili del
corpo non protette causata da radiazioni UV
ricorda una scottatura solare.
Anche collaboratori o le persone che si trovano
nelle vicinanze dell‘arco elettrico devono essere avvertiti del pericolo e forniti dei mezzi di
protezione necessari. Se necessario installare
pareti protettive.
Durante la saldatura, specialmente in luoghi
ristretti, bisogna assicurare una fonte di aria
fresca sufficiente, poiché sussistono fumi e gas
dannosi.
Non effettuare lavori di saldatura su contenitori,
nei quali vengono conservati gas, carburanti,
petrolio o simili, - anche quando svuotati da
molto tempo - in quanto sussiste un residuo pericolo di esplosione.
In luoghi a rischio esplosione e incendio val-
gono le stesse norme.
Collegamenti di saldatura, esposti a forti solle-
citazioni e che debbano soddisfare determinate
esigenze di sicurezza, possono essere eseguite
solo da saldatori qualificati e competenti. Come
ad esempio un‘autoclave, rotaie, ganci di traino
ecc.
ATTENZIONE! Collegare il morsetto di massa
sempre il più vicino possibile alla saldatura, in
modo che la corrente di saldatura possa usufruire della strada più breve possibile dall‘elettrodo al morsetto di massa. Non collegare mai
il morsetto di massa con il la cassa dell‘apparecchio!
Non collegare mai il morsetto di massa a parti
messe a terra che si trovano lontano dalla parte
da lavorare, ad es. un tubo dell‘acqua che si
trova nell‘angolo opposto della stanza. In caso
contrario può accadere che il conduttore di
protezione della stanza in cui si sta saldando,
venga danneggiato.
Non utilizzare la saldatrice in presenza di
pioggia.
Non utilizzare la saldatrice in presenza di
umidità.
Riporre la saldatrice su una superficie piana.
L‘uscita viene misurata con una temperatura
ambiente di 20 °C. il tempo di saldatura viene
ridotto con una temperatura più elevata.
Rischio da scossa elettrica:
La scossa elettrica di un elettrodo per
saldatura può essere mortale. Non
saldare in presenza di pioggia o neve.
Indossare guanti isolanti asciutti. Non maneggiare
l‘elettrodo a mani nude. Non indossare guanti bagnati o danneggiati. Proteggersi dal pericolo di
scossa elettrica isolando la parte da lavorare. Non
aprire l‘involucro dell‘impianto.
Rischio da fumi di saldatura:
L‘inalazione dei vapori dell‘elettrodo può essere
dannosa per la salute. Non tenere la testa nel
fumo. Utilizzare l‘impianto solo in luoghi aperti.
Utilizzare uno sfiato per la rimozione del fumo.
29 IT/CH
103333_Elektro-Schweissgeraet_content_CH.indd 29 06.11.14 15:09
Page 30

Indicazioni ... / Montaggio della maschera ... / Preparare la saldatura / Saldare
Indicazioni per la sicurezza
Rischio da scintille da saldatura:
Le scintille da saldatura possono causare esplosioni
o incendi. Tenere lontani dalla saldatura materiali
infiammabili. Non saldare vicino materiali infiammabili. Le scintille da saldatura possono causare
incendi. Tenere sempre pronto nelle vicinanze un
estintore e una persona attenta che lo possa immediatamente utilizzare. Non saldare su tamburi o
qualunque altro contenitore chiuso.
Rischio da radiazioni da arco elettrico:
Le radiazioni emesse dall‘arco elettrico danneggiare gli occhi e ferire la pelle. Indossare occhiali
protettivi e cappello. Indossare cuffie protettive e
chiudere il colletto della camicia totalmente. Indossare elmetto protettivo per saldature e filtri di giusta
grandezza. Indossare una protezione per il corpo
completa.
Rischio da campi magnetici:
La corrente di saldatura genera campi magnetici.
Non utilizzare in presenza di impianti medici. Non
avvolgere mai i cavi di saldatura intorno al corpo
dell‘apparecchio. Tenere insieme i cavi di saldatura.
Indicazioni di sicurezza
specifiche per la maschera
per saldatura
Indossare sempre la maschera per saldatura
durante la saldatura. Il mancato utilizzo può
causare lesioni severe alla retina.
Indossare sempre indumenti protettivi durante
la saldatura.
Non utilizzare mai la maschera per saldatura
senza vetro di sicurezza, in questo modo si può
danneggiare la vista.
Sostituire il vetro di protezione regolarmente
per una buona revisione e per lavorare senza
fatica.
Luoghi umidi e stretti
In caso di lavori in luoghi umidi, stretti o caldi
bisogna utilizzare l‘apparecchiature e rivestimenti isolanti, indossare inoltre guanti con
risvolto in cuoio o altri materiali isolanti per
isolare il corpo da terra.
Con l‘utilizzo della saldatrice in condizioni di
rischio elettrico, ad es. in alcune stanze con pareti che possono condurre elettricità (caldaie,
tubi ecc) in stanze bagnate (per l‘umidità degli
indumenti di lavoro), la tensione di uscita della
saldatrice a vuoto non può essere più alta di
48 Volt (valore effettivo). In questi casi questa
saldatrice può essere utilizzata in base alla
sua tensione di uscita.
Assicurarsi del funzionamento regolare della
maschera per saldatura con l‘aiuto di una
Indumenti protettivi
fonte di luce luminosa (ad es. accendino)
all‘inizio di ogni lavoro di saldatura.
Il vetro di sicurezza può essere stato danneg-
giato da spruzzi di saldatura. Sostituire subito
il vetro di sicurezza danneggiato o graffiato.
Sostituire immediatamente componenti dan-
neggiati o estremamente sporchi ad es. con
schizzi.
L‘apparecchio può essere messo in funzione
solo da persone di 16 anni già compiuti.
Prendere visione delle norme di sicurezza per
la saldatura. Osservare a questo proposito anche le indicazioni di sicurezza della saldatrice
elettrica.
30 IT/CH
103333_Elektro-Schweissgeraet_content_CH.indd 30 06.11.14 15:09
Durante il lavoro il saldatore deve essere
protetto con appositi indumenti e protezioni
per il viso da radiazioni e bruciature. Bisogna
osservare i seguenti passi:
- Indossare gli indumenti protettivi prima di
saldare.
- Indossare i guanti.
- Aprire la finestra o ventilatore per consentire il
flusso d‘aria.
- Indossare occhiali protettivi e mascherina.
Indossare su entrambe le mani guanti con ri-
svolto di un materiale indicato (cuoio). Bisogna
trovarsi in condizioni perfette.
Page 31

Indicazioni ... / Montaggio della maschera ... / Preparare la saldatura / Saldare
Indossare un grembiule indicato per la prote-
zione di indumenti da scintille nell‘aria e bruciature. Indossare quando il tipo di lavoro lo
richiede, ad es. saldature sopra il livello del
capo, una tuta di protezione e, se necessario,
anche un casco protettivo.
Protezione da radiazioni e
bruciature
Informare sul posto di lavoro con un avviso
„Attenzione! Non guardare direttamente nella
fiamma!“ del rischio per gli occhi. I luoghi di
lavoro possono così rendere possibile, che le
persone nelle vicinanze siano protette. I non
addetti devono mantenersi distanti dai lavori di
saldatura.
Nelle immediate vicinanze del luogo di lavoro
fisso la pareti devono essere di colore chiaro o
lucente. Le finestre che sono almeno fino all‘altezza della testa devono essere assicurate contro la fuoriuscita o il rimbalzo di radiazioni, ad
es. con vernice apposita.
Montaggio della maschera
per saldatura
Unire l‘impugnatura 9 alla maschera per
saldatura
8
come mostrato in fig. B.
Montare il vetro protettivo 10 alla maschera
per saldatura
8
come mostrato in fig. B.
Preparare la saldatura
Nota: quando si imposta la corrente, verificare se
l‘indicatore di corrente si muove e che il mandrino
principale sia libero da impedimenti.
Nota: Verificare ad ogni utilizzo, se le viti di fissaggio del porta elettrodi 6 e del morsetto di massa 4
siano ben salde. Avvitare eventualmente con un
cacciavite a stella.
Nota: allentare la forza di tensione del porta
elettrodi
immediatamente.
6
e del morsetto di massa 4 e sostituirle
Connettere il cavo elettrico.
Impostate l‘interruttore ON / OFF 2 sulla
posizione „ON“. L‘indicatore di corrente si illumina, la sessione di lavoro può iniziare.
Per terminare la sessione di lavoro, impostate
l‘interruttore ON / OFF
Nota: se la spia di controllo
2
sulla posizione „OFF“.
7
si illumina,
indica un surriscaldamento. Il collegamento
elettrico verrà automaticamente interrotto. La
sessione di lavoro verrà terminata.
Fissare il morsetto di massa 4 direttamente
sulla parte da lavorare, o al dispositivo sul
quale la parte da lavorare si trova.
Nota: assicurarsi che vi sia un contatto diretto
con la parte da lavorare. Evitare quindi superfici laccate e / o materiali isolanti.
Nota: utilizzare sempre la maschera per sal-
8
datura
durante la saldatura. Protegge gli
occhi dall‘arco elettrico raggi luminosi e consente anche una vista chiara sulla parte da
lavorare.
Saldare
Dopo aver eseguito tutti i collegamenti elettrici per
l‘alimentazione così come per il circuito elettrico di
saldatura, procedere come segue:
Posizionare la parte non rivestita dell‘elettrodo
nel porta elettrodi
4
massa
alla parte da lavorare. Fare atten-
zione che vi sia un buon contatto elettrico.
Accendere l‘apparecchio posizionando l‘inter-
ruttore ON / OFF
Regolare la corrente di saldatura con la mano-
3
pola
a seconda dell‘elettrodo utilizzato.
Mantenere la maschera per saldatura 8
davanti al volto e posizionare la punta dell‘elettrodo sulla parte da lavorare, come se si
volesse accendere un fiammifero. Questo è il
miglior modo, per accendere l‘arco elettrico.
Provare su una parte, se sono stati scelti il
giusto elettrodo e intensità di corrente.
ATTENZIONE!
Non picchettare la parte da lavorare con l‘elettrodo. Potrebbe danneggiarsi e rendere più difficile
6
e collegare il morsetto di
2
sulla posizione „ON“.
31 IT/CH
103333_Elektro-Schweissgeraet_content_CH.indd 31 06.11.14 15:09
Page 32

… / … / … / Schema elettrico / Indicazioni relative alla garanzia e all‘assistenza
l‘accensione dell‘arco elettrico. Appena l‘arco elettrico si accende, provare a mantenere una distanza
dalla parte da lavorare, corrispondete al diametro
dell‘elettrodo utilizzato. La distanza deve possibilmente rimanere costante, mentre si salda. L‘inclinazione dell‘elettrodo deve essere di 20-30 gradi
rispetto alla superficie lavorate.
ATTENZIONE!
Utilizzare sempre una pinza, per rimuovere l‘elettrodo utilizzato o per muovere parti calde dalla
parte lavorata. Attenzione, il porta elettrodi dopo
la saldatura deve essere deposto sempre su un
supporto isolato.
Le scorie devono essere rimosse dalla saldatura
dopo il raffreddamento. Per ripetere la saldatura su
un punto di saldatura discontinuo, bisogna prima
rimuovere le scorie dall‘attaccatura.
ATTENZIONE!
Il lavoro di saldatura genera calore. Per questo motivo la saldatrice elettrica deve funzionare a vuoto
per almeno mezz‘ora dopo l‘utilizzo. Alternativamente lasciare raffreddare l‘apparecchio per
un‘ora. L‘apparecchio può essere richiuso e riposto, solo dopo aver normalizzato la temperatura.
interruttore di sicurezza). Ulteriori protezioni possono avere come conseguenza incendi ossia danni
ad edifici a provocati da incendi.
Attenzione: l‘apparecchio deve essere collegato
ad una sorgente di rete con il suddetto fusibile.
Quando il porta elettrodi e il morsetto di massa
sono cortocircuitati, il fusibile può scattare in
16-20 secondi.
Classificazione secondo le direttive ECM (EMV)
apparecchio di classe A IEC 60974-10
Attenzione: come apparecchi classificati come
Classe A sono destinati all‘impiego nell‘ambito industriale. Con l‘impiego in altri ambiti la compatibilità elettromagnetica in alcune circostanze non può
essere garantita, ad es. può causare guasti.
Manutenzione
Rimuovere regolarmente polvere e sporcizia
dall‘apparecchio.
Pulire l‘apparecchio con una piccola spazzola
o panno asciutto.
Schema elettrico
Spegnare l‘apparecchio, posizionando
l‘interruttore ON / OFF
„OFF“.
2
sulla posizione
Protezione da
surriscaldamento
Indicazioni relative alla
Questa saldatrice elettrica è dotata di un dispositivo
di protezione da surriscaldamento. In caso di surriscaldamento, la spia di controllo
sciare che la saldatrice elettrica si raffreddi per un
po di tempo.
PESG 120 A1 (mit AC 230 V 50 Hz Spina):
La protezione dei collegamenti alla presa deve
rispettare le normative (VDE 0100). Presa schuko
deve essere protetta con max. 16 A (Tipologie e
dati tecnici: NDM1-63, AC 230 / 400 V C16. IEC
60898 scattare. Produttore: Nader) (fusibili o
32 IT/CH
103333_Elektro-Schweissgeraet_content_CH.indd 32 06.11.14 15:09
7
si illumina. La-
garanzia e all‘assistenza
Garanzia di Creative Marketing
Consulting GmbH
Egregio Cliente, l‘apparecchio da Lei acquistato
dà diritto ad una garanzia di 3 anni a partire dalla
data di acquisto. In caso di difetti del prodotto,
l‘acquirente può far valere i propri diritti legali nei
confronti del venditore. Questi diritti legali non vengono limitati in alcun modo dalla garanzia di seguito riportata.
Page 33

Condizioni di garanzia
Condizioni di garanzia
Il termine di garanzia ha inizio a partire dalla data
di acquisto. Conservare lo scontrino di acquisto
originale in buone condizioni. Questo documento
servirà a documentare l‘avvenuto acquisto.
Se entro tre anni dalla data di acquisto di questo
prodotto si rileva un difetto di materiale o di fabbricazione, il prodotto verrà riparato o sostituito
gratuitamente, a nostra discrezione. La presente
prestazione in garanzia presuppone che entro il
termine di tre anni venga presentato l‘apparecchio
difettoso e il documento d‘acquisto (scontrino),
corredati da una descrizione del difetto e del
momento in cui è comparso.
Se il difetto rientra delle prestazioni della nostra
garanzia, avrete la possibilità di riparare l‘apparecchio o riceverne uno nuovo. Con la riparazione
o la sostituzione del prodotto inizia un nuovo
periodo di garanzia.
Condizioni di garanzia
L‘apparecchio è stato prodotto secondo severe direttive di qualità e controllato con premura prima
della consegna.
La prestazione di garanzia vale sia per difetti di
materiale che per difetti di fabbricazione. La presente garanzia non si estende a parti del prodotto
soggette a normale usura e che possono essere
identificate come parti soggette a usura, né a
danni su parti staccabili, come interruttore, batterie
o simili, realizzate in vetro.
La presente garanzia decade nel caso di danneggiamento del prodotto, di utilizzo o di manutenzione
inadeguati. Per utilizzare correttamente il prodotto,
rispettare scrupolosamente le istruzioni d‘uso. Evitare assolutamente destinazioni d‘uso e azioni a
cui nelle istruzioni per l‘uso si fa esplicito riferimento
o interventi che sono chiaramente sconsigliati.
Il prodotto è destinato esclusivamente all’uso
domestico e non a quello commerciale. In caso di
utilizzo scorretto e inappropriato, di esercizio della
forza e in caso di interventi sul prodotto non eseguiti da personale autorizzato dei nostri partner
responsabili per l‘assistenza, decade il diritto alla
garanzia.
Disbrigo in caso di garanzia
Per garantire un rapido disbrigo delle vostre pratiche,
seguire le nostre istruzioni:
Per ogni richiesta, conservare lo scontrino e il numero
di articolo (ad es. IAN) come prova di acquisto.
Il numero di articolo è riportato sulla targhetta
identificativa incisa, sulla copertina delle istruzioni
(in basso a sinistra) o sull‘adesivo posizionato sulla
parte posteriore o inferiore.
In caso di difetti di funzionamento o di altro tipo,
contattare innanzitutto i seguenti partner di assistenza telefonicamente oppure via e-mail.
Successivamente potrete inviare gratuitamente il
prodotto ritenuto difettoso, corredato dal documento
di acquisto (scontrino) e dalla descrizione del difetto,
specificando anche quando tale difetto si è verificato, all‘indirizzo del centro di assistenza indicato.
Nota:
Su www.lidl-service.com troverete le
presenti istruzioni e molti altri manuali,
video sui prodotti e software da scaricare.
Recapiti:
IT
Nome: C. M. C. GmbH
Indirizzo internet: www.cmc-creative.de
E-mail: service.it@cmc-creative.de
Telefono: +49 (0) 6894 9989752
(tariffa normale da rete fissa in
Germania)
Sede: Germania
IAN 103333
Si prega di osservare che il seguente indirizzo non
è un indirizzo di assistenza.
33 IT/CH
103333_Elektro-Schweissgeraet_content_CH.indd 33 06.11.14 15:09
Page 34

Condizioni ... / Indicazioni sull‘ambiente ... / Dichiarazione di conformità
Contattate dapprima il punto di assistenza sopra
citato.
Indirizzo:
C. M. C. GmbH
Katharina-Loth-Str. 15
66386 St. Ingbert
Germania
Indicazioni sull‘ambiente e
sullo smaltimento
Recupero delle materie prime
anziché smaltimento dei rifiuti!
Apparecchio, accessori e imballaggio
devono essere condotti ad un centro di
recupero apposito.
Non gettare la saldatrice elettrica nei rifiuti domestici, nel fuoco o nell‘acqua. Se possibile, riciclare
gli apparecchi non più funzionanti. Chiedere assistenza al rivenditore locale.
Dichiarazione di
conformità EU
Il fabbricante
C. M. C. GmbH
Responsabile per la documentazione: Markus Zimmer
Katharina-Loth-Str. 15
66386 St. Ingbert
dichiara sotto la propria responsabilità che il prodotto
Saldatrice elettrica
Numero di serie: 1790
Anno di produzione: 2015 / 16
IAN: 103333
Modello: PESG 120 A1
soddisfa i requisiti di sicurezza minimi stabiliti dalle
Direttive Europee
Direttiva CE sulla bassa tensione
2006/95/CE
Direttiva CE sulla compatibilità
elettromagnetica
2004/108/CE
e relative modificazioni.
Per la valutazione della conformità si è fatto
riferimento alle seguenti norme armonizzate:
EN 60974-10:2007
EN 60974-6:2011
St. Ingbert, 30.11.2014
Markus Zimmer
- Garanzia di qualità del direttore -
34 IT/CH
103333_Elektro-Schweissgeraet_content_CH.indd 34 06.11.14 15:09
Page 35

Table of contents
Introduction
Intended use ........................................................................................................................................ Page 36
Parts description .................................................................................................................................. Page 36
Symbols / Technical Data ................................................................................................................... Page 36
Scope of delivery ................................................................................................................................ Page 37
Safety information .................................................................................................................. Page 37
Safety hazards during arc welding ...................................................................................................Page 38
Safety notices specific to the welding shield ..................................................................................... Page 39
Tight and moist spaces .......................................................................................................................Page 40
Protective clothing ............................................................................................................................... Page 40
Protecting against rays and burns ...................................................................................................... Page 40
Assembling the welding shield ..................................................................................... Page 40
Preparing to weld .................................................................................................................... Page 40
Welding ............................................................................................................................................Page 41
Overheat protection ..............................................................................................................Page 41
Maintenance ................................................................................................................................. Page 41
Wiring diagram .........................................................................................................................Page 42
Information about warranty and service processing ............................... Page 42
Warranty terms
Extent of warranty ............................................................................................................................... Page 42
Processing of warranty claims ............................................................................................................ Page 42
Environmental instructions and disposal information .............................. Page 43
EU Conformity Declaration ............................................................................................... Page 43
35 GB
103333_Elektro-Schweissgeraet_content_CH.indd 35 06.11.14 15:09
Page 36

Introduction
Arc welder PESG 120 A1
Introduction
Congratulations! You have chosen a
high-quality device from our company.
Familiarise yourself with the product
before using it for the first time. In addition, please
carefully refer to the operating instructions and the
safety advice below. Initial operation of this tool
must be performed by trained personnel.
KEEP OUT OF THE REACH OF CHILDREN!
Intended use
This electric welding equipment is suitable for
manual arc welding using the appropriate coated
electrodes. Improper product handling can be dangerous to persons, animals and objects. Only use
the welding shield with welding glass and protective glass overlay marked accordingly, and only for
welding. The welding shield is not suitable for laser
welding! Only use the product as described and
for the indicated purpose. Keep these instructions in
a safe place. When passing this product on to others,
please also include all the documents. Any use other
than the intended is prohibited and potentially dangerous. Damages resulting from noncompliance or
misuse are not covered by the warranty and are not
included in the manufacturer‘s liability. This device
has been designed for household use and may not
be used for commercial or industrial purposes.
Welding shield
8
Welding shield
9
Handle
10
Protective glass
Symbols / Technical Data
EN 60974-6 European standard on welding
equipment for manual arc welding
with limited duty cycle
50 Hz Mains frequency
U1 Mains voltage
I1 max maximum mains current rated value
U
Rated no-load voltage
0
I
Welding current
2
φmm Electrode diameter
I
Effective value of the highest mains
1eff
current (A)
t
(S) Average duty cycle (s)
w
t
(S) Average reset time (s)
r
IP21S Protection type
H Insulation class
Power input; phase number, as well as
Parts description
1 ~ 50 Hz alternating current symbol and
rated value of the frequency
Electric Welding Equipment
1
Handle
2
ON / OFF switch
3
Hand wheel
4
Earth terminal
5
Brush
6
Electrode holder
7
Overheating control lamp
36 GB
103333_Elektro-Schweissgeraet_content_CH.indd 36 06.11.14 15:09
Do not dispose of electrical equip-
ment in the household waste. In accordance with European Directive
2002 / 96 / EC covering waste
electrical and electronic equipment
and its transposition into national
legislation, worn out electrical
Page 37

Introduction / Safety information
devices must be collected separately
and taken for environmentally compatible recycling. Alternate recycling
option for return request:
T
he owner of the electrical equipm
is alternatively obligated to contribute to proper recycling in place of
a return in the case of abandonment.
For this purpose the used equipment
may also be taken to a collection
site disposing within the terms of the
German Closed SubstanceCycle
and Waste Management Act. This
does not apply to accessories attached to the used equipment and
implements without electrical components.
Carefully read and follow the in-
structions for use before using this
equipment.
Do not store or use the equipment
in a wet environment or in the rain.
Only use the equipment in confined
spaces.
Electric shock from the welding
electrode can be fatal.
Mains connection: 230 V ~50 Hz
Max. welding current
and the respective
conventional load voltage: 30 A / 19.2 V-80 A /
ent
U
: 48 V
0
21.2 V
I2max: 80 A
U1: 230 V
I1max: 18 A
I
: 7.1 A
1eff
Scope of delivery
1 Welding Equipment
1 Welding shield
2 Welding cables
1 Combination wire brush with chipping hammer
1 Instructions for assembly and use
Safety information
Please carefully read the instructions for use and follow the specified notices. Familiarise yourself with the
equipment, its proper use and the safety notices using
these instructions for use. The nameplate contains all
technical data for this welding equipment, please ob
tain information on the technical facts of this equipment.
the
-
Inhaling welding fumes can
jeopardize your health.
Only have repairs and / or maintenance
performed by electrically skilled persons.
Only use the welding cables included (PESG
Welding sparks can cause an
explosion or fire.
120 A1 H01N2-D1x10 mm²).
During use the equipment should not be lo-
cated directly against a wall, be covered, or
Arc rays can damage the eyes and
injure the skin.
be jammed between other equipment to ensure
ample air can be taken in through the ventilation louvres. Verify the equipment is correctly
Electromagnetic fields can interfere
with the functionality of pacemakers.
connected to the mains voltage. Avoid any tensile load on the mains. Unplug the mains plug
from the socket before transferring the equipment to a different location.
Electrode holder connection
Always switch the equipment off with the ON /
OFF switch when not in use. Set the electrode
Earth terminal connection
holder down on an insulated pad and allow to
cool for 15 minutes before removing the electrodes from the holder.
37 GB
103333_Elektro-Schweissgeraet_content_CH.indd 37 06.11.14 15:09
Page 38

Safety information
Pay attention to the condition of the welding
cables, the electrode holders and the earth terminals. Worn insulation and conducting parts
can produce hazards and reduce the welding
quality.
Arc welding produces sparks, melted metal
parts and smoke. Therefore note: Remove any
flammable substances and / or materials from
the work area and its immediate surroundings.
Ensure the work area is ventilated.
Do not weld atop containers, receptacles or
pipes, which do or did contain flammable liq-
uids or gasses.
Avoid any direct contact with
the welding circuit. The no-load voltage be-
tween the electrode holder and earth terminal
can be dangerous, there is a risk of electric
shock.
Do not store or use the equipment in a moist or
wet environment or in the rain. The Protection
Provision IP21S applies in this respect.
Protect the eyes with the appropriate safety
glass (DIN Grad 9- 10) to be installed in the
included welding shield. Use gloves and dry
protective clothing free from oil and grease to
protect the skin from ultraviolet rays and the
arc.
Do not use the welding power
source to thaw pipes.
Remember:
The arc ray can damage the eyes and cause
burns to the skin.
Arc welding produces sparks and drops of
molten metal, the welded work piece begins to
glow and remains very hot for a relatively long
time. Therefore do not touch the work piece
with bare hands.
Arc welding releases noxious fumes. Be careful
not to inhale these as best possible.
Protect yourself from the dangerous effects of
the arc and keep persons not involved in the
work at least 2 m away from the arc.
Attention!
Depending on mains conditions at the connec-
tion point, operating the welding equipment
may interfere with the voltage supply for other
loads. When in doubt, please contact your
power supply company.
Operating the welding equipment may inter-
fere with the functionality of other devices, e.g.
hearing aids, pacemakers, etc.
Safety hazards
during arc welding
Arc welding produces a variety of safety hazards.
It is therefore particularly important for the welder
to observe the following rules to avoid putting himself and others in danger and to prevent damage
to persons and the equipment
Only have work to the mains voltage end, e.g.
to cables, plugs, outlets, etc. performed by a
electrically skilled person in accordance with
national and local regulations.
In the event of an accident, immediately dis-
connect the welding equipment from the mains
voltage.
If electrical contact voltage occurs, immedi-
ately switch the equipment off and have it
inspected by an electrically skilled person.
Always ensure good electrical contacts on the
welding current end.
Always wear insulating gloves on both hands
whilst welding. These will protect from electric
shock (no-load voltage of the welding current),
from hazardous rays (heat and UV rays) and
glowing metal and weld splashes.
Wear solid, insulating shoes. The shoes should
also insulate when exposed to moisture. Low
shoes are not suitable, as glowing metal drops
falling could cause burns.
Wear suitable protective clothing, no synthetic
garments.
Do not look into the arc with unprotected eyes,
only use a welding shield with approved protective glass per DIN. In addition to light- and
heat rays which could result in blinding or
burns, the arc also emits UV rays. Without adequate protection, this invisible ultraviolet radiation causes very painful conjunctivitis which is
only noticed a few hours later. UV rays further
cause burns similar to a sunburn in unprotected
areas of the body.
38 GB
103333_Elektro-Schweissgeraet_content_CH.indd 38 06.11.14 15:09
Page 39

Safety information
Persons near the arc or assistants must also be
informed of the risks and outfitted with the nec-
essary protection. If necessary, set up protective
panels.
Ensure an adequate supply of fresh air whilst
welding, particularly in small spaces, as it pro-
duces smoke and harmful gasses.
Do not weld containers in which gasses, fuels,
mineral oils, etc. were stored - even if emptied
a long time ago - as residue poses an explosion
hazard.
Special regulations apply in rooms posing
fire- and explosion hazards.
Welded joints exposed to great strain and
needing to meet certain safety requirements must
be made by specially trained and certified
welders. Examples are pressure vessels, run-
ning rails, tow couplings, etc.
ATTENTION! Always connect the earth termi-
nal as close as possible to the point of weld to
provide the shortest possible path for the weld-
ing current from the electrode to the earth ter-
minal. Never connect the earth terminal to the
housing of the welding equipment!
Never connect the earth terminal to earthed
parts far away from the work piece, e.g. a
water pipe in another corner of the room. This
could otherwise damage the protective bond-
ing system of the room you are welding.
Do not use the welding equipment in the rain.
Do not use the welding equipment in a moist
environment.
Only place the welding equipment in a level
location.
The output is rated at an ambient temperature
of 20 °C. The welding time may be reduced in
higher temperatures.
Danger of electric shock:
Electric shock from a welding electrode
can be fatal. Do not weld in rain or snow.
Wear dry insulating gloves. Do not touch
the electrode with bare hands. Do not wear wet or
damaged gloves. Protect yourself from electric shock
by insulating from the work piece. Do not open the
equipment housing.
Danger due to welding smoke:
Inhaling welding smoke can jeopardize your health.
Keep your head out of the smoke. Use facilities in
open areas. Use ventilation to remove smoke.
Danger due to welding sparks:
Welding sparks can cause an explosion or fire.
Keep flammables away from the welding area. Do
not weld next to flammables. Welding sparks can
cause a fire. Keep a fire extinguisher nearby and
an observer ready to use it. Do not weld on top of
drums or any closed containers.
Danger due to arc rays:
Arc rays can damage the eyes and injure the skin.
Wear a hat and safety goggles. Wear hearing protection and a closed, high shirt collar. Wear welding
helmets and proper filter sizes. Wear full personal
protection.
Danger due to electromagnetic fields:
Welding current produces electromagnetic fields.
Do not use along with medical implants. Never wrap
the welding cables around the body. Consolidate
welding cables.
Safety notices specific to the
welding shield
Using a hot light source (e.g. lighter) always
check the welding shield is working properly
before starting to weld.
Welding splashes can damage the glass
shield. Replace damaged or scratched glass
shields immediately.
Promptly replace damaged or heavily soiled /
splashed components.
The equipment may only be operated by per-
sons who have turned 16.
Familiarise yourself with the safety instructions
for welding. Also refer to the safety instructions
of your welding equipment.
Always use the welding shield when welding.
Failure to use the shield may result in serious injuries to the retina.
Always wear protective clothing when welding.
39 GB
103333_Elektro-Schweissgeraet_content_CH.indd 39 06.11.14 15:09
Page 40

Safety information / Assembling the welding shield / Preparing to weld
Never use the welding shield without protective
glass, as the optics can otherwise be damaged.
Replace the protective glass early to ensure
good visibility and fatigue-proof working.
Tight and moist spaces
When working in tight, moist or hot spaces, use
insulating pads and intermediate layers in addition to gauntlet gloves made from leather or
other insulating materials to insulate the body
from earth.
When using welding equipment in electrically
dangerous conditions, e.g. in tight spaces from
conductive walls (kettles, pipes, etc.), in wet
spaces (soaking of work clothes), the output
voltages of the welding equipment may not be
higher than 48 Volts (rms value) in open loop.
Based on the output voltage this welding
equipment may be used in these conditions.
Protective clothing
Whilst working the welder must be protected
against rays and burns all over the body with
the appropriate clothing and face protection.
Remember the following steps:
- Put on protective clothing before welding.
- Put on gloves.
- Open windows or vent to ensure air supply.
- Wear safety goggles and a mask.
Wear gauntlet gloves made from suitable ma-
terial (leather) on both hands. These must be in
good condition.
Wear suitable aprons to protect the clothing
from sparks and burns. When required based
on the working method, e.g. welding overhead,
wear a protective suit and, if necessary, a head
guard.
Protecting against
rays and burns
Mark the work area with a sign „Danger! Do
not look into flames!“ to indicate the risk to the
eyes. If possible, shield the work areas to protect
persons nearby. Keep unauthorised persons
away from the welding area.
Walls in the direct vicinity of fixed work areas
should be neither light coloured nor glossy.
Protect windows against rays passing through
or reflecting at a minimum to head height, e.g.
with suitable paint.
Assembling the welding shield
Attach the handle 9 to the welding shield 8
as shown in Fig. B.
Install the protective glass 10 to the welding
8
shield
as shown in Fig. B.
Preparing to weld
Note: When activating the power verify the
current indicator moves and the lead screw is not
jammed.
Note: Verify the retaining screw on the electrode
6
holder
before every use If necessary, tighten with a crosstip screwdriver.
Note: If the tensioning force of the electrode
holder
replace immediately.
Connect the electric cables.
Set the ON/OFF switch 2 to the „ON“ posi-
To end operation, set the ON/OFF switch 2
Note: The yellow indicator light
Attach the earth terminal 4 directly to the
Note: Ensure direct contact to the work piece.
Note: Always use the welding shield
and the earth terminal 4 are secured
6
and the earth terminal 4 subsides,
tion. The current indicator will light up when
operation starts.
to the auf „OFF“ position.
7
lighting
up indicates overheating. The electric circuit will
automatically be broken. Operation will end.
work piece or to the pad on which the work
piece is placed.
Thus avoid painted surfaces and/or insulation.
8
whilst welding. It protects the eyes from the
40 GB
103333_Elektro-Schweissgeraet_content_CH.indd 40 06.11.14 15:09
Page 41

Preparing to weld / Welding / Overheat protection / Maintenance
light beam emitted by the arc, yet allows for a
clear view of the work piece.
Welding
After making all the electrical connections for the
power supply and for the welding circuit, proceed
as follows:
Insert the uncoated end of the electrode into
the electrode holder
terminal
4
to the work piece. Be sure the
electrical contact is good.
Switch on the equipment by setting the ON/
OFF switch
2
Adjust the welding current according to the
electrode being used using the hand wheel
Hold the welding shield 8 in front of your
face and guide the tip of the electrode over the
work piece as if trying to light a match. This is
the best method for sparking the arc.
Use a test piece to check if you selected the
correct electrode and current.
ATTENTION!
Do not dab the work piece with the electrode. It
could become damaged and make it more difficult
to spark the arc. Once the arc is sparked, try to
maintain a distance to the work piece appropriate
for the selected electrode diameter. Keep the distance as consistent as possible whilst welding. The
electrode grade in the work flow direction should
be 20 - 30 degrees.
ATTENTION!
Always use forceps to dispose of used electrodes
or move hot work pieces. Please remember to always place the electrode holder onto an insulating
pad after welding.
Only remove slag once the seam has cooled. If
continuing to weld on an interrupted weld seam,
first remove the slag at the start of weld.
6
and connect the earth
to the „ON“ position.
3
equipment to cool off for one hour. Only pack up
and store the equipment once the equipment temperature has normalised.
Switch the equipment off by setting the ON /
OFF switch
2
to the „OFF“ position.
Overheat protection
The welding equipment features overheat protection. If the overheat protection is triggered, the
control light
7
will light up. Allow the welding
equipment to cool down for a while.
PESG 120 A1 (with AC 230 V 50 Hz power plug):
The supply line fuses to the mains sockets must
.
meet the requirements (VDE 0100). Earthed wall
sockets must be protected with max. 16 A (model
and technical data: NDM1-63, AC 230 / 400 V
C16. IEC 60898.time lag. Manufacturer: Nader)
(fuses or line circuit breaker). Higher fuse ratings
can result in burnt wires or fire damage to the
building.
Attention: The equipment must be connected to
a mains source with the fuse rating specified
above. If the electrode holder and earth terminal is
short circuited, the fuse can be triggered in
16-20 seconds.
Classification per EMV standard: Class A per IEC
60974-10
Warning: Equipment categorised Class A are
intended for industrial use. When used in other
areas, electromagnetic tolerance may not be warranted or failures may occur.
Maintenance
Regularly clean dust and dirt off the equipment.
Clean the equipment with a fine brush or a dry
cloth.
ATTENTION!
Welding produces heat. The welding equipment
must therefore be operated in open loop after use
for at least half an hour. Or alternatively allow the
41 GB
103333_Elektro-Schweissgeraet_content_CH.indd 41 06.11.14 15:09
Page 42

Warranty terms / Environmental instructions and ... / EU Conformity Declaration
… / Information about warranty and service processing / Warranty terms
Wiring diagram
Information about warranty
and service processing
Creative Marketing Consulting GmbH
warranty
Dear customer, the warranty for this device is
3 years from the date of purchase. In the event of
product defects, you have legal rights against the
retailer of this product. Your statutory rights are not
limited in any way by our warranty detailed below.
Warranty terms
The warranty period begins on the date of purchase.
Please retain the original receipt safely. This document is required as your proof of purchase.
Should this device show any fault in materials or
manufacture within three years from date of purchase, it will be repaired or replaced - at our choice
- by us free of charge. This warranty is conditional
on the defective device and the receipt of purchase
(store receipt) being presented within the three year
warranty period, and that there is a brief written
description of the nature of the defect and of the
date it arose.
If the defect is covered by our warranty, we will
return the repaired equipment or replacement
thereof. A repair or exchange of the equipment
does not extend a new warranty period.
Extent of warranty
The appliance has been manufactured to strict
quality guidelines and meticulously examined
before delivery.
The warranty applies to faults in material or manufacture. This warranty does not apply to product
parts subject to normal wear and tear and which
can therefore be considered as wear items, or to
damage to fragile parts, e.g. switches, storage
batteries or glass parts.
This warranty becomes void if the device has been
damaged or improperly used or maintained. All
instructions provided in the operating instructions
must be followed strictly to constitute proper use of
the product. Purposes and practices which the operating instructions warn of or advise against must
be avoided without fail.
This product is intended for private, non-commercial
use only. Any incorrect or improper use of the device,
use of force and changes not performed by our authorized service branch will void the warranty.
Processing of warranty claims
Please follow the instructions below to ensure your
claim is processed quickly:
When inquiring about your product please have
your receipt and product number (e.g. IAN) ready
as your proof of purchase.
The product number can be found on the type plate,
an engraving, the cover page of your instructions
(bottom left) or the decal at the back or bottom.
In the event of malfunctions or other defects please
first contact the service department below by
phone or e-mail.
A product recorded as defective, along with the
proof of purchase (sales receipt) and a description
of the defect and when it occurred, can then be returned free of charge to you to the service address
provided.
42 GB
103333_Elektro-Schweissgeraet_content_CH.indd 42 06.11.14 15:09
Page 43

Warranty terms / Environmental instructions and ... / EU Conformity Declaration
Notice:
Download this and many other manuals,
product videos and software from
www.lidl-service.com.
How to contact us:
GB
Name: C. M. C. GmbH
Website: www.cmc-creative.de
E-mail: service.gb@cmc-creative.de
Phone: 0-808-189-0652
(standard German landline
rates apply)
Registered office: Germany
IAN 103333
Please note that the following address is not a service address.
Please first contact the service point named above.
Address:
C. M. C. GmbH
Katharina-Loth-Str. 15
66386 St. Ingbert
Germany
EU Conformity Declaration
We,
C. M. C. GmbH
Responsible for documentation: Markus Zimmer
Katharina-Loth-Str. 15
66386 St. Ingbert
declare in our sole responsibility that the product
Arc welder
Serial number: 1790
Year of manufacture: 2015/16
IAN: 103333
Model: PESG 120 A1
meets the basic safety requirements of European
Directives
EC Low Voltage Directive
2006 / 95 / EC
EC Directive for Electromagnetic
Compatibility
2004 / 108 / EC
and its amendments.
The conformity assessment is based on the following
Environmental instructions
harmonised standards:
and disposal information
EN 60974-10:2007
Don‘t waste,
recycle!
Device, accessories and packaging
should be recycled in an environmentally friendly manner.
Do not dispose of the power welding equipment with
your household waste, or throw into fire or water. If
possible, non-operational equipment should be recycled. Contact your local retailer for information.
103333_Elektro-Schweissgeraet_content_CH.indd 43 06.11.14 15:09
EN 60974-6:2011
St. Ingbert, 30.11.2014
Markus Zimmer
- Quality Control Manager -
43 GB
Page 44

C. M. C . GmbH
Katharina-Loth-Str. 15
66386 St. Ingbert
Deutschland
Stand der Informationen · Version des
informations · Versione delle informazioni
Last Information Update: 11 / 2014
Ident.-No.: PESG120A1112014-CH
IAN 103333
103333_Elektro-Schweissgeraet_cover_CH.indd 1 06.11.14 15:09
 Loading...